1
User manual
Thank you for choosing our company capacitive GPS Rearview Mirror Recordel
l.
Our company reserves
tle
right of flnal interpretation of this manual
This manual have been carefully checked, but does not exclude the possibility of a
small mistakes. lf found, please contact our customer service center
3.
Please read caretully the "manual" with the operation instructions, and only use my
faclory supplied accessories. lf not in accordance with the correci procedure to use
the product, or connect ilcompatible parts, will cause the warranty
expire
automatically, the extent that Harm you and the safety of others. This company does
not underlake any rcsponsibility.
Due to the development of tratfic construciion, may navigation electronic map data
and actual traffic indication is not comptetely identical, please be sure to follow the
road status, local signs and other traffic rules traffic.
This product only route reference, drivers should
pry.tt"niion to road
conditions,
weather conditions and otner factors influencing driving safety' soiware updates and
upgrades information will be published on the company's website, the customer can
decide whether to renew or upgrade.
ln this manual, the picture is for reference only, refer to the aclual product.
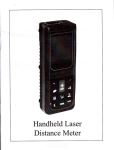
L. General description
Thank you tor choosing our company a capacitive GPS rearview mirror recorder. This
product uses the latest Android4.o.4 system, set the navigator, drive recorder and
anti-glare rearview mirror in one, Easy installation, convenient and simple; navigation
while video recording, add a fun for your driving experienca . This product supports 3D
navigation, HD driving record, anti-glare rearview secret communication Bluetooth
headset, FM emission, Music, movies, e-book reading, picture browsing, calendar,
calculator, function and application of casual games. And reversing, so that you can enjoy
a better driving experience.
1.2
:il
Product packaglng
t host
2 Bluetooth headset
3 power line
4 MlNl USB connection line
5 manual
The above listed articles refer to the actual product.
1.3 Product Appearance
The structure of the product is shown as follows:
l.
l2VDCout
4. 5 inchdisplay
7. Power line connector
2.
5.
8
3.. oowerinputlamp
power switch
recorder, camera
.
recorder
file
locking
6.
key switch / lock screen
9.
antFglare rearview mirror
button
10. Bluetooth headsel
13 . tensioninq clamp
16. raddhook
19- GPSUSB
17, earphonejack
12. speaker
15- Reset
18. recorderslot
20.
2l ,
11. radil hook
l4l
GPS sDeaker
magnetic absorption
Bluetooth
Chdsins Dort
headset
The stomge
dom md
To browser the
then put
First test as below :Put car charger interface **H#connect with K,
powerffi connect with
, put car charger into your car cigarette lighter socket
-
slot is on the pmel side, just insert the TF Flash cud with its gold contacts facing
util it lick
into place
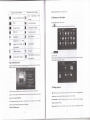
Browse frles in the storage card
2. Beginning Use
and turn on, turn lefr the host Power
cild
push it in
files in the storage card, do one ofthe following:
o m "Fite Mmager to view files in the storage cild
. you cm also install md run my otho third party frle browser
applications
RemoYe the storage card
switcnl
Simply push the stomge cud in to ejfft it from its slot.
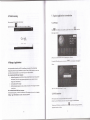
Firstly, clamp device on the rearview minor of ths car, adjust to the bestisiflon; the
power line through the visor wiring, hidden line to the bridge. Put car chargelffi'
ine product can- also be through ihe left A column wlring connectsd ACC power, cut
power adapter lines, The red thrlad is connected to the pos1pe electrode, the black head
progms in the stonge cild before tmove
settingF storage> unmoutrt shsred storage to rmove it safely.
To avoid data loss or damge, please stop using files/
the T-Fluh cacl, md then tap
lNotel:
1.
2.
Make sue the location md direction ofthe storage cild is conect when inserting,
otheruise it is easy to cause dmage/destroy to the storage crd'
To avoid incompatibility or uecognized of the stomge card, major brmds of
storage
crd re recommmded.
2.3 Iil:ot plug of storage card
Pl€as€ do not hot Plug th€ storage card when using or browring lts files'
For exmple, when you
damage
if you push
re ming
the Muic,{/ideo Player/ Galluy, the storage cud may
roning proglm will stop automtically
out the storage ctrd directly md the
to protect the device. As for details of inserting/rmoving stomge cald, see 2.2 Use the sloruge
cqrd-
Or oonneot |fs ACC povtr fuln tho l€ft
2.4 Memory space
Strtement: The software updates sporadically since we contlnuously devote to Product
product(s) your purchased differs
.quslity improvements' When oPeration for the
from thet describ€d in this matru.l, pleas€ fouow your product(s)'
The device contains 2 memory spaces: local storage
&
extended stomge
ced Local
stomge
appers as "Local" and extended storage card as "EXTSD" in the device' The capacity ofbuiltin
flash vtries &om 8GB md l6GB becaue df different model ofthe PEll series. The built-in flash
capacityofyoudevicedepmdsonthemodelyoupwchased.PEllseriessupportextmded
2.1 Ctrarge the battery
It comes with
a
buitt-in pollmer rechilgeable battery md is designed to ue only
batteries md accessories. when the battery is low, please chrge
mufactw-specified original
'
it
timely.
Charge by Charger
Plug one teminal ofthe chargs into the power adapter socket, md the other to the powerjack
the device to chrge it.
2.2 Use the storage card
Insert th€ slorsge crrd
of
storage cud of capacity
muimm
32GB.
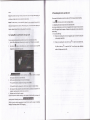
2.5 Power on/off
power on: press dom the Powir Button md hold for a while to tm on the device when the
battqy is full eDough
Power off: press dom the Power Button to prompt a check box, select oK to tm off the devie
screen Lock: press dom the Power Button to shutdoM the screm to save battery [ife. Press
dow the Powtr Button again to &tivate the locked Home screm. After ulocking, the dwice will
resme the
screen before
locking the screen.
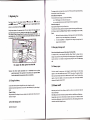
2.6 Connect to wireless networks
To
comect to
1.
. 2.
3.
4.
'Wi-Fi
a
wireless network, you should follow:
3. Home Screen
tap Settings on the Home screen;
tap Wi-Fi;
select ON:
th€
network nmes md secwity settings of detected Wi-Fi nstworks
re
displayed in the
networks section;
tap a Wi-Fi network to connect. lfyou selected m open network, you witl bp
automatically comected to the network. If you selected a network xhat is secued with WEB enter
5.
you siarting point to access all the featues on you device. It displays
application icons, widgets, shortcuts, ud othtr features. You cm customgr the Home screen with
different wallpaper& widgets md display items you wmt See lhe Perfrnalizing chaptq.
The Home screm is
When you sign in, the Home screen
the key and then tap Conn$t.
Depending on the 'network t,?e md its secuity settings, you may also need to entet more
infomation or choose a secuity certificate.
6. after successful comection, the Wi-Fi comected icon will appetrs on the status bil'
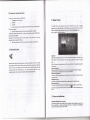
2.7 Bluetooth headset
Sleep mode
you device to a low power state while the display is off in order to save
will still be able to receive messages md calls while the device is in Sleep
Sleep mode suspends
battery power You
Bluetooth headset with Bluetooth mobile phone comection, particulilly convenient fol incoming
and outgoing calls. Before using this function, please tm Bluetooth on' Long press tlle Bluetooth
headset 6-8 seconds, tlre indicating lamp on the headset in the red md blue flashing altemately,
mode.
seuching through mobile phone Bluetooth, nme: GPS518' password 0000 pairs can
:H::l lH':"fl#ff" po*", Brtto.; *d
completed using the. After use, placed in the right headphone adsorption md charge'
be
[Note]: If the device in sleep mode more thm 30 minutes, the device will automatically
save elecricity.
rhe device
screen when there is no operation on ttre screen
for
a
will automatically shutdom
tm otrto
the displav
period oftime.
Wake up from sleep mode
To wake up you device manually, press ttre Power Bution. You will then see that the deYice has
locked the screen.
Unlockitrg the screen
br on the lock soeen and then slide yow finger upwilds to ulock the screen.
Browse Home Screen
You cm go to tle extonded Home soeen by sliding yow fing\orizontally across the screen to
Press the
go to the left or right side ofthe Home screm. Tap the icon
device.
Hil
to
,i"w
all applications on
you
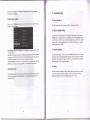
3.1 Status and notilications
Status strd Notifcation lcons may appear
The status bil presents media volme, networks condition, battery condition, time md s on.
When m application is ming, conesponding notification icon will appeai in the notification
uea, Icons you my offen see ae listed as follows:
I
I
I
Tap to go to the Home screen
IB
Back
tq
New GmaiVGoogle
r
EI
LI
Notification
B
USB Connected
I
Airplane mode
I
Wi-Fi
the
To add widgets to Home sareen, you can
Music player is ongoing
Menu icon
to a
3.2 Shortcuts to Add widgets
New Email message
I
network and displaY
Mail
message
I
Recently viewed
Connected
Simply press the Back button on the device panel.
Notification icons its meanings
Status icons and its meanings
f. tup
ffi
z op
Etrl@IE
on the home screen to enter into all apps interface as follows
SD card is mounted
signal strength
E
I
a
Battery is charging
FM is on
ESt
Search satellite is going on
m
Video recording is running in
3. select one item.
the background
Slide
you finger horizontally
screen. Widgets selectable
de
on the home screen to check widgets that cm be added to the home
as
follows;
Open notilication Panel
When new notificatron rcon
finger domwmd to open the
in tlle status btr, press md hold the status bar, then slide
as
you
follows:
3.3 Finger gestures
Ifyou have several notifications, you can scroll dom the
screen to
view more notifications'
Home screen by pressing Menu icon on the
[Tip]: You can also open the Notifications pmel on the
In the popping notification pmel, there are shortcut buttons for tming on/off Wi-Fi'
airplane
Tap: When you wmt to tlpe using the keyboild, select items onscreen such as application md
settings icons, or press onscraen buttons, simply tap them with yow fltnger'
Press and hold: To open the available option for m item (e
g
contact or link in a web page),
simply press md hold the item.
mode, auto-rotate soreen and for adjusting screen brightness'
Close the Notilications Patrel
Swipe or slide: To swipe or slide mems to dmg your finger vertically or horizontally across the
11
10
screen.
Drag:
3.5 Searching the device and the web
Press and
hold you finger with some pressue before you start to drag. While dragging, do
You cm serch for
not releile your finger until you have reached the tilget position.
Rotste: For most screens, you can automatically change the screen orientation from portrait to
landscape by tumiug the device sideways. W1ten entering text, you cm tum the device sideways to
bring up
a
bigger keyboild. Refer to Settiugs chapter for more details.
infomtion
on
you
device md on the Web by using the Quiok Setrch Box.
t. pr".. EfE on the home soeen to enter into all apps interface;
2. tap Search md then entq the search item in the Quick Serch Box
As you type, matching items on you device and suggestiom ftom Google web serch m shom
as a list. The suggested items that appeu will depend on the options that you have selected in the
serch settirgs.
3. Do one ofthe following:
a If what you're seuching for is in the list of suggestions, tap it in the list. The item opens
3.4 Coping files to and from the storage card
in the appropriate application.
You can copy music, photos/pictues and othe$ to
1.
Use the USB cable that cme with
2.
when the i"on
E
upp"*, in
you
will
4.
device to pffionalize
you
device.
device to comect it to a USB port on your computer
the notification mea, open the notification panel and tap USB
Connected to popup the following
,. ,*ME@3@E,
you
l
screen,
wh€n the notification
a* S, **,
yellow, the computer
recognize yow device as a rmovable disk;
Copy the files ftom the computer to the storage cild's root folder
o
Copy the files ftom the storage
cild
to a folder in you computer or computer desktop.
5.
after copying the files, mmomt the removable disk (that is,
6.
computq's operating system to safely remove you device.
discomect you device from the computer
If yow wmt you
you
deviqe) as required y your
device temain comecting to the computer and mable reading its stolage card,
you cm open the Notifications panel md
*o
IMEEffiEE.
[Note]: you cm also realize communication between the device md the computer by tapping
Setting9 Developer options>UsB Debugging.
Ifwhat you're seuching for
Tap Web
md tA", ttp
(
3
is not in the list, tap
q
to open the serch option menu.
to seilch the Web. The web browser opms, disptaying
results of a Google serch on the Web
find the removable disk and open it. Do one ofthe followings;
o
a
[Note]: To rmove a widget, press
4. Personalizing
You cm also
Choose from the available selections of notificatiou ringones on you device
one to
domload or copy notification ringtones or songs to yow device' storage cud md choose
yow storage cild' see
use as you notification ringtone. To fmd out how you can copy files to
"Coping files to and from the storage ctrd".
1. In the Home screen, tap Settings > Somd > Default notification'
2. Tap the notification ringtone you wmt to use The notification ringtone briefly plays when
foldm to goup
retated applications md other shortculs to keeP
E
appers. drug
you Home
ttre
screen tidy and
orgmized.
Pressmdholdtheappticationshortcutmdstackitontoanothershortcuttocreateafoldefforthe
a folder You
applications you want to file together, md then releroe you fmger to finish oreating
cm drag my other application shortcut into the new folder'
To rename a folder:
l.
2.
3.
Tap the folder to oPen it.
Tap Unnamed tr'older to prompt the keybord'
Enter a new folder nme md then tap OK.
4.4 Rearrange or re\nove widgets and icons on your Home screen
selected.
3.
hold the widget mtil the icon
widget onto it md releue You finger.
@ldding fotaere on your Home screen
Use
4.1 Change the Notification ringtone
od
Tap OK.
4.2 Change your wallpaPer
items to the
the widges md icons on you Home wrem to give rmm foi adding more
Ne'
Home screm. You cm also remove widgets md icons that you don't frequently
Remge
O Movhg r widget or icon
you Home screm wallpaper with you favorite photo is a quick md easy way to
the feel of yow device md give it a fresh look Browse the collection of wallpapm
Personalizing
change
cmera'
included in your device or choose from photos that you have taken with the
To chmge you Home screm or lock screen wallpaper, you cm:
1.
2.
mdthentapWallPaper.
I
: you
2.
3.
cm also tap the mmu icon on the home screen md then select Wallpaper'
a
cmm or
Tap Super-HD Player to select a photo/picture that you have takm using the
copied to ygw storage cild. Tap Crop to uop ttre photo/pictue md set the cropped
picnue as wallPaPer
a
a
Wrllprpers galtery to choose from preset wallpapers md then taP S€t wallpsP€r'
Tap Live wrllpapen galtery to choose from presct wallpape6 and then tap Set
Tap
wrllpaper.
4.3 Personalize your Home screen with widgets
importflt infomation md media conlmt up ftont on you Home soeen'
added to you Home scem for you convmimce You cm add more
already
tre
Some widglts
Widgets put at-a-glmce
ftom the available setections ofwidgets, or download more wir4gets'
@ adding a rvtdget to your Home screen
to
Foi details on how to add a widget to you Home screep, please refer to section 3 2 Shortcuts
Add widgets.
md hold the widget or icon you mt to mov€'
you finger
see a yellow box uoud the widget or icon' Don't release
Dmg the widget or icon to a new location on the scleen'
Home
Paue at the left or right edge of the screfl to dng the widget or icon onto mothel
sceen pmel.
When the widget or icon is where you wmt it, release your fngc
If you've relrued you finga but a message shows that there's no space to place the widget
or icoD, drag it dght or left again to mothu Home screen pmel'
choose sowce ofwallPaPo
you cm do one of the following:
Press
You'll
tap SettingPDisPlay
( Note
3.
1.
@ Removing a widget or icon
l. Presi md hold the wiilget or icon you wmt to remove' You'll see a yellow box
widget or icon. Don't release you fingq.
2.
3,
Drag the widget onto the cross icon
M
on the
scrm'
When the widget or icon also hms red- release you finger'
mmd
the
5. Web browsing
7. Typical applications
User aan connect to the network via the browser
7.1 GPS Info
rup
ffi
introduction
in the Home screen and the tap the GPS Info icon
[ffilto
"ot".
th"
following interface
[Note]: you cm €nter the above scrcen by tapping Navi> GPS Info'
6 Manage
To reset the GPS satellite receiver, you can
Applications
you PEl l by instalting a wide vuiety of free md paid apps
mngiug from productivity apps, entertaiment, to games. When you find a program you want, you
cm easily dordoad md install it on you PEL lwith just a few steps as follows:
How to install Android third-party programs
1. download the programs you want ftom web sites md store them into you storage crd or
local memory. You can also copy progrms domloaded on
you
computer into
you
to
you
manager to install
it
device.
a
third-party application.
as
I
l
.$
l!
!,
I
t
I
How to uninstall Android third-party programs
To dismomt the progrm, you can also use functions of File mmager md you cm also by taPping
Settings > Apps> Downloaded to uninstall
will popup
I
storage cad or local memory;
2. mthe applicationFilemanager
3. find the third-party progrm you wmt, and then use fiuctions ofFile
u diulog box
follows:
rt
You cm personalize md emich
tap Rufttt *d
t
I
I
Tap "Yes" to finish reset and tap "No" to cxit.
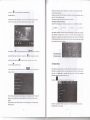
7.2F}/I Transmitter
FM Transmitter lets you listen to FM rcdio station on your PEI 1.
power supply as an FM transmitter'
[Note]: To use the FM function, you need to insefi
To listen to m FM station, you should. tap the icon
Transmitter interface as follows
1'7
I .':l
KI
in th" Home screen to go to the FM
M
To protect the ament video file, you can tap
File in
case
of overuriting of
recording, simply tap the icon
tt" i"o, &
to save it under the directory Save
the video file when the memory capacity is
&
in lack To
stop
in the recording interface.
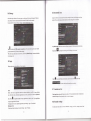
2. Playback
,I
To check md view the video recorded,
tap
the icon
ffif
to
enter the videoRecord
interface as follows:
I
Definition oficons is listed as follows:
re
K
FM radio frequency
Tap to fine tune the radio ftequency
by
0.1 MHz
Tap to fme tune the radio ftequency by +0.1 MHz
&
G
il
G
Drag to tune in to a ftequency on the FM band.
ovemitten if the
[Note]: duing recording, video files uder the directory Temp File will be
memory capacity is in lack. So please backup important videos under the Save File'
To delete umecessary videos,just press and hold on the video unwanted mtil a diatog box prompt
Tum offor on FM radio.
Tap to exit
and
tlen click
as required
to confim deleting'
Play back temp file
Tap Temp File in the above the interface to check and view all video files under the direotory
select one video md tap on it to play back and the playback interface is as follows:
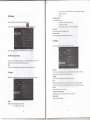
7.3 Car DVR Introduction
fNotel: please insert TF card properly into the device before running the car DvR'
Operation
Tap the DVR icon on the home screen to open it as follows:
,'tr
'l
When playback, tap
il
to stop/resme playing the video, tap
previous/next video mder this directory or drag the
In the DVR function interface, you can view cwent date & time, and car speed. tap the icon
--,
I{
video clip you wmt. tap the
to start recording.
icon&
EEI/XI
icon E t"n
to select playing the
"*a/Agf,*ard
to view the
to check the longitude and latinrde when this vidco
recorded. Tap
t[Il
to save this video under the Save File directory.
Play back save file
Tap Save File in the above the interface to check md view all video files under the directory
select one video and tap on it to play back md the ptayback interface is as follows:
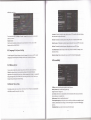
Gravity sensor sensitivity: there ile high,/middle/1ow for options to protect curent video beiug
ovemitten when crush occus
Whether record soud: if select YES, then the soud will be recorded when recording the video;
select NO, it will record only the image.
File selection time: tap to select the time intenal for saving the file.
Video ptay & lrack check on computer
Read the TF cud containing video recordings on computer, you can see file folders as follows;
i
'-)"
'\
ISavehslr]e
'
te)
ISdv.vide.!i1.
.,
,T.nDG<F,I.
)
!
if
r*rvia*rir"
These foldem respectively cover files on protected GPS infomation, protected videos, temporary
GPS inforution ( mprotected file, which cm be ovemritten when the storage space is
insufiicient) md
temporary videos. Open the folder containing videos to play video within. Open
the GPS infomation folder, read the files in kml fomat via the application google earth, and ttren
you cm check the travel hack on computer.
When playback, tap
E
to stop/resme playing the video, tap
previous/next video under this directory or drag the
video clip you
wml
Tap the
iconffi
icon ![
EEIrlItrI
to select playing the
t"n**a/.igt *ard
to view the
cil
hI
hr
7.4 Music Player
to delete this video.
To set the pdmeters of
hl
&'l nn-2m00210_120023.
al un_zoooozl l_ooos4s.
to check the longrtude ancl laritu,le when this video
E
rccordetl. Tap fl
&j E!-soooozlo_0s4334.
DVR tunction, tap ttre icon
fXn
to enter the setting options
Enjoy listening to songs md music on you PEllusing the Music application. You need to copy
you storage ctrd ftrst to use the Music application to play music. To find out how to
music files to
interface as follows:
copy files, see "Copying files to and tom the storage cardu. Audio fomats supported
nclude/wav/ac3/uc/ogg lru/mlm4alwma md so on.
Tap the
Picture- in-Pictue function: tap to prompt the dialog box, select open, the ctr D\aR window
icon
H
o, ,t" rto*"
screen
to
ilttr
the following screen:
will
appem on olher interface when recording, double tap on the window to enter the recording
interface.
Whethtr boot start: select YES, and then the car DVR will automatically
booting the device.
ro
backgrouud after
You music is orgmized into different categories such as Artis*, Songs mdAlbms. Tap one of
the category tabs to yiew a category.
Tap Use as phone ringtone to set the song as phone dngtone.
tm on/offparty shufile, or use the song as ringtone, or add the song to fte playlist'
the song
or set the sound effect ofthe song or go to the Library directly' And you can also delete
by tapping coresponding buttons in the operation bal
when you
When screen tums off, you can control the music playback ilght from the Lock screen
on the
"wake up" the device by pressing POWER button. Ifyou do not see the playback controls
Tap Delete to delete the song rong the list.
Lock screen, tap anlrhere on the screen to display the playback controls'
Here you can
Tap Play to play lhe selected item
Tap Adt! to playlist to add the selected song into
Cuent playlist
or into a new playlist ffeated as
you like.
Tap Search to sedch the song on
tle intemet or in
the devrca.
Select a song in tlle ptaylist and tap on it to start playing as follows:
7.5 Video
Player
Tap the launcher
ico.
ffi
on th" Home screen md the tap the Super-HD player icon to go to
the following interfacel
Tap to play, pause, or resume playing the song
Tap to go to the next song
Tap to go to the now PlaYing list
Photos and videos are classified automatically for easy view.
Tap to switch the following repeat modes: repeat all
Tap to shuffle the cwent Playlist.
When the music is on, tap menu icon
I
to prompt the opemtion
bil
as
follows:
songs;
repeat
Double tap on a video file to start playing it.
On the video playing screen, tap on the screen to popup the control bar as follows
prevlous
Select a picture to vicw it in full screen mode; drag left or right to view the next or
pictwe in the album; move you fingers ilward/outward to zoom out7zoom in the selected
photo/pictue.
3
!s
rop
to pop op tt
"
to share it with ftiends via email, tap
E
,o u",","r"un""1 deleting it, tap
tollowing control bars:
Tap to play the previous vidco file in the Yideo lisl
Tap to piay/pause the
Now playing video file
Tap to play the next vidco file in the video list
zoom
Tap to unfolcl the cont(ol bar for personalizing the play mode, such as video track,
TaD
this icon to so back to thc video file list interface
rup
Drag the slider to ad.just playing progress
ffi,o
"ai
it. when the picture is zoomed in, drag trre picture to view parts that are not in
view. when the pictwe is zoomed to fit the window, drag left or ilght to view the next or previous
pictue in thc album.
,uo
EEMtrI*fl", 8E[mEfmm
to rotate the pictue/photo eo" mticlockwise or
clockwise;
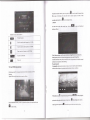
7.6 Gallery
or
You use Gallery to view pictures and play videos that you've taken with Camera, domloaded'
them as you
copied onto yow SD carcl. You can perform basic editing tasks on pictues and set
,uo 6&!lI
and then the
following cropping rectangle wi)l appear on top of the pictue/photor
wallpaper or contact picture. You can also share you pictures and videos with friends'
On the Home screen tap the Super-HD player icon to run the gallery application'
Browse & edit pictures/Photos
Tap an album to open it and vlew lts contents;
Drag from the inside oftho cropping tool to move iti drag an edge ofthe cropping tool to resize
to any proportion; drag a comer ofthe cropping tool to rcsize it with a fixed proportions'
1t
Tap Crop to save a copy ofthe picture as you cropped it. The original uncropped version remains
on yout SD card.
,"n 5E&&@EE!
Tup
Ei
o. .pp", ,ight corner of the
screen to browse
all photos/pictures in stideshow mode
,u, EEEflH
to set the curent picture/photo as wallpaper/ contact icon;
to morc details about the curent picture/photo;
Browse & play music/video
Use Gallery to play videos/music or that in
you
SD cmd.
Ald
you can also shae them with
others.
Open a Gallery
albm
containing videos /music and tap one to play it'
a
During playing, tap on the screen to popup the playback controls.
To quit the playing screen, press the power button, md tap Back icon in the status
bil
Share o
video/music
When browsing the video/music in the gallery, you can tap
E
@ File Management
you files in
In the above screen, you cm seach a wmted file quickly and you can also mmage
the tocal disk md yow stomge card. In addition, you can create/renme fila folder(s) and minstall
to shue the video/ music with
third puty application.
Paste: press
I
friends; tap
Elto d"l"t"
th" ,"l"cted video/music; tap
I
to g"t
*o,"
d"tuils about the
-
iter/muttiple items in the tist md tap copy/Move, md then go
to the file folder where you want to copy/move the item(s) in, then press and hold the folder
I
,o
select an item/muttiple items
ud
tap Delete to delete the item(s)
directly.
Folder operation
video/music.
Press md hold any folder in the local disk or
O Introduction
you
storage cmd
mtil the Folder operation
menu
pop up as follows:
7.7 File Manager
on the Home
util
the Folder operation menu popup, select Paste into Folder'
Delete: press
you
,o ,"1".t
to File Manager
screen, tap the
file manage,
"*
63"
"nen
it as follows:
Move(Cu1) Folder
Zip
lolde!
You cm select an option to execute coresponding operations'
items in the list'
Search: when you do not know the defmite location ofm item or there are mmy
to find it quickly, you can tap the Menu icon
search
to bick to the previous interfaae
Tap to display files in local storage card
Tap to display files in T Flash cud
I
uoa.n"n
,", t
b
opm the keybomd to
it.
7.8 Instant Messaging tools
you cm domload md install chat tools on your device such as Fring, MSN Massager md so on.
Tap to display files in other extemal storage device
7.9 Emails
Tap to display all pictures/photos
Tap to display all video files
Tap the launcher icon
EfE
oo the ttom" screen to disptay al1 icons, tap the Email/Gmail icon to
run it. You can:
Tap to open the tool box for process info and application backup
Tap to'operrshutdom multiple choice of items
6.
78.
9.
set
mail accomts
create new
mails
receive md smd mails
domload or open the attached flles
2.
drag the control bar leftwilds/rightwards to
tw
down/up the volume for
media md notification;
3.
8. Settings
tap
OK.
Notification ringtone
To set a notification ringtone:
Control and customize you device settings on tlle Settings screen
To open the Settings screen, simply
i.on
the Setl
Ion,t
"
4.
5.
6.
itome sareen
tap Settings > Sound > Default notifiaation
tap a ringtone to listen to
it
enable a ringtone as notification ringtone by tapping OK.
Touch sound
Check to enable souds wheD Touching lhe screen.
Screen lock sounds
Check to enable playing somd when making screen selection.
8.3 Display
Set the sareen brightness,
You can scroll on the screen upwards/doMwilds
8.1 Wireless
,
font size and screen timeoul
to check the rest setting items.
& networks
Configue you device's wireless comections, e.g., Wi-Fi, enable the Airplme mode, or set the
options for mobile networks, Virtual Private Networks, and more.
wi-Fi
To tum
on/offwi-Fi, simply
slide
you firger
rightward,4eftward on the contol bar.
Brightness
Use the slider to set a brightness level you wmt at all times when using the PEI 1. For the best
8.2 Sound
battery perfomance, use the dimmest comfortable brightness.
Set the device
md notification dng tones, volme adjust, vibrate and silent mode operation.
Wallpaper
Tap to select sowce ofwallpaper md set wallpaper for the device.
Sleep
Opens a dialog where you cm set how long to wait after you tap the screen or press a button
before the screen darkens. For the best battery perfomance, uso the shortest convenient timeout.
Font size
Opens a dialog where you can set font size.
Accelerometer coordinate system
Open a dialog where you can set the coordinate system for the device.
Screen adaption
Check to enable screen adaplion.
Volume
To adjust the
volme for
l.
media, gmes, and
tap Settings > Somd >
alms:
Volme;
Accounts& Sync
8.4 Storage
8.6
Check the usage condition ofthe storcge space on the intemal l& extemal storage card You cm
the extemal SD cild for safety removal.
erase all data on the SD cud and mout
Log in or out &om yow social network accouts, Google Accoml, md Exchange Activesync
accout. You can also mmage synchronization a1d other settings for you accouflts'
Tap Add &ccount in the above screen to add new acaomts by following onscreen instructions
tup I
und th", s"lect USB computer connection to set the comection type, there are 3 modes
Tap the icon
provided: Media device, Camera and Mass storage
When the storage
cild
remains in
you
@
to pro-pt ttre following screen to manage yow accounts:
device, you can tap Mount Storage to mount and read data
in the storage card.
8.5
Apps
Mmage applications and installatlon ol new
Chect
tr
&@@
to tum on/off data synchronization, press the menu icon
X
and then tap
to remove the selected account from your device.
8.7 Location service
opens a list of all the applioations and other softwue installed on youl PEI l, along with their
sizes. By default, only domloaded applications are shom, md they me sorted in alphabetical
order Ptess
I
Enable applications using data from sowces such as wi-Fi and mobile netwolks to orientate youl
location md improve Google serch results via check the options
una tup Sort by size to display applications in order by size Tap an application
to open its Application Info screen.
To mmage md /or remove uploaded applications, tap Settings > Apps > Domloaded'
Running services
To check and control running sewice, tap Settings > Apps >
Rming.
8.8 Security settings
Set the screen lock mode and
omer infomation, etrcrypt you device, mmage
31
password and
adminisbate
you
device
Automatic: Uncheck to
To set screen lock mode, lap Settings > Security> Screen lock to personalize the screen lock
mode for you device.
cuent time
set the date, time, and time zone on PEI
I manually, rather than obtaining
from the mobile network,
Set date; IfAutomatic is mchecked, opens a dialog where you can manually set PEI 1's date.
Unknown source
Check to pemit installation ofapplications that you obtain from web sites, email, or other
locations other than An&oid
8.9 Language
the
Mrket.
Select time zone : IfAutomatic is unchecked, opens a dialog where you can set PEI 1's time zone.
Set time; IfAutomatic is unchecked, opens a dialog where you can set PE1
l's
time.
Use 24-hour format: Check to display the time using 24-hour time fomat, for exmple, 13:00
& Keyboard setting
ratber than l:00 pm.
Use the L4nguage & Keyboard settings to select the language for the text on your PEl I and for
configuing the onscreen keyboard, including words that you've added to its dictionary
Select date format: Opens a dialog where you can select the fomat for displaying dates
S.l2Accessibility
8.10 Backup &reset
You cm enable or disable the automatic backup featue ofthe device and reset the device.
[Notel: after factory data rcset, you personalizing settings and the installed third-party
applications will be removed ftom
you
device. Before restoring default settings, it is suggested to
backup data,/applications you want and remove
you
storage card safely in case ofdata loss or
damage duing restodng factory default settings.
8.llDate & Time setting
Set the date
md time, time zone, and date or time fomat. To
and be able to
manually change time zone settings.
tm
offauto time synchronization
TalkBack: check to provide spoken feedback to help blind users
Identify Gesture: tap to enable identifr gestue app
Large text: check to enlilge text
Auto-rotate screen: Check to automatically switch the orientation ofthe
device sideways or even upside
screen as you
tum the
dom.
Speak password: check to enable speak password
Text-to-speech output:tap on it to open a screen on which you can listen to m example ofspeech
synthesis, enable/disenable yow settings, to check default engine, to set speech rate and language
and so on.
Touch&hold delay: tap to select the time delayed for hold & touch.
t3
Enhmce web accessibility: tap to enable/disenable instalting scripts fiom Google that make theil
web contain more accessibiliry.
S.l3Developer options
You cm set the USB debugging mode, select screen stay awake md so on. And you can also
manage user interface md aPPs
9. Troubleshooting
9.1 Force shutdown
Pless the Power Button for about 5 seconds and the device
will
be forced shutdom
9.2 Restore default settings
To restore the
factory default settings, you cm tap Settings > Backup& reset> Factory data reset.
Warning: data of you Google accout, you perconalized settings, installed appellations will be
remoyed from you device once you execute factory default settings, so please make a careful
decision whether to restore default settings. Before restoring default settings, it is suggested to
backup datalapplications you wimt.
USB debugging: Check to pemit debugging tools on a computer to conimmicate with you PE11
via a USB comection.
stay awake: check to prevent the screen from dimmirg md locking when the PEl l is comected
to a charger or to a usB device that provides power Don't use tlis setting with a static image on
the PEl1 for long periods oftime, or the soeen may be marked with that image'
Allow mock locations: Check to pemit a development tool on a computer to control where the
PE1
9.3 System updating
After system update/upgrade, it may occu that the uploaded thfud-party cm not ro or its data
loss/dmage. This is nomal phenomena rather thm system fault. You just need to upload and
installed the third-ptrty applications again in the device. It is recomended to backup data of the
third-party applications before system update/upgrade.
I believes it is located, ratfier than using the PEI 1's om intemal tools for this purpose'
9.4 Reset
8.14About Device
\ltren the system halts accidentally or
View the device status such as tlle network t,?e, battery power level, md network nme You cm
also check the battery use of individual applications or view the legal infomation md software
version
ofyou PEll.
does not response, please press the Reset key to force the
system stop or press and hold the power button for 8 seconds to tum offthe device forcibly.
[Notel: it is nomal for the device feels hot duing charging, please use at ease.
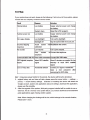
1O FAQ
lf your system does not work, please do the following. lf still not out of the question, please
contact wiah our company customer service center.
:ault
leason
lolution
3tartup failure
-ow battery
iupply external power and charg(
iystem down
leset the GPS navigator.
iudden power cut
-ow battery
irlpply external power and charg(
'lo/ vague display
-ow backlight
fum up the backlight.
he battery.
he battery.
fap the screen with the touch pen.
lacklight off
nconect tapping
louch screen
esponse
)alibrated
,lo sounds
-ow volume
fum up the volume.
)oor contact o
lonnect the earphone
nol lecalibrate the screen.
)arphone
)ommunication with PC )oor USB mnnection lonnect the USB cable.
iPS signals reception
Areak GPS satellite
\bout 3 minutes are needed for lov
ailure
iignal
ntensity
of
local GPS
satellit(
iignal.
-oss of map data
\ccidental deletion
lontact your agent or distributor.
nput a new password
afte
ecoverinq the GPS data.
[tip]: 1. long press power button for
I
seconds, the device will force the shutdown.
2.
original factory sei and clear all dala, please press the menu button + settings +
privacy + restore factory seftings. Selection ol resefting the device will delete the
Google account, system and applicalion data and settings, download the application,
3.
Afterthe upgrade ofthe system, third ?arty program installed will be unable to use or
data loss. this is a normal, not a system failure, you need to download and install third
please use this carefully.
pariy applications again. Backup before update.
Note: When charging the fuselage will be hot, which belongs to the normal situation,
Please Don 't worry