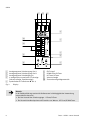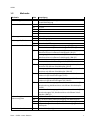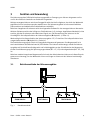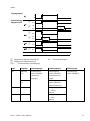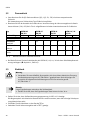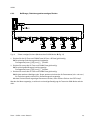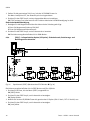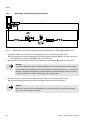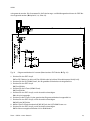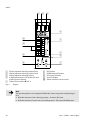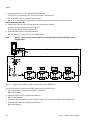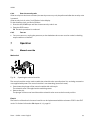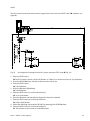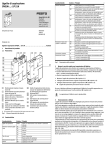
1
Vakuumsaugdüse Vacuum generator OVEM de Bedienungs anleitung en Operating instructions 8038302 1407c [8038303] OVEM Symbole/Symbols: Warnung Warning Vorsicht Caution Einbau und Inbetriebnahme darf nur durch Fach personal mit entsprechender Qualifikation gemäß dieser Bedienungsanleitung durchgeführt werden. Installation and commissioning may only be per formed in accordance with these instructions by technicians with appropriate qualifications. Hinweis Note Umwelt Environment Zubehör Accessories Deutsch – Vakuumsaugdüse OVEM . . . . . . . . . . . . . . . . . . . . . . . . . . . . . . . . . . . . . . . . . . . . . . . . . . . 3 English – Vacuum generator OVEM . . . . . . . . . . . . . . . . . . . . . . . . . . . . . . . . . . . . . . . . . . . . . . . . . . . 57 2 Festo – OVEM – 1407c OVEM Deutsch – Vakuumsaugdüse OVEM Inhaltsverzeichnis 1 Produktbeschreibung . . . . . . . . . . . . . . . . . . . . . . . . . . . . . . . . . . . . . . . . . . . . . . . . . . . . . . 5 1.1 1.2 Übersicht . . . . . . . . . . . . . . . . . . . . . . . . . . . . . . . . . . . . . . . . . . . . . . . . . . . . . . . . . . . . . . . . Merkmale . . . . . . . . . . . . . . . . . . . . . . . . . . . . . . . . . . . . . . . . . . . . . . . . . . . . . . . . . . . . . . . 5 7 2 Schnellinbetriebnahme mit Werkseinstellung . . . . . . . . . . . . . . . . . . . . . . . . . . . . . . . . . . 8 3 Funktion und Anwendung . . . . . . . . . . . . . . . . . . . . . . . . . . . . . . . . . . . . . . . . . . . . . . . . . . 9 3.1 3.2 3.3 3.4 3.5 3.6 Betriebszustände der Vakuumsaugdüse . . . . . . . . . . . . . . . . . . . . . . . . . . . . . . . . . . . . . . . Schaltausgänge und Schalteingang . . . . . . . . . . . . . . . . . . . . . . . . . . . . . . . . . . . . . . . . . . . Funktionsweise Luftsparfunktion (LS) . . . . . . . . . . . . . . . . . . . . . . . . . . . . . . . . . . . . . . . . . Schaltpunkte und Hysterese . . . . . . . . . . . . . . . . . . . . . . . . . . . . . . . . . . . . . . . . . . . . . . . . . Diagnose . . . . . . . . . . . . . . . . . . . . . . . . . . . . . . . . . . . . . . . . . . . . . . . . . . . . . . . . . . . . . . . . Messgrößen . . . . . . . . . . . . . . . . . . . . . . . . . . . . . . . . . . . . . . . . . . . . . . . . . . . . . . . . . . . . . 9 10 12 14 14 15 4 Voraussetzungen für den Produkteinsatz . . . . . . . . . . . . . . . . . . . . . . . . . . . . . . . . . . . . . . 16 5 Einbau . . . . . . . . . . . . . . . . . . . . . . . . . . . . . . . . . . . . . . . . . . . . . . . . . . . . . . . . . . . . . . . . . . 18 5.1 5.2 5.3 Mechanisch . . . . . . . . . . . . . . . . . . . . . . . . . . . . . . . . . . . . . . . . . . . . . . . . . . . . . . . . . . . . . . 5.1.1 Direkte Befestigung . . . . . . . . . . . . . . . . . . . . . . . . . . . . . . . . . . . . . . . . . . . . . . . 5.1.2 Befestigung mit Zubehör . . . . . . . . . . . . . . . . . . . . . . . . . . . . . . . . . . . . . . . . . . . Pneumatisch . . . . . . . . . . . . . . . . . . . . . . . . . . . . . . . . . . . . . . . . . . . . . . . . . . . . . . . . . . . . . Elektrisch . . . . . . . . . . . . . . . . . . . . . . . . . . . . . . . . . . . . . . . . . . . . . . . . . . . . . . . . . . . . . . . . 18 18 18 20 20 6 Inbetriebnahme . . . . . . . . . . . . . . . . . . . . . . . . . . . . . . . . . . . . . . . . . . . . . . . . . . . . . . . . . . 22 6.1 Symbolik LCD-Display . . . . . . . . . . . . . . . . . . . . . . . . . . . . . . . . . . . . . . . . . . . . . . . . . . . . . . 6.1.1 Segmentleisten . . . . . . . . . . . . . . . . . . . . . . . . . . . . . . . . . . . . . . . . . . . . . . . . . . SHOW-Modus . . . . . . . . . . . . . . . . . . . . . . . . . . . . . . . . . . . . . . . . . . . . . . . . . . . . . . . . . . . . 6.2.1 Einstellungen für Out A/B anzeigen . . . . . . . . . . . . . . . . . . . . . . . . . . . . . . . . . . . 6.2.2 Minimal-/Maximalwert anzeigen/löschen . . . . . . . . . . . . . . . . . . . . . . . . . . . . . . 6.2.3 Belüftungs-/Evakuierungszeitenanzeigen/löschen . . . . . . . . . . . . . . . . . . . . . . 24 26 27 27 28 29 6.2 Festo – OVEM – 1407c Deutsch 3 OVEM 6.3 EDIT-Modus . . . . . . . . . . . . . . . . . . . . . . . . . . . . . . . . . . . . . . . . . . . . . . . . . . . . . . . . . . . . . . 6.3.1 EDIT-Modus starten . . . . . . . . . . . . . . . . . . . . . . . . . . . . . . . . . . . . . . . . . . . . . . . 6.3.2 Schaltverhalten der Schaltausgänge einstellen . . . . . . . . . . . . . . . . . . . . . . . . . 6.3.3 Dauer Abwurfimpuls einstellen, elektrische Handhilfsbetätigung FORC . . . . . . 6.3.4 [SPEC] – Luftsparfunktion-Option (LS-Option), Sicherheitscode, Evakuierungs- und Belüftungszeiten einstellen . . . . . . . . . . . . . . . . . . . . . . . . . . . . . . . . . . . . . . . . . TEACH-Modus . . . . . . . . . . . . . . . . . . . . . . . . . . . . . . . . . . . . . . . . . . . . . . . . . . . . . . . . . . . . 6.4.1 Schaltgrößen teachen . . . . . . . . . . . . . . . . . . . . . . . . . . . . . . . . . . . . . . . . . . . . . 6.4.2 Luftsparfunktion (LS) teachen . . . . . . . . . . . . . . . . . . . . . . . . . . . . . . . . . . . . . . . 6.4.3 Belüftungs- und Evakuierungszeiten teachen . . . . . . . . . . . . . . . . . . . . . . . . . . . 6.4.4 Sicherheitscode eingeben . . . . . . . . . . . . . . . . . . . . . . . . . . . . . . . . . . . . . . . . . . 6.4.5 Probelauf . . . . . . . . . . . . . . . . . . . . . . . . . . . . . . . . . . . . . . . . . . . . . . . . . . . . . . . 30 30 32 33 7 Bedienung und Betrieb . . . . . . . . . . . . . . . . . . . . . . . . . . . . . . . . . . . . . . . . . . . . . . . . . . . . 39 7.1 7.2 7.3 Handhilfsbetätigung . . . . . . . . . . . . . . . . . . . . . . . . . . . . . . . . . . . . . . . . . . . . . . . . . . . . . . . Einstellungen und Werte ändern . . . . . . . . . . . . . . . . . . . . . . . . . . . . . . . . . . . . . . . . . . . . . . Auf Werkseinstellung zurücksetzen . . . . . . . . . . . . . . . . . . . . . . . . . . . . . . . . . . . . . . . . . . . 39 40 40 8 Wartung und Diagnose . . . . . . . . . . . . . . . . . . . . . . . . . . . . . . . . . . . . . . . . . . . . . . . . . . . . . 40 8.1 8.2 Wartung . . . . . . . . . . . . . . . . . . . . . . . . . . . . . . . . . . . . . . . . . . . . . . . . . . . . . . . . . . . . . . . . . Diagnose . . . . . . . . . . . . . . . . . . . . . . . . . . . . . . . . . . . . . . . . . . . . . . . . . . . . . . . . . . . . . . . . 8.2.1 Diagnosemeldekanal di x setzen . . . . . . . . . . . . . . . . . . . . . . . . . . . . . . . . . . . . . 8.2.2 Fehlercode . . . . . . . . . . . . . . . . . . . . . . . . . . . . . . . . . . . . . . . . . . . . . . . . . . . . . . 40 41 42 44 9 Störungsbeseitigung . . . . . . . . . . . . . . . . . . . . . . . . . . . . . . . . . . . . . . . . . . . . . . . . . . . . . . 46 10 Ausbau . . . . . . . . . . . . . . . . . . . . . . . . . . . . . . . . . . . . . . . . . . . . . . . . . . . . . . . . . . . . . . . . . 47 11 Zubehör . . . . . . . . . . . . . . . . . . . . . . . . . . . . . . . . . . . . . . . . . . . . . . . . . . . . . . . . . . . . . . . . . 47 12 Technische Daten . . . . . . . . . . . . . . . . . . . . . . . . . . . . . . . . . . . . . . . . . . . . . . . . . . . . . . . . . 48 12.1 Werkseinstellung . . . . . . . . . . . . . . . . . . . . . . . . . . . . . . . . . . . . . . . . . . . . . . . . . . . . . . . . . . 12.2 Schaltsymbole . . . . . . . . . . . . . . . . . . . . . . . . . . . . . . . . . . . . . . . . . . . . . . . . . . . . . . . . . . . 49 50 13 51 6.4 4 Menüstruktur . . . . . . . . . . . . . . . . . . . . . . . . . . . . . . . . . . . . . . . . . . . . . . . . . . . . . . . . . . . . 34 35 36 37 38 39 39 Festo – OVEM – 1407c Deutsch OVEM 1 Produktbeschreibung 1.1 Übersicht 1 2 3 4 5 6 aD aC 7 aB aA aJ 9 8 1 2 3 4 5 6 7 8 Magnetventil Abwurfimpuls (E) Magnetventil Vakuum EIN/AUS (V) Druckluftanschluss Abluftanschluss / Schalldämpfer Vakuumanschluss Filterelement zum Wechseln Gehäuse mit Befestigungsbohrungen Schieber zum Wechseln des Filters Fig. 1 9 aJ aA aB aC aD Filtergehäuse mit Sichtfenster Drosselschraube zur Einstellung der Intensi tät des Abwurfimpulses Bedientasten EDIT-Knopf LCD-Display Stecker für elektrischen Anschluss (M12) Bedienteile und Anschlüsse Festo – OVEM – 1407c Deutsch 5 OVEM 1 2 3 4 aJ 5 aJ 3 9 6 7 8 1 2 3 4 5 Anzeigesegment Schaltausgang Out A Anzeigesegment Schaltausgang Out B Anzeigesegment Schalteingang In 4-stellige alpha-numerische LCD-Anzeige (Vakuumanzeige, Spezialanzeige) Symbolleiste für Funktionen è Tab. 9 Fig. 2 6 7 8 9 EDIT-Knopf DOWN-Taste/B-Taste UP-Taste/A-Taste Vakuumanzeige aJ Zustandsanzeige Magnetventile Display Hinweis In der Bedienerführung werden die Bedientasten in Abhängigkeit der Verwendung unterschiedlich benannt! Bei der Auswahl der Schaltausgänge - A-Taste/B-Taste Bei Auswahl der Menüpunkte und Einstellen von Werten - UP-Taste/DOWN-Taste 6 Festo – OVEM – 1407c Deutsch OVEM 1.2 Merkmale Merkmale Code Ausprägung Vakuumsaugdüse OVEM Nennweite Lavaldüse -05 -07 -10 -14 -20 -H -L -B -BN -QS Vakuumsaugdüse mit Magnetventil Vakuum EIN/AUS und Handhilfsbetätigung 0,45 mm 0,7 mm 0,95 mm 1,4 mm 2,0 mm Hoher Unterdruck Hohes Saugvolumen 20 mm breit, ISO-Norm 20 mm breit, NPT alle Anschlüsse mit QS-Verschraubungen (-B-QS) alle Anschlüsse mit QS-Verschraubungen Zoll (-BN-QS) Versorgung / Vakuumanschluss mit QS-Verschraubungen, Abluftanschluss mit offenem Schalldämpfer (-B-QO) Versorgung / Vakuumanschluss mit QS-Verschraubungen Zoll, Abluftanschluss mit offenem Schalldämpfer (-BN-QO) alle Anschlüsse mit G- Innengewinde (-B-GN) alle Anschlüsse mit NPT- Innengewinde (-BN-GN) Versorgung / Vakuumanschluss mit G- Innengewinde, Abluft anschluss mit offenem Schalldämpfer (-B-GO) Versorgung / Vakuumanschluss mit NPT- Innengewinde, Abluft anschluss mit offenem Schalldämpfer (-BN-GO) Vorbereitet für Versorgungsleiste, Vakuum- und Abluftan schluss mit QS-Verschraubungen (-B-PL) Vorbereitet für Versorgungsleiste, Vakuum- und Abluftan schluss mit QS-Verschraubungen Zoll (-BN-PL) Vorbereitet für Versorgungsleiste, Vakuumanschluss mit QSVerschraubung, Abluftanschluss mit offenem Schalldämpfer (-B-PO) Vorbereitet für Versorgungsleiste, Vakuumanschluss mit QSVerschraubungen Zoll, Abluftanschluss mit offenem Schall dämpfer (-BN-PO) NO, stromlos offen (Vakuumerzeugung) NO, stromlos offen (Vakuumerzeugung) mit Abwurfimpuls NC, stromlos geschlossen (keine Vakuumerzeugung) NC, stromlos geschlossen (keine Vakuumerzeugung) mit Ab wurfimpuls Stecker M12 (5-polig) Vakuumtyp Gehäusegröße/Breite Pneumatische Anschlüsse -QO -GN -GO -PL -PO Ruhestellung der Vakuumsaugdüse -ON -OE -CN -CE Elektrischer Anschluss -N Festo – OVEM – 1407c Deutsch 7 OVEM Merkmale Code Ausprägung Drucksensor, elektrischer Schaltausgang -2P -2N -PU -PI -NU -NI -B -W -H 2 Schaltausgänge PNP 2 Schaltausgänge NPN 1 Schaltausgang PNP, 1 Analogausgang 0 … 10 V 1 Schaltausgang PNP, 1 Analogausgang 4 … 20 mA 1 Schaltausgang NPN, 1 Analogausgang 0 … 10 V 1 Schaltausgang NPN, 1 Analogausgang 4 … 20 mA Bar (-B), inchHg (-BN) bar InchH2O InchHg Alternative Vakuumanzeige Tab. 1 2 Variantenübersicht Schnellinbetriebnahme mit Werkseinstellung Die Vakuumsaugdüse wird mit folgender Werkseinstellung ausgeliefert: Luftsparfunktion bei -CE/-OE: aktiv Schaltverhalten des elektrischen Ausgangs: Schwellwert-Komparator Schaltelementfunktion des elektrischen Ausgangs: NO (normally open – Schließer) weitere Werkseinstellungen è Kapitel 12.1, Seite 49 1. Montieren Sie die Vakuumsaugdüse (è Kapitel 5.1, Seite 18). 2. Schließen Sie die Vakuumsaugdüse pneumatisch an (è Kapitel 5.2, Seite 20). 3. Schließen Sie die Vakuumsaugdüse elektrisch an (è Kapitel 5.3, Seite 20). è Die Vakuumsaugdüse kann in Betrieb genommen werden. Wenn Sie die Werkseinstellung nicht nutzen möchten, können Sie einen Schaltpunkt für Out A oder Out B manuell festlegen (è Kapitel 6.3.2, Seite 32). Sie können Schaltpunkte auch teachen (è Kapitel 6.4.1, Seite 36). 8 Festo – OVEM – 1407c Deutsch OVEM 3 Funktion und Anwendung Die Vakuumsaugdüse OVEM wird bestimmungsgemäß zur Erzeugung von Vakuum eingesetzt und ist nur für den Gebrauch innerhalb von Gebäuden vorgesehen. Mit dem erzeugten Vakuum und einem Sauggreifer wird eine Kraft aufgebaut, durch die das Werkstück gegriffen wird und somit transportiert werden kann. Die Vakuumsaugdüse ist mit unterschiedlichen pneumatischen und elektrischen Schaltfunktionen erhältlich. Mit einem integrierten Drucksensor wird der eingestellte Sollwert für das erzeugte Vakuum überwacht. Wird der Sollwert erreicht oder infolge von Fehlfunktionen (z. B. Leckage, abgefallenes Werkstück) nicht erreicht, gibt der Drucksensor ein elektrisches Signal aus. Die Überwachung des Vakuums ist die Grundlage für die Luftsparfunktion der Vakuumsaugdüse (è Kapitel 3.3, Seite 12). Werksseitig ist die Luftsparfunktion der Vakuumsaugdüse -CE/-CO aktiviert. Die Luftsparfunktion kann ausgeschaltet werden (è Kapitel 6.3.4, Seite 34). Die Druckluftversorgung wird durch ein integriertes Magnetventil gesteuert. Das Magnetventil ist in zwei verschiedenen Schaltfunktionen NC/NO lieferbar. Das Vakuum wird erzeugt, sobald die Vakuum saugdüse mit Druckluft beaufschlagt wird und in Abhängigkeit von der Schaltfunktion des Magnetven tils der Druckluftversorgung die Spannung zugeschaltet (NC: -CE, -CN) oder abgeschaltet (NO: -OE, -ON) ist. Mit einem zweiten integrierten Magnetventil wird nach dem Abschalten des Vakuums ein Abwurfimpuls gesteuert und erzeugt, um das Werkstück sicher vom Sauger zu lösen und das Vakuum beschleunigt abzubauen. 3.1 Betriebszustände der Vakuumsaugdüse SHOW-Modus Fig. 3 EDIT-Modus TEACH-Modus Betriebszustände Festo – OVEM – 1407c Deutsch 9 OVEM RUN-Modus oder Betrieb Der RUN-Modus ist der Grund- oder Betriebszustand der Vakuumsaugdüse OVEM. Im RUN-Modus werden – der aktuelle Messwert (Relativdruck) sowie – die Signalzustände – der Schaltausgänge (Out A/Out B), – des Schalteingangs und – der Magnetventile angezeigt. SHOW-Modus oder Anzeige Aus dem RUN-Modus kann in den SHOW-Modus gewechselt werden. Im SHOW-Modus werden die ein gestellten Daten angezeigt, è Kapitel 6.2, Seite 27. EDIT-Modus Aus dem RUN-Modus kann in den EDIT-Modus gewechselt werden. Im EDIT-Modus können die Einstel lungen der Vakuumsaugdüse vorgenommen oder verändert werden. Außerdem können in diesem Zu stand die Magnetventile über das LCD-Display betätigt werden (elektronische Handhilfsbetätigung FORC), è Kapitel 6.3, Seite 30. TEACH-Modus Aus dem RUN-Modus kann in den TEACH-Modus gewechselt werden. Der TEACH-Modus dient zum schnellen Konfigurieren der Daten der Vakuumsaugdüse. Die Daten können bei Bedarf über den EDITModus geändert werden, è Kapitel 6.4, Seite 35. 3.2 Schaltausgänge und Schalteingang Das Vakuum wird mit Hilfe eines piezoresistiven Sensorelementes mit nachgeschalteter elektronischer Auswerteeinheit gemessen. Das Messergebnis von In A1 wird numerisch und grafisch am Display ange zeigt. Die Vakuumsaugdüse kann über zwei Schaltausgänge (Out A/Out B) oder einen Schaltausgang (Out A) und einen Analogausgang (Out B), und durch einen Schalteingang an übergeordnete Systeme angebunden werden. Die Schaltausgänge können als Öffner oder Schließer konfiguriert werden. Die Schaltfunktion der Ausgänge kann als Schwellwert- oder Fenster-Komparator festgelegt werden, bis auf Out A mit Luftsparfunktion, hier ist automatisch der Schwellwert-Komparator festgelegt. Abhängig vom Eingangssignal (In) werden die Magnetventile zur Ansteuerung der Druckluft und des Abwurfimpulses betätigt. 10 Festo – OVEM – 1407c Deutsch OVEM Eingangssignal Schaltstellung Magnetventile 1 2 1 2 1 1 1 2 EIN AUS EIN EIN AUS EIN AUS tab EIN AUS EIN AUS Magnetventil Vakuum EIN/AUS (V) Magnetventil Abwurfimpuls (E) Fig. 4 tab AUS tab Dauer Abwurfimpuls Schaltverhalten Schalteingang Code Diagnose Schaltausgang A Schaltausgang B Schalteingang -2P Meldung aus Schaltausgang positiv schaltend Drucksensor Ausgang A Schaltausgang positiv schaltend Drucksensor Aus gangB Schalteingang positiv schaltend Meldung ein Schaltausgang positiv schaltend Diagnosemeldung -PI – Analogausgang 4 … 20 mA Vakuum -PU – Analogausgang 0 … 10 V Vakuum Festo – OVEM – 1407c Deutsch 11 OVEM Code Diagnose Schaltausgang A Schaltausgang B Schalteingang -2N Meldung aus Schaltausgang negativ schaltend Drucksensor Aus gangA Schaltausgang negativ schaltend Drucksensor Aus gangB Schalteingang negativ schaltend Meldung ein Schaltausgang negativ schaltend Diagnosemeldung -NI – Analogausgang 4 … 20 mA Vakuum -NU – Analogausgang 0 … 10 V Vakuum Tab. 2 3.3 Varianten Schaltausgänge Funktionsweise Luftsparfunktion (LS) Prüfen Sie die Nutzbarkeit der Luftsparfunktion (Energieeinsparung). Die Funktion ist nur bei den Geräten -CE und -OE möglich. Werksseitig ist die Luftsparfunktion akti viert. Die Luftsparfunktion kann ausgeschaltet werden (è Kapitel 6.3.4, Seite 34). Ist der gewünschte Schwellwert 1 für das Vakuum erreicht, wird die Vakuumerzeugung selbstständig ausgeschaltet. Ein Rückschlagventil verhindert den Abbau des Vakuums. Durch Leckage (z. B. rauhe Werkstückoberflächen) wird das Vakuum trotzdem langsam abgebaut. Bei Unterschreitung des einge stellten Schwellwertes 3 wird die Vakuumerzeugung selbstständig eingeschaltet. Es wird so lange Vakuum erzeugt, bis der eingestellte Schwellwert 1 wieder erreicht ist. Fig. 5 verdeutlicht die Funktionsweise der Luftsparschaltung. Im oberen Teil der Grafik wird der Druck verlauf mit den Schwellwerten und Schwellen dargestellt. Die dazugehörigen Signale In (Steuerein gangssignal) und Out A (Meldesignal nach außen) werden im unteren Bereich der Grafik gezeigt. 12 Festo – OVEM – 1407c Deutsch OVEM 50 mbar (fix) Hysterese 1/2 3 4 5 1 2 3 Schwellwert “Saugen abschalten” Einschaltschwelle “Meldung einschalten” Schwellwert “Saugen einschalten” (intern) Fig. 5 4 5 Rückschaltschwelle “Objekt gegriffen” (mini mal) “Saugen einschalten” (extern) Funktionsweise Luftsparfunktion Bei aktiver Luftsparfunktion: Die Vakuumerzeugung wird ausgeschaltet, sobald das Vakuum besser ist als der Schwellwert 1 und wird wieder eingeschaltet, sobald das Vakuum schlechter ist als der Schwellwert 3. Die Schwellwerte sind wie folgt definiert: Schwellwert “Saugen abschalten“ 1 Der Schwellwert 1 ist gleich der vom Kunden einstellbaren Einschaltschwelle 2 des Ausgangs Out A (è Fig. 5), d.h. der Vakuumerzeuger wird gleichzeitig mit dem Setzen des Ausgangs Out A abgeschaltet. Schwellwert “Saugen einschalten” 3 Der Schwellwert 3 liegt zwischen der Einschaltschwelle 2 und der Rückschaltschwelle 4 (Einschalt schwelle abzüglich der einstellbaren Hysterese) des Ausgangs Out A in einem Abstand von 50 mbar zur Rückschaltschwelle. Dadurch wird verhindert, dass die Rückschaltschwelle erreicht wird. Festo – OVEM – 1407c Deutsch 13 OVEM 3.4 Schaltpunkte und Hysterese Schwellwert-Komparator Fenster-Komparator NO (Schließer) OUT OUT 1 1 Hy 0 P Hy Hy 0 P SP min SP SP max NC (Öffner) OUT OUT 1 1 Hy 0 P 3.5 Hy 0 SP Tab. 3 Hy P SP min SP max Einstellung Schaltpunkte SP und Hysterese Hy Diagnose Neben der reinen Funktion als Drucksensor überwacht die Vakuumsaugdüse noch weitere Systemei genschaften. Dazu zählen z.B. Evakuierungszeiten oder die Funktion der Magnetventile. Die Diagnosefunktion ermöglicht dem Bediener das frühzeitige Erkennen von Störungen und das schnelle Auffinden von Fehlern. Bei Störungen leuchtet die rote Hintergrundbeleuchtung des Displays. Der Anlagenzustand kann über große Entfernungen identifiziert werden. Die Diagnosemeldungen werden im Display angezeigt. Bei Varianten mit zwei Schaltausgängen (-2P,-2N) kann die Fehlermeldung auch über den Schaltausgang Out B erfolgen. Details zur Diagnosefunktion è Kapitel 8.2, Seite 41 14 Festo – OVEM – 1407c Deutsch OVEM 3.6 Messgrößen Vakuum Wird kontinuierlich zwischen Vakuumanschluss und Filter gemessen (Messsignal In A1). Minimal-/Maximalwert Der minimale und maximale gemessene Druckwert (Vakuum) wird in der Vakuumsaugdüse gespeichert. Die Werte gehen verloren, wenn die Versorgungsspannung der Vakuumsaugdüse abgeschaltet wird. Zyklus Die Dauer eines Zyklus umfasst den Zeitraum von Beginn der Evakuierung über das Abwerfen bis zum Beginn der erneuten Evakuierung (è Fig. 6) 1 2 3 2 4 5 In Out A Saugen 1 2 3 Zyklus Evakuierungszeit tevac Belüftungszeit tbel Fig. 6 4 5 Einschaltpunkt Out A Ausschaltpunkt Out A Definition Zyklus, Beispiel für Out A Belüftungs- und Evakuierungszeiten Die minimale und maximale Belüftungs- und Evakuierungszeit wird in der Vakuumsaugdüse gemessen. Die Werte gehen verloren, wenn die Vakuumsaugdüse abgeschaltet wird. Festo – OVEM – 1407c Deutsch 15 OVEM Messbedingungen – Evakuierungszeit: Wird vom Beginn der Evakuierung bis zum Zeitpunkt, an dem der Schaltpunkt ([SP] oder [SPmax]) von Out A erreicht ist, gemessen. – Belüftungszeit: Wird vom Start der Belüftung bis zum Zeitpunkt, an dem das Vakuum einen Wert von –0,050 bar unterschreitet, gemessen. Die Grenzwerte für die Evakuierungs- und Belüftungszeiten können über den EDIT-Modus eingestellt werden (è Kapitel 6.3, Seite 30). 4 Voraussetzungen für den Produkteinsatz Warnung Abhängig von der Funktionalität der Maschine/Anlage kann die Manipulation von Si gnalzuständen schwere Personenschäden verursachen. Berücksichtigen Sie, dass das Ändern des Schaltverhaltens der Schaltausgänge im EDIT-Modus sofort wirksam wird. Aktivieren Sie den Passwortschutz (Sicherheitscode), um das versehentliche Ändern durch unbefugte Dritte zu verhindern (è Kapitel 6.3, Seite 30). Hinweis Durch unsachgemäße Handhabung entstehen Fehlfunktionen. Stellen Sie sicher, dass die nachfolgenden Vorgaben stets eingehalten werden. Hinweis Das Vakuum wird als Relativdruck gemessen. Der angezeigte Druckwert entspricht der tatsächlischen Druckdifferenz zum Umgebungsdruck. In Abhängigkeit vom aktuellen absoluten Umgebungsdruck/Luftdruck kann der erreichbare, angezeigte Druckwert geringer sein, als der in den technischen Daten angegebene Wert. Vergleichen Sie die Grenzwerte in dieser Bedienungsanleitung mit denen Ihres Einsatzfalls (z. B. Be triebsmedium, Drücke, Kräfte, Momente, Temperaturen, Massen, Geschwindigkeiten, Betriebsspan nungen, Durchflüsse). Berücksichtigen Sie die Umgebungsbedingungen am Einsatzort. Berücksichtigen Sie die Vorschriften der Berufsgenossenschaft, des Technischen Überwachungsve reins, des VDE oder entsprechende nationale Bestimmungen. Entfernen Sie die Transportvorkehrungen wie Schutzwachs, Folien (Polyamid), Kappen (Polyethy len), Kartonagen (außer den Verschlusselementen der pneumatischen Anschlüsse). Die Verpackungen sind vorgesehen für eine Verwertung auf stofflicher Basis (Ausnahme: Ölpapier = Restmüll). Verwenden Sie den Artikel im Originalzustand ohne jegliche eigenmächtige Veränderung. 16 Festo – OVEM – 1407c Deutsch OVEM Einsatzbereich und Zulassungen In Verbindung mit dem UL-Kennzeichen auf dem Produkt gelten zusätzlich die Informationen dieses Abschnitts zur Einhaltung der Zertifizierungsbedingungen von Underwriters Laboratories Inc. (UL) für USA und Kanada. Beachten Sie die folgenden englischsprachigen Hinweise von UL: UL approval information Product category code File number Considered standards QUYX (USA) QUYX7 (Canada) E322346 UL 61010-1 C22.2 No.61010-1 UL mark Tab. 4 UL approval information Only for connection to a NEC/CEC Class 2 supply. Raccorder Uniquement a un circuit de NEC/CEC Classe 2. This device is intended to be used with a Class 2 power source or Class 2 transformer in accordance with UL1310 or UL1585. As an alternative a LV/C (Limited Voltage/Current) power source with one of the following properties can be used: – This device shall be used with a suitable isolating source such that the maximum open circuit vol tage potential available to the product is not more than 24 V DC and the current is limited to a value not exceeding 8 amperes measured after 1 minute of operation. – This device shall be used with a suitable isolating source in conjunction with a fuse in accordance with UL248. The fuse shall be rated max. 4 A and be installed in the 24 V DC power supply to the device in order to limit the available current. Note that, when more than one power supply or isolating device is used, connection in parallel is not permitted. Hinweis Der Schalldruckpegel ist im Endprodukt zu messen und gegebenenfalls zu berück sichtigen. Festo – OVEM – 1407c Deutsch 17 OVEM 5 Einbau Die Einbaulage ist beliebig. Montieren und verschlauchen Sie die Vakuumsaugdüse so, dass sich kein Kondensat aus den Druckluftleitungen im Gerät ansammeln kann. Hinweis Eine ungünstige Einbaulage kann zu einem erhöhten Schalldruck führen. Achten Sie beim Einbau darauf, dass die Abluft ungehindert abströmen kann. 5.1 Mechanisch 5.1.1 Direkte Befestigung Fig. 7 Direkte Befestigung Befestigen Sie die Vakuumsaugdüse mit zwei Schrauben an der vorgesehenen Stelle (Größe der Befestigungsschrauben è Tab. 5), Anziehdrehmoment max. 2,5 Nm. Die Verwendung von entsprechenden Unterlegscheiben wird empfohlen. oder Befestigen Sie die Vakuumsaugdüse an der Unterseite mit 4 Schrauben M3, Anziehdrehmoment max. 0,8 Nm. OVEM Größe Befestigungsschrauben -05/-07/-10 -14/-20 M5 M4 Tab. 5 Größe Befestigungsschrauben 5.1.2 Befestigung mit Zubehör Das erforderliche Zubehör wird aufgeführt in è Zubehör. 18 Festo – OVEM – 1407c Deutsch OVEM Hutschienenbefestigung 1 Fig. 8 Hutschienenbefestigung 1. Befestigen Sie die Hutschienenbefestigung mit 4 Schrauben M3 an der Unterseite der Vakuumsaug düse, Anziehdrehmoment max. 0,8 Nm. 2. Hängen Sie die Vakuumsaugdüse in die Hutschine ein und drücken sie in Pfeilrichtung. 3. Sichern Sie mit der Schraube 1 die Vakuumsaugdüse an der Hutschiene. Befestigungswinkel Fig. 9 Befestigungswinkel Befestigen Sie die Vakuumsaugdüse mit zwei Schrauben an der vorgesehenen Stelle (Größe der Befestigungsschrauben è Tab. 5), Anziehdrehmoment max. 2,5 Nm. Die Verwendung von entsprechenden Unterlegscheiben wird empfohlen. P-Anschlussleiste Die Vakuumsaugdüse kann außerdem auf einer P-Anschlussleiste mit maximal 8 Plätzen montiert wer den. Information zur Montage è Montageanleitung OABM-P-…. Festo – OVEM – 1407c Deutsch 19 OVEM 5.2 Pneumatisch Verschlauchen Sie die QS-Steckanschlüsse (-QS, -QO, -PL, -PO) mit einem entsprechenden Schlauch. Die Verwendung vom Schlauch des Typs PUN wird empfohlen. Beachten Sie bei der Auswahl der Schläuche zur Verschlauchung der Vakuumsaugdüse mit Gewin deanschlüssen (-GN, -GO) die in Tab. 6 aufgeführten minimalen Innendurchmesser für Schläuche. Typ Schlauchlänge OVEM-05 GN/GO < 0,5 m < 2 m OVEM-07 GN/GO < 0,5 m < 2 m OVEM-10 GN/GO < 0,5 m < 2 m OVEM-14/-20 GN/GO < 0,5 m < 2 m minimaler Schlauch-Innendurchmesser [mm] Anschluss 1 Druckluft 1 2 1,5 2 2 3 3 4 Anschluss 2 Vakuum 2 3 3 4 4 5 5,5 6 Anschluss 3 Abluft 2 3 3 4 4 5 5,5 6 Tab. 6 Minimale Schlauch-Innendurchmesser Bei Bedarf können Sie den Schalldämpfer bei OVEM-07/-10/-14/-20 mit einer Schalldämpfererwei terung verlängern (è Kapitel 11, Seite 47). 5.3 Elektrisch Warnung Verwenden Sie ausschließlich Stromquellen, die eine sichere elektrische Trennung der Betriebsspannung nach IEC/EN 60204-1 gewährleisten. Berücksichtigen Sie zusätzlich die allgemeinen Anforderungen an PELV-Stromkreise gemäß IEC/EN 60204-1. Hinweis Lange Signalleitungen reduzieren die Störfestigkeit. Stellen Sie sicher, dass die Signalleitungen stets kürzer sind als 30 m. Stellen Sie sicher, dass die Betriebsversorgungspannung 24 VDC ±15 % beträgt. Die Magnetspulen und elektrische Bauteile können zerstört werden, wenn die zulässige Schaltspan nung überschritten wird. Schließen Sie die Kabeldose an den Stecker aD an. Verkabeln Sie die Vakuumsaugdüse wie in Tab. 7 gezeigt. 20 Festo – OVEM – 1407c Deutsch OVEM Stecker M12x1, 5-polig2) 1 2 4 5 3 Pin Kabelfarben 1) Belegung 1 Braun (BN) Versorgungsspannung +24 V DC 2 Weiß (WH) Schaltausgang B (Out B) 3 Blau (BU) 0V 4 Schwarz (BK) Schaltausgang A (Out A) 5 Grau (GY) Schalteingang In (Uin) 1) Bei Verwendung der Anschlussdose mit Kabel lt. Zubehör. 2) Anziehdrehmoment max. 0,3 Nm. Tab. 7 Pin-Belegung Schaltbilder OVEM-...-2P OVEM-...-2N OVEM-...-PU OVEM-...-NU OVEM-...-PI OVEM-...-NI Tab. 8 Schaltbilder Vakuumsaugdüse Festo – OVEM – 1407c Deutsch 21 OVEM 6 Inbetriebnahme Stellen Sie sicher, dass im Transportbereich des Werkstücks: – sich niemand unter dem Werkstück befindet – sich keine Fremdgegenstände befinden (z. B. durch Schutzgitter). Vermeiden Sie lange Schlauchleitungen und große Volumen zwischen Sauggreifer und Vakuum saugdüse. Ein großes Volumen führt zu langen Evakuierungszeiten und möglichen Einstellfehlern am Drucksen sor. Berücksichtigen Sie auftretende Beschleunigungen, Fremdeinwirkungen etc. am Werkstück bei der Einstellung der notwendigen Haltekraft. Inbetriebnahme Vorbereitung Im Grundzustand befindet sich die Vakuumsaugdüse im RUN-Modus. Es werden die aktuellen Mess werte angezeigt. Hinweis Der EDIT-Knopf wird bei der Inbetriebnahme oft zur Auswahl und Bestätigung von Werten verwendet. Bitte betätigen Sie den EDIT-Knopf nur mit einem stumpfen Gegen stand, um Beschädigungen des EDIT-Knopfs zu vermeiden. Der Grundzustand kann aus anderen Modi erreicht werden durch: – EDIT-Knopf 3 s drücken oder – Ablauf einer Überwachungszeit (Timeout è Kapitel 13, Seite 51) 1. Schalten Sie die Betriebsspannung ein. è Die Vakuumsaugdüse befindet sich im RUN-Modus. 2. Prüfen Sie die Einstellungen der Vakuumsaugdüse. Hinweis Eine Übersicht zur Menüstruktur finden Sie in Kapitel 13. Zum Aufbau des Vakuums: 1. Beaufschlagen Sie die Vakuumsaugdüse mit einem Betriebsdruck am Druckluftanschluss 3. 2. Schalten Sie die Betriebsspannung ein. Das Magnetventil (-CN, -CE) wird geöffnet (bei -OE, -ON umgekehrt). Die Druckluft durchströmt die Vakuumsaugdüse und erzeugt ein entsprechendes Vakuum am Vakuumanschluss 5. Durch Verän dern des Betriebsdrucks kann das Vakuum eingestellt werden. Zur Einstellung des Drucksensors: Die Einstellung des Drucksensors zur Überwachung des Vakuums hängt von der jeweiligen Anwendung ab. Die Vakuumsaugdüse ist werksseitig voreingestellt (Werkseinstellungen è Kapitel 12.1, Seite 49). Diese Einstellungen können über den EDIT-Modus oder im TEACH-Modus schnell auf die Applikation angepasst werden. 22 Festo – OVEM – 1407c Deutsch OVEM Die Vakuumsaugdüse muss sich im Grundzustand befinden (RUN-Modus). Legen Sie das gewünschte Schaltverhalten der Schaltausgänge fest (è Kapitel 6.3, Seite 30). Das Werkstück muss durch das erzeugte Vakuum sicher am Sauggreifer halten. Der Abwurfimpuls kann in seiner Intensität und Dauer eingestellt werden. Die Intensität des Abwurfimpulses stellen Sie über die Drosselschraube aJ ein. 1. Drehen Sie die Drosselschraube aJ im Uhrzeigersinn ganz hinein. è Damit ist der Kanal des Abwurfimpulses geschlossen. Es wird kein Abwurfimpuls erzeugt. 2. Drehen Sie die Drosselschraube heraus, bis die notwendige Intensität des Abwurfimpulses erreicht ist. Die Dauer des Abwurfimpulses stellen Sie im EDIT-Modus ein (è Kapitel 6.3.3, Seite 33). 3. Testen Sie die Einstellungen des Abwurfimpulses vor der Inbetriebnahme. Zum Abbau des Vakuums: OVEM-...-CN/-ON Sperren Sie die Druckluftzufuhr durch Abschalten (bei -CN) oder Einschalten (bei -ON) der Eingangs spannung. è Der Vakuumanschluss 5 wird belüftet. Das Werkstück löst sich vom Sauggreifer. OVEM-...-CE/-OE Durch Abschalten(bei -CE) oder Einschalten (bei -OE) der Eingangsspannung wird das zweite Magnetventil geschaltet und ein Abwurfimpuls erzeugt. è Der Vakuumanschluss 5 wird belüftet. Das Werkstück löst sich vom Sauggreifer. Hinweis Wird während des Abwurfimpulses die Eingangsspannung eingeschaltet (bei -CE) oder abgeschaltet (bei -OE), dann wird das Magnetventil in Grundstellung geschaltet und somit kein Abwurfimpuls mehr erzeugt. Hinweis Bei Verwendung von großen Saugern kann es beim Abheben des Saugers vom Werk stück durch den Strömungswiderstand im Sauger zum Aufbau eines geräteunabhängi gen Vakuums kommen. Dies kann dazu führen, dass trotz ausreichend groß gewählter Dauer des Abwurfimpulses sich das Werkstück beim Ablegen nicht vom Sauger löst. Die Eingangsspannung sollte deshalb erst kurz vor dem Abheben des Saugers abge schaltet (bei -CE) oder eingeschaltet (bei -OE) werden, damit der Abwurfimpuls während des Abhebens des Saugers aktiv ist. Festo – OVEM – 1407c Deutsch 23 OVEM 6.1 Symbol Beschreibung Modus RUN SHOW EDIT TEACH Display Symbolik LCD-Display Schaltausgang gesetzt/nicht gesetzt X Schaltausgang selektiert/nicht selektiert Segment Am Schalteingang liegt ein Signal an Schaltein gang In leuch Handhilfsbetätigung aktiv tet Schwellwert-Komparator X X X X X X X Fenster-Komparator X X Abwurfimpuls (Zeiteinstellung) X X [msec] [SP] [SP] [min] [SP] [max] Schaltpunkt (switching point) Unterer Schaltpunkt (switching point – minimal) Oberer Schaltpunkt (switching point – maximal) Diagnose: Grenzwert Evakuierungszeit X X X X X X X X [SP] [max] Diagnose: Grenzwert Belüftungszeit X X [SP] [max] [HY] [NO] [NC] [min] / [max] Hysterese Schaltcharakteristik Schließer (normally open) Schaltcharakteristik Öffner (normally closed) Extremwerte: Minimaler/maximaler Eingangs messwert (In A1) 1) Min. Evakuierungszeit X X X X X X X X [min] [msec] Max. Evakuierungszeit X [max] [msec] Min. Belüftungszeit X [min] [msec] Max. Belüftungszeit X [max] [msec] [TeachIn] 24 TeachIn-Modus aktiv X Festo – OVEM – 1407c Deutsch OVEM Symbol Beschreibung [Option] [Lock] Luftsparfunktion aktiv Sicherheitscode aktiv (Sperrung gegen unbefugte Parametrierung) Grafische Anzeige des aktuellen Messwerts be zogen auf den maximalen Messwert des Mess bereichs. Die linke Segmentreihe zeigt den Messwert von In A1, die rechte Segmentreihe zeigt den Zustand von In und den Magnet ventilen. Bedeutung in anderen Modi è Tab. 10 Spezialmenü (SPEC) ist aktiv 1) Modus RUN SHOW EDIT TEACH Display In A1 (digitale An zeige) di1 (digitale An zeige) di2 (digitale An zeige) Er X (digitale An zeige) ON/OFF FORC (digitale An zeige) 1) X X X X X X X Druckmesswert steuert Schaltausgang Out B X X Diagnosemeldekanal 1 steuert Schaltausgang Out B X X Diagnosemeldekanal 2 steuert Schaltausgang Out B X X Fehlermeldung, Fehlernummer è Kapitel 8.2, Seite 41 X Diagnosekanal gesetzt/ nicht gesetzt – / kein Abwurfimpuls Lock aktiv/ nicht aktiv Luftsparfunktion aktiv/ nicht aktiv zusätzliche Funktion der Handhilfsbetätigung über Bedientasten X X Zusätzlich zeigen die Segmentleisten eine besondere Symbolik è Tab. 10 Tab. 9 Symbolik auf dem Display Festo – OVEM – 1407c Deutsch 25 OVEM 6.1.1 Segmentleisten In den Segmentleisten werden neben der grafischen Anzeige des aktuellen Messwertes auch verschie dene Zustände der Vakuumsaugdüse über eine definierte Symbolik angezeigt. Symbolik Darstellung Bedeutung Segment links unten und [A] leuchten und [min] oder [max] blinkt 1) – SHOW-Modus aktiv auf der LCD-Anzeige wird ein Extrem wert von In A1 (Vakuum) angezeigt – EDIT-Modus aktiv Segment rechts unten und [B] leuchtet und [_|¯¯|_] [msec] blinkt – SHOW-Modus aktiv auf der LCD-Anzeige wird die Dauer des Abwurfimpulses angezeigt Markierte Segmente leuchten – SHOW-Modus aktiv Diagnose: Belüftungs- und Evakuie rungszeit (è Fig. 23) – EDIT-Modus aktiv Markierte Segmente blinken – TEACH-Modus aktiv Schaltpunkt Evakuierungszeit max. Schaltpunkt Belüftungszeit max. – EDIT-Modus aktiv ON: Luftsparfunktion aktiv OFF: Luftsparfunktion inaktiv – EDIT-Modus aktiv Spezialmenü (SPEC) ist geöffnet, auf der LCD-Anzeige wird der Sicherheitscode angezeigt Markierte Segmente leuchten und [Option] blinkt Markierte Segmente leuchten und [Lock] blinkt Segment rechts unten leuchtet Segment rechts mitte leuchtet 3. Segment von unten in der rechten Segmentleiste leuchtet 1) – RUN-Modus aktiv Am Schalteingang liegt ein Signal an. Zusätzlich leuchtet noch Segment Schalteingang In – EDIT-Modus: Dauer Abwurfimpuls – RUN-Modus aktiv – Magnetventil Vakuum bestromt – RUN-Modus aktiv – Magnetventil Abwurf bestromt Extremwerte:min = minimaler Messwert max = maximaler Messwert Tab. 10 26 Besondere Symbolik der Segmentleisten Festo – OVEM – 1407c Deutsch OVEM 6.2 SHOW-Modus Im SHOW-Modus werden folgende Einstellungen und Werte angezeigt: Einstellungen für Out A/B – Schaltfunktion [Schwellwert-/Fenster-Komparator] – Schaltpunkte [SP] , Schaltpunkt [SP] bei LS-aktiv oder [SP] [min] und [SP] [max] – Hysterese [HY], Hysterese [HY] bei LS-aktiv – Schaltcharakteristik [NO/NC] Extremwerte von In A – Minimaler Druckwert [min] – Maximaler Druckwert [max] Abwurfimpulslänge von In B – Dauer Abwurfimpuls in [msec] Diagnose (A-Taste + B-Taste = C-Taste) – Zulässige Evakuierungszeit [msec] – Zulässige Belüftungszeit [msec] – Evakuierungszeit [min][msec] – Evakuierungszeit [max][msec] – Belüftungszeit [min][msec] – Belüftungszeit [max][msec] 6.2.1 Einstellungen für Out A/B anzeigen Die Vakuumsaugdüse muss sich im RUN-Modus befinden. Drücken Sie die A-Taste (Schaltausgang Out A) oder B-Taste (Schaltausgang Out B). è Der SHOW-Modus des entsprechenden Schaltausgangs ist aktiv. Hinweis Liegen Fehler vor, werden nach Drücken der A- oder B-Taste zuerst entsprechende Fehlernummern angezeigt (è Kapitel 8.2, Seite 41). Drücken Sie die Taste des gewählten Schaltausgangs erneut. è Mit jeder weiteren Betätigung der Taste werden nacheinander die aktuellen Einstellungen des jeweiligen Schaltausgangs dargestellt. Wurden alle Werte angezeigt, so wird nach nochmaliger Betätigung der Taste der RUN-Modus wieder aktiv. Festo – OVEM – 1407c Deutsch 27 OVEM Fig. 10 6.2.2 Fig. 11 Beispiel SHOW-Modus für Schaltausgang Out A (Menüstruktur SHOW-Modus è Fig. 23) Minimal-/Maximalwert anzeigen/löschen Werte anzeigen/löschen (Menüstruktur SHOW-Modus è Fig. 23) 1. Drücken Sie die UP-Taste (A-Taste), bis die Einstellung [min] ausgewählt ist. è [min] blinkt. Der Minimalwert von In A1 wird angezeigt (Symbolik bei Anzeige von Extremwerten è Tab. 10 ) 2. Drücken Sie kurz den EDIT-Knopf. è Der Minimalwert wird gelöscht. 3. Drücken Sie die UP-Taste (A-Taste). è [max] blinkt. Der Maximalwert von In A wird angezeigt. 4. Drücken Sie kurz den EDIT-Knopf. è Der Maximalwert wird gelöscht. 5. Drücken Sie die UP-Taste (A-Taste). è Die Vakuumsaugdüse schaltet in den RUN-Modus. 28 Festo – OVEM – 1407c Deutsch OVEM 6.2.3 L Belüftungs-/Evakuierungszeitenanzeigen/löschen L Fig. 12 L L Zeiten anzeigen/löschen (Menüstruktur SHOW-Modus è Fig. 23) 1. Drücken Sie die UP-Taste und DOWN-Taste (A-Taste + B-Taste) gleichzeitig. è Die zulässige Evakuierungszeit wird angezeigt. Die Segmente [msec], [SP], [max], [_|¯] blinken. 2. Drücken Sie erneut die UP-Taste und DOWN-Taste gleichzeitig. è Die zulässige Belüftungszeit wird angezeigt. Die Segmente [msec], [SP], [max], [¯|_] blinken. 3. Drücken Sie erneut die UP-Taste und DOWN-Taste gleichzeitig. è Mit jeder weiteren Betätigung der Tasten werden nacheinander die Extremwerte (min. und max.) für Evakuierungszeit und dann für die Belüftungszeit angezeigt. Möchten Sie den aktuell angezeigte Extremwert löschen, dann drücken Sie kurz den EDIT-Knopf. Wurden alle Werte angezeigt, so wird nach nochmaliger Betätigung der Tasten der RUN-Modus wieder aktiv. Festo – OVEM – 1407c Deutsch 29 OVEM 6.3 EDIT-Modus Im EDIT-Modus können folgende Einstellungen vorgenommen werden: – Schaltfunktion (Schwellwert- oder Fenster-Komparator) – Schaltpunkte [SP], Schaltpunkt [SP] bei LS-aktiv oder [SP] [min] und [SP] [max] – Hysterese [HY], Hysterese [HY] bei LS-aktiv – Schaltelementfunktion[NO/NC] (Schließer/Öffner) – Luftsparfunktion [OPTION] ON/OFF – Sicherheitscode (Lock) – Dauer Abwurfimpuls – Zulässige Belüftungszeit – Zulässige Evakuierungszeit – Diagnoseausgang aktivieren – Elektrische Handhilfsbetätigung Hinweis Bei aktiver Luftsparfunktion (Werkseinstellung nur -CE, -OE) werden deren Einstellungen im Menü von Out A vorgenommen. Wird die Luftsparfunktion deaktiviert, ist Out A ein normaler Schaltausgang. 6.3.1 EDIT-Modus starten Warnung Abhängig von der Funktionalität der Maschine/Anlage kann die Manipulation von Si gnalzuständen schwere Personen- oder Sachschäden verursachen. Berücksichtigen Sie, dass das Ändern des Schaltverhaltens der Schaltausgänge im EDIT-Modus sofort wirksam wird. Mit den Bedientasten können verschiedene Einstellungen ausgewählt werden (è Fig. 13). – Ausgang (Out A, Out B), dessen Verhalten eingestellt werden soll – Dauer Abwurfimpuls – Spezialmenü (SPEC) zum Einstellen der Luftsparfunktion-Option (LS-Option), der maximalen Eva kuierungs- und Belüftungszeiten und des Sicherheitscodes (Lock). Hinweis Bei aktiver Luftsparfunktion (Werkseinstellung nur -CE, -OE) kann für Out A die Funktion Fenster-Komparator nicht eingestellt werden. Die Luftsparfunktion muss dafür über das Spezialmenü (SPEC) deaktiviert werden. 30 Festo – OVEM – 1407c Deutsch OVEM Schaltverhalten Schaltausgang Out A einstellen Out B einstellen: Schaltausgang oder Diagnosemeldeausgang (nur -2P und -2N) Dauer Abwurfimpuls einstellen, elektrische Handhilfsbetätigung Spezialmenü Luftsparfunktion-Option (LS-Option), Sicherheitscode, maximale Evakuierungs- und Belüftungszeiten einstellen Fig. 13 Einstellmöglichkeiten im EDIT-Modus (Menüstruktur EDIT-Modus è Fig. 24) 1. Drücken Sie den EDIT-Knopf. è Der EDIT-Modus ist aktiv und [Out A] blinkt oder bei aktiver Sicherheitssperre blinkt [Lock]. 2. Drücken Sie die UP/DOWN-Tasten, bis der gewählte Sicherheitscode eingestellt ist. 3. Drücken Sie den EDIT-Knopf. è [Out A] blinkt. Sicherheitscode wiederauffindbar hinterlegen. Bei vergessenem Sicherheitscode è Kapitel 7.3, Seite 40. Festo – OVEM – 1407c Deutsch 31 OVEM 6.3.2 Fig. 14 Schaltverhalten der Schaltausgänge einstellen Schaltausgänge einstellen (Menüstruktur EDIT-Modus è Fig. 24) Hinweis Der Ablauf zum Einstellen der Schaltausgänge Out A (A-Taste) und Out B (B-Taste) ist grundsätzlich gleich. Zusätzlich muss für Out B der Schaltausgang In A1 gesetzt werden, da Out B auch als Diagnoseausgang konfiguriert werden kann. ( è Kapitel 8.2, Seite 41) Nachfolgend wird der Ablauf anhand des Schaltausgangs Out B beschrieben. Die Vakuumsaugdüse befindet sich im EDIT-Modus und [Out A] blinkt. Um Out B einzustellen gehen Sie wie folgt vor: 1. Drücken Sie die B-Taste (DOWN-Taste). è [Out B] blinkt. 2. Drücken Sie den EDIT-Knopf, um die Auswahl zu bestätigen. è In A1 wird angezeigt. 3. Drücken Sie den EDIT-Knopf, um die Auswahl zu bestätigen. è Die aktuell eingestellte Schaltfunktion blinkt. 4. Wählen Sie die gewünschte Schaltfunktion (Schwellwert-/Fenster-Komparator) mit den UP/DOWNTasten aus. 32 Festo – OVEM – 1407c Deutsch OVEM 5. Drücken Sie den EDIT-Knopf, um die Auswahl zu bestätigen. è [SP] bzw. [SP] [min] blinkt. 6. Stellen Sie den Schaltpunkt (SP bzw. SPmin) mit den UP/DOWN-Tasten ein. 7. Drücken Sie den EDIT-Knopf, um den eingestellten Wert zu bestätigen. 8. Nur bei Schaltfunktion Fenster-Komparator è [SP] [max] blinkt. Stellen Sie den Wert (SPmax) mit den UP/DOWN-Tasten ein. Drücken Sie den EDIT-Knopf, um den eingestellten Wert zu bestätigen. è [HY] blinkt. 9. Stellen Sie den Wert für die Hysterese (HY) mit den UP/DOWN-Tasten ein. 10.Drücken Sie den EDIT-Knopf, um den eingestellten Wert zu bestätigen. è [NO] oder [NC] blinkt. 11.Wählen Sie die Schaltcharakteristik [NO/NC] mit den UP/DOWN-Tasten aus. 12.Drücken Sie den EDIT-Knopf, um die Auswahl zu bestätigen. è Die Vakuumsaugdüse befindet sich im RUN-Modus. 6.3.3 L Fig. 15 Dauer Abwurfimpuls einstellen, elektrische Handhilfsbetätigung FORC L L L Abwurfimpulslänge einstellen (Menüstruktur EDIT-Modus è Fig. 24) Die Vakuumsaugdüse befindet sich im EDIT-Modus und [Out A] blinkt. Dauer Abwurfimpuls einstellen 1. Drücken Sie B-Taste, bis das Segment rechts unten und B blinken. 2. Drücken Sie den EDIT-Knopf, um die Auswahl zu bestätigen. Festo – OVEM – 1407c Deutsch 33 OVEM 3. Stellen Sie die gewünschte Zeit (in ms) mit den UP/DOWN-Tasten ein. Der Wert 0 entspricht OFF, der Abwurfimpuls ist ausgeschaltet. 4. Drücken Sie den EDIT-Knopf, um den eingestellten Wert zu bestätigen. è FORC leuchtet. Das Untermenü für die Funktion elektrische Handhilfsbetätigung ist aktiv. Elektrische Handhilfsbetätigung 5. Betätigen Sie die Magnetventile über die elektronische Schaltung wie folgt: A-Taste: für Magnetventil Vakuum EIN/AUS B-Taste: für Magnetventil Abwurfimpuls 6. Drücken Sie den EDIT-Knopf, um das Untermenü zu beenden. è Die Vakuumsaugdüse befindet sich im RUN-Modus. 6.3.4 L Fig. 16 [SPEC] – Luftsparfunktion-Option (LS-Option), Sicherheitscode, Evakuierungs- und Belüftungszeiten einstellen L L L Spezialmenü (SPEC) (Menüstruktur EDIT-Modus è Fig. 24) Die Vakuumsaugdüse befindet sich im EDIT-Modus und [Out A] blinkt. 1. Drücken Sie A-Taste, bis das Menü (SPEC) ausgewählt ist. è [SPEC] blinkt. 2. Drücken Sie den EDIT-Knopf, um die Auswahl zu bestätigen. è [Option] blinkt. 3. Wählen Sie mit den UP/DOWN-Tasten die gewünschte LS-Option (ON: LS aktiv; OFF: LS inaktiv) aus. 4. Drücken Sie den EDIT-Knopf, um die Auswahl zu bestätigen. è [Lock] blinkt. 34 Festo – OVEM – 1407c Deutsch OVEM 5. Stellen Sie den gewünschten Sicherheitscode mit den UP/DOWN-Tasten ein. (OFF = kein Schutz). Sicherheitscode wiederauffindbar hinterlegen. Bei vergessenem Sicherheitscode è Kapitel 7.3, Seite 40. Hinweis Werksseitig ist die Überwachung der Evakuierungs- und Belüftungszeiten deaktiviert. 6. Drücken Sie den EDIT-Knopf, um den eingestellten Wert zu bestätigen. è [msec], [SP], [max], [_|¯] blinken. 7. Stellen Sie die maximale Evakuierungszeit mit den UP/DOWN-Tasten ein. (OFF: Überwachung der Evakuierungszeit ist deaktiviert) 8. Drücken Sie den EDIT-Knopf, um den eingestellten Wert zu bestätigen. è [msec], [SP], [max], [¯|_] blinkt 9. Stellen Sie die maximale Belüftungszeit mit den UP/DOWN-Tasten ein. (OFF: Überwachung der Belüftungszeit ist deaktiviert) 10.Drücken Sie den EDIT-Knopf, um den eingestellten Wert zu bestätigen. è Die Vakuumsaugdüse befindet sich im RUN-Modus. 6.4 TEACH-Modus Im TEACH-Modus kann die Schaltgröße (Schaltpunkt oder Schaltfenster) mit und ohne Luftsparfunktion sowie die Belüftungs- und Evakuierungszeiten geteacht werden. Hinweis Stellen Sie vor dem Teachen sicher, dass im EDIT-Modus die gewünschte Schaltfunktion (Fenster- oder Schwellwert-Komparator) und die gewünschte Hysterese eingestellt sind (è Kapitel 6.3, Seite 30). Schwellwert-Komparator Fenster-Komparator Der (geteachte) Schaltpunkt ergibt sich aus dem Mittelwert beider Teach-Punkte. Berechnungsfor mel: SP = 1/2 (TP1 + TP2) Wenn beide TeachPunkte gleich sind, gilt: SP = TP1 = TP2. Das geteachte Schaltfenster ergibt sich aus: SPmin = kleinerer Teach-Punkt (TP1 oder TP2); SPmax = größerer Teach-Punkt (TP1 oder TP2). Lage der Teach-Punkte (Beispiel) Lage der Teach-Punkte (Beispiel) Tab. 11 Schaltgröße einstellen Festo – OVEM – 1407c Deutsch 35 OVEM 6.4.1 Schaltgrößen teachen Hinweis Der Ablauf zum Teachen der Schaltausgänge Out A (A-Taste) und Out B (B-Taste) ist gleich. Nachfolgend wird der Ablauf anhand des Schaltausgangs Out A beschrieben. Fig. 17 Schaltgrößen teachen am Beispiel Out A (Menüstruktur TEACH-Modus è Fig. 25) 1. Schalten Sie die Betriebsspannung ein. è Die Vakuumsaugdüse befindet sich im RUN-Modus. 2. Stellen Sie ein erstes Vakuum (TP1) ein (z.B. Objekt gegriffen oder Objekt nicht gegriffen, die Rei henfolge ist frei wählbar) 3. Drücken Sie zuerst die A-Taste (UP-Taste) und dann zusätzlich den EDIT-Knopf. è [A] und [TeachIn] blinken und der Messwert wird als Teach-Punkt (TP1) für Out A übernommen oder bei aktiver Sicherheitssperre blinkt [Lock] (è Kapitel 6.4.4, Seite 39). 4. Wiederholen Sie die Punkte 2. und 3. für den zweiten Teach-Punkt (TP2). è Der zweite Teach-Punkt (TP2) wird übernommen und der neue Schaltpunkt (SP) oder die Schalt punkte (SPmin und SPmax) werden gültig. Die Vakuumsaugdüse schaltet in den RUN-Modus. Hinweis Die Einstellung für die Hysterese wird angepasst. Sie kann über den EDIT-Modus geän dert werden (è Kapitel 6.3, Seite 30). Werkseinstellung è Kapitel 12.1, Seite 49. 36 Festo – OVEM – 1407c Deutsch OVEM 6.4.2 Luftsparfunktion (LS) teachen -H: 100 mbar -L: 50 mbar 50 mbar (fix) Hysterese 1 2/3 4 5 6 1 2 3 TP – Objekt gegriffen Schwellwert “Saugen abschalten” Einschaltschwelle “Meldung einschalten” Fig. 18 4 5 6 Schwellwert “Saugen einschalten” Rückschaltschwelle “Meldung abschalten” TP – kein Objekt gegriffen Luftsparfunktion teachen Während der Teachfunktion wird die LS automatisch deaktiviert. Dadurch wird das Einstellen der End punkte erleichtert. 1. Schalten Sie die Betriebsspannung ein. è Die Vakuumsaugdüse befindet sich im RUN-Modus. 2. Stellen Sie ein erstes Vakuum (TP1) ein (z.B. Objekt gegriffen oder Objekt nicht gegriffen, die Reihenfolge ist frei wählbar) 3. Drücken Sie zuerst die A-Taste (UP-Taste) und dann zusätzlich den EDIT-Knopf. è LS wird deaktiviert. [A] und [TeachIn] blinken und der Messwert wird als Teach-Punkt (TP1) für Out A übernommen oder bei aktiver Sicherheitssperre blinkt [Lock] (è Kapitel 6.4.4, Seite 39). 4. Wiederholen Sie die Punkte 2. und 3. für den zweiten Teach-Punkt (TP2). è Der zweite Teach-Punkt (TP2) wird übernommen und der neue Schaltpunkt (SP) wird gültig. Die Vakuumsaugdüse schaltet in den RUN-Modus. Die Luftsparfunktion wird wieder aktiviert. Festo – OVEM – 1407c Deutsch 37 OVEM 6.4.3 Fig. 19 Belüftungs- und Evakuierungszeiten teachen Belüftungs- und Evakuierungszeiten teachen (Menüstruktur TEACH-Modus è Fig. 25) 1. Drücken Sie die A- und B-Taste (Z C) gleichzeitig und dann zusätzlich den EDIT-Knopf. è [TeachIn] blinkt und das Balkensegment Diagnose blinkt (Symbolik è Tab. 10) oder bei aktiver Sicherheitssperre blinkt [Lock] (è Kapitel 6.4.4, Seite 39). 2. Messen Sie mindestens einen Zyklus (d.h. evakuieren und abwerfen è Kapitel 3.6, Seite 15). Hinweis Es wird ein Mittelwert über die Zyklen gebildet. Für sinnvolle Ergebnisse sollten ausrei chend Zyklen durchlaufen werden. Je mehr Zyklen durchlaufen werden, um so besser ist der Wert. Die geteachten Werte, Evakuierungszeit und Belüftungzeit, werden mit einer Funktionsreserve von 100% beaufschlagt und abgespeichert. 3. Drücken Sie die A- und B-Taste (Z C) gleichzeitig und dann zusätzlich den EDIT-Knopf. è Das Teachen wird beendet. Die Vakuumsaugdüse schaltet in den RUN-Modus. Hinweis Werden Parameter wie Schaltschwellwert und Einstellung der Drosselschraube geän dert, muss erneut geteacht werden. 38 Festo – OVEM – 1407c Deutsch OVEM 6.4.4 Sicherheitscode eingeben Wurde die Sicherheitssperre aktiviert, dann kann erst nach Eingabe des Sicherheitscodes der TeachVorgang weitergeführt werden. Ist die Sicherheitssperre aktiv, dann blinkt im Display [Lock]. Um die Sperre zu deaktivieren gehen Sie wie folgt vor. 1. Drücken Sie die UP/DOWN-Tasten, bis der gewählte Sicherheitscode eingestellt ist. 2. Drücken Sie den EDIT-Knopf. è Der Teach-Vorgang wird fortgesetzt. 6.4.5 Probelauf Prüfen Sie im Probelauf durch Variieren des Drucks, ob die Schaltausgänge der Vakuumsaugdüse wie gewünscht schalten. 7 Bedienung und Betrieb 7.1 Handhilfsbetätigung Mechanisch Fig. 20 Bedienung Handhilfsbetätigung Im nicht angesteuerten oder stromlosen Zustand kann mit der Handhilfsbetätigung das Magnetventil manuell geschaltet werden. Die Handhilfsbetätigung ist tastend (automatische Rückstellung) ausge führt. Drücken Sie den Stößel der Handhilfsbetätigung mit einem stumpfen Stift hinein. Das Magnetventil wird in Schaltstellung gebracht. Entfernen Sie den Stift. Der Stößel der Handhilfsbetätigung und das Magnetventil gehen in Grundstellung. Elektrisch Die Funktion der elektrischen Handhilfsbetätigung kann mit dem Untermenü FORC im EDIT-Modus realisiert werden. Für weitere Information è Kapitel 6.3.3, Seite 33. Festo – OVEM – 1407c Deutsch 39 OVEM 7.2 Einstellungen und Werte ändern Informationen, wie Einstellungen und Werte geändert werden können è Kapitel 6.3, Seite 30. Hinweis Bei Stromausfall bleiben die letzten gespeicherten Einstellungen erhalten. 7.3 Auf Werkseinstellung zurücksetzen (auch bei nicht wiederauffindbarem Sicherheitscode) Hinweis Durch das Rücksetzen auf Werkseinstellung gehen die aktuellen Einstellungen verloren. Notieren Sie bei Bedarf diese Einstellungen vor dem Rücksetzen. Um die Vakuumsaugdüse auf Werkseinstellung zurückzusetzen, gehen Sie wie folgt vor: 1. Schalten Sie die Betriebsspannung aus. 2. Drücken Sie alle drei Einstellelemente gleichzeitig (UP-Taste + DOWN-Taste + EDIT-Knopf ) und halten sie gedrückt. 3. Schalten Sie die Betriebsspannung wieder ein. 8 Wartung und Diagnose 8.1 Wartung Schalten Sie zur äußeren Reinigung folgende Energiequellen ab: – Betriebsspannung – Druckluft. Reinigen Sie bei Bedarf die Vakuumsaugdüse von außen. Zulässige Reinigungsmedien sind Seifenlauge (max. +60 °C) und alle werkstoffschonenden Medien. Prüfen Sie ob der Luftfilter verunreinigt ist. Zur Sichtkontrolle kann der Filter durch den transparenten Filterdeckel eingesehen werden. 40 Festo – OVEM – 1407c Deutsch OVEM Luftfilter reinigen: 2 1 Fig. 21 Filter aus-/einbauen 1. Entlüften Sie die Vakuumsaugdüse. 2. Ziehen Sie den Schieber 1 des Filters 2 vorsichtig bis zur ersten Rastung heraus. Der Schieber 1 muss in dieser Position am Filter verbleiben. 3. Ziehen Sie den Filter heraus. (Bei Bedarf mit einem Schraubendreher das Herauslösen des Filters unterstützen.) 4. Reinigen Sie den Filter 2 mit Waschbenzin. 5. Schieben Sie den Filter 2 mit Schieber 1 in das Gehäuse. 6. Drücken Sie den Schieber 1 hinein. è Der Filter wird durch den Schieber 1 hineingezogen. 8.2 Diagnose Es gibt vier Diagnosestufen. Um die Diagnosemeldungen anzuzeigen, stehen zwei Möglichkeiten zur Verfügung: über die logischen Diagnosekanäle di 1 und di 2 des Ausgangs Out B (nur bei -2P und -2N) über die Anzeige im LCD-Display der Vakuumsaugdüse. Wenn die Diagnosemeldung am Ausgang Out B gewünscht wird, muss der Diagnosekanal di 1 oder di 2 gesetzt werden (Konfiguration des Schaltausgangs Out B è Kapitel 6.3.2, Seite 32). Bei Meldungen der Diagnosestufe 1 bis 3 leuchtet die rote Hintergrundbeleuchtung des LCD-Displays. Diese Funktion ist für -2P ab Revision 09 (Rev09), für alle anderen Typen ab Revision 07 (Rev07) verfüg bar è Typenschild. Festo – OVEM – 1407c Deutsch 41 OVEM Diagno Beschreibung sestufe Anzeige im 0 – Alles in Ordnung Keine Anzeige 11) SHOW-MODUS TEACH-MODUS – Noch keine Funktionsein Segmente [min] schränkung, aber Betriebs und [max] blin parameter verschlechtern ken synchron sich. – Meldung auf dem Schaltaus gang Out B (logischer Kanal di 1 aktiv) Anzeige Fehler code vor jedem SHOW-Menü Segmente [min] und [max] blin ken synchron 21) – Funktion noch gewähr leistet, aber mit Einschränk ungen (höherer Energiever brauch, …) - “Notbetrieb”, Wartung dringend nötig – Meldung auf dem Schalt ausgang Out B (logische Kanäle di 1 oder di 2 aktiv) LCD-Anzeige und [min], [max] blinken Anzeige Fehler code vor jedem SHOW-Menü LCD-Anzeige und [min], [max] blinken 31) – Funktion nicht mehr gewähr leistet. – Meldung auf dem Schalt ausgang Out B (logische Kanäle di 1 oder di 2 aktiv) und alle ansteuerbaren Aus gänge des Geräts inaktiv Alle Segmente blinken und LCD-Anzeige zeigt den aktu ellen Fehler an Alle Segmente blinken bis auf LCD-Anzeige Kann nicht er reicht werden, da Tasten ge sperrt 1) RUN-MODUS Rote Hintergrundbeleuchtung des Displays leuchtet. Diese Funktion ist für -2P ab Revision 09 (Rev09), für alle anderen Typen ab Revision 07 (Rev07) verfügbar è Typenschild. Tab. 12 8.2.1 Diagnosestufen Diagnosemeldekanal di x setzen Hinweis Für Out B kann nur ein Kanal gesetzt werden (nur -2P und -2N): – In A1 Definition als Schaltausgang – di 1 Diagnosemeldekanal oder – di 2 Diagnosemeldekanal. Mit dem Setzen des Diagnosemeldekanals di 1 oder di 2 ist der Ausgang Out B kein Schaltausgang mehr, sondern ein Diagnosemeldeausgang, der als NO oder NC definiert werden kann. Mit dem Setzen des Kanals di 1 erhalten Sie eine Meldung auf dem Ausgang Out B bereits mit der Diagnosestufe 1. Setzen Sie Kanal di 2 aktiv, erhalten Sie erst ab Diagnosestufe 2 eine Meldung. Eine Überwachung der Evakuierungs- und Belüftungszeit findet nur statt, wenn die Bedingungen eingestellt 42 Festo – OVEM – 1407c Deutsch OVEM oder geteacht wurden. Die Grenzwerte für die Evakuierungs- und Belüftungszeiten können im EDIT-Mo dus eingestellt werden (è Kapitel 6.3.4, Seite 34). L Fig. 22 L L L Diagnosemeldekanal di x setzen (Menüstruktur EDIT-Modus è Fig. 24) 1. Drücken Sie den EDIT-Knopf. è Der EDIT-Modus ist aktiv und [Out A] blinkt oder bei aktiver Sicherheitssperre blinkt [Lock]. 2. Drücken Sie die UP/DOWN-Tasten, bis der gewählte Sicherheitscode eingestellt ist. 3. Drücken Sie den EDIT-Knopf. è [Out A] blinkt. 4. Drücken Sie die B-Taste (DOWN-Taste). è [Out B] blinkt. 5. Drücken Sie den EDIT-Knopf, um die Auswahl zu bestätigen. è In A1 wird angezeigt. 6. Drücken Sie die B-Taste, bis der gewünschte Diagnosemeldekanal ausgewählt ist. 7. Drücken Sie den EDIT-Knopf, um die Auswahl zu bestätigen. è [NO] oder [NC] blinkt. 8. Wählen Sie die Schaltcharakteristik [NO/NC] mit den UP/DOWN-Tasten aus. 9. Drücken Sie den EDIT-Knopf, um die Auswahl zu bestätigen. è Die Vakuumsaugdüse befindet sich im RUN-Modus. Festo – OVEM – 1407c Deutsch 43 OVEM 8.2.2 Fehlercode Hinweis Es gibt natürlich auch Fehler bei denen die Diagnose nicht mehr funktioniert. Um diese zu beheben, wird auf das Kapitel Störungsbeseitigung verwiesen. Diagno Fehler sestufe code Beschreibung Abhilfe 11) Er34 Evakuierungszeit in 2 von 5 Zyklen überschritten Auf Leckage prüfen Er36 Belüftungszeit in 2 von 5 Zyklen über schritten Auf Leckage prüfen Belüftungszeit verlängern Drosselstellung überprüfen Er33 Magnetventil schaltet nicht oder nicht richtig. Plunger bewegt sich nicht, Strom durch Magnetspule ist zu gering, Kurzschluss Magnetspule Mechanische Handhilfsbetätigung mehrmals drücken. Versorgungsspannung überprüfen. Tritt keine Verbesserung ein, ist das Gerät defekt. Gerät zu Festo senden. Er35 Die eingestellte Schwelle der Evakuie rungszeit ist in 2 von 5 Zyklen um das doppelte überschritten. Auf Leckage prüfen Er37 Die eingestellte Schwelle der Belüf tungszeit in 2 von 5 Zyklen um das doppelte überschritten. Auf Leckage prüfen Belüftungszeit verlängern Drosselstellung überprüfen 22) 22) 22) 44 Er38 Schaltfrequenz der Luftsparfunktion liegt über dem Grenzwert 1 Hz Er393)4) Vorgegebener Vakuumwert wird innerhalb von 10 s nicht erreicht Rückschaltschwelle unterschritten (aktive Luftsparfunktion und Schwell wert-Komparator) Oberer Schaltschwelle überschritten oder untere Schaltschwelle unter schritten (Fenster-Komparator) Auf Leckage prüfen Auf Leckage prüfen Druckluftversorgung prüfen Schaltschwellen sinnvoll einstellen Einstellungen Out A prüfen Druckluftversorgung prüfen Schaltschwellen sinnvoll einstellen Einstellungen Out A prüfen Druckluftversorgung prüfen Festo – OVEM – 1407c Deutsch OVEM Diagno Fehler sestufe code Beschreibung Abhilfe 35) Er176) Unterspannung der Versorgungsspan nung < 15 V Versorgungsspannung prüfen Er01 Gerät defekt Gerät ersetzen 1) [min] [max] blinken synchron;Fehleranzeige im SHOW-Modus (è Tab. 9) 2) Alle Segmente blinken. Die aktuell kleinste Fehlernummer wird angezeigt. 3) Fehlercode ist für -2P ab Revision 09 (Rev09), für alle anderen Typen ab Revision 07 (Rev07) verfügbar è Typenschild. 4) Gilt nur für die Einstellungen des Schaltausgangs Out A 5) Mittlere Reihe der Barcodesegmente blinken; Fehleranzeige im SHOW-Modus (è Tab. 9) 6) Ausgänge werden selbsttätig zurückgesetzt (0-Signal). Tab. 13 Fehlercode der Vakuumsaugdüse Festo – OVEM – 1407c Deutsch 45 OVEM 9 Störungsbeseitigung Störung Mögliche Ursache Abhilfe Werkstück löst sich nicht vom Sauger Beim schnellen Abheben großer Sau ger wurde Vakuum aufgebaut Dauer und Intensität des Abwurf impulses erhöhen Sauger langsamer vom Werkstück abheben beim Abheben des Saugers den Ab wurfimpuls aktiv setzen Werkstück löst sich nicht vom Sauger Verwendeter Schlauch zwischen Sau Schlauch ersetzen ger und Vakuumsaugdüse ist falsch Schlauchanforderung dimensioniert (Schlauch ist zu lang è Kapitel 5.2, Seite 20 und/oder Schlauch-Innendurch messer zu klein) Keine Anzeige im Display Unvollständige An zeige im Display Drosselschraube ist geschlossen Drosselschraube öffnen Versorgungsspannung fehlt oder keine zulässige Betriebsspannung Versorgungsspannung einschalten/ zulässigen Betriebsspannungsbe reich einhalten Elektrische Anschlüsse vertauscht (verpolt) Gerät gemäß Anschlussbild ver kabeln Gerät defekt Gerät ersetzen Display defekt Gerät ersetzen Falsche Druckanzeige Pneumatische Anschlüsse vertauscht Verschlauchung gemäß Abschnitt “Einbau pneumatisch” ausführen Ausgänge schalten nicht entsprechend der vorgenommenen Einstellungen Einstellungen nicht editierbar (“Lock” in der Anzeige) 46 Gerät mit unzulässigem Medium be trieben Gerät austauschen und nur mit Druckluft betreiben Kurzschluss oder Überlast am ent sprechenden Ausgang Kurzschluss/Überlast beseitigen Gerät defekt Gerät ersetzen Zugriffsschutz aktiv Sicherheitscode eingeben (bei nicht wieder auffindbarem Sicherheitscode Gerät auf Werkseinstellung zurück setzen è Kapitel 7.3, Seite 40) Festo – OVEM – 1407c Deutsch OVEM Störung Mögliche Ursache Abhilfe [min] [max] blinken Synchron Diagnosestufe 1 aktiv è Tab. 13 LCD-Anzeige und [min], [max] blinken Diagnosestufe 2 aktiv è Tab. 13 LCD-Anzeige blinkt und ErXX wird ange zeigt Diagnosestufe 3 aktiv è Tab. 13 [Option] blinkt Einstellungen beim Teachen fehler haft z.B. Hysterese bei Luftsparfunk tion 100 mbar Neu teachen, Hysterese zurücksetzen Tab. 14 10 Störungsbeseitigung Ausbau 1. Schalten Sie zum Ausbau folgende Energiequellen ab: – Betriebsspannung – Druckluft. 2. Trennen Sie die elektrischen und pneumatischen Anschlüsse von der Vakuumsaugdüse. 3. Demontieren Sie die Vakuumsaugdüse. 11 Zubehör Bezeichnung OVEM-05 Verbindungsleitung M12x1, 5-polig, 2,5 m NEBU-M12G5-K-2.5-LE5 Verbindungsleitung M12x1, 5-polig, 5 m Hutschienenbefestigung NEBU-M12G5-K-5-LE5 Befestigungswinkel HRM-1 Schalldämpfererweiterung P-Anschlussleiste – OABM-P-4 OABM-P-6 OABM-P-8 OASC-G1-P Blindstopfen Tab. 15 OVEM-07/-10 OVEM-14/-20 OABM-H UOMS-¼ UOMS-¼ Zubehör Festo – OVEM – 1407c Deutsch 47 OVEM 12 Technische Daten OVEM -05 Betriebsdruck -QS, -GN, -PL: 2 … 6 -QO, -GO, -PO: 2 … 8 Druckluft nach ISO 8573-1:2010 [7:4:4] geölter Betrieb nicht möglich 0 … 50 0 … 50 3 5 …85 24 ±15 % -2P, -2N: 270 -PI, -PU, -NI, -NU: 180 Betriebsmedium Hinweis zum Betriebsmedium Umgebungstemperatur Mediumstemperatur Verschmutzungsgrad relative Luftfeuchtigkeit Nennbetriebsspannung Max. Stromaufnahme [bar] [°C] [°C] [%] [V DC] [mA] -07/-10 Leerlaufstrom Spulenkennwerte 24 VDC [mA] [W] Zeit bis Stromabsenkung Bereitschaftsverzögerung Schaltausgänge – Max. Ausgangsstrom – Spannungsfall – Kapazitive Last maximal DC Totzeit Schutzfunktionen – Induktive Schutzbeschaltung – Kurzschlussfestigkeit – Überlastfestigkeit Verpolungsschutz Isolationsspannung Stoßspannungsfestigkeit Schutzart Schutzklasse Störfestigkeit Störaussendung Schwingungsfestigkeit [ms] [ms] 70 Niederstromphase: 0,3 Hochstromphase: 2,55 80 500 [mA] [V] [nF] [ms] 100 ≤ 1,5 ≤ 100 10 Schockfestigkeit 48 [V] [kV] ≤ 20 -14/-20 ≤ 35 angepasst an MZ, MY, ME-Spulen ja ja für alle elektrischen Anschlüsse 50 0,8 IP65 3 siehe Konformitätserklärung (www.festo.com)1) siehe Konformitätserklärung (www.festo.com)1) nach IEC/EN 60068 Teil 2-6: 0,35 mm Weg bei 10 … 60 Hz, 5 g Beschleunigung bei 60 … 150 Hz nach IEC/EN 60068 Teil 2-27: 30 g Beschleunigung bei 11 ms Dauer (Halbsinus) Festo – OVEM – 1407c Deutsch OVEM OVEM -05 -07/-10 -14/-20 Max. zul. Signalleitungslänge Überlastdruck am Vakuum anschluss [m] [bar] 30 ≤5 Druckmessbereich Genauigkeit Einstellbereich Schwellwerte [bar] [% FS] [bar] –1 … 0 ±3 –0,999 … 0 (empfohlener Arbeitsbereich: –0,95 … –0,05) Hysterese Einstellbereich Hysterese Einstellbereich Dauer Abwurfimpuls [% FS] [bar] [ms] ±0,1 –0,9 … 0 20 … 9999 1) 40 … 9999 Das Produkt ist für den Einsatz im Industriebereich vorgesehen. Im Wohnbereich müssen evtl. Maßnahmen zur Funkentstörung getroffen werden. Tab. 16 12.1 Technische Daten Werkseinstellung OVEM-...-H-... Out A SP SPmin SPmax HYS SPLS HYSLS Out B SP SPmin SPmax HYS Abwurfimpuls Tab. 17 OVEM-...-L-... –0,7 bar 0,25 bar –0,7 bar 0,25 bar –0,4 bar –0,7 bar –0,97 bar 0,25 bar –0,7 bar 0,25 bar –0,5 bar 0,2 bar 200 ms 0,1 bar –0,4 bar 0,25 bar –0,4 bar –0,67 bar 0,1 bar –0,4 bar 0,25 bar –0,2 bar –0,5 bar –0,71 bar 0,2 bar 200 ms 0,1 bar 200 ms –0,2 bar –0,41 bar 0,1 bar 200 ms Werkseinstellung Festo – OVEM – 1407c Deutsch 49 OVEM 12.2 Schaltsymbole OVEM-... Symbol OVEM-... Symbol -QO/-GO-CN-... -2P/2N/PU/PI/NU/NI -QO/-GO-CE-... -2P/2N/PU/PI/NU/N -QS/-GN-CN-... -2P/2N/PU/PI/NU/NI -QS/-GN-CE-... -2P/2N/PU/PI/NU/NI -QO/-GO-ON-... -2P/2N/PU/PI/NU/NI -QO/-GO-OE-... -2P/2N/PU/PI/NU/NI -QS/-GN-ON-... -2P/2N/PU/PI/NU/NI -QS/-GN-OE-... -2P/2N/PU/PI/NU/NI Tab. 18 50 Schaltsymbole der Funktion Festo – OVEM – 1407c Deutsch OVEM 13 Symbol Menüstruktur Bedeutung Automatische Rückkehr in den Grundzustand (RUN-Modus) nach Ablauf der Überwachungszeit (hier 80 Sekunden) Um manuell in den Grundzustand (RUN-Modus) zurückzukehren, 3 Sekunden EDIT-Knopf drücken TP1 z.B Objekt gegriffen oder nicht gegriffen (zum Teachen des Messwertes – hierTP1) Symbol auf dem Display blinkt / leuchtet (hier Out A) Sicherheitscode aktiv (Sperrung gegen unbefugte Programmierung / Parame trierung) Sicherheitscode inaktiv UP-Taste (A) drücken (weiterschalten/umschalten im Menü) UP-Taste (A) oder DOWN-Taste (B) drücken (Wert einstellen) Taste (hier DOWN-Taste) und EDIT-Knopf gleichzeitig drücken EDIT-Knopf drücken Verzweigung im Menüsystem Anzeige aktueller Fehler Minimal-/Maximalwert löschen Zyklus Teach-Punkt wird übernommen Tab. 19 Symbolik zur Darstellung der Menüstruktur Festo – OVEM – 1407c Deutsch 51 OVEM Fig. 23 52 SHOW-Modus Festo – OVEM – 1407c Deutsch OVEM Fig. 24 EDIT-Modus Festo – OVEM – 1407c Deutsch 53 OVEM Fig. 25 54 TEACH-Modus Festo – OVEM – 1407c Deutsch OVEM Stichwortverzeichnis A Abwurfimpuls – Dauer einstellen . . . . . . . . . . . . . . . . . . . . . . 33 – Intensität einstellen . . . . . . . . . . . . . . . . . . . 23 – Symbolik . . . . . . . . . . . . . . . . . . . . . . . . . . . . 24 Analogausgang . . . . . . . . . . . . . . . . . . . . . . . . 10 Anschlüsse . . . . . . . . . . . . . . . . . . . . . . . . . . . . . 5 B Bedienteile . . . . . . . . . . . . . . . . . . . . . . . . . . . . . 5 Befestigung – direkt . . . . . . . . . . . . . . . . . . . . . . . . . . . . . . . 18 – mit Zubehör . . . . . . . . . . . . . . . . . . . . . . . . . 18 Befestigungswinkel . . . . . . . . . . . . . . . . . . . . . 19 Belüftungszeit . . . . . . . . . . . . . . . . . . . . . . . . . 15 – anzeigen . . . . . . . . . . . . . . . . . . . . . . . . . . . . 29 – einstellen . . . . . . . . . . . . . . . . . . . . . . . . . . . 34 – löschen . . . . . . . . . . . . . . . . . . . . . . . . . . . . . 29 – teachen . . . . . . . . . . . . . . . . . . . . . . . . . . . . . 38 Betriebszustände . . . . . . . . . . . . . . . . . . . . . . . . 9 – EDIT-Modus . . . . . . . . . . . . . . . . . . . 10, 30, 53 – RUN-Modus . . . . . . . . . . . . . . . . . . . . . . . . . 10 – SHOW-Modus . . . . . . . . . . . . . . . . . . 10, 27, 52 – TEACH-Modus . . . . . . . . . . . . . . . . . . 10, 35, 54 D Diagnose . . . . . . . . . . . . . . . . . . . . . . . . . . . . . 14 – Diagnosestufen . . . . . . . . . . . . . . . . . . . . . . 42 – Symbolik . . . . . . . . . . . . . . . . . . . . . . . . . . . . 24 Diagnosemeldekanal setzen . . . . . . . . . . . . . . 42 Diagnosestufe – Anzeige . . . . . . . . . . . . . . . . . . . . . . . . . . . . . 42 – Diagnosemeldekanal . . . . . . . . . . . . . . . . . . 42 – Fehlercode . . . . . . . . . . . . . . . . . . . . . . . . . . 44 Display . . . . . . . . . . . . . . . . . . . . . . . . . . . . . . . . 6 – Symbolik . . . . . . . . . . . . . . . . . . . . . . . . . . . . 24 E EDIT-Modus . . . . . . . . . . . . . . . . . . . . . 10, 30, 53 Einbau – elektrisch . . . . . . . . . . . . . . . . . . . . . . . . . . . 20 – mechanisch . . . . . . . . . . . . . . . . . . . . . . . . . . 18 Festo – OVEM – 1407c Deutsch – pneumatisch . . . . . . . . . . . . . . . . . . . . . . . . . Einschaltschwelle . . . . . . . . . . . . . . . . . . . . . . . Einstellen – Belüftungszeit . . . . . . . . . . . . . . . . . . . . . . . – Dauer Abwurfimpuls . . . . . . . . . . . . . . . . . . . – Evakuierungszeit . . . . . . . . . . . . . . . . . . . . . – Intensität Abwurfimpuls . . . . . . . . . . . . . . . . – Luftsparfunktion . . . . . . . . . . . . . . . . . . . . . . – Schaltausgänge . . . . . . . . . . . . . . . . . . . . . . – Sicherheitscode . . . . . . . . . . . . . . . . . . . . . . Evakuierungszeit . . . . . . . . . . . . . . . . . . . . . . . – anzeigen . . . . . . . . . . . . . . . . . . . . . . . . . . . . – einstellen . . . . . . . . . . . . . . . . . . . . . . . . . . . – löschen . . . . . . . . . . . . . . . . . . . . . . . . . . . . . – teachen . . . . . . . . . . . . . . . . . . . . . . . . . . . . . – Vakuum, löschen . . . . . . . . . . . . . . . . . . . . . Extremwerte – Belüftungszeit . . . . . . . . . . . . . . . . . . . . . . . anzeigen . . . . . . . . . . . . . . . . . . . . . . . . . . . . löschen . . . . . . . . . . . . . . . . . . . . . . . . . . . . . – Evakuierungszeit . . . . . . . . . . . . . . . . . . . . . anzeigen . . . . . . . . . . . . . . . . . . . . . . . . . . . . löschen . . . . . . . . . . . . . . . . . . . . . . . . . . . . . – Vakuum . . . . . . . . . . . . . . . . . . . . . . . . . . . . . anzeigen . . . . . . . . . . . . . . . . . . . . . . . . . . . . 20 13 34 33 34 23 34 32 34 15 29 34 29 38 28 15 29 29 15 29 29 15 28 F Fehlercode . . . . . . . . . . . . . . . . . . . . . . . . . . . . Fenster-Komparator – Hysterese . . . . . . . . . . . . . . . . . . . . . . . . . . . – Schaltpunkte . . . . . . . . . . . . . . . . . . . . . . . . – Symbolik . . . . . . . . . . . . . . . . . . . . . . . . . . . . 14 14 24 H Handhilfsbetätigung – elektrisch . . . . . . . . . . . . . . . . . . . . . . . . . . . – mechanisch . . . . . . . . . . . . . . . . . . . . . . . . . . Hutschienenbefestigung . . . . . . . . . . . . . . . . . Hysterese . . . . . . . . . . . . . . . . . . . . . . . . . . . . . 33 39 19 14 44 55 OVEM L Luftfilter reinigen . . . . . . . . . . . . . . . . . . . . . . . Luftsparfunktion – Einschaltschwelle . . . . . . . . . . . . . . . . . . . . . – einstellen . . . . . . . . . . . . . . . . . . . . . . . . . . . – Funktionsweise . . . . . . . . . . . . . . . . . . . . . . . – Rüchschaltschwelle . . . . . . . . . . . . . . . . . . . – Schwellwerte . . . . . . . . . . . . . . . . . . . . . . . . – teachen . . . . . . . . . . . . . . . . . . . . . . . . . . . . . 41 13 34 12 13 13 37 M Menü – EDIT-Modus . . . . . . . . . . . . . . . . . . . . . . . . . 53 – SHOW-Modus . . . . . . . . . . . . . . . . . . . . . . . . 52 – Symbolik . . . . . . . . . . . . . . . . . . . . . . . . . . . . 51 – TEACH-Modus . . . . . . . . . . . . . . . . . . . . . . . . 54 Merkmale . . . . . . . . . . . . . . . . . . . . . . . . . . . . . . 7 Messgrößen – Belüftungszeit min./max. . . . . . . . . . . . . . . . 15 – Evakuierungszeit min./max. . . . . . . . . . . . . . 15 – Vakuum min./max. . . . . . . . . . . . . . . . . . . . . 15 – Zyklus . . . . . . . . . . . . . . . . . . . . . . . . . . . . . . 15 R Rückschaltschwelle . . . . . . . . . . . . . . . . . . . . . 13 RUN-Modus . . . . . . . . . . . . . . . . . . . . . . . . . . . 10 S Schaltausgang . . . . . . . . . . . . . . . . . . . . . . . . . – einstellen . . . . . . . . . . . . . . . . . . . . . . . . . . . – Einstellungen anzeigen . . . . . . . . . . . . . . . . . – Symbolik . . . . . . . . . . . . . . . . . . . . . . . . . . . . – teachen . . . . . . . . . . . . . . . . . . . . . . . . . . . . . Schaltbilder . . . . . . . . . . . . . . . . . . . . . . . . . . . Schalteingang . . . . . . . . . . . . . . . . . . . . . . . . . Schaltpunkte . . . . . . . . . . . . . . . . . . . . . . . . . . Schlauch-Innendurchmesser . . . . . . . . . . . . . . Schwellwert – Saugen abschalten . . . . . . . . . . . . . . . . . . . . – Saugen einschalten . . . . . . . . . . . . . . . . . . . 10 32 27 24 36 21 10 14 20 13 13 Schwellwert-Komparator – Hysterese . . . . . . . . . . . . . . . . . . . . . . . . . . . 14 – Schaltpunkt . . . . . . . . . . . . . . . . . . . . . . . . . 14 – Symbolik . . . . . . . . . . . . . . . . . . . . . . . . . . . . 24 SHOW-Modus . . . . . . . . . . . . . . . . . . . . 10, 27, 52 Sicherheitscode – eingeben . . . . . . . . . . . . . . . . . . . . . . . . . . . . 39 – einstellen . . . . . . . . . . . . . . . . . . . . . . . . . . . 34 – zurücksetzen . . . . . . . . . . . . . . . . . . . . . . . . . 40 Spezialmenü – Belüftungszeit . . . . . . . . . . . . . . . . . . . . . . . 34 – Evakuierungszeit . . . . . . . . . . . . . . . . . . . . . 34 – Luftsparfunktion-Option . . . . . . . . . . . . . . . . 34 – Sicherheitscode . . . . . . . . . . . . . . . . . . . . . . 34 – Symbolik . . . . . . . . . . . . . . . . . . . . . . . . . . . . 25 Stecker, Pin-Belegung . . . . . . . . . . . . . . . . . . . 21 Störungsbeseitigung . . . . . . . . . . . . . . . . . 44, 46 Symbolik – Display . . . . . . . . . . . . . . . . . . . . . . . . . . . . . 24 – Segmentleisten . . . . . . . . . . . . . . . . . . . . . . . 26 T TEACH-Modus . . . . . . . . . . . . . . . . . . . . 10, 35, 54 Teachen – Belüftungszeit . . . . . . . . . . . . . . . . . . . . . . . 38 – Evakuierungszeit . . . . . . . . . . . . . . . . . . . . . 38 – Luftsparfunktion . . . . . . . . . . . . . . . . . . . . . . 37 – Schaltausgang . . . . . . . . . . . . . . . . . . . . . . . 36 V Vakuum – anzeigen . . . . . . . . . . . . . . . . . . . . . . . . . . . . 28 – löschen . . . . . . . . . . . . . . . . . . . . . . . . . . . . . 28 – Messgrößen . . . . . . . . . . . . . . . . . . . . . . . . . 15 Variantenübersicht . . . . . . . . . . . . . . . . . . . . . . . 8 W Werkseinstellung . . . . . . . . . . . . . . . . . . . . . . . 49 – zurücksetzen . . . . . . . . . . . . . . . . . . . . . . . . . 40 Z Zyklus . . . . . . . . . . . . . . . . . . . . . . . . . . . . . . . . 15 56 Festo – OVEM – 1407c Deutsch OVEM English – Vacuum generator OVEM Table of contents 1 Product description . . . . . . . . . . . . . . . . . . . . . . . . . . . . . . . . . . . . . . . . . . . . . . . . . . . . . . . 59 1.1 1.2 Overview . . . . . . . . . . . . . . . . . . . . . . . . . . . . . . . . . . . . . . . . . . . . . . . . . . . . . . . . . . . . . . . . Key features . . . . . . . . . . . . . . . . . . . . . . . . . . . . . . . . . . . . . . . . . . . . . . . . . . . . . . . . . . . . . 59 61 2 Fast commissioning with factory setting . . . . . . . . . . . . . . . . . . . . . . . . . . . . . . . . . . . . . . . 62 3 Function and application . . . . . . . . . . . . . . . . . . . . . . . . . . . . . . . . . . . . . . . . . . . . . . . . . . . 63 3.1 3.2 3.3 3.4 3.5 3.6 Operating statuses of the vacuum suction nozzle . . . . . . . . . . . . . . . . . . . . . . . . . . . . . . . . Switching outputs and switching input . . . . . . . . . . . . . . . . . . . . . . . . . . . . . . . . . . . . . . . . Mode of operation of the air-saving function (LS) . . . . . . . . . . . . . . . . . . . . . . . . . . . . . . . . Switching points and hysteresis . . . . . . . . . . . . . . . . . . . . . . . . . . . . . . . . . . . . . . . . . . . . . . Diagnostics . . . . . . . . . . . . . . . . . . . . . . . . . . . . . . . . . . . . . . . . . . . . . . . . . . . . . . . . . . . . . . Measured variables . . . . . . . . . . . . . . . . . . . . . . . . . . . . . . . . . . . . . . . . . . . . . . . . . . . . . . . . 63 64 66 68 68 69 4 Requirements for product use . . . . . . . . . . . . . . . . . . . . . . . . . . . . . . . . . . . . . . . . . . . . . . . 70 5 Installation . . . . . . . . . . . . . . . . . . . . . . . . . . . . . . . . . . . . . . . . . . . . . . . . . . . . . . . . . . . . . . 72 5.1 5.2 5.3 Mechanical . . . . . . . . . . . . . . . . . . . . . . . . . . . . . . . . . . . . . . . . . . . . . . . . . . . . . . . . . . . . . . 5.1.1 Direct mounting . . . . . . . . . . . . . . . . . . . . . . . . . . . . . . . . . . . . . . . . . . . . . . . . . . 5.1.2 Mounting with accessories . . . . . . . . . . . . . . . . . . . . . . . . . . . . . . . . . . . . . . . . . Pneumatic . . . . . . . . . . . . . . . . . . . . . . . . . . . . . . . . . . . . . . . . . . . . . . . . . . . . . . . . . . . . . . . Electrical . . . . . . . . . . . . . . . . . . . . . . . . . . . . . . . . . . . . . . . . . . . . . . . . . . . . . . . . . . . . . . . . 72 72 72 74 74 6 Commissioning . . . . . . . . . . . . . . . . . . . . . . . . . . . . . . . . . . . . . . . . . . . . . . . . . . . . . . . . . . . 76 6.1 Symbolic LCD display . . . . . . . . . . . . . . . . . . . . . . . . . . . . . . . . . . . . . . . . . . . . . . . . . . . . . . 6.1.1 Segment bars . . . . . . . . . . . . . . . . . . . . . . . . . . . . . . . . . . . . . . . . . . . . . . . . . . . . SHOW mode . . . . . . . . . . . . . . . . . . . . . . . . . . . . . . . . . . . . . . . . . . . . . . . . . . . . . . . . . . . . . 6.2.1 Display settings for Out A/B . . . . . . . . . . . . . . . . . . . . . . . . . . . . . . . . . . . . . . . . . 6.2.2 Display/delete minimum/maximum value . . . . . . . . . . . . . . . . . . . . . . . . . . . . . 6.2.3 Display/delete pressurisation/evacuation times . . . . . . . . . . . . . . . . . . . . . . . . 78 80 81 81 82 83 6.2 Festo – OVEM – 1407c English 57 OVEM 6.3 Edit mode . . . . . . . . . . . . . . . . . . . . . . . . . . . . . . . . . . . . . . . . . . . . . . . . . . . . . . . . . . . . . . . 6.3.1 Start EDIT mode . . . . . . . . . . . . . . . . . . . . . . . . . . . . . . . . . . . . . . . . . . . . . . . . . . 6.3.2 Setting the switching characteristics of the switching outputs . . . . . . . . . . . . . 6.3.3 Set duration of ejector pulse, electrical manual override FORC . . . . . . . . . . . . . 6.3.4 [SPEC] – Set air saving function option (LS option), security code, evacuation and air supply times . . . . . . . . . . . . . . . . . . . . . . . . . . . . . . . . . . . . . . . . . . . . . . . . . . TEACH mode . . . . . . . . . . . . . . . . . . . . . . . . . . . . . . . . . . . . . . . . . . . . . . . . . . . . . . . . . . . . . 6.4.1 Teach switching variables . . . . . . . . . . . . . . . . . . . . . . . . . . . . . . . . . . . . . . . . . . . 6.4.2 Teach air saving function (LS) . . . . . . . . . . . . . . . . . . . . . . . . . . . . . . . . . . . . . . . 6.4.3 Teach pressurisation and evacuation times . . . . . . . . . . . . . . . . . . . . . . . . . . . . . 6.4.4 Enter the security code . . . . . . . . . . . . . . . . . . . . . . . . . . . . . . . . . . . . . . . . . . . . 6.4.5 Test run . . . . . . . . . . . . . . . . . . . . . . . . . . . . . . . . . . . . . . . . . . . . . . . . . . . . . . . . . 84 84 86 87 7 Operation . . . . . . . . . . . . . . . . . . . . . . . . . . . . . . . . . . . . . . . . . . . . . . . . . . . . . . . . . . . . . . . 93 7.1 7.2 7.3 Manual override . . . . . . . . . . . . . . . . . . . . . . . . . . . . . . . . . . . . . . . . . . . . . . . . . . . . . . . . . . Changing settings and values . . . . . . . . . . . . . . . . . . . . . . . . . . . . . . . . . . . . . . . . . . . . . . . . Reset to factory setting . . . . . . . . . . . . . . . . . . . . . . . . . . . . . . . . . . . . . . . . . . . . . . . . . . . . . 93 94 94 8 Maintenance and diagnostics . . . . . . . . . . . . . . . . . . . . . . . . . . . . . . . . . . . . . . . . . . . . . . . 94 8.1 8.2 Maintenance . . . . . . . . . . . . . . . . . . . . . . . . . . . . . . . . . . . . . . . . . . . . . . . . . . . . . . . . . . . . . Diagnostics . . . . . . . . . . . . . . . . . . . . . . . . . . . . . . . . . . . . . . . . . . . . . . . . . . . . . . . . . . . . . . 8.2.1 Set diagnostic message channel di x . . . . . . . . . . . . . . . . . . . . . . . . . . . . . . . . . . 8.2.2 Error code . . . . . . . . . . . . . . . . . . . . . . . . . . . . . . . . . . . . . . . . . . . . . . . . . . . . . . . 94 95 96 98 9 Fault clearance . . . . . . . . . . . . . . . . . . . . . . . . . . . . . . . . . . . . . . . . . . . . . . . . . . . . . . . . . . . 100 10 Disassembly . . . . . . . . . . . . . . . . . . . . . . . . . . . . . . . . . . . . . . . . . . . . . . . . . . . . . . . . . . . . . 101 11 Accessories . . . . . . . . . . . . . . . . . . . . . . . . . . . . . . . . . . . . . . . . . . . . . . . . . . . . . . . . . . . . . . 101 12 Technical data . . . . . . . . . . . . . . . . . . . . . . . . . . . . . . . . . . . . . . . . . . . . . . . . . . . . . . . . . . . . 102 12.1 Factory setting . . . . . . . . . . . . . . . . . . . . . . . . . . . . . . . . . . . . . . . . . . . . . . . . . . . . . . . . . . . . 12.2 Circuit symbols . . . . . . . . . . . . . . . . . . . . . . . . . . . . . . . . . . . . . . . . . . . . . . . . . . . . . . . . . . . 103 104 13 105 6.4 58 Menu structure . . . . . . . . . . . . . . . . . . . . . . . . . . . . . . . . . . . . . . . . . . . . . . . . . . . . . . . . . . . 88 89 90 91 92 93 93 Festo – OVEM – 1407c English OVEM 1 Product description 1.1 Overview 1 2 3 4 5 6 aD aC 7 aB aA aJ 9 8 1 2 3 4 5 6 7 8 Solenoid valve ejector pulse (E) Solenoid valve vacuum ON/OFF(V) Supply port Exhaust port / silencer Vacuum port Replaceable filter element Housing with mounting holes Slide for changing the filter Fig. 1 9 aJ aA aB aC aD Filter housing with inspection window Flow control screw for adjusting the intensity of the ejector pulse Operating buttons EDIT button LCD display Plug connector for electrical connection (M12) Control sections and connections Festo – OVEM – 1407c English 59 OVEM 1 2 3 4 aJ 5 aJ 3 9 6 7 8 1 2 3 4 5 Display segment switching output Out A Display segment switching output Out B Display segment switching input In 4-digit alphanumeric LCD display (vacuum display, special display) Toolbar for functions è Tab. 9 Fig. 2 6 7 8 9 EDIT button DOWN-button/B-button UP-button/A-button Vacuum display aJ Status indicator solenoid valve Display Note The operating buttons are designated differently in the user guidance depending on use! With the selection of the switching outputs - A-button/B-button With the selection of menu items and setting values - UP-button/DOWN-button 60 Festo – OVEM – 1407c English OVEM 1.2 Key features Features Code Specification Vacuum suction nozzle OVEM Nominal width of laval nozzle -05 -07 -10 -14 -20 -H -L -B -BN -QS Vacuum suction nozzle with vacuum solenoid valve ON/OFF and manual override 0.45 mm 0.7 mm 0.95 mm 1.4 mm 2.0 mm High vacuum High suction volume 20 mm wide, ISO standard 20 mm wide, NPT All ports with QS fittings (-B-QS) All ports with QS fittings in inch sizes (-BN-QS) Supply/vacuum port with QS fittings, exhaust port with open pneumatic silencer (-B-QO) Supply/vacuum port with QS fittings in inch sizes, exhaust port with open pneumatic silencer (-BN-QO) All ports with female G thread (-B-GN) All ports with NPT female thread (-BN-GN) Supply/vacuum port with female G threads, exhaust port with open silencer (-B-GO) Supply/vacuum port with female NPT threads, exhaust port with open pneumatic silencer (-BN-GO) Prepared for supply strip, vacuum port and exhaust port with QS fittings (-B-PL) Prepared for supply strip, vacuum port and exhaust port with QS fittings in inch sizes (-BN-PL) Prepared for supply strip, vacuum port with QS fitting, exhaust port with open pneumatic silencer (-B-PO) Prepared for supply strip, vacuum port with QS fitting in inch size, exhaust port with open silencer (-BN-PO) NO, normally open (vacuum generation) NO, normally open (vacuum generation) with ejector pulse NC, normally closed (no vacuum generation) NC, normally closed (no vacuum generation) with ejector pulse Plug M12 (5-pin) Vacuum type Housing size/width Pneumatic ports -QO -GN -GO -PL -PO Normal position of the va cuum suction nozzle Electrical connection Festo – OVEM – 1407c English -ON -OE -CN -CE -N 61 OVEM Features Code Specification Pressure sensor, electrical switching output -2P -2N -PU -PI -NU -NI -B -W -H 2 switching outputs PNP 2 switching outputs NPN 1 switching output PNP, 1 analogue output 0 … 10 V 1 switching output PNP, 1 analogue output 4 … 20 mA 1 switching output NPN, 1 analogue output 0 … 10 V 1 switching output NPN, 1 analogue output 4 … 20 mA Bar (-B), inches Hg (-BN) bar Inches H2O Inch Hg Alternative vacuum display Tab. 1 2 Overview of variants Fast commissioning with factory setting The vacuum suction nozzle is shipped with the following factory settings: Air-saving function with -CE/-OE: active Switching characteristics of the electrical output: threshold value comparator Switching element function of the electrical output: NO (normally open) Additional factory settings è chapter 12.1, page 103 1. Mount the vacuum suction nozzle (è chapter 5.1, page 72). 2. Connect the vacuum suction nozzle pneumatically (è chapter 5.2, page 74). 3. Connect the vacuum suction nozzle electrically (è chapter 5.3, page 74). è The vacuum suction nozzle can be placed in operation. If you do not wish to use the factory setting, you can manually define a switching point for Out A or Out B as follows: (è chapter 6.3.2, page 86). You can also teach switching points (è chapter 6.4.1, page 90). 62 Festo – OVEM – 1407c English OVEM 3 Function and application The OVEM vacuum suction nozzle is intended for use to generate vacuum and is only intended for use inside buildings. The vacuum generated is used together with a suction gripper to create a force that can grip a work piece so that it can be transported. The vacuum suction nozzle is available with a variety of pneumatic and electric switching functions. The set reference value for the generated vacuum is monitored via an integrated pressure sensor. If the reference value is reached or if it is not reached due to malfunctions (e.g. leakage, dropped workpiece), the pressure sensor emits an electrical signal. Vacuum monitoring is the basis for the vacuum suction nozzle’s air-saving function (è chapter 3.3, page 66). The air saving function of the vacuum suction nozzle -CE/-CO is activated in the factory. The air saving function can be switched off (è chapter 6.3.4, page 88). The compressed air supply is controlled by an integrated solenoid valve. The solenoid valve can be supplied with two different switching functions, NC and NO. The vacuum is generated as soon as com pressed air is applied to the vacuum suction nozzle and the voltage is switched on (NC: -CE, -CN) or off (NO: -OE, -ON), dependent on the switching function of the compressed air supply solenoid valve. With a second integrated solenoid valve, an ejector pulse is activated and generated after the vacuum is switched off to release the workpiece safely from the suction cup and to reduce the vacuum quickly. 3.1 Operating statuses of the vacuum suction nozzle SHOW mode Fig. 3 EDIT mode TEACH mode Operating statuses Festo – OVEM – 1407c English 63 OVEM RUN mode or operation RUN mode is the basic or operating status of the OVEM vacuum suction nozzle. In the RUN mode, the following are displayed: – the current measurement (relative pressure) and – the signal statuses – the switching outputs (Out A/Out B), – the switching input and – the solenoid valve. SHOW mode or display You can switch to the SHOW mode from the RUN mode. The data set is displayed in the SHOW mode, è chapter 6.2, page 81. EDIT mode You can switch to the EDIT mode from the RUN mode. The following settings of the vacuum suction nozzle can be made or changed in the EDIT mode. In addition, in this status the solenoid valves are actuated via the LCD display (electronic manual override FORC), è chapter 6.3, page 84. TEACH mode You can switch to the TEACH mode from the RUN mode. The TEACH mode is used for fast configuration of the vacuum suction nozzle’s data. The data can be revised if needed via the EDIT mode, è chapter 6.4, page 89. 3.2 Switching outputs and switching input The vacuum is monitored with the aid of a piezo-resistive sensor element with following electronic eval uation unit. The measurement result of In A1 is now shown numerically and graphically on the display. The vacuum suction nozzle can be connected to higher-order systems by means of two switching out puts (Out A/Out B) or one switching output (Out A) and one analogue output (Out B). The switching outputs can be configured as normally closed or normally open contacts. The switching function of the outputs can be defined as a threshold or window comparator, except for Out A with air saving function, for which the threshold value comparator is automatically defined. The solenoid valves for control of the compressed air and ejector pulse are actuated, depending on the input signal (In). 64 Festo – OVEM – 1407c English OVEM Input signal Switching position Solenoid valves ON 1 OFF ON 2 ON 1 OFF ON 2 OFF tej ON 1 OFF ON 1 1 2 tej OFF OFF Solenoid valve vacuum ON/OFF (V) Solenoid valve ejector pulse (E) Fig. 4 tej Duration of ejector pulse Switching characteristics of switching input Code Diagnostics Switching output A Switching output B Switching input -2P Message off Switching output Positive switching Pressure sensor out put B Switching input Positive switching Switching output Positive switching Pressure sensor out put A Message on Switching output Positive switching Diagnostic message -PI – Analogue output 4 ... 20 mA Vacuum -PU – Analogue output 0 … 10 V Vacuum Festo – OVEM – 1407c English 65 OVEM Code Diagnostics Switching output A Switching output B Switching input -2N Message off Switching output Negative switching Pressure sensor out put B Switching input Negative switching Switching output Negative switching Pressure sensor out put A Message on Switching output Negative switching Diagnostic message -NI – Analogue output 4 ... 20 mA Vacuum -NU – Analogue output 0 … 10 V Vacuum Tab. 2 3.3 Switching outputs variants Mode of operation of the air-saving function (LS) Check the effectiveness of the air saving function (energy saving). The function is only possible for the devices -CE and -OE. The air saving function is activated in the factory. The air saving function can be switched off (è chapter 6.3.4, page 88). If the desired threshold value 1 is reached for the vacuum, vacuum generation is automatically switched off. A non-return valve prevents the reduction of the vacuum. Nonetheless, leakage (e.g. due to rough workpiece surfaces) will slowly reduce the vacuum. If the pressure drops below the set threshold value 3, vacuum generation is switched on automatically. Vacuum is generated until the set threshold value 1 is reached again. Fig. 5 illustrates the mode of operation of the air-saving circuit. The pressure curve together with the threshold values and thresholds is illustrated in the upper part of the diagram. The related signals In (control input signal) and Out A (status signal outward) are shown in the lower part of the diagram. 66 Festo – OVEM – 1407c English OVEM 50 mbar (fixed) Hysteresis 1/2 3 4 5 1 2 3 Threshold value “Switch off suction” Switch-on threshold “Switch on message” Threshold value “Switch on suction” (internal) Fig. 5 4 5 Switch-back threshold “Object gripped” (minimum) “Switch on suction” (external) Mode of operation of the air-saving function With active air saving function: Vacuum generation is switched off when the vacuum is better than threshold 1 and is switched on again when the vacuum is worse than threshold 3. The threshold values are defined as follows: Threshold value “Switch off suction” 1 The threshold value 1 is equal to the customer-adjustable switch-on threshold 2 of the output Out A (è Fig. 5), that is, the vacuum generator is switched off simultaneously with the setting of the output Out A. Threshold value “Switch on suction” 3 The threshold value 3 lies between the switch-on threshold 2 and the switch-back threshold 4 (switch-on threshold minus the adjustable hysteresis) of the output Out A at a difference of 50 mbar the the switch-back threshold. This prevents the switch-back threshold from being reached. Festo – OVEM – 1407c English 67 OVEM 3.4 Switching points and hysteresis Threshold value comparator Window comparator NO (normally open) OUT 1 OUT 1 Hy 0 P Hy Hy 0 P SP min SP SP max NC (normally closed) OUT OUT 1 1 Hy 0 P Hy 0 SP Tab. 3 3.5 Hy P SP min SP max Setting of switching points SP and hysteresis Hy Diagnostics Besides the pure function as pressure sensor, the vacuum suction nozzle monitors additional system characteristics as well. These include evacuation times or the function of the solenoid valves, for ex ample. The diagnostic function permits the user to detect malfunctions early and locate errors quickly. In case of malfunctions, the red background illumination of the display lights up. The system status can be identified over large distances. The diagnostic messages are shown in the display. For variants with two switching outputs (-2P,-2N), the error message can also be made over the switching output Out B. Details on the diagnostic function è chapter 8.2, page 95 68 Festo – OVEM – 1407c English OVEM 3.6 Measured variables Vacuum Measurement takes place continuously between the vacuum port and filter (measurement signal In A1). Minimum/maximum value The minimum and maximum measured pressure values (vacuum) are saved in the vacuum suction nozzle. The values are lost if the supply voltage to the vacuum suction nozzle is switched off. Cycle The duration of a cycle covers the time from the start of evacuation through ejection to the start of the new evacuation (è Fig. 6) 1 2 3 2 4 5 In Out A Suction 1 2 3 Cycle Evacuation time tevac Air supply time tair Fig. 6 4 5 Switch-on point Out A Switch-off point Out A Definition of cycle, example for Out A Pressurisation and evacuation times The minimum and maximum pressurisation and evacuation time are measured in the vacuum suction nozzle. The values are lost if the vacuum suction nozzle is switched off. Festo – OVEM – 1407c English 69 OVEM Measurement conditions – Evacuation time: It is measured from the start of evacuation to the time at which the switching point ([SP] or [SP max]) of Out A is reached. – Air supply time: It is measured from the start of pressurisation to the time at which the vacuum falls below a value of –0.050 bar. The limit values for the evacuation and air supply times can be set through the EDIT mode (è chapter 6.3, page 84). 4 Requirements for product use Warning Dependent on the functioning of the machine/system, manipulation of signal statuses may cause serious personal injury. Note that if the switching characteristics of the switching outputs is modified in the EDIT mode, the new status will be effective immediately. Activate the password protection (security code) in order to prevent unintentional modification by unauthorised third parties (è chapter 6.3, page 84). Note Improper handling can result in malfunctions. Make sure that the following specifications are always observed. Note The vacuum is measured as relative pressure. The displayed pressure value is the actual pressure difference to ambient pressure. The attainable, displayed pressure value may be lower than the value indicated in the specifications, depending on the current abso lute ambient pressure/air pressure. Compare the limit values specified in these operating instructions with those of your actual applica tion (e.g. operating media, pressures, forces, torques, temperatures, masses, speeds, operating voltages, flow rates). Take into consideration the ambient conditions at the location of use. Comply with the regulations of the trade association, the German Technical Control Board (TÜV), of the VDE or relevant national regulations. Remove all transport packing such as protective wax, foils (polyamide), caps (polyethylene), card board boxes (except for the sealing elements of the pneumatic connections). The material used in the packaging has been specifically chosen for its recyclability (exception: oil paper = residual waste). Use the product in its original state. Unauthorised modification is not permitted. 70 Festo – OVEM – 1407c English OVEM Range of application and certifications The information in this section, in combination with the UL marking on the product, must be observed in order for there to be compliance with the certification conditions of Underwriters Laboratories Inc. (UL) for USA and Canada. Observe the following English-language remarks from UL: UL approval information Product category code File number Considered standards QUYX (USA) QUYX7 (Canada) E322346 UL 61010-1 C22.2 No.61010-1 UL mark Tab. 4 UL approval information Only for connection to an NEC/CEC Class 2 supply. Raccorder Uniquement a un circuit de NEC/CEC Classe 2. This device is intended to be used with a Class 2 power source or Class 2 transformer in accordance with UL1310 or UL1585. As an alternative a LV/C (Limited Voltage/Current) power source with one of the following properties can be used: – This device shall be used with a suitable isolating source such that the maximum open circuit voltage potential available to the product is not more than 24 V DC and the current is limited to a value not exceeding 8 amperes measured after 1 minute of operation. – This device shall be used with a suitable isolating source in conjunction with a fuse in accordance with UL248. The fuse shall be rated max. 4 A and be installed in the 24 V DC power supply to the device in order to limit the available current. Note that, when more than one power supply or isolating device is used, connection in parallel is not permitted. Note The noise level must be measured in the end product and taken into account. Festo – OVEM – 1407c English 71 OVEM 5 Installation Any mounting position is permitted. Mount the vacuum suction nozzle and connect its tubing in such a way that no condensation from the compressed air lines can gather in the device. Note An unfavourable mounting position can result in increased sound pressure. During installation, make sure that the exhaust can flow without hindrance. 5.1 Mechanical 5.1.1 Direct mounting Fig. 7 Direct mounting Mount the vacuum suction nozzle at the intended position with two screws (size of the mounting screws è Tab. 5), assembly torque max. 2.5 Nm. We recommend the use of corresponding washers. or Mount the vacuum suction nozzle on the bottom with 4 screws, size M3, with max. mounting torque 0.8 Nm. OVEM Size of mounting screws -05/-07/-10 -14/-20 M5 M4 Tab. 5 5.1.2 Size of mounting screws Mounting with accessories The required accessories are listed in è Accessories. 72 Festo – OVEM – 1407c English OVEM H-rail mounting 1 Fig. 8 H-rail mounting 1. Fasten the H-rail mounting to the bottom of the vacuum suction nozzle with 4 screws, size M3, with max. assembly torque of 0.8 Nm. 2. Hook the vacuum suction nozzle onto the H-rail and press in the direction of the arrow. 3. Secure the vacuum suction nozzle to the H-rail with screw 1. Mounting bracket Fig. 9 Mounting bracket Mount the vacuum suction nozzle at the intended position with two screws (size of the mounting screws è Tab. 5), assembly torque max. 2.5 Nm. We recommend the use of corresponding washers. Common supply manifold The vacuum suction nozzle can also be mounted on a common supply manifold with up to 8 positions. Information on mounting è Mounting instructions OABM-P-…. Festo – OVEM – 1407c English 73 OVEM 5.2 Pneumatic Connect appropriate tubing to the QS push-in connectors (-QS, -QO, -PL, -PO). Usage of the type PUN hose is recommended. When selecting hoses for the tubing connection of the vacuum suction nozzle with threaded ports (-GN, -GO), pay attention to the minimum internal diameter for hoses stated in Tab. 6. OVEM-05 GN/GO < 0.5 m < 2 m Type Tube length OVEM-07 GN/GO < 0.5 m < 2 m OVEM-10 GN/GO < 0.5 m < 2 m OVEM-14/-20 GN/GO < 0.5 m < 2 m Minimum hose internal diameter [mm] Port 1 Compressed air 1 2 1.5 2 2 3 3 4 Port 2 Vacuum 2 3 3 4 4 5 5.5 6 Port 3 Exhaust air 2 3 3 4 4 5 5.5 6 Tab. 6 Minimum hose internal diameters If required, you can extend the pneumatic silencer for OVEM-07/-10/-14/-20 with a sound absorber extension (è chapter 11, page 101). 5.3 Electrical Warning Use only power sources which guarantee reliable electrical isolation of the operating voltage in accordance with IEC/EN 60204-1. Also observe the general requirements for PELV power circuits in accordance with IEC/EN 60204-1. Note Long signal lines reduce the resistance to interference. Make sure that the signal lines are always shorter than 30 m. Make sure that the operating voltage supply is 24 V DC ±15 %. The solenoid coils and electrical components could be damaged if the maximum permitted switch ing voltage is exceeded. Connect the plug socket with cable to the plug connector aD. Wire the vacuum suction nozzle as shown in Tab. 7. 74 Festo – OVEM – 1407c English OVEM Plug connector M12x1, 5-pin2) 1 2 4 5 3 Pin Cable colours 1) Assignment 1 Brown (BN) Supply voltage +24 V DC 2 White (WH) Switching output B (Out B) 3 Blue (BU) 0V 4 Black (BK) Switching output A (Out A) 5 Grey (GY) Switching input In (Uin) 2) With usage of the plug socket with cable as specified in Accessories. 3) Max. tightening torque 0.3 Nm. Tab. 7 Pin allocation Circuit diagrams OVEM-...-2P OVEM-...-2N OVEM-...-PU OVEM-...-NU OVEM-...-PI OVEM-...-NI Tab. 8 Circuit diagrams for vacuum suction nozzle Festo – OVEM – 1407c English 75 OVEM 6 Commissioning Observe the transport area of the workpiece and make sure that: – Nobody is located below the workpiece – There are no foreign objects (e.g. by means of a protective screen). Avoid long tubing lines and large volumes between the suction grippers and the vacuum suction nozzle. A large volume leads to long evacuation times and possibly incorrect settings on the pressure sensor. Take into account accelerations, external influences, etc. on the work item when setting the re quired holding force. Preparing commissioning In the basic status, the vacuum suction nozzle is in RUN mode. The current measurement values are displayed. Note The EDIT button is often used during commissioning to select and confirm values. In order to avoid damaging the EDIT button please press it using a blunt object. The basic status can be reached from other modes by: – pressing EDIT button 3 s or – expiration of a monitoring time (timeout è chapter 13, page 105) 1. Switch on the operating voltage. è The vacuum suction nozzle is in the RUN mode. 2. Check the settings of the vacuum suction nozzle. Note An overview of the menu structure can be found in chapter 13. Building up the vacuum: 1. Pressurize the vacuum suction nozzle with an operating pressure at the supply port 3. 2. Switch on the operating voltage. The solenoid valve (-CN, -CE) is opened (reversed for -OE, -ON). The compressed air flows through the vacuum generator and generates a corresponding vacuum at the vacuum port 5. The vacuum can be set by changing the operating pressure. Setting the pressure sensor: The pressure sensor setting for monitoring the vacuum depends on the application. The vacuum generator is preset at the factory (factory settings è chapter 12.1, page 103). These set tings can be quickly adapted to the application via the EDIT mode or in the TEACH mode. 76 Festo – OVEM – 1407c English OVEM The vacuum suction nozzle must be in its initial position (RUN mode). Define the desired switching characteristics of the switching outputs (è chapter 6.3, page 84). The workpiece must be held reliably against the suction gripper by the vacuum generated. The intensity and duration of the ejector pulse can be adjusted. You can set the intensity of the ejector pulse by adjusting the flow control screw aJ. 1. Screw the flow control screw aJ clockwise completely in. è The ejector pulse channel is now closed. No ejector pulse is generated. 2. Unscrew the flow control screw until the required intensity of the ejector pulse is reached. You can set the duration of the ejector pulse in the EDIT mode (è chapter 6.3.3, page 87). 3. Test the settings of the ejector pulse before commissioning. Reducing the vacuum: OVEM-...-CN/-ON Cut off the compressed air supply by switching the input voltage off (in the case of -CN) or on (in the case of -ON). è The vacuum port 5 is pressurized. The workpiece detaches itself from the suction gripper. OVEM-...-CE/-OE Switching the input voltage off (for -CE) or on (for -OE) switches the second solenoid valve and gen erates an ejector pulse. è The vacuum port 5 is pressurized. The workpiece detaches itself from the suction gripper. Note Switching the input voltage on (for -CE) or off (for -OE) during the ejector pulse switches the solenoid valve into the initial position and no more ejector pulse is generated. Note When large suction cups are used, flow resistance in the suction cup as the cup lifts away from the workpiece can cause the buildup of a vacuum independent of the gener ating device. This might mean that the workpiece being set down does not detach from the suction cup, even when the ejector pulse is set to a long duration. Therefore, the input voltage should be switched off (for -CE) or on (for -OE) shortly be fore the suction cup is lifted away, to ensure that the ejector pulse is active while the suction cup lifts away. Festo – OVEM – 1407c English 77 OVEM 6.1 Symbol Description Mode RUN SHOW EDIT TEACH Display Symbolic LCD display Switching output set/not set X Switching output selected/not selected Segment Switching input In is illuminated A signal is present at the switching input X X X X Manual override active X Threshold value comparator X X Window comparator X X Ejector pulse (time setting) X X [msec] [SP] [SP] [min] [SP] [max] Switching point Lower switching point (switching point – minimum) Upper switching point (switching point – maximum) Diagnostics: evacuation time limit value X X X X X X X X [SP] [max] Diagnostics: air supply time limit value X X [SP] [max] [HY] [NO] [NC] [min] / [max] Hysteresis Switching characteristic of normally open contact Switching characteristic of normally closed contact Extreme values: minimum/maximum input measured value (In A1) 1) Min. evacuation time X X X X X X X X [min] [msec] Max. evacuation time X [max] [msec] Min. air supply time X [min] [msec] Max. air supply time X [max] [msec] [TeachIn] 78 TeachIn mode active X Festo – OVEM – 1407c English OVEM Symbol Description [Option] [Lock] Air-saving function active Security code active (blocking of unauthorised parameterisation) Graphic display of the current measured value related to the maximum measured value of the measuring range. The left-hand segment row shows the measured value of In A1, the righthand segment row shows the status of In and the solenoid valves. Significance in other modes è Tab. 10 Special menu (SPEC) is active 1) Mode RUN SHOW EDIT TEACH Display In A1 (digital display) di1 (digital display) di2 (digital display) Er X (digital display) ON/OFF FORC (digital display) 1) X X X X X X X Pressure measurement value controls switching output Out B X X Diagnostic message channel 1 controls switch ing output Out B X X Diagnostic message channel 2 controls switch ing output Out B X X Error message, error number è chapter 8.2, page 95 X Diagnostic channel set/not set – / no ejector pulse Lock active/ not active Air-saving function active/ not active Additional function of the manual override via operating buttons X X The segment bars also show special symbols è Tab. 10 Tab. 9 Symbols on the display Festo – OVEM – 1407c English 79 OVEM 6.1.1 Segment bars Besides the graphic display of the current measured value, the segment bars also indicate different statuses of the vacuum suction nozzle via defined symbols. Symbols Representation Significance Segment below left and [A] lights up and [min] or [max] flashes 1) – SHOW mode active on the LCD display, an extreme value of In A1 (vacuum) is displayed – EDIT mode active Segment below right and [B] are lit and [_|¯¯|_] [msec] flashes – SHOW mode active The duration of the ejector pulse is displayed on the LCD display Marked segments are illuminated – SHOW mode active Diagnostics: pressurisation and evacuation time (è Fig. 23) – EDIT mode active Marked segments flash – TEACH mode active Switching point max. evacuation time Switching point max. air supply time – EDIT mode active ON: Air-saving function active OFF: Air-saving function inactive – EDIT mode active Special menu (SPEC) is open, the security code is shown on the LCD display Marked segments light up and [Option] flashes Marked segments light up and [Lock] flashes Segment at the bottom right is lit Segment in the middle right is lit Third segment from the bottom in the right segment bar is illuminated 1) – RUN mode active A signal is present at the switching input. In addition, switching input In segment is illuminated – EDIT mode: duration of ejector pulse – RUN mode active – Vacuum solenoid valve is energised – RUN mode active – Ejector solenoid valve is energised Extreme values: min = minimum measured value max = maximum measured value Tab. 10 80 Special symbols of the segment bars Festo – OVEM – 1407c English OVEM 6.2 SHOW mode The following settings and values are indicated in the SHOW mode: Settings for Out A/B – Switching function [threshold/window comparator] – Switching points [SP], switching point [SP] with LS-active or [SP] [min] and [SP] [max] – Hysteresis [HY], hysteresis [HY] with LS active – Switching characteristic [NO/NC] Extreme values of In A – Minimum pressure value [min] – Maximum pressure value [max] Ejector pulse length of In B – Duration of ejector pulse in [msec] Diagnostics (A button + B button = C button) – Permitted evacuation time [msec] – Permitted air supply time [msec] – Evacuation time [min][msec] – Evacuation time [max][msec] – Air supply time [min][msec] – Air supply time [max][msec] 6.2.1 Display settings for Out A/B The vacuum suction nozzle must be in the RUN mode. Press the A-button (switching output Out A) or the B-button (switching output Out B). è The SHOW mode of the corresponding switching output is active. Note If there are errors, pressing the A or B button first displays corresponding error numbers (è chapter 8.2, page 95). Press the button of the selected switching output again. è If you continue pressing the button, the current settings of that switching output will be dis played one after the other as the button is pressed. If all values have been displayed and the button is pressed again, the RUN mode is reactivated. Festo – OVEM – 1407c English 81 OVEM Fig. 10 6.2.2 Fig. 11 Example SHOW mode for switching output Out A (menu structure SHOW mode è Fig. 23) Display/delete minimum/maximum value Display/delete values (menu structure SHOW mode è Fig. 23) 1. Press the UP key (A button) until the setting [min] is selected. è [min] flashes. The minimum value of In A1 is displayed (Symbols during display of extreme values è Tab. 10 ) 2. Briefly press the EDIT button. è The minimum value is deleted. 3. Press the UP key (A button). è [max] flashes. The maximum value of In A is displayed. 4. Briefly press the EDIT button. è The maximum value is deleted. 5. Press the UP key (A button). è The vacuum suction nozzle switches to the RUN mode. 82 Festo – OVEM – 1407c English OVEM 6.2.3 L Display/delete pressurisation/evacuation times L Fig. 12 L L Display/delete times (menu structure SHOW mode è Fig. 23) 1. Press the UP key and DOWN key (A button + B button) simultaneously. è The permitted evacuation time is displayed. The segments [msec], [SP], [max], [_|¯] flash. 2. Press the UP key and DOWN key again simultaneously. è The permitted air supply time is displayed. The segments [msec], [SP], [max], [_|¯] flash. 3. Press the UP key and DOWN key again simultaneously. è Each additional time the buttons are actuated, the extreme values (min. und max.) for evacu ation time and then for air supply time will be shown one after the other. If you wish to delete the currently displayed extreme value, briefly press the EDIT button. If all values have been displayed and the buttons are pressed again, the RUN mode is reactivated. Festo – OVEM – 1407c English 83 OVEM 6.3 Edit mode The following settings can be made in the EDIT mode: – Switching function (threshold value or window comparator) – Switching points [SP], switching point [SP] with LS-active or [SP] [min] and [SP] [max] – Hysteresis [HY], hysteresis [HY] with LS active – Switching element function[NO/NC] (N/O contact / N/C contact) – Air-saving function [OPTION] ON/OFF – Security code (Lock) – Duration of ejector pulse – Permitted air supply time – Permitted evacuation time – Activate diagnostic output – Electrical manual override Note With the air saving function active (factory setting only -CE, -OE), its settings are made in the menu of Out A. If the air saving function is deactivated, Out A is a normal switching output. 6.3.1 Start EDIT mode Warning Depending on the functions of the machine/system, the manipulation of signal statuses can cause serious injury to people and material damage. Note that if the switching characteristics of the switching outputs is modified in the EDIT mode, the new status will be effective immediately. Various settings can be selected with the operating buttons (è Fig. 13). – Output (Out A, Out B) for which the characteristics are to be set – Duration of ejector pulse – Special menu (SPEC) for setting the air saving function option (LS option), the maximum evacuation and air supply times and the security code (Lock). Note With the air saving function active (factory setting only -CE, -OE), the window comparat or function cannot be set for Out A. The air saving function must be deactivated for this purpose via the special menu (SPEC). 84 Festo – OVEM – 1407c English OVEM Set switching characteristics of switching output Out A Set Out B: Switching output or diagnostic message output (only -2P and -2N) Set duration of ejector pulse, electrical manual override Special menu Set the air saving function option (LS option), security code, maximum evacuation and air supply times Fig. 13 Setting options in the EDIT mode (menu structure EDIT mode è Fig. 24) 1. Press the EDIT button. è The EDIT mode is active and [Out A] flashes or, if there is an active security lock, [Lock] flashes. 2. Press the UP/DOWN keys until the chosen security code is set. 3. Press the EDIT button. è [Out A] flashes. Store the security code where it can be found again. If you forget the security code è chapter 7.3, page 94. Festo – OVEM – 1407c English 85 OVEM 6.3.2 Fig. 14 Setting the switching characteristics of the switching outputs Set switching outputs (menu structure EDIT mode è Fig. 24) Note The process for setting the switch outputs Out A (A-button) and Out B (B-button) is fun damentally the same. Additionally, the switching output IN A1 must be selected for Out B, since Out B can also be configured as a diagnostic output. ( è chapter 8.2, page 95) In the following, the process is described using the switching output Out B. The vacuum suction nozzle is in the EDIT mode and [Out A] is flashing. To set Out B, proceed as follows: 1. Press the B button (DOWN key). è [Out B] flashes. 2. Press the EDIT button to confirm the selection. è In A1 is displayed. 3. Press the EDIT button to confirm the selection. è The currently set switching function flashes. 4. Select the desired switching function (threshold value/window comparator) with the UP/DOWN keys. 86 Festo – OVEM – 1407c English OVEM 5. Press the EDIT button to confirm the selection. è [SP] or [SP] [min] flashes. 6. Set the switching point (SP or SPmin) with the UP/DOWN keys. 7. Press the EDIT button to confirm the set value. 8. Only with Window comparator switching function è [SP] [max] flashes. Set the value (SPmax) with the UP/DOWN keys. Press the Edit button to confirm the set value. è [HY] flashes. 9. Set the value for the hysteresis (Hy) with the UP/DOWN keys. 10.Press the EDIT button to confirm the set value. è [NO] or [NC] flashes. 11.Select the switching characteristic [NO/NC] by pressing the UP/DOWN keys. 12.Press the EDIT button to confirm the selection. è The vacuum suction nozzle is in the RUN mode. 6.3.3 L Fig. 15 Set duration of ejector pulse, electrical manual override FORC L L L Set ejector pulse length (menu structure EDIT mode è Fig. 24) The vacuum suction nozzle is in the EDIT mode and [Out A] is flashing. Set duration of ejector pulse 1. Press the B button until the segment at the bottom right and B flash. 2. Press the EDIT button to confirm the selection. Festo – OVEM – 1407c English 87 OVEM 3. Set the desired time (in ms) with the UP/DOWN keys. The value 0 corresponds to OFF, the ejector pulse is switched off. 4. Press the EDIT button to confirm the set value. è FORC is illuminated. The submenu for the function electrical manual override is active. Electrical manual override 5. Actuate the solenoid valve via the electronic switching as follows: A button: for vacuum solenoid valve ON/OFF B button: for ejector pulse solenoid valve 6. Press the EDIT button to exit the submenu. è The vacuum suction nozzle is in the RUN mode. 6.3.4 L Fig. 16 [SPEC] – Set air saving function option (LS option), security code, evacuation and air supply times L L L Special menu (SPEC) (menu structure EDIT mode è Fig. 24) The vacuum suction nozzle is in the EDIT mode and [Out A] is flashing. 1. Press the A button until the menu (SPEC) is selected. è [SPEC] flashes. 2. Press the EDIT button to confirm the selection. è [Option] flashes. 3. Select the desired setting LS option (ON: LS active; OFF: LS inactive) with the UP/DOWN keys. 4. Press the EDIT button to confirm the selection. è [Lock] flashes. 88 Festo – OVEM – 1407c English OVEM 5. Set the desired security code with the UP/DOWN keys. (OFF = no protection). Store the security code where it can be found again. If you forget the security code è chapter 7.3, page 94. Note Monitoring of the evacuation and air supply times is deactivated in the factory. 6. Press the EDIT button to confirm the set value. è [msec], [SP], [max], [_|¯] flash. 7. Set the maximum evacuation time with the UP/DOWN keys. (OFF: monitoring of evacuation time is deactivated) 8. Press the EDIT button to confirm the set value. è [msec], [SP], [max], [¯|_] flash 9. Set the maximum air supply time with the UP/DOWN keys. (OFF: monitoring of air supply time is deactivated) 10.Press the EDIT button to confirm the set value. è The vacuum suction nozzle is in the RUN mode. 6.4 TEACH mode In the TEACH mode, the switching variable (switching point or switching window) with and without air saving function as well as the air supply and evacuation times can be taught. Note Before teaching, make sure that the desired switching function (window or threshold comparator) and the desired hysteresis are set in the EDIT mode (è chapter 6.3, page 84). Threshold value comparator Window comparator The (taught) switching point is derived from the average value of both teach points. Calculation equation: SP = 1/2 (TP1 + TP2) If both teach points are equal: SP = TP1 = TP2. The taught switching window results from: SPmin = smaller teach point (TP1 or TP2); SPmax = lar ger teach point (TP1 or TP2). Position of the teach points (example) Position of the teach points (example) Tab. 11 Set switch variable Festo – OVEM – 1407c English 89 OVEM 6.4.1 Teach switching variables Note The process is the same for teaching the switching outputs Out A (A button) and Out B (B button). In the following, the process is described using the switching output Out A. Fig. 17 Teach switching variables using the example of Out A (menu structure TEACH mode è Fig. 25) 1. Switch on the operating voltage. è The vacuum suction nozzle is in the RUN mode. 2. Set an initial vacuum (TP1) (e.g. object gripped or object not gripped, the sequence is freely select able) 3. First press the A button (UP key) and then also the Edit button. è [A] und [TeachIn] flash and the measurement value is taken over as a teach point (TP1) for Out A, or [Lock] flashes if security blocking is active (è chapter 6.4.4, page 93). 4. Repeat points 2 and 3 for the second teach point (TP2). è The second teach point (TP2) is taken over and the new switching point (SP) or the switching points (SPmin and SPmax) become valid. The vacuum suction nozzle switches to the RUN mode. Note The setting for hysteresis is adjusted. It can be revised through the EDIT mode (è chapter 6.3, page 84). Factory setting è chapter 12.1, page 103. 90 Festo – OVEM – 1407c English OVEM 6.4.2 Teach air saving function (LS) -H: 100 mbar -L: 50 mbar 50 mbar (fixed) Hysteresis 1 2/3 4 5 6 1 2 3 TP – object gripped Threshold value “Switch off suction” Switch-on threshold “Switch on message” Fig. 18 4 5 6 Threshold value “Switch on suction” Switch-back threshold “Switch off message” TP – no object gripped Teach air saving function During the teach function, LS is automatically deactivated. This makes it easier to set the end points. 1. Switch on the operating voltage. è The vacuum suction nozzle is in the RUN mode. 2. Set an initial vacuum (TP1) (e.g. object gripped or object not gripped, the sequence is freely select able) 3. First press the A button (UP key) and then also the Edit button. è LS is deactivated. [A] und [TeachIn] flash and the measurement value is taken over as a teach point (TP1) for Out A, or [Lock] flashes if security blocking is active (è chapter 6.4.4, page 93). 4. Repeat points 2 and 3 for the second teach point (TP2). è The second teach point (TP2) is then accepted and the new switching point (SP) become valid. The vacuum suction nozzle switches to the RUN mode. The air saving function is reactivated. Festo – OVEM – 1407c English 91 OVEM 6.4.3 Fig. 19 Teach pressurisation and evacuation times Teach pressurisation and evacuation times (menu structure TEACH mode è Fig. 25) 1. Press the A and B button (Z C) simultaneously and then also the Edit button. è [TeachIn] flashes and the Diagnostics bar segment flashes (symbol è Tab. 10) or [Lock] flashes if the security blocking is active (è chapter 6.4.4, page 93). 2. Measure at least one cycle (i.e. evacuate and eject è chapter 3.6, page 69). Note A mean value is created across the cycles. A sufficient number of cycles should be run so that the results will be meaningful. The more cycles are run, the better is the value. The taught values, evacuation time and air supply time are applied with a function re serve of 100 % and stored. 3. Press the A and B button (Z C) simultaneously and then also the Edit button. è Teaching is ended. The vacuum suction nozzle switches to the RUN mode. Note If parameters such as trigger level value and setting of the flow control screw are changed, teaching must take place again. 92 Festo – OVEM – 1407c English OVEM 6.4.4 Enter the security code If the security lock has been activated, the teach process may only be performed after the security code is entered. If the security lock is active, [Lock] flashes in the display. To deactivate the lock, proceed as follows. 1. Press the UP/DOWN keys until the chosen security code is set. 2. Press the EDIT button. è The teach procedure is continued. 6.4.5 Test run Carry out a test run, varying the pressure; to check whether the vacuum suction nozzle’s switching output switches as desired. 7 Operation 7.1 Manual override Mechanical Fig. 20 Operating the manual override The manual override can be used to switch the solenoid valve manually when it is not being actuated or not supplied with power. The manual override is non-detenting (automatic reset). Press down the plunger of the manual override with a blunt pin. The solenoid valve is brought into the switching status. Remove the pin. The plunger of the manual override and the solenoid valve move to their normal position. Electric The function of the electrical manual override can be implemented with the submenu FORC in the EDIT mode. For further information è chapter 6.3.3, page 87. Festo – OVEM – 1407c English 93 OVEM 7.2 Changing settings and values Information such as settings and values can be changed, è chapter 6.3, page 84. Note The last saved settings are retained in the event of a power failure. 7.3 Reset to factory setting (also if the security code cannot be found) Note By resetting to factory settings, the current settings are lost. If required, make a note of these settings before resetting. To reset the vacuum suction nozzle to factory setting, proceed as follows: 1. Switch off the operating voltage. 2. Press all three setting elements (UP button + DOWN button + EDIT button) simultaneously and keep them depressed. 3. Switch the operating voltage back on. 8 Maintenance and diagnostics 8.1 Maintenance Switch off the following energy sources before cleaning the exterior of the device: – operating voltage – compressed air. If necessary, clean the outside of the vacuum suction nozzle. Permissible cleaning agents are soap suds (max. +60 °C) and all non-abrasive agents. Check whether the air filter is contaminated. The filter can be inspected visually through the transparent filter cover. 94 Festo – OVEM – 1407c English OVEM Cleaning the air filter: 2 1 Fig. 21 Removing/installing the filter 1. Vent the vacuum suction nozzle. 2. Carefully pull out the slide 1 on the filter 2 up to the first detent. The slide 1 must stay in this position on the filter. 3. Pull the filter out. (Use a screwdriver to help bring out the filter, if necessary) 4. Clean the filter 2 with petroleum ether. 5. Push the filter 2 into its housing using the slide 1. 6. Push in the slide 1. è The filter is pulled in by the slide 1. 8.2 Diagnostics There are four diagnostic levels. There are two options for displaying the diagnostic messages: via the logical diagnostic channels di 1 and di 2 of the output Out B (only for -2P and -2N) via the indicator in the LCD display of the vacuum suction nozzle. If the diagnostic message is desired at the output Out B, the diagnostic channel di 1 or di 2 must be set (configuration of the switch output Out B è chapter 6.3.2, page 86). The red background illumination of the LCD display lights up for messages of the diagnostic levels 1 to 3. This function is available for -2P from Revision 09 (Rev09), for all other types from Revision 07 (Rev07) è rating plate. Festo – OVEM – 1407c English 95 OVEM Dia gnostic level Description 0 – Everything OK No display 11) – No restriction in function yet, but operating paramet ers are worsening. – Message on the switching output Out B (logical chan nel di 1 active) 21) 31) 1) Display in RUN MODE SHOW MODE TEACH MODE Segments [min] and [max] are flashing syn chronously Display of error code before every SHOW menu Segments [min] and [max] are flashing syn chronously – Function still ensured, but with restrictions (higher power consumption, …) “emergency operation”, maintenance urgently re quired – Message on the switching output Out B (logical chan nels di 1 or di 2 active) LCD display and [min], [max] are flashing Display of error code before every SHOW menu LCD display and [min], [max] are flashing – Function is no longer as sured. – Message on the switching output Out B (logical chan nels di 1 or di 2 active) and all controllable outputs of the device are inactive All segments are flashing and LCD display shows the cur rent error All segments are flashing ex cept for LCD dis play Cannot be achieved, since keys are blocked Red background illumination of the display is lit. This function is available for -2P from Revision 09 (Rev09), for all other types from Revision 07 (Rev07) è rating plate. Tab. 12 8.2.1 Diagnostic levels Set diagnostic message channel di x Note For Out B, only one channel can be set (only -2P and -2N): – In A1 definition as switching output – di 1 diagnostic message channel or – di 2 diagnostic message channel. With setting of the diagnostic channel di 1 or di 2, the output Out B is no longer a switching output, but a diagnostic message output that can be defined as NO or NC. With setting of the channel di 1, you receive a message on the output Out B even with diagnostic level 1. If you set the channel di 2 active, you do not receive a message until diagnostic level 2. Monitor ing of the evacuation and air supply time takes place only if the conditions have been set or taught. 96 Festo – OVEM – 1407c English OVEM The limit values for the evacuation and air supply times can be set in the EDIT mode (è chapter 6.3.4, page 88). L Fig. 22 L L L Set diagnostic message channel di x (menu structure EDIT mode è Fig. 24) 1. Press the EDIT button. è The EDIT mode is active and [Out A] flashes or, if there is an active security lock, [Lock] flashes. 2. Press the UP/DOWN keys until the chosen security code is set. 3. Press the EDIT button. è [Out A] flashes. 4. Press the B button (DOWN key). è [Out B] flashes. 5. Press the EDIT button to confirm the selection. è In A1 is displayed. 6. Press the B button until the desired diagnostic channel is selected. 7. Press the EDIT button to confirm the selection. è [NO] or [NC] flashes. 8. Select the switching characteristic [NO/NC] by pressing the UP/DOWN keys. 9. Press the EDIT button to confirm the selection. è The vacuum suction nozzle is in the RUN mode. Festo – OVEM – 1407c English 97 OVEM 8.2.2 Error code Note There are, of course, also errors in which the diagnostics no longer work. See the chapter on fault clearance to eliminate them. Dia gnostic level Error code Description Remedy 11) Er34 Evacuation time exceeded in 2 of 5 cycles Check for leakage Er36 Air supply time exceeded in 2 of 5 cycles Check for leakage Lengthen air supply time Check throttle setting Er33 Solenoid valve does not switch or does not switch correctly. Plunger does not move; current through solenoid coil is too low; short circuit in solenoid coil Press mechanical manual override several times. Check supply voltage. If there is no improvement, the device is defective. Send device to Festo. Er35 The set threshold for evacuation time is exceeded by a factor of two in 2 of 5 cycles. Check for leakage Er37 The set threshold for air supply time is exceeded by a factor of two in 2 of 5 cycles. Check for leakage Lengthen air supply time Check throttle setting 22) 22) 22) 98 Er38 Switching frequency of the air saving function lies above the limit value of 1 Hz Er393)4) Specified vacuum value is not reached within 10 s Switch-back threshold fallen below (active air saving function and threshold value comparator) Upper trigger level exceeded or lower trigger level fallen below (window comparator) Check for leakage Check for leakage Check compressed air supply Set trigger levels logically Check settings for Out A Check compressed air supply Set trigger levels logically Check settings for Out A Check compressed air supply Festo – OVEM – 1407c English OVEM Dia gnostic level Error code Description Remedy 35) Er176) Undervoltage in power supply < 15 V Check power supply Er01 Device defective Replace the device 1) [min] [max] are flashing synchronously; error display in SHOW mode (è Tab. 9) 2) All segments are flashing. The currently smallest error number is shown. 3) Error code is available for -2P from Revision 09 (Rev09), for all other types from Revision 07 (Rev07) è rating plate. 4) Applies only for the settings of the switching output Out A 5) Middle row of the barcode segments is blinking; error display in the SHOW mode (è Tab. 9) 6) Outputs are reset automatically (logic 0). Tab. 13 Error code of the vacuum suction nozzle Festo – OVEM – 1407c English 99 OVEM 9 Fault clearance Malfunction Possible cause Remedy Workpiece does not release from the suction cup A vacuum has built up when lifting large suction cups quickly Increase the duration and intensity of the ejector pulse Lift the suction cup from the workpiece more slowly Actively set the ejector pulse when lifting the suction cup Workpiece does not release from the suction cup Hose used between the suction cup and vacuum suction nozzle is incorrectly dimensioned (hose is too long and/or hose internal diameter is too small) Replace the hose Hose requirements è chapter 5.2, page 74 Flow control screw is closed Open the flow control screw Supply voltage not applied or permitted operating voltage not present Switch on supply voltage / maintain permitted operating voltage range Electrical connections swapped (incorrect polarity) Wire in accordance with the circuit diagram No display Device defective Replace the device Incomplete display Display defective Replace the device Incorrect pressure display Pneumatic connections swapped Connect tubing in accordance with section “Pneumatic installation” Device operated with impermissible medium Replace device and operate with compressed air only Outputs do not switch according to settings Short circuit/overload at relevant output Eliminate short circuit/overload Device defective Replace the device Settings cannot be edited (“Lock” in the display) Access protection active Enter the security code (if the security code has been lost, reset the device to the factory settings è chapter 7.3, page 94) 100 Festo – OVEM – 1407c English OVEM Malfunction Possible cause Remedy [min] [max] flash synchronously Diagnostic level 1 active è Tab. 13 LCD display and [min], [max] are flashing Diagnostic level 2 active è Tab. 13 LCD display is flashing and ErXX is displayed Diagnostic level 3 active è Tab. 13 [Option] flashing Settings during teaching faulty e.g. hysteresis with air saving function 100 mbar Teach again, reset hysteresis Tab. 14 10 Fault clearance Disassembly 1. Switch off the following sources of energy before disassembly: – operating voltage – compressed air. 2. Disconnect the electrical and pneumatic connections to the vacuum suction nozzle. 3. Remove the vacuum suction nozzle. 11 Accessories Designation OVEM-05 Connecting cable M12x1, 5-pin, 2.5 m NEBU-M12G5-K-2.5-LE5 Connecting cable M12x1, 5-pin, 5 m H-rail mounting NEBU-M12G5-K-5-LE5 Mounting bracket HRM-1 Silencer extension Common supply manifold – OABM-P-4 OABM-P-6 OABM-P-8 OASC-G1-P Blanking plug Tab. 15 OVEM-07/-10 OVEM-14/-20 OABM-H UOMS-¼ UOMS-¼ Accessories Festo – OVEM – 1407c English 101 OVEM 12 Technical data OVEM -05 Operating pressure -QS, -GN, -PL: 2 … 6 -QO, -GO, -PO: 2 … 8 Compressed air to ISO 8573-1:2010 [7:4:4] Lubricated operation not possible 0 … 50 0 … 50 3 5 …85 24 ±15 % -2P, -2N: 270 -PI, -PU, -NI, -NU: 180 Operating medium Note on the operating medium Ambient temperature Temperature of medium Degree of contamination Relative air humidity Nominal operating voltage Max. current consumption [bar] [°C] [°C] [%] [V DC] [mA] -07/-10 Idle current Coil characteristics 24 V DC [mA] [W] Time until current reduction Ready-state delay Switching outputs – Max. output current – Voltage drop – Maximum capacitive load DC Dead time Protective functions – Inductive protective circuit – Protection against short circuit – Overload protection Protection against incorrect polarity Insulation voltage Surge resistance Degree of protection Protection class Resistance to interference Emitted interference Vibration resistance [ms] [ms] 70 Low-current phase: 0.3 High-current phase: 2.55 80 500 [mA] [V] [nF] [ms] 100 ≤ 1.5 ≤ 100 10 Resistance to shocks 102 [V] [kV] ≤ 20 -14/-20 ≤ 35 Adapted to MZ, MY, ME coils Yes Yes For all electrical connections 50 0.8 IP65 3 See declaration of conformity (www.festo.com)1) See declaration of conformity (www.festo.com)1) in accordance with IEC/EN 60068, part 2-6: 0.35 mm path at 10 … 60 Hz, 5 g acceleration at 60 ... 150 Hz in accordance with IEC/EN 60068 part 2-27: 30 g acceleration with 11 ms duration (half-sine) Festo – OVEM – 1407c English OVEM OVEM -05 -07/-10 -14/-20 Max. permitted signal line length Overload pressure at vacuum port Pressure measuring range Accuracy Threshold value setting range [m] [bar] [bar] [% FS] [bar] 30 ≤5 –1 … 0 ±3 –0.999 … 0 (recommended work range: –0.95 … –0.05) Hysteresis Hysteresis setting range Setting range Duration of ejector pulse [% FS] [bar] [ms] ±0.1 –0.9 … 0 20 … 9999 1) 40 … 9999 The product is intended for use in industrial environments. Measures for interference suppression may need to be implemented in residential areas. Tab. 16 12.1 Technical data Factory setting OVEM-...-H-... Out A SP SPmin SPmax HYS SPLS HYSLS Out B SP SPmin SPmax HYS Ejector pulse Tab. 17 OVEM-...-L-... –0.7 bar 0.25 bar –0.7 bar 0.25 bar –0.4 bar –0.7 bar –0.97 bar 0.25 bar –0.7 bar 0.25 bar –0.5 bar 0.2 bar 200 ms 0.1 bar –0.4 bar 0.25 bar –0.4 bar –0.67 bar 0.1 bar –0.4 bar 0.25 bar –0.2 bar –0.5 bar –0.71 bar 0.2 bar 200 ms 0.1 bar 200 ms –0.2 bar –0.41 bar 0.1 bar 200 ms Factory setting Festo – OVEM – 1407c English 103 OVEM 12.2 Circuit symbols OVEM-... Symbol OVEM-... Symbol -QO/-GO-CN-... -2P/2N/PU/PI/NU/NI -QO/-GO-CE-... -2P/2N/PU/PI/NU/N -QS/-GN-CN-... -2P/2N/PU/PI/NU/NI -QS/-GN-CE-... -2P/2N/PU/PI/NU/NI -QO/-GO-ON-... -2P/2N/PU/PI/NU/NI -QO/-GO-OE-... -2P/2N/PU/PI/NU/NI -QS/-GN-ON-... -2P/2N/PU/PI/NU/NI -QS/-GN-OE-... -2P/2N/PU/PI/NU/NI Tab. 18 104 Circuit symbols for the function Festo – OVEM – 1407c English OVEM 13 Symbol Menu structure Significance Automatic return to the basic status (RUN mode) when the monitoring time has expired (here 80 seconds) To manually return to the basic state (RUN mode), press and hold the EDIT button for 3 seconds TP1 For example, object gripped or not gripped (for teaching the measured value – here TP1) Symbol on the display flashes / illuminated (here Out A) Security code active (block to prevent unauthorised programming/parameterisa tion) Security code inactive Press the UP key (A) (continue/reverse in the menu) Press the UP key (A) or the DOWN key (B) (set value) Press key (here DOWN key) and EDIT button simultaneously Press the EDIT button Branching in the menu system Display of current faults Delete minimum/maximum value Cycle Teach point is taken over Tab. 19 Symbols for representing the menu structure Festo – OVEM – 1407c English 105 OVEM Fig. 23 106 SHOW mode Festo – OVEM – 1407c English OVEM Fig. 24 EDIT mode Festo – OVEM – 1407c English 107 OVEM Fig. 25 108 TEACH mode Festo – OVEM – 1407c English OVEM Index A Air filter, cleaning . . . . . . . . . . . . . . . . . . . . . . . Air supply time . . . . . . . . . . . . . . . . . . . . . . . . . – Delete . . . . . . . . . . . . . . . . . . . . . . . . . . . . . . – Display . . . . . . . . . . . . . . . . . . . . . . . . . . . . . – Setting . . . . . . . . . . . . . . . . . . . . . . . . . . . . . – Teach . . . . . . . . . . . . . . . . . . . . . . . . . . . . . . . Air-saving function – Mode of operation . . . . . . . . . . . . . . . . . . . . – Setting . . . . . . . . . . . . . . . . . . . . . . . . . . . . . – Switch-back threshold . . . . . . . . . . . . . . . . . – Switch-on threshold . . . . . . . . . . . . . . . . . . . – Teach . . . . . . . . . . . . . . . . . . . . . . . . . . . . . . . – Threshold values . . . . . . . . . . . . . . . . . . . . . Analogue output . . . . . . . . . . . . . . . . . . . . . . . 66 88 67 67 91 67 64 Evacuation time . . . . . . . . . . . . . . . . . . . . . . . . – Delete . . . . . . . . . . . . . . . . . . . . . . . . . . . . . . – Display . . . . . . . . . . . . . . . . . . . . . . . . . . . . . – Setting . . . . . . . . . . . . . . . . . . . . . . . . . . . . . – Teach . . . . . . . . . . . . . . . . . . . . . . . . . . . . . . . – Vacuum, Delete . . . . . . . . . . . . . . . . . . . . . . Extreme values – Air supply time . . . . . . . . . . . . . . . . . . . . . . . Delete . . . . . . . . . . . . . . . . . . . . . . . . . . . . . . Display . . . . . . . . . . . . . . . . . . . . . . . . . . . . . – Evacuation time . . . . . . . . . . . . . . . . . . . . . . Delete . . . . . . . . . . . . . . . . . . . . . . . . . . . . . . Display . . . . . . . . . . . . . . . . . . . . . . . . . . . . . – Vacuum . . . . . . . . . . . . . . . . . . . . . . . . . . . . . Display . . . . . . . . . . . . . . . . . . . . . . . . . . . . . C Circuit diagrams . . . . . . . . . . . . . . . . . . . . . . . . Connector, pin allocation . . . . . . . . . . . . . . . . . Control sections . . . . . . . . . . . . . . . . . . . . . . . . Cycle . . . . . . . . . . . . . . . . . . . . . . . . . . . . . . . . . 75 75 59 69 F Factory setting . . . . . . . . . . . . . . . . . . . . . . . . 103 – Reset . . . . . . . . . . . . . . . . . . . . . . . . . . . . . . . 94 Fault clearance . . . . . . . . . . . . . . . . . . . . . 98, 100 Features . . . . . . . . . . . . . . . . . . . . . . . . . . . . . . 61 D Diagnostic level – Diagnostic message channel . . . . . . . . . . . . – Display . . . . . . . . . . . . . . . . . . . . . . . . . . . . . – Error code . . . . . . . . . . . . . . . . . . . . . . . . . . . Diagnostics . . . . . . . . . . . . . . . . . . . . . . . . . . . . – Diagnostic levels . . . . . . . . . . . . . . . . . . . . . . – Symbols . . . . . . . . . . . . . . . . . . . . . . . . . . . . Display . . . . . . . . . . . . . . . . . . . . . . . . . . . . . . . – Symbols . . . . . . . . . . . . . . . . . . . . . . . . . . . . 95 69 83 83 88 92 96 96 98 68 96 78 60 78 E EDIT mode . . . . . . . . . . . . . . . . . . . . 64, 84, 107 Ejector pulse – Adjusting intensity . . . . . . . . . . . . . . . . . . . . 77 – Set duration . . . . . . . . . . . . . . . . . . . . . . . . . 87 – Symbols . . . . . . . . . . . . . . . . . . . . . . . . . . . . 78 Error code . . . . . . . . . . . . . . . . . . . . . . . . . . . . . 98 Festo – OVEM – 1407c English 69 83 83 88 92 82 69 83 83 69 83 83 69 82 H H-rail mounting . . . . . . . . . . . . . . . . . . . . . . . . 73 Hose internal diameters . . . . . . . . . . . . . . . . . . 74 Hysteresis . . . . . . . . . . . . . . . . . . . . . . . . . . . . . 68 I Installation – Electrical . . . . . . . . . . . . . . . . . . . . . . . . . . . . 74 – Mechanical . . . . . . . . . . . . . . . . . . . . . . . . . . 72 – Pneumatic . . . . . . . . . . . . . . . . . . . . . . . . . . . 74 M Manual override – Electrical . . . . . . . . . . . . . . . . . . . . . . . . . . . . – Mechanical . . . . . . . . . . . . . . . . . . . . . . . . . . Measured variables – Air supply time min./max. . . . . . . . . . . . . . . – Cycle . . . . . . . . . . . . . . . . . . . . . . . . . . . . . . . – Evacuation time min./max. . . . . . . . . . . . . . . – Vacuum min./max. . . . . . . . . . . . . . . . . . . . . 87 93 69 69 69 69 109 OVEM Menu – EDIT mode . . . . . . . . . . . . . . . . . . . . . . . . . . 107 – SHOW mode . . . . . . . . . . . . . . . . . . . . . . . . 106 – Symbols . . . . . . . . . . . . . . . . . . . . . . . . . . . 105 – TEACH mode . . . . . . . . . . . . . . . . . . . . . . . . 108 Mounting – Direct . . . . . . . . . . . . . . . . . . . . . . . . . . . . . . 72 – with accessories . . . . . . . . . . . . . . . . . . . . . . 72 Mounting bracket . . . . . . . . . . . . . . . . . . . . . . . 73 O Operating statuses . . . . . . . . . . . . . . . . . . . . . . 63 – EDIT mode . . . . . . . . . . . . . . . . . . . 64, 84, 107 – RUN mode . . . . . . . . . . . . . . . . . . . . . . . . . . . 64 – SHOW mode . . . . . . . . . . . . . . . . . 64, 81, 106 – TEACH mode . . . . . . . . . . . . . . . . . 64, 89, 108 Overview of variants . . . . . . . . . . . . . . . . . . . . . 62 P Ports . . . . . . . . . . . . . . . . . . . . . . . . . . . . . . . . . 59 R RUN mode . . . . . . . . . . . . . . . . . . . . . . . . . . . . 64 S Security code – Enter . . . . . . . . . . . . . . . . . . . . . . . . . . . . . . . 93 – Reset . . . . . . . . . . . . . . . . . . . . . . . . . . . . . . . 94 – Setting . . . . . . . . . . . . . . . . . . . . . . . . . . . . . 88 Set diagnostic message channel . . . . . . . . . . . 96 Setting – Air supply time . . . . . . . . . . . . . . . . . . . . . . . 88 – Air-saving function . . . . . . . . . . . . . . . . . . . . 88 – Duration of ejector pulse . . . . . . . . . . . . . . . 87 – Evacuation time . . . . . . . . . . . . . . . . . . . . . . 88 – Intensity of ejector pulse . . . . . . . . . . . . . . . 77 – Security code . . . . . . . . . . . . . . . . . . . . . . . . 88 – Switching outputs . . . . . . . . . . . . . . . . . . . . 86 SHOW mode . . . . . . . . . . . . . . . . . . . 64, 81, 106 Special menu – Air supply time . . . . . . . . . . . . . . . . . . . . . . . 88 – Air-saving function option . . . . . . . . . . . . . . 88 110 – Evacuation time . . . . . . . . . . . . . . . . . . . . . . – Security code . . . . . . . . . . . . . . . . . . . . . . . . – Symbols . . . . . . . . . . . . . . . . . . . . . . . . . . . . Switch-back threshold . . . . . . . . . . . . . . . . . . . Switch-on threshold . . . . . . . . . . . . . . . . . . . . . Switching input . . . . . . . . . . . . . . . . . . . . . . . . Switching output . . . . . . . . . . . . . . . . . . . . . . . – Display settings . . . . . . . . . . . . . . . . . . . . . . – Setting . . . . . . . . . . . . . . . . . . . . . . . . . . . . . – Symbols . . . . . . . . . . . . . . . . . . . . . . . . . . . . – Teach . . . . . . . . . . . . . . . . . . . . . . . . . . . . . . . Switching points . . . . . . . . . . . . . . . . . . . . . . . . Symbols – Display . . . . . . . . . . . . . . . . . . . . . . . . . . . . . – Segment bars . . . . . . . . . . . . . . . . . . . . . . . . 88 88 79 67 67 64 64 81 86 78 90 68 78 80 T TEACH mode . . . . . . . . . . . . . . . . . . . 64, 89, 108 Teaching – Air supply time . . . . . . . . . . . . . . . . . . . . . . . 92 – Air-saving function . . . . . . . . . . . . . . . . . . . . 91 – Evacuation time . . . . . . . . . . . . . . . . . . . . . . 92 – Switching output . . . . . . . . . . . . . . . . . . . . . 90 Threshold value – Switch off suction . . . . . . . . . . . . . . . . . . . . . 67 – Switch on suction . . . . . . . . . . . . . . . . . . . . . 67 Threshold value comparator – Hysteresis . . . . . . . . . . . . . . . . . . . . . . . . . . . 68 – Switching point . . . . . . . . . . . . . . . . . . . . . . . 68 – Symbols . . . . . . . . . . . . . . . . . . . . . . . . . . . . 78 V Vacuum – Delete . . . . . . . . . . . . . . . . . . . . . . . . . . . . . . 82 – Display . . . . . . . . . . . . . . . . . . . . . . . . . . . . . 82 – Measured variables . . . . . . . . . . . . . . . . . . . 69 W Window comparator – Hysteresis . . . . . . . . . . . . . . . . . . . . . . . . . . . 68 – Switching points . . . . . . . . . . . . . . . . . . . . . . 68 – Symbols . . . . . . . . . . . . . . . . . . . . . . . . . . . . 78 Festo – OVEM – 1407c English Copyright: Festo AG & Co. KG Postfach 73726 Esslingen Deutschland Phone: +49 711 347-0 Weitergabe sowie Vervielfältigung dieses Dokuments, Verwertung und Mitteilung seines Inhalts sind verboten, soweit nicht aus drücklich gestattet. Zuwiderhandlungen verpflichten zu Schaden ersatz. Alle Rechte sind für den Fall der Patent-, Gebrauchsmuster‐ oder Geschmacksmustereintragung vorbehalten. Reproduction, distribution or sale of this document or communica tion of its contents to others without express authorization is prohibited. Offenders will be liable for damages. All rights re served in the event that a patent, utility model or design patent is registered. Fax: +49 711 347-2144 e-mail: [email protected] Internet: www.festo.com Original: de