1
THERMAL RE-WRITABLE
CARD READER / WRITER
TCP300II SERIES
User’s Manual
Manuel d’utilisation
Benutzerhandbuch
Manuale dell’utente
Manual del usuario
操作手册
이용안내
ご利用の手引き
Federal Communications Commission
Radio Frequency Interference
Statement
This equipment has been tested and found to comply with the limits for a Class A digital device,
pursuant to Part 15 of the FCC Rules. These limits are designed to provide reasonable protection
against harmful interference when the equipment is operated in a commercial environment. This equipment generates, uses and can radiate radio frequency energy and, if not installed and used in accordance with the instruction manual, may cause harmful interference to radio communications. Operation of this equipment in a residential area is likely to cause harmful interference in which case the user
will be required to correct the interference at his own expense.
For compliance with the Federal Noise Interference Standard, this equipment requires a shielded cable.
This statement will be applied only for the printers marketed in U.S.A.
Statement of
The Canadian Department of Communications
Radio Interference Regulations
This digital apparatus does not exceed the Class A limits for radio noise emissions from digital apparatus set out in the Radio Interference Regulations of the Canadian Department of Communications.
Le présent appareil numérique n’émet pas de bruits radioélectriques dépassant les limites applicables aux
appareils numériques de la classe A prescrites dans le Règlement sur le brouillage radioélectrique édicté par le
ministère des Communications du Canada.
The above statement applies only to printers marketed in Canada.
Trademark acknowledgmentsotice
TCP300II: Star Micronics Co., Ltd.
Notice
• All rights reserved. Reproduction of any part of this manual in any form whatsoever,
without STAR’s express permission is forbidden.
• The contents of this manual are subject to change without notice.
• All efforts have been made to ensure the accuracy of the contents of this manual at the
time of going to press. However, should any errors be detected, STAR would greatly
appreciate being informed of them.
• The above notwithstanding, STAR can assume no responsibility for any errors in this
manual.
©
Copyright 2005 Star Micronics Co., LTD.
1. Precautions for Safe Use .......................................................... 1
2. Unpacking ................................................................................. 3
3. External Appearance and Part Names ...................................... 3
4. Connecting to External Devices ................................................ 4
5. Connecting the Power Cord ...................................................... 5
6. Setting Fonts Using the Font Setting Card ............................... 6
7. Cleaning Cards ......................................................................... 6
8. Troubleshooting ........................................................................ 8
Appendixes
A. Connection Settings ................................................................ 81
B. Removing / Installing Interface Board ..................................... 83
C. General Specifications ............................................................ 84
This User’s Manual describes important information to enable you to use
the reader/writer safely.
Carefully read this manual before using the reader/writer and observe the
descriptions herein.
CE
Manufacturer’s Declaration of Conformity
EC Council Directive 89/336/EEC of 3 May 1989
This product has been designed and manufactured in accordance with the International Standards
EN 61000-6-3/10.2001 and EN 55024/09.98 following the provisions of the Electro Magnetic Compatibility Directive of the European Communities as of May 1989.
EC Council Directive 73/23/EEC and 93/68/EEC of 22 July 1993
This product, has been designed and manufactured in accordance with the International Standards
EN 60950-1, following the provisions of the Low Voltage Directive of the European Communities
as of 2001.
The above statement applies only to printers marketed in EU.
WEEE Statement
In the European Union, this label indicates that this product should not be disposed
of with household waste. It should be deposited at an appropriate facility to enable
recovery and recycling in accordance with legislation under the WEEE Directive
(Directive 2002/96/EC).
ENGLISH
TABLE OF CONTENTS
1. Precautions for Safe Use
Always observe the following items.
Carefully read and obey the following items to prevent injury to yourself or to others
and to prevent damaging property.
1-1. Precautions for Reader/Writer Setup
1. Setup the reader/writer in a solid, and level location.
2. Do not use or place the reader/writer in areas exposed to direct sunlight, or near heat
sources.
3. Avoid using or storing the reader/writer in areas of high humidity.
Do not use or store liquids near the reader/writer.
4. Avoid using or storing the reader/writer in locations where there is dust or other airborne particles.
5. Avoid using the reader/writer in locations where corrosive gases, ignition gases, chemicals or vapors are emitted.
6. Do not operate the reader/writer near devices which may produce magnetic fields or
interference.
7. Do not get power from a circuit to which electrical devices that generate electrical
noise are connected.
8. Connect a grounding wire to use this device safely.
9. Allow plenty of space around the reader/writer for ventilation.
1-2. Precautions for Reader/Writer Use
1. Use only Star recommended cards.
2. Do not use cards that are dirty or oily or wet in any other manner. Also, do not handle
cards with dirty or wet hands. Do not apply tape or glue to cards.
3. Do not place cards near devices that generate magnetic fields (such as cellular telephones, speakers, televisions, etc.).
4. Do not place cards in direct sunlight or high temperature areas (such as dashboards
in automobiles), as high temperatures can cause cards to bend or can erase the
information recorded on cards.
5. Do not use bent cards, as this can cause them to become jammed in the reader/
writer.
6. Insert cards in the indicated direction.
7. Never insert anything other than the appropriate cards into the reader/writer.
–1–
8. Do not obstruct the insertion or discharge path of the cards.
9. Do not cut the power while a card is being processed.
10. In case of reader/writer error (abnormal sounds, abnormal odors, smoke, fire) turn off
the reader/writer immediately and unplug it from the power outlet.
11. Always hold the plug to unplug the power cord from its outlet. Pulling on the cord will
damage the cord.
12. When disconnecting use for prolonged periods, always remove the power plug from
the outlet.
13. Do not use the reader/writer in an environment where condensation has formed.
14. To ensure reader/writer reliability, clean the reader/writer everyday, or when the cleaning
lamp has lit.
15. Avoid contact with the optional cleaning liquid. If it gets in your eyes, or is ingested,
seek immediate medical assistance.
16. Do not disassemble or modify the reader/writer.
17. Do not expose cards to direct sunlight or fluorescent lights for extended periods of
time.
18. If a card is to be reprinted, allow for at least three minutes between prints.
When printing repeatedly to different cards, no wait is required.
19.
This symbol is placed near the thermal print head and erase head to indicate that it may be hot.
Never touch the thermal print head and erase head immediately after the printer has
been used. Let the thermal print head and erase head cool for a few minutes before
touching it.
20.
This symbol is placed near the thermal print head and erase head to indicate that it is easily damaged.
Observe the precautions for handling electrostatic sensitive devices.
21. Be careful not to drop paper clips, pins or other foreign matter into the unit as these
cause the reader/writer to malfunction.
22. Do not open the cover while operating.
23. The reader/writer is equipped with a DC motor or switches which use electrical contacts. Plese avoid using the reader/writer in an area where silicon gas is present.
–2–
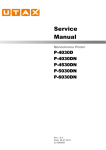
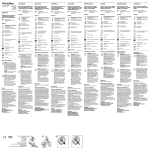
2. Unpacking
The following outlines the reader/writer and its accessories.
1
1. Reader/writer
2. Power cord
3. Cleaning cards (2 cards)
4. Ferrite core
5. This manual
6. Font setting card
2
6
Note :Whether there are a ferrite core and font
setting card depends on the reader/writer model.
3
5
4
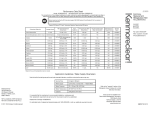
3. External Appearance and Part Names
2 3 4
5
7
6
1
1. Power Switch ............................ This turns the power to the reader/writer on and off.
2. Power Lamp ............................. Indicates that reader/writer power is on.
3. Status Lamp ............................. Indicates printer ready, printing and errors.
4. Cleaning Lamp ......................... Indicates the reader/writer needs cleaning.
5. Interface Connector .................. Connects to host computer via a cable.
6. AC Inlet ..................................... Connects to accessory power cord.
7. Cleaning Switch ........................ Press the cleaning switch while turning the power on.
Insert a cleaning card dampened with alcohol to
clean the reader/writer.
–3–
4. Connecting to External Devices
Conect either the RS-232C interface Cable or USB interface Cable to the reader/writer.
4-1 Mounting the RS-232C Interface Cable
1. Cut the power to the host computer and the reader/writer.
2. Connect one end of the interface cable to the reader/writer and the other end to the
host computer.
3. Mount the accessory ferrite core to the interface cable.
4. Tighten the left and right screws on the connector.
4-2 Mounting the USB Interface Cable
1. Affix the ferrite core onto the USB cable as shown in the illustration below and make
sure to pass the cable through the cable support as shown in the illustration.
2. Plug on end of the USB cable into the USB port on the back of the reader/writer.
3. Plug the other end of the USB cable into the USB port of the host computer.
4. If a driver for the reader/writer is required, use the media that was distributed by your
agent to install the driver.
–4–
5. Connecting the Power Cord
1. Turn the power switch off.
2. Connect the powr cord to the AC inlet on the backside of the reader/writer.
3. Insert the power cord plug into a properly grounded AC outlet.
Connect the grounding terminal to a metal portion (such as an outlet that has a grounding point) on a ground in the vicinity to use this reader/writer safely.
Caution:
We recommend that you unplug the reader/writer from the power
outlet whenever you do not plan to use it for long period. Because
of this, you should locate the reader/writer so that the power outlet
it is plugged into is nearby and easy to access.
–5–
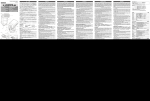
6. Setting Fonts Using the Font Setting Card
European, US and Korean bound models are provided a standard font setting card that is
for their country. Before using the reader/writer, set the fonts according to the directions
below.
<Procedures to Set Fonts>
1. Turn the power ON while pressing the Cleaning switch.
2. The buzzer will ring and the green status lamp will flash. This indicates that the
reader/writer has entered the “setting mode to use the setting card.”
3. Insert the font setting card. The font setting information is automatically read from the
magnetic strip. That new font setting information is then written to the internal memory.
4. When the new settings have been completed successfully, “COMPLETE!” is printed
and the card is discharged. The reader/writer will then return to its normal operating
status.
Status Lamp
Font Setting Card
Cleaning Switch
7. Cleaning Cards
A cleaning card is used to clean the transport rollers inside the unit. Two cleaning cards
accompany each unit. They are in the plastic wrap.
22.0
54.0
7-1 External Shape
Felt Surface
Felt Surface
85.6
89.6
–6–
7-2 Frequency of Use
1. Everyday, or once every 300 prints.
2. If errors occur repeatedly, or if there are printing problems, clean the reader/writer.
3. The cleaning LED will flash when there have been 300 printings. Clean the reader/
writer when this flashes.
7-3 How to Use
Use the following procedures to clean the reader/writer.
1. Press the cleaning switch.
2. Dampen the felt surfaces (both side) of a cleaning card with optional cleaning liquid.
3. Insert the cleaning card from the normal card insertion inlet.
4. Allow the reader/writer to sit for approximately one minute before using again, to
allow it to dry.
Note: 1. Do not use bent cleaning cards. Using bent cards can cause them to become
jammed.
2. A cleaning fluid is not supplied with the unit. Therefore, an optional cleaning
fluid or a commercially available ethanol (85% minimum purity) must be obtained. To obtain the optional cleaning fluid, contact your sales agent.
3. The attached cleaning card attains its cleaning effectiveness by absorbing a
cleaning fluid before use. Make sure to allow it to absorb a cleaning fluid
before using it for cleaning.
4. Make sure to use ethanol with a minimum purity of 85%. If ethanol with a
lower purity is used, it will take the cleaning card a longer time to dry. If an
undried cleaning card is inserted into the slot, it could cause a malfunction,
such as card slippage.
5. Cleaning cards can be used approximately 30 times. Contact your sales agent
if they are damaged or excessively dirty.
Cleaning Switch
–7–
8. Troubleshooting
8-1. Trouble when Turning on the Power
Symptom
The power lamp
does not light.
The power lamp
lights.
Possible Cause
Won’t accept
cards.
What to Do
The power cord is not
correctly connected.
Broken wire in power cord.
Broken wire in fuse.
Accepts cards. Display LED burned out.
Won’t accept Reader/writer error.
cards.
Accepts cards Bad Card
but reader/
Card damaged, bent,
writer
data erased on card,
operating
or other user card.
incorrectly.
Head is dirty.
Composing system is
not operating normally.
Correct connect the power
cord.
Contact your dealer.
Use a normal card.
Clean using a cleaning card.
Contact your dealer.
Reader/writer error.
8-2. Trouble when Operating
Symptom
Possible Cause
What to Do
Cards are not discharged.
Card is jammed.
Reading/Writing errors occur
Inappropriate card.
Using other card type.
Card data erased by magnet.
Card is bent.
Issue a new card.
Card is damaged.
Head is dirty.
Clean using a cleaning card.
–8–
Turn on power to reader/writer
again.
If cards are still not discharged,
turn off the power and open the
upper cover.
Then, pull the snap lever to
raise the upper portion of the
mechanism to remove the card.
Use the recommended card.
Use the correct card.
8-3. Removing Jammed Cards
1. Turn off the power and unplug the reader/writer.
2. Press the cover opener.
3. Lift the upper cover while the cover is open.
Upper cover
Cover Opener
4. While pulling the mechanism’s snap lever (green), lift the mechanism.
Snap lever
5. Remove the card while the cover is open.
Note: Do not touch the thermal head or erasing head. There is the danger of getting
burned.
Thermal head
Erase head
6. Return the mechanism to its original position.
7. Close the upper cover.
–9–
1.
2.
3.
4.
5.
6.
Précautions pour une utilisation en toute sécurité ..................
Déballage ................................................................................
Aspect extérieur et noms des éléments ..................................
Connexion à des périphériques externes ...............................
Connexion du câble d’alimentation .........................................
Paramétrage des polices à l’aide de la carte de paramétrage
des polices ..............................................................................
7. Cartes de nettoyage ................................................................
8. Dépannage .............................................................................
Appendice ......................................................................................
11
13
13
14
15
16
16
18
81
L’appendice n’est pas traduit.
Ce manuel d’utilisation contient des informations importantes qui vous
permettent d’utiliser le lecteur/graveur en toute sécurité.
Veuillez lire attentivement ce manuel avant d’utiliser votre lecteur/graveur
et tenez compte des descriptions.
CE
Déclaration de conformité du fabricant
Directive du Conseil 89/336/CEE du 3 mai 1989
Ce produit a été conçu et fabriqué conformément aux normes internationales EN 61000-6-3/2001 et
EN 55024/1998, en vertu des dispositions de la Directive sur la compatibilité électro-magnétique des
Communautés européennes de mai 1989.
Directives du Conseil 73/23/CEE et 93/68/CEE du 22 juillet 1993
Ce produit a été conçu et fabriqué conformément à la norme internationale EN 60950-1, en ver-tu des
dispositions de la Directive sur la basse tension des Communautés européennes de 2001.
L’instruction ci-dessus ne s’applique qu’aux imprimantes commercialisées dans l’UE.
Déclaration WEEE
Dans l’union européenne (U.E.), cette étiquette indique que ce produit ne doit pas
être jeté avec les déchêts ménagers. Il doit être déposé dans un container approprié
permettant la récu-pération et le recyclage en accord avec les directives WEEE de la
législation européenne (Directive 2002/96/EC).
FRANCAIS
TABLE DES MATIERES
1. Précautions pour une utilisation en toute sécurité
Conformez-vous toujours aux points suivants.
Lisez attentivement les points suivants et respectez-les afin d’éviter tout dommage,
corporel ou matériel.
1-1. Précautions relatives à l’installation du lecteur/graveur
1. Installez le lecteur/graveur sur une surface stable et de niveau.
2. N’utilisez pas et ne placez pas le lecteur/graveur à un endroit directement exposé aux
rayons du soleil ou proche d’une source de chaleur.
3. Evitez d’utiliser ou de stocker le lecteur/graveur dans un endroit soumis à un taux
d’humidité élevé.
N’utilisez pas et ne stockez pas de substances liquides à proximité du lecteur/graveur.
4. Evitez d’utiliser ou de stocker le lecteur/graveur dans un endroit poussiéreux ou comportant des particules en suspension dans l’air.
5. Evitez d’utiliser le lecteur/graveur dans un endroit où des gaz corrosifs, des gaz inflammables, des produits chimiques ou des vapeurs peuvent être émis.
6. N’utilisez pas le lecteur/graveur à proximité d’appareils susceptibles de produire des
champs magnétiques ou des interférences.
7. Ne branchez pas l’appareil à un circuit auquel sont connectés des appareils électriques générant des parasites d’origine électrique.
8. Connectez un fil de mise à la terre à l’appareil pour l’utiliser en toute sécurité.
9. Laissez un espace conséquent autour du lecteur/graveur pour l’aération.
1-2. Précautions relatives à l’utilisation du lecteur/graveur
1. N’utilisez que les cartes Star recommandées.
2. N’utilisez en aucun cas des cartes encrassées, graisseuses ou humides. De même,
ne manipulez pas les cartes avec des mains sales ou humides. Ne mettez pas de
bande adhésive ni de colle sur les cartes.
3. Ne placez pas les cartes à proximité d’appareils générant des champs magnétiques
(tels que des téléphones portables, des enceintes, des téléviseurs, etc.).
4. N’exposez pas les cartes aux rayons directs du soleil ni à des températures élevées
(comme le tableau de bord d’un véhicule). Sous l’effet de la chaleur, elles pourraient
se plier ou les informations qu’elles contiennent pourraient être effacées.
5. N’utilisez pas de cartes pliées car elles risquent de se coincer dans le lecteur/graveur.
6. Insérez les cartes dans le sens indiqué.
7. N’insérez aucun autre objet que les cartes appropriées dans le lecteur/graveur.
— 11 —
8. N’obstruez pas la fente d’insertion ou de libération des cartes.
9. Ne coupez pas l’alimentation lorsqu’une carte est en cours de traitement.
10. En cas de problème au niveau du lecteur/graveur (odeurs ou bruits anormaux, fumée, feu), mettez-le immédiatement hors tension et débranchez-le.
11. Tenez toujours la fiche lorsque vous retirez le câble d’alimentation de la prise. Si vous
tirez directement sur le câble, vous risquez de l’endommager.
12. Lorsque vous n’utilisez pas l’appareil pendant une période prolongée, débranchez-le.
13. N’utilisez pas le lecteur/graveur dans un environnement où de la condensation s’est
formée.
14. Afin d’assurer la fiabilité du lecteur/graveur, nettoyez-le chaque jour ou lorsque le
témoin de nettoyage s’allume.
15. Evitez tout contact avec le liquide de nettoyage optionnel. En cas de contact avec les
yeux ou d’ingestion, contactez immédiatement un médecin.
16. Ne démontez pas et ne modifiez pas le lecteur/graveur.
17. N’exposez pas les cartes aux rayons directs du soleil ou à des lumières fluorescentes
pendant une période prolongée.
18. Si une carte doit être rééditée, attendez au moins trois minutes entre chaque impression.
Dans le cas d’une impression répétitive de différentes cartes, aucun temps d’attente
n’est nécessaire.
19.
Ce symbole est placé près de la tête d’impression thermique et de la tête d’effacement.
Ne touchez jamais la tête d’impression thermique ni la tête d’effacement tout de
suite après avoir utilisé l’imprimante.
Laissez la tête d’impression thermique ou la tête d’effacement refroidir pendant
quelques minutes avant de les toucher.
20.
Ce symbole est placé près de la tête d’impression thermique et de la tête d’effacement.
Ne touchez jamais la tête d’impression thermique ni la tête d’effacement directement pour ne pas endommager ces dispositifs qui sont sensibles à l’électrique
statique.
21. Veillez à ne pas laisser tomber de trombones, punaises ou autres objets dans le
lecteur/graveur. Un dysfonctionnement pourrait en résulter.
22. N’ouvrez pas le capot pendant le fonctionnement de l’appareil.
23. Evitez d’utiliser le lecteur/graveur dans un endroit contenant du gaz de silicium car
l’appareil est équipé d’un moteur à courant continu ou de commutateurs qui utilisent
des contacts électriques.
— 12 —
2. Déballage
Les points suivants décrivent brièvement le lecteur/graveur et ses accessoires.
1
1. Lecteur/graveur
2. Câble d’alimentation
3. Cartes de nettoyage (2)
4. Tore magnétique
2
5. Le présent manuel
6
6. Carte de paramétrage
des polices
Remarque : la présence d’un tore magnétique et
d’une carte de paramétrage des polices dépend du
modèle du lecteur/graveur.
3
5
4
3. Aspect extérieur et noms des éléments
2 3 4
5
7
1
6
1. Commutateur d’alimentation ....... Il permet de mettre le lecteur/graveur sous/hors
tension.
2. Témoin alternatif .......................... Indique que le lecteur/graveur est sous tension.
3. Témoin état ................................. Indique que l’imprimante est prête, en fonctionnement ou rencontre un problème.
4. Témoin nettoyage ........................ Indique que le lecteur/graveur a besoin d’être nettoyé.
5. Connecteur d’interface ................ Connecte l’appareil à l’ordinateur hôte via un câble.
6. Entrée secteur ............................. Connecte l’appareil au câble d’alimentation annexe.
7. Commutateur de nettoyage ......... Appuyez sur le commutateur de nettoyage lors de
la mise sous tension.
Insérez une carte de nettoyage humidifiée d’alcool
pour nettoyer le lecteur/graveur.
— 13 —
4. Connexion à des périphériques externes
Connectez le câble d’interface RS-232C ou le câble d’interface USB au lecteur/graveur.
4-1 Installation du câble d’interface RS-232C
1. Coupez l’alimentation de l’ordinateur hôte et du lecteur/graveur.
2. Connectez l’une des extrémités du câble d’interface au lecteur/graveur et l’autre à
l’ordinateur hôte.
3. Installez le tore magnétique sur le câble d’interface.
4. Serrez les vis gauche et droite du connecteur.
4-2 Installation du câble d’interface USB
1. Fixez le tore de ferrite sur le câble USB comme indiqué sur le schéma ci-dessous et
veillez à bien acheminer le câble par le guide de câble comme indiqué sur le schéma.
2. Branchez l’extrémité du câble USB dans le port USB du lecteur/enregistreur.
3. Branchez l’autre du câble USB dans le port USB de l’ordinateur principal.
4. Si le lecteur/graveur nécessite un pilote, utilisez le contenu multimédia distribué par
votre revendeur pour l’installer.
— 14 —
5. Connexion du câble d’alimentation
1. Mettez l’appareil hors tension.
2. Connectez le câble d’alimentation à l’entrée secteur située à l’arrière du lecteur/graveur.
3. Insérez la fiche du câble d’alimentation dans une prise secteur reliée à la terre.
Reliez la borne de mise à la terre à un élément métallique (tel qu’une prise disposant
d’une prise de masse) mis à la terre à proximité afin d’utiliser le lecteur/graveur en
toute sécurité.
Attention : Nous recommandons de débrancher le lecteur/graveur à chaque nonutilisation prolongée. Vous devez donc positionner le lecteur/graveur
de manière à ce que la prise de courant à laquelle il est branché soit
facilement accessible.
— 15 —
6. Paramétrage des polices à l’aide de la carte de
paramétrage des polices
Les modèles européens, américains et coréens proposent une carte de paramétrage des
polices standard propre à leur pays. Avant d’utiliser le lecteur/graveur, paramétrez les
polices en respectant les instructions ci-dessous.
<Procédures de paramétrage des polices>
1. Mettez l’appareil sous tension tout en appuyant sur le commutateur de nettoyage.
2. L’avertisseur sonore retentit alors et le témoin d’état vert clignote. Ceci indique que le
lecteur/graveur est en “mode de paramétrage pour carte de paramétrage”.
3. Insérez la carte de paramétrage des polices. Les informations relatives au paramétrage
des polices sont lues automatiquement par la bande magnétique. Ces nouvelles informations sont alors enregistrées dans la mémoire interne.
4. Une fois les nouveaux réglages appliqués, le terme “COMPLETE!” est imprimé et la
carte est libérée. Le lecteur/graveur reprendra ensuite son fonctionnement normal.
Témoin d’état
Carte de paramétrage
des polices
Commutateur de
nettoyage
7. Cartes de nettoyage
Une carte de nettoyage permet de nettoyer les rouleaux de transport à l’intérieur de l’unité.
Chaque unité dispose de deux cartes de nettoyage. Elles se présentent sous emballage
plastique.
22,0
54,0
7-1 Aspect extérieur
Surface feutrée
Surface feutrée
85,6
89,6
— 16 —
7-2 Fréquence d’utilisation
1. Quotidienne ou toutes les 300 impressions.
2. Si des erreurs ou des problèmes d’impression surviennent de manière récurrente,
nettoyez le lecteur/graveur.
3. Le voyant de nettoyage clignote lorsque les 300 impressions sont atteintes. Nettoyez
le lecteur/graveur à ce moment.
7-3 Procédure de nettoyage
Respectez les procédures suivantes pour nettoyer le lecteur/graveur.
1. Appuyez sur le commutateur de nettoyage.
2. Humidifiez les surfaces feutrées (des deux côtés) d’une carte de nettoyage avec du
liquide de nettoyage optionnel.
3. Insérez la carte de nettoyage dans la fente d’insertion de carte normale.
4. Laissez le lecteur/graveur tel quel pendant environ une minute avant de l’utiliser de
nouveau, afin de lui permettre de sécher.
Remarques : 1. N’utilisez pas de cartes de nettoyage pliées. Elles risquent de se coincer lors de leur utilisation.
2. Le liquide de nettoyage n’est pas fourni avec l’unité. Par conséquent,
vous devez vous procurer un liquide de nettoyage des accessoires ou
un produit de nettoyage à base d’éthanol (à 85% minimum) disponible
dans le commerce. Vous pouvez vous procurer le liquide de nettoyage
des accessoires auprès de votre point de vente habituel.
3. Pour être efficace, la carte de nettoyage fournie doit absorber le liquide de nettoyage avant le nettoyage. Veillez à ce que la carte absorbe le liquide avant de procéder au nettoyage.
4. Le liquide de nettoyage doit contenir 85% d’éthanol minimum. Si vous
utilisez un produit contenant moins de 85% d’éthanol, la carte de nettoyage séchera moins vite. Si vous insérez une carte humide dans la
fente, vous pourriez provoquer un dysfonctionnement dû à un glissement de la carte par exemple.
5. Les cartes de nettoyage peuvent servir environ 30 fois. Contactez votre
revendeur si elles sont endommagées ou excessivement encrassées.
Commutateur de nettoyage
— 17 —
8. Dépannage
8-1. Problème lors de la mise sous tension
Symptôme
Le témoin
d’alimentation ne
s’allume pas.
Le témoin
d’alimentation
s’allume.
Cause possible
N’acceptera Le Câble d’alimentation n’est
pas les cartes. pas connecté correctement.
Fil rompu au câble d’alimentation.
Fil rompu du fusible.
Accepte les Voyant d’affichage grillé.
cartes.
N’acceptera Erreur de lecteur/graveur.
pas les cartes.
Le lecteur/
Carte inappropriée Carte
graveur
endommagée ou pliée, données
accepte les
supprimées sur la carte
cartes mais
ou autre carte utilisateur.
ne fonctionne Tête encrassée.
pas
Le système de composition ne
correctement. fonctionne pas normalement.
Action
Corrigez la connexion
de câble d’alimentation.
Contactez votre revendeur.
Utilisez une carte normale.
Nettoyez l’unité à l’aide d’une carte de nettoyage.
Contactez votre revendeur.
Erreur de lecteur/graveur.
8-2. Problème de fonctionnement
Symptôme
Les cartes ne sont
pas libérées.
Des erreurs de lecture/
écriture apparaissent.
Cause possible
Carte coincée.
Action
Mettez de nouveau le lecteur/
graveur sous tension.
Si les cartes restent emprisonnées,
mettez l’appareil hors tension et
ouvrez le capot supérieur.
Tirez ensuite sur le levier de
sécurité afin de lever la partie
supérieure du mécanisme et
de retirer la carte.
Carte inappropriée.
Utilisez la carte recommandée.
Utilisation d’un autre type de carte. Utilisez la carte appropriée.
Données de la carte supprimées à cause d’un aimant.
Carte pliée.
Prenez une nouvelle carte.
Carte endommagée.
Tête encrassée.
Nettoyez l’unité à l’aide d’une carte de nettoyage.
— 18 —
8-3. Retrait des cartes coincées
1. Mettez le lecteur/graveur hors tension et débranchez-le.
2. Appuyez sur le mécanisme d’ouverture du capot.
3. Soulevez le capot supérieur une fois ouvert.
Capot supérieur
Mécanisme d’ouverture du capot
4. Tout en tirant sur le levier de sécurité (vert), soulevez le mécanisme.
Levier de sécurité
5. Retirez la carte lorsque le capot est ouvert.
Remarque :
Ne touchez ni la tête thermique ni la tête d’effacement. Vous pourriez vous
brûler.
Tête thermique
Tête d’effacement
6. Replacez le mécanisme dans sa position d’origine.
7. Fermez le capot supérieur.
— 19 —
1. Sicherheitsvorkehrungen ........................................................
2. Auspacken ..............................................................................
3. Äußere Merkmale und Bezeichnungen der Teil ......................
4. Anschluss externer Geräte .....................................................
5. Anschließen des Netzkabels ...................................................
6. Font-Einstellung mit der Font-Einstellkarte .............................
7. Reinigungskarten ....................................................................
8. Fehlerbehebung ......................................................................
Anhang ...........................................................................................
21
23
23
24
25
26
26
28
81
Der Anhand dieser Bedienungsanleitung ist nur in englischer
Sprache.
Dieses Benutzerhandbuch enthält wichtige Informationen zur sicheren
Verwendung des Lese-Schreib-Geräts.
Lesen Sie dieses Handbuch vor der Verwendung des Lese-Schreib-Geräts
aufmerksam durch und befolgen Sie die darin enthaltenen Anweisungen.
CE
Konformitätserklärung des Herstellers
Richtlinie 89/336/EWG des EG-Rates vom 3. Mai 1989
Dieses Produkt wurde nach den internationalen Normen EN 61000-6-3/2001 und
EN 55024/1998 entwickelt und hergestellt, gemäß den Bestimmungen der Richtlinie zur
elektromagneti-schen Verträglichkeit der Europäischen Gemeinschaften vom Mai 1989.
Richtlinie 73/23/EWG und 93/68/EWG des EG-Rates vom 22. Juli 1993
Dieses Produkt wurde nach der internationalen Norm EN 60950-1 entwickelt und hergestellt,
gemäß den Bestimmungen der Niederspannungsrichtlinie der Europäischen Gemeinschaften
von 2001.
Die oben stehende Erklärung gilt nur für in der EU verkaufte Drucker.
WEEE Angabe
In der Europäischen Union dient dieses Symbol als Hinweis dieses Produkt nicht im
normalen Hausmüll zu entsorgen. Die Entsorgung sollte als getrennte Sammlung
über geeignete Einrichtungen/Sammelstellen zum Recycling nach WEEE-Vorschrift
(EU-Richtlinie 2002/96/EC) erfolgen.
DEUTSCH
INHALT
1. Sicherheitsvorkehrungen
Beachten Sie stets die folgenden Punkte.
Lesen Sie die folgenden Anweisungen sorgfältig durch, um Verletzungen an sich selbst
und anderen Personen sowie Sachschäden zu vermeiden.
1-1. Sicherheitsvorkehrungen für die Installation des Lese-Schreib-Geräts
1. Stellen Sie das Lese-Schreib-Gerät auf eine feste, ebene Oberfläche.
2. Setzen Sie das Lese-Schreib-Gerät keiner direkten Sonneneinstrahlung und keinen
hohen Temperaturen aus (z.B. neben offenem Feuer oder anderen Wärmequellen).
3. Das Gerät darf nicht an Orten mit hoher Luftfeuchtigkeit verwendet oder gelagert
werden.
Vermeiden Sie die Verwendung oder Lagerung von Flüssigkeiten in der Nähe des
Lese-Schreib-Geräts.
4. Verwenden Sie das Lese-Schreib-Gerät möglichst nicht an Orten, an denen Staub
oder andere Schwebstoffe vorhanden sind.
5. Verwenden Sie das Lese-Schreib-Gerät nicht an Orten, an denen ätzende oder feuergefährliche Gase, Chemikalien oder Dämpfe ausströmen.
6. Verwenden Sie das Gerät nicht in der Nähe von Objekten, die ein Magnetfeld oder
elektrische Interferenzen erzeugen.
7. Das Lese-Schreib-Gerät sollte an keine Stromquelle angeschlossen werden, mit der
auch Elektrogeräte, die elektrische Interferenzen erzeugen, verbunden sind.
8. Schließen Sie ein Erdungskabel an, um den sicheren Betrieb dieses Geräts zu gewährleisten.
9. Stellen Sie sicher, dass um das Lese-Schreib-Gerät herum genügend Platz für Luftzirkulation vorhanden ist.
1-2. Sicherheitsvorkehrungen für die Verwendung des Lese-Schreib-Geräts
1. Verwenden Sie nur von Star empfohlene Karten.
2. Verwenden Sie keine Karten, die verunreinigt, ölig oder durch andere Flüssigkeiten
nass geworden sind. Fassen Sie die Karten nur mit sauberen, trockenen Händen an.
Versehen Sie die Karten nicht mit Klebefilm oder Klebstoff.
3. Bewahren Sie die Karten nicht in der Nähe von Geräten auf, die Magnetfelder erzeugen (z.B. Mobiltelefone, Lautsprecher, Fernsehgeräte).
4. Bewahren Sie Karten nicht an Orten auf, die direktem Sonnenlicht ausgesetzt sind
oder an denen hohe Temperaturen entstehen können (z.B. auf dem Armaturenbrett
eines Fahrzeugs). Dies kann zu Verbiegungen der Karten oder zum Verlust der darauf gespeicherten Daten führen.
5. Verwenden Sie keine verbogenen Karten. Solche Karten könnten sich im Gerät verklemmen.
6. Stecken Sie die Karten nur in der angegebenen Richtung in das Gerät ein.
7. Stecken Sie niemals andere Gegenstände als geeignete Karten in das Gerät ein.
— 21 —
8. Behindern Sie nicht den Einführungs- oder Ausgabeweg der Karten.
9. Unterbrechen Sie während der Verarbeitung einer Karte nicht die Stromversorgung.
10. Bei Fehlern des Lese-Schreib-Geräts (abnormale Geräusche oder Gerüche, Rauch,
Feuer) sofort das Lese-Schreib-Gerät ausschalten und den Netzstecker ziehen.
11. Ziehen Sie zum Lösen des Netzsteckers aus der Steckdose niemals am Kabel, sondern direkt am Stecker. Ein Ziehen am Kabel kann zu Beschädigungen des Kabels
führen.
12. Ziehen Sie stets den Netzstecker aus der Steckdose, wenn das Gerät längere Zeit
nicht verwendet wird.
13. Verwenden Sie das Lese-Schreib-Gerät nicht in Umgebungen, in denen
Kondenswasserbildung aufgetreten ist.
14. Um zu gewährleisten, dass das Lese-Schreib-Gerät zuverlässig arbeitet, sollte es
täglich bzw. bei Aufleuchten des Reinigungslämpchens gereinigt werden.
15. Vermeiden Sie den Kontakt mit der optionalen Reinigungsflüssigkeit. Bei Augenkontakt
oder Verschlucken begeben Sie sich sofort in medizinische Behandlung.
16. Niemals das Lese-Schreib-Gerät zerlegen oder modifizieren.
17. Setzen Sie Karten nicht über längere Zeit hinweg hellem Sonnen- oder
Leuchtstoffröhrenlicht aus.
18. Wenn Sie eine Karte mehrmals bedrucken möchten, müssen mindestens drei Minuten zwischen den einzelnen Druckvorgängen liegen.
Beim Bedrucken verschiedener Karten ist keine Wartezeit zwischen den einzelnen
Druckvorgängen erforderlich.
19.
Dieses Symbol befindet sich in der Nähe des Thermal-Druckkopfes und
Löschkopfes.
Berühren Sie nie den Thermal-Druckkopf oder Löschkopf sofort nach der Verwendung des Druckers.
Lassen Sie den Thermal-Druckkopf und den Löschkopf vor dem Berühren einige Minuten lang abkühlen.
20.
Dieses Symbol befindet sich in der Nähe des Thermal-Druckkopfes und
Löschkopfes.
Berühren Sie den Thermal-Druckkopf oder Löschkopf niemals direkt, um Schäden an diesen gegen Elektrostatik empfindlichen Teilen zu vermeiden.
21. Achten Sie darauf, keine Büroklammern oder andere Fremdkörper in den Drucker
fallenzulassen, da diese Betriebsstörungen oder Schäden am Lese-Schreib-Gerät
hervorrufen können.
22. Öffnen Sie nicht die Abdeckung während des Betriebs.
23. Verwenden Sie das Lese-Schreib-Gerät nicht an Orten, an denen Siliziumgas vorhanden ist, da das Lese-Schreib-Gerät mit einem Gleichstrommotor bzw. Schaltern
ausgestattet ist, die mit elektrischen Kontakten arbeiten.
— 22 —
2. Auspacken
Nachstehend finden Sie eine Übersicht über den Lieferumfang des Lese-Schreib-Geräts
und des Zubehörs.
1
1. Lese-Schreib-Gerät
2. Netzkabel
3. Reinigungskarten
(2 Stück)
2
4. Ferritkern
6
5. Benutzerhandbuch
6. Karte zur Font-Einstellung
3
5
4
Hinweis: Ob Ferritkern und Font-Einstellkarte vorhanden sind, ist abhängig vom Modell des LeseSchreib-Geräts.
3. Äußere Merkmale und Bezeichnungen der Teil
2 3 4
5
7
1
6
1. Netzschalter ................................ Hiermit schalten Sie den Netzstrom ein und aus.
2. Netzkontrollleuchte ...................... Zeigt an, dass das Lese-Schreib-Gerät eingeschaltet ist.
3. Statusanzeige .............................. Zeigt an, dass das Gerät druckbereit ist, momentan druckt und/oder dass Fehler vorliegen.
4. Reinigungslämpchen ................... Zeigt an, dass das Lese-Schreib-Gerät gereinigt
werden muss.
5. Schnittstellen-Steckverbindung ... Ermöglicht eine Kabelverbindung zu einem HostComputer.
6. Netzanschlussbuchse .................. Dient zum Anschluss des mitgelieferten Netzkabels.
7. Reinigungstaste ........................... Zum Reinigen des Geräts halten Sie die Reinigungstaste während des Einschaltens gedrückt.
Stecken Sie zum Reinigen eine mit Alkohol getränkte Reinigungskarte in das Gerät ein.
— 23 —
4. Anschluss externer Geräte
Verbinden Sie entweder das RS-232C-Schnittstellenkabel oder das USB-Schnittstellenkabel mit dem Lese-Schreib-Gerät.
4-1 Anschließen des RS-232C-Schnittstellenkabels
1. Trennen Sie die Stromversorgung des Host-Computers und des Lese-Schreib-Geräts.
2. Schließen Sie das eine Ende des Schnittstellenkabels an das Lese-Schreib-Gerät
und das andere Ende an den Host-Computer an.
3. Befestigen Sie den mitgelieferten Ferritkern am Schnittstellenkabel.
4. Ziehen Sie die Schrauben an beiden Seiten des Steckers fest.
4-2 Anschließen des USB-Schnittstellenkabels
1. Bringen Sie den Ferritkern am USB-Kabel an, wie in der Abbildung unten gezeigt und
stellen Sie sicher, das Kabel durch die Kabelhalterung zu führen, wie in der Abbildung
gezeigt.
2. Stecken Sie das Ende des USB-Kabels in den USB-Anschluss am Lese-/Schreibgerät.
3. Stecken Sie das andere Ende des USB-Kabels in den USB-Anschluss am Host-Computer.
4. Sofern für das Lese-Schreib-Gerät ein Treiber benötigt wird, installieren Sie den Treiber mithilfe des vom Händler bereitgestellten Speichermediums.
— 24 —
5. Anschließen des Netzkabels
1. Bringen Sie den Netzschalter in die „Aus“-Position.
2. Verbinden Sie das Netzkabel mit der Anschlussbuchse auf der Rückseite des LeseSchreib-Geräts.
3. Stecken Sie den Netzstecker in eine korrekt geerdete Wechselstrom-Steckdose.
Verbinden Sie den Erdungsanschluss mit einem Metallteil (z.B. einer Steckdose mit
Erdungspunkt) an einer Erdung in der näheren Umgebung, um den sicheren Betrieb
des Lese-Schreib-Geräts zu gewährleisten.
Achtung: Es wird empfohlen, den Netzstecker des Lese-Schreib-Geräts auszustecken, wenn es über einen längeren Zeitraum nicht verwendet werden soll. Aus diesem Grund sollten Sie das Lese-Schreib-Gerät in der
Nähe einer Steckdose aufstellen, damit diese leicht zugänglich ist.
— 25 —
6. Font-Einstellung mit der Font-Einstellkarte
Modellen für den Markt in Europa, USA und Korea liegt eine Karte zur Einstellung der
Standard-Fonts für das betreffende Land bei. Bevor Sie das Lese-Schreib-Gerät verwenden, stellen Sie die Fonts entsprechend der nachfolgenden Anleitung ein.
<Vorgehensweise zur Font-Einstellung >
1. Halten Sie während des Einschaltens die Reinigungstaste gedrückt.
2. Der Summer ertönt und die grüne Statusanzeige blinkt. Dadurch wird angezeigt, dass
das Lese-Schreib-Gerät sich in der “Betriebsart zur Verwendung der Einstellkarte”
befindet.
3. Führen Sie die Font-Einstellkarte ein. Die Informationen zur Font-Einstellung werden
automatisch vom Magnetstreifen gelesen. Diese neuen Font-Einstelldaten werden
automatisch in den internen Speicher geschrieben.
4. Nachdem die neuen Einstellungen erfolgreich beendet wurden, wird die Meldung
“COMPLETE!” gedruckt und die Karte ausgegeben. Das Lese-Schreib-Gerät kehrt
anschließend in die normale Betriebsart zurück.
Statusanzeige
Karte zur Font-Einstellung
Reinigungstaste
7. Reinigungskarten
Reinigungskarten dienen zum Reinigen der Transportwalzen im Gerät. Zwei Reinigungskarten liegen jedem Gerät bei. Sie sind in einer Kunststoffhülle verpackt.
22,0
54,0
7-1 Außenansicht
Filzoberfläche
Filzoberfläche
85,6
89,6
— 26 —
7-2 Häufigkeit der Benutzung
1. Täglich oder nach jeweils 300 Druckvorgängen.
2. Reinigen Sie das Lese-Schreib-Gerät, wenn häufig Fehler auftreten oder wenn Druckprobleme vorliegen.
3. Nach 300 Druckvorgängen leuchtet automatisch das Reinigungslämpchen auf. Reinigen Sie das Lese-Schreib-Gerät, wenn das Licht blinkt.
7-3 Vorgehensweise
So reinigen Sie das Lese-Schreib-Gerät:
1. Drücken Sie die Reinigungstaste.
2. Tränken Sie die Filzoberflächen (beide Seiten) einer der Reinigungskarten mit der
optionalen Reinigungsflüssigkeit.
3. Stecken Sie die Reinigungskarte in den normalen Karteneinschubschlitz.
4. Lassen Sie die Reinigungsflüssigkeit ca. 1 Minute lang trocknen, bevor Sie das Gerät
wieder in Betrieb nehmen.
Hinweis: 1. Verwenden Sie keine verbogenen Reinigungskarten. Solche Karten könnten sich im Gerät verklemmen.
2. Das Gerät wird ohne Reinigungsflüssigkeit ausgeliefert. Daher müssen
Sie optionale Reinigungsflüssigkeit oder im Handel erhältliches Ethanol
(mind. 85% Reinheit) besorgen.
Die optionale Reinigungsflüssigkeit erhalten Sie bei Ihrem Händler.
3. Die beiliegende Reinigungskarte erhält ihre Reinigungskraft, indem sie
vor der Verwendung mit einer Reinigungsflüssigkeit getränkt wird. Stellen Sie sicher, dass sie vor dem Reinigungsvorgang mit einer Reinigungsflüssigkeit getränkt wurde.
4. Stellen Sie sicher, dass Sie Ethanol mit einer Reinheit von mindestens
85% verwenden. Bei Verwendung von Ethanol mit niedrigerer Reinheit benötigt die Reinigungskarte länger, um zu trocknen. Wird eine nicht vollständig getrocknete Reinigungskarte in den Steckplatz eingesetzt, kann
es zu Fehlfunktionen kommen, wie z.B. Rutschen der Karte.
5. Eine Reinigungskarte kann ca. 30-mal verwendet werden. Wenn die Karte
beschädigt oder stark verunreinigt ist, wenden Sie sich an Ihren Händler.
Reinigungstaste
— 27 —
8. Fehlerbehebung
8-1. Probleme beim Einschalten
Symptom
Mögliche Ursache
Netzkontrollleuchte Karten werden Netzkabel ist nicht
leuchtet nicht.
nicht
richtig eingesteckt.
angenommen. Leitungsunterbrechung im Netzkabel.
Sicherung durchgebrannt.
Karten werden Kontrollleuchte ist defekt.
angenommen.
Netzkontrollleuchte Karten werden
Fehler des Lese-Schreibleuchtet.
nicht angenommen. Geräts.
Karten werden Fehlerhafte Karte
angenommen, Karte beschädigt, verbogen,
doch das Lese- Daten der Karte gelöscht,
Schreib-Gerät oder andere Benutzerkarte.
funktioniert nicht Kopf ist verunreinigt.
korrekt.
Beschriftungssystem
funktioniert nicht ordnungsgemäß.
Korrekturmaßnahme
Netzkabel richtig
einstecken.
An den Händler wenden.
Eine normale Karte
verwenden.
Mit Reinigungskarte reinigen.
An den Händler wenden.
Fehler des Lese-Schreib-Geräts.
8-2. Probleme bei der Nutzung des Geräts
Symptom
Karten werden nicht
ausgegeben.
Lese-/Schreibfehler
Mögliche Ursache
Karte ist verklemmt.
Korrekturmaßnahme
Lese-Schreib-Gerät erneut ein
schalten.
Wird die Karte noch immer nicht
ausgegeben, Gerät ausschalten
und obere Abdeckung öffnen.
Dann den Verriegelungshebel
ziehen, um den oberen Teil des
Mechanismus anzuheben.
Karte entnehmen.
Falsche Karte.
Empfohlene Karte verwenden.
Verwendung eines anderen Kartentyps. Richtige Karte verwenden.
Kartendaten wurden durch Magneten gelöscht.
Karte ist verbogen.
Neue Karte erstellen.
Karte ist beschädigt.
Kopf ist verunreinigt.
Mit Reinigungskarte reinigen.
— 28 —
8-3. Entfernen von verklemmten Karten
1. Schalten Sie das Gerät aus und ziehen Sie den Netzstecker.
2. Drücken Sie die Abdeckungsöffnertaste.
3. Klappen Sie die Abdeckung nach oben.
Obere
Abdeckung
Abdeckungsöffnertaste
4. Ziehen Sie an dem Verriegelungshebel (grün) und heben Sie dabei den Mechanismus an.
Verriegelungshebel
5. Entnehmen Sie die Karte bei geöffneter Abdeckung.
Hinweis: Berühren Sie niemals den Thermokopf oder den Löschkopf. Dies kann zu
Verbrennungen führen.
Thermokopf
Löschkopf
6. Bringen Sie den Mechanismus wieder in seine ursprüngliche Position.
7. Schließen Sie die obere Abdeckung.
— 29 —
SOMMARIO
Precauzioni per l’utilizzo sicuro ...............................................
Apertura della confezione .......................................................
Aspetto esterno e nomi dei componenti .................................
Connessione a dispositivi esterni ...........................................
Collegamento del cavo di alimentazione .................................
Impostazione dei caratteri mediante la scheda di
impostazione caratteri .............................................................
7. Schede per pulizia ..................................................................
8. Risoluzione dei problemi .........................................................
Appendice ......................................................................................
31
33
33
34
35
36
36
38
81
L’Appendice appare solo nella sezione in inglese di questo manuale.
Il presente Manuale dell’utente contiene informazioni importanti che consentono di utilizzare in sicurezza il dispositivo di lettura/scrittura.
Leggere attentamente questo manuale prima di utilizzare il dispositivo di
lettura/scrittura e osservare le descrizioni fornite.
CE
Dichiarazione di conformità del fabbricante
Direttiva del Consiglio CE 89/336/EEC del 3 maggio 1989
Questo prodotto è stato progettato e fabbricato secondo gli Standard Internazionali
EN 61000-6-3 / 2001 ed EN 55024 / 1998, seguendo quanto previsto dalla Direttiva sulla
Compatibilità Elettromagnetica della Comunità Europea del maggio 1989.
Direttiva del Consiglio CE 73/23/CEE e 93/68/EEC del 22 luglio 1993
Questo prodotto è stato progettato e fabbricato secondo gli Standard Internazionali EN 609501, seguendo quanto previsto dalla Direttiva sulla Bassa Tensione della Comunità Europea del
2001.
La dichiarazione di cui sopra si applica solo i prodotti in vendita nell’ UE.
Dichiarazione WEEE
Nell unione europea, la presente etichetta indica che il prodotto non deve essere
gettato nei rifiuti, bensi’ riciclato attarverso gli appositi contenitori secondo la legislazione sotto la Direttiva WEEE (Direttiva 2002/96/EC).
ITALIANO
1.
2.
3.
4.
5.
6.
1. Precauzioni per l’utilizzo sicuro
Tenere sempre presente le indicazioni seguenti.
Leggere attentamente e seguire le indicazioni fornite di seguito per evitare danni alle
persone o alle cose.
1-1. Precauzioni per l’installazione del dispositivo di lettura/scrittura
1. Collocare il dispositivo di lettura/scrittura in un luogo solido e piano.
2. Non utilizzare il dispositivo in aree esposte alla luce solare diretta o vicino a fonti di
calore.
3. Non collocare il dispositivo in aree ad elevata umidità.
Non tenere né utilizzare liquidi in prossimità del dispositivo.
4. Non collocare il dispositivo in aree polverose o in cui sono presenti particelle sospese
nell’atmosfera.
5. Non utilizzare il dispositivo in aree di emissione di gas corrosivi, infiammabili, di prodotti chimici o vapori.
6. Non utilizzare il dispositivo in prossimità di apparecchiature che possono produrre
campi magnetici o interferenze.
7. Non collegare il dispositivo a un circuito a cui sono connesse apparecchiature che
generano disturbi elettrici.
8. Collegare un cavo di terra per utilizzare in sicurezza il dispositivo.
9. Per una ventilazione ottimale, lasciare un ampio spazio attorno al dispositivo.
1-2. Precauzioni per l’utilizzo del dispositivo di lettura/scrittura
1. Utilizzare esclusivamente schede consigliate da Star.
2. Non utilizzare schede sporche, umide o contenenti tracce di olio. Non toccare le schede
con le mani sporche. Non applicare nastri adesivi o colla alle schede.
3. Non tenere le schede in prossimità di apparecchiature che generano campi magnetici (ad esempio, telefoni cellulari, altoparlanti, televisori, ecc.).
4. Non tenere le schede in aree esposte alla luce solare diretta o in zone in cui si possono raggiungere elevate temperature (ad esempio, i cruscotti delle auto), poiché le
alte temperature possono provocare la piegatura delle schede o cancellare le informazioni in esse registrate.
5. Non utilizzare carte piegate, poiché potrebbero provocare inceppamenti nel dispositivo di lettura/scrittura.
6. Inserire le schede nella direzione indicata.
7. Non inserire nel dispositivo di lettura/scrittura oggetti diversi dalle apposite schede.
— 31 —
8. Non ostruire il percorso di inserimento o espulsione delle schede.
9. Non interrompere l’alimentazione durante l’elaborazione delle schede.
10. In caso di anomalia del dispositivo di lettura/scrittura (rumori, odori anomali, fumo,
fuoco) spegnere subito il dispositivo e scollegarlo dalla presa di alimentazione.
11. Staccare il cavo di alimentazione tenendo la spina con la mano e mai tirando il cavo,
poiché quest’ultimo potrebbe danneggiarsi.
12. Se il dispositivo non viene utilizzato per un lungo periodo di tempo, staccare sempre
la spina dalla presa di alimentazione.
13. Non utilizzare il dispositivo di lettura/scrittura in un ambiente soggetto a condensa.
14. Per assicurare l’affidabilità del dispositivo, pulirlo tutti i giorni o in caso di accensione
dell’apposita spia di pulizia.
15. Evitare il contatto con il liquido detergente opzionale. Se viene a contatto con gli
occhi, o in caso di ingestione, consultare subito un medico.
16. Non disassemblare né modificare il dispositivo di lettura/scrittura.
17. Non esporre le schede alla luce solare diretta o alla luce fluorescente per lunghi
periodi di tempo.
18. Se occorre ristampare la stessa scheda, aspettare almeno tre minuti prima della ristampa.
Se si stampa ripetutamente su schede diverse, non è necessario attendere.
19.
Questo simbolo è collocato accanto alla testina termica e alla testina di cancellazione.
Non toccare mai la testina termica o la testina di cancellazione immediatamente
dopo l’uso della stampante.
Attendere alcuni minuti per consentire il raffreddamento della testina termica o
della testina di cancellazione prima di toccarle.
20.
Questo simbolo è collocato accanto alla testina termica o alla testina di cancellazione.
Non toccare mai direttamente la testina termica o la testina di cancellazione per
evitare di danneggiare tali dispositivi, sensibili all’energia elettrostatica.
21. Fare attenzione a non lasciar cadere graffette, spilli e altri oggetti estranei nel dispositivo di lettura/scrittura perché potrebbero causare problemi di funzionamento.
22. Non aprire il coperchio durante il funzionamento.
23. Non utilizzare il dispositivo di lettura/scrittura in aree con presenza di gas di silicio, in
quanto il dispositivo è dotato di motore CC o interruttori che utilizzano contatti elettrici.
— 32 —
2. Apertura della confezione
Di seguito vengono presentati il dispositivo di lettura/scrittura e gli accessori.
1
1. Dispositivo di lettura/scrittura
2. Cavo di alimentazione
3. Schede per la pulizia
(2 schede)
4. Nucleo di ferrite
2
5. Il presente manuale
6
6. Scheda impostazione
caratteri
3
Nota: la presenza di nucleo di ferrite e scheda di
impostazione dei caratteri dipende dal modello del
dispositivo di lettura/scrittura.
5
4
3. Aspetto esterno e nomi dei componenti
2 3 4
5
7
1
6
1. Interruttore di alimentazione ........ Consente di accendere e spegnere il dispositivo di
lettura/scrittura.
2. Spia di alimentazione .................. Indica che il dispositivo è acceso.
3. Spia di stato ................................. Indica che la stampante è pronta, in fase di stampa
e la presenza di errori.
4. Spia di pulizia .............................. Indica che è necessario pulire il dispositivo.
5. Connettore interfaccia ................. Collega al computer host tramite cavo.
6. Ingresso CA ................................. Collega al cavo di alimentazione in dotazione.
7. Interruttore di pulizia .................... Premere l’interruttore di pulizia durante l’accensione.
Inserire una scheda per pulizia imbevuta d’alcol per
pulire il dispositivo.
— 33 —
4. Connessione a dispositivi esterni
Collegare il cavo di interfaccia RS-232C o USB al dispositivo di lettura/scrittura.
4-1 Montaggio del cavo di interfaccia RS-232C
1. Disattivare l’alimentazione del computer host e del dispositivo di lettura/scrittura.
2. Collegare un’estremità del cavo di interfaccia al dispositivo di lettura/scrittura e l’altra
al computer host.
3. Montare il nucleo di ferrite al cavo di interfaccia.
4. Serrare le viti a destra e sinistra sul connettore.
4-2 Montaggio del cavo di interfaccia USB
1. Applicare l’anima di ferrite al cavo USB come illustrato, accertandosi di far passare il
cavo attraverso il supporto come indicato nell’illustrazione.
2. Collegare l’estremità del cavo USB alla porta USB del lettore/scrittore.
3. Collegare l’altra estremità del cavo USB alla porta USB del computer host.
4. Se viene richiesto un driver per il dispositivo di lettura/scrittura, utilizzare il supporto
fornito dall’agente per installare il driver.
— 34 —
5. Collegamento del cavo di alimentazione
1. Posizionare l’interruttore di alimentazione su Off.
2. Collegare il cavo di alimentazione all’ingresso CA nel retro del dispositivo di lettura/
scrittura.
3. Inserire la spina del cavo di alimentazione in una presa CA collegata a terra.
Collegare il terminale di messa a terra a una parte metallica (ad esempio una presa
con punto di messa a terra) in un punto di messa a terra in prossimità per utilizzare in
sicurezza il dispositivo.
Attenzione: Si consiglia di scollegare il dispositivo dalla presa di alimentazione
se non viene utilizzato per un lungo periodo di tempo. Posizionare,
per questo motivo, il dispositivo di lettura/scrittura in prossimità di
una presa CA di facile accesso.
— 35 —
6. Impostazione dei caratteri mediante la scheda di
impostazione caratteri
I modelli per l’Europa, gli USA e la Corea sono forniti di una scheda di impostazione
caratteri per la relativa area geografica. Prima di utilizzare il dispositivo di lettura/scrittura,
impostare i caratteri in base alle istruzioni seguenti.
<Procedure per impostare i caratteri>
1. Accendere il dispositivo premendo contemporaneamente l’interruttore di pulizia.
2. Il cicalino emette un suono e la spia di stato verde lampeggia per indicare che il
dispositivo di lettura/scrittura è entrato nella “modalità di configurazione per l’utilizzo
della scheda di impostazione”.
3. Inserire la scheda di impostazione caratteri. Le informazioni sull’impostazione caratteri vengono lette automaticamente dalla striscia magnetica. Le nuove informazioni
vengono scritte nella memoria interna.
4. Al termine dell’impostazione, viene stampato il messaggio “COMPLETE!” e la scheda
viene espulsa. Il dispositivo di lettura/scrittura torna allo stato operativo normale.
Spia di stato
Scheda impostazione caratteri
Interruttore di pulizia
7. Schede per pulizia
La scheda per pulizia viene utilizzata per pulire i rulli di trasporto all’interno dell’unità.
Ciascuna unità è dotata di due schede per pulizia avvolte in un rivestimento di plastica.
22,0
54,0
7-1 Aspetto esterno
Superficie feltrata
Superficie feltrata
85,6
89,6
— 36 —
7-2 Frequenza di utilizzo
1. Tutti i giorni o una volta ogni 300 stampe.
2. Se si verificano spesso errori, oppure problemi di stampa, pulire il dispositivo di lettura/scrittura.
3. Il LED di pulizia lampeggia dopo l’esecuzione di 300 stampe. Pulire il dispositivo
quando la spia lampeggia.
7-3 Modalità di utilizzo
Seguire le procedure indicate per pulire il dispositivo di lettura/scrittura.
1. Premere l’interruttore di pulizia.
2. Inumidire le superfici feltrate (entrambi i lati) di una scheda per pulizia con il liquido
detergente opzionale.
3. Inserire la scheda per pulizia nella normale fessura di inserimento schede.
4. Attendere almeno un minuto prima di riutilizzare il dispositivo di lettura/scrittura, per
consentirne l’asciugatura.
Nota: 1. Non utilizzare schede per pulizia piegate. L’utilizzo di schede piegate può
provocare inceppamenti.
2. Con l’unità non viene fornito il liquido detergente. Sarà quindi necessario
richiedere il liquido detergente opzionale o acquistare dell’etanolo disponibile in commercio (purezza minima 85%).
Per richiedere il liquido detergente opzionale, rivolgersi all’agente di vendita.
3. Per ottenere la maggiore efficacia della scheda per pulizia inclusa, inumidirla
con il liquido detergente prima dell’uso. Assicurarsi che sia stato assorbito il
liquido detergente prima di utilizzarla per la pulizia.
4. Verificare di utilizzare etanolo con purezza minima dell’85%. Se si utilizza
etanolo con percentuale di purezza inferiore, la scheda per pulizia impiegherà un tempo maggiore prima di asciugare. Se si inserisce una scheda per
pulizia umida nello slot, si potrebbe ottenere un errato funzionamento, come
ad esempio lo slittamento della scheda.
5. È possibile riutilizzare le schede per pulizia per circa 30 volte. Rivolgersi all’agente di vendita se risultano danneggiate o eccessivamente sporche.
Interruttore di pulizia
— 37 —
8. Risoluzione dei problemi
8-1. Problemi all’accensione
Sintomo
La spia di
alimentazione non
si accende.
La spia di
alimentazione si
accende.
Causa possibile
Non vengono Il cavo di alimentazione non
accettate
è collegato correttamente.
schede.
Filo rotto nel cavo di alimentazione.
Filo rotto nel fusibile.
Vengono accettate Il LED è bruciato.
le schede.
Non vengono
Errore del dispositivo
accettate schede. di lettura/scrittura.
Le schede
Scheda errata
vengono
Scheda danneggiata, piegata,
accettate ma il dati cancellati sulla scheda,
dispositivo di o altra scheda utente.
lettura/scrittura La testina è sporca.
non funziona Il sistema di composizione
correttamente. non funziona normalmente.
Soluzione
Collegare il cavo di
alimentazione.
Rivolgersi al fornitore.
Utilizzare una scheda
normale.
Pulire con una scheda per la pulizia.
Rivolgersi al fornitore.
Errore del dispositivo di lettura/scrittura.
8-2. Problemi durante il funzionamento
Sintomo
Le schede non vengono
espulse.
Si verificano errori di
lettura/scrittura
Causa possibile
Soluzione
Inceppamento della scheda. Riaccendere il dispositivo di
lettura/scrittura.
Se le schede non vengono
espulse, spegnere e aprire il
coperchio superiore.
Quindi, tirare la leva di blocco
per sollevare la parte superiore
del meccanismo e rimuovere
la scheda.
Scheda non appropriata.
Utilizzare le schede consigliate.
Impiego di un altro tipo di scheda. Utilizzare la scheda corretta.
Dati scheda cancellati da un magnete.
Scheda piegata.
Emettere una nuova scheda.
Scheda danneggiata.
Testina sporca.
Pulire con una scheda per la pulizia.
— 38 —
8-3. Rimozione delle schede inceppate
1. Spegnere il dispositivo di lettura/scrittura e scollegare il cavo di alimentazione.
2. Premere il dispositivo di apertura coperchio.
3. Tenere aperto il coperchio superiore.
Coperchio
superiore
Dispositivo di
apertura coperchio
4. Mentre si tira la leva di blocco del meccanismo (verde), sollevare il meccanismo.
Leva di blocco
5. Rimuovere la scheda mentre il coperchio è aperto.
Nota: non toccare la testina termica o la testina di cancellazione. Rischio di ustioni.
Testina termica
Testina di cancellazione
6. Ricollocare il meccanismo nella posizione originale.
7. Chiudere il coperchio superiore.
— 39 —
CONTENIDO
Precauciones de uso .............................................................. 41
Desembalaje ........................................................................... 43
Aspecto exterior y nombres de las piezas .............................. 43
Conexión a un dispositivo externo .......................................... 44
Conexión del cable de alimentación ....................................... 45
Configuración de las fuentes con la tarjeta de configuración
de fuentes ............................................................................... 46
7. Tarjetas limpiadoras ................................................................ 46
8. Solución de problemas ........................................................... 48
Apéndice ........................................................................................ 81
1.
2.
3.
4.
5.
6.
Este manual del usuario contiene información importante que le permitirá
utilizar la impresora/lectora con seguridad.
Léalo con atención antes de utilizar la impresora/lectora y siga las instrucciones.
CE
Declaración de conformidad del fabricante
Directiva 89/336/CEE del consejo del 3 de mayo de 1989
Este producto ha sido diseñado y fabricado en conformidad con la norma internacional
EN 61000-6-3/2001 y EN 55024/1998, con arreglo a las disposiciones de la Directiva de
Compatibilidad Electromagnética de la Comunidad Europea con fecha de mayo de 1989.
Directivas 73/23/CEE y 93/68/CEE del consejo del 22 de julio de 1993
Este producto ha sido diseñado y fabricado en conformidad con la norma internacional
EN 60950-1, con arreglo a las disposiciones de la Directiva de Baja Tensión de la Comunidad
Europea a partir de 2001.
Esta declaración se aplica únicamente a las impresoras comercializadas en la UE.
WEEE Declaración
En la Unión Europea, la presente etiqueta indica que el presente producto no tiene
que tirarse a la basura. Se tiene que depositar en un contenedor adecuado para facilitar la recuperación y el reciclaje del mismo, según la legislación en WEEE Directive
(Directive 2002/96/CE)
SPANISH
El apéndice no se ha traducido al español.
1. Precauciones de uso
Cumpla siempre estas recomendaciones.
Lea atentamente y cumpla las siguientes recomendaciones. Evitará posibles lesiones a otras personas o a usted mismo, así como daños a materiales.
1-1. Precauciones para la instalación de la impresora/lectora
1. Coloque la impresora/lectora en un lugar estable y nivelado.
2. No utilice ni coloque la impresora/lectora en zonas expuestas a la luz solar directa, ni
cerca de fuentes de calor.
3. Evite utilizar o almacenar la impresora/lectora en zonas con gran humedad.
No utilice ni almacene líquidos cerca de la impresora/lectora.
4. Evite utilizar o almacenar la impresora/lectora en lugares donde haya polvo u otras
partículas en suspensión.
5. Evite utilizar la impresora/lectora en lugares donde se emitan gases corrosivos, gases combustibles, productos químicos o vapores.
6. No utilice la impresora/lectora cerca de dispositivos que puedan generar campos
magnéticos o interferencias.
7. No conecte el aparato a circuitos a los que se hayan conectado dispositivos eléctricos que generen ruido eléctrico.
8. Por seguridad, conecte el dispositivo a una toma de tierra.
9. Deje suficiente espacio alrededor de la impresora/lectora para su ventilación.
1-2. Precauciones para el uso de la impresora/lectora
1. Utilice únicamente las tarjetas recomendadas por Star.
2. No utilice tarjetas sucias, aceitosas ni húmedas en general, ni las toque con las manos sucias o húmedas. No pegue las tarjetas con pegamento ni con cinta adhesiva.
3. No deje las tarjetas cerca de dispositivos que generen campos magnéticos (como
teléfonos móviles, altavoces, televisores, etc.).
4. No coloque las tarjetas en zonas expuestas a la luz solar directa o altas temperaturas
(como el salpicadero de un coche), ya que pueden doblarse o perder la información
registrada en ellas.
5. No utilice tarjetas dobladas: se atascan en la impresora/lectora.
6. Introduzca las tarjetas en la dirección indicada.
7. No introduzca nunca en la impresora/lectora ningún otro objeto que no sean las tarjetas adecuadas.
— 41 —
8. No obstruya el conducto de entrada ni de salida de las tarjetas.
9. No corte el suministro eléctrico si hay una tarjeta en proceso.
10. En caso de error (sonidos u olores anormales, humo, fuego, etc.), apague la impresora/lectora inmediatamente y desconéctela de la toma de corriente.
11. Para la conexión o desconexión de la toma de corriente, sujete siempre el enchufe,
no el cable: de lo contrario, podría dañarlo.
12. Siempre que no vaya a usar el aparato durante un periodo prolongado, desconecte el
enchufe de la toma de corriente.
13. No utilice la impresora/lectora en lugares donde se haya producido condensación.
14. Para garantizar la fiabilidad de la impresora/lectora, límpiela a diario o cuando se
encienda la luz Limpieza.
15. Evite el contacto con el líquido limpiador opcional. En caso de ingestión o contacto
con los ojos, acuda a un médico inmediatamente.
16. No desmonte ni modifique la impresora/lectora.
17. No exponga las tarjetas a la luz solar directa ni a luces fluorescentes durante periodos de tiempo prolongados.
18. Si es necesario repetir la impresión de una tarjeta, espere al menos tres minutos
antes de hacerlo.
Esta pausa no es necesaria cuando se imprimen tarjetas diferentes.
19.
Este símbolo está ubicado cerca del cabezal de impresión térmica y del cabezal
de borrado.
No toque nunca el cabezal de impresión térmica ni el cabezal de borrado inmediatamente después de haber utilizado la impresora.
Deje que el cabezal de impresión térmica y el cabezal de borrado se enfríen
durante algunos minutos antes de tocarlos.
20.
Este símbolo está ubicado cerca del cabezal de impresión térmica y del cabezal
de borrado.
No toque nunca directamente el cabezal de impresión térmica ni el cabezal de
borrado para evitar dañar estos dispositivos sensibles a la electrostática.
21. Tenga cuidado de que no se introduzcan clips, chinchetas o cualquier otro material
extraño: podría causar problemas de funcionamiento en la unidad de lectura/escritura.
22. No abra la tapa si la unidad está en funcionamiento.
23. Evite usar la unidad de lectura/escritura en lugares donde haya gas de sílice: la unidad está equipada con interruptores o un motor de CC que emplean contactos eléctricos.
— 42 —
2. Desembalaje
A continuación se detallan la impresora/lectora y sus accesorios:
1
1. Impresora/lectora
2. Cable de alimentación
3. Tarjetas limpiadoras (2)
4. Núcleo de ferrita
2
5. Este manual
6
6. Tarjeta de configuración
de fuentes
Nota: según el modelo, la unidad de lectura/escritura estará provista de un núcleo de ferrita y una tarjeta de tipos de letra.
3
5
4
3. Aspecto exterior y nombres de las piezas
2 3 4
5
7
1
6
1. Interruptor general ....................... Sirve para encender y apagar la impresora/lectora.
2. Luz de encendido ........................ Indica que la impresora/lectora está encendida.
3. Luz de estado .............................. Indica que la impresora está lista, imprimiendo o
que se ha producido un error.
4. Luz de limpieza ........................... Indica que es necesario limpiar la impresora/lectora.
5. Conector de interconexión .......... Permite la conexión a un ordenador mediante un
cable.
6. Entrada de corriente alterna ........ Permite conectar el cable de alimentación.
7. Interruptor de limpieza ................. Pulse el interruptor de limpieza mientras apaga el
aparato.
Introduzca una tarjeta limpiadora empapada en alcohol para limpiar la impresora/lectora.
— 43 —
4. Conexión a un dispositivo externo
Conecte el cable de interconexión RS-232C o el cable de interconexión USB a la impresora/lectora.
4-1 Colocación del cable de interconexión RS-232C
1. Desconecte el ordenador y la impresora/lectora de la corriente.
2. Conecte un extremo del cable de interconexión a la impresora/lectora y el otro al
ordenador.
3. Fije el núcleo de ferrita al cable de interconexión.
4. Apriete los tornillos laterales del conector.
4-2 Colocación del cable de interconexión USB
1. Fije el núcleo de ferrita en el cable USB como se muestra en la ilustración de abajo y
cerciórese de pasar tal cable a través del soporte del cable como se muestra en la
ilustración.
2. Enchufe el extremo del cable USB en el puerto USB del lector/escritor.
3. Enchufe el otro extremo del cable USB en el puerto USB del ordenador principal.
4. Si es necesario un controlador para la impresora/lectora, instálelo utilizando los discos suministrados por su proveedor.
— 44 —
5. Conexión del cable de alimentación
1. Apague el interruptor general.
2. Conecte el cable de alimentación a la entrada de corriente alterna ubicada en la parte
posterior de la impresora/lectora.
3. Enchufe el cable de alimentación a una toma de corriente conectada a tierra correctamente.
Para utilizar la impresora/lectora con seguridad, conecte el borne de tierra a un elemento metálico con conexión a masa (por ejemplo, un enchufe que tenga conexión a
tierra).
Precaución: Le recomendamos desenchufar la impresora/lectora de la toma de
corriente cuando no la vaya a utilizar durante un periodo prolongado. Por este motivo, la impresora debe instalarse en un lugar en el
que la toma de corriente se encuentre cerca y se pueda acceder
fácilmente a ella.
— 45 —
6. Configuración de las fuentes con la tarjeta de
configuración de fuentes
Los modelos destinados a Europa, EE. UU. y Corea disponen de una tarjeta de configuración de fuentes estándar para cada país. Antes de utilizar la impresora/lectora, configure las fuentes siguiendo estas instrucciones.
<Procedimientos para la configuración de las fuentes>
1. Encienda la impresora mientras mantiene pulsado el interruptor de limpieza.
2. Se oirá un pitido y se encenderá la luz de estado verde, indicando que la impresora/
lectora ha pasado al “modo configuración para utilizar la tarjeta de configuración”.
3. Introduzca la tarjeta de configuración de fuentes. La información de configuración de
fuentes se lee automáticamente en la banda magnética. A continuación, esta nueva
información de configuración de fuentes se almacena en la memoria interna.
4. Cuando se hayan establecido correctamente los nuevos parámetros, se imprimirá el
mensaje “COMPLETE!” y se expulsará la tarjeta. La impresora/lectora volverá entonces a su modo normal de funcionamiento.
Luz de estado
Tarjeta de configuración de fuentes
Interruptor de limpieza
7. Tarjetas limpiadoras
Las tarjetas limpiadoras se utilizan para limpiar los rodillos transportadores que se encuentran en el interior de la unidad. Cada unidad viene acompañada de dos tarjetas
limpiadoras. Se encuentran en el envoltorio plástico.
22,0
54,0
7-1 Forma exterior
Superficie de fieltro
Superficie de fieltro
85,6
89,6
— 46 —
7-2 Frecuencia de uso
1. Todos los días o cada 300 impresiones.
2. Limpie la impresora/lectora si se producen errores repetidamente o si surgen problemas de impresión.
3. El testigo de limpieza parpadea cuando se hayan producido 300 impresiones. Limpie
la impresora/lectora cuando esto ocurra.
7-3 Instrucciones de uso
Limpie la impresora/lectora siguiendo estos procedimientos.
1. Pulse el interruptor de limpieza.
2. Empape las superficies de fieltro (ambos lados) de una tarjeta limpiadora con líquido
limpiador opcional.
3. Introduzca la tarjeta limpiadora en la ranura normal para tarjetas.
4. Deje reposar la impresora/lectora durante un minuto aproximadamente antes de volver a utilizarla, para que se seque.
Nota: 1. No utilice tarjetas limpiadoras dobladas: pueden quedarse atascadas en el
interior.
2. No se suministra líquido limpiador con la unidad. Por tanto, deberá obtener el
líquido limpiador opcional o bien un etanol disponible en el comercio (con un
grado mínimo de pureza del 85%). Para solicitar el líquido limpiador opcional,
póngase en contacto con el vendedor.
3. La tarjeta limpiadora que se incluye, para resultar eficaz, debe absorber líquido limpiador antes de usarla. Antes de usarla para limpiar, verifique que haya
absorbido líquido limpiador.
4. Asegúrese de utilizar etano con un grado mínimo de pureza del 85%. Si utiliza un etanol con un grado de pureza inferior, la tarjeta limpiadora tardará más
en secarse. Si introduce en la ranura una tarjeta limpiadora que no esté seca,
puede provocar deficiencias de funcionamiento, por ejemplo el deslizamiento de la misma.
5. Las tarjetas limpiadoras se pueden utilizar aproximadamente 30 veces. Si
están dañadas o muy sucias, póngase en contacto con su proveedor.
Interruptor de limpieza
— 47 —
8. Solución de problemas
8-1. Problemas al encender el aparato
Síntoma
No se enciende la
luz de encendido.
Se enciende la luz
de encendido.
Posible causa
No se
aceptan
las tarjetas.
Se aceptan
las tarjetas.
No se aceptan
las tarjetas.
Se aceptan
las tarjetas,
pero la
impresora/
lectora
funciona
incorrectamente.
Qué hacer
El cable de alimentación Conecte correctamente
está mal conectado.
el cable de alimentación.
Hay un cable roto en el cable de alimentación.
Se ha roto el hilo del fusible.
Contacte con su proveedor.
Testigo fundido.
Error en la impresora/
lectora.
Problema en la tarjeta
Utilice una tarjeta normal.
Tarjeta dañada o doblada,
datos de la tarjeta borrados,
o introducida tarjeta de otro usuario.
Cabezal sucio.
Límpielo con una tarjeta limpiadora.
El sistema de composición
no funciona con normalidad. Contacte con su proveedor.
Error en la impresora/lectora.
8-2. Problemas durante el uso
Síntoma
No se expulsan las tarjetas.
Se producen errores de
lectura o de impresión.
Posible causa
Tarjeta atascada.
Qué hacer
Vuelva a encender la
impresora/lectora.
Si las tarjetas siguen sin ser
expulsadas, apague el aparato
y abra la tapa superior.
A continuación, tire de la
palanca para levantar la parte
superior del mecanismo y
retirar la tarjeta.
Tarjeta inadecuada.
Utilice las tarjetas recomendadas.
Se está utilizando otro tipo de tarjeta. Use la tarjeta adecuada.
Datos de tarjeta borrados por campo magnético.
Tarjeta doblada.
Emita una nueva tarjeta.
Tarjeta dañada.
Cabezal sucio.
Límpielo con una tarjeta limpiadora.
— 48 —
8-3. Cómo retirar tarjetas atascadas
1. Apague la impresora/lectora y desconéctela de la toma de corriente.
2. Pulse la palanca de apertura de la tapa.
3. Con la tapa superior abierta, levante la tapa superior.
Tapa superior
Palanca de
apertura de la tapa
4. Levante el mecanismo mientras tira de la palanca del mecanismo (verde).
Palanca
5. Con la tapa abierta, retire la tarjeta.
Nota: No toque el cabezal térmico ni el de borrado: podría quemarse.
Cabezal térmico
Cabezal de borrado
6. Vuelva a colocar el mecanismo en su posición original.
7. Cierre la tapa superior.
— 49 —
Ⳃᔩ
1. Փ⫼ᯊ⊼ᛣџ乍.............................................................................. 51
2. ᓔㆅẔᶹ.......................................................................................... 53
3. ൟ㒧ᵘ.......................................................................................... 53
4. 䖲㕂䆒.................................................................................. 54
5. 䖲⬉⑤㒓...................................................................................... 55
6. Փ⫼ᄫᑧ䆒㕂व䆒㕂ᄫᑧ.............................................................. 56
7. ⏙⋫व.............................................................................................. 56
8. ᬙ䱰໘⧚.......................................................................................... 58
䰘ᔩ ..................................................................................................... 81
ℸݠ䇈ᯢབԩᅝܼഄՓ⫼䇏ݭᴎDŽ
Փ⫼䇏ݭᴎПࠡˈ䇋Ҩ㒚䯙䇏ℸݠDŽ
Ё᭛
䰘ᔩাߎ⦄ᴀⱘݠ㣅䇁䚼ߚЁDŽ
1. Փ⫼ᯊ⊼ᛣџ乍
㒣ᐌ⊼ᛣҹϟ乍DŽ
Ҩ㒚䯙䇏ҹϟ乍ˈ䙓ܡ䗴៤ӸᆇDŽ
1-1. ᅝ㺙ᯊ⊼ᛣџ乍
1.
ᬒ㕂䇏ݭᴎѢᑇ〇ⱘᎹৄDŽ
2.
䙓ܡ䇏ݭᴎফ䰇✻ ܝᇘ䴴䖥⛁⑤DŽ
3.
䙓ܡ䇏ݭᴎ䖛╂ⱘ⦃๗ϟՓ⫼DŽ䙓ܡ䇏ݭᴎ䴴䖥⎆ԧDŽ
4.
䙓ܡ䇏ݭᴎ਼ೈᏗ⒵♄ᇬ
5.
䙓ܡ䇏ݭᴎ䴴䖥㜤㱔ᗻ⇨ԧǃᯧ➗ᗻ⇨ԧǃ࣪ᄺ⠽ԧㄝDŽ
6.
䙓ܡ䇏ݭᴎ䴴䖥㛑ѻ⫳⺕എᑆᡄⱘ䆒DŽ
7.
䙓ܡ䇏ݭᴎϢ݊ᅗ㛑ѻ⫳⬉ⱘ䆒ᦦѢৠϔᦦᑻDŽ
8.
䇏ݭᴎ䳔㽕䖲ഄ㒓DŽ
9.
䇏ݭᴎⱘ਼ೈᑨ᳝䎇ぎ⇨⌕䗮DŽ
1-2. Փ⫼ᯊ⊼ᛣџ乍
1.
䇋Փ⫼ Star ݀ৌᦤկⱘ䞡ݭवDŽ
2.
ᔧ䞡ݭवᏆ㒣ᓘ㛣ǃᏗ⒵⊍ᓘˈ䇋ϡ㽕ݡՓ⫼DŽˈϡ㽕
䞡ݭव㸼䴶Ϟ䌈Ϟ㛊ᏺ⍖Ϟ㛊∈DŽ
3.
䙓ܡ䞡ݭव䴴䖥㛑ѻ⫳⺕എⱘ䆒DŽབ˖ᴎǃ᪁ᬒ఼ǃ⬉㾚ㄝ䆒DŽ
4.
䙓ܡ䞡ݭवফ䰇✻Ⳉܝᇘ䴴䖥催⏽DŽЎ催⏽Ӯᇍव䗴៤বᔶ
ߴ䰸ᄬټवֵⱘݙᙃDŽ
5.
ϡ㽕Փ⫼Ꮖ㒣বᔶⱘ䞡ݭवˈЎӮ䗴៤वव⦄䈵DŽ
6.
ᣝॄवϞⱘᣛ⼎ᮍᦦܹ䞡ݭवDŽ
7.
䇋࣓ᦦܹϡヺড়㾘Ḑⱘ䞡ݭवDŽ
– 51 –
8.
䙓ܡᬒ㕂⠽ӊѢवⱘ䖯ߎষԡ㕂DŽ
9.
ᴎ఼䖤ᯊˈϡ㽕ߛᮁ⬉⑤DŽ
10. ᔧ䇏ݭᴎথ⫳䫭䇃ᯊˈབথߎϡℷᐌໄ䷇ǃᓖੇǃ⚳ݦㄝˈ䇋偀Ϟ
݇䯁䇏ݭᴎ⬉⑤ᑊᢨᥝ⬉⑤㒓DŽ
11. ᢨᥝ⬉⑤㒓ᯊˈ㽕ᣓԣ⬉⑤㒓ⱘᦦ༈ᴹᢨᥝDŽ
12. བޚ䭓ᯊ䯈ϡӮՓ⫼䇏ݭᴎˈ䇋ᢨᥝ⬉⑤㒓DŽ
13. 䙓ܡ䇏ݭᴎ䴴䖥⿃∈ⱘഄᮍDŽ
14. Ўֱᣕ䇏ݭᴎⱘৃ䴴ᗻˈ᳔ད↣⏙⋫ᠧॄ༈ᔧ⏙⋫♃҂ⴔᯊᠡ
䖯㸠⏙⋫DŽ
15. 䙓ⴐܡ㾺䗝䌁ⱘ⏙⋫ࠖDŽབϡᇣᖗ㾺њ⏙⋫ࠖˈ䇋偀Ϟⳟए⫳DŽ
16. ϡ㽕㞾㸠ᢚ㺙䇏ݭᴎDŽ
17. 䙓ܡ䞡ݭव䭓ᯊ䯈ফ䰇✻Ⳉܝ♃ܝᇘDŽ
18. བৠϔᓴव䳔㽕䞡ˈݭ䇋㟇ᇥㄝᕙϝߚ䩳ᠡ䞡ݭDŽԚབ䞡ݭᰃϔ
ᓴवˈ߭᮴䳔ㄝᕙDŽ
19.
ℸᷛ䆄䌈Ѣᠧॄ༈᪺ݭ༈ᮕDŽ
߮Փ⫼ᅠᠧॄᴎৢˈ䇋࣓㾺ᩌᠧॄ༈᪺ݭ༈DŽ
䇋ㄝᕙᠧॄ༈᪺ݭ༈ˈৢैދᠡৃ㾺ᩌDŽ
20.
ℸᷛ䆄䌈Ѣᠧॄ༈᪺ݭ༈ᮕDŽ
䇋࣓Ⳉ㾺ᩌᠧॄ༈᪺ݭ༈ˈ䰆ℶᇍ䴭⬉䕗ᬣᛳⱘ䆒ⱘ䗴
៤⸈ണDŽ
21. ᇣᖗϡ㽕ᇚ㒌།ǃ䫔݊ᅗᴖ䋼ᥝ㨑ࠄᴀᴎЁˈ৺߭Ӯ䗴៤䇏 / ݭ
༈ᬙ䱰DŽ
22. ᪡ᯊ䇋࣓ᠧᓔⲪDŽ
23. 䇏 / ݭ༈䜡᳝Ⳉ⌕⬉ᴎՓ⫼⬉㾺⚍ⱘᓔ݇DŽ䇋ϡ㽕᳝⸙➗⇨ⱘ
ഄᮍՓ⫼䇏 / ݭ༈DŽ
– 52 –
2. ᓔㆅẔᶹ
ᠧᓔࣙ㺙ㆅˈᇍ✻ϟẔᶹㆅݙ䚼ӊᰃ৺唤ܼDŽ
1.
䇏ݭᴎ
2.
⬉⑤㒓
3.
⏙⋫व ( ϸᓴ )
4.
⺕㢃
5.
᪡ݠ
6.
ᄫᑧ䆒㕂व
⊼˖ᰃ৺᳝⺕㢃ᄫԧ䆒㕂वপ
އѢ䇏 / ݭ༈ൟোDŽ
3. ൟ㒧ᵘ
2 3 4
5
7
1
6
1. ⬉⑤ᓔ݇ ............................. ਃࡼ݇䯁䇏ݭᴎ⬉⑤DŽ
2. ⬉⑤♃ ................................ 㸼⼎䇏ݭᴎⱘ⬉⑤⢊ᗕDŽ
3. ⢊ᗕ♃ ................................. 㸼⼎䇏ݭᴎⱘ⾡⢊ᗕDŽ
4. ⏙⋫♃ ................................ 㸼⼎ᠧॄ༈ᰃ৺䳔㽕⏙⋫DŽ
5. ষ .................................... 䗮䖛䖲㒓䖲ЏᴎDŽ
6. ⬉⑤㒓ᦦᑻ ......................... 䖲⬉⑤㒓DŽ
7. ⏙⋫䬂 ................................. ᣝԣ⏙⋫䬂ᓔᴎˈ✊ৢᦦܹᏆ⍖Ϟ⏙⋫ࠖ
ⱘ⏙⋫वDŽ
– 53 –
4. 䖲㕂䆒
Փ⫼ RS-232C Іষ㒓 USB 㒓䖲䇏ݭᴎDŽ
4-1 Փ⫼ RS-232C Іষ㒓䖲
1.
݇䯁Џᴎ䇏ݭᴎⱘ⬉⑤DŽ
2.
ᦦܹІষ㒓ⱘϔッ㟇䇏ݭᴎˈ㗠Іষ㒓ⱘϔッᦦܹЏᴎDŽ
3.
ᅝ㺙䱣ᴎⱘ⺕㢃Іষ㒓DŽ
4.
䫕㋻ᦦ༈DŽ
4-2 Փ⫼ USB Іষ㒓䖲
1.
བϟ᠔⼎ˈᇚ⺕㢃ᅮ USB 㒓Ϟˈᑊ⹂ᅮབ᠔⼎ᇚ㒓こ䖛㒓
ᬃᶊDŽ
2.
ᇚ USB 㒓ⱘϔッᦦܹ䇏ݭᴎⱘ USB ッষDŽ
3.
ᇚ USB 㒓ⱘϔッᦦܹЏᴎⱘ USB ッষDŽ
4.
ᅝ㺙偅ࡼ
– 54 –
5. 䖲⬉⑤㒓
1.
݇䯁䇏ݭᴎᓔ݇DŽ
2.
ᴎৢᦦϞ⬉⑤㒓DŽ
3.
ᇚ⬉⑤㒓ⱘϔッᦦܹ⬉⑤ᦦᑻDŽ
䄺ਞ ˖ བޚ䭓ᯊ䯈ϡӮՓ⫼䇏ݭᴎˈ䇋ᢨᥝ⬉⑤㒓DŽℸᓎ䆂
䇏ݭᴎ䴴䖥⬉⑤ᦦᑻˈᮍ֓ᢨᦦDŽ
– 55 –
6. Փ⫼ᄫᑧ䆒㕂व䆒㕂ᄫᑧ
བᰃ⌆ǃ㕢ǃ䶽⠜ᴀᴎൟˈ䱣ᴎӮ᳝ϔᓴᷛⱘޚᄫᑧ䆒㕂वDŽ䇋
ḍҹϟℹ偸䖯㸠䆒㕂˖
< 䆒㕂ᄫᑧℹ偸 >
1.
ᣝԣ⏙⋫䬂ᓔᴎDŽ
2.
㳖号఼Ӯડϔໄˈ⢊ᗕ♃Ӯҹ㓓㡆䮾⚕DŽ䖭㸼⼎䇏ݭᴎᏆ䖯ܹ䆒㕂
ᓣDŽ
3.
ᦦܹᄫᑧ䆒㕂वˈ䇏ݭᴎӮ䯙䇏वϞ⺕ᏺⱘ᭄ˈ✊ৢܹݭᴎˈݙ
ᄬټ䆒㕂ؐDŽ
4.
ᔧ䆒㕂ᅠ៤ৢˈ
ĀCOMPLETE!āḋᄫӮᠧॄवϞᑊӮ䗔वˈ✊ৢ
䇏ݭᴎӮ㞾ࡼಲ㟇ℷᐌᓣDŽ
⢊ᗕ♃
ᄫᑧ䆒㕂व
⏙⋫䬂
7. ⏙⋫व
⏙⋫वᰃ⫼Ѣ⏙⋫ᴎݙ㾺व䴶ⱘ⒮䕂DŽ䱣ᴎᏺ᳝ϸᓴवˈᏆᬒᇣ
䗣ᯢ㹟ᄤݙDŽ
22.0
54.0
7-1 ൟ
↯↵䴶
↯↵䴶
85.6
89.6
– 56 –
7-2 Փ⫼乥⥛
1.
↣᮹↣ᠧॄ 300 DŽ
2.
བᵰ䫭䇃ϡ⦄ߎذᠧॄߎ⦄䯂乬ˈᇱ䆩⏙⋫䇏ݭᴎDŽ
3.
ᠧॄ 300 ৢˈ⏙⋫♃Ӯ䮾⚕DŽℸᯊ䳔㽕⏙⋫䇏ݭᴎDŽ
7-3 བԩՓ⫼
ḍҹϟℹ偸⏙⋫䇏ݭᴎ˖
1.
ᣝϟ⏙⋫䬂DŽ
2.
⏙⋫वⱘ↯↵䴶˄ϸ䴶˅⍖Ϟ䗝䌁ⱘ⏙⋫ࠖDŽ
3.
ᦦܹ⏙⋫वDŽ
4.
བ䳔㽕䖲㓁Փ⫼ˈ䇋ㄝᕙ㑺ϔߚ䩳ˈ䅽⏙⋫ࠖव䴶ᑆ䗣DŽ
⊼ᛣ˖ 1. ϡ㽕Փ⫼Ꮖবᔶⱘ⏙⋫वDŽՓ⫼Ꮖবᔶⱘ⏙⋫वӮ䗴៤ववDŽ
2. ᴀᴎϡ䰘ᏺ⏙⋫ࠖDŽℸˈᖙ乏᳝䗝䌁ⱘ⏙⋫ࠖᏖଂ䜦㊒
( 㒃ᑺ 85% ҹϞ )DŽ㢹㽕ᕫࠄ䗝䌁ⱘ⏙⋫ࠖˈ䇋㘨㋏䫔ଂҷ⧚ଚDŽ
3. Փ⫼ࠡˈᅝ㺙ⱘ⏙⋕वӮᬊ⏙⋫ࠖҹ䖒ࠄ⏙⋕ᬜᵰDŽ䇋ࡵᖙ
䅽݊ᬊ⏙⋫ࠖݡ䖯㸠⏙⋕DŽ
4. ࡵᖙՓ⫼㒃ᑺЎ 85% ҹϞⱘ䜦㊒DŽབᵰ䜦㊒㒃ᑺԢˈ߭䳔㽕
䭓ⱘᯊ䯈ᇚ⏙⋕व⚬ᑆDŽབᵰᦦܹῑЁⱘव⠛⚬ᑆˈ
Ӯᇐ㟈ᬙ䱰ˈབव⠛⒥㨑DŽ
5. ⏙⋫वৃ⫼㑺 30 DŽ
⏙⋫䬂
– 57 –
8. ᬙ䱰໘⧚
8-1. ᓔᴎᬙ䱰
ᬙ䱰⦄䈵
ॳ
⬉⑤♃ϡ वϡ㛑䖯䇏ݭᴎDŽ ৃ㛑⬉⑤㒓ᦦདDŽ
҂DŽ
ৃ㛑⬉⑤㒓ⱘݙ㒓ᮁᓔDŽ
ৃ㛑ֱ䰽ϱ⚻ᥝDŽ
व㛑䖯䇏ݭᴎDŽ ৃ㛑䴶⠜♃⚻ᥝDŽ
⬉⑤♃ϡ वϡ㛑䖯䇏ݭᴎDŽ ৃ㛑䇏ݭᴎᬙ䱰DŽ
҂DŽ
व㛑䖯䇏ݭᴎˈ ৃ㛑ണवǃवবᔶǃᄬ
Ԛ䇏ݭ᪡ϡℷ वⱘݙ᭄϶༅ᦦ
ᐌDŽ
䫭वDŽ
ৃ㛑ᠧॄ༈Ꮖᓘ㛣DŽ
ৃ㛑㋏㒳᪡ϡℷᐌDŽ
ৃ㛑䇏ݭᴎᬙ䱰DŽ
໘⧚
ᡞ⬉⑤㒓ᦦདDŽ
㘨㒰㒣䫔ଚDŽ
Փ⫼ϔᓴव
ݡ䆩DŽ
Փ⫼⏙⋫व⏙
⋫䇏ݭᴎDŽ
㘨㒰㒣䫔ଚDŽ
8-2. ᪡Ϟᬙ䱰
ᬙ䱰⦄䈵
ॳ
ϡ㛑䗔वDŽ ৃ㛑ववDŽ
䇏ݭᬙ䱰DŽ ৃ㛑Փ⫼ϡℷ⹂ⱘ
䞡ݭवDŽ
ৃ㛑Փ⫼ϔ㉏ൟ
ⱘ䞡ݭवDŽ
ৃ㛑वϞⱘ᭄Ꮖ
㹿⺕䪕ߴ䰸DŽ
ৃ㛑वবᔶDŽ
ৃ㛑वᏆ㒣ᤳണDŽ
ৃ㛑ᠧॄ༈Ꮖᓘ
㛣DŽ
໘⧚
݇䯁䇏ݭᴎ⬉⑤ˈ✊ৢݡਃࡼDŽ
བवҡ✊ϡ㛑䗔ߎˈ݇䯁䇏ݭᴎ⬉⑤ˈ
ᠧᓔϞⲪDŽᢝᓔ㓓㡆䪰ᴚᑊᕔϞᦤ䍋ᴎ
㢃ⱘϞ䚼ӑˈࡼߎ䞡ݭवDŽ
Փ⫼ᓎ䆂ⱘ䞡ݭवDŽ
Փ⫼ℷ⹂ⱘ䞡ݭवDŽ
䞡ᮄⱘথ㸠ᮄⱘ䞡ݭवDŽ
Փ⫼⏙⋫व⏙⋫䇏ݭᴎDŽ
– 58 –
8-3. ⏙䰸वव
1.
݇䯁䇏ݭᴎ⬉⑤ˈᢨᥝ⬉⑤㒓DŽ
2.
ᣝϟϞⲪᓔ݇DŽ
3.
ᠧᓔϞⲪDŽ
4.
ᢝᓔ㓓㡆䪰ᴚᑊᕔϞᦤ䍋ᴎ㢃ⱘϞ䚼ӑDŽ
㓓㡆䪰ᴚ
5.
ࡼߎ䞡ݭवDŽ
⊼ᛣ˖䙓ܡ㾺⛁ᬣᠧॄ༈⏙䰸ᠧॄ༈DŽ
⛁ᬣᠧॄ༈
⏙䰸ᠧॄ༈
6.
䗔ಲᴎ㢃ⱘϞ䚼ӑࠄॳᴹԡ㕂DŽ
7.
݇ϞϞⲪᓔ݇DŽ
– 59 –
巑͑宅͑瞄
XUG 㙼㤸䚐G㇠㟝㡸G㠸䚐G㇠㤸G㨰㢌㇠䚡GUUUUUUUUUUUUUUUUUUUUUUUUUUUUUUUUUUUUUUUUUUUUUUUUU ]X
YUG 䔠㣙G䖴ὤGUUUUUUUUUUUUUUUUUUUUUUUUUUUUUUUUUUUUUUUUUUUUUUUUUUUUUUUUUUUUUUUUUUUUUUUUUUUUUUUUUU ]Y
ZUG 㞬㛅GⵃG⺴䖼G⮹㾡GUUUUUUUUUUUUUUUUUUUUUUUUUUUUUUUUUUUUUUUUUUUUUUUUUUUUUUUUUUUUUUUUUUUUUUU ]Z
[UG 㞬⺴Gὤὤ㝴㢌G㜤ᷤGUUUUUUUUUUUUUUUUUUUUUUUUUUUUUUUUUUUUUUUUUUUUUUUUUUUUUUUUUUUUUUUUUUUUU ]Z
\UG 㤸㠄G䀴㢨⽈G㜤ᷤGUUUUUUUUUUUUUUUUUUUUUUUUUUUUUUUUUUUUUUUUUUUUUUUUUUUUUUUUUUUUUUUUUUUUUUUU ][
]UG 䔤䏬G㉘㥉G㾨☐⪰G㇠㟝䚌㜠G䔤䏬G㉘㥉䚌ὤGUUUUUUUUUUUUUUUUUUUUUUUUUUUUUUUUUUUUUUU ][
^UG 䆠⫠␑G㾨☐GUUUUUUUUUUUUUUUUUUUUUUUUUUUUUUUUUUUUUUUUUUUUUUUUUUUUUUUUUUUUUUUUUUUUUUUUUUUUUUU ]\
_UG 㣙㚔G㐐G䚨ᷤGUUUUUUUUUUUUUUUUUUUUUUUUUUUUUUUUUUUUUUUUUUUUUUUUUUUUUUUUUUUUUUUUUUUUUUUUUUUUUU ]]
⺴⦑G GUUUUUUUUUUUUUUUUUUUUUUUUUUUUUUUUUUUUUUUUUUUUUUUUUUUUUUUUUUUUUUUUUUUUUUUUUUUUUUUUUUUUUUUUUUUUU _X
⺴⦑Gⶼ㜡 U
⸬G㇠㟝㣄G⬘⎨㛰㡴G⸬Gὤὤ㢌G㙼㤸䚐G㇠㟝㡸G㠸䚐G
㩅㟈䚐G㥉⸨⪰Gὤ㍔䚌ḔG㢼㏩⏼␘ U
ὤὤ⪰G㇠㟝䚌ὤG㤸G㢨G⬘⎨㛰㡸G㨰㢌G᷀G㢱㛨G
⸨㐐ḔG㇠㟝Gⵝⷉ㡸G㨴㍌䚌㜠G㨰㐐ὤGⵈ⣁⏼␘ U
KOREAN
G
1. 桰欬碄͑揔槑橬͑樬碄͑揔欬͑氤檀͑揔碕͑͑͑͑͑͑͑棠歄叀͑檜碀檀͑碕巑橬͑注牄͑氤摠榼 ͟
␘㢀㡸G㨰㢌G᷀G㢱㡰㐐ḔG㙼⇨G㇠䚡㡸G㣌G㨴㍌䚌㜠GỴ䚌㝴G䇴㢬㜄G䚐G⺴ㇵ㢨⇌G
㣙⽸㢌G㋄㐘㡸Gⵝ㫴䚌㐐ὤGⵈ⣁⏼␘ U
1-1. 峔噼 ͠ 媤檜瑘͑摌熀͑昄͑氤檀揔碕͑
XUGG 䓽䓽䚌ḔG␜␜䚐Gḧ㜄㉐G⸬G⫠⒈ V ⢰㢨䉤⪰G㉘㾌䚌㐡㐐㝘 U
YUGG 㫵㇠ṅ㉔㢨⇌G㜨㜄G㫵㥅G⊬㻐═Gḧ㜄㉐⏈G⸬Gὤὤ⪰G㇠㟝䚌ᶤ⇌GẄ㷨䚌㫴G⫼㐡㐐㝘 U
ZUGG ㏩ὤᴴG⋆㡴Gḧ㜄㉐G⸬Gὤὤ⪰G㤴㣙䚌ᶤ⇌G㟨㟝G䚌㫴G⫼㐡㐐㝘 UG⸬GὤὤGἰ㥅䚐Gḧ
㜄㉐G㚕㷨GⱰ㫼㡸G㇠㟝䚌ᶤ⇌G㤴㣙䚌㫴G⫼㐡㐐㝘 U
[UGG ⭰㫴⇌Gὤ㜄G⺸㫸㢨G㢼⏈G㣙㋀㜄㉐G⸬Gὤὤ⪰G㇠㟝䚌ᶤ⇌G㤴㣙䚌㫴G⫼㐡㐐㝘 U
\UGG ⺴㐑G❄⏈Gⵐ䞈㉥㢨G㢼⏈Gᴴ㏘ SG䞈䚍Ɒ㫼G䝭㡴Gὤ䔠ᴴG⺸㻐╌⏈G㣙㋀㜄㉐G⸬Gὤὤ
⪰G㟨㟝䚌㫴G⫼㐡㐐㝘 U
]UGG 㣄ὤ㣙G❄⏈Gᴸ㉡㡸G㈑㉥䚌⏈GὤὤᴴGἰ㥅䚐Gḧ㜄㉐G⸬Gὤὤ⪰G㟨㟝䚌㫴G⫼㐡㐐㝘 U
^UG 㤸㣄G㣙㚔ᴴGⵐ㈑╌⏈G㤸㣄ὤὤ㢌G䟀⦐㜄G㤸㠄㡸G㜤ᷤ䚌㫴G⫼㐡㐐㝘 U
_UG ⸬Gὤὤ㢌G㙼㤸䚐G㟨㟝㡸G㠸䚨G㥅㫴⪰G䚌㐡㐐㝘 U
`UG 䞌ὤ⪰G㠸䚨GὤὤG㨰ⷴ㜄G㻝⺸䚐Gḩᴸ㡸G䞉⸨䚨G㨰㐡㐐㝘 UG
1-2. 峔噼 ͠ 媤檜瑘͑揔槑͑昄͑氤檀揔碕
XUG ㇠ᴴG㻈㷐䚐G㾨☐⬀㡸G㇠㟝䚌㐡㐐㝘 U
YUG ⒈⤱ᶤ⇌G ὤ⪸G Ɐ㛼ᶤ⇌G 㥊㡴G 㾨☐G ⵃG 㾨☐⪰G ὤ䇴G ␘⪬G 㟝⓸⦐G ㇠㟝䚌㫴G ⫼㐡㐐
㝘 UG❄䚐G⒈⤱ᶤ⇌G㥊㡴G㋄㡰⦐G㾨☐⪰G␘⨜㫴G⫼㐡㐐㝘 UG㾨☐㜄G䊀㢨䘸⇌G㥅㵝㥐
⪰G㇠㟝䚌㫴G⫼㐡㐐㝘 U
ZUGG 㣄ὤ O 覛罃 P ᴴGⵐ㈑䚌⏈GὤὤGOG䚬☐䔤 SG㏘䙰䀘 SG{}G☥㢌GPG㨰ⷴ㜄G㾨☐⪰G⋇㫴G⫼㐡㐐㝘 U
[UGG 㫵㇠ṅ㉔㢨⇌GḔ㝜㢨Gⵐ㈑䚌⏈Gḧ OG㣄┍㵜㢌G㎠⸨☐G☥ P 㜄G㾨☐⪰G⋇㫴G⫼㐡㐐㝘 UG
㾨☐ᴴG䡌㛨㫴ᶤ⇌G㤴㣙═G㥉⸨ᴴG㋄㐘╔G㟤⥘ᴴG㢼㏩⏼␘ U
\UGG 㾨☐⪰GẠ⺴⫠㫴G⫼㐡㐐㝘 UGὤὤG⇨㜄㉐Gᶬ⫰G䜸ㇵ㡸G㢰㡰䇠G㍌G㢼㏩⏼␘ U
]UGG 㫴㐐═Gⵝ䛙㡰⦐G㾨☐⪰Gㇱ㢹䚌㐡㐐㝘 U
^UGG 㤵㤼䚐G㾨☐G㞬㜄G㛨⛔䚐GⱰ㫼⓸GὤὤG㙼㡰⦐Gㇱ㢹䚌㫴G⫼㐡㐐㝘 U
_UGG 㾨☐㢌Gㇱ㢹 V ⵤ㻐G㐐G㋄㫴G⫼㐡㐐㝘 U
`UGG 㾨☐G⒤㢨䉤ᴴGὤ⦑ V ㋀ᶤ╌⏈G㩅G㤸㠄㡸Gⅸ㫴G⫼㐡㐐㝘 U
XWUGὤὤG㜄⤠㢰Gᷱ㟤 OG⽸㥉ㇵG㋀㢀 SG㫸┍ SG㜤ὤ SGⵐ䞈 PSG㪽㐐Gὤὤ㢌G㤸㠄㡸GⅸḔG㤸
㠄G䙀⤠Ἤ⪰G䂌㉰䏬㜄㉐Gゅ㡰㐡㐐㝘 U
XXUG䂌㉰䏬㜄㉐G㤸㠄G䂈☐⪰Gゅ㙸G▄㐡㐐㝘 UG䂈☐⪰G㣕㙸Gὤ⮨G䂈☐ᴴGㇵ䚔G㍌G㢼㏩⏼␘ U
XYUGὤὤ⪰G㝘⣟┍㙼G㇠㟝㾌G㙾㡸Gᷱ㟤G㤸㠄䂈☐⪰G䂌㉰䏬㜄㉐Gゅ㙸G▄㐡㐐㝘 U
XZUG㍌⺸G㢅㻉䜸ㇵ㢨Gⵐ㈑䚌⏈Gḧ㜄㉐⏈Gὤὤ⪰G㇠㟝䚌㫴G⫼㐡㐐㝘 U
X[UGὤὤ㢌G㐔⧤㉥㡸G㡔㫴䚌ὤG㠸䚨G⬘㢰G❄⏈G䆠⫠␑G⣜䘸ᴴGᾐ⾕㢰Gᷱ㟤Gὤὤ⪰G㷡㋀
䚨G㨰㐡㐐㝘 U
X\UG㚕㉬㉐⫠㢬G䆠⫠␑G㚕G㇠㟝㐐G㨰㢌䚌㐡㐐㝘 UG⬀㢰G⌼㜄G☘㛨ᴴᶤ⇌G⫼㊜㡸Gᷱ㟤G㪽
㐐G㢅Ἵ㷌㾌⪰Gⵏ㡰㐡㐐㝘 U
– 61 –
X]UGὤὤ⪰G⺸䚨䚌ᶤ⇌G㍌㥉䚌㫴G⫼㐡㐐㝘 U
X^UG㾨☐⪰G㫵㇠ṅ㉔G❄⏈G䝉ṅ☥㜄G㝘⣐GὤᴸG⊬㻐㐐䇘㫴G⫼㐡㐐㝘 U
X_UG㢨G䖐㐐⏈Gᵄ㜨G䜘☐GⵃG㋀ᶤG䜘☐Gᴴᾀ㢨㜄G䖐㐐╌㛨G㢼㡰⮤G䜘☐ᴴG⡜ᶤ㟬G㍌G㢼㢀㡸G
⇌䇴⇹⏼␘ UG䘸⫤䉤G㇠㟝G㫵䟸㜄⏈G㤼Gᵄ㜨G䜘☐GⵃG㋀ᶤG䜘☐⪰G⬀㫴㫴G⫼㐡㐐㝘 UG
⮻G⺸G◘Gᵄ㜨G䜘☐ᴴG㐑㡴G䟸G⬀㫴⓸⦑G䚌㐡㐐㝘 U
X`UG
G
㢨G䖐㐐⏈Gᵄ㜨G䜘☐GⵃG㋀ᶤG䜘☐Gᴴᾀ㢨㜄G䖐㐐╌㛨G㢼㡰⮤G䜘☐ᴴG㎱᷀G㋄
ㇵ╔G㍌G㢼㢀㡸G⇌䇴⇹⏼␘ UG㥉㤸ὤ㜄Gⴰᵄ䚐Gὤὤ⪰G␘⨤G⚀㢌G㨰㢌G㇠䚡㡸G
㨴㍌䚌㐡㐐㝘 U
䘸⫤䉤ᴴG㇠㟝═G䟸 SG㜨㢬㣄G䜘☐㝴G㋀ᶤG䜘☐㜄Gᷤ䂈G㫴G⬄㙸G㨰㉬㟈 UG㋄ὤG
㤸㜄G⮻G⺸ᴸG㜨㢬㣄G䜘☐㝴G㋀ᶤG䜘☐⪰G⇽ᴵ㐐䁐G㨰㉬㟈 U
YWUG
⸬G䖐㐐⏈G䘸⫤䉤Gᵄ㜨G䜘☐GⵃG㋀ᶤG䜘☐G㨰㠸㜄G䖐㐐╌㛨G㢼㡰⮤G㎱᷀G㋄ㇵ
╔G㍌G㢼㢀㡸G㢌䚝⏼␘ U
YXUG䓌㢨䒰G䆨⫱ SG䙴G❄⏈Gὤ䇴G㢨Ɒ㫼㡸G⫠⒈ V ⢰㢨䉤G㠸㜄G⛜㛨⡜⫠㫴G⫼㐡㐐㝘 UUGḔ㣙
㢌G㠄㢬㢨G╔G㍌G㢼㏩⏼␘ U
YYUG㟨㟝G㩅㜄G䀘ⶸ⪰G㜨㫴G⫼㐡㐐㝘 U
YZUG⫠⒈ V ⢰㢨䉤⏈G㤸ὤᴴG䢄⪨⏈GkjG⯜䉤G❄⏈G㏘㠸㾌ᴴG㣙㵝╌㛨G㢼㏩⏼␘ U ἐ㋀Gᴴ㏘
ᴴG㢼⏈Gḧ㜄㉐G⫠⒈ V ⢰㢨䉤⪰G㇠㟝䚌㫴G⫼㐡㐐㝘 U
2. 眔櫍瞨兘
␘㢀㡴GὤὤGⵃG㚕㉬㉐⫠G⇨㜡㢹⏼␘ UGG
XUG ⸬㷨G
[UG 䓌⫳G䂈㛨
YUG 㤸㠄G䂈☐G
\UG ⬘⎨㛰
ZUG 䆠⫠␑G㾨☐ OGY 㣙 PG
]UG 䔤䏬G㉘㥉G㾨☐
潠倈͑ͫ 盀峧͑牼棜͑強͑眘痠͑摌欽͑熜堄檀͑眔碐͑椔您喼͑
峔噼 ͠ 媤檜瑘͑巐嚠棸͑塘媤͑嘌岭嗰嘌 ͟
– 62 –
3. 榠梹͑強͑伩͑您樬͑嶭熕
2 3 4
5
7
1
6
XUG 㤸㠄G㏘㠸㾌GUUUUUUUUUUUUUUUUUUUUU ὤὤ⪰G䁐ᶤ⇌G↉⏼␘ U
YUG 㤸㠄G⣜䘸GUUUUUUUUUUUUUUUUUUUUUUUU ὤὤ㜄G㤸㠄㢨G䁐㫸Gᶷ㡸G⇌䇴⇹⏼␘ UGG
ZUG ㇵ䈐G⣜䘸GUUUUUUUUUUUUUUUUUUUUUUUUUUU 䘸⫤䉤㢌G㨴⽸ㇵ䈐 SG㻐⥙GⵃG㜄⤠⪰G⇌䇴⇹⏼␘ U
[UGG䆠⫠␑G⣜䘸GUUUUUUUUUUUUUUUUUUUUU ὤὤG㷡㋀G㐐㥄㡸G⇌䇴⇹⏼␘ UG
\UGG㢬䉤䓌㢨㏘G㜤ᷤ⺴GUUUUUUUUUUUUUU 䀴㢨⽈㡸G䋩䚨G䝬㏘䏬G䀨䘜䉤㜄G㜤ᷤ䚝⏼␘ UGG
]UGGhjG㤸㠄⺴GUUUUUUUUUUUUUUUUUUUUUUU 㤸㠄䂈☐㜄G㜤ᷤ䚝⏼␘ UGG
^UGG䆠⫠␑G㏘㠸㾌GUUUUUUUUUUUUUUUUUU 㤸㠄㡸G䁐ḔG䆠⫠␑G㏘㠸㾌⪰G⌸⪹⏼␘ UG㚀䂈㝠㡸GⱯ䣀G䆠
⫠␑G㾨☐⪰Gㇱ㢹䚌㜠Gὤὤ⪰㷡㋀䚝⏼␘ UGG
4. 榠您͑兘兘棸͑椘俘͑
yzTYZYjG㢬䉤䓌㢨㏘G䀴㢨⽈G❄⏈G|ziG㢬䉤䓌㢨㏘G䀴㢨⽈㡸Gὤὤ㜄G㜤ᷤ䚝⏼␘ UGGGG
4-1. RS-232C 檠瑘盀檜旌͑爨檜愼͑椘俘碀兘 ͟
XUGG 䝬㏘䏬G䀨䘜䉤GⵃGὤὤ㢌G㤸㠄㡸G↉⏼␘ U
YUGG ὤὤ㝴G䝬㏘䏬G䀨䘜䉤⪰G㢬䉤䓌㢨㏘G䀴㢨⽈⦐G㜤ᷤ䚝
⏼␘ U
ZUGG 㚕㉬㉐⫠㢬G 䓌⫳G 䂈㛨⪰G 㢬䉤䓌㢨㏘G 䀴㢨⽈㜄G ᵄ㙸
㩁⏼␘ U
[UGG 㜤ᷤ⺴㢌G㧀 V 㟤G⇌㇠⪰GḔ㥉㐐䇩⏼␘ U
4-2. USB 檠瑘盀檜旌͑爨檜愼͑椘俘碀兘͑
XUGG ὤὤ㝴G䝬㏘䏬G䀨䘜䉤⪰G㢬䉤䓌㢨㏘G䀴㢨⽈⦐G㜤ᷤ䚝⏼␘ U
YUGG Ἤ⫰ḰGᵍ㢨G|ziG䀴㢨⽈㡸G䀴㢨⽈GḔ㥉G䟸䆠㜄Gᶬ㛨G㩁⏼␘ U
ZUGG ὤὤ㟝G ☐⢰㢨ⶸᴴG 䙸㟈䚐G ᷱ㟤G ⫠㥄㜄㉐G 㥐ḩ╌⏈G ♈㛨⪰G ㇠㟝G ☐⢰㢨ⶸ⪰G
㉘㾌䚌㐡㐐㝘 U
[UG ὤὤ㟝G☐⢰㢨ⶸᴴG䙸㟈䚌⮨G⫠㥄㜄㉐G㥐ḩ═G♈㛨⪰G䞐㟝 SG☐⢰㢨ⶸ⪰G㉘㾌
䚌㐡㐐㝘 U
– 63 –
5. 欬槸牼堄͑椘俘碀兘
XUGG 㤸㠄G㏘㠸㾌⪰G↉⏼␘ U
YUG ὤὤ㢌G䟸⮨㜄G㢼⏈GhjG㤸㠄⺴㜄G㤸㠄G䂈☐⪰G㜤ᷤ䚝⏼␘ U
ZUG 㤸㠄G䂈☐⪰G㤵㤼䢼GḔ㥉═GhjG䂌㉰䏬㜄Gⁱ㙸㩁⏼␘ U
G
⸬Gὤὤ㢌G㙼㤸䚐G㇠㟝㡸G㠸䚨G㥅㫴G⺴⺸㡸G㫴⮨㢌GἼ㋁⺴㠸 O 㥅㫴╌㛨G㢼⏈G䂌㉰
䏬 P 㜄G㜤ᷤ䚌㐡㐐㝘 U
͑氤檀͑ͫ͑ 兘兘岤͑楌嫄͑兘伬͑揔槑碀注͑桲橬͑俥様 ͑͝欬槸͑牼堄岤͑批桬͑氤昕昄楌 ͑͟櫍
嫀棸͑揔槑碈͑俥様棸͑嘨慬碜摄͑犀摤痠伨͑伨兴槜͑倛棸͑兘兘岤͑坸昄喼͑侫
檜͑殳旝嗰嘌 ͑͟
6. 眘痠͑摌欽͑熜堄岤͑揔槑碀椔͑眘痠͑摌欽碀兘
㡔⤱ SGạGⵃG䚐ạ㟝G⯜⒬㜄⏈G䖐㨴䝉G䔤䏬G㾨☐ᴴG㥐ḩ╝⏼␘ UGὤὤ⪰G㇠㟝䚌ὤG㤸 SG
䚌␜G㙼⇨G㇠䚡㜄G♤⢰G䔤䏬⪰G㉘㥉䚌㐡㐐㝘 U
c 䔤䏬G㉘㥉G㤼㵜 e
XUGG 䆠⫠␑G㏘㠸㾌⪰G⌸⪬Gㇵ䈐㜄㉐G㤸㠄㡸G䁐㐡㐐㝘 U
YUG ⺴㤴ᴴG㟬⫠⮨㉐G⊭ㇽGㇵ䈐G⣜䘸ᴴGᾐ⾕Gᶤ⫠⏈G⒤ SG㢨⏈GὤὤᴴGˈ㉘㥉G㾨☐G㇠㟝
㡸G㠸䚐G㉘㥉G⯜☐ˉ ⦐Gⵈ⅄Gᶷ㡸G⇌䇴⇹⏼␘ U
ZUG 䔤䏬G㉘㥉G㾨☐⪰Gㇱ㢹䚌㐡㐐㝘 UG㣄ὤG⢔㢌G䔤䏬G㉘㥉G㥉⸨ᴴG㣄┍㡰⦐G㢱䜴㬅⏼
␘ UG㢨⚀Gㇼ⦐㟨G䔤䏬G㉘㥉G㥉⸨ᴴG⇨⺴G⮈⯜⫠㜄G㤴㣙╝⏼␘ U
[UG ㇼ⦐㟨G㉘㥉㢨G㉥ḩ㤵㡰⦐G㍌䚽╌⮨ SGˈjvtwsl{lˉ ᴴG㢬㣄╌ḔG㾨☐ᴴGⵤ㻐╝⏼
␘ UG㢨⚀Gὤὤ⏈G㢰ⵌG㇠㟝G⯜☐⦐G╌─㙸Gᵅ⏼␘ UG
ㇵ䈐G䞉㢬G⣜䘸
䔤䏬G㉬䐹G㾨☐
䆠⫠␑G㏘㠸㾌
– 64 –
7. 玔峔嘅͑熜堄͑
䆠⫠␑G㾨☐⏈GὤὤG⇨⺴㢌G㢨㋕G⦘⤠⪰G㷡㋀䚌⏈⒤G㇠㟝╝⏼␘ UG▄G㣙㢌G㾨☐ᴴG┍⸽
╌㛨G㢼㡰⮤G䙀⢰㏘䐥G⣝㡰⦐G㑇㜠G㢼㏩⏼␘ UGG
22.0
54.0
7-1. 榠梹
85.6
89.6
7-2. 玔峔嘅͑秇敀͑
XUG ⬘㢰G❄⏈GZWW ⬘G㻐⥙G䟸
YUG 㜄⤠ᴴGⵌ⸩╌ᶤ⇌G❄⏈G㻐⥙G㐐Gⱬ㥐ᴴG㈑ὤ⮨Gὤὤ⪰G㷡㋀䚌㜠G㨰㐡㐐㝘 U
ZUG ZWW ⬘G㻐⥙G䟸 SG䆠⫠␑Gslk ᴴGᾐ⾕Gᶤ⫱⏼␘ UG㢨⚀Gὤὤ⪰G㷡㋀䚌㜠G㨰㐡㐐㝘 UGG
7-3. 揔槑徽͑
␘㢀G㤼㵜㜄G♤⢰Gὤὤ⪰G㷡㋀䚌㜠G㨰㐡㐐㝘 U
XUG 䆠⫠␑G㏘㠸㾌⪰G⌸⪹⏼␘ U
YUG 䆠⫠␑G㾨☐㢌G䓔䏬G䖐⮨ O 㛅⮨ P 㜄G䜘☐G䆠⫠␑G㚕㡸GⱯ䣍⏼␘ U
ZUG 㢰ⵌG㾨☐Gㇱ㢹Ạ㜄G䆠⫠␑G㾨☐⪰Gㇱ㢹䚝⏼␘ U
[UG 㚱G㢰G⺸G◘ SGὤὤᴴGᶨ㦤╌⮨G␘㐐G㇠㟝䚌㜠G㨰㐡㐐㝘 UGG
潠倈͑ͫ͑͑1. 穀棜泬͑玔峔嘅͑熜堄岤͑揔槑碀注͑峰昕昄楌 ͑͟侠峤͑礬揩檀͑槸檠檜͑坑嗰嘌 ͟
͑
2. 玔峔嘅͑梉橨͑叜椕棸͑眔碐址棜檰注͑桲旝嗰嘌 ͑͟楝撀橤宄͑玔峔嘅͑梉橬͑傔檭碀侘叀͑昄
氹棸摄͑瘸崌碀喼͑棸珬楔͙͑ 炄撴͑敄囬͖͚͑ͩͦ͑橬͑傔檭碀昕昄楌 ͑͟楝撀橤宄͑玔峔嘅͑梉
橬͑傔檭碀孌嶜͑嘨峔欸棸͑幠檀碀昕昄楌 ͟
3. 玔峔嘅͑熜堄喼͑揔槑͑欬棸͑玔峔嘅͑梉橬͑窉敀碜梤͑儠͑兘嗍橬͑彄穀碑嗰嘌 ͑͟玔峔嘅͑熜
堄岤͑揔槑碀兘͑欬棸͑彀堄昄͑玔峔嘅͑梉橬͑囬眔碜氤昕昄楌 ͟
4. 敄囬伨͑炄撴͖͑ͩͦ͑檠͑棸珬楔橬͑揔槑碀昕昄楌 ͑͟檜怜嘌͑取橨͑敄囬檀͑棸珬楔橬͑揔槑
碀嶜͑玔峔嘅͑熜堄伨͑侜殘碀喼嚘͑噼͑島橨͑昄伬檜͑撴榼址嶘 ͑͝侜殘址注͑桲橨͑玔峔嘅͑
熜堄岤͑旔宗棸͑揥檭碀嶜͑熜堄͑张卬嬤値͑佁橨͑倈櫍橬͑檤橤珔͑敀͑檰旝嗰嘌 ͟
͑
5. 玔峔嘅熜堄喼͑梥͑ͤ͡ 禴͑揔槑͑碈͑敀͑檰旝嗰嘌 ͑͟峴檤͑熜堄伨͑撸揩址侘叀͑崌様͑
噼嬔槠͑俥様 ͑͝傔崌激棸͑椘媥碀昕昄楌 ͑͑͟
䆠⫠␑G㏘㠸㾌
– 65 –
8. 櫍梈͑碜俘͑
8-1. 欬槸橬͑牌͑塴͑櫍梈
泅揩
槸檠
㤸㠄⣜䘸ᴴG 㾨☐ᴴGㇱ㢹╌㫴
㙼G䁐㬄 U
㙾㢀 U
殘熀揔碕
㤸㠄G䂈☐ᴴGⵈ⪨᷀G
㜤ᷤ╌㫴G㙾㢀 U
㤸 㠄 䂈 ☐ ⪰G ⵈ ⪨
᷀G㜤ᷤ U
㤸㠄G䂈☐G㋄ㇵ U
䡨㪼G㋄ㇵ U
㾨☐ᴴGㇱ㢹╜ U
㤸㠄G⣜䘸ᴴG 㾨☐ᴴGㇱ㢹╌㫴
䁐㬄 U
㙾㢀 U
㾨☐ᴴGㇱ㢹╌⇌
ὤὤᴴG㝠ⵈ⪨᷀
┍㣅䚌㫴G㙾㢀 U
Ạ⬘㷌㜄G㜤⢱ U
䖐㐐GslkG㋄ㇵ U
⫠⒈ V ⢰㢨䉤G㜄⤠ U
⺼⣽G㾨☐
㾨☐G㋄ㇵ SG䡌㛨㬄 SG⒤㢨䉤G
㋄ㇵ═G㾨☐G㇠㟝 U
㥉ㇵG㾨☐G㇠㟝 U
䜘☐G㝘㜰 U
䆠⫠␑G㾨☐⪰G㢨
㟝 S 㷡㋀ U
㐐㏘䊐㢨G㥉ㇵ㤵㡰⦐G
┍㣅䚌㫴G㙾㢀 U
Ạ⬘㷌㜄G㜤⢱ U
⫠⒈ V ⢰㢨䉤G㜄⤠ U
8-2. 圁檹͑氹͑櫍梈͑͑
泅揩
㾨☐ᴴGⵤ㻐
╌㫴G㙾㢀 U
槸檠
㾨☐G⫽䣌G䜸ㇵ U
⫠⒈ V ⢰㢨䉤G ⺴㤵㤼䚐G㾨☐ U
㜄⤠Gⵐ㈑ U
␘⪬G㾨☐G㇠㟝 U
㣄ὤ㜄G㢌䚐G⒤㢨䉤G㇡
㥐U
䡌㛨㫸G㾨☐ U
殘熀͑揔碕
ὤὤ⪰G␘㐐G䁡⏼␘ UG
㜠㤸䢼G 㾨☐ᴴG ⵤ㻐╌㫴G 㙾㡰⮨G 㤸㠄㡸G ⅸḔG
ㇵ␜G䀘ⶸ⪰G㜱⏼␘ UG
㏘⇹⤼ⶸ⪰Gᷜ㉐G⮈䀘⏼㫌Gㇵ␜⺴⪰G☘㛨G㝠
⫤G䟸G㾨☐⪰G㥐ᶤ䚝⏼␘ U
Ề㣙G㾨☐G㇠㟝 U
㝠ⵈ⪬G㾨☐G㇠㟝 U
ㇼ⦐㟨G㾨☐G㇠㟝 U
㾨☐G㋄ㇵ U
䜘☐G㝘㜰 U
䆠⫠␑G㾨☐⪰G㇠㟝G㷡㋀ U
– 66 –
8-3. 熜堄͑峱竀͑歄侘͑
XUG 䑀㠀⪰GⅸḔGὤὤ㢌G㤸㠄G䂈☐⪰Gゅ㏩⏼␘ U
YUG 䀘ⶸG㝘䘸∼⪰G⌸⪹⏼␘ U
ZUG 䀘ⶸᴴG㜨⥘㫸Gㇵ䈐㜄㉐G㡋⺴⺸㡸G☘㛨㝠⫱⏼␘ UG
ㇵ␜G䀘ⶸ
䀘ⶸG㝘䘸∼
[UG ⮈䀘⏼㫌㢌G㏘⇹⤼ⶸ O ⊭ㇽ P 㡸Gᷜ㉐G⮈䀘⏼㫌㡸G☘㛨㝠⫱⏼␘ U
㏘⇹⤼ⶸ
\UG 䀘ⶸᴴG㜨⫤Gㇵ䈐㜄㉐G㾨☐⪰G㥐ᶤ䚝⏼␘ UGG
潠倈͑ͫ͑伸検͑礌堄͑夸喼͑撴侘͑礌堄棸͑撸嘨注͑峰昕昄楌 ͑͟祼揩橬͑檭橬͑敀͑檰旝嗰嘌 ͑͑͟
ᵄ㜨䜘☐
㋀ᶤ䜘☐
]UG ⮈䀘⏼㫌㡸G㠄⣌G㠸㾌㜄G▄㐡㐐㝘 UG
^UG ㇵ␜G䀘ⶸ⪰G␟㏩⏼␘ U
– 67 –
目 次
1.安全上のご注意 ................................................................................... 69
2.開 梱 ...................................................................................................... 70
3.外観と各部の名称............................................................................... 71
4.外部機器との接続............................................................................... 72
5.電源コードの接続.................................................................................. 73
6.クリーニングカードの使用方法...................................................... 74
7.トラブル時の処理............................................................................... 75
付録 A. 接続設定...................................................................................... 77
付録 B. インターフェースボードの取り外 / 取り付け......................... 79
付録 C. 一般仕様...................................................................................... 80
この「ご利用の手引き」には、安全にお使いいただくために、
重要な内容を記載しています。
注意
この装置は、情報処理装置等電波障害自主規制協議会 (VCCI) の
基準に基づくクラスA情報技術装置です。この装置を家庭環境で
使用すると電波妨害を引き起こすことがあります。この場合には
使用者が適切な対策を講ずるよう要求されることがあります。
日本語
ご利用の前には、必ず本文をお読みになり、記載事項をお守り
ください。
1.安全上のご注意 必ずお守りください
お使いになる人や他の人への危害、財産への損害を未然に防止するため、必ずお守りい
ただくことを次のように説明しています。
●設置上の注意
1) 水平でしっかりした場所に設置し、衝撃や振動を加えないでください。
2) 直射日光の当たる場所、および火のそば、ストーブのそばなどの高温場所で
使用、放置をしないでください。
3) 水、油などの液体が内部に入るような場所や、湿度の多い場所での使用、
保管は避けてください。
4) 塵、金属粉などが内部に入るような場所での使用、保管は避けてください。
5) 腐食性ガス、引火性ガス、薬品、蒸気などが発散している場所は避けてく
ださい。
6) 磁界を発生するものの近くは避けてください。
7) 電気ノイズを発生する電気機器などと同じ回路から電源を取らないでくだ
さい。
8)本装置を安全に使用するために、アース線を接続してください。
9)本装置の回りに、放熱や動作のために必要なスペースを確保してください。
●使用上の注意
1) 弊社指定カード以外は使用しないでください。
2) 油などで汚れたカードおよび水で濡れたカードは使用しないでください。
また、汚れた手、濡れた手でカードに触らないでください。
カードにセロテープや糊などをつけないでください。
3) カードに磁石を近づけたり、磁界を発生する機器(携帯電話、スピーカー、
テレビ等)のそばにカードを保管しないでください。
4) カードを高温の場所(自動車内ダッシュボード等)に放置しないでください。
5) 曲がったカードは使用しないでください。
6) カードは定められた方向に挿入してください。
7) カード挿入口にはカード以外のものを絶対に入れないでください。
8)カードの挿入・排出を妨げないでください。
9) カードの処理中は電源を切らないでください。
10) 本装置に異常(異音、
異臭、
発煙、
発火等)がある場合、直ちに電源スイッチを切り、
電源プラグを引き抜いてください。
- 69 -
11) 電源コードは、必ずプラグを持ってコンセントに抜き差ししてください。
12) 長時間ご使用にならない場合は必ずプラグをコンセントから抜いてください。
13) 結露した状態での使用は避けてください。
14) 本装置の信頼性を確保するため毎日、あるいはクリーニングランプが点灯
したら、クリーニングを行ってください。
15) クリーニング液を目に入れたり、飲んだりしないでください。
16) 分解・改造をしないでください。
17) カードを直射日光や蛍光灯などに長時間さらさないでください。
18) 同じカードで連続してくり返し印字を行う場合は、3分以上間隔をあけて
ください。
19)
このシンボルのラベルは、サーマル印字ヘッド及びイレースヘッド
の近くに貼られています。
印刷直後は、サーマル印字ヘッド及びイレースヘッドが高温になっていま
すので、サーマル印字ヘッド及びイレースヘッドには手を触れないでくだ
さい。
20)
このシンボルのラベルは、サーマル印字ヘッド及びイレースヘッド
の近くに貼られています。
静電気の発生により、サーマル印字ヘッド及びイレースヘッド中のデバイ
スが破壊される恐れがありますので、サーマル印字ヘッド及びイレースヘ
ッドには直接手を触れないでください。
21) 本体内部へクリップ、虫ピンなど異物を落とさないように注意してくださ
い。故障の原因になります。
22) 動作中はカバーを開けないでください。
23) 本装置は電気接点を有するDCモータやスイッチを使用しておりますの
で、シリコーンガスが揮発する環境での使用は避けてください。
- 70 -
2.開 梱
個装箱に含まれている本体、付属品は下記の通りです。
�
1 本体
2 電源コード
3 クリーニングカード(2枚)
4 クリーニング液
5 ご利用の手引き
�
6 フェライトコア
�
�
�
�
3.外観と各部の名称
2 3 4
5
7
6
1
1 電源スイッチ ................................ 本装置の電源を入/切します。
2 電源ランプ .................................... 本装置に電源が入っていることを示します。
3 ステータスランプ........................ カード処理可能、カード処理中、エラー状態の表示が
可能です。
4 クリーニングランプ....................... クリーニング実施時期であることを示します。
5 インターフェイスコネクタ........... 各種ホストコンピュータとケーブルを介して接続します。
6 ACインレット............................ 付属の電源コードと接続します。
7 クリーニングスイッチ ............... 電源ON状態でクリーニングスイッチを押し、アル
コールを浸したクリーニングカードを挿入することに
より、クリーニングを行うことができます。
- 71 -
4.外部機器との接続
RS-232C インターフェイスケーブルまたは USB インターフェイスケーブルのどちら
かと接続してください。
4−1)RS-232C インターフェイスケーブルの取り付け
1) ホストコンピュータ、リーダ・ライタの電源を切ってください。
2) インターフェイスケーブルの一方の端子をリーダ・ライタのコネクタへ、他方の
端子をホストコンピュータのコネクタに差し込んでください。
3) コネクタの左右のネジを締めてください。
4−2)USB インターフェイスケーブルの取り付け
1) 図のように USB インターフェイスケーブルに添付のフェライトコアを取り付け、
ケーブル固定用フックに差し込んでください。
2) USB インターフェイスケーブルの一方の端子をリーダ・ライタのコネクタへ差し
込んでください。
3) 他方の端子をホストコンピュータのコネクタに差し込んでください。
4) リーダ・ライタ用のドライバーなどを要求された場合は、代理店等から配
布されたメディアを使用してインストールしてください。
- 72 -
5.電源コードの接続
1) 電源スイッチをOFFにしてください。
2) 電源コドを本体背面のACインレットに接続してください。
3) 電源コドのプラグをAC100Vのコンセントに差し込んでください。
本装置を安全に使用するために、アス端子と周囲のアスから取れる金属部分(アス
端子のあるコンセントなど)を接続してください。
●アース線接続図
ア−ス端子
警告
ガス管にア−ス線を接続する
と危険です。
絶対に行わないでください。
6.クリーニングカードの使用方法
クリーニングカードは本体内部のローラー等を清掃をするためのものです。クリーニング
カードは本体1台に2枚付属し、ビニール袋に入っています。
22.0
54.0
6 ー1)外形
6 ー2)使用頻度
フェルト面
フェルト面
85.6
89.6
1) 毎日、または 300 回に一度を目安にしてください。
2) エラーが連続して発生した場合、あるいは印字状態に問題がある場合には実施し
てください。
3) クリーニングLEDは 300 回の印字書き換えを行うと点滅しますので、点滅した
ら実施してください。
- 73 -
6 ー3)使用方法
クリーニングは以下の手順で行ってください。
1) クリーニングスイッチを押してください。
2) クリーニングカードのフェルト面(両面)に、クリーニング液をしみ込ませてく
ださい。
3) カードの挿入口からクリーニングカードを挿入してください。
4) 乾燥のため、約1分間放置した後に使用してください。
注記)1. 曲がりの発生したクリーニングカードは使用しないでください。
カード詰まりの原因となります。
2. クリーニング液は添付の専用クリーニング液または市販エタノール(純度
85%以上)をご使用ください。
3. 添付クリーニングカードは、クリーニング液をしみ込ませて使用すること
でクリーニング効果が得られます。クリーニングを行なう際は、必ずクリー
ニング液をしみ込ませてご使用ください。
4. 純度の低いエタノールを使用すると乾燥に時間がかかり、未乾燥の状態で
カードを挿入するとカードスリップ等の不具合が発生しますので、エタノー
ルは純度 85%以上のものをご使用ください。
5. クリーニングカードの耐用回数は約30回です。破損、汚れがひどい場合は、
ご購入先にお問い合わせください。
クリーニングスイッチ
- 74 -
7.トラブル時の処理
● 電源投入時のトラブル
症 状
予想される原因
処 理
電源コードが正しく接続 電源コードを正しく接続
されていない。
してください。
電源ランプが カードを受け付けない。
電源コードの断線。
点灯しない。
電源ヒューズの断線。
カードを受け付ける。 表示 LED ランプ切れ。
販売店へご相談ください。
カードを受け付けない。 本体に異常がある。
カード不良。
カードのキズ、曲がり、 正常なカードを使用して
カードデータの消失、
ください。
他ユーザーのカード。
電源ランプは
カードを受け付けるが
点灯する。
ヘッド汚れ。
正常動作をしない。
構成システムが正常に
動作しない。
本体に異常がある。
クリーニングカードを
使用してください。
販売店へご相談ください。
● 動作時のトラブル
症 状
予想される原因
カードが排出されない。 カード詰まり。
適合カードでない。
処 理
電源を入れなおしてください。
それでも排出されない場合は電源を
切り、上カバーを開いてください。
そして、スナップレバーを引いてメカ
上部を引き上げ、カードを取り出し
てください。
弊社指定カードを使用してください。
他のユーザーのカードを使用
正しいカードを使用してください。
している。
読み取り/書き込み
エラーになる。
カードデータが磁石で消去さ
れている。
カードが曲がっている。
カードにキズがある。
ヘッド汚れ。
- 75 -
新しいカードを発行してください。
クリーニングカードを使用してく
ださい。
● 詰まったカードの取り出し方法
1) 電源スイッチを OFF にして、電源プラグを抜いてください。
2) カバーオープナーを押してください。
3) 2) の状態で上カバーを持ち上げてください。
上カバー
カバーオープナー
4) メカニズムのスナップレバー ( 緑色 ) を手前に引きながらメカニズムを上に持ち上
げてください。
スナップレバー
5) カバーがオープンした状態でカードを取り除いてください。
注意: サーマルヘッド/消去ヘッドに触らないでください。
火傷をする恐れがあります。
サーマルヘッド
消去ヘッド
6) メカニズムを元の位置に戻してください。
7) 上カバーを閉めてください。
- 76 -
付録 A. 接続設定
A −1)RS-232C シリアルインターフェイス
< RS-232C シリアルインターフェイス仕様>
1 使用コネクタ
D-Sub 9PIN
3 コネクタ端子
下表による
2 適合コネクタ
4 入出力回路
5 レベル
6 ケーブル
D-Sub 9PIN
(オス型)※リーダ・ライタ側
(メス型)※ケーブル側
下表による
RS-232C
クロス(リバース)ケーブル
ピン番号
信号 名
入出力
2
RXD
入力
DTR
出力
1
3
4
5
6
7
8
9
NC
ー
TXD
出力
GND
ー
DSR
入力
CTS
入力
RTS
出力
NC
ー
機 能
未接続 受信データ
送信データ
データ端末レディ
信号用接地
データセットレディ(検出せず)
送信要求
送信可(検出せず)
未接続
<通信速度などの設定>
シリアル通信設定を変更する場合は、下記ディップスイッチの設定を変更します。
(工場出荷時:DSW1 ∼ 6 =ON、7 ∼ 8 =OFF)
スイッチ
DSW1-1
DSW1-2
DSW1-3
DSW1-4
DSW1-5
DSW1-6
DSW1-7
DSW1-8
ボーレート BPS
DSW1-1
DSW1-2
ON
OFF
ボーレート設定(下表参照)
8ビット
パリティ無効
奇数パリティ
ONに固定
OFFに固定
OFFに固定
4800 BPS
OFF
ON
7ビット
パリティ有効
偶数パリティ
9600 BPS
ON
ON
19200 BPS
ON
OFF
38400 BPS
OFF
OFF
※ディップスイッチの設定を誤りますと、誤動作・故障の恐れがあります。設定変更に
はご注意願います。
- 77 -
ディップスイッチの設定を変更する場合は、下記のようにしてください。
1) リーダ・ライタとホストコンピュータの電源がOFFであることを確認してください。
2) 2本のネジを取り外してください。
3) インターフェイスカードを抜いて、取り外してください。
4) インターフェイスカード上のディップスイッチの設定を変えてください。
5) インターフェイスカードを差し込んで、取り付けてください。
6) 2本のネジを取り付けてください。
7) リーダ・ライタとホストコンピュータの両方の電源をONにしてください。
注記)新しい設定は、リーダ・ライタの電源をONにした時から有効になります。
ディップスイッチ
A −2)USB インターフェイス
< USB インターフェイス仕様>
1 通信規格
USB 2.0 仕様に準拠
2 通信速度
USB フルスピードモード
(最大 12MBPS)
3 通信方式
USB バルク転送モード
4 電源仕様
USB 自己電源ファンクション
5 使用コネクタ
Type-B
- 78 -
付録 B. インターフェイスボードの取り外し / 取り付け
<取り外し>
1) 電源スイッチをOFFにして、電源コードのプラグをコンセントから取り外してくだ
さい。
2) 下図に示すように2本のネジを取り外してください。
3) インターフェイスボードを矢印方向に抜いて、取り外してください。
<取り付け>
1) インターフェイスボードを本体に差し込んでください。
注記)本体のコネクタとインターフェイスボードのコネクタが接続するように、しっ
かりと差し込んでください。
2) 2本のネジを締めて、インターフェイスボードを固定してください。
3) インターフェイスボードを接続後、インターフェイスケーブルを接続する前に、
下記に従って一度テスト印字を行ってください。正しく接続されていてば、接続
した I/F の機種を印字します。
<テスト印字の方法>
●
クリーニングスイッチを押しながら電源を入れてください。ブザーが鳴り、緑色
のステータスランプが点滅します。もう一度クリーニングスイッチをブザーが鳴
るまで押してください。ステータスランプがオレンジ色に変わり点滅します。この
状態でカードを挿入すると、自動的に磁気ストライプにデータを書き込み、読み
出し、テスト結果の印字を行い、カードを排出します。テスト結果は、磁気スト
ライプの読み書き結果、消去/印字ヘッドの設定ランク、EPROM の設定状況、
使用インターフェイスおよび ROM バージョンを印字します。
テスト印字に使用するカードは、所定の裏面磁気 PET 仕様カードを使用してくだ
さい。また、テスト印字を行うと、カードにテスト用の磁気データを書き込みます
ので、磁気ストライプの書き換えを行っても問題の無いカードを使用してください。
(カードリーダ・ライタの印字設定と合ったカード媒体を使用してください。)
ケーブルは添付されていませんので、仕様にあったケーブルをご用意ください。
- 79 -
付録 C. 一般仕様
項 目
カード仕様
カード搬送部 搬 送 方 式
カード挿入方向
仕 様
PET(うす型カード)
ローラー
表一方向
400mm/s(高速時:リード時)
30 ∼ 60mm/s(低速時:消去/印字時)
カード走行速度
磁気
機 能
ストライプ部
印 字 部
印字文字数
JIS Ⅱ型 ( 1 トラック ) リード/ライト(TCP300II)
ISO 型 ( 3 トラック ) リード/ライト(TCP310II)
最大 20 文字 13 行(480 320 dots)
ANK、漢字 (JIS 第1, 第2水準、拡張漢字 )
印字文字種
ドット構成
ドットピッチ
環境条件
適合カード
電 源 使 用 場 所
使用温湿度
保存温湿度
耐 振 動 性
インターフェイス
重 量
外形寸法 *1
24
外字、グラフィック
12、24 24、48 24、24 48、48
縦方向 0.125mm
48
横方向 0.121mm
屋 内
5 ∼ 35℃、20 ∼ 80% RH(結露無きこと)
-30 ∼ 65℃、20 ∼ 90% RH(結露無きこと)
1.5G 7 ∼ 100Hz XYZ 方向各1hr(梱包状態)
弊社指定サーマルリライトカード
AC 90 ∼ 132V 50/60Hz
AC 198 ∼ 264V 50Hz
RS-232C D-sub 9ピン& USB
約 2.5 kg
(
)
119 W
132.5 ( H ) 270.5 ( D ) mm
* 1 : インターフェイス部の突起部を含まず。
- 80 -
Appendix A: Connection Settings
A-1. RS-232C Interface
< RS-232C Serial Interface Specifications >
1 Connectors
D-Sub 9PIN
(Male) * Reader/Writer Side
2 Compatible Connectors
D-Sub 9PIN
(Female) * Cable Side
3 Connector Pins
See Table Below
4. I/O Circuit
See Table Below
5. Level
RS-232C
6. Cable
Cross (Reverse) Cable
Pin No. Signal Name
I/O
Functions
1
NC
-
Not Connected
2
RXD
Input
Reception Data
3
XD
Output
4
DTR
Output
5
GND
-
6
DSR
Input
7
RTS
Output
8
CTS
Input
9
NC
-
Transmission Data
Data Terminal Ready
Ground for Signal
Data Set Ready (Not Detected)
Transmission Request
Transmission Ready (Not Detected)
Not Connected
< Settings for Communication Speed >
To change the serial communication settings, change the following DIP switch settings.
(Ex-factory Default Settings: DSW 1 to 6 are ON, 7 and 8 are OFF.)
Switches
DSW 1-1
DSW 1-2
DSW 1-3
DSW 1-4
DSW 1-5
DSW 1-6
DSW 1-7
DSW 1-8
ON
OFF
Baud Rate Setting (See table below)
8 bit
Parity Disabled
Odd Parity
Fixed at On
Fixed at Off
Fixed at Off
7 bit
Parity Enabled
Even Parity
Baud Rates BPS
4800 BPS
9600 BPS
19200 BPS
DSW 1-1
OFF
ON
ON
38400 BPS
OFF
DSW 1-2
ON
ON
OFF
OFF
* If incorrect switch settings are made, there may be a failure of the card reader/writer.
Be careful when making setting changes.
– 81 –
To change the DIP switch settings, do the following.
1. Check that the power is turned off for both the reader/writer and the host computer.
2. Remove the two screws.
3. Pull out the interface card to remove it.
4. Change the DIP switch settings on the interface card.
5. Push in the interface card to mount it.
6. Tighten the two screws.
7. Turn on the power for both the reader/writer and the host computer.
Note: The new settings will take effect when the reader/writer power is turned back on.
DIP-Switch
A-2. USB Interface Specifications
Communication Rating
Conforms to USB 2.0 Specifications
2
Communication Speed
USB Full Speed Mode (Max. 12 MBPS)
3
Communication Method
USB Bulk Transmission Mode
4
Power Specifications
USB Self-power Function
5
Connectors
Type-B
APPENDIX
1
– 82 –
Appendix B: Removing / Installing Interface Board
B-1. Removing
1. Turn off the power switch. Then, unplug the power cord from the outlet.
2. Remove the two screws as shown in the figure below.
3. Pull the interface board in the direction of the arrow to remove it.
B-2. Installing
1. Insert the interface board to the reader/writer.
Note: Firmly insert so that the reader/writer connector and the interface board connector are securely connected.
2. Tighten the two screws to fasten the interface board.
3. After connecting the interface board, run a test print using the following steps before
connecting the interface cable. If the connection is good, the model of the connected
I/F will be printed.
< How to Run a Test Print >
Turn on the power while pressing the CLEANING switch. The buzzer will ring and
the green status lamp will flash. Press the CLEANING switch again. The status
lamp will switch to orange and will flash. Insert a card in this state. This will cause
the system to automatically write data to the magnetic stripe and to read data therefrom. The test results will be printed, and the card will be discharged. The results of
reading and writing to the magnetic stripe, the setting rank of the erase/print heads,
the status of the EEPROM setting, the type of interface being used and the ROM
version are printed in order for the test results.
Use a PET type card with the predetermined magnetic stripe on both sides to run a
test print.
When performing a test print, magnetic data for the test is written to the card.
Use a card whose magnetic stripe can be overwritten without causing a problem.
(Use a card that is right for the print settings on the card reader/writer.)
Note: A USB cable is not an accessory part. Purchase one that meets specifications.
– 83 –
Appendix C: General Specifications
Item
Specifications
Card Specification
PET (Thin type card)
Card Transport Unit
Transport Method
Rollers
Card Insertion Direction One Direction
Card Travel Speed
400 mm/s (at high speed: When reading)
30 to 60 mm/s
(at slow speed: when erasing/printing)
Magnetic Stripe
Functions
JISII type (1 track) read/write (TCP300 II)
ISO type (3 tracks) read/write (TCP310II)
Print Unit
Number of
Print Characters
Max. 20 characters x 13 lines (480 x 320 dots)
Printing Character
Types
ANK
Code Page 437, Code Page 858
GB, BIG 5
(Varies according to model and font settings.)
External characters, graphics
24 x 12, 24 x 24, 48 x 24, 24 x 48, 48 x 48
Dot Configuration
Dot Pitch
Environment
Conditions
Location of Use
Vertical Direction: 0.125 mm
Horizontal Direction: 0.121 mm
Indoors
Ambient Temperature
and Humidity
5 to 35°C, 20 to 80% RH
(There must be no condensation.)
Storage Temperature
and Humidity
-30 to 65°C, 20 to 90% RH
(There must be no condensation.)
Shock Durability
1.5 G 7 to 100 Hz XYZ Directions for
one hour (When packaged)
Recommended cards
STAR Recommended Thermal Re-writing Cards
Power Source
AC 90 to 132 V 50/60Hz
AC 198 to 264 V 50Hz
RS-232C D-sub 9 Pin & USB
Ethernet (option)
Approximately 2.5 kg
119 (W) x 132.5 (H) x 270.5 (D) mm
Interface
Mass
External Dimensions *1
*1: Not including the protruding portion of the interface.
– 84 –
特機事業部 営業部
〒 424-0066 静岡県静岡市清水区七ツ新屋 536 番地 TEL. 0543-47-0122 FAX. 0543-48-5013
http://www.star-m.jp/dl/dl03.htm
SALES AND MARKETING SECTION
STAR MICRONICS CO., LTD.
536 Nanatsushinya, Shimizu-ku,
Shizuoka, 424-0066 Japan
Tel: 0543-47-0122, Fax: 0543-48-5013
OVERSEAS SUBSIDIARY COMPANIES
STAR MICRONICS AMERICA, INC.
1150 King Georges Post Road, Edison,
NJ 08837-3729 U.S.A.
Tel: 732-623-5555, Fax: 732-623-5590
http://www.starmicronics.com
Please access the following URL
http://www.star-m.jp/eng/dl/dl03.htm
for the lastest revision of the manual
STAR MICRONICS EUROPE LTD.
Star House, Peregrine Business Park, Gomm Road,
High Wycombe, Bucks, HP13 7DL, U.K.
Tel: 01494-471111, Fax: 01494-473333
http://www.StarMicronicsEurope.com
TCP300II
2006.01.16
Printed in Japan, 59082111