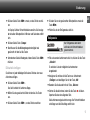
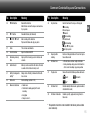
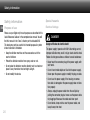
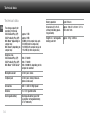
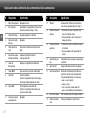
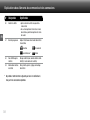
1
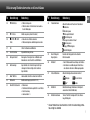
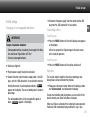
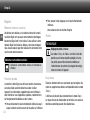
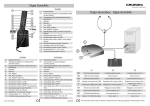
PUSH >> Kurzanleitung >> Quick Reference Guide >> Notice abrégée DE EN FR NL ES HINWEISE Die ausführlicheAnleitung zu Ihrem Digta 7 Push finden Sie auf der mitgelieferten DVD im Verzeichnis „Docu“. In der Hilfefunktion des Digta (untere seitliche Funktionstaste) finden Sie eine kurze Erklärung der zur Verfügung stehenden Funktionen. INFORMATION You will find the comprehensive manual for your Digta 7 Push in the “Docu” directory on the included DVD. In the help function (lower lateral function button) you will find a short description of the enabled functions. IT DA REMARQUE Vous trouverez la notice d‘utilisation détaillée de votre appareil Digta 7 dans le dossiers « Docu » du DVD fourni. Vous trouverez une brève explication concernant les fonctions disponibles dans la fonction d‘aide de l‘appareil Digta (touche fonctionnelle latérale inférieure). OPMERKING De handleiding voor uw Digta 7 Push vindt u op de meegeleverde DVD in de map „Docu“. Via de hulpfunctie van de Digta (onderste functietoets aan zijkant) krijgt u een korte beschrijving van de beschikbare functies. NOTA Las instrucciones del Digta 7 Push se hallan en el directorio „Docu“ del DVD que viene incluido. En la función de ayuda de Digta (tecla de función inferior lateral) encontrará un explicación breve de las funciones disponibles. NO SV INDICAZIONE Le Istruzioni relative al Digta 7 Push sono riportate nel DVD in dotazione, nella directory „Docu“. Nella funzione di aiuto del Digta (tasto funzione inferiore laterale) c‘è una breve spiegazione sulle funzioni disponibili. BEMÆRK Vejledningen til din Digta 7 Push findes på den medleverede dvd i biblioteket „Docu“. Under hjælpefunktionen på Digta (nederste funktionstast på siden) findes en kort forklaring med henblik på de funktioner, som står til rådighed. MERKNAD Veiledningen til din Digta 7 Push finnner du på medlevert DVD i mappen „Docu“. I hjelpefunksjonen til Digta (nedre funksjonstast på siden) finner du en kort erklæring av funksjonene som er tilgjengelige. ANVISNING Bruksanvisningen till Digta 7 Push finns i katalogen ”Docu” på medföljande DVD. För en kort förklaring av de tillgängliga funktionerna, använd Digtas hjälpfunktion (tryck på funktionsknappen längst ner på ena sidan). Fig. 1: Fig. 3: Fig. 4: 16 1 14 17 13 2 12 20 19 18 23 24 25 3 4 5 11 6 26 21 Fig. 5: 27 7 10 9 8 Fig. 2: 22 28 29 30 31 32 33 39 38 34 37 15 36 35 Erläuterung Bedienelemente und Anschlüsse Nr Bezeichnung Bedeutung Nr Bezeichnung Bedeutung 1 Mikrofonöffnung internes Mikrofon 14 Obere Funktionstaste 2 Tastenblock Steuerung von Aufnahme und Wiedergabe des aktuellen Diktates (siehe Fig. 4, 23-26) 3 Displaytasten Beschriftung im Display •Kurz drücken: Display-Beleuchtung ein- und ausschalten, auch wenn das Gerät in der Docking Station steht •Lang drücken: EOL* (wenn EOL-Funktion aktiviert) 4 Auf-Ab-Tasten Navigieren 15 Batteriefach Batteriefach für Batterien oder Akku* 5 Ein-Aus-Taste Digta ein- und ausschalten 16 Speicherkarte* Speichermedium für aufgezeichnete Diktate 6 Batteriefachdeckel Fach für AAA-Batterien oder Akkupack 962 17 Aufnahme-LED 7 Entriegelungstaste Entriegelungstaste für Batteriefachdeckel 8 Menu-Taste Zugang zum Menü des Digta 9 OK-Taste •Bestätigungstaste •Diktataufnahme beenden und wiedergeben (nur wenn im Digta Configurator aktiviert) leuchtet dauernd bei der Aufnahme und blinkt gleichmäßig bei Aufnahmepause •rot = Überschreiben/Anhängen •orange = Einfügen •grün = Wiedergabe im USB-Audio-Betrieb •gelb = USB-Verbindung/Datenübertragung 18 Mikrofonbuchse Anschluss für externes Zusatzmikrofon 19 Kartenschacht für Speicherkarte 20 Hörerbuchse Anschluss für Ohrhörer oder Kopfhörer 21 Kontaktleiste Anschluss für Dockingstation* 22 USB-Anschluss Schnittstelle für PC und Grundig Netzteil 23 g Steuerung der Aufnahme des aktuellen Diktates: Aufnahme starten, Aufnahmepause und Aufnahme fortsetzen Nur bei Geräten mit Spracherkennung*: •Gedrückt halten: Spracherkennung aktivieren für Nummer- und Zeicheneingabe 10 New-Taste •Neues Diktat anlegen •Aufnahme eines Diktates beenden und neues Diktat anlegen 11 Links-Rechts-Tasten Navigieren 12 Display Anzeige des Betriebszustandes und der einstellbaren Menüfunktionen (Details siehe Fig. 5) 13 Untere Funktionstaste •Kurz drücken: Hilfe zur aktuellen Funktion ein-/ausschalten •Lang drücken: Tastensperre ein-/ausschalten REC-Taste Erläuterung Bedienelemente und Anschlüsse Nr Bezeichnung Bedeutung Nr Bezeichnung Bedeutung 24 i REW-Taste •Diktat zurückspulen •Diktat beenden mit Kurzrücklauf und automatischer Wiedergabe 34 Tastenfunktionen Aktuelle Funktion der Tasten im Tastenblock g Aufnahme 25 h FF-Taste Diktat vorspulen (schneller Vorlauf) 26 e STOP-/ f PLAYTaste •Aufnahme des Diktates beenden •Diktat wiedergeben und Wiedergabe beenden 27 Uhr Uhrzeit in Stunden und Minuten 28 Voice Activation Sprachaktivierung ein/aus 29 Restspeicherzeit Anzeige des freien Speichers in Minuten und Sekunden ab einer Restzeit von 60 Minuten 30 Kartenanzeige Speicherkarte ist im Gerät eingesteckt, Speicherung der Daten erfolgt auf der externen Speicherkarte 31 Akku*/Batterie Ladezustand, blinkt bei schwachen Batterien 32 Statuszeile Geräteeinstellungen (siehe Nr 27-31) 33 Erweiterte Statuszeile •Ordnername •Dateiformat/ Aufnahmequalität für neue Diktate •Verschlüsselung •Ladezustand in % DE ll Aufnahmepause i Rückspulen/Rücklauf Ende Rückspulen h Vorspulen/schneller Vorlauf Ende Vorspulen e Stopp / f Wiedergabe Ende Wiedergabe 35 Beschriftung der Displaytasten Funktion der Displaytasten im aktuellen Betriebszustand 36 Diktatzeit •Nach Diktatanwahl: Gesamtlänge des Diktates •Bei Aufnahme und Wiedergabe: Diktatzeit an der aktuellen Aufnahme-/Wiedergabeposition 37 Fortschrittsbalken Aktuelle Diktatposition und kennzeichnet Einfügen Überschreiben Info* Index 38 Diktatfeld Diktatbezeichnung (Diktatname, Diktatpositionsnummer, Diktat-ID/Barcode) 39 Diktatinformationen Termin, Priorität, Zurückgestellt, Verschlüsselung, Diktatsperre * Dieses Produkt bzw. diese Funktion ist nicht im Lieferumfang enthalten und gilt als Zubehör. 1 Einleitung DE Einleitung Lesen Sie diese Bedienungsanleitung vollständig durch, bevor Sie das Diktiergerät verwenden. Für Schäden, die aufgrund der Nichtbeachtung dieser Bedienungsanleitung entstehen, übernehmen wir keine Haftung. Bewahren Sie die Bedienungsanleitung für einen späteren Gebrauch unbedingt auf. Wichtige Hinweise für Ihre Sicherheit sind besonders gekennzeichnet. Beachten Sie diese Hinweise unbedingt, um Unfälle und Schäden am Gerät zu vermeiden. Symbole in dieser Anleitung GEFAHR Weist auf mögliche Lebensgefahr hin. WARNUNG Weist auf mögliche Verletzungsgefahr hin. VORSICHT Weist auf mögliche Gefährdungen für das Gerät, Dateiinhalte oder andere Gegen-stände hin. 2 HINWEIS Hebt Tipps und Informationen für Sie hervor. Die Ausklappseiten am Anfang der Anleitung zeigen das Diktiergerät und seine Bedienelemente. Lieferumfang •Diktiergerät Digta 7 Push •DVD mit PC-Software und Dokumentation •USB-Kabel •Etui Nicht in allen Ausstattungsvarianten enthaltene Funktionen und Zubehör sind in dieser Anleitung mit einem Stern „*“ gekennzeichnet. Einleitung Registrierung im Kundencenter Reinigung Registrieren Sie ihr Digta 7 auf der folgenden Website: Reinigen Sie das Gerät nur mit einem trockenen, weichen Tuch. Verwenden Sie keine chemischen Reinigungsmittel. http://www.grundig-gbs.com/kundencenter . Mit einem Browser-AddIn wird ein angeschlossenens Digta 7 vom Kundencenter erkannt und die Seriennummer ausgelesen. Nutzen Sie das Kundencenter auch zur Verwaltung Ihrer Diktiertechnik und erfahren Sie die Vorteile, wie Garantieverlängerung, Firmware Updates usw.. Hinweise Bestimmungsgemäße Verwendung DE Defekt Warnung Verletzungsgefahr durch ein defektes Gerät Versuchen Sie nicht, ein defektes Gerät zu reparieren, sondern bringen Sie es zu Ihrem Fachhändler. Adressen von Fachhändlern finden Sie unter: www.grundig-gbs.com Verwenden Sie das Digta ausschließlich für den in dieser Anleitung und in der Langanleitung beschriebenen Gebrauch. Jede weitere Verwendung gilt als nicht bestimmungsgemäß und ist untersagt. • Halten Sie das Gerät und dessen Zubehör von Kindern fern. • Schützen Sie das Gerät vor Regen und Spritzwasser. • Legen Sie das Gerät nicht in unmittelbare Nähe der Heizung oder in die pralle Sonne. • Führen Sie keine Änderungen am Gerät durch. 3 Einleitung DE Gefahren durch Strom Gefahr 4 Zubehör Vorsicht Lebensgefahr durch elektrischen Strom! Beschädigungen Das Netzteil wird mit 230-V-Wechselstrom betrieben. Dabei besteht grundsätzlich die Gefahr eines elektrischen Schlags. Beachten Sie daher Folgendes: • Fassen Sie den Stecker des Netzteils nie mit nassen Händen an. • Ziehen Sie das Stromkabel immer nur direkt am Stecker aus der Steckdose heraus, aber niemals am Kabel. Das Kabel könnte reißen. • Stromkabel nicht knicken, einklemmen, überfahren oder mit Hitzequellen in Berührung bringen. • Betreiben Sie das Netzteil nur, wenn die auf dem Typenschild angegebene elektrische Spannung mit der Spannung Ihrer Steckdose übereinstimmt. Eine falsche Spannung kann das Gerät stören. Verwendung von nicht freigegebenem Zubehör kann zur Beschädigung des Gerätes führen. Aktuelles Zubehör wie Digta Card, Digta Station 447, Akkupack 962, Netzteil, Fußschalter, Aufsteckmikrofon und Ohrhörer finden Sie im Internet unter www.grundig-gbs.com. Die von Grundig Business Systems beschriebenen Leistungsmerkmale gelten nur bei Verwendung von Grundig Business Systems Originalzubehör. Wegen Mängeln, die auf die Verwendung von Zubehör zurückzuführen sind, das nicht Originalzubehör von Grundig Business Systems ist, bzw. nicht von Grundig Business Systems empfohlen oder freigegeben ist, können keine Mangelhaftungsansprüche gegen Grundig Business Systems geltend gemacht werden. Inbetriebnahme Inbetriebnahme Akku laden xx Schalten Sie Ihr Digta aus. Ausschalten xx Stecken Sie den Stecker des Netzteils* in die Steckdose. xx Drücken Sie die Taste „MENU“ bis das Gerät ausgeschaltet ist. xx Verbinden Sie das andere Ende des Netzteilkabels, den USBStecker, mit dem »USB-Anschluss« des Diktiergerätes. Tastensperre Nach kurzer Zeit erscheint auf dem Display die animierte Ladeanzeige » «. Der aktuelle Füllstand in Prozent wird angezeigt. Mit der Tastensperre können Sie verhindern, dass das Gerät während der Aufnahme oder Wiedergabe versehentlich ausgeschaltet wird. Nach ca. 4 Stunden ist der Akku vollständig geladen. Im Display wird » « angezeigt. xx Drücken Sie die untere Funktionstaste bis im Display ein Schlosssymbol und »Bedienung gesperrt« angezeigt wird. xx Ziehen Sie das Netzteil* aus der Steckdose und den USBStecker des Netzteilkabels aus dem »USB-Anschluss« des Diktiergerätes. Ein-/Ausschalten Einschalten xx Drücken Sie die Taste „MENU“ bis die erste Anzeige im Display eingeblendet wird. DE Das Digta wechselt nach wenigen Sekunden in den Hauptbildschirm und ist betriebsbereit. Außer bei Aufnahme und Wiedergabe können Sie Ihr Gerät trotz Tastensperre ganz normal ausschalten. Wenn Ihr Digta ausgeschaltet ist, schützt die Tastensperre ebenfalls vor versehentlichem Einschalten, z.B. in einer Aktentasche. Beim Anschalten erscheint die Meldung „Bedienung gesperrt“. Sie heben die Sperrung auf, indem Sie die untere Funktionstaste drücken bis der Hauptbildschirm vollständig eingeblendet ist. Dann ist die Tastensperre deaktiviert. Andernfalls schaltet sich das Gerat selbständig wieder aus. 5 Bedienung DE Bedienung Interner/Externer Speicher Ihre Diktate werden auf dem internen Speicher des Digta gespeichert, solange keine externe, wechselbare Speicherkarte (Digta Card*) eingesteckt ist. Wenn Sie eine Digta Card verwenden, werden alle Diktate auf dieser Speicherkarte gespeichert. Zwischen dem internen Speicher und der externen Speicherkarte kann nicht kopiert werden. Anzeige „Speicherkarte aktiv“ Im Display wird das Symbol „Speicherkarte aktiv“ eingeblendet. xx Zum Beenden der Hilfe drücken Sie erneut die untere Funktionstaste oder die Taste „OK“. Sie gelangen zur Ausgangssituation zurück. Profile Hinweis Werkseinstellung für Profile Der Easy Mode und Menu Mode stehen Ihnen als werkseitig voreingestellten Profile zur Verfügung. Diese Profile können jedoch vom Systemadministrator über die Konfigurationssoftware geändert und an das Gerät übertragen werden. Hilfefunktion Easy Mode Das Digta bietet Ihnen eine Hilfefunktion. Die kurzen Hilfetexte sollen Sie im Umgang mit dem Diktiergerät unterstützen. Für spezielle Anwendungssituationen, z.B. bei der Aufnahme von Diktaten oder im Menü, werden Ihnen zusätzliche Informationen angezeigt. Im Easy Mode stehen Ihnen alle Funktionen zur Verfügung, welche Sie zum Diktieren, Wiedergeben, Einfügen oder zum Löschen von Diktaten benötigen. xx Drücken Sie kurz die untere Funktionstaste bis im Display der Kurzhilfetext angezeigt wird. 6 Im Easy Mode ist das Display übersichtlicher. Die Gefahr von Fehlbedienungen ist vermindert, weil nur die wichtigen Funktionen angewählt werden können. Bedienung Im Menü des Easy Mode können Sie unter „Geräteinfo“ wichtige Informationen über Ihr Digta einsehen, z.B. Seriennummer, Version der Geräte-Software (Firmware) oder der aktuelle Stand der Speicherkapazität. Um die Vielzahl der Einstellmöglichkeiten im Menü nutzen zu können, wechseln Sie unter „Profile“ in den Menu Mode. Profil wechseln xx Drücken Sie die Taste „MENU“. xx Navigieren Sie mit den Auf-Ab-Tasten zum Menüpunkt „Profile“ und bestätigen Sie mit der Taste „OK“. Es wird eine Liste der möglichen Profile eingeblendet. xx Navigieren Sie mit den Auf-Ab-Tasten zum gewünschten Profil und bestätigen Sie mit der Taste „OK“. Neues Diktat aufnehmen xx Drücken Sie die Taste „NEW“. Das Gerät schaltet in die Aufnahmepause »ll«, die Aufnahmeanzeige blinkt rot. xx Starten Sie die Aufnahme, indem Sie die Taste »g« drücken. Sprechen Sie den neuen Text. DE Die Aufnahmeanzeige leuchtet rot im Aufnahmemodus Überschreiben bzw. orange im Aufnahmemodus Einfügen. Der Fortschrittsbalken wird länger und die Diktatlänge erhöht sich. xx Unterbrechen Sie die Aufnahme, indem Sie die Taste »g« erneut drücken. Das Gerät schaltet in die Aufnahmepause »ll«, die Aufnahmeanzeige blinkt rot bzw. orange. xx Setzen Sie die Aufnahme fort, indem Sie die Taste »g« erneut drücken. Sprechen Sie den Text weiter. xx Beenden Sie die Aufnahme, indem Sie die Taste »e/f« drücken. Diktat auswählen und anhören xx Wenn eine Aufnahme oder Wiedergabe läuft, drücken Sie zuerst die Taste »e/f«. Das Gerät schaltet in Aufnahme-Stopp. xx Wählen Sie das gewünschte Diktat mit den Auf-Ab-Tasten aus. 7 Bedienung DE xx Drücken Sie die Taste »e/f« erneut, um das Diktat anzuhören. Im Display läuft der Fortschrittsbalken vorwärts. Die Anzeige der aktuellen Diktatposition in Minuten und Sekunden erhöht sich. xx Wenn die Wiedergabe mit OK aktiviert ist, können Sie die Wiedergabe starten und unterbrechen, indem Sie die Taste „OK“ drücken xx Beenden Sie die Wiedergabe, indem Sie Taste »e/f« oder „OK“ drücken. xx Setzen Sie die Wiedergabe fort, indem Sie die Taste »e/f« drücken. Lautstärke einstellen xx Drücken Sie während der Wiedergabe die Auf-Ab-Tasten. Die Lautstärkeanzeige wird eingeblendet. Warnung Gefahr einer Gehörschädigung Halten Sie das Diktiergerät bei lauter Wiedergabe, insbesondere bei maximaler Lautstärke, nicht an ein Ohr, um sicher zu sein, dass das Gehör nicht geschädigt wird. Schneller Vorlauf und Rücklauf xx Drücken Sie die Taste »h« (schneller Vorlauf) oder »i« (Rücklauf). Der Fortschrittsbalken läuft vor bzw. zurück und die Diktatposition ändert sich. Schnellwiedergabe xx Drücken Sie die Taste »e/f«. Das Gerät schaltet in Aufnahme-Stopp. Falls sich das Gerät schon im Stopp-Modus befindet, startet die Wiedergabe des aktuellen Diktates sofort. 8 Bedienung xx Drücken Sie die Taste »e/f« erneut, um das Diktat anzuhören. Im Display läuft der Fortschrittsbalken vorwärts. Die Anzeige der aktuellen Diktatposition in Minuten und Sekunden erhöht sich. xx Drücken Sie die Taste „Tempo“. xx Beeinflussen Sie die Wiedergabegeschwindigkeit wie gewünscht mit den Auf-Ab-Tasten. xx Unterbrechen Sie die Wiedergabe, indem Sie die Taste »e/f« drücken. Diktatteil einfügen Sie können an jeder beliebigen Stelle eines Diktates eine neue Aufnahme einfügen. xx Drücken Sie die Taste »e/f«. Das Gerät schaltet in Aufnahme-Stopp. xx Wählen Sie das gewünschte Diktat mit den Auf-Ab-Tasten aus. xx Drücken Sie die Taste »e/f«, um das Diktat anzuhören. DE xx Drücken Sie an der gewünschten Diktatposition erneut die Taste »e/f«. xx Prüfen Sie, ob der Einfügemodus aktiv ist. Einfügemodus Der Einfügemodus wird durch ein Dreieck im Fortschrittsbalken gekennzeichnet. xx Falls eine andere Aufnahmeart aktiv ist, drücken Sie die Taste „Aufn-Art“. Es wird eine Liste der möglichen Aufnahmearten eingeblendet. xx Navigieren Sie mit den Auf-Ab-Tasten zur Aufnahmeart „Einfügen“ und bestätigen Sie mit der Taste „OK“. xx Beenden Sie die Auswahl mit der Taste „Sichern“. xx Starten Sie die Aufnahme, indem Sie die Taste »g« drücken. Sprechen Sie den einzufügenden Text. Die Aufnahmeanzeige leuchtet orange. Der Fortschrittsbalken wird länger und die Diktatlänge erhöht sich. 9 Bedienung DE Diktatteil überschreiben Sie können ab der aktuellen Diktatposition das aufgenommene Diktat übersprechen. xx Drücken Sie die Taste »e/f«. Das Gerät schaltet in Aufnahme-Stopp. xx Wählen Sie das gewünschte Diktat mit den Auf-Ab-Tasten aus. xx Drücken Sie die Taste »e/f« erneut, um das Diktat anzuhören. xx Drücken Sie an der gewünschten Diktatposition erneut die Taste »e/f«. xx Prüfen Sie, ob der Überschreibmodus aktiv ist. Überschreibmodus Der Überschreibmodus wird durch einen Strich im Fortschrittsbalken gekennzeichnet. xx Falls eine andere Aufnahmeart aktiv ist, drücken Sie die Taste „Aufn-Art“. 10 Es wird eine Liste der möglichen Aufnahmearten eingeblendet. xx Navigieren Sie mit den Auf-Ab-Tasten zur Aufnahmeart „Überschreiben“ und bestätigen Sie mit der Taste „OK“. xx Beenden Sie die Auswahl mit der Taste „Sichern“. Hinweis Überschreiben der Daten Ab der gewählten Diktatposition wird das Diktat überschrieben. xx Starten Sie die Aufnahme, indem Sie die Taste »g« drücken. Sprechen Sie den geänderten Text. Die Aufnahmeanzeige leuchtet rot. xx Beenden Sie die Aufnahme, indem Sie die Taste »e/f« drücken. Diktatteil anhängen Sie können an aufgenommene Diktate am Diktatende eine Aufnahme anhängen. Bedienung xx Drücken Sie die Taste »e/f«. Das Gerät schaltet in Aufnahme-Stopp. xx Wählen Sie das gewünschte Diktat mit den Auf-Ab-Tasten aus. Sie können das Anhängen auch für alle folgenden Aufnahmen voreinstellen. xx Drücken Sie die Taste »e/f« erneut, um das Diktat anzuhören. xx Drücken Sie die Taste „Aufn-Art“. xx Drücken Sie die Taste » « (Sprung ans Ende). Hinweis Es wird eine Liste der möglichen Aufnahmearten eingeblendet. xx Navigieren Sie mit den Auf-Ab-Tasten zur Aufnahmeart „Anhängen“ und bestätigen Sie mit der Taste „OK“. Sprungziel xx Beenden Sie die Auswahl mit der Taste „Sichern“. Wenn im Diktat Infos oder Indizes (siehe ausführliche Langanleitung, Kapitel „Info/Index-Funktion“) vorhanden sind, dann erfolgt der Sprung ( ) zur nächsten Markierung. Springen Sie so lange, bis das Diktatende erreicht ist. Diktateigenschaften ändern xx Starten Sie die Aufnahme, indem Sie die Taste »g« drücken. Sprechen Sie den anzuhängenden Text. Die Aufnahmeanzeige leuchtet rot. Der Fortschrittsbalken wird länger und die Diktatlänge erhöht sich. DE xx Beenden Sie die Aufnahme, indem Sie die Taste »e/f« drücken. Sie können die Diktateigenschaften von vorhandenen Diktaten nachträglich bearbeiten. Hinweis Diktateigenschaften Die Diktateigenschaften sind nur im Menu Mode verfügbar. xx Drücken Sie die Taste »e/f«. 11 Bedienung DE Das Gerät schaltet in Aufnahme-Stopp. xx Wählen Sie das gewünschte Diktat mit den Auf-Ab-Tasten aus. xx Drücken Sie die Taste „Details“. Das Menü zum Ändern der Diktateigenschaften wird eingeblendet. Der Cursor ist auf der zuletzt aufgerufenen Eigenschaft positioniert. Hinweis Menü „Details“ Je nachdem welchen Menüpunkt Sie wählen, werden die gewählten Eigenschaften mit unterschiedlichen Bedienabläufen aufgerufen. In der Hilfefunktion (untere Funktionstaste) finden Sie eine kurze Erklärung der Diktateigenschaften. Info/Index-Funktion Sie können jedem Diktat spezifische Informationen* und Anweisungen für Ihre Sekretärin aufsprechen oder Indexmarkierungen für bestimmte Diktatstellen setzen. 12 Hinweis Menu Mode Die Info/Index-Funktion ist nur im Menu Mode bei laufender Aufnahme und Wiedergabe verfügbar. Bei der Wiedergabe der Infos und Indizes im Diktat erklingt ein Signalton. Die Infos und Indizes werden mit dem Diktat auf den PC übertragen. Diktat löschen xx Drücken Sie die Taste »e/f«. xx Drücken Sie die Taste „Löschen“. Es erscheint eine Liste mit den Elementen, die Sie löschen können (Diktat, Index, Info, Diktatteil, Ordner). Bedienung DE Löschbare Elemente Die Liste der löschbaren Elemente ist nur im Menu Mode verfügbar. xx Prüfen Sie, ob „Diktat löschen“ ausgewählt ist und bestätigen Sie, indem Sie die Taste „OK“ drücken. Es erscheint eine Sicherheitsabfrage. xx Bestätigen Sie die Abfrage mit „OK“, um das Diktat endgültig zu löschen. xx Falls Sie das Diktat doch nicht löschen möchten, drücken Sie die Taste „Abbruch“. 13 Comment Controls/Keys and Connections EN No Description Meaning No Description Meaning 1 Microphone hole internal microphone 14 Upper function button 2 Keypad Record control and play-back control of the current dictation (see Fig. 4, 23-26) •Press button briefly: Display illumination On-/ Off •Press button long: EOL* (if activated) 3 Display buttons Labeling in the display 15 Battery compartment 4 Up-Down-buttons Navigation Battery compartment for batteries or rechargeable batteries* 5 On/Off button Digta On- and Off switching 16 Memory card* Memory medium for recorded dictations 6 Battery compartment For rechargeable 962- or AAA-batteries 17 Recording LED 7 Unlocking button Unlocking button for the battery compartment 8 Menu button Digta menu access 9 OK button Key button End recording of dictation and play it back (only if activated in the Digta Configurator) Multicolored LED lights up during recording, blinks regularly during recording pause •red = overwrite/append •orange = insert •green = play-back in USB-audio mode •yellow = USB-connection/data transmission 18 Microphone socket Connection for external extra microphone 19 Card slot For memory card Create a new dictation End recording and create a new dictation 20 Earphone jack Connection for earphone or headphone 21 Contact strip Docking station* connection 22 USB-connection Interface for PC and Grundig power supply 23 g REC button Control of the current dictation‘s recording: Start recording, record pause and continue the recording Only for devices with speech recognition*: •Keep pressing: Activates speech recognition for input of numbers and letters 10 New button 11 Left-right-buttons Navigation 12 Display Operational status indicator and indicator of the adjustable menu functions (for details see Fig. 5) 13 Lower function button •Press button briefly: Help for the current On-/ Off-setting of functions •Long pressing: Keylock On/Off switch 14 Comment Controls/Keys and Connections No Description Meaning No Description Meaning 24 i REW button Rewind the dictation End dictation via short backspace and automatic play-back 34 Key functions Current function of the keys on the keypad 25 26 h FF button e STOP / f PLAY g Recording EN ll Record pause i Rewind End rewinding h Fast forward End forwarding e Stop / f Play-back End of play-back Forward dictation (fast forward) button End recording of the dictation Play-back dictation and stop play-back 27 Clock Time in hours and minutes 28 Voice Activation Speech activation On/Off 35 29 Remaining memory time Display of free memory space in minutes and seconds Display button labeling Function of display buttons in the current operational status mode 36 Dictation time 30 Card indicator Memory card is inserted in the device, the data is saved on the external memory card •After dictation selection: length of dictation •During recording and play-back: dictation time at the current recording-/play-back position 31 Battery/rechargeable battery* Charge level of battery; blinks when the batteries are low 37 Progress bar Shows the current dictation position and marks 32 Status bar Device settings (see No 27-31) 33 Advanced status bar •Folder name •File format/recording quality of the next recording •Encryption •Charge level in % Insert Overwrite Info* Index 38 Dictation field Dictation data (dictation name, position number, dictation ID/bar code) 39 Dictation information Deadline, priority, postponed, encryption, dictation lock * This product or function is not included in the delivery and available as an accessory. 15 Introduction EN Introduction • Use of non-approved spare parts This operating manual contains important instructions for safe and efficient handling of the Grundig Business Systems Digta 7 (hereinafter referred to as “device”). This operating manual is a part of the device and must be kept accessible in the immediate vicinity of the device for persons working on and with the device. Carefully read and make sure you understand this operating manual and all product safety labels prior to starting any work with the device. The basic prerequisite for safe work is compliance with all specified safety and handling instructions. In addition, all local accident prevention guidelines and general safety regulations effective at the implementation site of the device apply. Illustrations in this operating manual are provided for basic understanding and can vary from the actual model of the device. No claims can be derived from the illustrations in this operating manual. The originator is solely liable to the full extent for damages caused by such conduct. The agreed upon obligations in the delivery contract, the general terms and conditions, the manufacturer’s delivery conditions, and the statutory regulations valid at the time the contract was concluded, apply. Disclaimer All information and instructions in this operating manual have been provided under due consideration of applicable guidelines and regulations, the current and known state of the art, as well as our many years of inhouse experience. The manufacturer assumes no liability for damages due to: • Failure to comply with the instructions in this operating manual • Improper use / misuse • Willful operation by non-authorized persons • Unauthorized conversions or non-approved technical modifications 16 Copyright This operating manual is protected by copyright. No part of this operating manual may be reproduced in any form or incorporated into any information retrieval system without written permission Grundig Business Systems GmbH (“the manufacturer”). Delivery of the operating manual to third parties, duplication in any form – including excerpts – as well as exploitation and/or communication of the content, are not permitted without a written declaration of release from manufacturer. Actions to the contrary make damage compensations mandatory. We reserve the right to enforce additional claims. The manufacturer © Grundig Business Systems GmbH Weiherstraße 10 D – 95448 Bayreuth holds the copyright. Introduction Explanation of signalwords and symbols in this Operating Instruction Important notes for your safety are highlighted. Please pay particular attention to these notes in order to avoid accidences and damages to the device: Warnings Warnings are indicated by symbols. In addition they are introduced with signal words that express the scope of the hazard. • All instructions must strictly complied with! • When working always act cautiously to prevent accidents, personal injury, or property damage! Danger Indicates a hazardous situation which, if not avoided, will result in death or serious injury. Warning EN Indicates a hazardous situation which, if not avoided, could result in death or serious injury. Caution Used with the safety alert symbol indicates a hazardous situation which, if not avoided, could result in minor or moderate injury. Notice Used to address practices not related to personal injury. It indicates specific actions which prevent from damage to the device and from loss of dictations. Indicates useful tips and recommendations as well as information for efficient and trouble-free operation. 17 Introduction Please read the entire operating instruction before usage. Grundig Business Systems cannot accept any liability for damaEN ges resulting from non-observance of the operating instruction. Please keep the user manual for future references. For safety reasons, follow all safety precautions to ensure a safe handling with the device! Registration in customer center Please register your Digta 7 on: http://www.grundig-gbs.com/en/customer-center . The browser AddIn of the customer center automatically identifies a connected Digta 7 and the serial number is read out. Open the inner leaflet at the beginning of this operating manual to view the dictating machine and its control elements. Make use of the customer center to administer your dictation technology and learn more about the benefits like warranty extension, firmware-updates etc.. Scope of supply Accessories •Dictation machine Digta 7 Push • DVD with PC-software and documentation • USB-cable • Pouch Accessories and functions which are not available for all product or equipment lines are marked in this manual with a star “*”. Notice Damages Damage to the device may occur due to unreleased accessories. For the latest accessories like Digta Card, Digta Station 447, rechargeable battery pack 962, power supply, foot control, plug-on microphone and earphone, please visit the Grundig Website on the internet at www.grundig-gbs.com. 18 Introduction The performance characteristics described by Grundig Business Systems are only valid when using original accessories released by Grundig Business Systems. Grundig Business Systems cannot accept liability for lacks caused through the utilization of accessories which are not Grundig Business Systems genuine accessories. This also applies to accessories which are neither released nor recommended by Grundig Business Systems. EN 19 Safety information Safety information EN Purpose of use Please use your Digta only for such purposes as described in this Quick Reference Guide or in the comprehensive manual. You will find this manual in the “Docu” directory on the included DVD. The device may only be used for its intended purpose. Any other kind of utilization is forbidden. • Keep the dictation machine and the accessories out of the reach of children. • Protect the dictation machine from spray water or rain. • Do not place the dictation machine directly next to a heater or place it away from direct heat or bright sunlight. • Do not modify the device. 20 Special hazards Electrical Voltage Danger Danger of life due to electric shock! The power supply* operates with 230 V alternating current. Improper utilization may result in injury due to electric shock. Follow all safety precautions as follows to avoid accidences: • Never touch the connector plug of the power supply with wet hands. • Do not insert metal objects or like into the power supply. • Never open the power supply or modify the plug or cable. • Do not use the power supply if the housing or connection cable is damaged or the power supply does not function properly. • Always unplug the power cable from the wall jack by pulling the connector plug but never use the power cable for plugging off because the cable could tear apart. • Do not bend, clamp or drive over the power cable, and keep it away from heat. Safety information • Data indicated on the tool identification plate must match the technical data of the mains supply otherwise this may destroy your device. • If the power supply is dropped, have it checked by an authorized dealer to ensure that it functions correctly and safely. Disregarding these precautions means risking a fatal electric shock. Warning Danger of fire, explosion and overheating! • Use the power supply only with the line voltage specified on the rating label. • Use the power supply only with its original connection cable or adapter (European, UK and USA version). Never use other connection cables or adapters with different plugs. • Do not place heavy objects on the power supply or connection cable, and do not cover the power supply. • Use the power supply only in a dry indoor environment. Protect the power supply from moisture in the form of water and high humidity. • Do not bend the connection cable of the power supply. • Do not operate or store the power supply near heaters or direct sunlight. Ensure adequate ventilation. The permitted temperature range is: -4°F (-20°C) to 158°F (70°C) for storage 5°F (-15 °C) to 95°F (35°C) for operation • Grundig Business Systems power supplies are only to be used with Grundig Business Systems office equipment. • Pull the power supply out of the socket to separate the device from the power grid. • Unplug the power supply before cleaning it. EN Disregarding these precautions means risking fire, explosion or overheating. 21 Safety information Rechargeable batteries EN Warning Danger of explosion and burns! The device operates with batteries and rechargeable batteries*. Follow all safety precautions as follows to avoid accidences: • Do not throw batteries or rechargeable batteries into fire. Do not try to short-circuit the electric contacts, this may lead to explosion. • Batteries or rechargeable batteries should not be kept unpacked in a bag and should not be opened or modified. Caution - there is the risk of burns through leakage. • Rechargeable batteries should only be charged in the dictation machine. The attempt to charge a rechargeable battery beyond its electrical capacity may lead to explosion. Disregarding these precautions means risking explosions and burns. 22 Traffic Warning Danger of accidents! • Do not use the device while operating vehicles (such as cars, bicycles, motorcycles, ATVs, etc.). Disregarding these precautions can lead to traffic accidents. Particular groups of persons Caution Risk of injury! • Do not leave the device unattended and use it with extreme caution if children or persons who cannot assess the danger are nearby. • Keep the device away from persons (including children) who are unable to use it safely due to their physical, sensory or mental limitations, lack of experience or lack of knowledge. Safety information Disregarding these precautions means risking injury. Electronic components Obstacle EN Notice Caution Stumbling hazard! • Ensure that the power supply is always in a safe position and that neither the power supply nor any cables connected to the device or to the docking station* constitute obstacles. Disregarding these precautions may lead to a stumbling hazard. Risk of damage and void warranty! • Protect the device from moisture (such as rain or water spray). • Do not place the device near a heater nor in direct sunlight. The permitted temperature range is: -4°F (-20°C) to 158°F (70°C) for storage 5°F (-15 °C) to 95°F (35°C) for operation • Do not open the device under any circumstances. • Do not modify the device. Disregarding these instructions can cause the device to be damaged and the warranty to become void. 23 Safety information Disposal EN Notice Signal interference! • Do not make recordings near mobile telephones. In case of interferences (such as hissing), increase the distance. Disregarding these instruction lead to disruption of the recording by interferences. Cleaning Notice Risk of damage! • Unplug the power supply before cleaning it. • Clean the device only on the outside with a dry, soft cloth. Do not use any chemical cleaning agents such as alcohol, thinner, gasoline or the like. Disregarding these instructions can cause the device to be damaged. 24 Electronic waste is not allowed to be disposed of with the domestic waste. Electronic waste has to be returned to collecting points at public recycling authorities set up for this purpose. Consumers are obliged by law to return batteries or rechargeable batteries at the end of their service lives to the public collecting points at public waste disposal authorities or point of sale set up for this purpose. Defects Warning Risk of injury due to a defect device! Do not try to repair a defect device. The device may only be repaired by a specialised dealer. A list of the specialised dealers is available on our website: www.grundig-gbs.com Initial setup Initial setup Charging of rechargeable batteries Warning Danger of explosion and burns! • Rechargeable batteries should only be charged in the dictation machine or Digta Station 447 Plus*. • Do not use damaged batteries. xx Disconnect the power supply* from the socket and the USB plug from the “USB-connection” of your device. Switching on xx Press the “MENU” button until the initial display view appears on the display. After a few seconds, the Digta changes to the main screen and is ready for operation. Switching off xx Switch your Digta off. xx Press the “MENU” button until the device switches off. xx Plug the power supply* plug to the wall outlet. Keylock xx Connect the other end of the mains supply cable - the USB plug - with the “USB-connection” of your dictation machine. The key lock helps to avoid that the active recording or playback process can be switched off by mistake. Shortly aftterwards, the animated load indicator » « appears on the display. The current loading level is shown in percentage. The rechargeable battery is fully charged after approx. 4 hours. » « appears in the display. EN Switching off/on xx Please press the lower function button until a locking symbol and “Device locked” are indicated on the display. Except when recording and playing back, you can switch off the device normally even when the buttons are locked. When your Digta is switched off, the button lock feature prevents the device from inadvertently being switched on, e.g. in your 25 Initial setup briefcase. When the device is switched on, the message “Device locked” is displayed. You can remove this lock by pressing the EN lower function button until the main screen is fully visible. The buttons are now unlocked. If you do not deactivate this function, the device switches off automatically. 26 Operating Operating Internal/external memory Dictations are stored on the internal memory of the Digta as long as no external, removable memory card (Digta Card*) is inserted. As soon as a Digta Card is inserted, all dictations will be stored on this memory card. Copying between the internal memory and the external memory card is impossible. Display “Memory card active” The icon “memory card active” pops up on the display. xx Press the lower function button again or the “OK” button in order to close the help texts. EN You will be resetted to the initial situation/screen. Profiles Default settings of profiles The Easy Mode and the Menu Mode are available in form of predefined default profiles. However, the system administrator can change these profiles by means of the configuration software and transfered them to the device. Help function Easy Mode The Digta offers a help function. Brief help texts shall support you by using your dictation machine correctly. Additional information is put at disposal when special operating situations occur, for example, during the recording of dictations or in the menu. All functions needed for dictating, play-back, deleting or inserting of dictations are available in the Easy Mode. xx Please press briefly the lower function button until the brief help texts are displayed. The display is organized more clearly in the Easy Mode. The risk that operating errors are made is diminished because only the most important functions can be activated. In the menu of Easy mode, you can view important information about your Digta under “Device info”, e.g. serial number, version of the device software (firmware) or the current status of the 27 Operating EN memory capacity. To allow you to use the majority of the settings in the menu, switch to Menu mode under “Profiles”. Change of profile xx Press “MENU”. xx Use the up/down buttons to navigate to the “Profile” menu item and confirm by pressing “OK”. A list of possible profiles appears on the display. xx Select the required profile by using the up-down buttons and confirm it by pressing the “OK” button. Recording of new dictation xx Please press the “NEW” button. The dictation machine switches over to the recording pause »ll«, the LED-indicator blinks red. xx Start the recording by clicking the »g« button. Dictate your new text. The recording indicator lights red in the Overwrite recording mode and shines orange in the Insert recording mode. The progress bar increases as well as the dictation length. xx Pause the recording by clicking the »g« button once again. 28 The dictation machine switches over to the recording pause »ll«, the LED-indicator blinks red resp. orange. xx Continue the recording by clicking the »g« button again. Go on dictating your text. xx End the recording by clicking the »e/f« button. Select and listen to a dictation xx Please press the »e/f« button again first if a recording or play-back is running. The device turns to recording stop. xx Select the desired dictation by using the up-down navigation buttons. xx Press the »e/f« button again to listen to the dictation. The progress bar on the display increases. The minutes and seconds of the current dictation position shown on the display increase. xx If play-back via OK is activated, you can start and pause the play-back process by pressing the “OK” button. xx End the play-back by clicking the »e/f« button again or “OK”. Operating xx Continue the play-back by clicking the »e/f« button. The device turns to recording stop. Setting the volume If the device is already in stop mode, play-back of the current dictation starts immediately. xx Press the up-down buttons during play-back. The volume indicator appears on the display. The play-back volume can be turned up/down or soundless. Warning Danger of hearing impairment Do not hold the dictation machine near your ear during playback, particularly when the volume is turned up to a maximum in order to save you from hearing damages. Fast forward and rewind xx Press the »h« (fast forward) or »i« (rewind) button. The progress bar increases or decreases and the dictation position changes. xx Press the »e/f« button again to listen to the dictation. The progress bar on the display increases. The minutes and seconds of the current dictation position shown on the display increase. xx Press the “Speed” button. xx Set the play-back speed as desired by means of the up-down buttons. xx Pause the play-back by clicking the »e/f« button. Insertion of a dictation part Additional dictation parts can be inserted at any position desired. xx Press the »e/f« button. The device turns to recording stop. Fast play-back xx Select the desired dictation by using the up-down navigation buttons. xx Press the »e/f« button. xx Press the »e/f« button to listen to the dictation. 29 EN Operating EN xx Press the »e/f« button again at the desired dictation position. Overwrite dictation parts xx Control if the insertion mode is activated. xx Press the »e/f« button. Insertion mode The device turns to recording stop. The insertion mode is marked through a triangle in the progress bar. xx If another recording mode is activated, please press the “RecMode” button. A list of possible recording modes appears on the display. xx Use the up/down buttons to navigate to the “Insert” recording mode and confirm by pressing “OK”. xx End your selection with the button “Save”. xx Start the recording by clicking the »g« button. Dictate the text which shall be inserted. The recording indicator blinks orange. The progress bar increases as well as the dictation length. 30 You can overwrite a dictation from any dictation position on. xx Select the desired dictation by using the up-down navigation buttons. xx Press the »e/f« button again to listen to the dictation. xx Press the »e/f« button again at the desired dictation position. xx Control if the overwriting mode is activated. Overwriting mode The overwriting mode is marked by means of a line in the progress bar. xx If another recording mode is activated, please press the “RecMode” button. A list of possible recording modes appears on the display. Operating xx Use the up/down buttons to navigate to the “Overwrite” recording mode and confirm by pressing “OK”. xx Select the desired dictation by using the up-down navigation buttons. xx End your selection with the “Save” button. xx Press the »e/f« button again to listen to the dictation. Overwriting of data The dictation will be overwritten from the selected dictation position on. xx Start the recording by clicking the »g« button. Dictate the modified text. The recording indicator lights red. xx End the recording by clicking the »e/f« button. Appending of dictation parts An additionally recorded text can be added at the end of a recorded dictation. xx Press the »e/f« button. The device turns to recording stop. EN xx Press the » « button (skip to the end). Skip mark aim The cursor skips to ( ) the next mark when dictation infos or indices exist (see the comprehensive manual, chapter “Info/ Index-function”). Skip until the dictation end is reached. xx Start the recording by clicking the »g« button. Dictate the text which you like to add. The recording indicator lights red. The progress bar increases as well as the dictation length. xx End the recording by clicking the »e/f« button. You can also preset the attaching function for all following recordings. xx Press the “RecMode” button. A list of possible recording modes appears on the display. 31 Operating EN xx Use the up/down buttons to navigate to the “Append” recording mode and confirm by pressing “OK”. xx End your selection with the “Save” button. Changing of dictation features The dictation features of stored dictations can be adapted subsequently. Dictation features The dictation features are only available in the Menu Mode. xx Press the »e/f« button. The device turns to recording stop. xx Select the desired dictation by using the up-down navigation buttons. xx Press the “Details” button. The menu for changing the dictation features appears on the display. The cursor is placed on the feature chosen last. 32 Menu “Details” The selected features which imply different operating procedures are opened according to the menu item selected. In the help function (lower function button) you will find a short description of the dictation features. Info/Index-function Additionally you can include specific information* and index* markings for the typist to specified dictation parts. Menu Mode The info/index function is only available in Menu Mode during recording and play-back. An audible signal is generated during play-back of the infos and indices. The infos and indices are transfered to the PC together with the dictation. Operating Delete dictation xx Confirm the question by pressing the “OK” button to delete the entire dictation. xx Press the button »e/f«. xx Press the “Delete” button. EN xx Press the “Escape” button in case that you do not want to delete the dictation. A list featuring all elements which you can delete appears (dictation, index or info, dictation part, folder). Deletable elements The deletable elements list is only available in the Menu Mode. xx Control if “Delete dictation” has been selected and confirm it by pressing the “OK” button. A security question prompts, to prevent deleting dictation parts by mistake. 33 Technical data Technical data EN The storage capacity for recording: 10 minutes DSS Standard Play (SP): DSS Pro Quality Play (QP): WAV Mono* (depending on sample rate): WAV Stereo* (depending on sample rate): Response area DSS Standard Play (SP): DSS Pro Quality Play (QP): WAV Mono* / WAV Stereo*: approx. 1 MB approx. 2 MB 9.6 MB (8 kHz sample rate) up to 57.6 MB (48 kHz sample rate) 19.2 MB (8 kHz sample rate) up to 115.2 MB (48 kHz sample rate) 200 - 5 500 Hz 200 - 7 500 Hz 200 - 20 000 Hz, depending on the sample rate selected Microphone socket 3.5 mm jack; stereo Earphone jack 3.5 mm jack; stereo (mono earphone can be used) Connections USB 1.1, USB 2.0 High Speed Batteries 2 x 1.5 V; type Micro/AAA Rechargeable battery Rechargeable battery pack 962 (Li-polymer rechargeable battery, 3.7 V/ 1000 mAh) 34 Battery operation up to 25 hours Dimensions (W x H x D, without protruding operating elements) approx. 130 x 52 x 22 mm / 5.12 x 2.05 x 0.87 inch Weight incl. rechargeable battery pack 962 approx. 122 g / 4.303 oz Trouble shooting Electrical devices can bring along malfunctions. These malfunctions cannot necessarily be referred to the device. You can check if you can remedy the errors by means of the following table. Malfunctions Possible reasons Removal of defect The devices cannot be switched on. The battery is empty. The current supply is interrupted. Charge the batteries or exchange them. (see chapter “Charging of rechargeable batteries”) The device is unresponding to button operations. The keylock is activated. Press the lower function button until the keylock is deactivated. There is no sound or too quiet. The microphone sensitivity or the play-back volume are not set correctly. Set the microphone sensitivity in the menu “recording” to “conference” or hold the device closer to your mouth during recording. Set up the play-back volume. (see chapter “Setting the volume”) The sound is distorted or too loud. The microphone sensitivity or the play-back volume are not set correctly. Set the microphone sensitivity in the menu “recording” to “dictation” or increase the distance between the device and your mouth during recording. Turn down the play-back volume. (see chapter “Setting the volume”) No menu function available. Switch over to the Menu Mode. (see chapter “Change of profile”) The device is running in the Easy Mode. 35 EN Explications des éléments de commande et des connexions FR N° Désignation Signification N° Désignation Signification 1 Orifice du microphone Microphone interne 12 Afficheur 2 Bloc de touches Commande de l‘enregistrement et de la lecture de la dictée actuelle (voir Fig. 4, 23-26) Visualisation de l‘état de service et des fonctions de menu réglables (détails sur la Fig. 5) 13 3 Touches d‘affichage Inscription visualisée sur l‘afficheur Touche fonctionnelle inférieure 4 Touches de montéedescente Navigation •Pression brève : activer et désactiver l‘aide relative à la fonction actuelle •Pression prolongée : activer et désactiver le blocage des touches 5 Touche de marchearrêt Pour allumer et éteindre la machine à dicter Digta 14 Touche fonctionnelle supérieure 6 Couvercle du compartiment d‘alimentation Logement de piles AAA ou de bloc d‘accumulateurs 962 •Pression brève: allumer et éteindre l‘éclairage de l‘afficheur •Pression prolongée : EOL* (lorsque EOL est activée) 15 7 Touche de déverrouillage Débloque le compartiment d‘alimentation Compartiment pour pile Compartiment à piles pour piles à usage unique ou batterie* 16 Carte mémoire* Support mémorisant les dictées enregistrées 8 Touche MENU Accès au menu de la machine à dicter Digta 17 DEL d‘enregistrement 9 Touche OK Touche de validation Terminer l‘enregistrement d‘une dictée (uniquement lorsque Digta Configurator est activé) 10 Touche NEW Pour enregistrer une nouvelle dictée Terminer l‘enregistrement d‘une dictée, puis créer une nouvelle dictée DEL (diode électroluminescente) multicolore allumée en continu lors de l‘enregistrement et clignotant régulièrement en cas de pause •rouge = écraser / joindre •orange = insérer •vert = lecture dans le mode audio USB •jaune = liaison USB/transmission de données 11 Touches de navigation gauche-droite Navigation 18 Prise de microphone Pour raccorder en plus un microphone externe 19 Fente d‘insertion de carte Prévue pour introduire la carte mémoire 36 Explications des éléments de commande et des connexions N° Désignation Signification N° Désignation Signification 20 Prise d‘écouteur Pour raccorder des écouteurs intra-auriculaires ou un casque d‘écoute 30 Témoin de carte mémoire 21 Barrette de contacts Pour raccorder une station d‘accueil* La carte mémoire étant insérée dans l‘appareil, la mémorisation des données se déroule sur la carte mémoire externe 22 Prise USB Interface de PC et bloc d‘alimentation Grundig 31 23 g REC button Commande de l‘enregistrement de la dictée actuelle : démarrer l‘enregistrement, pause d‘enregistrement, et reprendre l‘enregistrement Uniquement sur les appareils avec la reconnaissance vocale*: •Pression prolongée : activer la reconnaissance vocale en vue de saisir des chiffres et des caractères Des piles/voyant du bloc d‘accus* Signale l‘état de charge, clignote en cas de piles faibles 32 Ligne d‘état Réglages de l‘appareil (voir N° 27-31) 33 Ligne d‘état étendue •Nom de dossier •Format de fichier / qualité pour de nouvelles dictées •Cryptage •État de charge en % 34 Fonctions des touches Fonction actuelle des touches du bloc de touches g Enregistrement ll Pause d‘enregistrement i Rembobinage/retour Fin du rembobinage h Bobinage/avance rapide Fin de l‘avance rapide e Arrêt / f Lecture Fin de la lecture 35 Inscription des touches d‘affichage Fonction des touches d‘affichage dans leur état de fonctionnement actuel 24 i Touche REW Rembobiner la dictée Terminer la dictée avec un rembobinage court et une lecture automatique 25 h Touche FF Avance rapide de la dictée 26 e Touche STOP / f Touche PLAY Terminer l‘enregistrement de la dictée Lire la dictée et terminer la lecture 27 Heure Indiquée en heures et en minutes 28 Voice Activation Marche-arrêt de l‘activation vocale 29 Temps de mise en mémoire restant La capacité de mémorisation disponible en minutes et en secondes FR 37 Explications des éléments de commande et des connexions N° Désignation Signification 36 Durée de la dictée •Après le choix de la dictée : longueur totale de la dictée •En cas d‘enregistrement et de lecture : durée de la dictée au point d‘enregistrement / de lecture actuel 37 Barre de progression Indique l‘état d‘avancement actuel de la dictée et caractérise FR l‘insertion l‘écrasement les informations* l‘index 38 Zone d‘affichage de la dictée Désigne la dictée (nom, numéro d‘ordre, identifiant (ID) / code à barres de la dictée) 39 Informations relatives à la dictée Délai, priorité, ajourné, cryptage, verrouillage de la dictée * Ce produit et cette fonction ne figurent pas dans le matériel fourni, mais parmi les accessoires optionnels. 38 Introduction Introduction ATTENTION Lisez attentivement l‘ensemble de ce mode d‘emploi avant de vous servir de la machine à dicter. Nous déclinons toute responsabilité à l‘égard de dommages imputables au non-respect de ces instructions d‘emploi. Conservez impérativement le mode d’emploi en vue d’une utilisation ultérieure. Indique des risques potentiels d‘endommagement de l‘appareil, des contenus de fichier ou d‘autres objets. REMARQUE Met en évidence des conseils et des informations à votre intention. Les consignes primordiales à votre sécurité sont signalées par des symboles caractéristiques. Respectez-les impérativement pour éviter tout accident et tout endommage ment de l‘appareil. Symboles utilisés dans cette notice DANGER Indique un risque potentiel d‘accident mortel. AVERTISSE- Indique un risque potentiel de blessure. MENT FR Les rabats figurant au début de cette notice fournissent des illustrations de la machine à dicter et de ses éléments de commande. Matériel livré • Dictaphone Digta 7 Push • DVD avec logiciel de PC et documentation • Câble USB • Etui Les fonctions et les accessoires qui ne sont pas contenus dans toutes les variantes d‘équipement sont désignés par un astérisque « * » dans cette notice abrégée. 39 Introduction Enregistrement service clients Enregistrez votre appareil Digta 7 sur le site web: FR http://www.grundig-gbs.com/fr/service-clients . Après avoir installé un module complémentaire (add in) sur votre navigateur, tout appareil Digta 7 connecté sera automatiquement reconnu par service clients et son numéro de série automatiquement détecté. Vous pourrez également utiliser service clients pour la gestion de votre technique de dictée et recevoir de nombreux avantages tels que extension de garantie, mises à jour du firmware, etc. Consignes Emploi conforme aux prescriptions Utilisez la machine à dicter Digta exclusivement aux fins décrites dans cette notice et dans le mode d‘emploi. Tout autre usage est considéré comme dérogeant aux prescriptions et il est donc proscrit. • Tenez l‘appareil et ses accessoires à l‘écart des enfants. • Protégez l‘appareil de la pluie et des aspersions d‘eau. 40 • Ne posez pas l‘appareil tout près d‘une source de chauffage ni en plein soleil. • N‘apportez aucune modification à l‘appareil. Nettoyage Nettoyez l‘appareil uniquement avec un chiffon doux et sec. N‘utilisez aucun détergent chimique. Défectuosités Avertissement Risque de blessure induit par un appareil défectueux N‘essayez pas de réparer un appareil défectueux, mais rapportez-le à votre revendeur spécialisé. Les adresses des magasins spécialisés sont consultables sur le site : www.grundig-gbs.com Introduction Risques d‘origine électrique DANGER Accessoires Attention Risque d‘électrocution fatale ! Détériorations Le bloc secteur est alimenté par du courant alternatif de 230 V. Un rique de choc électrique existe toujours alors. Il convient donc de respecter les précautions suivantes : L‘utilisation d‘accessoires non autorisés risque d‘endommager l‘appareil. • Ne saisissez jamais le connecteur du bloc secteur avec des mains humides. • Veillez systématiquement à n‘enlever le câble d‘alimentation de sa prise que directement au niveau du connecteur, mais jamais en tirant sur le câble qui risquerait de céder. • Ayez soin de ne pas plier ni coincer le câble électrique, de ne pas non plus le franchir à bord d‘un véhicule ni le mettre en contact avec des sources de chaleur. • Ne faites fonctionner le bloc secteur que si la tension électrique spécifiée sur la plaque signalétique coïncide avec celle fournie sur votre prise d‘alimentation. Une tension erronée risque de perturber la bonne marche de l‘appareil. FR Les tout derniers accessoires, tels que la carte mémoire Digta Card, la station d‘accueil Digta Station 447, le bloc d‘accumulateurs 962, le bloc secteur, les pédales de commande, le microphone enfichable et les écouteurs intra-auriculaires vous sont présentés sur le réseau Internet à l‘adresse du site www.grundig-gbs.com. Les caractéristiques décrites par la société Grundig Business Systems ne s‘appliquent que si des accessoires originaux de la société Grundig Business Systems sont employés. Tout défaut imputable à l’utilisation d‘accessoires qui ne sont pas des accessoires originaux de la société Grundig Business Systems ou qui n‘ont pas été recommandés ni autorisés par ses soins ne saurait donner lieu à quelconque prétention au titre de la responsabilité des vices de fabrication à l’encontre de la société Grundig Business Systems. 41 Mise en service FR Mise en service Mise en marche / Arrêt Chargeur d‘accumulateurs Mise en marche xx Arrêtez votre machine à dicter Digta. xx Enfichez le connecteur du bloc secteur* dans la prise d‘alimentation. xx Reliez l‘autre extrémité du câble d‘alimentation, la fiche USB, à la « prise de connexion USB » de la machine à dicter. Après un bref laps de temps, l‘indicateur de charge animé apparaît sur l‘afficheur « ». L‘état de charge actuel est visualisé en pourcentage. Après env. 4 heures, le bloc d‘accumulateurs est complètement chargé. L‘indicateur « » est alors visible sur l‘afficheur. xx Débranchez le bloc secteur* de la prise d‘alimentation et le connecteur USB du câble secteur de la « prise de connexion USB » de la machine à dicter. xx Pressez la touche « MENU » jusqu‘à ce que le premier indicateur soit incrusté sur l‘afficheur. La machine à dicter Digta passe à l‘écran de visualisation principal au bout de quelques secondes et il est prêt à fonctionner. Arrêt xx Pressez la touche « MENU » jusqu‘à ce que l‘appareil soit désactivé. Blocage des touches Le verrouillage des touches vous permet d‘éviter que l‘appareil ne soit arrêté par mégarde durant l‘enregistrement ou la lecture. xx Appuyez sur la touche fonctionnelle inférieure jusqu‘à ce qu‘une icône de verrou et le message de maintien « L’utilisation imposs. » apparaissent sur l‘afficheur. Sauf lors de l’enregistrement et de la lecture, vous pouvez éteindre normalement votre appareil lorsque les touches sont verrouillées. 42 Mise en service Le verrouillage des touches permet d’éviter une remise en marche involontaire de votre Digta lorsqu’il est éteint, par ex. s’il est rangé dans votre porte-documents. Lorsque vous allumez l’appareil, le message « L’utilisation imposs. » s’affiche. Pour déverrouiller les touches, appuyez sur la touche de fonction inférieure jusqu’à ce que la totalité de l’écran principal soit affichée. Le verrouillage des touches est maintenant désactivé. Sinon, l’appareil s’éteint automatiquement. FR 43 Emploi Emploi Mémoire interne / externe FR Vos dictées sont stockées sur la mémoire interne de la machine à dicter Digta, tant qu‘aucune carte mémoire interchangeable externe (Digta Card*) n‘est insérée. Si vous utilisez la carte mémoire Digta Card, toutes les dictées y sont alors emmagasinées. Aucune copie ne peut être réalisée entre la mémoire interne et la carte mémoire externe. Indicateur «carte mémoire activée» L‘icône de la « carte mémoire activée » est incrustée sur l‘afficheur. xx Pour achever l‘aide, réappuyez sur la touche fonctionnelle inférieure. Vous retournez dans la situation d‘origine. Profils Remarque Réglage de profils à l‘usine Les modes « Easy » et « Menu » sont mis à votre disposition sous la forme de profils préréglés à l‘usine. Ces profils peuvent être néanmoins modifiés par l‘administrateur de système via le logiciel de configuration et transmis à l‘appareil. Fonction d‘aide Easy Mode La machine à dicter Digta vous offre une fonction d‘assistance. Les textes d‘aide succincts doivent vous aider à utiliser l‘appareil. Des informations supplémentaires sont affichées à votre intention en vue d‘applications spéciales, notamment lors de l‘enregistrement de dictées ou dans le menu. Toutes les fonctions dont vous avez besoin pour enregistrer, lire, insérer ou supprimer des dictées sont disponibles dans le mode « Easy ». xx Pressez brièvement la touche fonctionnelle inférieure jusqu‘à ce que le texte d‘assistance court soit visualisé sur l‘afficheur. 44 L‘afficheur est présenté plus clairement dans le mode «Easy ». Le risque d‘erreurs de manipulation est minimisé, car seules les fonctions essentielles peuvent être sélectionnées. Emploi Dans le menu en mode Easy, vous pouvez accéder sous « Information sur l’appareil » à des informations importantes concernant votre Digta, par ex. le numéro de série, la version du logiciel de l’appareil (firmware) ou la capacité mémoire. Pour utiliser les nombreux réglages possibles dans le menu, passez en mode Menu sous « Profils ». xx Démarrez l‘enregistrement en appuyant sur la touche » g «. Dictez le nouveau texte. Changement de profil xx Vous pouvez interrompre l‘enregistrement en appuyant une nouvelle fois sur la touche » g «. xx Appuyez sur la touche « MENU ». xx A l’aide des touches de montée/descente, naviguez jusqu’à la rubrique de menu « Profils », puis confirmez avec la touche « OK ». La liste des profils possibles est alors affichée en surimpression. xx Naviguez jusqu‘au profil requis à l‘aide des touches de montée-descente et validez-le en pressant la touche « OK ». Enregistrement d‘une nouvelle dictée xx Pressez la touche « NEW ». L‘appareil bascule sur la pause d‘enregistrement » ll « et l‘indicateur d‘enregistrement clignote en rouge. L‘indicateur d‘enregistrement s‘allume en rouge en mode d‘enregistrement « écraser » ou en orange en mode d‘enregistrement « insérer ».La barre de progression s‘allonge à mesure que la longueur de la dictée s‘accroît. FR L‘appareil bascule sur la pause d‘enregistrement » ll « et l‘indicateur d‘enregistrement clignote en rouge resp. orange. xx Vous pouvez continuer l‘enregistrement en appuyant une nouvelle fois sur la touche » g « . Continuez à dicter le texte. xx Terminez l‘enregistrement en appuyant sur la touche » e/f «. Sélection et écoute d‘une dictée xx Commencez par appuyer sur la touche » e/f « lorsqu‘un enregistrement ou une lecture est en cours. L‘appareil commute en mode « arrêt de l‘enregistrement ». 45 Emploi xx Sélectionnez la dictée souhaitée avec les touches de montée-descente. FR xx Appuyez à nouveau sur la touche » e/f « afin d‘écouter la dictée. La barre de progression évolue vers l‘avant sur l‘afficheur. La valeur exprimant la position de la dictée actuelle en minutes et en secondes augmente sur l‘indicateur correspondant. xx Vous pouvez démarrer ou interrompre la lecture en appuyant sur la touche « OK » lorsque la lecture est activée à l‘aide de OK. xx Terminez la lecture en appuyant sur la touche » e/f « ou « OK ». xx Vous pouvez continuer la lecture en appuyant sur la touche « e/f ». Avertissement Risque d’atteintes de la fonction auditive Ne tenez pas la machine à dicter contre votre oreille lors de la lecture, notamment si elle est réglée sur un volume sonore maximal pour être sûr de ne pas endommager votre ouïe. Avance rapide et retour xx Pressez la touche » h « (avance rapide) ou » i « (retour). La barre de progression avance ou recule et la position de la dictée varie. Lecture rapide xx Pressez la touche » e/f «. Réglage du volume sonore L‘appareil commute en mode « arrêt de l‘enregistrement ». xx Appuyez sur la touches de montée-descente durant la lecture. La lecture de la dictée actuelle démarre immédiatement dans le cas où l‘appareil se trouve en mode « arrêt ». L‘indicateur du volume sonore est incrusté sur l‘afficheur. 46 xx Appuyez à nouveau sur la touche » e/f « afin d‘écouter la dictée. Emploi La barre de progression évolue vers l‘avant sur l‘afficheur. La valeur exprimant la position de la dictée actuelle en minutes et en secondes augmente sur l‘indicateur correspondant. xx Appuyez sur la touche « Vitesse ». xx Ajustez la vitesse de lecture requise au moyen des touches de montée-descente. xx Vous pouvez interrompre la lecture en appuyant sur la touche » e/f «. Insertion d‘un passage de dictée Vous pouvez ajouter un nouvel enregistrement à n‘importe quel emplacement d‘une dictée. xx Pressez la touche » e/f «. L‘appareil commute en mode « arrêt de l‘enregistrement ». xx Sélectionnez la dictée souhaitée avec les touches de montée-descente. xx Appuyez sur la touche » e/f « afin d‘écouter la dictée. xx Appuyez à nouveau sur la touche » e/f « à la position de dictée souhaitée. xx Vérifiez que le mode d‘insertion est bien activé. Mode d‘insertion Le mode d‘insertion est matérialisé par un triangle dans la barre de progression. FR xx Appuyez sur la touche « Enregis. » dans le cas où un autre type d‘enregistrement est activé. Une liste des différents types d‘enregistrement apparaît à l‘écran. xx Vous pouvez naviguer vers le type d‘enregistrement « Insérer » à l‘aide des touches de montée/descente ; confirmez ensuite votre sélection avec la touche « OK ». xx Terminez votre sélection avec la touche « Enregist ». xx Démarrez l‘enregistrement en appuyant sur la touche » g «. Dictez le texte à ajouter. L‘indicateur d‘enregistrement s‘allume en orange. La barre de progression s‘allonge à mesure que la longueur de la dictée s‘accroît. 47 Emploi Ecrasement d‘un passage de dictée Vous pouvez parler par dessus la dictée enregistrée à partir de sa position momentanée. FR xx Pressez la touche » e/f «. L‘appareil commute en mode « arrêt de l‘enregistrement ». xx Sélectionnez la dictée souhaitée avec les touches de montée-descente. xx Appuyez à nouveau sur la touche » e/f « afin d‘écouter la dictée. xx Appuyez à nouveau sur la touche » e/f « à la position de dictée souhaitée. xx Vérifiez que le mode d‘écrasement est bien activé. Mode d‘écrasement xx Vous pouvez naviguer vers le type d‘enregistrement « Écraser » à l‘aide des touches de montée/descente ; confirmez ensuite votre sélection avec la touche « OK ». xx Terminez votre sélection avec la touche « Enregist » REMARQUE Ecrasement des données La dictée est effacée et remplacée par la nouvelle à partir de la position choisie. xx Démarrez l‘enregistrement en appuyant sur la touche » g «. Dictez le texte à modifier. L‘indicateur d‘enregistrement s‘allume en rouge. Le mode d‘écrasement est matérialisé par un trait vertical dans la barre de progression. xx Appuyez sur la touche « Enregis. » dans le cas où un autre type d‘enregistrement est activé. 48 Une liste des différents types d‘enregistrement apparaît à l‘écran. xx Terminez l‘enregistrement en appuyant sur la touche » e/f «. Ajout d‘un passage de la dictée Vous pouvez attacher un texte additionnel à la fin des dictées déjà enregistrées. Emploi xx Pressez la touche » e/f «. L‘appareil commute en mode « arrêt de l‘enregistrement ». xx Sélectionnez la dictée souhaitée avec les touches de montée-descente. xx Appuyez à nouveau sur la touche » e/f « afin d‘écouter la dictée. xx Pressez la touche » « (saut à la fin). REMARQUE Destination du saut Si des informations ou des index sont présents dans la dictée (voir le mode d‘emploi détaillé au chapitre « Informations / fonction d‘index »), le saut ( ) a lieu alors jusqu‘au prochain repère. Procédez ainsi jusqu‘à ce que la fin de la dictée soit atteinte. L‘indicateur d‘enregistrement s‘allume en rouge. La barre de progression s‘allonge à mesure que la longueur de la dictée s‘accroît. xx Terminez l‘enregistrement en appuyant sur la touche » e/f «. FR Vous pouvez également prédéfinir l‘ajout pour tous les enregistrements suivants. xx Pressez la touche « Enregist ». Une liste des différents types d‘enregistrement apparaît à l‘écran. xx Vous pouvez naviguer vers le type d‘enregistrement « Joindre » à l‘aide des touches de montée/descente ; confirmez ensuite votre sélection avec la touche « OK ». xx Terminez votre sélection avec la touche « Enregist ». xx Démarrez l‘enregistrement en appuyant sur la touche » g «. Dictez le texte à ajouter. 49 Emploi Modification des propriétés de la dictée Vous pouvez remanier après coup les propriétés des dictées présentes. FR REMARQUE Propriétés de la dictée Les propriétés de la dictée ne sont disponibles que dans le mode « Menu ». xx Pressez la touche » e/f «. L‘appareil commute en mode « arrêt de l‘enregistrement ». xx Sélectionnez la dictée souhaitée avec les touches de montée-descente. xx Pressez la touche « Détails ». Le menu servant à changer les propriétés de la dictée est incrusté sur l‘afficheur. Le curseur est positionné sur la dernière propriété utilisée. 50 REMARQUE Menu « Détails » Suivant l‘option de menu choisie, les propriétés sélectionnées sont appelées par différents processus de commande. Vous trouverez dans la fonction d’aide (la touche fonctionnelle inférieure) une brève explication concernant les propriétés de la dictée. Fonction d‘information / d‘index Vous pouvez assigner à chaque dictée l‘enregistrement d‘informations* spécifiques et d‘instructions à l‘intention de votre secrétaire et le réglage de repères d‘index* marquant certains passages de dictée. REMARQUE Menu Mode La fonction info/index est disponible uniquement en mode Menu pendant un enregistrement ou une lecture. Emploi Un signal sonore retentit lors de la lecture des informations et des index dans la dictée. Les informations et les index sont transférés sur le PC avec la dictée. xx Vérifier que l‘option « Supprimer la dictée » est sélectionnée et validez-la en pressant la touche « OK ». Suppression de la dictée xx Confirmez la demande à l‘aide de la touche « OK » pour effacer définitivement la dictée. xx Pressez la touche » e/f «. xx Pressez la touche « Supprimer ». La liste des éléments pouvant être effacés (dictée, index ou informations, fragment de dictée, dossiers) apparaît sur l‘afficheur. Une requête est alors affichée pour s‘assurer du choix fait. FR xx Si vous ne tenez pas finalement à supprimer la dictée, appuyez sur la touche « Annuler ». Eléments effaçables Liste des éléments effaçables 51 Garantie /Guarantee DE Die Bestimmungen der Grundig Business Systems Herstellergarantie finden Sie im Internet unter www.grundig-gbs.com. IT Die Konformität mit den für das Gerät relevanten EU-Richtlinien wird durch das CE-Zeichen bestätigt. EN Find out more details on the regulations of the Grundig Business Systems’ manufacturer guarantee on the internet: www.grundig-gbs.com La conformità con le direttive EU rilevanti per questo dispositivo sono confermate con il simbolo CE. DA The CE mark confirms that the device corresponds to the relevant guidelines of the European Union. FR Pour plus d’informations sur la garantie du fabricant de Grundig Business Systems visitez notre site Web: www.grundig-gbs.com De bepalingen van de fabrieksgarantie voor Grundig Business Systems vindt u op www.grundig-gbs.com. Het voldoen aan de voor het apparaat relevante EU richtlijnen wordt door het CE teken bevestigd. ES En contrará las condiciones de la garantía de fabricante de Grundig Business Systems en la página de Internet www.grundig-gbs.com. La conformidad con los parámetros de la UE relevantes para el equipo se confirma con el signo CE. Bestemmelserne i forbindelse med producentgarantien for Grundig Business Systems findes på internettet hos www.grundig-gbs.com. CE-mærket er vores tilkendegivelse om, at apparatet er i overensstemmelse med de relevante EU-retningslinjer. NO Le marque CE indique que l´appareil est en conformité avec les normes applicables de l´Union européenne. NL Le prescrizioni della garanzia del produttore per il Grundig Business Systems sono riportate in Internet nel sito www.grundig-gbs.com. Bestemmelsene til Grundig Business Systems produsentgaranti finner du på Internett under www.grundig-gbs.com. CE-merkingen stadfester samsvar med relevante EU-retningslinjer for apparatet. SV Grundig Business Systems garantivillkor finns på Internet på www.grundig-gbs.com. CE-märket innebär att apparaten uppfyller kraven i relevanta EU-riktlinjer. For USA/Canada: Note: Grundig Business Systems GmbH This equipment has been tested and found to comply with the limits for a Class B digital device, pursuant to part 15 of the FCC Rules. These limits are desi10 This equipment generates, uses and can radiate radio fregned to provide reasonable protection against harmful interferenceWeiherstraße in a residential installation. quency energy and, if not installed and used in accordance with the instructions, may cause harmful interference to radio communications. However, there is D-95448 Bayreuth no guarantee that interference will not occur in a particular installation. Germany If this equipment does cause harmful interference to radio or television reception, which can be determined by turning the equipment off and on, the user is encouraged to try to correct the interference by one or more of the following measures: • Reorient or relocate the receiving antenna. [email protected] • Increase the separation between the equipment and receiver. • Connect the equipment into an outlet on a circuit different from that to which the receiver is connected. • Consult the dealer or an experienced radio/TV technician for help. Changes or modifications not expressly approved by the party responsible for compliance could void the user’s authority to operate the equipment. www.grundig-gbs.com Grundig Business Systems GmbH, Weiherstraße 10, D-95448 Bayreuth, Germany Email: [email protected], Internet: www.grundig-gbs.com 36178942 0201 0200 03/2014 10/2011 FCC