1
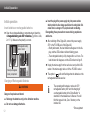
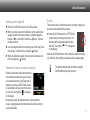
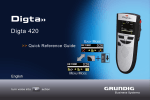
Digta 420 >> Quick Reference Guide Easy Mode + English x-Version Menu Mode This operating manual contains important instructions for safe and efficient handling of the Grundig Business Systems Digta 420 (hereinafter referred to as “device”). This operating manual is part of the device and must be kept accessible in the immediate vicinity of the device for persons working on and with the device. Carefully read and make sure you understand this operating manual and all product safety labels prior to starting any work with the device. The basic prerequisite for safe work is compliance with all specified safety and handling instructions. In addition, all local accident prevention guidelines and general safety regulations effective at the implementation site of the device apply. Illustrations in this operating manual are provided for basic understanding and can vary from the actual model of the device. No claims can be derived from the illustrations in this operating manual. Disclaimer All information and instructions in this operating manual have been provided under due consideration of applicable guidelines and regulations, the current and known state of the art, as well as our many years of in-house experience. The manufacturer assumes no liability for damages due to: ■ Failure to comply with the instructions in this operating manual ■ Improper use / misuse ■ Willful operation by non-authorized persons ■ Unauthorized conversions or non-approved technical modifications ■ Use of non-approved spare parts The originator is solely liable to the full extent for damages caused by such conduct. The agreed upon obligations in the delivery contract, the general terms and conditions, the manufacturer’s delivery conditions, and the statutory regulations valid at the time the contract was concluded, apply. Copyright This operating manual is protected by copyright. No part of this operating manual may be reproduced in any form or incorporated into any information retrieval system without written permission of Grundig Business Systems GmbH (“the manufacturer”). Delivery of the operating manual to third parties, duplication in any form - including excerpts - as well as exploitation and/or communication of the content, are not permitted without a written declaration of release from the manufacturer. Actions to the contrary make damage compensation mandatory. We reserve the right to enforce additional claims. The manufacturer © Grundig Business Systems GmbH Weiherstraße 10 D-95448 Bayreuth holds the copyright. Illustration 1: Device front Illustration 3: Device rear, battery compartment 8 25 1 7 2 32 31 6 5 4 26 27 3 28 30 Illustration 2: Display 10 9 11 18 19 17 16 15 14 13 12 20 21 22 24 29 23 Explanation of User Controls and Connections No Description 1 Fast forward button 2 Slide switch 3 4 5 6 Loudspeaker „NEW“ button Navigation button Selection button 7 Display 8 Record indicator 9 10 11 12 13 14 Dictation indicator Start-Stop-indicator Charging indicator Active key functions Status bar Dictation positions no. 15 Encryption Functional significance ►► FFWD Fast forward REC Recording STOP Stop ► PLAY Play-back ◄◄ REW Rewind Play-back of sound signals Create new dictation Dictation-/function selection Menu activation, cancel or execute a function Operational status indicator and indicator of the adjustable menu functions, for details see illustration 2 Lights up during recording, blinks regularly during recording pause Dictation-no., info-no., index-no. Recording/play-back runs or stops Rechargeable battery, USB-, power supply E.g. modify dictation, select dictation, menu Length of dictation Position of dictation in the active folder Indicator if dictation is encrypted or not No Description 16 Active function 17 18 19 20 Clock Folder indicator Voice activation Card indicator Functional significance ► Play-back Recording Recording pause _▼_ Insert Play-back end ►► Fast forward ◄◄ Rewind Time in hours and minutes Play-back/recording in the active folder On/Off Recording/play-back of dictations stored on the inserted memory card 21 Remaining storage time Free memory shown in hours and minutes 22 Microphone sensitivity Record volume adjustment (in 3 levels) 23 Priority indicator Dictation with priority (PR) 24 Dictation length Length of active dictation in hours, minutes and seconds 25 Digta card MMC / SD-card to save dictations on an external memory card 26 Microphone socket For external extra microphone 27 Microphone loophole Built-in, internal microphone 28 On/Off-switch On/Off-switch of device, key lock 29 USB-socket For mini-USB-cable to the pc 30 Battery compartment For rechargeable 466- or AAA-batteries 31 Card slot For Digta card to store dictations 32 Earphone socket Output voltage max. 90 mV Contents Contents General........................................................ 6 Explanation of signalwords and symbols....................................................... 6 Safety information...................................... 7 Intended use................................................ 7 Special hazards........................................... 7 Electrical voltage......................................... 7 Rechargeable batteries................................ 8 Traffic............................................................ 8 Particular groups of persons........................ 9 Obstacle....................................................... 9 Electronic components................................. 9 Cleaning..................................................... 10 Disposal...................................................... 10 CE note.......................................................11 Scope of delivery.........................................11 Accessories.................................................11 Initial operation......................................... 12 Insert batteries or rechargeable batteries.. 12 Charging of rechargeable batteries............ 12 Switching on the Digta 420........................ 13 Utilization of internal or external memories13 Key lock...................................................... 13 Software..................................................... 14 System requirements................................. 14 Operating................................................... 15 Easy Mode - Menu Mode............................. 15 Switchover of the modis from Easy Mode to Menu Mode. ................................................ 15 Easy Mode.................................................. 15 Initial display view....................................... 15 Create a new dictation............................... 16 Inserting a part of a dictation...................... 16 Modifying the dictation................................ 17 Select and listen to a dictation................... 18 Setting the volume...................................... 19 Fast play-back............................................ 19 Fast skip to the start/end position of a dictation ..................................................... 19 Delete an entire dictation........................... 20 Automatic formatting.................................. 20 Data transfer to the pc and forwarding....... 20 Menu function overview.......................... 21 Troubleshooting....................................... 22 Technical data........................................... 23 General General Explanation of signalwords and symbols Warnings Warnings are indicated by symbols. In addition they are introduced with signal words that express the scope of the hazard. ■ All instructions must be strictly complied with! ■ When working always act cautiously to prevent accidents, personal injury, or property damage! DANGER DANGER indicates a hazardous situation which, if not avoided, will result in death or serious injury. WARNING WARNING indicates a hazardous situation which, if not avoided, could result in death or serious injury. CAUTION CAUTION, used with the safety alert symbol indicates a hazardous situation which, if not avoided, could result in minor or moderate injury. NOTICE NOTICE is used to address practices not related to personal injury. It indicates specific actions which prevent from damage to the device and from loss of dictations. i Indicates useful tips and recommendations as well as information for efficient and trouble-free operation. Safety information Safety information Intended use ■ If the power supply is dropped, have it checked by an authorized dealer to ensure that it functions correctly and safely. T�������������������������������������������������������������� he Digta 420 has been designed exclusively for the recording, storage and play-back of dictations only. The device may only be used for its intended purpose. Any other kind of utilization is forbidden. Disregarding these precautions means risking a fatal electric shock. Special hazards Danger of fire, explosion and overheating! WARNING ■ Use the power supply only with the line voltage specified on the rating label. Electrical voltage DANGER Danger of electric shock! ■ Do not touch the power supply* with wet hands. ■ Do not insert metal objects or the like into the power supply. ■ Never open the power supply or modify the plug or cable. ■ Do not use the power supply if the housing or connection cable is damaged or the power supply does not function properly. ■ Use the power supply only with its original connection cable or adapter (European, UK and USA version). Never use other connection cables or adapters with different plugs. ■ Do not place heavy objects on the power supply or connection cable, and do not cover the power supply. ■ Use the power supply only in a dry indoor environment. Protect the power supply from moisture in the form of water and high humidity. ■ Do not bend the connection cable of the power supply. * Extra equipment Safety information ■ Do not operate or store the power supply* near heaters or direct sunlight. Ensure adequate ventilation. The permitted temperature range is:. -4°F (-20°C) to 158°F (70°C) for storage. 32°F (0°C) to 95°F (35°C) for operation ■ Grundig Business Systems power supplies are only to be used with Grundig Business Systems office equipment. ■ Pull the power supply out of the socket to separate the device from the power grid. ■ Unplug the power supply before cleaning it. ■ Clean the power supply only with a soft, dry cloth. Do not use chemical cleaning agents such as alcohol, thinner, gasoline or the like. Disregarding these precautions means risking fire, explosion or overheating. Rechargeable batteries WARNING Danger of explosion and burns! ■ Do not throw batteries* or rechargeable batteries* into a fire. Do not short-circuit the contacts. ■ Do not keep batteries or rechargeable batteries loose in pockets, take them apart or modify them. ■ Recharge the rechargeable batteries only in the dictation machine. ■ Do not use damaged batteries or rechargeable batteries. Disregarding these precautions means risking explosions and burns. Traffic WARNING Danger of accidents! ■ Do not use the device while operating vehicles (such as cars, bicycles, motorcycles, ATVs, etc.). * Extra equipment Disregarding this precaution can lead to traffic accidents. Safety information Particular groups of persons caution Risk of injury! ■ Do not leave the device unattended and use it with extreme caution if children or persons who cannot assess the dangers are nearby. ■ Keep the device away from persons (including children) who are unable to use it safely due to their physical, sensory or mental limitations, lack of experience or lack of knowledge. Disregarding these precautions means risking injury. Obstacle Disregarding these precautions may lead to a stumbling hazard. Electronic components NOTICE Risk of damage and void warranty! ■ Protect the device from moisture (such as rain or water spray). ■ Do not place the device near a heater nor in direct sunlight. The permitted temperature range is:. -4°F (-20°C) to 158°F (70°C) for storage. 5°F (-15°C) to 95°F (35°C) for operation ■ Do not open the device under any circumstances. CAUTION Stumbling hazard! ■ Ensure that the power supply* is always in a safe position and that neither the power supply nor any cables connected to the device or to the docking station* constitute obstacles. ■ Do not modify the device. Disregarding these points can cause the device to be damaged and the warranty to become void. * Extra equipment Safety information NOTICE Loss of data! ■ Please check your recording to ensure that it is complete and repeat it if necessary. If you are electrostatically charged and touch a device which is switched on, the device may switch off automatically to protect against damage. NOTICE Signal interference! ■ Do not make recordings near mobile telephones. In case of interference (such as hissing), increase the distance. Disregarding this point may lead to disruption of the recording by interference. 10 Cleaning NOTICE Risk of damage! ■ Clean the device only on the outside with a dry, soft cloth. Do not use chemical cleaning agents. Disregarding these instructions can cause the device to be damaged. Disposal Batteries and rechargeable batteries are not to be disposed of in ordinary household trash. Please dispose of them in an environmentally sound manner by bringing them to an appropriate public collection area or returning them to your dealer. Safety information CE note Accessories The CE mark confirms that the device corresponds to the relevant guidelines of the Eurpean Union. Scope of delivery ■ Dictation machine Digta 420 ■ USB cable ■ CD with pc-software ■ pouch You will find original accessories approved by the manufacturer for Digta 420 under: www.grundig-gbs.com The performance features described by Grundig Business Systems only apply to genuine Grundig Business Systems accessories. Please make sure to choose only genuine accessories from Grundig Business Systems. Product liability and warranty service are provided only in this case. The use of non-Grundig-BusinessSystems accessories or those which are not recommended and approved by Grundig Business Systems automatically void any warranty claims towards Grundig Business Systems. 11 Initial Operation Initial operation Insert batteries or rechargeable batteries ► Open the rechargeable/battery compartment and insert the re������������������������������������������ chargeable battery pack 466* or batteries (Typ Micro / AAA, 2 x 1.5 V). Make sure the polarity is correct. Rechargeable battery sensor contact ► After switching off the Digta 420, connect the power supply 475* to the PC/USB-jack of the Digta 420. – Shortly afterwards, the load indicator will appear on the display, and the LED-indicator will start flashing green. – The rechargeable battery is fully charged after ca. 4 hours. The load indicator will disappear, and the LED-indicator will go off. ► Unplug the mains supply from the wall socket, and pull the USBsocket of the mains supply cable out of the »PC/USB« socket. Battery/rechargeable battery compartment Charging of Rechargeable Batteries warning Danger of explosion and burns! ■ Recharge the batteries only in the dictation machine. ■ Do not use damaged batteries. 12 ■ Insert the plug of the power supply only into power sockets which provide the line voltage specified on the rating label. Otherwise there is a danger of fire, explosion and overheating. Disregarding these precautions means risking explosions and burns. ► The symbol » « will start flashing when the batteries or the rechargeable batteries are low. i The operating with batteries, mains unit 475*, rechargeable battery 466* and the charging of a rechargeable battery in the Digta Station* is described in the detailed user’s manual. You will find this manual in the „Docu” directory on the included CD. * Extra equipment Initial Operation Switching on the Digta 420 ► Move the On/Off switch down to the »ON« position. ► When the unit is started for the first time, opt the required language provided in the menu prompt by using the navigation buttons »◄►« and confirm it with the » «button. Then set the date and time. ► Use the navigation buttons to enter the year, month, day, hours and minutes. Confirm each by using the » « button. ► When an author-list appears, then select your name and confirm it by using the » « button. Utilization of internal or external memories Dictations are stored on the internal memory of the dictation machine as long as no external, removable memory card (Digta card) is inserted. As soon as a DIGTA Card is inserted, all dictations will be stored on this memory card. The card symbol » « will appear on the display. During this process, the internal memory is prevented from access. Copying between the internal memory and the memory card is not feasible. Key lock The key lock helps to avoid that the active recording or play-back process can be switched off by mistake. ► Move the On/Off switch to the »OFF/HOLD« position during recording or play-back. The buttons and the slide switch will be locked after this. The symbol » HOLD « will appear on the display. Move the On/Off switch to the »ON« position to deactivate the key lock. After this, the recording or play-back can be stopped again. i The dictation machine will go off when using the On/Off switch during other functions. 13 Initial Operation Software System requirements Insert into your pc drive the CD containing the software for administration, sending of dictations and configuration information of the Digta 420. Follow the instructions displayed on your pc. ■ Processor (500 MHz or higher) i . . . 14 Further information about the configuration/system requirements/firmware-update/usage of accessories is described in the comprehensive user‘s manual. ■ Windows 2000 SP4 (Rollup 1), XP SP2, Vista, Windows 7 ■ USB 1.1 or USB 2.0 ■ MAPI-compatible e-mail-programme for e-mail-connection (for example: Microsoft Outlook) Operating Operating Easy Mode Easy Mode - Menu Mode All functions needed for dictating, play-back or deleting dictations are available in the Easy Mode. The Easy Mode serves for making the pure dictation functionality of the Digta 420 available for the author. The menu functions are in an off-state in the Easy Mode. The switchover from the Easy Mode to Menu Mode is achieved through switching on the Digta 420. A description about the full functionality of the Digta 420 is included in the comprehensive user‘s manual. You will find this manual in the „Docu” directory on the delivered CD. Switchover of the modis from Easy Mode to Menu Mode ► Keep the „NEW“ button of the Digta 420 pressed. Initial display view A dictation name and the length of the dication appear on the initial display. In case that there are no dictations stored, the start/ stop indicator » « and the battery indicator » « or the rechargeable battery indicator » « will appear on the display. Pay attention to the remaining free memory space. When the remaining memory space is less than 60 minutes, the remaining memory space will appear in the upper right corner of the display. ► Switch on the Digta 420 by means of the On/Off switch and keep the „NEW“ button pressed until the initial signal appears on the display (hour glass and progress bar). 15 Operating Create a new dictation ► Move the slide switch to the » STOP« position. ► Press the „NEW“ button to start a new dictation. The Digta 420 will switch over to the recording pause , and the LEDindicator of the Digta 420 will flash red. ► Move the slide switch to the » REC« position to start the recording of a new dictation. The start-stop-indicator » « starts to rotate. The dictation length increases. i In case that workflow-functions such as „typist“, „group“, „dictation type“, „priority“ or „No./reference“ have been activated in the Menu Mode, you now will be prompt to select an item by using the navigation button and to confirm it by using the selction button » «. ► Move the slide switch to the position » STOP« (recording pause) to stop the recording. Press the left selection button » « to stop the recording pause. 16 Insertion of a dictation part During recording, a new recording can be inserted at a specific dictation position. ► Move the slide switch to the » STOP« position. ► Select the desired dictation by using the navigation buttons » «. ► Move the slide switch to the »►PLAY« position in order to listen to the dictation. ► Move the slide switch during recording to the » STOP« position, exactly at the position you would like to insert the text. ► Press the right selection button » «. Die record indicator flashes orange, and the pause symbole appears on the display » «. Operating ► Move the slide switch to the » REC« position and dictate the text to be inserted. ► Select the dictation position where you like to modify the dictation, then move the slide switch to the » STOP« position during play-back. ► Move the slide switch to the » STOP« position at the end of the insertion process. ► Move the slide switch to the position » REC« and record the new text. The red recording indicator will light up. The start-stop indicator » « will turn, and the pause symbol will turn into the recording symbol » «. Press the left selection button » « in order to accomplish the process. NOTICE Loss of data! From this point on, your old dictation will be overwriten. Modify a dictation You can rerecord the dictated text during the play-back process from a specific dictation point on or record an additional text at the end of the dictation. ► Move the slide switch to the position » STOP«. ► Select the desired dictation by using the navigation buttons » «. ► Move the slide switch to the position »►PLAY« (play-back). ► Move the slide switch to the » STOP« position, the red record indicator flashes, and the bright start-stop-indicator » « will appear on the display as well as the pause symbol » «. Press the left selection button » « in order to accomplish the process. 17 Operating Select and listen to a dictation ► Move the slide switch to the position » STOP«. ► Select the desired dictation by using the navigation buttons » «. The selected dictation name will appear on the display, for example: »DICT0001«. ► Move the slide switch to the position »►PLAY«. – ���������������������������������� The obscured start-stop-indicator » « on the display starts to rotate: The play-back symbol »►« appears on the left side of the display. The progress bar starts running. i 18 When you switch ON the dictation machine and do not select „new dictation,“ the dictation machine will skip exactly to the last position of the last dictation which was in progress. ► When you decide to interrupt the play-back process, just move the slide switch to the » STOP« position. Operating Setting the volume Press the left navigation button during the play-back process to turn down the volume or press the right one to turn up the volume. – The loudspeaker symbol » « in the display will turn into the volume setting symbol » «. Fast skip to the start/end position of the dictation ► Move the slide switch to the position »►PLAY«. ► You can skip to the end or the beginning of the dictation by lightly pressing the selection button. Fast play-back ► Press the right selection button »→1.5« during play-back. – The play-back will run ca 1.5 times faster. ► Press the right selection button »→1.0« during the fast play-back process to return to the standard play-back speed. 19 Operating Automatic formatting Delete an entire dictation ► Move the slide switch to the position » ► Select the desired dictation by means of the navigation buttons »◄►«. The selected dictation name will appear on the display, for example: »DICT0001«. ► Press the left selection button » « to activate the delete function. ► A prompt appears, and you are asked whether you really want to delete the entire dictation » «. If so, confirm it by pressing the right selection button » «. After this, the dictation will be deleted. ► Press the left selection button » «, in case that you do not want to delete the dictation. 20 STOP«. When 50 dictation have been stored and deleted, the memory will be formatted automatically when switching off the device. This process is progressed during the shut-down process. Data transfer to the PC and forwarding Connect the Digta 420 to the USB-cable and plug the USB-cable to the pc in order to transfer the dictations to your pc first, and in a next step, you can send the data to your typist. The Grundig Business System pc-software can be configurated so that the entire process runs automatically. The used memory space is then available again Menu Function Overview Easy Mode - Menu Mode The menu functions are switched off in the Easy Mode. Press the „NEW“ button when switching on the Digta 420 till the initial display view appears on the display (hour glass and progress bar). Menu Function Overview Press the right selection button » «. The following functions can be selected by means of the nagivation button »◄►« and by confirming with the » « button. –Delete: dictation, all dictations in a folder, all dictations in all folders. –Folder selection; for sorting of new dictations and play-back of dictations stored in different folders. –Workflow-function (typist, dictation type, group, priority, No./reference) activation. –Switch functions: – Set microphone sensitivity. – Voice activation. The recording stops automatically during silent periods or recording pause). – Select time when the energy saving, non-operative state shall be activated automatically. The Digta will switch off completely after 30 minutes. – Selection of the DSS standard "SP", DSS Pro "QP"and encryption. – Change of date/time. – Reset dictation counter to "1". – Switch off audio signals. – Display illumination bright/dimmed. – Pc-data transfer automatically through USB-connection or manual selection. – Switch off the loudspeakers for play back with earphones in the Digta station. – Change the fast forward/rewind speed. – Set an index or 1.5 fold play-back speed with the right selection button during play-back. – Dictation position number on/off. – Time indicator on/off. - Change of the date-/time format. - ID-contents (barcode) indicator on/off. –Basic settings of the device: – Information about serial number and firmware-version. – Reformat data medium. Attention: data loss! All dictations and other data will be erased. – Restore the factory setting of the device Attention: data loss! All dictations and other files as well as settings will be erased. – Selection of display language. – Functions in the modify menu: – Delete a dictation or a part of the dictation. – Insert a text, an info or an index. PR– Set dictation priority. – Postpone a dictation. – Lock a dictation. 21 Troubleshooting Troubleshooting Electrical devices can experience malfunctions. This is not necessarily always a fault on the device. Thus, based on the following table, check if you can eliminate the malfunction yourself. 22 Malfunction Possible cause Repair Device does not switch on. Battery empty. Power supply interrupted. Charge or replace the battery. (See the section “Insert batteries or rechargeable batteries” and “Charging of Rechargeable Batteries”.) Device does not respond to input commands. Key lock activated. Move the On/Off switch to the »ON« position to deactivate the key lock.� No sound audible, or too low. Play-back volume incorrectly set. Set volume (See the section “Setting the volume“). Sound distorted or too loud. Microphone sensitivity or playback volume incorrectly set. Set volume (See the section “Setting the volume“) or set microphone sensitivity to „ambience loud“ (See the section „Microphone sensitivity“ in the comprehensive user‘s manual on the delivered CD) No menu functions available. Easy Mode activated. Press the „NEW“ button when switching on the Digta 420 till the initial display view appears on the display (hour glass). Technical data Technical data Memory capacity for 10 min recording DSS standard play: approx. 1 MB DSSPro quality play: approx. 2 MB Frequency range DSS standard play: 200 Hz – 5500 Hz DSSPro quality play: 200 Hz – 7500 Hz Microphone socket 0.14 inch. (3.5 mm) jack Earphone socket 0.14 inch. (3.5 mm) jack, mono (stereo headphones can be used) PC interface USB 1.1, USB 2.0 FS (full speed) Batteries 2 x 1.5 V , Typ Micro / AAA, 2 x 1.5 V Rechargeable battery Rechargeable battery pack 466 (NiMH) and power supply/charger unit model 475 (500 mA, 5 V) Operating time approx. 9 h recording time Size (H x W x D, without pro- approx. 5 inch x 2.13 inch x 0.83 inch truding controls) (127 mm x 54 mm x 21 mm) Weight approx. 3.63 ounce (103 g) including rechargeable battery 466 23 08/2009 Germany [email protected] www.grundig-gbs.com 36174 943 0702 Mit allen Funktionen, durch die professionelle Vieldiktierer effektiv Zeit sparen. Mit einer überzeugenden Grundig Business Systems GmbH Bedienerfreundlichkeit. Weiherstraße 10 mit einer technischen Ausstattung, die D-95448Und Bayreuth keine Wünsche offen lässt.