1
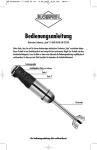
Bedienungsanleitung
Reiskocher 17 0900 00 00
Vielen Dank, dass Sie sich für diesen hochwertigen elektrischen Reiskocher/Dampfgarer
entschieden haben. Dieses Produkt ist ein Qualitätsprodukt und entspricht den anerkannten
Regeln der Technik und dem Gerätesicherheitsgesetz. Lesen Sie bitte vor dem ersten
Gebrauch die Bedienungsanleitung sorgfältig durch und bewahren Sie diese gut auf. Bitte
beachten Sie besonders die Sicherheitshinweise!
Die Bedienungsanleitung bitte aufbewahren!
D
Sicherheitshinweise
1. Bitte lesen Sie diese Bedienungsanleitung und die Sicherheitshinweise vor der ersten
Inbetriebnahme des Gerätes sorgfältig durch!
2. Sollte dieses Gerät an andere Personen weitergegeben werden, stellen Sie sicher, dass diese
Bedienungsanleitung mit ausgehändigt wird.
3. Bei unsachgemäßem Gebrauch oder falscher Handhabung kann keine Haftung für
eventuell auftretende Schäden übernommen werden. Dieses Gerät ist nur für den
Hausgebrauch bestimmt.
4. Prüfen Sie bitte zuerst, ob die Stromart und Netzspannung mit den Angaben auf dem
Typenschild übereinstimmen.
5. Fassen Sie weder den Reiskocher noch den Netzstecker mit nassen oder feuchten
Händen an.
6. Wir empfehlen, grundsätzlich keine Steckdosen zu benutzen, mit der bereits andere Geräte
betrieben werden.
7. Betreiben Sie den Reiskocher/Dampfgarer nur unter Aufsicht und benutzen Sie ihn
ausschließlich für den vorgesehenen Zweck. Achtung: Das Gerät wird während des
Gebrauchs heiß und Dampf entweicht!
8. Kinder erkennen nicht die Gefahren, die beim Umgang mit Elektrogeräten entstehen
können. Halten Sie deshalb Kinder von Elektrogeräten fern.
9. Stellen Sie den Reiskocher/Dampfgarer auf eine nicht brennbare, ebene und stabile
Oberfläche, nicht in die Nähe von heißen Herdplatten, Gasflammen oder anderen
Wärmequellen, sowie außer Reichweite für Kinder. Achten Sie auf ausreichend freien Raum
neben dem Reiskocher/Dampfgarer.
Nach jedem Gebrauch den Netzstecker ziehen, ebenso bei:
– Störungen während des Betriebes,
– jeder Reinigung
Bitte ziehen Sie nicht an der Anschlussleitung, sondern am Stecker selbst! Lassen Sie die
Anschlußleitung nicht herunterhängen.
2
D
10. Benutzen Sie keine brennbaren, ätzenden und alkalischen Materialien in der Nähe des
Gerätes.
11. Bitte tragen oder verschieben Sie den Reiskocher/Dampfgarer nicht, solange er in
Betrieb ist.
12. Tauchen Sie das Gerät, das Kabel oder den Stecker nie in Wasser oder andere Flüssigkeiten.
Bitte reinigen Sie es nicht in der Spülmaschine.
13. Überprüfen Sie das Kabel regelmäßig auf Beschädigungen. Vermeiden Sie, dass das Kabel
gequetscht oder geknickt wird, sich an scharfen Kanten scheuert oder Kontakt zu warmen
Oberflächen hat. Sollte das Kabel beschädigt sein oder werden, muss es in jedem Fall durch
einen Fachmann ersetzt werden.
14. Bitte benutzen Sie das Gerät niemals, wenn Sie Beschädigungen feststellen oder es
heruntergefallen ist.
15. Versuchen Sie nie, das Gerät selbst zu öffnen oder zu reparieren. Lassen Sie es im Falle
von Störungen nur von qualifizierten Fachleuten reparieren!
Vor der ersten Inbetriebnahme
• Bitte lesen Sie zuerst diese Gebrauchsanweisung sowie die Sicherheitshinweise sorgfältig
durch.
• Entfernen Sie zunächst sämtliche Verpackungsmaterialien.
• Nun gründlich mit einem weichen Tuch (ggf. leicht angefeuchtet) abwischen. Achtung: beim
Reinigen keine scharfen Flüssigkeiten oder scheuernde Reinigungsmittel
verwenden, danach ggf. abtrocknen. Der innere Metalltopf kann in der Spülmaschine
gereinigt werden; der Gareinsatz sowie der Messbecher sollten von Hand gespült werden,
um Beschädigungen zu vermeiden.
3
D
Inbetriebnahme
• Überprüfen Sie, dass die Netzspannung und die Stromart mit den Spannungsangaben auf
dem Gerät übereinstimmen.
• Stellen Sie den Reiskocher/Dampfgarer auf eine geeignete Oberfläche (keine
Metalloberfläche, keine Textilien etc.).
• Achten Sie darauf, dass der Kondenswasserbehälter rückseitig am Gerät, unterhalb der
Deckelbefestigung, immer eingesetzt ist!
Reis kochen/Vorbereitungen
• Messen Sie die gewünschte Menge Reis mit dem beiliegenden Messbecher ab. Jetzt den Reis
in einem separaten Topf oder Schüssel auswaschen, bis das Wasser klar wird.
1 Messbecher Reis entspricht ca. 125g ( ca. 1 – 2 Portionen ).
• Gießen Sie zuerst immer das Wasser in den Topf. Die Markierung im Innern des Topfes ist
eine Standard- Empfehlung; Sie können die Wassermenge aber nach Ihrem persönlichen
Geschmack verändern. In keinem Falle jedoch über die max. Markierungen ( 8 Cup )
einfüllen!
• z.B.: bei 2 Messbechern Reis, dies ist die Mindestmenge, füllen Sie Wasser bis zur
Markierung 2 Cup ein! Verfahren Sie mit den übrigen Maßen (3, 5, 6, 8 Messbecher/Cups
entsprechend!
3 Messbecher Reis
=
Flüssigkeit einfüllen bis 3 Cup
4 Messbecher Reis
=
Flüssigkeit einfüllen bis 4 Cup
5 Messbecher Reis
=
Flüssigkeit einfüllen bis 5 Cup
6 Messbecher Reis
=
Flüssigkeit einfüllen bis 6 Cup
8 Messbecher Reis
=
Flüssigkeit einfüllen bis 8 Cup
Geben Sie nun den ausgewaschenen Reis zum Wasser hinzu.
4
D
• Beim Kochen von original chinesischem Congee, dem englischen Porridge oder Risotto
verwenden Sie folgende Tabelle:
Wasserstandsanzeige
Reis ( Messbecher )
Congee/Porridge
Risotto
1/2
2
3/4
3
1
4
1
1 ⁄2
3 Cup
3
6 Cup
4
8 Cup
Oder benutzen Sie nur den mitgelieferten Messbecher für Flüssigkeit und Reis und
arbeiten mit folgenden „Verhältnissen“:
normaler Reis
1:2
= 1 MB Reis + 2 MB Flüssigkeit
Risotto
1:4
= 1 MB Reis + 4 MB Flüssigkeit
Congee/Porridge
Reisbrei
1:8
= 1 MB Reis + 8 MB Flüssigkeit
• Wischen Sie nach dem Einfüllen den Topfrand sorgfältig ab und stellen Sie ihn in den
Reiskocher/Dampfgarer. Vergewissern Sie sich, dass der Kondenswasserbehälter eingesetzt ist.
• Schließen Sie jetzt den Deckel, bis er hörbar einrastet. Andernfalls wird das Ergebnis
beeinträchtigt.
• Stecken Sie den Stecker in eine geeignete Steckdose (230 V Wechselstrom/50 Hz). Ein Signal
ertönt und im Display erscheint „88“ und alle Kontrolllampen leuchten auf. Sobald die
Kontrollleuchten erloschen sind, erscheint im Display „— —„ und der
Reiskocher/Dampfgarer ist nun einsatzbereit.
5
D
Timer - Taste
• Mit dieser Taste können Sie die Zeit einstellen, nach deren Ablauf der Kochvorgang starten
soll. Die Einstellung reicht von 2 – 15 Stunden.
• Jeder Druck auf die Taste zählt 1 Stunde mehr. Haben Sie hier eine Einstellung vorgenommen,
drücken Sie anschließend eine der folgenden Funktionstasten:
Reis/rice
Risotto
Suppe/soup
Sie hören einen Signalton und die Lampe beginnt entsprechend der Einstellung zu blinken.
• Beträgt die Restzeit nur noch eine Stunde, beginnt das System die Zeit rückwärts zu zählen.
Nach Ablauf der Zeit hören Sie einige Signaltöne und der Reiskocher startet das gewählte
Programm (Reis – Risotto – Suppe); die jeweilige Kontrollleuchte ist an!
• Vorsicht: Nach Beendigung des Kochvorganges kann beim Öffnen des Deckels heißer
Wasserdampf entweichen!
Funktionstaste „Reis/rice“
• Diese Einstellung gart den Reis etwas länger, aber dafür sehr schonend.
• Ist der Reiskocher an das Stromnetz angeschlossen, der Topf gefüllt und der Deckel gut
verschlossen, drücken Sie die Taste Reis/rice, die Kontrollleuchte für „Reis“ im Anzeigenfeld
leuchtet auf und im Display erscheint das Symbol „—„
• Sobald leichter Dampf aus dem Reiskocher/Dampfgarer austritt, wird der Reis für 14 Minuten
gegart. Im Display erscheint die Zahl 14 und das System zählt die Minuten nun rückwärts.
• Ist der Garvorgang beendet, leuchtet die „Warmhalten/keep warm“ Kontrollleuchte auf,
Sie hören einige Signaltöne und im Display erscheint das Symbol„b“
• Sie können jetzt den fertig gekochten Reis entnehmen, indem Sie vorsichtig den Deckel
öffnen. Als weitere Möglichkeit können Sie den Reis warmhalten. Wir empfehlen, den Reis
nur für kurze Zeit warmzuhalten.
6
D
Funktionstaste „Schnell/quick“
• Diese Einstellung ist für schnelle Zubereitung geeignet, aber auch geeignet für Mengen von
1 bis 2 Messbechern.
• Ist der Reiskocher an das Stromnetz angeschlossen, der Topf gefüllt und der Deckel gut
verschlossen, drücken Sie die Taste Schnell/quick ,die Kontrollleuchte für „Schnell“ im
Anzeigenfeld leuchtet und im Display erscheint das Symbol „—„
• Sobald leichter Dampf aus dem Reiskocher/Dampfgarer austritt, wird der Reis für 10
Minuten gegart. Im Display erscheint die Zahl 10 und das System zählt die Minuten nun
rückwärts.
• Ist das Garen beendet, leuchtet die „Warmhalten/keep warm“ Kontrollleuchte auf, Sie
hören einige Signaltöne und im Display erscheint das Symbol „b“
• Sie können jetzt den fertig gekochten Reis entnehmen, indem Sie vorsichtig den Deckel
öffnen. Als weitere Möglichkeit können Sie den Reis warmhalten. Wir empfehlen, den Reis
nur für kurze Zeit warmzuhalten.
Funktionstaste „Risotto“
• Diese Einstellung ist geeignet für original chinesischen Congee, englischen Porridge oder
Risotto.
• Ist der Reiskocher an das Stromnetz angeschlossen, der Topf gefüllt und der Deckel gut
verschlossen, drücken Sie die Taste Risotto,die Kontrollleuchte für „Risotto“ im Anzeigenfeld
leuchtet und im Display erscheint das Symbol „—„
• Sobald leichter Dampf aus dem Reiskocher/Dampfgarer austritt, wird der Inhalt für 20 Minuten
gegart. Im Display erscheint die Zahl 20 und das System zählt die Minuten nun rückwärts.
• Ist das Garen beendet, leuchtet die „Warmhalten/keep warm“ Kontrollleuchte auf, Sie
hören einige Signaltöne und im Display erscheint das Symbol „b“
• Sie können jetzt den fertig gekochten Inhalt entnehmen, indem Sie vorsichtig den Deckel
öffnen. Als weitere Möglichkeit können Sie den Reis warmhalten. Wir empfehlen, den Reis
nur für kurze Zeit warmzuhalten.
7
D
Funktionstaste „Suppe/soup“
• Diese Einstellung ist geeignet zum Kochen von Suppen; einfach die vorbereitete Suppe in
den Topf geben. In keinem Falle jedoch über die max. Markierungen (8 Cup – 1,5 l)
hinaus befüllen!
• Ist der Reiskocher an das Stromnetz angeschlossen, der Topf gefüllt und der Deckel gut
verschlossen, drücken Sie die Taste Suppe/soup,die Kontrollleuchte für „Suppe“ im
Anzeigenfeld leuchtet auf und im Display erscheint die Zahl „70“. Durch erneutes Drücken
der „Suppe“-Taste können Sie die Zeit in 5 Minutenschritten bis 95 Minuten einstellen, aber
auch durch Weiterdrücken 40 – 65 Minuten eingeben!
• Sobald die Flüssigkeit kocht, erscheint im Display die eingestellte Zeit und das System
zählt die Minuten nun rückwärts.
• Ist das Kochen beendet, leuchtet die „Warmhalten/keep warm“-Kontrollleuchte auf, Sie
hören einige Signaltöne und im Display erscheint das Symbol „b“
• Sie können jetzt die fertig gekochte Suppe entnehmen, indem Sie vorsichtig den Deckel
öffnen, oder Sie halten die Suppe noch etwas warm.
Funktionstaste „Warmhalten/keep warm – Stop/cancel“
Warmhalten/keep warm
• Ist der Reiskocher an das Stromnetz angeschlossen, drücken Sie die Taste
„Warmhalten/Stop“, wenn Sie den vorher zubereiteten Inhalt warmhalten wollen. Die
Kontrollleuchte für „Warmhalten/Stop“ leuchtet auf.
• Wird innerhalb von 24 Stunden keine andere Einstellung vorgenommen, schaltet das System
diese Funktion ab.
Stop/cancel
• Ist der Reiskocher mit dem Stromnetz verbunden und der Kochvorgang abgeschlossen,
drücken Sie immer diese Taste! Die Kontrollleuchte leuchtet auf, Sie hören einige Signaltöne
und im Display erscheint das Symbol „b“
• Drücken Sie die Taste Stop/cancel auch immer dann, wenn Sie den aktuellen Kochvorgang
stoppen wollen.
8
D
Dampfgaren
Sie können mit dem mitgelieferten, gelochten Einsatz auch Gemüse, Kartoffeln oder
andere Lebensmittel im Dampf garen. Je nach Gargut können Sie dies auch auf einen
flachen Teller oder in eine flache Schüssel geben, die Sie dann in den gelochten Einsatz
stellen. Sie können hierzu alle Funktionstasten benutzen, je nach Zeit, die Sie zum
Dampfgaren benötigen. Wie z. B. das Programm „Schnell/quick“, das die kürzeste
Garzeit hat, oder das Programm „Suppe/soup“, da hier die Zeit manuell eingestellt
werden kann und somit besser für längere Garzeiten geeignet ist. Füllen Sie Wasser in den
Topf und achten darauf, dass der gelochte Einsatz nicht im Wasser hängt!
• Jetzt den gelochten Einsatz zusammen mit dem Gargut einsetzen.
• Schließen Sie den Deckel und drücken Sie anschließend eine der Funktionstasten:
„Schnell/quick“ für 10 Minuten, „Reis/rice“ für 14 Minuten, die Taste „Risotto“ für
20 Minuten Garzeit oder die Taste „Suppe/soup“, die jeweilige Kontrollleuchte im
Anzeigenfeld leuchtet auf und im Display erscheint „—„ Haben Sie die Funktionstaste
„Suppe/soup“ gewählt, können Sie durch erneutes Drücken der „Suppe“ Taste die
voreingestellte Zeit von „70“ in 5 Minutenschritten bis 95 Minuten einstellen, bzw. zum
Dampfgaren durch Weiterdrücken zwischen 40 und 65 Minuten eingeben! Berechnen Sie
die benötigte Garzeit anhand der Lebensmittel, die Sie garen möchten; weichere Lebensmittel
haben eine kürzere Garzeit, festere oder härtere Lebensmittel eine etwas längere Garzeit.
• Sobald die Flüssigkeit kocht, erscheint im Display die eingestellte Zeit entsprechend der
gedrückten Funktionstaste, also „10 – 14 – 20“ oder die manuell eingestellte Zeit der
Funktionstaste „Suppe/soup“ und das System zählt die Minuten nun rückwärts.
• Ist das Garen beendet, leuchtet die „Warmhalten/keep warm“-Kontrollleuchte auf, Sie
hören einige Signaltöne und im Display erscheint das Symbol „b“
• Schalten Sie den Reiskocher nun aus, indem Sie den Stecker aus der Steckdose ziehen.
9
D
Beenden
• Schalten Sie das Gerät ab, wenn die Benutzung abgeschlossen ist oder es nicht mehr
eingesetzt wird.
• Ziehen Sie zuerst den Stecker aus der Steckdose und anschließend das Kabel aus dem Gerät.
• Nach jedem Gebrauch entnehmen Sie den rückseitig angebrachten Kondenswasserbehälter,
entleeren und reinigen diesen und setzen ihn wieder ein.
Reinigung und Pflege
• Vor jeder Reinigung immer das Gerät ausschalten, den Netzstecker ziehen und abkühlen
lassen.
• Wischen Sie den Reiskocher selbst nur mit einem feuchten Tuch ab.
• Verwenden Sie keine scharfen Gegenstände, Benzin, Lösungsmittel, Scheuerbürsten oder
scheuernde Mittel zum Reinigen.
• Trocknen Sie das Gerät mit einem weichen Tuch ab, bevor Sie es wegstellen oder neu
benutzen.
• Reinigen Sie den beschichteten Topf mit einem milden Spülmittel; verwenden Sie hierzu keine
kratzenden oder scheuernden Bürsten oder Schwämme.
• Kondenswasserbehälter, Messbecher und Dämpfeinsatz sollten ebenfalls mit einem milden
Spülmittel von Hand gereinigt werden.
Rezepte und Tipps
Congee:
Congee ist ein besonders in Asien beliebter Reisbrei, der vor allem zum Frühstück gegessen
wird. Er wird pur gegessen oder mit weiteren Zutaten ergänzt. Diese können sowohl herzhaft
wie auch süß sein. Probieren Sie es einfach mal aus. Hier ist das Grundrezept:
Zutaten für 4 Portionen:
– Wasser, im Verhältnis 1:8 (ca. 125g Reis auf 1,2 ltr. Wasser)
– Vollkornreis oder weißer Reis
10
D
Zubereitung: Die beiden Zutaten in den Reiskocher geben und, wie oben beschrieben, die
Funktionstaste „Risotto“ drücken – fertig!
• Je nach Bedarf oder Geschmack kann nun jeder in seine Portion eine oder mehrere der
folgenden Zutaten verwenden: Gewürze, fein geschnittenes oder gehacktes Gemüse oder
Kräuter (Schnittlauch, Petersilie, Lauchzwiebel), gekochte Eier, Champignons, usw. Lassen
Sie Ihrer Kreativität freien Lauf!
Risotto:
Verwenden Sie maximal 1 1⁄2 Messbecher Reis (ca. 190 g) und für eventuelle Beilagen auch
maximal ca. 180/190g. Ist der Reis nach Ende des Kochvorgangs noch etwas zu „hart“,
lassen Sie ihn im Reiskocher noch etwas nachziehen. Nach Beendigung des Kochvorgangs
sollten Sie das Risotto umgehend servieren und nicht warmhalten. Hier nun unser
Rezeptvorschlag für einen „Klassiker“ –
Risotto alla Milanese:
Zutaten: 1 1⁄2 Messbecher (ca. 190g) gewaschenen Reis
1
⁄2 mittelgroße Zwiebel
1 1⁄2 - 2 EL Olivenöl
4 Messbecher Flüssigkeit; verwenden Sie je nach Geschmack davon 1/2 bis 1 Messbecher
trockenen Weißwein und für die Restmenge eine Hühnerbrühe
1 kleines Tütchen (ca. 0,1g) Safran-Pulver
1 EL Butter
nach Bedarf geriebenen Parmesan
Zubereitung: Zunächst etwas Olivenöl in einer Pfanne erhitzen und die zuvor kleingehackte
Zwiebel zugeben, bis diese glasig sind. Anschließend aus der Pfanne nehmen und zur Seite
stellen. Dann das restliche Olivenöl in die Pfanne geben, erhitzen und den gewaschenen und
gut abgetropften Reis unter ständigem Rühren ca. 1 Minute in der Pfanne erhitzen, bis er
gerade warm ist. Anschließend den Reis aus der Pfanne nehmen und in den perfekt
plazierten Topf im Reiskocher einfüllen. Jetzt die Flüssigkeiten (Wein und Hühnerbrühe)
11
D
zugießen und gut umrühren. Nachdem Sie anschließend die Zwiebel auf den Reis gegeben
haben, fügen Sie noch das Safran-Pulver dazu. Den Deckel jetzt schließen und die Taste
„Risotto“ drücken; das Gerät beginnt zu arbeiten und das Risotto wird gekocht.
• Nach Beendigung des Kochvorgangs drücken Sie die Stopp – Taste, öffnen vorsichtig den
Deckel (Achtung: es kann heißer Dampf entweichen!) und nehmen das Risotto mit einem
Löffel heraus. Mit Salz, Pfeffer und Butter abschmecken, in eine Servierschüssel geben und
mit geriebenem Parmesan bestreuen. Fertig!
Dampfgaren:
Zum Dampfgaren eignen sich natürlich auch Meeresfrüchte oder Fisch. Hier einige
Empfehlungen:
– Garnelen: garen, bis sie sich rosa färben; ca.10-12 Minuten für ca. 300/350g
– Fischfilet: ca. 12-15 Minuten für ca. 300/350g
Probieren Sie andere Sorten anhand dieser Empfehlung einfach aus!
Vergessen Sie nicht ausreichend Wasser zuzugeben. (siehe unter „Dampfgaren“)
12
D
Technische Daten
Betriebsspannung:
Leistungsaufnahme:
220 V ~ 50Hz
700 Watt
Nur für den Hausgebrauch!
Nicht in Flüssigkeiten eintauchen!
Gewährleistung
Für dieses Gerät übernehmen wir eine Garantie von 2 Jahren ab Kaufdatum. Ausgeschlossen
von der Garantie sind Schäden, die auf normalen Verschleiß, zweckfremde Verwendung,
unsachgemäße Behandlung, falsche Bedienung, mangelnde Pflege und Reinigung,
mutwillige Zerstörung, Transport oder Unfall sowie Fremdeingriffe von nicht berechtigten
Personen zurückzuführen sind. Dieser Garantieschein muß zusammen mit dem ungeöffneten
Gerät eingesandt werden.
Die Garantie kann nur gewährt werden, wenn der Kassenbon/die Rechnung dem Gerät
beigefügt ist.
Dieses Produkt darf laut Elektro- und Elektronikgerätegesetz am Ende seiner Lebensdauer
nicht über den normalen Hausmüll entsorgt werden. Bitte geben Sie es daher kostenfrei an
einer kommunalen Sammelstelle (z. B. Wertstoffhof) für das Recycling von elektrischen und
elektronischen Geräten ab.
13
Instruction Manual
Electric rice cooker/steam cooker 17 0900 00 00
Thank you for choosing this high-quality electric rice cooker. This product is a quality product
and complies with the recognised technical regulations and the law on the safety of
appliances. Please read through the operating instructions carefully prior to using it for the first
time and keep these in a safe place. Please pay attention to the safety advice in particular.
Safekeeping of the instruction manual is requested!
GB
Safety information
1. Please read these operating instructions and safety instructions before using the device
for the first time!
2. If this device is given to other persons, ensure that these operating instructions are also
handed over.
3. We accept no responsibility for any damages that occur due to improper use or incorrect
handling. This device is only intended for household use.
4. Please first check whether the type of current and supply voltage match the information
on the data plate.
5. Do not touch either the rice cooker or the power plug with wet or damp hands.
6. We fundamentally recommend not using power outlets, with which other devices are
already being operated.
7. Never operate the rice cooker/steam cooker unsupervised and use it only for the
intended purpose. Caution: The device is hot when in use and steam escapes!
8. Children do not understand the dangers that can arise when using electrical devices. For
this reason, keep electrical devices away from children.
9. Place the rice cooker/steam cooker on a level and stable surface and not near hot stove
burners, gas flames, or other sources of heat. Keep out of reach of children. Ensure that
there is sufficient free space around the rice cooker/steam cooker.
Pull out the power plug after each use and in case of:
– Malfunctions during operation
– Cleaning
10. Please do not pull on the power cord, but rather on the plug itself! Do not allow the power
cord to hang down.
11. Do not use any flammable, corrosive, and alkaline materials near the device.
12. Never carry or move the rice cooker/steam cooker as long as it is in operation.
13. Never submerge the device, the cord, or the plug in water or other liquids. Please do not
clean it in the dishwasher.
15
GB
14. Check the power cord regularly for damage. Avoid smashing or kinking the power cord,
abrasion on sharp edges, or contact with hot surfaces. If the power cord is or becomes
damaged, it must definitely be replaced by an expert.
15. Please never use the device if you discover damage or if the device has fallen.
16. Never attempt to open or repair the device yourself. In case of malfunction, please only
have it repaired by qualified experts!
Before using for the first time
• Please first read these operating instructions and the safety instructions carefully!
• Remove all packing material first.
• Simply wipe off thoroughly with a soft rag (slightly damp if necessary). Caution: Do not
use any aggressive fluids or abrasive cleaning agents while cleaning, dry off
afterwards, if necessary. The inner metal pot can be washed in the dishwasher. The cooking
insert and the measuring cup should be washed by hand to avoid damage.
Use
• Check that the supply voltage and type of current match the information on the device.
• Place the rice cooker/steam cooker on a suitable surface (no metal surface, no textiles, etc.).
• Ensure that the condensation container on the back of the device beneath the lid attachment
is always installed!
Cooking rice/preparations
• Measure the desired amount of rice with the included measuring cup. Now, wash the rice
in a separate pot or bowl until the water is clear.
1 measuring cup rice is approximately 125g (approximately 1 – 2 portions).
16
GB
• Always pour the water into the pot first. The mark inside the pot is a standard
recommendation. However, you can change the amount of water to suit your personal taste.
However, never fill beyond the maximum mark (8 cups)!
• For example: For 2 measuring cups rice, the minimum amount, fill the water up to the
2 cups mark! Proceed accordingly for the other amounts (3, 5, 6, 8 measuring cups)
3 measuring cups rice
=
add liquid to 3 Cups
4 measuring cups rice
=
add liquid to 4 Cups
5 measuring cups rice
=
add liquid to 5 Cups
6 measuring cups rice
=
add liquid to 6 Cups
8 measuring cups rice
=
add liquid to 8 Cups
Now add the washed rice to the water.
• When cooking original Chinese Congee, English Porridge, or Risotto, use the following
table:
Water level indicator
Rice (measuring cup) Congee/Porridge
Risotto
1/2
2
3/4
3
1
4
1 1⁄2
3 Cup
3
6 Cup
4
8 Cup
Or simply use the included measuring cup for liquid and rice and use the following “ratios”:
Normal rice
1:2
= 1 mc Rice + 2 mc liquid
Risotto
1:4
= 1 mc Rice + 4 mc liquid
Congee/Porridge
Creamed rice
1:8
= 1 mc Rice + 8 mc liquid
Carefully wipe the edge of the pot after filling and place it in the rice cooker/steam
cooker. Make sure that the condensation container is installed.
17
GB
• Now, close the lid until it audibly locks into place. Otherwise, results will be adversely affected.
• Insert the plug into suitable outlet (230 V AC/50 Hz). A signal will sound and “88” will
appear in the display and all control lights light up. As soon as the control lights go out,
“— —” will appear in the display and the rice cooker/steam cooker is now ready to use.
Timer - button
• With this button, you can set the time delay before the start of the cooking process. The
setting is from 2 – 15 hours.
• Each press of the button adds 1 more hour. When you have made an adjustment here, press
the following function buttons:
Reis/rice
Risotto
Suppe/soup
You will hear a signal tone and the light will begin to blink according to the setting.
• If the remaining time is only one hour, the system begins to count down the time. After the
set time delay, you will hear several signal tones and the rice cooker will start the selected
program (rice – risotto – soup); the respective control light is on!
• Caution: After the cooking process has ended, hot steam can escape when the lid is opened!
Function button “Reis/rice”
• This setting cooks the rice somewhat longer, but very gently.
• If the rice cooker is connected to the power supply, the pot is filled, and the lid well closed,
press the button Reis/rice, the control light for “rice” in the display panel lights up and the
symbol “—” appears in the display.
• As soon as a slight amount of steam escapes from the rice cooker/steam cooker, the rice
is cooked for 14 minutes. The number 14 appears in the display and the system counts down
the minutes.
• Once the cooking process has ended, the “Warmhalten/keep warm” control light
illuminates, you will hear several signal tones, and the symbol “b” will appear in the display.
18
GB
• You can now remove the cooked rice by carefully opening the lid. You also have the option
of keeping the rice warm. We recommend only keeping the rice warm for a short time.
Function button “Schnell/quick”
• This setting is for quick preparation, as well as for amounts of 1 to 2 measuring cups.
• If the rice cooker is connected to the power supply, the pot is filled, and the lid well closed,
press the button Schnell/quick, the control light for “quick” in the display panel lights up
and the symbol “ —” appears in the display.
• As soon as a slight amount of steam escapes from the rice cooker/steam cooker, the rice
is cooked for 10 minutes. The number 10 appears in the display and the system counts down
the minutes.
• Once the cooking process has ended, the “Warmhalten/keep warm”-control light
illuminates, you will hear several signal tones, and the symbol “b” will appear in the display.
• You can now remove the cooked rice by carefully opening the lid. You also have the option
of keeping the rice warm. We recommend only keeping the rice warm for a short time.
Function button “Risotto”
• This setting is for original Chinese Congee, English Porridge, or Risotto.
• If the rice cooker is connected to the power supply, the pot is filled, and the lid well closed,
press the button Risotto, the control light for “Risotto” in the display panel lights up and
the symbol “—” appears in the display.
• As soon as a slight amount of steam escapes from the rice cooker/steam cooker, the
contents are cooked for 20 minutes. The number 20 appears in the display and the system
counts down the minutes.
• Once the cooking process has ended, the “Warmhalten/keep warm” control light
illuminates, you will hear several signal tones, and the symbol “b” will appear in the display.
• You can now remove the cooked contents by carefully opening the lid. You also have the option
of keeping the rice warm. We recommend only keeping the rice warm for a short time.
19
GB
Function button “Suppe/soup”
• This setting is for cooking soups. Simply place the prepared soup in the pot. However, never
exceed the maximum mark (8 cups – 1.5 l)!
• If the rice cooker is connected to the power supply, the pot is filled, and the lid well closed,
press the button Suppe/soup, the control light for “soup” in the display panel lights up and
the number “70” appears in the display. By pressing the “Soup” button again, you can
increase the time in 5 minute intervals up to 95 minutes, or 40 – 65 minutes by pressing
it further!
• As soon as the liquid cooks, the set time appears in the display and the system counts down
the minutes.
• Once the cooking process has ended, the “Warmhalten/keep warm” control light
illuminates, you will hear several signal tones, and the symbol “b” will appear in the display.
• You can now remove the cooked soup by carefully opening the lid. You also have the option
of keeping the soup warm.
Function button “Warmhalten/keep warm – Stop/cancel”
Warmhalten/keep warm
• If the rice cooker is connected to the power supply, press the button “Warmhalten/Stop”,
if you want to keep the previously prepared contents warm. The control light for
“Warmhalten/Stop” illuminates.
• If no other settings are made within 24 hours, the system switches this function off.
Stop/cancel
• If the rice cooker is connected to the power supply and the cooking process, always press
this button! The control light illuminates, you will hear several signal tones, and the
symbol “b” will appear in the display.
• Always press the button Stop/cancel if you want to stop the current cooking process.
20
GB
Steam cooking
You can also steam cook vegetables, potatoes, or other food with the included perforated
insert. Depending upon the food to be cooked, you can also place it on a flat plate or flat
bowl, which you then placed in the perforated insert. For this, you can use all function
buttons depending upon the time you need for the steam cooking. For example, the program
“Schnell/quick”, which has the shortest cooking time, or the program “Suppe/soup”, as
the time can be set manually and is therefore better suited for longer cooking times. Place
the water in the pot and ensure that the perforated insert does not hang into the water!
• Now, install the perforated insert together with the food to be cooked.
• Close the lid and then press one of the function button: “Schnell/quick” for 10 minutes,
“Reis/rice” for 14 minutes, the button “Risotto” for 20 minutes cooking time or the
button “Suppe/soup”, the respective control light in the display panel lights up and the
symbol “—” appears in the display. Suppe/soup, the control light for “soup” in the
display panel lights up and the number “70” appears in the display. If you have selected
the function button “Suppe/soup”, you can increase the preset time of “70” in 5 minute
intervals up to 95 minutes by pressing the “Soup” button again, or enter 40-65
minutes by pressing the button further for steam cooking! Calculate the necessary cooking
time based on the food that you want to cook. Softer foods have a shorter cooking time,
whereas more solid or harder foods require a somewhat longer cooking time.
• As soon as the liquid boils, the set time appears in the display in accordance with the
function button pressed, meaning “10 – 14 – 20” or the manually set time of the
function button “Suppe/soup” and the system counts down the minutes.
• Once the cooking process has ended, the “Warmhalten/keep warm” control light
illuminates, you will hear several signal tones, and the symbol “b” will appear in the display.
• Now, switch the rice cooker off by pulling the plug out of the outlet.
21
GB
Conclusion
• Switch the device off when you are finished using it or it will no longer be used.
• First, pull the plug out of the outlet and then pull the cable out of the device.
• After each use, remove the condensation container attached to the rear, empty and clean
it, and insert it once more.
Cleaning and care
• Always switch off the device, pull the plug, and allow the device to cool before cleaning it.
• Only wipe off the rice cooker itself with a moist rag.
• Do not use any sharp objects, benzene, solvents, scrub brushes, or abrasive agents for
cleaning.
• Dry the device with a soft cloth before putting it away or using it again.
• Clean the coated pot with a mild detergent. Do not use any scratching or abrasive brushes
or sponges for this.
• The condensation container, measuring cup, and steaming insert should also be washed by
hand with a mild detergent.
Recipes and tips
Congee:
Congee is a form of creamed rice that is particularly popular in Asia and is especially eaten
for breakfast. It is eaten plain or with additional ingredients added. This can be savory and
sweet. Try it. Here is the basic recipe:
Ingredients for 4 portions:
– water, in a ratio of 1:8 (approximately 125g rice in 1.2 l. water)
– whole grain rice or white rice
Preparation: Place the two ingredients into the rice cooker and, as described above, press
the function button “Risotto”– finished!
• Each person can add one or more of the following ingredients to his/her portion,
22
GB
depending upon taste: Spices, finely cut or chopped vegetables or herbs (chives, parsley,
spring onion), boiled egg, mushrooms, etc. Let your imagination run wild!
Risotto:
Use a maximum of 1 1⁄2 measuring cups of rice (approximately 190 g) and a maximum of
approximately 180/190g for any other ingredients. If the rice is still two “hard” at the end
of the cooking process, allow it to simmer for a while in the rice cooker. After the end of the
cooking process, you should serve the Risotto immediately and not keep it warm. Here is our
recipe suggestion for a “classic”
Risotto alla Milanese:
Ingredients: 1 1⁄2 measuring cup (approximately 190g) washed rice
1
⁄2 medium onion
1 1⁄2 - 2 Tbsp. olive oil
measuring cup of liquid; depending upon taste, use 1/2 to 1 measuring cup dry white wine
and chicken broth for the remaining amount
1 small package (approximately 0.1g) powdered saffron
1 Tbsp. butter
Grated Parmesan to taste
Preparation: First, heat some olive oil in a pan and add the previously diced onion and
glaze. Then, remove this from the pan and set it aside. Place the remaining olive oil in the
pan, heat and heat the washed and well drained rice in the pan while stirring constantly
for approximately 1 minute until it is just warm. Then, remove the rice from the pan and
place it into the perfectly positioned pot in the rice cooker. Now, add the liquids (wine and
chicken broth) and stir well. After you have added the onions to the rice, add the
powdered saffron. Now, close the lid and press the button “Risotto”. The device begins to
operate and the Risotto is cooked.
• After the end of the cooking process, press the Stop button, carefully open the lid (Caution:
Hot steam can escape!) and remove the Risotto with a spoon. Season with salt, pepper, and
butter, place in a service dish, and sprinkle grated Parmesan over it. Serve!
23
GB
Steam cooking:
Naturally, seafood or fish are also suitable for steam cooking. Here are a few suggestions:
– Shrimps: Cook until they turn pink; approximately 10-12 minutes for approximately
300/350g
– Fish filet: approximately 12-15 minutes for approximately 300/350g
Try other types based on these recommendations!
Don’t forget to add sufficient water. (See above under “Steam cooking”)
Technical Data
Operating Voltage:
Power Consumption:
220 - 240V ~ 50Hz
700 Watt
Only for domestic use!
Do not immerse in liquids!
Warranty
We undertake to guarantee this appliance for 2 years from the date of purchase. Damage or
losses which can be attributed to normal wear and tear, to being used for a purpose other than
that intended, inappropriate handling, incorrect operation, inadequate care and cleaning,
wilful destruction, transportation or an accident as well as interventions by unauthorised outside
persons are excluded. This warranty must be sent in along with the unopened appliance.
The warranty can only be allowed to stand if the till receipt/the invoice is enclosed along with
the appliance.
24
Mode d'emploi
Cuiseur à riz électrique/Cuiseur vapeur 17 0900 00 00
Merci d’avoir choisi ce Cuiseur à riz électrique de haute qualité. Ce produit est un produit de
qualité et répond aux règles reconnues de la technique et de la législation sur la sécurité des
appareils. Veuillez lire attentivement le mode d'emploi avant la première utilisation et bien
le conservez. Veillez tout particulièrement aux consignes de sécurité.
Conservez le mode d´emploi!
F
Avertissements
1. Nous vous prions de lire attentivement ce mode d’emploi et les consignes de sécurité avant
la première mise en service de l’appareil!
2. En cas de cession de l'appareil, assurez-vous que ce mode d’emploi est remis avec le
cuiseur.
3. Aucune responsabilité ne peut être endossée pour les dommages éventuels résultant d’une
mauvaise manipulation de l’appareil ou d’une utilisation non conforme à sa destination.
Cet appareil est uniquement destiné à l’usage domestique.
4. Vérifiez SVP en premier lieu si le type d'alimentation électrique et le voltage sont
conformes aux indications mentionnées sur la plaque de l’appareil.
5. Ne jamais toucher le cuiseur ou la prise de secteur en ayant les mains mouillées ou
humides.
6. Nous vous conseillons systématiquement de ne jamais utiliser de prise servant à
alimenter d'autres appareils.
7. Ne laissez jamais fonctionner le cuiseur à riz/cuiseur vapeur sans surveillance et
utilisez-le uniquement conformément à sa destination. Attention: quand il fonctionne,
l’appareil devient très chaud et émet de la vapeur!
8. Comme les enfants ne sont pas conscients des dangers associés à la manipulation d’appareils
électriques, il est indispensable que ces derniers soient tenus hors de leur portée.
9. Placez le cuiseur à riz/cuiseur vapeur sur une surface plane, solide et non combustible,
loin de toute source de chaleur (plaques de cuisson, brûleurs à gaz etc.) et hors de
portée des enfants. Veillez à ce qu’il y ait suffisamment d’espace libre à côté du cuiseur
à riz/cuiseur vapeur.
Débranchez l’appareil après chaque utilisation ainsi que dans les cas suivants :
– pannes pendant l’utilisation,
– à chaque nettoyage
Veillez à ne pas tirer sur le cordon d’alimentation mais sur la fiche même! Ne laissez pas
traîner ou pendre le cordon d’alimentation.
26
F
10. N’utilisez aucune matière combustible, agressive et alcaline à proximité de l’appareil.
11. Ne transportez pas le cuiseur à riz/cuiseur vapeur et ne le déplacez pas quand il est en
train de fonctionner.
12. Ne jamais plonger l’appareil, le câble ou la fiche dans de l’eau ou un liquide
quelconque. Ne le lavez pas dans le lave-vaisselle.
13. Vérifiez à intervalles réguliers que le câble est intact. Veillez à ce que le câble ne soit ni
écrasé, ni tordu et qu’il ne soit pas en contact avec des arêtes vives (risque de frottement)
ou avec des surfaces chaudes. Dès que le câble est endommagé, il doit être
impérativement remplacé par un technicien professionnel.
14. Ne jamais utiliser l’appareil si vous constatez un dommage quelconque ou après une chute
de l’appareil.
15. Ne jamais essayer d’ouvrir vous-même l’appareil ou de le réparer. Si l'appareil est en
panne, confiez-le à des professionnels qualifiés pour la réparation!
Avant la première mise en service
• Lisez SVP attentivement ce mode d'emploi ainsi que les consignes de sécurité.
• Enlevez d’abord toutes les parties de l'emballage.
• Essuyez ensuite l’appareil avec un chiffon doux (légèrement humidifié si nécessaire).
Attention: n’utiliser aucun liquide ou détergent agressif pour le nettoyage et
sécher ensuite l’appareil si nécessaire. La cuve métallique intérieure se nettoie au
lave-vaisselle; il est conseillé de laver à la main le plateau vapeur et le verre mesureur pour
éviter de les abîmer.
Mise en service
• Vérifiez que la tension et le type de courant sont conformes aux indications respectivement
mentionnées sur l'appareil.
• Placez le cuiseur à riz/cuiseur vapeur sur une surface appropriée (non métallique,
non textile etc.).
27
F
• Veillez à ce que le réservoir à eau de condensation se trouvant à l’arrière de l’appareil, sous
la fixation du couvercle, soit toujours à sa place!
Cuisson du riz/préparatifs
• À l’aide du verre mesureur fourni, mesurez la quantité de riz souhaitée. Lavez le riz dans
un autre récipient ou bol jusqu’à ce que l’eau soit claire.
1 mesure de riz correspond approximativement à 125 g (1 à 2 portions environ).
• Mettre d’abord l’eau dans la cuve. Les graduations apposées à l'intérieur de la cuve sont
une recommandation standard. Vous pouvez modifier la quantité d’eau à votre goût. Il est
impératif de ne jamais dépasser la graduation maximale (8 Cup) !
• Par exemple, pour 2 mesures de riz (soit la quantité minimum), mettez de l'eau jusqu'au
repère 2 Cup ! Faites de même pour les autres quantités (3, 5, 6, 8 mesures/cups !).
3 mesures de riz
=
ajouter de l’eau jusqu’à 3 Cup
4 mesures de riz
=
ajouter de l’eau jusqu’à 4 Cup
5 mesures de riz
=
ajouter de l’eau jusqu’à 5 Cup
6 mesures de riz
=
ajouter de l’eau jusqu’à 6 Cup
8 mesures de riz
=
ajouter de l’eau jusqu’à 8 Cup
Versez maintenant le riz lavé dans l’eau.
• Si vous préparez un véritable congee chinois, un porridge anglais ou un risotto,
respectez SVP les mesures suivantes:
Indication du niveau d’eau
Riz (verre mesureur) Congee/Porridge
Risotto
1/2
2
3/4
3
1
4
1
1 ⁄2
3 Cup
3
6 Cup
4
8 Cup
28
F
Ou bien utilisez le verre mesureur fourni pour l'eau et le riz avec les «proportions»
suivantes:
Riz normal
1:2
= 1 mesurer de riz + 2 mesures de liquide
Risotto
1:4
= 1 mesure de riz + 4 mesures de liquide
Congee/Porridge
Reisbrei
1:8
= 1 mesure de riz + 8 mesures de liquide
• Une fois les ingrédients remplis, essuyez soigneusement le bord de la cuve et placez-la dans
le cuiseur à riz/cuiseur vapeur. Vérifiez que le réservoir à eau de condensation est bien en place.
• Fermez maintenant le couvercle qui doit émettre un déclic audible, faute de quoi la
cuisson ne sera pas parfaite.
• Branchez l’appareil sur une prise adéquate (230 V courant alternatif/50 Hz). Un bip sonore
retentit, l'affichage indique «88» et tous les témoins lumineux s'allument. Dès que les
témoins lumineux s'éteignent, l'affichage indique « — — » et le cuiseur à riz/cuiseur
vapeur est prêt à être utilisé.
Touche minuterie
• Cette touche vous permet de paramétrer la durée devant s'écouler avant le démarrage de
la cuisson. Plage de réglage: de 2 à 15 heures.
• Chaque pression sur la touche prolonge cette durée d’une heure. Une fois que vous avez
procédé à ce réglage, appuyez sur l'une des touches de fonction suivantes:
Reis/rice
Risotto
Suppe/soup
• Vous entendez un bip sonore et la lampe commence à clignoter en fonction du réglage
effectué.
• S’il ne reste plus qu’une heure, le temps restant est décompté. Dès que la durée
programmée est écoulée, vous entendez plusieurs bips sonores et le cuiseur à riz démarre
le programme sélectionné (riz – risotto – soupe), le témoin lumineux respectif étant allumé!
Attention: une fois la cuisson terminée, de la vapeur d’eau très chaude peut s’échapper
quand vous ouvrez le couvercle!
29
F
Touche de fonction Reis/rice»
• Cette fonction assure la cuisson prolongée mais en douceur du riz.
• Une fois le cuiseur à riz branché sur le réseau électrique, la cuve remplie et le couvercle bien
fermé, appuyez sur la touche Reis/rice, le témoin lumineux pour «Reis» (riz) est allumé
et le symbole «—» est affiché.
• Dès qu’un peu de vapeur sort du cuiseur à riz/cuiseur vapeur, la cuisson de riz se fait en
14 minutes. Le nombre 14 s’affiche et le système fait le décompte des minutes restantes.
• Dès que la cuisson est terminée, le témoin «Warmhalten/keep warm» s’allume, vous
entendez quelques bips sonores et le symbole «b» est affiché.
• Vous pouvez maintenant enlever le riz cuit en ouvrant le couvercle avec précaution. Autre
possibilité: vous pouvez garder le riz au chaud. Nous vous conseillons de ne pas maintenir
le riz au chaud pendant trop longtemps.
Touche de fonction «Schnell/quick»
• Ce réglage est conseillé pour une préparation rapide et pour les petites quantités de riz
(1 à 2 mesures).
• Une fois le cuiseur à riz branché sur le réseau électrique, la cuve remplie et le couvercle bien
fermé, appuyez sur la touche Schnell/quick, le témoin lumineux pour «Schnell» (rapide)
est allumé et le symbole «—» s’affiche.
• Dès qu’un peu de vapeur sort du cuiseur à riz/cuiseur vapeur, la cuisson de riz se fait en
10 minutes. Le nombre 10 s’affiche et le système fait le décompte des minutes restantes.
• Dès que la cuisson est terminée, le témoin «Warmhalten/keep warm» s’allume, vous
entendez quelques bips sonores et le symbole «b» est affiché.
• Vous pouvez maintenant enlever le riz cuit en ouvrant le couvercle avec précaution. Autre
possibilité: vous pouvez garder le riz au chaud. Nous vous conseillons de ne pas maintenir
le riz au chaud pendant trop longtemps.
30
F
Touche de fonction «Risotto»
• Ce réglage est conseillé pour le véritable congee chinois, le porridge anglais ou le risotto.
• Une fois le cuiseur à riz branché sur le réseau électrique, la cuve remplie et le couvercle bien
fermé, appuyez sur la touche Risotto, le témoin lumineux pour «Risotto» est allumé et le
symbole «—» s’affiche.
• Dès qu’un peu de vapeur sort du cuiseur à riz/cuiseur vapeur, la cuisson de riz se fait en
20 minutes. Le nombre 20 s’affiche et le système fait le décompte des minutes restantes.
• Dès que la cuisson est terminée, le témoin «Warmhalten/keep warm» s’allume, vous
entendez quelques bips sonores et le symbole «b» est affiché.
• Vous pouvez maintenant enlever le contenu cuit en ouvrant le couvercle avec précaution.
Autre possibilité: vous pouvez garder le riz au chaud. Nous vous conseillons de ne pas
maintenir le riz au chaud pendant trop longtemps.
Touche de fonction «Suppe/soup»
• Ce réglage est conseillé pour la cuisson de soupes; il suffit de verser la soupe prête à cuire dans
la cuve. Veiller en tout cas à ne jamais dépasser la graduation maximale (8 Cup – 1,5 l)!
• Une fois le cuiseur à riz branché sur le réseau électrique, la cuve remplie et le couvercle bien
fermé, appuyez sur la touche Suppe/soup, le témoin lumineux pour «Suppe» (soupe) est
allumé et le nombre «70» s'affiche. En appuyant une nouvelle fois sur la touche «Soupe»,
vous pouvez programmer le temps, par paliers de 5 minutes, jusqu’à 95 minutes mais vous
pouvez également saisir entre 40 et 65 minutes en continuant d'appuyer sur la touche!
• Dès que le liquide bout, l’affichage indique la durée paramétrée et le système fait le
décompte des minutes restantes.
• Dès que la cuisson est terminée, le témoin «Warmhalten/keep warm» s’allume, vous
entendez quelques bips sonores et le symbole «b» est affiché.
• Vous pouvez maintenant enlever la soupe cuite en ouvrant le couvercle avec précaution. Vous
pouvez également la garder quelques minutes au chaud.
31
F
Touche de fonction «Warmhalten/keep warm – Stop/cancel»
Warmhalten/keep warm
• Une fois le cuiseur à riz branché sur le réseau électrique, appuyez sur la touche
«Warmhalten/Stop», si vous désirez maintenir au chaud la préparation terminée. Le
témoin lumineux «Warmhalten/Stop» s’allume.
• Si aucun autre réglage n’est effectué dans les 24 heures, le système désactive cette fonction.
Stop/cancel
• Si le cuiseur à riz est relié au réseau électrique et la cuisson achevée, il faut toujours appuyer
sur cette touche ! Le témoin lumineux s’allume, vous entendez quelques bips sonores et
le symbole «b» est affiché.
• Appuyez également sur la touche Stop/cancel chaque fois que vous voulez arrêter la
cuisson en cours.
Cuisson à la vapeur
Vous pouvez cuire à la vapeur légumes, pommes de terre ou tout autre aliment à l'aide du
plateau vapeur perforé fourni avec l'appareil. Vous pouvez également disposer les aliments
sur une assiette plate ou dans un plat que vous placerez ensuite sur le plateau vapeur. Vous
pouvez utiliser toutes les touches de fonction selon la durée nécessaire pour la cuisson vapeur:
le programme «Schnell/quick» par exemple, qui est le plus court, ou bien le programme
«Suppe/soup» qui vous permet de régler manuellement la durée, ce qui est recommandé
pour les longues cuissons. Versez de l’eau dans la cuve et vérifiez que le plateau vapeur ne
trempe pas dans l’eau!
• Placer maintenant le plateau vapeur garni dans l'appareil.
• Fermez le couvercle et appuyez ensuite sur l’une des touches de fonction: «Schnell/quick»
pour 10 minutes, «Reis/rice» pour 14 minutes, la touche «Risotto» pour 20 minutes de
cuisson ou la touche «Suppe/soup». Le témoin respectif s’allume alors et le symbole
«—» s'affiche. Si vous avez sélectionné la touche de fonction «Suppe/soup», vous
pouvez, en appuyant une nouvelle fois sur la touche «Suppe», programmer le temps, par
32
F
paliers de 5 minutes, entre «70» et 95 minutes ou bien saisir entre 40 et 65 minutes de
cuisson vapeur en continuant d'appuyer sur la touche! Calculez le temps de cuisson
nécessaire selon les aliments que vous désirez préparer; les aliments tendres cuisent plus
rapidement, les aliments plus fermes ou plus durs demandent un temps de cuisson prolongé.
• Dès que le liquide bout, la durée paramétrée s’affiche selon la touche de fonction sélectionnée,
autrement dit «10 – 14 – 20» ou bien le temps réglé manuellement pour la touche de
fonction «Suppe/soup» et le système fait maintenant le décompte des minutes.
• Dès que la cuisson est terminée, le témoin «Warmhalten/keep warm» s’allume, vous
entendez quelques bips sonores et le symbole «b» s’affiche.
• Éteignez maintenant le cuiseur à riz en retirant la fiche de la prise.
Dernière étape
• Éteignez l’appareil après utilisation ou quand vous n'en avez plus besoin.
• Retirez d’abord la fiche de la prise et débranchez ensuite le câble de l'appareil.
• Après chaque utilisation, enlevez le réservoir recueillant l’eau de condensation (à l’arrière
de l’appareil), videz-le, nettoyez-le et remettez-le en place.
Nettoyage et entretien
• Avant tout nettoyage, il est indispensable de toujours éteindre l'appareil, de le débrancher
et de le laisser refroidir.
• Essuyez le corps de l’appareil uniquement avec un chiffon humide.
• Objets tranchants, essence, solvants, brosses à récurer et produits à récurer sont absolument
proscrits pour le nettoyage.
• Essuyez l’appareil avec un chiffon doux avant de le ranger ou de le réutiliser.
• Utilisez un détergent doux pour nettoyer la cuve antiadhésive ; ne jamais utiliser de brosse
à récurer ou d’éponge grattante.
• Nous vous conseillons de laver à la main le réservoir à eau de condensation, le verre
mesureur et le plateau vapeur en utilisant un détergent doux.
33
F
Recettes et conseils
Congee:
Le congee est une bouillie de riz très appréciée notamment en Asie et surtout consommée au
petit déjeuner. Il se mange seul ou avec d’autres ingrédients soit salés, soit sucrés. Faites donc
un essai! Recette de base :
Ingrédients pour 4 portions:
– eau, la proportion étant de 1:8 (env. 125 g de riz pour 1,2 l d’eau)
– riz complet ou riz blanc
Préparation: mettre les deux ingrédients dans le cuiseur à riz, appuyer sur la touche de
fonction « Risotto » comme indiqué ci-dessus – c’est tout !
• Selon les goûts et les besoins, chaque convive peut maintenant ajouter à sa portion un ou
plusieurs des ingrédients suivants : épices, légumes finement émincés ou fines herbes
hachées (ciboulette, persil, oignons frais), œufs durs, champignons de Paris etc. Laissez donc
libre cours à votre créativité!
Risotto:
Prenez au maximum 1 1⁄2 mesure de riz (env. 190 g) et aussi env. 180/190 g pour les
garnitures éventuelles. Si le riz est encore un peu trop «dur» en fin de cuisson, laissez-le
gonfler encore un peu dans le cuiseur. Servez le risotto dès que la cuisson est terminée et
évitez de le garder au chaud. Nous vous proposons notre version d’un grand classique –
Risotto alla Milanese:
Ingrédients: 1 1⁄2 mesure (env. 190 g) de riz lavé
1
⁄2 la moitié d’un oignon moyen
1 1⁄2 à 2 cuil. à s. d’huile d’olive
4 mesures de liquide ; prenez à votre convenance 1/2 à 1 mesure de vin blanc sec et complétez par un bouillon de volaille
1 dosette (env. 0,1 g) de safran en poudre
1 cuil. à s. de beurre
parmesan râpé à votre convenance
34
F
Préparation: Faire d’abord chauffer un peu d’huile d’olive dans une poêle et y faire
revenir l'oignon haché jusqu’à ce qu’il soit translucide. Réserver. Faire chauffer l'huile
d'olive restante dans la poêle, ajouter le riz lavé et bien égoutté en remuant constamment
pendant une minute, pour juste le réchauffer. Enlever le riz de la poêle et le verser dans la
cuve correctement placée dans le cuiseur. Ajouter maintenant les liquides (vin et
bouillon de volaille) et bien mélanger. Ajouter ensuite l'oignon sur le riz puis le safran en
poudre. Fermer le couvercle et appuyer sur la touche «Risotto»: la cuisson du risotto est en
cours.
• Une fois la cuisson terminée, appuyer sur la touche Stopp, ouvrir le couvercle avec
précaution (attention: de la vapeur très chaude risque de s'échapper!) et enlever le
risotto à l’aide d'une cuillère. Assaisonner (sel, poivre, beurre), mettre dans le plat de
service et saupoudrer de parmesan râpé. C’est prêt!
Cuisson à la vapeur:
Cette méthode de cuisson est bien entendu aussi idéale pour les fruits de mer et le poisson.
Quelques conseils
– Crevettes: les faire cuire jusqu’à obtention d’une belle couleur rose ; entre 10 et 12
minutes pour env. 300/350 g
– Filets de poisson: de 12 à 15 minutes pour env. 300/350 g
Sur la base de ces recommandations, vous pouvez faire des essais avec d’autres variétés!
N’oubliez pas d’ajouter suffisamment d’eau (cf. ci-dessus à la rubrique «Cuisson vapeur»)
35
F
Spécifications techniques
Tension de service:
220 - 240V ~ 50Hz
Puissance consommée:
700 Watt
Uniquement pour l'usage domestique!
Ne pas plonger dans des liquides!
Garantie
Pour cet appareil, nous offrons une garantie de 2 ans à partir de la date d'achat. Exclus de
la garanties les dommages dus à une usure normale, une utilisation non conforme à la
finalité, un traitement incorrect, une mauvaise utilisation, un manque de soin et d'entretien,
une destruction volontaire, le transport ou un accident ou les interventions de personnes non
habilitées sont exclus de la garantie. Cette garantie doit être envoyée avec l'appareil non ouvert.
La garantie n'est assurée que si le bon de caisse/la facture de l'appareil est joint à
l'appareil.
36
Istruzioni per l'uso
Risottiera/Vaporiera elettrica 17 0900 00 00
La ringraziamo per aver acquistato questa Risottiera/Vaporiera elettrica. Questo è un prodotto
di alta qualità conforme alle regole riconosciute della tecnica e della sicurezza sugli apparecchi.
Leggere attentamente le istruzioni per l'uso e conservarle gelosamente. Osservare in modo
particolare le indicazioni di sicurezza!
Conservare le instruzioni per l´uso!
I
Istruzioni di sicurezza
1. Leggere attentamente le presenti istruzioni per l'uso e di sicurezza prima della messa
in funzione iniziale dell'apparecchio!
2. Qualora l'apparecchio venga consegnato ad altre persone, accertarsi che insieme venga
fornito anche il presente manuale d'uso
3. Un uso non conforme o l'errata manipolazione dell'apparecchio escludono qualsiasi
responsabilità per eventuali danni derivanti. Questo apparecchio è esclusivamente
idoneo a un impiego casalingo.
4. Si prega di verificare innanzitutto che il tipo di corrente e di tensione di rete
corrispondano a quanto indicato sulla targhetta identificativa.
5. Non afferrare la risottiera né la spina di rete con le mani bagnate o umide.
6. Consigliamo di norma di non utilizzare prese a cui siano già collegati altri apparecchi.
7. Azionare la risottiera/vaporiera solo sotto controllo e utilizzarla esclusivamente per lo scopo
previsto. Attenzione: L'apparecchio diventa rovente durante l'uso e sprigiona
vapore!
8. I bambini non sono consapevoli dei pericoli derivanti dalla manipolazione di
elettrodomestici. Tenerli quindi fuori della loro portata.
9. Collocare la risottiera/vaporiera su una superficie non infiammabile, piana e stabile, non
in prossimità di piastre da cucina roventi, fiamme di gas o altre fonti di calore nonché fuori
della portata dei bambini. Fare in modo che intorno alla risottiera/vaporiera ci sia
sufficiente spazio libero.
10. Estrarre la spina dopo l'uso, anche in caso di
– anomalie di funzionamento,
– qualsiasi operazione di pulizia.
11. Non utilizzare sostanze infiammabili, corrosive e alcaline in prossimità dell'apparecchio.
12. Non spostare né prendere in mano la risottiera/vaporiera finché è in funzione.
13. Non immergere mai l'apparecchio, il cavo o la spina in acqua o in altri liquidi. Non lavarla
in lavastoviglie.
38
I
14. Controllare regolarmente l'eventuale presenza di danni sul cavo. Evitare che il cavo resti
schiacciato o piegato, che sfreghi contro spigoli appuntiti o entri in contatto con superfici
roventi. Se il cavo fosse o venisse danneggiato, deve essere sostituito in ogni caso da un
tecnico specializzato.
15. Non utilizzare mai l'apparecchio se si è riscontrata la presenza di danni.
16. Non tentare mai di aprire o riparare da soli l'apparecchio. In caso di anomalie farlo
riparare esclusivamente da personale qualificato!
Prima della messa in funzione iniziale
• Si prega innanzitutto di leggere attentamente il presente manuale d'uso e le istruzioni di
sicurezza.
• Rimuovere tutti gli elementi dell'imballaggio.
• Pulire a fondo con un panno morbido (eventualmente leggermente inumidito). Attenzione:
per la pulizia non utilizzare liquidi corrosivi o detergenti aggressivi ed
eventualmente asciugare subito. La testa interna di metallo può essere lavata in
lavastoviglie; il cestello per il vapore e il bicchiere graduato devono essere lavati a mano
per evitare che si danneggino.
Messa in funzione
• Verificare che la tensione di rete e il tipo di corrente coincidano con i dati riportati
sull'apparecchio.
• Collocare la risottiera/vaporiera su una superficie adatta (non metallica né in tessuto, ecc.).
• Si ricorda che il serbatoio dell'acqua di condensa è sempre inserito sul retro dell'apparecchio,
al di sotto del bloccaggio del coperchio!
39
I
Cottura del riso/Operazioni preliminari
• Dosare la quantità di riso desiderata con il bicchiere graduato fornito in dotazione.
Sciacquare il riso in un recipiente o una ciotola separata fino a che l'acqua non presenta più
residui.
1 bicchiere graduato corrisponde a ca. 125 g (ca. 1 - 2 porzioni).
• L'acqua va sempre versata per prima nel recipiente. La tacca all'interno del recipiente è
un'indicazione standard; è possibile comunque variare la quantità di acqua in base ai
propri gusti personali. Non si deve però mai superare la tacca di livello massimo (8 cup)!
• Per es.: con 2 bicchieri graduati di riso, che è la dose minima, versare acqua fino alla tacca
2 cup! Procedere allo stesso modo per le misure successive (3, 5, 6, 8 bicchieri graduati/cup)!
3 bicchieri graduati di riso =
Versare il liquido fino a 3 Cup
4 bicchieri graduati di riso =
Versare il liquido fino a 4 Cup
5 bicchieri graduati di riso =
Versare il liquido fino a 5 Cup
6 bicchieri graduati di riso =
Versare il liquido fino a 6 Cup
8 bicchieri graduati di riso =
Versare il liquido fino a 8 Cup
A questo punto aggiungere all'acqua il riso sciacquato.
• Per la cottura del congee originale cinese, del porridge inglese o del risotto attenersi alla
tabella seguente:
Indicazione del livello di acqua
Riso (bicchiere graduato) Congee/Porridge
Risotto
1/2
2
3/4
3
1
4
1
1 ⁄2
3 Cup
3
6 Cup
4
8 Cup
Oppure utilizzare solo il bicchiere graduato fornito in dotazione per liquidi e riso e
procedere rispettando i "rapporti" qui indicati:
40
I
Riso normale
1 : 2 = 1 bicch. grad. di riso + 2 bicch. grad. di liquido
Risotto
1 : 4 = 1 bicch. grad. di riso + 4 bicch. grad. di liquido
Congee/Porridge
Riso al latte
1 : 8 = 1 bicch. grad. di riso + 8 bicch. grad. di liquido
• Dopo aver versato gli ingredienti pulire accuratamente il bordo del recipiente e introdurlo
nella risottiera/vaporiera. Controllare che il serbatoio dell'acqua di condensa sia inserito.
• Chiudere il coperchio fino ad avvertire uno scatto. Altrimenti si pregiudicherà il risultato della
preparazione.
• Inserire la spina in una presa adatta (230 V corrente alternata/50 Hz). Viene emesso un
segnale e sul display appare "88" mentre tutte le spie di controllo si illuminano. Non appena
le spie di controllo si spengono, sul display appare "— —" e la risottiera/vaporiera è pronta
per l'uso.
Tasto timer
• Con questo tasto è possibile impostare il tempo trascorso il quale la fase di cottura ha
inizio. L'impostazione è regolabile da 2 a 15 ore.
• Ad ogni pressione del tasto si avanza di 1 ora. Dopo avere effettuato l'impostazione
premere uno dei seguenti tasti funzione:
Reis/rice
Risotto
Suppe/soup
Si avvertirà un segnale sonoro e la spia inizierà a lampeggiare in base all' impostazione
effettuata.
• Se il tempo residuo è di un'ora soltanto, il sistema inizia il conto alla rovescia. Allo scadere
del tempo si avvertiranno alcuni segnali sonori e la risottiera darà inizio al programma
selezionato (Riso - Risotto - Minestra); la spia di controllo corrispondente è accesa!
• Cautela: Aprendo il coperchio al termine della fase di cottura può fuoriuscire vapore acqueo
bollente!
41
I
Tasto funzione "Riso/rice"
• Questa impostazione cuoce il riso un po' più a lungo ma molto dolcemente.
• Se la risottiera è collegata alla rete elettrica, il recipiente è pieno e il coperchio ben chiuso,
premere il tasto Riso/rice La spia di controllo "Riso" sul visualizzatore si illumina e sul
display appare il simbolo „—„
• A partire dal momento in cui fuoriesce un leggero vapore dalla risottiera/vaporiera, il riso
cuocerà per 14 minuti. Sul display appare il numero 14 e il sistema inizia il conto alla
rovescia dei minuti.
• Al termine della fase di cottura lenta si accende la spia di controllo "Tenere in caldo/keep
warm", vengono emessi alcuni segnali sonori e sul display appare il simbolo "b"
• A questo punto è possibile estrarre il riso cotto aprendo con cautela il coperchio. Come altra
opzione è possibile tenere in caldo il riso. Consigliamo di tenere il riso in caldo solo per breve
tempo.
Tasto funzione "Rapido/quick"
• Questa impostazione è indicata per una preparazione rapida, ma anche per dosi da 1 a 2
bicchieri graduati.
• Se la risottiera è collegata alla rete elettrica, il recipiente è pieno e il coperchio ben chiuso,
premere il tasto Rapido/quick La spia di controllo "Rapido" sul visualizzatore si illumina
e sul display appare il simbolo „—„
• A partire dal momento in cui fuoriesce un leggero vapore dalla risottiera/vaporiera, il riso
cuocerà per 10 minuti. Sul display appare il numero 10 e il sistema inizia il conto alla
rovescia dei minuti.
• Al termine della fase di cottura si accende la spia di controllo "Tenere in caldo/
keep warm", vengono emessi alcuni segnali sonori e sul display appare il simbolo "b"
• A questo punto è possibile estrarre il riso cotto aprendo con cautela il coperchio. Come altra
opzione è possibile tenere in caldo il riso. Consigliamo di tenere il riso in caldo solo per breve
tempo.
42
I
Tasto funzione "Risotto"
• Questa impostazione è indicata per il congee originale cinese, il porridge inglese o il risotto.
• Se la risottiera è collegata alla rete elettrica, il recipiente è pieno e il coperchio ben chiuso,
premere il tasto Risotto La spia di controllo "Risotto" sul visualizzatore si illumina e sul
display appare il simbolo „—„
• A partire dal momento in cui fuoriesce un leggero vapore dalla risottiera/vaporiera, il
composto cuocerà per 20 minuti. Sul display appare il numero 20 e il sistema inizia il conto
alla rovescia dei minuti.
• Al termine della fase di cottura si accende la spia di controllo "Tenere in caldo/keep
warm", vengono emessi alcuni segnali sonori e sul display appare il simbolo "b"
• A questo punto è possibile estrarre il composto cotto aprendo con cautela il coperchio. Come
altra opzione è possibile tenere in caldo il riso. Consigliamo di tenere il riso in caldo solo per
breve tempo.
Tasto funzione "Minestra/soup"
• Questa impostazione è indicata per la cottura di minestre; basta versare la minestra
preparata nel recipiente. Non si deve però mai superare la tacca di livello massimo
(8 Cup – 1,5 l)!
• Se la risottiera è collegata alla rete elettrica, il recipiente è pieno e il coperchio ben
chiuso, premere il tasto Minestra/soup La spia di controllo "Minestra" sul visualizzatore
si illumina e sul display appare il numero "70". Premendo nuovamente il tasto "Minestra"
è possibile impostare il tempo a intervalli di 5 minuti fino a 95 minuti, ma regolarlo anche
su 40 - 65 minuti, se si continua a premere!
• Non appena il liquido bolle, sul display appare il tempo impostato e il sistema inizia il
conto alla rovescia dei minuti.
• Al termine della fase di ebollizione si accende la spia di controllo "Tenere in caldo/keep
warm", vengono emessi alcuni segnali sonori e sul display appare il simbolo "b"
• Ora è possibile prelevare la minestra cotta aprendo con cautela il coperchio o tenerla ancora
in caldo.
43
I
Tasto funzione "Tenere in caldo/keep warm – Stop/cancel“
Tenere in caldo/keep warm
• Se la risottiera è collegata alla rete, premere il tasto "Tenere in caldo/Stop" se si
desidera tenere in caldo la preparazione precedentemente cucinata. La spia di controllo
per "Tenere in caldo/Stop" si accende.
• Se entro 24 ore non si effettuano altre impostazioni, il sistema disattiva questa funzione.
Stop/cancel
• Se la risottiera è collegata alla corrente elettrica e la fase di cottura è conclusa, premere
questo tasto! La spia di controllo si illumina, vengono emessi alcuni segnali sonori e sul
display appare il simbolo "b"
• Premere il tasto Stop/cancel tutte le volte che si desidera arrestare la fase di cottura in corso.
Cottura a vapore
Con il cestello forato fornito in dotazione si possono anche cuocere a vapore verdure, patate
o altri alimenti. A seconda del prodotto da cuocere a vapore, è possibile disporlo anche su
un piatto piano o una scodella piana che poi verrà introdotto nel cestello forato. Si
possono utilizzare tutti i tasti funzione, a seconda del tempo necessario per la cottura a
vapore. Ad es. il programma "Rapido/quick", che ha la minor durata di cottura a vapore
o il programma "Minestra/soup", perché in questo caso lo si può impostare manualmente
e quindi è più adatto a tempi di cottura a vapore prolungati. Versare acqua nel recipiente
facendo attenzione che il cestello forato non galleggi!
• Inserire ora il cestello forato insieme all'alimento da cuocere a vapore.
Chiudere il coperchio e premere successivamente uno dei tasti funzione. "Rapido/quick"
per 10 minuti, "Riso/rice" per 14 minuti, il tasto "Risotto" per 20 minuti di cottura a
vapore o il tasto "Minestra/soup". La spia di controllo corrispondente si illumina e sul
display appare „—„ Se è stato selezionato il tasto funzione "Minestra/soup", premendo
nuovamente il tasto "Minestra" è possibile impostare il tempo preregolato su "70" a
intervalli di 5 minuti fino a 95 minuti o, continuando a premere, immettere un tempo
compreso tra 40 e 65 per la cottura a vapore! Calcolare il tempo di cottura a vapore
44
I
necessario in base al tipo di alimento che si desidera cuocere; gli alimenti più morbidi
cuociono in minor tempo, quelli più consistenti o duri hanno un tempo di cottura prolungato.
• Non appena il liquido bolle, sul display appare il tempo impostato in base al tasto
funzione che è stato premuto, quindi "10 - 14 - 20" o il tempo impostato manualmente
con il tasto funzione "Minestra/soup" e il sistema inizia il conto alla rovescia dei minuti.
• Al termine della fase di cottura si accende la spia di controllo "Tenere in caldo/keep
warm", vengono emessi alcuni segnali sonori e sul display appare il simbolo "b"
• Spegnere la risottiera estraendo la spina dalla presa.
Conclusione
• Spegnere l'apparecchio dopo l'uso o quando non è più in funzione.
• Estrarre prima la spina dalla presa e successivamente il cavo dall'apparecchio.
• Dopo ogni uso estrarre il serbatoio dell'acqua di condensa applicato sul retro, svuotarlo
e pulirlo, poi reinserirlo.
Pulizia e cura
• Prima di qualsiasi operazione di pulizia spegnere sempre l'apparecchio, estrarre la spina
e lasciarlo raffreddare.
• Pulire la risottiera solo con un panno umido.
• Per pulire non utilizzare oggetti appuntiti, benzina, solventi, spazzole dure o altri strumenti
abrasivi.
• Asciugare l'apparecchio con un panno morbido prima di riporlo o di utilizzarlo nuovamente.
• Lavare il recipiente rivestito con un detersivo per stoviglie delicato; non utilizzare pagliette
o spazzole abrasive.
• Lavare a mano con un detersivo per stoviglie delicato anche il serbatoio dell'acqua di
condensa, il bicchiere graduato e il cestello per il vapore.
45
I
Ricette e consigli
Congee:
Congee è un riso al latte particolarmente apprezzato in Asia, che si consuma prevalentemente
a colazione. Si mangia da solo o insaporito da altri ingredienti, che possono avere un sapore
forte o delicato. Bisogna provarlo. La ricetta di base è:
Ingredienti per 4 persone:
– acqua, in un rapporto di 1:8 (ca. 125 g di riso in 1,2 l di acqua)
– riso integrale o bianco
Preparazione: versare nella risottiera i due ingredienti, come descritto sopra, premere
il tasto "Risotto"...fatto!
• A seconda delle esigenze o dei gusti, ognuno potrà aggiungere alla propria porzione uno
o più degli ingredienti seguenti: spezie, verdure o erbe finemente tritate (erba cipollina,
prezzemolo, porro), uova bollite, champignon, ecc. Basta lasciare spazio alla propria creatività!
Risotto:
Utilizzare al massimo 1 1⁄2 bicchiere graduato di riso (ca. 190 g) e anche per eventuali
contorni al massimo ca. 180/190 g. Se il riso al termine della fase di cottura risultasse ancora
leggermente troppo "duro", lasciarlo riposare ancora un po' nella risottiera. Al termine della
fase di cottura il risotto andrebbe servito subito e non mantenuto in caldo. Ecco la nostra ricetta
per un piatto "classico"
Risotto alla Milanese:
Ingredienti: 1 1⁄2 bicchiere graduato (ca. 190 g) di riso sciacquato
1
⁄2 cipolla media
1 1⁄2 - 2 EL cucchiai di olio di oliva
4 bicchieri graduati di liquido; di cui, a seconda dei gusti, da 1/2 a 1 bicchiere graduato
di vino bianco secco e il resto di brodo di pollo
1 bustina (ca. 0,1 g) di zafferano in polvere
1 cucchiaio di burro
parmigiano grattugiato quanto basta
46
I
Preparazione: Riscaldare innanzitutto un po' di olio di oliva in una padella e aggiungervi
la cipolla finemente tritata, facendola dorare. Togliere dalla padella e tenere da parte.
Versare poi nella padella l'olio di oliva rimasto, riscaldare e soffriggere il riso sciacquato
e perfettamente asciugato mescolando continuamente per ca. 1 minuto. Togliere il riso dalla
padella e versarlo nel recipiente perfettamente adagiato nella risottiera. Aggiungere ora
il liquido (vino e brodo di pollo) e mescolare bene. Dopo avere aggiunto la cipolla al riso,
cospargere con lo zafferano in polvere. Chiudere il coperchio e premere il tasto "Risotto";
l'apparecchio si mette in funzione e il risotto inizia a cuocere.
• Al termine della fase di cottura premere il tasto Stop, aprire con cautela il coperchio
(attenzione: può fuoriuscire vapore bollente!) e prelevare il risotto con un cucchiaio.
Insaporire con sale, pepe, burro, versare in un piatto di portata e cospargere di
parmigiano grattugiato. Fatto!
Cottura a vapore:
Anche i frutti di mare e il pesce possono essere cotti a vapore. Ecco alcuni consigli:
– Gamberetti: cuocere a vapore finché non assumono una colorazione rosea: ca. 10-12 minuti
per ca. 300/350 g
– Filetti di pesce: ca. 12-15 minuti per ca. 300/350 g
In base a queste indicazioni, si possono provare altre qualità di pesce! Non dimenticare di
aggiungere acqua in quantità sufficiente. (Vedi sopra alla voce "Cottura a vapore")
47
I
Dati tecnici
Tensione d'esercizio:
Potenza assorbita:
220 - 240V ~ 50Hz
700 Watt
L'apparecchio deve essere utilizzato
solo per scopi domestici!
Non immergerlo nei liquidi!
Garanzia
Per questo apparecchio vale una garanzia pari a 2 anni a partire dalla data di acquisto.
Vengono esclusi i danni che hanno origine da normale usura, uso diverso da quello previsto,
trattamento inappropriato, comando errato, scarsa cura e pulizia, distruzione dolosa, incidenti
o danni dovuti al trasporto ovvero interventi da parte di persone non autorizzate. Questo
certificato di garanzia deve essere inviato insieme all'apparecchio non aperto.
La garanzia può essere concessa solo se all'apparecchio viene accluso lo scontrino ovverosia
la fattura.
KÜCHENPROFI GmbH & Co. KG
Solingen · Germany
Tel.: +49 (0) 212/6582-0
Fax: +49 (0) 212/6582-10
Internet: www.kuechenprofi.de
Zusatz BA Reiskocher 17 0900 00 00
26.09.2008
15:32 Uhr
Seite 1
Zusätzliche Informationen zum Dampfgaren
Reiskocher 17 0900 00 00
Wenn Sie eine andere als die folgenden voreingestellten Zeiten benötigen, wählen Sie die nächst höhere Stufe als die, die Sie tatsächlich zum Garen der Lebensmittel benötigen.
10 min = Schnell / quick
14 min = Reis / rice
20 min = Risotto
40 - 95 min = Suppe / soup
Schalten Sie den Reiskocher manuell nach Ablauf der entsprechenden Garzeit durch drücken der Taste "Stop / cancel" aus.
Additional information for steam cooking
rice cooker 17 0900 00 00
If you need another time setting than the following preset time settings, select the next higher level witch you really need for steaming your food:
10 min = Schnell / quick
14 min = Reis / rice
20 min = Risotto
40 - 95 min = Suppe / soup
Press the "Stop / cancel" button after the expiration of cooking time to switch off the rice cooker manual.
Demander un complément d'informations sur la cuisson à vapeur
cuiseur à riz 17 0900 00 00
Si vous utilisez un autre que les heures précises, choisissez la plus proche de la phase que vous avez fait pour la cuisson des aliments ont exiges.
10 min = Schnell / quick
14 min = Reis / rice
20 min = Risotto
40 - 95 min = Suppe / soup
Mettez le riz manuellement aprËs la fin de la cuisson en appuyant sur la touche "Stop / cancel".
Informazioni supplementari per la vaporiera
cuociriso 17 0900 00 00
Se ha bisogno di un altro tempo pre selezionato di quelli che sono proposti, selezionare un grado ulteriore di quello che l¥alimento bisogna per la cottura.
10 min = Schnell / quick
14 min = Reis / rice
20 min = Risotto
40 - 95 min = Suppe / soup
Spegnere la risottiera manualmente dopo il decorso del tempo con il tasto "Stop/cancel".
KÜCHENPROFI GmbH & Co. KG
Solingen · Germany
www.kuechenprofi.de
Tel.: +49 (0) 212/6582-0