1
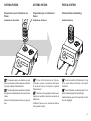
OPERATION INSTRUCTIONS
MODE D'EMPLOI
BEDIENUNGSANLEITUNG
INSTRUCCIONES DE EMPLEO
ISTRUZIONI PER L'USO
BRUKSANVISNING
14
37
15
®
AIR-FLOW MASTER PIEZON
Cleaning
AIR FLOW
MASTER
®
PIEZON
CLEANING
20
13
12
11
9
Caution! Federal (USA) law restricts this device
to sale by or on the order of a dentist.
1
/#5
6'42
+'<1
56#0
&
2'4+1
0
34
Standard
Perio
STANDARD
.19
35
17
PERIO
#+4(
36
16
2
3
4
5
6
7
10
8
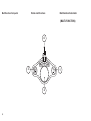
Fold out the cover pages to view technical drawings
Technische Zeichnungen auf der Innenseite der Deckblätter
Abra las tapas del manual para ver las ilustraciones
Aprire le pagine di copertina per visualizzare i disegni tecnici
Vik ut omslaget för att se illustrationerna
21
22
23
24
25
26
27
28
29
30
31
32
33
TECHNICAL MODIFICATIONS
MODIFICATIONS TECHNIQUES
TECHNISCHE ÄNDERUNGEN
EMS reserves the right to modify the technique,
accessories, operating instructions or contents
$
ments.
"
#
aux accessoires, au mode d’emploi et au contenu
"
"
EMS behält sich vor, im Zusammenhang mit
technischen oder wissenschaftlichen Weiterentwicklungen Änderungen an der Technik, dem
Zubehör, der Bedienungsanleitung sowie am
Inhalt der Originalverpackung vorzunehmen.
MODIFICACIONES TÉCNICAS
MODIFICHE TECNICHE
TEKNISKA ÄNDRINGAR
los accesorios, las instrucciones de empleo o el
EMS si riserva il diritto, nell’ambito delle innovazioni tecniche o scientifiche, di apportare
zioni per l’uso e al contenuto del set.
EMS förbehåller sig rätten att ändra teknik,
tillbehör, bruksanvisning eller innehåll i satsen
på grund av tekniska eller vetenskapliga förbättringar.
%.'#
0+0)
19
18
AIR F
LOW
MAST
ER
PIEZO
17
16
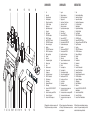
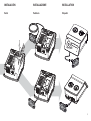
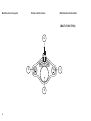
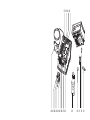
COMPONENTS
COMPOSANTS
BESTANDTEILE
1
2
3
4
5
6
7
8
9
10
11
12
13
14
15
16
17
18
19
20
21
22
23
24
25
26
27
28
29
30
31
32
33
34
1
2
3
4
5
6
7
8
9
10
11
12
13
14
15
16
17
18
19
20
21
22
23
24
25
26
27
28
29
30
31
32
33
34
1
2
3
4
5
6
7
8
9
10
11
12
13
14
15
16
17
18
19
20
21
22
23
24
25
26
27
28
29
30
31
32
33
34
15
N®
STAN
DARD
PERIO
CLEA
NING
35
36
37
1
2
3
4
5 6
7 8
9
10
11
12
13
14
Unit
Power setting
Working mode selection
Flow rate adjustment
"Cleaning" mode control lamp
"Dry Work" control lamp
Handpiece cord
Magnetic handpiece support
Purge switch
Piezon® handpiece
+%:;<=>;?® handpiece
@:%<=>;?® handpiece
GJ
$
+%:;<=>;?® nozzles
+%:;<=>;?® Nozzle extractor
Powder chamber rings set
SystemBox
+%:;<=>;?® Powder chamber
@:%<=>;?® Powder chamber
Bottle of irrigation liquid
Foot pedal
Power cable
Compressed air supply hose
Water supply hose
Fuses
Water hose connector
Air hose connector
Unit pump cover
Screw of the unit pump cover
@:%<=>;?® Powder bottle
@
@
%
|
Filter cartridge
Connector for @:%<=>;?® or +%:;<=>;?®
handpiece cord
Connector for connecting a second EMS unit
Connector for the foot pedal
Connector for Piezon® handpiece cord
EMS supplies this unit with various accessories. The
"Packing list" shows exactly what your unit includes.
35
36
37
Appareil
%
%
Voyant lumineux "Cleaning" mode
Voyant lumineux "Dry work"
'
*
#
*
#
Bouton de purge
+*
#
+/®
+*
#
+%:;<=>;?®
+*
#
@:%<=>;?®
GH
+%:;<=>;?®
J
+%:;<=>;?®
KJ
#
SystemBox
'
#
+%:;<=>;?®
'
#
@:%<=>;?®
Bouteille de liquide d'irrigation
+
Cable secteur
NP
Tuyau pour alimentation en eau
Fusibles
Raccord rapide d'eau
Raccord rapide d'air
Cache de la pompe de l'appareil
Vis du cache de la pompe de l'appareil
G
@:%<=>;?®
G
#
'
#
'
'
*
#
@:%<=>;?®
+%:;<=>;?®
Connecteur pour brancher un second appareil EMS
'
'
*
#
Piezon®
EMS fourn
$$
>
X+Y
X
J
avec votre appareil.
35
36
37
Gerät
Einstellen der Ultraschallleistung
Auswählen des Arbeitsmodus
@
\
Kontrolllampe für Reinigungsmodus
„Dry Work“-Kontrolllampe
Handstückschlauch
Magnetische Handstückhalterung
Schalter für Spülfunktion
Piezon®-Handstück
+%:;<=>;?®-Handstück
@:%<=>;?®-Handstück
+Y
+%:;<=>;?®-Düsen
?Y/
/
$
+%:;<=>;?®-Düsen
Ringe für Pulverkammer
SystemBox
+%:;<=>;?®-Pulverkammer
@:%<=>;?®-Pulverkammer
=
_\_Y
Fußschalter
Netzkabel
Druckluftschlauch
Wasserschlauch
Sicherungen
Anschluss für Wasserschlauch
Anschluss für Druckluftschlauch
Abdeckung Pumpeneinheit
Schraube für Abdeckung Pumpeneinheit
@:%<=>;?®<+\
@Y
>$j
>$j
/<>$_
Filterpatrone
@
$_
@:%<=>;?®
+%:;<=>;?®Handstückschlauch
Anschluss für weiteres EMS-Gerät
Anschluss für Fußschalter
Anschluss für Piezon®-Handstückschlauch
EMS bietet Geräte in unterschiedlichen Ausstattungsvarianten an. Für die genaue Ausstattung Ihres Geräts
beachten Sie bitte die beiliegende Packliste.
COMPONENTES
COMPONENTI
KOMPONENTER
1
2
3
4
5
6
7
8
9
10
11
12
13
14
15
16
17
18
19
20
21
22
23
24
25
26
27
28
29
30
31
32
33
34
1
2
3
4
5
6
7
8
9
10
11
12
13
14
15
16
17
18
19
20
21
22
23
24
25
26
27
28
29
30
31
32
33
34
1
2
3
4
5
6
7
8
9
10
11
12
13
14
15
16
17
18
19
20
21
22
23
24
25
26
27
28
29
30
31
32
33
34
35
36
37
Aparato
Ajuste de la potencia
Selección del modo de trabajo
%%
Piloto indicador del modo "Cleaning"
Piloto indicador "Dry Work"
Cable del mango
+Q!
Interruptor de purga
Mango Piezon®
=
®
=
®
>%(J
®
U!(J
®
Juego de anillos cámara de polvo
SystemBox
>Y
®
>Y
®
Botella de líquido de irrigación
Pedal
Cable de alimentación
Manguera suministro de aire comprimido
Manguera suministro de agua
Fusibles
Conector manguera de agua
Conector manguera de aire
Tapa de la bomba del aparato
Tornillo de la tapa de la bomba del aparato
Z
®
H%"
%"
!("
>!#"
>!!(
® o
®
Conector para conectar un segundo aparato de EMS
Conector para el pedal
Conector para el cable del mango Piezon®
=+!!!L
/!/!U!J!'
su aparato.
35
36
37
)*
Regolazione della potenza
+,*
,!*
+!*/,/
+!*!!:/;'
/<
Cavo del manipolo
Supporto del manipolo magnetico
Interruttore di spurgo
Manipolo Piezon®
=
®
=
®
+!
®
®
Set di anelli della camera della polvere
SystemBox
>
®
>
®
Flacone del liquido di irrigazione
Pedaliera
Cavo di alimentazione
Tubo di alimentazione dell'aria compressa
Tubo di alimentazione dell'acqua
Fusibili
Connettore del tubo dell'acqua
Connettore del tubo dell'aria
>!#@*
G!!#@*
!
®
H@"@
"@
>#"@!(
!!!"
>!
® o
®
>!!*
EMS
Connettore per la pedaliera
Connettore per il cavo del manipolo Piezon®
=+,J*!!L
Nella distinta di spedizione viene elencato esattamente
!*L
35
36
37
Enhet
Effektinställning
Driftsläge
Flödeshastighet
Kontrollampa för rengöringsläge
”Dry Work”-indikering
Slang till handstycke
Magnetisk handstyckehållare
Tömningsomkopplare
Piezon®-handstycke
®-handstycke
®-handstycke
®-spetsar
®-spetsbytare
Pulverkammarringar
SystemBox
®-pulverkammare
®-pulverkammare
Flaska med spolningsvätska
Fotpedal
Nätkabel
Tryckluftsslang
Vattenslang
Säkringar
Vattenslangsanslutning
Skydd för pumpenhet
Skruv till pumpenhetens skydd
®
!"#$%
"#$%
&'!$"('
Filterpatron
$
®
®handstyckets slang
Anslutning för ytterligare en EMS-enhet
Anslutning för fotpedal
Anslutning för Piezon®-handstyckets slang
EMS utrustar enheten med olika tillbehör. Packlistan visar
exakt vad som medföljer denna enhet.
DEAR CUSTOMERS,
CHERS CLIENTS,
SEHR GEEHRTE KUNDINNEN
UND KUNDEN,
Thank you for buying a new EMS product. It meets
the highest quality and safety standards.
Nous vousQ!@!J!
=+LQU#U!
JQQ!QL
Wir gratulieren Ihnen zum Kauf Ihres neuen
EMS-Produkts. Es erfüllt höchste Ansprüche an
Qualität und Sicherheit.
G
=+H\&!(@Q@',L
;
=+H\&](nation aus einem Air-Polishing-Gerät und einem
Piezon-System.
=+H\&!(nation of one air polishing unit and one Piezon
system.
It is for use in dentistry with the EMS Piezon
#=+
systems.
This product works exclusively with the powders
and the systems supplied by EMS.
The instructions in this manual cover the
!(
#!
#!,#!L
Please refer only to instructions related to
#! }# handpiece is not present.
For further details concerning the treatments, please refer to the instruction which are
}#'
Piezon systems. Please do not hesitate to contact
your local EMS dealer for further information.
Please refer to operation instructions of the related
system.
>Q!
* =+ , '
=+L
Ce produit fonctionne exclusivement avec les
poudres et les systèmes fournis par EMS.
! ! QQ!(Q@
!*
@!*
! * \&L
G,QQU!*
!*
!*
@QL
Q!!~,QQ
!'
,L&@#Q,*!!
distributeur EMS pour de plus amples informations.
G,QQ@'
correspondant
Das Gerät ist für den zahnmedizinischen
Einsatz mit Piezon-Ultraschallinstrumenten und
+'=+(L
Das Gerät darf ausschließlich mit Prophylaxepulver und Systemen von EMS verwendet werden.
Die Anweisungen der Bedienungsanleitung
beziehen sich auf die kombinierte Verwendung
`{!
mit einem Piezon-Handstück. Die Bedienungsan
`{!,
,}~}
Handstück verfügbar ist.
Weitere Informationen zur Behandlung
entnehmen Sie bitte den mitgelieferten Bedie,+'
~
,L
erhalten Sie bei Ihrem EMS-Händler.
Siehe Bedienungsanleitungen der jeweiligen
Geräte.
GENTILE CLIENTE,
BÄSTA KUND,
!J#'J
producto de EMS. Éste satisface las exigencias
más altas de calidad y seguridad.
Grazie di aver acquistato un nuovo prodotto EMS
!J*!,,
più elevati.
Tack för att du har köpt en EMS-produkt. Den
uppfyller högt ställda kvalitets- och säkerhetskrav.
=+H\&!(nación de un aparato de pulido por aire y un
sistema Piezon.
=+H\&!(,@*!
sistema Piezon.
Se utiliza en odontología con los instrumentos
de ultrasonidos Piezon de EMS y los sistemas
=+L
È previsto per l'uso in ambito dentistico assieme
agli strumenti agli ultrasuoni Piezon e ai sistemi
=+
L
Este producto funciona exclusivamente con los
polvos y sistemas suministrados por EMS.
Questo prodotto funziona esclusivamente con la
polvere e con i sistemi forniti da EMS.
!!!(
!(
',L
Consulte solo las instrucciones relacionadas con
!#'
L
,J
fanno riferimento all'utilizzo combinato del
manipolo Piezon. Quando il manipolo PERIO
!,
L
Si desea más información sobre los tratamientos, consulte las instrucciones que se facilitan
! ~ Piezon. No dude en ponerse en contacto con su
distribuidor local de EMS si desea información
adicional.
Per ulteriori informazioni relative ai trattamenti, consultare le istruzioni fornite con i sistemi
,L
informazioni rivolgersi al rivenditore locale EMS.
Ytterligare information om behand"$%
~
,'L
Tveka inte att kontakta din lokala EMS-återförsäljare om du vill ha mer information.
Consultare le Istruzioni per l'uso del relativo
sistema.
Se bruksanvisningarna för de separata systemen.
Consulte las instrucciones de empleo del sistema
correspondiente.
;
=+H\&(nation av en luftpoleringsenhet och ett Piezonsystem.
Den används för tandläkarvård tillsammans
med EMS Piezon-ultraljudsinstrument och EMS
'L
Produkten fungerar enbart med de pulver och
system som tillhandahålls av EMS.
Instruktionerna i denna handbok omfattar
( #'!
#'!
och ett Piezon-handstycke. Se endast instruk$
#'!
#'!L
%
For further details on the various instruments and their scopes of application, please refer
to the operating instructions supplied with your
Piezon system or available from the distributor in
your country.
!Q
!!Q
!~,QQ
mode d’emploi fourni avec votre système Piezon
ou auprès du distributeur de votre pays.
Nähere Informationen zu den verschiedenen Instrumenten und ihren Einsatzgebieten
entnehmen Sie bitte der Bedienungsanleitung,
die Ihrem Piezon-System beiliegt, oder wenden
Sie sich an Ihren EMS-Händler.
&&#
&&#
!"
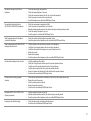
This product is designed for use in dentistry
with EMS Piezon ultrasound instruments for the
following indications:
Ce produiQ*Q
!*=+,
pour les applications suivantes:
Das Ultraschallgerät ist für den zahnmedizinischen
Einsatz mit EMS-Piezon-Ultraschallinstrumenten
für die folgenden Einsatzgebiete bestimmt:
#!
Removal of supragingival calculus
Removal of stains
Preparation, cleaning and irrigation of root
canals
Retrograde preparation of root canals
Condensing gutta-percha
Removal of crowns, bridges and restorations
Restorative
Preparation of cavities
''
Condensing of amalgams
Perio
Scaling and root planing
Periodontal treatments
'!
Elimination du tartre supra-gingival
Elimination des taches
Q~'!naux radiculaires
QQ!U!laires
Condensation de la gutta-percha
Descellement de couronnes, bridges et
restaurations
($
!Q
Scellement d’inlays et d’onlays
Condensation d'amalgame
;Q!
Traitements parodontaux
#!
Entfernen von supragingivalen Konkrementen
Entfernen von Flecken
Präparation, Reinigen und Spülen von Wurzelkanälen
Retrograde Präparation von Wurzelkanälen
Guttapercha-Kondensation
$]~Z{!
Stiftaufbauten
$!
Kavitätenpräparation
Befestigen von In- und Onlays
Kondensation von Amalgamen
Scaling und Wurzelglättung
Parodontaltherapie
Si desea información más detallada de los
distintos instrumentos y sus aplicaciones, consulte
las instrucciones de empleo que se proporcionan
!,(Q(
de su país.
Per ulteriori informazioni sui vari strumenti
e la loro applicazione, consultare il manuale
operativo in dotazione con il sistema Piezon o
disponibile presso il distributore autorizzato del
proprio paese.
Ytterligare information om de olika instru!#"
i bruksanvisningarna som medföljer Piezonsystemet. Dessa kan även beställas från distributören i det aktuella landet.
&#
&&#
)*!+
Este producto se ha diseñado para utilizar en
odontología con los instrumentos de ultrasonidos
Piezon de EMS para las siguientes indicaciones:
Questo prodotto è previsto per l'uso in odontoiatria
con strumentazioni agli ultrasuoni EMS Piezon per
le seguenti indicazioni:
Denna produkt är avsedd att användas för tandläkarvård med EMS Piezon-ultraljudsinstrument för
följande indikationer:
&
Eliminación del cálculo supragingival
Eliminación de manchas
!!
Rimozione di calcoli sopragengivali
Rimozione di macchie
#!
Borttagning av supragingival tandsten
Z!
Preparación, limpieza e irrigación de conductos radiculares
Preparación retrógrada de conductos radiculares
Condensación de gutapercha
Extracción de coronas, puentes y restauraciones
Preparazione, pulizia e irrigazione di canali
radicolari
Preparazione retrograda di canali radicolari
Condensazione della guttaperca
Rimozione di corone, ponti e restauri
Förberedelse, rengöring och spolning av
rotkanaler
Retrograd förberedelse av rotkanaler
Kondensering av guttaperka
Borttagning av kronor, broar och rekonstruktioner
($.
Preparación de cavidades
Cementación de incrustaciones (inlays) y
onlays
Condensación de amalgamas
Raspado y pulido radicular
Tratamientos periodontales
($
,!*
Fissaggio di intarsi e onlay
Condensa di amalgame
)&#
(,"!,!
Trattamenti periodontali
()"-#!
Förberedelse av kaviteter
Tätning av inlägg och pålägg
Kondensering av amalgam
Scaling och rotplaning
Periodontal behandling
(/0
%(/0
(/0
H#!"#}('}%
makes it possible to steer the water jet with great
precision and thus ensures a pleasant treatment
for your patient.
!%
(!Q!%~
!QJ~Q(
patient.
This product removes dental plaque, soft deposits
and surface stains from pits, grooves, interproximal spaces or smooth surfaces of the teeth.
> Q J
~Q!~
Q!~
des espaces proximaux.
Bei unseren Air-Flow-Systemen wird das Pulver
vom Wasserstrahl umhüllt. Dies gewährleistet
einen äußerst präzisen Strahl, der für eine
besonders patientenfreundliche Behandlung
sorgt.
&&#
Plaque removal for placement of sealants,
Surface preparation prior to bonding/cementation of inlays, onlays, crowns and veneers,
Surface preparation prior to placing composite restorations,
Cleaning prior to bonding of orthodontic
brackets,
Effective plaque and stain removal for orthodontic patients,
>"U~
Stain removal for shade determination,
J~
Plaque and stain removal prior to whitening
procedure.
&&#
Elimination de la plaque pour la pose de
sealant,
Q!lays, de couronnes ou de facettes,
Q!
avec des composites,
Nettoyage avant la pose de brackets,
Elimination de la plaque et de taches pour
les patients en traitement orthodontique,
Nettoyage des pivots avant mise en charge,
!#Qtion des teintes,
Elimination de la plaque avant l’application
J~
Elimination de la plaque et de taches avant
blanchiment.
Plaque, weiche Zahnbeläge und Verfärbungen in
Fissuren, Interdentalräumen und auf sichtbaren
\#!#}L
!"
Entfernen von Plaque vor der Versiegelung
G((!#setzen und Zementieren von Inlays, Onlays,
Kronen und Veneers
G((!#
von Kompositfüllungen
Reinigen der Zähne vor dem Anlegen orthodontischer Brackets
Reinigen festsitzender Bänder und Brackets
Reinigen von Implantathälsen und -köpfen
Reinigen der Zähne für die Zahnfarbbestimmung
Reinigen der Zähne vor der Fluoridierung
Reinigen der Zähne vor einem Bleaching
(/0
(/0
(/0
!"!#~
es posible dirigir dicho chorro con gran precisión
y, por consiguiente, garantizar un tratamiento
agradable al paciente.
,
d'acqua rende possibile dirigere il getto con grande
precisione assicurando un piacevole trattamento
per il paziente.
Eftersom pulvret innesluts i en vattenstråle kan
strålen styras med hög precision, vilket gör
behandlingen behagligare för patienten.
Este producto elimina la placa, los depósitos
('!#"!
fosas, surcos, espacios interproximales o super"!L
Questo prodotto consente la rimozione di placca
~(!!#"!
!~!~,"!
lisce dei denti.
&#
Eliminación de la placa para la colocación
de selladores
!"!
adhesión/cementación de inlays, onlays,
coronas y carillas
!"!!locación de restauraciones de composite
,(!
ortodóncicos
Eliminación efectiva de la placa y manchas
en pacientes ortodóncicos
,!
Eliminación de manchas para determinar
el tono
Eliminación de la placa antes de un trata!
Eliminación de la placa y manchas antes de
un blanqueamiento dental
&&#
Rimozione della placca per l'applicazione di
sigillanti
,"!
dell'adesione/cementazione di inlay, onlay,
corone e rivestimenti ceramici
,"!
posizionamento di ricostruzioni in materiale
composito
Pulizia prima dell'adesione di staffe ortodontiche
"!!,!!!!#
pazienti ortodontici
Pulizia dell'impianto prima del montaggio
Rimozione di macchie per la determinazio*
Rimozione della placca prima del trattamen
Rimozione di placca e di macchie prima della procedura di sbiancamento.
Produkten tar bort plack, mjuka avlagringar och
'!##~~U
områden och jämna ytor på tänderna.
)*!+
Plackborttagning för applicering av försegling
Ytförberedelse före limning/cementering av
inlägg, pålägg, kronor och fasader
Ytförberedelse före applicering av kompositrekonstruktioner
Rengöring före limning av tandregleringsfästen
!!#!($regleringspatienter
Rengöring av implantatfästen före belastning
Fläckborttagning för färgbestämning
!($(#
!!#!($(ning
(/0
%(/0
(/0
&&#
&&#
!"
H#!'(('J"
trained personnel (dentist or dental hygienist).
>QJ
J"QQ:#'Q<L
This product should only be used with powders
supplied by EMS for a subgingival application.
Ce produit fonctionne uniquement avec les
poudres fournies par EMS pour application
subgingivales.
Das Produkt darf nur von ausgebildetem und quali",}}:\#,
und Dentalhygieniker).
This product removes the subgingival biofilm
during periodic periodontal treatments. Its long
",,}!"!''
access inside the periodontal pocket.
>Q("(gival lors de traitements parodontaux de soutien.
+(QQQ!
QQ!!Q!
dans la poche parodontale.
Zu verwenden sind ausschließlich Prophylaxepulver für die subgingivale Anwendung von EMS.
Das Produkt dient der Entfernung des subgingivalen Biofilms während der regelmäßigen
Parodontaltherapie. Die lange, feine Düse ermög!#!#\,\#!#schen.
(/0
(/0
(/0
&#
&&#
)*!+
Este producto solo debe ser utilizado por personal
!"!':#<L
Questo prodotto può essere utilizzato esclusiJ"!
(dentista o igienista dentale).
Produkten får endast användas av behörig och
utbildad personal (tandläkare och tandhygienister).
Questo prodotto va utilizzato esclusivamente con
la polvere fornita da EMS per applicazioni sottogengivali.
Produkten får endast användas med pulver som
tillhandahålls av EMS för subgingival användning.
Este producto solo debe utilizarse con polvos
suministrados por EMS para aplicación subgingival.
Este producto elimina la biopelícula subgingival
durante los tratamientos periodontales periódicos.
(J'"#!ficamente para acceder fácilmente a la bolsa
periodontal.
Questo prodotto consente la rimozione della
biopellicola sottogengivale durante i trattamenti
periodontali periodici. Il suo sottile e lungo ugello
!"!
accesso all'interno della tasca periodontale.
(("diska parodontala behandlingar. Den långa smala
spetsen är speciellt framtagen för att ge enkel
"!L
ABOUT THIS MANUAL
A PROPOS DE CE MANUEL
ZU DIESEM HANDBUCH
These operating instructions are to ensure the
correct installation and use of this product.
>Q**
l’utilisation correcte de ce produit.
Please read these operating instructions carefully
as they explain all the most important details and
procedures. Please pay special attention to the
safety precautions.
Veuillez lire attentivement ce mode d’emploi car
Q'
!Q!L!,!
J!!Q!QL
Die Bediendungsanleitung soll Ihnen bei der
korrekten Installation und Bedienung des Produkts
helfen.
Always keep this document close at hand.
G,!!!%*Q
de main.
Instructions concerning the components of the system are provided separately in
the respective instructions for use. Read the
instruction manuals originally delivered with each
of the components before using this product. Do
not hesitate to contact your local EMS dealer for
further information.
This product needs special precautions
regarding electromagnetic compatibility and needs
to be installed and put into service according to
the "Electromagnetic compatibility" manual.
!!!! ' QQ
dans les manuels d’instructions correspondants.
G,!Q!
chacun des composant avant d’utiliser ce produit.
&#Q,*!!(=+
pour plus d’informations.
>Q!Q!!!!!(QQ!QJLQ!
/>(Q!QJ/L
+ !#~ die wesentlichen Einzelheiten und Handgriffe
anschaulich erklärt werden. Beachten Sie dabei
besonders die Sicherheitshinweise.
Bewahren Sie diese Unterlagen immer griffbereit
auf.
Anweisungen zur Bedienung der einzelnen
Systembestandteile sind in den jeweiligen Bedie,"LGG}
des Geräts sind die Bedienungsanleitungen, die
,+'(teile enthalten waren, zu lesen. Weitere Informationen erhalten Sie bei Ihrem EMS-Händler.
Für das Gerät sind besondere Vorsichtsmaßnahmen hinsichtlich der elektromagnetischen
Kompatibilität zu beachten. Die Installation und
Inbetriebnahme des Geräts muss die Anforderungen des Handbuchs „Electromagnetic compatibility“ erfüllen.
PRESENTACIÓN DEL MANUAL
INFORMAZIONI SU QUESTO
MANUALE
OM DENNA HANDBOK
Estas instrucciones de empleo sirven para garantizar una instalación y uso correctos de este
producto.
,@!
corretta installazione e utilizzo di questo prodotto.
Syftet med denna bruksanvisning är att säkerställa
att produkten installeras och används på rätt sätt.
J,@
poichè contengono la spiegazione di tutti i dettagli
e le procedure più importanti. Porre un'attenzione
speciale alle precauzioni di sicurezza.
(#(
viktiga detaljer och procedurer. Var särskilt
uppmärksam på säkerhetsföreskrifterna.
!!'
que explican todos los detalles y procedimientos
más importantes. Preste especial atención a las
precauciones de seguridad.
Tenga siempre a mano este documento.
!!!nentes del sistema se facilitan por separado en las
instrucciones de uso correspondientes. Antes de
utilizar este producto, lea los manuales de instrucciones suministrados originalmente con cada uno
de los componentes. No dude en ponerse en
contacto con su distribuidor local de EMS si desea
información adicional.
Este producto requiere precauciones
especiales referentes a compatibilidad electroQ!~'('!namiento conforme al manual de "Compatibilidad
!Q!/L
Tenere sempre questo documento a portata di
mano.
,!
vengono fornite separatamente nelle relative istruzioni per l'uso. Prima di usare questo prodotto
leggere i manuali di istruzione spediti originalmente con ciascun componente. Per ulteriori informazioni rivolgersi al rivenditore locale EMS.
Questo prodotto richiede precauzioni
!!(*!
,!*
/>(*!/L
Ha alltid detta dokument nära till hands.
Anvisningar som rör systemets beståndsdelar ges separat i respektive beståndsdels bruksL(rades tillsammans med varje beståndsdel innan
du använder produkten. Tveka inte att kontakta
din lokala EMS-återförsäljare om du vill ha mer
information.
Denna produkt kräver särskilda försiktighetsåtgärder vad gäller elektromagnetisk kompatibilitet och måste installeras och driftsättas i
enlighet med anvisningarna i handboken ”Electromagnetic compatibility”.
To prevent possible patient or user injury or
#
=+H\&~
please note the corresponding directives:
Q(!!!
*@
=+H\&,
merci de tenir compte des directives suivantes:
!
Risk of patient or user injury
!
Risque de blessure pour le patient ou
l'utilisateur
$
Risk of damage to the device or environmental harm
J*@*
l’environnement
#
Useful additional information and hints
-"
(6$
!Q
tours de main
$-
$'
Note that the English version of this manual is the
master from which translations derive. In case
of any discrepancy, the binding version is the
English text.
We would be pleased to answer your questions
or listen to your suggestions. We do, of course,
provide support in case of technical problems.
Please contact your approved EMS repair center
or your dealer.
We wish you lots of success!
EMS
!!(Q
sa version anglaise. Ainsi le texte en anglais fera
QQ!!!L
Zur Vermeidung von Personenschäden oder
+!#!#
=+H\&
beachten Sie bitte die folgenden Hinweise:
12-
Bei Gefahr von Personenschäden
-$!
Bei drohenden Sach- und Umweltschäden
34
Bei nützlichen Zusatzinformationen und
Anwendungstipps
5"
#$"
Es wird darauf hingewiesen, dass das englische
Original der Bedienungsanleitung als Vorlage für
alle Übersetzungen gilt. Bei eventuellen Abweichungen ist der englische Text bindend.
&*
Q * J * Q! Q L
Naturellement, nous vous proposons un soutien
technique en cas de problèmes. Veuillez contacter
!QQ=+
distributeur.
Wir stehen Ihnen gerne für Fragen zur Verfügung.
Bei Problemen bieten wir Ihnen selbstverständlich
technische Unterstützung an. Wenden Sie sich
bitte an ein EMS-genehmigtes Reparaturzentrum
oder Ihren Händler.
Avec nos meilleurs vœux de succès!
Ihre EMS
EMS
Wir wünschen Ihnen viel Erfolg!
Para evitar posibles lesiones en el paciente o
~
=+H\&~
nótense las directrices correspondientes:
Per impedire possibili lesioni al paziente o all'ope@
=+H\&
attenersi alle relative direttive:
#!
Riesgo de lesiones en el paciente o
usuario
Pericolo
Rischio di lesioni al paziente o all'operatore
Fara
Risk för skada på patient eller användare
$.
Riesgo de daños en el dispositivo o
medioambientales
Rischio di danni al dispositivo o all'ambiente
5!
Risk för skada på enheten eller miljön
").
Información y consejos útiles adicionales
Nota
Informazioni e consigli utili
Estaremos encantados de contestar a sus
preguntas o escuchar sus sugerencias. Por
supuesto, proporcionamos asistencia en caso
(Q!!L!!
con su centro de reparaciones autorizado o distribuidor de EMS.
!#QU
/7"8$
##+
$
$
&JQ
es la original de la que parten las traducciones.
En caso de discrepancias, la versión vinculante
es la inglesa.
")
Ytterligare praktisk information och tips
Vietato
-"
EMS
För att förhindra patientskador eller skador på
=+H \& $%
varningar observeras:
J versione master da cui deriva la traduzione. In
caso di discrepanze fa fede il testo in inglese.
Observera att den engelska versionen av
handboken är originalet som övriga språk har
översatts från. Vid eventuella avvikelser gäller
den engelska texten.
Rimaniamo a vostra disposizione per eventuali
domande e i suggerimenti sono ben accetti. Ovviamente forniamo assistenza in caso di problemi
tecnici. Rivolgersi direttamente al centro di
assistenza EMS autorizzato o al proprio rivenditore.
Vi svarar gärna på frågor och tar emot förslag.
Vi ger självklart support vid tekniska problem.
Kontakta ditt godkända EMS-reparationscenter
eller din återförsäljare.
Buon lavoro!
EMS
EMS
'!
CONTENTS
SOMMAIRE
INHALT
Installation ........................................................ 2
Foot pedal .................................................... 2
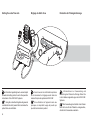
Handpiece cords and supports .................... 4
Connecting to the water supply and to
the compressed air supply ........................... 6
Connecting to the mains power ................... 8
Connecting to another EMS unit (option)... 10
Piezon System ............................................... 12
Preparing for the Piezon treatment ............ 12
Solutions compatible with the circuit ......... 14
Connecting the handpieces ....................... 16
Attaching the instruments .......................... 18
Switching On .............................................. 20
Power handpiece on compatible Piezon
devices (option) .......................................... 23
Working mode selection............................. 24
"Dry Work" mode selection ........................ 26
Multifunction foot pedal .............................. 28
,#!;............................... 30
Setting the ultrasound power ..................... 32
Setting the irrigation flow rate ................... 34
End of the treatment................................... 36
Cleaning and disinfecting the circuit .......... 38
Illustration of a "Cleaning" mode cycle ...... 42
Removing the bottle ................................... 44
+'......................................... 46
Powder choice ............................................ 46
Filling the powder chambers ...................... 48
>!#
#! ...... 52
Operating the unit.......................................54
Switching On ..............................................54
Installation ........................................................ 2
Q! .................................. 2
>!* ........ 4
>U*@@
Q@!Q.................................. 6
>UQQ!J .................. 8
>U*=+
(option)........................................................ 10
Système Piezon ............................................. 12
Q, .............. 12
Solutions compatibles avec le circuit ........ 14
>U!* .................... 16
Fixation des instruments ............................ 18
Mise sous tension ...................................... 20
!*}
Piezon compatibles (option) ....................... 23
+Q!...................... 24
+Q!*!
"Dry Work".................................................. 26
Q! ................................. 28
!*,; .......................... 30
Q! ..... 32
QQ(@ ...................... 34
Fin du traitement ........................................ 36
&'Q!!!........... 38
Illustration d'un cycle du
mode "Cleaning" ........................................ 42
Retrait de la bouteille ................................. 44
+'
...................................... 46
Choix de la poudre ..................................... 46
!#(* ....... 48
>U!*
...... 52
Utilisation de l’appareil ............................... 54
Mise sous tension ......................................54
Installation ........................................................ 2
Fußschalter .................................................. 2
Handstückschläuche und Halterungen ........ 4
Anschließen an die Wasser- und
Druckluftversorgung .................................... 6
Anschließen an das Stromnetz .................... 8
Anschließen an ein anderes EMS-Gerät
(optional)..................................................... 10
Piezon-System ............................................... 12
Vorbereiten für die Behandlung mit
dem Piezon ................................................ 12
=]($.... 14
Aufstecken der Handstücke ....................... 16
Befestigen der Instrumente ........................ 18
Einschalten ................................................. 20
Power-Handstück für kompatible
Piezon-Geräte (optional) ............................ 23
Auswählen des Arbeitsmodus ................... 24
Auswahl des Modus „Dry Work“ ................ 26
Multifunktionsfußschalter ........................... 28
,`{!; ............................. 30
Einstellen der Ultraschallleistung............... 32
Einstellen der Flüssigkeitsmenge ............. 34
Ende der Behandlung ................................ 36
Reinigen und desinfizieren
des Kreislaufs............................................. 38
Abbildungen zum Reinigungszyklus .......... 42
Abnehmen der Flasche .............................. 44
+' ........................................ 46
Auswahl des Pulvers .................................. 46
Befüllen der Pulverkammern ..................... 48
!
`{! ... 52
Bedienen des Geräts ................................. 54
Einschalten ................................................. 54
INDICE
INDICE
INNEHÅLL
Instalación ........................................................ 3
Pedal ............................................................ 3
Cables y soportes de los mangos ............... 5
Conexión al suministro de agua y de
aire comprimido............................................ 7
>UQ!! .......................... 9
Conexión a otro aparato de EMS
(opción) ....................................................... 11
Sistema Piezon .............................................. 13
Preparación para el tratamiento
con Piezon.................................................. 13
Soluciones compatibles con el circuito...... 15
Conexión de los mangos ........................... 17
Acoplamiento de los instrumentos ............. 19
Encendido .................................................. 21
Mango Power en aparatos Piezon
compatibles (opción) .................................. 23
Selección del modo de trabajo .................. 25
Selección del modo "Dry Work"................. 27
Pedal multifuncional ................................... 29
=,; .................................... 31
Ajuste de la potencia de los ultrasonidos .. 33
Ajuste del flujo de irrigación ...................... 35
Fin del tratamiento ..................................... 37
,'!!!! .......... 39
Ilustración de un ciclo del modo
"Cleaning"................................................... 43
Retirada de la botella ................................. 45
+
....................................... 47
Elección del polvo ...................................... 47
!Y .............. 49
>U
............... 53
Utilización del aparato................................ 55
Encendido .................................................. 55
Installazione ..................................................... 3
Pedaliera ...................................................... 3
Cavi e supporti del manipolo ....................... 5
Collegamento all'alimentazione dell'acqua
e dell'aria compressa ................................... 7
Collegamento all'alimentazione di rete ........ 9
>@*=+
(opzionale) .................................................. 11
Sistema Piezon ............................................. 13
Preparazione per un trattamento Piezon ... 13
Soluzioni compatibili con il circuito. ........... 15
Collegamento dei manipoli ........................ 17
Attacco degli strumenti .............................. 19
Accensione................................................. 21
Manipolo Power su dispositivi Piezon
compatibili (opzionale) ............................... 23
+,* ............ 25
+,*!!
"Dry Work".................................................. 27
Pedaliera multifunzionale ........................... 29
;, ........................... 31
Impostazione della potenza degli
ultrasuoni .................................................... 33
,!*
dell'irrigazione ........................................... 35
Fine trattamento ......................................... 37
Pulizia e disinfezione del circuito ............... 39
,!!*
di pulizia. .................................................... 43
Rimozione del flacone................................ 45
+
...................................... 47
Scelta della polvere.................................... 47
Riempimento delle camere delle polvere .. 49
>
.. 53
=,@* ....................... 55
Accensione................................................. 55
Installation ........................................................ 3
Fotpedal ....................................................... 3
Slangar och hållare till handstycke .............. 5
Ansluta vatten och tryckluft.......................... 7
Ansluta nätströmmen ................................... 9
Ansluta ytterligare en EMS-enhet (tillval) .. 11
Piezon-system ............................................... 13
Förbereda Piezon-behandling ................... 13
$( 15
Ansluta handstyckena ................................ 17
Fästa instrumenten .................................... 19
Slå på enheten ........................................... 21
Power-handstycke på kompatibla
Piezon-enheter (tillval) ............................... 23
Välja driftsläge............................................ 25
Välja Dry Work-läget .................................. 27
Flerfunktionspedal ..................................... 29
Piezon-handstyckets lampa ....................... 31
Ställa in ultraljudseffekten .......................... 33
Ställa in flödeshastigheten ........................ 35
Avsluta behandlingen ................................. 37
Rengöra och desinficera slingan ............... 39
Illustration av en cykel i rengöringsläget.... 43
Ta bort flaskan............................................ 45
' ...................................... 47
Välja pulver ................................................. 47
Fylla pulverkamrarna.................................. 49
#'! ................ 53
Använda enheten ....................................... 55
Slå på enheten ........................................... 55
Working mode selection............................. 56
Multifunction foot pedal .............................. 58
Setting the air/powder flow rate ................. 60
Setting the water flow rate ........................ 62
Purge switch and mode.............................. 64
Powder exchange or refill........................... 66
End of the treatment................................... 68
+' ................................... 70
Installing the nozzle and connecting
#
#! .................... 70
.................................. 72
Cleaning, disinfecting and sterilizing ............. 74
Cleaning the accessories........................... 76
Maintenance................................................... 80
Replacing the dome ................................... 80
O-rings ....................................................... 82
Replacing the water filter and the fuses .... 86
Air filter ....................................................... 88
Replacing the pump of the unit .................. 90
Safety precautions ......................................... 92
Storing the product ........................................ 96
Product disposal ............................................ 98
Warranty......................................................... 98
Accessories.................................................... 98
EMS-Service ................................................ 100
Symbols ....................................................... 102
Technical data .............................................. 110
Electromagnetic compatibility ...................... 114
Troubleshooting ........................................... 116
+Q!...................... 56
Q! ................................. 58
QQ(@ .................... 60
QQ(@ .............................. 62
Bouton et mode purge................................ 64
Echange ou recharge de poudre ............... 66
Fin du traitement ........................................ 68
+'
................................. 70
Mise en place de la busette et connexion
!*
.................70
=
.................................. 72
&'~Q!Q .......... 74
Nettoyage des accessoires........................ 76
Maintenance................................................... 80
Remplacement de la coupole .................... 80
O-rings ....................................................... 82
!*
des fusibles ................................................ 86
* ................................................... 88
Remplacement de la pompe
de l'appareil ................................................ 90
J!!Q!Q................ 92
Entreposage du produit ................................. 96
Recyclage ...................................................... 98
Garantie ......................................................... 98
Accessoires.................................................... 98
Service EMS ................................................ 100
Symboles ..................................................... 102
>!QJ!#J ........................ 110
>(QQ!QJ ................. 114
=*!@!........... 118
Auswählen des Arbeitsmodus ................... 56
Multifunktionsfußschalter ........................... 58
.............. 60
Einstellen der Flüssigkeitsmenge ............. 62
Spülfunktionsschalter und Spülmodus ...... 64
Austauschen bzw. Auffüllen des Pulvers... 66
Ende der Behandlung ................................ 68
+' ................................... 70
Aufsetzen der Düse und Anschließen
`{! ................. 70
= ................................ 72
~",........ 74
Reinigen des Zubehörs .............................. 76
Wartung .......................................................... 80
Ersetzen der Kuppel................................... 80
O-Ringe ...................................................... 82
Austauschen des Wasserfilters und
der Sicherungen ......................................... 86
...................................................... 88
Austauschen der Pumpe des Geräts ......... 90
Sicherheitshinweise ....................................... 92
Aufbewahren des Geräts ............................... 96
Entsorgen des Produkts ................................ 98
Garantie ......................................................... 98
Zubehör .......................................................... 98
EMS-Service ................................................ 100
Symbole ....................................................... 102
Technische Daten .........................................111
Elektromagnetische Verträglichkeit ............. 114
Fehlerbehebung ........................................... 120
Selección del modo de trabajo .................. 57
Pedal multifuncional ................................... 59
Ajuste del flujo de aire/polvo ...................... 61
Ajuste del flujo de agua ............................. 63
Interruptor y modo de purga ...................... 65
Cambio o recarga de polvo ........................ 67
Fin del tratamiento ..................................... 69
+
.................................. 71
Instalación de la boquilla y conexión
.......................... 71
=
.................................. 73
,~!!',! ......... 75
,!!........................ 77
Mantenimiento................................................ 81
Cambio de la cúpula .................................. 81
Juntas tóricas ............................................. 83
Cambio del filtro de agua y de
los fusibles.................................................. 87
Filtro de aire ............................................... 89
Cambio de la bomba del aparato ............... 91
Precauciones sobre seguridad ...................... 93
Almacenamiento del producto ....................... 97
Eliminación del producto................................ 99
Garantía ......................................................... 99
Accesorios ..................................................... 99
+!Q!!=+.............................. 101
Símbolos ...................................................... 103
!"!!Q!! ............................111
>(!Q! ................ 115
Solución de problemas ................................ 122
+,* ............ 57
Pedaliera multifunzionale ........................... 59
,!*
dell'aria/polvere .......................................... 61
,!*
dell'acqua .................................................. 63
*................ 65
Scambio o riempimento della polvere ....... 67
Fine trattamento ......................................... 69
+
.................................. 71
Installazione dell'ugello e collegamento
...................... 71
=*
.............................. 73
Pulizia, disinfezione e sterilizzazione ............ 75
Pulizia degli accessori ............................... 77
Manutenzione................................................. 81
Sostituzione della cupola ........................... 81
Anelli di tenuta ............................................ 83
Sostituzione del filtro dell'acqua e dei
fusibili ......................................................... 87
Filtro dell'aria .............................................. 89
+,@* ........... 91
Precauzioni di sicurezza ................................ 93
Stoccaggio del prodotto ................................. 97
Smaltimento del prodotto ............................... 99
Garanzia......................................................... 99
Accessori ....................................................... 99
Servizio assistenza EMS ............................. 101
Simboli ......................................................... 103
Dati tecnici.................................................... 112
>(*! .................... 115
Individuazione e risoluzione dei problemi ... 124
Välja driftsläge............................................ 57
Flerfunktionspedal ..................................... 59
Ställa in flödeshastighet för luft/pulver ...... 61
Ställa in vattenflödeshastigheten .............. 63
Tömningsomkopplaren och
tömningsläget ............................................. 65
Pulverbyte eller påfyllning .......................... 67
Avsluta behandlingen ................................. 69
' ................................ 71
Installera spetsen och ansluta
#'!........................ 71
................................... 73
Rengöring, desinfektion och sterilisering ...... 75
Rengöra tillbehör ........................................ 77
Underhåll ........................................................ 81
Byta kupan ................................................. 81
O-ringar ...................................................... 83
Byta vattenfilter och säkringar ................... 87
...................................................... 89
Byta ut enhetens pump .............................. 91
Säkerhetsföreskrifter ..................................... 93
Förvara produkten ......................................... 97
Kassering av produkten ................................. 99
Garanti ........................................................... 99
Tillbehör ......................................................... 99
EMS-service ................................................ 101
Symboler ...................................................... 103
Tekniska data ............................................... 112
Elektromagnetisk kompatibilitet ................... 115
Felsökning .................................................... 126
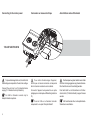
INSTALLATION
INSTALLATION
INSTALLATION
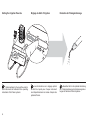
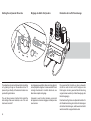
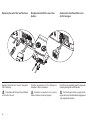
Foot pedal
'#
/$9-#
56#0
&#
2'4+1
4&
%.'#
0+0)
2
INSTALACIÓN
INSTALLAZIONE
INSTALLATION
Pedal
Pedaliera
Fotpedal
56#0
&#
2'4+1
4&
%.'#
0+0)
3
3&$&&
$&&&%;
56#0
&
56#0
&#
2'4+1
2'4+1
%.'#
0+0)
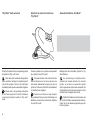
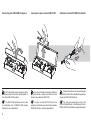
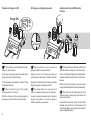
GQ"J!(!
!U*@L
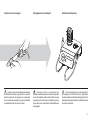
Only place the magnetic handpiece holder on the
metallic part of the unit or the furniture.
!QJ!*
QJ@
ou du mobilier.
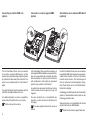
Always check that the cords will not rub
against the front face during the treatment because
this could eventually modify the selected settings.
4&
%.'#
0+0)
Check that the cords are fully dry before connecting
to the unit.
4
3:
-#*$-$3#$!
Toujours s'assurer que les cordons ne
passent pas sur la face avant durant l'utilisation
!!Q
QQ!QL
Stellen Sie sicher, dass die Schläuche vollständig
trocken sind, bevor Sie sie an das Gerät
anschließen.
Stellen Sie den magnetischen Handstückhalter
nur auf metallische Geräteoberflächen oder
Möbelstücke.
Stellen Sie sicher, dass die Schläuche
während der Behandlung nicht in Berührung mit
der Vorderseite des Geräts kommen, da sich die
ausgewählten Einstellungen sonst verändern
könnten.
"#&#!
)$&&#&#
STAN
DA
#!--+####-
56#0
&#
RD
PERIO
2'4+1
CLEA
NING
4&
%.'#
0+0)
>( J !( Q secos antes de conectarlos al aparato.
Controllare che i cavi siano completamente
!!@*L
Kontrollera att slangarna är helt torra innan du
ansluter dem till enheten.
>JQ!
en la parte metálica del aparato o del mobiliario.
Riporre il supporto magnetico del manipolo solo
!@*@L
Compruebe siempre que los cables no
rocen contra la parte frontal durante el tratamiento
'J"!%!!nados.
Controllare sempre che i cavi non sfreghino
!"!
J!(("!,
selezionate.
Den magnetiska handstyckehållaren ska endast
placeras på metallytor på enheten eller inredningen.
Kontrollera alltid att slangarna inte ligger
emot enhetens framsida under behandling
eftersom detta kan påverka inställningarna.
5
!-4$&&#
-&$&&#
X;#Y#Y$$
'$Y&'
-#90$
$
#$2)!$!
Z!#@*@@!
tuyau d'eau EMS fourni avec votre produit.
Schließen Sie das Gerät ausschließlich mit dem
mitgelieferten Original-Wasserschlauch von EMS
an die Wasserversorgung an.
H 2O
"
<=>?=>
psi
<?@J
<>>?>>
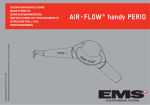
Connect the unit to a water supply using the
original EMS water hose supplied with your
product.
)''"!L
Check that the supply pressure of
!U!#!"
value (mentioned on the unit).
6
)J!Q!"QL
GQ"J@@
!QQQ!Q
:Q@<L
Verwenden Sie nur trockene und gefilterte
Druckluft.
Prüfen Sie, dass der Versorgungsdruck der
Druckluft den auf dem Gerät angegebenen Wert
nicht überschreitet.
X.#$!$
aire comprimido
##!##Y#
##Y6$##Y&
#$)-
#$2
Conecte el aparato al suministro de agua usando
la manguera de agua original de EMS proporcionada con el producto.
> @* @, @!J
usando il tubo originale per l'acqua EMS fornito
assieme al prodotto.
Anslut enheten till vattenförsöjningen med den
originalvattenslang från EMS som medföljer
produkten.
)!!!'"L
)!!"L
!#"'!L
Compruebe que la presión de suministro
del aire comprimido no sobrepase el valor especi"!:!<L
Controllare che la pressione di alimentazione dell'aria compressa non superi il valore
!"!:@*<L
Kontrollera att lufttrycket inte överstiger det
värde som anges på enheten.
Air
"
?=?@=?
psi
[><>\
??>@?>
7
!-&4
X$'$'#6$
-#9
Q @ @~
QJ!
(*!!(L
Die Nennspannung des Geräts muss mit der
örtlichen Versorgungsspannung übereinstimmen.
Das Gerät kann sonst beschädigt werden.
>! J * QQQ:!
FI).
Das Gerät darf nur an Steckdosen mit Fehlerstromschutz (FI-Schutzschalter) angeschlossen
werden.
Pour les USA ou le Canada: brancher
J*/`/L
USA und Kanada: Nur an Hospital-GradeSteckdosen anschließen.
<>>J]>5?>^>3
To prevent damage to the unit, check that its
rated voltage corresponds to the local line voltage.
Connect the unit only to a FI protected mains
supply (FI = Residual current protection).
For USA or Canada: connect only to
Hospital Grade receptacle.
8
X.##'
##!##Y#
#$*7
Para no dañar el aparato, compruebe que
su tensión nominal coincide con la tensión de la
red local.
@*~!!#
la tensione nominale corrisponda alla tensione
della linea locale.
Kontrollera att enhetens märkspänning
överensstämmer med nätspänningen i byggnaden
för att förhindra skador.
Conecte el aparato solamente a una red con
protección FI (FI = protección contra corriente
residual).
>@*!@tazione elettrica protetta FI (FI = protezione da
corrente residua).
Anslut enheten endast i FI-skyddade elnät (FI =
restströmsskydd).
Para EE.UU. o Canadá: conectar solamente
a una toma de calidad sanitaria.
Per Stati Uniti o Canada: collegare solo ad
una presa di grado ospedaliero.
För USA och Kanada: får endast anslutas
till ett uttag för sjukhusbruk.
9
!-$
_&`
X;$$&&#
_&`
-#91*
_&#`
The Air-Flow Master Piezon can be connected
to one other compatible EMS device, so both
devices can be operated using a single foot pedal.
An optional link cable allows this connection. This
option is only available with the "multi-function"
pedal.
@}=,!!Q*
autre appareil EMS compatible, ce qui permet d’utiJQ!L)!¡(
d'interconnection en option permet d’effectuer
cette combinaison. Cette option est uniquement
(!Q/!/L
The pedal will trigger only the handpiece which is
lifted from its support whatever the unit.
QJ!!
*QJJ
l'appareil.
Der Air-Flow Master Piezon kann an ein anderes
kompatibles EMS-Gerät angeschlossen werden,
sodass beide Geräte mit einem Fußschalter
bedient werden können. Die Verbindung wird
über ein optionales Verbindungskabel hergestellt. Diese Option ist nur beim Multifunktionsfußschalter verfügbar.
For additional details on device compatibility,
please contact the distributor in your country.
Both units must be turned on.
Q !(Q appareils, veuillez contacter le distributeur de
votre pays.
U
tension.
10
Unabhängig vom Gerät wird über den Fußschalter
jeweils nur das Handstück bedient, das aus der
Halterung genommen wird.
Weitere Angaben zur Kompatibilität der Geräte
erhalten Sie bei Ihrem EMS-Händler.
Beide Geräte müssen eingeschaltet sein.
X.&
_&.`
##!$Y#$;
_&#`
#$#!-
_##)#`
El Air-Flow Master Piezon se puede conectar a
otro dispositivo EMS compatible, de modo que
puedan utilizarse ambos aparatos con un solo
pedal. Un cable de conexión opcional permite
realizar esta conexión. Esta opción sólo está
disponible con el pedal "multifuncional".
@}=,!
ad un altro dispositivo EMS compatibile, pertanto
entrambi i dispositivi possono essere messi in
funzione da un'unica pedaliera. Questo collegamento è assicurato da un cavo di connessione
opzionale. Questa opzione è disponibile solo
mediante la pedaliera "multifunzionale".
Air-Flow Master Piezon kan anslutas till en annan
kompatibel EMS-enhet, så att båda enheterna
kan användas med samma fotpedal. Anslutningen görs med en länkkabel (tillval). Detta tillval
L
!YJQ
levantado de su soporte, cualquiera que sea el
aparato.
Si desea más detalles sobre la compatibilidad
de los aparatos, póngase en contacto con su
distribuidor.
Ambos aparatos deben estar encendidos.
*!#
sollevato dal suo supporto, indipendentemente
@*L
,!(*
dispositivo, rivolgersi al distributore locale.
Pedalen aktiverar endast det handstycke som har
tagits ur sin hållare, oavsett enhet.
Ytterligare information om kompatibla enheter kan
fås från våra återförsäljare.
Båda enheterna måste vara påslagna.
(*!!L
11
bf
fhb
bf
&!2-
'&$
5"2:g-#$!
##!-"#
&#"$##
$2/#-
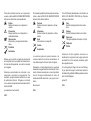
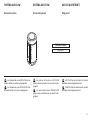
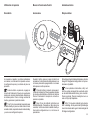
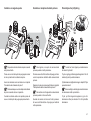
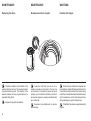
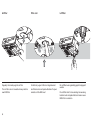
Always check the condition of the bottle cap
O-ring before installing the bottle. Please refer to
the chapter "Maintenance".
Toujours !@Q%
bouchon avant la mise en place de la bouteille.
G,QQ!#/=!/L
Kontrollieren Sie vor jedem Aufsetzen der
Flasche den O-Ring im Flaschendeckel. Beachten
Sie dazu die Hinweise im Abschnitt zur Wartung.
Use the graduations provided on the
bottle to adjust the quantity of the solution for the
treatment.
Utiliser les graduations sur la bouteille
%JQQ!
au traitement.
Install the bottle using a rotating movement until
it reaches the stop point.
Mettre en place la bouteille en effectuant un
%J(QL
Die erforderliche Menge der für die
Z#}$#
der Teilstriche auf der Flasche abgemessen
werden.
12
Setzen Sie die Flasche mit einer drehenden
Bewegung bis zum Anschlag der Flaschenaufnahme auf.
SISTEMA PIEZON
SISTEMA PIEZON
bf
&.&#
&&$
/7""-#!
#.#"##
##j
##j
Standa
rd
Perio
Cleani
ng
STAN
DARD
PERIO
CLEA
NING
Compruebe siempre el estado de la junta
tórica de la tapa de la botella antes de instalarla.
Consulte el capítulo "Mantenimiento".
Use las graduaciones provistas en la botella
para ajustar la cantidad de solución para el tratamiento.
Instale la botella girándola hasta que llegue al
tope.
Prima dell'installazione del flacone,
controllare sempre la condizione dell'anello
di tenuta del flacone. Consultare il capitolo
"Manutenzione".
),,!
J*,!
trattamento.
Kontrollera alltid att flasklockets O-ring
är hel innan flaskan installeras. Se kapitlet
”Underhåll”.
$
justera vätskemängden för behandlingen.
den når stoppläget.
!!
"JL
13
#$&"#4--$
#$&"#)#$
#$2
&"#7$!
Please read the instructions for use of the
disinfecting products.
G,QQU
Q!L
Please refer to standards applicable in your
country regarding the purchase and use of these
products.
G,QQU
dans votre pays pour l'acquisition et l'utilisation
de ces produits.
Bitte lesen Sie zunächst die Bedienungsanleitungen der einzelnen Desinfektionslösungen
durch.
2!#$2-
+#'!#:&>¢£¤<
>##U:¢¥L£¤<
#'!}:&>¢¥L¦¤<
Hydrogen peroxide (H2O2 ¢£¤<
Carbanilides
Povidone iodine
Quaternary ammonium compounds
Cetylpyridin chloride
Citric acid
Aromatic essence
Ethanol
#$'2&$#
`'!#:&>¢£¤<
>##U:¢¥L£¤<
#'J:&>¢¥L¦¤<
Peroxide d'hydrogène (H2O2 ¢£¤<
Carbanilides
Q
Composants ammonium quaternaires
Chlorure de cetylpyridine
Acide citrique
Essence aromatique
Ethanol
X&#&$$
X&$
BacterX® pro / Triclosan / Betadine®®
/ Alodont® / Meridol® / BreathRx® / CloSYS™ /
Dakin's solution / Scope® / Cepacol® /.
BacterX® pro / Triclosan / Betadine®®
/ Alodont® / Meridol® / BreathRx® / CloSYS™ /
Dakin's solution / Scope® / Cepacol® /.
2!#$24-!-$
EMS Ultra Clean (H2O2©¤<
Hydrogen peroxide (H2O2<ª¤
Sterilox (hypochlorous acid)
#$'2&$#)#$
EMS Ultra Clean (H2O2©¤<
Peroxide d'hydrogène (H2O2<ª¤
Sterilox (acide hypochlorique)
&"#X!
'#!&"#
Different disinfecting solutions can be used
during treatment. Chemical reactions might occur
between these solutions and damage the unit.
Wash the liquid circuit before using a different
solution (please refer to the "Cleaning mode" in
the "End of treatment" chapter).
;QQ!
QL;Q!
chimiques pourraient se produire entre ces liquides
L !! J@Q!
Q :, QQ />
mode" dans le chapitre "Fin de traitement").
14
Bitte halten Sie beim Kauf und beim
(!#!##
geltenden Normen ein.
2
#7$!2:g-#$!
&#'!#:&>¢£¤<
>##U:¢¥~£¤<
$:&>¢¥~¦¤<
Wasserstoffperoxid (H2O2 ¢£¤<
Carbanilide
Polyvidon-Jod
Quaternäre Ammoniumverbindungen
Cetylpyridinchlorid
Zitronensäure
Essenzielle Öle
Ethanol
g&#-*$k!)4$
BacterX® pro / Triclosan / Betadine®®
/ Alodont® / Meridol® / BreathRx® / CloSYS™ /
;$+!® / Cepacol® /.
2
#7$!$(!
1*
EMS Ultra Clean (H2O2©¤<
Wasserstoffperoxid (H2O2<ª¤
Sterilox (unterchlorige Säure)
5--
&"#7$!
Eventuell werden während der Behandlung
verschiedene Desinfektionslösungen verwendet,
zwischen denen es zu chemischen Reaktionen
kommen kann, die das Gerät beschädigen. Spülen
Sie das Gerät somit vor jedem Wechsel der Desinfektionslösung aus (siehe Abschnitt zur Reinigung
im Kapitel zum Ende der Behandlung).
#$&"##$
#$&"##$=
7!*
&"#
#!
!! productos desinfectantes.
,@
dei prodotti disinfettanti.
(ningar.
Consulte la normativa vigente en su país
con respecto a la adquisición y uso de estos
productos.
Fare riferimento alle normative in vigore
nel proprio paese sull'acquisto e utilizzo di questi
prodotti.
Kontrollera de standarder som gäller i ditt
land för köp och användning av dessa produkter.
#$2&#
`!!:&>¢£¤<
>#U:¢¥~£¤<
"!:&>¢¥~¦¤<
Agua oxigenada (H2O2 ¢£¤<
Carbanilidas
Povidona yodada
Compuestos de amonio cuaternario
Cloruro de cetilpiridina
Ácido cítrico
Esencia aromática
Etanol
#$2&#=
!:&>¢£¤<
>U:¢¥~£¤<
+,"!:&>¢¥~¦¤<
Perossido di idrogeno (H2O2¢£¤<
Carbanilidi
Iodio povidone
Composti di ammonio quaternari
Cloruro cetilpiridina
Acido citrico
Essenza aromatica
Etanolo
8&#&$-"$#
BacterX® pro / Triclosan / Betadine®®
/ Alodont® / Meridol® / BreathRx® / CloSYS™ /
Dakin's solution / Scope® / Cepacol® /.
BacterX® pro / Triclosan / Betadine®®
/ Alodont® / Meridol® / BreathRx® / CloSYS™ /
solución de Dakin / Scope® / Cepacol®.
#$2&#)#
$
EMS Ultra Clean (H2O2©¤<
Agua oxigenada (H2O2<ª¤
Sterilox (ácido hipocloroso)
#&"#
Durante el tratamiento se pueden usar
distintas soluciones desinfectantes. Podrían
producirse reacciones químicas entre estas
!'L!!
líquido antes de utilizar otra solución (consulte
"Modo Cleaning" en el capítulo "Fin del tratamiento").
Esempi di prodotti commerciali
#$2&##)!!#
$
EMS Ultra Clean (H2O2©¤<
Perossido di idrogeno (H2O2<ª¤
Sterilox (acido ipocloroso)
#&"#
Durante il trattamento possono essere
utilizzate diverse soluzioni disinfettanti. Fra queste
soluzioni si possono verificare delle reazioni
!#!#!!@*L
di usare una diversa diluzione lavare il circuito
J:!/=*,/!
"Fine trattamento")
2
#7!27"-#!
&#':&>¢£¤<
]#U:¢¥~£¤<
]$:&>¢¥~¦¤<
Väteperoxid (H2O2 ¢£¤<
Karbanilider
Povidonjod
Kvartära ammoniumföreningar
Cetylpyridinklorid
Citronsyra
Aromatisk essens
Etanol
X&#&+)#!&$
BacterX® pro/Triclosan/Betadine®®/
Alodont®/Meridol®/BreathRx®/CloSYS™/Dakins
lösning/Scope®/Cepacol®.
2
#7!27)*)#!
EMS Ultra Clean (H2O2©¤<
Väteperoxid (H2O2<ª¤
Sterilox (hypoklorsyra)
&"#"#!
Olika desinfektionslösingar kan användas
under behandling. Kemiska reaktioner kan uppstå
mellan dessa lösningar som kan skada enheten.
Tvätta vätskeslingan innan en annan desinfektionslösning används (se ”Cleaning-läge” i kapitlet
”Avsluta behandlingen”).
15
!--&
X&%;
$2
3:
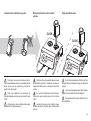
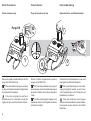
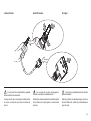
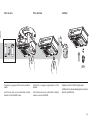
Blow dry the connections to remove
any presence of liquid and to ensure a proper
electrical contact. Never blow compressed air in
the irrigation connections as this will irremediably
damage internal parts.
+!!
Q!QJ"@
(!!Q!JL&%'@
!Q@!!
QQ( !
internes.
Trocknen Sie die einzelnen Komponenten
mit einem Fön, um mögliche Flüssigkeitsrückstände zu entfernen und eine einwandfreie
elektronische Verbindung zu gewährleisten.
Die Verbindungsstücke dürfen keinesfalls mit
Druckluft gereinigt werden, da es hierdurch zu
irreparablen Schäden an innenliegenden Teilen
kommen kann.
16
X.#!
##!&#
#$-
Standa
rd
Perio
Cleani
ng
Seque con aire las conexiones para eliminar
la existencia de líquido y garantizar un contacto
Q!!!L&J!
en las conexiones de irrigación ya que esto dañará
irremediablemente las partes internas.
Asciugare all'aria le connessioni per
eliminare qualsiasi presenza di liquidi e garantire
!!!L&"
!!,!#Q
le parti interne ne rimarrebbero irrimediabilmente
danneggiate.
Torka anslutningarna med en blåstork för
att avlägsna eventuell vätska och säkerställa
korrekt elektrisk kontakt. Blås aldrig med tryckluft i
spolningsanslutningarna eftersom detta kan skada
inre delar permanent.
17
-!-$
/X$
g2!$
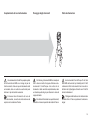
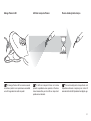
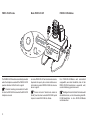
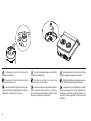
Use only the CombiTorque to tighten the
EMS instrument on the handpiece to the correct
torque. Once the instrument is screwed all the
way in, give an extra quarter of a turn to obtain
the required torque.
Utiliser uniquement la CombiTorque pour
U@=+!*
!QL)@Q~
!J"@(
couple de serrage requis.
For further details on the use of the instruments, please refer to the operating instructions
of the Piezon systems.
Q!!
~,QQ
d’emploi des systèmes Piezon.
Für die Befestigung des EMS-Instruments
am Handstück mit dem korrekten Drehmoment
darf nur der CombiTorque verwendet werden.
Sobald das Instrument vollständig aufgeschraubt
ist, ist eine weitere Vierteldrehung erforderlich, um
das erforderliche Drehmoment zu gewährleisten.
18
Weitere Informationen zur Verwendung
der Instrumente erhalten Sie in den jeweiligen
Bedienungsanleitungen der Piezon-Systeme.
&##$
/!!!#$
/*$
Use solamente la CombiTorque para ajustar
el instrumento de EMS en el mango al par de
!!L),JQ
enroscado, dele un cuarto de vuelta más para
obtener el par de torsión necesario.
"=+
con il valore corretto di coppia utilizzare esclusivamente il CombiTorque. Una volta che lo
strumento è stato avvitato completamente, dare
un ulteriore quarto di giro per ottenere il valore di
coppia richiesto.
Använd endast CombiTorque för att dra
fast EMS-instrumentet på handstycket till rätt
vridmoment. När instrumentet har skruvats in
helt drar du åt ytterligare ett kvarts varv för att få
korrekt vridmoment.
Si desea más información del uso de
los instrumentos, consulte las instrucciones de
empleo de los sistemas Piezon.
Per ulteriori informazioni su questi strumenti,
consultare i manuali operativi dei sistemi Piezon.
Ytterligare information om hur instrumenten
",'(ningar.
19
4-!
-#
$
ON
5VCPF
CTF
2GTKQ
Standa
rd
Perio
Standa
rd
Perio
Cleani
ng
Cleani
ng
When the unit is turned on, the indicator lamps
light up and then the unit returns to its previous
!"#}!#(
pressure.
~
voyants lumineux s’allument et ensuite l'appareil
!"Q!Q
!#(*L
Beim Einschalten des Geräts leuchten die Kontrolllampen auf, das Gerät wird auf die vorhergehende
]"
steht unter Druck.
After 15 min. of inactivity, the unit switches
('L!"#!#
sensitive zone wakes the unit from standby mode.
H#!"L
ǻL@!Q~@
en mode stand-by. Placer le doigt sur la zone
(Q@('L
@!"Q!Qdente.
Wird das Gerät nicht innerhalb von 15 Min.
in Betrieb genommen, schaltet es in den StandbyModus. Durch ein Berühren des Bedienfeldes wird
das Gerät wieder in den aktiven Modus geschaltet
:,]"<L
20
#+&+-
5VCPF
CTF
2GTKQ
Standa
rd
Perio
Cleani
ng
Al encender el aparato, los pilotos indicadores
se iluminan, a continuación el aparato vuelve a
!"!J'!Y
se presuriza.
¬@*!!~!
!!~@*!",!
si trovava prima dello spegnimento e la camera
della polvere è sotto pressione.
Tras 15 min. de inactividad, el aparato pasa
a modo standby. Al poner un dedo sobre la zona
sensible al tacto, el aparato sale del modo standby
'!"!L
;ǻL*~@*
*(',
(~@*!*('
ritorna alla configurazione in cui si trovava in
precedenza.
När enheten slås på tänds kontrollampan, enheten
$"!#kammaren trycksätts.
Efter 15 minuters inaktivitet går enheten
över i vänteläge. Om du pekar i den tryckkänsliga
zonen blir enheten aktiv igen. Enheten återgår då
"L
21
Working mode
Handpiece used
Power settings according to the instuments
Available power
Mode de travail
!*Q
Q!
Puissance disponible
Arbeitsmodus
Verwendetes Handstück
%!#
G{(
Ajustes de potencia según los instrumentos
Potencia disponible
Regolazione della potenza in base agli strumenti
Potenza disponibile
Effektinställning enligt instrumenten
Tillgänglig effekt
Modo de trabajo
Mango utilizado
=*Manipolo utilizzato
rativa
Driftsläge
Handstycke som används
Power
Standard
Universal
handpiece
Full curve
Power
MAX
MIN
Power
Standard
Power
handpiece
Power Full curve
(optional)
Power
MAX
MIN
Universal
handpiece
Power
Soft curve
Perio
Power
handpiece
(optional)
22
Power
MIN
MAX
4-&&"#
)_&`
%;4$&&#
&"#_&`
43:
2:
&"#
1*_&#`
The Piezon Power handpiece (option) used on
a compatible Piezon device delivers a maximum
}!£¥¤~
compared with a Piezon Universal handpiece, to
!##!"!
applications.
!*,}:<Q
!,!(Q
!UQQ@
£¥¤~!!
!*,)~"@Q
Q!
Q!"JL
Das Piezon-Power-Handstück (optional) gewährleistet bei Verwendung mit einem kompatiblen
,U
(,£¥¤+=:G!#
zum Handstück Piezon Universal). Hierdurch kann
die Dauer der Behandlung bei bestimmten Anwendungen verkürzt werden.
, Q * !Q(!
!*}Q!"Q
d'emploi des systèmes Piezon. Ne pas utiliser les
J@QQQQ
cette application car ils risquent de casser et
Q(@L
Welche Piezon-Instrumente sich für die
!#}`{!
eignen, erfahren Sie in den Bedienungsanleitungen der Piezon-Systeme. Instrumente, die
nicht für das Power-Handstück geeignet sind,
dürfen nicht verwendet werden, da sie brechen
und den Patienten oder den Anwender verletzen
könnten.
The Piezon instruments that are designed
for the increased power available with a Power
#!!"#!tions of the Piezon systems. Do not use the instruments that are not designed for this application as
they may break and eventually hurt the patient or
the user.
The Piezon Power handpiece will deliver
performances equivalent to those of a Piezon
Universal handpiece if it is used on a Piezon
device that is not Power handpiece compatible.
!*,}Q
!QJ*!*
,)Q!
un appareil Piezon qui n'est pas compatible avec
!*}L
Wenn ein Piezon-Power-Handstück mit
einem Piezon-Gerät verwendet wird, das nicht
mit einem Power-Handstück kompatibel ist, wird
!#)`{!
geliefert.
!4&
&"#_&.`
$&)
&"#_&#`
4-
&+
&"#
-_##)#`
El mango Piezon Power (opcional) utilizado en
un aparato Piezon compatible proporciona un
!YU#£¥¤
en modo estándar, en comparación con un mango
Piezon Universal, para reducir la duración del
!!!"!L
Il manipolo Piezon Power (opzionale) utilizzato su
dispositivi Piezon compatibili, eroga un aumento di
,"£¥¤*
rispetto ad un manipolo Piezon Universal in modo
da ridurre la durata del trattamento in applicazioni
!"!#L
Med Piezon Power-handstycket (tillval) på en
kompatibel Piezon-enhet får man en ökning av
U £¥¤ ~
jämfört med ett Piezon Universal-handstycke,
vilket förkortar behandlingstiden vid vissa tillämpningar.
, J Y
diseñados para aprovechar el aumento de
potencia disponible con un mango Power se
!"!!!
los sistemas Piezon. No utilice instrumentos
JQ!!'
que podrían romperse y lesionar al paciente o al
usuario.
Gli strumenti Piezon compatibili con la
maggior potenza erogata con un manipolo
Power vengono specificati nelle istruzioni per
l'uso dei sistemi Piezon. Non usare strumenti
non progettati per questa applicazione in quanto
possono rompersi e provocare lesioni al paziente
e all'operatore.
De Piezon-instrument som är utformade
för att ge ökad effekt tillsammans med ett Powerhandstycke anges i Piezons-systemens bruksanvisningar. Använd inte instrument som inte är
avsedda för detta eftersom de kan gå sönder och
skada patienten eller användaren.
El mango Piezon Power proporcionará un
rendimiento equivalente al de un mango Piezon
Universal si se utiliza en un aparato Piezon que
no sea compatible con el mango Power.
,}#*zioni equivalenti a quelle di un manipolo Piezon
Universal se utilizzato su un dispositivo Piezon
che non sia compatibile con un manipolo Power.
Piezon Power-handstycket ger en
prestanda som är jämförbar med Piezon Universalhandstycket om det används på en Piezon-enhet
som inte är kompatibel med Power-handstycken.
23
0
!#
'#$)#
5VCPF
CTF
2GTKQ
$4*-#"$
5VCPF
CTF
2GTKQ
Standa
rd
Perio
Cleani
ng
The unit includes two modes to optimize the ultrasound power range depending on the application.
The power setting allows adjustment of the power
within the selected range.
!#':
,<~#
unit remembers the last mode setting with the last
}#}L
24
@!U"
la plage de puissance des ultrasons en fonction
!!#LQ!
Q!Q!QL
Pour chaque système (
et Piezon),
@QQ!Q
JQ!Q
Q(L
Das Gerät verfügt über zwei Modi zur Optimierung
der Ultraschallleistung je nach Anwendung. Die
Ultraschallleistung kann innerhalb eines ausgewählten Bereichs reguliert werden.
{%(:
,<
wird die letzte Einstellung des Modus, der Ultraschallleistung und der Flüssigkeitsmenge gespeichert.
#.#"8
####;&)
5*#82#*!
El aparato incluye dos modos para optimizar el
intervalo de la potencia de los ultrasonidos dependiendo de la aplicación. El ajuste de la potencia
permite regular la potencia dentro del intervalo
seleccionado.
@*!*,,
gamma di potenza agli ultrasuoni in base all'appli!,L,!
la potenza all'interno della gamma selezionata.
Enheten har två driftslägen för att optimera ultraljudseffekten efter användningsområdet. Med
effektinställningen justerar du effekten inom det
valda intervallet.
!! :
,<~
@*!@,*
assieme all'ultima regolazione della potenza e
@,L
Enheten kommer ihåg det senaste driftsläget för
%':
!#,<~!#
!#$L
! :
' ,<~ aparato memoriza el último modo utilizado, el
%!'%%L
25
u0
u#
'#$)#;
u0
u
$4-#$n0
q
Press the foot pedal on the corresponding symbol
to activate the "Dry work" mode
Q'(!
pour activer le mode "Dry work".
Betätigen Sie den Fußschalter (Symbol für „Dry
Work“-Modus).
Never work dry to avoid heat damage to the
#!"cally for this purpose. The tip of the instrument
immediately heats up when used without irrigation.
&%*!"Q
Q#J!
Q!!!L
Q!#Q
en travaillant sans irrigation.
Zur Vermeidung von möglichen Hitzeschäden am Gewebe arbeiten Sie niemals
trocken, es sei denn, es werden die speziell
dafür vorgesehenen Instrumente verwendet. Die
Arbeitsspitze der Instrumente erwärmt sich bei
Arbeiten ohne Flüssigkeit sehr schnell.
Please refer to the operating instructions
of the Piezon systems for further information
concerning instruments usable in "Dry work"
mode.
26
G,QQ
des systèmes Piezon pour des informations plus
QQ!!(
en mode "Dry work".
Weitere Informationen zu Instrumenten, die
im „Dry Work“-Modus verwendet werden können,
finden Sie in den Bedienungsanleitungen der
Piezon-Systeme.
#.#u0
u
####;
u0
u
5*#80
#*!
Clean
ing
Standa
rd
Perio
Cleani
ng
Pise el pedal sobre el símbolo correspondiente
para activar el modo "Dry work".
Premere la pedaliera sul simbolo corrispondente
*/;'
/L
Tryck på ”Dry Work”-symbolen på fotpedalen för
att aktivera Dry Work-läget
No trabaje nunca en seco para evitar que el
!%~JQ
!"!!#"L
del instrumento se calienta enseguida cuando se
usa sin irrigación.
Non lavorare mai a secco per evitare danni
da calore ai tessuti, a meno che lo strumento non
!"!J!L
puntale dello strumento si surriscalda immediatamente se usato senza irrigazione.
Arbeta aldrig torrt för att undvika värmeskador på vävnaderna om inte instrumentet är
särskilt avsett för torranvändning. Instrumentets
spets värms omedelbart upp när det används utan
spolning.
Para más información sobre los instrumentos que pueden utilizarse en modo "Dry
work", consulte las instrucciones de empleo de
los sistemas Piezon.
Per ulteriori informazioni relative agli
,,( * /;' }/~
consultare le istruzioni per l'uso dei sistemi Piezon.
Ytterligare information om vilka instrument
som kan användas i Dry Work",
systemens bruksanvisningar.
27
$#2$2&#
'#$#2
$#2$
2$9-#
_w/w`
4
3
1
2
28
#$#2$#
#$#2$#
/#2$
&#
EN
FR
DE
ES
IT
SV
1
Irrigation + light
Irrigation + lumière
{±!#
Irrigación + luz
Irrigazione +
illuminazione
Spolning + belysning
2
Ultrasound +
irrigation + light
Ultrasons + irrigation
Ultraschall +
+ lumière
{±!#
Ultrasonidos +
irrigación + luz
Ultrasuoni +
irrigazione + illuminazione
Ultraljud + spolning
+ belysning
3
Ultrasound + light
"Dry work mode"
Ultrasons + lumière
"mode Dry work"
)!#±!#
Modus „Dry Work“
Ultrasonidos + luz
modo "Dry work"
"Boost" function*
+ light
Fonction "Boost"*
+ lumière
„Boost“-Funktion*
±!#
Función "Boost" *
+ luz
Funzione "Boost"*
+ illuminazione
Effektökning*
+ belysning
1 2 3
Same as
Standard mode
Identique au mode
Standard
Siehe StandardModus
Igual que el modo
Standard
>*
standard
Samma som
standardläge
4
Active
Active
Aktiv
Activo
Attivo
Aktiv
4
(+
2
)
Ultrasuoni +
Ultraljud + belysning
illuminazione
Dry work-läge
/=*;'}/
Perio mode
¯H'}!£¥¤:«¥¥¤<
¯!£¥¤:#«¥¥¤<
¯!Q£¥¤
:%J@*«¥¥¤<
¯,£¥¤:"«¥¥¤<
¯G{(##$#)!#£¥¤
:(,«¥¥¤<
¯H$$%£¥¤:«¥¥¤<
29
-&
%;
3:
H#,#!;#}#
the foot pedal is activated. The light stays on for
about 20 seconds after the foot pedal is released.
! * , ; @Q!
J Q ! !QL
QQ@³¥
!JQ¡!#QL
;;,`{!!#
auf, sobald der Fußschalter aktiviert wird. Nach
²!#!#;
noch etwa 20 Sekunden weiter.
30
!
#&#
-
#&
J>
,;!
!L,!!
unos 20 segundos tras soltar el pedal.
; , JL@zione rimane attiva per circa 20 sec. dopo che il
pedale viene rilasciato.
Piezon-handstyckets lampa tänds när
L'!³¥
sekunder efter det att fotpedalen har släppts upp.
31
!-$#$&4
('!#!#&$$#
Standa
rd
Perio
Cleani
ng
Stan
Perio
The settings can be obtained either by sliding or
('!#"#!#,L
H!#"!'#!
is a quick setting alternative.
Q(~
soit en plaçant le doigt sur la zone sensible. Placer
!*@QQ
QL
Optimal setting of the ultrasound power for
each instrument are indicated in the operating
instructions for the Piezon systems.
Q
de la puissance des ultrasons pour chaque
JQ
des systèmes Piezon.
The use of a sterile cover on the unit may
affect the settings.
32
##w#-###$!
@ @ # Q @!QL
Die gewünschte Einstellung kann entweder
stufenlos oder direkt durch Antippen des
Drehreglers bei der gewünschten Einstellung
vorgenommen werden (zur Beschleunigung des
Einstellvorgangs).
Beachten Sie für die optimale Einstellung
der Ultraschallleistung für die einzelnen Instrumente die Bedienungsanleitungen der PiezonSysteme.
Bei Verwendung einer sterilen Schutzabdeckung können sich die Einstellungen verändern.
8$#&#
$#
(!###&!#
$#$
*##$##8$22
El ajuste se puede realizar deslizando el dedo
Q(,(!L
colocación del dedo directamente en el lugar
deseado es una alternativa de ajuste rápida.
,!!
che posizionando il dito sulla zona sensibile. Per
un'alternativa rapida della regolazione basta
posizionare il dito sul punto desiderato.
Du kommer till inställningarna genom att dra
"'!,L
Snabbaste sättet är att peka direkt på önskad
inställning.
El ajuste óptimo de la potencia de los
ultrasonidos de cada instrumento se indica en las
instrucciones de empleo de los sistemas Piezon.
,,
ultrasuoni per ciascun strumento sono indicate
nelle istruzioni per l'uso dei sistemi Piezon.
Information om optimala inställningar
%$"
Piezon-systemens bruksanvisningar.
Q(
puede afectar a los ajustes.
@,,!@*
potrebbe interferire con le impostazioni.
Om ett sterilt hölje används på enheten kan
detta påverka inställningarna.
Sta
Perio
33
!-!j4
('!#!$'"Y!
##/#:!
!
Stand
ard
Perio
Clean
ing
Standa
rd
Perio
Cleani
ng
#J}
each instrument are indicated in the operating
instructions of the Piezon systems
34
Q
Q( J !#J sont disponibles dans les modes d’emploi des
systèmes Piezon.
Beachten Sie für die optimale Einstellung
der Flüssigkeitsmenge die Bedienungsanleitungen der einzelnen Piezon-Systeme.
8$#j$8!.
&##)#;j$
##Y!
*##j7-!-
,!*
flusso del liquido per ciascun strumento sono
indicate nelle istruzioni per l'uso dei sistemi
Piezon.
Information om optimala inställningar av
$##$",
systemens bruksanvisningar.
Stand
ard
Perio
Clean
ing
%%J!
instrumento se indica en las instrucciones de
empleo de los sistemas Piezon.
35
2-
/$
g-#$!
$"##!
'!!#Y$
$-$!
$
Clean the instrument with running water
before disinfection.
Nettoyer l'instrument avec de l’eau courante
Q!L
Spülen Sie das Instrument vor der Desin²
(L
Please conform to the recommendations of
the "Reprocessing Instructions" manual delivered
with your product regarding the procedures for
cleaning, disinfecting and sterilizing the components.
Veuillez vous conformer aux recommandations contenues dans le manuel "Reprocessing
!/Q!
!Q'~Q!Qsation des composants.
Beachten Sie die Empfehlungen des
Handbuchs „Reprocessing Instructions“, das im
##~,
Reinigung, Desinfektion und Sterilisation der
Bestandteile.
36
/#
/
)#$"-#!
8#&#$
!!&$###$
-!7&
!!
antes de desinfectarlos.
Pulire lo strumento con acqua corrente
prima della disinfezione.
Rengör instrumentet under rinnande vatten
före desinfektion.
Siga las recomendaciones del manual
"Reprocessing Instructions" suministrado con
su producto con respecto a los procedimientos
de limpieza, desinfección y esterilización de los
componentes.
Attenersi alle raccomandazioni del manuale
"Reprocessing Instructions" in dotazione al
prodotto sulle procedure di pulizia, disinfezione
e sterilizzazione dei componenti.
Följ rekommendationerna i handboken
”Reprocessing Instructions” som medföljer
produkten vad gäller procedurer för rengöring,
desinfektion och sterilisering av komponenter.
37
#!2!-$
!'2$$
(!$k
#$2
u#!u
u#!u
(!$!$
The liquid circuit of the unit should be
washed and disinfected daily.
!Q!QJ*Q!!!
de liquide de l’appareil.
Eine tägliche Spülung und Desinfektion des
Flüssigkeitskreislaufs des Geräts wird empfohlen.
The 'Cleaning' mode allows the circuit to
be washed and disinfected in order to reduce the
crystalline deposits and the number of bacteria
in the liquid circuit. A rinsing of the circuit is then
required to avoid a possible reaction caused by the
ageing of the solution or by an unwanted mixture
of liquids.
The bottle and the handpiece cords used
during treatment must be present during the
washing and the disinfecting of the liquid circuit
because the process is simultaneous for both
elements. Remove the handpiece.
Circuit washing cycle:
Prepare the bottle with distilled or demineralized water,
Press the "Purge" mode selector,
#!!!(~
Press the foot pedal to start the program.
Three beep sounds and the blinking of the
indicator lamp of the "Cleaning" mode con"##!'!L
Disinfecting cycle:
Prepare the bottle with 100 ml of a compatible disinfecting solution (refer to the list of
compatible disinfectants at the beginning of
this manual),
#!!!(~
Press the foot pedal to start the program.
Three beep sounds and the blinking of the
indicator lamp of the "Cleaning" mode con"##!'!,
38
/>/
Q!!!J"Q
Q!((!Q
circuit de liquide. Un rinçage du circuit est ensuite
J"@Q(Q!*
Q!*
QJL
(!Q
Q
Q!!!J!
!QQQ!UQQL
!*L
Cycle de lavage du circuit:
Q(!@Q
QQQ~
Q!//~
Soulever le connecteur et le placer au des@Q~
QQgramme. Trois "bips" et le clignotement de
!/>/
"!'!L
Cycle deQ!´
Qarer la bouteille avec 100 ml d'une
Q!!(:
Q!!(Q(
ce manuel),
Soulever le connecteur et le placer au des@Q~
QQgramme. Trois "bips" et le clignotement de
!/>/
"~
Der Reinigungsmodus erlaubt das
Reinigen und Desinfizieren des Flüssigkeitskreislaufs, in dem sich kristalline Ablagerungen
und Bakterien ansammeln können. Anschließend
muss der Kreislauf gespült werden, um mögliche
!#{($
unerwünschte Vermischung von Flüssigkeiten zu
vermeiden.
Die Flasche und die während der
Behandlung verwendeten Handstückschläuche
müssen während der Reinigung und Desinfektion
des Flüssigkeitskreislaufs angeschlossen sein,
da auf diese Weise beide Elemente gleichzeitig
gereinigt werden. Entfernen Sie das Handstück.
Reinigungszyklus für den Flüssigkeitskreislauf:
Bereiten Sie die Flasche mit destilliertem
oder demineralisiertem Wasser vor.
Wählen Sie den Spülmodus aus.
Heben Sie das Anschlussstück an und
halten Sie es über ein Waschbecken.
Betätigen Sie den Fußschalter, um das Programm zu starten. Durch drei Pieptöne und
ein Blinken der Kontrolllampe des Reinigungsmodus wird das Ende des Reinigungszyklus angezeigt.
Desinfektionszyklus:
Bereiten Sie die Flaschen mit 100 ml einer
kompatiblen Desinfektionslösung vor. (Eine
!#$"+fang des Handbuchs.)
Heben Sie das Anschlussstück an und
halten Sie es über ein Waschbecken.
&2.#$
$#2#$
(!7-k#!
u#!u
#;u$#u
#!#*!_!7!#*!`
El circuito de líquido del aparato debe
lavarse y desinfectarse a diario.
Si consiglia di procedere quotidianamente
al lavaggio e alla disinfezione del circuito liquido
@*L
Enhetens vätskeslinga bör tvättas och
"!gen.
El modo "Cleaning" permite lavar y desin!!!"!
cristalinos y el número de bacterias en el circuito
de líquido. A continuación hace falta aclarar
el circuito para prevenir una posible reacción
causada por el deterioro de la solución o por una
mezcla no deseada de líquidos.
('!(J
se hayan utilizado en el tratamiento deben estar
presentes durante el lavado y desinfección del
circuito de líquido ya que el proceso debe realizarse simultáneamente en ambos elementos.
Retire el mango.
Ciclo de lavado del circuito:
Prepare la botella con agua destilada o desmineralizada.
Pulse el selector del modo "Purge".
!!'!
un fregadero.
Pise el pedal para que empiece el programa. Tres pitidos y el parpadeo del piloto
!/>/!"
"!!L
Ciclo de desinfección:
Prepare la botella con 100 ml de una solución desinfectante compatible (consulte la
lista de desinfectantes compatibles al principio del manual).
!!'!
un fregadero.
Pise el pedal para que empiece el programa. Tres pitidos y el parpadeo del piloto
!/>/!"
"!!.
*,:/>/<!
di lavare e disinfettare il circuito liquido per ridurre
J*(!!
liquido. Quindi viene richiesto un risciacquo del
circuito per evitare una possibile reazione causata
dall'invecchiamento della soluzione o da una
miscela accidentale di soluzioni.
!!
il trattamento devono essere presenti durante il
lavaggio e la disinfezione del circuito liquido in
quanto il processo è simultaneo per entrambi gli
elementi. Togliere il manipolo.
Ciclo di lavaggio del circuito:
!!!J
acqua demineralizzata
*
"Purge"
Sollevare il connettore e collocarlo sul lavandino
Premere la pedaliera per attivare il programma. Tre segnali acustici e il lampeggiamen!*
,!"!!L
Ciclo di disinfezione:
Prepa!!«¥¥zione disinfettante compatibile (consultare
l'elenco dei disinfettanti compatibili all'inizio
di questo manuale)
Sollevare il connettore e collocarlo sul lavandino
I rengöringsläget ”Cleaning” kan vätske!#"!$
kristallavlagringarna och mängden bakterier i
vätskeslingan. Slingan måste sedan sköljas för
att undvika eventuella reaktioner som orsakas
av gammal vätska eller en oönskad blandning av
vätskor.
Flaskan och de handstyckesslangar som
har använts under behandling måste tvättas
!#"!
eftersom processen utförs samtidigt för dessa
beståndsdelar. Ta bort handstycket.
Tvättcykel för slingan:
$(tat vatten.
Tryck på tömningsomkopplaren.
'#'!!##$L
Tryck på fotpedalen för att starta programmet. Tre pip och en blinkande kontrollampa
bekräftar att cykeln är klar.
Desinfektionscykel:
$(«¥¥patibel desinfektionslösning (se listan över
kompatibla desinfektionslösningar i början
av handboken).
'#'!!##$L
Tryck på fotpedalen för att starta programmet. Tre pip och en blinkande kontrollampa
bekräftar att cykeln är klar.
$
fem minuter utan att röra enheten.
39
Then allow the disinfecting solution to act
for 5 minutes without without interrupting the
cycle or touching the unit.
Using the disinfecting solution, press the
foot pedal to start a second cycle of the
program and allow to act 5 minutes without
interrupting the cycle or touching the unit.
Rinsing cycle:
Prepare the bottle with sterile distilled water,
#!!(~
Press the foot pedal to start the program.
Three beep sounds and the blinking of the
indicator lamp of the "Cleaning" mode con"##!'!,
Press the "Purge" mode selector to exit this mode
(this cycle must be then restarted).
(Note: it is possible at any time to press the foot
pedal to stop the program in progress.)
For information, the duration of the 'Cleaning
'mode cycle is about 30 seconds and the quantity
of liquid necessary in the bottle is 50 ml (note that
;!«¥!<L
Q!tante pendant 5 minutes sans intervenir sur
l'appareil.
QQxième fois le programme avec la solution
Q!ª
intervenir sur l'appareil.
Cycle de rinçage:
Q(!@Q
Q~
Soulever le connecteur et le placer au des@Q~
QQgramme. Trois "bips" et le clignotement de
!/>/
"~
Q!//ortir
!:!!'!!!
ensuite).
:&´(*'
Q!<L
Q @ !'! />/£¥!JQ
Q!J(ª¥
:&´!*«¥!<L
Betätigen Sie den Fußschalter, um das Programm zu starten. Durch drei Pieptöne und
ein Blinken der Kontrolllampe des Reinigungsmodus wird das Ende des Zyklus
angezeigt.
+;$schließend fünf Minuten lang wirken, ohne
weitere Einstellungen am Gerät vorzunehmen oder das Gerät zu verwenden.
Betätigen Sie den Fußschalter, um das
Programm erneut zu starten und lassen
Sie die Desinfektionslösung wiederum fünf
Minuten lang wirken, ohne Einstellungen
am Gerät vorzunehmen oder das Gerät zu
verwenden.
Spülzyklus:
Bereiten Sie die Flasche mit sterilem, destilliertem Wasser vor.
Heben Sie das Anschlussstück an und
halten Sie es über ein Waschbecken.
Betätigen Sie den Fußschalter, um das Programm zu starten. Durch drei Pieptöne und
ein Blinken der Kontrolllampe des Reinigungsmodus wird das Ende des Zyklus
angezeigt.
Betätigen sie noch einmal die Auswahltaste für
den Spülmodus, um den Modus zu beenden.
(Der Zyklus muss dann erneut gestartet werden.)
(Hinweis: Das laufende Programm kann jederzeit
mithilfe des Fußschalters unterbrochen werden.)
Die Dauer des Reinigungszyklus beträgt 30
Sekunden. Die Flasche muss mit 50 ml Flüssigkeit
{L:`}´;!#«¥
Sekunden).
40
A continuación deje actuar la solución desinfectante durante 5 minutos sin interrumpir
el ciclo ni tocar el aparato.
Usando la solución desinfectante, pise el
pedal para empezar un segundo ciclo del
programa y deje actuar durante 5 minutos
sin interrumpir el ciclo ni tocar el aparato.
Ciclo de aclarado:
Prepare la botella con agua destilada esQL
!!'!
un fregadero.
Pise el pedal para que empiece el programa. Tres pitidos y el parpadeo del piloto
!/>/!"
"!!.
Pulse el selector del modo "Purge" para salir
de este modo (este ciclo deberá entonces reiniciarse).
(Nota: es posible pisar el pedal en cualquier
momento para detener el programa en curso.)
A modo informativo, la duración del ciclo del modo
"Cleaning" es de unos 30 segundos y la cantidad
de líquido necesario en la botella es de 50 ml
(nótese que un led corresponde a 10 segundos).
Premere la pedaliera per attivare il programma. Tre segnali acustici e il lampeggiamen!*
,!"!!
!,
5 minuti senza interrompere il ciclo o tocca@*
Premere la pedaliera per avviare una seconda volta il programma usando la soluzione disinfettante e lasciare agire 5 minuti
,@*L
Ciclo di risciacquo:
Prep!!!J
sterile
Sollevare il connettore e collocarlo sul lavandino
Premere la pedaliera per attivare il programma. Tre segnali acustici e il lampeggiamen!*
,!"!!
* //!J* (questo
!!*<L
Tryck ned fotpedalen igen för att starta en
andra cykel av programmet med desinfektionslösningen och låt verka i fem minuter
utan att röra enheten.
Sköljningscykel:
$(ten.
'#'!!##$L
Tryck på fotpedalen för att starta programmet. Tre pip och en blinkande kontrollampa
bekräftar att cykeln är klar.
Tryck på tömningsomkopplaren för att gå ut ur
rengöringsläget (cykeln måste då startas om).
(Obs! Du kan när som helst trycka på fotpedalen
och avbryta det pågående programmet.)
Rengöringscykeln varar i ca 30 sekunder och
(#$ª¥
(Obs! varje lampa lyser i 10 sekunder).
(Nota: è possibile in qualsiasi momento premere la
pedaliera per interrompere il programma in corso).
>,~!!*
,£¥!J*J
!!ª¥:&´
corrisponde a 10 secondi).
41
##$2u#!u#
##$Y$#$u#!u
""#$!$(!$!
#$
1
<X
2
STAN
DARD
STAN
DARD
PERIO
PERIO
CLEA
NING
CLEA
NING
CLEA
NING
P
42
#$.$##
u#!u
4
##$$####;
&$#=
5
6
##$)
#
!7!#*!
7
{X
<X
CLEA
NING
43
()!-"#
(#"$##
"-/#-
STAN
DARD
PERIO
CLEA
NING
At the end of each treatment a purge is
necessary to remove the liquid inside the cords.
If the unit is not going to be used for an extended
period, it is essential to completely clean and
disinfect the circuit.
"!#J
Q!J*Q
!LQ@~
!Q'*
Q!!!!L
Remove the bottle with a rotating movement.
Retirer la bouteille en effectuant un mouvement
de rotation.
44
Nach jeder Behandlung muss der Kreislauf
gespült werden, um die Flüssigkeit aus den
Schläuchen zu entfernen. Wenn das Gerät
längere Zeit nicht verwendet werden soll, muss
eine vollständige Reinigung und Desinfektion des
Kreislaufs durchgeführt werden.
Entfernen Sie die Flasche mit einer Drehbewegung.
(#"##
(#j
"j
OFF
STAN
DA
RD
PERIO
CLEA
NING
"!!
purgar el líquido del interior de los cables. Si
no se va a utilizar el aparato durante un tiempo
prolongado, es imprescindible limpiar y desinfectar completamente el circuito.
"!
uno spurgo per eliminare il liquido all'interno dei
!L*
@*~,
una disinfezione complete del circuito.
I slutet av varje behandling måste slangarna
tömmas på all vätska. Om enheten inte ska
användas under en längre tid är det viktigt att
$$!#"!
slingan.
Retire la botella girándola.
H!!L
H(L
45
(/0f
fh(/0
(/0f
4-
-X#&$
$4-#$#)
(/0
supragingival
H#
}!#(!'
be used with supragingival powders.
H#
}!#(!
only be used with subgingival powders.
46
!#(*
QJ!gingivales.
;
{
nur mit Pulver für die Reinigung von supragingi\#(!#({}L
!#( * Q J ! poudres subgingivales.
; dürfen nur mit Pulver für die Reinigung von subgin\#(!#({}L
(/0
(/0
(/0f
#.#&#)
Scelta della polvere
5*#8&$#)
(/0
subgingival
!Y
pueden utilizar con polvos supragingivales.
!Y
se pueden utilizar con polvos subgingivales.
! possono essere utilizzate solo con polveri sopragengivali.
!
possono essere utilizzate solo con polveri sottogengivali.
användas med supragingivala pulver.
användas med subgingivala pulver.
47
/##!-&4-"
(&#!-";&$
g2:##$#)
Make sure that the powder chambers are
completely dry. Moisture can cause the powder
to cake and block the circuit.
+@J!#(*
!#LQ!#Q
!Q!!Q~J
blocage du circuit.
Achten Sie darauf, dass die Pulverkammern
absolut trocken sind. Andernfalls kann das Pulver
verklumpen und den Kreislauf verstopfen.
H!#~"#
powder chambers above the line "Max".
Pour the powder as shown above in accordance with the different powder chamber designs.
Q@(@~
!#(*
ligne "Max".
Verser la poudre dans le centre du diffuseur
!#(*
L!#(
*
'Q~
!QL
48
Um ein Verstopfen des Geräts zu
vermeiden, dürfen die Pulverkammern nicht über
die Markierung „Max“ hinaus befüllt werden.
{+(
=L;
weist ein anderes Design auf, und ist gemäß der
Abbildung zu befüllen.
##|&#)
(&####
polvere
/##&$#)
CLICK
CLICK
STAN
DA
RD
PERIO
CLEA
NING
STAN
DA
RD
PERIO
CLEA
NING
Cerciórese de que las cámaras de polvo
Q!!L#
hacer que el polvo se endurezca y provocar la
obstrucción del circuito.
G"!!#!
!L@*!
indurimento della polvere e causare il blocco del
circuito.
Para que el aparato no se obstruya, no
llene las cámaras de polvo por encima de la línea
"Max".
@@*
riempire le camere della polvere oltre la linea
"Max".
Vierta el polvo como se indica arriba según
el diseño de la cámara de polvo.
Versare la polvere come illustrato sopra
in base alle diverse strutture delle camere della
polvere.
Se till att pulverkamrarna är helt torra. Fukt
kan göra att pulvret klumpar ihop sig och blockerar
slingan.
Fyll inte pulverkamrarna över ”Max”-markeringen för att undvika att enheten täpps till.
Pulverkamrarna har olika utformning. Fyll
på enligt bilden.
49
Only use the powder provided by EMS for
its intended purpose.
Utiliser uniquement de la poudre fournie
=+!*@!QL
Nur Original- EMS-Pulver entsprechend der
geplanten Anwendung einfüllen.
Do not remove the powder diffuser from the
}!#(}#"L
Ne pas enlever le diffuseur de poudre des
!#(*L
Der Pulverzerstäuber darf während des
Befüllens der Pulverkammer nicht entfernt werden.
Correctly close the bottle after use. The
conditions of storage are described in the chapters
"Storing the product" and "Technical data".
Fermer correctement la bouteille après
L!!Q!
aux chapitres "Entreposage du produit" et "CaracQJ!#J/L
Schließen Sie die Flasche nach der
G}²L;(gungen werden in den Abschnitten „Aufbewahren
des Geräts“ und „Technische Daten“ beschrieben.
Un set d'anneaux interchangeables de couleur
*!µ
!#LG,QQ!#
"Maintenance".
Zur Kenntlichmachung der gewählten
Geschmacksrichtung des Pulvers stehen
verschieden farbige Ringe zur Verfügung.
Beachten Sie hierzu die Hinweise im Abschnitt
zur Wartung.
A set of interchangeable colored rings is provided
#'#!#}L
Please refer to the information provided in the
chapter "Maintenance".
Check the condition of the threads on the
powder chamber, on the cap and on the o-ring
seals. Please refer to the information provided in
the chapter "Maintenance".
>Q!#(
*~(!#%LG,
QQ!#/=!/L
Clean the threads of the powder chamber and of
the cap before screwing them on.
&'!#(*
du bouchon avant de les visser.
Ensure that the powder chambers are
tightly closed. Otherwise air and powder could
leak.
+@J!#(*
(QL~@Q
@Q!#L
Do not turn the powder chambers upside
}"L
&!#(*
après le remplissage.
Prüfen Sie den Zustand der Gewinde der
Pulverkammer und des Schraubverschlusses
sowie den O-Ring. Beachten Sie hierzu die
Hinweise im Abschnitt zur Wartung.
Säubern Sie vor dem Aufschrauben des Deckels
die Gewinde der Pulverkammer und des Schraubverschlusses.
Stellen Sie sicher, dass die Pulverkammer
!#L$
oder Pulver entweichen.
Drehen Sie die Pulverkammern nach dem
Befüllen nicht auf den Kopf.
50
Utilice el polvo suministrado por EMS solo
para la aplicación indicada.
Usare solo la polvere fornita da EMS e
corrispondente all'applicazione.
No retire el difusor del polvo de las cámaras
de polvo cuando las llene.
Non togliere il diffusore della polvere dalle
camere della polvere durante il riempimento.
>(!!Q
L!!!
describen en los capítulos "Almacenamiento del
!/'/!"!!Q!!/L
Chiudere correttamente il flacone dopo
@L !, !, descritte ai capitoli "Stoccaggio del prodotto" e
"Dati tecnici".
Se proporciona un juego de anillos intercam((!'"!
sabores de los polvos elegidos. Consulte la información facilitada en el capítulo "Mantenimiento".
Come ausilio nel riconoscimento degli aromi delle
polveri scelte viene fornito un set di anelli colorati
intercambiabili. Consultare le informazioni fornite
nel capitolo "Manutenzione".
Compruebe el estado de las roscas de la
cámara de polvo, de la tapa y de las juntas tóricas.
Consulte la información facilitada en el capítulo
"Mantenimiento".
>!,"
sulla camera della polvere, sul tappo e sull'anello
di tenuta. Consultare le informazioni fornite nel
capitolo "Manutenzione".
!!Y'
tapa antes de enroscarlas.
"!
del tappo prima di avvitarlo.
Asegúrese de que las cámaras de polvo
Q ( !L ; !~
escaparse aire y polvo.
G"!!#!
(!#L(("!
di polvere e di aria.
&!YQ
de llenarlas.
Dopo il riempimento non capovolgere le
camere della polvere.
Använd endast pulver som tillhandahålls
av EMS och som överensstämmer med användningsområdet.
Ta inte bort pulverspridaren från pulverkammaren när kammaren fylls.
+L
Rekommenderade lagringsförhållanden beskrivs i
kapitlen ”Förvara produkten” och ”Tekniska data”.
En uppsättning utbytbara färgade ringar hjälper
dig hålla reda på vilken pulversmak som används.
Se informationen i kapitlet ”Underhåll”.
Kontrollera gängornas skick på pulverkammaren, på locket och på O-ringstätningarna. Se
informationen i kapitlet ”Underhåll”.
Rengör gängorna på pulverkammaren och locket
innan du skruvar på locket.
Se till att pulverkamrarna är ordentligt
stängda. Annars kan luft och pulver läcka ut.
Vänd inte pulverkamrarna upp och ned efter
fyllning.
51
!-(/0-&
X#&%;(/0
$2
(/03:
For further details concerning the use of the
handpiece, please refer to the operating instruc#
'L
Q!!
!*~,QQ
'
L
Weitere Informationen zur Verwendung des
Handstücks erhalten Sie in den Bedienungsanlei
+'L
H#
#!!(
!( }# }
chamber in some applications.
! *
Q!(!!#(*
!!L
Für einige Anwendungen kann das
`{!G(
}}L
52
X.#!(/0
##!#&#(/0
#$(/0-
CLICK
Standa
rd
Perio
Cleani
ng
Si desea más información referente al uso
del mango, consulte las instrucciones de empleo
L
Per ulteriori informazioni sull'utilizzo del
manipolo, consultare i manuali operativi dei
L
Ytterligare information om hur handstycket
"
'(visningar.
,
%!!Y
algunas aplicaciones.
In alcune applicazioni, il manipolo dell'AIR
,,!
L
#'!
( kammare för vissa användningsområden.
53
&!-$
w##}&&#
g1*
4-!
$
-#
ON
5VCPF
CTF
2GTKQ
Standa
rd
Perio
Standa
rd
Perio
Cleani
ng
Cleani
ng
When the unit is turned on, the control lamps light
##!"ration and the powder chamber is under pressure.
Before treating the patient, rinse the
eventual residues of the disinfecting solution
used by the Piezon system out of the circuit of
the Air-Flow system. Put the handpiece above a
sink and press the foot pedal.
After 15 min. of inactivity, the unit switches
('L!"#!#
sensitive zone wakes the unit from standby mode.
H#!"L
54
~
voyants lumineux s’allument et ensuite l'appareil
!"Q!Q
!#(*L
Beim Einschalten des Geräts leuchten die Kontrolllampen auf, das Gerät wird auf die vorhergehende
]"
steht unter Druck.
Avant de traiter le patient, rincer le circuit
'}QQ
Q!Q'
,L!!*@
QQ!L
Befor die Behandlung des Patienten das
Air-Flow von den möglichen Rückständen der
Desinfektionslösung in dem Piezon System
spülen. Das Handstück über dem Spülbecken
halten und den Fusspedal drücken.
ǻL@!Q~@
en mode stand-by. Placer le doigt sur la zone
(Q@('L
@!"Q!Qdente.
Wird das Gerät nicht innerhalb von 15 Min.
in Betrieb genommen, schaltet es in den StandbyModus. Durch ein Berühren des Bedienfeldes wird
das Gerät wieder in den aktiven Modus geschaltet
:,]"<L
w#.#&
2$##Y$;
)*-
#+&+-
5VCPF
CTF
2GTKQ
Standa
rd
Perio
Cleani
ng
Al encender el aparato, los pilotos indicadores
se iluminan, a continuación el aparato vuelve a
!"!'!Y
presuriza.
¬@*!!~!
!!~@*!",!
si trovava prima dello spegnimento e la camera
della polvere è sotto pressione.
När enheten slås på tänds kontrollampan, enheten
$"!#kammaren trycksätts.
Antes de tratar un paciente, enjuagar el
circuito del Sistema Air-Flow de los eventuales
residuos de solución desinfectante utilizado por
el sistema piezon. Poner el mango encima del
lavabo y presionar el pedal de mando.
Prima di trattare il paziente sciacquare il
circuito del sistema Air Flow da qualsiasi residuo
di soluzione disinfettante utilizzato dal sistema
Piezon. Posizionare il manipolo in un lavello e
premere sul pedale.
Innan patienten behandlas, skölj rent
Air-Flow system omloppet från eventuella rester
av den desinfekterande lösning som använts i
Piezon systemet. Placera handstycke över en
vask och tryck på fotpedalen.
Tras 15 min. de inactividad, el aparato pasa
a modo standby. Al poner un dedo sobre la zona
sensible al tacto, el aparato sale del modo standby
'!"!L
;ǻL*~@*
*(',
(~@*!*('
ritorna alla configurazione in cui si trovava in
precedenza.
Efter 15 minuters inaktivitet går enheten
över i vänteläge. Om du pekar i den tryckkänsliga
zonen blir enheten aktiv igen. Enheten återgår då
"L
55
0
!#
'#$)#
$4*-#"$
5VCPF
CTF
2GTKQ
5VCPFC
TF
2GTKQ
%NGCPK
PI
# ~ # ( !!#
mode. The air pressure changes automatically
with the selection mode.
~@(Q
L
@!#J!
Q!L
=#
!,G{
=L
;!!#!#%!#
gewähltem Modus.
~ ( generated every 5 seconds (recommended
duration per single pocket treatment).
~(Q
ª!:Q!Q!#
*<L
=${+
ein Piepton (empfohlene Behandlungsdauer pro
\#!#!#<L
56
#.#"8
####;&)
5*#82#*!
5VCPF
CTF
2GTKQ
5VCPFC
TF
2GTKQ
%NGCPK
PI
~
disponible es reducida en comparación con el
L !(
automáticamente con la selección del modo.
& * ~ @(*
L@!(!!*,L
!
5 segundos (duración recomendada de tratamiento de cada bolsa).
&*
~
segnale acustico ogni 5 secondi (durata consigliata del trattamento per ogni singola tasca).
'!
L'!
automatiskt när du byter läge.
#$ª´
(rekommenderad varaktighet för behandling av
"!<L
57
$#2$2&#
'#$#2
$#2$
2$9-#
_w/w`
4
3
1
2
58
#$#2$#
#$#2$#
/#2$
&#
EN
FR
DE
ES
IT
SV
1
Air/Water spray
Jet d'Air/Eau
Wassergemisch
Pulverización de
aire/agua
Spray aria/acqua
2
Air/Water/Powder
spray
Jet d'
Air/Eau/Poudre
Pulvergemisch
Pulverización de
aire/agua/polvo
Spray aria/acqua/
polvere
vatten-/pulverstråle
3
Air only
Air seul
&
Solo aire
Solo aria
Endast luft
"Boost" function*
Fonction "Boost"*
„Boost“-Funktion*
Función "Boost" *
Funzione "Boost"*
Effektökning*
1 2 3
Same as
Standard mode
Identique au mode
Standard
Siehe StandardModus
Igual que el modo
Standard
>*
standard
Samma som
standardläge
4
Beep On/Off
Beep On/Off
Piepton ein/aus
Pitido activado/
desactivado
Segnale acustico
on/off
%
4
(+
2)
Perio mode
¯H'!£¥¤:«¥¥¤<
¯£¥¤:#«¥¥¤<
¯@Q£¥¤:%J@*«¥¥¤<
¯@£¥¤:"«¥¥¤<
¯G{(##$#!£¥¤:(«¥¥¤<
¯H$$'!£¥¤:«¥¥¤<
59
!-~&4j4
('!#!$'"Y~&$
Stand
ard
Perio
##$2~$#)!
5VCPFC
TF
2GTKQ
%NGCPK
PI
The adjustments can be obtained either by sliding
('!"#,LH
!"!'#!
quick-setting alternative.
Q(~
soit en plaçant le doigt sur la zone sensible. Placer
!*@QQ
QL
The unit has a memory function that recalls the
last settings that were entered, even if the unit
has been turned off.
@!QJ
Q*!#J
sous tension.
60
Die gewünschte Einstellung kann entweder
stufenlos oder direkt durch Antippen des
Drehreglers bei der gewünschten Einstellung
vorgenommen werden (zur Beschleunigung des
Einstellvorgangs).
Das Gerät verfügt über eine Speicherfunktion für
die Wiederherstellung der letzten Einstellungen
der letzten Einstellungen, selbst wenn das Gerät
zwischenzeitlich ausgeschaltet wurde.
8$#j$8~&#)
&##)#;j$
##Y~&#)
*##j7-!-27#$2~&$#)
El ajuste se puede realizar deslizando o poniendo
(,(L!!!
dedo directamente en el lugar deseado es una
alternativa de ajuste rápida.
,!
scorrere che posizionando il dito sulla zona
sensibile. Per un'alternativa rapida d'impostazione
basta posizionare un dito sul punto desiderato.
Du kommer till inställningarna genom att dra
"'!,L
Snabbaste sättet är att peka direkt på önskad
inställning.
El aparato tiene una función de memoria que
recupera los últimos ajustes que se introdujeron,
incluso si ha estado apagado.
@*#,!#!
!#,!#@*
è stata spenta.
Enheten har en minnesfunktion som gör att de
senast använda inställningarna visas vid start,
även om enheten har varit avstängd.
61
!-4j4
('!#!$'"Y$
##/#:!
!
Information regarding how to use and adjust
the water/air setting can be found in the operation
!#
'L
G,Q!
Q
@'
L
Using the unit without irrigation will generate
a substantial cloud of powder that could make the
patient feel uncomfortable.
Une utilisation de l'appareil sans eau
provoque un important nuage de poudre qui
pourrait incommoder le patient.
Informationen zur Verwendung und
"+
Z
Systeme.
5VCPFC
TF
2GTKQ
%NGCPK
PI
62
Bei Verwendung des Geräts ohne Wasser
kann sich eine für den Patienten unangenehme,
erhebliche Pulverwolke entwickeln.
8$#j$8!$
&##)#;#j$
##Y6$
*##)j7-!-
Puede encontrarse información referente
al uso y ajuste de la regulación del agua/aire
en las instrucciones de empleo de los sistemas
L
, @,, regolazione dell'impostazione acqua/aria si
possono trovare nelle istruzioni per l'uso dei
L
Information om hur du använder och ändrar
systemens bruksanvisningar.
El uso del aparato sin irrigación generará
una considerable nube de polvo que podría
resultar desagradable para el paciente.
@,,@*,!J
"!!#(
il paziente.
Om enheten används utan vatten bildas ett
stort moln av pulver som kan orsaka obehag hos
patienten.
63
$!4-
g$&$!
&:#2$
-#$&:#$
5VCPFC
TF
2GTKQ
%NGCPK
PI
The purge switch allows the depressurization
of the powder chamber for safe removal and to
repressurize the chamber once it is back on the
unit.
(Q
!#(*"Q
Q!Q!#(
J@Q@L
A beep sound will be emitted when the purge
switch is pressed. After approximately 1 minute
#}!":
when pressing the switch a second time).
)(QJ(
'QL'!(
pour sortir du mode "Cleaning".
The purge switch also controls the "Cleaning"
function (see following pages).
64
( Q commander la fonction "Cleaning" (voir pages
suivantes).
Über den Spülfunktionsschalter kann der Druck in
der Pulverkammer gelöst werden, um die Kammer
sicher zu entfernen, bzw. wieder aufgebaut
werden, wenn die Pulverkammer wieder aufgesetzt wird.
Beim Betätigen des Schalters erklingt ein Piepton.
Nach etwa einer Minute wird die vorhergehende
]"}#:(,}L
wenn der Schalter ein zweites Mal betätigt wird).
Der Spülfunktionsschalter dient außerdem zum
Einschalten der Reinigungsfunktion (siehe unten).
$&&$!
$#;&$!
7!
&&#-
7!#*!
El interruptor de purga permite la despresurización de la cámara de polvo para quitarla con
seguridad y volverla a presurizar al encontrarse
de nuevo en el aparato.
@!rizzare la camera della polvere per consentirne
una rimozione in sicurezza e di metterla sotto
pressione quando viene posizionata nuovamente
@*L
Med tömningsomkopplaren kan du minska trycket
i pulverkammaren så att den kan tas bort, och
trycksätta den igen när du har satt tillbaka den
på enheten.
Se emitirá un pitido al presionar el interruptor de
L;Q«U~
Y!"!:
pulsar el interruptor por segunda vez).
(Q!!
/>/:QY<L
Quando viene premuto l'interruttore di spurgo
viene emesso un segnale acustico. Dopo circa 1
@**!!"gurazione (oppure quando si preme l'interruttore
una seconda volta).
Ett pip hörs när du trycker på tömningsomkopplaren. Efter cirka en minut återgår enheten till
$":'!
omkopplaren en gång till).
Tömningsomkopplaren styr även rengöringsfunktionen (se efterföljande sidor).
@!,
"Pulizia" (consultare le successive pagine).
65
4X-!k##
-!$-!&$
$$-"4=$22:##
$#)
$!
<X
5VCPFCTF
2GTKQ
%NGCPKP
I
Standard
Perio
Cleaning
Do not remove or open the powder chamber
when it is under pressure.
&!#(*
poudre lorsqu'elle est sous pression.
Die Pulverkammer darf weder entfernt noch
geöffnet werden, solange sie unter Druck steht.
Press once on the purge switch to release the air
pressure from the powder chamber.
Appuyer une fois sur le bouton de purge pour
@!#(*L
Fill the chambers as indicated in chapter "Filling
the powder chamber".
!#(!JQ!#
/!#(*/L
Durch einmaliges Betätigen des Spülfunktionsschalters entweicht die Druckluft aus der Pulverkammer.
Never unscrew the cap of the powder
chamber when it is on the unit.
& % Q !! !#(*J@@L
When the chamber is on the unit, press again on
the purge to put the chamber under pressure.
J!#(*@~
'*(
mettre la chambre sous pression.
66
Befüllen Sie die Pulverkammer laut den Anweisungen im Abschnitt „Befüllen der Pulverkammer“.
Der Deckel der Pulverkammer darf nicht
entfernt werden, solange sich die Kammer auf
("L
Sobald sich die Kammer wieder auf dem Gerät
("~;!]!#
erneutes Betätigen des Spülfunktionsschalters
wieder aufgebaut werden.
"!&#)
"&##&#)
$#)"##&+2##!
<X
CLICK
Standard
Perio
Cleaning
Standard
Perio
Cleaning
No quite ni abra la cámara de polvo cuando
Q,L
&~Q!
polvere quando è sotto pressione.
Ta inte bort eller öppna pulverkammaren
när den är trycksatt.
Pulse una vez el interruptor de purga para vaciar
el aire a presión de la cámara de polvo.
Premere una volta l'interruttore di spurgo per fare
uscire la pressione dell'aria dalla camera della
polvere.
Tryck en gång på tömningsomkopplaren för att
minska trycket i pulverkammaren.
!Y!!!
/!Y/L
No desenrosque nunca la tapa de la cámara
!QL
>!YQ~
nuevo el interruptor de purga para presurizarla.
!!!"!!
"Riempimento della camera della polvere".
Non svitare mai il tappo della camera della
J@*L
¬!@*~
di nuovo sull'interruttore di spurgo per metterla
sotto pressione.
Fyll kammaren enligt beskrivningen i kapitlet ”Fylla
pulverkamrarna”.
Skruva aldrig av locket på pulverkammaren
när kammaren sitter på enheten.
Tryck på tömningsomkopplaren igen när
kammaren sitter på enheten för att trycksätta
kammaren.
67
2-
/$
g-#$!
44&$!
$!#&$#Y$
&:#$#)$0
#$2
$!
1
<X
Standard
Perio
Standard
Cleaning
Perio
Cleaning
CLEA
NING
2
STA
PERI
O
Remove the powder chambers before or after the
#
!!L
!#(*
!!
L
Entfernen Sie die Pulverkammern vor oder nach
+{
]L
After each treatment a purge is necessary
to remove all residues of powder and liquid inside
the cords and the handpieces.
"!#J
Q!Q
J*Q!!
*L
Nach jeder Behandlung muss ein Spülvorgang durchgeführt werden, um alle Pulverund Flüssigkeitsreste in den Schläuchen und
Handstücken zu entfernen.
@Q@~
!!@"@Q
("L
Wenn das Gerät über einen längeren
Zeitraum nicht verwendet wird, muss der Spülkreislauf geleert werden, damit sich kein Biofilm
bilden kann.
If the unit is not going to be used for an
extended period, it is important to empty the
!!#("L
68
/#
/
)#$"-#!
$!#&#)!$
&$!##&#)##Y
7$&$#)-)
OFF
{X
STANDA
RD
PERIO
CLEA
NING
CLEANI
NG
+30 s
!YQ
!!
L
Rimuovere le camere della polvere prima e dopo
!!
L
Ta bort pulverkamrarna innan eller efter att
#$L
;Q!!
purgar todos los residuos de polvo y líquido del
interior de los cables y mangos.
Dopo ogni trattamento è necessario uno
spurgo per eliminare tutti i residui di polvere e di
liquido all'interno dei cavi e dei manipoli.
En tömning krävs efter varje behandling för
att avlägsna alla rester av pulver och vätskor inuti
slangarna och handstyckena.
Si no se va a utilizar el aparato durante
un período prolongado es importante vaciar el
circuito de irrigación para que no se forme biopelícula.
;@*~
è importante vuotare il circuito di irrigazione per
evitare la formazione della biopellicola.
Om enheten inte ska användas under en
längre tid är det viktigt att tömma spolningsslingan
$("(L
69
(/0f
fh(/0
(/0f
##!-#!
-(/0-&
&##"$X
#&%;(/0
$2:$-#9
(/03:
For further details concerning the use of the
handpiece please refer to the operating instruc#
'#
!#+'
#L
Q!!
!*~,QQ
'
!#
+'
!L
Weitere Informationen zur Verwendung
des Handstücks erhalten Sie in der
Z
Systems und in dieser Bedienungsanleitung im
(!#,
+'L
H# #! ( ' }# # }
chambers.
!*
Q J ! !#( *
L
; `{! {
G( Pulverkammern verwendet werden.
70
(/0
(/0
(/0f
#.#"6$##X.
#!(/0
####Y$!####!
#&#(/0
##&-#$(
/0-
CLICK
Standa
rd
Perio
Cleani
ng
Si desea más información referente al uso
del mango, consulte las instrucciones de empleo
' !
/+
/L
Per ulteriori informazioni sull'uso del
manipolo consultare le istruzioni per l'uso del
!
JL
Ytterligare information om hur handstycket
"
'(!#
'
denna handbok.
(,
solamente con las cámaras de polvo PERIO
L
!!
L
#'!
L
71
(/0
(/0
5VCPF
CTF
2GTKQ
(/0$
5VCPFC
TF
2GTKQ
%NGCPK
PI
H#
!'!
}###!}##
powder chamber is lifted from its support.
Press the "working mode selection" switch
}##
handpiece is used.
72
Q!QJJ!*Q!
!#(*
Q
de son support.
; = } !#
ausgewählt, wenn das Handstück, das mit der
} }~
aus der Halterung genommen wird.
(/Q!
/
J
!*
QL
Betätigen Sie den Schalter für die Auswahl
des Arbeitsmodus, um bei Verwendung des AIR
`{! =
zurückzukehren.
(/0
#;(/0
(/0#*!
! ! automáticamente cuando se levanta de su soporte
el mango que se utiliza con la cámara de polvo
L
Quando il manipolo utilizzato con la camera
~*
,
automaticamente.
%
#'!!#
kammaren har lyfts ur sin hållare.
Pulse el botón de "selección del modo de
(%/
!
!
L
*
J,,
@/,*
operativa".
Tryck på driftslägesomkopplaren för att
återgå handstycket används.
73
CLEANING, DISINFECTING AND
STERILIZING
f1/
ET STÉRILISATION
REINIGEN, DESINFIZIEREN UND
STERILISIEREN
STANDA
RD
PERIO
STANDA
RD
PERIO
CLEA
NING
CLEA
NING
Please conform to the recommendations of
the Reprocessing Instructions manual delivered
with your product regarding the procedure of
cleaning, disinfecting, sterilizing and packing of
the components.
Veuillez vous conformer aux recommandations contenues dans le manuel Reprocessing
!Q!!Q'~Q!~Q
des composants.
Beachten Sie die Empfehlungen des
Handbuchs „Reprocessing Instructions“, das
##~
zur Reinigung, Desinfektion, Sterilisation und
Verpackung der Bestandteile.
Follow present-day regulations enforced in
the country about reprocessing.
Se conformer aux règlements en vigueur
dans le pays en ce qui concerne le retraitement.
Die vor Ort geltenden, aktuellen Vorschriften
zur Wiederverwendung und Versorgung von
Geräten sind zu beachten.
Clean the unit only with an alcohol-based,
commercially available (ethanol, isopropanol),
colorless disinfectant. The use of scouring powder
or an abrasive sponge will damage its surface.
Nettoyez l’appareil uniquement avec un
Q!!*(@!~
!!:Q#~<L*Q!Q
abrasive endommagerait sa surface.
Never remove the silicone cap from the
powder chamber holder when cleaning the unit.
Ne jamais enlever les capuchons en
!!#(*
nettoyage de l'appareil.
Do not use needles on the silicone cap of
the powder chamber holder.
74
Ne pas utiliser d'aiguilles sur le capuchon
!!#(*L
Reinigen Sie das Gerät nur mit einem
handelsüblichen, farblosen Desinfektionsmittel
auf Alkoholbasis (Ethanol, Isopropanol). Bei
der Verwendung eines Scheuerpulvers oder
`!#}(!#(!#
werden.
Die Silikonkappe des Pulverkammerhalters
darf während der Reinigung des Geräts nicht
entfernt werden.
Die Silikonkappe des Pulverkammerhalters
darf nicht mit Nadeln gereinigt werden.
b/f
ESTERILIZACIÓN
PULIZIA, DISINFEZIONE E
STERILIZZAZIONE
RENGÖRING, DESINFEKTION
OCH STERILISERING
STANDA
RD
PERIO
CLEA
NING
Siga las recomendaciones del manual
"Reprocessing Instructions" suministrado con
su producto con respecto al procedimiento de
limpieza, desinfección, esterilización y envasado
de los componentes.
+!JQ
en su país con respecto al reprocesamiento.
!!fectante incoloro con alcohol disponible en el
mercado (etanol, isopropanol). El uso de polvos
limpiadores o una esponja abrasiva dañarán su
"!L
No quite nunca la tapa de silicona del
soporte de la cámara de polvo cuando limpie el
aparato.
No utilice agujas en la tapa de silicona del
soporte de la cámara de polvo.
Attenersi alle raccomandazioni del manuale
"Reprocessing instructions" in dotazione al
prodotto sulle procedure di pulizia, disinfezione,
sterilizzazione e imballaggio dei componenti.
Attenersi alle normative in vigore a livello
locale e nazionale sulla riprocessazione.
@*!(
alcol incolore, disponibile in commercio (etanolo,
<L@,,(
*"!L
Non togliere mai il tappo di silicone dal
supporto della camera della polvere durante la
,@*L
Non usare aghi sul tappo di silicone del
supporto della camera della polvere.
Följ rekommendationerna i handboken
”Reprocessing Instructions” som medföljer
produkten vad gäller procedurer för rengöring,
desinfektion, sterilisering och förpackning av
komponenter.
Följ gällande regler i ditt land för upparbetning.
Rengör endast enheten med ett alkoholba~$"
marknaden (etanol, isopropanol). Om skurpulver
eller en svamp med slipverkan används kan ytan
skadas.
Ta aldrig bort silikonlocket från pulverkammarhållaren medan enheten rengörs.
Använd inte nålarna på pulverkammarhållarens silikonlock.
75
#!-
!
(!b$"-7
135°C
The bottle can be washed in a dishwasher
and disinfected up to 95°C in a washer disinfector.
The bottle cannot be sterilized.
Please refer to the operating instructions
of the Piezon systems to remove, clean, disinfect
and sterilize the instruments and the handpiece.
76
('Q
Q!Q%J*¦ª·>
Q!#JL
Die Flasche kann in einer Spülmaschine
gereinigt und in einem Thermodesinfektor bei bis
,¦ª·>",}L
(QQL
Die Flasche kann nicht sterilisiert werden.
G,QQ
' , Q~ '~Q!Q
!*L
Beachten Sie für das Entfernen sowie die
Reinigung, Desinfektion und Sterilisation der
Instrumente und des Handstücks die Bedienungsanleitungen der Piezon-Systeme.
&#
$#!#
(!7##"-7
135°C
(%
y desinfectarse a un máximo de 95°C en una
lavadora desinfectante.
!
!"
95°C.
(,L
!,,L
Consulte las instrucciones de empleo de los
sistemas Piezon para retirar, limpiar, desinfectar
y esterilizar los instrumentos y el mango.
Consultare le istruzioni per l'uso dei sistemi
Piezon per eliminare, pulire, disinfettare e sterilizzare gli strumenti ed il manipolo.
Flaskan kan tvättas i diskmaskin och desin"!¦ª·>"!L
Flaskan kan inte steriliseras.
Information om hur man tar bort, rengör,
desinficerar och steriliserar instrumenten och
#'!",'(visningar.
77
Disassemble the dome to facilitate cleaning.
;Q!!'L
Regularly clean and disinfect the cap.
&'Q!Q(!#L
The ribs of the dome must be aligned
with the lugs of the ring. The two pieces must be
correctly aligned and interconnected.
!
(LU
QL
The cap must be completely dry before
closing.
(!#!
la fermeture.
$+]+!#(!#
für die Reinigung aus dem Ring heraus.
",++!#(schluss regelmäßig.
Die Rillen der Kuppel müssen in die Rippen
des Rings eingefügt werden. Die beiden Teile
müssen exakt ineinander gelegt und fest zusammengedrückt werden.
Vor dem Verschließen muss der Schraubverschluss vollständig trocken sein.
78
CLICK
Desmonte la cúpula para facilitar la limpieza.
Smontaggio della cupola per agevolare la pulizia.
Montera isär kupan för att underlätta rengöring.
'!!L
Pulire e disinfettare regolarmente il tappo.
$!#"!!(L
(!(
!L,(
alinearse y acoplarse correctamente.
!!
allineate con gli aggetti dell'anello. I due pezzi
devono essere correttamente allineati e interconnessi.
]#
kanter. De två delarna måste sättas ihop med
varandra på rätt sätt.
Il tappo deve essere completamente
asciutto prima della chiusura.
det.
(!!
antes de cerrarla.
!#
79
MAINTENANCE
MAINTENANCE
0(w1
(&#!-
(&##$&#
$&&#
Check the condition of the threads on the
powder chamber and cap. The powder chamber
is pressurized during use. The condition of the
powder chamber and cap (ring and dome) is an
important safety factor.
> Q !#(*(!#LH
~!#(*
L(Q!#(*
(!#:(!<Q
Q!QL
Prüfen Sie den Zustand der Gewinde der
Pulverkammer und des Schraubverschlusses. Die
Pulverkammer steht während der Verwendung
unter Druck. Für die Sicherheit des Geräts müssen
die Pulverkammer und der Schraubverschluss
(Ring und Kuppel) in gutem Zustand sein.
! Q !
Q!L
Schadhafte Teile müssen umgehend ersetzt
werden.
Replace faulty parts immediately.
80
MANTENIMIENTO
MANUTENZIONE
UNDERHÅLL
"#&$#
$##$&#
g
$&
Compruebe el estado de las roscas de la
!Y'L!Y
está presurizada durante el tratamiento. El estado
de la cámara de polvo y de la tapa (aro y cúpula)
es un factor de seguridad importante.
Verificare la condizione delle filettature
!L!
della polvere durante l'uso è sotto pressione.
!,!
tappo (anello e cupola) rappresenta un importante
fattore di sicurezza.
Kontrollera gängornas skick på pulverkammaren och locket. Pulverkammaren är trycksatt
under användning. Kammarens och lockets
(ringen och kupan) skick är en viktig säkerhetsfaktor.
Sustituya las partes defectuosas inmediatamente.
Byt ut defekta delar omedelbart.
Sostituire immediatamente le parti difettose.
81
!
!
(!
If an O-ring is damaged or worn out, it must
be replaced immediately.
+%QQ~
!QQL
Beschädigte oder verschlissene O-Ringe
müssen umgehend ersetzt werden.
Place the valve on the metallic bushing before
rescrewing it (do not turn the powder chamber
upside down).
!!QJ
le revisser (ne pas retourner la chambre).
Vor dem erneuten Aufschrauben wird das Ventil
auf den Metallring aufgesetzt. (Pulverkammer
nicht auf den Kopf drehen.)
82
$.
##$
!
Si una junta tórica está dañada o gastada
debe sustituirse de inmediato.
Se un anello di tenuta è danneggiato o
usurato va sostituito immediatamente.
Om en O-ring är skadad eller sliten ska den
bytas omedelbart.
Coloque la válvula en el casquillo metálico antes
de volver a enroscarla (no voltee la cámara de
polvo).
Sostituire la valvola sulla bronzina metallica prima
di riavvitarla (non capovolgere la camera della
polvere).
Sätt fast ventilen på metallbussningen innan du
skruvar tillbaka den (vänd inte pulverkammaren
upp och ned).
83
A damaged or worn out O-ring must be
replaced immediately.
)%QQ
!QQL
Beschädigte oder verschlissene O-Ringe
müssen umgehend ausgetauscht werden.
Please refer to the instructions provided
with the maintenance set.
G, QQ U !
fournies avec le set d’entretien.
Bitte beachten Sie hierzu die Anweisungen,
die mit dem Wartungssatz geliefert werden.
Always use EMS original parts. Using nonoriginal instruments may damage the unit and the
practitioner or patient may be injured.
Utiliser exclusivement des pièces originales
=+L@@U
µ*@
blessures au praticien ou au patient.
Verwenden Sie nur Originalteile von EMS.
Bei Verwendung anderer als der Originalinstrumente kann das Gerät beschädigt werden, und
es besteht Verletzungsgefahr für den Arzt oder
Patienten.
84
Una junta tórica dañada o gastada debe
cambiarse de inmediato.
Sostituire immediatamente l'anello di tenuta
danneggiato o usurato.
En skadad eller sliten O-ring måste genast
bytas ut.
Consulte las instrucciones facilitadas con
el equipo de mantenimiento.
Consultare le istruzioni fornite con il set di
manutenzione.
Se anvisningarna som medföljer underhållssatsen.
Use siempre piezas originales de EMS. Si
se utilizan instrumentos que no sean originales
podría dañarse el aparato y lesionarse el dentista
o el paciente.
Usare sempre parti di ricambio originali
=+L@,,,
@*~!,
possono rimanere lesionati.
Använd alltid originaldelar från EMS. Om
instrument som inte är originalinstrument används
kan enheten, tandläkaren eller patienten skadas.
85
(&#!-4k#-2$
(&#$k#;$
2$"#
$$-0k#$
-$!
'!#!#"L>!##
"!'L
> Q L &' !"Q!L
Der Filter muss regelmäßig geprüft und gegebenenfalls gereinigt oder ersetzt werden.
Only replace with the type of fuse indicated
on the back of the unit.
Remplacer uniquement par le type de
(Q@L
Die Sicherungen dürfen nur gegen Sicherungen des auf der Geräterückseite angegebenen
Typs ausgetauscht werden.
86
"#k#!$#
2$"#
$#k###Y6$
2$"#
g)k#-*
!
>("!~
cámbielo si es necesario.
Controllare regolarmente il filtro. Pulire o
"!"!L
"(L$('
det vid behov.
Sustituya el fusible solamente por el tipo
que se indica detrás del aparato.
Sostituire esclusivamente con il tipo di
(!@*L
Använd endast den typ av säkringar som
anges på enhetens baksida.
87
k#
/#;
$2k#
M
Cleaning
Standard
Perio
'!#!#"L
>"*QL
H#"(L}'
}=+"L
"*Q(LH%
"=+L
88
;"²{{
werden.
;"{G}
bestimmt und sind jedes Mal durch einen neuen
EMS-Filter zu ersetzen.
Filtro de aire
Filtro dell'aria
$2k#
Cleaning
Standard
Perio
Cleaning
Standard
Perio
>('"!mente.
Controllare e spurgare regolarmente il filtro
dell'aria.
",(L
"=+L
"@,,(L
"=+L
!#$"(L
"(L
'=+"L
89
(&#!-&$&2-$
(&##&&#Y&&#
$$-$&1*
The pump of the unit is subject to wear. It is recommended to replace it every 18 months.
@QQ@L
!Q!#«¹L
Please refer to the instructions provided
with the spare pump.
G, QQ U !
fournies avec la pompe de rechange.
Die Pumpe des Geräts ist ein Verschleißteil. Es
wird empfohlen, sie alle 18 Monate auszutauschen.
90
Bitte beachten Sie hierzu die Anweisungen,
die mit der Ersatzpumpe geliefert werden.
"#""#&
$##&&##Y$;
g$-&$&
((tarse. Se recomienda cambiarla cada 18 meses.
@*L
Si consiglia la sua sostituzione ogni 18 mesi.
Enhetens pump slits med tiden. Den bör bytas
var 18:e månad.
Consulte las instrucciones facilitadas con
la bomba de repuesto.
Consultare le istruzioni fornite con la pompa
di ricambio.
Se anvisningarna som medföljer reservdelspumpen.
91
/f(w
REMARQUES CONCERNANT LA
SÉCURITÉ
3(330
EMS and the distributor of this product accept no
liability for direct or consequential injury or damage
resulting from improper use, arising in particular
through non-observance of the operating instructions, or improper preparation and maintenance.
EMS et le distributeur de ce produit ne peuvent
(QQ%!
!!QQJ
ou d’un maniement incorrect, en particulier lorsque
QQ!QJ
QQQ!!!QL
EMS und der Vertreiber des Produkts haften
nicht für direkte und Folgeschäden, die durch
eine unsachgemäße Verwendung des Produkts
auftreten, insbesondere durch Nichtbeachtung der
Bedienungsanleitung oder unsachgemäße Vorbereitung oder Wartung.
Contraindication: ultrasonic oscillations may
!!!"(
functioning properly. Therefore, we recommend that
}#!!!"(
should not be treated with this product.
Use for the intended purpose only. Before
using the product, make sure the operating instructions have been carefully studied. This also applies
to any equipment used with this product. Failure
to observe the operating instructions may result in
the patient or user suffering serious injury or the
product being damaged.
Risk of explosion: do not use this product in
#!(#!L
This product must be used only by trained
J"L
Before each use, clean, disinfect and sterilize
the different pieces and accessories of this product.
Please refer to the information provided in the
operating instructions. Non-sterile pieces and
accessories may cause bacterial or viral infections.
92
Contre-indication: le fonctionnement correct
!JQ"(
(Q!J
#QJ!L&!
pas traiter les patients porteurs de stimulateurs
!JQ"(!!L
N’utilisez le produit que pour les applications
QL>
QQL>!Q(
QJQ
!(!!LGQ,
les risques de blessures et d’endommagement de
votre produit.
Risque d'explosion: ne pas utiliser ce produit
Q!#QJ,mables.
>QJ
J"QQL
!#J~'~Q!QQ!!!soires de ce produit. Respecter pour cela les
indications correspondantes du mode d’emploi.
;!!!QQ
*!(!QL
Kontraindikationen: Herzschrittmacher und
;"($!#)!#!#}gungen in ihrer Funktion gestört werden. Daher
empfehlen wir, Patienten mit Herzschrittmachern
;"(!#,
behandeln.
Nur für den vorgesehenen Verwendungszweck einsetzen. Die Bedienungsanleitung ist vor
dem Einsatz des Geräts sorgfältig zu lesen und
zu verstehen. Dies gilt gleichermaßen für alle in
Kombination mit dem Gerät eingesetzten Produkte.
Eine Nichtbeachtung der Bedienungsanleitung
kann zu ernsthaften Verletzungen des Patienten
oder Bedieners oder zu Schäden am Produkt
führen.
Explosionsgefahr: Verwenden Sie das
Produkt nicht in der Nähe von entzündlichen
Anästhetika oder Gasen.
Das Produkt darf nur von ausgebildetem und
J",}}L
Die einzelnen Bestandteile des Geräts
und das Zubehör müssen vor jeder Verwendung
gereinigt, desinfiziert und sterilisiert werden.
Beachten Sie hierzu die Hinweise in der Bedienungsanleitung. Nicht sterile Geräteteile und
Zubehör können bakterielle oder virale Infektionen
auslösen.
PRECAUCIONES SOBRE
SEGURIDAD
PRECAUZIONI DI SICUREZZA
SÄKERHETSFÖRESKRIFTER
EMS y el distribuidor de este producto no aceptan
ninguna responsabilidad por daños o lesiones
directos o emergentes derivados de un uso
incorrecto, en especial los que se produzcan por
la no adherencia a las instrucciones de empleo, o
de una preparación y mantenimiento inadecuados.
EMS ed il distributore di questo prodotto non
!(*
diretti o conseguenti derivati da un uso improprio,
!"!!,
delle istruzioni per l'uso o da una preparazione e
manutenzione non corrette.
EMS och produktens distributör påtar sig inget
ansvar för direkta skador eller följdskador som
uppstår på grund av felaktig användning, särskilt
om de beror på att användaren inte följt bruksanvisningen eller inte utfört korrekta förberedelser
eller korrekt underhåll.
Contraindicación: las vibraciones ultrasó!#!J!'"(ladores cardiacos no funcionen correctamente. Por
tanto, se recomienda no tratar con este producto
a pacientes portadores de un marcapasos o un
"(L
Controindicazioni: le oscillazioni ad ultrasuoni
possono impedire il funzionamento corretto di
!!"(L
consigliamo che i pazienti portatori di elettrostimo!!"(
con questo prodotto.
Kontraindikation: ultraljudssvängningar
$!!#"(
fungerar korrekt. Därför rekommenderar vi att
man inte behandlar patienter med pacemaker eller
"(L
Use para las aplicaciones indicadas exclusivamente. Antes de usar el producto, cerciórese
de haber leído atentamente las instrucciones de
L!(QJJ
se usen con este producto. Si no se observaran las
instrucciones de empleo, el paciente o el usuario
podrían sufrir una lesión grave o podría dañarse
el producto.
Utilizzo solo allo scopo previsto. Prima di
J~"!!#,
per l'uso siano state attentamente studiate. Questo
vale anche per qualsiasi apparecchiatura utilizzata
!JL!,
istruzioni per l'uso potrebbe comportare lesioni
gravi per il paziente o l'operatore, oppure il prodotto
potrebbe subire danni.
Riesgo de explosión: no use este producto
!Q!(L
Rischio di esplosione: non usare questo
,!"mabili.
Este producto sólo debe ser utilizado por
'!"!L
Antes de cada uso, limpie, desinfecte y
esterilice las distintas piezas y accesorios de este
producto. Consulte la información facilitada en las
!!L,'!!
Q!!!(!rianas o víricas.
Questo prodotto va usato solo da personale
J"!L
Prima di ogni utilizzo pulire, disinfettare e
sterilizzare le varie parti e accessori del prodotto.
Consultare le informazioni fornite nelle istruzioni
per l'uso. Parti e accessori non sterili possono
causare infezioni batteriche o virali.
Får endast användas för avsett ändamål.
(
används. Detta gäller all utrustning som används
tillsammans med produkten. Om bruksanvisningen
inte följs kan detta leda till att patienten eller användaren skadas allvarligt, eller att utrustningen går
sönder.
Explosionsrisk: använd inte produkten i
närheten av lättantändliga anestetika eller andra
gaser.
Produkten får endast användas av utbildad
och behörig personal.
Rengör, desinficera och sterilisera
produktens olika delar och tillbehör före varje
användningstillfälle. Se informationen i respektive
bruksanvisning. Icke-sterila delar och tillbehör kan
orsaka bakterie- eller virusinfektioner.
93
Use only the powder recommended by EMS
for the subgingival application when the PERIO
#!!!#L'
other powder could cause premature wear of the
nozzle and would consequently increase the risk
of emphysema and damage to the unenameled
dentine.
N’utili,J!Q
EMS pour l'application subgingivale lorsque la
!*
!!Q
l'appareil. Toute autre poudre engendrerait une
QQ(
!QJJ@#'
*QL
Verwenden Sie bei aufgesetztem PERIO
`{!=+#
für die subgingivale Zahnreinigung. Andere Pulver
könnten zu einem vorzeitigen Verschleiß der
Düse führen und das Risiko für Emphyseme und
Zahnbeinschäden bei freiliegenden Zahnhälsen
erhöhen.
The powders provided by EMS are specially
designed for use with the unit. Do not use powders
from other manufacturers as this could damage the
!'!"!!'L
=+Q!!Q!L
Ne pas utiliser de poudre provenant d’autres fabri!!Q
"!!Q!L
Die von EMS zur Verfügung gestellten
Pulver wurden speziell für die Verwendung mit
unseren Geräten entwickelt. Pulver anderer
Hersteller könnten das Gerät beschädigen oder
die Wirksamkeit der Behandlung beeinträchtigen.
Ne jamais utiliser de poudre abrasive par ex.
*(!@L>
l'appareil.
Verwenden Sie keine scheuernden Reinigungspulver auf der Grundlage von Kiesel- oder
Tonerde, da diese das Gerät beschädigen würden.
GQ !#J J QQL)!!
QQL
!QL&J!
des accessoires EMS d’origine.
Überprüfen Sie Ihr Produkt vor jeder
Behandlung auf Schäden. Beschädigtes Zubehör
oder ein beschädigtes Gerät dürfen nicht mehr
verwendet und müssen ersetzt werden. Verwenden
Sie ausschließlich Original-EMS-Ersatzteile und
-Zubehör.
Never use an abrasive powder i.e. based on
silica or alumina. This would damage the unit.
Always examine the product for damage
before starting treatment. Damaged accessories
or a damaged unit must not be used and must be
replaced. Use original EMS spare parts and accessories only.
This product must only be repaired by an
approved EMS repair center.
Q!U!
!QQQ=+L
This product has been investigated with
regard to safety from electrical shock and fire
hazard. CSA (Canadian Standard Association)
has not investigated physiological effects.
>(%Q!J
UJ!#!Q!J!L
CSA (Canadian Standard Association) n’a pas
QQ#'JL
Certain types of mobile telecommunication
equipment could potentially interfere with this
product. The separation distances recommended
in the note "Electromagnetic compatibility" manual
must be taken into account.
Certains types d’appareils mobiles de
QQ!!!(Q
! ! L ! Q
!Q/>(Q
!QJ/!QL
94
+!#²!#
einem von EMS genehmigten Reparaturzentrum
reparieren.
Das Produkt war Gegenstand einer Studie
zur Brand- und Stromschlaggefahr. Die physiologischen Auswirkungen wurden nicht von den CSA
(Canadian Standard Association) untersucht.
Bestimmte Arten mobiler Telekommunikationsgeräte können die Funktion des Produkts
beeinträchtigen. Die im Kapitel zur elektromagnetischen Verträglichkeit empfohlenen räumlichen
Entfernungen müssen eingehalten werden.
Use solo el polvo recomendado por EMS
para la aplicación subgingival cuando el mango
Q!!L>J
otro polvo podría causar el desgaste prematuro de
la boquilla y aumentar, por consiguiente, el riesgo
"'L
J =+ Y
diseñados especialmente para utilizar con este
aparato. No utilice polvos de otros fabricantes ya
que podría dañarse el aparato o afectar negativa"!!L
No use nunca un polvo abrasivo a base de
sílice o alúmina. Éste dañaría el aparato.
U!"!
JQ,miento. Si un accesorio o el aparato está dañado no
debe utilizarse y debe sustituirse. Use solamente
piezas de repuesto y accesorios originales de EMS.
Este producto solo debe ser reparado por
un centro de reparación autorizado de EMS.
Este producto ha sido investigado con
respecto a su seguridad frente a descargas
Q!!'!L>+:>
Standard Association) no ha investigado los efectos
"!L
Ciertos tipos de equipos de telecomunicaciones móviles podrían interferir con este
producto. Deben tenerse en cuenta las distancias
de separación recomendadas en el manual de
/>(!Q!/L
Usare solo la polvere raccomandata da
EMS per l'applicazione sottogengivale quando il
!@*L
Qualsiasi altra polvere potrebbe causare un'usura
precoce dell'ugello e conseguentemente potrebbe
!#"
non ricoperta da smalto.
=+
!"!@!@*L&
polveri fornite da altri produttori in quanto
((@*!
@"!,L
Non usare mai polvere abrasiva, ad esempio
(!L>*
@*L
Esaminare sempre il prodotto per la presenza
di eventuali danni prima di iniziare il trattamento. Gli
!!@*
devono essere utilizzati e vanno sostituiti. Usare
esclusivamente parti di ricambio e accessori EMS
originali.
Portare a riparare questo prodotto esclusivamente in un centro di assistenza EMS approvato.
Questo prodotto è stato analizzato per
quanto riguarda la sicurezza da scosse elettriche
!#!L>+:>+
!<#"!L
Certi tipi di apparecchiature di
telecomunicazione mobile potrebbero potenzialmente interferire con questo prodotto. Tenere in
considerazione le distanze di separazione consi/>(*!/L
Använd endast pulver som rekommenderas
av EMS för subgingival användning när PERIO
#'!#L
pulver kan göra att spetsarna slits ut i förtid, vilket
ökar risken för emfysem och skada på dentinet.
De pulver som tillhandahålls av EMS är
särskilt framtagna för att fungera tillsammans med
enheten. Använd inte pulver från andra tillverkare
då detta kan skada enheten eller försämra dess
effektivitet.
Använd aldrig pulver med slipeffekt, t.ex.
sådana som baseras på kiseldioxid eller aluminium.
Detta kan skada enheten.
Kontrollera alltid att produkten inte är skadad
innan behandling påbörjas. Skadade tillbehör eller
en skadad enhet får inte användas utan måste
bytas ut. Använd endast originalreservdelar och
tillbehör från EMS.
Produkten får endast repareras av ett
godkänt EMS-reparationscenter.
Denna produkt har testats med avseende
på säkerhet mot elektriska stötar och brandrisk.
CSA (Canadian Standard Association) har inte
undersökt enhetens fysiologiska verkan.
Vissa typer av mobil kommunikationsutrustning kan störa produkten. Följ rekommendationerna om avstånd som anges i dokumentet
”Electromagnetic compatibility”.
95
STORING THE PRODUCT
ENTREPOSAGE DU PRODUIT
COND
ITION
TRAN
S
DE
TRANSPOR
TRAN
Temp
SPORT AND SPOR
eratur
T
UND STOR T ET
e
LAGEAGE
-10°C
+40°
C
Humid R
ity
10
%
DE
STOC
COND
BEDIN
KAGE
ITION
GUNG
S
EN
Press
ure
95
%
500
hpa
1060
hpa
ITY
UAL
ISSQ
-SW
S
M
E
.CH
Keep the original packaging until the
product is to be disposed of permanently. It can
be used for shipping or storing at any time.
>(%J*
(LQ
*L
If the unit is not going to be used for an extended
period of time:
Proceed as described in the chapter "Cleaning, disinfecting and sterilizing",
Proceed to a "Cleaning" cycle without
bottles to empty the circuits,
#!}#}"
empty the unit,
Pack the product and all accessories in the
original packaging.
Si vous envisagez de ne pas utiliser votre produit
QQ´
+,QQ!!#/&'~Q!Q/~
!Q*!'!/>/
sans les bouteilles pour vider les circuits,
;Q,(!#"*
vider l'appareil,
Rangez le produit et les accessoires dans
l’emballage d’origine.
The powder should not be stored near acids
or heat sources.
!Q *
UQ!!!#L
Please refer to the storage and transport conditions in the chapter "Technical data".
Veuillez tenir compte des conditions de stockage
Q!!#/>!Qtiques techniques".
96
w/g03(1(
Bewahren Sie die Originalverpackung bis
zur endgültigen Entsorgung Ihres Produkts auf.
Sie kann somit jederzeit für das Verschicken oder
}}L
Wenn Sie Ihr Produkt längere Zeit nicht benutzen
wollen:
Gehen Sie entsprechend dem Kapitel „Rei~",¼L
Führen Sie einen Reinigungszyklus ohne
Flaschen durch, um den Kreislauf zu leeren.
++!#(
"ters, um das Gerät zu leeren.
Verpacken Sie das Produkt und alle Zubehörteile in der Originalverpackung.
Das Pulver darf nicht in der Nähe von
Säuren oder Hitzequellen gelagert werden.
Z!#+(!#Hbedingungen im Abschnitt „Technische Daten“.
ALMACENAMIENTO DEL
PRODUCTO
STOCCAGGIO DEL PRODOTTO
FÖRVARA PRODUKTEN
Guarde el embalaje original hasta que vaya
!#!"L
servir para su transporte o almacenamiento en
cualquier momento.
>@("J
(("L*,,,
o per lo stoccaggio.
Behåll originalförpackningen tills produkten
kasseras permanent. Den kan återanvändas för
frakt eller förvaring.
Si no se va a utilizar el producto durante un
período de tiempo prolongado:
Proceda como se describe en el capítulo
/,~!!',!/L
Realice un ciclo de limpieza sin botellas
para vaciar los circuitos.
¬"!
el aparato.
Guarde el producto y todos los accesorios
en el embalaje original.
Per mettere il prodotto fuori utilizzo per un periodo
di tempo prolungato:
Procedere come descritto nel capitolo "Pulizia, disinfezione e sterilizzazione".
!!!,,!
per vuotare i circuiti.
"@!J
@*L
Imballare il prodotto e tutti gli accessori nel
confezionamento originale.
El polvo no debe almacenarse cerca de
ácidos ni fuentes de calor.
Non conservare la polvere accanto ad acidi
o a fonti di calore.
Consulte las condiciones de almacenamiento
y transporte en el capítulo "Especificaciones
Q!!/L
Consultare le condizioni di conservazione e di
trasporto nel capitolo "Dati tecnici".
Gör så här om du vill ställa undan enheten under
en längre tid:
Följ anvisningarna i kapitlet ”Rengöring,
desinfektion och sterilisering”.
)$$!'$
tömma slingorna.
H("$$
enheten.
Packa ned produkten och alla tillbehör i originalförpackningarna.
Pulvret ska inte förvaras i närheten av syror
eller värmekällor.
Information om förvarings- och transportförhål"¶H¶L
97
PRODUCT DISPOSAL
(f1
ENTSORGEN DES PRODUKTS
The product must not be discarded in domestic
household waste.
%Q(
domestique.
Das Produkt darf nicht mit dem normalen
Haushaltsmüll entsorgt werden.
Should you wish to definitively dispose of the
product, please comply with the regulations which
apply in your country.
+#,Q"(
~!,!Q!"J'L
Wollen Sie Ihr Produkt endgültig entsorgen,
(!# + ( %} # geltenden Bestimmungen.
Waste Electrical and Electronic Equipment
belonging to customers located in the European
Union may be shipped to EMS for recycling in
accordance to the WEEE regulations. The costs of
recycling, exclusive of shipping fees, are covered
by EMS.
QJQ!JQ!J
"U!!Q
@)Q'Q*=+
!'!Q!!!!
L!½!'!~*@U!
frais de transports, sont couverts par EMS.
Abfall aus elektrischen und elektronischen
Geräten im Besitz von Kunden in der Europäischen Union kann gemäß der WEEE-Richtlinie
für die Wiederverwertung an EMS zurückgegeben
werden. Die Kosten für das Recycling, exklusive
der Kosten für die Anlieferung, werden von EMS
übernommen.
0((f
GARANTIE
GARANTIE
Damages due to non-adherence to the operating
instructions or wear out of parts are excluded
from warranty.
;Q¡Q!
*!U!L
Durch Nichtbeachtung der Bedienungsanleitung
und Abnutzung entstandene Schäden an Gerätebestandteilen sind von der Garantie ausgenommen.
The warranty of your product will be
cancelled if you try to open it.
Q
si vous essayez de l’ouvrir.
Die Garantie Ihres Produkts erlischt, wenn
Sie versuchen, es zu öffnen.
ACCESSORIES
ACCESSOIRES
ZUBEHÖR
Accessories are available from EMS or any authorized dealers. Please contact your customer
service directly.
Vous trouverez les accessoires auprès d'EMS
@(QLG,
contacter votre service clientèle directement.
Zubehör erhalten Sie bei Ihrer EMS-Niederlassung
oder Ihrem EMS-Fachhändler. Bitte wenden Sie
sich direkt an den Kundendienst.
98
ELIMINACIÓN DEL PRODUCTO
SMALTIMENTO DEL PRODOTTO
KASSERING AV PRODUKTEN
El producto no debe tirarse con los residuos
Q!L
&J"!L
Produkten får inte kastas i hushållssoporna.
Per smaltire definitivamente questo prodotto,
attenersi alla normativa in vigore nel proprio
paese.
Följ gällande regler i ditt land om du vill kassera
produkten permanent.
Si deseara deshacerse definitivamente del
producto, cumpla la normativa correspondiente
de su país.
Q!!'!nicos (RAEE) que pertenezcan a clientes que se
encuentren en la Unión Europea pueden enviarse
a EMS para su reciclaje de conformidad con la
normativa sobre RAEE. El coste del reciclaje,
excluidos los gastos de envío, lo cubre EMS.
@!!#!!
uso appartenente a clienti residenti nella UE
*=+!!
!*
L!
!!~!!!,~*
carico di EMS.
Avfall som utgörs av eller innehåller elektriska eller
:
!!
and Electronic Equipment) som tillhör kunder inom
EU kan skickas till EMS för återvinning i enlighet
med WEEE-direktivet. EMS står för återvinningskostnaden, men inte för fraktkostnaden.
GARANTÍA
GARANZIA
GARANTI
( #! instrucciones de empleo o al desgaste de piezas
están excluidos de la garantía.
I danni dovuti a non aderenza alle istruzioni
operative o ad usura delle parti sono esclusi dalla
garanzia.
Skador som beror på att användaren inte följt
bruksanvisningen eller på slitage omfattas inte
av garantin.
! JY
anulada si intenta abrirlo.
,*
caso di tentativo di apertura del prodotto stesso.
Garantin upphör att gälla om du själv
försöker öppna produkten.
ACCESORIOS
ACCESSORI
TILLBEHÖR
Podrá obtener los accesorios de EMS o de sus
distribuidores autorizados. Contacte con Atención
al Cliente directamente.
Presso EMS o i rivenditori autorizzati sono disponibili gli accessori. Rivolgersi direttamente al
servizio di assistenza clienti.
Tillbehör kan beställas från EMS eller våra auktoriserade återförsäljare. Kontakta kundtjänst direkt.
99
(5
SERVICE EMS
(5
Should your product need servicing and repairs,
please send it to your dealer or to an authorized
EMS Repair Center.
Pour toute intervention de maintenance et
Q~'*(
!*!QQQ
EMS.
Bitte schicken Sie Ihr Produkt für alle Wartungsoder Reparaturarbeiten an Ihren Händler oder ein
von EMS autorisiertes Reparaturzentrum.
EMS decline responsibility for the safety of the
device and declare the warranty null and void if
service or repair is carried out by an unauthorized
third party or if non-genuine spare parts are used.
It is best to ship the product in the original
packaging. It protects the product against damage
during shipment.
Please clean, disinfect and sterilize the
product and all accessories as described in the
operating instructions before dispatching them.
When sending the product directly to an approved
EMS repair center, please include the name of
'LH#"!L
=+Q!(Q
Q!Q@Q!
nulle et non-avenue si des entretiens ou des
Q!Q!
Q~!@
QQL
)QQ!(
UQLUQQ!
les incidents de transport.
&'~Q!Q
(!!!Q
UQL
!UQ!
!QQQ=+~J
(L>"
le traitement.
100
EMS lehnt jede Haftung hinsichtlich der Sicherheit
des Geräts ab und erklärt die Garantie für null
und nichtig, falls Wartungen und Reparaturen
durch nicht-autorisierte Personen durchgeführt
wurden, oder falls andere als die Original-Ersatzteile benutzt wurden.
Verwenden Sie für den Transport am besten
die Originalverpackung. Dadurch ist Ihr Produkt
während des Transports geschützt.
Vor dem Versand müssen das Gerät und
alle Zubehörteile gemäß der Bedienungsanleitung
~",}L
Bei Direktversand des Produkts an das von EMS
autorisierte Reparaturzentrum geben Sie bitte
den Namen Ihres Händlers an. Dies erleichtert
die Abwicklung.
SERVICIO TÉCNICO DE EMS
SERVIZIO ASSISTENZA EMS
(5
Si su producto necesitara una revisión o
reparación, envíelo a su distribuidor o a un centro
de reparación autorizado de EMS.
Se il prodotto ha bisogno di un'ulteriore assistenza
o di riparazioni, spedirlo al rivenditore o a un
centro di assistenza EMS autorizzato.
Om produkten behöver service eller reparation
skickar du den till din återförsäljare eller ett
godkänt EMS-reparationscenter.
EMS declina toda responsabilidad sobre la
seguridad del aparato, declarando la garantía nula
y no válida si una tercera persona no autorizada
realiza una revisión o reparación, o si se utilizan
piezas de repuesto no originales.
=+!J(*
sicurezza del dispositivo e dichiara la garanzia
nulla nel caso l'assistenza o la riparazione sia
effettuata da terzi non autorizzati o siano state
utilizzate parti di ricambio non originali.
EMS frånsäger sig allt ansvar för enhetens
säkerhet och förklarar garantin ogiltig om service
eller reparationer utförs av en icke-auktoriserad
tredjepart eller om reservdelar som inte är original
används.
%!(%
original, que lo protege de daños durante el transporte.
Si consiglia di spedire il prodotto nel suo imballo
LJ*
durante la spedizione.
Produkten transporteras bäst i originalförpackningen. Den skyddar produkten mot skador under
transporten.
impie, desinfecte y esterilice el producto
y todos los accesorios como se describe en las
instrucciones de empleo antes de mandarlos.
Prima della spedizione pulire, disinfettare
e sterilizzare il prodotto e tutti gli accessori
attenendosi alle descrizioni fornite nelle istruzioni
per l'uso.
Rengör, desinficera och sterilisera
produkten och alla tillbehör enligt beskrivningarna
i bruksanvisningen innan du skickar iväg dem.
Cuando envíe el producto directamente al centro
de reparación autorizado de EMS, incluya el
((L"!Y
proceso.
Quando si spedisce il prodotto direttamente ad un
centro di assistenza EMS approvato, includere il
L>"!#*
il processo.
Ange återförsäljarens namn om du skickar
produkten direkt till ett godkänt EMS-reparationscenter. Detta underlättar hanteringen.
101
fg
fg
fg
Manufacturer’s logo
(J
Herstellerlogo
Caution! Read the operation instructions
Attention! Veuillez lire le mode d’emploi
Achtung! Siehe Bedienungsanleitung
Manufacturer
Fabricant
Hersteller
Applied part, type BF
JQ'Z
Anwendungsteil Typ BF
Degree of protection against water permeability
;Q!!QQ
Schutzgrad gegen Wasserdurchlässigkeit
CE marking: refers to directive 93/42 EEC, including EN 60601-1 and EN 60601-1-2
=J!Q>´*!¦£¾³>~'!&©¥©¥««&©¥©¥««³
CE-Kennzeichen: Bezieht sich auf die Richtlinie 93/42 EWG, einschließlich EN 60601-1 und EN 60601-1-2
Disposal of old electrical & electronic equipment (applicable in the European Union and other European countries with
separate collection systems)
HQ!JQ!J":!(')Q
U'Q'!!Q!<
Entsorgung von Abfall aus elektrischen und elektronischen Geräten (für die Europäische Union und andere europäische
#'<
102
SÍMBOLOS
SIMBOLI
fg(
(!
L
Tillverkarens logotyp
!!!!
,,@
G(
Fabricante
Produttore
Tillverkare
Componente aplicado de tipo BF
Parte applicata, tipo BF
Patientansluten del, typ BF
Grado de protección frente a la penetración de agua
,!(*@!J
Skydd mot vattengenomtränglighet
=!>´"!¦£¾³>~!&©¥©¥««'&©¥©¥««³
Marchio CE: si riferisce alla direttiva 93/42 EEC, inclusa la EN 60601-1 e EN 60601-1-2
CE-märkning: hänvisar till direktiv 93/42 EEG, inklusive SS-EN 60601-1 och SS-EN 60601-1-2
!Q!!'!!:!()'
con sistemas de recogida selectiva)
Smaltimento di apparecchiature elettriche ed elettroniche in disuso (applicabile all'Unione Europea e ad altri paesi con
sistemi di raccolta differenziati)
Kassering av gammal elektrisk och elektronisk utrustning (gäller i EU och andra europeiska länder med system för
separat avfallsinsamling)
103
Power switch "ON"
QQ/&/
Hauptschalter „EIN“
Power switch "OFF"
QQ//
Hauptschalter „AUS“
Input
Q
Eingang
Output
Sortie
Ausgang
Footpedal connection
>UQ!
Anschluss Fußschalter
>+}#/>/"!!!!}#>/)+/!
conformance with US standards
=J>+!"!/>/!U!/)+/
conforme US
],!#>+",À>¼{!#À)+¼{
mit US-Normen
Irrigation
Irrigation
Spülung
Without irrigation
Sans irrigation
Ohne Spülung
104
Interruptor de alimentación encendido (ON)
Interruttore di accensione
På-knapp
Interruptor de alimentación apagado (OFF)
Interruttore di spegnimento
Av-knapp
Entrada
Ingresso
Ingång
Salida
Uscita
Utgång
Conexión para el pedal
Connessione della pedaliera
Fotpedalsanslutning
=!>+!"!!/>/!!!!'/)+/!
conformes con las estadounidenses
=!#>+!@"!,/>/!*!!/)+/
conformi agli standard statunitensi.
CSA-märkning med koden ”C” för produkter som överensstämmer med kanadensisk standard och ”US” för produkter
som överensstämmer med USA-standard
Irrigación
Irrigazione
Spolning
Sin irrigación
Senza irrigazione
Utan spolning
105
Fuse
Fusible
Sicherung
Serial number
&QQ
Seriennummer
Catalogue number
&QQQ!
Katalognummer
Perio
Standard
106
"PERIO" function
Fonction "PERIO"
„PERIO“-Funktion
"STANDARD" function
Fonction "STANDARD"
„STANDARD“-Funktion
Power
"Power" adjustment function
Fonction d'ajustement "Power"
,
Liquid
/J/%!
!@%/J/
Funktion zur Flüssigkeitseinstellung
Fusible
Fusibile
Säkring
Número de serie
Numero di serie
Serienummer
Número de catálogo
Numero di catalogo
Katalognummer
Perio
Standard
Función "PERIO"
Funzione "PERIO"
PERIO-funktion
Función "STANDARD"
Funzione "STANDARD"
STANDARD-funktion
Power
Función de ajuste "Power"
Funzione di regolazione della "Potenza"
Effektinställning
Liquid
!%/J/
,,/J/
Vätskeinställning
107
Max
Maximum setting
QU
Min
=U
Minimum setting
Q
=
PURGE
Purge switch
Bouton de purge
Spülfunktionsschalter
Cleaning
"Cleaning" mode
Mode "Cleaning"
Reinigungsmodus
+H}#>"!Z'(!!!}#
+H}#>"!Z'(!!!}#
+H\",,Z#${!#+
108
Max
Ajuste máximo
Impostazione massima
Maxinställning
Min
Ajuste mínimo
Impostazione minima
Minimiinställning
PURGE
Interruptor de purga
Interruttore di spurgo
Tömningsomkopplare
Cleaning
Modo "Cleaning"
=*/,/
Cleaning-läge (rengöringsläge)
=!+H!>"!!!!!
=!#+H!,@!"!,!*!
+H!"$#'
109
TECHNICAL DATA
CARACTÉRISTIQUES TECHNIQUES
DESCRIPTION
DESCRIPTION
Manufacturer
=+>H=;>++H=++~
CH-1260 Nyon, Switzerland
Fabriquant
=+>H=;>++H=++~
CH-1260 Nyon, Suisse
Model
=+H\&®
Modèle
=+HPIEZON®
>"!&©¥©¥««
- Class I
- Applied part, Type BF
- IP 20 unit
- IP X1, footpedal
>"!&©¥©¥««
- Classe I
JQH'Z
- IP 20 appareil
«~Q!
>"!¦£¾³>
Class IIa
>"!¦£¾³>
Classe IIa
Operating mode
with irrigation:
without irrigation:
Supply voltage
Continuous operation
;'!'!«¥¤
10 min. maximum
100-240 VAC 50-60Hz
Power consumption
max. 110 VA
Fuses
T 2.5 A 250 VAC (Ø5 X 20 mm, time lag)
Water supply
1 to 5 Bar (100 to 500 kPa)
Compressed air supply
5.5 to 7.5 Bar (550 to 750 kPa)
Mode de fonctionnement
avec irrigation:
sans irrigation:
Service continu
HU«¥¤
10 minutes maximum
Tension d'alimentation
100-240 VAC 50-60Hz
Puissance nominale
max. 110 VA
Fusibles
H³~ª³ª¥G>:êU³¥~Q<
Alimentation en eau
«*ªZ:«¥¥*ª¥¥<
!Q
ª~ª*Ä~ªZ:ªª¥*Ī¥<
+Q!"!
Puissance maximum:
QJ!´
12 Watts
24-32 kHz
)!"!
Maximum output:
Frequency range:
12 Watts
24-32 kHz
Weight (approx.)
4.5 kg
Poids (approx.)
4,5 kg
Dimensions in mm (HxWxD)
225 x 280 x 295
;:`UU<
225 x 280 x 295
Operating conditions
+10 °C to +40 °C
£¥¤Äª¤#'
Conditions de fonctionnement
±«¥·>*±¾¥·>
£¥¤Äª¤#Q
Storage and
transport conditions
-10 °C to +40 °C
«¥¤¦ª¤#'
500 hPa to 1060 hPa air pressure
Conditions de stockage
et de transport
«¥·>*±¾¥·>
«¥¤*¦ª¤#Q
Lª¥¥#*«¥©¥#
110
TECHNISCHE DATEN
ESPECIFICACIONES TÉCNICAS
BESCHREIBUNG
DESCRIPCIÓN
Hersteller
=+>H=;>++H=++~
CH-1260 Nyon, Schweiz
Fabricante
=+>H=;>++H=++~
CH-1260 Nyon, Suiza
Modell
=+H\&®
Modelo
=+H\&®
]"&©¥©¥««
- Klasse I
- Anwendungsteil Typ BF
- IP 20 für das Gerät
- IP X1 für den Fußschalter
>"!!&©¥©¥««
- Clase I
- Componente aplicado de tipo BF
- IP 20, aparato
- IP X1, pedal
]"¦£¾³
Klasse IIa
>"!!¦£¾³>
Clase IIa
Modus
Mit Flüssigkeit:
Ohne Flüssigkeit:
Dauerbetrieb
(,'«¥¤}#
max. 10 Min.
Modo de funcionamiento
Con irrigación:
Sin irrigación:
Funcionamiento continuo
>!(%«¥¤
10 min. máximo
Versorgungsspannung
100-240 VAC 50-60Hz
Tensión de red
100-240 Vca 50-60 Hz
#
max. 110 VA
Consumo de corriente
máx. 110 VA
Sicherungen
T 2,5 A 250 V AC (Ø 5 X 20 mm, träge)
Fusibles
T 2,5 A 250 Vca (Ø 5 X 20 mm, con retardo)
Wasserdruck
1 bis 5 bar (100 bis 500 kPa)
Suministro de agua
De 1 a 5 bar (de 100 a 500 kPa)
!
5,5 bis 7,5 bar (550 bis 750 kPa)
Suministro de aire comprimido
De 5,5 a 7,5 bar (de 550 a 750 kPa)
)!#+,"
Maximale Ausgangsleistung:
Frequenzbereich:
12 Watt
24-32 kHz
!"!!
Potencia máxima:
Intervalo de frecuencias:
12 vatios
24-32 kHz
Gewicht
ca. 4,5 kg
Peso (aprox.)
4,5 kg
Abmessungen in mm (HxBxT)
225 x 280 x 295
Dimensiones en mm (Al x An x P)
225 x 280 x 295
Betriebsbedingungen
+10 °C bis +40 °C
£¥¤(Ī¤L!#
Condiciones de funcionamiento
De +10 °C a +40 °C
£¥Äª¤#
Transportbedingungen
-10 °C bis +40 °C
«¥¤(¦ª¤L!#
!ª¥¥#(«¥©¥#
Condiciones de
almacenamiento y transporte
De -10 °C a +40 °C
«¥¦ª¤#
ª¥¥#«¥©¥#Q!
111
DATI TECNICI
TEKNISKA DATA
DESCRIZIONE
BESKRIVNING
Produttore
=+>H=;>++H=++~
CH-1260 Nyon, Svizzera
Tillverkare
=+>H=;>++H=++~
CH-1260 Nyon, Schweiz
Modello
=+H\&®
Modell
=+H\&®
>"!,&©¥©¥««
- Classe I
- Parte applicata, tipo BF
³¥~*
- IP X1, pedaliera
]"!&©¥©¥««
- Klass I
- Patientansluten del, typ BF
- IP 20, enhet
- IP X1, fotpedal
>"!,¦£¾³>
Classe IIa
]"!¦£¾³
Klass IIa
=*
con irrigazione:
senza irrigazione:
Funzionamento continuato
>!«¥¤
un massimo di 10 min.
Driftsläge
med spolning:
utan spolning:
Kontinuerlig drift
;!'«¥¤
högst 10 minuter
Tensione di alimentazione
100 - 240 V a.c. / 50-60Hz
Matningsspänning
«¥¥³¾¥G>ª¥©¥`,
Consumo corrente
max. 110 VA
Strömförbrukning
max 110 VA
Fusibili
T 2,5 A 250 VAC (Ø5 X 20 mm, ritardo di
tempo)
Säkringar
T 2,5 A 250 V AC (Ø5 X 20 mm,
tidsfördröjning)
Alimentazione idrica
da 1 a 5 Bar (da 100 a 500 kPa)
Vattentillförsel
1 till 5 bar (100 till 500 kPa)
Alimentazione di aria compressa
da 5,5 a 7,5 Bar (da 550 a 750 kPa)
Tryckluftstillförsel
5,5 till 7,5 bar (550 till 750 kPa)
+!"!#
Uscita max.:
Intervallo di frequenza:
12 Watt
24-32 kHz
)%!"
Maximal uteffekt:
Frekvensområde:
12 W
³¾£³`,
Peso (approssimativo)
4,5 kg
Vikt (cirka)
4,5 kg
;:UU<
225 x 280 x 295
Mått i mm (H x B x D)
225 x 280 x 295
Condizioni operative
Da +10 °C a +40 °C
£¥¤Äª¤*
Driftsförhållanden
+10 °C till +40 °C
£¥¤Äª¤#
Condizioni di
trasporto e di stoccaggio
Da -10 °C a +40 °C
«¥¤¦ª¤*
da 500 hPa a1060 hPa di pressione dell'aria
Förvarings- och
transportförhållanden
-10 °C till +40 °C
«¥¤¦ª¤#
500 hPa till 1 060 hPa lufttryck
112
113
ELECTROMAGNETIC
gf
COMPATIBILITÉ
ÉLECTROMAGNÉTIQUE
ELEKTROMAGNETISCHE
VERTRÄGLICHKEIT
This product needs special precautions
regarding electromagnetic compatibility and needs
to be installed and put into service according to
the note "Electromagnetic compatibility".
>Q!Q!!!!!(QQ!QJLQ!
!/>(Q!QJ/L
Certain types of mobile telecommunication
equipment could potentially interfere with this
product. The separation distances recommended
in the note "Electromagnetic compatibility" must
be taken into account.
Certains types d’appareils mobiles de
QQ!!!(Q
!!L!Q
!Q!/>(Q
!QJ/!QL
Für das Gerät sind besondere Vorsichtsmaßnahmen hinsichtlich der elektromagnetischen
Kompatibilität zu beachten. Die Installation und
Inbetriebnahme des Geräts muss gemäß der
Hinweise zur elektromagnetischen Kompatibilität erfolgen.
This product should not be used adjacent to
or stacked with another unit. If adjacent or stacked
use is necessary, this product should be observed
'#!"
which it will be used.
> Q *
UQQ!
L+!!"QQ~
Q@Q"(
fonctionnement dans les conditions d’utilisation.
The use of accessories and cables
other than those specified or sold by EMS as
replacement parts may result in increased
emissions or decreased immunity of this product.
!!!¡(
J!UQ!"Q=+
comme pièces de remplacement peut avoir
! !QJ! QQ!
produit.
114
Bestimmte Arten mobiler Telekommunikationsgeräte können die Funktion des Produkts
beeinträchtigen. Die in den Hinweisen zur
elektromagnetischen Kompatibilität empfohlenen
räumlichen Entfernungen müssen eingehalten
werden.
Das Produkt darf nicht unmittelbar neben
bzw. auf oder über einem anderen Gerät aufgestellt werden. Falls ein Aufbau in unmittelbarer
Nähe bzw. auf oder unter einem anderen Gerät
unvermeidbar ist, muss die Funktionsweise des
Geräts in der entsprechenden Konfiguration
geprüft werden.
Die Verwendung von Zubehör und Kabeln,
die nicht von EMS als Ersatzteile angegeben
oder vertrieben werden, kann eine Erhöhung
der Emissionen oder eine Verminderung der
Immunität des Produkts zur Folge haben.
COMPATIBILIDAD
ELECTROMAGNÉTICA
COMPATIBILITÀ
ELETTROMAGNETICA
ELEKTROMAGNETISK
KOMPATIBILITET
Este producto requiere precauciones
especiales referentes a la compatibilidad electroQ!~'('!namiento conforme a la nota sobre "Compatibi!Q!/L
Questo prodotto richiede precauzioni
!!(*!
,!*
/>(*!/L
Denna produkt kräver särskilda försiktighetsåtgärder vad gäller elektromagnetisk kompatibilitet och måste installeras och driftsättas i
enlighet med anvisningarna i dokumentet ”Electromagnetic compatibility”.
Ciertos tipos de equipos de telecomunicaciones móviles podrían interferir con este
producto. Deben tenerse en cuenta las distancias
de separación recomendadas en la nota sobre
/>(!Q!/L
Certi tipi di apparecchiature di
telecomunicazione mobile potrebbero potenzialmente interferire con questo prodotto. Tenere in
considerazione le distanze di separazione consi/>(*!/L
Vissa typer av mobil kommunikationsutrustning kan störa produkten. Följ rekommendationerna om avstånd som anges i dokumentet
”Electromagnetic compatibility”.
Este producto no debe utilizarse al lado
de o apilado sobre otro aparato. Si es necesario
utilizarlo de este modo, deberá observarse para
"!J!!!"guración en que se vaya a utilizar.
Questo prodotto non va utilizzato accanto
@*L+!
,,!!*~
tenere sotto osservazione questo prodotto per
"!!,!",!*L
Produkten får inte användas bredvid eller
staplad tillsammans med en annan enhet. Om
enheten måste användas bredvid eller staplad
tillsammans med en annan enhet måste man
noga kontrollera att den fungerar som avsett i den
"L
El uso de accesorios y cables distintos a los
!"!!!,=+!
piezas de repuesto podría aumentar las emisiones
o disminuir la inmunidad de este producto.
@,, !! ! J!"!=+!
ricambio può causare un aumento di emissioni o
*JL
Om andra tillbehör eller kablar än sådana
som specificeras eller säljs av EMS används
som ersättningsdelar kan detta resultera i
ökad utstrålning eller försämrad immunitet hos
produkten.
115
TROUBLESHOOTING
Symptom
#$
The unit does not start or stop
Check the electrical connections and power supply at the mains
Check the fuses on back panel
>#!}!#!´;((%}
The unit is in "standby" mode, tap on any sensitive zone to exit standby
Send the unit to an authorized EMS Repair Center
The foot pedal does not activate the unit
Check that the foot pedal is properly connected
Replace the foot pedal
Send the unit to an authorized EMS Repair Center
The unit is still activated when the foot
pedal is released
The foot pedal is active, check for jam at foot pedal
The switch in the pedal is blocked. Turn the unit off at the power switch
Replace the foot pedal
Send the unit to an authorized EMS Repair Center
User interface displays an error: there
!!;
blinking
Powder chamber pressure is too low or too high
The air or liquid regulator is switched off
Foot pedal and purge commands are not recognized by system. Check connections
The handpiece does not remain on the
magnetic support
Install the magnetic support on a metallic part of the unit
The support is demagnetized
Replace magnetic support
The handpiece does not hold on the
handpiece cord
Check for presence of the O-ring seal and replace if necessary
Replace the handpiece
Replace the handpiece cord
Send the handpiece and the handpiece cord to an authorized EMS Repair Center
&!"!
power
Make sure that the Piezon instrument is correctly tightened
Check the wear of the instrument and replace it if necessary
Check the connections between the unit, the handpiece cord and the handpiece
Dry the connectors of the handpiece cord and of the handpiece
Check the connection of the foot pedal
Check the settings and the working mode
Check that when the handpiece is lifted from its support, the control lamps of the bottle holder are turned on; if it is not the
case, send the handpiece to an approved EMS repair center
Replace the handpiece cord and/or the handpiece
Send the unit to an approved EMS repair center
Replace the light guide
"!###!
116
Cont. next page
No water jet coming from the Piezon
handpiece
>#!#}'}"
Check the water adjustment of your unit
Check the connections between the unit, the cord and the handpiece
Check for presence of water at the cord outlet port
Send the handpiece to an authorized EMS Repair Center
No powder/air jet coming from the
handpiece
>#!#!'"
Check for presence of powder/air at cord outlet port
Eliminate residual powder present in the channels using the cleaning needles provided
Check the quantity of powder in your unit
Send the system to an authorized EMS Repair Center
Water leakage between the handpiece
cord and the handpiece
Check the condition of the handpiece connecting O-rings
Send the system and the handpiece cord to an authorized EMS Repair Center
(}#
handpiece and the nozzle
Verify the position of the nozzle and its position on the handpiece
Verify that no dirt remains between the nozzle and the handpiece
G'##!#"U#,,L
Replace the nozzle
Replace the handpiece
+#'##!!!"=+>
Air and powder leakage on the main unit
Verify the positioning of the bottles
Check the O-rings under the silicone caps of the powder chamber holders
Verify the cap of the powder chamber and the O-ring positioning
Verify the check valve and the O-ring under the powder chamber
Remove all powder dust between the bottle holder and the powder chamber
Send the unit to an authorized EMS Repair Center
Air and powder is leaking at powder
chamber
Check the seal condition and the cleanliness of the thread of the powder chamber cap
Replace the seals if necessary
Clean the sealing surfaces carefully
Replace the powder chambers
Send the unit to an authorized EMS Repair Center
Handpiece "!!'!
Verify the quantity of powder in your unit
Eliminate residual powder present in the channels using a cleaning needle
+#'##!!!"=+>
#}'
Check the water supply connection and inlet pressure
Send the unit to an authorized EMS Repair Center
117
MESURES À PRENDRE EN CAS D'INCIDENT
2
#$
@@~@Q
GQ"!UQ!J
GQ"(*@@
'@!´;(,Q
@/('/~',!!
'@*!QQQ=+
Q!@
GQ"JQ!(!!Q
!Q!
'@*!QQQ=+
!!J
Q¡!#Q
Q!~Q"@!!Q
!!Q(JQL!@!
!Q
'@*!QQQ=+
!@"!#
erreur: Il y a un signal acoustique, les
;!
@!#(*(
Q@JQ
Q!@QQ!'L>!!
!*
QJ
QJ
QQQ
!QJ
!*!
GQ"Q!%'!Q!
!!*
Remplacer le cordon
'!*!!*!QQ=+
Pas de vibrations ultrasoniques ou
!"
>J,!!Q
>!Q!
>!U~!!*!*
+Q!#!!!!*!*
>!UQ!
>Q!
GQ"JJ!*Q~'U(QÆ
!!~'!**!QQQ=+
!!!*!*
'*!QQQ=+
Remplacer le guide lumière
!!*,
"
118
Suite page suivante
!%!*
>Q@"*
>Q@
>!U@~!!*
>Q!@*!!*
''*!QQQ=+
Aucun jet de poudre/air ne sort de la pièce
*
>@!Q"*
>Q!*!
QQ!U'
>JQ
''*!QQQ=+
!!*
!*
>Q%!!!*
''!!**!QQQ=+
(!*
(!(!*
GQ"J!Q!!(!*
>J@!@!#"U(
Changer la busette
>#!*
'!**!QQQ=+
Fuite d’air et de poudre au niveau de
l’appareil
>(
GQ"%!!#!!#(*
GQ"(!#!#(%
GQ"!%*
Q!#(*
'*!QQQ=+
;@@Q!#
!#(*
GQ"@Q%Q"!!#!#(*
!%Q!
Nettoyer soigneusement les surfaces des joints
!!#(*
'@*!QQQ=+
@"!!Q!*
GQ"JQ
Q!U'
''!!**!QQQ=+
*@@
>!U@@@Q
'@*!QQQ=+
119
FEHLERBEHEBUNG
/-#
7$!
Gerät lässt sich nicht ein- bzw.
ausschalten
Prüfen Sie Netzkabel, Anschlüsse und Stromversorgung
Prüfen Sie die Sicherungen auf der Rückseite des Geräts
{+`!#´(,}L}#(!#{(L;!#
L("!#À+('¼=´Z{#+Z~À+('¼=,(
Senden Sie das Gerät an ein von EMS autorisiertes Reparaturzentrum
Keine Aktivierung des Geräts
über den Fußschalter
Prüfen Sie den ordnungsgemäßen Anschluss des Fußschalters
Ersetzen Sie den Fußschalter
Senden Sie das Gerät an ein von EMS autorisiertes Reparaturzentrum
!#$
Fußschalters weiterhin in
Betrieb
Der Fußschalter ist aktiviert: Prüfen Sie ob er verklemmt ist
Der Schalter des Fußschalters ist blockiert: Schalten Sie das Gerät mit dem Hauptschalter aus
Ersetzen Sie den Fußschalter
Senden Sie das Gerät an ein von EMS autorisiertes Reparaturzentrum
Fehlermeldung der Benut,(!#´H
Z;
Zu niedriger oder zu hoher Druck in der Pulverkammer
{!#
Fußschalter und Spülbefehle werden vom System nicht erkannt: Prüfen Sie die Anschlüsse
Das Handstück löst sich aus
der magnetischen Halterung
Bringen Sie die magnetische Halterung auf einem Metallteil des Geräts an
Die Halterung ist nicht mehr magnetisch
Ersetzen Sie die magnetische Halterung
Das Handstück bleibt nicht auf
dem Handstückschlauch
Prüfen Sie den O-Ring und ersetzen Sie ihn gegebenenfalls
Ersetzen Sie das Handstück
Ersetzen Sie den Handstückschlauch
Senden Sie das Handstück und den Handstückschlauch an ein von EMS autorisiertes Reparaturzentrum
Keine Ultraschallschwingung
(,}L,!#
Stellen Sie sicher, dass das Piezon-Instrument fest angeschlossen ist
Prüfen Sie den Verschleiß des Instruments und ersetzen Sie es gegebenenfalls
Prüfen Sie die Verbindungen zwischen dem Gerät, dem Handstückschlauch und dem Handstück
Trocknen Sie die Anschlussstücke des Handstückschlauchs und des Handstücks
Überprüfen Sie die Verbindung zum Fußschalter
Prüfen Sie die Einstellungen und den Arbeitsmodus
Ç({+~(]!##!#~}`{!`}L
dies nicht der Fall ist, senden Sie das Handstück an ein von EMS autorisiertes Reparaturzentrum
Ersetzen Sie das den Handstückschlauch und/oder das Handstück
Senden Sie das Gerät an ein von EMS autorisiertes Reparaturzentrum
,+!#
Unzureichende Beleuchtung
des Handstücks
120
Fortsetzung nächste Seite
Kein Wasserstrahl aus dem
Piezon-Handstück
Prüfen Sie Wasserversorgung und Wasserdruck
{+},"!#
Prüfen Sie die Verbindungen zwischen dem Gerät, dem Handstückschlauch und dem Handstück
Sehen Sie nach, ob Wasser am Ausgang des Schlauchs austritt
Senden Sie das Handstück an ein von EMS autorisiertes Reparaturzentrum
]
(,}L
`{!
{+!"
+#+!#~(+!#!#
+{(!#{
Prüfen Sie den Pulvervorrat im Gerät
Senden Sie das System an ein von EMS autorisiertes Reparaturzentrum
Wasseraustritt zwischen
Handstückschlauch und
Handstück
Prüfen Sie den Zustand der O-Ringe am Übergang des Handstücks
Senden Sie das System und den Handstückschlauch an ein von EMS autorisiertes Reparaturzentrum
Wasseraustritt zwischen
`{!
Düse
Prüfen Sie die Position der Düse und die Befestigung am Handstück
Entfernen Sie eventuelle Verschmutzungen zwischen Düse und Handstück
Prüfen Sie, ob die Düse gerade aufgesetzt ist und stellen Sie sicher, dass die korrekte Befestigung der Düse nicht beeinträchtigt ist
Ersetzen Sie die Düse
Ersetzen Sie das Handstück
Senden Sie das System und den Handstückschlauch an ein von EMS autorisiertes Reparaturzentrum
Gerät
Prüfen Sie die Position der Flaschen
Prüfen Sie die O-Ringe unter den Silikonkappen der Pulverkammerhalter
Prüfen Sie den Verschluss der Pulverkammer und die Position der O-Ringe
Prüfen Sie das Kontrollventil und den O-Ring unter der Pulverkammer
Entfernen Sie Pulverrückstände zwischen Flaschenhalter und Pulverkammer
Senden Sie das Gerät an ein von EMS autorisiertes Reparaturzentrum
Pulverkammer
Prüfen Sie den Zustand der Dichtung und entfernen Sie eventuelle Verunreinigungen des Gewindes am Schraubverschluss der Pulverkammer
Ersetzen Sie bei Bedarf die Dichtungen
+(!#;!#
Ersetzen Sie die Pulverkammern
Senden Sie das Gerät an ein von EMS autorisiertes Reparaturzentrum
G#
`{!
Prüfen Sie den Pulvervorrat im Gerät
+{(!#{
Senden Sie das System und den Handstückschlauch an ein von EMS autorisiertes Reparaturzentrum
Wasseraustritt im Bereich der
Wasserversorgung des Geräts
Prüfen Sie den Anschluss an die Wasserversorgung und den Eingangsdruck
Senden Sie das Gerät an ein von EMS autorisiertes Reparaturzentrum
121
SOLUCIÓN DE PROBLEMAS
"#
#$.
El aparato no se pone en marcha o no se
para
>(!UQ!!'!
Compruebe los fusibles en el panel trasero
>(J!´(;!,%'
trabajo
El aparato está en el modo "standby", toque la zona sensible para salir de este modo
Envíe el aparato a un centro de reparación autorizado de EMS
El pedal no activa el aparato
Compruebe que el pedal está conectado correctamente
Cambie el pedal
Envíe el aparato a un centro de reparación autorizado de EMS
El aparato sigue activado al soltar el pedal
El pedal está activo, compruebe que no está atascado
El interruptor del pedal está bloqueado. Apague el aparato con el interruptor de alimentación
Cambie el pedal
Envíe el aparato a un centro de reparación autorizado de EMS
,´
'!!';
parpadean
!Y(%
El regulador de aire o de líquido está apagado
El sistema no reconoce los comandos del pedal ni de purga. Compruebe las conexiones
El mango no se sujeta en el soporte
Q!
>JQ!Y!
El soporte se ha desmagnetizado
>(Q!
El mango no se sujeta al cable
Compruebe que hay una junta tórica y cámbiela si fuera necesario
Cambie el mango
Cambie el cable del mango
Envíe el mango y su cable a un centro de reparación autorizado de EMS
No hay vibraciones ultrasónicas o la potencia
"!
J,Q(%
Compruebe el desgaste del instrumento y cámbielo si fuera necesario
Compruebe las conexiones entre el aparato, el cable del mango y el mango
Seque los conectores del cable del mango y del propio mango
Compruebe la conexión del pedal
Compruebe los ajustes y el modo de trabajo
Compruebe que al levantar el mango de su soporte se encienden los pilotos indicadores del soporte de la botella; si no es
así, envíe el mango a un centro de reparación autorizado de EMS
Sustituya el cable del mango y/o el mango
Envíe el aparato a un centro de reparación autorizado de EMS
Sustituya la guía de luz
!"!
122
Continúa en la página siguiente
No sale chorro de agua del mango Piezon
>('"
Compruebe el ajuste del agua del aparato
Compruebe las conexiones entre el aparato, el cable y el mango
Compruebe que hay agua en la salida del cable
Envíe el mango a un centro de reparación autorizado de EMS
No sale chorro de polvo/aire del mango
>(!'"
Compruebe que hay polvo/aire en la salida del cable
Elimine el polvo residual presente en los canales con las agujas de limpieza suministradas
Compruebe la cantidad de polvo que tiene el aparato
Envíe el sistema a un centro de reparación autorizado de EMS
Fuga de agua entre el cable del mango y
el mango
Compruebe el estado de las juntas tóricas de conexión del mango
Envíe el sistema y el cable del mango a un centro de reparación autorizado de EMS
y la boquilla
G"J!!!(J'!
G"JJ#'!(J'
G"JJ!!"%!(J
Cambie la boquilla
Cambie el mango
Envíe el sistema y el cable del mango a un centro de reparación autorizado de EMS
Fuga de aire y polvo en el propio aparato
G"J!!!(
Compruebe las juntas tóricas debajo de las tapas de silicona de los soportes de las cámaras de polvo
G"J!Y'!!!%!
G"JY!'%!(%!Y
Elimine todo el polvo entre el soporte de la botella y la cámara de polvo
Envíe el aparato a un centro de reparación autorizado de EMS
Hay un escape de aire y polvo en la cámara
de polvo
Compruebe el estado de las juntas y la limpieza de las roscas de la tapa de la cámara de polvo
Cambie las juntas si fuera necesario
"!!!!
Cambie las cámaras de polvo
Envíe el aparato a un centro de reparación autorizado de EMS
;'"!!
Compruebe la cantidad de polvo que tiene el aparato
Elimine el polvo residual presente en los canales con una aguja de limpieza
Envíe el sistema y el cable del mango a un centro de reparación autorizado de EMS
Fuga en el suministro de agua del aparato
Compruebe la conexión del suministro de agua y la presión de entrada
Envíe el aparato a un centro de reparación autorizado de EMS
123
INDIVIDUAZIONE E RISOLUZIONE DEI PROBLEMI
#$
@*
Controllare le connessioni elettriche e l'alimentazione di rete
Controllare i fusibili sul pannello posteriore
>,@!´;(*,
operative
@**('~!!J,(!('
@*!,=+,,
@*
Controllare che la pedaliera sia correttamente connessa
Sostituire la pedaliera
@*!,=+,,
@*!#J
pedaliera viene rilasciata
~"!!
@(!!L+@,!@,L
Sostituire la pedaliera
@*!,=+,,
@!!,,´
!!;
lampeggianti
!(
Il regolatore dell'aria o del liquido è spento
I comando della pedaliera e di spurgo non sono riconosciuti dal sistema. Controllare le connessioni
Il manipolo non rimane sul supporto
magnetico
!!@*
Il supporto è smagnetizzato
Sostituire il supporto magnetico
Il manipolo non è sostenuto dal cavo
Controllare la presenza dell'anello di tenuta e sostituirlo se necessario
Sostituire il manipolo
Sostituire il cavo del manipolo
Inviare il manipolo ed il relativo cavo ad un centro di assistenza EMS autorizzato
Mancanza di oscillazioni degli ultrasuoni o
,"!L
G"!!#,"L
Controllare l'usura dello strumento e sostituirlo se necessario.
>!@*~!L
Asciugare i connettori del cavo del manipolo e il manipolo.
Controllare la connessione della pedaliera
>,*
>!#J~!!!!Æ
sono, spedire il manipolo ad un centro assistenza approvato EMS.
Sostituire il cavo del manipolo e/o il manipolo.
@*!,=+
Sostituire la guida della luce
,"!
124
Continua alla pagina seguente
Dal manipolo Piezon non fuoriesce il getto
d'acqua
>@,@!J"@!J
>,@!J@*
>!@*~!L
Controllare la presenza di acqua alla porta di uscita del cavo
Inviare il manipolo ad un centro di assistenza EMS autorizzato
Assenza del getto di polvere/aria proveniente dal manipolo
>@,!"@
Controllare la presenza di polvere/aria alla porta di uscita del cavo
Eliminare la polvere residua nei canali usando l'ago di pulizia in dotazione
>J*@*
Inviare il sistema ad un centro di assistenza EMS autorizzato
Perdita di acqua fra il cavo del manipolo
ed il manipolo
Controllare la condizione degli anelli di tenuta di connessione del manipolo
Inviare il sistema ed il relativo cavo del manipolo ad un centro di assistenza EMS autorizzato
Perdita d'acqua fra il manipolo PERIO
@
G"!,@,
G"!!#!!!@
G"!!#!#!@!"@
Sostituire l'ugello
Sostituire il manipolo
!!,=+!"!
@*
principale
G"!,!
Controllare gli anelli di tenuta sotto ai tappi di silicone dei supporti della camera della polvere
G"!!,@
G"!!@!
H!!!!
@*!,=+,,
Perdita di aria e polvere sulla camera della
polvere
>!,,,"!L
Sostituire le guarnizioni se necessario
!!"!
Sostituire le camere della polvere
@*!,=+,,
@"!,
diminuisce
>J*@*
Eliminare la polvere residua nei canali usando un ago di pulizia
!!,=+!"!
Perdita nell'alimentazione dell'acqua
@*
Controllare la connessione dell'alimentazione dell'acqua e la pressione di ingresso
@*!,=+,,
125
FELSÖKNING
Symtom
7!
Enheten startar eller stannar inte
Kontrollera elanslutningarna och nätströmmen.
Kontrolera säkringarna på baksidan.
Kontrollera huvudströmbrytaren: minst en lampa ska lysa i inställnings- och driftslägesområdet.
Enheten är i vänteläge, peka i en tryckkänslig zon för att gå ut ur vänteläget.
Skicka enheten till ett godkänt EMS-reparationscenter.
Fotpedalen aktiverar inte enheten
Kontrollera att fotpedalen är korrekt ansluten.
Byt ut fotpedalen.
Skicka enheten till ett godkänt EMS-reparationscenter.
Enheten är fortfarande aktiv när fotpedalen
släpps upp
Fotpedalen är aktiv, titta om något håller ned fotpedalen.
Brytaren i pedalen är blockerad. Stäng av enheten med huvudströmbrytaren.
Byt ut fotpedalen.
Skicka enheten till ett godkänt EMS-reparationscenter.
Ett fel visas på displayen: en ljudsignal hörs
och alla lampor blinkar
Trycket i pulverkammaren är för lågt eller för högt.
L
Systemet känner inte av kommandon från fotpedalen eller tömningsomkopplaren. Kontrollera anslutningarna.
Handstycket sitter inte kvar i den magnetiska hållaren
Installera hållaren på en metallyta på enheten.
Hållaren har avmagnetiserats.
Byt ut den magnetiska hållaren.
Handstycket sitter inte fast på slangen
Kontrollera O-ringstätningen och byt ut den vid behov.
Byt ut handstycket.
Byt ut handstyckets slang.
Skicka handstycket och sladden till ett godkänt EMS-reparationscenter.
Inga ultraljudssvängningar eller otillräcklig
effekt
Kontrollera att Piezon-spetsen är korrekt åtdragen.
Kontrollera om spetsen är sliten och byt vid behov ut den.
Kontrollera anslutningarna mellan enheten, handstyckets slang och handstycket.
Torka anslutningarna på handstycket och dess slang.
Kontrollera fotpedalens anslutning.
Kontrollera inställningarna och driftsläget.
]##'!#L+!#'!et till ett godkänt EMS-reparationscenter.
Byt ut handstycket och/eller slangen.
Skicka enheten till ett godkänt EMS-reparationscenter.
Byt ut ljusledaren.
Otillräckligt ljus i handstycket
126
Forts. på nästa sida
Ingen vattenstråle kommer från Piezonhandstycket
]$!#"L
Kontrollera enhetens vatteninställning.
Kontrollera anslutningarna mellan enheten, slangen och handstycket.
]"L
Skicka handstycket till ett godkänt EMS-reparationscenter.
Ingen pulver-/luftstråle kommer från
-handstycket
]'!$!#"L
]"L
Avlägsna pulverrester i kanalerna med hjälp av medföljande rengöringsnålar.
Kontrollera pulvermängden i enheten.
Skicka systemet till ett godkänt EMS-reparationscenter.
Va t t e n l ä c k a g e m e l l a n s l a n g e n o c h
handstycket
Kontrollera O-ringarna i handstyckets anslutning.
Skicka systemet och handstyckets sladd till ett godkänt EMS-reparationscenter.
G! handstycket och spetsen
Kontrollera spetsens position samt dess position i handstycket.
]"!##'!L
Kontrollera att inget påverkar spetsens placering eller hindrar den från att fästa korrekt.
Byt ut spetsen.
Byt ut handstycket.
+!'!##'!!"=+!L
!#!##
]!L
Kontrollera O-ringarna under silikonlocken på pulverkammarhållarna.
Kontrollera locket på pulverkammaren och O-ringens placering.
Kontrollera ventilen och O-ringen under pulverkammaren.
H(#!#L
Skicka enheten till ett godkänt EMS-reparationscenter.
!#!
Kontrollera att tätningen är i bra skick och att gängorna på pulverkammarlocket är rena.
Byt ut tätningarna vid behov.
Rengör tätningsytorna noga.
Byt ut pulverkamrarna.
Skicka enheten till ett godkänt EMS-reparationscenter.
handstyckets effektivitet minskar
Kontrollera pulvermängden i enheten.
Avlägsna pulverrester i kanalerna med hjälp av en rengöringsnål.
+!'!##'!!"=+!L
!#$
Kontrollera vattenanslutningen och inloppstrycket.
Skicka enheten till ett godkänt EMS-reparationscenter.
127
128
37 36 35
34
Cleaning
Standard
Perio
20 21 22 23 24
25 26
27 28
29
30
31
32
33
CANADA
EMS Canada Inc.
?
'
Tel. +1 514 736 5066
Fax +1 514 736 5065
e-mail: [email protected]
FRANCE
EMS France Sarl
@
>
G
Immeuble Santos Dumont, Bâtiment D
=<
/P
P
N
Fax +33 1 34 58 03 90
e-mail: [email protected]
GERMANY
EMS Electro Medical Systems GmbH
Schatzbogen 86
D-81829 München
Tel. +49 89 42 71 61 0
Fax +49 89 42 71 61 60
e-mail: [email protected]
:N@>
EMS Italia S.p.a
Via Faravelli 5
I-20149 Milano
Tel. +39 02 3453 8111
Fax +39 02 3453 2778
e-mail: [email protected]
SPAIN
P
>
Bernardino Obregón 14 bis
E-28012 Madrid
Tlf. +34 91 528 99 89
Fax +34 91 539 34 89
e-mail: [email protected]
USA
EMS Corporation
11886 Greenville Avenue #120
Dallas, TX 75243, USA
Tel. +1 972 690 83 82
Fax +1 972 690 89 81
e-mail: [email protected]
WWW.EMS-SWISSQUALITY.COM
ed. 2009/08
Ch. de la Vuarpillière 31
1260 Nyon
?:N}%>@~
Tel. +41 22 99 44 700
Fax +41 22 99 44 701
e-mail: [email protected]
FB-450/3
© Copyright EMS SA
EMS Electro Medical Systems SA