1
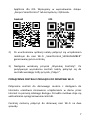
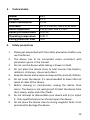
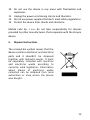
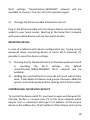
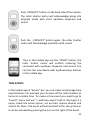
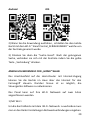
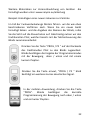
Zenpro SmartControl MODEL: ZSC1 PL - Instrukcja obsługi ENG - Manual DE - Anweisung 1 Spis treści 1. 2. 3. 4. 5. 6. 7. 8. Informacje ogólne Zawartość zestawu Dane techniczne Zasady bezpiecznego użytkowania Utylizacja Budowa urządzenia Użytkowanie Deklaracja CE 1. Informacje Ogólne 2 2 3 3 4 5 6 12 Centrala Zenpro SmartControl jest nowoczesnym sterownikiem pozwalającym kontrolować rolety oraz inne urządzenia działające w paśmie 433,92 MHz za pomocą urządzeń mobilnych oraz komputera. Centrala poszerza możliwości systemu o opcje grupowania urządzeń, dodaje obsługę zdarzeń czasowych i scen oraz umożliwia zdalną kontrolę przez sieć Internet. Dodatkowe materiały instruktażowe można znaleźć pod adresem: www.zenpro.pl/instrukcje 2. Zawartość zestawu - Centrala Zenpro SmartControl - Antena 433,92 MHz - Zasilacz 12 V DC - Przewód sieciowy - Instrukcja obsługi 2 3. Dane Techniczne Model Zasilanie centrali Pobór mocy Interfejsy Częstotliwość fal Podtrzymanie czasu Temperatura pracy Stopień ochrony obudowy 4. 1. 2. 3. 4. 5. 6. 7. ZSC1 DC 12 V 1,5 W Wi-Fi, Ethernet, ISM 433,92 MHz 433,84 MHz i 2,4 GHz Bateria CR1220 0-40 °C IP20 Zasady bezpiecznego użytkowania Przed rozpoczęciem użytkowania należy dokładnie zapoznać się z instrukcją. Urządzenie należy podłączyć do sieci zgodnej z parametrami podanymi w instrukcji. Nie należy korzystać z urządzenia podczas kąpieli lub pod prysznicem. Nie należy umieszczać urządzenia w pobliżu źródeł ciepła takich jak grzejniki, kominki, piece i inne. Urządzenie należy umieścić w miejscu niedostępnym dla dzieci. Urządzenia nie należy zakrywać. Zalecane jest pozostawienie 10cm wolnej przestrzeni po bokach urządzenia. Przed czyszczeniem lub konserwacją należy odłączyć urządzenie od sieci zasilającej. Urządzenie nie jest wodoszczelne, należy je chronić przed dostaniem się zanieczyszczeń, wilgoci, wody i innych płynów do środka. 3 8. 9. 10. 11. 12. 13. Nie należy rozkręcać urządzenia ani podejmować prób samodzielnych napraw. Naprawy mogą być przeprowadzane jedynie przez autoryzowany serwis lub producenta. Urządzenie nie może być umieszczone w pobliżu silnego pola magnetycznego, może ono doprowadzić do trwałego uszkodzenia urządzenia. Nie należy korzystać z urządzenia w obszarach zagrożonych wybuchem ani w innych miejscach, gdzie jest to zabronione. Podczas burzy należy urządzenie odłączyć od zasilania. Nie należy podłączać urządzenia do zasilacza nie spełniającego obowiązujących norm i wymogów bezpieczeństwa. Należy chronić urządzenie przed wibracjami i wstrząsami. Mobile Labs Sp. z o.o. nie ponosi odpowiedzialności za działanie akcesoriów innych producentów współpracujących z urządzeniem oraz za ich zgodność z normami bezpieczeństwa i innymi przepisami. 5. Utylizacja Niniejszy symbol oznacza, że po zakończeniu użytkowania urządzenie wraz z dołączonymi akcesoriami nie może być wyrzucane wraz z odpadami gospodarczymi. Urządzenia nie można wyrzucać z nieposortowanymi odpadami, lecz należy przekazać je do wyspecjalizowanego punktu recyklingu sprzętu elektrycznego i elektronicznego. 4 Przekazanie urządzenia po zakończeniu eksploatacji do wyspecjalizowanego punktu zbiórki umożliwi ponowne wykorzystanie surowców zastosowanych do produkcji i pomoże zachować zasoby naturalne naszego środowiska. Informacje o najbliższym punkcie zbiórki można uzyskać w miejscowym urzędzie lub punkcie, w którym urządzenie zostało nabyte. 6. Budowa urządzenia a) diody led na obudowie POWER – zapalona dioda sygnalizuje prawidłowe podpięcie urządzenia do zasilania STATUS – dioda statusowa zapala się w trakcie transmisji radiowej do urządzeń oraz potwierdza takie operacje, jak reset i ładowanie systemu LAN – dioda zapala się w momencie prawidłowego podpięcia przewodu sieciowego WI-FI – świecąca dioda symbolizuje aktywność interfejsu sieci bezprzewodowej 5 b) panel tylni 7. Użytkowanie PIERWSZE URUCHOMIENIE Po wyjęciu urządzenia z opakowania należy wyciągnąć z obudowy folię z napisem „PULL ME”, zabezpiecza ona baterię podtrzymującą czas. Następnie należy podłączyć zasilanie. Centrala przez około 60 sekund uruchamia się sygnalizując ten stan miganiem diody statusowej . W momencie kiedy dioda statusowa przestanie migać centrala jest gotowa do pracy. Centrala przy pierwszym uruchomieniu domyślnie udostępnia własną sieć Wi-Fi „SmartControl_SERIALNUMBER” (gdzie SERIALNUMBER to numer seryjny naszego urządzenia), do której należy połączyć się za pomocą urządzenia mobilnego. W tym celu należy wykonać następujące kroki: 1) Na urządzeniu mobilnym pobieramy aplikację Zenpro SmartControl ze sklepu Google Play dla platformy Android lub 6 AppStore dla iOS. Wpisujemy w wyszukiwarce sklepu: „Zenpro SmartControl” lub korzystamy z QR-kodu. Android iOS 2) Po uruchomieniu aplikacji należy połączyć się urządzeniem mobilnym do sieci Wi-Fi „SmartControl_SERIALNUMBER” generowanej przez centralę. 3) Następnie wciskamy przycisk „Wyszukaj Centralę”. Po pozytywnym wyszukaniu centrali należy połączyć się do centralki wciskając żółty przycisk „Połącz”. PODŁĄCZENIE CENTRALI STERUJĄCEJ DO DOMOWEJ Wi-Fi Połączenie centrali do domowego routera z dostępem do Internetu umożliwia sterowanie urządzeniami w domu przez Internet za pomocą zdalnego dostępu. Ponadto możliwe staje się uaktualniania oprogramowania centralki. Centralę możemy połączyć do domowej sieci Wi-Fi na dwa sposoby. 7 1) Poprzez sieć Wi-Fi Aby podłączyć centralę do domowej sieci Wi-Fi należy w aplikacji mobilnej wejść w zakładkę Ustawienia -> Połączenia sieciowe. W opcji tryb należy wybrać opcję „Podłączenie do sieci domowej”. Wybrać domową sieć Wi-Fi, a następnie wprowadzić hasło domowej sieci Wi-Fi jeśli jest ustawione. Nastąpi rozłączenie z siecią SmartControl_SERIALNUMBER, po którym należy połączyć urządzenie mobilne do domowej sieci WiFi. Następnie należy wyszukać centralę. W razie problemów z wyszukaniem centrali (np. zostało podane złe hasło do sieci Wi-Fi) należy zresetować ustawienia centrali zgodnie z procedurą opisaną w następnym punkcie. Centrala ponownie udostępni domyślną sieć Wi-Fi „SmartControl_SERIALNUMBER”. 2) Poprzez przewód sieciowy dołączony do zestawu Wpinamy przewód sieciowy w złącze Ethernet na tylnym panelu centrali oraz w wolne złącze Routera. Następnie łączymy się urządzeniem mobilnym do domowej sieci Wi-Fi i wyszukujemy centralę. RESETOWANIE USTAWIEŃ W przypadku problemów z konfiguracją centrali (np. podanie błędnego hasła do domowej sieci Wi-Fi) możemy zresetować ustawienia centrali. Istnieją dwa typy resetu: 8 1) 2) Pojedyncze krótkie wciśnięcie przycisku reset na tylnym panelu powoduje reset ustawień Wi-Fi, centrala ponownie udostępnia sieć „SmartControl_SERIALNUMBER”. Przytrzymanie przycisku reset przez 5 sekund powoduje przywrócenie urządzenia do ustawień fabrycznych. Usunięte zostaną wszystkie ustawienia i urządzenia dodane do systemu. STEROWANIE URZĄDZENIAMI ZA POMOCĄ KOMPUTERA Aby sterować urządzeniami z poziomu komputera należy będąc połączonym do tej samej sieci lokalnej co Centrala Zenpro otworzyć przeglądarkę internetową i w pasku przeglądarki wpisać adres IP centrali. Adres możemy sprawdzić w aplikacji mobilnej w zakładce Zaawansowane → Połączenie do centralki, adres IP centrali pojawia się też po wyszukaniu centrali w panelu logowania. DODAWANIE URZĄDZEŃ DO SYSTEMU W aplikacji mobilnej w zakładce „Ustawienia” wchodzimy w menu „Urządzenia”, a następnie wybieramy przycisk „Dodaj Urządzenie”. Z rozwijanego menu wybieramy typ urządzenia np. roleta, wpisujemy nazwę i korzystamy z przycisku „Dalej”. Pojawi się ekran, na którym możemy skonfigurować tryb impulsowy (jeżeli urządzenie go udostępnia) oraz przyciski sterujące „PROG” góra, stop, dół. Przyciski te odpowiadają przyciskom tradycyjnego pilota. Następnym krokiem jest sparowanie centralki z urządzeniem, które chcemy dodać do systemu. W tym celu należy postępować zgodnie z instrukcją dołączoną do dodawanego 9 urządzenia analogicznie. Cała operacja przebiega w ten sam sposób jak dodawanie drugiego pilota do urządzenia. Więcej materiałów ilustrujących dodawanie urządzeń do centrali można znaleźć na stronie www.zenpro.pl/instrukcje PRZYKŁAD: Dodawanie nowej rolety do centrali W przypadku radiowego silnika rolety wykonujemy procedurę opisaną powyżej. Po dodaniu nowego urządzenia i wprowadzeniu nazwy rolety, przechodzimy do widoku z przyciskami sterującymi. Jednocześnie korzystamy z tradycyjnego pilota, który już współpracuje z dodawanym do centrali silnikiem rolety. Wciskamy przycisk „PROG/P2” na tylnej obudowie tradycyjnego pilota przypisanego do rolety. Roleta potwierdzi wejście w tryb programowania ruchem góra/dół i krótkim sygnałem dźwiękowym. Wciskamy ponownie przycisk „PROG/P2”, roleta potwierdzi kolejnym krótkim sygnałem dźwiękowym. 10 W oknie aplikacji mobilnej wciskamy przycisk „PROG”. Roleta potwierdzi poprawne zaprogramowanie ruchem góra/dół oraz krótkim sygnałem dźwiękowym. ZDARZENIA CZASOWE W aplikacji mobilnej w zakładce „Zdarzenia” użytkownik może zarządzać zdarzeniami czasowymi/scenami takimi jak zamknięcie wszystkich rolet w domu o określonej godzinie. Aby utworzyć zdarzenie czasowe należy wejść w zakładkę „Zdarzenia”, przyciskiem „+ Dodaj zdarzenie czasowe” wybieramy opcję utworzenia nowego zdarzenia. Następnie przypisujemy do niego wybrane rolety, ustalamy, czy zdarzenie ma być aktywne oraz ewentualnie wybieramy czas uruchomienia. Na liście możemy wybrać akcje wykonywane przez wybrane urządzenia w momencie uruchomienia zdarzenia. Zdarzenie czasowe nie musi być aktywne, w takim przypadku nie będzie automatycznie uruchamiane przez centralkę. Użytkownik może je uruchomić samodzielnie korzystając z przycisku widocznego w zakładce „Zdarzenia” przy każdym zdarzeniu czasowym. TRYB ZDALNEGO DOSTĘPU W przypadku kiedy znajdujemy się poza zasięgiem domowej sieci Wi-Fi, do której podłączona jest centrala sterująca, możemy skorzystać z szyfrowanego połączenia przez Internet tzw. „zdalnego dostępu”. Aby zdalny dostęp działał, centralka musi być podłączona do sieci z dostępem do Internetu (przez Wi-Fi lub 11 przewód Ethernet) oraz musi być ustawiony prawidłowy czas w centrali (W aplikacji mobilnej zakładka „Zaawansowane” -> „Data i czas”). a) aktywacja zdalnego dostępu W momencie kiedy jesteśmy połączeni do centrali poprzez sieć domową wybieramy zakładkę „Ustawienia” -> „Zaawansowane” > „Zdalny dostęp” i zaznaczamy opcję „Włączony”. Następnie wybór zatwierdzamy przyciskiem „OK”. Funkcjonowanie zdalnego dostępu możemy sprawdzić przyciskiem „Testuj”. b) używanie zdalnego dostępu Kiedy telefon znajduje się poza zasięgiem domowej sieci Wi-Fi, pojawi się okno Połączenia do Centrali. Wybieramy opcję „Zdalny dostęp”. Powinno nastąpić połączenie do Centrali. c) powrót do dostępu lokalnego Wchodzimy w zakładkę Ustawienia (Ustawienia centrali są widoczne jedynie podczas dostępu lokalnego) i wduszamy przycisk „Powrót”. 8. Deklaracja CE Firma Mobile Labs Sp. z o.o. deklaruje, że urządzenie zostało zaprojektowane, wyprodukowane i wprowadzone na rynek zgodnie z wymaganiami dyrektywy o kompatybilności elektromagnetycznej 2004/108/WE oraz dyrektywy RTTE 1999/5/WE. Deklaracja zgodności jest dostępna na stronie internetowej: www.zenpro.pl/deklaracja 12 Table of contents 1. 2. 3. 4. 5. 6. 7. 8. General information Kit contents Technical data Safety precautions Disposal instructions Physical description Configuration and usage Declaration of conformity 1. General information 13 13 14 14 15 16 17 23 Zenpro SmartControl is an technologically advanced controller which allows to control blinds and other devices working in 433.92 MHz band through mobile devices and PC. Zenpro controller extends system capabilities by consolidating devices into groups, time events, scenes and allows for remote control devices through Internet. Additional instructional materials can be found at: www.zenpro.eu/manuals 2. Kit contents - Zenpro SmartControl Unit - 433.92 MHz Antenna - Power adapter - Ethernet cable - Manual 13 3. Technical data Model DC Input Power consumption Interfaces Radio frequencies Battery to sustain clock Operating temperature Casing protection level 4. 1. 2. 3. 4. 5. 6. 7. 8. 9. ZSC1 12 V 1,5 W Wi-Fi, Ethernet, ISM 433,92 MHz 433,84 MHz and 2,4 GHz CR1220 0-40 °C IP20 Safety precautions Please get acquainted with the safety precautions before you use the device. The device has to be connected mains consistent with parameters given in the manual. Do not use the device while taking a shower or bath. Do not place the device close to heat sources like heaters, radiators, chimneys, stoves and others. Keep the device and accessories beyond the reach of children. Do not cover the device. It’s recommended to leave 10cm of space at sides of the device. Before cleaning or maintenance unplug the device from mains. The device is not waterproof. Protect the device from dust, dump, water and other fluids. Do not attempt to disassemble your device and try to repair it. Only qualified personnel should repair the device. Do not place the device close to strong magnetic field, it can permanently damage the device. 14 10. Do not use the device in any areas with flammables and explosives. 11. Unplug the power cord during storms and thunders. 12. Do not use power supplies that don’t meet safety regulations. 13. Protect the device from shocks and vibrations. Mobile Labs Sp. z o.o. do not take responsibility for devices provided by other manufacturers that cooperate with the Zenpro device. 5. Disposal instructions The crossed bin symbol means that the device contains electronic and electrical parts and it shouldn’t be disposed together with domestic waste. It must be separately collected with electrical and electronic waste according to currently valid legislation. Information about places of electronic waste collection can be obtained from local authorities or shop where the device was bought. 15 6. Physical description a) led diodes on the top of the enclosure POWER – on when power supply is connected STATUS – blinks during radio transmission to receiver, and gives information about booting of the device LAN – on when Ethernet cable is properly connected WI-FI – on when wireless LAN interface is operational b) back panel 16 7. Configuration and usage FIRST USAGE After unpacking the device pull out the folium with “Pull me” note, it secures battery holding up the time. Next connect the power supply, Zenpro device boots for about 60 seconds. It’s illustrated by blinking of the status diode . When status diode stops to blink the device is ready to use. The Zenpro device by default provides own Wi-Fi network “SmartControl_SERIALNO” (where SERIALNO is the serial number of your Zenpro device). Connect to this network with mobile device. Following steps should be taken: 1) Android On the mobile device download Zenpro SmartContol application for Android – Google Play or iOS Appstore. Type “Zenpro SmartControl” in the search bar of store or use QR-code below to get directly to the app. iOS 17 2) After downloading the application connect to the “SmartControl_SERIALNO” Wi-Fi network, provided by the device. 3) Next press the “Search” button and wait till the device is found. After successful search, use the yellow “Connect” button. CONNECTING THE ZENPRO DEVICE TO HOME WI-FI NETWORK Connecting the Zenpro Unit to home router allows to control home automation devices remotely through Internet. It also allows to update the device software. There are two ways to connect Zenpro ZSC1 to home network. 1) By the local Wi-Fi network To connect ZSC1 to home network through Wi-Fi you have to open the mobile app, go to “SETTINGS” -> ”Network connections” -> “Wireless network configuration (WLAN)”. In the “Network mode” menu check the “Connection to home Wi-Fi network”. Next “Choose Wi-Fi network” and type in the home Wi-Fi password if it’s set up. The ZSC1 device will stop broadcasting “SmartConrol_SERIALNO” Wi-Fi network, and the mobile device will disconnect. Than log your mobile device into the home network, open the Zenpro app and search for the Unit. In case of problems with finding the device home network, first wait couple of seconds and try again. In case of problems press shortly the “Reset” button on the back of the Unit. It will bring back the default 18 Wi-Fi settings. “SmartControl_SERIALNO” network will be available to connect. You can retry the operation again. 2) Through the Ethernet cable attached to the set Plug in the Ethernet cable into the Zenpro Device and into empty socket in your home router. Next log to the home Wi-Fi network with your mobile device and use the search button. RESSETING DEVICE In case of problems with device configuration (ex. Typing wrong password when connecting device to home Wi-Fi network) it’s possible to reset the device settings. 1) 2) Pressing shortly the Reset button on the back panel will result in resetting the Wi-Fi settings. The default „SmartControl_SERIALNUMBER” Wi-Fi network will be available. Holding the reset button for 5 seconds will result with factory reset. It will delete all devices and groups that were added to system, and will bring back all the settings to the factory state. CONTROLLING THE DEVICES WITH PC To control the devices with PC, you have to open web browser (IR, Chrome, Firefox…), connect your PC to the same network which Zenpro Unit is connected and type in IP address of the Zenpro device in the address bar. The IP address of the Zenpro Unit can be 19 obtained from the mobile application, you have to go to the Settings->Advanced->Connection to the central. ADDING DEVICES TO THE CENTRAL CONTROLLER In the mobile app, go to “Settings” -> “Devices” and next press “Add Device”. From the drop down menu pick the device type (ex. Shutter) and type in the name of the device. Use the “Next” button, new screen will show up where it’s possible to check the impulse mode (if the device has such mode) and command buttons will show up: PROG, UP, DOWN, STOP. Those buttons are similar to traditional remote controller. Next step is to pair the physical device with the central controller. To do this you need to follow the device manual and do the same things as you would like to add new remote controller to the device. However instead of the traditional remote controller use the steering buttons. Additional instructional materials concerning adding devices can be found at: www.zenpro.eu/manuals Example – Window Roller Shutter Motor For window roller shutter radio motor, follow the steps above. Create a new device, choose the type, give the device a name and use “Next” button. A view with command buttons will show up (prog, up, down, stop). Take a traditional remote controller that works with the motor already. 20 Push „PROG/P2” button on the back side of the remote. The roller shutter motor will acknowledge going into program mode with short up/down sequence and sound. Push the „PROG/P2” button again, the roller shutter motor will acknowledge operation with sound. Then in the mobile app use the “PROG” button, the roller shutter motor will confirm receiving the command with up/down sequence and sound. You can test the new device with up/down/stop buttons in the mobile app. TIME EVENTS In the mobile app in “Events” bar, you can create and manage time events/scenes. For example you can close all the roller shutters at home at a certain time. To create a time event you need to go to “Events” menu and use “+ add time event” button. Next give it a name, check the active option, set up time, choose devices and actions for them. The event will be launched at the set up time or it can be activated by pressing the icon on the right of the event. 21 REMOTE ACCESS THROUGH INTERNET In case you are beyond the reach of local home Wi-Fi network, you can use encrypted remote access through Internet . In order to work Remote Access requires that Zenpro Central Unit is connected to home network with access to the Internet, proper time has to be set up in the device (“Settings”->”Advanced”>”Date and time”). 1) Remote access activation You have to be connected to your Zenpro device through local network. Go to “Settings”->”Advanced”->”Remote Access” and check the “On” option. You can check if remote access is working correctly by pressing “Test” button. 2) Using the remote access When your mobile device is away from your home network and you turn on the Zenpro app, after few seconds the connection window will show up. Pick up the “Remote access” button in the bottom. Your mobile device should connect to ZSC1 Unit. 3) Getting back to the local access When you are back in the range of your home network it’s always better to use local access. You can switch back, by going to the “Settings” menu where only one button is visible “Close remote access”, when you hit it connection window will appear. 22 8. CE declaration of conformity Mobile Labs Sp. z o.o. device manufacturer herby declares that the Zenpro ZSC1 device has been designed and manufactured to comply with all applicable essential requirements of the directives: EMC 2004/108/WE directive and RTTE 1999/5/WE directive. CE declaration of conformity is available on the webpage www.zenpro.eu/declaration 23 Inhaltsverzeichnis 1. 2. 3. 4. 5. 6. 7. 8. Allgemeine Informationen Inhalt Technische Daten Sicherheitsregeln Recykling Bau des Gerätes Anwendung Erklärung 1. Allgemeine Informationen 24 24 25 25 26 27 28 34 Die Zenpro Smart Control zentrale ist ein neuer Treiber, welche den Rollladen und andere Geräte im Band 433,92 MHz anhand der Mobil als auch Computer kontrollieren kann. Die Zentrale erweitert die Möglichkeiten des Systems mit der Option der Gruppierung des Gerätes, gibt die Bedienung des Zeitgeschehens und der Szene an und ermöglicht die Fernüberwachung über das Internet. Zusätzliche Unterrichtsmaterialien finden Sie unter : www.zenpro.eu/anleitung 2. Inhalt des Satzes - Hauptsitz Zenpro SmartControl - Antenne 433,92 MHz - Netzteil 12 V DC 24 - Netzkabel - Bedienungsanleitung 3. Technische Daten Model Leistungsregelung Leistungsaufnahme Schnittstellen Frequenzwellen Haltezeit Betriebstemperatur Schutzart ZSC1 DC 12 V 1,5 W Wi-Fi, Ethernet, ISM 433,92 MHz 433,84 MHz i 2,4 GHz Batterie CR1220 0-40 °C IP20 4. Sicherheitshinweise 1. Vor der Anwendung lesen Sie bitte die Anweisungen. 2. Das Gerät muss mit dem Netzwerk in Übereinstimmung und mit den angegebenen Parametern aus dem Handbuch stehen 3. Verwenden Sie das Gerät nicht während dem Baden oder Duschen. 4. Stellen Sie das Gerät nicht in der Nähe von Wärmequellen wie Heizungen, Kamine, Öfen oder andere. 5. Stellen Sie das Gerät außerhalb der Reichweite von Kindern. 6. Nicht abdecken. Es wird empfohlen, 10 cm Freiraum an den Seiten der Vorrichtung zu lassen. 7. Vor Reinigung oder Wartung, stellen Sie das Gerät vom Netz ab. Das Gerät ist nicht wasserdicht, muss gegen das Eindringen von Schmutz, Feuchtigkeit, Wasser und anderen Flüssigkeiten im Inneren geschützt werden. 25 8. Das Gerät nicht auseinander bringen und keine Selbstreparaturen machen. Reparaturen dürfen nur von einem autorisierten Kundendienst oder den Hersteller durchgeführt warden. 9. Das Gerät kann nicht in der Nähe eines starken Magnetfeld angeordnet werden, kann es zu einer dauerhaften Beschädigung des Gerätes führen. 10. Verwenden Sie das Gerät nicht in explosionsgefährdeten Bereichen oder in anderen Bereichen, wo es verboten ist. 11. Während eines Gewitters das Gerät vom Stromnetz. 12. Schließen Sie das Gerät nicht an die Stromversorgung nicht den geltenden Normen und Sicherheitsanforderungen gerecht zu warden. 13. Schützen Sie das Gerät vor Vibrationen und Stößen. Mobile Labs Sp. z o.o. ist nicht für den Betrieb von Zubehör anderer Hersteller, die Zusammenarbeit mit dem Gerät oder die Einhaltung von Sicherheitsstandards und Vorschriften verantwortlich 5. Entsorgung Dieses Symbol bedeutet, nach der Verwendung des Geräts mit angeschlossenem Zubehör können nicht mit dem Hausmüll entsorgt werden, sondern muss zum Recycling entsorgt werden, welche zu elektrische und elektronische Geräte geeignet sind. Übergabe nach der Nutzung zu den entsprechenden Sammelstellen ermöglichen die Wiederverwendung von dem 26 Produkt. Über den nächsten Sammelpunkt kann von der örtlichen Geschäftsstelle oder wo das Produkt gekauft wurde erhalten werden. 6. Bau des Gerätes a) LEDs auf dem Gehäuse •POWER - leuchtende LED zeigt korrekten Anschluss des Netzkabels •STATUS - Der Status LED leuchtet inmitten der die Funkübertragung mit dem Gerät und bestätigt die Operationen wie Reset und Booten •LAN - Diode leuchtet, wenn das Netzkabel richtig anschlossen ist •WI-FI - Diode stellt Netzwerkschnittstelle die Aktivität der Wireless- 27 b) Rückseite 7. Anwendung Erster START Nach Entfernen der Verpackung entfernen sie aus dem Gehäuse die Folie mit der Aufschrift ,,PULL“, die Batterieautonomie schützt. Dann schließen Sie zum Netz an. Das Bedienfeld blinkt ca. 60 Sekunden, um den Zustand der Status-LED zu zeigen. Zu der Zeit, wenn die Status-LED nicht mehr blinkt ist das Bedienfeld betriebsbereit. Beim ersten Start bietet Das Panel einen eigenen Wi-Fi "SmartControl_SERIALNUMBER" an. (wobei die SERIALNUMBER die Seriennummer des Geräts ist), zu welcher man sich in Verbindung mit mobilen Gerät setzen muss. Gehen Sie hierzu folgendermaßen vor : 1) Von dem mobilen Gerät laden wir die Applikation Zenpro SmartControl von dem Google Play Store Geschäft für Android oder Appstore für die iOS. Geben Sie in den SuchmaschinenGeschäft, " Zenpro SmartControl " oder verwenden Sie den QRCode an. 28 Android iOS 2) Wenn Sie die Anwendung ausführen , schließen Sie das mobile Gerät mit dem Wi-Fi " SmartControl_SERIALNUMBER " welche von der Zentrale generiert wurde. 3) Drücken Sie dann die "Suche Head". Nach der gelungenen Suche, verbinden sie sich mit der Zentrale indem Sie die gelbe Taste ,,Verbindung“ drücken. ANSCHLUSS BEDIENFELD FOR ,,HOME“ WLAN Das Anschlussfeld auf die Heim-Router mit Internet-Zugang können Sie die Geräte im Haus über das Internet für den Fernzugriff steuern. Darüber hinaus ist es möglich, die Steuergeräte-Software zu aktualisieren. Das Panel kann auf Ihre Wi-Fi Netzwerk auf zwei Arten angeschlossen werden. 1) Mit Wi-Fi Um die Kontrollleiste mit dem Wi-Fi- Netzwerk zu verbinden muss man in den Reiter Einstellungen Netzwerkverbindungen eingehen. 29 In der Modus Option wählen Sie "Verbindung mit Ihrem Heimnetzwerk. " Wählen Sie ein Wi-Fi- Netzwerk, und geben Sie dann ein Passwort zu Hause Wi-Fi ein, wenn es gesetzt ist. Es wird von dem SmartControl_SERIALNUMBER Netzwerk getrennt, dann muss man das mobile Gerät mit dem Wi-Fi Netzwerk verbinden. Suchen Sie dann die Zentrale. Wenn Sie Schwierigkeiten haben, die Systemsteuerung (z.B. Sie haben das falsche Passwort für Wi-Fi -Netzwerkenangegeben) muss man die Einrichtungen der Systemsteuerung ,,reseen“ in Übereinstimmung mit der im nächsten Abschnitt beschriebenen Verfahren. Das Panel wird gibt noch einmal den Zugang zu dem Wi-Fi "SmartControl_SERIALNUMBER ". 2) Durch den Netzstecker zu den Satz beigelegt Stecken Sie den Netzkabel in den Ethernet Anschluss auf der Rückseite und freien USB- Router. Verbinden Sie sich mit dem mobilen Gerät mit dem Wi-Fi- Netzwerk, und suchen sie den Panel. Rücksetzen -System Bei Problemen mit der Konfiguration Panels (zB. Geben Sie das falsche Passwort zu Ihrem Wi-Fi- Netzwerk), können wir das Gerät zurücksetzen. Es gibt zwei Arten von Reset: 1 ) Einzel kurzes Drücken der Reset-Taste an der Geräterückseite, um die WLAN-Einstellungen zurückzusetzen, wieder bietet die Zentrale ein Netzwerk von " SmartControl_SERIALNUMBER " an. 30 2) Halten Sie die Reset-Taste für 5 Sekunden , um das Gerät auf die Werkseinstellungen zurückzusetzen. Alle Ihre Einstellungen und Geräte des Systems werden verloren. KONTROLLE DURCH COMPUTER EQUIPMENT Um die Geräte vom Computer zu steuern, muss man mit dem gleichen lokalen Netzwerk verbunden sein, wie der Hauptsitz wie Zenpro öffne den Web-Browser und den Browserleiste gib die IP Adresse des Geräts ein . Die Adresse kann man in der mobilen Anwendung in der Registerkarte Erweitert überprüfen → Anschluss an TK-Anlage, IP-Adresse zeigt sich auch nach der Suche im Hauptquartier im Anmeldefenster. Hinfügen der Geräten zum SYSTEM Die mobile Anwendung im Menü "Einstellungen" , gehen Sie in die "Geräte" ein und klicken Sie auf " Gerät hinzufügen ". Wählen Sie im Drop -down -Menü Sie den Typ des Geräts , z. B. Blinde, geben Sie den Namen an und benutzen die Taste "Weiter". Es zeigt sich ein Fenster, in dem Sie den Pulsbetrie, den wir konfigurieren können (falls das Gerät es ermöglicht ) und Steuertasten „prog", „oben“, „stop“, „unten“. Diese Tasten entsprechen den Tasten einer herkömmlichen Fernbedienung. Der nächste Schritt ist es, die Steuereinheit mit dem Gerät zu koppeln, welche wir zum System dazugeben möchten. Um dies zu tun, folgen Sie den Anweisungen, der beigefügten Geräte analogisch. Die gesamte Operation wird in der gleichen Weise wie die Zugabe des zweiten Pilot dem Gerät durchgeführt. 31 Weitere Materialien zur Veranschaulichung von Geräten hinzufügt wurden unter: www.zenpro.eu/anleitung die Beispiel: Hinzufügen eines neuen Jalousien zur Zentrale Im Fall der Funkverdunkelungs Motors führen wir die wie oben beschriebenen Verfahren nach. Wenn Sie ein neues Gerät hinzufügt haben und die Angaben des Namens der Blinds, rufen Sie die Sicht auf die Steuertasten auf. Gleichzeitig nutzen wir den traditionellen Pilot, welcher bereits mit der Motorsteuerung des Blinds zusammenarbeitet. Drücken Sie die Taste "PROG / P2 " auf der Rückseite des traditionellen Pilot zu den Blinds zugeordnet. Blinde bestätigen die Eingabe der Programmiermodus mit der Bewegung oben / unten und mit einem kurzem Piepton. Drücken Sie die Taste erneut, "PROG / P2 " blind bestätigt ein weiteres kurzes akustisches Signal. In der mobilen Anwendung, drücken Sie die Taste "PROG". Blinde bestätigen die korrekte Programmierung der Bewegung nach oben / unten und ein kurzer Piepton. 32 EREIGNIS ZEIT Die mobile Anwendung in den "Ereignis" können Sie die Zeitereignisse/ Szenen wie die Schließung aller Jalousien im Haus zu einer bestimmten Zeit verwalten. Um ein einmaliges Ereignis zu erstellen, gehen Sie auf die Registerkarte "Ereignisse", klicken Sie auf " + Ereignis Zeit" wählen Sie die Option, um einen neuen Termin zu erstellen. Dann weisen Sie die ausgewählten Jalousien zu, dann schreiben sie das Ereignis zu, ob es aktiv sein soll und möglicherweise wählen Sie die Startzeit aus. In der Liste können Sie die Aktionen durch das ausgewählte Gerät ausgeführt werden. Das Zeitereignis muss nicht aktiv sein, wobei in diesem Fall es automatisch durch die Steuereinheit aktiviert wird. Sie können sie selbst ausführen mit der Taste in den "Ereignis" sichtbar bei jedem Zeitereignis. FERNZURGIFF Für den Fall , wenn wir uns außerhalb der Reichweite eines Wi-FiNetzwerks befinden, die mit der Steuereinheit verbunden ist, können wir eine verschlüsselte Verbindung über das Internet verwenden. "Remote Access/ Fernzugriff" . Das der Fernzugriff funktioniert, muss das Steuergerät mit einem Netzwerk mit Internetzugang (Wi-Fi oder Ethernet-Kabel) angeschlossen werden und muss auf die richtige Uhrzeit in der Systemsteuerung (in der mobilen Anwendung "Erweitert" -> "Datum und Uhrzeit") eingestellt werden. a) Aktivierung des Fernzugriffs In einer Zeit, in der wir an die Zentrale über ein Heimnetzwerk angeschlossen sind, wählen Sie " Einstellungen" -> "Erweitert" -> " Remote Access/Fernzugriff " und wählen Sie die Option auf "Ein". 33 Dann die Auswahl mit "OK" bestätigen. Funktionalität des Fernzugriffs überprüfen wir mit der Taste "Test". b ) die Verwendung des Fernzugriffs Wenn sich das Telefon außerhalb der Reichweite eines Wi-FiNetzwerk befindet , erscheint die Verbindungen mit der Zentrale. Wählen Sie die Option "Remote Access / Fernzugriff"., dann sollte zur Zentrale eine Verbindung gehen. c) an den lokalen Zugriff zurück Geben Sie auf die Registerkarte Einstellungen und drücken Sie die Taste "Zurück" (Steuereinstellungen werden nur beim lokalen Zugriff gezeigt). 8. CE-Erklärung Die Firma Mobile Labs Sp. z o.o. erklärt, dass das Gerät entwickelt wurde, hergestellt und in Übereinstimmung mit den Anforderungen der EMV-Richtlinie 2004/108/EG und R&TTE-Richtlinie 1999/5/EG in Verkehr gebracht. Die Konformitätserklärung erhalten Sie auf der Website: www.zenpro.eu/erklarung 34