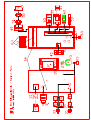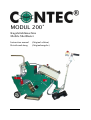
1
MODUL 200
®
Kugelstrahlmaschine
Mobile Shotblaster
Instruction manual
Betriebsanleitung
(Original edition)
(Originalausgabe)
INDEX
1. EG-Konformitätserklärung / EU-Declaration of Conformity
...3
2. Anwendungsbereich der Maschine / Machine applications
...6
3.Vorwort / Introduction
...6
4. Konzept / Concept
...7
5. Technische Daten / Technical data
...10
6. Safety rules
...10
7. Sicherheitsregeln für den Betrieb der Anlage / Operating and
blasting
...12
8. Einstellung und Wartung / Maintenance and adjustments
...15
8.1
8.2
8.3
...15
...16
8.4
8.5
8.6
8.7
8.8
8.9
Einstellung des Strahlbildes / Adjusting the blast track
Einstellung der Höhe der Strahlmaschine / Adjusting the height of the blaster
Verschleiß am Schleuderrad und an der Einlaufbuchse / Wear & tear on the
blast wheel and shot cage
Verschleiß an den Innenverkleidungen / Wear & tear on the linings
Verschleiß am Prallblech im Sichter / Wear & tear on the shot stop in
the separator
Riementrieb / Belt drive
Verschleiß an der Schleppe / Wear & tear on the back skirt
Verschleiß am Magnetrahmen und an der Strahlöffnung /
Wear & tear on the magnetic frame and the blast opening
Lager / Bearings
...17
...18
...19
...19
...20
...20
...21
9. Fehler und Behebubg / Troubleshooting
...22
10. Das modulare System / The modular system
...23
10.1
10.2
Anbau von MODUL 200® EU an MODUL 200® /
Connecting MODUL 200® EU to MODUL 200®
Mehrteile und Umtauschteile für den Anbau von MODUL 200® EU /
Additional and interchangeable parts for the extension of MODUL 200®
...23
...24
11. Verschleißteile / Wear & tear parts
...24
12. Strahlmittel / Shot
...25
13. Anhang / Appendix
...25
Konformitätserklärung mit gefordertem Inhalt gemäß EN ISO/IEC 17050-1
EG-Konformitätserklärung
Monat.Jahr:
.
Für das nachfolgend bezeichnete Erzeugnis
Bezeichnung:
Kugelstrahlmaschine
Modell:
MODUL 200
®
Seriennummer:
wird hiermit erklärt, dass es den wesentlichen Schutzanforderungen entspricht, die in
den nachfolgend bezeichneten Richtlinien festgelegt sind:
RICHTLINIE 2006/42/EG DES EUROPÄISCHEN PARLAMENTS UND DES RATES
vom 17. Mai 2006 über Maschinen und zur Änderung der Richtlinie 95/16/EG
(Neufassung) – kurz: Maschinenrichtlinie
Bevollmächtigte Person im Sinne des Anhang II Nr. 1. A. Nr. 2., 2006/42/EG für die
Zusammenstellung der technischen Unterlagen:
Name, Vorname:
Greb, Johannes
Stellung im Betrieb des
Technische Leitung
Herstellers:
Anschrift:
Neuer Weg 17, 57518 Alsdorf
Weitere Angaben über die Einhaltung dieser Richtlinien enthält die Anlage 1.
Diese Erklärung gilt für alle Exemplare, die nach den entsprechenden
Fertigungszeichnungen - die Bestandteil der technischen Dokumentation
sind – hergestellt werden.
Diese Erklärung wird verantwortlich für den Hersteller
®
Name:
Contec Maschinenbau & Entwicklungstechnik GmbH
Anschrift:
Hauptstraße 146, 57518 Alsdorf, Deutschland / Germany / Allemagne
abgegeben durch
Name, Vorname:
Greb, Johannes
Stellung im Betrieb des
Technische Leitung
Herstellers:
Alsdorf, 22.12.2010
Ort/Datum
Rechtsgültige Unterschrift
Die Anlagen sind Bestandteil dieser Erklärung. Diese Erklärung bescheinigt die Übereinstimmung mit
den genannten Richtlinien, beinhaltet jedoch keine Zusicherung von Eigenschaften.
Anlage 1 zur Konformitätserklärung
Für das nachfolgend bezeichnete Erzeugnis
(Bezeichnung,
Kugelstrahlmaschine
Modellnummer)
MODUL 200
®
wird hiermit erklärt, dass es den wesentlichen Schutzanforderungen entspricht, die in
den nachfolgend bezeichneten Richtlinien festgelegt sind:
RICHTLINIE 2004/108/EG DES EUROPÄISCHEN PARLAMENTS UND DES
RATES vom 15. Dezember 2004 zur Angleichung der Rechtsvorschriften der
Mitgliedstaaten über die elektromagnetische Verträglichkeit und zur Aufhebung der
Richtlinie 89/336/EWG – kurz: EMV-Richtlinie
RICHTLINIE 2006/42/EG DES EUROPÄISCHEN PARLAMENTS UND DES RATES
vom 17. Mai 2006 über Maschinen und zur Änderung der Richtlinie 95/16/EG
(Neufassung) – kurz: Maschinenrichtlinie
Die Konformität wird in Bezug auf folgende angewandte harmonisierte Europäische Normen erklärt:
EN 12100 Teil 1
EN 12100 Teil 2
„Sicherheit von Maschinen – Grundbegriffe, allgemeine
Gestaltungsleitsätze“. Grundsätzliche Terminologie, Methodologie
„Sicherheit von Maschinen – Grundbegriffe, allgemeine
Gestaltungsleitsätze“. Technische Leitsätze
Bedienungsanleitung / Manual MODUL 200®
-5-
Declaration of Conformity according to EN ISO/IEC 17050-1
EC-Declaration of Conformity
Month.Year:
.
For the machine described below
Product denomination:
Shotblaster
Model:
MODUL 200
®
Serial number:
Herewith we declare, that the machine is complying with all the essential requirements of the
Machine Directive 2006/42/EC of the EUROPEAN PARLIAMENT of the 17th of Mai 2006
The person authorized to compile the relevant technical documentation (According to Appendix II Nr.
1. A. Nr. 2, 2006/42/EG):
Name, Surname:
Greb, Johannes
Function:
Technical Manager
Address:
Neuer Weg 17, 57518 Alsdorf, Germany
More information on the compliance with the directive is contained in Appendix 1.
This Declaration is given by the manufacturer:
®
Name:
Contec Maschinenbau & Entwicklungstechnik GmbH
Address:
Hauptstraße 146, 57518 Alsdorf, Deutschland / Germany
Given by:
Name, Surname:
Greb, Johannes
Function:
Technical Manager
Alsdorf, 22.12.2010
Place/Date
Signature
Appendix 1 of the Declaration of Conformity
Month.Year:
.
For the machine described below
Product denomination:
Shotblaster
Model:
MODUL 200
®
Herewith we declare, that the machine is complying with all the essential requirements of the:
Directive 2004/108/EC of the EUROPEAN PARLIAMENT of the 15th of December 2004 on
Electromagnetic Compatibility
Directive 2006/42/EC of the EUROPEAN PARLIAMENT of the 17th of Mai 2006
Harmonised Standards used:
EN 12100 - 1 „Safety of Machinery – Basic concepts“
EN 12100 - 2 „Safety of Machinery – Technical principles”
CONTEC® GmbH Hauptstrasse 146, 57518 Alsdorf, Deutschland/ Germany/ Allemagne
[email protected], www.contecgmbh.com
© CONTEC® 2013
Bedienungsanleitung / Manual MODUL 200®
-6-
2. Anwendungsbereich der
Maschine:
2. Machine applications
Kugelstrahlen von horizontalen, trockenen
Böden wie Beton- und Stahlflächen mit und
ohne Beschichtung und Asphalt durch
Einsatz des von CONTEC® angebotenen
Strahlmittels.
Der
Einsatz
außerhalb
geschlossener Räume ist nur bei trockenem
Wetter gestattet.
Shotblasting of horizontal, dry floors such as
concrete and steel surfaces with or without a
coating and asphalt using CONTEC®
blasting tools. The use of the machine
outside is only possible in dry weather.
3. Vorwort
3. Introduction
CONTEC® bedankt sich bei Ihnen, dass Sie
sich für unsere Mobile Kugelstrahlanlage
MODUL 200® entschieden haben.
MODUL 200® wurde zum Abstrahlen und
Reinigen von waagerechten und leicht
geneigten Oberflächen aus Beton, Asphalt,
Stahl und ähnlichen entwickelt. Das
Herzstück der Maschine ist das sogenannte
Schleuderrad. Dem Mittelpunkt des Rades
wird Strahlmittel zugeführt. Das Strahlmittel
wird durch die Zentrifugalkraft des sich
schnell drehenden Rades auf die zu
bearbeitende Fläche geschleudert. Das
auftreffende Strahlmittel prallt von der
Fläche ab und wird durch den sogenannten
Rückprallkanal und Sichter wieder in den
Strahlmittelbehälter geführt. Beim Aufprall
auf der zu bearbeitenden Fläche, werden
Partikel von der Oberfläche gelöst und mit
dem Strahlmittel in den Sichter transportiert.
Im Sichter wird das abgestrahlte Material
vom Strahlmittel getrennt. Das Strahlmittel
gelangt zurück in den Strahlmittelbehälter.
Von dort wird es wieder dem Schleuderrad
zugeführt und der Kreislauf schließt sich.
Das abgestrahlte Material wird abgesaugt
und gelangt in den Staubbehälter der
Absauganlage. MODUL 200® arbeitet ohne
Staubentwicklung und kann sowohl im
Freien als auch in geschlossenen Räumen
eingesetzt werden. Eine Umweltbelastung
Thank you for deciding to buy the
CONTEC®
MODUL
200®
mobile
shotblasting machine.
MODUL 200® was developed for the blast
removal and cleaning of horizontal, dry
surfaces such as concrete, asphalt, steel and
similar.
The heart of the machine is the so called
blast wheel. Shot medium (also known as
shot or granules) is compelled via centrifugal
force through the blast wheel at high speed
onto the working / surface area. On impact,
the shot medium rebounds from the surface
area and is propelled through the reclaim
chamber, through the separator and then
stored in the shot compartment. On impact
particles from the working / surface area are
removed and transported together with the
shot medium back to the separator. Here, the
blasted material is separated from the shot.
The shot is then returned to the shot
compartment, from where it continues to be
propelled through the blast wheel completing
the blast cycle. The blasted floor particles are
then sucked away to the waste compartment
of the dust collector.
MODUL 200® operates on a dust free
principle and can be used in large open areas
CONTEC® GmbH Hauptstrasse 146, 57518 Alsdorf, Deutschland/ Germany/ Allemagne
[email protected], www.contecgmbh.com
© CONTEC® 2013
Bedienungsanleitung / Manual MODUL 200®
-7-
findet wegen der internen Abscheidung und
Ausfilterung des Staubs nicht statt.
Auf den folgenden Seiten werden Sie alle
nötigen Hinweise finden, die einen
störungsfreien und sicheren Betrieb von
MODUL 200® gewährleisten. Es werden
Ihnen alle nötigen Einstellungen und
Wartungshinweise vermittelt, welche die
Arbeit mit der Maschine erleichtern und für
den optimalen Lauf der Anlage notwendig
sind.
Es liegt also auch in Ihrem Interesse, dass
alle Personen, welche die Anlage betreiben,
die folgenden Seiten aufmerksam gelesen
haben und ihren Inhalt beherzigen. Machen
Sie sich und das Bedienungspersonal mit
allen Komponenten der Maschine und deren
Funktionen vertraut. Bei Beachtung der
nachfolgenden Hinweise wird es Ihnen nicht
schwerfallen, MODUL 200® effizient
einzusetzen und zu bedienen
or closed-in spaces. The internal separation
and filtering of dust particles causes no
pollution to the environment.
In the following pages, you will find all the
necessary information, to achieve a safe,
reliable and highly competent performance
from the MODUL 200®. It is therefore
important to follow the strict guidelines for
the deployment and servicing of the MODUL
200® in order to obtain optimum
performance. It is in the interest of all
persons operating or using the machine, to
take note of the operating instructions in this
manual in order to be fully conversant with
the components and functions of the
MODUL 200®. Following the straight
forward guidelines will ensure efficient and
reliable performance from the MODUL
200®.
4. Konzept
4. Concept
Heute existierende Mobile Kugelstrahlanlagen sind meist mit einem Schleuderrad
ausgerüstet. Andere Bauarten weisen zwei
oder mehrere Schleuderräder auf. Das
Prinzip
einer
Anlage
mit
zwei
Schleuderrädern ist in der Fig. 1 dargestellt.
The majority of today’s existing mobile
shotblasting machines are equipped with a
single blast wheel. Other models are
designed with two or more blast wheels. The
principle of a system with two blast wheels is
shown in Fig 1.
CONTEC® GmbH Hauptstrasse 146, 57518 Alsdorf, Deutschland/ Germany/ Allemagne
[email protected], www.contecgmbh.com
© CONTEC® 2013
Bedienungsanleitung / Manual MODUL 200®
-8-
Fig. 1
1
2
3
Schleuderrad / Blast wheel
Strahlmittel / Blast medium (shot)
Strahlbreite / Blasting width
Diese Bauart wird mit Doppel- oder
Mehrfachgehäuse hergestellt. Das Gehäuse
besteht
aus
einer
massiven
Schweißkonstruktion. Vorteile der Mobilen
Kugelstrahlanlagen
mit
mehreren
Schleuderrädern sind eine kleinere Bauhöhe
bei gleicher Strahlbreite. Eine der Grenzen
des
Einsatzes
der
Mobilen
Kugelstrahlanlagen
ist,
dass
die
abzustrahlende Fläche zu weich ist und
dadurch der Gummiballeffekt (Rückprall) des
auftreffenden Strahlmittels gedämpft wird.
Die Strahlmittelkugeln springen nicht mehr
selbständig in den Strahlmittelbehälter
zurück. Das Ergebnis nennt man die
Kugelstrahlanlage "zieht einen Teppich". Das
heißt, das Strahlmittel fällt zurück vom
Rückprallkanal auf die abzustrahlende
Fläche. Gleichzeitig fördert das Schleuderrad
weiter
Strahlmittel
aus
dem
Strahlmittelbehälter. Die Maschine verliert
ihr gesamtes Strahlmittel. Dieser Effekt,
"Teppichziehen", wird durch die Härte der
abzustrahlenden Fläche beeinflusst, aber
auch durch die Höhe des Rückprallkanals.
Generell gilt, je weicher die Fläche und je
höher der Rückprallkanal desto größer wird
die Gefahr des "Teppichziehens" der
Kugelstrahlanlage. In diesem Falle müssen
andere Flächenbearbeitungsmaschinen wie
This design is commonly produced with
double or multiple housings which are made
from a solid welded framework.
The advantage of mobile shotblasters with
more than one blast wheel is that the
machine’s height can remain small while the
blasting width can increase. A limitation in
the deployment of mobile shot blast
machines is when the surface area to be
blasted is too soft and the „rubber ball“ effect
is deadened. The shot medium no longer
rebounds independently back to the shot
compartment store. This consequence is
often referred to as “carpet laying”, which
means the shot loses its momentum and falls
back down the reclaim chamber onto the
work surface. At the same time the blast
wheel continues to propel the shot from the
shot compartment store thus emptying the
machine of all it’s shot. This „carpeting
effect“ is influenced by the hardness of the
surface and the height of the reclaim
chamber. It is generally accepted therefore
that the higher the reclaim chamber, the
greater the danger of “carpeting” by the
shotblaster. In these circumstances, other
surface preparation machines should be
applied first, e.g. concrete planers and
grinders.
CONTEC® GmbH Hauptstrasse 146, 57518 Alsdorf, Deutschland/ Germany/ Allemagne
[email protected], www.contecgmbh.com
© CONTEC® 2013
Bedienungsanleitung / Manual MODUL 200®
-9-
zum
Beispiel
Betonfräsen
oder
Betonschleifmaschinen
herangezogen
werden.
Rationelles
Arbeiten
mit
Kugelstrahlmaschinen im hohen Wettbewerb
der Lohnstrahler erfordert aber Anlagen mit
großer Strahlbreite. Bei Anlagen mit einem
Schleuderrad kann eine größere Strahlbreite
nur durch Vergrößern und Hochsetzen des
Schleuderrades erfolgen. Das bedeutet, dass
die Bauhöhe der Kugelstrahlmaschine höher
wird. Damit wird der Rückprallkanal und der
Weg, den das Strahlmittel zurücklegen muss
verlängert. Die Maschine wird schwerer und
klobiger in ihren Abmaßen. Eine geringe
Rückprallhöhe ist also immer von Vorteil
und erhöht entscheidend die Einsetzbarkeit
der Maschine. Die Kugelstrahlmaschine
MODUL 200® wird modular hergestellt.
Modular bedeutet, dass ausgehend von der
Basiseinheit MODUL 200®, theoretisch
beliebig viele gleiche Grundbausteine
angefügt werden können. Die Basiseinheit
verfügt über die Antriebseinheit, den
Schaltkasten und den Dosierhebel für das
Strahlmittelventil. Ansonsten entspricht sie
exakt dem Grundbaustein. Aus jedem
Grundbaustein kann durch Anfügen der oben
genannten Teile eine Basiseinheit entstehen.
Das bedeutet, dass die Strahlbreite der
Maschine
je
nach
Einsatzfall
den
Bedingungen angepasst werden kann. Kleine
Flächen oder schwer zugängliche Flächen
können mit einem Einzelsystem bearbeitet
werden, große Flächen mit Doppel- oder
Mehrfachsystemen.
Efficient working with shotblasting machines
in this competitive industry requires
machines with increasingly larger working
width. Machines with a single blast wheel
can achieve this only through an increase in
size together with a higher positioning of the
blast wheel. Consequently the height of the
machine is significantly increased which
results in much larger, overall dimensions.
The resultant extended reclaim chamber then
causing a longer return journey for the shot.
A lower positioned reclaim chamber is
always a definite advantage in the versatility
and function of the shotblaster. MODUL
200® is build in a modular concept. Modular
in this sense means, that from the basic
MODUL 200® unit, more than one extension
unit (MODUL 200® EU) can be joined onto
the original unit.
The basic unit can be connected to a single
drive motor, one main control panel and one
shot valve regulating lever. Subsequently all
modular extension units correspond exactly
with the original base unit and can be fitted
accordingly. Therefore the working width
can be effectively adjusted in line with the
application required. Small floors or areas
with difficult access can be effectively blast
cleaned with a single module just as large
areas can be blasted with a double module
system.
CONTEC® GmbH Hauptstrasse 146, 57518 Alsdorf, Deutschland/ Germany/ Allemagne
[email protected], www.contecgmbh.com
© CONTEC® 2013
Bedienungsanleitung / Manual MODUL 200®
- 10 -
5. Technische Daten
5. Technical data.
MODUL 200®
MODUL 200® (US data in brackets)
Arbeitsbreite (mm)
Turbinenleistung (kW)
Gewicht (kg)
Netzanschluss
Dimensionen (LxHxB) (cm)
Schwingungsgesamtwert ahv *
Schalleistungspegel Lwa *
Dauerschallpegel Leq *
200
7.5
195
400 V, 3 Phasen,
16 A
145 x 85 x 32
2.2 m/s2
96 dB(A)
85 dB(A)
MODUL 200® + MODUL 200® EU
Arbeitsbreite (mm)
Turbinenleistung (kW)
Gewicht (kg)
Netzanschluss
Dimensionen (LxHxB) (cm)
Schwingungsgesamtwert ahv *
Schalleistungspegel Lwa *
Dauerschallpegel Leq *
Working width (mm)
Turbine power (kW)
Weight (kg)
Power requirements
200 (8 in)
7.5 (9 kW, 12 hp)
195 (430 Lbs)
Dimensions (LxHxB) (cm)
Dimensions (HxLxW) (in)
Average value of acceleration
ahv *
Noise level Lwa *
Noise level Leq *
145 x 85 x 32
(57 x 33 x 13)
2.2 m/s2
96 dB(A)
85 dB(A)
MODUL 200® + MODUL 200® EU
415
2 x 7.5
300
Working breadth (mm)
Turbine power (kW)
400 V, 3 Phasen,
32 A
Weight (kg)
Power requirements
145 x 85 x 54
2.2 m/s2
96 dB(A)
85 dB(A)
400 V, 3 Phases, 16 A
(230 V, 3 phases, 26 A)
Dimensions (LxHxB) (cm)
Dimensions (HxLxW) (in)
Average value of
acceleration ahv *
Noise level Lwa *
Noise level Leq *
415 (17 in)
2 x 7.5
(9 kW, 12 hp)
300 (661 Lbs)
400 V, 3 Phases, 32 A
(230 V, 3 phases, 26 A)
145 x 85 x 54
(57 x 33 x 22)
2.2 m/s2
96 dB(A)
85 dB(A)
* Daten / Data: VÜA Verein zur Überwachung technischer Anlagen e.V.
6. Sicherheitsregeln für den 6. Safety rules for operating the
Betrieb der Kugelstrahlanlage
MODUL 200® shotblast machine
Die mobile Kugelstrahlanlage MODUL 200®
ist
unter
Berücksichtigung
geltender
Sicherheitsvorkehrungen entwickelt worden.
Die technischen Sicherheitsvorkehrungen
dürfen auf keinen Fall entfernt oder verändert
werden. Beim Betrieb der Anlage sollten
außerdem folgende Punkte beachtet werden:
Bevor irgendwelche Arbeiten, auch kleinster
Art, an der Maschine vorgenommen werden,
muss der Netzstecker gezogen werden. Bei
der MODUL 200® werden hohe mechanische
Leistungen
Übertragen.
Die
Verletzungsgefahr besteht also nicht nur
durch einen elektrischen Schock, sondern
auch durch sich drehende Teile. Der
Gebrauch von Schutzmitteln wie Brillen mit
The MODUL 200® mobile shotblast machine
is constructed according to existing safety
rules and regulations. These technical
precautions should not be removed or
changed under any circumstances. While
operating the machine the following items
should also be kept in mind:
Disconnect the machine before commencing
any servicing or maintenance work –
however menial. Never unplug the machine
while it is still running.
This notice can be found in every manual but
in nearly every part of the MODUL 200®
high electrical currents are transmitted. The
danger of injury is therefore not only from
electric shock, but also from moving parts of
CONTEC® GmbH Hauptstrasse 146, 57518 Alsdorf, Deutschland/ Germany/ Allemagne
[email protected], www.contecgmbh.com
© CONTEC® 2013
Bedienungsanleitung / Manual MODUL 200®
- 11 -
Seitenschutz und Ohrenschützern ist
erforderlich. Alle Personen, die sich im
Arbeitsbereich der Maschine befinden,
müssen diese Schutzmittel tragen. Beim
erstmaligen Anlauf der Strahlmaschine und
beim Liften / Kippen der Maschine während
des Strahlens ist es möglich, dass
Strahlmittel mit hoher Geschwindigkeit aus
der Strahlöffnung austritt. Es besteht in
diesem Fall hohe Verletzungsgefahr für die
Augen. Tragen Sie Kleidung, die fest am
Körper anliegt. Flatternde Kleidungsteile
können in die Maschine gelangen und in sie
hineingezogen werden. Alle drehenden Teile
der Maschine sind mit Abdeckungen
versehen, die verhindern sollen, dass KörperKleidungs- oder sonstige Fremdteile
hineingelangen.
Lassen
Sie
alle
Abdeckungen an ihrem Platz, bevor die
Maschine aktiviert wird. Der Zutritt von
unbefugten Personen in den Arbeitsbereich
der Maschine muss verhindert werden. (Hohe
Rutschgefahr auf liegen gebliebenem
Strahlmittel). Werden während des Betriebs
ungewöhnliche
von
MODUL
200®
Laufgeräusche oder erhöhte Vibrationen
registriert, muss die Maschine unverzüglich
abgeschaltet werden und die Ursache des
außergewöhnlichen Verhaltens ergründet
werden. Die zu strahlende Fläche muss vor
der Behandlung auf grobe Unebenheiten,
Steine, Metallstücke und ähnliches überprüft
werden. Gegebenenfalls muss die Fläche
gefegt oder abgesaugt werden. Nasse oder
verölte Stellen können den Strahlvorgang
unmöglich machen und Schäden in der
Absauganlage verursachen. Eine regelmäßige
Kontrolle der zuführenden Stromkabel ist
nötig, da diese beim Betrieb der Anlage
mechanische Schäden erlitten haben könnten.
(vorher Netzstecker ziehen !) Behandeln Sie
alle spannungsführenden Teile mit größter
Sorgfalt.
the machine.
It is necessary to use safety goggles with side
protectors and ear plugs. All persons, in the
operating area of the shotblaster must take
these precautions. When switching on, or
lifting the machine during blasting, it is
possible that shot escapes at high speed.
Unprotected eyes can be seriously damaged
in this case.
Never wear loose or badly fitting clothing.
Flapping sleeves may be pulled into the
machine causing serious injury.
All rotating parts of the machine are suitably
protected by covers, which prevent clothes or
similar from entering the machine. Under no
circumstances should these covers be
removed before you switch the machine on.
Access by unauthorised persons into the
blasting area should be prevented. (Due to a
high risk of slipping on lost shot)
The MODUL 200® should be switched off
immediately if unusual noises or vibrations
are detected during the operating of the
machinery. A thorough check must be
carried out in order to detect the cause.
Always pre check the floor for undulation,
stones, screws or other foreign bodies. It
might be necessary to brush, or in extreme
cases, vacuum the floor. Wet or oily spots
can make blasting impossible and damage
the dust collector.
Check the power cables regularly as damage
may have occurred while operating the
machine. Always disconnect the cables
before examination and treat all electrical
parts with extreme care.
CONTEC® GmbH Hauptstrasse 146, 57518 Alsdorf, Deutschland/ Germany/ Allemagne
[email protected], www.contecgmbh.com
© CONTEC® 2013
Bedienungsanleitung / Manual MODUL 200®
- 12 -
7. Inbetriebnahme und Strahlen
7. Operating and blasting
Die Inbetriebnahme darf nur unter
Berücksichtigung der in dieser Anleitung
beschriebenen
Sicherheitsregeln
und
Vorkehrungen erfolgen! Transportieren Sie
MODUL 200® und die Absauganlage auf die
abzustrahlende Fläche. Der Transport wird
durch Hochstellen der Maschine erheblich
erleichtert. Die Maschine wird hochgestellt
indem Sie den Hubstab (Anhang Skizze Nr.
185) in den Bolzen der Hinterradschwinge
(Anhang Skizze Nr.193) stecken und
hochziehen. Gesichert wird die hochgestellte
Hinterradschwinge
indem
Sie
den
Kupplungsstift (Anhang Skizze Nr. 209)
durch das Loch im rechten Seitenblech der
Maschine und das Loch in der Schwinge
stecken. Vergewissern Sie sich, dass alle
Verschleißteile in gutem Zustand sind. Alle
Verschleißteile werden in Kapitel 11
definiert.
Tauschen
Sie
diese
im
Zweifelsfalle aus. Überprüfen Sie auch die
elektrischen Zuleitungskabel. Verbinden Sie
MODUL 200® mittels des Absaugschlauchs
mit der Absauganlage. Es ist wichtig, dass
der Schlauch auf ganzer Länge und an den
Anschlussstücken dicht ist. Kleine Löcher
oder falscher Sitz der Anschlussstücke
können
die
Saugleistung
erheblich
herabsetzen. Falls Sie kleinere Räume
strahlen wollen ist es sinnvoll den
mitgelieferten Bügel (Anhang Skizze Nr.
169) für den Absaugschlauch am oberen
Strahlmittelausgleichsbehälter anzubringen.
Befestigen Sie den Absaugschlauch am Ende
des Bügels. Der Schlauch wird so beim
Rückwärtsfahren von der Maschine entfernt
gehalten und liegt Ihnen nicht immer vor den
Hinterrädern.
Stecken
Sie
die
Zuleitungskabel von MODUL 200® und
Absauganlage in die Netzsteckdosen. Es ist
sinnvoll die Zuleitung von MODUL 200® mit
Isolierband oder Ähnlichen an den
Absaugschlauch
festzubinden.
Die
Basiseinheit von MODUL 200® benötigt
einen 16 A, 3 Phasen + Erde Anschluss.
Wird eine Doppelmaschine Betrieben
Operating the MODUL 200® has to be
carried out according to the safety rules in
chapter 6.
Transport the MODUL 200® and the dust
collector to the floor which is to be blasted.
Lifting the machine will make transportation
somewhat easier. In between the rear wheels
on the axel is a pin. By slotting the lifting bar
(Appendix diagram No. 185) over this pin
the machine can be lifted. If the machine is
lifted, make sure that it can’t slip down from
its raised position. Align the hole in the end
of the right rear wheel swing arm (Appendix
diagram No. 193) and the hole in the
machine side frame. Now push the clutch pin
(Appendix diagram No. 209) through both
holes.
Check and make sure that all wear & tear
parts (defined in chapter 11) are in good
condition. If there are any doubts, replace
them immediately. Check the power cables.
Connect MODUL 200® with the hose to the
dust collector. It is important, that there are
no lesions or holes in the length of hose.
Even small holes or a bad connection can
significantly decrease the performance of the
dust collector. If small rooms are to be
blasted, it is sensible to use the hose support
arch (Appendix diagram No. 169). Connect
the hose to the end of the arch. The arch will
then hold the hose away from the rear wheels
when reversing.
Connect the power cables of MODUL 200®
and the dust collector to the sockets.
Insulation tape or similar can be used to
secure the power cable to the hose. The basic
European unit MODUL 200® only needs a
16 A, 3 phases, 400 V, 50 Hz connection.
The US version a 22 A, 3 phases, 230 V, 60
Hz connection. When operating a double unit
(MODUL 200® + MODUL 200® EU) a 32
A, 3 phases, 50 Hz connection is required.
CONTEC® GmbH Hauptstrasse 146, 57518 Alsdorf, Deutschland/ Germany/ Allemagne
[email protected], www.contecgmbh.com
© CONTEC® 2013
Bedienungsanleitung / Manual MODUL 200®
- 13 -
benötigen Sie einen 32 A, 3 Phasen + Erde
Anschluss. Kontrollieren Sie den zu
strahlenden Boden auf Teile wie Schrauben,
Muttern, Steine usw. und reinigen Sie die
Fläche gegebenenfalls mit einem Besen oder
einer Absauganlage. Leichte Hindernisse,
wie Betonfugen und Absätze stellen für die
Maschine kein Problem dar. Bei größeren
Absätzen sollte vor dem aktivieren der
Turbine geprüft werden, ob die Maschine
diese Stellen problemlos überfahren kann.
ACHTUNG
Bei größeren Absätzen, Fugen oder
Bodenwellen ist es möglich, dass die
Strahlöffnung der Maschine zu weit vom
Boden
abhebt.
Die
Dichtung
der
Strahlöffnung wird dann wirkungslos und
Strahlmittel kann mit hoher Geschwindigkeit
austreten. Es besteht Verletzungsgefahr für
anwesende Personen und die Gefahr der
Beschädigung
von
Einrichtungen.
Überprüfen Sie die Fläche vor dem
Abstrahlen auf solche Stellen. Klappen Sie
den Schaltkasten der Anlage zurück und
nehmen
Sie
den
Deckel
vom
Strahlmittelbehälter Anhang Skizze Nr. 159
– 161) ab. Vergewissern Sie sich, dass der
Dosierhebel (Anhang Skizze Nr. 165) des
Strahlmittelventils geschlossen ist und füllen
Sie den Strahlmittelbehälter mit Strahlmittel
bis zur Unterkante des Siebs auf. Strahlmittel
welches über dem Sieb liegt wird abgesaugt.
ACHTUNG
Füllen Sie nur neues oder gesiebtes
Strahlmittel
in
den
Strahlmittelausgleichsbehälter. Reinigen Sie
bei Bedarf das Siebblech (Anhang Skizze Nr.
157) im Strahlmittelbehälter. Nehmen Sie
den Kupplungspin aus der Bohrung im
Seitenblech und lassen Sie die Maschine mit
Hilfe des Hubstabs ab. Danach stecken Sie
den Pin in die Bohrung der äußeren
Antriebswelle (Anhang Skizze Nr. 213).
Kontrollieren Sie den Abstand des
Magnetrahmens zum Boden. Grundsätzlich
gilt, je geringer der Abstand zum Boden, je
besser. Leider sind Böden nur selten ideal
und meistens recht uneben. Der Abstand
sollte aber keinesfalls mehr als 10 mm
betragen. Schalten Sie die Absauganlage ein.
(USA 44 A, 230 V, 60 Hz)
Check the floor for screws, nuts or stones
etc., and sweep the floor if necessary with a
brush or vacuum system. Small obstacles like
joints pose no problems for MODUL 200®. If
there are bigger undulations or similar check
if it is possible for the machine to drive over
them before the turbine is switched on.
ATTENTION !
In the case of severe undulations or difficult
joints on the floor it is possible for the
magnetic frame of the machine to rise too far
above the floor. The sealing of the
shotblaster becomes ineffective and shot
escapes from the machine at high speed. This
can cause injury to persons and equipment.
Before operating always check the condition
of the floor to prevent this from occurring.
Lift up the control panel and remove the shot
compartment lid (Appendix diagram No. 159
- 161). Make sure that the shot valve lever
(Appendix diagram No. 165) is on “close”
position and fill the shot compartment with
shot until level with the sieve. Do not fill
above the sieve level as suction from the dust
collector will suck it away with the dust.
ATTENTION !
Only place new or clean shot in the shot
compartment.
Clean the sieve (Appendix diagram No. 157)
in the shot compartment if it is blocked.
Take the clutch pin (Appendix diagram No.
209) out of the drill in the rear side of the
machine and put it into the holes of the drive
axle (Appendix diagram No. 213). Take the
lifting bar and put the machine in the lower
position.
Check the distance of the magnetic frame to
the floor. The basic rule is the closer to the
floor the better. Unfortunately floors are
never ideal and mostly uneven. The distance
CONTEC® GmbH Hauptstrasse 146, 57518 Alsdorf, Deutschland/ Germany/ Allemagne
[email protected], www.contecgmbh.com
© CONTEC® 2013
Bedienungsanleitung / Manual MODUL 200®
- 14 -
Ziehen Sie den Not-Aus Schalter (Anhang
Skizze Nr. 241) und drücken Sie den AnlageEin Taster (Anhang Skizze Nr. 35). Betätigen
Sie den Todmannschalterhebel (Anhang
Skizze Nr. 237) und prüfen Sie die
Fahrtrichtung und Geschwindigkeit der
Maschine.
Mit
dem
Fahrtrichtung
Vor/Zurück Schalter (Anhang Skizze Nr. 33)
kann die Fahrtrichtung geändert werden.
Gestrahlt werden darf nur in die Richtung in
der vom Bediener rückwärts gegangen
werden muss. Die Fahrgeschwindigkeit wird
mit dem Geschwindigkeitsregler (Anhang
Skizze Nr. 27) am rechten, unteren Ende des
Schaltkastens eingestellt. Fahren Sie mit der
Maschine an die Stelle, an der das Strahlen
beginnen soll. Drehen Sie den Stern-Dreieck
Schalter (Anhang Skizze Nr. 31) des
Turbinenmotors von der 0 in die Stern (Y)
Position. Stellen Sie sicher, dass sich das
Schleuderrad in der richtigen Richtung dreht.
Die richtige Drehrichtung ist auf dem
Riemenschutz (Anhang Skizze Nr. 187) mit
einem roten Pfeil gekennzeichnet. Dreht sich
das Schleuderrad in die falsche Richtung
schalten Sie den Schalter zurück auf die 0Stellung. Betätigen Sie dann den Not-Aus
Schalter und ziehen Sie den Netzstecker. Der
Netzstecker ist als Phasenwender ausgelegt.
Durch Einstecken und Drehen eines
Schlitzschraubenziehers werden zwei Phasen
gewendet und die Turbine wird in richtiger
Drehrichtung anlaufen. Drehen Sie wieder
den Stern-Dreieck-Schalter in die Stern
Position. Warten Sie bis der Turbinenmotor
auf maximaler Drehzahl läuft und drehen Sie
den Schalter dann in die Dreieck Position.
Betätigen Sie den Todmannschalterhebel
(Anhang Skizze Nr. 237). MODUL 200® setzt
sich dann langsam, mit Zeitverzögerung in
Bewegung. Öffnen Sie langsam das
Strahlmittelventil mittels des Dosierhebels
(Anhang Skizze Nr. 165). Setzen Sie den
Strahlvorgang nicht bei stehender Maschine
in Gang, da Sie dann tiefe Löcher in den
Boden strahlen. Das Amperemeter (Anhang
Skizze Nr. 29) auf dem Schaltschrank zeigt
Ihnen
die
Stromaufnahme
des
Turbinenmotors. Achten Sie darauf, dass die
Stromaufnahme nicht 15 A überschreitet.
has to be adapted to the floor but should
never be more than 10 mm.
Switch the dust collector on.
Pull out the emergency STOP button
(Appendix diagram No. 241) and press the
START button (Appendix diagram No. 35).
Press the lever (Appendix diagram No. 237)
of the drive unit switch and check the
direction and the speed. With the direction
forward / reverse switch (Appendix diagram
No. 33) it is possible to change the direction.
Only blast in the direction in which the
operator has to walk backwards. The speed is
regulated by the speed regulator (Appendix
diagram No. 27) on the lower right end of the
control panel. Drive the machine to the place
where blasting should begin.
Now switch the star delta switch (Appendix
diagram No. 31) of the turbine motor from 0
to star (Y) position. Make sure, that the blast
wheel is rotating in the correct direction. The
right direction is indicated by a red arrow on
the belt drive cover (Appendix diagram No.
187). In case of wrong rotation, switch the
shotblaster off and disconnect the main
cable. The plug of the machine is a phase
reverse plug. Turn the two pins in the plug of
the machine cable with a screwdriver. Switch
the star delta switch again from 0 to star
position. When the required RPM is reached
it then is safe to switch to the delta position
whereby the motor runs at full performance.
Press the lever (Appendix diagram No. 237)
of the drive unit switch. MODUL 200® will
start to move with a time delay. Open the
shot valve slowly with the shot valve lever
(Appendix diagram No. 165). Do not attempt
to open it before the machine is moving or
deep holes will be blasted into the floor.
The Ammeter on the control panel indicates
the power consumption of the turbine motor.
Make sure that the consumption is not higher
than 15 A (22A US version).
CONTEC® GmbH Hauptstrasse 146, 57518 Alsdorf, Deutschland/ Germany/ Allemagne
[email protected], www.contecgmbh.com
© CONTEC® 2013
Bedienungsanleitung / Manual MODUL 200®
- 15 -
Nach einigen Metern Strahlbetrieb schließen
Sie das Strahlmittelventil und stoppen dann
die Kugelstrahlmaschine. Betrachten Sie das
Strahlbild
auf
dem
Boden.
Bei
ungleichmäßigem Strahlbild verändern Sie
die Stellung der Einlaufbuchse wie im
Kapitel
"Einstellung
und
Wartung"
beschrieben. Setzen Sie den Strahlvorgang
fort. Bei Fahrtrichtungswechsel muss die
Maschine erst zum Stillstand kommen, bevor
Sie den Fahrtrichtung Vor/Zurück Schalter
von der 0-Stellung in die entgegengesetzte
Stellung schalten.
ACHTUNG
Schlagartiges
Umschalten
des
Fahrtrichtungswahlschalters
kann
zur
Zerstörung des Vorschubmotors oder der
Steuerungsplatine führen. Erst Maschine zum
Stillstand bringen, dann umschalten! Der
Staubbehälter der Absauganlage muss bei
Bedarf
geleert
werden.
Die
Leerungsintervalle
sind
vom
Fassungsvermögen des Behälters und von
der Beschaffenheit des Bodens abhängig.
After a few meters of blasting close the shot
valve and stop the machine. Check the track
on the floor. If the track is not evenly blasted,
adjust the position of the shot cage as
described
in
the
“Maintenance
&
Adjustment” Chapter.
8. Einstellung und Wartung
8. Maintenance & Adjustment
Repeat the blasting. When the machine is
stopped it must be allowed to come to a
complete standstill before switching on the
reverse drive direction switch.
ATTENTION !
Abrupt reversing of the drive direction
switch causes damage to the drive motor
drive circuit. First stop the machine then
reverse the switch !
The dust container of the dust collector has to
be emptied on a regular basis. The intervals
depend on the size of the container and on
the condition of the floor.
ACHTUNG ! Vor jeglichen Arbeiten an der ATTENTION ! Disconnect the main cable
Maschine Netzstecker ziehen.
before starting any maintenance or adjusting.
8.1 Einstellen des Strahlbildes
8.1 Adjust the blasting path
Das Strahlbild wird durch drehen der
Einlaufbuchse (Anhang Skizze Nr. 119) im
Mittelpunkt des Schleuderraddeckel (Anhang
Skizze Nr. 117) eingestellt. Unter einem
ungleichen Strahlbild versteht man, dass auf
einer Seite der Strahlspur mehr abgestrahlt
wird, als auf der gegenüberliegenden.
Entfernen Sie den Einlaufschlauch (Anhang
Skizze Nr. 125) zwischen Strahlmittelventil
und Einlaufflansch (Anhang Skizze Nr. 123).
Der Einlaufflansch ist mittels zweier
Klemmen (Anhang Skizze Nr. 121) auf dem
Schleuderraddeckel aufgespannt. Lösen Sie
die Klemmen durch drehen der beiden
Muttern. Die Einlaufbuchse befindet sich
The blasting path is adjusted by turning the
shot cage (Appendix diagram No. 119) in the
blast wheel cover (Appendix diagram No.
117). If blasting leaves an uneven path, then
one side of the path is being blasted more
heavily than the other.
Remove the shot hose (Appendix diagram
No. 125) between the shot valve and the shot
enter pipe (Appendix diagram No. 123). The
shot enter pipe is secured with two clamps
(Appendix diagram No. 121) on the blast
wheel cover which can be removed by
unscrewing two nuts. The shot cage is
situated under and held in position by the
CONTEC® GmbH Hauptstrasse 146, 57518 Alsdorf, Deutschland/ Germany/ Allemagne
[email protected], www.contecgmbh.com
© CONTEC® 2013
Bedienungsanleitung / Manual MODUL 200®
- 16 -
unter dem Einlaufflansch. Sie wird durch den
Flansch in ihrer Position gehalten und ist
nach dem Lösen des Einlaufflanschs frei
drehbar. Oberhalb des Mittelpunkts des
Fensters der Einlaufbuchse befindet sich ein
Schlitz. Im Einlaufflansch steckt ein Stift, der
in dem Schlitz der Buchse endet. Wird im
linken Bereich der Strahlspur mehr
abgenommen als im rechten, muss der
Einlaufflansch und damit die Einlaufbuchse
entgegen dem Uhrzeigersinn verdreht werden
und
umgekehrt.
Fixieren
Sie
die
Einlaufbuchse wieder durch Festklemmen
des Einlaufflanschs. Bringen Sie den
Einlaufschlauch an und machen Sie einen
Strahlversuch.
Wiederholen
Sie
gegebenenfalls die Einstellung, bis sich in
der Strahlspur kein Unterschied im Abtrag
feststellen lässt.
shot enter pipe. On removing the shot enter
pipe the shot cage turns freely. Above the
centre of the cage window is a marking point
(pin) which is helpful for orientation.
8.2 Einstellung der Höhe der
Strahlmaschine MODUL 200®
8.2 Adjusting the height of the MODUL
200®
An der Anlage befinden sich drei
Einstellschrauben zur Veränderung der Höhe
der Maschine. Mit der Veränderung der
Höhe wird der Abstand zwischen der
Strahlöffnung und dem Boden eingestellt.
Grundsätzlich gilt, je kleiner der Abstand je
besser (weniger Strahlmittelverlust und
Verschleiß). Ein rauer, unebener Boden
benötigt aber einen größeren Abstand zur
Maschine als ein glatter.
Für die Einstellung im vorderen Bereich ist
die Schraube am oberen Ende der
Niveaubolzenrohres (Anhang Skizze Nr.
227), unter dem Schaltschrank zuständig. An
der Hinterradaufhängung befinden sich zwei
Schrauben zur Einstellung der Höhe im
hinteren Bereich.
Lösen Sie die Kontermuttern der Schrauben.
Für alle Schrauben gilt der selbe Effekt:
Drehen im Uhrzeigersinn hebt die Maschine
an, Drehen entgegen dem Uhrzeigersinn
senkt die Maschine ab. Der Abstand zum
Boden sollte an allen Stellen des
Magnetrahmens (Anhang Skizze Nr. 207, 79
und 81) gleichmäßig sein. Ein Abstand
zwischen 5 mm und 10 mm wird den meisten
Böden gerecht.
There are three adjustable screws for
changing the height of the MODUL 200®. By
changing the height, the gap between the
floor and the magnetic frame is adjusted
accordingly. For a more effective
performance, the smaller the gap between
floor and machine, the better. (Less wear &
tear and loss of abrasive). However a rough,
uneven floor requires a slightly larger gap
than a smooth floor.
For changing the height of the front of the
machine, the screw for adjusting is situated
on the upper end of the drive unit frame
(Appendix diagram No. 227) under the
control panel. For the back of the machine,
the two screws are situated on the rear wheel
unit.
Unscrew the nuts of the screws – this applies
to all screws. Turning the screws clockwise
lifts the machine, turning them anti
clockwise lowers it. The gap between the
magnetic frame (Appendix diagram No. 207,
79 and 81) and the floor should be the same
all over. For most floors this figure is
between 5 mm and 10 mm.
If the path is heavier blasted on the left hand
side compared to the right, turn the cage anti
– clockwise. Turn in a clockwise direction if
the path is heavier on the right hand side.
Reconnect the shot enter pipe with the
clamps, connect the shot hose and try a short
test run. Repeat the adjustment if necessary
until the path is smooth, even and without
variation.
CONTEC® GmbH Hauptstrasse 146, 57518 Alsdorf, Deutschland/ Germany/ Allemagne
[email protected], www.contecgmbh.com
© CONTEC® 2013
Bedienungsanleitung / Manual MODUL 200®
- 17 -
An dem Magnetrahmen sind an der vorderen
und an den seitlichen Leisten Gummistreifen
angebracht (Anhang Skizze Nr. 83). Die
Streifen dienen zur zusätzlichen Abdichtung
der Strahlöffnung. Wird die Maschine in der
Höheneinstellung verändert, müssen die
Gummistreifen angepasst werden. Lösen Sie
die Schrauben der Flacheisen (Anhang
Skizze Nr. 85 und 86), welche die
Gummistreifen festklemmen und verschieben
Sie diese in die erforderliche Richtung. Die
Gummistreifen sollten immer satt auf dem
Boden aufliegen.
On the front and sides of the magnetic frame
are rubber strips (Appendix diagram No. 83)
which act as protective seals against escaping
abrasive. If the height of the machine is
changed, the height of the rubber strips must
also change accordingly. Slacken screws of
the brackets (Appendix diagram No. 85 and
86) which clamp the rubber strips and place
them in the desired position. They should
always lie snug to the floor.
8.3 Verschleiß am Schleuderrad und an
der Einlaufbuchse
8.3 Wear & tear on the blast wheel and
shot cage
Das Schleuderrad (Anhang Skizze Nr. 115)
ist ein reines Verschleißteil und muss
regelmäßig überprüft werden. Wir empfehlen
die erste Überprüfung bei ca. 30
Betriebsstunden
vorzunehmen.
Die
Lebensdauer des Rads ist abhängig vom
Einsatz der Maschine.
Sehr verschleißfördernd ist beispielsweise
das Abstrahlen von weichem Beton mit viel
Schlemme. Betonstaub ist ein sehr
aggressives Medium und erhöht den
Verschleiß. Verschleißarme Einsätze sind
Abstrahlen von Stahl oder Aufrauen von
Fliesen. Einen Wert für die Lebensdauer des
Schleuderrads
anzugeben
ist
daher
unmöglich. Die Lebensdauer sollte zwischen
30 und 100 Stunden liegen.
Nehmen Sie den Einlaufschlauch (Anhang
Skizze Nr. 125) zwischen Strahlmittelventil
und Einlaufflansch (Anhang Skizze Nr. 123)
ab. Lösen Sie die vier Muttern mit denen der
Schleuderraddeckel (Anhang Skizze Nr. 117)
auf dem Strahlkasten aufgeschraubt ist.
Nehmen Sie den Deckel vorsichtig ab.
Zwischen
Schleuderraddeckel
und
Strahlkasten
befindet
sich
eine
Gummidichtung, welche auf beiden Seiten
festkleben kann. Beim unvorsichtigen
Abnehmen des Schleuderraddeckels kann die
Dichtung beschädigt werden.
Vor sich sehen Sie nun das Schleuderrad. In
der Mitte des Rads befindet sich eine
Innensechskantschraube. Lösen Sie die
The blast wheel (Appendix diagram No. 115)
is a pure wear & tear part and must be
checked regularly. CONTEC® recommend a
first check after 30 hours of blasting. The life
of the blast wheel depends on the application
of the machine.
For example a lot of wear & tear occurs
when blasting soft concrete with a lot of
surface fat. Concrete dust is a very
aggressive substance and increases wear &
tear enormously. This decreases when
blasting steel or ceramic tiles. To give an
accurate figure for the lifetime of the wheel
is therefore impossible. As a rough guide,
this could be anywhere between 30 and 100
hours.
Take off the shot hose (Appendix diagram
No. 125) in between the shot valve and the
shot enter pipe (Appendix diagram No. 123).
Loosen the four nuts which secure the blast
wheel cover (Appendix diagram No. 117) to
the machine. Remove the blast wheel cover
carefully. Between the blast wheel cover and
the blast chamber is a rubber sealing which
may, during the process of operation stick to
both sides. Pay special attention not to tear or
rip it. Failure to do so will result in damage
to this sealing.
Now the blast wheel should be visible. In the
middle of the blast wheel there is a
hexagonal shaped screw. Loosen the screw
CONTEC® GmbH Hauptstrasse 146, 57518 Alsdorf, Deutschland/ Germany/ Allemagne
[email protected], www.contecgmbh.com
© CONTEC® 2013
Bedienungsanleitung / Manual MODUL 200®
- 18 -
Schraube und nehmen Sie das Schleuderrad
aus dem Strahlkasten. Überprüfen Sie das
Rad auf Verschleiß. Die vier Schaufeln
sollten eine Dicke von 5 mm nicht
unterschreiten. Ab diesem Wert kann die
Schaufel brechen und das gesamte Rad
zerstören. Überprüfen Sie die Verteilerfinger
im Inneren des Schleuderrads auf Verschleiß.
Die Einlaufbuchse (Anhang Skizze Nr. 119)
ist wie das Schleuderrad ein Verschleißteil
und muss regelmäßig überprüft werden. Es
können zwei verschiedene Verschleißarten
an der Buchse auftreten. Das Fenster in der
Buchse hat eine Breite von 30 mm. Erneuern
Sie die Buchse bei einer Fensterbreite größer
33 mm. Die zweite Verschleißart besteht im
Abtragen der Wandstärke. Erneuern Sie die
Buchse bevor ein Loch eingestrahlt worden
ist. Ist das Rad und die Buchse in gutem
Zustand, fügen Sie die Bauteile in
umgekehrter Reihenfolge wieder zusammen.
and remove the wheel from the blast
chamber. Check the wear & tear on the
wheel. The thickness of the four blades
should not be less than 5 mm. If less, the
blade could break and destroy the whole
wheel.
8.4 Verschleiß an den Innenverkleidungen
8.4 Wear & tear on the linings
Der Strahlkasten und ein großer Teil des
Rückprallkanals sind durch Verschleißplatten
geschützt. Die Auskleidungen verhindern,
dass sich die Maschine selbst zerstört. Die
Platten müssen ausgetauscht werden, wenn
die verbliebene Restdicke an einer Stelle
unter ein Drittel der Ausgangsdicke
gekommen ist. Am meisten vom Verschleiß
betroffen sind die seitlichen Verkleidungen
(Anhang Skizze Nr. 1) und die obere
Verkleidung (Anhang Skizze Nr. 3) im
Strahlkasten. Die Dicke der Verkleidungen
beträgt 10 mm. Sollten also Auswaschungen
tiefer als 6 mm vorhanden sein, muss die
Verkleidung/en
ausgetauscht
werden.
Werden die Verkleidungen zu spät
ausgetauscht strahlt die Maschine nach
kürzester Zeit ein Loch in die Gehäusewand.
Auswechseln der Innenverkleidungen:
An beiden Seiten der Maschine befindet sich
ein Deckel (Anhang Skizze Nr. 71 und 73)
der den Strahlkasten und den Rückprallkanal
und verschließt. Entfernen Sie die Deckel
durch lösen der Schrauben. Die seitlichen
Innenverkleidungen können jetzt problemlos
abgenommen werden. Am oberen Ende des
The blast chamber and a large part of the
reclaim chamber are protected by linings.
These prevent the machine from destroying
itself. The linings must be changed if the
thickness is less than one third of the original
thickness in any one place. The most wear &
tear happens to the side (Appendix diagram
No. 1) and top linings (Appendix diagram
No. 3) of the blast chamber. The thickness
of these linings is 10 mm. Should the wear &
tear be more than 6 mm they must be
changed. If they are changed too late, the
machine will blast a hole in it’s frame in a
short time.
The shot cage (Appendix diagram No. 119)
is like the blast wheel – a pure wear & tear
part and must be checked regularly. Two
different kinds of wear & tear on the cage are
possible. The window in the cage has a width
of 30 mm. Change the cage if this width is
more than 33 mm. The second type of wear
& tear is the decrease in the thickness of the
cage wall itself. Change the cage before a
hole appears. If the blast wheel and cage are
in a good condition replace the parts using
the opposite direction to that described
above.
Changing the linings:
On both sides of the MODUL 200® are the
side covers (Appendix diagram No. 71 and
73) for the reclaim chamber and blast
chamber. Remove the side covers by
loosening the screws. The side linings can
now be easily removed. On the upper end of
the blast chamber are two screws directly
CONTEC® GmbH Hauptstrasse 146, 57518 Alsdorf, Deutschland/ Germany/ Allemagne
[email protected], www.contecgmbh.com
© CONTEC® 2013
Bedienungsanleitung / Manual MODUL 200®
- 19 -
Strahlkastens befinden sich zwei Schrauben
direkt unter dem Turbinenmotor. Lösen sie
die Kontermuttern an den Schrauben und
drehen Sie diese etwa 8 mm heraus. Die
obere
Innenverkleidung
kann
jetzt
herausgenommen
werden.
Sollte die
Verkleidung klemmen schlagen Sie mehrfach
leicht mit einem Hammer auf die Seiten.
Durch die Erschütterung löst sich
eingeklemmtes Strahlmittel und Staub. Die
Innenverkleidungen an der Front- und
Rückseite
von
Strahlkasten
und
Rückprallkanal sind jeweils mit 4 oder 5
Gewindebolzen an den Außenseiten der
Kugelstrahlanlage befestigt. Bauen Sie das
Schleuderrad aus (siehe "Verschleiß am
Schleuderrad und an der Einlaufbuchse").
Lösen Sie die angebrachten Muttern und
nehmen Sie die Verkleidungen ab.
Der Einbau der neuen Verschleißplatten
erfolgt in umgekehrter Reihenfolge wie der
Ausbau. Die Lebensdauer der Platten sollte
mehrere hundert Stunden betragen. Exakte
Angaben sind wie beim Schleuderrad nicht
möglich, da der Verschleiß auch hier vom
Einsatz der Maschine abhängt.
under the turbine motor. Loosen the nuts of
these screws and turn them out by 8 mm. The
top lining can now be removed. If this proves
difficult, tap gently, but firmly on both sides
with a hammer. The motion of the hammer
will remove trapped dust and shot which may
hinder removal of the linings.
8.5 Verschleiß am Prallblech im Sichter
8.5 Wear & tear on the shot stop in the
separator
Auf der Innenseite des Strahlmittelbehälterdeckels im Sichter von MODUL 200®
befindet sich ein Prallblech (Anhang Skizze
Nr. 161), welches dem mit hoher
Geschwindigkeit ankommenden Strahlmittel
die Energie nimmt und verhindert, dass der
Sichter und Strahlmittelbehälter selbst
Schaden nimmt. Das Prallblech verhindert
außerdem das Absaugen von Strahlmittel.
Beim Einfüllen von neuem Strahlmittel in
den Strahlmittelbehälter sollte das Prallblech
hin und wieder auf Verschleiß überprüft
werden. Das Wechseln des Prallblechs
erfolgt sehr einfach durch lösen der beiden
Schrauben am Strahlmittelbehälterdeckel.
8.6 Riementrieb
The front and back linings of the blast and
reclaim chambers are each secured by four
(vive) nuts on the outside of the chambers.
Remove the blast wheel (Refer to “wear &
tear on the blast wheel and shot cage”).
Loosen the four (vive) nuts and remove the
linings. The installation of the new linings is
the reverse procedure to removing them. The
lifetime of the linings should normally be
200 hours. Again a precise figure cannot be
given for the same reasons described for the
blast wheel – i.e. depending on the
application.
On the inner side of the shot compartment lid
in the separator is the shot stop (Appendix
diagram No. 161). This takes away the
energy of the high speed rebounding shot,
thus preventing the destruction of the shot
compartment. It also prevents the dust
collector from sucking shot out of the
machine. The shot stop should be regularly
checked. Changing the shot stop is easily
done by removing the two screws on the shot
compartment lid.
8.6 Belt drive
Der Riementrieb ist auf mindestens 500 The belt drive is made to last at least 500
Betriebsstunden ausgelegt. Dies gilt aber nur hours – but only if it is tensioned correctly.
bei ordnungsgemäß gespanntem Riemen. To check the tension remove the belt drive
CONTEC® GmbH Hauptstrasse 146, 57518 Alsdorf, Deutschland/ Germany/ Allemagne
[email protected], www.contecgmbh.com
© CONTEC® 2013
Bedienungsanleitung / Manual MODUL 200®
- 20 -
Zum Überprüfen des Riemens bauen Sie den
Riemenschutz (Anhang Skizze Nr. 187) ab.
Der Riemen (Anhang Skizze Nr. 97) sollte
auf
halber
Länge
zwischen
den
Riemenscheiben nicht mehr als einen halben
Zentimeter in beide Richtungen verschiebbar
sein. Sollte der Riemen zu locker sein muss
er nachgespannt werden. Lösen Sie die vier
Schrauben, mit denen der Turbinenmotor
(Anhang Skizze Nr. 91) angeflanscht ist. Auf
der Oberseite des Motorflanschs befindet
sich die Gewindestange des Riemenspanners
(Anhang Skizze Nr. 181) mit Mutter. Drehen
sie die Mutter solange im Uhrzeigersinn, bis
der Riemen die korrekte Vorspannung
aufweist. Ziehen Sie die Flanschschrauben
wieder an. Drehen Sie die Mutter des
Riemenspanners fest.
safety cover (Appendix diagram No. 187). It
shouldn’t be possible to move the belt
(Appendix diagram No. 97) more than half a
cm in each direction half way between the
pulleys. If it is too loose, adjust the tension
by loosening the four screws which hold the
turbine motor (Appendix diagram No. 91).
On the upper side of the motor flange
(Appendix diagram No. 181) is a nut. Turn
this in a clockwise direction until the tension
of the belt is correct. Tighten the four screws
of the motor and tighten the nut.
ATTENTION !
Secure the belt drive safety cover !
ACHTUNG
Befestigen Sie wieder den Riemenschutz !
8.7 Verschleiß an der Schleppe
8.7 Wear & tear on the back skirt
Die Schleppe (Anhang Skizze Nr. 199 bis
205) im hinteren Bereich der Strahlöffnung
hat die Aufgaben das Austreten des
Strahlmittels zu verhindern, den hinteren
Bereich abzudichten und den Kugelverlust
somit zu minimieren. Ist das Schleppenrohr
(Anhang Skizze Nr. 199) abgenutzt, muss es
erneuert werden. Lösen Sie die Schrauben
des Flacheisens, welches die Schleppe
festklemmt. Tauschen Sie die verschlissenen
Teile aus und befestigen Sie die Schleppe
wieder.
The back skirt (Appendix diagram No. 199 to
205) on the rear of the blast opening serves
to prevent shot from escaping and thereby
minimises the loss of shot. If the skirt is worn
out it must be replaced. Remove the screws
of the bracket which secures the skirt.
Remove the worn out parts, exchange them
and replace the skirt to it’s former position.
8.8 Verschleiß am Magnetrahmen und an
der Strahlöffnung
8.8 Wear & tear on the magnetic frame
and the blast opening
Im Bereich des Magnetrahmens befinden
sich mehrere Teile, die in größeren
Abständen überprüft werden müssen. Die
Teile sind Verschleiß durch Strahlmittel und
Aufsetzen auf dem Boden unterworfen. In
den vorderen- und den seitlichen Bereichen
befinden sich Leisten, in die Magnete
integriert wurden. Die Leisten sind einfach
zu Entfernen. Die seitlichen Magnetleisten
(Anhang Skizze Nr. 79 und 81) sind an den
Around the magnetic frame are several parts
which must be regularly checked. The parts
are subject to wear & tear through action of
the shot and through contact with the floor.
In the front and side areas are the magnetic
frames. These are easily removed. The left
and right frames (Appendix diagram No. 79
and 81) are screwed to the side cover. The
front frame (Appendix diagram No. 207) is
screwed to a bracket on the reclaim chamber.
CONTEC® GmbH Hauptstrasse 146, 57518 Alsdorf, Deutschland/ Germany/ Allemagne
[email protected], www.contecgmbh.com
© CONTEC® 2013
Bedienungsanleitung / Manual MODUL 200®
- 21 -
Seitendeckeln festgeschraubt. Die fordere
Leiste (Anhang Skizze Nr. 207) ist an einem
Flacheisen am Rückprallkanal befestigt.
Nach dem Entfernen der Magnetleisten wird
ein Schleppenhaltewinkel (Anhang Skizze
Nr. 197) sichtbar. An dem Winkel ist die
oben in 8.7 erwähnte Schleppe befestigt. Der
Winkel ist hauptsächlich beim Aufsetzen der
Maschine einem Verschleiß ausgesetzt. Alle
erwähnten Teile sollten regelmäßig überprüft
werden. Zum Überprüfen ist es aber nicht
nötig die Teile zu entfernen. Legt man die
Strahlmaschine vorsichtig auf die Seite,
werden alle Teile sichtbar. Sie bilden den
Rahmen der Strahlöffnung.
After removing the magnetic frame, on the
rear side of the opening is another part
(Appendix diagram No. 197). The back skirt,
mentioned in 8.7, is screwed to this part.
Wear & tear happens mainly to this part if it
is in contact with the floor. As previously
mentioned, it is important to check all parts
regularly. In doing so, it is not necessary to
unscrew the magnetic frame, just place the
machine carefully on it’s side and check for
wear & tear.
8.9 Lager
8.9 Bearings
Lager sind immer ein heikles Thema im
Maschinenbau. Lager ordnungsgemäß zu
wechseln ist eigentlich keine Kunst, wenn
grundlegende Regeln beachtet werden. Diese
Regeln zu beschreiben sprengt den Umfang
dieses Handbuchs. Lager befinden sich bei
der Kugelstrahlmaschine MODUL 200® in
den Motoren, der Hebevorrichtung, dem
Turbinenlager, in der Vorschubeinheit und in
den Hinterrädern. Die Lager in den Motoren
dürfen keinesfalls selbst gewechselt werden.
Schicken Sie die Motore ins Werk ein oder
bringen Sie diese in eine Ankerwicklerei. Die
Turbinenlagerböcke sind das schwierigste
Thema, zumal die Lager am häufigsten von
allen Lagern verschleißen. Die Lebensdauer
der sehr schnell drehenden und dadurch
hochbelasteten Lager beträgt zwischen 500
und 1000 Stunden. Zum Wechseln der Lager
muss die Maschine oder nur die Lagerung
ins Werk eingeschickt werden.
Bearings are always tricky in mechanical
engineering. To change bearings is generally
simple if the rules are observed. However,
for the purpose of this manual, too complex
to describe in any detail. If you have any
doubts always refer to trained or experienced
engineer.
The bearings for the MODUL 200®, are
situated in the motors, the drive unit lever,
the turbine axle housing, the drive unit frame
and the wheels. Never attempt to change the
motor bearings by yourself. Return the
motors to CONTEC® or take them to a
reputable motor rewind technician.
The turbine axle housing is the most difficult
item to deal with. The bearings inside are
under the greatest stress from the operation
of the machine. The lifetime of such high
speed revolving bearings is between 500 and
1000 hours. To change the bearings send the
machine or machine housing to CONTEC®.
CONTEC® GmbH Hauptstrasse 146, 57518 Alsdorf, Deutschland/ Germany/ Allemagne
[email protected], www.contecgmbh.com
© CONTEC® 2013
Bedienungsanleitung / Manual MODUL 200®
- 22 -
9. Fehler und Behebung
9. Troubleshooting
Beim aktivieren der Maschine mit dem
Anlage-Ein Taster leuchtet zwar noch die
Anlage-Aktiv Lampe auf, aber alle oder ein
Teil der Aggregate läuft nicht.
If, after activating the machine by pressing
„START“ the run lamp is lit but all or part of
the motor is not running – check the
following:
- Ist der Netzanschluss in Ordnung ?
- Sind die Zuleitungskabel in einwandfreiem Zustand
und richtig verlegt ?
- Sind die Sicherungsautomaten im Schaltkasten
geschlossen ?
- Sind die Motorschutzschalter im Schaltkasten
geschlossen ?
- Is the power connection correct ?
- Are the cables in a good condition and properly
laid ?
- Are the fuses in the control panel closed ?
- Is the motor overload protection in the control panel
closed ?
Der Turbinenmotor läuft nicht an.
The turbine motor is not working.
- Ist beim Transport der Maschine der Strahlkasten
voll Strahlmittel gelaufen und blockiert jetzt das
Schleuderrad ?
- Ist der Motorschutzschalter im Schaltkasten
geschlossen ?
- Has the blast chamber filled up with shot and
blocked the blast wheel during transportation of the
machine ?
- Is the motor overload protection in the control panel
closed ?
Der Vorschubmotor läuft nicht an.
The drive motor is not working.
- Ist die Sicherung der Vorschubeinheit im
Schaltkasten geschlossen ?
- Sind beide Feinsicherungen auf der Steuerplatine
durchgängig ?
- Ist das Antriebsrad im ausgekuppelten Zustand frei
drehbar ?
- Is the fuse for the drive unit in the control panel
closed ?
- Are both (glass) fuses on the control circuit OK ?
- Does the drive wheel turn easily when not connected
to the drive motor ?
Die Strahlleistung ist zu gering bei laufenden
Aggregaten
The blast performance is too low.
- Hat das Schleuderrad die richtige Drehrichtung ?
- Ist das Schleuderrad verschlissen ?
- Ist die Einlaufbuchse korrekt eingestellt ?
- Ist die Einlaufbuchse verschlissen ?
- Ist das Strahlmittelsieb im Strahlmittelbehälter
verstopft ?
- Ist das Strahlmittelventil verstopft ?
- Ist das Strahlmittel verschlissen ? (Kontrollieren Sie
die Korngröße)
- Is the blast wheel turning in the right direction ?
- Has the blast wheel worn out ?
- Has the shot cage been correctly adjusted ?
- Has the shot cage worn out ?
- Is the sieve in the shot compartment blocked ?
- Is the shot valve blocked ?
- Is the shot worn out ? (Check the size of the balls)
MODUL 200® strahlt kurzfristig und wirft
dann alles Strahlmittel wie einen Teppich
aus.
MODUL 200® works for a short time and
loses all the shot („carpeting effect“).
- Läuft das Schleuderrad im richtigen Drehsinn ?
- Ist das Schleuderrad verschlissen ?
- Ist die Einlaufbuchse richtig eingestellt ?
- Ist die Einlaufbuchse verschlissen ?
- Liegt die Gummiabdichtung um den Magnetrahmen
- Is the blast wheel rotating in the correct direction ?
- Has the blast wheel worn out ?
- Has the shot cage been correctly adjusted ?
- Has the shot cage been worn out ?
- Do the rubber seals of the magnetic frame lie snugly
CONTEC® GmbH Hauptstrasse 146, 57518 Alsdorf, Deutschland/ Germany/ Allemagne
[email protected], www.contecgmbh.com
© CONTEC® 2013
Bedienungsanleitung / Manual MODUL 200®
- 23 -
satt auf dem Boden ?
- Ist die Gummiabdichtung verschlissen ?
- Ist die Kugelstrahlmaschine zu hoch eingestellt ?
- Ist der Antriebsriemen der Turbine zu locker. (Es
entsteht Schlupf und das
Schleuderrad kommt nicht auf die benötigte
Drehzahl)
- Ist die der Boden strahlbar ? Ist er trocken, nicht zu
elastisch oder zu weich ?
with the floor ?
- Have the rubber seals worn out ?
- Is the height of the machine positioned too high ?
- Is the belt of the turbine too lose ? (The belt will slip
on the pulleys and the blast wheel will not rotate
quickly enough).
- Is it possible to blast the floor ? Check the condition.
Is it dry and not too elastic or soft ?
10. Das modulare System
10. The modular system
10.1 Anbau von MODUL 200® EU an
MODUL 200®
10.1 Connecting MODUL 200® EU to
MODUL 200®
Im Folgenden wird der Anbau eines Grundbausteins
MODUL 200® EU an die Basiseinheit MODUL 200®
beschrieben. Es wird davon ausgegangen, dass der
vorhandene
Schaltkasten
bereits
für
eine
Doppelmaschine ausgerüstet ist.
Nehmen Sie den rechten Seitendeckel (Anhang Skizze
Nr. 71) von MODUL 200® ab. Sie können jetzt die
rechten Innenverkleidungen von Strahlkasten (Anhang
Skizze Nr. 1) und Rückprallkanal (Anhang Skizze Nr.
9) herausnehmen. Über dem linken Seitendeckel
befindet sich auf Höhe des Sichters ein weiteres
Verschlussblech (Anhang Skizze Nr. 153). Entfernen
Sie das Blech.
Demontieren Sie die Schleppe (Anhang Skizze Nr.
199 bis 205) und die Gummistreifen (Anhang Skizze
Nr. 83) um den Magnetrahmen.
Legen Sie MODUL 200® vorsichtig auf die rechte
Seite zum Beispiel auf eine Palette. Beschädigen Sie
dabei nicht den Dosierhebel und den Bowdenzug des
Strahlmittelventils.
Bauen Sie das obere Hinterrad (Anhang Skizze Nr.
189) ab. Stecken Sie in die nun offene Achse der
Hinterradaufhängung den Verbindungsstift der
Hinterradaufhängung.
Stecken Sie die Wellenkupplung auf die nun nach
oben zeigende Welle (Anhang Skizze Nr. 133) des
Strahlmittelventils.
Legen Sie die Trennverkleidungen (Wandstärke 15
mm) des Strahlkastens und des Rückprallkanals an die
Stellen, wo Sie vorher die Innenverkleidungen
entnommen haben.
Legen Sie nun MODUL 200® EU vorsichtig auf
MODUL 200®. Vergewissern Sie sich, dass der
Verbindungsstift der Hinterradaufhängung in den
beiden Aufhängungen steckt und dass die
Trennverkleidungen in beiden Einheiten richtig
positioniert sind.
Verschrauben Sie beide Einheiten. Bringen Sie den
Seitendeckel nun auf der Oberseite von MODUL 200®
EU an. Ziehen Sie alle Muttern zum Verschrauben der
Einheiten und des Seitendeckels nur handfest an.
In the following the connection of a MODUL 200®
EU to a MODUL 200® basic unit is described. It is
assumed, that the control panel for a double unit has
already been prepared.
Remove the left side cover (Appendix diagram No.
71) of MODUL 200®. Now remove the left side
linings of the blast chamber (Appendix diagram No.
1) and the reclaim chamber (Appendix diagram No.
9). Above the left side cover is another cover
(Appendix diagram No. 153) for the shot
compartment, remove this also.
Remove the back skirt (Appendix diagram No. 199 to
205) and the rubber sealing (Appendix diagram No.
83) of the magnetic frame.
Place the MODUL 200® carefully on its right side.
Taking care not to damage the shot valve lever or the
remote control cable.
Remove the upper rear wheel (Appendix diagram No.
189). Place the level adjustment connector in the now
empty axle of the rear wheel system.
Insert the clutch for the shot valves into the shot valve
axle (Ap. diagram No. 133).
Place the separating linings (thickness 15 mm) for the
reclaim and blast chamber in the position of the
removed side linings.
Place the MODUL 200® EU carefully on MODUL
200®. Make sure that the level adjustment connector
of the rear wheel is connected to both machines and
that the position of the separating linings is correct.
Without the aid of power tools, hand screw both units
together and connect the side cover to MODUL 200®
EU. Now connect the rear wheel to MODUL 200®
EU. Return the machine to the normal upright position
CONTEC® GmbH Hauptstrasse 146, 57518 Alsdorf, Deutschland/ Germany/ Allemagne
[email protected], www.contecgmbh.com
© CONTEC® 2013
Bedienungsanleitung / Manual MODUL 200®
- 24 -
Bringen Sie das Hinterrad an der Hinterradaufhängung
von MODUL 200 EU® an. Stellen Sie die Maschine
auf. Verschrauben Sie jetzt erst den Seitendeckel und
dann beide Einheiten fest miteinander. Bringen sie das
Verschlussblech an MODUL 200® EU an.
Klappen Sie den Schaltkasten auf und entnehmen Sie
die Strahlmittelbehälterdeckel (Anhang Skizze Nr.
159 bis 163). Bringen Sie die Klappe (Anhang Skizze
Nr. 129) des Strahlmittelventils von MODUL 200
EU® in die gleiche Stellung wie die Klappe von
MODUL
200®.
Sollten
die
Wellen
der
Strahlmittelventile nicht genau fluchten, lösen Sie
jeweils
die
4
Befestigungsmuttern
der
Strahlmittelventile und stellen Sie diese ein. Ziehen
Sie
die
Wellenkupplung
auf
beide
Strahlmittelventilwellen und schrauben Sie diese fest.
Befestigen Sie die Doppelschleppe an beiden
Einheiten. Befestigen Sie die Gummistreifen an
beiden Einheiten.
Lösen Sie den Kabelschutz an der rechten Seite der
Maschine und führen Sie das Anschlusskabel des
Turbinenmotors von MODUL 200® EU ein. Stecken
Sie den Stecker des Kabels in die Kupplung am
Schaltschrank.
then screw first the side cover and then both units tight
together. Connect the shot compartment side cover to
MODUL 200® EU
Lift the control panel and remove the shot
compartment lids (Appendix diagram No. 159 to 163).
Align the valve (Appendix diagram No. 129) of
MODUL 200® EU to exactly the same position of the
MODUL 200® valve. To align the valves correctly
loosen the screws of the shot valves and place them in
the same position. Pull the clutch on both valve axles
and secure them.
Connect the double back skirt to both units. Connect
the rubber seals to the magnetic frames.
Loosen the cable protector on the right side of the
machine and insert the cable of the MODUL 200® EU
turbine motor inside. Connect the plug of the cable to
the socket on the control panel.
10.2 Mehrteile und Umtauschteile für
den Anbau von MODUL 200® EU
10.2 Additional and interchangeable
parts for the extension of MODUL 200®
Mehrteile:
Wellenkupplung des Strahlmittelventils
Verbindungsstift der Hinterradaufhängung
Additional parts:
Clutch for the shot valves
Connection pin for the rear wheel swing
Umtauschteile:
Schleppe
Gummistreifen um Magnetrahmen
Trennverkleidungen
Interchangeable parts:
Back skirt
Rubber sealing for the magnetic frame
Separating linings
11. Verschleißteile
11. Wear & tear parts
Folgend sind alle als Verschleißteil definierte
Bauteile von MODUL 350® aufgeführt:
Definition of wear & tear parts:
Schleuderrad, Einlaufbuchse,
Innenverkleidungen, Magnetrahmen,
Haltewinkel für Schleppe, Schleppe,
Strahlfeldabdichtung Gummileiste,
Prallblech im Sichter, Schleuderraddeckel,
Einlaufschlauch, Poly-V Riemen der
Turbine, Poly-V Riemenscheiben der
Turbine
Blast wheel, Shot cage, Linings,
Magnetic frame, Bracket for the back skirt,
Back skirt,
Rubber sealing for the magnetic frame,
Shot stop, Blast wheel cover,
Shot hose,
Poly-V belt of the turbine,
Poly-V Pulleys of the turbine
CONTEC® GmbH Hauptstrasse 146, 57518 Alsdorf, Deutschland/ Germany/ Allemagne
[email protected], www.contecgmbh.com
© CONTEC® 2013
Bedienungsanleitung / Manual MODUL 200®
- 25 -
12. Strahlmittel / Shot
Verschiedene Böden erfordern verschiedene Strahlmittel. Nachfolgend finden Sie einige
Informationen über die gebräuchlichsten Strahlmittel.
Normung
BSS 2451
S460
S390
G34-G47
Normung Korngröße
SAE J444a
S460
1,8-2,2 mm
S390
1,0-1,7 mm
0,85-2,0 mm
Anwendung
Strahlen von Beton und Beschichtungen oder Farbe
Strahlen von Beton falls feines Profil gefordert
Abstrahlen von hartnäckigen Beschichtungen auf
Beton oder Stahl.
G34-G47 darf nur als Beimischung zu S460/390
verwendet werden. Das Mischungsverhältnis darf
nicht mehr als 30% G43-G47 betragen !
Different floors need different shot. Here is a list of shot with the fitting application.
According to
BSS 2451
S390
S340
G34-G47
According to Shot size
SAE J444a
S390
1,0-1,7 mm
S330
0,85-1,4 mm
0,85-2,0 mm
Application
Plain concrete or coatings
Plain concrete to achieve a fine profile
Concrete with difficult coatings.
Steal surfaces like bridges, ship decks and tanks.
G34-G47 should never be used pure. Always
mix it with S390/340/330. Not more then 1 part
of G34 – G47 on two parts of S390/340/330
13. Anhang / Appendix
Explosionszeichnung (Skizze) / Diagrams
Verdrahtungsplan / Wire diagram
Teileliste / Part list
CONTEC® GmbH Hauptstrasse 146, 57518 Alsdorf, Deutschland/ Germany/ Allemagne
[email protected], www.contecgmbh.com
© CONTEC® 2013
MODUL 200
Artikel-Nr. / Part-No.
20-12-00-08
20-12-00-05
20-12-00-03
20-12-00-04
20-12-00-07
20-12-00-02
20-12-00-01
20-12-00-12
50-20-30-63-A
50-20-30-15
50-20-30-10-A
50-20-20-18
50-20-20-11
50-20-20-10
51-20-30-25
51-20-30-00
51-20-20-04
50-20-23-03
50-20-23-02-N
50-20-33-07
50-20-33-08
50-20-23-09
50-20-33-061
50-20-30-02
50-20-30-03
50-20-20-12
50-20-20-131
50-20-20-121
50-20-20-13
51-20-30-01
50-20-30-04
Bezeichnung1
Innenverkleidung Seite Strahlkasten Modul 200
Innenverkleidung Strahlkasten oben M200 komplett
Innenverkleidung Strahlkasten zum Lagerbock
Innenverkleidung Strahlkasten Einlaufseite
Innenverkleidung Seite Rückprallkanal Modul 200
Innenverkleidung Rückprallkanal Innenseite M 200
Innenverkleidung Rückprallkanal Außenseite
Innenverkleidung Bogenblech im Rückprallkanal M200
Feinsicherung 6,3 A für Vorschubsteuerung
Vorschubsteuerung Modul 350
Feinsicherung 10 A für Vorschubsteuerung
Potentiometer
Scala für Potentiometer
Drehknopf Potentiometer
Amperemeter 48mm 25 A
Anschlußabdeckungen für Amperemeter DIN 48
Stern-Dreieck-Schalter T3-5-25/E
Wahltaste Richtungsschalter M22-WRK3
Leuchtdrucktaster M22-DL-G
Kontaktelement M22-K10 Schliesser
Kontaktelement M22-K01 Öffner
Befestigungsadapter M22-A
LED-Element M22-LED 230-W
Sicherung Vorschub Siemens C6
Sicherung Steuerung Siemens C2
Harting/Walther Anbaugehäuse
Harting/Walther Stifteinsatz
Harting/Walther Buchseneinsatz
Harting/Walther Tüllengehäuse
Motorschutzschalter 0-16
Hauptschütz DILM25-10 230 Volt
1
Bezeichnung2
Modul 200
Modul 200
Modul 200
D-Nr
1
3
5
7
9
11
13
15
20
21
22
23
25
27
29
30
31
33
35
37
38
39
41
45
47
49
50
51
52
53
55
Weight KG
2,05
1,612
2,74
1,37
3,03
2,9
3,2
1,672
0
0,404
0
0,036
0,01
0,01
0,126
0,018
0,326
0,012
0,008
0,01
0,008
0,003
0,01
0,132
0,134
0,076
0,054
0,056
0,11
0,308
0,45
MODUL 200
50-20-30-05
50-20-30-13
50-11-11-04
50-11-11-02
50-10-10-99-M200
50-10-10-00
30-10-11-00
30-10-10-00
70-27-00-70
70-27-10-70
30-10-14-00
30-10-13-00
70-23-80-06
30-10-24-01
30-10-24-02
55-14-00-75
90-24-01-30
90-24-16-10-28
70-24-32-08
90-24-00-44
31-17-10-03
61-20-63-06
30-17-10-04
61-20-63-05
30-17-10-01
31-17-10-02
31-17-10-05
30-15-19-00
30-10-17-00
30-15-17-02
30-10-17-04
30-10-17-03
70-25-70-01
Hilfsbaustein für Hauptschütz 20 DIL
Stundenzähler
Weidmüller Reihenklemme ZDU 2,5/Beige
Weidmüller EK 2,5 / 35 Grün Gelb Version
Schaltkasten mit Löcher Modul 200
Schaltkasten komplett für Modul 200
Seitendeckel rechts M200
Seitendeckel links Modul 200
Stopfen (Kappe für Rohr) 70 mm
Stopfen Für Bohrung 70 mm
Magnetleiste rechts Modul 200/350 Elgator
Magnetleiste links Modul 200/350 Elgator
Strahlfeldabdichtung Gummileiste Modul 200
Strahlfeldabdichtung Flacheisen Modul 200/M350
Strahlfeldabdichtung Flacheisen vorne Modul 200
Motor 7,5 KW, 400 Volt Modul 200
Große Poly-V Riemenscheibe Modul 200/Elephant
Taperlock große Riemenscheibe Modul 200 Elephant
Poly-V Riemen M200/Elephant
Poly-V Riemenscheibe klein Modul 200/Elephant
Lagerbock Abdeckplatte zum Riementrieb Modul 200
Lager Turbine zum Riementrieb Modul 200/Elephant
Lagerwelle für 7,5 KW Modul 200
Lager Turbine zur Strahlkammer Modul 200/Elephant
Lagergehäuse für 7,5 KW Version Modul 200
Lagerbock Abdeckplatte zur Strahlkammer Modul 200
Schleuderradaufnahme
Schleuderrad inkl. Befestigungsschraube Modul 200
Schleuderraddeckel Modul 200
Schleuderrad Strahlmitteleinlaufbuchse Modul 200
Einlaufrohrsicherung M200/M350
Strahlmitteleinlaufrohr Modul 200
Flexrohr Strahlmitteleinlauf Modul 200
2
Elephant
Elephant
Elephant
Elephant
57
59
61
63
66
69
71
73
75
77
79
81
83
85
86
91
93
95
97
99
101
103
105
107
109
111
113
115
117
119
121
123
125
0,03
0,062
0,006
0,02
3,725
4
4,95
5,05
0,02
0,03
1,31
1,36
0,5
0,39
0,44
44
2,19
0,32
0,06
0,22
0,068
0,354
1,092
0,232
3,115
0,144
0,28
1,8
3,34
0,57
0,07
0,92
0,03
MODUL 200
30-14-16-01
30-10-16-03
30-10-16-04
30-10-16-02
10-10-00-00
30-10-27-00
30-10-01-04
30-10-01-03
30-10-04-00
90-21-50-16
30-10-05-04
30-10-05-01
90-20-00-10
30-10-07-01
30-10-28-02
30-10-28-01
50-10-15-53
30-10-01-05
50-20-40-01
30-10-23-00
30-10-06-00
70-21-26-10
30-10-09-00
30-10-25-01
80-20-31-60
30-10-08-04
30-10-08-00
30-10-07-00
30-10-26-00
30-10-15-01
70-23-35-03
30-10-15-02
70-23-00-06
Strahlmittelventil Alurohr mit Magneten Modul 200
Strahlmittelventildeckel Modul 200
Strahlmittelventilhebel Modul 200/M350
Strahlmittelventilstange Modul 200
Maschinenrahmen M200
Verschlußdeckel Sichter Seite li./re. Modul 200
Schaltschrankhalterung Rohr Modul 200
Bowdenzughalter am Schaltschrank Modul 200
Reinigungssieb Strahlmittelbehälter ohne Griff
Bügelgriff 160 mm
Prallblech Sichterdeckel Modul 200
Sichterdeckel ohne Griff und Prallblech Modul 200
Bowdenzug M200/M350/Elephant
Bowdenzughalter am Rahmen Modul 200/350
Absaugschlauchhalterung Bügel Modul 200
Absaugschlauchhalterung Aufnahme Modul 200
Klemmkasten EB 1553
Flacheisen für Trafobefestigung Modul 200
Transformator 250 Watt
Riemenspannerwinkel Modul 200/350
Riemenspanner Modul 200
Griffgummi Gross 26,9 mm
Hubstab Modul 200
Riemenschutz Modul 200
Hinterrad 160 F3
Achsbolzen Hinterrad M200
Hinterradaufhängung Modul 200
Kabelkanal Modul 200
Schleppe Haltewinkel Modul 200
Schleppenrohr M200
Schleppe Gummi zum hinterlegen Modul 200
Schleppe Flacheisen Modul 200
Schleppengummi Modul 200
Modul 200
3
127
129
131
133
151
153
154
155
157
159
161
163
165
167
169
171
173
175
177
179
181
183
185
187
189
191
193
195
197
199
201
203
205
0,31
0,06
0,07
0,17
0
0,54
0,53
0,49
0,8
0,12
1,76
1,28
1,5
0,07
0,8
0,44
1,78
0,14
3,7
0,19
1,21
0,044
1,01
0
1,19
0,37
1
0,96
1
0,58
0,04
0,3
0,27
MODUL 200
30-10-12-00
90-25-00-01
30-10-02-05
30-17-02-02
61-20-61-91
30-17-02-01
80-20-32-00-V
50-20-20-20
50-20-20-19
30-10-02-00
30-10-02-04
30-10-03-02
61-20-60-02
30-10-03-03
50-20-10-01
30-10-03-04
50-20-21-02-N
50-20-23-01
70-27-35-35
50-20-20-14
Magnetleiste vorne Modul 200
Kupplungsstift Antrieb Modul 200/350 Elgator
Antrieb Wellenabschlußdeckel M200
Antriebswelle für Vorschubmotor Mdul 200
Lager für Antriebsnabe Modul 200
Antriebsnabe für Vorschubmotor Modul 200
Antriebsrad Modul 200
Antriebsmotor Getriebe 170 Watt Modul 200
Antriebsmotor ohne Getriebe 170 W Modul 200
Antriebsgabel Modul 200
Niveaubolzenrohr für Antrieb M200
Griffunterteil Modul 200
Lager für Liftgabel Modul 200
Griffoberteil Modul 200
Todmannschalter komplett mit Hebel Modul 200/350
Todmannhebel Aluminium HH-A
Not-Aus-Gehäuse Aufbau am Griff
Not-Aus-Schalter Standard
Stopfen Griffrohr 535 Modul 200
Wendestecker 16 A, 400 Volt, 5P
120 : 1
Elgator
4
207
209
211
213
215
217
219
221
223
225
227
229
230
231
233
235
239
241
243
245
1,59
0,06
0,33
0,77
0,14
1,07
3,86
2,71
3,31
4,79
1,72
2,26
0,032
1,24
0,272
0,014
0,156
0,038
0,006
0,19
MODUL 200
Artikel-Nr. / Part-No.
20-12-00-08
20-12-00-05
20-12-00-03
20-12-00-04
20-12-00-07
20-12-00-02
20-12-00-01
20-12-00-12
50-20-30-63-A
50-20-30-15
50-20-30-10-A
50-20-20-18
50-20-20-11
50-20-20-10
51-20-30-25
51-20-30-00
51-20-20-04
50-20-23-03
50-20-23-02-N
50-20-33-07
50-20-33-08
50-20-23-09
50-20-33-061
50-20-30-02
50-20-30-03
50-20-20-12
50-20-20-131
50-20-20-121
50-20-20-13
51-20-30-01
50-20-30-04
Description1
Side Lining Blast Chamber Modul 200
Top Lining Blast Chamber Modul 200
Lining Blast Chamber to the Bearing Housing
Front Lining Blast Chamber to the Blast
Side Lining Reclaim Chamber Modul 200
Lining Reclaim Chamber Inside Modul 200
Front Lining Reclaim Chamb.Outside Modul 200
Curved Lining Reclaim Chamber M200
Fuse 6,3 A for control cercuit
Drive Circuit Modul 350
Fuse 10 A for Drive control
Potentiometer
Speed Scale
Potentiometer Speed Button only
Ampmeter 48 mm 25 A
Cover for Ampmeter 48 mm
Star-Delta Switch T3 Modul 350
Direction Switch
Start Button with Light
Contact Element M22-K01 closer
Contact Element M22-K01 opener
Mounting Adapter for Switches
LED Element for bulb
Circuit Breaker Drive Unit C6
Circuit Breaker Control C2
Harting Socket housing
Harting Plug Pin Mounting
Jack in the Housing
Harting Plug housing
Motor Protective 0-16
Main Contactor DILM25-10 230 Volt
Description2
Modul 200
Wheel Cover Modul 200
1
D-Nr
1
3
5
7
9
11
13
15
20
21
22
23
25
27
29
30
31
33
35
37
38
39
41
45
47
49
50
51
52
53
55
Weight KG
2,05
1,612
2,74
1,37
3,03
2,9
3,2
1,672
0
0,404
0
0,036
0,01
0,01
0,126
0,018
0,326
0,012
0,008
0,01
0,008
0,003
0,01
0,132
0,134
0,076
0,054
0,056
0,11
0,308
0,45
MODUL 200
50-20-30-05
50-20-30-13
50-11-11-04
50-11-11-02
50-10-10-99-M200
50-10-10-00
30-10-11-00
30-10-10-00
70-27-00-70
70-27-10-70
30-10-14-00
30-10-13-00
70-23-80-06
30-10-24-01
30-10-24-02
55-14-00-75
90-24-01-30
90-24-16-10-28
70-24-32-08
90-24-00-44
31-17-10-03
61-20-63-06
30-17-10-04
61-20-63-05
30-17-10-01
31-17-10-02
31-17-10-05
30-15-19-00
30-10-17-00
30-15-17-02
30-10-17-04
30-10-17-03
70-25-70-01
Auxilary Contact Module for Main Contactor 20 DIL
Hour Counter
Control Panel made for Modul 200
Complete Control Panel Module 200
Side Covering right Modul 200
Side Covering left M200
Filler Cap for Pipe 70 mm
Plug for hole diameter 70 mm
Right Magnetic Frame Modul 200/350 Elgator
Left Magnetic Frame M200/M350/Elgator
Rubber Sealing of Magnetic Frame Modul 200
Bracket rubber left and right Modul 200/M350
Bracket For Magnetic Frame Front Modul 200
Motor 7,5 KW, 400 Volt Modul 200
Large Pulley for Belt Drive Modul 200 Elephant
Taper Bush For Pulley Modul 200 Elephant
Poly-V Belt Modul 200 / Elephant
Small Pulley for Belt Drive Modul 200 Elephant
Back Plate Bearing Housing to the Belt Drive
Turbine Bearing to the Belt Drive Modul 200
Turbine Axis of 7,5 KW Version Modul 200
Front Turbine Bearing to the Blast Chamber
Bearing Housing of 7,5 KW Version Modul 200
Front Plate Bearing Housing to the Blast Wheel
Blast Wheel Socket M200/Elephant
Blast Wheel incl. Screw Modul 200/Elephant
Blast Wheel Cover Modul 200
Shot Cage Elephant/Modul 200
Shot Enter Pipe Fixture M200/M350
Shot Enter Pipe Steel Modul 200
Shot Hose Mdul 200
Modul 200/Elephant
and Elephant
Modul 200 / Elephant
Modul 200/Elephant
2
57
59
61
63
66
69
71
73
75
77
79
81
83
85
86
91
93
95
97
99
101
103
105
107
109
111
113
115
117
119
121
123
125
0,03
0,062
0,006
0,02
3,725
4
4,95
5,05
0,02
0,03
1,31
1,36
0,5
0,39
0,44
44
2,19
0,32
0,06
0,22
0,068
0,354
1,092
0,232
3,115
0,144
0,28
1,8
3,34
0,57
0,07
0,92
0,03
MODUL 200
30-14-16-01
30-10-16-03
30-10-16-04
30-10-16-02
10-10-00-00
30-10-27-00
30-10-01-04
30-10-01-03
30-10-04-00
90-21-50-16
30-10-05-04
30-10-05-01
90-20-00-10
30-10-07-01
30-10-28-02
30-10-28-01
50-10-15-53
30-10-01-05
50-20-40-01
30-10-23-00
30-10-06-00
70-21-26-10
30-10-09-00
30-10-25-01
80-20-31-60
30-10-08-04
30-10-08-00
30-10-07-00
30-10-26-00
30-10-15-01
70-23-35-03
30-10-15-02
70-23-00-06
Shot Valve Alu-Pipe With Magnets Modul 200
Shot Valve Disc Modul 200
Shot Valve Lever Modul 200/350
Shot Valve Axis Modul 200
Machine frame Modul 200
Shot Compartment Cover left and right M200
Bar for Control Panel Bracket Modul 200
Bracket Control Lever at Control Box Modul 200
Sieve without Handle Modul 200
Handle Aluminium 160 mm
Shot Stop Modul 200
Shot Compartment Lit only Modul 200
Control lever M200/M350/Elephant
Bracket for Shot Valve cable at Frame
Hose Support Arch Modul 200
Hose Support Bracket Modul 200
Modul 200/350
Bracket for Transformer Modul 200
Transformer 250 Watt
Bracket f.Belt Holding Fixture for
Belt Holding Fixture M200
Rubber Grip Handle
Lifting bar rear Axis Modul 200
Belt Cover Modul 200
Rear Wheel 160 mm F3
Axis Rear M200
Level Adjustment Back Wheel Modul 200
Cabel Pipe Modul 200
Retaining Plate For Back Skirt Modul 200
Back Skirt half pipe M200
Back Skirt Rubber small Modul 200
Bracket for Back Skirt Modul 200
Back Skirt Rubber Modul 200
M200
3
127
129
131
133
151
153
154
155
157
159
161
163
165
167
169
171
173
175
177
179
181
183
185
187
189
191
193
195
197
199
201
203
205
0,31
0,06
0,07
0,17
0
0,54
0,53
0,49
0,8
0,12
1,76
1,28
1,5
0,07
0,8
0,44
1,78
0,14
3,7
0,19
1,21
0,044
1,01
0
1,19
0,37
1
0,96
1
0,58
0,04
0,3
0,27
MODUL 200
30-10-12-00
90-25-00-01
30-10-02-05
30-17-02-02
61-20-61-91
30-17-02-01
80-20-32-00-V
50-20-20-20
50-20-20-19
30-10-02-00
30-10-02-04
30-10-03-02
61-20-60-02
30-10-03-03
50-20-10-01
30-10-03-04
50-20-21-02-N
50-20-23-01
70-27-35-35
50-20-20-14
Front Magnetic Frame M200
Drive Pin Modul200/350 Elgator
Drive Unit Axis Cover M200
Drive Axis Modul 200
Bearing for Drive Unit Modul 200
Center for Drive Wheel Modul 200
Drive Wheel Modul 200
Drive Unit Gearbox only for 170 Wat Modul 200
Drive Unit Motor without Gearbox
Drive Unit Frame Modul 200
Lifting Tube front Modul 200
Lifting Arm Modul 200
Bearing for Lifting Arm M200
Top Handle Modul 200
Drive Unit Switch Modul 200 Modul 350 Elgator
Drive Unit Lever Alloy
Housing for Emergency Switch
Emergency Switch Button
Plastic Plug Handle 35x35 Modul 200
Reverse plug 16 A, 400 Volt
120 : 1
Modul 200
4
207
209
211
213
215
217
219
221
223
225
227
229
230
231
233
235
239
241
243
245
1,59
0,06
0,33
0,77
0,14
1,07
3,86
2,71
3,31
4,79
1,72
2,26
0,032
1,24
0,272
0,014
0,156
0,038
0,006
0,19
MODUL 200 US
Artikel-Nr. / Part-No.
20-12-00-08
20-12-00-05
20-12-00-03
20-12-00-04
20-12-00-07
20-12-00-02
20-12-00-01
20-12-00-12
50-20-30-63-A
50-20-30-15
50-20-30-10-A
50-20-20-18
50-20-20-11
50-20-20-10
51-20-30-25
51-20-30-00
51-20-20-04
50-20-23-03
50-20-23-02-N
50-20-33-07
50-20-33-08
50-20-23-09
50-20-33-061
50-20-30-02
50-20-30-03
50-20-20-12
50-20-20-131
50-20-20-121
50-20-20-13
51-20-30-32
51-20-31-04
Description1
Side Lining Blast Chamber Modul 200
Top Lining Blast Chamber Modul 200
Lining Blast Chamber to the Bearing Housing
Front Lining Blast Chamber to the Blast
Side Lining Reclaim Chamber Modul 200
Lining Reclaim Chamber Inside Modul 200
Front Lining Reclaim Chamb.Outside Modul 200
Curved Lining Reclaim Chamber M200
Fuse 6,3 A for control cercuit
Drive Circuit Modul 350
Fuse 10 A for Drive control
Potentiometer
Speed Scale
Potentiometer Speed Button only
Ampmeter 48 mm 25 A
Cover for Ampmeter 48 mm
Star-Delta Switch T3 Modul 350
Direction Switch
Start Button with Light
Contact Element M22-K01 closer
Contact Element M22-K01 opener
Mounting Adapter for Switches
LED Element for bulb
Circuit Breaker Drive Unit C6
Circuit Breaker Control C2
Harting Socket housing
Harting Plug Pin Mounting
Jack in the Housing
Harting Plug housing
Motor Protective
Main Contactor 230 V, 60 HZ
Description2
Modul 200
Wheel Cover Modul 200
DILM32-10
1
D-Nr
1
3
5
7
9
11
13
15
20
21
22
23
25
27
29
30
31
33
35
37
38
39
41
45
47
49
50
51
52
53
55
Weight KG
2,05
1,612
2,74
1,37
3,03
2,9
3,2
1,672
0
0,404
0
0,036
0,01
0,01
0,126
0,018
0,326
0,012
0,008
0,01
0,008
0,003
0,01
0,132
0,134
0,076
0,054
0,056
0,11
0,304
0,452
MODUL 200 US
50-20-30-05-S
50-20-30-13
50-11-11-04
50-11-11-02
50-10-10-99-M200
50-10-10-00
30-10-11-00
30-10-10-00
70-27-00-70
70-27-10-70
30-10-14-00
30-10-13-00
70-23-80-06
30-10-24-01
30-10-24-02
55-14-00-75-US
90-24-11-25-US
90-24-16-10-28
70-24-32-08
90-24-00-44
31-17-10-03
61-20-63-06
30-17-10-04
61-20-63-05
30-17-10-01
31-17-10-02
31-17-10-05
30-15-19-00
30-10-17-00
30-15-17-02
30-10-17-04
30-10-17-03
70-25-70-01
Side Switch DilM32-XHI11-S
Hour Counter
Control Panel made for Modul 200
Complete Control Panel Module 200
Side Covering right Modul 200
Side Covering left M200
Filler Cap for Pipe 70 mm
Plug for hole diameter 70 mm
Right Magnetic Frame Modul 200/350 Elgator
Left Magnetic Frame M200/M350/Elgator
Rubber Sealing of Magnetic Frame Modul 200
Bracket rubber left and right Modul 200/M350
Bracket For Magnetic Frame Front Modul 200
Motor 8,6 KW, 230/400 Volt 60 HZ Modul 200
Large Pulley for Belt Drive US Version
Taper Bush For Pulley Modul 200 Elephant
Poly-V Belt Modul 200 / Elephant
Small Pulley for Belt Drive Modul 200 Elephant
Back Plate Bearing Housing to the Belt Drive
Turbine Bearing to the Belt Drive Modul 200
Turbine Axis of 7,5 KW Version Modul 200
Front Turbine Bearing to the Blast Chamber
Bearing Housing of 7,5 KW Version Modul 200
Front Plate Bearing Housing to the Blast Wheel
Blast Wheel Socket M200/Elephant
Blast Wheel incl. Screw Modul 200/Elephant
Blast Wheel Cover Modul 200
Shot Cage Elephant/Modul 200
Shot Enter Pipe Fixture M200/M350
Shot Enter Pipe Steel Modul 200
Shot Hose Mdul 200
US Version
Modul 200/Elephant
Modul 200/Elephant
and Elephant
Modul 200 / Elephant
Modul 200/Elephant
2
57
59
61
63
66
69
71
73
75
77
79
81
83
85
86
91
93
95
97
99
101
103
105
107
109
111
113
115
117
119
121
123
125
0,04
0,062
0,006
0,02
3,725
4
4,95
5,05
0,02
0,03
1,31
1,36
0,5
0,39
0,44
46
1,33
0,32
0,06
0,22
0,068
0,354
1,092
0,232
3,115
0,144
0,28
1,8
3,34
0,57
0,07
0,92
0,03
MODUL 200 US
30-14-16-01
30-10-16-03
30-10-16-04
30-10-16-02
10-10-00-00
30-10-27-00
30-10-01-04
30-10-01-03
30-10-04-00
90-21-50-16
30-10-05-04
30-10-05-01
90-20-00-10
30-10-07-01
30-10-28-02
30-10-28-01
50-10-15-53
30-10-01-05
50-20-40-01
30-10-06-00-US
30-10-06-00
70-21-26-10
30-10-09-00
30-10-25-01
80-20-31-60
30-10-08-04
30-10-08-00
30-10-07-00
30-10-26-00
30-10-15-01
70-23-35-03
30-10-15-02
70-23-00-06
Shot Valve Alu-Pipe With Magnets Modul 200
Shot Valve Disc Modul 200
Shot Valve Lever Modul 200/350
Shot Valve Axis Modul 200
Machine frame Modul 200
Shot Compartment Cover left and right M200
Bar for Control Panel Bracket Modul 200
Bracket Control Lever at Control Box Modul 200
Sieve without Handle Modul 200
Handle Aluminium 160 mm
Shot Stop Modul 200
Shot Compartment Lit only Modul 200
Control lever M200/M350/Elephant
Bracket for Shot Valve cable at Frame
Hose Support Arch Modul 200
Hose Support Bracket Modul 200
Modul 200/350
Bracket for Transformer Modul 200
Transformer 250 Watt
Belt Holding Fixture Modul 200 US Version
Belt Holding Fixture M200
Rubber Grip Handle
Lifting bar rear Axis Modul 200
Belt Cover Modul 200
Rear Wheel 160 mm F3
Axis Rear M200
Level Adjustment Back Wheel Modul 200
Cabel Pipe Modul 200
Retaining Plate For Back Skirt Modul 200
Back Skirt half pipe M200
Back Skirt Rubber small Modul 200
Bracket for Back Skirt Modul 200
Back Skirt Rubber Modul 200
3
127
129
131
133
151
153
154
155
157
159
161
163
165
167
169
171
173
175
177
179
181
183
185
187
189
191
193
195
197
199
201
203
205
0,31
0,06
0,07
0,17
0
0,54
0,53
0,49
0,8
0,12
1,76
1,28
1,5
0,07
0,8
0,44
1,78
0,14
3,7
2,02
1,21
0,044
1,01
0
1,19
0,37
1
0,96
1
0,58
0,04
0,3
0,27
MODUL 200 US
30-10-12-00
90-25-00-01
30-10-02-05
30-17-02-02
61-20-61-91
30-17-02-01
80-20-32-00-V
50-20-20-20
50-20-20-19
30-10-02-00
30-10-02-04
30-10-03-02
61-20-60-02
30-10-03-03
50-20-10-01
30-10-03-04
50-20-21-02-N
50-20-23-01
70-27-35-35
50-20-20-14
Front Magnetic Frame M200
Drive Pin Modul200/350 Elgator
Drive Unit Axis Cover M200
Drive Axis Modul 200
Bearing for Drive Unit Modul 200
Center for Drive Wheel Modul 200
Drive Wheel Modul 200
Drive Unit Gearbox only for 170 Wat Modul 200
Drive Unit Motor without Gearbox
Drive Unit Frame Modul 200
Lifting Tube front Modul 200
Lifting Arm Modul 200
Bearing for Lifting Arm M200
Top Handle Modul 200
Drive Unit Switch Modul 200 Modul 350 Elgator
Drive Unit Lever Alloy
Housing for Emergency Switch
Emergency Switch Button
Plastic Plug Handle 35x35 Modul 200
Reverse plug 16 A, 400 Volt
120 : 1
Modul 200
4
207
209
211
213
215
217
219
221
223
225
227
229
230
231
233
235
239
241
243
245
1,59
0,06
0,33
0,77
0,14
1,07
3,86
2,71
3,31
4,79
1,72
2,26
0,032
1,24
0,272
0,014
0,156
0,038
0,006
0,19