1
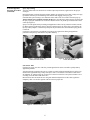
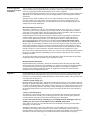
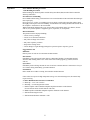
Liquid Pavement Marking Application Guidelines
Series 5000
Information Folder 5.28
Description
October 2014
3M™ Liquid Pavement Marking Series 5000 is designed for use on roadways and highways as a durable
pavement marking. Series 5000 is a 2:1 ratio two-component, 100 percent solid polyurea coating
material that cures rapidly to hardness after application. The Series 5000 binder can be used with a
number of different optics packages to provide desired levels of retroreflective performance.
For long-line applications, Series 5000 is applied using a mobile, truck-mounted and self-contained
pavement marking machine (Figure 1). This pavement marking machine is specifically designed for
application of two-component liquid materials and reflective media in continuous or skip patterns.
For intersections and transverse markings, any 2:1 ratio application equipment may also be used.
Due to the fast track-free time of this marking, it is necessary to have equipment that is capable of
applying optics immediately following binder application is required. Contact 3M Technical Service
(800-553-1380) for guidance on transverse applications.
Figure 1 — LPM Application Truck
Surface Preparation
Recommendations
Proper application of Series 5000 is essential for completion of a successful project. Below are some
surface preparation recommendations that should be followed.
Temperature
Application of Series 5000 is recommended when air and road temperatures are 30°F (-1°C) or higher.
Target Start-up Component Temperatures
LPM 5000/5001/5005, Part A: 130-140°F (54-60°C)
LPM 5050, Part B: 120°F (49°C)
Moisture
Road surfaces must be clean and dry prior to application of Series 5000. Road surfaces must be free of
dew, frost or other visible moisture. After periods of prolonged rainfall on pavement surfaces, use extra
caution to verify the pavement is completely dry prior to application.
Surface Preparation
Recommendations
(continued)
Oil, Debris and Dust
At time of application, pavement surfaces must be free of oil, dirt, dust, grease and similar foreign
materials. The designated surface must be blown with a high-pressure, high velocity 120 psi, 185 cfm air
to remove any loose material prior to application of the product. Use a grinder or shot blaster to remove
any surface contamination from automotive fluids such as oil and grease.
New Portland Cement Concrete
Curing compound on new Portland Cement Concrete must be completely removed prior to the
application of paint. Sandblasting, shotblasting, and grinding are acceptable methods to remove the
curing compound.
New concrete typically has a weak surface layer of powder-rich Portland cement material on the top
surface. Even if the new concrete surface was not treated with curing compound, the surface will still
need to be prepared using a grinder, sandblaster, or shotblaster to remove this thin layer of material to
expose a solid concrete surface with better surface integrity.
Temporary paint is occasionally applied over concrete prior to removal of curing compound. In this
instance, both the temporary paint and curing compound must be removed prior to application of
Series 5000.
Asphalt Cement Concrete (ACC) Surface
3M™ Liquid Pavement Marking Series 5000 can be applied directly to existing ACC surfaces.
Chip Seal or Slurry Seal
Series 5000 can be applied to chip seal or slurry seal surfaces that have set per manufacturer’s
recommendations.
Existing Pavement Markings
Series 5000 can be applied over any type of well-adhered existing pavement marking. Poorly adhered
existing pavement markings must be removed to expose a minimum of 80 percent of the pavement
surface prior to the application of Series 5000. Existing pavement markings should be removed using
methods such as grinding, shotblasting, or sandblasting.
Figure 2 — Poor removal — Need to slow
equipment down to remove more
of the existing marking.
2
Figure 3 — Good removal — All of existing
markings removed.
Recommended
Material Thickness
and Element/Bead
Application Rates
Applying Series 5000 to the proper thickness and with the proper reflective media application rate is
important to achieve optimal performance of the finished product.
Material Thickness and Application Requirements
The recommended material binder thickness will vary depending on the roughness of the surface
proposed for application of the product.
The installer of the markings is responsible for meeting the following requirements:
Table 1—Binder Application
Surface
Description or Use
Smooth (variation ≤ 0.125") pavement
(asphalt, concrete, grooved or
surface treatment)
Textured or variation ≥ 0.125”
(open graded, large stone mixes,
tined or sawn concrete, chip seal)
Over well worn
existing markings
For use as temporary markings
(prior to durable marking
application)
1
Recommended Series 5000 Liquid Binder
Thickness
(1 inch = 1000 mils)
& Usage Rates1
20 to 25 mils
(240-220 lineal feet per
gallon of 4-inch line width)
25 to 30 mils
(190-160 lineal feet per
gallon of 4-inch line width)
20 to 25 mils
(240-220 lineal feet per
gallon of 4-inch line width)
10 to 15 mils
(480-320 lineal feet per
gallon of 4-inch line width)
Application rates calculated using a conversion of 231 cubic inches per US liquid gallon.
Prior to starting a project, apply a line of Series 5000 without optics on a smooth, flat surface and check
the thickness of the material using a wet mil thickness gauge. Adjust the application speed as necessary
to achieve the proper material thickness.
An alternative method for checking the thickness of the material is to apply a test line without optics to
3M™ Duct Tape or other release liner material and allow the Series 5000 material to cure. After curing,
peel the material off the tape or liner and check the thickness of the material using a caliper gauge or
micrometer.
Reflective Media Application Rates
Microcrystalline element and glass beads application rates are shown in Table 2 and Table 3.
The minimum recommended element application rates stated in Table 2 are for smooth or dense
pavement surfaces. The application rates stated are designed to provide good initial wet and/or dry
reflectivity as well as to match the longevity or restripe frequency of the pavement marking binder
system to which the elements are installed. Therefore durable marking binder systems will require
greater amount of elements for longer-term performance.
Note: For rough pavement surfaces (open-graded mixes, large stone aggregate mixes, etc.), the surface
area can be up to 50 percent greater than the corresponding foot-print of a flat surface. As a result it
becomes necessary to increase materials (binder, elements and beads) used for the same coverage.
Table 2 — Microcrystalline Element or First Drop Glass Bead Application Rates
Units
Composite
Reflective Elements
Pounds per 4-inch lf
0.022 lbs/4-inch lf
Grams per 4-inch lf
10 grams per 4-inch lf
Pounds per gallon 20 mils ~ 240 ft/gal
5.30 lbs/gal per 4-inch lf
Pounds per gallon 25 mils ~ 190 ft/gal
4.2 lbs/gal per 4-inch lf
3
Recommended
Material Thickness
and Element/Bead
Application Rates
(continued)
Table 3 — Second Drop Glass Bead or Black Beauty® Application Rates
Units
Glass Beads
Pounds per 4-inch linear foot
0.033-0.053 lbs/4-inch lf
Grams per 4-inch linear foot
15-24 grams/4-inch lf
Pounds per gallon 20 mils ~ 240 ft/gal
8.0-12.8 lbs/gal
Pounds per gallon 25 mils ~ 190 ft/gal
6.4-10.0 lbs/gal
Pounds /100 sq ft
9.9-15.9 lbs/100 sq ft
Temporary
application* Pounds per gallon 15 mils,
10.6-17.0 lbs/gal
320 lineal 4-inch feet
per gallon
Temporary application* Pounds per
gallon 10 mils, 480 lineal 4-inch feet
15.8-25.4 lbs/gal
per gallon
*Note: For temporary markings use treated AASHTO M247 Type 1 beads
Knowing the line width and track speed for proper liquid binder application, the required catch weight
per catch time can be calculated.
Prior to starting a project, check the bead and element calibration using a pan to catch the reflective
media coming out of the guns for a set length of time, usually 15-30 seconds. Pour the reflective media
into a large graduated cylinder to check the volume and compare this volume with the calibration rate
tables available from the truck or bead gun manufacturer to verify that the reflective media application
weight is correct (Figure 4).
Figure 4—Equipment for Calibrating
Reflective Media
Note: Call 3M Technical Service with other questions about 3M optics calibration 1-800-553-1380.
Consult your truck operation manual and spray gun/bead gun operation manual available from the truck
manufacturer and bead gun manufacturer respectively, for information on specific recommendations
for spray tip selection, desired spray width, vehicle speed, and thickness of the application. Application
guidelines will vary from one truck to another.
Application in a
Groove
Series 5000 can be applied in a properly prepared groove cut into the pavement surface. Application of
pavement marking products in a groove provides several benefits including enhanced protection of the
pavement marking and retroreflective media from snowplow damage in northern climates.
For more information on applications of Series 5000 in a groove, see 3M Information Folder 5.18,
Application Guidelines for Pavement Markings in Grooved Pavement Surfaces.
4
General Equipment
Operating Procedures
Maintaining spray guns, trucks and equipment in good working order before and during an application
reduces the chances for product application problems.
When operating liquid pavement marking trucks, material temperatures and pressures must be
maintained to keep a 2:1 volumetric ratio to properly apply the product. Overheating the material can
be dangerous and can result in poor application. For information concerning truck conversion to Series
5000 from other two-part, 2:1 liquid pavement marking systems, please refer to Appendix A.
Below are some general operating procedures that should be followed when applying Series 5000 products.
Test Spray
Before starting application operations, spray a test line in a location where the line can be safely checked
to be within product specifications.
Choose a location where a test line can be applied to the road surface or place a long, narrow sheet of tar
paper on the road for the test (Figure 5).
Figure 5—Tar Paper Layout for a Test Spray
After following the proper start-up procedures recommended by the truck manufacturer, the material
will need to heat to the proper temperatures prior to application. When material has been heated to the
proper temperatures and application is ready to begin, start by first triggering the spray gun to spray in a
bucket.
Check the spray fan and look for a uniform, symmetrical, steady, pulse-free spray pattern (Figure 6).
The spray fan must not have “fingers” or “bands”. If the spray fan appears to be uniform, proceed with
application of the test line on tar paper or on the road surface.
Figure 6—Check the Spray Fan
After application of the test line, verify that the material thickness is correct as outlined in
“Recommended Material Thickness and Element/Bead Application Rates” section. Check the speed of
the cure time on the product according to the procedure outlined in the Check Cure Time section below.
Also look for uniform coverage of beads and elements across the width of the line. Adjust the bead and
element guns if necessary.
Check to make sure the bead and element gun is set properly to start and stop at the right time relative
to the liquid application start and stop for the skip line. Adjust the setting using the bead advance/retard
control if necessary. After all required adjustments are made, reapply another test line to verify that
adjustments were made correctly.
5
General Equipment
Operating Procedures
(continued)
Spray Tip Cleaning
After the product has been checked to be within required specifications, application on the project
can begin.
During application, each time the truck and mix chamber are stopped for 30 seconds or longer, the spray
tip must be cleaned to prevent hardening of the material and clogging of the spray gun.
If the shut-down period is longer, use carburetor cleaner and a brass wire brush to clean the spray tip.
Always lock the spray gun before cleaning the tip. Spray the carburetor cleaner directly on and up into
the spray tip (Figure 7) and then use a brass wire brush to remove any build-up of material and to clean
out the tip (Figure 8).
Spray in a bucket again before proceeding with application to blow out any carburetor cleaner from the
tip. When spraying in the bucket, always check for a uniform spray fan. If the spray is not uniform, the
tip may be dirty. Replace or clean the tip and repeat the procedures above until a uniform spray pattern
is achieved.
It is always a good practice to periodically clean the tip on a regular basis during the application
procedure to keep the tip clean and free of product build-up.
Figure 7—Clean the Spray Tip
with Carburetor Cleaner
Figure 8—Clean the Spray Tip with
a Brass Wire Brush
Check Cure Time
Checking for proper cure time of the new product applied on the road is essential to quickly identify
application problems.
After the material is applied to the road, set a watch or a timer and begin checking the cure three to ten
minutes after application. Drag a sharp steel object, such as a screwdriver, across the new material in
an elongated “X” pattern (Figure 9), covering two to three feet of the line. Verify that a uniform cure is
occurring across the entire width of the line.
Move down the line and check the cure using this method in adjacent two to three foot segments to
completely check a 30-40 foot segment of the new line for proper cure.
Figure 9—Check for Proper Cure
6
General Equipment
Operating Procedures
(continued)
After 10 minutes, the material should not show evidence of any surface scratching from the sharp object.
If up to 20 minutes have passed and the material continues to show signs that a complete cure has not
occurred, stop applying product and determine the cause of the cure problem.
With adequate training and experience, proper cure can be recognized within two to three minutes after
application. It is recommended to check cure time throughout the day, after refilling tanks and truck
maintenance.
Application in dry climate conditions with very low relative humidity levels may require a longer
time for a complete cure of the product. The time required for a track-free condition in this type of
environment will remain unchanged. It is recommended to check cure time throughout the day, after
refilling tanks and truck maintenance.
Material Handling and Storage
Store binder components in a cool, dry, well ventilated area indoors, 40°F – 100°F (4°C – 38°C). Use
within one (1) year of receipt. If Part B is exposed to high heat for an extended period, the container
can pressurize and possibly rupture. Pick-up of empty drums is the responsibility of the user. For more
information, see Appendix B, Series 5000 Safe Handling Procedures.
Avoid loading material from barrels into the Series 5000 truck tanks if precipitation is an imminent
possibility. Water must not be allowed to contaminate any of the materials, liquid components or
reflective media. When loading materials, use a dedicated/clean dip tube to load the Series 5050,
Part B material through the opening in the top of the barrel. Note: Loading entire drums of part
B is recommended. Make sure to pressurize Series 5050 Part B immediately after loading with dry
nitrogen or dry air. After loading is finished, loosely screw the bung on the empty Series 5050, Part B
drum. Tightly closing the bung will cause pressure to build-up in the drum. Keep the hoses used for
transferring material from containers to the truck tanks clean and free of material build-up. If material
hardens in the hoses it can be transferred to the material tanks and cause clogging in the system.
Do not run tanks dry. Running the tanks dry allows air to enter the system causing application problems.
Review the recommended safety and handling procedures outlined in Appendix B, Series 5000 Safe
Handling Procedures.
All vehicles with product on board must have Safety Data Sheet (SDS) sheets available for the product
being transported. Use materials within one year from date of receipt.
Health and Safety Information
Read all health hazard, precautionary, and first aid statements found in the Safety Data Sheet (SDS)
and/or product label of chemicals prior to handling or use. Follow all precautions on the SDS, including
recommended personal protective equipment during the filling, use or cleaning of the application
equipment. This product is intended for outdoor use. Application in tunnels or enclosed areas may
necessitate the use of additional precautions.
Appendix A
Recommendations for truck conversion to Series 5000 from other two-part, 2:1 liquid pavement marking
system, please contact 3M Technical Service prior to conversion 1-800-533-1380. Tanks, heaters and
hoses have to be inspected before adding 3M material to ensure absence of solids in the system that may
cause plugs after the change over.
1. Polyurea System Change Over
Drain the liquid components (Part A and Part B) separated into their former or new containers. Drain as
thoroughly as possible. Immediately add Part A in (2 part tank) and in Part B in (1 part tank). Make sure
to pressurize Part B immediately after loading with dry nitrogen or dry air. Slowly operate pump system
to remove any remaining material in tank, heaters, hoses (including recirculation hoses) and tips. Once
satisfied that all old material is out of the truck, begin to recirculate and heat Series 5000 materials for
test spray.
2. Epoxy System Change Over
The chemistry of epoxy and polyurea systems are not compatible. This means that a more thorough
clean out of the truck is necessary prior to running polyurea. For truck conversion please follow the
truck manufacturer clean out procedures before attempting to use 3M material.
For truck conversion previously containing epoxy resin liquid pavement marking procedure for
flushing epoxy Part A prior to and addition of Series 5000/5001 (white/yellow)
Empty tanks to the lowest level possible and follow truck manufacturer clean out procedures before
attempting to use 3M material.
Immediately add in Part A (2 part tank) and Part B (1 part tank). Make sure to pressurize Part B
immediately after loading with dry nitrogen or dry air. Slowly operate pump system to remove any
remaining material in tank, heaters, hoses (including recirculation hoses) and tips. Once satisfied that all
old material is out of the truck, begin to recirculate and heat Series 5000 materials for test spray.
7
Appendix B
Series 5000 Safe Handling Procedures
1. Safe Handling Procedures
Before handling any chemical product read the Safety Data Sheet (SDS) and label which contain the
following information:
Precautions for safe handling
Do not handle until all safety precautions have been read and understood. Do not breathe dust/fume/gas/
mist/vapors/spray.
Do not get in eyes, on skin, or on clothing. Do not eat, drink or smoke when using this product. Wash
thoroughly with soap and water after handling. Contaminated work clothing should not be allowed out of
the workplace. Avoid release to the environment.
Wash contaminated clothing before reuse. Avoid contact with oxidizing agents (eg. chlorine, chromic
acid etc.) Use personal protective equipment (gloves, respirators, etc.) as required.
Hazard Statements
The potential result of improper handling:
• Causes serious eye damage.
• Causes severe skin burns and blisters.
• May cause an allergic skin reaction.
• May cause respiratory irritation.
• Suspected of causing cancer.
• Causes damage to organs through prolonged or repeated exposure: respiratory system
Suggested First Aid
Inhalation:
Remove person to fresh air. Get immediate medical attention.
Skin Contact:
Immediately wash with soap and water. Remove contaminated clothing. Get immediate medical
attention. Wash clothing before reuse. Avoid contact with oxidizing agents (eg. chlorine, chromic
acid etc.)
Eye Contact:
Immediately flush with large amounts of water for at least 15 minutes. Remove contact lenses if easy to
do. Continue rinsing. Immediately get medical attention.
If Swallowed:
Rinse mouth. Do not induce vomiting. Get immediate medical attention.
If Part A has been exposed to high temperature storage over extended storage time, the material may
require remixing.
2. Mixer Minimum Characteristics recommended
a. Motors hp – 1/2 to 2 air or electric.
b. Mounting – six inch integrated tote mount.
c. Bottom impeller with four bladed collapsible impellers minimum 14 inch diameter
(no more than 14 inches from the bottom of the tote).
d. Middle impeller with bladed collapsible impellers minimum 14 inch diameter.
e. Shaft minimum length 32 inch.
f. Shaft minimum diameter minimum ¾ inch.
8
Appendix B
(continued)
Mixing and agitating in a tote can be challenging. Please read and carefully follow the Mixer
Manufacturer User Manual, Instructions and Recommendations before proceeding.
Some of the common steps to follow are:
• Lower the selected agitator in to the tote opening.
• Check that the impellers are adequately installed.
• Moving parts of the mixer should touch the tote.
• Lock the mixer.
• Connect the mixer.
Remember to always follow the Mixer Manufacturer User Manual.
3. Handling of Empty Drums and Totes
Empty drum and tote pickup is the contractor’s responsibility.
Contact
• DRUMCO of Tennessee at 800-960-3786
• Consolidated Container Systems 800-577-0715
• SCHUTZ Container Systems (Totes only) 888-724-8389
The drums and totes must be as empty as possible.
• Do NOT put any trash in empty drums.
• Leave one drum liner in each drum.
4. Cleanup and Waste Handling
• Follow all local, state and federal regulations for proper waste handling.
• Proper handling and disposal of all waste is the responsibility of the contractor.
• Safe handling procedures apply to all liquid waste materials, cleanup rags and similar items.
• All waste containing liquid must be incinerated.
• Contact
- Ashland Chemical 800-637-7922
- Heritage Environmental 800-827-4374
- Safety Kleen 800-669-5740 ext. 2592
• The use of Dibasic Esters* (DBE) as a cleaner will result in the generation of liquid waste with
non-regulated transportation status.
- To maintain this non-regulated transportation status the Series 5000 and DBE must not be
contaminated with traditional solvents.
- Pumpable (liquid only) should be kept separate from rags and other solid waste.
• Cleanup with solvents like methylene chloride, methyl ethyl ketone or acetone will result in the
production of liquid, hazardous waste with regulated transportation status.
• Solid waste such as cured Part A and B collected in a bucket before startup may be disposed of in an
ordinary landfill provided no liquid material remains.
*Note: Contact DuPont at 800-231-0998 to locate a DBE distributor in your area.
Literature Reference
Product Bulletin 5000 3M™ Liquid Pavement Marking Series 5000
Information Folder 5.18Application Guidelines for Pavement Markings in
Grooved Pavement Surfaces
For situations not specifically covered in this folder, or questions regarding application of 3M™ Liquid
Pavement Markings Series 5000, it is the responsibility of the installer to contact the appropriate
3M sales representative or 3M pavement marking technical service representative at 1-800-533-1380
for guidance.
9
FOR INFORMATION OR ASSISTANCE
CALL: 1-800-553-1380
IN CANADA CALL:
1-800-265-1840
Internet:
www.3M.com/roadwaysafety
3M assumes no responsibility for any injury, loss or damage arising out of the use of a product that is not of our manufacture. Where reference
is made in literature to a commercially available product, made by another manufacturer, it shall be the user’s responsibility to ascertain the
precautionary measures for its use outlined by the manufacturer.
Important Notice
All statements, technical information and recommendations contained herein are based on tests we believe to be reliable, but the accuracy
or completeness thereof is not guaranteed, and the following is made in lieu of all warranties, or conditions express or implied. Seller’s and
manufacturer’s only obligation shall be to replace such quantity of the product proved to be defective. Neither seller nor manufacturer shall be
liable for any injury, loss or damage, direct, special or consequential, arising out of the use of or the inability to use the product. Before using, user
shall determine the suitability of the product for his/her intended use, and user assumes all risk and liability whatsoever in connection therewith.
Statements or recommendations not contained herein shall have no force or effect unless in an agreement signed by officers of seller and
manufacturer.
3M is a trademark of 3M. Used under license in Canada.
Traffic Safety and Security Division
3M Center, Building 225-04-N-14
St. Paul, MN 55144-1000
1-800-553-1380
www.3M.com/roadwaysafety
3M Canada Company
P.O. Box 5757
London, Ontario N6A 4T1
1-800-3MHELPS
3M México, S.A. de C.V.
Av. Santa Fe No. 55
Col. Santa Fe, Del. Alvaro Obregón
México, D.F. 01210
Please Recycle
© 3M 2014. All rights reserved.
Electronic Only