1
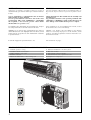
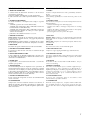
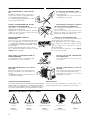
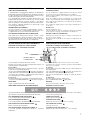
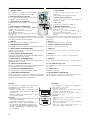
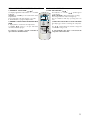
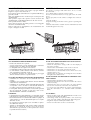
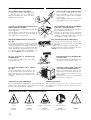
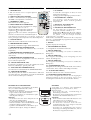
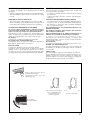
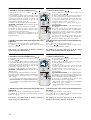
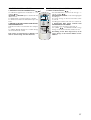
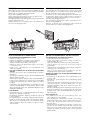
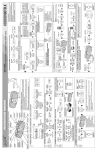
QU
H
H
H
A
RT
H★H
H
H
H H
HHH
H
IT
IFI
EM
L
D
E
T
C
EXW
E
Y SY
S
IEXWFX
0103
68731.00
MANUALE DI FUNZIONAMENTO • DIRECTIONS FOR USE
MANUEL DE FONCTIONNEMENT • BEDIENUNGSANLEITUNG
Split system
CARATTERISTICHE GENERALI • FEATURES
Infromazioni generali • General information
Componenti principali • Main components
Descrizione dei componenti • Component description
MISURE DI SICUREZZA • SAFETY MEASURES
Usi impropri • Improper uses
FUNZIONAMENTO • OPERATING
Informazioni aggiuntive • Other informations
Segnalazioni e tasti di controllo • Indications and controls
Telecomando a raggi infrarossi • Infrared remote control
Funzioni basilari • Basic operation
Orientamento del flusso d’aria • To adjust the air flow
Accensione temporizzata • Timer On
Spegnimento temporizzato • Timer Off
Spegnimento temporizzato ad un’ora • One-hour off timer
4
5
6
7
8
10
11
12
13
Manutenzione • Maintenance
Se il condizionatore non funziona • If the air conditioner does not work
CARACTERISTIQUES • EIGENSCHAFTEN
Informations générales • Allgemeine Informationen
Composants principaux • Hauptbestandteile
Description des composants • Beschreibung der Bauteile
MESURES DE SECURITE • SICHEREITSMAßNAHMEN
Usages impropres • Unsachgemäßer Gebrauch
FONCTIONNEMENT • BETRIEB
Autres informations • Weitere Anweisungen
Signalisations et touches de contrôle • Kontrollleuchten und Bedientasten
Telecommande à rayons infrarouges • Infrarot-Fernbedienung
Fonctions de base • Grundfunktionen
Orientation du flux d’air • Einstellung des Luftstroms
Démarrage temporisé • Progammiertes Einschalten
Arrêt temporisé • Progammiertes Ausschalten
Arrêt temporisé à 1 heure • In 1 Stunde Progammiertes Ausschalten
Entretien • Periodische Kontrolle
Si le climatiseur ne marche pas • Wenn das Klimagerät nicht Anläuft
14
16
17
18
19
20
22
23
24
25
26
3
a
OSSERVAZIONI
REMARKS
Conservare il manuale in luogo asciutto, per evitare il
deterioramento, per almeno 10 anni per eventuali riferimenti futuri.
Store the manual in a dry location to avoid deterioration, as
they must be kept for at least 10 years for any future reference.
Leggere attentamente e completamente tutte le informazioni contenute in questo manuale.
Prestare particolarmente attenzione alle norme d’uso
accompagnate dalle scritte “PERICOLO” o “ATTENZIONE” in quanto, se non osservate, possono causare danno
alla macchina e/o a persone e cose.
All the information in this manual must be carefully read
and understood.
Pay particular attention to the operating standards with
“DANGER” or “WARNING” signals as their disrespect can
cause damage to the machine and/or persons or objects.
Per anomalie non contemplate da questo manuale, interpellare tempestivamente il Servizio Assistenza di zona.
If any malfunctions are not included in this manual, contact
the local Aftersales Service immediately.
AERMEC S.p.A. declina ogni responsabilità per qualsiasi
danno dovuto ad un uso improprio della macchina, ad una
lettura parziale o superficiale delle informazioni contenute
in questo manuale.
AERMEC S.p.A. declines all responsibility for any damage
whatsoever caused by improper use of the machine, and a
partial or superficial acquaintance with the information contained in this manual.
Il numero di pagine di questo manuale è: 28.
This manual has 28 pages.
COMPONENTI PRINCIPALI • MAIN COMPONENTS
1
2
3
4
5
Mobile di copertura • Casing
Scheda di controllo • Control card
Gruppo ventilante • Fan section
Ricevitore • Receiver
Batteria di scambio termico • Heat exchange coil
6
7
8
9
10
1
Deflettore mandata aria • Air delivery louvre
Filtro aria • Air filter
Telecomando • Remote-controller
Valvola inversione ciclo • Cycle reverse valve
Compressore • Compressor
a
7
5
6
3
4
5
1
3
2
9
10
8
4
DESCRIZIONE DEI COMPONENTI
COMPONENT DESCRIPTION
1 MOBILE DI COPERTURA
È caratterizzato da dimensioni contenute e da un’estetica
estremamente gradevole.
Sulla parte frontale sono disposti i led di segnalazione.
Il tasto ausiliario AUX è sotto il pannello frontale di copertura.
1 CASING
Features compact dimensions and a particularly attractive
design.
Leds are on the front side.
AUX auxiliary pushbutton is under the front panel of the
casing.
2 SCHEDA DI CONTROLLO
La scheda elettronica a microprocessore svolge le seguenti
funzioni:
- controllo e gestione del ciclo di sbrinamento;
- controllo della temperatura dello scambiatore interno nel
funzionamento in raffreddamento;
- controllo della temperatura dello scambiatore interno nel
funzionamento in pompa di calore per evitare possibili
correnti di aria fredda;
- protezione da assorbimenti elettrici eccessivi.
2 CONTROL CARD
The electronic microprocessor-control card performs the following functions:
- controls and manages the defrosting cycle;
- regulates the indoor exchanger temperature in cooling
mode;
- regulates the indoor exchanger temperature in heat pump
mode to prevent cold air currents;
- protects against excessive power absorption.
3 GRUPPO VENTILANTE
Unità esterna: Costituito da un ventilatore assiale, bilanciato staticamente e dinamicamente, con griglia di protezione
a norme CEI 107-34.
Unità interna: Il gruppo ventilante è costituito da un ventilatore di tipo tangenziale estremamente compatto e silenzioso.
3 FAN UNIT
Outdoor unit: Comprises one dynamically and statically
balanced axial fan complete with CEI standard (107-34)
safety grill.
Indoor unit: Comprises an extremely compact and noiseless
cross-flow fan.
4 RICEVITORE
Ricevitore di segnale infrarosso emesso dal telecomando.
4 RECEIVER
Receiver for the remote control infrared signal.
5 BATTERIA DI SCAMBIO TERMICO
È realizzata in tubo di rame con alette in alluminio di tipo
turbolenziato.
5 HEAT EXCHANGE COIL
Comprises copper piping and turbo-type aluminium fins.
6 DEFLETTORE MANDATA ARIA
L’unità è dotata di un deflettore motorizzato e di alette verticali orientabili manualmente in modo da direzionare il flusso dell’aria in modo ottimale.
6 AIR DELIVERY LOUVRE
The unit is equipped with a motor-driven louvre and vertical
fins which may be moved manually to optimise the air flow
direction.
7 FILTRO ARIA
È rigenerabile, con trattamento antimuffa e facilmente
estraibile per la pulizia.
7 AIR FILTER
Re-usable air filter treated with mould inhibitor. Easy to
remove for cleaning.
8 TELECOMANDO
Il telecomando permette di impostare tutti i parametri di
funzionamento dell’apparecchio, tali parametri vengono
visualizzati su di un display a cristalli liquidi facilitando così
le operazioni di programmazione. Il telecomando è alimentato con 2 batterie stilo da 1,5 V di tipo R 03 AAA e funziona fino ad una distanza di 7 metri dall’unità.
8 REMOTE CONTROLL
The remote controll allows you to set all the equipment operating parameters. These parameters are displayed on a
liquid crystal display to facilitate programming. The remotecontroll is powered by 2 x 1.5 V “pencil” batteries, type R
03 AAA, and operates up to a maximum distance of 7
metres from the unit.
9 VALVOLA INVERSIONE CICLO
Inverte il flusso di refrigerante al variare del funzionamento
estivo / invernale.
9 CYCLE REVERSE VALVE
It inverts the refrigerant flow in accordance with
summer/winter operation variations.
10 COMPRESSORE
Compressore ermetico rotativo isolato acusticamente. È
dotato di separatore di liquido, che protegge il compressore
da un’eventuale ritorno di liquido refrigerante proveniente
dalle unità interne.
10 COMPRESSOR
Hermetic rotary compressor, complete with sound insulation. A liquid separator is also present, it protects the compressor from the return of refrigerant liquid from the indoor
units.
5
USI IMPROPRI
IMPROPER USES
NON STRATTONARE IL CAVO ELETTRICO
È molto pericoloso tirare, calpestare,
schiacciare o fissare con chiodi o puntine
il cavo elettrico di alimentazione.
Il cavo danneggiato può provocare corti
circuiti e danni alle persone.
DO NOT PULL THE FEEDING CABLE
It is very dangerous to pull, crush or nail
the feeding cable.
A damaged cable may cause short circuits
and damages to the people.
USARE IL TELECOMANDO PER ACCENDERE E
SPEGNERE IL CONDIZIONATORE
Non spegnere il condizionatore sfilando la spina
dalla presa di alimentazione.
L’operazione, se ripetuta di frequente, può danneggiare il cavo, la presa o la spina con conseguenti rischi per le persone.
USE THE REMOTE CONTROL TO SWITCH
ON AND OFF THE AIR CONDITIONER
Do not unplug the feeding cable to switch off
the air conditioner.
This operation, when repeated often, may
damage the cable, the plug and the socket
and become dangerous for the people.
ORIENTARE CORRETTAMENTE IL
GETTO D’ARIA
L’aria che esce dal condizionatore non deve
investire direttamente le persone; infatti, anche
se a temperatura maggiore di quella dell’ambiente, può provocare sensazione di freddo e conseguente disagio.
Orientare manualmente solo le alette verticali.
Per il deflettore orizzontale utilizzare il tasto
SWING del telecomando.
ADJUST THE AIR FLOW DIRECTION
The air leaving the air conditioner should not rush
directly against the people in the room.
In fact, although it comes out at a higher temperature it might create unpleasant sensations of coldness.
Only the angle of the vertical louvers must be
adjusted manually.
For the horizontal air deflector, use the SWING
key on the remote control.
NON USARE IL CONDIZIONATORE IN
MODO IMPROPRIO
Il condizionatore non va utilizzato per allevare, far nascere e crescere animali.
DO NOT USE THE AIR CONDITIONER
IN A WRONG WAY
The air conditioner must not be used to
rise animals.
NON INFILARE OGGETTI SULL’USCITA
DELL’ARIA
Non inserire oggetti di nessun tipo nelle feritoie di uscita dell’aria (sia unità interna che
esterna).
Ciò potrebbe provocare ferimenti alla persona e danni al ventilatore.
DO NOT INSERT OBJECT IN THE AIR
DELIVERY
Do not insert any object in the air delivery
vents (both indoor and outdoor units).
This might cause injuries to the people
and damages to the fan.
ANOMALIE DI FUNZIONAMENTO
In caso di funzionamento anomalo dell’unità (intervento degli
allarmi), dopo aver eliminato la causa dell’intervento, procedere ad un reset dell’apparecchio. Se il problema si ripresenta, chiamare tempestivamente il Servizio Assistenza di zona.
MALFUNCTIONS
In the event of unit malfunctions (alarm blocks), after
having eliminated the cause of the block, reset the unit.
SIMBOLI DI SICUREZZA • SAFETY SYMBOL
6
Pericolo:
Pericolo:
Pericolo:
Pericolo:
Tensione
Temperatura
Organi in movimento
Togliere tensione
Danger:
Danger:
Danger:
Danger:
Power supply
Temperature
Movings parts
Disconnect power line
Pericolo!!!
Danger!!!
INFORMAZIONI AGGIUNTIVE
OTHER INFORMATIONS
LIMITI DI FUNZIONAMENTO
Il condizionatore è equipaggiato di dispositivi di controllo che
proteggono l’unità dal funzionamento in condizioni pericolose.
In certe condizioni tali dispositivi possono intervenire impedendo il funzionamento del condizionatore:
Se il condizionatore funziona in modo continuativo in raffreddamento all’interno di un ambiente con elevata umidità
relativa (indicativamente superiore all’80%) si avrà formazione di condensa sulla mandata dell’aria dell’unità interna.
Tale condensa, potrebbe depositarsi sul pavimento e sugli
eventuali oggetti sottostanti.
OPERATION LIMITS
The air conditioner is equipped with control devices which
prevent the unit to work under dangerous conditions.
Under certain conditions, these devices may cut in and stop
the air conditioner:
If the air conditioner works continuously on cooling mode
inside a room with high relative humidity (higher than 80%)
there might be the production of condensate by air delivery
of the indoor unit.
The condensate might collect on the object underneath or
on the floor.
INTERRUZIONE DI CORRENTE
Se viene a mancare la tensione il condizionatore si ferma.
Al ritorno della stessa, il condizionatore ripartirà con le stesse impostazioni che aveva al momento dell’arresto.
BLACK OUT
The air conditioner stops.
After the black out, the air conditioner will work according
to the pattern of settings selected before the black out.
AVVIAMENTO RITARDATO DEL COMPRESSORE
Ogni volta che il compressore nell’unità esterna si ferma,
trascorrono almeno 3 minuti prima della nuova partenza.
Questo periodo di tempo evita di sovraccaricare il compressore dell’unità esterna e non può essere modificato.
DELAIED START OF COMPRESSOR
Each time the compressor stops, 3 minutes at least must elapse before a new starting.
This time avoids overloads to the compressor and cannot be
modified.
SEGNALAZIONI E TASTI DI CONTROLLO
INDICATIONS AND CONTROLS
COMANDI AUSILIARI SULL’UNITÀ INTERNA
AUXILIARY CONTROLS OF INDOOR UNIT
PULSANTE “AUX” (COMANDI AUSILIARI)
“AUX” PUSH BUTTON (AUXILIARY CONTROLS)
AUX
RICEVITORE I-R
I-R RECEIVER
Si usa quando il telecomando è fuori servizio.
Permette l’accensione nel solo funzionamento AUTO e lo
spegnimento del condizionatore.
Per accendere:
Sollevare il pannello anteriore dell’unità interna e premere
il tasto AUX sul pannello operativo.
-La spia rossa FUNZIONAMENTO
sull’unità si illuminerà e
l’unità comincerà il funzionamento nel modo AUTOMATICO.
-La velocità del ventilatore e l’impostazione della temperatura sono impostate su AUTOMATICO.
Per spegnere:
Premere nuovamente il tasto AUX sul pannello operativo.
-La spia rossa FUNZIONAMENTO
sull’unità si spegnerà.
Use this button when the remote control is out of order.
It performs the selection of AUTO operation only and allows
the unit to be stopped.
To activate:
Lift the front panel on the indoor unit; press the AUX key on
the control panel.
-The red OPERATION lamp
will come on and the unit
will commence AUTOMATIC mode operation.
-Fan speed and temperature settings are made by AUTOMATIC.
To deactivate:
Press the AUX key on the control panel.
-the red OPERATION lamp
will go out.
RICEVITORE
Capta i segnali provenienti dal telecomando.
RECEIVER
It receives the impulses from the remote control.
INDICATORI LUMINOSI DI FUNZIONAMENTO
OPERATING STATUS LAMPS
Sul pannello frontale dell’unità interna sono posizionate delle
spie luminose che indicano il funzionamento dell’unità.
The lamps on the front section of the indoor unit indicate
current unit operating status.
SPIA TEMPORIZZATORE ARANCIONE
Si accende quando il temporizzatore è inserito.
TIMER LED (ORANGE)
It lights up when the timer is on.
SPIA FUNZIONAMENTO ROSSA
Si accende quando il condizionatore sta funzionando.
OPERATION LED (RED)
It lights up when the air conditioner is working.
SPIE VELOCITÀ DI VENTILAZIONE VERDE
Indica la velocità di ventilazione.
FAN SPEED LEDS (GREEN)
Show the fan speed.
SPIA VENTILAZIONE AUTOMATICA VERDE
Si accende quando è impostato il modo di ventilazione
automatica.
AUTOMATIC FAN LED (GREEN)
It lights up when the automatic fan mode is working.
7
TELECOMANDO A RAGGI INFRAROSSI
1 - TRASMETTITORE
Invia i segnali al ricevitore sul condizionatore.
Deve essere tenuto rivolto verso il ricevitore.
2 - DISPLAY A CRISTALLI LIQUIDI
Indica il tipo di funzionamento, l’impostazione
del TIMER e la temperatura scelta.
3 - ACCENSIONE - SPEGNIMENTO
Permette di accendere e spegnere il condizionatore.
INFRARED REMOTE CONTROL
1 - TRANSMITTER
It sends the impulse to the receiver of the air
conditioner.
It must be directed towards the receiver.
2 - LIQUID CRYSTAL DISPLAY
It shows the operation mode, the TIMER and
temperature setting.
3 - ON / OFF
It switches on or off the air conditioner.
4 - IMPOSTAZIONE TEMPERATURA
Permette di impostare la temperatura ambiente
desiderata (tra 18 e 32 °C).
Il tasto
fa aumentare la temperatura;
il tasto
la fa diminuire.
Ogni pressione dei tasti corrisponde alla variazione di 1 °C.
Durante il funzionamento AUTOMATICO si può cambiare
la temperatura di 1 o 2 gradi, in più o in meno, rispetto alla
temperatura automaticamente impostata.
4 - TEMPERATURE SETTING
It selects the required room temperature
(between 18 and 32 °C).
Use button
to increase and button
to
lower the selected temperature.
Each touch of either button corresponds to 1 °C
variation.
During AUTOMATIC mode functioning the temperature can
be adjusted ti 1 - 2°C above or below the automatically set
temperature.
5 - DISPLAY
Permette di visualizzare il display dell’unità interna.
5 - DISPLAY
It shows the display panel on the indoor unit.
6 - PROGRAMMAZIONE (MODE)
Permette di selezionare il tipo di funzionamento desiderato.
6 - “MODE” OPERATION PUSH BUTTON
It selects the required operation mode.
7 - IMPOSTAZIONE TEMPORIZZATORE
Permette di programmare l’accensione ritardata del condizionatore (da 0,5 a 12 ore).
7 - TIMER SET
It can be used to set the start time (0,5 to 12 hours ahead).
8 - IMPOSTAZIONE TEMPORIZZATORE
Permette di programmare lo spegnimento ritardato del condizionatore (ritardo fisso di un’ora).
8 - TIMER SET
Use this button to set the stop time (1 hour fixed delay).
9 - IMPOSTAZIONE TEMPORIZZATORE
Permette di programmare lo spegnimento ritardato del condizionatore (da 0,5 a 12 ore).
9 - TIMER SET
Use this button to set the stop time (0,5 to 12 hours ahead).
10 - VELOCITÀ VENTILATORE (FAN)
Permette di impostare la velocità del ventilatore dell’unità
interna (automatica, alta, bassa o ultrabassa).
10 - FAN SPEED BUTTON (FAN)
Use this button to set indoor unit fan speed (automatic,high,
low or soft).
11 - ESCLUSIONE TEMPORIZZATORE (C)
Serve per disattivare il funzionamento del TIMER.
11 - TIMER “OFF” (C)
Switches the timer OFF.
12 - DEFLETTORE MOTORIZZATO
Questo tasto permette di mettere in movimento il deflettore
sull’unità interna, per ottenere una migliore distribuzione
dell’aria all’interno della stanza condizionata.
12 - MOTOR-DRIVEN AIR DEFLECTOR
This key operates the deflector on the indoor unit, improving air distribution inside the conditioned room.
BATTERIE
Usare due batterie al manganese o alcaline da 1,5
volt (stilo) ad alte prestazioni : R 03 (AAA).
Per sostituire le pile:
– Premere sul coperchio del vano batterie del
telecomando e farlo slittare nella direzione
della freccia.
– Sostituire le batterie facendo attenzione a rispettare la polarità indicata.
Importante
– Le batterie hanno una durata media di 10 mesi
con un utilizzo normale.
– Le due batterie devono essere identiche.
– Rimuovere le batterie dal telecomando se si
prevede di non utilizzarlo per lunghi periodi.
– Quando il telecomando funziona solo in prossimità del condizionatore è il momento di sostituire le batterie.
8
BATTERIES
Use 2 manganese or alkaline 1,5 V, high performance batteries: R 03 (AAA).
To replace the batteries:
– Push the battery cover of the remote control
and slide as marked by the arrow.
– Replace the batteries keeping the polarity as
marked by the signs.
Important
– The batteries last 10 months approx. if used normally.
– The two batteries must be the same.
– Remove the batteries from the remote control if
not used for long time.
– When the remote control works only close to
the receiver, change the batteries.
UTILIZZO DEL TELECOMANDO
– Rivolgere il trasmettitore del telecomando verso il ricevitore del condizionatore mentre si effettuano le impostazioni.
Se i segnali vengono captati correttamente il condizionatore emetterà un “segnale acustico”.
– Per la ricezione non devono esistere ostacoli (mobili o
tende) tra trasmettitore e ricevitore.
– Il telecomando è in grado di trasmettere fino a una distanza di 7 metri dal condizionatore.
USE OF THE REMOTE CONTROL
– Use the remote control directed owards the receiver of
the air conditioner.
If the impulses are received properly, a beep will be heard
from the air conditioner.
– No obstacles must be allowed between transmitter and
receiver.
– The remote control can transmit its impulse within 7
meter distance from the receiver.
DISPLAY A CRISTALLI LIQUIDI
LIQUID CRYSTAL DISPLAY
1 - TIPO DI FUNZIONAMENTO
Il simbolo indica il tipo di funzionamento impostato:
=
=
=
=
automatico
riscaldamento
raffreddamento
deumidificazione
1 - TYPE OF OPERATION
The type of operation selected is indicated by the symbol:
= automatic
= heating
= cooling
= dehumidification
2 - VELOCITÀ DEL VENTILATORE
Il simbolo indica la velocità selezionata per il ventilatore:
= automatica
= impostazione manuale
2 - FAN SPEED
The fan speed selected is shown by the symbol:
= automatic
= manual setting
3 - TEMPERATURA
L’indicazione della temperatura impostata appare selezionando i programmi di riscaldamento o raffreddamento.
Nel funzionamento automatico e in deumidificazione i
numeri indicano la variazione di temperatura impostata
rispetto al valore standard.
3 - TEMPERATURE
The temperature set is displayed when the heating or cooling programs are selected.
On automatic and dehumidification modes figures shows
variations of pre-set temperature values.
4 - INDICATORE DI TRASMISSIONE
Appare ogni volta che si preme un tasto e indica la trasmissione del segnale.
4 - TRANSMISSION INDICATOR
It appears every time any button is pushed to show the transmission of the impulse.
5 - INDICATORE DI VISUALIZZAZIONE DELL’ORARIO (H)
5 - TIME INDICATION SYMBOL (H)
6 - INDICATORE DI VISUALIZZAZIONE DELLA TEMPERATURA (°C)
6 - TEMPERATURE INDICATION SYMBOL (°C)
7 - SIMBOLO DEL TIMER
Appare quando si sta programmando il timer o quando lo
stesso è attivo.
N.B.:
– Quando si sostituiscono le batterie tutti gli indicatori sul
display si posizionano su AUTO.
Se il condizionatore viene spento tutte le impostazioni precedentemente effettuate vengono mantenute in memoria.
– Non fissare il supporto del telecomando vicino a una sorgente di calore o sotto la luce del sole. Evitare l’esposizione
del telecomando ad umidità eccessive o ad urti (si potrebbero avere deformazioni, rotture o perdita del colore).
7 - TIMER SYMBOL
It is displayed when the timer is being programmed or ON.
NOTE:
– When the batteries are replaced, all indicators on the
display go to AUTO.
If the air conditioner is switched off all previous settings
are stored.
– Do not leave the remote control near a heat source or
under direct sun rays.
Do not expose at excessive humidity or shocks to avoid
deformations, breaks or color losses.
9
FUNZIONI BASILARI
BASIC OPERATION
1) PREMERE IL TASTO MODE
Premere il tasto MODE per selezionare il funzionamento desiderato.
1) PRESS THE MODE KEY
Press the MODE key to select the desidered operation mode.
= automatico
= raffreddamento
= riscaldamento
= deumidificazione
= automatic
= cooling
= heating
= dehumidification
2) PREMERE IL TASTO ACCESO - SPENTO
Il condizionatore entra in funzione e si accende la
spia rossa di funzionamento.
2) PRESS THE “ON/OFF” KEY
The conditioner starts running and the red led
lights up.
3) REGOLARE LA TEMPERATURA
Nel funzionamento Auto e Deumidificazione la
temperatura può essere cambiata di 1 o 2 °C in più
o in meno rispetto alla temperatura impostata dal
microprocessore.
Nel funzionamento in Riscaldamento e
Raffreddamento la temperatura può essere regolata
da un minimo di 18 °C ad un massimo di 32 °C.
3) ADJUST THE TEMPERATURE
In the Auto and Dry mode, the temperature can
be changed in 1 °C increments within the range
of 2 °C higher to 2 °C lower from the temperature
autmatically determined by the air conditioner.
In the Heat and Cool mode, the temperature can
be set within the range of 18 °C to 32 °C.
4) PREMERE IL TASTO FAN (VENTILATORE)
Premere il tasto FAN per selezionare la velocità desiderata.
= automatica
= media
= minima
= massima
4) PRESS THE FAN KEY
Press the FAN key to select the desidered fan speed.
= automatic
= medium
= low
= high
5) PREMERE IL TASTO ACCESO - SPENTO
Per spegnere l’unità, premere di nuovo il tasto
ACCESO/SPENTO.
5) PRESS THE “ON/OFF” KEY
To turn off the unit, press the ON/OFF button again.
INFORMAZIONI SUL FUNZIONAMENTO AUTOMATICO
Nella modalità Auto, l’impostazione della temperatura e del
modo di funzionamento sono automaticamente selezionati
in base alle temperature interna ed esterna al momento
dell’accensione dell’unità.
Quando un’unità interna viene accesa per ultima ed è
impostata in modo Auto, la sua modalità di funzionamento
sarà la stessa di quella già accesa indipendentemente dalla
temperatura della stanza.
TIPS ABOUT AUTOMATIC MODE
In the Auto mode, the temperature setting and mode are
automatically selected according to the room temperature
and outdoor temperature when the unit is turned on.
When the indoor unit later operated is set in Auto mode, the
mode is the same as the one in operation regardless of room
temperature.
IMPOSTAZIONE DEL MODO DI FUNZIONAMENTO E DELLA TEMPERATURA NEI MODELLI EXW
OPERATION MODE AND TEMPERATURE SETTING ON EXW MODELS
Temp. ambiente
Funzionamento AUTOMATICO • AUTOMATIC operation
Room temperature
Modo
Impostazione del termostato
Mode
Thermostat setting
Deumidificazione
Temp. ambiente all’avviamento
<24°C
Dehumidification
Room temperature on start
24°C÷26°C
Rinfrescamento • Cooling
24°C
26°C÷28°C
Rinfrescamento • Cooling
25°C
>28°C
Rinfrescamento • Cooling
26°C
IMPOSTAZIONE DEL MODO DI FUNZIONAMENTO E DELLA TEMPERATURA NEI MODELLI EXW-H
OPERATION MODE AND TEMPERATURE SETTING ON EXW-H MODELS
Temp. ambiente
Funzionamento AUTOMATICO • AUTOMATIC operation
Room temperature
Modo
Impostazione del termostato
Mode
Thermostat setting
<21°C
Riscaldamento• Heating
23°C
Deumidificazione
Temp. ambiente all’avviamento
21°C÷24°C
Dehumidification
Room temperature on start
24°C÷26°C
Rinfrescamento • Cooling
24°C
26°C÷28°C
Rinfrescamento • Cooling
25°C
>28°C
Rinfrescamento • Cooling
26°C
10
ORIENTAMENTO DEL FLUSSO D’ARIA
TO ADJUST THE AIR FLOW
Le alette deflettrici sulla mandata dell’aria sono di due tipi:
– verticali per orientare il flusso d’aria sul piano orizzontale;
– orizzontali (deflettore) per orientare il flusso d’aria sul
piano verticale.
The air vents by the air delivery are:
– vertical to direct the air flow on a horizontal level;
– horizontal to direct the air flow vertically.
ORIENTARE LE ALETTE MANUALI
– Ruotare le alette verticali come indicato nella figura in
basso.
– Sia in riscaldamento che in raffreddamento è consigliabile
che il flusso d’aria non investa direttamente le persone.
MANUAL TYPE
– Turn the vertical louvers as shown in the figure below.
– The air flow should never be directed against the people,
either in heating or cooling mode.
IL DEFLETTORE MOTORIZZATO ORIZZONTALE
Non orientare mai manualmente il deflettore motorizzato.
Qualsiasi intervento manuale sul deflettore può danneggiare il sistema e provocare malfunzionamenti.
In particolare possono verificarsi condensazioni sulla superficie del deflettore (in raffreddamento o in deumidificazione) e gocciolamenti sulle superfici sottostanti.
In riscaldamento:
Il deflettore compie una rotazione di circa 90°.
In raffreddamento o deumidificazione:
Il deflettore descrive un angolo più stretto per impedire la
formazione di condensa sulla sua superficie.
THE HORIZONTAL AIR DEFLECTOR IS MOTOR-DRIVEN
Never make manual adjustments to the drive-type grille.
Any manual movement of the air deflector may damage
the system and cause malfunctions.
In particular, condensation may form on the surface of the
air deflector (cooling or dehumidification mode) with consequent dripping onto the surfaces below.
Heating mode:
The air deflector turns 90° approximately.
Cooling or dehumidification mode:
The air deflector turns through a more acute angle to prevent condensate on its surface.
TASTO SWING
Il deflettore inizia ad oscillare in modo continuo.
Quando si arresta il movimento del deflettore (tasto
SWING), questo si ferma in una posizione che viene mantenuta finchè non viene rimesso in moto o finchè non si cambia tipo di funzionamento (tasto MODE).
SWING BUTTON
The grille starts continuous oscillation.
When the air deflector is stopped (SWING key), it remains
still until it is started again or until the operation mode is
changed (MODE key).
Regolare la direzione del flusso
dell’aria come mostrato in figura.
Adjust air flow direction as showed in
the figure.
Funzionamento in raffreddamento o in deumidificazione.
Cooling or dehumidification
mode.
Funzionamento in riscaldamento
Heating mode
Modalità SWING.
SWING mode.
11
ACCENSIONE TEMPORIZZATA
TIMER ON
1) PREMERE IL TASTO TIMER (
)
Sul display appaiono l’indicazione “0.5 hr” e il
simbolo
.
A questo punto premere ripetutamente il tasto
fino ad impostare l’ora desiderata (ad esempio 3
ore).
Ad ogni pressione del tasto il valore aumenta di
0.5 ore fino al valore 9.5, e poi di 1 ora per volta
fino al valore 12.
Premendo ancora il tasto si ritorna a 0.5 hr.
Attendere 1 secondo per la trasmissione delle
impostazioni.
La spia arancione sull’unità interna si accende.
Il condizionatore entrerà in funzione prima delle
3 ore impostate, in modo che all’ora fissata la
stanza abbia già raggiunto la temperatura impostata.
L’anticipo viene calcolato dal microprocessore in
base alla temperatura ambiente e alla temperatura
impostata.
1) PRESS THE TIMER KEY (
)
The indication “0.5 hr” and the
symbol
appear on the display.
At this point, press the key repeatedly until the
desired time is set (e.g. 3 hrs).
Each time the key is pressed, the value increases
by 0.5 hrs. until reaching 9.5 hrs., and subsequently in increments of 1 hr. until reaching 12 hrs. By
pressing the key again, the setting returns to 0.5
hrs.
WAIT 1 SECOND to allow transmission of setting.
The orange led of the indoor unit lights up.
The air conditioner starts operating before the 3
hours set, so that within a period of three hours,
the room will have reached the temperature set.
The advance period is calculated by the microprocessor according to the ambient temperature and
the temperature set.
2) PREMERE IL TASTO CANCEL PER DISATTIVARE IL TIMER
Il display torna a visualizzare la temperatura.
Il simbolo
sparisce e la spia arancione sull’unità
interna si spegne.
2) PRESS THE CANCEL KEY TO STOP THE TIMER
The display goes back to showing the temperature.
The
symbol disappears and the orange led of the
indoor unit goes off.
Per verificare se il timer è inserito controllare la spia arancione sull’unità interna.
To check whether the timer is ON check the orange led of
the indoor unit.
SPEGNIMENTO TEMPORIZZATO
TIMER OFF
1) PREMERE IL TASTO TIMER (
)
Sul display appaiono l’indicazione “0.5 hr” e il
simbolo
.
A questo punto premere ripetutamente il tasto
fino ad impostare l’ora desiderata (ad esempio 3
ore).
Ad ogni pressione del tasto il valore aumenta di
0.5 ore fino al valore 9.5, e poi di 1 ora per volta
fino al valore 12.
Premendo ancora il tasto si ritorna a 0.5 hr.
Attendere 1 secondo per la trasmissione delle
impostazioni.
La spia arancione sull’unità interna si accende.
Il condizionatore si spegnerà all’ora impostata.
Un’ora dopo che il timer è stato attivato la temperatura viene variata:
– viene aumentata di 1 °C se il condizionatore sta
funzionando in RAFFREDDAMENTO o in DEUMIDIFICAZIONE;
– viene abbassata di 3 °C se sta funzionando in
RISCALDAMENTO.
1) PRESS THE TIMER KEY (
)
The indication “0.5 hr” and the
symbol
appear on the display.
At this point, press the key repeatedly until the
desired time is set (e.g. 3 hrs).
Each time the key is pressed, the value increases
by 0.5 hrs. until reaching 9.5 hrs., and subsequently in increments of 1 hr. until reaching 12 hrs. By
pressing the key again, the setting returns to 0.5
hrs.
WAIT 1 SECOND to allow transmission of setting.
The orange led of the indoor unit lights up.
The air conditioner is cut off at the pre-set time.
The temperature is changed one hour after the
timer is started:
– it increases by 1 °C if the air conditioner is
working on COOLING mode or in DEHUMIDIFICATION;
– it goes down by 3 °C if the unit is working on
HEATING mode.
2) PREMERE IL TASTO CANCEL PER DISATTIVARE IL TIMER
Il display torna a visualizzare la temperatura.
Il simbolo
sparisce e la spia arancione sull’unità
interna si spegne.
2) PRESS THE CANCEL KEY TO STOP THE TIMER
The display goes back to showing the temperature.
The
symbol disappears and the orange led of the
indoor unit goes off.
Per verificare se il timer è inserito controllare la spia arancione sull’unità interna.
To check whether the timer is ON check the orange led of
the indoor unit.
12
SPEGNIMENTO TEMPORIZZATO AD 1 ORA
ONE-HOUR OFF TIMER
1) PREMERE IL TASTO TIMER (
)
Sul display appaiono l’indicazione “1” e il simbolo
.
Attendere 1 secondo per la trasmissione delle
impostazioni.
La spia arancione sull’unità interna si accende.
Il condizionatore si spegnerà dopo un’ora.
1) PRESS THE TIMER KEY (
)
The indication “1” and the
symbol appear
on the display.
WAIT 1 SECOND to allow transmission of setting.
The orange led of the indoor unit lights up.
The air conditioner will stop operating after one
hour.
2) PREMERE IL TASTO CANCEL PER DISATTIVARE IL
TIMER
Il display torna a visualizzare la temperatura.
Il simbolo
sparisce e la spia arancione
sull’unità interna si spegne.
2) PRESS THE CANCEL KEY TO STOP THE TIMER
The display goes back to showing the temperature.
The
symbol disappears and the orange led
of the indoor unit goes off.
Per verificare se il timer è inserito controllare la
spia arancione sull’unità interna.
To check whether the timer is ON check the
orange led of the indoor unit.
13
MANUTENZIONE
MAINTENANCE
Per pulire l’unità interna usare panni o spugne morbidi
bagnati in acqua al massimo a 40 °C.
Per la pulizia del telecomando usare un panno morbido leggermente umido.
Non usare prodotti chimici o solventi per nessuna parte del
condizionatore.
Non spruzzare acqua sulle superfici esterne o interne del
condizionatore (si potrebbero provocare dei corti circuiti).
Pulire periodicamente il filtro:
Una pulizia frequente del filtro garantisce una maggiore
efficienza di funzionamento.
Pulire il filtro con un aspirapolvere ed eventualmente con
acqua e detergente neutro.
Use clothes or sponges with warm water (40 °C) to clean
the unit inside.
Use a damp cloth to clean the remote control.
Do not use chemical cleansers in any part of the air conditioner.
Do not spray water on the surfaces (it might cause short circuits).
Clean the air filter:
Frequent cleaning of the filter ensures greater operating efficiency.
Clean the filter with a vacuum cleaner and with water and
neutral detergent if necessary.
SE IL CONDIZIONATORE NON FUNZIONA
IF THE AIR CONDITIONER DOES NOT WORK
SE IL CONDIZIONATORE RAFFREDDA POCO
– Il filtro sull’unità interna è pulito?
– A quale temperatura è stata impostato per il funzionamento? (leggere sul display del telecomando)
– Ci sono porte o finestre aperte nella stanza?
– Ci sono molte persone presenti nella stanza (più del normale)?
– Ci sono fonti di calore anomale nella stanza? (ferro da
stiro, aspirapolvere, bollitore elettrico)
– Ci sono degli ostacoli che impediscono il passaggio
dell’aria all’unità esterna o a quella interna?
IF THE AIR CONDITIONER DOES NOT COOL ENOUGH
– Check if the air filter is clean.
– Check the temperature setting (read it on the display of
the remote control).
– Check if doors and windows of the room are closed.
– Check if there are too many people in the room.
– Check if there are unusual heat sources in the room (iron,
vacuum cleaner, etc.).
– Check if there are obstacles preventing the air to circulate
throughout the outdoor unit.
SE L’UNITÀ NON RICEVE IL SEGNALE DAL TELECOMANDO
– Controllare che le batterie del telecomando non siano
esaurite.
– Controllare che le polarità delle batterie del telecomando
siano allineate correttamente.
– Controllare che la distanza del telecomando dall’unità non
sia superiore a 7m e che non vi siano ostacoli davanti al
ricevitore e provare ad inviare nuovamente il segnale.
– L’unità potrà comunque funzionare in attesa del ripristino
del telecomando, agendo sul pulsante AUX (vedi:
SEGNALAZIONI E TASTI DI CONTROLLO).
IF THE UNIT DOES NOT RESPOND TO THE REMOTE CONTROL HANDSET
– Check whether the batteries have run down.
– Check that the batteries have been inserted in the remote
control correctly.
– Check that the unit is not more than 7 m away and that
the receiver on the front of the unit is not obstructed.
– To operate the unit without the remote control handset,
press the AUX button (see: SIGNALS AND CONTROL
KEYS).
È NORMALE:
– Il funzionamento in raffreddamento e in deumidificazione
può provocare la formazione di vapor acqueo all’esterno.
– Nel funzionamento in riscaldamento (modelli a pompa di
calore) durante il ciclo di sbrinamento può uscire vapore
dall’unità esterna.
– Un leggero fruscio d’aria può essere avvertibile in prossimità dell’unità interna.
– Talvolta il condizionatore può emettere odori sgradevoli
dovuti all’accumulo di sostanze presenti nell’aria
dell’ambiente (specialmente se non si provvede a ventilare periodicamente la stanza).
IT IS NORMAL:
– During cooling mode and dehumidification mode some
vapour can be produced outdoor.
– On heating mode (heat pump models) some steam may
come out of the outdoor unit during the defrosting cycle.
– A light hiss may be heard by the indoor unit.
– Air the room from time to time to avoid smells.
14
a
OBSERVATIONS
BEMERKUNGEN
Conserver le manuel dans un endroit sec, afin d’éviter leur
détérioration, pendant au moins 10, pour toutes éventuelles
consultations futures
Die Handbücher an einem trockenen Ort aufbewahren,
damit es mindestens weitere 10 Jahre für eventuelle
Informationen einsehbar ist.
Lire attentivement et entièrement toutes les informations
contenues dans ce manuel.
Prêter une attention particulière aux normes d’utilisation
signalées par les inscriptions “DANGER” ou “ATTENTION”, car leur non observance pourrait causer un dommage à l’appareil et/ou aux personnes et objets.
Alle in diesem Handbuch enthaltenen Informationen aufmerksam und vollständig lesen.
Insbesondere auf die Benutzungsanweisungen mit den
Hinweisen “VORSICHT” oder “ACHTUNG” achten, da
deren Nichtbeachtung Schäden am Gerät bzw. Sach- und
Personenschäden zur Folge haben kann.
Pour toute anomalie non mentionnée dans ce manuel, contacter aussitôt le Service Après-vente de votre secteur.
Sich bei Betriebsstörungen, die in diesem Handbuch nicht
aufgeführt sind, umgehend an die zuständige Kundendienststelle wenden.
AERMEC S.p.A. décline toute responsabilité pour tout dommage dû à une utilisations impropre de l’appareil et à une
lecture partielle ou superficielle des informations contenues
dans ce manuel.
Die AERMEC S.p.A. übernimmt keine Haftung für Schäden
aus dem unsachgemäßen Gebrauch des Gerätes und der
teilweisen oder oberflächlichen Lektüre der in diesem
Handbuch enthaltenen Informationen.
Ce manuel se compose de 28 pages.
Dieses Handbuch hat 28 Seiten.
PRINCIPAUX COMPOSANTS • HAUPTKOMPONENTEN
1
2
3
4
5
Meuble de couverture • Gehäuse
Carte de contrôle • Überwachungseinschub
Groupe de ventilation • Lüftereinheit
Récepteur • Empfänger
Batterie d’échange thermique • Wärmetauschbatterie
6
7
8
9
10
1
Déflecteur débit d’air • Gebläseablenkblech
Filtre à air • Luftfilter
Télécommande • Fernbedienung
Vanne inversion cycle • Umkerventil
Compresseur • Verdichter
a
7
5
6
3
4
5
1
3
2
9
10
8
16
DESCRIPTION DES COMPOSANTS
BESCHREIBUNG DER KOMPONENTEN
1 MEUBLE DE COUVERTURE
Il se caractérise par ses dimensions réduites et par son
esthétique agréable.
Les Led de signalation se situent sur la partie frontale.
La touche auxiliaire AUX se trouve sous le panneau de la
carrosserie.
1 GEHÄUSE
Dieses Gerät zeichnet sich durch bescheidene Baugröße
und besonders gefälliges Design aus.
Am unteren Teil der Frontseite befinden sich die Anzeigeleuchten. Die Hilfstaste AUX ist unter der Frontplatte angebracht.
2 CARTE DE CONTROLE
La carte de contrôle à microprocesseur remplit les fonction
suivantes:
- contrôle et gestion du cycle de dégivrage;
- contrôle de la température de l’échangeur interne en
fonctionnement refroidissement;
- contrôle de la température de l’échangeur interne en
fonctionnement pompe à chaleur afin d’éviter les éventuels courants d’air froid;
- protection contre les absorption électriques excessives.
2 MIKROPROZESSOR
Der elektronische Mikroprozessor führt folgende Funktionen
aus:
- Überwachung und Steuerung des Abtauvorgangs;
- Temperaturüberwachung des internen Wärmetauschers
bei Kühlbetrieb;
- Temperaturüberwachung des internen Wärmetauschers
bei Wärmepumpenbetrieb, um das Entstehen kalter
Luftzüge zu vermeiden;
- Schutz gegen übermäßige Stromaufnahme.
3 GROUPE DE VENTILATION
Unité extérieure: Le groupe de ventilation est composé d’un
ventilateur de type axial, équilibré statiquement et dynamiquement, avec grille de protection aux normes CEI (107-34).
Unité intérieure: Le groupe de ventilation est composé d’un ventilateur de type tangentiel extrêmement compact et silencieux.
3 LÜFTEREINHEIT
Außeneinheit: Die Lüftereinheit besteht aus einem statisch
und dynamisch gewuchteten Axialventilator mit Schutzgitter
nach CEI-Norm (107-34).
Inneneinheit : Die Lüftereinheit besteht aus einem besonders kompakten und leise laufenden Tangentiallüfter.
4 RECEPTEUR
Récepteur de signaux infrarouge émis par la télécommande.
4 EMPFÄNGER
Empfänger des signals der Fernbedienung.
5 BATTERIE D’ECHANGE THERMIQUE
Elle se compose d’un tube de cuivre avec ailettes d’aluminium du type turbulences.
5 WÄRMETAUSCHER
Der Wärmetauscher besteht aus Kupferrohren mit
Aluminium- Turbolenzflügeln.
6 DEFLECTEUR REFOULEMENT D’AIR
L’unité est équipé d’un déflecteur motorisé et d’ailettes verticales orientables manuellement afin de diriger le flux de
l’air de manière optimale.
6 KLAPPE-LUFTAUSTRITT
Die Einheit ist mit einem motorbetriebenen Ablenkblech
ausgerüstet, sowie mit manuell verstellbaren horizontalen
Flügeln, so daß eine optimale Ausrichtung des Luftstroms
gewährleistet ist.
7 FILTRE A AIR
Il est régénérable, avec traitement antimoisissure et facilement extractible pour le nettoyage.
7 LUFTFILTER
Regenerierbar, gegen Schimmelbildung behandelt und zur
Reinigung leicht herauszunehmen.
8 TELECOMMANDE
La télécommande permet de définir tous les paramètres de
fonctionnement de l’appareil. Ces paramètres sont affichés
sur un écran à cristaux liquides pour faciliter les opérations
de programmation. La télécommande est alimentée par 2
piles 1,5 V de type R 03 AAA et elle fonctionne jusqu’à une
distance de 7 mètres.
8 FERNBEDIENUNG
Die Fernbedienung gestattet die Eingabe aller
Betriebsparameter des Geräts. Diese Parameter werden auf
einem Flüssigkristalldisplay angezeigt, was den
Programmiervorgang erleichtert. Die Fernbedienung wird
durch zwei 1,5 V-Batterien Typ R 03 AAA gespeist und funktioniert bis zu einer Entfernung von 7 Metern von der Einheit.
9 VANNE INVERSION CYCLE
Elle inverse le flux de liquide de réfrigérant en passant du
fonctionnement été / hiver.
9 UMKERVENTIL
Nach dem Umschalten von Sommer- auf Winterbetrieb
kehrt dieses Ventil den Kältekreislauf um.
10 COMPRESSEUR
Le compresseur rotatif à haute efficacité, insonorisé. Il est
équipé d’un separateur de liquide, que protège le compresseur contre un éventuel retour de liquide réfrigérant provenant des unités internes.
10 VERDICHTER
Der hermetische, schallgedämpfte Rotationsverdichter
(Twin Rotary) ist mit Flüssigkeitsabscheider ausgerüstet, der
den Kompressor vor dem eventuellen Rückfluß von
Kältemittel aus den internen Einheiten schützt.
17
USAGES IMPROPRES
UNSACHGEMÄßER GEBRAUCH
NE PAS TIRER LE CABLE ELECTRIQUE
Il est dangereux de tirer, écraser ou clouer
le cable électrique qui, si endommagé,
pourrait provoquer des courts circuits et
dommages aux personnes.
NICHT AN DEN ELEKT. KABEL ZIEHEN
Es ist sehr gefährlich, an dem
Einspeisungskabel zu ziehen, es zu quetschen, oder mit Nägeln oder Reißnägeln
zu befestigen.
Das beschädigte Kabel kann einen Brand
oder Schäden an Personen verursachen.
UTILISER LA TELECOMMANDE POUR ALLUMER ET ARRETER L’APPAREIL
Ne pas débrancher le cable d’alimentation pour
arreter l’appareil.
Cette opération, répétée plusieurs fois peut abimer le cable ou la prise avec risque de courts circuits et dommages aux personnes.
DAS KLIMAGERÄT MIT DER I.R.- FERNBEDIENUNG EIN- UND AUSSCHALTEN
Das Klimagerät nicht durch Abziehung des
Einspeisungskabels ausschalten.
Wenn das Gerät auf dieser Weise ausgeschaltet wird, kann das Kabel, der Stecker und die
Steckdose beschädigt werden und es besteht
die Gefahr von Schäden an Personen.
ORIENTER CORRECTEMENT LE SOUFFLAGE
DE L’AIR
L’air sortant de l’appareil ne doit pas incomoder
les personnes dans la pièce car, meme si plus
chaud par rapport à la température ambiante, il
risque de provoquer une sensation désagreable
de froid. N’orienter manuellement que les ailettes verticales. Pour le déflecteur horizontal utiliser la touche SWING de la télécommande.
DEN LUFTSTROM RICHTIG ORIENTIEREN
Den Luftstrom nicht auf anwesende Personen richten, auch nicht im Heizbetrieb, um ein Kältegefühl
zu verhindern.
Nur die senkrechten Flügel manuell einstellen.
Für die horizontale Luftleitvorrichtung ist die Taste
SWING der Fernsteuerung zu nutzen.
NE PAS UTILISER LE CLIMATISEUR
IMPROPREMENT
Ce climatiseur ne doit pas etre utilisé pour
l’élevage d’animaux.
DAS KLIMAGERÄT NUR BETRIEBSGERECHT BENUTZEN
Das Klimagerät darf nicht für die Brut und
Aufzucht von Tieren benutzt werden.
NE PAS POSER D’OBJET SUR LA SORTIE
DE L’AIR
Ne pas insérer objets dans les fentes de sortie de l’air (tant dans l’unité intérieure que
dans l’unité extérieure) qui pourraient provoquer des dommages aux personnes et à
l’appareil.
SCHÜTZEN SIE DAS GERÄT GEGEN DAS
ANSAUGEN VON FREMDKÖRPERN
Keine Gegenstände in die Nähe der Öffnungen legen. Sie können angesaugt werden (sowohl Inneneinheit als auch
Außeneinheit).
Verletzungen von Personen und Schäden
an den Lüftern verursachen.
ANOMALIES DE FONCTIONNEMENT
En cas de fonctionnement anormal de l’unité (activation des
alarmes), après avoir éliminé la cause de son intervention,
procéder à la réinitialisation de l’appareil.
BETRIEBSSTÖRUNGEN
Bei Betriebsstörungen des Gerätes (Alarm) ist nach
Beseitigung der Störungsursache das Reset des Gerätes
auszuführen.
SYMBOLES DE SECURITE • SICHERHEITSSYMBOLE
18
Danger:
Danger:
Danger:
Danger:
Tension
Température
Organes en mouvement
Mettre hors tension
Vorsicht !
Vorsicht !
Vorsicht !
Vorsicht !
Spannung
Temperatur
Rotierende Teile
Spannung abschalten
Danger!!!
Gefahr!!!
AUTRE INFORMATIONS
WEITERE ANWEISUNGEN
LIMITES DE FONCTIONNEMENT
L’appareil est équipé de dispositifs de controle qui le protègent des conditions dangereuses de fonctionnement.
Dans certaines conditions, ces dispositifs peuvent intervenir
en empêchant le fonctionnement du climatiseur:
Le fonctionnement continu de l’appareil en refroidissement
dans une pièce aved un taux de humidité rélative très élévé
(supérieur à 80%) peut provoquer la formation de quelques
gouttes de condensats à proximitè du soufflage de l’air qui
pourraient couler de l’appareil. Les condensats pourraient
tomber sur les objets au dessous ou au sol.
EINSATZGRENZEN
Das Klimagerät ist mit Kontrollvorrichtungen versehen, die
das Gerät vor gefährlichen Betriebsbedingungen schützen.
Unter gewissen Bedingungen können diese Vorrichtungen mit
einer folgenden Verhinderung des Klimagerätbetriebes ansprechen: Wenn das Klimagerät im Dauerbetrieb (in der Betriebsart
Kühlung) in einer Atmosphäre mit mehr als 80% Feuchtigkeit
arbeitet, bilden sich Kondensationströpfchen am Luftaustritt der
Inneneinheit und können auf den Boden abtropfen.
Das Kondenswasser könnte auf den Boden oder auf die evtl.
unter dem Klimagerät befindlichen Gegenstände tropfen.
INTERRUPTIONS DE COURANT
Le climatiseur s’arrete quand l’électricité manque.
Après les coupures de coutant, le climatiseur repartira selor
les régulations selectionnées avant son arret.
UNTERBRECHUNG DER ELEKTRISCHEN EINSPEISUNG
Beim Spannungsabfall bleibt das Klimagerät stehen.
Wenn die elektrische Einspeisung wiederhergestellt ist, wird
das Gerät automatisch wieder in Betriebgesetzt. Die
Einstellungen bleiben unverändert.
DEMARRAGE TEMPORISE DU COMPRESSEUR
Après chaque arret, le compresseur ne peut redemarrer que
après un intervalle minimum de 3 minutes, pour éviter toutes surcharges au compresseur.
Cet intervalle ne peut pas etre modifié.
ANLAUFVERZOGERUNG DES VERDICHTERS
Nach jedem Stillstand läuft der Verdichter mit 3 Minuten
Verzögerung an. Diese Zeitverzögerung ist dazu bestimmt, den
Verdichter der Außeneinheit vor zu rasch aufeinanderfolgende
Anlaufvorgänge zu schützen und kann nicht verändert werden.
SIGNALISATIONS ET TOUCHES DE CONTROLE
KONTROLLKEUCHTEN UND BEDIENTASTEN
COMMANDES AUXILIAIRES DANS L’UNITE INTERIEURE
HILFSKONTROLLEN DER INNENEINHEIT
POUSSOIR "AUX" (COMMANDES AUXILIAIRES)
TASTE "AUX" (HILFSSTEUERUNGEN
AUX
RECEPTEUR
EMPFÄNGER
A utiliser lorsque la télécommande est hors service.
Il permet d'allumer le climatiseur uniquement en mode
AUTOMATIQUE et de l'éteindre.
Pour allumer :
Soulever le panneau supérieur de l'unité intérieure et
appuyer sur la touche AUX du tableau de commande.
-Le voyant rouge FONCTIONNEMENT
de l'unité s'allume et
cette dernière se met à fonctionner en mode AUTOMATIQUE.
-La vitesse du ventilateur et le réglage de la température
sont programmés sur AUTOMATIQUE.
Pour éteindre :
Appuyer de nouveau sur la touche AUX du tableau de commande.
-Le voyant rouge FONCTIONNEMENT
de l'unité s'éteint.
Si l'on appuie sur la touche AUX pendant la marche, l'unité
s'éteint.
Diese werden benutzt, wenn die Fernbedienung außer
Betrieb ist.
Mit ihnen kann das Klimagerät nur im AUTOMATIKBETRIEB
eingeschaltet, und ausgeschaltet werden.
Einschalten:
Die vordere Verkleidung des Innengeräts anheben und die
Taste AUX an der Bedienblende drücken.
-Die rote Kontrolllampe BETRIEB
BETRIEB am Innengerät
leuchtet auf und das Gerät beginnt, im AUTOMATIKBETRIEB zu laufen.
-Die Lüfterdrehzahl und der Temperatursollwert sind im
AUTOMATIKBETRIEB eingestellt.
Ausschalten:
Nochmals die Taste AUX an der Bedienblende drücken.
-Die rote Kontrolllampe BETRIEB
am Innengerät erlischt.
Wenn die Taste AUX während des normalen Betriebs
gedrückt wird, wird das Gerät ausgeschaltet.
RECEPTEUR
ll capte les impulses de la télécommande.
I.R.- EMPFÄNGER
Er erhält die Signale von der I.R.- Fernbedienung.
VOYANT DE FONCTIONNEMENT (led rouge)
Il s’allume quand le climatiseur est en marche.
KONTROLLEUCHTE BETRIEB (rot)
Sie leuchtet auf wenn das Klimagerät in Betrieb ist.
VOYANT TEMPORISATEUR (led orange)
Il s’allume quand le temporisateur est programmé.
KONTROLLEUCHTE PROGRAMMIERUNG (orange)
Sie leuchtet auf wenn eine Programmierung erfolgte.
VOYANT VITESSE DE VENTILATION (led vert)
Indique la vitesse de ventilation.
KONTROLLEUCHTE LÜFTERDREHZAHL (grün)
Zeigt die Lüfterdrehzahl an.
VOYANT VENTILATION AUTOMATIQUE (led vert)
Il s’allume quand le mode de ventilation automatique est fixé.
KONTROLLEUCHTE AUTOM. LÜFTERBETRIEB (grün)
Sie leuchtet auf, wenn der automatische Lüfterbetrieb programmiert worden ist.
19
TELECOMMANDE A RAYONS INFRAROUGES
1 - TRANSMETTEUR
Il doit etre orienté vers le recepteur pour lui
envoyer les impulses.
2 - DISPLAY A CRYSTAUX LIQUIDES
Il montre le fonctionnement, la programmation
du TIMER et la température selectionnée.
3 - DEMARRAGE - ARRET
Pour allumer ou éteindre l’appareil.
4 - REGULATION DE LA TEMPERATURE
Cette touche permet de selectionner une température ambiante entre 18 et 32 °C.
En poussant
la température augmente;
en poussant
la température diminue.
Chaque pression sur la touche correspond à 1
°C.
Durante le fonctionnement AUTOMATIQUE on
pent charger la température de 1 ou 2 degrés, en plus au en
moins, par rapport à la température fixée automatiquement.
5 - TOUCHE DISPLAY
Permet de visualier l’afficheur de l’unité intérieure.
6 - PROGRAMMATION (MODE)
Il permet de selectionner le type de fonctionnement.
7 - PROGRAMMATION TEMPORISATEUR
Permet la mise en marche du climatiseur (0,5 à 12 heures
auparavant).
8 - PROGRAMMATION TEMPORISATEUR
Permet la mise en marche du climatiseur (retardement fixe
d’une heure).
9 - PROGRAMMATION TEMPORISATEUR
Cette touche permet de programmer l’arret du climatiseur
(0,5 à 12 heures auparavant).
10 - VITESSE VENTILATEUR (FAN)
Il permet de selectionner la vitesse du ventilateur de l’unité
intérieure (automatique, grande, petite, soft).
11 - EXCLUSION DU TEMPORISATEUR (C)
Sert à désactiver le fonctionnement duTEMPORISATEUR.
12 - DEFLECTEUR MOTORISE
Cette touche permet de mettre en mouvement le déflecteur
sur l’unité intérieure, pour obtenir une meilleure distribution
de l’air à l’intérieur de la pièce climatisée.
BATTERIES DE LA TELECOMMANDE
Utiliser deux batteries au manganèse ou alcalines
de 1,5 V à haut rendement: R 03 ( AAA ).
Pour remplacer les batteries:
– pousser sur le couvercle du logement batteries,
le glisser dans la direction de la flèche.
– remplacer les batteries en maintenant la position des poles indiquée.
Important
– Les batteries ont une durée moyenne de 10
mois avec un emploi normal.
– Les deux batteries doivent etre identiques.
– Enlever les batteries de la télécommande si l’on
prévoit des longues périodes d’arret.
– Quand la télécommande ne fonctionne que à
proximité du récepteur, changer les batteries.
20
INFRAROT- FERNBEDIENUNG
1 - I.R. SENDER
Er sendet die Steuersignale zu dem, am Gerät
angebrachten Empfänger.
Er muß gegen den Empfänger gerichtet werden.
2 - FLÜSSIGKRISTALL- ANZEIGE
Diese Anzeige zeigt die Betriebsart, die
Einstellung des Timers und die gewählte
Temperatur an.
3 - KNOPF EIN- AUSSCHALTUNG
Hauptschalter der Klimaanlage.
4 - EINSTELLUNG DER TEMPERATUR
Zur Einstellung der gewünschten Raumtemperatur (zwischen 18 und 32 °C).
Mit dem Knopf
kann man die Temp. erhöhen;
mit dem Knopf
kann man die Temp. vermindern.
Bei jedem Druck der Knöpfe wird die
Temperatur um 1 °C geändert.
Während des automatischen Betribs kann die Temperatur
um 1 bis 2 °C hinsichtlich der programmierten Werte erhöht
bzw. vernindert Werten.
5 - DISPLAY
Zeigt das Display des Innengeräts.
6 - PROGRAMMIERUNG (MODE)
Sie ermöglicht die Auswahl der Betriebsart.
7 - EINSATZ TIMER (SET)
Zur verzögerten Einschaltung (von 0,5 bis 12 Stunden) des
Klimagerätes.
8 - EINSATZ TIMER (SET)
Zur verzögerten Einschaltung (Feste Verzögerung von einer
Stunde) des Klimagerätes.
9 - EINSATZ TIMER (SET)
Zur verzögerten Ausschaltung (von 0,5 bis 12 Stunden) des
Klimagerätes.
10 - LUFTERDREHZAHL (FAN)
Ermöglicht die Einstellung der Lüfterdrehzahl (Inneneinheit):
(automatische, hohe, mittlere und niedrige Drehzahl).
11 - AUSSCHALTEN TIMER (C)
Dient dem Aufheben des Timer- Betriebszustandes.
12 - GESTEUERTE LUFTLEITVORRICHTUNG
Diese Taste ermöglicht den Einsatz einer Bewegung der
Luftleitvorrichtung an der Interneinheit zur besseren
Verteilung der Luft im Inneren des betreffenden Raumes.
BATTERIEN
Verwenden Sie 2 Mangan- oder AlkaliHochleistungsbatterien von 1,5 Volt: R 03 (AAA).
Batteriewechsel:
– Den Deckel der I.R.- Fernbedienung in
Pfeilrichtung verschieben.
– die Batterien unter Beachtung der angegebenen
Polarität in das Aufnahmefach setzen.
ACHTUNG
– Beim normalen Betrieb haben die Batterien eine
Lebensdauer von ca. 10 Monaten.
– Die zwei Batterien müssen identisch sein.
– Die Batterien entfernen wenn die I.R.Fernbedienung über einen längeren Zeitraum
nicht benutzt werden sollte.
– Wenn die I.R.- Fernbedienung nur in kurzer
Entfernung vom Klimagerät funktioniert, müssen
die Batterien ausgetauscht werden.
EMPLOI DE LA TELECOMMANDE
– Adresser le transmetteur vers le recepteur de l’appareil
quand on selectionne les differentes fonctions.
Un signal acoustique de l’appareil signale la bonne
reception des impulses.
– Il ne doit pas avoir d’obstacles entre le transmetteur et le
recepteur.
– La télécommande peut transmettre son impulse jusqu’à 7
mètres de l’appareil.
BENUTZUNG DER I.R.- FERNBEDIENUNG
– Den Sender der I.R.- Fernbedienung während der
Programmierung auf den Empfänger des Klimagerätes
richten.
Bei Empfang des Signals wird ein Bestätigungston gesendet.
– Der Empfang des Signals kann durch sich zwischen
Fernbedienung und Klimagerät befindliche Gegenstände
(Möbel oder Vorhänge) gestört werden.
– Die I.R.- Fernbedienung ist in einer Entfernung von ca 7 m
vom Empfänger funktionsfähig.
DISPLAY A CRYSTAUX LIQUIDES
FLÜSSIGKRISTALL - DISPLAY
1 - TYPE DE FONCTIONNEMENT
Le symbol indique le type de fonctionnement réglé:
= automatique
= chauffage
= refroidissement
= déshumidification
2 - VITESSE DU VENTILATEUR
Le symbol indique la vitesse sélectionnée pour le ventilateur:
= automatique
= préréglage manuel
3 - TEMPERATURE
L’indication de la température programmée apparaît en
sélectionnant les programmes CHAUFFAGE, ou REFROIDISSEMENT.
En fonctionnement AUTOMATIQUE et en DEHUMIDIFICATION les numéros indiquent la variation de température
fixée par rapport à la valeur standard.
4 - INDICATEUR DE TRANSMISSION
Il parait à chaque fois que l’on pousse une touche et indique
la transmission de l’impulse.
1 - BETRIEBSART
Das Symbol gibt die voreingestellte
Betriebsart an:
= Automatik
= Heizung
= Kühlung
= Entfeuchtung
2 - LÜFTERGESCHWINDIGKEIT
Das Symbol zeigt die für den Lüfter gewählte
Geschwindigkeit an:
= Automatik
= Manuelle Einstellung
3 - TEMPERATUR
Die Angabe der voreingestellten Temperatur erscheint bei
Anwahl der Programme HEIZUNG, oder KÜHLUNG.
Bei den Betriebsarten AUTOMATIK und ENTFEUCHTUNG
zeigen die Zahlen den Unterschied zwischen der am
Aufstellungsort gewählten Temperatur und dem werkseitig
eingestellten Wert.
4 - KONTROLLEUCHTE SENDEN
Dieses Symbol erscheint immer wenn man auf einen Knopf
drückt und zeigt die Übertraugung des Signals an.
5 - INDICATEUR D’AFFINCHAGE DE L’HORAIRE (H)
5 - SYMBOL - ZEITANZEIGE (H)
6 - INDICATEUR D’AFFINCHAGE DE LA TEMPERATURE (°C)
7 - SYMBOLE DU TEMPORISATEUR
Apparaît lorsqu’on est en train de programmer le temporisateur ou quand celui-ci est actif.
NOTE:
– Quand on remplace les batteries tous les indicateurs sur
le diisplay se placent sur AUTO.
Si le climatiseur est éteint, toutes les régulations sont
mémorisées.
– Si le recepteur est exposé à une lumière intense (soleil ou
fluorescence) le climatiseur peut présenter des anomalies
de fonctionnement ou ne pas fonctionner tout à fait.
Ne pas fixer le support de la télécommande à proximité
d’une source de chaleur ou sous les rayons de soleil, éviter
l’humidité excessive et les chocs.
6 - SYMBOL - TEMPERATURANZEIGE (°C)
7 - TIMER- SYMBOL
Erscheint bei der Programmierung des Timers oder wenn
dieser aktiviert ist.
WICHTIG:
– Während des Batterien- wechsels sind alle DisplayAnzeigen auf AUTO.
Wenn das Klimagerät abgeschaltet wird, bleiben die
vorher eingestellten Funktionen gespeichert.
– Wenn der Empfänger einer starken Lichtquelle
(Sonneneinstrahlung oder Leuchtstofflampe) ausgesetzt
wird, kann der einwandfreie Betrieb des Gerätes beeinträchtigt werden.
Den Halter für die Fernbedienung nicht in der Nähe einer
Lichtquelle oder unter Sonneeinstrahlung befestigen.
Die Fernbedienung sollte vor übermäßiger Feuchtigkeit,
Hitze und Beschedigung geschützt werden
(Verformungen, Zerbrechen oder Farbenverluste).
21
FONCTIONS DE BASE
GRUNDFUNKTIONEN
1) PRESSER LA TOUCHE MODE
Appuyer sur la touche MODE pour sélectionner le
fonctionnement recherché.
1) BETÄTIGEN DER TASTE MODE
Zur Wahl der Betriebsart die Taste MODE
drücken.
= automatique
= refroidissement
= chauffage
= déshumidification
= Automatik
= Kühlung
= Heizung
= Entfeuchtung
2) PRESSER LA TOUCHE ALLUME-ETEINT
Le climatiseur entre en service et le témoin rouge
de fonctionnement s’allume.
2) BETÄTIGEN DER TASTE EIN-AUS
Das Klimagerät geht in Betrieb und die rote
Betriebsanzeige leuchtet auf.
3) REGLER LA TEMPERATURE
En fonctionnement Auto et Déshumidification, la
température peut varier plus ou moins de 1 ou 2 °C
par rapport à la température préréglée par le microprocesseur.
En fonctionnement Chauffage et Rafraîchissement,
la température peut être régulée d'un minimun de
18 °C à un maximum de 32 °C.
3) EINSTELLEN DER TEMPERATUR
In den Betriebsarten Auto und Entfeuchten kann
man die von der Mikroprozessor-Steuerung vorgegebene Temperatur um 1 - 2 °C erhöhen bzw.
verringern.
In den Betriebsarten Heizen und Kühlen kann
man die Raumtemperatur zwischen 18 °C und 32
°C einstellen.
4) PRESSER LA TOUCHE FAN (VENTILATEUR)
Appuyer sur la touche FAN pour sélectionner l’allure recherchée.
4) BETÄTIGEN DER TASTE FAN (LÜFTER)
Zur Wahl der Drehzahl die Taste FAN drücken.
= automatique
= moyenne
= minimum
= maximum
5) PRESSER LA TOUCHE ALLUME-ETEINT
Pour arrêter l’unité, réappuyer sur
MARCHE/ARRET.
= Automatik
= Mittel
la
touche
INFORMATIONS SUR LE FONCTIONNEMENT AUTOMATIQUE
En mode Auto, les préréglages de la température et du
mode de fonctionnement sont automatiquement sélectionnés en fonction des températures intérieure et extérieure
au moment de la mise en service de l'unité.
En cas de mise en service d’une unité intérieure en dernier
et en mode Auto, son fonctionnement sera le même que
celle déjà mise en marche, et ce indépendamment de la
température ambiante.
= Minimum
= Maximum
5) BETÄTIGEN DER TASTE EIN-AUS
Zum Ausschalten des Geräts erneut die EIN/AUS-Taste
drücken.
HINWEISE ZUM AUTOMATIKBETRIEB
Im Automatikbetrieb erfolgen Temperaturwahl und Wahl
der Betriebsart selbsttätig in Funktion der Innen- und
Außentemperatur bei Einschaltung des Geräts.
Wenn das Innengerät als letztes Gerät eingeschaltet wird
und im Automatikbetrieb läuft, übernimmt es unabhängig
von der Raumtemperatur die Betriebsart des zuvor eingeschalteten Geräts.
PREREGLAGE DU MODE DE FONCTIONNEMENT ET DE LA TEMPERATURE SUR MODELES EXW
BETRIEBSART UND SOLLWERTE BEI DEN EXW MODELLEN
Température ambiante
Fonctionnement AUTOMATIQUE • AUTOMATIK Betrieb
Raumtemperatur
Mode
Impostazione del termostato
Betrieb
Thermostatseinstellungen
Déshumidification
Temp. ambiante en mise en service
<24°C
Entfeuchtung
Raumtemperatur bei Einschallung
24°C÷26°C
Refroidissement • Kühlung
24°C
26°C÷28°C
Refroidissement • Kühlung
25°C
>28°C
Refroidissement • Kühlung
26°C
PREREGLAGE DU MODE DE FONCTIONNEMENT ET DE LA TEMPERATURE SUR MODELES EXW-H
BETRIEBSART UND SOLLWERTE BEI DEN EXW MODELLEN
Température ambiante
Fonctionnement AUTOMATIQUE • AUTOMATIK Betrieb
Raumtemperatur
Mode
Impostazione del termostato
Betrieb
Thermostatseinstellungen
<21°C
Chauffage• Heizung
23°C
Déshumidification
Temp. ambiante en mise en service
21°C÷24°C
Entfeuchtung
Raumtemperatur bei Einschallung
24°C÷26°C
Refroidissement • Kühlung
24°C
26°C÷28°C
Refroidissement • Kühlung
25°C
>28°C
Refroidissement • Kühlung
26°C
22
ORIENTATION DU FLUX D’AIR
EINSTELLUNG DES LUFTSTROMS
Les ailettes de déflexion sur le refoulement de l’air sont de
deux types:
– manuelles: pour orienter le flux d’air sur le plan horizontal;
– déflecteur motorisé: pour orienter le flux d’air sur le plan
vertical.
Die Lamellengitter zur Luftverteilung an der Ausblasseite
sind auf zwei Arten ausgeführt:
– Von Hand verstellbare Lamellen: Horizontale Ausrichtung
des Luftstroms;
– Stellmotor-betätigte Lamellen: Vertikale Ausrichtung des
Luftstroms.
ORIENTER LES AILETTES MANUELLES
– Tourner les ailettes comme indiqué sur la figure en bas.
– Tant en chauffage qu’en refroidissement, il est conseillé de
ne pas diriger directement le flux d’air sur les personnes.
EINSTELLEN DER HANDBETÄTIGTEN LAMELLEN
– Die Lamellen wie in der untenstehenden Abbildung drehen.
– Sowohl im Heiz- als auch im Kühlzyklus wird angeraten,
den Luftstrom so einzustellen, daß er im Raum befindliche
Personen nicht direkt trifft.
LE DEFLECTEUR HORIZONTAL EST MOTORISE
Ne orienter jamais manuellement le déflecteur motorisè.
Toute intervention manuelle sur le déflecteur peut endommager le système et provoquer des dysfonctionnements.
En particulier, il peut se produire des condensations sur la
surface du déflecteur (en refroidissement ou en déshumidification) et un égouttement sur les surfaces sous-jacentes.
En chauffage:
Le déflecteur accomplit une rotation d’environ 90°.
En refroidissement ou deshumidification:
le déflecteur décrit un angle plus étroit pour empêcher la
formation de condensation sur sa surface.
DIE HORIZONTALE LUFTLEITVORRICHTUNG IST
MOTOR GESTEUERT
Das Stellmotor-betätigte Luftverteilgitter darf auf keinen
Fall von Hand verstellt werden.
Jeder manuelle Eingriff an der Luftleitvorrichtung kann zu
Schäden am System führen und Störungen verursachen.
Es können speziell Kondenserscheinungen an der
Oberfläche der Luftleitvorrichtung (im Kühl- und
Entfeuchtungszyklus) und ein Tropfen auf die darunterliegenden Flächen auftreten.
Bei Heizbetrieb:
Die Luftleitvorrichtung führt eine Drehung um etwa 90° aus.
Bei Kühl- oder Entfeuchtungsbetrieb:
Die Luftleitvorrichtung beschreibt einen engeren Winkel, um
die Bildung von Kondenserscheinungen auf der Oberfläche
zu vermeiden.
TOUCHE SWING
Le déflecteur commence à osciller de façon continu.
Quand on arrête le mouvement du déflecteur (touche
SWING), celui-ci s’arrête dans une position qui est maintenue tant qu’il n’est pas remis en mouvement ou tant qu’on
ne change pas de type de fonctionnement (touche MODE).
SWING-TASTE
Das Luftverteilgitter beginnt im Dauerbetrieb zu oszillieren.
Bei Beendigung der Bewegung der Luftleitvorrichtung (Taste
SWING), stoppt diese in einer Stellung, die solange beibehalten wird, bis sie wieder in Bewegung gesetzt wird oder
bis die Betriebsart geändert wird (Taste MODE).
Régler la direction du flux de l’air
comme l’indique la figure.
Luftrichtung einstellen, wie in der
Abbildung gezeigt.
Fonctionnement en refroidissement ou déshumidification.
Betrieb im Kühl- oder
Entfeuchtungszyklus.
Fonctionnement en chauffage.
Betrieb im Heizzyklus.
Mode SWING.
Betriebsart SWING.
23
DEMARRAGE TEMPORISE
PROGRAMMIERTES EINSCHALTEN
1) PRESSER LA TOUCHE TEMPORISATEUR (
)
L’indication “0.5 hr” et le symbole
sur
l’afficheur apparaissent.
A ce stade presser plusieur fois la touche jusqu’à
ce que l’heure désirée soit fixée (par exemple 3 hr).
A chaque pression de la touche, la valeur augmente de 0,5 hr jusqu’à la valeur 9,5, puis de 1 hr
à chaque fois jusqu’à la valeur 12.
Si l’on presse encore la touche, on revient à 0,5 hr.
ATTENDRE 1 SECONDE pour la trasmission des
données fixées.
Le voyant jaune sur l’unité intérieure s’allume.
Le climatiseur entrera en service avant les 3 heures réglées, de façon que dans 3 heures la pièce
ait déjà atteint la température fixée.
L’avance est calculée par le microprocesseur en
fonction de la température ambiante et de la
température fixée.
1) TIMER- TASTE BETÄTIGEN (
)
Auf dem Bildschirm erscheinen die Anzeige “0,5
hr” und das Symbol
.
An dieser Stelle ist die Taste solange zu betätigen,
bis sich der gewünschte Zeitwert einstellt (z.B. 3
h). Bei jedem Tastendruck erhöht sich der Wert
um 0,5 h bis zum Erreichen des Wertes 9,5, und
anschließend um je 1 h bis zum Wert 12.
Betätigen Sie die Taste erneut, wird auf 0,5 h
zurückgegangen.
EINE SEKUNDE WARTEN vor der Ubertragungder
Einstellungen.
Die orange Anzeige an der internen Einheit schaltet sich ein. Das Klimagerät geht vor Ablauf der 3
eingestellten Stunden in Betrieb, sodaß die
Raumtemperatur in drei Stunden den eingestellten
Temperaturwert erreicht.
Die Vorausberechnung erfolgt durch den
Mikroprozessor auf Grundlage der Umgebungstemperatur und der eingestellten Temperatur.
2) PRESSER LA TOUCHE CANCEL POUR DÉSACTIVER LE TEMPORISATEUR
L’afficheur revient à la visualisation de la température.
Le symbole
disparaît et le témoin jaune sur l’unité
intérieure s’éteint.
2) BETÄTIGEN DER TASTE CANCEL ZUR ENTAKTIVIERUNG
DES TIMERS
Der Display zeigt erneut die Temperatur an.
Das Symbol
verschwindet und die orange Anzeige
an der internen Einheit schaltet sich aus.
Pour vérifier si le temporisateur est branché, contrôler le
témoin orange sur l’unité intérieure.
Zur Prüfung, ob der Timer eingesetzt ist, ist die orange
Anzeige an der internen Einheit zu kontrollieren.
ARRET TEMPORISE
PROGRAMMIERTES AUSSCHALTEN
1) PRESSER LA TOUCHE TEMPORISATEUR (
)
Sur l’afficheur apparaissent l’indication “0.5 hr” et
le symbole
.
A ce stade presser plusieur fois la touche jusqu’à
ce que l’heure désirée soit fixée (par exemple 3 hr).
A chaque pression de la touche, la valeur augmente de 0,5 hr jusqu’à la valeur 9,5, puis de 1 hr
à chaque fois jusqu’à la valeur 12.
Si l’on presse encore la touche, on revient à 0,5 hr.
ATTENDRE 1 SECONDE pour la trasmission des
données fixées.
Le voyant orange sur l’unité intérieure s’allume.
Le climatiseur d’air s’arrete à l’heure selectionnée.
Un’heure après le demarrage du timer, la température change:
– 1 °C en plus quand l’appareil fonctionne en
REFROIDISSEMENT ou en DESHUMIDIFICATION;
– 3 °C en moins quand l’appareil fonctionne en
CHAUFFAGE.
1) TIMER- TASTE BETÄTIGEN (
)
Auf dem Bildschirm erscheinen die Anzeige “0,5
hr” und das Symbol
.
An dieser Stelle ist die Taste solange zu betätigen,
bis sich der gewünschte Zeitwert
einstellt (z.B. 3 h).
Bei jedem Tastendruck erhöht sich der Wert um
0,5 h bis zum Erreichen des Wertes 9,5, und
anschließend um je 1 h bis zum Wert 12.
Betätigen Sie die Taste erneut, wird auf 0,5 h
zurückgegangen.
EINE SEKUNDE WARTEN vor der Ubertragungder
Einstellungen. Die orange Anzeige an der internen
Einheit schaltet sich ein. Das Klimagerät wird nach
der einzustellenden Uhrzeit ausgeschaltet.
Nach einem 1- Stundenbetrieb des Timers wird
die Raumtemperatur wie folgt geändert:
– beim KÜHL- oder ENTFEUCHTUNGSBETRIEB
wird die Temp. um 1 °C erhöht;
– beim HEIZBETRIEB sinkt die Temperatur um 3
°C ab.
2) PRESSER LA TOUCHE CANCEL POUR DÉSACTIVER LE TEMPORISATEUR
L’afficheur revient à la visualisation de la température.
Le symbole
disparaît et le témoin orange sur l’unité
intérieure s’éteint.
2) BETÄTIGEN DER TASTE CANCEL ZUR ENTAKTIVIERUNG
DES TIMERS
Der Display zeigt erneut die Temperatur an.
Das Symbol
verschwindet und die orange Anzeige
an der internen Einheit schaltet sich aus.
Pour vérifier si le temporisateur est branché, contrôler le
témoin orange sur l’unité intérieure.
Zur Prüfung, ob der Timer eingesetzt ist, ist die orange
Anzeige an der internen Einheit zu kontrollieren.
24
ARRET TEMPORISE A 1 HEURE
1) PRESSER LA TOUCHE TEMPORISATEUR (
Sur l’afficheur apparaissent l’indication “1” et le
symbole
.
ATTENDRE 1 SECONDE pour la trasmission des
données fixées.
Le voyant orange sur l’unité intérieure s’allume.
Le climatiseur s’arrêtera de fonctionner après une
heure.
2) PRESSER LA TOUCHE CANCEL POUR DÉSACTIVER LE TEMPORISATEUR
L’afficheur revient à la visualisation de la température.
Le symbole
disparaît et le témoin orange
sur l’unité intérieure s’éteint.
Pour vérifier si le temporisateur est branché, contrôler le témoin orange sur l’unité intérieure.
IN 1 STUNDE PROGRAMMIERTES AUSSCHALTEN
)
1) TIMER- TASTE BETÄTIGEN (
)
Auf dem Bildschirm erscheinen die Anzeige “1”
und das Symbol
.
EINE SEKUNDE WARTEN vor der Ubertragungder
Einstellungen.
Die orange Anzeige an der internen Einheit schaltet sich ein.
Das Klimagerät schaltet sich nach einer Stunde ab.
2) BETÄTIGEN DER TASTE CANCEL ZUR
ENTAKTIVIERUNG DES TIMERS
Der Display zeigt erneut die Temperatur an.
Das Symbol
verschwindet und die orange
Anzeige an der internen Einheit schaltet sich aus.
Zur Prüfung, ob der Timer eingesetzt ist, ist die
orange Anzeige an der internen Einheit zu kontrollieren.
25
ENTRETIEN
PERIODISCHE KONTROLLE
Pour nettoyer l’unité intérieure utiliser des chiffons ou éponges trempés dans de l’eau tiède. Pour nettoyer la télécommande utiliser un chiffon lègerment humide.
Ne pas utiliser produits chimiques.
Ne pas asperger d’eau l’appareil (risques de court circuit).
Nettoyer periodiquement le filtre a’air:
Un nettoyage fréquent du filtre garantit une plus grande efficacité de fonctionnement.
Nettoyer le filtre avec un aspirateur et, le cas échéant, avec
de l’eau et un détergent neutre.
Zur Reinigung der Inneneinheit müssen weiche Lappen und
Wasser unter 40 °C verwendet werden. Auch zur Reinigung
der I.R.- Fernbedienung weiche Lappen benutzen.
Vermeiden Sie die Verwendung chemischer Produkte und
Lösungsmittel. Beim reinigen nicht mit Wasser abspritzen
(elektrische Schäden können dadurch verursacht werden).
Den Filter Regelmäßig Reinigen:
Eine periodische Reinigung des Filters gewährleistet eine
höhere Leistungsfähigkeit.
Reinigen Sie ihn mit einem Staubsauger und eventuell mit
Wasser und einem neutralen Reinigungsmittel.
SI LE CLIMATISEUR NE MARCHE PAS
WENN DAS KLIMAGERÄT NICHT ANLÄUFT
SI LE CLIMATISEUR NE REFROIDI PAS ASSEZ
– Vérifier si le filtre est sale.
– Vérifier la température selectionneé (sur le display).
– Vérifier si les portes et les fenetres sont fermées.
– Vérifier le nombre de personnes dans la pièce.
– Vérifier les sources de chaleur dans la pièce (fer à répasser, aspirateurs, etc.).
– Vérifier s’il y a des obstacles à la circulation de l’air
autour de l’appareil.
SI L'UNITE NE RECOIT PAS LE SIGNAL DE LA TELECOMMANDE
– S'assurer que les piles de la télécommande ne sont pas
déchargées.
– S'assurer que les polarités des piles de la télécommande sont
alignées comme il se doit.
– S'assurer que la distance comprise entre la télécommande et
l'unité n'est pas supérieure à 7 m et qu'il n'y a aucun obstacle devant le récepteur. Essayer alors de nouveau à envoyer
le signal.
– Cependant, l'unité peut fonctionner en attendant que l'on
remette la télécommande en état de marche. Pour ce faire,
utiliser le poussoir AUX (voir: SIGNALISATION ET TOUCHES DE CONTROLE).
DAS KLIMAGERÄT NICHT RICHTIG KÜHLT
– Ist der Filter der Inneneinheit sauber?
– Ist die eingestellte Temperatur richtig (auf der I.R.Fernbedienung ablesen)?
– Gibt es im Raum Türen und Fenster die geöffnet wird?
– Sind im Raum viele Personen anwesend (mehr als
gewöhnlich)?
– Sind im Raum ungewöhnliche Wärmequelle (Bügeleise,
Staubsauger, Elt.- Heizung usw.)?
– Gibt es Gegenstände oder Fremdkörper, die den
Luftdurchsatz der Außeneinheit verhinden?
IL EST NORMAL:
– En refroidissement et en déshumidification, de la vapeur
d’eau peut se produir à l’extérieur.
– En chauffage, pendant le dégivrage, la sortie de vapeur de
l’unité extérieure.
– Un leger bruit peut etre entendu à proximité de l’appareil.
– Parfois le climatiseur peut envoyer des mauvaises odeurs
dans la pièce en consèquence de l’accumulation de substances conténues dans l’air (surtout si la pièce n’est pas
aérée souvent).
26
WENN DAS GERÄT DAS SIGNAL DER FERNBEDIENUNG
NICHT EMPFÄNGT
– Kontrollieren, ob die Batterien der Fernbedienung eventuell leer sind.
– Kontrollieren, ob die Batterien der Fernbedienung richtig
gepolt sind.
– Sicherstellen, dass die Fernbedienung nicht weiter als 7 m
entfernt ist und dass sich keine Hindernisse vor dem
Empfänger befinden, dann noch einmal versuchen, das
Signal zu senden.
– Bis die Fernbedienung wieder funktioniert kann das Gerät
dennoch in Betrieb gesetzt werden, indem die Taste AUX
gedrückt wird (siehe: SIGNALISIERUNGEN UND KONTROLLTASTEN).
WAS NORMAL IST:
– Im Kühlbetrieb und auf Entfeuchtung kann sich
Wasserdampf am Geräte bilden.
– Beim Heizbetrieb (Wärmepumpemodelle) kann Dampf
während der Abtau- Phase aus der Außeneinheit austreten.
– In der Nähe der Inneneinheit kann man ein leichtes
Rascheln hören.
– Manchmal kann das Klimagerät schlechte Gerüche ausströmen, die von Partikeln verursacht sind, welche sich im
Klimagerät ausgesammelt haben (Filter überprüfen und
reinigen) besonders wenn das Zimmer nicht regelmäßig
gelüftet wurde.
Aermec partecipa al Programma di
Certificazione EUROVENT.
I prodotti interessati figurano nella Guida
EUROVENT dei Prodotti Certificati.
Aermec is partecipating in the EUROVENT
Certification Programme.
Products are as listed in the EUROVENT
Directory of Certified Products.
Aermec partecipe au Programme de
Certification EUROVENT.
Les produits figurent dans l’Annuaire
EUROVENT des Produits Certifiés.
Aermec ist am Zertifikations - Programm
EUROVENT beteiligt.
Die entsprechend gekennzeichneten Produkte
sind im EUROVENT - Jahrbuch aufgefürt.
I dati tecnici riportati nella presente documentazione non sono impegnativi.
L’Aermec S.p.A. si riserva la facoltà di apportare in qualsiasi momento
tutte le modifiche ritenute necessarie per il miglioramento del prodotto.
Technical data shown in this booklet are not binding.
Aermec S.p.A. shall have the right to introduce at any time whatever
modifications deemed necessary to the improvement of the product.
Les données mentionnées dans ce manuel ne constituent aucun engagement de notre part. Aermec S.p.A. se réserve le droit de modifier à
tous moments les données considérées nécessaires à l’amelioration
du produit.
Im Sinne des technischen Fortsschrittes behält sich Aermec S.p.A. vor,
in der Produktion Änderungen und Verbesserungen ohne
Ankündigung durchzuführen.
AERMEC S.p.A.
I-37040 Bevilacqua (VR) - Italia
Via Roma, 44 - Tel. (+39) 0442 633111
Telefax 0442 93730 - (+39) 0442 93566
www.aermec.com