1
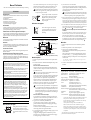
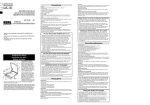
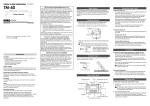
IMPORTANT NOTICE TO CONSUMERS Owner’s Manual Thank you for purchasing the Korg CA-40 chromatic tuner. This product has been manufactured according to strict specifications and voltage requirements that are applicable in the country in which it is intended that this product should be used. If you have purchased this product via the internet, through mail order, and/or via a telephone sale, you must verify that this product is intended to be used in the country in which you reside. WARNING: Use of this product in any country other than that for which it is intended could be dangerous and could invalidate the manufacturer’s or distributor’s warranty. Please also retain your receipt as proof of purchase otherwise your product may be disqualified from the manufacturer’s or distributor’s warranty. Introduction 4015-2 Yanokuchi, Inagi-city, Tokyo 206-0812 Japan 2005 KORG INC. Installing the batteries Slide and remove the battery compartment cover located on the back of the CA-40. Insert the batteries ensuring that you observe the correct polarity, and replace the cover. Precautions Location Using the unit in the following locations can result in a malfunction. • In direct sunlight • Locations of extreme temperature or humidity • Excessively dusty or dirty locations • Locations of excessive vibration • Close to magnetic fields If the CA-40 malfunctions and you are unable to solve the problem by turning the power off and on again, try removing the batteries and then reinstall them. The included batteries are provided for the purpose of verifying operation and therefore may have a shorter lifetime than usual. When the batteries run low, a battery indicator will appear in the left of the display. When this indicator appears, replace the batteries as soon as possible. Power-off the CA-40 before you replace the batteries. Power supply Be sure to turn the power switch to OFF when the unit is not in use. Remove the battery in order to prevent it from leaking when the unit is not in use for extended periods. Interference with other electrical devices Radios and televisions placed nearby may experience reception interference. Operate this unit at a suitable distance from radios and televisions. Using the stand Sound Out mode By opening the stand located on the back, you can position the CA-40 at a convenient angle. Handling To avoid breakage, do not apply excessive force to the switches or controls. Care If the exterior becomes dirty, wipe it with a clean, dry cloth. Do not use liquid cleaners such as benzene or thinner, or cleaning compounds or flammable polishes. Using the tuner Keep this manual Tuning guide [STANDBY/ON] button After reading this manual, please keep it for later reference. CALIB[ ], [ ] buttons Keeping foreign matter out of your equipment Never set any container with liquid in it near this equipment. If liquid gets into the equipment, it could cause a breakdown, fire, or electrical shock. Be careful not to let metal objects get into the equipment. Display CE mark for European Harmonized Standards CE mark which is attached to our company’s products of AC mains operated apparatus until December 31, 1996 means it conforms to EMC Directive (89/336/EEC) and CE mark Directive (93/68/EEC). And, CE mark which is attached after January 1, 1997 means it conforms to EMC Directive (89/336/EEC), CE mark Directive (93/68/EEC) and Low Voltage Directive (73/23/EEC). Also, CE mark which is attached to our company’s products of Battery operated apparatus means it conforms to EMC Directive (89/336/EEC) and CE mark Directive (93/68/EEC). This mode lets you listen to a reference tone while you tune your instrument. 1 Perform steps 2 and 3 of “Meter mode.” 2 Press the [SOUND/NOTE SELECT] button. The CA-40 will be in Sound Out mode, and the speaker will play a reference tone. Hold down the [SOUND/NOTE SELECT] button, and use the CALIB [ ] [ ] buttons to change the pitch of the reference tone that is audible from the speaker. The pitch will change in the following order. A ÷ B ÷ B ÷ C (C5) ÷ C (C4) ÷ C# ÷ D ÷ E ÷ E ÷ F ÷ F# ÷ G ÷ G# ÷ A ÷ ... 3 Tune your instrument to match the reference tone. Speaker Specifications THE FCC REGULATION WARNING (for U.S.A.) This equipment has been tested and found to comply with the limits for a Class B digital device, pursuant to Part 15 of the FCC Rules. These limits are designed to provide reasonable protection against harmful interference in a residential installation. This equipment generates, uses, and can radiate radio frequency energy and, if not installed and used in accordance with the instructions, may cause harmful interference to radio communications. However, there is no guarantee that interference will not occur in a particular installation. If this equipment does cause harmful interference to radio or television reception, which can be determined by turning the equipment off and on, the user is encouraged to try to correct the interference by one or more of the following measures: • Reorient or relocate the receiving antenna. • Increase the separation between the equipment and receiver. • Connect the equipment into an outlet on a circuit different from that to which the receiver is connected. • Consult the dealer or an experienced radio/TV technician for help. Unauthorized changes or modification to this system can void the user’s authority to operate this equipment. 2 Press the [STANDBY/ON] button. The CA-40 will be in Meter mode. The upper left of the display shows the calibration (reference pitch) you specified most recently. The power will turn off automatically if the tuner is not used for approximately twenty minutes. 3 If you want to change the calibration setting, press the CALIB [ ] or [ ] buttons. The calibration setting will change in steps of 1 Hz. If you hold down the button, the calibration setting will increase or decrease continuously. 4 Play a single note on your instrument. The name of the note closest to the note you played will appear in the upper right of the display. Tune your instrument so that the desired note name appears. If you're using the internal mic, position the mic as close as possible to your instrument, and ensure that extraneous background sounds are not picked up by the mic while tuning. 5 While playing a single note, tune your instrument so that the indicator in the center of the tuning guide is lit. The left indicator of the tuning guide will light if the pitch of your instrument is too low, and the right indicator will light if the pitch is too high. 6 If you want to tune to a pure major third or pure minor third above a certain note, use the “ ” (-13.7 cent) or “ ” (+15.6 cent) marks of the meter. Tuning to a pure major third or pure minor third If you want to tune your instrument to a pitch that is a pure major third above A (0 cents), make the note name indicator read C#, and tune your instrument so that the meter indicates the “ ” position. If you want to tune your instrument to a pitch that is a pure minor third above A (0 cents), make the note name indicator read C, and tune your instrument so that the meter indicates the “ ” position. OUTPUT jack Internal mic INPUT jack [SOUND/NOTE SELECT] button Meter mode This mode lets you tune using the meter in the display. 1 Connect the tuner. The connection method will depend on the type of instrument you're connecting. When tuning an instrument that has a pickup Be sure to use an instrument cable for connection to the CA-40's INPUT jack. You can't use the internal mic if a plug is inserted in the INPUT jack. If you're performing on stage, it is convenient to use the CA-40's OUTPUT jack. Connect your instrument to the CA-40's INPUT jack, and then connect your amp to the OUTPUT jack. The sound of your instrument will be sent from the CA-40's OUTPUT jack to your amp, allowing you to tune or perform while the CA-40 remains connected. If you've connected the OUTPUT jack to your amp etc., you must insert a cable into the INPUT jack. If nothing is connected to the INPUT jack, the internal mic will be automatically used. In this case, sound entering the internal mic could cause feedback, possibly damaging your amp. When tuning an acoustic instrument If you're using a separately sold Korg CM-100 contact mic, connect the CM-100's plug to the CA-40's INPUT jack. If you're using the internal mic, don't connect anything. Scale: Detection range: Reference tone: Tuning mode: Calibration range: Detection accuracy: Tone accuracy: Connectors: Speaker: Power supply: Battery life: Dimensions: Weight: Included items: 12-note equal temperament A0 (27.50 Hz) – C8 (4186.01 Hz): for a sine wave C4 (261.63 Hz) – C5 (523.25 Hz): 1 octave Meter mode (AUTO), Sound Out mode (MANUAL) A4=410 Hz–480 Hz (1 Hz steps) ±1 cents or better ±1.5 cents or better INPUT jack (1/4” mono phone jack) OUTPUT jack (1/4” mono phone jack) Dynamic speaker (28 mm diameter) Two AAA batteries (3 V) Approximately 85 hours (Meter mode, continuous A4 input, zinc-carbon batteries) 100 mm (W) x 67mm (D) x 17mm (H) 3.94” (W) x 2.64” (D) x 0.67” (H) 69g (without batteries), 88g (with batteries) 2.43oz. (without batteries), 3.10oz. (with batteries) Owner's manual, two AAA batteries for verifying operation The calibration setting and the Sound Out reference pitch are remembered even when you turn off the power. However when you replace the batteries, these settings will be initialized to the default values; the calibration will return to 440 Hz, and the Sound Out reference pitch will return to A. Even if the pitch is within the range of detection, the CA-40 may be unable to detect the pitch if the sound contains numerous overtones (such as the low and high notes on an acoustic piano) or if the instrument has a rapid decay. * Specifications and appearance are subject to change without notice for improvement of the product. Manuel D’utilisation Merci d’avoir fait l’acquisition de l'accordeur chromatique CA-40 Korg. Précautions Si le CA-40 ne fonctionne pas et si vous n'arrivez pas à corriger le problème en mettant à plusieurs reprises l'appareil hors et sous tension, essayez d'enlever puis de remettre les piles en place. Les piles fournies sont destinées à vérifier le bon fonctionnement de votre appareil. Il est possible que leur durée de vie soit plus courte que la normale. Emplacement L’utilisation de cet instrument dans les endroits suivants peut en entraîner le mauvais fonctionnement. • En plein soleil • Endroits très chauds ou très humides • Endroits sales ou fort poussiéreux • Endroits soumis à de fortes vibrations • A proximité de champs magnétiques Lorsque les piles sont faibles, le symbole de la pile apparaît dans la partie gauche de l’écran. Remplacez alors les piles dès que possible. Mettez le CA-40 hors tension avant de remplacer les piles. Utilisation du support Alimentation Lorsque vous n’utilisez pas l’appareil, n’oubliez pas de le mettre hors tension. Retirez les piles pour éviter toute fuite lorsque l’appareil ne sera pas utilisé pendant de longues périodes de temps. En ouvrant le support situé à l'arrière, vous pouvez incliner le CA-40 sous un angle permettant une lecture aisée de l'affichage. Interférences avec d’autres appareils électriques Les postes de radio et de télévision situés à proximité peuvent par conséquent souffrir d’interférences à la réception. Veuillez dès lors faire fonctionner cet appareil à une distance raisonnable de postes de radio et de télévision. Utilisation de l'accordeur Maniement Pour éviter de les endommager, manipulez les commandes et les boutons de cet instrument avec soin. Guide d’accord Entretien Lorsque l’instrument se salit, nettoyez-le avec un chiffon propre et sec. Ne vous servez pas d’agents de nettoyage liquides tels que du benzène ou du diluant, voire des produits inflammables. Commutateur [STANDBY/ON] Touches CALIB [ ], [ ] Afficheur Haut-parleur Conservez ce manuel Après avoir lu ce manuel, veuillez le conserver soigneusement pour toute référence ultérieure. Evitez toute intrusion d’objets ou de liquide Ne placez jamais de récipient contenant du liquide près de l’instrument. Si le liquide se renverse ou coule, il risque de provoquer des dommages, un court-circuit ou une électrocution.Veillez à ne pas laisser tomber des objets métalliques dans le boîtier (trombones, par ex.). Marque CE pour les normes europeennes harmonisees La marque CE apposée sur tous les produits de notre firme fonctionnant sur secteur jusqu’au 31 décembre 1996 signifie que ces appareils répondent à la Directive EMC (89/336/CEE) et à la Directive concernant la marque CE (93/68/CEE). La marque CE apposée après le 1 janvier 1997 signifie que ces appareils sont conformes à la Directive EMC (89/336/CEE), à la Directive concernant la marque CE (93/68/CEE) ainsi qu’à la Directive Basse Tension (73/23/CEE). La marque CE apposée sur tous les produits de notre firme fonctionnant sur piles signifie que ces appareils répondent à la Directive EMC (89/ 336/CEE) et à la Directive concernant la marque CE (93/68/CEE). REMARQUE IMPORTANTE POUR LES CLIENTS Ce produit a été fabriqué suivant des spécifications sévères et des besoins en tension applicables dans le pays où ce produit doit être utilisé. Si vous avez acheté ce produit via l’internet, par vente par correspondance ou/et vente par téléphone, vous devez vérifier que ce produit est bien utilisable dans le pays où vous résidez. ATTENTION: L’utilisation de ce produit dans un pays autre que celui pour lequel il a été conçu peut être dangereuse et annulera la garantie du fabricant ou du distributeur. Conservez bien votre récépissé qui est la preuve de votre achat, faute de quoi votre produit ne risque de ne plus être couvert par la garantie du fabricant ou du distributeur. Les noms de sociétés, noms de produits et noms de formats, etc. dans ce manuel sont des marques de fabrique ou des mar-ques déposées de leurs propriétaires respectifs. Introduction Mise en place des piles Faites glisser le couvercle du compartiment des piles à l'arrière du CA-40 et enlevez-le. Insérez les piles en respectant leur polarité et remettez le couvercle en place. Prise OUTPUT Microphone interne Prise INPUT Commutateur [SOUND/NOTE SELECT] Mode Compteur Ce mode vous permet d'accorder en observant le compteur affiché à l’écran. 1 Raccordez l'accordeur. La méthode utilisée dépendra du type d'instrument raccordé. Pour accorder un instrument avec micro Utilisez un câble avec fiches monophonique disponible dans le commerce. Utilisez le câble pour raccorder votre instrument à la prise INPUT du CA-40. Vous ne pouvez pas utiliser le microphone interne si une fiche est insérée dans la prise INPUT. Si vous jouez sur scène, il est pratique d'utiliser la prise OUTPUT du CA-40, Raccordez votre instrument à la prise INPUT du CA40, puis raccordez votre amplificateur à la prise OUTPUT. Utilisez un câble avec fiches monophonique disponible dans le commerce. Le son de votre instrument sera envoyé de la prise OUTPUT du CA-40 à votre amplificateur, vous permettant ainsi d'accorder ou de jouer alors que le CA-40 reste raccordé. Si vous avez raccordé la prise OUTPUT à votre amplificateur, etc., vous devez insérer une fiche dans la prise INPUT. Si rien n'est branché sur cette prise, le microphone interne sera automatiquement utilisé. Dans ce cas, le son entrant dans le micro interne risque de provoquer du feedback et d'endommager votre amplificateur. Pour accorder un instrument acoustique Si vous utilisez un microphone de contact Korg CM-100 vendu séparément, raccordez le CM-100 à la prise INPUT du CA-40. Si vous utilisez le microphone interne, ne branchez rien. 2 Appuyez sur le commutateur [STANDBY/ON]. Le CA-40 passera en mode Compteur. La partie supérieure gauche de l’afficheur indiquera le dernier réglage de calibrage (fréquence de reference) spécifié. L’accordeur se mettra automatiquement hors tension si vous ne l’utilisez pas pendant une vingtaine de minutes. 3 Si vous souhaitez changer le réglage de calibrage, appuyez sur la touche CALIB [ ] ou [ ]. Le réglage de calibrage augmentera ou diminuera par incréments de 1 Hz. Si vous maintenez la touche enfoncée, le réglage de calibrage changera de manière continue. 4 Jouez une note sur votre instrument. Le nom de la note la plus proche de celle jouée apparaîtra dans la partie supérieure droite de l'afficheur. Accordez grossièrement votre instrument de telle manière que le nom de la note souhaitée apparaisse. Si vous utilisez le microphone interne, disposez-le aussi près que possible de votre instrument et assurez-vous que les sons extérieurs ne puissent pas être captés pendant l'accord. 5 Tout en jouant une note sur votre instrument, accordez celui-ci de telle manière que la pointe de l'aiguille du compteur soit sur la position centrale et que la diode au centre du guide d’accord s'allume. La diode à gauche s'allumera si la hauteur de la note produite par votre instrument est trop basse et celle à droite si elle est trop élevée. 6 Si vous souhaitez accorder sur une tierce majeure pure ou sur une tierce mineure pure au-dessus d'une certaine note, utilisez les repères “ ” (-13.7 cents) ou “ ” (+15.6 cents) du compteur. Accord sur une tierce majeure pure ou une tierce mineure pure au-dessus Si vous souhaitez effectuer l'accord sur une tierce majeure pure audessus de A (0 cent), accordez votre instrument de telle façon que l'indicateur de note affiche C# et le compteur indique “ ”. Si vous souhaitez effectuer l'accord sur une tierce mineure pure au-dessus de A (0 cent), accordez votre instrument de telle façon que l'indicateur de note affiche C et le compteur indique “ ”. Mode Son Ce mode vous permet d'écouter une note de référence pendant l'accord. 1 Effectuez les opérations 2 et 3 de “Mode Compteur”. 2 Appuyez sur le commutateur [SOUND]. Le CA-40 passera en mode Son et le haut-parleur produira une note de référence. Tout en maintenant le commutateur [SOUND] enfoncé, utilisez les touches CALIB [ ], [ ] pour changer la hauteur de la note de référence produite par le haut-parleur. La note changera dans l’ordre suivant. A ÷ B ÷ B ÷ C (C5) ÷ C (C4) ÷ C# ÷ D ÷ E ÷ E ÷ F ÷ F# ÷ G ÷ G# ÷ A ÷ ... 3 Accordez votre instrument sur la hauteur de la note de référence entendue. Spécifications Gamme: Plage de détection: Note de référence: Modes d'accord: 12 notes tempérament égal A0 (27,50 Hz) – C8 (4186,01 Hz): onde sinusoïde C4 (261,63 Hz) – C5 (523,25 Hz): 1 octave Mode Compteur (AUTO) Mode Son (MANUEL) Plage de calibrage: A4=410 Hz – 480 Hz (par pas de 1 Hz) Précision de la détection: Supérieure à ± 1 centième Précision du son: Supérieure à ± 1.5 centième Prises: Prise INPUT (jack mono 1/4”) Prise OUTPUT (jack mono 1/4”) Haut-parleur: Haut-parleur dynamique (28 mm de diamètre) Alimentation: Deux piles de format AAA (3V) Durée de vie des piles: Environ 85 heures (mode Compteur, note A4 en fonctionnement continu, avec des piles zinc-carbone) Dimensions: 100 (L) x 67 (P) x 17 (H) mm Poids: 69g (sans les piles), 88g (piles comprises) Accessoires fournis: Mode d'emploi de l'utilisateur, deux piles AAA pour vérification du fonctionnement Les valeurs de calibrage et la hauteur du son de référence produit par le haut-parleur sont conservées même quand l'appareil est mis hors tension. Néanmoins, les réglages seront réinitialisés à leurs valeurs par défaut si vous remplacez les piles. Valeurs par défaut: calibrage = 440 Hz, note de référence = A Même si la hauteur du son se trouve à l'intérieur de la plage de détection, il est possible que le CA-40 n'arrive pas à détecter la note si de nombreux sons harmoniques sont présents (comme des notes basses ou élevées sur un piano acoustique) ou si le decay de votre instrument est important. * Les spécifications et l'aspect extérieur sont sujets à modifications sans préavis à des fins d'amélioration du produit. Bedienungsanleitung Herzlichen Glückwunsch zum Kauf des chromatischen Stimmgeräts CA-40 von Korg. Vorsichtsmaßnahmen Wenn eine Fehlfunktion am CA-40 auftritt und Sie das Problem durch wiederholtes Aus- und Einschalten nicht beheben können, nehmen Sie die Batterien heraus und setzen sie wieder ein. Die mitgelieferten Batterien dienen zur Bestätigung der richtign Funktion des Geräts und können eine kürzere Lebensdauer als normale Batterien haben. Wenn die Batterien schwach werden, erscheint eine Anzeige links im Display. Wenn diese Anzeige erscheint, ersetzen Sie die Batterien so schnell wie möglich. Schalten Sie das CA-40 Gerät aus, bevor Sie die Batterien ersetzen. Aufstellungsort Vermeiden Sie das Aufstellen des Geräts an Orten, an denen • es direkter Sonneneinstrahlung ausgesetzt ist; • hohe Feuchtigkeit oder Extremtemperaturen auftreten können; • Staub oder Schmutz in großen Mengen vorhanden sind; • das Gerät Erschütterungen ausgesetzt sein kann. • in der Nähe eines Magnetfeldes. Stromversorgung Stellen Sie den Netzschalter auf OFF, wenn das Gerät nicht benutzt wird. Wenn Sie das Gerät über einen längeren Zeitraum nicht benutzen, nehmen Sie die Batterien heraus, damit sie nicht auslaufen. Verwendung des Ständers Durch Öffnen des Ständers an der Rückseite können Sie das GA-40 in einem praktischen Winkel aufstellen. Störeinflüsse auf andere Elektrogeräte Dieser kann bei in der Nähe aufgestellten Rund-funkempfängern oder Fernsehgeräten Empfangsstörungen hervorrufen. Betreiben Sie solche Geräte nur in einem geeigneten Abstand von diesem Erzeugnis. Bedienung Verwendung des Stimmgeräts Vermeiden Sie bei der Bedienung von Schaltern und Reglern unangemessenen Kraftaufwand. Stimm-Anleitung Ein/Standby-Taste [STANDBY/ON] Reinigung Bei auftretender Verschmutzung können Sie das Gehäuse mit einem trockenen, sauberen Tuch abwischen. Verwenden Sie keinerlei Flüssigreiniger wie beispielsweise Reinigungsbenzin, Verdünnungs- oder Spülmittel. Verwenden Sie niemals brennbare Reiniger. Kalibriertaste CALIB [ ], [ ] Ton-Ausgabe-Modus Display Lautsprecher Bedienungsanleitung Bewahren Sie diese Bedienungsanleitung gut auf, falls Sie sie später noch einmal benötigen. Flüssigkeiten und Fremdkörper Stellen Sie niemals Behältnisse mit Flüssigkeiten in der Nähe des Geräts auf. Wenn Flüssigkeit in das Gerät gelangt, können Beschädigung des Geräts, Feuer oder ein elek-trischer Schlag die Folge sein. Beachten Sie, daß keinerlei Fremdkörper in das Gerät gelangen. Das CE-Zeichen für die Europäische Gemeinschaft Vor dem 31.12.1996 vergebene CE-Zeichen auf unseren netzgespeisten Geräten zeigen an, daß diese Geräte gemäß der EMC-Richtlinie (89/ 336/EWG) und der CE-Richtlinie (93/68/EWG) der EU arbeiten. Nach dem 01.01.1997 vergebene CE-Zeichen auf unseren netzgespeisten Geräten zeigen an, daß diese Geräte gemäß der EMC-Richtlinie (89/ 336/EWG), der CE-Richtlinie (93/68/EWG) und der Niederspannungsstromrichtlinie (73/23/EWG) der EU arbeiten. Die CE-Zeichen auf unseren batteriegespeisten Geräten zeigen an, daß diese Geräte gemäß der EMC-Richtlinie (89/336/EWG) und der CERichtlinie (93/68/EWG) der EU arbeiten. WICHTIGER HINWEIS FÜR KUNDEN Dieses Produkt wurde unter strenger Beachtung von Spezifikationen und Spannungsanforderungen hergestellt, die im Bestimmungsland gelten. Wenn Sie dieses Produkt über das Internet, per Postversand und/ oder mit telefonischer Bestellung gekauft haben, müssen Sie bestätigen, dass dieses Produkt für Ihr Wohngebiet ausgelegt ist. WARNUNG: Verwendung dieses Produkts in einem anderen Land als dem, für das es bestimmt ist, verwendet wird, kann gefährlich sein und die Garantie des Herstellers oder Importeurs hinfällig lassen werden. Bitte bewahren Sie diese Quittung als Kaufbeleg auf, da andernfalls das Produkt von der Garantie des Herstellers oder Importeurs ausgeschlossen werden kann. Die übrigen in dieser Bedienungsanleitung erwähnten Firmen-, Produkt, Formatnamen usw. sind Warenzeichen oder eingetra-gene Warenzeichen der rechtlichen Eigentümer und werden ausdrücklich anerkannt. Einführung Einsetzen der Batterien Schieben Sie den Batteriefachdeckel an der Rückseite des CA-40, und nehmen Sie ihn ab. Setzen Sie die Batterien unter Beachtung der richtigen Polung ein und setzen den Batteriefachdeckel wieder auf. 4 Spielen Sie eine einzelne Note auf Ihrem Instrument. Die Note, deren Name der gespielten Note am nächsten ist, erscheint oben rechts in der Notenanzeige. Stimmen Sie das Instrument etwa so, dass der gewünschte Notenname erscheint. Wenn Sie das interne Mikrofon verwenden, positionieren Sie das Mikrofon so nahe wie möglich am Instrument und stellen sicher, dass keine Außengeräusche beim Stimmvorgang eingefangen werden. 5 Während Sie eine einzelne Note auf Ihrem Instrument spielen, stimmen Sie Ihr Instrument so, dass die Spitze der Messanzeige die Mittenposition anzeigt, und die Mittenanzeige an der Stimmführung leuchtet. Die linke Stimmanzeige leuchtet auf, wenn die Tonlage des Instruments zu niedrig ist, und die rechte Anzeige leuchtet auf, wenn die Tonlage zu hoch ist. 6 Wenn Sie eine genaue große Terz oder eine kleine Terz über einer bestimmten Note stimmen wollen, verwenden Sie die Markierungen „ “ (-13,7 Cent) oder „ “ (+15,6 Cent) in der Messanzeige. Stimmen zu einer genauen großen Terz oder einer kleinen Terz nach oben Wenn Sie Ihr Instrument auf eine Tonhöhe stimmen wollen, die eine reine große Terz über A (0 Cent) liegt, lassen Sie die Notennamen-Anzeige C# anzeigen, und stimmen Sie das Instrument so ab, dass die Messanzeige „ “ anzeigt. Wenn Sie Ihr Instrument auf eine Tonhöhe stimmen wollen, die eine reine kleine Terz über A (0 Cent) liegt, lassen Sie die Notennamen-Anzeige C anzeigen, und stimmen Sie das Instrument so ab, dass die Messanzeige „ “ anzeigt. OUTPUT-Buchse Internes Mikrofon INPUT-Buchse Klang-/Notenwahl-Taste [SOUND/NOTE SELECT] Messmodus Dieser Modus erlaubt es Ihnen, mit einer Messanzeige im Display zu stimmen. 1 Scließen Sie das Stimmgerät an. Die Anschlussmethode ist je nach angeschlossenem Instrument unterschiedlich. Beim Stimmen eines Instruments, das einen Pickup hat Verwenden Sie ein handelsübliches Kabel mit Mono-Steckern. Verwenden Sie das Kabel zum Anschließen Ihres Instruments an die INPUT-Buchse des CA-40. Sie können nicht das interne Mikrofon verwenden, wenn ein Stecker in die INPUT-Buchse eingesteckt ist. Bei einem Bühnenauftritt ist es praktisch, die OUTPUT-Buchse des CA-40 zu verwenden. Verwenden Sie ein handelsübliches Kabel mit Mono-Steckern. Schließen Sie Ihr Instrument an die INPUTBuchse des CA-40 an und danach Ihren Verstärker an die OUTPUTBuchse. Der Sound des Instruments wird von der OUTPUT-Buchse des CA-40 zu Ihrem Verstärker geschickt und erlaubt es, zu stimmen oder zu spielen, während der CA-40 angeschlossen bleibt. Wenn Sie die OUTPUT-Buchse mit Ihrem Verstärker usw. verbunden haben, müssen Sie einen Stecker in die INPUT-Buchse stecken. Wenn nichts an die INPUT-Buchse angeschlossen ist, wird automatisch das interne Mikrofon verwendet. In diesem Fall kann über das interne Mikrofon eintretender Rückkopplung erzeugen und möglicherweise den Verstärker beschädigen. Beim Stimmen eines akustischen Instruments Wenn Sie einen getrennt erhältliches Korg CM-100 Kontaktmikrofon verwenden, schließen Sie den Stecker des CM-100 an die INPUT-Buchse des CA-40 an. Wenn Sie das interne Mikrofon verwenden wollen, schließen Sie nichts an. 2 Drücken Sie die Taste [STANDBY/ON]. Das CA-40 schaltet auf Messen-Modus. Oben links im Display wird die Kalibrierung (Bezugstonhöhe) gezeigt, wie zuletzt eingestellt. Das Gerät schaltet automatisch aus, wenn ca. 20 Minuten lang kein Ton am Eingang angelegt ist. 3 Wenn Sie die Kalibrierungseinstellung ändern wollen, drücken Sie die Taste CALIB [ ] oder [ ]. Die Kalibrierungseinstellung wird in Schritten von 1 Hz geändert. Wenn Sie die Taste gedrückt halten, wird die Kalibrierungseinstellung kontinuierlich höher oder niedriger gestellt. Dieser Modus erlaubt es, beim Stimmen des Instruments einen Bezugston zu hören. 1 Führen Sie Schritt 2 und 3 in „Messmodus“ aus. 2 Drücken Sie die Taste [SOUND]. Das CA-40 ist im Sound-Ausgabemodus, und der Lautsprecher spielt einen Bezugston ab. Halten Sie die Taste [SOUND] gedrückt und verwenden Sie die Tasten CALIB [ ] [ ] zum Ändern des Bezugstons vom Lautsprecher. Die Tonhöhe wird in der folgenden Reihenfolge geändert. A ÷ B ÷ B ÷ C (C5) ÷ C (C4) ÷ C# ÷ D ÷ E ÷ E ÷ F ÷ F# ÷ G ÷ G# ÷ A ÷ ... 3 Stimmen Sie Ihr Instrument auf die Referenztonlage. Technische Daten Skala: Erkennungsbereich: Referenzton: Stimmmodus: 12 Noten gleichschwebende Stimmung A0 (27,50 Hz) – C8 (4186,01 Hz): für eine Sinuswelle C4 (261,63 Hz) – C5 (523,25 Hz): 1 Oktave Messmodus (AUTO) Ton-Ausgabe-Modus (MANUAL) Kalibrierungsbereich: A4=410 Hz–480 Hz (1-Hz-Schritte) Messgenauigkeit: ±1 Cent oder besser Klanggenauigkeit: ±1,5 Cent oder besser Anschlüsse: INPUT-Buchse (1/4-Zoll Mono-Klinkenbuchse) OUTPUT-Buchse (1/4-Zoll Mono-Klinkenbuchse) Lautsprecher: Dynamischer Lautsprecher (28 mm Durchmesser) Stromversorgung: Zwei AAA-Batterien (R03, Micro) (3 V) Batterielebensdauer: approximately 85 hours (Meter mode, continuous A4 input, zinc-carbon batteries) Abmessungen: 100 mm (B) x 67 mm (T) x 17 mm (H) Gewicht: 69g (ohne Batterien), 88 g (mit Batterien) Lieferumfang: Bedienungshandbuch, zwei AAA-Batterien (R03, Micro) zur Funktionsbestätigung Die Kalibrierungseinstellung und Klangausgabe-Bezugstonhöhe werden auch in ausgeschaltetem Zustand bewahrt. Beim Ersetzen der Batterien werden diese Einstellungen auf Vorgabewerte initialisiert; die Kalibrierung schaltet auf 440 Hz zurück, und der Klangausgabe-Bezugstonhöhe schaltet auf A zurück. Auch wenn die Tonhöhe innerhalb des Erkennungsbereichs ist, kann das CA-40 nicht in der Lage sein, die Tonhöhe zu erkennen, wenn der Klang zahlreiche Obertöne (z.B. die niedrigen oder hohen Noten auf einem akustischen Klavier) hat oder das Instrument sehr schnelles Abklingen aufweist. * Änderungen des Designs und der technischen Daten ohne Vorankündigung bleiben im Sinne ständiger Produktverbesserungen vorbehalten.