1
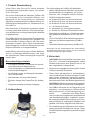
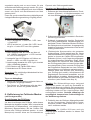
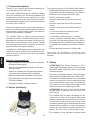
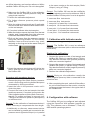
Bedienungsanleitung
CaliBox 200
Diffenzdruck Kalibrator/Messgerät
zur Kalibrierung und Prüfung von statischen und dynamischen
Luftdifferenzdruck-Messinstrumenten
Messbereich 0 bis 200 Pa
www.novasina.com
-1-
English
© by Novasina AG 2011
Technical data subject to modification
Technische Änderungen vorbehalten
Printed in Switzerland
-2-
Inhaltsverzeichnis
Produkt Beschreibung ............................................................................................................. 4
Lieferumfang............................................................................................................................ 4
Sicherheit................................................................................................................................. 4
Gerätebeschrieb ...................................................................................................................... 5
Inbetriebnahme........................................................................................................................ 6
Kalibrierung im Calibrator Modus ............................................................................................ 7
Kalibrierung im Indicator Modus .............................................................................................. 8
Konfiguration mittels Software ................................................................................................. 8
Systemmeldungen ................................................................................................................... 9
Unterhalt und Support ............................................................................................................. 9
Zubehör ................................................................................................................................... 10
Technische Daten ................................................................................................................... 10
Ersatzteile ............................................................................................................................... 10
Deutsch
Werkseinstellungen ................................................................................................................. 10
-3-
1. Produkt Beschreibung
Vielen Dank, dass Sie sich für dieses Novasina
Qualitätsprodukt entschieden haben. Wir danken
für Ihr Vertrauen.
Der mobile Differenzdruck Kalibrator CaliBox 200
von Novasina ist ein universelles Kalibrier- und
Messgerät für die Überprüfung von statischen
(Membran) sowie dynamischen (Massenfluss) LuftDifferenzdruck Messgeräten mit Messbereich von
0 bis 200 Pa.
Das Gerät kann in Reinräumen eingesetzt werden
und wird mittels Akku betrieben. Eine externe Speisung entfällt somit und eine grösstmögliche Mobilität
ist gewährleistet.
Die CaliBox 200 ist ein hochpräziser Druckgenerator
sowie Messgerät und erzeugt einen genauen und
kontinuierlichen Luftstrom, welcher sich über einen
Drehregler einstellen lässt. Dank automatischem
Nullpunktabgleich erreicht das Gerät eine sehr hohe
Reproduzierbarkeit und Langzeitstabilität.
Deutsch
Nebst Differenzdruck Erzeuger ist dieser Kalibrator
auch ein vollwertiges Messinstrument, das sogar
als akkreditiertes Referenzmessgerät eingesetzt
werden kann.
Besondere Eigenschaften:
• Universell einsetzbar für statische und dynamische Differenzdruck-Messumformer
Der Lieferumfang der CaliBox 200 beinhaltet:
• Mobiler Differenzdruck Kalibrator im robusten
Kunststoffkoffer mit integriertem „LiFe“ Akku
• Externes „LiFe“ Ladegerät mit 230 V Stecker
• RS-232 Konfigurationskabel
• 2m Schlauch ID 8mm mit Anschlussstutzen
• 2m Schlauch ID 5mm mit Anschlussstutzen
• 2m Schlauch ID 4mm mit Anschlussstutzen
• 2 x 2m Schlauch ID 4mm
• 2 x Lösegabeln für Druckstutzenpfropfen
• 4 x Stutzen für Schlauch ID Reduktion 8/5mm
• Werkskalibrierzertifikat mit 11 Kalibrierpunkten
über gesamten Arbeitsbereich von 0 bis 200
Pa
• CD mit PascalTool WIN GerätekonfigurationsSoftware und Bedienungsanleitung CaliBox
200
• Gedruckte Bedienungsanleitung CaliBox 200
Überprüfen Sie die Vollständigkeit des Lieferumfangs.
Unvollständige Lieferungen können von Ihrer Novasina
Vertretung umgehend ergänzt werden.
3. Sicherheit
• ACHTUNG! Das Gerät enthält einen Akku vom
Typ „LiFe“ mit hoher Energiekapazität. Laden
Sie das Gerät immer unter Aufsicht und nur mit
dem mitgelieferten Ladegerät auf.
• Hohe Genauigkeit und Stabilität dank automatischem Nullpunktabgleich
• Aufgrund des eingebauten Akkus gelten für den
Transport spezielle Richtlinien.
• Als Kalibrator sowie als Messgerät einsetzbar
(auch zertifizierbar)
• Dieses Gerät hat das Werk in sicherheitstechnisch einwandfreiem Zustand verlassen und darf
unter keinen Umständen manipuliert werden.
Beachten Sie die Hinweise und Warnschilder auf
dem Instrument und in der Bedienungsanleitung.
ACHTUNG! Aufgrund des internen Energiespeichers besteht bei Kurzschlüssen Brandgefahr!
• Akkubetrieben mit langer Betriebszeit
• Einfache Justage über PascalTool Win Software
• Integrierte skalierbare analoge Ausgänge
• Die CaliBox 200 wurde für die Überprüfung von
statischen- und dynamischen Differenzdruck
Messinstrumenten in Reinluftumgebung entwickelt
und sollte nur für diesen Zweck
und innerhalb der angegebenen Spezifikationen
und Betriebsbedingungen eingesetzt werden.
Bei unsachgemässer Benutzung wird vom Hersteller/Lieferant für entstandene Schäden nicht
gehaftet. Das Risiko trägt allein der Betreiber.
2. Lieferumfang
• Die Handhabung des Kalibrators setzt entsprechend geschultes Fachpersonal voraus. Lesen
Sie diese Bedienungsanleitung deshalb sorgfältig durch.
-4-
• Die CaliBox 200 ist nicht für den Einsatz in explosionsgefährdeten Räumen geeignet.
dus (kurz drücken); fürs Ein-/Ausschalten des
automatischen Nullpunktabgleichs (lang drükken).
Kalibriermodus (Calibrator): Der im Inneren
der CaliBox 200 generierte Druck wird über die 2
Stutzen (Calibrator/Dynamic/Static) nach aussen
geleitet und auf dem Display angezeigt, die Measure
LED leuchtet rot, die Indicator LED ist aus.
• Nur der fachgerechte Umgang mit dem Kalibrator
sowie entsprechende Messtechnikkenntnisse
erlauben die richtigen Rückschlüsse auf die
effektive Messgenauigkeiten und Toleranzen.
Messmodus (Indicator): Der Differenzdruck wird
von aussen auf die 2 Stutzen (Indicator/Static+/
Static-) angelegt und auf dem Display angezeigt, die
Measure sowie Indicator LED leuchten rot.
• Der Kalibrator sollte periodisch überprüft werden.
Dies kann intern oder durch unabhängige akkreditierte Messstellen (SCS/DKD usw.) erfolgen.
Ein-/Ausschalten der automatischen Nullung:
Werden beide Tasten gedrückt gehalten schaltet die
automatische Nullpunktjustierung aus. Das Display
zeigt kurzzeitig AZ OFF an und die Run/Error LED
blinkt orange. Die CaliBox 200 arbeitet jetzt ohne
automatische Nullung. Bei erneutem längerem
Drücken beider Tasten wird die Funktion wieder
eingeschaltet und dabei auch gleich eine Nullung
durchgeführt. Das Display zeigt kurz AZ ON an und
die Run/Error LED blinkt wieder grün.
• Verwenden Sie ausschliesslich Originalzubehör
und Originalersatzteile von Novasina.
• Das Öffnen oder Umbauen des Kalibrators ist zu
unterlassen und zieht die sofortige Aufhebung
der Garantieleistung mit sich. Dies gilt auch für
den Austausch des Akkus.
4. Gerätebeschrieb
Hauptschalter / Druckregler:
• Hauptschalter (Power On/Off) zum Ein- und
Ausschalten des Geräts.
• Drehregler mit Arretierung (Pressure Adjustment) zur Einstellung des generierten Differenzdruckes.
Power On/OFF
• Taste (Park Zero Adjustment/Measure) mit
Doppelfunktion; fürs Umschalten zwischen
Normalbetrieb/Parken (kurz drücken); für den
manuellem Nullpunktabgleich (lang drücken).
Parkmodus: Der Normalbetrieb im Kalibrier- oder
Messmodus kann jederzeit durch kurzes Drücken
dieser Taste unterbrochen werden. Die Membran
des Messelements wird dadurch kurzgeschlossen.
Die Measure LED geht dabei aus.
Bemerkung: Die Aktivierung dieser Funktion empfiehlt sich vor der manuellen Nullung im Messmodus.
Druckeinstellung
Drucktasten für Betriebmodus Auswahl:
• Die CaliBox 200 verfügt über 2 Tasten, mit denen sämtliche Betriebsmodi eingestellt werden
können.
TASTE :
Calibrator
Indicator
TASTE :
Messung
Park
Zero Adjust
• Taste (Calibrator/Indicator) mit Doppelfunktion;
fürs Umschalten zwischen Kalibrier-/ Messmo-
Manueller Nullpunktabgleich: Bei längerem
Drücken dieser Taste wird die manuelle Nullung
durchgeführt werden. Dabei spielt es keine Rolle in
welchem Modus sich das Gerät befindet. Auf dem
Display wird kurzzeitig ZERO CAL angezeigt.
Bemerkung: Beim Aus-/Wiedereinschalten wird der
Betriebsmodus auf Werkseinstellung zurückgesetzt.
Anschlussstutzen Druckerzeuger:
• Auf der Frontplatte der CaliBox 200 befinden sich
4 Stutzen, von denen jeweils 2 für den Betrieb
als Druckerzeuger/Kalibrator (Calibrator) und
2 für die Nutzung als Differenzdruck ReferenzMessgerät (Indicator) gebraucht werden.
• Die Anschlüsse für den Betrieb als Druckerzeuger/Kalibrator unterscheiden sich zwischen
-5-
Deutsch
• Dort, wo auftretende Fehler oder Fehlfunktionen
grosse Material- oder Personenschäden verursachen können sind zusätzliche Schutz- und
Sicherheitsvorkehrungen zu treffen, so dass im
Fehlerfall ein sicherer Betriebszustand gewährleistet wird (z.B. Grenzwertschalter).
dynamische (Dynamic) und statische (Static)
Kalibrierung, welche jeweils für Massenflussbzw. für Membran-Differenzdruck Messgeräte
benötigt wird.
Indicator
Static +
Calibrator
Dynamic
Output +
Indicator
Static -
Analoger Signalaussgang: Über diese Schnittstelle wird das aktuelle Messsignal des in der CaliBox 200 integrierten Messgeräts in 0/2...10VDC
ausgegeben. Zur Erhöhung der Auflösung kann es
entsprechend skaliert und zudem justiert werden.
Diese Einstellungen können über die mitgelieferte
PascalTool WIN Konfigurationssoftware durchgeführt werden.
Bemerkung: Das analoge Signal kann z.B. für den
Calibrator
Anschluss eines Datenschreibers genutzt werden.
Static
Output +
Akku-Ladebuchse:
• Akku Ladebuchse (Batt Charger) zum Einstecken
des XLR-Steckers des externen Ladegeräts.
Anschluss für dynamische Kalibrierung: Dieser
Druckanschluss dient der Kalibrierung von Prüflingen mit Massenfluss Messprinzip, d.h. Geräte, die
den dynamischen Differenzdruck messen und einen
kontinuierlichen Luftfluss benötigen. Für solche
Instrumente empfiehlt Novasina den mitgelieferten
Schlauch mit ID 8 mm zu verwenden, da sonst der
Druckabfall im Schlauch zu gross wird.
Deutsch
Bemerkung: Bei der Kalibrierung von Massenfluss Messgeräten ist infolge des Druckabfalls
im Schlauch, dessen max. Länge eingeschränkt.
Basierend auf einen ID 8mm ergibt sich eine maximale Länge von 30 m. Bei kleineren Schlauch ID
verringert sich diese Maximallänge erheblich.
Anschluss für statische Kalibrierung: Dieser
Druckanschluss dient der Kalibrierung von Prüflingen mit Membran Messprinzip, d.h. Geräte, die den
statischen Differenzdruck messen. Hier verwendet
man mit Vorteil einer der mitgelieferten Schläuche
mit ID 5 mm oder 4 mm.
Bemerkung: Beim statischen Druck hat weder der
Schlauch-Innendurchmesser noch die -Länge einen
Einfluss auf den generierten Druck.
Analoger Signalausgang:
• Analoger Signalausgang des aktuellen gemessenen und angezeigten Messwerts (Analogue
OutputVDC/Pressure Value)
Ladebuchse: Über diese Buchse wird der eingebaute Akku innerhalb einer Ladezeit von < 3 Std.
wieder zu 100% aufgeladen.
EMV Hinweise:
1. Das Gerätedesign ist so konzipiert, dass alle
Emissionen/Imissionen im Rahmen der gesetzlichen EMV-Normen und Vorschriften erfüllt
werden.
2. Störungsaussendende Leitungen im Bereich
des temporären Standortes der CaliBox 200
sind zu meiden.
5. Inbetriebnahme
Laden des Akkus:
Die CaliBox 200 wird immer mit voll aufgeladenem
Akku ausgeliefert und kann sofort in Betrieb genommen werden. Die Akku-Betriebszeit bei voller
Ladung beträgt je nach Verwendung min. 24 bis
max. 48 Stunden.
Der LiFe Akku kann jederzeit wieder voll aufgeladen
werden, d.h. er muss nicht zwingend zuerst voll
entladen werden. Die Ladekapazität verringert sich
dabei nicht.
Wichtig: Beim Aufladen darf ausschliesslich das
mitgelieferte Ladegerät verwendet werden. Die
CaliBox 200 darf während des Ladevorgangs nicht
-6-
Zustandsanzeige Ladegerät :
• LED 1 leuchtet rot -> Gerät ON / LED 1 aus
-> Gerät OFF.
• LED 2 leuchtet rot -> Laden ON / LED 2 leuchtet grün -> Laden OFF bzw. Akku geladen.
Vorgehensweise beim Laden:
1. Das Ladegerät über IEC-Dose am Netz mit
110...230VAC anschliessen -> LED1 leuchtet
rot, LED 2 leuchtet grün.
2. Ladegerät über XLR-Stecker mit Calibox verbinden -> LED1 und LED 2 leuchten rot.
3. Ladevorgang abwarten bis LED 2 grün leuchtet
(Akku vollständig geladen).
4. XLR-Stecker aus CaliBox 200 ziehen.
5. Netzkabel aus IEC-Dose ziehen.
Bemerkung: Die vollständige Akkuladezeit bei leerem Akku beträgt < 3Std.
Tipps zur Akkupflege:
• Wegen der Selbstentladung sollte der Akku nur
voll geladen eingelagert werden.
• Zum Schutz vor Tiefentladung sollte der Akku
jährlich min. einmal voll geladen werden.
6. Kalibrierung im Calibrator Modus:
(mit Druckgenerator)
Anschliessen der Prüflinge:
Vor dem Anschliessen des Prüflings, sollte dessen
Messprinzip abgeklärt werden. Man unterscheidet
dynamische (mit Massenfluss) und statische (mit
Membran) Messverfahren. Mit der CaliBox 200
können alle Prüflinge kalibriert werden. Je nach
Messprinzip werden diese am Druckanschluss
Dynamic oder Static angeschlossen.
Vorgehen bei Massenfluss Geräten:
1. Entfernen des Verschlusspfropfens beim Druckstutzens (Dynamic) ->Lösegabel ansetzen und
mit einer Kippbewegung nach unten drücken.
2. Schlauchstutzen bis zum Einrasten in Druckstutzenöffnung einstecken.
3. Schlauch eingangsseitig (positive Druckseite)
an Prüfling anschliessen. Gegebenenfalls mitgelieferten Gummi-Reduktionsstutzen ID 8/5mm
am Schlauchende einschieben. Ausgangsseitig
(negative Druckseite) idealerweise nichts an den
Prüfling anschliessen
4. Elektronische Kompensation der gesamten
Schlauchlänge. Diese besteht aus der Länge
zwischen Kalibrator und Prüfling (200 cm) + Länge des im Innern der CaliBox 200 eingebauten
Schlauchs (24 cm) + evtl. Länge des ausgangseitig angeschlossenen Schlauchs. Diese Länge
wird mittels der PascalTool WIN Software auf
den Prüfling geschrieben und somit bei der Messung kompensiert. Dazu muss der Prüfling über
das mitgelieferte Datenkabel an einen Rechner
angeschlossen und Software gestartet werden.
Danach Read data drücken (die Verbindung
zum Prüfling wird erstellt). Anschliessend die
Registerkarte Environment auswählen und die
Schlauchlänge eingeben. Abschliessend Write
data drücken um die Daten auf den Prüfling zu
schreiben (mehr Details siehe Kap. 8).
Wichtig: Die Schlauchlänge muss zwingend
kompensiert werden, da sonst der Druckabfall im
Schlauch die Messung verfälscht. Die kompensierte
Länge muss nach erfolgter Kalibrierung/Justierung
unbedingt wieder auf den ursprünglichen Wert
zurückgesetzt werden. Deshalb unbedingt die
ursprünglich kompensierte Schlauchlänge for
der Kalibrierung notieren.
5. Zusätzlich kann ein Referenz-Messgerät parallel
an den Druckstutzen (Static/Output+) angeschlossen werden. Dabei sollte wie in Punkt 1
und 2 verfahren werden.
Bemerkung: Die CaliBox 200 kann auch als
Referenz-gerät zertifiziert werden. In diesem Fall
entfällt Pkt 5.
-7-
Deutsch
zugedeckt werden und es muss immer für eine
ausreichende Belüftung gesorgt werden. Es gilt zu
beachten, dass das Ladegerät nach dem Aufladen
zuerst vom Gerät und anschliessend vom Netz
getrennt wird!
Lesen Sie vor der ersten Benutzung die beiliegende
Ladegerät-Bedienungsanleitung sorgfältig durch!
6. Sicherstellen, dass sich die Calibox im Kalibriermodus befindet und dann den gewünschten
Druck mit dem Drehregler einstellen.
7. Kalibrierung/Justierung durchführen.
8. Für weitere Druckpunkte Punkt 6/7 wiederholen.
9. Die ursprüngliche Schlauchlänge und ggf den
neuen GAIN Wert mit Write data auf den Prüfling
schreiben.
10.Bei Bedarf weitere Prüflinge kalibrieren.
11.Nach Abschluss der Arbeiten den Schlauch
vom Prüfling und evtl. vom Referenz-Messgerät
abziehen und Kalibrator ausschalten.
12.Die Schläuche mithilfe der Lösegabel von den
Druckstutzen rausziehen. Dazu Gabel zwischen
Schlauchende und Stutzenring einstecken,
vertikal auf den Ring drücken und gleichzeitig
Schlauch rausziehen.
wie der Prüfling (Static/Output+) angeschlossen
werden.
Bemerkung: Die CaliBox 200 kann auch als
Referenz-gerät zertifiziert werden. In diesem Fall
entfällt Pkt 4.
5. siehe Massenfluss Messgeräte
6. siehe Massenfluss Messgeräte
7. siehe Punkt 8 Massenfluss Messgeräte
8. Siehe Punkt 10 Massenfluss Messgeräte
9. Siehe Punkt 11 Massenfluss Messgeräte
10.Siehe Punkt 12 Massenfluss Messgeräte
11.Siehe Punkt 13 Massenfluss Messgeräte
7. Kalibrierung im Indicator Modus:
(ohne Druckgenerator)
Bemerkung: Die Calibox 200 dient dabei als Referenz Messgerät (mit oder ohne akkreditierte
Zertifizierung).
Kalibrierung beginnen:
Deutsch
13.Verschlusspfropfen bis zum Einrasten in die
Stutzen einstecken und Schläuche im Deckel
der CaliBox 200 verstauen.
Vorgehen bei Membran Geräten:
1. Mittels T-Stück die Druckeingänge von Prüfling
und CaliBox 200 (Static+) parallel verschlauchen.
Dabei achten, dass beide Eingänge (positive
Druckseite) zusammen verbunden werden.
2. Mittels T-Stück die Druckausgänge von Prüfling
und CaliBox 200 (Static-) parallel verschlauchen.
Dabei achten, dass beide Ausgänge (negative
Druckseite zusammen verbunden werden.
3. Kalibrierung/Justierung durchführen.
1. Entfernen des Verschlusspfropfens beim Druckstutzens (Static Output+) ->Lösegabel ansetzen
und Hebel mit einer Kippbewegung nach unten
drücken.
2. Schlauchstutzen bis zum Einrasten in Druckstutzenöffnung einstecken.
3. Schlauch eingangsseitig (positive Druckseite) an
Prüfling anschliessen. Nach Bedarf auch Ausgangsseite (negative Druckseite) anschliessen
(Static Pressure-), dabei ist evtl. eine Verbindung
mit einem T-Stück zum Referenzdruck (Atmosphäre) oder zur Referenzleitung nötig.
Bemerkung: Bei der Kalibrierung im Feld wird in der
Regel die Ausgangsseite (negative Druckseite) auf
die Referenzleitung geführt.
Bemerkung: Beim Kalibrieren von Membransensoren muss die Schlauchlänge zwischen Kalibrator
und Prüfling NICHT kompensiert werden.
Die CaliBox 200 kann mit der auf CD mitgelieferten
PascalTool WIN Software konfiguriert und justiert
werden. Diese läuft auf Rechnern mit Betriebssystem
Windows 7, Vista, XP, 2000 und 98.
4. Zusätzlich kann ein Referenz-Messgerät am
Druckstutzen (Dynamic/Output+) oder parallel
über ein T-Stück am gleichen Druckstutzen
-8-
4. Nach Abschluss der Arbeiten CaliBox 200
ausschalten, die Schläuche von den Stutzen
abziehen und im Deckel verstauen.
8. Konfiguration mittels Software :
Klinkenbuchse
für Anschluss
PascalTool WIN
Bedienung der PascalTool WIN Software :
Sobald die CaliBox 200 am Rechner angeschlossen
und das Gerät eingeschaltet ist, kann die PascalTool
WIN Software gestartet werden.
Kurzanleitung:
1. Software starten -> Hauptfester geht auf
2. Aktivierung des COM-Ports (falls USB Schnittstelle benutzt wird). Dieses kann im Menü Options -> Preferences -> COM Port -> OK aktiviert
werden.
3. Daten auslesen -> Read Data, danach werden
folgende Gerätedaten des in der CaliBox 200
eingebauten Differenzdruck Messgeräts angezeigt
- Instrument no.: Pascal-STV Z
- Serial No.:
XXXXXXX
- dP range:
0...200Pa
- Pressure:
XXX.XXPa (akt.
Messwert)
Bemerkung: Falls eine Fehlermeldung erscheint,
sollte ein anderer COM-Port ausgewählt werden.
4. Auswahl eines der folgenden Register für die
Ausführung der gewünschten Funktion.
- Measurement: Sensorjustierung mittels
Einstellung des Gain
Einstellung des TiefpassFilters für Glättung des
aktuellen Messwertes
- Analog Output: Skalierung des analogen
Ausgangs
Auswahl des Spannungs
bereichs 0/2....10V
Justierung des analogen
Ausgangs mittels Einstel
lung von Gain und Offset
- LC Display:
Auswahl der Messeinheit
und Kontrast auf Anzeige
5. Nach erfolgter Konfiguration bzw. Einstellung
jeweils auf Write Data drücken um die Daten auf
das Gerät zu speichern.
Bemerkung: Die PascalTool WIN Software bietet
auch die Möglichkeit, die eingestellten Parameter
zu mit einem Passwort zu schützen. Dieses kann in
der Menüleiste unter Options -> Change protection
code aktiviert werden.
Die Geräteeinstellungen können auch ausgedruckt
werden. Dies wird in der Menüleiste unter File mit
der Funktion Print durchgeführt.
PascalTool WIN bietet zudem auch ein Hilfe-programm. Die Help Funktion in der Menüleiste enthält
alle wichtigen Informationen zur Bedienung und zu
den Funktionen der PascalTool WIN Software.
9. Systemmeldungen
AZ OFF
AZ ON
ZERO CAL
Automatische Nullung aus
Automatische Nullung ein
Manuelle Nullung wird
durchgeführt
dP UNDERFLOW Druckerzeugung unter min.
Messbereich (<= 5 Pa)
dP OVERFLOW
Druckerzeugung über max.
Messbereich (> 200 Pa)
NOVAS SELFCAL Durchführung der Selbstkalibrierung (Selbsttest beim
Einschalten des Geräts)
10. Unterhalt und Support
Unterhalt/Reinigung:
Das Gerät bei Bedarf nur mit einem feuchten Tuch
abwischen. Auf keinem Fall dürfen aggressive Reinigungsmittel verwenden werden!
Akkreditierung & Rekalibrierung:
Für eine nachträgliche Zertifizierung des Kalibrators
durch ein akkreditiertes Labor, setzten Sie sich bitte
mit Ihrem lokalen Novasina Vertriebspartner in Verbindung. Dieser wird Sie entsprechen unterstützen.
-9-
Deutsch
Kurzanleitung Softwareinstallation:
1. CD in das Laufwerk des Rechners legen und im
Window Explorer Laufwerk auswählen
2. Durchführung der Installation auf Rechner mit der
Novasina_PascalTool WIN.exe Datei -> SETUP
abschliessen.
3. Die PascalTool WIN wurde erfolgreich installiert
Anschliessen des Rechners an die CaliBox 200:
Das mitgelieferte Datenkabel (DB-9 zu Klinkenstecker), wird in die Klinkenbuchse (Interface), welche
sich über dem Display befindet eingesteckt.
Technischer Support:
Melden Sie sich bei Fragen oder allfälligen Störungen bei Ihrem lokalen Novasina Vertriebspartner.
Mehr Infos auf www.novasina.com.
11. Zubehör
Es wird kein zusätzliches Zubehör benötigt.
12. Technische Daten
Typ
Artikel-Nr.
Differenzdruck Arbeitsbereich / Messbereich
Max. Auflösung Anzeige
Messgenauigkeit bei 20°C
Temperatureffekt
Deutsch
Offset drift
Hysterese
Messelement im Messgerät
Max. zulässiger Überdruck
Betriebstemperatur
Umgebungsmedium
Betriebsspannung
Akkuladezeit
Akkubetriebszeit bei voller Aufladung
Analoge Ausgänge
Genauigkeit der analogen Ausgänge
Digitale Schnittstelle
Abmessungen Gehäuse
Schutzklasse geöffnet
Schutzklasse geschlossen
Gesamtgewicht
Lager-Temperaturbereich
CaliBox 200
260 0538
0 ... 200 Pa statisch und dynamisch
0.01 Pa
typisch <= 0.15 Pa bzw. 0.08% FS (Full Scale = gesamter Messbereich)
Einfluss Konstanttemperatur: typisch <= 0.03 Pa/°C bzw. 0.015% FS/°C
Einfluss Temperaturänderung 10°C/h: typisch <=0.6 Pa bzw. 0.3% FS
typisch <= 0.15 Pa / Jahr (automatischer Nullpunkt-Abgleich)
typisch <= 0.15 Pa
Piezoresistiver Membran-Differenzdruck Sensor
-100...500 kPa
5...50°C
nicht kondensierende, nicht korrosive Luft
Akku 25.6V/10 Ah LiFe PO4 mit BMS
< 3 Stunden
> 24...48 Stunden
0/2 ... 10V (Last >= 10 kOhm)
typisch 0.05% vom gesamten Messbereich (FS)
RS 232
360 x 304 x 194 mm
IP 30
IP 54
7.3 kg
-10 ... + 60°C nicht kondensierend
13. Ersatzteile
Bezeichnung
Artikel Nr.
Stutzen für Schlauch
ID Reduktion 8/5mm
111 6332
14. Werkseinstellungen
Anzeige
AOUT
:
:
0... 200 Pa
0...10V
Passwort
Werksjustierung
:
:
Deaktiviert
Vorkalibriert
mit Zertifikat
- 10 -
- 11 -
Deutsch
- 12 -
Operating manual
CaliBox 200
Differential pressure calibrator / measurement device
for calibration and inspection of static and dynamic
Air differential pressure measurement instruments
Measurement range 0 to 200 Pa
- 13 -
- 14 -
Table of contents
Product description .................................................................................................................. 16
Scope of delivery ..................................................................................................................... 16
Safety ...................................................................................................................................... 16
Device description ................................................................................................................... 17
Initial operation ........................................................................................................................ 18
Calibration with calibrator mode .............................................................................................. 19
Calibration with indicator mode ............................................................................................... 20
Configuration with software ..................................................................................................... 20
System messages ................................................................................................................... 21
Maintenance and support ........................................................................................................ 21
Accessories ............................................................................................................................. 22
Technical data ........................................................................................................................ 22
Spare parts ............................................................................................................................. 22
English
Factory settings ....................................................................................................................... 22
- 15 -
1. Product description
Thank you for choosing this Novasina quality product. We thank you for your trust.
The mobile differential pressure calibrator CaliBox
200 from Novasina is an universal calibration and
measurement device for the inspection of static
(membrane) as well as dynamic (mass flow) air differential pressure measurement instruments within
the range of 0 to 200 Pa.
This device can be used in clean rooms and laboratories on site and is powered by a battery. An external
power supply is not necessary and thus a maximum
mobility and versatility is granted.
The CaliBox 200 is a highly accurate pressure
generator and also a measurement device, which
generates an accurate and stable continuous airflow, which is controlled by a rotary knob. Thanks
to its auto-zeroing function it achieves a very high
reproducibility and long term stability.
In addition to a differential pressure generator this
calibrator is also a professional measurement instrument, which can be even used as an accredited
reference device.
The scope of delivery of the CaliBox 200 contains:
• Mobile differential pressure calibrator with robust plastic case and integrated „LiFe“ battery
• External „LiFe“ charger with 230 V plug
• RS-232 configuration cable
• 2m hose inner diam.8mm with connection
nozzle
• 2m hose inner diam.5mm with connection
nozzle
• 2m hose inner diam.4mm with connection
nozzle
• 2 x 2m hose with inner diameter 4mm
• 2 x plug removing bracket
• 4 x nozzles for hose reduction i.d. 8/5mm
• Factory calibration certificate with 11 calibration points over the working span of 0 to 200 Pa
• CD containing the PascalTool WIN configuration software and operating manual for CaliBox
200
• Printed operating manual for CaliBox 200
Please check the completeness of the delivery. Incomplete deliveries can be completed by your local Novasina
distributor.
English
Specific characteristics:
• High versatility for static and dynamic differential pressure transducers
• High accuracy and stability thanks to the autozeroing function
• Usable as calibrator as well as measurement
instrument and reference (with certificate)
• Battery powered with extended running time
• Easy calibration and adjustment with PascalTool WIN software
• Integrated scalable analogue outputs
2. Scope of delivery
3. Safety
• ATTENTION! The device contains a „LiFe“
battery type with energy capacity. Do only charge
the device under supervision and only with the
delivered charger.
• Due to the integrated battery, special shipping
rules must be considered for the CaliBox 200.
• This device has left the factory in an impeccable
status from the point of view of safety and must
not be manipulated under any circumstances.
Pay attention to the remarks and signs on the
instrument and in the operating manual.
ATTENTION! Because of the internal energy
storage there is a danger of fire in case of a
short-circuit!
• The CaliBox 200 has been developed for the
inspection of static and dynamic differential
pressure measurement instruments in clean air
environment and should be only used for such
purposes respecting the indicated specifications
and operation conditions. In case of inappropriate use the manufacturer/supplier declines any
liability. The risk is only on the operator’s side.
• The handling of this calibrator requires skilled
- 16 -
• Where occurrent failures or malfunctions might
cause big damages on material or people additional safety precautions have to be taken to
assure a safe status in case of failure (e.g. limit
switch).
• The CaliBox 200 is not suitable for potentially
explosive processes and rooms.
• Only a professional handling of the calibrator
as well as a certain measurement technology
know-how allow a correct interpretation of the
real accuracy and tolerances.
• The calibrator should be inspected and calibrated
periodically. This can be performed internally or
by an accredited laboratory (e.g. SCS, DKD,
NIST, COFRAC etc.).
• Use only original Novasina accessories and
spare parts.
• The opening and altering of the calibrator is
strictly forbidden and revokes immediately the
warranty. This means also the battery replacement.
4. Device description
Main switch / pressure controller:
• Main switch (Power On/Off) to switch on and off
the device.
• Rotary knob controller with lock (Pressure Adjustment) for pressure adjustment.
Power On/OFF
Measurement mode (Indicator): The differential
pressure is carried from the outside to the 2 nozzles
(Indicator/Static+/Static-) and is shown on the display, the Measure as well the Indicator LED flash red.
Switching on/off the auto zeroing: If both buttons are kept pushed, the auto zeroing is switched
off. The display shows briefly AZ OFF and the Run/
Error LED blinks orange. Now the CaliBox 200 works
without auto zeroing function. If both buttons are
kept pushed again the function is re-activated and a
zeroing is performed immediately. The display shows
briefly AZ ON and the Run/Error LED blinks green.
• Button (Park Zero Adjustment/Measure) with
double function; for switching between standard
operation/park mode (push briefly); for manual
zeroing (push long).
Park mode: The standard operation in the calibration or measurement mode can be interrupted at any
time by pushing briefly this button. In this mode the
membrane of the sensor is bypassed. The Measure
LED is switched off.
Remark: The activation of this function is recommended prior to the manual zeroing in the measurement
mode.
Manual zeroing: If this button is pushed for a longer
time, the manual zeroing is performed, independent
from the actually selected mode. The display shows
briefly ZERO CAL.
Pressure adjustment
Push-button for operation mode
selection:
Remark: When the device is switched off and on
again, the operation mode is reset to factory settings.
• The CaliBox 200 has 2 buttons, with which all
available operation modes can be selected.
BUTTON:
Measure
Park
Zero Adjust
• Button (Calibrator/Indicator) with double function;
for switching between calibration/measurement
mode (push briefly); for switching on/off the auto
zeroing (push long).
Calibration mode (Calibrator): The pressure generated inside the CaliBox 200 is carried outwards
by the 2 nozzles (Calibrator/Dynamic/Static) and is
shown on the display, the Measure LED flashes red,
the Indicator LED is switched off.
BUTTON :
Calibrator
Indicator
Connection nozzles pressure generator:
• There are 4 nozzles on the CaliBox 200 front
panel of which 2 are for the operation as pressure
generator/calibrator (Calibrator) und the other 2
are for the use as differential pressure reference
measurement instrument (Indicator).
• The nozzles for pressure generator/calibrator
- 17 -
English
personnel. So, please read this operating manual
carefully.
operation are distinguished between dynamic (Dynamic) and static (Static) calibration,
which are used for mass flow respectively for
membrane differential pressure instruments.
Indicator
Static +
Calibrator
Dynamic
Output +
Indicator
Static Calibrator
Static
Output +
Analogue signal output: This interface provides
the actual measurement signal in 0/2...10VDC of
the measurement device integrated in the CaliBox
200. In order to obtain a higher resolution the signal
can be scaled and also adjusted. These settings
can be done using the delivered PascalTool WIN
configuration software.
Remark: The analogue signal can be used for the
connection to an external device (e.g. data logger
etc.)
Battery charger socket:
Connection for dynamic calibration: This
pressure nozzle can be used for the calibration
of instruments working with the mass flow measurement principle, which means devices detecting the dynamic differential pressure requiring
a continuous air flow. For such instruments it
is recommended to use the included hose with
i.d. 8mm as otherwise the loss of pressure will
be too big.
English
Remark: Due to the mass flow principle and the
loss of pressure inside the hose, the max. hose
length is limited to 30 m based on a hose with
i.d. 8 mm. On smaller diameters the max length
is reduced dramatically.
Connection for static calibration: This pressure
nozzle is used for the calibration of instruments
working with the membrane measurement principle, which means devices, detecting the static differential pressure. In this case it is recommended
to use the included hoses with i.d. 5 mm or 4 mm.
Remark: In the case of static pressure there is
neither an influence of the hose i.d. nor the hose
length on the generated pressure.
Analogue signal output:
• Analogue signal output of the actually measured and displayed measured value (Analogue
OutputVDC/Pressure Value)
• Battery charger socket (Batt Charger) for connection of the XLR-plug of the external battery
charger.
Charger socket: By this socket the integrated
battery is fully re-charged within < 3 hours.
EMC notes:
1. The device design has been adapted in order to
keep all emissions within the EMC norms and
regulations.
2. The CaliBox 200 should not be placed near
any wirings or devices emitting electromagnetic
interferences.
5. Initial operation
Charging the battery:
The CaliBox 200 is always delivered with a completely charged battery and can be used immediately
after reception. The operational time of the battery
if fully charged is min. 24 up to max. 48 hours depending on the use.
The LiFe battery can be re-charged at any time
and has not to be completely empty before the recharge. The battery capacity is not reduced by any
re-charging process.
Important: Use only the supplied external charger
for the the battery re-charge. The CaliBox 200
must not be covered or closed during the charging
process and a sufficient aeration must be assured.
- 18 -
After the charging process it should be paid attention
to first remove the charger from the device and then
form the mains!
test samples can be calibrated. Depending on the
principle they are connected to the Dynamic or
Static nozzle.
Read the charger’s manual before the first use!
Procedure with mass flow devices:
Status indicator charger:
• LED 1 flashes red -> device ON / LED 1 off
-> device OFF.
• LED 2 flashes red -> charging ON / LED 2 flashes green -> charging OFF/battery charged.
Charging procedure:
1. Connect the charger with the IEC socket to the
mains 110...230VAC -> LED1 flashes red, LED
2 flashes green.
2. Connect the charger with the CaliBox 200 via
the XLR plug -> LED1 and LED 2 flash red.
3. Wait for the charging process until the LED 2
flashes green (battery completely charged).
4. Remove XLR plug from the CaliBox 200.
5. Remove power cable from the IEC socket.
Remark: The charging time of an empty battery is
< 3 hours
Battery maintenance:
• Due to the self-discharge the battery should be
stored only completely charged.
• In order to protect the battery from a total discharge it should be charged completely min. once a
year.
6. Calibration with Calibrator mode:
(with pressure generator)
Connection of test sample:
Before connecting the test sample, its measurement
principle should be verified. There are 2 principles,
the dynamic (mass flow) and static (membrane)
measurement method. With the CaliBox 200 all
2. Insert the hose in the pressure nozzle until it
clicks into place.
3. Connect the hose to the test sample inlet side
(positive pressure) and use the reduction nozzle
i.d. 8/5mm if required. Leave the test sample
outlet side (negative pressure) open.
4. Electronic compensation of the complete hose
length. This consists of the hose length between
calibrator and test sample (200 cm) + hose length
inside the CaliBox 200 (24 cm) + an eventual
length of hoses connected to the outlet side. This
total length is entered for compensation into the
PascalTool WIN software and stored in the test
sample. For this purpose the test sample must
be connected to a PC/laptop via the delivered
data cable and the software must be started.
Afterwards press Read data (the connection to
the test sample is established). Subsequently
select the register Environment and enter the
hose length. To conclude press Write data to
write the data on the test sample (more details
see chapter 8).
Important: It is essential to compensate the hose
length as otherwise - due to the decrease of pressure - the value is falsified. The compensated length
value on the test sample must be reset to the original
value after the calibration /adjustment is completed.
So please do not forget to notify the originally
compensated hose length before the calibration!
5. Additionally a reference measurement device
can be installed in parallel. This is connected
to the pressure nozzle (Static/Output+). Follow
according the points 1 and 2.
Remark: The CaliBox 200 can also be certified by
- 19 -
English
1. Remove the plug of the (Dynamic Output+)
pressure nozzle ->fix the plug removing bracket
and press downwards by a tilting movement.
an official laboratory and used as reference. With a
certified CaliBox 200 the point 5 is not to be applied.
6. Make sure the CaliBox 200 is in the calibration
mode and set the required pressure using the
rotary knob controller.
7. Perform the calibration/adjustment.
8. For further reference pressure points repeat
points 6/7.
9. Write the original hose length and if applicable
the new GAIN value with the Write data function
on the test sample.
10. If required calibrate other test samples.
11.After conclusion remove the hose from the test
sample and if applicable from the reference
instrument and switch off the calibrator.
12.Pull out the hoses from the pressure nozzles
using the removing bracket. Fix the bracket
between hose end and nozzle ring, push
vertically on the ring and at the same time pull
out the hose.
to the same nozzle as the test sample (Static/
Output+) using a T-fitting.
Remark: The CaliBox 200 can also be certified by
an official laboratory and used as reference. With a
certified CaliBox 200 the point 4 is not to be applied.
5. see mass flow instruments
6. see mass flow instruments
7. see point 8 of mass flow instruments
8. see point 10 of mass flow instruments
9. see point 11 of mass flow instruments
10.see point 12 of mass flow instruments
11.see point 13 of mass flow instruments
7. Calibration with Indicator mode:
(without pressure generator)
Remark: The CaliBox 200 is used as reference
measurement instrument (with or without accredited
certification).
Starting the calibration:
English
13.Insert the pressure nozzle plug until it clicks into
place, stow the hoses inside the upper shell of
the CaliBox 200.
1. Connect the pressure inlets of test sample and
CaliBox 200 (Static+) in parallel using a T-fitting.
Pay attention that both inlet (positive pressure)
sides are connected together.
2. Connect the pressure outlets of test sample and
CaliBox 200 (Static-) in parallel using a T-fitting.
Pay attention that both outlet (negative pressure)
sides are connected together.
3. Perform the calibration/adjustment.
Remark: During on site calibrations usually the
outlet (negative pressure) side is connected to the
reference duct.
Procedure with membrane devices:
1. Remove the plug of the (Static Output+) pressure
nozzle ->fix the plug removing bracket and press
downwards by a tilting movement.
2. Insert the hose in the pressure nozzle until it
clicks into place.
3. Connect the hose to the test sample inlet side
(positive pressure). If required connect also the
outlet (negative pressure) side (Static Pressure-),
thereby it is maybe necessary to connect via a
T-fitting to the reference pressure (atmosphere)
or reference duct.
Remark: For the calibration of membrane devices it
is NOT necessary to compensate the hose length.
4. Additionally a reference measurement device
can be installed in parallel and connected to the
pressure nozzle (Dynamic/Output+) or in parallel
- 20 -
4. After completing the work, switch off the calibrator, pull out the hoses from the nozzles, close the
nozzles and stow the hoses in the upper shell of
the CaliBox 200.
8. Configuration with software:
The CaliBox 200 can be configured and adjusted
using the PascalTool WIN software (supplied on
CD). This software runs on Windows 7, Vista, XP,
2000 and 98 operating systems.
Brief instruction to software installation:
1. Put the CD in the PC disk drive and select the
drive directory with the Windows Explorer.
2. Proceed with the installation selecting the Novasina_PascalTool WIN.exe data file -> finish
the SETUP.
3. The PascalTool WIN software is now installed.
Connection of PC/Laptop to the CaliBox 200:
The supplied data cable (DB-9 to Stereo-plug) can
be connected to the stereo socket (Interface), which
can be found above the display.
Stereo socket
for PascalTool WIN
data cable
- LC Display:
Analogue output
calibration by gain and
offset adjustment
Selection of measurement
value unit and display
contrast
5. Press Write Data in order to save all device
settings.
Remark: The PascalTool WIN software offers also
the possibility to protect the settings by a personal
password. This can be activated by selecting the
function Options -> Change protection code.
The settings can also be printed out. This is done
by the function File -> Print.
PascalTool WIN offers also a help program. This
function can be found in the main menu bar and contains all relevant information and software functions.
Brief instruction:
1. Start the software -> main window appears
2. Activate the COM-Ports (is USB interface is
used). The comport can be selected in the menu
Options -> Preferences -> COM Port -> OK.
3. Read out the data -> Read Data, afterwards the
following device information appears (data of
integrated CaliBox 200 sensor)
- Instrument no.: Pascal-STV Z
- Serial No.:
XXXXXXX
- dP range:
0...200Pa
- Pressure:
XXX.XXPa
(currently measured value)
Remark: In case of error messages please select
another COM-Port.
4. Selection of one of the following registers for the
activation of the required function.
- Measurement: Sensor calibration by gain
adjustment
Adjustment of lowpass
filter for smoothing of the
actual value
- Analog Output: Scaling of the analogue
output
Selection of the voltage
output range 0/2....10V
9. System messages
AZ OFF
AZ ON
ZERO CAL
dP UNDERFLOW
auto-zeroing off
auto-zeroing on
Manual zeroing in progress
Pressure below min. level of
measurement range (<= 5 Pa)
dP OVERFLOW
Pressure above max. level of
measurement range (>200 Pa)
NOVAS SELFCAL Performance of self
calibration (self testing when
device is switched on)
10. Maintenance and support
Maintenance/cleaning:
The device can be wiped off with a damp cloth. Don’t
use any aggressive cleaning agent!
Accreditation & recalibration:
In case of a later certification of the device by an
accredited calibration laboratory please contact
you local Novasina distributor. He will support you
accordingly.
- 21 -
English
Operating the PascalTool WIN software :
Start the PascalTool WIN software as soon as the
CaliBox 200 is connected to the PC/laptop and all
devices are switched on.
Technical support:
Please get in touch with your local Novasina distributor in case of any questions or problems.
For more information visit www.novasina.com.
11. Accessories
There are no accessories required.
12. Technical data
Type
Part no.
Working/measuring range
Max. display resolution
Measurement accuracy at 20°C
Temperature effect
English
Offset drift
Hysteresis
Reference device sensor element
Max. permissible overpressure
Operating temperature
Environmental media
Power supply
Charging time
Operation time at full battery load
Analogue output
Accuracy of analogue output
Digital interface
Carrying case dimensions
Protection class open
Protection class closed
Total weight
CaliBox 200
260 0538
0 ... 200 Pa static and dynamic ... 200 Pa
0.01 Pa
typical <= 0.15 Pa respectively 0.08% FS (Full Scale)
influence temperature constant: typical <= 0.03 Pa/°C resp. 0.015% FS/°C
influence temperature change 10°C/h: typical <=0.6 Pa resp. 0.3% FS
typical <= 0.15 Pa / year (automatic zero-point adjustment)
typical <= 0.15 Pa
piezo-resistive membrane differential pressure sensor
-100...500 kPa
5...50°C
non condensing, non corrosive fresh air
Chargeable battery 25.6V/10 Ah LiFe PO4 with BMS
< 3 hours
> 24...48 hours
0/2 ... 10V (load >= 10 kOhm)
typical 0.05% of full scale (FS)
RS 232
360 x 304 x 194 mm
IP 30
IP 54
7.3 kg
Storage temperature range
-10 ... + 60°C non condensing
13. Spare parts
Description
Article no.
Reduction nozzle for hose
Inner diameter 8/5mm
111 6332
14. Factory settings
Display
AOUT
:
:
0... 200 Pa
0...10V
Password
Factory calibration
:
:
deactivated
calibrated (standard)
with certificate
- 22 -
- 23 -
English
Wir danken Ihnen fürs Vertrauen in unsere Produkte und wünschen Ihnen
erfolgreiche Messungen und Kalibrierungen mit Ihrer CaliBox 200 und ihren
vielseitigen Funktionen.
Für allfällige Fragen steht Ihnen die Novasina oder eine ihrer Vertretungen
gerne zur Verfügung.
Ihr Novasina Team
Thank you for trusting Novasina and our products. We wish you successful calibrations and measurements with your CaliBox 200 and its versatile functions.
For any question you can contact Novasina or your local Novasina distributor.
We remain at your complete disposal for any information.
260 0724 / 004059.00
Your Novasina team
Manufacturer :
Novasina AG
Neuheimstrasse 12
CH - 8853 Lachen SZ
Switzerland
Tel. : +41/ (0)55-642-67-67
Fax.: +41/ (0)55-642-67-70
Internet : www.novasina.com
E- Mail : [email protected]
- 24 -
Technical data subject to modification
Technische Änderungen vorbehalten