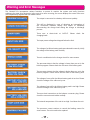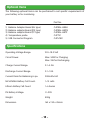
1
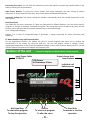
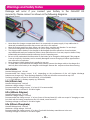
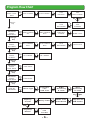
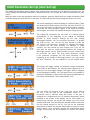
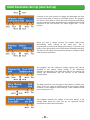
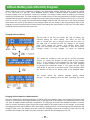
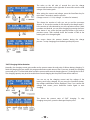
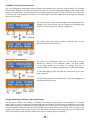
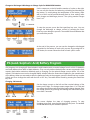
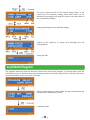
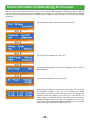
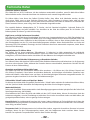
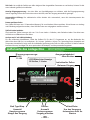
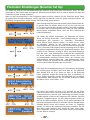
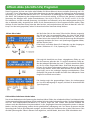
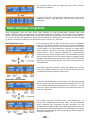
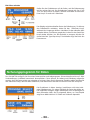
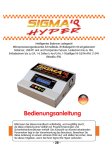
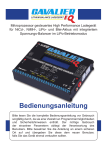
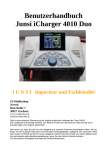
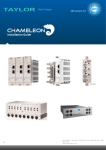
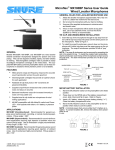
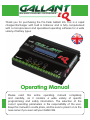
BALANCE CHARGER / DISCHARGER
Thank you for purchasing the Pro-Peak Gallant EQ. This is a rapid
charger/discharger with built in balancer and is fully computerised
with a microprocessor and specialised operating software for a wide
variety of battery types.
Operating Manual
Please read this entire operating manual completely
and carefully, as it contains a wide variety of specific
programming and safety information. The selection of the
correct operating parameters is the responsibility of the user.
Keep this manual in a safe place, and be sure to pass it on to the
new owner if you ever sell your Gallant EQ.
Special Features
Optimised operating software
When charging or discharging NiCad/NiMH batteries, the Gallant EQ has ‘AUTO’ functions that set the feed
current automatically. Alternatively, these can be set manually.
For Lithium batteries, the Gallant EQ can help prevent the over-charging that can potentially lead to an explosion,
purely through an error. Every program in the unit is controlled with specialised software to detect almost every
error, providing maximum safety. These parameters can be set at the operators discretion if required.
A special balance adaptor board for TP connectors is provided as standard with optional boards available for
other balance plug connectors. The ports on the side of the charger suit XH style connectors and a balance board
for this type is not required.
High Power and High Performance Circuit
The Gallant EQ employs a circuit that has a maximum charging output power of 50W (5W discharge). As a result,
it can charge or discharge up to 15 cell NiCd/NiMH packs and 6 series Lithium packs with a maximum charge
current of 5.0A (1.0A discharge). Furthermore, the cooling system is so efficient that can hold such power without
any trouble running the CPU or operating programs. If the combination of current and voltage exceeds 50W (5W
discharge), the circuit will limit the current automatically to prevent exceeding the limit.
Integral Balancer for Lithium Batteries
The Gallant EQ has a cell voltage balancer inside. It automatically balances the individual cell voltages in a pack
when charging all types of Lithium battery (Lilo/LiPO/LiFe). To use this, the pack must be fitted with a balance
adaptor lead/plug and be connected to the charger through a balance port sockets.
Balance Monitoring of Individual Cells During Discharge
The Gallant EQ can also monitor and balance individual cells in a Lithium battery pack during the
discharge process. If the voltage of anyone cell varies abnormally, the process will be stopped with an error
message.
Accept various types of Lithium battery
The Gallant EQ can accept three types of Lithium battery – Lilo (lithium Ion), LiPo (Lithium Polymer) and
LiFe (Lithium Phosphate). They have different characteristics according to their chemistry and require
different parameters for charging and discharging. You can select anyone of them and the associated
parameters as required. For their specifications, please refer to the ‘Warnings and Safety Notes’ section.
Lithium Battery ‘Fast’ Charge and ‘Storage’ Modes
You can charge Lithium battery for special purposes. ‘Fast’ charge reduces the charging time of a Lithium type
battery and ‘Storage’ mode controls the final voltage of the battery destined for long term storage.
Maximum Safety
Delta-peak sensitivity: This automatic charge termination program works on the principle of the Delta-peak
voltage detection. (NiCd/NiMH)
Auto-charge current limit: When charging NiCd or NiMH using ‘AUTO’ current mode, you can set the upper limit of
the change current to avoid over-current charging. This is very useful when charging low impedance and small
capacity NiMH batteries in ‘AUTO’ mode.
Capacity limit: The charging capacity is always calculated by multiplying the charging current by time. If the
charging capacity exceeds the programmed limit, the process will be terminated automatically. This limit can
be changed if required.
Temperature limit: The temperature of the battery during charging will rise due to its internal chemical
reaction. If you set a temperature limit, the charging process will be terminated when the limit has been reached.
The optional temperature probe will be required to use this function.
--
Processing Time Limit: You can limit the maximum process time (total) to prevent any possible defect in the
battery confusing the set parameters..
Input Power Monitor: To protect the source battery from being damaged, the input voltage is always
monitored. If it drops below the lower limit, the process will be terminated automatically.
Automatic Cooling Fan: The electric cooling fan activates automatically when the internal temperature of the
unit is raised.
Data Store/Load
The Gallant EQ can store a maximum of 5 data sets (memories) for different batteries. You can set the data for
programs to charge or discharge continually if required. This stored data can be recalled at any time and the
process can be executed without program settings being re-entered manually.
Cyclic Charging/Discharging
Perform 1 to 5 cycles of charge>discharge or discharge > charge continually for battery refreshing and
balancing.
PC Based Analysis using USB Communication
For the experienced modeller, the Gallant EQ offers PC based programs that allow you to analyse the
characteristics of the battery by using the USB port. You can see graphic curves of voltage, current,
capacityand temperature. It also shows the individual voltage of each cell in a Lithium battery pack. To use this
function requires the optional USB adaptor and program pack.
Exterior of the unit
Connection diagram for Lithium balance charge program
Input Power Cable
11-18V DC
LCD Screen
16 Characters, 2 lines
Output charge lead
4mm sockets
Individual cell
balance ports
LiPo BALANCE
5.0A
22.2V(6S)
Batt type/Stop
To select main program
To stop the operation
Dec/Inc
To select sub program
To alter the value
--
Start/Enter
To resume or start the
operation
Warnings and Safety Notes
Damage will occur if you connect your battery to the GALLANT EQ
incorrectly. Please connect as shown in the following diagrams.
With Adapter Board
Direct Connection
XH PLUGS ONLY
•
•
•
•
•
•
•
Never leave the charger unsupervised when it is connected to its power supply. If any malfunction is observed, immediately terminate the process and refer to this manual.
Keep the charger away from dust, damp, rain, heat, direct sunshine and vibration. Do not drop it.
The circuit is designed to be powered by a 10~18V DC power source only.
The charger and the battery to be charged (or discharged) should be placed on a head-resistant,
non-inflammable and non-conductive surface. Never place them on a car seat, carpet or similar. Keep
inflammable and volatile materials well away from the operating area.
Be sure to fully understand the information for the battery to be charged or discharged. If the program is set up incorrectly, the battery can be severely damaged. Incorrect charging of Lithium type batteries can cause a fire or explosion.
Never charge a Lithium battery that is swollen in any way.
To avoid short-circuits between the charge leads, always connect the charge cable to the charger first and only then to the battery to be charged or discharged. Reverse the sequence when disconnecting.
NiCd/NiMH
Nominal Voltage level: 1.2V/cell
Recommended fast charge current: 1C-2C, depending on the performance of the cell. Higher discharge
batteries can charge at 2C. Slow discharge batteries (TX/RX etc) should be no more than say 0.2C
Discharge voltage cut off level: 0.85V/cell (NiCd), 1.0V/cell (NiMH)
C = X ÷ 1000 (Where X = Battery capacity eg: 2200mAh)
Lilo (Lithium Ion)
Nominal Voltage level: 3.6V/cell
Maximum charge voltage: 4.1V/cell
Recommended fast charge current: 1C or less (0.5C recommended).
Discharge voltage cut off level: 2.5V/cell or higher
LiPo (Lithium Polymer)
Nominal Voltage level: 3.7V/cell
Maximum charge voltage: 4.2V/cell
Recommended fast charge current: 1C or less. Some of the very latest LiPo cells can accept 2C charging or more
but check with the battery manufacturer first. If in doubt, never exceed 1C.
Discharge voltage cut off level: 3.0V/cell or higher.
Life (Lithium Phosphate)
Nominal Voltage level: 3.3V/cell
Maximum. charge voltage: 3.6V/cell
Recommended fast charge current: 3C or less. Check with the battery maunfacturer to be sure.
Discharge voltage cut off level: 2.0V/cell or higher
--
Warnings and Safety Notes
Pb (lead Acid)
Nominal voltage level: 2.0V/cell
Maximum charge voltage: 2.46V/cell
Recommended fast charge current: 0.3C or less
Discharge voltage cut off level: 1.75V/cell or higher.
- Do not attempt to disassemble the battery pack for any reason.
- Please carefully verify the capacity and voltage of a Lithium battery pack before charging
discharging. It may be composed of mixed parallel and series connected cells. In parallel, the capacity of the
battery pack is multiplied by the number of cells in parallel (2P means x2), but the voltage remains the same. The
voltage imbalance possible in parallel packs can cause a fire or explosion during the charge process. We
recommend using Lithium battery packs in series cell format only.
Discharge
The typical purpose of discharging is to determine the residual capacity of the battery, or to lower the
voltage of battery to a defined level. When you discharge the battery you should take as much care as
the charging process. To avoid the battery becoming deep-discharged, set the final discharge voltage
correctly. Lithium batteries should not be deep-discharged to lower than the minimum voltage, as this leads to
a rapid loss of capacity or a total failure. Generally, you do not need to discharge Lithium battery as a matter of
procedure.
- Some rechargeable batteries are said to have a memory effect. If they are partly used and recharged
before the whole charge is used, they ‘remember’ this and next time will only use that part of their
capacity. This is a ‘memory effect’. NiCd and NiMH batteries are said to suffer from memory
effect. They prefer complete cycles. Fully charge, then use until empty. Do not fully recharge
before storage-allow them to self-discharge during storage. Give an occasional short charge to keep them above
the 1.0v per cell minimum. NiMH batteries have less memory effect than NiCd.
- Lithium batteries prefer a partial, rather than a full discharge. Frequent full discharges should be avoided if
possible. Instead, charge the battery more often or use a larger battery.
-A brand-new NiCd battery pack will not yield its full capacity until it has been subjected to 10 or more charge
cycles. The cyclic process of charge and discharge will lead to optimised capacity.
These warnings and safety notes are particularly important. Please follow these instructions for
maximum safety or the charger and battery may be severely damaged. Failure to follow these
instructions can also cause fire, injury to individuals or the loss of property if care is not taken.
--
Program Flow Chart
PRO G R A M
SELEC T L i X X
BATT
Start
Enter
INC
LiXX CHARGE
INC
L i X X CHARGE
DEC
DEC
LiXX
BALANCE
INC
DEC
LiXX
FAST CHARGE
INC
Batt type
Stop
PRO G R A M
SE L E C T
NiM H B A T T
LiXX
DISCHARGE
Start
Enter N i M H C H A R G E
Aut
INC
DEC
N i M H CHARGE
Man
INC
DEC
NiMH DISCHARGE
INC
DEC
DEC
LiXX
STORAGE
INC
NiMH CYCLE
DEC
Batt type
Stop
PRO G R A M
SE L E C T
Nicd B A T T
Start
Enter
Nicd CHARGE
Auto
INC
DEC
N i c d CHARGE
Man
INC
DEC
Nicd
DISCHARGE
INC
Nicd CYCLE
DEC
Batt type
Stop
PRO G R A M
SE L E C T
Pb B A T T
Start
Enter
INC
Pb CHARGE
P d CHARGE
DEC
Batt type
Stop
PRO G R A M
SE L E C T
SAVE D A T A
Start
Enter
SAVE DATA
Batt type
Stop
PRO G R A M
SE L E C T
LOAD D A T A
Start
Enter
LOAD DATA
Batt type
Stop
USE R S E T
PRO G R A M
Start
Enter L i X X V. Ty p e
INC
DEC
L i Lo/LiPo/
LiFe
C HK Time
INC
DEC
NiMH
Sensitivity
D. Peak
INC
DEC
Nicd
Sensitivity
D. Peak
INC
Capacity
Cut-Off
INC
INC
INC
S a f ety Timer
DEC
DEC
DEC
Key Beep
Buzzer
INC
DEC
I n p ut Power
Low
C ut-Off
--
Waste Time
CHG>DCHG
INC
DEC
DEC
Temp Cut-Off
USB Enable
lnitial Parameter Set Up (User Set Up)
The Gallant EQ will operate with its default value settings when connected to a 12V batttery for the first time. The
screen displays the following information in sequence and you can change the value of a parameter on each
screen.
When you wish to alter the parameter value in the program, press the Start/Enter key to make the selection flash
and then change the value with INC or DEC keys. The value will be stored by pressing Start/Enter once more.
This screen displays the nominal voltage of a Lithium battery. There
are three kinds of Lithium battery; LiFe (3.3V), Lilo (3.6V) or LiPo (3.7V).
This is very important, so make sure you check the battery carefully
and select the correct program regime. If you select an incorrect
value/regime, the battery can explode during the charge process!
The Gallant EQ recognises the cell count of a Lithium battery
automatically at the beginning of the charge or discharge
process to avoid incorrect settings by the user. Deeply
discharged batteries can be perceived incorrectly. To prevent
this kind of error, you can set the time interval to verify the
cell count by the processor. Normally, 10 minutes are enough
to perceive the cell count correctly. For batteries of larger
capacity, you may extend the time interval, but if you set the
time term too long for small capacity batteries, the charge or
discharge process can be finished within the time interval with
an erroneous cell count. This may cause disastrous results!
If the processor recognises the cell count incorrectly at the
beginning of the charge or discharge process, you may extend
the time. Otherwise, you are advised to use the default value.
This shows the trigger voltage for automatic charge termination
of an NiMH or NiCd battery. The effective value ranges from 5 to
20mV per cell. If the trigger voltage is set higher, there is a danger
of overcharging the battery. If it is set lower, there is a possibility of
premature termination. Please refer to the technical specification for
the battery. (NiCd default: 12mV, NiMH default: 7mV).
You can select the function of the 3-pin port on left side of
the unit. It can be used for the temperature sensor or USB
connection and is selected using this screen. If the port is
assigned as a temperature port, an optional temperature probe
attached to the surface of the battery can be used. When it is
selected as a USB port, you can link the charger to your PC via the
optional USB cable. This can utilize the optional software and show
you the charge process on the PC. You can set the maximum
temperature at which the charger should allow a battery to reach
during charge. Once a battery reaches this temperature during
charge, the process will be terminated to protect the battery.
--
lnitial Parameter Set Up (User Set Up)
A battery on the cyclic process of charge and discharge can often
become warm after a charge or discharge period. The program
can insert a time delay to occur after each charge and discharge
process to allow the battery adequate time to cool down before being
subjected to the next process. The value ranges from 1 to 60
minutes.
When you start a charge process, the integral safety timer
automatically starts running at the same time. This is
programmed to prevent overcharging the battery, if it proves to be
faulty, or if the termination circuit cannot detect the battery being full.
The value for the safety timer should be generous enough to allow
a full charge of the battery.
This program sets the maximum charge capacity that will be
supplied to the battery during charge. If the delta-peak
voltage is not detected or the safety timer fails for any reason, this
feature will automatically stop the process at the selected
capacity value.
The beep sounds at every pressing of the buttons to confirm your
action. There is a beep or melody sound at various times during
operation to alert different mode changes. These audible sounds
can be turned on or off.
This program monitors the voltage of the input battery. If the
voltage drops below the value you set, the operation forcibly
terminates to protect the input battery.
--
Lithium Battery (Lilo/LiPo/LiFe) Program
These programs are only suitable for charging and discharging Lithium batteries with a nominal voltage
of 3.3V, 3.6V and 3.7V per cell. These batteries need to adopt a different charge technique, termed a
constant voltage (CV) and constant current (CC) method. The charge current varies according to the battery
capacity and performance. The final voltage of the charge process is also very important; it should be precisely
matched with the specific maximum voltage of the battery type being charged. They are 4.2V for LiPo, 4.1V for Lilo,
and 3.6 V for LiFe. The charge current and nominal voltage, relative to the cell count, set on the charge program
must always be correct for the battery to be charged. When you are ready to alter the parameter value in the
program, press the Start/Enter key to make it flash, then change the value with INC or DEC key. The value will be
stored by pressing Start/Enter key once more.
Charging Lithium Batteries
The left side of the first line shows the type of battery you
selected during the users setting. The value on the left
side of second line sets a charge current and the value on
the right side of second line sets the voltage of the battery
pack. After setting the current and voltage press Start/
Enter key and hold for than 3 seconds to start the process.
(Charge current: 0.1~5.0A, Voltage: 1-6 series for instance)
This shows the number of cells you set up and the processor
detects. ‘R:’ shows the number of cells found by the charger
and ‘S:’ is the number of cells selected by you at the previous
screen. If both numbers are identical, you can start charging
by pressing the Start/Enter button. If not, press the Batt Type/
Stop button to go back to previous screen. Then carefully check
the number of cells of the battery pack to be charged again.
The screen shows the present situation during charge
process. To stop charging press the Batt Type/Stop key once.
Charging Lithium Batteries in Balance Mode
This is for balancing the individual voltages of Lithium cells in the battery pack to be charged. The battery pack
should be connected to the suitable balance port on the right side of the charger. The standard ports are of the
‘XH’ style. An adaptor board and lead is supplied for ‘TP’ style pugs and others are available as options. You also
need to connect the battery output plug (main power leads) to the output sockets of the charger. In this mode,
the charging process will be different from the ordinary charging process. The internal processor will monitor the
voltage of each cell in the battery pack and control the charging current that is feeding to each cell. This will
normalise the voltage of all cells in the pack and help to prevent over discharging of one cell.
--
The value on the left side of second line sets the charge
current and the value on the right side of second line sets the total
voltage of the battery pack.
After setting the current and voltage, press the Start/Enter key for
more than 3 seconds to start the process.
(Charge current: 0.1~5.0A, Voltage: 1~6 series for instance)
This shows the number of cells you set up and the processor
detects. ‘R:’ shows the number of cells found by the charger and ‘S:’
is the number of cells selected by you at the previous screen. If both
numbers are identical, you can start charging by pressing the Start/
Enter button. If not, press the Batt type/Stop button to go back to
previous screen. Then carefully check the number of cells in the
battery pack to be charged again.
The screen shows the present situation during the charge
process. To stop charging press the Batt type/Stop key once.
‘FAST’ Charging Lithium Batteries
Normally, the charging current gets smaller as the process nears the end point of Lithium battery charging. To
finish the charging process earlier, this program eliminates certain terms of the CV process. Actually, the charging
current will go to 1/5 of the initial value to end the process while normal charging goes to 1/10 during the CV term.
The charging capacity may be a bit smaller than normal charging but the process time will be reduced.
You can set up the charging current and the voltage of the
battery pack being charged. As you press the Start/Enter button,
the voltage confirmation will be displayed. Then, if you confirm the
voltage and current, press Start/Enter button again to start
charging.
This shows the present state of ‘FAST’ charging. To stop
charging at any time, press the Batt type/Stop key once.
- 10 -
‘STORAGE’ Control For Lithium Batteries
This is for charging or discharging Lithium batteries not intended to be used for the time being. The program
will determine whether to charge or discharge the battery to a certain voltage, depending on the voltage of the
battery at its initial stage. They are different for each type of battery, they are 3.75V for Lilo, 3.85V for LiPo and 3.3V
for LiFe per cell. If the voltage of the battery at its initial stage is over the voltage level for storage, the program
will start to discharge.
You can set up the current and the voltage of the battery pack to be
charged. The current will be used for charging or discharging the
battery to reach the required ‘storage’ voltage level.
This screen shows the present situation during process. To stop,
press the Batt type/Stop key once.
Discharging Lithium Batteries
The value of the discharge current on the left side of screen
should not exceed 1C for maximum safety. The final voltage
on the right should not be under the voltage level that is
recommended by the battery manufacturer for deep discharging.
To start discharging, press and hold the Start/Enter key for more
than 3 seconds.
This shows the present state of discharge. To stop discharging press
the Batt type/Stop key once.
Voltage Balancing and Monitoring During Discharge
The processor monitors the voltage of individual cells during ‘storage-mode’ and ‘discharge’ of a Lithium
battery pack. It tries to normalise the voltages and make them equal. For this feature, the balamnce plug of the
battery pack should be connected to the correct balance port of the charger. If the voltage of anyone or more cells
varies abnormally during the procedure, the GALLANT EQ terminates the process with an error message. If this
happens, the battery pack contains a bad cell, or has a bad connection at the cable plug. You can easily know
which cell is bad by pressing the INC button at the time of showing the error message.
- 11 -
The processor found that the voltage of one cell in the Lithium
battery pack is too Iow.
In this case, the 4th cell is bad. If this happens and there is a
connection-break at the cable or plug, the voltage value may show
zero.
NiMH/NiCd Battery Program
These programs are for charging or discharging NiMH (Nickel-Metal Hydride) or NiCd (Nickel-Cadmium) batteries
commonly used for R/C model applications. To alter the value at the display, press the Start/Enter key to make it
flash, then change the value using INC or DEC key. The value will be stored by pressing Start/Enter key once more.
To start the process, press Start/Enter button and hold for more than 3 seconds.
Charging NiCd/NiMH Batteries
This program simply charges the battery using the current you
set. In ‘Aut’ mode, you need to set the upper limit for the charge
current to avoid a higher feeding current that may damage the
battery. Because some batteries are of low impedance and
small capacity, this can lead to a higher charge current by the
processor in automatic charge mode. In ‘Man’ mode, it will
charge the battery with the charge current you set on the
display. Each mode can be switched by pressing INC or DEC button
simultaneously when the current field is flashing.
The screen displays the current state of charging. To stop the
process, press the Batt type/Stop key once. The audible sound
indicates the end of the process.
Discharging NiCd/NiMH Batteries
Set the discharge current on the left and final voltage on the
right. The discharge current ranges from 0.1 to 1.0A and the final
voltage ranges from 0.1 to 25.0V. To start the process, press and
hold the Start/Enter key for more than 3 seconds.
The screen displays the current state of discharge. You can
alter the discharge current by pressing the Start/Enter key
during the process. Once you change the current value, store it by
pressing the Start/Enter button again. To stop discharging press
the Batt type/Stop key once. The audible sound indicates the end
of the process.
- 12 -
Charge-to-Discharge & Discharge-to-Charge Cycle for NiMH/NiCd Batteries
Set the sequence on the left and the number of cycles on the right.
You can use this function for balancing, refreshing and breaking-in
the battery. To avoid raising the temperature of the battery, there
will be a brief cool-off period (already fixed at ‘User setting’) after
each charge and discharge process. The cycling number ranges
from 1 to 5.
To stop the process, press the Batt type/Stop key once. You can
change the discharge or charge current by pressing the Start/
Enter key once during the process. The audible sound indicates that
you ended the process.
At the end of the process, you can see the charged or discharged
capacities for the battery at each cyclic process. By pressing INC or
DEC button, the screen shows the result of each cycle in order.
Pb (Lead-Sulphuric Acid) Battery Program
This program is for charging Pb (lead-sulphuric acid) batteries with a nominal voltage from 2 to 20V. Pb batteries
are totally different from NiCd or NiMH batteries. They can only deliver relatively lower current compared to their
capacity and similar restrictions definitely apply to charging. So the optimal charge current will be 1/10 of the
capacity. Pb batteries must not be charged rapidly. Always follow the instructions supplied by the manufacturer
of the battery. When you are ready to alter the parameter value in the program, press the Start/Enter key to make
it flash and then change the value with the INC or DEC key. The value will be stored by pressing the Start/Enter
key once.
Charging Pb Batteries
Set the charge current on the left and the nominal voltage of the
battery on the right. The charge current ranges from 0.1 to 5.0A and
the voltage should be matched with the battery being charged. Start
the charge process by pressing and holding the Start/Enter key for
more than 3 seconds.
The screen displays the state of charging process. To stop
charging at any time, press the Batt type/Stop key once. The audible
sound indicates that you ended the process.
- 13 -
Discharging Pb Batteries
Set the discharge current on the left and final voltage on the right.
The discharge current ranges from 0.1 to 1.0A. To start the process,
press and hold the Start/Enter key for more than 3 seconds.
The screen displays the current state of discharge. You can alter
the discharge current by pressing the Start/Enter key during the
process. Once you change the current value, store it by pressing
Start/Enter button again. To stop discharging at any time press
the Batt type/ Stop key once. The audible sound indicates that you
ended the process.
Save Data Program
The GALLANT EQ has a data storage and load program for your convenience. This feature can store up to 5 battery
data sets by number, that represent the individual specification of batteries you are using. They can be called back
for the process of charging or discharging without setting up the program again. To set up the parameter values
in the program, press the Start/Enter key to make it flash and then change the value with the INC or DEC key.
The parameter values set up in this screen do not affect the charge
or discharge process, they only represent the specification of the
battery. The following screens will automatically display values/
settings matched with the battery type you set up. The example
shows a NiMH battery pack of 12 cells and 3000mAh capacity.
- 14 -
Set up the charge current for the manual charge mode, or the
current limit for automatic charge mode. Each mode can be
switched by pressing the INC and DEC button at the same time as
the current field is flashing.
Setting up discharge current and final voltage.
Setting up the sequence of charge and discharge plus the
cycling number.
Saving the data.
Load Data Program
This program selects the data set that was stored at the ‘Save Data’ program. To load the data, press the
Start/Enter key once to flash the data number field and select the number using the INC or DEC key, then press
and hold Start/Enter key for more than 3 seconds.
Select the data number to be recalled. The data matched with the
number will be displayed at this time.
Loading the data.
- 15 -
Various Information Provided During the Processes
You can inquire about various information on the LCD screen during charging or discharging. When you press
the DEC button, the charger shows the established user settings. You can also monitor the voltage of individual
cells during balancing by pressing the INC button when the balance cable is linked to the Lithium battery being
processed.
The final voltage will be reached at the end of process.
The 3-pin port is assigned as a USB port.
The external temperature only will be displayed when using the
thermal probe.
The present voltage of the input DC power.
When using the balance connector to the battery, you can check
the individual voltage of each cell in the battery pack. When
connected to one of the ports on the right side of the charger, the
program shows the voltage of each cell up to a maximum of 6
cells in series. To utilise this feature, the battery pack must have a
‘balance’ plug that is linked to each cell. Make sure that only ‘XH’
style plugs or the appropriate adaptor board/lead are used in the
ports on the right hand side (see optional items).
- 16 -
Warning and Error Messages
The GALLANT EQ incorporates various functions to protect & monitor the system and verify functions
relating to the state of its electronics. In the case of an error occurring, the screen displays the cause of the error
(self- explanatory) together with an audible sound.
The output is connected to a battery with incorrect polarity.
This will be displayed in case of detecting an interruption of
the connection between battery and output or voluntarily
disconnecting the charge lead during the charge or discharge
process.
There was a short-circuit at OUTPUT. Please check the
charging leads.
The input power voltage has dropped below the limit.
The voltage of a Lithium battery pack was selected incorrectly. Verify
the voltage of the battery pack carefully.
There is a malfunction in the charger circuit for some reason.
The processor detects that the voltage is lower than you set in the
Lithium program. Please check the cell count of the battery pack.
The processor detects that the voltage is higher than you set in the
Lithium program. Please check the cell count of the battery pack.
The voltage of one cell in the Lithium battery pack is too low. Please
check the voltage of the cells one by one.
The voltage of one cell in the Lithium battery pack is too high. Please
check the voltage of the cells one by one.
There are bad connections at the balance connector plug. Please
check the connector and cables carefully.
The internal temperature of the unit is too high. Cool down the unit.
The processor cannot continue to control the feeding current for
some reason. The unit needs to be repaired.
- 17 -
Optional Items
The following optional items can be purchased to suit specific requirements of
your battery or for monitoring
Part No:
1) Balance Adaptor Board (EH type)
2) Balance adaptor Board (PQ type)
3) Balance adaptor Board (TP type)
4) Temperature probe
5) USB Connector/Program
O-IPBAL-ABEH
O-IPBAL-ABPQ
O-IPBAL-ABTP
O-IPTS1
O-IPUSB1
Specifications
Operating Voltage Range:
10.0~18.0 Volt
Circuit Power:
Max. 50W for Charging
Max. 5W for Discharging
Charge Current Range:
0.1~5.0A
Discharge Current Range: 0.1~1.0A
Current Drain for Balancing Li-po:
300mAh/cell
NiCd/NiMH Battery Cell Count: 1~15 cells
Lithium Battery Cell Count:
1~6 Series
Pb Battery Voltage:
2~20V
Weight:
400g
Dimension:
165 x 130 x 45mm
- 18 -
Warranty and Service
We warrant this product for a period of one year (12 months) from the date of
purchase. This guarantee applies to materials or operational defects, which are
present at the time of purchasing the product. During that period we will replace,
without service charge, any product deemed defective due to those causes. You
will be required to present proof of purchase (invoice or receipt). This warranty
does not cover the damage due to wear, overloading, incorrect handling or use
of incorrect accessories.
- 19 -
BALANCE CHARGER / DISCHARGER
Distributed by Ripmax Ltd., 241 Green Street,
Enfield. EN3 7SJ. United Kingdom
BALANCE CHARGER / DISCHARGER
Danke, dass Sie sich für den Pro-Peak Gallant EQ entschieden haben.
Dieses Schnelllade/entlade Gerät mit eingebautem Balancer ist mit
einem Mikroprozessor, und einer spezialisierten Software für eine
große Vielfalt verschiedener Akkus ausgestattet.
BEDIENUNGSANLEITUNG
Bitte lesen Sie dieses Handbuch vollständig, und sorgfältig
durch, da diese Anleitung eine Vielfalt von Programmierungen
und Sicherheitsinformationen enthält. Die Auswahl von korrekt
arbeitenden Parametern liegen in der Verantwortung des
Benutzers. Bewahren Sie diese Anleitung an einem sicheren Platz
auf, und stellen Sie sicher, dass Sie diese mitgeben, wenn Sie
Ihren Gallant EQ verkaufen.
Technische Daten
Optimierte Bediener Software
Der Gallant EQ hat ‘AUTO’ Funktionen, die den Ladestrom automatisch einstellen, wenn Sie Nimh/Nicad Akkus
laden/entladen wollen. Alternativ dazu kann der Ladestrom auch manuell eingestellt werden.
Für Lithium Akkus, kann Ihnen der Gallant EQ dabei helfen, dass Akkus nicht überladen werden, da dies
durch einen Fehler sonst zu einer Explosion führen kann. Jedes Programm in diesem Lader wird mit einer
spezialisierten Software kontrolliert, um fast jeden Fehler zu bemerken. Dies stellt ein maximum an Sicherheit da.
Diese Parameter können, wenn nötig, durch den Anwender eingestellt werden.
Eine spezielle Balancer Adapterplatine für TP Stecker, wird als Standard mitgeliefert. Optionale Platinen für
andere Stecksysteme sind auch erhältlich. Der Anschluss an der Seite des Laders passt für XH Stecker. Eine
Balancerplatine für diesen Typ wird nicht benötigt.
High Power und High Performance Stromkreis
Der Gallant EQ verwendet einen Stromkreislauf, der einen max. Ausgangsladestrom von 50W (5W entladen) hat.
Man kann damit einen 15 zelligen NiCd/NiMH Pack, und 6 zellige Lithium Pack mit einem maximalen Strom von
5.0A (1.0A entladen) laden. Weiterhin ist das Kühlsystem so effizient, dass es diese Leistung halten kann, ohne
das Schwierigkeiten an der CPU, oder dem Bedienprogramm auftreten. Wenn die Kombination von Strom und
Spannung 50W (5W entladen) übersteigt, wird der Stromkreis den Strom automatisch anpassen, damit dieser
das Limit nicht übersteigt.
Integral Balancer für Lithium Akkus
Der Gallant EQ hat einen integrierten Zellenbalancer. Er balanciert im Akku automatisch die individuelle
Zellenspannung, während Sie die verschiedenen Typen von Lithium Akkus (Lilo/LiPO/LiFe) laden. Um dieses zu
ermöglichen, muß der Balancerstecker des Akkus mit dem Balancer des Ladegerät verbunden sein.
Balancieren der individuellen Zellenspannung, während dem Entladen
Der Gallant EQ kann die einzelnen Zellen während des Entladens überwachen und balancieren. Ist die Spannung
von einer oder mehreren Zellen, während der Prozedur abnorm unterschiedlich, beendet der GALLANT EQ den
Prozess mit einer Fehlermeldung.
Akzeptiert verschiedene Lithium Akku Typen
Der Gallant EQ kann drei verschiedene Lithium Akku annehmen – Lilo (lithium Ion), LiPo (Lithium Polymer) und
LiFe (Lithium Phosphate). Diese haben verschiedene Merkmale, und benötigen verschiedene Parameter zum
Laden und Entladen. Jedes dieser kann von Ihnen, mit den dazugehörigen Parametern ausgewählt werden. Für
genauere Angaben beziehen Sie sich auf die ‘Sicherheitswarnungen’.
Lithium Akku ‘Schnell’ Laden und ‘Speicher’ Modus
Sie können den Lithium Akku für spezielle Zwecke laden. ‘Schnell’ Laden reduziert die Ladezeit des Lithium Akkus,
und der ‘Speicher’ Modus kontrolliert die Endspannung des Akkus für eine längere Lagerung.
Maximale Sicherheit
Delta-peak Sensibilität: Dieses automatische Lade-Beendigungsprogramm arbeitet prinzipiell wie die Delta-Peak
Spannungserkennung. (NiCd/NiMH)
Auto-Ladestrom Limit: Wenn Sie NiCd oder NiMH mit dem ‘AUTO’ Mode laden, können Sie das obere Limit des
Ladestroms eingeben, um eine Überladung zu verhindern. Dies ist sehr sinnvoll beim Laden von NiMH Akkus, die
geringe Kapazitäten haben, oder nur geringe Ströme vertragen.
Kapazität Limit: Die Ladekapazität berechnet sich immer, indem Ladestrom mit Zeit multipliziert wird. Wenn die
Ladekapazität das programierte Limit überschreitet, wird der Prozess automatisch unterbrochen. Das Limit kann,
wenn nötig, verändert werden.
Temperatur Limit: Die Akkutemperatur wird, während des Ladens, wegen der chemischen Prozesse im inneren
ansteigen. Wenn Sie eine Temperaturgrenze setzen, wird der Ladeprozess beim erreichen dieser Grenze
beendet. Der optionale Temperaturfühler wird für diese Funktion benötigt.
- 22 -
Zeit Limit: Um mögliche Defekte am Akku Aufgrund der eingestellten Parameter zu verhindern, können Sie die
max. Ladezeit (gesamt) einschränken.
Anzeige Eingangsspannung : Um den Akku vor Beschädigungen zu schützen, wird die Eingangsspannung
immer angezeigt. Wenn dies unter das untere Limit fällt, wird der Vorgang automatisch gestoppt.
Automatische Kühlung: Der elektronische Lüfter aktiviert sich automatisch, wenn die Innentemperatur des
Laders steigt.
Daten speichern/laden
Der Gallant EQ kann max. 5 Datensätze (Memory) für verschiedene Akkus speichern. Diese können zur Ladung
und Entladung aufgerufen werden, ohne daß die Daten neu eingegeben werden müssen.
Zyklisch laden/entladen
Die Anzahl der Zyklen bewegen sich von 1 bis 5 zum Laden > Entladen, oder Entladen>Laden. Dies dient zum
Auffrischen und Balancieren der Akkus.
Analyse am PC mit USB Verbindung
Für den erfahrenen Modellbauer, bietet der Gallant EQ, für den PC, Progarmme an, um die Merkmale des
Akkus über den USB Port, zu analysieren. Sie können grafische Kurven für Spannung,Strom, Kapazität und
Temperatur darstellen.Es zeigt auch die individuelle Spannung jeder Zelle im Akku an.Damit Sie diese Funktion
benutzen können, benötigen Sie einen optionalen USB Adapter, und das passende Programm.
Außenseite des Ladegerätes
Verbindungsdiagramm für Lithium
Balance-Ladeprogramm
EingangsspannungsKabel
11-18V
LCD Bildschirm Anzeige
16 Stellen, 2 Linien
Ausgangsladekabel
4mm Buchse
Individueller Zellen
Balancer Eingang
LiPo BALANCE
BALANCE
LiPo
5.0A
22.2V(6S)
5.0A
22.2V(6S)
Batt Type/Stop
Auswahl
Hauptprogramm
Stoppt den Vorgang
Dec/Inc
Auswahl
Unterprogramm
Vorgang anhalten
- 23 -
Start/Enter
Um den Vorgagng
fortzusetzen oder zu
Starten
Sicherheitswarnungen
Ihr Akku wird beschädigt, wenn dieser nicht korrekt am GALLANT EQ angeschloßen
wird. Bitte anschließen, wie unten im Diagramm gezeigt.
Mit Adapterplatine
Direktanschluß
NUR MIT XH Stecker
•
•
•
•
•
•
•
Lassen Sie nie den Lader unbeaufsichtigt,wenn dieser mit der Stromversorung verbunden ist. Wenn sie eine Störung feststellen, unterbrechen Sie sofort den Ladevorgang, und beziehen Sie sich auf die Bedienungsanleitung.
Halten Sie den Lader von Staub, Dämpfen, Regen, Hitze, direkte Sonneneinstrahlung und Vibrationen fern. Nicht fallen lassen!
Der Lader ist für einen Stromeingang von 10~18V ausgelegt.
Der Lader, und der zu ladende Akku (oder entladen) sollte auf einer hitzebeständigen, nicht brennbaren,und
nicht leitfähigen Oberfläche stehen, niemals auf Autositzen,Teppichen, oder ähnlichem. Halten Sie
sich damit von entzündbaren und unsicheren Materialien fern.
Stellen Sie sicher, dass Sie die Anweisung für zum Laden oder Entladen des Akkus verstehen. Ist das
Programm nicht richtig eingestellt, kann der Akku beschädigt werden.Falsches laden der Lithium Akkus
kann zu Feuer oder Explosion führen.
Niemals einen Lithium Akku laden, wenn dieser aufgeblasen ist.
Um zu vermeiden, dass es zu einem Kurzschluß kommt,stecken Sie immer zuerst das Ladekabel in
den Lader, und dann an den Akku der geladen oder entladen wird. Trennen Sie in umgekehrter
Reihenfolge.
NiCd/NiMH
Nominelles Spannungsniveau: 1.2V/Zelle
Empfohlener Schnellladestrom: 1C-2C, abhängig von der Leistung der Zelle. Hochentladungszellen können mit
2C geladen werden. Normale Zellen (TX/RX etc) sollte nicht mit mehr als 0.2C geladen werden.
Entlade Schlußabschaltung: 0.85V/Zelle (NiCd), 1.0V/Zelle (NiMH)
C = X ÷ 1000 (X = Akku Kapazität in mAh)
Lilo (Lithium Ion)
Nominelles Spannungsniveau: 3.6V/Zelle
Maximale Spannung: 4.1V/Zelle
Empfohlener Schnellladestrorm: 1C oder weniger (0.5C empfohlen).
Entlade Schlußabschaltung: 2.5V/Zelle oder höher
LiPo (Lithium Polymer)
Nominelles Spannunsniveau: 3.7V/Zelle
Maximale Spannung: 4.2V/Zelle
Empfohlener Schnellladestrom: 1C oder weniger.Einige der neuesten LiPo Zellen können mit 2C oder mehr
geladen werden. Überprüfen Sie die Freigabe des Akkuherstellers. Im Zweifel nie über 1C laden.
Entlade Schlußabschaltung: 3.0V/Zelle oder höher.
Life (Lithium Phosphate)
Nominelles Spannungsniveau : 3.3V/Zelle
Maximale Spannung: 3.6V/Zelle
Empfohlener Schnellladestrom: 3C oder weniger. Überprüfen Sie die Herstellerangaben.
Entlade Schlußabschaltung.: 2.0V/Zelle oder höher.
- 24 -
Sicherheitswarnungen
Pb (Bleiakku)
Nominelles Spannungsniveau: 2.0V/Zelle
Maximale Spannung: 2.46V/Zelle
Empfohlener Schnellladestrom: 0.3C oder weniger
Entlade Schlußabschaltung: 1.75V/Zelle oder höher.
- Versuchen Sie nie den Akkupack auseinander zunehmen.
- Bitte überprüfen Sie sorgfältig die Kapazität und Spannung des Lithium Akkupacks, bevor Sie diesen laden/
entladen. Es besteht auch die Möglichkeit der Zusammenstellung von parallelen und seriellen Zellen. Bei
parallelen Zellen, addiert sich die Kapazität der parallelen Zellen (2P heißt x2), die Spannung bleibt die gleiche.
Das Spannungsungleichgewicht kann möglicherweise in parallelen Packs ein Feuer, oder eine Explosion,
während dem Ladeprozess, verursachen. Wir empfehlen Ihnen
nur serielle Lithium Akkupacks zu verwenden.
Entladen
Der typische Zweck von entladen ist, die verbliebene Kapazität des Akkus zu entsorgen, oder die Spannung
des Akkus auf ein definiertes Level zu bringen. Wenn Sie den Akku entladen, müssen Sie ebensoviel Sorgfalt
walten lassen, wie beim Ladeprozess. Um zu vermeiden, dass der Akku tiefentladen wird, setzten Sie die
Entladeschlußspannung korrekt. Lithium Akkus sollten nicht unter die minimale Spannung entladen werden, da
dies zu einem rapiden Verlust der Kapazität, oder zum Totalausfall führen kann. Im allgemeinen müssen Lithium
Alkkus nicht entladen werden.
- Einige wideraufladbare Akkus haben einen Memory Effekt. Werden diese teilweise gebraucht und aufgeladen,
bevor die ganze Ladung verwendet wurde, ‘erinnern’ Sie sich daran, dass das nächste Mal nur dieser Teil der
Kapazität verwendet wird. Das ist der ‘Memory Effekt’. NiCd und NiMH Akkus sind vom Memory Effekt betroffen.
Diese bevorzugen vollständige Zyklen. Vollaufgeladen, benutzen Sie den Akku, bis dieser leer ist. Nie den Akku
voll aufladen, während Sie diesen aufbewahren, damit sich dieser selbstentladen kann. Geben sie dem Akku
gelegentlich einen kleine Ladung, um diesen über 1.0v pro Zelle zu halten. NiMH Akkus haben einen kleineren
Memory Effekt als NiCd.
- Lithium Zellen ziehen eher partielle, als eine volle Entladung vor. Häufige Entladungen sollten, wenn möglichst,
vermieden werden. Stattdessen laden Sie öfter den Akku, oder verwenden Sie einen größeren Akku.
- Ein neuer NiCd Akkupack wird seine volle Kapzität nicht abgeben, bevor dieser 10 oder mehr Zyklen geladen
wurde. Der Zyklusprozeß zum Laden und Entladen wird zur optimierten Kapazität führen.
Diese Sicherheitswarnungen sind sehr wichtig. Bitte befolgen Sie diese Anweisungen zur maximalen Sicherheit,
oder das Ladegerät, und der Akku können schwerwiegend beschädigt werden. Falsche Handhabung kann einen
Brand verursachen, Personen verletzen, oder Eigentum zerstören.
- 25 -
Programm Menü Schritte
PRO G R A M
SELEC T L i X X
BATT
Start
Enter
INC
LiXX CHARGE
INC
L i X X CHARGE
DEC
DEC
LiXX
BALANCE
INC
DEC
LiXX
FAST CHARGE
INC
Batt type
Stop
PRO G R A M
SE L E C T
NiM H B A T T
LiXX
DISCHARGE
Start
Enter N i M H C H A R G E
Aut
INC
DEC
N i M H CHARGE
Man
INC
DEC
NiMH DISCHARGE
INC
DEC
DEC
LiXX
STORAGE
INC
NiMH CYCLE
DEC
Batt type
Stop
PRO G R A M
SE L E C T
Nicd B A T T
Start
Enter
Nicd CHARGE
Auto
INC
DEC
N i c d CHARGE
Man
INC
DEC
Nicd
DISCHARGE
INC
Nicd CYCLE
DEC
Batt type
Stop
PRO G R A M
SE L E C T
Pb B A T T
Start
Enter
INC
Pb CHARGE
P d CHARGE
DEC
Batt type
Stop
PRO G R A M
SE L E C T
SAVE D A T A
Start
Enter
SAVE DATA
Batt type
Stop
PRO G R A M
SE L E C T
LOAD D A T A
Start
Enter
LOAD DATA
Batt type
Stop
USE R S E T
PRO G R A M
Start
Enter L i X X V. Ty p e
INC
DEC
L i Lo/LiPo/
LiFe
C HK Time
INC
DEC
NiMH
Sensitivity
D. Peak
INC
DEC
Nicd
Sensitivity
D. Peak
INC
Capacity
Cut-Off
INC
INC
INC
S a f ety Timer
DEC
DEC
DEC
Key Beep
Buzzer
INC
DEC
I n p ut Power
Low
C ut-Off
- 26 -
Waste Time
CHG>DCHG
INC
DEC
DEC
Temp Cut-Off
USB Enable
Parameter Einstellungen (Benutzer Set Up)
Der Gallant EQ wird mit den Standardeinstellungen arbeiten, wenn dieser das erste Mal mit einem 12V Akku
verbunden ist. Das Display zeigt die folgenden Informationen der Reihe nach an, und Sie können den Wert des
Parameters in jeder Anzeige verändern.
Wenn Sie den Parameterwert in dem Programm ändern möchten, drücken Sie den Start/Enter Knopf, damit
die gewünschte Auswahl aufleuchtet, und Sie den Wert mit dem INC oder DEC Knopf verändern können. Die
Einstellung wird gespeichert, indem Sie den Start/Enter Knopf erneut drücken.
Diese Anzeige zeigt die nominelle Spannung eines Lithium Akkus an.
Es gibt drei Arten von Lithium Akkus; LiFe (3.3V), Lilo (3.6V) oder LiPo
(3.7V). Dies ist sehr wichtig, deshalb prüfen Sie den Akku sorgfältig,
und wählen das richtige Programm aus. Wenn Sie einen falschen
Wert/Program ausgewählt haben, kann der Akku, während des
Ladens explodieren!
Der Gallant EQ erkennt automatisch die Zellenzahl des Lithium
Akkus, am Anfang eines Lade - oder Entladeprozess,um falsche
Einstellungen des Benutzers zu vermeiden. Tiefentladene
Akkus können falsch erkannt werden. Um diese Art von Fehler
zu verhindern, können Sie das Zeitintervall setzen, um das
Zellenergebnis des Prozessors zu prüfen. Normalerweise genügen
10 min., damit das Zellenergebnis korrekt angezeigt wird. Für Akkus
von größerer Kapazität können Sie den Zeitintervall erweitern, aber
setzten Sie die Zeitdauer zu lang für Akkus mit kleiner Kapazität,
kann der Lade - oder Entladeprozess innerhalb des Zeitintervalles
mit einem falschen Zellenergebnis beendet werden. Dies kann
zu katastrophalen Resultaten führen! Wenn der Prozessor das
Zellenergebniss, während dem Lade - oder Entladeprozeß, falsch
erkennt, müssen Sie eventuell die Zeit verlängern. Ansonsten raten
wir Ihnen die Standard Einstellungen zu benutzen.
Dies zeigt die Erhaltungsspannung für automatische Beendigung
des Ladevorgangs für NiMH oder NiCd Akku an. Der effektivste
Wert bewegt sich von 5 bis 20mV pro Zelle. Ist die Spannung
höher eingestellt, besteht die Gefahr den Akku zu überladen, ist
sie zu niedrig eingestellt, besteht die Möglichkeit des vorzeitigen
Ladeschlusses. Bitte beziehen Sie sich auf die technischen Daten
des Akkus. (NiCd : 12mV, NiMH : 7mV).
Sie können die Funktion mit dem 3 Pin Anschluß auf der linken
Seite des Gerätes nutzen. Dieser Anschluß kann für den Einsatz des
Temperatursensors, oder die USB- Verbindung auf dieser Anzeige
gewählt werden. Ist der Port als Temperatur Port definiert, kann der
optionale Temperatursensor an dem Akku eingesetzt werden. Ist
der Port als USB Port definiert, können Sie mit einem optionalen USB
Kabel das Ladegerät mit Ihrem PC verbinden. Mit der dazugehörigen
Software können dann alle Prozesse auf Ihrem PC angezeigt
werden. Sie können die maximale Temperatur einstellen, die der
Akku beim Laden erreichen darf. Sobald der Akku, beim Laden,
diese Temperatur erreicht hat, wird dieser Prozess unterbrochen,
um den Akku zu schützen.
- 27 -
Parameter Einstellungen (Benutzer Set Up)
Ein Akku kann beim laufenden Zyklusprozeß, beim Laden oder
Entladen warm werden. Das Programm kann eine Verzögerungszeit
einlegen, damit der Akku nach jedem Lade - oder Entladeprozess
auskühlen kann, bevor der nächste Prozess beginnt. Der Wert
bewegt sich von 1 bis 60 min.
Wenn Sie den Ladevorgang beginnen, startet zur gleichen Zeit,
automatisch der integrierte Sicherheitstimer. Dieser wurde so
programmiert, damit der Akku nicht überladen wird, wenn es
sich erweist, dass er fehlerhaft ist, oder es den Akku nicht als voll
erkennen kann. Der Wert für den Sicherheitstimer ist großzügig
genug, um den Akku voll aufzuladen.
Dieses Programm stellt die maximale Ladekapazität ein, die
an den Akku, während des Ladens geliefert wird. Wird die
Delta-Peak Spannung nicht gefunden, oder der Sicherheitstimer
versagt grundlos, wird der Vorgang bei dem ausgewählten
Kapazitätwert automatisch gestoppt.
Jede Aktivität an den Tasten wird mit einem Piepston bestätigt.
Durch Piepstöne, oder Melodien werden zu verschiedenen Zeiten
die Wechsel der verschiedenen Modes angezeigt. Diese hörbaren
Klänge können an - oder ausgeschaltet werden.
Dieses Programm zeigt die Eingangsspannung an. Fällt die
Spannung unterhalb des Wertes den Sie eingestellt haben, wird der
Vorgang unterbrochen, um Ihre angeschlossene Stromversorgung
zu schützen.
- 28 -
Lithium Akku (Lilo/LiPo/LiFe) Programm
Diese Programme sind nur zum Laden oder Entladen für Lithium Akkus mit einer nominellen Spannung von 3.3V,
3.6V und 3.7V pro Zelle geeignet. Diese Akkus benötigen eine andere Ladetechnik, abhängig von der konstanten
Spannung (CV), und dem konstanten Strom (CC). Der Ladestrom ist abhängig von der Kapazität, und Leistung
des Akkus. Die Endspannung des Ladeprozesses ist auch sehr wichtig, es sollte mit der genauen, maximalen
Spannung des Akkutyps beim Laden übereinstimmen. Dies ist 4.2V für LiPo, 4.1V für Lilo, und 3.6 V für LiFe.
Der Ladestrom, und die nominelle Spannung, im Verhältnis zur Zellenzahl, muss das Ladeprogramm richtig, für
den zu ladenden Akku, eingestellt sein. Wenn Sie die Parameterwerte in dem Programm ändern wollen, dann
drücken Sie den Start/Enter Knopf, dass der Wert leuchtet, und wechseln dann den Wert mit dem INC oder DEC
Knopf. Der Wert wird gespeichert, indem Sie einmal mehr den Start/Enter Knopf drücken.
Lithium Akkus laden
Auf der linken Seite in der ersten Zeile wird der Akkutyp angezeigt,
den Sie beim Set Up ausgewählt haben. Der Wert auf der linken
Seite in der zweiten Zeile zeigt den Ladesstrom an, und auf der
rechten Seite in der zweiten Zeile wird die Spannung des Akkupacks
angezeigt. Nachdem Sie Strom und Spannung eingegeben haben,
drücken Sie den Start/
Enter Knopf, und halten diesen für 3 Sekunden, um den Vorgang zu
starten. (Ladestrom: 0.1~5.0A, Spannung: für 1-6 Zellen)
Dies zeigt die Anzahl der von Ihnen eingegebenen Zellen an, und
die der Prozessor gefunden hat. ‘R:’ zeigt die Anzahl der Zellen an,
die das Ladegerät gefunden hat, und ‘S:’ zeigt die Anzahl der Zellen
an, die Sie vorher ausgewählt haben. Sind beide Nummern gleich,
können Sie mit dem Ladevorgang beginnen, indem Sie den Start/
Enter Knopf drücken. Wenn nicht, dann drücken Sie den Batt Type/
Stop Knopf, um zu der vorherigen Anzeige zurückzukehren. Dann
überprüfen Sie genau die Anzahl der Zellen Ihres Akkupacks. Dann
fangen Sie nochmals an zu laden.
Die Anzeige zeigt den gegenwärtigen Status, des Ladevorgangs
an. Um den Ladevorgang zu stoppen, drücken Sie einmal den Batt
Type/Stop Knopf.
Lithium Akkus im Balancer Modus laden
Dies ist zum Balanacieren der Spannung der einzelnen Lithium Zellen, des zu ladenden Akkus. Der Akkupack sollte
in dem passenden Balancereingang, auf der rechten Seite des Laders eingesteckt werden. Die Standardeingänge
sind ‘XH’. Eine Adapterplatine und Kabel für ‘TP’ Stecker, liegen bei, und andere sind optional erhältlich. Sie
müssen auch den Akkustecker (Hauptstromkabel) in die Ausgangsbuchsen des Ladegerätes stecken. In diesem
Modus, wird der Ladevorgang, anders als der gewöhnliche Ladevorgang sein. Der interne Prozessor wird die
Spannung jeder Zelle in dem Akkupack anzeigen, und kontrolliert den Ladestrom der zu jeder Zelle kommt. Dies
wird die Spannung aller Zellen in diesem Pack angleichen, und hilft dabei, dass keine Zelle tiefentladen wird.
- 29 -
Der Wert auf der linken Seite in der zweiten Zeile zeigt den Ladestrom
an, und der Wert auf der rechten Seite in der zweiten Zeile zeigt die
Gesamtspannung des Akkupacks an.
Nachdem Sie Strom und Spannung eingegeben haben, drücken
Sie den Start/Enter Knopf, und halten diesen für 3 Sekunden, um
den Vorgang zu starten. (Ladestrom: 0.1~5.0A, Spannung: für 1-6
Zellen)
Dies zeigt die Anzahl der von Ihnen eingegebenen Zellen an, und
die der Prozessor gefunden hat. ‘R:’ zeigt die Anzahl der Zellen an,
die das Ladegerät gefunden hat, und ‘S:’ zeigt die Anzahl der Zellen
an, die Sie vorher ausgewählt haben. Sind beide Nummern gleich,
können Sie mit dem Ladevorgang beginnen, indem Sie den Start/
Enter Knopf drücken. Wenn nicht, dann drücken Sie den Batt Type/
Stop Knopf, um zu der vorherigen Anzeige zurückzukehren. Dann
überprüfen Sie genau die Anzahl der Zellen Ihres Akkupacks. Dann
fangen Sie nochmals an zu laden.
Die Anzeige zeigt den gegenwärtigen Status, des Ladevorgangs
an. Um den Ladevorgang zu stoppen, drücken Sie einmal den Batt
Type/Stop Knopf.
Lithium Akkus “Schnell” laden
Normalerweise wird der Ladestrom kleiner, wenn der Ladevorgang des Lithium Akkus kurz vor dem Ende ist. Um
den Ladevorgang schneller zu beenden, schaltet dieses Programm bestimmte CV Vorgänge aus. Tatsächlich
wird der Ladestrom bis zu 1/5 des Anfangswert gehen, um den Ladevorgang zu beenden. Normalerweise würde
dieser bei 1/10, während des CV Vorgangs liegen. Die Ladekapazität ist vielleicht ein bißchen geringer, als beim
normalen laden, aber dadurch wird der Ladeprozess verkürzt.
Sie können den Ladestrom und die Spannung, des zu ladenen
Akkus einstellen. Wenn Sie den Start/Enter Knopf drücken, wird die
Spannung auf dem Display angezeigt. Wenn Sie die Spannung und
den Strom bestätigen, drücken Sie wieder den Start/Enter Knopf, um
den Ladevorgang zu starten.
Dies zeigt den gegenwärtigen Zustand des “SCHNELL” Ladens an.
Um den Ladevorgang zu jeder Zeit zu stoppen, drücken Sie einmal
den Batt Type/Stop Knopf.
- 30 -
‘LAGERUNG’ von Lithium Akkus
Dies ist zum Laden, oder entladen von Lithium Akkus, die vorübergehend nicht benutzt werden. Das Programm
entscheidet, ob es den Akku, bis zu einer bestimmten Spannung läd oder entläd, abhängig von der Spannung
des Akkus, beim Anschluß an den Lader. Diese sind unterschiedlich für jeden Akku Typ.3.75V für Lilo, 3.85V für
LiPo und 3.3V für LiFe pro Zelle.Sollte die Spannung des Akkus beim Anschluß über dem Spannungslevel zur
Lagerung liegen, wird das Programm mit dem Entladen beginnen.
Sie können den Strom und Spannung, des zu ladenen Akkus
einstellen. Der Strom wir zum Laden oder Entladen des Akkus
benutzt, um das erforderliche Spannungsnieveau zur “Lagerung”
zu erreichen.
Dies zeigt den gegenwärtige Zustand des Ladevorgangs an. Um
dies anzuhalten, drücken Sie einmal den Batt Type/Stop Knopf.
Lithium Akkus entladen
Der Wert des Entladestrom auf der linken Seite der Anzeige, sollte
zur maximalen Sicherheit, 1C nicht überschreiten. Die Endspannung
auf der rechten Seite, sollte nicht unter das empfohlene
Spannungsniveau, des Akkuhersteller, zum Tiefentladen, sein.
Um den Entladevorgang zu starten, drücken und halten Sie den
Start/Enter Knopf für mehr als 3 Sekunden.
Dies zeigt den gegenwärtige Zustand des Entladens an. Um den
Entladevorgang zu stoppen, drücken Sie einmal den Batt Type/Stop
Knopf.
Balancieren der Spannung und Anzeige während des Entladens
Der Prozessor zeigt die Spannung der einzelnen Zellen, während des ‘storage-mode’und ‘discharge’ von
Lithium Akkupacks an. Er versucht die Spannung zu normalisieren, und diese gleichzustellen.Für diesen Vorgang
sollter der Balancerstecker des Akkupacks am richtigen Balanceranschluß des Laders angeschlossen sein. Ist
die Spannung von einer, oder mehreren Zellen, während der Prozedur abnormal unterschiedlich, beendet der
GALLANT EQ den Prozess mit einer Fehlermeldung.Ist dies der Fall, beinhaltet der Akkupack eine defekte Zelle,
oder hat eine schlechte Verbindung am Stecker. Um herauszufinden, welche Zelle defekt ist, drücken Sie den INC
Knopf zu dem Zeitpunkt, wenn die Fehlermeldung angezeigt wird.
- 31 -
Der Prozessor findet, dass die Spannung einer Zelle im Lithium
Akkupack zu niedrig ist.
In diesem Fall ist die 4. Zelle nicht in Ordnung. Wenn es einen Kabelbruch im Stecker, oder Kabel gibt, wird auf der Anzeige 0 Volt
angezeigt.
NiMH/NiCd Akku Programm
Diese Programme sind nur zum Laden oder Entladen für NiMH (Nickel-Metal Hydride) oder NiCd
(Nickel-Cadmium) Akkus, im allgemeinen für die Anwendung in R/C Modellen. Um den Wert in der Anzeige zu
ändern, drücken Sie den Start/Enter Knopf, bis der Wert aufleuchtet, dann ändern Sie den Wert mit dem INC oder
DEC Knopf. Der Wert wird gespeichert, indem Sie einmal mehr den Start/Enter Knopf drücken. Um den Vorgang
zu starten, drücken und halten Sie den Start/Enter Knopf für mehr als 3 Sekunden.
NiCd/NiMH Akkus laden
Dieses Programm läd den Akku mit dem Strom, den Sie eingestellt
haben. Im ‘Aut’ Modus, müssen Sie das obere Limit des Ladestroms
einstellen, damit Sie den Akku nicht mit zu hohen Strömen laden,
und ihn dadurch vor Beschädigungen schützen. Da einige Akkus
einen niedrigen Ladestrom, und eine geringe Kapazität haben,
könnte dies zu einem höheren Ladestrom im automatischen
Lademodus durch den Prozessor führen. Im ‘Man’ Modus wird der
Akku mit dem Ladestrom, den Sie auf dem Display eingestellt haben
geladen. Jeder Modus kann gewechselt werden, indem Sie den INC
oder DEC Knopf gleichzeitig drücken, wenn das dementsprechende
Feld aufleuchtet.
Das Display zeigt den aktuellen Status der Ladung an. Um den
Prozess zu stoppen drücken Sie einmal den Batt Type/Stop Knopf.
Die Melodie zeigt das Ende des Prozesses an.
NiCd/NiMH Akkus entladen
Stellen Sie den Entladestrom auf der linken, und die Endspannung
auf der rechten Seite ein. Der Entladestrom bewegt sich von 0.1 bis
1.0A, und die Endspannung bewegt sich von 0.1 bis 25.0V. Um den
Prozess zu starten, drücken und halten Sie den Start/Enter Knopf für
mehr als 3 Sekunden.
Das Display zeigt den aktuellen Status der Entladung an. Sie
können den Entladestrom verändern, indem Sie den Start/Enter
Knopf, während des Vorganges drücken. Nachdem Sie den
aktuellen Wert verändert haben, wird dieser gespeichert, indem Sie
den Start/Enter Knopf wieder drücken. Um das Entladen zu stoppen,
drücken Sie einmal den Batt Type/Stop Knopf. Die Melodie zeigt das
Ende des Prozesses an.
- 32 -
Laden--Entladen & Entladen--Lade Zyklus für NiMH/NiCd Akkus
Stellen Sie die Reihenfolge auf der linken, und die Anzahl der
Zyklen auf der rechten Seite, ein. Sie können diese Funktion zum
balancieren, auffrischen, und formatieren des Akkus verwenden.
Um zu vermeiden, dass die Temperatur des Akkus steigt, wird es
eine kurze Kühlperiode (bereits bei den ‘Benutzer Einstellungen’
eingestellt), nach jedem Lade - und Entladeprozess geben. Die
Anzahl der Zyklen bewegen sich von 1 bis 5.
Um den Prozess zu stoppen, drücken Sie einmal Batt Type/Stop
Knopf. Sie können den Entlade - oder den Ladestrom verändern,
indem Sie einmal den Start/Enter Knopf, während des Vorgangs
drücken. Die Melodie zeigt das Ende des Prozesses an.
Am Ende des Prozesses, können Sie die geladene - oder entladene
Kapazität des Akkus, bei jedem Zyklus, sehen.Indem Sie den INC
oder DEC Knopf drücken, zeigt das Display das Ergebnis jedes
Zyklus der Reihe nach an.
Blei (Pb) Akku Programm
Dieses Programm ist nur zum Laden oder Entladen für Blei Akkus mit einer nominellen Spannung von 2 bis 20V.
Blei Akkus unterscheiden sich von NiCd oder NiMH Akkus. Sie können nur einen relativ geringen Strom gegenüber
ihrer Kapazität abgeben, und müssen daher auch dementsprechend geladen werden. Der optimale Ladestrom
ist daher 1/10 der Kapazität. Blei Akkus müssen nicht schnell geladen werden. Folgen Sie daher den Anweisungen
des Akkuherstellers. Wenn Sie den Parameterwert einstellen wollen, drücken Sie den Start/Enter Knopf, dass der
Wert aufleuchtet, und stellen dann den Strom mit dem INC oder DEC Knopf ein. Der Wert wird gespeichert, indem
Sie noch einmal den Start/Enter Knopf drücken.
Blei Akkus laden
Stellen Sie den Ladestrom auf der linken, und die nominelle
Spannung des Akkus auf der rechten Seite, ein. Der Ladestrom
bewegt sich von 0.1 bis 5.0A, und die Spannung sollte mit der des zu
ladenden Akkus indentisch sein.Beginnen Sie mit dem Ladeprozess,
indem Sie den Start/Enter Knopf für mehr als 3 Sekunden drücken,
und halten.
Das Display zeigt den aktuellen Status der Ladung an. Um den
Prozess zu stoppen drücken Sie einmal den Batt Type/Stop Knopf.
Die Melodie zeigt das Ende des Prozesses an.
- 33 -
Blei Akkus entladen
Stellen Sie den Entladestrom auf der linken, und die Endspannung
auf der rechten Seite ein. Der Entladestrom bewegt sich von 0.1 bis
1.0A. Um den Prozess zu starten, drücken und halten Sie den Start/
Enter Knopf für mehr als 3 Sekunden.
Das Display zeigt den aktuellen Status der Entladung an. Sie können
den Entladestrom verändern, indem Sie den Start/Enter Knopf,
während des Vorganges drücken. Nachdem Sie den aktuellen Wert
verändert haben, wird dieser gespeichert, indem Sie den Start/Enter
Knopf wieder drücken. Um das Entladen zu stoppen, drücken Sie
einmal den Batt Type/Stop Knopf. Die Melodie zeigt das Ende des
Prozesses an.
Sicherungsprogramm für Daten
Der GALLANT EQ verfügt für Sie über einen Datenspeicher und Ladeprogramm. Dieses bietet Ihnen bis zu 5 Akku
Voreinstellungen, individuell numeriesch abzuspeichern. Diese können für Ladung und Entladung aufgerufen
werden, ohne die Daten wieder neu eingeben zu müssen. Wenn Sie die Parameter einstellen wollen, drücken Sie
den Start/Enter Knopf, dass der Wert aufleuchtet, und stellen dann den Wert mit dem INC oder DEC Knopf ein.
Die Einstellwerte in dieser Anzeige, beeinflussen nicht den Lade oder Entladeprozess. Sie zeigen lediglich die Daten des Akkus an.
Die folgenden Anzeigen zeigen automatisch Ihre Einstellungen zu
dem passenden Akku, die Sie eingestellt haben, an. Das Beispiel
zeigt einen NiMH Akku mit 12 Zellen und 3000mAh Kapazität.
- 34 -
Einstellung des Ladestrom im manuellen Lademodus, oder das
Limit des Stroms im automatischen Lademodus. Jeder Mode kann
gewechselt werden, indem Sie den INC und DEC Knopf zur gleichen
Zeit drücken, wenn das dementsprechende Feld aufleuchtet.
Einstellungen des Entladestrom und der Schlußspannung.
Einstellungen der Sequenz von laden oder entladen, und die Anzahl
der Zyklen.
Daten Sicherung.
Sicherungsprogramm laden
Dieses Programm wählt die Daten aus, die beim “Sicherungsprogramm für Daten” gespeichert wurden. Um die
Daten zu laden, drücken Sie einmal den Start/Enter Knopf, damit die Nummernanzeige aufleuchtet, und wählen
die Nummer mit dem INC oder DEC Knopf, und drücken den Start/Enter Knopf für mehr als 3 sek.
Wählen des nummerierten Datenspeichers. Die passenden Daten
werden zeitgleich angezeigt.
Laden der Daten.
- 35 -
Verfügbare Informationen, während des Betriebes
Sie können verschiedene Informationen auf der LCD Anzeige, während des Ladens oder Entladens, abrufen.
Wenn Sie den DEC Knopf drücken, zeigt der Lader die eingegebenen Daten an. Darüber hinaus können Sie die
Spannung der einzelnen Zellen, während des Balancierens anzeigen, indem Sie den INC Knopf drücken. Dazu
muß aber das Balancerkabel angeschlossen sein.
Die Schlußspannung wird am Ende des Prozesses erreicht.
Der Anschluß mit den 3-Pins ist als USB Anschluß ausgewählt.
Die externe Temperatur wird nur angezeigt, wenn Sie einen
Thermofühler verwenden.
Die aktuelle Eingangsspannung.
Wenn Sie den Balancerstecker des Akkus anschließen, können
Sie die individuelle Spannung jeder Zelle überprüfen. Dies wird
bis zu max. 6 Zellen angezeigt. Um dieses zu nutzen, muß der
Akkupack mit jeder Zelle an einem Balancerstecker angeschlossen
sein. Vergewissern Sie sich, dass nur ‘XH’ Stecker, oder geeignete
Adapter Platinen/Kabel an dem Eingang auf der rechten Seite
angeschlossen werden (siehe verfügbares Zubehör).
- 36 -
Warnungen und Fehler Meldungen
Der GALLANT EQ beinhaltet verschiedene Funktionen zum Schutz - und zur Überwachung, und überprüft die
Funktionen der Elektronik. Wenn ein Fehler auftritt, zeigt das Display die Ursache für den Fehler selbstständig
zusammen mit einer Melodie an.
Der Ausgang ist mit der falschen Polarität des Akku verbunden.
Dies wird angezeigt, wenn eine Unterbrechung zwischen dem Akku
und dem Ausgang, oder das Ladekabel wird während dem Laden
oder Entladen getrennt.
Es gab einen Kurzschlus am AUSGANG. Bitte überprüfen Sie die
Ladekabel.
Die Eingangsspannung ist unter das Limit gefallen.
Die Spannung eines Lithium Akkus wurde falsch ausgewählt.
Überprüfen Sie sorgfältig die Spannung des Akkupacks.
Es gibt eine Funktionsstörung im Lader.
Der Prozessor bemerkt, dass die Spannung niedriger ist, als Sie
diese für das Lithium Programm eingestellt haben. Bitte überprüfen
Sie die Zellenzahl des Akkus.
Der Prozessor bemerkt, daß die Spannung zu hoch ist, als Sie diese
für das Lithium Programm eingestellt haben.
Bitte überprüfen Sie die Zellenzahl des Akkus.
Die Spannung einer Zelle im Lithium Akku ist zu niedrig. Bitte
überprüfen Sie die Spannung jeder einzelnen Zelle.
Die Spannung einer Zelle im Lithium Akku ist zu hoch. Bitte
überprüfen Sie die Spannung jeder einzelnen Zelle.
Es gibt eine schlechte Verbindung zum Balancerstecker. Bitte
überprüfen Sie sorgfältig die Stecker und Kabel.
Die Innentemperatur des Lader ist zu hoch. Den Lader abkühlen
lassen.
Der Prozess kann nicht die Zufuhr des Stromes überprüfen. Das
Ladegerät muss repariert werden.
- 37 -
Verfügbares Zubehör
Die folgenden Zubehörteile können für die speziellen Einsätze gekauft werden,
um Ihre Akkudaten anzeigen zu können
Artikelnr:
1) Balancer Adapter Platine (EH)
2) Balancer Adapter Platine (PQ)
3) Balancer Adapter Platine (TP)
4) Temperatur Fühler
5) USB Anschluß/Programm
O-IPBAL-ABEH
O-IPBAL-ABPQ
O-IPBAL-ABTP
O-IPTS1
O-IPUSB1
Technische Daten
Arbeitsspannung:
10.0~18.0 Volt
Leistung:
Max. 50W zum Laden
Max. 5W zum Entladen
Ladestrom:
0.1~5.0A
Entladestrom: 0.1~1.0A
Balancerstrom Li-Po:
300mAh/Zelle
NiCd/NiMH Akku Zellen: 1~15 Zellen
Lithium Zellen:
1~6 seriell
Blei Akku Spannung:
2~20V
Gewicht:
400g
Größe:
165 x 130 x 45mm
- 38 -
Garantie und Service
Wir geben eine Garantie auf dieses Produkt für die Laufzeit von 1 Jahr (12
Monate) ab Kaufdatum. Diese Garantie bezieht sich auf Material, oder Defekte
in der Funktion, die zum Zeitpunkt des Kaufes aufgetreten sind. Während dieser
Zeit werden wir ohne weitere Kosten jedes dieser Produkte mit aufgetretenen
mangelhaften Ursachen austauschen. In diesem Falle benötigen wir einen
Kaufbeleg, oder Rechung mit dem Kaufdatum. Diese Garantie deckt nicht falsche
Handhabung, Beschädigungen während des Betriebes, Überbeanspruchung,
oder Zerstörungen in Verbindung mit falschen Zubehörteilen, ab.
- 39 -
BALANCE CHARGER / DISCHARGER
Vetrieb durch Ripmax Ltd., 241 Green Street,
Enfield. EN3 7SJ. United Kingdom