1
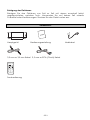
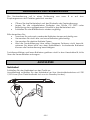
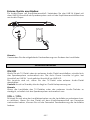
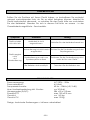
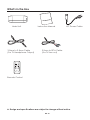
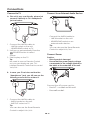
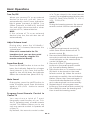
TS-220 Speakersystem Bedienungsanleitung Deutsch 1-10 Manual English 11-17 INHALT Seite Sicherheitshinweis 2-3 Zubehör 3 Bedienelemente 4 Fernbedienung 4 Handhabung der Fernbedienung 5 Anschlüsse 5-7 Grundfunktionen 7-8 Fehlersuche 9 Technische Daten 9 Entsorung / Hinweis zum Umweltschutz GE-1 10 SICHERHEITSHINWEISE Bitte beachten Sie: Lesen Sie diese Anleitung vollständig durch, bevor Sie das Gerät anschließen und in Betrieb nehmen. Das Gerät darf nicht geöffnet werden. Berühren Sie nicht die internen Komponenten des Gerätes. Schalten Sie das Gerät aus, wenn Sie es nicht benutzen. Bei längerer Nichtbenutzung sollte der Netzstecker gezogen werden. Setzen Sie das Gerät keinem direkten Sonnenlicht aus und stellen Sie es nicht in der unmittelbaren Nähe von Wärmequellen auf. Das Gerät darf weder Regen noch Feuchtigkeit ausgesetzt werden. Stellen Sie das Gerät auf einem stabilen Untergrund auf. Achten Sie darauf, dass die Belüftungsschlitze des Gerätes frei sind und die Luftzirkulation nicht behindert wird. Überhitzung kann zu Fehlfunktionen führen. Für eine ungehinderte Luftzirkulation benötigt das Gerät rund 20 cm Abstand oben und 5 cm seitlich und nach hinten. Ziehen Sie vor Reinigung des Gerätes den Netzstecker. Verwenden Sie zur Reinigung ein weiches Tuch. Nicht mit Reinigungsmitteln oder Alkohol reinigen. In dieser Anleitung wird ausschließlich die Bedienung des Gerätes erläutert. Stellen Sie keine mit Flüssigkeit gefüllten Behälter auf das Gerät. Verwenden Sie das Gerät nicht, wenn das Netzkabel eine Beschädigung aufweist. Achten Sie darauf, dass das Netzkabel nicht über scharfe Ecken oder heiße Oberflächen liegt. Wenden Sie sich im Falle einer notwendigen Reparatur an eine Fachwerkstätte. Das Blitzsymbol weist auf das Vorhandensein gefährlicher Spannungspegel im Inneren des Gerätes hin. Beim Berühren der internen Gerätekomponenten besteht die Gefahr von Stromschlägen. Das Ausrufungszeichen macht auf wichtige Hinweise aufmerksam. Versuchen Sie nicht, das Gehäuse zu öffnen, da die Gefahr von Stromschlägen besteht. Reparaturen dürfen nur von Fachwerkstätten ausgeführt werden. GE-2 Reinigung des Gehäuses: Reinigen Sie das Gehäuse von Zeit zu Zeit mit einem eventuell leicht angefeuchteten, weichen Tuch. Verwenden Sie auf keinen Fall scharfe Putzmittel oder Verdünnungen. Stecken Sie das Gerät vorher aus. ZUBEHÖR: Hauptgerät Bedienungsanleitung 3,5 mm zu 3,5 mm Kabel 3,5 mm zu RCA (Cinch) Kabel Fernbedienung GE-3 Netzkabel BEDIENELEMENTE 1. /SOURCE (Eingang) Taste 2. Auto Power Indikator Rotes Licht: Standby Grünes Licht: LINE IN 1 Gelbes Licht: LINE IN 2 3. Volume +/– 4. Fernbedienungssensor 5. LINE IN (1 + 2) 6. Netzkabelanschluß FERNBEDIENUNG 1. 2. 3. 4. 5. 6. 7. 8. GE-4 ON/OFF Taste LINE IN 1/LINE IN 2 Taste Learn Indikator LEARN Taste MUTE Taste Volume +/RS-Bass Taste TV Funktionen programmieren HANDHABUNG DER FERNBEDIENUNG Die Fernbedienung soll in einer Entfernung von max. 8 m auf den Empfangssensor des Gerätes gerichtet werden. Öffnen Sie das Batteriefach auf der Rückseite der Fernbedienung. Legen Sie die mitgelieferten Batterien der Größe CR 2025 unter Beachtung der vorgegebenen Polarität in das Batteriefach ein. Schließen Sie das Batteriefach wieder sorgfältig. Bitte beachten Sie: Tauschen Sie schwach werdende Batterien immer rechtzeitig aus. Verwenden Sie nicht alte und neue Batterien gleichzeitig. Verwenden Sie gleiche Batterie-Typen. Wird die Fernbedienung über einen längeren Zeitraum nicht benutzt, nehmen Sie diese bitte aus dem Batteriefach. Auslaufende Batterien können die Fernbedienung beschädigen. Funktionsunfähige und leere Batterien gehören nicht in den Haushaltsmüll, bitte über die Sammelstellen entsorgen. ANSCHLÜSSE Netzkabel Schließen Sie das Netzkabel an das Gerät an. Anschließend schließen Sie das Netzkabel an Ihre Haushaltssteckdose mit 230 V/50 Hz an (Das Gerät befindet sich nun im Standby-Modus). GE-5 LINE IN Über die „LINE IN“ Anschlüsse und den Kopfhöreranschluß des Fernsehers können Sie das TS-220 Speakersystem mit Hilfe des 3,5 mm zu 3,5 mm Kabel anschließen. Das Speakersystem schaltet sich, wenn ein Audio-Signal vorhanden ist, /SOURCE Taste um die gewünschte automatisch ein. Drücken Sie die Eingangsquelle zu wählen. Wählen Sie das gewünschte Programm am TV-Gerät. Hinweis: Um die Lautstärke am Speakersystem zu ändern, können Sie bei dieser Verbindung auch die Fernbedienung des TV-Gerätes verwenden. Sollte an Ihrem TV-Gerät kein Kopfhöreranschluß vorhanden sein, gibt es weitere Möglichkeiten um das Speakersystem mit dem TV-Gerät zu verbinden. Audio (RCA-Kabel) Schließen Sie das Audio-Kabel (3,5 mm zu RCA-Cinch) am LINE IN Eingang des Speakersystems und am Audio-LINE OUT Ausgang (Cinchbuchsen) des TVGerätes an. GE-6 Externe Geräte anschließen: Für Audio-Player mit Kopfhöreranschluß: Verbinden Sie das LINE IN Kabel mit dem LINE IN Anschluß am Speakersystem und mit der Kopfhöreranschlußbuchse am Audio-Player. Hinweis : Verwenden Sie die mitgelieferte Fernbedienung zum Ändern der Lautstärke. Grundfunktionen ON/OFF Wenn Sie ein TV-Gerät oder ein externes Audio-Gerät anschließen, schaltet sich das Speakersystem automatisch ein. Die Auto Power Leuchte ist grün, bei Anschluß an LINE IN 1 und gelb bei Anschluß an LINE IN 2. Die Leuchte wird rot, wenn Sie das TV-Gerät oder externe Audio-Gerät abschalten. Vorsicht: Auch im Standby Modus liegt im Gerät Netzspannung an. Hinweis: Wenn die Lautstärke des TV-Gerätes oder des externen Audio-Gerätes zu niedrig ist, schaltet sich das Speakersystem automatisch aus. VOL + / VOL- Drücken Sie auf eine der Lautstärkentasten um die Lautstärke zu reduzieren bzw. zu erhöhen. Wenn Sie das Gerät mit dem Kopfhöreranschluß am Fernseher verbunden haben, können Sie mit der Fernseher Fernbedienung die Lautstärke ändern. GE-7 Bassverstärkung Wählen Sie die RS-BASS Taste um den Bass auszuwählen. Beim Einstellen des Basses blinkt das Indikatorlicht länger als beim Ausschalten des Basses. MUTE - Stummschaltung Drücken Sie die Mute-Taste, um den Ton auszuschalten. Drücken Sie diese Taste ein weiteres Mal, um den Ton wieder zu aktivieren. Speakersystem Fernbedienung programmieren Sie können 7 häufig verwendete Funktionen der TV-Fernbedienung auf die TS-220-Fernbedienung programmieren. Fabrikseitig wurden die gängigsten Codes der TV-Fernbedienungen auf die TS-220-Fernbedienung gespeichert. Folgende Funktionen können programmiert werden: ON/OFF, FUNCTION, ENTER, TV VOL+/-, TV CH +/-. Hinweis: Während des Programmiervorganges sind alle anderen Fernbedienungsfunktionen nicht verfügbar. 1. Platzieren Sie die TS-220-Fernbedienung (A) Fernbedienung (B) (max. Abstand 5 – 50 mm). 2. Drücken und halten Sie die LEARN-Taste für ca. 2 Sekunden um den Programmiermodus zu aktivieren. Ein rotes Licht leuchtet auf der TS-220Fernbedienung. Drücken Sie eine der TV-Programmierzonen Tasten (Learning Zone) auf der TS-220-Fernbedienung, das rote Indikatorlicht blinkt. Drücken Sie die zu programmierende Taste auf der TV-Fernbedienung (B). Wenn der passende Code gefunden wurde, blinkt die rote Indikatorleuchte 3 mal, danach leuchtet er wieder dauerhaft. Sollte die Leuchte nur blinken, dann wurde der Code nicht gefunden. Wiederholen Sie die Schritte 3-4 um mehr Tasten/Funktionen zu programmieren. Drücken Sie nach Abschluß wieder die LEARN Taste um alles zu speichern und aus dem Programmodus auszusteigen. 3. 4. 5. 6. GE-8 gegenüber der TV- FEHLERSUCHE Sollten Sie ein Problem mit Ihrem Gerät haben, so kontrollieren Sie zunächst anhand nachstehender Liste, ob Sie es selbst beheben können. Arbeitet Ihr Gerät kontinuierlich abnormal, so schalten Sie das Gerät bitte aus und ziehen Sie das Netzkabel. Wenden Sie sich in diesem Fall bitte an unsere - in der Garantiekarte angeführte – Servicestelle. Symptom Ursachen Lösung Gerät schaltet sich nicht ein Netzkabel ist nicht angeschlossen. Schließen Sie das Netzkabel korrekt an. Fernbedienung ist nicht korrekt Richten Sie die Fernbedienung auf den ausgerichtet. Empfangssensor. Gerät reagiert nicht Auf Fernbedienung Fernbedienung zu weit vom Speakersystem entfernt Entfernen Sie die Fernbedienung nicht mehr als 8 m vom Gerät. Die Batterien sind erschöpft. Tauschen Sie die Batterien aus. TECHNISCHE DATEN Stromversorgung: Stromverbrauch: Frequenzreichweite: Max. Musikspitzenleistung inkl. Woofer: Abmessungen (B/H/T): Standfuß TV: Gewicht: Gewicht TV: AC 230V~ 50Hz 6,5 Watt 40 Hz ~ 20kHz (+0/-3 dB) ca. 30 Watt 584 x50 x 218 mm max. 350 x210 mm ca. 1,63 kg max. 50 Kg Design, technische Änderungen u. Irrtümer vorbehalten! GE-9 Entsorgung – Hinweise zum Umweltschutz Dieses Produkt darf am Ende seiner Lebensdauer nicht über den normalen Haushaltsabfall entsorgt werden, sondern muss an einem Sammelpunkt für das Recycling von elektrischen und elektronischen Geräten abgegeben werden. Das Symbol auf dem Produkt, in der Gebrauchsanleitung oder auf der Verpackung weist darauf hin. Die Werkstoffe sind gemäß ihrer Kennzeichnung wieder verwertbar. Mit der Wiederverwendung, der stofflichen Verwertung oder anderen Formen der Verwertung von Altgeräten, leisten Sie einen wichtigen Beitrag zum Schutze unserer Umwelt. Bitte fragen Sie bei Ihrer Gemeindeverwaltung nach der zuständigen Entsorgungsstelle. GE-10 Contents What’s in the Box..........................................................................................................12 Important Safety Instructions.........................................................................................13 Safety........................................................................................................................................13 Warning.....................................................................................................................................13 Identifying the Parts.......................................................................................................14 Main Unit: Top View & Front View............................................................................................14 Rear View.................................................................................................................................14 Smart Remote Control..............................................................................................................14 Connections..................................................................................................................15 Connect to TV...........................................................................................................................15 Connect to an External Audio Device.......................................................................................15 Connect Power.........................................................................................................................16 Basic Operations...........................................................................................................16 Turn On/Off...............................................................................................................................16 Adjust Volume Level.................................................................................................................16 Super Bass Boost.....................................................................................................................16 Mute Sound..............................................................................................................................16 Program Smart Remote Control to Control TV.........................................................................16 Troubleshooting.............................................................................................................17 Specifications................................................................................................................17 EN-11 What’s in the Box Main Unit 3.5mm to 3.5mm Cable (For TV Headphone Output) Instruction Manual AC Power Cable 3.5mm to RCA Cable (For TV Line out) Remote Control Design and specifications are subject to change without notice. EN-12 Important Safety Instructions WARNING RISK OF ELECTRIC SHOCK DO NOT OPEN CAUTION: TO REDUCE THE RISK OF ELECTRIC SHOCK, DO NOT REMOVE COVER (OR BACK). NO USER-SERVICEABLE PARTS INSIDE. REFER SERVICING TO QUALIFIED SERVICE PERSONNEL. The lightning flash with arrowhead symbol, within an equilateral triangle, is intended to alert the user to the presence of uninsulated “dangerous voltage” within the product’s enclosure that may be of sufficient magnitude to constitute a risk of electric shock to persons. The exclamation point within an equilateral triangle is intended to alert the user to the presence of important operating and maintenance (servicing) instructions in the literature accompanying the appliance. Safety 1 Read these instructions. 2 Keep these instructions. 3 Heed all warnings. 4 Follow all instructions. 5 Do not use this apparatus near water. 6 Clean only with dry cloth. 7 Do not block any ventilation openings. Install in accordance with the manufacturer’s instructions. 8 Do not install near any heat sources such as radiators, heat registers, stoves, or other apparatus (including amplifiers) that produce heat. 9 Do not override the safety purpose of the polarized or grounding-type plug. A polarized plug has two blades - one wider than the other. A grounding plug has two blades and a third grounding prong. The wide blade or the third prong is provided for your safety. If the provided plug does not fit into your outlet, consult electrician for replacement of the obsolete outlet. 10 Protect the power cord from being walked on or pinched particularly at plugs, convenience receptacles, and the point where it exit from the apparatus. 11 Only use attachment/accessories specified by the manufacturer. 12 Use only with a cart, stand, tripod, bracket or table specified by the manufacturer, or sold with the apparatus. When a cart is used, use caution when moving the cart/ apparatus combination to avoid injury from tip-over. 13 Unplug this apparatus during lightning storms or when unused for long periods of time. 14 Refer all servicing to qualified service personnel. Servicing is required when the apparatus has been damaged in any way, such as power-supply cord or plug is damaged, liquid has been spilled or objects have fallen into the apparatus, the apparatus has been exposed to rain or moisture, does not operate normally, or has been dropped. 15 Do not expose this equipment to dripping or splashing and ensure that no objects filled with liquids, such as vases, are placed on the equipment. 16 This is CLASS II apparatus with double insulation, and no protective earth provided. 17 Warning: to reduce the risk of electric shock, do not expose this apparatus near moisture. 18 Warning: the battery (battery or batteries or battery pack) shall not be exposed to exceessive heat such as sunshine, fire or the lick. 19 The mains plug is used as the disconnect device, the disconnect device shall remain readily operable. 20 Don’t put more than 50kg loading on top of this apparatus. EN-13 Identifying the Parts Main Unit: Top View & Front View Smart Remote Control 1 /SOURCE Select LINE IN 1 or LINE IN 2. 2 AUTO POWER Light Indicate mode of auto power. Red light: Standby mode. Green light: play through LINE IN 1. Yellow light: play through LINE IN 2. 3 + VOLUME Increase or decrease the volume level. 4 Remote Control Sensor Rear View 1 ON/OFF Turn on or turn off the unit. 2 LINE IN 1/LINE IN 2 Select LINE IN 1 or LINE IN 2. 3 Learning indication light. 4 LEARN Activate learning mode to setup commands from TV's remote control, in order to control basic TV functions. 5 MUTE Mute or resume the sound of unit. 6 VOL+/VOL Increase or decrease the volume level. 7 RS-BASS Boost low end bass. 8 TV(Learning Zone) You can store some functions of TV in TV (learning zone) on smart remote control. 5 LINE IN Terminal Connect to an external audio device. 6 AC~ Connect to a power. EN-14 Connections Connect to TV Connect to an External Audio Device A. This unit is very user friendly, please just connect it directly to TV’s headphone jack as below : 1 2 3 Connect the LINE IN cable to: - LINE IN socket on the unit. - HEADPHONE socket on TV. Unit turn on automatically. Press the /SOURCE button to select source. Start to play on the TV. Tip: No need to use our Remote Control set, you can simply use your TV’s inherent Remote Control set to control Vol+/Vol-. Connect the LINE IN cable to: - LINE IN socket on the unit. - HEADPHONE socket on an external audio device. Tip: You can also use the Smart Remote Control to adjust Vol+/Vol-. Connect Power Caution: - Risk of product damage! - Ensure that the power supply voltage corresponds to the voltage printed on the back or theunderside of the unit. B. In case your TV set does not has the “Headphone” jack, you still can use the following connection to achieve it. Connect the AC power cord to: - the AC ~ socket on this unit. - the wall socket. 1 Connect the LINE IN cable to: - LINE IN socket on the unit. - LINE OUT socket on TV. Tip: You can also use the Smart Remote Control to adjust Vol+/Vol-. EN-15 Basic Operations Turn On/Off When you connect TV or an external device to the unit, unit will turn on automatically. Auto Power indication light is green (connect to LINE IN 1) or yellow (connect to LINE IN 2). And will turn red when disconnected or when you turn off TV / external device. NOTE: If the volume of TV or an external device is too low, the unit also turn off automatically. of a TV are stored in the smart remote control. The available preset buttons are ON/OFF, FUNCTION, ENTER, TV VOL+/ VOL-, TV CH+/CH-. NOTE: During the learning process, the normal remote control functionsare disabled. Adjust Volume Level During play, press the VOLUME+/buttons to increase/decrease the volume level. If the unit is connected to the TV’s headphne jack, you can also control the Volume Level by using the TV’s remote control set directly. Super Bass Boost Press the RS-BASS button to turn on the bass, the indicator flashes for a longer time (abouts 1s-2s). Press this button again to turn off the bass, the indicator flashes for a shorter time (about 0.5s-1s). Mute Sound During play, press the MUTE button to mute or restore sound. Press this button again or VOL+/VOL - buttos to cancel the effect. 1 2 3 4 5 6 Program Smart Remote Control to Control TV You can store a total of 7 most frequently used function of you TV in the TV (learning zone) of smart remote control. This feature allows you to use only one remote control to operate all of your TV. By default, the remote control codes EN-16 Place the smart remote control (A) within 5mm-50mm distance from TV remote control (B). Press and hold LEARN button for 2 seconds to activate the learning mode. A red indicator on the smart remote control (A) lights up. Press one of the TV (learning zone) buttons on the smart remote control (A), the red indicator flashes. Press the button on TV remote control (B) that is to be stored on the smart remote control (A). When the code is received successfully, the red indicator flashes 3 times, then turns red again. If the red indicator flashes but not turn red, code received is not successfully. Repeat steps 3-4 to program more buttons on the smart remote control (A). Press LEARN to save the learning and then to exit the learning mode. Troubleshooting Specifications To keep the warranty valid, never try to repair the system yourself. If you encounter problems when using this unit, check the following points before requesting service. General Power Requirements...........AC 230V ~ 50Hz Power Consumption..............................6.5W Output Power....................... 7.5W x 2 + 15W Total Harmonic Distortion.............................. .................................................. 1%(1kHz, 1W) Audio Input Sensitivity/Impedance LINE: ... 500mV/47kΩ Frequency Response..................................... ..................................... 40Hz - 20kHz(+0/3dB) Unit Dimensions (W x H x D)........................... ...........................................584 x 50 x 218mm Speaker No power - Ensure that the AC cord of the apparatus is connected properly. - Ensure that there is power at the AC outlet. - Press standby button to turn the unit on. Remote control does not work - Before you press any function button, first select the correct source. - Reduce the distance between the remote control and the unit. - Insert the battery with its polarities (+/-) aligned as indicated. - Replace the battery. - Aim the remote control directly at the ensor on the front of the unit. Front Impedance............................................... 3 Ω Rate Power..............................................10W Woofer Impedance............................................... 6 Ω Rate Power..............................................30W Remote Distance.....................................................6m Angle......................................................... 30O No Response From the Unit - Disconnect and reconnect the AC power plug, then turn on the unit again. EN-17