1
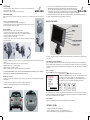
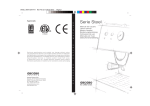
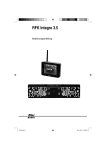
Bedienungsanleitung
Instructions for use
16000
Rückfahrkamera System mit Monitor
Back-Up Camera System with Monitor
Wichtig:
LESEN SIE DIESE INSTRUKTIONEN BEVOR SIE DAS Gerät BEDIENEN
12
Walser GmbH • Radetzkystraße 114 • 6845 Hohenems • Austria
Walser GmbH • Bleicheweg 15 • 88131 Lindau • Germany
Email: [email protected] • www.walser.net
IMPORTANT:
READ THESE INSTRUCTIONS BEFORE USE AND RETAIN
FOR FUTURE REFERENCE.
1
DE
Drahtlose Rückfahrkamera und Monitor
Sehr geehrter Kunde,
herzlichen Glückwunsch. Die drahtlose Rückfahrkamera & Monitor wird, wenn sie wie hier beschrieben verwendet wird, Ihre Sehfähigkeit hinter Ihrem Auto, Lastwagen, RV oder Mini-Van um einiges verbessern. Wir haben
vielzählige Maßnahmen in der Qualitätskontrolle durchgeführt, um sicherzustellen dass das Produkt wenn es Sie erreicht in
höchster Qualität sein, sowie zu Ihrer vollsten Zufriedenheit funktionieren wird.
MENU, + and – Buttons
Press MENU button to enter the menu screen as shown below:
Repeat pressing MENU button to select BRIGHTNESS,
CONTRAST or COLOR controls. Press + button or – button
to adjust settings within the control selected. Press the + button to increase the value and
the – button to decrease the value.
To change the orientation of the screen image, press MENU button until DIRECTION
is selected. Then press + or – repeatedly until desired screen orientation “left to right
down” is achieved.
Vor der Installation
Die Installation von Videozubehör kann auch für die erfahrensten Techniker manchmal schwierig sein. Wenn Sie sich mit den
Arbeiten mit 12 Volt DC Verkabelungen, entfernen oder installieren von Verdeckungen, Bodenbelaege, Faecher oder anderen
Komponenten Ihres Fahrzeugs nicht sicher sind, dann kontaktieren Sie bitte den Fahrzeughersteller oder bitten Sie eine professionelle Werkstätte dies zu tun.
Dieses Gerät, sowie andere drahtlose Geräte, können von mobilen Telefonen, Bluetooth Headsets, Wi-Fi Stationen,
Strom Kabel oder anderen elektrischen Geräten beeinflusst werden.
The different views allow you to mount the camera and / or monitor either right side up or upside down and still display the image
correctly on the monitor. The image displayed should match your rear view mirror. To exit the menu screen, select EXIT on the
screen using the MENU button and press either + or – to exit the menu screen.
Guideline ON/OFF
Press GUIDELINE ON/OFF button to switch ON or OFF the on-screen-display guideline.
Das betreiben des Produkts folgt folgenden Konditionen:
(1) Dieses Gerät hat keinen schädlichen Einfluss auf den Menschen und
(2) Dieses Gerät muss Einwirkungen von außen standhalten
TESTING THE SYSTEM
Teile
1. Monitor & Montage-Arm
2. Kamera mit Montage Rahmen inkl. Nacht-Sicht
1. Reattach the vehicle’s negative battery cable.
2. Turn the ignition key to the accessory position, do not start the vehicle.
3. Engage the parking brake, put the shifter in the reverse position.
4. Turn the monitor ON by pressing the ON/OFF button on the monitor.
5. Look at the monitor, if the image does not match your rear view mirror press the Image Orientation button on the monitor to
correct the image.
After testing the unit and you are satisfied with the route you have chosen for the cabling, you must permanently install it. Fully
tighten the license plate bolts.
Route all wires behind interior panels or under carpeting so they are hidden.
Use supplied cable ties to neatly gather any excess wire.
CLEANING
3. Funksender Gehäuse
4. Monitor Kabel
We kindly ask you for a regularly cleaning of the camera lenses and the LED lamps with a soft cloth.
DISPOSAL
Please dispose the camera as controlled waste only at places for recycling of electrical and electronic hardware.
5. Funksender Gehäuse Strom-Kabel
2
11
Installation
Diese Instruktionen beziehen sich nicht auf alle Auto Typen. Diese sind nur eine generelle Anleitung auf Grund verschiedenster Autohersteller & Typen. Für spezielle fahrzeugtechnische Fragen
kontaktieren Sie bitte den Fahrzeughersteller oder Ihre Werkstätte.
Monitor Installation
Stellen Sie bei der Auswahl für den Standort des Montiors sicher, dass der Monitor Ihre Sicht beim fahren nicht stört!
Insert the existing wire to be
tapped to the clamp.
Insert the wire to be
attached to the clamp.
Crimp clamp with pliers,
then close lock.
Wire clamp after locking.
13. You may not need to use the wire clamp. The power cable can be wired directly to the reverse light circuit by stripping the
reverse light wires then twisting the camera wires to the exposed reverse light wires. Once connected, wrap with electrical
tape. Do not attempt this if you are not knowledgeable with electrical installation practices. If in doubt, seek professional
installation assistance.
14. Next splice the black wire of the camera’s power cable to the reverse light’s negative (-) wire or ground.
15. Replace the reverse light bulb and re-install the light socket. Secure all the wires with cable ties or electrical tape. Reattach
the negative battery cable to the battery afterwards.
Auswahl des Standorts & Installation des Strom Kabels
1. Platzieren Sie den Monitor vorrübergehend am ausgewählten Standort.
2. Verbinden sie das Strom Kabel mit dem 12V Zigaretten-Anzünder. Das Kabel darf das sichere
Bedienen des Fahrzeugs nicht beeinflussen!
Montage des Monitors
Reinigen Sie den Bereich gründlich bevor Sie mit der Montage beginnen.
1. Positionieren Sie den Saugnapf auf einer glatten Oberfläche der Ihren Anforderungen entspricht.
2. Pressen Sie den Saugnapf auf eine glatte Oberfläche (z.B. Windschutzscheibe oder Armaturenbrett)
3. Zum fixieren pressen Sie die Arretierung nach unten
4. Rasten Sie den Monitor auf der Saugbefestigung ein
5. Justieren Sie den Monitor so dass er Ihrem Blickwinkel angepasst ist und ziehen Sie die Schrauben an der Befestigung an, um die Position zu fixieren.
MONITOR CONTROLS
Um die Befestigung zu garantieren empfehlen wir Ihnen das Gerät unter folgenden Konditionen zu installieren:
Die Bodentemperatur sollte zwischen 21°C und 38°C liegen (70-100° Fahrenheit)
Eine Befestigung unter 10°C (50° Fahrenheit) sollte vermieden werden.
Die Befestigung sollte nicht bei direkter Sonneneinstrahlung erfolgen.
Nach der Installation sollte das Gerät 24 Std lang keinem Sonnenlicht ausgesetzt werden.
BEMERKUNG: UNTER EXTREMER SONNENEINSTRAHLUNg KANN ES EIN PAAR SEKUNDEN DAUERN BIS SICH DER
Monitor ANPASST. BITTE WARTEN SIE BIS SICH DAS BILD EINGESTELLT HAT BEVOR SIE DAS FAHRZEUG BEWEGEN.
Verkabelung mit dem Monitor
Nehmen Sie den 12 Volt Zigarettenanzünder aus der Halterung herraus. Stecken Sie das Kabel in den 12 Volt Zigarettenanzünder.
1. Stecken Sie den kleinen 12VDC Stecker des Kabels in die rechte Seite des Monitors.
2. Stecken Sie den 12Volt Zigarettenanzünder wieder zurück in seine Halterung.
KAMERA INSTALLATION
Sie können die Kamera mit dem doppelseitigem Klebeband befestigen. Stellen Sie sicher dass die Sicht der Kamera nicht behindert wird. Die Kamera ist beweglich und kann im Winkel angepasst werden.
The monitor will automatically turn ON when the vehicle is in reverse gear. Also, there are 5 control buttons available for user to
have their controls.
Power On/Off Button - BLUE LED Power Indicator
Press POWER ON/OFF button to supply power to monitor. When monitor image is ON, the blue LED will be lit. If there is power
to the monitor but the monitor image is off, the blue LED will blink on and off. When the monitor power is OFF, no picture can
appear on the screen and the blue LED will be off.
When power supplied is on, the monitor will automatically turn ON and an image will appear when the vehicle is in reverse gear.
There are 5 settings available for the user to control the screen image.
10
3
1. Entfernen Sie eine Seite des doppelseitigen Klebebands und befestigen Sie es auf der Frontseite des Halters der Kamera
2. Nun entfernen Sie die andere Seite des doppelseitign Klebebands und befestigen Sie die Kamera auf dem Nummernschildhalter des Wagens.
3. Wählen Sie einen Kanal für das Kabel der Kamera in den hinteren Teil des Wagens. Bei Zweifel dieser Installation empfehlen
wir profesionelle Hilfe aufzusuchen.
4. Einige Fahrzeuge haben eine Öffnung um das Kabel durchzuführen. Zum Beispiel hinter der Kennzeichenhalterung oder
direkt hinter dem Kabel das an der Kamera montiert ist. Sobald Sie die Stelle festgelegt haben, entfernen Sie die Kennzeichenhalterung. Falls Sie eine bereits bestehende Öffnung haben überspringen Sie die nächsten 2 Punkte.
5. Falls Sie ein Loch bohren müssen, legen Sie die Stelle so nahe an der Kamera wo das Kabel herauskommt wie moeglich
fest. Bevor Sie ein Loch bohren, müssen Sie überprüfen was sich dahinter verbirgt. Sollten irgendwelche Komponenten, wie
z.B. elektronische Teile oder Benzinleitungen dahinter sein, müssen Sie darauf achten dass diese nicht beschädigt werden!
Entfernen Sie die Kennzeichenhalterung und Rückfahrkamera vor dem Bohren.
6. Nachdem Sie ein Loch mit 1,2cm Durchmesser gebohrt haben, können Sie das Kabel durch die Öffnung führen. Außerdem
sollten Sie den Dichtring um das Kabel an der Öffnung legen um zu verhindern, dass das Kabel von den Kanten der Bohrung
eingeschnitten wird.
7. Befestigen Sie das Funksender-Gehäuse im Kofferraum. Verbinden Sie das Kamera Kabel sowie das Strom Kabel mit dem Gehäuse.
8. Drehen Sie den Autoschlüssel auf die Parkposition, ziehen Sie die Handbreme an und stellen Sie den Rueckwärtsgang ein.
Schauen Sie auf die Rücklichter des Fahrzeugs. Um das 12V Kabel des Rücklichts zu finden ist es notwendig Zugang zum
Rücklicht Gehäuse zu haben. Kontaktieren Sie bitte den Hersteller Ihres Fahrzeugs, falls Sie die Verkabelung nicht finden.
9. Sobald Sie den Stromkreis Ihres Rücklichts gefunden haben müssen Sie die Verkabelung der Kamera zu dieser Stelle führen. Befestigen Sie die Verkabelung sicher um ein verrutschen oder verhängen zu verhindern. Führen Sie die Verkabelung
NIEMALS am äußeren des Fahrzeugs durch!
10. Lokalisieren Sie die Birnen-Fassung des Rücklichts und entfernen Sie die Birne. Bei den meisten Fahrzeugen sind 2 Kabel
an die Birne angeschlossen. Normalerweise ist das negative Kabel schwarz und das positive Kabel farbig. Falls Sie sich
bei der Verkabelung nicht sicher sind, verwenden Sie einen 12 Volt Multimeter um festzustellen welches Kabel positiv ist
(erhältlich in den meisten Autozubehör Läden). Folgen Sie den Anweisungen des Herstellers des Multimeters.
You can mount the camera using the supplied double side adhesive tape. Ensure the camera viewing is not obstructed. The camera is tiltable, camera angle can be adjusted manually on vertical
direction.
1. Remove one of the cover papers of double side adhesive tape, stick to the camera mount bracket front side.
2. Then remove the other side cover paper of adhesive tape, stick the camera to the back of license plate holder.
3. Choose a routing path for the camera’s power cable through the vehicle’s body to the reverse light circuit. If in doubt, seek
professional installation assistance.
4. Some vehicles may have a hole to pass the wire through. For example, the location of the license plate light is mounted, or
you can drill a hole close to the power cable that will attach to the camera. Once you have determined where the cable will
enter the vehicle’s trunk, remove the license plate with camera. If you are able to use an existing opening or hole, skip the
next two steps.
5. If you are going to drill a hole, choose a location as close to the camera where the power cable comes out. Before you drill a
hole you MUST CHECK WHAT IS BEHIND THE DRILLING LOCATION. If there are any vehicle components, like electrical
parts or fuel system components behind the drilling location, you must take precaution not to damage them. Remove the
license plate and camera before drilling.
6. After you have drilled a half inch (1/2”) hole, pass the camera wire connector through the hole into the vehicle and place the
grommet in the hole around the camera wire. You must use the grommet to prevent the metal edge of the hole from cutting
the camera cable.
7. Mount the transmitter box inside the trunk. Connect the camera cable and the power cable to the transmitter box.
8. Find the vehicle’s reverse lights. Turn the vehicle’s ignition key to the accessory position, engage the parking brake and put
the car in reverse. Look at the vehicle’s tail lights to see where the reverse white lights are located.
To locate the reverse light’s 12V+ wire, it is necessary to access to the rear part of the vehicle’s tail light. For help locating
the vehicle’s reverse light circuit, contact your vehicle’s manufacturer for vehicle specific wiring diagrams.
9. Once you have located the reverse light circ uit, you need to route the power cable supplied to that location. Fasten the power
cable securely to prevent it from being caught on any vehicle component like the trunk hinge. Never route the cable on the
outside of the vehicle.
10. Locate reverse light socket and remove light bulb. There are two wires connected to the reverse light sockets on most
vehicles. Usually the negative wire is black and the positive wire is a colored wire. If you are uncertain about the wiring,
use a 12 volt multimeter (available at most auto parts stores) to determine which wire is positive. Follow the manufacturer’s
instructions for the safe use of the multimeter.
11. Nachdem Sie festgestellt haben welches Kabel positiv ist, schalten Sie die Zündung des Fahrzeugs aus. Entfernen Sie nun
das negative Kabel von der Batterie.
12. Verbinden Sie das rote Kabel mit Hilfe der beigelieferten Kabelklemme mit dem rotem (+) Kabel des Rücklichts. Verwenden
Sie ein Set von Verbindungsklemmen um das Metallblatt anzupressen um eine gute Verbindung der Kabel zu sichern.
11. After determining which wire is the positive and which is the negative, turn off the ignition key, then remove the battery’s
negative cable.
12. Splice the red wire using the supplied wire clamp to the reverse light’s positive (+) wire. Use a set of slip joint pliers to squeeze the METAL BLADE and insure good connection of both wires.
Ziehen Sie das bestehende
Stromkabel vom Rückfahrscheinwerfer durch das Klemmstück.
4
Ziehen Sie das neue
Stromkabel ebenfalls
durch das Klemmstück.
Drücken Sie mit einer
Zange das Metallplättchen
fest in die Klemme und verschließen Sie die Klemme
mit der Lasche.
Ansicht der Kabelklemme
nach dem Verschließen.
9
Installation
These instructions do not apply to all vehicles. They are only meant as a general guide due to the
number of different makes & models.
For vehicle specific questions contact your vehicle’s manufacturer.
MONITOR INSTALLATION
When choosing a location to mount the monitor, make sure the monitor is in an area that will not obstruct your vision while
driving.
Choose a Location and Install Power Cable
1. Temporarily place the monitor in the location that you have chosen
2. Route the power cable to the vehicle’s cigarette lighter socket/12V power outlet. The cable must
not interfere with the safe operation of the vehicle.
13. Es könnte sein, dass Sie die Kabelklemme nicht benötigen. Das Stromkabel kann direkt mit
dem Rücklicht Stromkreis verbunden werden indem Sie die Isolierung der Kabel entfernen und
dann mit den Kabel des Rücklichts verbinden. Sobald verbunden sollten diese mit Isolierband
umwickelt werden. Versuchen Sie diesen Schritt NICHT wenn Sie keine Übung in Verkabelung
von elektronischen Apparaten haben. Im Zweifel suchen Sie Hilfe in einer professionellen Werkstätte.
14. Als nächstes verbinden Sie das schwarze Kabel der Kamera mit dem negativem (-) Kabel des Rücklichts oder der Masse.
15. Wechseln Sie die Rücklicht Birne aus und re-installieren Sie die Fassung.
MONITOR FUNKTIONEN
Mounting the Monitor
Before mounting the monitor, clean the mounting surface well.
1. Position the suction mount to the smooth surface which suits your requirement.
2. Press the suction cap against the smooth surface such as windshield or dashboard.
3. Press the lock down to attach and fix the mount to the surface.
4. Snap in the monitor to the suction mount.
5. Adjust the mounting arms to suit your view angle to the monitor and tighten the screws on the
mount to fix the position.
Der Monitor schaltet sich automatisch an sobald das Fahrzeug im Rückwärtsgang ist. Zusätzlich haben Sie 5 Funktionsknöpfe
zur Kontrolle.
To maximize the effectiveness of the suction mount, it is recommended that the application be performed under the following
conditions:
Surface temperature should be between 70oF and 100 oF (21 oC and 38 oC).
Application below 50 oF (10 oC) should be avoided.
Application should not occur in direct sunlight.
Mounting should be protected from exposure to direct sunlight for a period of 24 hours.
NOTE: UNDER EXTREME BRIGHT LIGHT CONDITIONS, THE SCREEN IMAGE MAY TAKE A FEW SECONDS TO STABLIZE.
PLEASE WAIT UNTIL THE IMAGE HAS STABLIZED BEFORE BACKING UP.
Monitor Power Connection
Use the 12 Volt cigarette lighter adaptor plugged into the vehicle’s cigarette lightersocket. Power Cable with 12 Volt Cigarette
Lighter Adaptor
Power AN/AUS Knopf – Blaue LED Indikation
Drücken Sie POWER ON/OFF um den Monitor mit Strom zu versorgen. Wen der Monitor an ist leuchtet eine blaue LED. Wenn
Strom zum Monitor besteht, der Monitor aber nicht an ist, blinkt die blaue LED. Wenn Strom verbunden ist geht der Monitor
automatisch an. Wenn das Fahrzeug im Rückwärtsgang ist wird ein Bild erscheinen. Es gibt 5 Einstellungen um das Bild zu
kontrollieren.
Menü, + und - Knöpfe
Drücken Sie MENU um das Menü wie unten beschrieben zu öffnen:
Wiederholtes drücken von MENU ermöglicht die Helligkeit einzustellen.
KONTRAST oder FARBE Kontrolle. Drücken Sie + oder - um die Einstellungen zu betätigen. Drücken Sie + um die Stärke zu erhöhen oder – um die Stärke zu verringern.
Um das Bild zu drehen, drücken Sie MENU bis die Auswahl DIRECTION erscheint.
Dann drücken sie + oder – bis Sie die gewünschte Einstellung erreicht haben.
1. Insert the small 12 Volt DC plug of the power cable into the right side of the monitor.
2. Plug the 12 Volt cigarette lighter adaptor into the vehicle’s cigarette lighter socket.
CAMERA INSTALLATION
Die verschiedenen Ansichten ermöglichen Ihnen die Kamera oder den Monitor auch rechts oder nach unten zu montieren, ohne
den Blick zu beeinträchtigen. Das Bild sollte Ihrem Rückspiegel entsprechen. Um das Menü zu verlassen betätigen Sie EXIT am
Monitor indem Sie den MENU Knopf, + oder – betätigen.
Guideline AN/AUS
Drücken Sie den GUIDELINE ON/OFF Knopf um das Display EIN oder AUSZUSCHALTEN.
TESTEN DES SYSTEMS
8
1. Verbinden Sie das negative Kabel mit der Batterie.
2. Stellen Sie die Zündung auf Position 1, starten sie das Fahrzeug nicht.
3. Ziehen Sie die Handbremse an, stellen Sie die Kupplung auf den Rückwärtsgang
5
4. Stellen Sie den Monitor an indem Sie ON drücken am ON/OFF Knopf des Monitors.
5. Beobachten Sie den Monitor, wenn das Bild nicht Ihrem Rückspiegel entspricht, drücken sie den
“Bild Einstell-Knopf” um das Bild korrekt einzustellen.
EN
Wireless Back-Up Camera and Monitor
Nach dem Testen des Apparates und Sie damit zufrieden sind muss die Einheit permanent installiert werden. Stellen Sie sicher
das die Kennzeichenhalterung wieder korrekt montiert ist. Verstecken Sie alle Kabel hinter den Kofferraum-Paneelen damit Sie
nicht von außen zugänglich sind. Verwenden Sie Kabelbinder um eventuelle überstehende Kabel festzubinden.
Dear Customer,
CONGRATULATIONS. The Wireless Back-up Camera and Monitor, when used as described, will
improve your ability to see behind your car, truck, RV, or mini-van. We have taken numerous measures in quality control to ensure
that your product arrives in top condition, and will perform to your satisfaction.
REINIGUNG
Before You Install
Reinigen Sie die Kameralinse und die LED‘s regelmäßig mit einem weichen Tuch.
Automotive video equipment installations can be difficult at times, even to the most experienced of installation technicians. DIf
you are not confident working with 12 volt DC vehicle wiring, removing and reinstalling interior panels, carpeting, dashboards
or other components of your vehicle, contact the vehicle’s manufacturer, or consider having the Wireless Back Up Camera and
Monitor professionally installed.
ENTSORGUNG
This device, as well as all other wireless devices, may be subject to interference. Interference may be caused by cell
phones, Bluetooth headsets, Wi-FI routers, power lines and other various electrical equipment, etc.
Entsorgen Sie das Gerät nur bei Annahmestellen für das Recycling von elektrischen und elektronischen Geräten.
Operation is subject to the following two conditions:
(1) this device may not cause harmful interference, and
(2) this device must accept any interference received, including interference that may cause undesired operation.
Parts
1. Monitor and Mounting Arm
2. Camera with mount bracket wth night vision
3. Transmitter Box
4. Monitor Power Cable
5. Transmitter Box Power Cable
6
7