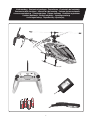
1
Montage- und Betriebsanleitung
Assembly and operating instructions
Instructions de montage et d’utilisation
Instrucciones de montaje y de servicio
Istruzioni per il montaggio e l’uso
Montage- en gebruiksaanwijzing
Instruções de montagem e modo de utilização
Asennus- ja käyttöohje
Instrukcja montażu i obsługi
Szerelési és használati utasítás
Navodila za montažo in uporabo
Návod k montáži a obsluze
Montajse- og bruksanvisning
Monterings- og driftsvejledning
Οδηγίες συναρμολόγησης και λειτουργίας
# 501006
Spider Fox
Monterings- och bruksanvisning
Made in China, Shantou.
Lieferumfang · Contents of package · Fournitures · Contenido del embalaje
Contenuto della fornitura · Inhoud van de levering · Volume de fornecimento
Leveransomfattning · Toimituslaajuus · Zakres dostawy · Szállítási terjedelem
Vsebina pakiranja · Rozsah dodávky · Leveringsomfang
Leveringsomfang · Παραδοτέος εξοπλισμός
ALKALINE
ALKALINE
ALKALINE
ALKALINE
2
Montage- und Betriebsanleitung
4
Technische und designbedingte Änderungen vorbehalten
Assembly and operating instructions
11
Subject to technical or design-related modification
Instructions de montage et d’utilisation
18
Sous réserve de modifications techniques et des véhicules
Instrucciones de montaje y de servicio
25
Reservado el derecho a modificaciones técnicas o debidas al diseño
Istruzioni per il montaggio e l’uso
32
Con riserva di modifiche tecniche e dovute al design
Montage- en gebruiksaanwijzing
39
Technische en door het design bepaalde wijzigingen voorbehouden
Instruções de montagem e modo de utilização
46
Sujeito a alterações de design e técnicas
Monterings- och bruksanvisning
53
Tekniska och designrelaterade ändringar förbehållna
Asennus- ja käyttöohje
60
Oikeudet teknisiin ja muotoilumuutosten aiheuttamiin muutoksiin pidätetään
Instrukcja montażu i obsługi
67
Zastrzega się prawo do zmian technicznych oraz uwarunkowanych wzornictwem
Szerelési és használati utasítás
74
A műszaki és formatervezésből eredő módosítások joga fenntartva
Navodila za montažo in uporabo
81
Tehnično in oblikovno pogojene spremembe pridržane
Návod k montáži a obsluze
88
Technické a designem podmíněné změny vyhrazeny
Montajse- og bruksanvisning
95
Det tas forbehold om endringer i teknikk og design
Monterings- og driftsvejledning
102
01/2012 · 1
Tekniske og designmæssige ændringer forbeholdes
Οδηγίες συναρμολόγησης και λειτουργίας
Με την επιφύλαξη τεχνικών και σχεδιαστικών αλλαγών
109
genannten Voraussetzungen (einschließlich der Vorlage des Original-Kaufbelegs
auch im Falle der Weiterveräußerung) für jeden späteren, künftigen Eigentümer des
Produkts.
Sehr geehrter Kunde
Wir beglückwünschen Sie zum Kauf Ihres Carrera RC-Modell-Helicopters, der nach
dem heutigen Stand der Technik gefertigt wurde. Da wir stets um Weiterentwicklung
und Verbesserung unserer Produkte bemüht sind, behalten wir uns eine Änderung in
technischer Hinsicht und in Bezug auf Ausstattung, Materialien und Design jederzeit
und ohne Ankündigung vor. Aus geringfügigen Abweichungen des Ihnen vorliegenden Produkts gegenüber Daten und Abbildungen dieser Anleitung können daher keinerlei Ansprüche abgeleitet werden. Diese Bedienungs- und Montageanleitung ist
Bestandteil des Produkts. Bei Nichtbeachtung der Bedienungsanleitung und der enthaltenen Sicherheitsanweisungen erlischt der Garantieanspruch. Bewahren Sie diese
Anleitung zum Nachlesen und für die eventuelle Weitergabe des Modells an Dritte
auf.
Konformitätserklärung
Hiermit erklärt Stadlbauer Marketing + Vertrieb GmbH, dass sich dieses Modell einschließlich Controller in Übereinstimmung mit den grundlegenden Anforderungen folgender EG-Richtlinien: EN 50371, EN 301489-1 v1.8.1:2008, EN 301489-03 V
1.4.1:2002, EN 50371, EN 300220- 2V21.1.2:2007, 2006/6/EC und 2004/108/EC über
die elektromagnetische Verträglichkeit und den anderen relevanten Vorschriften der
Richtlinie 1999/5/EG (R&TTE) befindet. Die Original-Konformitätserklärung kann
unter carrera-rc.com angefordert werden.
Garantiebedingungen
Bei den Carrera-Produkten handelt es sich um technisch hochwertige Produkte
(KEIN SPIELZEUG), die sorgfältig behandelt werden sollten. Beachten Sie bitte
unbedingt die Hinweise in der Bedienungsanleitung. Alle Teile werden einer
sorgfältigen Prüfung unterzogen (technische Änderungen und Modelländerungen, die der Verbesserung des Produktes dienen, sind vorbehalten).
Lieferumfang
Sollten dennoch Fehler auftreten, wird eine Garantie im Rahmen der nachstehenden Garantie-Bedingung gewährt:
Die Stadlbauer Marketing + Vertrieb GmbH (nachfolgend „Hersteller“) garantiert dem
Endkunden (nachfolgend „Kunde“) nach Maßgabe der nachfolgenden Bestimmungen, dass der an den Kunden gelieferte Carrera RC-Modell-Helicopter (nachfolgend
„Produkt“) innerhalb eines Zeitraums von zwei Jahren ab Kaufdatum (Garantiefrist)
frei von Material- oder Verarbeitungsfehlern sein wird. Derartige Fehler wird der Hersteller nach eigenem Ermessen auf seine Kosten durch Reparatur oder Lieferung
neuer oder generalüberholter Teile beheben. Die Garantie erstreckt sich nicht auf
Verschleißteile, Schäden durch unsachgemäße Behandlung/Nutzung oder bei
Fremdeingriffen. Sonstige Ansprüche des Kunden, insbesondere auf Schadensersatz, gegen den Hersteller sind ausgeschlossen.
Die vertraglichen oder gesetzlichen Rechte des Kunden (Nacherfüllung, Rücktritt
vom Vertrag, Minderung, Schadensersatz) gegenüber dem jeweiligen Verkäufer,
welche bestehen, wenn das Produkt bei Gefahrübergang nicht mangelfrei war,
werden durch diese Garantie nicht berührt.
Ansprüche aus dieser gesonderten Hersteller-Garantie bestehen nur, wenn
• der geltend gemachte Fehler nicht in Schäden liegt, die durch einen nach den
Vorgaben in der Bedienungsanleitung nicht bestimmungsgemäßen oder unsachgemäßen Gebrauch verursacht wurden,
• es sich nicht um betriebsbedingte Verschleißerscheinungen handelt,
• das Produkt keine Merkmale aufweist, die auf Reparaturen oder sonstige Eingriffe
von durch den Hersteller nicht autorisierten Werkstätten schließen lassen,
• das Produkt nur mit vom Hersteller autorisiertem Zubehör verwendet wurde und
• das Produkt zusammen mit dem Original-Kaufbeleg (Rechnung / Kassenzettel) und
der vollständig ausgefüllten Garantiekarte, an welcher keine eigenen Änderungen
vorgenommen wurden, eingesendet wird:
Stadlbauer Marketing + Vertrieb GmbH
Chiemseestraße 200 • D-83278 Traunstein
1x Helicopter Spider Fox
1x 2,4 GHz Controller mit LCD Display
1x Ladegerät
4x 1,5 V Mignon AA Batterien
Innerhalb Österreichs an:
Stadlbauer Marketing + Vertrieb GmbH
Handelszentrum 6 • A-5101 Bergheim
(nicht wiederaufladbar)
1x Lanyard
Hinweis für EU-Staaten: Es wird auf die gesetzliche Gewährleistungspflicht des Verkäufers hingewiesen, dass nämlich diese Gewährleistungspflicht durch gegenständliche Garantie nicht eingeschränkt wird.
Die Kosten der Einsendung und Rücksendung des Produkts übernimmt der Hersteller.
Diese Garantie gilt in dem vorstehend genannten Umfang und unter den oben
4
sollen bei den bekannten Sammelstellen abgegeben werden. So werden sie ordnungsgemäßem Recycling zugeführt. Ungleiche Batterietypen oder neue und gebrauchte Batterien dürfen nicht zusammen verwendet werden. Leere Batterien aus dem Spielzeug
herausnehmen.
Nicht aufladbare Batterien dürfen nicht geladen werden. Aufladbare Batterien sind nur
unter Aufsicht von Erwachsenen zu laden. Aufladbare Batterien vor dem Laden aus dem
Spielzeug nehmen. Anschlussklemmen dürfen nicht kurzgeschlossen werden. Es dürfen
nur die empfohlenen Batterien oder die eines gleichwertigen Typs verwendet werden.
Bei regelmäßigem Gebrauch des Ladegeräts, muss dieses am Kabel, Anschluss, Abdeckungen und anderen Teilen kontrolliert werden. Im Schadensfall darf das Ladegerät erst
nach einer Reparatur wieder in Betrieb genommen werden.
Warnhinweise!
Ein ferngesteuerter Helicopter ist KEIN SPIELZEUG und nur für Jugendliche ab 14
Jahren geeignet!
Dieses Produkt ist nicht für den Gebrauch durch Kinder ohne die Aufsicht eines Erziehungsberechtigten vorgesehen. Bei unsachgemäßer Verwendung kann es zu schweren
Verletzungen und/oder Sachbeschädigungen kommen.
Es muss mit Vorsicht und Umsicht gesteuert werden und erfordert einige mechanische
und auch mentale Fähigkeiten. Die Anleitung enthält Sicherheitshinweise und Vorschriften sowie Hinweise für die Wartung und den Betrieb des Produktes. Es ist unabdingbar,
diese Anleitung vor der ersten Inbetriebnahme komplett zu lesen und zu verstehen. Nur
so können Unfälle mit Verletzungen und Beschädigungen vermieden werden.
Fliegen Sie nur in geschlossenen Räumen, die genügend Platz bieten und befolgen Sie
alle Anweisungen, so wie sie in dieser Anleitung empfohlen werden. Stellen Sie sicher,
dass sich keine losen Gegenstände, einschließlich Kleidung, oder andere Gegenstände
wie Stifte und Schraubendreher, in den Rotorblättern verwickeln oder mit ihnen in Berührung kommen können. Achten Sie besonders darauf, dass Ihre Hände NICHT in die
Nähe der Rotorblätter kommen! Sie als Nutzer dieses Produkts sind alleinverantwortlich
für den sicheren Umgang, so dass weder Sie noch andere Personen oder deren Eigentum Schaden nehmen oder gefährdet werden.
Dieses Modell wird über ein Funksignal gesteuert, das durch unterschiedlichste Quellen
von außerhalb gestört werden kann. Diese Störungen können einen kurzzeitigen Verlust
der Steuerung zur Folge haben. Daher ist es ratsam immer einen sicheren Abstand zu
dem Modell zu halten, damit Sachbeschädigungen oder Verletzungen vermieden
werden können.
• Verwenden Sie Ihr Modell nie mit schwachen Controller-Batterien.
• Vermeiden Sie verkehrsreiche und belebte Bereiche. Achten Sie immer darauf, dass
genügend Platz zur Verfügung steht.
• Lassen Sie Ihr Modell möglichst nicht auf offener Straße oder in öffentlichen Bereichen
fliegen, um niemanden zu gefährden oder zu verletzen.
• Befolgen Sie genau die Anweisungen und Warnhinweise für dieses Produkt und für die
mögliche Zusatzausrüstung (Ladegerät, Akkus usw.), die Sie nutzen.
• Sollte der Helicopter mit Lebewesen oder harten Gegenständen in Berührung
kommen, bitte sofort den Gashebel in die Nullstellung bringen, d.h. der linke Joystick muss am unteren Anschlag sein!
• Achten Sie darauf, dass alle Chemikalien, Kleinteile oder elektrische Bauteile außerhalb der Reichweite von Kindern sind.
• Vermeiden Sie jegliche Feuchtigkeit, denn Sie kann die Elektronik beschädigen.
• Es besteht die Gefahr von schweren Verletzungen bis hin zum Tod, wenn Sie Teile
Ihres Modells in den Mund stecken oder an ihnen lecken.
Achtung! Vergewissern Sie sich vor dem Erst-Flug ob in ihrem Land für FlugModelle eine gesetzliche Versicherungspflicht für das von ihnen erworbene FlugModell besteht. Eine Auskunft erhalten Sie z.B. bei Ihrer Versicherung, die ihnen Auskunft darüber geben kann ob Ihre neuen und bisherigen Flug-Modelle in Ihrer HaftpflichtVersicherung eingeschlossen sind. Lassen Sie sich diese Bestätigung schriftlich geben
und heben Sie diese gut auf. Schließen Sie ggf. eine spezielle Modellflugversicherung
ab.
Weitere Informationen erhalten Sie In Deutschland z.B. beim Deutschen Modellfliegerverband unter http://www.dmfv.aero oder bzw. in Österreich unter http://www.omfv.at
oder http://www.aeroclub.at
Richtlinien und Warnhinweise für die Benutzung des Li-Ionen Akkus
Das 8,4 V
1000 mA Lithium-Ionen Akkuladegerät, das Sie zusammen mit dem Carrera RC Helicopter erhalten, ist zwar eigens für das sichere Laden des 7,4 V
650
mAh Li-Ionen-Akkus entwickelt worden, trotzdem müssen Sie die folgenden Sicherheitsbestimmungen und Warnhinweise vor dem Gebrauch oder dem Laden des Li-IonenAkkus lesen.
Hinweis: Li-Ionen-Akkus sind wesentlich empfindlicher als herkömmliche Alkali-, oder
NiMH- Akkus, die sonst bei funkferngesteuerten Modellen verwendet werden. Deshalb
müssen alle Vorschriften und Warnhinweise genau befolgt werden. Bei falscher Handhabung von Li-Ionen-Akkus besteht Brandgefahr. Mit der Handhabung, dem Laden oder
dem Gebrauch des beigefügten Li-Ionen-Akkus übernehmen Sie alle Risiken, die mit
Lithium Akkus verbunden sind. Wenn Sie diesen Bedingungen nicht zustimmen, geben
Sie das vollständige Helicopter Modell sofort in neuem und unbenutztem Zustand an den
Händler zurück.
• Sie müssen den beigefügten 7,4 V
650 mAh Li-Ionen-Akku an einem sicheren Ort
abseits entzündlicher Materialien aufladen.
• Lassen Sie den Akku beim Laden nie unbewacht. Wenn Sie den Akku aufladen, sollten
Sie immer in der Nähe sein, um den Ladevorgang zu überwachen und um ggf. auf potentielle Probleme zu reagieren.
• Zum Laden nach einem Flug muss sich der Akku zunächst auf die Umgebungstemperatur abgekühlt haben.
• Sie dürfen nur das dazugehörige Li-Ionen-Ladegerät verwenden. Bei Nichteinhaltung
dieser Hinweise besteht Brandgefahr und damit Gesundheitsgefährdung und/oder Sachbeschädigung. Benutzen Sie NIEMALS ein anderes Ladegerät.
• Lagern Sie den Akku bei Raumtemperatur an einem trockenen Ort.
• Laden Sie den Akku unbedingt nach Gebrauch wieder auf, um eine sog. Tiefenentladung des Akkus zu vermeiden. Beachten Sie dabei, dass Sie eine Pause von
ca. 20 Min. zwischen dem Flug und dem Ladevorgang einhalten. Laden Sie den
Akku von Zeit zu Zeit (ca. alle 2-3 Monate) auf. Eine Nichtbeachtung der o.g. Handhabung des Akkus kann zu einem Defekt führen.
• Für den Transport oder für eine übergangsweise Lagerung des Akkus sollte die Temperatur zwischen 5-50°C liegen. Lagern Sie den Akku oder das Modell, wenn möglich
nicht im Auto oder unter direktem Sonneneinfluss. Wenn der Akku der Hitze im Auto
ausgesetzt wird, kann er beschädigt werden oder Feuer fangen.
• Entladen Sie den Li-Ionen-Akku nicht unter ein bestimmtes Maß. Wenn der Akku zu tief
entladen wird, verringert sich die Leistung sowie die Haltbarkeit und kann letztlich bis
zum Totalausfall führen. Li-Ionen-Zellen sollten bei Beanspruchung nicht auf unter 6 V
entladen werden. Der Li-Ionen-Akku im Carrera RC Helicopter, darf während des Fluges
nicht unter 6 V Spannung fallen. Die Steuereinheit des Helicopters ist mit einem Schutzsystem ausgestattet, das bei einem Spannungsabfall auf unter 6 V einsetzt. Wenn diese
Abschaltung einsetzt, reduziert die Steuereinheit die Leistung der Motoren, damit die
Akku-Spannung nicht unter 6 V abfällt. Bemerken sie eine Leistungsreduzierung, sollten
Sie sofort landen und das Modell abschalten, da die weitere Entladung unter 6 V den LiIonen-Akku dauerhaft beschädigt. Dies führt zu einer Verringerung der Leistung und
Haltbarkeit für Folgeflüge, bzw. zu einem Totalausfall des Akkus. Außerdem können wiederholte Versuche den Akku weiter zu entladen, auch zu einem Ausfall der Steuerung
führen, obwohl die Motoren noch laufen. Die erforderliche Mindestspannung für den
Empfänger oder andere Elektronik wird dann nicht mehr erreicht. Es ist nicht empfehlenswert, den Akku bei jedem Flug bis auf 6 V auszureizen. Stattdessen sollten Sie den
Ladezustand des Akkus/Helikopters während des Fluges im Auge behalten und wenn es
Anzeichen gibt, dass der Helikopter im Schwebe- oder im Normalflug stärkere Steuerbewegungen als üblich braucht, sollten Sie das Modell sofort landen. Das häufige Entladen
des Akkus bis auf 6V kann diesen trotzdem dauerhaft beschädigen.
Hinweis: Bei geringer Batteriespannung/-leistung werden Sie feststellen, dass erhebliche Trimmung und/oder Steuerbewegungen erforderlich sind, damit der Helikopter nicht
ins Trudeln gerät. Dies tritt in der Regel vor dem Erreichen von 6 V Akkuspannung auf
und ist ein guter Zeitpunkt, um den Flug zu beenden.
Wichtige Informationen über Lithium-Ionen Akkus
Lithium-Ionen (Li-Ionen) Akkus sind wesentlich empfindlicher als herkömmliche Alkali-,
oder NiMH-Akkus, die sonst bei funkferngesteuerten Modellen verwendet werden. Die
Vorschriften und Warnhinweise müssen deshalb genauestens befolgt werden. Bei falscher Handhabung von Lithium-Ionen Akkus besteht Brandgefahr. Beachten Sie immer
die Herstellerangaben, wenn Sie Lithium-Ionen Akkus entsorgen.
Entsorgungsbestimmungen für Elektro- und Elektronik-Altgeräte laut WEEE
Das hier abgebildete Symbol der durchgestrichenen Mülltonnen soll Sie darauf hinweisen,
dass leere Batterien, Akkumulatoren, Knopfzellen, Akkupacks, Gerätebatterien, elektrische
Altgeräte etc. nicht in den Hausmüll gehören, da
sie der Umwelt und Gesundheit schaden. Helfen Sie bitte mit, Umwelt und Gesundheit zu
erhalten und sprechen Sie auch mit Ihren Kindern über die ordentliche Entsorgung
gebrauchter Batterien und elektrischer Altgeräte. Batterien und elektrische Altgeräte
5
Aufladen des Li-Ionen Akkus
Beschreibung des Helicopters
Achten Sie darauf, dass Sie den mitgelieferten 7,4 V
650 mAh Li-Ionen-Akku nur
mit dem mitgelieferten 8,4 V
1000 mA Li-Ionen-Ladegerät laden. Wenn Sie versuchen, den Akku mit einem anderen Li-Ionen-Akku Ladegerät oder einem anderen
Ladegerät zu laden, kann dies zu schweren Schäden führen. Bitte lesen Sie den
vorangehenden Abschnitt mit den Warnhinweisen und Richtlinien zur Akku-Verwendung sorgfältig durch, bevor Sie fortfahren.
1
1
2
1
3
2
4
rechte Seite
1. Rotorsystem
2
2. Heck
3. Steckverbindung zum
Laden des Li-Ionen-Akku
linke Seite
Gehen Sie bitte folgendermaßen vor, wenn Sie den im Helicopter befindlichen Akku
mit dem dazugehörigen Ladegerät laden:
• Verbinden Sie das Ladegerät mit der Steckdose. Die grüne LED am Netzteil zeigt
an, dass das Ladegerät ordnungsgemäß mit der Steckdose verbunden ist, bzw. dass
der angesteckte Akku voll geladen ist.
• Verbinden Sie den im Helicopter befindlichen Akku mit dem Ladegerät. Das Verbindungsstück bzw. der Anschluss zwischen Akku und Ladegerät sind so hergestellt,
dass verkehrte Polarität ausgeschlossen ist.
• Wenn der entladene Akku richtig eingesteckt wurde, leuchtet die rote LED-Anzeige
am Ladegerät und zeigt damit an, dass der Ladevorgang angefangen hat.
• Es dauert ungefähr 1 Stunde, um einen entladenen Akku (nicht tiefentladenen)
wieder aufzuladen. Wenn der Akku voll ist, leuchtet die LED-Anzeige am Ladegerät
grün auf.
4. Landekufen
5
5. ON-/OFF-Schalter
Funktionsübersicht des Controllers
1
1
3
2
• Lösen Sie die Steckverbindung zwischen Helicopter und Ladegerät
• Verbinden Sie nach dem Ladevorgang die am Helicopter befindliche Steckverbindung, um fliegen zu können.
• Lösen Sie die am Helicopter befindliche Steckverbindung wenn Sie den Helicopter nicht verwenden. Eine Nichtbeachtung kann zu Akkuschäden führen!
13
4
9
5
12
8
10
11
14
7
15
6
Hinweis: Bei der Auslieferung ist der enthaltene Li-Ionen-Akku teilgeladen. Daher
könnte der erste Ladevorgang etwas kürzer dauern.
2
16
17
17
8.
9.
10.
11.
12.
13.
18
1.
2.
3.
4.
Antenne
Powerschalter (ON / OFF)
Kontroll LED
Gas
Heck (Kreisdrehung)
5. Trimmer für Gas
6. Trimmer für Heck
7. Vor-/Zurück
Rechts-/Links Neigung
14.
15.
16.
17.
18.
LCD Display
UP-Taste (UP)
DN-Taste (DN)
Select-Taste (Sel)
Menü-Taste (Menu)
Beginner- /Advanced Modus
(rechten Joystick am Controller
senkrecht von oben eindrücken)
Trimmer für Vor-/Zurück
Trimmer für
Rechts-/Links Neigung
Batteriefach
Aufbewahrungsfächer für
Joystickverlängerungen
Joystick-Verlängerungen zum
Aufschrauben auf die Hebel 4. & 7.
Einsetzen der Batterien in den Controller
1
2
Öffnen Sie das Batteriefach mit einem
Schraubendreher und setzen Sie die
Batterien in den Controller ein. Achten
Sie auf die richtige Polarität. Nach dem
verschließen des Faches können sie
die Funktionalität des Controllers mit
Hilfe des Powerschalters auf der Vorderseite prüfen. Bei ON-Stellung des
Powerschalters und ordnungsgemäßer
Funktion sollte die LED oben in der
Mitte des Controllers rot aufleuchten.
Wenn die Kontroll LED schnell blinkt
und ein Signalton zu hören ist, müssen
die Batterien im Controller gewechselt
werden.
6
Vorbereitung des Erstfluges
Bindung des Modells mit dem Controller
Diese Checkliste ist kein Ersatz für den Inhalt dieser Bedienungsanleitung. Obwohl sie
als Quick-Start-Guide verwendet werden kann, empfehlen wir Ihnen eindringlich,
zunächst diese Betriebsanleitung komplett zu lesen, bevor Sie fortfahren.
• Überprüfen Sie den Verpackungsinhalt.
• Verbinden Sie das Ladegerät mit der Steckdose.
• Laden Sie den Li-Ionen-Akku wie im Abschnitt „Aufladen des Li-Ionen-Akkus“
beschrieben.
• Setzen Sie vier AA Batterien in den Controller ein und achten Sie auf die richtige Polarität.
• Suchen Sie eine geeignete Umgebung zum Fliegen.
• Stellen Sie den Helicopter auf eine gerade Fläche.
• Schalten Sie den Helicopter und anschließend den Controller ein.
• Überprüfen Sie die Steuerung.
• Machen Sie sich mit der Steuerung vertraut.
• Trimmen Sie den Helicopter ggf. wie auf S.9 beschrieben, so dass sich der Helicopter .
im Schwebeflug nicht mehr ohne Steuerbewegungen von der Stelle bewegt.
• Fliegen Sie das Modell.
• Landen Sie das Modell.
• Schalten Sie das Modell aus.
• Schalten Sie immer die Fernbedienung als letztes aus.
1
ON
ON
Der Carrera RC Helicopter und der Controller sind werkseitig gebunden. Sollte
es am Anfang Probleme bei der Kommunikation zwischen dem Carrera RC Helicopter und dem Controller geben,
führen Sie bitte eine neue Bindung
durch.
• Verbinden Sie die am Modell befindliche Steckverbindung und schalten Sie das
Modell am ON/OFF Schalter an.
• Die LED im Helicopter blinkt nun in rhythmisch beschleunigender Folge.
• Schalten Sie den Controller am ON/OFF Schalter ein. Während des
Bindungsvorgangs ertönt am Controller ein Signalton.
• Stellen Sie den geladenen Helicopter auf eine gerade Fläche.
• Geben Sie dem Helicopter einen Augenblick Zeit, bis das System korrekt initialisiert
und betriebsbereit ist.
• Die Kontroll LED leuchtet wieder permanent und zeigt an, dass die Bindung beendet ist.
Umschalten zwischen
Beginner- /Advanced Modus
Checkliste für die Flugvorbereitung
Diese Checkliste ist kein Ersatz für den Inhalt dieser Bedienungsanleitung. Obwohl
sie als Quick-Start-Guide verwendet werden kann, empfehlen wir Ihnen eindringlich,
zunächst diese Betriebsanleitung komplett zu lesen, bevor Sie fortfahren.
• Verbinden Sie die am Modell befindliche Steckverbindung und schalten Sie das
Modell am ON/OFF Schalter an.
• Die LED im Helicopter blinkt nun in rhythmisch beschleunigender Folge.
• Schalten Sie den Controller am ON/OFF Schalter ein. Während des
Bindungsvorgangs ertönt am Controller ein Signalton.
• Stellen Sie den geladenen Helicopter auf eine gerade Fläche.
• Geben Sie dem Helicopter einen Augenblick Zeit, bis das System korrekt initialisiert
und betriebsbereit ist.
• Die LED im Helicopter leuchtet nun permanent und der Signalton am Controller ist
nicht mehr zu hören.
• Der Helicopter ist jetzt einsatzbereit.
• Sofern der Helicopter keine Funktion zeigt, führen Sie bitte ggf. die u.g. Bindung des
Modells mit dem Controller durch.
• Fliegen Sie das Modell.
• Landen Sie das Modell.
• Schalten Sie das Modell am ON/OFF Schalter aus und trennen Sie die am Helicopter
befindliche Steckverbindung.
• Schalten Sie immer die Fernbedienung als letztes aus.
1
Beim Einschalten des Controllers und Helicopters befindet sich das Modell grundsätzlich im Beginner-Modus.
Zum Wechseln zwischen Beginner- und Advanced Modus bei eingeschaltetem Controller und Helicopter den rechten Joystick am Controller senkrecht von oben eindrücken. Eine Umschaltung kann auch während des Fluges erfolgen. Beim Umschalten in
den Advanced Modus ertönt ein „Beep“-, beim Beginner Modus ein „Beep-Beep“-Signalton.
Der Helicopter reagiert im Advanced-Modus im Vergleich zum Beginner-Modus
noch empfindlicher auf ihre Bewegungen am Controller.
Hinweis: Üben Sie das Fliegen mit dem Helicopter zuerst im Beginner-Modus
bis Sie das Modell voll unter Kontrolle haben. Schalten Sie erst dann in den Advanced Modus. Der Helicopter reagiert im Advanced-Modus noch empfindlicher auf ihre
Bewegungen am Controller!
7
Erklärung der LCD-Display Anzeige
Menü-Punkt: R – Rechts-Drehung (Kreisdrehung)
Standard-Anzeige- und Funktionsübersicht
Wählen Sie im Einstellmenü den MenüPunkt „R“ aus. Durch Drücken der „SEL“
Taste bestätigen Sie die Menü-Punkt
Auswahl „R“. Der Anzeigewert rechts
neben dem Menü-Punkt „R“ beginnt zu
blinken. Mit den Tasten „UP“ oder „DN“
können Sie den Anzeigewert verändern.
Je größer der Anzeigewert ist, desto mehr dreht sich das Modell nach rechts, wobei
der Wert zwischen 0 und 100 liegen kann. Die Standardeinstellung ist 100. Durch
erneutes Drücken der „SEL“ Taste bestätigen Sie den Anzeigewert. Drücken Sie zum
Schluss auf die Menü-Taste, um die Einstellungen zu speichern.
7
1
8
2
4
10
9
3
5
12
6
1. Gashebel-Anzeige
2. Heck-Anzeige
3. Trimm Anzeige Heck
(Kreisdrehung)
4. Trimm Anzeige Gas
5. Anzeige der Funksignalstärke
6. Menü-Punkt, Y = StandardAnzeige
11
7. Vor-Zurück-Anzeige
8. Links-/Rechtsneigungsanzeige
9. Trimm-Anzeige Links/Rechts
10. Trimm-Anzeige Vor-Zurück
11. Batterie-Status-Anzeige
12. Batterie Spannung in Volt (V)
Menü-Punkt: F – Vorwärtsbewegung
Wählen Sie im Einstellmenü den MenüPunkt „F“ aus. Durch Drücken der „SEL“
Taste bestätigen Sie die Menü-Punkt
Auswahl „F“. Der Anzeigewert rechts
neben dem Menü-Punkt „F“ beginnt zu
blinken. Mit den Tasten „UP“ oder „DN“
können Sie den Anzeigewert verändern.
Je größer der Anzeigewert ist, desto mehr bewegt sich das Modell nach vorne, wobei
der Wert zwischen 0 und 100 liegen kann. Durch erneutes Drücken der „SEL“ Taste
bestätigen Sie den Anzeigewert. Drücken Sie zum Schluss auf die Menü-Taste, um
die Einstellungen zu speichern.
Übersicht Menü-Punkte
Die Menü-Punkte des Einstellmenüs erreichen Sie, wenn Sie 3 Sekunden auf die
Menü-Taste drücken. Der zuletzt verwendete Menü-Punkt des Einstellmenüs blinkt
auf und erscheint im unteren Bereich des LCD Displays. Mit den Tasten „UP“ oder
„DN“ navigieren Sie durch das Einstellmenü. Mit der „SEL“ Taste wählen Sie den
jeweilig angezeigten Menü-Punkt aus und der jeweilige Anzeigewert blinkt auf. Mit
den Tasten „UP“ oder „DN“ können Sie den Anzeigewert des gewählten Menü-Punkt
verändern. Durch erneutes Drücken der „SEL“ Taste bestätigen Sie den Anzeigewert
und der Menü-Punkt fängt wieder an zu blinken. Drücken Sie zum Schluss auf die
Menü-Taste, um die jeweiligen Einstellungen zu speichern.
L
R
F
b
A
C
T1-4
–
–
–
–
–
–
–
Menü-Punkt: b – Rückwärtsbewegung
Wählen Sie im Einstellmenü den MenüPunkt „b“ aus. Durch Drücken der „SEL“
Taste bestätigen Sie die Menü-Punkt
Auswahl „b“. Der Anzeigewert rechts
neben dem Menü-Punkt „b“ beginnt zu
blinken. Mit den Tasten „UP“ oder „DN“
können Sie den Anzeigewert verändern.
Je größer der Anzeigewert ist, desto mehr bewegt sich das Modell nach hinten, wobei
der Wert zwischen 0 und 100 liegen kann. Durch erneutes Drücken der „SEL“ Taste
bestätigen Sie den Anzeigewert. Drücken Sie zum Schluss auf die Menü-Taste, um
die Einstellungen zu speichern.
Links-Drehung (Kreisdrehung)
Rechts-Drehung (Kreisdrehung)
Vorwärtsbewegung
Rückwärtsbewegung
Links-Neigung
Rechts-Neigung
Gas-Kurve
Menü-Punkt: L - Links-Drehung (Kreisdrehung)
Menü-Punkt: A - Links-Neigung
Wählen Sie im Einstellmenü den MenüPunkt „L“ aus. Durch drücken der „SEL“
Taste Bestätigen Sie die Menü-Punkt
Auswahl „L“. Der Anzeigewert rechts
neben dem Menü-Punkt „L“ beginnt zu
blinken. Mit den Tasten „UP“ oder „DN“
können Sie den Anzeigewert verändern.
Je größer der Anzeigewert ist desto mehr dreht sich das Modell nach links, wobei der
Wert zwischen 0 und 100 liegen kann. Die Standardeinstellung ist 100. Durch erneutes drücken der „SEL“ Taste bestätigen Sie den Anzeigewert. Drücken Sie zum
Schluss auf die Menü-Taste, um die Einstellungen zu speichern.
Wählen Sie im Einstellmenü den MenüPunkt „A“ aus. Durch Drücken der „SEL“
Taste Bestätigen Sie die Menü-Punkt
Auswahl „A“. Der Anzeigewert rechts
neben dem Menü-Punkt „A“ beginnt zu
blinken. Mit den Tasten „UP“ oder „DN“
können Sie den Anzeigewert verändern.
Je größer der Anzeigewert ist, desto mehr neigt sich das Modell nach links, wobei der
Wert zwischen 0 und 100 liegen kann. Durch erneutes Drücken der „SEL“ Taste bestätigen Sie den Anzeigewert. Drücken Sie zum Schluss auf die Menü-Taste, um die
Einstellungen zu speichern.
8
Steuerung des Helicopters
Menü-Punkt: C - Rechts-Neigung
1
Wählen Sie im Einstellmenü den MenüPunkt „C“ aus. Durch Drücken der „SEL“
Taste bestätigen Sie die Menü-Punkt
Auswahl „C“. Der Anzeigewert rechts
neben dem Menü-Punkt „C“ beginnt zu
blinken. Mit den Tasten „UP“ oder „DN“
können Sie den Anzeigewert verändern.
Je größer der Anzeigewert ist, desto mehr neigt sich das Modell nach rechts, wobei
der Wert zwischen 0 und 100 liegen kann. Durch erneutes Drücken der „SEL“ Taste
bestätigen Sie den Anzeigewert. Drücken Sie zum Schluss auf die Menü-Taste, um
die Einstellungen zu speichern.
+
+
L
‒
‒
Wenn Sie die Steuerfunktionen Ihres Carrera RC Helicopters noch nicht
kennen, nehmen Sie sich bitte vor dem ersten Flug ein paar Minuten Zeit,
um sich mit ihnen vertraut zu machen. Die Beschreibung Links oder Rechts
entspricht dem Blick aus dem Cockpit (Pilotensicht).
Menü-Punkt: T1-4 - Gas-Kurve
Achtung! Eine Änderung der Anzeigewerte unter den Menüpunkten T1, T2 , T3
und T4 wird nur erfahrenen HobbyPiloten empfohlen!
2
+
Wählen Sie im Einstellmenü den MenüPunkt T1, T2, T3 oder T4 aus. Durch Drücken der „SEL“ Taste bestätigen Sie die
Menü-Punkt Auswahl T1, T2, T3 oder T4.
Der Anzeigewert rechts neben dem MenüPunkt T1, T2, T3 oder T4 beginnt zu blinken. Mit den Tasten „UP“ oder „DN“
können Sie den jeweiligen Anzeigewert
verändern.
Die Standardverteilung ist T1 = 25%,
T2 = 50%, T3 = 75%, T4 = 100%. Durch
verändern der jeweiligen Werte verschiebt
sich das Ansprechverhalten des GasHebels.
Durch erneutes Drücken der „SEL“ Taste
bestätigen Sie den Anzeigewert.
Drücken Sie zum Schluss auf die MenüTaste, um die Einstellungen zu speichern.
‒
3
+
‒
4
R
5
100%
75%
L
50%
R
25%
0%
T1
T2
T3
Ist der Gashebel am untersten Anschlag
und die Gashebeltrimmung in der mittleren oder unterhalb der mittleren
Position, werden die Rotorblätter nicht
rotieren.
Schieben Sie den Gashebel nach oben,
um die Rotationsgeschwindigkeit der
Hauptrotorblätter zu erhöhen. Erhöhen
Sie die Rotationsgeschwindigkeit der
Hauptrotorblätter und das Modell
beginnt zu steigen.
Reduzieren Sie den Ausschlag des
Gashebels und damit die Rotationsgeschwindigkeit der Hauptrotorblätter, so
sinkt der Helicopter. Wenn das Modell
vom Boden abgehoben ist, können Sie
es durch vorsichtiges Bewegen des
Gashebels, nach oben oder nach
unten, in einen stationären Schwebeflug bringen, ohne dass es zu abrupt
steigt oder sinkt.
Bewegen Sie den linken Hebel (Heck)
nach links und die Nase des Helikopters dreht sich (giert) um die Achse des
Hauptrotors kreisförmig nach links.
Bewegen Sie den linken Hebel (Heck)
nach rechts und die Nase des Helikopters dreht sich (giert) um die Achse des
Hauptrotors kreisförmig nach rechts.
Verwenden Sie den Trimmer für Heck,
bis Sie eine stabile Neutralstellung des
Helicopters im Schwebeflug, ohne
Bewegung des linken Hebel (Heck),
erreicht haben.
L
Gas-Kurve
Rotordrehzahl
R
L
R
T4
Abschnitte / Anzeigenwert T1-4
6
‒
9
+
Der Vor-/Zurück-Hebel steuert die Neigung des Helikopters vorwärts/rückwärts. Wenn Sie den Hebel nach vorne
drücken, bewegt sich die Helikopternase nach unten und der Helikopter
fliegt vorwärts. Wenn Sie den Vor-/
Zurück-Hebel nach hinten drücken,
bewegt sich der Helikopter nach Hinten
und der Helikopter fliegt rückwärts.
Auswahl des Fluggebiets
7
Verwenden Sie den Trimmer für Vor-/
Zurück, um eine stabile Neutralstellung
zu erreichen und um zu verhindern,
dass der Helikopter im Schwebeflug,
ohne Bewegung des Vor-/ZurückHebels, vorwärts oder rückwärts fliegt.
+
‒
Wenn Sie den Hebel für Rechts-/LinksNeigung nach links oder rechts drücken, neigt sich der Helikopter nach
links oder rechts und führt eine Flugbewegung nach links bzw. rechts aus.
Verwenden Sie den Trimmer für
Rechts-/Links-Neigung, um eine stabile
Neutralstellung zu erreichen und um zu
verhindern, dass der Helikopter im
Schwebeflug, ohne Bewegung des
Hebels für Rechts-/Links-Neigung nach
links bzw. rechts fliegt.
78
R
L
9
L
Wenn Sie für Ihren ersten Flug bereit sind, sollten sie einen geschlossenen Raum
wählen, der ohne Personen und ohne Hindernisse sowie möglichst groß ist. Aufgrund
der Größe und Steuerbarkeit des Helikopters ist es für erfahrene Piloten möglich,
auch in relativ kleinen geschlossenen Räumen zu fliegen. Für Ihre ersten Flüge empfehlen wir unbedingt eine Mindestraumgröße von 3 mal 4 Metern Grundfläche und
2,40 Meter Höhe. Nachdem Sie Ihren Helikopter ausgetrimmt haben und mit seiner
Steuerung und seinen Fähigkeiten vertraut geworden sind, können Sie sich auch
daran wagen, in kleineren und weniger freien Umgebungen zu fliegen.
R
Der Helicopter kann draußen geflogen werden, allerdings nur bei Windstille oder sehr schwachem Wind.
Bitte beachten Sie, dass es trotz
Windstille in bodennähe, mit einigem
Abstand zum Boden sehr windig sein
kann.
Eine Nichtbeachtung dieses Hinweises kann zum Totalverlust des Helicopters führen.
Weitere Infos zu unseren RC Produkten finden Sie auf carrera-rc.com.
Nachdem Sie sich mit den Hauptsteuerfunktionen vertraut gemacht haben,
sind Sie nach Auswahl des Fluggebietes bereit für den ersten Flug.
Problemlösungen
Problem
Ursache
Lösung
Controller
funktioniert nicht.
Der ON/OFF-Powerschalter steht auf „OFF“.
Den ON/OFF-Powerschalter auf „ON“ stellen.
Die Batterien wurden falsch eingelegt.
Überprüfen Sie, ob die Batterien korrekt eingelegt sind.
Die Batterien haben nicht mehr genug Energie.
Neue Batterien einlegen
Der ON/OFF-Powerschalter des Controller steht auf „OFF“.
Zuerst den ON/OFF-Powerschalter am Helicopter,
dann am Controller auf „ON“ stellen.
Der Controller ist ggf. nicht richtig mit dem Empfänger im Helicopter
gebunden.
Stellen Sie wie unter “Bindung des Modells mit dem Controller”
beschrieben eine Bindung zwischen Helicopter und Controller her.
Der ON/OFF-Powerschalter am Modell bzw. Controller steht auf „OFF“.
Den ON/OFF-Powerschalter auf „ON“ stellen.
Der Akku ist zu schwach bzw. leer.
Den Akku aufladen (siehe Kapitel „Aufladen des Akkus“).
Die Akkuverbindung am Helicopter ist nicht hergestellt.
Verbinden Sie die am Helicopter befindliche Steckverbindung.
Sie haben die Anzeigewerte der Menü-Punkte T1-4 verändert.
Bitte stellen Sie die Anzeigewerte der Menü-Punkte T1-4
wieder auf die Werte der Standardverteilung (S.9) ein.
Die Rotorblätter bewegen sich zu langsam.
Den Gashebel nach oben schieben.
Die Akku-Leistung reicht nicht aus.
Den Akku aufladen (siehe Kapitel „Aufladen des Akkus“).
Der Akku ist zu schwach.
Den Akku aufladen (siehe Kapitel „Aufladen des Akkus“).
Kontrollverlust über den Gashebel.
Den Gashebel langsam hinunterziehen.
Der Helikopter lässt sich mit
dem Controller nicht steuern.
Die Rotorblätter bewegen sich
nicht.
Der Helicopter steigt nicht auf.
Der Helicopter verliert ohne
ersichtlichen Grund während
des Flugs an Geschwindigkeit
und sinkt ab.
Der Helicopter landet zu
schnell.
Zu schnelles Hinunterziehen des Gashebel.
Die aktuellste Version dieser Bedienungsanleitung und Informationen zu erhältlichen Ersatzteilen finden Sie auf carrera-rc.com im Servicebereich.
Irrtum und Änderungen vorbehalten
Farben / endgültiges Design – Änderungen vorbehalten
10
Technische und designbedingte Änderungen vorbehalten
Piktogramme = Symbolfotos
DUCTION OR COMMERCIAL LOSS IN ANY WAY CONNECTED WITH THE PRODUCT, WHETHER SUCH CLAIM IS BASED IN CONTRACT, WARRANTY, NEGLIGENCE, OR STRICT LIABILITY. Further, in no event shall the liability of Stadlbauer
Marketing + Vertrieb GmbH exceed the individual price of the Product on which liability is asserted. As Stadlbauer Marketing und Vertrieb GmbH has no control over use,
setup, final assembly, modification or misuse, no liability shall be assumed nor
accepted for any resulting damage or injury. By the act of use, setup or assembly, the
user accepts all resulting liability. If you as the Purchaser or user are not prepared to
accept the liability associated with the use of this Product, you are advised to return
this Product immediately in new and unused condition to the place of purchase.
Dear customer
Congratulation! You bought a Carrera RC-helicopter which has been manufactured
according to today´s state-of-the-art technology. As it is our constant endeavour to
develop and improve our products, we reserve the right to make modifications, either
of a technical nature or with respect to features, materials, and design, at any time,
and without prior notice. For this reason, no claims will be accepted for any slight
deviations in your product from the data and illustrations contained in these instructions. These operating and assembly instructions are an integral part of the product.
Non-observance of these operating instructions and the safety instructions they contain will render the guarantee null and void. These instructions are to be kept for future
reference and in the event that the product is passed on to a third party.
Declaration of conformity
Herewith Stadlbauer Marketing + Vertrieb GmbH declares that this model including
remote control meets the basic requirements of the following EC-guidelines: EN
50371, EN 301489-1 v1.8.1:2008, EN 301489-06 V 1.4.1:2002, EN 50371, EN 3002202V21.1.2:2007, 2006/6/EC and 2004/108/EC referring to the electromagnetic compatibility and any other relevant requirements of guideline 1999/5/EG (R&TTE).
The original declaration of conformity can be requested from carrera-rc.com.
Guarantee conditions
Carrera products are technically advanced products (NO TOYS) which should be
handled with care. It is important to follow the directions given in the operating instructions. All components have been subjected to careful inspection (technical modifications and alterations to the model for the purpose of product improvement are
reserved).
Should any faults nevertheless occur, guarantee is assumed within the scope
of the following conditions: In accordance with the following provisions, Stadlbauer
Marketing + Vertrieb GmbH (hereinafter referred to as “manufacturer”) warrants to the
endconsumer (hereinafter referred to as “customer”) that the Carrera RC-model-helicopter (hereinafter referred to as “product”) delivered to the customer shall be free
from defects in material or workmanship for two years from the date of purchase (guarantee period). Such defects will, at the manufacturer´s option, either be repaired by
the manufacturer or fixed by delivering new or refurbished parts free of charge. The
warranty does not cover any failure of the product due to normal wear and tear,
improper handling/misuse or unauthorised interference. Any other customer´s claims
asserted against the manufacturer, especially action for damages, shall be excluded.
The contractual and statutory rights of the customer against the seller (supplementary
performance, rescission of the contract, abatement, compensation) which exist with
the product not having been free from defects at the time of the passing of risk, shall
remain unaffected by this warranty.
Contents of package
1x Helicopter Spider Fox
1x 2,4 GHz Controller with LCD Display
1x Battery charger
4x 1.5 V Mignon AA batteries
Claims from this special warranty shall only be valid if:
• the defect reported has not arisen by damage caused by unintended use or misuse
as specified in the instruction manual,
• the failure of the product is not due to normal wear and tear
• the product does not show any signs resulting from repairs or other interferences
carried out by workshops not having been authorised by the manufacturer,
• the product has only been operated with accessories authorised by the manufacturer and
• the product is sent in together with the original proof of purchase (invoice / receipt)
and the completely filled in warranty card which has not been altered in any way.
Guarantee cards cannot be replaced.
Note for EU countries: Reference is hereby made to the seller’s statutory guarantee
obligation, to the extent that this guarantee obligation is not restricted by the product
guarantee.
The manufacturer shall bear the costs for sending in and returning the product.
This warranty shall be valid to the extent aforementioned and under the above-named
circumstances (including the submittal of the original proof of purchase also in case of
resale) for any future owner of the product.
(non-rechargeable)
1x Lanyard
Requirement for FCC Part 15
Warning: Changes or modifications not expressly approved by the party responsible for compliance could void the user’s authority to operate the equipment.
Note: This equipment has been tested and found to comply with the limits for a Class
B digital device, pursuant to Part 15 of the FCC Rules. These limits are designed to
provide reasonable protection against harmful interference in a residential installation. This equipment generates, uses and can radiate radio frequency energy and, if
not installed and used in accordance with the instructions, may cause harmful interference to radio communications.
However, there is no guarantee that interference will not occur in a particular installation. If this equipment does cause harmful interference to radio or television reception,
which can be determined by turning the equipment off and on, the user is encouraged
to try to correct the interference by one or more of the following measures:
• Reorient or relocate the receiving antenna.
• Increase the separation between the equipment and receiver,
• Connect the equipment into an outlet on a circuit different from that to which
the receiver is connected.
• Consult the dealer or an experienced radio/TV technician for help.
Damage Limits
STADLBAUER MARKETING + VERTRIEB GMBH SHALL NOT BE LIABLE FOR SPECIAL, INDIRECT OR CONSEQUENTIAL DAMAGES, LOSS OF PROFITS OR PRO-
11
If in regular use the charger must be examined for damage to the cord, plug, covers and
all other parts. If any signs of damage are found the charger may only be used again after
repair work has been completed.
Warning!
A remote-controlled helicopter is NOT A TOY and is only suitable for teenagers
over the age of 14!
This product is not intended for use by children without supervision of a parent.
Inappropriate use may result in severe injuries and/or damage to property.
It has to be operated with care and caution and requires both mechanical and mental
skills. The operating instructions contain notes on safety and technical regulations as well
as information on maintaining and operating the product. It is indispensable to read these
instructions thoroughly before the first usage. Only this helps to avoid accidents with injuries and damage.
Only use the helicopter in closed rooms which provide sufficient space and follow all
instructions given in this manual. Make sure that no lose objects, including clothes, or
other objects like pens or screwdrivers can become entangled in the rotor blades or can
get in contact with them. Especially take care that your hands DO NOT get close to the
rotor blades!
As user of this product you are solely responsible for handling it safely in order to ensure
that neither you nor other persons or their property suffer damages or are endangered.
This model is controlled via a radio signal which might be disturbed by various sources
from outside. These interferences can cause a short loss of control. Therefore it is advisable to always keep a safe distance to the model in order to avoid damage to property or
injuries.
• Never use your model with weak remote control batteries.
• Avoid busy areas. Always make sure that there is enough space.
• Preferably do not use your model on an open street or in public areas in order not to
endanger or hurt anyone.
• Exactly observe the instructions and warnings for this product and for any possible
additional equipment (battery charger, rechargeable batteries etc.) being used by you.
• Should the helicopter come into contact with any living thing or solid object,
immediately return the gas control to zero, in other words the left-hand joystick
must be at the stop at the bottom of the slide!
• Make sure that all chemicals, small parts and electrical components are out of childrens´ reach.
• Avoid any moisture as this might do damage to the electronics.
• There is a risk to suffer severe injury or even death if you put parts of your model into
your mouth or lick them.
Caution! Before you first fly the model, find out whether there is a legal requirement
to insure model aeroplanes such as this in your country. Information can be obtained
for example from your insurance company whether your new and any previous model
aeroplanes are included in your third-party insurance. Have this confirmed in writing and
keep the correspondence in a safe place. It may be necessary for you to take out a special
insurance policy to cover model aircraft.
Guidelines and warnings for the use of Li-ion rechargeable batteries
Although the 8.4 V
1000 mA Lithium-Ion battery charger you received together with the
Carrera RC helicopter has been developed especially for safe charging of the 7.4 V
650 mAh Lithium-Ion battery, you have to read the following safety regulations and warnings before using or charging the Li-ion rechargeable battery.
Note: Li-ion rechargeable batteries are significantly more sensitive than traditional
alkaline, or NiMH-rechargeable batteries normally used with radio controlled models.
Therefore all instructions and warnings have to be observed precisely. In case of improper
use of Li-ion rechargeable batteries there is a danger of fire. When handling, charging or
using the attached Li-ion rechargeable battery you assume all and any risks connected
with Lithium rechargeable batteries. If you do not agree to these terms please immediately return the complete helicopter model in new and unused condition to the retailer.
• You have to charge the attached 7,4 V
650 mAh Li-ion rechargeable battery in a
safe place and at a safe distance to flammable material.
• Never leave the battery unguarded when charging it. When charging the battery you
should always be nearby in order to control the charging process and to be able to react to
potential problems.
• After a flight, the rechargeable battery has to cool down to the ambient air temperature
before charging it.
• You may only use the appropriate Li-ion battery charger. In case of non-compliance
with these directions there is a danger of fire resulting in a health risk and/or damage to
property. NEVER use any other battery charger.
• Store the rechargeable battery at ambient temperature in a dry place.
• Always recharge the battery immediately after use to prevent its becoming deep
discharged. Please make sure to allow a pause of about 20 minutes between finishing the flight and recharging the battery. Recharge the battery occasionally (suggested every 2-3 months). Failure to treat the battery as described above can lead
to its becoming defective.
• When transporting or temporarily storing the rechargeable battery the temperature
should be between 5-50°C. If possible, do not store the battery or the model in a car and
do not expose it to direct sunlight. In case the battery is broiled it can be damaged or catch
fire.
• Do not discharge the Li-ion battery beyond a certain level. If the battery is unloaded too
deep the battery´s output as well as its durability will decrease which can finally lead to a
total breakdown. Li-ion cells should not be discharged beyond 6 V when being used. The
Li-ion battery in the Carrera RC helicopter must not fall beyond 6 V voltage during the
flight. The helicopter´s control unit is equipped with a protection system (LVC) which is
activated in case the voltage drops to under 6 V. With this cut-off being activated the control unit is going to reduce the engines´ performance in order to avoid a voltage drop to
under 6 V. Should you notice a reduction in performance you should land the helicopter at
once and switch off the model as further discharging below 6 V will damage the Li-ion
battery permanently. This results in a reduction in the battery´s output and durability for
any following flights or in a total breakdown. In addition, repeated attempts to discharge
the rechargeable battery furthermore may lead to the control system´s breakdown
although the engines are still running. The minimum voltage required for the receiver or
other pieces of electronics is no longer reached then. It is not advisable to max the
rechargeable battery to 6 V on each flight. Instead, you should keep an eye on the
battery´s/helicopter´s charge condition during the flight. Should you notice that the helicopter requires stronger controlling than normally when hovering or flying you should land
your model immediately. Nevertheless, frequent discharging of the rechargeable battery
down to 6 V can damage it permanently.
Note: If the battery voltage/output is low you will recognise that a considerable trim and/or
controlling is necessary to avoid that the helicopter starts trundling. This usually occurs
before reaching a battery voltage of 6 V and it is a good moment to end the flight.
Important information concerning Lithium-Ion rechargeable batteries
Lithium-Ion (Li-ion) rechargeable batteries are significantly more sensitive than traditional
alkaline, or NiMH-rechargeable batteries normally used with radio controlled models.
Therefore the instructions and warnings have to be observed in detail. In case of improper
use of Lithium-Ion rechargeable batteries there is a danger of fire. Always follow the manufacturers´ instructions if you dispose of Lithium-Ion rechargeable batteries.
Regulations on disposal for waste electrical and electronic equipment (WEEE)
This symbol, showing refuse bins with a cross through them, denotes that empty batteries, rechargeable batteries, button cells, rechargeable battery packs, equipment batteries, disused electrical equipment, etc. should not be disposed of in domestic refuse, as
they are harmful to the environment and health.
Please help to preserve environment and health
and talk to your children about the correct disposal of used batteries and disused electrical
equipment. Batteries and disused electrical
equipment should be handed in to the usual collection points where they can be properly
recycled.
Do not mix dissimilar battery types or employ new and used batteries together.
Empty batteries should be removed from the product. Do not attempt to recharge nonrechargeable batteries. Rechargeable batteries should only be charged under adult
supervision. Exhausted batteries are to be removed from the toy. Rechargeable batteries
should be removed from the product before charging. Supply terminal are not to be shortcircuited. Only use the batteries recommended or equivalent types.
12
Description of helicopter
Recharging the Li-ion rechargeable battery
Please make sure that you charge the provided 7.4 V
650 mAh Li-ion rechargeable
battery only with the provided 8.4 V
1000 mA Li-ion battery charger. In case you try
to charge the rechargeable battery with a different Li-ion battery charger or any other
battery charger, this might cause serious damages. Please carefully read the previous
chapter about warnings and guidelines on the usage of rechargeable batteries before
proceeding.
1
1
2
1
3
2
4
Right side
1. Rotor system
2. Tail rotor
3. Plugged connection for
charging the li-ion battery
4. Landing skids
5. ON-/OFF switch
2
5
Left side
Please proceed as follows when charging the rechargeable battery in the helicopter
with the appropriate battery charger:
• Connect the battery charger to the power socket. The green LED on the power
supply unit indicates that the charger has correctly been connected to the power
socket or that the rechargeable battery has been fully recharged.
• Connect the rechargeable battery in the helicopter to the charger. The green LED
on the power supply unit indicates that the charger has correctly been connected to
the power socket or that the rechargeable battery has been fully recharged
• Has the discharged battery been inserted correctly, the red LED on the charger will
light up to indicate that the battery is now being recharged.
• It takes approximately 1 hour to recharge a discharged battery (not exhaustively
discharged). As soon as the battery is completely charged the LED on the charger
lights up green.
Range of functions of the remote control
1
1
3
2
• Undo the plugged connection between the helicopter and the charger unit.
• In order to fly after charging, make the plugged connection to be found on
the helicopter.
• Undo the plugged connection on the helicopter if you are not going to use the
helicopter. Failure to observe this precaution may cause battery damage!
13
4
12
9
5
8
10
11
7
14
15
6
Note: when supplied, the li-ion-battery is already partially charged. so the first charging cycle may well take less time.
2
16
17
17
18
1.
2.
3.
4.
5.
6.
7.
Antenna
Power switch (ON / OFF)
Control LED
Gas · tail (spinning in circles)
Trimmer for gas
Trimmer for tail
Forward/backward
right/left pitch
8. LCD display
9. UP-button (UP)
10. DN-button (DN)
11. Select button (SEL)
12. Menu-button (Menu)
13. Beginner / Advanced mode
(press the right joystick on the controller down vertically from above)
14. Trimmer for forward/backward
15. Trimmer for right/left pitch
16. Battery compartment
17. Slot for keeping
Joystick extensions
18. Joystick extensions
to screw on lever 4. & 7.
Inserting the batteries
in the remote control
1
2
Open the battery compartment with a
screwdriver and insert the batteries in
the remote control. Please keep in mind
the correct polarity. After having closed
the compartment you can check all
functions of the remote control with the
help of the power-switch on the front.
With the power-switch turned ON and
proper functioning, the top center LED
on the remote control will light up red.
When the control LED flashes rapidly,
the batteries in the controller must be
changed.
13
Preparing the first flight
Frequency bind between
model and remote control
This checklist does not replace the contents of the operating instructions.
Although it can be used as a quick-start-guide we strongly advise to first read the
operating instructions in detail before you proceed.
• Check the contents of the package
• Connect the charger to the power socket
• Charge the li-ion-battery as described in the section „Charging the li-ion battery“.
• Fit four AA batteries in the controller, making sure their polarity is correct.
• Look for a suitable environment for flying
• Place the helicopter on a flat surface
• Switch on first the helicopter and then the controller.
• Check the control system
• Make yourself familiar with the control system
• Trim the helicopter if necessary as described on P. 16, so that when hovering,
the helicopter no longer moves from the spot without the controls being touched.
• Fly the model
• Land the model
• Switch the model off
• Always switch off the remote control last
1
ON
ON
The Carrera RC helicopter and the
remote control are frequency bound at
purchase. Should there occur any problems with the communication between
the Carrera RC helicopter and the
remote control at the beginning, please
carry out a new frequency bind.
• Connect the plug-in connection at the model and switch on the model at the ON/OFF
switch.
• The LED in the helicopter now flashes in rhythmically-accelerating sequence.
• Switch on the controller at the ON/OFF switch. While connecting, the controller
emits a signal tone.
• Place the charged helicopter on a flat surface.
• Allow the helicopter a few moments until the system is correctly initialised and is
ready for operation.
• The control LED now lights continuously once again, indicating that the connection
is ended.
Changeover between
Beginner / Advanced mode
Checklist for flight preparation
This checklist does not replace the contents of the operating instructions.
Although it can be used as a quick-start-guide we strongly advise to first read the
operating instructions in detail before you proceed.
• Connect the plug-in connection at the model and switch on the model at the
ON/OFF switch
• The LED in the helicopter now flashes in rhythmically-accelerating sequence.
• Switch on the controller at the ON/OFF switch. While connecting, the controller
emits a signal tone.
• Place the charged helicopter on a flat surface.
• Allow the helicopter a few moments until the system is correctly initialised and
is ready for operation.
• The LED in the helicopter is not lit continuously and the controller is no longer
emitting its signal tone.
• The helicopter is now ready to be flown.
• If the helicopter fails to display any function, connect the model with the
controller as necessary, as shown below.
• Fly the model
• Land the model
• Switch the model off at the ON/OFF switch and unplug the connection in the
helicopter.
• Always switch off the remote control last
1
When controller and helicopter are initially switched on, the model is in „Beginner“
mode.
To change between Beginner and Advanced mode when the controller and helicopter
are switched on, press the right-hand joystick in vertically from above.
The changeover can also be made while the machine is in flight. When changing over
into Advanced mode, you will hear a single „beep“ signal and when changing into
Beginner modus a „beep-beep“ will be heard.
The helicopter reacts more sensitively in Advanced mode to your commands on
the controller than it does in Beginner mode.
Note: you should first practice flying with the helicopter in Beginner mode until
you are fully in control of the model. Only then should you switch over to Advanced
mode. The helicopter will react in Advanced mode more sensitively to your commands
on the controller!
14
Explanation of the LCD-display
Menu-point: R – right rotation (circling)
Standard display and function overview
In the setting menu, select the menu point
„R“. By pressing the „SEL“ button, you
confirm selection of the menu point „R“.
The indicator value to the right alongside
the menu point „R“ begins to flash. You
can now alter the indicated value by using
the „UP“ or „DN“ buttons. The greater the
indicated value, the more sharply the model veers right; the value can lie between 0
and 100. The standard setting is 100. You confirm the indicated value by pressing the
„SEL“ button again. Finally, to confirm the settings press on the menu button again.
7
1
8
2
4
10
9
3
5
6
1.
2.
3.
4.
5.
6.
Throttle indicator
Rear indicator
Trim indicator rear (circling)
Trim indicator throttle
Indicator of radio signal strength
Menu-point, Y = standard
indicator
12
11
Menu-point: F – forwards movement
7. Forwards-backwards indicator
8. Left / right bank indicator
9. Trim indicator left / right
10. Trim indicator front / rear
11. Battery status indicator
12. Battery voltage (V)
In the setting menu, select the menu point
„F“. By pressing the „SEL“ button, you
confirm selection of the menu point „F“.
The indicator value to the right alongside
the menu point „F“ begins to flash. You
can now alter the indicated value by using
the „UP“ or „DN“ buttons. The greater the
indicated value, the more the model will head forwards; the value can lie between 0
and 100. You confirm the indicated value by pressing the „SEL“ button again. Finally,
to confirm the settings press on the menu button again.
Overview menu points
You call up the setting menu points by pressing for three seconds on the menu button.
The most recently-used setting menu point flashes and appears at the bottom of the
LCD display. Using the buttons „UP“ or „DN“, you navigate through the setting menu.
Use the „SEL“ button to select the respective menu point shown and the corresponding indicator value then flashes. Use the buttons „UP“ or „DN“ to alter the indicated
value of the selected menu point. Press the „SEL“ button again to confirm the indicator
value and the menu point will again start to flash. Finally, to confirm the settings press
on the menu button again.
L
R
F
b
A
C
T1-4
–
–
–
–
–
–
–
Menu-point: b – backwards movement
In the setting menu, select the menu point
„b“. By pressing the „SEL“ button, you
confirm selection of the menu point „b“.
The indicator value to the right alongside
the menu point „b“ begins to flash. You can
now alter the indicated value by using the
„UP“ or „DN“ buttons. The greater the
indicated value, the more the model will head backwards the value can lie between 0
and 100. You confirm the indicated value by pressing the „SEL“ button again. Finally,
to confirm the settings press on the menu button again.
left rotation (circling))
right rotation (circling)
forwards movement
backwards movement
left banking
right banking
Throttle curve
Menu-point: L - left rotation (circling)
Menu-point: A - left banking
In the setting menu, select the menu point
„L“. By pressing the „SEL“ button, you confirm selection of the menu point „L“. The
indicator value to the right alongside the
menu point „L“ begins to flash. You can
now alter the indicated value by using the
„UP“ or „DN“ buttons. The greater the
indicated value, the more sharply the model veers left; the value can lie between 0 and
100. The standard setting is 100. You confirm the indicated value by pressing the
„SEL“ button again. Finally, to confirm the settings press on the menu button again.
In the setting menu, select the menu point
„A“. By pressing the „SEL“ button, you
confirm selection of the menu point „A“.
The indicator value to the right alongside
the menu point „A“ begins to flash. You
can now alter the indicated value by using
the „UP“ or „DN“ buttons. The greater the
indicated value, the more the model will bank to the left the value can lie between 0
and 100. You confirm the indicated value by pressing the „SEL“ button again. Finally,
to confirm the settings press on the menu button again.
15
Controlling the helicopter
Menu-point: C - right banking
1
In the setting menu, select the menu point
„C“. By pressing the „SEL“ button, you
confirm selection of the menu point „C“.
The indicator value to the right alongside
the menu point „C“ begins to flash. You
can now alter the indicated value by using
the „UP“ or „DN“ buttons. The greater the
indicated value, the more the model will bank to the right the value can lie between 0
and 100. You confirm the indicated value by pressing the „SEL“ button again. Finally,
to confirm the settings press on the menu button again.
+
+
L
R
L
R
‒
‒
In case you don´t know the control functions of your Carrera RC helicopter yet,
please take some minutes before the first flight in or to make yourself familiar
with them. The descriptions left or right refer to the view out of the cockpit
(pilote´s view).
Menu-point: T1-4 - Throttle curve
Warning: altering the indicated values
under menu points T1, T2, T3 and T4
is only recommended to be carried out
by experienced hobby-pilots!
2
+
In the setting menu, select the menu point
T1, T2, T3 or T4. By pressing the „SEL“
button, you confirm selection of the menu
point T1, T2, T3 or T4. The indicator value to
the right alongside the menu point T1, T2,
T3 or T4 begins to flash. You can now alter
the indicated value by using the „UP“ or
„DN“ buttons.
The standard distribution is T1 = 25 %,
T2 = 50 %, T3 = 75 %, T4 = 100 %.
By altering the respective values, the
response behaviour of the throttle is
altered. You confirm the indicated value by
pressing the „SEL“ button again. Finally, to
confirm the settings press on the menu
button again.
‒
3
+
‒
4
Move the left lever (tail) to the left and
the helicopter´s nose turns (yaws)
round the main rotor´s axis in a circle to
the left. Move the left lever (tail) to the
right and the helicopter´s nose turns
(yaws) round the main rotor´s axis in a
circle to the right.
Use the trimmer for tail until you have
reached a stable neutral position of the
helicopter when hovering, without
moving the left lever (tail).
R
L
Throttle curve
Rotor speed
5
100%
With the throttle being at minimum position and the trim of throttle in medium or
lower position, the rotor blades are not
going to revolve. Push the throttle up to
increase the rotational speed of the
main rotor blades. Increase the rotational speed of the main rotor blades
and the model will start to ascend.
If you push down the throttle and thus
reduce the rotational speed of the main
rotor blades the helicopter will descend.
When the model has lifted off the
ground you can get it into stationary
hovering without abrupt ascending or
descending by carefully moving the
throttle upwards and downwards.
75%
L
50%
R
25%
0%
T1
T2
T3
T4
Sections / indicator values T1-4
6
‒
16
+
The forward-/backward lever controls
the helicopter´s pitch forward and backward. When shifting the lever forward
the nose of the helicopter will move
downwards and the helicopter will fly
forward. When shifting the forward-/
backward lever backward the helicopter
will move backwards and the helicopter
Choosing the flight area
7
will fly backward. Use the timmer for
forward-/backward in order to achieve a
stable neutral position and to avoid that
the helicopter flies forward or backward
when hovering without moving the forward-/backward lever.
+
‒
When shifting the lever for right/left
pitch to the left or right, the helicopter
pitches to the left or to the right and flies
to the left and right respectively. Use
the timmer for right/left pitch in order to
achieve a stable neutral position and to
avoid that the helicopter will fly to the
left or right when hovering without
moving the lever for right-/left pitch
78
R
L
The helicopter may be flown out of
doors, but only on calm days or days
of very little wind.
Please note that in spite of calm conditions near the ground, it can be
very windy a little further from the
ground.
If this advice is disregarded, the helicopter may suffer irreparable damage.
After having made yourself familiar with
the main control functions and having
chosen an appropriate area for flying
the helicopter, you can start the first
flight.
9
L
When being prepared for the first flight you should choose a closed room without any
persons or obstacles which is as big as possible. Due to the size and controllability of
the helicopter experienced pilotes may be able to fly the helicopter in relatively small
rooms. For your first flights we strongly recommend to choose a room with a minimum
floor space of 3 x 4 metres and 2.40 metres of height. After having trimmed your helicopter for flight and having made yourself familiar with the controlling and its functions
you may start flying in smaller and less open environments.
R
For more information on our RC-products please visit carrera-rc.com.
Troubleshooting
Problem
Cause
Solution
Remote control
does not work.
The ON/OFF-power switch is turned “OFF”.
Turn the ON/OFF-power switch “ON”.
The batteries have been wrongly inserted.
Check if the batteries have been correctly inserted.
The batteries do not have enough power.
Insert new batteries.
The ON/OFF power switch of the controller is set at “OFF”.
First set the ON/OFF power switch on the helicopter,
then that on the controller to “ON”.
The remote control is possibly not correctly frequency bound with the
receiver on the helicopter.
Please carry out a frequency bind between the helicopter and the
remote control as described in “frequency bind between model and
remote control”.
The power switch on the model or the controller is at “OFF”
Turn the ON/OFF-power switch “ON”.
The rechargeable battery is too weak or has run out of power.
Charge the battery (see chapter “Charging the battery”).
The battery connection on the helicopter is not made.
Make the plugged connection to be found on the helicopter.
You have altered the indicated values of menu points T1-4.
Please reset the indicated values of menu points T1-4
to the values of the standard distribution (P.16).
The rotor blades rotate too slowly.
Push the throttle up.
The battery´s power is not sufficient.
Charge the battery (see chapter “Charging the battery”).
The battery is too weak.
Charge the battery (see chapter “Charging the battery”).
Lost of throttle control.
Push the throttle down slowly.
The helicopter cannot be
controlled with the remote
control
The rotor blades do not rotate.
The helicopter does not lift.
During flight, the helicopter
loses speed and height
without any obvious reason.
The helicopter lands too
quickly.
Throttle has been pushed down too quickly.
For the latest version of these operating instructions and information on replacement and spare parts available, please visit carrera-rc.com in the service area.
Errors and changes excepted
Colours / final design – changes excepted
17
Technical changes and design-related changes excepted
Pictograms = symbolic photos
Chère cliente ! Cher client !
Déclaration de conformité
Nous vous félicitons pour l‘achat de votre maquette d‘hélicoptère Carrera RC qui a été
fabriqué selon le niveau actuel de la technique. Nous avons toujours pour ambition
d’améliorer et de perfectionner nos produits et nous réservons la possibilité de réaliser des modifications techniques relatives à la présentation et design de nos produits.
Les divergences de faible importance du produit, que vous avez acheté, par rapport
aux données et illustrations de ces instructions de montage et d’utilisation ne sauraient donner lieu à des réclamations de ce fait. Ces instructions de montage et d’utilisation forment partie intégrale du produit. Le fabricant décline toute responsabilité en
cas d’inobservation des instructions de montage et d’utilisation et des consignes de
sécurité y figurant. Veuillez conserver ces instructions de montage et d’utilisation, afin
que vous puissiez les consulter ultérieurement et et les remettre à tout utilisateur de
ce véhicule si besoin est.
Par la présente la société Stadlbauer Marketing + Vertrieb GmbH déclare que cette
maquette y compris le contrôleur est conforme aux exigences essentielles des directives européennes suivantes : EN 50371, EN 301489-1 v1.8.1:2008, EN 301489-06 V
1.4.1:2002, EN 50371, EN 300220- 2V21.1.2:2007, 2006/6/CE et 2004/108/CE relative
à la compatibilité électromagnétique et aux autres prescriptions importantes de la
directive 1999/5/CE (R&TTE). L’original de la déclaration de conformité est à votre
disposition sur le site internet carrera-rc.com.
Conditions de garantie
Les produits Carrera sont des produits de qualité technique élevée (PAS DE
JOUET) qui devraient être manipulés avec précaution. Veuillez impérativement
respecter les indications du mode d‘emploi. Tous les éléments sont soumis à
des contrôles approfondis (sous réserve de modifications techniques et des
véhicules destinées au perfectionnement du produit).
Fournitures
La responsabilité du fabricant est cependant engagée aux termes des conditions de garantie ci-après à supposer que le produit présente des défauts :
La société Stadlbauer Marketing + Vertrieb GmbH (ci-après désignée „Fabricant“)
garantit au client final (ci-après désigné „Client“) selon les clauses suivantes que la
maquette d‘hélicoptère Carrera RC livré au client (ci-après désigné „Produit“) sera
exempt de vices de matériel ou de fabrication durant une période de deux ans à partir
de la date d‘achat (délai de garantie). Le fabricant éliminera de tels vices selon sa
propre appréciation à ses frais en les réparant ou en livrant des pièces neuves ou
ayant subi une révision générale. La garantie ne s‘étend pas aux pièces d‘usure, aux
dommages dus à un traitement/utilisation non conforme ou à des interventions
externes. D‘autres revendications du client, en particulier de dommages et intérêts,
contre le fabricant sont exclus.
Les droits contractuels ou légaux du client (exécution ultérieure, résiliation du contrat,
réduction du prix, dommages et intérêts) vis-à-vis du vendeur correspondant, droits
existant si le produit n‘était pas exempt de vices lors du transfert du risque, ne sont
pas concernés par cette garantie.
Les droits issus de cette garantie du fabricant spéciale n‘existent que si
• le vice réclamé ne repose pas dans des dommages qui résultent d‘un emploi non
conforme ou non adapté aux directives prescrites dans le mode d‘emploi,
• il ne s‘agit pas de signes d‘usure dus à l‘emploi,
• le produit ne présente aucun signe qui permette de constater que des réparations
ou d‘autres interventions ont été effectuées par des ateliers non autorisés par le
fabricant,
• le produit n‘a été utilisé qu‘avec des accessoires autorisés par le fabricant et
• si le produit est envoyé avec le bon d‘achat original (facture / bon de caisse) et la
carte de garantie entièrement remplie, produit sur lequel aucune modification auto
nome n‘a été réalisée.
1x Hélicoptère Spider Fox
1x Controller 2,4 GHz avec écran LCD
1x Chargeur
4x Accus 1,5 V mignon AA
Avis destinés aux États de l’Union européenne : nous attirons l’attention sur l’obligation de garantie légale du vendeur, pour autant que cette obligation de garantie ne soit
pas restreinte par les conditions de la présente garantie.
(non rechargeable)
1x Cordon tour de cou
Le fabricant prend en charge les coûts de l’expédition et du renvoi du produit.
Cette garantie est valable dans l’ampleur susmentionnée et dans les conditions susmentionnées (y compris la présentation du bon d’achat original aussi en cas de
revente) pour chaque propriétaire ultérieur, futur du produit.
18
mentations en vigueur.
Il est strictement interdit d’utiliser des types différents de batteries ou des piles neuves
avec des piles usagées. Retirez toujours les batteries et piles vides du jouet. Ne jamais
recharger des piles, non rechargeables. Le chargement des accumulateurs doit impérativement se faire sous la surveillance des adultes. Retirez les accumulateurs du jouet avant
de les recharger. Il est interdit de court-circuiter les bornes de raccordement. Servez-vous
exclusivement du type de pile ou d’accumulateur recommandé ou d’un type de pile ou
d’accumulateur équivalent. En cas d’emploi régulier du chargeur, il faut contrôler le câble,
le raccord, les couvercles et les autres pièces de ce chargeur. En cas de dommage, le
chargeur ne doit être remis en service qu’après avoir subi une réparation.
Avertissements !
Un hélicoptère télécommandé N‘EST PAS UN JOUET et n‘est approprié que pour les
adolescent à partir de 14 ans !
Ce produit n‘est pas conçu pour être utilisé par des enfants sans la surveillance d‘une
personne chargée de l‘éducation. Un emploi non conforme peut entraîner de graves
blessures et/ou des dommages matériels.
Il doit être piloté avec prudence et circonspection et exige certaines facultés mécaniques et mentales. Le mode d‘emploi contient des consignes de sécurité et des prescriptions ainsi que des indications sur l‘entretien et l‘emploi du produit. Il faut impérativement avoir lu complètement et compris ce mode d‘emploi avant la première mise en
service. C‘est la seule manière d‘éviter les accidents accompagnés de blessures et de
dommages.
Ne faire voler que dans des pièces closes qui offrent suffisamment de place et suivre
toutes les consignes telles qu‘elles sont recommandées dans ce mode d‘emploi. S‘assurer qu‘aucun objet mobile, y compris les vêtements ou autres objets tels que des chevilles
et tournevis puissent s‘enchevêtrer dans les pales du rotor ou entrer en contact avec elles.
Veiller surtout à NE PAS tenir les mains à proximité des pales du rotor!
En tant qu‘utilisateur de ce produit, vous êtes seul responsable de la sécurité de manipulation de sorte que vous ni d‘autres personnes ou leur propriété ne subissent des
dommages ou soient mis en danger.
Cette maquette est pilotée via un signal radio qui peut être perturbé de l‘extérieur par
les sources les plus diverses. Ces perturbations peuvent entraîner une déperdition
temporaire de la commande. C‘est pourquoi il est toujours recommandé de conserver
une certaine distance de sécurité par rapport à la maquette afin de pouvoir éviter les
détériorations ou les blessures.
• Ne jamais utiliser cette maquette avec des accus faibles dans le contrôleur.
• Éviter les zones à forte circulation et animées. Veiller à disposer de suffisamment de place.
• Ne pas laisser si possible voler la maquette en pleine route ou dans des lieux publics
afin de ne blesser ni de mettre personne en danger.
• Respecter exactement les instructions et les avertissements pour ce produit et l‘équipement supplémentaire éventuel (chargeur, accus etc.) que vous utilisez.
• Si l’hélicoptère entre en contact avec des êtres vivants ou des objets durs, mettre
immédiatement le levier d’accélération en position zéro, à savoir le joystick gauche
doit être en butée inférieure !
• Veiller à mettre tous les produits chimiques, petites pièces ou éléments électriques
hors de portée des enfants.
• Éviter n‘importe quelle humidité, car elle peut endommager le système électronique.
• Il y a risque de graves blessures qui peuvent entraîner la mort si vous mettez des
pièces de votre maquette dans la bouche ou si vous la léchez.
Attention ! Assurez-vous avant le premier vol qu‘une obligation d‘assurance légale
existe dans votre pays concernant le modèle d‘avion dont vous avez fait l‘acquisition. Vous obtiendrez des informations auprès de votre assurance, à savoir si vos
modèles d‘avions anciens et nouveaux sont inclus dans votre assurance responsabilité
civile. Demandez une confirmation écrite et conservez-là. Contractez si nécessaire une
assurance spécifique pour le modélisme
Directives et avertissements pour l‘emploi de l‘accu Li-Ion
Le chargeur d‘accu Lithium-ion 8,4 V
1000 mA que vous achetez en même temps que
l‘hélicoptère Carrera RC, a été développé spécialement pour le chargement sûr de l‘accu
Li-Ion 7,4 V
650 mAh, vous devez quand même lire les consignes de sécurité et les
avertissements suivants avant d‘utiliser ou de charger l‘accu Li-Ion.
Remarque : Les accus Lithium-ion (Li-Ion) sont nettement plus sensibles que les accus
alcalins ou NiMh usuels qui sont utilisés normalement pour les modèles télécommandés
par radio. C‘est pourquoi toutes les prescriptions et avertissements doivent être suivis à la
lettre. En cas de mauvaise manipulation de l‘accu Li-Ion, il y a risque d‘incendie. En manipulant, chargeant ou utilisant l‘accu Li-Ion ci-joint, vous prenez tous les risques qui sont
liés aux accus au lithium. Si vous n‘êtes pas d‘accord avec ces conditions, renvoyez
immédiatement au commerçant la maquette de l‘hélicoptère intégrale dans sont état neuf
et non utilisé.
• Vous devez charger l‘accu Li-Ion 7,4 V
650 mAh dans un endroit sûr, à l‘écart de
matériaux inflammables.
• Ne jamais laisser l‘accu sans surveillance lors de sa charge. Quand vous chargez
l‘accu, vous devez toujours rester à proximité afin de surveiller la charge et de réagir le cas
échéant aux problèmes éventuels.
• Pour charger l‘accu après un vol, il faut tout d‘abord qu‘il refroidisse à la température
ambiante.
• Il ne faut utiliser que le chargeur Li-Ion 8,4 V
1000 mA correspondant. En cas de
non-respect de ces indications, il y a risque d‘incendie et donc un danger pour la santé et/
ou un risque de dommage matériel. NE JAMAIS utiliser un autre chargeur.
• Entreposer l‘accu à température ambiante dans un lieu sec.
• Rechargez votre accu après utilisation afin d’éviter une décharge profonde de
celui-ci. Chargez votre accu de temps en temps (environ tous les 2 à 3 mois). La
non-observation de l’utilisation mentionnée précédemment peut provoquer une
détérioration de l’accu.
• Pour le transport ou pour un entreposage temporaire de l‘accu, la température devrait
se situer entre 5-50 °C. Ne pas entreposer l‘accu et la maquette si possible dans la voiture
ou sous l‘effet direct du soleil. Si l‘accu est exposé à la chaleur dans la voiture, il peut être
endommagé ou prendre feu.
• Ne pas décharger l‘accu Li-Ion en dessous d‘une certaine valeur. Si la décharge de
l‘accu est trop profonde, sa puissance ainsi que sa durée de vie se réduisent et ceci peut
entraîner finalement à une défaillance totale. Les cellules Li-Ion ne devraient pas être
déchargées en dessous de 6 V. L‘accu Li-Ion dans l‘hélicoptère Carrera RC ne doit pas
tomber en dessous de 6 V de tension pendant le vol. L‘unité de commande de l‘hélicoptère
est équipée d‘un système de protection qui intervient en cas de chute de tension en dessous de 6 V. Si cette déconnection est déclenchée, l‘unité de commande réduit la puissance des moteurs afin que la tension de l‘accu ne tombe pas en dessous de 6 V. Si vous
remarquez une baisse de puissance,
vous devez atterrir automatiquement et éteindre le modèle étant donné qu’une autre
décharge inférieure à 6 volts pourrait abîmer durablement l’accu Li-Ion. Ceci entraîne une
réduction de la puissance et de la stabilité des vols suivants, voire une défaillance totale
de l‘accu. Par ailleurs si vous essayez plusieurs fois de continuer la décharge de l‘accu,
ceci peut aussi entraîner une défaillance de la commande bien que les moteurs tournent
encore. La tension minimale nécessaire pour le récepteur ou d‘autres systèmes électroniques ne sera plus atteinte. Il n‘est pas conseillé d‘épuiser l‘accu lors de chaque vol
jusqu‘à une tension de 6 V. Au lieu de cela, il faut surveiller l‘état de charge de l‘accu/hélicoptère pendant le vol et si l‘hélicoptère semble en vol stationnaire ou en vol normal utiliser des mouvements de pilotage plus puissants que d‘habitude, il faut faire atterrir la
maquette immédiatement. La décharge fréquente de l‘accu jusqu‘à 6 V peut quand même
détériorer cet accu durablement.
Remarque : Si la tension/puissance de l‘accu est faible, vous constaterez qu‘il faut
effectuer des opérations d‘équilibrage et/ou des mouvements de pilotage considérables
pour que l‘hélicoptère ne se mette pas en vrille. Ceci est le cas en général avant que la
tension de l‘accu n‘atteigne les 6 V et c‘est le bon moment pour interrompre le vol.
Informations importantes sur les accus Lithium-ion
Les accus Lithium-ion (Li-Ion) sont nettement plus sensibles que les accus alcalins ou
NiMh usuels qui sont utilisés normalement pour les modèles télécommandés par radio.
C‘est pourquoi il faut respecter très strictement les prescriptions et avertissements du
fabricant. En cas de mauvaise manipulation de l‘accu Li-Ion, il y a risque d‘incendie.
Toujours respecter les indications du fabricant quand vous éliminez des accus Li-Ion.
Prescriptions d‘élimination de vieux appareils électriques et électroniques
selon la réglementation WEEE (Déchets d‘équipements électriques et électroniques provenant des Équipements Électriques et Électroniques)
Le pictogramme ci-contre des poubelles sur
roues barrées est destiné à attirer votre attention
sur le fait qu’il est interdit de jeter les piles, accumulateurs, piles rondes, packs d’accus, batteries
d’appareils, appareils électriques usagés etc.
dans les ordures ménagères, étant donné que ces produits nuisent à l’environnement et à
la santé. Veuillez nous aider à sauvegarder l’environnement et la santé et attirez aussi
l’attention de vos enfants sur une élimination correcte des batteries, piles et appareils
électriques usagés. Remettez les batteries, piles et appareils électriques usagés aux
postes de collecte respectifs. Ces postes veilleront à leur recyclage aux termes des régle-
19
Description de l‘hélicoptère
Charger l‘accu Li-Ion
Veiller à ne charger l‘accu Li-Ion 7,4 V
650 mAh fourni avec la maquette qu‘à l‘aide
du chargeur 8,4 V
1000 mA Li-Ion fourni avec la maquette. Si vous essayez de
charger l‘accu avec un autre chargeur d‘accu Li-Ion ou un autre chargeur, ceci peut
entraîner de graves détériorations. Veuillez lire attentivement le chapitre précédent
avec les avertissements et les directives d‘emploi de l‘accu avant de continuer.
1
1
2
1
3
2
4
Côté droit
1. Système de rotor
2
2. Arrière
3. Douille pour charger
l’accu Li-Ion
Côté gauche
Procédez comme suit si vous chargez l‘accu se trouvant dans l‘hélicoptère avec le
chargeur correspondant :
• Relier le chargeur avec la prise de courant. La DEL verte sur le bloc d‘alimentation
indique que le chargeur est correctement relié avec la prise de courant voire que
l‘accu relié est entièrement chargé.
• Relier l‘accu se trouvant dans l‘hélicoptère avec le chargeur. La pièce de raccordement ou le raccord entre l‘accu et le chargeur sont élaborés de sorte qu‘une polarité
inversée est exclue.
• Si l‘accu déchargé a été correctement enfiché, le voyant DEL rouge sur le chargeur
s‘allume et indique ainsi que le processus de charge a commencé.
• La recharge d‘un accu déchargé (pas déchargé en profondeur) dure environ
1 heure. Quand l‘accu est plein, le voyant DEL s‘allume en vert sur le chargeur.
4. Patins d’atterrissage
5
5. Commutateur ON/OFF
Vue d‘ensemble des fonctions
du contrôleur
1
1
3
• Détacher la liaison à fiche entre l‘hélicoptère et le chargeur.
• Relier après la procédure de charge la liaison à fiche qui se trouve sur l‘hélicoptère
pour pouvoir voler.
• Détacher la liaison à fiche qui se trouve sur l‘hélicoptère quand l‘hélicoptère
n‘est pas utilisé. Le non-respect de cette prescription peut endommager l‘accu !
2
13
4
12
9
5
8
10
11
7
14
Remarque : Lors de la livraison, l‘accu Li-Ion contenu est chargé partiellement.C’est
pourquoi le premier processus de charge pourrait durer un peu moins longtemps.
15
6
2
16
17
17
18
1. Antenne
2. Commutateur puissance
(ON / OFF)
3. DEL de contrôle
4. Gaz
Arrière (rotation circulaire)
5. Trimmer pour le gaz
6. Trimmer pour l’arrière
7. Avant/Arrière
Inclinaison droite/gauche
8. Écran LCD
9. Touche UP (UP)
10. Touche DN (DN)
11. Touche Select (Sel)
12. Touche menu
13. Mode débutant / avancé
(appuyer à la verticale par le haut sur
le joystick droit du contrôleur.)
14. Trimmer pour Avant/Arrière
15. Trimmer pour
inclinaison droite/gauche
16. Compartiment à accu
17. Compartiment de rangement
pour rallonges de joystick
18. Rallonges de joystick à visser
sur le levier 4. & 7.
Insérer les accus dans le contrôleur
1
2
Ouvrir le compartiment à accu avec un
tournevis et insérer les accus dans le
contrôleur. Respecter la bonne polarité.
Après la fermeture du compartiment,
vous pouvez vérifier la fonctionnalité du
contrôleur à l‘aide du commutateur
puissance sur le devant. En position ON
du commutateur puissance et si le fonctionnement est correct, la DEL devrait
s‘allumer en rouge en haut au milieu du
contrôleur.
Si la LED de contrôle clignote rapidement et un signal sonore retentit, les
piles dans le contrôleur doivent être
échangées.
20
Préparation du premier vol
Liaison entre la maquette et le contrôleur
Cette check-list ne remplace pas le contenu de ce mode d‘emploi. Même si vous
pouvez l‘utiliser comme guide Quick-Start, nous vous conseillons impérativement de
lire tout d‘abord attentivement et intégralement ce mode d‘emploi avant de continuer.
• Vérifier le contenu de l‘emballage
• Relier le chargeur avec la prise de courant
• Charger l’accu Li-Ion comme cela est décrit au chapitre «Charger l’accu Li-Ion»
• Insérer quatre piles AA dans le contrôleur et veiller à la polarité correcte
• Chercher un environnement approprié pour le vol
• Placer l‘hélicoptère sur une surface plate
• Brancher l’hélicoptère et ensuite le contrôleur
• Vérifier la commande
• Se familiariser avec la commande
• Équilibrer l’hélicoptère le cas échéant comme cela est décrit à la p. 23 de sorte que
l’hélicoptère en vol stationnaire ne se déplace plus sans mouvements de commande.
• Faire voler la maquette
• Faire atterrir la maquette
• Débrancher le modèle
• Toujours débrancher la télécommande en dernier
1
ON
ON
L‘hélicoptère Carrera RC et le contrôleur
ont été reliés en usine. Si des problèmes
de communication entre l‘hélicoptère
Carrera RC et le contrôleur se produisent au début, exécuter une nouvelle
liaison.
• Switch on the helicopter at the ON-/OFF switch.
• The LED in the helicopter now flashes in rhythmically-accelerating sequence.
• Switch on the controller at the ON/OFF switch.
While connecting, the controller emits a signal tone.
• Place the charged helicopter on a flat surface.
• Allow the helicopter a few moments until the system is correctly initialised and is
ready for operation.
• The control LED now lights continuously once again, indicating that the connection
is ended.
Commutation entre le mode
Débutant/Avancé
Check-list pour la préparation du vol
Cette check-list ne remplace pas le contenu de ce mode d‘emploi. Même si vous
pouvez l‘utiliser comme guide Quick-Start, nous vous conseillons impérativement de
lire tout d‘abord attentivement et intégralement ce mode d‘emploi avant de continuer.
• Relier le raccord à fiche qui se trouve sur le modèle et mettre le modèle en marche
avec le commutateur ON/OFF.
• La DEL dans l’hélicoptère clignote à présent à un rythme accéléré.
• Mettre le contrôleur sous tension avec le commutateur ON/OFF. Pendant le processus
de liaison, un signal retentit sur le contrôleur.
• Placer l’hélicoptère chargé sur une surface plane.
• Laisser à l’hélicoptère un peu de temps jusqu’à ce que le système soit correctement
initialisé et prêt à l’emploi.
• La DEL dans l’hélicoptère reste à présent allumé en permanence et le signal sur le
contrôleur s’est arrêté.
• L’hélicoptère est à présent prêt à fonctionner.
• Si l‘hélicoptère ne réagit pas, exécutez le cas échéant la liaison du modèle avec le
contrôleur, décrite plus bas.
• Faire voler la maquette
• Faire atterrir la maquette
• Éteignez le modèle avec le commutateur ON/OFF et coupez la liaison à fiche qui se
trouve sur l’hélicoptère.
• Toujours débrancher la télécommande en dernier
1
Lors de l‘activation du contrôleur et de l‘hélicoptère, le modèle se trouve en principe en
mode débutant.
Pour changer entre le mode débutant et le mode avancé avec un contrôleur et
l‘hélicoptère activé, appuyer à la verticale par le haut sur le joystick droit du contrôleur.
Une commutation peut également s‘effectuer en plein vol. Lors de la commutation en
mode avancé, un seul bip retentit, en mode débutant, c‘est un double bip.
L‘hélicoptère réagit plus sensiblement à vos mouvements sur le contrôleur en
mode avancé qu‘en mode débutant.
Remarque : Exercez-vous au pilotage de l‘hélicoptère tout d‘abord en mode
débutant jusqu‘à ce que vous maîtrisiez le modèle. Commutez ensuite en mode
avancé. L‘hélicoptère réagit plus sensiblement à vos mouvements sur le contrôleur en
mode avancé !
21
Explication de l‘affichage de l‘écran LCD
Affichage standard et vue d’ensemble des fonctions
Point de menu: R – Rotation à droite (rotation circulaire)
Sélectionnez dans le menu de réglage le
point de menu „R“. En appuyant sur la
touche „SEL“, vous confirmez le point de
menu „R“. La valeur d‘affichage à droite à
côté du point de menu „R“ commence à
clignoter. Avec les touches „UP“ et
„DN“,vous pouvez modifier la valeur d‘affichage. Plus la valeur d‘affichage est grande, plus le modèle pivote vers la droite bien
que la valeur peut se situer entre 0 et 100. Le réglage standard est 100. En appuyant
de nouveau sur la touche „SEL“, vous confirmez la valeur d‘affichage. Appuyez pour
terminer sur la touche de menu afin de mémoriser les réglages.
7
1
8
2
10
4
9
3
5
12
6
1. Affichage du levier des gaz
2. Affichage queue
3. Affichage trim queue
(Rotation circulaire)
4. Affichage trim des gaz
5. Affichage de l’intensité du
signal radio
11
6. Point de menu, Y = affichage
standard
7. Affichage avance retour
8. Affichage de l’inclinaison
gauche/droite
9. Affichage trim gauche/droite
10. Affichage trim avance/retour
11. Affichage de l’état de la batterie
12. Batterie tension en volts (V)
Point de menu: F – Mouvement vers l‘avant
Sélectionnez dans le menu de réglage le
point de menu „F“. En appuyant sur la
touche „SEL“, vous confirmez le point de
menu „F“. La valeur d‘affichage à droite à
côté du point de menu „F“ commence à
clignoter. Avec les touches „UP“ et „DN“,
vous pouvez modifier la valeur d‘affichage.
Plus la valeur d‘affichage est grande, plus le modèle pivote vers l‘avant bien que la
valeur peut se situer entre 0 et 100. En appuyant de nouveau sur la touche „SEL“, vous
confirmez la valeur d‘affichage. Appuyez pour terminer sur la touche de menu afin de
mémoriser les réglages.
Vue d’ensemble des points de menu
Vous accédez aux points de menu de réglage en appuyant 3 secondes sur la touche
menu. Le dernier point de menu utilisé clignote et apparaît dans la zone inférieure de
l‘écran LCD. Vous naviguez dans le menu de réglage avec les touches „UP“ ou „DN“.
Sélectionnez le point de menu respectif avec la touche „SEL“ et la valeur d‘affichage
clignote. Vous pouvez modifier la valeur d‘affichage du point de menu sélectionné
avec les touches „UP“ ou „DN“. En appuyant de nouveau sur la touche „SEL“, vous
confirmez la valeur d‘affichage et le point de menu recommence à clignoter. Appuyez
pour terminer sur la touche de menu afin de mémoriser les réglages.
L
R
F
b
A
C
T1-4
–
–
–
–
–
–
–
Point de menu: b – Mouvement vers l‘arrière
Sélectionnez dans le menu de réglage le
point de menu „b“. En appuyant sur la
touche „SEL“, vous confirmez le point de
menu „b“. La valeur d‘affichage à droite à
côté du point de menu „b“ commence à
clignoter. Avec les touches „UP“ et „DN“,
vous pouvez modifier la valeur d‘affichage.
Plus la valeur d‘affichage est grande, plus le modèle pivote vers l‘arrière bien que la
valeur peut se situer entre 0 et 100. En appuyant de nouveau sur la touche „SEL“, vous
confirmez la valeur d‘affichage. Appuyez pour terminer sur la touche de menu afin de
mémoriser les réglages.
Rotation à gauche (rotation circulaire)
Rotation à droite (rotation circulaire)
Mouvement vers l‘avant
Mouvement vers l‘arrière
Inclinaison à gauche
Inclinaison à droite
Courbe des gaz
Point de menu: L - Rotation à gauche (rotation circulaire)
Point de menu: A - Inclinaison à gauche
Sélectionnez dans le menu de réglage le
point de menu „L“. En appuyant sur la
touche „SEL“, vous confirmez le point de
menu „L“. La valeur d‘affichage à droite à
côté du point de menu „L“ commence à
clignoter. Avec les touches „UP“ et
„DN“,vous pouvez modifier la valeur d‘affichage. Plus la valeur d‘affichage est grande, plus le modèle pivote vers la gauche bien
que la valeur peut se situer entre 0 et 100. Le réglage standard est 100. En appuyant
de nouveau sur la touche „SEL“, vous confirmez la valeur d‘affichage. Appuyez pour
terminer sur la touche de menu afin de mémoriser les réglages.
Sélectionnez dans le menu de réglage le
point de menu „A“. En appuyant sur la
touche „SEL“, vous confirmez le point de
menu „A“. La valeur d‘affichage à droite à
côté du point de menu „A“ commence
àclignoter. Avec les touches „UP“ et „DN“,
vous pouvez modifier la valeur d‘affichage.
Plus la valeur d‘affichage est grande, plus le modèle pivote vers la gauche bien que la
valeur peut se situer entre 0 et 100. En appuyant de nouveau sur la touche „SEL“, vous
confirmez la valeur d‘affichage. Appuyez pour terminer sur la touche de menu afin de
mémoriser les réglages.
22
Pilotage de l‘hélicoptère
Point de menu: C - Inclinaison à droite
1
Sélectionnez dans le menu de réglage le
point de menu „C“. En appuyant sur la
touche „SEL“, vous confirmez le point de
menu „C“. La valeur d‘affichage à droite à
côté du point de menu „C“ commence à
clignoter. Avec les touches „UP“ et „DN“,
vous pouvez modifier la valeur d‘affichage.
Plus la valeur d‘affichage est grande, plus le modèle pivote vers la droite bien que la
valeur peut se situer entre 0 et 100. En appuyant de nouveau sur la touche „SEL“, vous
confirmez la valeur d‘affichage. Appuyez pour terminer sur la touche de menu afin de
mémoriser les réglages.
+
+
L
‒
‒
Si vous ne connaissez pas encore les fonctions de pilotage de votre hélicoptère
Carrera RC, prenez quelques minutes de temps avant le premier vol pour vous
familiariser avec elles. La description Gauche ou Droite correspond à une vue à
partir du cockpit (vue du pilote).
Point de menu: T1-4 - Courbe des gaz
Attention : une modification des valeurs
d‘affichage aux points de menu T1, T2,
T3 et T4 est recommandée uniquement
pour les pilotes expérimentés !
2
+
Sélectionnez dans le menu de réglage le
point de menu T1, T2, T3 ou T4. En
appuyant sur la touche „SEL“, vous confirmez le point de menu T1, T2, T3 ou T4. La
valeur d‘affichage à droite à côté du point
de menu T1, T2, T3 ou T4 commence à
clignoter. Avec les touches „UP“ et „DN“,
vous pouvez modifier la valeur d‘affichage.
La répartition standard est T1 = 25%,
T2 = 50%, T3 = 75%, T4 = 100%
La réponse du levier des gaz est décalée
par la modification des valeurs.
En appuyant de nouveau sur la touche
„SEL“, vous confirmez la valeur d‘affichage.
Appuyez pour terminer sur la touche de
menu afin de mémoriser les réglages.
‒
3
+
‒
4
R
5
100%
75%
L
50%
R
25%
0%
T1
T2
T3
Si le levier du gaz se trouve à la butée la
plus inférieure et la correction du levier du
gaz se trouve à la position moyenne ou
sous la position moyenne, les pales du
rotor ne se mettront pas en rotation.
Poussez le levier des gaz vers le haut afin
d’augmenter la vitesse de rotation des
pales principales. Si vous augmentez la
vitesse de rotation des pales du rotor
principal, la maquette commence à
monter.
Si vous réduisez l’amplitude du levier du
gaz et donc la vitesse de rotation des
pales du rotor principal, l’hélicoptère descend. Quand la maquette a quitté le sol,
vous pouvez la mettre en vol stationnaire
en bougeant prudemment le levier du
gaz, vers le haut ou vers le bas sans
qu’elle ne monte ou ne descende abruptement.
Si vous bougez le levier de gauche
(arrière) vers la gauche, le nez de l‘hélicoptère se met en rotation (louvoie)
autour de l‘axe du rotor principal en faisant une rotation circulaire vers la gauche.
Si vous bougez le levier de gauche
(arrière) vers la droite, le nez de l‘hélicoptère se met en rotation (louvoie) autour de
l‘axe du rotor principal en faisant une
rotation circulaire vers la droite. Utiliser le
trimmer pour l‘arrière jusqu‘à ce que l‘hélicoptère ait atteint une position neutre
stable en vol stationnaire sans bouger le
levier de gauche (arrière).
L
Courbe des gaz
Régime du rotor
R
L
R
T4
Volets / Valeur d‘affichage T1-4
6
‒
23
+
Le levier Avant/Arrière commande l‘inclinaison de l‘hélicoptère vers l‘avant/
arrière. Si vous appuyez le levier vers
l‘Avant, le nez de l‘hélicoptère se déplace
vers le bas et l‘hélicoptère s‘envole en
avant. Si vous appuyez le levier Avant/
Arrière vers l‘arrière, l‘hélicoptère se
déplace vers l‘arrière et vole en marche
Choix de la zone de vol
7
arrière. Utiliser le trimmer pour Avant/
Arrière pour atteindre une position neutre
stable et pour empêcher l‘hélicoptère de
voler en vol stationnaire en marche avant
ou en marche arrière sans bouger le
levier Avant/Arrière.
+
‒
Si vous poussez vers la gauche ou la
droite le levier pour l‘inclinaison Droite/
Gauche, l‘hélicoptère s‘incline vers la
gauche ou la droite et exécute un mouvement vers la gauche ou la droite.
Utiliser le trimmer pour l‘inclinaison
Droite/Gauche pour atteindre une position neutre stable et pour empêcher
l‘hélicoptère de voler en vol stationnaire
en inclinaison gauche ou droite sans
bouger le levier pour l‘inclinaison
Droite/Gauche.
78
R
L
Quand vous êtes prêt pour votre premier vol, vous devriez choisir une pièce close qui
doit être aussi grande que possible sans la présence de personnes et d‘obstacles. En
raison de la taille et la facilité de pilotage de l‘hélicoptère, les pilotes expérimentés sont
capables de faire voler l‘hélicoptère aussi dans des pièces fermées relativement
petites. Mais pour vos premiers vols, nous recommandons une taille minimale de la
pièce de 3 fois 4 mètres de surface et de 2,40 mètres de haut. Après avoir trimmé votre
hélicoptère et vous être familiarisé avec son pilotage et ses facultés, vous pouvez
aussi risquer de le faire voler dans des environnements plus petites et moins libres.
L‘hélicoptère peut voler à l‘extérieur
mais uniquement en absence de vent
ou par vent très faible.
Ne pas oublier que malgré l‘absence
de vent à proximité du sol, il peut y
avoir beaucoup de vent à une certaine distance du sol.
Le non-respect de cette indication
peut entraîner la perte totale de l‘hélicoptère.
9
L
Vous trouverez d‘autres informations sur nos produits RC sous carrera-rc.com.
Après vous être familiarisé avec les
fonctions principales de pilotage, vous
êtes prêts pour effectuer votre premier
vol après avoir choisi la zone de vol.
R
Solutions aux problèmes
Problème
Cause
Remède
Le contrôleur
ne fonctionne pas.
Le commutateur puissance ON/OFF se trouve sur “OFF”.
Le commutateur puissance ON/OFF se trouve sur “ON”.
L’insertion des accus est incorrecte.
Vérifier si l’insertion des accus est correcte.
Les accus n’ont plus assez d’énergie.
Insérer des nouveaux accus
L’interrupteur ON/OFF du contrôleur est sur “OFF”.
Tout d’abord enclencher l’interrupteur ON/OFF de l’hélicoptère
puis placer celui du contrôleur sur “ON”.
Le cas échéant, le contrôleur n’est pas correctement relié au
récepteur dans l’hélicoptère.
Établir une liaison entre l’hélicoptère et le contrôleur comme décrit
sous “Liaison du modèle avec le contrôleur”.
Le commutateur puissance sur le modèle ou le contrôleur se trouve
sur “OFF”.
Le commutateur puissance ON/OFF se trouve sur “ON”.
L’accu est trop faible ou vide.
Charger l’accu (cf. Chapitre “Charger l’accu”)
La liaison avec l’accu sur l’hélicoptère n’est pas établie.
Relier la liaison à fiche qui se trouve sur l’hélicoptère.
Vous avez modifié les valeurs d’affichage des points de menu T1-4.
Réglez à nouveau les valeurs d’affichage des points de menu T1-4
aux valeurs de la répartition standard (page 23).
Les pales du rotor bougent trop lentement.
Poussez le levier des gaz vers le haut.
La puissance de l’accu ne suffit pas.
Charger l’accu (cf. Chapitre “Charger l’accu”).
L’hélicoptère perd de la vitesse
sans raison manifeste pendant
le vol et descend.
L’accu est trop faible.
Charger l’accu (cf. Chapitre “Charger l’accu”).
L’hélicoptère atterrit trop vite.
Perte de contrôle via le levier du gaz.
Tirer lentement le levier du gaz vers le bas.
L’hélicoptère ne se laisse pas
piloter avec le contrôleur.
Les pales du rotor ne bougent
pas.
L’hélicoptère ne monte pas.
Le levier du gaz a été tiré vers le bas trop rapidement.
Vous trouverez la version la plus actuelle de ce mode d‘emploi et les informations sur les pièces de rechange disponibles sur carrera-rc.com dans la zone de service.
Sous réserve d´erreurs et de modifications
Couleurs / design final – sous réserve de modifications
24
Sous réserve de modifications techniques et relatives au design
Pictogrammes = photos symboliques