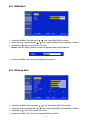
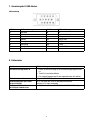
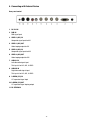
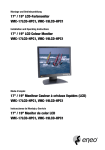
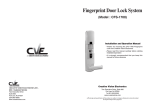
1
Montage und Betriebsanleitung
LCD/TFT-Monitor, VMC-17LCD-OPC2, VMC-19LCD-OPC2
Installation and Operating Instructions
LCD/TFT Monitor, VMC-17LCD-OPC2, VMC-19LCD-OPC2
Mode d’emploi
Moniteur LCD/TFT, VMC-17LCD-OPC2, VMC-19LCD-OPC2
Inhalt
Sommaire
1. Sicherheitshinweise / Pflege.................................. 3
1. Consignes de sécurité / Maintenance.................. 23
2. Allgemeine Beschreibung...................................... 4
2. Description générale............................................ 24
3. Lieferumfang......................................................... 4
3. Contenue de la livraison...................................... 24
4. Anschluss an externe Geräte................................. 5
4. Raccordement à un appareil externe................... 25
5. Fernbedienung...................................................... 6
5. Télécommande.................................................... 26
6. Steuerung und Funktionen..................................... 7
6. Commande et fonctions....................................... 27
6.1 Tastenfunktionen........................................... 7
6.1 Fonctions des touches................................. 27
6.2 Beschreibung des OSD-Menüs...................... 7
6.2 Description du menu OSD........................... 27
7. Zuordnung der D-SUB-Stecker............................ 11
7. Affectation de la prise D-SUB.............................. 31
8. Fehlersuche......................................................... 11
8. Dépannage.......................................................... 31
9. Technische Daten................................................ 12
9. Caractéristiques techniques................................ 32
10. Maßzeichnungen............................................33-34
10. Croquis...........................................................33-34
Contents
1. Safety Instructions / Maintenance........................ 13
2. General Description............................................. 14
3. Parts Supplied..................................................... 14
4. Connecting with External Device.......................... 15
5. Remote Controller................................................ 16
6. Control and Functions.......................................... 17
6.1 Key Functions............................................. 17
6.2 OSD Menu Description................................ 17
7. D-SUB Connector Pin Assigments........................ 21
8. Troubleshooting................................................... 21
9. Specifications...................................................... 22
10. Dimensional Drawings....................................33-34
Betriebsanleitung
Installation and Operating Instructions
Mode d’emploi
www.videor.com
⇒
www.eneo-securitiy.com
Instrukcja instalacji i obsługi
1. Sicherheitshinweise / Pflege
• Bevor Sie das Gerät anschließen und in Betrieb nehmen, lesen Sie bitte zuerst die Sicherheitshinweise und die Betriebsanleitung.
• Bewahren Sie die Betriebsanleitung für spätere Verwendung sorgfältig auf.
• Der Monitor gibt bei Betrieb nur wenig Wärme ab, trotzdem muss die Wärme abgeführt und ausreichend Frischluft zugeführt werden.
• Um Wärmestaus zu verhindern, Lüftungsschlitze niemals abdecken.
• Um die Luftzirkulation zu gewährleisten, auf ausreichenden Abstand zu anderen Geräten oder zu Wänden achten. Wärmestaus verringern die Lebensdauer des Gerätes und können es im Extremfall in Brand setzen.
• Bei Betrieb in geschlossenen Regalwänden sind unbedingt ausreichende Abstände einzuhalten.
• Wird der Monitor aus kalter Umgebung in einen warmen Raum gebracht, so ist erst abzuwarten bis er Raum-
temperatur angenommen hat.
•
Gerät und Anschlusskabel gegen Eindringen von Wasser und Feuchtigkeit schützen. Sollte dennoch Feuchtigkeit eingedrungen sein, das Gerät nie unter diesen Bedingungen einschalten, sondern zur Überprüfung an eine qualifizierte Servicestelle geben. Eindringende Feuchtigkeit kann das Gerät zerstören und birgt darüber hinaus die Gefahr eines Stromschlages.
• Das Gerät nur in einem Temperaturbereich von 0°C bis +50°C und einer Luftfeuchtigkeit bis max. 90% betreiben.
• Stellen Sie den Monitor nicht in direktes Sonnenlicht oder neben ein Fenster. Feuchtigkeit und direktes Sonnen-
licht können starke Schäden verursachen.
• Niemals metallische oder andere Gegenstände durch die Lüftungsschlitze stecken, dies könnte das Gerät dauerhaft schädigen.
• Stellen Sie keine schweren Gegenstände auf dem Gerät ab.
• Üben Sie keinen Druck auf den LCD-Bildschirm aus. Übermäßiger Druck kann das Display bleibend beschädigen.
• Vor der Reinigung oder wenn das Gerät über einen längeren Zeitraum nicht benutzt wird, ist es vom Netz zu trennen. Dazu die Netzzuführung niemals am Kabel, sondern immer nur am Stecker aus der Steckdose ziehen.
• V erlegen Sie die Verbindungskabel sorgfältig und stellen Sie sicher, dass die Kabel nicht mechanisch beansprucht,
geknickt oder beschädigt werden und keine Feuchtigkeit eindringen kann.
• Falls Funktionsstörungen auftreten, benachrichtigen Sie bitte Ihren Lieferanten.
• Das Gerät darf nur von qualifiziertem Servicepersonal geöffnet werden. Fremdeingriffe beenden jeden Garantie-
anspruch.
• Wartung und Reparaturen dürfen nur von autorisiertem Fachpersonal ausgeführt werden. Vor Öffnen des Gehäuses ist eine Netztrennung erforderlich.
• Verwenden Sie nur Originalersatzteile und Original-Zubehör von Videor E. Hartig GmbH.
• Zur Reinigung der Gehäuse immer nur ein mildes Haushaltsmittel verwenden. Niemals Verdünner oder Benzin benutzen, dies kann die Oberfläche dauerhaft schädigen.
• Der Benutzer dieses Systems ist dafür verantwortlich, dass er sich über örtliche Bestimmungen, Landes- und Bundesgesetze und Verordnungen bezüglich der Aufzeichnung und Überwachung von Audiosignalen informiert und sich an diese Bestimmungen hält.
HINWEISE zum Einbrenneffekt bei TFT-Monitoren
• Normalerweise kann sich das Bild bei einem LCD-Bildschirm nicht einbrennen, so wie es der Fall bei Röhren-
Monitoren ist.
• Jedoch kann ein „Memory Effekt” auftreten, der meist nach mehrstündiger Anzeige des gleichen Bildes sichtbar wird. Bei stehenden Bildern richten sich die Flüssigkeitskristall-Moleküle in einer bestimmten Art und Weise aus und können letztlich so träge werden, dass sie sich nicht mehr vollständig regenerieren.
• Kommt es doch einmal zu einem Nachbild, kann das mittels eines Generators erzeugten Weißsignals korrigiert werden.
• Der Effekt ist nicht als Mangel zu sehen, sondern ist im Aufbau und der Arbeitsweise der LCD Panels begründet. Ein Garantieanspruch kann auf Grund dieses Effektes nicht abgeleitet werden. Näheres auf Anfrage.
2. Allgemeine Beschreibung
• Professioneller LCD/TFT Monitor
• Automatische PAL/NTSC-Erkennung
• Mehrsprachige Bildschirm-Menüs
• 3D Kammfilter / Zeilenentflechtung
• Auflösung: 1280x1024 Pixel (SXGA)
• 2xFBAS, S-Video, RGB und Audio-Eingänge
• Hoher Kontrast und Helligkeitsumfang
• Schnelle Signalumschaltung / Kurze Reaktionszeit
• Integrierte Lautsprecher
• Betriebsspannung: 12VDC
• Robustes, kompaktes Kunststoffgehäuse
• Integrierter Standfuß
3. Lieferumfang
1x LCD/TFT-Monitor
1x Netzgerät 100~240VAC/12VDC mit Netzkabel
1x VGA-Kabel
1x Mehrsprachige Betriebsanleitung
4. Anschluss an externe Geräte
Bedienelemente auf der Rückseite
1. DC 12V IN
2. RGB IN
RGB-Signaleingang
3. VIDEO 1 (AV1) IN
Videosignaleingang für AV1
4. VIDEO 1 (AV1) OUT
Videoschleifenausgang für AV1
5. VIDEO 2 (AV2) IN
Videosignaleingang für AV2
6. VIDEO 2 (AV2) OUT
Videoschleifenausgang für AV2
7. AUDIO L IN
Audioeingang links
Dieser Eingang ist für AV1, AV2, S-VIDEO
8. AUDIO R IN
Audioeingang rechts
Dieser Eingang ist für AV1, AV2, S-VIDEO
9. S-VIDEO (Y/C) IN
Y/C getrennter Signaleingang
10.S-VIDEO (Y/C) OUT
Y/C getrennter Signalschleifenausgang
11.PC STEREO IN
5. Fernbedienung
1. POWER
Ein-/Ausschalten. Es dauert ein paar Sekunden, bis ein Bild erscheint.
2. MUTE
Audiosignal vorübergehend stumm schalten
3. VIDEO1
1
2
3
4
5
6
7
8
Auswahl von Videoquelle 1
4. VIDEO2
Auswahl von Videoquelle 2
5. S-VIDEO
9
Auswahl der S-Video-Quelle
6. RGB
11
Auswahl der RGB-Quelle
7. AUTO
Automatische Positionierung einer PC-Quelle
8. COLOR TEMP.
Auswahl der Farbtemperatur
)
9. VOL− / VOL+ (
Erhöhen oder Verringern der Lautstärke
10.UP / DOWN (
)
Aufruf des OSD-Menüs
11.MENU/EXIT
Aktivieren und Verlassen des OSD-Menüs
12.KEY LOCK
Verhindert den unbefugten Betrieb der Geräte durch Sperren der Tasten.
Key Lock-Funktion durch Drücken und Halten der Tasten und für fünf Sekunden.
10
10
9
12
6. Steuerung und Funktionen
6.1 Tastenfunktionen
1. MENU / EXIT
Aktiviert OSD und schaltet OSD ab
2. SOURCE /
Wählt die Eingangsquelle und bewegt das OSD-Menü
3. AUTO/
4. 5. 6. Bewegt das OSD-Menü und die Selbstregulierung der RGB-Quelle
(VOL-)
Senkt die Lautstärke und wechselt zum vorherigen Menü
(VOL+)
Erhöht die Lautstärke und wählt das OSD-Menü
/I
Ein- und Ausschalten (ON oder OFF) Es besteht eine kurze Verzögerung, bevor die Bildschirmanzeige erscheint.
Die Power LED (neben der Ein/-Ausschalttaste) leuchtet grün, wenn das Gerät eingeschaltet ist (ON).
Durch erneutes Drücken der Ein/-Ausschalttaste schaltet das Gerät aus, und die Power LED leuchtet rot.
7. LED LENSE (LED-Objektiv) / IR RECEIVE LENSE (IR-Empfänger-Objektiv)
6.2 Beschreibung des OSD-Menüs
Menüwahl
1. Taste MENU drücken, um zum Hauptmenü zu gelangen.
2. Verwenden Sie die und Pfeiltasten, um die Wahl zu markieren.
3. Drücken Sie die / OK Taste, um auszuwählen.
4. Verwenden Sie die und Pfeiltaste, um die Wahl zu markieren.
5. Verwenden Sie die und Pfeiltaste, um die Einstellung einer gewählten Position zu justieren.
ANMERKUNG: Wenn Sie den RGB-Port nicht anschließen, wird das RGB SETUP-Menü nicht gewählt.
6.2.1 INPUT Select
Die Eingänge können auf VIDEO1, VIDEO2, S-VIDEO und RGB-Modus eingestellt werden.
1. Drücken Sie die Taste SOURCE (Quelle) und dann die Tasten auf die gewünschte Quelle zu verschieben.
/
, um die Markierung 2. Drücken Sie die Taste , um die Quelle auszuwählen.
3. Drücken Sie die Taste MENU/EXIT, um das Menü INPUT zu verlassen.
6.2.2 PICTURE Menü
1. Drücken Sie die MENU / EXIT Taste und dann die 2. Drücken Sie die / OK Taste und dann die /
/
Taste, um das Menü PICTURE zu wählen.
Taste, um die Einstellposition, die Sie benötigen, zu wählen.
3. Drücken Sie die / OK Taste, um die Position zu aktivieren.
Beispiel: Wenn Sie BRIGHTNESS wählen, dann erscheint das Bild unten auf dem Bildschirm.
4. Drücken Sie die MENU / EXIT Taste, um zum vorherigen Menü zu wechseln.
5. Drücken Sie die Taste MENU/EXIT und dann die Tasten /
, um das Menü REVERSE SCAN aufzurufen.
Wenn Sie den REVERSE SCAN einschalten, wird das angezeigte Bild um 180˚ gedreht.
6.2.3 SOUND Menü
1. Drücken Sie die MENU Taste und dann die /
2. Drücken Sie die Taste und dann die Taste, um die Einstellposition, die Sie benötigen, zu wählen.
/
Taste, um das Menü SOUND zu wählen.
3. Drücken Sie die Taste, um die Position zu aktivieren.
Beispiel: Wenn Sie TREBLE auswählen, erscheint die folgende Anzeige auf dem Bildschirm.
4. Drücken Sie die MENU Taste, um zum vorherigen Menü zu wechseln.
6.2.4 RGB Setup Menü
1. Drücken Sie die MENU Taste und dann die /
2. Drücken Sie die Taste und dann die Taste, um die Einstellposition, die Sie benötigen, zu wählen.
/
Taste, um das Menü RGB SETUP zu wählen.
3. Drücken Sie die Taste, um die Position zu aktivieren.
4. Drücken Sie die MENU / EXIT Taste, um zum vorherigen Menü zu wechseln.
5. DPMS: Wenn Sie am PC-Bildschirm die DPMS-Funktion einschalten, schaltet der Bildschirm ohne PC-Eingabe-
signal in den Stromsparmodus. Wenn DPMS ausgeschaltet ist, erscheint auf dem Bildschirm dauerhaft der Hinweis „NO SIGNAL”.
6.2.5 FUNCTION Menü
1. Drücken Sie die MENU Taste und dann die /
2. Drücken Sie die Taste und dann die Taste, um die Einstellposition, die Sie benötigen, zu wählen.
/
Taste, um das Menü FUNCTION zu wählen.
3. Drücken Sie die Taste, um die Position zu aktivieren.
4. Drücken Sie die MENU Taste, um zum vorherigen Menü zu wechseln.
LANGUAGE:
Wählen Sie zwischen den Sprachen Deutsch, Englisch, Französisch, Spanisch, Italienisch
und Polnisch.
DEFAULT:
Wählen Sie RESET, um alle Einstellung auf die Werkeinstellungen zurückzusetzen.
BUTTON LOCK Wenn Sie die Button Lock-Funktion einschalten (ON), sind die Tasten an der Frontseite
(Tastensperre): wirkungslos.
Zum Entriegeln der Tastensperre die Tasten
halten.
10
und
für 5Sek. gleichzeitig gedrückt
7. Zuordnung der D-SUB-Stecker
Stiftzuordnung
Stift-Nr.
1
2
3
4
5
6
7
8
Stiftbezeichnung
Rot Video
Grün Video
Blau Video
Erdung
Erdung
Rot Erdung
Grün Erdung
Blau Erdung
Stift-Nr.
9
10
11
12
13
14
15
Stiftbezeichnung
NC
Signal Cable Detect
Erdung
SDA (für DDC)
H-SYNC
V-SYNC
SCL (für DDC)
8. Fehlersuche
Problem
Der Bildschirm zeigt nichts an.
Mögliche Lösung
1. Prüfen, ob das Gerät richtig an die Stromversorgung angeschlossen ist.
2. Taste Ein/-Ausschalten drücken.
Bildschirm ist zu hell oder zu dunkel.
Die Bildschirmgröße passt nicht
für das PC-Signal.
Die Farben des Bildschirms sehen
im PC-Signal sonderbar aus.
3. Das richtige Eingangssignal für den angeschlossenen Port wählen.
Helligkeit (BRIGHTNESS) regulieren
AUTO Taste unter den Tasten an der Vorderseite drücken. (wird nur im PC-Signal verwendet)
Im OSD-Menü und dann im FUNCTION-Menü AUTO-ADJUST betätigen
11
9. Technische Daten
Typ
Art.-Nr.
VMC-17LCD-OPC2
VMC-19LCD-OPC2
90571
90572
VIDEO
Bildschirmdiagonale
17” (2CCFL)
19” (2CCFL)
Pixeltyp
Active Matrix TFT
Max. Auflösung
Pixelgröße
1280 x 1024 @ 60Hz
0,264 x 0,264mm
0,294 x 0,294mm
Helligkeit
300 cd/2 (250 cd/2)
Kontrastverhältnis
800: 1
Bildformate
5: 4
Betrachtungswinkel (H/V)
170˚/ 160˚ (H/V)
Farbstufen
16,7 Millionen
Reaktionszeit
< 5ms
Videonorm
NTSC / PAL / SECAM
Frequenz (H)
31 ~ 63KHz
Frequenz (V)
55 ~ 75Hz
Lebensdauer der BildschirmHintergrundbeleuchtung
50.000 Std.
ABMESSUNGEN UND GEWICHT
Außenmaße B x T x H
Nettogewicht
370 x 313 x 56 (mm),
409 x 344 x 58.5 (mm),
4,5kg)
5,5kg
445 x 235x 430mm,
490 x 235 x 465mm,
Verpackungsgewicht
6,0kg
6,5kg
Leistungsaufnahme
35W
42W
Maße Verpackung B x T x H
Optionales Zubehör
Das aktuelle optionale Zubehör finden Sie auf unserer Homepage: www.videor.com
10. Maßzeichnungen
Siehe Seite 33-34
12
1. Safety Instructions / Maintenance
• Read these safety instructions and the operation manual first before you connect and power to the unit.
• Keep the operation manual at a safe place for later reference.
• The monitor generates only little heat. However, care has to be taken that the warm air can get out and fresh air gets in.
• Never cover the ventilation slots to avoid overheating.
• Keep sufficient distance to other units to ensure air circulation. Overheating shortens the life time of the unit and could set it on fire in worst case.
• If the unit is placed in closed racks it is mandatory to keep sufficient distances.
• If the monitor is brought to a warm room from a cold place allow it to warm up before you power it on.
• Protect unit and cables from entry of moisture and humidity. Never power the unit up if humidity entered but have it checked at a qualified service station. Contamination of humidity can destroy the unit and lead to an electrical shock.
• Operate the unit only at a temperature range of 0°C to +50°C and a humidity of max. 90%.
• Never place the monitor in direct sunlight or close to a window. Humidity and direct sunlight can cause substantial
damage.
• Never insert metallic or other parts into the ventilation slots. This could cause permanent damage to the unit.
• Do not place any heavy objects on the unit.
• Never apply pressure to the LCD screen. This could cause permanent damage to the display.
• Always disconnect the unit from mains if it has to cleaned or is not used for a longer time. Unplug the cable from the wall outlet in this case, not at the monitor.
• P ay attention when laying the connection cable and observe that the cable is not subject to heavy loads, kinks, or
damage and no moisture can get in.
• Contact your local dealer in case of malfunction.
• The warranty becomes void if repairs are undertaken by unauthorized persons. Do not open the housing.
• Maintenance and repair have to be carried out only by authorized service centers. Before opening the cover disconnect the unit from mains input.
• Only use original parts and accessories from Videor E. Hartig GmbH.
• D
o not use strong or abrasive detergents when cleaning the dome. Use a dry cloth to clean the dome surface. In case the dirt is hard to remove, use a mild detergent and wipe gently.
• The user of this system has to adhere to local regulations on surveillance, recording and interception of audio signals. This is his sole responsibility to keep himself informed on these regulations.
NOTES regarding burn-in effect on TFT monitors
• Normally, an image cannot be „burned” onto an LCD screen, as is the case with tubelar monitors.
• However, a „memory effect” can occur, which generally becomes visible after the same image has been displayed
for several hours. With fixed images the liquid crystal molecules are arranged in a certain way and can eventually become so inert that they no longer completely renew themselves.
• If an „after image” occurs, the resulting white images can be corrected using a generator.
• The memory effect should not be regarded as a fault; rather it is inherent in the LCD Panel structure and method of working. A warranty claim cannot be brought on the basis of the memory effect. More details on request.
13
2. General Description
• Professional LCD/TFT monitor
• PAL/NTSC Auto selection
• Multi-lingual on-screen menu driven set-up
• 3D Comb filter / De-interlacing
• Resolution of 1280x1024 pixels (SXGA)
• 2x CVBS, S-Video, RGB and audio inputs
• High contrast and high brightness ratio
• Quick signal switching / Fast response time
• Integrated loudspeakers
• Supply voltage: 12VDC
• Robust and compact plastic cabinet
• Table stand included
3. Parts Supplied
1x LCD/TFT monitor
1x network device 100~240VAC/12VDC with network cable
1x VGA-cable
1x multilingual operating instructions
14
4. Connecting with External Device
Rear panel control
1. DC 12V IN
2. RGB IN
RGB signal input
3. VIDEO 1 (AV1) IN
Composite signal input for AV1
4. VIDEO 1 (AV1) OUT
Video looping output for AV1
5. VIDEO 2 (AV2) IN
Composite signal input for AV2
6. VIDEO 2 (AV2) OUT
Video looping output for AV2
7. AUDIO L IN
Left side audio signal input
This input is for AV1, AV2, S-VIDEO
8. AUDIO R IN
Right side audio signal input
This input is for AV1, AV2, S-VIDEO
9. S-VIDEO (Y/C) IN
Y/C separated signal input
10.S-VIDEO (Y/C) OUT
Y/C separated signal looping output
11.PC STEREO IN
15
5. Remote Controller
1. POWER
Turn the power ON or OFF. There will be a few second time delay before the display appears.
1
2
2. MUTE
3
4
5
6
7
8
Mute the sound
3. VIDEO1
Select Video1 source
4. VIDEO2
Select Video2 source
9
5. S-VIDEO
Select S-Video source
11
6. RGB
Select RGB source
7. AUTO
Auto positioning of PC source
8. COLOR TEMP.
Select colour temperature
)
9. VOL− / VOL+ (
Increases or decreases the level of audio volume
10.UP / DOWN (
)
Move to OSD menu
11.MENU/EXIT
Activates and exits the On Screen Display
12.KEY LOCK
Prevent unauthorized operation of the equipment by locking the buttons.
Key Lock feature by pressing and holding the and buttons for five seconds.
16
10
10
9
12
6. Control and Functions
6.1 Key Functions
1. MENU / EXIT
Activates and exits the OSD
2. SOURCE /
Select input source, and move the OSD menu
3. AUTO /
4. 5. 6. Move the OSD menu and auto adjustment of RGB source
(VOL-)
Decreases the level of volume and move the previous menu
(VOL+)
Increases the level of volume and select the OSD menu
/I
Turns the power ON or OFF. There will be a few seconds delay before the display appears.
The power LED(next to the power switch) lights with green when the power is turned ON.
The power is turned off by pressing the power switch again and the power LED goes Red.
7. LED LENSE / IR RECEIVE LENSE
6.2 OSD Menu Description
Menu Selection
1. Press the MENU button to access the Main menu.
2. Use the and arrow button to highlight a selection.
3. Press the / OK button to select an item.
4. Use the and arrow button to highlight a selection.
5. Use the and arrow button to adjust the setting on a selected item.
NOTE: If you don’t connect RGB port, RGB SETUP menu is not select.
17
6.2.1 INPUT Select
Inputs can be set to VIDEO1, VIDEO2, S-VIDEO and RGB mode.
1. Press the SOURCE button and then /
button to move the source.
2. Press the button to select the source.
3. Press the MENU / EXIT button to exit the INPUT menu.
6.2.2 PICTURE Menu
1. Press the MENU / EXIT button and then 2. Press the
/ OK button and then
/
/
button to select the PICTURE menu.
button to select the adjustment item you need.
3. Press the / OK button to active the item.
Example: If you select the BRIGHTNESS, then the picture below appears on the bottom of the screen.
4. Press the MENU / EXIT key to move the previous menu.
5. Press the MENU / EXIT button and then /
button to select the REVERSE SCAN menu
If you turn on the REVERSE SCAN, the display will be rotated 180˚.
18
6.2.3 SOUND Menu
1. Press the MENU button and then /
2. Press the
button to select the adjustment item you need.
button and then
/
button to select the SOUND menu.
3. Press the button to active the item.
Example: If you select the TREBLE, then the picture below appears on the screen.
4. Press the MENU button to move the previous menu.
6.2.4 RGB Setup Menu
1. Press the MENU button and then /
2. Press the
button to select the adjustment item you need.
button and then
/
button to select the RGB SETUP menu.
3. Press the button to active the item.
4. Press the MENU button to move the previous menu.
5. DPMS: If you turn on the DPMS on the PC screen, the display goes to the power saving mode without PC input
Turn off the DPMS then the screen is appeared the „NO SIGNAL” screen continuously.
19
6.2.5 FUNCTION Menu
1. Press the MENU button and then /
2. Press the
button to select the adjustment item you need.
button and then
/
button to select the FUNCTION menu.
3. Press the button to active the item.
4. Press the MENU button to move the previous menu.
LANGUAGE:
Select the language between German, English, French, Spanish, Italian and Polish.
DEFAULT:
Select the RESET item, all setting to the factory default values.
BUTTON LOCK: Select Button lock ON don’t work the Front key.
Release the button lock: Push the
button is activated.
and
20
arrow at the same time for 5 sec then the
7. D-SUB Connector Pin Assigments
Pin Assignment
Pin No.
1
2
3
4
5
6
7
8
Pin Name
Red Video
Green Video
Blue Video
Ground
Ground
Red Ground
Green Ground
Blue Ground
Pin No.
9
10
11
12
13
14
15
Pin Name
NC
Signal Cable Detect
Ground
SDA (for DDC)
H-SYNC
V-SYNC
SCL (for DDC)
8. Troubleshooting
Problem
The screen doesn’t show up.
Possible Solution
1. Make sure if the power supply is connected property.
2. Turn on the power.
The screen is too light or to dark.
The screen size is not fit for the PC signal.
The screen color shows strange in the
PC signal.
3. Select the input signal right for the connected port.
Control the BRIGHTNESS
Press the AUTO key among keys in the front. (It is used only in the PC signal)
In the FUNCTION menu of OSD menu, perform the AUTO-ADJUST.
21
9. Specifications
Type
Art. No.
VMC-17LCD-OPC2
VMC-19LCD-OPC2
90571
90572
VIDEO
Screen Size
17” (2CCFL)
19” (2CCFL)
Pixel Type
Active Matrix TFT
Max. Resolution
Pixel Pitch
1280 x 1024 @ 60Hz
0.264 x 0.264mm
0.294 x 0.294mm
Brightness
300 cd/2 (250 cd/2)
Contrast Ratio
800: 1
Aspect Ratio
5: 4
Viewing Angle (H/V)
170˚/ 160˚ (H/V)
Display Colour
16.7 Million
Response Time
< 5ms
Video System
NTSC / PAL / SECAM
Frequency (H)
31 ~ 63KHz
Frequency (V)
55 ~ 75Hz
Panel Lamp Life
50,000hours
MECHANICAL
Outline Dimension W x D x H
Net Weight
Packing Dimension W x D x H
Packing Weight
Power Consumption
370 x 313 x 56 (mm)
409 x 344 x 58.5 (mm)
14.57” x 12.32” x 2.2”
16.1” x 13.54” x 2.3”
4.5kg)
5.5kg
445 x 235x 430mm
490 x 235 x 465mm
17.5” x 9.25” x 16.9”
19.3” x 9.25” x 18.3”
6.0kg (13.2 lbs)
6.5kg (14.3 lbs)
35W
42W
Power Source
DC12V adapter (Auto Switching)
Optional Accessories
The optional accessories currently available can be found on our Homepage: www.videor.com
10. Dimensional Drawings
See page 33-34
22
1. Consignes de sécurité / Maintenance
• Avant de raccorder l’appareil et de le mettre en service, lisez les consignes de sécurité et la notice d’utilisation.
• Conservez soigneusement la notice d’utilisation, elle peut vous servir ultérieurement.
• Le moniteur ne dégage qu’une faible quantité de chaleur en service, mais elle doit cependant être évacuée et un volume suffisant d’air frais doit être alimenté.
• Ne recouvrez jamais les fentes d’aération pour éviter des accumulations de chaleur.
• Afin de garantir la circulation d’air, respectez une distance suffisante par rapport aux autres appareils ou aux murs. Les accumulations de chaleur réduisent la durée de vie de l’appareil et peuvent l’enflammer dans un cas extrême.
• Respectez impérativement des distances suffisantes en cas d’utilisation dans des cloisons de rayonnage fermées.
• Si le moniteur est transporté d’un environnement froid dans un environnement chaud, attendez d’abord jusqu’à ce
qu’il soit à la température ambiante.
• Protégez l’appareil contre la pénétration d’eau et d’humidité. Si de l’humidité avait cependant pénétré, ne mettez jamais l’appareil en marche dans ces conditions, mais faites-le contrôler par un atelier de service après-vente qualifié. L’humidité qui pénètre peut détériorer l’appareil et présente en outre le risque d’un choc électrique.
• Utilisez l’appareil uniquement dans une plage de température de 0°C à +50°C et à une humidité de l’air maximale de 90%.
• N’exposez pas le moniteur au rayonnement direct du soleil et ne le placez pas près d’une fenêtre. L’humidité et la lumière directe du soleil peuvent provoquer de graves détériorations.
• N’enfoncez jamais d’objets métalliques ou autres à travers les fentes d’aération, vous pourriez endommager durablement l’appareil.
• Ne poser aucun objet lourd sur l’appareil.
• N’exercez pas de pression sur l’écran à cristaux liquides (LCD). Une pression excessive peut endommager l’écran définitivement.
• Avant le nettoyage ou si l’appareil n’est pas utilisé pendant une longue période, coupez-le du secteur. Ne tirez jamais par le câble, mais toujours par la fiche pour la débrancher de la prise.
• Lors de la pose du câble de branchement, toujours respecter la consigne suivante: le câble doit être placé de manière à ne pouvoir être endommagé, plié ou écrasé et la pénétration d’humidité doit être évitée.
• En cas de dysfonctionnements, informez-en votre fournisseur.
• L’appareil ne peut être ouvert que par un personnel de service après-vente qualifié. Toute intervention d’une personne non habilitée entraînera l’annulation de la garantie.
• La maintenance et les réparations sont réservées à des ateliers agréés. L’appareil doit être déconnecté du secteur
avant d’ouvrir le boîtier.
• N’utiliser que des pièces de rechange et des accessoires d’origine de Videor E. Hartig GmbH.
• Utilisez exclusivement un produit ménager doux pour nettoyer le boîtier de l’appareil. N’employez jamais un diluant ou de l’essence qui pourrait détériorer durablement la surface.
• L’utilisateur de ce système se doit de s’informer sur les stipulations, les lois et décrets en vigueur du pays concernant l´enregistrement et la surveillance de signaux audio et de se tenir à ces stipulations.
NOTICE sur l’effet de déverminage sur les moniteurs TFT
• En règle générale, l’image ne laisse pas de traînées sur un écran à cristaux liquides (LCD), comme c’est le cas des écrans à tube cathodique.
• Cependant, un „effet de mémoire” peut se produire, la plupart du temps, lorsque la même image reste affichée plusieurs heures. Dans le cas d’images fixes, les molécules de cristaux liquides adoptent une position différente et elles peuvent devenir plus lentes à tel point qu’elles ne sont plus régénérées.
23
• Si, malgré tout, il y a une rémanence à l’écran, vous pourrez la corriger en affichant un écran blanc.
• Cet effet ne doit pas être considéré comme un défaut mais se justifie par la conception et le mode de fonctionnement des écrans LCD. Il ne peut être donné suite aux demandes de garantie en raison de cet effet. Pour plus d’informations, n’hésitez pas à nous contacter.
2. Description générale
• Moniteur prof. LCD/TFT
• Commutation PAL/NTSC automatique
• Affichage menu en plusieurs langues
• 2D Filtre en peigne / Désentrelacement
• Résolution: 1280x1024 pixels (SXGA)
• Entrée 2xFBAS, S-Vidéo, RGB et Audio
• Haut contraste et clartée
• Commutation rapide du signal
• Deux haut-parleurs intégré
• Alimentation: 12VDC
• Robuste caisson plastique
• Pied intégré
3. Contenue de la livraison
1x moniteur LCD/TFT
1x bloc d’alimentation 100~240VAC/12VCC avec câble d’alimentation
1x câble VGA
1x mode d’emploi en plusieurs langues
24
4. Raccordement à un appareil externe
Éléments de commande sur la barre de connexion avant
1. DC 12V IN
2. RGB IN
Entrée de signal RVB
3. VIDEO 1 (AV1) IN
Entrée de signal vidéo pour AV1
4. VIDEO 1 (AV1) OUT
Sortie de boucle vidéo pour AV1
5. VIDEO 2 (AV2) IN
Entrée de signal vidéo pour AV2
6. VIDEO 2 (AV2) OUT
Sortie de boucle vidéo pour AV2
7. AUDIO L IN
Entrée de signal audio de gauche
Entrée réservée à AV1, AV2 , S-VIDÉO
8. AUDIO R IN
Entrée de signal audio de droite
Entrée réservée à AV1, AV2 , S-VIDÉO
9. S-VIDEO (Y/C) IN
Entrée de signal séparée Y/C
10.S-VIDEO (Y/C) OUT
Sortie de boucle de signal séparée Y/C
11.PC STEREO IN
25
5. Télécommande
1. POWER
Mise sous tension (ON) ou hors tension (OFF). Quelques secondes s’écouleront avant que l’affichage n’apparaisse.
1
2
2. MUTE
3
4
5
6
7
8
Coupure du son
3. VIDEO1
Sélection de la source Video1
4. VIDEO2
Sélection de la source Video2
9
5. S-VIDEO
Sélection de la source S-Video
11
6. RGB
10
10
9
12
Sélection de la source RGB
7. AUTO
Positionnement automatique de la source PC
8. COLOR TEMP.
Sélection de la température des couleurs
)
9. VOL− / VOL+ (
Augmentation ou diminution du niveau sonore
10.UP / DOWN (
)
Accès au menu OSD
11.MENU/EXIT
Activation et sortie de l’affichage sur écran
12.KEY LOCK
Le verrouillage des touches empêche toute utilisation non autorisée de l’appareil.
Activation de la fonction de verrouillage des touches en appuyant sur les touches et et en les maintenant enfoncées pendant cinq secondes.
26
6. Commande et fonctions
6.1 Fonctions des touches
1. MENU / EXIT
Activation et désactivation de l’OSD
2. SOURCE /
Sélection de la source d’entrée et déplacement dans le menu OSD
3. AUTO/
4. 5. 6. Déplacement dans le menu OSD et réglage automatique de la source RGB
(VOL-)
Diminution du volume sonore et retour au menu précédent
(VOL+)
Augmentation du volume sonore et sélection du menu OSD
/I
Activation et désactivation (ON ou OFF); un léger retard est constaté avant que l’affichage apparaisse à l’écran.
La DEL Power (à côté de la touche d’activation/désactivation) s‘allume en vert lorsque l’appareil est allumé (ON).
Une nouvelle pression sur la touche d’activation/désactivation éteint l’appareil et la DEL Power s‘allume en rouge.
7. LED LENSE (lentille DEL) / IR RECEIVE LENSE (lentille de réception IR)
6.2 Description du menu OSD
Choix du menu
1. Appuyez sur le bouton MENU pour accéder au menu principal.
2. Utilisez les touches fléchées et pour opérer votre sélection.
3. Appuyez sur la touche / OK pour sélectionner.
4. Utilisez les touches fléchées et pour opérer votre sélection.
5. Utilisez les touches fléchées et pour ajuster le réglage d’une position sélectionnée.
NOTE: Si le port RGB n’est pas utilisé, le menu SETUP RGB ne peut être sélectionné.
27
6.2.1 Sélection des entrées (INPUT Select)
Les entrées peuvent être réglées sur VIDÉO1, VIDÉO2, S-VIDÉO et mode RGB.
1. Appuyez sur le bouton SOURCE et ensuite sur la touche /
pour modifier la source.
2. Appuyez sur la touche pour sélectionner la source.
3. Appuyez sur le bouton MENU / EXIT pour quitter le menu INPUT.
6.2.2 Menu Image (PICTURE)
1. Appuyez sur la touche MENU / EXIT puis sur la touche 2. Appuyez sur la touche
/ OK puis sur la touche /
/
pour choisir le menu Image (PICTURE).
pour choisir l’emplacement de réglage souhaité.
3. Appuyez sur la touche / OK pour valider le réglage.
Exemple: Lorsque vous sélectionnez Luminosité (BRIGHTNESS), l’affichage apparaît en bas sur l’écran.
4. Appuyez sur la touche MENU / EXIT pour revenir au menu précédent.
5. Appuyez sur le bouton MENU / EXIT et ensuite sur la touche /
pour sélectionner le menu REVERSE SCAN.
Si vous activez l’exploration inversée (REVERSE SCAN), l’affichage subira une rotation à 180°.
28
6.2.3 Son (SOUND)
1. Appuyez sur la touche MENU puis sur la touche /
2. Appuyez sur la touche
pour choisir l’emplacement de réglage souhaité.
puis sur la touche /
pour choisir le menu Son (SOUND).
3. Appuyez sur la touche pour valider le réglage.
Exemple: Si vous sélectionnez le menu TREBLE, l’image ci-dessous apparaît à l’écran.
4. Appuyez sur la touche MENU pour revenir au menu précédent.
6.2.4 Menu RGB Setup
1. Appuyez sur la touche MENU puis sur la touche /
2. Appuyez sur la touche puis sur la touche
pour choisir l’emplacement de réglage souhaité.
/
pour choisir le menu RGB SETUP.
3. Appuyez sur la touche pour valider le réglage.
4. Appuyez sur la touche MENU pour revenir au menu précédent.
5.
DPMS: si vous activez le DPMS sur l’écran PC, l’affichage passe en mode économie d’énergie en l‘absence de tout accès PC.
Lorsque vous désactivez le DPMS, le message « PAS DE SIGNAL » (NO SIGNAL) est affiché continuellement à 29
l‘écran.
6.2.5 Menu Fonction (FUNCTION)
1. Appuyez sur la touche MENU puis sur la touche /
2. Appuyez sur la touche
pour choisir l’emplacement de réglage souhaité.
puis sur la touche
/
pour choisir le menu Fonction (FUNCTION).
3. Appuyez sur la touche pour valider le réglage.
4. Appuyez sur la touche MENU pour revenir au menu précédent.
Langue (LANGUAGE):
Choisissez votre langue (allemand, anglais, français, espagnol, italien et polonais.
Par défaut (DEFAULT):
Sélectionnez Réinitialiser (RESET) pour réinitialiser tous les réglages aux
réglages d’usine.
Verrouillage des touches: Si le verrouillage des touches est sur ON, la touche avant ne fonctionne pas.
(BUTTON LOCK)
Pour déverrouiller les touches, appuyez simultanément sur les
touches
et
pendant 5 secondes.
30
7. Affectation de la prise D-SUB
Affectation des broches
Pin No.
1
2
3
4
5
6
7
8
Nom de Pin
Vidéo Rouge
Vidéo Vert
Vidéo Bleu
Masse
Masse
Masse Rouge
Masse Vert
Masse Bleu
Pin No.
9
10
11
12
13
14
15
Nom de Pin
NC
Signal Cable Detect
Masse
SDA (pour DDC)
H-SYNC
V-SYNC
SCL (pour DDC)
8. Dépannage
Problème
Rien ne s’affiche à l’écran.
Solution possible
1. Vérifiez si l’appareil est bien branché sur l’alimentation de secteur.
2. Appuyez sur la touche activation/désactivation.
Écran trop clair ou trop sombre.
La taille de l’écran n’est pas adaptée
au signal PC.
Les couleurs de l’écran ne sont pas
correctes sur le signal PC.
3. Choisissez le signal d’entrée approprié pour le port raccordé.
Ajustez la luminosité (BRIGHTNESS)
Appuyez sur la touche AUTO, sous les touches de la face avant (utilisé uniquement avec un signal PC)
Passez dans le menu OSD puis, dans le menu Fonction (FUNCTION),
actionnez Ajustement automatique (AUTO-ADJUST)
31
9. Caractéristiques techniques
Modèle
VMC-17LCD-OPC2
VMC-19LCD-OPC2
90571
90572
17” (2CCFL)
19” (2CCFL)
No. d’article
VIDÉO
Diagonale écran
Type de pixels
Active Matrix TFT
Résolution max.
Taille des pixels
1280 x 1024 @ 60Hz
0,264 x 0,264 mm
Luminosité
0,294 x 0,294 mm
300 cd/2 (250 cd/2)
Rapport de contraste
800: 1
Format image
5: 4
Angle d’observation (H/V)
170˚/ 160˚ (H/V)
Niveaux de couleur
16,7 Million
Temps de réaction
< 5ms
Norme vidéo
NTSC / PAL / SECAM
Fréquence (H)
31 ~ 63KHz
Fréquence (V)
55 ~ 75Hz
Durée de vie de l’éclairage du panneau
50.000 heures
CONSIDÉRATIONS MÉCANIQUES
Dimensions extérieures L x P x H
370 x 313 x 56 mm
Poids net
409 x 344 x 58,5 mm
4,5kg
5,5kg
445 x 235x 430 mm
490 x 235 x 465 mm
Poids de l’emballage
6,0kg
6,5kg
Consommation
35W
42W
Dimensions de l’emballage L x P x H
Alimentation
Adaptateur 12VDC (Auto Switching)
Accessoires en option
Vous trouverez les accessoires actuels en option sur notre page d’accueil: www.videor.com
32
10. Maßzeichnungen / Dimensional Drawings / Croquis
VMC-17LCD-OPC2
370
355
313
56
182
253
Maße/Dimensions: mm
33
VMC-19LCD-OPC2
409
182
373
344
58.5
253
Maße/Dimensions: mm
34
35
eneo® ist eine eingetragene Marke der Videor E. Hartig GmbH
Vertrieb ausschließlich über den Fachhandel.
eneo® is a registered trademark of Videor E. Hartig GmbH
Exclusive distribution through specialised trade channels only.
eneo® est une marque propriété de Videor E. Hartig GmbH
Distribution et vente à travers les distributeurs spécialisés.
Technische Änderungen vorbehalten
Technical changes reserved
Sous réserve de modifications techniques
Videor E. Hartig GmbH
Carl-Zeiss-Straße 8 · 63322 Rödermark/Germany
Tel. +49 (0) 6074 / 888-0 · Fax +49 (0) 6074 / 888-100
© Copyright by Videor E. Hartig GmbH 01/2011
www.videor.com
36