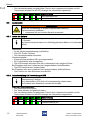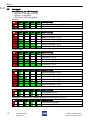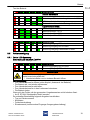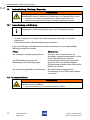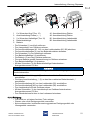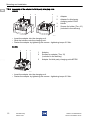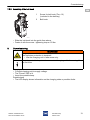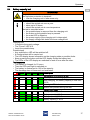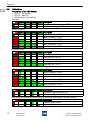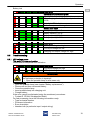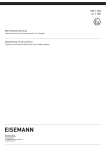
1
Betriebsanleitung
DE
Operating instructions
EN
Additional languages www.stahl-ex.com
DE EN
DE
EN
DE
EN
DE
EN
DE
EN
DE
EN
Handscheinwerfer
Portable Lamp
DE
EN
DE
EN
Reihe 6148
Series 6148
DE
Betriebsanleitung
DE
Additional languages www.stahl-ex.com
DE
DE
DE
DE
DE
DE
DE
DE
DE
DE
DE
DE
DE
DE
DE
DE
DE
DE
Handscheinwerfer
DE
DE
DE
Reihe 6148
DE
DE
DE
DE
DE
Inhaltsverzeichnis
DE
1
1.1
1.2
1.3
2
2.1
2.2
2.3
3
3.1
3.2
3.3
3.4
4
4.1
4.2
5
6
6.1
6.2
7
7.1
7.2
8
9
9.1
9.2
9.3
9.4
9.5
9.6
10
10.1
10.2
10.3
11
12
DE
DE
DE
DE
DE
DE
DE
DE
DE
DE
DE
DE
DE
DE
DE
DE
DE
DE
DE
DE
DE
DE
DE
2
Allgemeine Angaben ...........................................................................................3
Hersteller .............................................................................................................3
Angaben zur Betriebsanleitung ...........................................................................3
Konformität zu Normen und Bestimmungen .......................................................3
Erläuterung der Symbole ....................................................................................4
Symbole in der Betriebsanleitung .......................................................................4
Warnhinweise .....................................................................................................4
Symbole am Gerät ..............................................................................................5
Sicherheitshinweise ............................................................................................5
Aufbewahrung der Betriebsanleitung ..................................................................5
Sichere Verwendung ...........................................................................................6
Bestimmungsgemäße Verwendung ....................................................................6
Umbauten und Änderungen ................................................................................6
Funktion und Geräteaufbau ................................................................................6
Funktion ..............................................................................................................6
Geräteaufbau ......................................................................................................7
Technische Daten ...............................................................................................7
Transport und Lagerung .....................................................................................9
Allgemeines ........................................................................................................9
Batterien ..............................................................................................................9
Montage und Installation .....................................................................................9
Maßangaben / Befestigungsmaße ....................................................................10
Montage / Demontage, Gebrauchslage ............................................................10
Inbetriebnahme .................................................................................................13
Betrieb ...............................................................................................................14
Normalbetrieb ...................................................................................................14
Notlichtbetrieb ...................................................................................................15
Ladebetrieb .......................................................................................................16
Test der Batteriekapazität .................................................................................17
Anzeigen ...........................................................................................................18
Fehlerbeseitigung .............................................................................................19
Instandhaltung, Wartung, Reparatur .................................................................20
Instandhaltung und Wartung .............................................................................20
Reparatur ..........................................................................................................22
Rücksendung ....................................................................................................22
Entsorgung ........................................................................................................22
Zubehör und Ersatzteile ...................................................................................23
Handscheinwerfer
Reihe 6148
Allgemeine Angaben
1
Allgemeine Angaben
1.1
Hersteller
1.2
DE
DE
DE
R. STAHL Schaltgeräte GmbH
Business Unit Lighting & Signalling
Nordstr. 10
99427 Weimar
Germany
R. STAHL Schaltgeräte GmbH
Tel.:
Fax
Internet:
E-Mail:
Tel.:
Fax
Internet:
E-Mail:
+49 3643 4324
+49 3643 4221-76
www.stahl-ex.com
[email protected]
Angaben zur Betriebsanleitung
ID-Nr.:
Publikationsnummer:
DE
DE
Am Bahnhof 30
74638 Waldenburg
Germany
DE
DE
DE
+49 7942 943-0
+49 7942 943-4333
www.stahl-ex.com
[email protected]
DE
DE
DE
DE
DE
206676 / 614860300010
2015-02-10·BA00·III·de·04
DE
DE
Die Originalbetriebsanleitung ist die englische Ausgabe.
Diese ist rechtsverbindlich in allen juristischen Angelegenheiten.
1.3
DE
DE
Konformität zu Normen und Bestimmungen
DE
Siehe Zertifikate und EG-Konformitätserklärung: www.stahl-ex.com.
DE
Das Gerät verfügt über eine IECEx-Zulassung.
Siehe IECEx-Homepage: http://iecex.iec.ch/
DE
DE
DE
DE
DE
DE
206676 / 614860300010
2015-02-10·BA00·III·de·04
Handscheinwerfer
Reihe 6148
3
Erläuterung der Symbole
DE
DE
2
Erläuterung der Symbole
DE
2.1
Symbole in der Betriebsanleitung
DE
Symbol
DE
Bedeutung
Tipps und Empfehlungen zum Gebrauch des Geräts
DE
DE
DE
DE
Gefahr allgemein
DE
DE
DE
Gefahr durch explosionsfähige Atmosphäre
DE
DE
DE
Gefahr durch spannungsführende Teile
DE
DE
DE
DE
Gefahr von Augenschäden durch optische Strahlung
DE
DE
DE
Beschreibung der LED-Anzeige
• LED aus - Feld keine Füllung
• LED ein - Feld gefüllt
• LED blinkt - Feld halb gefüllt
Beispiel:
DE
DE
DE
rot
2.2
4
grün
grün
grün
grün Beschreibung
rote LED blinkt, 2. grüne LED blinkt
rote LED an, 2. grüne LED an
Warnhinweise
Warnhinweise unbedingt befolgen, um das konstruktive und durch den Betrieb bedingte
Risiko zu minimieren. Die Warnhinweise sind wie folgt aufgebaut:
• Signalwort: GEFAHR, WARNUNG, VORSICHT, HINWEIS
• Art und Quelle der Gefahr/des Schadens
• Folgen der Gefahr
• Ergreifen von Gegenmaßnahmen zum Vermeiden der Gefahr/des Schadens
Handscheinwerfer
Reihe 6148
206676 / 614860300010
2015-02-10·BA00·III·de·04
Sicherheitshinweise
DE
GEFAHR
DE
Gefahren für Personen
Nichtbeachtung der Anweisung führt zu schweren oder tödlichen
Verletzungen bei Personen.
DE
DE
DE
WARNUNG
DE
Gefahren für Personen
Nichtbeachtung der Anweisung kann zu schweren oder tödlichen
Verletzungen bei Personen führen.
DE
DE
VORSICHT
DE
Gefahren für Personen
Nichtbeachtung der Anweisung kann zu leichten Verletzungen bei Personen
führen.
DE
HINWEIS
Vermeidung von Sachschaden
Nichtbeachtung der Anweisung kann zu einem Sachschaden am Gerät und/oder seiner
Umgebung führen.
2.3
DE
DE
DE
DE
DE
DE
Symbole am Gerät
Symbol
DE
DE
Bedeutung
CE-Kennzeichnung gemäß aktuell gültiger Richtlinie.
DE
DE
DE
05594E00
Gerät gemäß Kennzeichnung für explosionsgefährdete Bereiche zertifiziert.
DE
DE
02198E00
DE
Gefahr von Augenschäden durch optische Strahlung
3
Sicherheitshinweise
3.1
Aufbewahrung der Betriebsanleitung
DE
• Betriebsanleitung sorgfältig lesen und am Einbauort des Geräts aufbewahren.
• Mitgeltende Dokumente und Betriebsanleitungen der anzuschließenden Geräte beachten.
206676 / 614860300010
2015-02-10·BA00·III·de·04
Handscheinwerfer
Reihe 6148
5
Funktion und Geräteaufbau
DE
DE
3.2
DE
DE
DE
DE
DE
DE
DE
DE
DE
DE
3.3
DE
DE
DE
DE
DE
3.4
Sichere Verwendung
• Sicherheitshinweise in dieser Betriebsanleitung lesen und beachten!
• Kennwerte und Bemessungsbetriebsbedingungen der Typ- und Datenschilder
beachten!
• Zusätzliche Hinweisschilder auf dem Gerät beachten!
• Gerät nur bestimmungsgemäß und nur für den zugelassenen Einsatzzweck
verwenden!
• Für Schäden, die durch fehlerhaften oder unzulässigen Einsatz sowie durch
Nichtbeachtung dieser Betriebsanleitung entstehen, besteht keine Haftung.
• Vor Installation und Inbetriebnahme sicherstellen, dass das Gerät unbeschädigt ist!
• Arbeiten am Gerät (Installation, Instandhaltung, Wartung, Störungsbeseitigung) nur
von dazu befugtem und entsprechend geschultem Personal durchführen lassen!
Bestimmungsgemäße Verwendung
Der Handscheinwerfer 6148 ist ein Betriebsmittel
• für ortsveränderliche Anwendungen
• im Kraftfahrzeug verwendbar
• für Verwendung in den Zonen 1, 21, 2, 22 und im sicheren Bereich.
• im Innen- und Außenbereich einsetzbar.
Umbauten und Änderungen
DE
GEFAHR
DE
Explosionsgefahr durch Umbauten und Änderungen am Gerät!
Nichtbeachten führt zu schweren oder tödlichen Verletzungen.
• Gerät nicht umbauen oder verändern. Für Schäden, die durch
Umbauten und Änderungen entstehen, besteht keine Haftung und keine
Gewährleistung.
DE
DE
DE
DE
DE
DE
4
Funktion und Geräteaufbau
GEFAHR
Explosionsgefahr durch zweckentfremdete Verwendung!
Nichtbeachten führt zu schweren oder tödlichen Verletzungen.
• Gerät ausschließlich entsprechend den in dieser Betriebsanleitung
festgelegten Betriebsbedingungen verwenden.
4.1
6
Funktion
•
•
•
•
•
•
Hauptlicht mit LED einschalten, ausschalten, dimmen, blinken
Nebenlicht mit LED einschalten, ausschalten
Notlichtfunktion in Verbindung mit dem Ladesessel
Die Notlichtfunktion ist de- und aktivierbar
Laden der Batterie mit Hilfe des Ladesessels
Test der Batteriekapazität
Handscheinwerfer
Reihe 6148
206676 / 614860300010
2015-02-10·BA00·III·de·04
Technische Daten
4.2
DE
Geräteaufbau
DE
1
2
3
1
2
3
4
5
6
Lampenkopf mit Hauptlicht und Nebenlicht
LED-Anzeige
Taster
Streuscheiben
Gehäuse
Ladesessel
DE
DE
DE
DE
DE
DE
4
DE
5
DE
6
DE
Power
DE
14769E00
DE
5
DE
Technische Daten
DE
Technische Daten
DE
Explosionsschutz
DE
Global (IECEx)
DE
Gas und Staub
IECEx IBE 11.0009
DE
Ex ib IIC T4 Gb
DE
Ex tb IIIC T75°C Db
DE
Europa (ATEX)
Gas und Staub
DE
IBExU 11ATEX 1066
DE
E II 2G Ex ib IIC T4 Gb
DE
E II 2 D Ex tb IIIC T75°C Db
DE
Bescheinigungen
und Zulassungen
Bescheinigungen
IECEx, ATEX, Brasilien (INMETRO), Russland ( GOST R)
KFZ-Zulassung
E1 10 R - 036569
Elektrische Daten
Batterie
Blei-Vlies-Akku, wartungsfrei, 6 V, 4,5 Ah
Lebensdauer
Batterie
> 0,5 Jahre bei 50 °C
> 4 Jahre bei 25 °C
LED
> 50.000 h bei 50 °C
206676 / 614860300010
2015-02-10·BA00·III·de·04
Handscheinwerfer
Reihe 6148
7
Technische Daten
DE
Technische Daten
DE
Lichttechnische Daten
DE
Lampenbestückung
DE
Hauptlicht, LED: 3 W
Nebenlicht, LED: 0,5 W
Lichtstärke
24.000 cd
DE
Lichtfarbe
6500 K
DE
Lichtverteilung
gem. DIN 14642
DE
Funktion
Dauerlicht oder Blinklicht des Hauptlichts, Dauerlicht des Nebenlichts,
Funktion des Hauptlichts stufenlos dimmbar
DE
DE
Brenndauer
DE
DE
DE
Tiefentladung
DE
DE
Hauptlicht:
Dauerbetrieb:
Blinkbetrieb:
kontinuierlich an, typisch 7 h
blinkend bis zu 18 h
Nebenlicht:
Dauerbetrieb:
kontinuierlich an, typisch 32 h
Bei Restkapazität der Batterie < 10 % erfolgt automatisches Umschalten von
Haupt- auf Nebenlicht.
Testfunktionen
DE
DE
DE
Lampenüberwachung
Bei defektem Hauptlicht erfolgt automatisches Umschalten auf Nebenlicht
Batteriekapazität
Ermittlung der aktuellen Batteriekapazität
Mechanische Daten
DE
DE
DE
Schutzart
IP66 (IEC/EN 60589)
Gehäusematerial
Polyamid, schlagfest
DE
Neigung des Schein- nach vorn: 100°, nach hinten: 90°
werferkopfes
DE
Drucktaster
Hauptlicht EIN - Nebenlicht EIN - Hauptlicht BLINKEN - AUS
DE
Kapazitätsanzeige
Leuchtdioden zeigen für ca. 5 Sekunden die verfügbare Kapazität an
Umgebungsbedingungen
DE
DE
Umgebungstemperatur
-20 ... +50 °C
Lagertemperatur
-20 ... +50 °C
Ladegerät
Ausführung
Ladesessel 6148/0000 (für explosionsgeschützte Handscheinwerfer)
Netzspannung: 110 ... 240 V AC, 50 / 60 Hz und 12 ... 30 V DC
mit Notlichtfunktion und Abschaltautomatik im Kfz-Betrieb
mit Netzzuleitung für 110 ... 240 V AC, 50 / 60 Hz
Optional ist ein Ladekabel für Kfz-Betrieb für 12 ... 30 V DC erhältlich.
Ladestrom
bei Raumtemperatur:
Ladevorgang
12 V DC
24 V DC
110 V AC
240 V AC
Ladezeit
8
Handscheinwerfer
Reihe 6148
Stand By
max. 170 mA
max. 120 mA
max. 90 mA
max. 60 mA
Leistungsaufnahme < 1 W
ca. 11 h
206676 / 614860300010
2015-02-10·BA00·III·de·04
Transport und Lagerung
DE
Technische Daten
Funktion
Ladebeginn beim Einsetzen des Handscheinwerfers in den Ladesessel - mit
Spannungsanzeige über grüne LED
Abschaltfunktion
Bei Kfz-Betrieb wird die Spannung der Autobatterie überwacht. Sinkt die
Spannung der Autobatterie unter 11,7 V bzw. 23,5 V bei 12 V bzw. 24 VBatterie, wird der Ladevorgang des Handscheinwerfers automatisch
unterbrochen.
Die Abschaltfunktion kann deaktiviert werden.
DE
DE
DE
DE
II (schutzisoliert)
Gehäusematerial
Polyamid, schlagfest, schwarz
Montage
Wand- oder Tischmontage
Anschlussleitungen
Ladekabel 110 ... 240 V AC: ca. 1,8 m lang, mit Euro-Stecker, 2-polig
Ladekabel 12 ... 30 V DC: ca. 1,8 m lang, mit freien Enden, 2-polig
Hinweis
Ex-Betrieb
Achtung!
Die Ladesessel sind nicht geeignet für den Einsatz in explosionsgefährdeten
Bereichen!
Ladesessel sind grundsätzlich im NICHT-Ex-Bereich zu montieren!
Transport und Lagerung
6.1
Allgemeines
7
DE
Schutzklasse
6
6.2
DE
DE
DE
DE
DE
DE
DE
DE
DE
DE
DE
DE
• Gerät nur in Originalverpackung transportieren und lagern.
• Gerät trocken (keine Betauung) und erschütterungsfrei lagern.
• Gerät nicht stürzen.
DE
Batterien
DE
•
•
•
•
DE
DE
Nicht mit anderen Materialien transportieren!
Vorsichtig umgehen!
Geschützt vor Feuer, Staubquellen, schädlichen Gasen und Flüssigkeiten lagern!
Kühl und trocken lagern!
DE
DE
DE
Montage und Installation
GEFAHR
Explosionsgefahr durch falsche Installation des Geräts!
Nichtbeachten führt zu schweren oder tödlichen Verletzungen.
• Installation strikt nach Anleitung und unter Berücksichtigung der
nationalen Sicherheits- und Unfallverhütungsvorschriften durchführen,
damit der Explosionsschutz erhalten bleibt.
• Das elektrische Gerät so auswählen bzw. installieren, dass der
Explosionsschutz aufgrund äußerer Einflüsse nicht beeinträchtigt wird,
z. B. Druckbedingungen, chemische, mechanische, thermische,
elektrische Einflüsse sowie Schwingungen, Feuchte, Korrosion
(siehe IEC/EN 60079-14).
• Gerät nur durch geschultes und mit den einschlägigen Normen
vertrautes Fachpersonal installieren lassen.
206676 / 614860300010
2015-02-10·BA00·III·de·04
Handscheinwerfer
Reihe 6148
9
Montage und Installation
DE
DE
7.1
Maßangaben / Befestigungsmaße
Maßzeichnungen (alle Maße in mm [Zoll]) - Änderungen vorbehalten
DE
DE
DE
ø 4,50
[ø 0,18]
90 [3,54]
143 [5,63]
DE
154 [6,06]
DE
DE
279 [10,98]
79 [3,11]
92 [3,62]
DE
64 [2,52]
25 [0,98]
DE
DE
DE
DE
140 [5,51]
DE
14754E00
Handscheinwerfer
DE
14753E00
Ladesessel
39 [1,54]
DE
DE
DE
74 [2,91]
135 [5,32]
55 [2,17]
DE
ø 4,50 [ø 0,18]
DE
90 [3,54]
126 [4,96]
131 [5,16]
DE
DE
DE
DE
64 [2,52]
DE
14807E00
Bohrbild für Wandhalter
7.2
Montage / Demontage, Gebrauchslage
WARNUNG
Gefahr bei Verwendung im explosionsgefährdeten Bereich!
Explosionsschutz gefährdet!
• Ladesessel nur im sicheren Bereich verwenden.
10
Handscheinwerfer
Reihe 6148
206676 / 614860300010
2015-02-10·BA00·III·de·04
Montage und Installation
DE
7.2.1 Montage Ladesessel
Der Montageort muss eben und tragfähig sein.
Die Schrauben für die Montage des Wandhalters sind nicht im Lieferumfang
enthalten.
DE
DE
DE
DE
DE
Wandmontage
DE
DE
1
1
2
3
4
2
Schrauben Ladesessel (Torx 20)
(im Lieferumfang Wandhalter enthalten)
Ladesessel
Wandhalter
Schrauben zur Befestigung des Wandhalters
(nicht im Lieferumfang enthalten)
DE
DE
DE
DE
DE
DE
DE
3
DE
4
DE
DE
14770E00
55 [
2,17
DE
]
39 [1,54]
ø 4,
50
[ø 0
,18]
14771E00
• Den Wandhalter waagerecht ausrichten.
• Mit 4 Schrauben am Montageort befestigen.
• Den Ladesessel von oben auf den Wandhalter schieben.
• Den Ladesessel mit den mitgelieferten Schrauben befestigen - Anzugsdrehmoment 1,5 Nm.
Tischmontage
1
2
1
2
3
Schrauben zur Befestigung des Ladesessels
(nicht im Lieferumfang enthalten)
Ladesessel
ebene Fläche
3
14772E00
• Den Ladesessel auf ebene Fläche stellen.
• Mit 3 Schrauben am Montageort befestigen - Anzugsdrehmoment 1,5 Nm.
206676 / 614860300010
2015-02-10·BA00·III·de·04
Handscheinwerfer
Reihe 6148
11
DE
DE
DE
DE
DE
DE
Montage und Installation
DE
DE
DE
7.2.2 Montage Adapter in Fremdgeräteladesessel
LG443
1
DE
2
3
4
DE
DE
DE
1
2
3
4
DE
DE
DE
Adapter
Fremdgeräteladesessel
LG443
Halterung
Schrauben Halterung
(Torx 10)
(im Lieferumfang enthalten)
DE
DE
14943E00
• Den Adapter in Ladesessel einsetzen.
• Die Halterungen auf Ladesessel schieben.
• Den Adapter mit den Schrauben befestigen - Anzugsdrehmoment 0,5 Nm.
DE
DE
DE
KFZ90
DE
DE
1
DE
2
3
DE
DE
1
2
3
DE
Adapter
Schrauben Adapter (Torx 10)
(im Lieferumfang enthalten)
Fremdgeräteladesessel KFZ90
DE
DE
DE
DE
14944E00
• Den Adapter in Ladesessel einsetzen.
• Den Adapter mit den Schrauben befestigen - Anzugsdrehmoment 0,5 Nm.
12
Handscheinwerfer
Reihe 6148
206676 / 614860300010
2015-02-10·BA00·III·de·04
Inbetriebnahme
DE
7.2.3 Montage Gürtelhaken
DE
DE
1
2
Schraube Gürtelhaken (Torx 10)
(im Lieferumfang enthalten)
Gürtelhaken
DE
DE
DE
1
DE
DE
2
DE
DE
DE
DE
DE
14773E00
• Den Gürtelhaken von oben in die Führung schieben.
• Mit der Schraube befestigen - Anzugsdrehmoment 0,5 Nm.
8
DE
DE
DE
Inbetriebnahme
DE
WARNUNG
DE
Gefahr bei Verwendung im explosionsgefährdeten Bereich!
Explosionsschutz gefährdet!
• Ladesessel nur im sicheren Bereich verwenden.
DE
DE
Den Handscheinwerfer vor dem ersten Benutzen in den angeschlossenen
Ladesessel setzen.
DE
DE
DE
DE
Ladesessel
• An die Versorgungsspannung anschließen.
• Die LED „Power“ leuchtet.
• Den Handscheinwerfer einsetzen.
Handscheinwerfer
• Die LED-Anzeige informiert über den Ladezustand oder mögliche Fehler.
206676 / 614860300010
2015-02-10·BA00·III·de·04
Handscheinwerfer
Reihe 6148
DE
13
Betrieb
DE
DE
9
Betrieb
GEFAHR
DE
Explosionsgefahr durch fehlerhafte Installation!
Nichtbeachten führt zu schweren oder tödlichen Verletzungen.
• Gerät vor der Inbetriebnahme auf korrekte Installation und Funktion
prüfen.
• Nationale Bestimmungen einhalten.
DE
DE
DE
DE
VORSICHT
DE
DE
Gefahr von Augenschäden durch optische Strahlung!
Leichte Verletzungen möglich!
• Nicht in die Lichtquelle sehen.
DE
DE
DE
DE
DE
DE
DE
DE
9.1
Das Haupt- oder Nebenlicht des Handscheinwerfers ist nur außerhalb des
Ladesessels einschaltbar.
Das ungedimmte Hauptlicht und das Nebenlicht leuchten stroboskopfrei.
Das Hauptlicht wird automatisch auf Nebenlicht umgeschaltet wenn:
• das Hauptlicht defekt ist.
• die Kapazität der Batterie kleiner 10 % beträgt.
DE
DE
DE
DE
DE
DE
Der Handscheinwerfer ist ein ortsveränderliches Betriebsmittel zum Beleuchten.
9.1.1 Funktion
• Hauptlicht - Einschalten / Dimmen / Ausschalten
• Hauptlicht - Blinken (Blinkfrequenz 1 x pro Sekunde)
• Nebenlicht - Einschalten / Ausschalten
DE
DE
Normalbetrieb
9.1.2 Einschalten / Wechsel der Funktion
Einschalten:
Den Taster drücken
• Das Hauptlicht schaltet sich ein.
Die LED-Anzeige informiert 5 Sekunden über die Batteriekapazität.
Wechsel
Den Taster wiederholt drücken während die LED-Anzeige aktiv ist.
• Das Nebenlicht schaltet sich ein.
• Das Hauptlicht blinkt einmal pro Sekunde.
• Die LED schaltet sich aus.
9.1.3 Ausschalten
Den Taster drücken:
• wenn das Hauptlicht blinkt.
• 5 Sekunden nach dem letzten Schaltvorgang.
14
Handscheinwerfer
Reihe 6148
206676 / 614860300010
2015-02-10·BA00·III·de·04
Betrieb
DE
9.1.4 Dimm-Modus
DE
WARNUNG
Gefahr durch stroboskopischen Effekt!
Schwere Verletzungen möglich!
• Den Dimm-Modus nicht verwenden bei rotierenden Teilen.
• Der Handscheinwerfer leuchtet im Dimm-Modus nicht stroboskopfrei.
• Das Rotieren von Teilen kann unter bestimmten Bedingungen nicht
erkannt werden.
Der Handscheinwerfer muss ausgeschaltet sein.
• Den Taster drücken bis die gewünschte Dimmstufe erreicht ist.
• Die LED-Anzeige zeigt die gewählte Dimmstufe an.
9.2
DE
DE
DE
DE
DE
DE
DE
DE
Notlichtbetrieb
DE
WARNUNG
DE
Gefahr bei Verwendung im explosionsgefährdeten Bereich!
Explosionsschutz gefährdet!
• Ladesessel nur im sicheren Bereich verwenden.
DE
DE
DE
Der Handscheinwerfer kann in Verbindung mit dem Ladesessel als
Notlichtleuchte verwendet werden.
Bei Netzausfall wird das Hauptlicht ungedimmt eingeschaltet.
DE
DE
DE
Ladesessel
• An die Versorgungsspannung anschließen.
• Die LED „Power“ leuchtet.
• Den Handscheinwerfer einsetzen.
Handscheinwerfer
• Eventuell eingeschaltete LED wird abgeschaltet.
• Ein Funktionstest wird durchgeführt.
• Die LED-Anzeige informiert über den Ladezustand oder mögliche Fehler.
• Bei Netzausfall schaltet sich der Handscheinwerfer ein.
DE
DE
DE
DE
DE
DE
9.2.1 Ein- und Ausschalten des Notlichtbetriebs
Bei Auslieferung ist die Funktion „Notlichtbetrieb“ eingeschaltet.
Bei ausgeschalteter Funktion und Netzausfall werden folgende Zustände am
Handscheinwerfer aktiviert:
vor Einsetzen in den Ladesessel
Haupt-LED und Neben-LED - AUS
Haupt-LED - EIN
Haupt-LED - GEDIMMT
Haupt-LED - BLINKEN
Neben-LED - EIN
bei Netzausfall
Haupt-LED und Neben-LED - AUS
Haupt-LED - EIN
Haupt-LED - EIN
Haupt-LED - BLINKEN
Neben-LED - EIN
• Das Hauptlicht einschalten.
• Die Taste drücken und gedrückt halten.
206676 / 614860300010
2015-02-10·BA00·III·de·04
DE
Handscheinwerfer
Reihe 6148
15
Betrieb
DE
• Den Handscheinwerfer mit gedrückter Taste in den Ladesessel einsetzen und die
Taste weiter drücken bis die LED-Anzeige das Umschalten signalisiert.
DE
DE
rot
DE
grün
grün
grün
DE
DE
DE
9.3
grün Beschreibung
Notlichtfunktion aus
Notlichtfunktion ein
Ladebetrieb
WARNUNG
DE
Gefahr bei Verwendung im explosionsgefährdeten Bereich!
Explosionsschutz gefährdet!
• Ladesessel nur im sicheren Bereich verwenden.
DE
DE
DE
DE
9.3.1 Laden der Batterie
Bei Raumtemperatur beträgt die Ladezeit einer entladenen Batterie ungefähr
11 Stunden.
Der Handscheinwerfer kann bei vollständig geladener Batterie im Ladesessel
bleiben.
DE
DE
DE
DE
Ladesessel
• An die Versorgungsspannung anschließen.
• Die LED „Power“ leuchtet.
• Den Handscheinwerfer einsetzen.
Handscheinwerfer
• Eventuell eingeschaltete LED wird abgeschaltet.
• Ein Funktionstest wird durchgeführt.
• Die LED-Anzeige informiert über den Ladezustand oder mögliche Fehler.
Bei Entnahme aus dem Ladesessel und eingeschalteter Notlichtfunktion
• Die LED Hauptlicht wird eingeschaltet.
Bei Entnahme aus dem Ladesessel und ausgeschalteter Notlichtfunktion
• Die Funktion vor dem Einsetzen wird aktiviert.
DE
DE
DE
DE
DE
DE
DE
DE
DE
9.3.2 Ladeabschaltung bei Verwendung im KFZ
Bei Auslieferung ist die Funktion „Abschalten Ladebetrieb bei
Unterspannung“ aktiviert.
Der Ladebetrieb im KFZ wird bei Unterspannung unterbrochen.
Die Funktion kann deaktiviert und aktiviert werden.
Aktivieren und Deaktivieren
• Das Nebenlicht einschalten.
• Die Taste drücken und gedrückt halten.
• Den Handscheinwerfer mit gedrückter Taste in den Ladesessel einsetzen und die
Taste weiter drücken bis die LED-Anzeige das Umschalten singanlisiert.
rot
16
grün
grün
Handscheinwerfer
Reihe 6148
grün
grün Beschreibung
Ladeabschaltung aus
Ladeabschaltung ein
206676 / 614860300010
2015-02-10·BA00·III·de·04
Betrieb
9.4
DE
Test der Batteriekapazität
DE
WARNUNG
DE
Gefahr bei Verwendung im explosionsgefährdeten Bereich!
Explosionsschutz gefährdet!
• Ladesessel nur im sicheren Bereich verwenden.
DE
DE
Der Test
• sollte jährlich durchgeführt werden.
• dauert bis zu 20 Stunden.
• sollte bei Raumtemperatur durchgeführt werden.
Der Test wird abgebrochen wenn:
• der Handscheinwerfer aus dem Ladesessel entnommen wird.
• die Taste am Handscheinwerfer gedrückt wird.
• die Haupt-LED defekt ist.
• die Spannungsversorgung des Ladesessels unterbrochen wird.
• die Versorgungsspannung die untere Spannungsgrenze unterschreitet.
Ladesessel
• An die Versorgungsspannung anschließen.
• Die LED „Power“ leuchtet.
• Den Handscheinwerfer einsetzen.
Handscheinwerfer
• Eventuell eingeschaltete LED wird abgeschaltet.
• Ein Funktionstest wird durchgeführt.
• Die LED-Anzeige informiert über den Ladezustand oder mögliche Fehler.
• Den Taster solange drücken bis die LED-Anzeige den Batterietest anzeigt.
• Die LED der LED-Anzeige schalten sich nacheinander ein und wieder aus.
grün
206676 / 614860300010
2015-02-10·BA00·III·de·04
grün
grün
DE
DE
DE
DE
DE
DE
DE
DE
DE
DE
DE
DE
DE
DE
DE
DE
DE
grün Beschreibung
Abruch Batterietest
Unterbrechung Ladebetrieb
Batteriekapazität nach Ladung kleiner als 100 %
LED-Hauptlicht defekt
Taste wurde während des Tests gedrückt
Ergebnis Batterietest
Batteriekapazität ( 40 %
Batteriekapazität ( 60 %
Batteriekapazität ( 80 %
Batteriekapazität > 80 %
Handscheinwerfer
Reihe 6148
DE
DE
Testablauf
• Die Batterie wird 12 Stunden geladen.
• Danach wird die LED Hauptlicht eingeschaltet.
• Die Batterie wird bis auf 10 % der Kapazität entladen.
• Die Entladezeit wird gemessen und bewertet.
rot
DE
17
Betrieb
DE
DE
9.5
DE
DE
DE
DE
Anzeigen
Beschreibung der LED-Anzeige
• LED aus - Feld keine Füllung
• LED ein - Feld gefüllt
• LED blinkt - Feld halb gefüllt
Beispiel:
rot
DE
grün
grün
grün
grün Beschreibung
rote LED blinkt, 2. grüne LED blinkt
rote LED an, 2. grüne LED an
grün
grün
grün Beschreibung
Batteriekapazität <10 %
Batteriekapazität ( 20 %
Batteriekapazität ( 42 %
Batteriekapazität ( 65 %
Batteriekapazität ( 88 %
Batteriekapazität > 88 %
grün
grün
grün Beschreibung
Dimmstufe < 20 %
Dimmstufe < 40 %
Dimmstufe < 60 %
Dimmstufe ( 80 %
Dimmstufe > 80 %
DE
DE
Batteriekapazität
DE
rot
DE
grün
DE
DE
DE
DE
DE
DE
Dimm-Modus
DE
rot
grün
DE
DE
DE
DE
DE
Ladebetrieb
DE
grün Beschreibung
Batteriekapazität < 20 %
Batteriekapazität < 42 %
Batteriekapazität < 65 %
Batteriekapazität < 88 %
Batteriekapazität ( 98 %
Batteriekapazität > 98 %
Aktivieren / Deaktivieren Notlichtbetrieb
DE
rot
grün
grün
grün
rot
grün
grün
grün
rot
grün
grün
grün
grün Beschreibung
Notlichtfunktion aus
Notlichtfunktion ein
Aktivieren / Deaktivieren Ladeabschaltung bei Verwendung im KFZ
18
Handscheinwerfer
Reihe 6148
grün Beschreibung
Ladeabschaltung aus
Ladeabschaltung ein
206676 / 614860300010
2015-02-10·BA00·III·de·04
Betrieb
DE
Test der Batterie
rot
grün
grün
grün
grün Beschreibung
Abruch Batterietest
Unterbrechung Ladebetrieb
Batteriekapazität nach Ladung kleiner als 100 %
LED-Hauptlicht defekt
Taste wurde während des Tests gedrückt
Ergebnis Batterietest
Batteriekapazität ( 40 %
Batteriekapazität ( 60 %
Batteriekapazität ( 80 %
Batteriekapazität > 80 %
Störungen
rot
grün
grün
grün
grün Beschreibung
Spannung Eingang LED zu hoch
Spannung Eingang LED zu klein
DE
DE
DE
DE
DE
DE
DE
DE
DE
DE
DE
grün
grün
DE
DE
DE
grün Beschreibung
Spannung Eingang LED zu hoch
Spannung Eingang LED zu klein
DE
DE
DE
WARNUNG
Gefahr bei Verwendung im explosionsgefährdeten Bereich!
Explosionsschutz gefährdet!
• Handscheinwerfer nur im sicheren Bereich öffnen.
Fehlerbehebung
• Den Handscheinwerfer öffnen (siehe Kapitel „Austausch der Batterie“).
• Die Batterie ab- und wieder anklemmen.
• Den Handscheinwerfer schließen.
• Den Handscheinwerfer in den Ladesessel einsetzen.
• Die Batterie laden.
Wenn sich der Fehler mit den genannten Vorgehensweisen nicht beheben lässt:
• An R. STAHL Schaltgeräte GmbH wenden.
Zur schnellen Bearbeitung folgende Angaben bereithalten:
• Typ und Seriennummer
• Kaufdaten
• Fehlerbeschreibung
• Einsatzzweck (insbesondere Eingangs-/Ausgangsbeschaltung)
206676 / 614860300010
2015-02-10·BA00·III·de·04
DE
DE
9.6.1 Fehler LED-Spannung
Die Haupt-LED hat keine Funktion.
Siehe Sequenz Anzeige-LED
grün
DE
DE
Fehlerbeseitigung
rot
DE
DE
Spannung Ausgang Ladesessel zu hoch
9.6
DE
Handscheinwerfer
Reihe 6148
19
Instandhaltung, Wartung, Reparatur
DE
DE
10
Instandhaltung, Wartung, Reparatur
WARNUNG
DE
Stromschlaggefahr bzw. Fehlfunktion des Geräts durch unbefugte Arbeiten!
Nichtbeachten kann zu schweren Verletzungen und Sachschäden führen.
• Arbeiten am Gerät ausschließlich von dazu autorisierter und
entsprechend geschulter Elektro-Fachkraft ausführen lassen.
DE
DE
DE
DE
DE
10.1 Instandhaltung und Wartung
DE
Die geltenden nationalen Bestimmungen im Einsatzland beachten.
DE
DE
DE
• Art und Umfang der Prüfungen den entsprechenden nationalen Vorschriften
entnehmen.
• Prüfungsintervalle an Betriebsbedingungen anpassen.
DE
DE
DE
Folgende Prüfungen und Maßnahmen müssen mindestens bei der regelmäßigen
Wartung durchgeführt werden.
DE
DE
DE
DE
Prüfen
Maßnahmen
der zulässigen Umgebungstemperatur
Bei Über- oder Unterschreiten der
zulässigen Umgebungstemperatur ist das
Gerät außer Betrieb zu nehmen.
der Gehäusekomponenten auf
Rissbildung oder Beschädigungen
Austauschbare Gehäusekomponenten
tauschen. Bei nicht austauschbaren
Gehäusekomponenten ist das Gerät außer
Betrieb zu nehmen.
der bestimmungsgemäßen Verwendung
Bei nicht bestimmungsgemäßer
Verwendung ist das Gerät außer Betrieb
zu nehmen.
DE
DE
DE
DE
DE
DE
10.1.1 Austausch Batterie
WARNUNG
Gefahr bei Verwendung im explosionsgefährdeten Bereich!
Explosionsschutz gefährdet!
• Handscheinwerfer nur im sicheren Bereich öffnen.
20
Handscheinwerfer
Reihe 6148
206676 / 614860300010
2015-02-10·BA00·III·de·04
Instandhaltung, Wartung, Reparatur
DE
DE
DE
DE
A1
B1
DE
DE
1
A2
DE
+
2
DE
3
4
B2
DE
5
15005E00
1
2
3
4
5
•
•
•
•
•
•
•
•
•
•
6 x Schrauben Kopf (Torx 10)
A1 Anschlussleitung Platine
Anschlussleitung Platine (+; -)
A2 Anschlussleitung Platine
2 x Schrauben Haltebügel (Torx 10)
B1 Anschlussleitung Ladekontakt
Batteriehaltebügel
B2 Anschlussleitung Ladekontakt
Batterie
Die Schrauben (1) am Kopf entfernen.
Den Lampenkopf vom Gehäuse nehmen.
Die Anschlussleitungen (A1, A2) von den Ladekontakten (B1, B2) abziehen.
Die Anschlussleitungen (2) von den Batteriekontakten abziehen.
Die Schrauben (3) vom Haltebügel entfernen.
Den Batteriehaltebügel (4) entnehmen.
Die Batterie (5) aus dem Gehäuse entfernen.
Die neue Batterie gemäß Kennzeichnung im Gehäuse einsetzen.
Den Batteriehaltebügel (4) einsetzen.
Mit den Schrauben (3) den Batteriehaltebügel festschrauben Anzugsdrehmoment 0,5 Nm.
DE
DE
DE
DE
DE
DE
DE
DE
DE
DE
DE
DE
DE
DE
HINWEIS
DE
Falscher Anschluss der Anschlussleitungen führt zur Beschädigung des
Handscheinwerfers.
• Die rote Anschlussleitung „+“ (2) an den rot markierten Batteriekontakt „+“
anschließen.
• Die blaue Anschlussleitung „-“ (2) an den blau markierten Batteriekontakt „-“
anschließen.
• Die Anschlussleitung (A1) an den Ladekontakt (B1) anschließen.
• Die Anschlussleitung (A2) an den Ladekontakt (B2) anschließen.
• Den Leuchtenkopf auf das Gehäuse setzen.
• Mit den Schrauben (1) den Leuchtenkopf am Gehäuse festschrauben Anzugsdrehmoment 0,5 Nm.
• Den Handscheinwerfer kurz in den Ladesessel einsetzen.
10.1.2 Reinigung
• Das Gerät nur mit einem feuchten Tuch reinigen.
• Wasser oder milde Reinigungsmittel verwenden.
• Keine scheuernden, kratzenden sowie aggressiven Reinigungsmittel oder
Lösungsmittel verwenden.
206676 / 614860300010
2015-02-10·BA00·III·de·04
Handscheinwerfer
Reihe 6148
DE
21
Entsorgung
DE
DE
10.2 Reparatur
GEFAHR
DE
Explosionsgefahr durch unsachgemäße Reparatur!
Nichtbeachten führt zu schweren oder tödlichen Verletzungen.
• Reparaturen an den Geräten ausschließlich durch
R. STAHL Schaltgeräte GmbH ausführen lassen.
DE
DE
DE
DE
DE
10.3 Rücksendung
Für die Rücksendung im Reparatur-/Servicefall das Formular "Serviceschein"
verwenden. Auf der Internetseite "www.stahl-ex.com" im Menü "Downloads >
Kundenservice":
• Serviceschein herunterladen und ausfüllen.
• Gerät zusammen mit dem Serviceschein wieder in der Originalverpackung an
die R. STAHL Schaltgeräte GmbH senden.
DE
DE
DE
DE
DE
DE
DE
11
DE
DE
DE
DE
Entsorgung
• Nationale und lokal gültige Vorschriften und gesetzliche Bestimmungen zur
Entsorgung beachten.
• Materialien getrennt dem Recycling zuführen.
• Umweltgerechte Entsorgung aller Bauteile gemäß den gesetzlichen Bestimmungen
sicherstellen.
VORSICHT
DE
Gefahr durch chemische Reaktionen!
Menschliche Gesundheit und Umwelt gefährdet!
Batterien
• getrennt sammeln
• kontrolliert der Entsorgung zuführen
• nicht im Hausmüll entsorgen
• an öffentliche Sammelstellen oder an den Lieferanten zurückgeben
DE
DE
DE
DE
DE
22
Handscheinwerfer
Reihe 6148
206676 / 614860300010
2015-02-10·BA00·III·de·04
Zubehör und Ersatzteile
12
DE
Zubehör und Ersatzteile
DE
HINWEIS
Fehlfunktion oder Geräteschaden durch den Einsatz nicht originaler Bauteile.
Nichtbeachten kann Sachschaden verursachen!
• Nur Original-Zubehör und Original-Ersatzteile der R. STAHL Schaltgeräte GmbH
verwenden.
Abbildung
Art. Nr.
Beschreibung
Gewicht
kg
Batteriepack
DE
DE
DE
DE
Zubehör und Ersatzteile
Benennung
DE
Blei-Vlies-Akku, 6 V, 4,5 Ah
211124
DE
DE
DE
0,720
DE
DE
14808E00
DE
weitere, siehe Datenblatt auf Homepage www.stahl-ex.com.
DE
DE
DE
DE
DE
DE
DE
DE
DE
DE
DE
DE
206676 / 614860300010
2015-02-10·BA00·III·de·04
Handscheinwerfer
Reihe 6148
23
Operating instructions
EN
Additional languages www.stahl-ex.com
EN
EN
EN
EN
EN
EN
EN
EN
EN
EN
EN
EN
EN
EN
EN
EN
EN
EN
Portable Lamp
EN
EN
EN
Series 6148
EN
EN
EN
EN
EN
Contents
EN
1
1.1
1.2
1.3
2
2.1
2.2
2.3
3
3.1
3.2
3.3
3.4
4
4.1
4.2
5
6
6.1
6.2
7
7.1
7.2
8
9
9.1
9.2
9.3
9.4
9.5
9.6
10
10.1
10.2
10.3
11
12
EN
EN
EN
EN
EN
EN
EN
EN
EN
EN
EN
EN
EN
EN
EN
EN
EN
EN
EN
EN
EN
EN
EN
2
General Information ............................................................................................3
Manufacturer .......................................................................................................3
Information regarding the operating instructions .................................................3
Conformity with standards and regulations .........................................................3
Explanation of the symbols .................................................................................4
Symbols in these operating instructions .............................................................4
Warning notes .....................................................................................................4
Symbols on the device ........................................................................................5
Safety notes ........................................................................................................5
Operating instructions storage ............................................................................5
Safe use ..............................................................................................................6
Intended Use .......................................................................................................6
Modifications and alterations ..............................................................................6
Function and device design ................................................................................6
Function ..............................................................................................................6
Device design .....................................................................................................7
Technical data .....................................................................................................7
Transport and storage .........................................................................................9
General ...............................................................................................................9
Batteries ..............................................................................................................9
Mounting and installation ....................................................................................9
Dimensions / fastening dimensions ..................................................................10
Mounting / dismounting, operating position ......................................................10
Commissioning .................................................................................................13
Operation ..........................................................................................................14
Normal Operation ..............................................................................................14
Emergency light operation ................................................................................15
Charging Operation ...........................................................................................16
Battery capacity test ..........................................................................................17
Indications .........................................................................................................18
Troubleshooting ................................................................................................19
Maintenance and repair ....................................................................................20
Maintenance .....................................................................................................20
Repair ...............................................................................................................22
Returning the device .........................................................................................22
Disposal ............................................................................................................22
Accessories and Spare parts ...........................................................................22
Portable Lamp
Series 6148
General Information
1
General Information
1.1
Manufacturer
1.2
EN
EN
EN
R. STAHL Schaltgeräte GmbH
Business Unit Lighting & Signalling
Nordstr. 10
99427 Weimar
Germany
R. STAHL Schaltgeräte GmbH
Phone:
Fax:
Internet:
E-mail:
Phone:
Fax:
Internet:
E-mail:
+49 3643 4324
+49 3643 4221-76
www.stahl-ex.com
[email protected]
EN
EN
Am Bahnhof 30
74638 Waldenburg
Germany
EN
EN
EN
+49 7942 943-0
+49 7942 943-4333
www.stahl-ex.com
[email protected]
EN
EN
EN
EN
Information regarding the operating instructions
ID-No.:
Publication Code:
EN
206676 / 614860300010
2015-02-10·BA00·III·en·04
EN
EN
The original instructions are the English edition.
They are legally binding in all legal affairs.
1.3
EN
EN
Conformity with standards and regulations
EN
See certificates and EC Declaration of Conformity: www.stahl-ex.com.
EN
The device has IECEx approval.
See IECEx homepage: http://iecex.iec.ch/
EN
EN
EN
EN
EN
EN
206676 / 614860300010
2015-02-10·BA00·III·en·04
Portable Lamp
Series 6148
3
Explanation of the symbols
EN
EN
2
Explanation of the symbols
EN
2.1
Symbols in these operating instructions
EN
Symbol
EN
Meaning
Tips and recommendations on the use of the device
EN
EN
EN
EN
General danger
EN
EN
EN
Danger due to explosive atmosphere
EN
EN
EN
Danger due to energised parts
EN
EN
EN
EN
Risk of damage to the eyes caused by optical radiation
EN
EN
EN
Description of the LED display
• LED off - field empty
• LED on - field full
• LED flashing - field half-full
Example:
EN
EN
EN
red
2.2
4
green green green green Description
red LED flashing, 2nd green LED flashing
red LED on, 2nd green LED on
Warning notes
Warning notes must be observed under all circumstances, in order to minimize the risk
due to construction and operation. The warning notes have the following structure:
• Signalling word: DANGER, WARNING, CAUTION, NOTICE
• Type and source of danger/damage
• Consequences of danger
• Taking countermeasures to avoid the danger/damage
Portable Lamp
Series 6148
206676 / 614860300010
2015-02-10·BA00·III·en·04
Safety notes
EN
DANGER
EN
Danger to persons
Non-compliance with the instruction results in severe or fatal injuries to
persons.
EN
EN
EN
WARNING
EN
Danger to persons
Non-compliance with the instruction can result in severe or fatal injuries to
persons.
EN
EN
EN
CAUTION
EN
Danger to persons
Non-compliance with the instruction can result in light injuries to persons.
EN
EN
NOTICE
EN
Avoiding material damage
Non-compliance with the instruction can result in material damage to the device
and / or its environment.
EN
EN
EN
2.3
EN
Symbols on the device
Symbol
EN
Meaning
CE marking according to the currently applicable directive.
EN
EN
EN
05594E00
According to marking, device approved for hazardous areas.
EN
EN
02198E00
EN
Risk of damage to the eyes caused by optical radiation
3
Safety notes
3.1
Operating instructions storage
EN
• Read the operating instructions carefully and store them at the mounting location of
the device.
• Observe applicable documents and operating instructions of the devices to be
connected.
206676 / 614860300010
2015-02-10·BA00·III·en·04
Portable Lamp
Series 6148
5
Function and device design
EN
EN
3.2
Safe use
3.3
Intended Use
3.4
Modifications and alterations
EN
EN
EN
EN
EN
EN
EN
EN
EN
EN
EN
EN
EN
EN
• Read and observe the safety notes in these operating instructions!
• Observe characteristic values and rated operating conditions on the rating and data
plates!
• Observe additional information plates on the device!
• Use the device in accordance with its intended and approved purpose only!
• We cannot be held liable for damage caused by incorrect or unauthorized use or by
non-compliance with these operating instructions.
• Before installation and commissioning, make sure that the device is not damaged!
• Work on the device (installation, maintenance, overhaul, repair) may only be carried
out by appropriately authorized and trained personnel.
The portable lamp 6148 is equipment
• for mobile applications
• usable in a motor vehicle
• for use in Zones 1, 21, 2, 22 and in the safe area
• can be used indoors and outdoors
EN
DANGER
EN
Explosion hazard due to modifications and alterations to the device!
Non-compliance results in severe or fatal injuries.
• Do not modify or alter the device. No liability or warranty for damage
resulting from modifications and alterations.
EN
EN
EN
EN
EN
4
Function and device design
EN
DANGER
EN
Explosion hazard due to improper use!
Non-compliance results in severe or fatal injuries.
• Use the device only according to the operating conditions described in
these operating instructions.
4.1
6
Function
•
•
•
•
•
•
To switch on, switch off, dim and make main light with LED flash
To switch on and switch off secondary light with LED
Emergency lighting function in connection with charging unit
The emergency lighting function can be deactivated and activated
To charge the battery via the charging unit
Battery capacity test
Portable Lamp
Series 6148
206676 / 614860300010
2015-02-10·BA00·III·en·04
Technical data
4.2
EN
Device design
EN
1
2
3
1
2
3
4
5
6
Lamp head with main light and secondary light
LED display
Pushbutton
Diffusing plates
Enclosure
Charging unit
EN
EN
EN
EN
EN
EN
4
EN
5
EN
6
EN
Power
EN
14769E00
EN
5
EN
Technical data
EN
Technical Data
EN
Explosion protection
EN
Global (IECEx)
EN
Gas and dust
IECEx IBE 11.0009
EN
Ex ib IIC T4 Gb
EN
Ex tb IIIC T75°C Db
EN
Europe (ATEX)
Gas and dust
EN
IBExU 11ATEX 1066
EN
E II 2 G Ex ib IIC T4 Gb
EN
E II 2 D Ex tb IIIC T75°C Db
EN
Certifications and
certificates
Certificates
IECEx, ATEX, Brazil (INMETRO), Russia ( GOST R)
Certificate for motor vehicles
E1 10 R - 036569
Electrical data
Battery
lead-fleece battery, maintenance-free, 6 V, 4.5 Ah
Service life
Battery
> 0.5 years at 50 °C
> 4 years at 25 °C
LED
> 50,000 h at 50 °C
206676 / 614860300010
2015-02-10·BA00·III·en·04
Portable Lamp
Series 6148
7
Technical data
EN
Technical Data
EN
Luminous
characteristics
EN
EN
EN
EN
EN
EN
EN
EN
Lamps
main light, LED: 3 W
secondary light, LED: 0.5 W
Light intensity
24,000 cd
CCT
6500 K
Light distribution
acc. to DIN 14642
Functions
continuous light or flashing light of the main light, continuous light of the
secondary light, function of the main light continuously dimmable
Emergency light
duration
EN
EN
EN
Deep discharge
protection
EN
main light:
continuous duty:
flashing mode:
continuously on, typical 7 h
flashing up to 18 h
secondary light:
continuous duty:
continuously on, typical 32 h
At a residual capacity of the battery of < 10 %, the main light is automatically
switched to the secondary light.
Test function
EN
EN
EN
EN
Lamp control
When the main light is defective, the light is switched automatically to the
secondary light
Battery capacity
Determination of the current battery capacity
Mechanical data
EN
Degree of protection
IP66 (IEC/EN 60589)
EN
Enclosure material
Polyamide, impact-strength
EN
Head tilting
toward the front: 100°, toward the back: 90°
EN
Pushbutton
main light ON - secondary light ON - main light FLASHING OFF
EN
Charge state display
The LEDs indicate the available capacity for approx. 5 seconds
Ambient conditions
EN
Ambient temperature -20 ... +50 °C
EN
Storage temperature
-20 ... +50 °C
Charging unit
Version
charging unit 6148/0000 (for explosion-protected portable lamps)
supply voltage: 110 ... 240 V AC, 50 / 60 Hz and 12 ... 30 V DC
with emergency lighting function and automatic break device for motor vehicle
operation
with power supply cable for 110 ... 240 V AC, 50 / 60 Hz
Optionally, a charging cable for motor vehicle operation for 12 ... 30 V DC is
available.
Charging current
at room temperature:
charging process
12 V DC
24 V DC
110 V AC
240 V AC
Charging time
8
Portable Lamp
Series 6148
max. 170 mA
max. 120 mA
max. 90 mA
max. 60 mA
stand by
power consumption < 1 W
approx. 11 h
206676 / 614860300010
2015-02-10·BA00·III·en·04
Transport and storage
EN
Technical Data
EN
Function
Charging starts upon inserting the portable lamp into the charging unit - with
voltage display via green LED
Automatic break
device
In motor vehicle operation, the car battery voltage is monitored. If the voltage
of the car battery drops below 11.7 V and 23.5 V with a 12 V and 24 V battery,
respectively, the charging process of the portable lamp will be interrupted
automatically.
EN
II (with protective insulation)
Enclosure material
polyamide, impact-resistant, black
Mounting
wall or table mounting
Connection cables
charging cable 110 ... 240 V AC: approx. 1.8 m long, with Europlug, 2-pin
charging cable 12 ... 30 V DC: approx. 1.8 m long, with free ends, 2-pin
Note
Ex operation
Attention!
The charging units are not suitable for use in hazardous areas!
Charging units must always be mounted in NON-Ex areas!
6
Transport and storage
6.1
General
6.2
7
EN
EN
EN
The automatic break device can be deactivated.
Protection class
EN
EN
EN
EN
EN
EN
EN
EN
EN
EN
EN
EN
• Transport and store the device only in the original packaging.
• Store the device in a dry place (no condensation) and vibration-free.
• Do not drop the device.
EN
Batteries
EN
•
•
•
•
EN
EN
Do not transport together with other materials!
Handle with care!
Store protected from fire, sources of dust, harmful gases and liquids!
Store in a dry and cool location!
EN
EN
EN
Mounting and installation
DANGER
Explosion hazard due to incorrect installation of the device!
Non-compliance results in severe or fatal injuries.
• Carry out installation strictly according to the instructions and national
safety and accident prevention regulations to maintain the explosion
protection.
• Select and install the electrical device so that explosion protection is not
affected due to external influences, i.e. pressure conditions, chemical,
mechanical, thermal and electric impact such as vibration, humidity and
corrosion (see IEC/EN 60079-14).
• The device must only be installed by trained qualified personnel who is
familiar with the relevant standards.
206676 / 614860300010
2015-02-10·BA00·III·en·04
Portable Lamp
Series 6148
9
Mounting and installation
EN
EN
7.1
Dimensions / fastening dimensions
Dimensional Drawings (All Dimensions in mm [inches]) - Subject to Alterations
EN
EN
EN
ø 4,50
[ø 0,18]
90 [3,54]
143 [5,63]
EN
154 [6,06]
EN
EN
279 [10,98]
79 [3,11]
92 [3,62]
EN
64 [2,52]
25 [0,98]
EN
EN
EN
EN
140 [5,51]
EN
14754E00
Portable lamp
EN
14753E00
Charging unit
39 [1,54]
EN
EN
EN
74 [2,91]
135 [5,32]
55 [2,17]
EN
ø 4,50 [ø 0,18]
EN
90 [3,54]
126 [4,96]
131 [5,16]
EN
EN
EN
EN
64 [2,52]
EN
14807E00
Drilling hole pattern for wall mounting bracket
7.2
Mounting / dismounting, operating position
WARNING
Danger when used in hazardous areas!
The explosion protection is impaired!
• Use the charging unit in safe areas only.
10
Portable Lamp
Series 6148
206676 / 614860300010
2015-02-10·BA00·III·en·04
Mounting and installation
EN
7.2.1 Charging Unit Assembly
EN
The assembly site must be level and support the weight.
The screws for mounting the wall bracket are not included in the delivery.
EN
EN
EN
EN
Wall mounting
EN
EN
1
2
1
2
3
4
Screws for charging unit (Torx 20)
(included in the delivery of the wall bracket)
Charging unit
Wall bracket
Screws for fastening the wall bracket
(not included in the delivery)
EN
EN
EN
EN
EN
EN
EN
3
EN
4
EN
EN
EN
14770E00
55 [
2,17
EN
]
• Align the wall bracket horizontally.
• Fasten it to the mounting site with 4 screws
• Slide the charging unit onto the wall bracket from
above.
• Fasten charging unit with the delivered screws tightening torque 1.5 Nm.
39 [1,54]
ø 4,
50
[ø 0
,18]
14771E00
Table mounting
1
1
2
2
3
Screws for fastening the charging unit
(not included in the delivery)
Charging unit
Level surface
3
14772E00
• Place the charging unit on a level surface.
• Fasten it to the mounting site with 3 screws - tightening torque 1.5 Nm.
206676 / 614860300010
2015-02-10·BA00·III·en·04
Portable Lamp
Series 6148
11
EN
EN
EN
EN
EN
Mounting and installation
EN
EN
EN
7.2.2 Assembly of the adapter in third-party charging units
LG443
1
EN
2
3
4
EN
EN
EN
1
2
3
4
EN
EN
Adapter
Adapter for third-party
charging units LG443
Holder
Screws for holder (Torx 10)
(included in the delivery)
EN
EN
EN
14943E00
• Insert the adapter into the charging unit.
• Slide the holders onto the charging unit.
• Fasten the adapter by tightening the screws - tightening torque 0.5 Nm.
EN
EN
EN
KFZ90
EN
EN
1
EN
2
3
EN
EN
1
2
3
EN
Adapter
Screws for adapter (Torx 10)
(included in the delivery)
Adapter for third-party charging units KFZ90
EN
EN
EN
EN
14944E00
• Insert the adapter into the charging unit.
• Fasten the adapter by tightening the screws - tightening torque 0.5 Nm.
12
Portable Lamp
Series 6148
206676 / 614860300010
2015-02-10·BA00·III·en·04
Commissioning
EN
7.2.3 Assembly of the belt hook
EN
EN
1
2
Screw for belt hook (Torx 10)
(included in the delivery)
Belt hook
EN
EN
EN
1
EN
EN
2
EN
EN
EN
EN
EN
14773E00
• Slide the belt hook into the guide from above.
• Fasten it with the screw - tightening torque 0.5 Nm.
8
EN
EN
EN
Commissioning
EN
WARNING
EN
Danger when used in hazardous areas!
The explosion protection is impaired!
• Use the charging unit in safe areas only.
EN
EN
Insert the portable lamp into the connected charging unit before using it for
the first time
EN
EN
EN
EN
Charging unit
• Connect charging unit to supply voltage.
• The "Power" LED is lit.
• Insert the portable lamp.
Portable lamp
• The LED display shows information on the charging state or possible faults.
206676 / 614860300010
2015-02-10·BA00·III·en·04
Portable Lamp
Series 6148
EN
13
Operation
EN
EN
9
Operation
DANGER
EN
Explosion hazard due to incorrect installation!
Non-compliance results in severe or fatal injuries.
• Check the device for proper installation and function before
commissioning.
• Comply with the national regulations.
EN
EN
EN
EN
CAUTION
EN
EN
Risk of damage to the eyes caused by optical radiation!
Minor injuries are possible!
• Do not look into the light source.
EN
EN
EN
EN
EN
EN
EN
EN
9.1
The main or secondary light of the portable lamp can only be switched on if
the portable lamp is outside the charging unit.
The undimmed main light and the secondary light light flicker-free.
The main light is switched automatically to the secondary light when:
• the main light is defective.
• the battery capacity is less than 10%.
EN
EN
EN
EN
EN
EN
The portable lamp is mobile lighting equipment.
9.1.1 Function
• Main light - Switching on / Dimming / Switching off
• Main light - Flashing (flashing frequency once per second)
• Secondary light - Switching on / Switching off
EN
EN
Normal Operation
9.1.2 Switching On / Changing the Function
Switching on:
Press the pushbutton
• The main light is switched on.
The LED display shows the battery capacity for 5 seconds.
Switching
Press pushbutton repeatedly while the LED display is active.
• The secondary light is switched on.
• The main light flashes once per second.
• The LED is switched off.
9.1.3 Switching off
Press the pushbutton:
• if the main light is flashing.
• 5 seconds after the last switching operation.
14
Portable Lamp
Series 6148
206676 / 614860300010
2015-02-10·BA00·III·en·04
Operation
EN
9.1.4 Dimming mode
EN
WARNING
EN
Danger due to stroboscopic effect!
Serious injuries are possible!
• Do not use the dimming mode for rotating parts.
• In dimming mode, the portable lamp does not light flicker-free!
• Under certain conditions, the rotation of parts cannot be detected.
The portable lamp must be off.
• Press the pushbutton until reaching the desired dimming level.
• The LED display shows the selected dimming level.
9.2
EN
EN
EN
EN
EN
EN
EN
Emergency light operation
EN
WARNING
EN
Danger when used in hazardous areas!
The explosion protection is impaired!
• Use the charging unit in safe areas only.
EN
EN
EN
In connection with the charging unit, the portable lamp can be used as
emergency light fitting.
In case of power failure, the main light will be switched on undimmed.
EN
EN
EN
Charging unit
• Connect to the supply voltage.
• The "Power" LED is lit.
• Insert the portable lamp.
Portable lamp
• Any switched-on LED will be switched off.
• A functional test will be carried out.
• The LED display shows information on the charging state or possible faults.
• In case of power failure, the portable lamp is switched on.
EN
EN
EN
EN
EN
EN
EN
9.2.1 Switching the emergency light mode on and off
Upon delivery, the "Emergency light mode" function is on.
With the function switched off and in case of power failure, the following states
will be activated at the portable lamp.
Before insertion into the charging unit
Main LED and secondary LED - OFF
Main LED - ON
Main LED - DIMMED
Main LED - FLASHING
Secondary LED - ON
In case of power failure
Main LED and secondary LED - OFF
Main LED - ON
Main LED - ON
Main LED - FLASHING
Secondary LED - ON
• Switch the main light on.
• Press button again and keep it pressed.
206676 / 614860300010
2015-02-10·BA00·III·en·04
Portable Lamp
Series 6148
15
Operation
EN
• With the pushbutton depressed, insert the portable lamp into the charging unit and
keep pressing the button until the LED signals the switchover.
EN
EN
red
EN
EN
EN
EN
9.3
green green green green Description
Emergency lighting function off
Emergency lighting function on
Charging Operation
WARNING
EN
Danger when used in hazardous areas!
The explosion protection is impaired!
• Use the charging unit in safe areas only.
EN
EN
EN
EN
9.3.1 Battery charging
At room temperature, the charging time of a discharged battery is
approx. 11 hours.
The portable lamp can remain in the charging unit even when the battery is
completely charged.
EN
EN
EN
EN
Charging unit
• Connect to the supply voltage.
• The "Power" LED is lit.
• Insert the portable lamp.
Portable lamp
• Any switched-on LED will be switched off.
• A functional test will be carried out.
• The LED display shows information on the charging state or possible faults.
Upon removal from the charging unit and with the emergency lighting function
switched on
• The LED main light will be switched on.
Upon removal from the charging unit and with the emergency lighting function
switched off
• The function before insertion will be activated.
EN
EN
EN
EN
EN
EN
EN
EN
EN
9.3.2 Charging switch-off when used in a motor vehicle.
Upon delivery, the function "Switch off charging operation in the event of
undervoltage" is active.
In case of undervoltage, the charging operation in the motor vehicle will be
interrupted.
The function can be deactivated and activated.
Activating and deactivating
• Switch on the secondary light.
• Press button again and keep it pressed.
• With the button depressed, insert the portable lamp into the charging unit and keep
pressing the button until the LED signals the switchover.
red
16
green green green green Description
Charging switch-off off
Charging switch-off on
Portable Lamp
Series 6148
206676 / 614860300010
2015-02-10·BA00·III·en·04
Operation
9.4
EN
Battery capacity test
EN
WARNING
EN
Danger when used in hazardous areas!
The explosion protection is impaired!
• Use the charging unit in safe areas only.
EN
EN
EN
The test
• should be carried out once a year.
• takes up to 20 hours.
• should be carried out at room temperature.
The test is cancelled when:
• the portable lamp is removed from the charging unit.
• the button on the portable lamp is pressed.
• the main LED is defective.
• the power supply of the charging unit is interrupted.
• the supply voltage falls below the lower voltage limit.
Charging unit
• Connect to the supply voltage.
• The "Power" LED is lit.
• Insert the portable lamp.
Portable lamp
• Any switched-on LED will be switched off.
• A functional test will be carried out.
• The LED display shows information on the charging state or possible faults.
• Keep pressing the button until the LED display shows the battery test.
• The LEDs of the LED display are switched on and off one after the other.
Test sequence
• The battery is charged for 12 hours.
• Then the LED main light is switched on.
• The battery is discharged to 10% of its capacity.
• The discharge time is measured and evaluated.
red
EN
EN
EN
EN
EN
EN
EN
EN
EN
EN
EN
EN
EN
EN
EN
EN
EN
EN
EN
green green green green Description
Cancellation of the battery test
Interruption of the charging operation
After charging, the battery capacity is less than
100%.
Main light LED defective
Button was pressed during the test
Battery test result
Battery capacity ( 40 %
Battery capacity ( 60 %
Battery capacity ( 80 %
Battery capacity > 80 %
206676 / 614860300010
2015-02-10·BA00·III·en·04
Portable Lamp
Series 6148
17
Operation
EN
EN
9.5
EN
EN
EN
EN
Indications
Description of the LED display
• LED off - field empty
• LED on - field full
• LED flashing - field half-full
Example:
red
green green green green Description
red LED flashing, 2nd green LED flashing
red LED on, 2nd green LED on
Battery capacity
EN
EN
EN
EN
red
EN
green green green green Description
Battery capacity < 10 %
Battery capacity ( 20 %
Battery capacity ( 42 %
Battery capacity ( 65 %
Battery capacity ( 88 %
Battery capacity > 88 %
Dimming mode
EN
red
EN
EN
EN
EN
EN
EN
green green green green Description
Dimming level < 20 %
Dimming level < 40 %
Dimming level < 60 %
Dimming level ( 80 %
Dimming level > 80 %
Charging operation
EN
EN
EN
EN
EN
EN
red
green green green green Description
Battery capacity < 20 %
Battery capacity < 42 %
Battery capacity < 65 %
Battery capacity < 88 %
Battery capacity ( 98 %
Battery capacity > 98 %
Activating and deactivating the emergency light operation
EN
red
green green green green Description
Emergency lighting function off
Emergency lighting function on
Activating and deactivating the charging switch-off when used in a motor vehicle.
red
18
green green green green Description
Charging switch-off off
Charging switch-off on
Portable Lamp
Series 6148
206676 / 614860300010
2015-02-10·BA00·III·en·04
Operation
EN
Battery test
red
green green green green Description
Cancellation of the battery test
Interruption of the charging operation
After charging, the battery capacity is less than
100%.
Main light LED defective
Button was pressed during the test
Battery test result
Battery capacity ( 40 %
Battery capacity ( 60 %
Battery capacity ( 80 %
Battery capacity > 80 %
Faults
red
EN
EN
EN
EN
EN
EN
EN
EN
EN
EN
EN
EN
EN
EN
9.6.1 LED voltage errors
The main LED has no function.
Please refer to sequence LED indication.
EN
EN
EN
green green green green Description
LED input voltage too high
LED input voltage too low
EN
EN
WARNING
Danger when used in hazardous areas!
The explosion protection is impaired!
• Open the portable lamp in safe areas only.
Troubleshooting
• Open the portable lamp (see chapter "Battery replacement").
• Disconnect and then reconnect battery.
• Close the portable lamp.
• Insert portable lamp into charging unit.
• Charge battery.
If the error cannot be eliminated using the mentioned procedures:
• Contact R. STAHL Schaltgeräte GmbH.
For fast processing, have the following information ready:
• Type and serial number
• Purchase information
• Error description
• Intended use (in particular input / output wiring)
206676 / 614860300010
2015-02-10·BA00·III·en·04
EN
EN
Troubleshooting
red
EN
EN
green green green green Description
LED input voltage too high
LED input voltage too low
Charging unit output voltage too high
9.6
EN
Portable Lamp
Series 6148
19
Maintenance and repair
EN
EN
10
Maintenance and repair
WARNING
EN
Risk of electric shock or malfunctioning of the device due to unauthorized
work!
Non-compliance can result in severe injuries and material damage.
• Work performed on the device must only be carried out by appropriately
authorized and qualified electricians.
EN
EN
EN
EN
EN
EN
10.1 Maintenance
EN
Observe the relevant national regulations in the country of use.
EN
EN
EN
• Consult the relevant national regulations to determine the type and extent of
inspections.
• Adapt inspection intervals to the operating conditions.
EN
EN
EN
The following tests and measures must be carried out during regular maintenance.
EN
EN
EN
Check
Measures
the permissible ambient temperature
If exceeding the permissible ambient
temperature or falling below the device
must be taken out of operation.
EN
EN
the enclosure components for formation of Replace the exchangeable enclosure
cracks and damage.
components. If the enclosure components
are non-exchangeable, the device must be
taken out of operation.
EN
EN
EN
its intended use
EN
If the device is not used according to its
intended use, it must be taken out of
operation.
10.1.1 Battery replacement
WARNING
Danger when used in hazardous areas!
The explosion protection is impaired!
• Open the portable lamp in safe areas only.
20
Portable Lamp
Series 6148
206676 / 614860300010
2015-02-10·BA00·III·en·04
Maintenance and repair
EN
EN
EN
EN
A1
B1
EN
EN
1
A2
EN
+
2
EN
3
4
B2
EN
5
15005E00
1
2
3
4
5
•
•
•
•
•
•
•
•
•
•
6 screws for head (Torx 10)
A1 PCB connection line
PCB connection line (+; -)
A2 PCB connection line
2 screws for retaining bracket (Torx 10) B1 Charging contact connection line
Battery retaining bracket
B2 Charging contact connection line
Battery
Remove the screws (1) at the head.
Remove lamp head from the enclosure.
Pull the connection lines (A1, A2) off the charging contacts (B1, B2).
Pull the connection lines (2) off the battery contacts.
Remove the screws (3) from the retaining bracket.
Remove the battery retaining bracket (4).
Remove battery (5) from the enclosure.
Insert new battery into enclosure according to marking.
Insert battery retaining bracket (4).
Screw down the battery retaining bracket with the screws (3) - tightening torque
0.5 Nm.
EN
EN
EN
EN
EN
EN
EN
EN
EN
EN
EN
EN
EN
EN
NOTICE
EN
Wrong connection of the connection lines will damage the portable lamp.
• Connect the red connection line "+" (2) to the battery contact marked in red "+".
• Connect the blue connection line "-" (2) to the battery contact marked in blue "-".
• Connect the connection line (A1) to the charging contact (B1).
• Connect the connection line (A2) to the charging contact (B2).
• Place the lamp head on the enclosure.
• Fasten the lamp head to the enclosure with the screws (1) - tightening torque
0.5 Nm.
• Insert portable lamp briefly into charging unit.
10.1.2 Cleaning
• Clean the device only with a damp cloth.
• Use water or mild cleaning agents.
• Do not use abrasive, scratching and aggressive detergents or solvents.
206676 / 614860300010
2015-02-10·BA00·III·en·04
EN
Portable Lamp
Series 6148
21
Disposal
EN
EN
10.2 Repair
DANGER
EN
Explosion hazard due to improper repair!
Non-compliance results in severe or fatal injuries.
• Repair work on the devices must be performed only by
R.STAHL Schaltgeräte GmbH.
EN
EN
EN
EN
EN
10.3 Returning the device
Use the "Service form" to return the device when repair/service is required. On the
internet site "www.stahl-ex.com" under "Downloads > Customer service":
• Download the service form and fill it out.
• Send the device along with the service form in the original packaging
to R. STAHL Schaltgeräte GmbH.
EN
EN
EN
EN
EN
EN
11
EN
EN
EN
Disposal
• Observe national and local regulations and statutory regulation regarding disposal.
• Separate materials when sending it for recycling.
• Ensure environmentally friendly disposal of all components according to the statutory
regulations.
CAUTION
EN
Danger due to chemical reactions!
Human health and the environment are at risk!
Batteries
• collect them separately
• dispose of them in controlled fashion
• do not dispose of them in the domestic waste
• return them to public collection points or to the supplier
EN
EN
EN
EN
EN
EN
EN
12
Accessories and Spare parts
NOTE
Malfunction or damage to the device due to the use of non-original components.
Non-compliance can result in material damage.
• Use only original accessories and spare parts from R. STAHL Schaltgeräte GmbH.
Accessories and Spare Parts
Designation
Figure
Description
Art. no.
Weight
kg
Battery
lead-fleece battery, maintenance-free, 211124
6 V, 4.5 Ah
0.720
14808E00
For others, see data sheet on homepage www.stahl-ex.com.
22
Portable Lamp
Series 6148
206676 / 614860300010
2015-02-10·BA00·III·en·04