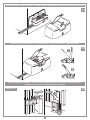
1
BL
CARDIN ELETTRONICA spa
Via Raffaello, 36
31020 San Vendemiano (TV) Italy
Tel:
+39/0438.404011-401818
Fax:
+39/0438.401831
email (Italian): [email protected]
email (Europe): [email protected]
Http:
www.cardin.it
24Vdc
Motors
Instruction manual
Series
Model
Date
ZVL372.04
BL
1924
02-12-2003
Questo prodotto è stato testato e collaudato nei laboratori della casa costruttrice, la quale ne ha verificato la
perfetta corrispondenza delle caratteristiche con quelle richieste dalla normativa vigente. This product has been
tried and tested in the manufacturer's laboratory who have verified that the product conforms in every aspect to
the safety standards in force. Ce produit a été testé et essayé dans les laboratoires du fabriquant. Pour l'installer
suivre attentivement les instructions fournies. Dieses Produkt wurde in den Werkstätten der Herstellerfirma
auf die perfekte Übereinstimmung ihrer Eigenschaften mit den von den geltenden Normen vorgeschriebenen
getestet und geprüft. Este producto ha sido probado y ensayado en los laboratorios del fabricante, que ha
comprobado la perfecta correspondencia de sus características con las contempladas por la normativa vigente.
AUTOMAZIONE PER CANCELLI A BATTENTE
AUTOMATION FOR HINGED GATES
AUTOMATISME POUR PORTAILS BATTANTS
Automatisierung für Flügeltore
AUTOMATIZACIÓN PARA CANCILLAS BATIENTES
24Vdc Motors 200/BL1924
FRANÇAIS
ATTENTION! Avant de commencer la pose, lire attentivement les instructions!
Type d’installation
Schéma de montage
Dimensions d’encombrement
Contraintes d’utilisation
Schémas de montage
Schéma électrique (exemple d’installation)
Consignes importantes
Instructions pour l’utilisation
Instructions pour l’installation
Branchement électrique
Déverrouillage manuel
Caractéristiques techniques
ITALIANO
ACHTUNG! Bevor mit der Installation begonnen wird,
sollte die Anleitung aufmerksam gelesen werden.
Pagina
Pagina
Pagina
Pagina
Pagina
Pagina
Pagina
Pagina
Pagina
Pagina
Pagina
Pagina
Anlagenart
Montageschema
Aussenabmessungen
Anwendungsgrenzen
Montageschemen
Elektrischer Schaltplan (Anlagenart)
Wichtige Hinweise
Betriebsanleitungen
Installationsanleitungen
Elektrischer Anschluss
Manuelle Entriegelung
Technische Daten
2
3
3
4
4-7
8
9
9
9
10
10
20
ENGLISH
ZVL372.04 Mod: 26-10-2008
Seite
Seite
Seite
Seite
Seite
Seite
Seite
Seite
Seite
Seite
Seite
Seite
2
3
3
4
4-7
8
15
15
15
16
16
20
ESPAÑOL
¡ATENCIÓN! Antes de iniciar la instalación del sistema,
leer atentamente las instrucciones.
ATTENTION! Before installing this device read the
following instructions carefully!
Installation example
Assembly
Overall dimensions
Limits of use
Assembly drawings
Wiring diagrams (installation example)
Important remarks
User instructions
Installation instructions
Electrical connection
Manual release mechanism
Technical specifications
2
3
3
4
4-7
8
13
13
13
14
14
20
DEUTSCH
ATTENZIONE! Prima di iniziare l'installazione leggere le
istruzioni attentamente!
Impianto tipo
Schema di montaggio
Dimensioni d’ingombro
Limiti d’impiego
Schemi di montaggio
Schema elettrico (impianto tipo)
Avvertenze importanti
Istruzioni per l’uso
Istruzione per l’installazione
Collegamento elettrico
Sblocco manuale
Caratteristiche tecniche
Page
Page
Page
Page
Page
Page
Page
Page
Page
Page
Page
Page
Page
Page
Page
Page
Page
Page
Page
Page
Page
Page
Page
Page
Instalación estándar
Esquema de montaje
Dimensiones máximas
Límites de empleo
Esquemas de montaje
Esquema eléctrico (instalación estándar)
Advertencias importantes
Instrucciones para el uso
Instrucciones para la instalación
Conexión eléctrica
Desbloqueo manual
Datos técnicos
2
3
3
4
4-7
8
11
11
11
12
12
20
1
Página
Página
Página
Página
Página
Página
Página
Página
Página
Página
Página
Página
2
3
3
4
4-7
8
17
17
17
18
18
20
1
1
Description : prodotti Technocity (lamp. fotocellule ecc.)
INSTALLAZIONE TIPO BL1924
5
8
4
11
3
7
LEGENDA
12
1 Motoriduttore (SX)
2 Motoriduttore (DX)
3 Fotocellula interna
4 Fotocellula esterna
5 Lampeggiatore
6 Selettore a chiave
7 Elettroserratura
8 Antenna esterna (Cavo coassiale RG58 Impedenza 50Ω)
9 Interruttore onnipolare con apertura contatti min. 3 mm
10 Cavo alimentazione principale 230 Vac
11 Canalatura per collegamenti motori 24 Vdc
12 Canalatura per collegamenti a bassa tensione
13 Programmatore elettronico
Attenzione: Lo schema rappresentato è puramente indicativo e
viene fornito come base di lavoro al fine di consentire una scelta dei
componenti elettronici Cardin da utilizzare. Detto schema non costituisce pertanto vincolo alcuno per l'esecuzione dell'impianto
2
6
23
13
10
0V
-50
Hz
9
LEGEND
1 Geared motor (SX - left)
2 Geared motor (DX - right)
3 Internal photocells
4 External photocells
5 Warning lights
6 Mechanical selector switch
7 Electric locking device
8 External antenna (RG58 coaxial cable - impedance 50Ω)
9 All-pole circuit breaker with a minimum of 3 mm between the
contacts
10 Mains cable 230 Vac
11 Channelling for the motor connection cable 24 Vdc
12 Channelling route for low voltage wires
13 Electronic programmer
Attention: The drawing is purely indicative and is supplied as working base from which to choose the Cardin electronic components
making up the installation. This drawing therefore does not lay down
any obligations regarding the execution of the installation.
Zeichenerklärung
1 Getriebemotor (SX - links)
2 Getriebemotor (DX - rechts)
3 Interne Lichtschranke
4 Externe Lichtschranke
5 Blinklicht
6 Schlüsselschalter
7 Elektroverriegelung
8 Antenne (Koaxialkabel RG58 Impedanz 50Ω)
9 Allpoliger Schalter mit Kontaktenabstand von mindestens 3 mm
10 Hauptversorgungskabel 230 Vac
11 Kanalverlauf für motorverbindungskabel 24 Vdc
12 Kanalverlauf für Anschluss auf Niederspannung
13 Elektronische Steuereinheit
NOMENCLATURE
1 Motoréducteur (SX - gauche)
2 Motoréducteur (DX - droite)
3 Cellule photoélectrique intérieure
4 Cellule photoélectrique extérieure
5 Clignoteur
6 Sélecteur à clé
7 Serrure électrique
8 Antenne (Câble coaxial RG58 - Impédance 50Ω)
9 Interrupteur omnipolaire avec ouverture des contacts d'au
moins 3 mm.
10 Câble d’alimentation principale 230 Vac
11 Chemin de câble branchement moteurs 24 Vdc
12 Chemin pour branchement basse tension
13 Armoire électronique
Attention: le schéma, diffusé à titre purement indicatif, est destiné
à vous aider dans le choix des composants électroniques Cardin
à utiliser. Par conséquent, il n'a aucune valeur obligatoire quant
à la réalisation de l'installation.
LEYENDA
1 Motorreductor (SX - izquierda)
2 Motorreductor (DX - derecha)
3 Fotocélula interior
4 Fotocélula exterior
5 Relampagueador
6 Selector con llave
7 Electrocerradura
8 Antena exterior (Cable coaxial RG58 Impedancia 50Ω)
9 Interruptor omnipolar con apertura entre los contactos de 3 mm.
como mínimo.
10 Cable de alimentación principal 230 Vac
11 Canaleta para motor cable 24 Vdc
Achtung: Bei dem dargestellten Plan handelt es sich nur um ungefähre
Angaben und er wird als Arbeitsgrundlage geliefert, um eine Auswahl der
zu benutzenden elektronischen Komponenten von Cardin zu erlauben. Der
besagte Plan ist daher für die Ausführung der Anlage nicht bindend.
12 Canaleta para el conexionado a baja tensión
13 Centralita electrónica
Atención: La pantalla que se muestra es sólo indicativa y se suministra
como base de trabajo, con el fin de permitir una elección de los componentes electrónicos Cardin por utilizar; en consecuencia, dicho esquema
no constituye vínculo alguno para la ejecución del sistema.
2
All rights reserved. Unauthorised copying or use of the information contained in this document is punishable by law
Drawing number : DI0446
Product Code : BL1924
ESEMPIO D'INSTALLAZIONE - Installation example - Exemple d'installation - Anlagenart - INSTALACIÓN ESTÁNDAR
All rights reserved. Unauthorised copying or use of the information contained in this document is punishable by law
SCHEMA DI MONTAGGIO - ASSEMBLY DRAWINGS - MONTAGE - MONTAGE VERFAHREN - ESQUEMA DE MONTAJE
2
2
3
1
4
5
All rights reserved. Unauthorised copying or use of the information contained in this document is punishable by law
9
6
8
7
10
12
11
Dimensioni d'ingombro - External dimensions - Dimensions d'encombrement - Aussenabmessungen - DIMENSIONES MÁXIMAS
3
All rights reserved. Unauthorised copying or use of the information contained in this document is punishable by law
170
All rights reserved. Unauthorised copying or use of the information contained in this document is punishable by law
All rights reserved. Unauthorised copying or use of the information contained in this document is punishable by
Drawing number : DM0496
Description : ISTRUZIONE PER IL MONTAGGIO
Product Code : BL1924
90
MONTAGGIO
BL1924
117
74
233
Draft : P.J.Heath164 Date : 31-05-2000
350
CARDIN ELETTRONICA S.p.A - 31020 San Vendemiano (TV) Italy - via Raffaello, 36 Tel: 0438/401818 Fax: 0438/401831
0
470
40
12
0
51
49
26
Ø25
3
3
α
74
1
Drawing number : DI0160
Draft : P.J.Heath
INSTALLAZIONE BL1924
Description : prodotti Technocity
1
Date : 06-06-2000
Product Code : BL1924
SCALA:
L
M
FISSAGGIO BASE MOTORE 1924
Description : Prodotti Technocity
A
5
All rights reserved. Unauthorised copying or use of the information contained in this document is punishable by law
esempio d'INSTALLAZIONE - INSTALLATION EXAMPLE - Exemple d'installation - ANLAGENart - EJEMPLO DE INSTALACIÓN
CARDIN ELETTRONICA S.p.A - 31020 San Vendemiano (TV) Italy - via Raffaello, 36 Tel: 0438/401818 Fax: 0438/401831
Drawing number : DI0161
Date : 20-06-2000
DIN ELETTRONICA S.p.A - 31020 San Vendemiano (TV) Italy - via Raffaello,
39 36 Tel: 0438/401818 Fax: 0438/401831
dett. 1
CARDIN ELETTRONICA S.p.A - 31020 San Vendemiano (TV) Italy - via Raffaello, 36 Tel: 0438/401818 Fax: 0438/401831
Draft : P.J.Heath
4
2
C
100
All rights reserved. Unauthorised copying or use of the information contained in this document is punis
POSIZIONAMENTO BASE MOTORE E STAFFA ANTERIORE - POSITIONING THE MOTOR SUPPORT BASE AND REAR BRACKET
MISE EN PLACE DE L’EMBASE DU MOTEUR ET DE LA PATTE ANTÉRIEURE
POSITIONIERUNG
MOTORGRUNDPLATTE
UND VORDERER
BÜGEL - COLOCACIÓN BASE MOTOR Y SOPORTE ANTERIOR
Description
:
wing number : DI0156
Product Code : BL1924
26
120 min
B
A
6
BL1924
BL1924
uct Code :
Date : 04-03-2000
t:
LIMITI D’IMPIEGO - limits of use - CONTRAINTES D'UTILISATION - ANWENDUNGSGRENZEN - LIMITES DE EMPLEO
4
fissaggio base motore al pilastro - fastening the motor to the column - FIXATION DE L’EMBASE DU MOTEUR AU PILIER
BEFESTIGUNG DER MOTORGRUNDPLATTE AM PFEILER - FIJACIÓN DE LA BASE DEL MOTOR EN EL PILAR
7
All rights reserved. Unauthorised copying or use of the information contained in this document is punishable by law
180
D
70
FISSAGGIO braccio ALL’albero motore - FASTENING THE OPERATOR ARM TO THE MOTOR
FIXATION DU BRAS À L’ARBRE DU MOTEUR - BEFESTIGUNG DES ARMES AN DER MOTORWELLE
FIJACIÓN DEL BRAZO EN EL ÁRBOL MOTOR
8
F
ber : DM0507
: BL1924
ath
Description : ISTRUZIONE PER IL MONTAGGIO
E
FISSAGGIO BASE MOTORE 1924
Date : 20-06-2000
RONICA S.p.A - 31020 San Vendemiano (TV) Italy - via Raffaello, 36 Tel: 0438/401818 Fax: 0438/401831
5
eserved. Unauthorised copying or use of the information contained in this document is punishable by law
fissaggio motoriduttore a destra del cancello - FITTING THE MOTOR TO THE RIGHT OF THE GATE
FIXATION DU MOTORÉDUCTEUR À DROITE
DU PORTAIL
BEFESTIGUNG
DESorGETRIEBEMOTORS
DER RECHTEN
TORSEITE
All rights
reserved. -Unauthorised
copying
use of the informationAUF
contained
in this document
is punishable by
FIJACIÓN DEL MOTORREDUCTOR A LA DERECHA DE LA Cancilla
9a
O
B
P
Dx
Dx
B1
G
All rights reserved. Unauthorised copying or use of the information contained in this document is punishable by law
A1
fissaggio motoriduttore a sinistra del cancello - FITTING THE MOTOR TO THE LEFT OF THE GATE
rights reserved. Unauthorised
copying or use of the AUF
information
this document is punishab
FIXATION DU MOTORÉDUCTEUR À GAUCHE DU PORTAIL - All
BEFESTIGUNG
DES GETRIEBEMOTORS
DERcontained
LINKENin TORSEITE
FIJACIÓN DEL MOTORREDUCTOR A LA IZQUIERDA DE LA CANCILLA
10a
10b
ber : DM0503
Description : ISTRUZIONE PER IL MONTAGGIO
e : BL1924
Rotture apertura albero 2 BL1924
eath
9b
A
Date : 31-05-2000
TRONICA S.p.A - 31020 San Vendemiano (TV) Italy - via Raffaello, 36 Tel: 0438/401818 Fax: 0438/401831
H
A
L
Description : POSIZIONE CAMME A Dx
Drawing number : DM0734
Product Code : BL1920-24
Draft : P.J.Heath
x
S
Date :19-11-2003
BL1920 - 1924
B Sx
CARDIN ELETTRONICA S.p.A - 31020 San Vendemiano (TV) Italy - via Raffaello, 36 Tel: 0438/401818 Fax: 0438/401831
B1
A1
Drawing number : DM0504
Description : ISTRUZIONE PER IL MONTAGGIO
6
APPLICAZIONe cARTER - FITTING THE CARTER - APPLICATION DU CARTER - anbringung schutzgehÄUSE - INCORPORACIÓN DEL CÁRTER
11
N
All rights reserved. Unauthorised copying or use of the information contained in this document is punishable
All rights reserved. Unauthorised copying or use of the information contained in this document is punishable
All rights reserved. Unauthorised copying or use of the information contained in this document is punishable by law
SBLOCCO MANUALE - MANUAL RELEASE - DÉVERROUILLAGE MANUEL - manuelle Entriegelung - DESBLOQUEO MANUAL
12
A
Description : ISTRUZIONE PER IL MONTAGGIO
Drawing number : DM0509
All rights reserved. Unauthorised copying or use of the information contained in this document is punishable by law
Product Code : BL1924
Applicazione Carter
Draft : P.J.Heath
Date : 21-06-2000
B
CARDIN ELETTRONICA S.p.A - 31020 San Vendemiano (TV) Italy - via Raffaello, 36 Tel: 0438/401818 Fax: 0438/401831
ELETTROSERRATURA (OPZIONALE) - ELECTRIC LOCKING DEVICE (OPTIONAL) - SERRURE ÉLECTRIQUE (EN OPTION)
ELEKTROSCHLOSS (EXTRA) - ELECTROCERRADURA (OPCIONAL)
13
980/XLSE11C
Drawing number : DM0510
Description : Posizione bloccato
Sblocco 1924
Product Code : BL1924
Description : Posizione sbloccato
Drawing number : DM0511
Date : 21-06-2000
Draft : P.J.Heath
Product Code : BL1924
Sblocco BL1924
CARDIN ELETTRONICA S.p.A - 31020 San Vendemiano (TV) Italy - via Raffaello, 36 Tel: 0438/401818 Fax: 0438/401831
Draft : P.J.Heath
Date : 21-06-2000
CARDIN ELETTRONICA S.p.A - 31020 San Vendemiano (TV) Italy - via Raffaello, 36 Tel: 0438/401818 Fax: 0438/401831
Drawing number : DM0508
Description : ISTRUZIONE PER IL MONTAGGIO
Product Code : BL1924
Sblocco manuale
Draft : P.J.Heath
Date : 21-06-2000
CARDIN ELETTRONICA S.p.A - 31020 San Vendemiano (TV) Italy - via Raffaello, 36 Tel: 0438/401818 Fax: 0438/401831
7
SCHEMA ELETTRICO IMPIANTO TIPO - STANDARD WIRING DIAGRAM - SCHÉMA ÉLECTRIQUE DE L'EXEMPLE D'INSTALLATION
Elektrischer Schaltplan Anlagenart - Esquema eléctrico INSTALACIÓN ESTÁNDAR
All rights reserved. Unauthorised copying or use of the information contained in this document is punishable by law
PROG L3
SEL
5
6
7
P2
CMN
FTC_S
FTC_I
L11 L12
TB
L10
CMN
L9
CMN
L8
TD
L7
TC
FCA2
L6
TA
L5
TAL
L4
FCC2
FCA1
FCC1
CMN
OUT 24V
LP 24V
3 4
LS 24V
1 2
ELS 12V
M2
CMN
M1
LC- OUT CH2
P1
9 10 11 12 13 14 15 16 17 18 19 20 21 22 23 24 25 26 27 28
8
1
2
1
2
3
24V 12V
4
LP
1
6
0
NA
ELS
5
C
2
3
1
0 12V 24V
NA
C
NC
NC
FTC-Tx
2
3
CLOSING
2
OPENING
1
COMMON
BRIDGE
SEL
FTC-Rx
M1 Dx
M1 Sx
5
1
FCC
5
FCC
3
4
COM.
FCA
2
3
FCA
4
2
COM.
1
24Vdc
M
M
24Vdc
Drawing number : DI0157
Description : Programmatore a microcontrollore per 2 motori
Product Code : BL1924
COLLEGAMENTO SERIE BL1924
Draft : P.J.Heath
Date : 08-06-2000
8
14
Avvertenze importanti
Avvertenze importanti
Avvertenze importanti
LEGGERE ATTENTAMENTE LE SEGUENTI AVVERTENZE PRIMA DI PROCEDERE ALL’INSTALLAZIONE.
DISPOSTE NEL TESTO. IL MANPRESTARE PARTICOLARE ATTENZIONE A TUTTE LE SEGNALAZIONI
CATO RISPETTO DI QUESTE POTREBBE COMPROMETTERE IL BUON FUNZIONAMENTO DEL SISTEMA E
CREARE SITUAZIONI DI PERICOLO GRAVE PER L'OPERATORE E GLI UTILIZZATORI DEL SISTEMA STESSO.
AVVERTENZE PER L'UTENTE
• Il presente manuale si rivolge a persone abilitate all'installazione di "apparecchi utilizzatori di energia elettrica" e richiede una buona conoscenza della
tecnica, esercitata in forma professionale e della normativa vigente. I materiali
usati devono essere certificati e risultare idonei alle condizioni ambientali di
installazione.
• Le operazioni di manutenzione devono essere eseguite da personale qualificato. Prima di eseguire qualsiasi operazione di pulizia o di manutenzione,
disinserire l'apparecchiatura dalla rete di alimentazione elettrica.
• Le apparecchiature qui descritte dovranno essere destinate solo all'uso per
il quale sono state espressamente concepite:
"La motorizzazione di cancelli a battente ad una o due ante" lunghezza max. 2 m - peso max. 150 kg.
• L'applicazione è possibile sia a sx che a dx della luce passaggio.
L'utilizzo dei prodotti e la loro destinazione ad usi diversi da quelli previsti e/o
consigliati, non è stata sperimentata dal costruttore, pertanto i lavori eseguiti
sono sotto la completa responsabilità dell'installatore.
Attenzione! Solo per clienti dell’EU - Marcatura WEEE.
Il simbolo indica che il prodotto alla fine della propria vita utile deve
essere raccolto separatamente dagli altri rifiuti. L’utente dovrà
pertanto conferire l’apparecchiatura agli idonei centri di raccolta
differenziata dei rifiuti elettronici ed elettrici, oppure riconsegnarla al
rivenditore al momento dell’acquisto di una nuova apparecchiatura
di tipo equivalente, in ragione di uno a uno.
L’adeguata raccolta differenziata per l’avvio al riciclaggio, al trattamento e
allo smaltimento ambientalmente compatibile contribuisce ad evitare possibili
effetti negativi sull’ambiente e sulla salute e favorisce il riciclo dei materiali. Lo
smaltimento abusivo del prodotto da parte del detentore comporta l’applicazione delle sanzioni amministrative previste dalla normativa vigente nello Stato
Comunitario di appartenenza.
Durante la manovra si deve controllare il movimento del cancello e azionare il
dispositivo di arresto immediato (STOP) in caso di pericolo. In caso di emergenza
il cancello può essere sbloccato manualmente utilizzando l'apposita chiave di
sblocco in dotazione (vedi sblocco manuale pag. 7).
Controllare periodicamente lo stato di usura dei perni ed eventualmente ingrassare le parti in moto usando lubrificanti che mantengano uguali caratteristiche
di attrito nel tempo e adatti a funzionare tra -20 e +70°C.
Verificare periodicamente il funzionamento delle sicurezze (fotocellule ecc.) Le
eventuali riparazioni devono essere eseguite da personale specializzato usando
materiali originali e certificati.
L'uso dell'automazione non è idoneo all'azionamento in continuo, bensì deve
essere regolato in base ai vari modelli (vedi caratteristiche tecniche pag. 20).
IMPORTANTE! Il motoriduttore è sprovvisto di limitatore di coppia,
pertanto utilizzare una centralina con limitazione della coppia impostando una spinta massima in punta d'anta pari a 150 N.
CONSIDERAZIONI GENERALI DI SICUREZZA
È responsabilità dell’installatore verificare le seguenti condizioni di sicurezza:
ATTENZIONE
1)L’installazione deve essere sufficientemente lontana APERTURA AUTOMATICA
NON
AVVICINARSI
dalla strada in modo da non costituire pericolo per la
circolazione.
2)L’operatore deve essere installato all’interno della
proprietà ed il cancello non deve aprirsi verso l’area
pubblica.
NON PERMETTERE A BAMBINI O AD
ANIMALI DOMESTICI DI SOSTARE NEL
3)Il cancello motorizzato è principalmente adibito al RAGGIO
D'AZIONE DEL CANCELLO
passaggio di vetture. Dove possibile installare per
pedoni un ingresso separato.
4)I comandi devono essere posti in vista, ad un altezza compresa tra 1,5 m
e 1,8 m, ma non entro il raggio d’azione del cancello. Inoltre quelli installati
all’esterno devono essere protetti da una sicurezza tale da prevenire l’uso
non autorizzato.
5)È buona norma segnalare l’automazione con targhe di avvertenza (simili
a quella in figura) che devono essere facilmente visibili. Qualora l’automazione sia adibita al solo passaggio di veicoli dovranno essere poste
due targhe di avvertenza di divieto di transito pedonale (una all’interno,
una all’esterno).
6)Rendere consapevole l’utente che bambini o animali domestici non
devono giocare o sostare nei pressi del cancello. Se necessario indicarlo
in targa.
7)Qualora l’anta completamente aperta vada ad avvicinarsi ad una struttura
fissa lasciando uno spazio di almeno 500 mm, tale spazio deve essere
protetto con una costa sensibile antischiacciamento.
8)Per qualsiasi dubbio a riguardo della sicurezza dell’installazione, non
procedere ma rivolgersi al distributore del prodotto.
ISTRUZIONI PER L'INSTALLAZIONE
I comandi minimi che possono essere installati sono APERTURA-STOP-CHIUSURA, tali comandi devono essere posti in un luogo non accessibile a bambini
o minori e fuori dal raggio d’azione del cancello.
Prima di procedere all'esecuzione dell'impianto verificare che la struttura da
automatizzare sia in perfetta efficienza nelle sue parti fisse e mobili e realizzata
in conformità alla normativa vigente.
A tal fine accertarsi della sufficiente rigidità del telo cancello (se necessario
intervenire con rinforzi sulla struttura) e del buon funzionamento dei perni (si
consiglia comunque di lubrificare tutte le parti in movimento usando lubrificanti
che mantengano uguali caratteristiche di attrito nel tempo e adatti a funzionare
tra -20 e +70°C).
• Controllare i franchi di sicurezza tra parti fisse e parti mobili:
- lasciare uno spazio minimo di 30 mm tra il cancello ed il pilastro di supporto
per tutta l’altezza e per tutto l’arco di apertura del cancello;
- assicurarsi che lo spazio tra il cancello ed il pavimento non superi mai 30
mm per tutto l’arco di apertura del cancello.
• La superficie delle ante non deve presentare aperture tali da permettere il
passaggio della mano o del piede di persone.
• Controllare l'esatto posizionamento di perni e cerniere, il loro buon stato di
mantenimento e lubrificazione (importante che la cerniera superiore e quella
inferiore siano a piombo tra loro).
• Prevedere il percorso dei cavi secondo le necessità di applicazione dei
dispositivi di comando e sicurezza. (ved. impianto tipo fig.1 pag.2).
• Controllare che l’operatore sia proporzionato alle dimensioni del cancello e
alla frequenza d’uso (intermittenza di lavoro, pag. 20).
DESCRIZIONE TECNICA
- Motore 24 Vdc in corrente continua .
- Carter di copertura in plastica antiurto.
- Particolari sblocco in plastica rinforzata.
- Riduttore con ingranaggi in acciaio racchiusi in semigusci di alluminio
pressofuso.
- Il motoriduttore è fornito di due microinterruttori di finecorsa: uno di
chiusura "FCC" ed uno di apertura "FCA" (vedi schema elettrico).
- Staffa supporto motore in acciaio zincato.
- Particolari braccio snodato in alluminio pressofuso verniciato.
- Lubrificazione a grasso fluido permanente.
FISSAGGIO DEL DISPOSITIVO
Il dispositivo può essere fissato sia alla sinistra che alla destra della luce
passaggio:
- nel caso di kit per due ante i motoriduttori sono già predisposti per
l'installazione a destra e a sinistra (vedi le etichette "SX" - "DX" sui
motori);
- nel caso di applicazioni su singola anta, la fornitura può essere
indifferentemente fatta con motoriduttori predisposti per applicazione
a destra o a sinistra quindi controllare l'etichetta applicato sul motore
"SX" o "DX";
ACCESSORI
980/XLSE11C - Elettroserrattura 12 Vac.
9
- nel caso che venga fornito un motore destro, mentre l'applicazione
verrà fatta a sinistra o viceversa, sarà necessario sfilare le camme e
reinserirle rovesciate (vedi fig. "9b" - "10b")
COLLEGAMENTO ELETTRICO (fig. 14)
Assicurarsi prima di allacciare l'apparecchiatura che la tensione corrisponda al valore riportato nella targhetta caratteristiche.
• Portare l'anta in posizione di chiuso.
• Scegliere la quota "A" in base all'angolo di apertura da ottenere (fig.
4) e definire in base alle caratteristiche strutturali del cancello a quale
altezza andrà fissata la staffa anteriore al cancello.
Una volta individuata la posizione, fissare la base motore con 4 viti M8
e 4 tasselli in acciaio Ø14 avendo cura di mettere in bolla la staffa in
acciaio zincato "D" (fig. 7).
• Inserire il braccio dritto "E" nell'albero motore, come indicato in figura
8, e fissarlo con la vite senza testa "F" avvitata a fondo.
• Fissare il motoriduttore alla piastra base con le due viti "G" e rispettivi
dadi autobloccanti, rispettando lo schema di montaggio a destra (fig.9)
ed a sinistra (fig.10).
Il motoriduttore viene fornito dalla fabbrica previsto per il montaggio a
destra del cancello (vista interna), per il montaggio a sinistra si deve
staccare la parte in plastica "H" (fig. 10) che occlude il foro di passaggio
dell'albero motore con l'ausilio di una pinza ed otturare con il dischetto
ad aggancio "L", in dotazione, il foro rimasto inutilizzato.
• Procedere quindi con il montaggio del braccio articolato completo di
staffa di attacco al cancello (fig.2):
- inserire le boccole in plastica "11" nei fori del braccio curvo "7", collegare il braccio curvo "7" al braccio dritto "6" e alla staffa "8" entrambi
con la vite "9" e dado autobloccante "12" dopo aver inserito il distanziale
zincato "10" all’interno della boccola "11".
• Sbloccare il motore (fig. 12).
• Fissare la staffa al cancello con 2 viti M8, 39 mm al di sotto della base
(dett.1 fig.6).
La posizione della staffa viene determinata portando il braccio alla
massima estensione, con anta in battuta meccanica di chiusura e punti
1,2,3 allineati (fig.4) sulla stessa retta, quindi facendo arretrare il punto
3 di 100 mm dal punto di allineamento in cui si trovava. Il braccio va
tenuto in bolla "M" (fig.6).
Fare la seguente verifica:
- la staffa appoggiata al cancello, durante la rotazione del cancello stesso
dalla posizione chiuso alla posizione aperto, non deve subire forzature
lungo l'asse "L" (fig. 6) né verso l’alto né verso il basso perché in questo
caso o il cancello, o il motoriduttore non sarebbero stati montati correttamente e ciò potrebbe danneggiare in poco tempo l'apparecchiatura.
Una volta verificato che tutto è apposto, fissare la staffa al cancello.
• Regolare il microinterruttore di finecorsa in chiusura (camma superiore
"A" fig. 9b-10b) e in apertura (camma inferiore "B" fig. 9b-10b): per far ciò
portare l'anta in apertura/chiusura fino alla posizione desiderata, quindi
far ruotare manualmente la camma fino allo scatto del microinterruttore
e quindi fissarla:
• L'apparecchiatura funziona alla tensione di 24Vdc in corrente continua
(vedi schema elettrico)
• Non utilizzare cavo con conduttori in alluminio; non stagnare l’estremità
dei cavi da inserire in morsettiera.
• I conduttori dovranno essere adeguatamente fissati in prossimità della
morsettiera in modo che tale fissaggio serri sia l’isolamento che il conduttore, utilizzando il pressacavo in dotazione.
• Per il collegamento dei cavi elettrici all’apparecchiatura sono disponibili
due ingressi:
- quello a muro "O" (fig. 9);
- quello da esterno "P" (fig. 9) tramite pressatubo, dopo aver sfondato
la parte in plastica che occlude il foro.
Per il buon funzionamento dell’apparecchiatura si raccomanda
di utilizzare esclusivamente programmatori elettronici Cardin
in corrente continua della serie PRG8511CC (con batterie e
senza caricabatterie) o PRG85110C (senza batterie e senza
caricabatterie) adatti all’azionamento di un motore o due motori
in parallelo.
Sblocco MANUALE (fig.12)
L'operazione di sblocco va fatta solamente a motore fermo, per mancanza
di energia elettrica.
Per sbloccare l'anta del cancello munirsi della chiave in dotazione all'apparecchiatura. Essa deve essere conservata in luogo di facile reperimento.
Per sbloccare
Aprire il portello e ruotare la leva in senso antiorario come indicato in dett.
"A" (fig. 12) fino a raggiungere la posizione di sblocco "B", dove resterò
agganciate grazie ad un fermo antiritorno. In questo modo si rende folle
l'ingranaggeria dell'attuatore e il cancello si potrà aprire e chiudere con
una leggera spinta a mano.
Per ribloccare
Forzare leggermente la leva dalla posizione di sblocco pos."B" in cui si
trova per vincere il fermo antiritorno che la mantiene in quella posizione,
nel verso opposto a quello di prima. Il ritorno alla posizione bloccato "A"
avviene automaticamente per effetto di una molla. Il riaggancio dei denti
dell’ingranaggeria all’interno del motoriduttore può non essere immediato
però può essere ottenuto o manualmente spingendo sull’anta o alla riattivazione del motoriduttore.
- i corretti punti di lavoro delle camme "A1"-"B1", per una installazione a destra, sono indicati nel figura "9b".
- i corretti punti di lavoro delle camme "A1"-"B1", per una installazione a sinistra, sono indicati nel figura "10b".
MANUTENZIONE
Per usufruire della garanzia di 24 mesi o di 50000 manovre
leggere attentamente le seguenti note.
• Dopo aver effettuato le descritte operazioni di montaggio e dopo
aver effettuato il collegamento elettrico si può procedere alla chiusura
dell'apparecchiatura con l'applicazione del carter (fig.11).
Esso va fissato con la vite autofilettante "N" dopo aver controllato
l'aggancio dei due dentini inferiori di ritegno sulla base in plastica.
• È consigliato l’uso di un’elettroserratura (vedi impianto tipo fig.1)
Il motore normalmente non necessita di particolari manutenzioni; in ogni
caso la garanzia fornita per 24 mesi o di 50000 manovre ha validità a condizione che vengono effettuati i seguenti controlli ed eventuali interventi
sulla macchina "cancello a battente":
- corretta lubrificazione delle parti in movimento.
10
IMPORTANT REMARKS
IMPORTANT REMARKS
IMPORTANT REMARKS
READ THE FOLLOWING REMARKS CAREFULLY BEFORE PROCEEDING WITH THE INSTALLATION. PAY PARTICULAR ATTENTION TO ALL THE PARAGRAPHS MARKED WITH THE SYMBOL
NOT READING THESE IMPORTANT INSTRUCTIONS COULD COMPROMISE THE CORRECT WORKING ORDER OF THE SYSTEM AND CREATE DANGER SITUATIONS FOR THE USERS OF THE SYSTEM.
USER INSTRUCTIONS
• These instructions are aimed at professionally qualified "installers of electrical
equipment" and must respect the local standards and regulations in force.
All materials used must be approved and must suit the environment in which
the installation is situated.
• All maintenance operations must be carried out by professionally qualified
technicians. Before carrying out any cleaning or maintenance operations
make sure the power is disconnected at the mains.
• This appliance must be used exclusively for the purpose for which it has
been made. "i.e. for the automation of hinged gates" with one or two gate
leaves, max. length 2 m, max. weight 150 kg.
• The unit may be fitted both to the right and to the left of the passageway. This
product and all its relative components has been designed and manufactured
by Cardin Elettronica who have verified that the product conforms in every
aspect to the safety standards in force.
Any non authorised modifications are to be considered improper dangerous
and the complete responsibility of the installer.
Attention! Only for EU customers - WEEE marking.
This symbol indicates that once the products life-span has expired
it must be disposed of separately from other rubbish. The user
is therefore obliged to either take the product to a suitable differential collection site for electronic and electrical goods or to
send it back to the manufacturer if the intention is to replace it
with a new equivalent version of the same product.
Suitable differential collection, environmental friendly treatment and disposal
contributes to avoiding negative effects on the ambient and consequently
health as well as favouring the recycling of materials. Illicitly disposing of this
product by the owner is punishable by law and will be dealt with according
to the laws and standards of the individual member nation.
During the opening/closing manoeuvre check for correct operation and
activate the emergency stop button in case of danger.
During blackouts the gate can be released and manually manoeuvred using
the supplied release key (see manual release pag. 7).
Periodically check the moving parts for wear and tear and grease if required
using lubricants which maintain their friction levels unaltered throughout
time and are suitable for temperatures of -20 to +70°C.
In case of failure or operational anomalies switch off the power at the mains
do not attempt to repair the appliance yourself.
Periodically check the correct operation of all safety devices (photoelectric
cells etc.). Eventual repair work must be carried out by specialised personnel using original spare parts. The appliance is not suitable for continuous
operation and must be adjusted according to the model (see technical
data on page 20).
IMPORTANT! The geared motor is not fitted with a torque limiter.
Only use an electronic programmer which has a torque limiter with
maximum force at the head of the gate equal to 150 N.
IMPORTANT SAFETY INSTRUCTIONS
It is the responsibility of the installer to make sure that the following public
safety conditions are satisfied:
1)Ensure that the gate operating installation is far enough away from the
main road to eliminate possible traffic disruptions.
2)The operator must be installed on the inside of the property and not on the
public side of the gate. The gates must not swing outwards onto a public area.
3)The gate operator is designed for use on gates through which vehicles are
passing. Pedestrians should use a separate entrance.
4)The gate must be in full view when it is operating therefore controls must be
situated in a position where the operator can see the gate at all times.
5)At least two warning signs (similar to the example on the right) should be
placed, where they can be easily seen by the public, in the
WARNING
area of the system of automatic operation. One inside the AUTOMATIC OPENING
kEEP CLEAR
property and one on the public side of the installation.
These signs must be indelible and not hidden by any
objects (such as tree branches, decorative fencing
etc.).
6)Make sure that the end-user is aware that children and/
or pets must not be allowed to play within the area of a
gate installation. If possible include this in the warning signs.
7)Whenever a fully open gate leaf comes within at least 500 mm of a fixed
structure the space must be protected by an anticrush buffer (fig. 1, detail 11).
8)A correct earth connection is fundamental in order to guarantee the electrical safety of the machine
9)If you have any questions about the safety of the gate operating system,
do not install the operator. Contact your dealer for assistance.
INSTALLATION INSTRUCTIONS
The minimum controls which may be installed are OPEN-STOP-CLOSE,
these controls must be installed in a location not accessible to children
and outside the opening range of the gate.
Before starting the installation of the system check that the structure
which is to be automated is in good working order and respects the local
standards and regulations in force.
To this end make sure that the gate is sufficiently rigid (if necessary reinforce the structure) and that it pivots easily.
You are advised to grease all the moving parts using lubricants which
maintain unaltered friction characteristics over a period of time and are
suitable for temperatures of -20 to +70°C.
• Check the safety measures between the fixed and moving parts:
- a minimum space of 30 mm must always be left along the entire distance between the gate and the support column measured throughout
the entire opening angle of the gate.
- make sure that the space between the bottom of the gate and the
pavement never exceeds 30 mm throughout the entire opening angle
of the gate.
• The surface of the gate must not feature openings which allow a person’s
hand or foot to pass through.
• Check the exact positioning of the pivots, and their good working order
(the upper and lower hinges/pivots must be aligned on the same axis).
• Work out the run of the cables according to the command and control
devices fitted and make sure the system conforms to the local standard
and regulations in force (see installation example fig. 1 pag. 2).
• Check that the appliance is suitable for the size, weight and duty cycle
of the gate to which it is to be applied (see duty cycle on page 20)
CHILDREN OR PETS MUST NOT
BE ALLOWED TO PLAY ON OR
NEAR THE INSTALLATION
Technical description
- 24 Vdc motor.
- Carter in shock-proof plastic.
- Release mechanism components in shockproof plastic.
- Geared motor with steel gears enclosed in a die cast two-piece aluminium
shell.
- The geared motor is fitted with two micro switches; one for closing "FCC"
and one for opening "FCA" (see wiring diagram).
- Motor support base in zinc-plated steel
- Articulated operator arm in die cast aluminium
- Lubrication using permanently fluid grease.
FITTING THE UNIT
The unit may be positioned either to the right or to the left of the passageway:
- if you have acquired a kit for 2 gate leaves the geared motors are
factory set for left and right installation (see the adhesives "SX" left
and "DX" right on the motors);
ACCESSORIES
980/XLSE11C - Electric lock 12 Vac.
11
- for single gate leaf installations the motor may be supplied as either a
left or a right-hand installation. You must therefore check the adhesive
applied on the motor "SX" left and "DX" right;
ELECTRICAL CONNECTION (fig. 14)
Before connecting the appliance make sure that the voltage rated on the
data plate conforms to that of the mains supply.
- if you have been supplied with a motor for a right-hand installation,
whereas your system requires the motor to be fitted to the left-hand
side of the gate/door or vice versa, you will have to slide off the cams
and re-insert them the other way round (see fig. "9b" - "10b").
• The appliance works off a 24V direct current power supply (see wiring
diagram).
• Do not use cables with aluminium conductors; do not solder the ends
of cables which are to be inserted into the binding posts.
• Move the gate/s to the closed position.
• Choose the value "A" (fig. 4) according to the required opening angle
and work out (depending on the structural characteristics of the gate) at
what height the front bracket will be fitted to the gate. Once the position
has been established, fasten down the motor support plate using four
M8 screws and steel Ø14 rawlplugs. Make sure that the support bracket
"D" (fig. 7) is in square.
• The cables must be fastened down near the terminal board so that both
the power wires and the sheath are well blocked by the supplied cable
clamp.
• The electrical wires may be run to the appliance in two ways:
- through the wall entrance "O" (fig. 9)
• Insert the operator arm "E" onto the motor drive shaft as indicated in fig
8 and tighten down using the supplied grub screw "F".
- externally, using a cable pipe, after having knocked out the plastic disk
blocking the entrance hole.
• According to the assembly drawings (motor installed to the right fig. 9)
and (motor installed to the left fig. 10) fix the geared motor to the base
plate using the two screws and self-locking nuts "G". The geared motor is
factory set to be installed to the right of the gate as seen from the inside.
To install the motor to the left first remove the plastic disk "H" (fig. 10)
which blocks the hole required for the motor drive shaft, using a pair of
pliers and then cover the other hole using the supplied mobile disk "L"
.
For the correct operation of the appliance you must use a Cardin
direct current electronic programmer from the series PRG8511CC
(with batteries and a battery charger) or PRG85110C (without batteries and without a battery charger) suitable for driving one motor
or two motors in parallel.
• Fit the articulated operator arm and bracket to the gate (fig. 2)
-insert the plastic guides "11" into the holes on the curved arm "7",
connect the curved arm "7" to the straight arm "6" and to the bracket
"8" using the screws "9" and self-locking nuts "12" after having inserted
the zinc-plated washer "10" inside the plastic guide "11".
MANUAL RELEASE MECHANISM (fig.12)
Releasing the gate should only be carried out when the motor has stopped
because of blackouts.
To release the gate use the key supplied with the appliance. It should be
stored in an easily accessible place.
• Release the motor (fig. 12).
• Fasten the front bracket to the gate using two M8 screws 39 mm below
the base (det. 1 fig. 6). The position of the front bracket is determined by
opening the arm to its maximum extension (with the gate fully closed)
and aligning the points 1,2 and 3 (fig. 4). Next, move point 3 backwards
by 100 mm from the point of alignment. The arm must be in square "M"
(fig. 6).
Releasing the gate
Open the access door and rotate the lever anticlockwise as shown in detail
"A" (fig.12) until it reaches the release position "B" where it will remain thanks
to an anti return mechanism.
Check the following:
- with the front bracket leaning against the gate check that it does not
suffer forcing along the "L" axis (fig. 6) either upwards or downwards
while the gate is moving. Should this occur either the gate or the geared
motor has been incorrectly installed and this could damage the appliance.
Once you have checked all the alignments fasten down the front bracket
to the gate.
Locking the gate
Lightly press the lever from the released position pos. "B" to overcome the
anti-return mechanism.
This will release the geared motor and free the gate, which can then be
opened by pushing lightly on the gate.
The presence of the spring will make the mechanism automatically return
to the blocked position "A".
• Adjust the closing direction travel end micro switch (upper cam "A" fig.
9b-10b) and the opening end micro switch (lower cam "B" fig. 9b-10b):
move the gate to the desired open/closed position, rotate the cam
manually until the switch trips and then fasten down.
The reduction motor gears may not lock immediately but they can be locked
manually by pressing on the gate or by reactivating the motor.
MAINTENANCE
• The correct working points for the cams "A1"-"B1", for a
right-hand installation, are indicated in figure "9b".
To use the 24 month or 50000 manoeuvre guarantee, read the
following notes carefully.
• The correct working points for the cams "A1"-"B1", for a
left-hand installation, are indicated in figure "10b".
The motor does not normally require particular maintenance; in any case
the 24 month or 50000 manoeuvre guarantee is only valid if the following
controls have been observed and eventual maintenance has been carried
out to the machine "hinged gate":
- correct lubrication (greasing) of the moving parts.
• After finishing the installation of the appliance and carrying out the electrical connection fit the carter (fig. 11) using the self-tapping screws "N"
and making sure that the two lower teeth on the plastic base lock the
cover.
• You are advised to fit an electric locking device on the installation (see
standard installation fig. 1).
12
CONSigneS Importantes! CONSigneS Importantes!
CONSigneS Importantes!
LIRE ATTENTIVEMENT LES CONSIGNES SUIVANTES AVANT DE PROCÉDER À LA POSE. PRÊTER GRANDE
ATTENTION À TOUTES LES SIGNALISATIONS
qui se trouvent dans le texte. LE NON RESPECT DE CES CONSIGNES POURRAIT COMPROMETTRE LE BON FONCTIONNEMENT DU SYSTÈME.
CONSIGNES POUR L’UTILISATION
• Ce livret est destiné à des personnes titulaires d'un certificat d'aptitude
professionnelle pour l'installation des "appareils électriques" et requiert
une bonne connaissance de la technique appliquée professionnellement,
ainsi que des normes en vigueur. Les matériels utilisés doivent être certifiés
et être adaptés aux conditions atmosphériques du lieu d'implantation.
• Les travaux de maintenance ne doivent être effectués que par un personnel
qualifié. Avant une quelconque opération de nettoyage ou de maintenance,
mettre l'appareil hors tension.
• Les appareils décrits dans le présent livret ne doivent être destinés qu’à
l’utilisation pour laquelle ils ont été expressément conçus, c’est-à-dire à “La
motorisation de portails battants à un ou deux vantaux” allant jusqu'à
2 m par vantail d'un poids maximum de 150 kg.
• Tous les modèles sont applicables aussi bien à droite qu’à gauche du
passage. Une diverse utilisation des produits ou leur destination à un usage
différent de celui prévu et/ou conseillé n'a pas été expérimentée par le
Constructeur.
Par conséquent, les travaux effectués sont entièrement sous la responsabilité
de l'installateur.
Attention! Seulement pour les clients de l'EU - Marquage WEEE.
Ce symbole indique l’obligation de ne pas éliminer l’appareil, à la fin
de sa durée de vie, avec les déchets municipaux non triés et de procéder à sa collecte sélective. Par conséquent, l’utilisateur doit remettre
l’appareil à un centre de collecte sélective des déchets électroniques
et électriques ou au revendeur qui est tenu, lorsqu’il fournit un nouvel
appareil, de faire en sorte que les déchets puissent lui être remis, sur une
base de un pour un, pour autant que l’appareil soit de type équivalent
à celui qu’il fournit.
La collecte sélective des équipements électriques et électroniques en vue de leur
valorisation, leur traitement et leur élimination dans le respect de l’environnement
contribue à éviter la nocivité desdits équipements pour l’environnement et pour
la santé et à encourager leur recyclage. L’élimination abusive de l’équipement de
la part du détenteur final comporte l’application des sanctions administratives
prévues par les normes en vigueur dans l’État Membre d’appartenance.
Durant la manœuvre, contrôler le mouvement du portail et actionner, en
cas de danger, le dispositif d'arrêt d'urgence (STOP).
IMPORTANT! Considéré que le motoréducteur est dépourvu de limiteur de couple, utiliser une armoire à limitation électronique du couple
avec poussée maximum en bout de vantail de l’ordre de 150 N.
En cas d’urgence, le portail peut être déverrouillé manuellement au moyen
de la clé de déverrouillage expressément conçue à cet effet et fournie en
dotation (voir déverrouillage manuel à la page 7).
CONSIGNES GÉNÉRALES DE SÉCURITÉ
Il appartient à l’installateur de vérifier les conditions de sécurité ci-dessous:
1)L’installation doit se trouver suffisamment loin de la route pour ne pas
constituer de risque pour la circulation;
2)L’opérateur doit être installé à l’intérieur de la propriété et le portail ne doit
pas s’ouvrir sur le domaine public;
3)Le portail automatisé est affecté principalement au passage de véhicules.
Si possible, prévoir une entrée séparée pour les piétons;
4)Les organes de commande doivent être placés de façon qu’ils soient bien en
vue et hors du rayon d’action du portail. En outre, ceux placés à l’extérieur
doivent être protégés contre les actes de vandalisme;
ATTENTION
5)Il est conseillé de signaler l’automatisation du portail par FERMETURE
AUTOMATISÉE
des panneaux de signalisation (comme celui indiqué en NE PAS S'APPROCHER
figure) placés bien en vue. Dans l’hypothèse où l’automatisme serait affecté exclusivement au passage de
véhicules, il faudra prévoir deux panneaux d’interdiction
de passage aux piétons (l’un à l’intérieur et l’autre à l’exNE PAS PERMETTRE AUx ENFANTS ET AUx
térieur);
ANIMAUx DOMESTIQUES DE STATIONNER
DANS LE RAYON D'ACTION DU PORTAIL
6)Faire prendre conscience à l’utilisateur du fait que les
enfants et les animaux domestiques ne doivent pas jouer ou stationner à
proximité du portail. Si nécessaire, l’indiquer sur le panneau;
7) Si le vantail, une fois qu’il est complètement ouvert, se trouve très proche
d’une structure fixe, laisser un espace de au moins 500 mm dans la zone
d’action du bras articulé; tel espace devra être protégé par un bord de
sécurité anti-coincement (voir fig. 1 dét. 11).
8) Pour garantir la sécurité électrique, il est impératif de brancher l’appareil à la prise de terre.
9) En cas d’un quelconque doute sur la sécurité de l’installation, interrompre la pose et contacter le distributeur du matériel.
Description technique
- Moteur 24 Vdc à courant continu.
- Carter de protection en matière plastique antichoc.
- Pièces du système de déverrouillage en matière plastique renforcée.
- Réducteur avec engrenages en acier sous boîtier constitué de deux
demi-coques en aluminium moulé sous pression.
- Le motoréducteur est équipé de deux micro-interrupteurs, l'un de fermeture "FCC" et l'autre d'ouverture "FCA" (voir schéma électrique).
- Étrier de support moteur en acier galvanisé.
- Éléments du bras articulé en aluminium moulé sous pression.
- Lubrification permanente par graisse fluide.
ACCESSOIRES
980/XLSE11C - Serrure électrique 12Vac.
13
Il est conseillé de graisser toutes les parties mobiles avec un lubrifiant
qui maintient au fil des années ses qualités lubrifiantes et qui est adapté
à des températures oscillant entre -20° et +70°C.
Contrôler régulièrement le fonctionnement des dispositifs de sécurité
(cellules photoélectriques, etc ...).
Les éventuelles réparations devront être effectuées par un personnel
spécialisé qui devra prendre soin de monter exclusivement des pièces
détachées d'origine et certifiées.
L'automatisme n'est pas adapté à une activation continue; l'actionnement
doit être conformé au modèle installé (voir caractéristiques techniques
page 20).
INSTRUCTIONS POUR L’INSTALLATION
L'organe de commande minimum requis est une boîte à boutons OUVERTURE-STOP-FERMETURE; celle-ci devra être installée impérativement
hors de portée de mineurs, notamment des enfants, et hors du rayon
d'action du portail.
Avant de réaliser l'installation, s'assurer de l'efficacité des parties fixes
et mobiles de la structure à automatiser et de la conformité de celle-ci
aux normes en vigueur.
Dans cet objectif, s'assurer de la rigidité du tablier du portail (si nécessaire
renforcer la structure) et du bon fonctionnement des pivots (il est conseillé
de graisser toutes les parties mobiles avec un lubrifiant qui maintient
au fil des années les caractéristiques de friction et qui est adapté à des
températures oscillant entre -20° et +70°C).
• Respecter les jeux fonctionnels entre parties fixes et mobiles:
- laisser un espace de 30 mm min. entre le portail et le pilier de support
sur toute la hauteur et sur la totalité de l’arc d’ouverture du portail,
- contrôler que l’espace entre le portail et le sol ne soit jamais supérieur
à 30 mm sur la totalité de l’arc d’ouverture du portail.
• Les panneaux des vantaux ne doivent pas présenter d’ouvertures qui
permettent le passage de la main ou du pied.
• Contrôler l’emplacement correct des pentures et des gonds, leur bon
état et leur lubrification (il est important que les gonds supérieur et
inférieur soient en aplomb l’un par rapport à l’autre).
• Prévoir une gaine pour le passage des câbles électriques en fonction des dispositifs de commande et de sécurité (voir exemple d’installation fig.1 page 2).
• Contrôler que l’opérateur soit proportionné aux dimensions du portail
et à la fréquence d’utilisation (facteur de marche page 20).
FIXATION DU DISPOSITIF
Le dispositif peut être fixé aussi bien à droite qu’à gauche du passage:
BRANCHEMENT ÉLECTRIQUE (fig. 14)
Avant de procéder au branchement électrique, contrôler que la tension
corresponde à celle indiquée sur la plaquette signalétique.
- en cas de kit pour deux vantaux, les motoréducteurs sont prédisposés
pour être montés à droite et à gauche (voir les étiquettes “SX “ gauche
-”DX” droite sur les moteurs);
• L’appareil fonctionne à une tension de 24Vdc à courant continu (voir
schéma électrique).
- en cas d’un seul vantail, il est possible que la fourniture se fasse
indistinctement avec un motoréducteur prédisposé pour un montage
à droite ou à gauche. Par conséquent, contrôler l’étiquette appliquée
sur le moteur “SX “ gauche -”DX” droite;
• Ne pas utiliser de câble avec conducteurs en aluminium; ne pas étamer
l’extrémité des fils à brancher sur le bornier.
• Les conducteurs devront être adéquatement fixés à proximité du bornier.
Cette fixation devra bloquer tant l’isolation que le conducteur. Utiliser le
presse-étoupe fourni en dotation.
- en cas de fourniture d’un moteur droite alors qu’il doit être monté à
gauche ou vice versa, il faudra retirer les cames et les réintroduire
sens dessus dessous (voir fig. “9b”-”10b”).
• Pour le branchement des câbles électriques à l’appareil, il y a deux
entrées:
• Fermer le vantail.
• Choisir la cote "A" en fonction de l’angle d’ouverture à réaliser (fig. 4) et
déterminer, en fonction de la particularité du portail, la hauteur à laquelle
devra être fixée la patte antérieure au portail. Une fois que la position a
été définie, fixer l’embase du moteur au moyen de 4 vis M8 et 4 chevilles
en acier Ø 14. S’assurer de l’horizontalité de l’étrier en acier galvanisé
"D" (fig. 7).
- celle au mur "O" (fig. 9);
- celle extérieure "P" (fig. 9). Utiliser le presse-étoupe après avoir défoncé
la partie en plastique qui bouche le trou.
Pour tirer le meilleur parti de l'appareil, utiliser exclusivement un
des programmateurs électroniques Cardin en courant continu de
la série PRG8511CC (avec batteries et chargeur de batterie) ou
PRG85110C (sans batterie et sans chargeur de batterie) en mesure
d'actionner un ou deux moteurs branchés en parallèle.
• Introduire le bras droit "E" dans l’arbre du moteur, comme indiqué en
figure 8, et le fixer au moyen de la vis sans tête "F" qui devra être serrée
à fond.
• Fixer le motoréducteur à la plaque de l’embase au moyen des deux vis
"G" et deux écrous indesserrables conformément au schéma de montage à droite (fig. 9) ou à gauche (fig. 10). Le motoréducteur est fourni
par le fabricant pour un montage à droite du portail (vue de l’intérieur).
Pour un montage à gauche, détacher, au moyen d’une pince, la partie
en plastique "H" (fig. 10) qui obture le trou de passage de l’arbre du
moteur et boucher au moyen de l’obturateur "L", fourni en dotation, le
trou inutilisé.
DÉVERROUILLAGE MANUEL (fig.12)
Le déverrouillage se fait seulement avec moteur arrêté par suite d’une
coupure de courant.
• Monter ensuite le bras articulé muni de la patte de fixation au portail
(fig. 2):
Pour déverrouiller le vantail du portail, se servir de la clé fournie en dotation
avec l’appareil. Celle-ci doit être gardée à un endroit aisément accessible.
- introduire les douilles en plastique "11" dans les trous du bras arrondi
"7", assembler le bras arrondi "7" au bras droit "6" et à la patte "8" au
moyen de la vis "9" et l’écrou indesserrable "12", après avoir introduit
l’élément d’espacement galvanisé "10" dans la douille "11".
Pour déverrouiller
Ouvrir le portillon et tourner le levier dans le sens contraire des aiguilles
d’une montre, comme indiqué au dét. "A" (fig. 12), jusqu'en position de
déverrouillage "B", où il restera accroché grâce à un arrête anti-retour;
ceci permettra de débrayer l’engrenage de l’opérateur et, par conséquent,
d’ouvrir et de fermer le portail en le poussant légèrement avec la main.
• Déverrouiller le moteur (fig. 12).
• Fixer la patte au portail, au moyen de 2 vis M8, à une distance de 39
mm au-dessous de l’embase (dét. 1 fig. 6). Pour pouvoir déterminer la
position de la patte, le bras doit être au maximum de son extension, avec
vantail en contact avec la butée mécanique en fermeture et points 1, 2
et 3 alignés (fig. 4). Ensuite, à partir de cette position d’alignement, faire
reculer le point 3 de 100 mm en veillant à maintenir le bras horizontal
"M" (fig. 6), et faire les contrôles suivants:
Pour verrouiller
Exercer une légère pression sur le levier dans le sens opposé à la position de
déverrouillage "B" qu'il occupe, afin de vaincre l'arrêt anti-retour. Le retour à
la position de verrouillage "A" s'effectue automatiquement grâce à l'action
d'un ressort. Il est possible que la mise en prise des dents de l'engrenage
à l'intérieur du motoréducteur ne se produise pas immédiatement. Pousser
alors manuellement la porte basculante ou actionner le motoréducteur pour
obtenir la mise en prise des dents.
- pendant la manœuvre d’ouverture, l’étrier, posé contre le portail, ne doit
subir de contraintes le long de l’axe "L" (fig. 6) ni vers le haut, ni vers le
bas. Des contraintes le long de cet axe seraient le révélateur d’un montage incorrect du portail ou du motoréducteur; ce qui endommagerait
en peu de temps l’appareil. Après avoir contrôlé que tout est correct,
fixer la patte au portail.
MAINTENANCE
Pour bénéficier de la garantie de 24 mois ou de 50000 manœuvres, lire attentivement ce qui suit.
• Régler le micro-interrupteur de fin de course en fermeture (came
supérieure “A” fig.“9b”-”10b”) et en ouverture (came inférieure “B”
fig.“9b”-”10b”): pour ce faire, placer le vantail en position d’ouverture/
fermeture désirée, tourner à la main la came jusqu’au déclic du microinterrupteur, et ensuite la fixer.
Généralement, le moteur ne nécessite pas de maintenances particulières.
Dans tous les cas, la garantie donnée pour 24 mois ou 50000 manœuvres
ne s’appliquera que dans la mesure où les contrôles et les interventions
suivants sur la machine "portail battant" auront été effectués:
- Les points de travail corrects des cames “A1”-”B1”, pour un
montage à droite , sont indiqués sur la figure “9b”.
- lubrification correcte (graissage) de toutes les parties mobiles.
- Les points de travail corrects des cames “A1”-”B1”, pour un
montage à gauche, sont indiqués sur la figure “10b”.
• Après avoir effectué le montage, ainsi qu’il est décrit ci-dessus, et la
connexion électrique, fermer l’appareil en y appliquant le carter (fig. 11).
Il doit être fixé au moyen de la vis-taraud "N", après avoir contrôlé que
les ergots de maintien inférieurs trouvent prise sur l’embase en matière
plastique.
• Il est conseillé de monter une serrure électrique.
14
WICHTIGE HINWEISE
WICHTIGE HINWEISE
WICHTIGE HINWEISE
VOR DER INSTALLATION SOLLTEN DIE NACHSTEHENDEN HINWEISE AUFMERKSAM GELESEN
WERDEN. BESONDERE AUFMERKSAMKEIT SOLLTE ALLEN IM TEXT BEFINDLICHEN HINWEISEN
GESCHENKT WERDEN. DEREN NICHTBEACHTUNG KÖNNTE DEN ORDENTLICHEN BETRIEB
DES SYSTEMS BEEINTRÄCHTIGEN.
BETRIEBSANLEITUNG
• Das vorliegende Handbuch wendet sich an Personen, die zur Installation von
"Elektrogeräten" befähigt sind und setzt gute technische Kenntnisse und die
Kenntnis der geltenden Vorschriften voraus. Die verwendeten Materialien müssen
zertifiziert sein und für die Umweltbedingungen der Installation geeignet sein.
• Die Wartungsarbeiten müssen von qualifiziertem Fachpersonal ausgeführt
werden. Bevor irgendwelche Säuberungs- oder Wartungsarbeiten ausgeführt
werden, ist die Apparatur vom Stromnetz zu trennen.
• Die hier beschriebenen Geräte dürfen nur für die Verwendung eingesetzt
werden, für die sie ausdrücklich konzipiert wurden, d.h. "Den Antrieb von
Drehtoren mit einem oder zwei Torflügeln" von bis zu 2 m und einem
Gewicht von 150 kg.
• Die Vorrichtung kann sowohl auf der linken als auch auf der rechten Seite der
Durchfahrt befestigt werden. Die Anwendung und Nutzung der Produkte zu
einem anderen Zweck, als es vorgesehen und/oder geraten wurde, ist nicht
vom Hersteller erprobt worden. Die Installationsarbeiten erfolgen daher unter
der vollständigen Verantwortung des Installateurs.
Achtung! Nur für EG-Kunden – WEEE-Kennzeichnung.
Das Symbol zeigt an, dass das Produkt am Ende seines Lebenszyklus getrennt von anderen Abfällen gesammelt werden muss.
Der Benutzer muss daher das Gerät in geeignete Zentren für die
getrennte Sammlung von Elektronik- und Elektroschrott bringen
oder zum Zeitpunkt des Erwerbs eines neuen Geräts gleicher Art
im Verhältnis eins zu eins beim Händler abgeben.
Die geeignete getrennte Sammlung für die Zuführung zum Recycling,
zur Aufbereitung und zur umweltfreundlichen Entsorgung trägt dazu bei,
mögliche negative Auswirkungen auf die Umwelt und die Gesundheit zu
vermeiden und fördert das Recycling der Materialien. Die widerrechtliche
Entsorgung des Produkts durch den Besitzer führt zur Anwendung der von
den geltenden Vorschriften im Mitgliedstaat der Europäischen Gemeinschaft
vorgesehenen Verwaltungsstrafen.
WICHTIG! Der Getriebemotor besitzt keinen Drehmoment-begrenzer,
deshalb ist eine elektronische Steuereinheit zur Drehmomentbegrenzung mit einem maximalem Schub am Torflügelende von gleich
150N zu verwenden.
Während der Betätigung ist die Torbewegung zu beobachten. Bei Gefahr
muss die Notstopvorrichtung (STOP) betätigt werden.
Bei Notfälle kann das Tor manuell mit einem speziellen Entriegelungsschlüssel, der mit zur Ausstattung gehört, entriegelt werden (siehe manuelle
Entriegelung S.4).
Es ist ratsam alle beweglichen Teile die die Reibungseigenschaften über
die Zeit gleichhalten und für einen Temperaturbereich von -20°C bis +70°C
geeignet sind. Die Funktionstüchtigkeit der Sicherheitsvorrichtungen
(Lichtschranken, usw) ist periodisch zu kontrollieren.
Eventuelle Reparaturen sind von Fachpersonal und unter Verwendung
von zertifizierten Originalersatzteilen auszuführen.
Die Automatisierung ist nicht für den Dauerbetrieb geeignet.
Die Gebrauchsfrequenz muss sich nach den verschiedenen Modellen
richten (siehe technische Eigenschaften Seite 20).
EINIGE BETRACHTUNGEN ZUR SICHERHEIT
Es unterliegt der Verantwortung des Installateurs, die nachstehenden Sicherheitsbedingungen zu überprüfen:
1) Die Installation sollte einen ausreichenden Abstand von der Strasse haben,
so dass sie keine Gefahr für den Strassenverkehr darstellt.
2) Der Antrieb muss innerhalb des Privatgeländes installiert und das Tor darf
nicht in Richtung öffentlichen Eigentums geöffnet werden.
3) Die Torautomatisierung ist prinzipiell für die Durchfahrt von Autos konzipiert
worden. Wenn möglich sollte für die Fußgänger ein eigener Eingang geschaffen
werden.
4) Die Bedienungsschalter sollten gut sichtbar aber außerhalb des Aktionsradiuses des Tores installiert werden. Desweiteren sollten die aussen installierten
Bedienungsschalter durch eine Schutzvorrichtung vor
ACHTUNG
unzulässiger Bedienung geschützt werden.
AUTOMATISCHE ÖFFNUNG
ABSTAND
HALTEN
5) Es ist wichtig die Automatisierung durch gut sichtbare
Hinweisschilder (wie in der Abbildung angezeigt) kenntlich
zu machen. Falls die Automatisierung nur für die Durchfahrt
von Autos vorgesehen ist, müssen zwei Schilder mit dem
Hinweis auf Durchgangsverbot für Fußgänger intern und
kINDER ODER HAUSTIERE
DüRFEN SICH NICHT IN REICH
extern angebracht werden.
-WEITE DES TORES AUFHALTEN
6) Der Benutzer sollte sich bewusst sein, dass Kinder oder
Haustiere nicht am Tor spielen oder verweilen dürfen. Falls nötig sollte dies
auf dem Hinweisschild angezeigt werden.
7) Falls der Torflügel sich bei seiner vollständigen Öffnung einer festen Struktur
nähert, muss ein Freiraum von mindestens 500 mm im Arbeitsbereich des
Gelenkarmes gelassen werden. Dieser Raum muss von einer Sicherheitsleiste
zum Schutz vor Quetschungen geschützt werden (siehe Abb. 1, Detail 11).
8)Die Güte des Erdungsanschlusses der Apparatur ist fundamental für die
Sicherheit der Elektrik.
9) Bei irgendwelchen Zweifeln bezüglich der Sicherheit bei der Installation, die
Arbeit einstellen und sich an den Vertrieb der Produkte wenden.
INSTALLATIONSANLEITUNGEN
Die Minimalbefehle, die installiert werden können, sind OFFNEN-STOPSCHLIESSEN.
Diese Befehle müssen von einer Stelle ausführbar sein, die sich außerhalb
des Aktionsradiuses des Tores befindet und für Kinder und Minderjährige
unzugänglich ist.
Vor der Installation ist zu überprüfen, dass die zu automatisierende Einrichtung in ihren festen und beweglichen Teilen einwandfrei funktioniert
und entsprechend den geltenden Richtlinien ausgeführt wurde.
Anschließend ist die ausreichende Robustheit des Torrahmens (falls notwendig die Struktur verstärken) und die gute Funktionsweise der Bolzen
(es ist ratsam alle beweglichen Teile mit Schmiermitteln zu schmieren,
die die Reibungseigenschaften über die Zeit gleichhalten und für einen
Temperaturbereich von -20°C bis +70°C geeignet sind) sicherzustellen.
• Die Sicherheitsfreiräume zwischen den festen und beweglichen Teilen
kontrollieren:
- auf der gesamten Höhe und Öffnungsweite der Tores einen Freiraum
von min. 30 mm zwischen dem Tor und dem Torpfeiler lassen;
- sich vergewissern, dass der Raum zwischen Tor und Boden auf der
gesamten Öffnungsweite der Tores niemals mehr als 30 mm beträgt.
• Die Torflügelflächen sollten keine offenen Stellen aufweisen, die den
Durchlass von Händen oder Füßen gestatten.
• Die exakte Positionierung der Bolzen und Scharniere, deren guten
Erhaltungsgrad und Schmierung (es ist wichtig, dass das obere und
untere Scharnier lotrecht zueinander stehen) kontrollieren.
• Den Kabelverlauf gemäß den Installationserfordernissen der Steuerund Sicherheitsvorrichtungen gemäß den Sicherheitsnormen (siehe
Anlagenart Abb.1, S.2) vorbereiten.
• Sicherstellen, dass der Antrieb der Torgröße und der Gebrauchsfrequenz
(Arbeitsintermittenz Seite 20) proportional ist.
TECHNISCHE BESCHREIBUNG
-24V-Gleichstrommotor.
-Schützgehäuse aus stoßfestem Kunststoffmaterial.
-Entriegelungsteile aus verstärktem Kunststoffmaterial.
-Untersetzungsgetriebe mit Stahlzahnrädern in DruckgussaluminiumhalbSchale eingeschlossen.
-Der Getriebemotor ist mit zwei Mikroschaltern ausgestattet; einen für die Schließung "FCC" und einen für die Öffnung "FCA" (siehe elektrischen Schaltplan).
-Motorhaltebügel aus verzinktem Stahl.
-Gelenkarmkomponenten aus Aluminiumpressguss.
-Dauerschmierung durch Flüssigfett.
ZUBEHÖR
980/XLSE011C - Elektroschloß 12Vac
15
BEFESTIGUNG DER VORRICHTUNG
ELEKTRISCHER ANSCHLUSS (Abb. 14)
Die Vorrichtung kann sowohl auf der rechten als auch auf der linken Seite der
Durchfahrt befestigt werden:
Vor dem Anschluss der Apparatur überprüfen, ob die Stromspannung mit
dem auf dem Geräteschild angegebenen Wert übereinstimmt.
- beim Bausatz für zwei Torflügel sind die Getriebemotoren für die Installation sowohl auf der linken als auch auf der rechten Seite der Durchfahrt
vorbereitet (siehe Etikette “SX “ links -”DX” rechts auf den Motoren);
- bei Anwendungen mit einem Torflügel kann die Lieferung unterschiedslos mit Getriebemotoren erfolgen, die für die Anwendung auf der rechten
oder linken Seite vorbereitet sind. Es muss deshalb das Etikett auf dem
Motor “SX “ links oder “DX” rechts kontrolliert werden;
- im Falle, dass für eine auf der linken Seite auszuführende Anwendung ein
rechter Motor, oder umgekehrt, geliefert wird, müssen die Nockenwellen
herausgenommen und umgekehrt wieder eingesetzt werden (siehe Abb.
9b-10b).
• Torflügel schließen.
• Höhe "A" gemäß dem zu erhaltenen Öffnungswinkel (Abb. 4) wählen und
an Hand der strukturellen Eigenschaften des Tores die Höhe des vorderen
am Tor zu befestigenden Bügels festlegen. Nachdem die Position bestimmt
wurde, Motoruntersatz mit 4 M8-Schrauben und 4 Stahldübeln Ø14
befestigen und darauf achten, dass der verzinkte Haltebügel aus Stahl "D"
waagerecht ausgerichtet wird (Abb. 7).
• Den geraden Arm "E" wie in Abb. 8 angezeigt in die Motorwelle einsetzen
und durch vollständiges Einschrauben des Schraubstiftes "F" befestigen.
• Den Getriebemotor an der Grundplatte mit den beiden Schrauben "G" und
deren selbstsperrenden Muttern unter Beachtung des Montageplanes rechts
(Abb. 9) oder links (Abb. 10) befestigen. Der Getriebemotor wird werksmäßig
für die Montage auf der rechten Torseite (von innen gesehen) geliefert. Für
die Montage auf der linken Seite muss das Plastikteil "H" (Abb. 10), das
das Loch für die Motorwelle abdeckt, mit einer Zange entfernt und mit der
mitgelieferten Einsetzscheibe "L" das verbliebene nicht verwendete Loch
abgedeckt werden.
• Mit der Montage des Gelenkarmes und dessen Tor-Haltebügels fortfahren
(Abb. 2):
- die Plastikbuchsen "11" in die Löcher des gebogenen Armes "7" einsetzen,
den gebogenen Arm "7" mit dem geraden Arm "6" und dem Bügel "8" mit
der Schraube "9" und der selbstsperrenden Mutter "12" verbinden nachdem
das verzinkte Distanzstück "10" in die Buchse "11" eingesetzt worden ist.
• Motor (Abb. 12) entriegeln.
• Den Bügel mit 2 Schrauben M8, 39 mm unterhalb der Grundplatte (Detail
1, Abb. 6) mit dem Tor verbinden. Die Stellung des Bügels wird ermittelt,
indem der Arm auf seine maximale Ausstreckung gebracht wird, wobei das
Tor bis zum mechanischen Anschlag geschlossenen und die Punkte 1, 2, 3
auf der gleichen Linie ausgerichtet sein müssen (Abb. 4). Danach wird der
Punkt 3 um 100 mm vom bisherigen Ausrichtungspunkt zurückversetzt.
Der Arm muss waagerecht ausgerichtet werden "M" (Abb. 6). Folgende
Kontrolle ist auszuführen:
- der am Tor angelehnte Bügel darf während der Drehung des Tores von der
geschlossenen zur geöffneten Stellung keinen Verspannungen längs der
Achse "L" (Abb. 6) weder nach oben noch nach unten ausgesetzt sein.
Falls dies der Fall sein sollte, würde das bedeuten, dass das Tor oder der
Getriebemotor nicht korrekt montiert worden sind, und in kurzer Zeit könnte
dies zu Schäden an der Apparatur führen.
Nach der Prüfung, dass alles in Ordnung ist, den Bügel am Tor befestigen.
• Den Mikroendschalter für die Schließung (obere Nockenwelle “A” Abb.
9b-10b) und die Öffnung (untere Nockenwelle “B” Abb. 9b-10b) einstellen:
Dazu den Torflügel bis zur gewünschten Position öffnen/schließen, dann
die Nockenwelle von Hand bis zum Auslösen des Mikroschalters drehen
und festsetzen.
• Die Apparatur funktioniert mit 24V-Gleichstrommotor (siehe elektrischer
Schaltplan).
• Keine Kabel mit Aluminiumleiter verwenden; die in die Anschlussklemmleiste
einzuführenden Kabelenden nicht verzinnen.
• Die Leitungen müssen in der Nähe der Klemmleiste in angemessener Weise
so befestigt werden, dass sowohl die Isolierung als auch der Leiter befestigt
wird. Die mitgelieferte Kabelschelle verwenden.
• Für den Anschluss der elektrischen Kabel an die Apparatur stehen zwei
Einlässe zur Verfügung:
- der Einlass von der Wand "O" (Abb. 9);
- der externe Einlass "P" (Abb. 9) mit Kabelzwinge, nachdem die Kunststoffabdeckungen der Öffnung entfernt worden ist.
Für den ordentlichen Betrieb der Apparatur wird dazu geraten, ausschließlich die elektronische Steuerung von Cardin für den Gleichstrombetrieb der Serie PGR8511CC (mit Batterie und Batterieladegerät) oder PRG85110C (ohne Batterie und ohne Batterieladegerät), die
für die Betätigung von einem oder zwei parallelgeschalteten Motoren
geeignet sind, zu verwenden.
MANUELLE ENTRIEGELUNG (Abb.12)
Die Entriegelung darf nur bei wegen Stromausfall stillstehendem Motor ausgeführt werden.
Zur Entriegelung des Torflügels muss der zur Ausstattung gehörende Schlüssel
verwendet werden. Er ist an einem leicht zugänglichen Ort aufzubewahren.
Zur Entriegelung
Das Türchen öffnen und den Hebel entgegen dem Uhrzeigersinn wie im Detail
"A" (Abb. 12) angezeigt bis zur Entriegelungsposition "B" bewegen, wo er durch
eine Rückhalte-Sperre festgehalten wird. Auf diese Weise wird das Getriebe
des Antriebes in den Leerlauf gebracht und das Tor kann nun durch leichtes
Drücken mit der Hand geöffnet und geschlossen werden.
Zur Verriegelung
Mit etwas Kraft den Hebel von der Entriegelungsposition "B" in der er sich
befindet, zur Überwindung der rückstellgesicherten Feststellvorrichtung, die
ihn in dieser Position festhält in die entgegengesetzte Richtung drehen. Die
Rückkehr in die verriegelte Position "A" erfolgt durch die Wirkung einer Feder
automatisch. Das Wiedereinhaken der Getriebezähne im Innern des Getriebemotors könnte gegebenenfalls auch nicht sofort erfolgen, kann aber durch
Drücken von Hand auf das Tor oder durch Einschalten des Getriebemotors
ausgeführt werden.
WARTUNG
Zur Nutzung der sich auf 24 Monate oder 50000 Betätigungen
erstreckende Garantie sollten die nachstehenden Anmerkungen
aufmerksam gelesen werden.
• Die korrekten Betriebspunkte der Nockenwellen “A1”-”B1” für die
Installation auf der rechten Seite sind in der Abbildung “9b” angegeben.
Der Motor bedarf keiner besonderen Wartung. In jedem Fall hat die sich auf 24
Monate oder 50000 Betätigungen erstreckende Garantie nur dann Gültigkeit, wenn
die folgenden Kontrollen und eventuellen Wartungsarbeiten an der "Drehtor"Maschine vorgenommen werden:
- korrekte Schmierung (Fetten) alle beweglichen Teile.
• Die korrekten Betriebspunkte der Nockenwellen “A1”-”B1” für die
Installation auf der linken Seite sind in der Abbildung “10b” angegeben.
• Nachdem die beschriebenen Montagearbeiten und die elektrischen
Anschlüsse ausgeführt worden sind, kann die Apparatur durch Anbringung des Schutzgehäuses geschlossen werden (Abb. 11). Es wird mit den
selbstschneidenden Schrauben "N" befestigt, nachdem überprüft worden
ist, ob die beiden unteren Haltezähne an der Basis aus Kunststoffmaterial
eingehakt sind.
• Es wird zur Verwendung eines Elektroschloßes geraten (siehe Anlagenart
Abb. 1).
16
Advertencias importantes
Advertencias importantes
Advertencias importantes
LÉANSE ATENTAMENTE LAS SIGUIENTES ADVERTENCIAS ANTES DE PROCEDER CON LA INSTALACIÓN
DEL SISTEMA. PRESTAR PARTICULAR ATENCIÓN A TODAS LAS SEÑALIZACIONES QUE HAN SIDO INDICADAS EN EL TEXTO
, YA QUE EL INCUMPLIMIENTO DE LAS MISMAS PODRÍA PERJUDICAR EL BUEN
FUNCIONAMIENTO DEL SISTEMA.
Advertencias PARA EL USO
• Este manual se dirige a personas habilitadas para la instalación de "aparatos utilizadores de energía eléctrica" y exige el buen conocimiento
de la técnica, realizada profesionalmente, y de la normativa vigente.
Los materiales utilizados deben estar certificados y ser idóneos para las
condiciones ambientales de instalación.
• Las operaciones de mantenimiento deben ser llevadas a cabo por personal
cualificado. Antes de realizar cualquier operación de limpieza o mantenimiento, desconectar el equipo de la red de alimentación eléctrica.
• Los equipos detallados en este manual de instrucciones se deben destinar
únicamente al uso para el cual han sido expresamente concebidos: "La
motorización de cancillas batientes de una o dos hojas" longitud de
hasta 2 m y 150 kg de peso por hoja.
• La aplicación para todos los modelos es posible tanto a la izda. como a
la dcha. de la abertura de paso.
El uso de los productos y su destino para usos diferentes a aquéllos previstos y/o aconsejados, no ha sido probado por el fabricante, por tanto
los trabajos ejecutados están sometidos a la total responsabilidad del
instalador.
¡Atención! Solo para clientes de la Unión Europea - Marcación WEEE.
El símbolo indica que el producto, una vez terminada su vida
útil, debe ser recogido por separado de los demás residuos.
Por lo tanto, el usuario deberá entregar el equipo en los centros
de recogida selectiva especializados en residuos electrónicos y
eléctricos, o bien volverlo a entregar al revendedor al momento
de comprar un equipo nuevo equivalente, en razón de uno
comprado y uno retirado.
La recogida selectiva destinada al reciclado, al tratamiento y a la gestión
medioambiental compatible contribuye a evitar los posibles efectos
negativos en el medio ambiente y en la salud, y favorece el reciclado de
los materiales. La gestión abusiva del producto por parte del posesor
implica la aplicación de las sanciones administrativas previstas por la
normativa vigente en el Estado comunitario al que pertenece.
¡IMPORTANTE! El motorreductor está desprovisto de limitador del
par, por tanto utilizar la centralita de limitación electrónica del par con
empuje máximo en el extremo de la hoja de 150 N.
ADVERTENCIAS GENERALES SOBRE LA SEGURIDAD
Es el instalador quien tiene que comprobar las siguientes condiciones de
seguridad:
1) La instalación debe estar lo suficientemente apartada de la carretera como
para no constituir un peligro para la circulación.
2) El operador se debe instalar al interior de la propiedad y la cancela no
debe abrirse hacia la superficie público.
3) La cancela motorizada está principalmente adhibida al paso de vehículos.
Donde sea posible, disponer una entrada separada para los peatones.
4) Los mandos deben estar colocados a la vista, pero no dentro del radio de
acción de la cancela; además los que están instalados
¡CUIDADO!
al exterior se tienen que proteger con un dispositivo de APERTURA AUTOMATICA
NO ACERCARSE
seguridad a fin de prevenir su uso no autorizado.
5) Es buena regla señalar la automatización mediante las
placas de advertencia (similares a la de la figura) que
debe estar fácilmente visible. Si la automatización está
adhibida únicamente al paso de vehículos se tienen que
poner dos placas de advertencia de prohibición de paso
peatonal (una al interior y otra al exterior).
6) Enterar al usuario de que los niños o los animales domésticos no deben jugar
ni estacionar cerca de la cancela. De ser necesario, indicarlo en la placa.
7) Si la hoja totalmente abierta se acerca a una estructura fija, hace falta dejar
un espacio libre de al menos 500 mm en la zona de acción del brazo
articulado; este espacio se debe resguardar con un protector sensible
antiaplastamiento (ver fig. 1, det. 11).
8) La calidad del conexionado de puesta a tierra del sistema es fundamental
para los fines de la seguridad eléctrica.
9) En caso de dudas sobre la seguridad de la instalación, no proceder, sino
dirigirse al distribuidor de los productos.
NO DEJAR QUE LOS NIÑOS O ANIMALES
DOMESTICOS ESTACIONEN EN EL RADIO
DE ACCION DE LA CANCELA
DESCRIPCIÓN TÉCNICA
- Motor 24 Vdc corriente continua.
- Cárter protector en plástico resistente a golpes.
- Detalles del dispositivo de desbloqueo en plástico reforzado.
-Reductor con engranajes de acero encerrados en semi cascos de
aluminio moldeado a presión.
-El motorreductor está provisto de dos microinterruptores: uno de cierre
"FCC" y otro de apertura "FCA" (ver esquema eléctrico).
- Soporte del motor en acero galvanizado.
- Detalles del brazo articulado en aluminio moldeado a presión.
- Lubricación con grasa fluida permanente.
ACCESORIOS
980/XLSE011C - Electrocerradura 12Vac.
17
Durante la maniobra se tiene controlar el movimiento de la cancilla y accionar
el dispositivo de parada inmediata (STOP) en caso de peligro.
En caso de emergencia, la cancilla se puede desbloquear manualmente
utilizando la llave correspondiente de desbloqueo suministrada (véase
desbloqueo manual, pág. 7).
Se aconseja lubricar todas las piezas en movimiento utilizando lubricantes
que mantengan las mismas características de rozamiento a lo largo del
tiempo y adecuados para funcionar entre -20 y +70°C.
En caso de avería o funcionamiento incorrecto, desconectar la alimentación eléctrica antes del equipo y contactar con el servicio de asistencia
técnica.
Comprobar periódicamente el funcionamiento de los dispositivos de seguridad (fotocélulas, etc.).
Las reparaciones eventuales deben ser realizadas por personal cualificado,
utilizando materiales originales y certificados.
El uso de la automatización no es idóneo para el accionamiento continuo,
sino que se lo debe ajustar en función de los varios modelos (ver características técnicas en página 20).
INSTRUCCIONES PARA LA INSTALACIÓN
Los mandos mínimos que se pueden instalar son APERTURA-STOP-CIERRE;
estos mandos deben estar colocados en un lugar no accesible para los
niños o menores y fuera del radio de acción de la cancilla.
Antes de ejecutar la instalación, comprobar que la estructura a automatizar
está totalmente eficiente en todas sus piezas fijas y móviles y realizada
cumpliendo con la normativa vigente.
A tal fin cerciorarse de la suficiente rigidez del tablero de la cancilla (de ser
necesario, hace falta reforzar su estructura) y del funcionamiento correcto
de los pernos (en todo caso se aconseja lubricar todas las piezas en movimiento, utilizando lubricantes que mantengan las mismas características
de rozamiento a lo largo del tiempo y adecuados para funcionar entre -20
y +70°C).
• Controlar los seguros entre las piezas fijas y móviles:
- dejar un espacio libre de 30 mm como mínimo entre la cancilla y el pilar
de soporte en toda la altura y el arco de apertura de la cancilla;
- comprobar que el espacio entre la cancilla y el suelo no exceda nunca
de 30 mm en todo el arco de apertura de la cancilla.
• La superficie de las hojas no debe tener aperturas tales que permitan el
paso de la mano o del pie de las personas.
• Controlar la correcta posición de pernos y goznes, su buen estado de
mantenimiento y lubricación (es importante que el gozne superior y el
inferior estén alineados entre sí).
• Prever el recorrido de los cables según las necesidades de aplicación
de los dispositivos de mando y seguridad cumpliendo con las normas
de seguridad vigentes (véase instalación estándar, fig. 1 pág. 2).
• Comprobar que la automatización sea adecuada para el tamaño de la
cancilla y la frecuencia de uso (intermitencia de trabajo en pág. 20).
FIJACIÓN DEL DISPOSITIVO
CONEXIÓN ELÉCTRICA (fig. 14)
El dispositivo se puede fijar tanto a la izquierda como a la derecha de la
luz de paso:
Comprobar, antes de realizar la conexión eléctrica, que la tensión indicada
en la placa de características coincida con la de la instalación de alimentación.
- en el caso del kit para dos puertas, los motorreductores ya están predispuestos para la instalación tanto a mano derecha como a mano izquierda
(véanse las etiquetas "SX" IZQDA. - "DX" DCHA.” en los motores).
• El equipo funciona con la tensión de 24 Vdc corriente continua (ver
esquema eléctrico).
- en el caso de aplicaciones en una puerta, la provisión puede realizarse
indistintamente con motorreductores predispuestos para la aplicación
tanto a mano derecha como a mano izquierda; en consecuencia, deberá
controlarse la etiqueta puesta en el motor "SX" IZQDA. - "DX" DCHA.”.
• No utilizar cables con conductores de aluminio; no estañar el extremo de
los cables que se deben introducir en la bornera.
• Los conductores se deben fijar debidamente cerca de la bornera de modo
que su fijación incluya tanto el aislamiento como el conductor. Utilizar el
prensahilo suministrado.
- en el caso de que se suministre un motor de mano derecha pero la
aplicación se realizara a mano izquierda o viceversa, deberán extraerse
las levas y reintroducirlas volteadas (véanse fig. “9b” y “10b”).
• Para la conexión de los cables eléctricos al aparato, están disponibles
dos entradas:
•Disponer la puerta en la posición de cerrado.
- la de pared "O" (fig. 9);
•Elegir la medida "A" en función del ángulo de apertura que se quiere
conseguir (fig. 4) y determinar según las características estructurales de
la cancela a qué altura se fijará el soporte anterior en la cancela. Una vez
determinada la posición, fijar la base del motor por medio de 4 tornillos
M8 y 4 tacos de acero Ø 14, cuidando que esté nivelado el soporte de
acero galvanizado "D" (fig. 7).
- la "P" para el exterior (fig. 9) mediante prensatubo, después de haber
quitado la pieza de plástico que tapa el orificio.
Para el buen funcionamiento del aparato, se recomienda utilizar
únicamente los programadores electrónicos Cardin en corriente
continua de la gama PRG8511CC (con baterías y cargador de
baterías) o PRG85110C (sin baterías ni cargador de baterías)
adecuados para el accionamiento de un motor o de dos motores
en paralelo.
•Introducir el brazo recto "E" en el árbol motor, según lo que está representado en la figura 8 y fijarlo por medio del tornillo "F" apretado debidamente.
•Fijar el motorreductor en la plancha de base con los dos tornillos "G" y las
tuercas autobloqueantes correspondientes, según el esquema de montaje
Dcho. (fig. 9) e Izdo. (fig. 10). El motorreductor se suministra de fábrica
para el montaje a la Dcha. de la cancela (vista interior), para el montaje a
la Izda. se debe quitar la pieza de plástico "H" (fig. 10) que tapa el orificio
de paso del árbol motor con el auxilio de una pinza y tapando por medio
del disco con enganche "L" suministrado el orificio sin utilizar.
desbloqueo MANUAL (fig.12)
La operación de desbloqueo se debe realizar únicamente con el motor
parado, a falta de fluido eléctrico.
Para desbloquear la hoja de la cancela hay que utilizar la llave suministrada
junto con el equipo. Esta se debe guardar en un sitio de fácil acceso.
•Luego proceder al montaje del brazo articulado provisto de soporte de
unión con la cancela (fig. 2).
•Inserir los casquillos de plástico "11" en los orificios del brazo curvo "7",
conectar el brazo curvo "7" al brazo recto "6" y al soporte "8", ambos
por medio del tornillo "9" y de la tuerca autobloqueante "12" después
de haber incorporado el distanciador galvanizado "10" en el interior del
casquillo "11".
Para desbloquear
Abrir la puerta y girar la palanca en dirección contraria a las agujas del reloj,
así como está indicado en el det. "A" (fig. 12) hasta alcanzar la posición
de desbloqueo "B", donde quedará enganchada gracias a un dispositivo
antirretorno. De esta forma los engranajes del actuador están sueltos y la
cancela se podrá abrir y cerrar empujándola suavemente con la mano.
•Desbloquear el motor (fig. 12).
•Fijar el soporte en la cancela con 2 tornillos M8, 39 mm por debajo de
la base (det. 1 fig. 8). La posición del soporte se determina colocando
el brazo en la máxima extensión, con la puerta en el tope de cierre y los
puntos 1, 2, 3 alineados (fig. 4) en la misma recta, retrayendo el punto 3
100 mm respecto al punto de alineación donde se encontraba. El brazo
se debe mantener a la medida "M" (fig. 6). Realizar la prueba siguiente:
Para bloquear
Forzar ligeramente la palanca desde la posición de desbloqueo "B" donde se
encuentra para vencer el tope antirretorno que la mantiene en esa posición,
en el sentido opuesto al anterior. El retorno a la posición de bloqueo "A" se
realiza automáticamente por la acción de un resorte. El enganche de los
dientes de los engranajes en el interior del motorreductor puede que no sea
inmediato, sin embargo se lo puede conseguir manualmente empujando la
puerta basculante o al reactivar el motorreductor.
- el soporte apoyado en la cancela, durante la rotación de la propia cancela
desde la posición de cerrado a la de abierto, no debe estar sometido a
esfuerzos a lo largo del eje "L" (fig. 6) ni hacia arriba ni tampoco hacia
abajo, porque en tal caso la cancela o el motorreductor estarían montados
incorrectamente y esto podría dañar en poco tiempo el equipo. Una vez
comprobado que todo está bien puesto, fijar el soporte en la cancela.
MANTENIMIENTO
Para beneficiar de la garantía de 24 meses o de 50000 maniobras, leer atentamente las siguientes notas.
• Ajustar el microinterruptor de fin de carrera en cierre (leva superior “A”
fig. 9b-10b) y en apertura (leva inferior “B” fig. 9b-10b); para ello, situar la
puerta en apertura/cierre hasta alcanzar la posición deseada, luego hacer
girar manualmente la leva hasta que se escuche el clic del microinterruptor
y a continuación fijarla.
El motor normalmente no precisa particulares operaciones de mantenimiento;
en todo caso, la garantía de 24 meses o de 50000 maniobras surte efecto
a condición de que se lleven a cabo los siguientes controles y eventuales
intervenciones sobre la máquina "cancilla batiente":
- lubricación correcta (engrase) de las partes en movimiento.
- Los puntos de operación correctos de las levas “A1”-”B1” para
una instalación a mano derecha se muestran en la figura “9b”.
- Los puntos de operación correctos de las levas “A1”-”B1” para una
instalación a mano izquierda se muestran en la figura “10b”.
•Después de haber realizado las operaciones de montaje que se acaban
de detallar y también la conexión eléctrica, se puede proceder a tapar el
equipo, incorporando el cárter (fig. 11). Éste se debe fijar por medio del
tornillo autorroscante "N" después de haber comprobado el enganche
de los dos dientes inferiores de sujeción en la base de plástico.
•Se aconseja el uso de una electrocerradura (véase instalación estándar,
fig. 1).
18
CARDIN ELETTRONICA spa
Via Raffaello, 36- 31020 San Vendemiano (TV) Italy
Tel:
+39/0438.404011-401818
Fax:
+39/0438.401831
email (Italy):
[email protected]
email (Europe):
[email protected]
Http:
www.cardin.it
CODICE
SERIE
MODELLO
DATA
DCE033
BL
24 Vdc
04-07-2002
Dichiarazione di Conformità CE
(Direttiva Macchine 89/392/CEE, All. II)
Il Costruttore:
CARDIN ELETTRONICA S.p.A.
Nome dell'apparato
Tipo di apparato
Modello
Marchio
Anno di prima fabbricazione
Motoriduttore BL1924
Automazione a 24 Vdc per cancelli a battente
BL1924
Cardin Elettronica
2002
DICHIARA CHE L'AppARECCHIAtuRA DEstInAtA AD EssERE InsERItA In
mACCHInE E non funzIonAntE In moDo InDIpEnDEntE:
è ideata per essere incorporata in una macchina o per essere assemblato con altri macchinari per costituire una macchina considerata
dalla Direttiva 89/392/CEE e successivi emendamenti.
è conforme alle disposizioni delle seguenti direttive comunitarie:
- Direttiva 89/336/CEE (Compatibilità Elettromagnetica)
- Direttiva 73/23/CEE (Bassa Tensione)
e sono state applicate le seguenti norme e/o specifiche tecniche:
- EN 61000-3-2 : 1995
- EN 61000-3-3 : 1995
- EN 55014-1
: 1997
- EN 55014-2
: 1997
- EN 60335-1
: 1994 + A11:1995 + A1 : 1996 + A12: 1996 + A13: 1998 + A14: 1998 + A15: 2000
Il costruttore è in possesso dei seguenti Certificati di Conformità CE rilasciati dal "Competent Body" PRIMA RICERCA & SVILUPPO:
- test report EMC.TR.00.583 (04/01/01) - certificato di conformità CE n. 01.001
- test report SAF.TR.00.380 (06/04/01) - certificato di conformità CE n. 01.111
INOLTRE DICHIARA CHE NON È CONSENTITO METTERE IN SERVIZIO L' APPARECCHIATURA FINO A CHE LA MACCHINA NELLA QUALE SARÀ
INCORPORATA E DELLA QUALE DIVENTERÀ COMPONENTE SIA STATA IDENTIFICATA E NE SIA STATA DICHIARATA LA CONFORMITÀ ALLE
DISPOSIZIONI DELLA DIRETTIVA 89/392/CEE E SUCCESSIVI EMENDAMENTI.
x
x
x
x
x
x
x
x
x
x
x
x
x
x
x
x
x
x
x
x
x
x
x
x
x
x
x
x
x
x
x
x
x
x
x
x
x
x
x
x
x
x
x
x
x
x
x
x
x
x
x
x
x
x
x
x
x
x
x
x
x
x
x
x
x
x
x
x
x
x
x
x
x
x
x
x
x
x
x
x
x
x
x
x
x
x
x
x
x
x
x
x
x
x
x
x
x
x
x
x
x
x
x
x
x
x
x
x
x
x
x
x
x
x
x
x
x
x
x
x
x
x
x
x
x
x
x
x
x
x
x
x
x
x
x
x
x
x
x
x
x
x
x
x
x
x
x
x
x
x
x
x
x
x
x
x
x
x
x
x
x
x
x
x
x
x
x
x
x
x
x
x
x
x
x
x
x
x
x
x
x
x
x
x
x
x
x
x
x
x
x
x
x
x
x
x
x
x
x
x
x
x
x
x
x
x
x
x
x
x
x
x
x
x
x
x
x
x
x
x
x
x
x
x
x
x
x
x
x
x
x
x
x
x
x
x
x
x
x
x
x
x
x
x
x
x
x
x
x
x
x
x
x
x
x
x
x
x
x
x
x
x
x
x
x
x
x
x
x
x
x
x
x
x
x
x
x
x
x
x
x
x
x
x
x
x
x
x
x
x
x
x
x
x
x
x
x
x
x
x
x
x
x
x
x
x
x
x
x
x
x
x
x
x
x
x
x
x
x
x
x
x
x
x
x
x
x
x
x
x
x
x
x
x
x
x
x
x
x
x
x
x
x
x
x
x
x
x
x
x
x
x
x
x
x
x
x
x
x
x
x
x
x
x
x
x
x
x
x
x
x
x
x
x
x
x
x
x
x
x
x
x
x
x
x
x
x
x
x
x
x
x
x
x
x
x
x
x
x
x
x
x
x
x
x
x
x
x
x
x
x
x
x
x
x
x
x
x
x
x
x
x
x
x
x
x
x
x
x
x
x
x
x
x
x
x
x
x
x
x
x
x
x
x
x
x
x
x
x
x
x
x
x
x
x
x
x
x
x
x
x
x
x
x
x
x
x
x
x
x
x
x
x
x
x
x
x
x
x
x
x
x
x
x
x
x
x
x
x
x
x
x
x
x
x
x
x
x
x
x
x
x
x
x
x
San Vendemiano il 04/07/02
x
x
x
x
x
x
x
x
x
x
x
x
x
x
x
x
Ing. M. Terruso
(Resp. Certif. & Omologazioni)
The CE conformity declaration for Cardin products is available in original language from the site www.cardin.it under the section "Standards and Certification".
Les déclarations de conformité CE des produits Cardin sont disponibles dans la langue originale sur le site www.cardin.it dans la section "normes et certificats".
Die CE-Konformitätserklärungen für die Cardin-Produkte stehen in der Originalsprache auf der Homepage www.cardin.it im Bereich "Normen und Zertifizierung" zur Verfügung.
Las declaraciones de conformidad CE de los productos Cardin se encuentran disponibles en el idioma original en el sitio www.cardin.it en la sección "normas y certificaciones".
19
Caratteristiche tecniche
Vdc
A
W
%
giri/min
s
°
Nm
IP
24
3,5
85
70
1,7
12,5
130
170
44
All rights reserved. Unauthorised copying or use of the information contained in this document is punishable by law
170
Alimentazione
Corrente nominale
Potenza assorbita
Intermittenza di lavoro
Velocità riduttore
Tempo apertura 90°
Apertura massima
Coppia
Grado di protezione
All rights reserved. Unauthorised copying or use of the information contained in this document is punishable by law
All rights reserved. Unauthorised copying or use of the information contained in this document is punishable b
Ø25
26
-
Dimensioni d'ingombro - External dimensions
Dimensions d'encombrement
Aussenabmessungen - DIMENSIONES MÁXIMAS
L’apparecchiatura è sprovvista di programmatore elettronico,
per il suo impiego si raccomanda l’utilizzo di programmatori
elettronici Cardin disponibili nelle versioni:
90
74
117
233
164
PRG851 (per 1 motore)
PRG852 (per 2 motori)
350
470
400
49
12
0
51
TECHNICAL SPECIFICATIONS
Description : Dimensioni d'ingombro
TECHNISCHE
DATEN
Drawing number : DI0152
BL1924
Product Code : BL1924
Draft : P.J.Heath
-
Power supply
Current input
Power input
Duty cycle
Shaft revolutions
Opening time 90°
Maximum opening angle
Torque
Protection grade
Vdc
A
W
%
revs/min
s
°
Nm
IP
24
3,5
85
70
1,7
12,5
130
170
44
CARDIN ELETTRONICA S.p.A - 31020 San Vendemiano (TV) Italy - via Raffaello, 36 Tel: 0438/401818 Fax: 0438/401831
Drawing number : DI0153
Product Code : BL1924
Draft : P.J.Heath
-
Vdc
24
A
3,5
W
85
% fissaggio a muro
70
staffa
dreh/min.
1,7
s
12,5
°
130
Nm
170
IP
44
Drawing number : DI0154
Description : Dimensioni d'ingombro bracci
Product Code : BL1924
BRACCIO CURVO
Draft : P.J.Heath
Date : 07-06-2000
CARDIN ELETTRONICA S.p.A - 31020 San Vendemiano (TV) Italy - via Raffaello, 36 Tel: 0438/401818 Fax: 0438/401831
Description : Dimensioni d'ingombro bracci
Date : 07-06-2000
Description : Dimensioni d'ingombro bracci
Drawing number : DI0155
Product Code : BL1924
Draft : P.J.Heath
Date : 07-06-2000
CARDIN ELETTRONICA S.p.A - 31020 San Vendemiano (TV) Italy - via Raffaello, 36 Tel: 0438/401818 Fax: 0438/401831
Die Apparatur verfügt über keine elektronische Steuerung. Zu
dessen Anwendung empfiehlt sich die Verwendung von elektronische Cardin-Steuerungen, die in den folgenden Ausführungen
zur Verfügung stehen:
PRG851 (for 1 motor)
PRG852 (for 2 motors)
PRG851 (für 1 Motor)
PRG852 (für 2 Motoren)
CARACTÉRISTIQUES TECHNIQUES
Alimentation
Courant nominal
Puissance absorbée
Intermittence de travail
Vitesse du réducteur
Temps d’ouverture 90°
Ouverture maximale
Couple
Indice de protection
Stromversorgung
Nominalstrom
Leistungsaufnahme
Arbeitsintermittenz
BRACCIO DRITTO
Getriebegeschwindigkeit
Öffnungszeit 90°
maximale Öffnung
Drehmoment
Schutzgrad
CARDIN ELETTRONICA S.p.A - 31020 San Vendemiano (TV) Italy - via Raffaello, 36 Tel: 0438/401818 Fax: 0438/401831
The appliance does not feature on board electronics and it recommended that you use the electronic programmers available
from Cardin with the following serial numbers
-
Date : 06-06-2000
Vdc
A
W
%
tr/mn
s
°
Nm
IP
datos técnicos
-
24
3,5
85
70
1,7
12,5
130
170
44
Alimentación
Corriente nominal
Potencia absorbida
Intermitencia de trabajo
Velocidad reductor
Tiempo de apertura 90°
Apertura máxima
Par
Grado de protección
Vdc
A
W
%
r.p.m.
s
°
Nm
IP
24
3,5
85
70
1,7
12,5
130
170
44
L’appareil est dépourvu de programmateur électronique; pour
son utilisation, il est conseillé de lui associer un des programmateurs Cardin, disponibles dans les versions:
El aparato está desprovisto de programador electrónico; para su
utilización se recomienda el uso de programadores electrónicos
Cardin disponibles en las versiones de:
PRG851 (pour 1 moteur)
PRG852 (pour 2 moteurs)
PRG851 (para 1 motor)
PRG852 (para 2 motores)
CARDIN ELETTRONICA spa
Via Raffaello, 36 - 31020 San Vendemiano (TV) Italy
Tel:
+39/0438.404011-401818
Fax:
+39/0438.401831
email (Italian):
[email protected]
email (Europe):
[email protected]
Http:
www.cardin.it
20