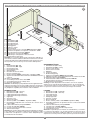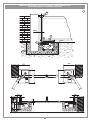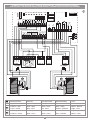
1
CARDIN ELETTRONICA spa
Via Raffaello, 36
31020 San Vendemiano (TV) Italy
Tel:
+39/0438.404011-401818
Fax:
+39/0438.401831
email (Italian): [email protected]
email (Europe): [email protected]
Http:
www.cardin.it
HL
230Vac
Motors
Instruction manual
Series
Model
Date
ZVL254.07
HL
251-2518
10-12-2003
Questo prodotto è stato testato e collaudato nei laboratori della casa costruttrice, la quale ne ha verificato la
perfetta corrispondenza delle caratteristiche con quelle richieste dalla normativa vigente. This product has been
tried and tested in the manufacturer's laboratory who have verified that the product conforms in every aspect to
the safety standards in force. Ce produit a été testé et essayé dans les laboratoires du fabriquant. Pour l'installer
suivre attentivement les instructions fournies. Dieses Produkt wurde in den Werkstätten der Herstellerfirma
auf die perfekte Übereinstimmung ihrer Eigenschaften mit den von den geltenden Normen vorgeschriebenen
getestet und geprüft. Este producto ha sido probado y ensayado en los laboratorios del fabricante, que ha
comprobado la perfecta correspondencia de sus características con las contempladas por la normativa vigente.
AUTOMAZIONE INTERRATA PER CANCELLI A BATTENTE
UNDERGROUND AUTOMATION FOR HINGED GATES
AUTOMATISME enterre POUR PORTAILS BATTANTS
UNTERFLUR-DREHTORANTRIEBE
AUTOMATIZACIÓN ENTERRADA PARA CANCILLAS BATIENTES
230Vac Motors 800/HL251CL
800/HL2518CL
806/HLCF1
806/HLCF18
FRANÇAIS
ATTENTION! Avant de commencer la pose, lire attentivement les instructions!
Type d’installation
Schéma de montage
Dimensions d’encombrement
Contraintes d’utilisation
Exemples de montage
Réglage du fin de course
Schéma électrique (exemple d’installation)
Consignes importantes
Instructions pour l’utilisation
Instructions pour l’installation
Branchement électrique
Déverrouillage manuel
Caractéristiques techniques
ITALIANO
ENGLISH
ENGLISH
ACHTUNG! Bevor mit der Installation begonnen wird,
sollte die Anleitung aufmerksam gelesen werden.
Pagina
Pagina
Pagina
Pagina
Pagina
Pagina
Pagina
Pagina
Pagina
Pagina
Pagina
Pagina
Pagina
Anlagenart
Montageschemen
Aussenabmessungen
Anwendungsgrenzen
Installationsbeispiele
Einstellung des mechanischen Endanschlages
Elektrischer Schaltplan (Anlagenart)
Wichtige Hinweise
Betriebsanleitungen
Installationsanleitungen
Elektrischer Anschluss
Manuelle Entriegelung
Technische Daten
2
3-4
5
5
6
7
8
9
9
9
10
10
20
ZVL254.07 Mod: 27-09-2007
Seite
Seite
Seite
Seite
Seite
Seite
Seite
Seite
Seite
Seite
Seite
Seite
Seite
2
3-4
5
5
6
7
8
15
15
15
16
16
20
ESPAÑOL
ATTENTION! Before installing this device read the
following instructions carefully!
Installation example
Assembly
Overall dimensions
Limits of use
Installation examples
Adjusting the travel limit
Wiring diagram (installation example)
Important remarks
User instructions
Installation instructions
Electrical connection
Manual release mechanism
Technical specifications
2
3-4
5
5
6
7
8
13
13
13
14
14
20
DEUTSCH
ATTENZIONE! Prima di iniziare l'installazione leggere
le istruzioni attentamente!
Impianto tipo
Schemi di montaggio
Dimensioni d’ingombro
Limiti d’impiego
Esempi d’installazione
Regolazione finecorsa
Schema elettrico (impianto tipo)
Avvertenze importanti
Istruzioni per l’uso
Istruzione per l’installazione
Collegamento elettrico
Sblocco manuale
Caratteristiche tecniche
Page
Page
Page
Page
Page
Page
Page
Page
Page
Page
Page
Page
Page
Page
Page
Page
Page
Page
Page
Page
Page
Page
Page
Page
Page
Page
¡ATENCIÓN! Antes de iniciar la instalación del sistema,
leer atentamente las instrucciones.
2
3-4
5
5
6
7
8
11
11
11
12
12
20
Instalación estándar
Esquemas de montaje
Dimensiones máximas
Límites de empleo
Ejemplos de instalación
Regulación del tope mecánico
Esquema eléctrico (instalación estandar)
Advertencias importantes
Instrucciones para el uso
Instrucciones para la instalación
Conexión eléctrica
Desbloqueo manual
Datos técnicos
1
Pàgina
Pàgina
Pàgina
Pàgina
Pàgina
Pàgina
Pàgina
Pàgina
Pàgina
Pàgina
Pàgina
Pàgina
Pàgina
2
3-4
5
5
6
7
8
17
17
17
18
18
20
1
Description : prodotti Technocity (lamp. fotocellule ecc.)
INSTALLAZIONE TIPO HL2524
4
5
8
1
3
7
6
11
LEGENDA
1 Motoriduttore (SX)
2 Motoriduttore (DX)
12
3 Fotocellula interna
4 Fotocellula esterna
5 Lampeggiatore
6 Selettore a chiave
7 Elettroserratura
8 Antenna esterna (Cavo coassiale RG58 Impedenza 50Ω)
9 Interruttore onnipolare con apertura contatti min. 3 mm
10 Cavo alimentazione principale 230 Vac
11 Canalatura per cavo 6 metri 230 Vac
12 Canalatura per collegamenti a bassa tensione
13 Programmatore elettronico
Attenzione: Lo schema rappresentato è puramente indicativo e
viene fornito come base di lavoro al fine di consentire una scelta dei
componenti elettronici Cardin da utilizzare. Detto schema non costituisce pertanto vincolo alcuno per l'esecuzione dell'impianto
2
23
13
10
0V
-50
Hz
9
LEGEND
1 Geared motor (SX - left)
2 Geared motor (DX - right)
3 Internal photocells
4 External photocells
5 Warning lights
6 Mechanical selector switch
7 Electric locking device
8 External antenna (RG58 coaxial cable - impedance 50Ω)
9 All-pole circuit breaker with a minimum of 3 mm between the
contacts
10 Mains cable 230 Vac
11 Channelling for the 6 metre cable 230V
12 Channelling route for low voltage wires
13 Electronic programmer
Attention: The drawing is purely indicative and is supplied as working base from which to choose the Cardin electronic components
making up the installation. This drawing therefore does not lay down
any obligations regarding the execution of the installation.
Zeichenerklärung
1 Getriebemotor (SX - links)
2 Getriebemotor (DX - rechts)
3 Interne Lichtschranke
4 Externe Lichtschranke
5 Blinklicht
6 Schlüsselschalter
7 Elektroverriegelung
8 Antenne (Koaxialkabel RG58 Impedanz 50Ω)
9 Allpoliger Schalter mit Kontaktenabstand von mindestens 3 mm
10 Hauptversorgungskabel 230 Vac
11 Kanalverlauf für 6-Meter-Verbindungskabel 230 Vac
12 Kanalverlauf für Anschluss auf Niederspannung
13 Elektronische Steuereinheit
NOMENCLATURE
1 Motoréducteur (SX - gauche)
2 Motoréducteur (SX - droit)
3 Cellule photoélectrique intérieure
4 Cellule photoélectrique extérieure
5 Clignoteur
6 Sélecteur à clé
7 Serrure électrique
8 Antenne (Câble coaxial RG58 - Impédance 50Ω)
9 Interrupteur omnipolaire avec ouverture des contacts d'au
moins 3 mm.
10 Câble d’alimentation principale 230 Vac
11 Chemin de câble 6 m 230 Vac
12 Chemin pour branchement basse tension
13 Armoire électronique
Attention: le schéma, diffusé à titre purement indicatif, est destiné
à vous aider dans le choix des composants électroniques Cardin
à utiliser. Par conséquent, il n'a aucune valeur obligatoire quant
à la réalisation de l'installation.
LEYENDA
1 Motorreductor (SX - izquierda)
2 Motorreductor (SX - derecha)
3 Fotocélula interior
4 Fotocélula exterior
5 Relampagueador
6 Selector con llave
7 Electrocerradura
8 Antena exterior (Cable coaxial RG58 Impedancia 50Ω)
9 Interruptor omnipolar con apertura entre los contactos de 3 mm.
como mínimo.
10 Cable de alimentación principal 230 Vac
11 Canaleta para cable 6m 230 Vac
12 Canaleta para el conexionado a baja tensión
13 Centralita electrónica
Atención: La pantalla que se muestra es sólo indicativa y se suministra como base de trabajo, con el fin de permitir una elección de los
componentes electrónicos Cardin por utilizar; en consecuencia, dicho
esquema no constituye vínculo alguno para la ejecución del sistema.
Achtung: Bei dem dargestellten Plan handelt es sich nur um ungefähre
Angaben und er wird als Arbeitsgrundlage geliefert, um eine Auswahl der
zu benutzenden elektronischen Komponenten von Cardin zu erlauben. Der
besagte Plan ist daher für die Ausführung der Anlage nicht bindend.
2
All rights reserved. Unauthorised copying or use of the information contained in this document is punishable by law
Drawing number : DI0447
Date :31-08-2006
Product Code : HL2524
Draft : P.J.Heath
ESEMPIO D'INSTALLAZIONE - Installation example - Exemple d'installation - Anlagenart - INSTALACIÓN ESTÁNDAR
All rights reserved. Unauthorised copying or use of the information contained in this document is punishable by law
SCHEMA DI MONTAGGIO motoriduttore - GEARED MOTOR ASSEMBLY - SCHÉMA DE MONTAGE DU motorÉduCtor
MONTAGEschema getriebemotor - ESQUEMA DE MONTAJE motorreductor
800/HL251CL
2
F
P
H
M
L
N
E
AT T E N Z I O N E ! - AT T E N T I O N ! - AT T E N T I O N ! - A C H T U N G ! - ¡ C U I D A D O !
Prima di collocare la cassetta all'interno dello scavo e di avvolgerla di calcestruzzo inserire le 6 viti "E" con testa tonda nelle rispettive sedi quadre ricavate sul fondo della cassetta, come indicato, e fissarle utilizzando dadi e rondelle in dotazione che poi serviranno per il fissaggio del motoriduttore.
Description : Accessori per l'interrato (sphere)
Drawing number : DM378
Before placing the embedding case inside the excavation and covering it with concrete, make sure you have inserted the 6 round-headed screws "E"
Code :square
HL251
intoProduct
their respective
holes on the bottom of the case and fastened them down using the supplied nuts and washers as shown in the drawing.
HL251
P.J.Heath
Draft
Avant
de :placer
le caissonDate
dans :le17-11-98
puits bétonné et de le sceller avec du béton, introduire les 6 vis "E" à tête ronde dans les perforations carrées,
pratiquées
fond du caisson,
comme
indiqué
figure, et les
serrer
fond
en utilisant
les écrous
et les rondelles
fournis en dotation et prévus pour
CARDINau
ELETTRONICA
S.p.A
- 31020
San en
Vendemiano
(TV)
Italy à- via
Raffaello,
36 Tel:
0438/401818
Fax: 0438/401831
bloquer successivement le motoréducteur.
Bevor das Gehäuse in die Aushebung gelegt und mit Beton umgossen wird, müssen die 6 Rundkopf-Schrauben "E" in die entsprechenden Vierkantlöcher im Gehäuseboden wie aufgezeigt eingesetzt und mit den mitgelieferten Muttern und Unterlegscheiben befestigt werden. Diese Schrauben dienen
später für die Befestigung des Getriebemotors.
Antes de colocar la caja dentro de la excavación y rodearla de hormigón, introducir los 6 tornillos "E" con cabeza redonda en los alojamientos cuadrados correspondientes, conseguidos en el fondo de la caja, según lo que está indicado, y fijarlos utilizando las tuercas y arandelas suministradas
que luego servirán para fijar el motorreductor.
3
SCHEMA DI MONTAGGIO motoriduttore - GEARED MOTOR ASSEMBLY - SCHÉMA DE MONTAGE DU motorÉduCtor
MONTAGEschema getriebemotor - ESQUEMA DE MONTAJE motorreductor
All rights reserved. Unauthorised copying or use of the information contained in this document is punishable by law
800/HL2518CL
A
B
3
C
P
S
Q
N
P
R
D
Q
F
G
L
E
Description : Accessori per l'interrata
Drawing
AT T E
N Z Inumber
O N E: DM324
! - AT T E N T
I O N ! - AT T E N T I O N ! - A C H T U N G ! - ¡ C U I D A D O !
HL251
Product Code
: HL251
Prima di collocare
la cassetta
all'interno dello scavo e di avvolgerla
di calcestruzzo inserire le 6 viti "E" con testa tonda nelle rispettive sedi quadre rica: 30-11-98
vate sul fondo
cassetta,Date
come
indicato, e fissarle utilizzando dadi e rondelle in dotazione che poi serviranno per il fissaggio del motoriduttore.
P.J.Heath
Draft :della
CARDIN ELETTRONICA S.p.A - 31020 San Vendemiano (TV) Italy - via Raffaello, 36 Tel: 0438/401818 Fax: 0438/401831
Before placing the embedding case inside the excavation and covering it with concrete, make sure you have inserted the 6 round-headed screws "E"
into their respective square holes on the bottom of the case and fastened them down using the supplied nuts and washers as shown in the drawing.
Avant de placer le caisson dans le puits bétonné et de le sceller avec du béton, introduire les 6 vis "E" à tête ronde dans les perforations carrées,
pratiquées au fond du caisson, comme indiqué en figure, et les serrer à fond en utilisant les écrous et les rondelles fournis en dotation et prévus pour
bloquer successivement le motoréducteur.
Bevor das Gehäuse in die Aushebung gelegt und mit Beton umgossen wird, müssen die 6 Rundkopf-Schrauben "E" in die entsprechenden Vierkantlöcher im Gehäuseboden wie aufgezeigt eingesetzt und mit den mitgelieferten Muttern und Unterlegscheiben befestigt werden. Diese Schrauben dienen
später für die Befestigung des Getriebemotors.
Antes de colocar la caja dentro de la excavación y rodearla de hormigón, introducir los 6 tornillos "E" con cabeza redonda en los alojamientos cuadrados correspondientes, conseguidos en el fondo de la caja, según lo que está indicado, y fijarlos utilizando las tuercas y arandelas suministradas
que luego servirán para fijar el motorreductor.
4
Dimensioni d’ingombro - External dimensions - Dimensions d’encombrement
AuSSenabmessungen - DIMENSIONES MAXIMAS
64
366
4
43
12
55
100
159
59
55
25
All rights reserved. Unauthorised copying or use of the information contained in this document is punishable by law
401
332
LIMITI D’IMPIEGO - limits of use - CONTRAINTES D'UTILISATION - ANWENDUNGSGRENZEN - LIMITES DE EMPLEO
5
1
1
SCALA:
Description : Prodotti Technocity
Drawing number : DI0104
Dimensioni d'ingombro
Product Code : HL
Draft : P.J.Heath
Date : 19-11-98
CARDIN ELETTRONICA S.p.A - 31020 San Vendemiano (TV) Italy - via Raffaello, 36 Tel: 0438/401818 Fax: 0438/401831
1
140
140
1
180
180
SCALA:
5
ESEMPIO D’INSTALLAZIONE - INSTALLATION EXAMPLE - EXEMPLE D'INSTALLATION
INSTALLATIONS BEISPEIL - EJEMPLO DE INSTALACIÓN
6
D
64mm
All rights reserved. Unauthorised copying
or use of the information contained in this document is punishable by law
F
G
3mm
I
B
C
E
A
SCALA:
332
332
Description : Prodotti Technocity
Drawing number : DI0106
Scavo per cassa di fondazione
Product Code : HL
Draft : P.J.Heath
Date : 19-11-98
401
401
CARDIN ELETTRONICA S.p.A - 31020 San Vendemiano (TV) Italy - via Raffaello, 36 Tel: 0438/401818 Fax: 0438/401831
3
64
159
100
59
64
6
MONTAGGIO DISPOSITIVO 180° - ASSEMBLING THE 180° DEVICE - MONTAGE DU DISPOSITIF 180°
MONTAGE VORRICHTUNG 180° - MONTAJE DISPOSITIVO 180°
7
Pos. 0°
Pos. 180°
Z
W
x
REGOLAZIONE FINECORSA MECCANICI - ADJUSTING THE MECHANICAL TRAVEL LIMITS - RÉGLAGE DES FINS DE COURSE
MÉCANIQUES - EINSTELLUNG DES MECHANISCHEN ENDANSCHLAGES - REGULACIÓN TOPES MECANICOS
R
ved. Unauthorised copying or use of the information
contained
in Unauthorised
this documentcopying
is punishable
law information contained 8
All rights
reserved.
or use by
of the
in this doc
T
M
N
Drawing number : DM325
Product Code : HL251
S
Draft : P.J.Heath
Description : Accessori per l'interrata (FIG.2)
HL251
T
Date : 08-01-98
CARDIN ELETTRONICA S.p.A - 31020 San Vendemiano (TV) Italy - via Raffaello, 36 Tel: 0438/401818 Fax: 0438/401831
SBLOCCO MANUALE - MANUAL RELEASE MECHANISM - DÉVERROUILLAGE MANUEL
MANUELLE ENTRIEGELUNG - DESBLOQUEO MANUAL
9
Q
O
J
H
SCALA:
Drawing number :
7
Description : Prodotti Technocity
SCHEMA ELETTRICO IMPIANTO TIPO - STANDARD WIRING DIAGRAM - SCHÉMA ÉLECTRIQUE DE L'EXEMPLE
All rights
reserved. Unauthorised
copyingSCHALTPLAN
or use of the information
contained
in this ELECTRICO
document is INSTALACIÓN
punishable by law
D'INSTALLATION
- ELEKTRISCHER
ANLAGENART
- ESQUEMA
ESTANDAR
10
13
C
LC
230V~
LP
230V~
PONTICELLI
NC
19
NC
20
FCC_2
FCA_2
FCC_1
NC
18
NC
21
22
ELS
LINE
230V~
28
29
30
31
32
33
34
35
N
F
36
37
38
OUT
24V3W 12V15W 24V
23
24
25
26
40
17
COMUNE
NA
16
COMUNE
C
15
LS
M1
C
39
FCA_1
27
OUT CH2
M2
14
CHIUSURA
12
COMUNE
11
APERTURA
NC
NC
10
CHIUSURA
NC
9
FTC_S
8
FTC_I
7
NA
6
COMUNE
NA
5
COMUNE
NA
4
PRG811
COMUNE
3
TB
LD8
APERTURA
2
TD
COMUNE
NA
1
TC
COMUNE
TAL TA
ANTENNA
COMUNE
CSER
LD1 LD2 LD3 LD4 LD5 LD6 LD7
41
PONTICELLI
1
3
2
3
24V 12V
CHIUSURA
APERTURA
2
COMUNE
1
4
5
0
NA
x-SELL
C
2
1
3
1
2
2
0 12V 24V
NA
NC
C1(10µF)
1
6
C
x-CELL Tx
xLSE01-1
x-LAMP
NC
C2 (10µF)
x-CELL Rx
M1
M2
1
2
3
3
2
1
Drawing number : DI0112
Description : Programmatore a microcontrollore per 1-2 motori
Product Code : BL
COLLEGAMENTO SERIE HL
Date : 25-11-98
P.J.Heath
Draft :Terra
di protezione
Earth wire
Terre de protection
Sicherheitserdung
CARDIN ELETTRONICA S.p.A - 31020 San Vendemiano (TV) Italy - via Raffaello, 36 Tel: 0438/401818 Fax: 0438/401831
Tierra
2
Grigio - Comune
Grey - Common
Gris - Commun
Grau - Gemeinsam
Gris - Común
3 Marrone - Apre
Brown - Open
Marron - Ouvre
Braun - Öffnen
Marrón - Apertura
1 Nero - Chiude
Black - Close
Noir - Ferme
Schwarz - Schließen
Negro - Cierre
1 Nero - Apre
Black - Open
Noir - Ouvre
Schwarz - Öffnen
Negro - Apertura
3 Marrone - Chiude
Brown - Close
Marron - Ferme
Braun - Schließen
Marrón - Cierre
M1
M2
8
Avvertenze importanti
Avvertenze importanti
Avvertenze importanti
PER RIDURRE IL RISCHIO DI FERITE GRAVI O MORTE, LEGGERE ATTENTAMENTE LE SEGUENTI
AVVERTENZE PRIMA DI PROCEDERE ALL’INSTALLAZIONE. PRESTARE PARTICOLARE ATTENZIONE A TUTTE LE SEGNALAZIONI
DISPOSTE NEL TESTO. IL MANCATO RISPETTO DI
QUESTE POTREBBE COMPROMETTERE IL BUON FUNZIONAMENTO DEL SISTEMA.
Descrizione tecnica
800/HL251CL Motoriduttore irreversibile, apertura anta max 110°.
806/HLCF1Z Cassa di fondazione in acciaio zincato con leve per apertura
anta max 110°
806/HLCF1
Cassa di fondazione in acciaio zincato con trattamento a
cataforesi e leve per apertura anta max 110°
800/HL2518CL Motoriduttore irreversibile, apertura anta 180°-360°
806/HLCF18Z Cassa di fondazione in acciaio zincato con accessori per
apertura anta 180°-360°
806/HLCF18
Cassa di fondazione in acciaio zincato con con trattamento
a cataforesi ed accessori per apertura anta 180°-360°
806/HLCA140 Kit leva accessoria per apertura a 140°
• Monoblocco motoriduttore;
- Motore monofase con protezione termica incorporata e riduttore irreversibile
montato su cassa in pressofusione di alluminio con lubrificazione a grasso
fluido permanente.
- Guarnizioni in gomma a tenuta d'olio;
- Sblocco manuale a chiave.
• Cassetta da interrare in acciaio pressopiegato, zincato a caldo;
- Scatola sblocco in alluminio pressofuso.
• Leve di trasmissione in acciaio zincato;
- Staffa di fissaggio cancello in acciaio zincato.
• Il presente manuale si rivolge a persone abilitate all'installazione di
"APPARECCHI UTILIZZATORI DI ENERGIA ELETTRICA" e richiede
una buona conoscenza della tecnica, esercitata in forma professionale
e della normativa vigente. I materiali usati devono essere certificati
e risultare idonei alle condizioni ambientali di installazione.
• Le operazioni di manutenzione devono essere eseguite da personale
qualificato. Prima di eseguire qualsiasi operazione di pulizia o di
manutenzione, disinserire l'apparecchiatura dalla rete di alimentazione
elettrica.
• Le apparecchiature qui descritte dovranno essere destinate solo
all'uso per il quale sono state espressamente concepite:
"La motorizzazione di cancelli a battente ad una o due ante".
Il dispositivo è destinato alla motorizzazione di cancelli e portoni con
ante battenti fino a 3 m max con le seguenti caratteristiche:
- peso massimo per anta 2-3 m = 550 kg
- peso massimo per anta meno di 2 m = 700 kg
• L'applicazione è possibile sia a sx che a dx della luce passaggio.
• Questo prodotto è stato progettato e fabbricato in tutte le sue parti
a cura della Cardin Elettronica la quale ne ha verificato la perfetta
corrispondenza delle caratteristiche con quelle richieste dalla normativa vigente.
ISTRUZIONI PER L'INSTALLAZIONE
L'utilizzo dei prodotti e la loro destinazione ad usi diversi da quelli
previsti e/o consigliati, non è stata sperimentata dal costruttore,
pertanto i lavori eseguiti sono sotto la completa responsabilità dell'installatore.
I comandi minimi che possono essere installati sono APERTURA-STOPCHIUSURA, tali comandi devono essere posti in un luogo non accessibile
a bambini o minori e fuori dal raggio d’azione del cancello.
Prima di procedere all'esecuzione dell'impianto verificare che la struttura da
automatizzare sia in perfetta efficienza nelle sue parti fisse e mobili e realizzata
in conformità alla normativa vigente. A tal fine accertarsi della sufficiente
rigidità del telo cancello (se necessario intervenire con rinforzi sulla struttura) e
del buon funzionamento dei perni (si consiglia comunque di lubrificare tutte le
parti in movimento usando lubrificanti che mantengano uguali caratteristiche
di attrito nel tempo e adatti a funzionare tra -20 e +70°C).
L'uso dell'automazione non è idoneo all'azionamento in continuo, bensì
deve essere contenuto entro il valore riportato in tabella (vedi caratteristiche
tecniche pagina 20).
Il costruttore non risponde qualora l'impianto elettrico non risulti
conforme alle norme vigenti ed in particolare qualora il circuito di
protezione (terra) non sia efficiente.
CONSIDERAZIONI GENERALI DI SICUREZZA
È responsabilità dell’installatore verificare le seguenti condizioni di sicurezza:
1)L’installazione deve essere sufficientemente lontana dalla strada in
modo da non costituire pericolo per la circolazione.
• Controllare i franchi di sicurezza tra parti fisse e parti mobili:
- lasciare uno spazio di 30 mm minimo tra il cancello ed il pilastro di
supporto per tutta l’altezza e per tutto l’arco di apertura del cancello;
- assicurarsi che lo spazio tra il cancello ed il pavimento non superi mai
30 mm per tutto l’arco di apertura del cancello.
• La superficie delle ante non deve presentare aperture tali da permettere
il passaggio della mano o del piede di persone.
• Controllare l'esatto posizionamento di perni e cerniere, il loro buono stato
di mantenimento e lubrificazione (è importante che la cerniera superiore
e quella inferiore siano a piombo tra loro).
• Prevedere il percorso dei cavi secondo le necessità di applicazione dei
dispositivi di comando e sicurezza (vedi impianto tipo fig.1 pag.2).
• Controllare che l’operatore sia proporzionato alle dimensioni del cancello
e alla frequenza d’uso (intermittenza di lavoro, pag. 20).
2)L’operatore deve essere installato all’interno della proprietà ed il
cancello non deve aprirsi verso l’area pubblica.
3)Il cancello motorizzato é principalmente adibito al passaggio di vetture.
Dove possibile installare per pedoni un ingresso separato.
4)I comandi devono essere posti in vista, ma non entro il raggio d’azione
del cancello. Inoltre quelli installati all’esterno devono essere protetti
da una sicurezza tale da prevenire l’uso non autorizzato.
5)È buona norma segnalare l’automazione con targhe di avvertenza
(simili a quella in figura) che devono essere facilmente visibili. Qualora
l’automazione sia adibita al solo passaggio di veicoli dovranno essere
poste due targhe di avvertenza di divieto di transito pedonale (una
all’interno, una all’esterno).
6)Rendere consapevole l’utente che bambini o animali domestici non
devono giocare o sostare nei pressi del cancello. Se necessario
indicarlo in targa.
Procedura di montaggio
- Scegliere la posizione della cassetta da interrare in base alla posizione
del perno d'incernieramento del cancello rispetto al pilastro e al tipo di
apertura (90°-110°-180°) da realizzare (fig. 5).
- Sistemare una battuta di arresto meccanico in chiusura.
- Eseguire uno scavo di fondazione "A" (fig. 6) nella posizione prescelta in
base alla dimensione della cassetta e prevedere uno scarico per l'acqua
piovana utilizzando il foro "B".
- Prevedere il percorso della canalatura per i cavi di collegamento elettrico
utilizzando il foro "C".
- Inserire le sei viti con testa tonda "E" nelle rispettive sedi quadre ricavate
sul fondo della cassetta e bloccarle utilizzando le rondelle e i dadi previsti
per il successivo bloccaggio del motoriduttore.
7)Qualora l’anta completamente aperta vada ad avvicinarsi ad una
struttura fissa lasciando uno spazio di almeno
500 mm, tale spazio deve essere protetto con
ATTENZIONE
una costa sensibile antischiacciamento.
8)La bontà della connessione di terra dell’apparecchiatura è fondamentale ai fini della sicurezza
elettrica.
9)Per qualsiasi dubbio a riguardo della sicurezza
dell’installazione, non procedere ma rivolgersi al
distributore del prodotto.
APERTURA AUTOMATICA
NON AVVICINARSI
NON PERMETTERE A BAMBINI O AD
ANIMALI DOMESTICI DI SOSTARE NEL
RAGGIO D'AZIONE DEL CANCELLO
9
- Collocare la cassetta all'interno dello scavo con il perno perpendicolare
rispetto al cardine superiore "D" e avvolgerla di calcestruzzo, curare la
messa in bolla e la corretta posizione del bordo superiore che dovrà
sporgere di 3 mm dal livello terra.
- Togliere i dadi e le rondelle utilizzati per bloccare i bulloni a testa tonda sul
fondo della cassetta.
- Inserire il motoriduttore nella cassetta e fissarlo a quattro dei sei perni
filettati "E" premontati sul fondo della stessa.
- Fissare il piatto superiore "F" completo di sblocco all'anta del cancello
con saldatura robusta, calcolando che il perno "G" della leva stessa deve
risultare in asse col cardine superiore "D".
- Quindi, a seconda del modello, procedere come segue:
COLLEGAMENTO ELETTRICO (fig. 10)
Assicurarsi prima di allacciare l’apparecchiatura che la tensione e la frequenza
di rete corrisponda ai valori riportati nella targhetta caratteristiche.
• L’apparecchiatura funziona con tensione monofase 230V 50Hz (vedi
schema elettrico)
• Il motoriduttore deve essere collegato ad un efficace impianto di messa
a terra, pertanto utilizzare il morsetto contrassegnato con il simbolo
che si trova sulla scatola riduttore.
• Non utilizzare cavo con conduttori in alluminio; non stagnare l’estremità dei
cavi da inserire in morsettiera; utilizzare cavo adatto ad essere interrato.
• Il motoriduttore è provvisto di cavo di alimentazione lungo 6 m, prevedere
se necessario una scatola di derivazione esterna per i collegamenti elettrici
(pos.4 fig.1), non sono ammessi collegamenti interrati.
• Mod. 800/HL251CL con cassa 806/HLCF1
- Posizionare la leva cancello "H" (fig. 2). sul perno della cassetta dopo
aver ingrassato il perno stesso e inserire all'interno della leva la sfera di
articolazione "L".
- Montare l'anta inserendo il perno della leva "F" nella rispettiva sede della
leva cancello "H" (fig. 2). dopo aver ingrassato le parti e fissare il cardine
superiore "D" (fig 6).
- Montare la biella di trasmissione "M" (fig. 2) tra la leva "N" del motoriduttore
e la leva "H" del cancello avendo cura di ingrassare bene i perni.
- Portare lentamente l'anta ad allinearsi con la leva cancello "H" (fig. 9)
in modo che il meccanismo di sblocco "O" vada ad impegnarsi con lo
scrocco della leva cancello "H". L’aggancio è automatico e non richiede
l’uso della chiave.
- Chiudere il coperchio "P" (fig. 2) con le due viti in dotazione.
Tra la centralina di comando e la rete deve essere interposto un
interruttore onnipolare con distanza di apertura tra i contatti di
almeno 3 mm.
• Collegare tra le fasi 1 e 3 del motoriduttore (fig. 10) il condensatore fornito
di serie (10µF).
IMPORTANTE! Il motoriduttore è sprovvisto di limitatore di coppia,
pertanto utilizzare una centralina a limitazione della coppia impostando una spinta massima in punta d'anta pari a 150 N.
REGOLAZIONE COPPIA MOTORE (vedi programmatore)
Per la realizzazione dell'impianto si consiglia di utilizzare programmatori
Cardin provvisti di regolazione della coppia.
I programmatori Cardin, ottimizzano il buon funzionamento della "macchina"
(portone motorizzato), garantendo allo spunto (inizio della manovra, apertura
- chiusura) sempre la coppia massima erogabile.
Durante tutta la manovra il programmatore garantisce al sistema la coppia
selezionata dall'installatore sull'apparecchiatura. La selezione dei diversi
valori viene operata in base alla dimensione, al peso dell'anta e a diverse
variabili ambientali valutate in loco.
Si ricorda che la normativa vigente richiede tassativamente una coppia
adeguatamente regolata sull'impianto in funzione.
Una coppia regolata correttamente garantisce la massima sicurezza e allunga
la vita di tutti gli organi meccanici.
REGOLAZIONE FINE CORSA MECCANICO
(solo per mod. 800/HL251CL con cassa 806/HLCF1 - fig. 8)
Il finecorsa meccanico regolabile previsto tra la leva "N" del motoriduttore e la
sporgenza "R" interna alla cassetta deve essere utilizzato al fine di non caricare
eccessivamente l'anta in chiusura e di permettere un regolare funzionamento
del meccanismo di sblocco. Per la regolazione procedere come segue:
- Portare l'anta "S" in battuta contro il fermo meccanico cancello e staccare
istantaneamente l'alimentazione al motore.
- Far fuoriuscire la vite "T" dalla leva "N" fino a portarla in battuta contro il
fermo "R" in questo modo la biella "M" mantiene chiuso il cancello senza
esercitare sforzi eccessivi su di esso.
- Utilizzare la vite e dado "T" in dotazione per effettuare un fermo meccanico
regolabile in apertura.
SBLOCCO MANUALE (fig. 9)
• Mod. 800/HL2518CL con cassa 806/HLCF18
- Togliere la squadretta "L" (fig. 3) dalla sua posizione.
- Inserire la leva "A" nel relativo perno della cassetta con un po’ di grasso
e quindi la sfera "G" all’interno.
- Applicare la piastra tendicatena "F" alla parte superiore del motoriduttore
con le viti in dotazione. - Dopo aver messo un anello seeger inferiore "Q" inserire i piatti tendicatena
"N" con pignone "D" e anelli distanziali "R" nel relativo perno delle piastra
"F" e fissare con un seeger superiore.
- Montare le due viti di registro "P", con dado di bloccaggio, nei rispettivi
fori M5 dei piatti "N" .
- Montare anche l’altro pignone "D" con relativo perno "S" e anelli distanziali
"R" nel foro asolato, facendo entrare le viti "P" nelle relative sedi del perno "S".
- Montare la catena "B" facendo aderire una sua estremità in posizione
"Z" (fig. 7) ai denti della corona della leva "A" (fig. 3). Leva cancello "A" in
posizione 0° (fig. 7).
- Ruotare la leva di 180°, in tal modo l’estremità posizione "Z" della catena
verrà trascinata in posizione "W" così da poter essere collegata all’altra
estremità tramite la maglia di giunzione "C" (fig. 3).
- Tendere la catena agendo sulle viti di registro. Per eseguire tale operazione si consiglia di portare l’anta in battuta meccanica nella posizione di
0° azionando il motoriduttore, così facendo si mette in tiro il lato "X" e si
scarica il lato "W" (fig. 7) della catena e sarà facilitato l’azzeramento dei
giochi. Serrare bene i dadi di bloccaggio "P" (fig. 3).
- Riposizionare la squadretta "L" nella sua posizione iniziale.
- È buona norma ingrassare catena e perni periodicamente.
- Portare lentamente l'anta ad allinearsi con la leva cancello "H" (fig. 9)
in modo che il meccanismo di sblocco "O" vada ad impegnarsi con lo
scrocco della leva cancello "H". L’aggancio è automatico e non richiede
l’uso della chiave.
- Chiudere il coperchio "P" (fig. 3) con le due viti in dotazione.
L'operazione di sblocco va fatta solamente a motore fermo, per mancanza
di energia elettrica. Munirsi della chiave in dotazione all’apparecchiatura.
Essa deve essere conservata in luogo di facile reperimento.
Per sbloccare l’anta
- Spostare lo sportellino "Q" (fig. 9) copriserratura.
- Inserire la chiave e ruotare di mezzo giro (180°), lo sgancio sarà
immediato.Tale operazione rende l’anta folle rispetto al meccanismo e
quindi libera di ruotare manualmente.
- Aprire l’anta esercitando una leggera spinta.
Per ribloccare l’anta
- Portare lentamente l’anta ad allinearsi con la leva cancello "H" in modo
che il meccanismo di sblocco "O" vada ad impegnarsi con lo scrocco
della leva cancello "H". Il riaggancio è automatico e non richiede l’uso
della chiave.
- È anche possibile fare ripartire il motoriduttore, il quale si andrà a riagganciare automaticamente all’anta.
ISTRUZIONI PER L'USO
Durante la manovra si deve controllare il movimento del cancello e azionare
il dispositivo di arresto immediato (STOP) in caso di pericolo.
In caso di emergenza il cancello può essere sbloccato manualmente utilizzando l'apposita chiave di sblocco in dotazione (vedi sblocco manuale).
Controllare periodicamente lo stato di usura dei perni ed eventualmente
ingrassare le parti in moto, usando lubrificanti che mantengano uguali
caratteristiche di attrito nel tempo e adatti a funzionare tra -20 e +70°C (in
particolare la leva sblocco che è munita di apposito ingrassatore "J" fig. 9). In
caso di guasto o anomalie di funzionamento staccare l'alimentazione elettrica
a monte dell'apparecchiatura e chiamare l'assistenza tecnica.
Verificare periodicamente il funzionamento delle sicurezze (fotocellule ecc.)
Le eventuali riparazioni devono essere eseguite da personale specializzato
usando materiali originali e certificati.
10
IMPORTANT REMARKS IMPORTANT REMARKS
IMPORTANT REMARKS
TO REDUCE THE RISK OF SEVERE INJURY OR DEATH READ THE FOLLOWING REMARKS CAREFULLY BEFORE
PROCEEDING WITH THE INSTALLATION. PAY PARTICULAR ATTENTION TO ALL THE PARAGRAPHS MARKED
WITH THE SYMBOL
. NOT READING THESE IMPORTANT INSTRUCTIONS COULD COMPROMISE THE CORRECT WORKING ORDER OF THE SYSTEM.
Technical description
800/HL251CL Reversible geared motor, maximum opening 110°.
806/HLCF1
Embedding case in zinc plated steel with cataphoresis
finishing and a transmission lever for 110°.
806/HLCF1Z Embedding case in zinc plated steel with transmission
lever for 110°.
800/HL2518CL Reversible geared motor, gate opening 118°-360°.
806/HLCF18
Embedding case in zinc-plated steel with cataphoresis
finishing and accessories for gate opening 110°-360°.
806/HLCF18Z Embedding case in zinc-plated steel with accessories for
gate opening 110°-360°.
806/HLCA140 Kit of lever accessories for a 140° opening angle.
• Single piece geared reduction unit;
- Single phase drive motor with an incorporated overload protector and a
permanently lubricated reversible reduction unit mounted on a cast iron
stator.
- Rubber sealing gasket;
- Key operated manual release mechanism.
• Embedding case in hot rolled zinc-plated steel;
- Release unit housing in pressed aluminium.
• Transmission levers in zinc-plated steel;
- Gate fastening bracket in zinc-plated steel.
• These instructions are aimed at professionally qualified "INSTALLERS
OF ELECTRICAL EQUIPMENT" and must respect the local standards
and regulations in force. All materials used must be approved and
must suit the environment in which the installation is situated.
• All maintenance operations must be carried out by professionally
qualified technicians. Before carrying out any cleaning or maintenance
operations make sure the power is disconnected at the mains.
• This appliance must be used exclusively for the purpose for which
it has been made. "i.e. for the automation of one or two hinged
gates".
The appliance may be used to operate hinged gates and doors, with gate
leaves up to 3 m in length and the following characteristics:
- maximum weight for 2-3 m long gates = 550 kg
- maximum weight for gates less than 2 m long = 700 kg
• The unit may be fitted both to the right and to the left of the passageway.
• This product and all its relative components has been designed and
manufactured by Cardin Elettronica who have verified that the product
conforms in every aspect to the safety standards in force.
Any non authorised modifications are to be considered improper and
therefore dangerous.
USER INSTRUCTIONS
The manufacturer accepts no liability for situations arising from the
use of an electrical installation which does not conform to the local
standards and regulations in force and in particular when the earthing
circuit is not efficient.
The minimum controls which may be installed are OPEN-STOP-CLOSE, these
controls must be installed in a location not accessible to children. Before
starting with the installation of the system check that the structure which is
to be automated is in good working order and respects the local standards
and regulations in force.
To this end make sure that the gate is sufficiently rigid (if necessary reinforce
the structure) and that the hinges turn easily.
You are advised to grease all the moving parts using lubricants which maintain
unaltered friction characteristics over a period of time and are suitable for
temperatures of -20 to +70°C.
The appliance is not suitable for continuous operation and must be contained
within the value stipullated (see technical data on page 20).
IMPORTANT SAFETY INSTRUCTIONS
It is the responsibility of the installer to make sure that the following
public safety conditions are satisfied:
1)Ensure that the gate operating installation is far enough away from
the main road to eliminate possible traffic disruptions.
• Check the safety measures between the fixed and moving parts:
- a minimum space of 30 mm must always be left along the entire distance
between the gate and the support column measured throughout the
entire opening angle of the gate.
- make sure that the space between the bottom of the gate and the
pavement never exceeds 30 mm throughout the entire opening angle
of the gate.
• The surface of the gate must not feature openings which allow a person’s
hand or foot to pass through.
• Check the exact positioning of the pivots and hinges, and their good
working order (the upper and lower hinges/pivots must be aligned on the
same axis).
• Work out the run of the cables according to the command and control
devices fitted and make sure the system conforms to the local standard
and regulations in force (see installation example fig.1 pag. 2).
• Check that the appliance is suitable for the size, weight and duty cycle of
the gate to which it is to be applied (see duty cycle on page 20).
2)The operator must be installed on the inside of the property and not
on the public side of the gate. The gates must not swing outwards
onto a public area.
3)The gate operator is designed for use on gates through which vehicles
are passing. Pedestrians should use a separate entrance.
4)The gate must be in full view when it is operating therefore controls
must be situated in a position where the operator can see the gate
at all times.
5)At least two warning signs (similar to the example on the right) should
be placed, where they can be easily seen by the public, in the area of
the system of automatic operation. One inside the property and one
on the public side of the installation.
These signs must be indelible and not hidden by any objects (such
as tree branches, decorative fencing etc.).
6)Make sure that the end-user is aware that children and/or pets must
not be allowed to play within the area of a gate installation. If possible
include this in the warning signs.
7)Whenever a fully open gate leaf comes within at least 500 mm of a
fixed structure the space must be protected by
an anticrush buffer.
WARNING
AUTOMATIC OPENING
8)A correct earth connection is fundamental in kEEP CLEAR
order to guarantee the electrical safety of the
machine
9)If you have any questions about the safety of the
gate operating system, do not install the operator.
Contact your dealer for assistance.
FITTING THE UNIT
- Choose the ideal position for the foundation case according to the opening
angle (90°-110°-180° fig. 5) and the position of the gate pivot.
- Place a mechanical travel buffer in the closing direction.
- Dig the foundation hole "A" (fig. 6) sufficiently large to house the foundation
case and run a drain channel up to the hole "B".
- Run the channelling for the cables up to the hole "C".
- Insert the six round headed screws "E" into the holes on the bottom of
the case and fasten down using the supplied nuts and washers.
CHILDREN OR PETS MUST NOT
BE ALLOWED TO PLAY ON OR
NEAR THE INSTALLATION
11
- Place the foundation case in the hole with the pin perpendicular to the
upper gate pivot "D", cover the case in concrete and check that it is in
square and that the upper edge protrudes by at lkeast 3 mm from the
ground.
- Remove the nuts and washers used to fasten down the round headed
bolts in the embedding case.
- Insert the motor reduction unit and fasten down using four of the six
threaded bolts "E" located underneath the motor.
Weld the upper bar "F" complete with release mechanism to the gate
remembering that the pin "G" of the lever must be in line with the upper
gate pivot "D" (fig. 5).
- At this point proceed according to your model as follows:
ELECTRICAL CONNECTION (fig. 10)
Before connecting the appliance make sure that the voltage and frequency
rated on the data plate conform to those of the mains supply.
• The appliance works off a single phase 230V 50Hz power supply (see
wiring diagram).
• The geared motor must be earthed, to this end use the binding post marked
which can be found on the geared motor.
• Do not use cables with aluminium conductors; do not solder the ends of
cables which are to be inserted into the binding posts; use cables which
are suitable for embedding.
• The motor is fitted with a standard 6m long cable which may require
external shunt boxes (pos. 4 fig.1) for the electrical connection. The cable
must never be embedded.
• Mod. 800/HL251CL with embedding case 806/HLCF1
- Position the gate lever "H" (fig. 2) on the case pin after having first greased
the pin and then insert the ball bearing "L" inside the lever.
- Mount the gate leaf by inserting the pin of the lever "F" into its housing on
the gate lever "H" (fig. 2) after having first greased the moving parts and
then position the upper hinge "D" (fig. 6).
- Mount the transmission rod "M" (fig. 2) between the motor reduction lever
"N" and the gate lever "H" after having first greased the moving parts.
- Align the gate leaf slowly with the gate lever "H" (fig. 9) so that the manual
release mechanism "O" slots into the seat in the gate lever "H". The connection between the two parts is automatic and does not require the use
of the key.
- Fit the cover "P" (fig. 2). using the two supplied screws.
An all pale circuit breaker with a minimum of 3 mm between the
contacts must be installed between the electronic programmer and
the mains supply.
• Connect the supplied capacitor (10µF) between the live wires 1 and 3 of
the geared motor (fig. 10).
IMPORTANT! The geared motor is not fitted with a torque limiter.
Only use an electronic programmer which has a torque limiter with
maximum force at the head of the gate equal to 150N (local standards
and regulations in force).
SETTING THE MOTOR TORQUE (see electronic programmer)
MECHANICAL TRAVEL LIMIT ADJUSTMENT (Mod. 800/HL251CL with
embedding case 806/HLCF1- fig. 8)
When carrying out the installation you are advised to use a Cardin
electronic programmer fitted with a torque limiter.
The Cardin programmers optimise the correct working order of the "machine"
(motorised gates/doors) and guarantee full power maximum thrust at the start
of the opening/closing manoeuvre).
The programmer also guarantees that the effective torque fed to the system
will be that selected by the operator in the electronic programmer. The choice
of settings depends on the weight and size of the gate leaf/door and the
different environmental conditions on-site.
You are reminded that the standards and regulations in force unequivocally require that the torque be set to a level suitable for the system.
Correctly choosing the torque will guarantee maximum security and long life
for the mechanical components.
The adjustable travel limit placed between the lever "N" of the geared motor
and the outcrop "R" inside the case is used to avoid excessively overloading
the gate in the closing direction and to allow the regular operation of the gate.
To adjust the mechanism proceed as follows:
- Move the gate leaf "S" until it rests up against the the mechanical gate
block and then switch off the power supply.
- Turn the screw "T" of the lever all "N" until it rests up tight against the
block "R" in this way the transmission rod "M" will keep the gate closed
without forcing it.
- Use the supplied nut and screw "T" to enable a manual mechanical travel
limit for the opening direction.
• Mod. 800/HL2518CL with embedding case 806/HLCF18
MANUAL RELEASE MECHANISM (fig. 9)
- Remove the bracket "L" (fig. 3).
- Insert the the lever "A" into the pin on the embedding case, grease the
components and then insert the ball bearing "G".
- Fit the chain tightener plate to the upper side of the geared motor using
the supplied screws.
- Fit the chain tightener brackets "N", with the pinion "D" and spacer washers "R", onto the pin on the plate "F" and tighten down using the upper
Seeger washer, after having inserted the lower Seeger washer "Q".
- Fit the 2 adjustment screws "P", along with their lock nuts, into the M5
holes on the brackets "N".
- Mount the other pinion "D", retaining pin "S" and spacer washers "R" into
the oval slot and allows the screws "P" to enter into the seats on the pin "S".
- Mount the chain "B" wrapping one of the ends "Z" (fig. 7) around the cog
of the lever "A" (fig. 3). The gate lever "A" must be in position 0° (fig. 7).
- Rotate the lever through 180° so the the end of the chain "Z" (fig. 7) is
dragged to the position "W" it can then be joined to the other end using
the chain joint "C" (fig. 3).
- Tighten the chain by adjusting the setting screws "P". To carry out this
operation you are advised to move the gate to the completely closed
position "0°" by activating the geared motor. This will put the side "X" (fig.
7) under tension and relax side "W" (fig. 7) thus allowing you to adjust the
play more easily. Tighten down the lock nuts "P" (fig. 3).
- Replace the bracket "L" in its original position.
- Grease the chain and retaining pins regularly.
- Align the gate leaf slowly with the gate lever "H" (fig. 9) so that the manual
release mechanism "O" slots into the seat in the gate lever "H". The connection between the two parts is automatic and does not require the use
of the key.
- Fit the cover "P" (fig 3). using the two supplied screws.
Releasing the gate should only be carried out when the motor has stopped
because of blackouts. To release the gate use the key supplied with the
appliance. It should be stored in an easily accessible place.
To release the gate
- Open the sliding key cover "Q" (fig. 9).
- Insert the key and rotate it half a turn (180°), the lock will release itself
immediately. This will release the geared motor and free the gate which
can then be opened by pushing lightly on the gate.
To block the gate
- Align the gate leaf slowly with the gate lever "H" (fig. 9) so that the manual
release mechanism "O" slots into the seat in the gate lever "H". The connection between the two parts is automatic and does not require the use
of the key.
- It is also possible to restart the geared motor which will automatically hook
up to the gate.
INSTALLATION INSTRUCTIONS
During the opening/closing manoeuvre check for correct operation and
activate the emergency stop button in case of danger.
During blackouts the gate can be released and manually manoeuvred using
the supplied release key (see manual release).
Periodically check the moving parts for wear and tear and grease if required,
using lubricants which maintain their friction levels unaltered throughout time
and are suitable for temperatures of -20 to +70°C (in particular the release
lever which is fitted with a greaser "J" fig. 9). In case of failure or operational
anomalies switch off the power at the mains do not attempt to repair the
appliance yourself. Periodically check the correct operation of all safety
devices (photoelectric cells etc.) Eventual repair work must be carried out
by specialised personnel using original spare parts.
12
CONSigneS IMPORTANTeS! CONSigneS IMPORTANTeS!
CONSigneS IMPORTANTeS!
POUR RÉDUIRE LES RISQUES DE BLESSURES GRAVES OU DE MORT, LIRE ATTENTIVEMENT
LES CONSIGNES SUIVANTES AVANT DE PROCÉDER À LA POSE. PRÊTER GRANDE ATTENTION
À TOUTES LES SIGNALISATIONS
qui se trouvent dans le texte. LE NON RESPECT
DE CES CONSIGNES POURRAIT COMPROMETTRE LE BON FONCTIONNEMENT DU SYSTÈME.
Description technique
800/HL251CL Motoréducteur irréversible, ouverture de vantail 110° maxi.
806/HLCF1 Caisson de fondation en acier galvanisé traité par cataphorèse
avec leviers pour une ouverture de vantail 110° maxi.
806/HLCF1Z Caisson de fondation en acier galvanisé avec leviers pour
une ouverture de vantail 110° maxi.
800/HL2518CLMotoréducteur irréversible, ouverture de vantail 180°-360°
806/HLCF18 Caisson de fondation en acier galvanisé traité par cataphorèse
avec accessoires pour ouverture de vantail 180°-360°.
806/HLCF18Z Caisson de fondation en acier galvanisé avec accessoires
pour ouverture de vantail 180°-360°.
806/HLCA140 Kit levier accessoire pour ouverture à 140°
• Monobloc motoréducteur;
- Moteur monophasé avec protection thermique intégrée et réducteur
irréversible sous caisson en aluminium moulé sous pression, lubrification
permanente par graisse fluide.
- Joints d’étanchéité à l’huile, en caoutchouc;
- Déverrouillage manuel à clé.
• Caisson à placer sous terre, en acier plié et galvanisé à chaud;
- Boîtier de déverrouillage en aluminium moulé sous pression.
• Leviers de transmission en acier galvanisé;
- Étrier en acier galvanisé pour la fixation du portail.
• Ce livret est destiné à des personnes titulaires d'un certificat d'aptitude
professionnelle pour l'installation des "appareils électriques"
et requiert une bonne connaissance de la technique appliquée professionnellement, ainsi que des normes en vigueur. Les matériels utilisés
doivent être certifiés et être adaptés aux conditions atmosphériques du
lieu d'implantation.
• Les travaux de maintenance ne doivent être effectués que par un personnel qualifié. Avant une quelconque opération de nettoyage ou de
maintenance, mettre l'appareil hors tension.
• Les appareils décrits dans ce livret ne doivent être destinés qu’à l’utilisation pour laquelle ils ont été expressément conçus à savoir: "La
motorisation de portails battants à un ou deux vantaux".
Le dispositif est indiqué pour la motorisation de portes et portails battants
de 3m maxi. par vantail avec les caractéristiques suivantes:
- poids maximal par vantail 2-3 m = 550 kg
- poids maximal par vantail moins de 2 m = 700 kg.
• Tous les modèles sont applicables aussi bien à droite qu’à gauche du
passage.
• Ce produit a été étudié et construit entièrement par la Sté Cardin Elettronica qui a pris soin de vérifier la conformité de ses caractéristiques avec
les exigences des normes en vigueur.
INSTRUCTIONS POUR L’INSTALLATION
Une diverse utilisation des produits ou leur destination à un usage
différent de celui prévu et/ou conseillé n'a pas été expérimentée par le
Constructeur. Par conséquent, les travaux effectués sont entièrement
sous la responsabilité de l'installateur.
L’organe de commande minimum requis est une boîte à boutons OUVERTURE-STOP-FERMETURE; celle-ci devra être installée impérativement hors
de portée de mineurs, notamment des enfants, et hors du rayon d’action
du portail. Avant de réaliser l’installation, s’assurer de l’efficacité des parties
fixes et mobiles de la structure à automatiser et de la conformité de celle-ci
aux normes en vigueur. Dans cet objectif, s’assurer de la rigidité du tablier
du portail (si nécessaire renforcer la structure) et du bon fonctionnement
des pivots (il est conseillé de graisser toutes les parties mobiles avec un
lubrifiant qui maintient au fil des années les caractéristiques de friction et qui
est adapté à des températures oscillant entre -20° et +70°C).
L’automatisme n’est pas adapté à une activation continue; mais il doit être
limité à la valeur indiquée sur le tableau (voir caractéristiques techniques
page 20).
Le Constructeur décline toute responsabilité en cas d'installation électrique non conforme aux normes en vigueur, notamment en cas de circuit
de protection (mise à terre) inefficace.
CONSIGNES GÉNÉRALES DE SÉCURITÉ
Il appartient à l’installateur de vérifier les conditions de sécurité ci-dessous:
• Contrôler les espaces de sécurité entre les parties fixes et mobiles:
- laisser un espace de 30 mm au moins entre le vantail et le pilier de support
sur toute la hauteur et sur tout l’arc d’ouverture du portail;
- contrôler que l’espace entre le portail et le sol ne soit jamais supérieur à
30 mm sur tout l’arc d’ouverture du portail.
• Sur la surface des vantaux il ne doit pas y avoir d’ouvertures qui permettent
le passage de la main ou du pied.
• Contrôler l’emplacement correct des pivots et des gonds, leur bon état et
leur lubrification (le gond du haut et celui du bas doivent être parfaitement
alignés).
• Prévoir le parcours des câbles en fonction des dispositifs de commande et
de sécurité imposés par les normes en vigueur (voir exemple d’installation
fig.1 page 2).
• Contrôler que l’opérateur soit adapté aux dimensions du portail et à la
fréquence d’utilisation (intermittence de travail, page 20).
1)L’installation doit se trouver suffisamment loin de la route pour ne pas
constituer de risque pour la circulation;
2)L’opérateur doit être installé à l’intérieur de la propriété et le portail ne
doit pas s’ouvrir sur le domaine public;
3)Le portail automatisé est affecté principalement au passage de véhicules.
Si possible, prévoir une entrée séparée pour les piétons;
4)Les organes de commande doivent être placés de façon qu’ils soient
bien en vue et hors du rayon d’action du portail. En outre, ceux placés à
l’extérieur doivent être protégés contre les actes de vandalisme;
5)Il est conseillé de signaler l’automatisation du portail par des panneaux
de signalisation (comme celui indiqué en figure) placés bien en vue. Dans
l’hypothèse où l’automatisme serait affecté exclusivement au passage
de véhicules, il faudra prévoir deux panneaux d’interdiction de passage
aux piétons (l’un à l’intérieur et l’autre à l’extérieur);
NOTICE DE MONTAGE
- Suivant la position du pivot de ferrure du portail par rapport au pilier et au
type d’ouverture (90°-110°-180°) prévu (fig. 5), déterminer l’endroit pour
enterrer le caisson.
- Installer une butée d’arrêt mécanique en fermeture.
- Réaliser un puits bétonné "A" (fig. 6), à l’endroit prédéterminé, en fonction
de la dimension du caisson. Prévoir une canalisation pour l’évacuation des
eaux pluviales à travers le trou "B".
- Prévoir le passage de la conduite pour les câbles de branchement électrique par le trou "C".
- Introduire les six vis "E" à tête ronde dans les perforations carrées, pratiquées au fond du caisson, comme indiqué en figure, et les serrer à fond
en utilisant les écrous et les rondelles prévus pour bloquer successivement
le motoréducteur.
6)Faire prendre conscience à l’utilisateur du fait que les enfants et les
animaux domestiques ne doivent pas jouer ou stationner à proximité du
portail. Si nécessaire, l’indiquer sur le panneau;
7) Si le vantail, une fois qu’il est complètement ouvert, se trouve très proche
d’une structure fixe, laisser un espace de au moins
500 mm dans la zone d’action du bras articulé; tel
ATTENTION
FERMETURE AUTOMATISÉE
espace devra être protégé par un bord de sécurité
NE PAS S'APPROCHER
anti-coincement.
8) Pour garantir la sécurité électrique, il est impératif
de brancher l’appareil à la prise de terre.
9) En cas d’un quelconque doute sur la sécurité de
l’installation, interrompre la pose et contacter le
distributeur du matériel.
NE PAS PERMETTRE AUx ENFANTS ET AUx
ANIMAUx DOMESTIQUES DE STATIONNER
DANS LE RAYON D'ACTION DU PORTAIL
13
- Placer le caisson dans le puits bétonné, en veillant à ce que le pivot soit
placé perpendiculairement au gond supérieur "D", et le sceller avec du
béton. Contrôler qu’il soit mis à niveau et que le bord supérieur soit en
saillie de 3 mm par rapport au sol.
- Enlever les écrous et les rondelles qui ont servi à bloquer les boulons à
tête ronde sur le fond du caisson.
- Placer le motoréducteur dans le caisson et le fixer à l’aide de quatre des
six goujons "E" prémontés sur le fond du caisson.
- Fixer le méplat supérieur "F", doté du système de déverrouillage du vantail,
en le soudant soigneusement. Veiller à ce que le pivot "G" du levier même
et le gond supérieur "D" soient sur le même axe.
- Ensuite, en fonction du modèle, procéder de la façon suivante:
BRANCHEMENT ÉLECTRIQUE (fig. 10)
Avant de procéder au branchement électrique, contrôler que la tension et
la fréquence du réseau d’alimentation correspondent aux données de la
plaquette signalétique.
• L’appareil fonctionne à une tension monophasée 230V 50 Hz (voir schéma
électrique).
• Le motoréducteur doit être branché à une installation efficace de mise
à terre. Utiliser impérativement la borne marquée du symbole qui se
trouve sur le boîtier du bornier.
• Ne pas utiliser de câble avec conducteurs en aluminium; ne pas étamer
l’extrémité des fils à brancher sur le bornier. Utiliser un câble adapté à être
placé sous terre.
- Le motoréducteur est muni d’un câble d’alimentation d’une longueur de
6 m. Prévoir, au besoin, une boîte de dérivation extérieure (pos. 4, fig. 1).
Les raccordements sous terre ne sont pas admis.
• Mod.800/HL251CL avec caisson 806/HLCF1
- Placer le levier du portail "H" (fig. 2) sur le pivot du caisson, après avoir
graissé ce dernier. Introduire la bille d’articulation "L" dans le levier.
- Monter le vantail en engageant le pivot du levier "F" dans le logement
relatif du levier "H" du portail (fig. 2), après avoir graissé les composants,
et fixer le gond supérieur "D" (fig. 6).
- Monter la bielle de transmission "M" (fig. 2) entre le levier "N" du motoréducteur et le levier "H" du portail après avoir bien graissé les pivots.
- Placer lentement le vantail au niveau du levier "H" du portail (fig. 9) de
façon à mettre en prise le mécanisme de déverrouillage "O" dans le cran
du levier "H" du portail. L’accouplement s’effectue automatiquement sans
qu’il soit besoin d’utiliser la clé.
- Fermer le capot "P" (fig. 2) à l’aide des deux vis fournies en dotation.
Il est impératif d’installer entre l’armoire de commande et le réseau
un interrupteur omnipolaire ayant une distance d’ouverture des
contacts d’au moins 3 mm.
• Brancher entre les phases 1 et 3 du motoréducteur (fig. 10) le condensateur
fourni en standard (10µF).
IMPORTANT ! Considéré que le motoréducteur est dépourvu de
limiteur de couple, utiliser une armoire à limitation électronique du
couple avec poussée maximum en bout de vantail de l’ordre de
150N (normes de sécurité en vigueur).
RÉGLAGE DU FIN DE COURSE MÉCANIQUE (uniquement pour mod.
800/HL251CL avec caisson 806/HLCF1 - fig. 8)
Le fin de course mécanique réglable, prévu entre le levier "N" du motoréducteur et la partie en saillie "R" à l’intérieur du caisson, doit être utilisé pour
ne pas soumettre le vantail à une contrainte excessive en fermeture et pour
permettre un bon fonctionnement du mécanisme de déverrouillage.
RÉGLAGE DU COUPLE MOTEUR (voir programmateur)
Pour réaliser l’installation, il est conseillé d’utiliser un des programmateurs Cardin dotés de réglage du couple.
Les programmateurs Cardin optimisent le fonctionnement de la «machine»
(porte motorisée) en garantissant toujours, au lancement (début des manœuvres d’ouverture et de fermeture), le couple maximum. Pendant toute la
manœuvre, le programmateur garantit, au système, le couple sélectionné
par l’installateur sur l’appareil. La sélection des différentes valeurs devra être
effectuée selon la dimension et le poids du vantail, ainsi qu’en fonction des
conditions environnementales à évaluer sur place.
Gardez à l’esprit que les normes en vigueur imposent que le couple soit
réglé d’une façon adéquate selon la spécificité de l’installation.
Un couple réglé adéquatement confère une sécurité maximum et augmente
la durée de vie de tous les organes mécaniques.
Pour le régler, procéder de la façon suivante:
- placer le vantail "S" en contact avec la butée mécanique du portail et
mettre immédiatement le moteur hors tension;
- faire sortir la vis "T" du levier "N" jusqu’à ce qu’elle soit en contact avec
l’arrêt "R". De cette façon, la bielle "M" tient le portail fermé sans exercer
une contrainte excessive sur celui-ci;
- utiliser la vis et l’écrou "T", fournis en dotation, pour réaliser en ouverture
un arrêt mécanique réglable.
DÉVERROUILLAGE MANUEL (fig. 9)
• Mod. 800/HL2518CL avec caisson 806/HLCF18
- Enlever l’équerre "L" (fig. 3) de sa place.
- Introduire le levier "A" dans le relatif pivot du caisson, avec un peu de
graisse, et ensuite la bille "G".
- Monter la plaque tendeuse de chaîne "F" sur la partie haute du motoréducteur au moyen des vis fournies en dotation.
- Après y avoir posé un anneau seeger "Q", placer les méplats tendeurs
de chaîne "N" avec le pignon "D" et les anneaux d’espacement "R" sur
le pivot de la plaque "F" et bloquer au moyen d’un autre anneau seeger.
- Monter les deux vis de réglage "P", au moyen d’un écrou de serrage, à
travers les trous M5 des méplats "N".
- Monter également l’autre pignon "D" avec le pivot "S" et les anneaux
d’espacement "R" dans le trou oblong, en faisant pénétrer les vis "P"
dans les relatifs trous du pivot "S".
- Monter la chaîne "B" en plaçant une de ses extrémités en position "Z" (fig.
7) côte à côte avec la denture de la couronne du levier "A" (fig. 3). Levier
"A" du portail en position 0° (fig. 7).
- Tourner le levier de 180°, l’extrémité en position "Z" de la chaîne sera alors
entraînée jusqu’en position "W" de façon à pouvoir être raccordée à l’autre
extrémité au moyen du maillon de jonction "C" (fig. 3).
- Tendre la chaîne en intervenant sur les vis de réglage.
Pour effectuer cette opération, il est conseillé de placer le vantail au contact
de la butée dans la position de 0° en actionnant le motoréducteur; ce qui
permettra d’avoir le côté "X" de la chaîne tendu et le côté "W" relâché
(fig. 9); l’élimination des jeux en sera facilitée. Serrer à fond les écrous de
serrage "P" (fig. 3).
- Remettre à sa position première l’équerre "L".
- Il est conseillé de graisser régulièrement la chaîne et les pivots.
- Placer lentement le vantail au niveau du levier "H" du portail (fig. 9) de
façon à mettre en prise le mécanisme de déverrouillage "O" dans le cran
du levier "H" du portail. L’accouplement s’effectue automatiquement sans
qu’il soit besoin d’utiliser la clé.
- Fermer le capot "P" (fig. 3) à l’aide des deux vis fournies en dotation.
Le déverrouillage se fait seulement avec moteur arrêté par suite d’une
coupure de courant. Pour déverrouiller le vantail du portail, se servir de la
clé fournie en dotation avec l’appareil. Celle-ci doit être gardée à un endroit
aisément accessible.
Pour déverrouiller le vantail
- Coulisser le cache "Q" de la serrure.
- Introduire la clé et la tourner d’un demi-tour (180°); le désaccouplement
est immédiat. Cette opération permet de débrayer le système afin de
manœuvrer manuellement le vantail.
- Ouvrir le vantail en le poussant légèrement avec la main.
Pour verrouiller de nouveau le vantail
- Placer lentement le vantail au niveau du levier "H" du portail de façon à
mettre en prise le mécanisme de déverrouillage "O" dans le cran du levier
"H" du portail. L’accouplement s’effectue automatiquement sans qu’il soit
besoin d’utiliser la clé.
- Il est également possible de redémarrer le motoréducteur qui s’accrochera
automatiquement au vantail.
INSTRUCTIONS POUR L’UTILISATION
Durant la manœuvre, contrôler le mouvement du portail et actionner, en cas
de danger, le dispositif d’arrêt d’urgence (STOP).
En cas de coupure de courant, le portail peut être déverrouillé manuellement
au moyen de la clé de déverrouillage expressément conçue à cet effet et fournie en dotation (voir déverrouillage manuel). Contrôler régulièrement le degré
d’usure des pivots et graisser éventuellement les parties mobiles en veillant
à utiliser un lubrifiant qui maintient au fil des années les caractéristiques de
friction et qui est adapté à des températures oscillant entre -20° et +70°C (en
particulier le levier de déverrouillage qui est muni d’une nipple de graissage
"J" fig. 9). En cas de panne ou de mauvais fonctionnement, mettre l’appareil
immédiatement hors tension et contacter le service d’assistance technique.
Contrôler régulièrement le fonctionnement des dispositifs de sécurité (cellules
photoélectriques, etc ...). Les éventuelles réparations devront être effectuées
par un personnel spécialisé qui devra prendre soin de monter exclusivement
des pièces détachées d’origine et certifiées.
14
WICHTIGE HINWEISE
WICHTIGE HINWEISE
WICHTIGE HINWEISE
ZUR VERRINGERUNG DER VERLETZUNGS- ODER TODESGEFAHR SOLLTEN DIE NACHSTEHENDEN
HINWEISE VOR DER INSTALLATION AUFMERKSAM GELESEN WERDEN. BESONDERE AUFMERKSAMKEIT SOLLTE ALLEN IM TEXT BEFINDLICHEN HINWEISEN
GESCHENKT WERDEN. DEREN
NICHTBEACHTUNG KÖNNTE DEN ORDENTLICHEN BETRIEB DES SYSTEMS BEEINTRÄCHTIGEN.
TECHNISCHE BESCHREIBUNG
800/HL251CL Selbstverriegelnder Getriebemotor, maximale Flügelöffnungswinkel 110°.
806/HLCF1
Versenkbares Grundgehäuse aus verzinktem Stahl mit Kataphoreselackierung und Hebeln für maximale Flügelöffnung 110°.
806/HLCF1Z Versenkbares Grundgehäuse aus verzinktem Stahl mit Hebeln
für maximale Flügelöffnung 110°.
800/HL2518CL Selbstverriegelnder Getriebemotor, Flügelöffnungswinkel 180°360°.
806/HLCF18 Versenkbares Grundgehäuse aus verzinktem Stahl mit Kataphoreselackierung und Zubehörteilen für Flügelöffnungswinkel
von 180°-360°.
806/HLCF18Z Versenkbares Grundgehäuse aus verzinktem Stahl mit Zubehörteilen für Flügelöffnungswinkel von 180°-360°.
806/HLCA140 Zusatzhebelbausatz für eine Öffnung auf 140°.
• Getriebemotorblock;
- Einphasenmotor mit eingebautem Überhitzungsschutz und selbsthemmender
Untersetzungsgetriebe in Druckgussaluminiumgehäuse mit Flüssigfettdauerschmierung;
- Öldichte Gummidichtungen;
- Manuelle Entriegelung mit Schlüssel.
• Versenkbares Gehäuse aus druckgebogenem, heissverzinktem Stahl;
- Entriegelungsgehäuse aus Aluminiumpressguss.
• Übertragungshebel aus verzinktem Stahl;
- Torbefestigungsbügel aus verzinktem Stahl.
• Das vorliegende Handbuch wendet sich an Personen, die zur Installation von
"ELEKTROGERÄTEN" befähigt sind und setzt gute technische Kenntnisse
und die Kenntnis der geltenden Vorschriften voraus. Die verwendeten Materialien müssen zertifiziert sein und für die Umweltbedingungen der Installation
geeignet sein.
• Die Wartungsarbeiten müssen von qualifiziertem Fachpersonal ausgeführt
werden. Bevor irgendwelche Säuberungs- oder Wartungsarbeiten ausgeführt
werden, ist die Apparatur vom Stromnetz zu trennen.
• Die hier beschriebenen Geräte dürfen nur für die Verwendung eingesetzt
werden, für die sie ausdrücklich konzipiert wurden, d.h. "Die Bewegung von
Drehtoren mit einem oder zwei Flügeln".
Die Vorrichtung ist für den Antrieb von Toren und Türen mit Torflügeln von bis
zu max. 3 m mit den nachstehenden Eigenschaften bestimmt:
- max. Gewicht von Torflügeln 2-3 m = 550 kg.
- max. Gewicht von Torflügeln geringer als 2 m = 700 kg.
• Die Vorrichtung kann sowohl auf der linken als auch auf der rechten Seite der
Durchfahrt befestigt werden:
• Dieses Produkt wurde in allen seinen Teilen von der Cardin Elettronica entwickelt
und hergestellt und von ihr bezüglich dessen perfekte Übereinstimmung mit
den geltenden Bestimmungen überprüft.
Die Anwendung und Nutzung der Produkte zu einem anderen Zweck, als es
vorgesehen und/oder geraten wurde, ist nicht vom Hersteller erprobt worden.
Die Installationsarbeiten erfolgen daher unter der vollständigen Verantwortung
des Installateurs.
INSTALLATIONSANLEITUNGEN
Die Minimalbefehle, die installiert werden können, sind OFFNEN-STOP-SCHLIESSEN. Diese Befehle müssen von einer Stelle ausführbar sein, die sich außerhalb
des Aktionsradiuses des Tores befindet und für Kinder und Minderjährige unzugänglich ist. Vor der Installation ist zu überprüfen, dass die zu automatisierende
Einrichtung in ihren festen und beweglichen Teilen einwandfrei funktioniert und
entsprechend den geltenden Richtlinien ausgeführt wurde.
Anschließend ist die ausreichende Robustheit des Torrahmens (falls notwendig
die Struktur verstärken) und die gute Funktionsweise der Bolzen (es ist ratsam
alle beweglichen Teile mit Schmiermitteln zu schmieren, die die Reibungseigenschaften über die Zeit gleichhalten und für einen Temperaturbereich von -20°C
bis +70°C geeignet sind) sicherzustellen. Die Automatisierung ist nicht für den
Dauerbetrieb geeignet. Die Gebrauchsfrequenz muss sich nach den verschiedenen Modellen richten (siehe technische Eigenschaften Seite 20).
• Die Sicherheitsfreiräume zwischen den festen und beweglichen Teilen kontrollieren:
- auf der gesamten Höhe und Öffnungsweite der Tores einen Freiraum von
min. 30 mm zwischen dem Tor und dem Torpfeiler lassen;
- sich vergewissern, dass der Raum zwischen Tor und Boden auf der gesamten Öffnungsweite der Tores niemals mehr als 30 mm beträgt.
• Die Torflügelflächen sollten keine offenen Stellen aufweisen, die den Durchlass
von Händen oder Füßen gestatten.
• Die exakte Positionierung der Bolzen und Scharniere, deren guten Erhaltungsgrad und Schmierung (es ist wichtig, dass das obere und untere Scharnier
lotrecht zueinander stehen) kontrollieren.
• Den Kabelverlauf gemäß den Installationserfordernissen der Steuer- und
Sicherheitsvorrichtungen gemäß den Sicherheitsnormen (siehe Anlagenart
Abb. 1, S. 2) vorbereiten.
• Sicherstellen, dass der Antrieb der Torgrösse und der Gebrauchsfrequenz
(Einschaltdauer Seite 20) proportional ist.
Der Hersteller lehnt jegliche Verantwortung ab, wenn die elektrische Anlage
nicht den geltenden Richtlinien entspricht und insbesondere wenn der Schutzkreislauf (Erdung) nicht leistungsfähig ist.
EINIGE BETRACHTUNGEN ZUR SICHERHEIT
Es unterliegt der Verantwortung des Installateurs, die nachstehenden Sicherheitsbedingungen zu überprüfen:
1) Die Installation sollte einen ausreichenden Abstand von der Strasse haben,
so dass sie keine Gefahr für den Strassenverkehr darstellt.
2) Der Antrieb muss innerhalb des Privatgeländes installiert und das Tor darf
nicht in Richtung öffentlichen Eigentums geöffnet werden.
3) Die Torautomatisierung ist prinzipiell für die Durchfahrt von Autos konzipiert
worden. Wenn möglich sollte für die Fußgänger ein eigener Eingang geschaffen
werden.
4) Die Bedienungsschalter sollten gut sichtbar aber außerhalb des Aktionsradiuses des Tores installiert werden. Desweiteren sollten die aussen installierten
Bedienungsschalter durch eine Schutzvorrichtung vor unzulässiger Bedienung
geschützt werden.
5) Es ist wichtig die Automatisierung durch gut sichtbare Hinweisschilder (wie in
der Abbildung angezeigt) kenntlich zu machen. Falls die Automatisierung nur
für die Durchfahrt von Autos vorgesehen ist, müssen zwei Schilder mit dem
Hinweis auf Durchgangsverbot für Fußgänger intern und extern angebracht
werden.
6) Der Benutzer sollte sich bewusst sein, dass Kinder oder Haustiere nicht am
Tor spielen oder verweilen dürfen. Falls nötig sollte dies auf dem Hinweisschild
angezeigt werden.
7) Falls der Torflügel sich bei seiner vollständigen Öffnung einer festen Struktur
nähert, muss ein Freiraum von mindestens 500 mm im Arbeitsbereich des
Torflügels gelassen werden. Dieser Raum muss von
einer Sicherheitsleiste zum Schutz vor Quetschungen
ACHTUNG
geschützt werden.
AUTOMATISCHE ÖFFNUNG
8) Die Güte des Erdungsanschlusses der Apparatur ist ABSTAND HALTEN
fundamental für die Sicherheit der Elektrik.
9) Bei irgendwelchen Zweifeln bezüglich der Sicherheit
bei der Installation, die Arbeit einstellen und sich an
den Vertrieb der Produkte wenden.
MONTAGEVERFAHREN
- Position des zu versenkenden Gehäuses an Hand der Position des Torverbindungsbolzens gegenüber dem Pfeiler und dem zu erstellenden Öffnungswinkel (90°-110°-180°) wählen (Abb. 5).
- Mechanischen Endanschlag für die Schließung erstellen.
- Aushebung "A" (Abb. 6) für das Gehäuse an der ausgewählten Stelle ausführen und einen Abfluss für das Regenwasser unter Verwendung des Loches
"B" vorsehen.
- Den Verlauf für die Kabelführung des Stromversorgungskabels unter Verwendung des Loches "C" vorsehen.
- Sechs Rundkopf-Schrauben "E" in die entsprechenden Vierkantlöcher im
Gehäuseboden einsetzen und die für die spätere Anbringung des Getriebemotors vorgesehenen Muttern und Unterlegscheiben aufschrauben.
kINDER ODER HAUSTIERE
DÜRFEN SICH NICHT IN REICH
-WEITE DES TORES AUFHALTEN
15
- Gehäuse in die Aushebung einlegen, wobei der Bolzen rechtwinklig zur oberen
Torangel "D" stehen muss. Mit Flüssigbeton eingießen, wobei darauf zu
achten ist, das es waagerecht ist und der obere Rand sich in der korrekten
Position befindet und 3 mm über den Erdboden hinausragt.
- Muttern und Unterlegscheiben, die zur Blockierung der Rundkopf-Schrauben
am Gehäuseboden verwendet wurden, entfernen.
- Getriebemotor in das Gehäuse einsetzen und mit vier der sechs auf dem
Gehäuseboden vormontierten Schraubenbolzen "E" befestigen.
- Oberen Flachstab "F" komplett mit Entriegelung an den Torflügel robust
anschweißen, wobei beachtet werden muss, dass der Bolzen "G" des Hebels
sich auf der gleichen Achse mit der oberen Torangel "D" befinden muss.
- Nun je nach Modell in der folgenden Weise verfahren:
ELEKTRISCHER ANSCHLUSS (Abb. 10)
Vor dem Anschluss der Apparatur überprüfen, ob die Stromspannung und
entsprechende Frequenz mit den auf dem Geräteschild angegebenen Werten
übereinstimmt.
• Die Apparatur funktioniert mit Einphasenstrom 230V 50Hz (siehe elektrischer
Schaltplan).
• Der Getriebemotor muss an ein effizientes Erdungssystem angeschlossen
werden. Zum Anschluss ist die Klemme mit dem Erdungssymbol auf dem
Klemmenkasten zu verwenden.
• Keine Kabel mit Aluminiumleiter verwenden; die in die Anschlussklemmleiste
einzuführenden Kabelenden nicht verzinnen; Unterirdisch verlegbares Kabel
verwenden.
• Der Getriebemotor ist mit einem 6 m langen Stromversorgungskabel ausgestattet. Falls notwendig eine Verteilerdose extern anbringen (Pos. 4 Abb. 1)
Unterirdische Anschlüsse sind nicht zulässig.
• Mod. 800/HL251CL mit Gehäuse 806/HLCF1
- Den Hebel "H" des Tores (Abb. 2) auf den Bolzen des Gehäuses positionieren, nachdem der Bolzen geschmiert und die Gelenkkugel "L" in den Hebel
eingesetzt worden ist.
- Torflügel montieren, indem der Bolzen des Hebels "F" in den entsprechenden
Sitz des Torhebels "H" (Abb. 2) eingesetzt wird, nachdem die Komponenten
geschmiert worden sind. Nun die obere Torangel "D" (Abb. 6) befestigen.
- Das Antriebspleuel "M" (Abb. 2) zwischen dem Hebel "N" des Getriebemotors
und dem Hebel "H" des Tores montieren, wobei darauf geachtet werden muss,
dass die Bolzen gut geschmiert sein müssen.
- Den Torflügel langsam mit dem Torhebel "H" (Abb. 9) ausrichten, so dass der
Entriegelungsmechanismus "O" von der Klinke des Torhebels "H" erfasst
wird. Das Einrasten ist automatisch und benötigt nicht die Verwendung des
Schlüssels.
- Deckel "P" (Abb. 2) mit den beiden mitgelieferten Schrauben schließen.
Zwischen der Steuereinheit und dem Stromnetz muss ein allpoliger
Schalter mit einem Öffnungsabstand zwischen den Kontakten von
mindestens 3 mm zwischengeschaltet werden.
• Den serienmäßig mitgelieferten Kondensator (10 µF) zwischen Phase 1 und 3
des Getriebemotors anschließen (Abb. 10).
WICHTIG! Der Getriebemotor besitzt keinen Drehmomentbegrenzer,
deshalb ist eine Steuereinheit zur Drehmomentbegrenzung mit einem
maximalem Schub am Torflügelende von
gleich 150 N (gemäß den Sicherheitsnormen) zu verwenden.
REGELUNG DES MOTORENDREHMOMENTES (siehe Steuerung)
Es ist ratsam für die Erstellung der Anlage Cardin-Steuerungen mit Drehmomentregelung zu verwenden.
Die Cardin-Steuerungen optimieren den Betrieb der "Maschine" (motorisierte
Tore), indem sie für den Anlauf (bei Beginn des Öffnens und Schließens) immer
das höchste lieferbare Drehmoment gewährleisten. Die Steuerung gewährleistet
dem System während der gesamten Betätigung das vom Installateur auf der
Apparatur eingestellte Drehmoment. Die Wahl der unterschiedlichen Werte sollte
anhand des Torflügelmaßes und -gewichtes und der verschiedenen vor Ort zu
beurteilenden Umweltwerte getroffen werden.
Es wird daran erinnert, dass die geltenden Bestimmungen strikt ein für die
Anlage angemessen eingestelltes Drehmoment vorschreiben.
Ein korrekt eingestelltes Drehmoment gewährleistet die höchste Sicherheit und
verlängert die Lebenszeit aller mechanischen Organe.
EINSTELLUNG DES MECHANISCHEN ENDANSCHLAGES (nur für Mod.
800/HL251CL mit Gehäuse 806/HLCF1 Abb. 8)
Der vorgesehene einstellbare mechanische Endanschlag zwischen dem Hebel
"N" des Getriebemotors und der im Gehäuse befindlichen Ausladung "R" dient
zur Verhinderung einer übermäßigen Belastung des Torflügels beim Schließen und
ermöglicht das ordentliche Funktionieren des Entriegelungsmechanismuses.
Zur Einstellung in der folgenden Weise verfahren:
- Den Torflügel "S" bis zum mechanischen Endanschlag des Tores bringen und
sofort die Stromversorgung des Motors unterbrechen.
- Die Schraube "T" aus dem Hebel "N" heraustreten lassen, bis diese gegen
die Ausladung "R" zum Anschlag kommt. In dieser Weise hält das Pleuel "M"
das Tor geschlossen ohne übermäßige Kraft darauf auszuüben.
- Die mitgelieferte Schraube und Mutter "T" verwenden, um die einstellbare
mechanische Sperre bei der Öffnung zu erstellen.
MANUELLE ENTRIEGELUNG (Abb. 9)
• Mod. 800/HL2518CL mit Gehäuse 806/HLCF18
- Das Winkelstück "L" (Abb. 3) aus seiner Position entfernen.
- Den Hebel "A" auf den Bolzen des Gehäuses mit ein wenig Fett setzen und
dann die Kugel "G" einsetzen.
- Die Kettenspannplatte "F" auf dem oberen Teil des Getriebemotors mit den
mitgelieferten Schrauben anbringen.
- Nachdem der untere Seegerring "Q" eingesetzt wurde, die Kettenspannflachstäbe "N" mit dem Ritzel "D" und den Distanzringen "R" auf den Bolzen der
Platte "F" setzen und mit dem oberen Seegerring befestigen.
- Die zwei Einstellschrauben "P" mit der Feststellmutter in den entsprechenden
M5-Löchern der Flachstäbe "N" montieren.
- Auch das andere Ritzel "D" mit dem entsprechenden Bolzen "S" und den
Distanzringen "R" auf das Langloch montieren und die Schrauben "P" in die
entsprechenden Sitze des Bolzens "S" einführen.
- Die Kette "B" so montieren, dass ein Kettenende in der Position "Z" (Abb. 7)
an den Zähnen des Kranzes des Hebels "A" anliegt (Abb. 3). Der Torhebel "A"
muss in Position 0° (Abb. 7) stehen.
- Den Hebel um 180° drehen. In dieser Weise wird das Kettenende von der Position "Z" in die Position "W" gebracht, so dass es mit dem anderen Kettenende
durch das Kettenglied "C" (Abb. 3) verbunden werden kann.
- Die Kette mit den Einstellschrauben spannen. Für das Spannen der Kette
ist es ratsam, den Torflügel durch Betätigung des Getriebemotors bis zum
mechanischen Endanschlag in die Position 0° bringen. Auf diese Weise wird
die Kettenseite "X" angespannt und die Seite "W" (Abb. 9) entlastet. Dies
erleichtert das Ausspannen eines eventuellen Kettenspiels. Die Feststellmuttern
"P" (Abb. 3) gut anziehen.
- Das Winkelstück "L" wieder in seine ursprüngliche Position einsetzen.
- Die Kette und die Bolzen sind regelmäßig zu schmieren.
- Den Torflügel langsam mit dem Torhebel "H" (Abb. 9) ausrichten, so dass der
Entriegelungsmechanismus "O" von der Klinke des Torhebels "H" erfasst
wird. Das Einrasten ist automatisch und benötigt nicht die Verwendung des
Schlüssels.
- Deckel "P" (Abb. 3) mit den beiden mitgelieferten Schrauben schließen.
Die Entriegelung darf nur bei wegen Stromausfall stillstehendem Motor ausgeführt werden.
Zur Entriegelung des Torflügels muss der zur Ausstattung gehörende Schlüssel
verwendet werden. Er ist an einem leicht zugänglichen Ort aufzubewahren.
Entriegelung
- Die Schlossverdeckung "Q" (Abb. 9) verschieben.
- Schlüssel einführen und um eine halbe Drehung (180°) drehen. Die Entriegelung
erfolgt sofort. Diese Handlung macht den Torflügel frei von der Mechanik und
er kann nun frei von Hand bewegt werden.
- Den Torflügel durch leichte Druckausübung öffnen.
Verriegelung
- Den Torflügel mit dem Torhebel "H" ausrichten, so dass der Entriegelungsmechanismus "O" von der Klinke des Torhebels "H" erfasst wird. Das Einrasten
ist automatisch und benötigt nicht die Verwendung des Schlüssels.
- Es kann auch der Getriebemotor wieder angeschaltet werden, der sich dann
wieder automatisch an den Torflügel ankuppelt.
BETRIEBSANLEITUNGEN
Während der Betätigung ist die Torbewegung zu beobachten. Bei Gefahr muss
die Notstopvorrichtung (STOP) betätigt werden.
Bei Notfälle kann das Tor manuell mit einem speziellen Entriegelungsschlüssel, der
mit zur Ausstattung gehört, entriegelt werden (siehe manuelle Entriegelung ). Periodische Kontrolle des Verschleissgrades der Bolzen und eventuelle Schmierung
der beweglichen Teile mit Schmiermitteln, die die Reibungseigenschaften über die
Zeit gleichhalten und für einen Temperaturbereich von -20°C bis +70°C geeignet
sind (insbesondere der Freistellhebel, der mit einem eigenen Schmiernippel "J"
(Abb. 9) ausgestattet ist). Im Falle von Störungen oder Unregelmäßigkeiten beim
Betrieb ist die Stromversorgung vor dem Einlass in die Apparatur zu unterbrechen
und der technische Kundendienst zu rufen.
Die Funktionstüchtigkeit der Sicherheitsvorrichtungen (Lichtschranken, usw.) ist
periodisch zu kontrollieren. Eventuelle Reparaturen sind von Fachpersonal und
unter Verwendung von zertifizierten Originalersatzteilen auszuführen.
16
Advertencias importantes
Advertencias importantes
Advertencias importantes
PARA REDUCIR EL RIESGO DE HERIDAS GRAVES O INCLUSO DE MUERTE, LÉANSE ATENTAMENTE LAS
SIGUIENTES ADVERTENCIAS ANTES DE PROCEDER CON LA INSTALACIÓN DEL SISTEMA. PRESTAR PARTICULAR ATENCIÓN A TODAS LAS SEÑALIZACIONES QUE HAN SIDO INDICADAS EN EL TEXTO
, YA QUE EL
INCUMPLIMIENTO DE LAS MISMAS PODRÍA PERJUDICAR EL BUEN FUNCIONAMIENTO DEL SISTEMA.
DESCRIPCION TECNICA
800/HL251CL Motorreductor irreversible, apertura hoja máx. 110°.
806/HLCF1 Caja de cimientos de acero galvanizado con tratamiento con
cataforesis y palancas de apertura hoja máx. 110°.
806/HLCF1Z
Caja de cimientos de acero galvanizado con palancas de
apertura hoja máx. 110°.
800/HL2518CL Motorreductor irreversible, apertura hoja 180°-360°.
806/HLCF18
Caja de cimientos de acero galvanizado con tratamiento con
cataforesis y accesorios para apertura hoja 180°-360°
806/HLCF18Z
Caja de cimientos de acero galvanizado con accesorios para
apertura hoja 180°-360°
806/HLCA140 Kit leva accesoria para apertura a 140°.
• Monobloc motorreductor.
- Motor monofásico provisto de protector térmico y reductor irreversible incorporado a caja de aluminio moldeado bajo presión con lubricación por grasa
fluida permanente.
- Juntas de caucho estancas al aceite.
- Desbloqueo manual con llave.
• Caja para soterrar en acero curvado bajo presión, galvanizado en caliente.
- Caja de desbloqueo en aluminio moldeado bajo presión.
• Palancas de transmisión en acero galvanizado.
- Soporte de fijación cancilla en acero galvanizado.
• Este manual se dirige a personas habilitadas para la instalación de
"aparatos utilizadores de energía eléctrica" y exige el buen conocimiento de la técnica, realizada profesionalmente, y de la normativa
vigente. Los materiales utilizados deben estar certificados y ser
idóneos para las condiciones ambientales de instalación.
• Las operaciones de mantenimiento deben ser llevadas a cabo por
personal cualificado. Antes de realizar cualquier operación de limpieza
o mantenimiento, desconectar el equipo de la red de alimentación
eléctrica.
• Los equipos detallados en este manual de instrucciones se deben
destinar únicamente al uso para el cual han sido expresamente concebidos: "La motorización de cancillas batientes, de una o dos
hojas".
El dispositivo está destinado a la motorización de cancillas y puertas
batientes de hasta 3 m como máximo, con las siguientes características:
- peso máximo de cada hoja 2-3 m = 550 kg;
- peso máximo de cada hoja menos que 2 m = 700 kg.
• La aplicación para todos los modelos es posible tanto a la izda. como
a la dcha. de la abertura de paso.
• Este producto ha sido diseñado y fabricado en todas sus piezas
por la empresa Cardin Elettronica, que ha comprobado su perfecta
coincidencia de sus características con lo que dispone la normativa
vigente.
El uso de los productos y su destino para usos diferentes a aquéllos
previstos y/o aconsejados, no ha sido probado por el fabricante, por
tanto los trabajos ejecutados están sometidos a la total responsabilidad
del instalador.
El fabricante no se responsabiliza si la instalación eléctrica no es
conforme con las normas vigentes y en especial si el circuito de
protección (tierra) no es eficiente.
INSTRUCCIONES PARA LA INSTALACION
Los mandos mínimos que se pueden instalar son APERTURA-STOP-CIERRE;
estos mandos deben estar colocados en un lugar no accesible para los niños o
menores y fuera del radio de acción de la cancilla. Antes de ejecutar la instalación,
comprobar que la estructura a automatizar está totalmente eficiente en todas
sus piezas fijas y móviles y realizada cumpliendo con la normativa vigente. A tal
fin cerciorarse de la suficiente rigidez del tablero de la puerta (de ser necesario,
hace falta reforzar su estructura) y del funcionamiento correcto de los pernos
(en todo caso se aconseja lubricar todas las piezas en movimiento, utilizando
lubricantes que mantengan las mismas características de rozamiento a lo largo
del tiempo y adecuados para funcionar entre -20 y +70°C).
El uso de la automatización no es idóneo para el accionamiento continuo, sino
que se lo debe ajustar en función de los varios modelos (ver características
técnicas en página 20).
• Controlar los seguros entre las piezas fijas y móviles:
- dejar un espacio libre de 30 mm como mínimo entre la cancilla y el pilar
de soporte en toda la altura y el arco de apertura de la cancilla;
- comprobar que el espacio entre la cancilla y el suelo no exceda nunca de
30 mm en todo el arco de apertura de la cancilla.
• La superficie de las hojas no debe tener aperturas tales que permitan el paso
de la mano o del pie de las personas.
• Controlar la correcta posición de pernos y goznes, su buen estado de mantenimiento y lubricación (es importante que el gozne superior y el inferior estén
alineados entre sí).
• Prever el recorrido de los cables según las necesidades de aplicación de los
dispositivos de mando y seguridad cumpliendo con las normas de seguridad
vigentes (véase instalación estándar, fig. 1 pág. 2).
• Comprobar que la automatización sea adecuada para el tamaño de la cancilla
y la frecuencia de uso (intermitencia de trabajo en pág. 20).
ADVERTENCIAS GENERALES SOBRE LA SEGURIDAD
Es el instalador quien tiene que comprobar las siguientes condiciones
de seguridad:
1) La instalación debe estar lo suficientemente apartada de la carretera
como para no constituir un peligro para la circulación.
2) El operador se debe instalar al interior de la propiedad y la cancilla
no debe abrirse hacia la superficie público.
3) La cancilla motorizada está principalmente destinado al paso de
vehículos. Donde sea posible, disponer una entrada separada para
los peatones.
4) Los mandos deben estar colocados a la vista, pero no dentro del
radio de acción de la cancilla; además los que están instalados al
exterior se tienen que proteger con un dispositivo de seguridad a
fin de prevenir su uso no autorizado.
5) Es buena regla señalar la automatización mediante las placas de
advertencia (similares a la de la figura) que debe estar fácilmente
visible. Si la automatización está adhibida únicamente al paso de
vehículos se tienen que poner dos placas de advertencia de prohibición de paso peatonal (una al interior y otra al exterior).
6) Enterar al usuario de que los niños o los animales domésticos no
deben jugar ni estacionar cerca de la cancilla. De ser necesario,
indicarlo en la placa.
7) Si la hoja totalmente abierta se acerca a una estructura fija, hace
falta dejar un espacio libre de al menos 500 mm
en la zona de acción del brazo articulado; este
¡CUIDADO!
espacio se debe resguardar con un protector APERTURA AUTOMATICA
sensible antiaplastamiento.
NO ACERCARSE
8) La calidad del conexionado de puesta a tierra
del sistema es fundamental para los fines de la
seguridad eléctrica.
9) En caso de dudas sobre la seguridad de la instalación, no proceder, sino dirigirse al distribuidor NO DEJAR QUE LOS NIÑOS O ANIMALES
DOMESTICOS ESTACIONEN EN EL RADIO
de los productos.
DE ACCION DE LA CANCELA
PROCEDIMIENTO DE MONTAJE
- Determinar la posición de la caja que se va a soterrar según la posición del
perno de engoznado de la cancilla respecto al pilar y al tipo de apertura (90°110°-180°) a realizar (fig. 5).
- Disponer un tope mecánico para el cierre.
- Realizar una excavación "A" (fig. 6) en la posición elegida en función del
tamaño de la caja y disponer un desagüe para el agua pluvial utilizando el
orificio "B".
- Prever el recorrido de la roza para los cables de conexión eléctrica utilizando
el orificio "C".
- Introducir los seis tornillos de cabeza redonda "E" en los alojamientos cuadrados correspondientes, conseguidos en el fondo de la caja y fijarlos utilizando
las tuercas y arandelas que luego servirán para fijar el motorreductor.
- Disponer la caja dentro de la excavación con el perno perpendicular respecto
17
-
-
-
-
al gozne superior "D" y rodearla de hormigón, cuidar la puesta a nivel y la
correcta posición del borde superior que deberá sobresalir 3 mm del nivel del
terreno.
Quitar las tuercas y arandelas utilizadas para fijar los pernos de cabeza redonda
en el fondo de la caja.
Incorporar el motorreductor a la caja y fijarlo en cuatro de los pernos roscados
"E" previamente dispuestos en el fondo de ésta.
Fijar el plato superior "F" provisto de desbloqueo en la hoja de la cancilla con
una soldadura resistente, teniendo en cuenta que el perno "G" de la propia
palanca debe estar alineado con el gozne superior "D".
Luego, en función del modelo, actuar como está indicado a continuación:
CONEXION ELECTRICA (fig. 10)
Comprobar, antes de realizar la conexión eléctrica, que la tensión y la frecuencia
indicadas en la placa de características coincidan con las de la instalación de
alimentación.
• El equipo funciona con la tensión monofásica de 230V 50Hz (ver esquema
eléctrico).
• El motorreductor debe estar conectado con una eficaz instalación de tierra,
por tanto hace falta utilizar el borne marcado con el símbolo de tierra que
se encuentra en la caja que soporta la bornera.
• No utilizar cables con conductores de aluminio; no estañar el extremo de los
cables que se deben introducir en la bornera. Utilizar un cable adecuado para
estar soterrado.
• El motorreductor está provisto de cable de alimentación de 6 m. de largo.
De ser necesario, disponer una caja de derivación exterior. No se admiten
conexiones soterradas.
• Mod. 800/HL251CL con caja 806/HLCF1
- Colocar la palanca de la cancilla "H" (fig. 2) en el perno de la caja después de
haber lubricado el propio perno e introducir dentro de la palanca la bola de
articulación "L".
- Montar la hoja introduciendo el perno de la palanca "F" en el alojamiento
correspondiente de la palanca de la cancilla "H" (fig. 2) después de haber
lubricado las piezas y fijar el gozne superior "D" (fig. 6).
- Incorporar la biela de transmisión "M" (fig. 2) entre la palanca "N" del
motorreductor y la palanca "H" de la cancilla, lubricando debidamente los
pernos.
- Disponer lentamente la hoja en línea con la palanca de la cancilla "H" (fig. 9) de
modo que el mecanismo de desbloqueo "O" llegue a accionar el dispositivo
de enganche de la palanca de la cancilla "H". El enganche es automático y
no hace falta utilizar la llave.
- Cerrar la tapa "P" (fig. 2) por medio de los dos tornillos suministrados.
Entre la centralita de mando y la red se debe disponer un interruptor
omnipolar cuya distancia de apertura de los contactos debe ser de 3
mm como mínimo.
• Conectar entre las fases 1 y 3 del motorreductor (fig. 10) el condensador
suministrado de serie (10 µF).
¡IMPORTANTE! El motorreductor está desprovisto de limitador del
par, por tanto utilizar la centralita de limitación electrónica del par
con empuje máximo en el extremo de la hoja de 150 N (normas de
seguridad vigentes).
AJUSTE DEL PAR DEL MOTOR (véase programador)
Para la realización del sistema, se aconseja utilizar programadores Cardin
provistos de ajuste del par del motor.
Los programadores Cardin optimizan el buen funcionamiento de la “máquina”
(puertas motorizadas), garantizando siempre el par máximo en el momento del
arranque (inicio de la maniobra, apertura-cierre). Durante toda la maniobra, el
programador garantiza que el sistema disponga del par seleccionado por el
instalador en el equipo; la selección de los diversos valores debe realizarse
en base al tamaño de la puerta, al peso de la misma y a las diversas variables
ambientales evaluadas in situ.
Se recuerda que la normativa en vigor exige terminantemente un par ajustado de forma apropiada al sistema en marcha.
Un par ajustado correctamente garantiza la máxima seguridad y aumenta la
duración de todas las partes mecánicas.
REGULACION DEL TOPE MECANICO (sólo para el mod. 800/HL251CL con
caja 806/HLCF1 - fig. 8)
El tope mecánico regulable dispuesto entre la palanca "N" del motorreductor
y el saliente "R" interior de la caja se debe utilizar para no cargar demasiado la
hoja en la fase de cierre y permitir el funcionamiento correcto del mecanismo de
desbloqueo. Para su regulación, actuar como está indicado a continuación:
- Disponer lentamente la hoja "S" en contacto con el tope mecánico de la cancilla
y desconectar el seguida la alimentación al motor.
- Dejar salir el tornillo "T" de la palanca "N" hasta que llegue en contacto con
el tope "R", así que la biela "M" mantendrá cerrada la cancilla sin ejercer
esfuerzos excesivos sobre ésta.
- Utilizar el tornillo y la tuerca "T" suministrados para realizar el tope mecánico
regulable en la apertura.
DESBLOQUERO (fig. 9)
• Mod. 800/HL2518CL con caja 806/HLCF18
- Quitar la escuadra "L" (fig. 3) de su alojamiento.
- Introducir la palanca "A" en el perno correspondiente de la caja con un poco
de grasa y luego la bola "G" en el interior.
- Incorporar la placa tensora de cadena "F" en la parte de arriba del
motorreductor por medio de los tornillos suministrados.
- Después de haber puesto abajo un anillo seeger "Q" introducir los platos
tensores de cadena "N" con el piñón "E" y los anillos distanciadores "R" en el
correspondiente perno de la placa "F" y fijar con el anillo seeger de arriba.
- Montar los dos tornillos de ajuste "P" junto con la tuerca de sujeción, en los
dos agujeros M5 de los platos "N".
- Incorporar el otro piñón "D" con el perno correspondiente "S" y los anillos
distanciadores "R" en el agujero ovalado, haciendo entrar los tornillos "P" en
los alojamientos correspondientes del perno "S".
- Montar la cadena "B" haciendo adherir un extremo suyo en la posición "Z"
(fig. 7) a los dientes de la corona de la palanca "A" (fig. 3). La palanca de la
cancilla "A" debe estar en la posición 0° (fig. 7).
- Rodar la palanca 180°, de modo que el extremo previamente dispuesto de la
cadena será arrastrado en la posición "W" a fin de poderlo empalmar con el
otro extremo mediante el eslabón de unión "C" (fig. 3).
- Tensar la cadena actuando sobre los tornillos de ajuste. Para realizar esta
operación se aconseja disponer la hoja en el tope mecánico en la posición de
0° accionando el motorreductor, para que esté sometido a tracción el lado "X"
y descargado el lado "W" (fig. 9) de la cadena y se favorecerá la eliminación
de los juegos. Apretar debidamente las tuercas de sujeción "P" (fig. 3).
- Volver a colocar la escuadra "L" en la posición original.
- Es buena regla lubricar la cadena y los pernos periódicamente.
- Disponer lentamente la hoja en línea con la palanca de la cancilla "H" (fig. 9) de
modo que el mecanismo de desbloqueo "O" llegue a accionar el dispositivo
de enganche de la palanca de la cancilla "H". El enganche es automático y
no hace falta utilizar la llave.
- Cerrar la tapa "P" (fig. 3) por medio de los dos tornillos suministrados.
La operación de desbloqueo se debe realizar únicamente con el motor parado,
a falta de fluido eléctrico. Para desbloquear la hoja de la cancilla hay que utilizar
la llave suministrada junto con el equipo. Esta se debe guardar en un sitio de
fácil acceso.
Para desbloquear
- Desplazar el portillo "Q" cubrecerradura.
- Introducir la llave y darle media vuelta (180°), el desenganche es inmediato.
Esta operación vuelve loca la hoja respecto al mecanismo y por tanto libre de
rodar manualmente.
- Abrir la hoja empujándola suavemente.
Para volver a bloquear
- Disponer la hoja en línea con la palanca de la cancilla "H" de modo que el
mecanismo de desbloqueo "O" llegue a accionar el dispositivo de enganche
de la palanca de la cancilla "H". El enganche es automático y no hace falta
utilizar la llave.
- También es posible hacer rearrancar el motorreductor, que se volverá a
enganchar automáticamente en la hoja.
INSTRUCCIONES PARA EL USO
Durante la maniobra se tiene controlar el movimiento de la cancilla y accionar el
dispositivo de parada inmediata (STOP) en caso de peligro.
En caso de emergencia, la cancilla se puede desbloquear manualmente utilizando
la llave correspondiente de desbloqueo suministrada (véase desbloqueo manual).
Controlar periódicamente el estado de desgaste de los pernos y en la eventualidad
engrasar las piezas en movimiento, utilizando lubricantes que tengan las mismas
características de rozamiento a lo largo del tiempo y adecuados para funcionar
entre -20 y +70°C (en especial la palanca de desbloqueo que está provista de
orificio para lubricador "J" fig. 9). En caso de avería o funcionamiento incorrecto,
desconectar la alimentación eléctrica antes del equipo y contactar con el servicio
de asistencia técnica. Comprobar periódicamente el funcionamiento de los
dispositivos de seguridad (fotocélulas, etc.).
Las reparaciones eventuales deben ser realizadas por personal cualificado,
utilizando materiales originales y certificados.
18
CARDIN ELETTRONICA spa
Via Raffaello, 36- 31020 San Vendemiano (TV) Italy
Tel:
+39/0438.404011-401818
Fax:
+39/0438.401831
email (Italy):
[email protected]
email (Europe):
[email protected]
Http:
www.cardin.it
CODICE
SERIE
MODELLO
DATA
DCE006
HL
230 Vac
11-01-2000
Dichiarazione di Conformità CE
(Direttiva Macchine 89/392/CEE, All. II)
Il Costruttore:
CARDIN ELETTRONICA S.p.A.
Nome dell'apparato
Tipo di apparato
Modello
Marchio
Anno di prima fabbricazione
Motoriduttore HL251
Motoriduttore elettromeccanico interrato 230 Vac per cancelli a battente
HL251 - HL2518 - HL251CL - HL2518CL
Cardin Elettronica
-
DICHIARA CHE L'APPARECCHIATURA DESTINATA AD ESSERE INSERITA IN
MACCHINE E NON FUNZIONANTE IN MODO INDIPENDENTE
è ideata per essere incorporata in una macchina o per essere assemblato con altri macchinari per costituire una macchina considerata
dalla Direttiva 89/392/CEE e successivi emendamenti.
è conforme alle disposizioni delle seguenti direttive comunitarie:
- Direttiva 89/336/CEE (Compatibilità Elettromagnetica)
- Direttiva 73/23/CEE (Bassa Tensione)
e sono state applicate le seguenti norme e/o specifiche tecniche:
- EN 61000-3-2 : 1995
- CEI EN 55014 : 1994
- EN 60335-1 : 1994 (e aggiornamenti successivi)
Il costruttore è in possesso dei rapporti di prova e Certificati di Conformità CE rilasciati da CMC Centro Misure Compatibilità e da PRIMA
RICERCA & SVILUPPO:
- test report R9634300 (11/11/96)
- test report SAF.TR.99.278 (23/12/99) - certificato di conformità CE n. 99.259
INOLTRE DICHIARA CHE NON È CONSENTITO METTERE IN SERVIZIO L' APPARECCHIATURA FINO A CHE LA MACCHINA NELLA QUALE SARÀ
INCORPORATA E DELLA QUALE DIVENTERÀ COMPONENTE SIA STATA IDENTIFICATA E NE SIA STATA DICHIARATA LA CONFORMITÀ ALLE
DISPOSIZIONI DELLA DIRETTIVA 89/392/CEE E SUCCESSIVI EMENDAMENTI.
x
x
x
x
x
x
x
x
x
x
x
x
x
x
x
x
x
x
x
x
x
x
x
x
x
x
x
x
x
x
x
x
x
x
x
x
x
x
x
x
x
x
x
x
x
x
x
x
x
x
x
x
x
x
x
x
x
x
x
x
x
x
x
x
x
x
x
x
x
x
x
x
x
x
x
x
x
x
x
x
x
x
x
x
x
x
x
x
x
x
x
x
x
x
x
x
x
x
x
x
x
x
x
x
x
x
x
x
x
x
x
x
x
x
x
x
x
x
x
x
x
x
x
x
x
x
x
x
x
x
x
x
x
x
x
x
x
x
x
x
x
x
x
x
x
x
x
x
x
x
x
x
x
x
x
x
x
x
x
x
x
x
x
x
x
x
x
x
x
x
x
x
x
x
x
x
x
x
x
x
x
x
x
x
x
x
x
x
x
x
x
x
x
x
x
x
x
x
x
x
x
x
x
x
x
x
x
x
x
x
x
x
x
x
x
x
x
x
x
x
x
x
x
x
x
x
x
x
x
x
x
x
x
x
x
x
x
x
x
x
x
x
x
x
x
x
x
x
x
x
x
x
x
x
x
x
x
x
x
x
x
x
x
x
x
x
x
x
x
x
x
x
x
x
x
x
x
x
x
x
x
x
x
x
x
x
x
x
x
x
x
x
x
x
x
x
x
x
x
x
x
x
x
x
x
x
x
x
x
x
x
x
x
x
x
x
x
x
x
x
x
x
x
x
x
x
x
x
x
x
x
x
x
x
x
x
x
x
x
x
x
x
x
x
x
x
x
x
x
x
x
x
x
x
x
x
x
x
x
x
x
x
x
x
x
x
x
x
x
x
x
x
x
x
x
x
x
x
x
x
x
x
x
x
x
x
x
x
x
x
x
x
x
x
x
x
x
x
x
x
x
x
x
x
x
x
x
x
x
x
x
x
x
x
x
x
x
x
x
x
x
x
x
x
x
x
x
x
x
x
x
x
x
x
x
x
x
x
x
x
x
x
x
x
x
x
x
x
x
x
x
x
x
x
x
x
x
x
x
x
x
x
x
x
x
x
x
x
x
x
x
x
x
x
x
x
x
x
x
x
x
x
x
x
x
x
x
x
x
x
x
x
x
x
x
x
x
x
x
x
x
x
x
x
x
x
x
x
x
x
x
x
x
x
x
x
x
x
x
x
x
x
x
x
x
x
x
x
x
x
x
x
x
x
x
x
x
x
x
x
x
x
x
x
x
x
x
x
x
x
x
x
x
x
x
x
x
x
x
x
x
x
x
x
x
x
x
x
x
x
x
x
x
x
x
x
x
x
x
x
x
x
x
x
x
x
x
x
x
x
x
x
x
x
x
x
x
x
x
x
x
x
x
x
x
x
x
x
x
x
x
x
x
x
x
x
x
x
x
x
x
x
x
x
x
x
x
x
x
x
x
x
x
x
x
x
x
x
x
x
x
x
x
x
x
x
x
x
x
x
x
x
x
x
x
x
x
x
x
x
x
x
x
x
x
x
x
x
x
x
x
x
x
x
x
x
x
x
x
x
x
x
x
x
x
x
x
x
x
x
x
x
x
x
x
x
x
x
x
x
x
x
x
x
x
x
x
x
x
x
x
x
x
x
x
x
x
x
x
x
x
x
x
x
x
x
x
x
x
x
x
x
x
x
x
x
x
x
x
x
x
x
x
x
x
x
x
x
x
x
x
x
x
x
x
x
x
x
x
x
x
x
x
x
x
x
x
x
x
x
x
x
x
x
x
x
x
x
x
x
x
x
x
x
x
x
x
x
x
x
x
x
x
San Vendemiano il 11.01.2000
x
x
x
x
x
x
x
x
x
x
x
x
x
x
x
x
Ing. M. Terruso
(Resp. Certif. & Omologazioni)
The CE conformity declaration for Cardin products is available in original language from the site www.cardin.it under the section "Standards and Certification".
Les déclarations de conformité CE des produits Cardin sont disponibles dans la langue originale sur le site www.cardin.it dans la section "normes et certificats".
Die CE-Konformitätserklärungen für die Cardin-Produkte stehen in der Originalsprache auf der Homepage www.cardin.it im Bereich "Normen und Zertifizierung" zur Verfügung.
Las declaraciones de conformidad CE de los productos Cardin se encuentran disponibles en el idioma original en el sitio www.cardin.it en la sección "normas y certificaciones".
19
CARATTERISTICHE TECNICHE
230
50
1,9
470
20
1,1
19,5
25
35
290
10
67
64
366
59
12
55
43
25
L’apparecchiatura è sprovvista di programmatore elettronico, per il suo
impiego si raccomanda l’utilizzo di programmatori elettronici Cardin disponibili nelle versioni:
100
V
Hz
A
W
%
giri/min
s
s
s
Nm
µF
IP
55
Alimentazione
Frequenza
Corrente nominale
Potenza assorbita
Intermittenza di lavoro
Velocità riduttore
Tempo apertura 90°
Tempo apertura 110°
Tempo apertura 180°
Coppia
Condensatore
Grado di protezione
159
-
DIMENSIONI D'INGOMBRO - EXTERNAL DIMENSIONS
DIMENSIONS D'ENCOMBREMENT
AUSSENABMESSUNGEN - DIMENSIONES MAXIMAS
401
332
PRG807 (per 1 motore)
PRG811 (per 2 motori)
TECHNICAL SPECIFICATIONS
-
TECHNISCHE DATEN
- Stromversorgung
V
V
230
- Frequenz
Hz
Hz
50
- Nominalstrom
A
A
1,9
- Leistungsaufnahme
W
W
470
- Arbeitsintermittenz
%
%
20
- Getriebegeschwindigkeit
dreh/min.
revs/min
1,1
- Öffnungszeit 90°
s
s
19,5
- Öffnungszeit 110°
s
s
25
- Öffnungszeit 180°
s
s SCALA: 35
- Drehmoment Description : Prodotti Technocity
Nm
Nm Drawing number
290 : DI0104
µF
µF Product Code
10 : HL - Kondensator Dimensioni d'ingombro
- Schutzgrad
IP
IP
67
Power supply
Frequency
Current input
Power input
Duty cycle
Shaft revolutions
Opening time 90°
Opening time 110°
Opening time 180°
Torque
Capacitor
Protection grade
Draft : P.J.Heath
Date : 19-11-98
230
50
1,9
470
20
1,1
19,5
25
35
290
10
67
CARDIN ELETTRONICA S.p.A - 31020 San Vendemiano (TV) Italy - via Raffaello, 36 Tel: 0438/401818 Fax: 0438/401831
The appliance does not feature onboard electronics and it is recommended
that you use the electronic programmers available from Cardin with the following serial numbers
Die Apparatur verfügt über keinen elektronischen Programmierer. Zu dessen
Anwendung empfiehlt sich die Verwendung von elektronischen CardinProgrammierern, die in den folgenden Versionen zur Verfügung stehen:
PRG807 (for 1 motor)
PRG811 (for 2 motors)
PRG807 (für 1 Motor)
PRG811 (für 2 Motoren)
CARACTÉRISTIQUES TECHNIQUES
-
Alimentation
Fréquence
Courant nominal
Puissance absorbée
Intermittence de travail
Vitesse du réducteur
Temps d’ouverture 90°
Temps d’ouverture 110°
Temps d’ouverture 180°
Couple
Condensateur
Indice de protection
V
Hz
A
W
%
tr/mn
s
s
s
Nm
µF
IP
DATOS TÉCNICOS
230
50
1,9
470
20
1,1
19,5
25
35
290
10
67
-
Alimentación
Frecuencia
Corriente nominal
Potencia absorbida
Intermitencia de trabajo
Velocidad reductor
Tiempo de apertura 90°
Tiempo de apertura 110°
Tiempo de apertura 180°
Par
Condensador
Grado de protección
V
Hz
A
W
%
r.p.m.
s
s
s
Nm
µF
IP
230
50
1,9
470
20
1,1
19,5
25
35
290
10
67
L’appareil est dépourvu de programmateur électronique; pour son utilisation,
il est conseillé de lui associer un des programmateurs Cardin, disponibles
dans les versions:
El aparato está desprovisto de programador electrónico; para su
utilización se recomienda el uso de programadores electrónicos Cardin
disponibles en las versiones de:
PRG807 (pour 1 moteur)
PRG811 (pour 2 moteurs)
PRG807 (para 1 motor)
PRG811 (para 2 motores)
CARDIN ELETTRONICA spa
Via Raffaello, 36 - 31020 San Vendemiano (TV) Italy
Tel:
+39/0438.404011-401818
Fax:
+39/0438.401831
email (Italian):
[email protected]
email (Europe):
[email protected]
Http:
www.cardin.it