1
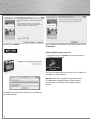
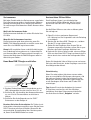
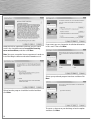
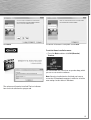
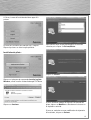
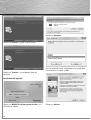
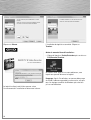
All listed brands are trademarks of the corresponding companies. Errors and omissions excepted,
and subject to technical changes. Our general terms of delivery and payment are applied.
00053330/01.10
Hama GmbH & Co KG
D-86651 Monheim/Germany
www.hama.com
N O
T
E
B
O
O
K
USB DVB-T Empfänger
»Nano«
o«
Receiver
ver
00053330
d Bedienungsanleitung
Packungsinhalt:
Treiber und Software Installieren:
• Nano DVB-T Dongle USB 2.0
• 3 auswechselbare Silikonhüllen in den Farben Weiß,
Blau und Rosa
• Passive DVB-T Stabantenne mit Magnetfuß
• Antennenkonverter
• Treiber und Software CD-ROM
• Diese gedruckte Betriebsanleitung zum schnellen
Einstieg.
Bei der Installation werden Sie Schritt für Schritt von
einem Installations-Assistenten unterstützt. Beachten
Sie dabei die angezeigten Informationen und Anweisungen. Abhängig vom verwendeten Betriebssystem
sind weitere Anfragen als die hier dargestellten möglich.
Hinweis: Die vollständige Dokumentation befindet sich
als PDF-Datei im Programmverzeichnis von MAGIX TV
& Video Recorder. Sie können sie direkt am Bildschirm
lesen oder ausdrucken. Sie benötigen dafür das
Anzeigeprogramm „Adobe Reader“, das Sie sich
kostenlos aus dem Internet herunterladen können, falls
es sich noch nicht auf Ihrem Rechner befindet.
Hinweis: Installieren Sie zuerst den Treiber des Nano
DVB-T Dongles, bevor Sie die Hardware anschließen.
1. Schalten Sie Ihren PC/Notebook ein und starten Sie
Windows. Schließen Sie alle laufenden
Anwendungsprogramme.
2. Legen Sie die Installations-CD ein.
Tipp: Je nach Signalstärke kann die mitgelieferte
Antenne nur eine eingeschränkte Senderauswahl
empfangen. Sollten Sie regelmäßige Störungen
beobachten, empfiehlt sich eine Aktiv-Antenne, die im
Elektronik-Fachhandel erhältlich ist. Falls Sie noch eine
alte Zimmerantenne besitzen, können Sie diese meistens
auch an den Stick anschließen.
Systemvoraussetzungen:
Für Microsoft® Windows® XP / Vista / 7
Minimale Konfiguration:
• Intel Pentium IV oder AMD Athlon XP ab 1 GHz und
höher
• 512 MB Arbeitsspeicher
• 1 GB freier Festplattenspeicher für die Programminstallation und DVB-Aufnahme
• freien USB 2.0-Anschluss
• Grafikkarte mit einer Bildschirmauflösung von
mindestens 1024 x 768
• Soundkarte
So finden Sie heraus, ob Ihr Computer die nötigen
Vorraussetzungen erfüllt:
1. Klicken Sie auf Start, dann auf Ausführen...
2. Geben Sie in das Feld „dxdiag“ ein und bestätigen
Sie mit OK.
3. Öffnen Sie die Registerkarte System. Unter Prozessor
finden Sie die Angaben zu Ihrer CPU Ihres Computers.
Die anderen Informationen finden Sie in der
Systemsteuerung Ihres verwendeten Windowssystems.
2
Die CD startet automatisch und am Bildschirm erscheint
das Auswahlmenü der Automatischen Wiedergabe:
Wählen Sie die Option autorun.exe ausführen.
Hinweis: Wenn die CD-ROM bei Ihrem PC nicht
automatisch startet, öffnen Sie den Arbeitsplatz Ihres
PCs, wählen das CD-ROM-Laufwerk aus und starten die
darin liegende Datei Autorun.exe mit einem Doppelklick.
Am Bildschirm erscheint nun das Hama Installationsmenü.
Dieses Installationsmenü ist für mehrere Sprachen
ausgelegt. Klicken Sie nun ihre bevorzugte Sprache an.
Wählen Sie Ihre bevorzugte Sprache im Auswahlmenü
aus und klicken anschließend auf Weiter.
Treiber Installieren:
Klicken Sie auf Weiter.
Klicken Sie auf die Schaltfläche Windows Treiber
installieren, um zuerst den Treiber für den Nano DVB-T
Dongle zu installieren.
Falls Sie das Installationsverzeichnis des Treibers
ändern wollen klicken Sie auf Ändern und wählen Ihr
gewünschtes Laufwerk bzw. Verzeichnis aus.
Klicken Sie auf Fortsetzen.
Sollten Sie keine Änderung des Installationsverzeichnis
wünschen klicken Sie auf Weiter.
3
Klicken Sie auf Fortsetzen.
Klicken Sie auf Installieren. Der Treiber wird installiert.
Klicken Sie auf Fertig stellen. Die Installation des Treibers ist abgeschlossen.
Wählen Sie im Menüfenster eine Sprache für die Installation aus und klicken Sie auf OK.
Software installieren:
Klicken Sie auf MAGIX TV & Videorecorder installieren,
um die Software zu installieren.
4
Klicken Sie auf Weiter
Lesen Sie sich den Lizenzvertrag aufmerksam durch
und aktivieren Sie das Auswahlkästchen Ich stimme
den Lizenzbedingungen zu und klicken anschließend
auf Weiter.
In diesem Menü können Sie, falls gewünscht die
Installationsverzeichnisse geändert werden. Klicken Sie
anschließend auf Weiter.
Hinweis: Das akzeptieren des Lizenzvertrages ist
Vorraussetzung um die Magix Software installieren und
Benutzen zu dürfen.
Wählen Sie Ihre bevorzugte Programmoberfläche aus
und klicken anschließend auf Weiter.
Wählen Sie aus, wie das Programm installiert werden
soll und klicken Sie anschließend auf Weiter.
Erstellen Sie eine Verknüpfung auf Ihrem Desktop, indem
Sie die Option auswählen und anschließend auf Weiter
klicken.
5
Klicken Sie auf Weiter.
Die Installation der Software ist beendet. Klicken Sie auf
Fertigstellen.
Hama Installationsmenü verlassen:
• Klicken Sie zuerst auf Zurück und anschließend auf
Exit/Beenden/Terminer.
Auf Ihrem Desktop liegt jetzt ein neues Icon, mit dem Sie
die Software starten können.
Hinweis: Nach der Installation ist ein Neustart des
PCs/Notebooks notwendig damit alle geänderten
Einstellungen von Windows übernommen werden
können.
Die Software wird installiert. Den Fortschritt erkennen
Sie an dem Balken.
6
Seriennummer
Austauschbare Silikon Hüllen:
Mit jedem Produkt wird eine Seriennummer ausgeliefert.
Diese Seriennummer wird zur Installation der Software
benötigt und berechtigt Sie zur Nutzung von weiteren
Zusatzleistungen. Bitte bewahren Sie die Nummer daher
gut auf.
Dem Empfänger liegen 3 verschiedenfarbige
austauschbare Silikon Hüllen bei, die Sie je nach
Geschmack über den DVB-T Dongle überstülpen
können.
Wo Sie die Seriennummer finden
Die Seriennummer befindet sich auf der Rückseite Ihrer
CD-Hülle.
Wann Sie die Seriennummer brauchen
Die Seriennummer wird dann gebraucht, wenn Sie
MAGIX TV & Video Recorder das erste Mal starten bzw.
wenn Sie es bei MAGIX registrieren wollen.
Hinweis: Wir empfehlen Ihnen ausdrücklich die kostenlose Produktregistrierung, denn erst sie berechtigt Sie
zum Herunterladen von Programmaktualisierungen, zur
Nutzung der Webseiten des MAGIX Supports oder zur
Aktivierung von Codecs.
Hama Nano DVB-T Dongle anschließen:
Um die Silikon Hüllen austauschen zu können gehen
Sie wie folgt vor:
1. Erden Sie sich an geeigneten Gegenstand
(z.B. Heizung) um eine ungewollte statische Entladung
zu verhindern.
2. Stecken Sie den Nano DVB-T Dongle aus, nachdem
Sie den PC ausgeschalten haben.
3. Sollten Sie den Empfänger über längere Zeit am
Computer angeschlossen haben, warten Sie ein paar
Minuten, damit der Empfänger abkühlen kann.
4. Entfernen Sie äußerst behutsam die schwarze Silikon
Hülle von dem Nano DVB-T Dongle und wechseln Sie
diesen durch einen anderen der beiliegenden Hüllen
aus.
Gehen Sie bitte dabei äußerst Behutsam vor und setzen
Sie keine rohe Gewalt ein, da der Empfänger sonst leicht
beschädigt werden könnte.
Schnelleinstieg
Wenn Sie sofort mit den Aufnahmen starten wollen,
ohne erst umständliche Erklärungen abzuwarten, sind
Sie in diesem Kapitel richtig. Hier erfahren Sie alles
Nötige kurz und knapp, während Sie gleichzeitig Ihre
ersten Sendungen aufzeichnen und CD oder DVD
unterbringen.
1. Stecken Sie den Nano DVB-T Dongle direkt an eine
USB 2.0 kompatible Anschlussbuchse Ihres PCs an.
2. Schließen Sie, falls benötigt, den Antennen Konverter
an, um z.B. eine Zimmerantenne anschließen zu
können.
3. Schließen Sie die beiliegende passive DVB-T
Stabantenne an den Dongle an.
Tipp: Nutzen Sie auch den Aufgaben-Assistenten!
Er zeigt Ihnen anschaulich, wie alles Wichtige
funktioniert. Nach dem Programmstart können Sie
ihn direkt über das Menü „Aufgaben“ aufrufen.
Beachten Sie bei der Erstinstallation: Die Treiber-Installation wird erst komplett ausgeführt, wenn Sie den Nano
DVB-T Dongle erstmalig anschließen. Warten Sie die
entsprechende Systemmeldung Ihres Betriebssystems
ab, bevor Sie die MAGIX Software starten.
7
TV-Sendungen anschauen & aufzeichnen
Sendungen aufzeichnen
Starten Sie nun MAGIX TV & Video Recorder per
Doppelklick auf da neue Icon auf Ihrem Desktop.
Zum direkten Umschalten vom TV-Modus in den
Videorekorder-Modus klicken Sie auf das
Videorekorder-Symbol.
Fernsehen am PC
Schritt 1: Automatische Sendersuche.
Beim ersten Programmstart werden Sie durch einen
Assistenten geführt, der alle TV-Sender über den
automatischen Sender-Suchlauf einstellt bzw. den Nano
DVB-T Dongle einrichtet. Sollte Ihr Sendegebiet in dem
oberen Dropdown-Menü aufgeführt sein, so können Sie
direkt eine voreingestellte Senderliste laden. Wählen Sie
dazu „Vorkonfigurierte Senderliste verwenden“. Wenn
Ihr Sendegebiet dort nicht aufgeführt ist, wählen Sie
im unteren Dropdown-Menü Ihren Aufenthaltsort und
MAGIX TV & Video Recorder sucht automatisch nach
allen verfügbaren Sendern. Wählen Sie dazu
„Sendersuchlauf durchführen“.
Schritt 2: Bild und Ton einstellen.
Falls kein Bild zu sehen ist oder eine Fehlermeldung
erscheint, öffnen Sie über die Schaltfläche „Setup“ den
Einstellungsdialog für den Videorekorder. Hier wählen
Sie den Treiber Ihrer TV- und Ihrer Soundkarte für Bild
und Ton aus und überprüfen die Tonwiedergabe.
Schritt 3: Bequem fernsehen.
Nachdem Sie alle Voreinstellungen vorgenommen
haben, können Sie dank der auch aus der Ferne gut
lesbaren Oberfläche mit Ihrer PC-kompatiblen
Fernbedienung (X10-Standard) bequem vom Sofa aus
Ihr Programm auswählen und genießen.
Tipp: Optional steht Ihnen ein TV-Programmführer mit
automatischem Timer für zeitgesteuerte Aufnahmen zu
Verfügung.
Ausgabe über ein externes Gerät
Mit dem Hama Nano DVB-T Dongle und der mitgelieferten MAGIX TV & Video Recorder Software verwandeln Sie Ihren PC in einen Fernseher. Sie können Ihr
Fernsehprogramm über verschiedene an Ihren Computer
angeschlossene Geräte wie PC-Monitor, Videoprojektor
(Beamer) oder TV-Gerät anzeigen lassen. Schließen Sie
einfach das gewünschte Ausgabegerät an den VGAAusgang (Bildschirmsymbol) Ihrer Grafikkarte an.
Tipp: Beim Anschluss von Videoprojektoren an
Notebooks kann es zur Anzeige „kein Signal“ kommen.
In diesem Fall muss mit der Tastenkombination Fn +
Bildschirmtaste auf den VGA-Ausgang des Laptops
umgeschaltet werden.
8
1. Sofortaufnahme:
Um das aktuell sichtbare Fernsehprogramm sofort mitzuschneiden, starten Sie über die Schaltfläche„Aufnahme“
(1) die Schnellaufnahme. Möchten Sie die Sendung während der Aufnahme weiterhin anschauen, so aktivieren
Sie die„Timeshift“- Option (2).
2. Videorekorder programmieren:
Um den Videorekorder für später zu programmieren
klicken Sie auf „Timer“ (3). Hier können Sie den
Videorecorder unter Verwendung der elektronischen
Programmzeitschrift oder manuell programmieren.
• Programmierung über die Programmzeitschrift:
Wählen Sie die gewünschte Sendung aus und kopieren
Sie sie mit der Pfeilschaltfläche nach rechts in die Aufnahmeliste. Jetzt wird die Sendung in der Aufnahmeliste
vorgemerkt.
• Manuelle Programmierung:
Um den Videorekorder manuell einzustellen wählen Sie
die Schaltfläche „Manuelle Programmierung“.
3. Aufnahmen gleich auf CD & DVD brennen:
Brennen Sie die aufgenommene Sendung direkt nach
Ende der Aufnahme automatisch auf das gewünschte
Zielmedium, indem Sie den Punkt „Disc-Projekt sofort
nach der Aufnahme brennen“ (4) aktivieren. Unter
„Setup“ > „Bearbeitung nach der Aufnahme“ können
Sie zusätzlich das gewünschte Zielmedium und weitere
Bearbeitungseinstellungen wie die automatische Entfernung von Werbeblöcken auswählen.
Wenn Sie noch Fragen haben
Aufgabenassistent:
Der Aufgabenassistent ist Ihr Informationsbüro. Er hilft
Ihnen bei der Lösung Ihrer Aufgaben und unterstützt
Sie bei allen Arbeitsschritten. Neben Schritt-für-SchrittAnleitungen in anschaulichen Videoclips finden Sie hier
auch Schnellzugriffe auf viele wichtige Funktionen. Die
Themen des Aufgabenassistenten finden Sie im Menü
„Aufgaben“.
Programmhilfe:
Die Programmhilfe enthält detaillierte Informationen zur
Bedienung des Programms und viele Zusatzinfos. Viele
wichtige Begriffe sind im Text kursiv hervorgehoben und
können für eine kurze Erklärung angeklickt werden.
Startseite:
Die Startseite der Hilfe erreichen Sie über das Menü
„Hilfe > Inhalt“.
Kontexthilfe:
Drücken Sie einfach die Taste „F1“ auf der Computertastatur an irgendeiner Stelle im geöffneten Programm und die Hilfe öffnet sich automatisch mit dem passenden
Artikel zum Thema.
PDF-Handbuch:
Das elektronische Handbuch (PDF) enthält wie die
Programmhilfe die vollständige Programmdokumentation. Sie finden es unter „Startmenü“ > „Programme“ >
MAGIX > „MAGIX TV & Video Recorder“ im Unterordner
„Dokumentation“.
Support für die MAGIX Software:
Wenn Probleme mit Ihrer Software auftreten sollten,
wenden Sie sich bitte an MAGIX Support:
http://support.magix.net
Hier erreichen Sie den MAGIX Kundenservice u.a. mit
folgenden kostenlosen Angeboten:
• FAQs (frequently asked questions, zu deutsch: häufig
gestellte Fragen) und allgemeine Tipps und Tricks:
In den meisten Fällen finden Sie hier eine Lösung Ihres
Problems. Wenn Sie nicht fündig werden, nutzen Sie am
besten das E-Mail-Supportformular.
• E-Mail-Supportformular:
Über ein spezielles Formular versorgen Sie unsere
Supportmitarbeiter mit Informationen über Ihr System.
Diese Informationen werden gebraucht, um Ihre
Probleme schnell und kompetent lösen zu können.
Einfach ausfüllen und per Mausklick abschicken!
• Support-Forum:
Sie sind nicht allein. Andere User hatten vielleicht
ähnliche Probleme und helfen Ihnen gerne weiter.
Auch unsere kompetenten Supportmitarbeiter sind hier
regelmäßig anzutreffen.
• Downloadsektion:
Weiterentwicklungen, Optimierungen und Fehlerbereinigungen, „Patches“ genannt, werden Ihnen ebenfalls
kostenlos per Download zur Verfügung gestellt. Viele
Probleme, die bei Ihnen vielleicht auftreten können, sind
uns bekannt und können behoben werden, indem Sie
den aktuellsten Patch installieren. Neben den Patches
finden Sie kleine Hilfsprogramme zum Checken und
Optimieren Ihres Systems.
• Links:
In der Linkliste finden Sie die Kontaktadressen von
wichtigen Hardwareherstellern.
Bitte beachten Sie: Um den Support in Anspruch
nehmen zu können, müssen Sie sich mithilfe der
Seriennummer Ihres Produktes bei MAGIX registrieren.
Die Seriennummer finden Sie auf der CD-Hülle Ihrer
Installations-CD..
Sie können die MAGIX Supportabteilung auch
telefonisch oder per Fax erreichen.
DEUTSCHLAND
Tel.: 0900-17 71 115
(1,24 EURO/Min. aus dem Festnetz,
werktags 9.00 – 17.00 Uhr)
Post: MAGIX Development GmbH
Postfach 200914
01194 Dresden
ÖSTERREICH
Tel.: 0900-45 45 71
(1,56 EURO/Min., werktags 9.00 – 17.00 Uhr)
SCHWEIZ
Tel.: 0900-45 45 71
(1,50 CHF/Min., werktags 9.00 – 17.00 Uhr)
9
Bitte halten Sie folgende Informationen bereit:
• Welches MAGIX Programm verwenden Sie (Version)?
• Welches Betriebssystem verwenden Sie?
• Wie heißt Ihre Grafikkarte, und in welcher
Bildschirmauflösung wird sie betrieben?
• Wie heißt Ihre Soundkarte? Oder benutzen Sie das
eingebaute Soundsystem Ihres Computers?
• Wie groß ist Ihr Arbeitsspeicher (RAM)?
• Welche DirectX-Version ist installiert?
Support für Treiber und Hardwareunterstützung
durch Hama:
Sollte Probleme mit der Hardware auftreten und durch
ein eventuell vorhandenes Treiberupdate von www.
hama.com nicht lösen lassen so kontaktieren Sie die
Hama Produktberatung entweder per Email, telefonisch
oder per FAX:
Tel.: +49 (0) 9091 / 502-115
Fax: +49 (0) 9091 / 502-272
e-mail: [email protected]
Bitte halten Sie neben der Hama Artikelnummer
folgende Informationen bereit:
• Welche Treiberversion verwenden Sie?
• Welches Betriebssystem verwenden Sie?
• Wie heißt Ihre Grafikkarte, und in welcher
Bildschirmauflösung wird sie betrieben?
• Wie heißt Ihre Soundkarte? Oder benutzen Sie das
eingebaute Soundsystem Ihres Computers?
• Wie groß ist Ihr Arbeitsspeicher (RAM)?
• Welche DirectX-Version ist installiert?
10
g Operating Instruction
Package contents
Installing the driver and software:
•
•
•
•
•
•
The installation wizard will take you through the installation procedure step-by-step. During the process, read
the displayed information and instructions. Depending
on which operating system you are using, the questions
you see may differ from those listed here.
Nano DVB-T USB 2.0 dongle
3 exchangeable silicon cases in white, blue and pink
Passive DVB-T rod antenna with magnetic stand
Antenna converter
CD-ROM with driver and software
This printed “Quick Start” operating manual
Note: The complete documentation is contained in a PDF
file in the MAGIX TV & Video Recorder program directory. You can read it on the computer screen or print it out.
This requires the “Adobe Reader” PDF display program,
which you can download from the Internet free of charge (in case it is not already installed on your computer).
Note: Install the driver for the Nano DVB-T dongle
before you connect the hardware.
1. Switch on your PC/notebook computer and start
Windows. Close all running applications.
2. Insert the installation CD.
Tip: Depending on the signal strength, you may only be
able to receive a limited number of channels with the
supplied antenna. If you do see a lot of interference, we
recommend that you use an active antenna, which you
can purchase in an electronics specialty store. If you
still have an old indoor antenna, you should be able to
connect it to the USB stick.
System requirements:
For Microsoft® Windows® XP/Vista/7
Minimum configuration:
• Intel Pentium IV or AMD Athlon XP (1 GHz and higher)
• 512 MB of RAM
• 1 GB of hard drive space for program installation and
DVB recording
• A free USB 2.0 port
• Graphics card with a screen resolution of at least
1024 x 768
• Sound card
How to find out whether your computer meets the
necessary requirements:
1. Click Start, and then select Run...
2. Enter “dxdiag” in the field and confirm your entry
with OK.
3. Select the System tab. The Processor entry indicates
what type of CPU your computer has.
The CD starts automatically and then the Autoplay
selection menu appears on the screen.
Select the option Run autorun.exe.
Note: If the CD-ROM on your computer does not start
automatically, open My Computer, select the CD-ROM
drive, and double-click the Autorun.exe file to start it.
Other information on your computer can be found in the
Control Panel on your Windows system.
11
The Hama installation menu is now displayed on the
screen.
This installation menu is available in several languages.
Now select your preferred language.
Select your preferred language in the selection menu
and then click Next/Weiter.
Installing the drivers:
Click Next.
First, click the Install Windows Driver button to install
the driver for the Nano DVB-T dongle.
Click Continue.
12
If you wish to change the installation directory for the
driver, click Change and select the desired drive or
directory.
If you do not wish to change the installation directory,
click Next.
Click Continue.
Click Install. The driver is now installed.
Click Finish. The driver installation is now complete.
In the menu screen, select a language for the installation and click OK.
Installing the software:
Click Install MAGIX TV & Videorecorder to install the
software.
Click Next.
13
Read the licence agreement carefully, place a check
mark in the checkbox next to I accept the licencing
terms and conditions, and then click Next.
If you want, you can change the installation directories
in this menu. Then click Next.
Note: You must accept the licence agreement in order to
install the Magix software and to be allowed to use it.
Select your preferred program interface and then click
Next.
Select how the program should be installed and then
click Next.
To create a shortcut on your desktop, select the option
and then click Next.
14
Click Next.
The driver installation is complete. Click Finish.
To exit the Hama installation menu:
• First click Back and then click Exit/Beenden/
Terminer.
You should now see a new icon on your desktop, which
you can use to start the software.
Note: Once the installation has finished, you have to
restart the PC/notebook computer in order for all of the
new settings to take effect in Windows.
The software will now be installed. The bar indicates
how far the installation has progressed.
15
Serial number
Exchangeable silicon cases:
A serial number is included with each product. This
serial number is required to install the software and it
entitles you to access additional services. You should
therefore keep this number in a place where you can
find it later on.
The receiver comes with three exchangeable silicon
cases in different colours, which you can put on the
DVB-T dongle according to your taste.
Where to find the serial number
The serial number is located on the back side of your
CD case.
1. Ground yourself by touching a suitable object
(e.g. heating radiator) to prevent undesired static
discharge.
2. Unplug the Nano DVB-T dongle after you have
switched off the PC.
3. If the receiver was connected to the computer for a
long period of time, wait a few minutes so that the
receiver can cool down.
4. Carefully remove the black silicon case from the Nano
DVB-T dongle and replace it with one of the other
included cases.
When will you need the serial number?
You will need the serial number when you start the
MAGIX TV & Video Recorder for the first time or when
you want to register the software with MAGIX.
Note: We highly recommend the free product registration, because you will then be entitled to download
program updates, access the MAGIX support web
pages, and activate codecs.
Hama Nano DVB-T Dongle anschließen:
To change the silicon cases, proceed as follows:
When you do this, be very careful and do not use brute
force, since otherwise the receiver could easily be
damaged.
Quick Start
You should read this chapter if you want to start recording right away, without having to read through long
explanations. It will provide you with a brief explanation
of everything you need, while you simultaneously record
your first programmes and store them on CD or DVD.
Tip: Don‘t forget to use the Task Wizard. It shows you
how to use all of the important functions. After you start
the program, you can access it directly via the “Tasks”
menu.
1. Connect the Nano DVB-T dongle directly to a USB 2.0
compatible port on your PC.
2. If necessary, connect the antenna converter so that
you can connect an indoor antenna (for example).
3. Connect the included passive DVB-T rod antenna to
the dongle.
Keep this in mind during the first installation:
The driver installation is not complete until you have first
connected the Nano DVB-T dongle. Wait for the relevant
system message from your operating system before you
start the MAGIX software.
16
Watching and recording TV shows
Recording programmes
Start the MAGIX TV & Video Recorder by double-clicking
the new icon on your desktop.
To switch directly from TV mode to video recorder mode,
click the video recorder icon.
Fernsehen am PC
Step 1: Automatic station search.
When you start the program for the first time, a wizard
will guide you through the steps to automatically search
for TV stations and configure the Nano DVB-T dongle. If
your area of reception appears in the upper dropdown
menu, you can immediately load a preconfigured list of
stations. To do so, select “Preconfigured station list”.
If your area of reception is not listed, select your location in the lower dropdown menu. MAGIX TV & Video
Recorder will automatically search for all available
stations. To do this, select “Perform station search”.
Step 2: Adjusting the picture and sound.
If there is no picture or if an error message appears,
select the “Setup” button to open the settings dialog box
for the video recorder. Here you can select the driver for
your TV/sound card for the picture and sound, and you
can test audio playback.
Step 3: Watch TV in comfort.
After you have made all of the presettings, you can use
your PC-compatible remote control (X10 standard) to sit
on the sofa and change stations in comfort, since the
interface can easily be seen from a distance.
Tip: As an option, you can use a TV programme guide
with automatic timer for time-controlled recording.
Displaying on an external device
With the Hama Nano DVB-T dongle and the included
MAGIX TV & Video Recorder software, you can turn
your PC into a television. You can display your TV programmes on various devices that are connected to your
computer, such as the PC monitor, a video projector, or
a TV set. To do so, simply connect the desired display
device to the VGA output (indicated by a monitor symbol)
on your graphics card.
1. Instant recording:
To record the currently displayed TV programme, select
the “Record” button (1) to start instant recording. If you
want to continue watching the programme while you
record it, activate the “Timeshift” option (2).
2. Programming the video recorder:
To program the video recorder to record a show at a
later point in time, click “Timer” (3). To program the
video recorder, you can use the Electronic Programme
Guide or you can program it manually.
• Programming using the Programme Guide:
Select the desired programme and use the right-arrow
button to copy it to the recording list. The programme is
now entered in the recording list.
• Manual programming:
To manually set the video recorder, select the “Manual
programming” button.
3. Burning recordings immediately to CD &DVD:
Immediately after the recording has ended, you can
automatically burn the recorded programme to the
desired target medium by activating the option “Burn
disc project immediately after recording” (4). Under
“Setup > Edit after recording”, you can also select the
desired target medium and make additional editing
settings, such as the automatic removal of advertising
breaks.
Tip: When you connect a video projector to your notebook computer, the message “No signal” may appear. In
this case, you have to use the key combination Fn + the
monitor button to switch to the VGA output of the laptop.
17
If you have any further questions
Task Wizard
The Task Wizard is your information office. It helps you
to solve your tasks and assists you during all work steps.
In addition to step-by-step instructions in descriptive
video clips, it also provides you with quick access to
many important functions. The topics of the Task Wizard
are contained in the “Tasks” menu.
Program help
The program help contains detailed information on operating the program, as well as a lot of additional information. Many important terms are highlighted using cursive
text. You can click on them to get a brief explanation.
Start page:
You can access the start page of the help via the “Help >
Contents” menu.
Context-sensitive help:
Simply press the “F1” key on the computer keyboard
at any place in the open program – the help will open
automatically with the corresponding article.
PDF manual
Like the program help, the electronic manual (PDF file)
contains the complete program documentation. The
file is located in the “Documentation” sub-folder under
“Start menu > All Programs > MAGIX > MAGIX TV &
Video Recorder”.
Support for the MAGIX software:
Should you encounter problems with your software,
please contact MAGIX support:
http://support.magix.net
There you can contact MAGIX customer service and
access the following free services:
• The FAQ (frequently asked questions) section, which
contains basic tips and tricks: In most cases, you will
find a solution to your problem in this section. If you do
not find a solution here, use the e-mail support form.
• E-mail support form:
This is a special form that you use to provide our support
employees with information about your system. This
information is needed in order to solve your problems
quickly and competently. Simply fill out the form and
submit it via mouse click.
• Support forum:
You are not alone. Other users may have had similar
problems and they will be glad to assist you. Our
competent support employees also post in the forum on
a regular basis.
• Download section:
This section is where you can download further developments, optimisations and error fixes (patches) free of
charge. We are aware of many of the problems that you
may encounter, and they can be fixed by simply installing
the latest patch. In addition to the patches, this section
also contains utility programs that you can use to check
and optimise your system.
• Links:
The link list contains contact addresses for major hardware manufacturers.
Note: In order to be entitled to use support, you have to
register your product at MAGIX with your serial number.
The serial number is located on the CD case for your
installation software.
You can also reach the MAGIX support department by
telephone or fax.
GERMANY
Tel.: 0900-17 71 115
(1.24 EUR/minute from a landline,
weekdays: 9:00–17:00)
Post: MAGIX Development GmbH
Postfach 200914
01194 Dresden, Germany
AUSTRIA
Tel.: 0900-45 45 71
(1.56 EUR/minute, weekdays: 9:00–17:00)
SWITZERLAND
Tel.: 0900-45 45 71
(1.50 CHF/minute, weekdays: 9:00–17:00)
18
Please have the following information ready:
• Which MAGIX program (and version) are you using?
• Which operating system are you using?
• Which graphics card model (and screen resolution)
are you using?
• What is your sound card model? Or are you using the
built-in sound system on your computer?
• How much main memory (RAM) does your computer
have?
• Which DirectX version is installed?
Driver and hardware support from Hama:
Should you encounter problems with the hardware
which cannot be remedied by installing a driver update
from www.hama.com, contact Hama Product Consulting
either by e-mail, phone or fax:
Tel.: +49 (0) 9091 / 502-115
Fax: +49 (0) 9091 / 502-272
E-mail: [email protected]
In addition to the Hama item number, please have the
following information ready:
• Which driver version are you using?
• Which operating system are you using?
• Which graphics card model (and screen resolution)
are you using?
• What is your sound card model? Or are you using the
built-in sound system on your computer?
• How much main memory (RAM) does your computer
have?
• Which DirectX version is installed?
19
f Mode d‘emploi
Contenu du paquet :
Installation du pilote et du logiciel :
• Dongle Nano TNT USB 2.0
• 3 étuis en silicone échangeables dans les couleurs
blanc, bleu et rose
• Antenne TNT tige passive avec pied aimanté
• Convertisseur d´antenne
• Pilote et logiciel sur CD-ROM
• Cette notice d´emploi imprimée pour une
connaissance rapide.
Lors de l´installation, vous serez soutenu étape par
étape par un assistant. Veuillez observer pour cela les
informations et indications affichées. Selon le système
d´exploitation il peut y avoir d´autres demandes que
celles représentées ici.
Remarque : La documentation complète se trouve
comme fichier PDF dans le répertoire de programme
de MAGIX TV & Video Recorder. Vous pouvez la lire
directement à l´écran ou l´imprimer. Pour cela, vous avez
besoin du programme d´affichage „Adobe Reader“ que
vous pouvez télécharger directement d´internet,
s´il n´est plus sur votre ordinateur.
1. Allumez votre PC/ordinateur portable et démarrez
Windows. Fermez tous les programmes d´application
courants.
Remarque : Installez d´abord le pilote du dongle TNT
Nano avant de raccorder le hardware.
2. Veuillez insérer le CD d´installation.
Conseil : Selon la puissance du signal, l´antenne ci-jointe
peut recevoir uniquement une sélection de programmes
limitée. Si vous observez régulièrement des pertubations, une antenne active que vous trouverez dans un
magasin électronique spécialisé est recommandée. Si
vous possédez encore une antenne intérieure, vous
pouvez normalement la raccorder au stick également.
Systèmes requis :
Pour Microsoft® Windows® XP / Vista / 7
Configuration minimale :
• Intel Pentium IV ou AMD Athlon XP à partir de 1 GHz
et plus élevé
• Mémoire centrale 512 MB
• Mémoire de disque dur 1 GB disponible pour
l´installation des programme et l´enregistrement DVB
• Interface USB 2.0 disponible
• Carte graphique avec une résolution de l´écran d´au
moins 1024 x 768
• Carte son
Pour constater si votre ordinateur emplit les conditions
nécessaires, poursuivez comme suit :
1. Cliquez sur Démarrage puis sur Exécuter...
2. Introduisez „dxdiag“ dans le champ puis confirmez
avec OK.
3. Ouvrez la carte de registre Système. Dans Processeur
vous trouverez les indications du CPU de votre
ordinateur.
Vous trouverez les autres informations dans le panneau
de configuration Windows utilisé.
20
Le CD démarre automatiquement et le menu de sélection
pour la Exécution Automatique apparaît à l´écran :
Sélectionnez l´option Exécuter autorun.exe.
Remarque : Au cas où le CD-ROM ne démarre pas
automatiquement à votre PC, ouvrez le Poste de travail
de votre PC, sélectionnez le lecteur CD-ROM et
démarrez le fichier Autorun.exe avec un double-clic.
A l´écran, le menu d´installation de Hama apparaît à
présent.
Ce menu d´installation possède plusieurs langues.
Cliquez à présent sur votre langue préférée.
Sélectionnez votre langue préférée dans le menu de
sélection puis cliquez sur Suivant/Weiter.
Installation du pilote :
Cliquez sur Suivant.
Cliquez sur le bouton de commande Installer le pilote
Windows, afin d´installer d´abord le dongle TNT Nano.
Cliquez sur Continuer.
Si vous souhaitez modifier le registre d´installation du
pilote, cliquez sur Modifier et sélectionnez le lecteur ou
le répertoire souhaité.
Si vous ne souhaitez aucune modification du répertoire
d´installation, cliquez sur Suivant.
21
Cliquez sur Continuer.
Cliquez sur Installer. Le pilote va être installé.
Cliquez sur Terminer. L´installation du pilote est
terminée.
Dans la fenêtre du menu, sélectionnez une langue pour
l´installation puis cliquez sur OK.
Installation du logiciel :
Cliquez sur MAGIX TV & Videorecorder Installer afin
d´installer le logiciel.
22
Cliquez sur Suivant.
Veuillez lire attentivement le contrat de license et
activez la case de sélection J´accepte les conditions de
license puis cliquez ensuite sur Suivant.
Dans ce menu, les répertoires d´installation peuvent
être modifiés si vous le souhaitez. Cliquez ensuite sur
Suivant.
Remarque : L´acceptation du contract de license est
la condition pour pouvoir installer le logiciel Magix et
l´utiliser.
Sélectionnez la surface que vous préférez et cliquez
ensuite sur Suivant.
Choisissez la manière d´installer le programme et
cliquez ensuite sur Suivant.
23
Veuillez effectuer une liaison avec votre microordinateur en sélectionnant l´option puis en cliquant
sur Suivant.
23
Cliquez sur Suivant.
L´installation du logiciel est terminée. Cliquez sur
Terminer.
Quitter le menu de Hama d´installation :
• Cliquez d´abord sur Zurück/Précédent puis ensuite sur
Exit/Beenden/Terminer.
Un nouvel icône apparaît sur votre ordinateur, avec
lequel vous pouvez démarrer le logiciel.
Le logiciel va être installé. Vous pouvez suivre
l´avancement de l´installation en observant la barre.
24
Remarque : Après l´installation, un nouveau démarrage
du PC/de l´ordinateur portable est nécessaire, afin que
tous les réglages modifiés de Windows puissent être
pris en considération.
Numéro de série
Etuis en silicone échangeables :
Un numéro de série est attribué à chaque produit.
Ce numéro de série est nécessaire pour l´installation du
logiciel et vous autorise à utiliser d´autres applications
supplémentaires. Veuillez donc bien conserver ce
numéro.
3 étuis en silicone échangeables et de couleur différente
sont à disposition, avec lesquels vous pouvez recouvrir
le dongle TNT selon vos goûts.
Où trouver le numéro de série?
Le numéro de série se trouve au dos de votre pochette
CD.
Quand avez-vous besoin du numéro de série?
Vous avez besoin du numéro de série lors du premier démarrage de MAGIX TV & Video Recorder ou quand vous
voulez vous enregistrer au MAGIX.
Remarque : Nous vous recommandons l´enregistrement
gratuit du produit car il vous permet de télécharger les
actualisations du programme, d´utiliser les pages Web
du support MAGIX ou d´activer le Codecs.
Raccorder le Hama Dongle Nano TNT :
Pour pouvoir échanger les étuis en silicone, procédez
comme suit :
1. Déchargez-vous de l´électricité statique en touchant
un objet relié au sol et approprié (par ex. un radiateur)
afin d´éviter une décharge statique non souhaitée.
2. Débranchez le dongle TNT Nano après avoir éteint le
PC.
3. Si le récepteur a été branché pendant longtemps
à l´ordinateur, attendez quelques minutes afin que le
récepteur puisse refroidir.
4. Veuillez enlever avec beaucoup de précaution l´étui
en
silicone noir du dongle TNT Nano et remplacez-le par
un autre étui ci-joint.
Veuillez procéder avec beaucoup de ménagement
et ne forcez pas car le récepteur pourrait être sinon
endommagé.
Accès rapide
Si vous souhaitez démarrer immédiatement les
enregistrements, sans attendre auparavant des
explications compliquées, ce chapitre est celui qui vous
convient. En effet, ce chapitre vous permet de connaître
rapidement le nécessaire pendant que simultanément
vous enregistrez vos premières émissions et stockez un
CD ou DVD.
1. Branchez le Nano dongle TNT directement à une
prise
de connexion USB 2.0 compatible de votre PC.
2. Si nécessaire, raccordez le convertisseur d´antenne,
pour pouvoir brancher par exemple une antenne
intérieure.
3. Raccordez l´antenne tige TNT passive ci-jointe au
dongle.
Conseil : Utilisez également l´Assistant des Tâches!
Il vous montre clairement comment les choses
importantes fonctionnent. Après le démarrage du
programme, vous pouvez le consulter directement dans
le menu „Tâches“ .
Lors de la première installation, veuillez observer :
L´installation du pilote sera complètement effectuée
seulement quand vous aurez raccordé la première fois
le dongle TNT. Veuillez attendre le message du système
correspondant avant de démarrer le logiciel MAGIX.
25
Visualiser & enregistrer des émissions TV
Démarrez à présent MAGIX TV & Video Recorder en
double-cliquant sur le nouvel icône de votre ordinateur.
Regarder la télévision à l´ordinateur
Etape 1 : Recherche automatique des chaînes.
Lors du premier démarrage des programmes, un
assistant règle toutes les chaînes TV avec la recherche
automatique de la fréquence optimale de réception des
chaînes et installe le dongle TNT Nano. Si votre zone
de transmission apparaît dans le menu déroulant du
haut, vous pouvez ainsi charger directement une liste
d´émissions préréglée. Sélectionnez pour cela „Utiliser
la liste d´émissions préconfigurée“. Si votre zone de
transmission n´y apparaît pas, sélectionnez dans le
menu déroulant du bas votre lieu de résidence et MAGIX
TV & Video Recorder recherche alors toutes les chaînes
disponibles. Pour cela, sélectionnez „Exécuter la
recherche automatique des chaînes“.
Etape 2 : Réglage de l´image et du son.
Si vous ne voyez aucune image ou si un message
d´erreur apparaît, ouvrez avec le bouton de commande
„Setup“ le dialogue de réglage pour le magnétoscope.
Sélectionnez le pilote de votre TV et votre carte son pour
l´image et le son et vérifiez la restitution sonore.
Etape 3 : Regarder confortablement la télévision.
Une fois tous les réglages effectués, vous pouvez
sélectionner et apprécier votre chaîne choisie grâce à
la surface également bien lisible de loin de la
télécommande compatible (norme X10) avec votre PC.
Conseil : En option, un guide des programmes TV avec
l´horloge à minuterie automatique pour les engistrements programmés.
Restitution via un appareil externe
Avec le dongle TNT Nano de Hama et le logiciel Nano
MAGIX TV & Video Recorder fournis, vous transformez
votre PC en un poste de télévision. Vous pouvez faire
afficher votre programme de télévision via différents
appareils raccordés à votre ordinateur comme le
moniteur du PC, le projecteur vidéo (beamer) ou
l´appareil TV. Raccordez simplement l´appareil de
restitution souhaité à la prise VGA (symbole de l´écran)
de votre carte graphique.
26
Conseil : Lors du raccordement de projecteurs vidéo à
des ordinateurs portables, le message „Pas de signal“
peut s´afficher. Dans ce cas, la combinaison de touches
Fn + la touche d´écran sur la prise VGA de l´ordinateur
portable doit être commutée.
Enregistrer des émissions
Pour la commutation directe du mode TV au mode
Magnétoscope, cliquez sur le symbole Magnétoscope.
1. Enregistrement immédiat :
Pour engistrer immédiatement le programme de télévision que vous voyez, démarrez l´enregistrement rapide
avec le bouton de commande „Enregistrement“ (1). Si
vous souhaitez continuer à regarder l´émission pendant
l´enregistrement, activez alors l´option „Timeshift“ (2).
2. Programmer le magnétoscope :
Pour programmer le magnétoscope pour plus tard,
cliquez sur „Timer (Horloge)“ (3). Ici, vous pouvez
programmer le magnétoscope en utilisant le magazine
électronique des chaînes ou manuellement.
• Programmation avec le magazine des chaînes :
Sélectionnez l´émission souhaitée et copiez-la avec
le bouton ayant une flèche vers la droite dans la liste
d´enregistrement. A présent, l´émission est inscrite
dans la liste d´enregistrement.
• Programmation manuelle : Afin de régler
manuellement le magnétoscope, sélectionnez le
bouton de comman de „Programmation manuelle“.
3. Graver immédiatement les enregistrement sur
CD & DVD :
Gravez l´émission enregistrée directement à la fin de
l´enregistrement et automatiquement sur le support
souhaité en activant le point „Graver sur un disque
immédiatement après l´enregistrement (4).
Dans „Setup“ > „Traitement après l´enregistrement“
vous pouvez sélectionner en plus le support souhaité
et d´autres réglages de traitement comme l´élimination
automatique de blocages de publicité.
Si vous avez d´autres questions
Assistant de tâches :
L´ Assistant de tâches est votre bureau d´information. Il
vous aide à solutionner vos tâches et vous assiste dans
toutes les étapes de travail. En plus des instructions
étape-par-étape dans des clips vidéo clairs, vous trouverez ici également des accès rapides à de nombreuses
fonctions importantes. Vous trouverez les thèmes de
l´Assistant de tâches dans le menu „Tâches“.
Aide pour programme :
L´aide pour programme contient des informations
détaillées sur l´utilisation du programme et de
nombreuses informations supplémentaires. De
nombreux termes importants sont mis en relief dans le
texte en italique et vous pouvez double-cliquer dessus
pour avoir une courte explication.
Page de démarrage :
Vous pouvez accéder à la page de démarrage de l´aide
dans le menu „Aide > Contenu“.
Aide contextuelle :
Appuyez simplement sur la touche „F1“ du clavier de
l´ordinateur à un endroit quelconque du programme ouvert – et l´Aide s´ouvre automatiquement avec l´article
correspondant au thème.
Manuel d´utilisation-PDF
Le manuel d´utilisation électronique (PDF) contient comme l´aide au programme la documentation intégrale du
programme. Dans „Menu de démarrage> „Programmes“
> MAGIX > „MAGIX TV & Video Recorder“ vous le trouverez dans le sous-répertoire „Documentation“.
Support pour le logiciel MAGIX :
Si des problèmes avec votre logiciel devaient surgir,
veuillez contacter le support MAGIX :
http://support.magix.net
Ici, vous accédez au service clients MAGIX avec entre
autres les offres gratuites suivantes :
• FAQs (frequently asked questions, foire aux questions)
et des Conseils et Astuces : Dans la plupart des cas,
vous trouverez une solution à votre problème. Si vous
ne trouvez pas la solution, utilisez alors le formulaire de
soutien par courriel (e-mail).
• Formulaire support e-mail :
Avec un formulaire spécial vous informez nos employés
de support de votre système. Ces informations sont
utiles pour solutionner rapidement et efficacement
vos problèmes. Il suffit de remplir le formulaire et de
l´envoyer par un clic sur la souris!
• Support-Forum :
Vous n´êtes pas tout seul. D´autres utilisateurs avaient
peut-être des problèmes similaires et vous aident
volontiers. Vous trouvez également ici aussi nos
employés du support compétents.
• Section de téléchargement :
Des perfectionnements techniques, des optimisations
et des corrections d´erreurs nommées „Patches“ vous
sont mis également à disposition gratuitement par
téléchargement. De nombreux problèmes qui peuvent
peut-être se produire chez vous nous sont connus
et peuvent être résolus en installant le Patch le plus
actuel. A côté des Patches vous trouverez des petits
programmes d´assistance pour vérifier et optimiser
votre système.
• Links :
Dans la liste Link se trouvent les adresses de contact
des importants fabricants de hardware.
Veuillez observer: Pour pouvoir utiliser le support, vous
devez vous inscrire à l´aide du numéro de série de votre
produit chez MAGIX. Le numéro de série se trouve sur la
pochette de votre CD d´installation.
Vous pouvez également contacter le service de support
MAGIX par téléphone ou par fax.
ALLEMAGNE
Tél. : 0900-17 71 115
(1,24 EURO/minute sur le réseau fixe, les jours de
semaine de 9 à 17 heures)
Adresse postale : MAGIX Development GmbH
Postfach 200914
01194 Dresden
AUTRICHE
Tél. : 0900-45 45 71
(1,56 EURO/ minute, les jours de semaine de 9 à
17 heures)
SCHWEIZ
Tél. : 0900-45 45 71
(1,50 CHF/ minute, les jours de semaine de 9 à
17 heures)
27
Veuillez avoir à portée de main les informations
suivantes :
• Quel programme MAGIX utilisez-vous (version)?
• Quel système d´exploitation utilisez-vous?
• Comment s´appelle votre carte graphique et dans
quelle résolution d´écran fonctionne-t-elle?
• Comment s´appelle votre carte son? Ou utilisez-vous
le système sonore intégré de votre ordinateur?
• Quelle est la taille de votre mémoire centrale (RAM)?
• Quelle version DirectX est installée?
Support pour le pilote et le hardware par Hama :
Si vous rencontrez des problèmes avec le hardware
(matériel) et ne pouvez pas le résoudre avec une mise
à jour du pilote existante de www.hama.com, veuillez
contacter le service de conseil de produits de Hama, par
e-mail, par téléphone ou par FAX :
Tél. : +49 (0) 9091 / 502-115
Fax : +49 (0) 9091 / 502-272
e-mail : [email protected]
En plus de la référence de Hama, veuillez avoir à portée
de main les informations suivantes :
• Quelle version de pilote utilisez-vous?
• Quel système d´exploitation utilisez-vous?
• Comment s´appelle votre carte graphique et dans
quelle résolution d´écran fonctionne-t-elle?
• Comment s´appelle votre carte son? Ou utilisez-vous
le système sonore intégré de votre ordinateur?
• Quelle est la taille de votre mémoire centrale (RAM)?
• Quelle version DirectX est installée?
28
d Hinweis zum Umweltschutz:
Ab dem Zeitpunkt der Umsetzung der europäischen Richtlinien 2002/96/EG und 2006/66/EG in nationales Recht gilt folgendes:
Elektrische und elektronische Geräte sowie Batterien dürfen nicht mit dem Hausmüll entsorgt werden. Der Verbraucher ist gesetzlich
verpflichtet, elektrische und elektronische Geräte sowie Batterien am Ende ihrer Lebensdauer an den dafür eingerichteten, öffentlichen
Sammelstellen oder an die Verkaufsstelle zurückzugeben. Einzelheiten dazu regelt das jeweilige Landesrecht. Das Symbol auf dem
Produkt, der Gebrauchsanleitung oder der Verpackung weist auf diese Bestimmungen hin. Mit der Wiederverwertung, der stofflichen
Verwertung oder anderen Formen der Verwertung von Altgeräten/Batterien leisten Sie einen wichtigen Beitrag zum Schutz unserer
Umwelt.
g
Note on environmental protection:
After the implementation of the European Directive 2002/96/EU and 2006/66/EU in the national legal system, the following applies:
Electric and electronic devices as well as batteries must not be disposed of with household waste. Consumers are obliged by law to
return electrical and electronic devices as well as batteries at the end of their service lives to the public collecting points set up for this
purpose or point of sale. Details to this are defined by the national law of the respective country.
This symbol on the product, the instruction manual or the package indicates that a product is subject to these regulations.
By recycling, reusing the materials or other forms of utilising old devices/Batteries, you are making an important contribution to
protecting our environment.
f
Remarques concernant la protection de l’environnement:
Conformément à la directive européenne 2002/96/CE et 2006/66/CE, et afin d'atteindre un certain nombre d'objectifs en matière de
protection de l'environnement, les règles suivantes doivent être appliquées:
Les appareils électriques et électroniques ainsi que les batteries ne doivent pas être éliminés avec les déchets ménagers. Le
pictogramme “picto” présent sur le produit, son manuel d'utilisation ou son emballage indique que le produit est soumis à cette
réglementation. Le consommateur doit retourner le produit/la batterie usager aux points de collecte prévus à cet effet. Il peut aussi
le remettre à un revendeur. En permettant enfin le recyclage des produits ainsi que les batteries, le consommateur contribuera à la
protection de notre environnement. C'est un acte écologique.
e
Nota sobre la protección medioambiental:
Después de la puesta en marcha de la directiva Europea 2002/96/EU y 2006/66/EU en el sistema legislativo nacional, se aplicara lo
siguiente:
Los aparatos eléctricos y electrónicos, así como las baterías, no se deben evacuar en la basura doméstica. El usuario está legalmente
obligado a llevar los aparatos eléctricos y electrónicos, así como pilas y pilas recargables, al final de su vida útil a los puntos de
recogida comunales o a devolverlos al lugar donde los adquirió. Los detalles quedaran definidos por la ley de cada país. El símbolo en
el producto, en las instrucciones de uso o en el embalaje hace referencia a ello. Gracias al reciclaje, al reciclaje del material o a otras
formas de reciclaje de aparatos/pilas usados, contribuye Usted de forma importante a la protección de nuestro medio ambiente.
o
Notitie aangaande de bescherming van het milieu:
Ten gevolge van de invoering van de Europese Richtlijn 2002/96/EU en 2006/66/EU in het nationaal juridisch system, is het volgende van
toepassing:
Elektrische en elektronische apparatuur, zoals batterijen mag niet met het huisvuil weggegooid worden. Consumenten zijn
wettelijk verplicht om electrische en elctronische apparaten zoals batterijen op het einde van gebruik in te dienen bij openbare
verzamelplaatsen speciaal opgezet voor dit doeleinde of bij een verkooppunt. Verdere specificaties aangaande dit onderwerp zijn
omschreven door de nationale wet van het betreffende land. Dit symbool op het product, de gebruiksaanwijzing of de verpakking duidt
erop dat het product onderworpen is aan deze richtlijnen. Door te recycleren, hergebruiken van materialen of andere vormen van
hergebruiken van oude toestellen/batterijen, levert u een grote bijdrage aan de bescherming van het mileu.
i
Informazioni per protezione ambientale:
Dopo l’implementazione della Direttiva Europea 2002/96/EU e 2006/66/EU nel sistema legale nazionale, ci sono le seguenti applicazioni:
Le apparecchiature elettriche ed elettroniche e le batterie non devono essere smaltite con i rifiuti domestici. I consumatori sono
obbligati dalla legge a restituire I dispositivi elettrici ed elettronici e le batterie alla fine della loro vita utile ai punti di raccolta pubblici
preposti per questo scopo o nei punti vendita. Dettagli di quanto riportato sono definiti dalle leggi nazionali di ogni stato. Questo simbolo
sul prodotto, sul manuale d’istruzioni o sull’imballo indicano che questo prodotto è soggetto a queste regole. Riciclando, ri-utilizzando i
materiali o utilizzando sotto altra forma i vecchi prodotti/le batterie, darete un importante contributo alla protezione dell’ambiente.
k
Υπόδειξη σχετικά με την προστασία περιβάλλοντος:
Από τη στιγμή που η Ευρωπαϊκή Οδηγία 2002/96/EΕ και 2006/66/EE ενσωματώνεται στο εθνικό δίκαιο ισχύουν τα εξής:
Οι ηλεκτρικές και οι ηλεκτρονικές συσκευές καθώς και οι μπαταρίες δεν επιτρέπεται να πετιούνται στα οικιακά απορρίμματα. Οι καταναλωτές
υποχρεούνται από τον νόμο να επιστρέφουν τις ηλεκτρικές και ηλεκτρονικές συσκευές καθώς και τις μπαταρίες στο τέλος της ζωής τους στα
δημόσια σημεία περισυλλογής που έχουν δημιουργηθεί γι’ αυτό το σκοπό ή στα σημεία πώλησης. Οι λεπτομέρειες ρυθμίζονται στη σχετική
νομοθεσία. Το σύμβολο πάνω στο προϊόν, στο εγχειρίδιο χρήσης ή στη συσκευασία παραπέμπει σε αυτές τις διατάξεις. Με την ανακύκλωση,
επαναχρησιμοποίηση των υλικών ή με άλλες μορφές χρησιμοποίησης παλιών συσκευών / Μπαταριών συνεισφέρετε σημαντικά στην
προστασία του περιβάλλοντος. Στη Γερμανία ισχύουν αντίστοιχα οι παραπάνω κανόνες απόρριψης σύμφωνα με τον κανονισμό για μπαταρίες
και συσσωρευτές.
s
Not om miljöskydd:
Efter implementeringen av EU direktiv 2002/96/EU och 2006/66/EU i den nationella lagstiftningen, gäller följande:
Elektriska och elektroniska apparater samt batterier får inte kastas i hushållssoporna. Konsumenter är skyldiga att återlämna elektriska
och elektroniska apparater samt batterier vid slutet av dess livslängd till, för detta ändamål, offentliga uppsamlingsplatser. Detaljer
för detta definieras via den nationella lagstiftningen i respektive land. Denna symbol på produkten, instruktionsmanualen eller på
förpackningen indikerar att produkten innefattas av denna bestämmelse. Genom återvinning och återanvändning av material/batterier
bidrar du till att skydda miljön och din omgivning.
m Ympäristönsuojelua koskeva ohje:
Siitä lähtien, kun Euroopan unionin direktiivi 2002/96/EU ja 2006/66/EU otetaan käyttöön kansallisessa lainsäädännössä, pätevät
seuraavat määräykset:
Sähkö- ja elektroniikkalaitteita ja paristoja ei saa hävittää talousjätteen mukana. Kuluttajalla on lain mukaan velvollisuus toimittaa
sähkö- ja elektroniikkalaitteet niiden käyttöiän päätyttyä niille varattuihin julkisiin keräyspisteisiin tai palauttaa ne myyntipaikkaan.
Tähän liittyvistä yksityiskohdista säädetään kulloisenkin osavaltion laissa. Näistä määräyksistä mainitaan myös tuotteen symbolissa,
käyttöohjeessa tai pakkauksessa. Uudelleenkäytöllä, materiaalien/paristoja uudelleenkäytöllä tai muilla vanhojen laitteiden
uudelleenkäyttötavoilla on tärkeä vaikutus yhteisen ympäristömme suojelussa.
q
Wskazówki dotyczące ochrony środowiska:
Od czasu wprowadzenia europejskiej dyrektywy 2002/96/EU i 2006/66/EU do prawa narodowego obowiązują następujące ustalenia:
Urządzeń elektrycznych, elektronicznych oraz baterii jednorazowych nie należy wyrzucać razem z codziennymi odpadami domowymi!
Użytkownik zobowiązany prawnie do odniesienia zepsutych, zniszczonych lub niepotrzebnych urządzeń elektrycznych i elektronicznych
do punktu zbiórki lub do sprzedawcy. Szczegółowe kwestie regulują przepisy prawne danego kraju. Informuje o tym symbol
przekreślonego kosza umieszczony na opakowaniu. Segregując odpady pomagasz chronić środowisko!
h
Környezetvédelmi tudnivalók:
Az európai irányelvek 2002/96/EU és 2006/66/EU ajánlása szerint, a megjelölt időponttól kezdve, minden EU-s tagállamban érvényesek
a következők:
Az elektromos és elektronikai készülékeket és az elemeket nem szabad a háztartási szemétbe dobni! A leselejtezett elektromos és
elektronikus készülékeket és elemeket, akkumulátorokat nem szabad a háztartási szemétbe dobni. Az elhasznált és működésképtelen
elektromos és elektronikus készülékek gyűjtésére törvényi előírás kötelez mindenkit, ezért azokat el kell szállítani egy kijelölt gyűjtő
helyre vagy visszavinni a vásárlás helyére. A termék csomagolásán feltüntetett szimbólum egyértelmű jelzést ad erre vonatkozóan a
felhasználónak. A régi készülékek begyűjtése, visszaváltása vagy bármilyen formában történő újra hasznosítása közös hozzájárulás
környezetünk védelméhez.
c
Ochrana životního prostředí:
Evropská směrnice 2002/96/EG a 2006/66/EU ustanovujete následující:
Elektrická a elektronická zařízení stejně jako baterie nepatří do domovního odpadu.
Spotřebitel se zavazuje odevzdat všechna zařízení a baterie po uplynutí jejich životnosti do příslušných sběren.
Podrobnosti stanoví zákon příšlušné země. Symbol na produktu, návod k obsluze nebo balení na toto poukazuje.
Recyklací a jinými způsoby zužitkování přispíváte k ochraně životního prostředí.
v
Ochrana životného prostredia:
Európska smernica 2002/96/EU a 2006/66/EU stanovuje:
Elektrické a elektronické zariadenia, rovnako ako batérie sa nesmú vyhadzovať do domáceho odpadu. Spotrebiteľ je zo zákona povinný
zlikvidovať elektrické a elektronické zariadenia, rovnako ako batérie na miesta k tomu určené.
Symbolizuje to obrázok v návode na použitie, alebo na balení výrobku. Opätovným zužitkovaním alebo inou formou recyklácie starých
zariadení/batérií prispievate k ochrane životného prostredia.
p
Nota em Protecção Ambiental:
Após a implementação da directiva comunitária 2002/96/EU e 2006/66/EU no sistema legal nacional, o seguinte aplica-se:
Os aparelhos eléctricos e electrónicos, bem como baterias, não podem ser eliminados juntamente com o lixo doméstico. Consumidores
estão obrigados por lei a colocar os aparelhos eléctricos e electrónicos, bem como baterias, sem uso em locais públicos específicos
para este efeito ou no ponto de venda. Os detalhes para este processo são definidos por lei pelos respectivos países. Este símbolo no
produto, o manual de instruções ou a embalagem indicam que o produto está sujeito a estes regulamentos. Reciclando, reutilizando os
materiais dos seus velhos aparelhos/baterias, esta a fazer uma enorme contribuição para a protecção do ambiente.
30
u
Охрана окружающей среды:
С момента перехода национального законодательства на европейские нормативы 2002/96/EU и 2006/66/EU действительно
следующее:
Электрические и электронные приборы, а также батареи запрещается утилизировать с обычным мусором. Потребитель, согласно
закону, обязан утилизировать электрические и электронные приборы, а также батареи и аккумуляторы после их использования
в специально предназначенных для этого пунктах сбора, либо в пунктах продажи. Детальная регламентация этих требований
осуществляется соответствующим местным законодательством. Необходимость соблюдения данных предписаний обозначается
особым значком на изделии, инструкции по эксплуатации или упаковке. При переработке, повторном использовании материалов
или при другой форме утилизации бывших в употреблении приборов Вы помогаете охране окружающей среды. В соответствии
с предписаниями по обращению с батареями, в Германии вышеназванные нормативы действуют для утилизации батарей и
аккумуляторов.
t
Çevre koruma uyarısı:
Avrupa Birliği Direktifi 2002/96/EU ve 2006/66/EU ulusal yasal uygulamalar için de geçerli olduğu tarihten itibaren:
Elektrikli ve elektronik cihazlarla piller normal evsel çöpe atılmamalıdır. Tüketiciler için, artık çalışmayan elektrikli ve elektronik cihazları
piller, kamuya ait toplama yerlerine götürme veya satın alındıkları yerlere geri verme yasal bir zorunluluktur. Bu konu ile ilgili ayrıntılar ulusal
yasalarla düzenlenmektedir. Ürün üzerinde, kullanma kılavuzunda veya ambalajda bulunan bu sembol tüketiciyi bu konuda uyarır. Eski
cihazların geri kazanımı, yapıldıkları malzemelerin değerlendirilmesi veya diğer değerlendirme şekilleri ile, çevre korumasına önemli bir
katkıda bulunursunuz. Yukarıda adı geçen atık toplama kuralları Almanya’da piller ve aküler için de geçerlidir.
r
Instrucţiuni pentru protecţia mediului înconjurător:
Din momentul aplicării directivelor europene 2002/96/UE în dreptul naţional sunt valabile următoarele:
Aparatele electrice şi electronice nu pot fi salubrizate cu gunoiul menajer. Consumatorul este obigat conform legii să predea
aparatele electrice și electronice la sfârșitul duratei de utilizare la locurile de colectare publice sau înapoi de unde au fost cumpărate.
Detaliile sunt reglementate de către legislaţia ţării respective. Simbolul de pe produs, în instrucţiunile de utilizare sau pe ambalaj
indică aceste reglementări. Prin reciclarea, revalorificarea materialelor sau alte forme de valorificare a aparatelor scoase din uz
aduceţi o contribuţie importată la protecţia mediului nostru înconjurător.
j
Anvisninger til beskyttelse af miljøet:
Fra og med indførelsen af EU-direktiverne 2002/96/EF og 2006/66/EF i national ret gælder følgende:
Elektrisk og elektronisk udstyr samt batterier må ikke bortskaffes sammen med almindeligt husholdningsaffald. Forbrugeren er
lovmæssigt forpligtet til at aflevere udtjent elektrisk og elektronisk udstyr samt batterier til dertil indrettede, offentlige indsamlingssteder
eller til forhandleren. De nærmere bestemmelser vedr. dette fastlægges af lovgivningen i det pågældende land. Symbolet på produktet,
brugsvejledningen eller emballagen henviser til disse bestemmelser. Ved genbrug, genvinding eller andre former for nyttiggørelse af
udtjent udstyr/batterier giver du et vigtigt bidrag til beskyttelse af miljøet.
n
Informasjon om beskyttelse av miljøet:
Fra tidspunktet for omsetning av de europeiske direktivene 2002/96/EF og 2006/66/EF i nasjonal rett gjelder følgende:
Elektriske og elektroniske apparater og batterier må ikke deponeres sammen med husholdningssøppelet. Forbrukeren er lovmessig
forpliktet til å levere elektriske og elektroniske apparater og batterier til de offentlige samlestedene eller tilbake til stedet hvor
produktene ble kjøpt. Detaljer angående dette reguleres av hvert land. Symbolet på produktet, bruksanvisningen eller emballasjen
henviser om disse bestemmelsene. Med resirkulering, gjenbruk av stoffer eller andre former av gjenbruk av gamle apparater/batterier
bidrar du betydelig til å beskytte miljøet vårt.
31