1
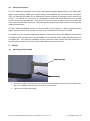
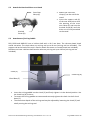
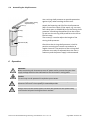
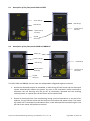
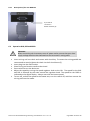
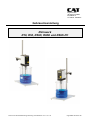
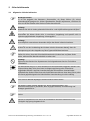
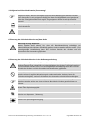
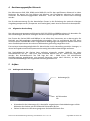
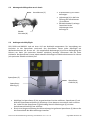
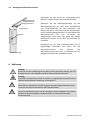
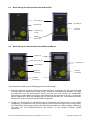
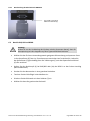
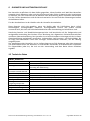
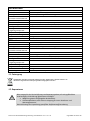
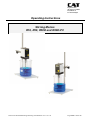
Ingenieurbüro M. Zipperer GmbH Etzenbach 16 D-79219 Staufen Operating Instructions Stirring Motors R18, R50, R50D and R80D-PC Instruction Manual/Bedienungsanleitung R10-R80D-PC 10/11 V 1.04 Page/Seite 1 of/von 39 Inhalt 1 General Information ................................................................................................................................................... 4 2 Unpacking the instrument .......................................................................................................................................... 4 2.1 3 Scope of Delivery ............................................................................................................................................. 4 Safety Information ...................................................................................................................................................... 6 3.1 General Safety Information............................................................................................................................... 6 3.2 Explanation of the safety information in the instruction manual ...................................................................... 7 3.3 Explanation of the safety information on the device......................................................................................... 7 4 Intended Use ............................................................................................................................................................... 7 4.1 5 General Description .......................................................................................................................................... 8 Set-up ......................................................................................................................................................................... 8 5.1 Mounting of Support Rod ................................................................................................................................. 8 5.2 Attach the Overhead Stirrer to a Stand ............................................................................................................. 9 5.3 Attachment of Stirring Paddle .......................................................................................................................... 9 5.4 Assembling the Shaft Protector ...................................................................................................................... 10 6 Operation .................................................................................................................................................................. 10 6.1 Description of the front panels R18 and R50 .................................................................................................. 11 6.2 Description of the front panels R50D and R80D-PC ...................................................................................... 11 6.2.1 Description of the rear R80D-PC ............................................................................................................... 12 6.3 Operation R18, R50 and R50D ....................................................................................................................... 12 6.4 Operation R80D-PC ........................................................................................................................................ 13 6.5 Serial Port Operation (for R80Dpc only) applicable from Version 3.1 (11.05.2007) ..................................... 13 6.5.1 Pinout of the I/O connector ........................................................................................................................ 13 6.5.2 Programming example: .............................................................................................................................. 14 7 Maintenance ............................................................................................................................................................. 15 8 Dismantling, Transport and Storage ......................................................................................................................... 16 8.1 Dismantling..................................................................................................................................................... 16 8.2 Transport and Storage ..................................................................................................................................... 16 9 Warranty and Liability ............................................................................................................................................. 17 10 Technical Data .................................................................................................................................................... 18 11 Disposal ............................................................................................................................................................... 19 12 Repairs ................................................................................................................................................................ 19 12.1 13 Repair Return Form ........................................................................................................................................ 20 Declaration of conformity ................................................................................................................................... 21 1 Allgemeine Information ........................................................................................................................................... 23 2 Auspacken ................................................................................................................................................................ 23 2.1 3 Lieferumfang .................................................................................................................................................. 23 Sicherheitshinweise .................................................................................................................................................. 25 3.1 Allgemeine Sicherheitshinweise ..................................................................................................................... 25 Erläuterung der Sicherheitshinweise auf dem Gerät..................................................................................................... 26 Erläuterung der Sicherheitshinweise in der Bedienungsanleitung ................................................................................ 26 4 Bestimmungsgemäßer Gebrauch .............................................................................................................................. 27 4.1 5 Allgemeine Beschreibung ............................................................................................................................... 27 Aufbau ...................................................................................................................................................................... 27 5.1 Anbringen der Haltestange ............................................................................................................................. 27 Instruction Manual/Bedienungsanleitung R10-R80D-PC 10/11 V 1.04 Page/Seite 2 of/von 39 5.2 Montage des Rührgerätes an ein Stativ ........................................................................................................... 28 5.3 Anbringen des Rührflügels ............................................................................................................................. 28 5.4 Montage des Rührwellenschutzes ................................................................................................................... 29 6 Bedienung................................................................................................................................................................. 29 6.1 Beschreibung der Bedienelemente des R18 und R50 ..................................................................................... 30 6.2 Beschreibung der Bedienelemente des R50D und R80D-PC ......................................................................... 30 6.2.1 Beschreibung der Rückseite des R80D-PC ................................................................................................ 31 6.3 Betrieb R18, R50 und R50D ........................................................................................................................... 31 6.4 Betrieb R80D-PC ............................................................................................................................................ 32 6.5 Serielle Schnittstelle (betrifft nur R80Dpc)ab Version 3.1 (11.05.2007) ........................................................ 33 6.5.1 Pinausgang des I/O Anschlusses: ............................................................................................................... 33 6.5.2 RS232 Programmierungsbeispiele: ............................................................................................................ 34 7 Wartung .................................................................................................................................................................... 34 8 Abbau Transport und Lagerung................................................................................................................................ 35 8.1 Abbau .............................................................................................................................................................. 35 8.2 Transport und Lagerung .................................................................................................................................. 35 9 GARANTIE UND HAFTUNGSAUSSCHLUSS .................................................................................................... 36 10 Technische Daten ................................................................................................................................................ 36 11 Entsorgung .......................................................................................................................................................... 37 12 Reparaturen ......................................................................................................................................................... 37 12.1 Rücksendeformular ......................................................................................................................................... 38 CE-Konformitätserklärung ............................................................................................................................................... 39 Instruction Manual/Bedienungsanleitung R10-R80D-PC 10/11 V 1.04 Page/Seite 3 of/von 39 1 General Information The CAT overhead stirrers R18, R50, R50D and R80D-PC are designed in accordance with Safety Class 1, and built and tested in accordance with DIN EN 61010. According to these regulations, the unit is designed to meet the requirements for safe and correct operations. To maintain the proper safety and operational functions of the instrument, the user should follow the instructions and safety guidelines in this manual. 2 Unpacking the instrument Unpack the instrument carefully and check to see that it is not damaged. It is important that any damage incurred in transport be recognized at the time of unpacking. Notify your carrier or forwarding agent immediately in case of such damage. 2.1 Scope of Delivery Inspect the content of the package for damage or missing parts: Or Or Or Or Or Or Or Or Or 1 Overhead stirrer R18, 230 V 1 Overhead stirrer R18, 115 V 1 Overhead stirrer R50, 230 V 1 Overhead stirrer R50, 115 V 1 Overhead stirrer R50D, 230 V 1 Overhead stirrer R50D, 115 V 1 Overhead stirrer R80D, 230 V 1 Overhead stirrer R80D, 115 V 1 Overhead stirrer R80D-PC, 230 V 1 Overhead stirrer R80D-PC, 115 V 1 Support Rod 1 Chuck key 1 Instruction Manual (Part no.: 60214-00) (Part no.: 60214-01) (Part no.: 60215-00) (Part no.: 60215-01) (Part no.: 60216-00) (Part no.: 60216-01) (Part no.: 60310-00) (Part no.: 60310-01) (Part no.: 60311-00) (Part no.: 60311-01) (Part no.: 50215-02) (Part no.: 20) Accessories and Stirring Paddles (optional) Protector Pedestal Stand incl. rod Cross over clamp Cross over clamp made of steel Blade stirring paddle Centrifugal stirring paddle Propeller stirring paddle (Part no.: 20618-60) (Part no.: 60491-00) (Part no.: 60492-00) (Part no.: 60492-50) (Part no.: 8B009405) (Part no.: 8B009211) (Part no.: 8B009105) Optional Accessories for R80D-PC 9 Pin SUB-D cable, 1.8 m long USB-RS232 Adaptor (Part no.: 30275-51) (Part no.: 30244-01) Instruction Manual/Bedienungsanleitung R10-R80D-PC 10/11 V 1.04 Page/Seite 4 of/von 39 Important Note: Read this instruction manual carefully before operating the instrument. Should there be any additional questions, after reading these instructions, concerning the set-up, operation or warranty, please contact either your distributor, or the manufacturer at the following address Important Note: After reading and understanding the instruction manual you may now start operating the unit. Ingenieurbüro CAT M. Zipperer GmbH Etzenbach 16 D-79219 Staufen Tel: +49-7636-7803-0 Fax: +49-7636-7803-45 Email: [email protected] Important Note: Please store the instruction manual in a place easily accessible to every user. A EURO AC plug (DIN 49441 CEE 7/VII10/ 16 A 250 V) is standard on all instruments. For North America instruments feature standard US plugs (NEMA Pub.No.WDI1961 ASA C 73.1. 1961 page 8 15A 125V). When operating the instruments in countries with different AC plug systems use an approved adapter or have a qualified electrician replace the AC plug with an approved model suitable fort the country of operation. The instrument is earthed as supplied. When replacing the original AC plug, ensure that the earth conductor is connected to the new plug! Instruction Manual/Bedienungsanleitung R10-R80D-PC 10/11 V 1.04 Page/Seite 5 of/von 39 3 3.1 Safety Information General Safety Information Attention: Please comply with all safety and accident-prevention regulations applicable to laboratory work. Attention: Use great caution when working in the vicinity of highly flammable or explosive substances. The instrument is not explosion-proof. Attention: Only instructed users may operate the instrument. Attention: When connecting the instrument to an AC power outlet, ensure that your local supply voltage matches that indicated on the instrument’s rating plate. Turn the power switch off when not using the instrument and before disconnecting it from its AC power outlet. Important Note: Make sure that all safety information of the instrument respectively on the device itself is clearly visible during operation. Attention: Do not open the instrument. Repairs are only to be carried out by trained service technicians. Always connect the instrument to an earthed AC power outlet. Ensure that the unit is firmly attached to a stand. Protect the vessel in which you stir against rotating, shaking or moving. Make sure that the unit has been turned off before exchanging the stirring elements. Only turn the motor on and off while the stirring rod is well inserted into the media that is to be stirred. Avoid splashing of liquids by using a tall vessel, lower level of liquid, or by using a cover on top of the container. For protection of the user against splashing, dress accordingly and use eye protection. Take care that the motor does not come into contact with the media to be stirred. Instruction Manual/Bedienungsanleitung R10-R80D-PC 10/11 V 1.04 Page/Seite 6 of/von 39 3.2 Explanation of the safety information in the instruction manual This symbol emphasizes the following notices, which have to be strictly observed by the user! Disregarding of warnings may result in impairment of serviceability as well as impairment of the user. This symbol emphasizes prohibitions, which have to be strictly observed. Any disregard of the prohibitions may result in severe impairment of serviceability as well as severe impairment of the user. This symbol emphasizes notices, which have to be observed by the user to assure a safe operation of the unit. CAUTION Hazard of fire or explosion! Advise for repair / maintenance Advise for connection to the mains 3.3 Explanation of the safety information on the device CAUTION: This symbol indicates to read the instruction manual carefully prior to operation of the instrument. Please mark points which require special attention in your field of application so they are not overlooked. Disregarding of warnings may result in impairment of serviceability as well as impairment of the user. 4 Intended Use The CAT overhead stirrers R18, R50, R50D and R80D-PC are designed for use in chemical and biological laboratories of industrial enterprises, universities and pharmacies. They are suitable for stirring and mixing of liquids from aqueous to medium viscosity. For correct use the devices must be fixed to an appropriate stand. To ensure maximum service life, observe the specified ambient conditions (temperature and humidity) and ensure that the instrument is not exposed to a corrosive atmosphere. Instruction Manual/Bedienungsanleitung R10-R80D-PC 10/11 V 1.04 Page/Seite 7 of/von 39 4.1 General Description The CAT laboratory overhead stirrers R18, R50 (without digital speed display), the R50D (with digital speed display), R80D (with digital display) and R80D-PC are microprocessor controlled. They are particularly suitable for all applications where solutions of average viscosity have to be stirred. The use of the instrument is advantageous where the speed adjustment of stirring processes has to be reproducible - such as when test series have to be carried out one after the other under comparable conditions, and when parallel experiments with several stirrers must be made simultaneously. The R50, R50D and R80Dpc stirrers can also be used in the treatment of special solutions where higher viscosity values occur for short periods as the individual constituents are added. The speed control is steplessly adjustable between 20 and 700 rpm for the R80D-PC, between 50 and 1600 rpm for stirring motors R50 and R50D; for the R18 the speed is adjustable between 110 and 2000 rpm. The electronic feedback control guarantees exact control and high precision so that fluctuations from the viscosity of the media being stirred will not occur. 5 Set-up 5.1 Mounting of Support Rod Support Rod (A) M5 Screws (B) Screw the support rod (A) to the rear panel of the overhead stirrer with the two M5 screws (B). Use a hexagon socket screw key with AF (across flats). Tighten the screws thoroughly. Instruction Manual/Bedienungsanleitung R10-R80D-PC 10/11 V 1.04 Page/Seite 8 of/von 39 5.2 Attach the Overhead Stirrer to a Stand Cross Over Clamp (C) Knurled Screw (D) 5.3 Mount the cross over clamp (C) to the rod of the stand. Insert the support rod (A) of the over head stirrer into the opening of the cross over clamp (C) and turn the knurled screw (D) until the drive unit is firmly attached to the stand. Attachment of Stirring Paddle R50, R50D and R80D-PC have a hollow shaft with a 10.5 mm bore. The chrome plated chuck avoids corrosion. The chuck takes any stirring rod up to 10 mm (stirring rod not included). The support rod at the back of the unit is used to attach the motor to a stand (stand not included). R18 does not have a hollow shaft but also takes any stirring rod up to 10 mm (stirring rod not included). Chuck (E) Chuck key (G) Chuck Bore (F) Insert the stirring paddle into the chuck (E) and firmly tighten it in the desired position. Use the chuck key (G) to do so. To center the stirring paddle we recommend to evenly tighten the chuck via the 3 chuck bores (F). The immersion depths of the stirring tool may be adjusted by loosening the chuck (E) and axially moving the stirring tool. Instruction Manual/Bedienungsanleitung R10-R80D-PC 10/11 V 1.04 Page/Seite 9 of/von 39 5.4 Assembling the Shaft Protector Fastening Rod for Stirring Shaft Protector (H) Screws (J) Bores (K) Screw (L) Use a stirring shaft protector to provide protection against injury when working with the unit. Attach the fastening rod (H) of the shaft protector (M) in front of the chuck to the stand; e.g. use cross over clamp part no. 60492-00) to fix the stirring shaft protector. Now bring the pockets (K) to the screws (J) and turn the stirring shaft protector to the left to the limit stop. The screw (L) is used to adjust the length of the stirring shaft protector. Shaft Protector (M) Check that the stirring shaft protector is held in position securely prior to each use and also at regular intervals. The position of the stirring shaft protector must only be adjusted when the unit is stationary and the power supply is disconnected. 6 Operation Attention: When connecting the instrument to an AC power outlet, ensure that your local supply voltage matches that indicated on the instrument’s rating plate. Caution The unit may not be operated in explosion-prone areas. Pull main plug as a protection against unauthorised or accidental operation whenever the work is interrupted for extended periods. Always start with the lowest speed. Increase the speed until the speed slowly until the desired speed setting has been reached. Instruction Manual/Bedienungsanleitung R10-R80D-PC 10/11 V 1.04 Page/Seite 10 of/von 39 6.1 Description of the front panels R18 and R50 Green LED (2) Red LED (3) Red LED (3) Speed control Knob (4) Speed control Knob (4) On/Off switch (5) 6.2 Description of the front panels R50D and R80D-PC Display (1) Green LED (2) Red LED (3) Red LED (3) Speed control Knob (4a) Speed control Knob (4a) On/Off switch (5) The R50, R50D and R80Dpc stirrers have two independent safeguards against overload: 1. Should the allowable torque be exceeded, a red warning LED will show and the electronic system automatically reduces the power. As soon as the overload is either removed or overcome the red warning LED will go off. At continuous overload and the resulting reduced power to a speed rpm<20 the motor will be switched off. 2. Should an overload occur from overheating during continual operations or too hot of an ambient, the red LED will show and the electronic will reduce the power intake. The motor will switch off if continuously overheated. After a cool down period and switching the unit off and on the motor will operate as normal. Instruction Manual/Bedienungsanleitung R10-R80D-PC 10/11 V 1.04 Page/Seite 11 of/von 39 6.2.1 Description of the rear R80D-PC 9-pin SUB- D connection RS232-interface (6) 6.3 Operation R18, R50 and R50D Attention: When connecting the instrument to an AC power outlet, ensure that your local supply voltage matches that indicated on the instrument’s rating plate. Insert stirring rod into chuck and secure with chuck key. To center the stirring paddle we recommend to evenly tighten the chuck via the 3 chuck bores (F). Insert plug into the mains outlet. Place stirring rod into the media to be stirred. Press switch to turn the device on. Adjust the speed by turning the speed regulator knob to the left. The speed for the R18 and R50 is reflected by the scale around the regulator knob. The speed for the R50D is indicated on the digital display. Always start with the lowest speed. To turn off, reduce the speed to the lowest rate, turn the switch off, and then remove the stirring rod from the media. Instruction Manual/Bedienungsanleitung R10-R80D-PC 10/11 V 1.04 Page/Seite 12 of/von 39 6.4 Operation R80D-PC Attention: When connecting the instrument to an AC power outlet, ensure that your local supply voltage matches that indicated on the instrument’s rating plate. 6.5 Insert stirring rod into chuck and secure with chuck key. To center the stirring paddle we recommend to evenly tightening the chuck via the 3 chuck bores (F). Insert plug into the mains outlet. Place stirring rod into the media to be stirred. Press switch to turn the device on. Adjust the speed by turning the speed regulator knob to the left. The speed for the R80DPC is indicated on the digital display. Always start with the lowest speed. Connect serial cable to the device. Set the regulator knob to the left end position minimum RPM). Switch the device on to control the device over the serial port. To turn off, reduce the speed to the lowest rate, turn the switch off, and then remove the stirring rod from the media. Serial Port Operation (for R80Dpc only) applicable from Version 3.1 (11.05.2007) 6.5.1 Pin out of the I/O connector The following signals are led out on the 9-pin SUB-D connector on the rear side of the instrument: RS232 control signals Pin Number Description 1 2 n.c. TxD (RS232 transmit data) RxD (RS232 receive data) n.c. GND (signal ground) n.c. n.c. n.c. n.c. 3 4 5 6 7 8 9 1 5 6 9 socket of the I/O connector (view on socket – 9 pin Sub-D socket) Instruction Manual/Bedienungsanleitung R10-R80D-PC 10/11 V 1.04 Page/Seite 13 of/von 39 Settings: Baudrate: Data bits: Parity: Stop bits: 1200 8 bit none 1 Commands: Query of version Change operation mode Set RPM: Read RPM: Write device address: 6.5.2 0,RTY,1 0,WSM,1 (1 – PC, 0 – manual) 0,WSE,xxx (“xxx” = 20 to 700) 0,RSE,1 0,WSA,x (“x” = 1 to 8) Programming example: Example 1: set RPM 1,WSM,1 1,WSE,100 ;PC mode ;programs speed, (device address “1”) The device replies with the following code string: 1,HS,OK ;command has been accepted and executed Example 2: Read RPM 1,WSM,1 1,RSE,1 ;PC mode ;Read RPM of device 1 The device replies with the following code string: 1,HS,OK,100 ;command has been accepted and executed; current RPM is 100 Instruction Manual/Bedienungsanleitung R10-R80D-PC 10/11 V 1.04 Page/Seite 14 of/von 39 7 Maintenance Attention: Do not open the instrument. Repairs are only to be carried out by trained service technicians. Apart from the motor carbon brushes the instruments are maintenance-free, except from normal wear and the statistical failure rate of the components. Should the instrument require repairs, it is recommended that they be done at the CAT factory. Please send any defective instrument either to the CAT factory or your CAT agent. Caution Unplug the AC power cord before opening the housing. The carbon brushes in the motor are subject to natural wear. To change the carbon brushes please carry out the following steps. 1. Remove the black cover at the side of the motor. 2. Bent up the metal clip and take out the spring. 3. Use a small screwdriver to remove the clip from the carbon and then take out the carbon. 4. Replace the carbon. Attach the spring. Bent aback the clip. Attach the black cover. Should the tooth belt have to be changed, then: Important Note: The following information does not apply for overhead stirring motors R80D and R80D-PC!!! 1. Remove the hard plastic undercover. 2. Pull the tooth belt from the large cogwheel. 3. Put the new tooth belt on the small cogwheel and then onto the large cogwheel. 4. Now turn lightly the large cogwheel until the belt is in the proper position. All bearings of the stirring motor are sufficiently lubricated so that with careful handling no maintenance is necessary. Should problems occur, please send the instrument to CAT or your CAT agent. Instruction Manual/Bedienungsanleitung R10-R80D-PC 10/11 V 1.04 Page/Seite 15 of/von 39 8 8.1 Dismantling, Transport and Storage Dismantling 1. Switch the unit off. 2. Disconnect the unit from the mains. 8.2 Remove any glass beakers and any other equipment around the overhead stirrer. Remove the stirring tool by loosening the chuck Loosen the cross over clamp and remove the clamp from the support rod Unscrew the support rod. Now you may remove the instrument from the working area. Transport and Storage Prior to transport: Switch the instrument off and unplug from power supply. Place the instrument and its parts in its original packaging or another suitable container to protect it during transport. Close the packaging with adhesive tape. Store the instrument in a dry environment. Please observe the specified conditions of the ambient (temperature and humidity). Do not subject the instrument to mechanical shocks or vibration during transporting it. In case you do not use the original packaging please mark the box with the following notes: - Glass symbol (handle with care, fragile) - Umbrella (keep dry) - Content (list of content) Instruction Manual/Bedienungsanleitung R10-R80D-PC 10/11 V 1.04 Page/Seite 16 of/von 39 9 Warranty and Liability The manufacturer agrees to correct for the original user of this product, either by repair, or at the manufacturer's election, by replacement, any defects in material or workmanship which develop within 24 months after delivery of this product to the original user. In the event of replacement, the replacement unit will be warranted for the remainder of the original twenty-four (24) months period of ninety (90) days, whichever is longer. If this product should require service, contact your distributor or manufacturer for necessary instructions. This warranty shall not apply if the defect or malfunction was caused by accident, neglect, unreasonable use, improper service, or other causes not arising out of defects in material or workmanship. There are no warranties, expressed or implied, including, but not limited to, those of merchantability or fitness for a particular purpose, which extended beyond the description and period set forth herein. The manufacturer's sole obligation under this warranty is limited to the repair or replacement of a defective product and the manufacturer shall not, in any event, be liable for any incidental or consequential damages of any kind resulting from use or possession of the product. Instruction Manual/Bedienungsanleitung R10-R80D-PC 10/11 V 1.04 Page/Seite 17 of/von 39 10 Technical Data R80D-PC and R80D Motor Speed Range Nominal Rating Permanently generated direct –current motor 20 – 700 1/min 120 Watt input Short Term Overload 30% Torque over entire speed 80 Ncm range Capacity of Chuck 0.5 – 10.5 mm Viscosity of Medium Average values (water to wallpaper paste) Mains Voltage 200 -250 V, 50/60 Hz or 110 V +/- 10%, 50/60 Hz Permissible period of Continuous operation may require service intervals operation Permissible ambient + 5°C to 40°C temperature Diameter of support rod 13 mm Length of support rod 196 mm Weight 2.6 kg Dimensions 65 x 192 (incl. 55 mm chuck) x 120 mm (w x h x d) R50 and R50D Motor Speed Range Nominal Rating Permanently generated direct –current motor 50 – 1600 1/min 120 Watt input Short Term Overload 30% Torque over entire speed 55 Ncm range Capacity of Chuck 0.5 – 10.5 mm Viscosity of Medium Average values (water to wallpaper paste) Mains Voltage 200 -250 V, 50/60 Hz or 110 V +/- 10%, 50/60 Hz Permissible period of Continuous operation may require service intervals operation Permissible ambient + 5°C to 40°C temperature Diameter of support rod 13 mm Length of support rod 196 mm Weight 2.4 kg Dimensions 65 x 192 (incl. 55 mm chuck) x 120 mm (w x h x d) Instruction Manual/Bedienungsanleitung R10-R80D-PC 10/11 V 1.04 Page/Seite 18 of/von 39 R18 Motor Speed Range Nominal Rating Permanently generated direct –current motor 110 – 2000 1/min 120 Watt input Short Term Overload 30% Torque over entire speed 18 Ncm range Capacity of Chuck 0.5 – 10.5 mm Viscosity of Medium Aqueous fluids Mains Voltage 200 -250 V, 50/60 Hz or 110 V +/- 10%, 50/60 Hz Permissible period of Continuous operation may require service intervals operation Permissible ambient + 5°C to 40°C temperature Diameter of support rod 13 mm Length of support rod 196 mm Weight 2.2 kg Dimensions 65 x 192 (incl. 55 mm chuck) x 120 mm (w x h x d) 11 Disposal Please dispose of used instruments and defective components at your local recycling collection point. Prior to disposal, sort according to materials: metal, glass, plastic, etc. Also be sure to dispose of the packing material in an environmental-friendly manner. 12 Repairs When returning instruments for repair that have come into contact with hazardous substances, please: Fill in attached “Repair Return Form” Provide precise information on the relevant medium Take protective measures to ensure the safety of our receiving and maintenance personnel Mark the package as appropriate for hazardous materials. Instruction Manual/Bedienungsanleitung R10-R80D-PC 10/11 V 1.04 Page/Seite 19 of/von 39 12.1 Repair Return Form Important: 1. Calibration of the device is done automatically. 2. You will receive an estimate for the expected repair costs. 3. Repairs will be done after release. CONTACT/USER INFORMATION Contact: Fax No. Phone No. Email: Billing: Company Address Shipping: Company Address DEVICE INFORMATION Model Please describe all problems/malfunctions Serial No. Operating Conditions (please fill in if applicable) Ambient Temperature Humidity Load Volume Temperature in °C Sample Temperature Sample Description* Speed Viscosity Operating Time *NOTE: If the device was exposed to hazardous material, it must be decontaminated BEFORE returning it to CAT and an MSDS for hazardous material must be included with the device. RETURN SHIPPING UPS Air Parcel Post Collect** Other** **Your account number is required for UPS collect respectively the address and contact of your preffered forwarder if you choose any other transport means PACKAGING INSTRUCTIONS TO RETURN A CAT DEVICE FOR REPAIR Remove all accessories (e.g. homogenizer tools, stirring paddles) from the device Clean excess testing material off the device/accessory Include MSDS for all hazardous materials used with this device. Pack the device in its original box. If the box is not available, take care to wrap the device and accessoiries with enough material to support them. Do NOT send pedestal stand unless there is a problem with the upright rod, clamp or base. If there is a problem with the stand remove the upright rod from the base and individually wrap each item to avoid contact with the device. (Applicable for overhead stirrers and homogenisers) Pack the device and related items in a strong box for shipping. Mark the outside of the box with handling instructions Example: “Handle with care“ or “Fragile-Delicate Instrument” and send to: Ingenieurbüro CAT, M. Zipperer GmbH, Service Department, Etzenbach 16, D-79219 Staufen Instruction Manual/Bedienungsanleitung R10-R80D-PC 10/11 V 1.04 Page/Seite 20 of/von 39 13 Declaration of conformity Etzenbach 16,D-79219 Staufen Tel.: +49 (0) 7636 78030 Fax: +49 (0) 7636 780345 E-Mail: [email protected] Internet: http://www.cat-ing.de Konformitätserklärung Declaration of conformity Déclaration de conformité We declare under our sole responsibility that this product (see table) corresponds to the regulations 2006/95/EC DIN EN 61010-1; VDE 0411-1:2002-08; Amendment 1; VDE 0411-1 Amendment 1:2002-11; Amendment 2; VDE 0411-1 Amendment 2:2004-01 DIN EN 61010-2-051; VDE 0411-2-051:2004-07 2004/108/EC DIN EN 61326-1; VDE 0843-20-1:2006-10 DIN EN 61000-6-2; VDE 0839-6-2:2006-03 DIN EN 61000-6-4; VDE 0839-6-4:2007-09 DIN EN 61000-4-2; VDE 0847-4-2:2009-12 DIN EN 61000-4-3; VDE 0847-4-3:2008-06 DIN EN 61000-4-4; VDE 0847-4-4:2005-07 DIN EN 61000-4-5; VDE 0847-4-5:2007-06 DIN EN 61000-4-6; VDE 0847-4-6:2009-12 DIN EN 55011; VDE 0875-11:2010-5 DIN EN 55014-1; VDE 0875-14-1:2010-02 DIN EN 55014-2; VDE 0875-14-2:2009-06 2006/42/EC DIN EN ISO 12100-1:2004-04 DIN EN ISO 12100-2:2004-04 In the case of a modification of the unit which has not been agreed on with us, this declaration becomes null and void and the warranty expires. Ingenieurbüro CAT M. Zipperer GmbH Manfred Zipperer, CEO Type R 80, R80 PC 230 V + 10% 50/60Hz, 85 W R50, R50D 230 V + 10%, 50/60 Hz, 85 W TYPE R18, 230 V + 10%, 50/60 Hz, 85 W Instruction Manual/Bedienungsanleitung R10-R80D-PC 10/11 V 1.04 Page/Seite 21 of/von 39 Ingenieurbüro M. Zipperer GmbH Etzenbach 16 D-79219 Staufen Gebrauchsanleitung Rührwerk R18, R50, R50D, R80D und R80D-PC Instruction Manual/Bedienungsanleitung R10-R80D-PC 10/11 V 1.04 Page/Seite 22 of/von 39 1 Allgemeine Information Das Gerät wurde gem. DIN EN 61010 gefertigt und geprüft. Es hat das Werk in sicherheitstechnisch einwandfreiem Zustand verlassen. Um diesen Zustand zu erhalten und einen gefahrlosen Betrieb sicherzustellen, muss der Anwender die Hinweise und Warnvermerke beachten, die in dieser Gebrauchsanleitung enthalten sind. 2 Auspacken Gerät sorgfältig auspacken. Auf Beschädigungen achten und den Inhalt mit der Packliste vergleichen. Schäden oder Abweichungen von der Packliste sind unverzüglich dem Lieferanten anzuzeigen. 2.1 Lieferumfang Bitte überprüfen Sie den Verpackungsinhalt auf Schäden oder Abweichungen von der Packliste: oder oder oder oder oder oder oder oder oder 1 Rührmotor R18 1 Rührmotor R18, 115 V 1 Rührmotor R50 1 Rührmotor R50, 115 V 1 Rührmotor R50D 1 Rührmotor R50D, 115 V 1 Rührmotor R80D 1 Rührmotor R80D, 115 V 1 Rührmotor R80D-PC 1 Rührmotor R80D-PC, 115 V 1 Haltestange 1 Spannfutterschlüssel 1 Bedienungsanleitung (Art.Nr.: 60214-00) (Art.Nr.: 60214-01) (Art.Nr.: 60215-00) (Art.Nr.: 60215-01) (Art.Nr.: 60216-00) (Art.Nr.: 60216-01) (Art.Nr.: 60310-00) (Art.Nr.: 60311-01) (Art.Nr.: 60311-00) (Art.Nr.: 60311-01) (Art.Nr.: 50215-02) (Art.Nr.: 20) Zubehör und Rührflügel (optional) Stativ Kreuzklemme Kreuzklemme (Stahl) Flächenrührer Zentrifugalrührer Propellerrührer (Art.Nr.: 60491-00) (Art.Nr.: 60492-00) (Art.Nr.: 60492-50) (Art.Nr.: 8B009405) (Art.Nr.: 8B009211) (Art.Nr.: 8B009105) Weitere Rührwerkzeuge finden Sie in unserer Preisliste. Berührschutz (Art.Nr.: 20618-60) Zubehör für R80D-PC (optional) 9poliges SUB-D Kabel, 1.8 m lang USB-RS232 Adapter (Art.Nr.: 30275-51) (Art.Nr.: 30244-01) Instruction Manual/Bedienungsanleitung R10-R80D-PC 10/11 V 1.04 Page/Seite 23 of/von 39 Wichtiger Hinweis: Gebrauchsanleitung gründlich und aufmerksam lesen und dafür sorgen, dass auch jeder Betreiber des Gerätes die Anweisung vor Inbetriebnahme sorgfältig gelesen hat. Gebrauchsanleitung an einem für jedermann zugänglichen Ort aufbewahren. Gibt es nach dem Lesen der Gebrauchsanleitung noch Fragen zu Installation, Betrieb oder Wartung, wenden Sie sich bitte an Ingenieurbüro CAT M. Zipperer GmbH Etzenbach 16 D-79219 Staufen, Germany Tel. : 0 76 36 / 78 03 - 0 Fax : 0 76 36 / 78 03 - 45 Email [email protected] Die Geräte sind standardmäßig mit einem EURO-Stecker (DIN 49441 CEE 7/VII10/ 16 A 250 V) versehen. Für Nordamerika mit einem US-Norm Stecker (NEMA Pub.No.WDI1961 ASA C 73.1. 1961 Seite 8 15A 125V). Falls Sie das Gerät in einem Land mit anderem Stecker-System betreiben möchten, müssen Sie einen zugelassenen Adapter verwenden oder der mitgelieferte Stecker muss durch einen Fachmann ausgewechselt und durch einen für dieses Netz passenden und zugelassenen Stecker ersetzt werden. Achten Sie vor der Verbindung des Gerätes mit dem Stromnetz darauf, dass die Netzspannung mit den Angaben auf dem Typenschild übereinstimmt. Bei Lieferung ist das Gerät geerdet. Beim Auswechseln des Originalsteckers achten Sie bitte unbedingt darauf, dass Schutzleiter am neuen Stecker angeschlossen wird! Instruction Manual/Bedienungsanleitung R10-R80D-PC 10/11 V 1.04 Page/Seite 24 of/von 39 3 3.1 Sicherheitshinweise Allgemeine Sicherheitshinweise Wichtiger Hinweis Es ist die Aufgabe des Benutzers festzustellen, ob dieser Rührer für seinen Anwendungsfall geeignet ist. Sollten irgendwelche Zweifel aufkommen, so klären Sie diese mit Ihrem Händler oder direkt mit dem Hersteller ab. Achtung: Beachten Sie alle im Labor geltenden Sicherheits- und Unfallverhütungsvorschriften! Achtung: Verwenden Sie dieses Gerät nicht in unsicherer Umgebung und speziell nicht in explosionsgefährdender Umgebung. Lebensgefahr! Achtung: Ausschließlich unterwiesene Anwender dürfen das Gerät in Betrieb nehmen. Achtung: Achten Sie vor der Verbindung des Gerätes mit dem Stromnetz darauf, dass die Netzspannung mit den Angaben auf dem Typenschild übereinstimmt. Hinweis: Stellen Sie sicher, dass alle Sicherheitshinweise des Gerätes bzw. auf dem Gerät selbst, während des Betriebs deutlich zu sehen sind. Achtung: Öffnen Sie das Gerät nicht. Reparaturen sind eingewiesenen Service-Technikern vorbehalten. Der Netzstecker darf nur in eine Steckdose mit Schutzkontakt eingeführt werden. Die Schutzwirkung darf nicht durch eine Verlängerungsleitung ohne Schutzleiter aufgehoben werden. Jegliche Unterbrechung des Schutzleiters innerhalb oder außerhalb des Gerätes oder Lösen des Schutzleiteranschlusses kann dazu führen, dass das Gerät gefahrbringend wird. Absichtliche Unterbrechung ist nicht zulässig Zum sicheren Betrieb befestigen Sie das Gerät an einem Stativ. Das Gefäß, in dem gerührt werden soll, durch geeignete Spann- und Klemmvorrichtungen so festhalten, dass es gegen Rotation, Erschütterung und Bewegen geschützt ist. Zum Austausch von Rührelementen Gerät am Schalter ausschalten und Netzstecker ziehen. Starten Sie den Motor nicht, bevor der einwandfrei montierte Rührflügel in die Flüssigkeit tief genug eingetaucht ist. Instruction Manual/Bedienungsanleitung R10-R80D-PC 10/11 V 1.04 Page/Seite 25 of/von 39 3.3 Allgemeine Sicherheitshinweise (Fortsetzung) Sorgen Sie dafür, dass die Flüssigkeit nicht aus dem Behälter geschleudert werden kann. Benutzen sie ein geeignetes Gefäß, bei dem die Gefäßwände noch genügend über den Flüssigkeitsstand hoch ragen. Ein geeigneter Deckel ist als Spritzschutz sinnvoll. Wenn Sie mit Spritzern rechnen müssen, ziehen Sie Schutzkleidung an und tragen Sie eine Schutzbrille Achten Sie darauf, dass das Spannfutter nicht in das Rührgut eintaucht. Erläuterung der Sicherheitshinweise auf dem Gerät Warnung vor allg. Gefahren: Dieses Symbol weist darauf hin, dass die Betriebsanleitung unbedingt vor Inbetriebnahme des Gerätes vollständig gelesen und verstanden werden sollte. Eine unsachgemäße Handhabung kann den sicheren Betrieb des Gerätes und die Gesundheit des Anwenders gefährden. Erläuterung der Sicherheitshinweise in der Bedienungsanleitung Warnung vor allgemeinen Gefahren: Dieses Symbol weist darauf hin, dass die Bedienungsanleitung unbedingt vor Inbetriebnahme des Gerätes vollständig gelesen und verstanden werden sollte. Eine unsachgemäße Handhabung kann den sicheren Betrieb des Gerätes und die Gesundheit des Anwenders gefährden. Dieses Symbol hebt Verbote hervor, welche durch den Anwender unbedingt beachtet werden müssen! Jegliche Missachtung der nebenstehenden Verbote, kann die Funktionstüchtigkeit, sowie die Sicherheit des Anwenders erheblich beinträchtigen. Dieses Symbol hebt Hinweise hervor, welche durch den Anwender unbedingt beachtet werden sollten um einen sicheren Betrieb des Gerätes gewährleisten zu können. Achtung Brand- oder Explosionsgefahr Hinwies zur Reparatur / Wartung Hinweis zur Spannungsversorgung Instruction Manual/Bedienungsanleitung R10-R80D-PC 10/11 V 1.04 Page/Seite 26 of/von 39 4 Bestimmungsgemäßer Gebrauch Die Rührmotoren R18, R50, R50D sowie R80D-PC sind für den qualifizierten Gebrauch im Labor bestimmt. Sie eignen sich zum Rühren und Mischen von Flüssigkeiten wässriger bis mittlerer Viskosität. Zum bestimmungsgemäßen Gebrauch muss das Gerät an einem Stativ befestigt werden. Die Grundvoraussetzung für den dauerhaften Einsatz ist die Einhaltung der maximal zulässigen Umgebungstemperaturen (Temperatur und Feuchtigkeit) sowie eine korrosionsfreie Atmosphäre. 4.1 Allgemeine Beschreibung Die mikroprozessorgesteuerten Rührwerke R18, R50, R50D und R80Dpc eignen sich besonders für alle Anwendungen, bei denen Lösungen mittlerer Viskosität gerührt werden sollen. Der Einsatz der Geräte R50D und R80Dpc ist vor allem dort interessant, wo es darum geht, die Drehzahl von Rührvorgängen reproduzierbar einzustellen. Dies ist zum Beispiel der Fall, wenn Versuchsreihen nacheinander unter vergleichbaren Bedingungen durchgeführt werden sollen und wenn Parallelexperimente mit mehreren Rührwerken gleichzeitig vorgesehen sind. Eine weitere Anwendungsmöglichkeit für diese Geräte ist die Herstellung spezieller Lösungen, in denen bei Zugabe einzelner Komponenten kurzzeitig Viskositätsschwankungen auftreten. Der Drehzahlbereich der Geräte kann stufenlos eingestellt werden. R80D-PC hat einen Drehzahlbereich von 20 – 700 1/min, R50 und R50D können von 50 – 1600 1/min eingestellt werden. Der Drehzahlbereich des R18 liegt bei 110 – 2000 1/min. Die elektronische Nachführregelung gewährleistet eine genaue Steuerung sowie hohe Präzision, so dass bei Viskositätsschwankungen die eingestellte Drehzahl gehalten wird. 5 Aufbau 5.1 Anbringen der Haltestange Haltestange (A) M5 Schrauben (B) Schrauben Sie die Haltestange (A) in den dafür vorgesehenen Gewindebohrungen auf der Rückseite des Gerätes mit den beiden M5 Schrauben (B) fest. Ziehen Sie diese mit Hilfe eines geeigneten Sechskantschlüssels fest. Instruction Manual/Bedienungsanleitung R10-R80D-PC 10/11 V 1.04 Page/Seite 27 of/von 39 5.2 Montage des Rührgerätes an ein Stativ Kreuzklemme (C) RändelSchraube (D) 5.3 Kreuzklemme (C) am Stativ befestigen Haltestange (A) in die freie Öffnung der Kreuzklemme (C) einführen Rändelschraube D) solange festzeihen bis die Haltestange sicher befestigt ist. Anbringen des Rührflügels R50, R50D und R80D-PC sind mit einer 10,5 mm Hohlwelle ausgestattet. Zur Vermeidung von Korrosion ist das Spannfutter verchromt. Das Spannfutter nimmt jeden Rührflügel mit Wellendurchmesser bis 10 mm auf. Die mitgelieferte Haltestange (A) wird zur Befestigung des Rührers am Stativ (als optionales Zubehör erhältlich) benötigt. Rührmotor R18 hat keine Hohlwelle. Das Spannfutter nimmt jedoch ebenfalls Rührflügel mit Wellendurchmesser bis 10 mm (als optionales Zubehör erhältlich) auf. Spannfutter (E) SpannfutterBohrung (F) Spannfutterschlüssel (G) Rührflügel ins Spannfutter (E) bis zur gewünschten Position einführen. Spannfutter (E) mit Hilfe des Spannfutterschlüssels (G) festziehen. Einen besseren zentrischen Lauf erreichen Sie, indem Sie das Spannfutter (E) gleichmäßig über die 3 Bohrungen (F) mit dem Spannfutterschlüssel (G) fest anziehen. Durch eine Längsverschiebung des Rührwerkzeugs bei gelöstem Spannfutter (E) können Sie die Eintauchtiefe des Rührwerkzeugs einstellen. Instruction Manual/Bedienungsanleitung R10-R80D-PC 10/11 V 1.04 Page/Seite 28 of/von 39 5.4 Montage des Rührwellenschutzes Befestigungsstange für Rührwellenschutz (H) Befestigungsschrauben (J) Aussparungen (K) Schraube (L) Rührwellenschutz (M) 6 Verwenden Sie zum Schutz vor Verletzungen beim Arbeiten mit dem Gerät einen Rührwellenschutz. Montieren Sie die Befestigungsstange (H) des Rührwellenschutzes mit Hilfe einer Kreuzklemme (z.B. Art.Nr.60492-00) vor dem Bohrfutter des Gerätes am Stativ. Jetzt führen Sie die Aussparungen (K) an die Befestigungsschrauben (J) und drehen den Rührwellenschutz bis zum An-schlag der Aussparungen nach links. Die Höhe der beiden Halbschalen können sie mit Hilfe der Schraube (L) verstellen. Überprüfen Sie vor jeder Inbetriebnahme und in regelmäßigen Abständen den festen Sitz des Rührwellenschutzes. Die Position des Rührwellenschutzes darf nur im Stillstand und mit gezogenem Netzstecker verändert werden. Bedienung Achtung: Achten Sie vor der Verbindung des Gerätes mit dem Stromnetz darauf, dass die Netzspannung mit den Angaben auf dem Typenschild übereinstimmt. Achtung: Verwenden Sie dieses Gerät nicht in unsicherer Umgebung und speziell nicht in explosionsgefährdender Umgebung. Lebensgefahr! Achtung: Ziehen Sie den Netzstecker als Schutz gegen unbeabsichtigtes Benutzen wenn immer Sie Ihre Arbeit unterbrechen oder beendet haben Achtung: Starten Sie den Motor immer mit der niedrigsten Geschwindigkeit und erhöhen Sie dann die Geschwindigkeit entsprechend der von Ihnen gewünschten Arbeitsintensität. Instruction Manual/Bedienungsanleitung R10-R80D-PC 10/11 V 1.04 Page/Seite 29 of/von 39 6.1 Beschreibung der Bedienelemente des R18 und R50 Grüne LED (2) Rote LED (3) Rote LED (3) Drehzahl- (4) Knopf DrehzahlKnopf (4) EIN/AUS Schalter (5) 6.2 Beschreibung der Bedienelemente des R50D und R80D-PC Anzeige (1) Grüne LED (2) Rote LED (3) Rote LED (3) DrehzahlKnopf (4a) DrehzahlKnopf (4a) EIN/AUS Schalter (5) Diese Rührwerke haben zwei unabhängige Überlast-Sicherungen: 1) Wird das maximal zulässige Drehmoment überschritten, so leuchtet die rote LED (overload) und die Elektronik steuert die Leistung zurück. Sobald die Überforderung behoben ist, regelt die Elektronik auf die Soll-Drehzahl zurück und die rote LED erlischt. Bei anhaltender Überlastung und der dadurch erfolgten Zurück-Regelung der Drehzahl bis U/min < 20 wird der Motor abgeschaltet. Nach der Beseitigung der Überlast und dem aus- und wiedereinschalten des Rührers, ist die normale Funktion wieder hergestellt. 2) Erfolgt eine Überlastung im Dauerbetrieb durch Überhitzen des Motors oder in sehr heißer Umgebung, so leuchtet die rote LED (overload) und die Elektronik regelt die Leistung zurück. Bei anhaltender Überhitzung schaltet die Elektronik den Motor aus. Nach erfolgter Abkühlung und dem Aus- und Wiedereinschalten des Rührers, ist die normale Funktion wieder hergestellt. Instruction Manual/Bedienungsanleitung R10-R80D-PC 10/11 V 1.04 Page/Seite 30 of/von 39 6.2.1 Beschreibung der Rückseite des R80D-PC 9-pin SUB- D Anschluss RS232-Schnittstelle(6) 6.3 Betrieb R18, R50 und R50D Achtung: Achten Sie vor der Verbindung des Gerätes mit dem Stromnetz darauf, dass die Netzspannung mit den Angaben auf dem Typenschild übereinstimmt. Wählen Sie das für Ihren Anwendungszweck geeignete Rührwerkzeug und spannen Sie es in das Spannfutter (E) fest ein. Einen besseren zentrischen Lauf erreichen Sie, indem Sie das Spannfutter (E) gleichmäßig über die 3 Bohrungen (F) mit dem Spannfutterschlüssel (G) fest anziehen. Stellen Sie den Drehknopf (4) bei R18/R50 oder (4a) bei R50 D an den linken Anschlag (Minimaldrehzahl). Stecken Sie den Netzstecker in eine geerdete Steckdose Tauchen Sie den Rührflügel in das Medium ein Schalten Sie das Rührwerk mit dem Schalter (5) ein Wählen Sie dann die gewünschte Drehzahl. Instruction Manual/Bedienungsanleitung R10-R80D-PC 10/11 V 1.04 Page/Seite 31 of/von 39 6.4 Betrieb R80D-PC Achtung: Achten Sie vor der Verbindung des Gerätes mit dem Stromnetz darauf, dass die Netzspannung mit den Angaben auf dem Typenschild übereinstimmt. Wählen Sie das für Ihren Anwendungszweck geeignete Rührwerkzeug und spannen Sie es in das Spannfutter (E)fest ein. Einen besseren zentrischen Lauf erreichen Sie, indem Sie das Spannfutter (E) gleichmäßig über die 3 Bohrungen (F) mit dem Spannfutterschlüssel (G) fest anziehen. Stellen Sie den Drehknopf (2) bei R18/R50 oder (3) bei R50 D an den linken Anschlag (Minimaldrehzahl). Stecken Sie den Netzstecker in eine geerdete Steckdose Tauchen Sie den Rührflügel in das Medium ein Schalten Sie das Rührwerk mit dem Schalter (1) ein Wählen Sie dann die gewünschte Drehzahl. Schließen Sie das serielle Kabel an das Gerät an. Drehen Sie den Drehknopf (3) bei R80Dpc bis zum linken Anschlag (Minimaldrehzahl). Schalten Sie das Rührwerk mit dem Schalter (1) ein und jetzt können Sie das Gerät über die serielle Schnittstelle steuern Instruction Manual/Bedienungsanleitung R10-R80D-PC 10/11 V 1.04 Page/Seite 32 of/von 39 6.5 Serielle Schnittstelle (betrifft nur R80Dpc)ab Version 3.1 (11.05.2007) 6.5.1 Pinausgang des I/O Anschlusses: Pinbelegung des 9-pin SUB-D Anschlusses (10) an der Rückseite des Gerätes: RS232 Steuersignale Pin Nummer Beschreibung 1 n.c. 2 TxD (Sendeleitung) RxD (Empfangsleitung) n.c. 3 4 5 6 GND (Signal Masse) n.c. 7 n.c. 8 n.c. 9 n.c. 1 6 5 9 Pinbelegung der I/O Buchse (Draufsicht - 9 pin Sub-D Buchse) Einstellungen: Baudrate: 1200 Data bits: 8 bit Parity: none Stopbits: 1 Befehlsatz: Version abfragen: Betriebsart umschalten: Drehzahl setzen: Drehzahl lesen: Geräteadresse setzen: 0,RTY,1 0,WSM,1 0,WSE,xxx 0,RSE,1 0,WSA,x (1 – PC, 0 – manuell) (“xxx” = 20 bis 700) (“x” = 1 bis 8) Instruction Manual/Bedienungsanleitung R10-R80D-PC 10/11 V 1.04 Page/Seite 33 of/von 39 6.5.2 RS232 Programmierungsbeispiele: Beispiel 1: Drehzahl setzen. 1,WSM,1 1,WSE,100 ;PC-Modus ;programmiert Drehzahl, (Geräteadresse „1“) Das Gerät sendet danach folgende Zeichenkette zurück zum PC: 1,HS,OK ;Befehl akzeptiert und ausgeführt Beispiel 2: Drehzahl lesen 1,WSM,1 1,RSE,1 ;PC-Modus ;Abfrage der Drehzahl (Geräteadresse „1“) Das Gerät sendet danach folgende Zeichenkette zurück zum PC: 1,HS,OK,100 7 ; Befehl akzeptiert und ausgeführt; 100 ist die aktuelle Drehzahl Wartung Achtung: Öffnen Sie das Gerät nicht. Reparaturen sind eingewiesenen Service-Technikern vorbehalten. Das Gerät ist bis auf die Motorkohlen wartungsfrei, es unterliegt nur der natürlichen Alterung und statistischen Ausfallrate der Bauelemente. Reparaturen sollten nur im Hause CAT durchgeführt werden. Senden Sie deshalb defekte Geräte direkt an CAT oder an Ihre zuständige Vertretung. Achtung: Vor Öffnen des Gerätes Netzstecker ziehen! Achtung: Im Motor unterliegen die Kohlen einem natürlichen Verschleiß. Das Auswechseln der Motorkohlen kann vom Anwender selbst durchgeführt werden. 1. Ziehen sie hierzu die schwarze Kappe über dem Kontakt seitlich am Motor ab. 2. Nun biegen Sie die Metall-Lasche auf und entnehmen die Feder. 3. Mit Hilfe eines kleinen Schraubendrehers drücken Sie die Lasche von der Kohle herunter und entnehmen diese. 4. Jetzt können sie die Kohle wechseln. Setzen Sie die Feder wieder auf, die Lasche wieder zurück biegen und danach die Kappe wieder über den Kontakt schieben. Instruction Manual/Bedienungsanleitung R10-R80D-PC 10/11 V 1.04 Page/Seite 34 of/von 39 Sollte der Zahnriemen ausgewechselt werden müssen, gehen Sie wie folgt vor: Wichtiger Hinweis: Folgendes gilt nicht für R80D und R80D-PC!!! 1. Kunststoffhaube auf der Unterseite des öffnen. 2. Den defekten Zahnriemen vom großen Zahnrad herunterziehen. 3. Neuen Zahnriemen zuerst am kleinen Motorzahnrad anlegen; danach am großen Zahnrad anlegen und durch Drehen des großen Zahnrades aufziehen. Alle Lager des Rührwerks sind ausreichend geschmiert, so dass bei sachgemäßer Behandlung keine Wartung erforderlich ist. Sollten trotzdem Störungen auftreten, bitten wir um Einsendung des Gerätes an CAT oder an die zuständige Vertretung. 8 Abbau Transport und Lagerung 8.1 Abbau 1. Schalten Sie das Gerät ab 2. ziehen Sie den Netzstecker aus der Steckdose. 8.2 Entfernen Sie bitte Kolben, Behälter oder andere Gerätschaften um das Rührwerk. Nehmen Sie das Rührwerkzeug aus dem Gerät. Hierzu lösen Sie das Spannfutter. Lockern Sie dann die Kreuzklemme und entfernen das Gerät aus dieser. Entfernen Sie die Haltestange. Jetzt können Sie das Gerät aus dem Arbeitsbereich entfernen. Transport und Lagerung Vor dem Transport: Schalten Sie das Gerät aus und gehen Sie wie unter Punkt 8.1 beschrieben vor. Verpacken Sie Gerät und Zubehör in den Originalkarton oder einen anderen geeigneten Karton, um das Gerät während des Transports zu schützen. Verschließen Sie den Karton mit Klebeband. Lagern Sie das Gerät in einer trockenen Umgebung. Beachten Sie bitte die angegebenen Umgebungsbedingungen wie Temperatur und Luftfeuchtigkeit. Setzen Sie das Gerät keinen mechanischen Erschütterungen oder Vibrationen während des Transports aus. Sollte der Originalkarton nicht mehr zur Verfügung sein markieren Sie die Verpackung wie folgt: Glassymbol (Vorsicht zerbrechlich) Regenschirm (trocken aufbewahren) Inhalt (Aufstellung des Inhalts) Umgebungsbedingung: Max. Umgebungstemperatur : RT bis +40°C Max. Feuchtigkeit: 80% Instruction Manual/Bedienungsanleitung R10-R80D-PC 10/11 V 1.04 Page/Seite 35 of/von 39 9 GARANTIE UND HAFTUNGSAUSSCHLUSS Der Hersteller verpflichtet sich dem Käufer gegenüber, dieses Produkt nach Wahl des Herstellers entweder durch Reparatur oder nach durch Austausch jeden Fehler in Material oder Verarbeitung zu beheben, der sich innerhalb von 24 Monaten nach Auslieferung dieses Produktes herausstellt. Für den Fall des Austausches wird die Garantie weiterhin bis zum Ende der 24monatigen Laufzeit ab Kaufdatum laufen. Für den Kundendienst ist der Händler oder der Hersteller einzuschalten. Diese Garantie wird nicht gewährt, wenn der Defekt oder die Fehlfunktion durch Unfall, Nachlässigkeit, unsachgemäßen Gebrauch, unsachgemäßen Service und andere Gründe verursacht wird, die nicht auf fehlerhafte Materialien oder Verarbeitung zurückzuführen sind. Sämtliche Garantie- und Gewährleistungsansprüche sind beschränkt auf die fachgerechte und sachgemäße Anwendung des Gerätes unter Beachtung der allgemeinen Sicherheitsvorschriften und dieser Gebrauchsanleitung. Der Hersteller ist zu keinerlei anderen Leistungen als den in dieser Garantieerklärung enthaltenen verpflichtet. Insbesondere sind Personen- und Sachschäden, die als Folge von fehlerhaften Teilen oder sonstigen Funktionsfehlern auftreten, von der Haftung ausgeschlossen. Die Verpflichtung des Herstellers ist im Umfang begrenzt auf die Reparatur oder den Austausch von fehlerhaften Teilen. Der Hersteller ist unter keinen Umständen zu Schadensersatz verpflichtet für Folgeschäden jeder Art, die sich aus der Verwendung und dem Besitz dieses Produktes ergeben. 10 Technische Daten R80D, R80D-PC Motor Drehzahlbereich Leistungsaufnahme Drehmoment über den gesamten Drehzahl-bereich Spannfutter-Spannbereich Viskosität des Mediums Netzspannung Zulässige Einschaltdauer Zulässige Umgebungstemperatur Ø der Haltestange Länge der Haltestange Gewicht Abmessungen Permanent erregter Gleichstrommotor 20 – 700 1/min 120 Watt Kurzzeitig 30% Überlastung 80 Ncm 0.5 – 10.5 mm Mittlere Werte (bis Kleister) 200 -250 V, 50/60 Hz or 110 V +/- 10%, 50/60 Hz 100%, Dauerbetrieb erfordert Service-Intervalle + 5°C to 40°C 13 mm 196 mm 2.6 kg 65 x 192 (inkl. 55 mm Spannfutter) x 120 mm (B x H x T) Instruction Manual/Bedienungsanleitung R10-R80D-PC 10/11 V 1.04 Page/Seite 36 of/von 39 R50 and R50D Motor Drehzahlbereich Leistungsaufnahme Drehmoment über den gesamten Drehzahl-bereich Spannfutter-Spannbereich Viskosität des Mediums Netzspannung Zulässige Einschaltdauer Zulässige Umgebungstemperatur Ø der Haltestange Länge der Haltestange Gewicht Abmessungen Permanent erregter Gleichstrommotor 50 – 1600 1/min 120 Watt , kurzzeitig 30% Überlastung 55 Ncm 0.5 – 10.5 mm Mittlere Werte (bis Kleister) 200 -250 V, 50/60 Hz or 110 V +/- 10%, 50/60 Hz 100%, Dauerbetrieb erfordert Service-Intervalle + 5°C to 40°C 13 mm 196 mm 2.4 kg 65 x 192 (inkl. 55 mm Spannfutter) x 120 mm (B x H x T) R18 Motor Drehzahlbereich Leistungsaufnahme Drehmoment über den gesamten Drehzahl-bereich Spannfutter-Spannbereich Viskosität des Mediums Netzspannung Zulässige Einschaltdauer Zulässige Umgebungstemperatur Ø der Haltestange Länge der Haltestange Gewicht Abmessungen Permanent erregter Gleichstrommotor 110 – 2000 1/min 120 Watt, kurzzeitig 30% Überlastung 18 Ncm 0.5 – 10.5 mm Dünnflüssige Medien (wässrig) 200 -250 V, 50/60 Hz or 110 V +/- 10%, 50/60 Hz 100%, Dauerbetrieb erfordert Service-Intervalle + 5°C to 40°C 13 mm 196 mm 2.2 kg 65 x 192 (incl. 55 mm Spannfutter) x 120 mm (B x H x T) 11 Entsorgung Schadhafte und/oder entsorgte elektrische oder elektronische Geräte müssen an den dafür vorgesehenen Recycling-Stellen abgegeben werden. 12 Reparaturen Bitte sorgen Sie bei der Anlieferung von Reparaturgeräten, die mit gefährlichen Arbeitsstoffen in Berührung gekommen sind dafür: Möglichst genaue Stoffangabe des Mediums Schutzmaßnahmen zum sicheren Umgang für unser Annahme- und Wartungspersonal Kennzeichnung der Verpackung gemäß der Gefahrenstoffverordnung Instruction Manual/Bedienungsanleitung R10-R80D-PC 10/11 V 1.04 Page/Seite 37 of/von 39 12.1 Rücksendeformular Wichtig: 4. 5. 6. Kalibrieren des Instruments wird automatisch durchgeführt. Sie erhalten einen Kostenvoranschlag für die zu erwartenden Reparaturkosten. Reparaturen werden bei Freigabe durchgeführt. KONTAKT Ansprechpartner: Fax Nr. Tel. Email: Rechnungsanschrift: Firma Adresse Lieferanschrift: Firma Adresse GERÄTEINFORMATION Modell Problem-/Fehrlerbeschreibung Serien- Nr. Betriebsbedingungen (bitte ausfüllen, wenn zutreffend) Umgebungstemperatur Rel. Feuchtigkeit Zulade-Gewicht Volumen Temperatur in °C Probentemperatur Probenbeschreibung* Drehzahl Viskosität Laufzeit *HINWEIS: Sollte das Gerät mit gefährlichen Stoffen in Berührung gekommen sein, muss es vor dem Versand an CAT dekontaminiert werden. Fügen Sie der Rücklieferung die entsprechenden Sicherheitsdatenblätter bei . RÜCKSENDUNG UPS Paketpost Andere** **Bitte nennen Sie uns Ihren Spediteur, Anschrift, Sachbearbeiter/in sowie dessen/deren Telefonnummer VERPACKUNGSHINWEISE Bitte entfernen Sie sämtliches Zubehör. (Z.B. Dispergierwerkzeuge, Rührpaddel, etc.) Reinigen Sie das Gerät und Zubehör von Probematerial-Rückständen Legen Sie dem Gerät die entsprechenden Sicherheitsdatenblätter für eventuell benutzte gefährliche Stoffe bei. Verpacken Sie das Gerät in die Originalverpackung. Sollte diese nicht mehr vorhanden sein, achten Sie darauf, dass das Gerät sowie Zubehör ausreichend geschützt verpackt wird. Plattenstativ und Halteklammer bitte nicht einschicken. Diese senden Sie nur zurück, wenn sie beschädigt sind. Um Transportschäden zu vermeiden, achten Sie bitte darauf, dass Gerät und Zubehör individuell verpackt werden. Verpacken Sie das Gerät mit dem Zubehör in einen ausreichend starken Versandkarton. Kennzeichnen Sie dessen Außenseite mit Beispiel: “Vorsicht” oder “Vorsicht-zerbrechlich” und schicken Sie die Waren an: Ingenieurbüro CAT, M. Zipperer GmbH, Service Department, Etzenbach 16, D-79219 Staufen Instruction Manual/Bedienungsanleitung R10-R80D-PC 10/11 V 1.04 Page/Seite 38 of/von 39 CE-Konformitätserklärung Etzenbach 16,D-79219 Staufen Tel.: +49 (0) 7636 78030 Fax: +49 (0) 7636 780345 E-Mail: [email protected] Internet: http://www.cat-ing.de Konformitätserklärung Declaration of conformity Déclaration de conformité Wir erklären in alleiniger Verantwortung, dass dieses Produkt (siehe Tabelle) den Bestimmungen der Richtlinien entspricht und mit den folgenden Normen oder normativen Dokumenten übereinstimmt: 2006/95/EG DIN EN 61010-1; VDE 0411-1:2002-08; Berichtigung 1; VDE 0411-1 Berichtigung 1:2002-11; Berichtigung 2; VDE 0411-1 Berichtigung 2:2004-01 DIN EN 61010-2-051; VDE 0411-2-051:2004-07 2004/108/EG DIN EN 61326-1; VDE 0843-20-1:2006-10 DIN EN 61000-6-2; VDE 0839-6-2:2006-03 DIN EN 61000-6-4; VDE 0839-6-4:2007-09 DIN EN 61000-4-2; VDE 0847-4-2:2009-12 DIN EN 61000-4-3; VDE 0847-4-3:2008-06 DIN EN 61000-4-4; VDE 0847-4-4:2005-07 DIN EN 61000-4-5; VDE 0847-4-5:2007-06 DIN EN 61000-4-6; VDE 0847-4-6:2009-12 DIN EN 55011; VDE 0875-11:2010-05 DIN EN 55014-1; VDE 0875-14-1:2010-02 DIN EN55014-2; VDE 0875-14-2:2009-06 2006/42/EG, 93/68/EWG DIN EN ISO 12100-1:2004-04 DIN EN ISO 12100-2:2004-04 Bei einer nicht mit uns abgestimmten Änderung des Gerätes verliert diese Erklärung ihre Gültigkeit und die Gewährleistung erlischt. Ingenieurbüro CAT M.Zipperer GmbH Manfred Zipperer Geschäftsführer Type R 80, R80 PC 230 V + 10% 50/60Hz, 85 W R50, R50D 230 V + 10%, 50/60 Hz, 85 W TYPE R18, 230 V + 10%, 50/60 Hz, 85 W Instruction Manual/Bedienungsanleitung R10-R80D-PC 10/11 V 1.04 Page/Seite 39 of/von 39