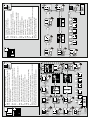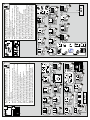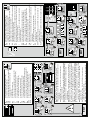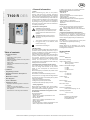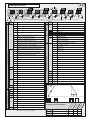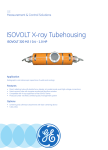
1
WN 905005-35-6-50 03/14 D Montage- und Bedienungsanleitung (Original) T 100 R DES Softwarerelease 1.05 1A2 GB Mounting and operating instructions FR Notice de pose et d'utilisation ES Instrucciones de montaje y de manejo NL Montage- en bedieningshandleiding P Instruções de montagem e manual de operação I Istruzioni per il montaggio e l'uso DK Monterings- og betjeningsvejledning SE Monterings- och driftinstruktion N Monterings- og bruksveiledning CZ Návod k montáži a obsluze FIN Asennus- ja käyttöohje PL Instrukcja montażu i obsługi H Szerelési- és kezelési útmutató BL Ръководство за монтаж и експлоатация EST Paigaldus- ja kasutusjuhend SLO Navodila za montažo in uporabo 182 mm 6mm T 20 2 3 242 mm 13 1400 mm 0 2 1 D Anschlussübersicht GB Overview of connections ES Vista general de las conexiones FR Schéma de connexion NL Aansluitklemmenschema PT Vista geral da ligação I Istruzioni per il montaggio e l'uso DK Koblingsoversigt SE Anslutningsöversikt N Koblingsoversikt CZ Přehled připojení FIN Liitännän yleiskuva PL Przegląd przyłączy H Bekötési rajz BG Преглед на свързването EST Ülevaade ühendusskeemist SLO Pregled priključkov 24V DC 700 mA 3a 3 X1 T °C N 1 2 3 W 1.2 1.1 1.3 1.1 1.4 1.1 1.1 PE X3 4 5 6 V U PE U1 V1 L1 L2 L3 N W1 PE M 3~ 3 x 400V, N, PE 4 N U2 V2 W2 3 W 4a PE PE 2 V 1 U X1 N G1 Y1 - PE V X3 ~ 1.2 1.1 1.3 1.1 1.4 1.1 1.1 ~ + W U PE L1 L2 L3 U1 V1 PE W1 M 3~ 3 x 230V, PE U2 V2 W2 4b NC NO NO J1 X8a 1.1 8a.1 4 1.1 1.2 8a.2 2 1.2 1.3 8a.3 1 1.3 1.4 X8b 3 1.4 5 J1 1- GND J9 2- RS485 A 1 2 3 3- 24V DC 4- 12V DC 5- 24V DC 4 5 6 6- RS485 B X4 4.1 1.1 4.2 1.1 P 8b.1 N 6 8b.2 6a 3 2 1 4 PE 8b.3 8b.4 J1 1.1 5 1.2 1.3 1.4 6b J1 1.1 1.2 1.3 1.4 6c X7 W V U N PE 6d X8b J8 X2 Loop 8.1 8.2 8.3 8.4 8.5 8.6 L N 24V- 8.1 GND 8.2 24V- 8.3 GND 8.4 J8 J8 8 7 6 5 8.1 8.2 8.3 8.4 8.5 8.6 4 8.1 8.2 8.3 8.4 8.5 8.6 Detector 230V 9 10 11 1 2 7a 1 3 2 4 Motion Detector 3 7b 7c X8b GN 24V- 8.1 BN GND 8.2 J2 8.3 2.1 +24V 8.4 2.2 GND GN 24V- BN GND PK 2.3 24V GN PK 2.4 GND BN Radar 8.1 8.2 8.3 8.4 8.5 8.6 VT PK VT BK IR J8 VT WH YE GY YE YE WH WH 8 J3 N S YE GY GN WH BN g b w ST+ ST SK/g SK/w SK/b w g b ST g b w WH 3.1 WH GN 3.2 GN BN 3.3 8K2 3.1 J3 3.2 3.3 BN J4 YE 4.1 GY 4.2 8K2 4.3 4.4 9 X8a BN BK BU BN BK BU +24V Test GND +24V GND 8.1 8.2 8.3 +24V J3 Test GND BN BK BK BU J2 BN 2.1 +24V BU 2.2 GND BK BK 2.3 2.4 8K2 3.1 9a J3 3.2 3.3 9b WH 3.1 GN 3.2 BN 3.3 LS 2 LS 5 LS 5 LS 2 SICK WL280 -S135 X8 1 1 2 1 2 +V -V NO C NC 2 8.6 8.7 J2 J2 2.1 2.1 2.2 2.1 +24V 2.2 GND 2.3 WH 2.4 11b 2.4 11c Anti Crash Detector LS 5 BK 2.3 2.4 J2 BU 2.2 2.3 11a BN J4 Anti Crash Detector ELS 300 NO 4.1 21 4.2 LS 5 4.3 22 4.4 1 2 13 +V -V NO C NC J6 6.1 BN SIG 6.2 BK GND 6.3 +24V J6 6.1 0 6.2 BU J7 I 7.1 6.3 7.2 12a 14 12b 10b X2 N X8 L 24V 2.1 2.2 1.1 X5 X6 5.1 5.2 5.3 1.1 6.1 6.2 6.3 1.1 GND 8.6 8.7 X5 X6 5.1 5.2 5.3 1.1 6.1 6.2 6.3 1.1 red 230V max. 2A 230V max. 2A green 15 16a 24V max. 200mA 24VDC max. 1A 24V 10b 16b J7 DOOR 1 J7 7.1 DOOR 2 7.1 7.2 7.2 X5 X6 X5 X6 5.1 5.2 5.3 1.1 6.1 6.2 6.3 1.1 5.1 5.2 5.3 1.1 6.1 6.2 6.3 1.1 16c J7 DOOR 1 J7 7.1 J7 7.1 7.2 16d DOOR 2 DOOR 3 7.1 7.2 7.2 X5 X6 X5 X6 X5 X6 5.1 5.2 5.3 1.1 6.1 6.2 6.3 1.1 5.1 5.2 5.3 1.1 6.1 6.2 6.3 1.1 5.1 5.2 5.3 1.1 6.1 6.2 6.3 1.1 1x 1x 1x 1x EXIT 1x 5x 1x 1x 5x 5 sec. D Einstellungen obere [30] und untere [31] Torendlage GB Setting the door's top [30] and bottom [31] end-of-travel position FR Réglage de la position de fin de course supérieure [30] et inférieure [31] de la porte ES Configurar la posición superior [30] e inferior [31] final de la puerta NL Instellen van de bovenste [30] / onderste [31] eindpositie van de deur PT Ajuste da posição final superior [30] / inferior [31] I Impostazione posizione finale superiore [30] / inferiore [31] del portone DK Indstilling øverste [30] / nederste [31] port-stoppunkt SE Inställning av portens övre [30] / undre [31] slutposition N Innstilling øvre [30] / nedre [31] portendestilling CZ Nastavení horní [30] / spodní [31] koncové polohy vrat FIN Oven ylä- [30] ja alaraja-asennon [31] säädöt PL Nastawy górnego [30] i dolnego [31] położenia krańcowego bramy H A kapu felső [30] és alsó [31] végállásának beállítása BG Настройки на горно [30] и долно [31] крайно положение на порталната врата EST Ukse ülemise [30] ja alumise [31] lõppasendi seadistamine SLO Nastavitev zgornjega [30] in spodnjega [31] končnega položaja vrat 1x 1x 5x 1x 1/2 2x 1/2 1x 1x EXIT D Einstellen 1/2 Toröffnung [32] GB Setting the door to the half-open position [32] FR Réglage de la 1/2 ouverture de porte [32] ES Configuración de ½ apertura de la puerta [32] NL Instellen deur half open [32] PT Ajuste da abertura parcial do portão (½) [32] I Impostazione apertura portone a metà [32] DK Indstilling ½ portåbning [32] SE Inställning av en ½ portöppning [32] N Innstilling ½ portåpning [32] CZ Nastavení ½ otevření vrat [32] FIN Oven säätö [32] puoleksi auki PL Nastawianie ½ otwarcia bramy [32] H Félig nyitott pozíció [32] beállítása BG Настройка за 1/2 отваряне на порталната врата [32] EST 1/2 avatud ukse seadistamine [32] SLO Nastavitev 1/2 odprtosti vrat [32] - ~80mm 1x EXIT 3x 5x 1x 1x + ~80mm - ~80mm 1x 5x - ~ max. 80mm + ~ max. 80mm * 1x 1x D Feineinstellung Torendlage oben [33] und unten [34] GB Fine adjustment of the top [33] and bottom [34] end-of-travel position FR Réglage précis de la position de fin de course supérieure [33] et inférieure [34] ES Configuración precisa de la posición final superior [33] e inferior [34] NL Fijn instellen van de bovenste [33] / onderste [34] eindpositie van de deur PT Ajuste preciso da posição final superior [33] / inferior [34] I Microregolazione posizione finale superiore [33] / inferiore [34] del portone DK Finindstilling øverste [33] / nederste [34] stoppunkt SE Fininställning av den övre [33] / undre [34] slutpositionen N Fininnstilling øvre [33] / nedre [34] endestilling CZ Přesné nastavení horní [33] / spodní [34] koncové polohy FIN Oven ylä- [33] ja alaraja-asennon [34] hienosäätö PL Nastawa dokładna położenia krańcowego bramy u góry [33] i u dołu [34] H A kapu felső [33] és alsó [34] végállásának finombeállítása BG Фина настройка на крайно положение на порталната врата горе [33] и долу [34] EST Ukse ülemise [33] ja alumise lõppasendi [34] täpne seadistamine SLO Fina nastavitev končnega položaja vrat zgoraj [33] in spodaj [34] + ~80mm - ~80mm - ~ max. 80mm + ~ max. 80mm * 1x + ~80mm - ~80mm + ~80mm 2 4 4 2 4 2 2 4 8k2 1x OSE 1x 5x 1x 1x 1x 5x 1x 1x 5x D Auswahl Schließkante J3 [35] / Auswahl Lichtschranke J4 [36] GB Selecting the closing edge J3 [35] / Selecting the photocell J4 [36] FR Sélection du profil de sécurité optique J3 [35] et de la barrière photoélectrique J4 [36] ES Selección de los cantos de cierre J3 [35] y de la barrera fotoeléctrica [36] NL Keuze van de sluitkant J3 [35] / Keuze van de fotocel J4 [36] PT Selecção do perfil de fecho [35]/ da barreira fotoeléctrica [36] I Selezione del bordo di chiusura [35] / della fotocellula [36] DK Valg af lukkekant J3 [35] / Valg af fotocelle J4 [36] SE Val av tillslutningskant [35] / Val av fotocell [36] N Valg av lukkekant [35] / Valg av fotocelle [36] CZ Výběr uzavírací hrany [35] / Výběr optické závory [36] FIN Sulkureunan J3 [35] valinta/valokennon J4 [35] valinta PL Wybór krawędzi zamykającej J3 [35]/ Wybór zapory świetlnej J4 [36] H A záró élvédelem J3 [35] / fénysorompó J4 [36] kiválasztása BG Избор на затварящ кант J3 [35] / Избор на фотоклетка J4 [36] EST Alumise serva J3 valimine [35] / fotoelemendi J4 valimine [36] SLO Izbira zapiralnega rova J3 [35] / Izbira svetlobne pregrade J4 [36] EXIT 1x 8k2 OSE * * EXIT 1x 1x max.~150mm 1x 7x 1x 5x 1x max. 50mm Abschaltposition Schließkantensicherheit [37] Cut-off point of the safety edge [37] Position de désactivation de la sécurité de contact optique [37] Posición de desconexión de la protección contra accidentes [37] Afschakelpositie sluitkant [37] Posição de corte da protecção do perfil de fecho [37] Posizione di disattivazione costola di sicurezza [37] Udkoblingsposition lukkekantsikring [ 37] Frånkopplingsposition slutkantssäkring [37] Utkoblingsstilling lukkekantsikring [37] Pozice vypnutí jištìní uzávìrových hran [37] Turvareunavarmistimen katkaisukohta [37] Pozycja wyłączania bezpieczeństwa krawędzi zamykającej A záró élvédelem leállítási pontjának beprogramozása [37] Позиция на изключване на затварящия кант [37] Alumise turvaserva väljalülitamise asend [37] Položaj za izklop Varnost zapiralnega roba [37] - ~ max. 50mm + ~ max. 50mm D Abschaltung > 50mm - En12543 / EN2445 nicht erfüllt, Verlust Zulassung GB Cut-off > 50 mm - En12543 / EN2445 not met, loss of approval FR Désactivation > 50 mm - EN12543 / EN2445 non satisfaites, perte de l'homologation ES Desconexión > 50 mm; no se cumple la norma En12543 / EN2445, pérdida de la autorización NL Afschakelen > 50 mm – niet voldaan aan EN12543/EN2445, niet meer goedgekeurd PT Corte > 50 mm – Norma EN12543/EN2445 não satisfeita, perda de homologação I Disattivazione > 50 mm - EN12543/EN2445 non rispettata, erdita dell'omologazione DK Udkobling > 50 mm – EN12543 / EN2445 ikke opfyldt, tab af tilladelse SE Frånkoppling > 50 mm - EN12543/EN2445 inte uppfyllt, förlust av godkännande N Utkobling > 50 mm - EN12543/EN2445 ikke oppfylt, mister godkjennelse CZ Vypnutí > 50 mm - EN12543/EN2445 nesplněno, ztráta certifikace FIN Katkaisu > 50 mm - standardit EN12543/EN2445 ei täytetty, hyväksynnän menetys PL Wyłączenie > 50 mm – EN12543/EN2445 niespełnione, utrata dopuszczenia H Ha a leállítási magasság nagyobb, mint 50mm, az EN12543 / EN2445 szabványi előírás nem teljesül, a minősítés érvényét veszti. BG Изключване > 50 mm - неизпълнен стандарт EN12543 / EN2445, допустима загуба EST Väljalülitamine > 50mm - EN12543 / EN2445 ei vasta nõuetele, atesteerimine kaotab kehtivuse SLO Izklop > 50mm - EN12543 / EN2445 ni izpolnjen, izguba dovoljenja NL PT I DK SE N CZ FIN PL H BG EST SLO D GB FR ES * EXIT 1x EXIT 1x H 1x 1x 1x 1x 1x 3sec 3sec 5x 1/2 5x A távirányítású indítás [60], résznyitás [61] beállítása BG Програмиране на старт [60], програмиране на частично отваряне [61] чрез радиоконтрол EST Raadiosidega käivitamise programmeerimine [60], osalise avamise programmeerimine [61] SLO Programiranje zagona z radijskim oddajnikom [60], programiranje delne odprtosti [61] częściowego [61] Funk Start einlernen [60], Teilöffnung einlernen [61] Programming radio control of the START button [60], programming radio control of partial opening [61] FR Apprentissage du code radio de la touche de démarrage [60], apprentissage radio de l'ouverture partielle [61] ES Aprendizaje de la tecla de inicio del control remoto [60], aprendizaje de la apertura parcial del control remoto [61] NL Draadloze starttoets leren [60], Draadloos gedeeltelijk openen leren [61] PT Memorização da tecla de arranque por radiofrequência [60], da abertura parcial por radiofrequência [61] Radio: apprendimento del tasto di avvio [60], radio: apprendimento I dell'apertura parziale [61] DK Indkøring trådløs startknap [60], indkør trådløs delåbning [61] SE Inlärning radio startknapp [60], inlärning radio delöppning [61] N Lære inn trådløs startknapp [60], lære inn trådløs delåpning [61] CZ Programování tlačítka Start rádiového ovládání [60], programování rádiem ovládaného částečného otevření [61] FIN Radiokäynnistyksen ohjelmointi [60], asennon osittain auki ohjelmointi [61] PL Zaprogramowanie startu radiowego [60], zaprogramowanie otwarcia D GB WN 905005-35-6-50 03/14 D • Allgemeine Informationen T100 R DES 1A2 • Sicherheit Vor Beginn sämtlicher Arbeiten am Produkt die Betriebsanleitung, insbesondere das Kapitel Sicherheit und die jeweiligen Sicherheitshinweise, vollständig lesen. Das Gelesene muss verstanden worden sein. Es könnten von diesem Produkt Gefahren ausgehen, wenn es nicht fachgerecht, unsachgemäß oder nicht bestimmungsgemäß verwendet wird. Bei Schäden die aufgrund der Nichtbeachtung dieser Anleitung entstehen, erlischt die Herstellerhaftung. • Symbolerklärung WARNUNG: Drohende Gefahr Dieses Symbol kennzeichnet Hinweise, die bei Nichtbeachtung zu schweren Verletzungen führen können. WARNUNG: Gefahr durch elektrischen Strom! Die ausführenden Arbeiten dürfen nur von einer Elektrofachkraft ausgeführt werden. ! 0 Inhaltsverzeichnis • Allgemeine Informationen - Sicherheit - Symbolerklärung - Arbeitssicherheit - Gefahren, die vom Produkt ausgehen können - Sicherheitsrelevante Vorschriften - Ersatzteile - Veränderungen und Umbauten am Produkt - Typenschild - Verpackung - Technische Daten • Installation • Programmierübersicht • Bedienungsanleitung und Funktionsbeschreibung • Wartung / Überprüfung • Fehlerdiagnose • Garantiebestimmungen • Prüfbuch - Prüfung der Toranlage - Prüfliste der Toranlage - Prüfungs- und Wartungsnachweise der Toranlage - Konformitätserklärung Dieses Symbol kennzeichnet Hinweise, die bei Nichtbeachtung zu Fehlfunktionen oder und/oder Ausfall des Antriebes führen können Verweis auf Text und Bild • Arbeitssicherheit Durch Befolgen der angegebenen Sicherheitshinweise und Anweisungen in dieser Betriebsanleitung können Personen- und Sachschäden während der Arbeit mit und an dem Produkt vermieden werden. Bei Nichteinhaltung der angegebenen Sicherheitshinweise und Anweisungen in dieser Betriebsanleitung sowie die für den Einsatzbereich geltenden Unfallverhütungsvorschriften und allgemeinen Sicherheitsbestimmungen sind jegliche Haftpflichtund Schadenersatzansprüche gegen den Hersteller oder seinen Beauftragten ausgeschlossen. • Gefahren, die vom Produkt ausgehen können Das Produkt wurde einer Gefährdungsanalyse unterzogen. Die darauf aufbauende Konstruktion und Ausführung des Produktes entspricht dem heutigen Stand der Technik. Das Produkt ist bei bestimmungsgemäßer Verwendung betriebssicher. Dennoch bleibt ein Restrisiko bestehen! Das Produkt arbeitet mit hoher elektrischer Spannung. Vor Beginn der Arbeiten an elektrischen Anlagen ist folgendes zu beachten: 1. Freischalten 2. Gegen Wiedereinschalten sichern 3. Spannungsfreiheit feststellen • Sicherheitsrelevante Vorschriften Bei der Installation, Inbetriebnahme, Wartung und Prüfung der Steuerung müssen die örtlichen Schutzbestimmungen eingehalten werden! Zusätzlich müssen die normativen Verweise der aufgeführten Normen beachtet werden. VDE-Vorschriften - DIN EN 418 Sicherheit von Maschinen NOT-AUS-Einrichtung, funktionelle Aspekte Gestaltungsleitsätze - DIN EN 60204-1 / VDE 0113-1 Elektrische Anlagen mit elektrischen Betriebsmitteln - DIN EN 60335-1 / VDE 0700-1 Sicherheit elektrischer Geräte für den Hausgebrauch und ähnliche Zwecke • Ersatzteile Nur Original-Ersatzteile des Herstellers verwenden. Falsche oder fehlerhafte Ersatzteile können zu Beschädigungen, Fehlfunktionen oder Totalausfall des Produktes führen. • Veränderungen und Umbauten am Produkt Zur Vermeidung von Gefährdungen und zur Sicherung der optimalen Leistung dürfen am Produkt weder Veränderungen noch An- und Umbauten vorgenommen werden, die durch den Hersteller nicht ausdrücklich genehmigt worden sind. • Typenschild Das Typenschild befindet sich seitlich am Steuerungsgehäuse. Die angegebenen Anschlusswerte sind zu beachten. • Verpackung Entsorgung der Verpackungsmaterialien stets umweltgerecht und nach den geltenden örtlichen Entsorgungsvorschriften vornehmen. Technische Daten Steuerung: Typenschild: T100 R WN021042 Abmessungen Gehäuse: Höhe x Breite x Tiefe 550mm x 215mm x 120mm Montage senkrecht Kabeldurchführungen: 6 x M20 2 x M16 2 x M20 V-Ausschnitt Versorgungsspannung: 3 x 400 V AC 3 x 230 V AC Steuer-Spannung: externe Versorgung: 24 V DC max. 700mA Max. Motorleistung: max. 3,0kW Schutzklasse: Temperaturbereich: IP65 / CEE-Stecker = IP44 +55°C -20°C Hersteller: Novoferm tormatic GmbH Oberste-Wilms-Str. 15a D-44309 Dortmund Folgende Vorschriften müssen Sie beachten: Europäische Normen - DIN EN 12445 Nutzungssicherheit kraftbetätigter Tore Prüfverfahren - DIN EN 12453 Nutzungssicherheit kraftbetätigter Tore Anforderungen - DIN EN 12978 Schutzeinrichtungen für kraftbetätigte Tore Anforderungen und Prüfverfahren Diese Montage-, Bedienungs- und Wartungsanleitung ist während der gesamten Nutzungsdauer aufzubewahren! D Installation ACHTUNG: Wichtige Anweisungen für die sichere Montage. Alle Anweisungen beachten, falsche Montage kann zu ernsthaften Verletzungen führen. Die Steuerung T100 R ist nur für den Betrieb an vertikal und horizontal bewegten Toren bestimmt. ! 0 Benötigte Werkzeuge 1 Montage Steuerung 2 Öffnen der Steuerungsabdeckung Vor Öffnen der oberen Steuerungsabdeckung Hauptschalter ausschalten oder Netzstecker abziehen. Eine mögliche Restspannung am Motoranschluss 1 Minute abklingen lassen. Gegen unbefugtes Wiedereinschalten sichern. 3 Anschlüsse Benennung: J1 J2 Impuls-Eingänge Sicherheitslichtschranke 2-, 4-Draht oder Lichtgitter J3 Schließkantensicherung OSE / 8K2 / DW J4 Not-Aus-Taster, Schlaffseil, Verriegelung J5 frei J6 Anti-Crash-Detector J7 Schlüsselschalter J8 Timer-Eingänge J9 Digitaler Endschalter - Motorkabel J10 Anschluss Erweiterungssteuerungen J11 Anschluss Funkempfänger J12 Antenne J13 Folientastatur X1 Netzanschluss X2 Netzausgang L, N (500W / 230V) X3 Schutzleiterkontakt X4a Magnetbremse X5 Potentialfreier Relais Kontakt 1, Torstatusrelais X6 Potentialfreier Relais Kontakt 2, Torstatusrelais X7 Torantrieb X8a Anschluss Lichtgitter-Sender X8b 24V DC, max. 700mA 4 Netzanschluss Die Steuerung ist mit einem CEE-Cara Stecker 16A und ca. 1m Kabel anschlussfertig entsprechend 4a verdrahtet. ! Netzanschluss muss entsprechend der vorhandenen Netzspannung ausgeführt werden. Bauseitig ist die Steuerung mit einem 10A Sicherungsautomaten abzusichern. 5 Motoranschlussleitung Die Anschlussleitung ist für Motor und digitalen Endschalter DES vorkonfektioniert - aufstecken und Bremse 230VAC am Anschluss X4 anschließen. 6 Anschlüsse für Impulsgeber Das Tor muss von dem Ort der Bedienung aus einsehbar sein. 6a/6b Anschluss J1 für externe Befehlsgeber Auf, Halt und Zu. 6c Schaltfolge Auf-Halt-Zu, im Menü 51 den Wert 4 einstellen. J1.3 - ½ Toröffnung, J1.4 - volle Toröffnung 6d Auf-Halt-Zu mit Beleuchtung 7 Timereingänge Anschluss J8 ist für Befehlsgeräte im AR-Betrieb 7a Zug- und Druckschalter, 7b Induktionsschleife 230V 7c Bewegungsmelder Nach der eingestellten Offenhaltezeit im Menü 44 schließt das Tor automatisch. Eine Verkürzung der Offenhaltezeit durch die Lichtschranke kann im Menü 38 ausgewählt werden. 8 Vorfeldüberwachung Ist die Schließgeschwindigkeit größer als 50 cm/s muss das Vorfeld über die gesamte Torbreite und in der Tiefe von 90 cm beidseitig vom Tor überwacht werden. Anschlussbild 8 zeigt Vorfeldüberwachung durch Bewegungs- und Präsentmelder Condor. 9 Toranschlussdose / Schließkantensicherung Toranschlussdose mit Schlaffseilschalter oder Break Away Sensor und Schlupftürkontakt 8. Einstellung Schließkantensicherung im Menü 35 auswählen: optische Schließkantensicherung nur OSE von Fraba oder Witt zulässig - elektrische Schließkantensicherung 8K2 mit 8,2 KOhm Abschlusswiderstand (Wert = 1) - elektrische Schließkantensicherung 8K2 in Reihenschaltung mit Schlaffseil- und Schlupftürschalter (Wert = 3) - Druckwellenleiste und -schalter mit 8,2 KOhm Schleifenwiderstand (Wert = 2) - Bei Einsatz von Lichtgitter, RadioSafe oder einer anderen sicherheitstechnischen Lösung ist der 8K2 Widerstand direkt an der Klemme J3 anzuschließen. (Wert = 1) 10 Anschluss für Lichtgitter Es können folgende Lichtgitter angeschlossen werden. 9a Lichtgitter mit Testung Im Menü 36 muss dafür der Wert 5 eingestellt werden. 9b Lichtgitter mit OSE-Interface Im Menü 35 muss dafür der Wert 0 eingestellt werden. 11 Anschluss für Lichtschranke 11a 2-Drahtlichtschranke LS2 11b 4-Drahtlichtschranke LS5 mit Testung 11e Reflexionslichtschranke WL280 Wenn im Menü die Lichtschranke in der Zarge montiert ausgewählt wurde, führt die Steuerung bei der nächsten Fahrt in Zu eine Lernfahrt zur Positionserkennung durch. Hierbei wird E10 angezeigt. Dabei darf die Schließfahrt nicht gestört werden, um keine falsche Position zu erfassen. 12 Anti Crash Sensor Eingang J6 erkennt, wenn der Vorhang aus der Führung ist und leitet eine automatische Wiedereinfädelung ein. Einweglichtschranke mit Relaisausgang 12a, mit Transistorausgang 12b. 13 Anschluss Not-Halt Eingang auch für Federbruchschalter verwenden. 14 Anschluss Schlüsselschalter Bei Verwendung eines Schlüsselschalters ist im Menü 50 die gewünschte Funktion auszuwählen. 15 Funkfernsteuerung Empfängermodul (Option) auf J11 aufstecken und Antenne anschließen. Handsender einlernen. 16 Relaisausgänge 2 Wechslerkontakte max. belastbar mit 250V AC / 2A oder 24V DC / 1A. Der 24V-Ausgang an X8 darf max. mit 700mA belastet werden. Die Relaisfunktion ist in den Menü 45 und 46 auszuwählen. 16c Gegenseitige Verriegelung von 2 Toren (Schleusenschaltung) . Menü 50 Wert 2 oder 3 und Menü 45 Wert 0. 16d Gegenseitige Verriegelung von 3 Toren (Schleusenschaltung) . Menü 50 Wert 2 oder 3 und Menü 45 und 46 Wert 0. D Programmieren der Steuerung Die Programmierung ist menügesteuert. Toreinstellung bitte entsprechend dem Schema durchführen. Nachfolgende Seiten zeigen den kompletten Menüumfang. ! Vor Einstellen der Endlagen muss der richtige Motor- und Bremstyp eingestellt werden. Eine falsche Einstellung kann zu Beschädigungen am Tor führen. Auswahl Bremse (Menü 78) Bremse Typ A, stromlos bremsend, wird zeitgleich (Wert = 0) oder verzögert (1-9) nach dem Stoppen des Motors angezogen. Bremse Typ B, stromlos öffnend, wird zeitgleich (Wert = 10) oder verzögert (11-19) nach dem Stoppen des Motors geöffnet. Einstellen Torendlagen (Menü 30 und 31) Die obere und untere Endlage müssen direkt nacheinander eingestellt werden. Torlaufoptimierung Um einem ruhigen Torlauf zu erreichen, im Menü 70 und 72 einen Softstart und einen Softstopp vor Erreichen der oberen Endlage im Menü 71 einstellen. Nachlaufwegkorrektur (Menü 42) Gleicht Veränderungen der Zuposition aus, die durch Temperatur, Einlaufen des Getriebes usw. herrühren. Bodenanpassung (Menü 43) Gleicht Veränderungen der Zuposition aus, die durch Seillängung bzw. durch Anheben des Fußbodens entstehen. Die Endlage Zu wird durch die Bodenberührungen der Schließkantesicherung angepasst. Zuvor erst genaue Zuposition einstellen, anschliessend Menü 43 einstellen. In den Einstellungen 2, 3 und 4 werden die eingelernten Positionen aus Menüs 31, 34 und 37 entsprechend angepasst. Softanlauf und Softstopp Um Laufruhe und Laufverhalten zu optimierenkönnen die Einstellungen in den Menüs 70, 71 und 72 verändert werden. Einschaltdauer (Menü 49) Die eingestellte Einschaltdauer verhindert die Überhitzung des Antriebsmotors und vermeidet Schäden. RWA-Funktion (Rauch-Wärme-Abzug) Im Menü 55 die entsprechende Torposition einstellen. Brandmeldeanlage an J7 anschließen und im Menü 50 Wert 9 einstellen. Funk Handsender einlernen Bitte beachten Sie, dass jeder Handsender für sich eingelernt werden muss. Sie haben die Möglichkeit 30 Funkcodes einzulernen. Folgende Funktionen sind einlernbar. KeeLoq, 12 Bit Multibit. Der erste Code bestimmt den Typ. Startimpuls (Menü 60) Gehen sie ins Menü und betätigen Sie die Taste des Handsenders für die Startfunktion. Sobald der Code eingelernt ist blinkt die Punktanzeige im Display 5 mal. ½ Toröffnung (Menü 61) Gehen sie ins Menü und betätigen Sie die Taste des Handsenders für die ½ Toröffnung. Sobald der Code eingelernt ist blinkt die Punktanzeige im Display 5 mal. Lichtfunktion (Menü 62) Gehen sie ins Menü und betätigen Sie die Taste des Handsenders für die Lichtfunktion. Sobald der Code eingelernt ist blinkt die Punktanzeige im Display 5 mal. Funkcodes löschen (Menü 63) Zum Löschen aller eingelernter Codes im Menü ovale Taste für 5 Sekunden gedrückt halten. In den weiteren Menüs kann die Betriebsart für die Starttaste ausgewählt werden. Auswahl Betriebsart für Handsender (Menü 64) Zusätzlich können in diesem Menü die eingelernten Handsender vorübergehend gesperrt werden. D Programmierübersicht Menü Item Exit Enter 3037 3-9 1x Nr. Menü- Einpunkt gabe 3 Auswahl Toreinstellung obere Endlage 30 Nr. Menü- Einpunkt gabe Bodenanpassung 4 Richtungsumkehr (5 Sek. drücken) 0* Toreinstellung untere Endlage 1 Bodenanpassung für 200 Zyklen aktiviert 32 Toreinstellung 1/2 Öffnung 2 Bodenananpassung für 1000 Zyklen aktiviert Feinkorrektur obere Endlage 3 50* 43 50 - 0 0... 80mm tiefer 50* 34 0* Feinkorrektur untere Endlage 44 50 - 0 0... 80mm tiefer 61 - 99 210 Sek. ... 22,5 Min (30 Sek. Schritten) 0* Tor-Zu-Meldung Messwertanzeige (5 Sek. drücken) 1 Tor-Auf-Meldung 0 Optische Schließkantensicherung OSE 2 Torstatus für Ampelsteuerung A800 1* Elektrische Schaltleiste 8K2 3 2 Minuten Garagenlicht 2 Druckwellenleiste mit Testung 4 5 Minuten Garagenlicht 3 Elektrische Schaltleiste 8K2 mit Schlaffseilschalter 5 Ein / aus mit Handsender (Menü 62) 4 Drahtlose Schließkante, RadioBand 6 Wischimpuls ELTACO 0 Tor-Zu-Meldung 1* Tor-Auf-Meldung 2 Torstatus für Ampelsteuerung A800 3 Verriegelung weitere Toreinstellungen 45 Statusrelais X6 0* Ohne Lichtschranke 1 2-Drahtlichtschranke LS2 2 4-Drahtlichtschranke LS5, Reflexionslichts. 3 Lichtschranke LS2, Reflexionsl. in Zarge montiert 4 Lichtschranke LS5, Reflexionsl. in Zarge montiert 4 - 14 Warnleuchte in Zufahrt (0 - 10 Sek. Vorwarnzeit) 5 Lichtgitter mit Testung 15 - 25 Warnleuchte in Auf- und Zufahrt (0 - 10 Sek.) 25* 37 Statusrelais X5 Auswahl Schließkantensicherung Auswahl Lichtschranke 36 25 - 0 46 Korrektur Vorendschalter Schließkantensicher. Motoreinschaltdauer 0... 50mm tiefer 25 - 99 0... 100mm höher Reaktion Lichtschranke 38 25 Min / 35% 2 25 Min / 30% 3 25 Min / 60% 1 Verkürzung Offenhaltezeit bei AR-Betrieb 4 25 Min / 20% Menü beenden 5 10 Min / 35% Funktion Folientasten 6 25 Min / 60% 0 Totmann Auf / Totmann Zu 1 Impuls Auf / Totmann Zu 2* Impuls Auf / Impuls Zu 3 AR - automatisches Schließen Reaktion auf Schließkantensicherung 0* Vollreversieren 1 Teilreversieren 0 Aus Nachlaufwegkorrektur 42 Ohne Begrenzung Ohne Verkürzung Offenhaltezeit -- 41 49 0* 1 0* 4 40 0 Sek. 1 - 30 1 Sek ... 30 Sek (in 1 Sek. Schritten) 31 - 60 35 Sek ... 180 Sek (in 5 Sek. Schritten) 50 - 99 0... 80mm höher 35 Permanente Bodenanpassung Offenhaltezeit in Sekunden 50 - 99 0... 80mm höher Tor - Grundeinstellungen Aus 31 33 weitere Toreinstellungen Auswahl 1* In Tor-Zu-Position 2 In Tor-Auf-Position 3 In Tor-Auf- und Tor-Zu-Position -- Menü beenden * Werkseinstellung D Programmierübersicht Menü Item Exit Enter 3037 3-9 1x Eingabe Auswahl Funktion Schlüsselschalter (J7) 5 diverse Einstellungen 50 Nr. Menü- EinPunkt gabe 7 52 1 Bedienfeld sperren 2 externe Bedienelemente sperren 3 4 5 Umschalten in Totmann Zu 6 Umschalten auf 1/2 Öffnung 0* kein Serviceinterval 7 Impulseingang AUF-Halt-Zu 1 10000 Zyklen 8 Impulseingang 1/2 Öffnung-Halt-Zu 2 20000 Zyklen 9 automatisches Schließen AR 3 30000 Zyklen 10 Impulseingang für RWA (Einstellung in Menü 55) 4 40000 Zyklen 5 50000 Zyklen 70 0 1 - 13 Zeit (60ms - 300ms, in 20ms Stufen) 71 0 - 40 Auslaufweg vor oberer Endlage (0 - 40cm, 10*) Bedienfeld und externe Bedienelemente sperren 72 0 - 20 reduziertes Drehmoment (16*) Bedienelemente für 10 Sekunden aktivieren -- Aus Totmann Auf / Totmann Zu Menü beenden Vorwahl Wartungszyklus Tor 9 90 Servicemenü 0* 1 6 60000 Zyklen 7 80000 Zyklen 8 100000 Zyklen 9 120000 Zyklen 2 Impuls Auf / Totmann Zu 3 Impuls Auf / Impuls Zu 4 Impuls 1/2 Öffnung / Impuls Zu 10 150000 Zyklen 5 AR-Betrieb, automatisches Schließen 11 200000 Zyklen 6 AR-Betrieb, 1/2 Öffnung 12 250000 Zyklen 7 Auf-Zu-Betrieb Modul Toransteuerung 97 aus 98 - Zyklen - Stunden Ausgabe Fehlerspeicher - Stunden - Fehlercode Ausgabe - Softwareversion - Serien-Nr - H-Datum - 91 001-256 Eingabe Steuerungsadresse 0* 53 Softstart mit reduziertem Drehmoment aus Impulseingang Auf/Zu Funktion externe Impulsgeber (J1) 51 Auswahl 0* Motor Nr. MenüPunkt 96 Ausgabe Zyklenzähler Ausgabe Betriebsstundenzähler DC-Modul 99 Rücksetzen Werkseinstellung (5 Sek. drücken) 5 drahtlose Schließkante, RadioSafe -- Menü beenden 6 WLAN Modul 1-4 55 Toreinstellung für RWA-Position 70 Handsender Taste 1/2 einlernen 62 Handsender Lichttaste einlernent 63 Funkcodes löschen (5 Sek. drücken) Betriebsart Starttaste 64 -- 0* aus 1 Impulsbetreieb Auf-Halt-Zu 2 automatisches Schließen AR 3 Auf-Zu Betrieb Menü beenden * Werkseinstellung empfohlene Einstellungen Menü 70 Softanlaufzeit Menü 71 Softstopp Menü 72 reduziertes Drehmoment 0 Handsender Starttaste einlernen 61 5.6 60 71 SI 3 Menü beenden .46 mit Rückmeldung 30 2 72 0 zeitgesteuert, ohne Rückmeldung SI 1 0.9 aus -- Funk 6 0* SI 2 56 Speed Elektrische Verriegelung 2 2 1 10 10 10 3 6 1 D Betriebsanleitung / Funktionsbeschreibung Die Steuerung ermöglicht unterschiedliche Betriebsarten: Totmann Auf / Totmann Zu Durch Dauerdruck auf die Taste startet der Torlauf in Richtung Auf, bis Torendlage Auf erreicht ist, oder durch Loslassen der Taste der Torlauf gestoppt wird. Ein Schließen des Tores erfolgt über Dauerdruck (Totmann-Funktion) der Taste , bis Torendlage erreicht ist. Wird dieTaste während des Zulaufes losgelassen, stoppt das Tor sofort. Impuls Auf / Totmann Zu Durch kurzen Druck auf die Taste oder externe Impulsgeber startet der Torlauf in Richtung Auf bis Torendlage Auf erreicht ist, oder durch Tastendruck auf gestoppt wird. Ein erneuter Tastendruck auf Taste setzt die Öffnungsfahrt fort. Ein Schließen des Tores erfolgt über Dauerdruck (TotmannFunktion) der Taste , bis Torendlage erreicht ist. Wird die Taste während des Zulaufes losgelassen, stoppt das Tor sofort. Impuls Auf / Impuls Zu Ein kurzes Betätigen der Taste oder externer Impulsgeber startet den Torlauf in Richtung Auf bis Endlage Auf erreicht, oder durch Taste gestoppt wird. Ein kurzes Betätigen der Taste startet den Torlauf in Richtung Zu bis Endlage Zu erreicht ist. Diese Betriebsart verlangt die Installation einer Schießkantensicherung (Menü 35). Ein Auslösen der Schließkantensicherung bewirkt während der Schließfahrt ein Stoppen und eine Richtungsumkehr. Während der Öffnungsfahrt hat das Auslösen keinen Einfluss. Impulsbetrieb Erste Impulsgabe: Antrieb startet und fährt Tor in die eingestellte Endposition AUF oder ZU. Impulsgabe während der Fahrt: Tor stoppt. Erneuter Impuls: Tor setzt in entgegengesetzter Richtung den Lauf fort. AR-Betrieb /automatisches Schließen Ein kurzes Betätigen der Taste oder externer Impulsgeber startet den Torlauf in Richtung Auf bis Endlage Auf erreicht ist oder das Tor vorab mit Taste angehalten wurde. Nach Ablauf der eingestellten Offenhaltezeit läuft eine eingestellte Vorwarnzeit ab, danach schließt das Tor automatisch. AR-Betrieb mit Verkürzung durch Lichtschranke Funktion wie oben beschrieben, jedoch bewirkt eine Unterbrechung der Lichtschranke den Abbruch der eingestellten Offenhaltezeit und die Vorwarnzeit beginnt. Nach Ablauf der Vorwarnzeit schließt das Tor automatisch. AUF-ZU-Betrieb In gleicher Betriebsart wie Einbahnregelung mit RotGrün-Ampel (optional Ampelsteuerung A800) jedoch bleibt der Empfänger im Antrieb gesteckt. Funktionsablauf für externe Impulsgeber: Impulsgabe in Zu-Position: Antrieb startet und fährt Tor in die Auf-Position. Impulsgabe während der Auffahrt: Ohne Einfluss Tor fährt weiter auf. Impulsgabe in Auf-Position: Tor fährt zu. Impulsgabe während der Zufahrt: Tor stoppt und fährt wieder auf. ½ Toröffnung Durch Betätigen der Taste ½ wird das Tor in die eingestellte ½ Toröffnung (Menü 32) geöffnet. Diese Funktion gibt es nicht in der Betriebsart Totmann Auf / Totmann Zu und nicht bei einem installierten Lichtgitter. Beleuchtung und oder Vorwarnlicht Die Steuerung verfügt über 2 Relaisausgänge mit denen Beleuchtung oder Vorwarnlicht geschaltet werden (Menü 45 und 46). Externe Befehlsgeräte / Impulsgeber Das Tor kann durch externe Befehlsgeräte / Impulsgeber geöffnet und geschlossen werden. Sicherheiten Angeschlossene Lichtschranken und Schließkantensicherungen dienen zur Vermeidung von Unfällen. Nach einem festgestellten Defekt schaltet die Steuerung auf die Betriebsart Totmann Zu um. Funktion Schlüsselschalter (optional) Die Steuerung besitzt einen Eingang für einen Schlüsselschalter. Sie haben damit die Möglichkeit, folgende Funktionen (Menü 50) zu aktivieren: 0 Eingang J7 für Impulsgeber mit Schaltfolge AufZu 1 Bedienfeld der Steuerung wird gesperrt. 2 Alle externen Bedienelemente werden gesperrt. 3 Bedienfeld der Steuerung und alle externen Bedienelemente werden gesperrt. 4 Für 10 Sekunden sind Bedienfeld der Steuerung und alle externen Bedienelemente aktiv. 5 Umschaltung der Betriebsart in Impuls Auf / Totmann Zu. 6 Umschaltung auf ½-Toröffnung 7 Eingang J7 für Impulsgeber mit Schaltfolge AufHalt-Zu 8 Eingang J7 für Impulsgeber mit Schaltfolge 1/2Halt-Zu 9 AR-Betrieb 10 RWA-Funktion (Rauch- und Wärmeabzug) Nach Auslösung wird zwangsweise die RWAPosition angefahren. Um die Steuerung wieder in Betrieb zu nehmen, ist ein Netzreset durchzuführen. Funkhandsender (optional) Taste: Start Taste: ½-Toröffnung Für beide Tasten sind Impuls-, AR- und Auf-ZuBetrieb einstellbar (Menü 64). Bei Funktion Taste Start fährt das Tor nur die eingestellte ½ Toröffnung an. Taste: Licht Bei der Lichtfunktion handelt es sich um ein Dauerlicht, welches unabhängig vom Torlauf „Ein/Aus“ geschaltet werden kann. Wartung / Überprüfung Die Toranlage ist bei der Inbetriebnahme und nach Bedarf - jedoch mindestens einmal jährlich - von einem Fachbetrieb prüfen zu lassen. Serviceanzeige Stellt die Steuerung Bedarf für eine Überprüfung fest, leuchtet die Serviceanzeige im Display auf. Fachbetrieb informieren. Warnanzeige ! Bei Unterbrechung des Sicherheitskreises leuchtet die Warnanzeige, siehe Fehlerdiagnose. Garantiebestimmungen Sehr geehrter Kunde, die von Ihnen erworbene Steuerung ist seitens des Herstellers bei der Fertigung mehrfach auf seine einwandfreie Qualität geprüft worden. Sollte dieser oder Teile davon nachweisbar wegen Material- oder Fabrikationsfehlern unbrauchbar oder in der Brauchbarkeit erheblich beeinträchtigt sein, werden wir diese nach unserer Wahl unentgeltlich nachbessern oder neu liefern. Für Schäden infolge mangelhafter Einbau- und Montagearbeiten, fehlerhafter Inbetriebsetzung, nicht ordnungsgemäßer Bedienung und Wartung, nicht sachgerechter Beanspruchung sowie jeglichen eigenmächtigen Änderungen an dem Antrieb und den Zubehörteilen wird keine Haftung übernommen. Entsprechendes gilt auch für Schäden, die durch den Transport, höhere Gewalt, Fremdeinwirkung oder natürliche Abnutzung sowie besondere atmosphärische Belastungen entstanden sind. Nach eigenmächtigen Änderungen oder Nachbesserungen von Funktionsteilen kann keine Haftung übernommen werden. Mängel sind uns unverzüglich schriftlich anzuzeigen; die betreffenden Teile sind uns auf Verlangen zuzusenden. Die Kosten für Aus- und Einbau, Fracht und Porti werden von uns nicht übernommen. Stellt sich eine Beanstandung als unberechtigt heraus, hat der Besteller unsere Kosten zu tragen. Diese Garantie ist nur gültig in Verbindung mit der quittierten Rechnung und beginnt mit dem Tage der Lieferung. Für die Mängelfreiheit des Produktes leistet der Hersteller Gewähr. Die Gewährleistungsdauer beträgt 24 Monate, sofern der rückseitige Nachweis ordnungsgemäß ausgefüllt ist. Ansonsten endet die Gewährleistungsfrist 27 Monate nach Herstelldatum. D Fehlerdiagnose Fehler Zustand Diagnose / Abhilfe __________________________________________________________________________________________________________________ E04 Vorhang ist aus der Führung Anti Crash Detector hat ausgelöst. __________________________________________________________________________________________________________________ E05 Tor fährt weder auf noch zu Schlaffseilschalter hat ausgelöst (siehe Bild 8c) __________________________________________________________________________________________________________________ E06 Tor reversiert / schließt nicht Schließkante hat ausgelöst. Menüeinstellung [35] prüfen. __________________________________________________________________________________________________________________ E07 Tor reversiert / schließt nicht Lichtschranke hat ausgelöst. Menüeinstellung [36] prüfen. __________________________________________________________________________________________________________________ E08 Tor fährt weder auf noch zu Externe Sicherheitseinrichtung (Not-Aus, Schlaffseil, Schlupftür, Motorthermoschalter) hat angesprochen. Überprüfen (J4). __________________________________________________________________________________________________________________ E09 Tor fährt weder auf noch zu Keine Torendlage eingelernt. Torendlagen in Menü [30] [31] einlernen. __________________________________________________________________________________________________________________ E10 Menü [37] auf 3 oder 4 eingestellt Tor komplett auf und zufahren, damit die Position der Lichtschranke festgestellt wird. __________________________________________________________________________________________________________________ F01 Keine Bewegung Tor Rückmeldung Bremsrelais fehlerhaft. __________________________________________________________________________________________________________________ F02 Keine Reaktion Fehler bei Selbsttestung aufgetreten. Steuerung tauschen. __________________________________________________________________________________________________________________ F03 Keine Reaktion Fehler bei Selbsttestung aufgetreten. Steuerung tauschen. __________________________________________________________________________________________________________________ F04 Keine Reaktion Fehler bei Selbsttestung aufgetreten. Steuerung tauschen. __________________________________________________________________________________________________________________ F05 Keine Reaktion Fehler bei Selbsttestung aufgetreten. Steuerung tauschen. __________________________________________________________________________________________________________________ F06 Keine Reaktion Schließkantensicherung fehlerhaft. Spannung (J3.3 - J3.1 >12V) überprüfen. __________________________________________________________________________________________________________________ F07 Tor fährt weder auf noch zu 24V Spannungsversorgung zusammengebrochen. Anschlüsse prüfen. F19 Tor fährt nur in Totmannbetrieb zu Testung Schließkante fehlgeschlagen. Schließkantensicherung überprüfen. __________________________________________________________________________________________________________________ F20 Tor fährt nur in Totmannbetrieb zu Testung Lichtschranke fehlgeschlagen. Lichtschranke überprüfen. __________________________________________________________________________________________________________________ F21 Kurzzeitige Bertiebsunterbrechung Laufzeitbegrenzung Torantrieb, Antrieb ca. 20 Min abkühlen lassen. __________________________________________________________________________________________________________________ F24 Keine Reaktion auf Startbefehl Keine Verbindung zum DES. Motoranschlusskabel und DES prüfen. __________________________________________________________________________________________________________________ F25 Keine Reaktion Interner Test Folientastatur fehlerhaft. Folientastatur tauschen. __________________________________________________________________________________________________________________ F26 Keine Reaktion Interner Test externe Taster / Schalter fehlgeschlagen. __________________________________________________________________________________________________________________ F27 Torendlage wird nicht erreicht Im Menü [33]/[34] nachjustieren. Motor blockiert Tormechanik überprüfen / Motoranschlusskabel überprüfen. __________________________________________________________________________________________________________________ F28 Keine Reaktion auf Startbefehl Fehler in der Spannungsversorgung. Netzseitigen Anschluss überprüfen. __________________________________________________________________________________________________________________ F29 Motor dreht falsch herum Motorphasen wurden getausccht, korrigieren oder neu einstellen. __________________________________________________________________________________________________________________ F30 Tor fährt nur in Totmannbetrieb zu Rücksprung von Impuls- auf Totmannbetrieb. Schließkantensicherung, Lichtschranke prüfen. __________________________________________________________________________________________________________________ F31 Tor fährt weder auf noch zu Taste betätigt. Dauerimpuls liegt an. Externe Befehlsgeber (J1) überprüfen. __________________________________________________________________________________________________________________ F34 Tor fährt weder auf noch zu Einschaltdauer wurde überschritten. Warten und Motor abkühlen lassen. __________________________________________________________________________________________________________________ F35 Tor fährt weder auf noch zu F36 Tor fährt weder auf noch zu Drehzahlüberwachung hat angesprochen. DU-Antrieb austauschen. Interne Kommunikation zwischen Steuerung und FU gestört. Verbindung an Klemme J10 überprüfen. __________________________________________________________________________________________________________________ F40 Erweiterungssteuerung 24V zusammengebrochen. Anschlüsse an Erweiterungssteuerung prüfen. __________________________________________________________________________________________________________________ F41 Erweiterungssteuerung Fehler bei Selbsttestung aufgetreten. Erweiterungsteuerung tauschen. __________________________________________________________________________________________________________________ F42 Erweiterungssteuerung Fehler bei Selbsttestung aufgetreten. Erweiterungsteuerung tauschen. __________________________________________________________________________________________________________________ F43 Erweiterungssteuerung Verbindung fehlt. __________________________________________________________________________________________________________________ F45 Tor schließt nicht RadioSafe-Modul fehlt oder defekt. __________________________________________________________________________________________________________________ F46 RadioSafe Alarm RadioSafe Batterie erneuern. L Der Zugang ins Menü wurde vom autorisierten Fachhändler gesperrt Kontakt mit Fachhändler aufnehmen. Entsperren des Menüs nur mit Service-Tool möglich. Lo Steuerung wurde gesperrt Kontakt mit Fachhändler aufnehmen. Entsperren des Menüs nur mit Service-Tool möglich. U Der Zugang ins Menü wurde vom autorisierten Fachhändler entsperrt Änderungen vorbehalten Diese Montage-, Bedienungs- und Wartungsanleitung ist während der gesamten Nutzungsdauer aufzubewahren! sonstige Einrichtungen Verriegelung / Schloss Schlupftür Schlupftürkontakt Türschließer Ampelsteuerung Lichtschranken Schließkantensicherung Dokumentation des Betreibers Typenschild / CE-Kennzeichnung Konformitätserklärung der Toranlage Montage-,Bedienungs-, Wartungsanleitungen 5.0 5.1 5.2 5.2.1 5.2.2 5.3 5.4 5.5 6.0 6.1 6.2 vollständig / lesbar vollständig / lesbar vollständig / lesbar Zustand / Funktion Funktion / Zustand Funktion / Zustand Funktion / Zustand Funktion / Zustand Funktion / Zustand Funktion / Zustand Sicherheitsabstände stoppt und reversiert Torblatt Zustand / Funktion Zustand / Befestigung Zustand Zustand / Funktion Zustand / Funktion Zustand / Funktion Zustand / Funktion Zustand / Funktion ________________________ ________________________ ________________________ ________________________ ________________________ ________________________ ________________________ ________________________ ________________________ ________________________ ________________________ ________________________ ________________________ ________________________ ________________________ ________________________ ________________________ ________________________ ________________________ ________________________ ________________________ Diese Montage-, Bedienungs- und Wartungsanleitung ist während der gesamten Nutzungsdauer aufzubewahren! 6.3 4.3 Quetsch- und Scherstellensicherung Kraftbegrenzung Schutz gegen Anheben von Personen bauseitiges Umfeld 4.0 4.1 4.2 3.5 Antrieb / Steuerung Antrieb / Konsole Elektrische Leitungen / Anschlüsse Notentriegelung Schnelle Kette Handkurbel Schnellentriegelung Betätigungseinrichtungen Taster / Handsender Endabschaltung ________________________ ________________________ ________________________ ________________________ ________________________ ________________________ ________________________ ________________________ ________________________ ________________________ 3.0 3.1 3.2 3.3 3.3.1 3.3.2 3.3.3 3.4 2.0 2.1 2.1.1 2.1.2 2.1.3 2.2 2.2.1 2.2.2 2.2.3 2.3 2.4 Zustand / Sitz / Einstellung Zustand Zustand/ Typenschild Zustand / Sitz Zustand / Sitz Zustand / Sitz 2 Sicherheitswindungen Zustand / Sitz / Funktion Zustand Zustand Gewichtsausgleich / Sicheres Öffnen Federn Spannköpfe, Lagerböcke Federbruchsicherung Sicherungselemente Drahtseile Seilbefestigung Seiltrommeln Schlaffseilschalter Absturzsicherung Rundlauf T-Welle 1.0 1.1 1.2 1.3 1.4 1.5 1.6 1.7 Prüfliste der Toranlage (Ausstattung bei Inbetriebnahme durch Abhaken dokumentieren) Ausstattung vorhanden zu prüfende zutreffend Eigenschaften i.O.Bemerkung Tor Handbetätigung des Tores Leichtgängikeit ________________________ Befestigungen / Verbindungen Zustand / Sitz ________________________ Drehpunkte / Gelenke Zustand / Schmierung ________________________ Laufrollen / Laufrollenhalter Zustand / Schmierung ________________________ Dichtungen / Schleifleisten Zustand / Sitz ________________________ Torrahmen / Torführung Ausrichtung / Befestigung ________________________ Torblatt Ausrichtung / Zustand ________________________ Diese Montage-, Bedienungs- und Wartungsanleitung ist während der gesamten Nutzungsdauer aufzubewahren! Prüfungs- und Wartungsnachweise der Toranlage Konformitätserklärung T100 R Ulrich Theile Leiter Entwicklung Dokumentationsbevollmächtigter ____________________ Diese Montage-, Bedienungs- und Wartungsanleitung ist während der gesamten Nutzungsdauer aufzubewahren! Dortmund, 29.04.2013 Das Produkt darf erst in Betrieb genommen werden, wenn festgestellt wurde, dass die Toranlage den Bestimmungen der Maschinenrichtlinie entspricht. • Konform ist mit der EMV-Richtlinie 2004/108/EG • Konform ist mit der Niederspannungsrichtlinie 2006/95/EG • Konform ist mit der Bauproduktenverordnung BauPVO Die technischen Unterlagen nach Anhang VII A wurden erstellt. Wir verpflichten uns, den Marktaufsichtbehörden auf begründetes Verlangen die speziellen Unterlagen in schriftlicher Form zu übermitteln. Angewandte nicht harmonisierte Normen: EN 12453:2000 Abschnitt / Chapter 5.2 Angewandte harmonisierte Normen: EN ISO 13849-1:2008 EN 60335-2-103:2003 EN 60335-1:2012 EG-Baumusterprüfzertifikat Gültigkeit: Es wurde das in Anhang IX beschriebene EG-Baumusterprüfverfahren durch die anerkannten Prüfstelle TÜV NORD CERT GmbH (NB 0044), Langemarckstr. 20, 45141 Essen, durchgeführt. • der Maschinenrichtlinie 2006/42/EG, Anhang IV entspricht und zum Einbau in eine Toranlage bestimmt ist. erklärt hiermit, dass die Torsteuerung Novoferm tormatic GmbH Oberste-Wilms-Str. 15a D-44309 Dortmund nach der Maschinenrichtlinie 2006/42/EG, Anhang II Teil 1A GB WN 905005-35-6-50 03/14 • General Information • Safety T100 R DES Before commencing any work on the product, carefully read through the operating instructions from start to finish, in particular the section entitled “Safety” and the related safety advice. It is important for you to have understood what you have read. This product could prove hazardous if not used properly as directed or in accordance with the regulations. Any damage occurring as a result of non-compliance with these instructions shall render the manufacturer’s liability null and void. • Explanation of the symbols 1A2 WARNING: imminent danger This symbol indicates that instructions are being given which, if not observed, could lead to malfunctions and/or failure of the operator. WARNING! Danger by electric current The works may only be executed by an electrician. In addition to the above, the normative references of the standards listed must be observed. VDE regulations - DIN EN 418 Safety of Machinery Emergency-STOP device, functional aspects Design principles - DIN EN 60204-1 / VDE 0113-1 Electrical installations with electrical equipment - DIN EN 60335-1 / VDE 0700-1 Safety of household and similar electrical appliances • Spare parts Only use genuine spare parts of the manufacturer. Wrong or faulty spare parts can cause damage, malfunctions or even a total failure of the product. • Changes and modifications to the product In order to prevent hazards and ensure optimum performance, no changes, modifications or conversions may be made to the product that have not been expressly approved by the manufacturer. • Data plate ! 0 This symbol indicates that instructions are being given which, if not observed, could lead to serious injury. Reference to text and figure • Working safety Table of contents • General Information - Safety - Explanation of the symbols - Working safety - Hazards that may emanate from the product - Safety regulations - Spare parts - Changes and modifications to the product - Data plate - Packaging - Technical data • Installation • Programming overview • Operating instructions / Description of functions • Maintenance / Checks • Error Diagnosis • Terms of Guarantee • Inspection log book - Inspection and Test Log Book for the Door System - Check List of the Door System - Proof of Inspection and Maintenance of the Door System - Declaration of Conformity and Installation By complying with the safety advice and information provided in these Operating Instructions, injury to persons and damage to property whilst working on and with the product can be avoided. Failure to observe the safety advice and information provided in these Operating Instructions as well as the accident prevention and general safety requirements relevant to the field of application shall exempt the manufacturer or ist authorized representatives from all liability and shall render any damage claims null and void. • Hazards that may emanate from the product The product has been subjected to a risk assessment. The design and execution of the product based on this corresponds to state-of-the-art technology. When used properly as intended, the product is safe and reliable to operate. Nevertheless, a residual risk will always remain! The product runs on a high electrical voltage. Before commencing any work on electrical systems, please observe the following: 1. Disconnect from the power supply 2. Safeguard to prevent a power restart 3. Check that the electricity supply is cut off. • Safety regulations When performing installation work, initial operation, maintenance jobs or testing the control unit, take care to observe the local safety regulations! The following standards and regulations must be observed: European standards - DIN EN 12445 Safety in Use of Power-operated Doors and Gates - Test Methods - DIN EN 12453 Safety in Use of Power-operated Doors and Gates - Requirements - DIN EN 12978 Protective Devices for Power-operated Doors and Gates - Requirements and Test Methods The date plate is located under the control panel cover. Observe the specified power rating. • Packaging Always dispose of the packaging in an environmentlly-friendly manner and in accordance with the local regulations on disposal. Technical Data Control unit T100 R Data plate WN021042 Dimensions of housing Height x width x depth 250mm x 215mm x 120mm Mounting vertical Number of cable lead-throughs 6 x M20 2 x M16 2 x M20 V-cutout Supply voltage 3 x 400 V AC 3 x 230 V AC Control voltage 24 V DC External supply max. 700mA Max. motor output max. 3.0kW Protection classification IP 65 / CEE-Cara plug = IP 44 Operating temperature - 20°C to + 55°C Manufacturer: Novoferm tormatic GmbH Oberste-Wilms-Str. 15a D-44309 Dortmund Retain these installation, operating and maintenance instructions for the full duration of the operator’s service life! GB Installation 8 Front area monitoring If the closing speed is greater than 50 cm / s than must the entire door width and depth of 90 cm are monitored on both sides of the door. WARNING: wrong installation can cause injuries. ! The control type T100 R is intended for operation on gates with vertical and horizontal movement. 0 Required tools 1 Installing the control unit 2 Opening the control unit cover Turn off the main switch or pull the mains plug before opening the top control cover. Wait 1 minute to let any residual voltage at the motor terminal die down. Protect against unauthorized starting. 3 Connections Designation: J1 Impulse inputs J2 Safety photocell, two or four-wire or light array J3 Closing edge OSE / 8K2 / DW J4 Emergency-STOP, slack cable, latching J5 Unassigned J6 Anti-crash detector J7 Key switch J8 Timer inputs J9 Digital limit switch - motor cable J10 Connection of add-on controls J11 Connection of radio receiver J12 Aerial J13 Membrane keypad X1 Mains connection X2 Mains output L, N (500W / 230V) X3 Protective conductor contact X4a Magnetic brake X5 Floating relay contact 1, door status relay X6 Floating relay contact 2, door status relay X7 Door operator X8a Light array transmitter output X8b 24V DC, max. 700mA 4 Mains connection The control is ready for connection by CEE-Cara 16A plug and approx. 1m cable as shown in 4a. ! The unit must be connected to the mains in accordance with the existing power supply voltage. The customer should provide a 10amp fused automatic circuit breaker for the control. 5 Motor connecting lead The connecting lead for the motor and digital limit switch (DES) is pre-assembled and ready to use attach accordingly. X4 - magnetic brake connection. 6 Impulse generator connection The gate must remain visible from the place of operating it. 6a/6b - Connection J1 for external control units Open, Stop and Close. 6c - Switching sequence Open-Stop-Close, set value 4 in menu 51. J1.3 - door half open, J1.4 – door fully open 6d - Open-Stop-Close with lighting 7 Timer inputs Terminal J8 is intended for operating devices, for AR service, same as push-pull switch 7a, induction loops 7b and motion detector 7c. The door closes automatically at the end of the time set in menu 44. The open time by the light barrier can be set to a shorter time in menu 38. Connection diagram 8 shows the run-up monitoring by motion and present detectors Condor. 9 Safety edge connection Door connection socket with slack rope switch or break-away sensor and slip door contact 8. Select the setting of the safety edge connection in menu 35: Door connection socket with slack rope switch and slip door contact 8. - Optical closing edge OSE - only OSE from Fraba or Witt are permitted - Electrical safety edge 8K2 with a termination resistor of 8.2 kOhm (value = 1) - Electrical safety edge 8K2 in series connection with slack rope and wicket door switch (value = 3) - Pressure wave edge and switch with a loop resistance of 8.2 kOhm (value = 2) 10 Connection for light array The following light arrays can be connected. 9a Light array with testing For this, set value 5 in menu 36. 9b Light array with OSE interface For this, set value 0 in menu 36. 11 Photocell connection 10a Two-wire photocell Ls2 10b Four-wire photocell LS5 with self-testing 10c Reflection photocell If in the menu the frame-fitted photocell has been selected, the next time the door closes the control unit automatically initiates a learning run to detect the position. E10 will be disdplayed. During this process the closing procedure must not be interfered with, otherwise the wrong position could be recorded. 12 Anti-crash sensor Input J6 detects when the curtain is off guide and starts an automatic threading up. One-way light barrier with relay output 11a, with transistor output 11b. 13 Emergency-STOP connection Use input also for spring break switch. 14 Key switch / pull button connection When using a key switch / pull button, the desired function in menu 50 should be selected. 15 Radio remote control Slip receiver module (optional) on J11 and connect the antenna. Program the handheld transmitter. 16 Relay output 2 change-over contacts: max. 250VAC / 2A or 24VDC / 1A. 24V-output X8: max. 700mA Selecting the relay function in menu 45 and 46. 15c Interlocking of two doors (lock circuit). Menu 50 value 2 and menu 46 value 1. 15c Interlocking of three doors (lock circuit). Menu 50 value 2 and menu 46 value 1. Programming the control unit The programming is menu-driven. Carry out adjustment of the door in accordance with the scheme. The following page shows the full extent of the menu. ! Set the correct motor and brake type before setting the end positions (menus 78 and 79). Wrong setting can damage the door. No door type selected: E01 is displayed. Brake selection (menu 78) Brake type A, currentless braking, is applied at the same time (value=0) or with a delay (1-9) after stop of the motor. Brake type B, currentless opening, opens at the same time (value=10) or with a delay (11-19) after stop of the motor. Setting the door end-of-travel positions (menus 30 and 31) The top and bottom end positions should be set directly one after the other. Gate run optimization For smooth gate run, set soft start in menus 70 and 72 and soft start for attaining end position in menu 71. Correcting the slowing-down path (menu 42) Compensates changes in the closed position resulting from temperature fluctuations, gearbox run-in etc. Level adjustment (menu 43) Compensates changes in the closed position resulting from cable elongation or a rise in the floor level. The Closed end position is adapted by ground contact of the closing edge guard. Set the precise closed position beforehand, then set in menu 43. The positions taught in menus 31, 34 and 37 are adapted accordingly in settings 2, 3 and 4. Soft start and soft stop To optimize smooth run and running behavior, the settings in menus 70, 71 and 72 can be changed. ON period (menu 49) The ON period set will prevent the drive motor from getting overheated and thus getting damaged. RWA (smoke-heat exhaust) function Set the required door position in menu 55. Connect fire alarm to J7 and set value 9 in menu 50. Programming the radio remote control Please note that each hand transmitter must be individually programmed. It is possible for up to 30 radio codes to be learned. The following functions can be taught in. KeeLoq, 12 Bit Multibit. The first code determines the type. Start impulse (menu 60) Enter the menu and press the button on the hand transmitter for the START function. As soon as the code has been learned, the incremental display flashes five times. Half-open position of the door (menu 61) Enter the menu and press the button on the hand transmitter for the half-open position. As soon as the code has been learned, the incremental display flashes five times. Light function (menu 62) Enter the menu and press the button on the hand transmitter for the light function. As soon as the code has been learned, the incremental display flashes five times. Deleting radio codes (menu 63) To delete all the learned codes in the menu, press the oval button and keep it pressed for 5 seconds. Selection of the transmitter mode (menu 64) In addition, the transmitters taught in this menu can temporarily be blocked in this menu. GB Programming Overview Menu Item Exit Enter 3037 3-9 1x No. Menu- Entry Selection point 3 Setting the door's top end-of-travel position 30 0* off 1 activated for 200 cycles Setting the door's half-open position 2 activated for 1000 cycles Fine adjustment of top end-of-travel position 3 Permanent ground adjustment Setting the door's bottom end-of-travel position 32 50* 43 50 - 0 0... 80mm deeper Hold-open phase in seconds 50 - 99 0... 80mm higher 50* 34 0* Fine adjustment of bottom end-of-travel position 44 50 - 0 0... 80mm deeper 61 - 99 210 secs. ... 22,5 min. (in 30 secs. increments) Status relay X5 Selecting the closing edge Measuring value display (press 5 sec.) 3 2 minutes garage light Pressure wave edge DW with testing 4 5 minutes garage light 3 Electric safety edge 8K2 with slack rope switch 5 Hand transmitter on / off (menu 62) 4 Wireless closing edge, RadioBand 6 Wipe impulse ELTACO Extended door settings Basic door settings Status relay X6 0* without photocell 1 2-wire photocell LS2 2 4-wire photocell LS5, Reflection photocell 3 Photocell LS2, frame fitted reflection photocell 4 Photocell Ls5, frame fitted reflection photocell 4 - 14 Warning lamp on close move (0-10 secs. advance warning) 5 Light array with testing 15 - 25 Warning lamp on open and close move (0 - 10 secs.) 25 - 0 46 Extended door settings 0 Door closed signal 1* Door open signal 2 Door state for A800 traffic lights control 3 Interlock circuit Adjustment pre-limit switch safety edge Motor starting time 0... 50mm deeper 49 0* No limit 1 25 min / 35% 2 25 min / 30% 0* Without shortening the hold-open time 3 25 min / 60% 1 Shortening the hold-open time during AR service 4 25 min / 20% Exit menu 5 10 min / 35% 4 Membrane key function 0 Dead man OPEN / Dead man CLOSE 1 Impulse OPEN / Dead man CLOSE 2* Impulse OPEN / Impulse CLOSE 3 AR - automatic closing Response of safety edge 0* Full reversing 1 Partial reversing Correcting the slowing-down path 42 Door state for A800 traffic lights control 2 -- 41 Door open signal 2 Electrical safety edge 8K2 Light barrier response 40 1 1* 45 25 - 99 0... 100mm higher 38 Door closed signal Optical closing edge OSE 25* 37 0* 0 Selecting the photocell 36 0 secs. 1 - 30 1 sec. ... 30 secs. (in 1 sec. increments) 31 - 60 35 secs. ... 180 secs. (in 5 secs. increments) 50 - 99 0... 80mm higher 35 Selection Level adjustment 4 Change of direction (press for 5 sec.) 31 33 No. Menu- Entry point 0 off 1* at gate-close position 2 at gate-up position 3 at gate-up and gate-close positions 6 -- 25 min / 60% Exit menu * Factory defaults GB Programming Overview Menu Item Exit Enter 3037 3-9 1x Key switch function (J7) 5 50 0* Open/Close pulse input 1 Block control panel 2 Block external control elements 3 Block control panel and external control elements 51 52 No. Menu- Entry point 7 Soft start at reduced torque 70 71 0 - 40 Run-out distance before top end position (0-40cm, 10*) 72 0 - 20 Reduced torque (16*) -- 4 Activating the control elements for 10 secs. Switch to dead man's Close 6 Switch to half opening of the door 7 Pulse input for Open-Stop-Close 8 Pulse input for Half Open-Stop-Close 9 AR - automatic closing 0* no service interval 10 Pulse input for (smoke-heat exhaust) (menu 55) 1 10000 cycles Function of external impulse generators (J1) 2 20000 cycles off 3 30000 cycles 4 40000 cycles 5 50000 cycles 1 Dead man OPEN / Dead man CLOSE 2 Impulse OPEN / Dead man CLOSE 3 Impulse OPEN / Impulse CLOSE 4 Impuls 1/2 Öffnung / Impuls Zu 5 AR - automatic closing 6 AR - automatic closing, half opening 7 Open-close operation Type B, in preparation 9 Selecting the door's service intervals 90 6 60000 cycles 7 80000 cycles 8 100000 cycles 9 120000 cycles 10 150000 cycles 11 200000 cycles 12 250000 cycles - cycles - off 91 Issue of cycles counter 96 Issue of operating hours counter - hours - 5 Wireless closing edge, RadioSafe JCM 97 Issue of error memory - hours - error code - 6 W-LAN module 98 Issue of software version - serial-no. - date - Expansion control 99 Resetting of factory setting (press for 5 sec.) off -- Exit menu 0* 1, 2, 3 Actuation profiles, see extension control 70 Exit menu 60 Programming the START button on the transmitter 61 Programming button for 1/2-opening on the transmitter 62 Programming the light button on the transmitter 63 Deleting radio codes (press for 5 sec.) Speed Door setting for smoke-heat exhaust position -- Radio Type A, in preparation 78 DC-module 1-4 55 72 71 Start button operating mode Recommended adjustments * Factory defaults SI Exit menu .60 Open-close operation 35 3 .46 AR - automatic closing 30 Impulse open-stop-close 2 SI -- 1 .90 64 off 20 0* SI 6 Exit menu Motor brake 001-256 Entering the control address 0* 54 off 0 1 - 13 Time (60mS – 300mS, in 20mS increments) Module 53 Selection 5 0* Miscellaneous settings Selection Motor Entry Service menu No. Menupoint Menü 70 Soft start 2 2 1 Menü 71 Soft stop 10 10 10 Menü 72 Reduced torque 3 6 1 GB Operating instructions / Description of function The control unit allows a variety of operating modes: Dead man OPEN / dead man CLOSE Pressing button and keeping it pressed causes the door to open until the OPEN end-of-travel position is reached. Releasing the button causes the door to stop. The door is closed by dead man's control, i.e. pressing button and keeping it pressed, until the door reaches its CLOSE end-of-travel position. If the button is released during closing, the door stops instantly. Impulse OPEN / dead man CLOSE By briefly pressing the button or generating an impulse from an external impulse generator, the door starts to open until reaching the OPEN end-of-travel position or the door can be stopped beforehand by pressing button . If button is pressed again, the door continues to open. The door is closed by dead man's control, i.e. pressing button and keeping it pressed, until the door reaches its CLOSE end-oftravel position. If the button is released during closing, the door stops instantly. Impulse OPEN / impulse CLOSE By briefly pressing button or generating an impulse from an external impulse generator the door starts to open until reaching the OPEN end-of-travel position, or the door can be stopped beforehand by pressing button . By briefly pressing button the door starts closing until reaching the CLOSE end-of-travel position. This operating mode demands that a safety edge (menu 35) be installed. If the safety edge is triggered during closing, the door stops and changes direction. If the safety edge is triggered during opening, this has no effect. In the case of a defect, the door can be closed by pressing button . First impulse: The operator starts up and causes the door to travel to the set OPEN or CLOSE travel limits. Function as described above, but an interruption of the photocell causes the set hold-open time to be terminated and the early warning phase to begin. After the early warning phase has expired, the door automatically closes. OPEN-CLOSE operation However, the receiver remains plugged into the drive in the same operating mode like the one-way control with the red-green traffic light (optional traffic light control A800). Operating sequence for external impulse generators: Generating an impulse in the close position: Drive starts and moves the door into the open position Generating an impulse during the opening: Door continues to move without being affected Generating an impulse in the open position: Door closes Generating an impulse during the closing: Door stops and opens again Half-opening of the door Pressing the ½ button initiates the set half-opening of the door (menu 32). This function is not available in dead man's open / dead man's close mode and also not when a light array is installed. Lighting and / or early warning light The control unit has two relay outputs allowing the switching of lighting or the early warning light (menu 45 and 46). External command units / impulse generators The door can be opened and closed via external command units/impulse generators. Safety Connected light barriers and closing edge guards help avoid accident. The control will only switch to dead man's c lose mode when it detects a defect. Impulse generated during travel: Door stops. Key switch function (optional) The control unit has an input for a key switch. This allows you to activate the following functions (menu 50): A new impulse is generated: Door continues to travel but in the opposite direction. 0 Input J7 for pulse transducer with OpenClose switching sequence 1 Control panel on the control unit is blocked. 2 All external control elements are blocked. 3 Control panel on the control unit and all external control elements are blocked. 4 For 10 secs. the control panel on the control unit and all the external control elements are active. 5 Switching of operating mode to impulse OPEN / dead man CLOSE. 6 Switch to half opening of the door. AR-mode / automatic closing By briefly pressing button or generating an impulse from an external impulse generator, the door starts opening until reaching the OPEN end-of-travel position. Or the door was stopped prematurely using button . Once the set hold-open time has elapsed, there follows an early warning phase of 10 seconds, after which time the door automatically closes. If button is pressed when the door is in the open position or while it is closing, the door is immobilized until a new impulse or is generated. AR-mode with shortened response time via photocell Dear customer, During production the control unit you have purchased has undergone various checks by the manufacturer to ensure that it is of impeccable quality. Should this operator or parts of it prove to be of no use or limited use as a result of proven material or manufacturing defects, we shall rectify this, at our discretion, through free-ofcharge repair or replacement. We shall not accept any liability for damage as a result of unsatisfactory fitting and installation, improper putting into service, incorrect operation and 7 Input J7 for pulse transducer with OpenStop-Close 8 Input J7 for pulse transducer with Half Open-Close 9 AR-mode / automatic closing 10 RWA (smoke-heat exhaust) function The RWA position is actuated compulsorily when this function is triggered. To restart the control, a network reset must be performed. Radio hand transmitter (optional) Button: Start ½ button for half-opening: Pulse, AR and open-close modes can be set for both keys (menu 68). Function as with the START button, but the door travels to the set half-open position only. Button: Light The light function involves a continuous light that can be switched on/off independent of the door action. Maintenance / Checks For your own safety, we recommend that prior to initial operation and whenever required - however at least once a year, you have the door system tested by a specialist company. Service display If the control unit establishes the need for testing / inspection, "service" shows up in the display. Contact a specialist company. Warning ! The warning lamp lights when the safety circuit is open, see troubleshooting guide. Terms of Guarantee maintenance, excessive use and overloading as well as any alterations or modifications carried out to the operator and accessory parts by the customer. The same shall also apply for damage incurred during transit or as a result of force majeure, external influences or natural wear as well as special atmospherical stresses. We cannot accept any liability following alterations or modifications of functional parts carried out by the customer. We must be notified of any defects immediately in writing; on request the parts in question are to be made available to us. We shall not bear the costs for dismantling and installation, freight and carriage. If a complaint is proven to be unjustified, the customer must bear our costs. This guarantee is only valid in conjunction with the signed invoice and commences on the day of delivery. The manufacturer guarantees that the product is free of defects. The warranty is granted for a period of 24 months, in as far as the verification overleaf has been properly filled out. Otherwise the warranty shall expire 27 months after the date of manufacture. GB Error Diagnosis Error State Diagnosis / Remedy E04 Curtain has come off guide Anti-crash detector has tripped. E05 Door neither opens nor closes The slack cable switch has tripped (see fig. 8c). E06 Door reverses / does not close Closing edge has been triggered. Check menu setting [35]. E07 Door reverses / does not close Photocell has been triggered. Check menu setting [36]. E08 Door neither operns nor closes External safety device (emergency-STOP, slack cable, wicket door, motor's thermal switch) has been activated. Check (J4). E09 Door neither opens nor closes No end-of-travel positions learned. Programme the end-of-travel positions [30] [31]. E10 Menu [37] set at 3 or 4 Allow door to open and close fully in order for the position of the photocell to be detected. F01 No door movement Brake relay feedback faulty. F02 No response Error occurred during self-testing, exchange control unit. F03 No response Error occurred during self-testing, exchange control unit. F04 No response Error occurred during self-testing, exchange control unit. F05 No response Error occurred during self-testing, exchange control unit. F06 No response Safety edges defective, Check voltage (J3.3 - J3.1 >12V). F07 Door neither opens nor closes The 24V power supply has broken down. Check the connections. F10 Door stops shortly after START command given Door neither opens nor closes. Malfunction in the control unit electronics. Replace control unit. F19 Door responds only to dead man's control for closing Closing edge self-testing has failed. Check safety edge. F20 Door responds only to dead man's control for closing Photocell self-testing has failed. Check photocell. F21 Operation briefly interrupted Door operator's excess travel stop activated, allow operator to cool down for approx. 20 min. F24 No response to START command No connection to DES. Check motor connecting lead and DES. F25 No response Internal testing of membrane keypad defective. Replace membrane keypad or control unit. F26 No response Internal testing of external buttons / switches has failed. F27 Door end positions not obtained Motor blocks Adjust setting in menu [33]/[34]. Check door mechanical system / check motor connection cable. F28 No response to START command Fault in the voltage supply. Check mains connection. F29 Motor rotates in the wrong direction Motor phases reversed. Check motor terminals. F30 Door responds only to dead man's control for closing Returns from impulse to dead man's control. Check safety edges and photocell. F31 Door neither opens nor closes Button actuated. Continuous impulse operative. Check external command generators (J1). F34 Door neither opens nor closes The ON period has been exceeded. Wait and let the motor cool down. F35 Door neither opens nor closes The speed monitoring has tripped. Exchange DU drive. F36 Door neither opens nor closes Internal communication fault between control and frequency converter. Check contact at terminal J10. F40 Expansion control The 24-V power supply has broken down. Check the connections at the expansion control. F41 Expansion control Fault during the self-test. Replace the expansion control. F42 Expansion control Fault during the self-test. Replace the expansion control. F43 Expansion control No connection. F43 Door does not close RadioSafe module not installed or defective. F46 RadioSafe alarm Replace RadioSafe battery. L Access to the menu has been blocked by the authorized dealer Contact authorized dealer. Menu bock can only be lifted using service tool. Lo Control unit has been blocked Contact authorized dealer. Menu bock can only be lifted using service tool. U Access block of the menu has been lifted by the authorized dealer Safeguarding of crush and shearing zones Force limit Stops and reverses Safeguards to prevent persons Door leaf from being lifted up by the door Site conditions Safety distances All inspections and maintenance carried out must be documented in the inspection log book provided. It must be kept safe by the ownero p e r a t o r, t o g e t h e r w i t h t h e documentation on the door system, throughout the operator's entire service life and must be filled out in full and handed over to the owneroperator by the installer at the latest at the time of putting into service. (We also recommend this for manually operated doors.) It is absolutely imperative that the guidelines provided in the Testing of door system Other devices Latching / lock Wicket door Wicket door contact Door closer Traffic light control Photocells Safety edge Documentation of the operator / owner Data plate / CE marking complete / readable Door system's declaration complete / readable of conformity Installation, Operating and complete / readable Maintenance Instructions 5.0 5.1 5.2 5.2.1 5.2.2 5.3 5.4 5.5 6.0 6.1 6.2 6.3 Alterations to the door system (in as far as permitted) must also be documented. Caution: An inspection is not the same as maintenance! The manufacturer's guarantee becomes null and void in the event that inspection / maintenance has not been properly carried out. documentation accompanying the door system (Installation, Operating and Maintenance Instructions etc.) are adhered to. State / Function Function / State Function / State Function / State Function / State Function / State Function / State State / Function State / Fastening State State / Function State / Function State / Function State / Function State / Function ________________________ ________________________ ________________________ ________________________ ________________________ ________________________ ________________________ ________________________ ________________________ ________________________ ________________________ ________________________ ________________________ ________________________ ________________________ ________________________ ________________________ ________________________ ________________________ ________________________ ________________________ ________________________ ________________________ ________________________ ________________________ ________________________ ________________________ ________________________ ________________________ ________________________ ________________________ ________________________ ________________________ ________________________ ________________________ ________________________ ________________________ ________________________ Remark GB Retain these installation, operating and maintenance instructions for the full duration of the operator’s service life! 4.3 3.5 4.0 4.1 4.2 Operator / controls Operator / support bracket Electrical cables / connections Emergency release Quick chain Crank handle Quick release Control devices, push-button / hand transmitter Travel cut-out State / Seat / Setting State State / Data plate State / Seat State / Seat State / Seat 2 safety windings State / Seat / Function State State 3.0 3.1 3.2 3.3 3.3.1 3.3.2 3.3.3 3.4 Smooth running State / Seat State / Lubrication State / Lubrication State / Seat Alignment / Fastening Alignment / State Features to be tested Weight counterbalance / safe opening Springs Clamping heads / bearing blocks Spring safety device Safety elements Wire cables Cable fastening Cable drums Slack cable switch Anti-fall safeguard Concentricity of T-shaft present applicable 2.0 2.1 2.1.1 2.1.2 2.1.3 2.2 2.2.1 2.2.2 2.2.3 2.3 2.4 Equipment Door Manual operation of the door Fastenings / connections Pivots / joints Track rollers / track roller holders Seals / sliding contact strips Door frame / Door guide Door leaf Subsequent alterations Signature: Check list of door system (Document the equipment present at the time of initial operation by ticking off) 1.0 1.1 1.2 1.3 1.4 1.5 1.6 1.7 Retain these installation, operating and maintenance instructions for the full duration of the operator’s service life! When being put into service poweroperated doors must be inspected and maintained by correspondingly qualified persons (persons with suitable training and qualifications based on knowledge and experience) at intervals as specified in the manufacturer's maintenance instructions and, if necessary, also in accordance with any special national regulations (e.g. BGR 232 "Guidelines for Power-operated Windows, Doors and Gates"). General information Other details Initial operation on: Company, installer: Installation and initial operation Name, installer: Leaf weight: Serial no.: Door dimensions: Year of construction: Operating mode: Date of manufacture: Type: Door data: Manufacturer: Operator type: Operator data: Location of door system: Owner / operator of the system: Inspection and test log book for the door system GB Initial operation, first testing Work performed / necessary measures Test carried out Defects rectified Signature / address Signature / address of the company of the company Retain these installation, operating and maintenance instructions for the full duration of the operator’s service life! Date Proof of inspection and maintenance of the door system GB Declaration T100 R Ulrich Theile Head of Development Official Documentation Representative ____________________ Retain these installation, operating and maintenance instructions for the full duration of the operator’s service life! Dortmund, 29.04.2013 The product may not be put into service until it has been established that the door system complies with the provisions of the Machinery Directive. • Conformity is in accordance with the EMC Directive 2004/108/EC • Conformity is in accordance with the Low-voltage Directive 2006/95/EC • Conformity is in accordance with the Construction Products Regulation BauPVO The technical documents according to Annex VII B have been prepared. We undertake submit written copies of specific documents requested by the competent market supervisory authorities on their substantiated request. Applied non-harmonized norms: EN 12453:2000 chapter 5.2 Applied harmoized norms: EN ISO 13849-1:2008 EN 60335-2-103:2003 EN 60335-1:2012 EC Type Test certificate No. Validity: The EC Type Test Procedure described in Annex IX was performed by the approved testing laboratory TÜV NORD CERT GmbH (NB 0044), Langemarckstr. 20, 45141 Essen. complies with the Machinery Directive 2006/42/EC, annex IV, and is intended for installing into a door system. hereby declares that the control unit Novoferm tormatic GmbH Oberste-Wilms-Str. 15a D-44309 Dortmund in accordance with the Machinery Directive 206/42/EC, annex II part 1A GB FR WN 905005-35-6-50 03/14 • Informations générales T100 R DES • Sécurité Lire attentivement la notice dans son intégralité avant de commencer toute opération sur le produit, en particulier le chapitre concernant la sécurité et les consignes correspondantes. Le texte lu doit avoir été compris. Ce produit peut comporter des risques s’il n’est pas utilisé correctement ou à d’autres fins que celles prévues par son affectation. Toute responsabilité du fabricant est exclue en cas de dommages résultant du non-respect de la présente notice. • Explication des symboles AVERTISSEMENT: DANGER Ce symbole caractérise des consignes dont la non-observation risque de provoquer des blessures graves. 1A2 AVERTISSEMENT ! Danger d'origine électrique. Les travaux à effectuer doivent être réalisés uniquement par un électricien qualifié. ! 0 Table des matières • Informations générales - Sécurité - Explication des symboles - Sécurité au travail - Dangers susceptibles d’émaner du produit - Prescriptions de sécurité - Pièces de rechange - Modifications et transformations du produit - Plaque signalétique - Emballage - Données techniques • Installation • Récapitulatif de programmation • Notice d'utilisation / Description des fonctions • Maintenance / Contrôle • Affichage des erreurs • Conditions de garantie • Cahier d'inspection - Cahier d'inspection - Liste de vérification de l’installation de porte - Justificatifs de contrôle et de maintenance de l'installation de porte - Déclaration de conformité et de montage Ce symbole introduit des consignes. Le non-respect de celles-ci peut entraîner des dysfonctionnements et/ou une défaillance de la motorisation. Renvoi au texte et aux figures • Sécurité au travail L’observation des consignes de sécurité et des instructions indiquées dans la présente notice d’utilisation permet d’éviter des dommages corporels aux personnes et des dégâts matériels pendant le travail et sur le produit. Tout recours en matière de responsabilité civile et en dommages et intérêts contre le fabricant sera exclu en cas de non-respect des consignes de sécurité et des instructions indiquées dans la présente notice d’utilisation ou de non-respect de la réglementation en matière de prévention des accidents en vigueur dans le domaine d’utilisation concerné ainsi que des consignes générales de sécurité. • Dangers susceptibles d’émaner du produit Le produit a été soumis à une analyse de risques. Basées sur cette analyse, la conception et la réalisation du produit répondent à l'état actuel de la technique. Le produit offre une parfaite sécurité de fonctionnement s’il est utilisé conformément à l’affectation prévue. Toutefois, un risque résiduel demeure. Le produit fonctionne avec une tension électrique élevée. Règles à observer avant le début de toute opération à effectuer sur des installations électriques: 1. Mettre hors tension 2. Verrouiller contre le redémarrage intempestif 3. Vérifier l’absence de tension • Prescriptions de sécurité Pendant l'installation, la mise en service, la maintenance et le contrôle de la commande, les dispositions de protection locales doivent être observées. Les prescriptions suivantes doivent être observées : Normes européennes: - NF EN 12445 Sécurité à l'utilisation des portes motorisées Méthode d'essai - NF EN 12453 Sécurité à l'utilisation des portes motorisées Prescriptions - NF EN 12978 Dispositifs de sécurité pour portes motorisées Prescriptions et méthodes d'essai. Les références normatives des normes citées doivent également être observées. Prescriptions VDE - DIN EN 418 Sécurité des machines Dispositif d'arrêt d'urgence, aspects fonctionnels Principes de conception - DIN EN 60204-1/VDE 0113-1 Equipement électrique des machines - DIN EN 60335-1/VDE 0700-1 Sécurité des appareils électrodomestiques et analogues • Pièces de rechange N’utiliser que des pièces de rechange d’origine du fabricant. Les contrefaçons ou les pièces de rechange défectueuses peuvent entraîner des dommages, des dysfonctionnements ou une défaillance totale du produit. • Modifications et transformations du produit Pour éviter la mise en danger des personnes et assurer une performance optimale, il est interdit de procéder à des modifications, des transformations ou des extensions du produit sans l’autorisation expresse du fabricant. • Plaque signalétique La plaque signalétique se trouve sur la face latérale de la tête de l’opérateur. Respecter la puissance connectée indiquée. • Emballage Pour l’élimination du matériel d’emballage, respecter l’environnement et les réglementations en vigueur sur place pour les déchets. Données techniques Commande T100 R Plaque signalétique WN021042 Dimensions du boîtier hauteur x largeur x profondeur 250mm x 215mm x 120mm Montage vertical Nombre de passages de câbles 6 x M20 2 x M16 2 x M20 section en V Tension d'alimentation 3 x 400 V CA 3 x 230 V CA Tension de commande 24 V DC Alimentation externe max. 700mA Puissance max. du moteur max. 3,0 kW Classe de protection IP 65 / fiche CEE-Cara 16A = IP 44 Température de fonctionnement de - 20 °C à + 55 °C Fabricant: Novoferm tormatic GmbH Oberste-Wilms-Str. 15a D-44309 Dortmund Veuillez conserver cette notice de pose, d’emploi et d’entretien pendant toute la durée d’utilisation! FR Installation AVERTISSEMENT: Une pose incorrecte peut mettre en danger la sécurité des personnes! ! La commande T100 R est seulement conçue pour être utilisée sur les portails à mouvement vertical et horizontal. 0 Outils nécessaires 1 Montage de la commande 2 Ouverture du capot de la commande Avant d'ouvrir le couvercle de la commande supérieure, éteindre l'interrupteur principal ou bien débrancher la fiche secteur. Laisser s'affaiblir une éventuelle tension résiduelle sur le raccord du moteur pendant 1 minute. Protéger contre une remise en marche non autorisée. 3 Connexions Dénomination: J1 Entrées impulsion J2 Barrière photoélectrique de sécurité à 2 ou 4 fils ou dispositif photoélectrique J3 Profil de sécurité optique / OSE / 8K2 / DW J4 Arrêt d'urgence, câble, verrouillage J5 Libre J6 Détecteur anti-crash J7 Contacteur à clé J8 Entrée programmation J9 Commutateur fin de course numérique Câble du moteur J10 Branchement Commandes d'extension J11 Branchement Récepteur radio J12 Antenne J13 Clavier à membrane X1 Raccordement secteur X2 Sortie secteur L, N (500W / 230V) X3 Contact du conducteur de protection X4a Frein magnétique X5 Relais libre de potentiel contact 1, relais d'état de porte X6 Relais libre de potentiel contact 2, relais d'état de porte X7 Motorisation de la porte X8a Raccord de l'émetteur du dispositif photoélectrique X8b 24V DC, max. 700mA 4 Raccordement secteur La commande est câblée avec une fiche CEE-Cara 16A et un câble d'un mètre environ, prêt à être branché avec 4a. Le branchement secteur doit être réalisé conformément à la tension secteur sur le site. Le client doit protéger la commande avec un disjoncteur 10A. ! 5 Câble de raccordement du moteur Le cable de raccordement pour le moteur et le commutateur de fin de course numerique DES est preconfectionne. Le brancher. Raccordement pour frein magnétique - X4. 6 Raccordement pour impulseur externe On doit pouvoir voir la porte depuis le poste de commande. 6a/6b - Raccord J1 organe de commande externe Ouvrir, Stop et Fermer. 6c - Séquence de commutations Ouvrir-StopFermer, régler la valeur 4 dans le menu 51. J1.3 - ½ ouverture de porte, J1.4 – ouverture complète de porte commande, à l'exploitation AR comme les interrupteurs à tirage et à pression 7a, les boucles à induction 7b et détecteurs de mouvement 7c. Enficher le module récepteur (option) sur J11 et raccorder l'antenne. Programmer l'émetteur manuel. Sélection de la fonction: menu 64. La porte se referme automatiquement une fois que la durée d'ouverture réglée dans le menu 44 est écoulée. Une diminution de la durée d'ouverture par le dispositif photoélectrique peut être sélectionnée dans le menu 38. 16 Sorties du relais 2 contacts inverseur: max. 250VAC / 2A ou 24VDC / 1A 24V-sortie X8: max. 700mA Function du relais: menu 45 et 46 8 La surveillance de la zone avant Si la vitesse de fermeture est supérieure à 50 cm / s doit le zone sur toute la porte ampleur et la profondeur de 90 cm surveiller au niveau des deux côtés de la porte. Schéma de câblage 8 montre le surveillance avec l' par détecteur de mouvement et présence Condor. 9 Branchement pour une sécurité de contact optique Boîte de raccordement de la porte avec actionnement par câble détendu ou capteur Break Away et sécurité portillon 8. Sélectionner le réglage de la sécurité de contact optique dans le menu 35: Boîte de raccordement de la porte avec actionnement par câble détendu et sécurité portillon 8. - Sécurité de contact optique OSE Contact optique, seulement type OSE de Fraba ou Witt autorisé - Sécurité de contact électrique 8K2 avec résistance terminale de 8,2 Kohm (valeur = 1) - Sécurité de contact électrique 8K2 de couplage en série avec et interrupteur à tirette et portillon (valeur = 3) - Barre d'ondes de pression et commutateur avec résistance de boucle de 8,2 Kohm (valeur = 2) 10 Raccord pour dispositif photoélectrique Il est possible de raccorder les dispositifs photoélectriques suivants: 9a dispositif photoélectrique avec contrôle Pour ceci, il faut régler la valeur 5 dans le menu 36. 9b dispositif photoélectrique avec interface OSE Pour ceci, il faut régler la valeur 0 dans le menu 35. 11 Branchement pour la barrière photoélectrique Dans le menu 36, la barrière photoélectrique doit être paramétrée de manière correspondante. 10a Barrière photoélectrique LS2 à 2 fils 10b Barrière photoélectrique à 4 fils LS5 avec test 10c Barrière photoélectrique à réflexion Si la barrière photoélectrique montée dans le montant est sélectionnée dans le menu, la commande effectue un parcours d'apprentissage en direction FERMETURE lors du prochain parcours afin de reconnaître la position. E10 s'affiche. Le mouvement de fermeture ne doit pas être perturbé pendant ce parcours pour que la position détectée soit correcte. 12 Détecteur Anti Crash L'entrée J6 reconnaît si le rideau est hors du guidage et initie un ré-enfilage automatique de la tenture. Barrière photoélectrique avec sortie de relais 11a, avec sortie de transistor 11b. 13 Branchement de l'arrêt d'urgence Egalement utiliser l'entrée pour interrupteur pour rupture de ressort. 6d - Ouvrir-Stop-Fermer avec éclairage 14 Branchement du commutateur à clé Si un commutateur à clé est utilisé, sélectionner la fonction souhaitée dans le menu 50. 7 Entrée programmation Le raccord J8 est destiné aux appareils de 15 Commande radiotélécommandée 16c Verrouillage mutuel de 2 portes (commutation en écluse). Menu 50 valeur 2 ou 3 et menu 45 valeur 0. 16d Verrouillage mutuel de 3 portes (commutation en écluse). Menu 50 valeur 2 ou 3 et menu 56 et menu 46 valeur 0. FR Programmation de la commande La programmation est assistée par les menus. Paramétrer la porte conformément au schéma. La page suivante montre la structure complète des menus. ! Avant de régler les fins de course, il faut régler le type de moteur et le type de frein corrects (menu 78 et 79). Un mauvais réglage peut endommager la porte. Pas de moteur sélectionné: E01 apparaît sur l’afficheur. Sélection du frein (menu 78) Frein du type A, freinant lorsque hors tension ; il se serre en même temps (valeur=0) que le démarrage du moteur ou avec un retard (1-9) par rapport à ce stop. Frein du type B, ouvert lorsque hors tension ; il s'ouvre en même temps (valeur=10) que le démarrage du moteur ou avec un retard (11-19) par rapport à ce stop. Réglage des positions de fin de course de la porte (menu 30 et 31) Il faut régler la position finale supérieure et inférieure directement l'une après l'autre. Optimisation du déplacement du portail Pour obtenir un fonctionnement silencieux, réglez dans les menus 70 et 72 un démarrage en douceur et, dans le menu 71, un arrêt en douceur avant d'atteindre la fin de course. Correction de la distance de marche à vide (menu 42) Compense les modifications de la position FERMEE que peuvent entraîner la température, le rodage de l'engrenage etc. Ajustement au sol (menu 43) Compense les modifications de la position FERMEE que peuvent entraîner la déformation du câble et/ou le soulèvement du sol. La position finale Fermer s'adapte en fonction des contacts de sécurité du bord de fermeture avec le sol. Régler tout d'abord la position FERMEE, puis régler dans le menu 43. Dans les réglages 2, 3 et 4, les positions apprises des menus 31, 34 et 37 sont adaptées. Démarrage en douceur et arrêt en douceur Pour optimiser le déplacement silencieux et le comportement en déplacement, il est possible de modifier les réglages dans les menus 70, 71 et 72. Facteur de marche (menu 49) Le facteur de marche réglé empêche la surchauffe du moteur d'entraînement et prévient ainsi les dégâts. Fonction RWA (EFC = Evacuation fumée chaleur) Régler la position respective de la porte dans le menu 55. Raccorder le détecteur d'incendie à J7 et régler la valeur 9 dans le menu 50. Apprentissage du code radio de l'émetteur portatif À noter que chaque émetteur portatif doit subir un apprentissage indépendant. Vous pouvez effectuer l'apprentissage de 30 codes radio. Les fonctions suivantes peuvent être apprises: KeeLoq, 12 Bit Multibit. Le premier code détermine le type. Impulsion Démarrage (menu 60) Allez dans le menu et appuyez sur la touche de l'émetteur portatif déclenchant le démarrage. Dès que le code est appris, l'afficheur ponctuel de l'écran clignote cinq fois. ½ ouverture de porte (menu 61) Allez dans le menu et appuyez sur la touche de l'émetteur portatif déclenchant la 1/2 ouverture de porte. Dès que le code est appris, l'afficheur ponctuel de l'écran clignote cinq fois. Fonction d'éclairage (menu 62) Allez dans le menu et appuyez sur la touche de l'émetteur portatif déclenchant la fonction d'éclairage. Dès que le code est appris, l'afficheur ponctuel de l'écran clignote cinq fois. Effacer les codes de télécommande (menu 63) Pour effacer tous les codes appris dans le menu, maintenez la touche ovale appuyée pendant 5 secondes. Sélection du mode pour la télécommande portative (menu 64) Dans ce menu, il est possible en plus de bloquer temporairement les télécommandes qui ont été programmées. R é c a p i t u l a t i f FR d e Menu Item Enter Exit 30- 3-9 1x N° Élément Saisie de menu Sélection N° Élément Saisie de menu 3 Réglage de la position de fin de course 4 30 Ajustement au sol Inversion du sens (appuyer pendant 5 secondes) 0* Réglage de la position de fin de course inférieure 1 Activé pour 200 cycles 32 Réglage de la 1/2 ouverture de porte 2 Activé pour 1000 cycles Réglage précis de la position de fin de course 3 Adaptation permanente au sol 50* 43 50 - 0 0... 80mm plus bas Durée de maintien de l'ouverture en secondes 50 - 99 0... 80mm plus haut 50* 34 0* 44 Réglage précis de la position de fin de course 50 - 0 0... 80mm plus bas 50 - 99 0... 80mm plus haut Sélection du profil de sécurité optique Sécurité de contact optique OSE 1* Barre de commutation électrique 8K2 2 Barre d'ondes de pression DW avec test 3 Barre électrique de commutation 8K2 avec interrupteur de 4 Bord de fermeture sans contact, RadioBand Sélection de la barrière photoélectrique 36 3 2 minutes d'éclairage du garage 4 5 minutes d'éclairage du garage 5 Marche / arrêt émetteur portatif (menu 62) 6 Impulsion de passage ELTACO 1 Barrière photoélectrique 2 fils LS2 2 Barrière photoélectrique 4 fils LS5 et photolumineuse à 3 LS2, photolumineuse à réflexion dans le dormant 4 LS5, photolumineuse à réflexion dans le dormant 4 - 14 Voyant à l'entrée (0 - 10 sec. de temps de pré-alerte) Dispositif photoélectrique avec contrôle 15 - 25 Voyant à l'entrée et à la sortie (0 - 10 sec.) 25 - 0 46 1 4 Message OUVERTURE porte 2 Statut de la porte pour système des feux de signalisation 3 Verrouillage Facteur de marche du moteur 0... 50mm plus bas Sans diminution de la durée d'ouverture Message FERMETURE porte 1* Correction l’interrupteur de fin de course préliminaire sécurité 0* -- 49 0* Sans limite 1 25 min / 35% 2 25 min / 30% 3 25 min / 60% Diminution de la durée d'ouverture en mode AR 4 25 min / 20% Quitter le menu 5 10 min / 35% Fonction touches à membranes 6 25 min / 60% 0 Homme mort Ouverture / Homme mort Fermeture 1 Impulsion Ouverture / Homme mort Fermeture 2* Impulsion Ouverture / Impulsion Fermeture 3 AR – Fermeture automatique Réaction sécurité de contact optique 0* Renversement de marche entier 1 Renversement de marche partiel 0 Arrêt 1* En position Portail Fermé 2 En position Portail Ouvert 3 En position Portail Ouvert et Portail Fermé Correction de la distance de marche à vide 42 Statut de la porte pour système des feux de signalisation Relais d'état de porte X6 Réaction barrière photoélectrique 41 Message OUVERTURE porte 2 0 25 - 99 0... 100mm plus haut 40 1 Sans barrière photoélectrique 5 38 Message FERMETURE porte 0* 25* 37 45 Réglages avancés de la porte 35 0 0 sec. 1 - 30 1 sec. ... 30 sec. (étapes de 1 sec.) 31 - 60 35 sec. ... 180 sec. (étapes de 5 sec.) 61 - 99 210 sec. ... 22,5 min (étapes de 30 sec.) Relais d'état de porte X5 0* Affichage valeurs mesurées (appuyer pendant 5 Réglages de base de la porte Arrêt 31 33 Réglages avancés de la porte Sélection -- Quitter le menu * Réglages usine R é c a p i t u l a t i f FR d e Menu Item Exit Enter 30- 3-9 1x Sélection 5 Fonctionnement du commutateur à clé (J7) 52 Verrouiller la console 2 Verrouiller des éléments de commande externe 3 71 0 - 40 Verrouiller la console et les éléments de commande 72 0 - 20 Course de ralentissement avant la fin de course supérieure (0-40 cm, 10*) Couple réduit (16*) -- 4 Activation des éléments de commande pendant 10 Commuter sur dispositif d'homme mort Fermer 6 Commuter sur 1/2 ouverture de porte 7 Entrée d'impulsions Ouvrir-Stop-Fermer Frein moteur Type A, en préparation 78 Type B, en préparation Entrée d'impulsions 1/2 ouverture-Stop-Fermer 9 AR – Fermeture automatique 0* Pas d'intervalle de maintenance 10 Entrée d'impulsions pour EFC (menu 55) 1 10000 cycles Fonction de l'impulseur extérieur (J1) 2 20000 cycles 0* Arrêt 3 30000 cycles 1 Homme mort Ouverture / Homme mort Fermeture 4 40000 cycles 2 Impulsion Ouverture / Homme mort Fermeture 5 50000 cycles 9 Sélection de l'intervalle d'intervention de porte 90 3 Impulsion Ouverture / Impulsion Fermeture 6 60000 cycles 4 Impulsion 1/2 ouverture de porte / Impulsion 7 80000 cycles 5 AR – Fermeture automatique 8 100000 cycles 6 AR – Fermeture automatique, 1/2 ouverture de 9 120000 cycles 7 Mode Ouvrir/Fermer 10 150000 cycles 11 200000 cycles 001-256 Saisie de l'adresse de commande Arrêt 12 250000 cycles 91 Sortie Compteur de cycles - cycles - Module DC 96 Sortie Compteur d'heures de service - heurs - 5 Contact optique sans fil, RadioSafe JCM 97 Sortie Mémoire d'erreurs - heurs - code d'erreur - 6 W-LAN Module 98 Sortie Version du logiciel - numéro de série - date - Commande d'extension 99 Réinitialisation réglages usine (appuyer pendant 5 Arrêt -- Quitter le menu 1-4 0* Profil d'adressage voir commande d'extension 55 Réglage de porte pour la position EFC -- Quitter le menu 60 Apprentissage de la touche de démarrage de 61 Apprentissage de la touche 1/2 ouverture de 62 Apprentissage de la touche d'éclairage de 63 Effacer les codes de télécommande (appuyer pendant 5 70 72 71 Mode d'exploitation touche démarrage Quitter le menu * Réglages usine Menü 70 Démarrage en douceur Menü 71 Bec souple Menü 72 Couple réduit 0 Paramètres recommandés 5.6 Mode Ouvrir/Fermer SI 3 3 6 AR – Fermeture automatique 0.4 Impulsion Ouvrir-Stop-Fermer 2 SI 3 -- 1 .90 64 Arrêt 20 0* SI Codes radio Quitter le menu 8 1, 2, 3 6 Arrêt Temps (60 ms – 300 ms, par pas de 20 ms) Modules 54 0 1 - 13 5 0* 53 Sélection Démarrage en douceur à un couple réduit 70 Réglages de service 51 Entrée d'impulsions Ouvrir/Fermer 7 Speed Réglages divers 50 0* 1 N° Élémen Saisie t de Moteur N° Élément Saisie de menu 2 2 1 10 10 10 3 6 1 FR Notice d'utilisation / Description des fonctions La commande permet différents modes de fonctionnement: Homme mort Ouverture/Homme mort Fermeture Une pression sur la touche démarre la course de la porte dans le sens Ouverture jusqu'à ce que la position de fin de course Ouverture soit atteinte, ou que la course de la porte soit arrêtée par le relâchement de la touche. Une fermeture de la porte est effectuée par une pression prolongée (fonction Homme mort) de la touche jusqu'à ce que la position de fin de course soit atteinte. Si la touche est relâchée pendant la fermeture, la porte s'arrête aussitôt. Impulsion Ouverture/Homme mort Fermeture Une brève pression sur la touche ou sur des impulseurs externes démarrer la course de la porte dans le sens Ouverture jusqu'à ce que la position de fin de course Ouverture soit atteinte ou qu'une pression sur la touche l'arrête. Une nouvelle pression sur la touche permet de continuer le mouvement d'ouverture. Une fermeture de la porte est effectuée par une pression prolongée (fonction Homme mort) de la touche jusqu'à ce que la position de fin de course soit atteinte. Si la touche est relâchée pendant la fermeture, la porte s'arrête aussitôt. Impulsion Ouverture/Impulsion Fermeture Un actionnement bref de la touche ou des impulseurs extérieurs démarre la course de la porte dans le sens Ouverture jusqu'à ce que la position de fin de course Ouverture soit atteinte ou qu'une pression sur la touche l'arrête. Un actionnement bref de la touche démarre la course de la porte dans le sens Fermeture jusqu'à ce que la position de fin de course Fermeture soit atteinte. Ce mode de fonctionnement exige l'installation d'une sécurité de contact optique (menu 35). Le déclenchement de la sécurité de contact optique pendant la fermeture entraîne l'arrêt et la remontée automatique de la porte. Pendant l'ouverture, le déclenchement n'a aucune influence sur le mouvement de la porte. Première impulsion: La motorisation démarre et fait avancer la porte vers la position finale OUVERTURE ou FERMETURE programmée. Impulsion donnée pendant le déplacement: La porte s'arrête. Nouvelle impulsion: La porte inverse sa manœuvre et continue dans le sens contraire. Mode AR - Fermeture automatique Un actionnement bref de la touche ou des impulseurs extérieurs démarre la course de la porte dans le sens Ouverture jusqu'à ce que la position de fin de course Ouverture soit atteinte. Ou bien la porte a été mise en pause auparavant avec la touche . Une fois la durée d'ouverture réglée écoulée, une durée de préavis de 10 s s'écoule, puis la porte se ferme automatiquement. Si la touche est actionnée en position OUVERTURE pendant un parcours FERMETURE, la porte reste immobilisée jusqu'à ce qu'il y ait une nouvelle impulsion sur ou . 1 2 3 4 Mode AR avec raccourcissement dû à la barrière photoélectrique Fonction telle que décrite plus haut, mais l'interruption du faisceau de la barrière photoélectrique entraîne l'interruption de la durée d'ouverture réglée, et la durée de préavis commence. Après expiration de la durée de préavis, la porte se ferme automatiquement. Mode Ouvrir/Fermer Dans le même mode de fonctionnement que la régulation à voie unique avec feu rouge-vert (en option signalisation par feux A800), toutefois le récepteur reste branché à la motorisation. Description du fonctionnement pour l'impulseur externe : Impulsion en position de fermeture: La motorisation démarre et fait avancer la porte sur la position d'ouverture. Impulsion pendant l'ouverture: Sans influence, la porte continue de s'ouvrir. Impulsion en position d'ouverture: La porte se ferme. Impulsion pendant la fermeture: La porte s'arrête et s'ouvre à nouveau. ½ ouverture de porte L'actionnement de la touche ½ entraîne le positionnement en demi-ouverture de porte telle que réglée (menu 32). Cette fonction n'existe pas avec le mode d'exploitation homme-mort ouverture / homme-mort fermeture ni avec un dispositif photoélectrique installé. Eclairage et / ou lumière d'avertissement La commande dispose de 2 sorties de relais qui permettent de brancher l'éclairage ou une lumière d'avertissement (menus 45 et 46). Appareils de commande externes / impulseurs La porte peut être ouverte et fermée à l'aide d'appareils de commande/impulseurs extérieurs. Sécurité Les barrières photoélectriques et sécurités de contact optiques raccordés servent à éviter les accidents. Après avoir découvert un défaut, la commande passe au mode d'exploitation hommemort fermeture. Fonctionnement du commutateur à clé (en option) La commande dispose d'une entrée pour un commutateur à clé. Elle vous permet d'activer les fonctions suivantes (menu 50): 0 Entrée J7 pour impulseur avec séquence 5 6 7 8 9 10 EFC de commutation Ouvrir-Fermer La console de la commande est verrouillée. Tous les éléments de commande externes sont verrouillés. La console de la commande et tous les éléments de commande externes sont verrouillés. Pendant 10 s, la console de la commande et tous les éléments de commande externes sont activés. Commutation du mode de fonctionnement en Impulsion Ouverture/Impulsion Fermeture. Commuter sur 1/2 ouverture de porte. Entrée J7 pour impulseur avec séquence de commutation Ouvrir-StopFermer Entrée J7 pour impulseur avec séquence de commutation 1/2-StopFermer AR – Fermeture automatique Fonction EFC (Evacuation fumée chaleur) Après le déclenchement, la position est lancée. Pour remettre la commande en route, il faut procéder à un reset du réseau. L'émetteur portatif (en option) Touche: Start Touche ½ ouverture de porte: Il est possible de régler les deux touches sur les modes Impulsion, AR et Ouverture-Fermeture (menu 64). fonctionnement comme pour la touche Démarrer, mais la porte va seulement en position de 1/2 ouverture. Touche: lumière La fonction d'éclairage est une lumière continue qui peut être commutée indépendamment de la course de porte "Marche/Arrêt". Maintenance / Contrôle Pour votre sécurité, nous vous conseillons de faire contrôler l'installation de votre porte par un spécialiste avant la première mise en service et selon les besoins (mais au moins une fois par an). Témoin d'intervention technique Si la commande décèle le besoin pour un contrôle, le témoin d'intervention technique s'allume. En informer l'entreprise spécialisée. Signal d'avertissement ! Si le relais de sécurité est interrompu, le signal d'avertissement s'allume, voir diagnostic des erreurs. Conditions de Garantie Cher client, La motorisation dont vous venez de faire l'acquisition pour votre motorisation de porte industrielle a subi plusieurs contrôles de qualité successifs lors de sa fabrication. Si toutefois cette motorisation ou certaines pièces de cette motorisation devaient s'avérer, preuve à l'appui, comme étant inutilisables ou leur utilisation très limitée en raison de défauts de matière ou de fabrication, nous procéderons, selon notre choix, à leur réparation ou à leur remplacement. Nous déclinons toute responsabilité concernant les dommages résultant de travaux de montage et d'installation incorrects, de mise en service déficiente, de manœuvre et d'entretien non conformes, de contrainte inadéquate ainsi que concernant toute modification effectuée de libre arbitre sur la motorisation et les pièces annexes. La même règle sera applicable pour les dommages intervenus par suite du transport, de cas de force majeure, d'une action externe ou de l'usure naturelle, ainsi que par suite de contraintes atmosphériques particulières. Toute modification ou réparation effectuée de libre arbitre sur des pièces liées au fonctionnement de la porte entraînera l'annulation de notre responsabilité. Les défauts devront nous être signalés immédiatement sous forme écrite et les pièces concernées devront nous être envoyées sur demande. Nous n'assumerons pas les coûts de démontage et de montage, ni les frais de transport ou taxes postales. Si la réclamation s'avérait être injustifiée, le client devra prendre nos frais à sa démontage et de montage, ni les frais de transport ou taxes postales. Si la réclamation s'avérait être injustifiée, le client devra prendre nos frais à sa charge. La présente garantie n'est applicable qu'en corrélation avec le récépissé de la facture et prend effet le jour de la livraison. Le fabricant garantit que le produit est exempt de tout défaut. La garantie accordée est de 24 mois, à condition que la pièce justificative au verso ait été dûment remplie. En cas contraire, la garantie prend fin 27 mois après la date de fabrication. FR Affichage des erreurs Erreur Etat E04 E05 E06 E07 E08 E09 E10 F01 F02 F03 F04 F05 F06 F07 F10 F19 F20 F21 F24 F25 F26 F27 F28 F29 F30 F31 F34 F35 F36 F40 F41 F42 F43 F45 F46 L Lo U Le rideau est hors du guidage La porte ne fait aucun mouvement d'ouverture ni de fermeture La porte change de sens de marche/ne ferme pas La porte change de sens de marche/ne ferme pas La porte ne fait aucun mouvement d'ouverture ni de fermeture La porte ne fait aucun mouvement d'ouverture ni de fermeture Menu [37] réglé sur 3 ou 4 Pas de mouvement de porte Aucune réaction Aucune réaction Aucune réaction Aucune réaction Aucune réaction La porte ne fait aucun mouvement d'ouverture ni de fermeture La porte s'arrête juste après l'ordre de démarrage La porte ne se positionne qu'en Homme mort Fermeture La porte ne se positionne qu'en Homme mort Fermeture Interruption brève de fonctionnement Aucune réaction suite à l'ordre de démarrage Aucune réaction Aucune réaction Position finale de la porte pas atteinte. Moteur bloqué. Aucune réaction suite à l'ordre de démarrage Le moteur tourne dans le mauvais sens La porte ne se positionne qu'en Homme mort Fermeture La porte ne fait aucun mouvement d'ouverture ni de fermeture La porte ne fait aucun mouvement d'ouverture ni de fermeture La porte ne fait aucun mouvement d'ouverture ni de fermeture La porte ne fait aucun mouvement d'ouverture ni de fermeture Commande d'extension Commande d'extension Commande d'extension Commande d'extension La porte ne ferme pas Alarme RadioSafe L'accès au menu a été bloqué par le revendeur autorisé. La commande est bloquée. L'accès au menu a été débloqué par le revendeur autorisé. Diagnostic / Remède Le détecteur Anti Crash s'est déclenché. L'interrupteur à tirette s'est déclenché (voir figure 8c). La sécurité par contact optique s'est déclenchée. Vérifier le réglage du menu [35]. La barrière photoélectrique s'est déclenchée. Vérifier le réglage du menu [36]. Le dispositif de sécurité externe (arrêt d'urgence, âble, portillon, thermorupteur du moteur) s'est déclenché. Vérifier. Aucune position de fin de course de la porte n'est détectée. Effectuer l'apprentissage des positions de fin de course de la porte menu [30] [31]. Ouvrir et fermer complètement la porte pour déterminer la position de la barrière photoélectrique. Retour d'infos du relais de freinage défectueux. Erreur survenue pendant l'autotest. Remplacer la commande. Erreur survenue pendant l'autotest. Remplacer la commande. Erreur survenue pendant l'autotest. Remplacer la commande. Erreur survenue pendant l'autotest. Remplacer la commande. Défaut de contact optique. Vérifier la tension (J3.3 - J3.1 >12V). Alimentation électrique 24V coupée. Contrôler les branchements. La porte ne fait aucun mouvement d'ouverture ni de fermeture. Panne dans l'électronique de commande. Remplacer la commande. Échec du test du contact optique. Vérifier il contact optique. Échec du test de la barrière photoélectrique. Vérifier la barrière photoélectrique. Limite de la durée d'exécution de la motorisation de la porte. Laisser la motorisation refroidir pendant env. 20 minutes. Aucune connexion avec le DES. Vérifier le câble de raccordement au moteur et le DES. Défaut lors du test interne du clavier à membrane. Remplacer le clavier à membrane ou la commande. Échec du test interne poussoirs / commutateurs externes. Réajuster dans le menu 33/34. Contrôler la mécanique de la porte / contrôler le câble de raccordement du moteur. Défaut sur l'alimentation électrique. Vérifier le raccordement côté secteur. Phases moteur remplacées. Contrôler le raccord du moteur. Passage d'impulsion à la commande Homme mort. Vérifier les baguettes de sécurité, la barrière photoélectrique. Touche actionnée. Présence d'une impulsion continue. Vérifier les commandes externes (J1). Facteur de marche excédé. Patienter et laisser le moteur refroidir. Le contrôle de vitesse de rotation s'est déclenché. Remplacer la commande du contrôle de vitesse de rotation. Communication internet perturbée entre la commande et le variateur de fréquences (VF). Vérifiez la jonction à la borne J10. 24V coupée. Contrôler les branchements de la commande d'extension. Erreur survenue pendant l'autotest. Remplacer la commande d'extension. Erreur survenue pendant l'autotest. Remplacer la commande d'extension. Liaison manque. Module RadioSafe absent ou défectueux. Changer batterie RadioSafe. Prendre contact avec le revendeur. Déblocage du menu seulement possible avec l'outil de service. Prendre contact avec le revendeur. Déblocage du menu seulement possible avec l'outil de service. Modifications ultérieures Signature: Nom, technicien: Poids du vantail: Année de fabrication: Mode de fonctionnement: Date de fabrication: FR Attention: il convient de différencier les opérations de contrôle de celles de maintenance. Toute modification (si autorisée) apportée à l'installation de porte doit également être documentée Le fabricant décline toute responsabilité en cas de contrôle/maintenance non conformes. porte (consignes de montage, de commande et de maintenance) doivent également être impérativement observées. Veuillez conserver cette notice de pose, d’emploi et d’entretien pendant toute la durée d’utilisation! Tous les travaux de maintenance et de contrôle doivent être documentés dans le cahier d'inspection fourni. L'exploitant doit le conserver au même endroit que la documentation de l'installation de porte pendant toute la durée d'utilisation après l'avoir reçu complété des mains du technicien après la mise en service effectuée. (Nous le recommandons également pour les portes à actionnement manuel.) Les prescriptions issues de la documentation de l'installation de et portes de garage motorisées". Contrôle de l'installation de porte Les portes motorisées doivent être inspectées et/ou entretenues par des techniciens de montage qualifiés (ce sont des personnes qui ont la formation appropriée et disposent des compétences nécessaires de par leur connaissance et leur expérience) ou des experts lors de la mise en service et selon les intervalles prévus par le fabricant dans la notice de maintenance, également selon les éventuelles réglementations nationales spécifiques (comme pour l'Allemagne la réglementation 232 "Directives pour les fenêtres, portes Généralités Autres données Mise en service effectuée le: Société, technicien: Montage et mise en service Dimensions de la porte: N° de série: Modèle: Caractéristiques de la porte: Fabricant: Données de motorisation Modèle de motorisation: Emplacement d'installation de la porte: Exploitant de l'installation: Cahier d'inspection entièrement / lisible entièrement / lisible entièrement / lisible Etat / Fonction Fonction / Etat Fonction / Etat Fonction / Etat Fonction / Etat Fonction / Etat Fonction / Etat Etat / Fonction ________________________ ________________________ ________________________ ________________________ ________________________ ________________________ ________________________ ________________________ _________________________ __________________________ ________________________ ________________________ ________________________ ________________________ ________________________ ________________________ ________________________ ________________________ ________________________ _________________________ ________________________ ________________________ ________________________ ________________________ ________________________ ________________________ ________________________ ________________________ ________________________ ________________________ ________________________ ________________________ _________________________ ________________________ ________________________ ________________________ ________________________ ________________________ Remarque Veuillez conserver cette notice de pose, d’emploi et d’entretien pendant toute la durée d’utilisation! Documentation de l'exploitant Plaque signalétique / désignation CE Déclaration de conformité de l'installation de porte Notice de montage, d'utilisation et de maintenance 6.0 6.1 6.2 6.3 Autres dispositifs Verrouillage / serrure Portillon Contact de portillon Contact de fermeture de porte Signalisation par feux Barrières photoélectriques Sécurité de contact optique 5.0 5.1 5.2 5.2.1 5.2.2 5.3 5.4 5.5 4.3 Sécurité contre l'écrasement et le cisaillement Limitation de la force Arrête et change de sens Protection contre le Vantail soulèvement de personne Environnement sur site de montage Distances de sécurité 4.0 4.1 4.2 3.5 Motorisation / commande Motorisation / console Câbles / branchements électriques Déverrouillage d'urgence Chaîne d'accélération Manivelle Déverrouillage rapide Dispositifs d'actionnement, poussoirs / émetteur portatif Désactivation de fin 3.0 3.1 3.2 3.3 3.3.1 3.3.2 3.3.3 3.4 Etat / Fixation Etat Etat / Fonction Etat / Fonction Etat / Fonction Etat / Fonction Etat / Fonction Équilibrage du poids / ouverture en toute sécurité Ressorts Etat / Assise / Réglage Têtes de serrage / supports de palier Etat Dispositif contre la rupture des ressorts Etat / Plaque signalétique Éléments de sécurité Etat / Assise Câbles métalliques Etat / Assise Fixation de câble Etat / Assise Tambours d'enroulement 2 bobines de sécurité Interrupteur à tirette Etat / Assise / Fonction Sécurité antichute Etat Déplacement radial de l'arbre en T Etat 2.0 2.1 2.1.1 2.1.2 2.1.3 2.2 2.2.1 2.2.2 2.2.3 2.3 2.4 Manœuvrabilité Etat / Sitz Etat / Graissage Etat / Graissage Etat / Assise Orientation / Fixation Orientation / Etat Porte Actionnement manuel de la porte Fixations / raccordements Points de rotation / éléments articulés Galet / support de galet Joints / barres de contact Châssis de porte / guidage de porte Vantail présent Caractéristiques à vérifier applicable (Cocher l'équipement présent lors de la mise en service!) 1.0 1.1 1.2 1.3 1.4 1.5 1.6 1.7 Équipement Liste de vérification de l'installation de porte FR Date Défauts supprimés Signature / Signature / Adresse de la société Adresse de la société Contrôle effectué Veuillez conserver cette notice de pose, d’emploi et d’entretien pendant toute la durée d’utilisation! Mise en service, premier contrôle Travaux/mesures exigées effectué(e)s Justificatifs de contrôle et de maintenance de l'installation de porte FR Déclaration T100 R Ulrich Theile Directeur Développement Chargé de documentation ____________________ Veuillez conserver cette notice de pose, d’emploi et d’entretien pendant toute la durée d’utilisation! Dortmund, 29.04.2013 Le produit ne doit être mis en service qu'après qu'il ait été déterminé que l'installation de porte est conforme aux dispositions de la directive Machines. • Elle est conforme à la directive CEM 2004/104/CE • Elle est conforme à la directive CE Basse tension 2006/95/CEE. • Conforme avec la règlementation sur les produits de construction BauPVO 305/2011 La documentation technique selon l'annexe VII B a été élaborée. Nous nous engageons à transmettre les documents spéciaux sous forme écrite aux autorités de surveillance du marché si elles l'exigent de manière justifiée. Normes non harmonisées appliquées: EN 12453:2000 chapitre 5.2 Normes harmonisées appliquées: EN ISO 13849-1:2008 EN 60335-2-103:2003 EN 60335-1:2012 Certificat d'examen de type CE Validité: Le service de contrôle reconnu TÜV NORD CERT GmbH (NB 0044), Langemarckstr. 20, 45141 Essen, a réalisé la procédure d'examen de type CE décrite à l'annexe IX. correspond à la directive Machines 2006/42/CE et qu'elle est destinée à être montée dans une installation de porte de garage. déclare ici que la commande Novoferm tormatic GmbH Oberste-Wilms-Str. 15a D-44309 Dortmund En vertu de la directive sur les machines 2006/42/CE, Annexe II Partie 1 A FR ES WN 905005-35-6-50 03/14 • Informaciones generales T100 R DES • Seguridad Antes de iniciar cualquier trabajo en el producto se deben leer totalmente las instrucciones de manejo, en particular el capítulo Seguridad y las correspondientes indicaciones de seguridad. Se debe haber comprendido lo leído. De este producto podrían provenir peligros, si se utiliza de forma incorrecta, inexperta o para un uso no apropiado. La garantía del fabricante se extingue para los daños ocasionados por el incumplimiento de estas instrucciones. • Explicación de los símbolos 1A2 ADVERTENCIA: AMENAZA PELIGRO Este símbolo identifica indicaciones que, en caso de no seguirse, pueden causar lesiones graves. ¡Advertencia! ¡PELIGRO! ¡PORCORRIENTE ELÉCTRICA! Los trabajos a ejecutar sólo los puede realizarun técnico electricista. ! 0 Índice • Informaciones generales - Seguridad - Explicación de los símbolos - Seguridad en el trabajo - Peligros que pueden proceder del producto - Normativa relevante para la seguridad - Recambios - Modificaciones y reformas en el producto - Placa de características - Embalaje - Datos técnicos • Instalación • Programación de la unidad de control • Instrucciones de manejo / Descripción del funcionamiento • Mantenimiento / Comprobación • Indicación de errores • Disposiciones de la garantía • Libro de comprobación para la instalación de la puerta - Libro de comprobación para la instalación de la puerta - Lista de comprobación de la instalación - Comprobantes de comprobación y mantenimiento de la instalación de la puerta - Declaración de conformidad y de incorporación Este símbolo identifica indicaciones que, en caso de no seguirse, pueden ocasionar funcionamiento defectuoso y/o fallo del automatismo.. Remisión a texto y figura • Seguridad en el trabajo Siguiendo las indicaciones de seguridad y las instrucciones contenidas en estas instrucciones de manejo, se pueden evitar daños personales y materiales durante el trabajo con y en el producto. En caso de no seguirse las indicaciones de seguridad y las instrucciones contenidas en estas instrucciones de manejo, así como las prescripciones de prevención de los accidentes vigentes para el campo de aplicación y las disposiciones generales de seguridad, quedarán excluidos todos los derechos a reclamación de garantía y reposición de daños al fabricante o a su representante. • Peligros que pueden proceder del producto El producto fue sometido a un análisis de peligro. En función de ello, el diseño y la realización del producto corresponden al actual estado de la técnica. El producto, empleado para el uso apropiado, es de funcionamiento seguro. No obstante, queda un riesgo residual. El producto trabaja con tensión eléctrica elevada. Antes de iniciar los trabajos en las instalaciones eléctricas se debe tener en cuenta lo siguiente: 1. Desconectar 2. Asegurar contra una nueva conexión. 3. Comprobar la ausencia de tensión. • Normativa relevante para la seguridad En la instalación, la puesta en marcha, el mantenimiento y la comprobación de la unidad de control deben respetarse las disposiciones de protección locales. Debe observar las siguientes normativas: Normas europeas - DIN EN 12445 Seguridad de uso de las puertas accionadas por fuerza, procedimiento de ensayo - DIN EN 12453 Seguridad de uso de las puertas accionadas por fuerza, requisitos - DIN EN 12978 Seguridad de uso de las puertas accionadas por fuerza, requisitos y procedimiento de ensayo Además deben observase las advertencias normativas de las normas citadas. Normativa de la Asociación electrotécnica alemana (VDE) - DIN EN 418 Seguridad de las máquinas Dispositivo de parada de emergencia, aspectos funcionales Principios de configuración - DIN EN 60204-1 / VDE 0113-1 Instalaciones eléctricas con medios de producción eléctricos - DIN EN 60335-1 / VDE 0700-1 Seguridad de aparatos eléctricos para el uso doméstico y fines parecidos • Recambios Utilizar exclusivamente recambios originales del fabricante. Los recambios incorrectos o defectuosos pueden causar daños, funcionamiento defectuoso o fallo total del producto. • Modificaciones y reformas en el producto Para evitar peligros y asegurar el óptimo rendimiento, no se deben realizar en el producto modificaciones, montajes adicionales, ni reformas, que no hayan sido previamente autorizadas de forma explícita por el fabricante. • Placa de características La placa de características se encuentra en el lado dl cabezal del motor. Se deben tener en cuenta los valores de conexión eléctrica indicados. • Embalaje Realizar la eliminación del material de embalaje siempre de forma respetuosa con el medio ambiente y según las normas de eliminación locales vigentes. Datos técnicos Modelo T100 R Placa de características WN021042 Dimensiones de la carcasa altura x anchura x profundidad 250 mm x 215 mm x 120 mm Montaje vertical Cantidad de pasos para cables 6 x M20 2 x M16 2 x M20 sección en V Tensión de alimentación 3 x 400 V CA 3 x 230 V CA Tensión de control 24 V CC Alimentación externa máx. 700mA Potencia del motor máx. máx. 3,0 kW Grado de protección IP 65 / conector CEE-Cara de 16 A = IP 44 Temperatura durante el funcionamiento de - 20 °C hasta + 55 °C Fabricante: Novoferm tormatic GmbH Oberste-Wilms-Str. 15a D-44309 Dortmund ¡Estas instrucciones de montaje, manejo y mantenimiento se deben guardar durante toda la duración del uso! ES Instalación ADVERTENCIA: En caso de montaje incorrecto puede peligar la seguridad de personas! ! La unidad de control T10 R está destinada unicamente al uso en puertas de movimiento vertical y horizontal. 0 Herramientas necesarias 1 Montaje de la unidad de control 2 Abrir la cubierta de la unidad control Desconecte el interruptor principal o desenchufe el enchufe de la red eléctrica antes de abrir la cubierta superior de la unidad de control. Deje que se disipe durante 1 minuto una posible tensión residual en la conexión al motor. Asegurar contra una nueva conexión no autorizada. 3 Conexiones Denominación: J1 J2 J3 J4 J5 J6 J7 J8 J9 cable J10 J11 J12 J13 X1 X2 X3 X4a X5 X6 X7 X8a X8b Entradas de impulsos Barrera fotoeléctrica de seguridad de 2 o 4 hilos o cortina fotoeléctrica de seguridad Cantos de cierre / OSE / 8K2 / DW Parada de emergencia, cable flojo, bloqueo, interruptor de tirador Libre Detector anticolisión Botón de llave Entradas de temporizador Interruptor de fin de carrera digital, de motor Conexión de controles de expansión Conexión de radioreceptor Antena Teclado de membrana Conexión a la red Salida de la red L, N (500W / 230V) Contacto del conductor protector Freno magnético Contacto de relé 1 libre de potencial, relé de estado de la puerta Contacto de relé 2 libre de potencial, relé de estado de la puerta Automatismo de la puerta Conexión cortina fotoeléctrica de seguridad-emisor 24V DC, max. 700mA 4 Conexión a la red La unidad de control está dotada de un conector CEE-Cara de 16 A y un cable de aprox. 1 m listo para ser conectado de acuerdo con 4a. ! La conexión a la red debe realizarse de acuerdo con la tensión de red disponible. Al propietario corresponde proteger la unidad de control con un fusible automático de 10 A. 5 Línea de conexión de motor La linea de conexion esta preconfeccionada para un motor y un interruptor de fin de carrera digital DES, insertar. Conexión para freno magnético - X4. 6 Conexión para generador de impulsos La puerta tiene que ser visible desde el lugar de mando. 6a/6b - Conexión J1 para transmisores de mandos externos abrir, parar y cerrar. funcionamiento AR, como interruptor de tirador e interruptor pulsante 7a, bucles de inducción 7b y detector de movimiento 7c. La puerta se cierra automáticamente después del tiempo de espera en abierto configurado en el menú 44. En el menú 38 se puede seleccionar una reducción del tiempo de espera en abierto mediante la barrera fotoeléctrica. 8 zona de monitorizar Si la velocidad de cierre es mayor que 50 cm / s deberá el zona la totalidad Anchura de la puerta y la profundidad de 90 cm son monitoreados en ambos lados de la puerta. Diagrama de conexión 8 muestra el detectores de movimiento y presente Cóndor. 9 Conexión para protección contra accidentes Caja de conexión de la puerta con disyuntor de cable flojo o interruptor de seguridad y contacto de puerta deslizante 8. Seleccionar la configuración de la protección contra accidentes en el menú 35: Caja de conexión de la puerta con disyuntor de cable flojo y contacto de puerta deslizante 8. - Protección contra accidentes óptica OSE Se admite únicamente la protección contra accidentes óptica OSE de Fraba o Witt. - Protección contra accidentes eléctrica 8K2 con 8,2 Kohm de impedancia de cierre (valor = 1) - Protección contra accidentes eléctrica 8K2 de conexión en serie con disyuntor para cable flojo y con interruptor de puerta deslizante (valor = 3) - Barra e interruptor de ondas de presión 8,2 Kohm de resistencia de bucle (valor = 2) 10 Conexión para cortina fotoeléctrica de seguridad Se pueden conectar las siguientes cortinas fotoeléctricas de seguridad. 9a Cortina fotoeléctrica de seguridad con comprobación En el menú 36 hay que configurar para ello el valor 5. 9b Cortina fotoeléctrica de seguridad con interfaz OSE En el menú 35 hay que configurar para ello el valor 0. 11 Conexión para la barrera fotoeléctrica La barrera fotoeléctrica debe ajustarse correspondientemente en el menú 36. 10a barrera fotoeléctrica de dos cables Ls2 10b barrera fotoeléctrica de cuatro cables LS5 con comprobación 10c barrera fotoeléctrica de reflexión Si en el menú se ha seleccionado la barrera fotoeléctrica montada en el bastidor de la puerta, en el siguiente recorrido en el sentido cerrar la unidad de control realiza una marcha de aprendizaje. Entonces se indica E10. Para ello no debe interferirse en el cierre con el fin de que no se registre una posición incorrecta. 12 Sensor anticolisión La entrada J6 detecta si la cortina se ha salido de la guía e inicia una recolocación automática. Barrera fotoeléctrica unidireccional con salida de relé 11a, con salida de transistor 11b. 6c - Secuencia de conmutación abrir-parar-cerrar, configurar el valor 4 en el menú 51. J1.3 - ½ apertura de la puerta, J1.4 – apertura completa de la puerta. 13 Conexión de parada de emergencia Emplear la entrada también para el disyuntor de rotura de muelle. 6d - Abrir-parar-cerrar con iluminación 14 Conexión interruptor de llave Al utilizar un interruptor de llave debe seleccionarse la función deseada en el menú 50. 7 Entradas de temporizador La conexión J8 es para aparatos de mando, para 15 Mando por radiocontrol Enchufar el módulo receptor (opcional) en J11 y conectar la antena. Aprendizaje del emisor manual. 16 Salida de un relé 2 cambiadores: max. 250VAC / 2A o 24VDC / 1A Salida de 24V X8: max. 700mA Selección - relé función: menú 45 y 46 16c. Bloqueo mutuo de 2 puertas (conexión de barrera) Menú 50 valor 2 y menú 45 valor 0. 16d. Bloqueo mutuo de 2 puertas (conexión de barrera) Menú 50 valor 2 y menú 45 y 46 valor 0 ES Programación de la unidad de control La programación está controlada por el menú. Realizar los ajustes de la puerta de acuerdo con el esquema. La página siguiente muestra la extensión completa de los menús. ! Antes de configurar las posiciones finales hay que configurar el tipo de motor y de freno correcto (menú 78 y 79). Una configuración errónea puede causar daños en la puerta. No se ha seleccionado un motor: E01 aparece en el indicador. Selección del freno (menú 78) Freno tipo A, de frenado sin corriente, se aplica con efecto simultáneo (valor=0) o retardado (1-9) al stop del motor. Freno tipo B, de apertura sin corriente, se abre con efecto simultáneo (valor=10) o retardado (11-19) al stop del motor. Configurar posiciones finales de la puerta (menú 30 y 31) Las posiciones finales superior e inferior tienen que configurarse consecutivamente. Optimización del funcionamiento de la puerta Para lograr una marcha suave de la puerta, configurar en el menú 70 y 72 un arranque suave y una parada suave antes de alcanzar la posición final en el menú 71. Corrección del trayecto de la marcha de inercia (menú 42) Compensa las modificaciones de la posición cerrada resultantes de la temperatura, el movimiento del automatismo, etc. Adaptación al suelo (menú 43) Compensa las modificaciones de la posición cerrada que se producen debido al alargamiento de la cuerda o la elevación del suelo. La posición final cerrar se adapta a través de los contactos con el suelo de los cantos de cierre. Primero ajustar de forma exacta la posición cerrada, a continuación ajuste el menú 43. En las configuraciones 2, 3 y 4 se adaptan correspondientemente las posiciones aprendidas de los menús 31, 34 y 37. Arranque suave y parada suave Para optimizar la suavidad de marcha y el comportamiento de marcha pueden modificarse los ajustes en los menús 70, 71 y 72. Tiempo de conexión (menú 49) El tiempo de conexión configurado impide que se sobrecaliente el órgano motor y evita daños. Función RWA (Función de evacuación de humo y calor) Configurar la posición correspondiente de la puerta en el menú 55. Conectar el sistema de detección de incendios a J7 y configurar el valor 9 en el menú 50. Aprendizaje del emisor manual de control remoto Tenga en cuenta que cada emisor manual debe realizar el aprendizaje. Tiene la posibilidad de aprender 30 códigos de radio. Se pueden aprender las siguientes funciones: KeeLoq, 12 Bit Multibit. El primer código define el tipo. Impulso piloto (menú 60) Vaya al menú y pulse la tecla del emisor manual para la función de inicio. Tan pronto como haya sido aprendido el código, el punto indicador parpadeará 5 veces en la pantalla. ½ apertura de la puerta (menú 61) Vaya al menú y pulse la tecla del emisor manual para la ½ apertura. Tan pronto como haya sido aprendido el código, el punto indicador parpadeará 5 veces en la pantalla. Función de luz (menú 62) Vaya al menú y pulse la tecla del emisor manual para la función de luz. Tan pronto como haya sido aprendido el código, el punto indicador parpadeará 5 veces en la pantalla. Borrar el código de radio (menú 63) Para borrar en el menú todos los códigos aprendidos, mantener pulsada la tecla ovalada durante 5 segundos. Selección del modo de operación para emisores manuales (menú 64) En este menú pueden bloquearse además provisionalmente los emisores manuales aprendidos. ES Guía rápida de la Menu 3-9 Item Enter Exit 30- 1x Opción N.° de menú Entrada Selección 3 Configurar la posición superior final de la puerta 30 N.° Opción de menú Entrada Selección Adaptación al suelo 4 Inversión de la dirección (pulsar 5 seg.) 0* 31 Configurar la posición inferior final de la puerta 1 Activado para 200 ciclos 32 Configuración de ½ apertura de la puerta 2 Activado para 1000 ciclos Configuración precisa de la posición final 3 Adaptación permanente al suelo 50* 33 43 50 - 0 0... 80mm más profundo Tiempo de espera en abierto en segundos 50 - 99 0... 80mm más alto 50* 34 0* Configuración precisa de la posición final inferior 44 50 - 0 0... 80mm más profundo 61 - 99 210 seg. ... 22,5 min. (en etapas de 30 seg.) 0* Mensaje de puerta cerrada Indicador de valores medidos (pulsar 5 seg.) 1 Mensaje de puerta abierta 2 Estado de la puerta para control de semáforo A800 3 Luz del garaje de 2 minutos 4 Luz del garaje de 5 minutos 5 Emisor manual con / des (menu 62) 6 Wischimpuls ELTACO 0 Mensaje de puerta cerrada 1* Mensaje de puerta abierta 2 Estado de la puerta para control de semáforo A800 3 Bloqueo 0 Cantos de cierre ópticos OSE 1* Regleta eléctrica de conmutación 8K2 2 Barra de ondas de presión con test 3 Regleta eléctrica de conmutación 8K2 con disyuntor 4 Protección contra accidentes inalámbrica, RadioBand Selección de la barrera fotoeléctrica 0* 36 37 Sin barrera fotoeléctrica 1 Barrera fotoeléctrica de dos hilos LS2 2 Barrera fotoeléctrica de 4 hilos LS5 y de reflexión 3 Barrera fotoeléctrica LS2 y de reflexión en el bastidor de la 4 Barrera fotoeléctrica LS5 y de reflexión en el bastidor de la 5 Barrera fotoeléctrica con comprobación 25* 25 - 0 Relé de estado de la puerta X5 Selección de los cantos de cierre 45 Configuraciones ampliadas de la puerta Configuraciones básicas de la puerta 35 Relé de estado de la puerta X6 46 4 - 14 Luz de advertencia en puerta cerrada (0-10 seg. de tiempo de 15 - 25 Luz de advertencia en puerta abierta y cerrada (0 - 10 Corección preinterruptor de final de carrera de los cantos de Tiempo de conexión del motor 0... 50mm más profundo 25 - 99 0... 100mm más alto Reacción barrera fotoeléctrica 38 25 min / 35% 2 25 min / 30% 3 25 min / 60% 1 Reducción tiempo de espera en abierto en funcionamiento 4 25 min / 20% Finalizar menú 5 10 min / 35% Función teclas de membrana 6 25 min / 60% 0 Hombre muerto abrir / hombre muerto cerrar 1 Impulso abrir / hombre muerto cerrar 2* Impulso abrir / impulso cerrar 3 Funcionamiento AR - cierre automático Reacción de la protección contra accidentes 0* Inversión parcial de la marcha 1 Inversión total de la marcha Corrección del trayecto de la marcha en inercia 42 Sin limitación Sin reducción tiempo de espera en abierto -- 41 49 0* 1 0* 4 40 0 seg. 1 - 30 1 seg. ... 30 seg. (en etapas de 1 seg.) 31 - 60 35 seg. ... 180 seg. (en etapas de 5 seg.) 50 - 99 0... 80mm más alto Configuraciones ampliadas de la puerta des 0 des 1* En posición puerta cerrada 2 En posición puerta abierta 3 En posición puerta abierta y puerta cerrada -- Finalizar menú * Restablecimiento del ajuste de fábrica ES Guía rápida de la Menu 3-9 Item Exit Enter 30- 1x Función del interruptor llave (J7) 5 52 1 Bloquear campo de manejo 2 Bloquear elementos de manejo externos 3 4 5 Cambiar a hombre muerto cerrar 6 Cambiar a ½ apertura de la puerta Recorrido de marcha en inercia antes de la posición final superior 0 - 40 (0 -40cm,10*) Bloquear campo de manejo y elementos de manejo 72 0 - 20 Par reducido (16*) Activación de los elementos de manejo por 10 seg. -- Finalizar menú 78 Tipo A, en preparación Freno del motor Entrada de impulso abrir-parar-cerrar 8 9 Funcionamiento AR - cierre automático 0* Sin intervalo de servicio 10 Entrada de impulso para Función RWA (menú 55) 1 10000 ciclos Función generador de impulsos externos (J1) 2 20000 ciclos Tipo B, en preparación 9 Intervalos de servicio de la puerta 0* des 3 30000 ciclos 1 Hombre muerto abrir / hombre muerto cerrar 4 40000 ciclos 5 50000 ciclos 6 60000 ciclos 2 Impulso abrir / hombre muerto cerrar 3 Impulso abrir / impulso cerrar 4 Impulso ½ apertura de la puerta / impulso cerrar 5 Funcionamiento AR - cierre automático 6 Funcionamiento AR - cierre automático, ½ apertura de la 7 Funcionamiento abrir/cerrar 001-256 Introducción de la dirección de la unidad de des 90 7 80000 ciclos 8 100000 ciclos 9 120000 ciclos 10 150000 ciclos 11 200000 ciclos 12 250000 ciclos Impresión del contador de ciclos - ciclos - 91 Módulo DC 96 Impresión del contador de hora de servicio - horas 5 Protección contra accidentes inalámbrica, RadioSafe 97 Impresión de la memoria de fallos - horas - códigos de 6 Módulo W-LAN 98 Impresión versión de software - número de serie - Unidad de control de la ampliación 99 Restablecimiento del ajuste de fábrica (pulsar 5 des -- Finalizar menú 1-4 0* Perfiles de acceso ver control de expansión 55 Configuración de la puerta para la posición de -- Finalizar menú 60 Aprendizaje de la tecla de inicio del emisor 61 Aprendizaje de la tecla ½ del emisor manual 62 Aprendizaje de la tecla luminosa del emisor 63 Borrar código de radio (pulsar 5 seg.) 70 72 71 Finalizar menú * Restablecimiento del ajuste de fábrica Menü 70 Arranque suave Menü 71 Recorrido de marcha Menü 72 Par reducido 0 recomendadan 5.6 Configuración SI 3 Funcionamiento AR - cierre automático Funcionamiento abrir/cerrar .46 2 3 30 Impulso abrir-parar-cerrar SI -- des 1 20 64 0* .90 Modo de funcionamiento tecla de inicio SI Control remoto 1 - 13 Tiempo (60mS – 300mS, en etapas de 20mS) Entrada de impulso ½ apertura de la puerta-parar- 1, 2, 3 6 des 71 Módulo 54 0 7 0* 53 Arranque suave con par reducido 70 Configuraciones de servicio 51 Entrada de impulso abrir/cerrar Opción de menú Entrada Selección 7 Speed Diversas configuraciones 50 0* N.° Motor Opción N.° de menú Entrada Selección 2 2 1 10 10 10 3 6 1 ES Instrucciones de manejo / Descripción del funcionamiento La unidad de control permite diferentes modos de funcionamiento: Hombre muerto abrir / Hombre muerto cerrar Presionando la tecla de forma continua se inicia el funcionamiento de la puerta en el sentido abrir hasta que se alcanza la posición final abrir, o si se deja de presionar la tecla el funcionamiento de la puerta se para. La puerta se cierra pulsando la tecla de forma continua (función de hombre muerto) hasta que se alcanza la posición final. Si durante el funcionamiento se deja de presionar la tecla , la puerta se para inmediatamente. Impulso abrir / Hombre muerto cerrar Pulsando un instante la tecla o un generador de impulsos externo se inicia el funcionamiento de la puerta en el sentido abrir, hasta que se alcanza la posición final abrir, o pulsando de nuevo la tecla se para. Pulsando de nuevo la tecla continúa la apertura. La puerta se cierra pulsando la tecla de forma continua (función de hombre muerto) hasta que se alcanza la posición final. Si durante el funcionamiento se deja de pulsar la tecla , la puerta se para inmediatamente. Impulso abrir / Impulso cerrar Accionado un instante la tecla o un generador de impulsos externo se inicia el funcionamiento de la puerta en el sentido abrir hasta que se alcanza la posición final abrir, o se para mediante la tecla . Accionando un instante la tecla se inicia el funcionamiento en el sentido cerrar hasta que se alcanza la posición final cerrar. Este modo de funcionamiento requiere la instalación de una protección contra accidentes (menú 35). La activación de la protección contra accidentes provoca que se pare y retroceda durante el cierre. Durante la apertura esta activación no tiene influencia. Primera emisión de impulsos: El órgano motor se inicia y la puerta se desplaza a la posición final ABRIR o CERRAR configurada. Emisión de impulsos durante el recorrido: La puerta se para. Nuevo impulso: La puerta continúa el funcionamiento en el sentido contrario. Funcionamiento AR Accionado un instante la tecla o un generador de impulsos externo se inicia el funcionamiento de la puerta en el sentido abrir hasta que se alcanza la posición final abrir o la puerta fue detenida de antemano con la tecla . Tras la secuencia del tiempo de apertura transcurre un tiempo de preaviso de 10 segundos, a continuación la puerta se cierra automáticamente. Si se pulsa la tecla en la posición abierta o durante el recorrido de cierre, la puerta se para hasta que se emita un nuevo impulso o . Distinguido cliente: El automatismo para puerta industrial que acaba de adquirir ha sido comprobado en la empresa del fabricante durante la producción varias veces con respecto a su perfecta calidad. Si, de forma demostrable, el automatismo o partes de él estuvieran inutilizables o su utilidad estuviera mermada considerablemente como consecuencia de defectos de material o de fabricación, procederemos, según nuestro criterio, a una reparación gratuita o a una entrega de reposición. No podemos aceptar ninguna responsabilidad en caso de daños causados por la ejecución El funcionamiento AR con reducción a través de una barrera fotoeléctrica La función tal como se describe arriba, provoca por otra parte una interrupción de la barrera fotoeléctrica y la interrupción del tiempo de apertura configurado y empieza el tiempo de preaviso. Tras la secuencia del tiempo de preaviso la puerta se cierra automáticamente. 2 3 4 5 Funcionamiento abrir/cerrar En el mismo modo de operación que en la regulación de una sola vía con semáforo rojo-verde (opcionalmente control de semáforo A800), pero el receptor permanece enchufado en el órgano motor. 6 7 Secuencia de funcionamiento para generadores de impulsos externos: 8 Emisión de impulsos en posición cerrar: El órgano motor se inicia y la puerta se desplaza a la posición abrir. 10 Emisión de impulsos durante el recorrido de apertura: Sin influencia. La puerta sigue abriéndose. Emisión de impulsos en posición abrir: La puerta se cierra. Emisión de impulsos durante el recorrido de cierre: La puerta se para y se abre de nuevo. ½ apertura de la puerta Accionado la tecla ½ arranca la ½ apertura de la puerta configurada (menú 32). Esta función no está disponible en el modo de funcionamiento hombre muerto abrir / hombre muerto cerrar ni tampoco con una cortina fotoeléctrica de seguridad instalada. Iluminación o luz de preaviso La unidad de control dispone de dos salidas de relé con los que se conecta la iluminación o la luz de preaviso (menú 45 y 46). Aparatos de mando externos / generador de impulsos La puerta se puede abrir y cerrar mediante aparatos de mando externos. Seguridades Las barreras fotoeléctricas y protecciones contra accidentes conectadas sirven para evitar accidentes. Cuando se ha comprobado un defecto, la unidad de control cambia al modo de funcionamiento hombre muerto cerrar. Función del interruptor llave (opcional) La unidad de control dispone de una entrada para un interruptor de llave. Con ello usted tiene la posibilidad de activar las siguientes funciones (menú 50). 0 1 9 Entrada J7 para generador de impulsos con secuencia de conmutación abrircerrar Se bloquea el campo de manejo de la unidad de control. Se bloquean todos los elementos de manejo externos. Se bloquean el campo de manejo de la unidad de control y todos los elementos de manejo externos. Durante 10 segundos están activos el campo de manejo de la unidad de control y todos los elementos de manejo externos. Cambio de modo de funcionamiento en impulso abrir/hombre muerto cerrar. Cambiar a ½ apertura de la puerta. Entrada J7 para generador de impulsos con secuencia de conmutación abrirparar-cerrar Entrada J7 para generador de impulsos con secuencia de conmutación 1/2-pararcerrar Funcionamiento AR - cierre automático Función de evacuación de humo y calor Después del accionamiento se accede obligatoriamente a la posición de evacuación de humo y calor. Para poder poner de nuevo en funcionamiento la unidad de control, hace falta reinicializar la red. Aprendizaje del emisor manual del control remoto (opcional) Tecla: Arranque Tecla: ½ apertura de la puerta Para ambas teclas pueden configurarse la operación por impulsos, el funcionamiento AR y el funcionamiento abrir/cerrar. La función como en la tecla inicio, sin embargo la puerta recorre sólo la ½ apertura configurada de la puerta. Tecla: Luz En la función de luz se trata de una luz continua que se puede conectar independientemente del funcionamiento de la puerta “con/des”. Mantenimiento / Comprobación Por su seguridad recomendamos que una empresa especializada compruebe la instalación de la puerta antes de la primera puesta en marcha y cuando sea necesario, una vez al año como mínimo. Visualización de servicio Si la unidad de control detecta la necesidad de comprobación, se enciende la indicación de servicio. Informar a la empresa especializada. Señal de aviso ! En caso de interrupción del circuito de seguridad se enciende la señal de aviso, ver indicación de errores. Disposiciones de la garantía defectuosa de los trabajos de instalación y montaje, una puesta en servicio incorrecta, un manejo y mantenimientos inadecuados, una solicitación inapropiada, así como cualquier modificación no autorizada en el automatismo y sus accesorios. Lo mismo se aplica en caso de daños causados por el transporte, por fuerza mayor, influencias externas o desgaste natural, así como solicitaciones atmosféricas especiales. Después de modificaciones o reparaciones no autorizadas de elementos funcionales no se aceptará ninguna responsabilidad. Los eventuales defectos se tendrán que comunicar sin demora y por escrito al fabricante; las piezas en cuestión nos deberán ser enviados a nuestro requerimiento. No asumimos los gastos para el desmontaje y montaje, el transporte y los portes. En caso de que una reclamación resultara ser injustificada, el comprador deberá asumir nuestros gastos. Esta garantía sólo es válida en combinación con la factura con acuse de recibo y se inicia el día de la entrega. El fabricante garantiza la ausencia de defectos en su producto. El plazo de garantía es de 24 meses, a condición de que el certificado en el dorso esté rellenado correctamente. De lo contrario, el plazo de garantía expira 27 meses después de la fecha de fabricación. ES Indicación de errores Error Estado Diagnóstico / Remedio E04 Cortina fuera de la guía Se ha accionado el detector anticolisión. E05 La puerta no se abre ni se cierra Se ha accionado el disyuntor para cable flojo (ver figura 8c). E06 La puerta invierte la marcha / no se cierra El canto de cierre se ha aflojado. Comprobar el ajuste del menú [35]. E07 La puerta invierte la marcha / no se cierra La barrera fotoeléctrica se ha aflojado. Comprobar el ajuste del menú [36]. E08 La puerta no se abre ni se cierra Se ha activado el dispositivo de seguridad externo (parada de emergencia, cable flojo, puerta deslizante, contacto térmico de motor). Comprobar. (J4). E09 La puerta no se abre ni se cierra No se ha aprendido ninguna posición final de la puerta. Aprender las posiciones finales de la puerta en el menú [30] [31]. E10 Menú [37] ajustado a 3 o 4 F01 La puerta no se mueve Dejar que la puerta se abra y se cierre por completo, para verificar la posición de la barrera fotoeléctrica. Acuse de recibo relé de freno defectuoso. F02 No hay reacción alguna Se ha producido un fallo en la comprobación automática, Cambia la unidad de control F03 No hay reacción alguna Se ha producido un fallo en la comprobación automática, Cambia la unidad de control F04 No hay reacción alguna Se ha producido un fallo en la comprobación automática, Cambia la unidad de control F05 No hay reacción alguna Se ha producido un fallo en la comprobación automática, Cambia la unidad de control F06 No hay reacción alguna La protección contra accidentes defectuoso, Comprobar la tensión (J3. – J3.1 > 12 V) F07 La puerta no se abre ni se cierra Falla del suministro de tensión de 24 V. Comprobar las conexiones. F19 La puerta sólo funciona en hombre muerto cerrar No se ha establecido la comprobación de los cantos de cierre. Comprobar la protección contra accidentes. F20 La puerta sólo funciona en hombre muerto cerrar No se ha establecido la comprobación de la barrera fotoeléctrica. Comprobar la barrera fotoeléctrica. F21 Interrupción del funcionamiento por poco tiempo Limitación del tiempo de funcionamiento del automatismo de la puerta, dejar enfriar el automatismo 20 min aprox. F24 No hay reacción alguna a la orden de inicio Sin conexión a DES. Comprobar el cable de conexión del motor y DES. F25 No hay reacción alguna Prueba interna del teclado de membrana defectuosa. Cambiar el teclado de membrana o F26 No hay reacción alguna No se ha establecido la prueba interna del botón / interruptor externo. F27 No se alcanza la posición final de la puerta. Motor bloqueado. Reajustar en el menú [33]/[34]. Comprobar la mecánica de la puerta / comprobar el cable de conexión al motor. F28 No hay reacción alguna a la orden de inicio Error en el suministro de tensión. Comprobar la conexión de la parte de la red. F29 El motor gira en sentido incorrecto Fases de motor invertidas. Comprobar la conexión al motor. F30 La puerta sólo funciona en hombre muerto cerrar Retroceso del impulso al control de hombre muerto. Comprobar las barras de seguridad y la barrera fotoeléctrica. F31 La puerta no se abre ni se cierra Pulse la tecla. Impulso constante ajustado. Comprobar transmisor de mandos externo (J1). F34 La puerta no se abre ni se cierra Exceso de tiempo de conexión. Esperar y dejar enfriar el motor. F35 La puerta no se abre ni se cierra Se ha activado el control de velocidad. Sustituir el automatismo DU. F36 La puerta no se aber ni se cierra Perturbación de la comunicación interna entre la unidad de mando y FU. Verificar la conexión en el borne J10. F40 F41 Unidad de control de la ampliación Unidad de control de la ampliación F42 Unidad de control de la ampliación Falla 24V. Comprobar conexiones en la unidad de control de la ampliación. Se ha producido un fallo en la comprobación automática. Cambiar la unidad de control de la ampliación. Se ha producido un fallo en la comprobación automática. Cambiar la unidad de control de la ampliación. F43 Unidad de control de la ampliación Falta una conexión. F45 La puerta no se cierra Módulo RadioSafe falta o está defectuoso. F46 Alarma RadioSafe Cambiar batería RadioSafe. L El acceso al menú ha sido bloqueado por el distribuidor autorizado. Póngase en contacto con el distribuidor. El desbloqueo del menú es sólo posible con una herramienta de servicio. Lo La unidad de control ha sido bloqueada. Póngase en contacto con el distribuidor. El desbloqueo del menú es sólo posible con una herramienta de servicio. U El acceso al menú ha sido desbloqueado por el la unidad de control. Modificaciones Firma: Atención: Una comprobación no es equiparable a un mantenimiento. También deben documentarse las modificaciones de la instalación de la puerta (siempre que estén permitidas). La garantía del fabricante se extingue en caso de que no se realice correctamente la comprobación/el mantenimiento. mantenimiento, etc.). ¡Estas instrucciones de montaje, manejo y mantenimiento se deben guardar durante toda la duración del uso! En el presente libro de comprobación deben documentarse todos los trabajos de mantenimiento y de comprobación. La empresa explotadora de conservarlo en un lugar seguro junto con la documentación de la instalación de la puerta durante el tiempo de utilización y como muy tarde en la puesta en marcha cumplimentarlo con el montador. (También es recomendable para puertas accionadas a mano). Deben tenerse en cuenta siempre las especificaciones de la documentación de la instalación de la puerta (instrucciones de montaje, manejo y Comprobación de la instalación de la puerta Montadores cualificados adecuados (persona con la formación adecuada, cualificada por su conocimiento y experiencia) o especialistas deben realizarse el mantenimiento de las puertas accionadas por fuerza a partir del momento de su puesta en marcha y tras los intervalos prescritos por el fabricante en las instrucciones de mantenimiento y, eventualmente, por las reglamentaciones especiales de cada país (p. ej. BGR 232 Directivas para ventanas, puertas y portones accionados por fuerza). Generalidades Otros datos Puesta en marcha el: Empresa, montador: Nombre, montador: Peso de las hojas: N.º de serie: Incorporación y puesta en marcha Año de construcción: Modo de funcionamiento: Fecha de fabricación: Diseño: Datos de la puerta: Fabricante: Tipo del órgano motor: Datos del órgano motor Lugar de la instalación de la puerta: Empresa explotadora de la instalación ES Libro de comprobación para la instalación de la puerta ________________________ ________________________ ________________________ ________________________ ________________________ ________________________ ________________________ ________________________ ________________________ ________________________ ________________________ ________________________ ________________________ ________________________ ________________________ ____________________________ ________________________ ________________________ ________________________ ________________________ ________________________ ___________________________ ____________________________ ___________________________ ________________________ ________________________ ________________________ ________________________ ________________________ ________________________ ________________________ ________________________ ________________________ ________________________ ________________________ ________________________ ________________________ ________________________ Observación ¡Estas instrucciones de montaje, manejo y mantenimiento se deben guardar durante toda la duración del uso! 6.3 Documentación de la empresa explotadora Placa de características / identificación CE completo / legible Declaración de conformidad de la completo / legible instalación de la puerta Instrucciones de montaje, completo / legible manejo y mantenimiento Estado / Función Función / Estado Función / Estado Función / Estado Función / Estado Función / Estado Función / Estado 6.0 6.1 6.2 Otros dispositivos Bloqueo / cerradura Puerta deslizante Contacto de puerta deslizante Cierre para puertas Control de semáforo Barreras fotoeléctricas Protección contra accidentes 5.0 5.1 5.2 5.2.1 5.2.2 5.3 5.4 5.5 4.3 Estado / Posición Protección contra aplastamiento y cizalladura Limitación de fuerza Para / invierte la marcha Protección contra elevación Hoja de la puerta de personas Entorno del propietario Distancia de seguridad Estado / Fijación Estado Estado / Función Estado / Función Estado / Función Estado / Función Estado / Función 4.0 4.1 4.2 3.5 Estado / Asiento / Configuración Estado Estado / Placa de características Estado / Asiento Estado / Asiento Estado / Asiento 2 vueltas de seguridad Estado / Asiento / Función Estado Estado Órgano motor / unidad de control Órgano motor / pupitre de mando Cables eléctricos / conexiones Desbloqueo de emergencia Cadena rápida Manubrio Desbloqueo rápido Dispositivos de accionamiento, botones / emisores manuales Desconexión final Contrapeso / apertura segura Muelles Dispositivos tensores / soportes de cojinete Protección contra rotura de muelle Elementos de seguridad Cables metálicos Sujeción de cable Tambores de cable Disyuntor para cable flojo Protección antichoque Marcha circular onda T 2.0 2.1 2.1.1 2.1.2 2.1.3 2.2 2.2.1 2.2.2 2.2.3 2.3 2.4 Suavidad Estado / Asiento Estado / Lubricación Estado / Lubricación Estado / Asiento Organización / Fijación Organización / Estado 3.0 3.1 3.2 3.3 3.3.1 3.3.2 3.3.3 3.4 Puerta Accionamiento a mano de la puerta Fijaciones / conexiones Puntos de rotación / articulaciones Ruedas / soporte de la ruedas Juntas / listones de deslizamiento Marco / guía de puerta Hoja de la puerta disponible Características que acertado deben ser comprobadas 1.0 1.1 1.2 1.3 1.4 1.5 1.6 1.7 Equipamiento (Documentar el equipamiento en la puesta en marcha marcándolo en la lista) Lista de comprobación de la instalación de la puerta ES Puesta en marcha, comprobación Trabajos realizados / medidas Defectos enmendados Firma / dirección de Firma / dirección de la empresa la empresa Comprobaciones realizadas ¡Estas instrucciones de montaje, manejo y mantenimiento se deben guardar durante toda la duración del uso! Fecha Comprobantes de comprobación y mantenimiento de la instalación de la puerta ES Declaración Ulrich Theile Jefe de desarrollo Apoderado de la documentación ____________________ ¡Estas instrucciones de montaje, manejo y mantenimiento se deben guardar durante toda la duración del uso! Dortmund, 29.05.2013 • producto sólo se podrá poner en marcha cuando se haya verificado que la instalación de la puerta El cumple con las disposiciones de la Directiva de máquinas. • Está conforme con la Directiva CEM 2004/108/CE. • Está conforme con la Directiva CE de baja tensión 2006/95/CE. • Está conforme con el Reglamento sobre Productos de Construcción BauPVO 305/2011 La documentación técnica se creó de acuerdo con el anexo VII B. Nos comprometemos a facilitar a las autoridades de supervisión del mercado, a petición justificada, la documentación especial en forma escrita. Normas no armonizadas aplicadas: EN 12453:2000 apartado / Chapter 5.2 Normas armonizadas aplicadas: EN ISO 13849-1:2008 EN 60335-2-103:2003 EN 60335-1:2012 Certificado de examen CE de tipo Validez: Se aplicó el procedimiento de examen CE de tipo descrito en el anexo IX por el organismo de control reconocido TÜV NORD CERT GmbH (NB 0044), Langemarckstr. 20, 45141 Essen. de puerta. • cumple la Directiva de máquinas 2006/42CE y es adecuada para la incorporación en una instalación T100 R con la presente declara que la unidad de control Novoferm tormatic GmbH Oberste-Wilms-Str. 15a D-44309 Dortmund según la Directiva de Máquinas 2006/42/EG, anexo II parte 1 A ES NL WN 905005-35-6-50 03/14 • Algemene informatie T100 R DES 1A2 • Veiligheid Bij alle werkzaamheden aan het product geldt dat u eerst de handleiding voor het bedrijf, en wel in het bijzonder het hoofdstuk over de veiligheid en de desbetreffende instructies volledig gelezen moet hebben en dat u begrijpt wat u hebt gelezen. Dit product kan gevaar opleveren als het niet op deskundige wijze of niet voor het doel gebruikt wordt waarvoor het is ontworpen. Voor schade die het gevolg is van het feit dat men zich niet aan de instructies in deze handleiding heeft gehouden, is de fabrikant niet aansprakelijk. • Verklaring van de symbolen WAARSCHUWING: DREIGEND GEVAAR Dit symbool staat voor instructies waarvoor geldt dat als ze niet worden opgevolgd, ernstig letsel van personen het gevolg kan zijn. Waarschuwing! GEVAAR DOOR ELEKTRISCHE STROOM! De werkzaamheden mogen uitsluitend door een gekwalificeerde elektricien worden uitgevoerd! ! 0 Inhoudsopgave • - Algemene informatie Veiligheid Verklaring van de symbolen Arbeidsveiligheid Gevaren die van het product kunnen uitgaan Voor de veiligheid relevante voorschriften Reserve-onderdelen Veranderingen aan en ombouwen van het product Machineplaatje Verpakking Technische gegevens • Installatie • Overzicht programmering • Handleiding voor het bedrijf / beschrijving van de functies • Onderhoud / controle • Foutdiagnose • Garantievoorwaarden • Keuringsboekje - Keuringsboekje voor deurinstallatie - Checklijst voor de deurinstallatie - Documentatie van controle- en onderhoudsbeurten van de deurinstallatie - Verklaring van conformiteit en inbouw Dit symbool staat voor instructies waarvoor geldt dat als ze niet worden opgevolgd, beschadigingen, foutieve werking en / of het uitvallen van de aandrijving het gevolg kunnen zijn. Verwijzing naar tekst en afbeelding • Arbeidsveiligheid Wanneer u zich aan de in deze bedrijfshandleiding vastgelegde veiligheids- en overige instructies houdt, kan het ontstaan van persoonlijk letsel en materiële schade tijdens het werken met en aan het product vermeden worden. Wanneer u zich niet aan de in deze bedrijfshandleiding vastgelegde veiligheids- en overige instructies en aan de voor de plaats van gebruik van het product geldende voorschriften ter voorkoming van ongevallen en algemene veiligheidsbepalingen houdt, kan de fabrikant of diens opdrachtnemer op geen enkele wijze aansprakelijk worden gehouden noch kan tegen hem aanspraak op schadevergoeding worden gemaakt. • Gevaren die van het product kunnen uitgaan Voor het product wordt een analyse van de risico’s uitgevoerd. De hierop gebaseerde constructie en uitvoering van het product komt overeen met de huidige stand der techniek. Indien het product voor het doel wordt gebruikt waarvoor het ontworpen is, is het veilig te gebruiken. Desondanks blijft er een restrisico bestaan! Het product werkt met hoge elektrische spanning. Voordat u aan elektrische installaties gaat werken, dient u met het volgende rekening te houden: 1. Vrijschakelen 2. Tegen opnieuw inschakelen beveiligen 3. Vaststellen dat het product niet onder spanning staat • Voor de veiligheid relevante voorschriften Bij de installatie, inbedrijfstelling, het onderhoud en het testen van de besturing moeten de ter plaatse geldende veiligheidsvoorschriften nageleefd worden! U dient zich aan de volgende voorschriften te houden: Europese normen - DIN EN 12445 Gebruiksveiligheid van aangedreven deuren – Beproevingsmethoden - DIN EN 12453 Gebruiksveiligheid van aangedreven deuren – Eisen - DIN EN 12978 Veiligheidsvoorzieningen voor automatisch werkende deuren en hekken - Eisen en beproevingsmethode Bovendien dienen ook de normatieve verwijzingen naar de genoemde normen te worden nageleefd. Voorschriften van de VDE: - DIN EN 418 Veiligheid van machines Noodstopvoorzieningen, functionele aspecten Ontwerpbeginselen - DIN EN 60204-1 / VDE 0113-1 Elektrische installaties met elektrische bedrijfsmiddelen - DIN EN 60335-1 / VDE 0700-1 Huishoudelijke en soortgelijke elektrische toestellen - Veiligheid • Reserve-onderdelen Nur Gebruik uitsluitend originele, door de fabrikant vervaardigde reserveo n d e r d e l e n . Ve r k e e r d e o f f o u t i e v e reserve-onderdelen kunnen beschadigingen, fouten in de werking of het complete uitvallen van het product tot gevolg hebben. • Veranderingen aan en ombouwen van het product Om gevaarlijke situaties te voorkomen en om te kunnen garanderen dat het product optimaal functioneert, mogen er geen veranderingen aan worden uitgevoerd en mag het ook niet uitgebreid of omgebouwd worden, tenzij de fabrikant hiervoor uitdrukkelijk zijn toestemming heeft verleend. • Machineplaatje Het machineplaatje bevindt zich aan de zijkant op de motorkop. U dient zich te houden aan de opgegeven aangesloten vermogenswaarden. • Verpakking Het verpakkingsmateriaal dient steeds op een voor het milieu verantwoorde wijze en volgens de ter plaatse geldende hiervoor geldende voorschriften te worden verwijderd. Technische gegevens Controle T100 R Machineplaatje WN021042 Afmetingen van de behuizing (hoogte x breedte x diepte) 250 x 215 x 120 mm Montage verticaal Aantal kabeldoorgangen 6 x M20 2 x M16 2 x M20 V-uitsnijding Voedingsspanning 3 x 400V AC 3 x 230V AC Stuurspanning 24V DC Externe voeding max. 700mA Max. motorvermogen max. 3,0kW Beschermingsklasse IP 65 / CEE-Cara stekker 16A = IP 44 Bedrijfstemperatuur - 20°C bis + 55°C Fabricant: Novoferm tormatic GmbH Oberste-Wilms-Str. 15a 44309 Dortmund Deze handleiding voor de montage, de bediening en het onderhoud dient zolang te worden bewaard als de deur gebruikt wordt! NL Installatie WAARSCHUWING: Een foutieve montage kan gevaar voor de veiligheid van personen betekenen! ! Benodigd gereedschap 1 Montage van de besturing 2 Openen van de afdekking van de besturing Vooraleer de bovenste afdekking van de besturingsinrichting te openen hoofdschakelaar uitschakelen of netstekker aftrekken. Een mogelijke restspanning aan de motoraansluiting 1 minuut laten afnemen. Tegen een onbevoegde nieuwe inschakeling beveiligen. 3 Aansluitingen Omschrijving: J1 impulsingangen J2 veiligheidsfotocel 2- of 4-draads of fotoelektrische beveiliging J3 sluitkant OSE / 8K2 / DW J4 noodstop, slap koord, vergrendeling J5 vrij J6 Anti Crash detector J7 sleutelschakelaar J8 timeringangen J9 digitale eindschakelaar - motorkabel J10 aansluiting van uitbreidingsbesturingen J11 aansluiting voor draadloze ontvanger J12 antenne J13 folietoetsenbord X1 stroomaansluiting X2 netuitgang L, N (500W / 230V) X3 randaardecontact X4a magneetrem X5 potentiaalvrij relais contact 1, deurstatusrelais X6 potentiaalvrij relais contact 2, deurstatusrelais X7 deuraandrijving X8a aansluiting foto-elektrische beveiliging zender X8b 24V DC, max. 700mA 4 Stroomaansluiting De besturingsinrichting is met een CEE-Cara stekker 16A en ca. 1 m kabel klaar voor aansluiting in overeenstemming met 4a van bedrading voorzien. De ansluiting op het stromnet moet overeenkomen met de op het net staande spanning. Door de klant dient de besturingsinrichting met een 10A veiligheidsschakelaar beveiligd te worden. 5 Aansluiting voor motor De aansluitleiding is vooraf aangepast voor de motor en een digitale eindschakelaar DES. Beide kunnen op de leiding worden gestoken. Aansluiting voor magneetrem - X4. 6 8 De front area bewaking Als de sluitsnelheid groter is dan 50 cm / s bedragen de schort over de gehele Poort breedte en diepte van 90 cm worden bewaakt aan beide zijden van de poort. De besturingsinrichting T100 R is uitsluitend voor de werking aan verticaal en horizontaal bewogen deuren bestemd. 0 ! Een verkorting van de openhoudtijd door de fotocel kan in het menu 38 geselecteerd worden. Aansluiting voor impulsgever De deur moet vanop de plaats van de bediening zichtbaar zijn. 6a/6b - Aansluiting J1 voor externe commandogevers “Open”, “Stop”, “Dicht”. 6c - Schakelvolgorde “Open”-“Stop”-“Dicht”, in het menu 51 de waarde 4 instellen. J1.3 - ½ deuropening, J1.4 – volledige deuropening 6d - Op-Stop-Neer verlicht 7 Timeringangen Aansluiting J8 is voor commandoapparatuur, voor functie “Automatisch sluiten”, zoals trek- en drukschakelaars 7a, ringleidingen 7b en bewegingsmelders 7c. Na de ingestelde openhoudtijd in het menu 44 sluit de deur automatisch. Aansluitschema 8 toont de aanloop bewaking door bewegings en aanwesigheid melder Condor. 9 Aansluiting voor de sluitkantbeveiliging Deuraansluitdoos met schakelaar voor slappe kabel of Break Away Sensor en klinketdeurcontact 8. Instelling sluitkantbeveiliging in het menu 35 selecteren: Deuraansluitdoos met schakelaar voor slappe kabel en klinketdeurcontact 8. - optische sluitkantbeveiliging OSE Optische sluitkantbeveiliging uitsluitend OSE van Fraba of Witt toegestaan - elektrische sluitkantbeveiliging 8K2 met 8,2 kOhm afsluitweerstand (Waarde = 1) - elektrische sluitkantbeveiliging 8K2 in rijbedrading met slappe koordschakelaar en loopdeurschakelaar (Waarde = 3) - drukgolfdrempel en –schakelaar met 8,2 kOhm lusweerstand (Waarde = 2) 10 Aansluiting voor foto-elektrische beveiliging Volgende foto-elektrische beveiligingen kunnen aangesloten worden. 9a Foto-elektrische beveiliging met testing In het menu 36 moet daarvoor de waarde 5 ingesteld worden. 9b Foto-elektrische beveiliging met OSEinterface In het menu 35 moet daarvoor de waarde 0 ingesteld worden. 11 Aansluiting voor fotocel In menu 36 moet de fotocel dienovereenkomstig worden ingesteld. 10a 2-draads fotocel Ls2 10b 4-draads fotocel LS5 met testen 10c Reflectie-fotocel Wanneer in het menu de fotocel in de kozijn gemonteerd wordt geselecteerd, zal de besturing bij de volgende beweging in de SLUIT-richting een leerbeweging uitvoeren om de positie te kunnen herkennen. Hierbij wordt E10 aangegeven. Daarbij mag de SLUIT-beweging niet worden gestoord om te voorkomen dat er een verkeerde positie wordt geregistreerd. 12 Anti Crash sensor Ingang J6 detecteert als het gordijn uit de geleiding is en zorgt ervoor dat het terug ingestoken wordt. 1-weg fotocel met relaisuitgang 11a, met transistoruitgang 11b. 13 Aansluiting noodstop Ingang ook voor veerbreukschakelaar gebruiken. 14 Aansluiting sleutelschakelaar Wanneer er een sleutelschakelaar wordt gebruikt, dient in menu 50 de gewenste functie te worden geselecteerd. 15 Radiografische afstandsbediening Ontvangermodule (optie) op J11 spelden en antenne aansluiten. Handzender programmeren. aansluiten. Handzender programmeren. 16 Relaisuitgang 2 wisselaarcontacte: max. 250VAC / 2A of 24VDC / 1A 24V-uitgang X8: max. 700mA Keuze van de relaisfunctie: Menu 45 en 46 15c Onderlinge vergrendeling van 2 deuren (sluisschakeling). menu 50 waarde 2 en menu 46 waarde 0. 15d Onderlinge vergrendeling van 3 deuren (sluisschakeling). menu 50 waarde 2 en menu 45 en menu 46 waarde 0. NL Programmeren van de besturing aangeleerd, zullen de puntjes in het display vijf keer knipperen. De programmering wordt door een menu gestuurd. Stel de programmering van de deur in zoals in het schema is aangegeven. Op de volgende pagina wordt de complete menuomvang weergegeven. Radiografische codes wissen (menu 63) Om alle aangeleerde codes in het menu te wissen moet u vijf seconden lang de ovale toets ingedrukt houden. Voor het instellen van de eindposities moet het juiste motor- en remtype worden ingesteld (menu’s 78 en 79). Een verkeerde instelling kan tot beschadigingen aan de Keuze bedrijfsmodus voor handzender (menu 64) Daarnaast kunnen in dit menu de geteachte handzenders tijdelijk worden geblokkeerd. ! deur leiden. Geen motor geselecteerd: E01 verschijnt in het display. Keuze rem (menu 78) Rem type A, stroomloos remmend, wordt tegelijkertijd (waarde=0) of vertraagd (1-9) na het stop van de motor aangetrokken. Rem type B, stroomloos openend, wordt tegelijkertijd (waarde=10) of vertraagd (11-19) na het stop van de motor geopend. Instellen deureindstanden (menu's 30 en 31) De bovenste en onderste eindstand moeten direct na elkaar ingesteld worden. Optimalisering van de deurloop Om een rustige loop te bereiken, dient er in het menu 70 en 72 een softstart en een softstop te worden ingesteld voor het bereiken van de eindpositie in menu 71. Correctie van de naloopweg (menu 42) Hiermee worden veranderingen in de DICHT-positie gecompenseerd die veroorzaakt zijn door de temperatuur, het inlopen van de aandrijving etc. Aanpassing aan de vloer (menu 43) Hiermee worden veranderingen in de DICHT-positie gecompenseerd die veroorzaakt zijn door de kabel langer is geworden of de vloer iets omhoog is gekomen. De eindstand “Dicht” wordt door de aanrakingen van de grond aan de sluitkantbeveiligingen aangepast. Stel eerst de DICHT-positie nauwkeurig in en stel vervolgens menu 43 in. In de eindstanden 2, 3 en 4 worden de geprogrammeerde posities uit menu's 31, 34 en 37 dienovereenkomstig aangepast. Softstart en softstop Om een rustige loop en het loopgedrag te optimaliseren, kunnen de instellingen in de menu´s 70, 71 en 72 worden veranderd. Inschakelduur (menu 49) De ingestelde inschakelduur verhindert de oververhitting van de aandrijfmotor en voorkomt beschadigingen. RWA-functie (rook-/warmteafvoer) In het menu 55 de overeenkomstige deurpositie instellen. Brandmeldinstallatie op J7 aansluiten en in het menu 50 waarde 9 instellen. Leren van de radiografische handzender Denk eraan dat iedere handzender afzonderlijk moet leren. U hebt de mogelijkheid, 30 radiografische codes te leren. De volgende functies kunnen aangeleerd worden: KeeLoq, 12 Bit Multibit. De eerste code bepaalt het type. Startimpuls (menu 60) Ga naar het menu en druk op de handzender op de toets voor de startfunctie. Zodra de code is aangeleerd, zullen de puntjes in het display vijf keer knipperen. Deur half open (menu 61) Ga naar het menu en druk op de handzender op de toets voor Deur half open. Zodra de code is aangeleerd, zullen de puntjes in het display vijf keer knipperen. Lichtfunctie (menu 62) Ga naar het menu en druk op de handzender op de toets voor de lichtfunctie. Zodra de code is NL Overzicht Menu 3-9 Item Enter Exit 3037 1x Nr. Menu- Invoer Selectie punt 3 Instellen bovenste eindpositie van de deur 30 Aanpassing van de vloer 4 Richting omkeren (5 sec. indrukken) 31 0* uit 1 voor 200 cyclussen geactiveerd Instellen deur half open 2 voor 1000 cyclussen geactiveerd Fijn instellen bovenste eindpositie van de deur 3 Permanente grondaanpassing Instellen onderste eindpositie van de deur 32 50* 33 Nr. Menu- Invoer Selectie punt 43 50 - 0 0... 80mm lager Openingstijd in seconden 50 - 99 0... 80mm hoger 50* 34 0* Fijn instellen onderste eindpositie van de deur 44 50 - 0 0... 80mm lager 61 - 99 210 sec. ... 22,5 min (in stappen van 30 sec.) 50 - 99 0... 80mm hoger Statusrelais X5 Keuze van de sluitkant Weergave van de meetwaarde (5 sec. indrukken) 3 2 minuten licht in garage Drukgolfdrempel met testing 4 5 minuten licht in garage 3 Elektrische schakellijst 8K2 met schakelaar voor slappe 5 Handzender aan / uit (Menu 62) 4 Draadloze sluitkant, RadioBand 6 Wisimpuls ELTACO 0* Zonder fotocel 1 2-draads fotocel LS2 2 4-draads fotocel LS5, reflectiefotocel 3 Fotocel LS2, reflectiefotocel in het kozijn 4 Fotocel LS5, reflectiefotocel in het kozijn 5 Foto-elektrische beveiliging met testing 25 - 0 Statusrelais X6 46 Deur - Geavanceerde instellingen Melding deur DICHT Melding deur OPEN 2 Deurstatus voor stoplichtbesturing A800 3 Vergrendeling 4 - 14 Lamp in “Gesloten” (0-10 sec. voorwaarschuwingstijd) 15 - 25 Lamp in “Open”, “Gesloten” (0-10 sec. Correctie vooreindschakelaar Inschakelduur van de motor 0... 50mm lager 49 0* Zonder beperking 1 25 Min / 35% 2 25 Min / 30% Zonder verkorting openhoudtijd 3 25 Min / 60% 1 Verkorting openhoudtijd bij functie Automatisch sluiten 4 25 Min / 20% Menu beeindigen 5 10 Min / 35% 4 Functie folietoetsen 0 Dodemansknop Open / Dodemansknop Dicht 1 Impuls Open / dodemansknop Dicht 2* Impuls Open / Impuls Dicht 3 AR – Automatisch sluiten Reactie sluitkantbeveiliging 0* Volledig omkeren 1 Gedeeltelijk omkeren Correctie van de naloopweg 42 0 1* 0* -- 41 Deurstatus voor stoplichtbesturing A800 2 Reactie fotocel 40 Melding deur OPEN 2 Elektrisch schakelpaneel 8K2 45 25 - 99 0... 100mm hoger 38 1 1* 25* 37 Melding deur DICHT Optische sluitkant OSE Keuze van de fotocel 36 0* 0 Deur - Geavanceerde instellingen Deur - Basisinstellingen 35 0 sec. 1 - 30 1 sec. ... 30 sec. (in stappen van 1 sec.) 31 - 60 35 sec. ... 180 sec. (in stappen van 5 sec.) 0 uit 1* In deur-dicht-positie 2 In deur-open-positie 3 In deur-open- en deur-dicht-positie 6 -- 25 Min / 60% Menu beeindigen * Fabrieksinstelling NL Overzicht Menu 3-9 Item Exit Enter 30- 1x Functie van de sleutelschakelaar (J7) 5 51 52 Impulsingang “Open” / ”Dicht” 1 Bedieningsveld blokkeren 2 Externe bedieningselementen blokkeren 3 Bedieningsveld, externe bedieningselementen 4 Activering bedieningselementen gedurende 10 5 Omschakelen naar Dodemansknop Dicht 6 Omschakelen naar 1/2 deuropening 7 uit 1 - 13 Tijd (60ms – 300ms, in 20ms stappen) 71 0 - 40 Uitloopafstand voor bovenste eindpositie (0 – 40cm, 72 0 - 20 Verlaagd koppel (16*) Motorrem Typ A, in de maak 78 Typ B, in de maak -- Impulsingang “Open”-“Stop”-“Dicht” 8 Impulsingang “1/2 opening”-“Stop”-“Dicht” 9 AR – Automatisch sluiten 0* Geen service-interval 10 Impulsingang voor RWA (instelling in het menu 1 10000 cyclussen Functie externe impulsgever (J1) 2 20000 cyclussen Menu beeindigen 9 Keuze servicefrequentie deur 0* uit 3 30000 cyclussen 1 Dodemansknop Open / Dodemansknop Dicht 4 40000 cyclussen 2 Impuls Open / Dodemansknop Dicht 5 50000 cyclussen 3 Impuls Open / Impuls Dicht 6 60000 cyclussen 4 Impuls 1/2 opening / Impuls Dicht 5 AR – Automatisch sluiten 6 AR – Automatisch sluiten, 1/2 deuropening 7 Modus Open-Gesloten 90 001-256 Invoer adres besturing Module 1-4 5 6 54 0 7 0* 53 Selectie Softstart met verlaagd koppel 70 Service menu Diverse instellingen 50 0* Nr. Menu- Invoer punt Motor Nr. Menu- Invoer Selectie punt 0* 7 80000 cyclussen 8 100000 cyclussen 9 120000 cyclussen 10 150000 cyclussen 11 200000 cyclussen 12 250000 cyclussen W-LAN Module 98 - cyclussen Uitvoer bedrijfsurenteller - uren Uitvoer foutgeheugen - uren - foutcode Uitvoer softwareversie - seriennummer - datum - Uitbreidingssturing 99 Resetten naar fabrieksinstelling (5 sec. indrukken) uit -- Menu beeindigen uit 91 DC-Module 96 Draadloze sluitkant, RadioSafe JCM 97 Uitvoer cyclusteller 1, 2, 3 Aansturingsprofielen: zie uitbreidingsbesturing Deurinstelling voor RWA-positie -- Menu beeindigen 60 Handzender starttoets leren 61 Handzender toets 1/2 leren 62 Handzender lichttoets leren 72 71 Radiografische codes wissen (5 sec. 63 Radio 70 Speed Aanbevolen instellingen Menu beeindigen * Fabrieksinstelling Menü 70 Softstart Menü 71 Uitloopafstand Menü 72 Verlaagd koppel .60 Modus Open-Gesloten 35 AR – Automatisch sluiten SI 2 3 .46 Impuls “Open”-“Stop”-“Dicht” 30 uit 1 SI -- 0* 20 64 .90 Bedrijfsmodus starttoets SI 6 55 2 2 1 10 10 10 3 6 1 NL Handleiding voor het bedrijf / Beschrijving van de functies De besturing maakt een aantal uiteenlopende bedrijfsmodussen mogelijk: Dodemansknop Open / Dodemansknop Dicht Door de toets ingedrukt te houden gaat de deur open tot de eindpositie Open is bereikt of tot door de toets los te laten de beweging van de deur wordt gestopt. De deur wordt gesloten door de toets ingedrukt te houden (dodemansknopfunctie) tot de eindpositie bereikt is. Wanneer de toets tijdens de sluitbeweging wordt losgelaten, stopt de deur onmiddellijk. Impuls Open / Dodemansknop Dicht Door heel even op de toets te drukken of met behulp van de externe impulsgever start de beweging om de deur te openen tot de eindpositie Open is bereikt of tot de beweging door op de toets te drukken gestopt wordt. Wanneer opnieuw op de toets wordt gedrukt, zal de deur verder worden geopend. De deur wordt gesloten door de toets ingedrukt te houden (dodemansknopfunctie) tot de eindpositie van de deur is bereikt. Wanneer de toets tijdens de sluitbeweging losgelaten wordt, zal de beweging van de deur onmiddellijk stoppen. Impuls Open / Impuls Dicht Door heel even op toets te drukken of met behulp van de externe impulsgever zal de deur open gaan tot de eindpositie Open is bereikt of tot de beweging door middel van toets gestopt wordt. Door heel even op toets te drukken, gaat de deur weer Dicht tot de eindpositie Dicht is bereikt. Voor deze bedrijfsmodus moet een sluitkantbeveiliging (menu 35) zijn bereikt. Wanneer de sluitkantbeveiliging tijdens de sluitbeweging geactiveerd wordt, zal de deur stoppen en de richting van de beweging omgekeerd worden. Tijdens het openen is het activeren van deze beveiliging niet van invloed. Ingeval van een defect kan de deur met behulp van de toets . Eerste impuls geven: De aandrijving start en brengt de deur in de ingestelde eindpositie OPEN of DICHT. Impuls geven tijdens de beweging: De deur stopt. Opnieuw een impuls: De deur beweegt in de tegengestelde richting verder. AR-bedrijf Door heel even op toets te drukken of met behulp van de externe impulsgever begint de deur open te gaan tot de eindpositie Open bereikt is of de deur vooraf via toets gestopt wordt. Na afloop van de ingestelde openingstijd start er een voorwaarschuwingstijd van 10 seconden, waarna de deur automatisch dichtgaat. Wanneer in de OPEN-positie of tijdens der DICHTbeweging op de toets wordt gedrukt, dan blijft de deur in de stand van dat moment staan totdat opnieuw een impuls of gegeven wordt. Geachte klant, u heeft een controle gekocht die tijdens het productieproces door de fabrikant verschillende malen is gecontroleerd op de onberispelijke kwaliteit. Mocht de aandrijving of delen hiervan aantoonbaar wegens materiaal- of fabrikagefouten onbruikbaar zijn of mocht de bruikbaarheid hierdoor aanzienlijk worden beperkt, zullen wij de aandrijving naar eigen goeddunken repareren of een nieuw exemplaar leveren. Voor schade die het gevolg is van ondeskundige montagewerkzaamheden, een foutieve inbedrijfstelling, een onjuiste bediening en AR-bedrijf met verkorten door fotocel Deze functie werkt als hierboven beschreven, maar een onderbreking van de fotocel breekt de ingestelde openingstijd af en de voorwaarschuwingstijd begint. Na afloop van de voorwaarschuwingstijd sluit de deur automatisch. Modus “OPEN/GESLOTEN” In dezelfde bedrijfsmodus als de 1-baansregeling met rood / groen stoplicht (optioneel stoplichtbesturing A800), maar de ontvanger blijft op de aandrijving aangesloten. Verloop van de werking voor externe impulsgeneratoren: Impulsgave in positie “Gesloten”: Aandrijving start en brengt deur in de positie “Open”. Impulsgave tijdens de beweging naar de positie “Open”: Zonder invloed gaat deur terug open. Impulsgave in positie “Open”: Deur wordt gesloten. Impulsgave tijdens de beweging naar de positie “Gesloten”: Deur stopt en gaat terug open. Deur half open Door op de toets ½ te drukken, wordt de ingestelde ½ deuropening (menu 32) aangestuurd. Deze functie bestaat niet in de bedrijfsmodus dodemanscontact “Open” / dodemanscontact “Gesloten” en niet bij een geïnstalleerde fotoelektrische beveiliging. Verlichting en of voorwaarschuwingslicht De besturing beschikt over 2 relaisuitgangen waarmee de verlichting of het voorwaarschuwingslicht geschakeld worden (menu 45 en 46). Externe commandoapparaten / impulsgevers De deur kan via externe commandoapparaten / impulsgevers geopend en gesloten worden. Veiligheden Aangesloten fotocellen en sluitkantbeveiligingen dienen ter preventie van ongevallen. Na een vastgesteld defect schakelt de besturingsinrichting over naar de bedrijfsmodus “Dodemanscontact Gesloten”. Functie sleutelschakelaar (optie) De besturing heeft een ingang voor een sleutelschakelaar. Hiermee hebt u de mogelijkheid, de volgende functies (menu 50) te activeren: 0 1 2 3 4 5 6 7 8 9 10 bedieningsveld van de besturing en alle externe bedieningselementen geactiveerd Omschakeling van de bedrijfsmodus naar Impuls Open / dodemansknop Dicht Omschakelen naar 1/2 deuropening Ingang J7 voor impulsgever met schakelvolgorde “Open”-“Stop”-“Dicht” Ingang J7 voor impulsgever met schakelvolgorde 1/2 - “Stop” – “Dicht” AR – Automatisch sluiten RWA-functie (rook- en warmteafvoer) Na activering wordt er onvermijdelijk naar de RWA-positie gegaan. Om de besturing terug in gebruik te nemen, dient een reset van het stroomnet doorgevoerd te worden. Draadloos handzender (optie) Toets: Start Toets voor deur half open: Voor beide toetsen kunnen impuls-, AR- en opendicht-bedrijf worden ingesteld. Functie als bij de toets Start, de deur gaat echter slechts half open tot de hiervoor ingestelde positie is bereikt. Toets: Lichtfunctie De lichtfunctie heeft betrekking op een continu licht dat onafhankelijk van de beweging van de deur „aan / uit“ geschakeld kan worden. Onderhoud / Controle Ter wille van uw eigen veiligheid adviseren wij om de deur vóór de eerste inbedrijfstelling en naar behoefte door een deskundig bedrijf te laten controleren. Laat de inspectie echter ten minste eenmaal per jaar uitvoeren. Servicemelding Wanneer de besturing de behoefte aan een controle constateert, zal de servicemelding oplichten. Raadpleeg in dat geval uw vakbedrijf. Waarschuwingsindicator ! Bij onderbreking van de veiligheidsschakeling is de waarschuwingsindicator verlicht, zie foutdiagnose. Ingang J7 voor impulsgever met schakelvolgorde “Open”-“Dicht” Het bedieningsveld van de besturing wordt geblokkeerd Alle externe bedieningselementen worden geblokkeerd Het bedieningsveld van de besturing en alle externe bedieningselementen worden geblokkeerd Gedurende 10 seconden zijn het Garantievoorwaarden onderhoud, van ondeskundige belasting en principieel van eigenmachtige wijzigingen die aan de aandrijving en het toebehoren zijn doorgevoerd, zijn wij niet aansprakelijk. Dit geldt tevens voor schade die het gevolg is van het transport, overmacht, invloed van buitenaf of natuurlijke slijtage en bijzonder atmosferische belastingen. Na eigenhandige wijzigingen of reparaties aan functionele delen zijn wij niet aansprakelijk. Gebreken dienen onmiddellijk schriftelijk ter kennis te worden gebracht. De betreffende onderdelen dienen ons desgevraagd te worden toegezonden. Wij zijn niet aansprakelijk voor de kosten voor demontage, montage, vracht en porti. Mocht blijken dat de reclamatie ongegrond is, is de besteller voor onze kosten aansprakelijk. Deze garantie is uitsluitend geldig in combinatie met de gekwiteerde factuur en treedt op de dag van de levering in kracht. De fabrikant garandeert dat het product vrij is van gebreken. De garantieduur bedraagt 24 maanden, mits het formulier op de achterkant juist is ingevuld. Mocht dit niet het geval zijn, vervalt de garantie 27 maanden na productiedatum. NL Foutdiagnose Fout Status Diagnose / remedie E04 Gordijn is uit de geleiding Anti Crash Detector is in werking getreden. E05 De deur gaat niet open en niet dicht Schakelaar voor slappe kabel is geactiveerd (zie afbeelding 8c). E06 Beweging deur omgekeerd / De deur gaat niet dicht Sluitkant geactiveerd. Controleer de menu-instelling [35]. E07 Beweging deur omgekeerd / De deur gaat niet dicht Fotocell geactiveerd. Controleer de menu-instelling [36]. E08 De deur gaat niet open en niet dicht Externe veiligheidsinstallatie (noodstop, slap koord, loopdeur, thermische schakelaar motor) is geactiveerd. Controleren (J4). E09 De deur gaat niet open en niet dicht Er is geen eindpositie voor de deur geleerd. Leer de eindposities van de deur (menu [30] [31]). E10 Menu [37] is op 3 of 4 ingesteld Laat de deur helemaal open en dicht gaan, zodat de positie van de fotocel vastgesteld wordt. F01 Geen beweging deur Terugkoppeling remrelais foutief. F02 Geen reactie Er is een fout opgetreden tijdens de zelftest. Vervang de besturing. F03 Geen reactie Er is een fout opgetreden tijdens de zelftest. Vervang de besturing. F04 Geen reactie Er is een fout opgetreden tijdens de zelftest. Vervang de besturing. F05 Geen reactie Er is een fout opgetreden tijdens de zelftest. Vervang de besturing. Sluitkantbeveiliging fout. Controleer de spanning (J3.3 - J3.1 >12V). F06 Geen reactie F07 De deur gaat niet open en niet dicht 24V spanningsvoorziening ingestort. Aansluitingen nakijken. F10 Deur stopt vlak na startcommando De deur gaat niet open en niet dicht. Storing in de elektronica van de besturing. Vervang de besturing. F19 Deur beweegt slechts tot dodemansinstallatie Dicht Testen sluitkant mislukt. Controleer de sluitkantbeveiliging. F20 Deur beweegt slechts tot dodemansinstallatie Dicht Testen fotocel mislukt. Controleer de fotocel. F21 Kortstondige onderbreking van het bedrijf Begrenzing van de looptijd van de deuraandrijving, laat de aandrijving ca. 20 minuten afkoelen. F24 Geen reactie op startcommando Er is geen verbinding met de DES. Controleer de kabel voor de aansluiting van de motor en de DES. F25 Geen reactie Interne test folietoetsenbord fout. Vervang het folietoetsenbord / besturing. F26 Geen reactie Interne test externe toets / schakelaar mislukt. F27 Deureindstand wordt niet bereikt. Motor blokkeert. In het menu 33/34 bijregelen. Deurmechaniek controleren / motoraansluitkabel controleren. F28 Geen reactie op startcommando Fout in de stroomtoevoer. Controleer de aansluiting aan de netzijde. F29 Motor draait verkeerd rond Motorfasen gewisseld. Motoraansluiting nakijken. F30 Deur beweegt slechts tot Impuls springt terug naar besturing via dicht dodemansknop. Controleer de fotocel, sluitkant. F31 De deur gaat niet open en niet dicht Er is op de toets gedrukt. Er is een continu impuls. Controleer de externe commandogever (J1). F34 De deur gaat niet open en niet dicht Inschakelduur werd overschreden. Wachten en motor laten afkoelen. F35 De deur gaat niet open en niet dicht Toerentalcontrole is in werking getreden. DU-aandrijving uitwisselen. F36 De deur gaat niet open en niet dicht Interne communicatie tussen besturing en FU gestoord. Verbinding aan klem J10 controleren. F40 Uitbreidingsbesturing Toerentalcontrole is in werking getreden. DU-aandrijving uitwisselen. F41 Uitbreidingsbesturing 24V ingestort. Aansluitingen aan uitbreidingsbesturing nakijken. F43 Uitbreidingsbesturing Verbinding ontbreekt. F45 Deur sluit niet RadioSafe-module ontbreekt of defect F46 RadioSafe alarm RadioSafe batterij vernieuwen L De toegang tot het menu werd door de geautoriseerde dealer geblokkeerd. Contact met dealer opnemen. Deblokkeren van het menu uitsluitend met servicetool mogelijk. Lo Besturing werd geblokkeerd. Contact met dealer opnemen. Deblokkeren van het menu uitsluitend met servicetool mogelijk. U De toegang tot het menu werd door de geautoriseerde dealer gedeblokkeerd. Gewicht vleugels: Serienummer: Handtekening: Achteraf uitgevoerde In bedrijf gesteld op: Overige gegevens In dit keuringsboekje moeten alle uitgevoerde onderhouds- en controlewerkzaamheden gedocumenteerd worden. Het boekje dient zolang als de deur gebruikt wordt, door de exploitant samen met de documentatie van de deurinstallatie op een veilige plaats te worden bewaard en uiterlijk bij de inbedrijfstelling door de monteur volledig ingevuld te worden overhandigd. (Dit adviseren wij ook voor met de hand bediende deuren.) De instructies en aanwijzingen die in de documentatie van de deurinstallatie staan vermeld Let op: Een controle is niet hetzelfde als een onderhoudsbeurt! Wijzigingen aan de deurinstallatie (voor zover deze zijn toegestaan) dienen eveneens gedocumenteerd te worden. De door de fabrikant afgegeven garantie vervalt indien de deur niet volgens voorschrift gecontroleerd en onderhouden wordt! (handleidingen voor de montage, bediening en onderhoud etc.) dienen in ieder geval absoluut te worden opgevolgd. Deze handleiding voor de montage, de bediening en het onderhoud dient zolang te worden bewaard als de deur gebruikt wordt! Algemeen Door middel van kracht bediende deuren moeten bij de inbedrijfstelling en na de door de fabrikant in de handleiding voor het onderhoud opgegeven intervals en evt. op grond van speciale regels in het land van plaatsing (bijv. de Duitse BGR 232 „Richtlinien für kraftbetätigte Fenster, Türen und Tore“) door hiervoor gekwalificeerde monteurs (persoon met geschikte opleiding, die zichzelf door kennis en praktische ervaring heeft gekwalificeerd) dan wel deskundigen gecontroleerd dan wel onderhouden worden. Keuring van de deurinstallatie Naam, monteur: Firma, monteur: Inbouw en inbedrijfstelling Afmetingen deur: Bouwjaar: Bedrijfsmodus: Datum fabricage: Model: Gegevens deur: Fabrikant: Gegevens aandrijving Type aandrijving: Locatie van de deurinstallatie: Exploitant van de installatie: Keuringsboekje voor deurinstallatie NL Checklijst voor de deurinstallatie Aandrijving / besturing Aandrijving / looprail Elektrische bedrading / aansluitingen Nooddeblokkering Snelle ketting Handkruk Sneldeblokkering bedieningselementen, toets / handzender Eindafschakeling Knel- en schaarbescherming Krachtbegrenzing Bescherming tegen optillen van personen Bouwomgeving Overige onderdelen Vergrendeling / slot Loopdeur Loopdeurcontact Deursluiter Verkeerslichtbesturing Fotocellen Sluitkantbeveiliging Documentatie van de exploitant Typeplaatje / CE-markering Verklaring van conformiteit van de deurinstallatie Handleiding voor de montage, bediening, onderhoud 3.0 3.1 3.2 3.3 3.3.1 3.3.2 3.3.3 3.4 4.0 4.1 4.2 5.0 5.1 5.2 5.2.1 5.2.2 5.3 5.4 5.5 6.0 6.1 6.2 volledig / leesbar volledig / leesbar volledig / leesbar Toestand / Functie Functie / Toestand Functie / Toestand Functie / Toestand Functie / Toestand Functie / Toestand Functie / Toestand Veiligheidsafstanden Stopt en keert om Deurblad Toestand / Positie Toestand / Bevestiging Toestand Toestand / Functie Toestand / Functie Toestand / Functie Toestand / Functie Toestand / Functie ________________________ _________________________ ________________________ ________________________ ________________________ ________________________ ________________________ __________________________ ________________________ ________________________ ________________________ ________________________ ________________________ ________________________ _________________________ ________________________ ________________________ ________________________ ________________________ ________________________ ________________________ ________________________ ________________________ ________________________ ________________________ ________________________ ________________________ ________________________ ________________________ ________________________ ________________________ ________________________ ________________________ ________________________ ________________________ ________________________ ________________________ ________________________ Toestand / Bevestigd / Instelling Toestand Toestand / Typeplaatje Toestand / Bevestigd Toestand / Bevestigd Toestand / Bevestigd 2 veiligheidswindingen Toestand / Bevestigd / Functie Toestand Toestand Soepele loop Toestand / Bevestigd Toestand / Smering Toestand / Smering Toestand / Bevestigd Gericht / Bevestiging Gericht / Toestand Opmerking Deze handleiding voor de montage, de bediening en het onderhoud dient zolang te worden bewaard als de deur gebruikt wordt! 6.3 4.3 Gewichtscompensatie / veilig openen Veren Spankoppen / lagerbokken Veerbreukbeveiliging Veiligheidselementen Staalkabels Kabelbevestiging Kabeltrommels Slappe koordschakelaar Valbeveiliging Draaiarm T-as 2.0 2.1 2.1.1 2.1.2 2.1.3 2.2 2.2.1 2.2.2 2.2.3 2.3 2.4 3.5 Deur Handmatige bediening van de deur Bevestigingen / verbindingen Draaipunten / scharnieren Loopwieltjes / loopwielhouder Dichtingen / slijtstrippen Deurframe / deurgeleiding Deurblad aanwezig Te testen eigenschappen van toepassing 1.0 1.1 1.2 1.3 1.4 1.5 1.6 1.7 Onderdeel (De aanwezigheid van de diverse onderdelen dient bij de inbedrijfstelling door afvinken te worden bevestigd!) NL Inbedrijfstelling, eerste controle Uitgevoerde werkzaamheden / noodzakelijke maatregelen Controle uitgevoerd Defecten opgeheven Handtekening / adres Handtekening / adres van de firma van de firma Deze handleiding voor de montage, de bediening en het onderhoud dient zolang te worden bewaard als de deur gebruikt wordt! Datum Documentatie van controle- en onderhoudsbeurten van de deurinstallatie NL T100 R Novoferm tormatic GmbH Oberste-Wilms-Str. 15a D-44309 Dortmund Ulrich Theile Het Hoofd Ontwikkeling ____________________ Deze handleiding voor de montage, de bediening en het onderhoud dient zolang te worden bewaard als de deur gebruikt wordt! Dortmund, 29.05.2013 Het product mag pas in bedrijf worden gesteld wanneer is geconstateerd dat de deurinstallatie aan de bepalingen van de machinerichtlijn voldoet. • voldoet aan de EMV-richtlijn 2004/108/EG • voldoet aan de Laagspanningsrichtlijn 2006/95/EG • voldoet aan de Duitse Bouwproductenverordening BauPVO 305/2011 De technische documenten conform bijlage VII B werden opgemaakt. Wij gaan de verplichting aan, de op de markt toezichthoudende autoriteiten op gegrond verzoek de speciale documenten in schriftelijke vorm te bezorgen. Toegepaste niet-geharmoniseerde normen: EN 12453:2000 paragraaf / Chapter 5.2 Toegepaste geharmoniseerde normen: EN ISO 13849-1:2008 EN 60335-2-103:2003 EN 60335-1:2012 EG-typeonderzoekscertificaat Geldigheid: Het in bijlage IX beschreven EG-typeonderzoek werd door de erkende keuringsinstantie TÜV NORD CERT GmbH (NB 0044), Langemarckstr. 20, D-45141 Essen, doorgevoerd. • en hoger voldoet aan de machinerichtlijn 2006/42/EG en bedoeld is om in een deurinstallatie te worden ingebouwd. Bij dezen verklaart Verklaring conform de machinerichtlijn 2006/42/EG, bijlage II deel 1 A NL PL WN 905005-35-6-50 03/14 • Informacje ogólne T100 R DES • Bezpieczeństwo Przed rozpoczęciem prac przy produkcie należy przeczytać całą instrukcję obsługi, w szczególności rozdział Bezpieczeństwo oraz poszczególne wskazówki dotyczące bezpieczeństwa. Należy dobrze zrozumieć instrukcję. Produkt ten może powodować zagrożenia, jeżeli nie będzie użytkowany w sposób właściwy, fachowy i zgodny z przeznaczeniem. W przypadku uszkodzeń powstałych w wyniku nieprzestrzegania instrukcji wygasa odpowiedzialność producenta. • Objasnienie symboli 1A2 UWAGA: Niebezpieczeństwo Symbol ten oznacza wskazówki, których nieprzestrzeganie może prowadzić do poważnych obrażeń. UWAGA: Niebezpieczeństwo porażenia prądem Prace mogą być wykonywane wyłącznie przez elektryka. ! 0 Karta tytulowa • Informacje ogólne - Bezpieczeństwo - Objaśnienia symboli - Bezpieczeństwo pracy - Niebezpieczeństwa, które mogą wiązać się z produktem - Przepisy bezpieczeństwa - Części zamienne - Modyfikacje i przebudowa produktu - Tabliczka identyfikacyjna - Opakowanie - Dane techniczne • Instalacja • Przegląd programowania • Instrukcja obsługi / Opis funkcjonowania • Konserwacja / Kontrola • Diagnostyka błędów • Zasady gwarancji • Kontrola systemu bramy - Kontrola systemu bramy - Lista kontroli instalacji bramowej - Dokumenty potwierdzenia kontroli i konserwacji instalacji bramowej - Deklaracja zgodności i wbudowania Ten symbol oznacza wskazówki, które w razie nieprzestrzegania moga doprowadzić do nieprawidłowego działania i/lub zepsucia napędu. Odniesienie do tekstu i rysunku • Bezpieczeństwo pracy Przestrzeganie wskazówek dotyczących bezpieczeństwa, zamieszczonych w niniejszej instrukcji, pozwoli uniknąć obrażeń fizycznych i szkód rzeczowych podczas pracy z produktem i przy nim. W przypadku nieprzestrzegania wskazówek dotyczących bezpieczeństwa, zamieszczonych w niniejszej instrukcji, oraz przepisów zapobiegania wypadkom obowiązujących dla danych zastosowań wykluczone są roszczenia z tytułu odpowiedzialności cywilnej lub roszczenia odszkodowawcze wobec producenta lub jego przedstawicieli. • Niebezpieczeństwa, które mogą wiązać się z produktem Produkt został poddany analizie zagrożeń. Oparte na niej konstrukcja i wykonanie produktu odpowiadają najwyższemu poziomowi techniki. Przy użytkowaniu zgodnym z przeznaczeniem produkt jest bezpieczny w działaniu. Mimo to zawsze istnieje ryzyko szczątkowe! Produkt działa przy wysokim napięciu elektrycznym. Od początku prac przy systemie elektrycznym należy przestrzegać następujących zasad: 1. odłączenie od zasilania 2. zabezpieczenie przed ponownym włączeniem 3. sprawdzenie braku napięcia Przepisy bezpieczeństwa Podczas instalacji, uruchomienia, przeglądów i kontroli sterowania należy przestrzegać miejscowych przepisów bezpieczeństwa! Urządzenia zabezpieczające dla bram o napędzie silnikowym – Wymagania i kontrole Dodatkowo należy przestrzegać normatywnych odnośników w podanych normach. Przepisy VDE - DIN EN 418 Bezpieczeństwo maszyn. Urządzenia WYŁ. AWA R . , a s p e k t y f u n k c j o n a l n e , i d e e kształtowania DIN EN 60204-1/VDE 0113-1 Instalacje elektryczne z elektrycznymi środkami obrotowymi DIN EN 60335-1/VDE 0700-1 Bezpieczeństwo elektryczne do użytku domowego i podobnych celów • Części zamienne Stosować wyłącznie oryginalne część zamienne producenta. Niewłaściwe lub wadliwe części zamienne mogą spowodować uszkodzenia, nieprawidłowe działanie lub całkowitą awarię produktu. • Modyfikacje i przebudowa produktu Dla uniknięcia zagrożeń i zapewnienia optymalnego działania nie można wprowadzać w produkcie modyfikacji ani podejmować przebudowy, na które producent nie udzielił wyraźnego zezwolenia. • Tabliczka identyfikacyjna Tabliczka identyfikacyjna znajduje się z boku przy obudowie sterowania. Należy przestrzegać podanych wartości poboru mocy. • Opakowanie Materiały opakowaniowe powinny zostać usunięte w sposób chroniący środowisko i zgodnie z obowiązującymi lokalnymi przepisami o usuwaniu odpadów. Dane techniczne Sterowanie: T100 R Tabliczka identyfikacyjna: WN021042 Wymiary obudowy Wysokość x szerokość x głębokość: 250 x 215 x 120 mm Montaż pionowy Przepusty kablowe: 6 x M20 2 x M16 2 x M20 wycięcie w kształcie litery V Napięcie zasilania: 3 x 400 V AC 3 x 230 V AC Napięcie sterujące: 24 V DC Zasilanie zewnętrzne: maks. 700mA Maks. moc silnika: maks. 3,0 kW Klasa ochrony: IP 65 / wtyku typu CEECara 16A = IP 44 Temperatura robocza: - 200C do + 550C Producent: Novoferm tormatic GmbH Oberste-Wilms-Str. 15a D-44309 Dortmund • Należy przestrzegać następujących przepisów: Normy europejskie - DIN EN 12445 Bezpieczeństwo użytkowania bram sterowanych siłowo. Metody kontroli. DIN EN 12453 Bezpieczeństwo użytkowania bram sterowanych siłowo. Wymagania. DIN EN 12978 Urządzenia ochronne dla bram sterowanych siłowo. Wymagania i metody kontroli. Niniejszą instrukcję montażu, obsługi i konserwacji należy przechowywać przez cały okres trwania użytkowania urządzenia! PL Instalacja UWAGA: Nieprawidłowy montaż może stanowić zagrożenie dla ludzi! ! Układ sterujący T100 R przeznaczony jest tylko do zastosowania w bramach otwieranych pionowo I poziomo. 0 Wymagane narzędzia 1 Montaż sterowania 2 Otwieranie przykrycia sterowania Przed otwarciem pokrywy górnej sterowania należy wyłączyć wyłącznik główny lub wyciągnąć wtyk sieciowy z gniazda sieciowego. Pozwolić, aby napięcie resztkowe, które mogło pozostać na przyłączu silnika, zanikało przez 1 minutę. Zabezpieczyć przed nieupoważnionym ponownym włączeniem. 3 Przyłącza Nazwa: J1 Wejścia impulsowe J2 Zapora świetlna bezpieczeństwa 2-drutowa lub 4-drutowa lub siatka świetlna J3 Bezpieczeństwo krawędzi zamykającej OSE / 8K2 / DW J4 Przycisk Wył. Awar., lina obwisła, blokada J5 Wolny J6 Detektor Anti-Crash J7 Przycisk kluczykowy J8 Wejścia zegarowe J9 Cyfrowy wyłącznik krańcowy – kabel silnikowy J10 Przyłącze sterowania rozszerzającego J11 Przyłącze odbiornika radiowego J12 Antena J13 Klawiatura foliowa X1 Przyłącze sieciowe X2 Wyjście sieciowe L, N (500W / 230V) X3 Zestyk przewodu ochronnego X4a Hamulec magnetyczny X5 Bezpotencjałowy zestyk przekaźnikowy 1 Przekaźnik statusowy bramy X6 Bezpotencjałowy zestyk przekaźnikowy 2 Przekaźnik statusowy bramy X7 Napęd bramy X8a Przyłącze nadajnika siatki świetlnej X8b 24V DC, maks. 700mA 4 Przyłącze sieciowe Sterowanie okablowane jest za pomocą wtyku typu CEE-Cara 16A oraz około 1m kabla w sposób gotowy do podłączenia 4a. Przyłącze sieciowe musi zostać wykonane zgodnie z aktualnym napięciem sieci. Po stronie budowy należy zabezpieczyć sterowania poprzez bezpiecznik samoczynny 10A. ! 5 Przewód przyłączeniowy silnika Przewod przył ączeniowy jest konfekcjonowany dla silnika i cyfrowego wył ącznika krań cowego DES – wetknąć. Przyłącze hamulec magnetyczny - X4 6 Przyłącze dla nadajnika impulsu Brama musi być dobrze widoczna z miejsca obsługi. 6a/6b - Podłączenie J1 dla sterowników zewnętrznych Otwórz, Stop i Zamknij. 6c - Kolejność sterowania Otwórz-Stop-Zamknij, w menu 51 nastawić wartość 4. J1.3 - ½ otwarcia bramy, J1.4 - pełne otwarcie bramy 6d - Otwórz-Stop-Zamknij z oświetleniem 7 Wejścia zegarowe Przyłącze J8 przewidziane jest dla przyrządów sterujących, dla trybu pracy regulacji automatycznej, takich jak wyłączniki pociągane i wyłączniki ciśnieniowe 7a, pętle indukcyjne 7b oraz sygnalizatory ruchu 7c. Po upływie nastawionego w menu 44 czasu utrzymywania bramy w stanie otwartym brama zamyka się automatycznie. Skrócenie czasu utrzymywania bramy w stanie otwartym poprzez zaporę świetlną może zostać wybrane w menu 38. 8 przed przystąpieniem do kontroli Jeśli prędkość zamykania jest większa niż 50 cm / s powinien fartuch na całego Brama i szerokość 90 cm głębokość monitoruje się po obu stronach bramy. Schemat podłączenia 8 przedstawia monitorowanie rozpędzania przez czujniki ruchu i prezent Condor. 9 Przyłącze dla zabezpieczenia krawędzi zamykającej Gniazdo przyłączeniowe bramy z przełącznikiem liny zwisającej lub z czujnikiem Break Away oraz poślizgowym zestykiem drzwiowym 8. Wybrać nastawę zabezpieczania krawędzi zamykającej w menu 35: Gniazdo przyłączeniowe bramy z przełącznikiem liny zwisającej i poślizgowym zestykiem drzwiowym 8. - Optyczne zabezpieczenie krawędzi zamykającej OSE Dopuszczone jest optyczne zabezpieczenie krawędzi zamykającej z interfejsem OSE wyłącznie firmy Fraba lub Witt - Elektryczne zabezpieczenie krawędzi zamykającej 8K2 z rezystorem zamykającym 8,2 kΩ (Wartość = 1) - Elektryczne zabezpieczenie krawędzi zamykającej 8K2 w połączeniu szeregowym z przełącznikiem liny obwisłej i przełącznikiem ślizgowym drzwiowym. (Wartość = 3) - Listwa wałka dociskowego i przełącznik wałka dociskowego z rezystorem ślizgowym 8,2 kΩ (Wartość = 2) 10 Przyłącze dla siatki świetlnej Podłączone mogą zostać następujące siatki świetlne. 9a Siatka świetlna z testowaniem W tym celu w menu 36 musi zostać nastawiona wartość 5. 9b Siatka świetlna z interfejsem OSE W tym celu w menu 35 musi zostać nastawiona wartość 0. 11 Przyłącze dla zapory świetlnej Opcje ustawień fotokomórki znajdują się w menu 36. 10a Zapora świetlna 2-drutowa Ls2 10b Zapora świetlna 4-drutowa LS5 z testowaniem 10c Zapora świetlna refleksyjna Jeżeli wybrana w menu zapora świetlna została zamontowana w odrzwiach, to sterowanie przeprowadza przy następnym przesuwie do pozycji Zamknięta jazdę programującą w celu identyfikacji pozycji. Przy tym wskazywane jest E10. Przesuw zamykający nie może przy tym zostać zakłócony, aby nie zarejestrować nieprawidłowej pozycji. 12 Czujnik Anti-Crash Wejście J6 identyfikuje sytuację, w której kurtyna znajduje się poza prowadnicą, i wprowadza automatyczne ponowne nawleczenie kurtyny. Zapora świetlna jednodrogowa z wyjściem przekaźnikowym 11a, z wyjściem tranzystorowym 11b. 13 Podłączenie bezpiecznika krawędziowego Wejścia należy używać również dla wyłącznika od pękniętej sprężyny. 14 Podłączenie przełącznika kluczowego Aby korzystać z przełącznika kluczowego należy wybrać odpowiednią opcję w menu 50. 15 Zdalne sterowanie radiowe Wetknąć moduł odbiornikowy (opcja) na J11 i podłączyć antenę. Zaadaptować nadajnik ręczny w trybie uczenia. 16 Wyjścia przekaźnikowe 2 zestyki zmienne o obciążeniu maksymalnym 250 VAC/2A lub 24 VDC/1A. Wyjście 24 V na X8 może być obciążone maksimum 700 mA. Blokada wzajemna 2 bram (układ śluzowy) 15c. Menu 50 wartość 2 oraz menu 46 wartość 1. PL Programowanie sterowania Programowanie sterowane jest za pomocą Menu. Nastawienie bramy należy przeprowadzić odpowiednio do schematu. Następująca strona pokazuje kompletny zakres Menu. ! Przed nastawieniem położeń krańcowych należy ustawić prawidłowy typ silnika i hamulca (Menu 78 i 79). Nieprawidłowe ustawienie może prowadzić do uszkodzeń na bramie. Nie wybrano żadnego silnika, wyświetla się E01. Wybór hamulca (Menu 78) Hamulec typu A, hamuje w stanie odłączonym od prądu, zaczyna działać natychmiast (wartość =0) lub z opóźnieniem (1-9) po zatrzymaniu silnika. Hamulec typu B, zostaje zwolniony w stanie odłączonym od prądu, zostaje zwolniony natychmiast (wartość =10) lub z opóźnieniem (1119) po zatrzymaniu silnika. Nastawianie położeń krańcowych bramy (Menu 30 i 31) Górne i dolne położenie końcowe muszą zostać nastawione bezpośrednio po sobie. Optymalizacja funkcjonowania bramy Aby uzyskać spokojną pracę bramy, w menu 70 oraz 72 należy nastawić łagodne ruszanie i łagodne zatrzymywanie przed osiągnięciem położenia krańcowego w menu 71. Korekta trasy bramy (Menu 42) Powoduje kompensację zmian pozycji Zamknięta, które pochodzą od temperatury, docierania przekładni itd. Dopasowanie podłoża (Menu 43) Powoduje kompensację zmian pozycji Zamknięta, które powstają wskutek wydłużenia się liny względnie podwyższania się podłogi. Położenie końcowe zamknij dostosowane zostaje przez dotknięcia ziemi przez zabezpieczenie krawędzi zamykającej. Najpierw należy nastawić dokładną pozycję Zamknięta, następnie Menu 43. W nastawieniach 2, 3 i 4 wyuczone pozycje z menu 31, 34 i 37 zostaną odpowiednio dostosowane. Łagodne ruszanie i łagodne zatrzymywanie Aby zoptymalizować spokojna pracę oraz charakterystykę funkcjonowania, można zmieniać ustawienia w menach 70, 71 oraz 72. Czas trwania załączenia (Menu 49) Nastawiony czas trwania załączenia zapobiega przegrzaniu się silnika napędowego i dzięki temu unika się szkód. Funkcja RWA (dym-ciepło-wyciąg) W menu 55 nastawić odpowiednią pozycję bramy. Instalację alarmu przeciwpożarowego podłączyć do J7 i w menu 50 nastawić wartość 9. Programowanie radiowego nadajnika ręcznego Uwaga: każdy nadajnik ręczny powinien zostać zaprogramowany osobno. Możliwe jest wprowadzenie do pamięci systemu maksymalnie 30 kodów. Istnieje możliwość zapamiętania następujących funkcji: KeeLoq, 12 Bit Multibit. Pierwszy kod określa typ. Impuls startowy (Menu 60) Wejdź do menu i naciśnij przycisk nadajnika ręcznego dla funkcji startu. Gdy tylko kod zostanie zaprogramowany wskaźnik kropkowy na wyświetlaczu mignie 5 razy. Otwarcie bramy do ½ (Menu 61) Wejdź do menu i naciśnij przycisk nadajnika ręcznego dla otwarcia bramy do ½. Gdy tylko kod zostanie zaprogramowany wskaźnik kropkowy na wyświetlaczu mignie 5 razy. Funkcja Światło (Menu 62) Wejdź do menu i naciśnij przycisk nadajnika ręcznego dla funkcji Światło. Gdy tylko kod zostanie zaprogramowany wskaźnik kropkowy na wyświetlaczu mignie 5 razy. Kasowanie kodów radiowych (Menu 63) W celu skasowania wszystkich zaprogramowanych kodów należy przytrzymać w Menu owalny przycisk przez 5 sekund. Wybór trybu pracy dla nadajników ręcznych (Menu 64) Dodatkowo w menu tym zalogowane nadajniki ręczne można tymczasowo zablokować. PL Funkcje programowania Menu Item Enter Exit 30- 3-9 1x Nr Punkt- Wprowa- Opis menu dzanie Nr Punkt- Wprowa- Opis menu dzanie 3 4 Nastawa bramy Górne położenie krańcowe 30 Odwrócenie kierunku (nacisnąć przez 5 sekund) 31 0* Nieaktywna 1 Aktywowane dla 200 cyklów Nastawa bramy Otwarcie ½ 2 Aktywowane dla 1000 cyklów Korekta skrajnej górnej pozycji 3 Permanentne dopasowanie do ziemi Nastawa bramy Dolne położenie krańcowe 32 50* 33 Dopasowanie podłoża 43 50 - 0 0... 80mm niżej Czas utrzymywania w stanie otwartym w 50 - 99 0... 80mm wyżej 50* 34 0* Korekta skrajnej dolnej pozycji 44 50 - 0 0... 80mm niżej 61 - 99 210 s ... 22,5 min (w krokach 50-sekudowych) 50 - 99 0... 80mm wyżej Przekaźnik statusowy X5 Wybór Zabezpieczenie krawędzi zamykającej Wskaźnik wartości pomiarowej (nacisnąć przez 5 1 Meldunek Brama-Otwieranie 2 Status bramy dla sterowania ampli A800 1* Elektryczna listwa przełączająca 8K2 3 2 minuty Światło garażowe 2 Listwa wałków dociskowych z testowaniem 4 5 minuty Światło garażowe 3 Elektroniczna listwa z przełącznikami 8K2 z wyłącznikiem kontroli napięcia 5 Nadajnik ręczny Włącz./Wyłącz. (Menu 62) 4 Bezprzewodowa krawędź zamykająca, moduł 6 Impuls wycierania ELTACO 0* Bez zapory świetlnej 1 Zapora świetlna 2-drutowa LS2 2 Zapora świetlna 4-drutowa LS5, zapora świetlna 3 Zapora świetlna LS2, refleksyjna zamontowana w 4 Zapora świetlna LS5, refleksyjna zamontowana w 5 Siatka świetlna z testowaniem 25* 37 Meldunek Brama-Zamykanie Optyczne zabezpieczenie krawędzi zamykającej OSE Wybór Zapora świetlna 36 0* 0 25 - 0 45 Dalsze nastawy bramy Nastawy podstawowe bramy 35 Przekaźnik statusowy X6 46 0 Meldunek Brama-Zamykanie 1* Meldunek Brama-Otwieranie 2 Status bramy dla sterowania ampli A800 3 Blokada 4 - 14 Lampa ostrzegawcza w trakcie przesuwu bramę (czas wstępnego ostrzeżenia 0 - 10 s) Korekcja Wyłącznik krańcowy wstępny Zabezpieczenie krawędzi 15 - 25 Lampa ostrzegawcza w trakcie przesuwu otwierającego 0... 50mm niżej przesuwu zamykającego bramę (czas wstępnego ostrzeżenia 0- 25 - 99 0... 100mm wyżej 38 0* Bez ograniczenia 0* Bez skracania czasu utrzymywania bramy w stanie 1 25 min / 35% 1 Skracanie czasu utrzymywania bramy w stanie 2 25 min / 30% 3 25 min / 60% -4 Dalsze nastawy bramy 4 25 min / 20% Funkcja klawiszy foliowych 5 10 min / 35% 0 Czujnik OTWIERANIA / czujnik ZAMYKANIA 1 Impuls OTWIERANIA / czujnik ZAMYKANIA 2* Impuls OTWIERANIA / Impuls ZAMYKANIA 3 AR – Zamykanie automatyczne 0* Pełna zmiana ruchu na odwrotny 1 Częściowa zmiana ruchu na odwrotny Korekta drogi wybiegu 42 49 Wyjście z menu Reakcja Otwieranie zabezpieczenia krawędzij 41 Czas trwania włączenia silnika Reakcja zapory świetlnej w przypadku trybu pracy regulacji automatycznej 40 0s 1 - 30 1 s ... 30 s (w krokach 1-sekudowych) 31 - 60 35 s ... 180 s (w krokach 5-sekudowych) 0 Nieaktywna 1* W pozycji bramy zamkniętej 2 W pozycji bramy otwartej 3 W pozycji bramy otwartej i bramy zamkniętej 6 -- 25 min / 60% Wyjście z menu * Nastawy fabryczne PL Funkcje programowania Menu Item Exit Enter 30- 3-9 1x Nr Punkt- Wprowa- Opis menu dzanie Funkcja przełącznika kluczykowego (J7) 5 51 52 7 Łagodne uruchamianie ze zredukowanym Wejście impulsu Otwórz/Zamknij 1 Blokada pola obsługi 2 Blokada zewnętrznych elementów obsługi 3 Blokada pola obsługi i zewnętrznych elementów 72 4 Aktywowanie elementów obsługi na 10 sekund -- Wyjście z menu 5 Przełączenie na czujnik Zamknij 6 Przełączenie na 1/2 otwarcia 78 Typu A, w pracy Silnik 70 1 - 13 Czas (60msek. – 300msek., krokowo co 20msek.) 71 Długość dobiegu przed górnym położeniem krańcowym 0 - 40 (0 -40cm, 10*) 0 - 20 Zredukowany moment obrotowy (16*) Hamulec silnikowy Wejście impulsu Otwórz-Stop-Zamknij 8 Wejście impulsu 1/2 otwarcia-Stop-Zamknij 9 AR – Zamykanie automatyczne 0* Brak przerwy konserwacyjnej 10 Wejście impulsu dla RWA (Nastawienie w menu 55) 1 10000 cykli Funkcja zewnętrznych nadajników impulsu (J1) 2 20000 cykli Typu B, w pracy 9 Wstępny wybór cyklu konserwacji 0* Nieaktywna 3 30000 cykli 1 Czujnik OTWIERANIA / czujnik ZAMYKANIA 4 40000 cykli 2 Impuls OTWIERANIA / czujnik ZAMYKANIA 5 50000 cykli 3 Impuls OTWIERANIA / Impuls ZAMYKANIA 6 60000 cykli 4 Impuls 1/2 otwarcia / Impuls ZAMYKANIA 5 AR – Zamykanie automatyczne 6 AR – Zamykanie automatyczne, 1/2 otwarcia 7 Tryb pracy OTWIERANIE / ZAMYKANIE 001-256 Wprowadzanie Adres sterowania 90 Moduł 1-4 5 6 54 0 7 0* 53 Nieaktywna 0* Menu serwisowe Różne nastawy 50 Nr Punkt- Wprowa- Opis menu dzanie 0* 7 80000 cykli 8 100000 cykli 9 120000 cykli 10 150000 cykli 11 200000 cykli 12 250000 cykli Nieaktywna 91 Wprowadzenie Licznik cyklów - Cykle - Moduł DC 96 Wprowadzenie Licznik godzin eksploatacji - Bezprzewodowa krawędź zamykająca, moduł RadioSafe 97 Wprowadzenie Pamięć błędów -Godziny- Kod Moduł W-LAN 98 Wprowadzenie Wersja oprogramowania - Nr seryjny - H.- Sterowanie rozszerzające 99 Reset Nastawa fabryczna (nacisnąć przez 5 nieaktywna -- Wyjście z menu 1, 2, 3 Profile regulowania patrz sterowanie rozszerzone 60 Nadajnik ręczny Zaprogramowanie przycisku 61 Nadajnik ręczny zaprogramowanie przycisku 1/2 62 Nadajnik ręczny Zaprogramowanie przycisku 63 Kasowanie kodow radiowych (nacisnąć przez 5 70 Speed Nastawa bramy dla pozycji RWA Wyjście z menu Radio 72 71 Tryb pracy OTWIERANIE / ZAMYKANIE Zalecane ustawienia * Nastawy fabryczne SI Wyjście z menu .60 AR – Zamykanie automatyczne 35 2 3 .46 Impuls Otwórz-Stop-Zamknij 30 Nieaktywna 1 SI -- 0* 20 64 .90 Tryb pracy Klawisz startowy SI 6 55 -- Menü 70 Miękki start 2 2 1 Menü 71 Miękki stop 10 10 10 Menü 72 Zredukowane torque 3 6 1 PL Instrukcja obsługi / Opis funkcjonowania Sterowanie umożliwia zastosowanie zróżnicowanych reżimów pracy: Czuwak Otwieranie / Czuwak Zamykanie Poprzez długotrwałe naciśnięcie przycisku startuje ruch bramy w kierunku Otwarta do momentu aż zostanie osiągnięte położenie krańcowe bramy Otwarta lub aż poprzez zwolnienie przycisku bieg bramy zostanie zatrzymany. Zamknięcie bramy następuje poprzez długotrwałe naciśnięcie (funkcja czuwakowa) przycisku do momentu, aż zostanie osiągnięte położenie krańcowe bramy. Jeżeli podczas dobiegu bramy przycisk zostanie zwolniony, to brama zatrzyma się natychmiast. lub podczas dobiegu zostanie naciśnięty przycisk , to brama zostaje zatrzymana do momentu aż zostanie wysłany ponowny impuls lub . Tryb pracy AR ze skróceniem poprzez zaporę świetlną Funkcjonuje jak to opisano powyżej jednakże przerwanie zapory świetlnej powoduje przerwanie nastawionego czasu utrzymywania bramy w stanie otwartym i zaczyna się upływ czasu ostrzeżenia wstępnego. Po upływie czasu ostrzeżenia wstępnego brama zamyka się automatycznie. Tryb pracy OTWIERANIE / ZAMYKANIE W tym samym trybie pracy co regulacja jednokierunkowa za pomocą ampli czerwonozielonej (opcja: sterowanie za pomocą ampli A800), jednakże odbiornik pozostaje wetknięty w napędzie. Impuls Otwieranie / Czuwak Zamykanie Poprzez krótkie naciśnięcie przycisku l ub poprzez zewnętrzny nadajnik impulsu wystartowany zostaje bieg bramy w kierunku Otwarta do momentu aż zostanie osiągnięte położenie krańcowe bramy Otwarta lub poprzez naciśnięcie przycisku bieg bramy zostanie zatrzymany. Ponowne naciśnięcie przycisku spowoduje kontynuację jazdy w kierunku otwierającym. Zamknięcie bramy następuje poprzez długotrwałe naciśnięcie (funkcja czuwakowa) przycisku do momentu, aż zostanie osiągnięte położenie krańcowe bramy. Jeżeli podczas dobiegu bramy przycisk zostanie zwolniony, to brama zatrzyma się natychmiast. Wysyłanie impulsu w pozycji Zamknięta: Napęd startuje i powoduje jazdę bramy do pozycji Otwarta. Wysyłanie impulsu podczas jazdy w kierunku Otwarta: Bez wpływu na jazdę, brama nadal otwiera się. Impuls Otwieranie / Impuls Zamykanie Poprzez krótkie naciśnięcie przycisku lub poprzez zewnętrzny nadajnik impulsu wystartowany zostaje bieg bramy w kierunku Otwarta do momentu aż zostanie osiągnięte położenie krańcowe bramy Otwarta lub aż poprzez naciśnięcie przycisku bieg bramy zostanie zatrzymany. Krótkie naciśnięcie przycisku powoduje wystartowanie biegu bramy w kierunku Zamknięta do momentu aż zostanie osiągnięte położenie krańcowe bramy Zamknięta. Otwarcie bramy do ½ Poprzez naciśnięcie przycisku ½ następuje przesuw do nastawionej ½ otwarcia bramy (Menu 32). Tej funkcji nie ma w trybie pracy Czuwak Otwieranie/Czuwak Zamykanie ani w przypadku zainstalowanej siatki świetlnej. Te n t r y b p r a c y w y m a g a z a i n s t a l o w a n i a zabezpieczenia krawędzi zamykającej (Menu 35). W przypadku włączenia tego zabezpieczenia w trakcie zamykania brama zatrzyma się i zmieni kierunek ruchu. Włączenie tego zabezpieczenia podczas otwierania nie będzie miało żadnych skutków. Pierwsze wysłanie impulsu: Napęd startuje i powoduje jazdę bramy do pozycji krańcowej OTWARTA lub ZAMKNIĘTA. Wysłanie impulsu podczas jazdy: Brama zatrzymuje się. Impuls ponowny: Brama kontynuuje bieg w kierunku przeciwnym. Tryb pracy AR / Zamykanie automatyczne Poprzez krótkie naciśnięcie przycisku lub poprzez zewnętrzny nadajnik impulsu startuje ruch bramy w kierunku Otwarta do momentu aż zostanie osiągnięte położenie krańcowe bramy Otwarta lub gdy za pomocą przycisku bieg bramy został z góry zatrzymany. Po upływie nastawionego czasu utrzymywania bramy w stanie otwartym upływa czas ostrzeżenia wstępnego 10 sekund, następnie brama zamyka się automatycznie. Jeżeli w pozycji Otwarta Przebieg funkcjonowania dla zewnętrznych nadajników impulsu: Wysyłanie impulsu w pozycji Otwarta: Brama zamyka się. Wysyłanie impulsu podczas jazdy w kierunku Zamknięta: Brama zatrzymuje się i znowu otwiera się. Oświetlenie lub światło ostrzeżenia wstępnego Sterowanie dysponuje 2 wyjściami przekaźnikowymi, za pomocą których załącza się oświetlenie lub światło ostrzeżenia wstępnego (Menu 45 i 46). Zewnętrzne urządzenia sterujące / nadajniki impulsów Brama może być otwierana i zamykana przez zewnętrzne urządzenia sterujące / nadajniki impulsów. Bezpieczeństwa Podłączone zapory świetlne i zabezpieczenia krawędzi zamykającej służą do unikania nieszczęśliwych wypadków. W przypadku wykrycia jakiejś usterki sterowanie przełącza się na tryb pracy Czuwak Zamykanie. Funkcjonowanie przełącznika kluczykowego (opcja) Sterowanie posiada wejście dla przełącznika kluczykowego. Dzięki temu będziesz miał możliwość aktywowania następujących funkcji (Menu 50): 0 1 2 3 4 5 6 7 8 9 10 Wszystkie zewnętrzne elementy obsługi zostają zablokowane. Pole obsługi sterowania oraz wszystkie zewnętrzne elementy obsługi zostają zablokowane. Przez 10 sekund pole obsługi sterowania oraz wszystkie zewnętrzne elementy obsługi są aktywne. Przełączenie trybu pracy na Impuls Otwieranie / Czuwak Zamykanie. Przełączenie na 1/2 otwarcia. Wejście J7 dla generatora impulsów z kolejnością sterowania Otwórz-StopZamknij Wejście J7 dla generatora impulsów z kolejnością sterowania 1/2-StopZamknij AR – Zamykanie automatyczne Funkcja RWA (Wyciąg dymu i ciepła) Po wyzwoleniu pozycja RWA uruchomiona zostaje przymusowo. Aby ponownie uruchomić sterowanie należy przeprowadzić reset sieci. Ręczne nadajniki radiowe (opcja) Przycisk: Start Przycisk otwarcie drzwi do ½: Dla obydwu przycisków istnieje możliwość nastawienia trybu pracy impulsowej, trybu AR oraz trybu otwierania I zamykania (Menu 64). Funkcjonuje jak w przypadku przycisku Start, jednakże brama przesuwa się tylko do nastawionego otwarcia bramy do ½. Przycisk: Światło W przypadku funkcji Światło chodzi o światło ciągłe, które niezależnie od biegu bramy może być przełączane w stan „Włącz./Wyłącz.”. Konserwacja / Kontrola Kontrolę instalacji bramowej przy uruchamianiu oraz według potrzeby - jednakże co najmniej raz na rok należy zlecić specjalistycznemu zakładowi. Wskaźnik serwisowy Jeżeli sterowanie stwierdzi potrzebę kontroli, to na wyświetlaczu zapali się wskaźnik serwisowy. Należy poinformować o tym specjalistyczny zakład. Wskaźnik ostrzegawczy ! W przypadku przerwania obwodu bezpieczeństwa pali sie wskaźnik ostrzegawczy, zobacz diagnostyka błędów. Wejście J7 dla generatora impulsów z kolejnością sterowania Otwórz-Zamknij Pole obsługi sterowania zostaje zablokowane. Zasady gwarancji Szanowna Klientko, Szanowny Kliencie, Zakupiony przez Ciebie naped bramy garazowej zostal ze strony producenta wielokrotnie sprawdzony pod katem nienagannej jakosci. Jesli stanie sie on lub jego elementy niezdatny do uzytku w wyniku wady materialowej lub produkcyjnej lub jego cechy uzytkowe zostana znacznie ograniczone, dokonamy naprawy lub wymiany. Decyzja co do sposobu postepowania nalezy do nas. Za szkody powstale wskutek wadliwych prac zwiazanych z zabudowa i montazem, wadliwego rozruchu, nieprawidlowej obslugi i konserwacji, niewlasciwego obciazenia oraz zmian przeprowadzonych na wlasna reke w napedzie i elementach osprzetu nie ponosimy odpowiedzialnosci. To samo dotyczy równiez szkód powstalych w wyniku transportu, sily wyzszej, dzialania osób trzecich lub naturalnego zuzycia oraz szczególnie silnego dzialania czynników atmosferycznych. W przypadku przeprowadzenia zmian lub usprawnien czesci funkcyjnych na wlasna reke nie ponosimy odpowiedzialnosci. Niezwlocznie nalezy nam zglosic w sposób pisemny wady. Czesci wysylamy na zamówienie. Nie ponosimy kosztów montazu, demontazu, transportu i oplat. Jesli reklamacja okaze sie nieuzasadniona, wówczas zamawiajacy pokrywa poniesione przez nas koszty. Gwarancja ta jest wazna wylacznie w polaczeniu z pokwitowanym rachunkiem i rozpoczyna sie w dniu dostawy. Producent gwarantuje, ze produkt jest wolny od wad. Czas trwania gwarancji wynosi 24 miesiace, o ile potwierdzenie na odwrocie jest poprawnie wypelnione. Poza tym okres gwarancji konczy sie 27 miesiecy od daty wyprodukowania. PL Diagnostyka błędów Błąd Stan Diagnoza/Środek zaradczy ____________________________________________________________________________________________________________________________ E04 Kurtyna znajduje sie poza prowadnicą Zadziałał detektor Anti-Crash E05 Brama nie otwiera się ani nie zamyka się Zadziałał przełącznik liny obwisłej (zobacz Rysunek 8c). ____________________________________________________________________________________________________________________________ E06 Brama nie zmienia kierunku biegu na Zadziałała krawędź zamykająca. Skontrolować nastawę menu [35]. odwrotny/nie zamyka się ____________________________________________________________________________________________________________________________ E07 Brama nie zmienia kierunku biegu na Zadziałała zapora świetlna. Skontrolować nastawę menu [36]. odwrotny/nie zamyka się ____________________________________________________________________________________________________________________________ E08 Brama nie otwiera się ani nie zamyka się Zadziałało zewnętrzne urządzenie bezpieczeństwa (Wył. Awar., obwisła lina, drzwi poślizgowe, wyłącznik termiczny silnika). Skontrolować (J4). ____________________________________________________________________________________________________________________________ E09 Brama nie otwiera się ani nie zamyka się Nie zostało zaprogramowane żadne położenie krańcowe. Zaprogramować menu położeń krańcowych [30], [31]. ____________________________________________________________________________________________________________________________ E10 Menu [37] nastawione na 3 lub 4 Całkowicie otworzyć i zamknąć bramę, aby zostało ustalone położenie zapory świetlnej. F01 Brak ruchu Brama Meldunek zwrotny Przekaźnik hamulcowy jest wadliwy. ____________________________________________________________________________________________________________________________ F02 Brak reakcji Wystąpił błąd przy autotestowaniu. Wymienić sterowanie. ____________________________________________________________________________________________________________________________ F03 Brak reakcji Wystąpił błąd przy autotestowaniu. Wymienić sterowanie. ____________________________________________________________________________________________________________________________ F04 Brak reakcji Wystąpił błąd przy autotestowaniu. Wymienić sterowanie. ____________________________________________________________________________________________________________________________ F05 Brak reakcji Wystąpił błąd przy autotestowaniu. Wymienić sterowanie. ____________________________________________________________________________________________________________________________ F06 Brak reakcji Wadliwe zabezpieczenie krawędzi zamykającej. Skontrolować napięcie (J3.3 – J3.1 > 12V). ____________________________________________________________________________________________________________________________ F07 Brama nie otwiera się ani nie zamyka się Zanik zasilania napięciowego 24 V. Skontrolować przyłącza. ____________________________________________________________________________________________________________________________ F19 Brama przesuwa się tylko w reżimie Testowanie krawędzi zamykającej dało wynik negatywny. Skontrolować krawędź czuwakowym do pozycji Zamknięta zamykającą. ____________________________________________________________________________________________________________________________ F20 Brama przesuwa się tylko w reżimie Testowanie zapory świetlnej dało wynik negatywny. Skontrolować zaporę świetlną. czuwakowym do pozycji Zamknięta ____________________________________________________________________________________________________________________________ F21 Krótkotrwała przerwa w eksploatacji Ograniczenie czasu biegu napędu bramy. Pozwolić, żeby napęd ochłodził się przez około 20 min. ____________________________________________________________________________________________________________________________ F24 Brak reakcji na rozkaz startowy Brak połączenia z DES. Skontrolować kabel przyłączeniowy silnika oraz DES. ____________________________________________________________________________________________________________________________ F25 Brak reakcji Test wewnętrzny klawiatury foliowej z wynikiem negatywnym. Wymienić klawiaturę foliową/sterowanie. ____________________________________________________________________________________________________________________________ F26 Brak reakcji Test wewnętrzny przycisków/przełączników zewnętrznych przeszedł z wynikiem negatywnym. F27 Końcowe położenie bramy nie zostaje Dostosować w menu 33/34. osiągnięte. Silnik zablokowany. Sprawdzić mechanikę bramy / sprawdzić kabel podłączenia silnika. ____________________________________________________________________________________________________________________________ F28 Brak reakcji na rozkaz startowy Błąd w zasilaniu napięciowym. Skontrolować przyłącze od strony sieci. ____________________________________________________________________________________________________________________________ F29 Silnik obraca się nieprawidłowo dookoła Zamienione fazy silnika. Skontrolować przyłącze silnika. ____________________________________________________________________________________________________________________________ F30 Brama przesuwa się do położenia Skok zwrotny do trybu czuwakowego. Zamknięta tylko w trybie czuwakowym Skontrolować zabezpieczenie krawędzi zamykającej oraz zaporę świetlną. ____________________________________________________________________________________________________________________________ F31 Brama nie otwiera się ani nie zamyka się Naciśnięty przycisk. Wysyłany jest impuls długotrwały. Skontrolować zewnętrzne nadajniki dyspozycyjne (J1). ____________________________________________________________________________________________________________________________ F34 Brama nie otwiera się ani nie zamyka się Czas trwania załączenia został przekroczony w górę. Odczekać i pozwolić, żeby silnik ochłodził się. ____________________________________________________________________________________________________________________________ F35 F36 Brama nie otwiera się ani nie zamyka się Brama nie otwiera się ani nie zamyka się Zadziałała kontrola obrotów. Wymienić napęd DU. Istnieje zakłócenie wewnętrznej komunikacji pomiędzy układem sterującym oraz przetwornikiem częstotliwości. Sprawdzić połączenie na zacisku J10. ____________________________________________________________________________________________________________________________ F40 Sterowanie rozszerzające Zanik napięcia 24 V, skontrolować przyłącza na sterowaniu rozszerzającym. ____________________________________________________________________________________________________________________________ F41 Sterowanie rozszerzające Wystąpił błąd przy autotestowaniu. Wymienić sterowanie rozszerzające. F42 Sterowanie rozszerzające Brak połączenia. F43 Sterowanie rozszerzające Brak połączenia. F45 Brama nie zamyka się Brak modułu RadioSafe lub moduł RadioSafe jest uszkodzony. F46 Moduł RadioSafe, Alarm Wymienić baterię modułu RadioSafe. L Dostęp do menu zablokowany został przez autoryzowanego sprzedawcę. Nawiązać kontakt ze sprzedawcą. Odblokowanie menu możliwe tylko z Service-Tool. Lo Sterowanie zostało zablokowane. Nawiązać kontakt ze sprzedawcą. Odblokowanie menu możliwe tylko z Service-Tool. U Dostęp do menu został odblokowany przez autoryzowanego sprzedawcę. Niniejszą instrukcję montażu, obsługi i konserwacji należy przechowywać przez cały okres trwania użytkowania PL 6.3 4.3 5.0 5.1 5.2 5.2.1 5.2.2 5.3 5.4 5.5 6.0 6.1 6.2 4.2 3.5 4.0 4.1 2.4 3.0 3.1 3.2 3.3 3.3.1 3.3.2 3.3.3 3.4 2.1.3 2.2 2.2.1 2.2.2 2.2.3 2.3 1.5 1.6 1.7 2.0 2.1 2.1.1 2.1.2 1.0 1.1 1.2 1.3 1.4 Lista kontroli instalacji bramowej Niniejszą instrukcję montażu, obsługi i konserwacji należy przechowywać przez cały okres trwania (wyposażenie należy udokumentować przy uruchamianiu poprzez odhaczenie) Wyposażenie Istnieje/ dot. Kontrolowane właściwości Uwaga Brama Sterowanie ręczne bramy Lekkość biegu ________________________ Mocowania/połączenia Stan/osadzenie ________________________ Punkty obrotu/przeguby Stan/smarowanie ________________________ Krążki biegowe/uchwyty krążków Stan/smarowanie ________________________ biegowych Uszczelki/listwy ślizgowe Stan/osadzenie ________________________ Rama bramy/prowadnica bramy Ustawienie/mocowanie ________________________ Skrzydło bramy Ustawienie/stan ________________________ Wyważenie masowe / bezpieczne otwieranie Sprężyny Stan/osadzenie/nastawa ________________________ Naprężniki/kozły łożyskowe Stan ________________________ Zabezpieczenie przed pęknięciem Stan/tabliczka znamionowa ________________________ sprężyny Elementy zabezpieczające Stan/osadzenie ________________________ Liny druciane Stan/osadzenie ________________________ Mocowanie lin Stan/osadzenie ________________________ Bębny linowe 2 zwoje bezpieczeństwa ________________________ Przełącznik liny obwisłej Stan/osadzenie//funkcjonowanie ___________________________ Zabezpieczenie przed upadkiem Stan ________________________ z dużej wysokości Dokładny bieg obrotowy wału T Stan ________________________ Napęd /sterowanie Napęd/konsola Stan/mocowanie ________________________ Przewody elektryczne/przyłącza Stan ________________________ Odblokowanie awaryjne Stan/funkcjonowanie ________________________ Szybki łańcuch Stan/funkcjonowanie ________________________ Korba ręczna Stan/funkcjonowanie ________________________ Szybkie odblokowanie Stan/funkcjonowanie ________________________ Urządzenia sterujące Stan/funkcjonowanie ________________________ Przyciski/nadajniki ręczne Wyłączenie krańcowe Stan/funkcjonowanie ________________________ Zabezpieczenie miejsc zagrażających zmiażdżeniem i cięciem Ograniczenie siły Zatrzymuje i zmienia ________________________ kierunek ruchu na odwrotny Ochrona przed podniesieniem Skrzydło bramy ________________________ osób Otoczenie po stronie budowy Odstępy bezpieczeństwa ________________________ Pozostałe urządzenia Blokada/zamek Funkcjonowanie/stan ________________________ Drzwi poślizgowe Funkcjonowanie/stan ________________________ Zestyk drzwi poślizgowych Funkcjonowanie/stan ________________________ Zestyk zwierny drzwi Funkcjonowanie/stan ________________________ Sterowanie amplowe Funkcjonowanie/stan ________________________ Zapory świetlne Funkcjonowanie/stan ________________________ Zabezpieczenie krawędzi zamykającej Funkcjonowanie/stan _________________________ Dokumentacja użytkownika Tabliczka znamionowa/oznaczenie CE Kompletne/czytelne __________________________ Deklaracja zgodności instalacji Kompletne/czytelne ________________________ bramowej Instrukcje montażowe, obsługi, Kompletne/czytelne ________________________ konserwacji PL Uruchomienie / pierwsza kontrola Przeprowadzone prace / konieczne czynnosci d Podpis / adres firmy Przeprowadzona kontrola Wady usuniete d Podpis / adres firmy Niniejszą instrukcję montażu, obsługi i konserwacji należy przechowywać przez cały okres trwania użytkowania Data Dokumenty potwierdzenia kontroli i konserwacji instalacji bramowej PL Deklaracja T100 R Ulrich Theile Kierownik Działu Rozwoju, Pełnomocnik od dokumentacji ____________________ Niniejszą instrukcję montażu, obsługi i konserwacji należy przechowywać przez cały okres trwania Dortmund, 29.04.2013 Produkt może zostać włączony do eksploatacji dopiero wtedy, gdy zostanie stwierdzone, że instalacja bramowa spełnia przepisy dyrektywy maszynowej. • Zgodne jest z dyrektywą EMV 2004/108/EG • Zgodne jest z dyrektywą niskonapięciową 2006/108/EG • Zgodne z rozporządzeniem o produktach budowlanych BauPVO 305/2011 Opracowana została dokumentacja techniczna zgodnie z załącznikiem VII B. Na uzasadnione żądanie organów nadzoru rynku zobowiązujemy się do przekazania specjalnej dokumentacji w formie pisemnej. Zastosowane normy niezharmonizowane: EN 12453:2000 Ustęp / Chapter 5.2 Zastosowane normy zharmonizowane: EN ISO 13849-1:2008 EN 60335-2-103:2003 EN 60335-1:2012 Certyfikat badania prototypu WE Okres ważności: Procedura badania prototypu WE opisana w załączniku IX została dokonana przez notyfikowaną placówkę badawczą TÜV NORD CERT GmbH (NB 0044), Langemarckstr. 20, 45141 Essen. • od oznaczenia 01/10 (tydzień/rok) spełnia dyrektywę maszynową 2006/42/EG i że przeznaczone jest ono do wbudowania do instalacji bramowej. oświadcza niniejszym, że sterowanie bramowe Novoferm tormatic GmbH Oberste-Wilms-Str. 15a D-44309 Dortmund Zgodnie z dyrektywą maszynową 2006/42/EG, Załącznik II Część 1 A PL