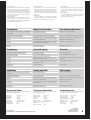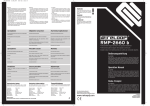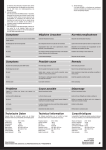
1
WARNUNG!
Um Feuer oder einen elektrischen Schock zu vermeiden, setzen Sie dieses Gerät nicht Wasser
oder Flüssigkeiten aus! Öffnen Sie niemals das
Gehäuse!
WARNING!
To prevent fire or avoid an electric shock do not
expose the device to water or fluids! Never open
the housing!
!
ATTENTION !
Afin d'éviter un incendie ou une décharge
électrique, veillez à tenir cet appareil à l'écart
des liquides et de l'humidité ! N´ouvrez jamais le
boîtier !
RMP-2660s
Professioneller Doppel CD-Player mit separatem Bedienteil
Professional double CD player with separate control unit
Double lecteur de CD professionnel avec unités de commande séparées
Bedienungsanleitung
ACHTUNG!
Lesen Sie sich vor der ersten Inbetriebnahme zur eigenen Sicherheit diese
Bedienungsanleitung sorgfältig durch! Alle Personen, die mit der Aufstellung ,
Inbetriebnahme, Bedienung, Wartung und Instandhaltung dieses Gerätes zu
tun haben, müssen entsprechend qualifiziert sein und diese Betriebsanleitung
genau beachten. Dieses Produkt erfüllt die Anforderungen der geltenden europäischen und nationalen Richtlinien, die Konformität wurde nachgewiesen, die
entsprechenden Erklärungen und Unterlagen sind beim Hersteller hinterlegt.
Operation Manual
CAUTION!
For your own safety, please read this operation manual carefully before initial
operation! All persons involved in the installation, setting-up, operation,
maintenance and service of this device must be appropriately qualified and
observe this operation manual in detail. This product complies with the
requirements of the applicable European and national regulations. Conformity
has been proven. The respective statements and documents are deposited at
the manufacturer.
Mode d'emploi
ATTENTION !
Für weiteren Gebrauch aufbewahren!
Keep information for further reference!
Gardez ces instructions pour des utilisations ultérieurs !
www.reloopdj.com
Pour votre propre sécurité, veuillez lire attentivement ce mode d'emploi avant
la première utilisation! Toutes les personnes chargées de l'installation, de la
mise en service, de l'utilisation, de l'entretien et la maintenance de cet
appareil doivent posséder les qualifications nécessaires et respecter les
instructions de ce mode d'emploi. Ce produit est conforme aux directives
européennes et nationales, la conformité a été certifiée et les déclarations et
documents sont en possession du fabricant.
Wir gratulieren Ihnen zum Kauf des Reloop RMP-2660 s CDPlayers. Vielen Dank, dass Sie unserer Diskjockey Technologie Ihr Vertrauen schenken. Vor Inbetriebnahme
bitten wir Sie, alle Anweisungen sorgfältig zu studieren und
zu befolgen.
Congratulations on purchasing your Reloop RMP-2660 s CD
player. Thank you for placing your trust in our disc jockey
technology. Before operating this equipment we ask you to
carefully study and observe all instructions.
Nous vous félicitons d'avoir choisi le lecteur de CD Reloop
RMP-2660 s, preuve de la confiance que vous accordez à
notre technologie pour Disc Jockey. Avant la mise en service,
nous vous prions de lire attentivement ce mode d'emploi et
de respecter les instructions pendant l'utilisation.
Nehmen Sie den Reloop RMP-2660 s aus der Verpackung. Bitte
überprüfen Sie vor der ersten Inbetriebnahme, ob kein offensichtlicher Transportschaden vorliegt. Sollten Sie Schäden am
Stromkabel oder am Gehäuse entdecken, nehmen Sie das Gerät
nicht in Betrieb und setzen Sie sich bitte mit Ihrem Fachhändler in
Verbindung.
Please remove the RMP-2660 s from its packaging. Check before
initial operation to make sure that the device has not been visibly
damaged during transport. If you detect any damage to the power
cable or the casing, do not operate the device. Contact your
specialised dealer.
Retirez le Reloop RMP-2660 s de son emballage. Avant la première
mise en service, vérifiez le bon état de l'appareil. Si le boîtier ou
le câble sont endommagés, n'utilisez pas l'appareil et contactez
votre revendeur.
Sicherheitshinweise
Safety instructions
Consignes de sécurité
ACHTUNG! Seien Sie besonders vorsichtig beim Umgang mit
der Netzspannung 230 V. Bei dieser Spannung können Sie
einen lebensgefährlichen elektrischen Schlag erhalten! Bei
Schäden, die durch Nichtbeachtung dieser Bedienungsanleitung verursacht werden, erlischt jeder Garantieanspruch. Bei Sach- oder Personenschäden, die durch
unsachgemäße Handhabung oder Nichtbeachtung der
Sicherheitshinweise verursacht werden, übernimmt der
Hersteller keine Haftung.
- Dieses Gerät hat das Werk in einwandfreiem Zustand verlassen.
Um diesen Zustand zu erhalten und einen gefahrlosen Betrieb
sicherzustellen, muss der Anwender unbedingt die
Sicherheitshinweise und die Warnvermerke beachten, die in
dieser Gebrauchsanleitung enthalten sind.
- Aus Sicherheits- und Zulassungsgründen (CE) ist das eigenmächtige Umbauen und/oder Verändern des Gerätes nicht
gestattet. Beachten Sie bitte, dass Schäden, die durch manuelle Veränderungen an diesem Gerät verursacht werden, nicht
unter den Garantieanspruch fallen.
- Im Geräteinneren befinden sich keine zu wartenden Teile, ausgenommen die von außen austauschbaren Verschleißteile. Die
Wartung darf nur von fachkundigem Personal durchgeführt
werden, ansonsten verfällt die Garantie!
- Stellen Sie sicher, dass die Stromversorgung erst nach dem
Aufbau des Gerätes erfolgt. Den Netzstecker immer als letztes
einstecken. Vergewissern Sie sich, dass der Netzschalter auf
"OFF" steht, wenn Sie das Gerät ans Netz anschließen.
- Benutzen Sie nur vorschriftsmäßige Kabel. Achten Sie darauf,
dass alle Stecker und Buchsen fest angeschraubt und richtig
angeschlossen sind. Bei Fragen wenden Sie sich bitte an Ihren
Händler.
- Stellen Sie sicher, dass beim Aufstellen des Produktes das
Netzkabel nicht gequetscht oder durch scharfe Kanten beschädigt wird.
- Lassen Sie das Netzkabel nicht mit anderen Kabeln in Kontakt
kommen! Seien Sie vorsichtig beim Umgang mit Netzkabeln
und -anschlüssen. Fassen Sie diese Teile nie mit nassen Händen
an!
- Vergewissern Sie sich, dass am Netzwahlschalter -22- die korrekte länderspezifische Spannung (230 V, 50 Hz oder 115 V, 60
Hz) eingestellt ist (für die BRD: 230 V, 50 Hz). Für Schäden, die
aus einer falschen Stellung des Netzwahlschalters resultieren
übernimmt der Hersteller keine Haftung. In solchen Fällen
erlischt jeder Garantieanspruch.
- Stecken Sie das Stromkabel nur in geeignete
Schukosteckdosen ein. Als Spannungsquelle darf dabei nur
eine ordnungsgemäße Netzsteckdose des öffentlichen
Versorgungsnetzes verwendet werden.
- Trennen Sie das Gerät bei Nichtbenutzung und vor jeder
Reinigung vom Netz! Fassen Sie dazu den Netzstecker an der
Grifffläche an und ziehen Sie niemals an der Netzleitung!
- Stellen Sie das Gerät auf einer horizontalen und stabilen,
schwerentflammbaren Unterlage auf.
- Vermeiden
Sie
Erschütterungen
und
jegliche
Gewaltanwendung bei der Installation oder Inbetriebnahme
des Gerätes.
- Achten Sie bei der Wahl des Installationsortes darauf, dass das
Gerät nicht zu großer Hitze, Feuchtigkeit und Staub ausgesetzt
wird. Vergewissern sie sich, dass keine Kabel frei herumliegen.
Sie gefährden Ihre und die Sicherheit Dritter!
- Stellen Sie keine Flüssigkeitsbehälter, die leicht umfallen
können, auf dem Gerät oder in dessen Nähe ab. Falls doch einmal Flüssigkeit in das Geräteinnere gelangen sollte, sofort den
Netzstecker ziehen. Lassen Sie das Gerät von einem qualifizierten Servicetechniker prüfen, bevor es erneut genutzt wird.
Beschädigungen, die durch Flüssigkeiten im Gerät hervorgerufen wurden, sind von der Garantie ausgeschlossen.
- Betreiben Sie das Gerät nicht in extrem heißen (über 35° C)
oder extrem kalten (unter 5° C) Umgebungen. Halten Sie das
Gerät von direktem Sonnenlicht und von Wärmequellen wie
Heizkörpern, Öfen, usw. (auch beim Transport in geschlossenen
Wagen) fern. Sorgen Sie immer für eine ausreichende
Ventilation.
CAUTION! Please exercise particular caution when handling
230 V power voltage. This voltage rating may lead to a
critical electrical shock! Any damage caused by the nonobservance of this operation manual excludes any warranty
claims. The manufacturer is not liable for any damage to
property or for personal injury caused by improper handling
or non-observance of the safety instructions.
- This device left the works in a perfect condition. To maintain
this condition and to ensure a risk-free operation the user
must observe the safety instructions and warnings contained
in this operation manual.
- For reasons of safety and certification (CE) the unauthorised
conversion and/or modification of the device is prohibited.
Please note that in the event of damage caused by the manual modification to this device any warranty claims are
excluded.
- The inside of the device does not contain any parts which
require maintenance, with the exception of wear parts that can
be exchanged from the outside. Qualified staff must carry out
maintenance, otherwise the warranty does not apply!
- Ensure that the power will only be supplied after the device
has been fully set up. Always plug in the mains plug last.
Ensure that the mains switch is in the "OFF" position when
connecting the device to power.
- Only use cables that comply with regulations. Observe that all
jacks and bushes are tightened and correctly hooked up. Refer
to your dealer if you have any questions.
- Ensure that when setting up the product the mains cable is not
squashed or damaged by sharp edges.
- Prevent the mains cable from coming into contact with other
cables! Exercise great care when handling mains cables and
connections. Never touch these parts with wet hands!
- Ensure that the voltage selector -22- is set to the correct
national voltage level (230 V, 50 Hz or 115 V, 60 Hz, in FRG: 230
V, 50 Hz). The manufacturer is not liable for damage resulting
from an incorrect setting of the voltage selector. In such a case
any warranty claims are excluded.
- Connect the power cable exclusively to appropriate shockproof outlets. The only supply point to be used is a supply
outlet in accordance with specifications of the public supply
network.
- Disconnect the device from the supply outlet when not in use
and before cleaning! Be sure to hold the mains plug by the
body. Never pull the mains cord!
- Position the device on a horizontal and stable low-flame base.
When experiencing feedback, direct the radiation field of your
loudspeakers away from the device.
- Avoid any concussions or violent impact when installing or
operating the device.
- When selecting the location of installation make sure that the
device is not exposed to excessive heat, humidity, and dust. Be
sure that no cables lie around openly. You will endanger your
own safety and that of others!
- Do not rest any containers filled with liquid that could easily
spill onto the device or in its immediate vicinity. If, however,
fluids should access the inside of the device, immediately
disconnect the mains plug. Have the device checked by a
qualified service technician before re-use. Damage caused by
fluids inside the device is excluded from the warranty.
- Do not operate the device under extremely hot (in excess of
35° C) or extremely cold (below 5° C) conditions. Keep the
device away from direct exposure to the sun and heat sources
such as radiators, ovens, etc. (even during transport in a closed
vehicle). Never cover the cooling fan or vents. Always ensure
sufficient ventilation.
- The device must not be operated after being taken from a cold
environment into a warm environment. The condensation
caused hereby may destroy your device. Do not switch on or
operate the device until it has reached ambient temperature!
ATTENTION ! Soyez particulièrement vigilant lors des
branchements avec la tension secteur 230 V. Une décharge
électrique à cette tension peut être mortelle ! La garantie
exclu tous les dégâts dus au non-respect des instructions de
ce mode d'emploi. Le fabricant décline toute responsabilité
pour les dégâts matériels et personnels dus à un usage
incorrect ou au non-respect des consignes de sécurité.
- Cet appareil a quitté l'usine de fabrication en parfait état. Afin
de conserver cet état et assurer la sécurité de
fonctionnement, l'utilisateur doit absolument respecter les
consignes de sécurité et les avertissements indiqués dans ce
mode d'emploi.
- Pour des raisons de sécurité et de certification (CE), il est
interdit de transformer ou modifier cet appareil. Tous les
dégâts dus à une modification de cet appareil ne sont pas
couverts par la garantie.
- Le boîtier ne contient aucune pièce nécessitant un entretien, à
l'exception de pièces d'usure pouvant être remplacées de
l'extérieur. La maintenance doit exclusivement être effectuée
par du personnel qualifié afin de conserver les droits de
garantie !
- Veillez à n'effectuer le raccordement secteur qu'une fois
l'installation terminée. Branchez toujours la fiche secteur en
dernier. Vérifiez que l'interrupteur principal soit sur "OFF"
avant de brancher l'appareil.
- Utilisez uniquement des câbles conformes. Veillez à ce que
toutes les fiches et douilles soient bien vissées et
correctement connectées. Si vous avez des questions,
contactez votre revendeur.
- Veillez à ne pas coincer ou endommager le cordon
d'alimentation par des arrêtes tranchantes lorsque vous
installez l'appareil.
- Prenez garde à ce que le cordon électrique n'entre pas en
contact avec d'autres câbles et soyez prudent lorsque vous
manipulez des lignes ou des prises électriques. Ne touchez
jamais ces éléments avec des mains humides !
- Vérifiez que le sélecteur de tension -21- soit correctement
réglé sur la tension nationale (230 V, 50 Hz ou 115 V, 60 Hz)
(Allemagne : 230 V, 50 Hz). Le fabricant décline toute
responsabilité pour les dégâts dus à un mauvais réglage du
sélecteur de tension. Ce cas n'est pas couvert par la garantie.
- Insérez uniquement le cordon d'alimentation dans des prises
électriques de sécurité. La source de tension utilisée doit
uniquement être une prise électrique en ordre du réseau
d'alimentation publique.
- Débranchez l'appareil lorsque vous ne l'utilisez pas ou pour le
nettoyer ! Pour débrancher l'appareil, tirez toujours sur la
prise, jamais sur le câble !
- Placez l'appareil sur une surface plane, stable et difficilement
inflammable. En cas de larsen, éloignez les enceintes de
l'appareil.
- Évitez tous les chocs et l'emploi de la force lors de
l'installation et l'utilisation de l'appareil.
- Installez l'appareil dans un endroit à l'abri de la chaleur, de
l'humidité et de la poussière. Ne laissez pas traîner les câbles
pour votre sécurité personnelle et celle de tiers !
- Ne placez jamais des récipients de liquides susceptibles de se
renverser sur l'appareil ou à proximité directe. En cas
d'infiltration de liquides dans le boîtier, retirez immédiatement
la fiche électrique. Faites contrôler l'appareil par un technicien
qualifié avant de le réutiliser. La garantie exclu tous les dégâts
dus aux infiltrations de liquides.
- N'utilisez pas l'appareil dans un environnement extrêmement
chaud (plus de 35°C) ou froid (sous 5° C). N'exposez pas
l'appareil directement aux rayons solaires ou à des sources de
chaleur telles que radiateurs, fours, etc. (également valable
lors du transport). Veillez à ne pas obstruer les ventilateurs ou
les fentes de ventilation. Assurez toujours une ventilation
convenable.
2
- Das Gerät darf nicht in Betrieb genommen werden, wenn es
von einem kalten Raum in einen warmen Raum gebracht
wurde. Das dabei entstehende Kondenswasser kann unter
Umständen Ihr Gerät zerstören. Lassen Sie das Gerät solange
uneingeschaltet, bis es Zimmertemperatur erreicht hat!
- Regler
und
Schalter
sollten
niemals
mit
Sprühreinigungsmitteln und Schmiermitteln behandelt werden. Dieses Gerät sollte nur mit einem feuchten Tuch gereinigt
werden, verwenden Sie niemals Lösungsmittel oder
Waschbenzin zum Reinigen.
- Bei Umzügen sollte das Gerät im ursprünglichen
Versandkarton transportiert werden.
- Zu Beginn müssen die Überblendregler und Lautstärkeregler
Ihres Verstärkers auf Minimum eingestellt und die
Lautsprecherschalter in "OFF"-Position geschaltet sein. Vor
dem Lauterstellen 8 bis 10 Sekunden warten, um den durch
Einschwingung erzeugten Schroteffekt zu vermeiden, welcher
zu Lautsprecher- und Frequenzweichenschäden führen könnte.
- Achten Sie stets darauf, dass Sie nur unverkratzte und nicht
verschmutzte CDs verwenden. Auch Ihre Hände sollten dabei
sauber sein.
- Schließen Sie stets die CD-Laden, um den Laserkopf sauber zu
halten.
- Geräte, die an Netzspannung betrieben werden, gehören nicht
in Kinderhände. Lassen Sie deshalb in Anwesenheit von
Kindern besondere Vorsicht walten.
- In
gewerblichen
Einrichtungen
sind
die
Unfallverhütungsvorschriften des Verbandes der gewerblichen
Berufsgenossenschaft zu beachten.
- In Schulen, Ausbildungseinrichtungen, Hobby- oder
Selbsthilfewerkstätten ist das Betreiben des Gerätes durch
geschultes Personal verantwortlich zu überwachen.
- Heben Sie diese Bedienungsanleitung für spätere Fragen und
Probleme gut auf.
- Controls and switches should never be treated with spray-on
cleaning agents and lubricants. This device should only be
cleaned with a damp cloth. Never use solvents or cleaning
fluids with a petroleum base for cleaning.
- When relocating the device should be transported in its
original packaging.
- When starting operation the cross-faders and volume controls
of your amplifier must be set to minimum level. Bring the
loudspeaker switches into the "OFF" position. Wait between 8
to 10 seconds before increasing the volume to avoid shot noise
created by transient effect, which could cause damage to
loudspeakers and the diplexer.
- Always ensure that you place scratch-free, clean CDs into the
player. When placing the CD into the tray, your hands should
also be clean.
- To keep the laser head clean always close the CD tray.
- Devices supplied by voltage should not be left in the hands of
children. Please exercise particular care when in the presence
of children.
- At commercial facilities the regulations for the prevention of
accidents as stipulated by the association of professional
associations must be observed.
- At schools, training facilities, hobby and self-help workshops
the operation of the device must be monitored with
responsibility by trained staff.
- Keep this operation manual in a safe place for later reference
in the event of questions or problems.
- N'utilisez pas l'appareil lorsqu'il est amené d'une pièce froide
dans une pièce chaude. L'eau de condensation peut détruire
votre appareil. Laissez l'appareil hors tension jusqu'à ce qu'il
ait atteint la température ambiante!
- Ne nettoyez jamais les touches et curseurs avec des produits
aérosols ou gras. Utilisez uniquement un chiffon légèrement
humide, jamais de solvants ou d'essence.
- Utilisez l'emballage original pour transporter l'appareil.
- Réglez d'abord les curseurs de réglage et de volume de votre
ampli au minimum et les interrupteurs des enceintes sur
"OFF". Attendez 8 à 20 secondes avant d'augmenter le volume
afin d'éviter l'effet de Schottky, susceptible d'endommager les
enceintes et le diviseur de fréquence.
- Veillez toujours à utiliser des CD propres et en parfait état. De
même, vous devez avoir les mains propres.
- Fermez toujours le tiroir du lecteur pour éviter de salir la tête
laser.
- Les appareils électriques ne sont pas des jouets. Soyez
particulièrement vigilants en présence d'enfants.
- Les directives de prévention des accidents de l'association des
fédérations professionnelles doivent être respectées dans les
établissements commerciaux.
- Dans les écoles, instituts de formation, ateliers de loisirs etc.
l'utilisation de l'appareil doit être effectuée sous la
surveillance de personnel qualifié.
- Conservez ce mode d'emploi pour le consulter en cas de
questions ou de problèmes.
Bestimmungsgemäße
Verwendung
Application in accordance
with regulations
Utilisation conforme
- Bei diesem Gerät handelt es sich um einen professionellen
Doppel CD-Player, mit dem sich handelsübliche MP3 / Audio CDs
abspielen lassen. Das Gerät wird dabei an ein Mischpult angeschlossen.
- Dieses Produkt ist für den Anschluss an 230 V, 50 Hz und 115 V,
60 Hz Wechselspannung zugelassen und wurde ausschließlich
zur Verwendung in Innenräumen konzipiert.
- Wird das Gerät anders verwendet als in dieser
Bedienungsanleitung beschrieben, kann dies zu Schäden am
Produkt führen und der Garantieanspruch erlischt. Außerdem
ist jede andere Verwendung mit Gefahren wie z.B. Kurzschluss,
Brand, elektrischem Schlag, etc. verbunden.
- Die vom Hersteller festgelegte Seriennummer darf niemals
entfernt werden, da ansonsten der Garantieanspruch erlischt.
- This device is a professional double CD player for replay of
conventional MP3/ audio CDs. To listen to CDs connect this
equipment to a mixing console.
- This product is authorised for connection to 230 V, 50 Hz and
115 V, 60 Hz, AC and is designed exclusively for indoor
application.
- If the device is used for any other purposes than those
described in the operation manual, damage can be caused to
the product, leading to exclusion of warranty rights. Moreover,
any other application that does not comply with the specified
purpose harbours risks such as short circuit, fire, electric
shock, etc.
- The serial number determined by the manufacturer must
never be removed to uphold the warranty rights.
- Cet appareil est un double lecteur de CD professionnel
permettant la lecture de CD MP3/ Audio courants. L'appareil
doit pour cela être connecté à une console de mixage.
- Ce produit est certifié pour le branchement sur secteur 230 V,
50 Hz et 115 V, 60 Hz tension alternative et est exclusivement
conçu pour être utilisé en local fermé.
- Toute utilisation non conforme peut endommager le produit et
annuler les droits de garantie. En outre, toute utilisation autre
que celle décrite dans ce mode d'emploi peut être source de
court-circuits, incendies, décharge électrique, etc.
- Le numéro de série attribué par le fabricant ne doit jamais être
effacé sous peine d'annuler les droits de garantie.
Wartung
Maintenance
Entretien
- Überprüfen Sie regelmäßig die technische Sicherheit des
Gerätes auf Beschädigungen des Netzkabels oder des
Gehäuses, sowie auf die Abnutzung von Verschleißteilen wie
Dreh- und Schiebereglern.
- Wenn anzunehmen ist, dass ein gefahrloser Betrieb nicht mehr
möglich ist, so ist das Gerät außer Betrieb zu setzen und gegen
unbeabsichtigten Betrieb zu sichern. Netzstecker aus der
Steckdose ziehen!
- Es ist anzunehmen, dass ein gefahrloser Betrieb nicht mehr
möglich ist, wenn das Gerät sichtbare Beschädigungen aufweist, das Gerät nicht mehr funktioniert, nach längerer
Lagerung unter ungünstigen Verhältnissen oder nach schweren Transportbeanspruchungen.
- Check the technical safety of the device regularly for damage
to the mains line or the casing, as well as for wear of wear
parts such as rotary and sliding switches.
- If it is to be assumed that the safe operation is no longer
feasible then the device must be disconnected and secured
against accidental use. Always disconnect mains plug from the
outlet!
- It must be assumed that a safe operation is no longer feasible
if the device bears visible defects, if the device no longer
functions, following longer storage under unfavourable
conditions or after major transport stress.
- Contrôlez régulièrement le bon état de l'appareil (boîtier,
cordon) et l'usure éventuelle des molettes et curseurs.
- Si vous supposez que l'appareil ne peut plus être utilisé en
toute sécurité, mettez l'appareil hors-service et assurez-le
contre toute réutilisation involontaire. Débranchez la fiche
électrique de la prise de courant !
- La sécurité d'emploi est susceptible d'être affectée lorsque
l'appareil est visiblement endommagé, ne fonctionne plus
correctement, après un stockage prolongé dans des conditions
défavorable ou après une forte sollicitation de transport.
3
VORSICHT LASERSTRAHLUNG!
Dieses Gerät enthält zwei Laserdioden der Klasse 1. Um einen
sicheren Betrieb zu gewährleisten, dürfen weder
Abdeckungen entfernt werden, noch darf versucht werden,
sich Zugang zum Geräteinneren zu verschaffen. Im
Geräteinneren befinden sich keine zu wartenden Teile.
Wartungsarbeiten dürfen nur von qualifiziertem
Fachpersonal durchgeführt werden.
CAUTION LASER RADIATION!
This device is equipped with two Class 1 laser diodes. To
ensure a safe operation do not remove any covers or try to
access the inside of the equipment. The inside of the device
does not contain any parts which are subject to
maintenance. Maintenance must only be carried out by
qualified staff.
ATTENTION RAYON LASER!
Cet appareil est équipé de deux diodes laser de la classe 1.
Afin de garantir une utilisation en toute sécurité, il est
interdit de retirer les couvercles ou d'ouvrir le boîtier. Le
boîtier ne contient aucune pièce nécessitant un entretien.
Les réparations doivent exclusivement être effectuées par
des professionnels qualifiés.
Vorderseite
Bedieneinheit
Front panel
operation controls
Face avant de
l'unité de commande
7
4
Rückseite
Bedieneinheit
5
8
7
6
12
3
9
1
2
11
15
Rear panel
operation controls
14
13
10
Face arrière de
l'unité de commande
21
21
18
4
Vorderseite
Abspieleinheit
Front panel
replay unit
Face avant de
l'unité de lecture
1
16
Rückseite
Abspieleinheit
17
16
Rear panel
replay unit
Face arrière de
l'unité de lecture
20
23
19
22
20
18
19
Bezeichnungen
Designation
Description
1.
2.
3.
4.
5.
6.
7.
8.
9.
10.
11.
12.
13.
14.
15.
16.
17.
18.
19.
20.
21.
22.
23.
1.
2.
3.
4.
5.
6.
7.
8.
9.
10.
11.
12.
13.
14.
15.
16.
17.
18.
19.
20.
21.
22.
23.
1.
2.
3.
4.
5.
6.
7.
8.
9.
10.
11.
12.
13.
14.
15.
16.
17
18.
19.
20.
21.
22.
23.
Open/Close Taste
Display
Jog Shuttle
Jog Wheel
Cue Taste
Play/Pause Taste
Skip Tasten
Skip +10 Taste
Pitch Bend Tasten
Pitch Fader
Pitch Taste
Loop Taste
Programm-Taste
Single/Continue Taste
Time Taste
CD Schubfach
EIN/AUS Schalter
Anschlussbuchsen für Verbindungskabel
Ausgangsbuchsen (Cinch)
Ausgangsbuchse (Digital)
Anschlussbuchse für Faderstart
Spannungswahlschalter
Netzkabel
Open / Close button
Display
Jog Shuttle
Jog Wheel
Cue button
Play/Pause button
Skip buttons
Skip + 10 button
Pitch Bend buttons
Pitch Fader
Pitch button
Loop button
Programm button
Single/Continue button
Time button
CD tray
ON/OFF switch
Connecting jack for connecting cable
Connection out (cinch)
Connection out (digital)
Connecting jack for faderstart
Voltage selector
Line cord
Touche Open/Close
Affichage
Molette Jog Shuttle
Molette Jog Wheel
Touche Cue
Touche Play/Pause
Touches Skip
Touche Skip +10
Touches Pitch Bend
Potentiomètre linéaire
Touche Pitch
Touche Loop
Touche Program
Touche Single/Continue
Touche Time
Tiroir de CD
Interrupteur
Prises de connexion pour le câble de connexion
Prises de sortie (coaxiale)
Prise de sortie (numérique)
Prise de connexion pour Faderstart
Sélecteur de tension
Cordon secteur
5
Anschlüsse
Connections
Connexions
1. Verbinden Sie die Abspieleinheit über die mitgelieferten Kabel
mit der Bedieneinheit. Verbinden Sie dazu die
Anschlussbuchsen für das Verbindungskabel -18-.
2. Verbinden Sie die Ausgangsbuchsen -19- mit den Line In
Buchsen Ihres Mischpultes. Verbinden Sie die
Ausgangsbuchsen -20- mit einem digitalen Aufnahmegerät
(MiniDisc, CompactDisc, DVD), falls Sie eine Aufnahme wünschen.
3. Verbinden Sie die Anschlussbuchsen -21- mit den
Ausgangsbuchsen für Faderstart Ihres Mischpultes (falls vorhanden).
4. Schließen Sie das Netzkabel -23- an Ihre Steckdose an.
1. Connect the replay unit via the supplied cable with the
operating unit. For this, connect it with the connecting jacks
for the connecting cable -18-.
2. Hook up Connection Out -19- with the Line In of your mixing
console. Hook up Connection Out -20- with a digital recording
device (MiniDisc, CompactDisc, DVD) if you wish to make a
recording.
3. Hook up Connecting jack -21- for faderstart with the
Connection Out for faderstart of your mixing console (if
available).
4. Connect the line cord -23- with your outlet.
1. Connectez l'unité de lecture et l'unité de commande avec le
câble de connexion livré avec l'appareil. Branchez le câble
dans les prises de connexion -18-.
2. Connectez les prises de sortie -19- avec les prises Line In de
votre console de mixage. Connectez les prises de sortie -20avec un appareil d'enregistrement numérique (MiniDisc,
CompactDisc, DVD) si vous voulez effectuer un enregistrement.
3. Connectez les prises de connexion -21- avec le prises de sortie
(s'il existe) pour Faderstart de votre console de mixage.
4. Branchez le cordon secteur -23- sur une prise de courant.
Bedienung
Operation
Utilisation
1. Strom einschalten
Nachdem alle Anschlüsse vorgenommen wurden, das Gerät mit
dem EIN/AUS Schalter -17- einschalten. Die LED leuchtet auf.
2. CD laden
Drücken Sie die entsprechende Open/Close Taste -1-, um das
gewünschte CD-Schubfach -16- zu öffnen. Legen Sie die CD ein.
Drücken Sie erneut die entsprechende Open/Close Taste, um
den CD-Trägereinschub zu schließen.
ACHTUNG!
Versuchen Sie auf keinen Fall die CD-Schubfächer manuell
zu schließen, da dies eine Beschädigung des Mechanismus
zur Folge haben kann.
3. Display
Wird das Gerät eingeschaltet und es befindet sich keine CD im
Schubfach, erscheint auf dem jeweiligen Display -2- "NO DISC".
Wurde die CD korrekt eingelegt, wird für kurze Zeit die
Gesamtspielzeit und die Gesamtzahl aller Titel angezeigt.
Danach wird oberhalb von "T" die Titelnummer angezeigt,
oberhalb von M(inute), S(ekunde) und F(rame) wird die
Abspielzeit angezeigt. Eine Kästchen-Übersicht aller verbleibenden Titel wird angezeigt, wobei das Kästchen des aktuellen
Titels blinkt. Ein 10-stelliges Balkendiagramm zeigt zusätzlich
die Abspielzeit an. Sie können mit den Time Tasten -15zwischen drei Anzeigemodi wählen:
a) Elapsed
Im Display erscheint "Elapsed". Die verstrichene Zeit des
aktuellen Titels wird angezeigt. Das Balkendiagramm nimmt
von links nach rechts zu; ist der Balken voll, blinkt der komplette Balken bis der Titel endet.
b) Remain
Im Display erscheint "Remain". Die verbleibende Zeit des
aktuellen Titels wird angezeigt. Das Balkendiagramm nimmt
von links nach rechts ab; wird die letzte Stelle erreicht, blinkt
der komplette Balken bis der Titel endet.
c) Total Remain
Im Display erscheint keine Angabe. Es wird die verbleibende
Zeit der gesamten CD angezeigt. Das Balkendiagramm nimmt
von links nach rechts ab; wird die letzte Stelle erreicht, blinkt
der komplette Balken bis die CD endet.
4. Abspielen
Drücken Sie die Play/Pause Taste -6-, um mit der Wiedergabe zu
beginnen. Erneutes Drücken ruft den Pause-Modus auf. Für die
beiden Laufwerke lassen sich mit den Single/Continue Tasten -14unabhängig voneinander zwei verschiedene Abspielmodi auswählen:
a) Single
Im Display erscheint "Single". Der aktuelle Titel wird abgespielt; danach geht der Player in den Pause-Modus.
1. Power on
After making all connections turn on the power with the
ON/OFF switch -17-. The LED illuminates.
2. Load CD
Press the respective Open/Close button -1- to open the CD tray
-16-. Place the CD in the tray. Press the Open/Close button again
to close the CD tray.
ATTENTION!
Do not try to close the CD tray by pushing it. This could
damage the mechanism.
3. Display
When switching on the device without a CD in the tray, the
respective display -2- indicates "NO DISC". If the CD was
correctly inserted the total playing time and the total number
of tracks is briefly displayed. The track number is then
displayed above the "T", and the playing time above M(inute),
S(econd) and F(rame). A grid overview of all remaining tracks
is also displayed, whereby the grid of the current track being
played flashes. Additionally, a 10-digit bar diagram indicates
the playing time. Use the Time Buttons -15- to choose between
three display modes:
a) Elapsed
The display indicates "Elapsed". The time passed of the current
track is displayed. The bar diagram increases from left to right;
if the bar is complete, the entire bar flashes until the track
ends.
b) Remain
The display indicates "Remain". The remaining time of the
current track is displayed. The bar diagram decreases from left
to right; when reaching the last digit, the entire bar flashes
until the track ends.
c) Total Remain
The display indicates "Total Remain". The total remaining time
of the entire CD is displayed. The bar diagram decreases from
left to right; when reaching the final point the entire bar
flashes until the CD ends.
4. Play
Press the Play/Pause button -6- to start replay. Press again to
activate the Pause mode. It is possible to select two different
playing modes independently from one another for both
players with the Single/Continue buttons -14-:
a) Single
The display indicates "Single". The current track is replayed;
the player then goes into Pause mode.
1. Mise sous tension
Après avoir effectué toutes les connexions, allumez l'appareil
en appuyant sur l'interrupteur -17-. La DEL s'allume.
2. Tiroir CD
Appuyez sur la touche Open/Close -1- respective pour ouvrir le
tiroir -16-. Insérez le CD. Appuyez ensuite de nouveau sur la
touche Open/Close pour fermer le tiroir.
ATTENTION !
Évitez à tout prix de fermer les tiroirs CD manuellement,
vous pouvez endommager le mécanisme.
3. Affichage
Lorsque vous allumez l'appareil et qu'un tiroir est vide,
l'affichage respectif -2- indique"NO DISC". Une fois le disque
inséré, la durée et le nombre de titres est affichée
momentanément. Ensuite le numéro de titre est affiché au
dessus de "T" et la durée au dessus de M(inutes), S(econdes)
et F(rame). Les titres restants sont affichés dans une grille et
la case du titre actuel clignote. Un diagramme à barres à 10
positions indique en supplément la durée. Appuyez sur les
touches Time -15- pour sélectionner l'un des deux modes
suivants:
a) Elapsed
xL'affichage indique "Elapsed". Le temps écoulé du titre actuel
est affiché. Le diagramme à barres augmente de gauche à
droite; lorsque la barre est pleine, toute la barre clignote
jusqu'à la fin du titre.
b) Remain
L'affichage indique "Remain" et affiche le temps restant du
titre actuel. Le diagramme à barres diminue de gauche à
droite; à la dernière position, toute la barre clignote jusqu'à la
fin du titre.
c) Total Remain
Aucune indication dans l'affichage. Le temps restant de tout le
CD est affiché. Le diagramme à barres diminue de gauche à
droite; à la dernière position, toute la barre clignote jusqu'à la
fin du CD.
4. Lecture
Appuyez sur la touche Play/Pause -6- pour commencer la
lecture. Appuyez de nouveau pour passer en mode Pause. Les
touches Single/Continue -14- permettent de sélectionner
quatre modes de lecture pour chaque lecteur :
a) Single
L'affichage indique "Single". Après la lecture du titre actuel, le
lecteur passe en mode Pause.
6
b) Continue
Im Display erscheint "Continue". Die gesamte CD wird abgespielt; danach geht der Player in den Pause-Modus. Drücken Sie
die Single/Continue Taste und die Programm-Taste -13- gleichzeitig, um den Relay-Modus zu aktivieren. Die gesamte CD wird
abgespielt; danach geht der Player in den Pause-Modus.
Daraufhin wird die gesamte CD des anderen Players abgespielt;
danach geht der Player in den Pause-Modus. Daraufhin wird die
gesamte CD des anderen Players abgespielt, usw.
5. Trackauswahl, Vor- und Zurückspulen
Mit den Skip Tasten -7- können Sie die Titelauswahl vornehmen.
Mit der rechten Taste werden die nächsten Titel angewählt. Mit
der linken Taste wird durch einmaliges Drücken der aktuelle
Titel neu gestartet; durch mehrmaliges Drücken werden die
vorherigen Titel angewählt. Mit der Skip +10 Taste -8- springen
Sie 10 Titel nach vorn. Durch Drehen des Jog Shuttles -3- im
Wiedergabe-Modus sowie im Pause-Modus können Sie den Titel
schnell vor- (im Uhrzeigersinn) und zurückspulen (gegen den
Uhrzeigersinn). Durch Drehen des Jog Wheels -4- im PauseModus können Sie Titelpassagen framengenau suchen; der
aktuelle Frame (=1/75 Minute) wird permanent wiederholt.
6. Cueing
Wenn Sie die jeweilige Cue Taste -5- im Wiedergabe-Modus
drücken, kehrt der Player an den Anfang des Titels zurück und
befindet sich im Pause-Modus, wenn kein Cue-Punkt gespeichert ist. Wurde zuvor ein Cue-Punkt gespeichert, kehrt
der Player an den Cue-Punkt zurück und befindet sich im
Pause-Modus. Sie setzen einen Cue-Punkt, indem Sie durch
Drücken der Play/Pause Taste -6- in den Pause-Modus gehen;
suchen Sie nun mittels des Jog Wheels -4- framegenau den
gewünschten Cue-Punkt. Drücken Sie nun die Cue Taste zum
Speichern. Durch Gedrückthalten der Cue Taste kehren Sie
solange in den Wiedergabe-Modus zurück, bis Sie die Taste loslassen; danach kehrt der Player an den Cue-Punkt zurück und
befindet sich im Pause-Modus. Durch Drücken der Play/Pause
Taste kehren Sie dauerhaft in den Wiedergabe-Modus zurück.
7. Looping
Ein Loop ist die permanente Wiederholung einer Sequenz
zwischen einem gewählten Loop-Anfangspunkt und einem
gewählten Loop-Endpunkt. Wählen Sie einen LoopAnfangspunkt durch einmaliges Drücken der Loop-Taste -12-;
die LED blinkt. Wählen Sie den Loop-Endpunkt durch nochmalige Drücken der Loop-Taste; der Player geht in automatisch in
den Loop-Modus über. Die so gewählte Sequenz wird so lange
nacheinander wiederholt, bis Sie ein drittes Mal die Loop Taste
drücken; der Player geht nahtlos in den Wiedergabemodus
über.
8. Geschwindigkeits-Feinregelung
Aktivieren Sie die Geschwindigkeits-Feinregelung mit der Pitch
Taste -11-; die LED leuchtet. Halten Sie die Pitch Taste für mehr
als 1 Sekunde gedrückt, um zwischen einem Pitchbereich von
+/- 8%, +/-12% oder +/-16% zu wählen. Mit dem Pitch Fader -10können Sie nun die Geschwindigkeit der CD stufenlos im
gewählten Bereich. Die Abweichung von der
Originalgeschwindigkeit wird im Display angezeigt. Mit den
Pitch Bend Tasten -9- können Sie die Geschwindigkeit des
jeweiligen Tracks durch Gedrückthalten um +16% (+ Taste), bzw.
um -16% (- Taste) verändern. Wenn Sie die Taste loslassen kehrt
der Player zur mit dem Pitch Fader eingestellten
Geschwindigkeit zurück. Durch Drehen des Jog Wheels -4- im
Wiedergabe-Modus können Sie die Geschwindigkeit ebenfalls
um bis zu +16% (gegen den Uhrzeigersinn), bzw. um bis zu -16%
(im Uhrzeigersinn) verändern.
9. Programmierung
Drücken sie die jeweilige Programm Taste -13-. Wählen mit den
jeweiligen Skip Tasten -7- den ersten gewünschten Track aus.
Drücken Sie zum Speichern erneut die Programm Taste. Wählen
Sie nun mit den Skip Tasten den zweiten gewünschten Track
aus und speichern Sie ihn durch Drücken der Programm Taste.
Setzen Sie auf diese Weise die Programmierung fort, bis sie
alle gewünschten Titel gespeichert haben.
HINWEIS!
Es können maximal 20 Tracks gespeichert werden.
Drücken Sie die jeweilige Play/Pause Taste -6- um mit der
Wiedergabe des Programms zu beginnen. Solange ein
Programm gespeichert ist, schalten die Skip Tasten die Tracks
in der Reihenfolge des Programms durch und nicht in der
Reihenfolge der CD. Zum Löschen des Programms halten Sie
die Programm Taste ca. 2 Sekunden lang gedrückt.
10. Faderstart
Falls Sie die Anschlussbuchsen -21- mit den Ausgangsbuchsen
für Faderstart Ihres Mischpultes verbunden haben, können Sie
dem jeweiligen Player vom Mischpult aus starten (beachten Sie
bitte hierzu die Bedienungsanleitung des Mischpultes).
b) Continue
The display indicates "Continue". The entire CD is replayed; the
player then goes into Pause mode.
Push the Single/Continue button and the Program button -13simultaneously to activate relay play. The entire CD is played;
the player then goes into Pause mode. The entire CD of the
other player is then replayed. The player then goes into pause
mode. Then the entire CD of the other player is replayed, etc.
5. Select Track, Forward, Rewind
Use the Skip buttons -7- to select a track. Use the right button
to select the next track following. Press the left button once
to restart the current track being played; press again to
select the respective previous title. Use the "Skip +10" button
-8- to skip 10 tracks. Turn the Jog Shuttle -3- in Replay mode
as well as Pause mode to fast forward (clockwise) and rewind
(counter clockwise) the track. Frame track passages by
turning the Jog Wheel -4- in Pause mode; the current frame
(=1/75 minute) is constantly repeated.
6. Cueing
When activating the respective Cue button -5- in Replay mode
the player returns to the start of the track and goes into Pause
mode if no Cue position has been stored. If prior to this a Cue
position was stored the player returns to the Cue position and
goes into Pause. Set a Cue position by pressing the Play/Pause
button -6- in Pause mode; now frame-search the precise Cue
position with the help of the Jog Wheel -4-. Activate the Cue
button to save this position. By holding the Cue button down
you will keep returning to Replay mode until you release the
button; the player then returns to the Cue position and is in
Pause mode. By pressing the Play/Pause button you will
lastingly return to the Replay mode.
7. Looping
A loop is the permanent replay of a sequence between a
selected loop starting point and a selected loop end point.
Select a loop starting point by pressing the Loop button -12once; the LED flashes. Select the loop end point by pressing the
loop button again; the player automatically goes into loop
mode. The sequence chosen as such is repeated until the loop
button is activated a third time; the Player then smoothly
returns to Replay mode.
8. Speed pitch
Activate the speed fine-tuning with the Pitch button -11-; the
LED display is illuminated. Hold the Pitch button depressed for
more than 1 second to choose between a pitch range of +/- 8%,
+/- 12% or +/- 16%. Use the Pitch Fader -10- to infinitely regulate the speed of the CD within the choosen range. The deviation
from the original speed is indicated in the display. Hold the
Pitch Bend buttons -9- to adjust the speed of the respective
track by +16% (+ button) or by -16% (- button). Release the button for the player to return to the set pitch speed with the
Pitch Fader. By turning the Jog Wheel -4- in Replay mode the
pitch can also be adjusted by up to +16% (counter clockwise) or
by up to -16% (clockwise).
9. Programming
Press the respective Program button -13-. With the respective
Skip buttons -7- select the first desired track. To program the
selected track, press Program again. Now select the desired
second track with the Skip buttons and program it by pressing
the Program button again. Continue programming like this
until all desired tracks have been stored.
NOTE!
A maximum 20 tracks can be programmed.
Press the respective Play/Pause button -6- to start the replay
of the program. As long as a program is stored the Skip buttons
will skip through the tracks in the order as programmed, not in
the order of the CD. To delete the program hold the Program
button pressed for ca. 2 seconds.
10. Faderstart
If you have connected the Connection jacks -21- with the
Connection Out for faderstart of your mixing console you can
start the respective player from the mixing console (please
follow the instruction manual of your mixing console).
b) Continue
L'affichage indique "Continue". Après la lecture de tout le CD,
le lecteur passe en mode Pause.
Pressez le touche Single/Continue et le touche Program -13ensemble, pour activer le Mode Relais. Après la lecture de tout
le CD, le premier lecteur passe en mode Pause. Le deuxième
lecteur enchaîne ensuite avec la lecture du deuxième CD et
ainsi de suite.
5. Sélection des titres, avance et retour
Les touches Skip -7- vous permettent de sélectionner les titres.
Appuyez sur la touche droite pour sélectionner le(s) titre(s)
suivant(s). Appuyez une fois sur la touche gauche pour
redémarrer la lecture du titre actuel; appuyez plusieurs fois
pour sélectionner les titres précédents. Vous pouvez mover 10
titres en avant avec le touche Skip +10 -8-. Tournez la molette
Jog Shuttle -3-, en mode de lecture ou Pause, pour à droite
pour avancer rapidement dans le titre et à gauche pour
reculer. Tournez la molette Jog Wheel -4- en mode Pause pour
la recherche exacte de séquences ; la séquence actuelle (=1/75
minute) est répété en permanence.
6. Cueing
Lorsque vous appuyez sur la touche Cue respective -5- en
mode de lecture, le lecteur retourne au début du titre et passe
en mode Pause, si vous n'avez pas mémorisé de point Cue. Si
un point Cue est mémorisé préalablement, le lecteur retourne
au point Cue et passe en mode Pause. Pour mémoriser un point
Cue, appuyez sur la touche Play/Pause -6- pour passer en mode
Pause, cherchez le point Cue désiré avec la molette Jog Wheel
-4- et appuyez sur la touche Cue pour le mémoriser. Si vous
enfoncez la touche Cue, vous repassez en mode de lecture
jusqu'à ce que vous relâchiez la touche ; le lecteur retourne
ensuite au point Cue et passe en mode Pause. Appuyez de
nouveau sur la touche Play/Pause pour reprendre la lecture.
7. Looping
Un Loop est la répétition continue d'une séquence définie par
deux points Loop (point initial et point final). Pour définir un
point Loop initial, appuyez le touche Loop -12- une fois; la DEL
clignote. Choissisez le point Loop finale avec appuyez le touche Loop en plusieures fois ; le lecteur change
automatiquement en Mode Loop. La séquence programmée est
répétée jusqu'à ce que vous appuyiez de nouveau sur la
touche Loop ; le lecteur passe instantanément en mode de
lecture.
8. Réglage fin de la vitesse
Activez le réglage fin de la vitesse en appuyant sur la touche
Pitch -11-. La DEL s'allume. Si vous continuez d'appuyer la
touche Pitch plus d'une seconde, vous pouvez changer entre
une plage Pitch de +/- 8%, +/-12% ou +/-16%. Le potentiomètre
linéaire -10- vous permet de modifier progressivement la
vitesse du CD dans la plage choisie. L'écart avec la vitesse
originale est indiquée sur l'affichage. Enfoncez les touches
Pitch Bend -9- pour modifier la vitesse du morceau respectif de
+16% (touche +) ou de -16% (touche -). Lorsque vous relâchez
la touche, le lecteur retourne à la vitesse réglée avec le
potentiomètre linéaire. Tournez la molette Jog Wheel -4- en
mode de lecture pour modifier la vitesse de jusque +16% (sens
contraire des aiguilles d'une montre) ou de jusque -16% (sens
des aiguilles d'une montre).
9. Programmer
Appuyzer le touche Program -13-. Choisissez le premier titre
avec les touches Skip -7- respectives. Pour sauver appuyer le
touche Program encore une fois. Choisissez maintenant le
deuxième titre avec les touches Skip et sauvez-le avec appuyer
le touche Program. Continuez le programmer en cette manière
jusque vous avez sauvé tous les titres.
ATTENTION !
Vous pouvez sauver seulement 20 titres.
Appuyer le touche Play/Pause -6-respective pour commencer
de reprendre la lecture de la programme. Tant une programme
est sauvée, les touches Skip appèlent les titres dans l'ordre de
la programme et pas dans l'ordre de la disque. Pour effacer la
programme continuez d'appuyer le touche Program pour appr.
2 secondes.
10. Faderstart
Si vous avez connecté les prises de connexion -21- avec le
prises de sortie pour Faderstart de votre console de mixage,
vous pouvez reprendre la lecture du lecteur de la console de
mixage (faire attention la mode d'emploi de la console de
mixage).
7
11. Terminating operation
Before switching off the device with the ON/OFF switch -17check that no CDs have been left in one of the CD players. Also,
check that the CD trays -16- are closed. If this is not the case
after switching off the device then switch on the device again
and close the open CD trays with the respective Open/Close
button -1-.
12. Toubleshooting
If your Reloop RMP-2660 s is experiencing any difficulties
please check the following table for malfunction symptoms
and take the corrective measures proposed in the table.
11. Fin de l'utilisation
Avant d'éteindre l'appareil avec l'interrupteur -17-, vérifiez que
les tiroirs CD -16- soient vides et fermés. Sinon, rallumez le
lecteur et fermez les tiroirs avec la touche Open/Close -1respective.
12. Aide de dépannage
Si le Reloop RMP-2660 s ne fonctionne pas correctement,
recherchez le problème dans le tableau suivant et suivez les
mesures de dépannage indiquées.
Symptome
Mögliche Ursachen
Korrekturmaßnahmen
Das Gerät bekommt keinen Strom, wenn man es mit dem EIN/AUS
Schalter aktiviert
Schlechter Netzstecker-Anschluss
Überprüfen Sie den Netzstecker-Anschluss
Die Wiedergabe der CD wird nicht gestartet
Die CD liegt falsch herum in der Lade oder ist verschmutzt
Legen Sie die CD mit dem Label nach oben ein, reinigen Sie die CD
Kein Ton
Ausgangskabel falsch oder nicht angeschlossen, falsche
Verstärker-, bzw. Mixerbedienung
Überprüfen Sie die Anschlüsse der Ausgangskabel und die
Einstellungen am Verstärker, bzw. Mixer
CD springt
Der CD-Player unterliegt ununterbrochen länger als 10 Sekunden
starken Vibrationen oder Erschütterungen
Installieren Sie die Anlage an einem anderen Ort
Brummen
Lockere Kabelverbindungen
Überprüfen Sie alle Tonstecker
Symptoms
Possible cause
Remedy
No power when activating the power ON/OFF switch
Poor mains plug connection
Check mains plug connection
The CD replay does not start
The CD is upside in the tray down or is soiled
Place CD in tray with label facing up; clean CD
No sound
Output cable is wrong or not correctly connected, wrong
amplifier or mixing console operation
Check connections of output cables and settings on amplifier or
mixing console
CD skips
The CD player is continuously exposed to vibrations and shocks
for longer than 10 seconds
Install the equipment at another location
Humming sound
Loose cable connections
Check sound plugs
Problème
Cause possible
Dépannage
L'appareil ne s'allume pas lorsque vous appuyez sur
l'interrupteur
Mauvais branchement secteur
Vérifiez le branchement secteur
La lecture du CD ne démarre pas
Le CD est à l'envers ou sale
Insérez le CD avec l'étiquette vers le haut ou nettoyez-le
Pas de son
Le câble de sortie n'est pas ou mal branché, mauvais réglage de
l'ampli ou de la console de mixage
Vérifiez les connexions du câble de sortie et les réglages de
l'ampli ou de la console de mixage
Le CD saute
Le lecteur est soumis à des chocs ou de fortes vibrations pendant
plus de 10 secondes
Installez la chaîne ailleurs
Ronflements
Branchement des câbles incorrect
Vérifiez toutes les connexions audio
Technische Daten
Technical information
Caractéristiques
Folgende Daten des Herstellers werden von der GDT GmbH nicht
auf Plausibilität und Richtigkeit geprüft:
The following specifications are not verified by GDT GmbH in
terms of plausibility and accuracy:
La plausibilité et l'exactitude des données suivantes du fabricant
ne sont pas contrôlées par la société GDT GmbH :
Frequenzgang
Kanaltrennung
Rauschabstand
D/A Wandler
Maße Laufwerk
Maße Bedienteil
Gewicht Laufwerk
Gewicht Bedienteil
Frequency response
Channel separation
S/N ratio
D/A converter
Dimensions of drive
Dimensions of control unit
Weight of drive
20 Hz - 20 kHz
> 100 dB
> -102 dB
8-fold/1 Bit
482 x 88.8 x 262.5 mm
482 x 88.8 x 97 mm
5 kg
Weight of control unit
1.8 kg
Réponse en fréquence
Pouvoir de séparation
Rapport signal-bruit
Convertisseur D/A Wandler
Dimensions lecteur
Dimensions commande
Poids lecteur
Poids commande
11. Ende der Benutzung
Bevor Sie das Gerät mit dem EIN/AUS Schalter -17- abschalten,
überzeugen Sie sich davon, dass sich keine CD mehr in einem
der CD-Player befindet. Achten Sie ebenso darauf, dass die CDSchubfächer -16- geschlossen sind. Sollte dies nach Abschalten
des Gerätes nicht der Fall sein, schalten Sie das Gerät wieder
ein und schließen Sie die offenen CD-Schubfächer mittels der
jeweiligen Open/Close Taste -1-.
12. Hilfe zur Fehlersuche
Falls Schwierigkeiten mit dem Reloop RMP-2660 s auftreten
sollten, suchen Sie in der folgenden Tabelle nach den
Störungssymptomen und folgen Sie den Korrekturmaßnahmen,
die in der Tabelle vorgeschlagen werden.
20 Hz - 20 kHz
> 100 dB
> -102 dB
8fach/1 Bit
482 x 88,8 x 262,5 mm
482 x 88,8 x 97 mm
5 kg
1,8 kg
Reloop Distribution
GDT GmbH, Hafenstr. 64, 48153 Münster/Germany Fax ++49/251/60993-68
20 Hz - 20 kHz
> 100 dB
> -102 dB
8x/1 bit
482 x 88,8 x 262,5 mm
482 x 88,8 x 97 mm
5 kg
1,8 kg
© COPYRIGHT
Nachdruck verboten!
Reproduction prohibited!
Réproduction interdite !
8