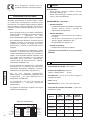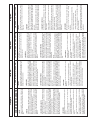
1
CG 200 S
Manuel d'utilisation et d'entretien
Rabotage des sols
Manuale di istruzioni
Piallatura dei suoli
10/04 - N° 543048906 -K-
Manual de instrucciones
Pulido de suelos
Operating instructions
Floor planer
Betriebs- und Wartungsanleitung
Bodenabrichthobel
Gebruiksaanwijzing
Het schaven van vloeren
DÉCLARATION DE CONFORMITÉ À LA DIRECTIVE "MACHINES"
F
(Directive 89/392/CEE modifiée) et aux réglementations prises pour sa transposition
DICHIARAZIONE DI CONFORMITA' ALLA DIRETTIVA "MACCHINE"
I
(Direttiva 89/392/CEE modificata) ed alla normativa inerente alla sua applicazione
DECLARACIÓN DE ADECUACIÓN A LA NORMATIVA "MAQUINÁS"
E
(Normativa 89/392/CEE modificada) y a las reglamentaciones adoptadas para su incorporación
DECLARATION OF CONFORMITY WITH THE "MACHINES" DIRECTIVE
GB
(Directive 89/392/CEE, modified) and the rules governing its transposition
ERKLÄRUNG HINSICHTLICH ÜBEREINSTIMMUNG MIT U DER RICHTLINIE "MASCHINEN"
D
(Abgeänderte EG-Richtlinie 89/392) sowie mit den entsprechenden Anwendungsbestimmungen
CONFORMITEITSVERKLARING MET DE RICHTLIJN "MACHINES"
NL
(Richtlijn 89/392/CEE, gewijzigd) en de voorschriften betreffende haar omzetting
déclare que la machine désignée ci-dessous
LE FABRICANT
dichiara che la macchina designata qui appresso
IL FABBRICANTE
EL FABRICANTE
MANUFACTURER
DER HERSTELLER
FABRIKANT
ELECTROLUX CONSTRUCTION
PRODUCTS FRANCE SA
S.A. au Capital de 3 895 000 Euros
R.C. BLOIS B 068 500 206
Siège Social : 26, Route Nationale – B.P. 2
41260 LA CHAUSSEE SAINT VICTOR
Tél. 02 54 56 44 00 – Fax 02 54 56 44 44
declara que la máquina descrita a continuación
herewith declares that the machine designed hereunder
erklärt hiermit, daß die nachstehend bezeichnete
Maschine
verklaart bij deze dat de hieronder aangegeven machine
CG 200 S
est conforme aux dispositions de la directive “MACHINES” modifiée (89/392/CEE),
la directive “BASSE TENSION” (73/23/CEE) la directive "CEM” (89/336/CEE) suivant les normes européennes EN 50081/1 et EN 55022
et la directive ”BRUITS” (2000/14/CEE) suivant les normes européennes EN ISO 3744
è conforme alle disposizioni della direttiva “MACCHINE” modificata (89/392/CEE),
della direttiva “BASSA TENSIONE” (73/23/CEE) della direttiva "CEM” (89/336/CEE) secondo le norme europee EN 50081/1 e EN 55022
e della direttiva ”RUMORI” (2000/14/CEE)) secondo le norme europee EN ISO 3744
es conforme a las disposiciones de la directiva “MÁQUINAS” modificada (89/392/CEE),
la directiva “BAJA TENSION” (73/23/CEE) y la directiva “CEM” (89/336/CEE), según las normas europeas EN 50081/1 y EN 55022
y la directiva ”RUIDOS” (2000/14/CEE), según las normas europeas EN ISO 3744
conforms to the modified “MACHINES” Directive (89/392/CEE),
the “LOW VOLTAGE” Directive (73/23/CEE) the “EMC” Directive (89/336/CEE) in accordance with European standards EN 50081/1 and EN 55022
and the ”NOISE” Directive (2000/14/CEE) in accordance with European standards EN ISO 3744
is conform de bepalingen van de gewijzigde richtlijn “MACHINES” (89/392/CEE),
de richtlijn “LAAGSPANNING” (73/23/CEE) en de richtlijn "CEM” (89/336/CEE) volgens de Europese normen EN 50081/1 en EN 55022
en de richtlijn "LAWAAI” (2000/14/CEE) volgens de Europese normen EN ISO 3744
konform mit der “MASCHINENBAURICHTLINIE” in Änderungsfassung Nr. 89/392/CEE
sowie der “NIEDERSPANNUNGSRICHTLINIE” Nr. 73/23/CEE sowie der Richtlinie “ELEKTROMAGNETISCHE STÖRSICHERHEIT”
(CEM) Nr, 89/336/CEE gemäß den europäischen Normen EN 50081/1 und EN 55022
Und die Lärmschutzrichtlinie (2000/14/EWG) gemäß den europäischen Normen EN ISO 3744
está em conformidade com as disposições da directiva “MÁQUINAS” modificada (89/392/CEE)
a directiva “BAIXA TENSÃO” (73/23/CEE) e a directiva “ CEM” (89/336/CEE) de acordo com as normas europeias EN 50081/1 e EN 5502e a directiva
”RUIDOS” (2000/14/CEE) de acordo com as normas europeias EN ISO 3744
Christer Carlberg
Operations Manager
Electrolux Construction Products
PREFACE DU MANUEL
Avant de quitter notre usine, chaque machine subit une série de contrôles au cours desquels tout est
minutieusement vérifié.
La stricte observation de nos instructions assurera à votre machine, dans des conditions normales de travail,
une grande longévité.
Les conseils d'utilisation et pièces détachées figurant sur ce document sont donnés à titre d'information et non
d'engagement. Aucune garantie ne sera accordée en cas d'erreurs ou d'omissions, ou pour des dommages
relarifs à la livraison, à la conception ou l'utilisation de la machine. Soucieux de la qualité de nos produits, nous
nous réservons le droit d'effectuer, sans préavis, toutes modifications techniques en vue de leur amélioration.
Ce document servira l'utilisateur à :
• se familiariser avec la machine,
• connaître ses possibilités d'utilisation,
• éviter les accidents lors d'un emploi non adapté, par une personne non formée, lors de l'entretien,
maintenance, remise en état, déplacement, transport,
• augmenter la fiabilité et la durée de la machine,
• d'assurer une utilisation correcte, un entretien régulier, un dépannage rapide afin de diminuer les frais
de réparation et les temps d'immobilisation.
Disponibilité du manuel à tout moment sur le lieu de travail.
Lecture et utilisation par toute personne assurant l'installation ou l'utilisation.
Les réglementations techniques obligatoires en vigueur dans le pays d'utilisation de la machine
sont également à respecter pour une sécurité maximum.
CONSIGNES GENERALES DE SECURITE
L'emploi de pictogrammes sur les machines (en couleur) et dans le manuel indiqueront des conseils qui
concernent votre sécurité.
OBLIGATIONxx☛ xxFond bleu marquage blanc : sécurité obligatoire
OBLIGATIONxx☛xx+ marquage rouge : interdiction de mouvement
AVERTISSEMENTxx☛xxTriangle et marquage noir sur fond jaune : danger si non respect, risque
de blessures pour l'utilisateur ou des tiers, pouvant entraîner des dégâts
sur la machine ou l'outil.
INDICATIONxx☛xxInformation - Instruction : indications particulières concernant l'utilisation, le
contrôle.
Français
INTERDICTIONxx☛xx Cerclage rouge avec ou sans barre : utilisation, présence interdite.
Le fabricant décline toute responsabilité résultant d'un emploi inadapté ou de toute modification.
1
Ce symbole signifie que la machine est
conforme à la directive européenne.
1
Emploi
UTILISATION :
• Pour égaliser, rainurer, éliminer, nettoyer,
dérouiller, décaper, etc...
• Efficace sur béton, asphalte, peinture, colle,
acier et autres revêtements.
CONSIGNES PARTICULIERES
Conçue pour assurer un service sûr et fiable dans
des conditions d'utilisation conformes aux
instructions, la raboteuse peut présenter des
dangers pour l'utilisateur et des risques de
détérioration, des contrôles réguliers sur le chantier
sont nécessaires, s'assurer :
• de l'état technique parfait (utilisation suivant
affectation en tenant compte des risques
éventuels, suppression de toute malfonction
nuisible à la sécurité),
• de l'usage de tambours conformes s'adaptant
d'origine sur la machine, utilisation interdite de
tout autre tambour de forme, de dimension, de
fixation non appropriés à la machine,
• d'un personnel compétent (qualification, âge,
formation, instruction) ayant pris connaissance
dans le détail du manuel avant de commencer
le travail ; toute anomalie électrique, mécanique
ou d'autre origine sera contrôlée par une
personne habilitée à intervenir (électricien,
responsable de l'entretien, agent revendeur
agréé, etc...),
• s'assurer du respect des avertissements et
directives marqués sur la machine (protections
adéquates personnelles), utilisation conforme,
instructions de sécurité en général...),
OUTILS - Applications :
• Molettes étoiles :
- Nettoyage/enlèvement des peintures époxy,
huiles et graisses, colles, bandes de
signalisation thermoplastiques.
• Molettes dentées :
- Rectification de surfaces asphaltes et
bétons.
- Rainurages anti-dérapants (rampes d'accès,
garages, écuries,...)
- Décalaminages de tôles, etc...
• Pointes de carbures :
- Fraisage des bétons et asphaltes.
(Renseignements auprès de votre fournisseur
habituel)
2
Caractéristiques techniques
• Profondeur de passe : variable, max. 20 mm.
• Largeur de travail utile : 200 mm.
Option : tambour latéral
• Rendement : de 40 à 80 m 2/heure (selon la
surface à traiter).
• qu'aucune modification, transformation ou
complément soit nuisible à la sécurité et ne sera
pas réalisée sans l'autorisation du fabricant,
• Dimensions (L x I x H) : 740 x 410 x 800 mm.
• du respect des fréquences de vérifications et
contrôles périodiques préconisés,
• Vitesse de rotation du tambour : 1500 tr/mn
(maximum à vide).
• Poids : de 52 à 60 kg (selon version).
• de la garantie de pièces de rechange d'origine
lors de réparations.
Français
MODELE
TYPE
Lpa (dB)
EN ISO 4871
G ENV
25349
HONDA GX160
98
89
1
ROBIN EY
96
86
1
2.2 K W 230 V
80
81
0.4
3 KW 400 V
80
80
0.45
ANNEE DE
FABRICATION
MASSE UTILE
Kg
PUISSANCE
kW
Ø MAXI OUTIL
mm
PLAGE DE
TENSION
V
Ø ALESAGE
mm
FREQUENCE
Hz
T/MN - RPM
2
N° SERIE
NIVEAU DE
VIBRATION
Lwa (dB)
EN ISO 3744
Plaque signalétique
LE FABRICANT
PUISSANCE
PRESSION
ACOUSTIQUE ACOUSTIQUE
INT. UTIL.
A
3
Contrôle et Description de la machine
5
Changement de tambour
• A réception, contrôler l'état de votre machine.
• La conserver en permanence en bon état de
propreté.
Arrêt moteur.
Eviter tout démarrage involontaire.
• Contrôler périodiquement l'entretien du moteur
(motorisation thermique), le cordon d'alimentation,
la rallonge (dans le cas d'une motorisation
électrique).
Débrancher la machine.
• Pendant le travail, rester toujours attentif.
• Vérifier la fixation des pièces (vibration anormale),
le bon montage.
VOIR FIG. 1
1 - Levier de sécurité (homme mort)
2 - Brancard
3 - Volant réglage profondeur millimétrique
• Desserrer les trois écrous borgnes (F) de
centrage du tambour [VOIR FIG. 3].
• Tirer sur le flanc droit (G).
• Présenter le tambour, et le faire coulisser sur
l'arbre (J).
• Replacer le flanc droit.
4 - Clé de service
• Serrer les écrous borgnes.
5 - Volant réglage brancard
• Pour un fraisage au ras du mur, monter le
tambour latéral (K), son carter (L), son flanc (M)
avec palier de roulement (N) en lieu et place du
tambour et du flanc d'origine [VOIR FIG. 4].
6 - Levier remontée/descente rapide
7 - Anneau d'élingage
8 - Moteur
9 - Contacteur mise en route
10 - Carter de courroie
11 - Châssis
12 - Tension courroie
13 - Rallonge vidange
14 - Flanc démontage rapide
6
Vérification avant mise en service
15 - Ecrous borgnes de centrage
16 - Tuyau flexible aspiration poussières
17 - Transmission
18 - Tambour largeur 200 mm
Avant toute mise en service, lire
attentivement la notice, et se
familiariser avec la machine.
19 - Tambour ras du mur (option)
4
Manutention - Transport
• Hauteur du brancard réglable : desserrage du
volant (H) [VOIR FIG. 2].
• Pour amener la machine sur chantier, il suffit de la
pousser, sans mettre le moteur en marche.
• L'anneau (A) soudé sur le montant du brancard
permet de lever la machine.
Obligation port du casque antibruit.
Le champ de travail doit être
parfaitement en ordre, bien éclairé
et ne doit présenter aucun risque (ni
humidité, ni produits dangereux à
proximité)
L'opérateur doit porter des
protections appropriées au
travail
Français
20 - Câble d'alimentation
Toute personne étrangère doit être
écartée du champ de travail
3
• MOTEUR THERMIQUE : se reporter au livret
d'entretien moteur.
7
Mise en service
Rester toujours attentif.
Adopter une position confortable et
équilibrée.
Avant la mise en service, enlever les
clés et outils de réglage du sol ou de
la machine.
Tenir compte des conditions ambiantes
(santé et sécurité).
Pour le démarrage de la machine,
manœuvrer la poignée homme mort
(I) du brancard. Arrêt du moteur en
cas de relâchement. Par sécurité,
contrôler régulièrement son bon
fonctionnement, pas de blocage
autorisé.
- S'assurer du plein de carburant et d'huile.
- Pour le démarrage, se reporter à la notice des
moteurs, et paragraphe 7 "mise en service".
• MOTEUR ÉLECTRIQUE : vérifier ce qui suit :
SECURITE ELECTRIQUE :
Obligation de branchement sur un
réseau équipé d'un disjoncteur à
courant différentiel résiduel 30 mA
avec mise à la terre. Dans le cas
d'absence de ce disjoncteur sur le
réseau, consulter notre catalogue
proposant différents modèles.
- S'assurer du voltage du réseau (MONO
230xVx- TRIPHASE 400 V).
- Utiliser le type de câble d'alimentation suivant:
monophasé 4 mm 2, triphasé 2,5 mm 2. Et ce
pour des longueurs de câble inférieures à
100xm. Au-delà, doubler la section.
- TRIPHASE : S'assurer que le sens de rotation
du moteur corresponde à la flèche indiquée sur
le carter de courroie (sinon, inverser deux des
fils d'alimentation).
- Pour le démarrage, se reporter au
paragraphe 7 "mise en service".
• MOTEUR THERMIQUE :
- Se référer au manuel du moteur.
- Laisser chauffer le moteur.
• MOTEUR ÉLECTRIQUE :
- Mise en marche et arrêt par commutateur
(arrêt par la poignée (I)).
• GROUPE D'ASPIRATION :
- Brancher le flexible (U) du groupe directement
sur le tube arrière de la machine (santé et
sécurité) [VOIR FIG. 5].
8
• Pour les travaux de fraisage du béton en
profondeur, il est préconisé d'effectuer plusieurs
passes jusqu'au résultat désiré.
• Réglage millimétrique de la profondeur
[VOIR FIG. 6] :
- Actionner le volant (C) qui agira sur la vis (D).
- Tourner l'écrou moleté (E) pour bloquer la vis et
ainsi fixer la profondeur de passe.
• Dégagement rapide:
- Actionner le levier (B) vers soi pour dégager le
tambour du sol.
- Actionner le levier vers l'avant de la machine
pour retourner à la profondeur de passe
sélectionnée.
9
Français
Méthode de travail
Tension de courroie
• Vérifier périodiquement la courroie et retendre
celle-ci sans exagération à l'aide de l'écrou (S) et
du contre-écrou (T) [VOIR FIG. 7].
La tension d'origine ne peut jamais
être dépassée.
4
10
Entretien (machine débranchée)
• Pas de rotation du moteur ou du tambour (suite)
CAUSES
- Eviter tout démarrage involontaire.
• Après quelques heures de fonctionnement,
effectuer un resserrage genéral de la boulonnerie.
• Nettoyer la machine après chaque usage.
• Alimenter modérément les éléments suivants:
- graisseurs du palier à roulement (P) [ VOIR
FIG.x8],
- graisseurs de la came (Q),
- graisseurs des paliers d'articulation du réglage
de profondeur (R).
HUILE
• Vérifier l'huile moteur quotidiennement. Se
référer au manuel du moteur pour les intervalles
de remplacement . Utiliser :
Commutateur défec- - Faire vérifier par un
tueux, câble moteur électricien ou s'aendommagé
dresser au service
après-vente.
Moteur endommagé - Remplacer le moteur
(pas de puissance, en s'adressant au
odeur désagréable...)
service après-vente.
Démarrage impossible - Arrêt sur moteur.
- Bougie défectueuse
(moteur thermique)
ou débranchée.
- Se reporter au livret
d'entretien moteur,
ou s'adresser au
service après-vente.
Courroie cassée
- Contacter le service
pièces détachées
pour remplacement.
Tambour bloqué
- Contrôler la rotation
du tambour, retirer
l'élément gênant la
rotation.
- Une huile moteur SAE 10W30 avec classe API
MS, SD, SE ou supérieure pour les moteurs à
essence.
Le
lubrifiant
sera
éliminé
conformément aux modalités prescrites
par la législation en vigueur.
Pour vidanger le moteur, présenter une goulotte à la
sortie de vidange (V) [VOIR FIG. 9].
Stocker dans un endrolt sûr, hors de
portée des enfants.
Entretenlr soigneusement les outlls.
RECHERCHE DES PANNES (selon version)
REMEDES
• Démarrage difficile
CAUSES
REMEDES
Frottement tambour
au sol
- Dégager le tambour
pour faciliter le
démarrage.
Condensateur
démarrage moteur
monophasé
- Remplacer le
condensateur.
Alimentation triphasée
non conforme (sur 2
phases, câble moteur
détérioré)
- Faire vérifier par un
électricien
ou
contacter le service
après vente.
En cas de fonctionnement anormal, se reporter aux
tableaux ci-après pour trouver une solution aux
problèmes rencontrés.
CAUSES
REMEDES
CAUSES
REMEDES
Mauvais branchement
ou câble endommagé
- S'assurer du branchement correct à
l'alimentation (fiche,
rallonge...).
- Vérifier le câble
d'alimentation.
- Aucun
travail
constaté
- Descente maxi du
tambour
- Usure maxi
- Vérifier le montage
du tambour (fraises).
- Changer le tambour
ou les molettes,
brosse, etc...
Pas de tension sur le
réseau
- Vérifier ou faire
vérifier
par
un
électricien (disjoncteur, prise...).
- Vibrations anormales en rainurage
fraisage
- Usure anormale des
molettes
- Contrôler la rotation
des molettes sur les
quatre axes.
- Changer le tambour
ou les molettes.
Français
• Pas de rotation du moteur ou du tambour
• Travail nul par à coups, vibrations
importantes
5
11
Recommandations importantes
Le
fabricant
décline
toute
responsabilité résultant d'un emploi
inadapté, de toute modification,
adaptation ou motorisation non
conforme à la définition d'origine
prévue par le constructeur.
13
Pièces de rechange
Pour une livraison rapide de pièces de rechange et
afin d'éviter toute perte de temps, il est nécessaire
de rappeler à chaque commande les indications qui
figurent sur la plaque signalétique de la machine
ainsi que la référence de la pièce à remplacer.
Au poste de travail, la puissance
sonore peut dépasser 85 db (A).
Dans ce cas, des mesures
individuelles de protection doivent
être prises.
00000000 (0)
Code
Quantité
voir vue éclatée
Dans le cas de travail dans un endroit
restreint ou fermé, assurez-vous
d'une ventilation adéquate, les gaz
d'échappement contenant de l'oxyde
de carbone (une exposition à ce gaz
toxique peut provoquer une perte de
conscience et être mortelle).
12
Réparations
14
S
A
V
Nous sommes à votre entière disposition
pour vous assurer toute réparation dans
les délais les plus réduits et aux
meilleurs prix (voir adresse au verso)
Mise au rebut
En cas de détérioration et de casse de
la machine, ceux-ci seront éliminés
conformément
aux
modalités
prescrites par la législation en
vigueur.
• Matériaux principaux :
- Moteur : Aluminium (AL) - Acier (AC) Cuivre (CU) - Polyamide (PA)
Français
- Machine : Tôle acier (AC) - Fonte (FT)
- Machine : Aluminium (AL)
6
Les conseils d'utilisation et pièces détachées figurant sur
ce document sont donnés à titre d'information et non
d'engagement.
Soucieux de la qualité de nos produits, nous nous
réservons le droit d'effectuer, sans préavis, toutes
modifications techniques en vue de leur amélioration.
PREFAZIONE DEL MANUALE
Prima di lasciare la nostra fabbrica, ciascuna macchina viene sottoposta a una serie di controlli durante i quali
si procede ad un'accurata verifica di tutti i componenti.
Il rigoroso rispetto delle nostre istruzioni assicura una notevole durabilità alla Vostra macchina in condizioni
normali di lavoro.
I consigli per l'uso ed i pezzi di ricambio menzionati in questo documento sono dati a titolo indicativo e non
hanno un carattere vincolante. Nessuna garanzia verrà concessa in caso di errori o negligenze, o in caso di
danni in relazione alla consegna, alla progettazione o all'utilizzo della macchina. Essendo coscienziosi quanto
alla qualità dei nostri prodotti, ci riserviamo il diritto di effettuare, senza preavviso, tutte le modifiche tecniche
necessarie al loro miglioramento.
Questo documento servirà all'operatore per:
• familiarizzarsi con la macchina,
• conoscere le sue possibilità di imoiego
• evitare gli incidenti da uso improprio e da uso da parte di personale inesperto, nonchè queli che
potrebbero verificarsi durante le operazioni di manutenzione, movimentazione, riparazione,
spostamento o trasporto,
• aumentare l'affidabilità e la durata di vita della macchina,
• assicurare un utilizzo corretto, una manutenzione regolare, una riparazione rapida ,onde far diminuire
le spese di riparazione e ridurre i tempi di fermo macchina.
Il manuale dovrà essere disponibile in qualsiasi momento sul posto di lavoro.
Esso dovrà essere letto ed utilizzato da ogni persona incaricata dell'installazione o dell'impiego
della macchina.
Le regolamentazioni tecniche obbligatorie in vigore nel paese d'utilizzo della macchina, devono
ugualmente essere rispettate per la massima sicurezza del suo uso.
ISTRUZIONI GENERALI DI SICUREZZA
La presenza di pittogrammi (a colori) sulle macchine e nel manuale serve ad evidenziare le raccomandazioni
da seguire per la Vostra sicurezza.
AVVERTENZAxx☛xxTriangolo e marcatura nera su fondo giallo : pericolo in caso di mancato
rispetto, rischio di ferite per l'operatore o terzi, possibilità di danni alla
macchina o all'utensile.
Italiano
OBBLIGATORIAMENTExx☛ xxMarcatura bianca su fondo blu : sicurezza obbligatoria
OBBLIGATORIAMENTExx☛ xx+ marcatura rossa: interdizione di movimento.
INTERDIZIONExx☛xx Cerchiatura rossa con o senza sbarra: utilizzo e presenza vietati.
INDICAZIONExx ☛ xx Informazione - Istruzione : indicazioni speciali riguardanti l'utilizzo e il
controllo.
Il fabbricante declina ogni responsabilità per danni conseguenti ad un uso improprio della macchina, o
dovuti a qualsiasi modifica apportata alla macchina.
7
Questo simbolo indica che la macchina
è conforme alla direttiva europea.
Uso
UTILIZZO :
• Per uguagliare, scanalare, eliminare, pulire,
togliere la ruggine, decapare, ecc.
• Efficace su cemento, asfalto, vernici, colle,
acciaio e altri rivestimenti.
ISTRUZIONI SPECIALI
Progettata per assicurare un servizio sicuro ed
affidabile in condizioni d'utilizzo conformi alle
istruzioni, la troncatrice può tuttavia presentare
pericoli per l'operatore ed essere soggetta a rischi di
deterioramento. Pertanto, si rendono necessari
controlli regolari sul cantiere. In particolare,
verificare:
• il perfetto stato della macchina sotto il profilo
tecnico (utilizzo conforme alle specifiche di
progettazione, tenendo conto degli eventuali
rischi;
soppressione
di
qualsiasi
malfunzionamento che comprometta la
sicurezza),
• dell’uso di tamburi conformi e originali alla
macchina. E’ vietato l’uso di altri tipi di tamburi,
di forma, di dimensioni e di fissaggio non
appropriati per la macchina.
• della presenza di personale competente
(qualificazione, età, formazione, istruzione) che
abbia preso conoscenza del manuale in modo
dettagliato prima di cominciare il lavoro;
qualsiasi anomalia elettrica, meccanica o di altra
origine dovrà essere controllata da una persona
abilitata ad intervenire (elettricista, responsabile
della manutenzione, rivenditore autorizzato,
ecc...)
UTENSILI - Applicazione :
• Mollette a stella :
- Pulizia / rimozione delle vernici epoxy, oli e
grassi, colle, strisce di segnaletica in
termoplastica.
• Mollette dentate :
- Rettifica delle superfici asfaltate e in
cemento.
- Scanalature antisdrucciolevoli (rampe di
accesso, garage, scuderie, ecc.)
- Rimozione di scaglie dalle lamiere, ecc.
• Punte di carburo :
- Fresatura di cemento e asfalto.
(Rivolgersi al rivenditore qualificato per le
migliori informazioni)
2
Caratteristiche tecniche
• il rispetto delle avvertenze e delle direttive
riportate sulla macchina (uso di protezioni
personali appropriate, impiego conforme,
istruzioni di sicurezza in generale...),
• Profondità di lavoro : variabile, max. 20 mm.
• che nessuna modifica, trasformazione o
aggiunta comprometta la sicurezza; qualsiasi
intervento del genere potrà essere effettuato
solo previa autorizzazione da parte del
fabbricante,
• Resa : da 40 a 80 m2/ora (secondo la superficie
da trattare).
• il rispetto della frequenza delle verifiche e dei
controlli periodici raccomandati,
Italiano
1
• la garanzia dei pezzi di ricambio originali
durante le riparazioni.
• Larghezza di lavoro utile : 200 mm
Opzione : tamburo laterale : 247 mm
• Peso : 65 kg
• Dimensioni (L x I x A) : 740 x 475 x 800 mm
• Velocità di rotazione del tamburo : 1500
giri/minuto (massimo a vuoto).
POTENZA
ACUSTICA
PRESSIONE
ACUSTICA
LIVELLO DI
VIBRAZIONE
Lwa (dB)
EN ISO 3744
Lpa (dB)
EN ISO 4871
G ENV
25349
HONDA GX160
98
89
1
ROBIN EY
96
86
1
2.2 K W 230 V
80
81
0.4
3 KW 400 V
80
80
0.45
MODELLO
Targhetta segnaletica
IL FABBRICANTE
TIPO
TYPE
N° SERIE
SERIE
ANNEE DE
FABRICATION
8
PESO
MASSE UTILE
Kg
PUISSANCE
kW
MASSIMO
USTENSILE
ALESAGGIO
Ø MAXI OUTIL
mm
PLAGE DE
TENSION
V
Ø ALESAGE
mm
FREQUENCE
Hz
GIRI/MIN VELOCITA
DI ROTATIONE
T/MN - RPM
INT. UTIL.
A
ANNO
FABRICAZIONNE
POTENZIA
TENSIONE
FREQUENCA
INTENSITA
3
Descrizione della macchina
5
• Al ricevimento della macchina, controllare lo stato
della stessa.
Arresto motore.
Evitare qualsiasi avviamento
involontario della macchina.
• Conservarla permanentemente in un perfetto stato
di pulizia.
• Controllare periodicamente la manutenzione del
motore (motorizzazione termica), il cordone di
alimentazione, l’allonge (nel caso di una
motorizzazione elettrica).
• Durante il lavoro, prestare la massima attenzione.
• Verificare che i pezzi siano fissati e montati
correttamente per evitare vibrazioni anormali.
Sostituzione del tamburo
Disinserire la macchina.
• Rallentare i tre dadi ciechi (F) di centraggio del
tamburo [VEDERE FIG. 3].
• Tirare dal lato destro (G).
VEDERE FIG. 1
• Posizionare il tamburo (H) e farlo scivolare
sull'asse (J).
1 - Leva di sicurezza (uomo morto)
2 - Longarone
• Sostituire il lato destro.
3 - Volano regolabile profondità millimetrica
• Serrare i dadi ciechi.
4 - Chiave di servizio
5 - Volano regolabile del longarone
6 - Leva di risalita / discesa rapida
7 - Anello di imbracatura
• Per una fresatura rasente ai muri, montare il
tamburo laterale (K), il suo carter (L), il suo fianco
(M) con il cuscinetto di scorrimento (N) al posto
del tamburo e del fianco d’origine [VEDERE FIG.
4].
8 - Motore
9 - Contattore di avviamento
10 - Carter di cinghia
11 - Telaio
12 - Tensione cinghia
13 - Allonge cambio olio
14 - Fianco smontaggio rapido
6
Verifiche prima dell'avviamento
15 - Dado cieco di centraggio
16 - Tubo flessibile per aspirazione polvere
17 - Trasmissione
18 - Tamburo larghezza 200 mm
Prima della messa in funzione,
leggere attentamente l'istruzione
d'uso e prendere confidenza con la
macchina.
19 - Tamburo rasente ai muri (opzione)
4
Movimentazione - Trasporto
• Altezza del longarone regolabile: rallentamento
del volano (H) [VEDERE FIG. 2].
• Per trasportare la macchina sul cantiere, basta
spingerla a mano senza mettere in moto il motore.
• L'anello (A) saldato sul montante del braccio
permette se necessario di sollevare della
macchina.
Obbligo di
antirumore.
mettere
il
casco
Tenere il campo di lavoro
perfettamente in ordine, bene
illuminate e senza rischio (umidità,
prodotti pericolosi nelle vicinanze).
Italiano
20 - Cavo di alimentazione
L'operatore deve portare
protezioni appropriate.
Non permettere ad altre persone di
rimanere vicino alla sega quando
taglia.
9
• MOTORE TERMICO. Riferirsi al libretto istruzioni
del motore.
7
Avviamento
Prestare sempre la massima attenzione.
Adottare una posizione confortevole e
ben bilanciata.
Prima dell'avviamento, togliere le
chiave e gli utensili di regolazione
Per ogni lavoro, valutare attentamente
le condizioni di utilizzo dal punto di
vista della sicurezza e della salute
dell'operatore.
Per l’avvio della macchina usare
l’impugnatura uomo morto (I) del
longarone. Arresto del motore in caso
di allentamento. Per sicurezza
controllare regolarmente il buon
funzionamento della macchina per
evitare bloccaggi non autorizzati.
- Controllare il pieno di carburante e il livello
dell'olio.
- Per l’avvio consultare le istruzioni sui
motori e il paragrafo 7 "messa in
servizio".
• MOTORE ELETTRICO. Controllare ció che
segue:
SICUREZZA ELETTRICA :
Obbligo di collegamento ab un
interuttore a corrente differenziale
residua 30 mA con messa a terra. In
mancanza di quest'interruttore sulla
rete, consultare il nostro catalogo per i
differenti modelli proposi.
- Assicurarsi sul voltaggio della rete (MONO 230
V - TRIFASE 400 V).
- Utilizzare il seguente tipo di cavo di
alimentazione: monofase, 4 mm 2 , trifase
2,5xmm 2 per lunghezze di cavo inferiori a
100xm. Oltre questa lunghezza, raddoppiare la
sezione dei conduttori.
Italiano
- TRIFASE : Accertarsi che il senso di rotazione
corrisponda a quello indicato dalla freccia sul
coperchio posteriore del motore (altrimenti,
invertire i due fili di alimentazione).
- Per l’avvio consultare il paragrafo 7
"messa in servizio".
• MOTORE TERMICO:
- Riferirsi al manuale del motore.
- Lasciare scaldare il motore.
• MOTORE ELETTRICO:
- Messa in marcia e arresto con arresto con
commutatore (arresto con l’impugnatura (I)).
• GRUPPO DI ASPIRAZIONE:
- Attaccare il flessibile (U) del gruppo
direttamente al tubo posteriore della macchina
(salute e sicurezza) [VEDERE FIG. 5].
8
Metodo di lavoro
• Per i lavori di fresatura in profondità su
calcestruzzo, si raccomanda di procedere
effettuando più passaggi fino ad ottenere il
risultato desiderato.
• Regolazione millimetrica della profondità
[VEDERE FIG. 6] :
- Ruotare il volano (C) che agisce sulla vite (D).
- Ruotare il dado zigrinato (E) per bloccare la vite
e fissare in tal modo la profondità di lavoro.
• Disimpegno rapido:
- Azionare la leva (B) tirando verso sé per
disimpegnare il tamburo dal suolo.
- Spingere la leva verso la parte anteriore della
macchina per ripristinare la profondità di lavoro
selezionata.
9
Tensione della cinghia di trasmissione
• Verificare ad intervalli regolari la cinghia di
trasmissione e ritenderla senza forzare con il
dado (S) e il controdado (T) [VEDERE FIG. 7].
Non tensionare le cinghie mai oltre la
tensionatura originale
10
10
Manutenzione (macchina dlslnserlta)
- Evitare qualsiasi avviamento
involontario della macchina.
• Il tamburo o il motore non girano (seguito)
CAUSE
RIMEDI
Commutatore
difettoso, cavo motore
d a n n e g g i a t o
assistenza
- Far verificare da un
elettricista
o
rivolgersi al servizio
Motore danneggiato
(nessuna potenza,
odore sgradevole)
- Sostituire il motore
rivolgendosi
al
servizio assistenza
A v v i a m e n t o
impossibile (motore
termico)
- Arresto del motore
- Candela difettosa o
staccata.
- Consultare
il
manuale
sulla
manutenzione del
motore o rivolgersi al
servizio tecnico.
CInghia rotta
- Contattare il servizio
pezzi di ricambio per
sostituzione.
Tamburo bloccato
- Controllare
la
rotazione
del
tamburo e togliere
l’elemento che ne
disturba la rotazione.
• Periodicamente controllo generale dei bulloni.
• Pulire la macchina, dopo ogni utilizzazione.
• Alimentare moderatamente i seguenti componenti:
- gli oliatori dei cuscinetti a rotolamento (P)
[VEDERE FIG. 8].
- gli oliatori della camma (O).
- gli oliatori dei cuscinetti di articolazione della
regolazione di profondità (R).
OLIO
• Verificare l’olio del motore ogni giorno.
Consultare il manuale del motore per gli intervalli
di sostituzione. Usare:
- olio motore SAE 10W30 classe (API) MS, SD,
SE o superiore per motori a benzina.
Il lubrificante verrà eliminato
conformemente alle modalità prescritte
dalla legislazione in vigore.
• Avviamento difficile
Stoccare in un posto sicuro, fuori dalla
portata dei bambini
Avere cura degli utensili
RICERCA GUASTI
In caso di funzionamento anomalo, fare riferimento
alle tabelle di cui sotto per trovare una soluzione ai
problemi riscontrati.
• Il tamburo o il motore non girano
CAUSE
RIMEDI
Attrito tamburo al
suolo
- Liberare il tamburo
per facilitare l’avvio.
Condensatore
avviamento motore
monofase
- Sostituire il
condensatore.
Alimentazione trifase
non conforme (su 2
fasi, cavo motore
deteriorato)
- Far verificare da un
elettricista o contattare
il servizio assistenza.
• Lavoro nullo a scatti, vibrazioni importanti
CAUSE
RIMEDI
CAUSE
RIMEDI
Allacciamento
scorretto o cavo
danneggiato
- Verificare il corretto
allacciamento
dell'alimentazione
(spina, prolunga,...)
- Verificare il cavo
d'alimen tazione
- Nessun
lavoro
constatato
- Discesa massima del
tamburo
- Usura massima
- Verificare il montaggio
del tamburo (frese).
- Cambiare il tamburo o
le
mollette,
le
spazzole, ecc.
Nessuna
sullarete
-Verificare o far
verificare da un
e l e t t r i c i s t a
(interruttore, presa...
- Vibrazioni anormali
in
scanalatura
fresatura.
- Usura anormale
delle mollette
- Controllare
la
rotazione delle mollette
sui quattro assi.
- Cambiare il tamburo o
le mollette
tensione
Italiano
• Per cambiere l'olio del motore, mettere un
contenitore all"uscita della prolunga (V) [VEDERE
FIG.X9].
11
11
Raccomandazioni importanti
Il
costruttore
declina
ogni
responsabilità derivante da un uso
non corretto, da qualsiasi, modifica,
adattamento o motorizzazione diversi
da quanto specificatamente previsto in
origine dal costruttore stesso.
13
Pezzi di ricambio
Per una consegna rapida dei pezzi di ricambio, ed
onde evitare qualsiasi perdita di tempo, è
necessario richiamare su ogni ordine le indicazioni
che fig.no sulla targhetta segnaletica della
macchina nonchè il numero di riferimento del
pezzo da sostituire.
00000000
Sul posto di lavoro il livello di
pressione acustica può superare 85 db
(A).
Il tal caso bisogna prendere delle
misure individuali di protezione.
Codice
(0)
Quantità
Vedi spaccato
Nel caso di lavoro in ambiente ristretto
o chiuso, assicurare una ventilazione
adeguata, i gas di scarico contengono
ossido di carbonio (una esposizione a
questi gas tossici possono provocare
una perdita di conoscenza ed essere
mortali).
12
Riparazioni
S
A
V
Siamo a Vostra completa disposizione
per garantir Vi qualsiasi riparazioni nei
tempi più brevi e ai prezzi migliori
(vedere l'indirizzo sul retro).
14
Scarto
In caso di deterioramento degli
accessori o dell'intera macchina,
questa verrà buttata secondo i metodi
prescritti dalla legislazione in vigore.
• Materiali principali :
- Motore : Alluminio (AL) - Acciaio (AC)
Motore : Rame (CU) - Poliammide (PA)
Italiano
- Macchina : Lamiera acciaio (AC) - Ghisa (FT)
- Macchina : Alluminio (AL)
Le notizie tecniche sono date a titolo informativo e non
vincolano il costruttore.
Per migliorare costantemente la qualità del nostro prodotti
ci riserviamo di apportare modifiche senza preaviso.
12
PREFACIO DEL MANUAL
Antes de abandonar nuestra fábrica, cada máquina pasa por una serie de controles durante los cuales se
verifica todo minuciosamente.
El estricto cumplimiento de nuestras instrucciones garantizará a su máquina una gran longevidad, en
condiciones normales de trabajo.
Los consejos de utilización y las piezas sueltas que figuran en este documento se indican a título de
información y no de compromiso . No se concederá ninguna garantía en caso de errores u omisiones o por
daños relativos al suministro, el diseño o la utilización de la máquina. Nos reservamos el derecho de efectuar,
sin previo aviso, cualquier modificación técnica con objeto de aumentar la calidad de nuestros productos.
Este documento servirá al usuario para:
• familiarizarse con la máquina,
• conocer sus posibilidades de utilización,
• evitar los accidentes debidos a un uso no adaptado, una persona no formada, durante el
mantenimiento, la conservación, la reparación, el desplazamiento y el transporte,
• aumentar la fiabilidad y la duración de la máquina,
• garantizar una utilización correcta, un mantenimiento regular y un arreglo rápido para reducir los
gastos de reparación y los tiempos de inmovilización.
El manual debe estar disponible en cualquier momento en el lugar de trabajo.
Deberá ser leído y utilizado por cualquier persona que se encargue de la instalación o del
funcionamiento.
Para mayor seguridad, también deben respetarse las normativas técnicas obligatorias vigentes en
el país de utilización de la máquina.
Los pictogramas que figuran en las máquinas (en color) y en el manual indicarán algunos consejos
referentes a su seguridad.
OBLIGACIONxx☛ xxFondo azul, marcado blanco: seguridad obligatoria
OBLIGACIONxx☛ xx+ marcado rojo : prohibición de movimiento
Espagñol
CONSIGNAS GENERALES DE SEGURIDAD
ADVERTENCIAxx☛xxTriángulo y marcado negro sobre fondo amarillo: peligro si no se respeta,
riesgo de heridas para el usuario o terceros y de deterioros en la máquina
o la herramienta.
PROHIBICIONxx☛xx Círculo rojo con o sin barra: utilización, presencia prohibida.
INDICACIONxx☛xxInformación - Instrucción: indicaciones particulares relativas a la utilización y
el control.
El fabricante declina toda responsabilidad derivada de un empleo inadaptado o de cualquier
modificación.
13
Este anagrama certifica que la
máquina cumple la normativa europea.
CONSIGNAS PARTICULARES
Diseñado para efectuar un servicio seguro y fiable
en condiciones de utilización conformes a las
instrucciones, el cortador puede presentar peligros
para el usuario y riesgos de deterioro. Por tanto, es
necesario realizar controles regulares en la obra.
Verificar:
• que el estado técnico es perfecto (utilización
según el destino, teniendo en cuenta los riesgos
eventuales,
y
supresión
de
todo
disfuncionamiento perjudicial para la seguridad),
• de la utilización de tambores conformes que se
adapten de origen a la máquina. Se prohíbe
cualquier otro tambor que tenga una forma,
dimensiones o fijación no apropiadas para la
máquina,
• un personal competente (cualificación, edad,
formación, instrucción) que haya estudiado el
manual detalladamente antes de comenzar el
trabajo. Toda anomalía eléctrica mecánica o de
otro origen será controlada por una persona
habilitada para intervenir (electricista,
responsable del mantenimiento, agente,
revendedor acreditado, etc.),
Espagñol
• que se respetan las advertencias y directivas
marcadas en la máquina (protecciones
personales adecuadas), utilización conforme,
instrucciones de seguridad en general, etc.),
• que no hay ninguna modificación,
transformación o complemento perjudicial para
la seguridad, y no será realizada sin la
autorización del fabricante,
1
Empleo
UTILIZACION :
• Para igualar, ranurar, eliminar, limpiar,
desoxidar, decapar, etc.
• Eficaz sobre hormigón, asfalto, pintura, cola,
acero y otros revestimientos.
HERRAMIENTAS - Aplicación :
• Moletas estrellas:
- Limpieza/eliminación de pinturas epoxídicas,
aceites, grasas, colas, y bandas de
señalización termoplásticas.
• Moletas dentadas :
- Rectificación de superficies de asfalto y
hormigón.
- Ranurados antideslizantes (rampas de
acceso, garajes, caballerizas, etc.).
- Decalaminados de chapas, etc.
• Puntas de carburos :
- Fresado de hormigones y asfaltos.
(Información disponible en su proveedor
habitual)
2
Características técnicas
• Profundidad de pasada : max. 20 mm
• Anchura de trabajo útil : 200 mm.
Opción : tambor lateral : 247 mm.
• Rendimiento : de 40 a 80 m 2/hora (según la
superficie a tratar).
• el cumplimiento de las frecuencias de
verificaciones y controles periódicos
preconizados,
• Peso : 65 kg
• la garantía de piezas de recambio de origen
durante las reparaciones.
• Velocidad de rotación del tambor : 1.500 r.p.m.
(máxima en vacío).
• Dimensiones (I x a x h) : 740 x 410 x 800 mm
NIVEL
SONORO
NIVEL
ACUSTICO
NIVEL DE
VIBRACIÓN
Lwa (dB)
EN ISO 3744
Lpa (dB)
EN ISO 4871
G ENV
25349
HONDA GX160
98
89
1
ROBIN EY
96
86
1
2.2 K W 230 V
80
81
0.4
3 KW 400 V
80
80
0.45
MODELO
Placa de caracteristicas
EL FABRICANTE
TIPO
TYPE
N° SERIE
SERIE
ANNEE DE
FABRICATION
14
PESO
MASSE UTILE
Kg
PUISSANCE
kW
MAXI
UTENSILIO
ESE
Ø MAXI OUTIL
mm
PLAGE DE
TENSION
V
Ø ALESAGE
mm
FREQUENCE
Hz
VELOCIDAD
DE ROTACION
T/MN - RPM
INT. UTIL.
A
AÑO
FABRICACION
POTENCIA
TENSION
FRECUENCIA
INTENSITAD
3
Descripción de la máquina
5
• Comprobar el estado de la máquina en el
momento de su recepción.
Parada del motor.
Evitar toda puesta en marcha
involuntaria.
• Conservarla constantemente en buen estado de
limpieza.
• Controlar periódicamente el mantenimiento del
motor (motorización térmica), el cable de
alimentación y la prolongación (en el caso de una
motorización eléctrica).
• Permanecer siempre muy atento durante el
trabajo .
Cambio de tambor
Desenchufar la máquina
• Aflojar las tres tuercas ciegas (F) de centrado del
tambor [VEASE LA FIG. 3].
• Verificar la fijación de las piezas (vibración
anormal) y el correcto montaje.
• Afloje las tres tuercas ciegas (F).
VEASE LA FIG.x1
• Tire del flanco derecho (G).
1 - Palanca de seguridad (hombre muerto)
• Presente el tambor (H) y haga que se deslice por
el árbol (J).
2 - Riel
3 - Volante ajuste profundidad milimétrica
• Vuelva a colocar el flanco derecho.
4 - Llave de servicio
• Apriete las tuercas ciegas.
5 - Volante ajuste riel
6 - Palanca subida/bajada rápida
7 - Anillo de eslingado
8 - Motor
• Para un fresado a ras de la pared, montar el
tambor lateral (K), su cárter (L), su flanco (M) con
el cojinete de rodamiento (N) en lugar del tambor
y del flanco de origen [VEASE LA FIG.x4].
9 - Contactor de puesta en marcha
10 - Cárter de correa
11 - Chasis
12 - Tensión correa
6
Verificación antes de la puesta en marcha
14 - Flanco de desmontaje rápido
15 - Tuercas ciegas de centrado
16 - Tubo flexible aspiración polvo
Antes de la puesta en marcha, leer
detenidamente las instrucciones y
familiarizarse con la máquina.
17 - Transmisión
18 - Tambor anchura 200 mm
19 - Tambor ras de la pared (opcional)
20 - Cable de alimentación
4
Manutención - Transporte
• Altura del riel ajustable: aflojamiento del volante
(H) [VEASE LA FIG. 2].
Es obligatorio el uso del caso
antiruidos.
Espagñol
13 - Prolongador vaciado
El campo de trabajo debe estar
perfectamente en orden, bien
iluminado y no debe presentar
ningún riesgo o peligro. (Ni
humedad, ni productos peligrosos
cerca)
Llevar las protecciones propias
de su trabajo
• Para llevar la máquina a la obra, basta con
empujarla sin poner en marcha el motor.
• El anillo (A) soldado sobre el montante del riel,
permite levantar la máquina.
Alejar a toda persona, ajena a la
obra.
15
• MOTOR TERMICO. Ver instrucciones de
mantenimiento del motor.
7
Puesta en marcha
Estar siempre atento.
Adoptar una posición cómoda y
equilibrada.
Tome en cuenta las condiciones de trabajo
desde el punto de vista de la salud la
seguridad.
Antes de la puesta en marcha, quitar
las llaves y útiles de reglaje
- Asegúrese de que el depósito del carburante
está lleno y de que el nivel de aceite es el
correcto.
Para el arranque de la máquina,
maniobrar la palanca hombre muerto
(1) del riel. El motor se para si se
suelta la palanca. Por seguridad,
controlar
regularmente
su
funcionamiento. No se autoriza su
bloqueo.
- Para el arranque, remitirse a las
instrucciones de los motores y al
apartado 7 "puesta en servicio".
• MOTOR TERMICO :
- Consulte el manual de funcionamiento del
motor.
- Espere a que se caliente el motor.
Espagñol
• MOTOR ELECTRICO. Compruebe lo siguiente:
• MOTOR ELECTRICO :
- Puesta en marcha y parada por conmutador
(parada con la palanca (I)).
SEGURIDAD
ELECTRICA:
La
conexión debe realizarse a un cuadro
con disyuntor diferencial residual de 30
mA con toma de tierra. En caso de que
no tenga ese tipo de disyuntor, consulte
nuestro catálogo en el cual le
proponemos varios modelos.
• GRUPO DE ASPLRACION:
- Conecte el flexible (U) del gnupo directamente
sobre el tubo trasero de la máquina (salud y
seguridad) [VEASE LA FIG. 5].
- Comprobar el voltaje de la red (MONO 230 V TRIFASICA 400 V).
• Para trabajos de fresado de hormigón en
profundidad, se recomienda realizar varias
pasadas hasta obtener el resultado deseado.
- Utilice el tipo de cable siguiente: monofásico de
4 mm2, trifásico de 2,5 mm2 (para longitudes de
cable inferiores a 100 m). Para longitudes
superiores, es necesario duplicar la sección.
• Ajuste milimétrico de la profundidad
[VEASE LA FIG. 6] :
- Accione el volante (C) que actuará sobre el
tornillo (D).
- Gire la tuerca estriada (E) para bloquear el
tornillo y de esta forma fijar la profundidad de la
pasada.
- TRIFASICA : Asegúrese de que el sentido de la
rotación del motor corresponde al de las
flechas grabadas en el capó trasero del motor
(en el caso contrario, invierta 2 de los
filamentos del cable de alimentación).
- Para el arranque remitirse al apartado
7 "puesta en servicio".
8
Método de trabajo
• Separación rápida :
- Empuje la palanca (B) hacia usted para
separar el tambor del suelo.
- Empuje la palanca hacia la parte delantera de
la máquina para volver a la profundidad de
pasada seleccionada.
9
Tensado de la correa
• Compruebe periódicamente la correa y vuelva a
tensarla, sin excederse en ello, sirviéndose de la
tuerca (S) y la contratuerca (T) [VEASE LA FIG. 7].
16
No tensar nunca las correas por
debajo de su tension primitiva
Mantenimiento (parada obligatoria del motor)
- Evitar toda puesta en marcha
involuntaria.
• Vuelva a apretar periódicamente tornillos y
tuercas.
• Limpie la máquina después de cada utilización.
• Engrase moderadamente los elementos
siguientes:
- engrasadores del soporte de rodamiento (P)
[VEASE LA FIG. 8].
- engrasadores de la leva (Q).
- engrasadores de los soportes de articulación
del ajuste de profundidad (R).
ACEITE
• Verificar el aceite del motor diariamente.
Remitirse al manual del motor para los intervalos
de cambio de aceite. Utilizar:
• No hay rotación del motor o del tambor (continuación)
CAUSAS
SOLUCIONES
C o n m u t a d o r
defectuoso, cable
motor deteriorado
- Hacer verificar por
un electricista o
dirigirse al servicio
postventa.
Motor deteriorado (no
hay potencia, olor
desagradable...)
- Hacer cambiar el
motor por el servicio
postventa.
Arranque imposible
(motor térmico)
- Parada en motor.
- Bujía defectuosa o
desconectada.
- Remitirse al folleto
de mantenimiento
del motor o dirigirse
al servicio postventa.
Correa rota
- Ponerse en contacto
con el servicio de
piezas sueltas para
sustituirla.
Tambor bloqueado
- Controlar la rotación
del tambor y retirar
el elemento que
obstaculiza la rotación.
- aceite de motor SAE 10W30 con API clase MS,
SD, SE, o mejor para motores de GASOLINA.
El lubricante se eliminará de
conformidad con las modalidades
prescritas por la legislación vigente.
• Para vaciar el aceite del motor, coloque un canal
en la salida del liquido (V) [VEASE LA FIG.X9].
• Arranque difícil
CAUSAS
SOLUCIONES
Rozamiento tambor
con el suelo
- Liberar el tambor
para facilitar el
arranque.
Condensador arranque
motor monofásico
- Cambiar el
condensador
Alimentación trifásica
no conforme (en 2
fases, cable motor
deteriorado)
- Hacer
que
un
electricista verifique
la alimentación o
ponerse en contacto
con el servicio postventa.
Guardar en un lugar seguro, fuera del
alcance de los niños.
Efectuar un mantenimiento cuidadoso
de las herramientas.
BUSQUEDA DE AVERIAS
En caso de funcionamiento anormal, remitirse a los
cuadros que figuran a continuación para encontrar
una solución a los problemas planteados.
Espagñol
10
• No hay rotación del motor o del tambor
CAUSAS
SOLUCIONES
Conexión incorrecta o
cable deteriorado
- Comprobar que la
conexión
a
la
alimentación
es
correcta (enchufe,
prolongador, etc.).
- Comprobar el cable
de alimentación.
No hay tensión en la
red
- Verificar o hacer
verificar por un
electricista (disyuntor,
enchufe, etc.).
• Trabajo nulo por sacudidas, vibraciones
importantes
CAUSAS
SOLUCIONES
- No
se
efectúa
ningún trabajo
- Bajada máxima del
tambor
- Desgaste máximo
- Verificar el montaje
del tambor (fresas).
- Cambiar el tambor o
las moletas, cepillo,
etc.
-V i b r a c i o n e s
anormales
en
ranurado fresado
- Desgaste anormal
de las moletas
- Controlar la rotación
de las moletas en los
cuatro ejes.
- Cambiar el tambor o
las moletas.
17
11
Recomendaciones importantes
El fabricante no se responsabiliza de
los daños causados en caso de
utilización inadaptada, modificación,
adaptación o motorización no
conforme a la definición de origen
prevista por el fabricante.
13
Piezas de recambio
Para una entrega rápida de las piezas de recambio,
y con el fin de evitar cualquier contratiempo, es
necesario especificar en cada pedido las
indicaciones que figuran en la placa que contiene la
descripción de la máquina, aso como la referencia
de la pieza que se va a reemplazar.
En el puesto de trabajo, el nivel de
intensidad acústica no debe pasar los
85 db (A).
En este caso, se deberán utilizar
medidas individuales de protección.
00000000
(0)
Codigo
Cantidad
Ver despiece
En un lugar de trabajo cerrado,
asegurese una ventilación adecuada,
ya que el gas resultante contiene
oxido de carbono. Una fuerte
exposición a esta gas podría provocar
la pérdida de consciencia e incluso la
muerte.
12
Reparaciones
S
A
V
Estamos a su entera disposición para
asegurarle todas las reparaciones en el
plazo más breve posible, y a los
mejores precios (ver dirección al
reverso).
14
Desecho
En caso de deterioro y de rotura de la
máquina, ésta deberá ser eliminada
de conformidad con las modalidades
prescritas por la legislación vigente.
Espagñol
• Materiales principales :
18
- Motor : Aluminio (AL) - Acero (AC) Motor : Cobre (CU) - Poliamida (PA).
- Máquina : Chapa de acero (AC) Máquina : Fundición (FT) - Aluminio (AL)
Los consejos de utilización y repuestos que se
encuentran sobre este documento son dados para su
informatión y no como promesa.
Preocupados por la calidad de nuestros productos, nos
reservamos el derecho de efectuar, sin previo aviso,
todas las modificaciones tecnicas en fig. de su
mejoramiento.
PREFACE TO THE MANUAL
Before leaving our factory every machine passes an exacting inspection programme in which everything is
checked minutely.
Following the instructions will ensure that your machine gives long service, in normal operating conditions.
The user advice and spare parts mentioned in this document are given as an indication, and do not constitute
an undertaking. No warrantee will be granted in the event of errors or omissions, or for damage occurring
during delivery, or caused by the design or use of the machine. We are very concerned about the quality of our
products and we reserve the right to make any technical modifications to improve them, without warning.
This document will:
• provide the user with: information about the machine
• information about its possible uses
• prevent accidents due to unsuitable use, by an untrained person, during maintenance, repairs,
overhauls, handling or transport
• improve the reliability and durability of the machine
• ensure correct use, regular maintenance, and fast fault finding in order to reduce repair costs and
downtime.
English
The manual should always be available at the place of work.
It should be read and used by any person installing or using the machine.
The obligatory technical regulations in force in the country where the machine is used must also
be adhered to for maximum safety.
GENERAL SAFETY INSTRUCTIONS
The use of symbols on machines (in color) and in the manual identify advice concerning your safety.
OBLIGATIONxx☛xxBlue background, white marking : obligatory safety
OBLIGATIONxx☛xx+ red marking : movement forbidden
WARNINGxx☛xxBlack triangle and marking on a yellow background : danger if not adhered to.
Risk of injury to the user or third parties, with possibility of damage top the
machine or the tool.
PROHIBITIONxx☛xx Red circle with or without bar : use or presence prohibited.
INFORMATIONxx ☛ xxInformation - Instruction: special instructions concerning use and
inspection.
The manufacturer declines any responsibility resulting from improper use, or modifications.
19
This symbol indicates that the machine
is in conformance with the applicable
European directive.
Use
USE :
• For scarifying, milling grooving, texturing,
cleaning and more.
• Effective on concrete, asphalt, paint and other
coatings, glue and steel.
SPECIAL INSTRUCTIONS
The disc cutter is designed to provide safe and
reliable service in operating conditions
corresponding with the instructions, but it can
present dangers for the user and risks of damage,
consequently regular on site inspection is necessary
to ensure:
• Perfect technical condition (use for the purpose
for which it is intended and taking into account
any risks, and correction of any malfunction
detrimental to safety).
• Use manufacturers’ original drums. Do not use
any other drum whose shape, size and
mounting do not fit the planer.
• Competent staff (qualifications, age, training)
who have read and understood the manual in
detail before starting work: any electrical,
mechanical or other problem should be
investigated by a qualified maintenance
engineer (electrician, maintenance manager,
approved dealer, etc . . .).
English
1
• That the warnings and instructions marked on
the machine are followed (adequate personal
protection, correct use, general safety
instructions, etc).
• That no modification, transformation or addition
is detrimental to safety and that it is carried out
without prior authorization from the
manufacturer.
• Respect of the maintenance intervals and
periodical checks recommended.
• That only genuine spare parts are used for
repairs.
TOOLS - Applications :
• Star Cutting Head :
- Cleaning/removal of epoxy paint, oil and
glazes, glue, thermo plastic road marking.
• Beam Cutting Heand :
- Dressing of asphalt and concrete.
- Anti-skid grooving (ramps, garages, farm
yards, etc).
- Descaling steel decking.
- Oil and glazes thermo plastic road marking.
• Carbide Cutting Heand capacity :
- Texturing of asphalt and concrete.
(Information from your usual supplier)
2
Technical specifications
• Pass depth : variable, max. 20 mm
• Useful working width : 200 mm
Option : side drum :
247 mm
• Performance : 40 to 80 m2 per hour (depending
on the surface to be planed)
• Weight : 65 kg
• Dimensions (L x w x H) : 740 x 410 x 800 mm
• Drum rotation speed : 1500 rpm (maximum off
load).
POWER
LEVEL
PRESSURE
LEVEL
VIBRATION
LEVEL
Lwa (dB)
EN ISO 3744
Lpa (dB)
EN ISO 4871
G ENV
25349
HONDA GX160
98
89
1
ROBIN EY
96
86
1
2.2 K W 230 V
80
81
0.4
3 KW 400 V
80
80
0.45
MODEL
Instruction plate
MANUFACTURER
TYPE
TYPE
N° SERIE
SERIAL
ANNEE DE
FABRICATION
20
WEIGHT
MASSE UTILE
Kg
PUISSANCE
kW
MAXI TOOL
Ø MAXI OUTIL
mm
PLAGE DE
TENSION
V
BORE
Ø ALESAGE
mm
FREQUENCE
Hz
SPEED
T/MN - RPM
INT. UTIL.
A
FABRICATION
YEAR
POWER
VOLTAGE
FREQUENCY
INTENSITY
3
Description of the machine
5
• On receiving the machine check its condition.
Interchange of drums
Motor off.
Take care to avoid accidental
damage.
• Always keep it perfectly clean
• Check regularly that the engine is serviced (petrol
engine), the state of the supply cable and
extension cable (for electric motor).
Disconnect the machine.
• Always keep alert when working
• Check that the parts are properly fixed (no
abnormal vibration) and that it is correctly
assembled.
• Unscrew the three drum centring dome nuts (F)
[SEE FIG. 3].
SEE FIG. 1
• Remove the right shield (G).
1 - Safety lever (dead man’s handle)
2 - Steering shaft
3 - Depth adjustment knob (mm)
4 - Spanner
• Fit the drum (H) and slid it on its shaft (J).
• Refit the shield.
• Tighten the capnuts.
5 - Shaft adjustment knob
6 - Quick raise/lower lever
7 - Sling loop
• To mill up to a wall, fit the side drum (K), housing
(L), plate (M) and bearing (N) in the place of the
original drum and plate [SEE FIG. 4].
8 - Engine / Motor
9 - On / off switch
10 - Belt guard
11 - Chassis
English
12 - Belt tensioner
13 - Drain extension
14 - Quick release guard
15 - Centring dome nuts
6
Check before starting
16 - Dust extractor hose
17 - Transmission
18 - 200 mm wide drum
19 - Floor edge drum (optional)
Please read the instructions for use
prior to operating the machine for
the first time.
20 - Supply cable
The use of ear protection is
mandatory.
4
Handling - Transport
• The height of the steering shaft can be adjusted
by slackening the knob (H) [SEE FIG. 2].
• Upon installation at the work site, the machine
can be moved without running the engine simply
by pushing it along on its three wheels.
• A slinging ring (A) enables the lifting ot the
machine.
The working area must be
completely cleared, well lit and all
safety hazards removed (no water or
dangerous objects in the vicinity)
The operator must wear
protective clothing appropriate to
the work he is doing. We
recommend that this includes
both eye and ear protection
Any persons not involved in the work
should leave the working area
21
• PETROL VERSION. Consult
maintenance manual.
the
engine
7
Starting up
Always take care.
Get into a comfortable, balanced
position.
Remove all adjustment tools and
wrenches from floor and machine
Take into account the working conditions
from health and safety point of wiew.
To start the planer, grasp the dead
man’s handle (I) on the steering shaft.
The motor stops if this is released. As
a safety precaution, check regularly
that it operates correctly. Do not lock
it in position.
- Check fuel and oil level.
- To start the engine, refer to the engine
operating instructions and paragraph 7
"Starting up".
• PETROL VERSION:
- Refer to the manufacturers manual.
- Let the engine warm up.
English
• ELECTRIC VERSION. Check the following:
ELECTRICAL SAFETY :
Operate this machine only on a supply
equipped with a 30 mA earthed currentlimiting circuit-breaker. Otherwise,
consult our catalogue for appropriate
models.
- Check the mains voltage (SINGLE PHASE, 230
V - THREE PHASE 400 V).
- Check that the motor is connected to electric
cable with conductors of 4 mm2 section (single
phase) and 2.5 mm2 (three phase) for lengths
less than 100 m. Above this length, double the
section.
- THREE PHASE : Check that the motor is
turning in the same direction as that of the
arrow located on rear cover of the motor (if not,
reverse 2 of the wires).
• ELECTRIC VERSION:
- The planer is operated by the on/off switch
(emergency stop using the handle (I)).
• DUST EXTRACTOR:
- Fit the suction (U) hose directly onto connector
located on the back of the machine (health and
safety) [SEE FIG. 5].
8
Working procedure
• To mill concrete, pass the machine over several
times according to the nature of concrete and
until desired result is obtained.
• Millimetric depth adjustment [SEE FIG. 6] :
- Action the fly-wheel (C) that will act on the
screw (D).
- Turn the nut (E) to lock the screw and secure
the cutting depth.
• Quick release:
- Pull lever (B) backwards to release the drum
quickly.
- And push forwards at the preselected depth to
resume work.
- To start the motor, refer to paragraph
7 "Starting up".
9
Belt tensioning
• Check periodically belt tension and retighten it
when necessary but do not overtighten, by
means of the nut (S) and lock nut (T) [ SEE
FIG.x7].
22
Never set belts beyond original
tension
10
Maintenance (machine disconnected)
- Take care to avoid accidental
damage.
• After some hours of use, carry out a general
retightening of all nuts and bolt.
• Clean machine after each use.
• Lubricate moderately the grease nipples:
- of the rolling bearings (P) [SEE FIG. 8].
- of the cam (Q).
- of the depth adjustment bearing (R).
OIL
• Check the engine oil every day. Refer to the
engine manual for the replacement schedule. Use:
- SAE 10W30 motor oil with API class MS, SD,
SE or better for PETROL engines.
• Motor or drum does not rotate (cont)
CAUSES
REMEDIES
Switch
defective,
motor cable damaged
- Have tested by an
electrician or contact
the
service
department
Motor faulty (no
power, unpleasant
smell)
- Contact the service
department to have
the motor replaced
Does not start (petrol
engine)
- Engine stopped.
- Faulty or loose spark
plug.
- Refer to engine
servicing instructions
or contact after sales
service.
Belt broken
- Contact the parts
department for a
replacement.
Drum stuck
- Check that the drum
rotates,
remove
whatever is preventing
rotation.
Dispose of the old oil as laid down by
the regulations in force.
• To empty the motor, place a funnel at the drain
outlet (V) [SEE FIG.X9].
CAUSES
REMEDIES
Drum rubs against
ground
-Free the drum to
make it easier to
start.
Single phase motor
starting condenser
- Replace the
condenser.
Faulty three phase
supply (2 phases only
or motor cable in poor
condition)
- Have it checked by
an electrician or
contact the service
department.
Store in a dry place, not accessible to
children.
Maintain the tools carefully.
FAULT FINDING
English
• Difficult starting
In the event of faulty operation refer to the tables
below to find a solution.
• Motor or drum does not rotate
• Ineffective operation with jerks and
considerable vibration
CAUSES
REMEDIES
CAUSES
REMEDIES
Not
plugged
in
properly or cable
damaged
- Make sure that the
supply is correctly
plugged in (plug,
extension lead, etc)
- Check the supply
cable
- No noticeable work
done
- Drum at lowest
position
- Maximum wear
- Check the setting of
the drum (mills)
- Change the drum or
the cutters, brush,
etc . . .
No mains voltage
- Test or have tested
by an electrician
(circuit breaker, plug,
etc)
- Abnormal vibration
when grooving or
milling
- Abnormal
cutter
wear
- Check the rotation of
the cutters on the
four shafts.
- Change the drum or
the cutters.
23
11
Important advice
The manufacturer declines all
responsibility for loss or damage
resulting from misuse or any
modification, alteration or powering
that does not conform to the
manufacturer's original specifications.
14
Spare parts
For quick supply of spare parts and to avoid any lost
time it is essential to quote the data on the
manufacturer's plate fixed to the machine and the
part number of the part to be replaced with every
order.
00000000
At the work station, the sound
pressure level may exceed 85 db (A)
In this case individual protection
measures must be taken.
(0)
Item number
Quantity
See exploded view
When working in a limited or closed
area, make sure that the ventilation is
adequate. The exhaust gases contain
carbon monoxide (exposure to this
toxic gas can cause loss of
consciousness and can be fatal).
English
13 Repairs
S
A
V
We carry out all repairs in the shortest
possible time and at the most
economical prices (see overleaf for our
address).
15
Scrapping
In the event of deterioration and
scrapping of the machine, the
following items must be disposed of
in accordance with the requirements
of the legislation in force.
• Main materials :
- Motor : Aluminium (AL), Steel (AC),
Motor : Copper (CU), Polyamide (PA)
- Machine : Steel sheet (AC), Cast iron (FT)
- Machine : Aluminium (AL)
24
The instructions for use and spare parts found in this
document are for information only and are not binding.
As part of our product quality improvement policy, we
reserve the right to make any and all technical
modifications without prior notice.
EINLEITUNG ZU DIESEM HANDBUCH
Vor dem Verlassen unseres Werkes hat jede Maschine eine Reihe von Prüfungen erfolgreich bestanden, bei
denen die gesamte Anlage bis ins Detail getestet wird.
Die genaue Befolgung unserer Anweisungen gewährleistet unter normalen Arbeitsbedingungen Ihrer Maschine
lange Lebensdauer.
Die in vorliegendem Handbuch aufgeführten Einsatzhinweise und Ersatzteilreferenzen stellen Richtangaben
dar, die eine Haftungspflicht unsererseits ausschließen. Ein Garantieanspruch kann bei Fehlern oder
Auslassungen bzw. bei Schäden, die auf die Lieferung, Auslegung oder Anwendung der Maschine
zurückzuführen sind, nicht hergeleitet werden. Ständig um eine Qualitätsausführung unserer Produkte bemüht,
behalten wir uns vor, ohne Vorankündigung, der Weiterentwicklung dienende technische Änderungen
vorzunehmen.
Vorliegendes Handbuch muß jederzeit am Arbeitsplatz verfügbar sein.
Inkenntnisnahme und Anwendung durch jegliche mit der Aufstellung oder dem Betrieb beauftragte
Person.
Für ein Höchstmaß an Sicherheit sind die im jeweiligen Einsatzland der Maschine geltenden
technischen Vorschriften einzuhalten.
Deutsch
Vorliegendes Dokument dient dem Anwender:
• sich mit der Maschine vertraut zu machen,
• deren Einsatzmöglichkeiten kennenzulernen,
• Unfälle bei unsachgemäßer Verwendung durch eine nicht fachmännisch ausgebildete Person zu
vermeiden, bei der Pflege, Wartung, Instandsetzung, Umstellung und dem Transport der Maschine;
• die Betriebssicherheit und Lebensdauer der Maschine zu erhöhen,
• eine korrekte Anwendung, regelmäßige Wartung, rasche Entstörung sicherzustellen, um
Reparaturkosten und Stillstandszeiten auf ein Mindestmaß zu begrenzen.
ALLGEMEINE SICHERHEITSVORSCHRIFTEN
Die Piktogramme auf den Maschinen in Farbe und in diesem Handbuch geben Hinweise, die Ihrer Sicherheit
dienen.
OBLIGATORISCHxx☛ xxblauer Grund, weiße Markierung: Sicherheit obligatorisch
OBLIGATORISCHxx☛ xx+ rote Markierung: Bewegung untersagt
WARNUNGxx☛
WARNUNGxx☛
Dreieck, schwarze Markierung auf gelbem Grund : Gefahr bei Nichteinhaltung
Verletzungsrisiko für den Anwender oder Dritte mit Beschädigung der
Maschine oder des Werkzeuges in der Folge.
VERBOTxx☛xx roter Kreis mit oder ohne Querstrich: Anwendung, Anwesenheit untersagt.
HINWEISxx☛ Information - Anweisung : Spezielle, die Anwendung und Prüfung betreffende
Angaben.
Der Hersteller haftet in keinem Fall für eine unsachgemäße Verwendung und jegliche Änderung.
25
Dieses Symbol bedeutet, daß die
Maschine den europäischen Richtlinien
entspricht.
Einsatz
EINSATZBEREICHE :
• Zum Nuten, Abfräsen, Reinigen, Entrosten,
Abschleifen, usw.
• Einzusetzen auf Beton, Asphalt, Lack, Kleber,
Stahl und anderen, Beschichtungen.
SONDERVORSCHRIFTEN FÜR
Ihre Trennschneidmaschine ist für einen sicheren
und dauerhaften Betrieb ausgelegt. Doch können
auch bei einsatzkonformer Verwendung von der
Trennschneidmaschine für den Anwender Gefahren
und Risiken ausgehen. Deshalb sind vorbeugend
regelmäßige Prüfungen auf der Baustelle notwendig
zur Überwachung:
• des einwandfreien technischen Zustandes
(Einsatz
bestimmungsgemäß
unter
Berücksichtigung evtl. Risiken und unter
Ausschaltung jeglicher, der Sicherheit
abträglicher Fehlfunktion),
Deutsch
1
• ein sachgemäßer Einsatz passender
Originaltrommeln auf der Maschine. Untersagt
ist die Verwendung von Trommeln jeglicher
anderer, maschinenungeeigneter Form,
Abmessung oder Befestigung,
• eines kompetenten Personals (fachliche
Eignung, Alter, Ausbildung, Einweisung), das
vor der Arbeitsaufnahme detaillierte Kenntnisse
dieses Handbuches erwarb; jegliche
Unregelmäßigkeit elektrischer, mechanischer
oder anderer Art ist von einer befugten,
einzuschaltenden Person zu prüfen (Elektriker,
Wartungsverantwortlicher,
autorisierter
Wiederverkäufer, usw. ...).,
• der Einhaltung der Warnungen und auf der
Maschine markierten Anweisungen (dem
Arbeitseinsatz angepaßte Schutzmittel),
sachgemäße
Anwendung,
Sicherheitsanweisungen im Allgemeinen, ...),
• daß keinerlei Änderung, kein Umbau oder
Zusatz, die die Sicherheit in Frage stellen, und
die nicht in Abstimmung mit dem Hersteller
erfolgten, vorgenommen wurden.
• der Einhaltung der Überprüfungshäufigkeit
sowie der empfohlenen Kontrollintervalle,
• der Garantie von Originalersatzteilen im
Reparaturfall.
WERKZEUGE - Anwendungen :
• Sternfräser :
- Reinigung/Entfernung von Epoxyharzlacken,
Öl und Fett, Kleber, Thermoplastischen
Straßenmarkierungen.
• Rillenfräser :
- Oberflächenbearbeitung von Asphalt und
Beton.
- Aufrauhen von Oberflächen (Auffahrten,
Garagen, Viehställe).
- Entzundern von Blechen, usw...
• Hartmetallfräser :
- Fräsen von Asphalt und Beton.
(Auskünfte bei Ihrem üblichen Händler)
2
Technische Daten
• Schnittiefe : variabel, höchstens 20 mm
• Arbeitsnutzbreite :
200 mm.
Option : Seitentrommel : 47 mm.
• Leistung : 40 bis 80 m 2 /Stunde (je nach
Arbeitsgrund).
• Gewicht : 65 kg
• Abmessungen (L x B x H) : 740 x 410 x 800 mm
• Walzendrehzahl
Leerlaufdrehzahl).
:
1500
U/Min.
(max.
SHALLEIS
TUNG
SHALLDRUCK
SCHWINGUNGS
PEGEL
Lwa (dB)
EN ISO 3744
Lpa (dB)
EN ISO 4871
G ENV
25349
HONDA GX160
98
89
1
ROBIN EY
96
86
1
2.2 K W 230 V
80
81
0.4
3 KW 400 V
80
80
0.45
AUSFÜHRUNG
Typenschild
DER HERSTELLER
MODELL
TYPE
N° SERIE
SERIE
ANNEE DE
FABRICATION
26
HERSTELLUNGS
JAHR
LEISTUNG
GEWICHT
MASSE UTILE
Kg
PUISSANCE
kW
MAX.
WERKZEUG
Ø MAXI OUTIL
mm
PLAGE DE
TENSION
V
SPANNUNG
BOHRUNG
Ø ALESAGE
mm
FREQUENCE
Hz
FREQUENZ
U/MIN
DREHZAHL
T/MN - RPM
INT. UTIL.
A
INTENSITAT
3
Beschreibung
5
• Bei Erhalt Maschinenzustand prüfen.
• In sauberem, ordnungsgemäßen Zustand halten.
• Regelmäßig prüfen :
Motorwartung (Verbrennungsmotor), EVersorgungskabel u. Verlängerung (bei E-Motor).
• Während der Arbeit immer aufmerksam bleiben.
• Teilebefestigugn prüfen (abnorme Schwingung).
Auf richtige Montage achten.
Auswechseln der Rolle
Motor aus!
Jeglichen
vermeiden.
ungewollten
Anlauf
Die Maschine ausschalten.
• die
drei
Hutmuttern
(F)
auf
Walzenzentrierung lösen [SIEHE ABB. 3].
der
SIEHE ABB. 1
• An der rechten Flanke (G) ziehen.
1 - Sicherheitsheben (Totmannschaltung)
2 - Führungsholm
• Die Rolle (H) freilegen und sie auf der Achse
schwenken.
3 - Tiefenstellrad / mm-Teilung
5 - Führungsholmstellrad
6 - Schnellversrtellungsheben Auf/Ab
7 - Hubanschlagring
8 - Motor
• Die rechte Flanke wieder einsetzen.
• Die Hutmuttern anziehen.
• Zum Fräsen an Wandrändern, die Seitenwalze
(K), deren Gehäuse (L), das Montageprofil, (M)
einschl. Lauflager (N), anstelle der normalen
Walzen- u. Flanke montieren [SIEHE ABB. 4].
9 - Hauptschalter Ein/Aus
Deutsch
4 - Kontaktschlüssel
10 - Riemengehäuse
11 - Chassis
12 - Riemenspanner
13 - Entleerungsverlängerung
14 - Schnelldemontaflanke
15 - Hut-Zentriermuttern
16 - Staubabsaugschlauch
6
Kontrollen vor Inbetriebnahme
17 - Kraftübertragung
18 - Walze, 200 mm breit
19 - Wandrandwalze (Option)
20 - E-Versorgungskabel
Vor
jeder
Inbetriebnahme
Betriebsanleitung aufmerksam lesen
und sich mit der Maschine vertraut
machen.
Lärmschutz obligatorisch.
4
Handhabung - Transport
Der Arbeitsbereich muß sorgfältig
aufgeräumt und gut beleuchtet sein,
er darf keine Gefahrensquelle
aufweisen (keine Feuchtigkeit oder
gefährlichen Produkte in der Nähe)
• Höhe des einstellbaren Führungsholmes: Handrad
lösen (H) [SIEHE ABB. 2].
• Für den Transport der Maschine zur Baustelle
genügt es, sie zu schieben, ohne den Motor
einzuchalten.
• Der am Ständer des Längsträgers geschweißte
Ring (A) ermöglicht ein Anheben der Maschine.
Die Bedienungsperson muß
geignete Arbeitsschütze tragen
Im Arbeitsbereich darf sich keine
Drittperson aufhalten
27
• VERBRENNUNGSMOTOR.
Wartungsanweisungen des Herstellers beachten.
7
Inbetriebnahme
Immer aufmerksam bleiben.
Eine sachgemäße und ausgewogene
Arbeitsposition einnehmen.
Vor der Inbetriebnahme die Schlüssel
und die Regelwerkzeuge entfernen.
Die Arbeitsbedingungen in bezug auf
Gesundheit
und
Sicherheit
berücksichtigen.
Zum Anfahren der Machine, den
Totmann-Schalthebel
(I)
des
Führungsholmes betätigen. Der
Motor schaltet beim Loslassen sofort
ab. Aus Sicherheitsgründen dessen
ordnugnsgemäße
Funktion
regelmäßig
überprüfen.
Ein
Blockieren des Hebels ist unzulässig.
- Tankfüllung und Ölstand prüfen.
- Zum Anfahren der Machine, siehe
Motor-Betriebsanleitung sowie Punktx7
vorliegender
Anleitung
"Inbetriebnahme".
Deutsch
• ELEKTROMOTOR. Prüfen Sie folgendes :
ELEKTRISCHE ABSICHERUNG :
Anschluß über DifferenzreststromAbschalter 30 mA mit Erdleiter. Ist ein
solcher Abschalter nicht vorhanden,
können andere Ausführungsarten
eingesetzt werden, die Sie bitte
unserem Katalog entnehmen wollen.
• VERBRENNUNGSMOTOR :
- Sich an das Bedienungshandbuch für den
Motor halten.
- Den Motor warmlaufen lassen.
• ELEKTROMOTOR:
- Ein/Aus über den Hauptschalter (Abschalten
mittels Schaltgriff (I)).
• ANSAUGBLOCK :
- Den Schlauch des Blocks (U) direkt auf das
hintere Rohr der Maschine befestigen
(Arbeitshygiene u. Sicherheit) [SIEHE ABB. 5].
8
- Netzspannung beachten (Einphasen 230 V/
Drehstrom 400 V).
- Folgende Versorgungskabel verwenden:
einphasig 4 mm2, dreiphasig 2,5 mm2. Dies für
Kabellängen unter 100 m. Bei größeren Längen
ist der Querschnitt zu verdoppeln.
- DREHSTROM : Prüfen, ob die Drehrichtung
des Motors dem auf der hinteren Motorhaube
angegebene Pfeil entspricht (ansonsten sind
zwei Zuführdrähte umzupolen).
- Zum Anfahren der Maschine, siehe
Punkt 7 vorliegender Anleitung
"Inbetriebnahme".
Arbeitsmethode
• Für tiefes Fräsen in Beton ist es ratsam, mehrere
Arbeitsgänge bis zum Erreichen der gewünschten
Tiefe durchzuführen.
• Genaue Einstellung der Schnittiefe [SIEHE ABB. 6]:
- Das Stellrad (C) betätigen; es wirkt auf die
Schraube (D) ein.
- Die Rändelmutter (E) drehen, um die Schraube
zu blockieren und somit die Schnittiefe zu
fixieren.
• Schnelles Auslösen:
- Den Hebel (B) zu sich ziehen, um die Rolle vom
Boden zu lösen;
- Den Hebel zur Vorderseite der Maschine legen,
um zur gewählten Schnittiefe zurückzukehren.
9
Spannung des Motorriemens
• Den Riemen regelmäßig prüfen und ihn anhand der
Schraubenmutter (S) und der Gegenmutter (T) neu
spannen, ohne zu überdehnen [SIEHE ABB. 7].
28
Die Riemen dürfen nie stärker
gespannt werden als werkseitig
vorgegeben
10
Wartung ( bel ausgeschaltetem Motor)
- Jeglichen
vermeiden.
ungewollten
Anlauf
• Motor bzw. Walze dreht nicht (Fortsetzung)
URSACHE
BEHEBUNG
Schalter
defekt,
M o t o r k a b e l
beschädigt
- Durch einen Elektriker
prüfen lassen bzw.
Kundendienst
benachrichtigen.
Motor geschädigt (keine
Leistung, unangenehmer
Geruch...)
- Motor austauschen,
Kundendienst
benachrichtigen.
Anlassen unmöglich
(Wärmekraftmotor)
- Motorabschaltung in
Anlaßstellung
bringen.
- Zündkerze defekt oder
Kontaktkabel lose.
- Motor-Wartungsanleitung heranziehen
oder KD benachrichtigen.
• Regelmäßig sämtliche Schrauben und Muttern
nachziehen.
• Folgende Teile mäßig schmieren:
- öler des Wälzlagers (P) [SIEHE ABB. 8],
- öler des Nockens (Q),
- öler der Gelenklager der Schnittiefeneinstellung (R).
ÖL
• Motorölstand täglich prüfen.
Öltauschabstände: siehe Motor-Betriebsanleitung.
Zu verwendende Ölsorte:
- Sie SAE 10W30-Motoröll mit API-Klasse MS,
SD, SE oder hhere Qualität fur
BENZINMOTOREN.
Entsorgung des Schmiermittels in
Übereinstimmung mit der geltenden
Gesetzgebung.
Um das Motoröl zu wechseln, eine Wanne unter
den Ölablaß stellen (V) [SIEHE ABB.X9].
An einen sicheren Ort für Kinder
unzugänglich abstellen.
Die Diamantwerkzeuge sorgsam
lagern.
PANNENBEHEBUNG
Bei abnormaler Funktion nachstehende Tabelle zur
Behebung des Problemes einsehen.
• Motor bzw. Walze dreht nicht
URSACHE
BEHEBUNG
Mangelhafter
EAnschluß oder Kabel
beschädigt
- Auf ordnungsgemä-ßen
E-Anschlußachten
(Stecker,
Verlängerung...)
- Stromversorgungskabel prüfen.
Keine Netzspannung
- E-Teile prüfen oder
durch einen Elektriker
prüfen
lassen
(Abschalter, Stecker...)
Riemen gerissen
Walze blockiert
- Zum
Austausch
Ersatzteil-Kundendienst
benachrichtigen.
- Walzendrehung
prüfen, die Drehung
verhinderndes
Element entfernen.
Deutsch
• Die Maschine nach jeder Benutzung reinigen.
• Schwieriger Anlauf
URSACHE
BEHEBUNG
Walze schleift am
Boden
- Walze freisetzen um
Anlauf zu erleichtern.
Monophase Motoranlaufkondensator
- Kondensator
austauschen.
Drehstromversorgung
nicht korrekt (nur 2
Phasen anstatt 3,
M o t o r k a b e l
beschädigt).
- Durch
einen
Elektriker prüfen
lassen bzw. Kundendienstabteilung
benachrichtigen.
• Absolut unzufriedenstellendes
Arbeitsergebnis, hohe Schwingung
URSACHE
BEHEBUNG
- Überhaupt
kein
Arbeitsergebnis
- Walze
maximal
abgesenkt
- Verschleiß
am
Maximalpunkt
-Walzemontage
(Fräseinsätze)
prüfen.
- Walze, oder Rändelrädchen bzw. Bürste
usw... tauschen.
-A b n o r m a l e
Schwingungen beim
Nutfräsen.
-A b n o r m a l e r
Verschleiß
der
Rändelrädchen.
- Rotation
der
Rändelrädschen auf
den 4 Achsen prüfen.
- Walze oder Rändelrädchen tauschen.
29
11
Wichtige Hinweise
Der Hersteller haftet in keinem Fall bei
unsachgemäßer Verwendung, jeglicher
Änderung,
Anpassung
oder
Motorisierung, die nicht mit der
herstellerseitigen Originalauslegung
übereinstimmen.
13
Ersatzteile
Um eine schnelle Lieferung der Ersatzteile zu
gewährleisten, ist es unbedingt erforderlich, uns bei
jeder Bestellung alle auf dem Maschinenkennschild
befindliche
Daten
(Maschinentyp,
Maschinennummer,
Ersatzteilbenennung,
Bestellnummer, Bestellmenge) sowie die
Teilbezeichnung gemäß Teilliste anzugeben.
Aufgrund der Unfallverhütungsvorschrift ‘Lärm’ (VGB 121) sind bei
Beurteilungsshallpegeln von 85 dB(A)
und mehr von den Beschäftigten
persönliche Schallschutzmittel zu
tragen
00000000
(0)
Artikel-NR
Anzahl
e siehe Explosionszeichnung
Deutsch
Beim
Arbeiten
in
einem
gfeschlossenem, abgegrenztem
Bereich, auf ausreichende Belüftung
der Kohlendioxyd-Auspuffgase achten
(Einatmen
dieser
Gase
ist
gesundheitsschädlich)
12
Reparaturen
S
A
V
Wir stehen zu Ihrer vollen Verfügung,
um sämtliche Reparaturarbeiten zu
günstigen Preisen und schnellstmöglich
durchzuführen (siehe Adresse auf der
Rückseite).
14
Endgültige Stillegung
Bei Beschädigung von Zubehör oder
der gesamten Maschine, ist diese
nach den geltenden gesetzlichen
Vorschriften und vorgeschriebenen
Verfahren zu entsorgen.
• Wichtigste Werkstoffe :
- Motor : Aluminium (AL) - Stahl (AC) Motor : Kupfer (CU) - Polyamid (PA)
- Maschine : Stahlblech (AC) - Guß (FT)
- Maschine : Aluminium (AL)
30
Die Bedienungsanleitung und die Ersatzteilliste, die in
diesem Dokument aufgeführt sind, sind nur zur
Kenninsnahme und nicht verbindlich.
Bekümmert um die Qualität unserer Produkte, behalten
wir uns das Recht vor, ohne vorherige Benachrightigung,
technische Abänderungen zur Verbesserung dieser
vorzunehmen.
VOORWOORD
Elke machine ondergaat vóór het verlaten van onze fabriek een aantal controlebeurten waarbij alles
nauwkeurig gecontroleerd wordt.
Indien u onze instructies strikt naleeft, zal uw machine bij normale werkomstandigheden lang meegaan.
De gebruiksaanwijzingen en de onderdelen uit deze handleiding worden ter informatie opgegeven en zijn niet
bindend. De garantievoorwaarden zijn niet geldig bij foutief gebruik of nalatigheid, of bij beschadigingen die te
wijten zijn aan de levering, het concept of het gebruik van de machine. Teneinde de kwaliteit van onze
produkten steeds te verbeteren, behouden wij ons het recht voor, technische wijzigingen aan te brengen
zonder voorafgaande berichtgeving.
De gebruiker kan dit document gebruiken om :
• alle toepassingsmogelijkheden te leren kennen,
• ongevallen te vermijden die te wijten zouden zijn aan een verkeerd gebruik, door een persoon die daar
niet toe is opgeleid, bij onderhouds- en herstellingswerken of bij het verplaatsen en het vervoer,
• de betrouwbaarheid en de levensduur van de machine te verbeteren,
Nederlands
• zich aan de machine te wennen,
• in te staan voor een juist gebruik, een regelmatig onderhoud en een snelle reparatie, om zo de
herstellingskosten en de duur van de immobilisatie tot een minimum te herleiden.
Deze handleiding dient steeds beschikbaar te zijn op de plaats waar de machine gebruikt wordt.
Iedere persoon die de machine installeert of gebruikt, dient deze handleiding te lezen en te
gebruiken.
Met het oog op een optimale veiligheid, dienen de verplichte technische reglementeringen die van
kracht zijn in het land waar de machine gebruikt wordt, eveneens te worden nageleefd.
ALGEMENE VEILIGHEIDSVOORSCHRIFTEN
De gebruikte pictogrammen op de machines (in kleur) en in de handleiding wijzen op tips i.v.m. uw
veiligheid.
VERPLICHTINGxx☛ xxBlauwe achtergrond, witte markering : verplichte veiligheid
VERPLICHTINGxx☛ xx+ rode markering : bewegingen verboden
WAARSCHUWINGxx☛xxZwarte driehoek en markering op gele achtergrond : gevaar bij het niet
naleven, de gebruiker of derden kunnen gekwetst worden en de
machine of het gereedschap kunnen beschadigingen oplopen.
VERBODxx☛xx Rode cirkel met of zonder streep : gebruik, aanwezigheid verboden.
AANWIJZINGxx☛ xxInformatie - instructie : bijzondere aanwijzingen i.v.m. het gebruik, de
controle.
De fabrikant kan in geen geval aansprakelijk worden gesteld bij een verkeerd gebruik van of
wijzigingen aan de machine.
31
Dit symbol betekent dat de machine
overeenstemt met de betreffende
Europese ritchtlijn.
Nederlands
BIJZONDERE VOORSCHRIFTEN
De afkortmachine is zo ontworpen dat een veilige
en betrouwbare werking mogelijk is, indien ze
volgens de instructies gebruikt wordt, maar kan
toch enig gevaar inhouden voor de gebruiker en
kan beschadigingen oplopen ; regelmatige
controles op het werkterrein zijn dus noodzakelijk.
Controleer :
• of de machine in een technisch perfecte staat
verkeert (gebruik voor de voorziene
doeleinden, rekening houdend met de
eventuele risico's, defecten die de veiligheid in
gevaar kunnen brengen, herstellen),
• het gebruik van gelijkvormige trommels die
oorspronkelijk op de machine passen ; het
gebruik van andere trommels waarvan vorm,
afmetingen of bevestigingswijze niet met de
machine overeenstemmen, is verboden.
• bevoegd personeel (bekwaamheid, leeftijd,
opleiding, training) dat zorgvuldig alle
aanwijzingen gelezen heeft voordat met het
werk
begonnen
wordt.
Electrische,
mechanische en overige storingen worden door
een daartoe bevoegde persoon nagezien
(electricien, functionaris onderhoud, erkende
dealer, enz.),
1
Gebruik
GEBRUIK :
• Vlak maken, groeven, wegwerken, reinigen,
ontroesten, afschuren, enz...
• Efficiënt op beton, asfalt, lak, lijm, staal en
andere bekledingen.
GEREEDSCHAP - Toepassingen :
• Stervormige slijpschijven :
- Reinigen/verwijderen van epoxylak, olie en
vet,
lijm,
thermoplastische
signalisatiebanden.
• Getande slijpschijven :
- Rectificatie van asfalt- en betonvloeren.
- Anti-slipgroeven (opritten, garages,
paardestallen, enz...)
- Ontkoling van platen, enz...
• Carbidpennen :
- Frezen van beton en asfalt.
(Meer informatie bij uw vaste leverancier)
2
Technische kenmerken
• Slijpaanzet : regelbaar, max. 20 mm
• of de waarschuwingen en richtlijnen op de
machine, nageleefd worden (aangepaste
bescherming van het bedienend personeel), en
of de machine naar behoren gebruikt wordt
(algemene veiligheidsinstructies...),
• Nuttige werkbreedte : 200 mm
Afzonderlijk verkrijgbaar : zijtrommel : 47 mm
• of de veiligheid niet in het gedrang wordt
gebracht doordat de machine gewijzigd,
omgebouwd of aangevuld werd, dit zonder
toestemming van de fabrikant,
• Gewicht : 65 kg
• of de aanbevolen frequentie van de
controlebeurten wordt nageleefd,
• of uitsluitend originele reserve-onderdelen
gebruikt worden bij het uitvoeren van
herstellingen.
• Rendement : 40 à 80 m2/uur (afhankelijk van het
te behandelen oppervlak).
• Afmetingen (L x B x H) : 740 x 410 x 800 mm
• Rotatiesnelheid trommel : 1500 omw./min.
(maximum onbelast).
GELUID
NIVEAU
GELUIDSDRUK
NIVEAU
VIBRATI
NIVEAU
Lwa (dB)
EN ISO 3744
Lpa (dB)
EN ISO 4871
G ENV
25349
HONDA GX160
98
89
1
ROBIN EY20
96
86
1
2.2 K W 230 V
80
81
0.4
3 KW 400 V
80
80
0.45
MODEL
Typeplaatje
FABRIKANT
TYPE
TYPE
N° SERIE
SERIENUMMER
ANNEE DE
FABRICATION
32
GEWICHT
MASSE UTILE
Kg
PUISSANCE
kW
O MAX.
ZAAGBLAD
Ø MAXI OUTIL
mm
PLAGE DE
TENSION
V
O ASGAT
Ø ALESAGE
mm
FREQUENCE
Hz
T.P.M.
T/MN - RPM
INT. UTIL.
A
JAAR
GEPRODUCEERD
VERMOGEN
VOLTAGE
FREQUENTIE
STROOMSTERKTE
3
Beschrijving van de machine
5
• Controleer de staat van de machine bij de
inontvangstneming.
Vervangen van de trommel
• Zorg er steeds voor dat ze perfect schoon blijft.
Motor uitzetten
Vermijd dat de machine per ongeluk
wordt ingeschakeld.
• Het onderhoud van de motor (warmtemotor), het
snoer en de verlengkabel (bij elektromotor)
regelmatig controleren.
Haal de stekker uit het stopcontact.
• Blijf bij het werken altijd aandachtig.
1 - Veiligheidshendel (dodemansknop)
2 - Arm
• Draai de drie dopmoeren (F) voor het centreren
van de trommel los [ZIE FIG. 3].
• Trek aan het rechterschot (G).
• Schuif de trommel (H) op de as (J).
3 - Afstelknop diepte in mm
4 - Sleutel
5 - Afstelknop arm
6 - Hefboom snel optillen/zakken
7 - Hijsring
8 - Motor
9 - Contactsluiter
• Plaats het rechterschot terug.
• Draai de dopmoeren vast.
Nederlands
• Controleer de bevestiging van de stukken
(abnormale vibratie), of ze goed gemonteerd zijn.
• Om naast een muur te frezen, de zijtrommel (K),
het carter (L), het schot (M) samen met het
kogellagerblok (N) op de plaats van de
oorspronkelijke trommel en het oorspronkelijk
schot aanbrengen [ZIE FIG. 4].
10 - Drijfriemcarter
11 - Chassis
12 - Riemspanning
13 - Purgeerbuisje
14 - Schot snelle demontage
15 - Centreerdopmoeren
16 - Stofafzuigslang
6
Controle vóór de ingebruikname
17 - Overbrenging
18 - Trommel breedte 200 mm
19 - Zijtrommel (afzonderlijk verkrijgbaar)
20 - Snoer
Voor het in gebruik nemen van de
machine, eerst aandachtig de
handleiding lezen en uzelf vertrouwd
maken met de machine.
Het dragen van gehoorbescherming
is verplicht.
4
Verlading - Transport
• Regelbare armhoogte : de afstelknop (H)
losdraaien [ZIE FIG. 2].
• U kunt de machine op de bouwplaats brengen,
door ze te verduwen, zonder de motor aan te
zetten.
• De op de staander van de stelbalk gelaste ring
(A) dient om de machine op te heffen.
De werkruimte moet in orde zijn,
goed verlicht en vrij van elk
ongevalsrisico (geen vochtigheid of
gevaarlijke produkten in de
nabijheid)
De operator moet aan het werk
aangepaste beschermingsuitrusting dragen
De operator moet aan het werk
aangepaste beschermingsui-trusting
dragen
33
• WARMTEMOTOR. Raadpleeg het onderhoudsboekje van de motor
7
Inbedrijfstelling
Let steeds nauwkeurig op wat u doet
Plaats uzelf in een gemakkelijke,
evenwichtige houding.
Verwijder de sleutels en het
stelgereedschap voordat u de
machine in gebruik neemt
Hou rekening met de werkvoorwaarden
vanuit het standpunt van gezondheld en
velligheld.
De machine wordt gestart met behulp
van de dodemansknop (I) op de arm.
De motor valt stil zodra de hendel
wordt losgelaten. Voor uw veiligheid,
regelmatig de goede werking
controleren ; het is verboden de
hendel te blokkeren.
Nederlands
- Controleer het brandstof- en motoroliepeil.
- Om te starten de gebruiksaanwijzing
van de motoren en paragraaf 7
"inbedrijfstelling" raadplegen.
• WARMTEMOTOR :
- Raadpleeg de gebruiksaanwijzing van de
motor.
- Laat de motor warmlopen.
• ELEKTROMOTOR. Controleer het volgende:
• ELEKTROMOTOR :
- De motor wordt aan-/uitgezet met een
schakelaar (uitschakelen d.m.v. hendel (I)).
ELECTRISCHE VEILIGHEID :
De machine mag uitsluitend worden
aangesloten op een geaarde 30 mA
aardlekschakelaar. Zie onze catalogus
indien geen aardlekschakelaar
geïnstalleerd is.
• ZUIGPOMPAGGREGAAT:
- Sluit de leiding van het pompaggregaat (U)
rechtstreeks aan op de achterste buis van de
machine (gezondheid en veiligheid) [ ZIE
FIG.x5].
8
- De spanning van het elektriciteitsnet
controleren (EENFASE 230 V - DRIEFASE 400
V).
- Gebruik een aansluitsnoer van het volgende
type: eenfasig 4 mm2, driefasig 2,5 mm2 voor
een kabellengte van minder dan 100 m. Bij
langere kabels, moet u de diameter
verdubbelen.
- DRIEFASE : Ga na of de draairichting van de
motor overeenkomt met de pijl op de achterste
motorkap (anders moet u twee aansluitdraden
verwisselen).
- Om te starten paragraaf
"inbedrijfstelling" raadplegen.
7
Werkmethode
• Voor het diepfrezen van beton, verdient het
aanbeveling in meerdere bewerkingsgangen te
werk te gaan tot u het gewenste resultaat bereikt.
• Fijnregeling van de freesdiepte [ZIE FIG. 6] :
- Draai aan het handwiel (C) om de schroef (D)
te verstellen.
- Draai aan de kartelmoer (E) om de schroef
vast te zetten en de slijpaanzet te regelen.
• Snel losmaken:
- Trek hefboom (B) naar u toe om de trommel
van de grond te los te maken.
- Duw de hefboom naar de voorkant van de
machine om terug te keren naar de gekozen
slijpaanzet.
9
Riemspanning
• Controleer regelmatig de riemspanning. Span de
riem op zonder te forceren met behulp van moer
(S) en contramoer (T) [ZIE FIG. 7].
Overtref nooit de riemspanning bij
een nieuwe zaag
34
Onderhoud (machlne uitgeschakeld)
- Vermijd dat de machine per ongeluk
wordt ingeschakeld.
• Draai de schroeven en bouten geregeld aan.
• Maak de machine na elke gebruiksbeurt schoon.
• Smeer de volgende onderdelen:
- Smeernippels van het kogellagerblok (P) [ZIE
FIG. 8].
- Smeernippels van de nok (Q).
- Smeernippels van de draaipunten van de
snedediepte (R).
• De motor of de trommel draait niet (vervolg)
OORZAKEN
OPLOSSINGEN
Defecte schakelaar,
b e s c h a d i g d e
motorkabel
- Voor de controle een
elektricien of de
klantendienst
raadplegen.
Beschadigde motor
(abnormaal
laag
toerental,
onaangename geur...
- Laat de motor door
de klantendienst
vervangen.
Starten onmogelijk
(warmtemotor)
- Pal op de motor.
- Defecte of losse
bougie.
- Het boekje met de
onderhoudsinstructie
s van de motor of de
klantenservice
raadplegen.
Gebroken drijfriem
- Voor vervanging,
raadpleeg
de
afdeling reserveonderdelen.
Geblokkeerde trommel
- De draaibeweging van
de
trommel
controleren;de
hindernis verwijderen.
OLIE
• Controleer het oliepeil van de motor dagelijks.
I.v.m. de regelmaat waarmee de olie ververst
dient te worden de gebruiksaanwijzing van de
motor raadplegen. Gebruik :
- SAE 10W30 motorolie van API klasse MS, SD,
SE of beter voor BENZINE- motoren.
Bij het weggooien van de gebruikte
smeerolie, dienen de wettelijke
voorschriften in acht te worden
genomen.
- Om de motorolie te verversen moet u een
afvoergootje aan de aflaatopening plaatsen (V)
[ZIE FIG.X4].
Bewaar de machine op een veilige
plaats en houd ze buiten het bereik
van kinderen Onderhoud het
snijgereedschap zorgvuldig
OPSPOREN VAN DEFECTEN
Indien de machine niet normaal werkt, raadpleeg
dan de volgende tabellen om een oplossing te
vinden voor het probleem dat zich voordoet.
• De machine raakt moeilijk op gang
OORZAKEN
OPLOSSINGEN
De trommel wrijft
tegen de bodem
- Maak de trommel vrij
om
het
starten
gemakkelijker
te
maken.
Condensator starten
eenfasige motor
- Vervang de condensator.
Niet conforme driefase
voeding (op 2 fasen,
beschadigd snoer)
- Voor de controle de
elektricien of de
klantendienst
raadplegen.
• De motor of de trommel draait niet
OORZAKEN
OPLOSSINGEN
Slechte aansluiting of
beschadigd snoer
- Controleer of het
snoer
goed
is
a a n g e s l o t e n
(stopcontact,
verlengkabel...).
- Controleer
de
voedingskabel.
Elektriciteitsnet niet
onder spanning
- Controleer zelf of laat
door een elektricien
c o n t r o l e r e n
(smeltzekering,
contactdoos...).
Nederlands
10
• Geen resultaat, schokken, hevige trillingen
OORZAKEN
OPLOSSINGEN
- Geen resultaat
- Trommel zo ver
mogelijk omlaag
- Maximum slijtage
- Abnormale trillingen
bij het groeven/frezen.
- Abnormale slijtage
slijpschijven.
- De montage van de
trommel (frezen)
controleren.
- De
trommel
of
slijpschijven, borstel,
enz... vervangen.
- De draaibeweging
van de slijpschijven
op de vier assen
controleren.
- De trommel of de
slijpschijven vervangen.
35
11
Belangrijke gebruikstips
De fabrikant is niet aansprakelijk voor
oneigenlijk gebruik, wijziging,
aanpassing of motorisering anders
dan oorspronkelijk door hem bepaald.
14
Onderdelen
Vermeld bij elke bestelling de aanwijzingen op het
typekenplaatje van de machine alsook de referentie
van het te vervangen onderdeel. Op die manier
verliezen wij minder tijd en kunnen wij de te
vervangen onderdelen sneller leveren.
Op de werkplek mag de geluidsdruk
groter zijn dan 85 dB (A).
In dat geval moet u individuele
beschermingsmaatregelen nemen.
00000000
(0)
Artikel-nr
Aantal
zie explosietekening
Nederlands
Bij werk in een gesloten of kleine
ruimte, moet u zorgen voor een goede
luchtverversing
omdat
de
uitlaatgassen koolmonoxyde bevatten
(blootstelling aan dat giftige gas kan
bewusteloosheid en zelfs de dood tot
gevolg hebben).
13
Reparatie
S
A
V
Wij staan volledig tot uw beschikking om
uw machine zo snel en goedkoop
mogelijk te repareren (zie adres op
keerzijde).
15
De schroothoop
Wanneer de machine definitief
afgedankt wordt, dienen de wettelijke
modaliteiten nageleefd te worden bij
het weggooien ervan.
• Belangrijkste materialen :
- Motor : Aluminium (AL), Staal (AC),
Motor : Koper (CU), Polyamide (PA)
- Machine : Staalplaat (AC), Gietijzer (FT)
- Machine : Aluminium (AL)
36
De gebruiksaanwijzingen en wisselstukken opgenomen in
dit document zijn gegeven ter titel van inlichting en zijn
niet van verbintenis.
Bekommerd over de kwaliteit van onze produkten
behouden wij ons het voorrecht elke technische
aanpassing te doen ter verbetering.
A
732211801(1)
543044708(1)
543044719(3)
728549501(3)
732212001(3)
543041851(1)
543044614(3)
543045458(2)
543044749(1)
725537001(1)
543048906(1)
543046080(1)
543045456(1)
543045893(1)
543041865(1)
543041872(1)
543045936(1)
05/03 - CG 200 S
543044750(1)
543044708(1)
543045968(1)
543041838(1)
543044708(1)
543041856(1)
731232001(1)
543044719(2)
731232001(1)
543044611(1)
543041835(1)
543048416(0,5M)
543044709(2)
543041903(1)
543041837(1)
543044767(2)
543044709(2)
543044613(2)
543045099(1)
543041814(1)
B
543041959(1)
543044715(3)
543042071(1)
05/03 - CG 200 S
543041852(1)
543044614(4)
543042071(1)
543044613(1)
732212201(1)
543044720(1)
543041858(1)
543044822(1)
543044822(1)
543044613(1)
543044810(1)
543041855(1)
543041849(1)
543044734(1)
543041874(1)
731232201(1)
543041857(1)
543049847(1)
543044709(4)
543041959(1)
543044715(1)
543045948(1)
543044715(1)
543045948(1)
543041839(1)
543044810(1)
543044715(1)
543044810(2)
543049846(1)
C
01/04 - CG 200 S
543044613(4)
735217301(4)
543041871(1)
543041859(3)
543045051(1)
543041828(1)
543041869(1)
543044709(4)
543041830(1)
543044614(4)
735217301(4)
543041834(1)
543041551(1)
735217301(1)
543044615(1)
543044793(1)
543068313(1)
543041908(1)
725236661(1)
543041860(1)
543045198(1)
543045654(2)
543049848(1)
543045249(1)
543042134(1)
543047388(1)
543047841(1)
722781802(4)
05/03 - CG 200 S
D
543041904(1)
725236661(1)
543041904(1)
725236661(1)
543047382(1)
543045253(2)
543045253(2)
543044718(4)
543044605(4)
543044718(4)
543044604(4)
543041866(2)
543044718(4)
735216401(4)
543044718(4)
735216401(4)
543044750(4)
543041833(1)
728736400(1)
543044980(1)
(Poly V762 J12)
543044750(4) 543045249(1)
543041891(1) 543042135(1)
728736400(1)
543044980(1)
(Poly V762 J12)
543047852(1)
543045661(1)
543045661(1)
543049849(1)
E
543045237(3)
543044717(2)
729641401(4)
543045258(0,3M)
543045263(1)
05/03 - CG 200 S
543045978(2)
543045242(3)
543045242(1)
543045252(4)
725538101(2)
543044599(4)
735216401(4)
543044718(4)
543041867(2)
543044718(4)
735216401(4)
543044601(4)
543046929(1)
543041892(1)
725636451(2)
543045125(1)
728844300(1)
543044980(1)
(Poly V762 J12)
543041905(1)
725533901(2)
543041909(1)
543041907(1)
543045252(2)
543045069(1)
543045064(1)
543044748(2)
543044706(2)
725236661(2)
543041914(1)
543045189(1)
543049850(1)
F
543044717(2)
729641401(4)
543045261(0,3M)
543045261(2M)
543045145(1) (3P+N+T)
543045136(1) (3P+N+T)
543045254(5)
543045252(5)
543045242(2)
543045978(2)
543045242(5)
543045237(5)
725538101(2)
543045126(1)
725636451(2)
543041905(1)
725533901(2)
543041909(1)
543041907(1)
543045252(2)
543045069(1)
543045064(1)
543044748(2)
543044706(2)
725236661(2)
543041914(1)
543045189(1)
543049851(1)
05/03 - CG 200 S
543044599(4)
735216401(4)
543044718(4)
543041867(2)
543044718(4)
735216401(4)
543044601(4)
543046933(1)
543041892(1)
728844300(1)
543044980(1)
(Poly V762 J12)
G
05/03 - CG 200 S
543041890(4)
735217301(4)
543041889(4)
543044801(4)
731432001(4)
543041886(1)
543044618(4)
543041880(1)
543041882(1)
543044709(3)
735217301(4)
731232001(4)
543041875(1)
543044614(2)
543041885(1)
543044719(2)
732212001(2)
543044767(3)
543044709(3)
543041900(1)
543041899(1)
543041868(1)
543040211(4)
543044614(3)
543045007(1)
543041881(1)
543041887(1)
543041888(1)
543040212
543040210
543040213
543041894(1)
543044597(4)
543041897(1)
543041898(1)
543040217
543040217
543040217
543040217
543040214
Ø 60 x 2 mm
543040209
Ø 62 x 5 mm
543040216
Ø 56 x 6,5 mm
543040215
TYPE
05/03 - CG 200 S
543040218 METAL
7/10ème
Ø 180 x 190 mm
543040219 NYLON
8/10ème
Ø 180 x 190 mm
H
543040218 (1)
543040219 (1)
➨ 543040217 (80)
➨ 543040215 (28)
➨ 543040217 (210)
➨ 543040216 (24)
➨ 543040217 (84)
➨ 543040216 (84)
➨ 543040217 (100)
➨ 543040209 (100)
➨ 543040209 (160)
➨ 543040217 (164)
➨ 543040214 (160)
➨ 543040214 (400)
EQUIPEMENT TAMBOUR
7
6
5
4
3
2
1
543040226 (1)
543040225(1)
543040224 (1)
543040223 (1)
543040222 (1)
543040221 (1)
543040220 (1)
TAMBOUR COMPLET
STANDARD - Largeur 200 mm
➨ 543040217 (24)
➨ 543040209 (24)
➨ 543040209 (40)
➨ 543040217 (40)
➨ 543040214 (40)
➨ 543040214 (92)
EQUIPEMENT TAMBOUR
TAMBOUR COMPLET
LATERAL - Largeur 47 mm
4. EXCLUSIONS
La garantie ne peut être accordée pour dommages ou pannes
provenant :
- d’une utilisation anormale, erreur de transport ou de
manutention, ou d’entretien,
- d’utilisation de lubrifiants ou combustibles de qualité non
adéquate ou non préconisée par Dimas,
- suite à l’utilisation de pièces ou d’accessoires n’étant pas
d’origine,
- suite à des interventions effectuées par du personnel non
agréé,
- de l’utilisation d’un outil diamanté défectueux ou inadéquat.
(Nous préconisons l’utilisation d’outils Dimas).
Les marchandises voyagent aux frais et risques et périls de
l’acheteur à qui il appartient d’exercer tout recours à l’encontre
du transporteur dans les formes et délais légaux.
3. CONDITIONS DE GARANTIE
Pour avoir droit à la garantie, il est indispensable de renvoyer
à Dimas, dans les huit jours après l’achat, le certificat de
garantie joint dûment complété.
En cas de problème survenant à la machine pendant la
période de garantie, nos services après-vente vous
indiqueront la meilleure marche à suivre pour vous permettre
de résoudre votre problème et vous conseilleront si besoin le
centre de service agréé le plus proche.
Vous pouvez également expédier votre machine, à vos frais, à
nos services après-vente, en joignant votre facture d’achat
ainsi qu’un rapport décrivant le problème observé et
demandant la mise en jeu de la garantie. Un diagnostic
technique sera effectué sans délai dès réception de la
machine dont les conclusions sous seront adressées.
2. ETENDUE
La garantie se limite au remplacement gratuit des pièces ayant
des vices de fabrication reconnus par Dimas (à l’exception des
pièces d’usure et consommables) si la réparation est effectuée
dans un atelier Dimas ou agréé par Dimas.
Le fabricant ne saurait couvrir les dommages consécutifs,
directs ou indirects, matériels ou immatériels, causés aux
personnes ou aux choses suite aux pannes ou à arrêts de la
machine.
1. DURÉE
La garantie prend effet à la date d’achat par l’utilisateur (date
de facture du distributeur) et est valable pour une durée de 6
mois.
CONDITIONS DE GARANTIE
Français
La merce viaggia a spese, rischio e pericolo dell’acquirente,
che ha il diritto di presentare ricorso contro il trasportatore
nelle forme e nei termini’ previsti dalla legge.
- in seguito all’utilizzo di un attrezzo diamantato difettoso o
inadeguato. (Noi prevediamo l’utilizzo di utensili Dimas).
- in seguito a interventi di personale non autorizzato;
- in seguito all’utilizzo di ricambi o accessori non originali;
- utilizzo di lubrificanti o combustibili di qualità non adeguata o
non prevista da Dimas;
- un utilizzo anormale, errato trasporto 0 manu-tenzione;
La garanzia non può essere accordata per danni o rotture
causate da:
4. ESCLUSIONI
Potete anche spedire la vostra macchina, a vostre spese, ai
nostri servizi Post-vendita, allegando la fattura d’acquisto e un
rapporto che descriva il problema e che richieda l’intervento
della garanzia. Una diagnostica tecnica sarà effettuata al
momento del ricevimento della macchina, e vi saranno inviate
le conclusioni dell’esame.
In caso di problemi insorgenti alla macchina nel periodo della
garanzia, i nostri servizi post-vendita vi indicheranno il miglior
cammino da seguire per permettervi di risolvere il problema, e
vi consiglieranno all’occorrenza il centro di servizio autorizzato
piu vicino a voi.
Per aver diritto alla garanzia, è indispensabile inviare a Dimas,
entro 8 giorni dall’acquisto, il certificato di garanzia allegato,
debitamente compilato.
3. CONDIZIONI DI GARANZIA
(In caso di riparazione effettuata da personale non autorizzato
da Dimas) il fabbricante non copre i danni, diretti o indiretti,
materiali o immateriali, causati alle persone 0 alle cose in
seguito a rottura 0 arresto della macchina.
La garanzia si limita alla sostituzione gratuita di parti che
abbiano dei difetti di fabbricazione riconosciuti da Dimas (fatta
eccezione per le parti d’usura e di consumo) se la riparazione
è effettuata in una officina Dimas o autorizzata da Dimas.
2. ESTENSIONE
La garanzia ha effetto dalla data di acquisto da parte
dell’utilizzatore (data della fattura del distributore) e avrà
validiatà per la durata di sei mesi.
4. EXCLUSIONES
La garantia no se aplica a las piezas de desgaste o las
consideradas como:
- Una utilización anormal, error de transporte, manipulación, 0
mantenimiento.
- Utilización de lubricantes o combustibles de calidad no
adecuada o no recomendada por Dimas.
- Utilización de piezas o accesorios que no sean originales.
- Reparaciones efectuadas por personal no autorizado.
- Utilización de un ùtil diamantado defectuoso o inadecuado.
(Recomendamos la utilización de outiles Dimas).
Las mercancias viajan por cuenta y riesgo del comprador,
siendo el comprador el que deberà ejercer toda demanda
frente al transportista en las formas y plazos legales.
3. CONDICIONES DE GARANTIA
Para tener derecho a la garantia, es indispensable enviar a
Dimas, antes del octavo dia despuès de la compra, el
certificado de garantía adjunto debidamente cumplimentado.
En caso que surgiera algùn problema con la maquina, durante
el periodo de garantia, nuestro servicio post venta les
indicaran el mejor sistema que permita resolver su problema y
le aconsejaran si lo necesitaran, el centro de servicio
autorizado mas
próximo.
Igualmente puede enviarnos su maquina, portes pagados por
el expedidor, a nuestro servicio post-venta adjuntando su
factura de compra, asi como un informe describiendo el
problema observado, y sodicitands su reparación en garantia.
Se le efectuara un primer diagnostico tècnico a la recepcion
de la maquina, y las conclusiones les serán remitidas vìa fax 0
carta.
2. COBERTURA
La garantia se limita al recambio gratuito de las piezas que
tuvieran defecto de material reconocido por Dimas (con
excepción de piezas de desgeste y consumibles), si la
reparación es efectuada en el taller de Dimas o en uno
autorizado por Dimas.
El fabricante no cubre los daños directos o indirectos,
materiales o inmateriales, causados a personas o cosas
debido a averias de la maquina ni a paros prolongados de la
maquina.
1. DURACION
La garantia tiene efecto desde la fecha de compra del
utilizador, (fecha de factura del distribuidor), y tiene una
duración de 6 meses.
CONDICIONES DE GARANTIA
CONDIZIONI Dl GARANZIA
1. DURATA
Español
Italiano
The goods are returned at the sole responsibility of the Buyer
who must appeal against the transporter in the usual manner
without delay.
- use of incorrect specifications of cutting tools. (We suggest
the use of Dimas tools).
- repairs made by non approved service centres,
- use of non-genuine parts or accessories,
- use of incorrect fuel or lubricants not advised by Dimas,
- incorrect use, error in transportation, handling or
maintenance,
Warranty will not be applied for damages or failures caused by :
4, EXCLUSIONS
As an alternative, you may return, at your cost, the machine
together with a written description of the problem and
damages with a copy of the invoice directly to our after sales
department where upon a full investigation will be instigated
without delay.
will inform you of the appropriate and most effective method of
dealing with your claim and advise you if necessary of your
nearest approved service centre.
In case of failure of the machine during the warranty period,
our after-sales services
To benefit the warranty, it is necessary to return the joined
warranty certificate, duly completed, to Dimas within eight days
of the purchase.
3. WARRANTY CONDITIONS
The manufacturer is not responsible for any direct or indirect,
material or immaterial, damages caused to persons or things
by failure of the machine or the non operation of the machine.
The warranty is limited to the free of charge replacement of
parts recognised as defective by Dimas (excluding wear
components and consumables) providing the repair is made
within after-sales service of Dimas or a recognised Dimas
repair centre.
2. WARRANTY
The warranty is acknowledged as of the date of purchase
(date of the invoice of the distributor) and is valid for a period
of 6 months.
1. PERIOD
WARRANTY CONDITIONS
English
1. DUUR
De garantie vangt aan vanaf de datum van aankoop door de
gebruiker (faktuurdatum van de wederverkoper) en is gedurende
6 maanden geldig.
2. DEKKING
De garantie beperkt zich tot het gratis vervangen door Dimas van
onderdelen door haar als defekt erkend (met uitzondering van
verbruiksdelen en versleten delen) op voorwaarde dat de
reparatie wordt uitgevoerd in een werkplaats van Dimas of in een
werkplaats die aangewezen is door Dimas.
De fabrikant aanvaardt geen enkele aansprakelijkheid voor
schade, direkt of indirekt, materieel of immaterieel, die berokkend
wordt aan personen of zaken, die het gevolg is van gebreken aan
de machine of het langere tijd niet kunnen gebruiken van de
machine.
1. DAUER
Die Garantie wird wirksam am Tag des Kaufs durch den
Anwender (Rechnungsdatum des Händlers) und gilt für einen
Zeitraum von sechs Monaten.
2. UMFANG
Die Garantie beschränkt sich auf den kostenlosen Ersatz von
Teilen, die von Dimas als fehlerhaft anerkannt wurden
(ausgenommen sind Verschleißteile und Verbrauchsartikel),
vorausgesetzt, die Reparatur erfolgt in einer Werkstatt von
Dimas oder einer von Dimas anerkannten Werkstatt.
Der Hersteller haftet nicht für direkte oder indirekte materielle
oder immaterielle Personen- oder Sachschäden durch
Versagen oder Stillstand der Maschine.
4. AUSSCHLÜSSE
Die Garantie kann nicht gewährt werden bei Schäden oder
Ausfällen aufgrund :
- von falscher Anwendung, Transport-, Handhabungs-oder
Wartungsfehlern;
der Verwendung von nicht geeigneten oder nicht von Dimas
empfohlenen Schmiermitteln oder Kraftstoffgemische;
- der Verwendung nicht originaler Teile oder Zubehörteile;
- von Arbeiten an der Maschine, die von nicht anerkanntem
Personal ausgeführt wurden;
- der Verwendung eines schadhaften oder nicht geeigneten
Diamantwerkzeugs. (Wir empfehlen die Verwendung von
Dimas Werkzeugen).
Die Waren werden auf Kosten und Gefahr des Käufers
transportiert, der selbst dafür verantwortlich ist,
Regreßansprüche gegen den Spediteur in der gesetzlich
vorgesehenen Form und Frist geltend zu machen.
4. UITSLUITINGEN
Geen garantie wordt verleend bij gebreken of storingendie het
gevolg zijn van:
- verkeerd gebruik, schade ontstaan bij vervoer ofonderhoud,
- het gebruik van smeermiddelen en brandstoffen die niet door
Dimas aanbevolen zijn of van slechte kwaliteit zijn,
- het gebruik van niet-originele onderdelen of toebehoren,
- reparaties die uitgevoerd zijn door een werkplaats die niet door
Dimas erkend is,
- het gebruik van beschadigd of verkeerd gekozen
diamantgereedschap (wij bevelen het gebruik van Dimas
gereedschappen aan).
De goederen zullen op kosten en voor risiko van de koper
verzonden worden, die zelf de verantwoordelijkheid draagt voor
verhaal op de transporteur binnen de wettelijke normen en
termijnen.
3. GARANTIEVOORWAARDEN
Om aanspraak te kunnen maken op garantie is het noodzakelijk
om bijgaand garantie certifikaat volledig ingevuld binnen 8 dagen
na aankoop terug te zenden naar Dimas.
Indien u gedurende de garantieperiode onverhoopt problemen
mocht hebben met de machine, zal onze After-Salesservicedienst
aangeven hoe deze snel en op de beste manier opgelost kunnen
worden en zal zij aangeven tot welke dichtstbijzijnde
reparatiewerkplaats u zich kunt wenden.
Indien gewenst kunt U de machine op Uw kosten naar de AfterSales servicedienst terug sturen vergezeld van de
aankoopfaktuur met schriftelijke opgave van het geconstateerde
probleem en met het verzoek om toepassing van de
garantiebepalingen.
Na ontvangst van de machine zal direkt een technisch onderzoek
uitgevoerd worden, waarvan het resultaat U bekend wordt
gemaakt.
GARANTIE VOORWAARDEN
GARANTIEBEDINGUNGEN
3. GARANTIEBEDINGUNGEN
Um Anspruch auf die Garantie zu haben, muß das beigefügte
Garantiezertifikat ordnungsgemäß ausgefüllt innerhalb von
acht Tagen nach dem Kauf an Dimas geschickt werden.
Wenn an der Maschine während der Garantiezeit ein Problem
auftritt, wird unser Kundendienst Ihnen die beste
Vorgehensweise zur Lösung Ihres Problems aufzeigen und
Ihnen nötigenfalls die nächstgelegene anerkannte
Servicestelle nennen.
Sie können Ihre Maschine auch auf eigene Kosten Zusammen
mit der Kaufrechnung und einem Bericht, in dem das
aufgetretene Problem beschrieben und um Gewährung der
Garantie gebeten wird, an unseren Kundendienst schicken.
Nach Erhalt der Maschine erfolgt unverzüglich eine technische
Untersuchung, deren Ergebnis Ihnen mitgeteilt wird.
Nederlands
Deutsch
- Användning av defekta eller olämpliga diamantverktyg. (Vi
rekommenderar användning av DIMAS-verktyg.)
As mercadorias viajam por conta e risco do comprador, sendo
este que deverá exercer todas as demarches frente ao
transportador de como deve ser feito o transporte das
mesmas.
Transport av varorna sker på köparens bekostnad och risk.
Köparen bör därför tillvarata sina rättigheter gentemot
transportföretaget på det sätt och inom de tidsfrister som lagen
föreskriver.
- Ingrepp som utförts av ej behörig personal.
- Utilização de ferramentas diamantadas defeitosas ou
inadequadas.
. (Recomendamos a utilização de discos Dimas).
- Användning av reservdelar eller tillbehör som inte är original.
- Reparaçâo efectuada por pessoas nâo autorizadas.
- Användning av smörjmedel eller drivmedel av
otillfredsställande kvalitet eller av fabrikat som inte
rekommenderas av DIMAS.
- Onormal användning, felaktig transport eller hantering eller
felaktigt underhåll.
Garantin gäller inte för skador eller fel av följande orsaker:
4. UNDANTAG
Du kan också på egen bekostnad sända maskinen till vår
kundtjänst. Bifoga då fakturan samt en beskrivning av det uppkomna problemet och en begäran om att få ta garantin i
anspråk. Så snart vi tagit emot maskinen genomför vi då en
teknisk besiktning och meddelar dig resultatet av denna.
Om det uppstår problem med maskinen under garantitiden kan
vår kundtjänst upplysa dig om bästa sättet att lösa problemet
och om så behövs hänvisa dig till närmaste auktoriserade
serviceverkstad.
För att garantin skall gälla måste användaren inom åtta dagar
efter inköpet insända det vederbörligen ifyllda
garanticertifikatet till DIMAS.
3. GARANTIVILLKOR
Tillverkaren ersätter inte direkta eller indirekta, materiella eller
immateriella följdskador som drabbat personer eller egendom
som följd av felaktigheter hos eller stopp av maskinen.
Garantin är begränsad till kostnadsfritt byte av delar som är
behäftade med tillverkningsfel som godkänts av DIMAS (med
undantag för slitdelar och förbrukningsmateriel) om
reparationen utförs vid en DIMAS-verkstad eller en verstad
som auktoriserats av DIMAS.
- Utilização de peças ou acessõrios que nâo sejam de origem.
- Utilização de lubrificantes ou combustivel de qualidade nâo
recomendada pela Dimas.
- Uma utilização anormal, mau transporte, manuseamento ou
manutenção.
A garantia não se aplica a peças de desgaste ou ás
consideradas como :
4. EXCLUSÕES
lgualmente poderáo enviar-nos a sua máquina (portes pagos
pelo expedidor), aos nossos serviços pós-venda, juntando a
factura de compra, assim como descriçao da avaria e se esta
ou náo na garantia. Apos recepção da mesma efectuar-se-á
um primeiro diagnostico técnico e as conclusões serão
remetidas por fax.
Em caso de algum problema com a máquina durante o
periodo de garantia, os nossos serviços pós-venda, indicarlhe-ão o melhor sistema que permita resolver o seu problema
e o aconselharão, se necessitar, o centro de serviço
autorizado mais próximo.
Para ter direito à garantia, é indispensavel enviar à Dimas, 8
dias após a compra, a certificaçáo de garantia devidamente
carimbada eassinada.
3. CONDIÇÕES DE GARANTIA
0 fabricante não cobre danos directos ou indirectos, causados
pela má utilização da máquina, nem por paragens
prolongadas da mesma.
A garantia limita-se à troca gratuita das peças que tiverem
defeito, material este que terá de ser reconhecido pela Dimas
(com excepção de uso de consumiveis) e se a reparação for
efectuada nas nossas instalações - Dimas - ou numa oficina
autorizada.
2. OMFATTNING
Garantin gäller från inköpsdagen (datum på återförsäljarens
faktura) och därefter under sex månader.
2. COBERTURA
1. GARANTITID
A garantia tem efeito a partir da data de compra do utilizador
(data da factura do distribuidor) e tem a duração de 6 meses.
GARANTIVILLKOR
Svenska
1. DURACÂO
CONDlÇÕES DE GARANTIA
Portugués
Construction Business Group
........................................
........................................
........................................
UNITED KINGDOM
PARTNER DIMAS UK
Oldends Lane Ind. Estate
Stonedale road, Stonehouse
Gloucestershire
GB- GL 10 3SY
GREAT BRITAIN
GERMANY
DIMAS Deutschland
Nierfeldstrasse 6
D-58313 Herdecke
GERMANY
DENMARK
DIMAS Denmark
Lundtoftegardsvej 93A
DK - 2800 Lyngby
DENMARK
FINLAND
DIMAS FINLAND
Panimokatu 4
Sisapina
FI - 00511 HELSINKI
FINLAND
ITALIE
DIAMANT BOART Italiana
Via REMATO
Loc. MAGUZZANO
IT-25017 LONATO
ITALIA
NORWAY
DIMAS Norge
Okern Naringspark
Rislokkeveien 2
NO -0580 OSLO
NORWAY
SWEDEN
DIMAS AB Sverige
Industrigatan 8
SE -55002 JONKOPING
SWEDEN
ESPANA
DIAMANT BOART IBERICA
Ctra de Rivas Km 4.600
Appartado Correos 49007
ES-28052
ESPANA
FRANCE
DIMAS FRANCE
Rue des Merisiers
F-41260 La Chaussée Saint
Victor
FRANCE
GREECE
DIMAS HELLAS SA
Industrial Zone of INOFYTA
55km ATHINON-LAMIAS
GR-32011 INOFYTA BEOTIA
GREECE
PORTUGAL
DIAMANT BOART Portuguesa
SA
Lagao - Albarraque
PT-263595 RIO DE MOURO
PORTUGAL
DIMAS in Europe
BELGIQUE - LUXEMBOURG NETHERLANDS
DIAMANT BOART SA
Avenue du Pont de Luttre
B-1190 Brussels
BELGIUM
✂
DIMAS
• Placer ici l’autocollant CE
avec le N° de série
• Hier EU Etikette mit
Serienummer aufkleben
• Attaccare qui l’adesivo CE
con N° di matricola
• Plaats hier de CE sticker
met reeks Nr
• Colar o autocolante CE
com o numéro de série
• Colocar aqui la pegatina CE
con el numéro de série
• Fäst CE-dekalen med serienummer här
Place here CE
sticker with serial N°
• Certificat de garantie
• Garantie-Zertifikat
• Certifïca to di garanzia
• Garantiebewijs
• Certificado de garantia
• Certifição de garantia
• Garanticertifikat
Warranty certificate
To benefit from the warranty, it is mandatory to return, within eight days
after the purchase, the attached warranty certificate.
Pour avoir droit à la garantie, il est indispensable de
renvoyer dans les huits jours après l’achat, le certificat de
garantie ci-joint, dûment complété.
Um ein Anrecht auf die Garantie zu erwerben, muß der
beigefügte Garantieschein ordnungsgemäß ausgefüllt
innerhalb von acht Tagen nach Kauf eingeschickt werden.
Per poter fruire della garanzia, è indispensabile resperdire
il certificato di garanzia allegato, debitamente compilato
otto giorni consecutivi all’acquisto.
Om recht te hebben op de garantie, is het noodderendezakelijk om binnen de 8 dagen na aankoop, het
garantie certifikaat, volledig ingevuld, op te sturen.
Para ter direito à garantia, é indispenável enviar
antes do oitavo dia depois da compra, o certificado
de garantia devidamente carimbado e assi-dem
nado.
Para tener derecho a la garantia, es indispen-rinvio
negli sable enviar antes del octavo dia despuès de la
compra, el certificado de garantia adjunto
debidamente cumplimentado.
För att garantin skall gälla måste användaren inom Om
recht te hebben op de garantie, is het nood åtta dagar
efter köpet insända det bifogade derendede zakelijk om
binnen de 8 dagen na aankoop, garanticertifikatet,
vederbörligen ifyllt.
✂
Warranty certificate
Certificat de garantie • Garantie-Zertitïkat • Certificato di garanzia • Garantie bewijs • CertifÏcado de garantia • Certificado de garantia • Garanticertifikat
Company : ...............................................................................................................
Société • Gesellschaft • Societa • Maatchappij • Sociedade • sociedad • Företag
Address :..................................................................................................................
Adresse • Adresse • indirizzo • Adres • Endereco • Direccion • Adress
Date of Acquisition : .................................................................................................
Date d’achat • Datum des Kaufs • Data di acquisto • Datum van aankoop • Data de compra • Fecha de comprar • Inköpsdatum
Machine Type : ........................................................................................................
Type de la machine • Maschinen Type • Tipo della macchina • Machine Type • Tipo de maquina • Tipo de maquina
• Maskintyp
Machine Serial Nr : ..................................................................................................
N° de référence de la machine • Maschinen seriennumer • Numeor di matricola • Machine Reeks • Nr Numéro de série
da maquina • Numéro de série de la maquina • Maskinens serienummer
Date : .......................................................................................................................
Date • Datum • Data • Datum • Data • Fecha • Date • Datum
Signature
signature • Unterschrift • ondertekening • Assinatura • Firma • Namnteckning
Place here sticker
or serial Nr.
• Placez ici l'autocollant
ou le N° de série
• Sticker hier aukleben
oder geben sie die seriennummer
bekannt
• Attacare qui l’adesivo
o ii numéro di matricola
• Piaats hier de sticker of reeks Nr.
• Colar 0 autocolante
o numéro de série
• Colocar aqui la pegatina
o numéro de série
• Placera dekalen eller serienumret här