1
GEBRAUCHSANLEITUNG
Originalversion
OPERATING MANUAL
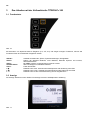
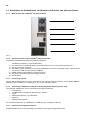
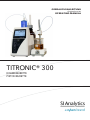
TITRONIC® 300
KOLBENBÜRETTE
PISTON BURETTE
Gebrauchsanleitung Originalversion .................................................................................. Seite 3 .....54
®
Wichtige Hinweise: Die Gebrauchsanleitung vor der ersten Inbetriebnahme der Kolbenbürette TITRONIC
®
300 bitte sorgfältig lesen und beachten. Aus Sicherheitsgründen darf die Kolbenbürette TITRONIC 300
ausschließlich nur für die in dieser Gebrauchsanleitung beschriebenen Zwecke eingesetzt werden.
Bitte beachten Sie auch die Gebrauchsanleitungen für die anzuschließenden Geräte.
Alle in dieser Gebrauchsanleitung enthaltenen Angaben sind zum Zeitpunkt der Drucklegung gültige Daten. Es
können jedoch von SI Analytics sowohl aus technischen und kaufmännischen Gründen, als auch aus der
Notwendigkeit heraus, gesetzliche Bestimmungen der verschiedenen Länder zu berücksichtigen,
®
Ergänzungen an der Kolbenbürette TITRONIC 300 vorgenommen werden, ohne dass die beschriebenen
Eigenschaften beeinflusst werden.
Operating Instructions ....................................................................................................... Page 55 ... 106
®
Important notes: Before initial operation of the Piston Burette TITRONIC 300, please read and observe the
operating instructions carefully. For safety reasons the Piston Burette TITRONIC® 300 may only be used for
the purposes described in these present operating instructions.
Please also observe the operating instructions for the units to be connected.
All specifications in this instruction manual are guidance values which are valid at the time of printing.
However, for technical or commercial reasons or in the necessity to comply with the statuary stipulations of
®
various countries, SI Analytics may perform additions to the Piston Burette TITRONIC 300 without changing
the described properties.
Copyright © 2014, SI Analytics GmbH
Nachdruck - auch auszugsweise - nur mit schriftlicher Genehmigung der SI Analytics GmbH, Mainz.
Printed in Germany.
INHALTSVERZEICHNIS
SEITE
1 .. Technische Eigenschaften der Kolbenbürette TITRONIC® 300 ............................. 5
1.1
1.2
1.3
Zusammenfassung .................................................................................................................... 5
®
Technische Eigenschaften der Kolbenbürette TITRONIC 300 ............................................... 6
Warn- und Sicherheitshinweise ................................................................................................. 8
2 .. Aufstellen und Inbetriebnahme ................................................................................ 9
2.1
2.2
2.3
2.3.1
2.3.2
2.3.3
2.3.4
2.3.5
2.4
2.5
2.6
Auspacken und Aufstellen der Kolbenbürette ........................................................................... 9
Montage des Rührers TM 50 .................................................................................................... 9
Anschlüsse der Kolbenbürette. Kombination mit Zubehör und weiteren Geräten .................. 10
®
Rückwand der Kolbenbürette TITRONIC 300 ....................................................................... 10
®
Anschlüsse der Kolbenbürette TITRONIC 300. .................................................................... 10
Anschluss eines Druckers ....................................................................................................... 10
Anschluss eines USB-Gerätes (Handtaster, Tastatur, Speichergerät, HUB) ......................... 10
Anschluss von Analysenwaagen ............................................................................................. 10
Einstellen der Landessprache ................................................................................................. 11
Dosieraufsatz und Zubehör ..................................................................................................... 13
Spülen und Erstbefüllen .......................................................................................................... 14
3 .. Das Arbeiten mit der Kolbenbürette TITRONIC® 300 ............................................ 16
3.1
3.2
3.3
3.4
3.5
3.6
3.6.1
3.6.2
Fronttastatur ............................................................................................................................ 16
Anzeige ................................................................................................................................... 16
Handtaster ............................................................................................................................... 17
Externe PC Tastatur; (Optional) .............................................................................................. 17
Menüstruktur ........................................................................................................................... 18
Hauptmenü .............................................................................................................................. 19
Manuelle Titration .................................................................................................................... 20
Dosierung ................................................................................................................................ 22
4 .. Methodenparameter ................................................................................................ 25
4.1
4.2
4.3
4.4
4.5
4.5.1
4.5.2
4.5.3
4.5.4
4.5.5
Methode editieren und neue Methode .................................................................................... 25
Standardmethoden .................................................................................................................. 26
Methoden kopieren.................................................................................................................. 26
Methoden löschen ................................................................................................................... 27
Methodenparameter ändern .................................................................................................... 27
Methodentyp ............................................................................................................................ 27
Ergebnis (nur manuelle Titration) ............................................................................................ 28
Dosierparameter...................................................................................................................... 33
Probenbezeichnung ................................................................................................................ 33
Dokumentation ........................................................................................................................ 34
5 .. Systemeinstellungen ............................................................................................... 36
5.1
5.1.1
5.2
5.3
5.4
5.5
5.6
5.7
5.8
5.9
5.10
Reagenzien/Dosieraufsatz ...................................................................................................... 36
Aufsatzwechsel ....................................................................................................................... 36
Globale Speicher ..................................................................................................................... 40
RS232 Einstellungen ............................................................................................................... 40
Anschluss von Drucker............................................................................................................ 42
Datum und Uhrzeit .................................................................................................................. 42
RESET .................................................................................................................................... 43
Geräteinformationen................................................................................................................ 43
Systemton ............................................................................................................................... 44
Datenaustausch ...................................................................................................................... 44
Software Update...................................................................................................................... 45
6 .. Anschluss von Analysenwaagen ........................................................................... 48
6.1
Waagedateneditor ................................................................................................................... 48
7 .. Datenkommunikation über die RS-232- und USB-B- Schnittstelle ...................... 50
7.1
7.2
7.3
Allgemeines ............................................................................................................................. 50
Verkettung mehrerer Geräte — „Daisy Chain Konzept“ ......................................................... 50
Befehlsliste für RS-Kommunikation ......................................................................................... 51
8 .. Wartung und Pflege der Kolbenbürette TITRONIC® 300....................................... 52
9 .. Lagerung und Transport ......................................................................................... 53
10 Recycling und Entsorgung ..................................................................................... 53
11 Index ......................................................................................................................... 54
Konformitätserklärung…………………………………………letzte Seite des Dokuments
Hinweise zur Gebrauchsanleitung
Die vorliegende Gebrauchsanleitung soll Ihnen den bestimmungsgemäßen und sicheren Umgang mit
den Titrationsgeräten ermöglichen.
Das verwendete Piktogramm
!
hat folgende Bedeutung:
Aktualität bei Drucklegung
Fortschrittliche Technik und das hohe Qualitätsniveau unserer Produkte werden durch eine ständige
Weiterentwicklung gewährleistet. Daraus können sich evtl. Abweichungen zwischen dieser
Betriebsanleitung und Ihrem Produkt ergeben. Irrtümer können wir nicht ganz ausschließen. Haben
Sie deshalb bitte Verständnis, dass aus den Angaben, Abbildungen und Beschreibungen keine
juristischen Ansprüche abgeleitet werden können.
Hinweis
Eine möglicherweise aktuellere Version dieser Gebrauchsanleitung finden Sie im Internet auf
unserer Webseite unter www.si-analytics.com. Die deutsche Fassung ist die Originalversion und in
allen technischen Daten bindend.
Version 140815 D
Für eine größtmögliche Sicherheit beachten Sie unbedingt die Sicherheits- und Warnhinweise in
der Gebrauchsanleitung.
Warnung vor einer allgemeinen Gefahr für Personal und Material.
Bei Nichtbeachtung können Personen verletzt oder Material zerstört werden.
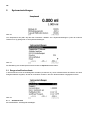
5
1
Technische Eigenschaften der Kolbenbürette TITRONIC® 300
1.1 Zusammenfassung
®
Die TITRONIC 300 ist eine Kolbenbürette und für folgende Anwendungen geeignet:
−
−
−
−
Manuelle Titrationen mit oder ohne Berechnung des Ergebnisses
Dosierungen
®
Verwendung als Dosierbürette mit dem Titrator TitroLine 7750
Verwendung als Dosier- oder Titrierbürette in Kombination mit der Steuersoftware TitriSoft ab Version 3.1.
Bei jeder Methode sind unterschiedliche Dosier- und Füllgeschwindigkeiten einstellbar.
Es können bis zu 3 Anwendermethoden im Gerät abgespeichert werden.
Einsetzbare Lösungen sind:
Praktisch sind alle Flüssigkeiten und Lösungen mit einer Viskosität < = 10 mm² / s wie z.B.: konzentrierte
Schwefelsäure zu verwenden. Jedoch Chemikalien die Glas, PTFE oder FEP angreifen oder explosiv sind wie
z.B. Flusssäure, Natriumazid, Brom dürfen nicht eingesetzt werden! Suspensionen mit hohem Feststoffgehalt
können das Dosiersystem verstopfen oder beschädigen.
!
!
Allgemein gilt:
Es sind die jeweiligen gültigen Sicherheitsrichtlinien im Umgang mit Chemikalien unbedingt zu beachten. Dies
gilt insbesondere für brennbare und / oder ätzende Flüssigkeiten.
Garantieerklärung
Wir übernehmen für das bezeichnete Gerät eine Garantie auf Fabrikationsfehler, die sich innerhalb
von zwei Jahren ab dem Kaufdatum herausstellen. Der Garantieanspruch erstreckt sich auf die
Wiederherstellung der Funktionsbereitschaft, nicht jedoch auf die Geltendmachung weitergehender
Schadensersatzansprüche.
Bei unsachgemäßer Behandlung oder bei unzulässiger Öffnung des Geräts erlischt der
Garantieanspruch. Von der Garantie ausgeschlossen sind Verschleißteile wie z.B. Kolben, Zylinder,
Ventile, Schläuche inkl. der Verschraubungen und Titrierspitzen. Ebenso ist der Bruch bei Glasteilen
von der Garantie ausgenommen.
Zur Feststellung der Garantiepflicht bitten wir Sie, uns das Gerät und den Kaufbeleg mit Kaufdatum
frachtfrei bzw. postfrei einzusenden.
6
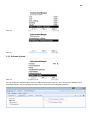
1.2 Technische Eigenschaften der Kolbenbürette TITRONIC® 300
Stand 17.07.2014
CE-Zeichen:
EMV - Verträglichkeit nach der Richtlinie 2004/108/EG des Rates;
angewandte harmonisierte Norm: EN 61326/1:2012.
Niederspannungsrichtlinie nach der Richtlinie 2006/95/EG des
Rates, angewandte harmonisierte Norm: EN 61 010, Teil 1.
Ursprungsland:
Germany, Made in Germany
Folgende Lösemittel/ Titrierreagenzien dürfen eingesetzt werden:
− Alle gebräuchlichen Titrierlösungen.
− Als Lösemittel sind Wasser und alle nichtaggressiven anorganischen und organischen Flüssigkeiten
möglich. Beim Umgang mit brennbaren Stoffen sind die Explosionsschutz - Richtlinien der
Berufsgenossenschaft der chemischen Industrie zu beachten.
2
− Für Flüssigkeiten mit höherer Viskosität (≥ 5 mm /s), niedrigem Siedepunkt oder Neigung zum Ausgasen,
kann die Füll- und Dosiergeschwindigkeit angepasst werden.
2
− Flüssigkeiten mit einer Viskosität über 20 mm /s können nicht dosiert werden.
Anzeige:
grafikfähiges 3,5 Zoll -1/4 VGA TFT Display mit 320x240 Bildpunkten.
Spannungsversorgung: durch externes Steckernetzteil von 90 – 230 V, 50/60 Hz
Leistungsaufnahme 30 VA
Nur das Netzteil TZ 1853, mit der Typbezeichnung: FW 7362M/12, verwenden.
RS-232-C-Schnittstellen: RS-232-C-Schnittstelle galvanisch getrennt mittels Opto-Koppler
Daisy Chain Funktion möglich.
Datenbits:
einstellbar, 7 oder 8 Bit (Defaultwert 8 Bit)
Stoppbit:
einstellbar, 1 oder 2 Bit (Defaultwert 1 Bit)
Startbit:
fest 1 Bit
Parity:
einstellbar: even / odd / none
Baudrate:
einstellbar: 1200, 2400, 4800, 9600, 19200 (Default 4800 Baud)
Adresse:
einstellbar, (0 bis 15, Defaultwert:01)
RS-232-1
RS-232-2
für Computer, Eingang Daisy Chain
Geräte von SI Analytics, Titrator TitroLine 7750,
- Kolbenbüretten TITRONIC 500, TITRONIC 110 plus,
TITRONIC universal/300,
- Waagen des Typs Mettler, Sartorius, Kern, Ohaus, weitere auf Anfrage
- Ausgang Daisy-Chain
USB-Schnittstellen
1 x USB-Typ-A und 1 x USB-Typ-B (Mini-Ausführung)
USB –Typ B („Slave“)
für Computeranschluss,
USB –Typ A („Master“)
für Anschluss von
r
Rührer:
- USB-Handtaster („Maus“), oder
- USB-Tastatur, oder
- USB-Drucker, oder
- USB-Speichermedien wie z.B. USB-Stick, oder
- USB-Hub zum Anschluss mehrere USB-Geräte
Steckverbindung mit integrierter Niederspannungsversorgung (12 V ⎓) im
®
Gehäuseboden der Kolbenbürette TITRONIC 300 für Magnetrührer TM 50
7
Stand 17.07.2014
Gehäuse-Werkstoff:
Polypropylen
Fronttastatur:
Polyester
Gehäuse-Abmessungen: 135 x 310 x 205 mm (B x H x T), Höhe inklusive Dosiereinheit, ohne Rührer
Gewicht:
ca. 2 kg
Klima:
Umgebungstemperatur: + 10 ... + 40 °C für Betrieb und Lagerung
Luftfeuchtigkeit nach EN 61 010, Teil 1: 80 % für Temperaturen bis 31 °C
linear abnehmend bis zu 50 % relativer Feuchte bei einer Temperatur von
40 °C
Dosieraufsätze
®
®
Zylinder:
Kolbenbürette TITRONIC 300 : 20 ml DURAN (Borosilikatglas 3.3) – Zylinder
®
®
Kolbenbürette TITRONIC 300 : 50 ml DURAN (Borosilikatglas 3.3) - Zylinder
UV-Schutz: Schutzmantel aus TROGAMID, blau, transparent
Ventil:
Schläuche:
volumenneutrales Kegelventil aus Fluorkohlenstoffpolymeren (PTFE), TZ 3000
FEP-Schlauchgarnitur, blau
Dosiergenauigkeit:
Richtigkeit :
Präzision:
nach DIN EN ISO 8655, Teil 3
0,15 %
0,05 %
8
1.3 Warn- und Sicherheitshinweise
®
Das Gerät TITRONIC 300 entspricht der Schutzklasse III. Es ist gemäß EN 61 010 - 1, Teil 1,
Sicherheitsbestimmungen für elektrische Mess-, Steuer-, Regel- und Laborgeräte, gebaut und geprüft und hat
das Werk in sicherheitstechnisch einwandfreiem Zustand verlassen. Um diesen Zustand zu erhalten und einen
gefahrlosen Betrieb sicherzustellen, muss der Anwender die Hinweise und Warnvermerke beachten, die in
dieser Gebrauchsanleitung enthalten sind. Die Entwicklung und Produktion erfolgt in einem System, das die
Anforderungen der Norm DIN EN ISO 9001 erfüllt.
®
Aus sicherheitstechnischen Gründen darf die Kolbenbürette TITRONIC 300 grundsätzlich nur von
autorisierten Personen geöffnet werden. So dürfen z.B. Arbeiten an der elektrischen Einrichtung nur von
ausgebildeten Fachleuten durchgeführt werden.
! Bei Nichtbeachtung kann von der Kolbenbürette Gefahr ausgehen: elektrische Unfälle von Personen
®
und Brandgefahr. Bei unbefugtem Eingriff in die TITRONIC 300 sowie bei fahrlässiger oder
vorsätzlicher Beschädigung erlischt außerdem die Gewährleistung. !
Vor dem Einschalten ist sicherzustellen, dass die Betriebsspannung des Netzteils der Kolbenbürette
®
TITRONIC 300 und die Netzspannung übereinstimmen. Die Betriebsspannung ist auf dem Typenschild
®
angegeben. Bei Nichtbeachtung können das Netzteil und/oder die Kolbenbürette TITRONIC 300 beschädigt
werden und es kann zu Personen- oder Sachschäden kommen.
®
Wenn anzunehmen ist, dass ein gefahrloser Betrieb nicht möglich ist, ist die Kolbenbürette TITRONIC 300
außer Betrieb zu setzen und gegen ein unbeabsichtigtes Inbetriebnehmen zu sichern. Die Kolbenbürette
®
TITRONIC 300 bitte ausschalten, das Steckernetzteil aus der Steckdose ziehen und die Kolbenbürette
®
TITRONIC 300 vom Arbeitsplatz entfernen.
Es ist z.B. zu vermuten, dass ein gefahrloser Betrieb nicht mehr möglich ist,
wenn eine Beschädigung der Verpackung vorliegt,
®
wenn die Kolbenbürette TITRONIC 300 sichtbare Beschädigungen aufweist,
®
wenn die Kolbenbürette TITRONIC 300 nicht bestimmungsgemäß funktioniert,
wenn Flüssigkeit in das Gehäuse eingedrungen ist.
wenn die Kolbenbürette technisch verändert wurde oder wenn nicht autorisierte Personen mit
Reparaturversuchen in das Gerät eingegriffen haben.
Nimmt der Anwender das Gerät in diesen Fällen dennoch in Betrieb, gehen alle daraus resultierenden Risiken
auf ihn über.
®
Die Kolbenbürette TITRONIC 300 darf nicht in feuchten Räumen gelagert oder betrieben werden.
®
Aus Sicherheitsgründen darf die Kolbenbürette TITRONIC 300 ausschließlich nur für das in der
Gebrauchsanleitung beschriebene Einsatzgebiet verwendet werden.
Die entstehenden Risiken muss der Anwender bei allen Abweichungen vom bestimmungsgemäßen Gebrauch
selber beurteilen.
!
Die einschlägigen Vorschriften im Umgang mit den verwendeten Stoffen müssen eingehalten
werden: die Gefahrstoffverordnung, das Chemikaliengesetz und die Vorschriften und Hinweise des
Chemikalienhandels. Es muss seitens des Anwenders sichergestellt sein, dass die mit dem Gebrauch der
®
TITRONIC 300 betrauten Personen Sachkundige im Umgang mit den im Umfeld der Kolbenbürette
angewendeten Stoffen sind oder von sachkundigen Personen beaufsichtigt werden.
! Bei allen Arbeiten mit Chemikalien: Schutzbrille tragen! !
®
Die Kolbenbürette TITRONIC 300 ist mit integrierten Schaltkreisen (z.B. Flashspeicher) ausgerüstet.
Röntgen- oder andere energiereiche Strahlen können durch das Gerätegehäuse hindurch dringen und die
Betriebssoftware löschen.
Bei Arbeiten mit Flüssigkeiten, die nicht gebräuchlichen Titriermitteln entsprechen, ist insbesondere die
®
chemische Beständigkeit der Materialien der TITRONIC 300 zu berücksichtigen (siehe Kapitel 1.1).
Bei Einsatz von Flüssigkeiten mit hohem Dampfdruck und/oder Stoffen oder Stoffgemischen, die nicht unter
Kapitel 1.1 als einsetzbar beschrieben sind, muss der gefahrlose und einwandfreie Betrieb der Kolbenbürette
®
TITRONIC 300 seitens des Anwenders sichergestellt werden.
Beim Hochfahren des Kolbens bleibt auf der Innenwand des Zylinders in allen Fällen ein Mikrofilm aus
Dosierflüssigkeit haften, der auf die Dosiergenauigkeit keinen Einfluss hat. Dieser minimale Rest von
Flüssigkeit kann jedoch verdunsten und dadurch in die Zone unterhalb des Kolbens geraten und dort die
verwendeten Materialien korrodieren oder anlösen (siehe Kapitel 8 „Wartung und Pflege der Kolbenbürette
®
TITRONIC 300“).
9
2
Aufstellen und Inbetriebnahme
2.1 Auspacken und Aufstellen der Kolbenbürette
Die Kolbenbürette und alle Zubehörteile sowie die Peripheriegeräte sind werkseitig sorgfältig auf Funktion und
Maßhaltigkeit geprüft.
Bitte achten Sie darauf, dass auch die kleinen Zusatzteile aus der Verpackung restlos entnommen werden.
Den Lieferumfang entnehmen Sie bitte der beigefügten Packliste.
®
Die Kolbenbürette TITRONIC 300 kann auf jeder beliebigen ebenen Unterlage aufgestellt werden.
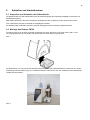
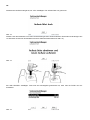
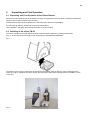
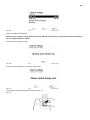
2.2 Montage des Rührers TM 50
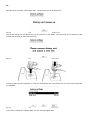
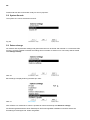
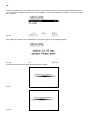
Der Rührer wird an der rechten Unterseite eingesteckt und durch Schieben nach hinten fixiert (Abb 1). Die
Versorgungsspannung für den Rührer TM 50 ist hierdurch automatisch angeschlossen.
Abb. 1
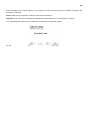
Die Stativstange TZ 1748 wird in das Gewinde eingeschraubt und die Titrationsklammer Z 305 kann nun auf die
Stativstange montiert werden (Abb. 2). Anstelle des Rührers TM 50 kann auch der Titrierstand ohne Rührfunktion
TZ3886 montiert werden.
Abb. 2
10
2.3 Anschlüsse der Kolbenbürette. Kombination mit Zubehör und weiteren Geräten
2.3.1
®
Rückwand der Kolbenbürette TITRONIC 300
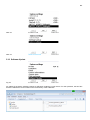
1
2
3
4
5
6
Abb. 3
2.3.2
®
Anschlüsse der Kolbenbürette TITRONIC 300.
Der TITRONIC® 300 verfügt über folgende Anschlüsse:
Zwei RS232 Schnittstellen, 4-polig (Mini-DIN):
1. RS2 für den Anschluss einer Waage und weiterer Geräte von SI Analytics (Büretten usw.)
2. RS1 für den Anschluss an den PC
3. USB-A („Master“) Schnittstelle für den Anschluss von USB-Geräten wie Handtaster, Tastatur, Drucker,
USB-Hub oder USB-Speicherstick.
4. USB-B Schnittstelle (Mini-USB) für den Anschluss an einen PC
5. Anschluss für das externe Netzteil TZ 1853
6. Ein-/Ausschalter
2.3.3
Anschluss eines Druckers
Drucker mit USB-Schnittstelle werden an die USB-A Schnittstelle bzw. an einen USB-HUB angeschlossen. Die
Drucker müssen eine HP PCL -Emulation (3, 3 enhanced, 5, 5e, nicht GUI, nicht GDI-Drucker) enthalten.
2.3.4
Anschluss eines USB-Gerätes (Handtaster, Tastatur, Speichergerät, HUB)
Folgende USB-Geräte können an die USB-A-Schnittstellen angeschlossen werden:
• Handtaster TZ 3880 („Maus“)
• PC-Tastatur
• Drucker
• USB-Speichergeräte / USB-Stick
• USB-Hub
• USB-Barcodescanner
Für den Anschluss von mehr als einem USB-Gerät wird ein USB-HUB (z.B. TZ 3830) benötigt.
2.3.5
Anschluss von Analysenwaagen
Analysenwaagen werden mit einem entsprechenden Kabel an die RS232-2 Schnittstelle angeschlossen.
11
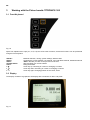
2.4 Einstellen der Landessprache
Werkseitig ist Englisch als Sprache voreingestellt. Nach dem die Kolbenbürette eingeschaltet und der
Startvorgang beendet ist, erscheint das Hauptmenü:
Abb. 4
Mit <MODE> und dann <System settings> wechselt man zu den Systemeinstellungen.
Abb. 5
Das erste Menü ist gleich die Einstellung der Landessprache:
Abb. 6
Mit <ENTER>/<OK> das Menü aufrufen. Mit den Pfeiltasten <↑↓> die gewünschte Landessprache auswählen
und mit <ENTER>/<OK> bestätigen:
12
Abb. 7
Die gewählte Sprache erscheint sofort. Mit zweimal betätigen der <ESC> Taste befindet man sich wieder im
Hauptmenü.
13
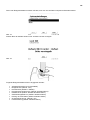
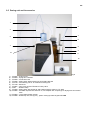
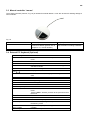
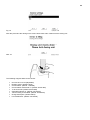
2.5 Dosieraufsatz und Zubehör
1
2
3
5
4
6
7
8
9
10
11
12
Abb. 8
TZ 3281 – Ansaugschlauch
TZ 2003 – Trockenrohr TZ 2003
TZ 3283 – Verbindungsschlauch
TZ 3282 – Dosierschlauch ohne Dosierspitze und Halter
TZ 3130 – 20 ml Dosiereinheit oder TZ 3160 50 ml Dosiereinheit
TZ 1748 – Stativstange
TZ 3801 – Ventilabdeckung und TZ 3000 3-/2 Wege Ventil
Z 305 – Titrierklammer
TZ 3620 – Dosierschlauch mit Dosierspitze und Halter (Schaft); Schaft = TZ 3875
TZ 3802 – Schraubkappe GL 45 mit Bohrung, inkl. Adapter mit 2 Öffnungen für Trockenrohr und
Ansaugschlauch
11) TZ 3803 – 1 Liter Reagenzienflasche, braun
12) TZ 3656 – Titrierspitzenaufsatz blau (5 Stück); Alternativ Dosierspitze aus Glas TZ 1503
1)
2)
3)
4)
5)
6)
7)
8)
9)
10)
14
2.6
Spülen und Erstbefüllen
Die Dosiereinheit und die Schläuche sind schon ab Werk fertig montiert. Nachdem die Reagenzienflasche
angeschlossen ist, kann die Erstbefüllung des Dosieraufsatzes durchgeführt werden. Beim Ablauf dieses
Erstbefüll- bzw. Spülprogramms muss ein ausreichend dimensioniertes Abfallgefäß unter der Titrierspitze stehen.
Vom Grundmenü (Abb. 9) aus:
Abb. 9
Die Mode Taste drücken und <Spülen> anwählen
Abb. 10
Nun wählt man 2x Spülen aus bestätigt die Auswahl mit OK, oder ENTER bei angeschlossener Tastatur.
Abb. 11
Das Gerät füllt erst und startet dann den Spülvorgang:
15
Abb. 12
Abb. 13
Abb. 14
Abb. 15
Den Spülvorgang (Abb.12-15) kann man jederzeit mit <STOP> abbrechen und anschließend mit <START>
fortsetzen. Wenn der Spülvorgang beendet ist, gelangt man mit 2 x ESC wieder zurück ins Startmenü.
16
3
Das Arbeiten mit der Kolbenbürette TITRONIC® 300
3.1 Fronttastatur
Abb. 16
Mit Ausnahme von alphanumerischen Eingaben (a-z, A-Z, 0-9) und einigen wenigen Funktionen, können alle
Funktionen über die Fronttastatur ausgeführt werden.
<Mode>:
<EDIT>:
<ESC>:
<START/STOP>
<FILL>:
< ↑>
<↓>
<→>
Auswahl der Methoden, Spülen, Systemeinstellungen, Waagedaten
Ändern der aktuellen Methode, neue Methode, Methode kopieren und löschen,
Standardmethoden
Mit <ESC> wird die vorherige Ebene im Menü erreicht.
Start und Stopp einer aktuellen Methode
Füllen der Bürette
Pfeiltaste nach oben: Auswahl eines Menüpunktes oder Änderung einer Zahl
Pfeiltaste nach unten: Auswahl eines Menüpunktes oder Änderung einer Zahl
Pfeiltaste nach rechts: Positionsänderung Cursor Eingabe Menü
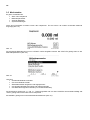
3.2 Anzeige
Die Anzeige besteht aus einer Grafik-LCD-Anzeige mit 320 x 240 Bildpunkten Auflösung.
Abb. 17
17
3.3 Handtaster
Der Handtaster („Maus“, Abb. 18) wird bei der manuellen Titration benötigt. Er kann aber auch zum Start von
Dosiermethoden verwenden werden.
Abb. 18
Modus
Manuelle Titration
Dosieren über Dosiermethode
Schwarze Taste
Start der Titration, Einzelschritte
und kontinuierliches Titrieren (siehe
Kap. 3.6.1 manuelles Titrieren)
Start der Dosierung
Graue Taste
Füllen
Stopp der Titration mit Auswertung
Füllen
3.4 Externe PC Tastatur; (Optional)
Tasten
<ESC>
<F1>/<START>
<F2>/<STOP>
<F3>/<EDIT>
<F4>/<FILL>
<F5>/
<F6>/<MODE>
<F7>/<SYS>
<F8/<CAL>
<F9>/+ / <F10>/<DOS>
Num/ Scroll
Lock/ Lock
Prt Sc
Sys Rq
< ↑> < ↓ > <←> <→>
0...9
<ENTER>
< ←Backspace >
Buchstaben,
ASCII-Zeichen
alle anderen Tasten
Funktion
Mit <ESC> wird die vorherige Ebene im Menü erreicht.
Start einer ausgewählten Methode
Stopp der aktuellen Methode
Ändern der aktuellen Methode, neue Methode, Methode
kopieren, Standardmethoden
Füllen des Aufsatzes
Anzeige und Änderung der Waagedaten
Auswahl der Methoden, Spülen, Systemeinstellungen,
Waagedaten
Systemeinstellungen (Sprachauswahl, Uhrzeit/Datum..)
®
Keine Funktion bei TITRONIC 300
Vorzeichenwechsel
Aufruf Dosiermenü
Keine Funktion
Keine Funktion
Auswahl der Einzelmenüs und Zahlenwerte
Eingabe von Zahlenwerten
Bestätigung eingegebener Parameter
Löschen einer eingegebenen Ziffer / eines eingegebenen
Zeichens links neben dem blinkenden Curser
Alphanumerische Eingaben möglich. Groß- und
Kleinschreibung ist möglich
Haben keine Funktion.
18
3.5 Menüstruktur
Es gibt 4 Auswahlmenüs:
• Start- oder Hauptmenü
• Methodenparameter
• Auswahl Methoden
• Systemeinstellungen
Nach dem Einschalten erscheint immer das Hauptmenü. Es wird immer die zuletzt verwendete Methode
angezeigt (Abb. 19).
Abb. 19
Die angezeigte Methode kann nun mit <START> sofort ausgeführt werden. Mit <EDIT>/F3 gelangt man zu den
Methodenparametern (Abb. 20).
Abb. 20
Hier kann
• die aktuelle Methode verändert
• eine neue Methode erstellt
• Standardmethoden aufgerufen und abgespeichert
• eine bestehende Methode kopiert oder gelöscht werden
• eine Methode ausgedruckt werden (nur Titrationsmethoden)
Die Untermenüs werden mit <↓> und <↑>- Tasten angewählt und mit <OK>/<ENTER> die Auswahl bestätigt. Mit
<ESC> gelangt man wieder zurück zum Hauptmenü.
Mit <MODE> gelangt man zu dem Methodenauswahlmenü (Abb. 21).
19
Abb. 21
Die vorhandenen Methoden (max. 3) werden mit <↓> und <↑>- Tasten angewählt und mit <OK>/<ENTER> die
Auswahl bestätigt. Nach der Auswahl kommt man sofort mit der neu ausgewählten Methode zurück zum
Hauptmenü. Ohne Auswahl einer Methode gelangt man mit <ESC> ebenfalls wieder zurück zum Hauptmenü.
In die Systemeinstellungen (Abb. 22 und Abb. 23) gelangt man auch über das Methodenauswahlmenü oder
alternativ bei angeschlossener Tastatur TZ 3835 über die <SYS>/F7 Taste:
Abb. 22
Abb. 23
3.6 Hauptmenü
Nach dem Einschalten erscheint immer das Hauptmenü. Es wird immer die zuletzt verwendete Methode
angezeigt (Abb. 24). In diesem Fall eine Titrationsmethode.
20
Abb. 24
3.6.1
Manuelle Titration
Die manuelle Titration wird immer mit dem Handtaster, der so genannten „Maus“ durchgeführt. Eine manuelle
Titration ohne Handtaster ist nicht möglich.
Abb. 25
Durch <START> oder betätigen der schwarzen Taste am Handtaster wird die manuelle Titrationsmethode
gestartet.
Je nach Methodeneinstellung werden nacheinander die Probenbezeichnung (Abb. 26) und die Einwaage
abgefragt (Abb. 27). Es kann eine 20-stellige alphanumerische Probenbezeichnung mit einer externen PCTastatur eingegeben werden.
Abb. 26
21
Abb. 27
Die Waagedaten können mit Hilfe der Fronttastatur oder der externen Tastatur eingegeben werden. Die Eingabe
wird mit <OK>/<ENTER> bestätigt.
Bei automatischer Waagedatenübernahme werden die Einwaagen aus dem Waagedatenspeicher ausgelesen.
Falls keine Waagedaten im Speicher vorhanden sind, wird eine Meldung angezeigt, dass keine Waagedaten
vorhanden sind (Abb. 28).
Abb. 28
Durch Drücken der Print-Taste an der Waage können noch zu diesem Zeitpunkt die Waagedaten transferiert
werden. Nach der Eingabe der Probenbezeichnung und/oder Einwaage/Vorlage erscheint folgende Anzeige:
Abb. 29
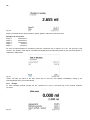
Mit der schwarzen Taste des Handtasters („Maus“) wird die Zugabegeschwindigkeit kontrolliert. Mit einem
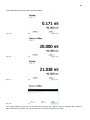
einzelnen Tastendruck bis zur ersten Stufe wird ein Schritt ausgeführt. Je nach Aufsatzgröße sind das 0,0025 ml
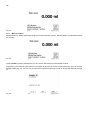
(20 ml) oder 0,00625 ml (50 ml). Angezeigt werden dann entsprechend 0.003 oder 0.006 ml beim Einzelschritt.
Hält man die schwarze Taste auf der ersten Stufe gedrückt, wird kontinuierlich langsam zutitriert. Drückt man die
schwarze Taste ganz durch (2. Stufe), wird mit einer schnelleren Geschwindigkeit zutitriert. Die Geschwindigkeit
der 2. Stufe lässt sich in 5 Stufen durch die Pfeiltasten <↓↑> einstellen. Die Stufen können auch während der
manuellen Titration verändert werden.
22
Abb. 30
Stufe 5 entspricht maximale Titriergeschwindigkeit. Die Geschwindigkeit reduziert sich jeweils um etwa 50 %.
Bsp.: Dosieraufsatz 20 ml:
Stufe 5
Stufe 4
Stufe 3
Stufe 2
Stufe 1
40,00 ml/min
20,00 ml/min
10,00 ml/min
5 ml/min
2,5 ml/min
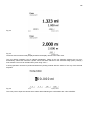
Wenn die manuelle Titration beendet ist, drückt man auf die <STOP> -Taste bzw. die rechte graue Maustaste.
Das Titrationsergebnis wird berechnet und angezeigt und optional auf dem angeschlossenen Drucker
ausgedruckt bzw. auf dem angeschlossenen USB-Stick gespeichert:
Abb. 31
Mit <ESC> gelangt man wieder zurück in das Startmenü und kann sofort die nächste manuelle Titration starten.
Der Dosieraufsatz wird automatisch gefüllt.
3.6.2
Dosierung
Eine Dosiermethode wird mit <START>/<F1> oder mit der schwarzen Taste des Handtasters („Maus“) gestartet.
Abb. 32
23
Abb. 33
Abb. 34
Das dosierte Volumen wird kurz angezeigt bevor die Anzeige wieder zum Hauptmenü zurückspringt (siehe Abb.
32)
Die nächste Dosierung kann dann sofort gestartet werden. Der Aufsatz wird nicht automatisch nach der
Dosierung gefüllt, es sei denn das maximale Zylindervolumen ist erreicht, oder die automatische Fülloption
(immer) ist eingeschaltet. Mit <FILL> kann der Aufsatz jederzeit gefüllt werden.
Eine Dosierung kann auch über die <DOS>/<F10> Taste der externen Tastatur ohne Dosiermethode ausgeführt
werden:
Abb. 35
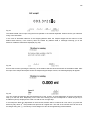
Das Volumen wird eingegeben und nach der Bestätigung mit <OK> dosiert:
24
Abb. 36
Weitere Dosierungen können mit <OK> oder <ENTER> ausgeführt werden. Der Aufsatz wird hier nicht
automatisch nach der Dosierung gefüllt, es sei denn das maximale Zylindervolumen ist erreicht. Mit <FILL> kann
der Aufsatz jederzeit gefüllt werden. Mit <ESC> gelangt man wieder zurück ins Hauptmenü
.
25
4
Methodenparameter
Vom Hauptmenü aus (Abb. 32) gelangt man <EDIT> in die Methodenparameter:
Abb. 37
4.1 Methode editieren und neue Methode
Bei Anwahl von <Methode editieren> oder <neue Methode> gelangt man zur Änderung bzw. Neuerstellung einer
Methode. Bei <neue Methode> wird immer nach der Eingabe des Methodennamens gefragt (Abb. 38). Das
entfällt bei der Änderung einer bereits erstellten Methode.
Abb. 38
Der Methodenname kann bis zu 21 Zeichen enthalten. Es sind auch Sonderzeichen möglich. Falls keine Tastatur
angeschlossen ist muss der angezeigte Methodenname (hier „Methode 01“) übernommen werden. Die
Methodennummern werden automatisch durchnummeriert. Die Eingabe wird mit <OK>/<ENTER> bestätigt. Der
Methodenname kann jederzeit geändert werden. Weiter dann mit Kapitel 4.5
26
4.2 Standardmethoden
In der TITRONIC® 300 sind unter <Standardmethoden> eine Standardmethode für Dosieren und für die
manuelle Titration abgespeichert, die man einfach auswählen kann (Abb. 39).
Abb. 39
Nach der Auswahl wird man direkt nach der Eingabe des Methodennamens gefragt (Abb. 40).
Abb. 40
Man kann den Standardnamen übernehmen oder auch abändern. Danach kommt man zu <Methodenparameter
ändern>. Weiter dann mit Kapitel 4.5.
4.3 Methoden kopieren
Methoden können kopiert und unter einem neuen Namen abgespeichert werden. Bei Anwahl der Funktion wird
die aktuelle Methode kopiert und man kann einen neuen Namen eingeben. (Abb. 41)
Abb. 41
Es wird automatisch ein neuer Name mit dem Zusatz [1] vergeben, damit nicht 2 Methoden mit dem gleichen
Namen existieren. Danach kommt man zu <Methodenparameter ändern>. Weiter dann mit Kapitel .4.5
27
4.4 Methoden löschen
Nach Auswahl der Funktion wird gefragt, ob die aktuelle Methode wirklich gelöscht werden soll. Man muss
explizit <Ja> anwählen und dies dann mit <OK>/<ENTER> bestätigen.
Abb. 42
4.5 Methodenparameter ändern
Die Eingabe oder Änderung des Methodenamens wurde bereits in Kapitel 4.1 und 4.3. beschrieben.
Abb. 43
4.5.1
Methodentyp
Im Untermenü <Methodentyp> wählt man aus, ob man eine manuelle Titration oder eine Dosierung durchführen
möchte (Abb. 44).
Abb.44
Die Auswahl des Methodentyps beeinflusst die weitere Parametrierung der Methode. Wählt man z.B. den
Dosiermodus aus, kann man keine Formel mehr auswählen.
28
4.5.2
Ergebnis (nur manuelle Titration)
Das Menü <Ergebnis> umfasst folgende Einstellungsmöglichkeiten:
Abb. 45
Der Ergebnistext kann bis zu 21 alphanumerische Zeichen inkl. Sonderzeichen enthalten:
Abb. 46
Die Eingabe wird mit <OK</<ENTER> bestätigt.
4.5.2.1 Formeln für die manuelle Titration
In dem Untermenü Formelauswahl wählt man die passende Berechnungsformel aus:
Abb. 47
Folgende Berechnungsformeln stehen bei der manuellen Titration zur Verfügung:
Formel für Titration
ml
(ml-B)*T*M*F1/(W*F2)
(B-ml)*T*M*F1/(W*F2)
Hinweis
Berechnet den Verbrauch in ml.
Formel zur Berechnung der Konzentration einer
Probe mit Berücksichtigung eines Blindwertes in
ml.
Formel zur Berechnung der Konzentration einer
29
(B*F3–ml*F1)*T*M/(W*F2)
(W*F2)/(ml-B)*M*F1)
Probe mit Berücksichtigung eines Blindwertes in
ml. Rücktitration (Bsp. CSB, Verseifungszahl)
Formel zur Berechnung der Konzentration einer
Probe mit Berücksichtigung eines Blindwertes,
inkl. multiplikativer Faktor. Rücktitration
Formel zur Berechnung eines Titers (T) einer
Titrierlösung.
Dabei haben die Abkürzungen folgende Bedeutung:
ml:
B:
T:
M:
F1
F2
W
Verbrauch Titrationslösung in ml
Blindwert in ml. Meist ermittelt durch Titration.
Titer der Titrationslösung (z.B. 0,09986)
Mol; Mol- oder Äquivalentgewicht der Probe (z.B NaCl 58,44)
Faktor 1. Umrechnungsfaktor
Faktor 2. Umrechnungsfaktor
Weight, Einwaage in g oder Vorlage in ml.
Wenn man eine Formel ausgewählt hat, wird die Auswahl mit <OK>/<ENTER> bestätigt:
Abb. 48
Die Werte der einzelnen Parameter der ausgewählten Berechnungsformel können nun einzeln eingegeben
werden:
Abb. 49
4.5.2.2 Einwaage und Vorlage (Probenmenge)
30
Abb. 50
Abb. 51
Bei der Probenmenge (W) wird ausgewählt, ob man eine Einwaage oder Vorlage bei der Titration oder dem
Ansetzen der Lösung verwenden möchte.
Es gibt folgende Optionen (Abb. 51):
•
•
•
•
•
Einwaage manuell: Die Einwaage in g wird beim Start der Methode abgefragt und manuell eingeben.
Einwaage automatisch: Die Einwaage wird automatisch durch eine angeschlossene Waage transferiert.
Feste Einwaage: Eine feste Einwaage in g wird eingegeben. Diese wird bei jedem Start der Methode
dann automatisch ohne Abfrage der Einwaage verwendet.
Manuelle Vorlage: Die Vorlage in ml wird beim Start der Methode abgefragt und manuell eingeben.
Feste Vorlage: Eine feste Vorlage in ml wird eingegeben. Diese wird bei jedem Start der Methode dann
automatisch ohne Abfrage der Vorlage verwendet.
4.5.2.3 Formeleinheit
Die Formeleinheit kann in dem Untermenü Einheit ausgewählt werden.
Abb. 52
Nach der Auswahl (z.B. %) erscheint die Einheit auch als Information in der Anzeige:
31
Abb. 53
4.5.2.4 Dezimalstellen
Hier legt man die Anzahl der Dezimalstellen von 0 – 6 festlegen. Die Standardeinstellung ist 2.
4.5.2.5 Globale Speicher
Wenn ein Titrationsergebnis später wieder verwendet werden soll wie z.B. der Faktor oder Titer einer Lösung
oder ein Blindwert, kann dieser automatisch gespeichert werden. Die Erstellung eines globalen Speichers ist nur
bei der Verwendung einer externen Tastatur möglich. Das Erstellen von einem globalen Speicher ist in den
Systemeinstellungen möglich oder durch Eingabe von Shift+F5 auf der externen Tastatur. Damit gelangt man in
die <Globalen Speicher>:
Abb. 54
Mit F3 kann man dann einen globalen Speicher hinzufügen:
Abb. 55
32
Abb. 56
MO1 kann übernommen werden oder mit einer Bezeichnung wie z.B. Blindwert oder Titer versehen werden:
Abb. 57
Dieser Wert kann dann in der Berechnungsformel verwendet werden:
Abb. 58
Der Blindwert, der z.B vorab titriert wurde, wird damit immer automatisch berücksichtigt.
Abb. 59
33
4.5.3
Dosierparameter
Abb. 60
Die Dosierparameter (Dosiergeschwindigkeit, Füllgeschwindigkeit und max. Dosier-/Titriervolumen ) werden für
jede einzelne Methode festgelegt. Dies gilt für beide Methodentypen, für manuelle Titration und dem Dosieren.
Abb. 61
Die Dosiergeschwindigkeit in % kann je nach Wechselaufsatz von 1 – 100 % eingestellt werden. 100 %
entsprechen 100 ml/min beim 50 ml Aufsatz.
Dosieraufsatz
20 ml
50 ml
maximale
Dosiergeschwindigkeit [ml/min]
40
100
Die Füllgeschwindigkeit in Sekunden kann von 20 bis 999 Sekunden eingestellt werden. Standardwert ist auf 30
Sekunden eingestellt. Für verdünnte wässrige Lösungen kann man die Füllgeschwindigkeit auf 20 Sekunden
einstellen. Für nichtwässrige Lösungen sollte man die Füllgeschwindigkeit auf 30 Sekunden eingestellt lassen.
Bei hochviskosen Lösungen, wie höher konzentrierte Schwefelsäure, sollte die Füllgeschwindigkeit noch weiter
auf 40-60 Sekunden reduziert werden.
Das (maximale) Dosiervolumen oder Titriervolumen kann je nach Methodentyp auf 999.99 oder auf 9999,999
eingestellt werden.
4.5.4
Probenbezeichnung
Bei der manuellen Titration kann man eine Probenbezeichnung eingeben. Man kann eine manuelle,
automatische und keine Probenbezeichnung einstellen:
34
Abb. 62
Bei der manuellen Probenbezeichnung wird immer nach dem Start der Methode nach der Probenbezeichnung
gefragt (Siehe dazu auch Kapitel 3.6, Hauptmenü). Bei der automatischen Probenbezeichnung wird eine
Stammbezeichnung festgelegt (hier Wasser, siehe Abb. 63), die dann automatisch mit 01 beginnend
durchnummeriert wird:
Abb. 63
Nach einem erneuten Einschalten beginnt die Nummerierung von vorne mit 01.
4.5.5
Dokumentation
Abb. 64
Die Dokumentation bei der manuellen Titration auf einem Drucker oder USB-Stick als PDF kann in 2
verschiedenen Formaten eingestellt werden: kurz und GLP:
35
Abb. 65
Methodentyp
Manuelle Titration
Dosierung
Kurzdokumentation
Methodenname, Datum, Uhrzeit,
Probenbezeichnung,
Einwaage/Vorlage, Ergebnisse
und Berechnungsformel
Nur Methodenausdruck möglich:
Methodenname, Datum, Uhrzeit
und Dosierparameter
GLP-Dokumentation
Wie Kurzdokumentation +
Methodeninhalt
36
5
Systemeinstellungen
Abb. 66
Vom Hauptmenü aus (Abb. 66) über die Fronttasten <MODE> und <Systemeinstellungen> (oder der externen
Tastatur mit F7) gelangt man in die Systemeinstellungen:
Abb. 67
Die Einstellung der Landessprache wurde bereits im Kapitel 2.5 beschrieben.
5.1 Reagenzien/Dosieraufsatz
In dem Menü kann man die Aufsatzgröße einstellen (20 oder 50 ml), einen Aufsatzwechsel durchführen und auch
Reagenziendaten eingeben, die bei der manuellen Titration in der GLP Dokumentation ausgegeben werden.
Abb. 68
5.1.1
Aufsatzwechsel
Mit <OK/ENTER> Aufsatzgröße bestätigen.
37
Abb. 69
Aufsatzwechsel anwählen.
Achtung: Der Aufsatzwechsel beginnt sofort ohne weitere Warnung. Bitte daher Titrierspitze in
Reagenzflasche oder Becher hängen.
Der Kolben fährt bis ca. 85 % hoch
Abb. 70
Danach kommt die Aufforderung den Aufsatz zu entriegeln:
Abb. 70
Jetzt den Dosiersausatz entriegeln wie in der Abbildung 71 gezeigt:
Abb. 71:
38
Nachdem der Aufsatz entriegelt ist, mit <OK> bestätigen. Der Aufsatz fährt nun ganz hoch:
Abb. 72
Aufsatz nach oben abziehen und neuen Dosieraufsatz genauso wieder aufsetzen. Die beiden Verstrebungen des
UV-Schutzes müssen mit der Markierung an dem Gehäuse übereinstimmen (Abb. 73).
Abb. 73
Mit <OK>/<ENTER> bestätigen. Falls man die Aufsatzgröße gewechselt hat, kann man die Größe nun hier
auswählen:
Abb. 74
39
Wenn man Reagenziendaten wechseln möchte, kann man nun die Daten komplett zurücksetzen lassen:
Abb. 75
Danach fährt der Aufsatz wieder runter. Aufsatz nun bitte verriegeln.
Abb. 76
Folgende Reagenziendaten können eingegeben werden:
•
•
•
•
•
•
•
•
•
Aufsatzgröße 20 der 50 ml (einstellbar)
Reagenzname (default: Leer)
Konzentration (default: 1.000000)
Konzentration bestimmt am: (default: aktuelles Datum)
Haltbarkeit bis (default: aktuelles aktuelles Datum)
Geöffnet/Hergestellt am: (default: aktuelles Datum)
Prüfung nach ISO 8655: (default: aktuelles Datum)
Chargenbezeichnung: (default: Leer)
Letzte Änderung (default: aktuelles Datum)
40
Abb. 77
5.2 Globale Speicher
Die Verwendung der globalen Speicher wurde schon in Kapitel 4.5.2.5 beschrieben.
5.3 RS232 Einstellungen
®
Unter dem Menü <RS232- Einstellungen> kann man die Geräteadresse der TITRONIC 300 festlegen und die
Parameter der beiden RS232-Schnittstellen separat einstellen:
Abb. 78
Die Geräteadresse kann von 0 – 15 eingestellt werden. Die Adresse 1 ist voreingestellt:
Abb. 79
41
Abb. 80
Die Baudrate ist auf 4800 voreingestellt. Sie kann von 1200 – 19200 eingestellt werden:
Abb. 81
Die Parität kann zwischen <No> (Keine), <Even> (Gerade) und <Odd> (Ungerade) eingestellt werden. <No> ist
voreingestellt:
Abb. 82
Die Datenbits können zwischen 7 und 8 Bit eingestellt werden. 8 Bit sind voreingestellt:
Abb. 83
42
Die Stopbits können auf 1, 1,5 und 2 eingestellt werden. 1 ist voreingestellt:
Abb. 84
Die RS Parameter können durch ein RESET auf die Standardwerte 4800, 8, 1, no zurückgesetzt werden
5.4
Anschluss von Drucker
Ergebnisse und Methoden können auf folgenden Medien ausgedruckt werden:
•
•
•
HP PCL kompatiblen Drucker (A4) Farbe und Monochrom (z.B. Laserdrucker)
Seiko DPU S445 (Thermopapier 112 mm Breite)
Auf dem USB-Stick im PDF- und CSV-Format
Zum Anschluss der Drucker sind die USB Anschlüsse des Geräts zu verwenden. Beim Ausdruck ist darauf zu
achten, welcher Drucker angeschlossen ist. So ist es beispielsweise nicht möglich, das Layout eines HP
Druckers auf einem Kassendrucker oder umgekehrt auszudrucken. Die Druckereinstellungen des Geräts sollten
daher beim Wechsel des Druckers entsprechend geprüft und ggf. angepasst werden.
Abb. 85
Es darf nur ein Drucker pro Gerät angeschlossen werden, da eine automatische Druckererkennung nicht
unterstützt wird. PDF Druck“ ist voreingestellt.
5.5 Datum und Uhrzeit
Die Uhrzeit ist Werkseitig auf die MEZ eingestellt. Bei Bedarf kann Sie verändert werden:
43
Abb. 86
5.6 RESET
Durch ein RESET werden alle Einstellungen auf die Werkseinstellung zurückgestellt.
Achtung: Es werden auch alle Methoden gelöscht. Bitte vorab die Methoden ausdrucken oder auf ein
angeschlossenes USB-Speichermedium exportieren/kopieren (vgl. Kap. 5.1).
Der RESET muss noch mal extra bestätigt werden:
Abb. 87
5.7 Geräteinformationen
Die <Geräteinformationen> enthalten Informationen über die
• Aktuelle Softwareversion
• Seriennummer des Gerätes
• Druckertreiberversion
• Updateversion
• Eingestellte Geräteadresse
Abb. 88
Bitte halten Sie bei Servicefällen die Geräteinformationen bereit.
44
5.8 Systemton
Der Systemton kann ein- oder ausgeschaltet werden.
Abb. 89
5.9 Datenaustausch
Die kompletten Einstellungen des Gerätes inklusive der Methoden können auf einem USB-Stick gesichert und
auf weitere Geräte oder auf dasselbe Gerät wieder geladen werden.
Abb. 90
Abb. 91
Die Sicherungsdatei bekommt einen Zeitstempel. Die Sicherungsdatei auswählen und sofort werden die
Einstellungen übertragen bzw. wieder hergestellt:
45
Abb. 92
Abb. 93
5.10 Software Update
Abb. 94
Für ein Update der Gerätesoftware wird ein USB-Stick benötigt auf der sich eine neue Version befindet. Die 2
benötigten Dateien müssen sich dazu einfach im Root- Verzeichnis des USB-Sticks befinden:
46
Man steckt den USB-Stick in den USB-A (Master) Port, wartet ein paar Sekunden und wählt dann die Funktion
Software Update aus. Die gültigen Softwareupdates werden im Display angezeigt. In diesem Fall ist es die
Version „14_29“ aus dem Jahr 2014, Woche 29.
Abb. 95
Nachdem man das Update mit <OK/ENTER> gestartet hat, erscheint erst diese Anzeige:
Abb. 96
und wechselt dann nach wenigen Sekunden zu dieser Anzeige:
Abb. 97
Abb. 98
47
Nach erfolgtem Update (ca. 2-3 Minuten) fährt das Gerät die Software komplett herunter und startet neu.
Wichtig: Die Methoden werden bei dem Update nicht gelöscht! Sie können weiter verwendet werden.
Wenn sich keine gültige Datei auf dem USB-Stick befindet, erscheint diese Meldung:
Abb. 99
48
6
Anschluss von Analysenwaagen
Da sehr häufig die Probe auf einer Analysenwaage eingewogen wird, ist es auch sinnvoll diese Waage an den
®
®
TITRONIC 300 anzuschließen. Um die Waage an den einen TITRONIC 300 anschließen zu können, muss die
Waage über eine RS232-C-Schnittstelle verfügen und es muss ein entsprechend konfiguriertes
Verbindungskabel vorhanden sein. Für folgende Waagetypen gibt es bereits fertig konfektionierte
Verbindungskabel:
Waage
Sartorius (alle Typen mit 25p. RS)
Mettler, AB-S, AG, PG
Neue Sartorius mit USB-Schnittstelle via RS-Adapter
Precisa XT-Serie
Kern mit 9-poliger RS232
TZ-Nummer
TZ 3092
TZ 3099
TZ 3099
TZ 3183
TZ 3180
Für andere Waagetypen kann auf Anfrage ebenfalls ein Verbindungskabel konfektioniert werden. Wir
benötigen dazu detaillierte Informationen über die RS232-C-Schnittstelle der verwendeten Waage.
®
Das Verbindungskabel wird an die RS232-C-Schnittstelle 2 der TITRONIC 300 angeschlossen. Diese Seite des
Verbindungskabels besteht immer aus einem 4-poligen Mini-Stecker. Die andere Seite des Kabels kann je nach
Waagentyp ein 25-poliger Stecker (Sartorius) oder ein 9-poliger Stecker (Mettler AB-S) sein.
®
Damit Waagedaten an die TITRONIC 300 gesendet werden können, müssen die Datenübertragungsparameter
®
der TITRONIC 300 und der Waage übereinstimmen. Es müssen zusätzlich noch ein paar andere
Grundeinstellungen an den Waagen vorgenommen werden:
•
Die Waage soll nur auf einen Print-Befehl die Waagedaten via RS232-C senden
•
Die Waage soll nur nach Stillstand der Anzeige die Waagedaten senden
•
Die Waage sollte niemals auf „send continuous“, „automatic sending“ bzw. „kontinuierlich senden“
eingestellt sein.
•
„Handshake“ an der Waage muss auf „aus“, „off“, eventuell auch auf „Software Handshake“ oder „Pause“
eingestellt sein.
•
Es sollten keine Sonderzeichen wie S oder St den Waagedaten im Waagedatenstring vorangestellt sein.
®
Eventuell können dadurch die Waagedaten von der TITRONIC 300 nicht richtig verarbeitet werden.
®
Nachdem Sie die Waage mit dem richtigen Kabel an der TITRONIC 300 angeschlossen und alle Einstellungen
®
in der Software der Waage und gegebenenfalls in der TITRONIC 300 angepasst haben, kann man die
Waagedatenübertragung sehr einfach überprüfen. Starten Sie eine Methode. Bestätigen Sie die
Probenbezeichnung. Auf der Anzeige erscheinen folgende Meldungen:
a) „Keine Waagedaten vorhanden. Warten auf automatische Einwaage“.
Parameter auf „automatische Einwaage“
b) Die Einwaage einzugeben dann sind die Parameter noch auf „manuelle Einwaage“ eingestellt
Legen Sie einen Gegenstand auf die Waage und drücken Sie die Print-Taste. Nach dem Stillstand der Anzeige
an der Waage ertönt ein Piepston am Titrator und
a) die Anzeige wechselt danach automatisch zur Messanzeige.
b) die Einwaage muss manuell eingegeben und mit <Enter><OK> bestätigt werden.
6.1 Waagedateneditor
Mit dem Druck auf die Funktionstaste der externen Tastatur <F5/Waagesymbol> ruft man den so genannten
Waagedateneditor auf.
Es erscheint eine Liste mit den vorhandenen Waagedaten:
49
Abb. 100
Die Waagedaten können einzeln editiert werden. Nach einer Änderung erscheint ein Stern vor der Einwaage:
Abb. 101
Es können Einwaagen einzeln gelöscht und hinzugefügt werden. Es ist auch möglich, alle Einwaagen auf einmal
zu löschen:
Abb. 102
Wenn keine Waagedaten vorhanden sind erscheint die Meldung keine Waagedaten:
Abb. 103
50
7
Datenkommunikation über die RS-232- und USB-B- Schnittstelle
7.1 Allgemeines
®
Die TITRONIC 300 verfügt über zwei serielle RS-232-C- Schnittstellen zur Datenkommunikation mit anderen
Geräten. Mit diesen beiden Schnittstellen lassen sich mehrere Geräte an einer PC - Schnittstelle betreiben.
®
Zusätzlich verfügt die TITRONIC 300 alternativ zur RS232-1 noch über eine USB-B Schnittstelle, die
ausschließlich für die Anbindung an einem PC genutzt werden kann.
RS-232-C- 1 übernimmt die Verbindung zu einem angeschlossenen Rechner oder zum vorherigen Gerät der
„Daisy Chain“. An der RS-232-C- 2 können weitere Geräte angeschlossen werden (Daisy Chain Konzept).
PIN-Nr.
1
2
3
PIN-Belegung der RS-232-C- Schnittstellen:
Bedeutung / Beschreibung
T x D Datenausgang
R x D Dateneingang
Digitale Masse
7.2 Verkettung mehrerer Geräte — „Daisy Chain Konzept“
Damit Sie mehrere Geräte in einer Kette individuell ansprechen können, muss jedes Gerät eine eigene
Geräteadresse aufweisen. Hierzu wird zunächst mit einem RS-232-C- Datenkabel, z.B. Typ Nr. TZ 3097, eine
Verbindung vom Rechner zur RS-232-C- Schnittstelle 1 des ersten Gerätes der Kette hergestellt. Mit einem
weiteren RS-232-C- Datenkabel, Typ Nr. TZ 3094, wird die RS-232-C- Schnittstelle 2 des ersten Gerätes mit der
RS-232-C-Schnittstelle 1 des zweiten Gerätes verbunden. An die Schnittstelle 2 des zweiten Gerätes kann ein
®
weiteres Gerät angeschlossen werden. Alternativ kann die TITRONIC 300 auch mit einem Mini-USB- Kabel an
eine USB-Schnittstelle eines Rechners angeschlossen werden. Dazu muss einmalig ein Software-Treiber auf
dem PC installiert werden. Damit übernimmt die USB-B Schnittstelle die Funktion der RS232-1 Schnittstelle.
Bezüglich des Software-Treibers setzen Sie sich bitte mit der Firma SI Analytics in Verbindung.
Die Adresse besteht immer aus zwei Zeichen: z.B. Adresse 1 aus den beiden ASCII- Zeichen <0> und <1>. Die
Adressen können von 00 bis 15 eingestellt werden, also insgesamt 16 Möglichkeiten. Es ist darauf zu achten,
dass die Geräte in der Kette unterschiedliche Adressen aufweisen. Wird ein Gerät mit seiner Adresse
angesprochen, so arbeitet das Gerät diesen Befehl ab, ohne ihn an ein weiteres Gerät zusenden. Die Antwort an
den Rechner wird auch mit der eigenen Adresse versehen.
®
Von einem Rechner empfängt die TITRONIC 300 an der Schnittstelle 1 (bzw. USB- B Schnittstelle) Befehle,
wenn diese mit seiner Adresse versehen sind, und sendet auch über diese Schnittstelle seine Antwort. Stimmt
die Adresse des ankommenden Befehls nicht mit seiner Geräteadresse überein, so wird der komplette Befehl an
die Schnittstelle 2 weitergesendet. Diese Schnittstelle 2 ist mit der Schnittstelle 1 eines weiteren Gerätes
®
verbunden. Dieses Gerät prüft nun seinerseits die Adresse und reagiert wie die erste TITRONIC 300 auf diesen
Befehl.
®
Alle Informationen (Datenstrings) die an der Schnittstelle 2 der TITRONIC 300 ankommen, werden unverzüglich
über die Schnittstelle 1 (bzw. USB- B Schnittstelle) an den Rechner ausgegeben. Somit erhält der Rechner auf
jeden Fall die Informationen aller Geräte. Es können in der Praxis bis zu 16 Geräte an einer PC- Schnittstelle
angeschlossen werden.
51
7.3 Befehlsliste für RS-Kommunikation
Die Befehle bestehen aus drei Teilen: Adresse
zweistellig aa, z.B.: 01
Befehl
z.B.: DA
Variable, falls erforderlich z.B.: 14
und Befehlsende
<CR> <LF>
Jeder Befehl muss mit den ASCII - Zeichen <CR> und <LF> (Carriage Return und Line Feed) abgeschlossen
werden. Alle Antworten werden erst nach Beendigung der jeweiligen Aktion an den Rechner zurückgesandt.
®
Beispiel:
Es soll der Befehl an einer TITRONIC 300 mit der Adresse 2 zum Dosieren von 12,5 ml,
geschickt werden.
Der Befehl setzt sich aus den Zeichen zusammen: 02DA12.5<CR LF>
Hierbei gilt: 02
=
Geräteadresse
DA
=
Befehl für Dosieren ohne Füllen und Nullstellen der Anzeige
12.5
=
zu dosierendes Volumen in ml
<CR> <LF>
=
Steuerzeichen als Befehlsende
Befehl
Beschreibung
Antwort
aaAA
aaMC1...XX
aaBF
aaBV
aaDA
aaDB
aaDO
aaGDM
aaGF
aaES
aaEX
aaGDM
aaGF
aaGS
aaLR
aaLI
aaLO
aaRH
aaRC
aaRS
automatische Vergabe der Geräteadresse
Auswahl einer Methode
„Bürette füllen“. Aufsatz wird gefüllt.
dosiertes Volumen in ml ausgeben
dosiere Volumen ohne Füllen, mit Addition des Volumens
dosiere Volumen ohne Füllen, Nullstellen des Volumens
dosiere Volumen mit Füllen, ohne Addition des Volumens
Geschwindigkeit für Dosieren in ml/min
Füllzeit in Sekunden (min ist 20, Default 30)
„ESC" Funktion einen Schritt zurück
„EXIT“ Funktion zurück zum Hauptmenü
Dosiergeschwindigkeit in ml/min (0.01 – 100 ml/min)
Füllzeit in sec (einstellbar von20 – 999 Sekunden)
Ausgabe Seriennummer des Gerätes
Ausgabe Report (Kurzreport)
Ausgabe Methodeninhalt
Ausgabe Dokumentation (wie eingestellt)
Anforderung der Identifikation
sende letzten Befehl
Report Status
Mögliche Antworten sind:
„STATUS:READY“ für Bereit
„STATUS:dosing“ beim Dosieren
„STATUS:filling“ beim Bürette füllen
„ERROR:busy“ wenn keine Wechseleinheit aufgesetzt wurde.
Start ausgewählte Methode
EEPROM auf Werksdaten zurücksetzen
Stopp der laufenden Funktion
Versionsnummer der Software
aaY
aaY
aaY
aa0.200
aaY
aaY
aaY
aaY
aaY
aaY
aaY
aaY
aaY
aaGS08154711
aaY
aaSM
aaSEEPROM
aaSR
aaVE
aaIdent:TITRONIC 300
aa“letzter Befehl“
aaStatus:“text"
aaY
aaY
aaY
aaVersion:
52
8
Wartung und Pflege der Kolbenbürette TITRONIC® 300
Zur Erhaltung der Funktionsfähigkeit
Wartungsarbeiten durchgeführt werden.
der
Kolbenbürette
müssen
regelmäßig
Prüf-
und
Voraussetzung für die Richtigkeit des Volumens und Funktionsfähigkeit der Kolbenbürette sind
regelmäßige Überprüfungen.
Die Richtigkeit des Volumens wird bestimmt durch alle Chemikalien führenden Teile (Kolben, Zylinder,
Ventil, Titrierspitze und Schläuche). Diese Teile sind von einem Verschleiß betroffen und daher
Verschleißteile. Besonders beansprucht sind Kolben und Zylinder und bedürfen somit besonderer
Aufmerksamkeit.
Starke Beanspruchung:
Einsatz von, zum Beispiel konzentrierten Lösungen, Reagenzien und Chemikalien (> 0,5 mol/L);
Chemikalien, die Glas angreifen wie Fluoride, Phosphate, Alkalilösungen; Lösungen die zum
Auskristallisieren neigen; Fe(III)Chlorid-Lösungen; Oxidierende und korrodierende Lösungen wie Iod,
2
Kaliumpermanganat, Cer(III), Karl-Fischer Titriermittel, HCl; Lösungen mit einer Viskosität > 5 mm /s;
Einsatz häufig, täglich.
Normale Beanspruchung:
Einsatz von zum Beispiel nicht Glas angreifende, nicht kristallisierende oder nicht korrodierende
Lösungen, Reagenzien und Chemikalien (bis 0,5 mol/L).
Benutzungspausen:
Wird das Dosiersystem länger als zwei Wochen nicht eingesetzt, empfehlen wir, den Glaszylinder
und alle Schläuche zu leeren und zu reinigen [6]. Dies gilt insbesondere bei den unter „Starke
Beanspruchung“ genannten Betriebsbedingungen. Wird dies unterlassen, kann der Kolben oder das
Ventil undicht werden und die Kolbenbürette wird dadurch beschädigt.
Wenn die Flüssigkeit im System belassen wird, muss außerdem damit gerechnet werden, dass
Korrosionen eintreten, und dass sich die verwendeten Lösungen im Lauf der Zeit verändern, z.B.
auch auskristallisieren. Da es nach dem derzeitigen Stand der Technik für die Verwendung an
Titriergeräten keine Kunststoffschläuche gibt, die völlig frei von Diffusionserscheinungen sind, gilt
diese Vorsicht insbesondere für den Bereich der Schlauchleitungen.
Wir empfehlen folgende Prüf- und Wartungsarbeiten
Einfache Reinigung:
Äußerliches Abwischen von Chemikalienspritzer [1]
Sichtprüfung:
Auf Undichtigkeit im Bereich des Dosiersystems prüfen? [2]
Ist der Kolben dicht? [3]
Ist das Ventil dicht? [4]
Titrierspitze frei? [5]
Grundreinigung des Dosiersystems:
Alle Teile des Dosiersystems einzeln reinigen. [6]
Technische Prüfung:
Prüfung auf Luftblasen im Dosiersystem. [7]
Sichtprüfung
Elektrische Anschlüsse überprüfen [8]
Überprüfung des Volumens nach ISO 8655
Grundreinigung durchführen
Prüfung nach ISO 8655 Teil 6 oder Teil 7 [9]
Starke Beanspruchung
Immer bei Gebrauch,
wenn erforderlich
Normale
Beanspruchung
Immer bei Gebrauch,
wenn erforderlich
Wöchentlich, bei
Monatlich, bei
Wiederinbetriebnahme Wiederinbetriebnahme
Alle drei Monate
Wenn erforderlich
Halbjährlich, bei
Halbjährlich, bei
Wiederinbetriebnahme Wiederinbetriebnahme
Halbjährlich
Jährlich
Achtung: Alle Prüfungen und Wartungsarbeiten können applikationsabhängig auch anders festgelegt
werden. Die einzelnen Intervalle können verlängert werden, wenn keine Beanstandung auftritt, Sie
müssen wieder verkürzt werden, sobald eine Beanstandung aufgetreten ist.
Kapitel
8 Lagerung
Transport
Kapitel
7 Wartung
undund
Pflege
des Titrators
53
Die Prüfung der messtechnischen Zuverlässigkeit einschließlich Wartungsarbeiten wird als
Serviceleistung (auf Bestellung mit Herstellerprüfzertifikat) von SI Analytics GmbH angeboten. Das
Titriergerät muss hierzu an SI Analytics GmbH eingesandt werden.
Detaillierte Beschreibung der Prüf- und Wartungsarbeiten:
[1]
Mit einem weichen Tuch (und ggf. etwas Wasser mit normalem Haushaltsreiniger) abwischen.
[2]
Eine undichte Verbindung ist an Feuchtigkeit oder Kristallen an den Verschraubungen der
Schläuche, an den Dichtlippen des Kolbens im Dosierzylinder oder am Ventil sichtbar.
[3]
Wird Flüssigkeit unterhalb der ersten Dichtlippe beobachtet muss in kürzeren Zeitabständen
überprüft werden, ob sich die Flüssigkeit auch unter der zweiten Dichtlippe ansammelt. In
diesem Fall muss der Kolben und der Glaszylinder sofort getauscht werden. Es ist ohne
weiteres möglich, dass sich im Betrieb unterhalb der ersten Dichtlippe kleine
Flüssigkeitströpfchen ansammeln die allerdings auch wieder verschwinden können. Dies ist
noch kein Grund zum Austausch.
[4]
Das Ventil muss zur Überprüfung aus der Halterung herausgezogen werden. Die Schläuche
bleiben dabei mit dem Ventil verbunden. Prüfen Sie, ob sich Feuchtigkeit unterhalb des Ventils
befindet. Beim Wiedereinsetzen muss darauf geachtet werden, dass die kleine Nase an der
Drehachse wieder in die entsprechende Nut eingesetzt wird.
[5]
Es dürfen sich keine Niederschläge oder Kristalle an der Titrierspitze befinden, die das
Dosieren behindern oder das Ergebnis verfälschen könnten.
[6]
Abnehmen des Zylinders, Ventil aus der Ventilaufnahme nehmen, Schläuche abschrauben
und alle Teile sorgfältig mit destilliertem Wasser spülen. Demontage von Zylinder, Schläuchen
und der anderen Teilen des Aufsatzes siehe Gebrauchsanleitung.
[7]
Dosierung von einem Bürettenvolumen und wieder füllen. Luftblasen sammeln sich an der
Spitze des Zylinders und im Titrierschlauch und können dort leicht erkannt werden. Werden
Luftblasen beobachtet, alle Verbindungen handfest nachziehen und den Dosiervorgang
wiederholen. Bei weiteren Luftblasen im System Ventil [6] überprüfen und
Schlauchverbindungen ersetzen. Die Luftblasen können auch an der Verbindung Dichtlippe
des Kolbens zum Zylinder entstehen. Wenn ein Herabsetzen der Füllgeschwindigkeit nicht
hilft, muss die Dosiereinheit ersetzt werden.
[8]
Prüfen der elektrischen Steckkontakte auf Korrosion und mechanische Beschädigung. Defekte
Teile müssen repariert oder durch neue Teile ersetzt werden.
[9]
Siehe Applikation Bürettenprüfung nach ISO 8655 Teil 6.
9
Lagerung und Transport
®
Soll die Kolbenbürette TITRONIC 300 zwischengelagert oder erneut transportiert werden, bietet die
Verwendung der Originalverpackung die beste Voraussetzung für den Schutz der Geräte. In vielen
Fällen ist diese Verpackung jedoch nicht mehr zur Hand, so dass ersatzweise eine gleichwertige
Verpackung zusammengestellt werden muss. Das Einschweißen des Gerätes in eine Folie ist dabei
vorteilhaft.
Als Lagerort ist ein Raum zu wählen, in dem Temperaturen zwischen + 10 und + 40 °C herrschen und
Luftfeuchtigkeitswerte bis zu 70 % (rel.) nicht überschritten werden.
Sollen Dosieraufsätze zwischengelagert oder erneut transportiert werden, müssen die im System
enthaltenen Flüssigkeiten, insbesondere aggressive Lösungen entfernt werden, siehe auch Kapitel 8
®
„Wartung und Pflege der Kolbenbürette TITRONIC 300”.
10
Recycling und Entsorgung
Diese Kolbenbürette und seine Verpackung wurden weitestgehend aus Materialien hergestellt, die
umweltschonend entsorgt und einem fachgerechtem Recycling zugeführt werden können.
Achtung: Auf der Hauptleiterplatte befindet sich eine Lithium-Batterie. Batterien gehören nicht in den
Hausmüll. Sie werden vom Hersteller kostenlos zurückgenommen und einer fachgerechten
Verwertung bzw. Entsorgung zugeführt.
Wenn Sie Fragen zur Entsorgung haben wenden Sie sich bitte an SI Analytics.
54
11
Index
Analysenwaage 10
Anschluss von Analysenwaagen 48
Anschluss von Drucker 42
Anzeige 16
Aufsatzwechsel 36
Aufstellen 9
Befehlsliste für RS-Kommunikation 51
Benutzungspausen 52
Betriebsspannung 8
Dokumentation 34
Dosieraufsätze 7
Dosiergeschwindigkeit 33
Dosierparameter 33
Drucker 10
Einwaage und Vorlage (Probenmenge) 29
Entsorgung 53
Externe PC Tastatur 17
Formelauswahl 28
Formeleinheit 30
Formeln für die manuelle Titration 28
Fronttastatur 16
Geräteadresse 40
Geräteinformationen 43
Handtaster 17
Handtaster TZ 3880 („Maus“) 10
Hauptmenü 19
Inbetriebnahme 9
Lagerung 53
Manuelle Titration 20
max. Dosier-/Titriervolumen 33
Methode editieren 25
Methoden kopieren 26
Methoden löschen 27
Methodenname 25
Methodenparameter 25
Methodenparameter ändern 27
Netzspannung 8
neue Methode 25
Pflege 52
Probenbezeichnung 33
Reagenzien/Dosieraufsatz 36
Recycling 53
RESET 43
RS232 Einstellungen 40
Sicherheitshinweise 8
Software Update 45
Standardmethoden 26
Systemeinstellungen 36
Systemton 44
Transport 53
USB-Barcodescanner 10
USB-Hub 10
USB-Stick 10
Viskosität 6
Waagedateneditor 48
Warnhinweise 8
Wartung 52
TABLE OF CONTENT
PAGE
1 .. Technical Specifications of the TITRONIC® 300 Piston Burette .......................... 57
1.1
1.2
1.3
Summary ................................................................................................................................. 57
®
Specifications Piston burette TITRONIC 300 ........................................................................ 58
Warning and safety information .............................................................................................. 60
2 .. Unpacking and First Operation .............................................................................. 61
2.1
2.2
2.3
2.3.1
2.3.2
2.3.3
2.3.4
2.3.5
2.4
2.5
2.6
Unpacking and First Operation of the Piston Burette.............................................................. 61
Installing of the stirrer TM 50 ................................................................................................... 61
Anschlüsse der Kolbenbürette. Kombination mit Zubehör und weiteren Geräten .................. 62
®
Back panel of the TITRONIC 300 piston burette ................................................................... 62
®
Connection ports of the TITRONIC 300 piston burette ......................................................... 62
Connecting a printer ................................................................................................................ 62
Connecting a USB device (manual controller, keyboard, memory device, hub) .................... 62
Connection of analytical balances ........................................................................................... 62
Setting the Language of the Country ...................................................................................... 63
Dosing unit and Accessories ................................................................................................... 65
Initial Filling or Rinsing of the Dosing unit ............................................................................... 66
3 .. Working with the Piston burette TITRONIC® 300 ................................................. 68
3.1
3.2
3.3
3.4
3.5
3.6
3.6.1
3.6.2
Front Keyboard ........................................................................................................................ 68
Display ..................................................................................................................................... 68
Manual controller “mouse“ ...................................................................................................... 69
External PC Keyboard (Optional) ............................................................................................ 69
Menu Structure ........................................................................................................................ 70
Main Menu ............................................................................................................................... 71
Manual Titration....................................................................................................................... 72
Dosage .................................................................................................................................... 74
4 .. Method Parameters ................................................................................................. 77
4.1
4.2
4.3
4.4
4.5
4.5.1
4.5.2
4.5.3
4.5.4
4.5.5
Method editing and new method ............................................................................................. 77
Standard Methods ................................................................................................................... 78
Copy Methods ......................................................................................................................... 78
Delete Methods ....................................................................................................................... 79
Change Method Parameters ................................................................................................... 79
Method type ............................................................................................................................. 79
Result (only for manual Titration ............................................................................................. 80
Dosing parameters .................................................................................................................. 85
Sample identification ............................................................................................................... 85
Documentation ........................................................................................................................ 86
5 .. System Settings ....................................................................................................... 88
5.1
5.1.1
5.2
5.3
5.4
5.5
5.6
5.7
5.8
5.9
5.10
Reagents/Dosing Unit ............................................................................................................. 88
Dosing unit exchange .............................................................................................................. 88
Global Memories ..................................................................................................................... 92
RS232 Settings ....................................................................................................................... 92
Connection of Printers ............................................................................................................. 94
Date and Time ......................................................................................................................... 94
RESET .................................................................................................................................... 95
Device Information .................................................................................................................. 95
System Sounds ....................................................................................................................... 96
Data exchange ........................................................................................................................ 96
Software Update...................................................................................................................... 97
6 .. Connection of Analytical Balances ...................................................................... 100
6.1
Balance data editor ............................................................................................................... 100
7 .. Data Communication via RS-232- and USB-B interface ..................................... 102
7.1
General Information............................................................................................................... 102
Meaning / Description ............................................................................................................................ 102
7.2
Chaining multiple devices — „Daisy Chain Concept“ ........................................................... 102
7.3
Instruction Set for RS-Communication .................................................................................. 103
8 .. Maintenance and Care of the TITRONIC® 300 Piston Burette ............................ 104
9 .. Storage and transportation ................................................................................... 105
10 Recycling and Disposal......................................................................................... 105
11 Index ....................................................................................................................... 106
Declaration of conformity……………………………………….last page of the document
Notes to the Manual
The provided manual will allow you the proper and safe handling of the titration instruments.
The pictogram ! has the following meaning:
Status at time of printing
Advanced technology and the high quality of our products are guaranteed by a continuous development. This
may result in differences between this operating manual and your product We can not exclude mistakes. We
are sure you understand that no legal claims can be derived from the information, illustrations and
descriptions.
Note
A potentially more recent version of this manual is available on our internet website at www.si-analytics.com.
The German version is the original version and binding in all specification.
Version 140815 US
For maximum security, observe the safety and warning instructions in the Instructions.
Warning of a general danger to personnel and equipment
Non-compliance may result in injury or material will be destroyed.
7 .. Data Communication via RS-232- and USB-B interface ..................................... 102
7.1
7.2
7.3
General Information............................................................................................................... 102
Chaining multiple devices — „Daisy Chain Concept“ ........................................................... 102
Instruction Set for RS-Communication .................................................................................. 103
8 .. Maintenance and Care of the TITRONIC® 300 Piston Burette ............................ 104
9 .. Storage and transportation ................................................................................... 105
10 Recycling and Disposal......................................................................................... 105
11 Index ....................................................................................................................... 106
Declaration of conformity……………………………………….last page of the document
Notes to the Manual
The provided manual will allow you the proper and safe handling of the titration instruments.
The pictogram ! has the following meaning:
Status at time of printing
Advanced technology and the high quality of our products are guaranteed by a continuous development. This
may result in differences between this operating manual and your product We can not exclude mistakes. We
are sure you understand that no legal claims can be derived from the information, illustrations and
descriptions.
Note
A potentially more recent version of this manual is available on our internet website at www.si-analytics.com.
The German version is the original version and binding in all specification.
Version 140815 US
For maximum security, observe the safety and warning instructions in the Instructions.
Warning of a general danger to personnel and equipment
Non-compliance may result in injury or material will be destroyed.
57
1
Technical Specifications of the TITRONIC® 300 Piston Burette
1.1
Summary
®
The TITRONIC 300 is a piston burette and suitable for the following applications:
−
−
−
−
Manual titration with or without calculation of the result
Dosage
®
It can be used as a dosing burette with the TitroLine 7750 Titrator
It can be used as a dosing or titrating burette in combination with the TitriSoft control software from version
3.1 on-going.
A variety of dosing and filling speeds can be set for each method.
Up to 3 user methods can be memorised in the device.
Solutions to be used:
Virtually, any liquids and solutions with a viscosity of < = 10 mm² / s such as concentrated sulphuric acid may
be used. However, one has to avoid the use of chemicals that may attack glass, PTFE or FEP or that are
explosive, such as hydrofluoric acid, sodium azide or bromine! Suspensions containing high solids
percentages may clog or even damage the dosing system.
!
General provisions: !
The safety guidelines that are applicable to the handling of chemicals have to be observed under all
circumstances. This applies in particular to inflammable and/or etching liquids.
Guarantee
We provide guarantee for the device described for two years from the date of purchase. This
guarantee covers manufacturing faults being discovered within the mentioned period of two years.
Claim under guarantee covers only the restoration of functionality, not any further claim for damages
or financial loss.
Improper handling/use or illegitimate opening of the device results in loss of the guarantee rights.
The guarantee does not cover wear parts, as lobes, cylinders, valves and pipes including the thread
connections and the titration tips. The breach of glass parts is also excluded. To ascertain the
guarantee liability, please return the instrument and proof of purchase together with the date of
purchase freight paid or prepaid.
58
1.2 Specifications Piston burette TITRONIC® 300
CE sign:
Country of origin:
Status July 17. 2014
EMC compatibility according to the Council Directive: 2004/108/EG;
applied harmonized standards: EN 61326-1:2012
Low-voltage directive according to the Council Directive 2006/95/EG
applied harmonized standards: EN 61 010, part 1.
Germany, Made in Germany
The following dissolvents/titration reagents are allowed to be used:
− All common titration solutions.
− As reagent water and all non-aggressive non-organic and organic fluids are allowed. If using combustible
fluids fire please adhere to the Guidelines for Explosion Protection and Prevention of the chemical industry.
2
− For fluids with higher viscosity (≥ 5 mm /s), lower boiling point or affinity to outgas, the filling and dosage
speed can be adjusted.
2
− Fluids with viscosity over 20mm /s cannot be dosed.
Display:
3.5 inches -1/4 VGA TFT display with 320x240 pixels.
Power supply:
power supply 90-240 V; 50/60 Hz, power input: 30 VA
Use the Power supply TZ 1853, Type No.: FW 7362M/12 only!
RS-232-C Interface:
RS-232-C interface separated galvanically through photocoupler
Daisy Chain function available.
adjustable, 7 or 8 Bit (default: 8 Bit)
adjustable, 1 or 2 Bit (default: 1 Bit)
static 1 Bit
adjustable: even / odd / none
adjustable: 1200, 2400, 4800, 9600, 19200 (Default 4800 baud)
adjustable, (0 to 15, default: 01)
Data bits:
Stop bit:
Start bit:
Parity:
Baud rate:
Address:
RS-232-1
RS-232-2
USB Interface:
for computer, input Daisy Chain
devices of SI Analytics, titrator TitroLine 7750,
- Burettes TITRONIC 500, TITRONIC 110 plus, TITRONIC universal/300,
- Balances of the types Mettler, Sartorius,
Kern, Ohaus (for more, please contact SI Analytics)
- Exit Daisy Chain
1 x USB-type A and 1 x USB-type B
USB –Typ B
for connecting a PC
USB –Typ A („Host“)
for connecting:
- USB keyboard
- USB printer
- USB „mouse“ („mouse“),
- USB data media e.g. USB stick
- USB Hub to connect more USB devices
Stirrer:
Plug connection with integrated low-voltage supply (15 V ⎓) for the TM 50 Stirrer
®
incorporated in the bottom of the casing of the TITRONIC 300 piston burette
59
Status July 17. 2014
Housing material:
Front keyboard:
Housing dimensions:
Weight:
Ambient conditions:
Polypropylene
Polyester
135 x 310 x 205 mm (w x h x d), height incl. cylinder, excluding stirrer
ca. 2 kg for basic unit
Ambient temperature: + 10 ... + 40 °C for operation and storage
Humidity according to EN 61 010, Part 1:
Max. relative humidity 80 % for temperatures up to 31 °C,
linear decrease down to 50 % relative humidity at a temperature of 40 °C
Dosing units
®
®
Valve:
Hoses:
Piston burette TITRONIC 300 : 20 ml DURAN (borosilicate glass 3.3) cylinder
®
®
Piston burette TITRONIC 300 : 50 ml DURAN (borosilicate glass 3.3) cylinder
UV protection: cover made out of TROGAAMID, blue, transparent
volume neutral cone valve made from fluorocarbon polymers (PTFE), TZ 3000
FEP hose set, blue
Dosing accuracy:
Accuracy:
Precision:
after DIN EN ISO 8655, part 3
0.15 %
0.05 %
Cylinder:
60
1.3 Warning and safety information
The Piston Burette TITRONIC 300 corresponds to protection class III. It was manufactured and tested according
to DIN EN 61 010, Part 1, Protective Measures for electronic measurement devices and control devices s and
has left the factory in an impeccable condition as concerns safety technology. In order to maintain this condition
and to ensure safe operation, the user should observe the notes and warning information contained in the
present operating instructions. Development and production is done within a system which meets the
requirements laid down in the DIN EN ISO 9001 standard.
For reasons of safety, the Piston Burette TITRONIC 300 must be opened by authorised persons only; this
means, for instance, that work on electrical equipment must only be performed by qualified specialists.
In the case of nonobservance of these provisions the Piston Burette TITRONIC 300 may constitute a
danger: electrical accidents of persons or fire hazard. Moreover, in the case of unauthorised intervention
in the Piston Burette TITRONIC 300 as well as in the case of negligently or deliberately caused damage,
the warranty will become void. !
!
Prior to switching the device on it has to be ensured that the operating voltage of the power supply and the Piston
Burette TITRONIC 300 matches the mains voltage. The operating voltage is indicated on the specification plate.
Nonobservance of this provision may result in damage to the power supply Piston Burette TITRONIC 300 or in
personal injury or damage to property.
If it has to be assumed that safe operation is impossible, the Piston Burette TITRONIC 300 has to be put out of
operation and secured against inadvertent putting to operation. In this case please switch the Piston Burette
TITRONIC 300 off, pull plug of the mains cable out of the mains socket, and remove the Piston Burette
TITRONIC 300 from the place of work.
Examples for the assumption that a safe operation is no longer possible,
the package is damaged,
the Piston Burette TITRONIC 300 shows visible damages,
the Piston Burette TITRONIC 300 does not function properly,
liquid has penetrated into the casing.
If the Piston Burette TITRONIC 300 has been altered technologically or if unauthorized personnel tried or
succeeded to open the instrument as attempt to repair it.
In case that the user operates such a device, all thereof resulting risks are on the user.
The Piston Burette TITRONIC 300 must not be stored or operated in humid rooms.
For reasons of safety, the Piston Burette TITRONIC 300 must only be used for the range of application
described in the present operating instructions.
In the case of deviations from the intended proper use of the device, it is up to the user to evaluate the
occurring risks.
! The relevant regulations regarding the handling of the substances used have to be observed: The
Decree on Hazardous Matters, the Chemicals Act, and the rules and information of the chemicals trade. It has
to be ensured on the side of the user that the persons entrusted with the use of the Piston Burette
TITRONIC 300 are experts in the handling of substances used in the environment and in the Piston Burette
TITRONIC 300 or that they are supervised by specialised persons, respectively.
! During all work with titration solutions: Please wear protective glasses! !
The TITRONIC® 300 Piston Burette is equipped with integrated circuits (EPROMs). X rays or other high energy
radiation may penetrate through the device’s casing and delete the program.
For working with liquids, not beeing common titration solvents, especially the chemical resistance of the
construction materials of the TITRONIC® 300 have to be considered (please also refer to chapter 1.1).
For the use of liquids with high vapour pressure or (mixture of) substances not being mentioned in chapter 1.1 as
allowed substances, the safe and proper operation of the Piston Burette TITRONIC® 300 has to be guaranteed
by the user.
When the piston moves upwards within the cylinder, a microfilm of dosing liquid or titration solution will always
remain adhered to the inner wall of the cylinder, but this has no influence on the dosing accuracy. This small
residue of liquid, however, may evaporate and thus penetrate into the zone underneath the piston, and if non®
admitted liquids are being used, the materials of the TITRONIC 300 Piston Burette may be dissolved or
corroded (please refer also to chapter 8 "Maintenance and Care of the Piston Burette TITRONIC® 300").
61
2
Unpacking and First Operation
2.1 Unpacking and First Operation of the Piston Burette
The piston burette itself as well as all related accessory and peripheral parts have been carefully checked at the
factory to ensure their correct function and size.
Please ensure that the small accessories are also removed in full from the packaging.
For the scope of delivery, please refer to the enclosed parts list.
®
The TITRONIC 300 piston burette may be placed on any flat surface.
2.2 Installing of the stirrer TM 50
The stirrer connects to the right side at the bottom and is locked in position by pushing it backwards
(Fig. 1). In this way the power supply of the TM 50 stirrer is automatically established.
Fig. 1
The stand rod TZ 1748 is screwed into the thread and the titration clamp Z 305 may now be mounted on the
stand rod. (Fig.2). Instead of the stirrer TM 50, also the titration stand without stirring function (TZ3886 ) can be
connected.
Fig. 2
62
2.3 Anschlüsse der Kolbenbürette. Kombination mit Zubehör und weiteren Geräten
2.3.1
®
Back panel of the TITRONIC 300 piston burette
1
2
3
4
5
6
Fig. 3
2.3.2
®
Connection ports of the TITRONIC 300 piston burette
The burette TITRONIC® 300 offers the following interfaces:
Two RS232 interfaces, 4-channel (Mini-DIN):
1) For connection of a weighing balance and other devices from von SI Analytics (burettes,etc.)
2) RS1 for connection to the PC
3) One USB-A (“Host“) interface for connecting USB devices such as a keyboard, printer, manual control
unit (mouse), USB memory stick and USB hub
4) USB-B interface (mini USB) for connection to a PC
5) Connection of the external power supply TZ 1853
6) On/Off switch
2.3.3
Connecting a printer
Printers with a USB interface are to be connected to one of the two USB-A interfaces. These printers have to
feature HP PCL emulation (3, 3 enhanced, 5, 5e, no GUI and GDI printers).
2.3.4
Connecting a USB device (manual controller, keyboard, memory device, hub)
The following USB devices can be connected to the USB-A interfaces:
• PC-keyboard
• TZ 3880 manual controller (in the following: ”mouse“)
• Printer
• USB storage devices, e.g. USB sticks
• USB hub
• USB barcode scanners
For connecting more than one USB device, a USB hub (e.g. TZ 3830) is required.
2.3.5
Connection of analytical balances
Analytical balances are to be connected to the RS232-2 port using an appropriate cable.
63
2.4 Setting the Language of the Country
The ex-factory default language setting is English. When the piston burette is switched on, the main menu will
appear once the boot sequence is completed:
Fig. 4
Using <MODE>, followed by <System settings> you navigate to the system settings. The very first menu is to be
used for setting the language of the country:
Fig. 5
The first menu is the language settings.
Fig. 6
Use <OK> to call the menu. Select the national language using the <↑↓> arrow keys, confirm it with
<ENTER>/<OK>:
64
Fig. 7
The selected language will appear immediately. Pressing the <ESC> key twice will return the user to the main
menu.
65
2.5 Dosing unit and Accessories
1
2
3
5
4
6
7
8
9
10
11
12
Fig.8
TZ 3281 – suction hose
TZ 2003 – drying tube TZ 2003
TZ 3283 – connection hose
TZ 3282 – dosing hose without dosing tip and holding bracket
TZ 3130 – 20 ml dosing unit or TZ 3160 50 ml dosing unit
TZ 1748 – stand rod
TZ 3801 – valve cover lid and TZ 3000 3-/2 way valve
Z 305 – titration clamp
TZ 3620 – dosing hose with dosing tip and holding bracket; bracket = TZ 3875
TZ 3802 – threaded cap with bore hole GL 45, incl. adapter with 2 openings for drying tube and suction
hose
11) TZ 3803 – 1 litre reagent bottle, amber
12) TZ 3656 – titration tip unit, blue (5 pcs.), option: dosing tip made of glass TZ 1503
1)
2)
3)
4)
5)
6)
7)
8)
9)
10)
66
2.6 Initial Filling or Rinsing of the Dosing unit
The dosing unit and the tubes are already mounted and ready-to-use. After the reagent bottle is connected, the
initial filling of the dosing unit can be performed. While performing the initial filling or washing program, an
adequately sized waste bin has to be placed below the titration tip.
On the main menu (fig. 9)
Fig. 9
Press <MODE> key and select Rinsing:
Fig. 10
Confirm the selection by pressing <OK>.
At this point you can select the number of rinsing cycles (Fig. 11). Initial filling requires a minimum of two rinsing
cycles. You can stop the rinsing operation (Fig. 12 and 13) at any time by pressing <STOP> and then resume
rinsing with <START>.
Fig. 11
67
Das Gerät füllt erst und startet dann den Spülvorgang:
Fig. 12
Fig. 13
Fig 14
Fig. 15
The rinsing program (Fig.12-15) can be canceled at all time with <STOP> and the continued with <START>.
When the rinsing is finished, you can get back to the start menu by pushing 2 x<ESC>.
68
3
Working with the Piston burette TITRONIC® 300
3.1 Front Keyboard
Fig. 16
Apart from alphanumeric input (a-z, A-Z, 0-9) and a few other functions, almost all functions can be performed
using the front keyboard.
<Mode>:
<EDIT>:
<ESC>:
<START/STOP>
<FILL>:
< ↑>
<↓>
<→>
Methods selection, rinsing, system settings, balance data
Changing the current method, new method, copy and delete method, standard methods
<ESC> will take you back to the previous menu level
Start and Stop of a current method
Filling the burette
Arrow-key up: Choosing of a menu or changing a number
Arrow-key down: Choosing of a menu or changing a number
Arrow-key right: Changing position of the cursor, Enter
3.2 Display
The display consists of a graphical LCD display with a resolution of 320 x 240 pixels.
Fig. 17
69
3.3 Manual controller “mouse“
The manual controller (“Mouse”, Fig. 18) is needed for manual titration. It can also be used for starting dosage or
other methods.
Fig. 18
Mode
Manual titration
Dosage through Dosage method
Black key
Start of titration, single-step and
continuous titration (please refer to
chapter 3.6.1, manual titration)
Start dosage
Grey Key
Filling
Stop of titration including evaluation
Filling
3.4 External PC Keyboard (Optional)
Keys
<ESC>
<F1>/<START>
<F2>/<STOP>
<F3>/<EDIT>
<F4>/<FILL>
<F5>/
<F6>/<MODE>
Function
<ESC> will take the user to the previous level on the
menu.
Start of a selected method
Stop of the current method
Change of the current method, new method, copy method,
standard methods
Fill the interchangeable unit
Display and modification of the balance data
Selection of method, rinsing, system settings, balance
data
<F7>/<SYS>
System settings (language selection, time/date ...)
<F8/<CAL>
No function on the TITRONIC® 300
<F9>/+ / Change of sign
<F10>/<DOS>
Call dosing menu
Num/ Scroll and Lock/ Lock Without function
Prt Sc and Sys Rq
Without function
<ESC>
Selection of the method-selection menu from the main
menu.
Elders: <ESC> will take you back to the previous level in
the menu.
Selection of individual menus and numeric values
< ↑> < ↓ > <←> <→>
0...9
Input of numeric values
<ENTER>
Confirmation of input parameters
Deletion of one input digit / an input character to the left of
< ←Backspace >
the blinking cursor
Letters,
Alphanumeric input possible. Uppercase and lowercase
ASCII-symbols
possible.
All other keys
Do not have any function
70
3.5 Menu Structure
There are 4 selection menus:
• Start or main menu
• Method parameters
• Method selection
• System settings
After power-up, the main menu is always the first menu to appear. The method displayed will always be the last
method that was used (Fig. 19).
Fig. 19
Pressing <START> will result in the immediate execution of the method shown. <EDIT>/F3 will take you to the
method parameters (Fig. 20.
Fig. 20
At this point you can
• modify the current method
• create a new method
• call and memorise standard methods
• copy or delete an existing method
• print a method (titration methods only)
Use the <↓> und <↑> keys to select the submenus, confirm your selection with <OK>/<ENTER>. <ESC> will take
you back to the main menu.
<MODE>/F6 will take you to the method selection menu (Fig. 21).
71
Fig. 21
Existing methods can be selected by pressing the <↓> und <↑> keys and confirming the selection with
<OK>/<ENTER>. Once the selection made, you will return to the main menu with the newly selected method. If
no method is selected, <ESC> will also take you back to the main menu.
To navigate directly to the system settings (Fig. 22 and Fig. 23) you can use the <SYS>/F7 key; you can also
navigate there through the method selection menu.
Fig. 22
Fig. 23
3.6 Main Menu
After power-up, the main menu is always the first menu to appear. The method displayed will always be the last
method that was used (Fig. 24). In the present case it was a titration method.
72
Fig. 24
3.6.1
Manual Titration
Manual titration is always performed using the manual controller "mouse". Manual titration is impossible without
the „mouse“.
Fig. 25
Using <START> pressing the Black key on the “mouse“ will start the manual titration method.
Depending on the settings of the method, the system will prompt you for the sample description (Fig. 26) and the
sample weight (Fig. 27). You can use an external PC keyboard (optional) to enter a 20-digit alphanumeric sample
ID.
Fig. 26
73
Fig. 27
The balance data can be input using the front keyboard or the external keyboard. Please confirm your selection
using <OK>/<ENTER>.
In the case of automatic takeover of the weighing-balance data, the sample weights will be read out of the
balance data memory. If the memory does not contain any balance data, a message informing you of the
absence of balance data will be displayed (Fig. 28).
Fig. 28
Even at this moment, pressing the Print key on the balance will still cause the transfer of the balance data. After
the input of the sample description and/or the sample weight/ sample volume, the following display will appear:
Fig. 29
You can control the metering rate with the black key of the “mouse“. A single depression of the key will cause a
step up to the first level. Depending on the size of the dosing unit, this corresponds to 0.0025 ml (20 ml) or
0.00625 ml (50 ml). Displayed are 0.003 or 0.006 ml from a single step.
If one keeps the black key depressed on the first level, titration will be continued at a low rate. If you press the
nd
black key fully down (2 level) titration will proceed at a higher rate. The rate of the second level can be set in
five stages using the <↓↑> arrow keys. These stages can also be changed during manual titration.
74
Fig. 30
Stage 5 corresponds to maximum titration speed. Speed is reduced by 50% each time.
Example: 20 dosing unit:
Stage 5
Stage 4
Stage 3
Stage 2
Stage 1
40.00 ml/min
20.00 ml/min
10.00 ml/min
5 ml/min
2.5 ml/min
As soon as manual titration is completed, press the <STOP/F2> key or approx. for 1 sec. the grey key of the
“mouse”. The titration result will be calculated and displayed and optionally printed on the connected printer or
USB stick in PDF format::
Fig. 31
<ESC> will take you back to the start menu way to start the next titration immediately. Filling of the
interchangeable unit occurs automatically.
3.6.2
Dosage
To start a dosage method, please use the <START>/<F1> key or the black key of the manual controller
("mouse")
Fig. 32
75
Fig. 33
Fig. 34
The dosed volume will be briefly displayed before the display returns to the main menu.
The next dosage operation can be started immediately. Filling of the unit following dosage will not occur
automatically, unless the maximum cylinder volume has been reached or the automatic filling option (“always")
was activated. The unit can be filled at any time using <FILL>.
A dosing operation can also be performed without any dosing method with the <DOS>/<F10> key of the external
keyboard:
Fig. 35
This is the point to input the volume which will be dosed following the confirmation with <OK>/<ENTER.
76
Fig. 36
Further dosages can be performed using <OK> or <ENTER.> Filling of the unit following dosage will not occur
automatically here, unless the maximum cylinder volume has been reached. The unit can be filled at any time
using <FILL>. <ESC> will take you back to the main menu.
77
4
Method Parameters
From the main menu shown in (Fig. 32), <EDIT> will take you to the method parameters:
Fig. 37
4.1 Method editing and new method
If you select <edit method> or <new method> you will be taken to the modification or new creation of a method.
Selecting <new method> will always lead to the prompt for the input of a method name (Fig. 38). This prompt will
not appear in the case of the modification of an already created method.
Fig. 38
The method name can contain up to 21 characters. Special characters are also possible. If no keyboard is
connected, the method name being displayed has to be adopted (in the present case „Method 01“). Numbering of
methods will occur automatically. Press <OK>/<ENTER> to confirm the input. The method name can be changed
at any time. Please continue at this point with Chapter 4.5.
78
4.2 Standard Methods
®
The <Standard methods> item of the TITRONIC 300 contains a series of ready-made standard methods which
can be conveniently selected (Fig. 39).
Fig. 39
Once the selection made, you are directly prompted for the input of the method name (Fig. 40).
Fig. 40
The standard name may be adopted or modified. Subsequently, you will be taken to the <Change method
parameters> item. Please continue at this point with Chapter 4.5.
4.3 Copy Methods
Methods can be copied or stored with a new name. If you select this function, the current method will be copied
and you can include a new name (Fig. 41)
Fig. 41
A new name with the suffix [1] will be assigned automatically, so as to avoid the existence of 2 methods having
the same name. Subsequently, you will be taken to <Change method parameters>. Please continue at this point
with Chapter 4.5.
79
4.4
Delete Methods
If this function is selected, you will be prompted to know whether the current method is actually to be deleted.
You have to reply <Yes> in explicit terms and also confirm this reply with <OK>/<ENTER>.
Fig. 42
4.5 Change Method Parameters
The input or modification of the method name was already described in Chapters 4.1 and 4.3.
Fig. 43
4.5.1
Method type
On the <Method type> you can select whether you wish to perform a manual titration or a dosage or whether you
wish to prepare a solution (Fig. 44).
Fig. 44
The selection of the Method type will have an influence of the further parameterisation of the method. For
instance, if you select the dosing mode, no selection of a formula will be available.
80
4.5.2
Result (only for manual Titration
The <Result> menu offers the following possible settings:
Fig. 45
The Result text may contain up to 21 alphanumeric characters including special characters.
Fig. 46
Please confirm your input with <OK</<ENTER>.
4.5.2.1 Formulae for manual titration
On the Formula Selection submenu you can select the appropriate calculation formula:
Fig. 47
The following calculation formulae are available for manual titration:
Titration formula
ml
(ml-B)*T*M*F1/(W*F2)
(B-ml)*T*M*F1/(W*F2)
Additional information
Used to calculate the consumption in ml
Formula for calculating the concentration of a
sample taking into account a blank value in
terms of ml.
Formula for calculating the concentration of a
sample taking into account a blank value in
81
(B*F3–ml*F1)*T*M/(W*F2)
(W*F2)/(ml-B)*M*F1)
terms of ml. Reverse titration (examples. CSB,
saponification number)
Formula for calculating the concentration of a
sample taking into account a blank value,
including a multiplicative factor. Reverse
titration.
Formula for calculating a titer (T) of a titration
solution.
Legend of the abbreviations used:
ml:
B:
T:
M:
F1
F2
W
Titration solution consumption in ml
Blank value in ml, in most cases determined by titration
Titer of the titration solution (e.g. 0.09986)
Mol; Mol- or equivalent weight of the sample (e.g. NaCl 58.44)
Factor 1, Conversion factor
Factor 2, Conversion factor
Weight, sample weight in grams or sample volume in ml.
After selecting a formula, please confirm your selection with <OK>/<ENTER>:
Fig. 48
The values of the individual parameters of the selected calculation formula can now be input one by one.
Fig. 49
4.5.2.2 Sample weight and volume (sample quantity)
82
Fig. 50
Fig. 51
The Sample Quantity (W) item is used to select whether one is wishing to use a sample weight or a sample
volume for titration or solution preparation.
You have the following options (Fig. 51):
•
•
•
•
•
Manual sample weight: The sample weight is enquired by a prompt at the start of the method and
manually input.
Automatic sample weight: The sample weight is automatically transferred by a connected balance.
Fixed sample weight: A fixed sample weight is input in g. This weight will then automatically be used for
each start of the method without any sample weight being enquired by a prompt.
Manual sample volume: The sample volume in ml is prompted at the start of the method and manually
input.
Fixed sample volume: A fixed sample volume is input in ml. this volume will then automatically be used
for each test of the method without any sample volume enquired by a prompt.
4.5.2.3 Formula unit
The formula unit can be selected in the Unit submenu.
Fig. 52
Once the selection made (e.g. %), the unit will also be displayed as piece of information on the display.
83
Fig. 53
4.5.2.4 Decimal digits
To conclude, it is possible to determine the number of decimal digits from 2-6. The standard setting is 2.
4.5.2.5 Globale Speicher
If a titration result should be used again later, e.g. the factor or titer of a solution or a blank value, it can be saved
automatically. The creation of a global memory is possible when using an external keyboard only. The creation of
a global memory can be managed with the system settings or by typing Shift + F5 on the external keyboard. This
leads to the <Global memory>:
Fig. 54
A global memory can be added by pressing F3:
Fig. 55
84
Fig. 56
MO1 can either be accepted or substituted by a designation of a blank value or a titer.
Fig. 57
This value can be used with the formula.
Fig. 58
The blank value, being titrated previously is always taken into account automatically.
Fig. 59
85
4.5.3
Dosing parameters
Fig. 60
The dosing parameters (dosing speed, filling speed and max. dosing/titration volume) are determined for each
method. This applies to both types of methods such as manual titration and dosage.
Fig. 61
The dosing speed can be set as a function of the interchangeable unit in terms of ml/min from 0.1 to 100 ml/min.
Dosing unit
20 ml
50 ml
Max. dosing speed [ml/min]
40
100
The filling speed can be set in terms of seconds from 20 to 999. The standard setting of this value is 30 seconds.
For diluted aqueous solutions the filling speed can be six to 20 seconds. For non-aqueous solutions the filling
speed should be set to the 30 seconds. In the case of highly viscous solutions such as concentrated sulphuric
acid the filling speed should be further reduced down to 40 - 60 seconds.
Depending on the method type, the (maximum) the living volume or titration volume can be set to 999.999 or
even 9999.999.
4.5.4
Sample identification
In the manual titration it is possible to input a sample identification. The possible input includes manual, automatic
or no sample identification at all.
86
Fig. 62
For the manual sample ID, a prompt for the sample ID will always be displayed at the start of the method (Cp.
also chapter 3.6, Main menu). For an ‘automatic’ sample ID there will be selected a master ID (in the current case
this is water, cp. Fig. 68), which will then automatically be numbered starting on 01.
Fig. 63
After a new power-up, numbering will resume with 01.
4.5.5
Documentation
Fig. 64
Two different format settings are available for documentation on a printer or USB memory stick: short and GLP:
87
Fig. 65
Method type
Manual titration
Dosing
Short documentation
Method name, date, time, sample
description, sample weight/sample
volume, results and calculation
formula
Only method printout, Method name,
date, time, dosing parameters
Standard documentation
N/A
GLP-Documentation
Same as ‘Short
documentation’ +
plus method contents
N/A
N/A
The documentation can also be stored in PDF and CSV-files on a connected USB stick.
88
5
System Settings
Fig. 66
From the main menu (Fig. 66), press <MODE> followed by <System settings> (or with the external keyboard
connected, press F7) you get to the system settings:
Fig. 67
Setting the national language was already described in Chapter 2.5.
5.1 Reagents/Dosing Unit
In this menu you can set the size of the dosing unit (20 or 50 ml), perform an exchange of the dosing unit and
enter reagents data, being stored during manual titration in the GLP documentation.
Fig. 68
5.1.1
Dosing unit exchange
Confirm with <OK/ENTER> the size of the dosing unit.
89
Fig. 69
Chose <Dosing unit exchange>.
Warning: The exchange of the dosing unit starts without any warning. Therefor please place the titration
tip in a reagents bottle or beaker.
The piston is moving up to 85%.
Fig. 70
Then the system prompts to unlock the dosing unit.
Fig. 70
Then please unlock the dosing unit as shown in fig. 71:
Fig. 71:
90
After the unit is unlocked, confirm with <OK>. The unit will move up the whole way.
Fig. 72
Pull off the dosing unit and attach the new one just like it was before. The two struts of UV protection must
comply with the mark on the housing (Fig.73).
Fig. 73
Accept by pushing <OK>/<ENTER>. In case you changed the size of the dosing unit, you can choose which size
you attached:
Fig. 74
If you want to change the reagents data, you can reset all reagent data.
91
Fig. 75
After this procedure the dosing unit is moving back down again. Please lock the dosing unit.
Abb. 76
The following reagents data can be chosen:
•
•
•
•
•
•
•
•
•
Unit size 20 or 50 ml (adjustable)
Reagent name: (default: blank)
Concentration: (default: 1.000000)
Concentration determined on: (default: actual date)
To be used until: (default: actual date)
Opened/Produced on: (default: actual date)
Test according to ISO 8655: (default: actual date)
Charge description: (default: blank)
Last modification: (default: actual date)
92
Fig. 77
5.2 Global Memories
Please refer to chapter 4.5.2.5.
5.3 RS232 Settings
®
The <RS232 settings> item can be used to determine the device address of the TITRONIC 300 and set the
parameters of the two RS232 interfaces separately:
Fig. 78
The device address can be set from 0 – 15. Address 1 is the default setting:
Fig. 79
93
Fig. 80
The baud rate is preset to 4800. It may be set to 1200 – 19200:
Fig. 81
The parity setting can be selected amongst <No>, <Even> and <Odd>. <No> is the standard setting.
Fig. 82
You may select between 7 and 8 data bits. 8 bits is the standard setting.
Fig. 83
94
The stop bits can be set to 1, 1,5 and 2. The default setting is 1.
Abb. 84
Selecting <Reset RS Parameters> will reset the RS232 parameters to the factory settings.
5.4
Connection of Printers
The results and methods can be printed on the following media:
•
•
•
HP PCL compatible printer (A4), colour (chromatic) and monochrome (e.g. laser printer)
Seiko DPU S445 (Thermo paper 112 mm width)
On the USB stick in PDF format
To connect the printers to the burette please use the USB socket. When printing, please check whether the
correct printer is connected. It is not possible to print "HP" printer layouts on a Seiko thermal printer or vice versa.
The printer settings should always be checked and adjusted after changing the printer.
Fig. 85
Only one printer at a time can be connected, because automatic printer recognition is not supported.
HP PCL is the default setting. If you select “Print PDF“, please make sure that a USB stick is connected to the
device. Print PDF is the default setting.
5.5 Date and Time
The factory time setting is Central European Time. This setting may be changed, where necessary:
95
Fig. 86
5.6 RESET
RESET will reset all settings to the factory setting.
Please note: All methods will also be deleted. So please print the methods or export/copy them to a connected
USB storage medium (refer to chap. 5.9).
The RESET has to be confirmed separately once again:
Fig. 87
5.7 Device Information
<Device Information> contains information about
• the current software version
• the serial number of the device
• printer driver and update version
• device address set
• number of measurements (Starts of a method)
• a number of strokes/filling cycles
Fig. 88
96
Please hold this device information ready for service purposes.
5.8 System Sounds
The system tone can be switched on and off.
Fig. 89
5.9 Data exchange
All methods with all parameter settings and global memories can be stored and restored on a connected USBmemory. It is also possible to transfer the settings from one titrator to another one. The backup will be started
with Settings backup:
Abb. 90
Back settings is displayed during the backup in blue:
Abb. 91
After a Reset or a maintenance case it is possible to restore the backup with Restores settings:
Die Sicherungsdatei bekommt einen Zeitstempel. Die Sicherungsdatei auswählen und sofort werden die
Einstellungen übertragen bzw. wieder hergestellt:
97
Abb. 92
Abb. 93
5.10 Software Update
Fig. 94
An update of the device software requires a USB stick containing a new version. For this operation, the two files
that are needed have to be located in the root directory of the USB stick:
98
Plug the USB stick into a free USB-A port, wait for some seconds, and then select the Software Update function.
The valid software updates will be shown on the display. In the present case this is Version „14_29“ from week
29, year 2014.
Fig. 95
After starting the update using <OK/ENTER>, next thing to appear is the following graphic:
Fig. 96
which will change after a few seconds to the following display:
Fig. 97
Fig. 98
99
Upon completion of the update (approx. 2-3 minutes), the device will shut down the software completely and
proceed to a new start.
Please note: During the update, the device must not be switched off.
Important: In the course of an update, the methods will not be deleted! You can continue to use them.
If no valid update file is stored on the USB stick, the following message will appear:
Fig. 99
100
6
Connection of Analytical Balances
As it often happens that the sample is weighed in on an analytical balance, it makes sense to connect this
®
®
balance to the TITRONIC 300. To connect the balance to the TITRONIC 300, the balance must have a RS232-C-interface and the connection cable must be configured accordingly. For the following types of balances
there are already assembled connection cables:
Balance
Sartorius (all types with 25 pin RS)
Mettler, AB-S, AG, PG
New Sartorius balances with USB-Interface (via RS-converter)
Precisa XT-Series
Kern with 9-pole RS232
TZ-Number
TZ 3092
TZ 3099
TZ 3099
TZ 3183
TZ 3180
For all other types of balances it is possible to obtain an already assembled connection cable (on demand). For
this we need detailed information about the RS-232-C-interface of the balance used.
®
The connection cable is to be connected to the RS-232-C-interface 2 of the TITRONIC 300. This side of the
connection cables always consists of a 4-pole mini-plug. The other side of the cable can, depending on the type
of balance, be a 25-pole plug (Sartorius) or a 9-pole plug (Mettler AB-S.
®
In order to allow the balance data to be sent to the TITRONIC 300, the data transmission parameters of the
titrator and the balance must correspond to each other. Additionally, it is necessary to carry out some more
standard settings on the side of the balances:
The balance is to send the balance data via RS-232-C only by means of a print command.
The balance is to send the balance data only after the display standstill.
The balance should never be set to ‘automatic sending’ and/or ‘send continuously’.
‘Handshake’ on the balance must be set to ‘off’, or even ‘Software Handshake’ or ‘Pause’.
No special characters such as S or St are allowed to be used as prefix in the balance data of the balance
®
data string. In such a case it might be possible that the TITRONIC 300 cannot process the balance data
correctly.
After you have connected the balance with the appropriate cable to the TITRONIC® 300 and have adjusted all
®
settings in the balance software, and possibly in the TITRONIC 300, you can now test the data transfer of the
balance very easily. Start the one method. Confirm the sample designation. Then, the display asks you:
a) To press the print-button at the balance Parameters to ‘weighted sample automatically’
b) To enter the weighted sample then the parameters are still set to ‘weighted sample manually’
Put an object onto the balance and press the print button. After the standstill of the balance display there will be
®
beep at the TITRONIC 300 and the transmitted balance data appear:
•
•
After approx. 5 sec. in the display and the display changes automatically into the measuring display.
The weighted sample must again be confirmed with <Enter> or <F1>.
6.1 Balance data editor
Pressing the die <F5/balance symbol > function key will invoke the so-called balance data editor.
A list with the existing balance data will appear:
101
Fig.100
The balance data can be edited one by one. Following a change, a star will appear opposite the weighed-in
quantity:
Fig. 101
Weights may be deleted or added individually. It is also possible to delete all weights at one stroke.
Fig. 102
If no balance data is available, the “No balance data found” message will appear.:
Fig. 103
102
7
Data Communication via RS-232- and USB-B interface
7.1 General Information
®
The burette TITRONIC 300 has two serial RS-232-C interfaces to communicate data with other devices. By
means of these two interfaces it is possible to operate several devices on one computer (PC) interface.
®
In addition to that, the TITRONIC 300 also has an alternatively USB-B interface, which can only be used to
connect a PC.
RS-232-C-1 establishes the connection to a connected computer or to the previous device of the “Daisy Chain”.
At the RS-232-C-2 it is possible to connect additional devices (Daisy Chain Concept).
PIN assignment of the RS-232-C interfaces:
PIN-No.
1
2
3
Meaning / Description
T x D Data output
R x D Data input
Digital mass
7.2 Chaining multiple devices — „Daisy Chain Concept“
In order to activate several devices in a chain individually, each device must have an own device address. For
this it is at first necessary to establish a connection from the computer to the RS-232-C interface 1 of the first
devise in the chain by means of a RS-232-C data cable, e.g. Type No. TZ 3097. With the additional RS-232-C
data cable, Type No. TZ 3094, the RS-232-C- interface 2 of the first device is connected with the RS-232-Cinterface 1 of the second device. At interface 2 of the second device it is possible to connect an additional device.
®
The TITRONIC 300 can also be connected via USB cable TZ 3480 (type A (M) – type B (M), 1.8m). It is also
®
possible to connect the TITRONIC 300 via a mini USB to a USB interface of a PC. To accomplish this
connection, a driver has to be installed on the PC. Then the USB-B interface takes over the function of the
RS232-1 interface. Please contact SI Analytics for acquiring the software.
The address always consists of two characters: e.g. address 1 of the two ASCII- characters <0> and <1>. The
addresses can be set from 00 to 15, i.e. 16 possibilities. It must be ensured that the devices in a chain have
different addresses. If a device is addressed with its address, this device will process this command without
sending it to another device. The reply to the computer has also an own address. The addresses are allocated as
described in Chapter 5.2.
®
The burette TITRONIC 300 receives commands from a PC at the interface 1 (USB- B) if the computer knows the
address. It also sends the answer via this interface. If the address of the incoming command does not match the
device address, the complete command will be forwarded to interface 2. Interface 2 is connected to interface 1 of
®
another device. This device checks the address as well and reacts to the command as the first TITRONIC 300
did before.
®
All information (data strings) which arrive at interface 2 of the burette TITRONIC 300 will immediately be send to
the computer via interface 1 (or USB-B interface). Thus, the computer receives the data of all devices. In practice
it is possible to connect up to 16 devices to one computer- (PC-) interface.
103
7.3 Instruction Set for RS-Communication
The commands consist of three parts: Address
two-digit aa, e.g.: 01
Command
e.g.: DA
Variable, if necessary
e.g.: 14
and end of command
<CR> <LF>
Every command must be completed with the ASCII - sign <CR> and <LF> (Carriage Return and Line Feed).
Only if the respective action has ended the answers will be returned to the computer.
®
Example:
The command to dose 12.5 ml shall be sent to the burette TITRONIC 300 with the address 2.
The command consists of the characters: 02DA12.5<CR LF>
In detail:
02
= Device address
DA
= Dosage command with filling and zero points of the display
12.5
= Volume in ml to be dosed
<CR LF> = Control character as command end
Command
Description
Reply
aaAA
aaMC1...XX
aaBF
aaBV
aaDA
aaDB
aaDO
aaGDM
aaGF
aaES
aaEX
aaGDM
aaGF
aaGS
aaLR
aaLI
aaLO
aaRH
aaRC
aaRS
automatic allocation of device address
choosing a method
„filling burette“. Aufsatz wird gefüllt.
output of dosed volume in ml
dose volume without filling, with adding the volume
dose volume without filling, reset of the volume
dose volume with filling, without adding the volume
dosing speed in ml/min
filling time in seconds (min is 20, default 30)
„ESC" function one step backwards
„EXIT“ function.back to main menu
dosing speed in ml/min (0.01 – 100 ml/min)
filling time in sec (adjustable 20 – 999 seconds)
output serial no. Of device
output report (short report)
output method content
output documentation (as configured)
request of identification
send last command
report status
possible answers are:
„STATUS:READY“ for ready
„STATUS:dosing“ dosing
„STATUS:filling“ filling
„ERROR:busy“ if no interchangeable unit has been attached
start selected method
EEPROM reset to factory defaults
stop the actual function
Version number of the software
aaY
aaY
aaY
aa0.200
aaY
aaY
aaY
aaY
aaY
aaY
aaY
aaY
aaY
aaGS08154711
aaY
aaSM
aaSEEPROM
aaSR
aaVE
aaIdent: TITRONIC 300
aa“last command“
aaStatus:“text
aaY
aaY
aaY
aaVersion:
104
8
Maintenance and Care of the TITRONIC® 300 Piston Burette
The preservation of the proper functioning of the piston burette requires testing and maintenance work
to be performed on a regular basis.
Regular inspections are essential prerequisites for the correctness of the volume and the proper
functioning of the piston burette.
The accuracy of the volume is determined by all chemicals-carrying components (piston, cylinder,
valve, titration tip and hoses). These parts are subject to wear and tear, i.e. zthey are or wearing parts,
respectively. The piston and cylinder are subject to particular strain, hence they require special
attention.
Heavy strain:
Use of e.g. concentrated solutions, reagents and chemicals (> 0,5 mol/L); chemicals attacking glass,
such as fluorides, phosphates, alkali solutions; solutions with a tendency to crystallising out; Fe (III)
chloride solutions; oxidising and corroding solutions such as iodine, potassium permanganate, Cer
2
(III), Karl-Fischer titration agent, HCl; solutions with a viscosity of > 5 mm /s; frequent, or even daily
use.
Normal strain:
Use of solutions, reagents and chemicals (up to 0.5 mol/l) which do not attack glass, crystallise out or
corrode.
Interrupted use :
If the dosing system is not in use for more than two weeks, we recommend emptying and cleaning the
glass cylinder and all hoses [6]. This applies in particular under the operating conditions referred to in
the “Heavy strain” section. If this recommendation is not adhered to, the piston of the valve may
become leaking, this may result in damage to the piston burette.
If the liquid is left within the system, you will also have to reckon with corrosion and an alteration of
the solutions used over time, which includes e.g. crystallisation. Considering that as of the state of the
art there are no plastic hoses available for the use in titration equipment which would be perfectly free
of diffusion phenomena, particular attention is to be paid to the range of the hose lines.
We recommend the following inspection and maintenance work
Simple cleaning:
Wiping off splashed chemicals from the outer surface. [1]
Heavy strain
Whenever required in
operation
Normal strain
Whenever required in
operation
Sight check:
Check for leakage in the area of the dosing system. [2]
Is the piston tight? [3]
Is the valve tight? [4]
Titration to clear? [5]
Weekly, when putting
back into operation
Monthly, when putting
back into operation
Basic cleaning of the dosing system:
All parts of the dosing system to be cleaned separately. [6]
Every three months
Whenever necessary
Technical inspection:
Check for air bubbles in the dosing system. [7]
Visual inspection
Check of the electrical connections. [8]
Semi-annually when
putting back into
operation
Semi-annually when
putting back into
operation
Semi-annually
Annually
Verification of the volume according to ISO 8655:
Perform basic cleaning
Inspection according to ISO 8655 Part 6 or Part 7. [9]
Please note: Depending on the respective application, there may be different specifications for the
entirety of the inspection and maintenance work to be performed. The individual intervals may be
extended if no complaints occur, but they will have to be shortened again as soon as any problem has
arisen.
105
The inspection of the metrological reliability including maintenance work is offered as a service by SI
Analytics GmbH (including a manufacturer’s certificate, if so ordered). For this purpose, the titration
device is to be sent in to SI Analytics GmbH.
Detailed description of the inspection and maintenance work:
[1]
Wipe off using a soft cloth (and some water with a normal household detergent).
[2]
Leaking connections can be identified by moisture or crystals at the threaded connections of
the hoses, at the sealing lips of the piston inside the dosing cylinder or at the valve.
[3]
If any liquid becomes visible below the first sealing lip, it has to be checked at short timely
intervals whether any liquid will build up under the second sealing lip, too. In this case both the
piston and the glass cylinder have to be replaced immediately. It is easily possible that in
operation small liquid droplets build up under the first sealing lip, but they may also disappear
again. This phenomenon alone is no reason for replacement.
[4]
The valve has to be removed from its housing for inspection. In this process, the hoses remain
connected to the valve. Please check for moisture underneath the valve. When reinserting the
valve, please make sure that the small cam at the rotating axis is fitted into the corresponding
groove again.
[5]
The titration tip must be free of sedimentation or crystals which might obstruct the dosing
process or falsify the results.
[6]
Remove the cylinder, take the valve out of the valve housing, unscrew the hoses and then
rinse all parts carefully with distilled water. For the assembly of the cylinder, hoses and other
parts of the interchangeable unit, please refer to the operating instructions.
[7]
Dose one burette volume, then refill. Air bubbles will gather at the tip of the cylinder and in the
titration hose where they can be detected easily. If bubbles become visible, please re-tighten
all connections finger tight, and then repeat dosing. If air bubbles still remain within the
system, [6] please check the valve and replace the hose connections. The air bubbles may
also occur at the interface between the sealing lip of the piston and the cylinder. If a reduction
of the filling speed will not do, the dosing unit has to be replaced.
[8]
Check the electrical plug contacts for corrosion and mechanical damage. Defective parts have
to be repaired or replaced by new parts.
[9]
Please refer to the application “Burette inspection according to ISO 8655 Part 6”.
9
Storage and transportation
If the TITRONIC® 300 Piston Burette or the interchangeable units have to be stored over some time,
or to be dislocated, the use of the original packing will be the best protection of the devices. However,
in many cases this packing will not be available anymore, so that one will have to compose an
equivalent packaging system. Sealing the lower section in a foil is hereby recommended.
The devices should be stored in a room with a temperature between +10 and +40°C, and the (relative)
humidity of the air should not exceed 70 %.
If the interchangeable have to be stored over some time, or to be dislocated, the fluids inside the
system, especially aggressive solution have to be removed (please refer also to chapter 8.
®
„Maintenance and Care of the TITRONIC 300 Piston Burette”).
10
Recycling and Disposal
The present piston burette and its packaging are manufactured as far as possible from materials which
can be disposed of environmental-friendly and recycled in a technically appropriate manner.
Please note: The main printed board carries a lithium battery. Batteries should not to be disposed of
with the normal domestic waste. They will be taken back and recycled or disposed of properly by the
manufacturer at no cost.
Should you have any questions regarding disposal, please contact SI Analytics.
106
11
Index
analytical balance 62
Balance data editor 100
Care 104
change method parameters 79
Connection of Analytical Balances 100
Connection of Printers 94
copy methods 78
Data exchange 96
delete methods 79
device address 92
Device Information 95
Display 68
Disposal 105
Documentation 86
Dosing parameters 85
dosing speed 85
Dosing unit exchange 88
Dosing units 59
edit method 77
external PC Keyboard 69
Formula Selection 80
Formula unit 82
Formulae for manual titration 80
Front Keyboard 68
interchangeable units 105
Interrupted use 104
Main Menu 71
Maintenance 104
manual controller 69
manual controller TZ 3880 („Mouse“) 62
Manual Titration 72
max. dosing/titration volume 85
method name 77
method parameters 77
new method 77
printer 62
Reagents/Dosing Unit 88
RESET 95
RS232 Settings 92
safety information 60
Sample identification 85
Sample weight and volume (sample quantity)
81
Software Update 97
standard methods 78
storage 105
System Settings 88
System sounds 96
transportation 105
Unpacking and First Operation 61
USB Barcode scanner 62
USB Hub 62
USB stick 62
Viscosity 58
Warning 60
EG - KONFORMITÄTSERKLÄRUNG
EC - DECLARATION OF CONFORMITY
CE - DÉCLARATION DE CONFORMITÉ
CEE - DECLARATIÓN DE CONFORMIDAD
Wir erklären in alleiniger
Verantwortung, dass das
folgende Produkt
We declare under our sole
responsibility that the
following product
Nous déclarons sous notre
seule responsabilité que le
produit ci-dessous
Declaramos bajo nuestra
única responsabilidad, que el
producto listado a
continuación
Kolbenbürette
Piston burette
Burette à Piston
Bureta de émbolo
TITRONIC® 300
auf das sich diese
Erklärung bezieht,
übereinstimmt mit den
folgenden EG Richtlinien.
to which this declaration
auxquels se réfère cette
todo lo relativo a esta
relates are in conformity with déclaration est conforme
declaración está en
the following EC directives. directives CE soul vantes. conformidad con las directivas
CEE siguientes
EMV
EMC
CEM
CEM
EG-Richtlinie 2014/30/EG
EC-Directive 2014/30/EG
CE-Directive 2014/30/EG
CEE siguientes 2014/30/EG
Sicherheit
Safety
Sécurité
Seguridad
EG Richtlinie 2014/ 35
EC-Directive 2014/ 35
CE-Directive 2014/ 35
CEE siguientes 2014/ 35
Angewandte harmonisierte
Normen oder normative
Dokumente
Applied harmonized
standards or normative
documents
Normes harmonisées ou
documents normatifs
appliqués
Estándares armonizados
aplicados o documentos
normativos
EMV
EMC
CEM
CEM
EN 61326-1:2012
EN 61326-1:2012
EN 61326-1:2012
EN 61326-1:2012
Sicherheit
Safety
Sécurité
Seguridad
EN 61010-1 :2010
EN 61010-1 :2010
EN 61010-1 :2010
EN 61010-1 :2010
Mainz den 17.07.2014
Konf. No.:Titrat 019
________________
Dr. Robert Reining
Geschäftsführer, Managing Director
SI Analytics GmbH
Hattenbergstraße 10
55122 Mainz
Deutschland, Germany, Allemagne
TITRONIC® 300
Typ / type / type / tipo
Bescheinigung des Herstellers
Wir bestätigen, dass das oben genannte Gerät gemäß
DIN EN ISO 9001, Absatz 8.2.4
„Überwachung und Messung des Produkts“ geprüft wurde und dass die festgelegten
Qualitätsanforderungen an das Produkt erfüllt werden.
Supplier’s Certificate
We certify that the above equipment has been tested in accordance with DIN EN ISO 9001, Part 8.2.4
”Monitoring and measurement of product” and that the specified quality requirements for the product
have been met.
Certificat du fournisseur
Nous certifions que le produit a été vérifié selon DIN EN ISO 9001, partie 8.2.4 ”Surveillance et
mesure du produit” et que les exigences spécifiées pour le produit sont respectées.
Certificado del fabricante
Certificamos que el aparato arriba mencionado ha sido controlado de acuerdo con la norma
DIN EN ISO 9001, sección 8.2.4 „Seguimiento y medición del producto“ y que cumple con los requisitos
de calidad fijados para el mismo.
SI Analytics GmbH
Hattenbergstr. 10
Tel. +49.(0)6131.66.5111
Fax. +49.(0)6131.66.5001
55122 Mainz
Deutschland, Germany, Allemagne, Alemania
E-Mail: [email protected]
www.si-analytics.com
SI Analytics is a trademark of Xylem Inc. or one of its subsidiaries.
© 2014 Xylem, Inc. Version 140 0