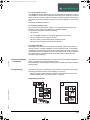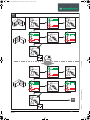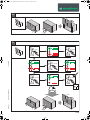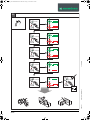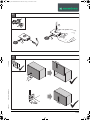
1
BA_MA_Free-Kesseböhmer.book Seite 1 Freitag, 12. Juni 2015 9:50 09
4037240000
sion
r
e
v
n
e
i
Vorser
sion
r
e
v
s
e
ri
Pre-se
Deutsch (Originalbetriebsanleitung)................................................................................................... 2
English (Translation of the original operating instructions) ................................................................ 9
HDE KE1
12.0001.010.428.0000.00
Italiano (Traduzione delle istruzioni d'uso originali).......................................................................... 16
BA_MA_Free-Kesseböhmer.book Seite 2 Freitag, 12. Juni 2015 9:50 09
Deutsch (Originalbetriebsanleitung)
Inhaltsverzeichnis
1.
Inhalt und Zielgruppe der Anleitung ...................................................... 3
2.
Sicherheitsbestimmungen ..................................................................... 3
2.3 Bestimmungsgemäße Verwendung ...................................................... 4
2.4 Bestimmungswidrige Verwendung ........................................................ 4
2.5 Nutzungsbeschränkung ........................................................................ 4
3.
Allgemeine Montagehinweise ............................................................... 4
4.
Programmierung ................................................................................... 4
4037240000
4.1 Funktaster anlernen .............................................................................. 5
4.2 Parallelbetrieb anlernen (OPTIONAL) .................................................. 6
4.3 Übereckbetrieb anlernen (OPTIONAL) ................................................. 6
4.4 Setup durch automatische Referenzfahrt abschließen ......................... 6
5.
Programmierungsänderungen .............................................................. 6
5.1 Neue Referenzfahrt initiieren ................................................................ 6
5.2 Werkseinstellung ................................................................................... 7
5.3 Funktaster auslernen ............................................................................ 7
6.
Bedienung ............................................................................................. 7
7.
Systempflege ........................................................................................ 7
7.1 Beschlagreinigung ................................................................................ 7
7.2 Frontreinigung ....................................................................................... 7
12.0001.010.428.0000.00
7.3 Batteriewechsel ..................................................................................... 8
8.
Entsorgung ............................................................................................ 8
9.
Problembehandlung .............................................................................. 8
HDE KE1
10. Technische Daten ................................................................................. 8
2/8
BA_MA_Free-Kesseböhmer.book Seite 3 Freitag, 12. Juni 2015 9:50 09
1. Inhalt und Zielgruppe der
Anleitung
Diese Bedienungsanleitung beschreibt Programmierung und Inbetriebnahme von
FREElift-Klappenbeschlägen mit motorisch unterstützter Öffnungs- und Schließfunktion.
Die Betriebsanleitung sowie die separate Montageanleitung bis zur Entsorgung des
Produkts aufbewahren und bei Weiterverkauf oder Weitergabe an den neuen Besitzer weitergeben.
Das Bedienpersonal muss über den sicheren und sachgerechten Umgang mit dem
Produkt informiert sein.
2. Sicherheitsbestimmungen
2.1 Bedeutung der Sicherheitshinweise
In dieser Betriebsanleitung sind die Sicherheitshinweise nach der Schwere der Gefahr klassifiziert.
WARNUNG
Der Sicherheitshinweis kennzeichnet eine möglicherweise gefährliche Situation, die zu schwerer Körperverletzung führen könnte.
HINWEIS
Der Hinweis wird verwendet zum Hinweis auf mögliche Folgeschäden am Produkt
bei Nichtbeachtung. Der Hinweis wird auch verwendet für wichtige Zusatzinformationen.
2.2 Sicherheitshinweise
Grundsätzliche Sicherheitshinweise
4037240000
» Einbau und Anschluss, Inbetriebnahme, Wartung und Demontage nur durch
geschultes Fachpersonal durchführen lassen.
» Alle Reparaturen von geschultem Fachpersonal durchführen lassen. Eine Reparatur ist nötig, wenn das Gerät beschädigt wurde, z. B. durch Schäden am
Netzkabel, am Stecker, durch Verschütten von Flüssigkeiten, durch das Hineinfallen von Objekten, durch Feuchtigkeit, durch Funktionsstörungen oder
Stürze.
» Den FREElift eTouch-Antrieb NICHT in der Nähe von Wasser oder in feuchten
Räumen benutzen. Den FREElift eTouch-Antrieb NUR mit einem trockenen
oder leicht angefeuchteten Tuch reinigen. Der FREElift eTouch-Antrieb darf
nicht durch Gegenstände, Produkte (z. B. Lebensmittel) verschüttet oder verdeckt werden oder diese ins Gehäuse eindringen.
» Der Anschluss darf nur mit dem gelieferten Netzteil des Typs FW7436/24 verbunden werden. Vermeiden Sie, dass das Netzkabel belastet oder geknickt
wird.
» Den FREElift eTouch-Antrieb vor Öl und aggressiven Reinigungsmitteln schützen.
12.0001.010.428.0000.00
» Beschlag, die Antriebseinheit, das Netzteil oder den Funktaster nicht öffnen.
Eigenmächtige Veränderungen am Beschlag schließen eine Haftung des Herstellers für daraus resultierende Schäden aus.
» Beim Öffnen und Schließen der Schranktüren nicht an diesen festhalten oder
in den Bewegungsbereich der Hebelarme greifen.
Elektrische Sicherheit
» Die Stromversorgung muss den Angaben auf dem Typenschild des Netzteils
entsprechen.
» Netzstecker und das Netzgerät müssen leicht zugänglich sein.
HDE KE1
» Netzgerät nie in Wasser tauchen, Feuchtigkeit aussetzen oder mit feuchten
Händen anfassen. Kurzschluss- und Brandgefahr.
» Netzstecker und Netzkabel nicht austauschen oder modifizieren.
» Nicht am Netzkabel ziehen, sondern immer am Netzstecker.
3/8
BA_MA_Free-Kesseböhmer.book Seite 4 Freitag, 12. Juni 2015 9:50 09
2.3 Bestimmungsgemäße Verwendung
Die mit einer elektrischen Antriebseinheit versehenen FREElift-Klappenbeschläge
sind ausschließlich für den Einsatz in Möbeln mit Klappenfronten im Wohn-, Bad-,
Büro- oder Küchenbereich, entsprechend dem angegebenen Frontgewicht bei entsprechender Schrankhöhe, geeignet. Genaue Angaben zum jeweiligen Einsatzbereich können den zugehörigen Montageanleitungen entnommen werden.
2.4 Bestimmungswidrige Verwendung
Jede Verwendung, die nicht in Kapitel 2.3 genannt wird, gilt als bestimmungswidrig.
Für hieraus resultierende Schäden trägt das Risiko allein der Betreiber bzw. Benutzer.
Insbesondere sind folgende Verwendungen nicht zulässig:
• Einsatz im Außenbereich
• Einsatz in explosionsgefährdeter und chemisch-aggressiver Umgebung
• Einsatz als Schließeinrichtung an Toren und Türen
• Einsatz nahe elektromagnetisch empfindlicher Geräte
• Nutzung durch nicht eingewiesene Personen
3. Allgemeine Montagehinweise
Im Auslieferzustand des Herstellers können die Antriebseinheiten ohne Rücksicht
auf Paarung oder Zuordnung zu den Funktastern installiert werden.
Der Zugriff zum Netzstecker muss auch nach Anbringung des Oberschranks immer
gewährleistet sein.
4. Programmierung
Im Auslieferzustand sind die Funktaster nicht angelernt. Es können einzelne Funktaster angelernt oder entfernt werden.
4037240000
2.5 Nutzungsbeschränkung
Dieser Beschlag ist nicht dafür bestimmt, durch Personen (einschließlich Kinder) mit
eingeschränkten physischen, sensorischen oder geistigen Fähigkeiten oder mangelhafter Erfahrung und / oder Wissen benutzt zu werden, es sei denn, sie werden
durch eine für ihre Sicherheit zuständige Person beaufsichtigt oder eingewiesen.
Kinder müssen beaufsichtigt werden, um sicherzustellen, dass sie nicht mit dem
Funktaster bzw. dem Beschlag selbst spielen oder sich im Schwenkbereich der
Schranktüren aufhalten.
» Vor der Programmierung die Funktaster mit Batterien bestücken oder den eingelegten Trennstreifen entfernen, siehe Bildteil Seite 24.
Programmiervorgang
+
4.2
4.3
5.2
7.2
HDE KE1
4.4
5.1
12.0001.010.428.0000.00
4.1
4/8
BA_MA_Free-Kesseböhmer.book Seite 5 Freitag, 12. Juni 2015 9:50 09
HINWEIS
Ein aktivierter Menüpunkt bleibt für 30 Sekunden aktiv, danach wird das SetupMenü automatisch beendet.
Akustische Rückmeldung
Jede Handlung wird durch ein Signal beendet.
Bestätigung
Ein gelernter Schritt beim Anlernen / Programmieren wurde bestätigt.
Abbruch
Der vorige Schritt wurde abgebrochen.
Nächster Menüpunkt
Der nächste Menüpunkt wurde erreicht.
Warnung
Warnsignal bei Fehlfunktion/Fehlbedienung.
Optische Rückmeldung
Jede Handlung wird durch Blinken oder Leuchten der LEDs beendet.
LED leuchtet dauerhaft
LED blinkt
4037240000
LED dauerhaft aus
Betätigungen
Grüne LED
Schaltknopf
Menüauswahl
• Langes Drücken > 2 s
Setup Start / Menüpunkt
aktivieren
• sehr kurzes Antippen < 100 ms
Nächster Menüpunkt
HDE KE1
12.0001.010.428.0000.00
Rote LED
4.1 Funktaster anlernen
HINWEIS
Ein Funktaster kann immer nur an einem Antrieb angelernt werden.
Nach Auswahl des Menüpunkts muss der Funktaster innerhalb von 30 Sekunden
gedrückt werden. Das erfolgreiche Anlernen wird durch einen Signalton bestätigt.
» Schrittweise Anleitung siehe Bildteil Seite 24, Punkt 4.1.
» Vorgang mit allen Funktastern wiederholen, die der Antriebseinheit zugeordnet
sind (i. d. R. zwei Funktaster).
» Fortfahren zum nächsten Menüpunkt oder Setup abschließen, siehe Abschnitt
„4.4 Setup durch automatische Referenzfahrt abschließen“.
5/8
BA_MA_Free-Kesseböhmer.book Seite 6 Freitag, 12. Juni 2015 9:50 09
HINWEIS
Die Referenzfahrt darf auf keinen Fall durch Eingreifen gestoppt oder unterbrochen
werden.
4.2 Parallelbetrieb anlernen (OPTIONAL)
HINWEIS
Es können immer nur zwei Antriebseinheiten gleichzeitig aufeinander abgestimmt
werden. Für jede weitere Antriebseinheit muss der Vorgang wiederholt werden.
Damit beide Antriebseinheiten parallel geschaltet werden können, müssen die jeweiligen Menüpunkte beider Antriebseinheiten innerhalb von 30 Sekunden aufgerufen werden.
» Schrittweise Anleitung siehe Bildteil Seite 25, Punkt 4.2.
» Fortfahren zum nächsten Menüpunkt oder Setup abschließen, siehe Abschnitt
„4.4 Setup durch automatische Referenzfahrt abschließen“.
HINWEIS
Die Referenzfahrt darf auf keinen Fall durch Eingreifen gestoppt oder unterbrochen
werden.
4.3 Übereckbetrieb anlernen (OPTIONAL)
HINWEIS
» Schrittweise Anleitung siehe Bildteil Seite 26, Punkt 4.3.
» Setup durch Referenzfahrt abschließen, siehe Abschnitt „4.4 Setup durch automatische Referenzfahrt abschließen“.
4037240000
Um bei einer Übereckkonstellation das Zusammenstoßen der Fronten zu vermeiden, müssen die jeweiligen Menüpunkte beider Antriebseinheiten innerhalb von 30
Sekunden aufgerufen werden.
4.4 Setup durch automatische Referenzfahrt abschließen
» Front schließen und Referenzfahrt durch leichten Druck auf die Front auslösen.
Die Einstellungen werden durch zwei abgeschlossene Öffnungs- und Schließvorgänge gespeichert.
HINWEIS
Die Referenzfahrt darf auf keinen Fall durch Eingreifen gestoppt oder unterbrochen
werden.
5.1 Neue Referenzfahrt initiieren
Eine erneute Referenzfahrt kann erforderlich sein, wenn Änderungen am System
vorgenommen werden (z. B. neue Front mit einem anderen Gewicht) oder wenn der
Antrieb während der Öffnungs- oder Schließfahrt stehen bleibt.
» Menüpunkt auswählen und innerhalb von 30 Sekunden die Schrankklappe
schließen.
» Referenzfahrt durch leichten Druck auf die Front auslösen.
» Schrittweise Anleitung siehe Bildteil Seite 27, Punkt 5.1.
HINWEIS
12.0001.010.428.0000.00
5. Programmierungsänderungen
HDE KE1
Die Referenzfahrt darf auf keinen Fall durch Eingreifen gestoppt oder unterbrochen
werden.
6/8
BA_MA_Free-Kesseböhmer.book Seite 7 Freitag, 12. Juni 2015 9:50 09
HINWEIS
Bei Anwendungen von mehreren Antriebseinheiten für eine durchgängige Front
muss die neue Referenzfahrt bei allen parallel geschalteten Antrieben gleichzeitig
durchgeführt bzw. aktiviert werden.
5.2 Werkseinstellung
Die Antriebseinheit wird in den Auslieferungszustand zurück gesetzt.
HINWEIS
Alle gespeicherten Einstellungen werden gelöscht.
» Schrittweise Anleitung siehe Bildteil Seite 28, Punkt 5.2.
5.3 Funktaster auslernen
Der Funktaster wird auf Werkseinstellung zurückgesetzt und kann erneut eingelernt
werden.
» Batterie aus dem Gehäuse des Funktasters nehmen und bei gedrückter Taste
wieder einsetzen.
» Schrittweise Anleitung siehe Bildteil Seite 29, Punkt 5.3.
6. Bedienung
» Schrittweise Anleitung siehe Bildteil Seite 29, Punkt 6.
7. Systempflege
7.1 Beschlagreinigung
4037240000
WARNUNG
Stromführende Bauteile
Kurzschluss- und Brandgefahr durch unsachgemäße Reinigung
» Beschlag und Antrieb nie mit Flüssigkeiten, alkoholhaltigen Reinigern,
Lösungsmitteln oder Verdünnern reinigen.
» Keine Hochdruck- oder Dampfreinigungsgeräte einsetzen.
» Vor der Reinigung den Netzstecker ziehen.
HINWEIS
» Zur Trockenreinigung nur Staubtuch oder Staubsauger verwenden.
» Zur Feuchtreinigung nur weiches, handfeuchtes Tuch verwenden.
HINWEIS
» Die Beschläge sind wartungsfrei.
12.0001.010.428.0000.00
7.2 Frontreinigung
HINWEIS
» Zur Trockenreinigung nur Staubtuch oder Staubsauger verwenden.
» Zur Feuchtreinigung nur weiches, handfeuchtes Tuch verwenden.
» Front öffnen und gummierte Schaltfläche am Taster drücken.
» Front innerhalb von 3 Sekunden schließen. Die Antriebseinheit reagiert nun für
2 Minuten nicht mehr auf Drücken der Front.
HDE KE1
» Schrittweise Anleitung siehe Bildteil Seite 30, Punkt 7.2.
7/8
BA_MA_Free-Kesseböhmer.book Seite 8 Freitag, 12. Juni 2015 9:50 09
7.3 Batteriewechsel
HINWEIS
» Altbatterie umweltgerecht entsorgen.
» Schrittweise Anleitung siehe Bildteil Seite 30, Punkt 7.3.
8. Entsorgung
9. Problembehandlung
» Bei Entsorgung und Recycling des Beschlags oder dessen Komponenten die
jeweiligen nationalen und örtlichen Vorschriften beachten!
Störung
Ursache
Abhilfe
Keine Funktion
Netzspannung nicht vorhanden
Prüfen, ob der Netzstecker eingesteckt ist
Steckverbindungen haben
keinen Kontakt
Alle Steckverbindungen auf sicheren Kontakt prüfen
Nach 2 Minuten Dauer-be- 8 Minuten abwarten
trieb - 8 Minuten Standzeit
Referenzfahrt nicht
durchführbar
Abstimmung Funktaster/
Antriebseinheit nicht
durchgeführt
Abstimmung Funktaster
durchführen, siehe Kapitel 4.1
Funktaster anlernen
Krafteinstellung gemäß Punkt
Krafteinstellung des BeReferenzfahrt starschlages ist nicht auf das 12 der Montageanleitungen
tet, wird aber nicht
bis zum Ende durch- Klappengewicht eingestellt Klappenbeschläge Free
durchführen
geführt
Referenzfahrt startet Stromausfall
erneut
4037240000
Batterie im Funktaster leer, Neue Batterie einsetzen oder
nicht vorhanden oder
die richtige Einbaulage prüfen,
falsch eingelegt
siehe Kapitel 7.3 Batteriewechsel
Referenzfahrt durchführen
siehe Kapitel 5.1 Neue Referenzfahrt initiieren
HINWEIS
Spannung / Frequenz / Stromstärke
100 - 240 V AC / 50 - 60 Hz / 1,3 A
Leistung
60 Watt
Umgebungs-Temparaturbereich
0 - 40 °C
Überspannungskategorie
Schutzklasse 3
Schutzart / Schutzklasse
IP2X / Schutzklasse 2
Funkfrequenz
2,4 GHz
Batterie
CR 2032 LIthium Knopfzelle, 3 V
Standby-Leistung
≤ 1 Watt
HDE KE1
10. Technische Daten
12.0001.010.428.0000.00
» Wenden Sie sich an Ihren Fachhändler, falls der Beschlag nach den beschriebenen Abhilfe-Maßnahmen immer noch gestört ist oder andere Störungen
auftreten.
8/8
BA_MA_Free-Kesseböhmer.book Seite 9 Freitag, 12. Juni 2015 9:50 09
English (Translation of the original operating instructions)
Table of contents
1.
Contents and target group of the instructions ..................................... 10
2.
Safety regulations ............................................................................... 10
2.3 Correct purpose of use ........................................................................ 11
2.4 Incorrect purpose of use ...................................................................... 11
2.5 Usage restriction .................................................................................. 11
3.
General installation instructions ........................................................... 11
4.
Programming ....................................................................................... 11
4037240000
4.1 Teach in push-button sender ............................................................... 12
4.2 Teach in parallel operation (OPTIONAL) ............................................ 13
4.3 Teach in over-corner operation (OPTIONAL) ...................................... 13
4.4 Complete set-up by carrying out an automatic reference run ............. 13
5.
Programming changes ........................................................................ 13
5.1 Initiating a new reference run .............................................................. 13
5.2 Factory settings ................................................................................... 14
5.3 Push-button sender reset .................................................................... 14
6.
Operation ............................................................................................ 14
7.
System cleaning .................................................................................. 14
7.1 Cleaning the fitting .............................................................................. 14
7.2 Cleaning the front panel ...................................................................... 14
8.
Disposal .............................................................................................. 15
9.
Troubleshooting .................................................................................. 15
10. Technical data ..................................................................................... 15
HDE KE1
12.0001.010.428.0000.00
7.3 Battery change .................................................................................... 15
9/15
BA_MA_Free-Kesseböhmer.book Seite 10 Freitag, 12. Juni 2015 9:50 09
1. Contents and target
group of the instructions
These operating instructions describe the programming and start-up of FREElift flap
fittings with motorised opening and closing.
The operating instructions and the separate installation instructions must be retained until the product is disposed of and passed on to the new owner in the event
of resale or transfer.
The operating personnel must be informed how to handle the product in a safe and
proper way.
2. Safety regulations
2.1 Meaning of the safety instructions
The safety instructions in these operating instructions are classified according to the
severity of the danger.
WARNING
This safety instruction marks a hazardous dangerous situation that could
lead to severe physical injuries.
NOTE
Notes are used to point out the possibility of consequential damage to the product
if they are not complied with. The note is also used to provider important additional
information.
2.2 Safety instructions
Basic safety instructions
» Have all repairs carried out by trained experts. A repair is needed if the device
has been damaged, e.g. due to damage to the power cable or plug, fluid spillage, objects that have fallen inside, moisture, malfunctions or dropping the device.
» Do NOT use the in the vicinity of water or in damp rooms. ONLY clean the
FREElift eTouch drive with a dry or slightly moist cloth. The FREElift eTouch
drive must not be buried or covered by objects, products (e.g. food), nor may
these materials be allowed to penetrate into the housing.
4037240000
» Installation and connection, start-up, maintenance and dismantling must only
be carried out by trained experts.
» The connection may only be made using the provided power supply unit of
type FW7436/24. Do not allow the power cable to be subjected to loads or
kinked.
» Protect the FREElift eTouch drive from oil and aggressive cleaning agents.
» Do not open the fitting, the drive unit, the power supply unit or the push-button
sender. Unauthorised modifications to the fitting will invalidate the manufacturer's liability for any resulting damage.
» Do not hold onto the flaps when they are being opened or closed, or reach into
the movement range of the lever arms.
» The power supply unit must comply with the information on the type plate.
» The power plug and the power supply unit must be easily accessible.
» Never immerse the power supply unit in water, expose to humidity, or touch
with wet hands. Risk of short circuits and fire.
» Never replace or modify the power plug or the power cable.
HDE KE1
» Never pull on the power cable - always hold the power plug.
12.0001.010.428.0000.00
Electrical safety
10/15
BA_MA_Free-Kesseböhmer.book Seite 11 Freitag, 12. Juni 2015 9:50 09
2.3 Correct purpose of use
The FREElift eTouch flap fittings, which are equipped with an electric drive unit, are
only suitable for use in furniture with flap fronts in living room, bathroom, office and
kitchen areas in accordance with the specified front panel weight and the appropriate cabinet height. Exact details of the respective area of application can be found
in the
associated installation instructions.
2.4 Incorrect purpose of use
Any use that is not mentioned in chapter 2.3 is considered to be improper. The
operator or user is solely responsible for any resulting damage.
It is particularly important to avoid the following:
• Use outdoors
• Use in potentially explosive or chemically aggressive environments
• Use as a closing device on gates and doors
• Use in the vicinity of electromagnetically sensitive devices
• Use by persons who have not been given instruction
4037240000
2.5 Usage restriction
This fitting is not intended for use by persons (including children) with restricted
physical, sensory or mental capabilities or lack of experience and / or knowledge,
unless they are supervised by a person who is responsible for safety or has been
provided with instruction. Children must be supervised in order to ensure that they
do not play with the push-button sender or the fitting itself or stand within the
swivelling range of the flaps.
3. General installation
instructions
Upon delivery from the manufacturer's, the drive units can be installed regardless of
pairing or assignment to the push-button senders.
It must always be ensured that the power plug is accessible, also after the wall unit
has been fitted.
4. Programming
Upon delivery from the manufacturer's, the push-button senders are not taught in.
Individual push-button senders can be taught in or removed.
» Before programming the push-button senders, insert batteries or remove the
inserted insulating strip, see picture section on page 24.
Programming procedure
+
4.2
4.3
4.4
5.1
5.2
7.2
HDE KE1
12.0001.010.428.0000.00
4.1
11/15
BA_MA_Free-Kesseböhmer.book Seite 12 Freitag, 12. Juni 2015 9:50 09
NOTE
An activated menu item remains active for 30 seconds, then the setup menu is
automatically exited.
Acoustic feedback
A signal is emitted after every action.
Confirmation
A step that was learned during teach-in or
programming has been confirmed.
Cancel
The previous step has been cancelled.
Next menu item
The next menu item has been reached.
Warning
Warning signal in the event of a malfunction or
erroneous operation.
Visual feedback
Every action is completed by flashing or illumination of the LEDs.
LED permanently on
LED permanently off
4037240000
LED flashing
Operations
Green LED
• Long press > 2s
Setup start / Activate
Menu selection
menu item
switching but• Extremely short press < 100 ms
ton
Next menu item
NOTE
A push-button sender can only be taught in at one drive.
After selecting the menu item, the push-button sender must be pressed within
30 seconds. A successful teach-in is confirmed by an acoustic signal.
» For step by step instructions, see picture section on page 24, point 4.1.
» Repeat procedure for all push-button senders that are assigned to the drive unit
(usually two push-button senders).
» Continue to next menu item or complete setup, see section "4.4 Complete setup by carrying out an automatic reference run".
12/15
HDE KE1
4.1 Teach in push-button sender
12.0001.010.428.0000.00
Red LED
BA_MA_Free-Kesseböhmer.book Seite 13 Freitag, 12. Juni 2015 9:50 09
NOTE
The reference run must not be stopped or interrupted by intervening under any
circumstances.
4.2 Teach in parallel operation (OPTIONAL)
NOTE
Only two drive units can ever be coordinated with each other simultaneously. The
procedure must be repeated for every other drive unit.
The respective menu items of both drive units must be called up within 30 seconds
for both drive units to be switched in parallel.
» For step by step instructions, see picture section on page 25, point 4.2.
» Continue to next menu item or complete setup, see section "4.4 Complete setup by carrying out an automatic reference run".
NOTE
The reference run must not be stopped or interrupted by intervening under any
circumstances.
4.3 Teach in over-corner operation (OPTIONAL)
NOTE
In order to avoid front panel collisions with an over-corner configuration, the
respective menu items of both drive units must be called up within 30 seconds.
» For step by step instructions, see picture section on page 26, point 4.3.
4037240000
» Complete set-up by carrying out a reference run, see section "4.4 Complete
set-up by carrying out an automatic reference run".
4.4 Complete set-up by carrying out an automatic reference run
» Close front panel and trigger a reference run by applying gentle pressure to the
front panel. The settings are saved by carrying out two complete opening and
closing procedures.
NOTE
The reference run must not be stopped or interrupted by intervening under any
circumstances.
5. Programming
changes
5.1 Initiating a new reference run
A new reference run may be required if changes are made to the system (e.g. new
front panel with a different weight) or if the drive stops during the opening or closing
run.
» Trigger a reference run by applying gentle pressure to the front panel.
» For step by step instructions, see picture section on page 27, point 5.1.
NOTE
The reference run must not be stopped or interrupted by intervening under any
circumstances.
HDE KE1
12.0001.010.428.0000.00
» Select menu item and close the cabinet flap within 30 seconds.
13/15
BA_MA_Free-Kesseböhmer.book Seite 14 Freitag, 12. Juni 2015 9:50 09
NOTE
If several drive units are being used in order to create a continuous front panel, the
new reference run must be carried out or activated simultaneously at all drives
connected in parallel.
5.2 Factory settings
The drive unit is reset in the as-delivered condition.
NOTE
All saved settings are deleted.
» For step by step instructions, see picture section on page 28, point 5.2.
5.3 Push-button sender reset
The push-button sender is reset to the factory settings and can be taught in again.
» Remove battery from housing of push-button sender and insert again with the
button pressed.
» For step by step instructions, see picture section on page 29, point 5.3.
6. Operation
» For step by step instructions, see picture section on page 29, point 6.
7. System cleaning
7.1 Cleaning the fitting
WARNING
» Never clean fitting and drive using liquids, cleaning agents containing
alcohol, solvents or thinners.
» Do not use pressure or steam cleaning devices.
4037240000
Live components
Risk of short circuits and fire due to improper cleaning
» Disconnect power plug before cleaning.
NOTE
» Only use a duster or vacuum cleaner for dry cleaning.
» Only use a soft, damp cloth for wet cleaning.
NOTE
» The fittings are maintenance-free.
7.2 Cleaning the front panel
» Only use a duster or vacuum cleaner for dry cleaning.
» Only use a soft, damp cloth for wet cleaning.
» Open front panel and press rubberised surface of button.
» Close front panel within 3 seconds. The drive unit will now no longer react to
pressing the front for 2 minutes.
12.0001.010.428.0000.00
NOTE
HDE KE1
» For step by step instructions, see picture section on page 30, point 7.2.
14/15
BA_MA_Free-Kesseböhmer.book Seite 15 Freitag, 12. Juni 2015 9:50 09
7.3 Battery change
NOTE
» Dispose of old battery in an environmentally friendly manner.
» For step by step instructions, see picture section on page 30, point 7.3.
8. Disposal
» Please comply with the respective national and local regulations when
disposing of or recycling the fitting or its components!
9. Troubleshooting
Problem
Cause
Remedy
Not working
Mains voltage not present
Check whether power plug
has been inserted
Plug connections have no
contact
Check all plug connections for
proper contact
After 2 minutes of
continuous operation stop for 8 minutes
Wait for 8 minutes
Push-button sender / drive
unit coordination not carried out
Perform push-button sender
coordination, see chapter 4.1
Teach in push-button sender
Battery in push-button
sender empty, not present
or wrongly inserted
Insert new battery or check for
correct installation position,
see chapter 7.3 Battery
change
4037240000
Unable to perform
reference run
Reference run starts Force setting of fitting does Perform force setting as per
but is not completed not match flap weight
point 12 of the Free flap fitting
installation instructions
Reference run restarts
Power failure
Perform reference run, see
chapter 5.1 Initiating a new reference run
NOTE
» Contact your specialist dealer if the fitting is still defective after performing the
described remedial measures or other problems arise.
Voltage / frequency / current strength
100 - 240 V AC / 50 - 60 Hz / 1.3 A
Wattage
60 Watt
Ambient temperature range
0 - 40 °C
Overvoltage category
Degree of protection 3
Protection type / degree of protection
IP2X / degree of protection 2
Radio frequency
2.4 GHz
Battery
CR 2032 Lithium button cell, 3 V
Standby power
≤ 1 Watt
HDE KE1
12.0001.010.428.0000.00
10. Technical data
15/15
BA_MA_Free-Kesseböhmer.book Seite 16 Freitag, 12. Juni 2015 9:50 09
Italiano (Traduzione delle istruzioni d'uso originali)
Indice
1.
Indice e gruppo di destinatari delle istruzioni ...................................... 17
2.
Norme di sicurezza ............................................................................. 17
2.3 Utilizzo appropriato ............................................................................. 18
2.4 Utilizzo inappropriato .......................................................................... 18
2.5 Limitazione d'uso ................................................................................ 18
3.
Istruzioni di montaggio generali .......................................................... 18
4.
Programmazione ................................................................................. 18
4037240000
4.1 Configurazione dell‘interruttore wireless ............................................. 19
4.2 Configurazione del funzionamento parallelo (OPZIONALE) ............... 20
4.3 Configurazione del funzionamento in diagonale (OPZIONALE) ......... 20
4.4 Concludere il setup mediante corsa di riferimento .............................. 20
5.
Modifiche della programmazione ........................................................ 20
5.1 Iniziare una nuova corsa di riferimento ............................................... 20
5.2 Impostazione di fabbrica ..................................................................... 21
5.3 Reset dell‘interruttore wireless ............................................................ 21
6.
Comando ............................................................................................ 21
7.
Cura del sistema ................................................................................. 21
7.1 Pulizia della ferramenta ...................................................................... 21
7.2 Pulizia del frontale ............................................................................... 21
12.0001.010.428.0000.00
7.3 Sostituzione delle batterie ................................................................... 22
8.
Smaltimento ........................................................................................ 22
9.
Soluzione dei problemi ........................................................................ 22
HDE KE1
10. Dati tecnici .......................................................................................... 23
16/23
BA_MA_Free-Kesseböhmer.book Seite 17 Freitag, 12. Juni 2015 9:50 09
1. Indice e gruppo di
destinatari delle
istruzioni
Le presenti istruzioni d'uso descrivono la programmazione e l'attivazione di
guarniture per ante a ribalta Free con funzione di apertura e chiusura motorizzata.
Conservare le istruzioni d'uso e le separate istruzioni di montaggio fino allo smaltimento del prodotto e, in caso di rivendita o passaggio, trasmetterle al nuovo proprietario.
Il personale operativo deve essere informato riguardo al trattamento sicuro ed
appropriato del prodotto.
2. Norme di sicurezza
2.1 Significato delle indicazioni di sicurezza
Nelle presenti istruzioni d'uso le indicazioni di sicurezza sono classificate in base
alla gravità del pericolo.
AVVERTENZA
Questa indicazione di sicurezza segnala una situazione pericolosa, in cui
potrebbero verificarsi lesioni fisiche gravi.
AVVISO
L'avviso segnala possibili danni al prodotto in caso di inosservanza. L'avviso indica
anche informazioni supplementari importanti.
2.2 Indicazioni di sicurezza
Indicazioni di sicurezza fondamentali
4037240000
» Fare eseguire il montaggio ed il collegamento, l'attivazione, la manutenzione
e lo smontaggio solo da personale specializzato addestrato.
» Fare eseguire tutte le riparazioni solo da personale specializzato addestrato.
La riparazione è necessaria quando l'apparecchio è danneggiato, per es. a
causa di vizi del cavo di rete, della spina, del versamento di liquidi, della penetrazione di oggetti, dell'umidità, di anomalie di FREElift eTouch o di cadute.
» NON utilizzare il FREElift eTouch in prossimità di acqua o in ambienti umidi.
Pulire il FREElift eTouch SOLO con un panno asciutto o leggermente inumidito. Il FREElift eTouch non deve essere raggiunto o coperto da oggetti, prodotti
(per esempio alimenti) e questi non devono penetrare nella scatola.
» Il collegamento deve essere effettuato solo con l'alimentatore del tipo
FW7436/24 fornito. Evitare di caricare o piegare il cavo di rete.
» Proteggere il FREElift eTouch dall'olio e da detergenti aggressivi.
» Non aprire la ferramenta, l'unità di azionamento, l'alimentatore o l‘interruttore
wireless. Il produttore non assume responsabilità per danni derivanti da trasformazioni arbitrarie della ferramenta.
» Non trattenere le ante in apertura e in chiusura e non mettere le mani nell'area
di movimento dei bracci di leva.
Sicurezza elettrica
» La spina elettrica e l'alimentatore di rete devono essere facilmente accessibili.
» Non immergere mai l'alimentatore di rete in acqua, non esporlo all'umidità, non
toccarlo con mani umide. Pericolo di cortocircuito e d'incendio.
» Non sostituire o modificare la spina elettrica e il cavo di rete.
» Non tirare il cavo di rete: agire sempre sulla spina elettrica.
HDE KE1
12.0001.010.428.0000.00
» L'alimentazione elettrica deve corrispondere sempre alle indicazioni sulla
targhetta dell'alimentatore.
17/23
BA_MA_Free-Kesseböhmer.book Seite 18 Freitag, 12. Juni 2015 9:50 09
2.3 Utilizzo appropriato
Le guarniture per ante a ribalta Free dotate di unità di azionamento elettrica sono
adatte esclusivamente per l'impiego in mobili con frontali a ribalta in zona giorno,
bagno, ufficio e cucina, secondo il peso del frontale indicato e con altezza pensile
appropriata. Indicazioni precise sull'applicazione si trovano nelle relative istruzioni
di montaggio.
2.4 Utilizzo inappropriato
Ogni utilizzo non citato nel capitolo 2.3 vale come inappropriato. Per i danni da ciò
risultanti il rischio è solamente a carico del gestore o dell'utente.
In particolare non sono consentiti i seguenti utilizzi:
• impiego all'esterno
• impiego in ambiente a rischio di esplosione e soggetto ad agenti chimici
aggressivi
• impiego come dispositivo di chiusura su cancelli e porte
• impiego nei pressi di apparecchi sensibili elettromagneticamente
• utilizzo da parte di persone non istruite
3. Istruzioni di
montaggio generali
Allo stato di consegna da parte del fabbricante le unità di azionamento possono
essere installate senza riguardo all'accoppiamento o all'assegnazione agli interruttori wireless.
Dopo l'applicazione del pensile deve essere sempre garantito l'accesso alla spina
elettrica.
4. Programmazione
Allo stato di consegna gli interruttori wireless non sono programmati. I singoli interruttori wireless possono essere configurati o cancellati.
4037240000
2.5 Limitazione d'uso
La presente guarnitura non è destinata ad essere utilizzata da persone (inclusi i
bambini) con ridotte capacità fisiche, sensoriali o mentali o con scarsa esperienza
e/o conoscenza, a meno che tali persone siano sorvegliate o istruite da una persona
responsabile per la loro sicurezza. È necessario sorvegliare i bambini affinché non
giochino con l‘interruttore wireless o con la ferramenta stessa o si intrattengano nel
campo d'azione delle ante.
» Prima della programmazione munire di batterie gli interruttori wireless oppure
rimuovere la striscia di separazione inserita: vedere l'immagine a pagina 24.
Procedura di programmazione
+
4.2
4.3
5.2
7.2
HDE KE1
4.4
5.1
12.0001.010.428.0000.00
4.1
18/23
BA_MA_Free-Kesseböhmer.book Seite 19 Freitag, 12. Juni 2015 9:50 09
AVVISO
Una voce di menu attivata rimane attiva per 30 secondi, poi il menu di setup viene
automaticamente terminato.
Riscontro acustico
Ogni azione termina con l'emissione di un segnale acustico.
Conferma
Conferma dell'istruzione di un passo in configurazione/programmazione.
Interruzione
Interruzione del passo precedente.
Voce di menu successiva
Raggiungimento della voce di menu successiva.
Avvertenza
Segnale di avvertimento in caso di malfunzionamento / errore
utente.
Riscontro visivo
Ogni azione termina con il lampeggio o l'illuminazione dei LED.
LED illuminato permanentemente
4037240000
LED lampeggiante
LED spento permanentemente
Comandi
LED verde
Pulsante
selezione
menu
• Pressione prolungata, > 2 s
Setup avvio / attivazione
voce di menu
• Breve tocco leggero, < 100 ms
Voce di menu successiva
12.0001.010.428.0000.00
LED rosso
4.1 Configurazione dell‘interruttore wireless
AVVISO
Un interruttore wireless può essere configurato sempre solo su un azionamento.
Dopo avere scelto la voce di menu l‘interruttore wireless deve essere premuto entro 30 secondi. Un segnale acustico conferma che la configurazione è avvenuta
con successo.
HDE KE1
» Vedere le istruzioni passo passo nelle immagini a pagina 24, punto 4.1.
» Ripetere la procedura con tutti gli interruttori wireless associati all'unità di
azionamento (di regola sono due).
19/23
BA_MA_Free-Kesseböhmer.book Seite 20 Freitag, 12. Juni 2015 9:50 09
» Passare alla voce di menu successiva oppure concludere il setup: vedere il
paragrafo "4.4 Concludere il setup mediante corsa di riferimento".
AVVISO
La corsa di riferimento non deve essere in nessun caso arrestata o interrotta da intervento esterno.
4.2 Configurazione del funzionamento parallelo (OPZIONALE)
AVVISO
Possono essere accordate contemporaneamente l'una all'altra sempre solo due
unità di azionamento. Per ogni ulteriore unità di azionamento la procedura deve
essere ripetuta.
Per inserire parallelamente due unità di azionamento, le rispettive voci di menu
delle due unità devono essere richiamate entro 30 secondi.
» Vedere le istruzioni passo passo nelle immagini a pagina 25, punto 4.2.
» Passare alla voce di menu successiva oppure concludere il setup: vedere il
paragrafo "4.4 Concludere il setup mediante corsa di riferimento".
AVVISO
La corsa di riferimento non deve essere in nessun caso arrestata o interrotta da intervento esterno.
4.3 Configurazione del funzionamento in diagonale (OPZIONALE)
AVVISO
» Vedere le istruzioni passo passo nelle immagini a pagina 26, punto 4.3.
» Concludere il setup mediante corsa di riferimento: vedere il paragrafo "4.4 Concludere il setup mediante corsa di riferimento".
4037240000
Per evitare la collisione dei frontali in configurazione diagonale, le rispettive voci di
menu delle due unità di azionamento devono essere richiamate entro 30 secondi.
4.4 Concludere il setup mediante corsa di riferimento
» Chiudere il frontale ed avviare la corsa di riferimento premendo leggermente
sul frontale. Le impostazioni si memorizzano effettuando due aperture e
chiusure complete.
AVVISO
5. Modifiche della
programmazione
5.1 Iniziare una nuova corsa di riferimento
Può essere necessaria una nuova corsa di riferimento quando si devono eseguire
modifiche nel sistema (per es. applicazione di un nuovo frontale con peso diverso)
oppure quando l‘azionamento si arresta durante la corsa di apertura o di chiusura.
» Selezionare la voce di menu e chiudere l'anta a ribalta dell'armadio entro
30 secondi.
» Avviare la corsa di riferimento premendo leggermente sul frontale.
» Vedere le istruzioni passo passo nelle immagini a pagina 27, punto 5.1.
12.0001.010.428.0000.00
La corsa di riferimento non deve essere in nessun caso arrestata o interrotta da intervento esterno.
La corsa di riferimento non deve essere in nessun caso arrestata o interrotta da
intervento esterno.
20/23
HDE KE1
AVVISO
BA_MA_Free-Kesseböhmer.book Seite 21 Freitag, 12. Juni 2015 9:50 09
AVVISO
In applicazioni con più unità di azionamento per un frontale passante, la nuova
corsa di riferimento deve essere eseguita o attivata contemporaneamente in tutti
gli azionamenti inseriti parallelamente.
5.2 Impostazione di fabbrica
L'unità di azionamento si resetta riportandola allo stato di consegna.
AVVISO
Tutte le impostazioni memorizzate vengono cancellate.
» Vedere le istruzioni passo passo nelle immagini a pagina 28, punto 5.2.
5.3 Reset dell‘interruttore wireless
L‘interruttore wireless si resetta riportandolo allo stato di consegna e può essere
nuovamente programmato.
» Togliere la batteria dalla scatola dell‘interruttore wireless e reinserirla tenendo
premuto l‘interruttore.
» Vedere le istruzioni passo passo nelle immagini a pagina 29, punto 5.3.
6. Comando
» Vedere le istruzioni passo passo nelle immagini a pagina 29, punto 6.
7. Cura del sistema
7.1 Pulizia della ferramenta
4037240000
AVVERTENZA
Componenti che conducono corrente
Pericolo di cortocircuito e d'incendio in caso di pulizia inappropriata
» Non pulire mai la ferramenta e l‘azionamento con liquidi, detergenti
contenenti alcol, solventi o diluenti.
» Non impiegare apparecchi per pulizia ad alta pressione o a vapore.
» Prima della pulizia estrarre la spina elettrica dalla presa.
AVVISO
» Per la pulizia a secco utilizzare solo un panno per spolverare oppure l'aspirapolvere.
» Per la pulizia a umido utilizzare solo un panno morbido inumidito.
AVVISO
» Le ferramenta sono esenti da manutenzione.
12.0001.010.428.0000.00
7.2 Pulizia del frontale
AVVISO
» Per la pulizia a secco utilizzare solo un panno per spolverare oppure l'aspirapolvere.
» Per la pulizia a umido utilizzare solo un panno morbido inumidito.
» Aprire il frontale e premere il pulsante gommato sull‘interruttore.
HDE KE1
» Chiudere il frontale entro 3 secondi. L'unità di azionamento ora non reagisce
più alla pressione sul frontale per 2 minuti.
» Vedere le istruzioni passo passo nelle immagini a pagina 30, punto 7.2.
21/23
BA_MA_Free-Kesseböhmer.book Seite 22 Freitag, 12. Juni 2015 9:50 09
7.3 Sostituzione delle batterie
AVVISO
» Smaltire la batteria esaurita ecologicamente.
» Vedere le istruzioni passo passo nelle immagini a pagina 30, punto 7.3.
9. Soluzione dei
problemi
» In caso di smaltimento e riciclaggio della ferramenta o dei suoi componenti
osservare le relative norme nazionali e locali!
Guasto
Causa
Rimedio
Nessuna funzione
Tensione di rete non
disponibile
Controllare che la spina
elettrica sia inserita
Assenza di contatto nei
collegamenti a innesto
Verificare il contatto sicuro di
tutti i collegamenti a innesto
Dopo 2 minuti di funzionamento continuo - 8 minuti
di pausa
Attendere 8 minuti
Accoppiamento interruttore wireless / unità di azionamento non eseguito
Eseguire l'accoppiamento
dell‘interruttore wireless,
vedere il capitolo 4.1 Configurazione dell‘interruttore wireless
Batteria nell‘interruttore
wireless esaurita, assente
o inserita erroneamente
Inserire una batteria nuova
oppure verificare la corretta
posizione di inserimento, vedere il capitolo 7.3 Sostituzione delle batterie
La corsa di riferimento si avvia, ma
non è eseguita fino
alla fine
La forza della guarnitura
non è impostata in base al
peso dell'anta a ribalta
Eseguire l'impostazione della
forza secondo il punto 12 delle
istruzioni di montaggio delle
guarniture per ante a ribalta
Free
La corsa di riferimento si avvia
nuovamente
Interruzione della corrente
Eseguire la corsa di riferimento, vedere il capitolo 5.1 Iniziare una nuova corsa di
riferimento
Corsa di riferimento
non eseguibile
4037240000
8. Smaltimento
HDE KE1
» Se dopo i provvedimenti descritti la ferramenta dovesse ancora presentare
anomalie o dovessero verificarsi altre anomalie, contattare il proprio rivenditore specializzato.
12.0001.010.428.0000.00
AVVISO
22/23
BA_MA_Free-Kesseböhmer.book Seite 23 Freitag, 12. Juni 2015 9:50 09
10. Dati tecnici
Tensione / frequenza / amperaggio
100 - 240 V AC / 50 - 60 Hz / 1,3 A
Potenza
60 Watt
Intervallo di variazione della temperatura 0 - 40 °C
ambiente
Categoria di sovratensione
Classe di protezione 3
Tipo di protezione / classe di protezione IP2X / classe di protezione 2
2,4 GHz
Batteria
Batteria a bottone al litio CR 2032, 3 V
Potenza in standby
≤ 1 watt
HDE KE1
12.0001.010.428.0000.00
4037240000
Frequenza radio
23/23
BA_MA_Free-Kesseböhmer.book Seite 24 Freitag, 12. Juni 2015 9:50 09
PULL /
ZIEHEN
Batterie einlegen / Taster 4.1
>2s
4037240000
4.1
>2s
≤ 30 s
4.4
2x
24/32
HDE KE1
4.3
12.0001.010.428.0000.00
4.2
BA_MA_Free-Kesseböhmer.book Seite 25 Freitag, 12. Juni 2015 9:50 09
4.2
4.2
A
>2s
B
< 100ms
A
>2s
≤ 30 s
4037240000
>2s
< 100 ms
B
4.3
>2s
12.0001.010.428.0000.00
4.4
1
A
A
B
B
C
A
2
B
C
D
D
HDE KE1
D
3
C
25/32
BA_MA_Free-Kesseböhmer.book Seite 26 Freitag, 12. Juni 2015 9:50 09
4.3
4.3
>2s
< 100 ms
< 100 ms
A
>2s
4037240000
≤ 30 s
>2s
< 100 ms
B
4.4
HDE KE1
>2s
12.0001.010.428.0000.00
< 100 ms
26/32
QV2
BA_MA_Free-Kesseböhmer.book Seite 27 Freitag, 12. Juni 2015 9:50 09
4.1+5.1
4.4
2x
2
1
5.1
>2s
4037240000
< 100 ms
< 100 ms
>2s
< 100 ms
HDE KE1
12.0001.010.428.0000.00
≤ 30 s
2x
1
2
27/32
BA_MA_Free-Kesseböhmer.book Seite 28 Freitag, 12. Juni 2015 9:50 09
Funktionskontrolle / Taster 5.2
5.2
>2s
< 100 ms
4037240000
< 100 ms
< 100 ms
>2s
HDE KE1
12.0001.010.428.0000.00
< 100 ms
28/32
BA_MA_Free-Kesseböhmer.book Seite 29 Freitag, 12. Juni 2015 9:50 09
5.3+6
5.3
2
3
1
HDE KE1
12.0001.010.428.0000.00
4037240000
6
29/32
BA_MA_Free-Kesseböhmer.book Seite 30 Freitag, 12. Juni 2015 9:50 09
7.2+7.3
7.2
1
2
4
2 min
4037240000
≤ 3s
3
12.0001.010.428.0000.00
7.3
1
HDE KE1
2
30/32
HDE KE1
12.0001.010.428.0000.00
4037240000
BA_MA_Free-Kesseböhmer.book Seite 31 Freitag, 12. Juni 2015 9:50 09
31/32
HDE KE1
12.0001.010.428.0000.00
4037240000
BA_MA_Free-Kesseböhmer.book Seite 32 Freitag, 12. Juni 2015 9:50 09
32/32
Subject to
alterations
© 2015 by Häfele GmbH & Co KG
Adolf-Häfele-Str. 1 · D-72202 Nagold · www.hafele.com