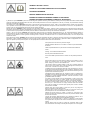
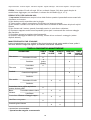
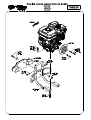
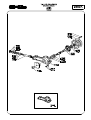
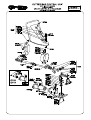
1
02409 - 14 GRILLO G84 OPERATOR'S MANUAL MANUALE DELL'OPERATORE MANUEL D'EMPLOI ET ENTRETIEN BEDIENUNGSANLEITUNG MANUAL DE USO Y INSTRUCCIONES РУКОВОДСТВО ПО ЭКСПЛУАТАЦИИ SUMMARY Safety rules Instructions: 1 Warnings Identification and servicing Technical specifications Putting the machine into service Instructions for use Maintenance and lubrication Implements 5 6 7 7 8 9 10 57 75 Illustrations EC Declaration of conformity – Noise and vibrations levels INDICE Norme antinfortunistiche Istruzioni: Avvertenze Identificazione e assistenza Caratteristiche tecniche Messa in opera della macchina Istruzioni d’uso Manutenzione e lubrificazione Accessori Figure Certificato di conformità CE - Rumorosità e livelli di vibrazione 1 13 14 15 15 16 17 19 57 75 INDEX Règles de sécurité Instructions: Mises en garde Identification et assistance Caractéristiques techniques Mise en service de la machine Mode d’emploi Maintenance et lubrification Outils Illustrations Certificat de conformité CE - Niveaux sonores et de vibration 1 21 22 23 24 24 25 27 57 75 INHALTSÜBERSICHT Sicherheitsvorschriften Anleitung: Sicherheitsrelevante Hinweise Identifikation der Maschine und Kundendienst Technische Daten Inbetriebnahme der Maschine Betriebsanleitung Wartung und Schmierung Zubehöre Abbildungsverzeichnis EG-Konformitätserklärung - Geräuschemission und Vibrationspegel 1 30 31 32 33 33 35 36 57 75 ÍNDICE Normas de seguridad Instrucciones: Advertencias Identificación y asistencia Características técnicas Puesta en servicio de la máquina Instrucciones de uso Mantenimiento y lubricación Equipos Indice de ilustraciones Certificado de conformidad CE - Niveles de ruido y vibración 1 39 40 41 42 42 44 45 57 75 СОДЕРЖАНИЕ Правила техники безопасности Инструкции: Меры предосторожности и рекомендации Идентификация и обслуживание Технические характеристики Пуск машины Инструкции по эксплуатации Техобслуживание и смазка Комплектующие Рисунки 1 48 49 50 51 51 53 57 75 -i- SAFETY SYMBOLS - SIMBOLOGIA PER LA SICUREZZA - SYMBOLOGIE POUR LA SECURITE – SICHERHEITSSYMBOLE- SIMBOLOGÍA DE SEGURIDAD OPEN MANUAL- means that you must read the operator's manual very carefully. MANUALE APERTO - significa che dovete leggere attentamente il manuale di uso e manutenzione. MANUEL OUVERT – signifie qu'il faut lire avec attention le présent manuel. OFFENES HANDBUCH – bedeutet, dass Sie die Gebrauchs- und Wartungsanleitung aufmerksam durchlesen müssen. MANUAL ABIERTO – es decir que hay que leer muy atentamente el manual del operador. CAUTION! - means that you have to pay particular attention to the operation you have to carry out, in particular if there is the indication “DANGER”. ATTENZIONE! - significa che dovete porre particolare attenzione all’operazione che dovete effettuare, in particolare se vi è anche l’indicazione di “Pericolo”. ATTENTION! - signifie qu'il faut faire particulière attention dans l'opération que vous allez faire, en particulier s'il y a aussi l'indication “DANGER”. VORSICHT! - bedeutet, dass Sie besondere Aufmerksamkeit beim Durchführen des Vorgangs haben müssen, insbesondere wenn auch der Hinweis “GEFAHR” aufgeführt ist. ATENCIÓN! - es decir que hay que poner mayor atención en la operación a ejecutar si, en particular cuando hay también la indicación “Peligro”. INTERDICTION, YOU MUST NOT DO THAT! - means that it is absolutely forbidden to carry out the operations reported under this symbol because they could lead to mortal danger. DIVIETO, NON FARE! - significa che non dovete assolutamente fare le operazioni riportate sotto questo simbolo, potrebbe comportare un pericolo mortale. INTERDICTION, NE PAS FAIRE! - signifie qu'il est absolument interdit d' effectuer les opérations reportées sous cette indication, car elles pourraient conduire au danger de mort. VERBOT, strengstens untersagt! - bedeutet, dass der Vorgang unter diesem Symbol absolut nicht durchgeführt werden darf, da er zur einer lebensgefährlichen Situation führen könnte. PROHIBICIÓN, NO LO HAGAN! - es decir que no hay que hacer absolutamente las operaciones bajo este símbolo, podría comportar un peligro mortal. NOTE, you have to pay particular attention to the note put next to this symbol NOTA, dovete porre particolare attenzione alla nota posta accanto a questo simbolo. NOTE, il faut faire attention particulière à la note mise à côté de ce symbole. ANMERKUNG, besondere Aufmerksamkeit muss auf die Anmerkungen neben diesem Symbol gelenkt werden. NOTA, hay que poner atención particular en la nota puesta a lado de este símbolo. You must not repair nor lubricate the machine with moving parts or with the engine put on. Non riparare o lubrificare la macchina con organi in movimento o motore acceso Ne pas réparer ou lubrifier la machine avec des parties en mouvement ou à moteur en marche. Niemals bei bewegenden Objekten oder bei laufendem Motor Reparationen oder Einschmierungen durchführen. No reparar ni lubrificar la máquina con órganos en movimiento o motor en marcha. You must not smoke, light matches or lift flames, trigger frames nor cause sparks. Vietato fumare, accendere fiammiferi o fiamme, lasciare fiamme libere o creare scintille. Il est interdit de fumer, allumer des allumettes ou du feu, laisser des flammes libres ou de causer des étincelles. Es ist untersagt zu Rauchen, Streichhölzer oder Feuer anzuzünden, Flammen auslösen oder Funken verursachen. Prohibido fumar, encender cerillas o fuego, dejar llamas o crear chispas. Use personal protective equipement Utilizzare mezzi di protezione individuali Utilisez l'équipement de protection individuelle Individuelle Schutzausrüstung benutzen Utilizar dispositivo de proteccion individual GENERAL SECURITY RULES NORME DI CARATTERE GENERALE SULLA SICUREZZA SICHERHEITSHINWEISE RÈGLES GÉNÉRALES DE SÉCURITÉ NORMAS DE CARÁCTER GENERAL SOBRE LA SEGURIDAD NORMAS DE CARÁCTER GENERAL ACERCA DA SEGURANÇA ay attention to symbol DANGER! It points out all most dangerous operations according to the situation. All safety rules are important and therefore must be strictly observed. Always keep this handbook within the reach, read it carefully and learn how to use the equipment in a safe way. Let nobody, not provided with necessary information, work with the equipment. Fare attenzione al simbolo PERICOLO! Esso indica la presenza delle principali situazioni di pericolo. Tutte le norme antinfortunistiche contente sono importanti e vanno rispettate. Tenere sempre questo manuale a portata di mano, leggerlo attentamente ed imparare ad usare l’attrezzatura in modo sicuro. Non permettere che qualcuno operi con questa attrezzatura senza aver ricevuto istruzioni esaurienti. Attention au symbole DANGER! Il indique la présence des principales situations de danger. Toutes les normes contenues pour la prévention des accidents sont importantes et doivent être respectées scrupuleusement. Garder toujours ce manuel à la portée de la main, le lire attentivement et apprendre à utiliser ce matériel en toute sécurité. Ne pas permettre que d’autres personnes utilisent ce matériel sans avoir reçus des instructions exhaustives. Achtung - die mit dem Symbol GEFAHR! gekennzeichneten Hinweise weisen auf potentielle Gefahrensituationen hin. Alle sicherheitsrelevanten Hinweise in diesem Handbuch sind sehr wichtig und müssen unbedingt befolgt werden. Bewahren Sie dieses Handbuch stets griffbereit auf, lesen Sie es aufmerksam durch, und lernen Sie, die Maschine und die gesamte Ausrüstung sicher zu benutzen. Die Maschine darf nur von Personen benutzt werden, die vorher entsprechend unterwiesen wurden. Preste atención al símbolo ¡PELIGRO! Indica la presencia de situaciones importantes de peligro. Todas las normas de prevención de accidentes detalladas son importantes y deben respetarse estrictamente. Conserve este manual al alcance de la mano, léalo atentamente y aprenda a utilizar el equipamiento de modo seguro. No permita que otras personas operen con este equipamiento sin haber recibido instrucciones exhaustivas. Take special care not to touch hot parts of the engine. Prestate particolare attenzione a non entrare in contatto con parti surriscaldate del motore. Veiller tout particulièrement à ne pas toucher des éléments surchauffés du moteur. Achtung – keine heißen Motorteile berühren! No tocar partes recalentadas del motor. Tome muito cuidado para não entrar em contacto com as partes aquecidas do motor. Engine exhaust fumes can cause sickness or death. If it is necessary to run an engine in an enclosed area, use an exhaust pipe extension to remove the fumes. Always try to work in a well ventilated area. I gas di scarico possono causare malanni o morte. Se è necessario mettere in moto un motore in uno spazio chiuso, usare una prolunga tubo di scarico per far uscire il fumo. Lavorare in una zona ben ventilata. L’exhalation des gaz d’échappement peut être cause d’intoxication ou de mort. S’il est vraiment nécessaire d’allumer le moteur à l’intérieur, appliquer au tuyau d’échappement un autre tuyau extensible pour permettre la sortie des gaz. Il est toujours mieux de travailler en plein air. Auspuffgase können Übelkeit oder Tod verursachen. Wenn es notwendig ist, einen Motor in einem geschlossenen Raum laufen zu lassen, benützen Sie eine Verlängerung, um das Auspuffgas abzuleiten. Versuchen Sie immer in einem gut belüfteten Raum zu arbeiten. Los gases de escape pueden provocar enfermedades o muerte. De tener que poner en marcha un motor en un espacio cerrado, usar una prolongación del tubo de escape para que salga el humo. Trabajar en una zona bien ventilada. Os gases de escape podem causar danos ou morte. Caso seja necessário fazer com que o motor funcione num espaço fechado, utilize uma extensão para o tubo de escape que os fumos sejam expulso para o exterior. Trabalhe numa área bem ventilada. Caution! Never touch moving pulleys or belts. They can be very dangerous. Never do maintenance with engine running. Attenzione! Non toccare mai pulegge o cinghie in movimento, creano gravi danni alla persona. Non fare manutenzione col motore in moto. Attention! Ne jamais toucher ni poulies ni courroies en mouvement, elles peuvent provoquer des accidents aux personnes. Ne pas faire l’entretien quand le moteur est en marche. Vorsicht! Nie laufende Riemenscheiben oder Treibriemen anfassen, da es gefährlich ist. Nie bei laufendem Motor Instandhaltung machen. ¡Atención! No tocar jamás poleas o correas en movimiento, porque pueden crear graves daños a la persona. No efectuar el mantenimiento con el motor en marcha. Atenção! Nunca toque nas polias ou correias em movimento devido ao alto risco de ferimentos. Nunca faça a manutenção da máquina com o motor ligado. A burst which separates the tyre from the rim parts can cause serious injury or death. La separazione fra pneumatico e cerchione, causata dall’esplosione del pneumatico, può provocare serie ferite o addirittura la morte. La séparation entre le pneu et la jante, provoquée par l’explosion d’une roue peut causer des dommages, blessures ou la mort. Die Trennung der Räder von den Felgen durch Explosion kann schwere Verletzungen oder den Tod verursachen. La separación entre el neumático y la llanta producida por la explosión del neumático puede provocar graves herida e incluso la muerte. A separação entre o pneumático e o aro, provocada pela explosão do pneumático, pode causar graves ferimentos ou até mesmo a morte. Handle fuel with care, it is highly flammable: Do not refuel machine while smoking, when machine is near an open flame or sparks, or when the engine is running. Stop the engine. Maneggiare il carburante con cura, è altamente infiammabile; non fate rifornimento mentre fumate, o vicino a fiamme o scintille, o quando il motore è acceso. Manier avec soin le carburant car c’est très inflammable. Ne pas remplir le réservoir si vous êtes en train de fumer ou pendant que la machine est près du feu ou d’étincelles ou encore pendant que la machine travaille. Arrêter le moteur. Treibstoff vorsichtig handhaben, da er sehr entzündbar ist: beim Tanken nicht rauchen. Nicht tanken, wenn die Maschine in der Nähe von Flammen oder Funken ist oder wenn der Motor läuft. Immer den Motor abschalten. Manejar el combustible con cuidado porque es sumamente inflamable; no repostar mientras se fuma o cerca de llamas o chispas, o cuando el motor está encendido. Manuseie o carburante com cuidado, pois este è altamente inflamável; não fume durante o abastecimento da máquina ou enquanto o motor estiver ligado, não o aproximado de chama ou de faíscas. Prevent battery explosions: keep sparks, lighted matches and open flames away from the top of the battery. Battery gas can explode. Per prevenire l’esplosione della batteria, tenete scintille, fiammiferi accesi e fiamme lontani dalla stessa. Il gas della batteria può esplodere. Prévenir l’explosion de la batterie: tenir les étincelles, les allumettes et le feu loin de la batterie. Le gaz de la batterie peut exploser. Vorbeugung der Batterie-Explosion. Entfernen Sie Funken, Zündhölzer und Flammen von der Batterie. Das Batteriegas kann explodieren. Para prevenir la explosión de la batería, mantener chispas, cerillas encendidas y llamas lejos de la misma. El gas de la batería puede explotar. Para prevenir explosão da bateria ter centelhas, fósforos acendido e chamas longe da mesma. O gás da bateria poderia explodir. WARNING! SHARP PARTS. Keep hands and feet away. Do not operate the mower over gravel or foreign bodies which may be sucked up and ejected by the blades, generating a danger. Keep people away. Remove the key and read the instruction manual before attempting to carry out any maintenance or repairs to the machine. ATTENZIONE! ORGANO TAGLIENTE. Tenere lontano mani e piedi. Non lavorare col rasaerba sopra alla ghiaia o corpi estranei che possono essere aspirati e centrifugati dalle lame risultando molto pericolosi, tenere lontano le persone. Togliere la chiave e leggere le istruzioni prima di effettuare qualsiasi operazione di manutenzione e riparazione. ATTENTION! ORGANE TRANCHANT. Éloigner les mains et les pieds. Ne pas utiliser la tondeuse sur le gravier ou sur des corps qui peuvent être aspirés et centrifugés par les lames et devenir très dangereux. Les personnes doivent se trouver à une certaine distance. Enlever la clé et lire les instructions avant toute opération de maintenance et de réparation. ACHTUNG! SCHARFE KLINGEN. Hände und Füße fernhalten. Beim Mähen nicht über Schotter, Steine oder andere Fremdkörper fahren, da diese durch die Drehbewegung der Messer angesaugt und weggeschleudert werden können (Verletzungsgefahr). Nicht in der Nähe von anderen Personen mähen. Vor jedem Wartungs- bzw. Reparatureingriff den Startschlüssel abziehen und die Gebrauchsanleitung durchlesen. ¡PELIGRO! ÓRGANO CORTANTE. Mantener alejados los pies y las manos. No limpiar la herramienta con el motor en marcha. ¡Peligro! Expulsión de objetos: mantener alejadas a las personas. Atención: quitar la llave y leer las instrucciones antes de efectuar cualquier operación de mantenimiento o reparación. ATENÇÃO! Órgão cortante. Ficar longe com pés e mãos. Não trabalhar com a máquina sobre cascalho ou objetos que podem ser aspirados e centrifugados gerando perigo, manter-se longe das pessoas. Tirar a chave de ignição e ler as instruções antes de efetuar qualquer operação de reparo ou serviço. Warning! Cutting edges, keep your hands and feet away. Do not clean the attachment when the engine is running. Attenzione! Organo tagliente, tenere lontano piedi e mani. Non pulire l'attrezzo col motore in moto. Attention! Organe tranchant, ne pas approcher main et pieds. Ne pas nettoyer le moteur quand le moteur est en marche. Achtung! Schneidende Klinge, Hände und Füße fernhalten. Niemals bei laufendem Motor reinigen. DANGER! READ THE INSTRUCTION MANUAL. KEEP SAFETY DISTANCES. PERICOLO! LEGGERE IL MANUALE D’ISTRUZIONE. TENERE LONTANO LE PERSONE. DANGER! LIRE LE MANUEL D’INSTRUCTIONS. RESPECTER LES DISTANCES DE SÉCURITÉ GEFAHR! DIE GEBRAUCHS ANLEITUNG DURCHLESEN. NICHT IN DER NÄHE VON ANDEREN PERSONEN MÄHEN. PELIGRO! LEER LAS INSTRUCCIONES. MANTENER ALEJADAS LAS PERSONAS. PERIGO! LER O MANUAL DE INSTRUÇÕES. MANTER AS PESSOAS AFASTADAS. Before using the machine, it is mandatory to put on the appropriate individual safety devices: body protection, protection gloves, security shoes, ear protection. Prima di utilizzare la macchina, è obbligatorio indossare gli appositi dispositivi di sicurezza individuali: protezione del corpo, guanti di protezione, calzature di sicurezza, protezione dell’udito. Avant d’utiliser la machine, il est obligatoire de mettre les dispositifs individuels de sécurité appropriés: protection du corps, gants de protection, chaussures de sécurité, protection de l’ouïe. Vor dem Gebrauch der Maschine ist es vorgeschrieben, die geeignete persönlichen Schutzkleidung anzuziehen: Körperschutz, Schutzhandschuhe, Sicherheitsschuhe, Gehörschutz. Antes de utilizar la máquina es obligatorio ponerse los dispositivos individuales de seguridad apropiados: protección del cuerpo, guantes de protección, calzado de seguridad, protección del oído. GEAR LEVER 1-2 GEARS F IN NEUTRAL POSITION MARCE 1-2 MARCE F POSIZIONE DI FOLLE DANGER! READ THE INSTRUCTION MANUAL. KEEP SAFETY DISTANCES. VITESSES 1-2 VITESSES F POINT MORT PERICOLO! LEGGERE IL MANUALE D’ISTRUZIONE. TENERE LONTANO LE PERSONE. GETRIEBEHEBEL 1-2 GÄNGE F LEERLAUF DANGER! LIRE LE MANUEL D’INSTRUCTIONS. RESPECTER LES DISTANCES DE SÉCURITÉ PALANCA DE LAS MARCHAS 1-2 MARCHAS F PUNTO MUERTO ПЕРЕДАЧИ 1-2 ПЕРЕДАЧИ F НЕЙТРАЛЬНОЕ ПОЛОЖЕНИЕ GEFAHR! DIE GEBRAUCHS ANLEITUNG DURCHLESEN. NICHT IN DER NÄHE VON ANDEREN PERSONEN MÄHEN. PELIGRO! LEER LAS INSTRUCCIONES. MANTENER ALEJADAS LAS PERSONAS. PERIGO! LER O MANUAL DE INSTRUÇÕES. MANTER AS PESSOAS AFASTADAS. ОПАСНОСТЬ! ПРОЧИТАТЬ РАБОЧЕЕ РУКОВОДСТВО. СОБЛЮДАТЬ БЕЗОПАСНОЕ РАССТОЯНИЕ. DRIVE CLUTCH INVERTITORE DI MARCIA INVERSEUR DE MARCHE UMKEHRGETRIEBE INVERSOR DE MARCHA РЕВЕРСИВНЫЙ МЕХАНИЗМ Fig. 1 Рис. 1 Warning! Turning gears, keep your hands and feet away. Do not clean the attachment when the engine is running. Attenzione! Organo in rotazione, tenere lontano piedi e mani. Non pulire l'attrezzo col motore in moto. Attention! Organ en rotation, ne pas approcher main et pieds. Ne pas nettoyer le moteur quand le moteur est en marche. Achtung! Rotierende Klinge, Hände und Füße fernhalten. Niemals bei laufendem Motor reinigen. ¡Peligro! Órgano cortante. Mantener lejos los pies y las manos. No limpiar la herramienta con el motor en marcha. Atenção! Órgão em rotação. Mantenha as mãos e os pés afastados. Não limpe o equipamento com o motor em movimento. Внимание! Движущийся орган, не приближать руки и ноги. Не чистить инструмент, когда включен двигатель. 4 Translation of the Original Instructions ROTAVATOR G84 Dear Customer, Thank you for choosing our rotavator; we are sure that your new machine’s performance will meet your requirements in full. To ensure optimum service and maintenance of its qualities over time, read this manual carefully and follow its instructions. This will give you the best results and protect your investment. Please keep this manual, which must always accompany the machine. GENERAL DESCRIPTION AND INTENDED USE The Grillo G84 is a single-axle self-propelled walking tractor complete with a rotary tiller for tilling soil. These machines are used primarily to prepare the soil (elimination of weed, surface tilling of the soil) and used in gardening, for small ground work, refinement work and orchard inter-rows. The machine is constructed on a chassis and fitted with either a petrol or diesel engine. The engine drives the wheels and P.T.O, which is usually connected to a rotary tiller. Other implements can be connected to the P.T.O such as a snow thrower, swinging front blade, cutter bars, rotary cutters, ploughs, power brushes and sprayer pumps. The Grillo G84 is a pedestrian-controlled machine, the operator steers the machine via the handle- bar where the controls are mounted. CAUTION! Before starting the engine, read this carefully. The following warnings are very important in ensuring safety! WARNINGS Caution is the main safeguard in preventing accidents! We urge you to read the warnings that follow when using the rotavator, before starting any work at all. Improper use of the rotavator and its equipment can be dangerous; to reduce the risks to the minimum, observe the necessary precautions set out below: 1) Read the whole of this manual before starting the machine or putting it in motion. 2) Pay special attention to the safety warnings and labels. 3) Rotation of the tiller is extremely dangerous; never insert hands or feet under the tiller! 4) Before other people are allowed to use the machine they must first be informed about the safety regulations and how to use the vehicle. 5) Before starting the engine, make sure that there is no-one nearby, particularly children. 6) Never use the machine when tired and do not drink alcohol. 7) Check the ground before tilling for stones, sticks or foreign bodies which might damage the machine or be flung dangerously to some distance during operation. 8) Before starting work, put on suitable working clothes, gloves, heavy footwear and goggles. 9) Never use the rotavator on steep slopes; it might tip over (max. 25%). 10) Never allow the machine to be used by anyone under 16 years of age. 11) Never reverse with the engine at high throttle. 12) It is dangerous to operate the levers sharply with the engine at maximum r.p.m. 13) Never keep the engine running indoors; you may inhale poisonous gases. 14) Always switch off the engine before filling up with fuel, keep away from sparks or flames and do not smoke! 15) Avoid fuel spills and after filling the tank clean all spills before starting the engine. 16) Store fuel in containers specially constructed for this purpose. 17) Work only in sunlight or with good artificial light. IMPROPER USES TO BE AVOIDED 18) Any improper uses causes the machine to become null and void and the constructor will decline all liability. 19) Never use the machine to transport people, animals or objects. 5 Translation of the Original Instructions FURTHER SAFETY ADVICES 20) Never tamper with or deactivate the safety devices. 21) Never make any adjustments or do any cleaning with the engine running. 22) Never have anyone check the machine while you are driving with the engine running. 23) The user is always responsible for injury or damage to third parties. Misshapen or damaged hoes must always be replaced and never repaired. 24) Always use original Grillo spare parts. 25) Before starting any work with the machine, check that all the accident prevention systems with which it is equipped are in perfect working order. They must never be disabled or tampered with. 26) Before starting work, check that the nuts and bolts securing the tiller and hoes are perfectly tight. 27) All protective fittings (hoods, mudguards, etc.) must be kept in place during operation. 28) Never clean the tiller with the engine running. 29) Never use the machine barefoot. 30) Do not use the fast connection or other possible extensions with the rotary hoe since they could approach the rotary hoe to the operator’s feet and therefore not comply with the security regulation EN 709. 31) Never change the engine settings, especially the max. r.p.m. 32) Allow the engine to cool before placing the machine indoors. 33) CAUTION: to reduce the risk of fire, keep the engine, the exhaust pipe and the exhaust manifolds free from grass, leaves, dust, etc… 34) If you have to empty the fuel tank, do this outdoors. 35) Rotovator must be driven by only one operator. IDENTIFICATION AND SERVICING IDENTIFICATION The vehicle’s serial number is punched on the nameplate on the left-hand longitudinal member of the chassis and on the gearbox nameplate. Always state the serial number when ordering spare parts. AFTER-SALES SERVICE This handbook provides instructions for use of the cultivator and for correct basic servicing which the user can carry out himself. For all procedures not described in this handbook, contact your local dealer. SPARE PARTS Always use original spare parts, as they are the only ones to offer complete safety and interchangeability. Always state the serial number when ordering. For engine parts, refer to the specific handbook. GUARANTEE The guarantee is given in compliance with the current law. The dealer will have to give the client a copy of the registration card of the machine, which they will print up from the Grillo website. For the engine the guarantee of the relative manufacturers apply. ORDERING SPARE PARTS Always state the machine serial number and the code number of the part to be replaced. Contact your local dealer. Our address is: GRILLO S.p.A. Via Cervese 1701 - 47521 CESENA (FC) - ITALY Tel. 0039 / 0547 / 633111 - Fax 0039 / 0547 / 632011 Web site: www.grillospa.it - E-mail: [email protected] 6 Translation of the Original Instructions TECHNICAL SPECIFICATIONS ENGINE: - HONDA GX200 OHV 196 cm³ 5,5HP 4,1Kw (@ 3600 r.p.m.), one-cylinder, petrol engine. STARTER: recoil starter. FUEL TANK: 3,6 Litres CLUTCH: active conic clutch. GEARBOX: gears in oil bath with 2 forward gears + 2 reverse gears as walking tractor – 2 forward + 2 reverse gears as sickle bar. CLUTCH ENGAGEMENT: by lever. P.T.O: at 965 revolutions independent from the gearbox, with clockwise rotation as walking tractor; with anticlockwise rotation as sickle bar. SAFETY DEVICE: active conic clutch and disengagement of the PTO in reverse gear. HANDLEBARS: with height and side adjustment, reversible and mounted on anti-vibration elements. ROTARY TILLER: standard 580 mm and adjustable at 370 – 470 mm and at 680 mm with enlargements. WORKING DEPTH: 160 mm. WHEELS: 4.00-8 EXTERNAL DIMENSION with 4.00-8 wheels: 420-370 mm. ATTACHMENTS: 110-115-117-127-137 cm central sickle bars, plough, furrower, driven trailer 150×110 cm, cage wheels, tow bar, 60 cm snowthrower, 100 cm orientable front blade, snow chains for 4.00-8 wheels. PUTTING THE MACHINE INTO SERVICE 1) Check that the machine has not been damaged in transit. 2) Fill with grease the machine PTO flanging all around the coupling (fig. 3 no. 20). 3) Select driving handlebar position according to the use, Walking tractor or Motormower, by using the two levers (fig. 3, no. 10 and no. 12). 4) Mount wheels and implement (e.g. rotary tiller, plough etc. fig. 4A) and tighten the securing nuts completely. 5) Add engine oil, please refer to attached instruction booklet. 6) Add gearbox oil – fig. 6 (MP80W90 oil, or international equivalent API GL5 oil, US MIL-L-2105D, quantity 2,2 litres. 7) Insert the control levers (fig. 3 no. 13, no. 15 and no. 2). 9) Verify the tyre pressure according to the table provided below: TYRE PRESSURE 4.00-8 2 PLY RATING 1,1 BAR 4.00-10 2 “ “ 1,1 “ 5.00-10 2 “ “ 1,5 “ 7 Translation of the Original Instructions INSTRUCTIONS FOR USE Before starting the engine always check: − the oil levels inside the engine (fig. 5, ref. A) and the gearbox; the level check cap is on the upper cover (fig. 6); the oil level must be between the two notches. − that all screws and nuts are well tightened especially those fastening the attachments to the machine (fig. 4A). − that all levers are in neutral. − that the air filter (dry version) is clean (fig. 7). Caution! Never blow the cartridge with compressed air; if clogged it must be replaced. Check that the air filter (oil bath version) is clean and that the oil is at the right level (fig. 7). − that the air filter (in oil bath version) is clean and its oil at the right level (fig. 7A). − check the oil level inside the tiller gearbox (fig. 4 no. 3) − fill the tank with fuel, using a funnel with very fine filter (fig. 3, no. 11) STARTING THE ENGINE Turn on the petrol cock (fig. 7, no. 1) push the throttle lever (fig. 3 n. 14) to the midway position and, if the engine is cold, engage the choke on the carburettor (fig. 7, no. 2). Start the engine by pulling hard on the pull starter handle (6, Fig. 3). STARTING THE MACHINE Set the gearbox lever in the desired position. If the gear does not engage immediately, give a few light touches on the clutch. The machine moves pressing the clutch lever (fig. 3 no.1) until the machine starts moving. By releasing the red lever, the machine will stop but the engine will keep running and the lever returns back to position 1 (fig. 3). To turn the engine off, turn the switch positioned on the handle (21, fig. 3), position OFF. N.B. - If the P.T.O. is connected the reverse gear cannot be inserted. Disengage the P.T.O. and then engage the reverse gear. NOTE: to avoid problems to the clutch during the functioning of the machine, please keep the red lever firmly depressed. Attention. Do not use the machine whilst only partially depressing the red lever or damage to the clutch may result. During work the spring (fig. 8) should be nearly totally compressed. STARTING WORK Connect the P.T.O., moving the clutch lever slightly if it does not engage at once. Increase speed as appropriate and press the clutch lever to start work. END OF WORK When work is ended, in order to stop the engine, set the gear and P.T.O. in neutral position and leave the handles, then turn the switch inserted in the throttle lever to the position OFF (fig. 3 n. 21). TROUBLESHOOTING The following is a list of small problems which may occur during the use of the rotovator, which the operator himself can remedy. 1) if the engine does not start, check as follows: – that the fuel tank is at least half full; – that the petrol cock is turned on; – that the choke is engaged (when the engine is cold); – that fuel is reaching the carburettor; – that the vent hole on the fuel tank is not blocked; – that the mesh filter at the carburettor intake is clean; 8 Translation of the Original Instructions – that the carburettor jets are clean. Check by unscrewing them and if dirty, clean them with a jet of air; – that spark plug is generating a spark. To check this, remove the spark plug, re-connect it to the electricity supply wire, rest the metal side on an electrical earth and turn the engine-pulley as if to start it. If no spark is seen between the electrodes, check the connection of the spark plug cable; if there is still no current replace the spark plug with a new one. If a spark is still not obtained, the problem is in the electric system: capacitor, coil, or in some other component. Contact your nearest service centre or a specialist workshop. 2) If the gears do not engage: – regulate the clutch by unscrewing the adjuster screw until the clutch release distance is satisfactory. Remember that there must always be a little slack on the clutch cable. FOR LONG IDLE PERIODS In case the machine is not to be used for a long period, the following precautions are recommended: – empty the fuel tank and the carburettor. – clean the engine and the machine thoroughly. Oil the handlebar support reversing mechanism. MAINTENANCE AND LUBRICATION CAUTION! - Before performing any cleaning, maintenance or repair operation always wear suitable clothing and working gloves. - When the machine or part of it is lifted to carry out maintenance operations, always remember to use suitable fixing tools such as holders and safety locks. - When carrying out maintenance operations and/or when the machine is tilted without safety locks or supports, never leave it unguarded in places where inexperienced people and children could have easy access to it. - Protect the environment: carefully dispose of used oils, petrol and any other pollutant product! - Effective maintenance and correct lubrication help to keep the machine fully efficient. RUNNING-IN: change the engine oil after the first twenty working hours. ENGINE – Follow the instructions on lubrication intervals in the relative manual. In general users are advised to check the oil level every 8 working hours and to change it every 100 hours. Always use 10W30. Check the air filter every 8 working hours or more often in very dusty conditions. On versions with dry filter, replace the cartridge if clogged (do not clean with compressed air jets). GEARBOX—Check the oil level every 50 working hours (fig. 6) by removing the cap and checking with the machine horizontal the oil reaches between the two notches. If necessary add MP 80 W/90 (API GL5 US-MIL-L-2105D) oil. Change the oil once a year. ROTARY TILLER – Check the oil level every 50 hours by removing the plug; the oil must almost fill the rotary tiller box. If necessary add the same oil as for the gearbox. HELPFUL HINTS FOR PROPER USE 1) Important! Always use the clutch for forward and reverse travel. 2) Never leave the out in the rain. 3) Keep the reversing mechanism in the handlebar support clean and well oiled. 4) Never force the gearbox if the gear does not engage; give a succession of little touches on the clutch. 5) Never strain the engine: if smoke comes out of the exhaust, the engine is toiling and must be slowed down. 9 Translation of the Original Instructions 6) Even impossible ground can be tilled, but the machine must be well run-in first. 7) Check the tyre pressure often. 8) When fitting the implements (e.g. rotary tiller) take care not to damage the centring device (see chapter on «Implements»). END OF SEASON MAINTENANCE Clean the machine carefully; change the engine, gearbox and tiller gearbox oil. Clean the air filter. Sharpen and grease the blades, replacing them if worn. MAINTENANCE SUMMARY TABLE PROCEDURE Engine oil check the level change check Air filter Spark plug EVERY 8 HOURS AFTER 20 HOURS EVERY 50 HOURS ● (running-in) ● ● replace ٭ check/adjust ● ● Check the level ● ● replace Check that the engine intake grid is clean Check blade Cutter bar attachment grease Check that tines are well-sharpened and well-fixed Lubricate with grease ONCE A YEAR OR EVERY 200 HOURS ● replace Gearbox oil EVERY 100 HOURS ● ● ● ● ● ● ● ● ● ● Check clutch clearance (free play) ● recommended procedure ٭procedure to be carried out if necessary IMPLEMENTS ROTARY TILLER The rotary tiller is used to break the surface layer of the ground in order to increase its permeability and at the same time to rid of weeds. Till in first speed if the soil is hard and tough or in second speed in soft, sandy soil. The working depth can be adjusted by lifting or lowering the central knife situated under the rotary unit (fig. 4B). The tiller cover position will change at the same time. Raise the knife to increase the depth. Start work with the knife in its lowest position, and then raise it if greater depth is required (fig. 4B). 10 Translation of the Original Instructions N.B. - On hard soils the machine may jump forward. In this case lower the central knife and fit it into the first hole (fig. 4B, n. 1). Check that the blades are fitted correctly (see fig. 9). MOWER BAR The mower bar which can be attached to the rotovator has a central or side control. Its strength and high performance make it the best way of mowing small pieces of land when it does not make economic sense to purchase a motor mower which would remain unused for most of the year, while a rotovator can be used with other implements. The mower bar is attached to rotovator implement frame instead of the rotary tiller and fixed using the same two nuts. The handlebar must be turned 180° towards the engine. Before turning the handlebar engage first gear, then release the drive rods. Once the handlebar has been turned, fit the rods back into the supports. Now that the handlebar has been reversed the handlebar support mechanism enables the use of all the rotovator gears, except the fastest speed which could be dangerous. To drive the mower bar, disconnect the safety device which prevents simultaneous engagement of the reverse speed and the P.T.O. (necessary when using the rotary tiller – fig. 2) by simply removing the screw that blocks the gear lever and stops the engagement of the two functions together. Important: when reconnecting the rotary tiller, the safety device must be set in the original position (fig.2A). Maintenance: grease the cross pins every 8 working hours through the grease nipples on the swinging crank. Grease the mower bar swinging bushing every 50 working hours through the grease nipple under the swinging protection. Keep the blade ledger plates properly adjusted. They must be neither too tight, so that they block the blade, nor too loose so that there is too much clearance between them and the blades. To adjust the ledger plates in both directions loosen the locking bolts (fig. 11, n.6) and adjust the pressor screw. The ledger plates should be replaced when worn even if they are still able to apply pressure against the blades. Regulate the clearance between the blade and the strip by loosening the screws fixing the plates pressing the strip and moving the strip forward until it touches the bar which supports the nailed blade section. Then retighten the pressing plates. To remove the blade take off the L-shaped blade coupling by removing the two screws (fig 11 no. 3) and slip off the blade. Take care to tighten the fixing screws of the coupling after assembling the blade again. Always use sharp blades: the machine will be subject to less strain and its working life will be longer. Clean the mower bar after every working day, removing any remaining pieces of grass or earth; every now and then check that all screws are tight. PLOUGHS The ploughs designed for this Rotavator have been especially developed to obtain good ploughing without overstraining the operator (fig. 10). The depth of the furrow obtained may vary from 10 to 15 cm depending on the terrain. Users can achieve excellent performances using high tyres and possibly the wheel-weights, which improve machine's adhesion. TOW BAR The towing bar is needed to attach the riding sulky or the trailer to the machine without removing the rotary tiller. This attachment must be fastened to the towing hook on the Rotavator (fig. 12). ROTARY TILLER SUPPORT WHEEL It is very useful while transferring the machine, because it keeps the rotary tiller off the ground, making transfer easier and less tiring (fig. 13). WHEEL EXTENSIONS These help to widen the machine’s track and increase its stability on crosswise slopes. They must be fixed between the wheels and the hubs. The track is widened by 6 cm on each side (fig. 14). 11 Translation of the Original Instructions CAGE WHEELS These wheels are particularly advisable when working on very hard soils with the rotary tiller. The cross bars placed around the wheels dig into the ground, giving the machine a firm grip and preventing the wheels from skidding (fig. 15). The wide steel wheels can be also used when tyres or the narrow steel wheels, might skid or sink in damp or recently tilled ground. The use of wide steel wheels is recommended, although only in these cases. Otherwise tyres are generally advisable; if special grip is not required, they give the machine more even traction and form an elastic buffer between the machine and the ground. Twin rings are also available for fitting to these wheels. BACK-CUTTER FURROWER This tool is mounted at the rear of the tiller and works in tandem with it. The furrower is designed to produce irrigation and seed drills (fig. 16). TILTING FRONT BLADE - 100 cm This highly resistant device is ideal for removing snow and levelling mounds of soil or gravel. May be tilted to the right and left (fig. 17). WHEEL-WEIGHTS These are mounted on the wheel rims and fixed with two of the four nuts which fix the wheels themselves. They increase the weight of the machine and thus its grip, and their use is recommended when working with the plough, the adjustable furrower, and even the rotary tiller and the trailer if special performances are required (fig. 18). 12 Original Instructions - Istruzioni Originali - Instructions Originales - Original Anleitungen - Instrucciones Originales – Instruções Original MOTOCOLTIVATORE G84 Gentile Cliente, nel ringraziarLa per la fiducia e la preferenza accordata al nostro motocoltivatore, confidiamo che l'uso di questa sua nuova macchina risponda pienamente alle sue esigenze. Per l'impiego ottimale e per la sua manutenzione nel tempo, la preghiamo di leggere attentamente e seguire scrupolosamente le indicazioni di questo libretto; ciò le consentirà di ottenere i massimi risultati e salvaguardare la sua spesa. La preghiamo di conservare questo libretto, che dovrà sempre accompagnare la macchina. DESCRIZIONE GENERALE E USO PREVISTO Il motocoltivatore è una macchina agricola semovente ad un solo asse, equipaggiata con una fresa per la lavorazione del terreno. Queste macchine sono impiegate per effettuare lavori di preparazione del terreno (eliminazione di infestanti, fresatura superficiale) e impiegate per piccole superfici, lavori di rifinitura, nell'interfila dei frutteti e nell'orticultura. La macchina è costituita da un telaio portante, sul quale è installato un motore a scoppio che aziona le ruote e una presa di forza alla quale viene collegata generalmente una fresa e cui possono essere collegati anche altri utensili come frese da neve, barre falcianti, lame neve, aratri, spazzolatrici, pompe irroratrici etc… La macchina è comandata da un operatore a terra che segue il movimento della stessa guidandola mediante un manubrio, su cui sono dislocati i comandi. ATTENZIONE! Leggere attentamente prima di avviare il motore. Le seguenti avvertenze sono importanti per l'incolumità dell'operatore! AVVERTENZE La prudenza è l'arma principale nella prevenzione degli incidenti! La preghiamo vivamente di leggere con attenzione le seguenti avvertenze, prima ancora di iniziare il lavoro. L'uso improprio del motocoltivatore e il suo equipaggiamento può risultare dannoso; per ridurre queste possibilità osservare le precauzioni necessarie di seguito riportate: 1) Leggere questo manuale interamente, prima di accendere e mettere in movimento il motocoltivatore. 2) Dare particolare attenzione alle ammonizioni e alle etichette di sicurezza attorno alla macchina. 3) La rotazione della fresa è altamente pericolosa, non mettere mai le mani o i piedi sotto alla fresa. 4) Prima di fare lavorare col motocoltivatore altre persone bisogna metterle al corrente delle norme di sicurezza e di come si usa la macchina. 5) Prima di accendere il motocoltivatore verificare che non ci siano persone intorno; specialmente bambini. 6) Non usare il motocoltivatore quando si è affaticati e non bere alcolici. 7) Controllare il terreno prima di procedere alla fresatura, che non vi siano sassi, bastoni o corpi estranei, che potrebbero danneggiare la macchina o essere scagliati lontano, e quindi molto pericolosi. 8) Prima di iniziare il lavoro, indossare indumenti appropriati da lavoro, guanti, scarponi. 9) Non usare il motocoltivatore su forti pendenze, si potrebbe ribaltare (max. 25%). 10) Non fare lavorare ragazzi troppo giovani; è vietato l'uso ai minori di 16 anni. 11) Non fare retromarcia col motore accelerato. 12) È pericoloso azionare le leve bruscamente, col motore a massimo regime. 13) Per evitare il pericolo di esalazioni velenose, non adoperare il motore acceso in un locale chiuso. 14) Spegnere sempre il motore prima di fare rifornimento di combustibile, stare lontano da scintille o fiamme, non fumare! 13 Original Instructions - Istruzioni Originali - Instructions Originales - Original Anleitungen - Instrucciones Originales – Instruções Original 15) Evitare fuoriuscite di combustibile e dopo aver riempito il serbatoio pulire ogni fuoriuscita prima di avviare il motore. 16) Immagazzinare il carburante in contenitori specificatamente costruiti con questo obiettivo. 17) Lavorare solo con la luce del sole o con buona luce artificiale. USI IMPROPRI DA EVITARE 18) Ogni utilizzo improprio comporta il decadimento della garanzia ed il declino di ogni responsabilità del costruttore. 19) Non utilizzare mai la macchina per trasportare persone. ULTERIORI ACCORGIMENTI PER LA SICUREZZA 20) Non manomettere o disattivare i dispositivi di sicurezza. 21) Non fare nessun tipo di regolazione o pulizia col motore in moto. 22) Non fare controllare la macchina da nessuno mentre siete alla guida col motore in moto. 23) L'utilizzatore è sempre responsabile dei danni arrecati a terzi. 24) Le zappe deformate o danneggiate devono essere sempre sostituite, mai riparate. 25) Usare sempre ricambi originali Grillo. 26) Prima di cominciare qualsiasi lavoro con la macchina, verificare che tutti i sistemi antinfortunistici, di cui essa è dotata, siano perfettamente funzionanti. È severamente vietato escluderli o manometterli. Verificare che il disinnesto della fresa in retromarcia funzioni. 27) Prima di iniziare il lavoro, controllare che le viti e i dadi di bloccaggio della fresa e delle zappette siano perfettamente serrati. 28) L'attrezzatura protettiva (cofani, parafanghi, ecc.), va assolutamente mantenuta durante i lavori di zappatura. 29) Non pulire la fresa con il motore acceso. 30) Non utilizzare la macchina a piedi nudi. 31) Non cambiare le regolazioni del motore, in modo particolare il numero di giri massimo. 32) Far raffreddare il motore prima di mettere la macchina in locali chiusi. 33) ATTENZIONE: per ridurre il pericolo di incendio mantenere il motore, la marmitta e i collettori di scarico liberi da erba, foglie, polvere ecc.. 34) Se dovete svuotare il serbatoio carburante eseguite l’operazione all’aperto. 35) La macchina deve essere condotta da un solo operatore IDENTIFICAZIONE E ASSISTENZA IDENTIFICAZIONE La macchina è fornita di una targhetta posta sul telaio con il numero di matricola. Questo numero è indispensabile per ogni richiesta di intervento tecnico e per l'ordinazione dei ricambi. SERVIZIO ASSISTENZA Questo manuale fornisce le indicazioni per l'uso del motocoltivatore e per una corretta manutenzione di base, eseguibile dall'utilizzatore. Per gli interventi non descritti in questo libretto, interpellare il Rivenditore di Zona. RICAMBI Si raccomanda di impiegare esclusivamente ricambi originali, gli unici che offrono caratteristiche di sicurezza e intercambiabilità. Ogni richiesta deve essere corredata del numero di matricola. Per i ricambi del motore, attenersi a quanto indicato nel libretto specifico. 14 Original Instructions - Istruzioni Originali - Instructions Originales - Original Anleitungen - Instrucciones Originales – Instruções Original GARANZIA La garanzia è fornita nei modi e nei limiti indicati dalla legge vigente. Per quanto riguarda il motore, valgono le condizioni previste dai rispettivi Produttori. COME ORDINARE I RICAMBI Indicare sempre il numero di matricola della macchina e il numero di codice del pezzo da sostituire. Rivolgersi ai nostri centri ricambi oppure presso le nostre officine, il nostro indirizzo è: GRILLO S.p.A. Via Cervese 1701 - 47521 CESENA (FC) Tel. 0547 / 633111 - Fax 0547 / 632011 Web site: www.grillospa.it - E-mail: [email protected] CARATTERISTICHE TECNICHE MOTORE: - HONDA GX200 OHV 196 cm³, 5,5 HP, 4,1 Kw (a 3600 G/1’), monocilindrico a benzina. AVVIAMENTO: autoavvolgente. CAPACITA' SERBATOIO CARBURANTE: 3,6 litri. FRIZIONE: conica attiva. CAMBIO: con ingranaggi in bagno d'olio. In versione motocoltivatore 2 AV + 2 RM – in versione motofalciatrice 2 AV + 2 Rm. INVERTITORE: ad asta. PRESA DI FORZA: a 965 giri indipendenti dal cambio con senso di rotazione destro in versione motocoltivatore con senso di rotazione sinistro in versione motofalciatrice. DISPOSITIVO DI SICUREZZA: frizione attiva, disinnesto della PTO in retromarcia. STEGOLA: regolabile sia in altezza che lateralmente, reversibile e montata su antivibranti. FRESA: da mm 580, registrabile a 370 – 470 mm e a 680 mm con allargamenti. PROFONDITÀ DI LAVORO: 160 mm. RUOTE: 4.00-8 INGOMBRO ESTERNO con ruote 4.00-8: mm 420-370. ACCESSORI: barra falciante centrale 110/115/117/127/137 cm, aratro, assolcatore, rimorchio trainato, 150x110 cm, ruote in ferro, tiro di traino, spazzaneve da 60 cm, lama orientabile da 100 cm, catene da neve per ruote 4.00-8. MESSA IN OPERA DELLA MACCHINA 1) Controllare l’integrità della macchina per verificare che non abbia subito danni nel trasporto. 2) Riempire di grasso la flangiatura PTO della macchina intorno all’innesto (fig. 3 n. 20). 3) Posizionare il manubrio di guida nella posizione desiderata motocoltivatore o motofalciatrice utilizzando le due leve (fig.3, n°10 - n°12). 4) Montare le ruote e l’accessorio (ad es. fresa, aratro, ecc. fig. 4A), serrare a fondo i dadi di fissaggio. 5) Inserire l’olio motore, attenersi all’apposito libretto allegato. 6) Controllare l’olio cambio - fig. 6 (olio MP80W90, corrispondenza internazionale API GL5, US MIL-L- 2105D, quantità 2,2 litri). 15 Original Instructions - Istruzioni Originali - Instructions Originales - Original Anleitungen - Instrucciones Originales – Instruções Original 7) Inserire le aste di comando (fig. 3 n. 13, n. 15 e n. 2). 8) Verificare la pressione dei pneumatici vedi tabella: PRESSIONE PNEUMATICI 4.00-8 2 PLY RATING 1,1 BAR 4.00-10 2 “ “ 1,1 5.00-10 2 “ “ 1, 5 “ “ ISTRUZIONI D'USO Prima di avviare il motore controllare sempre: − I livelli dell'olio nel motore (fig. 5, rif. A) e nella scatola cambio; il tappo di livello è posto sul coperchio superiore (fig.6); l'olio deve arrivare tra i due bordini. − Che tutte le viti e i dadi siano ben serrati, in particolare quelli di fissaggio delle zappe e degli attrezzi al motocoltivatore (fig. 4A). − Che tutte le leve siano in posizione di folle. − Che il filtro aria (vers. a secco) sia ben pulito (fig. 7). Attenzione! Non soffiate la cartuccia con l'aria compressa, se risulta molto intasata va sostituita. Verificare che il filtro aria (versione a bagno d'olio) sia ben pulito e l'olio a livello (fig. 7). − controllare il livello olio del carter fresa (fig. 4 n. 3) − riempire il serbatoio di carburante servendosi di un imbuto munito di fibre molto fine (fig. 3, n.11). AVVIAMENTO DEL MOTORE A SCOPPIO Aprire il rubinetto del carburante, spingere fino a metà corsa la levetta comando gas e, se il motore è freddo, azionare il dispositivo di starter posto sul carburante. Avviare il motore tirando con forza la manopola dell'autoavvolgente (fig. 3 n. 6). AVVIAMENTO DELLA MACCHINA Portare la leva del cambio nella posizione desiderata. Nel caso la marcia non si innestasse subito dare dei piccoli colpi di frizione. La macchina si mette in movimento premendo sulla leva frizione (fig. 3 n°1) fino a che la macchina si sarà messa in movimento. Abbandonando la presa della leva rossa la macchina si ferma ma il motore rimane acceso, la leva ritorna nella posizione 1 (fig. 3). Per spegnere il motore agire sull'interruttore posto sul manettino acceleratore (fig. 3 n. 21), posizione OFF per motori a benzina. N.B.: Se la presa di forza è innestata non si potrà inserire la retromarcia. In questo caso disinnestare la presa di forza ed inserire poi la retromarcia. NOTA: Per evitare problemi alla frizione durante il lavoro la leva rossa va mantenuta ben premuta. Attenzione: non lavorare con la leva parzialmente premuta. La molla (fig. 8) durante il lavoro deve comprimersi quasi totalmente. INIZIO DEL LAVORO Innestare la presa di forza dando dei piccoli colpi di frizione se non si innesta subito. Accelerare opportunamente il motore e premere la leva di frizione iniziando il lavoro. FINE LAVORO Terminato il lavoro, per arrestare il MOTORE A BENZINA, mettere il cambio e la presa di forza in folle e ruotare l'interruttore posto nel manettino acceleratore nella posizione OFF (fig. 3 n. 21). 16 Original Instructions - Istruzioni Originali - Instructions Originales - Original Anleitungen - Instrucciones Originales – Instruções Original POSSIBILI INCONVENIENTI E LORO RIMEDI Diamo qui di seguito un elenco dei piccoli inconvenienti che possono avvenire nell'uso del motocoltivatore e che possono essere rimediati direttamente dal cliente: 1) Il motore non parte (motore a scoppio). Eseguire nell'ordine i seguenti controlli: – che il serbatoio della benzina sia pieno almeno per metà; – che il rubinetto della benzina sia aperto; – che lo starter sia azionato (se il motore è freddo); – che la benzina arrivi al carburatore; – che il foro di sfiato sul tappo del serbatoio non sia otturato; – che i getti del carburatore siano puliti. Per controllarli, svitarli e se sporchi, pulirli con un getto d'aria; – che la candela dia la scintilla. Per far questo controllo, smontare la candela, ricollegarla al cavo che le porta la corrente, appoggiare la parte metallica a massa, e far girare la puleggia del motore come per avviarlo. Se non si vede scoccare la scintilla tra i due elettrodi, provare a controllare i collegamenti del cavo della candela e se la corrente non arriva ancora, sostituire la candela. Se anche quest'ultima sostituzione non desse effetto, il guasto è da ricercarsi nell'impianto elettrico, o condensatore o bobina o in qualche altro organo, ed è conveniente rivolgersi al centro di assistenza più vicino o ad una officina specializzata. 2) Non si innestano le marce: – regolare la frizione avvitando la vite di registro fino ad ottenere un buon distacco della frizione. Fare attenzione a non annullare completamente il gioco. PERIODI DI LUNGA INATTIVITÀ Nel caso la macchina non debba essere utilizzata per un lungo periodo, è opportuno adottare queste precauzioni: – scaricare il carburante; – lavare accuratamente il motore e la macchina. Oliare il meccanismo di inversione nel supporto stegola. MANUTENZIONE E LUBRIFICAZIONE ATTENZIONE! Prima di iniziare qualsiasi intervento di pulizia, manutenzione o riparazione, indossare indumenti adeguati e guanti da lavoro. - Qualora si sollevi la macchina o parte di essa, usare sempre strumenti idonei quali supporti o fermi di sicurezza. Non lasciare la macchina in manutenzione, priva di sicurezze o sollevata, in luoghi accessibili a persone inesperte, specialmente bambini. - Non disperdere mai nell’ambiente olii esausti, benzina, gasolio ogni altro prodotto inquinante! - Un’efficiente manutenzione e una corretta lubrificazione contribuiscono a mantenere la macchina in perfetta efficienza. RODAGGIO – Entro le prime 8 ore di lavoro, sostituire l'olio motore. MOTORE - Per gli intervalli di lubrificazione seguire le norme contenute nel libretto del motore. In linea di massima è opportuno controllare il livello dell'olio ogni 8 ore di lavoro e sostituirlo ogni 100 ore. Impiegare sempre olio motore 10W30. Controllare il filtro dell'aria ogni 8 ore, od anche più frequentemente se l'ambiente è molto polveroso. Cambiare la cartuccia se risulta molto intasata (non usate getti d'aria per pulirla). SCATOLA CAMBIO - Controllare il livello dell'olio ogni 50 ore di lavoro (fig. 6) togliendo il tappo e controllando che, a macchina orizzontale, l'olio arrivi tra i due bordini. Se occorre, aggiungere olio MP 80 W/90 (API GL5 US MIL-L-2105D). Cambiare l'olio una volta all'anno. 17 Original Instructions - Istruzioni Originali - Instructions Originales - Original Anleitungen - Instrucciones Originales – Instruções Original FRESA - Controllare il livello olio ogni 100 ore, svitando il tappo; l'olio deve quasi riempire la scatola fresa. Aggiungere, se necessario, lo stesso olio del cambio (fig. 4, rif. 3). REGOLE UTILI PER UN BUON USO 1) Importante! Abbandonare sempre la leva della frizione quando si passa dalle marce avanti alle retromarce e viceversa. 2) Non lasciare mai la macchina sotto la pioggia. 3) Tenere pulito e oliato il meccanismo di inversione nel supporto stegola. 4) Non forzare il cambio se la marcia non entra mentre si innesta la marcia dare dei piccoli colpi di frizione. 5) Non forzare mai il motore; quando fuma dallo scarico, è sotto sforzo: rallentare. 6) Si possono zappare anche terreni impossibili; prima però è necessario fare un buon rodaggio alla macchina. 7) Controllare spesso la pressione degli pneumatici. 9) Durante il montaggio di attrezzi (es. la fresa), cercare di non rovinare il centraggio (vedere capitolo attrezzi). MANUTENZIONE DI FINE STAGIONE Lavare la macchina con cura; sostituire l'olio sia nel motore sia nel carter cambio e fresa, pulire il filtro aria. Affilare le zappe ed ungerle; se risultano consumate: cambiarle. TABELLA RIASSUNTIVA MANUTENZIONE OPERAZIONE Olio motore Controllare il livello Cambiare Controllare Filtro aria Candela OGNI 8 ORE PRIME 20 ORE OGNI 50 ORE ● (primo cambio) ● ● Sostituire ٭ Controllare/registrare ● ● Controllare il livello ● ● Sostituire Controllare che la griglia aspirazione motore sia ben pulita Barra Controllare attacco lama falciante Lubrificare ● ● ● ● ● ● ● ● ● Controllare affilatura e fissaggio zappe Lubrificare con grasso OGNI ANNO O 200 ORE ● Sostituire Olio cambio OGNI 100 ORE ● Controllo gioco frizione ● operazione raccomandata ٭operazione da eseguire se necessario 18 Original Instructions - Istruzioni Originali - Instructions Originales - Original Anleitungen - Instrucciones Originales – Instruções Original ATTREZZI FRESA La fresa serve per rompere lo strato superficiale del terreno onde aumentare la permeabilità ed allo stesso tempo per liberarlo dalle erbe infestanti. La fresatura si può eseguire in prima velocità se il terreno è duro e tenace o in seconda se il terreno è sciolto o sabbioso. La profondità di fresatura può essere variata alzando od abbassando il coltello centrale posto sotto il corpo fresa (fig. 4B). Per aumentare la profondità bisogna spostare il coltello verso l'alto. È buona norma iniziare il lavoro col coltello nella posizione più bassa ed alzarlo poi se si vuole ottenere maggiore profondità. (fig. 4B). N.B.: Nei terreni duri, se la macchina tende a saltare in avanti, abbassare al massimo il coltello fissandolo nel primo foro (fig. 4B, pos. 1). Controllare che il montaggio dei coltelli sia corretto (vedi fig. 9). BARRA FALCIANTE La barra falciante applicabile al motocoltivatore è a comando centrale. La costruzione robusta e l'elevato rendimento la rende il mezzo ideale per falciare. La barra va montata sull'attacco attrezzi del motocoltivatore, al posto della fresa, e fissata con gli stessi due dadi. Il manubrio va ruotato di 180° portandolo dalla parte del motore. Prima di ruotare il manubrio il cambio va messo in 1ª, quindi vanno sganciate le aste di comando marce e presa di forza. Una volta girato il manubrio le aste vanno reinserite nei supporti superiori. Avendo ruotato il manubrio il meccanismo nel supporto stegola permette lo sfruttamento di tutte le marce come nella versione motocoltivatore eliminando però la marcia veloce, che potrebbe essere pericolosa. Per inserire il movimento alla lama bisognerà disattivare il dispositivo di sicurezza che impedisce l'innesto contemporaneo della retromarcia e della presa di forza (necessario invece per l'uso della fresa – fig. 2). Per fare ciò basterà togliere la vite che fa da contrasto contro la leva del cambio impedendo il doppio innesto. Importante: se viene rimontata la fresa è obbligatorio rimettere nelle condizioni iniziali il dispositivo di sicurezza (fig. 2/A). Manutenzione: ingrassare ogni 8 ore di lavoro i perni della crociera attraverso l'ingrassatore posto sulla manovella oscillante (fig. 11, n.1 – n. 2). Ingrassare ogni 50 ore di lavoro anche la boccola di oscillazione barra, attraverso l'ingrassatore posto sotto la protezione oscillante. Mantenere registrata la lama con opportuna regolazione dei premilama che non debbono essere tanto stretti da bloccare la lama ma nemmeno permetterle un gioco eccessivo rispetto alle piastrine dei denti. Per effettuare le registrazioni dei premilama per i due tipi, si allentano le viti di bloccaggio (fig.11 n.6) e si regola la vite di pressione. Quando i premilama sono consumati, conviene procedere alla loro sostituzione anche se possono premere ancora. Registrare il gioco tra la lama e la striscia di consumo allentando le viti che fissano i premistriscia e spostando in avanti la striscia fino ad appoggiare contro l'asta che porta chiodate le sezioni lama. Bloccare poi di nuovo i premistriscia. Per smontare la lama togliere l'attacco lama L smontando le due viti (fig.11 n° 3) e sfilare la lama. Avere cura, dopo aver rimontato la lama, di stringere bene le viti di fissaggio dell'attacco. Usare sempre lame ben affilate: la macchina forzerà meno e durerà di più. Dopo ogni giornata di lavoro lavare la barra falciante liberandola da ogni residuo di erba o terra; controllare saltuariamente che tutte le viti siano ben serrate. ARATRI Gli aratri studiati per il motocoltivatore sono stati particolarmente messi a punto per ottenere dei buoni lavori di aratura senza affaticare eccessivamente l'operatore (fig. 10). La profondità del solco ottenibile può variare dai 10 ai 15 cm. a seconda del terreno. Le prestazioni ottenibili sono ottimali montando le ruote 5.00-12 ed eventualmente le zavorre che aumentano l'aderenza. TIRO TRAINO Il tiro di traino serve per accoppiare al motocoltivatore il carrello di trasferimento o il rimorchio, senza smontare la fresa. Questo attacco si fissa al gancio di traino del motocoltivatore (fig. 12). 19 Original Instructions - Istruzioni Originali - Instructions Originales - Original Anleitungen - Instrucciones Originales – Instruções Original RUOTINO SOSTEGNO FRESA È molto utile nei trasferimenti della macchina perché tenendo sollevata la fresa dal terreno ne rende più agevole e meno faticosa la traslazione (fig. 13). DISTANZIALI PER RUOTE Servono per allungare la carreggiata e aumentano quindi la stabilità della macchina sulle pendenze trasversali. Si montano interposti tra le ruote e i mozzi porta ruote e allargano la carreggiata di 6 cm. per parte (fig. 14). RUOTE METALLICHE A GABBIA Queste ruote trovano particolare utilizzazione nell'impiego del motocoltivatore con fresa in terreni molto duri. Infatti le traversine poste sulla circonferenza delle ruote penetrano nel terreno realizzando quindi un buon ancoraggio della macchina a terra e impedendo alle ruote di slittare (fig. 15). Le ruote a gabbia si usano anche quando le altre ruote gommate, potrebbero slittare o sprofondare in terreni molli o soffici perché appena lavorati. Vengono utilizzate anche con l'aratro. Negli altri casi in genere è consigliabile l'uso delle ruote pneumatiche, che, dove non siano richieste prestazioni di aderenza limite, danno alla macchina una trazione più regolare e fanno da cuscinetto elastico tra questa e il terreno. ASSOLCATORE RETROFRESA Si applica posteriormente alla fresa e lavora congiuntamente ad essa, serve per tracciare solchi da irrigazione o semina (fig. 16) LAMA FRONTALE ORIENTABILE La sua robustezza la rende il mezzo ideale per togliere la neve e spianare cumuli di ghiaia o terriccio, è inclinabile a destra o a sinistra (fig. 17). ZAVORRE PER RUOTE Le zavorre si montano nei cerchi delle ruote e vengono fissate con due dei quattro dadi che fissano le ruote stesse. Servono ad aumentare il peso della macchina e quindi l'aderenza; sono consigliabili nei lavori con l'aratro, con l'assolcatore registrabile ed eventualmente con la fresa o il rimorchio se si vogliono ottenere prestazioni limite (fig.18). 20 Traductions des instructions originales MOTOCULTEUR G84 Cher Client, Nous vous remercions de la confiance et de la préférence que vous avez bien voulu accorder à notre motoculteur et nous sommes certains que son usage répondra entièrement à vos exigences. Pour une utilisation optimale et un entretien à long terme, nous vous demandons de lire attentivement et de suivre scrupuleusement les indications contenues dans cette brochure. Cela vous permettra d’obtenir d’excellents résultats et de sauvegarder votre investissement. Nous vous demandons de conserver ce manuel qui devra toujours accompagner la machine. DESCRIPTION GENERALE ET USAGE PREVU Le motoculteur Grillo G84 est une machine automotrice à essieu unique, équipée d'une fraise pour travailler le terrain. Ces machines sont généralement utilisées pour la préparation du sol (élimination des mauvaises herbes ou fraisage superficiel) et pour le travail dans de petites surfaces et la finition, dans les ouillère et dans l'horticulture. La machine est composé par un châssis porteur où le moteur est installé. Celui-ci actionne les roues et la prise de force où la fraise est généralement attachée. La prise de force peut entraîner aussi d'autres outils comme les turbines à neige, les barres de coupe, les broyeurs d'herbe, les brosses orientables, les pompes pulvérisateurs et être utilisée comme support d’attelage pour les lames orientable et les charrues. Il s'agit d'une machine à conducteur marchand où l'utilisateur la conduit grâce à un mancheron où les commandes sont placés. ATTENTION! Lire attentivement les instructions avant de mettre le moteur en marche. Les précautions suivantes sont importantes pour votre sécurité! MISES EN GARDE La prudence est la meilleure arme pour la prévention des accidents! Nous vous demandons de lire attentivement les normes suivantes avant même de commencer le travail. L’utilisation inadéquate du motoculteur et de son équipement peut être dangereuse. Pour réduire ces éventualités de danger, veuillez respecter les précautions nécessaires décrites ci après: 1) Lire entièrement ce manuel avant d’allumer et de mettre en mouvement la machine. 2) Suivre avec une attention particulière les mises en garde et les étiquettes de sécurité placées autour de la machine. 3) La rotation de la fraise est extrêmement dangereuse, ne jamais mettre les mains ou les pieds sous la fraise. 4) Avant de confier votre motoculteur à d’autres personnes, il faut leur illustrer aussi bien les normes de sécurité que le mode d’emploi. 5) Avant d’allumer le motoculteur, vérifier qu’il n’y a personne aux alentours et, en particulier, qu’il n’y a pas d’enfants. 6) Ne pas utiliser le motoculteur en cas de fatigue et ne pas boire d’alcools. 7) Contrôler le terrain avant d’effectuer le fraisage, vérifier qu’il n’y a pas de pierres, de bâtons ou de corps étrangers qui pourraient endommager la machine ou être lancés au loin et donc être très dangereux. 8) Avant de commencer le travail, revêtir des vêtements de travail appropriés, des gants, des bottes et des lunettes. 9) Ne pas utiliser le motoculteur sur des pentes abruptes car il pourrait se renverser (max. 25%). 10) Ne pas faire travailler des personnes trop jeunes; l’utilisation de la machine est interdite aux mineurs de moins de 16 ans. 11) Ne pas faire marche arrière avec le moteur accéléré. 12) Il est dangereux d’actionner brusquement les leviers, avec le moteur à plein régime. 13) Pour éviter le danger d’exhalaisons toxiques, ne pas faire tourner le moteur dans un local fermé. 21 Traductions des instructions originales 14) Éteindre toujours le moteur avant de faire le plein de combustible; s’éloigner des étincelles ou des flammes et ne pas fumer! 15) Éviter les fuites de combustible; après avoir rempli le réservoir, nettoyer soigneusement les fuites avant d’activer le moteur. 16) Stocker le carburant dans des contenants spécifiquement prévus à cet effet. 17) Utiliser la tondeuse uniquement en plein jour ou avec un bon éclairage artificiel. USAGES IMPROPRES A EVITE 18) Toute utilisation impropre annule la garantie et supprime la responsabilité du constructeur. 19) Ne pas utiliser la machine pour transporter personnes, animaux ou objets. PRECAUTIONS DE SECURITE SUPPLEMENTAIRES 20) Ne pas altérer ou désactiver les dispositifs de sécurité. 21) N’effectuer aucun réglage ou nettoyage avec le moteur en marche. 22) Ne pas faire contrôler la machine lorsque le conducteur est au volant avec le moteur en marche. 23) L’utilisateur est toujours responsable des dommages occasionnés aux tiers. 24) Les houes déformées ou endommagées doivent être remplacées, jamais réparées. 25) Utiliser toujours des pièces de rechange Grillo d’origine. 26) Avant de commencer tout travail avec la machine, vérifier que tous les systèmes contre les accidents dont la machine est équipée fonctionnent parfaitement. Il est formellement interdit de les exclure ou de les modifier. 27) Avant de commencer le travail, contrôler que les vis et écrous de blocage de la fraise et des houes sont bien serrés 28) Les équipements de protection (capots, garde-boue, etc) doivent être maintenus durant le travail. 29) Ne pas nettoyer la fraise lorsque le moteur est allumé. 30) Ne pas utiliser la machine nu-pieds. 31) Ne pas modifier les réglages du moteur, en particulier le nombre de tours maximal. 32) Laisser refroidir le moteur avant d’entreposer la machine dans des locaux fermés. 33) ATTENTION: pour réduire tout danger d’incendie, éliminer les herbes, les feuilles et la poussière qui pourraient obstruer le moteur, le pot et les collecteurs d’échappement. 34) Effectuer l’éventuelle vidange du réservoir du carburant en plein air. 35) La machine doit être conduite par un seul opérateur. IDENTIFICATION ET ASSISTANCE IDENTIFICATION Le numéro de série se trouve sur une plaquette placée sur le châssis. Le numéro de matricule doit toujours être cité dans toute demande d’intervention technique et sur les commandes de pièces de rechange. SERVICE ASSISTANCE Cette brochure fournit les indications pour l’usage du motoculteur et pour un entretien correct de base, réalisable par l’utilisateur. Pour les interventions non décrites dans ce Manuel, contacter le Revendeur de Zone. PIECES DE RECHANGE Nous recommandons d’utiliser exclusivement des pièces détachées d’origine, les seules qui offrent des caractéristiques de sécurité et d’interchangeabilité. Toutes les demandes doivent indiquer le numéro de matricule. Pour les pièces de rechange relatives au moteur, respecter les indications contenues dans la brochure spécifique. 22 Traductions des instructions originales GARANTIE La garantie est assurée selon les modes et les limites indiquées par la loi en vigueur. Le revendeur devra remettre au client final une copie de la carte de garantie de la machine, qui pourra être téléchargée du site Grillo après avoir enregistré la machine même. En ce qui concerne le moteur, seulement les conditions prévues par le constructeur concerné sont valables. COMMENT COMMANDER LES PIECES DE RECHANGE Indiquer toujours le numéro de série de la machine et la référence de la pièce à remplacer. S’adresser à nos Centres de pièces de rechange qui se trouvent dans chaque département. Voici notre adresse: GRILLO S.p.A. Via Cervese 1701 - 47521 CESENA (FC) - ITALIE Tél. (+39) 0547 / 633111 - Fax (+ 399 0547 / 632011 Web site: www.grillospa.it - E-mail: [email protected] CARACTERISTIQUES TECHNIQUES MOTEUR: HONDA GX200 OHV 196 cm3 5,5cv 4,1Kw ( à 3600 tours/min.) mono-cylindre à essence DEMARRAGE: par lanceur à rappel automatique. CAPACITE RESERVOIR CARBURANT: 3,6 Litres EMBRAYAGE: conique et actif. BOITE DE VITESSES: avec engrenages en bain d’huile. Version motoculteur à 2 vitesses en marche AV et 2 en marche AR et version motofaucheuse à 2 vitesses en marche AV et 2 en marche AR. INVERSEUR: par levier. PRISE DE FORCE: à 965 tours indépendants de la boîte de vitesses. Version motoculteur avec sens de rotation droite; version motofaucheuse avec sens de rotation gauche. DISPOSITIF DE SECURITE: embrayage actif, désaccouplement PTO en marche arrière. MANCHERON: réglable en hauteur et latéralement, réversible et monté sur amortisseurs. FRAISES: mm 580, réglable à mm 370- 470 et à 680 mm avec élargisseurs. PROFONDEUR DE TRAVAIL: 160 mm. ROUES: 4.00-8 ENCOMBREMENT HORS TOUT avec roues 4.00-8: 420 – 370 mm. ACCESSOIRES: barre de coupe centrale cm 110/115/117/127/137, charrue, buttoir, remorque traînée cm 150x110, roues à cage, attelage pour remorque, turbine à neige cm 60, lame orientable cm 100, chaînes à neige pour roues 4.00-8. 23 Traductions des instructions originales MISE EN SERVICE DE LA MACHINE 1) Contrôler que la machine soit intacte et qu’elle n’ait pas été endommagée pendant le transport. 2) Remplir de graisse la prise de force de la machine autour de l’accouplement (fig. 3 n° 20). 3) Placer le mancheron de conduite dans la position souhaitée, motoculteur ou motofaucheuse, en utilisant les deux leviers (fig. 3 n° 10 et n° 12). 4) Monter les roues et l’accessoire (par ex. fraise, charrue – fig. 4A) en veillant à bien serrer les écrous de blocage. 5) Introduire l’huile moteur en respectant les indications contenues dans le manuel fourni avec la machine. 6) Contrôler l’huile de la boîte de vitesses – fig.6 (huile MP 80W 90, correspondance internationale API GL5 huile, 2,2 litres). 7) Monter les tiges de commande (fig. 3 n° 13, n° 15 et n° 2). 9) Vérifier la pression des pneus (voir le tableau ci-dessous): PRESSION DE PNEUS 4.00-8 2 PLY RATING 1,1 BAR 4.00-10 2 “ 1,1 “ 5.00-10 2 “ “ “ 1, 5 “ MODE D'EMPLOI Avant de mettre en marche le moteur, effectuer toujours les vérifications suivantes: – contrôler les niveaux de l’huile dans le moteur (fig. 5, réf. A) et dans la boîte de vitesses; le bouchon du niveau est placé sur le couvercle supérieur (fig. 6); le niveau de l’huile doit se situer entre les deux bords. – contrôler que toutes les vis et tous les écrous sont bien serrés, en particulier les éléments de fixation des mancherons et des outils au motoculteur (fig. 4A). – contrôler que tous les leviers soient au point mort. – vérifier que le filtre à air est propre (version à sec) (fig. 7). Attention! Ne pas souffler le filtre avec de l’air comprimé, s’il est bouché il faut le remplacer. Vérifier que le filtre à air (version en bain d'huile) est propre et vérifier le niveau de l'huile (fig. 7). – contrôler le niveau de l’huile du carter fraise (fig. 4 n° 3). – remplir le réservoir de carburant à l'aide d'un entonnoir muni d'un filtre très fin (fig. 3, n. 11). MISE EN MARCHE DU MOTEUR A EXPLOSION Ouvrir le robinet du carburant, pousser jusqu’à mi-course le levier de commande gaz et, si le moteur est froid, actionner le starter situé sur le carburateur. Remettre le moteur en route en tirant sur la manette du lanceur (fig. 3, n. 6). MISE EN MARCHE DE LA MACHINE Placer le levier de la boîte vitesses dans la position souhaitée. Dans le cas où la vitesse ne s’enclenche pas immédiatement, donner de petits coups d’embrayage. La machine démarre en appuyant sur le levier de l'embrayage (fig. 3 n°1) jusqu’à ce que la machine se mets en marche. En relâchant le levier rouge la machine s'arrête mais le moteur est encore en fonction et le levier revient à la position 1 (fig. 3). Pour arrêter les moteurs essence il faut agir sur l'interrupteur monté sur le levier accélérateur, position OFF (fig. 3 n° 21). N.B. - Si la prise de force est enclenchée, il ne sera pas possible d’enclencher la marche arrière. Dans ce cas, déconnecter la prise de force puis enclencher la marche arrière. 24 Traductions des instructions originales Important: pour éviter tous problèmes à l'embrayage pendant le travail, le levier rouge doit être bien maintenu. Attention! Ne travaillez pas avec le levier à moitié course. Pendant le travail, le ressort (fig. 8) doit être comprimé presque complètement. DEBUT DU TRAVAIL Engager la prise de force en donnant de petits coups d’embrayage si la prise de force ne s’enclenche pas immédiatement. Accélérer opportunément le moteur et appuyer sur l’embrayage en commençant le travail. FIN DU TRAVAIL Pour arrêter le moteur à essence mettre la prise de force et les vitesses au point mort et tourner l'interrupteur placé sur le levier de commande gaz à la position OFF (fig. 3 n. 21). INCONVENIENTS POSSIBLES ET REMEDES La liste suivante énumère les petits inconvénients qui peuvent survenir lors de l’utilisation de l’appareil du motoculteur et que le client peut résoudre lui-même: 1) Le moteur ne démarre pas (moteur à explosion). Vérifier dans l’ordre: – que le réservoir d’essence est au moins à moitié plein. – que le robinet d’essence est ouvert. – que le starter est actionné (si le moteur est froid). – que l’essence arrive au carburateur. – que l’ouverture de l’évent sur le bouchon du réservoir n’est pas bouché. – que le filtre à filet à l’entrée du carburateur est propre. – que les gicleurs du carburateur sont propres. Pour contrôler les gicleurs, les dévisser et, s’ils sont sales, les nettoyer au moyen d’un jet d’air. – que la bougie jette l’étincelle. Pour effectuer ce contrôle, démonter la bougie, la raccorder au câble qui apporte le courant, appuyer la partie métallique à la masse et faire tourner la poulie du moteur comme pour le faire démarrer. Si aucune étincelle ne jaillit entre les deux électrodes, contrôler les connexions du câble de la bougie et si le courant n’arrive toujours pas, remplacer la bougie. En cas de nouvel échec, rechercher la panne dans l’installation électrique, dans le condensateur, dans la bobine ou dans quelque autre organe. Il convient alors de s’adresser au service après-vente le plus proche ou à un atelier spécialisé. 2) Les vitesses ne s’enclenchent pas: – régler l’embrayage en dévissant la vis de réglage jusqu’au décollement de l’embrayage. Veiller à ne pas annuler complètement le jeu. PERIODES DE LONGUE INACTIVITE Si la machine reste inutilisée pendant une longue période, il faut adopter les précautions suivantes: – déverser le carburant. – laver soigneusement le moteur et la machine. Huiler le mécanisme d’inversion dans le support mancheron. MAINTENANCE ET LUBRICATION ATTENTION! - Débrancher la bougie d'allumage avant de procéder à toute opération de nettoyage, de maintenance ou de réparation. Porter des vêtements appropriés et des gants de travail. - Quand on relève la machine ou une partie de la machine, utiliser toujours des instruments appropriés comme des support des sécurité. - Ne pas laisser la machine relevée et sans supports de sécurité non gardée, surtout dans des lieux où personnes inexpertes et enfants peuvent avoir accès à la machine. - Ne jamais jeter dans la nature les huiles usées, l’essence et tout autre produit polluant! - Une maintenance fiable et une lubrification correcte contribuent à maintenir la tondeuse en parfait état de marche. 25 Traductions des instructions originales RODAGE - Après les premières 8 heures de travail, remplacer l’huile moteur. MOTEUR - Pour les indications de la lubrification, suivre les normes contenues dans la notice moteur. En principe, il faut contrôler le niveau de l’huile toutes les 8 heures de travail et de remplacer l’huile toutes les 100 heures. Utiliser toujours l’huile 10W30. Pour le filtre à air, contrôler le niveau de l’huile toutes les 8 heures et même plus fréquemment si l’environnement est très poussiéreux. Remplacer le filtre s’il est bouché (ne pas utiliser des jets d’air pour le nettoyer). BOITE DE VITESSES - Vérifier le niveau de l’huile toutes les 50 heures de travail. Retirer le bouchon (fig. 6) et contrôler, en maintenant la machine dans la position horizontale, que le niveau de l’huile se situe entre les deux bords. Si nécessaire, ajouter de l’huile MP80W90 (API GL5 US MIL-L-2105D). Changer l’huile une fois par an. FRAISE - Contrôler le niveau de l’huile toutes les 100 heures en dévissant le bouchon. L'huile doit presque remplir le boîtier de la fraise. Si nécessaire, ajouter la même huile que l’huile pour la boîte de vitesses (fig. 4, réf. 3). REGLES UTILES POUR UN BON USAGE 1) Important! Utiliser toujours l'embrayage lorsque l'on passe des marches avant aux marches arrière et vice-versa. 2) Ne jamais laisser la machine sous la pluie. 3) Vérifier que le mécanisme d’inversion dans le support mancheron est propre et huilé. 4) Ne pas forcer la boîte de vitesses si la vitesse ne passe pas: pendant que la vitesse s’enclenche, donner de petits coups sur l’embrayage. 5) Ne jamais forcer le moteur; lorsque de la fumée sort du pot d’échappement, le moteur est forcé et il faut ralentir! 6) Il est également possible de fraiser des terrains extrêmement difficiles. Effectuer préalablement un bon rodage de la machine. 7) Contrôler souvent la pression des pneus. 8) Lors du montage des outils (par ex. la fraise), essayer de ne pas abîmer le centrage (voir le chapitre correspondant aux outils). ENTRETIEN DE FIN DE SAISON Laver soigneusement la machine. Changer l’huile du moteur, du carter boîte de vitesses et fraise. Nettoyer le filtre à air. Repasser et enduire de graisse les houes et changer les houes usées. 26 Traductions des instructions originales TABLEAU RECAPITULATIF DE MAINTENANCE OPERATION Huile moteur contrôler le niveau remplacer contrôler Filtre à air Bougie d'allumage TOUTES APRES LES TOUTES TOUTES LES 8 PREMIERES LES 50 LES 100 HEURES 20 HEURES HEURES HEURES ● ● (premier remplacement) ● ● remplacer ٭ contrôler/régler ● remplacer Huile boite de vitesses ● Contrôler le niveau ● ● remplacer Contrôler que la grille d'aspiration du moteur soit propre Barre Contrôler l'attache faucheuse lame graisser Contrôler fixation et affûtage des houes Lubrifier avec graisse UNE FOIS PAR AN/ TOUTES LES 200 HEURES ● ● ● ● ● ● ● ● ● ● Contrôler le jeu de l'embrayage ● opération recommandée ٭à effectuer si nécessaire OUTILS FRAISE La fraise sert à briser la couche superficielle du terrain pour en augmenter la perméabilité et en même temps pour le débarrasser des mauvaises herbes. Le fraisage peut être effectué en première vitesse si le terrain est dur et tenace, ou en deuxième vitesse si le terrain est fondu ou sablonneux. Il est possible de régler la profondeur de fraisage en levant ou en baissant la lame centrale située sous le corps de la fraise (fig. 4B). Pour augmenter la profondeur, il est nécessaire de déplacer la lame vers le haut. Il est de règle de commencer le travail avec la lame abaissée au maximum, et de la tirer vers le haut si l’on veut obtenir une profondeur plus importante (fig. 4B). N.B. - Si, sur les terrains très durs si la machine tend à sauter en avant, il est nécessaire de baisser au maximum la lame en la fixant dans le premier trou (fig. 4B, pos. 1). Contrôler que le montage des lames est correct (voir fig. 9). 27 Traductions des instructions originales BARRE FAUCHEUSE La barre faucheuse du motoculteur est à commande centrale ou latérale. La construction robuste et le rendement élevé font de la barre faucheuse l’outil idéal pour faucher. La barre doit être installée sur l’attache-outils du motoculteur, à l’endroit de la fraise, et fixée au moyen des mêmes écrous. Tourner la poignée de 180° et la placer du côté du moteur. Avant de retourner la poignée, mettre la première vitesse et détacher les barres de commande. Une fois la poignée retournée, les barres doivent être replacées dans les supports supérieurs. Après avoir retourné la poignée, grâce au mécanisme dans le support mancheron, il sera possible d’utiliser toutes les vitesses comme dans la version motoculteur mais en éliminant la vitesse rapide, qui pourrait se révéler dangereuse. Pour insérer le mouvement à la lame, il faudra désamorcer le dispositif de sécurité qui empêche l’embrayage simultané de la marche arrière et de la prise de force (nécessaire pour l’emploi de la fraise – fig. 2). Il sera suffisant alors d’enlever la vis contrastant le levier de la boîte de vitesses, empêchant ainsi le double embrayage. Important: lorsque l’on remonte la fraise, il est obligatoire de remettre le dispositif de sécurité dans les conditions initiales (fig. 2, rèf. A). Entretien: graisser toutes les 8 heures de travail les pivots du croisillon avec le graisseur situé sur la manivelle oscillante (fig. 11, n. 1 et n. 2). Graisser toutes les 50 heures de travail la boîte d’oscillation barre avec le graisseur situé sous la protection oscillante. Régler la lame et les serrelames qui ne doivent pas être serrés au point de bloquer la lame. Veiller aussi à ce qu’il n’y ait pas non plus un jeu excessif par rapport aux plaques des dents. Pour effectuer les réglages des serrelames pour les deux types, il est nécessaire de desserrer les vis de blocage (fig. 11, n. 6) et de régler la vis de pression. Lorsque les serre-lames sont usés, il faut procéder à leur substitution, même s’ils peuvent encore servir. Régler le jeu entre la lame et la bande d’usure, en desserrant les vis qui fixent les serre-bandes et en déplaçant vers l’avant la bande jusqu’à ce qu’elle touche la barre contenant les sections lame clouées. Bloquer de nouveau les serre-bandes. Pour démonter la lame, enlever l’attache-lame L en démontant les deux vis (fig. 11 n° 3) et désenfiler la lame. Après avoir réinstallé la lame, veiller à bien serrer les vis de fixation de l’attache. Utiliser toujours des lames bien aiguisées: la machine forcera moins et durera plus longtemps. A la fin de chaque journée de travail, laver la barre faucheuse en enlevant tout résidu d’herbe ou de terre; contrôler de temps en temps que toutes les vis sont bien serrées. CHARRUES Les charrues pour le motoculteur ont été spécialement étudiées pour obtenir de bons labours sans fatiguer excessivement l’opérateur (fig. 10). La profondeur du sillon peut varier de 10 à 15 cm selon le terrain. L' utilisateur peut obtenir des performances excellentes en montant les roues pneumatiques 5.00-12 et en ajoutant les masses pour roues, qui augmentent l'adhérence de la machine. CROCHET D'ATTELAGE L’attelage pour remorque sert à attacher le chariot de déplacement ou la remorque au motoculteur sans démonter la fraise. Cette attache se fixe au crochet de remorquage du motoculteur (fig. 12). ROUE DE SUPPORT POUR FRAISE Cet accessoire est très utile pour déplacer la machine car il maintient la fraise soulevée par rapport au terrain et facilite ainsi le transport (fig. 13). ENTRETOISES POUR ROUES Elles servent à élargir la voie et augmentent ainsi la stabilité de la machine sur les pentes transversales. Elles s’intercalent entre les roues et les moyeux porte-roues et élargissent la voie de 6 cm de chaque côté (fig. 14). 28 Traductions des instructions originales ROUES METALLIQUES A CAGE Ces roues sont surtout utilisées lors de l’emploi du motoculteur avec fraise sur des terrains très durs. En effet, les petites barres placées sur la circonférence des roues pénètrent dans le terrain, en assurant ainsi un bon ancrage et en empêchant les roues de patiner (fig. 15). Les roues à cage sont aussi utilisées lorsque les autres roues caoutchoutées pourraient patiner ou s’enfoncer dans des terrains mous ou moelleux car à peine travaillés. Elles sont utilisées aussi avec la charrue. Dans les autres cas, il est en général recommandé d’utiliser des roues pneumatiques qui, lorsque des prestations d’adhérence limite ne sont pas requises, donnent à la machine une traction plus régulière et servent de coussin élastique entre la machine et le terrain. BUTTOIR DERRIERE LA FRAISE Il est accroché derrière la fraise et travaille conjointement à elle. Il trace les jauges pour l'irrigation ou pour l'ensemencement (fig. 16). LAME FRONTALE ORIENTABLE cm 125 Grâce à sa robustesse, il est le moyen idéale pour déblayer la neige, pour niveler le gravier ou le terreau. Il s'incline à droite et à gauche (fig. 17). MASSES POUR ROUES Les masses doivent être installés dans les cercles des roues et fixés au moyen de deux des quatre écrous qui fixent les roues mêmes. Elles servent à augmenter le poids de la machine et par conséquent, son adhérence. Elles sont recommandés dans les travaux avec la charrue, le buttoir réglable et éventuellement avec la fraise ou la remorque pour obtenir des performances limite (fig. 18). 29 Übersetzung der Original-Anleitungen EINACHSSCHLEPPER G84 Sehr geehrter Kunde, Wir danken Ihnen für Ihr Vertrauen, und sind sicher, dass Sie mit Ihrem neuen Einachsschlepper voll und ganz zufrieden sein werden. In diesem Handbuch finden Sie alles, was Sie für den Gebrauch und die Wartung Ihrer Maschine wissen müssen. Lesen Sie es daher aufmerksam durch, und halten Sie sich genau an die Anleitungen, damit Sie auch wirklich immer optimale Resultate erzielen und lange Freunde an Ihrer Maschine haben werden. Bewahren Sie dieses Handbuch immer zusammen mit der Maschine auf. ALLGEMEINE BESCHREIBUNG UND VORGESEHENER GEBRAUCH Die Grillo-Maschine G85 ist ein selbstfahrender Einachsschlepper mit nur einer Achse, der mit einer Fräse zur Bearbeitung des Bodens ausgestattet ist. Diese Maschine wird benutzt, um den Boden vorzubereiten (Entfernen von Unkraut, oberflächliches Fräsen) und ist für kleine Feldstücke, Gartenbau und Verbesserungsarbeiten im Garten gedacht sowie auch in Obstanlagen zwischen den Reihen geeignet. Die Maschine besteht aus einem Trägerrahmen, wo der Verbrennungsmotor aufgebaut ist. Der Motor setzt sowohl die Räder als auch eine Zapfwelle in Gang, und die Zapfwelle ist normalerweise mit einer Fräse verbunden. Der Motor setzt sowohl die Räder als auch eine Zapfwelle in Gang, und die Zapfwelle ist normalerweise mit einer Fräse verbunden. Es handelt sich um eine Maschine, die von dem Benutzer zu Fuß durch einem Lenkholm geführt wird, mit der Schaltung am Lenkholm. ACHTUNG! Vor dem Anlassen des Motors die folgenden sicherheitstechnischen Hinweise genau durchlesen. Sie dienen zur Sicherheit des Nutzers. SICHERHEITSTECHNISCHE HINWEISE Vorsicht ist immer die beste Maßnahme, um Unfälle zu vermeiden! Lesen Sie die folgenden Hinweise genau durch, bevor Sie mit der Arbeit beginnen. Ein unsachgemäßer Gebrauch der Maschine und ihrer Ausrüstung kann Personen- oder Sachschäden zur Folge haben. Um alle eventuellen Risiken auf ein Minimum zu reduzieren, sind die folgenden Hinweise genauestens zu beachten: 1) Lesen Sie dieses Handbuch vor der ersten Benutzung der Maschine sorgfältig und ganz durch. 2) Die auf der Maschine angebrachten Hinweise bzw. Plaketten beachten. 3) Hände und Füße von der rotierenden Fräse fernhalten - Verletzungsgefahr! 4) Bevor andere Nutzer die Maschine bedienen, müssen diese über die laufenden Sicherheitsvorschriften und über die Funktionsweise der Maschine unterwiesen werden. 5) Vergewissern Sie sich vor dem Einschalten der Maschine, dass sich keine anderen Personen und vor allem keine Kinder in der Nähe befinden. 6) Das Gerät auf keinen Fall benutzen, wenn Sie unter Alkoholeinfluss stehen und/oder müde sind. 7) Vor dem Fräsen den Boden kontrollieren; Steine, Stöcke oder andere Gegenstände können von der Fräse weggeschleudert werden oder die Maschine beschädigen, und müssen daher entfernt werden. 8) Beim Arbeiten immer geeignete Arbeitskleidung, Handschuhe, Arbeitsschuhe und Schutzbrillen tragen. 9) Die Maschine nicht auf steilen Hängen einsetzen; sie könnte sich überschlagen (max. 25%). 10) Das vorgeschriebene Mindestalter für die Benutzung der Maschine beträgt 16 (sechzehn) Jahre. 11) Im Rückwärtsgang nur langsam fahren. 12) Bei hohen Motordrehzahlen müssen die Bedienungshebel “mit Gefühl” benutzt werden. 13) Den Motor nicht in geschlossenen Räumen laufen lassen (Vergiftungsgefahr - gefährliche Abgase). 30 Übersetzung der Original-Anleitungen 14) Beim Nachtanken den Motor immer abschalten, nicht rauchen, und offene Flammen bzw. Funken aus dem Gefahrenbereich entfernen. 15) Keinen Treibstoff verschütten, und beim Tanken ausgetretenen/verschütteten Treibstoff vor dem Anlassen des Motors entfernen. 16) Den Treibstoff in speziell zu diesem Zweck hergestellten Behältern aufbewahren. 17) Nur bei Tageslicht oder guter Beleuchtung arbeiten. FOLGENDES IST ZU VERMEIDEN 18) Jeder unsachgemäße Gebrauch hat den Verfall des Garantieanspruches und der Haftung des Herstellers zur Folge. 19) Die Maschine nicht benutzen, um Personen, Tieren oder Dinge zu befördern. WEITERE SICHERHEITSRELEVANTE HINWEISE 20) Die Sicherheitsvorrichtungen auf der Maschine niemals außer Funktion setzen bzw. entfernen! 21) Niemals mit laufendem Motor Reinigungsarbeiten bzw. Einstellungen durchführen. 22) Die Maschine niemals von einer anderen Person kontrollieren lassen, während Sie selbst auf dieser sitzen und der Motor läuft. 23) Der Benutzer ist immer für anderen Personen zugefügte Schäden verantwortlich! 24) Beschädigte bzw. verformte Hacken nicht reparieren, sondern immer auswechseln. 25) Ausschließlich Original-Grillo-Ersatzteile verwenden. 26) Vor jeder Benutzung der Maschine sicherstellen, dass alle Sicherheitseinrichtungen funktionieren. Es ist strengstens untersagt, die Sicherheitseinrichtungen außer Funktion zu setzen oder zu entfernen. Die Auskupplung der Fräse im Rückwärtsgang prüfen. 27) Vor jeder Benutzung der Maschine sicherstellen, dass alle Schrauben und Feststellmuttern der Fräs- bzw. der Hackeinrichtung gut angezogen sind. 28) Die Schutzverkleidung (Gehäuse, Kotbleche, usw.) darf nicht abmontiert werden. 29) Die Fräseinrichtung niemals mit laufendem Motor reinigen. 30) Niemals barfuß arbeiten. 31) Niemals die Einstellungen am Motor, insbesodere die max. Drehzahl, verstellen. 32) Bevor die Maschine in einem eingeschlossenen Raum abgestellt wird, muss der Motor abgekühlt sein. 33) ACHTUNG: Um die Brandgefahr zu reduzieren, müssen der Motor, der Auspufftopf, die Auspuffkrümmer immer frei von Gras, Blättern, Staub usw. gehalten werden. 34) Den Treibstofftank immer nur im Freien entleeren. 35) Die Maschine darf ausschließlich von nur einem Nutzer geführt werden. IDENTIFIKATION DER MASCHINE UND KUNDENDIENST IDENTIFIKATION DER MASCHINE Auf dem Maschinenrahmen befindet sich eine Plakette mit der Seriennummer der Maschine, die für die Bestellung von Ersatzteilen und bei allen die Maschine betreffenden Anfragen an den Hersteller/Händler anzugeben ist. KUNDENDIENST In diesem Handbuch finden Sie Anleitungen für den korrekten Gebrauch Ihrer Maschine und die vom Benutzer allein durchführbaren Wartungseingriffe. Für alle nicht in diesem Handbuch beschriebenen Eingriffe und Arbeiten wenden Sie sich bitte an Ihren Grillo-Händler. ERSATZTEILE Verwenden Sie ausschließlich Original-Ersatzteile, die unter sicherheits- und montagetechnischem Standpunkt keine Probleme bereiten können. Bei der Ersatzteilebestellung immer die Seriennummer der Maschine angeben. 31 Übersetzung der Original-Anleitungen Für die Ersatzteile des Motors die Hinweise im Handbuch des Motors beachten. GARANTIE Es gelten die gesetzlichen Garantiebedingungen. Der Händler muss eine Kopie der Garantie-Karte der Maschine dem Kunden geben. Die Kopie kann von der Grillo Webseite heruntergeladen werden. Für den Motor gelten die vom jeweiligen Hersteller vorgesehenen Garantiebedingungen. ERSATZTEILE-BESTELLUNG Immer die Seriennummer der Maschine und die Artikelnummer des gewünschten Ersatzteils angeben. Wenden Sie sich bitte an unsere Ersatzteilelager. Unsere Adresse ist: GRILLO S.p.A. Via Cervese 1701 - 47521 CESENA (FC) - ITALIEN Tel. 0039 / 0547 / 633111 - Fax 0039 / 0547 / 632011 Web site: www.grillospa.it - E-mail: [email protected] TECHNISCHE DATEN MOTOR: HONDA GX 200, OHV, 196 cm³, 5,5 HP, 4,1 Kw (bei 3600 U.p.M.), Einzylinder Benzinmotor ANLASSER: Reversierstarter FASSUNGSVERMÖGEN KRAFTSTOFFTANK: 3,6 Liter KUPPLUNG: konisch und Aktiv-Kupplung. GETRIEBE: mit Zahnradgetrieben im Ölbad. Version Einachschlepper 2 Vorwärtsgänge + 2 Rückwärtsgänge – Version Motormäher 2 Vorwärtsgänge + 2 Rückwärtsgänge WENDEGETRIEBE: mit Hebel. ZAPFWELLE: 965 UpM unabhängig vom Getriebe (Drehsinn nach rechts bei Version Einachsschlepper; Drehsinn nach links bei Version Motormäher). SICHERHEITSVORRICHTUNG: Aktiv-Kupplung, Interferenz RG- Zapfwelle LENKHOLM: höhen- und seitenverstellbar, reversibel, auf Schwingungsdämpfern eingestellt. FRÄSE: 580 mm, verstellbar auf 370 – 470 mm (680 mm mit Erweiterungen) ARBEITSTIEFE: 160 mm. RÄDER: 4.00-8 RAUMBEDARF mit 4.00-8 Rädern: mm 420-370. ZUBEHÖR: Zentralmähbalken 110/115/117/127/137 cm, Einscharpflug, Häufelkörper, Anhänger 150x110 cm, Metallräder, Anhängerkupplung, Schneefräse 60 cm, schwenkbares Schneeschild 100 cm, Schneeketten für 4.00-8 Räder. 32 Übersetzung der Original-Anleitungen INBETRIEBNAHME DER MASCHINE 1) Die Maschine auf Transportschäden untersuchen. 2) Die Zapfwelle der Maschine um die Kupplung mit Fett füllen (Abb. 3 Nr. 20). 3) Durch die zwei Hebel (Abb.3, Nr. 10 – Nr. 12) den Lenkholm in die gewünschte Position Einachsschlepper oder Motormäher positionieren. 4) Die Reifen und das Zubehör (z.B. Fräse, Pflug, etc. Abb. 4A) einbauen, die Feststellmuttern gut anziehen. 5) Motoröl einfüllen, halten Sie sich genau an das beiliegende Handbuch. 6) Getriebeöl kontrollieren - Abb. 6 und Öl der Marke MP 80W 90, oder die internationale Korrespondenz Öl API GL5, US MIL-L-2105D hinzufügen, Menge: 2,2 Liter 7) Die Steuerhebel einkuppeln (Abb. 3 Nr. 13, Nr. 15 und Nr. 2). 8) Reifendruck kontrollieren (siehe Tabelle): REIFENDRUCK 4.00-8 2 PLY RATING 1,1 BAR 4.00-10 2 “ “ 1,1 5.00-10 2 “ “ 1, 5 “ “ BETRIEBSANLEITUNG Vor dem Anlassen des Motors immer Folgendes kontrollieren: − Ölstand im Motor (Abb. 5, Punkt A) und im Getriebegehäuse; der Ölstandmesser befindet sich auf dem oberen Deckel (Abb. 6); der Ölstand muss zwischen den beiden Rändern liegen. − dass alle Schrauben und Muttern fest angezogen sind; dies gilt vor allem für die Schrauben und Muttern zum Befestigen der Hacken und der Geräte am Einachsschlepper. (Abb. 4A). − dass alle Hebel in Leerlaufposition sind. − dass der Luftfilter (Version Trockenfilter) sauber ist (Abb. 7). Achtung! Den Einsatz nicht mit Pressluft blasen; ein verstopfter Filter muss ausgewechselt werden. Vergewissern Sie sich, dass der Luftfilter (Ölbad-Version) sauber ist und dass, das Ölstand stimmt (Abb. 7). − Ölstand im Fräsgehäuse kontrollieren (Abb. 4 Nr, 3) − Den Kraftstofftank auffüllen; dazu einen mit einem sehr feinen Filter ausgerüsteten Trichter verwenden. (Abb. 3, Nr.11). − ANLASSEN DES VERBRENNUNGMOTORS Den Treibstoffhahn öffnen, den Gashebel bis zur Hälfte drücken und bei kaltem Motor die auf dem Vergaser befindliche Starthilfe betätigen. Kräftig am Seilzuggriff anziehen (Abb. 3 Pos. 6). ANLASSEN DER MASCHINE Den Ganghebel in die gewünschte Position bringen. Sollte sich der Gang nicht sofort einlegen lassen, mit kurzen Kupplungsschlägen nachhelfen. Die Maschine fährt an, wenn man den Kupplungshebel drückt (Abb. 3, Nr.1), bis sich die Maschine in Bewegung setzt. Beim Loslassen des roten Hebels bleibt die Maschine stehen, der Motor aber läuft weiter und der Hebel kehrt zur Position 1 zurück (Abb. 3). Um den Motor auszuschalten ist der Schalter auf dem Gashebel auf Position OFF zu stellen bei Benzinmotoren (Abb. 3, Nr. 21,). Merke: Ist die Zapfwelle eingeschaltet, dann kann der Rückwärtsgang nicht eingelegt werden. Vor dem Einlegen des Rückwärtsgangs die Zapfwelle abschalten. Notiz: um Probleme der Kupplung während der Arbeit zu vermeiden muss der rote Hebel gut gedrückt bleiben. ACHTUNG: nicht mit nur teilweise gedrücktem Hebel arbeiten! Die Feder (Abb. 8) muss beim Arbeiten fast komplett gedrückt werden. 33 Übersetzung der Original-Anleitungen BEGINN DER ARBEIT Die Zapfwelle einschalten und gegebenenfalls mit kurzen Kupplungsschlägen nachhelfen. Gas geben, die Kupplung loslassen und mit der Arbeit beginnen. ENDE DER ARBEIT Um nach Beenden der Arbeit den BENZINMOTOR abstellen, setzen Sie das Getriebe und die Zapfwelle in den Leerlauf, stellen Sie den Schalter auf den Gashebel auf die Position OFF (Abb. 3 Nr. 21). EVENTUELL AUFTRETENDE STÖRUNGEN UND DEREN BEHEBUNG Nachfolgend finden Sie eine Liste kleiner Störungen, die bei der Benutzung der Maschine auftreten und vom Kunden selbst behoben werden können. 1) Der Motor springt nicht an: Verbrennungsmotor Der Reihe nach die folgenden Kontrollen durchführen: – der Benzintank muss mindestens halb voll sein – der Benzinhahn muss offen sein – der Starter muss eingeschaltet sein (falls der Motor kalt ist) – der Vergaser muss mit Benzin versorgt werden – das Entlüftungsloch auf dem Tankdeckel darf nicht verstopft sein – die Vergaserdüsen müssen sauber sein; zum Überprüfen die Düsen abschrauben und gegebenenfalls mit Druckluft reinigen – die Zündkerze muss einen Funken erzeugen. Zum Durchführen dieser Kontrolle die Kerze ausbauen, wieder an das Speisekabel anschließen, das Metallteil erden und die Motorscheibe wie zum Anlassen drehen lassen. Springt zwischen den beiden Elektroden kein Funken über, die Verbindungen des Zündkerzenkabels überprüfen. Funktioniert die Stromversorgung noch immer nicht, die Kerze auswechseln. Funktioniert die Maschine noch immer nicht, dann liegt die Störungsursache bei der elektrischen Anlage, dem Kondensator, der Spule oder einem anderen Organ und wir empfehlen Ihnen, sich an die nächste Kundendienststelle oder an eine Fachwerkstätte zu wenden. 2) Die Gänge lassen sich nicht einlegen: – die Kupplung einstellen; dazu die Einstellschraube lockern, bis eine gute Auskupplung gegeben ist. Ein wenig Spiel muss jedoch bestehen bleiben; das Kupplungsseil darf nicht zu stark gespannt werden. WIRD DIE MASCHINE LANGE ZEIT NICHT BENUTZT sind folgenden Vorkehrungen zu treffen: – den Tank entleeren – Motor und Maschine sorgfältig waschen. Den Lenkholm-Umkehrmechanismus ölen. 34 Übersetzung der Original-Anleitungen WARTUNG UND SCHMIERUNG VORSICHT! - Vor jedem Reinigungs-, Wartungs- oder Reparatureingriff den Zündkerzenkabel aus Zündspule entfernen. Zweckmäßige Arbeitskleidung und Arbeitshandschuhe tragen. - Wenn die Maschine oder ein Teil der Maschine angehoben wird, benutzen Sie immer geeignete Arbeitsmittel wie z.B Hubtische oder Radkeile. - Wenn Sie Wartungsarbeiten an der Maschine durchführen, lassen Sie die angehobene Maschine nie in ungesichertem und unbewachtem Zustand (ohne Radkeile), vor allem an einem Ort, wo unerfahrene Personen oder Kinder leichten Zugang zur Maschine haben könnten. - Altöl, Benzin und andere umweltverschmutzende Produkte ordnungsgemäß entsorgen! - Eine gute Wartung und eine korrekte Schmierung halten den Mäher stets funktionstüchtig und einsatzbereit. EINFAHREN: Nach den ersten acht Arbeitsstunden das Motoröl wechseln. MOTOR - Die im Handbuch des Motors enthaltenen schmierungsrelevanten Hinweise befolgen. In der Regel muss der Ölstand alle 8 Betriebsstunden kontrolliert und alle 100 Betriebsstunden ein Ölwechsel vorgenommen werden. Stets Motoröl 10W30 verwenden. Beim Luftfilter alle acht Betriebsstunden den Ölstand überprüfen, bei besonders staubiger Umgebung auch häufiger. Den Einsatz auswechseln, wenn er verstopft ist (nicht mit Pressluft zu reinigen versuchen). GETRIEBEGEHÄUSE - Alle fünfzig Betriebsstunden den Ölstand kontrollieren (Abb. 6); dazu den Verschluss abnehmen und prüfen, ob das Öl bei waagrecht stehender Maschine zwischen den beiden Rändern steht. Gegebenenfalls dasselbe Öl MP 85 W/90 (API GL5 US MIL-L-2105D) wie für das Getriebe nachfüllen. Einmal jährlich einen Ölwechsel vornehmen. FRÄSE - Alle 50 Betriebsstunden den Ölstand kontrollieren; dazu den Verschluss abschrauben; das Fräsegehäuse muss beinahe voll sein. Gegebenenfalls dasselbe Öl wie für das Getriebe nachfüllen (Abb. 4, Nr. 3). EINIGE NÜTZLICHE HINWEISE: 1) Wichtig! Zum Vor- und Rückwärtsfahren immer die Kupplung benutzen. 2) Die Maschine niemals im Regen stehen lassen. 3) Den Holmpositionierungsmechanismus immer sauber und gut geölt halten. 4) Den Gang nicht mit Gewalt einlegen; ggf. mit kurzen Kupplungsschlägen nachhelfen. 5) Den Motor niemals überlasten; tritt Rauch aus dem Auspuff, langsamer fahren! 6) Es kann auch auf schwierigstem Gelände gehackt werden; vorher jedoch die Maschine gut einfahren. 7) Den Reifendruck öfters kontrollieren. 8) Beim Montieren der Geräte (z.B. der Fräseinrichtung) darauf achten, dass die Zentrierung nicht beschädigt wird (siehe auch Kapitel Anbaugeräte). WARTUNG AM SAISONENDE Die Maschine sorgfältig waschen. Motor-, Getriebe- und Fräsenöl wechseln und den Luftfilter reinigen. Die Hacken schleifen und einfetten und gegebenenfalls durch neue Hacken ersetzen. 35 Übersetzung der Original-Anleitungen ZUSAMMENFASSENDE TABELLE DER WARTUNGSARBEITEN JEDE 8 NACH DEN JEDE 50 OPERATION JEDE 100 JEDES STUNDEN ERSTEN STUNDEN STUNDEN JAHR ODER 20 JEDE 200 STUNDEN STUNDEN Motoröl Stand prüfen auswechseln Luftfilter Zündkerze Prüfen ● ● (erster Wechsel) ● ● auswechseln ٭ überprüfen/einstellen ● auswechseln Getriebeöl ● Stand prüfen ● ● auswechseln Überprüfen Sie, dass das Ansauggitter des Motors sauber ist Mähbalken Den Anschluss des Messers prüfen schmieren Überprüfen Sie, dass die Hacken gut geschärft und befestigt sind. Mit Fett schmieren ● ● ● ● ● ● ● ● ● ● Kupplungsspiel prüfen ● empfohlene Operation ٭nur bei Bedarf durchführen ZUBEHÖR FRÄSE Die Fräse dient zum Auflockern der oberen Erdschichten, um deren Durchlässigkeit zu verbessern und sie gleichzeitig von Unkraut zu befreien. Auf harten Böden die erste Geschwindigkeit benutzen, auf lockeren, sandigen Böden die zweite Stufe. Die Einfrästiefe kann durch Anheben und Absenken des unter dem Fräskörper befindlichen Zentralmessers verstellt werden.(Abb. 4B). Um die Frästiefe zu erhöhen, ist das Messer nach oben zu verstellen. Es empfiehlt sich, die Arbeit mit dem Messer in der tiefsten Position zu beginnen und anschließend je nach gewünschter Frästiefe das Messer anzuheben (Abb. 4B). Merke: Wenn die Maschine auf harten Böden nach vorne zu hüpfen beginnt, das Messer ganz absenken und im dritten Loch befestigen (Abb. 4B). Kontrollieren, ob die Messer korrekt montiert sind (s. Abb. 9). 36 Übersetzung der Original-Anleitungen MÄHBALKEN Der auf dem Einachsschlepper montierbare Mähbalken verfügt über eine zentrale Steuerung. Dank seiner robusten Konstruktion und hohen Leistung ist dieser Mähbalken ideal zum Mähen. Der Mähbalken wird anstelle der Fräse an der Gerätekupplung montiert und mit den selben zwei Muttern befestigt. Den Lenkholm um 180° zur Motorseite hin schwenken. Dazu den 1. Gang einlegen und danach die Steuerstangen aushaken. Den Holm drehen und die Stangen wieder in die oberen Träger einsetzen. Durch das Drehen des Lenkholmes können dank des Mechanismus im Holmlager alle Gänge wie bei der Variante Einachsschlepper genutzt werden unter Wegnahme des schnellsten 3. Ganges, der aus Sicherheitsgründen ungenutzt bleibt. Zum Einschalten der Messerbewegung die Sicherheitsvorrichtung ausschalten, die das gleichzeitige Einschalten von Rückwärtsgang und Zapfwelle verhindert (was jedoch für die Fräse erforderlich ist– Abb. 2). Dazu einfach die Schraube entfernen, die gegen den Ganghebel drückt, und dadurch die Doppeleinschaltung verhindern. Wichtig: Wird die Fräse wieder aufgesetzt, dann muss die Sicherheitsvorrichtung wieder aktiviert werden. Der Hersteller lehnt jede Verantwortung ab, falls diese Maßnahme nicht beachtet wird (Abb. 2/A). Wartung: Die Kreuzstifte durch die Fettbüchse auf der oszillierenden Kurbel alle acht Betriebsstunden fetten. (Abb. 11, Nr.1 – Nr. 2). Das Balkenschwinglager alle 50 Betriebsstunden durch die unter dem oszillierenden Schutz liegende Fettbüchse nachfetten. Das Messer durch Einstellen der Messerhalterungen justieren; die Messerhalterungen dürfen nicht zu fest angezogen sein, da das Messer dadurch blockiert würde; es darf jedoch andererseits nicht zu viel Spiel zu den Zahnplatten bestehen. Zum Einstellen der Messerhalterungen für die beiden Typen die Feststellschrauben lockern (Abb.11 Nr.6) und die Andruckschraube einstellen. Sind die Messerhalterungen verbraucht, empfiehlt es sich, sie durch neue zu ersetzen, auch wenn sie noch Druck ausüben könnten. Zum Einstellen des Spiels zwischen Messer und Abnutzstreifen die Schrauben, welche die Streifenandrücker arretieren, lockern und den Streifen nach vorne setzen, bis er gegen die Stange stößt, auf der die Messerabschnitte genagelt sind. Nun die Streifenandrücker wieder blockieren. Zum Abnehmen des Messers die Messerkupplung L durch Abschrauben der beiden Schrauben abnehmen (Abb. 13 Nr. 3) und das Messer herausziehen. Nach dem Einsetzen des neuen Messers die Blockierschrauben der Kupplung wieder gut anziehen. Stets gut geschliffene Messer verwenden; die Maschine arbeitet dadurch leichter und hält länger. Nach Beendigung der Arbeit jeden Tag den Mähbalken waschen und von Schnittgut- und Erdresten befreien. Hin und wieder kontrollieren, ob alle Schrauben fest angezogen sind. PFLÜGE Die für den Einachsschlepper konzipierten Pflüge ermöglichen ein gutes Pflügen ohne übermäßige Kraftanstrengung für den Benutzer (Abb. 10). Die Furchentiefe kann je nach Bodenbeschaffenheit zwischen 10 und 15 cm schwanken. Der Benutzer kann optimale Leistung erhalten, indem er hohe Räder montiert und eventuell auch die Radgewichte, die die Haftung auf der Straße verbessern. ANHÄNGERKUPPLUNG Die Anhängerkupplung dient zum Ankuppeln des Sitzwagens oder des Anhängers, ohne dass die Fräse abgenommen werden muss. Sie wird am Zughaken der Maschine befestigt (Abb. 12). STÜTZRAD FÜR FRÄSE Das Stützrad sorgt beim Transport für die erforderliche Bodenfreiheit und stellt daher eine wesentliche Arbeitserleichterung dar (Abb. 13). SPURERWEITERUNGEN Sie dienen zur Verbreiterung der Spur und erhöhen daher die Stabilität der Maschine in Schräglage. Die Spurverbreiterungen werden zwischen den Rädern und der Radnabe angebracht und verbreitern die Spur um 6 cm pro Seite (Abb. 14). METALLGITTERRÄDER Diese Räder werden vor allem beim Einsatz des Einachsschleppers mit Fräse auf besonders harten Böden verwendet. 37 Übersetzung der Original-Anleitungen Die auf dem Radkreis angebrachten Schwellen dringen in den Boden ein, erhöhen also die Bodenhaftung, und verhindern ein Durchrutschen der Räder (Abb. 15). Die Gitterräder werden auch immer dann verwendet, wenn Gummiräder im eben bearbeiteten und daher lockeren Boden durchrutschen oder versinken könnten. Sie werden auch in Kombination mit Pflügen benutzt. Ansonsten empfehlen wir die Verwendung von Luftreifen, die, sofern keine außergewöhnliche Bodenhaftung erforderlich ist, der Maschine eine gleichmäßigere Zugkraft verleihen und die Aufgabe von Stoßdämpfern zwischen Maschine und Boden übernehmen. KOMBI-HÄUFELKÖRPER Wird hinter der Fräse montiert, und arbeitet zusammen mit dieser; dient zum Ziehen von Bewässerungs- oder Saatfurchen (Abb. 16). SCHWENKBARES SCHNEESCHILD Dieses Schneeschild dient zum Schneeräumen und zum Planieren von Schotter- oder Erdhaufen, und ist nach links und rechts schwenkbar (Abb. 17). RADGEWICHTE Die Radgewichte werden auf die Radfelgen montiert und mit zwei der vier Muttern, die zur Befestigung der Räder dienen, blockiert. Sie erhöhen das Gewicht der Maschine und damit deren Bodenhaftung und sind für alle Arbeiten mit dem Pflug oder dem verstellbaren Häufelkörper empfehlenswert, sowie bei besonders anspruchsvollen Arbeiten mit der Fräse oder dem Anhänger (Abb. 18). 38 Traducción de las Instrucciones Originales MOTOCULTOR G84 Amable cliente, dándole las gracias por la confianza y la preferencia otorgada a nuestro motocultor, confiamos en que el uso de esta nueva máquina suya se ajuste plenamente a sus necesidades. Por su correcto uso y por su mantenimiento a través del tiempo, le rogamos lea atentamente y siga escrupulosamente las indicaciones de este libro; esto le permitirá obtener los máximos resultados y proteger su inversión. Le rogamos que guarde este libro, el cual tendrá que acompañar siempre a la máquina. DESCRIPCIÓN GENERAL Y USO PREVISTO El motocultor es una máquina agrícola autopropulsada con un solo eje, equipada de fresa para la elaboración del terreno. Estas máquinas se utilizan para preparar el suelo (limpieza de las malezas, fresado superficial) y para pequeñas obras de acabado, entre los arboles y en la horticultura en general. La máquina está constituida por un chasis portante sobre el que se encuentra posicionado el motor de explosión que acciona las ruedas y una toma de fuerza. Esta toma de fuerza es utilizada generalmente con un grupo fresa, además de otros accesorios como quitanieves, barra segadora, pala frontal orientable, arado, barredora, bombas de tratamiento, etc... La máquina es conducida por un operador que sigue los movimientos del motocultor a través de un manillar donde se encuentran los mandos. ¡ATENCIÓN! Antes de arrancar el motor leer atentamente. ¡Las siguientes advertencias son importantes para su integridad física! ADVERTENCIAS CONTRA ACCIDENTES La prudencia es el arma principal en la prevención de los accidentes. Le rogamos vivamente que lea con atención las advertencias siguientes sobre el uso de la máquina, antes de empezar el trabajo. El uso incorrecto del motocultor y de su equipamiento puede ser perjudicial; para reducir estas posibilidades adoptar las precauciones necesarias que se indican a continuación: 1) Lea este manual en su totalidad, antes de encender y poner en marcha el motocultor. 2) Preste una atención especial a las prohibiciones y a las etiquetas de seguridad alrededor de la máquina. 3) La rotación de la fresa es muy peligrosa, no poner nunca las manos o los pies debajo de la fresa. 4) Antes de permitir que otras personas trabajen con el motocultor, es preciso ponerlas al corriente de las normas de seguridad y de cómo se usa la máquina. 5) Antes de encender el motocultor comprobar que no hay personas alrededor; especialmente niños. 6) No usar el motocultor cuando se esté cansado y no beber alcohol. 7) Controlar el terreno antes de realizar el fresado, viendo que no hay piedras, palos o cuerpos extraños, que pudieran dañar la máquina o ser lanzados lejos, y por lo tanto muy peligrosos. 8) Antes de comenzar el trabajo, ponerse prendas apropiadas de trabajo, guantes, botas y gafas. 9) No usar el motocultor en fuertes pendientes (max. 25%). 10) No dejar trabajar a muchachos demasiado jóvenes; está prohibido el uso de la máquina a los menores de 16 años. 11) No hacer marcha atrás con el motor acelerado. 12) Es peligroso accionar las palancas bruscamente, con el motor al régimen máximo. 13) Para evitar el peligro de exhalaciones venenosas, no utilizar el motor encendido en un local cerrado. 14) Apagar siempre el motor antes de repostar combustible, mantenerse alejado de chispas o llamas y ¡no fumar! 39 Traducción de las Instrucciones Originales 15) Evitar derrames de combustible y tras haber llenado el depósito limpiar cualquier derrame antes de arrancar el motor. 16) Almacenar el combustible en recipientes fabricados específicamente con dicha finalidad. 17) Trabaje sólo con la luz natural o con luz artificial muy buena. EVITAR LOS USOS INCORRECTOS 18)Cualquier uso impropio supone la anulación de la garantía y exonera al fabricante de cualquier tipo de responsabilidad. 19) Nunca utilizar la máquina para transportar personas. MEDIDAS PREVENTIVAS COMPLEMENTARIAS 20) No manipular o desactivar sin autorización los dispositivos de seguridad. 21) No hacer ningún tipo de regulación o limpieza con el motor en marcha. 22) No hacer controlar la máquina por nadie mientras esté conduciendo con el motor en marcha. 23) El usuario siempre es responsable de los daños originados a terceros. 24) Las azadas deformadas o dañadas deberán sustituirse siempre, no repararlas nunca. 25) Usar siempre repuestos originales Grillo. 26) Antes de comenzar cualquier trabajo con la máquina, comprobar que todos los sistemas contra accidentes, de los cuales la máquina va dotada, funcionan perfectamente. Está rigurosamente prohibido desactivarlos o manipularlos sin autorización. Verificar que, en marcha atrás, la fresa se pare. 27) Antes de comenzar a trabajar, controlar que los tornillos y las tuercas de bloqueo de la fresa y de las azadas están bien apretados. 28) El equipamiento de protección (capós, guardabarros, etc.), se mantiene siempre durante el trabajo. 29) No limpiar la fresa con el motor encendido. 30) No usar la máquina con los pies descalzos. 31) No modificar las regulaciones del motor, especialmente la cantidad máxima de revoluciones. 32) Dejar enfriar el motor antes de guardar la máquina en ambientes cerrados. 33) ATENCIÓN: para reducir el peligro de incendio, mantener el motor, el silenciador del escape y los tubos de escape libres de hierba, hojas, polvo, etc.. 34) Si fuera necesario vaciar el tanque de combustible, efectuar la operación al aire libre. 35) Trabajar sólo a la luz del sol o con buena iluminación artificial. IDENTIFICACIÓN Y ASISTENCIA IDENTIFICACIÓN La máquina va dotada de una placa situada sobre el chasis con el número de matrícula. Este número es indispensable para cualquier intervención técnica y para solicitar los repuestos. SERVICIO DE ASISTENCIA Este manual da las indicaciones para usar el motocultor y para efectuar un mantenimiento básico correcto, que puede realizar el mismo usuario. Para las operaciones que no se describen en este libro, consultarse con el Revendedor de la Zona. RECAMBIOS Se aconseja emplear exclusivamente recambios originales, los únicos que ofrecen características de seguridad e intercambiabilidad. Cualquier pedido ha de llevar el número de matrícula. Para los recambios del motor, atenerse a las indicaciones del libro específico. 40 Traducción de las Instrucciones Originales GARANTÍA La garantía es ofrecida en los modos y dentro de los límites previstos por la ley en vigor. En lo que concierne al motor, valen las condiciones previstas por los respectivos fabricantes. COMO SOLICITAR LOS RECAMBIOS Indicar siempre el número de matrícula de la máquina y la referencia de la pieza que se ha de sustituir. Dirigirse a nuestros centros de recambios que se encuentran en todas las provincias. Nuestros contactos son: GRILLO S.p.A. Via Cervese 1701 - 47521 CESENA (FC) - ITALIA Tel. 0039 / 0547 / 633111 - Fax 0039 / 0547 / 632011 Web site: www.grillospa.it - E-mail: [email protected] CARACTERÍSTICAS TECNICAS MOTOR: HONDA GX200 OHV, 196 cm³, 5,5 HP, 4,1Kw (a 3600 rpm), mono-cilíndrico gasolina. ARRANQUE: de tiro con autoenvolvente. CAPACIDAD DEPÓSITO CARBURANTE: 3,6 Litros EMBRAGUE: cónico y activo. CAMBIO: con engranajes en baño de aceite: en versión motocultor 2 marchas adelante + 2 atrás, en versión motosegadora 2 marchas adelante + 2 atrás. INVERTIDOR: de asta. TOMA DE FUERZA: de 965 rpm independientes del cambio, sentido de rotación hacia la derecha (versión motocultor), hacia la izquierda (versión motosegadora). DISPOSITIVO DE SEGURIDAD: embrague activo, interferencia marcha atrás – PTO. MANCERAS: regulable en altura y lateralmente, reversible y montada sobre dispositivo antivibración. FRESAS: 580 mm (azadas x 4) regulable hasta 370-470 (680 con ensanchamiento). PROFUNDIDAD DE TRABAJO: 160 mm. RUEDAS: 4.00-8 DIMENSIONES TOTALES con ruedas 4.00-8: mm 420 – 370. ACCESORIOS: barra segadora central 110/115/117/127/137 cm, arado, asurcador, remolque arrastrado 150x110 cm, ruedas de jaula, tirante de tracción, quitanieves 60 cm, pala frontal 100 cm, cadenas para ruedas 4.00-8. 41 Traducción de las Instrucciones Originales PUESTA EN SERVICIO DE LA MÁQUINA 1) Controlar que la máquina esté íntegra constatando que no haya sufrido daños durante el transporte. 2) Llenar de grasa la brida de la toma de fuerza de la máquina, alrededor del embrague (fig. 3 n. 20). 3) Colocar el manubrio de guía en la posición deseada (motocultor o segadora mecánica) utilizando las dos palancas (fig. 3 n. 10 y n. 12). 4) Montar las ruedas y el accesorio (p. ej. fresa, arado, etc..fig.4A) apretando fuertemente las tuercas de fijación. 5) Cargar el aceite motor ateniéndose al manual de instrucciones adjunto. 6) Controlar el aceite en la caja de cambios – fig. 6 (tipo MP 80W 90, correspondencia internacional API GL5, US MILL-2105D con una cantidad de 2,2 litros). 7) Colocar las palancas de mando (fig. 3 n. 13, n. 15 y n. 2). 8) Controlar la presión de los neumáticos (consultar tabla): PRESIÓN NEUMÁTICOS 4.00-8 2 PLY RATING 1,1 BAR 4.00-10 2 “ “ 1,1 5.00-10 2 “ “ 1, 5 “ “ INSTRUCCIONES DE USO Antes de arrancar el motor controlar siempre: – Los niveles del aceite en el motor (fig. 5, rif. A) y en la caja del cambio; el tapón de nivel va colocado en la tapa superior (fig. 6); el aceite ha de llegar a la posición que está entre los dos bordes. – Que todos los tornillos y tuercas están bien apretados, sobre todo los de fijación de las azadas y de los equipos al motocultor (fig.4A). – Que todas las palancas están en posición de punto muerto. – Que el filtro de aire (versión en seco) está bien limpio (fig. 7). ¡Atención! No soplar el cartucho con aire comprimido, si se encuentra atascado ha de sustituirse. Controle que el filtre del aire (vers. en baño de aceite) esté bien limpio y el aceite a su nivel (fig. 7). – Controlar el nivel del aceite del cárter de la fresa (fig. 4, nº 3). – Llenar el depósito de combustible utilizando un embudo dotado de filtro muy fino (fig.3, n.11). ARRANQUE DEL MOTOR DE EXPLOSIÓN Abrir el grifo del combustible, empujar hasta mitad del recorrido la palanca de mando del gas y, si el motor está frío, accionar el dispositivo de starter situado en el carburador. Arrancar el motor tirando enérgicamente de la empuñadura del autoenvolvente (fig. 3, nº 6). ARRANQUE DE LA MÁQUINA Colocar la palanca del cambio en la posición deseada. Si la marcha no se engrana inmediatamente pisar ligera y frecuentemente el embrague. La máquina se pone en movimiento presionando sobre la palanca del embrague (fig. 3, n.1). Abandonando la presa de la palanca roja, la máquina se detiene pero el motor permanece encendido y la palanca retorna en la posición 1 (fig. 3). Para apagar el motor, actúe sobre el interruptor sobre el mando del acelerador en posición OFF (fig. 3, n°21), para motores a gasolina. NOTA: Si la toma de fuerza está activada no se podrá engranar la marcha atrás. En este caso desactivar la toma de fuerza y luego engranar la marcha atrás. 42 Traducción de las Instrucciones Originales NOTA: para evitar problemas en el embrague durante el trabajo, la palanca roja debe mantenerse bien presionada. ¡Atención! No trabajar con la palanca parcialmente presionada. Durante el trabajo, el muelle (fig. 8) tiene que estar casi totalmente comprimido. COMIENZO DEL TRABAJO Activar la toma de fuerza accionando varias veces pero ligeramente el embrague, si no se acopla inmediatamente. Acelerar oportunamente el motor y soltar el embrague comenzando el trabajo. FIN DEL TRABAJO Una vez terminado el trabajo, para parar el MOTOR A GASOLINA, colocar la palanca de la toma de fuerza y de velocidades en punto muerto y girar el interruptor sobre la palanca acelerador en posición OFF (fig. 3, n. 21). POSIBLES INCONVENIENTES Y SUS REMEDIOS A continuación damos una lista de los pequeños inconvenientes que pueden producirse al utilizar un motocultor y que el cliente puede remediar directamente: 1) El motor no arranca (motor de explosión). Efectuar por este orden los controles siguientes: – que el depósito de la gasolina está lleno hasta la mitad por lo menos; – que el grifo de la gasolina está abierto; – que el starter está accionado (si el motor está frío); – que la gasolina llega al carburador ; – que el respiradero del tapón del depósito no está obstruido; – que los surtidores del carburador están limpios. Para controlarlos, desenroscarlos y si están sucios, limpiarlos con un chorro de aire; – que la bujía da la chispa. Para efectuar este control, desmontar la bujía, volverla a conectar al cable que le lleva la corriente, apoyar la parte metálica a masa y hacer que la polea del motor gire como si tuviera que arrancarlo. Si no se produce la chispa entre los dos electrodos, controlar las conexiones del cable de la bujía y si la corriente sigue sin llegar, sustituir la bujía. Si esta última sustitución tampoco da buenos resultados, la avería se deberá localizar en la instalación eléctrica, en el condensador, o en la bobina o en cualquier otro órgano, y conviene dirigirse al centro de asistencia más cercano o a un taller especializado. 2) No se engranan las marchas: – regular el embrague atornillando el tornillo de reglaje hasta que se desacople bien el embrague. Tratar de no anular completamente la holgura. PERIODOS DE LARGA INACTIVIDAD Si no ha de utilizarse la máquina durante mucho tiempo conviene adoptar estas precauciones: – vaciar el combustible; – lavar esmeradamente el motor y la máquina. Engrasar el mecanismo de inversión en el soporte de la mancera. 43 Traducción de las Instrucciones Originales MANTENIMIENTO Y LUBRICACION ¡ATENCIÓN! - Antes de comenzar toda intervención de limpieza, mantenimiento o reparación, ponerse prendas apropiadas y guantes de trabajo. - Si fuera necesario levantar la máquina o parte de esa, utilizar siempre herramienta adecuada como soportes o ganchos de seguridad. - No dejar la máquina en mantenimiento, sin dispositivos de seguridad o levantada en lugares accesibles a personas inexpertas, especialmente niños. - Nunca desechar en el medio ambiente el aceite usado, la gasolina o cualquier otro producto contaminante. - Un mantenimiento eficaz y una correcta lubricación contribuyen a mantener la máquina en perfectas condiciones. RODAJE: pasadas las primeras 8 horas de trabajo sustituir el aceite del motor. MOTOR - Para los intervalos de lubricación seguir las normas contenidas en el libro del motor. En general conviene controlar el nivel del aceite cada 8 horas de trabajo y sustituirlo cada 100 horas. Emplear siempre aceite 10W30. Controlar el filtro de aire cada 8 horas, o incluso más frecuentemente si el ambiente es muy polvoriento. Cambiar el cartucho si se encuentra atascado (no use chorros de aire para limpiarlo). CAJA DEL CAMBIO - Controlar el nivel del aceite cada 50 horas de trabajo (fig. 6) quitando el tapón y controlando que, con la máquina horizontal, el aceite llega a la posición situada entre los dos bordes. De ser necesario, añadir aceite MP 80 W/90 (API GL5 US MIL-L-2105D). Cambiar el aceite una vez al año. FRESA - Controlar el nivel del aceite cada 100 horas: desenroscando el tapón, el aceite ha de llenar casi el cárter de la fresa. De ser necesario añadir el mismo aceite del cambio (fig. 4, rif. 3). REGLAS UTILES PARA UN BUEN USO: 1) ¡Importante! Abandonar siempre la palanca del embrague cuando se pasa de las marchas hacia adelante a las marchas atrás y viceversa. 2) No dejar nunca la máquina bajo la lluvia. 3) Mantener limpio y engrasado el mecanismo de inversión en el soporte de la mancera. 4) No forzar el cambio si la marcha no entra: mientras se engrana la marcha, soltar al mismo tiempo un poco el embrague. 5) No forzar nunca el motor; cuando sale humo por el escape, está bajo esfuerzo: ¡reduce la velocidad! 6) Se pueden azar también terrenos imposibles; pero antes es necesario hacer un buen rodaje a la máquina. 7) Controlar a menudo la presión de los neumáticos. 8) Al montar el equipo (ej.: la fresa), tratar de no estropear el centrado (véase capítulo de equipos). MANTENIMIENTO DE FIN DE TEMPORADA Lavar la máquina con cuidado; sustituir el aceite tanto en el motor como en el cárter del cambio de la fresa, limpiar el filtro de aire. Afilar las azadas y engrasarlas; si están gastadas: cambiarlas. 44 Traducción de las Instrucciones Originales TABLA RECAPITULATIVA DE MANTENIMIENTO INTERVENTOS Aceite motor Controlar el nivel Sustituir Filtro aire Controlar CADA 8 PRIMERAS CADA 50 CADA 100 CADA AÑO HORAS 20 HORAS HORAS HORAS O CADA 200 HORAS ● ● (primer cambio) ● ● Sustituir Bujía ٭ Controlar/registrar ● Sustituir Aceite caja de cambios ● Controlar el nivel ● ● Sustituir Controlen que la rejilla de aspiración motor sea limpia Barra Controlar empalme segadora cuchilla Lubricar ● ● ● ● ● ● ● ● Controlar afilado y fijación azadas Lubricar con grasa ● ● Controlar el juego del embrague ● intervención recomendada ٭intervenir si necesario EQUIPOS FRESA La fresa sirve para romper la capa superficial del terreno con objeto de aumentar la permeabilidad y al mismo tiempo para despejarlo de las malas hierbas. El fresado puede realizarse en primera velocidad si el terreno es duro y tenaz o en segunda si el terreno es suelto y arenoso. La profundidad de fresado puede variarse levantando o bajando la cuchilla central situada bajo el cuerpo de la fresa(fig. 4B). Para aumentar la profundidad hay que desplazar la cuchilla hacia arriba. Convine comenzar el trabajo con la cuchilla en la posición más baja y luego levantarla si se desea obtener más profundidad (fig. 4B). NOTA: En los terrenos duros, si la máquina tiende a saltar hacia delante, bajar al máximo la cuchilla fijándola en el primer orificio (fig. 4B, pos.1). Controlar que el montaje de las cuchillas sea correcto (véase fig. 9). 45 Traducción de las Instrucciones Originales BARRA SEGADORA La barra segadora aplicable al motocultor posee un accionamiento central. La construcción robusta y el gran rendimiento la convierte en el medio ideal para segar. La barra va montada en el empalme de los equipos del motocultor, en lugar de la fresa, y va fijada con las mismas dos tuercas. El manillar se girará 180° colocándole por la parte del motor. Antes de girar el manillar el cambio se colocará en 1ª, luego se desengancharán las varillas de mando y de toma de fuerza. Una vez girado el manillar las varillas se han de volver a colocar en los soportes superiores. Habiendo girado el manillar el mecanismo del soporte de la mancera permite aprovechar todas las marchas como en la versión motocultor eliminando la marcha más rápida, que podría ser peligrosa. Para activar el movimiento de la cuchilla habrá que desactivar el dispositivo de seguridad que impide que se engranen simultáneamente la marcha atrás y la toma de fuerza (en cambio es necesario para el uso de la fresa – fig.2). Para ello basta con quitar el tornillo que hace de contraste contra la palanca del cambio impidiendo la doble activación. Importante: si vuelve a montar la fresa es obligatorio restablecer las condiciones iniciales del dispositivo de seguridad (fig. 2/A). Mantenimiento: engrasar cada 8 horas de trabajo los pernos de la cruceta a través del engrasador situado en la manilla oscilante (fig. 11, n.1 – n.2). Engrasar cada 50 horas de trabajo también el casquillo de oscilación de la barra, a través del engrasador situado bajo la protección oscilante. Mantener regulada la cuchilla regulando oportunamente los prensacuchillas que no han de bloquear la cuchilla pero tampoco permitir una holgura excesiva respecto a las chapitas de los dientes. Para efectuar el reglaje de los prensacuchillas para los dos tipos, se aflojan los tornillos de bloqueo (fig. 11, n.6) y se regula el tornillo de presión. Cuando los prensacuchillas están consumidos, conviene sustituirlos cuando aún puedan prensar. Regular la holgura entre la cuchilla y la tira de consumo aflojando los tornillos que fijan los prensatiras y desplazando hacia adelante la tira hasta que se apoye contra la varilla que lleva clavadas las secciones de la cuchilla. Bloquear otra vez los prensatiras. Para desmontar la cuchilla quitar el empalme de la cuchilla L desmontando los dos tornillos (fig. 11 n. 3) y extraer la cuchilla. Tras haber montado la cuchilla, tratar de apretar bien los tornillos de fijación del empalme. Utilizar siempre cuchillas bien afiladas: la máquina sufrirá menos esfuerzos y durará más. Tras cada jornada de trabajo lavar la barra segadora quitándole cualquier residuo de hierba o tierra; controlar de vez en cuando que todos los tornillos están bien apretados. ARADOS Los arados estudiados para el motocultor se han puesto a punto especialmente para realizar trabajos de arado sin que el operador se canse excesivamente (fig.10). La profundidad del surco que puede obtenerse puede variar de 10 a 15 cm según el terreno. Se aconseja utilizar ruedas altas y eventualmente montando también los contrapesos que aumentan la adherencia. TIRO DEL REMOLQUE El tiro de remolque sirve para acoplar al motocultor el carro de traslado o el remolque, sin desmontar la fresa. Este empalme se fija al gancho de remolcado del motocultor (fig. 12). RUEDA DE APOYO DE LA FRESA Es muy útil en los desplazamientos de la máquina porque manteniendo levantada la fresa del terreno hace más fácil y menos cansado su traslado (fig. 13). SEPARADORES DE LAS RUEDAS Sirven para ensanchar la vía y aumentan la estabilidad de la máquina en las pendientes transversales. Se montan entre las ruedas y los bujes porta ruedas y ensanchan la vía 6 cm por cada parte (fig. 14). 46 Traducción de las Instrucciones Originales RUEDAS METALICAS DE JAULA Estas ruedas se usan sobre todo al utilizar el motocultor con fresa en terrenos muy duros. De hecho, las traviesas situadas en la circunferencia de las ruedas penetran en el terreno realizando un buen anclaje de la máquina al suelo e impidiendo que las ruedas patinen (fig. 15). Las ruedas de jaula se usan también cuando las otras ruedas de caucho podrían patinar o hundirse en terrenos blandos o suaves porque están poco trabajados. Conviene usar ruedas de jaula sólo en estos casos. En los demás casos suele aconsejarse usar ruedas neumáticas que, donde no se necesiten prestaciones de adherencia exageradas, dan a la máquina una tracción más regular y hacen de rodamiento elástico entre ésta y el terreno. SURCADOR RETROFRESA Se aplica posteriormente a la fresa y trabaja conjuntamente con esta, sirve para trazar surcos de riego o siembra (fig. 16). PALA FRONTAL ORIENTABLE Su resistencia la convierte en el medio ideal para quitar la nieve y aplanar cúmulos de grava o tierra; es inclinable a derecha o a izquierda (fig. 17). CONTRAPESOS PARA RUEDAS Los contrapesos se montan en las llantas de las ruedas y se fijan con dos de las cuatro tuercas que fijan las ruedas en cuestión. Sirven para aumentar el peso de la máquina y por tanto la adherencia; se aconsejan en los trabajos con arado, con asurcador regulable y de ser necesario con fresa o remolque si se desean obtener prestaciones máximas (fig. 18). 47 Перевод оригинальной инструкции МОТОКУЛЬТИВАТОР G84 Уважаемый клиент! Благодарим Вас за доверие и предпочтение, отданное нашему мотокультиватору. Мы надеемся, что эта новая машина будет полностью соответствовать Вашим требованиям. Для её оптимального использования и техобслуживания необходимо внимательно прочитать и тщательно выполнять указания руководства, это позволит получить максимальные результаты и защитить вложения. Храните эти инструкции, которые должны всегда находиться при машине. ОБЩЕЕ ОПИСАНИЕ И ПРЕДУСМОТРЕННОЕ ИСПОЛЬЗОВАНИЕ Мотокультиватор - это самоходная одноосная сельскохозяйственная машина, оснащённая фрезой для обработки почвы. Эти машины используются для подготовки небольших участков почвы (удаление сорняков, поверхностное фрезерование), для отделочных работ, в междурядье фруктовых садов и овощных грядок. Машина состоит из несущей рамы, на которой установлен двигатель внутреннего сгорания, приводящий в движение колёса и отбор мощности, к которому обычно присоединяется фреза, а также другие орудия: снежные фрезы, режущие аппараты, ножи для снега, плуги, машины для зерна, опрыскиватели и т.д. Оператор управляет машиной вручную с помощью рукоятки с органами управления. ВНИМАНИЕ! Внимательно прочитать перед пуском двигателя. Эти правила пользования важны для безопасности оператора! МЕРЫ ПРЕДОСТОРОЖНОСТИ И РЕКОМЕНДАЦИИ Осторожность - это главный помощник для предупреждения травматизма! Настоятельно рекомендуем внимательно прочитать правила пользования перед началом работ. Неправильное использование мотокультиватора и его оснащения может нанести вред. Для предотвращения этого необходимо соблюдать приведённые ниже меры предосторожности: 1) Полностью прочитать данное руководство перед включением и пуском мотокультиватора. 2) Обращать особое внимание на предостережения и предупредительные этикетки на машине. 3) Вращение фрезы очень опасно, никогда не ставить руки или ноги под фрезу. 4) Если с мотокультиватором должны работать другие люди, необходимо сообщить им правила техники безопасности и как работать с машиной. 5) Перед включением мотокультиватора проверить, чтобы вокруг не было людей, особенно детей. 6) Оператор не должен использовать мотокультиватор, если он устал или находится в состоянии алкогольного опьянения. 7) Проверить почву перед фрезерованием, чтобы не было камней, палок или инородных тел, которые несут опасность, т.к. могут повредить машину или далеко отбрасываться. 8) Перед работой надеть подходящую одежду, перчатки, обувь. 9) Не использовать мотокультиватор на сильных склонах, т.к. он может перевернуться (макс. 25%). 10) Запрещено использовать мотокультиватор лицам до 16 лет. 11) Не давать задний ход, когда увеличивается число оборотов двигателя. 12) Опасно резко включать рычаги, когда двигатель работает с максимальной скоростью. 13) Для предотвращения ядовитых выхлопов не включать двигатель в закрытом помещении. 14) Всегда выключать двигатель перед заправкой топлива, держаться вдали от огня или искр, не курить! 15) Избегать утечек топлива. После наполнения бака и перед включением двигателя убрать все утечки топлива. 16) Хранить топливо в специальных баках. 17) Работать только днём или с хорошим искусственным освещением. 48 Перевод оригинальной инструкции НЕ СООТВЕТСТВУЮЩИЕ ИСПОЛЬЗОВАНИЯ, КОТОРЫХ НЕОБХОДИМО ИЗБЕГАТЬ 18) Все не соответствующие использования приводят к утрате гарантии и освобождают производителя от ответственности. 19) Никогда не использовать машину для перевозки людей. ДОПОЛНИТЕЛЬНЫЕ МЕРЫ ПРЕДОСТОРОЖНОСТИ 20) Не вскрывать и не отключать защитные устройства. 21) Не выполнять регулировку или очистку, когда двигатель включен. 22) Никто не должен проверять машину, когда оператор работает на ней и включен двигатель. 23) Пользователь всегда несёт ответственность за ущерб, нанесённый третьим лицам. 24) Всегда заменять деформированные или повреждённые мотыги, а не ремонтировать их. 25) Всегда использовать оригинальные запчасти Grillo. 26) Перед выполнением любой работы с машиной проверить, чтобы работали все установленные на ней системы защиты. Категорически запрещено отключать или вскрывать их. Проверить отключение фрезы на заднем ходе. 27) Перед началом работы проверить, чтобы стопорные винты и гайки фрезы и тяпок были полностью зажаты. 28) Обязательно оставлять защитное оборудование (кожухи, крылья и т.д.) при мотыжении. 29) Не чистить фрезу, когда включен двигатель. 30) Не использовать машину босиком. 31) Не изменять настройки двигателя, особенно максимальное количество оборотов. 32) Охладить двигатель перед тем, как поставить машину в закрытое помещение. 33) ВНИМАНИЕ: для сокращения опасности пожаров, в двигателе, глушителе и отводящих трубах не должно быть травы, листьев, пыли и т.д. 34) Если необходимо слить топливный бак, выполнить операцию на улице. 35) Машиной должен управлять только один оператор. ИДЕНТИФИКАЦИЯ И ОБСЛУЖИВАНИЕ ИДЕНТИФИКАЦИЯ На раме машины находится табличка с паспортным номером. Это номер необходимо сообщать при вызове техников или заказе запчастей. СЕРВИСНОЕ ОБСЛУЖИВАНИЕ Это руководство содержит инструкции по правильному использованию и основному техобслуживанию мотокультиватора, выполняемому пользователем. Если операции не были описаны в этом руководстве, связаться с территориальным дистрибьютором. ЗАПЧАСТИ Рекомендуется использовать только оригинальные запчасти, только они гарантируют безопасность и взаимозаменяемость. Во всех запросах должен указываться паспортный номер. Для запчастей двигателя использовать информацию из специального руководства. ГАРАНТИЯ Гарантия соответствует процедурам и ограничениям действующего закона. Для двигателя действительны условия, предусмотренные его производителем. 49 Перевод оригинальной инструкции ЗАКАЗ ЗАПЧАСТЕЙ Всегда указывать паспортный номер машины и код запчасти. Обратиться в наши центры запчастей или в мастерские. Наш адрес: GRILLO S.p.A. Via Cervese 1701 - 47521 CESENA (FC) Тел. 0547 / 633111 - Факс 0547 / 632011 Вэб-сайт: www.grillospa.it - E-mail: [email protected] ТЕХНИЧЕСКИЕ ХАРАКТЕРИСТИКИ ДВИГАТЕЛЬ: HONDA GX200 OHV 196 см3 5,5 л.с. 4,1 кВт (при 3600 об / мин.) Одноцилиндровый бензина. ЗАПУСК: шнуровой. ЁМКОСТЬ ТОПЛИВНОГО БАКА: 3,6 литра СЦЕПЛЕНИЕ: конусное активное. КОРОБКА ПЕРЕДАЧ: с масляными шестернями. В версии мотокультиватора: 3 передних хода + 2 задних хода; в версии автокосилки: 2 передних хода + 2 задних хода. РЕВЕРСОР: стержневой. ОТБОР МОЩНОСТИ: 965 оборотов, независимо от коробки передач с правым направлением вращения в версии мотокультиватора, с левым направлением вращения в версии автокосилки. ЗАЩИТНОЕ УСТРОЙСТВО: активное сцепление, выключение КОМ при заднем ходе. РУКОЯТЬ УПРАВЛЕНИЯ: регулируется по высоте и по бокам, реверсивная, установлена на антивибраторах. ФРЕЗА: 580 мм, регулируется на 370 - 470 мм и на 680 мм с расширениями. РАБОЧАЯ ГЛУБИНА: 160 мм. КОЛЁСА: 4.00-8 – 4.00.10 – 5.00-10 (5.00-12 только для вспашки). ВНЕШНИЕ ГАБАРИТНЫЕ РАЗМЕРЫ с колёсами 4.00-8: 420-370 мм. КОМПЛЕКТУЮЩИЕ: центральный режущий аппарат 110/115/117/127/137 см, плуг, бороздоделатель, прицеп 150x110 см, колёса из железа, буксирная тяга, снегоочиститель на 60 см, поворотный нож на 100 см, цепи противоскольжения для шин 4.00-8. 50 Перевод оригинальной инструкции ПУСК МАШИНЫ 1) Проверить целостность машины, чтобы удостовериться в отсутствии повреждений во время перевозки. 2) Наполнить смазкой фланцевое соединение КОМ машины вокруг сцепления (рис. 3, №20). 3) Поставить рукоятку управления в положение мотокультиватора или автокосилки, используя два рычага (рис. 3, №10-12). 4) Установить колёса и комплектующую (напр., фрезу, плуг и т.д., рис. 4А), зажать до упора крепёжные гайки. 5) Налить моторное масло, см. приложенное руководство. 6) Проверить масло коробки передач - рис. 6 (масло MP80W90, международное соответствие API GL5, US MIL-L- 2105D, количество 2,2 литра). 7) Вставить штанги привода (рис. 3 №13, 15 и 2). 8) Проверить давление в шинах, см. таблицу: ДАВЛЕНИЕ ШИН 4.00-8 2 НОРМА СЛОЙНОСТИ 1,1 БАР 4.00-10 2 “ “ 1,1 5.00-10 2 “ “ 1, 5 “ “ РАБОЧИЕ ИНСТРУКЦИИ Перед включением двигателя всегда проверять: − Уровень масла в двигателе (рис. 5, дет. А) и коробке передач; пробка уровня находится на верхней крышке (рис.6); масло должно доходить до двух кромок. − Чтобы все винты и гайки были хорошо зажаты, особенно те, которые крепят мотыги и орудия к мотокультиватору (рис. 4А). − Чтобы все рычаги были в нейтральном положении. − Чтобы воздушный фильтр (сухая верс.) был чистым (рис. 7). Внимание! Не продувать патрон сжатым воздухом. Если он сильно засорился, заменить. − проверить уровень масла картера фрезы (рис. 4, №3). − наполнить топливный бак, используя мелковолокнистую воронку (рис. 3, №11). ПУСК ДВИГАТЕЛЯ ВНУТРЕННЕГО СГОРАНИЯ Открыть топливный кран, нажать до половины хода рычажок управления газом и, если двигатель холодный, включить расположенное на карбюраторе пусковое устройство. Включить двигатель, с силой потянув рукоятку шнурового стартера (рис. 3, №6). ПУСК МАШИНЫ Поставить рычаг переключения передач в необходимое положение. Если движение не включается сразу, несколько раз быстро нажать на сцепление. Машина включается при нажатии на рычаг сцепления (рис. 3, №1). Отпустив красный рычаг, машина остановится, двигатель останется включенным, рычаг вернётся в положение 1 (рис. 3). Для выключения двигателя использовать выключатель на рукоятке газа (рис. 3 №21), положение ВЫКЛ для бензиновых двигателей. ПРИМЕЧ.: Если включен отбор мощности, нельзя включить задний ход. В подобном случае, отключить отбор мощности и включить задний ход. ПРИМЕЧАНИЕ: Чтобы во время работы не было проблем со сцеплением, полностью нажать красный рычаг. Внимание: не работать, когда рычаг частично нажат. Во время работы пружина (рис. 8) должна практически полностью сжаться. 51 Перевод оригинальной инструкции НАЧАЛО РАБОТЫ Включить отбор мощности, несколько раз быстро нажав на сцепление, если оно сразу не включилось. Увеличить число оборотов. двигателя и нажать рычаг сцепления, начав работу. КОНЕЦ РАБОТЫ В конце работы для остановки БЕНЗИНОВОГО ДВИГАТЕЛЯ, поставить коробку передач и отбор мощности в нейтральное положение и повернуть выключатель на рукоятке газа в положение ВЫКЛ (рис. 3, №21). ВОЗМОЖНЫЕ СБОИ И ИХ РАЗРЕШЕНИЕ Ниже приводится список небольших неполадок, которые могут возникнуть использовании мотокультиватора и которые клиент может самостоятельно устранить: при 1) Двигатель не включается (двигатель внутреннего сгорания). По порядку выполнить следующие проверки: - бензобак наполнен не менее половины; - бензокраник открыт; - включено пусковое устройство (если двигатель холодный); - чтобы бензин доходил до карбюратора; - чтобы не засорилось вентиляционное отверстие на пробке; - чтобы жиклёры карбюратора были чистыми. Для их проверки, отвинтить и, если они грязные, очистить струёй воздуха; - чтобы свеча давала искру. Для выполнения этой проверки, снять свечу, присоединить её к токоподводящему кабелю, положить металлическую часть на корпус и повернуть шкив двигателя, как для запуска. Если нет искры между двумя электродами, проверить соединения кабеля свечи и, если ток продолжает не поступать, заменить свечу. Если замена не устранила проблему, надо искать неисправность в электрооборудовании: в конденсаторе, бобине или в другом органе. Рекомендуется обратиться в ближайший сервисный центр или специализированную мастерскую. 2) Не включаются передачи: - отрегулировать сцепление, завинтив регулировочный винт так, чтобы сцепление хорошо выключалось. Оставить зазор. ПЕРИОД ДЛИТЕЛЬНОГО ПРОСТОЯ Если машина не будет долго использоваться, необходимо: - слить топливо; – аккуратно вымыть двигатель и машину. Смазать реверсивный механизм на опоре рукояти управления. 52 Перевод оригинальной инструкции ТЕХОБСЛУЖИВАНИЕ И СМАЗКА ВНИМАНИЕ! - Перед тем, как приступить к выполнению любой операции по очистке, техобслуживанию или ремонту, надеть подходящую одежду и рабочие перчатки. - Для подъёма машины или её части всегда использовать подходящие инструменты или предохранительные стопоры. - Не оставлять ремонтирующуюся машину без защит или в поднятом состоянии в местах, доступных для неопытных людей и особенно для детей. - Никогда не выбрасывать в окружающую среду отработавшие масла, бензин, газойль и любые другие загрязняющие средства! - Эффективное техобслуживание и правильная смазка способствуют сохранению эффективности машины. ОБКАТКА - В течение первых 8 часов работы заменить моторное масло. ДВИГАТЕЛЬ - Периодичность смазки указана в руководстве двигателя. Рекомендуется проверять уровень масла каждые 8 часов работы и заменять его каждые 100 часов. Всегда использовать моторное масло 10W30. Проверять воздушный фильтр каждые 8 часов или даже чаще, если помещение очень пыльное. Заменить патрон, если он сильно засорился (для его очистки не использовать струи воздуха). КОРОБКА ПЕРЕДАЧ - Проверять уровень масла каждые 50 часов работы (рис. 6), сняв пробку и проверив, чтобы в горизонтальном положении машины масло доходило до двух кромок. Если необходимо, долить масло MP 80 W/90 (API GL5 US MIL-L-2105D). Менять масло раз в год. ФРЕЗА - Проверять уровень масла через 100 часов, отвинтив пробку; масло должно практически полностью наполнять коробку фрезы. Если необходимо, долить то же масло, что и в коробке передач (рис. 4, дет. 3). ПОЛЕЗНЫЕ ДЛЯ РАБОТЫ СОВЕТЫ : Важно! Всегда отпускать рычаг сцепления, когда выполняется переход с переднего хода на задний и наоборот. 2) Не оставлять машину под дождём. 3) Реверсивный механизм на опоре рукояти управления должен быть чистым и смазанным. 4) Не форсировать переключение передач. Если передача не включается, несколько раз быстро нажать на сцепление. 5) Никогда не форсировать двигатель. Когда из выпускной трубы выходит дым, двигатель перегружен и необходимо уменьшить число оборотов. 6) Можно мотыжить даже очень трудную почву. Однако сначала необходимо провести хорошую обкатку машины. 7) Часто проверять давление шин. 9) При монтаже орудий (напр., фрезы) не нарушать центровку (см. главу орудий). ТЕХОБСЛУЖИВАНИЕ В КОНЦЕ СЕЗОНА Тщательно вымыть машину; заменить масло в двигателе и картере коробки передач и фрезы, очистить воздушный фильтр. Заточить и смазать мотыги; если они износились, заменить их. 53 Перевод оригинальной инструкции СВОДНАЯ ТАБЛИЦА ТЕХОБСЛУЖИВАНИЯ ОПЕРАЦИЯ Моторное масло Проверить уровень Заменить Проверить Воздушный фильтр Свеча КАЖДЫ Е8 ЧАСОВ ПЕРВЫ Е 20 ЧАСОВ ПЕРВЫЕ 50 ЧАСОВ ● (первая замена) ● ● Заменить ٭ Проверить/отрегулиро вать ● ● Проверить уровень ● ● Заменить Проверить, чтобы воздухозаборная решётка двигателя была чистой Режущий Проверить крепление аппарат ножа Смазать ● ● ● ● ● ● ● ● ● Проверить заточку и крепление мотыг Смазать смазкой ЕЖЕГО ДНО ИЛИ ЧЕРЕЗ 200 ЧАСОВ ● Заменить Замена масла КАЖДЫЕ 100 ЧАСОВ ● Проверка зазора сцепления ● рекомендуемая операция ٭если необходимо, выполнить эту операцию ОРУДИЯ ФРЕЗА Фреза служит для разрыхления поверхностного слоя почвы, чтобы увеличить водопроницаемость и удалить сорняки. Фрезерование почвы можно выполнять с первой скоростью, если почва твёрдая и вязкая, и со второй, если она рыхлая или песчаная. Глубину фрезерования можно изменить, подняв или опустив центральный нож под корпусом фрезы (рис. 4В). Для увеличения глубины переместить нож вверх. Рекомендуется начинать работу с ножом в самом нижнем положении и поднять его, когда необходимо достичь большей глубины. (рис. 4В). ПРИМЕЧ.: На твёрдой почве, если машина прыгает вперёд, максимально опустить нож, закрепив его в первом отверстии (рис. 4В, полож. 1). Проверить, чтобы ножи были правильно установлены (см. рис. 9). 54 Перевод оригинальной инструкции РЕЖУЩИЙ АППАРАТ Режущий аппарат крепится к мотокультиватору и имеет центральное управление. Крепкая конструкция и повышенная производительность делают его идеально подходящим для косьбы. Аппарат устанавливается на соединение орудий мотокультиватора, вместо фрезы, и крепится теми же двумя гайками. Рукоятка поворачивается на 180° , в сторону двигателя. Перед поворотом рукоятки необходимо включить первую передачу, затем разомкнуть штанги привода передач и отбор мощности. После поворота рукоятки штанги снова должны войти в верхние опоры. Повернув рукоятку, механизм в опоре рукояти управления позволяет использовать все передачи, как и в версии мотокультиватора, за исключением быстрого хода, т.к. он может быть опасным. Для включения движения ножа необходимо отключить защитное устройство, которое предотвращает одновременное включение заднего хода и отбора мощности (что необходимо для использования фрезы - рис. 2). Для этого достаточно убрать винт, который блокирует рычаг коробки передачи, предотвращая двойное включение. Важно: если снова устанавливается фреза, необходимо обратно установить защитное устройство (рис. 2/А). Техобслуживание: смазывать каждые 8 часов работы пальцы крестовины через маслёнку на качающимся кривошипе (рис. 11, №12). Смазывать каждые 50 часов работы втулку штанги качания через маслёнку под качающейся защитой. Установить нож, отрегулировав резцедержатели, которые не должны быть слишком тесными, чтобы не блокировать нож, кроме того, между пластинкам зубцов зазор не должен быть слишком большим. Для регулировки резцедержателей для двух типов необходимо ослабить стопорные винты (рис. 11, №6) и отрегулировать нажимной винт. Когда резцедержатели износились, заменить их, даже если они могут ещё нажимать. Отрегулировать зазор между ножом и полоской износа, ослабив винты, которые крепят держатели полоски, и переместив полоску вперёд так, чтобы она касалась стержня, на котором гвоздями прикреплены участки ножа. Затем снова заблокировать держатели полоски. Чтобы снять нож, снять соединение ножа L, отвинтив два винта (рис. 11 №3), и вынуть нож. После установки ножа надо плотно зажать крепёжные винты. Всегда использовать хорошо заточенные ножи: машина подвергается меньшей нагрузке и дольше служит. В конце рабочего дня вымыть режущий аппарат, чтобы удалить все остатки травы или земли; периодически проверять, чтобы все винты были плотно затянуты. ПЛУГИ Разработанные для мотокультиваторов плуги были специально налажены для выполнения качественной распашки, не утомляя оператора (рис. 10). Глубина получаемой борозды: 10 15 см, в зависимости от почвы. Оптимальные характеристики получаются при установке высоких колёс, а также балластов, которые увеличивают прилегание. БУКСИРНАЯ ТЯГА Буксирная тяга служит для присоединения к мотокультиватору транспортной тележки или прицепа, не снимая фрезу. Эта закладная деталь крепится к буксирному крюку мотокультиватора (рис. 12). МАЛЕНЬКОЕ ОПОРНОЕ КОЛЕСО ФРЕЗЫ Оно очень полезно при езде машины. Держа фрезу в поднятом положении, оно облегчает езду (рис. 13). РАСПОРКИ ДЛЯ КОЛЁС Они служат для расширения колеи и увеличивают устойчивость машины на поперечных склонах. Они устанавливаются между колёсами и ступицами колёс и расширяют колею на 6 см с каждой стороны (рис. 14). 55 Перевод оригинальной инструкции МЕТАЛЛИЧЕСКИЕ РЕШЕТЧАТЫЕ КОЛЕСА Эти колёса особенно подходят для применения мотокультиваторов с фрезой на очень твёрдой почве. Расположенные по окружности колёс распорки проникают в почву и машина хорошо прилегает к почве, что предотвращает пробуксовывание колёс (рис. 15). Решетчатые колёса используются также, когда другие резиновые колёса могут скользить или завязать в мягкой, только что обработанной почве. Используются и с плугом. В других случаях рекомендуется использовать пневмоколеса, которые, если не требуются характеристики предельного сцепления, придают машине более однородную тягу и служат в качестве эластичного подшипника между машиной и почвой. СМОНТИРОВАННЫЙ СЗАДИ БОРОЗДОДЕЛАТЕЛЬ Он крепится сзади фрезы и работает вместе с ней для разбивания борозд для поливки или посева (рис. 16). ПЕРЕДНИЙ ПОВОРОТНЫЙ НОЖ Благодаря своей прочности он идеально подходит для удаления снега и выравнивания навалов гравия или почвы. Он может наклоняться направо или налево (рис. 17). БАЛЛАСТЫ ДЛЯ КОЛЕС Балласты устанавливаются на ободья колес и крепятся двумя гайками (из четырёх), которые крепят сами колёса. Они служат для увеличения веса машины и, следовательно, прилегания. Они рекомендуются для работ с плугом, регулируемым бороздоделителем, а также с фрезой или прицепом, если необходимы максимальные характеристики (рис. 18). 56 ATTENZIONE! Sickle bar – Motofalciatrice – Motofaucheuse – Motormäher Motosegadora – косилка Fig. 2 Walking tractor – Motocoltivatore – Motoculteur – Einachser – Motocultor – культиватор Fig. 2A 57 1 14 17 12 15 2 13 10 19 16 18 11 14 21 4 23 22 8 9 6 20 Fig. 3 7 3 5 Fig. 4 58 LEGEND – ЛЕГЕНДА – LEGENDA FIG. 3-4 1) Clutch lever 2) Reverse lever 3) Tiller oil plug 4) Hoeing depth adjustment rod 5) Central tiller blade 6) Start handle 7) Reverse interference 8) Wheel locking nuts 9) Motor oil level 10) Handlebar positioning lever 11) Fuel plug 12) Handle positioning lever 13) Power takeoff gear lever 14) Accelerator lever 15) Gear lever 16) Tiller cover adjustment rod 17) Clutch cable adjustment screw 18) Rod split pin 19) Air filter 20) Flanging for implement 21) Gasoline engine stop switch 22) Motor guards 23) Rod joint 1) Leva frizione 2) Leva retromarcia 3) Tappo olio fresa 4) Asta regolazione profondità zappatura 5) Coltello centrale fresa 6) Maniglia avviamento 7) Interferenza retromarcia 8) Dadi fissaggio ruote 9) Livello olio motore 10) Leva posizionamento manubrio 11) Tappo carburante 12) Leva posizionamento stegola 13) Leva innesto presa di forza 14) Manettino acceleratore 15) Leva marce 16) Asta regolazione cofano fresa 17) Registro filo frizione 18) Coppiglia asta 19) Filtro aria 20) Flangiatura attrezzi 21) Interruttore spegnimento motore benzina 22) Paraurti motore 23) Snodo asta 1) Levier embrayage 2) Levier marche arrière 3) Bouchon huile fraise 4) Réglage profondeur de travail 5) Couteau centrale fraise 6) Levier de démarrage 7) Interférence marche arrière 8) Écrous de fixation de roues 9) Niveau huile moteur 10) Levier du positionnement du guidon 11) Bouchon du carburant 12) Levier du positionnement du mancheron 13) Levier enclenchement prise de force 14) Manette accélérateur 15) Levier vitesses 16) Réglage du capot de la fraise 17) Vis de réglage câble embrayage 18) Goupille tige 19) Filtre à air 20) Bridage outils 21) Interrupteur arrêt moteur 22) Pare-chocs moteur 23) Pivot tige 1) Kupplungshebel 2) Rückwärtsgang-Hebel 3) Öldeckel Fräse 4) Hacktiefeneinstellung 5) Zentralmesser Fräse 6) Startgriff 7) Rückwärtsgang-Sperre 8) Befestigungsmuttern Räder 9) Motorölstand 10) Lenker-Positionierungshebel 11) Kraftstoff-Tankdeckel 12) Lenkholm-Positionierungshebel 13) Zapfwellen-Kupplungshebel 14) Gashebel 15) Ganghebel 16) Fräshauben-Einstellstange 17) Kupplungsseil-Einstellung 18) Splint Stange 19) Luftfilter 20) Geräteflansch 21) Schalter auf dem Gashebel um Benzinmotoren zu stoppen 22) Stoßstange Motor 23) Stangengelenk 1) Palanca embrague 2) Palanca marcha atrás 3) Tapón aceite fresa 4) Espolón regulación profundidad azado 5) Cuchilla central fresa 6) Empuñadura arranque 7) Interferencia marcha atrás 8) Tuercas fijación ruedas 9) Nivel aceite motor 10) Palanca regulación manillar 11) Tapón combustible 12) Palanca regulación manceras 13) Palanca embrague toma de fuerza 14) Mando acelerador 15) Palanca marchas 16) Regulación capo fresa 17) Registro cable embrague 18) Pasador de seguridad palanca 19) Filtro aire 20) Acople equipos 21) Interruptor apague motor gasolina 22) Parachoques motor 23) Pivote palanca 1) Рычаг сцепления 2) Рычаг заднего хода 3) Пробка масла фрезы 4) Регулировочная тяга глубины мотыжения 5) Центральный нож фрезы 6) Ручка пуска 7) Интерференция заднего хода 8) Крепёжные гайки колёс 9) Уровень моторного масла 10) Рычаг расположения рукоятки 11) Топливная пробка 12) Рычаг расположения рукояти управления 13) Рычаг включения отбора мощности 14) Рукоятка газа 15) Рычаг передач 16) Регулировочная тяга кожуха фреза 17) Регулятор троса сцепления 18) Шплинт тяги 19) Воздушный фильтр 20) Фланцевое соединение орудий 21) Выключатель бензинового двигателя 22) Бампер двигателя 23) Шарнир тяги 59 Fig. 4A HOW TO FIX THE IMPLEMENTS 1) Draw the implement near the machine 2) Insert it right in the centre and then tighten using two nuts Important: The lack of observance of this rule can ruin the couplings and consequently the implement disengages ISTRUZIONI MONTAGGIO ATTREZZI 1) Accostare l'attrezzo alla macchina 2) Inserirlo bene nel centraggio e serrare con i dadi Importante: Non osservando questa regola si compromette il centraggio, di conseguenza l'attrezzo si disinnesta. INSTRUCTIONS POUR LE MONTAGE DES OUTILS 1) Approcher l'outil à la machine. 2) Introduire l'outil bien au centre et serrer par les deux écrous. Important: si l'on n'observe pas cette règle on peut endommager la jonction et par conséquence l'outil débraye. MONTAGEANLEITUNG FÜR ZUBEHÖR 1) Das Gerät ersichtlich an die Maschine bringen. 2) Das Gerät in das Zentrierstück einlegen und die Muttern anziehen. WICHTIG: diese Anleitungen müssen sorgfältig befolgen werden. Andernfalls wird die Zentrierung beeinträchtigt und das Gerät funktioniert nicht. INSTRUCCIONES MONTAJE HERRAMIENTAS 1) Acercar las herramientas a la maquina. 2) Insertarlas bien en el acoplamiento y apretarlas con dos tuercas. IMPORTANTE: No observando estas reglas se daña el acoplamiento y consecuentemente se desconecta la herramienta. ИНСТРУКЦИИ ДЛЯ МОНТАЖА ОРУДИЙ 1) Поставить орудие возле машины 2) Хорошо вставить его в центровку и затянуть гайки. ПРИМЕЧ: Несоблюдение этого правила нарушит центровку и орудие отцепится. 60 WORKING DEPTH ADJUSTMENT REGOLAZIONE DELLA LAMA ZAPPETTO REGLAGE PROFONDEUR DE TRAVAIL EINSTELLUNG DER ARBEITSTIEFE BEI FRÄSEN REGULACION PROFUNDIDAD DE TRABAJO РЕГУЛИРОВКА НОЖА ТЯПКИ Fig. 4B Fig. 4B - Для твёрдой почвы закрепить в первой точке (Рис. 4B n. 1) - Для мягкой почвы закрепить в третьей точке( Рис. 4B n. 3) 61 OIL A Fig. 5 Fig. 6 Fig. 7 Fig. 8 Fig. 9 Fig. 10 62 1 2 4 3 5 Fig. 11 THE CUTTER BAR MUST BE WASHED AND GREASED AFTER EACH USE LAVARE E LUBRIFICARE LA BARRA FALCIANTE DOPO OGNI UTILIZZO NETTOYER ET LUBRIFIER LA BARRE DE COUPE APRES CHAQUE USAGE If you want your cutter bar to last long lubricate your cutter bar as follows: 1) Lubricate every 50 hours 2) Lubricate every 8 hours 3) The blade coupling must be replaced when it gains too much clearance 4) Often check fingers and ledger plates and keep them well-lubricated 5) Often lubricate the blade. You can use exhaust oil taken from engine oil changes 6) Ledger plates adjuster. Per mantenere l'efficienza della vostra barra falciante il più a lungo possibile seguire i punti di lubrificazione: 1) Lubrificare con grasso ogni 50 ore 2) Lubrificare con grasso ogni 8 ore 3) L'attacco lama va sostituito quando prende gioco 4) i denti e i premilama vanno controllati spesso e tenuti ben lubrificati 5) La lama va spesso lubrificata con olio vecchio, recuperato dai cambi olio del motore. 6) Registro premilama. Pour assurer l'efficacité de Votre barre de coupe suivez les indications suivantes: 1) Lubrifier avec graisse toutes les 50 heures 2) Lubrifier avec graisse toutes les 8 heures 3) L'attache doit être remplacé quand il prend du jeu. 4) Les dents et les guarde-lame doivent être contrôles souvent et bien lubrifiés. 5) La barre de coupe doit être lubrifiée souvent avec de l'huile moteur usé. 6) Régler les guarde-lame. DER MÄHBALKEN MUSS NACH JEDER BENUTZUNG GEREINIGT UND NACHGESCHMIERT WERDEN LAVAR Y LUBRICAR LA BARRA DE SIEGA TRAS CADA МЫТЬ И СМАЗЫВАТЬ РЕЖУЩИЙ АППАРАТ USO ПОСЛЕ КАЖДОГО ИСПОЛЬЗОВАНИЯ Zur Gewährleistung von Effizienz und langer Lebensdauer müssen folgende Stellen nachgeschmiert werden: 1) Alle 50 Stunden nachschmieren. 2) Alle 8 Stunden nachschmieren. 3) Sobald die Messerkupplung locker wird muss diese ausgewechselt werden 4) Zähne und Messerdrücker müssen häufig kontrolliert und nachgeschmiert werden 5) Das Messer oft mit altem Motoröl geschmiert werden. 6) Messerdrücker Regler. Para mantener la eficiencia de vuestra barra de siega el mayor tiempo posible seguir los puntos de lubricación: 1) Lubricar con grasa cada 50 horas 2) Lubricar con grasa cada 8 horas 3) Sustituir el empalme de la cuchilla cuando esto cada holgura 4) Controlar los dientes y los prensa-cuchilla frecuentemente y mantenerlos bien lubricados. 5)Lubricar la cuchilla a menudo y con aceite recuperado delos vaciados del motor. 6) Registro prensa-cuchilla. 63 Для длительной эффективности режущего аппарата смазывать его в следующих точках: 1) Смазывать смазкой каждые 50 часов 2) Смазывать смазкой каждые 8 часов 3) Крепление ножа заменять, когда оно расшаталось. 4) Зубцы и резце держатели часто проверять и хорошо смазывать. 5) Часто смазывать нож старым маслом, после замены масла двигателя. 6) резце держатели Fig. 12 Fig. 13 Fig. 14 Fig. 15 Fig. 16 Fig. 17 Fig. 18 64 Grillo S.p.A. Via Cervese, 1701 - 47521 Cesena ( FC ) – Italia / www.grillospa.it / e-mail: [email protected] EC DECLARATION OF CONFORMITY / DICHIARAZIONE DI CONFORMITÀ CE / CERTIFICAT DE CONFORMITE CE / EG-KONFORMITÄTSERKLÄRUNG / CERTIFICADO DE CONFORMIDAD CE / DECLARAÇÃO CE DE CONFORMIDADE (2006/42/CE, II.A) The undersigned / Io sottoscritto / Je soussigné / Der Unterzeichner / Yo suscrito / Eu abaixo assinado: Ing. Andrea Pinza Authorized officer of / In qualità di legale rappresentante della / En qualité de représentant légal de la / Als rechtlicher Vertreter der / En calidad de legal representante de la / Na qualidade de representante legal da GRILLO SPA – Via Cervese, 1701 – 47521 CESENA (FC) – ITALY Hereby certifies that the underwritten machinery / Dichiaro che la macchina sotto indicata / Certifie que la machine indiquée ci-dessous / Bescheinigt, dass die untenstehende Maschine / Certifico que la máquina indicada a continuación / Certifica que a máquina abaixo indicada: Authorized person to compile the relevant technical documentation / Persona autorizzata alla compilazione del fascicolo tecnico / Personne autorisée à constituer le dossier technique / Person, die bevollmächtigt ist, die technischen Unterlagen zusammenzustellen / Persona facultada para elaborar el expediente técnico / Pessoa autorizada a compilar a documentação técnica relevante: WALKING TRACTOR – MOTOCOLTIVATORE – MOTOCULTEUR – EINACHSSCHLEPPER – MOTOCULTOR - MOTOCULTIVADOR Machine model / Maccina tipo / Machine type / Maschine Typ / Máquina tipo: G84 Serial n° / Numero / Numéro / Nummer / Número: Engine / Motore / Moteur / Motor / Motor: HONDA GX200 Is in compliance with the relevant provisions of the Directive / Rispetta le disposizioni pertinenti della Direttiva / Satisfait à l'ensemble des dispositions pertinentes de la Directive / Entspricht allen einschlägigen Bestimmungen dieser Richtlinie / Cumple todas las disposiciones aplicables de la presente Directiva / Está em conformidade com as disposições relevantes da Directiva 2006/42/CE - UNI EN 709 NOISE LEVELS: LpA 85 dBA with petrol engine at 3600 rpm engine speed. RUMOROSITÀ: LpA 85 dBA con motore a benzina e motore a 3600 giri/min. NIVEAUX SONORES: LpA 85 dBA avec moteur essence et régime moteur de 3600 tr/min. tr/min. GERÄUSCHEMISSION: LpA 85 dBA mit Benzinmotor und Motordrehzahl 3600 UpM. NIVELES DE RUIDO: LpA 85 dBA con motor de gasolina y motor a 3600 rpm. NIVELES DE RUIDO: LpA 85 dBA con motor a gasolina e regime do motor 3600 rpm. CESENA, ________________ VIBRAZIONI VIBRATION SCHWINGUNG VIBRACIONES VIBRAÇOES m/s2 X 3,03 1,44 Y 1,25 2,85 Z 3,41 2,93 80 S.p.A. Grillo S.p.A. 47521 CESENA (ITALY) – Via Cervese 1701 Tel: +39 0547 633111 Fax: +39 0547 632011 Website: www.grillospa.it E-mail: [email protected] GRILLO DEUTSCHLAND GmbH Pilsener Strasse, 9 - D-86199 Augsburg Tel: + 49 082126879910 Faxnr.: + 49 01733132860 Webseite: www.grillodeutschland.de E-Mail: [email protected] Grillo Agrigarden LTD Dove fields Uttoexeter - ST148HU Staffordshire Tel: + 44 01889569149 Fax no.: + 44 01889592666 Website: www.grilloagrigarden.co.uk E-mail: [email protected]