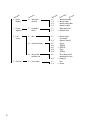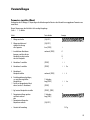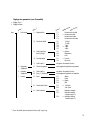
1
Operating Instructions | Betriebsanleitung | Mode d’emploi |
Istruzioni per l’uso | Manual de instrucciones
ALC Models | ALC-Modelle | Modèles ALC |
Modelli ALC | Serie ALC
Electronic Analytical Balances and Precision Scales | Elektronische Analysen- und Präzisionswaagen |
Balances électroniques d’analyse et de précision | Bilance elettroniche analitiche e di precisione |
Balanzas electrónicas analíticas y de precisión
98648-012-74
Languages
English
page 3
In cases involving questions of
interpretation, the German-language
version shall prevail.
Deutsch
Seite 30
Im Auslegungsfall ist die
deutsche Sprache maßgeblich.
Français
page 57
En cas de questions concernant
l’interprétation, la version
en langue allemande fera autorité.
Italiano
pagina 84
In caso di interpretazione,
fa testo la versione in lingua tedesca.
Español
página 111
En caso de interpretación,
la versión en lengua alemana
será determinante.
2
Practical Use
The Acculab ALC Series offers precision balances/scales
with capacities ranging from 0.1 mg to 6 kg.
These balances/scales meet the highest requirements on
the accuracy and reliability of weighing results through the
following features:
– Efficient filtering-out of unfavorable ambient conditions
such as vibrations, drafts, etc.
– Stable and reproducible results
– Rugged, durable weighing system
ALC balances and ALC scales save work
and speed up simple routine applications through:
– Ultrafast response times
– Easy operation
–
–
–
–
–
You can also choose from the following
extra functions for simple applications:
Toggling between weight units
Net-total formulation (tare memory)
Counting
Weighing in percent
Averaging
Contents
3 Practical Use
3 Warning and Safety Information
4 Getting Started
Operating the Balance/Scale
8 Basic Weighing Function
9 Calibration/Adjustment
10
11
13
15
17
Application Programs
Net-Total Formulation/Second Tare Memory
Counting
Weighing in Percent
Weigh Averaging
Toggle Between Weight Units
18
19
21
22
23
24
Configuring the Balance/Scale
Setting the Parameters (Menu Codes)
Balance/Scale Operating Menu (Overview)
Data Interface
Error Codes
Care and Maintenance
Instructions for Recycling
Overview
25 Specifications
29 Accessories (Options)
29 C Marking
Warning and Safety Information
Read these operating instructions thoroughly before using
your balance/scale to prevent damage to the equipment.
Keep these instructions in a safe place.
Follow the instructions below to ensure safe and troublefree operation of your balance/scale:
!
!
Make sure that the voltage rating printed on the
AC adapter is identical to your local line voltage
Use only a commercially available 9-volt battery or
rechargeable battery
!
Do not use this balance/scale in a hazardous area/location
– The only way to turn the power off completely is to
disconnect the AC adapter
– Connect only Sartorius accessories and options, as these
are optimally designed for use with your balance/scale.
– Protect the AC adapter from contact with liquid.
Do not open the balance/scale housing. If the seal is
broken, this will result in forfeiture of all claims under the
manufacturer’s warranty.
3
Getting Started
Storage and Shipping Conditions
Do not expose the balance/scale to shocks, vibration,
moisture or extreme temperatures.
Unpacking the Balance/Scale
§ After unpacking the balance/scale, check it immediately
for any visible damage as a result of rough handling
during shipment.
$ If you see any sign of damage, proceed as directed in the
chapter entitled “Care and Maintenance,” under the
section on “Safety Inspection.”
Save the box and all parts of the packaging until
you have successfully installed your balance/scale.
Only the original packaging provides the best protection for
shipment. Before packing your balance/scale, unplug all
connected cables to prevent damage.
–
–
–
–
–
–
Equipment Supplied
The equipment supplied includes the components listed
below:
ALC-80.4, ALC-110.4, ALC-210.4, ALC-210.3
Balance/scale
Weighing pan
Pan support
Shield ring
Shield plate
AC adapter
–
–
–
–
–
–
–
ALC-150.3, ALC-320.3
Balance/scale
Weighing pan
Pan support
Shield ring
Shield plate
AC adapter
Glass cylinder
–
–
–
–
ALC-810.2, ALC-1100.2, ALC-2100.2, ALC-3100.2,
ALC-2100.1, ALC-4100.1, ALC-6100.1
Balance/scale
Weighing pan
Pan support
AC adapter
4
–
–
–
–
–
–
Installation Instructions
Your balance/scale is designed to provide reliable
weighing results under normal ambient conditions.
When choosing a location to set up your balance/scale,
observe the following so that you will be able to work with
added speed and accuracy:
Set up the balance/scale on a stable, even surface
Avoid placing the balance/scale in close proximity to a
heater or otherwise exposing the balance/scale to heat or
direct sunlight
Protect the balance/scale from drafts that come from open
windows or doors
Avoid exposing the balance/scale to extreme vibrations
during weighing
Protect the balance/scale from aggressive chemical vapors
Do not expose the balance/scale to extreme moisture over
long periods
Conditioning the Balance/Scale:
Moisture in the air can condense on the surfaces of a cold
balance/scale whenever it is brought into a substantially
warmer place. If you transfer the balance/scale to a warmer area, make sure to condition it for about 2 hours at
room temperature, leaving it unplugged from AC power.
Information on Radio Frequency Interference
Warning!
This equipment generates, uses and can radiate radio
frequency energy and, if not installed and used in accordance with the instruction manual, may cause interference
to radio communications. It has been tested and found to
comply with the limits for a Class A computing device pursuant to Subpart J of Part 15 of FCC Rules, which are
designed to provide reasonable protection against such
interference, when operated in a commercial environment.
Operation of this equipment in a residential area is likely to
cause interference, in which case the user, at his own
expense, will be required to take whatever measures may
be required to correct the interference.
Setting up the Balance/Scale
Balances/Scales with an Analytical Draft Shield Chamber:
§
–
–
–
–
Place the components listed below inside the chamber in the order given:
Shield plate
Shield ring
Pan support
Weighing pan
Balances/Scales with a Round Weighing Pan:
§ Place the components listed below on the balance/scale in the order given:
– Pan support
– Weighing pan
§ Place the components listed below on the balance/scale in the order given:
– Pan support
– Weighing pan
5
Connecting the Balance/Scale to AC Power/Safety Precautions
Use only original Acculab AC adapters:
– for Europe: 6971948
– for the RSA: 6971949
– for the U.S.: 6971947
– for Australia: 6971950
§ Insert the right-angle plug into the jack
§ The AC adapter rated to Class 2 can be plugged into any wall outlet without
requiring any additional safety precautions
The ground is connected to the balance/scale housing, which can be additionally
grounded for operation.
Using a Non-Rechargeable/Rechargeable Battery
(for models ALC-810.2, ALC-2100.1, ALC-4100.1 and ALC-6100.1)
$ A non-rechargeable or rechargeable battery is not included with the equipment
supplied
! Use only a commercially available non-rechargeable or rechargeable
9-volt battery
! When using a rechargeable battery, always use an external charger to recharge
the battery
§ Lay the balance/scale on its side
§ Open the battery compartment: Lift the compartment cover
§ Insert the 9-volt (rechargeable) battery in the compartment
$ Make sure to connect the positive and negative poles correctly
!
All used batteries are classified as waste that requires special handling (not
“household” waste). Dispose of rechargeable batteries in accordance with the
applicable special waste disposal regulations.
§ Close the battery compartment: Press down on the cover until it clicks into place
6
Selecting the Line Voltage (Mains Voltage)
Use the following original AC adapters for selecting the line voltage:
– AC adapter TNG8, order no. 6971951 (universal)
or
– AC adapter TNG8, order no. 6971952 (for the U.K.)
● Use the switch to toggle between 230 V and 115 V
Leveling the Balance/Scale
Level the balance/scale any time you set it up in a new location.
Use only the 2 front feet of the balance/scale for leveling.
§ Turn the 2 rear feet until they are in position
§ Turn the 2 front feet as shown here in the illustration until the air bubble
is centered in the level indicator
> In most cases, this will require several adjustment steps
Anti-theft Locking Device
To protect against theft, use the mounting lug on the rear panel of the
balance/scale.
● Secure the balance/scale at the place of installation, for example with a chain
or a lock
7
Operating the Balance/Scale
Basic Weighing Function
Available Features
– Taring the balance/scale
You can tare the balance/scale within the entire weighing range.
Preparation
§ Turn on the balance/scale: Press [ON/OFF]
§ To change configurations: See the chapter entitled “Configuring the Balance/Scale”
§ To load factory-set configurations: See “Configuring the Balance/Scale,” parameter 9 – 1
$ To tare the balance/scale: Press [ZERO]
Additional Functions
§ To turn off the balance/scale: Press [ON/OFF]
Example
Basic weighing
Menu code settings: Factory-set codes
Step
Key (or instruction)
1. Turn on the balance/scale
[ON/OFF]
Display/Printout
Self-test is performed
2. Place container on balance/
scale (here: 52 g)
3. Tare the balance/scale
4. Place sample in container on
balance/scale (in this example, 150.2 g)
8
[ZERO]
+
52.0 g
+
0.0 g
+ 150.2 g
Calibration/Adjustment*
Always calibrate/adjust the balance/scale after setting it up in a new location.
Available Features
Calibration/adjustment can only be performed when
– there is no load on the balance/scale,
– the balance/scale is tared,
– the internal signal is stable.
If these conditions are not met, an error message is displayed.
The weight required for calibration/adjustment is displayed (see “Accessories” for calibration weights).
On ALC balances, calibration/adjustment can be performed with any of three weight units: g, kg**, or lb (menu code 1. 4. x)
Factory setting: Grams (menu code 1. 4. 1)
Example
Calibrate the balance/scale
Menu code settings: Factory-set codes
Step
Key (or instruction)
1. Turn on the balance/scale
[ON/OFF]
2. Tare the balance/scale
[ZERO]
3. Begin calibration
Calibration weight is displayed
without weight unit (here: 1000 g)
[CAL]
Display/Printout
0.0 g
+
4. Place the indicated calibration
weight on the balance/scale
After calibration, the calibration
weight is displayed with wt. unit
5. Remove the calibration weight
1000.0 g
1000.0 g
+
1000.0 g
0.0 g
* = “Calibration” technically means to determine the difference between the balance/scale readout and the actual weight
on the pan to determine the accuracy. Adjustment means to bring a balance/scale into the state of accuracy required for its use.
Therefore, “calibration,” as used in this manual, actually means “adjustment.”
**= not on models with a readability of 0.1 mg or 1 mg
9
Application Programs
Net-Total Formulation/Second Tare Memory
With this application program you can weigh in components for formulation of a mixture.
Preparation
Configure the Net-Total Formulation/Second Tare Memory application in the operating menu: See “Configuring the Balance/Scale”
Menu code 2.1.3
Example
Step
Key (or instruction)
1. Turn on the balance/scale
[ON/OFF]
2. Place an empty container on
the balance/scale
3. Tare the balance/scale
+
65.0 g
+
120,5 g
[ZERO]
4. Add the first component
5. Store the first component weight
If the print format is set
to include data ID codes,
the following is printed:
Display/Printout
[F]
0.0 gNET
N1
6. Add the next component
+
7. Store the 2nd component weight
[F]
8. Add further components,
if desired
As described
for steps 5 and 6
9. Display total weight
[CAL] <2 sec
+
and fill to desired final weight
10
+
120.5 g
70,5 g
0.0 gNET
191,0 g
Counting
Purpose
With the Counting program you can determine the number of parts that each
have approximately equal weight.
Available Features
– Store the current weight value to have it loaded as the preset reference sample
quantity next time you initialize the Counting application
– The reference sample quantity can be changed in the operating menu:
See “Configuring the Balance/Scale”
– The average piece weight is automatically output via the optional data interface
port after initialization, if the menu code for “Printout with data ID codes” is set
– Press [F] to toggle the display between piece count and weight
Factory Settings
Reference sample quantity: 10 (menu code 3. 3. 2)
Preparation
§ Configure the Counting application in the operating menu:
See “Configuring the Balance/Scale”
Menu code 2. 1. 4 Counting
§ Reference sample quantity:
Menu code 3. 3. 1
5 pcs
Menu code 3. 3. 2
10 pcs
Menu code 3. 3. 3
20 pcs
Menu code 3. 3. 4
50 pcs
Menu code 3. 3. 5 100 pcs
See also “Configuring the Balance/Scale”
11
Example
Determine an unknown piece count; weigh the preset reference sample quantity
Settings (changes in the factory settings required for this example):
Menu:
Application program: Counting (menu code 2. 1. 4)
Reference sample quantity: 20 pcs (menu code 3. 3. 3)
Step
Key (or instruction)
1. Turn on the balance/scale
[ON/OFF]
2. Tare the balance/scale
[ZERO]
3. Display the reference sample
quantity (here: 20 pcs)
[F] >2 sec.
4. Place the reference sample quantity
(20 pcs) on the balance/scale (here: 66 g)
5. Start the application; if the print format
is set to include data ID codes,
the following is printed:
Display/Printout
0.0 g
+
[F]
6. Weigh uncounted parts
(here: 174 pcs)
20 pcs
wRef
+
7. Display weight
[F]
+
8. Display quantity
[F]
+
10. Delete the reference value
11. Repeat the procedure starting from step 6, if desired.
12
66.0 g
+
+
9. Unload the balance/scale
(briefly)
ref 20
3.300 g
174 pcs
574.2 g
174 pcs
0 pcs
[CAL] > 2 sec.
Weighing in Percent
Purpose
This application program allows you to obtain weight readouts in percent which
are in proportion to a reference weight.
Available Features
– Store the current weight value to have it loaded as the preset reference percentage next time you initialize the Weighing in Percent application
– The reference percentage can be changed in the operating menu:
See “Configuring the Balance/Scale”
– The reference percentage is automatically output via the optional data interface
port after initialization, if the menu code for “Printout with data ID codes” is set
– Press [F] to toggle the display between percentage and weight
Factory Settings
Reference percentage: 10 (menu code 3. 3. 2)
Preparation
§ Configure the Weighing in Percent application in the operating menu:
See “Configuring the Balance/Scale”
Menu code 2. 1. 5 Weighing in percent
§ Reference percentage:
Menu code 3. 3. 1
Menu code 3. 3. 2
Menu code 3. 3. 3
Menu code 3. 3. 4
Menu code 3. 3. 5
5%
10 %
20 %
50 %
100 %
See also “Configuring the Balance/Scale”
13
Example
Determine an unknown percentage; store the weight on the balance/scale as a reference percentage
Settings (changes in the factory settings required for this example):
Menu: Application program: Weighing in percent (menu code 2. 1. 5)
Menu: Reference percentage 100 % (menu code 3. 3. 5)
Step
Key (or instruction)
1. Turn on the balance/scale
[ON/OFF]
2. Tare the balance/scale
[ZERO]
13. Display the reference
percentage
0.0 g
[F] > 2 sec.
14. Place the reference weight for 100%
on the balance/scale (here: 222.5 g)
15. Start application; if the print
format is set to include data
ID codes, the following is printed:
Display/Printout
ref 100
+
[F]
222.5 g
+ 100.00 %
Wxx%
16. Place an unknown weight
on the balance/scale (here: 322.5 g)
+
222.500 g
+ 144.94 %
17. Display weight
[F]
+
18. Display percentage
[F]
+ 144.94 %
19. Unload the balance/scale
10. Delete the reference percentage
11. Repeat the procedure starting from step 6, if desired.
14
322.5 g
0.00
[CAL] > 2 sec.
%
Weigh Averaging
Purpose
Use this program to determine weights under unstable ambient conditions.
In this program, the balance/scale calculates the weight as the average value
from a defined number of individual weighing operations. These weighing
operations are also known as “subweighing operations” or “subweighs.”
Available Features
– The measured result displayed is the arithmetic mean shown in the selected
weight unit; a triangle indicates that this is a calculated value
– You can set the number of subweighing operations performed in the operating
menu: See “Configuring the Balance/Scale”
– Press [F] for at least 2 sec. to display the preset number of subweighing
operations
– Press [F] to toggle the display between the calculated result and the weight
Factory Settings
Number of subweighs for averaging: 10 (3. 3. 2)
Preparation
§ Configure the Weigh Averaging application in the operating menu:
See “Configuring the Balance/Scale”
Menu code 2. 1.12 Averaging
– Number of subweighs for weigh averaging:
3. 3. 1
5 subweighs
3. 3. 2
10 subweighs
3. 3. 3
20 subweighs
3. 3. 4
50 subweighs
3. 3. 5 100 subweighs
See also “Configuring the Balance/Scale”
15
Example
Determine the weight of a sample in extremely unstable ambient conditions by calculating the average of 10 subweighing operations.
Settings (changes in the factory settings required for this example):
Menu: Application program: Weigh Averaging (menu code 2. 1.12)
Step
Key (or instruction)
1. Turn on the balance/scale
[ON/OFF]
2. Tare the balance/scale
[ZERO]
3. Display the number
of subweighs
(here: 10)
[F] >2 sec.
4. Place sample on the balance/
scale (weight readout fluctuates;
here: about 275 g)
5. Start measurement
[F]
0.0 g
+
8888
+
8888
10
9
8
...
1
275.5 g
+
If the print format is set to include
data ID codes, the following is printed:
RES
7. Delete the result
8. Repeat the procedure starting from step 4, if desired.
10 (briefly)
ref
After 10 subweighs
6. Unload the balance/scale
16
Display/Printout
+
275.5 g
+
275.5 g
(stable display)
[CAL] > 2 sec.
G
G
Toggle Between Weight Units
With this application program you can toggle the display of a weight value back and forth between two weight units.
Configure the “Toggle Weight Units” application in the operating menu:
See “Configuring the Balance/Scale,” menu code 2.1. 2 Toggle weight units (factory setting on ALC models)
Menu code
1. 7. 2 o
1. 7. 3 1)
1. 7. 4
1. 7. 5
1. 7. 6
1. 7. 7
1. 7. 8
1. 7. 9
1. 7. 10
1. 7. 11
1. 7. 12
1. 7. 13
1. 7. 14
1. 7. 15
1. 7. 16
1. 7. 17
1. 7. 18
1. 7. 19
1. 7. 20
1. 7. 22
3. 1. 2 o
3. 1. 3 1)
3. 1. 4
3. 1. 5
3. 1. 6
3. 1. 7
3. 1. 8
3. 1. 9
3. 1. 10
3. 1. 11
3. 1. 12
3. 1. 13
3. 1. 14
3. 1. 15
3. 1. 16
3. 1. 17
3. 1. 18
3. 1. 19
3. 1. 20
3. 1. 22
Unit
Grams
Kilograms
Carats
Pounds
Ounces
Troy ounces
Hong Kong taels
Singapore taels
Taiwanese taels
Grains
Pennyweights
Milligrams
Parts per pound
Chinese taels
Mommes
Austrian carats
Tola
Baht
Mesghal
lb/oz
Conversion factor
1.00000000000
0.00100000000
5.00000000000
0.00220462260
0.03527396200
0.03215074700
0.02671725000
0.02645544638
0.02666666000
15.43235835000
0.64301493100
1000.00000000000
1.12876677120
0.02645547175
0.26670000000
5.00000000000
0.08573333810
0.06578947437
0.21700000000
0.03527396200
Abbr. on printout
g
kg
ct
lb
oz
ozt
tlh
tls
tlt
GN
dwt
mg
/lb
tlc
mom
K
tol
bat
MS
o
o = Factory setting
1
) = not for models with a readability of ≤ 1 mg
Function
● To toggle the display between the 1st and 2nd weight units:
Press the [F] key
17
Configuring the Balance/Scale
Setting the Parameters (Menu Codes)
You can configure your ALC balance to meet individual requirements by selecting from the parameters available in the menu.
Example: Adapt the balance/scale to unstable ambient conditions:
Menu code 1 1 4
Step
Key (or instruction)
Display
1. Turn off the balance/scale
[ON/OFF]
2. Turn the balance/scale back on;
while all segments
are displayed:
[ON/OFF]
[ZERO] briefly
1.
$ To navigate within a menu
level; the last menu option is
followed by the first option
[ZERO]
repeatedly
2.
...
9.
1.
3. Select the 2nd menu level
[PRINT]
1. 1.
4. Select the 3rd menu level
[PRINT]
1. 1. 2 o
5. In Menu Level 3:
Select the desired option
[ZERO]
repeatedly
1. 1. 4
6. Confirm new setting;
the “o” indicates the currently set
option
$ Select the next menu level
(here: change from the 3rd to the 1st level)
[PRINT]
for 2 sec.
1. 1. 4 o
[PRINT]
1.
$ Set other menu codes, if desired
[PRINT], [ZERO]
7. Store parameter settings
and exit operating menu
or
$ Exit operating menu without
storing changes
[ZERO]
for 2 sec.
> Restart the application
18
[ON/OFF]
0.0 g
Balance/Scale Operating Menu (Overview)
ο Factory setting
√ User setting
Menu
el 2
u lev
Men
1.1. Adapt filter
tting
el 3
el 4
ry se
u lev
u lev
Facto
Men
Men
1.1.1
Minimum vibration
1.1.2
ο Normal vibration
1.1.3
Strong vibration
1.1.4
Extreme vibration
1.3. Stability range
1.3.1
1.3.2
1.3.3
1.3.4
1.3.5
1/4 digit
1/2 digit
1 digit
ο 2 digits
4 digits
1.4. Weight unit for
calibration weight
1.4.1
1.4.2
1.4.3
ο Grams
Kilograms1)
Pounds
1.6. Auto zero
1.6.1
1.6.2
ο On
Off
1.7. Weight unit 1
See “Toggle between Weight Units”
2. Application
programs
2.1. Program selection
see the desired application program description
3. Application
parameters
3.1. Weight unit 2
3.3. Reference qty or %
see “Toggle between Weight Units”
see the desired application program description
5. Data Interface
5.2
Parity
5.2.1
5.2.2
5.2.3
5.2.4
Mark
Space
o Odd
Even
5.3
No. of stop bits
5.3.1
5.3.2
o 1 stop bit
2 stop bits
5.4
Handshake mode
5.4.1
5.4.2
Software
Hardware,
2 char. after CTS
o Software,
1 char. after CTS
el 1
u lev
Men
1. Balance/
scale functions
5.4.3
1
) = not for models with a readability of 0.1 mg or 1 mg
19
el 2
u lev
Men
6.1 Manual/auto
print mode
el 3
u lev
Men
6.1.1
6.1.2
o
6.1.3
6.1.4
7. Print with
applications
7.1
7.1.1
7.1.2
Without data ID Codes
o With data ID Codes
8. Extra
functions
8.1. Menu
8.1.1
8.1.2
o Parameter settings
can be changed
Parameters “read only”
8.2. External switch function
8.2.1
8.2.4
8.2.5
8.2.6
8.2.8
[CAL] key
[ZERO] key
o [PRINT] key
[F] key
[ZERO] key
8.3. Power-on mode
for balance/scale
8.3.1
8.3.2
Off/on (battery shuts off
automatically after 3 min)
o Stand-by/on
9.– 1
9.– 2
Reset
o Not reset
9. Reset menu
20
tting
el
ry se
u lev
Facto
Men
Manual without stability
Manual at stability
Automatic without stability
Automatic at stability
el 1
u lev
Men
6. Print for
Weighing
9.–
Line format of
Printout
Factory settings
Data Interface
Purpose
Your balance/scale comes equipped with an interface
port for connection to a computer or other peripheral
device. You can use an on-line computer to change,
start and/or monitor the functions of the
balance/scale and the application programs.
Preparation
You can set these parameters for other
devices in the Setup menu (see the chapter
entitled “Configuring the Balance/Scale”).
You will also find a detailed description
of the available data interface commands
in the file “Data Interface Descriptions for
ALC Models”, which you can download
from the Internet (www.acculab.com, or
www.acculab-europe.com).
Female interface connector
25
13
14
1
Pin Assignment Chart, 25-pin
female interface connector, RS-232:
Pin 1: Shield
Pin 2: Data output (TxD)
Pin 3: Data input (RxD)
Pin 4: Internal ground (GND)
Pin 5: Clear to Send (CTS)
Pin 6: Not connected
Pin 7: Internal ground (GND)
Pin 8: Internal ground (GND)
Pin 9: Not connected
Pin 10: Not connected
Pin 11: Charging voltage for rechargeable battery pack
+12 … +20 V (I _ out 25mA)
Pin 12: Reset _ Out *)
Pin 13: +5 V output
Pin 14: Internal ground (GND)
Pin 15: Universal remote switch
Pin 16: Not connected
Pin 17: Not connected
Pin 18: Not connected
Pin 19: Not connected
Pin 20: Data Terminal Ready (DTR)
Pin 21: Internal ground (GND)
Pin 22: Not connected
Pin 23: Not connected
Pin 24: Not connected
Pin 25: +5 V output
The many and versatile properties of these
balances/scales can be fully utilized for
printing out records of the results when you
connect your balance/scale to a Sartorius
data printer. The recording capability for
printouts makes it easy for you to work
in compliance with ISO/GLP.
For remote switch
*) = Hardware restart
21
Error Codes
Error codes are shown on the main display for approx. 2 seconds, after which the program automatically returns to the weighing mode.
Display
No segments appear
on the display
Cause
No AC power is available
The AC adapter is not plugged in
Battery is dead
h
l
The load exceeds the balance/scale capacity
The weighing pan is not in place
Something is touching
the weighing pan
Display capacity exceeded:
Value to be output cannot
be shown on the display
Calibration parameter
requirement not met; e.g.:
– balance/scale not zeroed
– balance/scale is loaded
When gross value < zero, no tare
The [ZERO] key is blocked when
there is data in the second tare
memory (net-total) – only 1 tare
function can be used at a time
Value input is not allowed for
second tare memory
Weight is too light or there is
no sample on the balance/scale
Interface port for printer output is blocked
The balance/scale was
turned on without the
weighing pan in place
The balance/scale has not
been calibrated/adjusted
The balance/scale was not
tared before weighing
e 01
e 02
e 09
e 10
e 11
e 22
e 30
Max. weighing capacity
is less than indicated
under “Specifications”
The weight readout
is obviously wrong
If any other errors occur, please contact your local Acculab Service Center.
22
Solution
Check the AC power supply
Plug in the AC adapter
Replace the battery
Recharge the battery using an external charger
Unload the balance/scale
Place the weighing pan on the balance/scale
Move the object that is
touching the weighing pan
Decrease the weight on the balance/scale
Calibrate only when zero
is displayed
Press [ZERO] to zero the balance/scale
Unload the balance/scale
Tare the balance/scale
Press [CAL] to clear the tare memory and release
the tare key
Press [ZERO]
Increase the reference quantity
or sample amount
Contact your local Acculab Service Center
Place the weighing pan on the
balance/scale and press [ON/OFF] to
turn the balance/scale back on
Calibrate/adjust the balance/scale
Tare before weighing
Care and Maintenance
Repairs
Repair work must be performed by trained service technicians. Any attempt by
untrained persons to perform repairs may lead to hazards for the user.
Cleaning
! Disconnect the balance/scale from the AC adapter and unplug any interface
cables that are connected to the balance/scale
! Make sure that no liquid enters the balance/scale housing
! Do not use any aggressive cleaning agents (solvents or similar agents)
§ Clean the balance/scale using a piece of cloth which has been wet with a mild
detergent (soap)
§ After cleaning, wipe down the balance/scale with a soft, dry cloth
Removing and Cleaning the Weighing Pan:
● Lift up and remove the weighing pan together with the pan support by gripping
them from under the shield ring. Make sure that you do not damage the
weighing system in doing so.
Cleaning Stainless Steel Surfaces
Clean all stainless steel parts regularly. Remove the stainless steel weighing
pan/load plate and thoroughly clean it separately. Use a damp cloth or sponge
to clean any stainless steel parts on the balance/scale. You can use any
commercially available household cleaning agent that is suitable for use on
stainless steel. Clean stainless steel surfaces by wiping them down. Then clean
the weighing pan/load plate thoroughly, making sure to remove all residues.
Use a damp cloth or sponge to wipe down any stainless steel parts on the
balance/scale again. Afterwards, allow the balance/scale to dry. If desired,
you can apply oil to the cleaned surfaces as additional protection.
! Do not use stainless steel cleaning agents that contain soda lye (caustic),
acetic acid, hydrochloric acid, sulfuric acid or citric acid.
The use of scrubbing sponges made of steel wool is not permitted.
Solvents are permitted for use only on stainless steel parts.
23
Safety Inspection
If there is any indication that safe operation of the balance/scale with the
AC adapter is no longer warranted:
§ Turn off the power and disconnect the equipment from AC power immediately
> Lock the equipment in a secure place to ensure that it cannot be used for the time
being
Safe operation of the balance/scale with the AC adapter is no longer ensured
when:
– there is visible damage to the AC adapter
– the AC adapter no longer functions properly
– the AC adapter has been stored for a relatively long period under unfavorable
conditions
In this case, notify your nearest Acculab Service Center or the International
Technical Support Unit based in Goettingen, Germany. Maintenance and repair
work may only be performed by service technicians who are authorized
by Acculab and who
– have access to the required maintenance manuals
– have attended the relevant service training courses
Instructions for Recycling the Packaging
To ensure adequate protection for safe shipment, your balance/scale has been
packaged to the extent necessary using environmentally friendly materials.
After successful installation of the balance/scale, you should return this packaging for recycling because it is a valuable source of secondary raw material.
For information on recycling options, including recycling of old weighing equipment, contact your municipal waste disposal center or local recycling depot.
24
Overview
Specifications
Model
Weighing capacity
Readability
Tare range (subtractive)
Repeatability
Linearity
Operating temperature range
Allowable ambient
operating temperature
Sensitivity drift
within +10…+30°C
Response time (average)
Adaptation to ambient conditions
Display update (depends on
the filter level selected)
External calibration weight
(of at least accuracy class…)
Net weight, approx.
Pan size
Weighing chamber height
g
mg
g
≤±mg
≤±mg
ALC-80.4
ALC-110.4
80
110
0.1
0.1
80
110
0.1
0.1
0.3
0.3
+10…+30 °C (50 to 86°F)
ALC-210.4
210
0.1
210
0.1
0.3
+5…+40 °C (41 to 104°F)
≤±/K
s
3 · 10–6
3 · 10–6
3
3
By selection of 1 of 4 optimized filter levels
3 · 10–4
3
s
g
0.2–0.4
100 (E2)
0.2–0.4
200 (E2)
kg/lb
mm
inches
mm
inches
mm
3.0/6.6
3.0/6.6
80 Ø
80 Ø
3.3 Ø
3.3 Ø
200
200
7.9
7.9
200 x 270 x300
AC adapter, 230 V or 115 V, +15%…– 20%
48–60 Hz
10 to 20
1
1
Dimensions (W x D x H)
AC power source/power requirements
Frequency
Power requirements, direct current
V
Power consumption (average)
W
0.2–0.4
100 (E2)
3.0/6.6
80 Ø
3.3 Ø
200
7.9
1
25
Model
Weighing capacity
Readability
Tare range (subtractive)
Repeatability
Linearity
Operating temperature range
Allowable ambient
operating temperature
Sensitivity drift within
+10…+30°C
Response time (average)
Adaptation to ambient conditions
Display update (depends on
the filter level selected)
External calibration weight
(of at least accuracy class…)
Net weight, approx.
Pan size
g
mg
g
<±mg
<±mg
ALC-320.3
320
1
320
1
3
+5…+40 °C (41 to 104°F)
≤±/K
s
3.3 · 10–6
5 · 10–4
≤2.5
≤3
By selection of 1 of 4 optimized filter levels
5 · 10–6
≤3
s
g
0.2–0.4
100 (F1)
0.2–0.4
200 (F1)
00.2–0.4
200 (F1)
kg/lb
mm
inches
mm
1.6/6.6
100 Ø
4Ø
–
3.0/6.6
80 Ø
3.3 Ø
200 x270 x 75
3.0/6.6
80 Ø
3.3 Ø
200 x 270 x 300
Dimensions (W x D x H)
AC power source/
power requirements
Frequency
Power requirements, direct current V
Power consumption (average)
W
26
ALC-150.3
ALC-210.3
150
210
0.001
1
150
210
0.0015
1
0.003
3
+10…+30 °C (50 to 86°F)
AC adapter, 230 V or 115 V, +15%…–20%
48–60 Hz
10 to 20
1
1
1
Model
Weighing capacity
Readability
Tare range (subtractive)
Repeatability
Linearity
Operating temperature range
Allowable ambient
operating temperature
Sensitivity drift within
+10…+30°C
Response time (average)
Adaptation to ambient conditions
Display update (depends on
the filter level selected)
External calibration weight
(of at least accuracy class…)
Net weight, approx.
Pan size
Dimensions (W x D x H)
g
g
g
<±g
<±g
ALC-810.2
ALC-1100.2
810
1100
0.01
0.01
810
1100
0.01
0.03
0.02
0.03
+10…+30 °C (50 to 86°F)
ALC-2100.2
2100
10
2100
10
30
ALC-3100.2
3100
10
3100
10
30
+5…+40 °C (41 to 104°F)
<±/K
s
0.5 · 10–5
5 · 10–6
3 · 10–6
2
2.5
≤ 2.5
By selection of 1 of 4 optimized filter levels
3 · 10–6
≤3
s
g
–
1000 (F1)
0.2–0.8
1000 (F1)
0.2–0.4
2000 (F1)
0.2–0.4
2000 (F1)
kg/lb
mm
inches
mm
inches
1.4/3.0
116 Ø
4.6 Ø
–
–
150 Ø
6Ø
200x270x75
7.9x10.6x3
150 Ø
6Ø
200x270x75
7.9x10.6x3
150 Ø
6Ø
200x270x75
7.9x10.6x3
AC power source/
power requirements
Frequency
Power requirements, direct current V
Power consumption (average)
W
AC adapter, 230 V or 115 V, +15%…–20%
48–60 Hz
10 to 20
–
0.75
1
1
27
Model
Weighing capacity
Readability
Tare range (subtractive)
Repeatability
Linearity
Operating temperature range
Allowable ambient
operating temperature
Sensitivity drift within
+10…+30°C
Response time (average)
Adaptation to
ambient conditions
Display update (depends on
the filter level selected)
External calibration weight
(of at least accuracy class…)
Net weight, approx.
Pan size
Dimensions (W x D x H)
AC power source/
power requirements
Frequency
Power requirements, direct current
Power consumption (average)
Hours of operation with 9-volt battery:
– Battery, approx.
– Rechargeable battery when
fully charged, approx.
28
g
g
g
<±g
<±g
ALC-2100.1
ALC-4100.1
2100
4100
0.1
0.1
2100
4100
0.2
0.2
0.2
0.2
+10…+30 °C (50 to 86°F)
ALC-6100.1
6100
0.1
6100
0.2
0.2
+5…+40 °C (41 to 104°F)
<±/K
s
2 · 10–5
2
1 · 10–5
2
0.5 · 10–5
2
By selection of 1 of 4 optimized filter levels
s
g
0.2–0.8
1000 (F2)
0.2–0.8
2000 (F2)
0.2–0.8
5000 (F2)
kg/lb
mm
inches
mm
inches
1.4/3.0
150 Ø
6Ø
200 x 270 x 75
7.9x10.6x3
150 Ø
6Ø
150 Ø
6Ø
V
W
AC adapter, 230 V or 115 V, +15%…– 20%
48–60 Hz
10 to 20
0.75
0.75
0.75
h
11
11
11
h
2.5
2.5
2.5
Accessories (Options)
–
–
–
–
–
Product
Interface cable for connecting a PC;
25-pin
Order No.
7357314
Calibration weights
for ALC-80.4 (50 g, E2)
for ALC-110.4 (100 g; E2)
for ALC-210.4 (200 g; E2)
for ALC-150.3 (100 g, E2)
for ALC-210.3 (200 g; F1)
YCW4528-00
YCW5128-00
YCW5228-00
YCW5128-00
YCW5238-00
–
–
–
–
–
–
–
–
Product
for ALC-320.3 (200 g; F1)
for ALC-810.2 (500 g, F1)
for ALC-1100.2 (1 kg; F1)
for ALC-2100.2 (2 kg; F1)
for ALC-3100.2 (2 kg; F1)
for ALC-2100.1 (1 kg; F2)
for ALC-4100.1 (2 kg; F2)
for ALC-6100.1 (5 kg; F2)
Order No.
YCW5238-00
YCW5538-00
YCW6138-00
YCW6238-00
YCW6238-00
YCW6148-00
YCW6248-00
YCW6548-00
C Marking
The C marking affixed to the equipment indicates that
the equipment meets the requirements of the following
Directive(s) issued by the Council of the European Union:
Council Directive 73/23/EU
“Electrical equipment designed for use within
certain voltage limits”
Directive 89/336/EEC
“Electromagnetic compatibility (EMC)”
Applicable European Standards:
Limitation of Emmissioins:
According to Product Standard EN 61326-1 Cl.B
(Residential environment)
Defined immunity to interference:
According to Peroduct Standard EN 61326-1
(Industrial environment)
Important Note:
The operator shall be responsible for any modifications
to Acculab equipment and for any connections of cables or
equipment not supplied by Acculab and must check and,
if necessary, correct these modifications and connections.
On request, Acculab will provide information on the minimum
operating specifications (in accordance with the Standards
listed above for defined immunity to interference).
EN 60950
Safety of information technology equipment including
electrical business equipment
EN 61010
Safety requirements for electrical equipment for
measurement,
control and laboratory use
Part 1: General requirements
When you use electrical equipment in installations and
under ambient conditions requiring higher safety
standards, you must comply with the provisions as
specified in the applicable regulations for installation in
your country.
29
Verwendungszweck
Die ALC-Serie besteht aus Waagen zum Messen von Wägegütern zwischen 0,1 mg und 6 kg.
Die Waagen garantieren zuverlässige Wägeergebnisse
durch:
– Ausfiltern von ungünstigen Umgebungsbedingungen wie
Vibrationen, Luftbewegungen, usw.
– Reproduzierbare Wägeergebnisse
– Robuste Ausführung
ALC-Waagen erleichtern und beschleunigen Routineabläufe
durch:
– Kurze Messzeiten
– Einfache Bedienung
Eine weitere Funktion für einfache Anwendungen.
Zur Auswahl stehen:
Einheitenwechsel
Netto-Total (Zweiter Taraspeicher)
Zählen
Prozentwägen
Mittelwertbildung
–
–
–
–
–
Inhalt
30
30
30
31
Verwendungszweck
Inhalt
Warn- und Sicherheitshinweise
Inbetriebnahme
Betrieb
35 Grundfunktion Wägen
36 Justieren
37
38
40
42
44
Anwendungsprogramme
Netto-Total/Zweiter Taraspeicher
Zählen
Prozentwägen
Mittelwertbildung
Einheitenwechsel
45
46
48
49
50
51
Voreinstellungen (Menü)
Parameter einstellen (Menü)
Parametereinstellungen (Übersicht)
Datenschnittstelle
Fehlermeldungen
Pflege und Wartung
Entsorgung
Übersicht
52 Technische Daten
56 Zubehör (Optionen)
56 C -Kennzeichnung
Warn- und Sicherheitshinweise
Die Betriebsanleitung aufmerksam durchlesen, bevor das
Gerät in Betrieb genommen wird. Dadurch werden
Schäden am Gerät vermieden.
Die Betriebsanleitung sorgfältig aufbewahren.
! Nicht in explosionsgefährdeten Bereichen einsetzen.
Folgende Hinweise sind für einen sicheren und problemlosen Betrieb mit der Waage zu beachten:
– Zubehör und Optionen von Sartorius verwenden, diese
sind optimal auf die Waage abgestimmt.
! Der auf dem Netzgerät aufgedruckte Spannungswert
muss mit der lokalen Netzspannung übereinstimmen.
! Nur handelsübliche 9 Volt-Block Batterie oder Akku
verwenden.
30
– Waage kann nur durch Ziehen des Netzgerätes
spannungslos geschaltet werden.
– Netzgerät vor Nässe schützen.
Die Waage nicht öffnen. Bei verletzter Sicherungsmarke
entfällt der Garantieanspruch.
Inbetriebnahme
Lager- und Transportbedingungen
Das Gerät nicht extremen Temperaturen, Stößen,
Vibrationen und Feuchtigkeit aussetzen.
Auspacken
§ Das Gerät sofort nach dem Auspacken auf eventuell
sichtbare äußere Beschädigungen überprüfen
$ Im Fall einer Beschädigung: siehe Kapitel »Pflege und
Wartung«, Abschnitt »Sicherheitsüberprüfung«
Alle Teile der Verpackung für einen eventuell notwendigen
Versand aufbewahren, denn nur die Originalverpackung
gewährleistet sicheren Transport. Vor dem Versand alle
angeschlossenen Kabel trennen, um unnötige
Beschädigungen zu vermeiden.
Lieferumfang
Folgende Einzelteile werden mitgeliefert:
–
–
–
–
–
–
ALC-80.4, ALC-110.4, ALC-210.4, ALC-210.3
Waage
Waagschale
Unterschale
Schirmring
Schirmblech
Steckernetzgerät
–
–
–
–
–
–
–
ALC-150.3, ALC-320.3
Waage
Waagschale
Unterschale
Schirmring
Schirmblech
Steckernetzgerät
Glasring
–
–
–
–
ALC-810.2, ALC-1100.2, ALC-2100.2, ALC-3100.2,
ALC-2100.1, ALC-4100.1 und ALC-6100.1
Waage
Waagschale
Unterschale
Steckernetzgerät
–
–
–
–
–
–
Aufstellhinweise
Die Waage ist so konstruiert, dass unter den im Betrieb
üblichen Einsatzbedingungen zuverlässige Wägeergebnisse
erzielt werden. Exakt und schnell arbeitet die Waage,
wenn der richtige Standort gewählt ist:
Waage auf eine stabile, gerade Fläche stellen
extreme Wärme durch Aufstellen neben der Heizung oder
direkte Sonneneinstrahlung vermeiden
Waage vor direktem Luftzug schützen (geöffnete Fenster
und Türen)
starke Erschütterungen während des Wägens vermeiden
Waage vor aggressiven chemischen Dämpfen schützen
extreme Feuchte vermeiden
Waage akklimatisieren:
Eine Betauung kann auftreten (Kondensation von
Luftfeuchtigkeit am Gerät), wenn ein kaltes Gerät in eine
wesentlich wärmere Umgebung gebracht wird. Das vom
Netz getrennte Gerät ca. 2 Stunden bei Raumtemperatur
akklimatisieren.
31
Waage aufstellen
Waagen mit Analysenwaagen-Aufsatz
§
–
–
–
–
Teile nacheinander in den Wägeraum setzen:
Schirmblech
Schirmring
Unterschale
Waagschale
Waagen mit runder Waagschale
§ Teile nacheinander aufsetzen:
– Unterschale
– Waagschale
§ Teile nacheinander aufsetzen:
– Unterschale
– Waagschale
32
Netzanschluss/Schutzmaßnahmen
Verwenden Sie nur
– Originalnetzgerät für Europa: 6971948
§ Winkelstecker an der Waage einsetzen
§ Netzgerät der Schutzklasse 2 darf ohne weitere Maßnahmen an jede Steckdose
angeschlossen werden
Die Ausgangsspannung ist durch einen Pol mit dem Waagengehäuse verbunden.
Das Waagengehäuse darf zu Funktionszwecken geerdet werden.
Batterie/Akku einsetzen
bei Modellen: ALC-810.2, ALC-2100.1, ALC-4100.1 und ALC-6100.1
$ Batterie oder Akku gehören nicht zum Lieferumfang der Waage
! Nur handelsübliche 9 Volt-Block Batterie oder Akku verwenden
! Akku nur mit externem Ladegerät laden
§ Waage auf die Seite drehen
§ Batteriefach öffnen: Batteriefachabdeckung anheben
§ 9 Volt-Block Batterie oder Akku in die Batteriehalterung einsetzen
$ Polarität beachten
! Verbrauchte Batterien oder Akkus sind Sondermüll (kein Hausmüll):
Akkus gemäß Abfallwirtschaftsgesetz als Sondermüll speziell entsorgen
§ Batteriefach schließen: Batteriefachabdeckung herunterdrücken und einrasten
lassen
33
Netzspannung wählen
Zur Netzspannungswahl folgende Originalnetzgeräte verwenden:
– Netzgerät TNG8 Best.-Nr. 6971951 (Universal)
oder
– Netzgerät TNG8 Best.-Nr. 6971952 (für Großbritannien)
§ Mit Schalter umschalten zwischen 230 V und 115 V
Waage nivellieren
Die Waage nach jedem Stellplatzwechsel neu nivellieren.
Das Nivellieren erfolgt nur mit den beiden vorderen Stellfüßen.
§ Beide hintere Stellfüße eindrehen
§ Vordere Fußschrauben gemäß Abbildung so drehen, bis die Luftblase der Libelle
in der Kreismitte steht
> In der Regel sind mehrere Nivellierschritte nötig
Diebstahlsicherung
Zur Diebstahlsicherung die Befestigungsöse an der Rückseite der Waage
verwenden.
§ Waage am Aufstellort z.B. mit einer Kette oder einem Schloss befestigen
34
Betrieb
Grundfunktion Wägen
Merkmale
– Waage tarieren
Das Tarieren kann innerhalb des gesamten Wägebereiches der Waage erfolgen.
Vorbereitung
§ Waage einschalten: Taste [ON/OFF] drücken
§ Ggf. Voreinstellungen ändern: siehe Kapitel »Voreinstellungen«
§ Ggf. Werksvoreinstellungen laden: siehe Kapitel »Voreinstellungen«, Parameter 9. – 1
$ Ggf. Waage tarieren: Taste [ZERO] drücken
Weitere Funktion:
§ Waage ausschalten: Taste [ON/OFF] drücken
Beispiel
Wägewert ermitteln
Voreinstellungen: wie Werksvoreinstellungen
Schritt
Taste drücken
1. Waage einschalten
[ON/OFF]
Anzeige
Selbsttest wird durchgeführt
2. Behälter für Wägegut auflegen
(hier z.B. 52 g)
3. Waage tarieren
4. Wägegut in Behälter legen
(hier z.B. 150,2 g)
[ZERO]
+
52.0 g
+
0.0 g
+ 150.2 g
35
Justieren
Die Waage nach der Installation am Aufstellort justieren.
Merkmale
Der Justiervorgang kann nur gestartet werden, wenn
– die Waage unbelastet ist
– die Waage tariert ist
– das interne Wägesignal stabil ist
Sind diese Voraussetzungen nicht erfüllt, erscheint eine Fehlermeldung. Das zur Justierung erforderliche Gewicht wird in der
Anzeige angezeigt (Gewichte siehe Abschnitt »Zubehör«).
Das Justieren kann bei ALC-Modellen mit unterschiedlichen Gewichtseinheiten erfolgen: g, kg*, lb (Code1. 4. x)
Werksvoreinstellung: Gramm (Code 1. 4. 1)
Beispiel
Waage justieren
Voreinstellungen: wie Werksvoreinstellungen
Schritt
Taste drücken
1. Waage ggf. einschalten
[ON/OFF]
2. Waage tarieren
[ZERO]
3. Justiervorgang starten
Justiergewicht wird ohne Einheit
angezeigt (hier z.B. 1000 g)
[CAL]
Anzeige/Ausgabe
0.0 g
+
4. Angezeigtes Justiergewicht
auflegen
nach dem Justieren erscheint
das Justiergewicht mit Einheit
5. Justiergewicht abnehmen
* = nicht bei Modellen mit Ablesbarkeit 0,1 mg oder 1 mg
36
1000.0 g
1000.0 g
+
1000.0 g
0.0 g
Anwendungsprogramme
Netto-Total/Zweiter Taraspeicher
Mit diesem Anwendungsprogramm können Komponenten für ein Gemisch eingewogen werden.
Vorbereitung
Anwendungsprogramm »Netto-Total/Zweiter Taraspeicher« im Menü einstellen:
siehe Kapitel »Voreinstellungen« Code 2.1. 3
Beispiel
Schritt
Taste drücken
1. Waage ggf. einschalten
[ON/OFF]
2. Leeren Behälter zum Einfüllen
der Komponenten auf die Waage stellen
3. Tarieren
+
65.0 g
+
120,5 g
[ZERO]
4. Erste Komponente einfüllen
5. Komponente übernehmen
Wenn Ausdruck mit Kennzeichnung
gewählt ist, wird ausgedruckt
Anzeige/Ausgabe
[F]
0.0 g NET
N1
6. Nächste Komponente einfüllen
+
7. Komponente übernehmen
[F]
8. Ggf. weitere Komponenten
einfüllen
Schritt 5 und 6
entsprechend oft
wiederholen
9. Gesamtgewicht anzeigen
[CAL] <2 sek
Endwert auffüllen
+
120.5
g
70,5 g
0.0 g NET
+
191,0 g
37
Zählen
Zweck
Mit diesem Anwendungsprogramm kann die Anzahl von Teilen ermittelt werden,
die ein annähernd gleiches Stückgewicht haben.
Merkmale
– Übernahme des aktuellen Wägewertes als eingestellten Stückzahl für die
Initalisierung beim Start des Programms »Zählen«
– Ändern der Referenzstückzahl im Menü möglich: siehe Kapitel »Voreinstellungen«
– Automatische Ausgabe des Stückgewichtes über die optionale Datenschnittstelle
nach Abschluss der Initialisierung, wenn Ausdruck mit Kennzeichnung im Menü
eingestellt ist
– Umschalten zwischen Stückzahlanzeige und Gewichtswertanzeige mit Taste [F]
Werksvoreinstellung der Parameter
Referenzstückzahl: 10 (Code 3. 3. 2)
Vorbereitung
§ Anwendungsprogramm »Zählen« im Menü einstellen: siehe »Voreinstellungen«
Code 2. 1. 4
Zählen
§ Referenzstückzahl:
Code 3. 3. 1
5 Stück
Code 3. 3. 2 10 Stück
Code 3. 3. 3 20 Stück
Code 3. 3. 4 50 Stück
Code 3. 3. 5 100 Stück
siehe auch Kapitel »Voreinstellungen«
38
Beispiel
Ermittlung einer unbekannten Stückzahl: Vorgegebene Referenzstückzahl wiegen
Voreinstellungen (Abweichungen von der Werksvoreinstellung):
Menü:
Anwendungsprogramm Zählen (Code 2. 1. 4),
Referenzstückzahl 20 (Code 3. 3. 3)
Schritt
Taste drücken
1. Waage ggf. einschalten
[ON/OFF]
2. Waage tarieren
[ZERO]
3. Information: Referenzstückzahl
anzeigen (hier z.B. 20 Stück)
[F] lang
4. Referenzstückzahl (20 Stück)
auflegen (hier z.B. 66 g)
5. Anwendung starten; wenn
Ausdruck mit Kennzeichnung
gewählt ist, wird ausgedruckt
Anzeige/Ausgabe
0.0 g
+
[F]
6. Unbekannte Stückzahl auflegen
(hier z.B. 174 Stück)
20 pcs
wRef
+
7. Gewicht anzeigen
[F]
+
8. Stückzahl anzeigen
[F]
+
10. Referenzwert löschen
66.0 g
+
+
9. Waage entlasten
(kurzzeitig)
ref 20
3.300
g
174 pcs
574.2 g
174 pcs
0 pcs
[CAL] lang
11. Ggf. weiter bei 6.
39
Prozentwägen
Zweck
Mit diesem Anwendungsprogramm kann der prozentuale Anteil eines Wägegutes
bezogen auf ein Referenzgewicht ermittelt werden.
Merkmale
– Übernahme des aktuellen Wägewertes als eingestellte Prozentzahl für die
Initalisierung beim Start des Programms »Prozentwägen«
– Ändern der Referenzprozentzahl im Menü möglich:
siehe Kapitel »Voreinstellungen«
– Automatische Ausgabe des Referenzgewichtes über die optionale Datenschnittstelle nach Abschluss der Initialisierung, wenn Ausdruck mit Kennzeichnung im
Menü eingestellt ist
– Umschalten zwischen Prozentzahlanzeige und Gewichtswertanzeige mit Taste [F]
Werksvoreinstellungen der Parameter
Referenzprozentzahl: 10 (Code 3. 3. 2)
Vorbereitung
§ Anwendungsprogramm »Prozentwägen« im Menü einstellen:
siehe »Voreinstellungen«
Code 2. 1. 5 Prozentwägen
§ Referenzprozentzahl:
Code 3. 3. 1
5%
Code 3. 3. 2
10 %
Code 3. 3. 3
20 %
Code 3. 3. 4
50 %
Code 3. 3. 5
100 %
siehe auch Kapitel »Voreinstellungen«
40
Beispiel
Prozentwert messen mit: Referenzgewicht übernehmen durch aufgelegtes Gewicht
Voreinstellungen (Abweichungen von der Werksvoreinstellung):
Menü: Anwendungsprogramm Prozentwägen (Code 2. 1. 5)
Menü: Referenzprozentzahl 100 % (Code 3. 3. 5)
Schritt
Taste drücken
Anzeige/Ausgabe
1. .Waage ggf. einschalten
[ON/OFF]
2. Waage tarieren
[ZERO]
0.0 g
3. Information:
Referenzprozentzahl anzeigen
[F] lang
ref 100
4. Referenzgewicht für 100 %
auflegen (hier z.B. 222,5 g)
5. Anwendung starten; wenn
Ausdruck mit Kennzeichnung
gewählt ist, wird ausgedruckt
+ 222.50 g
[F]
+ 100.00 %
Wxx%
6. Unbekanntes Gewicht auflegen
(hier z.B. 322,5 g)
+
222.500
+ 144.94 %
7. Gewicht anzeigen
[F]
+ 322.50 g
8. Prozentzahl anzeigen
[F]
+ 144.94 %
9. Waage entlasten
10. Referenzprozentzahl löschen
g
0.00 %
[CAL] lang
11. Ggf. weiter bei 6.
41
Mittelwertbildung
Zweck
Mit diesem Anwendungsprogramm ist die Messung von Wägegütern in extrem
unruhiger Umgebung möglich. Dafür wird über mehrere Messzyklen ein Mittelwert gebildet.
Merkmale
– Messergebnis (arithmetischer Mittelwert) erscheint als feste Anzeige in der
vorgewählten Gewichtseinheit mit Kennzeichnung »Dreieck«
– Anzahl der Messungen kann im Menü eingestellt werden:
siehe Kapitel »Voreinstellungen«
– Anzeige der Anzahl Messungen für die Mittelwertbildung (Taste [F]
lange drücken)
– Umschalten zwischen Messergebnisanzeige und normaler Gewichtsanzeige mit
Taste [F]
Werksvoreinstellungen der Parameter
Anzahl Messungen für Mittelwertbildung: 10 (3. 3. 2)
Vorbereitung
§ Anwendungsprogramm »Mittelwertbildung« im Menü einstellen: siehe Kapitel
»Voreinstellungen«
Code 2. 1.12 Mittelwertbildung
– Anzahl Messungen für Mittelwertbildung:
3. 3. 1
5 Messungen
3. 3. 2
10 Messungen
3. 3. 3
20 Messungen
3. 3. 4
50 Messungen
3. 3. 5 100 Messungen
siehe auch Kapitel »Voreinstellungen«
42
Beispiel
Wägewert ermitteln in extrem unruhiger Umgebung mit 10 Messungen für eine
Mittelwertbildung.
Voreinstellungen (Abweichungen von der Werksvoreinstellung):
Menü: Anwendungsprogramm Mittelwertbildung (Code 2. 1.12)
Schritt
1. Waage ggf. einschalten
Taste drücken
[ON/OFF]
2. Waage tarieren
[ZERO]
3. Anzahl der Untermessungen
anzeigen
(hier z.B. 10 Messungen)
[F] lang
4. Wägegut auflegen
(angezeigter Gewichtswert
schwankt, hier z.B. um 275 g)
5. Messung starten
Anzeige/Ausgabe
[F]
+
8888
+
8888
10
9
8
...
1
275.5 g
+
Wenn Ausdruck mit Kennzeichnung
gewählt ist, wird ausgedruckt
RES
7. Messergebnis löschen
(kurzzeitig)
ref 10
Nach 10 Messungen
6. Waage entlasten
g
0.0
+
G
275.5
+
275.5 g
(feste Anzeige)
g
G
[CAL] lang
8. Ggf. weiter bei 4.
43
Einheitenwechsel
Mit diesem Anwendungsprogramm kann ein Wägewert in zwei unterschiedlichen Einheiten angezeigt werden.
Anwendungsprogramm »Einheitenwechsel« im Menü einstellen:
siehe Kapitel »Voreinstellungen« Code 2.1. 2 Einheitenwechsel
(Werksvoreinstellung bei ALC-Modellen)
Menüpunkt
1. 7. 2 o
1. 7. 3 1)
1. 7. 4
1. 7. 5
1. 7. 6
1. 7. 7
1. 7. 8
1. 7. 9
1. 7. 10
1. 7. 11
1. 7. 12
1. 7. 13
1. 7. 14
1. 7. 15
1. 7. 16
1. 7. 17
1. 7. 18
1. 7. 19
1. 7. 20
1. 7. 22
3. 1. 2 o
3. 1. 3 1)
3. 1. 4
3. 1. 5
3. 1. 6
3. 1. 7
3. 1. 8
3. 1. 9
3. 1. 10
3. 1. 11
3. 1. 12
3. 1. 13
3. 1. 14
3. 1. 15
3. 1. 16
3. 1. 17
3. 1. 18
3. 1. 19
3. 1. 20
3. 1. 22
Einheit
Gramm
Kilogramm
Carat
Pound
Ounce
Troy ounce
Tael Hongkong
Tael Singapur
Tael Taiwan
Grain
Pennyweight
Milligramm
Parts per Pound
Tael China
Momme
Karat
Tola
Baht
Mesgha
lb/oz
o = Werksvoreinstellung
1
) = nicht bei Modellen mit Ablesbarkeit ≤ 1 mg
Funktion
§ Zwischen Gewichtseinheit 1 und Gewichtseinheit 2 wechseln:
Taste [F] drücken
44
Umrechnung
1,00000000000
0,00100000000
5,00000000000
0,00220462260
0,03527396200
0,03215074700
0,02671725000
0,02645544638
0,02666666000
15,43235835000
0,64301493100
1000,00000000000
1,12876677120
0,02645547175
0,26670000000
5,00000000000
0,08573333810
0,06578947437
0,21700000000
0,03527396200
Druck
g
kg
ct
lb
oz
ozt
tlh
tls
tlt
GN
dwt
mg
/lb
tlc
mom
K
tol
bat
MS
o
Voreinstellungen
Parameter einstellen (Menü)
Konfiguration der ALC-Waage, d.h. Anpassung an die Anforderungen der Benutzer durch Auswahl von vorgegebenen Parametern aus
einem Menü.
Beispiel: Anpassung an den Aufstellort »Sehr unruhige Umgebung«
(Code 1. 1. 4) wählen
Schritt
Taste drücken
1. Waage ausschalten
[ON/OFF]
2. Waage einschalten und
während der Anzeige
aller Segmente
[ON/OFF]
kurz [ZERO]
1.
$ Innerhalb einer Menüebene
bewegen; nach dem letzten
Menüpunkt erscheint wieder
der erste Menüpunkt
mehrmals [ZERO]
2.
...
9.
1.
3. Menüebene 2 anwählen
[PRINT]
1. 1.
4. Menüebene 3 anwählen
[PRINT]
1. 1. 2 o
5. Menüebene 3:
Menüpunkt wählen
mehrmals [ZERO]
1. 1. 4
2 Sekunden
lang [PRINT]
1. 1. 4 o
[PRINT]
1.
6. Einstellungsänderung bestätigen;
»o« zeigt den eingestellten
Menüpunkt an
$ Zurück zur übergeordneten Menüebene (von der 3. Menüebene)
$ Ggf. weitere Menüpunkte einstellen
[PRINT], [ZERO]
7. Parametereinstellung speichern
und Menü verlassen
oder
$ Parametereinstellung ohne
Abspeichern verlassen
2 Sekunden
lang [ZERO]
> Neustart der Anwendung
Anzeige
[ON/OFF]
0.0 g
45
Parametereinstellungen (Übersicht)
o Werksvoreinstellung
√ Einstellung Benutzer
Menü
ne 2
üebe
Men
1.1. Filteranpassung
ng
tellu
kt
ne 3
seins
üpun
üebe
Werk
Men
Men
1.1.1
Sehr ruhige Umgebung
1.1.2
o Ruhige Umgebung
1.1.3
Unruhige Umgebung
1.1.4
Sehr unruhige Umgebung
1.3. Stillstandsbereich
1.3.1
1.3.2
1.3.3
1.3.4
1.3.5
1/4 Ziffernschritt
1/2 Ziffernschritt
1 Ziffernschritt
o 2 Ziffernschritte
4 Ziffernschritte
1.4. Gewichtseinheit
für Justiergewicht
1.4.1
1.4.2
1.4.3
o Gramm
Kilogramm1)
Pound
1.6. Autozero
1.6.1
1.6.2
o Eingeschaltet
Ausgeschaltet
1.7. Gewichtseinheit 1
siehe Abschnitt »Einheitenwechsel«
2. Anwendungsprogramme
2.1. Programmwahl
siehe jeweiliges Anwendungsprogramm
3. Anwendungsparameter
3.1. Gewichtseinheit 2
3.3. Referenz-Stück/-%
siehe Abschnitt »Einheitenwechsel«
siehe jeweiliges Anwendungsprogramm
5. Schnittstelle
5.2
Parität
5.2.1
5.2.2
5.2.3
5.2.4
Mark
Space
o Odd (Ungerade)
Even (Gerade)
5.3
Anzahl Stopbits
5.3.1
5.3.2
o 1 Stopbit
2 Stopbits
5.4
Handshake Betriebsart
5.4.1
5.4.2
Software-Handshake
Hardware-Handshake
nach CTS noch 2 Zeichen
o Software-Handshake
nach CTS noch 1 Zeichen
ne 1
üebe
Men
1 Wägen
5.4.3
1
) = nicht bei Modellen mit Ablesbarkeit 0,1 mg oder 1 mg
46
ng
tellu
seins
k
r
e
W
ne 1
üebe
Men
ne 2
üebe
Men
ne 3
üebe
Men
6. Drucken
bei Wägen
6.1
Druck manuell/
automatisch
6.1.1
6.1.2
6.1.3
6.1.4
Manuell ohne Stillstand
o Manuell nach Stillstand
Autom. ohne Stillstand
Automatisch bei Stillstand
7. Drucken
bei
Anwendung
7.1
Zeilenformat
des Ausdrucks
7.1.1
7.1.2
Ohne Kennzeichnung
o Mit Kennzeichnung
8. Zusatzfunktionen
8.1. Menü
8.1.1
9. Menü-Reset
kt
üpun
Men
8.1.2
o Parametereinstellung
veränderbar
Parameter nur lesen
8.2. Funktion des ext. Tasters
8.2.1
8.2.4
8.2.5
8.2.6
8.2.8
Taste [CAL]
Taste [ZERO]
o Taste [PRINT]
Taste [F]
Taste [ZERO]
8.3. Einschalten der
Waage
8.3.1
8.3.2
Aus/ein (Batteriebetrieb:
Autom. aus nach 3 Min.)
o Stand-by/ein
9.– 1
9.– 2
wiederherstellen
o nicht wiederherstellen
9.–
Werkseinstellung
47
Datenschnittstelle
Zweck
Die Waage besitzt eine Datenschnittstelle, an die ein Rechner
(oder ein anderes Peripheriegerät) angeschlossen werden
kann. Mit einem Rechner können Waagenfunktionen und
Funktionen der Anwendungsprogramme verändert, gestartet
und überwacht werden.
Schnittstellenbuchse
25
13
Pinbelegung 25-polige Buchse, RS232:
Pin 1: Betriebserde
Pin 2: Datenausgang (TxD)
Pin 3: Dateneingang (RxD)
Pin 4: Masse intern (GND)
Pin 5: Clear to Send (CTS)
Pin 6: nicht belegt
Pin 7: Masse intern (GND)
Pin 8: Masse intern (GND)
Pin 9: nicht belegt
Pin 10: nicht belegt
Pin 11: Akku-Ladespannung
+12 ... +20 V ( I _ out 25mA)
Pin 12: Reset _ Out *)
Pin 13: +5 V Ausgang
Pin 14: Masse intern (GND)
Pin 15: Universal-Taste
Pin 16: nicht belegt
Pin 17: nicht belegt
Pin 18: nicht belegt
Pin 19: nicht belegt
Pin 20: Data Terminal Ready (DTR)
Pin 21: Masse intern (GND)
Pin 22: nicht belegt
Pin 23: nicht belegt
Pin 24: nicht belegt
Pin 25: +5 V Ausgang
*) = Peripherie-Neustart
48
14
1
Vorbereitung
Die Anpassung an das andere Gerät ist im Menü vorzunehmen
(siehe Kapitel »Voreinstellungen«).
Eine detaillierte Beschreibung der verfügbaren Schnittstellenbefehle sind zu finden in der »Schnittstellenbeschreibung
für ALC Waagen«, welche aus dem Internet heruntergeladen
werden kann (www.acculab.com oder www.acculabeurope.com).
Die vielseitigen Eigenschaften der Waagen bezüglich
Dokumentation der Resultate lassen sich erst mit dem
Anschluss eines Druckers von Sartorius voll nutzen.
Die Druckresultate tragen zu einer einfachen Arbeitsweise nach
GLP entscheidend bei.
Anschluss für Taster
Fehlermeldungen
Fehlermeldungen werden in der Hauptanzeige für ca. 2 Sekunden dargestellt. Danach kehrt das Programm automatisch in den
Wägezustand zurück.
Anzeige
keine Anzeigesegmente
erscheinen
Ursache
Keine Betriebsspannung
Netzgerät nicht
eingesteckt
Batterie oder Akku ist leer
h
l
Wägebereich überschritten
Waagschale nicht aufgelegt
Berührung zwischen
Waagschale und Umgebung
Anzeigeüberlauf:
Auszugebender Wert in
der Anzeige nicht darstellbar
Justierbedingung wurde
nicht eingehalten, z.B.:
– Nullstellen
– Waagschale belastet
Bei Brutto < Null kein Tara
Taste [ZERO] gesperrt bei
belegtem zweiten
Taraspeicher (Netto-Total)
Tarafunktionen sind
gegeneinander verriegelt
Wert für zweiten
Taraspeicher nicht erlaubt
Gewicht zu gering oder kein
Wägegut auf der Waagschale
bei Anwendungsprogrammen
Datenschnittstelle für
Druckausgabe gesperrt
Waage ohne
aufgelegte Waagschale
eingeschaltet
Waage nicht justiert
Vor dem Wägen nicht tariert
e 01
e 02
e 09
e 10
e 11
e 22
e 30
Max. Wägebereich kleiner
als im Abschnitt »Technische
Daten« angegeben
Offensichtlich falsches
Wägeergebnis
Abhilfe
Stromversorgung überprüfen
Netzgerät an die
Stromversorgung anschließen
Batterie wechseln
Akku aufladen mit
externem Ladegerät
Waagschale entlasten
Waagschale korrekt auflegen
Waagschale darf umgebende Teile nicht berühren
Wägegut verringern
Waage entlasten
Tarieren mit Taste [ZERO]
Erst nach Nullanzeige justieren
Waage tarieren
Erst nach Löschen des
Taraspeichers über
[CAL] ist die Tariertaste
wieder ausführbar
Taste [ZERO] drücken
Gewicht erhöhen
Acculab-Kundendienst
ansprechen
Waagschale auflegen
Aus- und wieder
Einschalten mit Taste [ON/OFF]
Justieren
Tarieren
Falls andere Fehlermeldungen auftreten, Acculab-Kundendienst anrufen!
49
Pflege und Wartung
Reparaturen
Reparaturen dürfen nur von Fachkräften ausgeführt werden. Durch unsachgemäße Reparaturen können erhebliche Gefahren für den Benutzer entstehen.
Reinigung
! Waage von der Spannungsversorgung trennen, ggf. angeschlossenes Datenkabel
an der Waage lösen.
! Es darf keine Flüssigkeit in die Waage gelangen.
! Keine aggressiven Reinigungsmittel verwenden (Lösungsmittel o.ä.).
§ Waage mit in Seifenlauge leicht angefeuchtetem Tuch reinigen.
§ Waage mit weichem Tuch abtrocknen.
Waagschale abnehmen und reinigen:
§ Unter den Schirmring fassen und zusammen mit der Unterschale die Waagschale
nach oben führen, damit das Wägesystem nicht beschädigt wird.
Reinigung der Edelstahloberflächen
Grundsätzlich alle Edelstahlteile in regelmäßigen Abständen reinigen.
Die Edelstahllastplatte abnehmen, um diese separat gründlich zu reinigen.
Edelstahlteile an der Waage mit einem feuchten Tuch oder Schwamm reinigen.
Handelsübliche Haushaltsreiniger, die für Edelstahl geeignet sind (z.B. Stahlfix),
können gefahrlos eingesetzt werden. Edelstahloberflächen durch einfaches
Abreiben reinigen. Danach die Lastplatte gründlich nachspülen, bis alle
Rückstände beseitigt sind. Edelstahlteile am Gerät mit einem feuchten Tuch oder
Schwamm nachreinigen. Anschließend das Gerät trocknen lassen.
Als zusätzlicher Schutz kann ein Pflegeöl aufgetragen werden.
! Keine Reinigungsmittel für Edelstahlteile verwenden, die Natronlauge,
Essig-, Salz-, Schwefel- oder Zitronensäure enthalten. Die Verwendung von
Putzschwämmen aus Stahlwolle (z.B. AKOpads) ist verboten!
Lösungsmittel nur ausschließlich für die Reinigung von Edelstahlteilen verwenden.
50
Sicherheitsüberprüfung
Erscheint ein gefahrloser Betrieb der Waage nicht mehr gewährleistet:
§ Netzgerät aus der Steckdose ziehen
> Waage vor weiterer Benutzung sichern
Ein gefahrloser Betrieb des Netzgerätes ist nicht mehr gewährleistet:
– Wenn das Netzgerät sichtbare Beschädigungen aufweist
– Wenn das Netzgerät nicht mehr arbeitet
– Nach längerer Lagerung unter ungünstigen Verhältnissen
In diesem Fall den Acculab-Kundendienst benachrichtigen. Instandsetzungsmaßnahmen dürfen ausschließlich von Fachkräften ausgeführt werden:
– die Zugang zu den nötigen Instandsetzungsunterlagen und -anweisungen haben
– die an entsprechenden Schulungen teilgenommen haben
Entsorgung
Für den Transport sind die Acculab-Produkte durch die Verpackung soweit wie
nötig geschützt. Die Verpackung besteht durchweg aus umweltverträglichen
Materialien, die als wertvolle Sekundär-Rohstoffe der örtlichen Müllentsorgung
zugeführt werden sollten.
Zu Entsorgungsmöglichkeiten die Gemeinde- bzw. Stadtverwaltung ansprechen
(auch für ausgediente Geräte).
51
Übersicht
Technische Daten
Modell
Wägebereich
Ablesbarkeit
Tarierbereich (subtraktiv)
Reproduzierbarkeit
Linearitätsabweichung
Einsatz-Temperaturbereich
Zulässige BetriebsUmgebungstemperatur
Empfindlichkeitsdrift
innerhalb +10…+30 °C
Einschwingzeit (typisch)
Anpassung an Einsatznd Aufstellbedingungen
Anzeigefolge (je nach
eingestellter Filterstufe)
Externer Justiergewichtswert
(mind. Genauigkeitsklasse)
Nettogewicht, ca.
Waagschalenabmessung
Wägeraumhöhe
Abmessungen (BxTxH)
Netzanschluss, Netzspannung
Netzfrequenz
Netzanschluss, Gleichspannung
Leistungsaufnahme (typisch)
52
g
mg
g
≤±mg
≤±mg
ALC-80.4
80
0,1
80
0,1
0,3
+10…+30 °C
ALC-110.4
110
0,1
110
0,1
0,3
ALC-210.4
210
0,1
210
0,1
0,3
3 · 10–6
3
3 · 10–4
3
0,2–0,4
100 (E2)
0,2–0,4
200 (E2)
+5…+40 °C
≤±/K
s
3 · 10–6
3
4 optimierte Filterstufen
s
g
0,2–0,4
100 (E2)
kg
mm
mm
mm
3,0
3,0
3,0
80 Ø
80 Ø
80 Ø
200
200
200
200x270x300
über Steckernetzgerät 230 V oder 115 V, +15%…– 20%
48–60 Hz
10 bis 20
1
1
1
V
W
Modell
Wägebereich
Ablesbarkeit
Tarierbereich (subtraktiv)
Reproduzierbarkeit
Linearitätsabweichung
Einsatz-Temperaturbereich
Zulässige BetriebsUmgebungstemperatur
Empfindlichkeitsdrift
innerhalb +10…+30 °C
Einschwingzeit (typisch)
Anpassung an Einsatzund Aufstellbedingungen
Anzeigefolge (je nach
eingestellter Filterstufe)
Externer Justiergewichtswert
(mind. Genauigkeitsklasse)
Nettogewicht, ca.
Waagschalenabmessung
Abmessungen (BxTxH)
Netzanschluss, Netzspannung
Netzfrequenz
Netzanschluss, Gleichspannung
Leistungsaufnahme (typisch)
g
mg
g
<±mg
<±mg
ALC-150.3
150
0,001
150
0,0015
0,003
+10…+30 °C
ALC-210.3
210
1
210
1
3
ALC-320.3
320
1
320
1
3
5 · 10–4
≤3
5 · 10–6
≤3
0,2–0,4
200 (F1)
00,2–0,4
200 (F1)
+5…+40 °C
≤±/K
s
3,3 · 10–6
≤2,5
4 optimierte Filterstufen
s
g
0,2–0,4
100 (F1)
kg
mm
mm
1,6
3,0
3,0
100 Ø
80 Ø
80 Ø
–
200x270x75
200x270x300
über Steckernetzgerät 230 V oder 115 V, +15%…– 20%
48–60 Hz
10 bis 20
1
1
1
V
W
53
Modell
Wägebereich
Ablesbarkeit
Tarierbereich (subtraktiv)
Reproduzierbarkeit
Linearitätsabweichung
Einsatz-Temperaturbereich
Zulässige BetriebsUmgebungstemperatur
Empfindlichkeitsdrift
innerhalb +10…+30 °C
Einschwingzeit (typisch)
Anpassung an Einsatzund Aufstellbedingungen
Anzeigefolge (je nach
eingestellter Filterstufe)
Externer Justiergewichtswert
(mind. Genauigkeitsklasse)
Nettogewicht, ca.
Waagschalenabmessung
Abmessungen (BxTxH)
Netzanschluss, Netzspannung
Netzfrequenz
Netzanschluss, Gleichspannung
Leistungsaufnahme (typisch)
54
g
g
g
<±g
<±g
ALC-810.2
810
0,01
810
0,01
0,02
+10…+30 °C
ALC-1100.2
1100
0,01
1100
0,03
0,03
ALC-2100.2
2100
10
2100
10
30
ALC-3100.2
3100
10
3100
10
30
5 · 10–6
2,5
3 · 10–6
≤ 2,5
3 · 10–6
≤3
0,2–0,4
2000 (F1)
0,2–0,4
2000 (F1)
+5…+40 °C
<±/K
s
0,5 · 10–5
2
4 optimierte Filterstufen
s
g
–
1000 (F1)
kg
mm
mm
1,4
116 Ø
150 Ø
150 Ø
–
200x270x75
200x270x75
über Steckernetzgerät 230 V oder 115 V, +15%…–20%
48–60 Hz
10 bis 20
–
0,75
1
V
W
0,2–0,8
1000 (F1)
150 Ø
200x270x75
1
Modell
Wägebereich
Ablesbarkeit
Tarierbereich (subtraktiv)
Reproduzierbarkeit
Linearitätsabweichung
Einsatz-Temperaturbereich
Zulässige BetriebsUmgebungstemperatur
Empfindlichkeitsdrift
innerhalb +10…+30 °C
Einschwingzeit (typisch)
Anpassung an Einsatzund Aufstellbedingungen
Anzeigefolge (je nach
eingestellter Filterstufe)
Externer Justiergewichtswert
(mind. Genauigkeitsklasse)
Nettogewicht, ca.
Waagschalenabmessung
Abmessungen (BxTxH)
Netzanschluss, Netzspannung
Netzfrequenz
Netzanschluss, Gleichspannung
Leistungsaufnahme (typisch)
Betriebsdauer mit 9 Volt-Block
– Batterie, ca.
– Akku bei voller Aufladung, ca.
g
g
g
<±g
<±g
ALC-2100.1
2100
0,1
2100
0,2
0,2
+10…+30 °C
ALC-4100.1
4100
0,1
4100
0,2
0,2
ALC-6100.1
6100
0,1
6100
0,2
0,2
1 · 10–5
2
0,5 · 10–5
2
0,2–0,8
2000 (F2)
0,2–0,8
5000 (F2)
+5…+40 °C
<±/K
s
2 · 10–5
2
4 optimierte Filterstufen
s
g
0,2–0,8
1000 (F2)
kg
mm
mm
V
W
1,4
150 Ø
150 Ø
150 Ø
200x270 x75
über Steckernetzgerät 230 V oder 115 V, +15%…–20%
48–60 Hz
10 bis 20
0,75
0,75
0,75
h
h
11
2,5
11
2,5
11
2,5
55
Zubehör (Optionen)
Artikel
Datenanschlusskabel für
PC-Anschluss (25 polig)
–
–
–
–
–
Justiergewichte
für ALC-80.4 (50 g, E2)
für ALC-110.4 (100 g; E2)
für ALC-210.4 (200 g; E2)
für ALC-150.3 (100 g, E2)
für ALC-210.3 (200 g; F1)
Bestell-Nr.
7357314
YCW4528-00
YCW5128-00
YCW5228-00
YCW5128-00
YCW5238-00
–
–
–
–
–
–
–
–
Artikel
für ALC-320.3 (200 g; F1)
für ALC-810.2 (500 g, F1)
für ALC-1100.2 (1 kg; F1)
für ALC-2100.2 (2 kg; F1)
für ALC-3100.2 (2 kg; F1)
für ALC-2100.1 (1 kg; F2)
für ALC-4100.1 (2 kg; F2)
für ALC-6100.1 (5 kg; F2)
Bestell-Nr.
YCW5238-00
YCW5538-00
YCW6138-00
YCW6238-00
YCW6238-00
YCW6148-00
YCW6248-00
YCW6548-00
C-Kennzeichnung
Das Gerät erfüllt die Anforderungen der Richtlinien des
Rates der Europäischen Union:
89/336/EWG »Elektromagnetische
Verträglichkeit (EMV)«
Zugehörige Europäische Normen:
Störaussendung:
nach Produktnorm EN 61326-1 Kl.B (Wohnbereich)
Störfestigkeit:
nach Produktnorm EN 61326-1
(Mindestprüfanforderungen, nicht kontinuierlicher Betrieb)
Hinweis:
Modifikationen der Geräte sowie der Anschluss von nicht
von Acculab gelieferten Kabeln oder Geräten unterliegen
der Verantwortung des Betreibers und sind von diesem
entsprechend zu prüfen und falls erforderlich zu korrigieren.
Acculab stellt auf Anfrage Angaben zur Betriebsqualität zur
Verfügung (gemäß) den o.g. Normen zur Störfestigkeit).
56
73/22/EWG »Elektrische Betriebsmittel zur
Verwendung innerhalb bestimmter
Spannungsgrenzen«
Zugehörige Europäische Normen:
EN 60950
Sicherheit von Einrichtungen der Informationstechnik,
einschließlich elektrischer Büromaschinen
EN61010
Sicherheitsanforderungen an elektrische Mess-, Steuer-,
Regel- und Laborgeräte
Teil 1: Allgemeine Anforderungen
Bei Verwendung elektrischer Betriebsmittel in Anlagen
und Umgebungsbedingungen mit erhöhten Sicherheitsanforderungen sind die Auflagen gemäß den zutreffenden
Errichtungsbestimmungen zu beachten.
Description générale
La série ALC est constituée de balances destinées à peser
des échantillons de 0,1 mg à 6 kg.
Ces balances garantissent des résultats de pesée fiables
pour les exigences les plus élevées grâce aux avantages
suivants :
– filtrage des conditions ambiantes défavorables telles que
vibrations, courants d’air…etc…
– résultats de pesée reproductibles,
– construction robuste.
Les balances ALC permettent de faciliter et d’accélérer
les travaux de routine grâce à :
– des temps de mesure courts,
– une utilisation des plus simples.
–
–
–
–
–
Une autre application au choix parmi les fonctions
suivantes :
commutation d’unités
total net (deuxième mémoire de tare)
comptage
pesée en pourcentage
calcul de la valeur moyenne
Sommaire
57
57
57
58
Description générale
Sommaire
Conseils de sécurité
Mise en service
Fonctionnement
62 Pesée simple
63 Ajustage
64
65
67
69
71
Programmes d’application
Total net/Deuxième mémoire de tare
Comptage
Pesée en pourcentage
Calcul de la valeur moyenne
Commutation d’unités
72
73
75
76
77
78
Réglages
Réglages des paramètres (menu)
Vue d’ensemble des paramètres
Interface de données
Messages d’erreur
Entretien et maintenance
Recyclage
Données techniques de l’appareil
79 Caractéristiques techniques
83 Accessoires (options)
83 Marque C
Conseils de sécurité
Veuillez lire attentivement ce mode d’emploi avant
d’utiliser votre nouvelle balance afin d’éviter tout dommage.
Conservez ce manuel pour toute consultation ultérieure.
Afin de garantir un fonctionnement sûr et fiable de votre
balance, veuillez observer les conseils de sécurité suivants :
! Veillez à ce que la tension indiquée sur le bloc d’alimenta-
tion soit conforme à la tension d’alimentation secteur sur
votre lieu d’installation.
! N’utilisez pas votre balance dans les domaines à risques
d’explosions.
– La balance n’est plus sous tension uniquement lorsque le
bloc d’alimentation est débranché.
– Veuillez utiliser les accessoires et options d’origine
Sartorius ; ils ont été adaptés de façon optimale à la balance.
– Protégez le bloc d’alimentation de l’humidité.
! Utilisez uniquement une pile ou un accumulateur
monobloc de 9 volts en vente dans le commerce.
N’ouvrez pas la balance ! Si vous endommagez la bande
de sécurité, vous perdez tout droit à la garantie.
57
Mise en service
Conditions de stockage et de transport
Ne pas exposer l’appareil à des températures, des chocs,
des vibrations et une humidité extrêmes.
Déballage
§ Aussitôt après avoir déballé l’appareil, veuillez vérifier
s’il ne présente aucune détérioration externe visible.
$ Si la balance devait présenter une détérioration, veuillez
vous reporter au chapitre «Entretien et maintenance»,
paragraphe «Contrôle de sécurité».
Veuillez conserver tous les éléments de l’emballage au cas
où une éventuelle réexpédition serait nécessaire. Seul
l’emballage d’origine vous garantit la sécurité nécessaire
pendant le transport. Avant le transport, démontez tous les
câbles de connexion afin d’éviter tout dommage.
–
–
–
–
–
–
Contenu de la livraison
Les éléments suivants sont livrés avec la balance :
ALC-80.4, ALC-110.4, ALC-210.4, ALC-210.3
balance
plateau de pesée
support de plateau
anneau de blindage
plaque de blindage
bloc d’alimentation
–
–
–
–
–
–
–
ALC-150.3, ALC-320.3
balance
plateau de pesée
support de plateau
anneau de blindage
plaque de blindage
bloc d’alimentation
paravent cylindrique en verre
–
–
–
–
ALC-810.2, ALC-1100.2, ALC-2100.2, ALC-3100.2,
ALC-2100.1, ALC-4100.1 und ALC-6100.1
balance
plateau de pesée
support de plateau
bloc d’alimentation
58
–
–
–
–
–
–
Conseils d’installation
La balance a été conçue pour donner des résultats de
pesée fiables dans les conditions d’utilisation habituelles.
Elle travaille de façon rapide et précise lorsque son lieu
d’installation a été choisi convenablement :
positionner la balance sur une surface stable et plane,
éviter les rayonnements de chaleur extrêmes, dus par
exemple à un radiateur ou aux rayons du soleil directs,
protéger la balance des courants d’air directs causés par
des fenêtres ou des portes ouvertes,
éviter les vibrations extrêmes pendant la pesée,
protéger la balance de dégagements chimiques corrosifs et
éviter de l’exposer à une humidité extrême.
Adaptation de la balance à son
environnement :
Il peut se produire de la condensation lorsqu’un appareil
froid est placé dans un environnement nettement plus
chaud. Adaptez l’appareil, débranché du secteur, à la
température de la pièce pendant environ deux heures.
Montage de la balance
Balances avec chambre de pesée
§
–
–
–
–
Installer successivement les éléments suivants dans la chambre de pesée :
plaque de blindage
anneau de blindage
support de plateau
plateau de pesée
Balances avec plateau de pesée rond
§ Installer successivement les éléments suivants :
– support de plateau
– plateau de pesée
§ Installer successivement les éléments suivants :
– support de plateau
– plateau de pesée
59
Raccordement au secteur/Mesures de protection
N’utilisez que des blocs d’alimentation d’origine Sartorius :
pour l’Europe : 6971948.
§ Insérez la fiche coudée dans la balance.
§ Le bloc d’alimentation de la classe de protection 2 peut être raccordé sans précautions particulières à toute prise secteur.
La tension de sortie est reliée au boîtier de la balance par un pôle.
Le boîtier de la balance doit être mis à la terre.
Mise en place de la pile/de l’accumulateur
(sur les modèles ALC-810.2, ALC-2100.1, ALC-4100.1 et ALC-6100.1)
$ La pile ou l’accumulateur ne font pas partie de la livraison.
!Utiliser uniquement une pile ou un accumulateur monobloc de 9 volts en vente
dans le commerce.
!Charger l’accumulateur uniquement à l’aide d’un chargeur de pile externe.
§ Tourner la balance sur le côté.
§ Ouvrir le compartiment à pile : relever le cache du compartiment à pile.
§ Placer la pile ou l’accumulateur monobloc de 9 volts dans le support à pile.
$ Respecter la polarité.
!Les piles ou accumulateurs usagés sont des ordures spéciales (pas des ordures
ménagères) : ils doivent être traités en conformité avec la lois sur les ordures
industrielles.
§ Fermer le compartiment à pile : appuyer sur le cache du compartiment à pile
jusqu’à ce qu’il s’enclenche.
60
Choix de la tension du secteur
Pour choisir la tension du secteur, utilisez les blocs d’alimentation d’origine
Sartorius suivants :
– bloc d’alimentation TNG8 référence 6971951 (universel)
ou
– bloc d’alimentation TNG8 référence 6971952 (pour la Grande-Bretagne).
● Pousser le commutateur sur la tension souhaitée (230 V ou 115 V).
Mise à niveau de la balance
Remettre la balance à niveau après chaque changement du lieu de travail.
La mise à niveau est réalisée seulement avec les deux pieds de réglage avant.
● Visser les deux pieds de réglage arrière.
● Visser les pieds de réglage avant, selon le schéma ci-contre, jusqu’à ce que la
bulle d’air du niveau à bulle soit centrée.
> En général, plusieurs étapes sont nécessaires à la mise à niveau.
Système antivol
Utilisez l’œillet de fixation à l’arrière de la balance comme système antivol.
● Fixez la balance sur le lieu d’installation, par exemple au moyen d’une chaîne ou
d’un cadenas.
61
Fonctionnement
Pesée simple
Caractéristiques
– Tarer la balance
Il est possible de tarer à l’intérieur de l’étendue de pesée de la balance.
Opérations préliminaires
§ Mettre en marche la balance : appuyer sur la touche [ON/OFF].
§ Modifier les réglages si nécessaire : voir le chapitre «Réglages».
§ Retourner aux réglages d’usine si nécessaire : voir le chapitre «Réglages», paramètre 9. – 1.
$ Tarer la balance si nécessaire : appuyer sur la touche [ZERO].
Autre fonction :
§ Eteindre la balance : appuyer sur la touche [ON/OFF].
Exemple
Calcul de la valeur de pesée
Réglages : comme réglages d’usine
Etape
Appuyer sur la touche
1. Mettre la balance en service
[ON/OFF]
Affichage
Un test automatique est effectué.
2. Poser le récipient pour
l’échantillon (ici par ex. 52 g)
3. Tarer la balance
4. Déposer l’échantillon dans le
récipient (ici par ex. 150,2 g)
62
[ZERO]
+
52.0 g
+
0.0 g
+ 150.2 g
Ajustage
Ajuster la balance après l’avoir installée sur son lieu de travail.
Caractéristiques
Le processus d’ajustage externe ne peut être démarré que lorsque
– la balance est déchargée,
– la balance est tarée,
– le signal de pesée interne est stable.
Si ces conditions ne sont pas remplies, un message d’erreur apparaît.
Le poids nécessaire à l’ajustage apparaît à l’affichage (poids : voir le paragraphe «Accessoires»).
Sur les modèles ALC, l’ajustage externe peut être effectué dans différentes unités pondérales : g, kg*, lb (code1. 4. x).
Réglage d’usine : grammes (code1. 4. 1)
Exemple
Ajustage de la balance
Réglages : comme réglages d’usine.
Etape
Appuyer sur la touche
1. Mettre la balance en service,
si nécessaire
[ON/OFF]
2. Tarer la balance
[ZERO]
3. Démarrer le processus d’ajustage
Le poids d’ajustage est affiché
sans unité (ici par ex. 1000 g)
[CAL]
Affichage/Sortie de données
0.0 g
+
4. Déposer le poids d’ajustage
affiché
Après l’ajustage, le poids d’ajustage
apparaît avec son unité
5. Retirer le poids d’ajustage
1000.0
1000.0
+
1000.0 g
0.0 g
* = pas sur les modèles avec une précision de lecture de 0,1 mg ou 1 mg.
63
Programmes d’application
Total net/Deuxième mémoire de tare
A l’aide de ce programme d’application, il est possible de peser des composants pour un mélange.
Opérations préliminaires
Régler le programme d’application «Total net/Deuxième mémoire de tare» dans le menu :
voir le chapitre «Réglages», code 2.1.3
Exemple
Etape
Appuyer sur la touche
1. Mettre la balance en service, si nécessaire
[ON/OFF]
2. Poser le récipient vide destiné
à recevoir les composants sur la balance
3. Tarer
65.0 g
+
120,5 g
[F]
6. Mettre le composant suivant
7. Mémoriser le composant
[F]
8. Mettre d’autres composants,
si nécessaire
Répéter les étapes
6 et 7 autant de fois
qu’il est nécessaire
9. Afficher le poids total et, si nécessaire,
remplir afin d’atteindre la valeur souhaitée
[CAL]
64
+
[ZERO]
4. Mettre le premier composant
5. Mémoriser le composant
Impression lorsque l’édition avec
identification a été sélectionnée
Affichage
0.0 gNET
N1
+
120.5 g
+
70,5 g
0.0 gNET
+
191,0 g
Comptage
Fonction
Ce programme d’application permet de déterminer le nombre de pièces ayant
pratiquement le même poids.
Caractéristiques
– Mémorisation de la valeur pondérale actuelle sous la forme d’un nombre de
pièces réglé pour l’initialisation lors du démarrage du programme «Comptage».
– Possibilité de modifier le nombre de pièces de référence dans le menu : voir le
chapitre «Réglages».
– Edition automatique du poids de pièce par l’intermédiaire de l’interface de données en option à la fin de l’initialisation lorsque l’impression avec identification
a été sélectionnée dans le menu.
– Commutation entre l’affichage du nombre de pièces et l’affichage de la valeur
pondérale à l’aide de la touche [F].
Réglages des paramètres en usine
Nombre de pièces de référence : 10 (code 3. 3. 2)
Opérations préliminaires
§ Réglage du programme d’application «Comptage» dans le menu :
voir le chapitre «Réglages».
Code 2. 1. 4
Comptage
§ Nombre de pièces de référence :
Code 3. 3. 1
5 pièces
Code 3. 3. 2
10 pièces
Code 3. 3. 3
20 pièces
Code 3. 3. 4
50 pièces
Code 3. 3. 5
100 pièces
voir aussi le chapitre «Réglages»
65
Exemple
Calcul d’un nombre de pièces inconnu en pesant le nombre de pièces de référence prédéfini.
Réglages (écarts par rapport au réglage en usine) :
Menu :
programme d’application Comptage (code 2. 1. 4)
nombre de pièces de référence 20 (code 3. 3. 3)
Etape
1
1. Mettre la balance en service,
si nécessaire
2. Tarer la balance
13. Information : afficher le nombre
de pièces de référence (ici par ex., 20 pièces)
Appuyer sur la touche
[ON/OFF]
[ZERO]
0.0 g
[F] longuement
14. Poser le nombre de pièces de
référence (20 pièces) (ici par ex., 66 g)
15. Démarrer l’application ;
impression lorsque l’édition avec
identification a été sélectionnée
Affichage/Sortie des données
ref 20 (brièvement)
+
[F]
16. Poser le nombre de pièces
inconnu (ici par ex., 174 pièces)
+
20 pcs
wRef
+
+
17. Afficher le poids
[F]
+
18. Afficher le nombre de pièces
[F]
+
19. Décharger la balance
10. Effacer la valeur de référence
11. Le cas échéant, renouveler
l’opération à partir du point 6.
66
66.0 g
3.300 g
174 pcs
574.2 g
174 pcs
0 pcs
[CAL] longuement
Pesée en pourcentage
Fonction
Ce programme d’application permet de déterminer le pourcentage d’un
échantillon par rapport à un poids de référence.
Caractéristiques
– Mémorisation de la valeur pondérale actuelle sous la forme d’un pourcentage
réglé pour l’initialisation lors du démarrage du programme «Pesée en
pourcentage».
– Possibilité de modifier le pourcentage de référence dans le menu : voir le chapitre
«Réglages».
– Edition automatique du poids de référence par l’intermédiaire de l’interface de
données en option à la fin de l’initialisation lorsque l’édition avec identification a
été réglée dans le menu.
– Commutation entre l’affichage de la valeur en pourcentage et l’affichage de la
valeur pondérale à l’aide de la touche [F].
Réglages des paramètres en usine
Pourcentage de référence : 10 (code 3. 3. 2)
Opérations préliminaires
§ Régler le programme d’application «Pesée en pourcentage» dans le menu :
voir le chapitre «Réglages».
Code 2. 1. 5
Pesée en pourcentage
§ Pourcentage de référence :
Code 3. 3. 1
5%
Code 3. 3. 2
10 %
Code 3. 3. 3
20 %
Code 3. 3. 4
50 %
Code 3. 3. 5
100 %
voir aussi le chapitre «Réglages»
67
Exemple
Mesurer la valeur en pourcentage par rapport à un poids de référence mémorisé.
Réglages (écarts par rapport au réglage d’usine) :
Menu : Programme d’application Pesée en pourcentage (code 2. 1. 5)
Menu : Pourcentage de référence 100 % (code 3. 3. 5)
Etape
Appuyer sur la touche
11.
Mettre la balance en service, si nécessaire
[ON/OFF]
12.
Tarer la balance
[ZERO]
13.
Information : afficher le
pourcentage de référence
[F] longuement
14.
Poser le poids de référence
pour 100 % (ici par ex., 222,5 g)
15.
Démarrer l’application ;
impression lorsque l’édition avec
identification a été sélectionnée
16.
Poser le poids inconnu
(ici par ex., 322,5 g)
17.
Afficher le poids
18.
Afficher le pourcentage
19.
Décharger la balance
10.
Effacer le pourcentage de référence
11.
Le cas échéant, recommencer
l’opération à partir du point 6.
68
[F]
Affichage/Sortie des données
0.0 g
ref 100
+
222.5 g
+
100.00 %
Wxx%
+
222.500 g
+
144.94 %
[F]
+
322.5 g
[F]
+
144.94 %
0.00 %
[CAL] longuement
Calcul de la valeur moyenne
Fonction
Grâce à ce programme d’application, il est possible de peser des échantillons
dans un environnement extrêmement instable. Pour cela, une valeur moyenne
est calculée sur plusieurs cycles de mesure.
Caractéristiques
– Le résultat de mesure (valeur moyenne arithmétique) est affiché de façon
permanente dans l’unité de poids présélectionnée avec un symbole triangulaire.
– Le nombre des mesures peut être réglé dans le menu : voir le chapitre
«Réglages».
– Affichage du nombre de mesures nécessaires pour le calcul de la valeur moyenne
(appuyer longuement sur la touche [F]).
– Commutation entre l’affichage du résultat de mesure et l’affichage pondéral
normal à l’aide de la touche [F].
Réglages des paramètres en usine
Nombre de mesures nécessaires pour le calcul
de la valeur moyenne : 10 (3. 3. 2).
Opérations préliminaires
§ Régler le programme d’application «Calcul de la valeur moyenne» dans le menu :
voir le chapitre «Réglages».
Code 2. 1.12 Calcul de la valeur moyenne
– Nombre de mesures nécessaires pour le calcul de la valeur moyenne :
3. 3. 1
5 mesures
3. 3. 2
10 mesures
3. 3. 3
20 mesures
3. 3. 4
50 mesures
3. 3. 5 100 mesures
voir aussi le chapitre «Réglages»
69
Exemple
Calcul de la valeur pondérale dans un environnement extrêmement instable avec 10 mesures pour le calcul d’une valeur moyenne.
Réglages (écarts par rapport au réglage d’usine) :
Menu : Programme d’application Calcul de la valeur moyenne (code 2. 1.12)
Etape
Appuyer sur la touche
1. Mettre la balance en service, si nécessaire
[ON/OFF]
2. Tarer la balance
[ZERO]
3. Afficher le nombre de mesures
pour le calcul de la valeur
moyenne (ici par ex., 10 mesures)
[F] longuement
4. Poser l’échantillon
(la valeur pondérale affichée
oscille, ici par ex., aux environs de 275 g)
5. Démarrer la mesure
[F]
0.0 g
+
8888
+
8888
10
9
8
...
1
275.5 g
+
Impression lorsque l’édition avec
identification a été sélectionnée
RES
7. Effacer le résultat de mesure
8. Le cas échéant, recommencer
l’opération à partir du point 4.
10 (brièvement)
ref
Après 10 mesures
6. Décharger la balance
70
Affichage
+
275.5 g
+
275.5 g
(affichage stable)
[CAL] longuement
G
G
Commutation d’unités
Grâce à ce programme d’application, il est possible d’afficher une valeur de pesée dans deux unités différentes.
Régler le programme d’application «Commutation d’unités» dans le menu :
voir le chapitre «Réglages» Code 2.1. 2 Commutation d’unités (réglage d’usine sur les modèles ALC)
Option du menu
1. 7. 2 o 3. 1. 2 o
1. 7. 3 1) 3. 1. 3 1)
1. 7. 4
3. 1. 4
1. 7. 5
3. 1. 5
1. 7. 6
3. 1. 6
1. 7. 7
3. 1. 7
1. 7. 8
3. 1. 8
1. 7. 9
3. 1. 9
1. 7. 10 3. 1. 10
1. 7. 11 3. 1. 11
1. 7. 12 3. 1. 12
1. 7. 13 3. 1. 13
1. 7. 14 3. 1. 14
1. 7. 15 3. 1. 15
1. 7. 16 3. 1. 16
1. 7. 17 3. 1. 17
1. 7. 18 3. 1. 18
1. 7. 19 3. 1. 19
1. 7. 20 3. 1. 20
1. 7. 22 3. 1. 22
Unité
Grammes
Kilogrammes
Carats
Livres
Onces
Onces de Troy
Taels Hongkong
Taels Singapour
Taels Taïwan
Grains
Pennyweights
Milligrammes
Pièces par livre
Taels chinois
Mommes
Carats autrichiens
Tolas
Bahts
Mesghals
lb/oz
Facteur de conversion
1,00000000000
0,00100000000
5,00000000000
0,00220462260
0,03527396200
0,03215074700
0,02671725000
0,02645544638
0,02666666000
15,43235835000
0,64301493100
1000,00000000000
1,12876677120
0,02645547175
0,26670000000
5,00000000000
0,08573333810
0,06578947437
0,21700000000
0,03527396200
Pression
g
kg
ct
lb
oz
ozt
tlh
tls
tlt
GN
dwt
mg
/lb
tlc
mom
K
tol
bat
MS
o
o = Réglage d’usine ;
1
) = Pas sur les modèles ayant une précision de lecture ≤ 0,2 mg
Fonction
● Commuter entre l’unité de poids 1 et l’unité de poids 2 :
appuyer sur la touche [F].
71
Réglages
Réglages des paramètres (menu)
La configuration de la balance peut être adaptée aux exigences de l’utilisateur en
sélectionnant des paramètres parmi une liste dans un menu.
Exemple : Sélectionner l’adaptation au lieu d’installation «Environnement très instable»
(code 1 1 4).
Etape
Appuyer sur la touche
1. Mettre la balance hors service
[ON/OFF]
2. Mettre la balance en service et pendant l’affichage de tous les segments
[ON/OFF]
[ZERO] brièvement
$ Se déplacer à l’intérieur d’un niveau
du menu ; la première option du
menu apparaît de nouveau après la
dernière option du menu
plusieurs
fois [ZERO]
2.
...
9.
1.
3. Sélectionner le niveau du menu 2
[PRINT]
1. 1.
4. Sélectionner le niveau du menu 3
[PRINT]
1. 1. 2 o
5. Niveau du menu 3 :
sélectionner l’option du menu
plusieurs
fois [ZERO]
1. 1. 4
2 secondes
longuement [PRINT]
1. 1. 4 o
[PRINT]
1.
6. Confirmer la modification de
réglage ; «o» indique l’option
du menu réglée
$ Revenir au niveau du menu supérieur
(à partir du 3ème niveau du menu)
$ Régler, le cas échéant, d’autres
options du menu
[PRINT], [ZERO]
7. Mémoriser le réglage des
paramètres et quitter le menu
ou
$ Quitter le réglage des paramètres
sans mémorisation
2 secondes
longuement [ZERO]
>
72
Redémarrer l’application
Affichage
1.
[ON/OFF]
0.0 g
Réglages des paramètres (vue d’ensemble)
ο Réglage d’usine
√ Réglage utilisateur
Menu
au 2
Nive
1.1. Adaptation filtre
au 3
Nive
1.1.1
1.1.2
1.1.3
1.1.4
u
ine
men
d’us
n du
ages
Régl
Optio
Environnement très stable
ο Environnement stable
Environnement instable
Environnement très instable
1.3. Etendue de stabilité
1.3.1
1.3.2
1.3.3
1.3.4
1.3.5
1/4 digit
1/2 digit
1 digit
ο 2 digits
4 digits
1.4. Unité de poids pour
poids d’ajustage
1.4.1
1.4.2
1.4.3
ο Grammes
Kilogrammes1)
Livres
1.6. Zéro automatique
1.6.1
1.6.2
ο En service
Hors service
1.7. Unité de poids 1
voir chapitre «Commutation d’unités»
2. Programmes
d’application
2.1. Sélection programme
voir le programme d’application correspondant
3. Paramètres
d’application
3.1. Unité de poids 2
3.3. Pièces/% de référence
voir chapitre «Commutation d’unités»
voir le programme d’application correspondant
5. Interface
5.2
Parité
5.2.1
5.2.2
5.2.3
5.2.4
Marque
Espace
o Impaire
Paire
5.3
Nombre de bits d’arrêt
5.3.1
5.3.2
o 1 bit d’arrêt
2 bits d’arrêt
5.4
Mode handshake
5.4.1
5.4.2
Handshake via logiciel
Handshake hardware
2 caractères après CTS
o Handshake hardware
1 caractères après CTS
au 1
Nive
1 Pesée simple
5.4.3
1)
= Pas sur les modèles ayant une précision de lecture de 0,1 mg ou 1 mg.
73
6. Impression
lors pesée
6.1
Impresion manuelle/
automatique
6.1.1
6.1.2
6.1.3
6.1.4
u
usine
men
es d’
g
n du
a
l
Rég
Optio
Manuelle sans stabilité
o Manuelle après stabilité
Automatique sans stabilité
Automatique avec stabilité
7. Impression
lors
applications
7.1
Format des lignes
de l’impression
7.1.1
7.1.2
Sans identification
o Avec identification
8. Fonctions
diverses
8.1. Menu
8.1.1
8.1.2
o Modifier les réglages de
paramètres
Lire les paramètres
8.2. Fonction commande
universelle
8.2.1
8.2.4
8.2.5
8.2.6
8.2.8
Touche [CAL]
Touche [ZERO]
o Touche [PRINT]
Touche [F]
Touche [ZERO]
8.3. Mode de mise en
service de la balance
8.3.1
8.3.2
Hors service/En service (mode de
fonctionnement de la pile :
hors service autom. après 3 min.)
o Veille/En service
9.– 1
9.– 2
Restaurer
o Ne pas restaurer
au 1
Nive
9. Reset menu
74
au 2
Nive
9.–
Réglagles d’usine
au 3
Nive
Interface de données
Fonction
La balance est équipée d’une interface de données à laquelle
il est possible de connecter un ordinateur (ou un autre
appareil périphérique). Les fonctions de la balance et les
fonctions des programmes d’application peuvent être
modifiées, démarrées et contrôlées à l’aide d’un ordinateur.
Opérations préliminaires
L’adaptation à l’autre appareil doit être effectuée dans le menu
(voir chapitre «Réglages»). Vous trouverez une description
détaillée des ordres d’interfaces disponibles dans la «Description
de l’interface des balances ALC» que vous pouvez télécharger
sur Internet (www.acculab.com ou acculab-europe.com).
Connecteur femelle
Les nombreuses propriétés des balances en matière de
documentation des résultats peuvent être utilisées dans leur
intégralité uniquement si l’on raccorde une imprimante
Sartorius. Les résultats d’impression contribuent de manière
significative à faciliter le travail conformément aux normes BPL.
25
13
14
1
Affectation des broches du connecteur femelle
à 25 pôles, RS232 :
Broche 1 : prise de terre
Broche 2 : sortie de données (TxD)
Broche 3 : entrée de données (RxD)
Broche 4 : masse interne (GND)
Broche 5 : Clear to Send (CTS)
Broche 6 : non occupée
Broche 7 : masse interne (GND)
Broche 8 : masse interne (GND)
Broche 9 : non occupée
Broche 10 : non occupée
Broche 11 : tension de charge de
l’accumulateur
+12 ... +20 V ( I _ out 25mA)
Broche 12 : Reset _ Out *)
Broche 13 : sortie +5 V
Broche 14 : masse interne (GND)
Broche 15 : touche universelle
Broche 16 : non occupée
Broche 17 : non occupée
Broche 18 : non occupée
Broche 19 : non occupée
Broche 20 : Data Terminal Ready (DTR)
Broche 21 : masse interne (GND)
Broche 22 : non occupée
Broche 23 : non occupée
Broche 24 : non occupée
Broche 25 : sortie +5 V
Connexion pour
commande universelle
*) = Redémarrage de l’appareil périphérique
75
Messages d’erreur
Les messages d’erreur apparaissent sur l’afficheur principal pendant environ 2 secondes.
Ensuite le programme repasse automatiquement en mode de pesée.
Affichage
Aucun segment d’affichage
n’apparaît
Cause
Pas de tension d’alimentation
Le bloc d’alimentation n’est pas branché
La pile ou l’accumulateur est vide
h
l
L’étendue de pesée a été dépassée
Le plateau de pesée n’est pas posé
Le plateau de pesée touche quelque chose
e 01
Affichage trop long :
la valeur à éditer n’est pas
représentable à l’affichage
L’une des conditions d’ajustage
n’a pas été respectée, par ex. :
– pas mise à zéro
– le plateau est chargé
Brut < à zéro, pas possible de tarer
La touche [ZERO] est bloquée
lorsque la deuxième mémoire
de tare (Total net) est occupée.
Les fonctions de tare sont verrouillées.
La valeur pour la deuxième
mémoire de tare n’est pas autorisée
Le poids est trop petit ou aucun
échantillon n’est posé sur le plateau
L’interface de données est bloquée
pour l’impression de données
La balance a été mise en service sans
que le plateau de pesée ne soit posé
e 02
e 09
e 10
e 11
e 22
e 30
L’étendue de pesée max. est
inférieure à l’étendue de pesée
max. indiquée au paragraphe
«Caractéristiques techniques»
Le résultat de pesée
est manifestement faux
La balance n’est pas ajustée
La balance n’a pas été tarée avant la pesée
Si d’autres erreurs survenaient, veuillez contacter le service après-vente Acculab !
76
Remède
Vérifier l’alimentation en courant
Brancher le bloc d’alimentation
à l’alimentation en courant
Changer la pile
Recharger l’accumulateur avec
un chargeur de piles externe
Décharger le plateau de la balance
Poser le plateau de pesée correctement
Le plateau de pesée ne doit pas
toucher les objets alentours
Diminuer l’échantillon
Décharger la balance
Tarer avec la touche [ZERO]
Ajuster seulement après
l’affichage du zéro
Tarer la balance
La touche de tare est de nouveau disponible
dès que la mémoire de tare a été effacée
à l’aide de la touche [CAL]
Appuyer sur la touche [ZERO]
Augmenter le poids
Adressez-vous au service
après-vente Acculab
Poser le plateau de pesée.
Mettre la balance hors service
puis la remettre en service en appuyant
sur la touche [ON/OFF]
Ajuster
Tarer
Entretien et maintenance
Réparations
Les réparations ne doivent être effectuées que par du personnel spécialisé agréé
qui possède les qualifications nécessaires au dépannage. Toute réparation non
conforme peut représenter un danger pour l’utilisateur.
Nettoyage
!Débrancher la balance de la tension du secteur, débrancher le cas échéant les
câbles de données raccordés à la balance.
! Veiller à ce qu’aucun liquide ne pénètre dans la balance.
! Ne pas utiliser de produits de nettoyage corrosifs (solvants ou produits
similaires).
§ Nettoyer la balance avec un chiffon légèrement humecté d’eau savonneuse.
§ Essuyer et sécher la balance avec un chiffon doux.
Enlever et nettoyer le plateau de pesée :
§ Saisir l’anneau de blindage par en dessous et soulever le plateau de peseé avec
le support de plateau afin de ne pas endommager le système de pesée.
Nettoyage des surfaces en acier inoxydable
Nettoyer toujours toutes les parties en acier inoxydable à intervalles réguliers.
Retirer le plateau de pesée en acier inoxydable afin de pouvoir le nettoyer
séparément minutieusement. Nettoyer toutes les parties en acier inoxydable de
la balance avec un chiffon ou une éponge humides. Les produits d’entretien
ménagers usuels appropriés pour l’acier inoxydable peuvent être utilisés en toute
sécurité. Nettoyer les surfaces en acier inoxydable simplement en les frottant.
Puis rincer minutieusement le plateau de pesée pour retirer tous les restes de
saleté et de produits d’entretien. Rincer les parties en acier inoxydable de la
balance avec un chiffon ou une éponge humide. Ensuite, laisser sécher l’appareil.
Pour le protéger encore davantage, vous pouvez appliquer une huile d’entretien .
! Ne pas d’utiliser de produits de nettoyage pour parties en acier inoxydable qui
contiennent de la soude caustique, de l’acide acétique, de l’acide chlorhydrique,
de l’acide sulfurique ou de l’acide citrique. L’utilisation d’éponges à récurer
en laine d’acier est interdite !
Utiliser des détergents exclusivement pour nettoyer les parties en acier
inoxydable !
77
Contrôle de sécurité
S’il vous semble que l’appareil ne peut plus fonctionner sans danger :
§ Débranchez le bloc d’alimentation du secteur.
> Assurez-vous que la balance ne sera plus utilisée.
Un fonctionnement exempt de danger du bloc d’alimentation n’est plus garanti :
– lorsqu’il présente des chocs visibles,
– lorsqu’il ne fonctionne plus,
– après un stockage prolongé dans de mauvaises conditions.
Informez dans ce cas le service après-vente Acculab. La remise en état de
l’appareil ne doit être effectuée que par une main d’œuvre qualifiée :
– ayant accès à la documentation et aux conseils techniques nécessaires au
dépannage
– et ayant participé aux stages de formation correspondants.
Recyclage
Pour le transport, les produits Acculab sont protégés du mieux possible grâce à
leur emballage. Cet emballage se compose entièrement de matériaux respectant
l’environnement qui devraient donc être apportés au service local de retraitement
des déchets de votre commune.
Veuillez vous informer auprès de la municipalité de votre ville sur les possibilités
de recyclage (également pour les appareils usagés).
78
Données techniques de l’appareil
Caractéristiques techniques
Modèle
Etendue de pesée
Précision de lecture
Etendue de tarage (soustractive)
Reproductibilité
Ecart de linéarité
Gamme de température spécifiée
Conditions réglementaires
d’utilisation
Dérive de sensibilité
à l’intérieur de +10…+30 °C
Temps de mesure (typique)
Adaptation à l’environnement
Cycle d’affichage (selon
l’échelon de filtrage utilisé)
Valeur de poids d’ajustage externe
(classe de précision minimale)
Poids net, environ
Dimensions du plateau de pesée
Hauteur de la chambre de pesée
Dimensions (LxPxH)
Raccordement au réseau, tension
Fréquence
Raccordement au réseau,
tension continue
Consommation (typique)
g
mg
g
≤±mg
≤±mg
ALC-80.4
80
0,1
80
0,1
0,3
+10…+30 °C
ALC-110.4
110
0,1
110
0,1
0,3
ALC-210.4
210
0,1
210
0,1
0,3
+5…+40 °C
≤±/K
s
3 · 10–6
3 · 10–6
3
3
4 échelons de filtrage optimisés
3 · 10–4
3
s
g
0,2–0,4
100 (E2)
0,2–0,4
200 (E2)
kg
mm
mm
mm
3,0
3,0
80 Ø
80 Ø
200
200
200x270x300
par l’intermédiaire d’un bloc d’alimentation
230 V ou 115 V, +15%…– 20%
48–60 Hz
V
W
10 à 20
1
0,2–0,4
100 (E2)
1
3,0
80 Ø
200
1
79
Modèle
Etendue de pesée
Précision de lecture
Etendue de tarage (soustractive)
Reproductibilité
Ecart de linéarité
Gamme de température spécifiée
Conditions réglementaires d’utilisation
Dérive de sensibilité
à l’intérieur de +10…+30 °C
Temps de mesure (typique)
Adaptation à l’environnement
Cycle d’affichage (selon
l’échelon de filtrage utilisé)
Valeur de poids d’ajustage externe
(classe de précision minimale)
Poids net, environ
Dimensions du plateau de pesée
Dimensions (LxPxH)
Raccordement au réseau, tension
Fréquence
Raccordement au réseau,
tension continue
Consommation (typique)
80
g
g
g
<±g
<±g
ALC-150.3
150
0,001
150
0,0015
0,003
+10…+30 °C
+5…+40 °C
ALC-210.3
210
1
210
1
3
ALC-320.3
320
1
320
1
3
3,3 · 10–6
5 · 10–4
≤2,5
≤3
4 échelons de filtrage optimisés
5 · 10–6
≤3
s
g
0,2–0,4
100 (F1)
0,2–0,4
200 (F1)
kg
mm
mm
1,6
3,0
100 Ø
80 Ø
–
200x270 x75
par l’intermédiaire d’un bloc d’alimentation
230 V ou 115 V, +15%…– 20%
48–60 Hz
V
W
10 à 20
1
≤±/K
s
0,2–0,4
200 (F1)
1
3,0
80 Ø
200x270 x300
1
Modèle
Etendue de pesée
Précision de lecture
Etendue de tarage (soustractive)
Reproductibilité
Ecart de linéarité
Gamme de température spécifiée
Conditions réglementaires
d’utilisation
Dérive de sensibilité
à l’intérieur de +10…+30 °C
Temps de mesure (typique)
Adaptation à l’environnement
Cycle d’affichage (selon
l’échelon de filtrage utilisé)
Valeur de poids d’ajustage externe
(classe de précision minimale)
Poids net, environ
Dimensions du plateau de pesée
Dimensions (LxPxH)
Raccordement au réseau, tension
Fréquence
Raccordement au réseau,
tension continue
Consommation (typique)
g
g
g
<±g
<±g
ALC-810.2
810
0,01
810
0,01
0,02
+10…+30 °C
ALC-1100.2
1100
0,01
1100
0,03
0,03
ALC-2100.2
2100
10
2100
10
30
ALC-3100.2
3100
10
3100
10
30
+5…+40 °C
<±/K
s
0,5 · 10–5
5 · 10–6
2
2,5
4 échelons de filtrage optimisés
3 · 10–6
≤ 2,5
3 · 10–6
≤3
s
g
–
1000 (F1)
0,2–0,4
2000 (F1)
0,2–0,4
2000 (F1)
kg
mm
mm
1,4
116 Ø
150 Ø
150 Ø
–
200x270x75
200x270x75
par l’intermédiaire d’un bloc d’alimentation
230 V ou 115 V, +15%…– 20%
48–60 Hz
V
W
10 à 20
–
0,2–0,8
1000 (F1)
0,75
1
150 Ø
200x270x75
1
81
Modèle
Etendue de pesée
Précision de lecture
Etendue de tarage (soustractive)
Reproductibilité
Ecart de linéarité
Gamme de température spécifiée
Conditions réglementaires
d’utilisation
Dérive de sensibilité
à l’intérieur de +10…+30 °C
Temps de mesure (typique)
Adaptation à l’environnement
Cycle d’affichage (selon
l’échelon de filtrage utilisé)
Valeur de poids d’ajustage externe
(classe de précision minimale)
Poids net, environ
Dimensions du plateau de pesée
Dimensions (LxPxH)
Raccordement au réseau, tension
Fréquence
Raccordement au réseau,
tension continue
Consommation (typique)
Durée de fonctionnement avec
monobloc de 9 volts
– pile, environ
– accumulateur en cas
de charge totale, environ
82
ALC-2100.1
2100
0,1
2100
0,2
0,2
+10…+30 °C
g
g
g
<±g
<±g
ALC-4100.1
4100
0,1
4100
0,2
0,2
ALC-6100.1
6100
0,1
6100
0,2
0,2
+5…+40 °C
<±/K
s
2 · 10–5
1 · 10–5
2
2
4 échelons de filtrage optimisés
0,5 · 10–5
2
s
g
0,2–0,8
1000 (F2)
0,2–0,8
5000 (F2)
0,2–0,8
2000 (F2)
kg
mm
mm
1,4
150 Ø
150 Ø
200x270 x75
par l’intermédiaire d’un bloc d’alimentation
230 V ou 115 V, +15%…– 20%
48–60 Hz
V
W
10 à 20
0,75
0,75
150 Ø
0,75
h
–
11
11
11
h
–
2,5
2,5
2,5
Accessoires (options)
–
–
–
–
–
Article
Câble de raccordement à un
ordinateur (25 pôles)
Référence
7357314
Poids d’justage
pour ALC-80.4 (50 g, E2)
pour ALC-110.4 (100 g ; E2)
pour ALC-210.4 (200 g ; E2)
pour ALC-150.3 (100 g, E2)
pour ALC-210.3 (200 g ; F1)
YCW4528-00
YCW5128-00
YCW5228-00
YCW5128-00
YCW5238-00
–
–
–
–
–
–
–
–
Article
pour ALC-320.3 (200 g ; F1)
pour ALC-810.2 (500 g, F1)
pour ALC-1100.2 (1 kg ; F1)
pour ALC-2100.2 (2 kg ; F1)
pour ALC-3100.2 (2 kg ; F1)
pour ALC-2100.1 (1 kg ; F2)
pour ALC-4100.1 (2 kg ; F2)
pour ALC-6100.1 (5 kg ; F2)
Référence
YCW5238-00
YCW5538-00
YCW6138-00
YCW6238-00
YCW6238-00
YCW6148-00
YCW6248-00
YCW6548-00
Marque C
L’appareil répond aux exigences des directives du Conseil de
l’Union Européenne :
89/336/CEE «Compatibilité électromagnétique (CEM)»
Normes européennes applicables :
Emissions parasites :
conformément à la norme du produit EN 61326-1 Cl.B
(environnement résidentiel)
Immunité à ces émissions :
conformément à la norme du produit EN 61326-1
(environnement industriel)
Remarque :
L’utilisateur engage sa propre responsabilité concernant
toutes modifications de l’unité d’affichage et de commande
et tout raccordement de câbles ou d’appareils non livrés
par Acculab Instrument. C’est à lui de vérifier et,
si nécessaire, de corriger ces modifications.
Sur simple demande, Acculab met à disposition une documentation concernant les caractéristiques de fonctionnement minimales des appareils (conformément aux normes
concernant la définition de l’immunité aux émissions
parasites ci-dessus mentionnées).
73/23/CEE «Matériel électrique destiné
à être employé dans certaines limites de
tension»
Normes européennes applicables :
EN 60950
Sécurité de matériels de traitement de l’information,
y compris les matériels de bureau électriques
EN 61010
Règles de sécurité pour appareils électriques de mesurage,
de régulation et de laboratoire
Partie 1 : Prescriptions générales
En cas d’utilisation de matériel électrique dans des installations et des conditions d’environnement exigeant des
mesures de sécurité accrues, vous devez respecter les
instructions conformément aux consignes d’installation
correspondantes.
83
Impiego previsto
La serie ALC consiste di bilance per misurare campioni
con un peso tra 0,1 mg e 6 kg.
Le bilance garantiscono risultati di pesata sicuri grazie
alle seguenti caratteristiche:
– Filtraggio delle condizioni ambientali sfavorevoli,
come vibrazioni, correnti d’aria ecc.
– Risultati di pesata stabili e riproducibili
– Costruzione robusta e di lunga durata
Le bilance ALC facilitano e velocizzano le operazioni
di routine grazie alle seguenti caratteristiche:
– Tempi di risposta brevi
– Utilizzo facilissimo
–
–
–
–
–
È disponibile una seconda funzione per applicazioni facili.
Si può scegliere tra le funzioni di:
Commutazione delle unità di peso
Totale netto (seconda memoria di tara)
Conteggio
Pesate in percentuale
Formazione della media
Indice
84
84
84
85
Impiego previsto
Indice
Istruzioni di sicurezza e di avvertenza
Messa in funzione
Modo operativo
89 Funzione base di pesata
90 Regolazione
91
92
94
96
98
Programmi applicativi
Totale netto/Seconda memoria di tara
Conteggio
Pesate in percentuale
Formazione della media
Commutazione delle unità di peso
99
100
102
103
104
105
Impostazioni (Menù)
Come impostare i parametri (menù)
Impostazioni dei parametri (prospetto)
Interfaccia dati
Messaggi di errore
Cura e manutenzione
Riciclaggio dell’imballo
Prospetto
106 Dati tecnici
110 Accessori (opzioni)
110 Marchio CE
Istruzioni di sicurezza e di avvertenza
Leggere attentamente le presenti istruzioni per l’installazione prima di rendere operativa la Vostra bilancia. È una
precauzione di sicurezza per Voi stessi ed inoltre evitate
che lo strumento possa essere danneggiato. Conservate
il manuale pronto ad essere subito consultato.
Osservare le seguenti indicazioni per un funzionamento
della bilancia sicuro e senza problemi:
! Il voltaggio riportato sull’alimentatore deve coincidere
con il voltaggio locale
! Utilizzare solo batterie normali a 9 volt d’uso commerciale
o batterie ricaricabili
84
! Non impiegare la bilancia in un’area a pericolo di
esplosione
– La bilancia può venire spenta estraendo l’alimentatore solo
se non è collegata alla corrente elettrica
– Utilizzare accessori e opzioni Sartorius che sono adattati in
modo ottimale alla bilancia
– Proteggere l’alimentatore dall’umidità
Non aprire la bilancia. Se si danneggiano i sigilli di
sicurezza decadono i diritti di garanzia.
Messa in funzione
Condizioni di deposito e di trasporto
Non esporre lo strumento a temperature estreme,
umidità, urti, correnti d’aria e vibrazioni.
Disimballaggio
§ Dopo aver disimballato lo strumento Vi preghiamo
di controllare subito eventuali danni visibili
$ In caso di danni, vedere il capitolo «Cura e manutenzione», sezione «Controllo di sicurezza».
Conservate tutte le parti dell’imballaggio per evitare
in caso di rispedizione della bilancia, dei danni dovuti
al trasporto. La rispedizione può essere fatta solo se
l’imballaggio di serie è completo. Prima della spedizione,
staccare tutti i cavi per evitare eventuali danni inutili.
Equipaggiamento fornito
Fanno parte dell’equipaggiamento i seguenti componenti:
–
–
–
–
–
–
ALC-80.4, ALC-110.4, ALC-210.4, ALC-210.3
Bilancia
Piatto di pesata
Supporto del piatto di pesata
Anello di schermatura
Piatto di schermatura
Alimentatore a rete
–
–
–
–
–
–
–
ALC-150.3, ALC-320.3
Bilancia
Piatto di pesata
Supporto del piatto di pesata
Anello di schermatura
Piatto di schermatura
Alimentatore a rete
Cilindro in vetro
–
–
–
–
ALC-810.2, ALC-1100.2, ALC-2100.2, ALC-3100.2,
ALC-2100.1, ALC-4100.1 und ALC-6100.1
Bilancia
Piatto di pesata
Supporto del piatto di pesata
Alimentatore a rete
–
–
–
–
–
–
Consigli per l’installazione
La bilancia è costruita in modo tale che in condizioni
di utilizzo normali fornisce risultati di pesata precisi.
La bilancia lavora in modo veloce ed esatto quando
è stato scelto un luogo di installazione appropriato:
mettere la bilancia su una superficie di lavoro stabile
e piana
evitare l’irraggiamento di calore diretto attraverso
raggi solari, riscaldamento o simili
proteggere la bilancia contro correnti d’aria
(provenienti da porte, finestre aperte)
evitare forti vibrazioni durante la pesata
proteggere la bilancia da vapori chimici aggressivi
evitare l’umidità estrema
Acclimatazione della bilancia
L’umidità dell’aria può condersarsi sulle superfici della bilancia, quando da fredda viene portata in un ambiente sensibilmente più caldo. Tenere lo strumento per circa
2 ore a temperatura ambiente, senza collegarlo alla
corrente elettrica.
85
Montaggio delle parti della bilancia
Bilance con camera di pesata analitica
§
–
–
–
–
Montare le parti nell’ordine seguente:
Piatto di schermatura
Anello di schermatura
Supporto del piatto di pesata
Piatto di pesata
Bilance con piatto di pesata rotondo
§ Montare le parti nell’ordine seguente:
– Supporto del piatto di pesata
– Piatto di pesata
§ Montare le parti nell’ordine seguente:
– Supporto del piatto di pesata
– Piatto di pesata
86
Collegamento a rete/Misure di sicurezza
Utilizzare solo
– Alimentatore originale per l’Europa: 6971948
§ Inserire la spina angolare nella bilancia
§ L’alimentatore della classe di protezione 2 può essere collegato a qualsiasi
presa di corrente senza ulteriori precauzioni
La tensione in uscita è collegata tramite un polo all’alloggiamento della bilancia.
L’alloggiamento della bilancia può essere collegato a terra per scopi funzionali.
Montaggio della batteria normale o ricaricabile
per i modelli ALC-810.2, ALC-2100.1, ALC-4100.1 und ALC-6100.1
$ La batteria normale o ricaricabile non è compresa nell’equipaggiamento
della bilancia
! Usare solo batterie normali a 9 volt d’uso commerciale o batterie ricaricabili
! Caricare la batteria ricaricabile solo con uno strumento carica-batterie esterno
§ Girare la bilancia di lato
§ Aprire il vano batterie: sollevare la copertura del vano
§ Inserire la batteria normale a 9 volt o la batteria ricaricabile nel vano
porta batterie
$ Fare attenzione alle polarità
! Le batterie normali o ricaricabili usate fanno parte dei rifiuti speciali
(non sono rifiuti domestici): le batterie ricaricabili devono essere eliminate
come rifiuti speciali in base alla legge sull’economia dei rifiuti
§ Chiudere il vano batterie: abbassare la copertura del vano finché si sente un
clic di arresto
87
Selezione della tensione di rete
In base alla tensione di rete utilizzare i seguenti alimentatori:
– alimentatore TNG8 codice 6971951 (universale)
– alimentatore TNG8 codice 6971952 (per la Gran Bretagna)
§ Usare il commutatore per cambiare tra il voltaggio 230 V e 115 V
Come livellare la bilancia
La bilancia deve essere livellata ogni volta che si cambia il posto di installazione.
Il livellamento avviene solo con i due piedini anteriori.
§ Ritrarre i due piedini posteriori
§ Girare i piedini anteriori come mostrato in figura finché la bolla di livello si
trova in centro
> Normalmente sono necessarie più operazioni di regolazione
Dispositivo antifurto
Per il dispositivo antifurto utilizzare il foro apposito posto sulla parte posteriore
della bilancia
§ Fissare la bilancia sul luogo di installazione, per es. con una catena o con
un lucchetto
88
Modo operativo
Funzione base di pesata
Caratteristiche
– Taratura della bilancia
La taratura può avvenire all’interno di tutto il campo di pesata della bilancia.
Preparazione
§ Accendere la bilancia: premere il tasto [ON/OFF]
§ Modificare event. le impostazioni: vedere capitolo «Impostazioni»
§ Caricare event. le impostazioni di fabbrica: vedere il capitolo «Impostazioni», parametro 9 – 1
$ Event. tarare la bilancia: premere il tasto [ZERO]
Ulteriori funzioni:
§ Spegnere la bilancia: premere il tasto [ON/OFF]
Esempio
Determinazione del valore di pesata
Impostazioni: come le impostazioni di fabbrica
Passo
Premere il tasto
1. Accendere la bilancia
[ON/OFF]
Lettura
Viene eseguito l’autotest
2. Collocare il contenitore per il campione
(qui, per es. 52 g)
3. Tarare la bilancia
4. Collocare il campione nel contenitore
(qui, per es. 150,2 g)
[ZERO]
+
52.0 g
+
0.0 g
+ 150.2 g
89
Regolazione
Regolare la bilancia sul luogo di installazione.
Caratteristiche
L’operazione di regolazione esterna può essere avviata solo se
– la bilancia non è caricata
– la bilancia è tarata
– il segnale di pesata interno è stabile
Se queste condizioni non vengono soddisfatte, appare un messaggio di errore. Il peso necessario per la regolazione viene
indicato sul display (per i pesi vedere la sezione «Accessori»).
La regolazione sui modelli BL può avvenire con unità di peso diverse: g, kg*, lb (codice1. 4. x)
Impostazione di fabbrica: grammi (codice 1. 4. 1)
Esempio
Regolazione della bilancia
Impostazioni: come le impostazioni di fabbrica
Passo
Premere il tasto
1. Event. accendere la bilancia
[ON/OFF]
2. Tarare la bilancia
[ZERO]
3. Avviare l’operazione di regolazione
Il peso di regolazione viene indicato senza
unità di peso (qui, per es. 1000 g)
[CAL]
Lettura/Uscita dati
0.0 g
+
4. Collocare il peso di regolazione
visualizzato
Dopo la regolazione appare il peso
di regolazione con l’unità di peso
5. Togliere il peso di regolazione
* = non per i modelli con una precisione di lettura di 0,1 mg o di 1 mg
90
1000.0 g
1000.0 g
+
1000.0 g
0.0 g
Programmi applicativi
Totale netto/Seconda memoria di tara
Con questo programma applicativo si possono dosare i componenti per una formula.
Preparazione
Impostare nel menù il programma applicativo «Totale netto/Seconda memoria di tara»:
vedere il capitolo «Impostazioni» codice 2.1. 3
Esempio
Passo
Premere il tasto
1. Event. accendere la bilancia
[ON/OFF]
2. Collocare il contenitore vuoto per il
dosaggio dei componenti sulla bilancia
3. Tarare
+
65.0 g
+
120,5 g
[ZERO]
4. Versare il primo componente
5. Memorizzare il componente
Se è stato scelto: Stampa con
identificazione, viene stampato
Lettura/Uscita dati
[F]
0.0 g NET
N1
6. Versare il componente successivo
+
7. Memorizzare il componente
[F]
8. Event. versare altri componenti
Ripetere il passo 5 e 6
in base al numero dei
componenti da versare
9. Visualizzare il peso complessivo
[CAL] < 2 sec.
continuare a versare fino al
valore finale desiderato
+
120.5
g
70,5 g
0.0 g NET
+
191,0 g
91
Conteggio
Scopo
Con questo programma applicativo si può determinare il numero di pezzi che
hanno all’incirca un peso equivalente.
Caratteristiche
– Memorizzazione del valore di pesata attuale per il numero di pezzi impostato
per l’inizializzazione all’avvio del programma di «Conteggio»
– Possibilità di modificare il numero dei pezzi di riferimento: vedere il capitolo
«Impostazioni»
– Uscita automatica del peso dei pezzi tramite l’interfaccia dati alla fine
dell’inizializzazione, se è stato impostato nel menù il parametro:
Stampa con identificazione
– Commutazione tra il numero dei pezzi ed il valore del peso con il tasto
[F]
Parametri impostati in fabbrica
Numero dei pezzi di riferimento: 10 (codice 3. 3. 2)
Preparazione
§ Impostazione nel menù del programma applicativo «Conteggio»:
vedere «Impostazioni»
codice 2. 1. 4 Conteggio
§ Numero di pezzi di riferimento:
Codice 3. 3. 1
5 pezzi
Codice 3. 3. 2
10 pezzi
Codice 3. 3. 3
20 pezzi
Codice 3. 3. 4
50 pezzi
Codice 3. 3. 5 100 pezzi
vedere anche il capitolo «Impostazioni»
92
Esempio
Misurazione di un numero di pezzi sconosciuto con: pesata di un numero di pezzi di riferimento prestabilito
Impostazioni (differiscono dalle impostazioni di fabbrica):
Menù: Programma applicativo: Conteggio (codice 2. 1. 4)
Numero di pezzi di riferimento 20 (codice 3. 3. 3)
Passo
Premere il tasto
1. Event. accendere la bilancia
[ON/OFF]
2. Tarare la bilancia
[ZERO]
3. Informazione: visualizzare il numero di
pezzi di riferimento (qui, per es. 20 pezzi)
[F] a lungo
4. Collocare il numero di pezzi di riferimento
(20 pezzi) (qui, per es. 66 g)
5. Avviare l’applicazione; se è stato scelto:
Stampa con identificazione,
viene stampato
Lettura/Uscita dati
0.0 g
+
[F]
6. Collocare un numero di pezzi
sconosciuto (qui, per es. 174 pezzi)
20 pcs
wRef
+
7. Visualizzare il peso
[F]
+
8. Visualizzare il numero di pezzi
[F]
+
10. Cancellare il valore di riferimento
66.0 g
+
+
9. Scaricare la bilancia
(brevemente)
ref 20
3.300
g
174 pcs
574.2 g
174 pcs
0 pcs
[CAL] a lungo
11. Event. continuare dal passo 6.
93
Pesate in percentuale
Scopo
Con questo programma applicativo si può determinare il valore percentuale del
peso di un campione relativo ad un peso di riferimento.
Caratteristiche
– Memorizzazione del valore di pesata attuale per il numero percentuale impostato
per l’inizializzazione all’avvio del programma di «Pesate in percentuale»
– Possibilità di modificare il valore percentuale di riferimento: vedere il capitolo
«Impostazioni»
– Uscita automatica del peso di riferimento tramite l’interfaccia dati alla fine
dell’inizializzazione, se è stato impostato nel menù il parametro: Stampa con
identificazione
– Commutazione tra il numero percentuale ed il valore del peso con il tasto
[F]
Parametri impostati in fabbrica
Valore percentuale di riferimento: 10 (codice 3. 3. 2)
Preparazione
§ Impostare nel menù del programma applicativo «Pesate in percentuale»:
vedere il capitolo «Impostazioni»
Codice 2. 1. 5 Pesate in percentuale
§ Valore percentuale di riferimento:
Codice 3. 3. 1
5%
Codice 3. 3. 2 10 %
Codice 3. 3. 3 20 %
Codice 3. 3. 4 50 %
Codice 3. 3. 5 100 %
vedere anche il capitolo «Impostazioni»
94
Esempio
Misurazione del valore percentuale con: memorizzazione del peso di riferimento ponendo un peso sulla bilancia
Impostazioni (differiscono dalle impostazioni di fabbrica):
Menù: Programma applicativo: Pesate in percentuale (codice 2. 1. 5)
Menù: Valore percentuale di riferimento 100 % (codice 3. 3. 5)
Passo
Premere il tasto
1. Event. accendere la bilancia
[ON/OFF]
2. Tarare la bilancia
[ZERO]
3. Informazione: visualizzare il numero
percentuale di riferimento
[F] a lungo
4. Collocare il peso di riferimento
per il 100 % (qui, per es. 222,5 g)
5. Avviare l’applicazione; se è stato scelto:
Stampa con identificazione,
viene stampato
Lettura/Uscita dati
0.0 g
ref 100
+ 222.50 g
[F]
+ 100.00 %
Wxx%
6. Collocare un peso sconosciuto
(qui, per es. 322,5 g)
+
222.500
+ 144.94 %
7. Visualizzare il peso
[F]
+ 322.50 g
8. Visualizzare il valore percentuale
[F]
+ 144.94 %
9. Scaricare la bilancia
10. Cancellare il numero percentuale
di riferimento
g
0.00 %
[CAL] a lungo
11. Event. continuare dal passo 6.
95
Formazione della media
Scopo
Con questo programma applicativo è possibile misurare il peso di campioni
che si trovano in condizioni ambientali molto instabili. Il peso viene determinato
in forma di valore medio in base a più cicli di misurazioni.
Caratteristiche
– Il valore medio aritmetico viene indicato come risultato di misurazione nell’unità
di peso preselezionata, con il simbolo triangolare
– Il numero delle misurazioni può essere impostato nel menù: vedere il capitolo
«Impostazioni»
– Visualizzazione del numero delle misurazioni per la formazione della media
(premere a lungo il tasto [F])
– Commutazione tra la lettura del risultato di misurazione e la normale lettura
del peso con il tasto [F]
Parametri impostati in fabbrica
Numero delle misurazioni per la formazione della media: 10 (3. 3. 2)
Preparazione
§ Impostare nel menù il programma applicativo «Formazione della media»:
vedere il capitolo «Impostazioni»
Codice 2. 1.12 Formazione della media
– Numero delle misurazioni per la formazione della media:
3. 3. 1
5 misurazioni
3. 3. 2
10 misurazioni
3. 3. 3
20 misurazioni
3. 3. 4
50 misurazioni
3. 3. 5
100 misurazioni
vedere il capitolo «Impostazioni»
96
Esempio
Determinazione del valore di pesata in condizioni ambientali estremamente instabili con un numero di 10 misurazioni per
la formazione della media.
Impostazioni (differiscono dalle impostazioni di fabbrica):
Menù: Programma applicativo: Formazione della media (codice 2. 1.12)
Passo
Premere il tasto
1. Event. accendere la bilancia
[ON/OFF]
2. Tarare la bilancia
[ZERO]
3. Impostare il numero delle misurazioni
(qui, per es. 10 misurazioni)
[F] a lungo
4. Collocare il campione
(il valore visualizzato oscilla,
qui, per es. di 275 g)
5. Avviare la misurazione
[F]
Lettura/Uscita dati
ref 10
(brevemente)
+
8888
+
8888
10
9
8
...
1
275.5 g G
Dopo 10 misurazioni
+
Se è stato scelto: Stampa con
identificazione, viene stampato
RES
+
275.5
g
+
275.5 g G
(indicazione fissa)
6. Scaricare la bilancia
7. Cancellare il risultato di misurazione
g
0.0
[CAL] a lungo
8. Event. continuare dal passo 4.
97
Commutazione delle unità di peso
Con questo programma applicativo un valore di pesata può essere indicato in due unità di peso diverse.
Impostare nel menù il programma applicativo «Commutazione delle unità di peso»:
vedere il capitolo «Impostazioni» codice 2.1. 2 Commutazione delle unità di peso (Impostazioni di fabbrica sui modelli ALC)
Voce di menú
1. 7. 2 ο
1. 7. 3 1)
1. 7. 4
1. 7. 5
1. 7. 6
1. 7. 7
1. 7. 8
1. 7. 9
1. 7. 10
1. 7. 11
1. 7. 12
1. 7. 13
1. 7. 14
1. 7. 15
1. 7. 16
1. 7. 17
1. 7. 18
1. 7. 19
1. 7. 20
1. 7. 22
3. 1. 2 ο
3. 1. 3 1)
3. 1. 4
3. 1. 5
3. 1. 6
3. 1. 7
3. 1. 8
3. 1. 9
3. 1. 10
3. 1. 11
3. 1. 12
3. 1. 13
3. 1. 14
3. 1. 15
3. 1. 16
3. 1. 17
3. 1. 18
3. 1. 19
3. 1. 20
3. 1. 22
Unità di peso
Grammi
Chilogrammi
Carati
Libbre
Once
Once Troy
Tael Hongkong
Tael Singapore
Tael Taiwan
Grani
Pennyweight
Milligrammi
Parti per libbra
Tael Cina
Momme
Carati austriaci
Tola
Baht
Mesghal
lb/oz
o = impostazione di fabbrica
1)
= non per i modelli con una precisione di lettura di < 0,1 mg
Funzione
§ Commutare la l’unità di peso 1 e l’unità di peso 2:
premere il tasto [F]
98
Conversione
1,00000000000
0,00100000000
5,00000000000
0,00220462260
0,03527396200
0,03215074700
0,02671725000
0,02645544638
0,02666666000
15,43235835000
0,64301493100
1000,00000000000
1,12876677120
0,02645547175
0,26670000000
5,00000000000
0,08573333810
0,06578947437
0,21700000000
0,03527396200
Simbolo
g
kg
ct
lb
oz
ozt
tlh
tls
tlt
GN
dwt
mg
/lb
tlc
mom
K
tol
bat
MS
o
Impostazioni
Come impostare i parametri (menù)
Configurazione della bilancia, cioè l’adattamento della bilancia alle richieste dell’utente mediante la scelta di parametri predefiniti
contenuti in un menù.
Esempio: Selezionare per l’adattamento alle condizioni ambientali la voce «Condizioni ambientali molto instabili» (codice 1, 1. 4)
Passo
Premere il tasto
1. Spegnere la bilancia
[ON/OFF]
2. Accendere la bilancia e durante
la visualizzazione di tutti i
segmenti
[ON/OFF]
[ZERO] brevemente
1.
$ Spostarsi all’interno di un
livello di menù; dopo l’ultima
voce di menù riappare
la prima
[ZERO] più volte
2.
...
9.
1.
3. Selezionare il livello di menù 2
[PRINT]
1. 1.
4. Selezionare il livello di menù 3
[PRINT]
1. 1. 2 o
5. Livello di menù 3:
selezionare la voce di menù
[ZERO] più volte
1. 1. 4
6. Confermare la modifica dell’impostazione;
«o» indica la voce di menù impostata
[PRINT] per
2 secondi
1. 1. 4 o
$ Ritornare al livello di menù
principale (dal livello di menù 3)
[PRINT]
1.
$ Event. impostare altre voci di menù
[PRINT], [ZERO]
7. Memorizzare l’impostazione
dei parametri e uscire dal menù
oppure
$ Uscire dall’impostazione dei
parametri senza memorizzare
[ZERO] per
2 secondi
> Riavvio dell’applicazione
Lettura
[ON/OFF]
0.0 g
99
Impostazioni dei parametri (prospetto)
o impostazione di fabbrica
√ impostazione dell’operatore
Menù
lo 2
Livel
1.1. Adattamento del filtro
lo 3
Livel
1.1.1
1.1.2
1.1.3
1.1.4
cca
fabri
ni di
o
enù
i
z
di m
sta
Impo
Voce
Condizioni molto stabili
o Condizioni stabili
Condizioni instabili
Condizioni molto instabili
1.3. Campo di stabilità
1.3.1
1.3.2
1.3.3
1.3.4
1.3.5
1/4 digit
1/2 digit
1 digit
o 2 digit
4 digit
1.4. Unità di peso per il
peso di regolazione
1.4.1
1.4.2
1.4.3
o Grammi
Chilogrammi 1)
Libbre
1.6. Autozero
1.6.1
1.6.2
o On
Off
1.7. Unità di peso 1
vedi sez. «Com. delle unità di peso»
2. Programmi
applicativi
2.1. Selezione del programma
vedere il programma applicativo relativo
3. Parametri
applicativi
3.1. Unità di peso 2
3.3. Pezzo di riferimento in %
vedi sez. «Com. delle unità di peso»
vedi il programma applic. relativo
5. Interfaccia
5.2
Parità
5.2.1
5.2.2
5.2.3
5.2.4
Mark
Space
o Odd (dispari)
Even (pari)
5.3
Numero di bit di stop
5.3.1
5.3.2
o 1 bit di stop
2 bit di stop
5.4
Modalità di handshake
5.4.1
5.4.2
Handshake software
Handshake hardware
ancora 2 caratteri dopo CTS
o Handshake software
ancora 1 carattere dopo CTS
lo 1
Livel
1 Pesata
5.4.3
1)
= non per i modelli con una precisione di lettura di 0,1 mg o di 1 mg
100
lo 1
Livel
6. Stampa
per pesata
lo 2
Livel
6.1 Stampa manuale/
Automatica
lo 3
Livel
6.1.1
6.1.2
6.1.3
6.1.4
ca
abric
i di f
n
o
enù
i
di m
staz
Impo
Voce
Manuale senza stabilità
o Manuale dopo la stabilità
Automatica senza stabilità
Automatica alla stabilità
7. Stampa
per
Applicazioni
7.1
7.1.1
7.1.2
Senza identificazione
o Con identificazione
8. Funzioni
supplementari
8.1. Menù
funzioni
8.1.1
8.1.2
o Modifica
parametri
Lettura parametri
8.2. Funzione commut. est.
8.2.1
8.2.4
8.2.5
8.2.6
8.2.8
Tasto [CAL]
Tasto [ZERO]
o Tasto [PRINT]
Tasto [F]
Tasto [ZERO]
8.3. Accensione della
bilancia
8.3.1
8.3.2
Off/On (Funz. A batteria:
autom. Off dopo 3 min.)
o Stand-by/On
9.–
9.– 1
9.– 2
Impostazione di fabricca
o Non ripristinare
9. Menù bilancia
Formato delle
righe di stampa
Impostazione
di fabbrica
101
Interfaccia dati
Scopo
La bilancia possiede un’interfaccia dati alla quale può
essere collegato un computer (o un’altra periferica).
Le funzioni della bilancia e le funzioni dei programmi
applicativi possono essere modificate, avviate e monitorate
da un computer.
Preparazione
Per l’adattamento all’altro apparecchio fare
riferimento al menù (vedi capitolo «Impostazioni»).
La descrizione dettagliata dei comandi interfaccia disponibili
si trova in «Descrizione interfaccia per bilance ALC» che può
essere scaricato direttamente da Internet (www.acculab.com
o www.acculab-europe.com).
Presa dell’interfaccia
25
13
14
1
Destinazione dei pin del connettore femmina
D-Sub, RS232:
Pin 1:Terra
Pin 2:Uscita dati (TxD)
Pin 3:Ingresso dati (RxD)
Pin 4:Massa interna (GND)
Pin 5:Clear to Send (CTS)
Pin 6:Non utilizzato
Pin 7:Massa interna (GND)
Pin 8:Massa interna (GND)
Pin 9:Non utilizzato
Pin 10:Non utilizzato
Pin 11:Tensione carica-batteria
+12 ... +20 V ( I _ out 25mA)
Pin 12:Reset _ Out *)
Pin 13:+5 V uscita
Pin 14:Massa interna (GND)
Pin 15:Tasto universale
Pin 16:Non utilizzato
Pin 17:Non utilizzato
Pin 18:Non utilizzato
Pin 19:Non utilizzato
Pin 20:Data Terminal Ready (DTR)
Pin 21:Massa interna (GND)
Pin 22:Non utilizzato
Pin 23:Non utilizzato
Pin 24:Non utilizzato
Pin 25:+5 V uscita
*) = riavvio periferica
102
Le numerose proprietà delle bilance in relazione alla
documentazione dei risultati, possono essere sfruttate appieno
collegando una stampante Sartorius. I risultati di stampa
contribuiscono a rendere semplici le modalità di lavoro
conformi a GLP.
Collegamento per il
commutatore
Messaggi di errore
I messaggi di errore vengono visualizzati sul display principale per circa 2 secondi.
Poi il programma ritorna automaticamente alla modalità di pesata.
Problema
Non appaiono i segmenti
luminosi sul display
Causa
Mancanza di tensione
L’alimentatore non è collegato
Le batterie normali o quelle
ricaricabili sono scariche
h
l
Il peso eccede il campo di pesata
Il piatto di pesata non è a posto
Il piatto di pesata tocca
oggetti circostanti
Sovraccarica del display: il valore
che deve essere emesso non può
essere visualizzato sul display
La condizione di regolazione
non è stata rispettata, per es.:
– azzerare
– la bilancia è carica
Se il val. lordo < zero, non é possibile la tara
Tasto [ZERO] bloccato se la
memoria della 2° tara è
occupata (totale netto)
Le funzioni di tara sono
bloccate l’una con l’altra
Valore per la seconda memoria
di tara non permesso
Peso troppo leggero o nessun
campione sul piatto di pesata
durante i programmi applicativi
Interfaccia dati per l’uscita dati bloccata
Lo bilancia è stata accesa
senza aver montato il piatto
di pesata
La bilancia non è regolata
Non è stata tarata prima della pesata
e 01
e 02
e 09
e 10
e 11
e 22
e 30
È stato introdotto un campo di
pesata max. minore di quello
riportato nel paragrafo «Dati tecnici»
Il risultato di pesata
è evidentemente errato
Soluzione
Controllare se c’è tensione
Collegare l’alimentatore alla tensione
Cambiare le batterie
Ricaricare le batterie con lo
strumento carica-batterie esterno
Scaricare il piatto di pesata
Posizionare il piatto di pesata
Il piatto di pesata non deve
toccare oggetti circostanti
Diminuire il campione
di pesata
Scaricare la bilancia
Tarare con il tasto [ZERO]
Regolare solo dopo l’azzeramento
del display
Tarare la bilancia
Solo dopo la cancellazione
della memoria di tara con
il tasto [CAL], il tasto di tara
è di nuovo attivabile
Premere il tasto [ZERO]
Aumentare il peso
Rivolgersi al Servizio Assistenza Cliente
Collocare il piatto di pesata
Spegnere e riaccendere
la bilancia con il tasto [ON/OFF]
Regolare
Tarare
In caso si presentassero altri errori, telefonare al Servizio Assistenza Cliente Acculab!
103
Cura e manutenzione
Riparazioni
Le riparazioni possono essere eseguite solo da personale specializzato. In caso
di riparazioni non idonee si possono causare dei pericoli rilevanti per l’operatore.
Pulizia
! Staccare la bilancia dalla alimentazione ed eventualmente staccare anche il cavo
dati se è collegato alla bilancia
! Non deve entrare liquido o polvere nella bilancia
! Non utilizzare detergenti aggressivi (solventi o simili)
§ Pulire la bilancia con un panno leggermente inumidito con acqua saponata
§ Asciugare la bilancia con un panno morbido
Come togliere e pulire il piatto di pesata:
● Afferrare sotto l’anello di schermatura ed insieme al supporto del piatto di
pesata spingere il piatto di pesata verso l’alto, in questo modo non si danneggia
il sistema di pesata.
Pulizia delle superfici in acciaio inossidabile
Si consiglia di pulire tutte le parti in acciaio inossidabile in intervalli regolari.
Togliere il piatto di carico per poter pulirlo a fondo. Per la pulizia delle parti in
acciaio inox utilizzare detergenti appositi disponibili in commercio e un panno
umido o una spugna. Strofinare leggermente tutte le superfici in acciaio inox
e poi sciacquare il piatto di carico a fondo per togliere ogni residuo. Pulire le parti
in acciaio inossidabile dello strumento con un panno umido o una spugna e poi
lasciare asciugare lo strumento. Per una maggiore protezione si può applicare un
olio di manutenzione.
! Non si devono usare detergenti che contengono soluzione di soda caustica,
acido acetico, acido cloridrico, acido solforico oppure acido citrico. È vietato
l’uso di spugnette di lana d’acciaio! L’uso di solventi deve essere limitato
esclusivamente alla pulizia delle parti in acciaio inossidabile.
104
Controllo di sicurezza
Se Vi sembra che la sicurezza operativa della bilancia non sia più garantita:
§ Staccare la bilancia dall’alimentazione: togliere l’alimentatore dalla presa
> Assicurare la bilancia contro un eventuale utilizzo
La sicurezza operativa dell’alimentatore non è più garantita quando:
– l’alimentatore presenta segni visibili di danneggiamento
– l’alimentatore non funziona più correttamente
– l’alimentatore è stato conservato per lungo tempo in condizioni ambientali
non adatte
In questo caso rivolgeteVi al più vicino Centro Assistenza Cliente Acculab.
Solo personale autorizzato dotato della necessaria documentazione può eseguire
lavori di riparazione e manutenzione della strumentazione in quanto:
– ha accesso alla documentazione e alle istruzioni per la riparazione
– ha partecipato ai relativi corsi di formazione
Riciclaggio dell’imballo
I prodotti Acculab sono imballati per il trasporto in modo sicuro. L’imballaggio
consiste completamente di materiali non inquinanti e riciclabili come materie
prime secondarie pregiate, che possono essere portati al centro locale di riciclo
e smaltimento dei rifiuti. Per il riciclaggio degli apparecchi usati ci sono diverse
possibilità di cui potete essere informati presso l’azienda comunale.
105
Prospetto
Dati tecnici
Modello
Campo di pesata
Precisione di lettura
Campo di tara (sottrattiva)
Riproducibilità
Scostamento di linearità
Campo di temperatura di lavoro
Temperatura ambiente
ammessa
Deriva della sensibilità
tra +10 ... +30 °C
Tempo di stabilizzazione (tipico)
Adattamento all’applicazione
e alle condizioni ambientali
Sequenza di lettura
in funzione dei filtri digitali
Peso di regolazione esterno
(classe di precisione minima)
Peso netto, circa
Dimensioni del piatto di pesata
Altezza della camera di pesata
Dimensioni (LxPxA)
Alimentazione
Frequenza
Alimentazione, tensione continua
Potenza assorbita (tipico)
106
g
mg
g
≤±mg
≤±mg
ALC-80.4
80
0,1
80
0,1
0,3
+10…+30 °C
ALC-110.4
110
0,1
110
0,1
0,3
ALC-210.4
210
0,1
210
0,1
0,3
3 · 10–6
3
3 · 10–4
3
+5…+40 °C
≤±/K
s
3 · 10–6
3
4 livelli di filtrazione ottimizzati
s
g
0,2–0,4
100 (E2)
kg
mm
mm
mm
3,0
3,0
3,0
80 Ø
80 Ø
80 Ø
200
200
200
200x270x300
tramite alimentatore 230 V oppure 115 V, +15% ... – 20%
48–60 Hz
10 bis 20
1
1
1
V
W
0,2–0,4
100 (E2)
0,2–0,4
200 (E2)
Modello
Campo di pesata
Precisione di lettura
Campo di tara (sottrattiva)
Riproducibilità
Scostamento di linearità
Campo di temperatura di lavoro
Temperatura ambiente
ammessa
Deriva della sensibilità
tra +10 ... +30 °C
Tempo di stabilizzazione (tipico)
Adattamento all’applicazione
e alle condizioni ambientali
Sequenza di lettura
in funzione dei filtri digitali
Peso di regolazione esterno
(classe di precisione minima)
Peso netto, circa
Dimensioni del piatto di pesata
Dimensioni (LxPxA)
Alimentazione
Frequenza
Alimentazione, tensione continua
Potenza assorbita (tipico)
g
mg
g
<±mg
<±mg
ALC-150.3
150
0,001
150
0,0015
0,003
+10…+30 °C
ALC-210.3
210
1
210
1
3
ALC-320.3
320
1
320
1
3
5 · 10–4
≤3
5 · 10–6
≤3
+5…+40 °C
≤±/K
s
3,3 · 10–6
≤2,5
4 livelli di filtrazione ottimizzati
s
g
0,2–0,4
100 (F1)
kg
mm
mm
1,6
3,0
3,0
100 Ø
80 Ø
80 Ø
–
200x270x75
200x270x300
tramite alimentatore 230 V oppure 115 V, +15% ... – 20%
48–60 Hz
10 bis 20
1
1
1
V
W
0,2–0,4
200 (F1)
00,2–0,4
200 (F1)
107
Modello
Campo di pesata
Precisione di lettura
Campo di tara (sottrattiva)
Riproducibilità
Scostamento di linearità
Campo di temperatura di lavoro
Temperatura ambiente
ammessa
Deriva della sensibilità
tra +10 ... +30 °C
Tempo di stabilizzazione (tipico)
Adattamento all’applicazione
e alle condizioni ambientali
Sequenza di lettura
in funzione dei filtri digitali
Peso di regolazione esterno
(classe di precisione minima)
Peso netto, circa
Dimensioni del piatto di pesata
Dimensioni (LxPxA)
Alimentazione
Frequenza
Alimentazione, tensione continua
Potenza assorbita (tipico)
108
g
g
g
<±g
<±g
ALC-810.2
810
0,01
810
0,01
0,02
+10…+30 °C
ALC-1100.2
1100
0,01
1100
0,03
0,03
ALC-2100.2
10
2100
10
30
5 · 10–6
3 · 10–6
ALC-3100.2
2100
3100
10
3100
10
30
+5…+40 °C
<±/K
s
0,5 · 10–5
2
2,5
3 · 10–6
≤ 2,5
≤3
4 livelli di filtrazione ottimizzati
s
g
–
1000 (F1)
kg
mm
mm
1,4
116 Ø
150 Ø
150 Ø
150 Ø
–
200x270x75
200x270x75
200x270x75
tramite alimentatore 230 V oppure 115 V, +15% ... – 20%
48–60 Hz
10 bis 20
–
0,75
1
1
V
W
0,2–0,8
1000 (F1)
0,2–0,4
2000 (F1)
0,2–0,4
2000 (F1)
Modello
Campo di pesata
Precisione di lettura
Campo di tara (sottrattiva)
Riproducibilità
Scostamento di linearità
Campo di temperatura di lavoro
Temperatura ambiente
ammessa
Deriva della sensibilità
tra +10 ... +30 °C
Tempo di stabilizzazione (tipico)
Adattamento all’applicazione
e alle condizioni ambientali
Sequenza di lettura
in funzione dei filtri digitali
Peso di regolazione esterno
(classe di precisione minima)
Peso netto, circa
Dimensioni del piatto di pesata
Dimensioni (LxPxA)
Alimentazione
Frequenza
Alimentazione, tensione continua
Potenza assorbita (tipico)
Durata di funzionamento
– batterie a 9 volt, circa
– batterie ricaricabili a 9 volt
a carica completa, circa
ALC-2100.1
2100
0,1
2100
0,2
0,2
+10…+30 °C
g
g
g
<±g
<±g
ALC-4100.1
4100
0,1
4100
0,2
0,2
ALC-6100.1
6100
0,1
6100
0,2
0,2
1 · 10–5
2
0,5 · 10–5
2
+5…+40 °C
2 · 10–5
2
<±/K
s
4 livelli di filtrazione ottimizzati
s
g
0,2–0,8
1000 (F2)
kg
mm
mm
1,4
150 Ø
150 Ø
150 Ø
200x270 x75
tramite alimentatore 230 V oppure 115 V, +15% ... – 20%
48–60 Hz
10 bis 20
0,75
0,75
0,75
V
W
0,2–0,8
2000 (F2)
0,2–0,8
5000 (F2)
h
–
11
11
11
h
–
2,5
2,5
2,5
109
Accessori (opzioni)
Articolo
Codice
Cavo di collegamento per la connessione
ad un PC (25 pin)
7357314
–
–
–
–
–
Pesi di regolazione
per ALC-80.4 (50 g, E2)
per ALC-110.4 (100 g; E2)
per ALC-210.4 (200 g; E2)
per ALC-150.3 (100 g, E2)
per ALC-210.3 (200 g; F1)
YCW4528-00
YCW5128-00
YCW5228-00
YCW5128-00
YCW5238-00
–
–
–
–
–
–
–
–
Articolo
per ALC-320.3 (200 g; F1)
per ALC-810.2 (500 g, F1)
per ALC-1100.2 (1 kg; F1)
per ALC-2100.2 (2 kg; F1)
per ALC-3100.2 (2 kg; F1)
per ALC-2100.1 (1 kg; F2)
per ALC-4100.1 (2 kg; F2)
per ALC-6100.1 (5 kg; F2)
Codice
YCW5238-00
YCW5538-00
YCW6138-00
YCW6238-00
YCW6238-00
YCW6148-00
YCW6248-00
YCW6548-00
Marchio C
Lo strumento soddisfa le prescrizioni delle direttive del
Consiglio dell’Unione Europea:
Direttiva 89/336/CEE
«Compatibilità elettromagnetica (EMC)»
Norme europee relative:
Limitazione dell'emissione di disturbo:
secondo la norma di prodotto EN 61326-1 Cl. B
(Ambiente residenziale)
Immunità ai disturbi:
secondo la norma di prodotto EN 61326
(requisiti minimi, funzionamento sottoposto a controllo
non continuo)
Avvertenza!
L'utente risponde in prima persona di qualsiasi modifica
apportata allo strumento così come della realizzazione
di collegamenti con cavi o dispositivi di altri costruttori.
Su richiesta, Acculab mette a disposizione informazioni
riguardanti le caratteristiche minime di funzionamento
degli apparecchi (secondo le norme sull’immunità
ai disturbi soprannominate).
110
Direttiva 73/23/CEE
«Materiale elettrico destinato ad essere
adoperato entro taluni limiti di tensione»
Norme europee relative:
EN 60950
Sicurezza per apparecchi della tecnologia di informazione
comprendenti macchine per ufficio elettriche
EN 61010
Prescrizioni di sicurezza per apparecchi elettrici di misura,
di controllo e da laboratorio
Parte 1: Prescrizioni generali
Qualora vengano usati dispositivi elettrici in installazioni e
in condizioni ambientali che richiedono maggiori standard
di sicurezza, bisogna conformarsi alle prescrizioni contenute
nei regolamenti specifici per l’installazione vigenti nel
Paese.
Uso
La serie ALC- está compuesta de balanzas para la pesada
de muestras entre 0,1 mg y 6 kg.
Las balanzas garantizan resultados de pesada
fiables mediante:
– filtración de las condiciones ambientales desfavorables,
como p. ej. vibraciones, corrientes de aire, etc.
– resultados de pesada reproducibles
– diseño robusto
Las balanzas ALC- simplifican y aceleran los procesos
de rutina mediante:
– tiempos de medición breves
– manejo fácil
–
–
–
–
–
Una función adicional para aplicaciones simples,
a seleccionar entre:
conmutación de unidad de peso
total-neto (segunda memoria de tara)
conteo
pesada en porcentaje
formación del valor promedio
Contenido
111
111
111
112
Uso
Contenido
Advertencias de seguridad
Puesta en funcionamiento
Funcionamiento
116 Función básica “Pesar”
117 Calibrar/ajustar
118
119
121
123
125
Programas de aplicaciones
Total neto/segunda memoria de tara
Conteo
Pesada en porcentaje
Formación del valor promedio
Conmutación de unidades
126
127
129
130
131
132
Ajustes previos
Ajustar parámetros (menú)
Ajustes de parámetros (sinopsis)
Interfaz de datos
Mensajes de error
Cuidado y mantenimiento
Eliminación de desechos, reciclado
Sinopsis
133 Datos técnicos
137 Accesorios (opciones)
137 Marca C
Advertencias de seguridad
Lea atentamente las instrucciones de manejo, antes de
la puesta en funcionamiento del aparato. De esta manera
se evitarán daños. Conserve y cuide este manual de
instrucciones.
! no emplear en áreas con peligro de explosión
Han de observarse las siguientes advertencias para un funcionamiento seguro y sin problemas de la balanza:
– utilizar accesorios y opciones de Sartorius, ya que estos
se ajustan en forma óptima en la balanza
!el valor de tensión impreso en el adaptador de CA
– las conexiones en la balanza deben realizarse sólo con
balanza desconectada de la red de alimentación
– proteger el adaptador de CA contra la humedad
debe concordar con la tensión de red local
! utilizar sólo baterías block de 9 voltios, o bien, equipo
No abrir la balanza. Al violarse las marcas de sello, los
derechos de garantía carecerán de validez.
de batería recargable
111
Puesta en funcionamiento
Condiciones de transporte y almacenamiento
No exponga el aparato a temperaturas extremas, golpes,
vibraciones y humedad.
Desembalar
§ Controle de inmediato al desembalar el aparato, para
detectar daños eventuales visibles exteriormente
$ En caso de existir algún daño, ver en
“Controles de seguridad”
Conserve todas las partes del embalaje para algún envío
eventual necesario, ya que un transporte libre de riesgos se
garantiza sólo con embalaje original; al enviar,
separe todas las conexiones de cables, con el fin de evitar
daños innecesarios.
Equipo suministrado
Se suministran los siguientes componentes:
–
–
–
–
–
–
ALC-80.4, ALC-110.4, ALC-210.4, ALC-210.3
balanza
platillo de pesada
soporte de platillo
anillo apantallador
placa apantalladora
adaptador de CA
–
–
–
–
–
–
–
ALC-150.3, ALC-320.3
balanza
platillo de pesada
soporte de platillo
anillo apantallador
placa apantalladora
adaptador de CA
anillo de vidrio
–
–
–
–
ALC-810.2, ALC-1100.2, ALC-2100.2, ALC-3100.2,
ALC-2100.1, ALC-4100.1 y ALC-6100.1
balanza
platillo de pesada
soporte de platillo
adaptador de CA
112
–
–
–
–
–
–
Advertencias de instalación
La balanza está construida de tal manera que, al funcionar
bajo condiciones normales de empleo, se obtendrán resultados fiables de medición. La balanza trabaja en forma
exacta y rápida, si se ha elegido el lugar apropiado de instalación:
colocar la balanza sobre una superficie plana y estable
evitar los calores extremos que se producen al instalar la
balanza cerca de calefactores o al exponerla directamente
a los rayos solares
proteger la balanza contra las corrientes directas de aire
(ventanas y puertas abiertas)
evitar las vibraciones fuertes durante la medición
proteger la balanza contra emanaciones químicas
agresivas
evitar humedades extremas
Aclimatar la balanza:
Una condensación de la humedad del aire en el aparato se
puede producir, si un aparato que está frío se instala
en un ambiente mucho más temperado. Dejar que el
aparato, separado de la tensión de red, se aclimate por
aprox. 2 horas a la temperatura del ambiente.
Instalar la balanza
Balanzas con protector de vidrio contra corrientes de aire
●
–
–
–
–
Montar componentes uno tras otro:
placa apantalladora
anillo apantallador
soporte del platillo de pesada
platillo de pesada
Balanzas con platillo de pesada redondo
● Montar componentes uno tras otro:
– soporte del platillo de pesada
– platillo de pesada
● Montar componentes
– soporte de platillo
– platillo de pesada
113
Conexión a la red/medidas de protección
Utilice sólo adaptadores de CA originales
– en Europa: 6971948
● Colocar enchufe angular en la balanza
● Los adaptadores de CA de la clase de protección 2 pueden conectarse en
cualquier enchufe tomacorriente, sin necesidad de tomar medidas de seguridad
especiales
La tensión de salida está puesta a tierra mediante un polo que se conecta
con la carcasa de la balanza. La carcasa de la balanza, por motivos funcionales,
también puede ser puesta a tierra.
Utilización de batería/equipo de batería
los modelos: ALC-810.2, ALC-2100.1, ALC-4100.1 y ALC-6100.1
$ La batería o equipo de batería no pertenecen al suministro de balanza
! Utilizar sólo baterías block de 9 voltios adquiribles en el comercio,
o equipo de batería
! Cargar equipo de batería con aparato de recargar externo
● Volcar la balanza
● Abrir compartimento para batería: quitar tapa del compartimento
● Colocar batería block de 9 voltios en el compartimento
$ Observar la polaridad
! Baterías utilizadas o equipos de batería son desechos especiales (no es basura
domiciliaria): eliminar equipos de batería en forma especial, según la reglamentación para los residuos industriales
● Cerrar compartimento para baterías: insertar la tapa del compartimento,
presionándola
114
Seleccionar tensión de red
Para la selección de tensión de red, utilizar los siguientes adaptadores
de CA originales:
– adaptador de CA TNG8, N° de pedido 6971951, (universal),
o bien,
– adaptador de CA TNG8, N° de pedido 6971952, (para Gran Bretaña)
● Con interruptor, conmutar entre 230 voltios y 115 voltios
Nivelar la balanza
Nivelar la balanza cada vez que se cambie de lugar de instalación. La nivelación
se realiza girando sólo las dos patas de regulación delanteras.
● Apretar girando las patas de apoyo traseras
● Girar las patas atornillables delanteras, como lo representa el dibujo adjunto,
hasta que la burbuja del nivel quede en el centro del círculo
> Por regla general, se requieren varios pasos para nivelar
Seguro antirrobo
Como seguro antirrobo, utilizar la orejeta de fijación en la parte trasera
de la balanza
● Fijar la balanza en el lugar de instalación, p.ej. con una cadena o candado.
115
Funcionamiento
Función básica “Pesar”
Características
– Tarar balanza
La tara puede realizarse dentro del rango completo de pesada de la balanza.
Preparación
● Encender balanza: pulsar tecla [ON/OFF]
● En caso dado, modificar ajustes previos: ver en “Ajustes previos”
● En caso dado, cargar ajustes de fábrica: ver en “Ajustes previos”, parámetro 9. – 1
$ En caso dado, tarar la balanza: pulsar tecla [ZERO]
Otra función:
● Apagar balanza: pulsar tecla [ON/OFF]
Ejemplo
Determinar valor de peso
Ajustes previos: como los ajustes de fábrica
Paso
Pulsar tecla
1. encender balanza
[ON/OFF]
Indicación
se realiza test automático
2. colocar recipiente para la
muestra (aquí p. ej. 52 g)
3. tarar balanza
4. poner muestra en el recipiente
(aquí p. ej. 150,2 g)
116
[ZERO]
+
52.0 g
+
0.0 g
+ 150.2 g
Calibrar/ajustar
Calibrar/ajustar la balanza después de realizada la instalación.
Características
El proceso de calibración puede activarse sólo si
– la balanza está descargada
– la balanza está tarada
– la señal interna de pesada es estable
Si estas condiciones no se cumplen, aparece un mensaje de error. El peso requerido para la calibración aparece indicado
(pesas, ver en “accesorios”).
La calibración puede realizarse, en los modelos ALC, con unidades de peso diferentes: g, kg*, lb (código1. 4. x)
Ajuste de fábrica: gramos (código 1. 4. 1)
Ejemplo
Calibrar balanza
Ajustes previos: como los ajustes de fábrica
Paso
Pulsar tecla
1. en caso dado, encender
[ON/OFF]
2. tarar balanza
[ZERO]
3. activar proceso calibración
se indica pesa para calibrar,
sin unidad peso (aquí 1000 g)
[CAL]
Indicación/salida
0.0 g
+
4. colocar pesa indicada
para la calibración
después de calibrar aparece
la pesa para calibrar, con unidad
5. retirar pesa de calibración
1000.0 g
1000.0 g
+
1000.0 g
0.0 g
* = excepto en los modelos con legibilidad 0,1 mg, o bien 1 mg
117
Programas de aplicación
Total neto/segunda memoria de tara
Con este programa de aplicación pueden determinarse los pesos de componentes para una mezcla.
Preparación
Ajustar en el menú programa de aplicación “Total neto/segunda memoria de tara”:
ver en “Ajustes previos”, código 2.1. 3
Ejemplo
Paso
Pulsar tecla
1. en caso dado, encender
[ON/OFF]
2. colocar recipiente vacío para
llenar con los componentes
3. tarar
65.0 g
+
120,5 g
[F]
0.0 g NET
N1
6. dosificar sig. componente
+
7. memorizar componente
[F]
8. en caso dado, dosificar
los demás componentes
repetir pasos 5 y 6
tantas veces como
corresponda
9. indicar peso total y, en caso
dado, dosificar hasta
el peso final deseado
[CAL]
118
+
[ZERO]
4. dosificar el primer componente
5. memorizar componente,
si está ajustado impresión
con identificación, se imprime
Indicación/salida
+
120.5
70,5 g
0.0 g NET
+
191,0 g
g
Conteo
Uso
Con este programa de aplicación puede determinarse la cantidad de piezas
con igual peso individual.
Características
– Memorización del valor actual de peso como cantidad de piezas ajustada para la
inicialización, al activar el programa “Conteo”
– Modificación de la cantidad de referencia en el menú, posible: ver en
“Ajustes previos”
– Salida automática del peso de piezas vía interfaz de datos opcional, al finalizar la
inicialización, si en el menú existe el ajuste impresión con identificación
– Conmutación entre lectura cantidad de piezas y lectura valor de peso,
con la tecla [F]
Ajuste de fábrica de parámetros
Cantidad de referencia: 10 (código 3. 3. 2)
Preparación
● Ajustar en el menú programa de aplicación “Conteo”: ver en “Ajustes previos”
Código 2. 1. 4
Conteo
– Cantidad piezas de referencia:
Código 3. 3. 1
5 piezas
Código 3. 3. 2
10 piezas
Código 3. 3. 3
20 piezas
Código 3. 3. 4
50 piezas
Código 3. 3. 5
100 piezas
ver también en “Ajustes previos”
119
Ejemplo
Determinación de una cantidad desconocida de piezas: pesar cantidad definida de piezas de referencia
Ajustes previos (desviaciones respecto al ajuste de fábrica):
Menú:
Programa de aplicación “Conteo” (código 2. 1. 4)
Cantidad piezas de referencia 20 (código 3. 3. 3)
Paso
Pulsar tecla
1. en caso dado, encender
[ON/OFF]
2. tarar balanza
[ZERO]
3. información: indicar cant.
piezas ref. (aquí, 20 piezas)
[F] largo
4. colocar cant. piezas refer.
(20 piezas) (aquí p. ej. 66 g)
5. iniciar aplicación; si está
seleccionada impresión con
identificación, se imprime
Indicación/salida
0.0 g
+
[F]
6. colocar cant. pcs. desconocida
(aquí, p. ej. 174 piezas)
20 pcs
wRef
+
7. indicar peso
[F]
+
8. indicar cant. piezas
[F]
+
10. borrar valor de referencia
11. en caso dado, seguir desde 6.
120
66.0 g
+
+
9. descargar balanza
(brevemente)
ref 20
3.300
174 pcs
574.2 g
174 pcs
0 pcs
[CAL] largo
g
Pesada en porcentaje
Uso
Con este programa de aplicación puede determinarse el porcentaje de muestra
con relación a un peso de referencia.
Características
– Memorización del valor actual de peso como porcentaje ajustado para la
inicialización, al activar el programa “Pesada en porcentaje”
– Modificación de la cantidad porcentaje de referencia en el menú, posible:
ver en “Ajustes previos”
– Salida automática del peso de referencia a través de la interfaz de datos
opcional, después de finalizar la inicialización, si en el menú está ajustado
“Impresión con identificación”
– Conmutación entre indicación en porcentaje e indicación valor de peso,
con la tecla [F]
Ajustes de fábrica de parámetros
Cantidad porcentaje de referencia: 10 (código 3. 3. 2)
Preparación
● Ajustar en el menú programa de aplicación “Pesada en porcentaje”:
ver en “Ajustes previos”
Código 2. 1. 5
Pesada en porcentaje
– Cantidad porcentaje de referencia:
Código 3. 3. 1
5%
Código 3. 3. 2
10 %
Código 3. 3. 3
20 %
Código 3. 3. 4
50 %
Código 3. 3. 5
100 %
ver también en “Ajustes previos”
121
Ejemplo
Determinar valor de porcentaje con: memorización del peso colocado como peso de referencia
Ajustes previos (desviaciones con respecto al ajuste de fábrica):
Menú: programa de aplicación “Pesada en porcentaje” (código 2. 1. 5)
Menú: cantidad porcentaje de referencia 100 % (código 3. 3. 5)
Paso
Pulsar tecla
1. caso dado, encender balanza
[ON/OFF]
2. tarar balanza
[ZERO]
3. infomación:
indicar cant. pct. refer.
[F] largo
4. colocar peso refer.
para 100% (aquí 222,5 g)
5. iniciar aplicación, si está
seleccionado impresión con
identificación, se imprime
Indicación/salida
0.0 g
ref 100
+ 222.50 g
[F]
+ 100.00 %
Wxx%
6. colocar peso desconocido
(aquí, p. ej. 322,5 g)
+
222.500
+ 144.94 %
7. indicar peso
[F]
+ 322.50 g
8. indicar cant. pct.
[F]
+ 144.94 %
9. descargar balanza
10. borrar cant. pct. refer.
11. caso dado, seguir desde 6.
122
0.00 %
[CAL] largo
g
Formación del valor promedio
Uso
Con este programa de aplicación, es posible pesar muestras en ambientes con
extrema intranquilidad. En tales casos, se determina un valor promedio a través
de varios ciclos de medición.
Características
– El resultado de medición (valor promedio aritmético) aparece como lectura
definitiva en la unidad de peso seleccionada e identificado mediante “triángulo”
– La cantidad de mediciones puede ser ajustada en el menú: ver en
“Ajustes previos”
– La indicación de la cantidad de mediciones para la formación del valor promedio
(pulsar largo tecla [F])
– Conmutar entre lectura resultado de medición y lectura normal de peso,
con la tecla [F]
Ajustes de fábrica de parámetros
Cantidad de mediciones para la formación del valor promedio: 10 (3. 3. 2)
Preparación
● Ajustar en el menú programa de aplicación “Formación del valor promedio”:
ver en “Ajustes previos”
Código 2. 1.12
formación del valor promedio
– Cantidad de mediciones para la formación del valor promedio:
3. 3. 1
5 mediciones
3. 3. 2
10 mediciones
3. 3. 3
20 mediciones
3. 3. 4
50 mediciones
3. 3. 5
100 mediciones
ver también en “Ajustes previos”
123
Ejemplo
Determinar valor de peso en ambiente de extrema intranquilidad con 10 mediciones
para la formación del valor promedio.
Ajustes previos (desviaciones respecto al ajuste de fábrica):
Menú: programa de aplicación formación del valor promedio (código 2. 1.12)
Paso
1. caso dado, encender balanza
Pulsar tecla
[ON/OFF]
2. tarar balanza
[ZERO]
3. indicar la cantidad de
mediciones parciales
(aquí p. ej. 10 mediciones)
[F] largo
4. colocar muestra
(valor peso indicado oscila,
aquí p. ej. aprox. 275 g)
5. iniciar mediciones
[F]
+
8888
+
8888
10
9
8
...
1
275.5 g
si se ha seleccionado
impresión con identificación
RES
8. en caso dado, seguir desde 4.
(brevemente)
ref 10
+
7. borrar resultado medición
g
0.0
después de 10 mediciones
6. descargar balanza
124
Indicación/salida
+
275.5
+
275.5 g
(indicación fija)
[CAL] largo
G
G
g
Conmutación de unidades
Con este programa de aplicación puede indicarse un valor de medición en dos unidades diferentes.
Ajustar en el menú programa de aplicación “Conmutación de unidades”:
ver en “Ajustes previos”, código 2.1. 2 conmutación de unidades
(ajuste de fábrica en los modelos ALC)
Item de menú
1. 7. 2 ο
1. 7. 3 1)
1. 7. 4
1. 7. 5
1. 7. 6
1. 7. 7
1. 7. 8
1. 7. 9
1. 7. 10
1. 7. 11
1. 7. 12
1. 7. 13
1. 7. 14
1. 7. 15
1. 7. 16
1. 7. 17
1. 7. 18
1. 7. 19
1. 7. 20
1. 7. 22
3. 1. 2 ο
3. 1. 3 1)
3. 1. 4
3. 1. 5
3. 1. 6
3. 1. 7
3. 1. 8
3. 1. 9
3. 1. 10
3. 1. 11
3. 1. 12
3. 1. 13
3. 1. 14
3. 1. 15
3. 1. 16
3. 1. 17
3. 1. 18
3. 1. 19
3. 1. 20
3. 1. 22
Unidad
Gramos
Kilogramos
Quilates
Libras
Onzas
Onzas Troy
Taeles Hongkong
Taeles Singapur
Taeles Taiwan
Granos
Penyweight
Miligramos
Piezas por libra
Taeles China
Momes
Quilates austriacos
Tolas
Bahts
Mesghales
lb/oz
Conversión
1,00000000000
0,00100000000
5,00000000000
0,00220462260
0,03527396200
0,03215074700
0,02671725000
0,02645544638
0,02666666000
15,43235835000
0,64301493100
1000,00000000000
1,12876677120
0,02645547175
0,26670000000
5,00000000000
0,08573333810
0,06578947437
0,21700000000
0,03527396200
Símbolo
g
kg
ct
lb
oz
ozt
tlh
tls
tlt
GN
dwt
mg
/lb
tlc
mom
K
tol
bat
MS
o
o = ajuste de fábrica
1
) = excepto en modelos con legibilidad ≤1 mg
Función
● Conmutar entre unidad de peso 1 y unidad de peso 2:
pulsar tecla [F]
125
Ajustes previos
Ajustar parámetros (menú)
Configurar la balanza significa adaptarla a las necesidades del usuario, seleccionando en un menú parámetros predefinidos.
Ejemplo: seleccionar adaptación al lugar de instalación “Ambiente muy intranquilo”
(código 1, 1. 4)
Paso
Pulsar tecla
1. apagar balanza
[ON/OFF]
2. encender balanza y, durante
la indicación de todos
los segmentos
[ON/OFF]
$ moverse dentro de un nivel
de menú; después del último
ítem de menú aparece otra
vez primer ítem de menú
repetidam. [ZERO]
3. seleccionar nivel menú 2
[PRINT]
4. seleccionar nivel menú 3
[PRINT]
1.
2.
...
9.
1.
1. 1.
1. 1. 2 o
5. nivel menú 3:
seleccionar ítem de menú
repetidam. [ZERO]
1. 1. 4
6. confirmar modific. ajuste;
“o” indica ítem de menú
ajustado
$ retorno al nivel de menú
superior (desde el 3. nivel)
breve [ZERO]
2 segundos
largo [PRINT]
[PRINT]
$ en caso dado, ajustar otros ítems
de menú
[PRINT], [ZERO]
7. memorizar ajuste parámetro
y abandonar menú
o bien,
$ abandonar ajuste parámetro
sin memorizar
2 segundos
largo [ZERO]
> reinicio de la aplicación
126
Indicación/salida
1. 1. 4 o
1.
[ON/OFF]
0.0 g
Ajustes de parámetros (sinopsis)
o ajuste de fábrica
√ ajuste de usuario
Menú
es de
Ajust
ca
nú
fábri
e me
ón d
i
c
p
O
l1
Nive
l2
Nive
l3
Nive
1
1.1. Adaptación de filtro
1.1.1
1.1.2
1.1.3
1.1.4
ambiente muy tranquilo
ο ambiente tranquilo
ambiente intranquilo
ambiente muy intranquilo
1.3. Rango estabilidad
1.3.1
1.3.2
1.3.3
1.3.4
1.3.5
1/4 de dígito
1/2 dígito
1 dígito
ο 2 dígitos
4 dígitos
1.4. Unidad peso para
la calibración
1.4.1
1.4.2
1.4.3
ο gramos
kilogramos1)
libras
1.6. Auto-cero
1.6.1
1.6.2
ο activada
desactivada
1.7. Unidad peso 1
ver en “Conmutación de unidades”
2. Programas
de aplicación
2.1. Selecc. programa
ver en progr. aplicación
correspondiente
3. Parámetros
de aplicación
3.1. Unidad peso 2
3.3. % piezas/referencia
ver en “Conmutación de unidades”
ver en progr. aplic. correspondiente
5. Interfaz
5.2
Paridad
5.2.1
5.2.2
5.2.3
5.2.4
marca
espacio
o Odd (impar)
Even (par)
5.3
Cant. bits stop
5.3.1
5.3.2
o 1 bit stop
2 bits stop
5.4
Modo Handshake
5.4.1
5.4.2
software-handshake
hardware-handshake después de
CTS todavía 2 caracteres
o sardware-handshake después de
CTS todavía 1 caracter
Pesar
5.4.3
1
) = sólo en modelos con legibilidad 0,1 mg, o bien 1 mg
127
l1
Nive
6. Impresión
al pesar
ca
nú
fábri
e me
s de
ón d
i
c
p
jA uste
O
manual sin estabilidad
o manual después de estabilidad
autom. sin establilidad
autom. con estabilidad
7.1.1
7.1.2
sin identificación
o con identificación
8.1.1
8.1.2
o ajuste parámetro modificable
modificable
sólo leer parámetro
8.2. Función interr. ext.
8.2.1
8.2.4
8.2.5
8.2.6
8.2.8
tecla [CAL]
tecla [ZERO]
o tecla [PRINT]
tecla [F]
tecla [ZERO]
8.3. Encender la
balanza
8.3.1
8.3.2
Off/On (modo batería:
autom. Off después de 3 min.)
o standby/On
9.–
9.– 1
9.– 2
reponer
o no reponer
7. Impresión
en
Applicaciones
7.1
8. Funciones
adicionales
8.1. Menú
9. Reset menú
128
l3
Nive
6.1.1
6.1.2
6.1.3
6.1.4
l2
Nive
6.1 Manual/
automática
Formato línea
de impresión
Ajuste fábrica
Interfaz de datos
Objeto
La balanza posee un puerto interfaz de datos, al que puede
conectarse un ordenador (u otro aparato periférico).
Con un ordenador pueden modificarse, inicializarse
y supervisarse funciones de balanza y funciones de
los programas de aplicación.
Hembrilla de interfaz
25
13
14
1
Asignación de pines hembrilla de
25 contactos, RS232
Pin 1:
tierra
Pin 2:
salida de datos (TxD)
Pin 3:
entrada de datos (RxD)
Pin 4:
masa interna (GND)
Pin 5:
clear to send (CTS)
Pin 6:
no asignado
Pin 7:
masa interna (GND)
Pin 8:
masa interna (GND)
Pin 9:
no asignado
Pin 10:
no asignado
Pin 11:
tensión de carga equipo batería
+12 ... +20 V ( I _ out 25mA)
Pin 12:
reset _ Out *)
Pin 13:
+5 V salida
Pin 14:
masa interna (GND)
Pin 15:
tecla universal
Pin 16:
no asignado
Pin 17:
no asignado
Pin 18:
no asignado
Pin 19:
no asignado
Pin 20:
data terminal ready (DTR)
Pin 21:
masa interna (GND)
Pin 22:
no asignado
Pin 23:
no asignado
Pin 24:
no asignado
Pin 25:
+5 V salida
Preparación
La adaptación a otro aparato ha de realizarse en el menú
(ver en “ajustes previos”). Una descripción detallada de
los comandos disponibles de interfaz se encuentran en la
“descripción de interfaz para balanzas ALC” que puede bajarse
desde (www.acculab.com, o bien, www.acculab-europe.com).
Las múltiples características de las balanzas, con respecto
a la documentación de los resultados, pueden explotarse
completamente recién al conectar una impresora Sartorius.
Los resultados impresos aportan decisivamente al modo de
trabajo simple, según la normativa GLP.
conexión para
interruptor
*) = reinicio perifería
129
Mensajes de error
Mensajes de error aparecen por 2 segundos en la indicación principal. Luego, el programa retorna automáticamente
al modo de pesada.
Indicación
no aparecen
segmentos
h
l
e 01
e 02
e 09
e 10
e 11
e 22
e 30
capac. carga máx. menor
que lo indicado en
“Datos técnicos”
resultado de pesada
obviamente falso
Causa
no hay tensión de red
Solución
controle la alimentación
no está conectado el adaptador
de CA batería o equipo
de batería descargados
conecte adaptador de CA a la tensión
de red recambie batería, recargue
equipo de batería con un aparato
recargador externo
descargue el platillo de pesada
coloque platillo de pesada correctamente
platillo no debe rozar con
otros componentes
disminuya la muestra
excedida capac. de carga
platillo pesada sin colocar
roce entre platillo de pesada
y componentes adyacentes
desborde de lectura:
valor no representable
condición de calibración
no fue observada, p. ej.:
– puesta a cero
– platillo con carga
en bruto < cero, tara no es posible
tecla [ZERO] bloqueada con
segunda memoria tara
cubierta (total-neto)
funciones de tara bloqueadas entre sí
valor no permisible para
la segunda mem. de tara
peso muy liviano, o bien, no hay carga
puesta en el platillo de pesada en los
programas de aplicación
interfaz de datos bloqueada
para la salida de impresión
balanza encendida sin
colocar platillo de pesada
balanza sin calibrar
faltó tarar antes de pesar
En caso de aparecer otros mensajes de error, comunique al servicio técnico Sartorius
130
descargue el platillo de pesada
tare con la tecla [ZERO]
calibre con lectura cero
tare la balanza
recién después de borrar
memoria de tara mediante [CAL]
está nuevamente en función
la tecla de tara
pulse la tecla [ZERO]
aumente el peso
comunique al serv. tec. Acculab
coloque platillo de pesada
apague y vuelva a encender
con la tecla [ON/OFF]
calibre
tare
Cuidado y mantenimiento
Reparaciones
Las reparaciones deben ser realizadas sólo por técnicos autorizados. A causa de
reparaciones inapropiadas pueden producirse graves peligros para el usuario.
Limpieza
! Separar la alimentación de tensión, en caso dado, desenchufar cable de datos
en la balanza
! No debe infiltrarse líquido en la balanza
! No utilizar detergentes agresivos (disolventes, o similares)
● Limpiar la balanza con un paño suave humedecido en agua jabonosa
● Secar la balanza con un paño suave
Retirar y limpiar platillo de pesada:
● Asir por debajo del anillo apantallador y, junto con el soporte, levantar el platillo,
de tal manera que no se dañe el sistema de medición.
Limpieza de las superficies de acero inoxidable
Es fundamental limpiar todas las piezas de acero inoxidable a intervalos
regulares. Limpiar la placa de acero inoxidable por separado. Limpiar las piezas
de acero inoxidable de la balanza frotándola suavemente con un paño o esponja
humectados. Utilizar sólo detergentes de limpieza de uso común, apropiados
para el acero inoxidable. Después de limpiar, enjuagar minuciosamente,
hasta eliminar el más mínimo residuo. A continuación, dejar secar el aparato.
Como protección puede aplicarse adicionalmente un aceite cosmético. Utilizar
disolventes exclusivamente para la limpieza de piezas de acero inoxidable.
! No usar detergentes de limpieza para las piezas de acero inoxidable, que
contengan soda cáustica, ácido acético, ácido clorhídrico, ácido sulfúrico o ácido
cítrico. ¡Se prohibe el uso de esponjas de limpieza en base a lana de acero!
Usar disolventes exclusivamente para la limpieza de piezas de acero inxidables.
131
Controles de seguridad
Si por algún motivo un funcionamiento libre de riesgo ya no se garantiza:
● Desconectar adaptador de CA de la tensión de red
> asegure la balanza contra el uso ulterior
Un funcionamiento libre de riesgo del adaptador de CA ya no se garantiza si:
– presenta daños visibles
– ya no funciona correctamente
– ha estado almacenado por largo tiempo, bajo condiciones inapropiadas
En estos casos, comunique al servicio técnico de Acculab. Las reparaciones sólo
pueden ser realizadas por especialistas que:
– tienen a su disposición los documentos e instrucciones necesarias y que
– han recibido instrucción correspondiente
Eliminación de desechos, reciclado
Para el transporte, nuestros productos están protegidos por el embalaje.
El embalaje está compuesto de materiales no contaminantes, los que pueden ser
entregados al organismo correspondiente para el reciclado, puesto que se trata
de valiosa materia prima secundaria.
Sobre el reciclado en general y de aparatos que ya no se utilizan, rogamos consultar a las autoridades locales pertinentes.
132
Sinopsis
Datos técnicos
Modelo
Capac. de pesada
Legibilidad
Rango de tara (substract.)
Repetibilidad
Desviación de linealidad
Rango temp. de empleo
Temperatura ambiental
permitida de funcionamiento
Deriva de sensibilidad
dentro de +10…+30 °C
Tiempo estabilización (típico)
Adaptación a las condiciones
de empleo y lugar de instalación
Secuencia de indicación
(seg.escala ajustada de filtro)
Valor pesa calibración externa
(clase de precisión mínima)
Peso neto (aprox.)
Dimensiones del platillo
Altura cámara de pesada
Dimensiones (AxPxA)
Conexión/tensión de red
Frecuencia de red
Conexión de red, tensión continua
Consumo eléctrico (típico)
g
mg
g
≤±mg
≤±mg
ALC-80.4
80
0,1
80
0,1
0,3
+10…+30 °C
ALC-110.4
110
0,1
110
0,1
0,3
ALC-210.4
210
0,1
210
0,1
0,3
3 · 10–6
3
3 · 10–4
3
+5…+40 °C
≤±/K
s
3 · 10–6
3
4 escalas optimizadas de filtro
s
g
0,2–0,4
100 (E2)
kg
mm
mm
mm
3,0
3,0
3,0
80 Ø
80 Ø
80 Ø
200
200
200
200x270x300
a través de adaptador de CA 230 V o 115 V, +15%…– 20%
48–60 Hz
10 hasta 20
1
1
1
V
W
0,2–0,4
100 (E2)
0,2–0,4
200 (E2)
133
Modelo
Capac. de pesada
Legibilidad
Rango de tara (substract.)
Repetibilidad
Desviación de linealidad
Rango temp. de empleo
Temperatura ambiental
permitida de funcionamiento
Deriva de sensibilidad
dentro de +10…+30 °C
Tiempo estabilización (típico)
Adaptación a las condiciones
de empleo y lugar de instalación
Secuencia de indicación
(seg.escala ajustada de filtro)
Valor pesa calibración externa
(clase de precisión mínima)
Peso neto (aprox.)
Dimensiones del platillo
Dimensiones (AxPxA)
Conexión/tensión de red
Frecuencia de red
Conexión de red, tensión continua
Consumo eléctrico (típico)
134
g
mg
g
<±mg
<±mg
ALC-150.3
150
0,001
150
0,0015
0,003
+10…+30 °C
ALC-210.3
210
1
210
1
3
ALC-320.3
320
1
320
1
3
5 · 10–4
≤3
5 · 10–6
≤3
+5…+40 °C
≤±/K
s
3,3 · 10–6
≤2,5
4 escalas optimizadas de filtro
s
g
0,2–0,4
100 (F1)
kg
mm
mm
1,6
3,0
3,0
100 Ø
80 Ø
80 Ø
–
200x270x75
200x270x300
a través de adaptador de CA 230 V o 115 V, +15%…– 20%
48–60 Hz
10 hasta 20
1
1
1
V
W
0,2–0,4
200 (F1)
00,2–0,4
200 (F1)
Modelo
Capac. de pesada
Legibilidad
Rango de tara (substract.)
Repetibilidad
Desviación de linealidad
Rango temp. de empleo
Temperatura ambiental
permitida de funcionamiento
Deriva de sensibilidad
dentro de +10…+30 °C
Tiempo estabilización (típico)
Adaptación a las condiciones
de empleo y lugar de instalación
Secuencia de indicación
(seg.escala ajustada de filtro)
Valor pesa calibración externa
(clase de precisión mínima)
Peso neto (aprox.)
Dimensiones del platillo
Dimensiones (AxPxA)
Conexión/tensión de red
Frecuencia de red
Conexión de red, tensión continua
Consumo eléctrico (típico)
g
g
g
<±g
<±g
ALC-810.2
810
0,01
810
0,01
0,02
+10…+30 °C
ALC-1100.2
1100
0,01
1100
0,03
0,03
ALC-2100.2
2100
10
2100
10
30
ALC-3100.2
3100
10
3100
10
30
5 · 10–6
2,5
3 · 10–6
≤ 2,5
3 · 10–6
≤3
0,2–0,4
2000 (F1)
0,2–0,4
2000 (F1)
+5…+40 °C
<±/K
s
0,5 · 10–5
2
4 escalas optimizadas de filtro
s
g
–
1000 (F1)
kg
mm
mm
1,4
116 Ø
150 Ø
150 Ø
150 Ø
–
200x270x75
200x270x75
200x270x75
a través de adaptador de CA 230 V o 115 V, +15%…– 20%
48–60 Hz
10 hasta 20
–
0,75
1
1
V
W
0,2–0,8
1000 (F1)
135
Modelo
Capac. de pesada
Legibilidad
Rango de tara (substract.)
Repetibilidad
Desviación de linealidad
Rango temp. de empleo
Temperatura ambiental
permitida de funcionamiento
Deriva de sensibilidad
dentro de +10…+30 °C
Tiempo estabilización (típico)
Adaptación a las condiciones
de empleo y lugar de instalación
Secuencia de indicación
(seg.escala ajustada de filtro)
Valor pesa calibración externa
(clase de precisión mínima)
Peso neto (aprox.)
Dimensiones del platillo
Dimensiones (AxPxA)
Conexión/tensión de red
Frecuencia de red
Conexión de red, tensión continua
Consumo eléctrico (típico)
Tiempo de funcionamiento con
– batería block 9 V, aprox.
– batería carga completa, aprox.
136
g
g
g
<±g
<±g
ALC-2100.1
2100
0,1
2100
0,2
0,2
+10…+30 °C
ALC-4100.1
4100
0,1
4100
0,2
0,2
ALC-6100.1
6100
0,1
6100
0,2
0,2
1 · 10–5
2
0,5 · 10–5
2
+5…+40 °C
<±/K
s
2 · 10–5
2
4 escalas optimizadas de filtro
s
g
0,2–0,8
1000 (F2)
0,2–0,8
2000 (F2)
kg
mm
mm
V
W
1,4
150 Ø
150 Ø
150 Ø
200x270 x75
a través de adaptador de CA 230 V o 115 V, +15%…– 20%
48–60 Hz
10 hasta 20
0,75
0,75
0,75
h
h
11
2,5
11
2,5
0,2–0,8
5000 (F2)
11
2,5
Accesorios (opciones)
–
–
–
–
–
Artículo
Cable conector de datos para
conexión PC (25 puntas)
Pedido N°
7357314
Pesas de calibración
para ALC-80.4 (50 g, E2)
para ALC-110.4 (100 g; E2)
para ALC-210.4 (200 g; E2)
para ALC-150.3 (100 g, E2)
para ALC-210.3 (200 g; F1)
YCW4528-00
YCW5128-00
YCW5228-00
YCW5128-00
YCW5238-00
–
–
–
–
–
–
–
–
Artículo
para ALC-320.3 (200 g; F1)
para ALC-810.2 (500 g, F1)
para ALC-1100.2 (1 kg; F1)
para ALC-2100.2 (2 kg; F1)
para ALC-3100.2 (2 kg; F1)
para ALC-2100.1 (1 kg; F2)
para ALC-4100.1 (2 kg; F2)
para ALC-6100.1 (5 kg; F2)
Pedido N°
YCW5238-00
YCW5538-00
YCW6138-00
YCW6238-00
YCW6238-00
YCW6148-00
YCW6248-00
YCW6548-00
Declaración de conformidad
El aparato cumple los requisitos de las siguientes Directivas
del Consejo de la Unión Europea:
73/23/CEE “Material eléctrico a utilizarse
con determinados límites de tensión”
89/336/CEE “Compatibilidad electromagnética” (CEM)
Normas Europeas aplicables:
Normas Europeas aplicables:
Limitación de las fuentes de distorsión:
Según la norma para producto EN 61326-1 Cl.B
(Area residencial)
Inmunidad definida:
Según la norma para producto EN 61326-1
(requisitos de control mínimos, funcionamiento no
continuado)
Advertencia:
Modificaciones en los aparatos o la conexión de cables
o aparatos no suministrados por Acculab es responsabilidad
del usuario y deben ser controladas por el mismo y,
en caso necesario, realizar las correcciones pertinentes.
Acculab pone a disposición, según consultas, informaciones
sobre los datos mínimos del funcionamiento de los
aparatos (según las normas sobre inmunidad, más arriba
mencionadas).
EN 60950
Seguridad de los equipos de tratamiento de la información
incluyendo los equipos eléctricos de oficina
EN 61010
Requisitos de seguridad de equipos eléctricos de medida,
control y uso en laboratorio
Parte 1: Requisitos generales
Al utilizarse equipo eléctrico en instalaciones, bajo condiciones ambientales que requieren altas medidas de seguridad, han de observarse las prescripciones orrespondientes
para la instalación.
137
ACCULAB EUROPE
Weender Landstrasse 94–108
37075 Goettingen
Germany
ACCULAB ASIA-PACIFIC
Unit 1110-12, LU Plaza
2 Wing Yip Street, Kwon Tong
Kowloon, Hong Kong
www.acculab.com
www.acclulab-europe.com
Copyright by Acculab.
All rights reserved. No part of this publication
may be reprinted or translated in any form
or by any means without the prior written
permission of Acculab.
The status of the information, specifications
and illustrations in this manual is indicated
by the date given below.
Acculab reserves the right to make changes
to the technology, features, specifications
and design of the equipment without notice.
Status:
November 2004, Acculab
Printed in Germany on paper that has
been bleached without any use of chlorine
W1A000 · KT
Publication No.: WAL6001-p04112