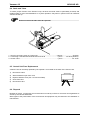
1
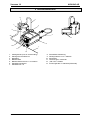
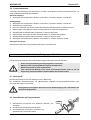
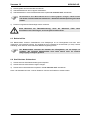
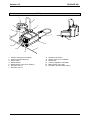
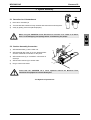
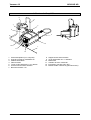
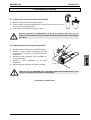
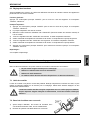
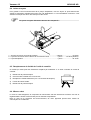
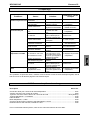
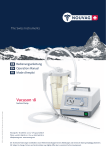
Vacuson 18
Made in Switzerland
Bedienungsanleitung
Operation manual
Mode d'emploi
D
GB
F
Nr. 31790
www.nouvag.com
NOUVAG
®
NOUVAG AG
Herzlichen Glückwunsch zum Kauf eines Produktes der Firma NOUVAG AG. Wir freuen uns, dass
Sie sich für ein NOUVAG Erzeugnis entschieden haben und danken Ihnen für Ihr entgegengebrachtes Vertrauen.
Diese Bedienungsanleitung wird Sie mit dem Gerät und seinen Eigenschaften vertraut machen,
damit eine möglichst lange und problemlose Funktion gewährleistet werden kann.
Im Anhang finden Sie die Konformitätserklärung und unsere autorisierten Servicestellen.
•
Bitte lesen Sie diese Anleitung vor Inbetriebnahme aufmerksam durch!
Congratulations on your purchase of a NOUVAG AG product. Thank you for the confidence shown
in our products.
Please consult the instruction manual for the use and maintenance of the device in order to ensure
that it will function properly and efficiently for many years.
You will find the conformity statement and list of authorized service representatives attached.
•
Before operating, please read instructions carefully!
Félicitations vous venez d’acheter un produit NOUVAG AG. Merci de la confiance que vous
montrez en nos produits.
Merci de consulter le mode d’emploi pour l’utilisation et l’entretien de cet appareil de manière à
vous assurer qu’il fonctionnera correctement et efficacement pendant de nombreuses années.
Vous trouverez ci-joint les déclarations de conformité et la liste des agents agréés pour l’entretien.
•
Lire soigneusement les instructions avant utilisation!
NOUVAG AG
Vacuson 18
INHALTSVERZEICHNIS
1
Produktbeschreibung
1.1
1.2
1.3
1.4
1.5
Einsatz und Funktionsweise
Technische Daten
Umgebungsbedingungen für Betrieb
Umgebungsbedingungen für Transport und Lagerung
Gerätesymbole
2
2
2
2
2
2
2
Sicherheitshinweise
3
3
Lieferumfang
3
3.1
4
Gerätezusammenbau
4.1
4.2
5
Einschalten der Vacuson 18
Regulierung des Saugvorganges
Entleeren der vollen Sekretflasche
Funktionskontrolle
Desinfektion, Reinigung und Sterilisation
6.1
6.2
6.3
6.4
7
Aufsetzen des Sekretflaschendeckels auf die Sekretflasche
Anschluss Absaugzubehör
Bedienung
5.1
5.2
5.3
5.4
6
Vacuson 18 komplett
Steuergerät
Sekretflasche mit Flaschendeckel
Bakterienfilter
Sterilisierbare Schlauchset
Wartung
7.1
7.2
7.3
7.4
7.5
7.6
Bakterienfilter
Sekretflasche
Funktionskontrolle der Überlaufsicherung
Dichtungen und Schläuche
Austausch der Steuergerätesicherungen
Hinweis zur Entsorgung
3
4
5
5
6
6
6
6
7
7
7
7
8
8
9
9
9
9
10
10
10
8
Störungen und Fehlersuche
11
9
Ersatzteilliste mit Bestellnummern
11
No. 31790 35/05
1
Vacuson 18
NOUVAG AG
1 Produktbeschreibung
1.1 Einsatz und Funktionsweise
Mit dem VACUSON 18 werden Flüssigkeiten und Sekrete abgesaugt. Das durch die Absaugpumpe
erzeugte Vakuum kann stufenlos reguliert werden. Der VACUSON 18 wird in folgenden Gebieten
eingesetzt:
- Chemie
- Labor
- Medizin
- Intensivpflege
- Dentaltechnik
- Chirurgie
- Nachsorge
1.2 Technische Daten
Betriebsspannung:........................................... 115V∼/ 60Hz oder 230V∼/ 50Hz (siehe Geräteaufkleber)
Sicherungen Stromversorgung:.................................................... T2A (bei 115V∼) und T1A (bei 230V∼)
Masse (B x H x T):.................................................................................................... 190 x 130 x 250 mm
Gewicht netto:.................................................................................................................................. 3.2 kg
Saugleistung Vakuumpumpe:...................................................................................................... 18l / min
Regelbarer Unterdruck: .......................................................................................................... -0.7 – 0 bar
Gerätetyp Vakuumpumpe:..................................................................................... high vacuum / low flow
Motorleistung Vakuumpumpe:.........................................................................................................175VA
Anwendungsteil: ............................................................................................................................. Typ BF
Schutzart:......................................................................................................................................Klasse 1
1.3 Umgebungsbedingungen für
Betrieb
1.4 Umgebungsbedingungen für
Transport und Lagerung
Rel. Luftfeuchtigkeit: ................... max. 80%
Temperatur: ................................ 5 bis 35°C
Luftdruck:..........................800 bis 1060hPa
Rel. Luftfeuchtigkeit:......................... max. 90%
Temperatur:..................................... 5 bis 50°C
Luftdruck:............................... 700 bis 1060hPa
1.5 Gerätesymbole
: Achtung Begleitpapiere beachten
: Anwendungsteil des Typs BF
1275 : EU-Konformitätszeichen
2
20min on / : Durchlaufbetrieb mit
Aussetzbelastung
20min off
20min ein, 20min aus
: Alte Elektro- und
Elektronikgeräte müssen
getrennt entsorgt werden und
dürfen nicht dem Hausmüll
zugeführt werden.
No. 31790 35/05
NOUVAG AG
Vacuson 18
2 Sicherheitshinweise
Ihre Sicherheit, die Ihres Teams und selbstverständlich die Sicherheit Ihrer Patienten ist uns ein grosses
Anliegen. Daher ist es unerlässlich, die folgenden Hinweise zu beachten:
•
Das Gerät wird nicht steril ausgeliefert!
•
Die VACUSON 18 darf ausschliesslich von fachkundigem und geschultem
Personal bedient werden!
•
Vergewissern Sie sich, dass die Betriebsspannung und die Netzspannung
übereinstimmen!
•
Die Verwendung von Fremdprodukten liegt in der Verantwortung des
Betreibers!
•
Beim Gebrauch, bei Lagerung und einem allfälligen Transport muss
insbesondere das Steuergerät vorsichtig behandelt werden!
•
Reparaturen dürfen ausschliesslich durch autorisierte NOUVAG ServiceTechniker vorgenommen werden!
•
Unsachgemässer Gebrauch und Reparatur des Gerätes, sowie die
Nichteinhaltung
unserer
Anweisungen,
entbindet
uns
von
jeder
Garantieleistung oder anderen Ansprüchen!
3 Lieferumfang
3.1 Vacuson 18 komplett
Art.-Nr.
Bezeichnung
Stückzahl
4046 ........................... Steuergerät Vacuson 18 ............................................................................ 1 Stück
4049 ........................... Sekretflasche 1.5 Liter ............................................................................... 1 Stück
4039 ........................... Flaschendeckel komplett zu Sekretflasche ............................................... 1 Stück
No. 31790 35/05
3
Vacuson 18
NOUVAG AG
4 Gerätezusammenbau
6
5
7
4
8
3
9
13
2
10
1
11
12
1.
2.
3.
4.
5.
6.
7.
4
Absaugkanüle (nicht im Lieferumfang)
Steuergerät VACUSON 18
Netzkabel
Bakterienfilter
Bakterienfilterschlauch 8 x 3 x 350mm
Sekretflaschendeckel
Sekretflasche 1.5l
8.
9.
10.
11.
12.
13.
Sekretflaschenhalterung
Absaugschlauch 8 x 3 x 2000mm
Manometer
Vakuumregler “VACUUM“
„ON / OFF“-Schalter
Sicherungshalter / Luftaustritt (Rückseite)
No. 31790 35/05
NOUVAG AG
Vacuson 18
4.1 Aufsetzen des Sekretflaschendeckels auf die Sekretflasche
1)
Deckel auf Flasche aufsetzen.
2)
Deckel im Uhrzeigersinn so lange drehen, bis er an Flasche eingehängt ist
und weiteres Drehen nicht mehr möglich ist.
3)
Mit vertikaler Zugbewegung kontrollieren, ob Deckel an Flasche eingehängt
ist.
Die Sekretflasche muss bei Gebrauch immer in die Sekretflaschenhalterung
gestellt werden. So kann sie nicht umkippen und die Funktion des
Überlaufschutzes ist gewährleistet. Andernfalls könnte Flüssigkeit in die Pumpe
gelangen und diese zerstören!
4.2 Anschluss Absaugzubehör
2
3
1
4
1)
Bakterienfilter (1) bei Steuergerät aufpfropfen.
2)
Bakterienfilterschlauch (2) auf Bakterienfilter und Anschluss “VACUUM“ des Flaschendeckels
aufpfropfen.
3)
Absaugschlauch (3) auf Anschluss “PATIENT“ bei Sekretflasche aufpfropfen.
4)
Absaugkanüle (4) an Absaugschlauch aufpfropfen.
5)
Steuergerät mittels Netzkabel an Stromversorgung anschliessen.
Beachten Sie, dass Gerät nie ohne Bakterienfilter im Einsatz ist, da es sonst
zerstört werden kann!
Das Gerät ist einsatzbereit!
No. 31790 35/05
5
Vacuson 18
NOUVAG AG
5 Bedienung
5.1 Einschalten der Vacuson 18
Mit dem Hauptschalter “ON/OFF“ wird das Steuergerät ein- respektiv ausgeschaltet.
5.2 Regulierung des Saugvorganges
Der Vakuumregler “VACUUM“ dient der Regulierung des Saugvorganges. Über das Manometer kann
der momentane Unterdruck in [bar] und [kPa] abgelesen werden.
Drehen nach rechts “+“:..................verstärken des Vakuums
Drehen nach links “-“: .....................abschwächen des Vakuums
Einstellen des gewünschten Unterdrucks:
1)
Vakuumregler an linken Anschlag “-“ (= Vakuum min.).
2)
Schalter “ON / OFF“ drücken um Pumpe einzuschalten (Schalter leuchtet).
3)
Saugschlauch abklemmen um damit maximale Dichte des Systems zu erzeugen.
4)
Vakuumregler an rechten Anschlag “+“ (= Vakuum max.).
5)
Warten bis Manometer maximalen Unterdruck erreicht hat (> -0.6).
6)
Durch Drehen des Vakuumreglers kann jetzt Absaugleistung von 0 bis -0.6bar stufenlos eingestellt
werden.
Falls das System undicht ist (Bsp.: Dichtung defekt), zeigt das Manometer nur
einen sehr geringen Wert an (< -0.5bar)!
5.3 Entleeren der vollen Sekretflasche
Der Flaschendeckel der Sekretflasche hat eine mechanische
Überlaufsicherung. Diese verhindert, dass abgesaugte Flüssigkeit
in den Verbindungsschlauch zwischen Flaschendeckel und Pumpe
gelangt. Der Schwimmer der Überlaufsicherung schliesst bei zu
hohem Flüssigkeitsniveau das Ventil.
Bei zu hohem Flüssigkeitsniveau und daraus folgendem Schliessen der Überlaufsicherung muss die
Flasche geleert oder durch eine leere ersetzt werden:
1)
Absaugpumpe ausschalten.
2)
Schläuche vom Sekretflaschendeckel entfernen.
3)
Volle Flasche aus Sekretflaschenhalterung entfernen und abgesaugte Flüssigkeit gemäss
Vorschriften des Gesetzgebers entsorgen.
4)
Sekretflaschendeckel auf Sekretflasche montieren und wieder an Sekretflaschenhalterung hängen.
5)
Schläuche wieder gemäss Anleitung an Sekretflaschendeckel anschliessen (siehe Kapitel 4.2
Anschluss Absaugzubehör).
Mit der leeren und korrekt angeschlossenen Sekretflasche kann nun weitergearbeitet werden.
6
Auch nach der Aktivierung der Überlaufsicherung wird noch Flüssigkeit in die
Absaugflasche gesogen.
No. 31790 35/05
NOUVAG AG
Vacuson 18
5.4 Funktionskontrolle
Vor Beginn der Behandlung mit der Vacuson 18 sollten die einzelnen Funktionen überprüft werden, um
einen problemlosen Betrieb sicherzustellen.
Generelle Funktion:
1)
Steuergerät mit Hauptschalter “ON/OFF“ einschalten Schalter “ON/OFF“ leuchtet auf.
Absaugpumpe:
1)
Steuergerät mit Hauptschalter “ON/OFF“ einschalten Schalter “ON/OFF“ leuchtet auf.
2)
Absaugpumpe eingeschaltet.
3)
Hand vor Luftaustritt “EXHAUST“ halten (Rückseite des Steuergerätes) Luftstrom tritt aus.
4)
Vakuumregler “VACUUM“ an rechten Anschlag drehen maximale Saugleistung.
5)
Saugintensität am Kanülenende kontrollieren Pumpe saugt stark.
6)
Vakuumregler “VACUUM“ an linken Anschlag drehen minimale Saugleistung.
7)
Saugintensität am Kanülenende kontrollieren Pumpe saugt schwach.
8)
Steuergerät mit Hauptschalter “ON/OFF“ ausschalten Schalter “ON/OFF“ dunkel.
Störungen und Fehler:
Bei Störungen und Fehler siehe Kapitel 8 Störungen und Fehlersuche.
6 Desinfektion, Reinigung und Sterilisation
Für die Pflege des Materials sind insbesondere folgende wichtige Punkte zu beachten:
•
Keine lösungsmittelhaltigen Reinigungsmittel verwenden!
•
Material immer im Sterilgutbeutel verpackt autoklavieren!
•
Material bei maximal 134°C autoklavieren!
•
Falls sterilisiertes Material nicht sofort zum Einsatz kommt, sollte es auf der
Verpackung mit Sterilindikator und Sterildatum beschriftet werden!
6.1 Steuergerät
Das Steuergerät kommt mit dem Patienten nicht in Berührung:
Nur äusserliche Wischdesinfektion mit mikrobiologisch geprüften Flächendesinfektionsmitteln oder
80%-igem Äthyl-Alkohol verwenden.
Steuergerät nur mit Lappen abwischen. Keine Sprühreinigung und –desinfektion, da
Gerät nicht abgedichtet!
6.2 Sekretflasche mit Flaschendeckel
“TOP“
1)
Sekretflasche und Deckel nach Gebrauch entleeren und
ausspülen.
2)
Überlaufschutz aus Deckel ausschrauben.
3)
Anschlusszapfen “VACUUM“ & “PATIENT“ mit
Drehbewegung vom Deckel ziehen.
No. 31790 35/05
7
Vacuson 18
NOUVAG AG
4)
Dichtungsteile aus Flaschendeckel entfernen.
5)
Alle Bestandteile mit einem Lappen desinfizieren.
6)
Alle Bestandteile in einem Sterilisationsbeutel verpackt bei maximal 134°C sterilisieren.
7)
Bei Autoklaven ohne Nachvakuum muss Trocknungsphase erfolgen, indem Flasche
und Deckel im Klarsichtbeutel mindestens 1 Stunde bei Raumtemperatur getrocknet
werden.
Deckel in umgekehrter Reihenfolge wieder montieren.
Beim Montieren der Überlaufsicherung, muss die Aufschrift
Schwimmer nach oben zeigen, da sonst System undicht wird!
“TOP“
beim
6.3 Bakterienfilter
Der Bakterienfilter zwischen Sekretflasche und Gerätpumpe ist ein Einwegartikel und kann nicht
gewaschen oder sterilisiert werden. Es empfiehlt sich ein periodisches Auswechseln (ca. 50h). Jedoch
unbedingt, wenn Schaum oder infektiöses Material angesaugt wurde.
Der Bakterienfilter schliesst bei Kontakt mit Flüssigkeiten, um die Pumpe zu
schützen. Bei feuchtem Bakterienfilter wird somit jedoch auch ein weiterer
Saugvorgang unmöglich gemacht
6.4 Sterilisierbare Schlauchset
1)
Schlauchset mit Desinfektionsmittel gut durchspülen.
2)
Schlauchset mit befeuchtetem Lappen reinigen.
3)
Schlauchset in Klarsichtbeutel verpacken und bei maximal 134°C sterilisieren.
Nach 100 Sterilisationen oder 3 Jahren Gebrauch müssen die Schläuche ersetzt werden.
8
No. 31790 35/05
NOUVAG AG
Vacuson 18
7 Wartung
7.1 Bakterienfilter
Der Bakterienfilter wird als Einwegartikel periodisch
ausgewechselt, vor allem jedoch wenn Schaum oder
infektiöses Material angesaugt wurde.
(Art.Nr.
siehe
Kapitel
9.
Ersatzteilliste
mit
Bestellnummern)
7.2 Sekretflasche
Das einströmende Sekret / Luftgemisch verursacht eine Schaumbildung in der Sekretflasche. Es
empfiehlt sich daher ein Mittel zu verwenden, dass die Schaumbildung unterbindet. Vor dem Gebrauch
der Sekretflaschen das Schaumschutzmittel in die saubere und trockene Flasche einfüllen. Verwenden
Sie keine Desinfektionslösung, da die meisten dieser Lösungen eine Schaumbildung fördern.
Achten Sie darauf, dass sich die Sekretflaschen in gutem Zustand befinden. Prüfen Sie die Flaschen
regelmässig auf Bruchstellen, Risse und einwandfreien Flaschenrand. Dies ist wichtig, um eine absolute
Dichtheit zu gewährleisten, was wiederum für eine einwandfreie Funktion der Absaugpumpe notwendig
ist.
7.3 Funktionskontrolle der Überlaufsicherung
Die einwandfreie Funktion der Überlaufsicherung muss von Zeit zu Zeit überprüft werden:
1)
Sekretflaschendeckel ohne Flasche mittels Bakterienfilterschlauch an Steuergerät anschliessen.
2)
Deckel senkrecht halten.
3)
Schwimmer mehrmals gegen Flaschendeckel drücken.
4)
Schwimmer muss selbständig in Normallage zurückfallen.
5)
Vakuumregler “VACUUM“ an Steuergerät durch Drehen im Uhrzeigersinn öffnen.
6)
Vakuum mit Hauptschalter “ON / OFF“ einschalten.
7)
Schwimmer der Überlaufsicherung an den Flaschendeckel drücken, bis dieser durch Vakuum
festgehalten wird.
8)
Vakuummeter zeigt steigenden Wert, bis zum maximal erreichbaren Vakuum (< -0.6bar).
Wenn Schwimmer nicht selbstständig zurückfällt oder die Vakuumanzeige das
maximale Vakuum nicht erreicht, muss Überlaufsicherung zerlegt und gereinigt
werden!
No. 31790 35/05
9
Vacuson 18
NOUVAG AG
7.4 Dichtungen und Schläuche
Damit die Saugpumpe einwandfrei funktioniert, müssen sämtliche Schläuche und Dichtungen periodisch
überprüft werden und spätestens nach 100 Sterilisationen oder 3 Jahren Gebrauch ausgewechselt
werden. Nur wenn sie unbeschädigt sind, kann ein genügendes Vakuum aufgebaut werden.
Defekte Dichtungen und Schläuche austauschen!
2
3
1
1. Dichtung Anschlussstutzen bei Steuergerät .......................................... 2 Stück ........................ Art.4063
2. Verbindungsschlauch zwischen Bakterienfilter und Sekretflasche........ 1 Stück ........ Art.4075 (350mm)
3. Saugschlauch ........................................................................................ 1 Stück ....................... Art. 4076
7.5 Austausch der Steuergerätesicherungen
Defekte Steuergerätsicherungen können von Benützer selbstständig ausgewechselt werden. Sie
befinden sich auf der Rückseite des Gerätes:
1)
Netzkabel ausstecken.
2)
Sicherungsgehäuse im Gegenuhrzeigersinn öffnen.
3)
Defekte Sicherung auswechseln (siehe 1.2 Technische Daten).
4)
Sicherungsgehäuse im Uhrzeigersinn wieder schliessen.
5)
Netzkabel wieder anschliessen.
7.6 Hinweis zur Entsorgung
Bei der Entsorgung von Gerät, Gerätbestandteilen und Zubehör müssen die erlassenen Vorschriften
des Gesetzgebers befolgt werden.
Im Sinne des Umweltschutzes können Altgeräte an den Händler oder den Hersteller zurückgegeben
werden.
10
No. 31790 35/05
NOUVAG AG
Vacuson 18
8 Störungen und Fehlersuche
Störung:
Gerät funktioniert
überhaupt nicht:
Ursache:
1.2 Technische Daten
Netzverbindung nicht
hergestellt
3 Geräteübersicht
Vakuumpumpe nicht
eingeschaltet
Undichtheiten
Falsch montierte
Schläuche
Flasche ist voll und
Überlaufsicherung
geschlossen
Bakterienfilter feucht und
somit verschlossen
Fehlbedienung
Absaugpumpe saugt
zuwenig:
Vakuumregler zuwenig
geöffnet
Durchflussleistung
Bakterienfilter zu klein
Undichtheiten
Absaugpumpe saugt
zu stark:
Hinweis
Betriebsanleitung:
Falsche Betriebsspannung Netzspannung überprüfen
Sicherung defekt
Absaugpumpe
funktioniert nicht:
Behebung:
Vakuumregler zu fest
geöffnet
Steuergerät an Stromnetz
anschliessen
Sicherungen überprüfen
und gegebenenfalls
auswechseln
Pumpe mit Grünem „ON /
OFF“-Schalter einschalten
Sämtliche Dichtungen und
Schläuche überprüfen.
Sitz des Flaschendeckels
auf der Flasche
kontrollieren
Schläuche richtig
montieren
7.5 Austausch der
Steuergerätsicherungen
3 Geräteübersicht
7 Wartung
7.4 Dichtungen und
Schläuche
Volle Flasche gegen leere
ersetzen
5.2 Überlaufsicherung
Flaschendeckel
Bakterienfilter ersetzen
6.3 Bakterienfilter
Betriebsanleitung
nachlesen
Regler “VACUUM“ im
Uhrzeigersinn drehen, bis
gewünschte Saugleistung
erreicht ist
Bakterienfilter ersetzten
Sämtliche Dichtungen und
Schläuche überprüfen.
Sitz des Flaschendeckels
auf Flasche überprüfen.
Regler “VACUUM“ im
Gegenuhrzeigersinn
drehen, bis gewünschte
Saugleistung erreicht ist.
5 Bedienung
5.1 Regulierung des
Saugvorganges
7.1 Bakterienfilter
7 Wartung
5.1 Regulierung des
Saugvorganges
Kann ein Fehler nicht behoben werden, wenden Sie sich bitte an Ihren Lieferanten oder an eine
autorisierte Servicestelle. Die Anschriften sind auf der letzten Seite der Bedienungsanleitung zu finden.
9 Ersatzteilliste mit Bestellnummern
Bezeichnung
Art.-Nr.
Steckhülse klein zu Gerätestutzen .................................................................................................... 4047
Dichtung Anschlussstutzen bei Steuergerät ...................................................................................... 4063
Verbindungsschlauch zwischen Bakterienfilter und Sekretflasche.....................................4075 (350mm)
Saugschlauch 8 x 3 x 2000mm ......................................................................................................... 4076
Bakterienfilter; Ø 64mm ..................................................................................................................... 4246
Sekretflasche; 1,5 Liter ...................................................................................................................... 4049
Flaschendeckel mit Überlaufsicherung zu 1,5 Liter Flasche ............................................................. 4039
Silikon-Antischaum Emulsion 1 Liter ................................................................................................. 4422
Für Bestellungen anderer Teile steht Ihnen unser Kundendienst gerne zur Verfügung.
No. 31790 35/05
11
NOUVAG AG
Vacuson 18
TABLE OF CONTENTS
1
Description
1.1
1.2
1.3
1.4
1.5
2
3
Operation and Functions
Technical Data
Operating Environment
Transport and Storage Environment
Symbols
2
2
2
2
2
2
Safety Measures
3
Shipping Contents
3
3.1
Vacuson 18 Complete
3
4
Shipment contents
4
5
System Assembly
5
5.1
5.2
6
Operation
6.1
6.2
6.3
7
Control unit
Secretion Jar with bottle lid.
Bacterial Filter
Sterilizable Suction Set
Servicing
8.1
8.2
8.3
8.4
8.5
8.6
9
Regulation of the Suction Procedure
Overflow Protection System
Function Control
Disinfection, Cleaning, and sterlization
7.1
7.2
7.3
7.4
8
Secretion Jar Lid attachment
Suction Assembly Connection
Bacterial Filter
Secretion Jar
Inspection of Overflow Protection Elements
Seals and Tubes
Control Unit Fuse Replacement
Disposal
Troubleshooting
10 Replacement parts and numbers
No. 31790 35/05
5
5
6
6
6
6
7
7
7
8
8
9
9
9
9
10
10
10
11
11
1
Vacuson 18
NOUVAG AG
1 Description
1.1 Operation and Functions
The VACUSON 18 can be used for the suction of fluids and secretions. The vacuum procedure can be
variably controlled. The Vacuson 18 can be used in the following areas:
- Chemistry
- Laboratory
- Medicine
- Intensive care
- Dental laboratory
- Surgery
- Postoperative care
1.2 Technical Data
Voltage:.......................................................................... 115V∼/ 60Hz or 230V∼/ 50Hz (see device label)
Fuses: ................................................................................ 2 x T2A (for 115V∼) and 2 x T1A (for 230V∼)
Dimensions (W x H x D): .......................................................................................... 190 x 130 x 250 mm
Net weight: ....................................................................................................................................... 3.2 kg
Suction Pump Capacity:............................................................................................................... 18l / min
Device type vacuum pump: ................................................................................... high vacuum / low flow
Adjustable vacuum: ................................................................................................................. -0.7 – 0 bar
Suction Motor Power:.......................................................................................................................175VA
Application Part::........................................................................................................................... Type BF
Protection Level: ............................................................................................................................ Class 1
1.3 Operating Environment
1.4 Transport and Storage Environment
Relative Humidity: ....................... max. 80%
Temperature: ............................... 5 to 35°C
Barometric Pressure: ......... 800 to 1060hPa
Relative Humidity:.............................max. 90%
Temperature:..................................... 5 to 50°C
Barometric Pressure:...............700 to 1060hPa
1.5 Symbols
: Attention accompanying
documents
: Application of part Type BF
1275 : Conforms to EU standards
2
20min on / : Continous operation with
intermittent loading
20min off
20min on, 20min off
: Old electrical and electronic
equipment must be disposed
separately and may not be
included in regular domestic
waste.
No. 31790 35/05
NOUVAG AG
Vacuson 18
2 Safety Measures
Your safety, the safety of your team, and, it goes without saying, the safety of your patients is for Nouvag
AG the first priority. It is therefore vital that the following measures be strictly observed:
•
The unit will be not supplied in a sterile condition!
•
The Vacuson 18 should be operated by qualified personnel only!
•
Check the correct operation voltage on the rating plate!
•
Responsibility for the use of sub-units, accessories, parts or assemblies from
other manufacturers rests solely with the user!
•
In operating, storing or transporting the VACUSON 18 particular care should
be taken handling the Control Unit!
•
Repairs are to be carried out by authorized NOUVAG service technicians only!
•
Nouvag AG cannot be held liable for any malfunction of the VACUSON 18, or
performance failure and/or its designed or desired utility, nor can Nouvag AG
be held liable for any injuries to persons or animals, in any case when the
VACUSON 18 is miss-used or not operated, applied or maintained in strict
accordance with the user/owner instructions set out in the operating manual.
In the event of any doubt or question, the user is to contact Nouvag AG or its
lawful representative for clarification or assistance!
3 Shipping Contents
3.1 Vacuson 18 Complete
Art.-Nr.
Description
Units
4046 ........................... Control unit Vacuson 18..............................................................................1 piece
4049 ........................... Secretion Jar 1.5 Liter.................................................................................1 piece
4039 ........................... Jar Lids, complete.......................................................................................1 piece
No. 31790 35/05
3
Vacuson 18
NOUVAG AG
4 Shipment contents
6
5
7
4
8
3
9
13
2
10
1
11
12
1.
2.
3.
4.
5.
6.
7.
4
Suction cannula (not included)
Control unit VACUSON 18
Mains Cable
Bacterial Filter
Bacterial Filter Tube 8 x 3 x350mm
Secretion Jar Lid
Secretion Jar 1.5l
8.
9.
10.
11.
12.
13.
Secretion Jar Holder
Suction Tube 8 x 3 x 2000mm
Manometer
Vacuum Regulator “VACUUM”
Mains Switch “ON / OFF“
Fuse Box / Exhaust (back panel)
No. 31790 35/05
NOUVAG AG
Vacuson 18
5 System Assembly
5.1 Secretion Jar Lid attachment
1)
Place lid on secretion jar
2)
Turn lid clockwise until lid is firmly secured and cannot be turned anymore.
3)
Verify by pulling, if the lid is placed properly.
When using the VACUSON 18 the Secretion Jar must be in its holder at all times!
This is to avoid tipping and spillage which could destroy the pump!
2
5.2 Suction Assembly Connection
1)
Affix bacterial filter (1) at the main unit.
2)
Affix bacterial filter tube (2) at the bacterial filter
and the “VACUUM” connection on the jar lid.
3)
Affix suction tube (3) to “PATIENT“ connection on
secret jar
4)
Affix suction cannula (4) to suction tube.
5)
Plug in control unit mains.
3
1
4
Insure that the VACUSON 18 is never operated without the Bacterial Filter,
otherwise the equipment could be destroyed!
The System is Operational!
No. 31790 35/05
5
Vacuson 18
NOUVAG AG
6 Operation
6.1 Regulation of the Suction Procedure
The Vacuum Regulator “VACUUM“ regulates the Suction mode. The Manometer indicates the actual
negative, barometric, pressure (rarefaction) in [bar] and [kPa].
Turn right: .......................................rarefaction increases
Turn left:..........................................negative pressure decreases
Setting the Desired Barometric Maximum:
6)
Set Vacuum Regulator left to minimum “-“ (= Vacuum min.).
7)
Press “ON / OFF“ button to switch on pump (switch illuminates)
8)
Crimp Suction Tube to achieve maximum system integrity
9)
Turn Vacuum regulator right to maximum “+“ (= Vacuum max.).
10) Wait till manometer indicates maximum (< -0.6 bar).
11) Set Regulator to desired maximum between 0 and -0.6bar.
If the system is not airtight (a defective seal, for example) the Manometer will
indicate (> -0.5 bar!)
6.2 Overflow Protection System
The Secretion Jar Lid has a mechanical Overflow Protection device. This
prevents liquid backing up in the connecting Tube and, crucially, into the pump
The Overflow Protection float closes the tube at the maximum secretion level.
When the Overflow Protection device closes, turn Main switch off, and replace
the full Jar.
When the secretion level is too high and the Overflow Protection device closes, empty the full Jar or
replace it by an empty one:
12) Turn Suction Pump off.
13) Remove Tubings from Suction Jar.
14) Remove full Jar from holder and dispose suctioned secretion in conformity with local laws and
regulations.
15) Secure Lid firmly and hang Secretion Jar on support mounting.
16) Reconnect Tubes according to Secretion Jar’s instructions (see Chapter 4.2 Suction Assembly
Connection).
Operation can be resumed with the empty and properly connected Secretion Jar.
Even after closing, some liquid will still run into the Jar, subject to the negative
pressure remaining in the system.
6.3 Function Control
To ensure a smooth operation, check each function before using the Vacuson 18 and make sure they
work properly.
6
No. 31790 35/05
NOUVAG AG
Vacuson 18
General Function:
Press “ON/OFF“ Mains Switch to start the unit Switch “ON/OFF“ will illuminate.
Suction Pump:
1)
Turn on control unit with main switch “ON/OFF” switch “ON/OFF” illuminates.
2)
Suction pump is on.
3)
Hold hand in front of “EXHAUST”-vent at the back of unit airflow should be discernible.
4)
Turn vacuum control knob to back stop in clockwise direction maximum suction performance.
5)
Check suction intensity at end of cannula suction should be strong.
6)
Turn vacuum control knob to initial stop in counterclockwise direction minimum suction
performance.
7)
Check suction intensity at end of cannula suction should be weak.
8)
Turn off control unit with main switch “ON/OFF” switch “ON/OFF” is extinguished.
Troubleshooting:
See Chapter 9 Troubleshooting.
7 Disinfection, Cleaning, and sterlization
Please pay attention to the following important points for the maintenance of the material :
•
Do not use dissolving agents for cleaning
•
Autoclave material in sterilization bag
•
Autoclave at maximum 134C!
•
Sterilized material should be stored and tagged with sterilizing date!
7.1 Control unit
The control unit do not come into contact with patients. Only clean the surface of the unit, do not use
harsh cleaners or solvents for cleaning. Use 80% ethyl alcohol or microbiologically effective
disinfectants.
The Control Unit should be wiped with a clean, damp cloth only. No spray cleaners
or disinfecting agents should be employed, as the Control Unit face is not
watertight!
7.2 Secretion Jar with bottle lid.
1)
After every use, Secretion Jars with bottle lids are to be
emptied, rinsed and disinfected.
2)
Unscrew Overflow Protection System from lid.
3)
Pull connection spigot “VACUUM“ & “PATIENT“ by turning
from lid.
4)
Remove all seals from bottle lid.
5)
Wipe all parts with a clean cloth dampened with
disinfectant solution.
6)
Bag and autoclave all parts at maximum 134C.
No. 31790 35/05
“TOP“
7
Vacuson 18
7)
NOUVAG AG
After Autoclaving, allow Jar and Lid to dry in transparent bag for one hour at room
temperature.
Reassemble lid in reverse order.
When assembling the Overflow Protection System, the inscription “TOP“ on float
must face up, this is important to insure a properly sealed system.
7.3 Bacterial Filter
The Bacteria-filter between the Secretion Jar and Control Unit Pump is a one-way device and cannot be
cleaned. It should be replaced periodically every 50h, or immediately should foam or bacterial substance
appear.
In order to protect the pump, the Bacterial filter closes when it comes in contact
with liquid. So further suction procedure is not possible when the Bacterial filter is
saturated.
7.4 Sterilizable Suction Set
1)
Rinse Suction -Set well with disinfecting agent.
2)
Clean with damp cloth.
3)
Bag and autoclave at maximum 134C.
To insure proper function of the Suction Pump, all tubes must be periodically checked, and replaced
after at most 100 sterilizations or 3 years operation
8
No. 31790 35/05
NOUVAG AG
Vacuson 18
8 Servicing
8.1 Bacterial Filter
As one-way element, the Bacterial Filter must be
periodically changed, and immediately when foam or
infectious material is sucked in.
(Art. Nr. see chapter 9 Replacement parts and numbers)
8.2 Secretion Jar
Because the inflow of secretion material mixed with air produces a build-up of foam in the Secretion Jar,
an anti-foaming agent is required. Before operation, put anti-foaming agent in clean and dry Secretion
Jar. Do not add disinfecting agents, as they increase the build-up of foam.
Check carefully that the Secretion Jar is in good condition. Make sure that there are no cracks or chips
and that the rim is unmarked. This is important to insure a properly sealed system, and enables the
Suction Pump to function correctly.
8.3 Inspection of Overflow Protection Elements
To insure proper function, the Overflow Protection must be checked out from time to time:
1)
Connect Secretion Lid, without Jar, to the Bacteria Filter tube.
2)
Hold lid vertical
3)
Press float repeatedly against lid.
4)
Check that float falls back independently to normal position.
5)
Turn regulator „VACUUM“ on Control Unit clockwise to open.
6)
Turn „VACUUM“ on with Mains switch ON/OFF.
7)
Press Overflow Protection float on Secretion Lid.
8)
Vacuum Meter should indicate increasing value, to a maximum of < -0.6bar.
If floater does not fall back autonomous or the manometer doesn’t reach the
maximum value, cleaning of the overflow protection must be repeated.
No. 31790 35/05
9
Vacuson 18
NOUVAG AG
8.4 Seals and Tubes
To insure proper function of the Suction Pump, all tubes and seals must be periodically checked, and
replaced after at most 100 sterilizations or 3 years operation. Only when in perfect order can sufficient
vacuum be built up.
Defective seals and tubes must be replaced!
2
3
1
1. Seal for connecting neck on Control Unit .............................................2 pieces ........................Art.4063
2. Connecting Tube between Bacteria Filter and Jar lid ........................... 1 piece ........ Art.4075 (350mm)
3. Suction Tube.......................................................................................... 1 piece .......................Art. 4076
8.5 Control Unit Fuse Replacement
A blown Fuse can be easily replaced by the operator. It is located on the back of the Control Unit:
1)
Disconnect mains.
2)
With screwdriver open fuse cover
3)
Replace defective fuse (see 1.2 Technical Data).
4)
Close fuse case
5)
Reconnect mains.
8.6 Disposal
Disposal of device, components and accessories must strictly conform to local laws and regulations as
set out by the relevant authorities.
With regard to the preservation of the environment old equipment may be returned to the distributor or
manufacturer.
10
No. 31790 35/05
NOUVAG AG
Vacuson 18
9 Troubleshooting
Problem:
Cause:
Device does not
operate at all
Wrong operating
voltage
Mains not connected
Defective Fuse
Vacuum Pump does
not function
Vacuum Pump not
turned on
Vacuum leaks
Improperly mounted
hoses
Jar is full and Overflow
Protection is closed
Solution:
Check mains voltage
output
Connect mains to
Control Unit
Check fuse and replace
if indicated
Turn pump on with
green „ON / OFF“- Switch
Check all seals and
hoses. Make sure Lid
rests securely on Jar.
Inspect hose
connections
Replace Jar
Bacterial Filter is saturated
Replace Bacterial Filter
and closed
Pump suction power
too weak:
Pump suction power
too strong:
Refer: Operating
Manual
1.2 Technical Data
3. Shipment contents
7.5 Control Unit Fuse
Replacement
3. Shipment contents
7 Servicing
7.4 Seal and Tubes
5.2 Overflow Protection
System
6.3 Bacterial Filter
Improper use
Refer to Operating
Manual
Vacuum regulator not
completely open
Turn “VACUUM“ regulator
clockwise until the desired
suction power is reached
5.1 Regulation of the
Rate of flow
Bacterial Filter too small
Replace Bacterial Filter
7.1 Bacterial Filter
Vacuum leaks
Check all seals and
hoses. Make sure Lid
rests securely on Jar.
7 Servicing
Vacuum regulator
completely open
Turn “VACUUM“ regulator
counterclockwise until the
desired suction power is
reached.
5 Operation
Suction Procedure
5.1 Regulation of the
Suction Procedure
In the event a problem cannot be solved, contact dealer or authorized service technicians, as listed on
the last page of your Operating Instruction Manual.
10 Replacement parts and numbers
Description
Art.-Nr.
Narrow Connector for Jar Lid suction neck ....................................................................................... 4047
Seal for connecting neck on Control Unit .......................................................................................... 4063
Connecting Tube between Bacterial Filter and Jar lid
4075 (350mm)
Suction Tube 8 x 3 x 2000mm ........................................................................................................... 4076
Bacterial Filter .................................................................................................................................... 4246
Suction Jar; 1,5 Liter .......................................................................................................................... 4049
Jar Lid with Overflow protection for 1,5 Liter Jar ............................................................................... 4039
Silicon-Antifoam Emulsion, 1 Liter bottle ........................................................................................... 4422
For ordering other parts, our customer service personnel are pleased to assist.
No. 31790 35/05
11
NOUVAG AG
Vacuson 18
TABLE DES MATIERES
1
Description
1.1
1.2
1.3
1.4
1.5
2
3
Utilisation et fonctionnement
Données techniques
Environnement d'utilisation
Environnement de transport et Stockage
Icônes
2
2
2
2
2
2
Mesures de sécurité
3
Contenu
3
3.1
Vacuson 18 complet
3
4
Contenu de l'expédition
4
5
Assemblage du système
5
5.1
5.2
6
Fonctionnement
6.1
6.2
6.3
7
Unité de contrôle
Bocal de sécrétion avec couvercle
Le filtre bactérien
Set d'aspiration stérilisable
Entretien
8.1
8.2
8.3
8.4
8.5
8.6
9
Réglage du procédé d'aspiration
Système anti-débordement
Réglage des fonctions
Désinfection, nettoyage et stérilisation
7.1
7.2
7.3
7.4
8
Fixation du couvercle du bocal de sécrétion
Branchement de l'ensemble d'aspiration
Le filtre bactérien
Le bocal de sécrétion
Contrôle des éléments anti-débordement
Joints et tuyaux
Remplacement du fusible de l'unité de contrôle
Mise au rebut
Dépannage
10 Références des pièces de rechange
No. 31790 35/05
5
5
6
6
6
7
7
7
7
8
8
9
9
9
9
10
10
10
11
11
1
Vacuson 18
NOUVAG AG
1 Description
1.1 Utilisation et fonctionnement
Le VACUSON 18 s'utilise pour l'aspiration d'humeurs et sécrétions. Le vide peut se contrôler avec un
variateur. Le Vacuson 18 s'utilise dans les domaines suivants :
- Chimie
- Laboratoire
- Médecine
- Soins intensif
- Laboratoire dentaire
- Chirurgie
- Soins postopératoire
1.2 Données techniques
Voltage :............................................................... 115V∼/ 60Hz ou 230V∼/ 50Hz (voir étiquette appareil)
Fusibles : ......................................................................... 2 x T2A (pour 115V∼) et 2 x T1A (pour 230V∼)
Dimensions (L x H x P) : ........................................................................................... 190 x 130 x 250 mm
Poids net : ........................................................................................................................................ 3.2 kg
Capacité de la pompe d'aspiration :............................................................................................. 18l / min
Dépressurisation réglable: ...................................................................................................... -0.7 – 0 bar
Typ pompe d’aspiration: ........................................................................................ high vacuum / low flow
Puissance du moteur d'aspiration :..................................................................................................175VA
Pièce d'application : ...................................................................................................................... Type BF
Niveau de protection : .................................................................................................................. Classe 1
1.3 Environnement d'utilisation
1.4 Environnement
Stockage
de
transport
et
Humidité relative : .......................maxi. 80%
Température : ............................... 5 à 35°C
Pression barométrique :...... 800 à 1060hPa
Humidité relative :............................ maxi. 90%
Température :..................................... 5 à 50°C
Pression barométrique : ...........700 à 1060hPa
1.5 Icônes
: Attention documents joints
20min on / : Fonctionnement en continu
avec charge intermittente,
20min off
1min de marche pour 3min
d'arrêt.
: Pièce d'application de type BF
1275 : Conforme aux normes
européennes
2
: De vieux appareils électriques
et d'électronique doivent être
éliminés séparé et ne peuvent
pas être amenés aux ordures
ménagères.
No. 31790 35/05
NOUVAG AG
Vacuson 18
2 Mesures de sécurité
Votre sécurité, la sécurité de votre équipe et, il va sans dire, la sécurité de vos patients est pour Nouvag
AG la première des priorités. Il est donc vital que les mesures suivantes soient strictement respectées :
•
L'unité n'est pas livrée stérile !
•
Le Vacuson 18 doit être utilisé uniquement par du personnel qualifié !
•
Vérifier le voltage de fonctionnement sur la plaque signalétique !
•
L'utilisation de sous ensembles, accessoires, pièces ou assemblages d'autres
fabricants reste sous la responsabilité exclusive de l'utilisateur !
•
Un soin particulier doit être pris lors de la manipulation de l'unité de contrôle
du VACUSON 18 pendant l'utilisation, le stockage ou le transport !
•
Les réparations doivent être effectuées uniquement par des techniciens
agréés par NOUVAG !
•
L'utilisation du VACUSON 18 à des fins non-conformes ou son mauvais
entretien annule la garantie et décharge la firme Nouvag AG de toute
responsabilité. En cas de doute ou de question, l'utilisateur peur contacter
Nouvag AG ou ses représentants légaux pour clarification ou assistance !
3 Contenu
3.1 Vacuson 18 complet
Article réf.
Description
Quantité
4046 ........................... Unité de contrôle Vacuson 18.....................................................................1 pièce
4049 ........................... Bocal de sécrétion 1.5 litres........................................................................1 pièce
4039 ........................... Couvercle bocal, complet ...........................................................................1 pièce
No. 31790 35/05
3
Vacuson 18
NOUVAG AG
4 Contenu de l'expédition
6
5
7
4
8
3
9
13
2
10
1
11
12
1.
2.
3.
4.
5.
6.
7.
4
Canule d'aspiration (non comprise)
Unité de contrôle du VACUSON 18
Câble d'alimentation
Filtre bactérien
Tuyau du filtre bactérien 8 x 3 x 350mm
Couvercle du bocal de sécrétion
Bocal de sécrétion 1.5l
8.
9.
10.
11.
12.
13.
Support du bocal de sécrétion
Tuyau d'aspiration 8 x 3 x 2000mm
Manomètre
Variateur de vide “VACUUM”
Interrupteur principal “ON / OFF“
Boîte à fusible / sortie d’air (panneau arrière)
No. 31790 35/05
NOUVAG AG
Vacuson 18
5 Assemblage du système
5.1 Fixation du couvercle du bocal de sécrétion
1)
Mettre le couvercle sur le bocal de sécrétion.
2)
Tourner dans le sens des aiguilles d'une montre jusqu'à ce qu'il soit bien
fixé et qu'il ne puisse plus tourner.
3)
Vérifier que le couvercle est bien fixé en tirant.
Pendant l'utilisation du VACUSON 18 le bocal de sécrétion doit être sur son
support à tout moment ! Ceci afin d'éviter tout déversement pouvant endommager
la pompe !
2
5.2 Branchement de l'ensemble d'aspiration
1)
Attacher le filtre bactérien (1) à l'unité de contrôle.
2)
Attacher le tuyau du filtre bactérien (2) au filtre
bactérien et au connecteur du couvercle du bocal
“VACUUM“.
3)
Attacher le tuyau d'aspiration (3) du “PATIENT“ au
couvercle du bocal.
4)
Attacher la canule d'aspiration (4) au tuyau
d'aspiration.
5)
Brancher la prise électrique de l'unité de contrôle.
3
1
4
Veiller à ce que le VACUSON 18 ne soit jamais utilisé sans filtre bactérien, en cas
contraire l'équipement pourrait être endommagé !
Le système est opérationnel !
No. 31790 35/05
5
Vacuson 18
NOUVAG AG
6 Fonctionnement
6.1 Réglage du procédé d'aspiration
Le rhéostat du vide “VACUUM“ règle le mode d'aspiration. Le manomètre indique la pression
barométrique actuelle négative (raréfaction) en [bar] et [kPa].
Tourner à droite : ............................augmente la raréfaction.
Tourner à gauche : .........................la pression négative baisse.
Réglage du maximum barométrique souhaité :
6)
Régler le rhéostat du vide au minimum, vers la gauche “-“ (= Vide mini.).
7)
Appuyer sur le bouton “ON / OFF“ pour mettre la pompe en marche (le bouton s'allume).
8)
Pincer le tuyau d'aspiration pour obtenir l'étanchéité maximum du système.
9)
Tourner le rhéostat du vide au maximum vers la droite “+“ (= Vide maxi.).
10) Attendre jusqu'à ce que le manomètre indique le maximum (-0.6 bar).
11) Mettre le rhéostat sur le vide souhaité entre 0 et -0.6 bar.
Si le système n'est pas étanche à l'air (un joint défectueux, par exemple) le
manomètre indiquera (> -0.5 bar!)
6.2 Système anti-débordement
Le couvercle du bocal de sécrétion a un système de protection antidébordement. Ceci empêche le liquide de retourner dans le tuyau de
connexion et, plus grave, dans la pompe. Le flotteur de la protection
anti-débordement ferme le tuyau lorsque le niveau maximum de
sécrétion est atteint.
Lorsque l'appareil de protection anti-débordement se ferme, tourner
l'interrupteur principal sur "off" et remplacer le bocal plein.
Lorsque le niveau de sécrétions est trop élevé, la protection anti-débordement se ferme, videz le bocal
ou remplacez-le par un vide:
1)
Arrêter la pompe d’aspiration.
2)
Oter les tubulures du bocal d’aspiration.
3)
Oter le bocal plein du support et jeter les sécrétions en conformité avec les lois et réglementations
locales.
4)
Fermer solidement le couvercle et suspendre le bocal de sécrétion sur le support.
5)
Rebrancher les tubulures selon les instructions de montage du bocal (voir chapitre 4.6
Branchement de l’ensemble d’aspiration).
L’opération peut reprendre avec un bocal de sécrétion vide et correctement installé.
6
Même après la fermeture, un peu de liquide s'écoulera encore dans le bocal, ceci
est dû à la pression négative restant dans le système !
No. 31790 35/05
NOUVAG AG
Vacuson 18
6.3 Réglage des fonctions
Après l’installation du Vacuson 18, vérifier les différentes fonctions de manière à obtenir de l’appareil les
performances et le service maximal.
Fonction générale :
Appuyer sur l’interrupteur principal “ON/OFF“ pour la mise en route de l’appareil l’interrupteur
“ON/OFF“ s’allumera..
Pompe d’aspiration:
1)
Appuyer sur l’interrupteur principal “ON/OFF“ pour la mise en route de la pompe l’interrupteur
“ON/OFF“ s’allumera..
2)
La pompe d’aspiration est mise en marche.
3)
Maintenir la main devant le ventilateur d’air “EXHAUST“ (Panneau arrière de l’unité de contrôle) l’air est ventilé.
4)
Tourner le régulateur de vide “VACUUM“ vers la droite Débit d’aspiration maximum..
5)
Vérifier l’intensité de l’aspiration à l’extrémité de la canule L’aspiration de la pompe augmente.
6)
Tourner le régulateur de vide “VACUUM“ vers la gauche Puissance d’aspiration minimum
7)
Vérifier l’intensité de l’aspiration à l’extrémité de la canule L’aspiration de la pompe baisse.
8)
Appuyer sur l’interrupteur principal “ON/OFF“ pour mettre hors marche la pompe L’interrupteur
“ON/OFF“ est foncé.
Dépannages :
Voir chapitre 9 Dépannage.
7 Désinfection, nettoyage et stérilisation
Merci de faire très attention aux points suivants concernant la maintenance du matériel :
•
Ne pas utiliser d'agent solvant pour le nettoyage !
•
Stériliser le matériel dans un sac à stérilisation !
•
Stériliser à 134°C maximum !
•
Le matériel stérile doit être stocké et étiqueté avec la date de stérilisation !
7.1 Unité de contrôle
L'unité de contrôle n'est pas au contact des patients. Nettoyer simplement la surface de l'unité, ne pas
utiliser de nettoyant abrasif ou de solvant pour le nettoyage. Utiliser 80% d'alcool éthylique ou des
désinfectants antimicrobiens.
L'unité de contrôle doit être essuyée uniquement avec un chiffon propre et humide.
Ne pas vaporiser d'agent nettoyant ou désinfectant, l'unité de contrôle n'étant pas
étanche !
7.2 Bocal de sécrétion avec couvercle
1)
Après chaque utilisation, les bocaux de sécrétion avec
couvercles doivent être vidés, rincés et désinfectés.
2)
Dévisser le système anti-débordement du couvercle.
No. 31790 35/05
“TOP“
7
Vacuson 18
NOUVAG AG
3)
Oter les connexion “VACUUM“ & “PATIENT“ du couvercle en tournant.
4)
Oter tous les joints du couvercle du bocal.
5)
Essuyer toutes les pièces avec un chiffon propre imbibé de solution désinfectante.
6)
Mettre dans un sac et stériliser à 134°C maximum.
7)
Après la stérilisation, laisser le bocal et le couvercle sécher dans le sac transparent
pendant une heure à température ambiante.
Remonter le couvercle dans l'ordre inverse.
Pendant le montage du système anti-débordement, l'inscription “TOP“ sur le
flotteur doit être sur le dessus, ceci est important pour garantir l'étanchéité du
système.
7.3 Le filtre bactérien
Le filtre bactérien entre le bocal de sécrétion et la pompe de l'unité de contrôle est à usage unique et ne
peut pas être nettoyé. Il doit être remplacé périodiquement toutes les 50h et impérativement si de la
mousse ou des substances bactériennes ont été aspirées.
Afin de protéger la pompe, le filtre bactérien se ferme lorsqu'il entre en contact
avec du liquide. Dans ce cas, lorsque le filtre bactérien est détrempé, il n'est plus
possible d'aspirer.
7.4 Set d'aspiration stérilisable
1)
Rincer le set d'aspiration avec un agent désinfectant.
2)
Nettoyer avec un chiffon humide.
3)
Mettre dans un sac et stériliser à 134°C maximum.
Pour garantir le bon fonctionnement de la pompe d'aspiration, tous les tuyaux doivent être régulièrement
vérifiés et changés après 100 stérilisations ou 3 ans d'utilisation maximum.
8
No. 31790 35/05
NOUVAG AG
Vacuson 18
8 Entretien
8.1 Le filtre bactérien
En tant qu'élément jetable, le filtre bactérien doit être
changé régulièrement et immédiatement lorsque de la
mousse ou des matériaux infectieux sont aspirés.
(Voir chapitre 9 Références des pièces détachées)
8.2 Le bocal de sécrétion
Le mélange matériau de sécrétion et air produisant de la mousse, il est recommandé de mettre un
agent anti-mousse dans le bocal de sécrétion. Mettre l'agent anti-mousse, avant l'utilisation, dans le
bocal propre et sec. Ne pas utiliser de liquide désinfectant car ils augmentent en général la production
de mousse.
Vérifier soigneusement que le bocal de sécrétion est en bon état. Vérifier qu'il n'y a pas de fêlure ou
d'ébréchure et que le bord est intact. Ceci est important pour l'étanchéité du système et permet à la
pompe d'aspiration de fonctionner correctement.
8.3 Contrôle des éléments anti-débordement
Pour garantir un bon fonctionnement, la protection anti-débordement doit être vérifiée périodiquement :
1)
Brancher le couvercle de sécrétion, sans le bocal, au tuyau du filtre bactérien.
2)
Maintenir le couvercle verticalement.
3)
Pousser le flotteur contre le couvercle à plusieurs reprises.
4)
Vérifier que le flotteur retombe tout seul dans sa position initiale.
5)
Tourner le rhéostat "VACUUM“ de l'unité de contrôle dans le sens des aiguilles d'une montre pour
l'ouvrir.
6)
Mettre "VACUUM“ en marche avec l'interrupteur principal "ON/OFF".
7)
Pousser le flotteur de la protection anti-débordement vers le couvercle du bocal.
8)
Le compteur de vide doit indiquer une valeur croissante, jusqu'à < -0.6bar maximum.
Si le flotteur ne retombe pas, ou si la valeur maximale du vide n'est pas atteinte, il
faut à nouveau procéder au démontage et refaire le nettoyage.
No. 31790 35/05
9
Vacuson 18
NOUVAG AG
8.4 Joints et tuyaux
Pour garantir le bon fonctionnement de la pompe d'aspiration, tous les tuyaux et joints doivent être
vérifiés et remplacés régulièrement toutes les 100 stérilisations ou 3 ans d'utilisation maximum. C'est
seulement lorsque tout est en bon état que le vide se fait.
Les joints et tuyaux défectueux doivent être remplacés !
2
3
1
1. Joint de connexion de l'unité de contrôle..............................................2 pièces ........................ réf.4063
2. Tuyau de connexion entre le filtre et le couvercle du bocal .................. 1 pièce .........réf.4075 (350mm)
3. Tuyau d'aspiration.................................................................................. 1 pièce ....................... réf. 4076
8.5 Remplacement du fusible de l'unité de contrôle
Un fusible qui saute peut être facilement remplacé par l'utilisateur. Il se situe à l'arrière de l'unité de
contrôle :
1)
Débrancher la prise électrique.
2)
Ouvrir la boite à fusible avec un tournevis.
3)
Remplacer le fusible défectueux (voir 1.2 Données techniques).
4)
Fermer la boite à fusible.
5)
Rebrancher la prise électrique.
8.6 Mise au rebut
La mise au rebut d'appareil, de composant et d'accessoire doit être strictement conforme aux lois et
réglementations locales comme fixées par les autorités compétentes.
Dans le sens de la protection de l'environnement, de vieux appareils peuvent être rendus au
commerçant ou au fabricant.
10
No. 31790 35/05
NOUVAG AG
Vacuson 18
9 Dépannage
Problème :
Cause :
L'appareil ne
Mauvais voltage
fonctionne pas du tout d'utilisation
La prise électrique n'est
pas branchée
Fusible défectueux
L'aspirateur de vide
ne fonctionne pas
La pompe n'est pas sur
"on"
Le vide fuit
Tuyaux mal montés
La puissance de
l'aspiration est faible
Vérifier le voltage.
Référence : mode
d'emploi
1.2 Données techniques
Brancher la prise à
3. Contenu de
l'unité de contrôle.
l'expédition
Vérifier le fusible et le
7.5 Remplacement du
remplacer si nécessaire
fusible de l'unité…
Mettre en marche avec
3. Contenu de
le bouton vert "ON /
l'expédition
OFF“.
Vérifier les joints et
tuyaux, vérifier que le
couvercle est bien fixé.
Vérifier les connections
des tuyaux.
7 Maintenance
7.4 Joints et tuyaux
Le bocal est plein et la
protection est fermée
Remplacer le bocal
5.2 Système de protection
anti-débordement
Le filtre bactérien est
saturé et fermé
Remplacer le filtre
bactérien.
6.3 Le filtre bactérien
Mauvaise utilisation
Se référer au mode
d'emploi.
5 Fonctionnement
Le rhéostat du vide n'est
pas entièrement ouvert
Vitesse d'écoulement
Filtre bactérien trop petit
L'aspiration est trop
forte
Solution :
Tourner le rhéostat
"VACUUM“ dans le sens
des aiguilles d'une montre
jusqu'à ce que l'aspiration
souhaitée soit atteinte.
Remplacer le filtre
bactérien.
Le vide fuit
Vérifier les joints et
tuyaux, vérifier que le
couvercle est bien fixé.
Le rhéostat est
complètement ouvert
Tourner le rhéostat
“VACUUM“ dans le sens
inverse des aiguilles d'une
montre.
5.1 Réglage du procédé
d'aspiration
7.1 Le filtre bactérien
7 Maintenance
5.1 Réglage du procédé
d'aspiration
Si le problème ne peut être résolu, contacter votre revendeur ou les services techniques agréés, dont la
liste se trouve sur la dernière page de votre mode d'emploi.
10 Références des pièces de rechange
Description
Article réf.
Connecteur étroit pour couvercle du bocal d'aspiration..................................................................... 4047
Joint de connexion pour l'unité de contrôle........................................................................................ 4063
Tuyau de connexion entre le filtre et le couvercle du bocal................................................4075 (350mm)
Tuyau d'aspiration 8 x 3 x 2000mm ................................................................................................... 4076
Filtre bactérien ................................................................................................................................... 4246
Bocal d'aspiration; 1,5 litre................................................................................................................. 4049
Couvercle de bocal avec protection anti-débordement 1,5 litre......................................................... 4039
Emulsion silicone anti-mousse, bouteille de 1 litre ............................................................................ 4422
Pour la commande d'autres pièces, notre service client sera heureux de vous aider.
No. 31790 35/05
11
NOUVAG AG
Anhang
Appendix
Appendice
Electromagnetic compatibility (EMC)
Remark:
The Product subsequently referred to herein always denotes the Vacuson 18.
Changes or modifications to this product not expressly approved by the manufacturer may result in increased emissions or decreased immunity
performance of the product and could cause EMC issues with this or other equipment. This product is designed and tested to comply with
applicable regulations regarding EMC and shall be installed and put into service according to the EMC information stated as follows.
WARNING
Use of portable phones or other radio frequency (RF) emitting equipment near the product may cause unexpected or adverse
operation.
WARNING
The product shall not be used adjacent to, or stacked with, other equipment. If adjacent or stacked use is necessary, the product
shall be tested to verify normal operation in the configuration in which it is being used.
Compliant Cables and Accessories
WARNING
The use of accessories, transducers and cables other than those specified may result in increased emissions or decreased immunity
performance of the product.
The table below lists cables, transducers, and other applicable accessories for which the manufacturer claims EMC compliance.
NOTE: Any supplied accessories that do not affect EMC compliance are not listed.
Description
Length max.
Guidance and manufacturer’s declaration – electromagnetic emissions
The Product is intended for use in the electromagnetic environment specified below. The customer or the user of the Product should
assure that it is used in such an environment.
Emissions test
Compliance
Electromagnetic environment - guidance
RF emissions
Group 1
The Product uses RF energy only for its
CISPR 11
internal function. Therefore, its RF emissions
are very low and are not likely to cause any
interference in nearby electronic equipment.
The Product is suitable for use in all
RF emissions
Class B
establishments, including domestic
CISPR 11
establishments and those directly connected to
Harmonic emissions
Not applicable
the public low-voltage power supply network
IEC 61000-3-2
that supplies buildings used for domestic
Voltage fluctuations/flicker emissions
Not applicable
purposes.
IEC 61000-3-3
Guidance and manufacturer’s declaration – electromagnetic immunity
The Product is intended for use in the electromagnetic environment specified below. The customer or the user of the Product should
assure that it is used in such an environment.
Immunity tests
IEC 60601
Compliance level
Electromagnetic environment - guidance
Test level
Electrostatic discharge
+/- 6 kV contact
+/- 6 kV contact
Floors should be wood, concrete or ceramic
(ESD)
tile. If floors are covered with synthetic
+/- 8 kV air
+/- 8 kV air
material, the relative humidity should be at
IEC 61000-4-2
least 30 %.
Electrical fast
+/- 2 kV for power supply
+/- 2 kV for power supply
Mains power quality should be that of a typical
transient/burst
lines
lines
commercial or hospital environment.
IEC 61000-4-4
Surge
IEC 61000-4-5
Voltage dips, short
interruptions and voltage
variations on power
supply input lines
IEC 61000-4-11
+/- 1 kV for input/output
lines
+/- 1 kV differential mode
+/- 1 kV for input/output
lines
+/- 1 kV differential mode
+/- 2 kV common mode
< 5 % UT
(> 95 % dip in UT )
for 0,5 cycle
+/- 2 kV common mode
< 5 % UT
(> 95 % dip in UT )
for 0,5 cycle
Mains power quality should bet hat of a typical
commercial or hospital environment.
40 % UT
(60 % dip in UT )
for 5 cycles
40 % UT
(60 % dip in UT )
for 5 cycles
If the user of the Product requires continued
operation during power mains interruptions, it
is recommended that the Product be powered
from an uninterruptible power supply or a
battery.
70 % UT
(30 % dip in UT )
for 25 cycles
70 % UT
(30 % dip in UT )
for 25 cycles
< 5 % UT
(> 95 % dip in UT )
for 5 sec
Not applicable
< 5 % UT
(> 95 % dip in UT )
for 5 sec
Not applicable
Power frequency
(50/60Hz) magnetic field
IEC 61000-4-8
Note: UT is the a.c. mains voltage prior to application of the test level.
Mains power quality should be that of a typical
commercial or hospital environment.
Power frequency magnetic fields should be at
levels characteristic of a typical location in a
typical commercial or hospital environment.
Guidance and manufacturer’s declaration – electromagnetic immunity for not life support equipment
The Product is intended for use in the electromagnetic environment specified below. The customer or the user of the Product should
assure that it is used in such an environment.
Immunity tests
IEC 60601
Compliance level
Electromagnetic environment - guidance
Test level
Portable and mobile RF communications
equipment should be used no closer to any part of
the Product, including cables, than the
recommended separation distance calculated from
the equation applicable to the frequency of the
transmitter.
Recommended separation distance:
Conducted RF
IEC 61000-4-6
Radiated RF
IEC 61000-4-3
3 V rms
150 kHz to 80 MHz
outside ISM bands
3 V/m
80 MHz to 2.5 GHz
3 V rms
150 kHz to 80 MHz
outside ISM bands
3 V/m
80 MHz to 2.5 GHz
d = 1,2
P
d = 1,2
P
80 MHz to 800 MHz
d = 2,3
P
800 MHz to 2,5 GHz
where P is the maximum output power rating in the
transmitter in watts (W) according to the transmitter
manufacturer and d is the recommended
separation distance in metres (m).
Field strengths from fixed RF transmitters, as
determined by an electromagnetic site survey a,
should be less than the compliance level in each
frequency range b.
Interference may occur in the vicinity of equipment
marked with the following symbol:
Note 1:
At 80 MHz and 800 MHz, the higher frequency range applies.
Note 2:
These guidelines may not apply in all situations. Electromagnetic propagation is affected by absorption and reflection from
structures, objects and people.
Fixed strengths from fixed transmitters, such as base stations for radio (cellular/cordless) telephones and land mobile radios,
amateur radio, AM and FM radio broadcast and TV broadcast cannot be predicted theoretically with accuracy. To access the
electromagnetic environment due to fixed RF transmitters, and electromagnetic site survey should be considered. If the
measured field strength in the location in which the Product is used exceeds the applicable RF compliance level above, the
Product should b observed to verify normal operation. If abnormal performance is observed, additional measures may be
necessary, such as reorienting or relocating the Product.
a
b
over the frequency range 150 kHz to 80 MHz, field strengths should be less than 3 V/m.
Recommended separation distances between
portable and mobile RF communications equipment and the not life support equipment
The Product is intended for use in an electromagnetic environment in which radiated RF disturbances are controlled. The customer or
the user of the Product can help prevent electromagnet interference by maintaining a minimum distance between portable and mobile
RF communications equipment (transmitters) and the Product as recommended below, according to the maximum output power of the
communications equipment.
Rated maximum output power
of transmitter
W
Separation distance according to frequency of transmitter
m
150 kHz to 80 MHz
80 MHz to 800 MHz
800 MHz to 2.5 GHz
d = 1,2 P
d = 1,2 P
d = 2,3 P
0,01
0,12
0,12
0,23
0,1
0,38
0,38
0,73
1
1,2
1,2
2,3
10
3,8
3,8
7,3
100
12
12
23
For transmitters rated at a maximum output power not listed above, the recommended separation distance d in metres (m) can be
estimated using the equation applicable to the frequency of the transmitter, where P is the maximum output power rating of the
transmitter in watts (W) according to the higher frequency range applies.
Note 1:
Note 2:
At 80 MHz and 800 MHz, the separation distance fort the higher frequency range applies.
These guidelines may not apply in all situations. Electromagnetic propagation is affected by absorption and reflection from
structures, objects and people.
Servicestellen / Servicecenter / Service /
Assistenza tecnica / Centro de Servicio
SWITZERLAND
(Hersteller/ Producer/ Producteur/ Produttore/ Productor)
NOUVAG AG
St. Gallerstrasse 23-25
CH - 9403 Goldach
Switzerland
GERMANY
Phone:
Fax:
E-Mail:
+41 (0)71 846 66 00
+41 (0)71 845 35 36
[email protected]
(Europ. Bevollmächtigter / European Mandatory / Mandataire Européen / Mandatario Europeo)
NOUVAG GmbH
Schulthaißstrasse 15
D - 78462 Konstanz
Germany
Phone:
Fax:
E-Mail:
+49 (0)7531 1290-0
+49 (0)7531 1290-12
[email protected]
Phone:
Fax:
Toll Free:
E-Mail
+1 (661) 724 0217
+1 (661) 724 1590
(800) 673 7427
[email protected]
Phone:
Fax:
E-Mail:
+33 (0)494 44 87 34
+33 (0)494 44 87 34
[email protected]
Phone:
Fax:
E-Mail:
+44 (0)1733 571958
+44 (0)1733 571958
[email protected]
Phone:
Fax:
E-Mail:
+852 2604 9389
+852 2694 0866
[email protected]
USA
NOUVAG USA Inc.
18058 Albyn Court
Lake Hughes
CA 93532
USA
FRANCE
DTR - Dentaire Turbine Repair Europe
55, allée de Châtaigniers
F - 83600 Les Adrets de l`Estérel
France
GREAT BRITAIN
S.R.Electromatics
511 Fulbridge Road
Werrington
GB - PE4 6SB Peterborough
Great Britain
ASIA
Associated Medical Supplies Co. Ltd.
Room 1201, Fo Tan Industrial Center
26 Au Pui Wan Street
Fo Tan, Shatin
Hong Kong
D
Wir bitten Sie, bei Benötigung von Service, Reparatur oder Ersatzteilen, den Händler oder Vertreter
Ihres Landes zu kontaktieren.
GB In case of service, maintenance and spare part questions – we kindly ask you to contact your dealer or
representitiv in your area.
F
En cas de demandes regardent le service technique, l’entretien ou pièces détachées, nous vous prions
de contacter le revendeur ou représentant dans votre région.
I
La preghiamo di contattare il suo rivenditore o il nostro rappresentante della sua zona, riguardo
l’assistenza technica, la manuntenzione o per richiedere pezzi di ricambio.
E
Por favor contactar al distribuidor en su area, para preguntas concernientes a servicio, mantenimento
y repuestos.