1
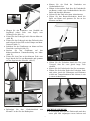
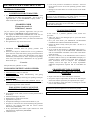
HAPPY CAT LIGHT EIGNER-HANDBUCH OWN ER´ S M AN UAL Bootsbesitzer/Name: boat owner/name: PLZ, Ort: Post code, town: Straße, Nr.: Street, nr Bootstype Boat type Bootsnummer Boat number Telefon Nr. telefon: HAPPY CAT LIGHT AT-GRA Kaufdatum Date of purchase -1- Verklicker pennant Großsegel main sail Segellatte batten Mast mast Wantenseil shroud rope Vorsegel foresail Reff-Bändsel reef saizing Windfäden sail-telltales Sichtfenster window Baum Niederholer boom downhaul Baum boom Großschot main sheet Paddel Halteschlaufen paddle secure straps Trampolintuch trampolin cloth Großschotklemme main sheet clamp Steuerruder rudder Großfall main halyard Schwert center board Rollfock furling jib Trampolinrahmen trampolin frame Klüverbaum jib boom Abspannseil für Klüverbaum release rope for jib boom Fockschot Fockschotklemme Ausreitgurt hiking strap jib sheet jib sheet clamp -2- LIEBER WASSERSPORTFREUND! 1 Großsegel mit 4 Segellatten 2 Paar Windfäden 1 Großfall 5 mm 1 Fockschot 8 mm 1 Großschot 8 mm 1 Baum-Niederholer 1 Verklicker 1 Reparaturset inkl. Ventilschlüssel 1 Eignerhandbuch Herzlichen Glückwunsch zum Kauf Ihres neuen HAPPY CAT LIGHT! Wir wünschen Ihnen damit viele schöne Stunden in Ihrer Freizeit und im Urlaub! Diese Informationsbroschüre soll Ihnen helfen, Ihren HAPPY CAT LIGHT richtig aufzubauen und fachgerecht zu warten. Lesen Sie bitte alle Kapitel sorgfältig durch - Sie ersparen sich dadurch Ärger und verlängern die Lebensdauer Ihres Bootes. Sie werden bestimmt mit Ihrem HAPPY CAT LIGHT sehr zufrieden sein. Wir freuen uns auf Ihre Empfehlung an Freunde und Bekannte. Damit Sie möglichst bald in See stechen können, wollen wir Ihnen Ihr "Studium" nicht länger vorenthalten. INHALTSVERZEICHNIS Produktabbildung Stückliste Einsatzbereich Betriebsdaten Typenschild Aufbau Trampolin Schwimmer Steuerruder Klüverbaum Schwert Takelage Abbau Hinweise zum Segeln Zubehör Pflege und Lagerung Wie man Schäden vermeidet Allgemeine Hinweise zum Segeln Aus Seglers Sprachkiste Garantieurkunde Bootshaut Garantie Prüfbefund Konformitätserklärung Registrierkarte ACHTUNG! Bitte lesen Sie vor dem ersten Gebrauch Ihres HAPPY CAT LIGHT diese Gebrauchsanweisung sorgfältig durch und beachten Sie alle wichtigen Hinweise! Um Ihre Garantieansprüche zu wahren, senden Sie die ausgefüllte Garantie -Registrierkarte an: GRABNER GMBH Weistracherstraße 11, A-3350 HAAG Tel 07434-42251, Fax 07434-42251-66 e-mail: [email protected] Internet: www.grabner-sports.at Alle Maß- und Gewichtsangaben sind gerundet. Die Zeichnungen bzw. Abbildungen in der Gebrauchsanweisung sind nicht Maßstabgetreu und stimmen nicht immer mit dem Originalboot zusammen. WICHTIGER HINWEIS Segeln ist ein Sport, der mit gewissem Risiko verbunden ist. Das Segeln mit dem HAPPY CAT LIGHT setzt Segelkenntnisse voraus, besonders wenn man bei der maximalen Windstärke segelt. Seite 2 3 4 3 4 4-5 5 5 6 5-6 6-7 8 9 10 - 11 11 12 12 - 13 13 14 15 29 30 31 – 32 BETRIEBSDATEN Länge außen: Breite außen: Länge Trampolin: Breite Trampolin: Eigengewicht: Personen: Zulässige Nutzlast: Betriebsdruck: Max. Motorleistung: Max. Motorgewicht: Masthöhe: Segelfläche Vor-/Großsegel: Segelfläche gesamt: Max. Windstärke: Norm: Kategorie: STÜCKLISTE 2 Schwimmer 1 Trampolinrahmen 4-teilig 1 Trampolintuch 2-teilig 1 Klüverbaum 2 Abspannseile für Klüverbaum 1 Steuerruder 1 Mittelschwert mit Halterung 1 Mast 3-teilig 2 Wantenseile 1 Baum 1 Vorsegel (Rollfock) 3 450 cm 220 cm 190 cm 150 cm 63 kg 4 Erwachsene 700 kg 0,3 bar 4,4 kw / 6 PS 30 kg 500 cm 4 m² / 6 m² 10 m² 4 Beaufort EN ISO 6185/VI C EINSATZBEREICH Segel-Katamaran für Seen und Küstengewässer bis Windstärke 4 (ca.30 km/h, mäßige Brise Zweige werden bewegt, verbreitet Schaumköpfe, Wimpel sind gestreckt) Motorisierbar mit maximal 4,4 KW / 6 PS bzw. 30 kg Motorgewicht Schieben Sie die beiden seitlichen Rahmenteile, seitlich von vorne auf das Trampolintuch - die Schotklemmen müssen nach oben und Richtung Bug zeigen HINWEIS: An der Unterseite der Rahmenteile sind die Nummern 1-4 eingestanzt. Wenn der Rahmen richtig zusammen gebaut ist, passen die Nummern zusammen (1-1, 2-2, 3-3, 4-4) Stecken Sie die Seitenteile auf den Hinterteil und ziehen Sie das Trampolintuch nach vorne. TYPENSCHILD 1 HAPPY CAT LIGHT HIN: AT-GRA 3 2 ISO Norm/Standard 4 ISO 6185 = Kategorie/Category 5 VI EU Richtlinie/Katego EU guideline/catego 6 C 4,4 kW 11 = 4 6 PS 0.3 bar 30 kg = 12 4.3 psi 66 lbs 4 Beaufor t 10 + + 700 kg 1540 l bs 13 = 2 10 m 107 sqft GRABNER GMBH Luf t boot f abri k 7 A- 3350 HAAG AUSTRI A EUROPA 1) Bootstype 2) CE-Kennzeichnung 3) Seriennummer 4) Norm 5) Kategorie der Norm 6) Kategorie der EU Richtlinie 7) Hersteller und Herstellungsland 8) Motorhöchstleistung 9) Maximales Motorgewicht 10) Höchstzulässige Nutzlast (Personen+Gepäck+Motor) 11) Höchstzulässige Personen 12) Empfohlener Betriebsdruck 13) Höchstzulässige Segelfläche ACHTUNG: Die Daten auf dem Typenschild dürfen auf keinen Fall überschritten werden! Stecken Sie den vorderen Rahmenteil, von vorne auf die beiden seitlichen Rahmenteile. AUFBAU TRAMPOLIN Nehmen Sie den hinteren Rahmenteil und schieben Sie das Trampolintuch in die Nut ein die Seite mit den Paddelhalterungen muss Richtung Bug zeigen. Stellen Sie den Rahmen auf und stecken Sie die Schnallen vom Trampolintuch zusammen. Spannen Sie das Trampolintuch, indem Sie an den Gurten anziehen. 4 Drücken Sie den Knopf in der Mitte des Ventils und verdrehen ihn, im gedrückten Zustand, eine viertel Umdrehung. Der Knopf kommt nach außen und das Ventil ist geschlossen. Stecken Sie den Schlauch Ihrer Pumpe mit dem Bajonettadapter auf das Ventil (Bajonettverschluss) und pumpen die Schwimmer auf Betriebsdruck (0,3 bar) auf. Prüfen Sie den richtigen Druck mit dem Manometer auf Ihrer Pumpe. Noch einfacher ist die Druckprüfung mit einem externen Prüfmanometer (Sonderzubehör). Nehmen Sie den Schlauch samt Adapter vom Ventil ab und verschließen Sie das Ventil mit der Ventilkappe (Bajonettverschluss). ACHTUNG: Ventilkappe unbedingt schließen! Voraussetzung damit das Ventil 100% dicht ist. ACHTUNG: Für die ersten 2-3 Aufbauten müssen Sie etwas mehr Kraft aufbringen. Wenn sich das Trampolinnetz dann etwas gedehnt hat, geht der Aufbau leicht. SCHWIMMER Legen Sie die beiden Schwimmer links und rechts neben das Trampolin - die Ventile sind hinten am Schwimmer und der Aufdruck muss außen sein. Bug STEUERRUDER Stecken Sie das Steuerruder, in der Mitte von hinten auf den hinteren Rahmenteil. Stecken Sie die beiden Schrauben durch die Bohrungen und schrauben sie mit den Flügelschrauben fest. Heck Stecken Sie die Schwimmer mit den Laschen auf die Krallen vom Trampolinrahmen - die vorderen Laschen werden von hinten auf die Krallen gesteckt, die hinteren Laschen von vorne. ACHTUNG: Je Rahmenecke sind zwei Befestigungen – 1x an der Oberseite und 1 x an der Innenseite. SCHWERT Stecken Sie die Schwerthalterung, in der Mitte von vorne auf den vorderen Rahmenteil. Stecken Sie die beiden Schrauben durch die Bohrungen und schrauben sie mit den Flügelschrauben fest. 5 Ziehen Sie das Großfall, mit dem Ende ohne Karabiner, von hinten nach vorne, durch die Rollen an der Mastspitze vom Mast-Oberteil. Klinken Sie das Vorsegel mit dem Karabiner, von der Oberseite des Vorsegels, am Rollfockgelenk an der Mastspitze ein. Stecken Sie den Verklicker von oben durch die beiden Löcher in der Klammer am Masttop. KLÜVERBAUM Schäkeln Sie die beiden Spannseile, links und rechts, an den Ösen vom Trampolinrahmen an. ACHTUNG: Den Bolzen vom Schäkel um 180° verdrehen bis er einrastet. Schäkeln Sie die anderen Enden der Spannseile an den Ösen vom Klüverbaum an. Stecken Sie den Klüverbaum mit den Zapfen in die Bohrung, in der Mitte vorne an der Schwerthalterung. Legen Sie den Mast so auf das Boot, dass die Mastspitze Richtung Heck zeigt. Befestigen Sie die beiden Wantenseile an den seitlichen Ösen an der Unterseite vom MastOberteil. Befestigen Sie die beiden Wantenseile, links und rechts, an den Ösen am Trampolinrahmen. FORTSETZUNG SCHWERT Ziehen Sie die Schwert-Aufholerleine (an der hinteren, abgeflachten Seite vom Schwert befestigt) durch die Teilung vom Trampolintuch und befestigen sie an der backbordseitigen Klemme der Schwerthalterung. Ziehen Sie die Schwert-Niederholerleine durch die Umlenkrolle am Klüverbaum und knoten sie an der Schwertvorderseite an. Klemmen Sie die Niederholerleine an der steuerbordseitigen Klemme der Schwerthalterung fest. Heben Sie den Mast hinten an und halten Sie den Mastfuß mit den Zapfen in die Bohrung in der Mitte von der Schwerthalterung. Stellen Sie den Mast jetzt ganz auf. Halten Sie den Mast mit einer Hand fest und klinken Sie, mit der anderen Hand, den unteren Karabiner vom Vorsegel an der Klemme der Rollfocktrommel am Klüverbaum ein - jetzt bleibt der Mast alleine stehen. HINWEIS: Das Aufstellen vom Mast geht mit zwei Personen wesentlich leicht. ACHTUNG: Achten Sie darauf, dass der Klüverbaum nicht herausrutscht. Spannen Sie nun das Rigg mit der Klemme an der Rollfocktrommel straff ab. TAKELAGE Stecken Sie die 3 Mastteile zusammen, dass die Arretierungen einrasten. 6 Knoten Sie ein Ende der Großschot am Großschotblock fest. Führen sie das andere Ende über die Umlenkrolle am Baum, zurück zum Großschotblock über die Rolle und durch die Klemme. Sichern Sie das Ende mit einem Achterknoten. Ziehen Sie den Baum-Niederholer durch die Rolle am Baum und spannen Sie ihn an der Klemme am Mast. Hängen Sie den Karabiner vom Großfall am Segelkopf (obere Ecke vom Segel) vom Großsegel ein.(Abb. A) Ziehen Sie das Großsegel in die Nut am Mast ein. (Abb. B) Ziehen Sie das Großsegel mit dem Fall nach oben und belegen Sie das Fall an der Klampe am MastUnterteil.(Abb. C) Schieben Sie den Großbaum von hinten auf das Unterliek vom Segel.(Abb. D) Stecken Sie den Großbaum auf den höhenverstellbaren Lümmelbeschlag am Mast. (Abb. E) Ziehen Sie den Gurt an der hinteren Ecke vom Segel durch die Öse am Baumende und spannen sie das Segel mit der Schnalle. (Abb. F) A C E Ziehen Sie die Fockschot durch die Öse vom Vorsegel, dass Sie zwei gleich lange Teile erhalten. Knoten Sie die Fockschot bei der Öse zusammen. Führen Sie die beiden Enden der Fockschot, links und rechts, durch die Führungen und Klemmen seitlich am Trampolinrahmen und sichern sie mit je einem Achterknoten. B D F Befestigen Sie den “Großschotblock Klemme” an der Öse der Ruderpinne. mit WICHTIGE HINWEISE Es ist möglich, dass sich die Flachventile nach den ersten paar Mal aufpumpen etwas lockern und 7 Lockern Sie die Spannung vom Rigg mit der Klemme am Rollfock. Halten Sie den Mast mit einer Hand fest und klinken Sie das Vorsegel aus. Heben Sie den Mast etwas an und legen Sie den Mast nach hinten um. Hängen Sie die Wantenseile und das Vorsegel aus. Nehmen Sie die drei Mastteile auseinander und entfernen sie den Verklicker vom Mast-Oberteil. Ziehen Sie den Klüverbaum vom Trampolinrahmen heraus und entfernen Sie die beiden Spannseile. Schrauben Sie das Steuerruder und die Schwerthalterung ab. Lassen Sie die Luft von den Schläuchen komplett aus - Ventilkappe öffnen und den grünen Knopf im gedrückten Zustand eine viertel Umdrehung verdrehen. Ziehen Sie den Trampolinrahmen aus den Laschen der Schläuche. Rollen Sie die Schläuche von vorne nach hinten zu den Ventilen - zusammen. Öffnen Sie die Schnallen vom Trampolintuch und ziehen Sie zuerst den vorderen Rahmenteil, dann die beiden seitlichen Rahmenteile und den hinteren Rahmenteil ab. daher im Bereich der Ventile etwas Luft verlieren können (Durch strecken und zusammenziehen der Bootshaut). Sollte das bei Ihrem Boot der Fall sein, gehen Sie folgt vor: - Boot auf Betriebsdruck aufpumpen - Ventilschlüssel auf das Ventil stecken - Ventilschlüssel so lange nach rechts drehen, bis der Widerstand zu stark wird. ACHTUNG: Ein Druckabfall von 20 % des Betriebsdrucks innerhalb von 24 Stunden, bei gleich bleibender Außentemperatur, liegt in der Norm und ist kein Reklamationsgrund! Betriebsdruck 0,30 bar -Druckabfall (20 %) 0,06 bar =Normdruck 0,24 bar Ein Temperaturunterschied von 1°C verändert den Betriebsdruck um ca. 0,004 bar. Das Boot wird werkseitig satt mit HochglanzPflegemittel eingelassen. Dadurch kann beim auspacken noch überschüssiges Pflegemittel auf der Bootshaut sein. Dieses können Sie mit einem trockenen Tuch einfach abwischen. Die matten Stellen bei den RahmenEinschubteilen entstehen durch das Eloxieren (Oberflächenveredelung). Der Korrosionsschutz oder Zusammenbau wird dadurch nicht beeinträchtigt. ACHTUNG: Es darf kein Wasser in die Schläuche kommen. Sollte es trotzdem passieren, sind die Schläuche so rasch wie möglich zu entleeren und vollkommen zu trocknen. Wasser im Schlauchinneren kann die Innengummierung beschädigen und es kann dadurch zu Riefenschäden kommen. VERPACKUNG Zum Verpacken empfehlen wir das 3-teilige Packtaschenset (Sonderzubehör). Tasche 1: Zusammengerollte Schwimmer in Packsack verpacken. Luftpumpe und eventuelle Kleinteile (Leinen, Verklicker,..) dazugeben. Tasche 2: Rahmen-Vorderteil mit der Oberseite nach unten in die Tasche legen. Die beiden Rahmen-Seitenteile mit den Unterseiten zusammenlegen und auf die Einsteckteile von Rahmen-Vorderteil legen. Dann das Schwert entlang der Rahmenteile dazugeben. Das Ruderblatt abnehmen und gemeinsam hinzufügen. Das Trampolintuch darauf legen und die Tasche verschließen. Tasche 3: Rahmen-Hinterteil mit der Oberseite nach unten in die Tasche legen. Die 3 Mastteile, Klüverbaum und Baum dazugeben. Die zusammengelegten Segel darauf legen und die Tasche verschließen. Eventuelles Zubehör (Bugverdeck, Paddel, Sitzpolster,...) kann wahlweise in die Taschen aufgeteilt werden. Somit ist Ihr HAPPY CAT LIGHT fahrbereit. Bitte lesen Sie vor der ersten Fahrt, die gesamte Gebrauchsanweisung durch! ABBAU Der Abbau erfolgt in umgekehrter Reihenfolge wie der Aufbau. Lösen Sie den Baumniederholer und nehmen Sie den Großschotblock vom Steuerruder ab - beides bleibt am Baum befestigt. Lassen Sie das Großsegel herunter und ziehen Sie das Großfall komplett aus - lassen Sie das Fall am Segel eingeklinkt. Rollen Sie das Großsegel zusammen - lassen Sie die Segellatten im Segel. Ziehen Sie beide Enden der Fockschot aus den Klemmen und Führungen - lassen Sie die Fockschot am Vorsegel angeknotet. 8 VERKLICKER Der Verklicker ist am Masttopp befestigt und zeigt die Windrichtung an. HINWEISE ZUM SEGELN ROLLFOCK Mit der Rollfock können Sie das Vorsegel, rasch und einfach verkleinern oder wieder vergrößern. Nehmen Sie die Fockschot aus den Klemmen. Ziehen Sie an der dünnen Rollfockleine am hinteren Ende vom Klüverbaum - das Vorsegel rollt sich auf. Wenn das Vorsegel die gewünschte Größe erreicht hat, klemmen Sie die Rollfockleine an der Seilklemme am Klüverbaum fest. Wenn Sie das Vorsegel wieder vergrößern möchten, lösen Sie die Rollfockleine von der Seilklemme und ziehen Sie an einem Ende der Fockschot an - das Segel rollt sich wieder aus. Wenn die gewünschte Größe wieder erreicht ist, klemmen Sie die Rollfockleine an der Seilklemme fest. SEGEL TRIMM-WINDFÄDEN Kleben Sie sich je ein Paar Windfäden auf das Vorsegel und auf das Hauptsegel. Mit den Windfäden können Sie die Segel optimal trimmen und die Segelleistung steigern. Ist das Segel korrekt getrimmt, dann zeigen die Windfäden auf beiden Segelseiten gleich an (parallel). Wird zu hoch am Wind gesegelt oder wenn der Segeltrimm noch nicht stimmt, so werden die Windfäden in Luv flattern und abheben. Wird zu tief am Wind gesegelt, oder ist das Segel zu stark getrimmt, so werden die Windfäden in Lee nach oben wandern. Liegt ein Fixkurs an, so trimmen sie das Segel mit Hilfe der Windfäden. Wird am Wind gesegelt, so steuern sie das Boot nach Stellung der Windfäden. AUSREITGURTE Das Trampolintuch ist in der Mitte mit einem Ausreitgurt mit zwei Schlaufen versehen. Der Ausreitgurt ermöglicht es der Mannschaft sich mit den Füßen einzuhängen und sich dadurch weit nach Luv hinauslehnen (ausreiten) zu können. BINDEREFF Mit dem Bindereff können Sie das Großsegel, bei starkem Wind, verkleinern. Lassen Sie das Großsegel soweit herunter, bis die Reffbändsel die Höhe vom Baum erreicht haben. Binden Sie die Reffbändsel fest um den Baum herum - die weggenommene Segelfläche ist am Baum, unter den Bändseln, eingebunden. Um das Großsegel wieder zu Vergrößern, brauchen Sie nur die Reffbändsel lösen und das Segel aufziehen. ACHTUNG: Das Reffen kann nicht während des Segelns gemacht werden! PADDEL-HALTESCHLAUFEN Auf der Vorderseite vom Trampolintuch sind vier Gummischlaufen zur Befestigung von zwei Stechpaddeln angebracht. Die zwei Paddel 130 cm (Sonderzubehör) quer auf das Trampolintuch legen - ein Paddelblatt nach links und das andere nach rechts schauend - und mit den Knebeln fixieren. SCHWERT Das Schwert kann von waagrechter bis senkrechter Position stufenlos verstellt werden. Zum Abschwenken vom Schwert lösen Sie die Schwert-Aufholerleine. Ziehen Sie an der Schwert-Niederholerleine bis das Schwert in der gewünschten Eintauchtiefe ist. Belegen Sie die Schwert-Niederholerleine in der Klemme. ACHTUNG: Diese Klemme macht bei zu starker Zugkraft (z.B. wenn Sie auf Grund laufen) automatisch auf. Die Stärke, wann die Klemme aufmacht, kann an der Klemme eingestellt werden. Durch das Verändern der Schwertposition kann der Trimm des Bootes geändert werden. SEGELLATTEN Das Großsegel ist mit vier Segellatten ausgestattet. Die Segellatten sind in die Lattentaschen eingeschoben und am hinteren Ende werden sie mit einem Gurt fixiert. Je straffe Sie die Gurten spannen, desto mehr Wölbung bekommt das Segel. BAUM-BAUMNIEDERHOLER Der Baumniederholer sollte immer gut gespannt sein, ein leichtes Durchbiegen des Baumes ist dabei normal. 9 Bugtasche, Gepäck, Paddel,... kann an den Schlaufenleisten verzurrt werden. Am Bugverdeck kann 1 Person bis ca. 75 kg liegen ZUBEHÖR Serienmäßig nicht enthalten SITZPOLSTER Pumpen Sie die Sitzpolster auf (maximaler Betriebsdruck 0,3 bar) - gleiches Ventil wie bei den Schwimmern. Die Härte der Sitzpolster kann durch verändern des Luftdrucks stufenlos eingestellt werden. Legen Sie die Sitzpolster auf den Übergang von Trampolinrahmen und Schwimmer. Befestigen Sie die Sitzpolster, mit den Gurten, hinten am Trampolinrahmen und vorne an der Öse für das Wantenseil. BUGVERDECKTASCHE Befestigen Sie die Bugverdecktasche, mit den vier Gurten, an den Schlaufenleisten vom Bugverdeck Es können entweder zwei Taschen der Länge nach oder eine Tasche quer montiert werden. BUGVERDECK Stecken Sie die Querstrebe durch die Tasche an der Vorderseite vom Bugverdeck. Schieben Sie die Querstrebe, mit den langen Teilen der Befestigungsplatten, von hinten nach vorne in die vorderen Laschen an den Bugspitzen der Schwimmer. Heben Sie die hinteren Laschen an und hängen sie die kurzen Teile ein. Schieben Sie die Querstrebe nach hinten bis sie ansteht. MOTORHALTERUNG Die Motorhalterung kann entweder anstelle vom Steuerruder oder seitlich neben dem Steuerruder montiert werden. Wenn Sie die Motorhalterung neben dem Steuer montieren, müssen 2 Löcher in den Rahmen gebohrt werden. Stecken Sie die Motorhalterung von hinten auf den Rahmen und markieren Sie sich die Bohrungen - wählen Sie die Position so, dass sich Motor und Steuerruder gegenseitig nicht behindern. Nehmen Sie die Motorhalterung wieder ab und durchbohren Sie die markierten Stellen. Geben Sie die Motorhalterung auf den Rahmen und stecken Sie die Schrauben von unten nach oben durch die Bohrungen und schrauben Sie die Halterung mit den Flügelmuttern fest. Der Motor wird am Motorhalterungsbrett festgeschraubt. ACHTUNG: Überprüfen Sie nach ca. 15 Minuten Motorbetrieb den festen Halt der Schrauben. Die Motorhalterung ist für einen Langschaftmotor mit einer maximalen Motorleistung von 4,4 KW/6 PS und einem maximalen Motorgewicht von 30 kg ausgelegt. Geben Sie die beiden Gummischlaufen über die Rohrenden der Querstrebe. Befestigen Sie die Gurten der beiden hinteren Ecken an der Außenseite vom Trampolinrahmen. Befestigen Sie die vier innen liegenden Gurte an den D-Ringen vom Trampolintuch. Befestigen Sie die beiden seitlichen Gurten an den D-Ringen von den Schwimmern. Spannen Sie alle Gurte fest ab. 10 PFLEGE UND LAGERUNG Durch die richtige Pflege und Lagerung erhalten Sie den Wert und erhöhen die Lebensdauer Ihres Bootes. Damit Ihnen Ihr Boot besonders lange Freude bereitet, halten Sie sich bitte an die nachstehenden Punkte. Halten Sie die Verbindungen von den Mastteilen und Rahmen immer sauber. Wischen Sie die Verbindungen mit einem sauberen Tuch ab und schmieren sie im Bedarfsfall leicht mit Silikonfett- oder spray - besonders nach Salzwassergebrauch. Reinigen Sie die Segel mit lauwarmem Seifenwasser. Reparieren Sie Löcher und Risse im Segel sofort damit diese nicht weiterreißen können - im Notfall mit Klebeband zukleben. Bessern Sie eventuelle Holzschäden von Schwert und Ruderblatt mit Polyacrylatharz Lack aus das Holz muss vorher komplett getrocknet werden. Schmieren Sie die Blöcke, Schotklemmen, Karabiner und Schäkel mit Silikonfett-oder spray. Reinigen Sie die Schwimmer mit lauwarmem Seifenwasser und tragen Sie regelmäßig das Grabner Bootspflegemittel, Bootswachs oder Hochglanz-Pflegemittel auf. Spülen Sie, nach Salzwassergebrauch, die komplette Besegelung mit Süßwasser ab. Trocknen Sie alle Teile vor dem Verpacken. Verpacken Sie den HAPPY CAT LIGHT in das originale Packtaschenset (Sonderzubehör). Lagern Sie das Boot an einem trockenen, vor direkter Sonneneinstrahlung geschützten Platz. Bei längerer Lagerung (mehrere Monate) sollten die Schwimmer in leicht aufgepumpten Zustand gelagert werden. Wenn sie zu wenig Platz dafür haben, können sie die Schwimmer locker zusammenlegen (auf keinen Fall verschnüren oder belasten). Die Schwimmer dürfen keinen großen Temparaturschwankungen ausgesetzt werden. BATTERIEHALTERUNG Entfernen Sie die Abdeckkappen der Bohrungen am Trampolinrahmen. Legen Sie die Batteriehalterung auf die rechte hintere Ecke vom Trampolinrahmen. Stecken Sie die Befestigungsschraube von oben durch die Bohrung von Batteriehalterung und Trampolinrahmen. Schrauben Sie die Batteriehalterung mit der Mutter fest. Stellen Sie die Batterie immer nur mit einem Batteriekasten in die Halterung und befestigen sie den Batteriekasten mit einem Gurt. SONNENDACH Bei Verwendung als Badeplattform spendet es wohltuenden Schatten. Die Montage entnehmen Sie der beigefügten Montageanleitung. WICHTIGER HINWEIS Für Schäden am Boot oder sonstige Folgeschäden durch unkorrekte Pflege und Lagerung kann die Firma GRABNER oder deren Händler keine Haftung übernehmen! Technische Änderungen, Irrtum, Druckfehler vorbehalten. 11/07 11 WIE MAN SCHÄDEN VERMEIDET ALLGEMEINE HINWEISE ZUM FAHRBETRIEB Damit Sie ihren HAPPY CAT LIGHT vor Schäden schützen, beachten Sie folgende Hinweise. Informieren Sie sich über örtliche Vorschriften Prüfen Sie Wetterberichte, örtliche Strömungen, Gezeiten und Windverhältnisse. Informieren Sie eine Person an Land über Ihr geplantes Reiseziel und geplante Rückkehr. Erklären Sie allen Passagieren Grundzüge des Segelns. Vergewissern Sie sich, dass einer Ihrer Passagiere das Boot in einem Notfall führen kann. Sicherheit steht an 1. Stelle - Lernen Sie Unfälle zu vermeiden! Seien Sie immer verantwortungsbewußt Vernachlässigen Sie nie die Sicherheitsvorschriften, Sie würden Ihr Leben und das anderer gefährden. Lernen Sie, Ihr Boot jederzeit zu beherrschen. Sichern Sie Ihr mitgeführtes Gepäck gegen Verlust bei Kenterung mit einer Leine oder Gurt. Respektieren Sie die örtlichen Vorschriften. Fahren Sie in Strandnähe ausschließlich in den gekennzeichneten Fahrbereichen und halten Sie besonders Ausschau. Tragen Sie und Ihre Passagiere eine Rettungsweste. Führen Sie nie ein Boot unter Einfluss von Alkohol, Drogen oder Medikamenten. Halten Sie auch die Passagiere nüchtern. Achten Sie beim anlegen, dass alle Passagiere Ihre Arme und Beine Im Bootsinnenraum haben Verletzungsgefahr! Halten Sie sich fern von Schwimmern und Tauchern. Machen Sie keine spontanen Wendemanöver, ohne Ihre Passagiere vorher zu informieren. Verkleinern Sie die Segelfläche wenn Sie bei der maximalen Windstärke segeln. Halten Sie sich an diese Gebrauchsanweisung. Schützen Sie ihr Boot vor unnötiger Sonneneinstrahlung. Legen Sie Ihr Boot an Land immer in den Schatten oder decken sie es mit einer Abdeckpersenning ab. Reduzieren Sie eventuell an Land den Luftdruck um Schäden durch Überdruck zu vermeiden - der Betriebsdruck von 0,3 bar darf nicht überschritten werden. Durch direkte Sonneneinstrahlung und der damit verbundenen Temparaturerhöhung, erhöht sich der Druck von selbst (bei 1°C Temparaturerhöhung ca. 0,004 bar Druckerhöhung). Pumpen Sie Ihr Boot nie mit Pressluft auf. Schützen Sie die Schwimmer vor scharfen und spitzen Gegenstände. Ziehen Sie Ihr Boot nie über Sand, Steine, Asphalt,... sondern tragen sie es. Vermeiden Sie während der Fahrt unnötige Grundberührungen. Befreien Sie Ihr Boot vor Salzrückständen nach Salzwassergebrauch. Verwenden Sie zum Reinigen keine aggressiven Reinigungsmittel. Reinigen Sie Ihr Boot niemals mit Hochdruckreinigern. Pflegen Sie Ihr Boot nur mit original GRABNER Pflegemittel, Bootswachs oder HochglanzPflegemittel. Verwenden Sie zum Schmieren keine säurehaltigen Fette oder Öle - am besten verwenden Sie Silikonfett oder Silikonspray. Vermeiden Sie bei Motorbetrieb, dass Kraftstoff, Öl, Fett oder Batteriesäure auf das Boot kommt. Dadurch kann die Gummierung zerstört werden. Es darf kein Wasser in das Schlauchinnere kommen. Wenn es doch einmal passiert, muss der Schlauch wieder komplett ausgetrocknet werden. Verkleinern Sie die Segelfläche wenn Sie bei der maximalen Windstärke segeln. AUSWEICH- UND ÜBERHOLREGELN Wenn beide Boote mit verschiedener Segelstellung fahren, hat Backbordschot vor Steuerbordschot Vorrang. Das heißt, das Boot welches seine Segel auf der Backbordseite (links) hat, hat Vorrang. Wenn beide Boote mit der gleichen Segelstellung fahren, hat Lee vor Luv Vorrang. Das heißt, das Boot welches näher beim Wind ist muss ausweichen. Beim überholen muss das überholende Boot nach Luv ausweichen. 12 Das Ausweichen soll rechtzeitig, deutlich, mit genügend Abstand und nicht vor dem Bug des anderen erfolgen. Das Boot mit Vorrang soll seinen Kurs beibehalten und nur wenn es zu einer Kollision kommen würde ausweichen. AUS SEGLERS SPRACHKISTE Segler haben eine "eigene Sprache". Damit Ihnen diese Ausdrücke geläufig sind, übersetzen wir Ihnen die wichtigsten Begriffe. VORRANGREGELN Segelboote haben Vorrang gegenüber Motor,Ruder,- Tret- und Paddelboote sowie Schwimmkörper und Surfer. Hingegen haben Sie Nachrang gegenüber Einsatzfahrzeuge, Vorrangfahrzeuge, Verbände, schwerbewegliche Fahrzeuge und Berufsfischer. Backbord Achterliek Bändsel belegen bergen Bug Fall SICHERHEITSAUSRÜSTUNG Prüfen Sie die gesetzlichen Vorschriften des Landes oder der Region Ihres jeweiligen Fahrbetriebes. Die gesetzlich vorgeschriebene Notausrüstung. Die Bootspapiere und Segelschein. Pro Person eine Rettungsweste Geeignete Wetterschutzkleidung - für Schlechtund Schönwetter Luftpumpe, Paddel, Reparaturset und Werkzeug Eine Boots - Abschleppleine Reserveleinen, Bändsel, Schäkel und Klebeband für Notreparaturen. Messer und Feuerzeug Erste Hilfe Ausrüstung Fock Heck Lee Luv Masttopp Nock Rigg Der hintere Rand des Segels Die linke Seite in Fahrtrichtung Dünne kurze Leine Eine Leine festmachen Das Segel einholen Das vordere Ende eines Bootes Leine zum Setzen der Segel Kleines Vorsegel Das hintere Ende eines Bootes Die dem Wind abgewandte Seite Die dem Wind zugekehrte Seite Das obere Ende des Mastes Das äußere Ende vom Baum Verbindung zwischen Rumpf und Segel (Mast, Baum, Wanten und Vorstag) Leine zum Regulieren der Stellung der Segel Die vordere Ecke des Segels Die hintere Ecke des Segels Die obere Ecke des Segels Die rechte Seite in Fahrtrichtung Der untere Rand des Segels Der vordere Rand des Segels WICHTIGES FÜR DIE UMWELT Vermeiden Sie starken Wellenschlag Halten Sie klaren Abstand von Badezonen Respektieren Sie die Tierwelt Vermeiden Sie unnötigen Lärm Hinterlassen Sie keine Abfälle Verwenden Sie nur Umweltfreundliche Reinigungsmittel Schot Wir alle tragen die Verantwortung für eine saubere und gesunde Umwelt. Wenn jeder diese regeln befolgt, können wir dazu beitragen, die Erde für zukünftige Generationen intakt zu halten. Unterliek WICHTIGER HINWEIS Für Schäden am Boot, der Besegelung, an Personen oder sonstige Folgeschäden durch falsche Bedienung, Nichteinhaltung der Betriebs und Sicherheitshinweise kann die Firma GRABNER oder deren Händler keine Haftung übernehmen! Jetzt steht Ihren ersten Segeltörn nichts mehr im Weg. Wir wünschen Ihnen viel Freude und Spaß mit Ihrem HAPPY CAT LIGHT - "Mast und Schotbruch". Segelhals Segelhorn Segelkopf Steuerbord Vorliek 13 Wenn andere als die von GRABNER vorgeschriebenen Originalteile und/oder Reparaturmaterialien verwendet werden. Bei gewerblichem Einsatz. Druckverlust in der Norm - laut Norm darf das Boot innerhalb von 24 Stunden 20 % vom Betriebsdruck verlieren. Beschädigung der Innengummierung durch Wasser im Schlauchinnenraum. GARANTIEURKUNDE GENERAL GARANTIE VORAUSETZUNGEN FÜR GARANTIEANSPRÜCHE: Schicken Sie die vom Händler gestempelte und unterschriebene GARANTIE - REGISTRIER-KARTE innerhalb von 3 Wochen - am besten eingeschrieben - an: Geldansprüche sind ausgeschlossen, ausgewechselte Teile sind Eigentum der Firma GRABNER. Die Rechte aus dieser Garantie sind nicht auf andere Personen als den Käufer übertragbar. GRABNER GMBH Weistracherstraße 11 3350 HAAG Wird ein Boot oder Zubehör zur Garantie-Reklamation eingesandt, wo sich nach der Prüfung herausstellt, dass es sich um keine Reklamation handelt, erfolgt ein schriftlicher Kostenvoranschlag für eine Reparatur gegen Berechnung. (Das Einsenden der Garantie-Registrier-karte garantiert Ihnen auch laufende Information über alle Produktneuheiten.) Lassen Sie die GARANTIEURKUNDE ebenfalls vom Händler stempeln und unterschreiben. Diese bleibt dann in Ihrer Verwahrung. In Garantiefällen ist auch eine Rechnungskopie beizulegen. Die Garantie gilt nur für den Erstkäufer. ABWICKLUNG VON GARANTIEFÄLLEN Falls es zu einem berechtigten Garantiefall kommen sollte, gehen Sie wie folgt vor: Liefern Sie Ihr Boot bzw. den beschädigten Teil bei Ihrem Bootshändler (Verkaufsstelle) ab. Übergeben Sie Ihrem Bootshändler Ihre ORIGINAL GARANTIEURKUNDE und die EINKAUFSRECHNUNG. Beschreiben Sie dem Händler den genauen Schaden Ihres Bootes oder Zubehörteiles - am besten schriftlich. Den weiteren Ablauf erledigt dann Ihr Händler für Sie. Wenn Sie Ihr Boot direkt an die Firma GRABNER schicken, legen Sie eine Kopie der GARANTIEURKUNDE, der EINKAUFS-RECHNUNG sowie eine genaue Beschreibung des Schadens bei. Die Firma GRABNER übernimmt bei berechtigten Garantiefällen die Anlieferungs- und Rücksendungskosten vom Händler zur Fabrik. Der Absender ist aufgefordert, die kostengünstigste Transportweise zu wählen. Die Firma GRABNER muss sich vorbehalten, ungerechtfertigte Transport-Mehrkosten nicht anzuerkennen und rückzubelasten. GARANTIE GRABNER Luftboote sind Qualitätsprodukte mit GARANTIE. Alle Boote durchlaufen beim Herstellungsprozeß zahlreiche Kontrollen: Laborkontrolle der Bootshaut, Klebe- und Vulkanisationsproben, Festigkeits,Sichtund Meßprüfungen während der Bootsherstellung, 24 Stunden Dichtheits- und Druckprüfungskontrolle, Checklisten und Endkontrolle. Sollte trotz der vielen Prüfungen ein Mangel auftreten, gewährt die Firma GRABNER ab Kaufdatum 24 Monate GARANTIE GARANTIEFÄLLE SIND: Materialfehler: Schadhaftes Rohmaterial Fertigungsfehler: Produktionsmängel und Klebefehler Verpackungsfehler: Beschädigung durch schlechte Verpackung seitens der Fabrik Druckverlust über der Norm - laut Norm darf das Boot innerhalb von 24 Stunden nicht mehr als 20 % vom Betriebsdruck verlieren. Gerechtfertigte Reklamationen - Garantiefälle werden von der Firma GRABNER wie folgt behandelt: Reparatur des Bootes bzw. des beschädigten Teiles. Wenn eine einwandfreie Reparatur nicht möglich ist Austausch des Bootes bzw. des betroffenen Bootsteiles auf ein gleichwertiges Boot bzw. Teil. Erhält das Boot durch die Garantiereparatur einen optischen Nachteil gegenüber dem ursprünglichen Zustand, so erfolgt ein Preisnachlass auf die entsprechende Qualitätsstufe. Eine Rücknahme des Bootes gegen Gutschrift bzw. GeldRückerstattung ist NICHT möglich. Ob das Boot repariert, ausgetauscht oder ein Preisnachlass gewährt wird, obliegt im ermäßen der Firma GRABNER GmbH. Durch eine Garantieleistung wird die Garantie nicht verlängert. ALS GARANTIEFÄLLE WERDEN NICHT ANERKANNT Überpumpen der Schlauchkörper (kann im Werk genau festgestellt werden). Mechanische Beschädigung des Bootes. Schäden infolge normaler Abnützung. Sonstige Gewaltanwendungen. Transportschäden vom Händler zu Ihnen. Wenn andere als die von GRABNER autorisierten ServiceStellen Reparaturen oder Umbauten während der Garantiezeit vornehmen. 14 Geldansprüche sind ausgeschlossen, ausgewechselte Teile sind Eigentum der Firma GRABNER. Die Rechte aus dieser Garantie sind nicht auf andere Personen als den Käufer übertragbar. BOOTSHAUT GARANTIE VORAUSSETZUNG FÜR GARANTIEANSPRÜCHE: Wird ein Boot zur Garantie-Reklamation eingesandt, wo sich nach der Prüfung herausstellt, dass es sich um keine Reklamation handelt, erfolgt ein schriftlicher Kostenvoranschlag für eine Reparatur gegen Berechnung. Schicken Sie die vom Händler gestempelte und unterschriebene GARANTIE - REGISTRIER-KARTE innerhalb von 3 Wochen - am besten eingeschrieben - an: GRABNER GMBH, Weistracherstraße 11 A- 3350 HAAG ABWICKLUNG VON GARANTIEFÄLLEN Falls es zu einem berechtigten Garantiefall kommen sollte, gehen Sie wie folgt vor: Bringen Sie Ihr Boot zu Ihrem Bootshändler (Verkaufsstelle). Übergeben Sie Ihrem Bootshändler Ihre ORIGINAL GARANTIEURKUNDE und die EINKAUFSRECHNUNG. (Das Einsenden der Garantie-Registrierkarte garantiert Ihnen auch laufende Information über alle Produktneuheiten.) Lassen Sie die GARANTIEURKUNDE ebenfalls vom Händler stempeln und unterschreiben. Diese bleibt dann in Ihrer Verwahrung. In Garantiefällen ist auch eine Rechnungskopie beizulegen. Eine jährliche Überprüfung des Bootes bei einer autorisierten Service/Reparaturstelle. Lassen Sie den rückseitigen Prüfbefund von der Service/Reparaturstelle ausfüllen. Die Garantie gilt nur für den Erstkäufer. Beschreiben Sie dem Händler den genauen Schaden Ihres Bootes oder Zubehörteiles - am besten schriftlich. Den weiteren Ablauf erledigt dann Ihr Händler für Sie. Wenn Sie Ihr Boot direkt an die Firma GRABNER schicken, legen Sie eine Kopie der GARANTIEURKUNDE, der EINKAUFS-RECHNUNG sowie eine genaue Beschreibung des Schadens bei. GARANTIE Die Firma GRABNER übernimmt bei berechtigten Garantiefällen die Anliefe-rungs- und Rücksendungskosten vom Händler zur Fabrik. Der Absender ist aufgefordert, die kostengünstigste Transportweise zu wählen. Die Firma GRABNER muss sich vorbehalten, ungerechtfertigte Transport-Mehrkosten nicht anzuerkennen und rückzubelasten. GRABNER Luftboote sind Qualitätsprodukte mit GARANTIE. Sollte trotz der vielen Prüfungen ein Mangel auftreten, gewährt die Firma GRABNER auf die Bootshaut ab Kaufdatum 5 JAHRE GARANTIE GARANTIEFÄLLE SIND Ablösung der Gummierung vom Trägergewebe Porosität der Gummierung Gerechtfertigte Reklamationen - Garantiefälle werden von der Firma GRABNER wie folgt behandelt: ALS GARANTIEFÄLLE WERDEN NICHT ANERKANNT Reparatur des Bootes. Wenn eine einwandfreie Reparatur nicht möglich ist Austausch des Bootes auf ein gleichwertiges Boot. Erhält das Boot durch die Garantiereparatur einen optischen Nachteil gegenüber dem ursprünglichen Zustand, so erfolgt ein Preisnachlass auf die entsprechende Qualitätsstufe. Eine Rücknahme des Bootes gegen Gutschrift bzw. GeldRückerstattung ist NICHT möglich. Beschädigung durch zu hohen Druck. Mechanische Beschädigung. Schäden infolge normaler Abnützung. Sonstige Gewalteinwirkung. Beschädigung durch Aufblasen mit Kom-pressoren. Beschädigung durch reinigen mit Hoch-druckreinigern oder Dampfstrahlern. Beschädigung durch aggressive Reinigungs-mittel oder Verdünnungen, die nicht von GRABNER empfohlen sind. Schäden infolge starker Sonneneinstrahlung. Beschädigung durch Benzin, Öl, usw. Beschädigung durch Sonnencreme oder -öl. Bei gewerblichem Einsatz. Beschädigung durch falsche Lagerung. Beschädigung durch ungenügende Reinigung und Pflege. Wenn Sie Ihr Boot nicht jährlich überprüfen und den Prüfbebefund von den Service/Reparaturstelle nicht ausfüllen lassen. Beschädigung der Innengummierung durch Wasser im Schlauchinnenraum. WICHTIGER HINWEIS Sowohl die Einhaltung sämtlicher Kapitel der Aufbau- und Betriebsanleitung, als auch die Benutzung und Methode der Behandlung, der Verwendung und Wartung eines GRABNER Bootes kann von der GRABNER nicht überwacht werden. Daher kann die Firma GRABNER keine Haftung für Verlust, Schäden oder Kosten, die sich aus fehlerhafter Verwendung und Betrieb ergeben oder in irgendeiner Weise zusammenhängen, übernehmen. 15 1 boom downhaul 1 wind flag 1 repair set with valve key 1 owner’s manual DEAR WATER SPORTS FRIEND! Congratulations on the purchase of your new HAPPY CAT LIGHT! We wish you many enjoyable hours with it in your free time and on vacation! This information booklet is meant to assist you in the proper assembly and care of your HAPPY CAT LIGHT. Please read all chapters thoroughly in order to avoid trouble and to extend the life of your boat. We are sure you will be very satisfied with your HAPPY CAT LIGHT. We hope you recommend it to friends and acquaintances alike. In order for you to push out to sea more quickly, we will not hold up your "studies" any longer. TABLE OF CONTENTS Illustration of the product Parts list Field of use Operational data Type sign Assembly Trampoline Floaters Rudder Jib boom Center boards Rigging Dismantling Advice on sailing Accessories Care and storage Avoiding damages General advice on sailing The language of sailing Guarantee certificate Guarantee boat surface Test certificate Declaration of conformity Guarantee registration card ATTENTION! Please read these instructions thoroughly and carefully before using your HAPPY CAT LIGHT and note all important points! In order to make use of your guarantee, please fill out the guarantee registration card and send it to: GRABNER GMBH Weistracherstraße 11, A-3350 HAAG Tel 07434-42251, Fax 07434-42251-66 e-mail: [email protected] Internet: www.grabner-sports.a All measures and weight details have been rounded. The drawings and illustrations in the operating instructions are not in scale and not always identical with the original boat. Page 2 16 16 16 17 17 - 18 18 18 18 18 - 19 19 - 21 21 22 23 - 24 24 25 25 - 26 26 27 28 29 30 31 – 32 OPERATIONAL DATA Lenght: Width: Trampoline lenght: Trampoline width: Net weight: Personen: Loading capacity: Operational pressure: Max. motor output: Max. motor weightt: Mast height: Sail area fore-/mainsail: Total sail area: Max. wind force: Standard: Category: IMPORTANT Sailing is a sport that involves a certain risk. Sailing using the HAPPY CAT LIGHT requires knowledge of sailing, particularly if you are sailing at maximum wind strength. PARTS LIST 2 tubular parts 1 4-part trampoline frame 1 2-part trampoline cloth 1 jib boom 2 release ropes for jib boom 1 rudder 1 lee-board 1 3-part mast 2 shroud ropes 1 boom 1 foresail (furling jib) 1 mainsail with 4 battens 2 pair sail-telltales 1 main halyard 5 mm with snap hook 1 jib sheet 8 mm 1 main sheet 8 mm 450 cm 220 cm 190 cm 150 cm 63 kg 4 adults 700 kg 0,3 bar 4,4 KW / 6 PS 30 kg 500 cm 4 m² / 6 m² 10 m² 4 Beaufort EN ISO 6185/VI C FIELD OF USAGE Sailing catamaran for lakes and coastal waters up to wind force 4 (approx. 30 km/h) Motorization up to maximum 4.4 KW / 6 PS resp. 30 kg Motor weight 16 TYPE SIGN 1 HAPPY CAT LIGHT HIN: AT-GRA 3 2 ISO Norm/Standard 4 ISO 6185 = Kategorie/Category 5 VI EU Richtlinie/Katego EU guideline/catego 6 C 4,4 kW 11 = 4 6 PS 0.3 bar 30 kg = 12 4.3 psi 66 lbs Push both side frame parts along from front on the trampoline cloth the clam cleats must face upwards towards the bow. ATTENTION: On the underside of the frame parts the numbers 1-4 stamped. If the trampoline frame correct assembled, the numbers do math (1-1, 2-2, 33 and 4-4) Insert the side parts in the back part and pull the trampoline cloth forward. 4 Beaufor t 10 + + 13 700 kg 1540 l bs = 2 10 m 107 sqft GRABNER GMBH Luf t boot f abri k 7 A- 3350 HAAG AUSTRI A EUROPA 1) Boot type 2) CE-declaration 3) Serial number 4) Norm 5) Norm - category 6) EU regulation category 7) Producer and production land 8) Permitted motor output 9) Maximal motor weight 10) Permitted loading capacity (Persons + luggage + motor) 11) Permitted human capacity 12) Suggested operational pressure 13) Permitted sailing area ATTENTION! The data in the type sign must not be exceeded under any circumstances! IMPORTANT NOTICE Sailing is a sport that involves a certain amount of risk. Sailing with the HAPPY CAT LIGHT requires the adequate sailing expertise, especially when sailing in conditions of maximum wind force. Insert the front frame part, from the front in both side frame parts. ASSEMBLY TRAMPOLINE Take the back frame parts and insert the trampoline cloth with the side with both D-rings towards the bow in the groove. Put up the frame and fit together the buckles from the trampoline cloth. Tighten the trampoline cloth by pull the straps. 17 course. The button will pop up thus closing the valve. Connect the hose of your pump with the bayonet adapter on the valve (bayonet fitting) and pump up the floaters to operating pressure (0,3 bar). Check the right pressure with the pressure gauge on your pump. The pressure can be checked even more easily by using an external precision pressure gauge (special accessory). Remove the hose and adapter from the valve and close the valve with the valve cap (bayonet fitting). ATTENTION! The valve cap must be closed to ensure that the valve is 100% tight! ATTENTION: The first few times you need some more effort for assemble. If the trampoline cloth is stretched, the assembly is easy. RUDDER Put the rudder in the middle of the back frame part. Put the both screws from below through the drill holes and screw it tight with both butterfly nuts. FLOATER Put both floaters left and right near the trampoline the valves are behind on the floater and the stamp must be outside. Bow Stern CENTRE BOARD Put the centreboard-mounting in the middle of the front frame part. Put the both screws from below through the drill holes and screw it tight with both butterfly nuts. Place the floaters with the loops on the clamps of the trampoline frames - the front loops are inserted on the clamps from behind and the back loops from the front. JIB BOOM Hook both guy ropes, left and right, at the front of the trampoline frame. ATTENTION: Turn the bolt of the hook a half-turn to snap. Press the button in the middle of the valve and twist it, while keeping it pressed, a quarter of its 18 RIGGING Connect the three mast parts. Pull the main halyard, with the end without snap hook, from the back to the front through the roll on top of the upper part of the mast. Latch the snap hook of the upper part of the foresail on the furling jib hinge on the upper part of the mast. Put the pennant from above through the two drill holes in the clip. Hook the other two ends of the both guy ropes on both eyes on the jib boom. Insert the jib boom with the cone in the drill hole, in the front midpoint, on the centreboardmounting. Place the mast on the boat with its top facing the stern. Fasten both shroud ropes in the side eyes on the lower part of the upper part of the mast. Fasten the shroud ropes, left and right, to the eyes on the trampoline frame. CONTINUATION CENTERBOARD Pull the halyard (fixed on the rear side of the centreboard) through the two parts of the trampoline cloth and fix it on the port sided clamp of the centreboard-mounting. Put the downhaul through the roll on the jib boom and fix it on the centreboard. Fix the downhaul and the starboard side clamp of the centreboard-mounting. 19 Lift the mast and hold the foot of the mast with the cones in the drill hole in the middle of the centreboard-mounting. Place the mast completely upwards. Hold the mast well with one hand and, with the other hand, latch the lower snap hook of the foresail on the clamp of the furling jib reel on the jib boom - now the mast can stand on its own. ATTENTION: It is easier to lift the mast with two persons. Take care that the jib boom doesn’t come out. Tighten up the rig with the clamp on the furling jib reel. C E D F Fasten the "main sheet block with clamp” on the eye of the tiller. Tie one end of the main sheet to the main sheet block well. Feed the other end over the return pulley on the boom, back to the main sheet block, over the pulley and through the clamp. Secure the end with a figure of eight knot. Pull the boom lowerer through the roll on the boom and tighten it on the clamp of the lower part of the mast. Lanch the main halyard with the snap hook on the sail head (upper corner of the sail) of the main sail. (Illustration A) Pull the mainsail in the tongue of the mast. (Illustration B) Pull the mainsail with the main halyard upwards until and fasten the halyard on the cleat on the lower part of the mast. (Illustration C) Push the boom from behind on the under-leech of the mainsail. (Illustration D) Put the boom on the boomfitting of the mast. (Illustration E) Pull the belt of the sail horn through the eyelet on the end of the boom and fix it with the buckle. (Illustration F) A B Draw the jib sheet through the eye of the foresail so as to obtain two equally long parts. Tie the jib sheet through the eye together. Draw both ends of the jib sheet, left and right, through the guides and clamps on the side of the trampoline frame and secure each with a figure of eight knot. 20 DISMANTELING In order to dismantle your boat, follow the sequence in the assembly section backwards. Remove the boom lowerer from the mast and the main sheet block from the rudder - both remain fastened to the boom. Put down the mainsail and pull back the main halyard completely - leave the halyard latched to the sail. Roll up the main sail - leave the battens in the sail. Pull out both ends of the jib sheet from the clips and guides - leave the jib sheet tied to the foresail. Loosen up the tension of the rig with the clamp on the furling jib. Hold the mast well with one had and unlatch the foresail. Bring down the mast backwards. Unhook the shroud rope and the foresail. Put apart the three pieces of the mast and remove the pennant from the upper part of the mast. Pull out the jib boom from the trampoline frame and remove both guy ropes. Unscrew the rudder and remove the centre board. Let out all the air from the hoses - open the valve cap and twist the green button a quarter of its course while keeping it pressed. Pull the trampoline frame out of the loops of the hoses. Wind the hoses together from the front backwards -to the valves. Open the buckles of the trampoline cloth and pull out first the frame part at the front, then both frame parts on the side and then the one at the back. IMPORTANT WARNINGS It is possible that the flat valve may become a little lose after the first few pumpings, and that as a result a little air can escape around the valve (as a result of the stretching and contracting of the boat skin). If this should happen with your boat, it is sufficient to turn the valve with the valve key by about one quarter to one half a turn until the resistance becomes too great. Caution: a loss of pressure of 20% of operating pressure within 24 hours at constant external temperature is normal and no reason for a complaint to the manufacturer! Operating pressure 0.30 bar - pressure loss (20%) 0.06 bar = standard pressure 0.24 bar A temperature difference of 1°C changes operating pressure by approx. 0.004 bar. Boat care agent is luscious applied to the boat before packing. You can remove the excessive boat care with a dry cloth. The mat areas on the trampoline frame because of surface finish (eloxieren). The corrosion-resistant or assembly is therefore not reduced. PACKING For packing we suggest the packing bag set (special accessory). Bag 1: Pack the up rolled hoses in the packbag. Add the pump and other small accessories (ropes, pennant, ...) Bag 2: Put in the front frame part with the upper side to the bottom in the bag. Fold the both side frame parts with the underside and lay it on the front frame part. The both lee boards with the handle upwards beside the frame part. Remove the rudder blade and added it together. Lay on the trampoline cloth and close the bag. Bag 3: Lay in the back frame part with the upper side to the bottom in the bag. Add the three mast parts, jib boom and boom. Lay on the sails and close the bag. ATTENTION: No water should come inside of the tubes. If it happens please empty as soon as possible and dry it totally. Water inside of the tubes can damage the inner rubber of the tube and which can cause I-beam damages. Your HAPPY CAT LIGHT is now ready for use. Before the first journey, please read the entire operating instructions! 21 Share out the accessories (bow canopy, paddle, seat cushion,..) in the bags. PENNANT The pennant is fastened to the top of the mast and indicates the wind direction. ADVICE ON SAILING SAIL TELLTALES Stick on one pair of the sail-telltales on the foresail and the other pair on the mainsail. With the telltales you can best trim the sails and increase sailing performance. When the sail is correctly trimmed, the two telltales on both sides of the sail are parallel. When sailing too close-hauled or when the sails are not yet trimmed correctly, the telltales flap windward and rise. When sailing under the lee or when the sail is trimmed too strongly, the telltales move upwards to the side sheltered from the wind. If you are heading a fixed course trim the sails with the help of the telltales. When sailing by the wind, steer the boat according to the position of the telltales. FURLING JIB With the furling jib you can easily furl the foresail and then unfurl it again. Remove the jib sheet from the clamps. Pull on the thin furling jib line on the back end of the jib boom the foresail will unfurl. When the foresail reaches the desired size, secure the furling jib line on the rope clips on the jib boom tightly. If you want to unfurl the foresail again, free the furling jib line from the rope clips a pull on one end of the jib sheet tightly the sail will furl again. When you reach the desired size again, secure the furling jib line on the rope clips tightly. HIKING STRAP The trampoline cloth is provided with a hiking strap belt with two loops (in the middle). The hiking strap allows the crew to secure their feet to be able to lean out (ride out) and away windward. PADDLE-SECURE STRAPS Four rubber loops to secure two jump-off paddles can be found on the front part of the trampoline cloth. The two 130-cm paddles (special accessory) are located diagonally on the trampoline cloth and fixed with the rubber loops and toggle fastenings one paddle blade out on the left and the other on the right. LINKING REEF By means of the linking reef you can reduce the main sail in case of strong winds. Lower the main sail down until the reef tape reaches the height of the boom. Bind the reef tape tight around the boom - the separated sail area is integrated on the boom under the tape. In order to unfurl the main sail again all you have to do is to remove the reef tape and hoist the sail. ATTENTION! You may not handle the reef while sailing! CENTRE BOARD The centre board can be seated from vertically to horizontally. In order to lower the centre board you must unfix the centre board-halyard. Pull on the centre board downhaul to the desired position. Belay the centre board downhaul in the clamp. ATTENTION: The clamp opens automatically when the tensile force is too much. You can setting up the force, when open the clamp. BATTENS The mainsail is equipped with 4 battens. The battens are housed in the batten bags and are fixed with a belt on the rear end. The tighter the belts, the more curved the sail. BOOM-BOOMLOWERER The boom lowerer should always be very taut. A slight bend through the boom is considered normal. Subject to change, errors and misprints. 11/07 22 ACCESSORIES Not standard equipment CUSHIONS Pump up the cushions (maximal operating pressure 0, 3 bar) same valve as the floaters'. The hardness of the cushion can be adjusted by working on the air pressure. Place the cushions with the big bulge outwards on the span between the trampoline frame and the floaters. Use the belts to fasten the cushions, behind on the trampoline frame and in front on the eye for the shroud rope. BOWDECK-BAG Fasten the bowdeck-bag, with the four belts on the straps of the bowdeck. You can use two bags lengthwise or one bag across. BOWDECK Draw the cross brace through the pocket on the front on the bowdeck. Push the cross brace, with the long parts of the fixing boards, from behind to the front in the front loops on the front bow of the floaters. Lift the back loops and hook in the short parts. Push the cross brace behind until it stop. MOTOR SUPPORT The motor support can mount instead the rudder or beside the rudder. If you mount the motor support beside the rudder you have to drill two holes into the frame. Put on the motor support from behind on the frame and mark the holes - choice the position that the motor and the rudder not hinder. Remove the motor support and drill through the marked places. Place the motor support from behind on the rear part of the trampoline frame. Insert the screws from below through the holes and screw the board tightly with the butterfly nuts. The motor is to be tightly screwed to the motor assembling board. Run both rubber straps over the tube extremities of the cross braces. Fasten the belts of both rear corners on the outer part of the trampoline frame. Fasten the inside belts on the D-rings of the trampoline cloth. Fasten the two side belts on the D-rings of the floaters. Pull all belts tightly. Luggage, paddle, etc., can be lashed on the straps. One person up to75 kg can lie on the bowdeck. After ca. 15 minutes of motor operation check if the screws are tight. The motor support is conceived for a maximal motor performance of 4.4 KW/6PS and a maximal weight of 30 kg. 23 CARE AND STORAGE With correct care and storage you can maintain the value of your boat and increase its longevity. In order to enjoy your boat for the longest possible time, please note the following points. Always keep the connections of the mast parts and jib clean. Wipe the connections with a clean cloth and, should the need arise, lubricate them gently with silicone grease or spray especially after every salt water use. Clean the sails with lukewarm soapy water. Fix holes or tears on the sail immediately to keep them from damaging further in an emergency fix them with adhesive tape. In case of possible wooden damages to the centre board and rudder blade with acrylic resinous varnish the wood must be completely dry prior to the application. Lubricate the blocks, cam cleats, snap hooks and shackles with silicon grease or spray. Clean the floaters with lukewarm soapy water and apply GRABNER cleaning products, boat wax and high gloss care products regularly. Rinse the rigging with fresh water after every salt water use. Dry all parts before packing them. Pack the HAPPY CAT LIGHT in the original packing bag set (special accessory). Store your boat in a dry place, out of direct sunlight. For long storage periods (several months) the floaters should be stored slightly pumped. If you do not have enough room for this purpose, you can put the floaters loosely together (never tie or put heavy material on them). The floaters are not to be subjected to big temperature changes. BATTERIE SUPPORT Place the battery support on the right rear corner of the trampoline frame. Insert the fastening screws from above through the holes on the support and trampoline frame. Screw the battery support tightly with the nut. Always place the battery with only one case in the support and fasten it with a belt. SUN CANOPY Protect against sun and ozone. Assembly details are set out in the user instruction. IMPORTANT NOTICE The company GRABNER and its dealers can assume no liability for damages resulting from incorrect care and storage. 24 AVOIDING DAMAGES GENERAL INSTRUCTIONS In order to protect your HAPPY CAT LIGHT against damages, pay attention to the following details. OPERATING Find out about local regulations Check weather reports, local currents, tides and wind conditions. Inform a person on land about your planned destination and planned return. Explain the principles of sailing to all your passengers. Ensure that one of your passengers can steer the boat in an emergency. Safety is the most important factor learn to avoid accidents Always be fully aware of your responsibilities never neglect safety regulations, thereby endangering your life and that of others. Learn to control your boat at all times. Secure luggage with a line or a belt against loss in the event of capsizing Comply with local regulations When close to beaches, only sail within the marked areas and keep a careful lookout. You and your passengers must wear a lifejacket Never sail a boat under the influence of alcohol, drugs or medicines. Ensure that your passengers are also sober. When making fast, ensure that all passengers keep their arms and legs within the boat - risk of injury! Keep away from swimmers and divers Do not make any sudden turns without first informing your passengers. Make the sail smaller when sailing with the maximum wind force. Follow these instructions absolutely. Protect your boat from unnecessary sunlight exposure. Always beach or moor your boat in the shade or cover it properly When on land, reduce the air pressure eventually in order to avoid damages due to excessive pressure the operational pressure of 0,3 bar must never be exceeded. Pressure increases automatically due to direct sunlight and consequence temperature increase (each temperature increase of 1°C equals to an increase of ca. 0,004 bar in the pressure). Never inflate your boat with pressurized air. Protect the floaters from sharp or pointed objects. Never pull your boat over sand, stones, asphalt, etc., rather carry it. Avoid unnecessary ground contact when in water. Free your boat from salty remains after every salt water use. Do not use aggressive cleansers on your boat. Never clean your boat with high-pressure cleaners. For the care of your boat, use only original GRABNER products, boat wax or high gloss care products. Do not use acid grease or oil to polish your boat; use silicon grease or silicon spray instead. During motor operation keep fuel, oil, grease or battery acid from getting in contact with the boat, which can seriously damage the rubber. No water should come inside of the tubes. If it happens please empty as soon as possible and dry it totally. Make the sail smaller when sailing with the maximum wind force. GIVING WAY AND OVERTAKE If two boats are sailing with different sail positions, the port sheet has priority over the starboard sheet. This means that the boat that has its sail on the port side (left) has priority. If both boats are sailing with the same sail position, lee has priority over luff. This means that the boat that is closer to the wind must give way. When overtaking, the overtaking boat pass on the luff side. The change of direction should be made in good time, clearly, with sufficient distance and not in front of the bow of the other boat. The boat with priority should keep its course and only change direction if there is a threat of a collision. 25 PRIORITY RULES Sailing boats have priority over motor boats, rowing boats, pedal boats and paddle boats and over floats and surfers. On the other hand, you must give way to emergency vessels, priority vessels, fleets, vessels difficult to manoeuvre and professional fishermen. THE LANGUAGE OF SAILING Sailing has a language of its own. To familiarise you with these expressions, we list an explanation of the most important terms. Leech Port The after edge of the sail The left side, in the direction of travel Seizing line Thin short line Belaying Fixing a line Furling Bringing down the sail Bow The front end of a boar Halyard Line for hoisting the sail Jib Small foresail Stern The back end of a boat Lee The side away from the wind Windward The side towards the wind Masthead The upper end of the mast Yardarm The outer end of the boom Rig Connection between the rump and the sails (mast, boom, shrouds and forestay) Sheet Line to control the position of the sails Sail collar The front corner of the sail Sail horn The back corner of the sail Sail head The upper corner of the sail Starboard The right side, in the direction of travel Under-leech The lower edge of the sail Fore-leach The front edge of the sail SAFETY EQUIPMENT Check the statutory regulations of the country or region where you are operating. The emergency equipment required by law The boat's papers and the sailing licence One lifejacket per person. Suitable protective clothing against the weather for bad and good weather. Air pump, paddle, repair kit and tools A boat tow line Reserve lines, seizing lines, shackles and adhesive tape for emergency repairs Knife and matches First aid equipment IMPORTANT FOR THE ENVIRONMENT Avoid making heavy waves. Keep a good distance from swimming areas Respect the animal world Avoid making unnecessary noise Do not leave any waste behind Only use environment-friendly cleaning agents We are all responsible for a clean and healthy environment. If everyone follows these rules, we can contribute to keeping the earth intact for future generations. You're now ready for your first sailing tour. We hope you enjoy your HAPPY CAT LIGHT and wish you many great days on the water. IMPORTANT NOTICE GRABNER or its dealers cannot assume any liability for damage to the boat, sails or persons or for other consequential losses resulting from the incorrect operation of the sails, or failure to comply with the operating and safety instructions. 26 Loose of air pressure in accordance to the norm - the loose of air pressure can be 20 % from operating pressure within 24 hours. Damage to the inner rubber as a result of water in the inside of the tube. GUARANTEE CERTIFICATE GENERAL GUARANTEE CONDITIONS FOR GUARANTEE: Financial claims are excluded. Replaced parts become the property of the manufacturer. The rights arising out of this guarantee cannot be transferred to other persons. The signed GUARANTEE REGISTRATION CARD must be tamped by the dealer and forwarded - best of all as a registered letter - to the GRABNER Company within 3 weeks of the date of purchase. If we receive a boat or an accessory-part where we see that it is no guarantee claim after we have checked it - we will make a price offer for the repair. GRABNER GMBH Weistracherstraße 11 3350 HAAG, Austria CLAIMS PROCEDURE (If you send us your guarantee registration card you will receive all news of GRABNER products automatically!) The signed GUARANTEE CERTIFICATE must also be stamped by the dealer, but it remains in your possession. In the event of a guarantee claim, you must also submit the purchase invoice. This guarantee is only for the first owner. In the event of a justified guarantee claim, follow this procedure: Take your boat or the damaged part to your boat dealer (place of purchase) Give your boat dealer your ORIGINAL GUARANTEE CERTIFICATE and the PURCHASE INVOICE. Inform the dealer exactly about your claim - the best in a written way Your dealer will then see to the rest. If you send the boat directly to GRABNER boat factory enclose also a copy of the GUARANTEE CERTIFICATE and the PURCHASE INVOICE and written information about the claim. The costs of delivery to the manufacturer and of return to the dealer shall be borne by the GRABNER Company if a guarantee claim is justified. The sender must choose the most economical form of transport. The GRABNER company reserves the right not to accept unjustifiable additional transportation expenses and to return-debit the costs. GUARANTEE GRABNER inflatable boats are quality products with guarantee. All boats are subject to numerous tests in every production phase: lab tests of the boat surface, gluing-and vulcanization samples, strength-, optical and measurement tests during manufacture, 24 hour tests for water- and pressure-proofing, check lists, final inspection. Should there be any product flaws found up to 24 months after purchase, the guarantee is valid. FOLLOWING DEFECTS ARE COVERED: GRABNER SETTLES JUSTIFIED COMPLAINTS – GUARANTEE CLAIMS – AS FOLLOWS: Material defects: faulty raw material Production defects: faulty manufacturing and gluing mistakes Packing defects: damage caused by poor packing on the part of the manufacturer. Loose of air pressure more than standards allows: in accordance to the norm the loose of air pressure can be 20 % from operating pressure within 24 hours. Repair of the boat or of the affected part of the boat. If a perfect repair is impossible, the boat or the affected part of the boat shall be replaced by an equivalent boat or part. It is not possible to return the boat in ex-change for a credit note or cash reimbursement. It shall be at GRABNER GmbH's discretion to decide whether the boat are repaired, replaced or if a discount is granted. FOLLOWING CASES CANNOT BE ACCEPTED AS GUARANTEE CLAMS The warranty shall not be extended by warranty work. Over inflation of the tubes (can be accurately determined in the factory) Mechanical damage to the boat Damage due to normal wear and tear. Application of any force. Transportation damage en route from the dealer to you. If repairs or conversions are carried out during the guarantee period by any persons other than the service centres authorized by GRABNER. If any replacement parts and/or repair material are used other than those stipulated by GRABNER. Commercial use 27 BOAT SKIN GUARANTEE If we receive a boat or an accessory-part where we see that it is no guarantee claim after we have checked it - we will make a price offer for the repair. CONDITIONS FOR GUARANTEE: The signed GUARANTEE REGISTRATION CARD must be tamped by the dealer and forwarded - best of all as a registered letter - to the GRABNER Company within 3 weeks of the date of purchase. CLAIMS PROCEDURE In the event of a justified guarantee claim, follow this procedure: Take your boat or the damaged part to your boat dealer (place of purchase) Give your boat dealer your ORIGINAL GUARANTEE CERTIFICATE and the PURCHASE INVOICE. GRABNER GMBH Weistracherstraße 11 3350 HAAG, Austria (If you send us your guarantee registration card you will receive all news of GRABNER products automatically!) The signed GUARANTEE CERTIFICATE must also be stamped by the dealer, but it remains in your possession. In the event of a guarantee claim, you must also submit the purchase invoice. This guarantee is only for the first owner. Inform the dealer exactly about your claim - the best in a written way. If you send the boat directly to GRABNER boat factory enclose also a copy of the GUARANTEE CERTIFICATE and the PURCHASE INVOICE. The costs of delivery to the manufacturer and of return to the dealer shall be borne by the GRABNER Company if a guarantee claim is justified. The sender must choose the most economical form of transport. The GRABNER company reserves the right not to accept unjustifiable additional transportation expenses and to return-debit the costs. GUARANTEE GRABNER inflatable boats are quality products with guarantee. Should there be any products flaws after you had made all checks we grant 5 YEARS GUARANTEE GRABNER SETTLES JUSTIFIED COMPLAINTS – GUARANTEE CLAIMS – AS FOLLOWS: FOLLOWING DEFECTS ARE COVERED Repair of the boat. If a perfect repair is impossible, the boat or the affected part of the boat shall be replaced by an equivalent boat or part. If as a result of the warranty repairs, the boat is impaired in terms of appearance as compared with the original condition, a price reduction is allowed to the corresponding quality level. It is not possible to return the boat in ex-change for a credit note or cash reimbursement. Rubber coming away from the base fabric Porosity of the rubber FOLLOWING CASES CONNOT BE ACCEPTED AS GUARANTEE CLAIMS Overinflation of the tubes (can be accurately determined in the factory) Mechanical damage to the boat Damage due to normal wear and tear. Application of any force. Damage caused by inflation with compressors. Damage caused by clearing with high pressure cleaners or steam spray. Damage caused by aggressive detergents or solutions not recommended by GRABNER Damage resulting from powerful sun radiation. Damage caused by petrol, oil etc. Commercial use. Sun crème or oil. Damage caused by incorrect storage Damage caused by insufficient cleaning and care. If you do not check your boat every year and have the inspection findings completed by the service/repair centre. Damage to the inner rubber as a result of water in the inside of the tube. IMPORTANT NOTICE GRABNER cannot monitor compliance with all the sections of the assembly and operating instructions or the use, method of treatment and maintenance of GRABNER boats. Consequently, GRABNER can assume no liability for the loss, damage or costs resulting from or in any way connected with faulty use and operation. Financial claims are excluded. Replaced parts become the property of the manufacturer. The rights arising out of this guarantee cannot be transferred to other persons. 28 PRÜFBEFUND Bootshaut/ INSPECTION FINDING boat skin 1. Überprüfung Zustand/Condition Check Datum/date Stempel und Unterschrift der Service/Reparaturstelle Stamp and Signature of the service/repair centre 2. Überprüfung Zustand/Condition Check Datum/date Stempel und Unterschrift der Service/Reparaturstelle Stamp and Signature of the service/repair centre 3. Überprüfung Zustand/Condition Check Datum/date Stempel und Unterschrift der Service/Reparaturstelle Stamp and Signature of the service/repair centre 4. Überprüfung Zustand/Conditon Check Datum/date Stempel und Unterschrift der Service/Reparaturstelle Stamp and Signature of the service/repair centre 29 LUFTBOOTE EG - KONFORMITÄTSERKLÄRUNG DECLARATION OF CONFORMITY Hersteller: producer Modell: model Seriennummer: serial number GRABNER GMBH Weistracherstraße 11 A-3350 HAAG HAPPY CAT LIGHT HIN: AT-GRA category Luftboot Kategorie C - Küstennahe Gewässer Länge: 2,5 bis 12 m Länge: Breite: Eigengewicht: Personen: Nutzlast: Motorleistung: Motorgewicht: Segelfläche: 450 cm 220 cm 62 kg 4 Erwachsene 700 kg 4.4 kW / 6 PS 30 kg 10 m2 Sportboot Kategorie: Length Width Net weight Persons Loading capacity Motor output Motor weight Sail area Für die Erreichung der Konformität zur Richtlinie 2003/44/EG des europäischen Parlaments und des Rates (Sportboote) wurde die DIN 7872, EN ISO 6185 und EN ISO 10087 verwendet. Interne Fertigungskontrolle nach Modul A. DIN 7872, EN ISO 6185 and EN ISO 10087 have been used to achieve conformity with Directive 2003/44/EC of the European Parliament and Council (Sports Boats). Haag, Wolfgang Grabner Firmeninhaber November 2007 Ort, Datum 30 Absender/Sender Vorn ame First name Name Second n ame Straße Street GRABNER GMBH Luftboote- und Schwimmwestenfabrik PLZ/Ort Post code/Town Weistracherstraße 11 A-3350 HAAG Staat Country AUSTRIA - EUROPA SICHERHEIT AM WASSER S AF ET Y O N Wassersport ist “mit Sicherheit” ein schönes Hobby. Wer zu seinem Vergnügen “ins Wasser geht”, will seine Freizeit unbeschwert genießen. Besonders, wenn man schwimmen kann, fühlt man sich zu schnell sicher. Dabei wird vergessen, daß Not, Panik und längeres Verweilen im Wasser auch dem besten Schwimmer die Kraft rauben und dadurch Risiken bergen kann. Water sports are “surely” a wonderful hobby. When enjoying a hobby, the possible connected dangers are not uppermost in our thoughts. Particularly when one can already swim, a false sense of safety can develop. In forgetting the effects of emergency situations, panic, longer periods of partial water submersion, even the best swimmer can be robbed of strength and be at great risk. Schützen Sie sich daher vor den Gefahren durch das Tragen von Schwimmhilfen oder Rettungswesten. Sie sind der beste Schutz in Notsituationen gegen Unterkühlung und Ertrinken. GRABNER ist nicht nur Hersteller von innovativen Luftbooten, sondern auch von Produkten für die Sicherheit am Wasser. Über 20 verschiedene CE + GS geprüfte Modelle garantieren dem Benützer maximale Sicherheit und langlebig Verwendung. Fordern Sie KOSTENLOS + unverbindlich den neuesten Katalog + Informationen TH E WA T E R The best insurance against emergency situations and drowning is to wear bouyancy aids and life jackets. GRABNER is not only the manufactory for innovative inflatable boats, but also for water-safety products More than 20 models - CE + GS-tested quality - guarentees the user maximal security and a long product life-span. Please request the new catalogue and further informations. 31 LUFTBOOT-GARANTIE-REGISTRIERKARTE (Sofort nach Kauf ausfüllen un d an Fab rik einsenden) (Complete immed iatly and return to the manufactury) Bootstype Boat type Bootsnummer Boat number Kaufdatum Date of purchase Händler/Stempel Dealer/Stamp HAPPY CAT LIGHT AT-GRA Bitte gut leserlich ausüllen ! G A R Please, complete legibly! A N T I E - U R K U N D E Bei Erfüllung der unter “Garantiebestimmungen” angeführten Bedingungen gewährt die Firma GRABNER ab Kaufdatum Povided the conditions listed for the Guarantee Terms are fulfilled, the GRABNER company shall 24 MONATE GENERAL GARANTIE 5 JAHRE BOOTSHAUT GARANTIE 24 MONTHS GENERAL GUARANTEE 5 YEARS BOAT SKIN GUARANTEE Bootstype Boat type Bootsnummer Boat number Kaufdatum Date of purchase Händler/Stempel Dealer/Stamp HAPPY CAT LIGHT AT-GRA 32