1
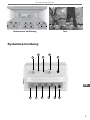
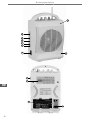
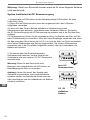
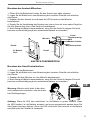
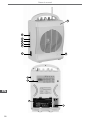
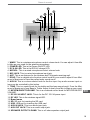
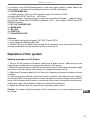
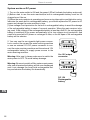
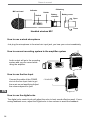
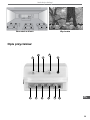
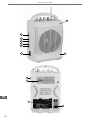
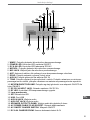
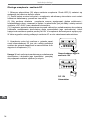
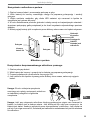
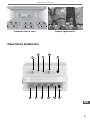
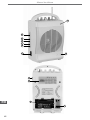
Portable Wireless PA Amplifier
SH222U
Bedienungsanleitung DE
User's manual EN
Instrukcja obsługi PL
Manual de utilizare RO
MIK0132
Bedienungsanleitung
Wir danken Ihnen für den Kauf dieses Verstärker-Systems. Vor der Inbetriebnahme
dieses Verstärker-System, lesen Sie die Bedienungsanleitung gründlich und sorgfältig.
Bitte bewahren Sie diese Betriebsanleitung an einem sicheren Ort für späteres
nachschlagen.
Allgemeine Funktionen des Verstärkers
• Alles in einem Entwurf für einfachen Transport und mobilen Einsatz.
• Einseitiges Ansteck-Mikrofon mit hoher Empfindlichkeit für deutliche
Sprachübertragung und Empfang.
• Quarzstabilisator für Trägerfrequenzübertragung um Interferenzen zu vermeiden .
• Das System funktioniert sowohl mit AC als auch mit DC. Sie können auch den
eingebauten 1,2 AH Akku oder Zigarettenanzünder für DC 12V benutzen. (Das
Netzkabel fürs Auto ist nicht enthalten, rufen Sie uns an, für optionalen Kauf)
• Der Verstärker arbeiten im VHF-Band und hat 98 verschiedene Kanäle bereit für eine
Gruppe von maximal 98 Verstärker gleichzeitig und an der gleichen Stelle arbeiten. Die
Trägerfrequenzen beginnen von 174 MHz bis 216 MHz.
• Niedriger Stromverbrauch für lange Funktionszeit mit integrierten Schaltungen.
• SMT Technologie und SMD elektronischen Komponenten benutzt beim Herstellen
dieses Verstärkers, führ sehr stabile und lange Qualität.
• 3 Arten von Mikrofonen können für verschiedene Zwecke alternativ verwendet
werden: Handmikrofon, Kopfhörer mit Mikrofon und Ansteck-Mikrofon.
• Klangregelung .
• Kabel / Schnurlos-Mikrofon.
• Digitale Echo-Steuerung .
• Aux -Eingang für den Anschluss an MD / CD usw.
• Aux -Ausgang.
• Lautsprecher Ausgang 8 Ohm.
• USB / SD zum abspielen von MP3
• UKW-Radios.
• LED-Anzeige.
• Niederspannungs-Schutz für den eingebauten Akku, um Beschädigung des Akku im
Falle einer Fehlbedienung zu vermeiden.
• Handelübliche 9V Batterie oder 8,4V Akku kann im Funkmikrofon und den kabellosen
Sender verwendet werden.
Vorsichtsmaßnahmen:
DE
• Dieses Gerät kann ein elektronisches Magnetfeld durch seine Magnet-Lautsprecher
erzeugen. Gerät weit vom PC, TV aufstellen, über 60 cm, ansonsten wird dieses
Magnetfeld Bild und Ton beeinflussen.
Nach Gebrauch ziehen Sie bitte den Netzstecker aus der Steckdose.
• Das Gerät sollte weit von Objekte mit hohen Temperatur oder Wärmequellen entfernt
sein, um Beschädigung zu vermeiden.
• Das Gerät sollte weit von starken Sendetürmen entfernt sei, um Interferenzen zu
vermeiden.
• Für den eingebauten Akku:
1. Sollte mehr als 8 Stunden vor dem Gebrauch aufgeladen werden um sicherzustellen,
3
Bedienungsanleitung
dass es Energie jederzeit liefern kann.
2. Sollten mehr als 8 Stunden aufgeladen nach Gebrauch werden, um den Akku und das
Netzteil zu schützen.
• Bitte verwenden Sie nicht diese Gerät, wenn die folgenden Umstände passieren,
wenden Sie sich an qualifiziertes Fachpersonal:
1. Netzkabel oder Steckdose wurden beschädigt.
2. Dieses Gerät war durchnässt durch Regen oder andere Hindernisse im Inneren des
Gerätes.
3. Einige Komponenten wurden beschädigt.
* Achten Sie darauf, 20 cm Abstand um diese Gerät zu halten, Belüftung ist für seine
Nutzung wichtig. Bitte ersetzen Sie die gleiche spezifische Batterie, wenn die eingebaute
Batterie 12V/1.2AH beschädigt wurde sonst wird diese Gerät beschädigt und bitte
beschädigten Akku sorgfältig entsorgen, um Umweltbelastung zu vermeiden.
Warnung:
Bitte nicht setzen dieses Gerät Regen, Feuchtigkeit und staubigen Orten aussetzen, um
Feuer oder Blitzschlag zu vermeiden.
Um Kriechstrecke und einen elektrischen Schlag zu vermeiden vor Gebrauch des
Netzteils, beachten Sie bitte:
1. Bitte überprüfen Sie das Netzkabel, stellen Sie sicher dass es ist im guten Zustand ist.
2. Die Wechselspannung der Steckdose sollten die gleichen sein, wie am Gerät oder
Bedienungsanleitung angegeben.
Bitte dieses Produkt nicht zerlegen. Die Wartungs- und Inspektionsarbeiten dürfen
nur von einem qualifizierten Techniker durchgeführt werden, um das Risiko eines
Stromschlags und Schäden an den Komponenten zu vermeiden.
Achten Sie darauf, das System nach Gebrauch auszuschalten, sonst wird die Batterie
entladen werden und austretende Säure kann den Akku beschädigen und die
Lebensdauer der Batterie erheblich verkürzen.
Nach Gebrauch des Funksenders, nehmen Sie bitte die Batterie heraus, um das
austreten von Säure zu vermeiden die den Sender beschädigen kann.
Bitte Sie die USB / SD-Karte nur in AUSGESCHALTETEM Zustand entfernen, um
Beschädigungen am USB / SD zu vermeiden.
DE
4
Benutung des Verstärkersystems
Dieses einzigartig gestaltete Verstärker-Lautsprecher-System mit Mikrofon ist ideal für
folgende Anwendungen.
Verwendet als Vortragsverstärker im Innen- oder Außenbereich. (Vor allem für Tanzund Sportlehrer).
Ein perfektes Adress- Zuführungssystem für Innen- und Außenbereich Treffen,
Tourismus und Kirchen.
Es ist ein guter Verstärker für Interpretation, Klassenlehre und Demonstrationen
kommerzieller Anbieter.
Mit diesem Verstärker-System, können Sie einen klaren Klang hervorbringen und
hören aus der Ferne!
Bedienungsanleitung
Klassenraum Vorführung
Tour
Systembeschreibung:
2
1
3
4
5
DE
6
7
8
9
10
11
5
Bedienungsanleitung
12
14
15
16
17
18
19
13
20
23
DE
22
21
6
Bedienungsanleitung
35
37
25
24
36
34
33
26
27
28
31
29
32
30
1. W/MIC: Dies ist ein Drehregler fürs Funkmikrofon. Sie können es von Min bis Max
einstellen gemäß Ihren Bedürfnissen für das Funkmikrofon.
2. POWER LED: Dies ist die Betriebsanzeige EIN/AUS LED.
3. DC 8,4V LED: Dies ist die DC 8,4 V Ladeanzeige LED.
4. MIC/VOL: Dies ist ein Drehregler fürs Kabelgebundene Mikrofon.
5. MIC JACK: Dies ist eine Eingangsbuchse fürs Kabelgebundene Mikrofon.
6. ANT: Dies ist eine Antenne für das Funkmikrofon sowie FM Empfang.
7. ECHO: Dies ist ein digitaler Echo-Funktion Drehregler zum Einstellen von Min bis
Max gemäß Ihren Bedürfnissen um den perfekten Echoklang zu erzielen.
8. AUX IN: Dies ist ein Lautstärkeregler für den Aux Eingang. Der Eingangspegel einer
beliebigen Audioquellen kann durch diesen Regler eingestellt werden.
9. TONE: Dies ist ein Drehregler für hohe Töne und Basston. Von Min bis Max ist
von Basston zu hohen Tönen. Langsam Einstellen von Min bis Max gemäß Ihren
Bedürfnissen.
10. MP3/FM/ON/OFF/VOLUME: Dies ist ein kombinierter Drehregler für MP3/FM EIN/
AUS/ LAUTSTÄRKE.
11. DC12V 2A INPUT JACK: Dies ist eine Eingangsbuchse für DC 12V 2A
Stromanschluss.
12. RF LED: Dies ist eine Signal LED für Funkempfang.
13. Markenname
14. SD: SD Steckplatz zum einfügen der SD Karte.
15. USB: USB Steckplatz zum Einfügen eines USB Speichers.
16. AUX IN JACK: Dies ist eine Audio-Eingangsbuchse.
DE
7
Bedienungsanleitung
DE
8
17. AUX OUT JACK: Dies ist eine Audio-Ausgangsbuchse.
18. LAUTSPRECHERAUSGANG 8 OHM: Dies ist eine 8 Ohm LautsprecherAusgangsbuchse.
19. AC NETZKABELSTECKER: Dies ist zum Anschließen des AC Stromkabels.
20. AC EIN/AUS LADEN SCHALTER
21. DC 8,4V NETZGERÄTFACH: Dies ist ein Fach für das DC 8,4V Netzgerät.
22. DC 12V 1,2 AH AKKU & NETZGERÄTFACH:
23. MP3/FM FUNKTIONS-BEDIENUNGSFELD
24. MODE/FM HINWEIS:
1) Im MP3 Modus: Drücken Sie einmal, um ein Lied oder Titel zu wiederholen, drücken
Sie zweimal, um den Ordner zu wiederholen; drücken Sie dreimal, um alle Dateien auf
dem USB- oder SD-Karte zu wiederholen und erneut drücken, um die Wiederholung
zu löschen. Die LED wird langsam blinken, schnell blinken, lange Zeit blinken oder
dämmen. Gleichzeitig zeigt das LED Display die Worte PONE, PFOL, PRLL, POFF.
2) Im FM Modus: Drücken Sie diese Taste, um die FM Speicher-Funktion
einzuschalten, erneut drücken, um den FM- Radiosender zu speichern.
3) Manuelle FM- Speicherfunktion: Drücken Sie die Taste MODE, die FM Sender
Zahlen blinken, dann drücken Sie die Taste STOPP, das LED Display zeigt den
nächsten FM Sender, wählen Sie Ihren gewünschten Sender, innerhalb von 5
Sekunden drücken die Taste Modus, um den Radiosender speichern . Wenn Sie
innerhalb von 5 Sekunden keinen Sender wählen, können die Sender nicht gespeichert
werden und verlässt automatisch den FM Speichermodus. Dieser Sender ist
gespeicherte, das LED-Display wird stabil sein, um die Stationsnummer anzeigen.
25. FOLDER+: Drücken Sie diese Taste um die nächste Datei abzuspielen.
26. VORWÄRTS:
1) Im MP3 Modus: Im WIEDERGABEMODUS drücken Sie diese Taste 1 Sekunden,
um den nächsten Titel abzuspielen. Im WIEDERGABEMODUS drücken Sie diese
Taste 2 Sekunde um +10 Titel zu überspringen. (Es sollte sich im gleichen Ordner
befinden. Falls der Ordner weniger als 10 Lieder oder Musik beinhaltet, springt es zum
letzten Lied.)
2) Im FM Modus: Drücken Sie diese Taste, um die Frequenz zu ERHÖHEN, drücken
Sie für 2 Sekunden, um automatisch die Frequenzen AUFWÄRTS zu suchen für
Automatische Sendersuche. Wenn das Radio sucht, stoppt es die Suche, jedoch das
FM Radio wird empfangen.
27. PLAY/PAUSE/FM SCAN:
1) Im MP3 Modus, drücken Sie diese Taste, für WIEDERGABE oder PAUSE. Während
der Wiedergabe, leuchtet die Wiedergabe - LED die ganze Zeit und am LED-Display,
werden die aktuelle Titelnummer, die Zeit, die Datei und MODUS angezeigt. Wenn
PAUSE wird die WIEDERGABE LED langsam blinken und das LED-Display blinken.
Die Wiedergabe-Sequenz ist als dieselben wie die Ladezeit. Wenn Sie den Titel in der
ersten Ordnung abspielen möchten, sollten Sie diesen zuerst in den Computer laden
und so weiter.
2) Im FM Modus: Drücken Sie diese Taste für 2 Sekunden, für die automatische
Suche der FM - Radiosender und speichern der Radiostationen. Es kann über 20 FM Radiosender speichern und die leeren Radiosender automatisch überspringen
28. LED DISPLAY: Dies ist ein LED Display zur Anzeige des MP3/FM Modus.
29. MP3/FM: Dies ist eine MP3/FM Wahltaste. Sie können diese Taste drücken zur
Wiedergabe von MP3 oder FM Radio.
Bedienungsanleitung
30. FOLDER-: Drücken Sie diese Taste um die vorherige Datei abzuspielen.
31. RÜCKWÄRTS:
1) Im MP3 Modus: Wenn im WIEDERGABEMODUS, drücken Sie diese Taste 1
Sekunden um das vorherige Lied oder Musik abzuspielen. Wenn in Wiedergabemodus
drücken Sie diese Taste 2 Sekunde um minus 10 Titel zu überspringen. (Es sollte
sich im gleichen Ordner befinden. Falls der Ordner weniger als 10 Lieder oder Musik
beinhaltet, springt es zum ersten Lied).
2) In FM Modus: Drücken Sie diese Taste, um die Frequenz zu VERRINGERN,
drücken Sie für 2 Sekunden, um automatisch die Frequenzen ABWÄRTS zu suchen für
Automatische Sendersuche. Wenn das Radio sucht, stoppt es die Suche, jedoch das
FM Radio wird empfangen.
32. STOPP/FM RECALL:
1) Im MP3 Modus: Im WIEDERGABEMODUS, drücken Sie diese Taste um die
Wiedergabe zu beenden. Wenn die Wiedergabe beendet ist, wird die WIEDERGABE
LED gedämmt.
2) Im FM Modus: Drücken Sie diese Taste zum Aufruf der gespeicherten
Radiosender. Im AUTOMATISCHEN SUCHMODUS, drücken Sie diese Taste um den
AUTOMATISCHEN SUCHMODUS zu beenden.
33. DC 12V LADEANZEIGE LED
34. MODUS LED
35. SD LED
36. USB LED
37. WIEDERGABE/PAUSE LED
Achtung:
1. Es werden drei Dateiformate unterstützt: FAT, FAT16 und FAT32.
2. Es kann USB Speicher lesen von 64MB bis 4GB.
3. Die MP3 Dateien im USB/SD Karte werden in der Sequenz gelesen wie sie
heruntergeladen werden.
Bedienung des Systems
Systembedienung mit AC Netzstrom
1. Stecken Sie das Netkabel in die Steckdose einer Stromquelle. Stellen Sie sicher,
dass Sie die richtige Spannung benutzen, wenn Sie das System an das Stromnetz
anschließen.
2. Schalten Sie den Hauptschalter ein, die LED Betriebsanzeige am Gerät leuchtet.
Wenn Sie das System nicht mehr benutzen, stellen Sie sicher, den Hauptschalter
ausschalten, um die eingebaute Batterie nicht über Gebühr zu entladen.
3. Wenn das Netzteil plötzlich ausfällt, wird der eingebaute Akku das System ohne
Verzögerung mit Strom versorgen.
4. Die Antenne voll ausziehen um das breiteste Leistungsspektrum des Funkmikrofons
zu erreichen. Wenn der Haupt-Empfänger auf den gleichen oder ähnlichen
Kanal trifft, entstehen starke Störungen des Funksignals, starkes Rauschen oder
Signalunterbrechungen sind die Folge. Um die Störung zu verringern oder beseitigen,
Antenne ausrichten.
5. Stellen Sie die Lautstärke mit dem Drehregler ein, um den perfekten Klang zu
erzielen.
DE
9
Bedienungsanleitung
Warnung: Gerät vom Stromnetz trennen wenn es für einen längeren Zeitraum
nicht benutzt wird.
System funktioniert mit DC Stromversorgung
1. Hauptschalter auf EIN stellen und die Betriebsanzeige LED leuchtet, der Akku
funktioniert richtig.
(1) Bevor Sie das Gerăt benutzen muss der eingebaute Akku über 8 Stunden
aufgeladen verwenden.
(2) Wenn sich das Gerät in Betrieb befindet und Unterbrechung sowie
Stimmverzerrungen auftreten, zeigt dieses einen schwachen Akku an, Sie sollten
die DC Stromversorgung mit AC Stromversorgung ersetzen und in der Zeit den Akku
aufladen.
(3) Niederspannung Schutz für den eingebauten Akku, um Schaden am Akku im Falle
einer Fehlbedienung zu vermeiden. Wenn der Haupt-Empfänger verwendet wird, wenn
die Spannung des Akkus kleiner als 9 ±0,5 V ist, wird der Akku von Gerät automatisch
durch seinen Niederspannungs-Schutz ausgeschaltet. Sie müssen Wechselstrom
verwenden oder in der Zeit wieder aufgeladen werden, oder der Lebensdauer der
Batterie wird verkürzt.
W/MIC
DC8.4 V
POWER
DC12V 2 A
ECHO
ANT
AUX IN
MP3/FM
/ON/OFF/VO L
Auto 12V
Stromanschluss
MIC/VO L
W/MIC
DC8.4 V
POWER
DC12V 2 A
ANT
ECHO
AUX IN
DE
DC 12V
Aufladbare
Batterie
10
TONE
MIC
Achtung: Achten Sie darauf, das System nach
Gebrauch auszuschalten, sonst wird die Batterie
entladen werden und austretende Säure kann den
Akku beschädigen und die Lebensdauer der Batterie
erheblich verkürzen.
MIC/VO L
Warnung: Wenn Sie das Gerät nicht mehr
Benutzen, bitte Hauptschalter auf AUS stellen um
Beschädigung des Akku zu vermeiden.
MIC
2. Sie können den Auto Zigarettenanzünder
Stromanschluss benutzen, um das Gerät an die
Autobatterie oder eine externe 12V DC Stromquelle
anzuschließen.
TONE
MP3/FM
/ON/OFF/VO L
Bedienungsanleitung
Benutzen des Ansteck-Mikrofons
1. Öffnen Sie das Batteriefach indem Sie den Deckel nach oben schieben.
2. Legen Sie die Batterie ein unter Beachtung der korrekten Polarität und schließen
den Deckel.
3. Schalten Sie den Sender ein und wenn die LED leuchtet ist das Mikrofon
betriebsbereit.
4. Regeln Sie die Verstärkung des Senders von leise zu laut auf einen nahen Pegel bis
Sie Ihre Stimme klar hören. Das Gerät ist betriebsbereit.
5. Nach Gebrauch Batterie herausnehmen, wenn Sie das Gerät für längere Zeit nicht
benutzen um Beschädigung durch auslaufende Batterie zu vermeiden.
Microfon
Deckel
9V Batterie
Fach
Volum
Betriebsanzeige
LED
Ein/Aus Schalter
Mikrofonanschluss
Deckel
ANSTECK-FUNKMIKROFON
Benutzen des Hand-Funkmikrofons
1. Öffnen Sie das Batteriefach.
2. Legen Sie die Batterie ein unter Beachtung der korrekten Polarität und schließen
den Deckel.
3. Schalten Sie das Mikrofon ein, das Mikrofon betriebsbereit.
4. Nach Gebrauch Batterie herausnehmen, wenn Sie das Gerät für längere Zeit nicht
benutzen um Beschädigung durch auslaufende Batterie zu vermeiden.
DE
Warnung: Mikrofon nicht direkt in der nähe
zum Lautsprecher ausrichten, oder es entstehen Rückkopplungen,
S
D
U
S
B
A
U
X
I
NA
U
X
O
U
T
SPK OUT
8¦¸
Achtung: Wenn die LED kurz aufleuchtet, ist die Batterie in gutem Zustand. Wenn
die LED leuchtet, ist die Batterie schwach und muss ausgetauscht werden bevor Sie
das System benutzen können. Wenn die LED nicht blinkt oder leuchtet ist die Batterie
erschöpft oder die Polarität ist vertauscht.
11
Bedienungsanleitung
Mikrofonkopf
Anzeige
Schlter
9V batterie
Griff
Batteriefach
Batteriedeckel
Offnen
Schlieben
HAND-FUNKMIKROFON
Benutzen eines Kabelgebundenen Mikrofons
Mikrofon einfach in die Buchse fürs Kabelgebundene Mikrofon einstecken, Sie hören
sogleich Ihre Stimme.
Anschluss eines Aufnahmesystems an das Verstärkersystem
Audioausgang an das
Aufnahmesystem anschließen, Sie
können mit der Aufnahme beginnen
während Sie den Verstärker
benutzen
S
D
U
S
B
A
U
X
I
NA
U
X
O
U
T
SPK OUT
8¦¸
Benutzen des Aux Eingangs
DE
Kabel von CD/MD usw. an die AUX
Eingangsbuchse anschließen um
die Musik zu verstärken. Regeln
Sie die Lautstärke abhängig von
Ihrem CD/MD/USW.
CD/MD/ETC
S
D
U
S
B
A
U
X
I
NA
U
X
O
U
T
SPK OUT
8¦¸
Benutzen des digitalen Echo
Der digitale Echo-Regler wird das Echo auf besten Klang effektives Ergebnis einstellen.
Wenn kreischend Rückkopplung auftritt, stellen Sie das Digital-Echo auf geringere
Lautstärke ein, um die Rückkopplung zu vermeiden.
12
Bedienungsanleitung
Fehlerbehebung
Wenn Sie irgendein Problem mit dem System haben, überprüfen Sie bitte den
Hauptschalter und Batterien des Mikrofon-Sets und eingebauten Akku. Wenn Sie eine
neue 9V Batterie benutzen, stellen Sie bitte sicher, dass Sie diese in der richtigen
Polarität einsetzen.
Für die folgenden Probleme:
Kreischen vom Lautsprecher
1. Bitte Lautstärke auf Minimum einstellen.
2. Lautstärke des Senders auf einen niedrigeren Pegel einstellen.
3. Richtung der Lautsprecher ändern um direkte Rückkopplung zu vermeiden.
4. TONE auf einen niedrigeren Pegel einstellen.
Wenn Sie die Lautstärke auf einen niedrigeren Pegel einstellen so dass keine
Rückkopplung entsteht.
Geräusch oder plötzlicher Stopp
1. Überprüfen Sie den Akku um zu sehen, ob dieser nicht erschöpft ist.
2. Akku ist erschöpft; bitte das System mit Netzstrom versorgen.
3. Überprüfen Sie die Kabelverbindung zum Lautsprecher. Das Kabel könnte nach
einer langen Zeit beschädigt sein.
4. Mögliche Frequenzstörungen mit lokaler Übertragung. Bitte wenden Sie sich an den
Händler, um die Kanäle zu ändern für einen besseren Empfang.
Keine Stimme zu hören
1. Eine der Stromquellen ist nicht eingeschaltet, bitte alle Stromquellen überprüfen um
sicherzustellen dass alle eingeschaltet sind.
2. Die Lautstärkeregler sind auf ein Minimum eingestellt. Stellen Sie sicher dass diese
auf einen richtigen Pegel eingestellt sind.
3. Ansteck-Kabel sind beschädigt nach langzeitiger Benutzung.
Nach Gebrauch 9V Batterie vom Sender herausnehmen, wenn Sie das Gerät für längere
Zeit nicht benutzen um Beschädigung durch auslaufende Batterie zu vermeiden.
DE
Warnung: Dieses Produkt nicht auseinander nehmen. Die Wartungs- und
Inspektionsarbeiten dürfen nur von einem qualifizierten Techniker durchgeführt werden,
um das Risiko eines Stromschlags und Schäden an den Komponenten zu vermeiden.
13
Bedienungsanleitung
Technische Daten
Stromversorgung
1. AC Spannung, bitte beachten Sie die korrekte
Spannung auf den Daten auf der Rückseite des
Gerätes
2. DC 12V/1,2AH eingebauter Akku
Spitze der Musikleistung
50W max
Lautsprecher
16CM,10W/4Ω
Frequenzbereich
VHF 174~216MHz
Empfindlichkeit
10dB/μV (S/N:>60dB)
Oszillationsmodus
±0.005% Quarz gesperrte Steuerphase
Schnurlose effektive
Reichweite
35 meter
Abmessungen
180 X 300 X 110mm
Die Spezifikationen können ohne Ankündigung geändert werden.
„Hiermit erklär die Firma Lechpol dass sich das Gerät MIK0132 im Einklang
mit den grundlegenden Anforderungen und anderen relevanten Bestimmungen der Richtlinie 1999/5/EG befindet. Konformitätserklärung zum Download
auf www.lechpol.eu”.
DE
14
Owner’s manual
We thank you for your purchasing this amplifier system.Before start to use this amplifier
system, please read the manual book thoroughly and carefully. Please keep this instruction book in a safe place after reading for future reference.
Basic features of the amplifier
• All in one design for easy carrying and portable use.
• Uni-directional Lavaliere microphone with high sensitivity for clearly voice transmission
and receiving.
• Quartz stabilizer for carrier frequency transmission to avoid interference.
• The system works on both AC and DC. You can also use the built in 1.2AH rechargeable battery. or with car cigarette lighter power for DC 12V.(The power cord for car is not
included, call us for optional purchase)
• Amplifier working in VHF band and there are 98 different possible channels ready for
max a group of 98 amplifiers working at the same place and same time.The carrier frequencies start from 174 MHz to 216 MHz.
• Low power consumption for long time operation with integrated circuitry.
• SMT technology and SMD electronic components used in building this amplifier, so the
quality is very stable and last long.
• 3 styles of microphones are good for different purposes. You can use the handheld mic,
headset mic and Lavaliere alternatively.
• Tone control.
• Wired/wireless microphone.
• Digital echo control.
• Aux input for connecting to MD/CD etc.
• Aux output.
• Speaker output 8 ohms.
• USB/SD play MP3.
• FM radios.
• LED display.
• Low voltage circuit protection for the built-in rechargeable battery to avoid the damage
of the rechargeable battery in case of incorrect operation.
• 9V common battery or 8.4V rechargeable battery can be used in the wireless handheld
microphone and the wireless transmitter.
Cautions:
EN
• This machine can produce the electronic magnetic field because it’s magnet speaker,
please let this machine far from PC, TV set over 60cm, otherwise this magnetic field will
effect their picture and voice.
After use, please pull out the power cable from the power socket.
• This machine should be far from the high temperature or heat objects to avoid damage
it.
• This machine should be far from the big power wireless transmitter tower to avoid the
interference.
15
Owner’s manual
• For the built-in rechargeable battery:
1. Should be charged over 8 hours before use, make sure it can be supplied power at
any time.
2. Should be charged over 8 hours after use to protect the battery and the power supply.
• Please don’t use this machine if the following circumstances happen, refer servicing to
qualified personnel only.
1. Power cable or power socket be damaged.
2. This machine was drenched by rain or other obstacles inside the machine.
3. Some components were damaged.
*Make sure to keep 20cm distance around this machine, aeration is important for it’s
usage. Please replace the same specific battery if the built-in 12V/1.2AH battery was
damaged otherwise will damage this machine and please handle this damaged battery
appropriate to avoid pollue the environment.
Warning:
Please don’t put this machine in the rain, moisture and dusty place to avoid the fire or
lightning striked.
In order to avoid creepage and get electric shock before use AC power, please refer to:
1. Please check the power cable, make sure it’s in the good condition.
2. The using AC voltage should be the same as we stated in the machine or manual.
Please don’t dismantle this product. The maintenance and inspection should be carried out by a qualified technician to avoid the risk of electric shock and damaging the
components.
Be sure to switch off the system main power after use, otherwise the battery will be over
discharged and it can damage the Lead Acid rechargeable battery and shorten the battery life dramatically.
After use the wireless transmitter, please take the battery out of it to avoid battery leaking
to damage the transmitter.
Please only take out the USB/SD card in OFF situation to protect the USB/SD’s damage.
The usage of the amplifier system
EN
16
This unique designed amplifier speaker system with microphone is perfect for the following applications.
Used as lecturing amplifier indoor or outdoor.(Especially for dancing and gym teachers).
A perfect address delivery system for in and out door meeting, tourism and churches.
It is a good amplifier for interpretation, class teaching and commercial vendor demonstrations.
With this amplifier system, you can make yourself a clear sound and heard from far!
Owner’s manual
Classroom teaching
Tour
The system descriptions:
2
1
3
4
5
EN
6
7
8
9
10
11
17
Owner’s manual
12
14
15
16
17
18
19
13
20
23
EN
22
21
18
Owner’s manual
35
37
25
24
36
34
33
26
27
28
31
29
32
30
1. W/MIC: This is a wireless microphone control volume knob. You can adjust it from Min
to Max as your need for the wireless microphone.
2. POWER LED: This is the Power ON/OFF LED.
3. DC 8.4V LED: This is the DC8.4V charge LED.
4. MIC/VOL: This is a wired microphone control volume knob.
5. MIC JACK: This is a wired microphone input jack.
6. ANT: This is an Antenna for the wireless and FM signals receiving well.
7. ECHO: This is a digital echo function control knob for your need to adjust it from Minimum to Maximum to have the perfect echo sound result.
8. AUX IN: This is a volume control knob for the Aux input. Any audio sources input volume can be controlled by this button.
9. TONE: This is a control knob for the treble and the bass sound result. From the Minimum to Maximum is from Bass to Treble. Adjust it slowly from Min to Max as your need.
10. MP3/FM/ON/OFF/VOLUME: This is a combined control knob for MP3/FM ON/OFF/
VOLUME.
11. DC12V 2A INPUT JACK: This is for the DC 12V 2A power input.
12. RF LED: This is the wireless signal LED.
13. Brand name
14. SD: SD port for inserting the SD card
15. USB: USB port for inserting the USB card
16. AUX IN JACK: This is an audio input jack.
17. AUX OUT JACK: This is an audio output jack.
18. SPEAKER OUTPUT 8 OHMS: This is a 8 ohms speaker output jack.
EN
19
Owner’s manual
EN
20
19. AC POWER CABLE PLUG SOCKET: This is for the input of the AC power cable.
20. AC ON/OFF CHARGE SWITCH
21. DC 8.4V CHARGE ROOM: This room is a DC 8.4V charger.
22. DC 12V 1.2 AH RECHARGEABLE BATTERY & CHARGE ROOM
23. MP3/FM FUNCTIONS OPERATE KEYBOARDS
24. MODE/FM MEMO:
1) In MP3 situation: Push one time to repeat a song or music; push
twice to repeat the file; push triple to repeat all the files in the USB or the SD card and
push again to delete the repeat. Its LED is slowly twinkling, fast twinkling, long time twinkling or dim. At the same time, the LED displayer displays PONE, PFOL, PRLL, POFF
words.
2) In FM situation: Push this button to turn On the FM momorize
function, push again to momorize the FM radio station.
3) Manually FM memorized function: Push the MODE button, the FM
station numbers are twinkling, then push the STOP button, the LED displayer displays
the next FM station, select your need station, within 5 seconds push this MODE to memorize the radio station. If within 5 seconds you can not settle the stations, it can not
memorize but auto exit the memorize operation. This memorized station is settled, the
LED displayer will be stablly displays this station numbers.
25. FOLDER+: Push this button to auto play the next file.
26. FORWARD:
1) In MP3 situation: When in PLAY situation push this button 1 seconds
to forward play the next one. When in PLAY situation push this button 2 second to plus
10 songs or musics to play. (It should be in the same file. If the file is less than 10 songs
or musics, it skips to the last song or music.)
2) In FM situation: Push this button to UP the frequency, push for 2
seconds to auto UP frequencies for auto scan radios. When search the radio, it will stop
the searching but receive the FM radio.
27. PLAY/PAUSE/FM SCAN:
1) In MP3 situation, push this button to PLAY or PAUSE. When Play,
the Play LED lights all the time and the LED displayer displays which song is playing,
the time, the file and the MODE. When PAUSE, the PLAY LED is twinkling slowly and
the LED displayer displays twinkling. The Play sequence is as the same as the down
load time. If you want to play the song in the first order, you should down load it first in
the computor and so on.
2) In FM situation: Push this button for 2 seconds to auto search the
FM radio station and memorize the radio stations. It can momorized over 20 FM radio
stations and auto skip the blank radio stations
28. LED DISPLAYER: This is a LED displayer display the MP3/FM
situation.
29. MP3/FM: This is the MP3/FM switch button. You can push this button
to play MP3 or FM radios.
30. FOLDER-: Push this button to auto play the last file.
31. BACKWARD:
1) In MP3 situation: When in Play situation, push this button 1 seconds
to backward play the last song or music. When in PLAY situation push this button 2 second to minus 10 songs or musics to play. (It should be in the same file. If the file is less
than 10 songs or musics, it skips to the last song or music.)
2) In FM situation: Push this button to DOWN the frequency, push for
Owner’s manual
2 seconds to auto DOWN frequencies for auto scan radio stations. When search the
radio station, it will stop the searching but receive the FM radio station.
32. STOP/FM RECALL:
1) In MP3 situation: When in PLAY situation, push this button to STOP
the play. When STOP, the PLAY LED dims.
2) In FM situation: Push this button to recall the memorized FM radio station’s frequency to play. When in AUTO SEARCH situation, push this button to STOP the AUTO
SEARCH function.
33. DC 12V CHARGE LED
34. MODE LED
35. SD LED
36. USB LED
37. PLAY/PAUSE LED
Cautions:
1. It can back up three files format: FAT, FAT16 and FAT32.
2. It can read the 64MB to 4GB USB.
3. The MP3 file in the USB/SD card is read in the sequence as its down load time which
is down loaded first then be read as the first one and so on.
Operation of the system
System operation on AC Power
1. Plug in the AC power to the power outlet from a power source. Make sure you are
using correct voltage when you plug in the system to AC power.
2. Switch the main power on, the LED on the body will be lit. After using the system,make
sure to turn the main power off to avoid over charge the battery built in.
3. When the AC power suddenly cut off, the built-in battery will power the system to work
no delay.
4. Fully hang up the antenna of the main frame to achieve the widest service range of
the wireless MIC.If the main receiver meets the same or similar channel strong interference of the wireless electric wave, it occurs the noisy voice or interuption phenomenon.
At this time, adjust the antenna to reduce or delete the interference.
5. Adjust the Volume with the control knob to get the perfect sound.
Caution: You have to plug the system off the main power if you are not going to use it
for a while.
EN
21
Owner’s manual
System works on DC power
1. Turn on the main switch to ON and the power LED will indicate the battery works well.
(1)Before start to use the main machine,the built-in rechargeable battery must be full
charged over 8 hours.
(2)When the main machine is operating and occur noisy interruption and distortion voice,
indicates the weak built-in rechargeable battery, you should replace the DC power to AC
power and charge the main machine in time.
(3)Low voltage circuit protection for the built-in rechargeable battery to avoid the damage
of the rechargeable battery in case of incorrect operation. When the main receiver is being used, if the voltage of the rechargeable battery is less than 9±0.5V, the rechargeable
battery is switched off its power automatically by its low voltage circuit protection. And
need to be used with AC power or recharged in time, or the life span of the rechargeable
battery will be shorten.
MIC/VO L
W/MIC
DC8.4 V
POWER
DC12V 2 A
ECHO
ANT
AUX IN
MP3/FM
/ON/OFF/VO L
Car 12V output
connector
MIC/VO L
W/MIC
DC8.4 V
POWER
Warning: Be sure to switch off the system main power
after use,otherwise the battery will be over discharged
and it can damage the Lead Acid rechargeable battery and shorten the battery life dramatically.
TONE
MIC
Warning: After use it, please make sure to switch the
main power to OFF. To avoid battery damage.
MIC
2. You may use the car cigarette light power connector to connect the car and the main receiving machine
or use an external 12V DC power connector to connect the main receiving machine and the external 12V
rechargeable battery to supply power source to the
main receiving machine.
DC12V 2 A
ANT
ECHO
AUX IN
TONE
MP3/FM
/ON/OFF/VO L
DC 12V
Rechargeable
battery
EN
22
Owner’s manual
How to use the lavaliere microphone
1. Open the battery compartment by sliding up the cover.
2. Put the battery into the compartment with correct polarity, and close the cover.
3. Switch on the power of the transmitter and when the LED shows, it is ready to work.
4. Be careful to adjust the main control of the transmitter, start from least volume and
slowly turn it to a appropriate level to hear your voice clearly and with feed back. The
system is ready to use.
5. After use, you have to take the battery out of the transmitter to avoid battery.
Volume
MIC
Power LED
Power switch
MIC port
Cover
9V battery
chamber
Cover
Lavaliere wireless MIC
How to use the wireless handheld microphone
1. Open the battery cover.
2. Put the battery into the compartment and make sure you have a right polarity before
you use it.
3. Turn the switch to ON and you can use the microphone now.
4. Please take the battery out if you are not going to use it for a period of time.
Warning: Don’t put the microphone directly
towards the horn of the main receiver in near
distance, or it will occur screaming feedback.
EN
S
D
U
S
B
A
U
X
I
NA
U
X
O
U
T
SPK OUT
8¦¸
Caution: If the LED flash up, it shows the battery is good to use. If the LED is on, it
shows that the battery is low, you have to change the battery before you can use the
system. If the LED does not flash and not on,it shows the battery is dead or polarities
are wrong.
23
Owner’s manual
MIC.net head
Indicator
Switch
9V battery
Holder
Battery
chamber
Battery cover
Open
Close
Handled wireless MIC
How to use a wired microphone
Just plug the microphone to the wired mic input jack, you hear your voice immediately.
How to connect recording system to the amplifier system
Audio output will go to the recording
system and you can record while
using the amplifier.
S
D
U
S
B
A
U
X
I
NA
U
X
O
U
T
SPK OUT
8¦¸
How to use the Aux Input
Connect the cable of the CD/MD
etc into the Aux Input Jack to get
the music sound amplifying.Adjust
the volume depend on your.
CD/MD/ETC
S
D
U
S
B
A
U
X
I
NA
U
X
O
U
T
SPK OUT
8¦¸
EN
How to use the digital echo
The digital echo control knob will adjust the echo to best sound effective result. If screaming feedback occur, adjust the Digital echo in less volume to avoid the feedback.
24
Owner’s manual
Trouble shooting
If you have any problem with the system, please check the main power and batteries
for microphone sets and rechargeable battery built-in. If you are using a new 9V battery,
please make sure you have put it in a correct polarity.
For the following problems:
Screaming from the speaker
1. Please adjust the speaker volume to the minimum.
2. Adjust the transmitter volume control to a low level.
3. Change the speaker direction to avoid direct feedback.
4. Turn the TONE to the lowest level.
When you low the volume to a level that no feedback can be heard.
Noise or abrupt stop
1. Check the rechargeable battery to see if it is low in voltage.
2. Rechargeable battery is low voltage, please use AC power instead to power the system.
3. Check the cable connection to the speaker. The cable might be broken after a long
time use.
4. Possible frequency interference with local transmission. Please contact the dealer to
change channels for better reception.
No voice heard
1. One of the powers is not turned, please check all power source and make sure they
are all on.
2. The volume control knobs are turned to lowest level. Make sure they are proper in
sound.
3. Lavaliere cables are broken after a long time use.
Take out the 9V battery to avoid its acid damaging the components of the transmitter if
you are not going to use it for a period of time.
Warning: Don’t dismantle this product. The maintenance and inspection should be carried out by a qualified technician to avoid the risk of electric shock and damaging the
components.
EN
25
Owner’s manual
Technical specifications
Power
1. AC power voltage please refer to the correct voltage on the label of the PA Amplifier main machine
2. DC 12V/1.2AH built-in rechargeable battery
Peak of music power
50W max
Speaker
16CM,10W/4Ω
Frequency range
VHF 174~216MHz
Sensitivity
10dB/μV (S/N:>60dB)
Oscillating mode
±0.005% quartz control phase locked
Wireless effective range
35 meters
Dimension
180 X 300 X 110mm
Specifications are subject to change without notice.
„The Lechpol company declares that product MIK0132 is consistent with the
essential requirements and other relevant provisions of directive 1999/5/EC.
The proper declaration for download from www.lechpol.eu”.
EN
26
Instrukcja obsługi
Dziękujemy Państwu za zakup naszego urządzenia. Przed rozpoczęciem korzystania
z urządzenia należy dokładnie i starannie zapoznać się z instrukcję obsługi. Po
przeczytaniu prosimy zachować niniejsza instrukcję obsługi na przyszłość.
Podstawowe cechy zestawu przenośnego
• Urządzenie przenośne all in one
• System zabezpieczenia przed zakłóceniami
• Możliwość zasilania urządzenia z wbudowanego akumulatora DC 12V, z gniazda
zasilania AC 230V lub gniazda zapalniczki samochodowej DC 12V(opcja)
• Urządzenie do transmisji wykorzystuje pasmo VHF w zakresie częstotliwości od 174
MHz do 216 MHz (98 kanałów).
• Niski pobór mocy w długotrwałej pracy urządzenia
• Technologia SMT, SMD.
• 3 rodzaje mikrofonów w zestawie: podręczny, nagłowny, na klips (w zależności od
modelu)
• Kontrola tonów
• Możliwość użycia mikrofonów bezprzewodowego / przewodowy
• Cyfrowa kontrola echa
• Wejście AUX
• Wyjście AUX.
• Wyjście głośnikowe 8 ohms.
• Odtwarzanie plików MP3 z kart SD i pamięci USB
• Radio FM.
• Wyświetlacz LED
• Zabezpieczenie przed całkowitym rozładowaniem akumulatora
• Urządzenie posiada wbudowany zasilacz do ładowania baterii mikrofonowych 9V (21)
Środki ostrożności:
• Poprzez zamontowany w urządzeniu głośnik, urządzenie to może wytwarzać pole
magnetyczne dlatego też nie zaleca się trzymania urządzenia w bliskiej odległości
komputerów i TV. Wytworzone pole magnetyczne może zakłócać obraz i dźwięk.
Po użyciu należy odłączyć urządzenie od zasilania.
• Aby uniknąć przegrzania i uszkodzenia urządzenia, urządzenie nie powinno być
wystawiane na działanie wysokich temperatur lub tez umieszczane w miejscach gdzie
takie warunki panują.
• Umieszczanie w pobliżu nadajników sieci bezprzewodowych może powodować
zakłócenia w działaniu urządzenia.
• Wbudowany akumulator:
1. Przed pierwszym użyciem należy naładować akumulator, czas ładowania ok. 8 godzin.
PL
27
Instrukcja obsługi
2. W celu długotrwałego użytkowania akumulatora, po każdym jego użyciu, urządzenie
powinno być zawsze ładowane do pełna przez ok. 8 godzin
• Jeżeli zaistniały następujące okoliczności:
1. Kabel zasilający lub gniazdo zasilania urządzenia jest uszkodzone.
2. Urządzenie zostało zalane.
3. Komponenty urządzenia zostały uszkodzone.
należy niezwłocznie zaprzestać korzystania z urządzenia i zgłosić się do wykwalifikowanego serwisu w celu naprawy.
*Podczas używania urządzenia należy upewnić się, że nic nie otacza urządzenia w
odległości ok 20 cm, ani też nie blokuje otworów wentylacyjnych. Wentylacja urządzenia
jest niezbędna w celu jego prawidłowego funkcjonowania. Podczas wymiany baterii
należy zwrócić szczególną uwagę na jej model. Użycie innej baterii może spowodować
awarię urządzenia.
Uwaga:
Nie należy wystawiać urządzenia na niekorzystne warunki atmosferyczne takie jak
deszcz, śnieg, czy kurz.
Przed podłączeniem urządzenia do instalacji elektrycznej w celu uniknięcia porażeniem
prądem należy:
1. Sprawdzić czy kabel zasilający jest w dobrym stanie.
2. Sprawdzić czy napięcie zasilające w gniazdku jest takie samo jak napięcie podane na
tabliczce znamionowej urządzenia.
W celu uniknięcia porażenia prądem i uszkodzenia komponentów, wszystkie naprawy
i konserwacje urządzenia powinny być wykonywane wyłącznie przez wykwalifikowany
serwis.
Pamiętaj aby wyłączyć zasilanie urządzenia po jego użyciu, w przeciwnym razie
zainstalowana w urządzeniu bateria może zostać uszkodzenia na skutek jej
przeładowania co może doprowadzić do skrócenia jej żywotność.
Jeżeli urządzenie przez dłuższy okres czasu nie będzie używane należy wyjąć baterię
z mikrofonu jak i nadajnika bezprzewodowego, w celu uniknięcia rozlania baterii i
uszkodzenia urządzenia.
Użytkowanie urządzenia
PL
28
Urządzenie idealnie nadaje się do wykorzystania:
- na wycieczkach
- do nauczania w klasach
- konferencjach
- dla instruktorów fitness, nauki tańca
Instrukcja obsługi
Nauczanie w klasie
Wycieczka
Opis przycisków:
2
1
6
7
3
8
4
9
5
10
11
PL
29
Instrukcja obsługi
12
14
15
16
17
18
19
13
20
23
PL
22
21
30
Instrukcja obsługi
35
37
25
24
36
34
33
26
27
28
31
29
32
30
1. W/MIC: Pokrętło głośności dla mikrofonu bezprzewodowego.
2. POWER LED: Kontrolka LED zasilania ON/OFF.
3. DC 8.4V LED: Kontrolka LED ładowania DC8.4V
4. MIC/VOL: Pokrętło głośności dla mikrofonu przewodowego.
5. MIC JACK: Wejście jack dla mikrofonu przewodowego.
6. ANT: Antena do odbioru fal radiowych oraz bezprzewodowego mikrofonu
7. ECHO: Pokrętło ustawień cyfrowej funkcji echa.
8. AUX IN: Pokrętło głośności dla wejścia AUX IN
9. TONE: Pokrętło regulacji tonów wysokich i niskich. Pokrętło ustawione na minimum przewaga tonów niskich, pokrętło ustawione na maksimum przewaga tonów wysokich.
10. MP3/FM/ON/OFF/VOLUME: Pokrętło regulacji głośności oraz włącznik ON/OFF dla
trybu FM/MP3
11. DC12V 2A INPUT JACK: Gniazdo zasilania 12V DC 2A.
12. RF LED: Kontrolka LED bezprzewodowego sygnału.
13. Logo producenta
14. SD: Gniazdo kart SD
15. USB: Port USB
16. AUX IN JACK: Wejście audio
17. AUX OUT JACK: Wyjście audio
18. SPEAKER OUTPUT 8 OHMS: Wyjście audio dla głośnika 8 ohms.
19. AC POWER CABLE PLUG SOCKET: Gniazdo kabla zasilania.
20. AC ON/OFF CHARGE SWITCH: Włącznik ON/OFF
21. DC 8.4V CHARGE ROOM: Komora ładowania baterii 8.4V
PL
31
Instrukcja obsługi
PL
32
22. DC 12V 1.2 AH AKUMULATOR
23. PANEL USTAWIEŃ DLA MP3/FM
24. MODE/FM MEMO:
1) W trybie MP3: Naciśnij jeden raz przycisk, aby powtórzyć piosenkę lub plik, wciśnij
dwa razy aby powtórzyć folder, wciśnij potrójne aby powtórzyć wszystkie pliki z USB lub
karty SD naciśnij przycisk 4 raz, aby usunąć powtórkę. W tym czasie na wyświetlaczu
wyświetli się PONE, PFOL, PRLL, POFF.
2) W trybie FM: naciśnij ten przycisk by włączyć funkcję zapisu stacji radiowej. Naciśnięcie go ponownie spowoduje zapisanie stacji radiowej pod bieżącym numerem stacji
3) Funkcja manualnego zapamiętywania stacji: Naciśnij przycisk MODE, a na wyświetlaczu zacznie mrugać numer kanału radiowego, naciskając przycisk STOP wybierz numer kanału pod którym chcesz zapisać stację radiową. Na wyświetlaczu wyświetlą się
kolejne numery wybieranych za pomocą przycisku STOP kanałów. Po wybraniu numeru
kanału w przeciągu 5 sekund naciśnij przycisk MODE aby zapamiętać pod wybranym
numerem stację radiową. Jeśli w przeciągu 5 sekund od wybrania numery kanału nie
nastąpi żadna akcja, stacja radiowa nie zapisze się a radio wyjdzie z trybu zapisywania
stacji i powróci do normalnego trybu pracy.
25. FOLDER+: Naciśnięcie przycisku spowoduje odtworzenie pierwszego utworu z następnego w kolejności do odtwarzania folderu.
26. FORWARD:
1) W trybie MP3: Naciśniecie przycisku spowoduje odtworzenie następnego utworu.
Naciśnięcie i przytrzymanie przycinku przez 2 sekundy spowoduje przeskoczenie o 10
utworów w przód. W przypadku gdy w odtwarzanym folderze jest mniej niż 10 utworów
urządzenie przeskoczy do ostatniego utworu.
2) W trybie FM: Naciśniecie przycisku spowoduje zmianę częstotliwości w przód o 1.
Naciśniecie i przytrzymanie przez 2 sekundy spowoduje automatyczne przeszukanie w
górę zakresu częstotliwości. Gdy urządzenie odnajdzie stacje zatrzyma wyszukiwanie.
27. PLAY/PAUSE/FM SCAN:
1) W trybie MP3 naciśnięcie przycisku zatrzyma/wznowi/włączy odtwarzanie utworu.
Podczas odtwarzania wskaźnik LED (37) świeci się a na wyświetlaczu na przemian
wyświetla się numer utworu, czas, oraz rodzaj trybu MODE o ile został on włączony. Po
włączeniu pauzy kontrolka LED (37) jak i napisy na wyświetlaczu zaczną migać
2) W trybie FM naciśnięcie przycisku spowoduje automatyczne wyszukiwanie stacji radiowych i ich zapamiętanie. Urządzenie może zapamiętać do 20 stacji radiowych.
28. Wyświetlacz LED.
29. MP3/FM: Przycisk służy do zmiany trybu pracy MP3/FM radio.
30. FOLDER-: Naciśnięcie przycisku spowoduje odtworzenie pierwszego utworu z poprzednie w kolejności do odtwarzania folderu.
31. BACKWARD:
1) W trybie MP3: Naciśniecie przycisku spowoduje odtworzenie poprzedniego utworu.
Naciśnięcie i przytrzymanie przycinku przez 2 sekundy spowoduje przeskoczenie o 10
utworów do tyłu. W przypadku gdy w odtwarzanym folderze jest mniej niż 10 utworów
urządzenie przeskoczy do pierwszego utworu.
2) W trybie FM: Naciśniecie przycisku spowoduje zmianę częstotliwości do tyłu o 1.
Naciśniecie i przytrzymanie przez 2 sekundy spowoduje automatyczne przeszukanie w
dół zakresu częstotliwości. Gdy urządzenie odnajdzie stacje zatrzyma wyszukiwanie.
32. STOP/FM RECALL:
1) W trybie MP3: zatrzymanie odtwarzanego utworu.
Instrukcja obsługi
2) W trybie FM naciśniecie przycisku włączy następny w kolejności kanał radiowy. W
trybie automatycznego wyszukiwania stacji radiowych naciśniecie przycisku zatrzyma
wyszukiwanie.
33. KONTROLKA ŁADOWANIA DC 12V CHARGE
34. KONTROLKA TRYBU MODE
35. KONTROLKA KARTY SD
36. KONTROLKA PORTU USB
37. KONTROLKA PLAY/PAUSE
Uwaga:
1. Obsługa formatów: FAT, FAT16 i FAT32.
2. Obsługa kart SD i pamięci USB max. 4GB.
Obsługa urządzenia
Obsługa urządzenia - zasilanie AC
1. Podłącz kabel zasilający do gniazda zasilania urządzenia (19) a drugi koniec do
gniazdka elektrycznego. Przed włączenie upewnij się, że do zasilana urządzenia używasz prawidłowego napięcia.
2. Włącznikiem ON/OFF (20) włącz urządzenie. Dioda LED (2) zaświeci się. Po zakończeniu korzystania z urządzenia należy wyłączyć urządzenie w celu uniknięcia przeładowania baterii urządzenia.
3. Gdy zasilanie AC zostanie nagle odcięte, wbudowana bateria będzie zasilać system
aby ten działał bez żadnych przerw.
4. Całkowicie wysuń antenę by osiągnąć jak najszerszy zakres odbioru częstotliwości
5. Wyreguluj głośność urządzenia za pomocą pokrętła głośności.
Uwaga: Jeśli urządzenie nie będzie używane przez jakiś czas to należy je odłączyć od
źródła zasilania.
PL
33
Instrukcja obsługi
Obsługa urządzenia - zasilanie DC
1. Głównym włącznikiem (20) włącz zasilanie urządzenia. Dioda LED (2) zaświeci się
wskazując że bateria w dobrym stanie.
(1) Zanim będzie można korzystać z urządzenia, wbudowany akumulator musi zostać
całkowicie naładowany, proces ten trwa ok 8h.
(2) Gdy podczas działania urządzenia zaczną występować głośne zakłócenia i
zniekształcenia głosu, oznaczać to będzie, że akumulator jest już słaby i należy zmienić
zasilanie z DC na AC oraz naładować akumulator.
(3) Urządzenie posiada zabezpieczenie przed całkowitym rozładowaniem akumulatora
(całkowite rozładowanie akumulatora może spowodować jego uszkodzenie). Jeżeli
napięcie akumulatora spadnie poniżej 9±0.5V to urządzenie automatycznie wyłączy się.
W takim wypadku należy podłączyć zasilanie AC w celu naładowania akumulatora.
MIC/VO L
W/MIC
DC8.4 V
POWER
DC12V 2 A
ECHO
ANT
AUX IN
TONE
MP3/FM
/ON/OFF/VO L
Samochodowe wyjście
zasilania 12V
MIC
MIC/VO L
Uwaga: W celu uniknięcia nadmiernego rozładowania
akumulatora i skrócenia jego żywotności pamiętaj,
aby wyłączać zasilanie systemu po użyciu.
MIC
2. Urządzenie może być zasilane z gniazda zapalniczki samochodowej. W tym celu należy podłączyć
zasilacz do gniazda zapalniczki w samochodzie a następnie do urządzenia (11)
W/MIC
DC8.4 V
POWER
DC12V 2 A
ANT
ECHO
AUX IN
TONE
DC 12V
Akumulator
PL
34
MP3/FM
/ON/OFF/VO L
Instrukcja obsługi
Korzystanie z mikrofonu z portem
1. Otwórz komorę baterii, przesuwając pokrywę w górę.
2. Włóż baterią do komory zawracając uwagę na poprawną polaryzację i zamknij
pokrywę.
3. Włącz zasilanie nadajnika, gdy dioda LED zaświeci się oznaczać to będzie że
urządzenie jest gotowe do pracy.
4. W celu dostosowania poziomu głośności należy zacząć od najmniejszych ustawień i
stopniowo pokręcając gałką zwiększać je do chwili uzyskania odpowiedniego poziomu
dźwięku.
5. Należy wyjąć baterię jeśli urządzenie przez dłuższy okres czasu nie będzie używane.
Głośność
Kontrolka
LED
Przełącznik
ON/OFF
Gniazdo jack
mikrofonu
Mikrofon
Pokrywa
Komora
baterii 9V
Pokrywa
Mikrofon z portem
Korzystanie z bezprzewodowego mikrofonu ręcznego
1. Otwórz pokrywę baterii
2. Włóż baterię do komory i upewnij się że bateria ma poprawną polaryzację.
3. Przesuń przełącznik na mikrofonie na pozycję ON.
4. Jeśli mikrofon nie będzie używany przez dłuższy okres czasu, zaleca się wyjęcie
baterii.
Uwaga: W celu uniknięcia sprzężenia
zwrotnego nie należy umieszczać mikrofonu
w niedalekiej odległości od głośnika
urządzenia.
S
D
U
S
B
A
U
X
I
NA
U
X
O
U
T
SPK OUT
8¦¸
PL
Uwaga: Jeśli przy włączaniu mikrofonu dioda sygnalizacyjna mignie raz oznaczać to
będzie, że bateria jest w dobrym stanie. Jeśli dioda pali się cały czas oznacza to, że
bateria jest słaba i trzeba ją wymienić przez skorzystaniem z mikrofonu. Jeśli dioda nie
pali się i nie miga oznacza to, że bateria jest całkowicie rozładowana lub jest źle włożona
do mikrofonu.
35
Instrukcja obsługi
Główka mikrofonu
Dioda
sygnalizacyjna
Bateria 9V
Obudowa
Komora
ON/OFF
baterii
Pokrywa baterii
Otwarcie
Zamknięcie
Bezprzewodowy mikrofon ręczny
Korzystanie z przewodowego mikrofonu
Aby korzystać z przewodowego mikrofonu wystarczy podłączyć mikrofon do gniazda
jack (5).
Podłączanie urządzenia do nagrywania
Do gniazda Aux-Out (17) podłącz
zewnętrzy system nagrywania np.
wierze stereo za pomocą której
dźwięk z zestawu przenośnego
można będzie nagrać.
S
D
U
S
B
A
U
X
I
NA
U
X
O
U
T
SPK OUT
8¦¸
Wejście Aux
Podłącz odtwarzacz CD, MP3 lub
inne urządzenie do gniazda Aux-in
(16) zestawu przenośnego, aby
odtworzyć i wzmocnić dźwięk.
PL
36
CD/MD/ETC
S
D
U
S
B
A
U
X
I
NA
U
X
O
U
T
SPK OUT
8¦¸
Cyfrowe echo
Za pomocą pokrętła cyfrowego echa dostosujesz poziom echa w celu otrzymania najlepszego efektu dźwiękowego. Jeżeli wystąpi sprzężenie zwrotne należy pokrętłem zmniejszyć poziom echa.
Instrukcja obsługi
Rozwiązywanie problemów
Jeśli występują jakiekolwiek problemy z systemem, należy w pierwszej kolejności sprawdzić zasilanie, baterie w mikrofonach jak i wbudowany akumulator w urządzeniu. Jeśli
używasz nowej baterii 9V w mikrofonie upewnij się że jest ona poprawnej polaryzacji.
W przypadku następujących problemów:
Piski
1. Ustaw głośność urządzenia na minimum
2. Ustaw głośność nadajnika bezprzewodowego na minimum
3. Zmień położenie urządzenia w celu uniknięcia sprzężenia zwrotnego
4. Ustaw Tony na najniższy poziom
Szumy, przerwy w nadawaniu.
1. Sprawdź czy akumulator jest naładowany.
2. Jeżeli akumulator jest rozładowany użyj zasilania AC.
3. Sprawdź czy kable nie są uszkodzone.
4. Możliwe zakłócenia częstotliwości transmisji lokalnej. Skontaktuj się ze sprzedawcą w
celu zmiany kanału częstotliwości dla lepszego odbioru
Brak głosu
1. Zasilanie nie jest włączone. Należy sprawdzić wszystkie źródła zasilania i upewnić
się że są one włączone
2. Pokrętła regulacji głośności są ustawione na najniższy poziom. Upewnij się że są one
odpowiednio nastawione.
3. Mikrofonowy kabel jest uszkodzony.
Jeśli urządzenie nie będzie używane przez dłuższy okres czasu zaleca się wyjęcie 9V
baterii z urządzenia w celu uniknięcia uszkodzenia podzespołów poprzez rozlanie się
baterii.
Uwaga: Nie należy samodzielnie rozmontowywać urządzenia. Aby uniknąć porażenia
prądem i uszkodzenia podzespołów wszelkie prace serwisowej jak również konserwacyjne należy powierzyć wykwalifikowanemu serwisowi.
PL
37
Instrukcja obsługi
Specyfikacja techniczna
Zasilanie
1. AC: należy zapoznać się z etykietą umieszczoną
na wzmacniaczu
2. DC: 12V/1.2AH wbudowany akumulator
Moc max.
50W max
Głośnik
16CM,10W/4Ω
Zakres częstotliwości
VHF 174~216MHz
Czułość
10dB/μV (S/N:>60dB)
Oscillating mode
±0.005% quartz control phase locked
Zasięg
35 m
Wymiary
180 X 300 X 110mm
Specyfikacja produktu może ulec zmianie bez powiadomienia.
„Niniejszym firma Lechpol oświadcza, że urządzenie MIK0132 jest zgodne z
zasadniczymi wymaganiami oraz innymi stosownymi postanowieniami dyrektywy 1999/5/WE. Właściwa deklaracja do pobrania na stronie
www.lechpol.eu”.
PL
38
Manual de utilizare
Va multumim pentru achizitionarea acestui amplificator.Inainte de a incepe sa utilizati
sistemul, va rugam sa cititi manualul cu atentie. Va rugam sa pastrati acest manual intrun loc sigur pentru referinte ulterioare.
Caracteristicile de baza ale amplificatorului
• Design multifunctional pentru a facilita transportul .
• Microfon lavaliera unidirectional , cu sensibilitate ridicata, pentru transmisia si receptia
clara a sunetelor.
• Stabilizare cu cuart a frecventei purtatoare pentru a evita interferentele .
• Sistemul functioneaza atat cu sursa de alimentare AC cat si DC . Puteti folosi , de
asemenea, acumulatorul incorporat de 1.2Ah . sau priza de bricheta auto de 12V DC. (
cablul de alimentare pentru masina nu este inclus)
• Amplificatorul receptioneaza microfonul pe lungimea de unda VHF si exista 98 de
canale diferite, frecventele purtatoare pornesc de la 174 MHz la 216 MHz.
• Consum redus de energie pentru functionare indelungata.
• Tehnologia SMT si componentele electronice SMD au fost folosite la construirea
acestui amplificator , pentru a-i asigura o fiabilitate si stabilitate ridicata.
• 3 stiluri de microfoane pentru scopuri diferite: puteti utiliza microfonul portabil, setul cu
casca sau microfonul cu lavaliera.
• Control de ton.
• Microfon cu fir / fara fir .
• Control digital al ecoului .
• Intrare auxiliara pentru conectarea surselor de semnal extern - CD player, etc
• Iesire AUX .
• Iesire pentru difuzor cu impedanta de 8 ohmi .
• Redarea fisierelor MP3 de pe dispozitivele USB/SD .
• Radio FM.
• Afisaj LED .
• Protectie pentru acumulatorul incorporat pentru a evita deteriorarea acestuia in caz
de operare incorecta .
• O baterie de 9V obisnuita sau un acumulator de 8.4V poate fi utilizat in microfonul
portabil wireless respectiv in transmitatorul wireless .
Precautii:
• Acest aparat poate produce camp magnetic , datorita difuzorului cu magnet , va
rugam sa pastrati acest aparat departe de PC , televizor, la o distanta mai mare de 60
cm , in caz contrar campul magnetic va afecta imaginea si sunetul.
Dupa utilizare , va rugam sa scoateti cablul de alimentare din priza.
• Acest aparat trebuie sa fie ferit de temperaturi inalte sau surse de caldura , pentru a
evita deteriorarea acestuia.
• Acest aparat trebuie sa fie amplasat departe de transmitatorul wireless pentru a evita
interferentele (diafonia)
• Pentru acumulatorul incorporat :
1. Trebuie lasat la incarcat cel putin 8 ore inainte de utilizare , asigurati-va ca poate fi
RO
39
Manual de utilizare
conectat la incarcare in orice moment.
2. Trebuie incarcat cel putin 8 ore dupa descarcare pentru a proteja bateria.
• Va rugam sa nu folositi acest aparat in urmatoarele situatii (adresati-va doar
personalului calificat pentru remedierea acestor situatii).
1. Cablul de alimentare sau priza sunt deteriorate.
2. In interiorul aparatului exista apa sau exista corpuri straine.
3. Unele componente au fost avariate.
* Asigurati-va ca mentineti o distanta de cel putin 20cm in jurul acestui aparat.
Ventilatia este importanta pe durata utilizarii aparatului. Va rugam sa inlocuiti
acumulatorul uzat cu acelasi tip ca si cel original, 12V/1.2AH. Va rugam sa reciclati in
mod responsabil acest acumulator pentru a evita poluarea mediului.
Atentie:
Feriti aparatul de ploaie, umezeala si locuri pline de praf.
Pentru a evita riscul aparitiei unui soc electric, inainte de utilizarea aparatului, va rugam
sa verificati urmatoarele:
1. Verificati cablul de alimentare, asigurati-va ca este in stare buna.
2. Tensiunea de la reteaua de alimentare trebuie sa fie aceeasi cu tensiunea inscrisa
pe aparat sau in manual.
Va rugam sa nu desfaceti acest produs. Intretinerea si inspectia aparutului trebuie sa
fie efectuata de catre un tehnician calificat pentru a evita riscul de electrocutare sau
deteriorarea componentelor.
Asigurati-va ca opriti alimentarea de la retea dupa utilizarea aparatului, in caz contrar
bateria se va descarca profund si se poate scurta dramatic durata de viata a bateriei.
Dupa utilizarea transmitatorului wireless, va rugam sa scoateti bateria din el, pentru a
evita scurgerea bateriei.
Va rugam sa scoateti cardul USB / SD doar cand aparatul este oprit pentru a preveni
deteriorarea dispozitivului USB/SD.
Utilizarea sistemului de amplificare
Acest sistem poate fi folosit pentru sustinerea de cursuri in interior sau exterior. (In
special pentru profesori de dans si gimnastica) – atentie la conditiile de mediu in cazul
utilizarii in exterior.
Este un amplificator bun pentru interpretare, predare la clasa sau demonstratii ale
agentilor comerciali.
Cu acest sistem de amplificare, veti obtine un sunet clar care va fi auzit de departe!
RO
40
Manual de utilizare
Predarea orelor la clasa
Calatorii (ghid turistic)
Descrierea sistemului
2
1
6
7
3
8
4
9
5
10
11
RO
41
Manual de utilizare
12
14
15
16
17
18
19
13
20
23
RO
22
21
42
Manual de utilizare
35
37
25
24
36
34
33
26
27
28
31
29
32
30
1.W/MIC: Buton pentru controlul volumului microfonului fara fir . Puteti sa-l reglati de la
min la max conform nevoilor dumneavoastra.
2. LED PORNIRE: LED martor PORNIRE / OPRIRE.
3. LED 8.4V DC: LED martor pentru incarcare de 8.4V DC .
4. MIC/VOL: Buton de control al volumului microfonului cu fir .
5. MUFA MIC: Mufa de intrare pentru microfonul cu fir.
6. ANT: Antena pentru receptionarea de semnale wireless si FM.
7. ECHO: Acesta este butonul de control al functiei de ecou digital, il veti putea regla
de la minim la maxim pentru a crea un ecou perfect.
8. AUX IN: Buton de control al volumului pentru intrarea AUX .
9. TONE: Buton de control pentru sunetele inalte si sunetele de bas . De la minim
la maxim reglajul sunetului va fi de la bas la inalte . Reglati de la min. la max. in functie
de dorintele dumneavoastra.
10. MP3/FM/ON/OFF/VOLUME : Buton de control combinat pentru MP3/FM ON / OFF
/ VOLUM .
11. Mufa de intrare 12V DC 2A : Mufa pentru intrarea 12V DC/2A .
12. LED RF : Acesta este LED-ul pentru semnalul wireless.
13. Denumire marca
14. SD : Slot pentru card SD
15. USB : port USB
16. MUFA AUX IN : Mufa de intrare audio .
17. MUFA AUX OUT : Mufa de iesire audio .
18. IESIRE DIFUZOR 8 ohmi : Iesire pentru difuzor cu impedanta de 8 ohmi .
RO
43
Manual de utilizare
RO
44
19. MUFA CABLU DE ALIMENTARE AC
20. COMUTATOR AC ON / OFF
21. COMPARTIMENT INCARCARE SURSA 8.4V DC : Compartiment pentru
incarcatorul de 8.4V DC .
22. ACUMULATOR 12V DC 1.2 AH & COMPARTIMENT INCARCARE
23. TASTATURA PENTRU FUNCTII MP3/FM
24. MODE / MEMO FM:
1) In cazul fisierelor MP3: Apasati o data pentru a repeta o melodie sau muzica;
apasati de doua ori pentru a repeta fisierul; apasati de 3 ori pentru a repeta toate
fisierele de pe dispozitivul USB sau cardul SD si apasati din nou pentru a anula modul
de repetare. LED-ul palpaie incet, palpaie rapid, palpaie timp indelungat sau lumina
este estompata. In acelasi timp, ecranul LED afiseaza cuvintele PHONE, PFOL, PRLL,
POFF.
2) In cazul functiei FM: Apasati acest buton pentru a porni functia de memorare FM,
apasati din nou pentru a memora postul de radio FM.
3) Functia de memorare manuala FM: Apasati butonul MODE, numerele posturilor
radio FM vor palpai, apoi apasati butonul STOP, ecranul LED afiseaza urmatorul post
FM, selectati postul dorit, in termen de 5 secunde apasati acest buton MODE pentru
a memora postul radio. Daca in termen de 5 secunde nu veti memora posturile, se va
iesi automat din operatiunea de memorare.
25. FOLDER + : Apasati acest buton pentru a reda automat fisierul urmator .
26. FORWARD:
1) In cazul fisierelor MP3 : In timpul REDARII (PLAY) apasati acest buton o secunda
pentru a derula inainte la urmatoarea piesa . In timpul REDARII (PLAY) apasați acest
buton 2 secunde pentru a sari peste 10 melodii - trebui esa fie in acelasi fisier. Daca
fisierul are mai putin de 10 de melodii sau genuri de muzica , se sare la ultima melodie.
2) In cazul functiei FM : Apasati acest buton pentru a creste frecvența , apasati timp
de 2 secunde pentru o
cautare automata a posturilor radio in sens crescator
al frecventei. Odata gasit un post radio, se va opri cautarea si se va reda postul
receptionat.
27. PLAY / PAUSE / FM SCAN:
1) In cazul fisierelor MP3 , apasati acest buton pentru REDARE sau PAUZA . In timpul
redarii, LED-urile vor fi aprinse tot timpul si ecranul cu LED-uri afiseaza melodia redata
, durata , fisierul si modul de redare. Cand melodia este intrerupta, LED-ul REDARE
palpaie incet si ecranul LED va palpai . Secventa redarii este identica cu ordinea de
scriere a piesei MP3. Daca doriti sa modificati ordinea, aranjati mai intai piesele in
calculator (dupa timp).
2) In cazul functiei FM : Apasati acest buton timp de 2 secunde pentru cautarea
automata a posturilor radio FM si memorarea posturile radio . Se pot memora peste 20
de posturi radio FM si se poate sari automat peste posturile radio goale.
28. AFISAJUL cu LED-uri: Acesta este un ecran cu LED-uri care afiseaza fisierele
MP3/FM.
29. MP3/FM: Buton de pornire MP3/FM. Puteti apasa acest buton pentru a reda
fisierele MP3 sau posturile radio FM.
30. FOLDER-: Apasati acest buton pentru redarea automata a ultimului fisier.
31. BACKWARD:
1) In cazul fisierelor MP3: In timpul redarii, apasati acest buton o secunda pentru a
derula inapoi la ultima melodie sau muzica. In timpul REDARII apasati acest buton 2
Manual de utilizare
secunde pentru a derula 10 melodii pentru redare - trebuie sa fie in acelasi fisier. Daca
acesta are mai putin de 10 de melodii se sare la ultima melodie.
2) In cazul functiei FM: Apasati acest buton pentru a reduce frecventa, apasati timp
de 2 secunde pentru scanarea automata a posturilor radio in sens descrescator
al frecventei. Odata gasit un post radio, se va opri cautarea si se va reda postul
receptionat.
32. STOP / FM RECALL:
1) In cazul fisierelor MP3: In timpul REDARII, apasati acest buton pentru a OPRI
redarea. In timpul acesta, LED-ul REDARE se va estompa.
2) In cazul functiei FM: Apasati acest buton pentru a relua redarea posturilor radio
memorate. In timpul CAUTARII AUTOMATE, apasati acest buton pentru a opri functia
de CAUTARE AUTOMATA.
33. LED INCARCARE 12V DC
34. LED-ul MOD
35. LED SD
36. LED USB
37. LED REDARE / PAUZA
Precautii:
1. Accepta trei formate de fisiere: FAT, FAT16 si FAT32.
2. Se pot citi dispozitive USB de la 64MB pana la 4GB.
3. Fisierul MP3 de pe cardul USB/SD este citit in ordinea scrierii acestora (dupa timp).
FUNCTIONAREA SISTEMULUI
Functionarea sistemului cu alimentare AC
1. Conectati cablul de alimentare AC la priza. Asigurati-va ca tensiunea retelei este
cea necesara aparatului.
2. Porniti aparatul, LED-ul martor se va aprinde. Dupa utilizarea sistemului, asigurati-va
ca ati oprit alimentarea pentru a evita supraincarcarea bateriei incorporate.
3. Cand sursa de alimentare AC se opreste brusc, bateria integrata va alimenta
sistemul, iar acesta va functiona fara nici o intarziere.
4. Intindeti complet antena de receptie pentru o mai buna receptie a semnalului de la
microfonul wireless. In cazul in care receptorul receptioneaza semnalul cu interferente,
reglati antena pentru a reduce sau a anula interferentele.
5. Reglati volumul cu ajutorul butonului de control pentru a obtine un nivelul dorit.
Atentie: Trebuie sa deconectati sistemul de la alimentare daca nu il veti folosi timp
indelungat.
RO
45
Manual de utilizare
Functionarea sistemului pe curent continuu
1. Pozitionati intrerupatorul principal pe ON (PORNIRE) si LED-ul va indica faptul ca
sistemul fnctioneaza pe baterie .
(1) Inainte de a incepe sa utilizati dispozitivul, acumulatorul incorporat trebuie sa fie
complet incarcat.
(2) Atunci cand dispozitivul este in functiune si apar intreruperi zgomotoase si
distorsiuni ale sunetelor, aceasta inseamna ca acumulatorul integrat este slab, ar trebui
sa inlocuiti sursa de alimentare DC cu sursa AC (de la retea) si sa incarcati bateria.
(3) Atunci tensiunea acumulatorului este mai mica de 9 ± 0.5V, redarea de pe
acumulator se opreste in mod automat si trebuie utilizata alimentarea de la retea, in
caz contrar durata de viata a acumulatorului va fi redusa.
MIC/VO L
W/MIC
DC8.4 V
POWER
DC12V 2 A
ECHO
ANT
AUX IN
MP3/FM
/ON/OFF/VO L
Conector auto
iesire 12V
MIC/VO L
W/MIC
DC8.4 V
POWER
Atentie: Asigurati-va ca opriti alimentarea de la retea
a sistemului dupa utilizare, in caz contrar bateria va
fi descarcata profuns si se poate scurta durata de
viata a bateriei.
TONE
MIC
Atentie: Dupa ce-l utilizati, asigurati-va ca ati
pozitionat comutatorul pe OFF (OPRIT), pentru a
evita deteriorarea bateriei.
MIC
2. Puteti folosi conectorul de alimentare al brichetei
auto pentru a conecta aparatul la bateria masinii
sau puteti folosi un conector de alimentare extern
de 12V DC pentru a conecta aparatul principal la un
acumulator extern de 12V
DC12V 2 A
ANT
ECHO
AUX IN
TONE
MP3/FM
/ON/OFF/VO L
Acumulator 12V
DC
RO
46
Manual de utilizare
Modul de utilizare a microfonului lavaliera
1. Deschideti compartimentul bateriei prin glisarea in sus a capacului.
2. Puneti bateria in compartiment respectand polaritatea corecta si inchideti capacul.
3. Porniti transmitatorul si atunci cand LED-ul se aprinde, microfonul este gata de
functionare.
4. Aveti grija sa reglati comanda principala a emitatorului, incepeti de la cel mai mic
volum pentru a ajunge incet
la un nivel adecvat pentru a va auzi vocea in mod clar si cu feed-back. Sistemul este
gata de utilizare.
5. Dupa utilizare, va trebui sa scoateti bateria din transmitator pentru a evita
deteriorarea bateriei.
Volum
MIC
LED
Comutator
pornire
Mufa
MICROFON
Capac baterie 9V
Baterie 9V
Cover
MICROFON LAVALIERA WIRELESS
Modalitatea de utilizare a microfonului portabil wireless
1. Deschideti capacul bateriei.
2. Puneti bateria in compartiment respectand polaritatea corecta.
3. Rotiti comutatorul in pozitia ON (PORNIRE) si veti putea acum folosi microfonul.
4. Va rugam sa scoateti bateria in cazul in care nu veti folosi microfonul pentru o
perioada indelungata de timp.
Atentie: Nu puneti microfonul aproape de
difuzor pentru a evita aparitia diafoniei.
S
D
U
S
B
A
U
X
I
NA
U
X
O
U
T
SPK OUT
8¦¸
Avertisment: Daca LED-ul palpaie, acesta indica faptul ca bateria poate fi utilizata. Daca
LED-ul este aprins, indica faptul ca nivelul bateriei este scazut si trebuie sa schimbati
bateria inainte de a putea utiliza sistemul. Daca LED-ul nu palpaie si nu se aprinde,
indica faptul ca bateria este descarcata sau polaritatea este gresita.
RO
47
Manual de utilizare
MIC.net head
Indicator
9V battery
Holder
Switch
Battery
chamber
Battery cover
Open
Close
MICROFON PORTABIL WIRELESS
Modalitatea de utilizare a microfonului cu fir
Conectati doar microfonul la mufa de intrare microfon cu fir si puteti utiliza microfonul.
Modalitatea de conectare a sistemului de inregistrare la sistemul
amplificatorului
Iesirea audio va merge la
sistemul de inregistrare si veti
putea inregistra in timp ce folositi
amplificatorul.
S
D
U
S
B
A
U
X
I
NA
U
X
O
U
T
SPK OUT
8¦¸
Modalitatea de utilizare a intrarii auxiliare
Conectati cablul CD/MD la mufa de
intrare auxiliara. Reglati volumul in
functie de dorinta dumneavoastra.
CD/MD/ETC
S
D
U
S
B
A
U
X
I
NA
U
X
O
U
T
SPK OUT
8¦¸
Modalitatea de utilizare a ecoului digital
RO
48
Butonul de control al ecoului digital va regla ecoul pentru a obtine un sunet de calitate. In
cazul in care va confruntati cu efectul de diafonie, reglati ecoul digital la volum mai mic
pentru a evita fenomenul.
Manual de utilizare
Depanare
Daca aveti vreo problema cu sistemul , va rugam sa verificati alimentarea de la retea si
bateriile seturilor de microfoane si acumulatorul integrat . Daca utilizati o baterie noua de
9V, va rugam asigurati-va ca polaritatea este cea corecta .
Mai jos sunt prezentate defectele mai des intalnite si modalitatea lor de depanare. Daca
defectul persista, apelati la un service autorizat.
Diafonie
1 . Va rugam sa reglati volumul difuzorului la minim.
2 . Reglati volumul transmitatorului la un nivel redus.
3 . Schimbati directia difuzorului.
4 . Reduceti volumul la un nivel la care diafonia dispare.
Zgomot sau oprire brusca
1 . Verificati acumulatorul pentru a vedea daca acesta are tensiunea scazuta.
2 . Daca acumulatorul are tensiunea scazuta , va rugam sa folositi alimentarea de la
retea pentru a utiliza sistemul.
3 . Verificati conexiunea cablului la difuzor. Cablul poate fi rupt dupa o utilizare
necorespunzatoare .
Nici o voce nu este auzita
1 . Una dintre sursele de alimentare nu este pornita, va rugam sa verificati toate
sursele de alimentare si sa va asigurati ca acestea sunt toate pornite.
2 . Butoanele de control ale volumului sunt setate la cel mai mic nivel . Asigurati-va ca
acestea au un nivel corespunzator.
3 . Verificati cablurile lavalierei - acestea se pot rupe dupa o utilizare
necorespunzatoare.
Scoateti bateria de 9V , daca nu aveti de gand sa folositi transmotatorul o perioada mai
indelungata.
Atentie: Nu demontati acest produs . Intretinerea si de inspectia trebuie sa fie efectuata
de catre un tehnician calificat pentru a evita riscul electrocutarii sau deteriorarea
componentelor.
RO
49
Manual de utilizare
Specificatii tehnice
Alimentare
1. In ceea ce priveste tensiunea AC a retelei, va
rugam sa verificati tensiunea necesara, inscrisa pe
eticheta amplificatorului
2. Acumulator incorporat12V DC/1.2AH
Putere maxima
50W max
Difuzor
16CM,10W/4Ω
Domeniul de frecventa
VHF 174~216MHz
Sensibilitate
10dB/μV (S/N:>60dB)
Oscilatie
±0.005% PLL
Distanta wireless
35 meters
Dimensiuni (mm)
180 X 300 X 110mm
Specificatiile sunt supuse schimbarilor fara notificare prealabila.
„Compania Lechpol declară că produsul MIK0132 este în conformitate cu
cerinţele esenţiale şi alte prevederi relevante ale Directivei 1999/5/CE.
Declaraţia pentru descărcare este postata pe site-ul
www.lechpol.eu”.
RO
50
Bedienungsanleitung
DE
51
www.azusa.pl