1
ROMApad
[DE ] Installationsanleitung
[EN] Installer Manual
[FR] Notice installateur
[NL] Installatiehandleiding
ROMApad
NL Deutsch
Hiermit erklärt die Firma ROMA KG, dass dieses Produkt mit den grundlegenden Anforderungen und
allen relevanten Vorschriften der Richtlinie 1999/5/EG übereinstimmt. Die Konformitätserklärung
ist unter der Internetadresse www.roma.de/ce verfügbar. Abbildungen ohne Gewähr.
Achtung!
Hinweis
Français
Par la présente, ROMA KG déclare que l’appareil est conforme aux exigences essentielles et
aux autres dispositions pertinentes de la directive 1999/5/CE. Une déclaration de conformité est
mise à disposition à l’adresse Internet www.roma.de/ce. Images non contractuelles.
Attention !
Remarque
English
ROMA KG hereby declares that this product conforms to the essential requirements and other
relevant provisions of Directive 1999/5/CE. A declaration of conformity is available at www.roma.
de/ce. Images are not contractually binding.
Caution!
Note
Nederlands
Bij deze verklaart ROMA KG dat het product voldoet aan de essentiële eisen en aan de andere
beschikkingen van richtlijn 1999/5/EG. Een conformiteitsverklaring staat ter beschikking op de
website www.somfy.com/ce. Aan de afbeeldingen kunnen geen rechten worden ontleend.
Waarschuwing!
2
Opmerking
ROMApad
Inhaltsverzeichnis
DE
1. Einleitung
4
7. Konfiguration des Hauses
8
2. Sicherheitshinweise
4
2.1. Sicherheit und Gewährleistung
4
7.1. Konfiguration der Stockwerke
und Außenbereiche
8
2.2. Spezifische Sicherheitshinweise
4
7.2. Zuweisen der Räume den Stockwerken
und Außenbereichen
8
3. Voraussetzungen
5
4. Lieferumfang
5
7.3. Zuweisen der Produkte den Räumen
und Außenbereichen
5. Das ROMApad im Detail
5
8. Kurzbeschreibung der Bedienoberfläche 8
5.1. Vorderansicht
5
9. Technische Daten
10
5.2. Seitenansicht
5
9.1. ROMApad
10
5.3. Unterseite
5
9.2. Funktionen
10
5.4. Rückansicht
5
9.3. Netzteil
10
6. Konfiguration der Anlage
6
6.1. Grundeinstellungen am ROMApad
6
6.2. Einlernen von
io-homecontrol®- Produkten
8
9
Weitere Informationen und die PC-Software
zum updaten des ROMApads bzw.
zur Erstellung des Backups der Installation
finden Sie auf folgender Homepage:
www.roma.de/romapad
3
ROMApad
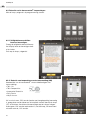
DE 1. Einleitung
Das ROMApad ist eine mobile lokale Haussteuerung, mit der bis zu 200 io-homecontrol Produkte bedient und
gesteuert werden können.
Die Bedienung gestaltet sich durch das 5 Zoll große Touchscreen Display sowie der bedienerfreundlichen
Bedienoberfläche sehr einfach.
Das Steuern von io-Antrieben bzw. von io-Produkten geschieht wie bei modernen Smartphones direkt mit
dem Finger. Es besteht die Möglichkeit, Ihr Haus virtuell nachzubilden. Ihr Haus kann in Etagen und Räumen
graphisch nachgebildet und die io-Produkte entsprechend zugeordnet werden. Außerdem besteht die
Möglichkeit, bis zu 40 Szenarien zu bilden, welche entweder manuell oder über bis zu 20 Tagesprogrammen
bzw. 4 Wochenprogrammen oder über verschiedene Sensoren aufgerufen werden können.
Achtung: Das ROMApad muss von einer fachlich qualifizierten Person konfiguriert werden, bevor es verwendet
werden kann.
io-homecontrol® ist eine Funktechnologie, die von Somfy und Partnerfirmen innerhalb des Verbunds
io-homecontrol® entwickelt wurde. Sie steuert alle Haustechnikantriebe und -automatisierungen, in die diese
Funktechnologie integriert wurde. Weitere Informationen
io-homecontrol bietet eine fortschrittliche und sichere Radio-Funktechnologie, die einfach
zu installieren ist. io-homecontrol gekennzeichnete Produkte kommunizieren miteinander,
wodurch Komfort, Sicherheit und Energieeinsparungen sichergestellt werden.
zur Technologie io-homecontrol® finden Sie auf der Website
www.io-homecontrol.com
www.io-homecontrol.com
®
®
2. Sicherheitshinweise
2.1. Sicherheit und Gewährleistung
Lesen Sie bitte vor der Installation und Verwendung dieses Produktes diese Gebrauchsanleitung sorgfältig durch.
Das ROMApad muss von einer fachlich qualifizierten Person für Antriebe und Automatisierungen im
Haustechnikbereich installiert werden, für die diese Anleitung bestimmt ist.
Außerdem muss die fachlich qualifizierte Person die gültigen Normen und Vorschriften des Landes befolgen, in
dem das Produkt installiert wird.
Jede Verwendung, die nicht dem von der Firma ROMA KG bestimmten Anwendungsbereich entspricht, gilt als
nicht bestimmungsgemäß. Im Falle einer nicht bestimmungsgemäßen Verwendung, wie auch bei Nichtbefolgung
der Hinweise in dieser Anleitung, entfällt die Haftung und Gewährleistungspflicht der ROMA KG.
Prüfen Sie vor der Montage die Kompatibilität dieses Produkts mit den vorhandenen Ausrüstungs- und
Zubehörteilen.
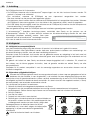
2.2. Spezifische Sicherheitshinweise
Entsprechend der Norm EN 12453 für die Nutzungssicherheit kraftbetätigter Tore ist bei der Verwendung des
ROMApad zur Steuerung automatischer Garagentor- oder Hoftorsysteme, die vom Benutzer nicht eingesehen
werden können, eine Sicherheitsvorrichtung vom Typ Fotozelle zu installieren. Im Falle einer Nichtbefolgung
dieser Anweisungen entfällt die Haftung und Gewährleistungspflicht der Firma ROMA KG für daraus entstehende Schäden.
Vermeidung von Schäden am Produkt:
1.Benutzen Sie ausschließlich das von ROMA mitgelieferte Zubehör
2. Der Einsatz von nicht kompatiblen Akkus kann zu schweren Schäden am Gerät führen. (Explosionsgefahr).
Zum Austauschen des Akkus wenden Sie sich bitte an Ihren Fachpartner
3.Vermeiden Sie Stöße.
4.Lassen Sie das Produkt nicht fallen.
5.Schützen Sie das Produkt vor Spritzwasser und tauchen Sie es
nicht in Flüssigkeiten.
6.Verwenden Sie zur Reinigung des Produkts keine Scheueroder Lösungsmittel. Sie können die Oberfläche mit einem
weichen und trockenen Tuch reinigen.
Speicherzellen und Batterien gehören nicht in den
Hausmüll. Entsorgen Sie sie entsprechend den geltenden Vorschriften im Handel oder den kommunalen
Sammelstellen.
Bewahren Sie das Produkt außerhalb der Reichweite von
Kindern auf.
4
ROMApad
3. Voraussetzungen
DE
1.Die Anlage muss elektrisch betriebene Produkte umfassen, die mit der io-homecontrol®-Technologie
ausgestattet sind (Rollläden, Garagentor, Dachfenster, Jalousien, Lampen usw.).
4. Lieferumfang
a ROMApad
1
a
b Netzteil1
b
c Tischständer1
c
d USB-Kabel1
d
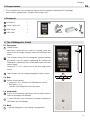
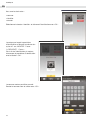
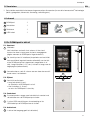
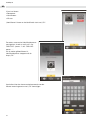
5. Das ROMApad im Detail
5.1. Vorderansicht
e
ROMA-Taste:
Kurz drücken: Wenn das ROMApad eingeschaltet ist und
sich das Display im Standby-Betrieb befindet, wird es aktiviert und die zuletzt angezeigte Seite wird aufgerufen.
Der Standby-Betrieb ist konfigurierbar (je nachdem ob das
ROMApad an der Spannungsversorgung angeschlossen
ist oder nicht, kann der Zeitraum bis zum Aktivieren des
Standbybetriebes frei eingestellt werden.).
( > 0,5 s) gedrückt halten: Die Startseite (Startmenü) wird
angezeigt.
f Touchscreen: Gestattet die Navigation durch die Menüs.
5.2. Seitenansicht
g
Taste
Ein/Aus/Standby:
•(2 s) gedrückt halten:
Das ROMApad wird ein- bzw. ausgeschaltet.
• Kurz drücken (< 2 s):
Das ROMApad geht in den Standby-Betrieb.
g
f
e
h
i
5.3. Unterseite
h Elektrische Kontakte, um das ROMApad im Tischständer
aufzuladen.
i
USB-Microstecker, um das ROMApad an die Spannungsversorgung anzuschließen.
j
5.4. Rückansicht
j
Batteriefach
5
ROMApad
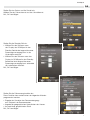
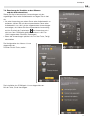
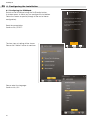
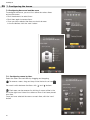
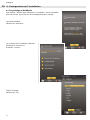
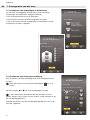
DE 6. Inbetriebnahme
6.1. Grundeinstellungen am ROMApad:
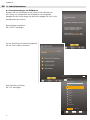
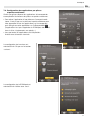
Schalten Sie das ROMApad mit der Taste Ein/Aus/Standby ein.
Ein Fenster zur Konfiguration des ROMApads wird angezeigt.
Befolgen Sie die Anweisungen der Bildschirmabfolge (bis zum Punkt:
Konfiguration des Hauses).
Beschreibung durchlesen:
Mit „START“ bestätigen.
Die vier Einstellschritte werden dargestellt.
Mit der Taste „Weiter“ fortfahren
Montag, 04.02.2013
20:15
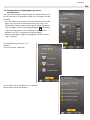
Sprache
Sprache wählen
Bitte Sprache auswählen:
Mit „OK“ bestätigen.
Français
Einstellungen
Deutsch
System
English
Español
Português
Sprache
Italiano
Ελληνικά
Datum
und Uhrzeit
Polska
Suomea
Anzeige
Danske
Svenska
Sonnenaufgang
und -untergang
Nederlandse
OK
6
Abbrechen
ROMApad
DE
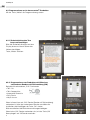
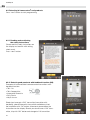
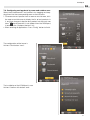
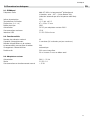
Stellen Sie das Datum und die Uhrzeit ein:
Wählen Sie das Datumsformat und das Uhrzeitformat.
Mit „OK“ bestätigen.
Stellen Sie die Standby-Zeit ein:
• Wählen Sie den Zeitraum wann
das Display des ROMApad in den
Standby-Betrieb bei angeschlossener
Spannungsversorgung bzw. in der
Ladestation wechselt.
• Wählen Sie den Zeitraum wann das
Display im ROMApad in den StandbyBetrieb bei nicht angeschlossener
Spannungsversorgung bzw. außerhalb
der Ladestation wechselt.
Mit „OK“ bestätigen
Stellen Sie die Dämmerungsfunktion ein:
Diese Funktion kann anhand einer der folgenden Kriterien
programmiert werden:
•Eingabe der Uhrzeiten des Sonnenuntergangs
zum Zeitpunkt der Sonnenwenden
•Angabe der geographischen Koordinaten des Hauses
•Auswahl einer gespeicherten Stadt
Mit „OK“ bestätigen
7
ROMApad
DE
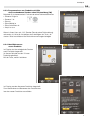
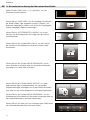
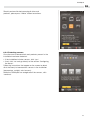
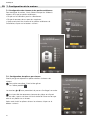
6.2. Programmieren von io-homecontrol®-Produkten
Mit der Taste „Weiter" die Programmierung starten
6.2.1 Sicherheitshinweise Tore
lesen und bestätigen
Bitte die Sicherheitshinweise auf dem
Display lesen und durch Setzen des
Hakens bestätigen.
Taste „Weiter“ drücken
6.2.2. Programmieren von Produkten mit Hilfe eines
vorhandenen Senders mit Rückmeldung (2W)
Beispiele für vorhandenen „2 W“-Funksender
• Telis 1 io
• Telis Composio io
• Impresario Chronis io
• Easy Sun io
• Keytis io usw.
Wenn in Ihrem Haus ein „2W“ Sender (Sender mit Rückmeldung)
vorhanden ist, bitte den vorhandenen Sender auswählen die
Installation durch betätigen der Taste „OK“ starten
Bitte anschließend die Bildschirmanweisungen befolgen.
Wenn keine „2W“ Sender vorhanden sind, mit der Taste „2W
überspringen“ auf 1W Sender wechseln
8
ROMApad
DE
6.2.3. Programmieren von Produkte mit Hilfe
eines vorhandenen Senders ohne Rückmeldung (1W)
Beispiele für io-homecontrol®-Funksender ohne Rückmeldefunktion:
• Smoove Origin io
• Smoove 1 io
• Situo io
• Situo Mobile io
• Situo Auto/Manu io
• Keytis io usw.
Wenn in Ihrem Haus ein „1W“ Sender (Sender ohne Rückmeldung)
vorhanden ist, bitte die Installation durch betätigen der Taste „Ja“
starten. Bitte anschließend die Bildschirmanweisungen befolgen
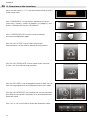
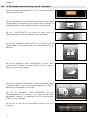
6.2.4. Identifizieren von
neuen Produkte
Im Display wird das erfolgreiche Suchen
nach Produkte dargestellt
(In diesem Beispiel wurden 12 neue
Produkte gefunden)
Mit der Taste „weiter“ fortfahren
Im Display werden alle neuen Produkte dargestellt:
Zum Identifizieren und Benennen der Produkte das
Icon des neuen Produktes auswählen:
9
ROMApad
DE
Sie können nun auswählen:
• Benennen
• Identifizieren
• Löschen
„Identifizieren“ auswählen und die Identifizierung mit „OK“ starten
Der Motor, bei dem der Identifizierungsprozess gestartet wurde, fährt nun zyklisch 1s
AUF - Pause - 1s Ab - Pause - …
Wenn der Motor identifiziert wurde, den
Identifizierungsprozess mit der Taste „OK“
stoppen
Anschließend kann der neue Motor benannt werden.
Neuen Namen eingeben und mit „OK“ bestätigen
10
ROMApad
DE
Wenn alle Antriebe und Produkte benannt wurden,
mit der Taste „weiter“ fortfahren.
6.2.5. Einprogrammieren von Sensoren
Gehen Sie nach dem Einlernen von neuen io-homecontrol®Produkten der Anlage wie folgt vor:
• Wenn die Anlage Sensoren umfasst, klicken Sie auf „weiter“.
• Andernfalls klicken Sie auf „abbrechen“ und machen weiter mit
dem Kapitel „Konfiguration des Hauses“.
Befolgen Sie die Bildschirmanweisungen für das Einlernen
sämtlicher io-homecontrol®-Sensoren der Anlage (Temperatur-,
Sonnen-, Windsensoren).
Wenn alle Sensoren von ROMApad erkannt wurden, klicken Sie
auf „weiter“
11
ROMApad
DE 7. Konfiguration des Hauses
7.1. Konfiguration der Stockwerke und Außenbereiche
Zur Konfiguration des Hauses müssen Sie zunächst die
Stockwerke und Außenbereiche auswählen,
in denen io-Produkte verbaut sind:
• Klicken Sie auf das Stockwerk bzw. den Außenbereich,
um es auszuwählen. .
• Klicken Sie erneut darauf, um es zu löschen.
•Wenn Sie die Stockwerke und Außenbereiche der Anlage
ausgewählt haben, klicken Sie auf die Schaltfläche „Weiter“.
7.2. Konfiguration der Räume pro Stockwerk
Ziehen Sie die Räume zum entsprechenden Stockwerk und legen
Sie sie dort ab.
Um einen Raum aus einem Stockwerk zu entfernen,
ziehen Sie ihn auf das Symbol des Papierkorbs.
Mit den Tasten
und
können Sie die Stockwerke durchwechseln.
Sie können jeden Raum umbenennen, indem Sie auf seinen
Namen klicken (in der Liste rechts im Bildschirm oder in einem
Stockwerk).
Wenn Sie alle Räume für alle Stockwerke ausgewählt haben,
klicken Sie auf die Schaltfläche „Weiter“.
12
ROMApad
DE
7.3. Zuweisung der Produkte zu den Räumen
und den Außenbereichen
Ziehen Sie die io-homecontrol®-Anwendungen auf den
zugehörigen Raum oder Außenbereich und legen Sie sie dort
ab.
• Um eine Anwendung aus einem Raum oder Außenbereich zu
entfernen, klicken Sie auf den entsprechenden Raum oder
Außenbereich, um die Liste der zugeordneten Anwendungen
anzuzeigen, und ziehen Sie die entsprechende Anwendung
auf das Symbol des Papierkorbs
(die Anwendung wird
nicht aus dem ROMApad gelöscht, sondern in die Liste
„Nicht zugeordnete Produkte“ übertragen).
• Wenn alle Anwendungen platziert sind: mit der Taste „Fertig“
abschließen
Die Konfiguration des Hauses ist nun
abgeschlossen.
Drücken Sie die Taste „weiter“.
Die Installation des ROMApads ist nun abgeschlossen.
Mit der Taste „Ende“ bestätigen.
13
Italiano
ROMApad
Suomea
Anzeige
Ελληνικά
Datum
und UhrzeitDanske
DE 8. Kurzebeschreibung der Benutzeroberfläche
Svenska
Polska
Sonnenaufgang
und -untergang
Halten Sie die ROMA-Taste (> 0,5 s) gedrückt, um zumSuomea
Anzeige
Startmenü zurückzukehren.
Nederlandse
Danske
Svenska
Sonnenaufgang
und -untergang
OK
Abbrechen
Klicken Sie auf „INFOPANEL“, um die Vorgänge, die während
Nederlandse
der letzten sieben Tage ausgeführt wurden („Historie“), die
laufenden Vorgänge („In Arbeit“) und die für den Tag programmierten Vorgänge („Geplant“) anzuzeigen.
OK
Klicken Sie auf „SYSTEMEINSTELLUNGEN“, um zu den
Fenstern für die Konfiguration der Anlage und des Hauses
zurückzukehren.
Abbrechen
Freitag, 13.08.2010
20:15
Startseite
Klicken Sie auf das Symbol „MEIN HAUS“, um die Position
der Produkte zu kontrollieren und/oder ein Produkt direkt
anzusteuern.
Freitag, 13.08.2010
20:15
Freitag, 13.08.2010
Klicken Sie auf das Symbol „MEINE SZENARIEN“, um ein
neues Szenario zu erstellen oder um vorhandene Szenarien
anzuzeigen, zu starten oder zu ändern.
Startseite
Startseite
MEIN HAUS
MEINE SZENARIE
20:15
MEINE SENSORE
MEINE WOCHE
MEIN HAUS
MEINE SZENARIEN
MEIN HAUS
MEINE SZENARIEN
Automatik
Klicken Sie auf das Symbol „MEINE WOCHE“, um einen
oder mehrere Tage zu programmieren, um vorhandene
Programmierungen anzuzeigen und in eine Woche aufzunehmen oder um den Automatikbetrieb zu aktivieren/deaktivieren.
an
aus
Klicken Sie auf das Symbol „MEINE SENSOREN“, um den MEINE WOCHE
MEINE SENSOREN
MEINE SENSOREN
MEINE WOCHE
Schwellenwert einzustellen und Szenarien zuzuordnen oder um
den Automatikbetrieb zu aktivieren/deaktivieren.
Automatik
Automatik
Klicken Sie auf „on“ oder „off“ zum Aktivieren oder Deaktivieren
des Automatikbetriebes (Sensoren und Zeiten).
14
an
aus
an
aus
ROMApad
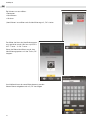
9. Technische Daten
DE
9.1. ROMApad
Funkfrequenz 868-870 MHz, io-homecontrol® bidirektional
Tri-Band, mit „LBT“ (Listen Before Talk),
(automatische Auswahl der freien Funkfrequenz)
SchutzgradIP20
Betriebstemperatur
+0 °C bis +60 °C
Abmessungen (B x H x T)
87 x 158 x 15 mm
KunststoffgehäuseABS
Spannungsversorgung
5 V DC mit Netzteil 230 V
Max. Stromverbrauch
15 W
USB-Schnittstelle
5 V DC 500 mA max.
9.2. Funktionen
Max. Anzahl Szenarien
Speicherkapazität
Max. Anzahl speicherbarer io-homecontrol®Anwendungen und -Sensoren
Umstellung Sommer-/Winterzeit
Funkreichweite
200
automatisch
200 m im Freifeld; 20 m durch zwei Stahlbetonwände
9.3. Netzteil
Spannungsversorgung
Ausgang
Energieverbrauch bei Normalbetrieb
230 V ~ 50 Hz
5 V DC 1 A
< 15 W
40
4 Wochen (max. 30 Szenarien pro Tag)
15
DE Notizen
16
ROMApad
Contents
EN
DE
1. Introduction
4
7. Configuring the house
2. Safety
4
2.1. Safety and liability4
2.2. Specific safety instructions4
3. Requirements
5
4. Contents
5
5. The ROMApad in Detail
5
5.1. Front panel5
5.2. Side5
5.3. Underneath5
8
7.1. Configuring floors and outside areas8
7.2.
Allocation of the rooms to floors
and outside areas8
7.3.
Allocation of the products to rooms
and outside areas9
8. Overview of the interface
8
9. Technical data
10
10
9.1. ROMApad
9.2. Functions10
9.3. Mains adapter10
5.4. Back5
6. Configuring the installation
6
6
6.1. Configuring the ROMApad
6.2. Detecting io-homecontrol end-products8
®
More information and the PC-software
for the ROMApad‘s update
respectively preparing the backup for installation
you will find at www.roma.de/romapad.
17
ROMApad
EN
DE 1. Introduction
The ROMApad is a mobile local home control which allows you to operate und control up to 200 io-homecontrol products.
The operation is very easy because of the 5 inch touchscreen display as well as the user-friendly interface.
The control of the io-drives respectively io-products is directly made by the finger like the modern Smartphones.
It is possible to reproduce your house virtually. You could graphically reproduce your house with floors and
rooms and match the io-products appropriately. Moreover, there is the opportunity to assembly up to 40
scenarios either could recalled that manual, by up to 20 daily programs respectively 4 weekly programs or by
different sensors.
Caution: The ROMApad have to be configurated by qualified staff before using.
(*) io-homecontrol®: radio control system developed by Somfy and its io-homecontrol® partners. The system
controls the motors and automatic devices in the home incorporating the technology (radio protocol). For more
information about io-homecontrol® technology, please go
io-homecontrol provides advanced and secure radio technology that is easy to install.
io-homecontrol labeled products communicate with each other, improving comfort, security
and energy savings.
to www.io-homecontrol.com.
www.io-homecontrol.com
2. Safety
2.1. Safety and liability
Before installing and using this product, please read this guide carefully.
This ROMA product must be installed by a home motorisation and automation professional, for whom this
guide is intended.
Moreover, installers must comply with the standards and legislation in force in the country where the product is
installed, and inform their customers of the operating and maintenance conditions for the product.
Any use outside the sphere of application specified by ROMA is prohibited. This invalidates the warranty and
absolves ROMA of all liability, as does any failure to comply with the instructions given herein.
Never begin installing without first checking the compatibility of this product with the associated equipment
and accessories.
2.2. Specific safety instructions
By using ROMApad please notice standard EN12453 for safety instructions of power operated doors to
control automatic garage door or gate systems. Should the systems not be in visual range for users, it is
necessary to install a safety device(s) with type photocell. ROMA does not accept any liability for any damage
may be caused by disregarding this instruction.
To avoid damaging the product:
1.Use only the mains adapter and accessories supplied by ROMA
2.Risk of explosion if battery is replaced by a non-compliant
battery. To replace the battery, please contact an installer.
3.Avoid impacts!
4.Do not drop!
5.Do not spill liquid on the unit or immerse in liquid.
6.Do not use abrasive products or solvents to clean it.
Its surface can be cleaned with a soft, dry cloth.
Please separate storage cells and batteries from other
types of waste and recycle them via your local
collection facility.
Keep out of the reach of children.
18
ROMApad
3. Requirement
EN
DE
1. The installation must include electrical devices that incorporate io-homecontrol® technology
(roller shutters, garage doors, skylights, blinds, lights etc.).
4.Contents
a ROMApad
1
b Power supply unit
1
c Table stand
1
d USB cable
1
a
b
c
d
5. The ROMApad in Detail
5.1. Front panel
e
ROMA-button:
Brief press: reactivates the screen in standby mode and
return to the last page displayed when the ROMApad was
active;
he standby setting can be configured (different periods
T
of inactivity may be selected depending on whether the
ROMApad is connected to or disconnected from the mains
power supply).
Long press ( > 0.5 s): returns you to the start page (home
menu).
Touchscreen:
used to navigate through the various menus.
f
5.2. Side
g Button on/off/standby:
• Long press (2 s): switches the ROMApad on and off.
• Brief press (< 2 s):
switches the ROMApad to standby mode.
g
f
e
h
i
5.3. Underneath
h 2 pins: for the electrical connection with the table mount in
order to recharge the ROMApad.
i
1 micro-USB port used to connect the power connector or
USB cable to the ROMApad.
j
5.4. Back
j 1 flap providing access to the battery compartment.
19
ROMApad
EN
DE 6. Configuring the installation
6.1. Configuring the ROMApad:
Switch on the ROMApad using the On/Standby button.
A window opens in which you can configure the installation.
Follow the screen sequence (through to the end of house
configuration).
Montag, 04.02.2013
20:15
First Setting Process
Thank you for using the new ROMApad.
For its first setting, we propose you to follow
a step by step process.
Read the presentation:
Confirm with „START“
A contextual help will guide you in each
setting phase.
Please, click on “start” to launch the
procedure.
The four steps of setting will be shown.
Please click “Weiter” button to continue.
Please select the language:
Confirm with „OK“
20
Start
ROMApad
EN
DE
Set the date and time:
Select the date format and time format.
Confirm with „OK“.
Set the standby periods:
• Select the period for which the
ROMApad must be inactive before
being switched to standby when
connected to the mains power supply.
• Select the period for which the
ROMApad must be inactive before
being switched to standby when not
connected to the mains power supply.
Confirm with „OK“.
Configure the dawn and twilight function.
Settings can be made for this function in accordance with
the following criteria:
• by entering sunset times at the solstices
• by entering the geographical coordinates of the house
• by selecting a preset city
Confirm with „OK“.
21
ROMApad
EN
DE
6.2. Detecting io-homecontrol® end-products
Press “next” button to start programming
6.2.1 Reading and confirming
the safety instructions
Please read the safety instructions on
the display and confirm with setting
check mark.
Press “next” button
6.2.2. Detecting end-products with feedback function (2W)
Examples of io-homecontrol® remote control transmitters with
feedback function:
• Telis 1 io
• Telis Composio io
• Impresario Chronis io
• Easy Sun io
• Keytis io usw.
Should you have got a “2W” transmitter (transmitter with
feedback), please choose this transmitter available and start
the installation with “OK” button. Afterwards please follow the
instructions on the display. Should you do not have a “2W” transmitter, skip with “2W” button and change to 1 W transmitter.
22
ROMApad
EN
DE
6.2.3. Detecting end-products without feedback function (1W)
Example of io-homecontrol® remote control transmitters
without feedback function:
• Smoove Origin io
• Smoove 1 io
• Situo io
• Situo Mobile io
• Situo Auto/Manu io
• Keytis io usw.
Should you have got a “1W” transmitter (transmitter without
feedback), please start the installation with “yes” button. Afterwards
please follow the instructions on the display.
6.2.4. Detecting new end-products
Follow the instructions that appear on the
screen to detect all the new io-homecontrol® end-products in the installation.
(In this example would be found 12
products)
Please press “next” button to continue.
On the display there is a list of all new products.
To identify and rename the products choose the
icon of the new product.
23
ROMApad
EN
DE
Now you could choose:
• Rename
• Identify
• Delete
Press “Identify” and “OK” to start identifying
The motor, started with process
of identifying, is now running
cyclically 1 sec “OPEN” – break – 1 sec
“CLOSE” – break - …
Stop by pressing “OK” button when the
motor is identified.
Afterwards the new motor could be renamed.
Entering new name und confirm with “OK” button
24
ROMApad
EN
DE
Should you have finished renaming all drives and
products, please press “Weiter” button to continue.
6.2.4. Detecting sensors
Once the new io-homecontrol® end-products present in the
installation have been detected:
• If the installation includes sensors, click “yes“.
• If not, click “no“ and go directly to the section “Configuring
the house“.
Follow the instructions that appear on the screen to detect
all of the Somfy io-homecontrol® sensors in the installation
(temperature, sunlight, wind sensors).
When the ROMApad has recognised all the sensors, click
“continue“.
25
ROMApad
EN
DE 7. Configuring the house
7.1.Configuring floors and outside areas
To configure the house, you must first define the various floors
and outside areas:
• Click the elements to select them.
• Click them again to remove them.
•Once you have selected the floors and outside areas
in the installation, click the “next“ button.
7.2. Configuring rooms by floor
Select the rooms on each floor by dragging and dropping.
To remove a room, drag and drop it into the trash can icon
You could switch between the floors with “ “ and “ “ buttons.
Each room can be renamed by clicking its name, either in the
list on the right-hand side of the screen or when it has been placed
on a floor.
Once you have selected the rooms on each floor, click the “next“
button.
26
ROMApad
EN
DE
7.3. Configuring end-products by room and outdoor area
Select the io-homecontrol® end-products by dragging and dropping them into the corresponding room or outside area.
• To remove an end-product from a room or outside area, click
the room or outside area to display the list of end-products in
it, and then drag and drop the end-product into the trash can
icons
(the end-product is not deleted from the ROMApad;
it returns to the "unplaced devices" list).
• When entering all applications: Press “Fertig” button to finish.
The configuration of the house is
finished. Click button “next“ .
The installation of the ROMApad is now
finished. Confirm with button “end“.
27
Italiano
ROMApad
Suomea
Anzeige
Ελληνικά
Datum
und UhrzeitDanske
EN
DE 8. Overview of the interface
Polska
Svenska
Sonnenaufgang
und -untergang
Press and hold down (> 0.5 s) the reactivation button to
return
Suomea
Anzeige
to the home menu.
Nederlandse
Danske
Svenska
Sonnenaufgang
und -untergang
OK
Abbrechen
Click “DASHBOARD“ to view actions performed in theNederlandse
last
seven days (“History“), actions in progress (“In progress“) and
actions scheduled for the day (“Scheduled“).
OK
Click “CONFIGURATION“ to return to the installation
and house configuration pages.
Click the “MY HOUSE“ icon to check the position
of end-products and/or directly operate an end-product.
Click the “MY SCENARIOS“ icon to create a new scenario
or view, start or modify existing scenarios.
Click the “MY WEEK“ icon to programme one or more days or
view existing programmes and incorporate them into a week.
Click the “MY SENSORS“ icon to adjust the sensor thresholds
and define the associated scenarios, or to activate/deactivate
automatic mode.
Click “on“ or “off“ to activate or deactivate automatic mode.
28
Abbrechen
ROMApad
9. Technical data
EN
DE
9.1. ROMApad
Radio frequency 868-870 MHz, io-homecontrol® two-way
three band, with LBT (Listen-Before-Talk),
(searches for an unoccupied radio frequency
prior to transmitting).
Protection ratingIP20
Operating temperature
+0 °C bis +60 °C
Dimensions (l x w x h)
87 x 158 x 15 mm
Plastic casingABS
Power supply
5V DC via 230 V mains adapter
Maximum power consumption
15 W
USB interface
5 V DC 500 mA max.
9.2. Functions
Maximum number of scenarios40
Storage capacity
4 weeks (30 scenarios per day maximum)
Number of io-homecontrol® end-products and
sensors that can be associated with the unit200
Summer/winter clock changeautomatic
Radio range
200 m (free field); 20 m through 2 reinforced concrete walls
9.3. Mains adapter
Power supply
Output
Power consumption during normal operation
230 V ~ 50 Hz
5 V DC 1 A
< 15 W
29
ROMApad
EN
DE Notes
30
ROMApad
Sommaire
FR
1. Introduction
4
7. Configuration de la maison8
2. Sécurité4
7.1.Configuration des niveaux et
des parties extérieures8
2.1. Sécurité et responsabilité4
2.2. Consignes spécifiques de sécurité4
3. Pré requis5
4. Contenu5
5. Le ROMApad en detail
5
5.1. Face avant5
5.2. Face latérale5
5.3. Face inférieure5
7.2.
Configuration des pièces par niveaux8
7.3.
Configuration des applications par
pièces et parties extérieures9
8. Description succincte de l'interface
8
9. Données techniques10
9.1. ROMApad
10
9.2. Fonctionnalités10
9.3. Adaptateur secteur10
5.4. Face arrière5
6. Configuration de l’installation6
6.1. Paramétrage du ROMApad
6
6.2. Découverte des applications
io-homecontrol®8
Vous trouverez plus d'information anisi que le logiciel
PC de mise à jour du ROMApad, permettant également
de sauvegarder vos paramètres d'installation,
en suivant le lien: www.roma.de/romapad
31
ROMApad
FR 1. Introduction
Le ROMApad est composé de 4 éléments :
• Le ROMApad qui permet le pilotage de tous les éléments io-homecontrol®*de l’habitat. Ce produit est
vendu par un professionnel.
• Une prise électrique qui permet de brancher sur le secteur le ROMApad. Cette prise permet aussi de le
recharger.
• Un support de table qui permet de poser et de connecter électriquement le ROMApad. Lorsque le
ROMApad est posé sur ce support, la prise branchée sur le secteur, il se recharge.
• Un câble USB qui permet de mettre à jour le ROMApad à l’aide d’un ordinateur connecté à Internet et de
le recharger.
Pour être opérationnel, le ROMApad devra être configuré par un installateur.
(*) io-homecontrol® : Système de radiocommande développé par Somfy et ses partenaires de l’association
io-homecontrol®. Ce système pilote les moteurs et automatismes de la maison qui intègrent cette technologie
(protocole radio). Pour plus d’informations sur la technoio-homecontrol bietet eine fortschrittliche und sichere Radio-Funktechnologie, die einfach
zu installieren ist. io-homecontrol gekennzeichnete Produkte kommunizieren miteinander,
wodurch Komfort, Sicherheit und Energieeinsparungen sichergestellt werden.
logie io-homecontrol®, nous vous remercions de consulter
www.io-homecontrol.com
le site Internet www.io-homecontrol.com.
®
®
2. Sécurité
2.1. Sécurité et responsabilité
Avant d’installer et d’utiliser ce produit, lire attentivement cette notice.
Ce produit ROMA doit être installé par un professionnel de la motorisation et de l’automatisation de l’habitat
auquel cette notice est destinée.
L’installateur doit par ailleurs, se conformer aux normes et à la législation en vigueur dans le pays d’installation
et informer ses clients des conditions d’utilisation et de maintenance du produit.
Toute utilisation hors du domaine d’application défini par ROMA est interdite. Elle entraînerait, comme tout
irrespect des instructions figurant dans cette notice, l’exclusion de la responsabilité et de la garantie ROMA.
Avant toute installation, vérifier la compatibilité de ce produit avec les équipements et accessoires associés.
2.2. Consignes spécifiques de sécurité
Conformément à la norme EN 12453, relative à la sécurité d’utilisation des portes et portails motorisés,
l’utilisation du TaHoma Pad pour la commande d’un automatisme de porte de garage ou de portail
sans visibilité de l’utilisateur, nécessite obligatoirement l’installation d’un dispositif de sécurité type cellule
photoélectrique sur cet automatisme. Dans le cas de non-respect de ces instructions, Somfy se libère de
toute responsabilité des dommages qui peuvent être engendrés.
Pour ne pas endommager le produit :
1. Utiliser uniquement l'adaptateur secteur et les accessoires fournis par ROMA
2. Risque d'explosion si la batterie est remplacée par une batterie non conforme.
Pour remplacer la batterie veuillez contacter un installateur.
3. Éviter les chocs !
4. Éviter les chutes !!
1
2
5. Ne pas faire de projection de liquide ni l’immerger.
6. Ne pas utiliser de produits abrasifs ni de solvants pour le
nettoyer. Sa surface peut être nettoyée à l’aide d’un chiffon
doux et sec.
Veiller à séparer les piles et batteries des autres types
de déchets et à les recycler via votre système local de
collecte.
Ne pas laisser à la portée des enfants
32
ROMApad
3. Pré requis
FR
1. L’installation doit posséder des équipements électriques intégrant la technologie io-homecontrol® (volet
roulant, porte de garage, fenêtre de toit, store, lumière etc).
4. Contents
a ROMApad
1
b Prise électrique
1
a
b
c Support de table1
c
d Câble USB1
d
5. Le ROMApad en détail
5.1. Face avant
e Bouton ROMA :
Appui bref : permet de réactiver l’écran en mode veille et
de revenir sur la dernière page affichée quand le ROMApad
est déjà allumé ;
f
La mise en veille est paramétrable (les temps d’inactivité
choisis peuvent être différents selon que le TaHoma Pad
est branché ou débranché).
Appui long ( > 0,5 s) : permet de revenir sur la page initiale
(menu d’accueil).
Écran tactile : permet de naviguer dans les différents
menus.
5.2. Face latérale
g Bouton de marche/veille :
•Appui long (2 s) :
permet d’allumer ou d’éteindre le ROMApad.
• Appui bref (< 3 s) :
permet de mettre en veille le ROMApad.
g
f
e
h
i
5.3. Face inférieure
h 2 plots : permettent le contact électrique avec le support
de table pour recharger le ROMApad.
i
1 prise micro-USB pour connecter soit la prise électrique,
soit le câble USB au ROMApad.
j
5.4. Face arrière
j 1 trappe donnant l’accès à la batterie.
33
ROMApad
FR 6. Configuration de l'installation
6.1. Paramétrage du ROMApad:
Une fenêtre s’affiche pour paramétrer l’installation, suivre l’enchaînement des écrans (jusqu’à la fin de la configuration de la maison).
Lire la présentation :
Valider avec «démarrer».
Les a étapes de l´installation s´affichent.
Continuer en cliquant sur
le bouton «suivant».
Choisir la langue :
Valider avec «OK».
34
ROMApad
FR
Régler la date et l’heure :
Choisir le format de la date, et le format de l’heure.
Valider avec «OK».
Régler la mise en veille :
• Choisir le temps d’inactivité nécessaire avant la mise en veille, quand le
ROMApad est branché.
• Choisir le temps d’inactivité nécessaire avant la mise en veille, quand le
ROMApad est débranché.
Valider avec «OK».
Paramétrer la fonction crépusculaire :
Cette fonction peut être paramétrée selon les critères
suivants :
• la saisie des heures de coucher du soleil aux solstices,
• les coordonnées géographiques de la maison,
• ou le choix d’une ville préenregistrée.
Valider avec «OK».
35
ROMApad
FR
6.2. Découverte des applications io-homecontrol®
Démarrer la programmation avec le bouton «suivant».
6.2.1 Lire et valider les consignes
de sécurité concernant les cotes
Veuillez lire les consignes de sécurité
qui s´affichent sur l´écran. Confirmer en
cochant la case.
Appuyer sur le bouton «suivant»
6.2.2. Découverte des applications avec retour
d’information (2W)
Exemples de télécommandes io-homecontrol® avec retour d’information :
• Telis 1 io
• Telis Composio io
• Impresario Chronis io
• Easy Sun io
• Keytis io usw.
Si vous disposez d´une télécommande «2W» (télécommande avec retour
d´information), veuillez sélectionner la télécommande à disposition et
démarrer l´installation avec la touche «OK». Veuillez suivre ensuite les
instructions qui s´affichent à l´écran.
Si vous ne disposez pas de télécommande «2W», veuillez passerà la
commande «1W» (sans retour d´information) avec le bouton «passer 2W».
36
ROMApad
FR
6.2.3. Découverte des applications sans retour d’information (1W)
Exemple de télécommandes io-homecontrol® sans retour d’information :
• Smoove Origin io
• Smoove 1 io
• Situo io
• Situo Mobile io
• Situo Auto/Manu io
• Keytis io usw.
Si vous disposez d´une télécommande «1W» (sans retour d´information),
veuillez démarrer l´installation en validant avec le bouton «oui». Suivre
ensuite les consignes qui s´affichent à l´écran.
6.2.4. Découverte de nouvelles
applications
Suivre les instructions qui s’affichent
à l’écran pour découvrir toutes les
nouvelles applications io-homecontrol®
de l’installation.
L´identification de 12 nouveaux produits
vous est présentée dans cet exemple.
Continuer avec le bouton «suivant».
Tous les nouveaux produits s´affichent à l´écran.
Pour l´identification et la dénomination des produits,
sélectionner l´icône du nouveau produit.
37
ROMApad
FR
Vous avez le choix entre :
• nommer
• identifier
• annuler
Sélectionner le bouton «identifier» et démarrer l´identification avec «OK».
Le moteur par lequel la procédure
d´identification a démarré, excécute des
cycles d´1 sec. MONTEE - Pause 1s DESCENTE - Pause ...
Dès la fin de l´identification du moteur,
interrompre la procédure d´identification
avec le bouton «OK».
Le nouveau moteur peut être nommé.
Rentrer le nouveau nom et valider avec «OK».
38
ROMApad
FR
Après avoir dénommé tous les moteurs et les
produits, cliquer sur «suivant» pour continuer.
6.2.5. Découverte des capteurs
Après avoir fini la découverte des nouvelles applications
io-homecontrol® de l’installation :
• Si l’installation comprend des capteurs, cliquer sur «continuer».
• Sinon cliquer sur «annuler» puis passer directement au chapitre
«Configuration de la maison».
Suivre les instructions qui s’affichent à l’écran pour découvrir tous
les capteurs Somfy io-homecontrol® de l’installation (capteurs de
température, de soleil, de vent).
Lorsque tous les capteurs ont été reconnus par le ROMApad,
cliquer sur «continuer».
39
ROMApad
FR 7. Configuration de la maison
7.1. Configuration des niveaux et des parties extérieures
Pour configurer la maison, il faut d’abord indiquer les différents
niveaux, ainsi que les parties extérieures :
• Cliquer sur les éléments pour les sélectionner.
• Cliquer à nouveau dessus pour les supprimer.
•Après avoir choisi les niveaux et les parties extérieures de
l’installation, cliquer sur le bouton «suivant».
7.2. Configuration des pièces par niveaux
Choisir par glisser-déposer les pièces relatives à chacun des
niveaux.
Pour retirer une pièce, il faut la faire glisser
sur l’icône poubelle
Les touches
et
vous permettent de passer d´un étage à un autre.
Il est possible de renommer chacune des pièces en cliquant
sur son nom, que ce soit dans la liste à droite de l’écran ou lorsque
celle-ci est placée sur un niveau.
Après avoir choisi les pièces de tous les niveaux, cliquer sur le
bouton «suivant».
40
ROMApad
FR
7.3. Configuration des applications par pièces
et parties extérieures
Choisir par glisser-déposer les applications io-homecontrol®
correspondant à chacune des pièces ou parties extérieures.
• Pour retirer l’application d’une pièce ou d’une partie extérieure, il faut cliquer sur la pièce ou la partie extérieure pour
faire apparaître la liste des applications qui la composent,
puis faire glisser cette application sur l’icône poubelle
(l’application n’est pas supprimée du ROMApad, elle revient
dans la liste « équipements non placés »).
• Lorsque toutes les applications ont été placées :
finaliser avec le bouton «terminé».
La configuration de la maison est
maintenat finie. Cliquer sur le bouton
«suivant».
La configuration de la ROMApad est
maintenat finie. Valider avec «end».
41
Italiano
ROMApad
Suomea
Anzeige
Ελληνικά
Datum
und UhrzeitDanske
FR 8. Discription succincte de l'interface Polska
Svenska
Sonnenaufgang
und -untergang
Faire un appui long (> 0,5 s) sur le bouton de réactivation
pour
Suomea
Anzeige
revenir au menu d’accueil.
Nederlandse
Danske
Svenska
Sonnenaufgang
und -untergang
OK
Abbrechen
Cliquer sur « TABLEAU DE BORD » pour visualiser les
actions
Nederlandse
réalisées les sept derniers jours (« Historique »), les actions en
cours (« en cours ») et les actions programmées pour la journée
(« programme »).
OK
Cliquer sur « CONFIGURATION » pour revenir aux pages de
configuration de l’installation et de la maison.
Cliquer sur l’icône « MA MAISON » pour contrôler la position des
applications et/ou manœuvrer directement une application.
Cliquer sur l’icône « MES SCÉNARIOS » pour créer un nouveau
scénario ou visualiser, lancer et modifier les scénarios existants.
Cliquer sur l’icône « MA SEMAINE » pour programmer une ou
plusieurs journées ou visualiser les programmations existantes
et les intégrer dans une semaine
Cliquer sur l’icône « MES CAPTEURS » pour régler le seuil des
capteurs et définir les scénarios associés, ou pour activer/
désactiver le mode automatique.
Cliquer sur «on» ou «off» pour activer ou désactiver le mode
automatique.
42
Abbrechen
ROMApad
9. Données techniques
FR
9.1. ROMApad
Fréquence radio 868-870 MHz, io-homecontrol® bidirectionnel
tri-bandes, avec « LBT » (Listen Before Talk), (sélection automatique de la fréquence radio libre).
Indice de protectionIP20
Température d’utilisation
+0 °C bis +60 °C
Dimensions (L x l x h)
87 x 158 x 15 mm
Boîtier plastiqueABS
Alimentation
5V DC par adaptateur secteur 230 V
Consommation maximum
15 W
Interface USB
5 V DC 500 mA max.
9.2. Fonctionnalités
Nombre de scénarios maximal40
Capacité d’enregistrement
4 semaines (30 scénarios par jour maximum)
Nombre d’applications et de capteurs
io-homecontrol® pouvant être associées200
Changement d’heure été/hiver
automatique
Portée radio
200 m en champ libre
20 m à travers 2 murs en béton armé
9.3. Adaptateur secteur
Alimentation
Sortie
Consommation en fonctionnement normal
230 V ~ 50 Hz
5 V DC 1 A
< 15 W
43
ROMApad
FR Notes
44
ROMApad
Inhoudsopgave
NL
1. Inleiding4
7. Configuratie van het huis10
2. Veiligheid4
7.1.Configuratie van verdiepingen
en buitenzones10
2.1. Veiligheid en aansprakelijkheid4
7.2.Configuratie van kamers per verdieping10
2.2. Bijzondere veiligheidsrichtlijnen4
3. Vereisten5
4. Inhoud5
5. De ROMApad in detail5
5.1. Voorkant5
5.2. Zijkant5
5.3. Onderkant5
7.3.
Configuratie van toepassingen
per kamer en buitenzone11
8. Beknopte beschrijving van de interface 14
9. Technische gegevens15
9.1. ROMApad
15
9.2. Functionaliteit15
9.3. Netadapter15
5.4. Achterkant5
6. Configuratie van de installatie6
6.1. De ROMApad instellen6
6.2. Detectie van
io-homecontrol®-toepassingen8
Verdere informatie en pc-software
voor het updaten van de ROMApads resp.
het maken van backups van de installatie
vindt u op de volgende Homepage:
www.roma.de\romapad
45
ROMApad
NL 1. Inleiding
De ROMApad bestaat uit 4 elementen:
• De ROMApad waarmee alle io-homecontrol®-toepassingen* van het huis bestuurd kunnen worden. Dit
product is te koop in de vakhandel.
• Een netstekker, waarmee de ROMApad op een stopcontact aangesloten kan worden.
Met deze stekker kan het product ook opgeladen worden.
• Een tafelsteun, die als houder dient en waarmee de ROMApad elektrisch aangesloten kan worden. Wanneer
de ROMApad in deze steun geplaatst is en de stekker in het stopcontact steekt, wordt hij opgeladen.
• Een USB-kabel, die het mogelijk maakt de software van de ROMApad bij te werken via een computer met
internetverbinding. Er wordt opnieuw geladen.
Voor een goede werking moet de ROMApad door een installateur geconfigureerd worden.
(*) io-homecontrol ®: draadloos besturingssysteem, ontwikkeld door Somfy en zijn partners van de
io-homecontrol ®-alliantie. Dit systeem bestuurt motoren en huisautomatiseringssystemen die met deze
technologie (draadloos protocol) werken. Voor meer
io-homecontrol bietet eine fortschrittliche und sichere Radio-Funktechnologie, die einfach
zu installieren ist. io-homecontrol gekennzeichnete Produkte kommunizieren miteinander,
informatie over de io-homecontrol ®-technologie verwijzen
wodurch Komfort, Sicherheit und Energieeinsparungen sichergestellt werden.
www.io-homecontrol.com
wij u naar de website www.io-homecontrol.com.
®
®
2. Veiligheid
2.1. Veiligheid en aansprakelijkheid
Lees deze handleiding zorgvuldig door alvorens dit product te installeren en in gebruik te nemen.
Dit Somfy-product moet geïnstalleerd worden door een professionele installateur van motoriserings- en
huisautomatiseringssystemen, voor wie deze handleiding bestemd is.
Daarnaast moet de installateur zich houden aan de geldende normen en wetgeving in het land waar het
product geïnstalleerd wordt en zijn klanten informatie geven over de bediening en het onderhoud van het
product.
Elk gebruik dat buiten het door Somfy omschreven toepassingsgebied valt is verboden. Dit, alsook het
niet naleven van de hierna gegeven instructies, doet de garantie vervallen en ontheft Somfy van elke
aansprakelijkheid.
Controleer of dit product compatibel is met de aanwezige apparatuur en accessoires alvorens met de
installatie te beginnen.
2.2. Bijzondere veiligheidsrichtlijnen
Wanneer de ROMApad gebruikt wordt om een geautomatiseerd systeem voor een garagedeur of hek te
bedienen dat niet zichtbaar is voor de gebruiker, is de installatie van een veiligheidsinrichting met fotoelektrische cel op dit geautomatiseerde systeem verplicht overeenkomstig de norm EN 12453 betreffende
de veiligheid van elektrisch bediende deuren en hekken. Als deze instructies niet nageleefd worden, is Somfy
niet aansprakelijk voor eventuele veroorzaakte schade.
Om schade aan het product te voorkomen:
1. Gebruik uitsluitend het meegeleverde toebehoren van Roma.
2. Het gebruik van niet-compatibele batterijen kan ernstige schade veroorzaken aan het apparaat
(explosiegevaar). Gelieve contact op te nemen met uw leverancier voor het wisselen van de batterij.
3. Vermijd schokken! 4. Laat het niet vallen!
5. Dompel het niet onder in een vloeistof.
1
2
6. Gebruik geen schurende producten of oplosmiddelen om
het product schoon te maken. Het productoppervlak kan
schoongemaakt worden met een zachte, droge doek.
Geheugencellen en de batterijen horen niet bij het
huishoudelijk vuil. Lever deze, volgens de toepasselijke
3
4
regelgeving, in bij een commercieel of gemeentelijk
inzamelpunt.
Houd het buiten het bereik van kinderen.
46
ROMApad
3. Vereisten
NL
1. De installatie moet elektrische toepassingen omvatten die voorzien zijn van de io-homecontrol®-technologie
(rolluik, garagedeur, dakvenster, zonwering, verlichting enz.).
4. Inhoud
a ROMApad
1
b Netstekker
1
a
b
c Tafelsteun1
c
d USB-kabel1
d
5. De ROMApad in détail
5.1. Voorkant
e Wektoets:
Kort indrukken: zo haalt u het scherm uit de standbystand en keert u terug naar de laatst weergegeven
pagina wanneer de ROMApad al ingeschakeld is;
f
De stand-bystand is instelbaar (de periode van inactiviteit
kan verschillend ingesteld worden afhankelijk van het feit
of de ROMApad op het stopcontact aangesloten is of
niet). Lang indrukken (> 0,5 sec.): zo keert u terug naar de
beginpagina (welkommenu).
Aanraakscherm: raak dit scherm aan om door de verschillende menu's te bladeren.
5.2. Zijkant
g Aan/uit/stand-bytoets:
•Lang indrukken (3 sec.):
zo schakelt u de ROMApad in of uit.
• Kort indrukken (< 3 sec.):
zo zet u de ROMApad in stand-by.
g
f
e
h
i
5.3. Onderkant
h 2 contactpunten: zorgen voor het elektrisch contact met
de tafelsteun om de ROMApad op te laden.
i
1 micro-USB-aansluiting om de netvoeding of de
USB-kabel op de ROMApad aan te sluiten.
j
5.4. Achterkant
j 1 deksel dat toegang geeft tot de batterij.
47
ROMApad
NL 6. Configuratie van de installatie
6.1. De ROMApad instellen
Schakel de ROMApad in met de aan/uit/stand-bytoets.
Er wordt een venster weergegeven om de installatie in te stellen.
Volg de opeenvolgende schermen (tot het einde van de configuratie
van het huis).
Lees de uitleg:
Bevestigen met „START“
De 4 stappen voor instellen worden
gespresenteert.
Ga verder met de knop „volgende“
Montag, 04.02.2013
20:15
Sprache
Sprache wählen
Français
Einstellungen
Deutsch
Kies de taal:
Bevestigen met „OK“
System
English
Español
Português
Sprache
Italiano
Ελληνικά
Datum
und Uhrzeit
Polska
Suomea
Anzeige
Danske
Svenska
Sonnenaufgang
und -untergang
Nederlandse
OK
48
Abbrechen
ROMApad
NL
Stel de datum en de tijd in:
Kies de datum- en tijdnotatie.
Bevestigen met „OK“
Stel de stand-bystand in:
• Kies de gewenste periode van inactiviteit voordat de ROMApad in stand-by
gaat wanneer hij op het stopcontact
aangesloten is.
• Kies de gewenste periode van inactiviteit voordat de ROMApad in stand-by
gaat wanneer hij niet op het stopcontact aangesloten is.
Bevestigen met „OK“
Stel de schemerfunctie in:
Deze functie kan worden ingesteld aan de hand van de volgende
criteria:
• de invoer van de tijden van zonsondergang bij de zonnewendes,
• de geografische coördinaten van het huis,
• of de keuze van een vooraf opgeslagen plaats.
Bevestigen met „OK“
49
ROMApad
NL
6.2. Detectie van io-homecontrol®-toepassingen
Met de knop „volgende“ de programmering starten.
6.2.1 Veiligheidsvoorschriften
lezen en bevestigen.
Graag de veiligheidsvoorschriften op
het display lezen en bevestigen door
af te vinken.
Druk op de knop „volgende“.
6.2.2. Detectie van toepassingen met statusmelding (2W)
Voorbeelden van io-homecontrol®-afstandsbedieningen met
statusmelding:
• Telis 1 io
• Telis Composio io
• Impresario Chronis io
• Easy Sun io
• Keytis io usw.
Als in uw huis een „2W“ zender (zender met terugkoppeling) aanwezig
is, graag deze zender kiezen en de installatie starten door op de knop
„OK“ te drukken. Aansluitend de aanwijzigen op het scherm volgen.
Indien geen „2W“ zender voorhanden is, met de knop „2W overslaan“
wisselen naar de „1W“ zender.
50
ROMApad
NL
6.2.3. Detectie van toepassingen zonder statusmelding (1W)
Exemple de télécommandes io-homecontrol® sans retour d’information :
• Smoove Origin io
• Smoove 1 io
• Situo io
• Situo Mobile io
• Situo Auto/Manu io
• Keytis io usw.
Als in uw huis een „1W“ zender aanwezig is (zender zonder
terugkoppeling), de installatie starten met de knop „Ja“. Aansluitend de
instructies op het scherm volgen.
6.2.4. Detectie van nieuwe
toepassingen
Volg de instructies op het scherm om alle
nieuwe io-homecontrol®-toepassingen
van de installatie te detecteren.
(In dit voorbeeld werden 12 nieuwe
producten gevonden).
Ga verder met de knop „volgende“.
In het display worden alle nieuwe producten getoond.
Om de producten te identificeren en te benoemen het
icoon van het desbetreffende product kiezen.
51
ROMApad
NL
U kunt nu kiezen:
• Benoemen
• Identificeren
• Wissen
„Identificeren“ kiezen en de identificatie start met „OK“
De motor, waarvan het identificatieproces
werd gestart, draait nu cyclisch 1 sec.
OMHOOG - pauze - 1 sec. OMLAAG pauze - ...
Als de motor geïdentificeerd is,
identificatieproces stoppen met de
knop „OK“
Aansluitend kan de nieuwe motor benoemd worden.
Nieuwe naam ingeven en met „OK“ bevestigen.
52
ROMApad
NL
Als alle motoren en producten benoemd zijn, vervolgen met de knop „volgende“.
6.2.5. Detectie van sensoren
Nadat de detectie van nieuwe io-homecontrol®-toepassingen
van de installatie is voltooid:
•Als de installatie sensoren bevat, klikt u op „ja“.
• Zo niet, dan klikt u op „nee“ en gaat u meteen door naar
„Configuratie van het huis“.
Volg de instructies op het scherm om alle Somfy
io-homecontrol®-sensoren van de installatie (temperatuur-,
zon- en windsensoren) te detecteren.
Wanneer alle sensoren door de ROMApad herkend zijn,
klikt u op „doorgaan“.
53
ROMApad
NL 7. Configuratie van det huis
7.1. Configuratie van verdiepingen en buitenzones
Om het huis te configureren moeten eerst de verschillende
verdiepingen en buitenzones aangeduid worden:
• Klik op de elementen om ze te selecteren.
• Klik er opnieuw op om de keuze ongedaan te maken.
•Klik na het kiezen van de verdiepingen en buitenzones van de
installatie op de knop "volgende".
7.2. Configuratie van kamers per verdieping
Kies de kamers van elke verdieping door ze te verslepen en neer
te zetten.
Sleep een kamer naar het vuilnisbakpictogram
om ze te
wissen.
Met de knoppen
en
kunt u de verdiepingen wisselen.
U kunt elke kamer hernoemen door op de naam ervan te
klikken, ofwel in de lijst rechts op het scherm, ofwel wanneer ze op
een verdieping geplaatst is.
Wanneer de kamers van alle verdiepingen gekozen zijn, klikt u op
de knop "volgende".
54
ROMApad
NL
7.3. Configuratie van toepassingen per kamer
en buitenzone
Kies de io-homecontrol®-toepassingen die overeenkomen met
elk van de kamers of buitenzones door ze te verslepen en neer
te zetten.
• Als u de toepassing van een kamer of buitenzone wilt wissen,
moet u op de kamer of buitenzone klikken om de lijst van
bijbehorende toepassingen weer te geven. Sleep de toepassing vervolgens naar het vuilnisbakpictogram
(de toepassing wordt niet gewist uit de ROMApad, maar verschijnt
opnieuw in de lijst "niet-geplaatste toepassingen").
• Wanneer alle toepassingen zijn ingegeven, afsluiten met de
knop „voltooien“.
De configuratie van het huis is nu
voltooid.
Druk op de knop „volgende“.
De installatie van de ROMApad is nu voltooid.
Met de knop „ëinde“ bevestigen.
55
Italiano
ROMApad
Suomea
Anzeige
Ελληνικά
Datum
und UhrzeitDanske
NL 8. Beknopte beschrijving van de interface
Polska
Svenska
Sonnenaufgang
und -untergang
Houd de wektoets lang ingedrukt (> 0,5 sec.) om terugSuomea
te keren
Anzeige
naar het welkommenu.
Nederlandse
Danske
Svenska
Sonnenaufgang
und -untergang
OK
Abbrechen
Klik op "DASHBOARD" om de acties die de laatste zeven
dagen
Nederlandse
zijn uitgevoerd ("Geschiedenis"), de lopende acties ("Bezig") en
de geplande acties voor vandaag ("Gepland") weer te geven.
OK
Abbrechen
Klik op "CONFIGURATIE" om terug te gaan naar de
configuratiepagina's van de installatie en van de woning.
Freitag, 13.08.2010
20:15
Startseite
Klik op het pictogram "MIJN HUIS" om de positie van de
toepassingen te controleren en/of een toepassing direct te
besturen.
Freitag, 13.08.2010
20:15
Freitag, 13.08.2010
Startseite
Startseite
MEIN HAUS
MEINE SZENARIE
20:15
Klik op het pictogram "MIJN SCENARIO'S" om een nieuw
scenario aan te maken of om bestaande scenario's weer te
geven, te starten of te wijzigen.
MEINE SENSORE
MEINE WOCHE
MEIN HAUS
MEINE SZENARIEN
MEIN HAUS
MEINE SZENARIEN
Automatik
Klik op het pictogram "MIJN WEEK" om een of meerdere dagen
te programmeren of om de bestaande programma's weer te
geven en ze te integreren in een week.
an
aus
Klik op het pictogram "MIJN SENSOREN" om de
activeringsdrempel van sensoren in te stellen en de eraan
MEINE SENSOREN
MEINE WOCHE
MEINE SENSOREN
MEINE WOCHE
gekoppelde scenario's te definiëren of om de automatische
modus in/uit te schakelen.
Automatik
Automatik
Klik op "on" of "off" om de automatische modus in of uit te
schakelen.
56
an
aus
an
aus
ROMApad
9. Technische gegevens
NL
9.1. ROMApad
Radiofrequentie 868-870 MHz, io-homecontrol® bidirectioneel
tri-band, met "LBT" (Listen Before Talk), (automatische keuze van de vrije radiofrequentie).
BeschermingsgraadIP20
Bedrijfstemperatuur
+0 °C bis +60 °C
Afmetingen (l x b x h)
87 x 158 x 15 mm
KunststofbehuizingABS
Voeding
5V DC par adaptateur secteur 230 V
Maximumverbruik
15 W
USB-interface
5 V DC 500 mA max.
9.2. Functionaliteit
Maximumaantal scenario's40
Opslagcapaciteit
4 weken (maximaal 30 scenario's per dag)
Aantal programmeerbare io-homecontrol®toepassingen en -sensoren200
Omschakeling zomer-/winteruur
automatique
Draadloos bereik
200 m in open veld
20 m door 2 betonnen muren
9.3. Netadapter
Voeding
Uitgang
Verbruik bij normaal gebruik
230 V ~ 50 Hz
5 V DC 1 A
< 15 W
57
ROMApad
NL Notities
58
Rollladen
Raffstoren
Textilscreens
© 2013 ROMA KG, 89331 Burgau, deutschland, 04.2013
ROMA, RONDO, PENTO, QUADRO, TRENDO, INTEGO, zipSCREEN, rollSCREEN, MODULO, WERSO, TERMO, PURO, KARO, ALUMINO,
ROLENTO, SILENTO, GECCO, funky, GENIO, SIDEO sind eingetragene Warenzeichen der ROMA KG, Burgau. Keine Haftung für Druckfehler.
Farbabweichungen sind drucktechnisch möglich. Texte und Bilder können Sonderaustattungen enthalten, die nicht zum Standardlieferumfang gehören.