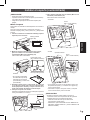
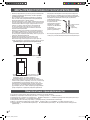
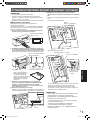
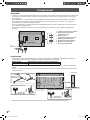
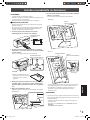
1
ENGLISH ENGLISH FRANÇAIS Setup Manual DEUTSCH PQ321 Series ESPAÑOL LCD Monitor РУССКИЙ ITALIANO IMPORTANT! To aid reporting in case of loss or theft, Model No.: please record the product’s model and serial numbers in the space provided. The numbers are located in the rear of the product. U8461 May 2013 First Edition Serial No.: Contents Installing the stand (supplied).............................................. 5 Connections............................................................................ 6 Turning Power On/Off............................................................ 7 Specifications.......................................................................... 8 Mounting Precautions . .............................................................................8 ENGLISH IMPORTANT INFORMATION................................................... 1 SAFETY PRECAUTIONS........................................................... 2 SAFETY INSTRUCTION............................................................ 3 MOUNTING PRECAUTIONS.................................................... 4 Supplied Components........................................................... 4 [ENGLISH] IMPORTANT INFORMATION WARNING: TO REDUCE THE RISK OF FIRE OR ELECTRIC SHOCK, DO NOT EXPOSE THIS PRODUCT TO RAIN OR MOISTURE. CAUTION RISK OF ELECTRIC SHOCK DO NOT OPEN CAUTION: TO REDUCE THE RISK OF ELECTRIC SHOCK, DO NOT REMOVE COVER. NO USER-SERVICEABLE PARTS INSIDE. REFER SERVICING TO QUALIFIED SERVICE PERSONNEL. The lightning flash with arrowhead symbol, within a triangle, is intended to alert the user to the presence of uninsulated “dangerous voltage” within the product’s enclosure that may be of sufficient magnitude to constitute a risk of electric shock to persons. The exclamation point within a triangle is intended to alert the user to the presence of important operating and maintenance (servicing) instructions in the literature accompanying the product. E SAFETY PRECAUTIONS Electricity is used to perform many useful functions, but it can also cause personal injuries and property damage if improperly handled. This product has been engineered and manufactured with the highest priority on safety. However, improper use can result in electric shock and/or fire. In order to prevent potential danger, please observe the following instructions when installing, operating and cleaning the product. To ensure your safety and prolong the service life of your LCD product, please read the following precautions carefully before using the product. 1. Read instructions — All operating instructions must be read and understood before the product is operated. 2.Keep this manual in a safe place — These safety and operating instructions must be kept in a safe place for future reference. 3. Observe warnings — All warnings on the product and in the instructions must be observed closely. 4. Follow instructions — All operating instructions must be followed. 5.Cleaning — Unplug the power cord from the AC outlet before cleaning the product. Use a dry cloth to clean the product. Do not use liquid cleaners or aerosol cleaners. 6.Attachments — Do not use attachments not recommended by the manufacturer. Use of inadequate attachments can result in accidents. 7.Water and moisture — Do not use the product near water. Do not install the product in a place where water may splash onto it. Be careful of equipment which drains water such as an air-conditioner. 8. Ventilation — The vents and other openings in the cabinet are designed for ventilation. Do not cover or block these vents and openings since insufficient ventilation can cause overheating and/or shorten the life of the product. Do not place the product on a sofa, rug or other similar surface, since they can block ventilation openings. Do not place the product in an enclosed place such as a bookcase or rack, unless proper ventilation is provided or the manufacturer’s instructions are followed. 9.Power cord protection — The power cords must be routed properly to prevent people from stepping on them or objects from resting on them. 10.The LCD panel used in this product is made of glass. Therefore, it can break when the product is dropped or applied with impact. Be careful not to be injured by broken glass pieces in case the LCD panel breaks. 11. Overloading — Do not overload AC outlets or extension cords. Overloading can cause fire or electric shock. 12.Entering of objects and liquids — Never insert an object into the product through vents or openings. High voltage flows in the product, and inserting an object can cause electric shock and/or short internal parts. For the same reason, do not spill water or liquid on the product. 13.Servicing — Do not attempt to service the product yourself. Removing covers can expose you to high voltage and other dangerous conditions. Request a qualified service person to perform servicing. 14.Repair — If any of the following conditions occurs, unplug the power cord from the AC outlet, and request a qualified service person to perform repairs. a. When the power cord or plug is damaged. b. When a liquid was spilled on the product or when objects have fallen into the product. c. When the product has been exposed to rain or water. d. When the product does not operate properly as described in the operating instructions. Do not touch the controls other than those described in the operating instructions. Improper adjustment of controls not described in the instructions can cause damage, which often requires extensive adjustment work by a qualified technician. e. When the product has been dropped or damaged. f.When the product displays an abnormal condition. Any noticeable abnormality in the product indicates that the product needs servicing. 15.Replacement parts — In case the product needs replacement parts, make sure that the service person uses replacement parts specified by the manufacturer, or those with the same characteristics and performance as the original parts. Use of unauthorized parts can result in fire, electric shock and/or other danger. 16.Safety checks — Upon completion of service or repair work, request the service technician to perform safety checks to ensure that the product is in proper operating condition. 17.Wall mounting — When mounting the product on a wall, be sure to install the product according to the method recommended by the manufacturer. 18.Heat sources — Keep the product away from heat sources such as radiators, heaters, stoves and other heat-generating products (including amplifiers). 19.Usage of the monitor must not be accompanied by fatal risks or dangers that, could lead directly to death, personal injury, severe physical damage or other loss, including nuclear reaction control in nuclear facility, medical life support system, and missile launch control in a weapon system. 20.Do not stay in contact with the parts of the product that become hot for long periods of time. Doing so may result in low-temperature burns. E SAFETY PRECAUTIONS (Continued) To maintain compliance with EMC regulations, use shielded cables to connect to the DisplayPort input terminal. ENGLISH If a monitor is not positioned in a sufficiently stable location, it can be potentially hazardous due to falling. Many injuries, particularly to children, can be avoided by taking simple precautions such as: • Using fixing devices like wall mount brackets recommended by the manufacturer. • Only using furniture that can safely support the monitor. • Ensuring the monitor is not overhanging the edge of the supporting furniture. • Not placing the monitor on tall furniture (for example, cupboards or bookcases) without anchoring both the furniture and the monitor to a suitable support. • Not standing the monitors on cloth or other materials placed between the monitor and supporting furniture. • Educating children about the dangers of climbing on furniture to reach the monitor or its controls. Especially for child safety - Don’t allow children to climb on or play with the monitor. - Don’t place the monitor on furniture that can easily be used as steps, such as a chest of drawers. - Remember that children can become excited while watching a program, especially on a “larger than life” monitor. Care should be taken to place or install the monitor where it cannot be pushed, pulled over, or knocked down. - Care should be taken to route all cords and cables connected to the monitor so that they cannot be pulled or grabbed by curious children. SAFETY INSTRUCTION - Do not use the monitor where there is a lot of dust, where humidity is high, or where the monitor may come into contact with oil or steam, as this could lead to fire. - Ensure that the monitor does not come into contact with water or other fluids. Ensure that no objects such as paper clips or pins enter the monitor as this could lead to fire or electric shock. - Do not place the monitor on top of unstable objects or in unsafe places. Do not allow the monitor to receive strong shocks or to strongly vibrate. Causing the monitor to fall or topple over may damage it. - Do not use the monitor near heating equipment or in places where there is likelihood of high temperature, as this may lead to generation of excessive heat and outbreak of fire. - Do not use the monitor in places where it may be exposed to direct sunlight. - The AC outlet shall be installed near the equipment and shall be easily accessible. The Power Cord and AC adapter - Use only the power cord and AC adapter supplied with the monitor. - When handling the AC adapter, observe the following: Incorrect handling may result in fire, electric shock, or injury. • Do not drop the AC adapter or subject it to impact. • Never disassemble the AC adapter. It contains high voltage parts that are dangerous to touch. • The AC adapter is for indoor use only. Do not use it outside. • Do not use the supplied AC adapter with other devices. - Do not damage the power cord and AC adapter nor place heavy objects on it, stretch it or over bend it. Also, do not add extension cords. Damage to the cord may result in fire or electric shock. - Do not use the power cord with a power tap. Adding an extension cord may lead to fire as a result of overheating. - Do not remove or insert the power plug with wet hands. Doing so could result in electric shock. - Unplug the power cord if it is not used for a long time. - Do not attempt to repair the power cord if it is broken or malfunctioning. Refer the servicing to the service representative. - Do not stay in contact with the parts of the product and the AC adapter that become hot for long periods of time. Doing so may result in low-temperature burns. - Do not fasten the AC adapter to the monitor or other equipment. Doing so may result in fire and electrical shock. E MOUNTING PRECAUTIONS • This product is for use indoors. • A mounting bracket compliant with VESA specifications is required. • To install on a stand (commercially available) or on a wall, or to remove or move the monitor, consult your dealer. • Mounting the monitor on the wall requires special expertise and the work must be performed by an authorized ASUS dealer. You should never attempt to perform any of this work yourself. Our company will bear no responsibility for accidents or injuries caused by improper mounting or mishandling. • Use the monitor with the surface perpendicular to a level surface. If necessary, the monitor may be tilted up to 25 degrees upward or 5 degrees downward. • This monitor should be used at an ambient temperature between 32°F (0°C) and 104°F (40°C). Provide enough space around the monitor to prevent heat from accumulating inside. For the monitor in landscape orientation • Do not place the monitor on a device which generates heat. • When installing the monitor in landscape orientation, you can attach the supplied horizontal sticker (Operation buttons) to the Horizontal sticker right side. Unit: inch [cm] 7-7/8 [20] 2 [5] * 2 [5] 2 [5] For the monitor in portrait orientation Unit: inch [cm] 7-7/8 [20] 2 [5] * 2 [5] 2 [5] * When you install this monitor on a wall, the monitor emits heat during operation, please be aware that this heat may discolor or alter the wall. • If it is difficult to provide sufficient space for any reason such as the installation of the monitor inside a housing, or if the ambient temperature may be outside of the range of 32°F (0°C) to 104°F (40°C), install a fan or take other measures to keep the ambient temperature within the required range. • Do not block any ventilation openings. If the temperature inside the monitor rises, this could lead to a malfunction. Supplied Components If any component should be missing, please contact your dealer. * Liquid Crystal Display Monitor: 1 * Power cord: 1 * AC adapter: 1 * Setup Manual (this manual): 1 * DisplayPort cable: 1 * RS-232C conversion cable (Φ3.5 mini-jack): 1 * Pedestal (for stand): 1 * Strut (for stand): 1 * Attachment plate (for stand): 1 (preinstalled on monitor) * Countersunk screws (M4 x 6 without washers): 5 * Screws (M4 x 10 with washers): 4 * Hex wrench: 1 * Cable clamp: 2 * Cable clamp (small): 1 * Cable clamp (large): 2 * Horizontal Sticker (operation buttons): 1 E (Operation buttons) Installing the stand (supplied) CAUTION! ENGLISH • Disconnect all cables from the monitor. • Firmly tighten the installation screws (supplied) with the hex wrench (supplied). • Ensure that you have sufficient space to work. 5.Fasten the stand to the monitor with the supplied screws (M4 x 10 with washers) (x4). Use the supplied hex wrench. • Landscape Screw (M4 x 10 with washers) nAttaching the stand Remove all packaging materials before starting work. To prevent the table (etc.) from being damaged by the stand pedestal, spread a thick, soft cloth (blanket, etc.) and work on the cloth. 1. Insert the stand strut into the packaging material (upper left) as shown. Packing material (upper left) Front 2.While supporting the stand pedestal with your hand, fasten to the stand strut with the supplied countersunk screws (M4 x 6 without washers) (x5). Use the supplied hex wrench. Countersunk screw (M4 x 6 without washers) • Portrait Operation buttons Screw (M4 x 10 with washers) Front 1 2 Pedestal Insert by hooking the tab Fixing pin * A bag containing the screws (supplied) and hex wrench (supplied) is attached to the round hole in the stand pedestal. 3.Spread a thick, soft cloth (blanket, etc.) that will prevent damage to the LCD panel on a stable flat surface where the entire monitor can be placed, and place the monitor with the LCD panel face down on the cloth. 4.Place the stand on the monitor. Hook the tab on the stand under the mounting plate (preinstalled on monitor). * If the monitor will be used in the portrait orientation, pull out the fixing pin (1), and insert it into the hole (2) as shown above. * To remove the stand, place the monitor and stand as shown above and remove the screws. CAUTION! • Adhere to the following when installing the monitor in its portrait orientation. Failing to adhere to the following may cause malfunctions. - Install the monitor such that the operation buttons are located on the top side. - Set the MONITOR on the MONITOR menu to PORTRAIT. (See USER MANUAL.) Tab E Connections CAUTION! • Be sure to turn off the main power switch and disconnect the plug from the power outlet before connecting/disconnecting cables. Also, read the manual of the equipment to be connected. • Be careful not to confuse the input terminal with the output terminal when connecting cables. Accidentally reversing cables connected to the input and output terminals may cause malfunctions and the other problems. • Do not use any cable that has a damaged or deformed terminal. Using such a cable may cause malfunctions. • Images may not be displayed properly depending on the computer (video cards), cables, or peripheral devices to be connected. 4 5 6 7 1. Main power switch 2. AC input terminal 3. Power cord (Supplied) 4. RS-232C input terminal 5. DisplayPort input terminal 6. Audio input terminal 7. Headphone terminal For power outlet 3 2 1 NOTE: • Set the audio input terminal used for each input mode in AUDIO SELECT on the SETUP menu. The factory settings are shown below. Input mode Audio input terminal (Factory setting) DisplayPort DisplayPort input terminal • The cables connected to the terminals on the rear of the monitor can be fastened with the cable clamp. Attach the cable clamps to the attachment parts on the back of the monitor and the stand, and bind the cables. Stand Cable Cable clamp attachment Cable clamp Cable clamp (small) Cable clamp (large) Cable clamp attachment Cable Cable clamp attachment • DisplayPort is a registered trademark of Video Electronics Standards Association. E Cable Turning Power On/Off Turning power on/off • Turn on the monitor first before turning on the PC or playback device. Press the power button ( ENGLISH CAUTION! ) to turn the power ON/OFF. Power button ( ) Turning on the main power Power LED Power lamp status Main power switch CAUTION! • The main power must be turned on/off with the main power switch. Do not connect/disconnect the power cord or turn the breaker on/off while the main power switch is on. • When switching the main power switch or the power button ( ) off and back on, always wait for at least 5 seconds. • For a complete electrical disconnection, pull out the main plug. Status of the monitor Green lit Power on Off Power off (Standby mode) Orange lit Input signal waiting mode CAUTION! • When switching the main power switch or the power button ( ) off and back on, always wait for at least 5 seconds. A short interval may result in a malfunction. NOTE: • When the main power switch is off, the monitor cannot be turned on. • If the monitor is in the input signal standby mode and you press the power button ( ), the monitor enters standby mode. E Specifications Model Power requirement Operating temperature Operating humidity Power consumption Dimensions Weight PQ321QE AC 100 V - 240 V, 50/60 Hz (when using the supplied AC adapter) 32°F to 104°F (0°C to 40°C) 20% to 80% (no condensation) 99 W * (when using the supplied AC adapter) Phys. Dimension with Stand(WxHxD) 750 x 489 x 256 mm Phys. Dimension without Stand (WxHxD) 750 x 441 x 35 mm Box Dimension (WxHxD) 990 x 558 x 230 mm Net Weight (Esti.) 13 Kg Gross Weight (Esti.) 17 Kg * When using the monitor in DC19 V : 88 W As a part of our policy of continuous improvement, ASUS reserves the right to make design and specification changes for product improvement without prior notice. The performance specification figures indicated are nominal values of production units. There may be some deviations from these values in individual units. Mounting Precautions • When installing, removing or moving the monitor, ensure that this is carried out by at least 2 people. • Be sure to use a wall-mount bracket designed or designated for mounting the monitor. • This monitor is designed to be installed on a concrete wall or pillar. Reinforced work might be necessary for some materials such as plaster / thin plastic board / wood before starting installation. This monitor and bracket must be installed on a wall which can endure at least 4 times or more the weight of the monitor. Install by the most suitable method for the material and the structure. • To attach a VESA-compliant mounting bracket, use M6 screws that are 5/16 inch (8 mm) to 3/8 inch (10 mm) longer than the thickness of the mounting bracket. • Do not use an impact driver. • When moving the monitor, be sure to hold it with the unit bottom and the side of unit. Do not hold the LCD panel or corners. This may cause product damage, failure, or injury. • Do not use any screw holes other than VESA holes for installation. E Table des matières INFORMATION IMPORTANTE................................................. 1 CHER CLIENT........................................................................... 1 PRÉCAUTIONS DE SÉCURITÉ.................................................. 2 MESURES DE SÉCURITÉ.......................................................... 3 PRÉCAUTIONS POUR LE MONTAGE....................................... 4 Composants fournis............................................................... 4 [FRANÇAIS] Mise en place du support (fourni)......................................... 5 Connexions............................................................................. 6 Mise sous tension et hors tension......................................... 7 Caractéristiques...................................................................... 8 Précautions pour le montage................................................ 8 AVERTISSEMENT : POUR RÉDUIRE LE RISQUE D’INCENDIE OU DE DÉCHARGE ÉLECTRIQUE, NE PAS EXPOSER CE PRODUIT À LA PLUIE OU À LA POUSSIÈRE. ATTENTION RISQUE DE DÉCHARGE ÉLECTRIQUE NE PAS OUVRIR ATTENTION : POUR RÉDUIRE LE RISQUE DE DÉCHARGE ÉLECTRIQUE, NE PAS RETIRER LE COUVERCLE. IL N’Y A AUCUNE PIÈCE RÉPARABLE PAR L’UTILISATEUR À L’INTÉRIEUR. AVERTIR LE PERSONNEL DE SERVICE QUALIFIÉ POUR TOUTE PROCÉDURE D’ENTRETIEN. FRANÇAIS INFORMATIONS IMPORTANTES Le symbole représenté par l’éclair à la tête en pointe de flèche à l’intérieur d’un triangle, est placé pour alerter l’utilisateur de la présence d’une “tension dangereuse” non isolée à l’intérieur du produit. Cette tension peut avoir une valeur suffisante pour constituer un risque d’électrocution à toute personne. Le point d’exclamation à l’intérieur d’un triangle est placé pour alerter l’utilisateur de la présence d’une procédure particulière ou d’une procédure de maintenance (entretien) importante dans les manuels accompagnant le produit. 1 F PRÉCAUTIONS DE SÉCURITÉ L’électricité remplit de nombreuses fonctions utiles, mais elle peut provoquer des blessures et des dégâts matériels si elle n’est pas utilisée correctement. Cet appareil a été conçu et fabriqué en attachant la plus grande importance à la sécurité. Cependant, une utilisation inadéquate peut entraîner une décharge électrique et/ou un incendie. Afin d’éviter tout danger potentiel, veuillez respecter les consignes suivantes lors de l’installation, de l’utilisation et du nettoyage de l’appareil. Afin d’assurer votre propre sécurité et de prolonger la durée de service de votre moniteur LCD, veuillez lire attentivement les précautions ci-dessous avant d’utiliser l’appareil. 1. Lisez ces explications — Vous devez lire et comprendre toutes les informations relatives au fonctionnement de l’appareil avant de l’utiliser. 2. Conservez cette brochure dans un endroit sûr — Ces explications concernant la sécurité et le fonctionnement doivent être conservées dans un endroit sûr pour vous y référer en cas de besoin. 3. Respectez les avertissements — Tous les avertissements figurant sur l’appareil et dans ce mode d’emploi doivent être strictement respectés. 4. Suivez les instructions — Toutes les explications sur le fonctionnement doivent être respectées. 5. Nettoyage — Débranchez le cordon d’alimentation au niveau de la prise du secteur avant de nettoyer l’appareil. Servez-vous d’un linge sec, et n’employez pas de détergents liquides ou en atomiseur. 6. Accessoires — N’utilisez pas d’accessoires non recommandés par le fabricant, car ceci pourrait provoquer des accidents. 7. Eau et humidité — N’utilisez pas cet appareil près de l’eau. N’installez pas le produit à un endroit où il pourrait recevoir de l’eau. Évitez en particulier les emplacements sous les appareils à vidange d’eau tels que les climatiseurs. 8. Ventilation — Des ouïes et autres ouvertures sont prévues dans le coffret de l’appareil pour sa ventilation. Ne recouvrez pas et ne bouchez pas ces ouvertures car une ventilation insuffisante peut provoquer une surchauffe et réduire la durée de vie de l’appareil. Ne placez pas l’appareil sur un sofa, un tapis ou toute autre surface analogue car ceci pourrait obstruer les ouvertures de ventilation. Cet appareil n’est pas conçu pour une installation encastrée; ne le placez donc pas dans un endroit fermé comme une bibliothèque ou une baie à moins qu’une ventilation adéquate ne soit prévue et que les consignes du fabricant ne soient respectées. 9. Protection du cordon d’alimentation — Faites passer les cordons d’alimentation à un endroit où ils ne seront pas écrasés ou coincés par d’autres objets. 10. Le panneau de l’écran à cristaux liquides (LCD) de cet appareil est fabriqué en verre et, par conséquent, il peut se briser si l’appareil tombe ou s’il reçoit un fort impact. Veillez à ne pas vous blesser par les éclats de verre si le panneau LCD devait être brisé. 11. Surcharge — Ne surchargez pas les prises de courant ou les rallonges car ceci peut entraîner un risque d’incendie ou d’électrocution. 12. Insertion de solides ou de liquides — N’introduisez jamais des objets par les orifices de cet appareil, car ils pourraient provoquer une électrocution et/ou un court-circuit en touchant des pièces internes sous haute tension. Pour la même raison, ne renversez jamais de l’eau ou un liquide sur l’appareil. 13. Entretien — N’essayez pas de réparer vous-même l’appareil. La dépose des couvercles peut vous exposer à une haute tension ou à d’autres dangers. Confiez toute réparation à un personnel qualifié. 14. Réparation — Dans les cas suivants, débranchez le cordon d’alimentation au niveau de la prise secteur et demandez à un personnel qualifié d’effectuer les réparations. a. Dégât sur le cordon ou la prise de courant. b. Infiltration d’un liquide ou pénétration d’un objet à l’intérieur de l’appareil. c. Exposition de l’appareil à la pluie ou à l’eau. d. Fonctionnement anormal malgré une conformité aux explications du mode d’emploi. Ne réglez que les commandes dont il est fait mention dans le mode d’emploi. Un réglage incorrect des autres commandes peut provoquer des dégâts qui nécessiteraient des réparations complexes par un technicien spécialisé. e. Chute ou dégâts subis par l’appareil. f. Tout changement notoire ou situation anormale de l’appareil indique qu’une réparation est nécessaire. 15. Pièces de rechange — Lorsque des pièces doivent être remplacées, assurez-vous que le technicien a utilisé les pièces spécifiées par le fabricant ou des pièces dont les performances et les caractéristiques sont identiques. Des changements non autorisés de pièces peuvent entraîner un incendie, une électrocution et/ou d’autres dangers. 16. Contrôles de sécurité — Après une intervention d’entretien ou de réparation, demandez au technicien de procéder à un contrôle pour être sûr que l’appareil peut être utilisé en toute sécurité. 17. Installation sur paroi — Si l’appareil doit être fixé sur une paroi, installez-le en respectant la méthode recommandée par le fabricant. 18. Sources de chaleur — Tenez l’appareil à l’écart de sources de chaleur, telles que radiateurs, dispositifs de chauffage, poêles et autres appareils dégageant de la chaleur (y compris les amplificateurs). 19. L’utilisation de ce moniteur ne doit pas entraîner des risques mortels ou des dangers qui pourraient provoquer directement la mort, des blessures sur le personnel, des dommages physiques sévères ou d’autres destructions, y compris dans le contrôle des réactions nucléaires dans les installations nucléaires, dans le système médical de réanimation, et dans le contrôle de lancement des missiles dans les systèmes d’armes. 20. N’entrez pas en contact direct avec les parties du produit ayant chauffé pendant de longues périodes. Il pourrait en résulter des brûlures à basse température. F 2 PRÉCAUTIONS DE SÉCURITÉ (Suite) Afin de satisfaire aux normes EMC, utiliser des câbles blindés pour connecter les bornes suivantes : Borne d’entrée DisplayPort. En particulier pour la sécurité des enfants - Ne laissez pas les enfants grimper sur ou jouer avec le moniteur. - Ne placez pas le moniteur sur des meubles qui peuvent facilement se transformer en marches comme une commode avec tiroirs. - Souvenez-vous que les enfants s’excitent souvent en visionnant un programme, surtout sur un moniteur « plus grand que la normale ». Il faut faire en sorte d’installer le moniteur là où il ne peut pas être poussé, tiré, ni basculé. - Il faut faire en sorte de placer les fils et les câbles connectés au moniteur de façon à ce que des enfants curieux ne puissent pas les tirer ni les saisir. FRANÇAIS Un moniteur placé sur un support instable est dangereux en raison des risques de chute qu’il présente. De nombreuses blessures, touchant en particulier les enfants, peuvent être évitées en prenant quelques précautions simples : • Utiliser les dispositifs de fixation tels que les supports muraux fournis par le fabricant. • Utiliser uniquement des meubles capables d’accueillir le moniteur en toute sécurité. • Vérifier que le moniteur ne dépasse pas du bord du meuble sur lequel il est posé. • Ne pas placer le moniteur sur des meubles hauts, armoires ou étagères, par exemple, sans fixer le meuble concerné et le moniteur à un support approprié. • Ne pas intercaler de tissu ou toute autre matière entre le moniteur et le meuble sur lequel il est posé. • Expliquer aux enfants qu’il est dangereux de grimper sur les meubles pour atteindre le moniteur ou ses boutons de commande. MESURES DE SÉCURITÉ - N’utilisez pas le moniteur dans un endroit où il y a beaucoup de poussières, où le degré d’humidité est élevé, ou encore là où il pourrait se trouver en contact avec de l’huile ou de la vapeur, car cela pourrait provoquer un début d’incendie. - Assurez-vous que le moniteur ne se trouve pas en contact avec de l’eau ou d’autres fluides. Assurez-vous qu’aucun objet tel que des agrafes et des trombones ne pénètre dans le moniteur, car cela pourrait provoquer un début d’incendie ou un choc électrique. - N’installez pas le moniteur au dessus des objets instables ou dans des endroits peu sûrs. Faites attention que le moniteur ne reçoive pas de chocs violents ni de fortes vibrations. Provoquer la chute du moniteur ou le culbuter peut l’endommager. - N’utilisez pas le moniteur à proximité d’un appareil de chauffage ou dans des endroits où la température est élevée, car cela pourrait conduire à un dégagement excessif de chaleur et provoquer un début d’incendie. - N’utilisez pas le moniteur dans des endroits exposés directement à la lumière du soleil. - La prise de secteur doit être installée près de l’équipement et être facilement accessible. Le cordon d’alimentation et l’adaptateur secteur - - Utilisez uniquement le cordon d’alimentation et l’adaptateur secteur fournis avec le moniteur. - Lorsque vous manipulez l’adaptateur secteur, respectez les instructions suivantes : Une mauvaise manipulation peut provoquer un incendie, un choc électrique ou des blessures. • Ne laissez pas tomber l’adaptateur secteur ou ne le soumettez pas à un choc. • Ne démontez jamais l’adaptateur secteur. Il contient des pièces sous haute tension dangereuses à toucher. - - - - - - • L’adaptateur secteur est destiné à être utilisé à l’intérieur uniquement. Ne l’utilisez pas à l’extérieur. • N’utilisez pas l’adaptateur secteur fourni avec d’autres appareils. N’endommagez pas le cordon d’alimentation, ni l’adaptateur secteur, ne déposez pas d’objets lourds sur ceux-ci, ne tirez pas dessus et ne les pliez pas de manière excessive. De même, n’ajoutez pas de rallonges. Tout endommagement du cordon d’alimentation peut provoquer un début d’incendie ou un choc électrique. Ne branchez pas le cordon d’alimentation sur une prise multiple. Ajouter une rallonge peut entraîner une surchauffe et provoquer un début d’incendie. Ne débranchez pas, ni ne branchez la prise d’alimentation avec des mains humides. En ce faisant, vous risquez un choc électrique. Débranchez le cordon d’alimentation si l’équipement n’est pas utilisé pendant une longue période. Ne tentez pas de réparer le cordon d’alimentation s’il est coupé ou s’il ne fonctionne pas correctement. Veuillez prendre contact avec le service après vente et suivre ses recommandations. N’entrez pas en contact direct avec les parties du produit et de l’adaptateur secteur ayant chauffé pendant de longues périodes. Il pourrait en résulter des brûlures à basse température. Ne fixez pas l’adaptateur secteur au moniteur ou à un autre matériel. Ceci pourrait provoquer un incendie ou un choc électrique. 3 F PRÉCAUTIONS POUR LE MONTAGE • Ce produit est destiné à être utilisé en intérieur. • Un support de montage conforme aux spécifications VESA est nécessaire. • Pour installer le moniteur sur un support (en vente dans le commerce) ou sur un mur, ou pour le démonter ou le déplacer, consultez votre revendeur. • Le montage du moniteur sur le mur demande des compétences techniques spéciales et le travail doit être fait par un revendeur agréé par ASUS. Vous ne devez jamais tenter de faire ce travail vous-même. Notre société déclinera toute responsabilité pour les accidents ou blessures causés par un montage incorrect ou par une mauvaise manipulation. • Utilisez le moniteur perpendiculairement à la surface horizontale. Si nécessaire, vous pouvez incliner le moniteur de 25 degrés vers le haut ou de 20 degrés vers le bas. • Ce moniteur doit être utilisé sous une température ambiante entre 0°C et 40°C. Laissez assez d’espace autour du moniteur pour empêcher que la chaleur ne s’accumule à l’intérieur. • Ne bloquez pas les ouvertures de ventilation. Si la température dans le moniteur s’élève, ceci pourrait causer un dysfonctionnement. • Ne placez le moniteur sur un équipement qui dégage de la chaleur. • Lorsque vous installez le moniteur dans la direction Autocollant horizontale, vous pouvez horizontal fixer l’autocollant horizontal (Boutons de (Boutons de fonctionnement) fonctionnement) fourni sur le côté droit. Pour le moniteur dans une direction horizontale Unité : cm 20 5 * 5 5 Pour le moniteur dans une direction verticale Unité : cm 20 5 * 5 5 *Si vous installez ce moniteur au mur, le moniteur émet de la chaleur pendant son fonctionnement ; cette chaleur peut décolorer ou altérer le mur. • S’il est difficile de laisser un espace suffisant pour une raison ou pour une autre (installation du moniteur dans une enceinte, par exemple) ou si la température ambiante est susceptible de dépasser la plage de valeurs prévue (de 0 à 40°C), installez un ventilateur ou prenez d’autres mesures appropriées pour maintenir la température ambiante dans la plage de valeurs requise. Composants fournis Si un composant venait à manquer, veuillez contacter votre revendeur. Moniteur à cristaux liquides : 1 Cordon d’alimentation : 1 Adaptateur secteur : 1 Manuel d’Installation (ce manuel) : 1 Câble DisplayPort : 1 Câble de conversion RS-232C (mini-prise ø3,5) : 1 Socle (pour support) : 1 Montant (pour support) : 1 Plaque de fixation (pour support) : 1 (pré-installée sur le moniteur) Vis fraisées (M4 x 6 sans rondelles) : 5 Vis (M4 x 10 avec rondelles) : 4 Clé Allen : 1 Serre-câbles : 2 Serre-câble (petit) : 1 Serre-câble (grand) : 2 Autocollant vertical (Logo) : 1 Autocollant vertical (Vierge) : 1 Autocollant horizontal (Boutons de fonctionnement) : 1 F 4 Mise en place du support (fourni) ATTENTION ! • Débranchez tous les câbles du moniteur. • Serrez fermement les vis d’installation (fournies) avec la clé Allen (fournie). • Assurez-vous d’avoir suffisamment d’espace pour travailler. 5. Fixez le support au moniteur avec les vis (M4 x 10 avec rondelles) fournies (x4). Utilisez la clé Allen fournie. • Horizontal Vis (M4 x 10 avec rondelles) nFixation du support FRANÇAIS Retirez tous les matériaux d’emballage avant d’entreprendre les travaux. Pour éviter que le socle du support n’abîme la table (etc.), étendez un tissu épais et doux (couverture, etc.) et travaillez sur ce tissu. 1. Insérez le montant du support dans le matériel d’emballage (supérieur gauche) comme indiqué. Matériau d’emballage (supérieur gauche) Face 2. Tout en maintenant le socle du support avec votre main, fixez-le au montant du support avec les vis fraisées fournies (M4 x 6 sans rondelles) (x5). Utilisez la clé Allen fournie. Vis fraisées (M4 x 6 sans rondelles) • Vertical Boutons de fonctionnement Vis (M4 x 10 avec rondelles) Avant 1 Socle 2 Insérer en accrochant la patte Broche de fixation *Un sachet contenant les vis (fournies) et la clé Allen (fournie) est attaché au trou rond sur le socle du support. 3. Pour éviter tout dommage au panneau LCD, étendez un tissu épais et doux (couverture, etc.) sur une surface plane et stable sur laquelle le moniteur tout entier peut être placé, et placez le moniteur en orientant le panneau LCD vers le bas sur ce tissu. 4. Placez le support sur le moniteur. Accrochez la patte sur le support sous la plaque de fixation (pré-installée sur le moniteur). * S i le moniteur est utilisé dans la direction verticale, retirez la broche de fixation (1), et insérez-la dans le trou (2) comme indiqué ci-dessus. *P our démonter le support, placez le moniteur et le support comme indiqué ci-dessus et retirez les vis. ATTENTION ! • Respectez la condition suivante quand vous installez le moniteur dans la direction verticale. Le non respect de cette condition peut causer des dysfonctionnements. - Installez le moniteur de sorte que les boutons de fonctionnement soient situés vers le haut. - Réglez le MONITOR <MONITEUR> sur PORTRAIT dans le menu MONITOR <MONITEUR>. (Voir le MODE D’EMPLOI.) Patte 5 F Connexions ATTENTION ! • Veillez à bien mettre hors tension l’interrupteur principal puis débranchez la prise de l’alimentation secteur avant de connecter ou de déconnecter les câbles. Lisez également le manuel de l’équipement à connecter. • Veillez à ne pas confondre la borne d’entrée avec la borne de sortie quand vous connectez les câbles. En confondant les câbles branchés aux bornes d’entrée et de sortie, vous pouvez causer des dysfonctionnements et d’autres problèmes. • N’utilisez pas de câble ayant un terminal endommagé ou déformé. Cela pourrait causer des dysfonctionnements. • Les images peuvent ne pas s’afficher correctement selon l’ordinateur (cartes vidéo), les câbles ou les périphériques connectés. 4 4 5 6 5 7 1. 2. 3. 4. 5. 6. 7. Interrupteur principal Borne d’entrée secteur Cordon d’alimentation (fourni) Borne d’entrée RS-232C Borne d’entrée DisplayPort Borne d’entrée audio Borne des écouteurs 6 7 Vers la prise d’alimentation secteur For power outlet 3 3 2 2 1 1 REMARQUE : • Sélectionnez la borne d’entrée audio à utiliser dans AUDIO SELECT <SÉLECTION ENTRÉE AUDIO> du menu SETUP <INSTALLATION>. Les réglages par défaut sont indiqués ci-dessous. Mode d’entrée Borne d’entrée audio (paramètre d’origine) DisplayPort Borne d’entrée DisplayPort • Les câbles raccordés aux bornes situées à l’arrière du moniteur peuvent être attachés à l’aide du serre-câbles. Fixez les serre-câbles dans les pièces de fixation à l’arrière du moniteur et du support, et reliez les câbles. Support Câble Fixation du serre-câble Serre-câbles Serre-câble (petit) Serre-câble (grand) Fixation du serre-câble Câble Fixation du serre-câble • DisplayPort est une marque déposée de Video Electronics Standards Association. F 6 Câble Mise sous tension et hors tension ATTENTION ! Mise sous/hors tension • Mettez sous tension le moniteur d’abord avant de mettre sous tension le PC ou l’équipement de lecture. Appuyez sur la bouton POWER ( ) ou sur l’interrupteur d’alimentation pour mettre sous/hors tension. Mise sous tension de l’interrupteur principal Bouton POWER ( ) Interrupteur principal État du témoin d’alimentation Allumé en vert Éteint Allumé en orange ATTENTION ! • La mise sous/hors doit être effectuée à l’aide de l’interrupteur d’alimentation. Ne branchez/débranchez pas le cordon d’alimentation ou ne mettez pas le disjoncteur sous/hors tension lorsque l’interrupteur d’alimentation est en position marche. • Lors de la mise hors tension et de la remise sous tension, ou lorsque vous appuyez sur l’interrupteur principal ou le bouton POWER ( ), attendez toujours au moins 5 secondes. • Pour déconnecter complètement l’alimentation électrique, retirez la fiche principale de la prise. FRANÇAIS Diode d’alimentation État du moniteur Power en position marche Power en position arrêt (mode Veille) Mode attente du signal d’entrée ATTENTION ! • Lors de la mise hors tension et de la remise sous tension, ou lorsque vous appuyez sur l’interrupteur principal ou le bouton POWER ( ), attendez toujours au moins 5 secondes. Un court intervalle peut entraîner un dysfonctionnement. REMARQUES : • Lorsque l’interrupteur principal est en position arrêt, il est impossible de mettre le moniteur en marche. • Si le moniteur est dans le mode veille du signal d’entrée et que vous appuyez sur le bouton POWER ( ), le moniteur entre en mode veille. 7 F Caractéristiques Modèle Alimentation Température de fonctionnement Hygrométrie de fonctionnement Consommation électrique Dimensions (mm) (à l’exclusion des éléments qui dépassent) Poids (kg) PQ321QE CA 100 V - 240 V, 50/60 Hz (en utilisant l’adaptateur secteur fourni) 0°C à 40°C 20 % à 80 % (sans condensation) 99 W * (en utilisant l’adaptateur secteur fourni) Dimensions physiques avec le socle (LxHxP) : 750 x 489 x 256 mm Dimensions physiques sans le socle (LxHxP) : 750 x 441 x 35 mm Dimensions de la boîte (LxHxP) : 990 x 558 x 230 mm Poids net (Estimé) : 13 Kg Poids brut (Estimé) : 17 Kg * Lors de l’utilisation du moniteur en 19Vcc : 88 W ASUS se réserve le droit d’apporter des modifications à la présentation et aux caractéristiques des appareils à fin d’amélioration. Les valeurs indiquées dans ce document sont les valeurs nominales des appareils de série mais de légères différences peuvent être constatées d’un appareil à l’autre. Précautions pour le montage • L’installation, le démontage ou le déplacement du moniteur doit être fait par 2 personnes ou plus. • Veillez à utiliser un support mural conçu ou prévu pour la fixation du moniteur. • Ce moniteur est prévu pour être installé sur un mur ou un pilier en béton. Un travail de renforcement pourrait s’avérer nécessaire pour certains matériaux tels que le plâtre, un mince panneau de plastique ou le bois avant de commencer l’installation. Le mur sur lequel ce moniteur et le support doivent être installés doit pouvoir supporter, au moins, 4 fois son poids ou davantage. Installez de la manière qui convient le mieux en fonction du matériau et de la structure. • Pour fixer un support de montage compatible avec VESA, utilisez des vis M6 de 8 mm à 10 mm plus longues que l’épaisseur du support de montage. • N’utilisez pas de tournevis à percussion. • Lorsque vous déplacez le moniteur, assurez-vous de le saisir sur le bas de l’unité et le côté de l’unité. Ne saisissez pas le panneau LCD ou les angles. Ceci pourrait causer une panne, un dysfonctionnement ou une blessure. • N’utilisez pas de trous de vis autres que les trous standard VESA pour l’installation. F 8 Índice INFORMACIÓN IMPORTANTE..........................................1 PRECAUCIONES DE SEGURIDAD..................................2 INSTRUCCIONES DE SEGURIDAD.................................3 PRECAUCIONES DE MONTAJE.......................................4 Componentes suministrados..........................................4 [ESPAÑOL] Instalar el soporte (suministrado)...................................5 Conexiones.......................................................................6 Encendido/apagado . .......................................................7 Especificaciones...............................................................8 Precauciones de montaje................................................8 INFORMACIÓN IMPORTANTE ADVERTENCIA: P ARA REDUCIR EL RIESGO DE INCENDIO O DESCARGAS ELÉCTRICAS, NO EXPONGA ESTE PRODUCTO A LA LLUVIA NI A LA HUMEDAD. RIESGO DE DESCARGAS ELÉCTRICAS NO ABRIR PRECAUCIÓN: PARA REDUCIR EL RIESGO DE DESCARGAS ELÉCTRICAS, NO RETIRE LA TAPA. EN EL INTERIOR NO HAY PIEZAS QUE EL USUARIO PUEDA REPARAR. SOLICITE CUALQUIER REPARACIÓN A UN TÉCNICO DE SERVICIO CALIFICADO. ESPAÑOL PRECAUCIÓN El símbolo del rayo con cabeza de flecha dentro de un triángulo está concebido para avisar al usuario de la presencia de “tensión peligrosa” sin aislamiento en el interior del producto que podría ser de magnitud suficiente para constituir un riesgo de descargas eléctricas a las personas. El símbolo de exclamación dentro de un triángulo está concebido para avisar al usuario de la presencia de instrucciones importantes de uso y mantenimiento (servicio) en la documentación que acompaña al producto. S PRECAUCIONES DE SEGURIDAD La electricidad se emplea para muchas funciones útiles pero también puede causar lesiones personales y daños en la propiedad si se manipula de forma inadecuada. Este producto se ha diseñado y fabricado poniendo el máximo énfasis en la seguridad. No obstante, el uso inadecuado podría tener como resultado descargas eléctricas y/o incendios. Para evitar peligros potenciales, observe las siguientes instrucciones cuando instale, utilice y limpie el producto. Para garantizar su seguridad y prolongar la vida de servicio de su producto de LCD, lea atentamente las siguientes precauciones antes de usar el producto. 1. Lea las instrucciones — Todas las instrucciones operativas deberán leerse y comprenderse antes de utilizar el producto. 2.Mantenga este manual en un lugar seguro — Estas instrucciones de seguridad y operativas deberán guardarse en un lugar seguro para referencia en el futuro. 3. Tenga en cuenta las advertencias — Todas las advertencias e instrucciones del producto deberán observarse estrictamente. 4. Respete las instrucciones — Deberán respetarse todas las instrucciones operativas. 5.Limpieza — Desenchufe el cable de alimentación de la toma de alimentación de corriente antes de limpiar el producto. Utilice un paño seco para limpiar el producto. No emplee limpiadores líquidos ni aerosoles. 6.Accesorios — No utilice accesorios no recomendados por el fabricante. El empleo de accesorios inadecuados podría provocar accidentes. 7.Agua y humedad — No utilice el producto cerca del agua. No instale este producto en lugares donde puedan producirse salpicaduras de agua. Preste especial atención a equipos que drenen agua, por ejemplo los de aire acondicionado. 8. Ventilación — Los respiraderos y otras ranuras de la caja están diseñados para ventilación. No cubra ni bloquee dichos respiraderos y ranuras, ya que la ventilación insuficiente podría provocar sobrecalentamiento y/o acortar la vida operativa del producto. No coloque el producto sobre un sofá, una alfombra u otras superficies similares ya que se podrían bloquear las ranuras de ventilación. No coloque el producto en un lugar cerrado como, por ejemplo, una librería o una estantería, a menos que se proporcione una ventilación adecuada o se respeten las instrucciones del fabricante. 9.Protección del cable de alimentación — Los cables de alimentación deberán ubicarse adecuadamente para evitar que las personas puedan tropezar con ellos o que los objetos puedan descansar sobre éstos. 10.El panel de LCD utilizado en este producto está hecho de cristal. Consiguientemente, podría romperse si el producto cae al suelo o recibe un golpe. Tenga cuidado de no herirse con los trozos de cristal en caso de rotura del panel de LCD. 11.Sobrecarga — No sobrecargue las tomas de corriente ni los cables alargadores o regletas. La sobrecarga podría provocar incendios o descargas eléctricas. 12.Introducción de objetos y líquidos — No inserte nunca objetos en el producto a través de los respiraderos o las ranuras de ventilación. El producto tiene altas tensiones en su interior y la inserción de objetos podría provocar descargas eléctricas y/o cortocircuitar los componentes internos. Por la misma razón, no derrame agua o líquidos sobre el producto. 13.Servicio — No intente reparar usted mismo el producto. La retirada de las tapas podría exponerle a alto voltaje y otras circunstancias peligrosas. Solicite cualquier reparación a un técnico de servicio calificado. 14.Reparación — Si se produjera cualquiera de las circunstancias siguientes, desenchufe el cable de alimentación de la toma de corriente y solicite la reparación a un técnico de servicio calificado. a. Cuando el cable de alimentación o el enchufe esté dañado. b. Cuando se haya derramado un líquido sobre el producto o hayan caído objetos al interior del producto. c. Cuando se haya expuesto el producto a la lluvia o al agua. d.Cuando el producto no funcione correctamente según lo descrito en las instrucciones operativas. No toque ningún control aparte de los descritos en las instrucciones de uso. El ajuste inadecuado de controles no descritos en las instrucciones podría provocar daños, lo que a menudo requiere un trabajo importante de ajuste por parte de un técnico calificado. e. Cuando el producto haya caído al suelo o se haya dañado. f.Cuando el producto presente un estado anormal. Cualquier anormalidad perceptible en el producto indicará que éste necesita servicio. 15.Repuestos — En caso de que el producto necesite repuestos, asegúrese de que el técnico de servicio utiliza las piezas de sustitución especificadas por el fabricante, o unas con las mismas características y rendimiento que las piezas originales. El uso de piezas no autorizadas podría tener como resultado incendio, descargas eléctricas y/u otros daños. 16.Comprobaciones de seguridad — Tras la finalización del trabajo de servicio o reparación, solicite al técnico de servicio que lleve a cabo comprobaciones de seguridad para asegurarse de que el producto se encuentra en perfectas condiciones de funcionamiento. 17.Montaje mural — Cuando monte el producto sobre una pared, asegúrese de instalarlo de acuerdo con el método recomendado por el fabricante. 18.Fuentes de calor — Mantenga el producto alejado de fuentes de calor como pueden ser radiadores, calentadores, estufas y otros productos que generen calor (incluyendo amplificadores). 19.El monitor no deberá utilizarse en lugares con riesgos o peligros fatales que pudieran provocar directamente la muerte, lesiones personales, daños físicos graves u otras pérdidas, incluyendo control de reacción nuclear en instalaciones nucleares, sistemas médicos de soporte vital y control de lanzamiento de misiles en sistemas armamentísticos. 20.No permanezca en contacto durante períodos prolongados de tiempo con componentes del producto que se recalienten. Podrían producirse quemaduras de baja temperatura. S PRECAUCIONES DE SEGURIDAD (Continuación) Para cumplir la normativa sobre compatibilidad electromagnética (EMC), utilice cables blindados para conectar los siguientes terminales: Terminal de entrada DisplayPort. Si el monitor no se coloca en una ubicación lo suficientemente estable, podría resultar potencialmente peligroso debido al riesgo de caída. Muchas lesiones, especialmente a los niños, pueden evitarse adoptando precauciones sencillas como pueden ser: • Utilizar dispositivos de fijación como pueden ser soportes de montaje mural recomendados por el fabricante. • Emplear únicamente muebles que puedan soportar de forma segura el monitor. • Asegurarse de que el monitor no sobresale del borde del mueble que sirve de apoyo. • No colocar el monitor sobre muebles altos (por ejemplo, armarios o librerías) sin anclar el mueble y el monitor a un soporte adecuado. • No colocar los monitores sobre paños u otros materiales ubicados entre el monitor y el mueble de apoyo. • Educar a los niños sobre los peligros de trepar a los muebles para llegar al monitor o a sus controles. Especialmente para la seguridad de los niños ESPAÑOL - No permita que los niños trepen al monitor o jueguen con éste. - No coloque el monitor sobre muebles que se puedan usar como peldaños, como pueden ser los cajones de una cómoda. - Recuerde que los niños se pueden agitar mientras ven un programa, especialmente en un monitor en el que las cosas se ven “más grandes que en la vida real”. Deberá tenerse cuidado de colocar o instalar el monitor en lugares en los que no se pueda empujar, mover o tirar al suelo. - Deberá procurarse enrutar todos los cables conectados al monitor de modo que los niños curiosos no puedan tirar de ellos ni agarrarlos. INSTRUCCIONES DE SEGURIDAD - No emplee el monitor en lugares con un nivel elevado de polvo o humedad ni donde éste pueda entrar en contacto con aceite o vapor, ya que esto podría provocar un incendio. - Asegúrese de que el monitor no entre en contacto con agua ni otros líquidos. Asegúrese de no introducir en el monitor objetos como pueden ser clips o chinchetas, ya que esto podría causar incendios o descargas eléctricas. - No coloque el monitor encima de objetos inestables ni en lugares inseguros. No permita que el monitor reciba golpes fuertes ni que vibre demasiado. La caída o pérdida de equilibrio del monitor podría dañarlo. - No utilice el monitor cerca de aparatos de calefacción ni en lugares donde puedan existir temperaturas elevadas, ya que esto podría conducir a la generación de calor excesivo y provocar un incendio. - No utilice el monitor en lugares en los que pueda estar expuesto a la luz solar directa. - La toma de corriente deberá estar instalada cerca del equipo y ser accesible fácilmente. Cable de alimentación eléctrica y adaptador de corriente - Utilice exclusivamente el cable de alimentación eléctrica y el adaptador de corriente suministrados con el monitor. - Cuando manipule el adaptador de corriente, tenga en cuenta lo siguiente: Una manipulación incorrecta puede provocar incendio, choques eléctricos o heridas. • Vigile que el adaptador de corriente no caiga o reciba algún golpe. • No desmonte el adaptador de corriente. Contiene partes de alta tensión peligrosos al contacto. • El adaptador de corriente está pensado para un uso en interior. No lo utilice en el exterior. • No utilice con otros aparatos el adaptador de corriente suministrado. - No deteriore el cable de alimentación eléctrica ni el adaptador de corriente, tampoco ponga objetos pesados sobre ellos, no los estire ni los doble. No añada cables alargadores. Si el cable sufre deterioros pueden provocarse incendios o choques eléctricos. - No utilice el cable de alimentación eléctrica con una regleta. Si añade un alargador puede provocarse un incendio como resultado del sobrecalentamiento. - No enchufe o desenchufe la clavija eléctrica con las manos mojadas. De lo contrario podría sufrir un choque eléctrico. - Desenchufe el cable de alimentación si no va a usarse durante mucho tiempo. - No intente reparar el cable de alimentación eléctrica si se rompe o funciona mal. Para cualquier reparación, contacte con el representante de servicio técnico. - No tenga contacto con las partes del producto o el adaptador de corriente que permanecen calientes durante mucho tiempo. De lo contrario, podría sufrir quemaduras leves. - No ate el adaptador de corriente al monitor u otro equipo. De lo contrario, podrían ocasionarse un incendio y descarga eléctrica. S PRECAUCIONES DE MONTAJE • Este producto es para uso en interiores. • Se requiere un soporte de montaje en conformidad con las especificaciones VESA. • Para instalar el monitor sobre un soporte (de venta en comercios) o en la pared, o para quitarlo o moverlo, consulte con el proveedor. • El montaje mural del monitor requiere un soporte especial y el trabajo deberá ser efectuado por un distribuidor autorizado de ASUS. Nunca deberá intentar realizar este trabajo usted mismo. Nuestra empresa no se hace responsable en caso de accidentes o lesiones causados por un montaje o una manipulación inadecuados. • Utilice el monitor perpendicular a una superficie nivelada. Si es necesario, el monitor puede inclinarse hasta 25 grados hacia arriba o 20 grados hacia abajo. • Este monitor deberá utilizarse a una temperatura ambiente de entre 0 y 40°C. Proporcione espacio suficiente alrededor del monitor para evitar que el calor se acumule en su interior. • No bloquee ninguna ranura de ventilación. Si la temperatura del interior del monitor aumentara, podrían producirse malfuncionamientos. • No coloque el monitor sobre un dispositivo que genere calor. • Si instala el monitor en orientación horizontal, puede pegar la Horizontal sticker etiqueta horizontal (Operation buttons) suministrada (Botones de funcionamiento) en la parte derecha. For the monitor in landscape orientation Unit: inch [cm] 7-7/8 [20] 2 [5] * 2 [5] 2 [5] For the monitor in portrait orientation Unit: inch [cm] 7-7/8 [20] 2 [5] * 2 [5] 2 [5] *Si instala el monitor en una pared, el monitor emite calor durante el funcionamiento, por lo que podría decolorar o alterar la pared. • Si fuera difícil proporcionar suficiente espacio por cualquier razón, como puede ser la instalación del monitor dentro de una carcasa, o si la temperatura ambiente pudiera estar fuera del rango de 0 a 40°C, instale un ventilador o adopte otras medidas para mantener la temperatura ambiente dentro del rango necesario. Componentes suministrados Si falta algún componente, póngase en contacto con su distribuidor. * Monitor de pantalla de cristal líquido: 1 * Cable de alimentación: 1 * Adaptador de corriente: 1 * Manual de Instalación (este manual): 1 * Cable DisplayPort: 1 * Cable de conversión RS-232C (mini clavija de ø3,5): 1 * Base (para soporte): 1 * Columna (para soporte): 1 * Placa de unión (para soporte): 1 (preinstalada en el monitor) * Tornillos avellanados (M4 x 6 sin arandelas): 5 * Tornillos (M4 x 10 con arandelas): 4 * Llave Allen: 1 * Abrazadera para cable: 2 * Abrazadera para cable (pequeña): 1 * Abrazadera para cable (grande): 2 * Etiqueta horizontal (Botones de funcionamiento): 1 S Instalar el soporte (suministrado) ¡PRECAUCIÓN! • Desconecte todos los cables del monitor. • Apriete firmemente los tornillos de fijación (suministrados) con la llave Allen (suministrada). • Asegúrese de que dispone de suficiente espacio para trabajar. 5. Fije el soporte al monitor con los tornillos (M4 x 10 con arandelas) suministrados (x4). Utilice la llave Allen suministrada. • Horizontal Screw (M4 x 10 with washers) nUnir el soporte Retire todos los materiales de embalaje antes de comenzar a trabajar. Para que la base del soporte no estropee la mesa (etc.), extienda un tejido grueso y suave (manta, etc.) y trabaje sobre el tejido. 1. Inserte la columna en el material de embalaje (superior izquierdo) como se ilustra. Packing material (upper left) 2. Mientras sostiene la base del soporte con la mano, fíjela a la columna con los tornillos avellanados suministrados (M4 x 6 sin arandelas) (x5). Utilice la llave Allen suministrada. Countersunk screw (M4 x 6 without washers) ESPAÑOL Front • Vertical Operation buttons Screw (M4 x 10 with washers) Front 1 2 Pedestal Insert by hooking the tab Fixing pin *En el agujero redondeado de la base del soporte hay una bolsa con los tornillos (suministrados) y la llave Allen (suministrada). 3. Extienda un tejido grueso y suave (manta, etc.), para que no se deteriore el panel LCD, sobre una superficie plana donde quepa todo el monitor y coloque el monitor con el panel LCD orientado hacia abajo encima del tejido. 4. Coloque el soporte en el monitor. Enganche la pestaña del soporte por debajo de la placa de unión (preinstalada en el monitor). * Si va a utilizar el monitor con la orientación vertical, tire del pasador de fijación (1), e insértelo en el agujero (2) como se ilustra arriba. * Para retirar el soporte, coloque el monitor y el soporte como se ilustra arriba y retire los tornillos. ¡PRECAUCIÓN! • Respete lo siguiente cuando instale el monitor en orientación vertical. El incumplimiento de las siguientes medidas podría provocar malfuncionamientos. - Instale el monitor de modo que los botones de funcionamiento queden arriba. - Establezca la opción MONITOR del menú MONITOR en PORTRAIT <MODO VERTICAL>. (Véase el MANUAL DE INSTRUCCIONES.) Tab S Conexiones ¡PRECAUCIÓN! • Asegúrese de apagar el interruptor primario y desconectar el enchufe de la toma de corriente antes de conectar/desconectar los cables. Asimismo, lea el manual del equipo que desea conectar. • Tenga cuidado de no confundir el terminal de entrada con el terminal de salida al conectar los cables. La inversión accidental de los cables conectados a los terminales de entrada y salida podría causar malfuncionamientos y otros problemas. • No use ningún cable que tenga dañado o deformado el terminal. Si usa este tipo de cables pueden generar fallos de funcionamiento. • Las imágenes podrían no visualizarse correctamente dependiendo del ordenador (tarjetas de vídeo), cables, o dispositivos periféricos que se conecten. 4 5 6 7 1. 2. 3. 4. 5. 6. 7. Interruptor primario Terminal de entrada de corriente Cable de alimentación (suministrado) Terminal de entrada RS-232C Terminal de entrada DisplayPort Terminal de entrada de audio Terminal del auricular For power outlet 3 2 1 NOTA: •��������������������������������������������������������������������������������������������������������������� Determine el terminal de entrada de audio que se utilizará en AUDIO SELECT <SELECCIÓN DE AUDIO> del menú SETUP <INSTALACIÓN>. A continuación se muestran los ajustes de fábrica. Modo de entrada Terminal de entrada de audio (ajuste de fábrica) DisplayPort Terminal de entrada DisplayPort • Los cables conectados a los terminales de la parte posterior de monitor pueden apretarse con la abrazadera para cable. Enganche las abrazaderas para cable en las partes de unión atrás del monitor y el soporte, y ate los cables. Stand Cable Cable clamp attachment Cable clamp Cable clamp (small) Cable clamp (large) Cable clamp attachment Cable Cable clamp attachment • DisplayPort es una marca registrada de Video Electronics Standards Association. S Cable Encendido/apagado ¡PRECAUCIÓN! • Encienda el monitor antes de encender el PC o el dispositivo de reproducción. Encendido/apagado Pulse el botón de encendido ( aparato. ) para encender o apagar el Power button ( ) Encendido de la alimentación principal Power LED Main power switch Estado del piloto de alimentación Encendido de verde ¡PRECAUCIÓN! • La alimentación principal deberá encenderse/apagarse con el interruptor primario. No conecte/desconecte el cable de alimentación ni active/desactive el disyuntor mientras el interruptor primario está encendido. • Cuando apague el interruptor primario o el botón de encendido ( ) y lo vuelva a encender, espere siempre 5 segundos como mínimo. • Para la desconexión eléctrica completa, desconecte el enchufe principal. Encendido de naranja Alimentación apagada (modo de reposo) Modo de espera de señal de entrada ¡PRECAUCIÓN! ESPAÑOL Apagado Estado del monitor Alimentación encendida • Cuando apague el interruptor primario o el botón de encendido ( ) y lo vuelva a encender, espere siempre 5 segundos como mínimo. Un intervalo demasiado corto podría provocar malfuncionamientos. NOTA: • Cuando el interruptor primario está apagado, el monitor no funcionará. • Si el monitor se encuentra en el modo en espera de señal de entrada y pulsa el botón de encendido ( ), el monitor entrará en modo de reposo. S Especificaciones Modelo Requisitos de alimentación Temperatura de funcionamiento Humedad de funcionamiento Consumo de energía Dimensiones Peso PQ321QE 100 V - 240 V ca, 50/60 Hz (al usar el adaptador CA suministrado) 0°C a 40°C 20% al 80% (sin condensación) 99 W * (al usar el adaptador CA suministrado) Dimensiones físicas con pedestal (ANxALxFO) 750 x 489 x 256 mm Dimensiones físicas sin pedestal (ANxALxFO) 750 x 441 x 35 mm Dimensiones de la caja (ANxALxFO) 990 x 558 x 230 mm Peso neto (estimado) 13 Kg Peso bruto (estimado) 17 Kg * Al usar el monitor en CC19 V : 88 W Como parte de la política de mejoras continuas, ASUS se reserva el derecho de realizar cambios en el diseño y especificaciones para la mejora del producto sin previo aviso. Las figuras indicadas que especifican el rendimiento son valores nominales de los aparatos de producción. Puede haber algunas desviaciones de estos valores en los aparatos individuales. Precauciones de montaje • Cuando instale, desinstale o traslade el monitor, asegúrese de sujetarlo entre 2 personas como mínimo. • Asegúrese de utilizar un soporte de montaje mural diseñado para la instalación del monitor. • Este monitor está diseñado para su instalación sobre un muro o pilar de hormigón. Tal vez resulte necesario realizar un trabajo de refuerzo para ciertos materiales como pueden ser yeso, paneles de plástico finos o madera antes de iniciar la instalación. Este monitor y el soporte deberán instalarse en una pared con una resistencia de al menos 4 veces el peso del monitor. Realice la instalación mediante el método más adecuado para el material y la estructura. • Para colocar una ménsula de montaje compatible con VESA, use tornillos M6 que sean 8 mm a 10 mm más largos que la ménsula de montaje. • No utilice un taladro percutor. • Cuando mueva el monitor, sujételo por la base y el lateral de la unidad. No lo agarre por el panel de LCD o las esquinas. Esto podría provocar daños en el producto, fallos o lesiones. • No utilice orificios de tornillos que no sean orificios VESA para la instalación. S Inhalt WICHTIGE INFORMATIONEN...........................................1 SICHERHEITSVORKEHRUNGEN.....................................2 SICHERHEITSANLEITUNG...............................................3 WICHTIGE HINWEISE ZUR BEFESTIGUNG....................4 Mitgelieferte Komponenten.............................................4 [DEUTSCH] Anbringen des Ständers (im Lieferumfang enthalten)..5 Anschlüsse........................................................................6 Ein- und ausschalten........................................................7 Technische Daten.............................................................8 Wichtige Hinweise zur Befestigung................................8 WICHTIGE INFORMATIONEN ACHTUNG: HALTEN SIE DAS GERÄT VON REGEN UND JEGLICHER ART VON FEUCHTIGKEIT FERN, UM DIE GEFAHR VON BRAND ODER STROMSCHLAG ZU VERRINGERN. VORSICHT ELEKTROSCHOCKGEFAHR NICHT ÖFFNEN Das Ausrufezeichen innerhalb eines Dreiecks weist den Benutzer auf wichtige Betriebs- und Wartungs- bzw. Serviceanweisungen in der Produktdokumentation hin. DEUTSCH VORSICHT: ABDECKUNG NICHT ENTFERNEN: GEFAHR VON ELEKTROSCHOCK. KEINE WARTUNGSTEILE IM INNEREN. SERVICEARBEITEN NUR VON QUALIFIZIERTEM FACHPERSONAL DURCHFÜHREN LASSEN. Das Blitzsymbol innerhalb eines Dreiecks weist den Benutzer auf das Vorhandensein nicht isolierter “gefährlicher Spannung” im Geräteinneren hin, die ausreichend groß ist, um einen Elektroschock hervorzurufen. 1 G8416_PQ321QE_QSG_DE.indd 1 D 06.06.2013 16:31:40 Uhr SICHERHEITSVORKEHRUNGEN Elektrizität erfüllt viele nützliche Aufgaben, kann aber auch Personen- und Sachschäden verursachen, wenn sie unsachgemäß gehandhabt wird. Dieses Produkt wurde mit Sicherheit als oberster Priorität konstruiert und hergestellt. Dennoch besteht bei unsachgemäßer Handhabung u.U. Stromschlag- und Brandgefahr. Um mögliche Gefahren zu vermeiden, befolgen Sie beim Aufstellen, Betreiben und Reinigen des Produkts bitte die nachstehenden Anleitungen. Lesen Sie im Interesse Ihrer eigenen Sicherheit sowie einer langen Lebensdauer des LCD-Gerätes zunächst die nachstehenden Hinweise durch, bevor Sie das Produkt in Verwendung nehmen. 1. Bedienungsanleitungen lesen — Nehmen Sie das Produkt erst in Betrieb, nachdem Sie alle diesbezüglichen Hinweise gelesen und verstanden haben. 2.Bedienungsanleitung aufbewahren — Diese Bedienungsanleitung mit den Sicherheits- und Bedienungshinweisen sollte aufbewahrt werden, damit Sie im Bedarfsfall jederzeit darauf zurückgreifen können. 3. Warnungen beachten — Alle Warnungen auf dem Gerät und in den Bedienungsanleitungen sind genauestens zu beachten. 4. Anleitungen befolgen — Alle Anleitungen zur Bedienung müssen befolgt werden. 5. Reinigung — Ziehen Sie vor dem Reinigen des Produkts das Netzkabel. Reinigen Sie das Gerät mit einem trockenen Tuch. Verwenden Sie keine flüssigen Reiniger oder Aerosol-Sprays. 6. Zusatzgeräte und Zubehör — Verwenden Sie ausschließlich vom Hersteller empfohlenes Zubehör. Bei Verwendung anderer Zusatzgeräte bzw. Zubehörteile besteht evtl. Unfallgefahr. 7. Wasser und Feuchtigkeit — Benutzen Sie das Gerät nicht in der Nähe von Wasser. Montieren Sie das Gerät unter keinen Umständen an einer Stelle, an der Wasser darauf tropfen kann. Achten Sie dabei besonders auf Geräte, aus denen zuweilen Wasser tropft, wie etwa Klimaanlagen. 8. Belüftung — Die Belüftungsschlitze und andere Öffnungen im Gehäuse dienen der Belüftung des Geräts. Halten Sie diese Öffnungen unbedingt frei, da eine unzureichende Belüftung zu einer Überhitzung bzw. Verkürzung der Lebensdauer des Produkts führen kann. Stellen Sie das Gerät nicht auf ein Sofa, einen Lappen oder ähnliche Oberflächen, da die Belüftungsschlitze dadurch blockiert werden können. Stellen Sie das Gerät auch nicht in ein umschlossenes Gehäuse, wie z.B. in ein Bücherregal oder einen Schrank, sofern dort nicht für eine ausreichende Belüftung gesorgt ist oder die Anweisungen des Herstellers befolgt werden. 9.Netzkabel-Schutz — Die Netzkabel sind so zu verlegen, dass sie vor Tritten geschützt sind und keine schweren Objekte darauf abgestellt werden. 10. Das LCD-Panel ist ein Glasprodukt. Es kann daher brechen, wenn es zu Boden fällt oder einen Schlag oder Stoß erhält. Achtung: bei einem Bruch des LCD-Panels besteht durch die Glasstücke Verletzungsgefahr. 11. Überlastung — Vermeiden Sie eine Überlastung von Netzsteckdosen und Verlängerungskabeln. Bei Überlastung besteht Brand- und Stromschlaggefahr. 12.Eindringen von Gegenständen und Flüssigkeiten — Schieben Sie niemals irgendwelche Gegenstände durch die Gehäuseöffnungen in das Innere des Geräts. Im Produkt liegen hohe Spannungen vor. Durch das Einschieben von Gegenständen besteht Stromschlaggefahr bzw. die Gefahr von Kurzschlüssen zwischen den Bauteilen. Aus demselben Grunde dürfen auch keine Flüssigkeiten auf das Gerät verschüttet werden. 13.Wartung — Versuchen Sie auf keinen Fall, selbst Wartungsarbeiten am Gerät durchzuführen. Durch das Entfernen von Abdeckungen setzen Sie sich hohen Spannungen und anderen Gefahren aus. Lassen Sie sämtliche Wartungsarbeiten ausschließlich von qualifiziertem Service-Personal ausführen. 14.Reparaturen — Ziehen Sie in den folgenden Situationen sofort das Netzkabel und lassen Sie das Produkt von qualifiziertem ServicePersonal reparieren: a. Wenn das Netzkabel oder der Netzstecker beschädigt ist. b. Wenn Flüssigkeit in das Gerät eingedrungen ist oder Gegenstände in das Gerät gefallen sind. c. Wenn das Gerät nass geworden ist (z.B. durch Regen). d. Wenn das Gerät nicht wie in der Bedienungsanleitung beschrieben funktioniert. Nehmen Sie nur die in den Bedienungsanleitungen beschriebenen Einstellungen vor. Unsachgemäße Einstellungen an anderen Reglern können zu einer Beschädigung führen und machen häufig umfangreiche Einstellarbeiten durch einen qualifizierten Service-Techniker erforderlich. e. Wenn das Produkt fallen gelassen oder beschädigt wurde. f.Wenn das Gerät einen anormalen Zustand aufweist. Jedes erkennbare anormale Verhalten zeigt an, dass der Kundendienst erforderlich ist. 15.Ersatzteile — Wenn Ersatzteile benötigt werden, stellen Sie bitte sicher, dass der Service-Techniker nur die vom Hersteller bezeichneten Teile oder Teile mit gleichen Eigenschaften und gleichem Leistungsvermögen wie die Originalteile verwendet. Die Verwendung anderer Teile kann zu einem Brand, zu Stromschlag oder anderen Gefahren führen. 16. Sicherheitsüberprüfungen — Lassen Sie vom Service-Techniker nach Service- oder Reparaturarbeiten eine Sicherheitsüberprüfung vornehmen, um sicherzustellen, dass das Produkt in einem einwandfreien Betriebszustand ist. 17.Wandmontage — Bei der Montage des Gerätes an der Wand ist sicherzustellen, dass die Befestigung nach der vom Hersteller empfohlenen Methode erfolgt. 18.Wärmequellen — Stellen Sie das Produkt nicht in der Nähe von Heizkörpern, Heizgeräten, Öfen oder anderen Geräten (wie z.B. Verstärkern) auf, die Hitze abstrahlen. 19.Bei der Verwendung des Monitors ist darauf zu achten, dass Gefahren für Leib und Leben, Schäden an Gebäuden und anderen Gegenständen sowie eine Beeinflussung von wichtigen oder gefährlichen Geräten, wie z.B. der Nuklearreaktionssteuerung in Atomanlagen, lebenserhaltenden Geräten in medizinischen Einrichtungen oder Raketenabschusssteuerungen in Waffensystemen vermieden werden. 20.Vermeiden Sie es, Teile des Produkts, die sich erwärmen, über längere Zeit hinweg zu berühren. Dies könnte zu leichten Verbrennungen führen. D 2 G8416_PQ321QE_QSG_DE.indd 2 06.06.2013 16:31:40 Uhr SICHERHEITSVORKEHRUNGEN (Fortsetzung) Um die EMV-Vorschriften einzuhalten, müssen für die Verbindung mit folgenden Anschlüssen geschirmte Kabel verwendet werden: DisplayPort-Eingangsanschluss. Wenn ein Monitor nicht auf einer stabilen Unterlage aufgestellt wird, besteht die Gefahr, dass er kippt oder fällt. Zahlreiche Verletzungen, besonders bei Kindern, können durch einfache Vorsichtsmaßnahmen vermieden werden: • Bei Verwendung der vom Hersteller empfohlenen Befestigungsvorrichtungen, wie z.B. Wandhaken. • Stellen Sie den Monitor nur auf Möbelstücke, die ausreichend stark sind. • Achten Sie darauf, dass der Monitor nicht über den Rand des Möbelstücks, auf dem er steht, vorsteht. • Stellen Sie den Monitor niemals auf ein großes Möbelstück (z.B. einen Schrank oder in ein Bücherregal), ohne sowohl das Möbelstück als auch den Monitor an einem geeigneten Element sicher zu verankern. • Stellen Sie den Monitor niemals auf ein Tuch oder andere Materialen, die zwischen dem Monitor und dem Möbelstück, auf dem er steht, liegen. • Weisen Sie Kinder eindringlich darauf hin, dass es gefährlich ist, auf ein Möbelstück zu klettern, um an den Monitor oder seine Regler zu gelangen. Wichtige Hinweise für die Sicherheit von Kindern - Lassen Sie Kinder niemals auf den Monitor klettern oder am Monitor spielen. - Stellen Sie den Monitor nicht auf Möbelstücke, die leicht als Stufen verwendet werden könnten, wie zum Beispiel eine Truhe oder Kommode. - Bedenken Sie, dass Kinder bei Betrachtung eines Fernsehprogramms – und ganz besonders bei einem “überlebensgroßen” Monitor – in starke Aufregung verfallen können. Der Monitor sollte so aufgestellt werden, dass er nicht umgestoßen oder gekippt werden kann. - Alle am Monitor angeschlossenen Kabel und Stränge sollten so verlegt werden, dass neugierige Kinder nicht daran ziehen oder sie ergreifen können. - Verwenden Sie den Monitor nicht an Orten mit hoher Staubentwicklung, hoher Luftfeuchtigkeit oder an Orten, an denen der Monitor mit Öl oder Dampf in Kontakt kommen könnte, da dies zu einem Brand führen könnte. - Achten Sie darauf, dass der Monitor nicht mit Wasser oder anderen Flüssigkeiten in Berührung kommt. Achten Sie auch darauf, keine Gegenstände, wie z.B. Büroklammern oder sonstige spitze Gegenstände, in den Monitor zu stecken. Die Folge könnte ein Brand oder Stromschlag sein. - Stellen Sie den Monitor nicht auf instabile Gegenstände oder an andere unsichere Stellen. Setzen Sie den Monitor keinen starken Stößen oder Erschütterungen aus. Wenn der Monitor hinunterfällt oder umkippt, könnte er Schaden nehmen. - Stellen Sie den Monitor nicht in der Nähe von Heizungen oder an anderen Stellen auf, an denen hohe Temperaturen auftreten, da dies zu einer übermäßig starken Erhitzung mit der Folge eines Brandes führen könnte. - Stellen Sie den Monitor nicht an Orten auf, an denen er direktem Sonnenlicht ausgesetzt ist. - Die Wandsteckdose sollte sich in der Nähe des Gerätes befinden und leicht zugänglich sein. Das Netzkabel und das Netzteil - Verwenden Sie nur das mit dem Monitor gelieferte Netzkabel und Netzteil. - Beachten Sie beim Umgang mit dem Netzteil Folgendes: Bei einem unsachgemäßen Umgang besteht Feuer-, Stromschlag- bzw. Verletzungsgefahr. •Lassen Sie das Netzteil nicht fallen, und setzen Sie es keinen Stößen aus. •Zerlegen Sie niemals das Netzteil. Es enthält Hochspannungsbauteile. Ein Berühren dieser ist gefährlich. •Das Netzteil ist ausschließlich für einen Einsatz in Innenräumen vorgesehen. Verwenden Sie es nicht im Freien. •Verwenden Sie das mitgelieferte Netzteil nicht an anderen Geräten. - Beschädigen Sie das Netzkabel und das Netzteil nicht, stellen Sie keine schweren Gegenstände darauf, und überdehnen oder knicken Sie es nicht. Verwenden Sie keine Verlängerungskabel. Bei einer Beschädigung des Kabels besteht Feuer- oder Stromschlaggefahr. - Verwenden Sie das Netzkabel nicht mit einer Mehrfachsteckdose. Die Verwendung eines Verlängerungskabels kann aufgrund von Überhitzung zu einem Brand führen. - Achten Sie darauf, dass Sie beim Einstecken oder Ausstecken des Netzsteckers keine nassen Hände haben. Anderenfalls kann es zu einem Stromschlag kommen. - Ziehen Sie das Netzkabel aus der Steckdose, wenn Sie das Gerät längere Zeit nicht verwenden. - Führen Sie keine Reparaturversuche an einem beschädigten oder nicht funktionstüchtigen Netzkabel durch. Überlassen Sie Reparaturarbeiten ausschließlich dem Kundendienst. - Vermeiden Sie es, die Teile des Produkts sowie des Netzteils, die sich erwärmen, über längere Zeit hinweg zu berühren. Dies könnte zu leichten Verbrennungen führen. - Befestigen Sie das Netzteil nicht am Monitor oder an anderen Geräten. Anderenfalls kann es zu einem Brand oder Stromschlag kommen. DEUTSCH SICHERHEITSANLEITUNG 3 G8416_PQ321QE_QSG_DE.indd 3 D 06.06.2013 16:31:40 Uhr WICHTIGE HINWEISE ZUR BEFESTIGUNG • Dieses Produkt ist nicht für den Gebrauch im Freien gedacht. • Ein Montagewinkel, der den VESA-Spezifikationen entspricht, ist erforderlich. • Fragen Sie Ihren Händler bei einer Montage auf einem Ständer (im Handel erhältlich) oder an einer Wand bzw. beim Abmontieren oder Transportieren des Monitors um Rat. • Für die Wandbefestigung des Monitors sind Spezialkenntnisse erforderlich. Diese Arbeit darf daher nur von einem autorisierten ASUS-Händler durchgeführt werden. Führen Sie diese Arbeit niemals selbst durch. Unser Unternehmen übernimmt keine Verantwortung für Unfälle oder Verletzungen, die sich durch eine falsche Befestigung oder einen falschen Umgang mit dem Gerät ergeben. • Verwenden Sie den Monitor mit der Vorderseite senkrecht zu einer ebenen Fläche auf. Der Monitor kann nötigenfalls bis zu 25 Grad nach oben oder bis zu 20 Grad nach unten gekippt werden. • Dieser Monitor sollte bei einer Umgebungstemperatur zwischen 0°C und 40°C verwendet werden. Rund um den Monitor muss genügend Luft sein, damit die Wärme aus dem Geräteinneren gut entweichen kann. Monitor horizontaler Ausrichtung For the in monitor in landscape orientation • Alle Belüftungsöffnungen müssen stets frei bleiben. Wenn die Temperatur innerhalb des Monitors ansteigt, kann dies zu Fehlfunktionen führen. • Stellen Sie den Monitor nicht auf ein anderes Gerät, das Wärme erzeugt. • Wenn der Monitor in der horizontalen Ausrichtung montiert wird, können Sie den Horizontaler mitgelieferten horizontalen Aufkleber Aufkleber (Bedientasten) an der (Bedientasten) rechten Seite anbringen. Einheit: Unit: inchcm [cm] 7-7/8 [20] 2 [5] * 2 [5] 2 [5] Monitor vertikaler Ausrichtung For the in monitor in portrait orientation Unit: inch Einheit: cm[cm] 7-7/8 [20] 2 [5] * 2 [5] 2 [5] * Der Monitor kann ganz an einer Wand installiert werden. Im Betrieb gibt der Monitor jedoch Wärme ab. Beachten Sie, dass die vom Monitor abgegebene Wärme die Wand verfärben oder verändern kann. • Wenn es aus irgendeinem Grund schwierig ist, ausreichend Platz frei zu lassen, etwa weil der Monitor in ein Gehäuse eingebaut wird, oder wenn die Umgebungstemperatur außerhalb des zulässigen Bereichs von 0°C bis 40°C liegen könnte, so müssen Sie ein Gebläse installieren oder andere Maßnahmen ergreifen, um die Umgebungstemperatur innerhalb des vorgeschriebenen Bereichs zu halten. Mitgelieferte Komponenten Sollte eine der angeführten Komponenten fehlen, kontaktieren Sie bitte Ihren Händler. * LCD-Monitor: 1 * Netzkabel: 1 * Netzteil: 1 * Installationsanleitung (diese Anleitung): 1 * DisplayPort-Kabel: 1 * RS-232C-Konvertierungskabel (ø3,5-mm-Miniklinke): 1 * Sockel (für Ständer): 1 * Strebe (für Ständer): 1 * Befestigungsplatte (für Ständer): 1 (am Monitor vormontiert) * Senkschrauben (M4 x 6 ohne Unterlegscheiben): 5 * Schrauben (M4 x 10 mit Unterlegscheiben): 4 * Sechskantschlüssel: 1 * Kabelbinder: 2 *Kabelbinder (klein): 1 * Kabelbinder (groß): 2 * Horizontaler Aufkleber (Bedientasten): 1 D 4 G8416_PQ321QE_QSG_DE.indd 4 06.06.2013 16:31:41 Uhr Anbringen des Ständers (im Lieferumfang enthalten) VORSICHTIG! • Ziehen Sie alle Kabel vom Monitor ab. • Ziehen Sie die Montageschrauben (im Lieferumfang enthalten) mit dem Sechskantschlüssel (im Lieferumfang enthalten) fest an. • Stellen Sie sicher, dass Sie genügend Platz zum Arbeiten haben. 5.Befestigen Sie den Ständer mit den mitgelieferten Schrauben (M4 x 10 mit Unterlegscheiben)(x4) am Monitor. Verwenden Sie den mitgelieferten Sechskantschlüssel. • Querformat Schrauben (M4 x 10 mit Unterlegscheiben) nBefestigen des Ständers Entfernen Sie vor Beginn der Arbeiten jegliches Verpackungsmaterial. Breiten Sie ein dickes, weiches Tuch (z. B. eine Decke) aus, um eine Beschädigung des Tisches (usw.) durch den Ständersockel zu verhindern, und arbeiten Sie auf dem Tuch. 1. Stecken Sie die Ständerstrebe wie gezeigt in das Verpackungsmaterial (oben links). Verpackungsmaterial (oben links) Vorne Vorne 2.Halten Sie den Ständersockel mit der Hand fest, und befestigen Sie ihn mit den mitgelieferten Senkschrauben (M4 x 6 ohne Unterlegscheiben) (x5) an der Ständerstrebe. Verwenden Sie den mitgelieferten Sechskantschlüssel. Senkschrauben (M4 x 6 ohne Unterlegscheiben) • Hochformat Bedientasten Schrauben (M4 x 10 mit Unterlegscheiben) 1 Sockel DEUTSCH Vorne 2 Zum Einsetzen den Zapfen einhaken Fixierstift * Ein Beutel mit den Schrauben (im Lieferumfang enthalten) und einem Sechskantschlüssel (im Lieferumfang enthalten) ist am runden Loch des Ständersockels befestigt. 3.Breiten Sie zum Schutz des LCD-Panels vor Beschädigung ein dickes, weiches Tuch (z. B. eine Decke) auf einer stabilen, ebenen Fläche aus, auf welcher der gesamte Monitor abgelegt werden kann, und legen Sie den Monitor mit dem LCD-Panel nach unten gerichtet auf das Tuch. 4.Legen Sie den Ständer auf den Monitor. Haken Sie den Zapfen des Ständers an der Befestigungsplatte (am Monitor vormontiert) ein. * Ziehen Sie den Fixierstift (1) heraus und stecken Sie ihn wie oben gezeigt in die Öffnung (2), wenn der Monitor in der vertikalen Ausrichtung verwendet werden soll. * Platzieren Sie zum Entfernen des Ständers den Monitor und den Ständer wie oben gezeigt, und entfernen Sie die Schrauben. VORSICHTIG! • Beachten Sie für die Installation des Monitors in vertikaler Ausrichtung die folgenden Punkte. Werden die folgenden Punkte nicht beachtet, kann dies zu Fehlfunktionen führen. - Montieren Sie den Monitor so, dass sich die Bedientasten an der Oberseite befinden. - Stellen Sie den MONITOR im Menü MONITOR auf PORTRAIT <HOCHFORMAT>. (Siehe BENUTZERHANDBUCH) Zapfen 5 G8416_PQ321QE_QSG_DE.indd 5 D 06.06.2013 16:31:41 Uhr Anschlüsse VORSICHTIG! • Schalten Sie unbedingt den Hauptschalter aus und ziehen Sie den Netzstecker, bevor Sie Kabel anschließen oder abziehen. Lesen Sie auch das Handbuch des Gerätes, das Sie an den Monitor anschließen möchten. • Verwechseln Sie beim Anschließen nicht die Eingangsklemmen mit den Ausgangsklemmen. Dies könnte zu Fehlfunktionen und anderen Problemen führen. • Verwenden Sie kein Kabel mit einer beschädigten oder deformierten Anschlussklemme. Anderenfalls kann es zu Funktionsstörungen kommen. • Je nach Computer (Videokarten), Kabeln oder Peripheriegeräten, die angeschlossen werden, können Bilder unter Umständen nicht korrekt angezeigt werden. 4 5 6 7 1. 2. 3. 4. 5. 6. 7. Hauptnetzschalter Netzsteckdose Netzkabel (im Lieferumfang enthalten) RS-232C-Eingangsanschluss DisplayPort-Eingangsanschluss Audio Eingangsanschlüsse Kopfhöreranschluss Zur Wandsteckdose 3 2 1 HINWEIS: • Legen Sie den Audioeingangsanschluss, der verwendet werden soll, im Menü SETUP <KONFIG.> unter AUDIO SELECT <AUDIO AUSWAHL> fest. Die Einstellungen bei der Auslieferung sind nachstehend gezeigt. Eingangsmodus Audioeingangsanschluss (Werkseinstellung) DisplayPort DisplayPort-Eingangsanschluss •Die auf der Rückseite des Monitors mit den Anschlüssen verbundenen Kabel können mithilfe des Kabelbinders gebündelt und befestigt werden. Befestigen Sie die Kabelbinder an den Befestigungsteilen auf der Rückseite des Monitors und des Ständers, und binden Sie die Kabel fest. Ständer Kabel Befestigung des Kabelbinders Kabelbinder Kabelbinder (klein) Kabelbinder (groß) Befestigung des Kabelbinders Kabel Befestigung des Kabelbinders Kabel • DisplayPort ist ein eingetragenes Warenzeichen von Video Electronics Standards Association. D 6 G8416_PQ321QE_QSG_DE.indd 6 06.06.2013 16:31:42 Uhr Ein- und ausschalten VORSICHTIG! Ein- und ausschalten • Schalten Sie zuerst den Monitor und erst danach den PC oder ein anderes Wiedergabegerät ein. Drücken Sie die Ein/Aus-Taste ( oder auszuschalten. Einschalten des Netzstroms ), um die Stromversorgung einEin/Aus-Taste ( ) Betriebs-LED Hauptnetzschalter Status der Betriebsleuchte VORSICHTIG! Leuchtet grün Monitor eingeschaltet Aus Monitor ausgeschaltet (StandbyModus) Leuchtet orange Eingangssignal-Wartemodus VORSICHTIG! • Warten Sie zwischen dem Ein- und Ausschalten des Hauptnetzschalters oder der Ein/Aus-Taste ( ) immer mindestens 5 Sekunden. Ist der zeitliche Anstand zu kurz, kann es zu Fehlfunktionen kommen. HINWEIS: • Bei ausgeschaltetem Hauptnetzschalter lässt sich der Monitor nicht einschalten. • Befindet sich der Monitor im Eingangssignal-Standby-Modus und Sie drücken auf die Ein/Aus-Taste ( ), wechselt der Monitor in den Standby-Modus. DEUTSCH • Die Hauptstromversorgung muss mithilfe des Hauptnetzschalters ein- und ausgeschaltet werden. Während der Hauptschalter eingeschaltet ist, darf das Netzkabel nicht abgezogen/angeschlossen oder der Trennschalter ein- und ausgeschaltet werden. • Warten Sie zwischen dem Ein- und Ausschalten des Hauptnetzschalters oder der Ein/Aus-Taste ( ) immer mindestens 5 Sekunden. • Für eine komplette elektrische Trennung muss der Netzstecker abgezogen werden. Betriebszustand des Monitors 7 G8416_PQ321QE_QSG_DE.indd 7 D 06.06.2013 16:31:43 Uhr Technische Daten Technische Daten Modell Leistungsaufnahme Betriebstemperatur Relative Luftfeuchtigkeit Stromverbrauch Abmessungen (ohne Vorsprünge) Gewicht PQ321QE AC 100 V - 240 V, 50/60 Hz (bei Verwendung des mitgelieferten Netzteils) 32°F bis 104°F (0°C bis 40°C) 20% bis 80% (Keine Kondensation) 99 W * (bei Verwendung des mitgelieferten Netzteils) (mm) 750 x 489 x 256 mm ( Monitor am mitgelieferten Ständer, WxHxD) 750 x 441 x 35 mm ( nur Monitor, WxHxD ) 990 x 558 x 230 mm (Verpackung, WxHxD ) (kg) 13kg ( Netto ) 17kg ( Brutto ) * Bei Verwendung des Monitors mit 19 V Gleichstrom: 88 W Bedingt durch fortlaufende technische Verbesserungen behält sich ASUS das Recht vor, das Design und die Spezifikationen ohne vorherige Ankündigung ändern zu können. Die angegebenen Leistungswerte stellen die Nennwerte einer in Serienherstellung produzierten Einheit dar. Geringe Abweichungen bei einzelnen Geräten sind möglich. Wichtige Hinweise zur Befestigung • Für das Befestigen, Abmontieren oder Transportieren des Monitors müssen mindestens 2 Personen zur Verfügung stehen. • Verwenden Sie dazu eine Wandhalterung, die für die Befestigung des Monitors geeignet sind. • Dieser Monitor wurde für die Befestigung an einer Betonwand oder an einer Betonsäule gebaut. Vor der Aufstellung des Monitors kann es notwendig sein, Wände, die aus bestimmten Materialien (z.B. Gips, dünnem Kunststoff usw.) bestehen, entsprechend zu verstärken. Der Monitor und der Befestigungswinkel dürfen nur an einer Wand montiert werden, die mindestens das vierfache Gewicht des Monitors tragen kann. Wählen Sie das für Material und Wandstruktur jeweils am besten geeignete Befestigungsverfahren aus. • Verwenden Sie die M6-Schrauben, die 8 bis 10 mm länger als die Dicke der Halterung sind, zum Befestigen der VESAkompatiblen Halterung. • Verwenden Sie keinen Schlagschrauber. • Halten Sie den Monitor beim Tragen an der Unterseite und der Seite des Geräts. Fassen Sie den Monitor nicht am LCD-Panel oder die Ecken an. Das Gerät könnte dadurch beschädigt werden, oder Sie könnten sich dabei verletzen. • Verwenden Sie für die Installation nur VESA-Bohrungen. D 8 G8416_PQ321QE_QSG_DE.indd 8 06.06.2013 16:31:43 Uhr Содержание ВАЖНАЯ ИНФОРМАЦИЯ................................................1 УВАЖАЕМЫЙ КЛИЕНТ КОМПАНИИ ASUS...................1 ПРАВИЛА ТЕХНИКИ БЕЗОПАСНОСТИ.........................2 Инструкции по безопасности........................................3 МЕРЫ ПРЕДОСТОРОЖНОСТИ ПРИ КРЕПЛЕНИИ......4 Комплектные принадлежности....................................4 [РУССКИЙ] Установка подставки (входит в комплект поставки)....5 Соединения......................................................................6 Включение/выключение питания................................7 Спецификации.................................................................8 Меры предосторожности при креплении ..................8 ВАЖНАЯ ИНФОРМАЦИЯ ПРЕДОСТЕРЕЖЕНИЕ: ДЛЯ УМЕНЬШЕНИЯ ОПАСНОСТИ ВОЗНИКНОВЕНИЯ ПОЖАРА ИЛИ ПОРАЖЕНИЯ ЭЛЕКТРИЧЕСКИМ ТОКОМ НЕ ПОДВЕРГАЙТЕ ДАННОЕ ИЗДЕЛИЕ ВОЗДЕЙСТВИЮ ДОЖДЯ ИЛИ ВЛАГИ. ВНИМАНИЕ ОПАСНОСТЬ ПОРАЖЕНИЯ ЭЛЕКТРИЧЕСКИМ ТОКОМ НЕ ОТКРЫВАТЬ ВНИМАНИЕ! НЕ УДАЛЯЙТЕ КРЫШКУ, ЧТОБЫ СНИЗИТЬ ОПАСНОСТЬ ПОРАЖЕНИЯ ЭЛЕКТРИЧЕСКИМ ТОКОМ. ВНУТРИ ПРИБОРА НЕТ ДЕТАЛЕЙ, КОТОРЫЕ МОГУТ ОБСЛУЖИВАТЬСЯ ПОЛЬЗОВАТЕЛЕМ. ДЛЯ ОБСЛУЖИВАНИЯ ОБРАЩАЙТЕСЬ К КВАЛИФИЦИРОВАННОМУ ПЕРСОНАЛУ СЕРВИСНЫХ ЦЕНТРОВ. Знак молнии со стрелкой на конце внутри треугольника предупреждает пользователя о наличии внутри корпуса неизолированного “опасного напряжения” такой величины, что оно представляет угрозу поражения электрическим током для людей. Восклицательный знак внутри треугольника предупреждает пользователя о наличии важных инструкций по эксплуатации и использованию (сервису) в литературе, которая поставляется в комплекте с изделием. РУССКИЙ 1 R8416_LCD_PQ321_SM.indb 1 P 6/6/13 5:23 PM ПРАВИЛА ТЕХНИКИ БЕЗОПАСНОСТИ Электричество используется для выполнения многих полезных функций, но оно также может причинять травмы персоналу и быть причиной повреждения имущества в случае неправильного обращения с ним. Данное изделие спроектировано и произведено с обеспечением максимальной безопасности. Однако неправильная эксплуатация может привести к поражению электрическим током и/или возникновению пожара. В целях предотвращения потенциальной угрозы соблюдайте следующие инструкции по установке, эксплуатации и чистке данного изделия. Для обеспечения вашей безопасности и увеличения срока эксплуатации вашего ЖК монитора внимательно прочтите следующие правила, прежде чем приступать к эксплуатации данного изделия. 1. Прочтите инструкции – Прежде чем начать эксплуатацию изделия, необходимо прочесть и понять все инструкции по его эксплуатации. 2. Храните данное руководство в надежном месте – Данные инструкции по безопасности и эксплуатации следует хранить в надежном месте, чтобы можно было обратиться к ним впоследствии. 3. Подчиняйтесь предостережениям – Все предостерегающие надписи и знаки, имеющиеся на изделии и в инструкции, должны строго соблюдаться. 4. Следуйте инструкциям – Необходимо следовать всем инструкциям по эксплуатации. 5. Чистка – Прежде чем приступать к чистке изделия, необходимо достать вилку из розетки переменного тока. Для чистки изделия необходимо использовать сухую тряпку. Запрещается использовать для этих целей жидкие или аэрозольные чистящие средства. 6. Принадлежности – Запрещается использовать принадлежности, не рекомендованные производителем данного изделия. Использование других принадлежностей может стать причиной несчастных случаев. 7. Вода и влага – Запрещается использовать изделия возле источников воды. Не размещайте монитор в месте, где на него может попасть вода. При размещении обратите внимание на оборудование, использующее в работе воду, например, кондиционер. 8. Вентиляция – Вентиляционные отверстия и другие отверстия в корпусе прибора предназначены для вентиляции. Запрещается закрывать или блокировать эти вентиляционные отверстия или другие отверстия, поскольку недостаточная вентиляция может привести к перегреву и/или сокращению срока службы изделия. Запрещается устанавливать изделие на софу, ковер или другие аналогичные поверхности, поскольку они могут заблокировать вентиляционные отверстия. Запрещается устанавливать изделие в закрытых пространствах, таких как книжный шкаф или полка, если там не обеспечена надлежащая вентиляция, за исключением случаев, когда это предусмотрено в инструкции производителя. 9. Защита шнура питания – Шнур питания должен размещаться таким образом, чтобы на него не наступали люди и не устанавливались какие-либо предметы. 10. ЖК панель, которая используется в данном изделии, изготавливается из стекла. Следовательно, она может разбиться в случае, если изделие уронят или нанесут по нему удар. Проявляйте осторожность, чтобы вас не повредили осколки разбитого стекла в случае, если ЖК панель будет разбита. 11. Перегрузка – Запрещается перегружать розетку переменного тока и/или удлинительные кабели. Перегрузка может привести к пожару или поражению электрическим током. 12. Попадание внутрь корпуса предметов и жидкостей – Категорически запрещается вставлять какие-либо предметы внутрь изделия через вентиляционные или другие отверстия. Внутрь изделия подается высокое напряжение, поэтому просовывание в его корпус через отверстие какого-либо предмета может привести к поражению электрическим током и/или короткому замыканию некоторых деталей. По той же причине запрещается допускать попадание внутрь изделия воды или других жидкостей. 13. Обслуживание – Запрещается заниматься обслуживанием изделия самостоятельно. Если вы будете снимать крышки, то можете подвергнуться воздействию высокого напряжения и других опасных факторов. Обратитесь к квалифицированному обслуживающему персоналу для выполнения обслуживания. 14. Ремонт – Если произойдет что-либо из перечисленного ниже, извлеките из розетки переменного тока вилку шнура питания и обратитесь к квалифицированному обслуживающему персоналу за выполнением необходимых ремонтных работ. а. Поврежден шнур питания или вилка. b. В случае попадания в изделие жидкости или каких-либо других предметов. c. Когда изделие попало под дождь или в воду. d. Когда изделие не работает так, как это описано в инструкции по эксплуатации. Запрещается трогать органы управления помимо тех, что описаны в инструкциях по эксплуатации. Неправильная регулировка органов управления, которая не описана в инструкциях, может привести к повреждениям, для устранения которых зачастую требуется привлекать квалифицированных специалистов, которым приходится выполнять большой объем работ по регулировке. e. В случае, если изделие уронили или повредили. f. В случае, если в рабочем изделии наблюдаются какие-либо отклонения. Явные отклонения в работе изделия указывают на то, что требуется его обслуживание. 15. Запасные детали — Если для изделия потребуются запасные детали, убедитесь в том, что выполняющий обслуживание человек использует запасные детали, указанные производителем или аналогичные детали с такими же характеристиками и производительностью, как и оригинальные. Использование деталей, не рекомендованных производителем, может привести к возгоранию, поражению электрическим током или созданию других опасных ситуаций. 16. Проверки безопасности — После завершения работ по обслуживанию или ремонту попросите техника по обслуживанию произвести проверку безопасности, чтобы убедиться, что изделие находится в надлежащем рабочем состоянии. 17. Крепление на стену — При креплении изделия на стену необходимо убедиться в том, что оно установлено с использованием метода, рекомендованного его производителем. 18. Источники тепла — Держите изделие вдали от источников тепла, таких как радиаторы, нагреватели, плиты и другое оборудование, генерирующее тепло (включая усилители). P 2 R8416_LCD_PQ321_SM.indb 2 6/6/13 5:23 PM ПРАВИЛА ТЕХНИКИ БЕЗОПАСНОСТИ (Продолжение) 19. Использование монитора не должно сопровождаться созданием фатальных угроз или же опасностей, которые могут непосредственно привести к смерти, получению травм, серьезных физических повреждений или потерь, включая управление ядерной реакцией в ядерных установках, медицинских системах поддержания жизни, а также управление запусками ракет в системах вооружений. 20.Не следует в течение длительного времени находиться в контакте с нагревающимися деталями изделия. Это может привести к возникновению низкотемпературных ожогов. Для соответствия нормативам по электромагнитной совместимости применяйте экранированные кабели для подключения к следующим разъемам: вход DisplayPort. Если монитор установлен на недостаточно стабильной поверхности, это может быть опасным, так как он может упасть. Многие травмы, особенно детей, можно предотвратить с помощью следующих простых мер предосторожности: • использование настенных кронштейнов или опор, рекомендованных производителем монитора; • использование только тех предметов мебели, которые могут выдержать вес монитора; • монитор не должен нависать над краем предмета мебели, на котором он установлен; • монитор не следует устанавливать на высокие предметы (например, шкафы или стеллажи) без соответствующего крепления предмета мебели и монитора к подходящей основе; • монитор не следует ставить на ткань или другие материалы, находящиеся между монитором и предметом мебели; • объясняйте детям, что забираться на мебель, чтобы достать до монитора или его частей, может быть опасно. Особые меры безопасности для детей - Не позволяйте детям забираться на монитор или играть рядом с ним. - Не устанавливайте монитор на мебели, которая может использоваться в качестве ступеней (например, комод). - Помните, что дети выражать бурные эмоции во время просмотра программ, особенно на огромном мониторе. Монитор следует устанавливать в месте, где дети не смогут его двигать, тянуть или уронить. - Все шнуры и кабели должны быть подведены таким образом, чтобы любопытные дети не могли их тянуть и хвататься за них. Инструкции по безопасности Шнур питания и блок питания - Используйте только кабель питания и блок питания, поставляемые в комплекте с этим монитором. - Пользуясь блоком питания, учтите следующее: Неправильное обращение может стать причиной пожара, поражения электрическим током или травм. • Не роняйте блок питания и не подвергайте его ударам. •Запрещается разбирать блок питания. В нем содержатся высоковольтные компоненты, прикосновение к которым опасно. •Блок питания предназначен для использования только внутри помещений. Не пользуйтесь им на улице. •Не применяйте блок питания, который входит в комплект поставки, с другими устройствами. - Не допускайте повреждения шнура питания и блока питания, не ставьте на них тяжелых предметов, не тяните за провода и не сгибайте их. Также, не пользуйтесь удлинителями. Повреждение шнура может привести к пожару или поражению электрическим током. - Не используйте шнур питания, обмотанный изоляционной лентой. Применение удлинителя может стать причиной пожара в результате перегрева. - Не вынимайте и не вставляйте электрическую вилку мокрыми руками. Это может привести к поражению электрическим током. - Если вы не пользуетесь устройством в течение длительного времени, вынимайте вилку из розетки. - Не пытайтесь ремонтировать провод питания в случае его разрыва или неисправности. Обратитесь в службу ремонта. - Не касайтесь слишком долго частей изделия продукта и блока питания, которые при продолжительной работе могут нагреваться. Это может стать причиной низкотемпературных ожогов. - Не прикрепляйте блок питания к монитору или другому оборудованию. Это может стать причиной пожара или поражения электрическим током. РУССКИЙ - Запрещается использовать монитор в запыленных местах, местах с высокой влажностью или же там, где монитор может соприкасаться с маслами или паром, поскольку это может стать причиной возгорания. - Следите за тем, чтобы монитор не соприкасался с водой или другими жидкостями. Следите за тем, чтобы никакие предметы, такие как скрепки для бумаги, иголки, заколки, не попадали внутрь корпуса монитора, поскольку это может стать причиной пожара или привести к поражению электрическим током. - Запрещается устанавливать монитор сверху неустойчивых предметов или же в местах, где не гарантируется его безопасность. Запрещается подвергать монитор воздействию сильных ударов или вибрации. Если монитор упадет или опрокинется, это может его повредить. - Запрещается использовать монитор вблизи нагревательного оборудования или в тех местах, где он может подвергаться воздействию высокой температуры, поскольку это может привести к его избыточному нагреву и, как результат, к возгоранию. - Не используйте монитор в местах, где на него могут попадать солнечные лучи. - Розетка переменного тока должна находиться вблизи оборудования таким образом, чтобы к ней обеспечивался беспрепятственный доступ. 3 R8416_LCD_PQ321_SM.indb 3 P 6/6/13 5:23 PM МЕРЫ ПРЕДОСТОРОЖНОСТИ ПРИ КРЕПЛЕНИИ • Монитор предназначен для эксплуатации в помещении. • Требуется крепежный кронштейн, соответствующий спецификации VESA. • Для установки на подставке (производится серийно) или на стене либо для демонтажа или перемещения монитора обратитесь к своему дилеру. • Крепление монитора к стене требует специальных навыков, поэтому такая работа должна выполняться специалистами компании ASUS. Вам не следует предпринимать попыток сделать эту работу самостоятельно. Наша компания не несет какой-либо ответственности за несчастные случаи или травмы, вызванные плохим монтажом или неправильным обращением. • Монитор должен использоваться перпендикулярно по отношению к поверхности, на которой он установлен. При необходимости монитор можно наклонять на угол до 25 градусов, обращая экран вверх, или на угол до 20 градусов, обращая экран вниз. • Данный монитор должен эксплуатироваться при температуре окружающей среды от 0°C до 40°C. Обеспечьте вокруг монитора достаточно пространства, чтобы предотвратить накопление тепла внутри его корпуса. Для монитора в горизонтальной ориентации • Запрещается блокировать вентиляционные отверстия монитора. Рост температуры внутри корпуса монитора может привести к его неправильному функционированию. • Запрещается размещать монитор на устройствах, генерирующих тепло. • При установке монитора в горизонтальной ориентации вы можете Горизонтальный прикрепить с правой стикер стороны поставляемый (кнопки в комплекте управления) горизонтальный стикер (Кнопки управления). • Используйте входящий в комплект поставки вертикальный стикер при установке монитора в вертикальной ориентации. Блок: см 20 * 5 5 5 Для монитора в вертикальной ориентации Блок: см 20 5 * 5 5 *Когда вы устанавливаете этот монитор к стене. Однако поскольку во время работы монитор генерирует тепло, это может привести к деформированию или обесцвечиванию стены. • Если сложно обеспечить достаточное пространство по той или иной причине, например, из-за того, что монитор устанавливается внутри кожуха, или из-за того, что температура окружающей среды выходит за диапазон от 0°C до 40°C, установите вентилятор или примите другие меры для того, чтобы температура окружающей среды находилась в пределах требуемого диапазона. Комплектные принадлежности В случае отсутствия какого-либо компонента, свяжитесь со своим дилером. Монитор с жидкокристаллическим дисплеем: 1 Шнур питания: 1 Блок питания: 1 Руководство по установке (это руководство): 1 Кабель DisplayPort: 1 Кабель-переходник RS-232C (мини-джек ø3,5): 1 Основание (подставки): 1 Стойка (подставки): 1 Соединительная пластина (подставки): 1 (предварительно установленная на мониторе) Винты с потайной головкой (М4 x 6 без шайб): 5 Винты (М4 x 10 с шайбами): 4 Шестигранный ключ: 1 Зажим кабеля: 2 Зажим кабеля (малый): 1 Зажим кабеля (большой): 2 Горизонтальный стикер (кнопки управления): 1 P 4 R8416_LCD_PQ321_SM.indb 4 6/6/13 5:23 PM Установка подставки (входит в комплект поставки) ВНИМАНИЕ! • Отсоедините от монитора все кабели. • Надежно затяните установочные винты (входят в комплект поставки) с помощью шестигранного ключа (входит в комплект поставки). • Обеспечьте наличие достаточного пространства для работы. 5. П рикрепите подставку к монитору с помощью поставляемых в комплекте винты (М4 x 10 с шайбами) (x4). Используйте поставляемый в комплекте шестигранный ключ. • Горизонтальная ориентация nПрикрепите подставку Винты (М4 x 10 с шайбами) Прежде чем приступать к работе, снимите все упаковочные материалы. Чтобы защитить стол (и т.д.) от повреждений основанием подставки, подстелите толстую мягкую ткань (например, одеяло) и работайте на ней. 1. Вставьте стойку подставки в упаковочный материал (вверху слева), как показано на рисунке. Упаковочный материал (вверху слева) Спереди 2. Поддерживая рукой основание подставки, прикрепите его к стойке подставки винтами с потайной головкой (М4 x 6 без шайб) (x5), которые входят в комплект поставки. Используйте поставляемый в комплекте шестигранный ключ. Винты с потайной головкой (М4 x 6 без шайб) • Вертикальная ориентация Кнопки управления Винты (М4 x 10 с шайбами) Вид спереди 1 Основание 2 Вставьте, зацепив ушко Ушко Фиксирующий штифт РУССКИЙ * Пакет с винтами (входят в комплект поставки) и шестигранным ключом (входит в комплект поставки) прикреплен к основанию подставки через круглое отверстие. 3. Расстелите толстую мягкую ткань (например, одеяло), которая предотвратит повреждение ЖКпанели, на плоской поверхности, на которой помещается весь монитор, и положите монитор на ткань ЖК-панелью вниз. 4. Поместите подставку на монитор. Введите ушко на подставке в зацепление с соединительной пластиной (предварительно установленной на мониторе). * Если монитор будет использоваться в вертикальной ориентации, выньте фиксирующий штифт (1) и вставьте его в отверстие (2), как показано выше. * Чтобы снять стойку, положите монитор и стойку, как показано выше, и снимите винты. ВНИМАНИЕ! • При установке монитора в вертикальной ориентации придерживайтесь следующих рекомендаций. Несоблюдение этих рекомендаций может привести к возникновению неисправностей. - Установите монитор так, чтобы кнопки управления были расположены сверху. - Задайте для опции MONITOR <МОНИТОР> в меню MONITOR <МОНИТОР> установку PORTRAIT <ПОРТРЕТ>. (Cм. РУКОВОДСТВО ПО ЭКСПЛУАТАЦИИ.) 5 R8416_LCD_PQ321_SM.indb 5 P 6/6/13 5:23 PM Соединения ВНИМАНИЕ! • Проверьте, что вы выключили главный выключатель питания и вынули вилку из электрической розетки, прежде чем присоединять/отсоединять кабели. Также прочтите руководство пользователя того оборудования, которое будет подсоединяться. • Будьте внимательны и не перепутайте при подсоединении кабелей входной и выходной разъемы. Если кабели, подсоединенные к входному и выходному разъемам, будут случайно перепутаны, это может стать причиной возникновения неисправностей и других проблем. • Не используйте кабели с поврежденными или деформированными разъемами. Применение такого кабеля может стать причиной неисправностей. • Возможность отображения зависит от компьютера (видеокарты), кабелей или подключаемых периферийных устройств. 4 5 6 7 1. Главный выключатель питания 2. Входной разъем питания переменного тока 3. Шнур питания (входит в комплект поставки) 4. Входной разъем RS-232C 5. Входной разъем DisplayPort 6. Входные разъемы аудио 7. Разъем для наушников Для разъема питания 3 2 1 ПРИМЕЧАНИЕ: • Задайте испольуемый входной аудиоразъем в разделе AUDIO SELECT <ВЫБРАТЬ АУДИОВХОД> меню SETUP <УСТАНОВКА>. Указанные ниже параметры настройки устанавливаются на заводе. Режим ввода DisplayPort Входной разъем аудио (настройка по умолчанию) Входной разъем DisplayPort • Кабели, подсоединенные к разъемам на задней панели монитора, могут быть скреплены с помощью кабельного зажима. Прикрепите зажимы для кабеля к креплениям, расположенным на задней поверхности монитора и на подставке, и закрепите кабели. Подставки Кабель Прикрепление зажима кабеля Зажим кабеля Зажим кабеля (малый) Зажим кабеля (большой) Прикрепление зажима кабеля Кабель Прикрепление зажима кабеля Кабель • DisplayPort является зарегистрированным товарным знаком Video Electronics Standards Association. P 6 R8416_LCD_PQ321_SM.indb 6 6/6/13 5:23 PM Включение/выключение питания ВНИМАНИЕ! • Включите монитор до того, как будет включен ПК или устройство воспроизведения. Подключение электропитания Включение/выключение питания Чтобы включить/выключить питание, нажмите кнопку питания ( ). Кнопка питания ( ) LED- индикатор питания Главный выключатель питания ВНИМАНИЕ! • Питание должно включаться и выключаться с помощью основного выключателя. Не подсоединяйте/ отсоединяйте шнур питания и не меняйте положение выключателя, когда основной выключатель питания находится во включенном положении. • Между выключением питания сетевым выключателем или кнопкой питания ( ) и повторным включением всегда делайте паузу не менее 5 секунд. • Для полного отключения питания выдерните шнур питания. Состояние индикатора питания Статус монитора Зеленое свечение Питание вкл. Выкл. Питание выкл. (Режим ожидания) Оранжевое свечение Pежим ожидания входного сигнала ВНИМАНИЕ! • Между выключением питания сетевым выключателем или кнопкой питания ( ) и повторным включением всегда делайте паузу не менее 5 секунд. Небольшой интервал может привести к возникновению неисправности. ПРИМЕЧАНИЕ: • Когда отключен главный выключатель питания, монитор нельзя включить. • Если монитор находится в режиме ожидания подачи входного сигнала и вы нажмете кнопку питания ( ), монитор перейдет в режим ожидания. РУССКИЙ 7 R8416_LCD_PQ321_SM.indb 7 P 6/6/13 5:23 PM Спецификации Модель Требование к электропитанию Рабочая температура Рабочая влажность Потребляемая мощность Размеры (исключая выступы) Вес PQ321QE AC 100 В - 240 В, 50/60 Гц (при использовании поставляемого в комплекте блока питания) 0°C - 40°C 20% - 80% (без конденсации) 99 Вт * (при использовании поставляемого в комплекте блока питания) Прибл. 750 x 441 x 35 мм (только монитор) Прибл. 750 x 489 x 256 мм Размер коробки 990 x 558 x 230 мм Прибл. 13 (нетто) Прибл. 17 (брутто) * Когда монитор работает от 19 В пост. тока: 88 Вт В соответствии с нашей политикой постоянного улучшения наших изделия, корпорация ASUS оставляет за собой право вносить изменения в дизайн и спецификации изделия без предварительного уведомления.Указанные значения технических характеристик являются номинальными значениями среднестатистического прибора. Возможны некоторые отклонения от этих значений у отдельных приборов. Меры предосторожности при креплении • При установке, снятии или перемещении монитора следует убедиться, что эту работу выполняют не менее 2 человек. • Убедитесь, что вы используете настенный кронштейн, спроектированный или предназначенный для крепления данного монитора. • Данный монитор проектировался для установки на бетонные стены или колонны. Для крепления к конструкциям из других материалов, таких как оштукатуренные стены/тонкие пластмассовые панели/ деревянные панели, необходимо до установки выполнить определенные работы по их укреплению. Данный монитор и крепежные кронштейны должны устанавливаться на стену, которая может выдержать как минимум 4-кратный вес монитора. Установку необходимо выполнять, используя подходящий для материала и конструкции метод. • Для крепления кронштейнов, совместимые со стандартом VESA следует использовать винты М6, длина которых на 8-10 мм больше толщины крепежного кронштейна. • Не используйте ударную отвертку. • При перемещении монитора обязательно удерживайте его снизу и по бокам. Не держите монитор за ЖК панель или углы. Это может привести к повреждению изделия, его неисправности или к травмированию людей. • Запрещается использовать какие-либо другие отверстия для крепежных винтов, за исключением отверстий VESA. P 8 R8416_LCD_PQ321_SM.indb 8 6/6/13 5:23 PM Indice INFORMAZIONI IMPORTANTI................................................ 1 PRECAUZIONI DI SICUREZZA................................................. 2 ISTRUZIONI DI SICUREZZA..................................................... 3 PRECAUZIONI DI MONTAGGIO.............................................. 4 Componenti in dotazione...................................................... 4 [ITALIANO] Installare il piedistallo (in dotazione)................................... 5 Connessioni............................................................................. 6 Accensione/Spegnimento...................................................... 7 Specifiche................................................................................ 8 Precauzioni per il montaggio................................................ 8 INFORMAZIONI IMPORTANTI ATTENZIONE: PER RIDURRE IL RISCHIO DI INCENDI O SHOCK ELETTRICI NON ESPONETE QUESTO PRODOTTO A PIOGGIA O UMIDITÀ. ATTENZIONE RISCHIO DI SHOCK ELETTRICO NON APRIRE ATTENZIONE:PER RIDURRE IL RISCHIO DI SCOSSE ELETTRICHE NON RIMUOVETE LA COVER. ALL'INTERNO NON VI SONO PARTI RIPARABILI DALL'UTENTE. RICHIEDETE ASSISTENZA A PERSONALE QUALIFICATO. Il simbolo di una freccia (in un triangolo equilatero) indica la presenza di un voltaggio pericoloso e non isolato (all'interno dell'apparecchio) che potrebbe essere sufficientemente elevato da provocare un rischio di scosse elettriche o shock nei confronti delle persone. Il punto esclamativo (in un triangolo equilatero) indica la presenza di importanti istruzioni sul funzionamento e la manutenzione del dispositivo nella documentazione in dotazione con il prodotto. ITALIANO 1 PQ321_Setup_IT.indb 1 I 06.06.2013 15:47:50 Uhr PRECAUZIONI DI SICUREZZA L'elettricità viene usata per molte operazioni utili ma può anche essere fonte di infortuni o danni alla proprietà se non usata correttamente. Questo prodotto è stato progettato e assemblato con la massima attenzione alla sicurezza. Tuttavia un uso improprio potrebbe causare uno shock elettrico o un incendio. Per evitare rischi e pericoli osservate le istruzioni fornite per il montaggio, l'uso e la pulizia del prodotto. Per garantire la vostra sicurezza e prolungare il più possibile la durata del vostro prodotto LCD leggete attentamente le seguenti istruzioni di sicurezza prima di usare il prodotto. 1. Leggete le istruzioni - Tutte le istruzioni operative devono essere lette e comprese prima di utilizzare il prodotto. 2.Tenete il manuale in un posto sicuro - Queste istruzioni operative e di sicurezza devono essere conservate in un posto sicuro per un eventuale utilizzo in futuro. 3. Osservate gli avvisi - Tutti gli avvisi presenti sul prodotto e nelle istruzioni devono essere osservati pienamente. 4. Seguite le istruzioni - Tutte le istruzioni operative devono essere seguite. 5.Pulizia - Scollegate il cavo di alimentazione dalla presa di corrente prima di pulire il prodotto. Usate un panno asciutto per la pulizia del prodotto. Non usate detergenti liquidi o spray. 6.Accessori - Non usate accessori non raccomandati dal produttore. Usare accessori non adeguati potrebbe causare incidenti. 7.Acqua e umidità - Non usate il prodotto vicino all'acqua. Non installate il prodotto in un luogo soggetto a schizzi d'acqua. Fate attenzione anche ai dispositivi che scaricano acqua come i condizionatori d'aria. 8. Ventilazione - Le prese d'aria e le altre fessure sono state progettate per la ventilazione. Non coprite nè bloccate queste prese d'aria poiché una ventilazione non sufficiente potrebbe causare un surriscaldamento e/ o diminuire la vita del prodotto. Non posizionate il prodotto nelle vicinanze di divani, tappeti e simili per non rischiare di ostruire le prese d'aria. A meno che una ventilazione adeguata sia possibile, e le istruzioni del produttore siano seguite in pieno, non posizionate il prodotto all'interno di una libreria o uno scaffale. 9.Protezione del cavo di alimentazione - Il cavo di alimentazione deve essere disposto correttamente impedendo alle persone di passarci sopra ed evitando di posizionarvi oggetti sopra o in prossimità . 10.Il pannello LCD di questo prodotto è fatto di vetro. Di conseguenza è soggetto a rottura in caso di caduta o impatti. Fate attenzione a non ferirvi con eventuali frammenti di vetro in caso di rottura del pannello LCD. 11. Sovraccarico - Non sovraccaricate le prese di corrente AC o le prolunghe di alimentazione. Un sovraccarico potrebbe generare incendi o shock elettrici. 12.Oggetti e liquidi estranei - Non inserite oggetti nel prodotto attraverso le prese d'aria e le fessure. Nel prodotto c'è alta tensione e inserendo oggetti all'interno potreste causare shock o cortocircuiti interni. Per la stessa ragione non versate acqua o altri liquidi all'interno del prodotto. 13.Assistenza - Non provate a riparare il prodotto da soli. La rimozione della cover potrebbe esporvi ad elevato voltaggio e altre situazioni pericolose. Se una riparazione fosse necessaria richiedete l'intervento di personale qualificato. 14.Riparazione - Se si verificasse una delle seguenti condizioni scollegate il cavo di alimentazione dalla presa di corrente AC e richiedete assistenza a personale qualificato. a. Il cavo di alimentazione o il connettore sono danneggiati. b. Del liquido è stato versato nel prodotto o oggetti estranei vi sono finiti dentro. c. Il prodotto è stato esposto a pioggia o acqua. d. Il prodotto non funziona correttamente così come descritto nelle istruzioni operative. Non toccate comandi diversi da quelli descritti nelle istruzioni operative. Una regolazione impropria, non descritta nelle istruzioni, potrebbe causare danni i quali, quasi sempre, richiedono una riparazione approfondita da parte di un tecnico qualificato. e. Il prodotto è caduto o è danneggiato. f.Il prodotto si presenta in condizioni anomale. Una qualsiasi condizione anomala e osservabile del prodotto indica che questo ha bisogno di assistenza. 15.Parti di ricambio - Nel caso in cui il prodotto necessiti di parti di ricambio assicuratevi che chi vi fornisce assistenza utilizzi parti suggerite dal produttore o, comunque, con le stesse caratteristiche e prestazioni delle parti originali. Un utilizzo di parti di ricambio non compatibili potrebbe generare incendi, shock elettrici e/o altri pericoli. 16.Verifiche di sicurezza - Una volta che la riparazione è completata chiedete al tecnico che ha eseguito la riparazione di eseguire una verifica di sicurezza per accertarvi che il prodotto sia nelle condizioni operative ottimali. 17.Montaggio a parete - Quando montate il prodotto a parete assicuratevi di installarlo seguendo il metodo consigliato dal produttore. 18.Fonti di calore - Tenete il prodotto lontano da fonti di calore come radiatori, caldaie, stufe o altri prodotti che generano calore (sono inclusi gli amplificatori). 19.L'uso di questo monitor non deve essere accompagnato a condizioni di grave pericolo e conseguenti rischi di infortuni, morte, gravi danni fisici o altre perdite. Il suo utilizzo inoltre non è ammesso in centrali nucleari, centri di assistenza medica d'urgenza e basi missilistiche. 20.Non rimanete in contatto con eventuali parti del prodotto che si scaldano per lunghi periodi di tempo. Ciò potrebbe provocare ustioni a bassa temperatura. I 2 PQ321_Setup_IT.indb 2 06.06.2013 15:47:50 Uhr PRECAUZIONI DI SICUREZZA (seconda parte) Affinché sia mantenuta la conformità con le disposizioni EMC è necessario usare cavi schermati per il collegamento all'ingresso DisplayPort. Se il monitor non è stabile potrebbe diventare potenzialmente pericoloso a causa del rischio di caduta. Per la garantire sicurezza di tutti, e in particolare dei bambini, la maggior parte degli infortuni può essere evitata prendendo precauzioni semplici come, ad esempio: • Usare dispositivi di fissaggio, come staffe per il montaggio a parete, raccomandati dal produttore. • Usare solamente mobili che siano in grado di sostenere adeguatamente il monitor. • Accertarsi che il monitor non sporga dai bordi del mobile su cui è poggiato. • Non posizionare il monitor su un mobile molto alto (ad esempio armadi o librerie) senza prima fissare entrambi ad un supporto adeguato. • Non posizionare materiali scivolosi come tessuti o altro tra il monitor e il mobile di supporto. • Educare i bambini in merito ai pericoli causati dall'arrampicarsi sui mobili per raggiungere il monitor o uno dei suoi tasti di controllo. In particolare per la sicurezza dei bambini: - Non permettete ai bambini di arrampicarsi o giocare con il monitor. - Non posizionate il monitor su mobili sui quali è facile arrampicarsi come le cassettiere. - Ricordatevi che i bambini sono molto attratti durante la visione di un programma, specialmente se il monitor è molto grande. Prestate attenzione a posizionare il monitor in un posto in cui non possa essere spinto, sollevato o buttato sul pavimento. - Fate molta attenzione al posizionamento dei cavi e al loro ordine. Fate in modo che non possano essere tirati o impugnati da bambini curiosi. ISTRUZIONI DI SICUREZZA - Non usate il monitor in ambienti molto polverosi, umidi o dove il monitor stesso potrebbe venire a contatto con olio o vapore perchè potrebbe generarsi un incendio. - Assicuratevi che il monitor non entri in contatto con sporcizia, liquidi o lubrificanti. Assicuratevi che nessun oggetto metallico come graffette o puntine entri all'interno del monitor perchè potrebbero generarsi incendi o shock elettrici. - Non posizionate il monitor su superfici insicure o oggetti instabili. Non permettete al monitor di ricevere urti violenti o forti vibrazioni. Far cadere il monitor, o rovesciarlo, potrebbe danneggiarlo. - Non usate il monitor nei pressi di fonti di calore o in ambienti in cui la temperatura è notoriamente alta poiché questo potrebbe generare surriscaldamenti e addirittura un principio d'incendio. - Non usate il monitor a diretto contatto con la luce solare. - La presa di corrente dovrebbe essere vicina al monitor e facilmente accessibile. Adattatore AC e cavo di alimentazione - Usate solamente il cavo di corrente e l'adattatore AC forniti con il monitor. - Quando maneggiate l'adattatore AC tenete presente che un gesto sbagliato potrebbe causare incendi, infortuni o shock elettrici. • Non fate cadere l'adattatore AC e non sottoponetelo ad impatti. • Non smontate mai l'adattatore AC. Contiene parti soggette ad alto voltaggio e pericolose al tocco. • L'adattatore AC è per uso esclusivamente interno. Non usate all'esterno. • Non usate l'adattatore AC con altri dispositivi. - Non danneggiate il cavo di alimentazione e l'adattatore AC, non posizionate oggetti pensanti su di essi nè tantomeno tentate di allungarli o piegarli in maniera innaturale. Non usate prolunghe di alimentazione. Un danno al cavo di alimentazione potrebbe generare incendi o shock elettrici. - Non usate il cavo di alimentazione con una ciabatta. Aggiungere una prolunga potrebbe generare un rischio di incendio a causa del surriscaldamento. ITALIANO - Non collegate/scollegate il cavo di alimentazione con le mani bagnate. Se lo fate potreste generare shock elettrici. - Scollegate il cavo di alimentazione se pensate di non usare il prodotto per molto tempo. - Non provate a riparare il cavo di alimentazione se è rotto o malfunzionante. In questo caso richiedete assistenza. - Non restate in contatto con parti del prodotto dell'adattatore AC che si scaldano o restano calde per lungo tempo. Ciò potrebbe provocare ustioni a bassa temperatura. - Non fissate l'adattatore AC al monitor o ad altri dispositivi. Farlo potrebbe generare incendi o shock elettrici. 3 PQ321_Setup_IT.indb 3 I 06.06.2013 15:47:50 Uhr PRECAUZIONI DI MONTAGGIO • Questo prodotto è stato progettato per uso interno. • Per l'installazione è richiesto un supporto di montaggio compatibile VESA. • Per installare ad un piedistallo o a parete, o per spostare il monitor, chiedete consiglio al vostro rivenditore. • Il montaggio del monitor a parete richiede una certa esperienza e il lavoro deve essere fatto solamente da un tecnico ASUS autorizzato. Non eseguite mai questa operazione da soli. ASUS non si riterrà responsabile di eventuali incidenti o infortuni causati da un montaggio o una manovra errati. • Usate il monitor con la sua superficie perpendicolare al piano d'appoggio. Se necessario il monitor può essere inclinato di 25 gradi all'indietro o di 5 gradi in avanti. • Questo monitor deve essere usato in temperature comprese tra gli 0°C (32°F) e i 40°C (104°F). Lasciate spazio sufficiente attorno al monitor per garantire una ventilazione adeguata. • Non bloccate le prese d'aria. Se la temperatura all'interno del monitor non fosse adeguata potrebbero verificarsi dei malfunzionamenti. • Non posizionate il monitor su alcuna sorgente di calore. • Quando installate il monitor in posizione orizzontale potete attaccare al lato destro Horizontal sticker l'adesivo con le indicazioni (Operation dei pulsanti (Operation buttons) buttons). For the monitor in landscape orientation Unit: inch [cm] 7-7/8 [20] 2 [5] * 2 [5] 2 [5] For the monitor in portrait orientation Unit: inch [cm] 7-7/8 [20] 2 [5] * 2 [5] 2 [5] * Il monitor, durante il suo funzionamento, produce calore. Se il monitor è installato a parete la stessa parete potrebbe perdere colore o modificarsi visibilmente. • Se per qualunque ragione non fosse possibile fornire sufficiente spazio al monitor, o se la temperatura fosse all'esterno dell'intervallo raccomandato 0°C (32°F) e i 40°C (104°F), sarà necessario dotarsi di misure adeguate per assicurarsi che il monitor non sia soggetto a temperature troppo alte o troppo basse. Componenti in dotazione Se qualche componente non fosse incluso nella confezione contattate il vostro rivenditore. * Monitor a cristalli liquidi: 1 * Cavo di alimentazione: 1 * Adattatore AC: 1 * Manuale d'installazione (questo manuale): 1 * Cavo DisplayPort: 1 * Adattatore RS-232C (Φ3.5 mini-jack): 1 * Base (per il piedistallo): 1 * Supporto (per il piedistallo): 1 * Piastra di ancoraggio (per il piedistallo): 1 (preinstallata sul monitor) * Viti a testa conica (M4 x 6 senza rondelle): 5 * Viti (M4 x 10 con rondelle): 4 * Chiave esagonale: 1 * Serracavi: 2 * Serracavi (piccolo): 1 * Serracavi (grande): 2 * Adesivo orizzontale (Operation buttons): 1 I 4 PQ321_Setup_IT.indb 4 06.06.2013 15:47:51 Uhr Installare il piedistallo (in dotazione) ATTENZIONE! • Scollegate tutti i cavi collegati al monitor. • Avvitate correttamente le viti d'installazione (in dotazione) con la chiave esagonale (in dotazione). • Assicuratevi di aver spazio sufficiente per l'operazione. 5.Assicurate il piedistallo al monitor con le 4 viti in dotazione (M4 x 10 con rondelle). Usate la chiave esagonale inclusa nella confezione. • Orizzontale Screw (M4 x 10 with washers) nAttaccare il piedistallo Rimuovete tutti i materiali usati per confezionare il prodotto prima di cominciare. Per evitare che il piano d'appoggio venga danneggiato dalla base del piedistallo usate un tessuto morbido (ad es. una coperta) e posizionate il monitor su di esso. 1. Inserite il supporto del piedistallo nel materiale d'imballaggio (in alto a sinista) come da figura. Packing material (upper left) Front 2.Tenendo fermo il supporto del piedistallo con una mano fissate la base con le 5 viti a testa conica in dotazione (M4 x 6 senza rondelle). Usate la chiave esagonale inclusa nella confezione. • Verticale Operation buttons Countersunk screw (M4 x 6 without washers) Screw (M4 x 10 with washers) Front 1 2 Pedestal Insert by hooking the tab Fixing pin * Nel foro rotondo della base del piedistallo troverete un sacchetto contenente le viti e la chiave esagonale. 4.Attaccate il piedistallo al monitor. Agganciate la fessura del supporto (sul monitor) alla linguetta del piedistallo. * Se intendete montare il monitor in verticale estraete il perno di fissaggio dalla posizione 1 e inseritelo nella posizione 2. * Per rimuovere il piedistallo posizionate il monitor e il piedistallo come mostrato nella figura precedente e rimuovete le viti. ITALIANO 3.Posizionate un panno morbido (ad es. una coperta) su una superficie stabile e omogenea per evitare di danneggiare il pannello LCD e posizionate il monitor a faccia in giù su di esso. ATTENZIONE! • Seguite queste regole quando installate il monitor in verticale. Se non lo fate potreste danneggiare il monitor o incorrere in un malfunzionamento. - Installate il monitor in modo che i pulsanti operativi siano collocati in alto. - Impostate la voce PORTRAIT alla voce MONITOR del menu MONITOR. (Vedi MANUALE UTENTE.) Tab 5 PQ321_Setup_IT.indb 5 I 06.06.2013 15:47:52 Uhr Connessioni ATTENZIONE! • Assicuratevi di posizionare l'interruttore principale su OFF e di scollegare il cavo di alimentazione prima di collegare/scollegare qualsiasi altro cavo. Leggete il manuale del dispositivo che intendete collegare al monitor. • Fate attenzione a non confondere i terminali di ingresso con i terminali di uscita quando state collegando uno o più cavi. In caso di errore potreste causare malfunzionamenti e altri problemi. • Non usate cavi con terminali danneggiati o deformati. Cavi in condizioni non ottimali potrebbero danneggiare il monitor. • Le immagini potrebbero non essere visualizzate correttamente a seconda del tipo di computer (in particolare la scheda video), cavo o periferica connesso. 4 5 6 7 1. Interruttore principale 2. Ingresso alimentazione AC 3. Cavo di alimentazione (in dotazione) 4. Ingresso RS-232C 5. Ingresso DisplayPort 6. Ingresso audio 7. Uscita cuffie For power outlet 3 2 1 NOTA: • Selezionate l'ingresso audio che volete usare per ciascuna modalità di input nella sezione AUDIO SELECT del menu SETUP. Di seguito le impostazioni predefinite di fabbrica. Ingresso video Ingresso audio (predefinito) DisplayPort Ingresso DisplayPort • I cavi collegati al retro del monitor possono essere ordinati con un serracavi. Fissate il serracavi agli appositi ganci che trovate nella parte posteriore del monitor e del piedistallo e poi fissate i cavi ad esso. Stand Cable Cable clamp attachment Cable clamp Cable clamp (small) Cable clamp (large) Cable clamp attachment Cable Cable clamp attachment Cable • DisplayPort® è un marchio registrato di Video Electronics Standards Association. I 6 PQ321_Setup_IT.indb 6 06.06.2013 15:47:52 Uhr Accensione/Spegnimento ATTENZIONE! • Accendete il monitor prima di accendere il PC o il dispositivo di riproduzione. Accensione/spegnimento Premete il pulsante di accensione/spegnimento ( o spegnere il monitor. ) per accendere Power button ( ) Attivare l'alimentazione principale Power LED Main power switch Stato LED di alimentazione Stato corrispondente monitor Verde Acceso Off Spento (Standby) Arancione Attesa segnale in ingresso ATTENZIONE! ATTENZIONE! • L'alimentazione principale può essere attivata/disattivata tramite il relativo interruttore. Non collegate/scollegate il cavo di alimentazione quando l'interruttore principale è posizionato su ON. • Quando agite sull'interruttore principale di alimentazione ( ) aspettate almeno 5 secondi prima di azionarlo di nuovo. • Per una completa disconnessione dalla rete elettrica scollegate il cavo di alimentazione dalla presa di corrente. • Quando agite sull'interruttore principale di alimentazione ( ) aspettate almeno 5 secondi prima di azionarlo di nuovo. Un intervallo più corto potrebbe causare un malfunzionamento. NOTA: • Quando l'interruttore principale di alimentazione è posizionato su OFF il monitor non può essere acceso tramite il pulsante di accensione/spegnimento. • Quando il monitor è in attesa del segnale in ingresso, e premete il pulsante di accensione/spegnimento ( ), il monitor entrerà in standby. ITALIANO 7 PQ321_Setup_IT.indb 7 I 06.06.2013 15:47:53 Uhr Specifiche Modello Requisiti di alimentazione Temperatura di esercizio Umidità di esercizio Consumo energetico Dimensioni Peso PQ321QE AC 100 V - 240 V, 50/60 Hz (se usate l'adattatore AC in dotazione) da 0°C a 40°C (da 32°F a 104°F) dal 20% all'80% (senza formazione di condensa) 99 W* (se usate l'adattatore AC in dotazione) Dimensioni fisiche con piedistallo (LxAxP) 750 x 489 x 256 mm Dimensioni fisiche senza piedistallo (LxAxP) 750 x 441 x 35 mm Dimensioni della confezione (LxAxP) 990 x 558 x 230 mm Peso netto (stimato) 13 Kg Peso lordo (stimato) 17 Kg * Quando usate il monitor in configurazione DC19 V: 88 W A sostegno della sua politica di continuo miglioramento ASUS si riserva il diritto di apportare modifiche all'aspetto e alle specifiche per il miglioramento del prodotto senza preavviso. Le specifiche che indichiamo in merito alle prestazioni sono i valori nominali delle unità in produzione. Potrebbero esserci alcune variazioni di questi valori nella singola unità. Precauzioni per il montaggio • Durante l'installazione, smontaggio o spostamento del monitor, assicuratevi che questo sia trasportato da almeno 2 persone. • Accertatevi di usare una staffa per il montaggio a parete adeguata a sostenere il vostro monitor. • Questo monitor è stato pensato per essere installato ad una parete di cemento o ad una colonna. Se la vostra parete è in cartongesso/ plastica/legno potrebbero essere necessari lavori di rinforzo prima di cominciare l'installazione. Il muro scelto per l'installazione deve essere in grado di reggere almeno 4 volte il peso totale di monitor e staffa per il montaggio. Individuate il metodo di installazione più adatto per il materiale e la struttura. • Se usate una staffa per il montaggio compatibile con lo standard VESA usate viti M6 che sporgano dagli 8 mm ai 10 mm oltre alla staffa di montaggio. • Non usate un cacciavite a percussione. • Quando spostate il monitor assicuratevi di reggerlo dalla parte inferiore e dalla parte laterale. Non reggete il monitor tramite il pannello LCD o dagli angoli. Potreste danneggiare il prodotto o ferirvi. • Non utilizzate fori delle viti diversi dai fori VESA per l'installazione. I 8 PQ321_Setup_IT.indb 8 06.06.2013 15:47:53 Uhr www.asus.com