1
Paint Scale Panda7, Panda7/X, Panda7/X2
Farbmischwaage Panda7, Panda7/X, Panda7/X2
Balance pour le mélange des couleurs Panda7, Panda7/X, Panda7/X2
Balanza para mezcla de colores Panda7, Panda7/X, Panda7/X2
Bilancia per vernici Panda7, Panda7/X, Panda7/X2
Page 5
Verfmengweegschaal Panda7, Panda7/X, Panda7/X2
Max.7100g
Min.5g
Deutsch
Page 57
Página 83
Español
Seite 31
Français
e=1g
d=0.1g
t3
G
Italiano
Pagina 135
Nederlands
t2
G
Pagina 109
Ca
TOLEDO
Ca
METTLER
English
Operating instructions
Bedienungsanleitung
Mode d’emploi
Instrucciones de manejo
Istruzioni per l’uso
Gebruiksaanwijzing
12
13
14
3
4
21
METTLER TOLEDO
Max.7100g
Min.5g
e=1g
d=0.1g
15
20
16
16
19
18
METTLER
TOLEDO
Max.7100g
Min.5g
e=1g
d=0.1g
Unit
Menu
+
Yes
O/T
On/Off
Mode
Enter
Last
Comp
Next
Comp
Factor
–
No
17
5
2
11
6
Italiano
Español
Français
Deutsch
10 9
Nederlands
7
Ca
t2
G
English
Ca
t3
G
8
1
English
Deutsch
1
2
3
4
1
2
3
4
5
6
7
8
9
10
11
12
13
14
15
16
17
18
19
20
21
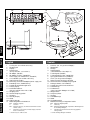
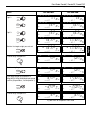
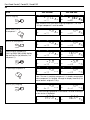
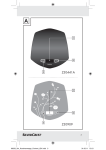
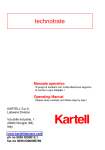
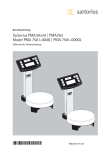
Leveling feet (on certified scales only)
Weighing pan
Display
Function keys
(for key functions, see Section 3)
AC adapter (Panda7)
AC adapter PS-EX2P (Panda7/X2)
Power supply unit PANDA-EX1P (Panda7/X)
Level indicator (on certified scales only)
Dual RS232C interface
Connecting socket for AC adapter/ power supply unit
Grounding screw (Panda7/X only)
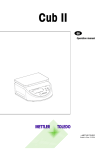
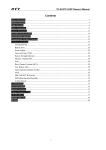
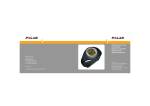
Symbol for calculated weight value
Primary display
Certification brackets
(only on certified scales with e=10d)
Weighing units
Formula weighing symbol
Tolerance
Auxiliary display
Factor
Stability detector
Model designation with details of:
Max: maximum capacity
d:
resolution
Min*: minimum capacity (recommended minimum load for
certified scales)
e*:
verification scale interval (smalest display increment
tested in certification)
* relevant only for certified scales
5
6
7
8
9
10
11
12
13
14
15
16
17
18
19
20
21
Stellfüsse (nur bei geeichten Waagen)
Waagschale
Anzeige
Funktionstasten
(Tastenfunktionen siehe Kapitel 3)
Tischnetzgerät (Panda7)
Tischnetzgerät PS-EX2P (Panda7/X2)
Speisegerät PANDA-EX1P(Panda7/X)
Libelle (nur bei geeichten Waagen)
Doppelt belegte Schnittstelle RS232C
Anschlussbuchse Netzadapter/Speisegerät
Erdungsschraube (nur Panda7/X)
Symbol für berechneten Gewichtswert
Primäranzeige
Eichklammern
(nur bei geeichten Waagen mit e=10d)
Wägeeinheiten
Rezeptiersymbole
Toleranz
Sekundäranzeige
Faktor
Stillstandskontrolle
Modellbezeichnung mit folgenden Details:
Max: Maximale Wägekapazität
d:
Auflösung
Min*: Minimale Wägekapazität (empfohlenes Minimalgewicht
für eichfähige Waagen)
e*:
Eichauflösung (kleinster bei der Eichung geprüfter
Anzeigeschritt)
* nur für eichfähige Waagen zutreffend
Max: capacité maximale de pesage
d:
résolution
Min*: capacité minimale de pesage (charge minimale recommandée pour les balances soumises à vérification)
e*:
résolution réglementaire (plus petit échelon d’affichage
contrôlé lors de la vérification)
Max: capacidad máxima de pesada
d:
resolución
Min*: capacidad mínima de pesada (carga mínima
recomendada para balanzas verificadas)
e*:
resolución de verificación (la mínima en la calibración
del paso de indicador verificado)
* sólo aplicable a balanzas verificables
* ne concerne que les balances admissibles à la vérification
Italiano
Nederlands
1
2
3
4
1
2
3
4
5
6
7
8
9
10
11
12
13
14
15
16
17
18
19
20
21
Piedini regolabili (solo per bilance omologate)
Piatto della bilancia
Display
Tasti funzione
(Tasti funzione vedi capitolo 3)
Adattatore di rete (Panda7)
Adattatore di rete PS-EX2P (Panda7/X2)
Alimentatore PANDA-EX1P (Panda7/X)
Livella (solo per bilance omologate)
Interfaccia a doppia assegnazione RS232C
Presa per adattatore/alimentatore
Vite di messa a terra (solo per Panda7/X)
Simbolo per il peso calcolato
Display primario
Parentesi di taratura
(solo per bilance omologate con e=10d)
Unità di misura
Simbolo per ricette
Tolleranza
Display secondario
Fattore
Rilevatore automatico di stabilità
Definizione modello contenente i seguenti dati:
Max: portata massima
d:
risoluzione
Min*: portata minima (portata minima consigliata per le
bilance omologate)
e*:
precisione approvata (passo d’indicazione minimo
rilevato durante l’omologazione)
* applicabile solo alle bilance omologabili
5
6
7
8
9
10
11
12
13
14
15
16
17
18
19
20
21
Stelvoeten (alleen bij geijkte weegschalen)
Weegplateau
Display
Functietoetsen
(voor toetsfuncties zie Hoofdstuk 3)
Netadapter (Panda7)
Netadapter PS-EX2P (Panda7/X2)
Voeding PANDA-EX1P (Panda7/X)
Waterpas (alleen bij geijkte weegschalen)
Dubbel toegewezen interface RS232C
Aansluitbus netadapter/voeding
Aardingsschroef (alleen Panda7/X)
Symbool voor berekende gewichtswaarde
Eerste display
Ijkmarkeringen
(alleen bij geijkte weegschalen met e=10d)
Weegeenheden
Recepteersymbolen
Tolerantie
Tweede display
Factor
Stilstandscontrole
Opschriftenplaat met de volgende kenmerken:
Max: maximaal weegvermogen
d:
resolutie
Min*: minimaal weegvermogen (aanbevolen ondergrens
weegbereik voor geijkte weegschalen)
e*:
ijkeenheid (de kleinst toegestaande ijkwettelijke
verandering op de uitlezing)
* alleen van toepassing bij ijkwettelijk gekeurde weegschalen
English
15
16
17
18
19
20
21
Deutsch
15
16
17
18
19
20
21
5
6
7
8
9
10
11
12
13
14
Français
5
6
7
8
8
10
11
12
13
14
Patas regulables (sólo balanzas verificadas)
Platillo
Pantalla
Teclas de función
(Teclas de función, ver capítulo 3)
Adaptador de red (Panda7)
Adaptador de red PS-EX2P (Panda7/X2)
Fuente de alimentación PANDA-EX1P (Panda7/X)
Nivel de burbuja (sólo en bal. verificadas)
Interface de doble conexión RS232C
Toma de adaptador de red/fuente de alimentación
Tornillo de tierra (sólo Panda7/X)
Símbolo del valor de peso calculado
Indicador primario
Paréntesis
(sólo en balanzas verificadas con e=10d)
Unidades de pesada
Símbolos de formulación
Tolerancia
Indicador secundario
Factor
Control de estabilidad
Placa de identificación con los siguientes datos:
Español
1
2
3
4
Pieds réglables (uniquement sur balances vérifiées)
Plateau
Afficheur
Touches de fonction (fonctions des touches, voir
chapitre 3)
Adaptateur secteur (Panda7)
Adaptateur secteur PS-EX2P (Panda7/X2)
Unité d'alimentation PANDA-EX1P (Panda7/X)
Niveau à bulle (uniquement sur balances vérifiées)
Interface RS232C à double affectation
Prise adaptateur secteur/unité d'alimentation
Vis de mise à la terre (uniquement Panda7/X)
Symbole pour valeur pondérale calculée
Afficheur primaire
Parenthèses
(uniquement sur balances vérifiées avec e=10d)
Unités de pesage
Symboles de formulation
Tolérance
Afficheur secondaire
Facteur
Détecteur de stabilité
Plaque signalétique avec les indications suivantes:
Italiano
Español
1
2
3
4
Nederlands
Francais
English
Deutsch
Français
Español
Italiano
Nederlands
Contents
Indice
1
Introduction .................................................. 5
1
Introducción ............................................... 83
2
Preparing the scale for use ............................. 7
2
Puesta en marcha ....................................... 85
3
Key functions ................................................ 9
3
Funciones de teclas ..................................... 87
4
Weighing .................................................... 11
4
Pesaje ........................................................ 89
5
Formula weighing ....................................... 12
5
Formulación ............................................... 90
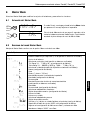
6
Master Mode ............................................... 21
6
Master Mode ............................................... 99
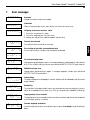
7
Error messages ........................................... 23
7
Mensajes de error ..................................... 101
8
Interfaces / accessories ............................... 24
8
Interfaces/ Accesorios ................................ 102
9
Technical data /
guidelines and test standards ....................... 25
9
Datos técnicos /
Directrices y normas de comprobación ....... 103
Inhalt
Indice
1
Einleitung ................................................... 31
1
Introduzione ............................................. 109
2
Inbetriebnahme ........................................... 33
2
Messa in funzione ..................................... 111
3
Tastenfunktionen ......................................... 35
3
Tasti funzione ........................................... 113
4
Wägen ....................................................... 37
4
Pesare ..................................................... 115
5
Rezeptieren ................................................. 38
5
Esecuzione della ricetta ............................. 116
6
Der Mastermode .......................................... 47
6
La modalità Master ................................... 125
7
Fehlermeldungen ......................................... 49
7
Messaggi di errore .................................... 127
8
Schnittstellen / Zubehör ................................ 50
8
Interfacce/Accessori ................................... 128
9
Technische Daten /
Richtlinien und Prüfnormen .......................... 51
9
Dati tecnici /
Direttive e norme ....................................... 129
Table des matières
Inhoud
1
Introduction ................................................ 57
1
Inleiding ................................................... 135
2
Mise en service ........................................... 59
2
Ingebruikname .......................................... 137
3
Fonctions des touches ................................. 61
3
Toetsfuncties ............................................. 139
4
Pesage ....................................................... 63
4
Wegen ..................................................... 141
5
Formulation ................................................ 64
5
Recepteren ................................................ 142
6
Le Master Mode .......................................... 73
6
De Mastermode ......................................... 151
7
Messages d’erreur ....................................... 75
7
Foutmeldingen .......................................... 153
8
Interfaces / Accessoires ............................... 76
8
Interfaces /Toebehoren ............................... 154
9
Caractéristiques techniques /
Directives et normes d’essai ......................... 77
9
Technische gegevens /
Richtlijnen en testnormen ........................... 155
Paint Scale Panda7, Panda7/X, Panda7/X2
5
1
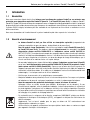
Introduction
1.1
General
Thank you for purchasing the Panda7 paint scale or the intrinsically safe versions Panda7/X (Ex zone 1) or
Panda7/X2 (Ex zone 2). The Panda7, Panda7/X, Panda7/X2 makes it possible to mix components in predefined
proportions by weighing. The scale has a number of correction modes to compensate for errors made while weighing
the components. A built-in RS232 interface allows the scale to be connected to a printer, a computer, or an auxiliary
display.
Please read through this manual carefully and always follow the instructions!
Safety and environment
– Do not use the Panda7 scale in hazardous environments where there are explosive mixtures of
gases, vapors, or dusts.
In hazardous areas, a Panda7/X (Ex zone 1) or Panda7/X2 (Ex zone 2) scale must be used. The
METTLER TOLEDO PANDA-EX1P certified power supply unit, or the METTLER TOLEDO PS-EX2P
certified AC adapter respectively, must always be used for connecting these scales. The operating
instructions for the power supply unit/AC adapter must always be observed and followed. Because
of the danger of electrostatic charge, it is only permitted to use a protective cover in hazardous areas
if the cover is made from statically non-hazardous material.
– To connect the scale to the power supply, use only the AC adapter (Panda7), the PANDA-EX1P
certified power supply unit (Panda7/X), or the PS-EX2P certified AC adapter (Panda7/X2)
supplied with the scale. Make sure the voltage printed on the adapter or supply unit is the same
as the local power supply voltage. Check the cable of the AC adapter/power supply unit regularly.
If the cable or the AC adapter/power supply unit is damaged, the scale must not be used.
– Use only recommended accessories and peripherals.
– Treat the scale carefully, it is a precision instrument. Knocks to the weighing pan, or overloading
it excessively, damage the scale.
– Before starting to clean the scale, disconnect it from the power supply!
Cleaning: Use a moist cloth (no acids, alkalis, or solvents). If the scale is heavily soiled, remove
weighing pan protective cover (if present) and the leveling feet (certified scales only), and clean
these parts separately. Observe company- and industry-specific regulations regarding cleaning
intervals and permitted cleaning agents.
– In conformance with the European Directive 2002/96 EC on Waste Electrical and Electronic
Equipment (WEEE) this device may not be disposed of in domestic waste.
This also applies to countries outside the EU, per their specific requirements.
Please dispose of this product in accordance with local regulations at the collecting point specified
for electrical and electronic equipment.
If you have any questions, please contact the responsible authority or the distributor from which you
purchased this device.
Should this device be passed on to other parties (for private or professional use), the content of this
regulation must also be related.
Thank you for your contribution to environmental protection.
English
1.2
Paint Scale Panda7, Panda7/X, Panda7/X2
6
1.3
Notes regarding certified models
On certified models the following functions are deactivated:
– Formula weighing (factor weighing and formula weighing with correction)
– Changing the weighing unit (on certified scales the weighing unit is set to “g” as standard)
English
– Calibration (certified models must be adjusted/calibrated by an authorized METTLER TOLEDO service representative)
Paint Scale Panda7, Panda7/X, Panda7/X2
7
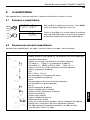
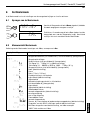
2
Preparing the scale for use
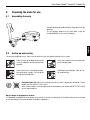
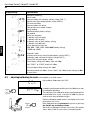
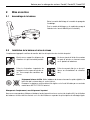
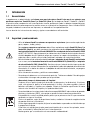
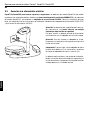
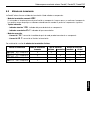
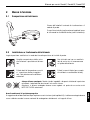
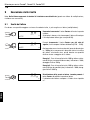
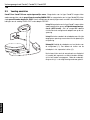
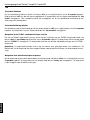
2.1
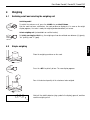
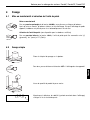
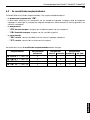
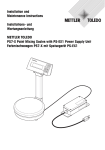
Assembling the scale
Remove the display module and the scale base from the
packing.
2.2
English
Fix the display module to the scale base using the
included M6x20 screw (see illustration).
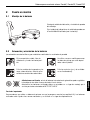
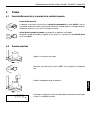
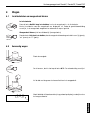
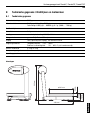
Setting up and leveling
For accurate weighing results, care must be taken to select the optimal location for the scale!
Place the scale on a stable surface which
is free of vibrations and as horizontal as
possible.
Never use a hammer to close paint cans
on the weighing pan.
Avoid excessively fluctuating temperatures and direct sunlight. Ensure correct
environmental conditions.
Avoid drafts (for example, from fans or
air conditioning).
Certified scales only: Adjust the leveling feet until the scale is absolutely horizontal. The air
bubble must lie within the inner circle.
Note: Certified scales must be adjusted at the workplace by an authorized METTLER TOLEDO
service representative.
Major changes of geographical location
It is advisable to calibrate the scale before using it for the first time (see Section 6.3). Certified scales must be certified
on site according to the local national certification regulations.
Paint Scale Panda7, Panda7/X, Panda7/X2
8
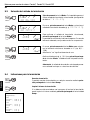
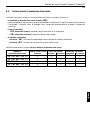
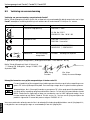
2.3
Connecting to the power supply
Panda7/X and Panda7/X2 for hazardous zones: To connect Panda7/X scales to the power supply you must always
use the PANDA-EX1P certified power supply unit, and for Panda7/X2 scales you must always use the PS-EX2P
certified AC adapter. You must therefore be sure to strictly observe and follow the instructions in the separate
Installation Instructions for the PANDA-EX1P power supply unit and PS-EX2P AC adapter.
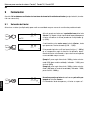
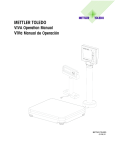
Important! For safety, Panda7 scales may only ever be
connected to a limited-energy low-voltage circuit.
You must always use the AC adapter supplied with the
scale to connect the scale to the power supply.
(2)
Important! Before connecting the AC adapter, check that
the voltage printed on the adapter is the same as the local
power supply voltage.
English
Note: First connect the AC adapter to the socket of the
scale (1). Only insert the plug of the AC adapter into the
power supply outlet after you have done this (2).
(1)
When the scale has been connected, it performs a display
test in which all the segments and then the software
version are briefly displayed. As soon as the zero display
appears, the scale is ready for operation.
Paint Scale Panda7, Panda7/X, Panda7/X2
9
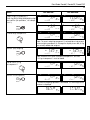
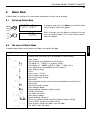
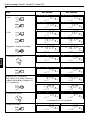
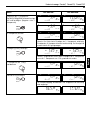
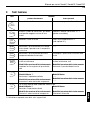
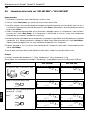
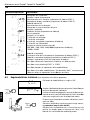
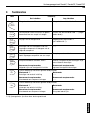
3
Key functions
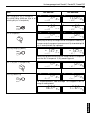
Key
Function
Press briefly
Press and hold down
Tare scale **
Switch scale on and off **
Select conversion factor for weighing a
smaller or larger quantity of a formula
Reset the conversion factor to “1” (weighing
without factor)
Change the weighing unit
Enter Master Mode **
(see Section 6.1)
Next
Comp
Confirm the target weight of a weighed
component and continue with the next
component
––––
Last
Comp
Confirm the target weight of the last component of a formula that was weighed
Abort formula weighing operation
Select formula weighing method or tolerance
Confirm selected formula weighing method or
confirm selected tolerance
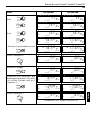
Advanced formula weighing mode
Set next digit of target weight
Advanced formula weighing mode
Confirm target weight entered
Factor
Unit
Menu
Mode
Enter
+
Yes
Function depends on the currently selected operating mode
Master mode
Master mode **
Confirm the current setting
––––
Advanced formula weighing mode
Increase target value of component
–
No
Advanced formula weighing mode
––––
Function depends on the currently selected operating mode
Master mode **
Reject the current setting
Master mode
––––
Advanced formula weighing mode
Reduce the target value of the component
Advanced formula weighing mode
Return to last digit
** On certified scales only these keys are active
English
O/T
On/Off
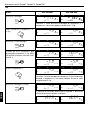
Paint Scale Panda7, Panda7/X, Panda7/X2
10
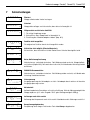
Locking the keyboard
To lock the keyboard, press the «O/T» and «+» keys simultaneously for at least 2 seconds. This locks all the keys except
the «O/T» key. If the scale has a display, “key locked” appears briefly. This message also appears if a key is pressed
while the keyboard is locked.
Unlocking the keyboard
To unlock the keyboard, press the «O/T» and «–» keys simultaneously for at least 2 seconds. If the scale has a display,
“key unlocked” appears briefly.
Setting the scale to PS7001 standard settings
To operate your Panda7 scale with the settings of a PS7001 scale, press the «Unit» and «Last Comp» keys
simultaneously for at least 2 seconds. If the scale has a display, “PS7001-F” appears briefly. The scale then operates
with the same standard settings as a PS7001 scale.
English
Note: You can change the scale settings back again whenever you wish (see Chapter 6, “Master Mode”) or you can
reset the scale to the factory settings (see next paragraph).
Resetting the scale to the factory settings
To reset the scale to the factory settings, press the «Unit» and «–» keys simultaneously for at least 2 seconds. If the
scale has a display, “factory set” appears briefly. The scale then operates with the factory settings.
Paint Scale Panda7, Panda7/X, Panda7/X2
11
4
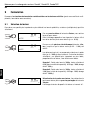
Weighing
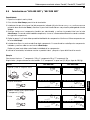
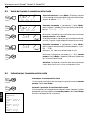
4.1
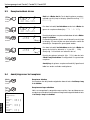
Switching on/off and selecting the weighing unit
Switching on/off
O/T
On/Off
To switch the scale on or off, press the «On/Off» key and hold it down.
After the scale has been switched on, the scale performs a display test. As soon as the weight
display appears, the scale is ready for weighing and automatically set to zero.
Select weighing unit (not available on certified scales)
By briefly pressing the «Unit» key, the weighing unit can be switched over between “g” (gram),
“oz” (ounce), and “P” (part).
Unit
Menu
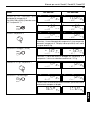
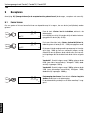
Simple weighing
English
4.2
Place the weighing container on the scale.
O/T
On/Off
Press the «O/T» key briefly to tare. The zero display appears.
Pour in the desired quantity of the substance to be weighed.
C.o.1.5.0.0 g
Wait until the stability detector (ring symbol in the display) goes off, and then
read the weighing result.
adv
Paint Scale Panda7, Panda7/X, Panda7/X2
12
5
Formula weighing
Note: On certified scales the formula weighing functions are deactivated (factor weighing, formula weighing with
correction).
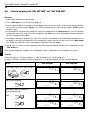
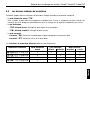
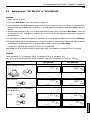
5.1
Select factor
To weigh a larger or smaller quantity of a given formula, a factor (multiplier) can be selected.
Factor
*
C.o.r.r.0.0
fctr
English
*
Factor
0.5.0. .C.U.M. .I.M.M.8.
C.o.r.r.0.0
fctr
5.0.0. .C.U.M. .I.M.M.8.
adv
To activate factor weighing, briefly press the «Factor» key.
The factor used for the last factor weighing (e.g. 0.50)
appears in the lower left corner of the display.
Now press the «Factor» key briefly several times until the
desired factor (0.20 ... 5.00) is displayed.
adv
In the subsequent weighing, a component is weighed to its
target weight (e.g. 1000 g) according to the formula. However, depending on the factor selected, the actual quantity
weighed is greater or smaller by the factor.
Example 1: Weight according to formula 1000 g, factor
selected 0.50 (for half quantity). Display: 1000; actually
weighed: 500 g.
Example 2: Weight according to formula 1000 g, factor
selected 3.00 (for triple quantity). Display: 1000; actually
weighed: 3000 g.
Factor
C.o.r.r.0.0 g
adv
To deactivate factor weighing: Press the «Factor» key and
hold it down.
The factor display disappears and the factor is reset to 1.
Paint Scale Panda7, Panda7/X, Panda7/X2
13
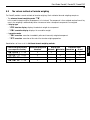
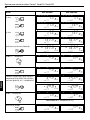
5.2
The various methods of formula weighing
The Panda7 provides several methods of formula weighing. Each method of formula weighing comprises:
ADV
– The advanced formula weighing mode “ADV
ADV”:
In this mode the target weight of a component is first entered. The component is then weighed and confirmed. Any
error in the weighing is automatically taken into account when subsequent components are weighed.
– A display type:
– “ABS
ABS” absolute display: displays the absolute weight of a component.
ABS
– “CUM
CUM” cumulative display: displays the cumulative weight.
CUM
– A correction mode:
– “IMM
IMM” correction: correction immediately after each incorrectly weighed component.
IMM
– “END
END” correction: correction at the end of the formula weighing operation.
END
Formula weighing method
(see respective section)
Formula weighing mode
Advanced
ADV ABS END –> 5.5
X
ADV CUM END –> 5.5
X
ADV ABS IMM –> 5.6
X
ADV CUM IMM –> 5.6
X
Display type
Absolute Cumulative
Correction mode
Immediate
At end
X
X
X
X
X
X
X
X
English
Combinations of these result in 4 different formula weighing methods:
Paint Scale Panda7, Panda7/X, Panda7/X2
14
5.3
Mode
Enter
Mode
Enter
English
Mode
Enter
Mode
Enter
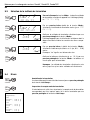
Select formula weighing method
C.o.r.r.0.?
Press the «Mode» key briefly. The formula weighing method
which was last pressed appears in the display (factory
setting: “ADV ABS END”).
C.o.r.r.0.?
Press the «Mode» key briefly several times to select the
desired formula weighing method (e.g. “ADV CUM END”).
.t.o.l.0.?
Confirm the selected formula weighing method by pressing
the «Mode» key and holding it down.
The display appears for selecting the tolerance above which
the individual components will be corrected.
A.D.V. .A.B.S. .E.N.D.8.
A.D.V. .CUM .E.N.D8.
A.D.V. .A.B.S. .E.1.1.0. % tol
.t.o.l.0.?
A.D.V. .A.B.S. .E.1.1.5. % tol
adv
adv
Press the «Mode» key briefly several times to select the
desired plus/minus tolerance in % (no, 0.5 ... 15.0).
Note: “no” means a tolerance of zero.
Confirm the selected tolerance (e.g. 1.5%) by pressing the
«Mode» key and holding it down. The scale is then ready for
formula weighing.
Mode
Enter
Note: The selected formula weighing method remains active
until you select another.
5.4
Terminating and documenting formula weighing
Last
Comp
Last
Comp
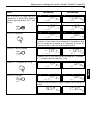
Mode :ADV ABS END
Components:
co01
target: 100.0 g
true : 110.0 g
co02
target: 20.0 g
true : 22.0 g
co03
target: 5.0 g
true : 5.5 g
Terminating formula weighing
Formula weighing can be terminated at any time by pressing the «Last Comp»
key and holding it down.
Documenting formula weighing
If your scale is connected to a printer, when the formula weighing is complete
you can print out the report for the formula weighing by pressing the «Last
Comp» key and holding it down.
Paint Scale Panda7, Panda7/X, Panda7/X2
15
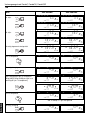
5.5
Formula weighing with “ADV ABS END” and “ADV CUM END”
Procedure
1. Place empty container on scale and tare.
2. Press «Next Comp» key to start formula weighing.
3. Enter the target weight of the component shown digit by digit. (Use the «+» and «–» keys to enter the digit and then
confirm it by briefly pressing the «Enter» key). Confirm the target weight entered by pressing the «Enter» key and
holding it down.
4. Fill and weigh the component to zero and then confirm the weighing with the «Next Comp» key (even if the quantity
weighed was excessive). If too much of the component was added, the error is automatically compensated when
subsequent components are added.
5. Repeat steps 3 and 4 until all the components have been filled and weighed. Confirm the last component with the
«Last Comp» key.
6. The scale checks whether extra quantities of individual components need to be added. If so, add the extra quantities
of the components indicated, confirming each one with the «Next Comp» key.
English
Repeat this step until all the extra quantities of components have been added.
When formula weighing is complete, the scale displays “done” and the final weight of the mixture.
Example
A formula comprises 125 g of component 1, 20 g of component 2, 5 g of component 3.
No factor and no tolerance have been selected. Component 2 was incorrectly weighed (22.0 g instead of 20.0 g).
Action
“ADV ABS END”
Place empty container on scale and tare
“ADV CUM END”
8.8.8.8.0.0 g
8.8.8.8.0.0 g
adv
adv
cum
O/T
On/Off
Start formula weighing
*
Next
Comp
8.8.8.8.0.0 g
*
8.8.8.8.0.1 g
*
8.8.8.8.1.0 g
*
8.8.8.8.c.o.0.1.8.8.1.0.
corr adv
8.8.8.8.0.0 g
8.8.8.8.c.o.0.1.8.8.1.0. corr
adv
cum
Enter target weight of component 1
(125 g) digit by digit
Digit 1
+
Yes
Mode
Enter
*
8.8.8.8.c.o.0.1.8.8.1.0.
*
corr adv
8.8.8.8.c.o.0.1.8.8.1.0. corr
adv
8.8.8.8.0.1 g
8.8.8.8.c.o.0.1.8.8.1.0. corr
8.8.8.8.1.0 g
8.8.8.8.c.o.0.1.8.8.1.0. corr
adv
cum
adv
cum
Paint Scale Panda7, Panda7/X, Panda7/X2
16
Action
Digit 2
“ADV ABS END”
+
Yes
Mode
Enter
Digit 3
+
Yes
Mode
Enter
English
Confirm the target weight entered
*
*
*
Mode
Enter
Add and weigh component 2
*
8.8.8.1.2.5 g
*
8.8.1.2.5.0 g
*
8.-.1.2.5.0 g
*
8.-.1.2.0.0 g
*
8.-.1.2.0.0 g
*
8.-.-.2.0.0 g
*
8.-.-.2.0.0 g
*
8.-.-.2.2.0 g
*
8.8.8.8.c.o.0.1.8.8.1.0.
*
8.8.8.8.c.o.0.1.8.8.1.0.
*
8.8.8.8.c.o.0.1.8.8.1.0.
*
Next
Comp
Target weight of component 2
Enter 20 g (ABS)/145 g (CUM) digit by
digit and confirm (for procedure, see
component 1)
8.8.8.1.2.0 g
8.8.8.8.c.o.0.1.8.8.1.0.
1.
Confirm weighing
*
8.8.8.8.c.o.0.1.8.8.1.0.
Mode
Enter
Add and weigh component 1
8.8.8.8.1.2 g
8.8.8.8.c.o.0.1.8.8.1.0.
*
8.8.8.8.c.o.0.28.8.1.0.
*
8.8.8.8.c.o.0.28.8.1.0.
*
8.8.8.8.c.o.0.28.8.1.0.
*
2.
“ADV CUM END”
8.8.8.8.c.o.0.28.8.1.0.
corr adv
8.8.8.8.1.2 g
8.8.8.8.c.o.0.1.8.8.1.0. corr
corr adv
8.8.8.1.2.0 g
8.8.8.8.c.o.0.1.8.8.1.0. corr
corr adv
8.8.8.1.2.5 g
8.8.8.8.c.o.0.1.8.8.1.0. corr
corr adv
8.8.1.2.5.0 g
8.8.8.8.c.o.0.1.8.8.1.0. corr
corr adv
8.-.1.2.5.0 g
8.8.8.8.c.o.0.1.8.8.1.0. corr
corr adv
8.-.1.2.0.0 g
8.8.8.8.c.o.0.1.8.8.1.0. corr
corr adv
8.-.1.2.0.0 g
8.8.8.8.c.o.0.28.8.1.0. corr
corr adv
8.-.1.4.5.0 g
8.8.8.8.c.o.0.28.8.1.0. corr
corr adv
8.-.-.2.0.0 g
8.8.8.8.c.o.0.28.8.1.0. corr
corr adv
8.-.-.2.2.0 g
8.8.8.8.c.o.0.28.8.1.0. corr
adv
cum
adv
cum
adv
cum
adv
cum
adv
cum
adv
cum
adv
cum
adv
cum
adv
cum
adv
cum
2 g too much of component 2 are added
Confirm weighing
Next
Comp
*
8.-.-.2.0.0 g
8.8.8.8.c.o.0.38.8.1.0.
corr adv
*
8.-.-.2.0.0 g
8.8.8.8.c.o.0.38.8.1.0. corr
adv
cum
Paint Scale Panda7, Panda7/X, Panda7/X2
17
Action
“ADV ABS END”
Target weight of component 3
Enter 5 g (ABS)/150 g (CUM) digit by digit
and confirm (for procedure, see component 1)
*
8.-.-.2.5.0 g
*
8.-.-.-.5.0
*
8.-.-.2.0.0
*
8.8.8.8.c.o.0.38.8.1.0.
*
Mode
Enter
8.8.8.8.c.o.0.38.8.1.0.
Fill and weigh component 3
*
8.8.8.8.c.o.0.38.8.1.0.
3.
“ADV CUM END”
corr adv
8.-.1.5.0.0 g
8.8.8.8.c.o.0.38.8.1.0. corr
corr adv
8.-.-.-.5.0
8.8.8.8.c.o.0.38.8.1.0. corr
corr adv
8.-.-.2.0.0
8.8.8.8.c.o.0.38.8.1.0. corr
adv
cum
adv
cum
adv
cum
Confirm (last) weighing
*
Last
Comp
*
8.-.-.1.2.5 g
8.8.8.8.c.o.0.18.8.1.0.
corr adv
8.-.-.1.2.5 g
8.8.8.8.c.o.0.18.8.1.0. corr
adv
cum
Note: Because of the error in weighing component 2, an extra
12.5 g of component 1 must be added.
Add an extra 12.5 g
of component 1
*
Next
Comp
*
8.-.-.2.0.0 g
*
8.8.8.8.c.o.0.18.8.1.0.
1.
Confirm the extra quantity
8.-.-.2.0.0 g
*
8.8.8.8.d.o.n.e8.8.8.8.
corr adv
corr adv
8.-.-.2.0.0 g
8.8.8.8.c.o.0.18.8.1.0. corr
8.-.-.2.0.0 g
8.8.8.8.d.o.n.e8.8.8.8. corr
adv
cum
adv
cum
The formula weighing operation is terminated. The final weight of the
mixture is displayed.
8.-.1.6.5.0 g
adv
8.-.1.6.5.0 g
adv
cum
English
Note: The error in weighing component 2 is already taken into account
when weighing component 3. Although the display shows 0.0, 5.5 g
are actually added and weighed.
Paint Scale Panda7, Panda7/X, Panda7/X2
18
5.6
Formula weighing with “ADV ABS IMM” and “ADV CUM IMM”
Procedure
1. Place empty container on scale and tare.
2. Press «Next Comp» key to start formula weighing.
3. Enter the target weight of the component shown digit by digit. (Use the «+» and «–» keys to enter the digit and then
confirm it by briefly pressing the «Enter» key). Confirm the target weight entered by pressing the «Enter» key and
holding it down.
4. Fill and weigh the component to zero and then confirm the weighing with the «Next Comp» key (even if the quantity
weighed was excessive). If too much of the component was added, the error is automatically compensated when
the other components are added.
English
5. Immediately after each component, the scale checks whether extra quantities of the preceding components must
be added. If so, add the extra quantities of the components shown, and confirm each time with the «Next Comp»
key. Repeat this step until all the extra component quantities have been added.
6. Repeat steps 3, 4, and 5 until all components have been filled and weighed. Confirm the last component with the
«Last Comp» key.
When formula weighing is complete, the scale displays “done”, followed by the final weight of the mixture.
Example
A formula comprises 125 g of component 1, 20 g of component 2, 5 g of component 3.
No factor or tolerance has been selected. Component 2 is incorrectly weighed (22.0 g instead of 20.0 g).
Action
“ADV ABS IMM”
Place empty container on scale and tare
“ADV CUM IMM”
8.8.8.8.0.0 g
imm
8.8.8.8.0.0 g
adv
imm
8.8.8.8.0.0 g
corr adv
imm
8.8.8.8.0.1 g
imm
O/T
On/Off
Start formula weighing
Next
Comp
*
imm
8.8.8.8.c.o.0.1.8.8.1.0.
*
8.8.8.8.0.0 g
8.8.8.8.c.o.0.1.8.8.1.0. corr
adv
cum
adv
cum
Enter target weight of component 1
(125 g) digit by digit
Digit 1
+
Yes
Mode
Enter
*
imm
*
8.8.8.8.c.o.0.1.8.8.1.0.
8.8.8.8.1.0 g
imm
*
corr adv
8.8.8.8.c.o.0.1.8.8.1.0. corr
*
adv
8.8.8.8.0.1 g
8.8.8.8.c.o.0.1.8.8.1.0. corr
8.8.8.8.1.0 g
imm
8.8.8.8.c.o.0.1.8.8.1.0. corr
adv
cum
adv
cum
Paint Scale Panda7, Panda7/X, Panda7/X2
19
Digit 2
“ADV ABS IMM”
+
Yes
Mode
Enter
Digit 3
+
Yes
Mode
Enter
Confirm the target weight you entered
Mode
Enter
Fill and weigh component 1
1.
Confirm weighing
Next
Comp
Enter target weight of component 2
20 g (ABS)/145 g (CUM) digit by digit and
confirm (for procedure, see component 1)
Mode
Enter
*
imm
8.8.8.1.2.0 g
imm
8.8.8.1.2.5 g
imm
8.8.1.2.5.0 g
imm
8.-.1.2.5.0 g
imm
8.-.1.2.0.0 g
imm
8.-.1.2.0.0 g
imm
8.-.-.2.0.0 g
imm
8.-.-.2.0.0 g
imm
imm
*
imm
*
imm
*
imm
*
imm
*
imm
*
imm
*
imm
Fill and weigh component 2
2.
*
*
8.8.8.8.1.2 g
imm
*
“ADV CUM IMM”
8.8.8.8.c.o.0.1.8.8.1.0.
8.8.8.8.c.o.0.1.8.8.1.0.
8.8.8.8.c.o.0.1.8.8.1.0.
8.8.8.8.c.o.0.1.8.8.1.0.
8.8.8.8.c.o.0.1.8.8.1.0.
8.8.8.8.c.o.0.1.8.8.1.0.
8.8.8.8.c.o.0.28.8.1.0.
8.8.8.8.c.o.0.28.8.1.0.
8.8.8.8.c.o.0.28.8.1.0.
corr adv
*
corr adv
*
corr adv
*
corr adv
*
corr adv
*
corr adv
*
corr adv
*
corr adv
*
corr adv
8.8.8.8.1.2 g
8.8.8.8.c.o.0.1.8.8.1.0. corr
8.8.8.1.2.0 g
8.8.8.8.c.o.0.1.8.8.1.0. corr
8.8.8.1.2.5 g
8.8.8.8.c.o.0.1.8.8.1.0. corr
8.8.1.2.5.0 g
8.8.8.8.c.o.0.1.8.8.1.0. corr
8.-.1.2.5.0 g
8.8.8.8.c.o.0.1.8.8.1.0. corr
8.-.1.2.0.0 g
8.8.8.8.c.o.0.1.8.8.1.0. corr
8.-.1.2.0.0
8.8.8.8.c.o.0.28.8.1.0. corr
8.-.1.4.5.0 g
8.8.8.8.c.o.0.28.8.1.0. corr
8.-.-.2.0.0 g
8.8.8.8.c.o.0.28.8.1.0. corr
8.-.-.2.2.0 g oz% *8.-.-.2.2.0 g
imm
8.8.8.8.c.o.0.28.8.1.0. corr
adv
cum
imm
8.8.8.8.c.o.0.28.8.1.0. corr
2 g too much of component 2 are filled
adv
cum
adv
cum
adv
cum
adv
cum
adv
cum
adv
cum
adv
cum
adv
cum
adv
cum
adv
cum
English
Action
Paint Scale Panda7, Panda7/X, Panda7/X2
20
Action
“ADV ABS IMM”
Confirm weighing
Next
Comp
*
“ADV CUM IMM”
8.-.-.1.2.5 g
imm
8.8.8.8.c.o.0.18.8.1.0. corr
8.-.-.1.2.5Pg oz%
+*
adv
imm
fctr
cum
8.8.8.8.c.o.0.18.8.1.0. %corrtol adv
Note: Because of the error when weighing component 2, an extra
12.5 g of component 1 must be added.
Add an extra 12.5 g
of component 1
1.
Confirm the extra quantity
English
Next
Comp
Target weight of component 3
Enter 5 g (ABS)/150 g (CUM) digit by
digit and confirm (for procedure, see
component 1)
Mode
Enter
Fill and weigh component 3
*
*
imm
8.-.-.2.0.0 g
imm
8.-.-.2.5.0 g
imm
8.-.-.-.5.0
imm
8.-.-.2.0.0
imm
imm
*
imm
*
imm
*
*
8.-.-.2.0.0 g
imm
imm
3.
8.8.8.8.c.o.0.18.8.1.0.
8.8.8.8.c.o.0.38.8.1.0.
8.8.8.8.c.o.0.38.8.1.0.
8.8.8.8.c.o.0.38.8.1.0.
8.8.8.8.c.o.0.38.8.1.0.
corr adv
*
corr adv
*
corr adv
*
corr adv
*
corr adv
8.-.-.2.0.0 g
8.8.8.8.c.o.0.18.8.1.0. corr
8.-.-.2.0.0 g
8.8.8.8.c.o.0.38.8.1.0. corr
8.-.1.5.0.0 g
8.8.8.8.c.o.0.38.8.1.0. corr
8.-.-.-.5.0
8.8.8.8.c.o.0.38.8.1.0. corr
8.-.-.2.0.0
8.8.8.8.c.o.0.38.8.1.0. corr
adv
cum
adv
cum
adv
cum
adv
cum
adv
cum
Note: The error in weighing component 2 is already compensated
when component 3 is weighed. Although the display shows 0.0, the
actual amount weighed is 5.5 g.
Confirm (last) weighing
Last
Comp
*
*
8.-.-.2.0.0
imm
8.8.8.8.d.o.n.e8.8.8.8.
corr adv
8.-.-.2.0.0
imm
8.8.8.8.d.o.n.e8.8.8.8. corr
adv
cum
The formula weighing operation is terminated. The actual final weight
of the mixture is displayed.
8.-.1.6.5.0 g
imm
adv
8.-.1.6.5.0 g
imm
adv
cum
Paint Scale Panda7, Panda7/X, Panda7/X2
21
6
Master Mode
In Master Mode, the settings of the scale can be changed and functions can be activated.
Calling up Master Mode
Unit
Menu
+
Yes
6.2
M.A.S.t.E.r
In weighing mode, press the «Menu» key and hold it down
until the display shown at left appears.
M.A.S.C.A.L
Within 3 seconds, press the «Yes» key (otherwise the scale
returns to weighing mode). The first menu block of Master
mode then appears.
The menus of Master Mode
To operate Master Mode: confirm option with «Yes», reject option with «No».
Display/Settings
Function/Notes
CAL
Calibrate scale (see Section 6.3, not available on certified scales)
SCALE
rESolu
0.1
0.05
Unit
g
oz
P
b.Light
On
Off
rEStAr
On
Off
VibrAt
MEd
HIGH
LOW
ProcES
UNIVEr
dOSING
rESEt
Std On
End SC
Scale settings
Select resolution (not available on certified scales)
”Full Range” 0 ... 7100 g / 0.1 g (factory setting)
”Delta Range” 0 ... 999.95 g / 0.05 g, 1000 ... 7100 g / 0.1 g
Select weighing unit (not available on certified scales)
Gram (factory setting)
Ounce
Parts (1 part = 1/32 oz)
Switch display lighting on/off
Switched on (factory setting)
Switched off
Switch automatic memory function on/off (not available on certified scales)
Switched on
Switched off (factory setting)
Select vibration adapter
Normal weighing substances (factory setting)
Unstable environment
Very stable environment
Select process adapter
Normal weighing substances
Dosing, e.g. liquid or powder weighing substances (factory setting)
Reset all SCALE settings to the factory settings
Reset to factory settings with «Yes», reject with «No»
Quit “SCALE” block with «Yes»
English
6.1
Paint Scale Panda7, Panda7/X, Panda7/X2
English
22
Display/Settings
Function/Notes
IFACE1 / IFACE2
ModE
dIALOG
2nd.dIS
PN
Print
CYCLE
Protok
HONOFF
NO
PAritY
7 EVEN
7 NO P
8 NO P
7 Odd
BAUd
300
Configure interface(s)
Select mode
Communication with computer (factory setting IFACE 1)
Control of auxiliary display (factory setting IFACE 2)
PM scale emulation
Communication with printer
Data printout when weight changes
Select protocol
Xon/Xoff protocol (factory setting)
No protocol
Select bits and parity
7 data bits with even parity
7 data bits with no parity
8 data bits with no parity (factory setting)
7 data bits with odd parity
Select data transmission rate
300, 600, 1200, 2400, 4800, 9600 (factory setting),
19200 and 38400
38400
Aut.Mod
AUt.SIR
NO
rESEt
Std On
EndIF1
Automatic mode
Interface continuously transmits data (factory setting IFACE 1)
Automatic mode switched off (factory setting IFACE 2)
Reset IFACE setting to factory settings
Reset factory settings with «Yes», reject with «No».
Quit “IFACE1” or “IFACE2” block with «Yes»
LiSt
Print out Master Mode settings with «Yes»
End
Quit Master Mode with «Yes». Answer “StorE?” with «Yes» to save settings or «No»
to reject them.
6.3
+
Yes
Adjusting/calibrating the scale (not available on certified scales)
M.A.S.C.A.L
Call up Master Mode and select “CAL”.
M.A.7.0.0.0 kg
Unload the weighing pan and then press the «Yes» key to start
the calibration procedure.
The scale flashes the calibration weight (corresponding to the
nominal load of the scale). If desired, the «No» key can be
used to select other calibration weights.
+
Yes
Place the calibration weight shown in the display on the scale
and confirm with «Yes».
Note: Calibration can be terminated at any time by pressing
the «On/Off» key and holding it down.
Wait until the calibration terminates successfully (the display
shows “done”) and the scale returns to weighing mode.
Paint Scale Panda7, Panda7/X, Panda7/X2
23
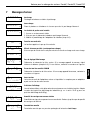
Error messages
Overload
{.|.|.|.|.}
adv
<.=.=.=.=.>
adv
------
adv
-.-.n.o.-.-
adv
Unload the scale or reduce the preload.
Underload
Place the weighing pan on the scale and ensure that it can move freely.
Weighing result never becomes stable
1. Ensure the environment is stable
2. Ensure the weighing pan can move freely
3. Change the setting of the vibration adapter (Section 6.2)
Function not executed
The called function could not be executed.
Zero setting not possible (overload/underload)
{.|.n.o.|.}
adv
<.=.n.o.=.>
adv
E.r.r.6.
adv
E.r.r.5.3.
adv
Ensure that zeroing is not done with overload or underload.
No calibration/adjustment
N.o. . .C.a.L. .I.M.M.8.
Unplug power plug and plug in again. If message reappears, calibrate/adjust scale (Section
6.3). If this still does not help, contact your authorized METTLER TOLEDO representative.
EAROM checksum error
Unplug power plug and plug in again. If message reappears, contact your authorized
METTLER TOLEDO representative.
Undervoltage
Err
low voltage
adv
The output voltage of the AC adapter is too low. Replace with an AC adapter with the correct
output voltage.
Readability
* rESO?
corr adv
* ÑÖOre
corr adv
loco01ltage
The resolution of the target weight which was entered when formula weighing is too fine.
Adjust to the readability of the scale (e.g. 15.01 g is entered with a readability of 0.05 g).
Target quantity not yet reached
loco01ltage
* Abort?
corr adv
loco01ltage
The target quantity of the component has not yet been reached. Add more of the component
until the target quantity is reached.
Formula weighing terminated
Formula weighing has been terminated by pressing the «Last Comp» key and holding it
down.
English
7
Paint Scale Panda7, Panda7/X, Panda7/X2
24
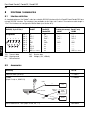
8
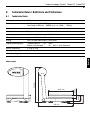
Interfaces / accessories
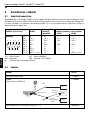
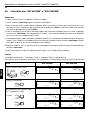
8.1
Interface definition
As standard equipment the Panda7 scale has a double RS232C interface while the Panda7/X and Panda7/X2 have
a single RS232C interface. The interface(s) are available via the 9-pin sub-D socket. The maximum cable length is
15 m. The interfaces are configured in Master Mode (see Section 6.2).
Built-in interface(s)
RS232C, 9-pin D-sub, f
Assignments
5
4
English
9
3
8
2
7
1
6
Assignment on Assignment on
Panda7
Panda7/X
Panda7/X2
Pin 1
Pin 2
Pin 3
Pin 4
Pin 5
Pin 6
Pin 7
Pin 8
Pin 9
TxD: Transmit data
GND: Signal ground
nc:
Not connected
8.2
nc
TxD 1
RxD 1
nc
GND
nc
RxD 2
TxD 2
VCC (5V, ≤50mA)
2 interfaces with use of
Y cable (accessory), Panda7 only
COM1
COM2
nc
TxD 1
RxD 1
nc
GND
nc
nc
nc
nc
–––
TxD 1
RxD 1
–––
GND
–––
–––
–––
–––
–––
TxD 2
RxD 2
–––
GND
–––
–––
–––
VCC (5V, ≤50mA)
RxD: Receive data
VCC: Voltage (+5V, ≤50mA)
Accessories
Accessory
Art. no.
Protective cover (set of 5)
71153871
Y-cable
(9-pin D-sub, m, COM1/2 f)
21203892
COM1
1:1
PC
ME-00410024
ME-21203892
Cable on
display
COM1,2
+5V
or
COM2
+5V
RS232 cable for PC 1.8 m (9-pin D-sub, m/f, 1:1)
Auxil.
display
Printer-specific
cable
Printer
00410024
Paint Scale Panda7, Panda7/X, Panda7/X2
25
9
Technical data / guidelines and test standards
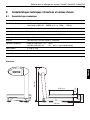
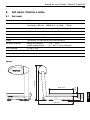
9.1
Technical data
Max. capacity
7100 g
Readability
Full Range: 0.1 g (0 ... 7100 g)
Delta Range: 0.05 g (0 ... 999.95 g), 0.1 g (1000 ... 7100 g)
Stabilization time
Approx. 1.0 seconds
Linearity
0.2 g
Power supply
Via AC adapter/power supply unit 15 VDC, 4 watt
Weighing units
g, oz and P (1 part = 1/32 oz)
LCD (liquid crystal display), backlit
Environmental conditions
Temperature range: +10 ... +30°C
Relative air humidity: 20 ... 80% rF (non-condensing)
Weight net/gross
3.4 kg / 4.5 kg
Overvoltage category:
II
Pollution degree:
2
English
Display
330 mm
78 mm
65 mm
ø232 mm
29 mm
342 mm
Dimensions
Paint Scale Panda7, Panda7/X, Panda7/X2
26
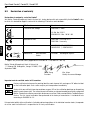
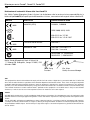
9.2
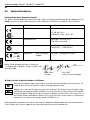
Declaration of conformity
Declaration of conformity: scale line Panda7
We, Mettler-Toledo (Changzhou) Scale & System Ltd., hereby declare with sole responsibility that the Panda7 scales
to which this declaration applies conform to the following EU directives and standards:
Marking
C
EU directive
Tested to standard
73/23EEC low voltage
EN61010-1: 2001
UL Std. No. 3101-1
CAN/CSA-22.2 No. 1010.1-92
US
89/336EEC EMC
EN61326-1 Emission Cl. B
EN61326-1 Immunity
English
AS/NZS2064.1/2, AS/NZS3548
AS/NZS4251.1, AS/NZS4252.1
[year]
[code]
1)
M
1)
90/384EEC 1)
Non-automatic
Scales
EN45501 1) Metrological Aspects
Applies only to certified scales (approval/test certificate no.: R76/1992-NL1-03.10)
Mettler-Toledo (Changzhou) Sacle & System Ltd.
111 Changxi Rd. Changzhou, Jiangsu 213001, PRC
September 2005
David Zheng
President
Chu Jinlan
Quality Assurance Manager
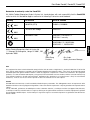
Important note for certified scales in EU countries
M
M
Factory-certified scales bear on the packing label the mark shown at left, and a green “M” adhesive label
on the certification plate. Such scales may be put into operation immediately.
Scales which are certified in two steps and have no green “M” on the certification plate bear on the packing
label the mark shown at left. The second step of certification must be performed by an officially recognized
Mettler-Toledo Service Center or a weights and measures official. Please contact Mettler-Toledo Customer
Service. The first step of verification was performed at the factory of manufacture. It included all tests
according to EN45501-8.2.2.
If the period of validity of the certification is limited by national regulations in the individual member states, the operator
of such a scale himself/herself is responsible for its timely recertification.
Paint Scale Panda7, Panda7/X, Panda7/X2
27
USA
This equipment has been tested and found to comply with the limits for a Class A digital device, pursuant to both Part 15 of the FCC
Rules and the radio interference regulations of the Canadian Department of Communications. These limits are designed to provide
reasonable protection against harmful interference when the equipment is operated in a commercial environment. This equipment
generates, uses and can radiate radio frequency energy and, if not installed and used in accordance with the instruction manual, may
cause harmful interference to radio communications. Operation of this equipment in a residential area is likely to cause harmful
interference, in which case the user will be required to correct the interference at his own expense.
Canada
English
ICES-001 Notice for Industrial, Scientific and Medical Radio Frequency Generators: This ISM apparatus meets all requirements of the
Canadian Interference-Causing Equipment Regulations. Please note that this requirement is only for generators which operate at over
10 kHz.
Avis de l’ICES-001, générateurs de radiofréquences dans le domaine industriel, scientifique et médical: Cet appareil ISM (industriel,
scientifique et médical) satisfait à toutes les exigences définies par la réglementation canadienne en matière d’équipements générant
des perturbations radioélectriques. Veuillez noter qu’il s’agit d’une exigence concernant uniquement les générateurs fonctionnant audelà de 10 kHz.
Paint Scale Panda7, Panda7/X, Panda7/X2
28
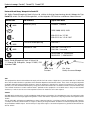
Declaration of conformity: scale line Panda7/X
We, Mettler-Toledo (Changzhou) Scale & System Ltd., hereby declare with sole responsibility that the Panda7/X scales
to which this declaration applies conform to the following EU directives and standards:
Marking
EU directive
Tested to standard
94/9/EEC (ATEX)
EN50014, EN50020
0032
FM
FMRC 3600, 3610, 3810
APPROVED
CSA-C22.2 No. 157-92
CSA-C22.2 No. 142-M 1987
ia
73/23EEC low voltage
EN61010-1
89/336EEC EMC
EN61326-1 Emission Cl. B
EN61326-1 Immunity
English
0032
0032
AS/NZS2064.1/2, AS/NZS3548
AS/NZS4251.1, AS/NZS4252.1
Mettler-Toledo (Changzhou) Sacle & System Ltd.
111 Changxi Rd. Changzhou, Jiangsu 213001, PRC
September 2005
David Zheng
President
Chu Jinlan
Quality Assurance Manager
USA
This equipment has been tested and found to comply with the limits for a Class A digital device, pursuant to both Part 15 of the FCC
Rules and the radio interference regulations of the Canadian Department of Communications. These limits are designed to provide
reasonable protection against harmful interference when the equipment is operated in a commercial environment. This equipment
generates, uses and can radiate radio frequency energy and, if not installed and used in accordance with the instruction manual, may
cause harmful interference to radio communications. Operation of this equipment in a residential area is likely to cause harmful
interference, in which case the user will be required to correct the interference at his own expense.
Canada
ICES-001 Notice for Industrial, Scientific and Medical Radio Frequency Generators: This ISM apparatus meets all requirements of the
Canadian Interference-Causing Equipment Regulations. Please note that this requirement is only for generators which operate at over
10 kHz.
Avis de l’ICES-001, générateurs de radiofréquences dans le domaine industriel, scientifique et médical: Cet appareil ISM (industriel,
scientifique et médical) satisfait à toutes les exigences définies par la réglementation canadienne en matière d’équipements générant
des perturbations radioélectriques. Veuillez noter qu’il s’agit d’une exigence concernant uniquement les générateurs fonctionnant audelà de 10 kHz.
Paint Scale Panda7, Panda7/X, Panda7/X2
29
Declaration of conformity: scale line Panda7/X2
We, Mettler-Toledo (Changzhou) Scale & System Ltd., hereby declare with sole responsibility that the Panda7/X2
scales to which this declaration applies conform to the following EU directives and standards:
Marking
EU directive
Tested to standard
94/9/EEC (ATEX)
EN50014, EN50020
73/23EEC low voltage
EN61010-1
89/336EEC EMC
EN61326-1 Emission Cl. B
EN61326-1 Immunity
0032
0032
0032
English
AS/NZS2064.1/2, AS/NZS3548
AS/NZS4251.1, AS/NZS4252.1
Mettler-Toledo (Changzhou) Sacle & System Ltd.
111 Changxi Rd. Changzhou, Jiangsu 213001, PRC
September 2005
David Zheng
President
Chu Jinlan
Quality Assurance Manager
USA
This equipment has been tested and found to comply with the limits for a Class A digital device, pursuant to both Part 15 of the FCC
Rules and the radio interference regulations of the Canadian Department of Communications. These limits are designed to provide
reasonable protection against harmful interference when the equipment is operated in a commercial environment. This equipment
generates, uses and can radiate radio frequency energy and, if not installed and used in accordance with the instruction manual, may
cause harmful interference to radio communications. Operation of this equipment in a residential area is likely to cause harmful
interference, in which case the user will be required to correct the interference at his own expense.
Canada
ICES-001 Notice for Industrial, Scientific and Medical Radio Frequency Generators: This ISM apparatus meets all requirements of the
Canadian Interference-Causing Equipment Regulations. Please note that this requirement is only for generators which operate at over
10 kHz.
Avis de l’ICES-001, générateurs de radiofréquences dans le domaine industriel, scientifique et médical: Cet appareil ISM (industriel,
scientifique et médical) satisfait à toutes les exigences définies par la réglementation canadienne en matière d’équipements générant
des perturbations radioélectriques. Veuillez noter qu’il s’agit d’une exigence concernant uniquement les générateurs fonctionnant audelà de 10 kHz.
Paint Scale Panda7, Panda7/X, Panda7/X2
English
30
Farbmischwaage Panda7, Panda7/X, Panda7/X2
31
1
Einleitung
1.1
Allgemein
Wir danken Ihnen, dass Sie die Farbmischwaage Panda7 bzw. deren explosionsgeschützte Varianten Panda7/X
(Ex Zone 1) und Panda7/X2 (Ex Zone 2) erworben haben. Mit der Panda7, Panda7/X und Panda7/X2 lassen sich
Komponenten mit einem zuvor festgelegten Mischverhältnis einwägen. Die Waage besitzt verschiedene Korrekturmodi,
um allfällig fehlerhaft eingewogene Komponenten zu kompensieren. Über die eingebaute RS232-Schnittstelle kann die
Waage an einen Drucker angeschlossen oder mit einem Rechner oder mit einer Zweitanzeige verbunden werden.
Bitte lesen Sie diese Bedienungsanleitung sorgfältig durch und halten Sie sich an die Anweisungen!
Sicherheit und Umwelt
– Die Panda7-Waage nicht in explosionsgefährdeter Umgebung (mit explosionsgefährdeten
Gemischen von Gasen, Dämpfen, Nebeln und Stäuben) betreiben.
Für explosionsgefährdete Zonen ist eine Waage des Typs Panda7/X (Ex Zone 1) oder Panda7/
X2 (Ex Zone 2) zu verwenden. Diese Waagen müssen zwingend über das zertifizierte Speisegerät PANDA-EX1P bzw. das zertifizierte Tischnetzgerät PS-EX2P von METTLER TOLEDO
angeschlossen werden. Die Hinweise in der Installationsanleitung zum Speisegerät bzw. Tischnetzgerät sind unbedingt zu beachten und einzuhalten. Die Verwendung einer Schutzhülle in explosionsgefährdeten Zonen ist wegen der Gefahr elektrostatischer Aufladung nur zulässig, wenn sie aus
statisch unbedenklichem Material besteht.
– Waage nur mit dem mitgelieferten Tischnetzgerät (Panda7) beziehungsweise mit dem Speisegerät PANDA-EX1P (Panda7/X) oder mit dem Tischnetzgerät PS-EX2P (Panda7/X2) ans
Stromnetz anschliessen. Sicherstellen, dass der aufgedruckte Spannungswert mit der lokalen Netzspannung übereinstimmt. Kabel des Tischnetzgerätes/Speisegerätes regelmässig überprüfen. Sind
die Kabel oder ist das Tischnetzgerät/Speisegerät beschädigt, darf die Waage nicht weiter betrieben
werden.
– Nur empfohlenes Zubehör und Peripheriegeräte verwenden.
– Waage sorgfältig behandeln, sie ist ein Präzisionsinstrument. Schläge auf die Waagschale sowie
das Auflegen hoher Überlasten beschädigen die Waage.
– Waage vor Beginn der Reinigungsarbeiten vom Stromnetz trennen!
Reinigung: Feuchten Lappen verwenden (keine Säuren, Laugen oder Lösungsmittel). Bei starker
Verschmutzung Waagschale, Schutzhülle (falls vorhanden) und Stellfüsse (nur bei geeichten
Waagen) entfernen und separat reinigen. Betriebsinterne und branchenspezifische Vorschriften
betreffend Reinigungsintervalle und zulässige Reinigungsmittel beachten.
– In Übereinstimmung mit den Anforderungen der Europäischen Richtlinie 2002/96 EG über Elektround Elektronik-Altgeräte (WEEE) darf dieses Gerät nicht mit dem Hausmüll entsorgt werden.
Sinngemäss gilt dies auch für Länder ausserhalb der EU entsprechend den geltenden nationalen
Regelungen.
Bitte entsorgen Sie dieses Produkt gemäss den örtlichen Bestimmungen in einer getrennten
Sammlung für Elektro- und Elektronikgeräte.
Bei allfälligen Fragen wenden Sie sich bitte an die zuständige Behörde oder den Händler, bei dem
Sie dieses Gerät erworben haben.
Bei Weitergabe dieses Gerätes (z.B. für private oder gewerbliche/industrielle Weiternutzung) ist
diese Bestimmung sinngemäss weiterzugeben.
Vielen Dank für Ihren Beitrag zum Schutz der Umwelt.
Deutsch
1.2
Farbmischwaage Panda7, Panda7/X, Panda7/X2
32
1.3
Hinweise zu geeichten Modellen
Bei geeichten Modellen sind die folgenden Funktionen deaktiviert:
– Rezeptieren (Faktorwägen und Rezeptieren mit Korrektur)
– Ändern der Wägeeinheit (Wägeeinheit bei Eichwaagen standardmässig auf “g” eingestellt)
Deutsch
– Kalibrierung (Geeichte Modelle müssen durch eine autorisierte METTLER TOLEDO Servicestelle justiert/kalibriert
werden)
Farbmischwaage Panda7, Panda7/X, Panda7/X2
33
2
Inbetriebnahme
2.1
Waage zusammensetzen
Anzeigemodul und Wägemodul aus der Verpackung
nehmen.
Anzeigemodul mit der mitgelieferten Schraube M6x20
am Wägemodul befestigen (siehe Abbildung).
2.2
Waage aufstellen und ausrichten
Stabile, erschütterungsfreie und
möglichst horizontale Lage wählen.
Verschliessen Sie Farbdosen, die
sich noch auf der Waagschale befinden niemals mit einem Hammer.
Vermeiden Sie übermässige Temperaturschwankungen und direkte
Sonnenbestrahlung. Umgebungsbedingungen beachten.
Vermeiden Sie Zugluft (z.B. von
Ventilatoren oder Klimaanlagen).
Nur Eichwaage: Waage durch Drehen der Stellfüsse horizontal ausrichten. Die Luftblase muss
innerhalb des inneren Kreises liegen.
Hinweis: Eichwaagen müssen am Aufstellungsort durch eine autorisierte METTLER TOLEDO
Servicestelle justiert werden.
Grössere geografische Standortänderungen
Wir empfehlen Ihnen, bei der ersten Inbetriebnahme die Waage zu kalibrieren (siehe Kapitel 6.3). Geeichte Waagen
müssen unter Beachtung der nationalen Eichvorschriften vor Ort geeicht werden.
Deutsch
Der richtige Standort trägt entscheidend zur Genauigkeit der Wägeresultate bei!
Farbmischwaage Panda7, Panda7/X, Panda7/X2
34
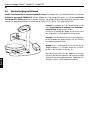
2.3
Stromversorgung anschliessen
Panda7/X und Panda7/X2 für explosionsgefährdete Zonen: Die Waagen des Typs Panda7/X dürfen nur über das
zertifizierte Speisegerät PANDA-EX1P und die Waagen des Typs Panda7/X2 dürfen nur über das zertifizierte
Tischnetzgerät PS-EX2P angeschlossen werden. Beachten und befolgen Sie deshalb unbedingt die Hinweise in den
separaten Installationsanleitungen zum Speisegerät PANDA-EX1P und zum Tischnetzgerät PS-EX2P.
(2)
Achtung! Die Waagen des Typs Panda7 dürfen nur an
einen energiebegrenzten Stromkreis mit Sicherheitskleinspannung angeschlossen werden.
Schliessen Sie deshalb die Waage ausschliesslich über
das mitgelieferte Tischnetzgerät ans Stromnetz an.
Achtung! Prüfen Sie vor dem Anschluss des Netzgerätes,
ob der aufgedruckte Spannungswert mit der örtlichen
Netzspannung übereinstimmt.
Wichtig! Zuerst Tischnetzgerät mit der Buchse an der
Waage verbinden (1). Erst dann Stecker des Tischnetzgerätes in die Steckdose einstecken (2).
Deutsch
(1)
Nach dem Anschliessen führt die Waage einen Anzeigetest durch, bei dem alle Segmente und anschliessend die
Softwareversion kurz angezeigt werden. Sobald die Nullanzeige erscheint, ist die Waage betriebsbereit.
Farbmischwaage Panda7, Panda7/X, Panda7/X2
35
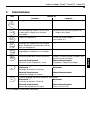
3
Tastenfunktionen
Taste
Funktion bei
Kurzdruck
Langdruck
Waage tarieren **
Waage ein- bzw. ausschalten **
Umrechnungsfaktor wählen, um eine kleinere oder grössere Menge eines Rezeptes
einzuwägen
Zurücksetzen des Umrechnungsfaktors auf
“1” (Wägen ohne Faktor)
Ändern der Wägeeinheit
Einstieg in den Mastermode **
(siehe Kapitel 6.1)
Next
Comp
Bestätigen des Zielgewichtes einer eingewogenen Komponente und weiterfahren mit der
nächsten Komponente
––––
Last
Comp
Bestätigen des Zielgewichtes der letzten
eingewogenen Komponente eines Rezeptes
Rezeptiervorgang abbrechen
Rezeptiermethode oder Toleranz auswählen
Gewählte Rezeptiermethode bestätigen oder
gewählte Toleranz bestätigen
Advanced-Rezeptiermodus
Nächste Ziffer des Zielgewichtes setzen
Advanced-Rezeptiermodus
Eingegebenes Zielgewicht bestätigen
Factor
Unit
Menu
Mode
Enter
+
Yes
Funktion abhängig vom aktuell gewählten Arbeitsmodus
Mastermode **
Mastermode
Bestätigen der aktuellen Einstellung
––––
Advanced-Rezeptiermodus
Sollwert der Komponente erhöhen
–
No
Advanced-Rezeptiermodus
––––
Funktion abhängig vom aktuell gewählten Arbeitsmodus
Mastermode **
Verwerfen der aktuellen Einstellung
Mastermode
––––
Advanced-Rezeptiermodus
Sollwert der Komponente verringern
Advanced-Rezeptiermodus
Zurück zur letzten Ziffer
** Bei Eichwaagen sind nur diese Tasten aktiv
Deutsch
O/T
On/Off
Farbmischwaage Panda7, Panda7/X, Panda7/X2
36
Tastatur sperren
Um die Tastatur zu sperren, die Tasten «O/T» und «+» gleichzeitig für mindestens 2 Sekunden drücken. Mit Ausnahme
der Taste «O/T» sind anschliessend alle Tasten gesperrt. Bei Waagen mit Anzeige erscheint kurz “key locked”. Diese
Meldung erscheint auch, wenn bei gesperrter Tastatur irgend eine Taste gedrückt wird.
Tastatursperrung aufheben
Um die Tastatursperrung aufzuheben, die Tasten «O/T» und «–» gleichzeitig für mindestens 2 Sekunden drücken. Bei
Waagen mit Anzeige erscheint kurz “key unlocked”.
Waage auf PS7001-Standardeinstellungen setzen
Um Ihre Panda7-Waage mit den Einstellungen einer PS7001-Waage zu betreiben, die Tasten «Unit» und «Last Comp»
gleichzeitig für mindestens 2 Sekunden drücken. Bei Waagen mit Anzeige erscheint kurz “PS7001-F”. Anschliessend
arbeitet die Waage mit den gleichen Standardeinstellungen wie eine PS7001-Waage.
Hinweis: Die Waageneinstellungen können jederzeit wieder geändert (siehe Kapitel 6 “Der Mastermode”) oder die
Waage kann wieder auf die Werkseinstellungen zurückgesetzt werden (siehe nächster Abschnitt).
Deutsch
Waage auf Werkseinstellungen zurücksetzen
Um die Waage auf die Werkseinstellungen zurückzusetzen, die Tasten «Unit» und «–» gleichzeitig für mindestens
2 Sekunden drücken. Bei Waagen mit Anzeige erscheint kurz “factory set”. Anschliessend ist die Waage auf die
Werkseinstellungen zurückgesetzt.
Farbmischwaage Panda7, Panda7/X, Panda7/X2
37
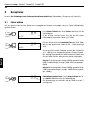
4
Wägen
4.1
Ein-/Ausschalten und Wägeeinheit wählen
Ein-/Ausschalten
O/T
On/Off
Durch langes Drücken der Taste «On/Off» schalten Sie die Waage ein bzw. aus.
Nach dem Einschalten führt die Waage einen Anzeigetest durch. Sobald die Gewichtsanzeige
erscheint, ist die Waage wägebereit und automatisch auf Null gestellt.
Wägeeinheit wählen (bei Eichwaagen nicht verfügbar)
Durch kurzes Drücken der Taste «Unit» kann die Wägeeinheit zwischen “g” (Gramm), “oz” (Unze)
und “P” (Parts) umgeschaltet werden.
Unit
Menu
4.2
Einfaches Wägen
Deutsch
Wägebehälter auflegen.
O/T
On/Off
Zum Tarieren, kurz die Taste «O/T» drücken. Die Nullanzeige erscheint.
Gewünschte Menge des Wägegutes einfüllen.
C.o.1.5.0.0
Warten bis die Stillstandskontrolle (Ringsymbol in der Anzeige) erlischt und
Wägeresultat ablesen.
g
adv
Farbmischwaage Panda7, Panda7/X, Panda7/X2
38
5
Rezeptieren
Hinweis: Bei Eichwaagen sind die Rezeptierfunktionen deaktiviert (Faktorwägen, Rezeptieren mit Korrektur).
5.1
Faktor wählen
Um eine grössere oder kleinere Menge eines vorgegebenen Rezeptes einzuwägen, kann ein Faktor (Multiplikator)
gewählt werden.
Factor
*
C.o.r.r.0.0
fctr
*
Factor
adv
0.5.0. .C.U.M. .I.M.M.8.
C.o.r.r.0.0
fctr
adv
5.0.0. .C.U.M. .I.M.M.8.
Durch kurzes Drücken der Taste «Factor» aktivieren Sie die
Faktorwägung.
In der Anzeige erscheint unten links der bei der letzten
Faktorwägung verwendete Faktor (z.B. 0.50).
Drücken Sie anschliessend mehrmals kurz die Taste «Factor», bis der gewünschte Faktor (0.20 ... 5.00) angezeigt
wird.
Deutsch
Bei der anschliessenden Wägung wird auf das Zielgewicht
(z.B. 1000 g) einer Komponente gemäss Rezept eingewogen. Abhängig vom gewählten Faktor wird effektiv jedoch eine
um den Faktor kleinere oder grössere Menge eingewogen.
Beispiel 1: Gewicht gemäss Rezept 1000 g, gewählter Faktor
0.50 (für halbe Menge). Anzeige: 1000, effektiv eingewogen:
500 g
Beispiel 2: Gewicht gemäss Rezept 1000 g, gewählter Faktor
3.00 (für dreifache Menge). Anzeige: 1000, effektiv eingewogen: 3000 g
Factor
C.o.r.r.0.0
g
adv
Faktorwägung deaktivieren: Durch langes Drücken der Taste «Factor» deaktivieren Sie die Faktorwägung.
Die Faktoranzeige verschwindet und der Faktor wird auf 1
zurückgesetzt.
Farbmischwaage Panda7, Panda7/X, Panda7/X2
39
5.2
Die verschiedenen Rezeptiermethoden
Die Panda7 bietet verschiedene Rezeptiermethoden an. Jede Rezeptiermethode setzt sich zusammen aus:
ADV
– dem Rezeptiermodus Advanced “ADV
ADV”:
In diesem Modus wird zuerst das Zielgewicht einer Komponente eingegeben. Anschliessend wird die Komponente
eingewogen und bestätigt. Ein allfälliger Einwägefehler wird beim Zuwägen nachfolgender Komponenten automatisch berücksichtigt.
– der Anzeigeart:
– “ABS
ABS” Absolut-Anzeige: Anzeige des absoluten Gewichtes einer Komponente.
ABS
– “CUM
CUM” Kumulativ-Anzeige: Anzeige des kumulierten Gewichtes.
CUM
– dem Korrekturmodus:
– “IMM
IMM” Korrektur: Korrektur unmittelbar nach jeder falsch eingewogenen Komponente
IMM
– “END
END” Korrektur: Korrektur am Schluss der Rezeptierung
END
Durch Kombination resultieren 4 verschiedene Rezeptiermethoden:
Rezeptiermodus
Advanced
ADV ABS END –> Kap. 5.5
X
ADV CUM END –> Kap. 5.5
X
ADV ABS IMM –> Kap. 5.6
X
ADV CUM IMM –> Kap. 5.6
X
Anzeigeart
Absolut
Kumulativ
Korrekturmodus
unmittelbar am Schluss
X
X
X
X
X
X
X
X
Deutsch
Rezeptiermethode
Farbmischwaage Panda7, Panda7/X, Panda7/X2
40
5.3
Mode
Enter
Mode
Enter
Mode
Enter
Deutsch
Mode
Enter
Rezeptiermethode wählen
C.o.r.r.0.?
A.D.V .A.B.S. .E.N.D.8.
Taste «Mode» kurz drücken. Die zuletzt angewählte Rezeptiermethode erscheint in der Anzeige (ab Werk: “ADV ABS
END”).
C.o.r.r.0.?
Durch wiederholtes, kurzes Drücken der Taste «Mode», die
gewünschte Rezeptiermethode (z.B. “ADV CUM END”) anwählen.
.t.o.l.0.?
Gewählte Rezeptiermethode durch langes Drücken der Taste
«Mode» bestätigen.
Es erscheint die Anzeige für die Auswahl der Toleranz, bei
deren Überschreitung die einzelnen Komponenten korrigiert
werden sollen.
A.D.V. .CUM .E.N.D8.
A.D.V. .A.B.S. .E.1.1.0. % tol
.t.o.l.0.?
A.D.V. .A.B.S. .E.1.1.5. % tol
adv
adv
Durch wiederholtes, kurzes Drücken der Taste «Mode», die
gewünschte Plus/Minus-Toleranz in % (no, 0.5 ... 15.0)
anwählen.
Hinweis: “no” bedeutet eine Toleranz von Null.
Gewählte Toleranz (z.B. 1.5%) durch langes Drücken der
Taste «Mode» bestätigen. Die Waage ist anschliessend bereit
für die Rezeptierung.
Mode
Enter
Hinweis: Die gewählte Rezeptiermethode bleibt aktiv, bis eine
andere angewählt wird.
5.4
Hinweise zum Rezeptieren
Last
Comp
Last
Comp
Mode :ADV ABS END
Components:
co01
target: 100.0 g
true : 110.0 g
co02
target: 20.0 g
true : 22.0 g
co03
target: 5.0 g
true : 5.5 g
Rezeptierung abbrechen
Eine Rezeptierung kann jederzeit durch langes Drücken der Taste «Last
Comp» abgebrochen werden.
Rezeptierprotokoll ausdrucken
Falls Ihre Waage mit einem Drucker verbunden ist, kann nach Abschluss einer
Rezeptierung durch langes Drücken der Taste «Last Comp» das entsprechende Rezeptierprotokoll ausgedruckt werden.
Farbmischwaage Panda7, Panda7/X, Panda7/X2
41
5.5
Rezeptieren mit “ADV ABS END” und “ADV CUM END”
Ablauf
1. Leeren Behälter auflegen und tarieren.
2. Taste «Next Comp» drücken, um mit dem Rezeptieren zu beginnen.
3. Zielgewicht der angezeigten Komponente ziffernweise eingeben (mit Taste «+» bzw. «–» Ziffer setzen und gesetzte
Ziffer durch kurzes Drücken der Taste «Enter» bestätigen). Eingegebenes Zielgewicht durch langes Drücken der
Taste «Enter» bestätigen.
4. Komponente gegen Null einwägen und Einwägung (auch bei Überfüllung) mit der Taste «Next Comp» bestätigen.
Falls die Komponente überfüllt wurde, wird der Fehler beim Einfüllen nachfolgender Komponenten automatisch
berücksichtigt.
5. Schritte 3 und 4 wiederholen, bis alle Komponenten eingewogen sind. Letzte Komponente mit der Taste «Last
Comp» bestätigen.
6. Die Waage prüft, ob einzelne Komponenten nachdosiert werden müssen. Falls ja: Angezeigte Komponenten
nachdosieren und jeweils mit der Taste «Next Comp» bestätigen.
Diesen Schritt wiederholen, bis alle Komponenten nachdosiert sind.
Nach Beendigung der Rezeptierung zeigt die Waage “done”, danach das Endgewicht der Mischung.
Beispiel
Aktion
“ADV ABS END”
Leeren Behälter auflegen und tarieren
Deutsch
Rezeptur besteht aus: 1. Komponente 125 g, 2. Komponente 20 g, 3. Komponente 5 g
Kein Faktor, keine Toleranz angewählt. Die 2. Komponente wird falsch eingewogen (22.0 g statt 20.0 g)
“ADV CUM END”
8.8.8.8.0.0 g
8.8.8.8.0.0 g
adv
adv
cum
O/T
On/Off
Rezeptieren starten
*
Next
Comp
8.8.8.8.0.0 g
*
8.8.8.8.0.1 g
*
8.8.8.8.1.0 g
*
8.8.8.8.c.o.0.1.8.8.1.0.
corr adv
8.8.8.8.0.0 g
8.8.8.8.c.o.0.1.8.8.1.0. corr
adv
cum
Zielgewicht der 1. Komponente
(125 g) ziffernweise eingeben
1. Ziffer
+
Yes
Mode
Enter
*
8.8.8.8.c.o.0.1.8.8.1.0.
*
corr adv
8.8.8.8.c.o.0.1.8.8.1.0. corr
adv
8.8.8.8.0.1 g
8.8.8.8.c.o.0.1.8.8.1.0. corr
8.8.8.8.1.0 g
8.8.8.8.c.o.0.1.8.8.1.0. corr
adv
cum
adv
cum
Farbmischwaage Panda7, Panda7/X, Panda7/X2
42
Aktion
2. Ziffer
“ADV ABS END”
+
Yes
Mode
Enter
3. Ziffer
+
Yes
Mode
Enter
Eingegebenes Zielgewicht bestätigen
*
*
*
Mode
Enter
2. Komponente einfüllen
Deutsch
*
8.8.8.1.2.5 g
*
8.8.1.2.5.0 g
*
8.-.1.2.5.0 g
*
8.-.1.2.0.0 g
*
8.-.1.2.0.0 g
*
8.-.-.2.0.0 g
*
8.-.-.2.0.0 g
*
8.-.-.2.2.0 g
*
8.8.8.8.c.o.0.1.8.8.1.0.
*
8.8.8.8.c.o.0.1.8.8.1.0.
*
8.8.8.8.c.o.0.1.8.8.1.0.
*
Next
Comp
Zielgewicht der 2. Komponente
20 g (ABS)/145 g (CUM) ziffernweise
eingeben und bestätigen (Vorgehen siehe 1. Komponente)
8.8.8.1.2.0 g
8.8.8.8.c.o.0.1.8.8.1.0.
1.
Einwägung bestätigen
*
8.8.8.8.c.o.0.1.8.8.1.0.
Mode
Enter
1. Komponente einfüllen
8.8.8.8.1.2 g
8.8.8.8.c.o.0.1.8.8.1.0.
*
8.8.8.8.c.o.0.28.8.1.0.
*
8.8.8.8.c.o.0.28.8.1.0.
*
8.8.8.8.c.o.0.28.8.1.0.
*
2.
“ADV CUM END”
8.8.8.8.c.o.0.28.8.1.0.
corr adv
8.8.8.8.1.2 g
8.8.8.8.c.o.0.1.8.8.1.0. corr
corr adv
8.8.8.1.2.0 g
8.8.8.8.c.o.0.1.8.8.1.0. corr
corr adv
8.8.8.1.2.5 g
8.8.8.8.c.o.0.1.8.8.1.0. corr
corr adv
8.8.1.2.5.0 g
8.8.8.8.c.o.0.1.8.8.1.0. corr
corr adv
8.-.1.2.5.0 g
8.8.8.8.c.o.0.1.8.8.1.0. corr
corr adv
8.-.1.2.0.0 g
8.8.8.8.c.o.0.1.8.8.1.0. corr
corr adv
8.-.1.2.0.0 g
8.8.8.8.c.o.0.28.8.1.0. corr
corr adv
8.-.1.4.5.0 g
8.8.8.8.c.o.0.28.8.1.0. corr
corr adv
8.-.-.2.0.0 g
8.8.8.8.c.o.0.28.8.1.0. corr
corr adv
8.-.-.2.2.0 g
8.8.8.8.c.o.0.28.8.1.0. corr
adv
cum
adv
cum
adv
cum
adv
cum
adv
cum
adv
cum
adv
cum
adv
cum
adv
cum
adv
cum
2. Komponente wir um 2 g überfüllt
Einwägung bestätigen
Next
Comp
*
8.-.-.2.0.0 g
8.8.8.8.c.o.0.38.8.1.0.
corr adv
*
8.-.-.2.0.0 g
8.8.8.8.c.o.0.38.8.1.0. corr
adv
cum
Farbmischwaage Panda7, Panda7/X, Panda7/X2
43
Aktion
“ADV ABS END”
Zielgewicht der 3. Komponente
5 g (ABS)/150 g (CUM) ziffernweise eingeben und bestätigen (Vorgehen siehe 1.
Komponente)
*
8.-.-.2.5.0 g
*
8.-.-.-.5.0
*
8.-.-.2.0.0
*
8.8.8.8.c.o.0.38.8.1.0.
*
Mode
Enter
8.8.8.8.c.o.0.38.8.1.0.
3. Komponente einfüllen
*
8.8.8.8.c.o.0.38.8.1.0.
3.
“ADV CUM END”
corr adv
8.-.1.5.0.0 g
8.8.8.8.c.o.0.38.8.1.0. corr
corr adv
8.-.-.-.5.0
8.8.8.8.c.o.0.38.8.1.0. corr
corr adv
8.-.-.2.0.0
8.8.8.8.c.o.0.38.8.1.0. corr
adv
cum
adv
cum
adv
cum
Hinweis: Der Fehler beim Einwägen der 2. Komponente wird beim
Einwägen der 3. Komponente bereits berücksichtigt. Bei Anzeige 0.0
wurden effektiv 5.5 g eingewogen.
*
Last
Comp
*
8.-.-.1.2.5 g
8.8.8.8.c.o.0.18.8.1.0.
corr adv
8.-.-.1.2.5 g
8.8.8.8.c.o.0.18.8.1.0. corr
adv
cum
Hinweis: Aufgrund des Fehlers beim Einwägen der 2. Komponente
muss die 1. Komponente um 12.5 g nachdosiert werden.
1. Komponente um 12.5 g
nachdosieren
*
Next
Comp
*
8.-.-.2.0.0 g
*
8.8.8.8.c.o.0.18.8.1.0.
1.
Nachdosierung bestätigen
8.-.-.2.0.0 g
*
8.8.8.8.d.o.n.e8.8.8.8.
corr adv
corr adv
8.-.-.2.0.0 g
8.8.8.8.c.o.0.18.8.1.0. corr
8.-.-.2.0.0 g
8.8.8.8.d.o.n.e8.8.8.8. corr
adv
cum
adv
cum
Der Rezeptiervorgang wird beendet. Das Endgewicht der Mischung
wird angezeigt.
8.-.1.6.5.0 g
adv
8.-.1.6.5.0 g
adv
cum
Deutsch
Einwägung (letzte) bestätigen
Farbmischwaage Panda7, Panda7/X, Panda7/X2
44
5.6
Rezeptieren mit “ADV ABS IMM” und “ADV CUM IMM”
Ablauf
1. Leeren Behälter auflegen und tarieren.
2. Taste «Next Comp» drücken, um mit dem Rezeptieren zu beginnen.
3. Zielgewicht der angezeigten Komponente ziffernweise eingeben (mit Taste «+» bzw. «–» Ziffer setzen und gesetzte
Ziffer durch kurzes Drücken der Taste «Enter» bestätigen). Eingegebenes Zielgewicht durch langes Drücken der
Taste «Enter» bestätigen.
4. Komponente gegen Null einwägen und Einwägung (auch bei Überfüllung) mit der Taste «Next Comp» bestätigen.
Falls die Komponente überfüllt wurde, wird der Fehler beim Einfüllen nachfolgender Komponenten automatisch
berücksichtigt.
5. Die Waage prüft unmittelbar nach jeder Komponente, ob die vorgängig eingewogenen Komponenten nachdosiert
werden müssen. Falls ja: Angezeigte Komponenten nachdosieren und jeweils mit der Taste «Next Comp» bestätigen. Diesen Schritt wiederholen, bis alle Komponenten nachdosiert sind.
6. Schritte 3, 4 und 5 wiederholen, bis alle Komponenten eingewogen sind. Letzte Komponente mit der Taste «Last
Comp» bestätigen.
Nach Beendigung der Rezeptierung zeigt die Waage “done”, danach das Endgewicht der Mischung.
Deutsch
Beispiel
Rezeptur besteht aus: 1. Komponente 125 g, 2. Komponente 20 g, 3. Komponente 5 g
Kein Faktor, keine Toleranz angewählt. Die 2. Komponente wird falsch eingewogen (22.0 g statt 20.0 g)
Aktion
“ADV ABS IMM”
Leeren Behälter auflegen und tarieren
“ADV CUM IMM”
8.8.8.8.0.0 g
imm
8.8.8.8.0.0 g
adv
imm
8.8.8.8.0.0 g
corr adv
imm
8.8.8.8.0.1 g
imm
O/T
On/Off
Rezeptieren starten
Next
Comp
*
imm
8.8.8.8.c.o.0.1.8.8.1.0.
*
8.8.8.8.0.0 g
8.8.8.8.c.o.0.1.8.8.1.0. corr
adv
cum
adv
cum
Zielgewicht der 1. Komponente
(125 g) ziffernweise eingeben
1. Ziffer
+
Yes
Mode
Enter
*
imm
*
8.8.8.8.c.o.0.1.8.8.1.0.
8.8.8.8.1.0 g
imm
*
corr adv
8.8.8.8.c.o.0.1.8.8.1.0. corr
*
adv
8.8.8.8.0.1 g
8.8.8.8.c.o.0.1.8.8.1.0. corr
8.8.8.8.1.0 g
imm
8.8.8.8.c.o.0.1.8.8.1.0. corr
adv
cum
adv
cum
Farbmischwaage Panda7, Panda7/X, Panda7/X2
45
2. Ziffer
“ADV ABS IMM”
+
Yes
Mode
Enter
3. Ziffer
+
Yes
Mode
Enter
Eingegebenes Zielgewicht bestätigen
Mode
Enter
1. Komponente einfüllen
1.
Einwägung bestätigen
Next
Comp
Zielgewicht der 2. Komponente
20 g (ABS)/145 g (CUM) ziffernweise
eingeben und bestätigen (Vorgehen siehe
1. Komponente)
Mode
Enter
*
imm
8.8.8.1.2.0 g
imm
8.8.8.1.2.5 g
imm
8.8.1.2.5.0 g
imm
8.-.1.2.5.0 g
imm
8.-.1.2.0.0 g
imm
8.-.1.2.0.0 g
imm
8.-.-.2.0.0 g
imm
8.-.-.2.0.0 g
imm
imm
*
imm
*
imm
*
imm
*
imm
*
imm
*
imm
*
imm
2. Komponente einfüllen
2.
*
*
8.8.8.8.1.2 g
imm
*
“ADV CUM IMM”
8.8.8.8.c.o.0.1.8.8.1.0.
8.8.8.8.c.o.0.1.8.8.1.0.
8.8.8.8.c.o.0.1.8.8.1.0.
8.8.8.8.c.o.0.1.8.8.1.0.
8.8.8.8.c.o.0.1.8.8.1.0.
8.8.8.8.c.o.0.1.8.8.1.0.
8.8.8.8.c.o.0.28.8.1.0.
8.8.8.8.c.o.0.28.8.1.0.
8.8.8.8.c.o.0.28.8.1.0.
corr adv
*
corr adv
*
corr adv
*
corr adv
*
corr adv
*
corr adv
*
corr adv
*
corr adv
*
corr adv
8.8.8.8.1.2 g
8.8.8.8.c.o.0.1.8.8.1.0. corr
8.8.8.1.2.0 g
8.8.8.8.c.o.0.1.8.8.1.0. corr
8.8.8.1.2.5 g
8.8.8.8.c.o.0.1.8.8.1.0. corr
8.8.1.2.5.0 g
8.8.8.8.c.o.0.1.8.8.1.0. corr
8.-.1.2.5.0 g
8.8.8.8.c.o.0.1.8.8.1.0. corr
8.-.1.2.0.0 g
8.8.8.8.c.o.0.1.8.8.1.0. corr
8.-.1.2.0.0
8.8.8.8.c.o.0.28.8.1.0. corr
8.-.1.4.5.0 g
8.8.8.8.c.o.0.28.8.1.0. corr
8.-.-.2.0.0 g
8.8.8.8.c.o.0.28.8.1.0. corr
8.-.-.2.2.0 g oz% *8.-.-.2.2.0 g
imm
8.8.8.8.c.o.0.28.8.1.0. corr
adv
cum
imm
8.8.8.8.c.o.0.28.8.1.0. corr
2. Komponente wird um 2 g überfüllt
adv
cum
adv
cum
adv
cum
adv
cum
adv
cum
adv
cum
adv
cum
adv
cum
adv
cum
adv
cum
Deutsch
Aktion
Farbmischwaage Panda7, Panda7/X, Panda7/X2
46
Aktion
“ADV ABS IMM”
Einwägung bestätigen
Next
Comp
*
“ADV CUM IMM”
8.-.-.1.2.5 g
imm
8.8.8.8.c.o.0.18.8.1.0. corr
8.-.-.1.2.5Pg oz%
+*
adv
imm
fctr
cum
8.8.8.8.c.o.0.18.8.1.0. %corrtol adv
Hinweis: Aufgrund des Fehlers beim Einwägen der 2. Komponente
muss die 1. Komponente um 12.5g nachdosiert werden.
1. Komponente um 12.5 g
nachdosieren
1.
Nachdosierung bestätigen
Next
Comp
Deutsch
Zielgewicht der 3. Komponente
5 g (ABS)/150 g (CUM) ziffernweise eingeben und bestätigen (Vorgehen siehe 1.
Komponente)
Mode
Enter
3. Komponente einfüllen
*
*
imm
8.-.-.2.0.0 g
imm
8.-.-.2.5.0 g
imm
8.-.-.-.5.0
imm
8.-.-.2.0.0
imm
imm
*
imm
*
imm
*
*
8.-.-.2.0.0 g
imm
imm
3.
8.8.8.8.c.o.0.18.8.1.0.
8.8.8.8.c.o.0.38.8.1.0.
8.8.8.8.c.o.0.38.8.1.0.
8.8.8.8.c.o.0.38.8.1.0.
8.8.8.8.c.o.0.38.8.1.0.
corr adv
*
corr adv
*
corr adv
*
corr adv
*
corr adv
8.-.-.2.0.0 g
8.8.8.8.c.o.0.18.8.1.0. corr
8.-.-.2.0.0 g
8.8.8.8.c.o.0.38.8.1.0. corr
8.-.1.5.0.0 g
8.8.8.8.c.o.0.38.8.1.0. corr
8.-.-.-.5.0
8.8.8.8.c.o.0.38.8.1.0. corr
8.-.-.2.0.0
8.8.8.8.c.o.0.38.8.1.0. corr
adv
cum
adv
cum
adv
cum
adv
cum
adv
cum
Hinweis: Der Fehler beim Einwägen der 2. Komponente wird beim
Einwägen der 3. Komponente bereits berücksichtigt. Bei Anzeige 0.0
wurden effektiv 5.5 g eingewogen.
Einwägung (letzte) bestätigen
Last
Comp
*
*
8.-.-.2.0.0
imm
8.8.8.8.d.o.n.e8.8.8.8.
corr adv
8.-.-.2.0.0
imm
8.8.8.8.d.o.n.e8.8.8.8. corr
adv
cum
Der Rezeptiervorgang wird beendet. Die effektive Endgewicht der
Mischung wird angezeigt.
8.-.1.6.5.0 g
imm
adv
8.-.1.6.5.0 g
imm
adv
cum
Farbmischwaage Panda7, Panda7/X, Panda7/X2
47
6
Der Mastermode
Im Mastermode lassen sich die Einstellungen der Waage ändern und Funktionen aktivieren.
6.1
Aufruf des Mastermodes
Unit
Menu
+
Yes
6.2
M.A.S.t.E.r
Im Wägemodus die Taste «Menu» solange gedrückt halten,
bis die nebenstehende Anzeige erscheint.
M.A.S.C.A.L
Innerhalb von 3 Sekunden die Taste «Yes» drücken (andernfalls kehrt die Waage wieder in den Wägemodus zurück).
Anschliessend erscheint der erste Menüblock des Mastermode.
Menü-Übersicht Mastermode
Anzeige/Einstellungen
Funktion/Hinweise
CAL
Waage kalibrieren (siehe Kapitel 6.3, bei Eichwaagen nicht verfügbar)
SCALE
rESolu
0.1
0.05
Unit
g
oz
P
b.Light
On
Off
rEStAr
On
Off
VibrAt
MEd
HIGH
LOW
ProcES
UNIVEr
dOSING
rESEt
Std On
End SC
Waageneinstellungen
Auflösung wählen (bei Eichwaagen nicht verfügbar)
”Full Range” 0 ... 7100 g / 0.1 g (Werkseinstellung)
”Delta Range” 0 ... 999.95 g / 0.05 g, 1000 ... 7100 g / 0.1 g
Wägeeinheit wählen (bei Eichwaagen nicht verfügbar)
Gramm (Werkseinstellung)
Unze
Parts (1 Part = 1/32 oz)
Anzeigebeleuchtung ein-/ausschalten
eingeschaltet (Werkseinstellung)
ausgeschaltet
Automatische Speicherfunktion ein-/ausschalten (bei Eichwaagen nicht verfügbar)
eingeschaltet
ausgeschaltet (Werkseinstellung)
Vibrationsadapter wählen
normale Wägegüter (Werkseinstellung)
unruhige Umgebung
sehr ruhige Umgebung
Prozessadapter wählen
normale Wägegüter
Dosieren, z.B. von flüssigen oder pulverförmigen Wägegütern (Werkseinstellung)
Rücksetzung aller SCALE-Einstellungen auf die Werkseinstellungen
Mit «Yes» auf Werkseinstellungen zurücksetzen, mit «No» verwerfen
“SCALE”-Block verlassen mit «Yes»
Deutsch
Bedienung des Mastermodes: Mit «Yes» Option bestätigen, mit «No» Option verwerfen.
Farbmischwaage Panda7, Panda7/X, Panda7/X2
48
Anzeige/Einstellungen
Funktion/Hinweise
IFACE1 / IFACE2
ModE
dIALOG
2nd.dIS
PN
Print
CYCLE
Protok
HONOFF
NO
PAritY
7 EVEN
7 NO P
8 NO P
7 Odd
BAUd
300
Schnittstelle(n) konfigurieren
Betriebsart wählen
Kommunikation mit Computer (Werkseinstellung IFACE 1)
Ansteuerung Zweitanzeige (Werkseinstellung IFACE 2)
PM-Waagenmodus
Kommunikation mit Drucker
Datenausdruck bei Gewichtsänderung
Protokoll wählen
Xon/Xoff-Protokoll (Werkseinstellung)
kein Protokoll
Bits und Parität wählen
7 Datenbits mit gerader Parität
7 Datenbits ohne Parität
8 Datenbits ohne Parität (Werkseinstellung)
7 Datenbits mit ungerader Parität
Datenübertragungsrate wählen
300, 600, 1200, 2400, 4800, 9600 (Werkseinstellung),
19200 und 38400
Deutsch
38400
Aut.Mod
AUt.SIR
NO
rESEt
Std On
EndIF1
Automatikmodus
Schnittstelle sendet ununterbrochen Daten (Werkseinstellung IFACE 1)
Automatikmodus ausgeschaltet (Werkseinstellung IFACE 2)
Rücksetzung der IFACE-Einstellung auf die Werkseinstellungen
Mit «Yes» auf Werkseinstellungen zurücksetzen, mit «No» verwerfen
“IFACE1”- bzw. “IFACE2”-Block verlassen mit «Yes»
LiSt
Mit «Yes» Mastermode-Einstellungen ausdrucken
End
Mit «Yes» Mastermode verlassen. Rückfrage “StorE?” mit «Yes» bestätigen, um die
Einstellungen zu speichern bzw. «No» um diese zu verwerfen.
6.3
+
Yes
Waage justieren/kalibrieren (bei Eichwaagen nicht verfügbar)
M.A.S.C.A.L
Mastermode aufrufen und “CAL” anwählen.
M.A.7.0.0.0 kg
Waagschale entlasten und anschliessend die Taste «Yes»
drücken, um den Kalibriervorgang zu starten.
Die Waage zeigt blinkend das Kalibriergewicht an (entsprechend der Nennlast der Waage). Mit der Taste «No» können
auf Wunsch andere Kalibriergewichte gewählt werden.
+
Yes
Kalibriergewicht gemäss Anzeige auflegen und mit «Yes»
bestätigen.
Hinweis: Die Kalibrierung kann jederzeit durch langes Drükken der Taste «On/Off» abgebrochen werden.
Warten bis die Kalibrierung erfolgreich abgeschlossen ist
(wird in der Anzeige mit “done” bestätigt) und die Waage in
den Wägemodus zurückkehrt.
Farbmischwaage Panda7, Panda7/X, Panda7/X2
49
Fehlermeldungen
Überlast
{.|.|.|.|.}
adv
<.=.=.=.=.>
adv
------
adv
-.-.n.o.-.-
adv
{.|.n.o.|.}
adv
<.=.n.o.=.>
adv
E.r.r.6.
adv
E.r.r.5.3.
adv
Err
adv
Waage entlasten oder Vorlast verringern.
Unterlast
Waagschale auflegen und sicherstellen, dass diese frei beweglich ist.
Wägeresultat erreicht keine Stabilität
1. Für ruhige Umgebung sorgen
2. Sicherstellen, dass Waagschale frei beweglich ist
3. Einstellung des Vibrationsadapters ändern (Kap. 6.2)
Funktion nicht ausgeführt
Die aufgerufene Funktion konnte nicht ausgeführt werden.
Nullstellen nicht möglich (Überlast/Unterlast)
Sicherstellen, dass Nullstellen nicht bei Überlast bzw. Unterlast durchgeführt wird.
Keine Kalibrierung/Justierung
N.o. . .C.a.L. .I.M.M.8.
Netzstecker aus- und wieder einstecken. Falls Meldung wieder erscheint, Waage kalibrieren/justieren (Kapitel 6.3). Falls auch dies nichts nützt, mit Händler oder Vertretung Kontakt
aufnehmen.
EAROM Prüfsummenfehler
Netzstecker aus- und wieder einstecken. Falls Meldung wieder erscheint, mit Händler oder
Vertretung Kontakt aufnehmen.
Unterspannung
low voltage
Ausgangsspannung des Netzadapters zu klein. Netzadapter durch solchen mit korrekter
Ausgangsspannung ersetzen.
Ablesbarkeit
* rESO?
corr adv
* ÑÖOre
corr adv
loco01ltage
Sollwerteingabe beim Rezeptieren mit zu feiner Auflösung. Wert der Ablesegenauigkeit der
Waage anpassen (z.B. wenn Eingabe 15.01 g bei Ablesegenauigkeit 0.05 g).
Sollmenge noch nicht erreicht
loco01ltage
* Abort?
corr
loco01ltage
Sollmenge der Komponente noch nicht erreicht. Nachdosieren bis Sollmenge erreicht ist.
Rezeptierung abgebrochen
adv
Rezeptierung durch langes Drücken der Taste «Last Comp» abgebrochen.
Deutsch
7
Farbmischwaage Panda7, Panda7/X, Panda7/X2
50
8
Schnittstellen / Zubehör
8.1
Schnittstellendefinition
Standardmässig ist die Waage Panda7 mit einer doppelt belegten RS232C-Schnittstelle und die Panda7/X sowie
die Panda7/X2 mit einer einfachen RS232C-Schnittstelle ausgerüstet. Die Schnittstelle(n) sind über die 9-polige SubD Buchse verfügbar. Die maximale Leitungslänge beträgt 15 m. Die Konfigurierung der Schnittstellen erfolgt im
Mastermode (siehe Kapitel 6.2).
Eingebaute Schnittstelle(n)
RS232C, 9-pin D-Sub, f
Belegung bei
Panda7
Belegung
nc
TxD 1
RxD 1
nc
GND
nc
RxD 2
TxD 2
VCC (5V, ≤50mA)
5
4
Deutsch
9
3
8
2
7
1
6
Pin 1
Pin 2
Pin 3
Pin 4
Pin 5
Pin 6
Pin 7
Pin 8
Pin 9
Belegung bei
Panda7/X
Panda7/X2
2 Schnittstellen bei Verwendung des
Y-Kabels (Zubehör), nur bei Panda7
COM1
COM2
nc
TxD 1
RxD 1
nc
GND
nc
nc
nc
nc
–––
TxD 1
RxD 1
–––
GND
–––
–––
–––
–––
–––
TxD 2
RxD 2
–––
GND
–––
–––
–––
VCC (5V, ≤50mA)
TxD: Daten senden
RxD: Daten empfangen
GND: Signalerde
VCC: Speisung (+5V, ≤50mA)
nc:
not connected (nicht angeschlossen)
8.2
Zubehör
Zubehör
Art.-Nr.
Schutzhülle (Set à 5 Stk.)
71153871
Y-Kabel
(9-pin D-Sub, m, COM1/2 f)
21203892
COM1
1:1
PC
ME-00410024
ME-21203892
COM1,2
+5V
Zweitanzeige
oder
COM2
+5V
RS232-Kabel für PC 1,8 m (9-pin D-Sub, m/f, 1:1)
Kabel an
Anzeige
Druckerspez.
Kabel
Drucker
00410024
Farbmischwaage Panda7, Panda7/X, Panda7/X2
51
9
Technische Daten / Richtlinien und Prüfnormen
9.1
Technische Daten
7100 g
Ablesbarkeit
Full Range: 0.1 g (0 ... 7100 g)
Delta Range: 0.05 g (0 ... 999.95 g), 0.1 g (1000 ... 7100 g)
Einschwingzeit
ca. 1.0 Sekunden
Linearität
0.2 g
Stromversorgung
über Netzadapter/Speisegerät 15 VDC, 4 Watt
Wägeeinheiten
g, oz und P (1 Part = 1/32 oz)
Anzeige
LCD (Flüssigkristallanzeige), hinterleuchtet
Umgebungsbedingungen
Temperaturbereich: +10 ... +30°C
Relative Luftfeuchtigkeit:
20 ... 80% rF (nicht betauend)
Gewicht netto/brutto
3.4 kg / 4.5 kg
Überspannungskategorie:
II
Verschmutzungsgrad:
2
Deutsch
Höchstlast
330 mm
78 mm
65 mm
ø232 mm
29 mm
342 mm
Abmessungen
Farbmischwaage Panda7, Panda7/X, Panda7/X2
52
9.2
Konformitätserklärung
Konformitätserklärung: Waagenlinie Panda7
Wir, Mettler-Toledo (Changzhou) Scale & System Ltd. erklären in alleiniger Verantwortung, dass die Waagen des Typs
Panda7, auf die sich diese Erklärung bezieht, mit den folgenden EG-Richtlinien und Normen übereinstimmen.
Kennzeichen
EG-Richtlinie
geprüft nach Norm
73/23EEC Niederspannung
EN61010-1: 2001
UL Std. No. 3101-1
CAN/CSA-22.2 No. 1010.1-92
C
US
89/336EEC EMC
EN61326-1 Emission Kl. B
EN61326-1 Immunität
AS/NZS2064.1/2, AS/NZS3548
AS/NZS4251.1, AS/NZS4252.1
[year]
Deutsch
[code]
1)
M
1)
90/384EEC 1)
Nicht selbsttätige
Waagen
EN45501
1)
Metrologische Aspekte
gilt nur für geeichte Waagen (Zulassung/Testzertifikat Nr: R76/1992-NL1-03.10)
Mettler-Toledo (Changzhou) Sacle & System Ltd.
111 Changxi Rd. Changzhou, Jiangsu 213001, PRC
September 2005
David Zheng
President
Chu Jinlan
Quality Assurance Manager
Wichtiger Vermerk für geeichte Waagen in EU-Ländern
M
M
Werksgeeichte Waagen tragen vorstehendes Kennzeichen auf dem Packetikett und einen grünen “M”Kleber auf dem Eichschild. Sie dürfen sofort in Betrieb genommen werden.
Waagen, die in zwei Schritten geeicht werden und kein grünes “M” auf dem Eichschild haben, tragen
vorstehendes Kennzeichen auf dem Packetikett. Der zweite Schritt der Eichung ist durch den behördlich
anerkannten Mettler-Toledo Service oder durch den Eichbeamten durchzuführen. Bitte nehmen Sie mit
dem Mettler-Toledo Kundendienst Kontakt auf. Der erste Schrit der Eichung wurde im Herstellerwerk
durchgeführt. Er umfasst alle Prüfungen gemäss EN45501-8.2.2.
Sofern gemäss den nationalen Vorschriften in den einzelnen Staaten die Gültigkeitsdauer der Eichung beschränkt ist,
ist der Betreiber einer solchen Waage für die rechtzeitige Nacheichung selbst verantwortlich.
Farbmischwaage Panda7, Panda7/X, Panda7/X2
53
USA
This equipment has been tested and found to comply with the limits for a Class A digital device, pursuant to both Part 15 of the FCC
Rules and the radio interference regulations of the Canadian Department of Communications. These limits are designed to provide
reasonable protection against harmful interference when the equipment is operated in a commercial environment. This equipment
generates, uses and can radiate radio frequency energy and, if not installed and used in accordance with the instruction manual, may
cause harmful interference to radio communications. Operation of this equipment in a residential area is likely to cause harmful
interference, in which case the user will be required to correct the interference at his own expense.
Canada
Deutsch
ICES-001 Notice for Industrial, Scientific and Medical Radio Frequency Generators: This ISM apparatus meets all requirements of the
Canadian Interference-Causing Equipment Regulations. Please note that this requirement is only for generators which operate at over
10 kHz.
Avis de l’ICES-001, générateurs de radiofréquences dans le domaine industriel, scientifique et médical: Cet appareil ISM (industriel,
scientifique et médical) satisfait à toutes les exigences définies par la réglementation canadienne en matière d’équipements générant
des perturbations radioélectriques. Veuillez noter qu’il s’agit d’une exigence concernant uniquement les générateurs fonctionnant audelà de 10 kHz.
Farbmischwaage Panda7, Panda7/X, Panda7/X2
54
Konformitätserklärung: Waagenlinie Panda7/X
Wir, Mettler-Toledo (Changzhou) Scale & System Ltd. erklären in alleiniger Verantwortung, dass die Waagen des Typs
Panda7/X, auf die sich diese Erklärung bezieht, mit den folgenden EG-Richtlinien und Normen übereinstimmen.
Kennzeichen
EG-Richtlinie
geprüft nach Norm
94/9/EEC (ATEX)
EN50014, EN50020
0032
FMRC 3600, 3610, 3810
FM
APPROVED
CSA-C22.2 No. 157-92
CSA-C22.2 No. 142-M 1987
ia
73/23EEC Niederspannung
EN61010-1
89/336EEC EMC
EN61326-1 Emission Kl. B
EN61326-1 Immunität
0032
0032
Deutsch
AS/NZS2064.1/2, AS/NZS3548
AS/NZS4251.1, AS/NZS4252.1
Mettler-Toledo (Changzhou) Sacle & System Ltd.
111 Changxi Rd. Changzhou, Jiangsu 213001, PRC
September 2005
David Zheng
President
Chu Jinlan
Quality Assurance Manager
USA
This equipment has been tested and found to comply with the limits for a Class A digital device, pursuant to both Part 15 of the FCC
Rules and the radio interference regulations of the Canadian Department of Communications. These limits are designed to provide
reasonable protection against harmful interference when the equipment is operated in a commercial environment. This equipment
generates, uses and can radiate radio frequency energy and, if not installed and used in accordance with the instruction manual, may
cause harmful interference to radio communications. Operation of this equipment in a residential area is likely to cause harmful
interference, in which case the user will be required to correct the interference at his own expense.
Canada
ICES-001 Notice for Industrial, Scientific and Medical Radio Frequency Generators: This ISM apparatus meets all requirements of the
Canadian Interference-Causing Equipment Regulations. Please note that this requirement is only for generators which operate at over
10 kHz.
Avis de l’ICES-001, générateurs de radiofréquences dans le domaine industriel, scientifique et médical: Cet appareil ISM (industriel,
scientifique et médical) satisfait à toutes les exigences définies par la réglementation canadienne en matière d’équipements générant
des perturbations radioélectriques. Veuillez noter qu’il s’agit d’une exigence concernant uniquement les générateurs fonctionnant audelà de 10 kHz.
Farbmischwaage Panda7, Panda7/X, Panda7/X2
55
Konformitätserklärung: Waagenlinie Panda7/X2
Wir, Mettler-Toledo (Changzhou) Scale & System Ltd. erklären in alleiniger Verantwortung, dass die Waagen des Typs
Panda7/X2, auf die sich diese Erklärung bezieht, mit den folgenden EG-Richtlinien und Normen übereinstimmen.
Kennzeichen
EG-Richtlinie
geprüft nach Norm
94/9/EEC (ATEX)
EN60079-15
73/23EEC Niederspannung
EN61010-1
89/336EEC EMC
EN61326-1 Emission Kl. B
EN61326-1 Immunität
0032
0032
0032
AS/NZS2064.1/2, AS/NZS3548
AS/NZS4251.1, AS/NZS4252.1
David Zheng
President
Chu Jinlan
Quality Assurance Manager
USA
This equipment has been tested and found to comply with the limits for a Class A digital device, pursuant to both Part 15 of the FCC
Rules and the radio interference regulations of the Canadian Department of Communications. These limits are designed to provide
reasonable protection against harmful interference when the equipment is operated in a commercial environment. This equipment
generates, uses and can radiate radio frequency energy and, if not installed and used in accordance with the instruction manual, may
cause harmful interference to radio communications. Operation of this equipment in a residential area is likely to cause harmful
interference, in which case the user will be required to correct the interference at his own expense.
Canada
ICES-001 Notice for Industrial, Scientific and Medical Radio Frequency Generators: This ISM apparatus meets all requirements of the
Canadian Interference-Causing Equipment Regulations. Please note that this requirement is only for generators which operate at over
10 kHz.
Avis de l’ICES-001, générateurs de radiofréquences dans le domaine industriel, scientifique et médical: Cet appareil ISM (industriel,
scientifique et médical) satisfait à toutes les exigences définies par la réglementation canadienne en matière d’équipements générant
des perturbations radioélectriques. Veuillez noter qu’il s’agit d’une exigence concernant uniquement les générateurs fonctionnant audelà de 10 kHz.
Deutsch
Mettler-Toledo (Changzhou) Sacle & System Ltd.
111 Changxi Rd. Changzhou, Jiangsu 213001, PRC
September 2005
Farbmischwaage Panda7, Panda7/X, Panda7/X2
Deutsch
56
Balance pour le mélange des couleurs Panda7, Panda7/X, Panda7/X2
57
1
Introduction
1.1
Généralités
Nous vous remercions d’avoir choisi d’une balance pour le mélange des couleurs Panda7 ou ses variantes avec
protection pour atmosphère explosible Panda7/X (zone Ex 1) et Panda7/X2 (zone Ex 2). La balance Panda7,
Panda7/X, Panda7/X2 permet de doser des composants avec un rapport de mélange préalablement défini. La balance
dispose de différents modes de correction, pour compenser les composants éventuellement incorrectement dosés. Via
l’interface RS232 intégrée, la balance peut être raccordée à une imprimante ou être reliée à un ordinateur ou à un
afficheur auxiliaire.
Nous vous demandons de lire attentivement le présent mode d’emploi et de respecter les instructions!
Sécurité et environnement
– La balance Panda7 ne doit pas être utilisée en atmosphère explosible (comportant des
mélanges explosibles de gaz, de vapeurs, de brouillards et de poussières).
Pour les zones à risque d’explosions, il faut utiliser une balance modèle Panda7/X (zone Ex 1)
ou Panda7/X2 (zone Ex 2). Ces balances doivent obligatoirement être raccordées via l’unité
alimentation secteur certifiée PANDA-EX1P ou l’adaptateur secteur certifié PS-EX2P de
METTLER TOLEDO. Tenez absolument compte des remarques données dans la notice d’installation
relative à l’unité d’alimentation/adaptateur secteur. L’utilisation d’une housse de protection dans des
zones à risques d’explosion n’est permise, en raison du danger de charge électrostatique, que si
elle est constituée d’un matériau neutre sur le plan statique.
– Ne raccorder la balance au réseau d’alimentation qu’avec l'adaptateur secteur fourni (Panda7)
ou qu’avec l’unité d’alimentation secteur certifiée PANDA-EX1P (Panda7/X) ou qu’avec l’adaptateur secteur certifié PS-EX2P (Panda7/X2). S’assurer que la valeur de tension imprimée sur
l’appareil concorde avec la tension secteur locale. Contrôler régulièrement le câble de l’adaptateur
secteur/de l’unité d’alimentation. Si les câbles ou si l’adaptateur secteur/l’unité d’alimentation sont
endommagés, il ne faut pas continuer à utiliser la balance.
– N’utiliser que les accessoires et les périphériques recommandés.
– Manipuler la balance avec précaution, elle est un instrument de précision. Des coups sur le plateau
de la balance et la pose de surcharges importantes sur celui-ci endommagent la balance.
– Avant de commencer des opérations de nettoyage, couper la balance du secteur!
Nettoyage: Utiliser un chiffon humide (pas d’acides, de détergents ou de solvants). En cas
d’encrassement important, retirer le plateau de la balance, la housse de protection (si existante) et
les pieds réglables (uniquement sur les balances vérifiées) et les nettoyer séparément. Respecter
les prescriptions internes à l’entreprise et spécifiques au secteur d’activité concernant les intervalles
de nettoyage et les produits de nettoyage autorisés.
– En conformité avec les exigences de la directive européenne 2002/96 CE relative aux déchets
d’équipements électriques et électroniques (DEEE), cet appareil ne doit pas être éliminé avec les
déchets ménagers.
Logiquement, ceci est aussi valable pour les pays en dehors de l’UE conformément aux
règlementations nationales en vigueur.
Veuillez éliminer cet appareil conformément aux prescriptions locales dans un conteneur séparé
pour appareils électriques et électroniques.
Français
1.2
Balance pour le mélange des couleurs Panda7, Panda7/X, Panda7/X2
58
Pour toute question, adressez-vous aux autorités compétentes ou au revendeur chez qui vous avez acheté cet
appareil.
En cas de remise de cet appareil (p. ex. pour une utilisation privée ou artisanale/industrielle), cette prescription doit
être transmise en substance.
Merci pour votre contribution à la protection de l’environnement.
1.3
Remarques sur les modèles vérifiés
Les fonctions indiquées ci-dessous sont désactivées sur les modèles vérifiés :
– formulation (pesée avec coefficient multiplicateur et formulation avec correction)
– modification de l’unité de pesée (unité de pesée définie par défaut sur “g” pour les balances vérifiées)
Français
– étalonnage (les modèles vérifiés doivent être ajustés/étalonnés par une agence de maintenance METTLER TOLEDO
agréée)
Balance pour le mélange des couleurs Panda7, Panda7/X, Panda7/X2
59
2
Mise en service
2.1
Assemblage de la balance
Retirer le module d’affichage et le module de pesage de
l’emballage.
Fixer le module d’affichage sur le module de pesage à
l’aide de la vis fournie M6x20 (voir illustration).
2.2
Installation de la balance et mise de niveau
Choisissez un support fixe, dépourvu de
vibrations et le plus horizontal possible.
Ne fermez jamais à l’aide d’un marteau
les pots de peinture se trouvant encore
sur le plateau de la balance.
Evitez les fluctuations importantes de
température et les rayons directs du soleil. Tenez compte des conditions ambiantes.
Evitez les courants d’air (p. ex. de ventilateurs ou d’installations de climatisation).
Uniquement balance vérifiée: Mettre la balance de niveau en tournant les pieds réglables. La
bulle d’air doit se trouver dans le cercle intérieur.
Remarque: Les balances vérifiées doivent être réglées sur le lieu d’utilisation par un service de
maintenance METTLER TOLEDO autorisé.
Changement d’emplacement, avec éloignement important
Nous vous recommandons d’étalonner la balance lors de la première mise en service (voir chapitre 6.3). La vérification
des balances vérifiées doit être effectuée sur le lieu d’utilisation en respectant les prescriptions de métrologie légale.
Français
L’emplacement approprié contribue de manière décisive à la précision des résultats de pesée!
Balance pour le mélange des couleurs Panda7, Panda7/X, Panda7/X2
60
2.3
Raccordement de l’alimentation électrique
Panda7/X et Panda7/X2 pour zones à risques d’explosions: les balances modèle Panda7/X ne doivent être
raccordées que via l’unité d’alimentation secteur certifiée PANDA-EX1P et les balances modèle Panda7/X2 que
via l’adaptateur secteur certifié PS-EX2P. Observer et suivre impérativement les instructions dans les notices
d’installation séparées pour l’unité d’alimentation secteur PANDA-EX1P et pour l’adaptateur secteur PS-EX2P.
(2)
Attention! Les balances modèle Panda7 ne doivent être
raccordées qu’à un circuit électrique limité en énergie
avec basse tension de sécurité.
Raccordez donc la balance au réseau d’alimentation
exclusivement à l’aide de l’adaptateur secteur fourni.
Attention! Avant le raccordement de l’adaptateur secteur,
contrôler si la valeur de tension imprimée sur l’appareil
concorde avec la tension secteur locale.
Important! Raccorder d’abord l’adaptateur secteur à la
prise de la balance (1). Ensuite seulement enficher le
connecteur mâle de l’adaptateur secteur dans la prise
secteur (2).
(1)
Français
Après le raccordement, la balance effectue un test d’affichage au cours duquel tous les segments et ensuite la
version logicielle sont brièvement affichés. Dès que
l’affichage du zéro apparaît, la balance est prête à
fonctionner.
Balance pour le mélange des couleurs Panda7, Panda7/X, Panda7/X2
61
3
Fonctions des touches
Touche
Fonction lors d’une
Pression brève
Pression prolongée
Tarer la balance **
Mettre en marche ou arrêter la balance **
Sélectionner le facteur de conversion pour
doser une quantité plus petite ou plus grande d’une formule
Réinitialiser le facteur de conversion à “1”
(pesage sans facteur)
Modifier l’unité de poids
Accéder au Master Mode **
(voir chapitre 6.1)
Next
Comp
Confirmer le poids cible d’un composant
dosé et poursuivre avec le prochain composant
––––
Last
Comp
Confirmer le poids cible du dernier composant dosé d’une formule
Annuler le processus de formulation
Sélectionner la méthode de formulation ou la
tolérance
Confirmer la méthode de formulation ou la
tolérance sélectionnée
Mode formulation avancée
Saisir le prochain chiffre du poids cible
Mode formulation avancée
Confirmer le poids cible entré
Factor
Unit
Menu
Mode
Enter
+
Yes
Fonction dépendante du mode de fonctionnement actuellement sélectionné
Master Mode **
Master Mode
Confirmer le paramétrage actuel
––––
Mode formulation avancée
Augmenter la val. de cons. du composant
–
No
Mode formulation avancée
––––
Fonction dépendante du mode de fonctionnement actuellement sélectionné
Master Mode **
Rejeter le paramétrage actuel
Master Mode
––––
Mode formulation avancée
Réduire la valeur de cons. du composant
Mode formulation avancée
Revenir au dernier chiffre
** Seules ces touches sont actives sur les balances vérifiées
Français
O/T
On/Off
Balance pour le mélange des couleurs Panda7, Panda7/X, Panda7/X2
62
Verrouillage du clavier
Pour verrouiller le clavier, presser simultanément les touches «O/T» et «+» pendant 2 secondes au minimum. A
l’exception de la touche «O/T», toutes les touches sont ensuite verrouillées. Sur les balances avec écran, “key locked”
s’affiche brièvement. Ce message apparaît aussi lorsqu’une touche est pressée le clavier étant verrouillé.
Déverrouillage du clavier
Pour déverrouiller le clavier, presser simultanément les touches «O/T» et «–» pendant 2 secondes au minimum. Sur
les balances avec écran, “key unlocked” s’affiche brièvement.
Configuration de la balance avec des paramétrages standards PS7001
Pour utiliser votre balance Panda7 avec les paramétrages d’une balance PS7001, presser simultanément les touches
«Unit» et «Last Comp» pendant 2 secondes au minimum. Sur les balances avec écran, “PS7001-F” apparaît
brièvement. Ensuite, la balance fonctionne avec les mêmes paramétrages standards qu’une balance PS7001.
Remarque: Les paramétrages de la balance peuvent à tout moment être à nouveau modifiés (voir le chapitre 6
“Mastermode”) ou la balance peut être ramenée aux paramétrages standards (voir le prochain paragraphe).
Français
Initialisation de la balance avec les paramétrages d’origine
Pour ramener la balance aux paramétrages d’origine, presser simultanément les touches «Unit» et «–» pendant
2 secondes au minimum. Sur les balances avec écran, “factory set” apparaît brièvement. Ensuite, la balance est
dispose à nouveau des paramétrages standards.
Balance pour le mélange des couleurs Panda7, Panda7/X, Panda7/X2
63
4
Pesage
4.1
Mise en marche/arrêt et sélection de l’unité de poids
Mise en marche/arrêt
O/T
On/Off
Par une pression prolongée de la touche «On/Off», vous allumez ou éteignez la balance.
Après la mise en marche, la balance effectue un test d’affichage. Dès que l’affichage du poids
apparaît, la balance est prête à peser et est automatiquement mise à zéro.
Sélection de l’unité de poids (non disponible pour les balances vérifiées)
Par une pression brève de la touche «Unit», l’unité de poids peut être commutée entre “g”
(gramme), “oz” (once) et “P” (Parts).
Unit
Menu
4.2
Pesage simple
Placer le récipient de pesage sur le plateau.
Pour tarer, presser brièvement la touche «O/T». L’affichage du zéro apparaît.
Français
O/T
On/Off
Verser la quantité de produit à peser voulue.
C.o.1.5.0.0 g
Attendre que le détecteur de stabilité (symbole annulaire dans l’affichage)
s’éteigne et lire le résultat de pesée.
adv
Balance pour le mélange des couleurs Panda7, Panda7/X, Panda7/X2
64
5
Formulation
Remarque: les fonctions de formulation sont désactivées sur les balances vérifiées (pesée avec coefficient multiplicateur, formulation avec correction).
5.1
Sélection du facteur
Pour doser une quantité plus importante ou plus faible d’une formule prédéfinie, un facteur (multiplicateur) peut être
sélectionné.
Factor
*
C.o.r.r.0.0
fctr
*
Factor
0.5.0. .C.U.M. .I.M.M.8.
C.o.r.r.0.0
fctr
5.0.0. .C.U.M. .I.M.M.8.
adv
adv
Par une pression brève de la touche «Factor», vous activez
la pesée avec facteur.
Dans l’affichage apparaît en bas à gauche le facteur utilisé
lors de la dernière pesée avec facteur (p. ex. 0.50).
Pressez ensuite plusieurs fois brièvement la touche «Factor», jusqu’à ce que le facteur voulu (0.20 ... 5.00) soit
affiché.
Lors de la pesée qui suit, un composant est dosé vers le poids
cible (p. ex. 1000 g) selon la formule. En fonction du facteur
sélectionné, une quantité plus importante ou plus faible,
proportionnelle au facteur, sera effectivement dosée.
Exemple 1: Poids selon formule 1000 g, facteur sélectionné
0.50 (pour la moitié de la quantité). Affichage: 1000, dosage
effectif: 500 g
Français
Exemple 2: Poids selon formule 1000 g, facteur sélectionné
3.00 (pour le triple de la quantité). Affichage: 1000, dosage
effectif: 3000 g
Factor
C.o.r.r.0.0 g
adv
Désactivation de la pesée avec facteur: Vous désactivez la
pesée avec facteur par une pression prolongée de la touche
«Factor».
L’affichage du facteur disparaît et le facteur est ramené à 1.
Balance pour le mélange des couleurs Panda7, Panda7/X, Panda7/X2
65
5.2
Les diverses méthodes de formulation
La Panda7 propose diverses méthodes de formulation. Chaque méthode de formulation comprend:
ADV
– le mode formulation avancé “ADV
ADV”:
Dans ce mode, le poids cible d’un composant est d’abord saisi. Ensuite, le composant est dosé et validé. Une
éventuelle erreur de dosage est automatiquement prise en compte lors du rajout des composants qui suivent.
– le type d’affichage:
– “ABS
ABS” Affichage absolu: Affichage du poids absolu d’un composant.
ABS
– “CUM
CUM” Affichage cumulatif: Affichage du poids cumulé.
CUM
– le mode correction:
IMM
– Correction “IMM
IMM”: Correction immédiate après chaque composant incorrectement dosé
END
– Correction “END
END”: Correction à la fin de la formulation
Les 4 méthodes de formulation différentes obtenues par combinaison:
Mode formulation
Avancé
ADV ABS END –> Chap. 5.5
X
ADV CUM END –> Chap. 5.5
X
ADV ABS IMM –> Chap. 5.6
X
ADV CUM IMM –> Chap. 5.6
X
Type d’affichage
Absolut
Cumulatif
Mode correction
immédiat
à la fin
X
X
X
X
X
X
X
X
Français
Méthode de formulation
Balance pour le mélange des couleurs Panda7, Panda7/X, Panda7/X2
66
5.3
Sélection de la méthode de formulation
Mode
Enter
Mode
Enter
C.o.r.r.0.?
A.D.V .A.B.S. .E.N.D.8.
Presser brièvement la touche «Mode» . La dernière méthode
de formualtion sélectionnée apparaît sur l’affichage (d’origine: “ADV ABS END”).
C.o.r.r.0.?
Par une pression brève répétée de la touche «Mode»,
sélectionner la méthode de formulation voulue (p. ex. “ADV
CUM END”).
.t.o.l.0.?
Confirmer la méthode de formulation sélectionnée par une
pression prolongée de la touche «Mode».
l’affichage apparaît pour la sélection de la tolérance dont le
dépassement doit entraîner la correction des divers composants.
A.D.V. .CUM. .E.N.D.8.
Mode
Enter
A.D.V. .A.B.S. .E.1.1.0. % tol
.t.o.l.0.?
Mode
Enter
A.D.V. .A.B.S. .E.1.1.5. % tol
adv
adv
Par une pression brève et répétée de la touche «Mode»,
sélectionner la tolérance plus/moins en % (no, 0.5 ... 15.0)
voulue.
Remarque: “no” signifie une tolérance de zéro.
Confirmer la tolérance sélectionnée (p. ex. 1.5 %) par une
pression prolongée de la touche «Mode». La balance est
ensuite prête pour la formulation.
Mode
Enter
Français
Remarque: La méthode de formulation sélectionnée reste
active jusqu’à ce qu’une autre méthode soit sélectionnée.
5.4
Divers
Last
Comp
Last
Comp
Mode :ADV ABS END
Components:
co01
target: 100.0 g
true : 110.0 g
co02
target: 20.0 g
true : 22.0 g
co03
target: 5.0 g
true : 5.5 g
Annulation de la formulation
Une formulation peut être annulée à tout moment par une pression prolongée
de la touche «Last Comp».
Impression du compte rendu de formulation
Si votre balance est reliée à une imprimante, le compte rendu de formulation
correspondant peut être imprimé après la fin d’une formulation par une
pression prolongée de la touche «Last Comp».
Balance pour le mélange des couleurs Panda7, Panda7/X, Panda7/X2
67
5.5
Formulation avec “ADV ABS END” et “ADV CUM END”
Déroulement
1. Placer le récipient vide sur le plateau et effectuer le tarage.
2. Presser la touche «Next Comp» pour commencer la formulation.
3. Saisir chiffre par chiffre le poids cible du composant affiché (sélectionner le chiffre avec la touche «+» ou «–» et
confirmer les chiffres sélectionnés par une pression brève de la touche «Enter»). Confirmer le poids cible saisi par
une pression prolongée de la touche «Enter».
4. Doser le composant jusqu’à ce que l’affichage indique zéro et confirmer le dosage (même en cas de surdosage)
avec la touche «Next Comp». Si le composant a été surdosé, l’erreur sera automatiquement prise en considération
lors du versement des composants qui suivent.
5. Répéter les étapes 3 et 4, jusqu’à ce que tous les composants soient dosés. Confirmer le dernier composant avec
la touche «Last Comp».
6. La balance contrôle si certains composants doivent être redosés. Si oui: Redoser les composants affichés et
confirmer à chaque fois avec la touche «Next Comp».
Répéter cette étape, jusqu’à ce que tous les composants soient redosés.
Lorsque la formulation est clôturée, la balance affiche “done”, puis le poids final du mélange.
Exemple
Formulation constituée de: 1er composant 125 g, 2e composant 20 g, 3e composant 5 g
Aucun facteur, aucune tolérance sélectionnés. Le 2e composant est incorrectement dosé (22.0 g au lieu de 20.0 g)
“ADV ABS END”
Placer le récipient vide et tarer
“ADV CUM END”
8.8.8.8.0.0 g
8.8.8.8.0.0 g
adv
adv
cum
O/T
On/Off
Démarrer la formulation
*
Next
Comp
8.8.8.8.0.0 g
*
8.8.8.8.0.1 g
*
8.8.8.8.1.0 g
*
8.8.8.8.c.o.0.1.8.8.1.0.
corr adv
8.8.8.8.0.0 g
8.8.8.8.c.o.0.1.8.8.1.0. corr
adv
cum
Saisir chiffre par chiffre le poids cible
du 1er composant (125 g)
1er chiffre
+
Yes
Mode
Enter
*
8.8.8.8.c.o.0.1.8.8.1.0.
*
corr adv
8.8.8.8.c.o.0.1.8.8.1.0. corr
adv
8.8.8.8.0.1 g
8.8.8.8.c.o.0.1.8.8.1.0. corr
8.8.8.8.1.0 g
8.8.8.8.c.o.0.1.8.8.1.0. corr
adv
cum
adv
cum
Français
Action
Balance pour le mélange des couleurs Panda7, Panda7/X, Panda7/X2
68
Action
2e chiffre
“ADV ABS END”
+
Yes
Mode
Enter
3e chiffre
+
Yes
Mode
Enter
Confirmer le poids cible saisi
*
*
*
Mode
Enter
Verser le 2e composant
Français
*
8.8.8.1.2.5 g
*
8.8.1.2.5.0 g
*
8.-.1.2.5.0 g
*
8.-.1.2.0.0 g
*
8.-.1.2.0.0 g
*
8.-.-.2.0.0 g
*
8.-.-.2.0.0 g
*
8.-.-.2.2.0 g
*
8.8.8.8.c.o.0.1.8.8.1.0.
*
8.8.8.8.c.o.0.1.8.8.1.0.
*
8.8.8.8.c.o.0.1.8.8.1.0.
*
Next
Comp
Saisir chiffre par chiffre le poids cible du
2e composant 20 g (ABS)/145 g (CUM)
et confirmer (pour la procédure, voir 1er
composant)
8.8.8.1.2.0 g
8.8.8.8.c.o.0.1.8.8.1.0.
1.
Confirmer le dosage
*
8.8.8.8.c.o.0.1.8.8.1.0.
Mode
Enter
Verser le 1er composant
8.8.8.8.1.2 g
8.8.8.8.c.o.0.1.8.8.1.0.
*
8.8.8.8.c.o.0.28.8.1.0.
*
8.8.8.8.c.o.0.28.8.1.0.
*
8.8.8.8.c.o.0.28.8.1.0.
*
2.
“ADV CUM END”
8.8.8.8.c.o.0.28.8.1.0.
corr adv
8.8.8.8.1.2 g
8.8.8.8.c.o.0.1.8.8.1.0. corr
corr adv
8.8.8.1.2.0 g
8.8.8.8.c.o.0.1.8.8.1.0. corr
corr adv
8.8.8.1.2.5 g
8.8.8.8.c.o.0.1.8.8.1.0. corr
corr adv
8.8.1.2.5.0 g
8.8.8.8.c.o.0.1.8.8.1.0. corr
corr adv
8.-.1.2.5.0 g
8.8.8.8.c.o.0.1.8.8.1.0. corr
corr adv
8.-.1.2.0.0 g
8.8.8.8.c.o.0.1.8.8.1.0. corr
corr adv
8.-.1.2.0.0 g
8.8.8.8.c.o.0.28.8.1.0. corr
corr adv
8.-.1.4.5.0 g
8.8.8.8.c.o.0.28.8.1.0. corr
corr adv
8.-.-.2.0.0 g
8.8.8.8.c.o.0.28.8.1.0. corr
corr adv
8.-.-.2.2.0 g
8.8.8.8.c.o.0.28.8.1.0. corr
adv
cum
adv
cum
adv
cum
adv
cum
adv
cum
adv
cum
adv
cum
adv
cum
adv
cum
adv
cum
Le 2e composant est surdosé de 2 g
Confirmer le dosage
Next
Comp
*
8.-.-.2.0.0 g
8.8.8.8.c.o.0.38.8.1.0.
corr adv
*
8.-.-.2.0.0 g
8.8.8.8.c.o.0.38.8.1.0. corr
adv
cum
Balance pour le mélange des couleurs Panda7, Panda7/X, Panda7/X2
69
Action
“ADV ABS END”
Saisir chiffre par chiffre le poids cible du 3e
composant 5 g (ABS)/150 g (CUM) et
confirmer (pour la procédure, voir 1er composant)
*
8.-.-.2.5.0 g
*
8.-.-.-.5.0
*
8.-.-.2.0.0
*
8.8.8.8.c.o.0.38.8.1.0.
*
Mode
Enter
8.8.8.8.c.o.0.38.8.1.0.
Verser le 3e composant
*
8.8.8.8.c.o.0.38.8.1.0.
3.
“ADV CUM END”
corr adv
8.-.1.5.0.0 g
8.8.8.8.c.o.0.38.8.1.0. corr
corr adv
8.-.-.-.5.0
8.8.8.8.c.o.0.38.8.1.0. corr
corr adv
8.-.-.2.0.0
8.8.8.8.c.o.0.38.8.1.0. corr
adv
cum
adv
cum
adv
cum
Remarque: L’erreur commise lors du dosage du 2e composant est déjà
prise en compte lors du dosage du 3e composant. 5.5 g ont été
effectivement dosés, alors que la balance affichait 0.0.
Confirmer le (dernier) dosage
*
Last
Comp
*
8.-.-.1.2.5 g
8.8.8.8.c.o.0.18.8.1.0.
corr adv
8.-.-.1.2.5 g
8.8.8.8.c.o.0.18.8.1.0. corr
adv
cum
Remarque: Suite à l’erreur commise lors du dosage du 2e composant,
le 1er composant doit être redosé de 12.5 g.
*
Next
Comp
*
8.-.-.2.0.0 g
*
8.8.8.8.c.o.0.18.8.1.0.
1.
Confirmer le redosage
8.-.-.2.0.0 g
*
8.8.8.8.d.o.n.e8.8.8.8.
corr adv
corr adv
8.-.-.2.0.0 g
8.8.8.8.c.o.0.18.8.1.0. corr
8.-.-.2.0.0 g
8.8.8.8.d.o.n.e8.8.8.8. corr
adv
cum
Français
Redoser le 1er composant de 12.5 g
adv
cum
Le processus de formulation est clôturé. Le poids final du mélange est
affiché.
8.-.1.6.5.0 g
adv
8.-.1.6.5.0 g
adv
cum
Balance pour le mélange des couleurs Panda7, Panda7/X, Panda7/X2
70
5.6
Formulation avec “ADV ABS IMM” et “ADV CUM IMM”
Déroulement
1. Placer le récipient vide sur le plateau et effectuer le tarage.
2. Presser la touche «Next Comp» pour commencer la formulation.
3. Saisir chiffre par chiffre le poids cible du composant affiché (sélectionner le chiffre avec la touche «+» ou «–» et
confirmer les chiffres sélectionnés par une pression brève de la touche «Enter»). Confirmer le poids cible saisi par
une pression prolongée de la touche «Enter».
4. Doser le composant jusqu’à ce que l’affichage indique zéro et confirmer le dosage (même en cas de surdosage)
avec la touche «Next Comp». Si le composant a été surdosé, l’erreur sera automatiquement prise en considération
lors du versement des composants qui suivent.
5. Immédiatement après chaque composant, la balance contrôle si les composants préalablement dosés doivent être
redosés. Si oui: Redoser les composants affichés et confirmer à chaque fois avec la touche «Next Comp». Répéter
cette étape, jusqu’à ce que tous les composants soient redosés.
6. Répéter les étapes 3, 4 et 5, jusqu’à ce que tous les composants soient dosés. Confirmer le dernier composant avec
la touche «Last Comp».
Lorsque la formulation est clôturée, la balance affiche “done”, puis le poids final du mélange.
Exemple
Formulation constituée de: 1er composant 125 g, 2e composant 20 g, 3e composant 5 g
Aucun facteur, aucune tolérance sélectionnés. Le 2e composant est incorrectement dosé (22.0 g au lieu de 20.0 g)
Action
“ADV ABS IMM”
Français
Placer le récipient vide et tarer
“ADV CUM IMM”
8.8.8.8.0.0 g
imm
8.8.8.8.0.0 g
adv
imm
8.8.8.8.0.0 g
corr adv
imm
8.8.8.8.0.1 g
imm
O/T
On/Off
Démarrer la formulation
Next
Comp
*
imm
8.8.8.8.c.o.0.1.8.8.1.0.
*
8.8.8.8.0.0 g
8.8.8.8.c.o.0.1.8.8.1.0. corr
adv
cum
adv
cum
Saisir chiffre par chiffre le poids cible
du 1er composant (125 g)
1er chiffre
+
Yes
Mode
Enter
*
imm
*
8.8.8.8.c.o.0.1.8.8.1.0.
8.8.8.8.1.0 g
imm
*
corr adv
8.8.8.8.c.o.0.1.8.8.1.0. corr
*
adv
8.8.8.8.0.1 g
8.8.8.8.c.o.0.1.8.8.1.0. corr
8.8.8.8.1.0 g
imm
8.8.8.8.c.o.0.1.8.8.1.0. corr
adv
cum
adv
cum
Balance pour le mélange des couleurs Panda7, Panda7/X, Panda7/X2
71
2e chiffre
“ADV ABS IMM”
+
Yes
Mode
Enter
3e chiffre
+
Yes
Mode
Enter
Confirmer le poids cible saisi
Mode
Enter
Verser le 1er composant
1.
Confirmer le dosage
Next
Comp
Saisir chiffre par chiffre le poids cible du 2e
composant 20 g (ABS)/145 g (CUM) et
confirmer (pour la procédure, voir 1er composant)
Mode
Enter
*
imm
8.8.8.1.2.0 g
imm
8.8.8.1.2.5 g
imm
8.8.1.2.5.0 g
imm
8.-.1.2.5.0 g
imm
8.-.1.2.0.0 g
imm
8.-.1.2.0.0 g
imm
8.-.-.2.0.0 g
imm
8.-.-.2.0.0 g
imm
imm
*
imm
*
imm
*
imm
*
imm
*
imm
*
imm
*
imm
Verser le 2e composant
2.
*
*
8.8.8.8.1.2 g
imm
*
“ADV CUM IMM”
8.8.8.8.c.o.0.1.8.8.1.0.
8.8.8.8.c.o.0.1.8.8.1.0.
8.8.8.8.c.o.0.1.8.8.1.0.
8.8.8.8.c.o.0.1.8.8.1.0.
8.8.8.8.c.o.0.1.8.8.1.0.
8.8.8.8.c.o.0.1.8.8.1.0.
8.8.8.8.c.o.0.28.8.1.0.
8.8.8.8.c.o.0.28.8.1.0.
8.8.8.8.c.o.0.28.8.1.0.
corr adv
*
corr adv
*
corr adv
*
corr adv
*
corr adv
*
corr adv
*
corr adv
*
corr adv
*
corr adv
8.8.8.8.1.2 g
8.8.8.8.c.o.0.1.8.8.1.0. corr
8.8.8.1.2.0 g
8.8.8.8.c.o.0.1.8.8.1.0. corr
8.8.8.1.2.5 g
8.8.8.8.c.o.0.1.8.8.1.0. corr
8.8.1.2.5.0 g
8.8.8.8.c.o.0.1.8.8.1.0. corr
8.-.1.2.5.0 g
8.8.8.8.c.o.0.1.8.8.1.0. corr
8.-.1.2.0.0 g
8.8.8.8.c.o.0.1.8.8.1.0. corr
8.-.1.2.0.0
8.8.8.8.c.o.0.28.8.1.0. corr
8.-.1.4.5.0 g
8.8.8.8.c.o.0.28.8.1.0. corr
8.-.-.2.0.0 g
8.8.8.8.c.o.0.28.8.1.0. corr
8.-.-.2.2.0 g oz% *8.-.-.2.2.0 g
imm
8.8.8.8.c.o.0.28.8.1.0. corr
adv
cum
imm
8.8.8.8.c.o.0.28.8.1.0. corr
Le 2e composant est surdosé de 2 g
adv
cum
adv
cum
adv
cum
adv
cum
adv
cum
adv
cum
adv
cum
adv
cum
adv
cum
adv
cum
Français
Action
Balance pour le mélange des couleurs Panda7, Panda7/X, Panda7/X2
72
Action
“ADV ABS IMM”
Confirmer le dosage
*
8.-.-.1.2.5 g
imm
Next
Comp
“ADV CUM IMM”
8.8.8.8.c.o.0.18.8.1.0. corr
8.-.-.1.2.5Pg oz%
+*
adv
imm
fctr
cum
8.8.8.8.c.o.0.18.8.1.0. %corrtol adv
Remarque: Suite à l’erreur commise lors du dosage du 2e composant,
le 1er composant doit être redosé de 12.5 g.
Redoser le 1er composant de 12.5 g
1.
Confirmer le redosage
Next
Comp
Saisir chiffre par chiffre le poids cible du 3e
composant 5 g (ABS)/150 g (CUM) et
confirmer (pour la procédure, voir 1er composant)
Mode
Enter
Français
Verser le 3e composant
*
*
imm
8.-.-.2.0.0 g
imm
8.-.-.2.5.0 g
imm
8.-.-.-.5.0
imm
8.-.-.2.0.0
imm
imm
*
imm
*
imm
*
*
8.-.-.2.0.0 g
imm
imm
3.
8.8.8.8.c.o.0.18.8.1.0.
8.8.8.8.c.o.0.38.8.1.0.
8.8.8.8.c.o.0.38.8.1.0.
8.8.8.8.c.o.0.38.8.1.0.
8.8.8.8.c.o.0.38.8.1.0.
corr adv
*
corr adv
*
corr adv
*
corr adv
*
corr adv
8.-.-.2.0.0 g
8.8.8.8.c.o.0.18.8.1.0. corr
8.-.-.2.0.0 g
8.8.8.8.c.o.0.38.8.1.0. corr
8.-.1.5.0.0 g
8.8.8.8.c.o.0.38.8.1.0. corr
8.-.-.-.5.0
8.8.8.8.c.o.0.38.8.1.0. corr
8.-.-.2.0.0
8.8.8.8.c.o.0.38.8.1.0. corr
adv
cum
adv
cum
adv
cum
adv
cum
adv
cum
Remarque: L’erreur commise lors du dosage du 2e composant est déjà
prise en compte lors du dosage du 3e composant. 5.5 g ont été
effectivement dosés, alors que la balance affichait 0.0.
Confirmer le (dernier) dosage
Last
Comp
*
*
8.-.-.2.0.0
imm
8.8.8.8.d.o.n.e8.8.8.8.
corr adv
8.-.-.2.0.0
imm
8.8.8.8.d.o.n.e8.8.8.8. corr
adv
cum
Le processus de formulation est clôturé. Le poids final effectif du
mélange est affiché.
8.-.1.6.5.0 g
imm
adv
8.-.1.6.5.0 g
imm
adv
cum
Balance pour le mélange des couleurs Panda7, Panda7/X, Panda7/X2
73
6
Le Master Mode
Le Master Mode permet de modifier les paramétrages de la balance et d’activer les fonctions.
6.1
Appel du Master Mode
Unit
Menu
+
Yes
6.2
M.A.S.t.E.r
En mode pesage, maintenir pressée la touche «Menu» jusqu’à ce qu’apparaisse l’affichage ci-contre.
M.A.S.C.A.L
Dans un délai de 3 secondes, presser la touche «Yes» (sinon
la balance retourne en mode pesage). Ensuite apparaît le
premier bloc du menu du Master Mode.
Vue d’ensemble du menu du Master Mode
Affichage/Paramétrages
Fonction/Remarques
CAL
Etalonnage de la balance
(voir chapitre 6.3, non disponible pour les balances vérifiées)
SCALE
rESolu
0.1
0.05
Unit
g
oz
P
b.Light
On
Off
rEStAr
On
Off
VibrAt
MEd
HIGH
LOW
ProcES
UNIVEr
dOSING
rESEt
Std On
End SC
Paramétrages de la balance
Sélection de la résolution (non disponible pour les balances vérifiées)
”Full Range” 0 ... 7100 g / 0.1 g (paramétrage d’origine)
”Delta Range” 0 ... 999.95 g / 0.05 g, 1000 ... 7100 g / 0.1 g
Sélection de l’unité de poids (non disponible pour les balances vérifiées)
Gramme (paramétrage d’origine)
Once
Parts (1 Part = 1/32 oz)
Allumage/extinction de l’éclairage de l’affichage
activé (paramétrage d’origine)
désactivé
Activation/désactivation de la fonction de mémorisation automatique
(non disponible pour les balances vérifiées)
activée
désactivée (paramétrage d’origine)
Sélection de l’adaptateur de vibration
produits à peser normaux (paramétrage d’origine)
environnement instable
environnement très stable
Sélection de l’adaptateur de processus
produits à peser normaux
dosage, p. ex. de produits à peser liquides ou pulvérulents (paramétrage d’origine)
Réinitialisation de tous les paramétrages SCALE aux paramétrages d’origine
Avec «Yes» retour aux paramétrages d’origine, rejet avec «No»
Quitter le bloc “SCALE” avec «Yes»
Français
Utilisation du Master Mode: Confirmer l’option avec «Yes», rejeter l’option avec «No».
Balance pour le mélange des couleurs Panda7, Panda7/X, Panda7/X2
74
Affichage/Paramétrages
Fonction/Remarques
IFACE1 / IFACE2
ModE
dIALOG
2nd.dIS
PN
Print
CYCLE
Protok
HONOFF
NO
PAritY
7 EVEN
7 NO P
8 NO P
7 Odd
BAUd
300
Configuration interface(s)
Sélection du mode de fonctionnement
communication avec un ordinateur (paramétrage d’origine IFACE 1)
commande de l’affichage auxiliaire (paramétrage d’origine IFACE 2)
mode balance PM
communication avec une imprimante
impression de données en cas de modification de poids
Sélection du protocole
protocole Xon/Xoff (paramétrage d’origine)
pas de protocole
Sélection des bits et de la parité
7 bits de données avec parité paire
7 bits de données sans parité
8 bits de données sans parité (paramétrage d’origine)
7 bits de données avec parité impaire
Sélection de la vitesse de transmission de données
300, 600, 1200, 2400, 4800, 9600 (paramétrage d’origine),
19200 et 38400
Français
38400
Aut.Mod
AUt.SIR
NO
rESEt
Std On
EndIF1
Mode automatique
l’interface transmet en continu des données (paramétrage d’origine IFACE 1)
mode automatique désactivé (paramétrage d’origine IFACE 2)
Réinitialisation du paramétrage IFACE au paramétrage d’origine
Réinitialisation aux paramétrages d’origine avec «Yes», rejet avec «No»
Quitter le bloc “IFACE1” ou “IFACE2” avec «Yes»
LiSt
Impression des paramétrages du Master Mode avec «Yes»
End
Avec «Yes» quitter le Master Mode. Avec «Yes», confirmer la demande de confirmation“StorE?” pour mémoriser les paramétrages ou la rejeter avec «No».
6.3
+
Yes
Réglage/étalonnage de la balance (non disponible pour les balances vérifiées)
M.A.S.C.A.L
Appeler le Master Mode et sélectionner “CAL”.
M.A.7.0.0.0 kg
Décharger le plateau de la balance et presser ensuite la
touche «Yes» pour démarrer le processus d’étalonnage.
La balance affiche en clignotant le poids d’étalonnage (en
fonction de la charge nominale de la balance). Avec la touche
«No» d’autres poids détalonnage peuvent être sélectionnés.
+
Yes
Placer sur le plateau le poids d’étalonnage conformément à
l’affichage et confirmer avec «Yes».
Remarque: L’étalonnage peut être interrompu à tout moment
par une pression prolongée de la touche «On/Off».
Attendre que l’étalonnage se soit clôturé avec succès (cela est
confirmé sur l’affichage par “done”) et que la balance soit
retournée dans le mode pesage.
Balance pour le mélange des couleurs Panda7, Panda7/X, Panda7/X2
75
Messages d’erreur
Surcharge
{.|.|.|.|.}
adv
<.=.=.=.=.>
adv
------
adv
-.-.n.o.-.-
adv
{.|.n.o.|.}
adv
<.=.n.o.=.>
adv
E.r.r.6.
adv
E.r.r.5.3.
adv
Err
adv
Décharger la balance ou réduire la précharge.
Sous-charge
Placer le plateau sur la balance et s’assurer que celui-ci peut bouger librement.
Le résultat de pesée reste instable
1. Assurer un environnement stable
2. S’assurer que le plateau de la balance peut bouger librement
3. Modifier le paramétrage de l’adaptateur de vibration (chap. 6.2)
Fonction non exécutée
La fonction appelée n’a pas pu être exécutée.
Mise à zéro non possible (surcharge/sous-charge)
S’assurer que la mise à zéro ne soit pas exécutée en cas de surcharge ou de sous-charge.
Pas de réglage/d’étalonnage
N.o. . .C.a.L. .I.M.M.8.
Débrancher et rebrancher la fiche secteur. Si le message apparaît à nouveau, régler/
étalonner la balance (chapitre 6.3). En cas d’échec, contacter le revendeur ou l’agence.
Erreur de total de contrôle EAROM
Débrancher et rebrancher la fiche secteur. Si le message apparaît à nouveau, contacter le
revendeur ou l’agence.
Sous-tension
low voltage
La tension de sortie de l’adaptateur secteur est trop faible. Le remplacer par un adaptateur
ayant une tension de sortie correcte.
Précision d’affichage
* rESO?
corr adv
* ÑÖOre
corr adv
loco01ltage
Lors de la formulation, saisie de la valeur de consigne avec une résolution trop fine. Adapter
la valeur de la précision d’affichage de la balance (p. ex. si saisie 15.01 g pour une
précision d’affichage de 0.05 g).
Quantité de consigne non encore atteinte
loco01ltage
* Abort?
corr adv
loco01ltage
Quantité de consigne du composant non encore atteinte. Redoser jusqu’à ce que la quantité
de consigne soit atteinte.
Formulation annulée
Formulation annulée par une pression prolongée de la touche «Last Comp».
Français
7
Balance pour le mélange des couleurs Panda7, Panda7/X, Panda7/X2
76
8
Interfaces / Accessoires
8.1
Définition d’interfaces
En standard, la balance Panda7 est dotée d’une interface RS232C double et la Panda7/X et la Panda7/X2 d’une
interface RS232C single. L’interface/les interfaces sont disponibles via le connecteur Sub-D à 9 broches. La longueur
maximale de la ligne est de 15 m. La configuration des interfaces s’effectue dans le Master Mode (voir chapitre 6.2).
Interface(s) intégrée(s)
RS232C, Sub D à 9 broches, f
Brochage pour
Panda7
Brochage
nc
TxD 1
RxD 1
nc
GND
nc
RxD 2
TxD 2
VCC (5 V, ≤ 50 mA)
5
4
9
3
8
2
7
1
6
Broche 1
Broche 2
Broche 3
Broche 4
Broche 5
Broche 6
Broche 7
Broche 8
Broche 9
Brochage pour
Panda7/X
Panda7/X2
2 interfaces pour utilisation du câble Y
(accessoire), uniquement pour Panda7
COM1
COM2
nc
TxD 1
RxD 1
nc
GND
nc
nc
nc
nc
–––
TxD 1
RxD 1
–––
GND
–––
–––
–––
–––
–––
TxD 2
RxD 2
–––
GND
–––
–––
–––
VCC (5 V, ≤ 50 mA)
TxD: Transmission de données RxD: Réception de données
GND: Terre de signalisation
VCC: Alimentation (+5 V, ≤ 50 mA)
nc:
not connected (non raccordée)
Français
8.2
Accessoires
Accessoire
N° d’article
Housse de protection (ensemble de 5 pièces)
71153871
Câble Y
(Sub D à 9 broches, m, COM1/2 f)
21203892
COM1
1:1
PC
ME-00410024
ME-21203892
Câble vers
afficheur
COM1,2
+5V
Afficheur
auxiliaire
ou
COM2
+5V
Câble RS232 pour PC 1,8 m (Sub D à 9 broches, m/f, 1:1)
Câble spécial
pour imprimante
Imprimante
00410024
Balance pour le mélange des couleurs Panda7, Panda7/X, Panda7/X2
77
9
Caractéristiques techniques / Directives et normes d’essai
9.1
Caractéristiques techniques
Portée
7100 g
Précision d’affichage
Full Range: 0.1 g (0 ... 7100 g)
Delta Range: 0.05 g (0 ... 999.95 g), 0.1 g (1000 ... 7100 g)
Temps de stabilisation
env. 1.0 seconde
Linéarité
0.2 g
Alimentation électrique
via adaptateur secteur/unité d’alimentation15 VDC, 4 W
Unités de poids
g, oz et P (1 Part = 1/32 oz)
Afficheur
LCD (afficheur à cristaux liquides), rétroéclairé
Conditions ambiantes
Plage de température:+10 ... +30°C
Humidité relative de l’air:
20 ... 80% hr (sans condensation)
Poids net/brut
3.4 kg / 4.5 kg
Classe de surtension:
II
Degré d’encrassement:
2
330 mm
78 mm
65 mm
ø232 mm
29 mm
342 mm
Français
Dimensions
Balance pour le mélange des couleurs Panda7, Panda7/X, Panda7/X2
78
9.2
Directives et normes d’essai
Déclaration de conformité: gamme de balances Panda7
Nous, Mettler-Toledo (Changzhou) Scale & System Ltd. déclarons sous notre seule responsabilité, que les balances
modèle Panda7, auxquelles se rapporte cette déclaration, sont conformes aux directives CEE et normes suivantes.
Marque
Directive CEE
Contrôle selon la norme
73/23EEC Basse tension
EN61010-1: 2001
UL Std. No. 3101-1
CAN/CSA-22.2 No. 1010.1-92
C
US
89/336EEC EMC
EN61326-1 Emissions parasites classe B
EN61326-1 Immunité
AS/NZS2064.1/2, AS/NZS3548
AS/NZS4251.1, AS/NZS4252.1
[year]
[code]
1)
M
1)
90/384EEC 1)
Balances à
fonctionnement
non automatique
EN45501 1) Aspects métrologiques
ne s’applique qu’aux balances vérifiées (approbation/certificat de test numéro: R76/1992-NL1-03.10)
Français
Mettler-Toledo (Changzhou) Sacle & System Ltd.
111 Changxi Rd. Changzhou, Jiangsu 213001, PRC
Septembre 2005
David Zheng
President
Chu Jinlan
Quality Assurance Manager
Note importante concernant les balances vérifiées dans les pays de la CE
M
M
Les balances vérifiées sur le site de production portent la marque précédente sur l’emballage et un
autocollant vert “M” sur la plaque signalétique. Elles peuvent être immédiatement mises en service.
Les balances vérifiées en deux étapes et qui ne comportent pas de “M” vert sur la plaque signalétique,
portent la marque précédente sur l’étiquette de l’emballage. La seconde étape de la vérification doit être
exécutée par le service certifié Mettler-Toledo ou par les autorités compétentes pour les poids et mesures.
Vuillez contacter votre service après-vente Mettler-Toledo. La première étape de la vérification a été
exécutée dans l’usine de fabrication. Celle-ci inclut l’ensemble des tests conformément à EN455018.2.2.
Dans la mesure où la durée de validité de la vérification est limitée selon les prescriptions nationales dans les différents
pays, l’utilisateur d’une telle balance est lui-même responsable de la vérification ultérieure dans les délais.
Balance pour le mélange des couleurs Panda7, Panda7/X, Panda7/X2
79
USA
This equipment has been tested and found to comply with the limits for a Class A digital device, pursuant to both Part 15 of the FCC
Rules and the radio interference regulations of the Canadian Department of Communications. These limits are designed to provide
reasonable protection against harmful interference when the equipment is operated in a commercial environment. This equipment
generates, uses and can radiate radio frequency energy and, if not installed and used in accordance with the instruction manual, may
cause harmful interference to radio communications. Operation of this equipment in a residential area is likely to cause harmful
interference, in which case the user will be required to correct the interference at his own expense.
Canada
Français
ICES-001 Notice for Industrial, Scientific and Medical Radio Frequency Generators: This ISM apparatus meets all requirements of the
Canadian Interference-Causing Equipment Regulations. Please note that this requirement is only for generators which operate at over
10 kHz.
Avis de l’ICES-001, générateurs de radiofréquences dans le domaine industriel, scientifique et médical: Cet appareil ISM (industriel,
scientifique et médical) satisfait à toutes les exigences définies par la réglementation canadienne en matière d’équipements générant
des perturbations radioélectriques. Veuillez noter qu’il s’agit d’une exigence concernant uniquement les générateurs fonctionnant audelà de 10 kHz.
Balance pour le mélange des couleurs Panda7, Panda7/X, Panda7/X2
80
Déclaration de conformité: gamme de balances Panda7/X
Nous, Mettler-Toledo (Changzhou) Scale & System Ltd. déclarons sous notre seule responsabilité, que les balances
modèle Panda7/X, auxquelles se rapporte cette déclaration, sont conformes aux directives CEE et normes suivantes.
Marque
Directive CEE
Contrôle selon la norme
94/9/EEC (ATEX)
EN50014, EN50020
0032
FMRC 3600, 3610, 3810
FM
APPROVED
CSA-C22.2 No. 157-92
CSA-C22.2 No. 142-M 1987
ia
73/23EEC Basse tension
EN61010-1
89/336EEC EMC
EN61326-1 Emissions parasites classe B
EN61326-1 Immunité
0032
0032
AS/NZS2064.1/2, AS/NZS3548
AS/NZS4251.1, AS/NZS4252.1
Mettler-Toledo (Changzhou) Sacle & System Ltd.
111 Changxi Rd. Changzhou, Jiangsu 213001, PRC
Septembre 2005
Français
David Zheng
President
Chu Jinlan
Quality Assurance Manager
USA
This equipment has been tested and found to comply with the limits for a Class A digital device, pursuant to both Part 15 of the FCC
Rules and the radio interference regulations of the Canadian Department of Communications. These limits are designed to provide
reasonable protection against harmful interference when the equipment is operated in a commercial environment. This equipment
generates, uses and can radiate radio frequency energy and, if not installed and used in accordance with the instruction manual, may
cause harmful interference to radio communications. Operation of this equipment in a residential area is likely to cause harmful
interference, in which case the user will be required to correct the interference at his own expense.
Canada
ICES-001 Notice for Industrial, Scientific and Medical Radio Frequency Generators: This ISM apparatus meets all requirements of the
Canadian Interference-Causing Equipment Regulations. Please note that this requirement is only for generators which operate at over
10 kHz.
Avis de l’ICES-001, générateurs de radiofréquences dans le domaine industriel, scientifique et médical: Cet appareil ISM (industriel,
scientifique et médical) satisfait à toutes les exigences définies par la réglementation canadienne en matière d’équipements générant
des perturbations radioélectriques. Veuillez noter qu’il s’agit d’une exigence concernant uniquement les générateurs fonctionnant audelà de 10 kHz.
Balance pour le mélange des couleurs Panda7, Panda7/X, Panda7/X2
81
Déclaration de conformité: gamme de balances Panda7/X2
Nous, Mettler-Toledo (Changzhou) Scale & System Ltd. déclarons sous notre seule responsabilité, que les balances
modèle Panda7/X2, auxquelles se rapporte cette déclaration, sont conformes aux directives CEE et normes suivantes.
Marque
Directive CEE
Contrôle selon la norme
94/9/EEC (ATEX)
EN50014, EN50020
73/23EEC Basse tension
EN61010-1
89/336EEC EMC
EN61326-1 Emissions parasites classe B
EN61326-1 Immunité
0032
0032
0032
AS/NZS2064.1/2, AS/NZS3548
AS/NZS4251.1, AS/NZS4252.1
Mettler-Toledo (Changzhou) Sacle & System Ltd.
111 Changxi Rd. Changzhou, Jiangsu 213001, PRC
Septembre 2005
David Zheng
President
Chu Jinlan
Quality Assurance Manager
This equipment has been tested and found to comply with the limits for a Class A digital device, pursuant to both Part 15 of the FCC
Rules and the radio interference regulations of the Canadian Department of Communications. These limits are designed to provide
reasonable protection against harmful interference when the equipment is operated in a commercial environment. This equipment
generates, uses and can radiate radio frequency energy and, if not installed and used in accordance with the instruction manual, may
cause harmful interference to radio communications. Operation of this equipment in a residential area is likely to cause harmful
interference, in which case the user will be required to correct the interference at his own expense.
Canada
ICES-001 Notice for Industrial, Scientific and Medical Radio Frequency Generators: This ISM apparatus meets all requirements of the
Canadian Interference-Causing Equipment Regulations. Please note that this requirement is only for generators which operate at over
10 kHz.
Avis de l’ICES-001, générateurs de radiofréquences dans le domaine industriel, scientifique et médical: Cet appareil ISM (industriel,
scientifique et médical) satisfait à toutes les exigences définies par la réglementation canadienne en matière d’équipements générant
des perturbations radioélectriques. Veuillez noter qu’il s’agit d’une exigence concernant uniquement les générateurs fonctionnant audelà de 10 kHz.
Français
USA
Balance pour le mélange des couleurs Panda7, Panda7/X, Panda7/X2
Français
82
Balanza para mezcla de colores Panda7, Panda7/X, Panda7/X2
83
1
Introducción
1.1
Generalidades
Le agradecemos su adquisición de una balanza para mezcla de colores Panda7 o de una de sus variantes para
atmósferas explosivas, Panda7/X (Zona 1) o Panda7/X2 (Zona 2). Las balanzas Panda7, Panda7/X y Panda7/
X2 permiten pesar componentes con una relación de mezclas previamente fijada. La balanza incorpora diversos
modos de corrección para compensar los posibles errores en el pesaje de los componentes. Con el interface RS232
integrado, la balanza se conecta a una impresora, un ordenador o a una pantalla auxiliar.
Lea con atención las instrucciones de manejo y siga las recomendaciones allí contenidas.
Seguridad y medio ambiente
– Utilice la balanza Panda7 en entornos no expuestos a explosiones (con mezclas explosivas de
gases, vapores, niebla y polvo).
Para sectores expuestos a explosiones debe utilizar una balanza modelo Panda7/X (Zona 1) o
Panda7/X2 (Zona 2), que debe conectarse a la red de alimentación obligatoriamente mediante
una fuente de alimentación certificada PANDA-EX1P o un adaptador de red certificado PS-EX2P
de METTLER TOLEDO. Siga estrictamente las indicaciones de instalación de la fuente de alimentación/del adaptador de red. Debido al peligro que suponen las cargas electroestáticas en zonas
explosivas sólo es posible utilizar fundas protectoras realizadas con material antiestático.
– Conecte la balanza a la red de alimentación solo con el adaptador de red (Panda7) suministrada
o, en su caso, con la fuente de alimentación certificada PANDA-EX1P (Panda7/X) o el adaptador
de red certificado PS-EX2P (Panda7/X2). Cerciórese de que el valor de tensión impreso coincide
con la tensión de red local. Compruebe con regularidad los cables del adaptador de red/fuente de
alimentación. Si se dañan los cables o el adaptador de red/fuente de alimentación, no ponga en
marcha la balanza.
– Utilice únicamente accesorios y periféricos recomendados.
– Recuerde que la balanza es un instrumento de precisión. Trátela con cuidado. Evite darle golpes
o colocar obre ella cargas más pesadas que las permitidas.
– ¡Desenchufe siempre la balanza antes de limpiarla!
Limpieza: utilice un paño húmedo (evite los ácidos, los detergentes y los disolventes). Si está muy
sucia, retire primero el platillo, la funda protectora (si la hay) y las patas regulables (sólo en
balanzas verificadas) y límpielos por separado. Respete la normativa específica de la marca
referente a los intervalos de limpieza y los productos admisibles.
– De conformidad con las exigencias de la directiva europea 2002/96 CE sobre residuos de aparatos
eléctricos y electrónicos (RAEE), este equipo no puede eliminarse como basura doméstica.
Esta prohibición es asimismo válida para los países que no pertenecen a la UE cuyas normativas
nacionales en vigor así lo reflejan.
Elimine este producto, según las disposiciones locales, mediante el sistema de recogida selectiva
de aparatos eléctricos y electrónicos.
Si tiene alguna pregunta al respecto, diríjase a las autoridades responsables o al distribuidor que
le proporcionó el equipo.
Si transfiere este equipo (por ejemplo, para la continuación de su uso con fines privados, comerciales o industriales), deberá transferir con él esta disposición.
Muchas gracias por su contribución a la conservación medioambiental.
Español
1.2
Balanza para mezcla de colores Panda7, Panda7/X, Panda7/X2
84
1.3
Indicaciones para modelos verificados
En los modelos verificados las siguientes funciones están desactivadas:
– Formulación (pesaje factorial y formulación con corrección)
– Modificación de la unidad de pesada (la unidad de pesada en balanzas verificadas está ajustada por defecto en “g”)
Español
– Calibración (los modelos verificados deben ser calibrados por un centro de servicio postventa autorizado por
METTLER TOLEDO)
Balanza para mezcla de colores Panda7, Panda7/X, Panda7/X2
85
2
Puesta en marcha
2.1
Montaje de la balanza
Extraiga el módulo de indicación y el módulo de pesada
del embalaje.
Fije el módulo de indicación en el módulo de pesada con
el tornillo M6x20 facilitado (vea ilustración).
2.2
Colocación y orientación de la balanza
Elija una posición estable, libre de
vibraciones y lo más horizontal posible.
No utilice nunca un martillo para cerrar
los botes de pintura que están depositados sobre el platillo.
Evite los cambios de temperatura y los
rayos solares directos. Atención a las
condiciones ambientales admisibles.
Evite las corrientes (p. ej. de ventiladores o climatizadores).
Sólo balanzas verificadas: oriente la balanza horizontalmente girando las patas regulables.
La burbuja de aire debe situarse dentro del círculo interior.
Advertencia: las balanzas verificadas deben ser ajustadas en su lugar de montaje por el
servicio postventa autorizado de METTLER TOLEDO.
Traslados importantes
Recomendamos que calibre su balanza la primera vez que la ponga en marcha (ver capitulo 6.3). Las balanzas
verificadas están sujetas a las normas nacionales y se verifican en su lugar de emplazamiento.
Español
¡La colocación correcta facilita en gran medida la exactitud de los resultados de pesada!
Balanza para mezcla de colores Panda7, Panda7/X, Panda7/X2
86
2.3
Conexión a la alimentación eléctrica
Panda7/X y Panda7/X2 para sectores expuestos a explosiones: las balanzas del modelo Panda7/X solo pueden
conectarse a la red de alimentación mediante una fuente de alimentación certificada PANDA-EX1P y las balanzas
del modelo Panda7/X2, solo mediante un adaptador de red certificado PS-EX2P. Observe y cumpla sin falta, por
tanto, las indicaciones de las instrucciones de instalación individuales del adaptador de alimentación PANDA-EX1P
y de la fuente de alimentación PS-EX2P.
(2)
¡Atención! Las balanzas del modelo Panda7 solo pueden conectarse a un circuito eléctrico con energía
limitada por baja tensión de seguridad.
Por tanto, conecte su balanza a la red de alimentación
exclusivamente con el adaptador de red suministrada.
¡Atención! Antes de conectar el adaptador a la red,
compruebe si el valor de tensión impreso coincide con la
tensión de red local.
(1)
¡Importante! En primer lugar, una el adaptador de red al
conector de la balanza (1). A continuación, introduzca
la clavija del adaptador de red en el enchufe (2).
Español
La balanza realiza entonces una prueba de indicación,
donde se muestran brevemente todos los segmentos y la
versión de software. La balanza está lista para funcionar
cuando aparece en el indicador de cero.
Balanza para mezcla de colores Panda7, Panda7/X, Panda7/X2
87
3
Funciones de teclas
Teclas
Función con
Pulsación breve
Pulsación prolongada
Tarar balanza **
Conectar y desconectar balanza **
Seleccionar factor de conversión, para pesar
una cantidad mayor o menor de una fórmula
Reponer factor de conversión a “1” (Pesada
sin factor)
Modificar unidad de pesada
Acceso a Master Mode **
(ver capítulo 6.1)
Next
Comp
Confirmar peso final de un componente
pesado y continuar con el componente
siguiente
––––
Last
Comp
Confirmar el peso final del último componente pesado de una fórmula
Cancelar el proceso de formulación
Seleccionar método de formulación o tolerancia
Confirmar método de formulación o tolerancia
seleccionados
Modo de formulación avanzado
Introducir siguiente cifra del peso final
Modo de formulación avanzado
Confirmar peso final introducido
O/T
On/Off
Unit
Menu
Mode
Enter
+
Yes
Función dependiente del modo de trabajo seleccionado
Master Mode
Master Mode **
––––
Confirmar ajuste actual
Modo de formulación avanzado
Aumentar valor teórico del componente
–
No
Modo de formulación avanzado
––––
Función dependiente del modo de trabajo seleccionado
Master Mode **
Desechar ajuste actual
Master Mode
––––
Modo de formulación avanzado
Reducir valor teórico del componente
Modo de formulación avanzado
Volver a la última cifra
** Las balanzas verificadas sólo tienen activadas las siguientes teclas
Español
Factor
Balanza para mezcla de colores Panda7, Panda7/X, Panda7/X2
88
Bloquear teclado
Para bloquear el teclado, pulse simultáneamente las teclas «O/T» y «+» durante al menos 2 segundos. Así quedarán
bloqueadas todas las teclas excepto «O/T». Si la balanza dispone de pantalla, aparecerá brevemente en ella la leyenda
“key locked”. Este mensaje también aparecerá si pulsa alguna tecla con el teclado bloqueado.
Desbloquear teclado
Para desbloquear el teclado, pulse simultáneamente las teclas «O/T» y «–» durante al menos 2 segundos. Si la
balanza dispone de pantalla, aparecerá brevemente en ella el mensaje “key unlocked”.
Configurar la balanza según la configuración estándar de la PS7001
Para operar su balanza Panda7 con la configuración de una balanza PS7001, pulse simultáneamente las teclas
«Unit» y «Last Comp» durante al menos 2 segundos. Si la balanza dispone de pantalla, aparecerá brevemente en
ella el mensaje “PS7001-F”. A continuación, la balanza funcionará con la misma configuración estándar que una
balanza PS7001.
Advertencia: puede volver a cambiar en cualquier momento la configuración de la balanza (cap. 6 “Master Mode”)
o devolverla a la configuración de fábrica (consulte el párrafo siguiente).
Español
Devolver la balanza a la configuración de fábrica
Para devolver la balanza a la configuración de fábrica, pulse simultáneamente las teclas «Unit» y «–» durante al
menos 2 segundos. Si la balanza dispone de pantalla, aparecerá brevemente en ella el mensaje “factory set”. La
balanza quedará de nuevo según la configuración de fábrica.
Balanza para mezcla de colores Panda7, Panda7/X, Panda7/X2
89
4
Pesaje
4.1
Conexión/Desconexión y selección de la unidad de pesada
Conexión/Desconexión
O/T
On/Off
La balanza se conecta y desconecta con la pulsación prolongada de la tecla «On/Off». Una vez
conectada, la balanza realiza una prueba de indicación. Cuando aparece el indicador de peso,
la balanza se pone a cero y ya está lista para funcionar.
Selección de la unidad de pesada (no disponible en balanzas verificadas)
Cambie de unidad de pesada “g” (gramo) a “oz” (onza) y “P” (piezas) con la pulsación breve
de la tecla «Unit».
Unit
Menu
4.2
Pesadas sencillas
Deposite el recipiente de pesada.
Para tarar, pulse brevemente la tecla «O/T». Verá enseguida el indicador de
cero.
O/T
On/Off
Español
Añada la cantidad deseada de producto.
C.o.1.5.0.0
Espere a que se apague el control de estabilidad (símbolo anular en pantalla)
y anote el resultado de pesada.
g
adv
Balanza para mezcla de colores Panda7, Panda7/X, Panda7/X2
90
5
Formulación
Atención: En las balanzas verificadas las funciones de formulación están desactivadas (pesaje factorial, formulación con corrección).
5.1
Selección del factor
Seleccione un factor (multiplicador) para medir una cantidad mayor o menor de una fórmula predeterminada.
Factor
*
C.o.r.r.0.0
fctr
*
Factor
0.5.0. .C.U.M. .I.M.M.8.
C.o.r.r.0.0
fctr
5.0.0. .C.U.M. .I.M.M.8.
adv
Active el pesaje con factor con la pulsación breve de la tecla
«Factor». En la parte inferior izquierda de la pantalla aparece
el factor utilizado en la última pesada con multiplicador (p.
ej. 0,50).
A continuación pulse varias veces la tecla «Factor», hasta
que aparezca el factor deseado (0,20 ... 5,00).
adv
En la pesada siguiente se utiliza el peso final (p. ej. 1.000 g)
de un componente según la fórmula. No obstante, dependiendo del factor seleccionado, el peso efectivo corresponde
a una cantidad mayor o menor.
Ejemplo 1: peso según fórmula de 1.000 g, factor seleccionado 0,50 (para media cantidad). Indicador: 1.000, peso
efectivo: 500 g
Español
Ejemplo 2: peso según fórmula de 1.000 g, factor seleccionado 3,00 (para un tercio de la cantidad). Indicador: 1.000,
peso efectivo: 3.000 g
Factor
C.o.r.r.0.0 g
adv
Desactivar pesaje con factor: desactivar con pulsación prolongada de la tecla «Factor».
El indicador del factor desaparece y el factor se repone a 1.
Balanza para mezcla de colores Panda7, Panda7/X, Panda7/X2
91
5.2
Métodos de formulación
La Panda7 ofrece diversos métodos de formulación. Cada método se compone de:
ADV
– Modo de formulación avanzada “ADV
ADV”:
En este modo se introduce primero el peso final de un componente. Luego se pesa y se confirma el componente.
Los posibles errores de pesaje se subsanan automáticamente cuando se pesan los componentes siguientes.
– Tipo de indicación:
ABS
– Indicador absoluto “ABS
ABS”: indicador del peso absoluto de un componente.
CUM
– Indicador acumulativo “CUM
CUM”: indicador del peso acumulativo.
– Modo de corrección:
IMM
– Corrección “IMM
IMM”: corrección inmediata después de cada pesada incorrecta de un componente
END
– Corrección “END
END”: corrección al final de la formulación
Por combinación resultan 4 métodos de formulación distintos:
Modo de formulación
Avanzado
ADV ABS END –> Cap. 5.5
X
ADV CUM END –> Cap. 5.5
X
ADV ABS IMM –> Cap. 5.6
X
ADV CUM IMM –> Cap. 5.6
X
Tipo de indicación
Absoluto Acumulativo
Método de corrección
Inmediato
Al final
X
X
X
X
X
X
X
X
Español
Método de formulación
Balanza para mezcla de colores Panda7, Panda7/X, Panda7/X2
92
5.3
Mode
Enter
Mode
Enter
Mode
Enter
Mode
Enter
Selección del método de formulación
C.o.r.r.0.?
Pulse brevemente la tecla «Mode». En la pantalla aparece el
último método de formulación seleccionado (configuración
de fábrica: “ADV ABS END”).
C.o.r.r.0.?
De nuevo, pulse brevemente la tecla «Mode» y seleccione el
método de formulación deseado (p. ej. “ADV CUM END”).
.t.o.l.0.?
Para confirmar el método de formulación seleccionado,
pulsación prolongada de la tecla «Mode».
La pantalla de selección de la tolerancia aparece. En caso de
tolerancia rebasada, corrija cada uno de los componentes.
ADV. .A.B.S. .E.N.D.8.
A.D.V. .CUM .E.N.D.8.
A.D.V. .A.B.S. .E.1.1.0. % tol
.t.o.l.0.?
A.D.V. .A.B.S. .E.1.1.5. % tol
adv
adv
Mode
Enter
De nuevo, pulse brevemente la tecla «Mode» para seleccionar la tolerancia más/menos deseada en % (no, 0,5 ...
15,0).
Advertencia: “no” significa tolerancia de cero.
Confirme la tolerancia (p. ej. 1,5%) con pulsación prolongada de la tecla «Mode». La balanza está lista para la formulación.
Advertencia: el método de formulación seleccionado permanece activado hasta que se selecciona otro distinto.
Español
5.4
Indicaciones para la formulación
Last
Comp
Last
Comp
Mode :ADV ABS END
Components:
co01
target: 100.0 g
true : 110.0 g
co02
target: 20.0 g
true : 22.0 g
co03
target: 5.0 g
true : 5.5 g
Cancelar formulación
Es posible cancelar la formulación en cualquier momento mediante pulsación prolongada de la tecla «Last Comp».
Imprimir informe de formulación
Si su balanza está conectada a una impresora, al terminar la formulación
puede imprimir el informe mediante pulsación prolongada de la tecla «Last
Comp».
Balanza para mezcla de colores Panda7, Panda7/X, Panda7/X2
93
5.5
Formulación con “ADV ABS END” y “ADV CUM END”
Procedimiento
1. Deposite el recipiente vacío y tárelo.
2. Pulse la tecla «Next Comp» para iniciar la formulación.
3. Introduzca cifra por cifra el peso final del componente indicado (elija la cifra con «+» y «–» y confirme con una
pulsación breve de la tecla «Enter»). Confirme el peso final introducido con una pulsación prolongada de la tecla
«Enter».
4. Dosifique hasta cero el componente (también por sobrellenado) y confirme la pesada inicial con la tecla
«Next Comp». En caso de sobrellenado de componente, el error se subsana automáticamente cuando se añaden
los siguientes componentes.
5. Repita los pasos 3 y 4 hasta haber pesado la totalidad de los componentes. Confirme el último componente con
la tecla «Last Comp».
6. La balanza verifica si es preciso redosificar algún componente. En caso afirmativo: redosifique los componentes
indicados y confirme cada vez con la tecla «Next Comp».
Repita este paso hasta haber redosificado la totalidad de los componentes.
Al terminar la formulación, la balanza muestra en pantalla “done” y después el peso definitivo de la mezcla.
Ejemplo
Fórmula consistente en: 1er componente 125 g, 2º componente 20 g, 3er componente 5 g
Ningún factor y ninguna tolerancia seleccionados. El 2º componente se pesa mal (22,0 g en lugar de 20,0 g)
Acción
“ADV ABS END”
Depositar y tarar el recipiente vacío
“ADV CUM END”
8.8.8.8.0.0 g
8.8.8.8.0.0 g
adv
adv
cum
Iniciar la formulación
*
Next
Comp
8.8.8.8.0.0 g
*
8.8.8.8.0.1 g
*
8.8.8.8.1.0 g
*
8.8.8.8.c.o.0.1.8.8.1.0.
corr adv
8.8.8.8.0.0 g
8.8.8.8.c.o.0.1.8.8.1.0. corr
adv
cum
Introducir cifra por cifra el peso final del
1er componente (125 g)
1ª cifra
+
Yes
Mode
Enter
*
8.8.8.8.c.o.0.1.8.8.1.0.
*
8.8.8.8.c.o.0.1.8.8.1.0.
corr adv
corr adv
8.8.8.8.0.1 g
8.8.8.8.c.o.0.1.8.8.1.0. corr
8.8.8.8.1.0 g
8.8.8.8.c.o.0.1.8.8.1.0. corr
adv
cum
adv
cum
Español
O/T
On/Off
Balanza para mezcla de colores Panda7, Panda7/X, Panda7/X2
94
Acción
2ª cifra
“ADV ABS END”
+
Yes
Mode
Enter
3ª cifra
+
Yes
Mode
Enter
Confirmar el peso final introducido
*
*
*
Español
Mode
Enter
Añadir 2º componente
*
8.8.8.1.2.5 g
*
8.8.1.2.5.0 g
*
8.-.1.2.5.0 g
*
8.-.1.2.0.0 g
*
8.-.1.2.0.0 g
*
8.-.-.2.0.0 g
*
8.-.-.2.0.0 g
*
8.-.-.2.2.0 g
*
8.8.8.8.c.o.0.1.8.8.1.0.
*
8.8.8.8.c.o.0.1.8.8.1.0.
*
8.8.8.8.c.o.0.1.8.8.1.0.
*
Next
Comp
Introducir cifra por cifra el peso final del 2ª
componente 20 g (ABS)/145 g (CUM) y
confirmar (proceso, ver 1er componente)
8.8.8.1.2.0 g
8.8.8.8.c.o.0.1.8.8.1.0.
1.
Confirmar la pesada
*
8.8.8.8.c.o.0.1.8.8.1.0.
Mode
Enter
Añadir el 1er componente
8.8.8.8.1.2 g
8.8.8.8.c.o.0.1.8.8.1.0.
*
8.8.8.8.c.o.0.28.8.1.0.
*
8.8.8.8.c.o.0.28.8.1.0.
*
8.8.8.8.c.o.0.28.8.1.0.
*
8.8.8.8.c.o.0.28.8.1.0.
2.
“ADV CUM END”
corr adv
8.8.8.8.1.2 g
8.8.8.8.c.o.0.1.8.8.1.0. corr
corr adv
8.8.8.1.2.0 g
8.8.8.8.c.o.0.1.8.8.1.0. corr
corr adv
8.8.8.1.2.5 g
8.8.8.8.c.o.0.1.8.8.1.0. corr
corr adv
8.8.1.2.5.0 g
8.8.8.8.c.o.0.1.8.8.1.0. corr
corr adv
8.-.1.2.5.0 g
8.8.8.8.c.o.0.1.8.8.1.0. corr
corr adv
8.-.1.2.0.0 g
8.8.8.8.c.o.0.1.8.8.1.0. corr
corr adv
8.-.1.2.0.0 g
8.8.8.8.c.o.0.28.8.1.0. corr
corr adv
8.-.1.4.5.0 g
8.8.8.8.c.o.0.28.8.1.0. corr
corr adv
8.-.-.2.0.0 g
8.8.8.8.c.o.0.28.8.1.0. corr
corr adv
8.-.-.2.2.0 g
8.8.8.8.c.o.0.28.8.1.0. corr
adv
cum
adv
cum
adv
cum
adv
cum
adv
cum
adv
cum
adv
cum
adv
cum
adv
cum
adv
cum
Sobrellenado del 2º componente en 2 g
Confirmar la pesada
Next
Comp
*
8.-.-.2.0.0 g
8.8.8.8.c.o.0.38.8.1.0.
corr adv
*
8.-.-.2.0.0 g
8.8.8.8.c.o.0.38.8.1.0. corr
adv
cum
Balanza para mezcla de colores Panda7, Panda7/X, Panda7/X2
95
Acción
“ADV ABS END”
Introducir cifra por cifra el peso final del 3er
componente 5 g (ABS)/150 g (CUM) y
confirmar (proceso, ver 1er. componente)
*
8.-.-.2.5.0 g
*
8.-.-.-.5.0
*
8.-.-.2.0.0
*
8.8.8.8.c.o.0.38.8.1.0.
*
Mode
Enter
8.8.8.8.c.o.0.38.8.1.0.
Añadir 3er componente
*
8.8.8.8.c.o.0.38.8.1.0.
3.
“ADV CUM END”
corr adv
8.-.1.5.0.0 g
8.8.8.8.c.o.0.38.8.1.0. corr
corr adv
8.-.-.-.5.0
8.8.8.8.c.o.0.38.8.1.0. corr
corr adv
8.-.-.2.0.0
8.8.8.8.c.o.0.38.8.1.0. corr
adv
cum
adv
cum
adv
cum
Advertencia: el error en la pesada del 2º componente se subsana al
pesar el 3er componente. El peso efectivo es de 5,5 g cuando el
indicador está en 0,0.
Confirmar la (última) pesada
*
Last
Comp
*
8.-.-.1.2.5 g
8.8.8.8.c.o.0.18.8.1.0.
corr adv
8.-.-.1.2.5 g
8.8.8.8.c.o.0.18.8.1.0. corr
adv
cum
Advertencia: el 1er componente debe redosificarse en 12,5 g debido al
error en la pesada del 2º componente.
*
Next
Comp
*
8.-.-.2.0.0 g
*
8.8.8.8.c.o.0.18.8.1.0.
1.
Confirmar la redosificación
8.-.-.2.0.0 g
*
8.8.8.8.d.o.n.e8.8.8.8.
corr adv
corr adv
8.-.-.2.0.0 g
8.8.8.8.c.o.0.18.8.1.0. corr
8.-.-.2.0.0 g
8.8.8.8.d.o.n.e8.8.8.8. corr
adv
cum
adv
cum
Fin del proceso de formulación. En pantalla aparece el peso definitivo
de la mezcla.
8.-.1.6.5.0 g
adv
8.-.1.6.5.0 g
adv
cum
Español
Redosificar el 1er componente en 12,5 g
Balanza para mezcla de colores Panda7, Panda7/X, Panda7/X2
96
5.6
Formulación con “ADV ABS IMM” y “ADV CUM IMM”
Procedimiento
1. Deposite el recipiente vacío y tárelo.
2. Pulse la tecla «Next Comp» para iniciar la formulación.
3. Introduzca cifra por cifra el peso final del componente indicado (elija la cifra con «+» y «–» y confirme con una
pulsación breve de la tecla «Enter»). Confirme el peso final introducido con una pulsación prolongada de la tecla
«Enter».
4. Dosifique hasta cero el componente (también por sobrellenado) y confirme la pesada inicial con la tecla
«Next Comp». En caso de sobrellenado de componente, el error se subsana automáticamente cuando se añaden
los siguientes componentes.
5. La balanza verifica inmediatamente después de cada componente si es preciso redosificar los componentes
pesados hasta el momento. En caso afirmativo: redosifique los componentes indicados y confirme cada vez con
la tecla «Next Comp». Repita este paso hasta haber dosificado la totalidad de los componentes.
6. Repita los pasos 3, 4 y 5 hasta haber pesado la totalidad de los componentes. Confirme el último componente con
la tecla «Last Comp».
Al terminar la formulación, la balanza muestra en pantalla “done” y después el peso definitivo de la mezcla.
Ejemplo
Fórmula consistente en: 1er componente 125 g, 2º componente 20 g, 3er componente 5 g
Ningún factor y ninguna tolerancia seleccionados. El 2º componente se pesa mal (22,0 g en lugar de 20,0 g)
Acción
“ADV ABS IMM”
Depositar y tarar el recipiente vacío
“ADV CUM IMM”
8.8.8.8.0.0 g
imm
8.8.8.8.0.0 g
adv
imm
8.8.8.8.0.0 g
corr adv
imm
8.8.8.8.0.1 g
imm
Español
O/T
On/Off
Iniciar la formulación
Next
Comp
*
imm
8.8.8.8.c.o.0.1.8.8.1.0.
*
8.8.8.8.0.0 g
8.8.8.8.c.o.0.1.8.8.1.0. corr
adv
cum
adv
cum
Introducir cifra por cifra el peso final del 1er
componente (125 g)
1ª cifra
+
Yes
Mode
Enter
*
imm
*
8.8.8.8.c.o.0.1.8.8.1.0.
8.8.8.8.1.0 g
imm
*
corr adv
8.8.8.8.c.o.0.1.8.8.1.0. corr
*
adv
8.8.8.8.0.1 g
8.8.8.8.c.o.0.1.8.8.1.0. corr
8.8.8.8.1.0 g
imm
8.8.8.8.c.o.0.1.8.8.1.0. corr
adv
cum
adv
cum
Balanza para mezcla de colores Panda7, Panda7/X, Panda7/X2
97
2ª cifra
“ADV ABS IMM”
+
Yes
Mode
Enter
3ª cifra
+
Yes
Mode
Enter
Confirmar el peso final introducido
Mode
Enter
Añadir el 1er componente
1.
Confirmar la pesada
Next
Comp
Introducir cifra por cifra el peso final del 2º
componente 20 g (ABS)/145 g (CUM) y
confirme (proceso, ver 1er componente)
Mode
Enter
*
imm
8.8.8.1.2.0 g
imm
8.8.8.1.2.5 g
imm
8.8.1.2.5.0 g
imm
8.-.1.2.5.0 g
imm
8.-.1.2.0.0 g
imm
8.-.1.2.0.0 g
imm
8.-.-.2.0.0 g
imm
8.-.-.2.0.0 g
imm
imm
*
imm
*
imm
*
imm
*
imm
*
imm
*
imm
*
imm
Añadir el 2º componente
2.
*
*
8.8.8.8.1.2 g
imm
*
“ADV CUM IMM”
8.8.8.8.c.o.0.1.8.8.1.0.
8.8.8.8.c.o.0.1.8.8.1.0.
8.8.8.8.c.o.0.1.8.8.1.0.
8.8.8.8.c.o.0.1.8.8.1.0.
8.8.8.8.c.o.0.1.8.8.1.0.
8.8.8.8.c.o.0.1.8.8.1.0.
8.8.8.8.c.o.0.28.8.1.0.
8.8.8.8.c.o.0.28.8.1.0.
8.8.8.8.c.o.0.28.8.1.0.
corr adv
*
corr adv
*
corr adv
*
corr adv
*
corr adv
*
corr adv
*
corr adv
*
corr adv
*
corr adv
8.8.8.8.1.2 g
8.8.8.8.c.o.0.1.8.8.1.0. corr
8.8.8.1.2.0 g
8.8.8.8.c.o.0.1.8.8.1.0. corr
8.8.8.1.2.5 g
8.8.8.8.c.o.0.1.8.8.1.0. corr
8.8.1.2.5.0 g
8.8.8.8.c.o.0.1.8.8.1.0. corr
8.-.1.2.5.0 g
8.8.8.8.c.o.0.1.8.8.1.0. corr
8.-.1.2.0.0 g
8.8.8.8.c.o.0.1.8.8.1.0. corr
8.-.1.2.0.0
8.8.8.8.c.o.0.28.8.1.0. corr
8.-.1.4.5.0 g
8.8.8.8.c.o.0.28.8.1.0. corr
8.-.-.2.0.0 g
8.8.8.8.c.o.0.28.8.1.0. corr
8.-.-.2.2.0 g oz% *8.-.-.2.2.0 g
imm
8.8.8.8.c.o.0.28.8.1.0. corr
adv
cum
imm
8.8.8.8.c.o.0.28.8.1.0. corr
Sobrellenado del 2º componente en 2 g
adv
cum
adv
cum
adv
cum
adv
cum
adv
cum
adv
cum
adv
cum
adv
cum
Español
Acción
adv
cum
adv
cum
Balanza para mezcla de colores Panda7, Panda7/X, Panda7/X2
98
Acción
“ADV ABS IMM”
Confirmar la pesada
*
8.-.-.1.2.5 g
imm
Next
Comp
“ADV CUM IMM”
8.8.8.8.c.o.0.18.8.1.0. corr
8.-.-.1.2.5Pg oz%
+*
adv
imm
fctr
cum
8.8.8.8.c.o.0.18.8.1.0. %corrtol adv
Advertencia: el 1er. componente debe redosificarse en 12,5 g debido
al error en la pesada del 2º componente.
Redosificar el 1er componente en 12,5 g
*
1.
imm
Confirmar la redosificación
Next
Comp
Introducir cifra por cifra el peso final del 3er
componente 5 g (ABS)/150 g (CUM) y
confirmar (proceso, ver 1er componente)
Mode
Enter
Añadir el 3er componente
*
imm
8.-.-.2.0.0 g
imm
8.-.-.2.5.0 g
imm
imm
*
imm
*
8.8.8.8.c.o.0.18.8.1.0.
8.8.8.8.c.o.0.38.8.1.0.
8.8.8.8.c.o.0.38.8.1.0.
corr adv
*
corr adv
*
corr adv
8.-.-.-.5.0
imm
*
*
8.-.-.2.0.0 g
8.8.8.8.c.o.0.38.8.1.0. corr
*
3.
8.8.8.8.c.o.0.38.8.1.0.
8.8.8.8.c.o.0.38.8.1.0. corr
8.-.1.5.0.0 g
8.8.8.8.c.o.0.38.8.1.0. corr
8.-.-.-.5.0
imm
corr adv
imm
*
8.8.8.8.c.o.0.18.8.1.0. corr
8.-.-.2.0.0 g
adv
8.-.-.2.0.0
imm
8.-.-.2.0.0 g
8.8.8.8.c.o.0.38.8.1.0. corr
8.-.-.2.0.0
8.8.8.8.c.o.0.38.8.1.0. corr
adv
cum
adv
cum
adv
cum
adv
cum
adv
cum
Español
Advertencia: el error en la pesada del 2º componente se subsana al
pesar el 3er componente. El peso efectivo es de 5,5 g cuando el
indicador está en 0,0.
Confirmar la (última) pesada
Last
Comp
*
*
8.-.-.2.0.0
imm
8.8.8.8.d.o.n.e8.8.8.8.
corr adv
8.-.-.2.0.0
imm
8.8.8.8.d.o.n.e8.8.8.8. corr
adv
cum
Fin del proceso de formulación. En pantalla aparece el peso final
efectivo de la mezcla.
8.-.1.6.5.0 g
imm
adv
8.-.1.6.5.0 g
imm
adv
cum
Balanza para mezcla de colores Panda7, Panda7/X, Panda7/X2
99
6
Master Mode
Seleccione Master Mode para modificar los ajustes de la balanza y para activar las funciones.
6.1
Selección del Master Mode
Unit
Menu
+
Yes
6.2
M.A.S.t.E.r
En modo Pesaje, mantenga pulsada la tecla «Menu» hasta
que aparezca el mensaje adjunto en la pantalla.
M.A.S.C.A.L
Pulse la tecla «Yes» antes de que pasen 3 segundos, de lo
contrario la balanza retorna al modo Pesaje. A continuación
accederá al primer bloque de menú de Master Mode.
Resumen del menú Master Mode
Pantalla/Ajustes
Función/Indicaciones
CAL
Calibrar la balanza (ver capítulo 6.3, no disponible en balanzas verificadas)
SCALE
rESolu
0.1
0.05
Unit
g
oz
P
b.Light
On
Off
rEStAr
On
Off
VibrAt
MEd
HIGH
LOW
ProcES
UNIVEr
dOSING
rESEt
Std On
End SC
Ajustes de la balanza
Seleccionar resolución (no disponible en balanzas verificadas)
”Full Range” 0 ... 7.100 g / 0,1 g (configuración de fábrica)
”Delta Range” 0 ... 999,95 g / 0,05 g, 1.000 ... 7.100 g / 0,1 g
Seleccionar unidad de pesada (no disponible en balanzas verificadas)
Gramo (configuración de fábrica)
Onza
Piezas (1 pieza = 1/32 oz)
Conectar/desconectar iluminación de la pantalla
Conectada (configuración de fábrica)
Desconectada
Conectar/Desconectar función de memoria automática
(no disponible en balanzas verificadas)
Conectada
Desconectada (configuración de fábrica)
Seleccionar adaptador de vibraciones
Objetos de pesada normales (configuración de fábrica)
Entorno inestable
Entorno muy estable
Seleccionar adaptador de proceso
Objetos de pesada normales
Dosificar, p. ej. objetos en estado líquido o pulverulento (config. de fábrica)
Reposición de todos los ajustes SCALE a la configuración de fábrica
Regresar a la configuración de fábrica con «Yes» y rechazar con «No»
Abandonar el bloque “SCALE” con «Yes»
Español
Manejo de Master Mode: confirme con la opción «Yes» o rechácela con «No».
Balanza para mezcla de colores Panda7, Panda7/X, Panda7/X2
100
Pantalla/Ajustes
Función/Indicaciones
IFACE1 / IFACE2
ModE
dIALOG
2nd.dIS
PN
Print
CYCLE
Protok
HONOFF
NO
PAritY
7 EVEN
7 NO P
8 NO P
7 Odd
BAUd
300
Configurar interface(s)
Seleccionar tipo de operación
Comunicación con ordenador (configuración de fábrica IFACE 1)
Control de pantalla auxiliar (configuración de fábrica IFACE 2)
Modo de la balanza PM
Comunicación con impresora
Impresión de datos cuando cambia el peso
Seleccionar informe
Informe Xon/Xoff (configuración de fábrica)
Ningún informe
Selección de bits y paridad
7 bits de datos con paridad par
7 bits de datos sin paridad
8 bits de datos sin paridad (configuración de fábrica)
7 bits de datos con paridad impar
Seleccionar velocidad de transferencia de datos
300, 600, 1.200, 2.400, 4.800, 9.600 (configuración de fábrica),
19.200 y 38.400
38400
Aut.Mod
AUt.SIR
NO
rESEt
Std On
EndIF1
Modo automático
El interface envía datos sin interrupción (configuración de fábrica IFACE 1)
Modo automático desconectado (configuración de fábrica IFACE 2)
Reposición del ajuste IFACE a la configuración de fábrica
Regresar a la configuración de fábrica con «Yes» y rechazar con «No»
Abandonar bloque “IFACE1” e “IFACE2” con «Yes»
LiSt
Imprimir ajustes Master Mode con «Yes»
End
Abandonar Master Mode con «Yes». Confirmar la pregunta “StorE?” con «Yes» para
guardar los ajustes o con «No» para rechazarlos.
Español
6.3
+
Yes
Ajuste/Calibración de la balanza (no disponible en balanzas verificadas)
M.A.S.C.A.L
Acceda a Master Mode y seleccione “CAL”.
M.A.7.0.0.0 kg
Descargue el platillo y luego pulse la tecla «Yes» para iniciar
el proceso de calibración.
La balanza muestra una señal intermitente con la pesa de
calibración a depositar (de acuerdo con la carga nominal de
la balanza). Para seleccionar otras pesas de calibración,
pulse la tecla «No».
+
Yes
Deposite la pesa de calibración que se indica en pantalla y
confirme con «Yes».
Advertencia: si desea interrumpir la calibración, pulsación
prolongada de la tecla «On/Off».
Espere a que aparezca el mensaje de calibración realizada
con éxito (confirmación en pantalla con “done”). A continuación, la balanza regresa al modo Pesaje.
Balanza para mezcla de colores Panda7, Panda7/X, Panda7/X2
101
Mensajes de error
Sobrecarga
{.|.|.|.|.}
adv
<.=.=.=.=.>
adv
------
adv
-.-.n.o.-.-
adv
Descargar la balanza o reducir la carga previa.
Carga insuficiente
Colocar el platillo, garantizando que pueda moverse libremente.
Resultado de pesada todavía inestable
1. Lograr un entorno estable
2. Garantizar que el platillo se mueve libremente
3. Cambiar el ajuste del adaptador de vibraciones (cap. 6.2)
Función no ejecutable
La función solicitada no pudo ejecutarse.
Puesta a cero imposible (Sobrecarga/Carga insuficiente)
{.|.n.o.|.}
adv
<.=.n.o.=.>
adv
E.r.r.6.
adv
E.r.r.5.3.
adv
Err
adv
Asegurar que la puesta a cero se realiza sin sobrecarga o carga insuficiente.
Sin calibración/ajuste
N.o. . .C.a.L. .I.M.M.8.
Quitar y volver a insertar el enchufe de alimentación. Si aparece de nuevo el mensaje,
calibrar/ajustar la balanza (capítulo 6.3). Si esto tampoco funciona, llamar al Distribuidor
o al Servicio Técnico.
Error en suma de prueba EAROM
Quitar y volver a insertar el enchufe de alimentación. Si aparece de nuevo el mensaje,
llamar al Distribuidor o al Servicio Técnico.
Tensión baja
low voltage
Tensión de salida del adaptador de red demasiado baja. Reemplazar el adaptador de red
por otro con la tensión de salida correcta.
Precisión de indicación
* rESO?
corr adv
* ÑÖOre
corr adv
loco01ltage
Introducción del valor teórico en formulación con resolución muy fina. Adapta el valor de
precisión de indicación de la balanza (p. ej. entrada 15,01 g con precisión de indicación
0,05 g).
Cantidad teórica no admisible
loco01ltage
* Abort?
corr adv
loco01ltage
Cantidad teórica del componente no admisible. Redosificar hasta alcanzar la cantidad
teórica.
Formulación cancelada
Formulación cancelada con pulsación prolongada de la tecla «Last Comp».
Español
7
Balanza para mezcla de colores Panda7, Panda7/X, Panda7/X2
102
8
Interfaces/ Accesorios
8.1
Definición de interfaces
La balanza Panda7 estándar lleva incorporado un interface RS232C doble y las balanzas Panda7/X y Panda7/X2
un interface RS232C simple. El/Los interface/s dispone/n de una clavija hembra Sub-D de 9 polos. La longitud máxima
del cable es de 15 m. La configuración de los interfaces se realiza en Master Mode (ver capítulo 6.2).
Interface(s) incorporado(s)
RS232C, 9 pines D-Sub, f
Ocupación en
la Panda7
Ocupación
nc
TxD 1
RxD 1
nc
GND
nc
RxD 2
TxD 2
VCC (5V, ≤50mA)
5
4
9
3
8
2
7
1
6
Pin 1
Pin 2
Pin 3
Pin 4
Pin 5
Pin 6
Pin 7
Pin 8
Pin 9
Ocupación en
la Panda7/X
y Panda7/X2
2 interfaces utilizando el cable Y
(accesorio), sólo en la Panda7
COM1
COM2
nc
TxD 1
RxD 1
nc
GND
nc
nc
nc
nc
–––
TxD 1
RxD 1
–––
GND
–––
–––
–––
–––
–––
TxD 2
RxD 2
–––
GND
–––
–––
–––
VCC (5V, ≤50mA)
TxD: enviar datos
RxD: recibir datos
GND: tierra de señales
VCC: alimentación (+5V, ≤50mA)
nc:
not connected (no conectado)
8.2
Accesorios
Accesorios
Nº de art.
Funda protectora (paquete de 5 unidades)
71153871
Cable Y
(D-Sub 9 pines, m, COM1/2 f)
21203892
Español
COM1
1:1
PC
ME-00410024
ME-21203892
Cable a
pantalla
COM1,2
+5V
Pantalla
auxiliar
o
COM2
+5V
Cable RS232 para PC 1,8m (D-Sub 9 pines, m/f, 1:1)
Cable especial
para impres.
Impresora
00410024
Balanza para mezcla de colores Panda7, Panda7/X, Panda7/X2
103
9
Datos técnicos / Directrices y normas de comprobación
9.1
Datos técnicos
Carga máxima
7.100 g
Precisión de indicación
Full Range: 0,1 g (0 ... 7.100 g)
Delta Range: 0,05 g (0 ... 999,95 g), 0,1 g (1.000 ... 7.100 g)
Tiempo de estabilización
1,0 segundos aprox.
Linealidad
0,2 g
Alimentación de corriente
a través de adaptador de red/fuente de alimentación 15 VDC, 4 vatios
Unidades de pesada
g, oz y P (1 pieza= 1/32 oz)
Pantalla
LCD (de cristal líquido), retroiluminada
Condiciones ambientales
Intervalo de temperatura:
+10 ... +30°C
Humedad atmosférica relativa: 20 ... 80% rF (sin condensación)
Peso neto/bruto
3,4 kg / 4,5 kg
Categoría de sobretensión:
II
Grado de ensuciamiento:
2
330 mm
78 mm
65 mm
29 mm
ø232 mm
Español
342 mm
Medidas
Balanza para mezcla de colores Panda7, Panda7/X, Panda7/X2
104
9.2
Directrices y normas de comprobación
Declaración de conformidad: línea de balanzas Panda7
Mettler-Toledo (Changzhou) Scale & System Ltd. declara bajo su única responsabilidad que las balanzas del modelo
Panda7 a las que se refiere esta declaración cumplen las siguientes directivas europeas y normas.
Distintivo
C
Directriz EC
Verificado según la norma
73/23EEC tensión baja
EN61010-1: 2001
UL Std. No. 3101-1
CAN/CSA-22.2 No. 1010.1-92
US
89/336EEC EMC
EN61326-1 Clase de emisión B
EN61326-1 Inmunidad
AS/NZS2064.1/2, AS/NZS3548
AS/NZS4251.1, AS/NZS4252.1
[year]
[code]
1)
M
1)
90/384EEC 1)
Balanzas no
automáticas
EN45501 1) Aspectos metrológicos
Sólo válido para balanzas verificadas (Aprobación/certificado de ensayo n.º: R76/1992-NL1-03.10)
Mettler-Toledo (Changzhou) Sacle & System Ltd.
111 Changxi Rd. Changzhou, Jiangsu 213001, PRC
Septiembre de 2005
Español
David Zheng
President
Chu Jinlan
Quality Assurance Manager
Observación importante para balanzas verificadas en países de la UE
M
Las balanzas verificadas en fábrica llevan un distintivo que sobresale en la etiqueta pegada sobre el
embalaje y un adhesivo verde “M” en la placa de datos metrológicos. Estas balanzas se pueden poner
en marcha de inmediato.
M
Las balanzas que se verifican en dos fases y que no llevan una “M” verde en la placa de datos
metrológicos portan un distintivo que sobresale en la etiqueta pegada sobre el embalaje. La segunda
fase de verificación debe llevarla a cabo el Servicio postventa oficialmente reconocido de Mettler-Toledo
o el inspector de la oficina de verificación de pesos y medidas. Rogamos se ponga en contacto con el
servicio postventa de Mettler-Toledo. El fabricante realizó la primera fase de verificación, que comprende
todas las pruebas según la norma EN45501-8.2.2.
En tanto que el periodo de validez de la verificación esté restringido por las normas nacionales de los distintos países,
el usuario de la balanza será responsable de efectuar las posteriores verificaciones periódicas a su debido tiempo.
Balanza para mezcla de colores Panda7, Panda7/X, Panda7/X2
105
EE.UU.
This equipment has been tested and found to comply with the limits for a Class A digital device, pursuant to both Part 15 of the FCC
Rules and the radio interference regulations of the Canadian Department of Communications. These limits are designed to provide
reasonable protection against harmful interference when the equipment is operated in a commercial environment. This equipment
generates, uses and can radiate radio frequency energy and, if not installed and used in accordance with the instruction manual, may
cause harmful interference to radio communications. Operation of this equipment in a residential area is likely to cause harmful
interference, in which case the user will be required to correct the interference at his own expense.
Canadá
Español
ICES-001 Notice for Industrial, Scientific and Medical Radio Frequency Generators: This ISM apparatus meets all requirements of the
Canadian Interference-Causing Equipment Regulations. Please note that this requirement is only for generators which operate at over
10 kHz.
Avis de l’ICES-001, générateurs de radiofréquences dans le domaine industriel, scientifique et médical: Cet appareil ISM (industriel,
scientifique et médical) satisfait à toutes les exigences définies par la réglementation canadienne en matière d’équipements générant
des perturbations radioélectriques. Veuillez noter qu’il s’agit d’une exigence concernant uniquement les générateurs fonctionnant audelà de 10 kHz.
Balanza para mezcla de colores Panda7, Panda7/X, Panda7/X2
106
Declaración de conformidad: línea de balanzas Panda7/X
Mettler-Toledo (Changzhou) Scale & System Ltd. declara bajo su única responsabilidad que las balanzas del modelo
Panda7/X a las que se refiere esta declaración cumplen las siguientes directivas europeas y normas.
Distintivo
Directriz EC
Verificado según la norma
94/9/EEC (ATEX)
EN50014, EN50020
0032
FMRC 3600, 3610, 3810
FM
APPROVED
CSA-C22.2 No. 157-92
CSA-C22.2 No. 142-M 1987
ia
73/23EEC tensión baja
EN61010-1
89/336EEC EMC
EN61326-1 Clase de emisión B
EN61326-1 Inmunidad
0032
0032
AS/NZS2064.1/2, AS/NZS3548
AS/NZS4251.1, AS/NZS4252.1
Mettler-Toledo (Changzhou) Sacle & System Ltd.
111 Changxi Rd. Changzhou, Jiangsu 213001, PRC
Septiembre de 2005
David Zheng
President
Chu Jinlan
Quality Assurance Manager
Español
EE.UU.
This equipment has been tested and found to comply with the limits for a Class A digital device, pursuant to both Part 15 of the FCC
Rules and the radio interference regulations of the Canadian Department of Communications. These limits are designed to provide
reasonable protection against harmful interference when the equipment is operated in a commercial environment. This equipment
generates, uses and can radiate radio frequency energy and, if not installed and used in accordance with the instruction manual, may
cause harmful interference to radio communications. Operation of this equipment in a residential area is likely to cause harmful
interference, in which case the user will be required to correct the interference at his own expense.
Canadá
ICES-001 Notice for Industrial, Scientific and Medical Radio Frequency Generators: This ISM apparatus meets all requirements of the
Canadian Interference-Causing Equipment Regulations. Please note that this requirement is only for generators which operate at over
10 kHz.
Avis de l’ICES-001, générateurs de radiofréquences dans le domaine industriel, scientifique et médical: Cet appareil ISM (industriel,
scientifique et médical) satisfait à toutes les exigences définies par la réglementation canadienne en matière d’équipements générant
des perturbations radioélectriques. Veuillez noter qu’il s’agit d’une exigence concernant uniquement les générateurs fonctionnant audelà de 10 kHz.
Balanza para mezcla de colores Panda7, Panda7/X, Panda7/X2
107
Declaración de conformidad: línea de balanzas Panda7/X2
Mettler-Toledo (Changzhou) Scale & System Ltd. declara bajo su única responsabilidad que las balanzas del modelo
Panda7/X2 a las que se refiere esta declaración cumplen las siguientes directivas europeas y normas.
Distintivo
Directriz EC
Verificado según la norma
94/9/EEC (ATEX)
EN50014, EN50020
73/23EEC tensión baja
EN61010-1
89/336EEC EMC
EN61326-1 Clase de emisión B
EN61326-1 Inmunidad
0032
0032
0032
AS/NZS2064.1/2, AS/NZS3548
AS/NZS4251.1, AS/NZS4252.1
Mettler-Toledo (Changzhou) Sacle & System Ltd.
111 Changxi Rd. Changzhou, Jiangsu 213001, PRC
Septiembre de 2005
David Zheng
President
Chu Jinlan
Quality Assurance Manager
EE.UU.
This equipment has been tested and found to comply with the limits for a Class A digital device, pursuant to both Part 15 of the FCC
Rules and the radio interference regulations of the Canadian Department of Communications. These limits are designed to provide
reasonable protection against harmful interference when the equipment is operated in a commercial environment. This equipment
generates, uses and can radiate radio frequency energy and, if not installed and used in accordance with the instruction manual, may
cause harmful interference to radio communications. Operation of this equipment in a residential area is likely to cause harmful
interference, in which case the user will be required to correct the interference at his own expense.
Español
Canadá
ICES-001 Notice for Industrial, Scientific and Medical Radio Frequency Generators: This ISM apparatus meets all requirements of the
Canadian Interference-Causing Equipment Regulations. Please note that this requirement is only for generators which operate at over
10 kHz.
Avis de l’ICES-001, générateurs de radiofréquences dans le domaine industriel, scientifique et médical: Cet appareil ISM (industriel,
scientifique et médical) satisfait à toutes les exigences définies par la réglementation canadienne en matière d’équipements générant
des perturbations radioélectriques. Veuillez noter qu’il s’agit d’une exigence concernant uniquement les générateurs fonctionnant audelà de 10 kHz.
Balanza para mezcla de colores Panda7, Panda7/X, Panda7/X2
Español
108
Bilancia per vernici Panda7, Panda7/X, Panda7/X2
109
1
Introduzione
1.1
Generale
Vi ringraziamo di aver scelto la bilancia per vernici Panda7, e le versioni per l’impiego in zone a rischio d’esplosione, Panda7/X (zona a rischio 1) e Panda7/X2 (zona a rischio 2). Con la Panda7, Panda7/X, Panda7/X2 si
possono pesare i componenti di una miscela avendone stabilito in precedenza le proporzioni. La bilancia possiede
diverse modalità di correzione al fine di riequilibrare i componenti che sono stati eventualmente dosati in modo errato.
Attraverso l’interfaccia incorporata RS232 la bilancia può essere connessa a una stampante oppure collegata a un
computer o a un secondo display.
Vi preghiamo di leggere attentamente queste istruzioni per l’uso e di attenervi alle disposizioni!
Sicurezza e ambiente
– Non usare la bilancia Panda7 in un ambiente a rischio di esplosioni (in presenza di miscele
esplosive di gas, vapori, fumi e polveri).
Nelle zone a rischio di esplosione è opportuno utilizzare una bilancia di tipo Panda7/X (zona a
rischio 1) o Panda7/X2 (zona a rischio 2). Queste bilance devono essere assolutamente collegate
tramite l’alimentatore certificato PANDA-EX1P o l’adattatore certificato PS-EX2P di METTLER
TOLEDO. Le indicazioni contenute nelle istruzioni per l’installazione e il collegamento all’alimentatore/all’adattatore di rete si devono osservare e seguire rigorosamente. A causa del pericolo di
cariche elettrostatiche l’impiego di una capottina di protezione in zone a rischio di esplosioni è
permesso solo se questo è composto da materiale sicuramente non soggetto a cariche statiche.
– Collegare la bilancia alla corrente esclusivamente con l’adattatore di rete (Panda7) compreso
nella confezione o con l’alimentatore certificato PANDA-EX1P (Panda7/X) o l’adattatore
certificato PS-EX2P (Panda7/X2). Assicurarsi che il valore della tensione impresso coincida con
quello della rete locale. Controllare regolarmente i cavi dell’adattatore di rete/alimentatore. Se i cavi
o l’adattatore di rete/alimentatore sono danneggiati, la bilancia non deve più essere messa in
funzione.
– Utilizzare solo gli accessori e le periferiche consigliati.
– Maneggiare la bilancia con cura, si tratta di uno strumento di precisione. Urti contro il piatto e
sovraccarichi eccessivi danneggiano la bilancia.
– Scollegare la bilancia dalla corrente prima di cominciare la pulizia!
Pulizia: utilizzare panni umidi (non usare acidi, soluzioni o solventi). Nel caso di uno sporco più
resistente rimuovere il piatto della bilancia, la capottina di protezione (se disponibile) e i piedini
regolabili (solo per bilance approvate) e pulirli separatamente. Attenersi alle disposizioni aziendali
e alle norme specifiche del settore riguardo agli intervalli di pulizia ed ai detergenti ammessi.
– In conformità a quanto stabilito dalla Direttiva Europea 2002/96 CE in materia di apparecchi elettrici
ed elettronici (RAEE), questo strumento non può essere smaltito come i normali rifiuti.
Tale presupposto resta valido anche per i Paesi al di fuori dei confini della UE, conformemente alle
norme nazionali in vigore.
Si prega quindi di smaltire questo prodotto separatamente e in modo specifico secondo le disposizioni locali relative alle apparecchiature elettriche ed elettroniche.
Per qualsiasi chiarimento, rivolgersi agli enti preposti o al rivenditore dell’apparecchiatura stessa.
In caso di cessione dello strumento (per es. per ulteriore utilizzo privato o aziendale/industriale),
si prega di comunicare anche questa disposizione.
Si ringrazia per il contributo alla tutela dell’ambiente.
Italiano
1.2
Bilancia per vernici Panda7, Panda7/X, Panda7/X2
110
1.3
Avvertenze inerenti i modelli approvati
Nei modelli approvati, sono disattivate le seguenti funzioni:
– ricettatura (pesate con fattore di moltiplicazione e ricettatura con correzione)
– cambio dell‘unità di pesata (nelle bilance approvate l‘unità di pesata impostata per default è “g”)
Italiano
– calibrazione (i modelli approvati devono essere regolati/calibrati ad opera di un centro di assistenza postvendita
autorizzato METTLER TOLEDO)
Bilancia per vernici Panda7, Panda7/X, Panda7/X2
111
2
Messa in funzione
2.1
Composizione della bilancia
Estrarre dall’imballo il terminale di visualizzazione e il
modulo di pesata.
Fissare il terminale di visualizzazione al modulo di pesata utilizzando la vite M6x20 fornita (vedi illustrazione).
2.2
Installazione e livellamento della bilancia
La giusta posizione contribuisce in modo decisivo alla precisione dei risultati di pesata.
Scegliete una posizione stabile, priva
di oscillazioni e possibilmente orizzontale.
Non richiudete mai con un martello le
latte di vernice che si trovano ancora
sul piatto della bilancia.
Evitate sbalzi di temperatura eccessivi
e l’ esposizione diretta ai raggi del
sole. Fate attenzione alle condizioni
ambientali.
Evitate le correnti d’aria (per esempio
di ventilatori o condizionatori d’aria).
Grandi cambiamenti di posizione geografica
Vi suggeriamo di calibrare la bilancia per la prima messa in funzione (vedi capitolo 6.3). Le bilance omologate devono
essere calibrate secondo le norme nazionali di omologazione direttamente sul luogo di utilizzo.
Italiano
Solo per bilance omologate: Ruotate i piedini regolabili e disponete la bilancia in posizione
orizzontale. La bolla d’aria deve trovarsi nel cerchio interno.
Attenzione: le bilance omologate devono essere regolate sul posto da un centro servizi
METTLER TOLEDO autorizzato.
Bilancia per vernici Panda7, Panda7/X, Panda7/X2
112
2.3
Collegamento all’alimentazione di corrente
Panda7/X e Panda7/X2 per zone a rischio di esplosione: il collegamento all’alimentazione deve avvenire solo tramite
l’alimentatore certificato PANDA-EX1P per le bilance del tipo Panda 7/X, e tramite adattatore certificato PS-EX2P
per le bilance del tipo Panda 7/X2. Per entrambi i dispositivi, seguire attentamente quanto indicato nei relativi manuali
di installazione.
(2)
Attenzione! Le bilance del tipo Panda7 possono essere
collegate esclusivamente a un circuito a energia limitata con funzionamento in bassissima tensione di sicurezza.
Quindi, collegare la bilancia all’alimentazione servendosi esclusivamente dell’unità fornita in dotazione.
Attenzione! Prima di collegare l’adattatore di rete verificate che il valore della tensione impresso coincida con la
tensione della rete locale.
Importante! per prima cosa collegare l’adattatore di rete
con la presa della bilancia (1). Solo successivamente
infilare la spina dell’adattatore di rete nella presa (2).
(1)
Italiano
Dopo il collegamento la bilancia esegue un test del
display, durante il quale tutti i segmenti e successivamente le versioni software vengono visualizzate brevemente. Non appena comparirà l’indicatore di zero la
bilancia sarà pronta per il funzionamento.
Bilancia per vernici Panda7, Panda7/X, Panda7/X2
113
3
Tasti funzione
Tasti
Funzioni
premere brevemente
tenere premuto
Tarare la bilancia **
Accendere o spegnere la bilancia **
Scegliere il fattore di conversione, per dosare
una quantità maggiore o minore di una
ricetta
Riportare il fattore di conversione su "1"
(pesata senza fattore)
Modificare l’unità di misura
Entrare nella modalità Master **
(vedi capitolo 6.1)
Next
Comp
Confermare il peso desiderato di un componente dosato e procedere con il componente
successivo
––––
Last
Comp
Confermare il peso desiderato dell’ultimo
componente dosato di una ricetta
Interrompere il processo di esecuzione della
ricetta
Scegliere il metodo di esecuzione della
ricetta o la tolleranza.
Confermare il metodo di esecuzione della
ricetta o la tolleranza scelti
Modalità di esecuzione della ricetta avanzata
Impostare la cifra seguente del peso desiderato
Modalità di esecuzione della ricetta avanzata
Confermare il peso desiderato inserito
O/T
On/Off
Unit
Menu
Mode
Enter
+
Yes
–
No
La funzione dipende dalla modalità di lavoro in atto
Modalità Master **
Confermare l'impostazione attuale
Modalità Master
––––
Modalità di esecuzione della ricetta avanzata
Aumentare il valore teorico del componente
Modalità di esecuzione della ricetta avanzata
––––
La funzione dipende dalla modalità di lavoro in atto
Modalità Master **
Cancellare l'impostazione attuale
Modalità Master
––––
Modalità di esecuzione della ricetta avanzata
Diminuire il valore teorico del componente
Modalità di esecuzione della ricetta avanzata
Ritornare all'ultima cifra
** Nelle bilance approvate sono attivi solo i seguenti tasti
Italiano
Factor
Bilancia per vernici Panda7, Panda7/X, Panda7/X2
114
Bloccare la tastiera
Per bloccare la tastiera, premere contemporaneamente i tasti «O/T» e «+» tenendoli premuti per almeno 2 secondi.
Successivamente, tutti i tasti, eccetto «O/T», saranno bloccati. Nelle bilance dotate di display apparirà brevemente “key
locked”. Lo stesso messaggio verrà visualizzato ogni volta che si premerà un tasto dopo aver bloccato la tastiera.
Togliere il blocco tastiera
Per togliere il blocco tastiera, premere contemporaneamente i tasti «O/T» e «–» tenendoli premuti per almeno 2 secondi.
Nelle bilance dotate di display apparirà brevemente “key unlocked”.
Impostare la bilancia sulla base del modello PS7001
Per utilizzare la bilancia Panda7 con le impostazioni di una bilancia PS7001, premere contemporaneamente i tasti
«Unit» e «Last Comp» per almeno 2 secondi. Nelle bilance dotate di display, apparirà brevemente “PS7001-F”.
Successivamente, la bilancia lavorerà con le stesse impostazioni di una bilancia PS7001.
Nota: le impostazioni della bilancia possono, in qualunque momento, essere modificate (vedi capitolo 6 “La modalità
master”) o essere riportate alle impostazioni di fabbrica (vedi prossima sezione).
Riportare la bilancia alle impostazioni di fabbrica
Italiano
Per riportare la bilancia alle impostazioni di fabbrica, premere contemporaneamente i tasti «Unit» e «–» per almeno
2 secondi. Nelle bilance dotate di display, apparirà brevemente “factory set”. Successivamente, la bilancia avrà le
impostazioni di fabbrica.
Bilancia per vernici Panda7, Panda7/X, Panda7/X2
115
4
Pesare
4.1
Accensione / spegnimento e scelta dell’unità di misura
Accensione / spegnimento
O/T
On/Off
Tenendo premuto il tasto «On/Off» accendete o spegnete la bilancia.
Dopo l’accensione la bilancia esegue un test del display. Non appena compare l’indicazione di
pesata, la bilancia è pronta a pesare ed è automaticamente impostata sullo zero.
Scelta dell’unità di misura (non disponibile nelle bilance approvate)
Premendo brevemente il tasto «Unit» si può cambiare l’unità di misura scegliendo tra “g”
(Grammi), “oz” (Once) e “P” (Parti).
Unit
Menu
4.2
Pesata semplice
Posizionare il contenitore sulla bilancia.
Per la taratura, premere brevemente il tasto «O/T». Comparirà l’indicazione di
zero.
O/T
On/Off
C.o.1.5.0.0
Attendere finché il rilevatore automatico di stabilità (simbolo circolare sul
display) si spegne e compaiono i risultati di pesata.
g
adv
Italiano
Versare la quantità desiderata del materiale da pesare.
Bilancia per vernici Panda7, Panda7/X, Panda7/X2
116
5
Esecuzione della ricetta
Nota: Nelle bilance approvate le funzioni di ricettatura sono disattivate (pesata con fattore di moltiplicazione,
ricettatura con correzione).
5.1
Scelta del fattore
Per dosare una quantità maggiore o minore di una data ricetta, si può scegliere un fattore (moltiplicatore).
Factor
*
C.o.r.r.0.0
fctr
*
Factor
0.5.0. .C.U.M. .I.M.M.8.
C.o.r.r.0.0
fctr
5.0.0. .C.U.M. .I.M.M.8.
adv
Premendo brevemente il tasto «Factor» attiverete la pesata
a fattore.
Sul display in basso a sinistra compare il fattore utilizzato per
l’ultima pesata a fattore (per esempio 0.50).
Premete brevemente il tasto «Factor» per più volte di
seguito, finché compare il fattore desiderato (0.20 ... 5.00).
adv
Con la pesata successiva viene dosato il peso desiderato (per
es. 1000 g) di un componente in base alla ricetta. In funzione
del fattore selezionato viene quindi dosata una quantità
effettiva minore o maggiore di un fattore.
Esempio 1: Peso in base alla ricetta 1000 g, fattore selezionato 0.50 (per una quantità dimezzata). Indicazione: 1000,
dosaggio effettivo: 500 g
Esempio 2: Peso in base alla ricetta 1000 g, fattore selezionato 3.00 (per la quantità tripla). Indicazione: 1000, dosaggio effettivo: 3000 g
Italiano
Factor
C.o.r.r.0.0 g
adv
Disattivazione della pesata a fattore: tenendo premuto il
tasto «Factor» disattivate la pesata a fattore.
L’indicazione del fattore scompare e il fattore viene riportato
a 1.
Bilancia per vernici Panda7, Panda7/X, Panda7/X2
117
5.2
I diversi metodi di esecuzione della ricetta
La Panda7 offre diversi metodi di esecuzione della ricetta. Ciascun metodo si compone di:
– la modalità di esecuzione della ricetta avanzata “ADV
ADV”:
ADV
In questa modalità viene prima immesso il peso desiderato di un componente. In seguito il componente viene dosato
e confermato. L’eventuale errore di dosaggio viene compensato automaticamente pesando il componente
successivo.
– il tipo di indicazione:
– “ABS
ABS” indicazione assoluta: indicazione del peso assoluto di un componente.
ABS
– “CUM
CUM” indicazione cumulativa: indicazione del peso accumulato.
CUM
– la modalità di correzione:
IMM
– correzione “IMM
IMM”: correzione immediata dopo ciascun componente dosato erroneamente
END
– correzione “END
END”: correzione al termine della esecuzione della ricetta
Dalla loro combinazione risultano 4 diversi metodi di esecuzione della ricetta:
Modalità esecuz. ricetta
Avanzata
ADV ABS END –> Cap. 5.5
X
ADV CUM END –> Cap. 5.5
X
ADV ABS IMM –> Cap. 5.6
X
ADV CUM IMM –> Cap. 5.6
X
Tipo di indicazione
Assoluta Cumulativa
Modalità di correzione
immediata al termine
X
X
X
X
X
X
X
X
Italiano
Metodo di
esecuzione della ricetta
Bilancia per vernici Panda7, Panda7/X, Panda7/X2
118
5.3
Mode
Enter
Mode
Enter
Mode
Enter
Mode
Enter
Scelta del metodo di esecuzione della ricetta
C.o.r.r.0.?
A.D.V. .A.B.S. .E.N.D.8.
Premere brevemente il tasto «Mode». Sul display compare
l’ultimo metodo di esecuzione della ricetta selezionato (impostazione di fabbrica: “ADV ABS END”).
C.o.r.r.0.?
Premendo brevemente e ripetutamente il tasto «Mode»,
potete scegliere il metodo di esecuzione della ricetta desiderato (es. “ADV CUM END”).
.t.o.l.0.?
Confermare il metodo di esecuzione della ricetta selezionato
tenendo premuto il tasto «Mode».
Sul display compare l’indicazione per la scelta della tolleranza; se la si supera i singoli componenti devono essere corretti.
A.D.V. .CUM. .E.N.D.8.
A.D.V. .A.B.S. .E.1.1.0. % tol
.t.o.l.0.?
A.D.V. .A.B.S. .E.1.1.5. % tol
adv
adv
Premendo brevemente e ripetutamente il tasto «Mode»,
potete scegliere la tolleranza più/meno desiderata in % (no.,
0.5 ... 15.0).
Attenzione: “no” indica una tolleranza pari a zero.
Confermare la tolleranza selezionata (es. 1.5%) tenendo
premuto il tasto «Mode». Dopodiché la bilancia sarà pronta
per l’esecuzione della ricetta.
Mode
Enter
Attenzione: Il metodo di esecuzione della ricetta selezionato
rimane attivo finché non ne viene selezionato un altro.
Italiano
5.4
Indicazioni per l’esecuzione della ricetta
Last
Comp
Interrompere l’esecuzione della ricetta
Last
Comp
Stampare il protocollo di esecuzione della ricetta
Mode :ADV ABS END
Components:
co01
target: 100.0 g
true : 110.0 g
co02
target: 20.0 g
true : 22.0 g
co03
target: 5.0 g
true : 5.5 g
L’esecuzione di una ricetta si può interrompere in qualsiasi momento tenendo
premuto il tasto «Last Comp».
Se la vostra bilancia è collegata a una stampante, potete stampare il relativo
protocollo di esecuzione della ricetta tenendo premuto il tasto «Last Comp»
al termine dell’operazione di esecuzione.
Bilancia per vernici Panda7, Panda7/X, Panda7/X2
119
5.5
Esecuzione della ricetta con “ADV ABS END” e “ADV CUM END”
Come procedere
1. Posizionare il contenitore vuoto sulla bilancia e mettere in tara.
2. Premere il tasto «Next Comp» per cominciare la esecuzione di una ricetta.
3. Immettere il peso desiderato del componente indicato per cifre (impostare la cifra con il tasto «+» o «–» e confermare
la cifra impostata premendo brevemente il tasto «Enter»). Confermare il peso desiderato immesso tenendo premuto
il tasto «Enter».
4. Dosare il componente sullo zero e confermare il dosaggio (anche in caso di sovradosaggio) con il tasto
«Next Comp». Se il componente è stato versato in eccesso, l’errore viene compensato automaticamente versando
i componenti successivi.
5. Ripetere i passaggi 3 e 4, finché non sono stati dosati tutti i componenti. Confermare l’ultimo componente con il
tasto «Last Comp».
6. La bilancia verifica se i singoli componenti devono essere nuovamente dosati. Se si, dosare nuovamente i
componenti e confermare ogni volta con il tasto «Next Comp».
Ripetere questo passaggio finché non sono stati nuovamente dosati tutti i componenti.
Terminata la esecuzione della ricetta, la bilancia indicherà “done”, e dopo il peso finale della miscela.
Esempio
La ricetta è composta da: Componente 1: 125 g, Componente 2: 20 g, Componente 3: 5 g
Nessun fattore, nessuna tolleranza selezionati. Il componente 2 è stato dosato in eccesso (22.0 g invece di 20.0 g)
Azione
“ADV ABS END”
Posizionare e tarare il contenitore vuoto
“ADV CUM END”
8.8.8.8.0.0 g
8.8.8.8.0.0 g
adv
adv
cum
O/T
On/Off
Avviare la esecuzione della ricetta
*
Next
Comp
8.8.8.8.0.0 g
*
8.8.8.8.0.1 g
*
8.8.8.8.1.0 g
*
8.8.8.8.c.o.0.1.8.8.1.0.
corr adv
8.8.8.8.0.0 g
8.8.8.8.c.o.0.1.8.8.1.0. corr
adv
cum
1° cifra
+
Yes
Mode
Enter
*
8.8.8.8.c.o.0.1.8.8.1.0.
*
8.8.8.8.c.o.0.1.8.8.1.0.
corr adv
corr adv
8.8.8.8.0.1 g
8.8.8.8.c.o.0.1.8.8.1.0. corr
8.8.8.8.1.0 g
8.8.8.8.c.o.0.1.8.8.1.0. corr
adv
cum
adv
cum
Italiano
Immettere per cifre il peso desiderato del
componente 1 (125 g)
Bilancia per vernici Panda7, Panda7/X, Panda7/X2
120
Azione
2° cifra
“ADV ABS END”
+
Yes
Mode
Enter
3° Cifra
+
Yes
Mode
Enter
Confermare il peso desiderato immesso
*
*
*
Italiano
Mode
Enter
Versare il componente 2
*
8.8.8.1.2.5 g
*
8.8.1.2.5.0 g
*
8.-.1.2.5.0 g
*
8.-.1.2.0.0 g
*
8.-.1.2.0.0 g
*
8.-.-.2.0.0 g
*
8.-.-.2.0.0 g
*
8.-.-.2.2.0 g
*
8.8.8.8.c.o.0.1.8.8.1.0.
*
8.8.8.8.c.o.0.1.8.8.1.0.
*
8.8.8.8.c.o.0.1.8.8.1.0.
*
Next
Comp
Immettere per cifre e confermare il peso
desiderato del componente 2
20 g (ABS)/145 g (CUM) (Procedere
come per il componente 1)
8.8.8.1.2.0 g
8.8.8.8.c.o.0.1.8.8.1.0.
1.
Confermare il dosaggio
*
8.8.8.8.c.o.0.1.8.8.1.0.
Mode
Enter
Versare il componente 1
8.8.8.8.1.2 g
8.8.8.8.c.o.0.1.8.8.1.0.
*
8.8.8.8.c.o.0.28.8.1.0.
*
8.8.8.8.c.o.0.28.8.1.0.
*
8.8.8.8.c.o.0.28.8.1.0.
*
8.8.8.8.c.o.0.28.8.1.0.
2.
“ADV CUM END”
corr adv
8.8.8.8.1.2 g
8.8.8.8.c.o.0.1.8.8.1.0. corr
corr adv
8.8.8.1.2.0 g
8.8.8.8.c.o.0.1.8.8.1.0. corr
corr adv
8.8.8.1.2.5 g
8.8.8.8.c.o.0.1.8.8.1.0. corr
corr adv
8.8.1.2.5.0 g
8.8.8.8.c.o.0.1.8.8.1.0. corr
corr adv
8.-.1.2.5.0 g
8.8.8.8.c.o.0.1.8.8.1.0. corr
corr adv
8.-.1.2.0.0 g
8.8.8.8.c.o.0.1.8.8.1.0. corr
corr adv
8.-.1.2.0.0 g
8.8.8.8.c.o.0.28.8.1.0. corr
corr adv
8.-.1.4.5.0 g
8.8.8.8.c.o.0.28.8.1.0. corr
corr adv
8.-.-.2.0.0 g
8.8.8.8.c.o.0.28.8.1.0. corr
corr adv
8.-.-.2.2.0 g
8.8.8.8.c.o.0.28.8.1.0. corr
adv
cum
adv
cum
adv
cum
adv
cum
adv
cum
adv
cum
adv
cum
adv
cum
adv
cum
adv
cum
Il componente 2 viene dosato in eccesso di 2 g
Confermare il dosaggio
Next
Comp
*
8.-.-.2.0.0 g
8.8.8.8.c.o.0.38.8.1.0.
corr adv
*
8.-.-.2.0.0 g
8.8.8.8.c.o.0.38.8.1.0. corr
adv
cum
Bilancia per vernici Panda7, Panda7/X, Panda7/X2
121
Azione
“ADV ABS END”
Immettere per cifre e confermare il peso
desiderato del componente 3
5 g (ABS)/150 g (CUM) (Procedere come
per il componente 1)
*
8.-.-.2.5.0 g
*
8.-.-.-.5.0
*
8.-.-.2.0.0
*
8.8.8.8.c.o.0.38.8.1.0.
*
Mode
Enter
8.8.8.8.c.o.0.38.8.1.0.
Versare il componente 3
*
8.8.8.8.c.o.0.38.8.1.0.
3.
“ADV CUM END”
corr adv
8.-.1.5.0.0 g
8.8.8.8.c.o.0.38.8.1.0. corr
corr adv
8.-.-.-.5.0
8.8.8.8.c.o.0.38.8.1.0. corr
corr adv
8.-.-.2.0.0
8.8.8.8.c.o.0.38.8.1.0. corr
adv
cum
adv
cum
adv
cum
Attenzione: L’errore di dosaggio del componente 2 viene compensato
dosando il componente 3. Il display indica quindi 0.0, ma in realtà
vengono dosati 5.5 g.
Confermare il dosaggio (l’ultimo)
*
Last
Comp
*
8.-.-.1.2.5 g
8.8.8.8.c.o.0.18.8.1.0.
corr adv
8.-.-.1.2.5 g
8.8.8.8.c.o.0.18.8.1.0. corr
adv
cum
Attenzione: A causa dell’errore di dosaggio del componente 2, il
componente 1 deve essere dosato nuovamente di 12.5 g.
*
Next
Comp
*
8.-.-.2.0.0 g
*
8.8.8.8.c.o.0.18.8.1.0.
1.
Confermare il nuovo dosaggio
8.-.-.2.0.0 g
*
8.8.8.8.d.o.n.e8.8.8.8.
corr adv
corr adv
8.-.-.2.0.0 g
8.8.8.8.c.o.0.18.8.1.0. corr
8.-.-.2.0.0 g
8.8.8.8.d.o.n.e8.8.8.8. corr
adv
cum
adv
cum
Il processo di esecuzione della ricetta è terminato. Il peso finale effetivo
della miscela compare sul display.
8.-.1.6.5.0 g
adv
8.-.1.6.5.0 g
adv
cum
Italiano
Ridosare di 12.5 g il componente 1.
Bilancia per vernici Panda7, Panda7/X, Panda7/X2
122
5.6
Esecuzione della ricetta con “ADV ABS IMM” e “ADV CUM IMM”
Come procedere
1. Posizionare il contenitore vuoto sulla bilancia e mettere in tara.
2. Premere il tasto «Next Comp», per cominciare la esecuzione della ricetta.
3. Immettere cifra per cifra il peso desiderato del componente indicato (impostare la cifra usando il tasto «+» o «–»
e confermare l’impostazione premendo brevemente il tasto «Enter»). Confermare il peso desiderato premendo a
lungo il tasto «Enter» .
4. Dosare il componente partendo dallo zero e confermare il dosaggio (anche se il componente è stato versato in
eccesso) con il tasto «Next Comp». Se il componente è stato versato in eccesso, l’errore viene compensato
automaticamente versando il componente successivo.
5. La bilancia verifica subito dopo ciascun componente se il componente precedentemente dosato deve essere dosato
nuovamente. Se si, dosare nuovamente i componenti indicati e ogni volta confermare con il tasto «Next Comp».
Ripetere questo passaggio finché non sono stati dosati nuovamente tutti i componenti.
6. Ripetere i passaggi 3, 4 e 5, finché non sono stati dosati tutti i componenti. Confermare l’ultimo componente con
il tasto «Last Comp».
Al termine della esecuzione della ricetta la bilancia indica “done” e dopo il peso finale della miscela.
Esempio
La ricetta è composta da: Componente 1: 125 g, Componente 2: 20 g, Componente 3: 5 g
Nessun fattore, nessuna tolleranza selezionati. Il componente 2 è stato dosato in eccesso (22.0 g invece di 20.0 g)
Azione
“ADV ABS IMM”
Posizionare e tarare il contenitore vuoto
“ADV CUM IMM”
8.8.8.8.0.0 g
imm
8.8.8.8.0.0 g
adv
imm
8.8.8.8.0.0 g
corr adv
imm
8.8.8.8.0.1 g
imm
8.8.8.8.1.0 g
imm
O/T
On/Off
Avviare la esecuzione della ricetta
Next
Comp
*
imm
8.8.8.8.c.o.0.1.8.8.1.0.
*
8.8.8.8.0.0 g
8.8.8.8.c.o.0.1.8.8.1.0. corr
adv
cum
adv
cum
Italiano
Immettere per cifre il peso desiderato del
componente 1 (125 g)
Cifra 1
+
Yes
Mode
Enter
*
imm
*
imm
8.8.8.8.c.o.0.1.8.8.1.0.
8.8.8.8.c.o.0.1.8.8.1.0.
corr adv
corr adv
*
*
8.8.8.8.0.1 g
8.8.8.8.c.o.0.1.8.8.1.0. corr
8.8.8.8.1.0 g
8.8.8.8.c.o.0.1.8.8.1.0. corr
adv
cum
adv
cum
Bilancia per vernici Panda7, Panda7/X, Panda7/X2
123
Cifra 2
“ADV ABS IMM”
+
Yes
Mode
Enter
Cifra 3
+
Yes
Mode
Enter
Confermare il peso desiderato immesso
Mode
Enter
Versare il componente 1
1.
Confermare il dosaggio
Next
Comp
Immettere per cifre e confermare il peso
desiderato del componente 2: 20 g (ABS)/
145 g (CUM) (Procedere come per il
componente 1)
Mode
Enter
*
imm
8.8.8.1.2.0 g
imm
8.8.8.1.2.5 g
imm
8.8.1.2.5.0 g
imm
8.-.1.2.5.0 g
imm
8.-.1.2.0.0 g
imm
8.-.1.2.0.0 g
imm
8.-.-.2.0.0 g
imm
8.-.-.2.0.0 g
imm
imm
*
imm
*
imm
*
imm
*
imm
*
imm
*
imm
*
imm
Versare il componente 2
2.
*
*
8.8.8.8.1.2 g
imm
*
“ADV CUM IMM”
8.8.8.8.c.o.0.1.8.8.1.0.
8.8.8.8.c.o.0.1.8.8.1.0.
8.8.8.8.c.o.0.1.8.8.1.0.
8.8.8.8.c.o.0.1.8.8.1.0.
8.8.8.8.c.o.0.1.8.8.1.0.
8.8.8.8.c.o.0.1.8.8.1.0.
8.8.8.8.c.o.0.28.8.1.0.
8.8.8.8.c.o.0.28.8.1.0.
8.8.8.8.c.o.0.28.8.1.0.
corr adv
*
corr adv
*
corr adv
*
corr adv
*
corr adv
*
corr adv
*
corr adv
*
corr adv
*
corr adv
8.8.8.8.1.2 g
8.8.8.8.c.o.0.1.8.8.1.0. corr
8.8.8.1.2.0 g
8.8.8.8.c.o.0.1.8.8.1.0. corr
8.8.8.1.2.5 g
8.8.8.8.c.o.0.1.8.8.1.0. corr
8.8.1.2.5.0 g
8.8.8.8.c.o.0.1.8.8.1.0. corr
8.-.1.2.5.0 g
8.8.8.8.c.o.0.1.8.8.1.0. corr
8.-.1.2.0.0 g
8.8.8.8.c.o.0.1.8.8.1.0. corr
8.-.1.2.0.0
8.8.8.8.c.o.0.28.8.1.0. corr
8.-.1.4.5.0 g
8.8.8.8.c.o.0.28.8.1.0. corr
8.-.-.2.0.0 g
8.8.8.8.c.o.0.28.8.1.0. corr
8.-.-.2.2.0 g oz% *8.-.-.2.2.0 g
imm
8.8.8.8.c.o.0.28.8.1.0. corr
adv
cum
imm
8.8.8.8.c.o.0.28.8.1.0. corr
Il componente 2 viene versato in eccesso di 2 g
adv
cum
adv
cum
adv
cum
adv
cum
adv
cum
adv
cum
adv
cum
adv
cum
adv
cum
adv
cum
Italiano
Azione
Bilancia per vernici Panda7, Panda7/X, Panda7/X2
124
Azione
“ADV ABS IMM”
Confermare il dosaggio
Next
Comp
*
“ADV CUM IMM”
8.-.-.1.2.5 g
imm
8.8.8.8.c.o.0.18.8.1.0. corr
8.-.-.1.2.5Pg oz%
+*
adv
imm
fctr
cum
8.8.8.8.c.o.0.18.8.1.0. %corrtol adv
Attenzione: A causa dell’errore di dosaggio del componente 2, il
componente 1 deve essere dosato nuovamente di 12.5g.
Dosare nuovamente il componente 1 di
12.5 g
1.
Confermare il nuovo dosaggio
Next
Comp
Immettere per cifre e confermare il peso
desiderato del componente 3: 5 g (ABS)/
150 g (CUM) (Procedere come per il componente 1)
Mode
Enter
Versare il componente 3
*
*
imm
8.-.-.2.0.0 g
imm
8.-.-.2.5.0 g
imm
8.-.-.-.5.0
imm
8.-.-.2.0.0
imm
imm
*
imm
*
imm
*
*
8.-.-.2.0.0 g
imm
imm
3.
8.8.8.8.c.o.0.18.8.1.0.
8.8.8.8.c.o.0.38.8.1.0.
8.8.8.8.c.o.0.38.8.1.0.
8.8.8.8.c.o.0.38.8.1.0.
8.8.8.8.c.o.0.38.8.1.0.
corr adv
*
corr adv
*
corr adv
*
corr adv
*
corr adv
8.-.-.2.0.0 g
8.8.8.8.c.o.0.18.8.1.0. corr
8.-.-.2.0.0 g
8.8.8.8.c.o.0.38.8.1.0. corr
8.-.1.5.0.0 g
8.8.8.8.c.o.0.38.8.1.0. corr
8.-.-.-.5.0
8.8.8.8.c.o.0.38.8.1.0. corr
8.-.-.2.0.0
8.8.8.8.c.o.0.38.8.1.0. corr
adv
cum
adv
cum
adv
cum
adv
cum
adv
cum
Attenzione: l’errore di dosaggio del componente 2 viene compensato
dosando il componente 3. Sul display compare 0.0 ma in realtà
vengono dosati 5.5 g.
Confermare il dosaggio (l’ultimo)
Italiano
Last
Comp
*
*
8.-.-.2.0.0
imm
8.8.8.8.d.o.n.e8.8.8.8.
corr adv
8.-.-.2.0.0
imm
8.8.8.8.d.o.n.e8.8.8.8. corr
adv
cum
Il processo di esecuzione della ricetta è terminato. Il peso finale
effetivo della miscela compare sul display.
8.-.1.6.5.0 g
imm
adv
8.-.1.6.5.0 g
imm
adv
cum
Bilancia per vernici Panda7, Panda7/X, Panda7/X2
125
6
La modalità Master
Nella modalità Master si possono modificare le impostazioni della bilancia e attivare le funzioni.
6.1
Richiamare la modalità Master
Unit
Menu
+
Yes
6.2
M.A.S.t.E.r
Nella modalità di pesata tenere premuto il tasto «Menu»
finché non compare l’indicazione successiva.
M.A.S.C.A.L
Premere il tasto «Yes» in tre secondi (altrimenti la bilancia
ritorna alla modalità di pesata). Successivamente compare il
primo blocco di opzioni del menù della modalità Master.
Panoramica del menù della modalità Master
Indicazione/Impostazioni
Funzione/Note
CAL
Calibrare la bilancia (vedi capitolo 6.3, non disponibile nelle bilance approvate)
SCALE
rESolu
0.1
0.05
Unit
g
oz
P
b.Light
On
Off
rEStAr
On
Off
VibrAt
MEd
HIGH
LOW
ProcES
UNIVEr
dOSING
rESEt
Std On
End SC
Impostazioni della bilancia
Scegliere la risoluzione (non disponibile nelle bilance approvate)
”Full Range” 0 ... 7100 g / 0.1 g (Impostazioni di fabbrica)
”Delta Range” 0 ... 999.95 g / 0.05 g, 1000 ... 7100 g / 0.1 g
Scegliere l’unità di misura (non disponibile nelle bilance approvate)
Grammi (Impostazione di fabbrica)
Once
Parti (1 Parte = 1/32 oz)
Accendere/spegnere l’illuminazione del display
acceso (Impostazione di fabbrica)
spento
Accendere/spegnere la funzione di memoria automatica
(non disponibile nelle bilance approvate)
accesa
spenta (Impostazione di fabbrica)
Scegliere l’adattatore per le vibrazioni
Ambiente normale (Impostazione di fabbrica)
Ambiente non tranquillo
Ambiente molto tranquillo
Scegliere l’adattatore di processo
Materiale da pesare normale
Dosare, per esempio materiale liquido o in polvere (Impostazione di fabbrica)
Riportare tutte le impostazioni SCALE alle impostazioni di fabbrica
Con «Yes» riportare alle impostazioni di fabbrica , con «No» annullare
Uscire dal blocco “SCALE” con «Yes»
Italiano
Condizione della modalità Master: con «Yes» si conferma l’opzione, con «No» si cancella l’opzione.
Bilancia per vernici Panda7, Panda7/X, Panda7/X2
126
Indicazione/Impostazioni
Funzione/Note
IFACE1 / IFACE2
ModE
dIALOG
2nd.dIS
PN
Print
CYCLE
Protok
HONOFF
NO
PAritY
7 EVEN
7 NO P
8 NO P
7 Odd
BAUd
300
Configurare la/le interfaccia/e
Scegliere il tipo di funzionamento
Comunicazione con il Computer (Impostazione di fabbrica IFACE 1)
Comando del display secondario (Impostazione di fabbrica IFACE 2)
Modalità bilancia PM
Comunicazione con la stampante
Stampa dati in caso di variazione del peso
Scegliere il protocollo
Protocollo Xon/Xoff (Impostazione di fabbrica)
Nessun protocollo
Scegliere i bit e la parità
7 bit di dati con parità pari
7 bit di dati senza parità
8 bit di dati senza parità (Impostazione di fabbrica)
7 bit di dati con Parità dispari
Scegliere la velocità di trasmissione dati
300, 600, 1200, 2400, 4800, 9600 (Impostazione di fabbrica),
19200 e 38400
38400
Aut.Mod
AUt.SIR
NO
rESEt
Std On
EndIF1
Modalità in automatico
L’interfaccia invia dati ininterrottamente (Impostazione di fabbrica IFACE 1)
Modalità in automatico disattivata (Impostazione di fabbrica IFACE 2)
Riportare l’impostazione IFACE alle impostazioni di fabbrica
Con «Yes» ritornare alle impostazioni di fabbrica, con «No» annullare
Con «Yes» uscire dal blocco“IFACE1” o “IFACE2”
LiSt
Con «Yes» stampare le impostazioni della modalità Master
End
Con «Yes» uscire dalla modalità Master. Alla domanda “StorE?” confermare con
«Yes» per salvare le impostazioni o con «No» per annullarle.
6.3
M.A.S.C.A.L
Richiamare la modalità Master e scegliere “CAL”.
M.A.7.0.0.0 kg
Svuotare il piatto della bilancia e poi premere il tasto «Yes» per
avviare la procedura di calibratura.
La bilancia indica lampeggiando il peso di calibratura (corrisponde al carico nominale della bilancia). Con il tasto «No»
si possono scegliere altri pesi di calibratura a piacere.
Italiano
+
Yes
Regolare/calibrare la bilancia (non disponibile nelle bilance approvate)
+
Yes
Disporre il peso di calibratura secondo l’indicazione e confermare con «Yes».
Attenzione: la calibratura si può interrompere in ogni momento premendo a lungo il tasto «On/Off».
Attendere finché la calibratura non si sia conclusa con esito
positivo (sul display appare la conferma con “done”) e la
bilancia non sia ritornata alla modalità di pesata.
Bilancia per vernici Panda7, Panda7/X, Panda7/X2
127
Messaggi di errore
{.|.|.|.|.}
adv
Sovraccarico
Scaricare la bilancia o diminuire il precarico.
Sottocarico
<.=.=.=.=.>
adv
------
adv
-.-.n.o.-.-
adv
{.|.n.o.|.}
adv
<.=.n.o.=.>
adv
E.r.r.6.
adv
E.r.r.5.3.
adv
Err
adv
Disporre il piatto della bilancia e accertarsi che sia libero di muoversi.
Il risultato della pesata non raggiunge la stabilità
1. Fare in modo che l’ambiente sia tranquillo
2. Disporre il piatto della bilancia e accertarsi che sia libero di muoversi.
3. Modificare l’impostazione dell’adattatore di vibrazioni (Cap. 6.2)
Funzione non eseguita
Non si è potuto eseguire la funzione richiamata.
Imposssibile azzerare (Sovraccarico/Sottocarico)
Assicurarsi che l’azzeramento non venga eseguito con sovraccarico o sottocarico.
Nessuna calibratura/regolazione
N.o. . .C.a.L. .I.M.M.8.
Staccare e reinserire la spina di rete. Se il messaggio ricompare, calibrare/regolare la
bilancia (Capitolo 6.3). Se non si ottiene alcun effetto, contattare il fornitore o il
rappresentante.
EAROM Errore della somma di controllo
Staccare e reinserire la spina di rete. Se il messaggio ricompare, contattare il fornitore o il
rappresentante.
Sottotensione
low voltage
La tensione di uscita dell’adattatore di rete è troppo bassa. Sostituire l’adattatore di rete con
un altro adattatore con tensione di uscita corretta.
Risoluzione
* rESO?
corr adv
* ÑÖOre
corr adv
loco01ltage
Immissione del valore teorico durante la esecuzione della ricetta insieme a una risoluzione
troppo precisa. Conformare alla bilancia il valore della precisione di lettura (per esempio
se il dato è 15.01 g con una precisione di lettura di 0.05 g).
Quantità teorica non raggiunta
loco01ltage
* Abort?
corr
loco01ltage
Quantità teorica del componente non ancora raggiunta. Ridosare finché non la si ottiene.
Esecuzione della ricetta interrotta
adv
La esecuzione della ricetta è stata interrotta premendo a lungo il tasto «Last Comp».
Italiano
7
Bilancia per vernici Panda7, Panda7/X, Panda7/X2
128
8
Interfacce/Accessori
8.1
Definizione delle interfacce
La bilancia standard Panda7 è fornita di una interfaccia RS232C dobbia mentre la Panda7/X e Panda7/X2 sono fornita
di una interfaccia RS232C singola. La/e interfaccia/e sono utilizzabili con una presa Sub-D a 9 poli. La lunghezza
massima del cavo è di 15 m. La configurazione delle interfacce si realizza nella modalità Master (vedi capitolo 6.2).
Interfaccia (e) incorporata (e)
RS232C, 9-pin D-Sub, f
Occupazione in
Panda7
Occupazione
nc
TxD 1
RxD 1
nc
GND
nc
RxD 2
TxD 2
VCC (5V, ≤50mA)
5
4
9
3
8
2
7
1
6
Pin 1
Pin 2
Pin 3
Pin 4
Pin 5
Pin 6
Pin 7
Pin 8
Pin 9
Occupazione in
Panda7/X
Panda7/X2
2 interfacce utilizzando il cavo Y
(Accessorio), solo per la Panda7
COM1
COM2
nc
TxD 1
RxD 1
nc
GND
nc
nc
nc
nc
–––
TxD 1
RxD 1
–––
GND
–––
–––
–––
–––
–––
TxD 2
RxD 2
–––
GND
–––
–––
–––
VCC (5V, ≤50mA)
TxD: Invio dati
RxD: Ricezione dati
GND: Massa del segnale
VCC: Alimentazione (+5V, ≤50mA)
nc:
Not connected (non collegato)
8.2
Accessori
Accessorio
N° art.
Capottina di protezione (Set da 5 pz.)
71153871
Cavo Y
(9-pin D-Sub, m, COM1/2 f)
21203892
COM1
1:1
PC
ME-00410024
Italiano
ME-21203892
Cavo collegato al
display
COM1,2
+5V
o
COM2
+5V Cavo speciale per
stampante
Cavo RS232 per PC 1,8m (9-pin D-Sub, m/f, 1:1)
Display
secondario
Stampante
00410024
Bilancia per vernici Panda7, Panda7/X, Panda7/X2
129
9
Dati tecnici / Direttive e norme
9.1
Dati tecnici
Capacità
7100 g
Risoluzione
Full Range: 0.1 g (0 ... 7100 g)
Delta Range: 0.05 g (0 ... 999.95 g), 0.1 g (1000 ... 7100 g)
Tempo di stabilizzazione
ca. 1.0 secondi
Linearità
0.2 g
Alimentazione
con adattatore di rete/alimentatore 15 VDC, 4 Watt
Unità di misura
g, oz e P (1 Parte = 1/32 oz)
Display
LCD (display a cristalli liquidi), con retroilluminazione
Condizioni ambientali
Campo di temperatura:
Umidità relativa dell’aria:
Peso netto/lordo
3.4 kg / 4.5 kg
Categoria di sovratensione:
II
Grado di inquinamento:
2
+10 ... +30°C
20 ... 80% rF (senza condensa)
330 mm
Italiano
78 mm
65 mm
ø232 mm
29 mm
342 mm
Ingombri
Bilancia per vernici Panda7, Panda7/X, Panda7/X2
130
9.2
Direttive e norme
Dichiarazione di conformità: Bilance della linea Panda7
Noi, Mettler Toledo (Changzhou) Scale & System Ltd, dichiariamo sotto la nostra esclusiva responsabilità che le
bilance di tipo Panda7, alle quali questa dichiarazione si riferisce, sono conformi alle seguenti norme e direttive CE:
Marchio
C
Direttiva CE
provato secondo la norma
73/23EEC Bassa tensione
EN61010-1: 2001
UL Std. No. 3101-1
CAN/CSA-22.2 No. 1010.1-92
US
89/336EEC EMC
EN61326-1 Emissioni cl. B
EN61326-1 Immunità
AS/NZS2064.1/2, AS/NZS3548
AS/NZS4251.1, AS/NZS4252.1
[year]
[code]
1)
M
1)
90/384EEC 1)
Bilance non
automatiche
EN45501
1)
Aspetti metrologici
vale solo per bilance omologate (approvazione/certificato di verifica n. R76/1992-NL1-03.10)
Mettler-Toledo (Changzhou) Sacle & System Ltd.
111 Changxi Rd. Changzhou, Jiangsu 213001, PRC
Settembre 2005
David Zheng
President
Chu Jinlan
Quality Assurance Manager
Italiano
Avvertenza importante per bilance omologate nei paesi della UE
M
Le bilance omologate in fabbrica presentano un contrassegno sull’etichetta dell’imballo e una “M” adesiva di colore verde sull’etichetta di omologazione. Queste bilance possono essere messe in funzione
immediatamente.
M
Le bilance omologate in due fasi e che non presentano la “M” adesiva di colore verde sull’etichetta di
omologazione, avranno un apposito contrassegno sull’etichetta dell’imballo. La seconda fase dell’omologazione deve essere effettuata da personale di assistenza autorizzato Mettler-Toledo o dall’ufficio omologazione. Rivolgersi al Servizio Clienti Mettler-Toledo. La prima fase dell’omologazione viene effettuata
nella fabbrica di produzione e prevede test conformemente alle norme EN45501-8.2.2.
Se le prescrizioni nazionali dei singoli stati prevedono una scadenza del certificato di omologazione, la responsabilità
del rinnovo nei termini del certificato si intende a carico dell’esercente.
Bilancia per vernici Panda7, Panda7/X, Panda7/X2
131
USA
This equipment has been tested and found to comply with the limits for a Class A digital device, pursuant to both Part 15 of the FCC
Rules and the radio interference regulations of the Canadian Department of Communications. These limits are designed to provide
reasonable protection against harmful interference when the equipment is operated in a commercial environment. This equipment
generates, uses and can radiate radio frequency energy and, if not installed and used in accordance with the instruction manual, may
cause harmful interference to radio communications. Operation of this equipment in a residential area is likely to cause harmful
interference, in which case the user will be required to correct the interference at his own expense.
Canada
Italiano
ICES-001 Notice for Industrial, Scientific and Medical Radio Frequency Generators: This ISM apparatus meets all requirements of the
Canadian Interference-Causing Equipment Regulations. Please note that this requirement is only for generators which operate at over
10 kHz.
Avis de l’ICES-001, générateurs de radiofréquences dans le domaine industriel, scientifique et médical: Cet appareil ISM (industriel,
scientifique et médical) satisfait à toutes les exigences définies par la réglementation canadienne en matière d’équipements générant
des perturbations radioélectriques. Veuillez noter qu’il s’agit d’une exigence concernant uniquement les générateurs fonctionnant audelà de 10 kHz.
Bilancia per vernici Panda7, Panda7/X, Panda7/X2
132
Dichiarazione di conformità: Bilance della linea Panda7/X
Noi, Mettler Toledo (Changzhou) Scale & System Ltd, dichiariamo sotto la nostra esclusiva responsabilità che le
bilance di tipo Panda7/X, alle quali questa dichiarazione si riferisce, sono conformi alle seguenti norme e direttive CE:
Marchio
Direttiva CE
provato secondo la norma
94/9/EEC (ATEX)
EN50014, EN50020
0032
FM
FMRC 3600, 3610, 3810
APPROVED
CSA-C22.2 No. 157-92
CSA-C22.2 No. 142-M 1987
ia
0032
73/23EEC Bassa tensione
EN61010-1
89/336EEC EMC
EN61326-1 Emissioni cl. B
EN61326-1 Immunità
0032
AS/NZS2064.1/2, AS/NZS3548
AS/NZS4251.1, AS/NZS4252.1
Mettler-Toledo (Changzhou) Sacle & System Ltd.
111 Changxi Rd. Changzhou, Jiangsu 213001, PRC
Settembre 2005
David Zheng
President
Chu Jinlan
Quality Assurance Manager
USA
Italiano
This equipment has been tested and found to comply with the limits for a Class A digital device, pursuant to both Part 15 of the FCC
Rules and the radio interference regulations of the Canadian Department of Communications. These limits are designed to provide
reasonable protection against harmful interference when the equipment is operated in a commercial environment. This equipment
generates, uses and can radiate radio frequency energy and, if not installed and used in accordance with the instruction manual, may
cause harmful interference to radio communications. Operation of this equipment in a residential area is likely to cause harmful
interference, in which case the user will be required to correct the interference at his own expense.
Canada
ICES-001 Notice for Industrial, Scientific and Medical Radio Frequency Generators: This ISM apparatus meets all requirements of the
Canadian Interference-Causing Equipment Regulations. Please note that this requirement is only for generators which operate at over
10 kHz.
Avis de l’ICES-001, générateurs de radiofréquences dans le domaine industriel, scientifique et médical: Cet appareil ISM (industriel,
scientifique et médical) satisfait à toutes les exigences définies par la réglementation canadienne en matière d’équipements générant
des perturbations radioélectriques. Veuillez noter qu’il s’agit d’une exigence concernant uniquement les générateurs fonctionnant audelà de 10 kHz.
Bilancia per vernici Panda7, Panda7/X, Panda7/X2
133
Dichiarazione di conformità: Bilance della linea Panda7/X2
Noi, Mettler Toledo (Changzhou) Scale & System Ltd, dichiariamo sotto la nostra esclusiva responsabilità che le
bilance di tipo Panda7/X2, alle quali questa dichiarazione si riferisce, sono conformi alle seguenti norme e direttive CE:
Marchio
Direttiva CE
provato secondo la norma
94/9/EEC (ATEX)
EN50014, EN50020
73/23EEC Bassa tensione
EN61010-1
89/336EEC EMC
EN61326-1 Emissioni cl. B
EN61326-1 Immunità
0032
0032
0032
AS/NZS2064.1/2, AS/NZS3548
AS/NZS4251.1, AS/NZS4252.1
Mettler-Toledo (Changzhou) Sacle & System Ltd.
111 Changxi Rd. Changzhou, Jiangsu 213001, PRC
Settembre 2005
David Zheng
President
Chu Jinlan
Quality Assurance Manager
USA
This equipment has been tested and found to comply with the limits for a Class A digital device, pursuant to both Part 15 of the FCC
Rules and the radio interference regulations of the Canadian Department of Communications. These limits are designed to provide
reasonable protection against harmful interference when the equipment is operated in a commercial environment. This equipment
generates, uses and can radiate radio frequency energy and, if not installed and used in accordance with the instruction manual, may
cause harmful interference to radio communications. Operation of this equipment in a residential area is likely to cause harmful
interference, in which case the user will be required to correct the interference at his own expense.
Italiano
Canada
ICES-001 Notice for Industrial, Scientific and Medical Radio Frequency Generators: This ISM apparatus meets all requirements of the
Canadian Interference-Causing Equipment Regulations. Please note that this requirement is only for generators which operate at over
10 kHz.
Avis de l’ICES-001, générateurs de radiofréquences dans le domaine industriel, scientifique et médical: Cet appareil ISM (industriel,
scientifique et médical) satisfait à toutes les exigences définies par la réglementation canadienne en matière d’équipements générant
des perturbations radioélectriques. Veuillez noter qu’il s’agit d’une exigence concernant uniquement les générateurs fonctionnant audelà de 10 kHz.
Bilancia per vernici Panda7, Panda7/X, Panda7/X2
Italiano
134
Verfmengweegschaal Panda7, Panda7/X, Panda7/X2
135
1
Inleiding
1.1
Algemeen
Onze dank voor het aanschaffen van de verfmengweegschaal Panda7 resp. de explosieveilige uitvoeringen
Panda7/X (voor Zone 1) en Panda7/X2 (voor Zone 2). Met de Panda7, Panda7/X, Panda7/X2 kunnen componenten
met een vooraf vastgestelde mengverhouding ingewogen worden. De weegschaal beschikt over diverse correctiemodi,
om mogelijk incorrect ingewogen componenten te compenseren. Via de ingebouwde RS232-interface kan de
weegschaal op een printer worden aangesloten of met een computer of een tweede weegschaal worden verbonden.
Lees deze bedieningshandleiding zorgvuldig door en houd de aanwijzingen in acht!
Veiligheid en milieu
– Gebruik de Panda7-weegschaal niet in een explosiegevaarlijke omgeving (met explosiegevaarlijke mengsels van gassen, dampen, nevels en stof).
In explosiegevaarlijke zones moeten weegschalen van het type Panda7/X (voor Zone 1) of
Panda7/X2 (voor Zone 2) worden gebruikt. Het is voorschrift deze weegschalen aan te sluiten via
de gecertificeerde voeding PANDA-EX1P resp. de gecertificeerde adapter PS-EX2P van METTLER TOLEDO. De aanwijzingen in de installatiehandleiding van de voeding/netadapter dienen te
allen tijde te worden gelezen en in acht te worden genomen. Het gebruik van een beschermhoes in
explosiegevaarlijke zones is vanwege het gevaar voor elektrostatische lading alleen toegestaan,
wanneer de hoes uit anti-statisch materiaal bestaat.
– Sluit de weegschaal alleen via de meegeleverde adapter (Panda7) resp. de gecertificeerde
voeding PANDA EX1P (Panda7/X) of de gecertificeerde adapter PS-EX2P (Panda7/X2) aan op
de netspanning. Zorg ervoor dat de aangegeven spanning overeenkomt met de plaatselijke
netspanning. Controleer de kabels van de netadapter/voeding regelmatig. Wanneer de kabels of de
netadapter/voeding beschadigd zijn, mag de weegschaal niet meer worden gebruikt.
– Gebruik alleen aanbevolen toebehoren en randapparatuur.
– Behandel de weegschaal zorgvuldig, het is immers een precisie-instrument. Schokken van de
weegschaal en het plaatsen van te zware gewichten leiden tot beschadiging van de weegschaal.
– Haal de stekker uit het stopcontact voordat u de weegschaal reinigt!
Reinigen: gebruik vochtige doek (geen zuren, logen of oplosmiddelen). In geval van sterke
vervuiling dient u de weegschaal, de beschermhoes (indien aanwezig) en de stelvoeten (alleen bij
geijkte wegers) te verwijderen en apart te reinigen. Houd bedrijfsinterne en branchespecifieke
voorschriften betreffende reinigingsintervallen en toegestane reinigingsmiddelen in acht.
– Conform de eisen van de Europese richtlijn 2002/96/EG betreffende afgedankte elektrische en
elektronische apparatuur (AEEA) mag dit apparaat niet met het huisvuil worden afgevoerd.
Dit geldt ook voor landen buiten de EU, overeenkomstig de aldaar geldende nationale regelingen.
Voer dit product conform de plaatselijke voorschriften af naar een punt voor gescheiden inzameling
van elektrische en elektronische apparatuur.
Neem bij eventuele vragen contact op met uw gemeente of met de leverancier waar u dit product hebt
aangeschaft.
Bij doorgifte van dit apparaat (b.v. voor privé-gebruik of bedrijfsmatig/industrieel gebruik) moet deze
verplichting worden overgedragen.
Hartelijk dank voor uw bijdrage aan de bescherming van het milieu.
Nederlands
1.2
Verfmengweegschaal Panda7, Panda7/X, Panda7/X2
136
1.3
Aanwijzingen voor geijkte modellen
Bij geijkte modellen zijn de volgende functies gedeactiveerd:
– Recepteren (factorwegen en recepteren met correctie)
– Wijzigen van de weegeenheid (weegeenheid bij ijkweegschalen standaard ingesteld op “g”)
Nederlands
– Kalibreren (geijkte modellen moeten door een geautoriseerde METTLER TOLEDO serviceafdeling worden afgesteld/
gekalibreerd)
Verfmengweegschaal Panda7, Panda7/X, Panda7/X2
137
2
Ingebruikname
2.1
Weeginstrument samenbouwen
Aanwijsinrichting en lastdrager uit de verpakking halen.
Aanwijsinrichting met de meegeleverde schroeven M6 X
20 aan de lastdrager bevestigen (zie figuur).
2.2
Weegschaal plaatsen en afstellen
De juiste opstelling is van groot belang voor de nauwkeurigheid van de weegresultaten!
Kies stabiele, schokvrije en zo
mogelijk horizontale positie.
Sluit verfbussen op de weegschaal
nooit met een hamer.
Vermijd overmatige temperatuurschommelingen en direct zonlicht. Houd
omgevingscondities in acht.
Vermijd tocht (bijv. van ventilatoren of
airconditionings).
Alleen ijkweegschaal: Stel de weegschaal horizontaal af door de stelvoeten te verdraaien. De
luchtbel moet zich binnen de cirkel bevinden.
Aanwijzing: ijkweegschalen moeten op de opstellingsplaats door een geautoriseerde METTLER
TOLEDO Servicedienst afgesteld worden.
Grotere geografische locatieveranderingen
Nederlands
Wij raden u aan om de weegschaal bij de eerste ingebruikname te kalibreren (zie Hoofdstuk 6.3). Ijkweegschalen
moeten onder inachtneming van de landelijke ijkvoorschriften ter plaatse geijkt worden.
Verfmengweegschaal Panda7, Panda7/X, Panda7/X2
138
2.3
Voeding aansluiten
Panda7/X en Panda7/X2 voor explosiegevaarlijke zones: Weegschalen van het type Panda7/X mogen alleen
worden aangesloten via de gecertificeerde voeding PANDA-EX1P en weegschalen van het type Panda7/X2 alleen
via de gecertificeerde adapter PS-EX2P. Houd u volledig aan de aanwijzingen zoals vermeld in de installatiehandleidingen van de voeding PANDA-EX1P en de adapter PS-EX2P.
(2)
Let op! Weegschalen van het type Panda7 mogen alleen
worden aangesloten op een veiligheidslaagspanningscircuit (SELV-circuit). Sluit de weegschaal daarom
uitsluitend via de meegeleverde adapter aan op de netspanning.
Let op! Controleer voordat u de netadapter aansluit of de
aangegeven spanning overeenkomt met de plaatselijke
netspanning.
Belangrijk! Verbind de netadapter eerst met de bus van
de weegschaal (1). Pas daarna de stekker van de
netadapter in het stopcontact steken (2).
Nederlands
(1)
Na het aansluiten voert de weegschaal een displaytest
uit, waarbij alle segmenten en aansluitend de softwareversie kort worden weergegeven. Zodra de nulaanduiding verschijnt, is de weegschaal gereed voor gebruik.
Verfmengweegschaal Panda7, Panda7/X, Panda7/X2
139
3
Toetsfuncties
Toets
Functie bij
Kort indrukken
Lang indrukken
Weegschaal tarreren **
Weegschaal in- of uitschakelen **
Omrekenfactor kiezen om kleinere of grotere
hoeveelheid van een recept in te wegen
Resetten van omrekenfactor naar “1” (wegen
zonder factor)
Wijzigen van de weegeenheid
Toegang tot de Mastermode **
(zie Hoofdstuk 6.1)
Next
Comp
Bevestigen van het streefgewicht van een
ingewogen component en doorgaan met de
volgende component
––––
Last
Comp
Bevestigen van het streefgewicht van de
laatst ingewogen component van een recept
Recepteerprocedure afbreken
Recepteermethode of tolerantie kiezen
Gekozen recepteermethode bevestigen of gekozen tolerantie bevestigen
Geavanceerd-recepteermodus
Volgende cijfer van streefgewicht instellen
Geavanceerd-recepteermodus
Ingevoerd streefgewicht bevestigen
O/T
On/Off
Factor
Unit
Menu
Mode
Enter
+
Yes
Functie afhankelijk van actuele gekozen bedrijfsmodus
Mastermode **
Mastermode
Bevestigen van actuele instelling
––––
Geavanceerd-recepteermodus
Streefwaarde van component verhogen
–
No
Geavanceerd-recepteermodus
––––
Functie afhankelijk van actuele gekozen bedrijfsmodus
Mastermode **
Verwerpen van actuele instelling
Mastermode
––––
Geavanceerd-recepteermodus
Streefwaarde van component verlagen
Geavanceerd-recepteermodus
Terug naar laatste cijfer
Nederlands
** Bij ijkweegschalen zijn alleen deze toetsen geactiveerd
Verfmengweegschaal Panda7, Panda7/X, Panda7/X2
140
Toetsenbord blokkeren
Om het toetsenbord te blokkeren houdt u de toetsen «O/T» en «+» tegelijkertijd ten minste 2 seconden ingedrukt.
Behalve de toets «O/T» zijn dan alle toetsen geblokkeerd. Bij weegschalen met een display wordt daarop kort “key
locked” weergegeven. Deze mededeling wordt ook weergegeven als bij een geblokkeerd toetsenbord op een
willekeurige toets wordt gedrukt.
Toetsenbordblokkering opheffen
Om de blokkering van het toetsenbord op te heffen houdt u de toetsen «O/T» en «–» tegelijkertijd ten minste 2 seconden
ingedrukt. Bij weegschalen met een display wordt dan kort “key unlocked” weergegeven".
Weegschaal op de PS7001-standaardinstellingen instellen
Om met uw Panda7-weegschaal te kunnen werken met de instellingen van een PS7001-weegschaal houdt u de
toetsen «Unit» en «Last Comp» tegelijkertijd ten minste 2 seconden ingedrukt. Bij weegschalen met een display wordt
dan kort “PS7001-F” weergegeven. De weegschaal werkt dan met dezelfde standaardinstellingen als een PS7001weegschaal.
Opmerking: De weegschaalinstellingen kunnen op elk moment weer gewijzigd worden (zie Hoofdstuk 6 “De
Mastermode”) of de weegschaal kan weer teruggezet worden naar de fabrieksinstellingen (zie onderstaande beschrijving).
Weegschaal naar fabrieksinstellingen terugzetten
Nederlands
Om de weegschaal terug te zetten naar de fabrieksinstellingen houdt u de toetsen «Unit» en «–» tegelijkertijd ten minste
2 seconden ingedrukt. Bij weegschalen met een display wordt dan kort “factory set” weergegeven". De weegschaal
is dan teruggezet naar de fabrieksinstellingen.
Verfmengweegschaal Panda7, Panda7/X, Panda7/X2
141
4
Wegen
4.1
In-/uitschakelen en weegeenheid kiezen
In-/uitschakelen
O/T
On/Off
Door de toets «On/Off» lang in te drukken, kunt u de weegschaal in- of uitschakelen.
Na het inschakelen voert de weegschaal een displaytest uit. Zodra de gewichtsaanduiding
verschijnt, is de weegschaal weegbereid en automatisch op nul gesteld.
Weegeenheid kiezen (niet beschikbaar bij ijkweegschalen)
Door de toets «Unit» kort in te drukken, kan de weegeenheid worden gewisseld tussen “g” (gram),
“oz” (ounce) en “P” (parts).
Unit
Menu
4.2
Eenvoudig wegen
Plaats de weegbak.
O/T
On/Off
Om te tarreren, drukt u kort op de toets «O/T». De nulaanduiding verschijnt.
Vul de bak met de gewenste hoeveelheid van het weegprodukt.
adv
Nederlands
C.o.1.5.0.0
Wacht totdat de stilstandscontrole (ringsymbool op display) verdwijnt en lees
het weegresultaat af.
g
Verfmengweegschaal Panda7, Panda7/X, Panda7/X2
142
5
Recepteren
Aanwijzing: Bij ijkweegschalen zijn de recepteerfuncties gedeactiveerd (factorwegen, recepteren met correctie).
5.1
Factor kiezen
Om een grotere of kleinere hoeveelheid van een bepaald recept in te wegen, kan een factor (multiplicator) worden
gekozen.
Factor
*
C.o.r.r.0.0
fctr
*
Factor
0.5.0. .C.U.M. .I.M.M.8.
C.o.r.r.0.0
fctr
5.0.0. .C.U.M. .I.M.M.8.
adv
Door de toets «Factor» kort in te drukken, activeert u de
factorweging.
In het display verschijnt linksonder de bij de laatste factorweging gebruikte factor (bijv. 0.50).
Druk aansluitend de toets «Factor» herhaaldelijk kort in,
totdat de gewenste factor (0.20 ... 5.00) weergegeven wordt.
adv
Bij de aansluitende weging wordt ingewogen op het streefgewicht (bijv. 1000 g) van een component volgens recept.
Afhankelijk van de gekozen factor wordt echter een hoeveelheid ingewogen die de desbetreffende factor kleiner of groter
is.
Voorbeeld 1: Gewicht volgens recept 1000 g, gekozen factor
0.50 (voor halve hoeveelheden). Weergave: 1000, daadwerkelijk ingewogen: 500 g
Voorbeeld 2: Gewicht volgens recept 1000 g, gekozen factor
3.00 (voor drievoudige hoeveelheid). Weergave: 1000,
daadwerkelijk ingewogen: 3000 g
Nederlands
Factor
C.o.r.r.0.0 g
adv
Factorweging deactiveren: Door de toets «Factor» lang in te
drukken, deactiveert u de factorweging.
De factoraanduiding verdwijnt en de factor wordt op 1 teruggezet.
Verfmengweegschaal Panda7, Panda7/X, Panda7/X2
143
5.2
De verschillende recepteermethoden
De Panda7 biedt verschillende recepteermethoden. Elke recepteermethode bestaat uit:
ADV
– de geavanceerd recepteermodus “ADV
ADV”:
In deze modus wordt eerst het streefgewicht van een component ingevoerd. Vervolgens wordt de component
ingewogen en bevestigd. Bij inweging van volgende componenten wordt automatisch rekening gehouden met
eventuele inweegfouten.
– de weergavesoort:
– “ABS
ABS” Absoluut-weergave: weergave van het absolute gewicht van een component.
ABS
– “CUM
CUM” Cumulatief-weergave: weergave van het cumulatieve gewicht.
CUM
– de correctiemodus:
– “IMM
IMM”-correctie: correctie onmiddellijk na elke incorrect ingewogen component
IMM
– “END
END”-correctie: correctie aan het einde van het recepteren
END
Via combinaties kunnen 4 verschillende recepteermethoden worden verkregen:
Recepteermodus
geavanceerd
ADV ABS END –> Hfdst. 5.5
X
ADV CUM END –> Hfdst. 5.5
X
ADV ABS IMM –> Hfdst. 5.6
X
ADV CUM IMM –> Hfdst. 5.6
X
Weergavesoort
Correctiemodus
absoluut cumulatief onmiddellijk aan einde
X
X
X
X
X
X
X
X
Nederlands
Recepteermethode
Verfmengweegschaal Panda7, Panda7/X, Panda7/X2
144
5.3
Recepteermethode kiezen
C.o.r.r.0.?
Druk toets «Mode» kort in. De als laatste gekozen recepteermethode verschijnt op het display (fabrieksinstelling: “ADV
ABS END”).
Mode
Enter
C.o.r.r.0.?
Kies door herhaald, kort indrukken van de toets «Mode» de
gewenste recepteermethode (bijv. “ADV CUM END”).
Mode
Enter
.t.o.l.0.?
Bevestig de gekozen recepteermethode door de toets «Mode»
lang in te drukken.
De aanduiding voor de selectie van de tolerantie verschijnt op
het display. Bij overschrijden van deze tolerantie moeten de
afzonderlijke componenten gecorrigeerd worden.
Mode
Enter
Mode
Enter
ADV. .A.B.S. .E.N.D.8.
A.D.V. .CUM. .E.N.D.8.
A.D.V. .A.B.S. .E.1.1.0. % tol
.t.o.l.0.?
A.D.V. .A.B.S. .E.1.1.5. % tol
adv
adv
Kies door herhaald, kort indrukken van de toets «Mode» de
gewenste plus/minus-tolerantie in % (no, 0.5 ... 15.0).
Aanwijzing: “no” betekent een tolerantie van nul.
Bevestig de gekozen tolerantie (bijv. 1.5%) door de toets
«Mode» lang in te drukken. De weegschaal is nu gereed voor
recepteren.
Mode
Enter
Aanwijzing: de gekozen recepteermethode blijft geactiveerd
totdat een andere methode wordt gekozen.
Nederlands
5.4
Aanwijzingen voor het recepteren
Last
Comp
Recepteren afbreken
Last
Comp
Recepteerverslagen afdrukken
Mode :ADV ABS END
Components:
co01
target: 100.0 g
true : 110.0 g
co02
target: 20.0 g
true : 22.0 g
co03
target: 5.0 g
true : 5.5 g
Het recepteren kan altijd worden afgebroken door de toets «Last Comp» lang
in te drukken.
Indien uw weegschaal is aangesloten op een printer, kan na afloop van een
receptering een desbetreffend recepteerverslag worden afgedrukt door de toets
«Last Comp» lang in te drukken.
Verfmengweegschaal Panda7, Panda7/X, Panda7/X2
145
5.5
Recepteren met “ADV ABS END” en “ADV CUM END”
Procedure
1. Plaats lege bak en tarreer.
2. Druk toets «Next Comp» in om met recepteren te beginnen.
3. Voer streefgewicht van de aangegeven component in (cijfers met toets «+» resp. «–» instellen en ingestelde cijfers
bevestigen door toets «Enter» kort in te drukken). Bevestig ingevoerd streefgewicht door toets «Enter» lang in te
drukken.
4. Weeg component op basis van nul in en bevestig dit (ook bij overvulling) met de toets «Next Comp». Indien van
de component te veel werd gevuld, wordt de fout bij het vullen van de volgende componenten automatisch
gecompenseerd.
5. Herhaal stap 3 en 4 totdat alle componenten ingewogen zijn. Bevestig laatste component met de toets «Last Comp».
6. De weegschaal controleert nu of afzonderlijke componenten opnieuw moeten worden gedoseerd. Indien ja: doseer
de aangegeven componenten opnieuw en bevestig deze telkens met de toets «Next Comp».
Herhaal deze stap totdat alle componenten opnieuw zijn gedoseerd.
Na beëindiging van de receptering geeft de weegschaal “done” aan, daarna het eindgewicht van het mengsel.
Voorbeeld
Recept bestaande uit: 1e component 100 g, 2e component 20 g, 3e component 5 g
Geen factor, geen tolerantie gekozen. De 2e component wordt onjuist ingewogen (22.0 g i.p.v. 20.0 g)
Actie
“ADV ABS END”
Plaats lege bak en tarreer
“ADV CUM END”
8.8.8.8.0.0 g
8.8.8.8.0.0 g
adv
O/T
On/Off
Start recepteren
*
Next
Comp
8.8.8.8.0.0 g
*
8.8.8.8.0.1 g
*
8.8.8.8.c.o.0.1.8.8.1.0.
corr adv
8.8.8.8.0.0 g
8.8.8.8.c.o.0.1.8.8.1.0. corr
adv
cum
adv
cum
Voer streefgewicht van 1e component
(125 g) per cijfer in
+
Yes
Mode
Enter
*
8.8.8.8.c.o.0.1.8.8.1.0. corr
*
8.8.8.8.1.0 g
8.8.8.8.c.o.0.1.8.8.1.0.
adv
corr adv
8.8.8.8.0.1 g
8.8.8.8.c.o.0.1.8.8.1.0. corr
*
8.8.8.8.1.0 g
8.8.8.8.c.o.0.1.8.8.1.0. corr
adv
cum
adv
cum
Nederlands
1e cijfer
Verfmengweegschaal Panda7, Panda7/X, Panda7/X2
146
Actie
2e cijfer
“ADV ABS END”
+
Yes
Mode
Enter
3e cijfer
+
Yes
Mode
Enter
Bevestig ingevoerd streefgewicht
*
*
*
Mode
Enter
Vul 2e component
*
8.8.8.1.2.5 g
*
8.8.1.2.5.0 g
*
8.-.1.2.5.0 g
*
8.-.1.2.0.0 g
*
8.-.1.2.0.0 g
*
8.-.-.2.0.0 g
*
8.-.-.2.0.0 g
*
8.-.-.2.2.0 g
*
8.8.8.8.c.o.0.1.8.8.1.0.
*
8.8.8.8.c.o.0.1.8.8.1.0.
*
8.8.8.8.c.o.0.1.8.8.1.0.
*
Next
Comp
Voer streefgewicht van 2e component
20 g (ABS)/145 g (CUM) per cijfer in en
bevestig dit (zie 1e component)
8.8.8.1.2.0 g
8.8.8.8.c.o.0.1.8.8.1.0.
1e
Bevestig inweging
*
8.8.8.8.c.o.0.1.8.8.1.0.
Mode
Enter
Vul 1e component
8.8.8.8.1.2 g
8.8.8.8.c.o.0.1.8.8.1.0.
*
8.8.8.8.c.o.0.28.8.1.0.
*
8.8.8.8.c.o.0.28.8.1.0.
*
8.8.8.8.c.o.0.28.8.1.0.
*
8.8.8.8.c.o.0.28.8.1.0.
2e
“ADV CUM END”
corr adv
8.8.8.8.1.2 g
8.8.8.8.c.o.0.1.8.8.1.0. corr
corr adv
8.8.8.1.2.0 g
8.8.8.8.c.o.0.1.8.8.1.0. corr
corr adv
8.8.8.1.2.5 g
8.8.8.8.c.o.0.1.8.8.1.0. corr
corr adv
8.8.1.2.5.0 g
8.8.8.8.c.o.0.1.8.8.1.0. corr
corr adv
8.-.1.2.5.0 g
8.8.8.8.c.o.0.1.8.8.1.0. corr
corr adv
8.-.1.2.0.0 g
8.8.8.8.c.o.0.1.8.8.1.0. corr
corr adv
8.-.1.2.0.0 g
8.8.8.8.c.o.0.28.8.1.0. corr
corr adv
8.-.1.4.5.0 g
8.8.8.8.c.o.0.28.8.1.0. corr
corr adv
8.-.-.2.0.0 g
8.8.8.8.c.o.0.28.8.1.0. corr
corr adv
8.-.-.2.2.0 g
8.8.8.8.c.o.0.28.8.1.0. corr
adv
cum
adv
cum
adv
cum
adv
cum
adv
cum
adv
cum
adv
cum
adv
cum
adv
cum
adv
cum
Nederlands
van 2e comp. is 2 g te veel gevuld
Bevestig inweging
Next
Comp
*
8.-.-.2.0.0 g
8.8.8.8.c.o.0.38.8.1.0.
corr adv
*
8.-.-.2.0.0 g
8.8.8.8.c.o.0.38.8.1.0. corr
adv
cum
Verfmengweegschaal Panda7, Panda7/X, Panda7/X2
147
Actie
“ADV ABS END”
Voer streefgewicht van 2e component
5 g (ABS)/150 g (CUM) per cijfer in en
bevestig dit (zie 1e component)
*
8.-.-.2.5.0 g
*
8.-.-.-.5.0
*
8.-.-.2.0.0
*
8.8.8.8.c.o.0.38.8.1.0.
*
Mode
Enter
8.8.8.8.c.o.0.38.8.1.0.
Vul 3e component
*
“ADV CUM END”
corr adv
8.8.8.8.c.o.0.38.8.1.0. corr
corr adv
8.8.8.8.c.o.0.38.8.1.0. corr
3e
8.-.1.5.0.0 g
8.-.-.-.5.0
8.8.8.8.c.o.0.38.8.1.0. corr
adv
8.-.-.2.0.0
8.8.8.8.c.o.0.38.8.1.0. corr
adv
cum
adv
cum
adv
cum
Aanwijzing: de fout bij het inwegen van de 2e component wordt bij het
inwegen van de 3e component gecompenseerd. Bij de aanduiding 0.0
zijn in werkelijkheid 5,5 g ingewogen.
Bevestig inweging (laatste)
*
Last
Comp
*
8.-.-.1.2.5 g
8.8.8.8.c.o.0.18.8.1.0.
corr adv
8.-.-.1.2.5 g
8.8.8.8.c.o.0.18.8.1.0. corr
adv
cum
Aanwijzing: op grond van de fout bij het inwegen van de 2e component
moet van de 1e component 12,5 g worden bijgevuld.
*
Next
Comp
*
8.-.-.2.0.0 g
*
8.8.8.8.c.o.0.18.8.1.0.
1e
Bevestig nadosering
8.-.-.2.0.0 g
*
8.8.8.8.d.o.n.e8.8.8.8.
corr adv
corr adv
8.-.-.2.0.0 g
8.8.8.8.c.o.0.18.8.1.0. corr
8.-.-.2.0.0 g
8.8.8.8.d.o.n.e8.8.8.8. corr
adv
cum
adv
cum
De recepteerprocedure wordt beëindigd. Het eindgewicht van het
mengsel wordt getoond.
8.-.1.6.5.0 g
adv
8.-.1.6.5.0 g
adv
cum
Nederlands
Vul 12,5 g van 1e component bij
Verfmengweegschaal Panda7, Panda7/X, Panda7/X2
148
5.6
Recepteren met “ADV ABS IMM” en “ADV CUM IMM”
Procedure
1. Plaats lege bak en tarreer.
2. Druk toets «Next Comp» in om met recepteren te beginnen.
3.Voer streefgewicht van de aangegeven component in (cijfers met toets «+» resp. «–» instellen en ingestelde cijfers
bevestigen door toets «Enter» kort in te drukken). Bevestig ingevoerd streefgewicht door toets «Enter» lang in te
drukken.
4. Weeg component op basis van nul in en bevestig dit (ook bij overvulling) met de toets «Next Comp». Indien van
de component te veel werd gevuld, wordt de fout bij het vullen van de volgende componenten automatisch
gecompenseerd.
5. De weegschaal controleert na elke component of de ingewogen componenten opnieuw moeten worden gedoseerd.
Indien ja: doseer de aangegeven componenten opnieuw en bevestig deze telkens met de toets «Next Comp».
Herhaal deze stap totdat alle componenten opnieuw zijn gewogen.
6. Herhaal stap 3, 4 en 5 totdat alle componenten zijn ingewogen. Bevestig laatste component met de toets «Last
Comp».
Na beëindiging van het recepteren geeft de weegschaal “done” aan, daarna het eindgewicht van het mengsel.
Voorbeeld
Recept bestaande uit: 1e component 125 g, 2e component 20 g, 3e component 5 g
Geen factor, geen tolerantie gekozen. De 2e component wordt onjuist ingewogen (22.0 g i.p.v. 20.0 g)
Actie
“ADV ABS IMM”
Plaats lege bak en tarreer
“ADV CUM IMM”
8.8.8.8.0.0 g
imm
8.8.8.8.0.0 g
adv
imm
8.8.8.8.0.0 g
corr adv
imm
8.8.8.8.0.1 g
imm
O/T
On/Off
Start recepteren
Next
Comp
*
imm
8.8.8.8.c.o.0.1.8.8.1.0.
*
8.8.8.8.0.0 g
8.8.8.8.c.o.0.1.8.8.1.0. corr
adv
cum
adv
cum
Voer streefgewicht van 1e component
(125 g) per cijfer in
Nederlands
1e cijfer
+
Yes
Mode
Enter
*
imm
*
8.8.8.8.c.o.0.1.8.8.1.0.
8.8.8.8.1.0 g
imm
*
corr adv
8.8.8.8.c.o.0.1.8.8.1.0. corr
*
adv
8.8.8.8.0.1 g
8.8.8.8.c.o.0.1.8.8.1.0. corr
8.8.8.8.1.0 g
imm
8.8.8.8.c.o.0.1.8.8.1.0. corr
adv
cum
adv
cum
Verfmengweegschaal Panda7, Panda7/X, Panda7/X2
149
2e cijfer
“ADV ABS IMM”
+
Yes
Mode
Enter
3e cijfer
+
Yes
Mode
Enter
Bevestig ingevoerd streefgewicht
Mode
Enter
Vul 1e component
1e
Bevestig inweging
Next
Comp
Voer streefgewicht van 2e component
20 g (ABS)/145 g (CUM) per cijfer in en
bevestig dit (zie 1e component)
Mode
Enter
*
imm
8.8.8.1.2.0 g
imm
8.8.8.1.2.5 g
imm
8.8.1.2.5.0 g
imm
8.-.1.2.5.0 g
imm
8.-.1.2.0.0 g
imm
8.-.1.2.0.0 g
imm
8.-.-.2.0.0 g
imm
imm
*
imm
*
imm
*
imm
*
imm
*
imm
*
imm
*
2e
*
8.8.8.8.c.o.0.1.8.8.1.0.
8.8.8.8.c.o.0.1.8.8.1.0.
8.8.8.8.c.o.0.1.8.8.1.0.
8.8.8.8.c.o.0.1.8.8.1.0.
8.8.8.8.c.o.0.1.8.8.1.0.
8.8.8.8.c.o.0.1.8.8.1.0.
8.8.8.8.c.o.0.28.8.1.0.
8.8.8.8.c.o.0.28.8.1.0.
corr adv
*
corr adv
*
corr adv
*
corr adv
*
corr adv
*
corr adv
*
corr adv
*
corr adv
8.-.-.2.0.0 g
imm
Vul 2e component
*
8.8.8.8.1.2 g
imm
*
“ADV CUM IMM”
8.8.8.8.c.o.0.28.8.1.0. corr
*
adv
8.8.8.8.1.2 g
8.8.8.8.c.o.0.1.8.8.1.0. corr
8.8.8.1.2.0 g
8.8.8.8.c.o.0.1.8.8.1.0. corr
8.8.8.1.2.5 g
8.8.8.8.c.o.0.1.8.8.1.0. corr
8.8.1.2.5.0 g
8.8.8.8.c.o.0.1.8.8.1.0. corr
8.-.1.2.5.0 g
8.8.8.8.c.o.0.1.8.8.1.0. corr
8.-.1.2.0.0 g
8.8.8.8.c.o.0.1.8.8.1.0. corr
8.-.1.2.0.0
8.8.8.8.c.o.0.28.8.1.0. corr
8.-.1.4.5.0 g
8.8.8.8.c.o.0.28.8.1.0. corr
8.-.-.2.0.0 g
imm
8.8.8.8.c.o.0.28.8.1.0. corr
8.-.-.2.2.0 g oz% *8.-.-.2.2.0 g
imm
8.8.8.8.c.o.0.28.8.1.0. corr
adv
cum
imm
8.8.8.8.c.o.0.28.8.1.0. corr
adv
cum
adv
cum
adv
cum
adv
cum
adv
cum
adv
cum
adv
cum
adv
cum
adv
cum
adv
cum
van 2e comp. is 2 g te veel gevuld
Nederlands
Actie
Verfmengweegschaal Panda7, Panda7/X, Panda7/X2
150
Actie
“ADV ABS IMM”
Bevestig inweging
Next
Comp
*
“ADV CUM IMM”
8.-.-.1.2.5 g
imm
8.8.8.8.c.o.0.18.8.1.0. corr
8.-.-.1.2.5Pg oz%
+*
adv
imm
fctr
cum
8.8.8.8.c.o.0.18.8.1.0. %corrtol adv
Aanwijzing: op grond van de fout bij het inwegen van de 2e component
moet van de 1e component 12,5 g worden bijgevuld.
Vul 12,5 g van 1e component bij
1e
Bevestig nadosering
Next
Comp
Voer streefgewicht van 2e component
5 g (ABS)/150 g (CUM) per cijfer in en
bevestig dit (zie 1e component)
Mode
Enter
Vul 3e component
*
*
imm
8.-.-.2.0.0 g
imm
8.-.-.2.5.0 g
imm
8.-.-.-.5.0
imm
8.-.-.2.0.0
imm
imm
*
imm
*
imm
*
*
8.-.-.2.0.0 g
imm
imm
3e
8.8.8.8.c.o.0.18.8.1.0.
8.8.8.8.c.o.0.38.8.1.0.
8.8.8.8.c.o.0.38.8.1.0.
8.8.8.8.c.o.0.38.8.1.0.
8.8.8.8.c.o.0.38.8.1.0.
corr adv
*
corr adv
*
corr adv
*
corr adv
*
corr adv
8.-.-.2.0.0 g
8.8.8.8.c.o.0.18.8.1.0. corr
8.-.-.2.0.0 g
8.8.8.8.c.o.0.38.8.1.0. corr
8.-.1.5.0.0 g
8.8.8.8.c.o.0.38.8.1.0. corr
8.-.-.-.5.0
8.8.8.8.c.o.0.38.8.1.0. corr
8.-.-.2.0.0
8.8.8.8.c.o.0.38.8.1.0. corr
adv
cum
adv
cum
adv
cum
adv
cum
adv
cum
Aanwijzing: de fout bij het inwegen van de 2e component wordt bij het
inwegen van de 3e component gecompenseerd. Bij de aanduiding
0.0 zijn in werkelijkheid 5,5 g ingewogen.
Bevestig inweging (laatste)
Last
Comp
*
*
8.-.-.2.0.0
imm
8.8.8.8.d.o.n.e8.8.8.8.
corr adv
8.-.-.2.0.0
imm
8.8.8.8.d.o.n.e8.8.8.8. corr
adv
cum
De recepteerprocedure wordt beëindigd. Het eindgewicht van het
mengsel wordt getoond.
8.-.1.6.5.0 g
Nederlands
imm
adv
8.-.1.6.5.0 g
imm
adv
cum
Verfmengweegschaal Panda7, Panda7/X, Panda7/X2
151
6
De Mastermode
In de Mastermode kunt u de instellingen van de weegschaal wijzigen en functies activeren.
6.1
Opvragen van de Mastermode
Unit
Menu
+
Yes
6.2
M.A.S.t.E.r
Houd in de Weegmodus de toets «Menu» ingedrukt, totdat de
hiernaast aangegeven weergave verschijnt.
M.A.S.C.A.L
Druk binnen 3 seconden op de toets «Yes» (anders keert de
weegschaal weer naar de Weegmodus terug). Aansluitend
verschijnt het eerste menublok van de Mastermode.
Menuoverzicht Mastermode
Display/instellingen
Functie/Aanwijzingen
CAL
Weegschaal kalibreren (zie Hoofdstuk 6.3, niet beschikbaar bij ijkweegschalen)
SCALE
rESolu
0.1
0.05
Unit
g
oz
P
b.Light
On
Off
rEStAr
On
Off
VibrAt
MEd
HIGH
LOW
ProcES
UNIVEr
dOSING
rESEt
Std On
End SC
Weegschaalinstellingen
Resolutie kiezen (niet beschikbaar bij ijkweegschalen)
”Full Range” 0 ... 7100 g / 0.1 g (fabrieksinstelling)
”Delta Range” 0 ... 999.95 g / 0.05 g, 1000 ... 7100 g / 0.1 g
Weegeenheid kiezen (niet beschikbaar bij ijkweegschalen)
Gram (fabrieksinstelling)
Ounce
Parts (1 Part = 1/32 oz)
Displayverlichting in-/uitschakelen
ingeschakeld (fabrieksinstelling)
uitgeschakeld
Automatische geheugenfunctie in-/uitschakelen
(niet beschikbaar bij ijkweegschalen)
ingeschakeld
uitgeschakeld (fabrieksinstelling)
Vibratieadapter kiezen
normale weegproducten (fabrieksinstelling)
onrustige omgeving
zeer rustige omgeving
Procesadapter kiezen
normale weegproducten
Doseren, bijv. van vloeibare of poedervormige weegproducten (fabrieksinstelling)
Terugzetten van alle SCALE-instellingen naar de fabrieksinstellingen
Met «Yes» terugzetten naar fabrieksinstelling, met «No» verwerpen
“SCALE”-blok verlaten met «Yes»
Nederlands
Bediening van de Mastermode: bevestigen met «Yes», verwerpen met «No».
Verfmengweegschaal Panda7, Panda7/X, Panda7/X2
152
Display/Instellingen
Functie/Aanwijzingen
IFACE1 / IFACE2
ModE
dIALOG
2nd.dIS
PN
Print
CYCLE
Protok
HONOFF
NO
PAritY
7 EVEN
7 NO P
8 NO P
7 Odd
BAUd
300
Interface(s) configureren
Modus kiezen
Communicatie met computer (fabrieksinstelling IFACE 1)
Aansturing tweede display (fabrieksinstelling IFACE 2)
PM-weegschaalmodus
Communicatie met printer
Gegevens afdrukken bij wijziging gewicht
Protokol kiezen
Xon/Xoff-protokol (fabrieksinstelling)
geen protokol
Bits en pariteit kiezen
7 databits met even pariteit
7 databits zonder pariteit
8 databits zonder pariteit (fabrieksinstelling)
7 databits met oneven pariteit
Baudrate kiezen
300, 600, 1200, 2400, 4800, 9600 (fabrieksinstelling),
19200 en 38400
38400
Aut.Mod
AUt.SIR
NO
rESEt
Std On
EndIF1
“IFACE1”- resp. “IFACE2”-blok verlaten met «Yes»
LiSt
Met «Yes» Mastermode-instellingen afdrukken
End
Met «Yes» Mastermode verlaten. Wedervraag “StorE?” met «Yes» bevestigen om
instellingen op te slaan of met «No» verwerpen.
6.3
+
Yes
Nederlands
Automatische modus
Interface stuurt continu gegevens (fabrieksinstelling IFACE 1)
Automatische modus uitgeschakeld (fabrieksinstelling IFACE 2)
Terugzetten van de IFACE-instelling naar de fabrieksinstellingen
Met «Yes» terugzetten naar fabrieksinstellingen, met «No» verwerpen
Weegschaal kalibreren/justeren (niet beschikbaar bij ijkweegschalen)
M.A.S.C.A.L
Vraag Mastermode op en kies “CAL”.
M.A.7.0.0.0 kg
Ontlast de weegschaal en druk vervolgens op de toets «Yes»
om de kalibratieprocedure te starten.
De weegschaal geeft het kalibratiegewicht knipperend aan
(overeenkomstig de nominale belasting van de weegschaal).
Met de toets «No» kunnen desgewenst andere kalibratiegewichten worden gekozen.
+
Yes
Plaats kalibratiegewicht aangegeven op het display en bevestig met «Yes».
Aanwijzing: Het kalibreren kan altijd worden afgebroken door
lang op de toets «On/Off» te drukken.
Wacht totdat het kalibreren met succes is afgerond (wordt op
het display aangegeven met “done”) en de weegschaal naar
de Weegmodus terugkeert.
Verfmengweegschaal Panda7, Panda7/X, Panda7/X2
153
Foutmeldingen
Overbelasting
{.|.|.|.|.}
adv
<.=.=.=.=.>
adv
------
adv
-.-.n.o.-.-
adv
Onderbelasting
1. Zorg voor een rustige omgeving
2. Zorg dat het weegplateau vrij kan bewegen
3. Wijzig de instelling van de vibratieadapter (Hfdst. 6.2)
Functie niet uitgevoerd
De opgevraagde functie kan niet worden uitgevoerd.
Nulstellen niet mogelijk (overbelasting/onderbelasting)
adv
<.=.n.o.=.>
adv
E.r.r.6.
adv
E.r.r.5.3.
adv
Err
adv
Zorg dat nulstellen niet bij over- of onderbelasting wordt uitgevoerd.
Geen kalibratie/justering
N.o. . .C.a.L. .I.M.M.8.
Verwijder netstekker en steek deze weer in. Indien melding weer verschijnt, dient u de
weegschaal te kalibreren/justeren (Hoofdstuk 6.3). Indien ook dit niet helpt, dient u contact
op te nemen met de leverancier of de vertegenwoordiger.
EAROM checksum error
Verwijder netstekker en steek deze weer in. Indien melding weer verschijnt, dient u contact
op te nemen met de leverancier of de vertegenwoordiger.
Onderspanning
low voltage
Uitgangsspanning van de netadapter te klein. Vervang netadapter door adapter met juiste
uitgangsspanning.
Afleesbaarheid
corr adv
loco01ltage
* ÑÖOre
Plaats weegplateau en zorg dat dit vrij kan bewegen.
Weegresultaat niet stabiel
{.|.n.o.|.}
* rESO?
Ontlast weegschaal of verminder voorbelasting.
Streefwaarde met te kleine resolutie bij recepteren ingevoerd. Pas waarde van afleesnauwkeurigheid weegschaal aan (bijv. invoer 15.01 g bij afleesnauwkeurigheid 0.05 g).
Streefhoeveelheid nog niet bereikt
corr adv
loco01ltage
* Abort?
corr
loco01ltage
Streefhoeveelheid van de component is nog niet bereikt. Vul bij totdat streefhoeveelheid is
bereikt.
Recepteren afgebroken
adv
Recepteren door lang indrukken van de toets «Last Comp» afgebroken.
Nederlands
7
Verfmengweegschaal Panda7, Panda7/X, Panda7/X2
154
8
Interfaces /Toebehoren
8.1
Interface-definitie
De weegschaal Panda7 is standaard uitgerust met één dubbelvoudige RS232C-interface en de Panda7/X en
Panda7/X2 met één enkelvoudige RS232C-interface. De interface(s) zijn beschikbaar via de 9-polige Sub-D bus. De
maximale kabellengte bedraagt 15 m. De configuratie van de interfaces gebeurt in de Mastermode (zie Hoofdstuk 6.2).
Ingebouwde interface(s)
RS232C, 9-pin D-Sub, f
Toewijzing bij
Panda7
Toewijzing
nc
TxD 1
RxD 1
nc
GND
nc
RxD 2
TxD 2
VCC (5V, ≤50mA)
5
4
9
3
8
2
7
1
6
Pin 1
Pin 2
Pin 3
Pin 4
Pin 5
Pin 6
Pin 7
Pin 8
Pin 9
Toewijzing bij
Panda7/X
Panda7/X2
2 interfaces bij gebruik van
Y-kabel (extra), alleen bij Panda7
COM1
COM2
nc
TxD 1
RxD 1
nc
GND
nc
nc
nc
nc
–––
TxD 1
RxD 1
–––
GND
–––
–––
–––
–––
–––
TxD 2
RxD 2
–––
GND
–––
–––
–––
VCC (5V, ≤50mA)
TxD: Data verzenden
RxD: Data ontvangen
GND: Signaalaarde
VCC: Voeding (+5V, ≤50mA)
nc:
not connected (niet aangesloten)
8.2
Toebehoren
Toebehoren
Art.-nr.
Beschermhoes (set à 5 stuks)
71153871
Y-kabel
(9-pin D-Sub, m, COM1/2 f)
21203892
COM1
1:1
ME-00410024
ME-21203892
Kabel naar
display
COM1,2
+5V
Nederlands
Tweede
display
of
COM2
+5V
RS232-kabel voor PC 1,8 m (9-pin D-Sub, m/f, 1:1)
PC
Printerkabel
Printer
00410024
Verfmengweegschaal Panda7, Panda7/X, Panda7/X2
155
9
Technische gegevens / Richtlijnen en testnormen
9.1
Technische gegevens
Maximale belasting
7100 g
Afleesbaarheid
Full Range: 0.1 g (0 ... 7100 g)
Delta Range: 0.05 g (0 ... 999.95 g), 0.1 g (1000 ... 7100 g)
Stabilisatietijd
ca. 1.0 seconde
Lineariteit
0.2 g
Voeding
via netadapter/voeding 15 VDC, 4 Watt
Weegeenheden
g, oz en P (1 Part = 1/32 oz)
Display
LCD (Liquid-Crystal Display), van achteren verlicht
Omgevingscondities
Temperatuurbereik: +10 ... +30°C
Relatieve luchtvochtigheid:
20 ... 80% rF (niet condenserend)
Gewicht netto/bruto
3.4 kg / 4.5 kg
Overspanningcategorie:
II
Vervuilingsgraad:
2
78 mm
65 mm
ø232 mm
29 mm
342 mm
Afmetingen
Nederlands
330 mm
Verfmengweegschaal Panda7, Panda7/X, Panda7/X2
156
9.2
Verklaring van overeenstemming
Verklaring van overeenstemming: weegschaalreeks Panda7
Mettler-Toledo (Changzhou) Scale & System Ltd. verklaart als enig verantwoordelijke dat de weegschalen van het type
Panda7 waarop deze verklaring betrekking heeft voldoen aan de onderstaande EG-richtlijnen en -normen.
Aanduiding
C
EG-richtlijn
getest conform norm
73/23EEC Laagspanning
EN61010-1: 2001
UL Std. No. 3101-1
CAN/CSA-22.2 No. 1010.1-92
US
89/336EEC EMC
EN61326-1 Emissie Kl. B
EN61326-1 Immuniteit
AS/NZS2064.1/2, AS/NZS3548
AS/NZS4251.1, AS/NZS4252.1
[year]
[code]
1)
M
1)
90/384EEC 1)
Niet-zelfstandige
weegschalen
EN45501 1) Metrologische aspecten
geldt alleen voor geijkte weegschalen (Toelating/testcertificaatnr.: R76/1992-NL1-03.10)
Mettler-Toledo (Changzhou) Sacle & System Ltd.
111 Changxi Rd. Changzhou, Jiangsu 213001, PRC
September 2005
David Zheng
President
Chu Jinlan
Quality Assurance Manager
Belangrijke kenmerken voor geijkte weegwerktuigen in landen va de EG
M
Nederlands
M
De vanuit produktie geijkte weegwerktuigen hebben genoemd kenteken op de buiten verpakking en een
groene “M”-sticker op de opschriftenplaat. Deze werktuigen mogen direct in gebruik worden genomen.
Weegwerktuigen, die in 2 fasen geijkt worden en geen groene “M”-sticker op de opschriftenplaat hebben,
zijn op de buiten verpakking van genoemd kenteken voorzien. De 2de fase ijking moet door de erkende
Mettler-Toledo Service Organisatie of door een medewerker van het NMI uitgevoerd worden. Neem
hiervoor contact op met Mettler-Toledo te Tiel afd. service. De 1ste fase van de ijking werd tijdens de
produktie uitgevoerd. Dit omvat alle proeven volgens EN45501-8.2.2.
Voor zover conform de nationale voorschriften in de afzonderlijke landen de geldigheidsduur van de ijking beperkt is,
is de gebruiker van een dergelijke weger er verantwoordelijk voor het tijdig naijken.
Verfmengweegschaal Panda7, Panda7/X, Panda7/X2
157
USA
This equipment has been tested and found to comply with the limits for a Class A digital device, pursuant to both Part 15 of the FCC
Rules and the radio interference regulations of the Canadian Department of Communications. These limits are designed to provide
reasonable protection against harmful interference when the equipment is operated in a commercial environment. This equipment
generates, uses and can radiate radio frequency energy and, if not installed and used in accordance with the instruction manual, may
cause harmful interference to radio communications. Operation of this equipment in a residential area is likely to cause harmful
interference, in which case the user will be required to correct the interference at his own expense.
Canada
Nederlands
ICES-001 Notice for Industrial, Scientific and Medical Radio Frequency Generators: This ISM apparatus meets all requirements of the
Canadian Interference-Causing Equipment Regulations. Please note that this requirement is only for generators which operate at over
10 kHz.
Avis de l’ICES-001, générateurs de radiofréquences dans le domaine industriel, scientifique et médical: Cet appareil ISM (industriel,
scientifique et médical) satisfait à toutes les exigences définies par la réglementation canadienne en matière d’équipements générant
des perturbations radioélectriques. Veuillez noter qu’il s’agit d’une exigence concernant uniquement les générateurs fonctionnant audelà de 10 kHz.
Verfmengweegschaal Panda7, Panda7/X, Panda7/X2
158
Verklaring van overeenstemming: weegschaalreeks Panda7/X
Mettler-Toledo (Changzhou) Scale & System Ltd. verklaart als enig verantwoordelijke dat de weegschalen van het type
Panda7/X waarop deze verklaring betrekking heeft voldoen aan de onderstaande EG-richtlijnen en -normen.
Aanduiding
0032
EG-richtlijn
getest conform norm
94/9/EEC (ATEX)
EN50014, EN50020
FM
FMRC 3600, 3610, 3810
APPROVED
CSA-C22.2 No. 157-92
CSA-C22.2 No. 142-M 1987
ia
0032
73/23EEC Laagspanning
EN61010-1
89/336EEC EMC
EN61326-1 Emissie Kl. B
EN61326-1 Immuniteit
0032
AS/NZS2064.1/2, AS/NZS3548
AS/NZS4251.1, AS/NZS4252.1
Mettler-Toledo (Changzhou) Sacle & System Ltd.
111 Changxi Rd. Changzhou, Jiangsu 213001, PRC
September 2005
David Zheng
President
Chu Jinlan
Quality Assurance Manager
USA
This equipment has been tested and found to comply with the limits for a Class A digital device, pursuant to both Part 15 of the FCC
Rules and the radio interference regulations of the Canadian Department of Communications. These limits are designed to provide
reasonable protection against harmful interference when the equipment is operated in a commercial environment. This equipment
generates, uses and can radiate radio frequency energy and, if not installed and used in accordance with the instruction manual, may
cause harmful interference to radio communications. Operation of this equipment in a residential area is likely to cause harmful
interference, in which case the user will be required to correct the interference at his own expense.
Nederlands
Canada
ICES-001 Notice for Industrial, Scientific and Medical Radio Frequency Generators: This ISM apparatus meets all requirements of the
Canadian Interference-Causing Equipment Regulations. Please note that this requirement is only for generators which operate at over
10 kHz.
Avis de l’ICES-001, générateurs de radiofréquences dans le domaine industriel, scientifique et médical: Cet appareil ISM (industriel,
scientifique et médical) satisfait à toutes les exigences définies par la réglementation canadienne en matière d’équipements générant
des perturbations radioélectriques. Veuillez noter qu’il s’agit d’une exigence concernant uniquement les générateurs fonctionnant audelà de 10 kHz.
Verfmengweegschaal Panda7, Panda7/X, Panda7/X2
159
Verklaring van overeenstemming: weegschaalreeks Panda7/X2
Mettler-Toledo (Changzhou) Scale & System Ltd. verklaart als enig verantwoordelijke dat de weegschalen van het type
Panda7/X2 waarop deze verklaring betrekking heeft voldoen aan de onderstaande EG-richtlijnen en -normen.
Aanduiding
0032
EG-richtlijn
getest conform norm
94/9/EEC (ATEX)
EN50014, EN50020
73/23EEC Laagspanning
EN61010-1
89/336EEC EMC
EN61326-1 Emissie Kl. B
EN61326-1 Immuniteit
0032
0032
AS/NZS2064.1/2, AS/NZS3548
AS/NZS4251.1, AS/NZS4252.1
Mettler-Toledo (Changzhou) Sacle & System Ltd.
111 Changxi Rd. Changzhou, Jiangsu 213001, PRC
September 2005
David Zheng
President
Chu Jinlan
Quality Assurance Manager
USA
This equipment has been tested and found to comply with the limits for a Class A digital device, pursuant to both Part 15 of the FCC
Rules and the radio interference regulations of the Canadian Department of Communications. These limits are designed to provide
reasonable protection against harmful interference when the equipment is operated in a commercial environment. This equipment
generates, uses and can radiate radio frequency energy and, if not installed and used in accordance with the instruction manual, may
cause harmful interference to radio communications. Operation of this equipment in a residential area is likely to cause harmful
interference, in which case the user will be required to correct the interference at his own expense.
Canada
Nederlands
ICES-001 Notice for Industrial, Scientific and Medical Radio Frequency Generators: This ISM apparatus meets all requirements of the
Canadian Interference-Causing Equipment Regulations. Please note that this requirement is only for generators which operate at over
10 kHz.
Avis de l’ICES-001, générateurs de radiofréquences dans le domaine industriel, scientifique et médical: Cet appareil ISM (industriel,
scientifique et médical) satisfait à toutes les exigences définies par la réglementation canadienne en matière d’équipements générant
des perturbations radioélectriques. Veuillez noter qu’il s’agit d’une exigence concernant uniquement les générateurs fonctionnant audelà de 10 kHz.
Verfmengweegschaal Panda7, Panda7/X, Panda7/X2
Nederlands
160
For further information
–––> http://www.e-refinish.com
Für weitere Informationen
–––> http://www.e-refinish.com
Pour de plus amples informations
–––> http://www.e-refinish.com
Para más información
–––> http://www.e-refinish.com
Per ulteriori informazioni
–––> http://www.e-refinish.com
Voor nadere informatie
–––> http://www.e-refinish.com
71148310D
Subject to technical changes and to the availability of the accessories supplied with the instruments
© Mettler-Toledo (Changzhou) Scale & System Ltd.
Mettler-Toledo GmbH
Industrial
PO Box VI-400
CH-8606 Greifensee, Switzerland
Tel. ++41-44-944 22 11
Fax ++41-44-944 31 70
WWW.mt.com
71148310D Printed in China 0604/6.32
Mettler-Toledo (Changzhou)
Scale & System Ltd.
Jiangsu 213001
People’s Republic of China
Tel. ++86-519-664 20 40
Fax ++86-519-664 19 91