1
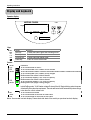
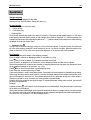
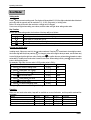
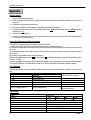
Cub II
GB
Operation manual
Χ METTLER TOLEDO
Printed in China 01/2004
Operating Instructions
GB
Dimensions
Precautions
READ this manual BEFORE operating or servicing this equipment. FOLLOW these instructions carefully.
SAVE this manual for future reference.
Daily Maintenance
DO NOT allow untrained personnel to operate, clean, inspect, maintain, service, or tamper with this equipment.
DO NOT attempt to remove the cover or perform service or maintenance on the internal parts of the scale.
ALWAYS DISCONNECT this equipment from the power source before cleaning or performing maintenance.
Wrong
Right
KEEP the scale clean.
DO NOT put the scale in the water, but you may use watery cloth to clean the scale.
DO NOT put the scale upside down or remove the scale by holding the spider as left.
DO NOT turn the 2 feet on the back tightly to let the air flowing between inside and outside
of the scale smoothly. But please turn these 2 feet tightly until seal the gap between the foot
and base to void water to get into the scale if you want to wash down the scale with water.
PLUG the rubber plug in the hole with power connector (DC) tightly to protect the power
connector as left.
Hole (DC)
How to move scale?
Battery Notice
The battery (6V/5Ah rechargeable lead-acid battery) service life will be affected by the charge and discharge
conditions. When used properly, it can withstand 300 cycles;
The new battery can provided 50 hours work after fully charged. The charge time normally is 15 hours if the battery
is discharged fully. The charge time will be shorter if the battery is not discharge fully. It is commended to charge
the battery every day.
Don Not short the positive pole (+) and negative pole (-) when replace the battery.
Charge the battery at least every 3 months to keep battery in good condition.
The work hours of the battery is shorter than normally if the battery is not used for a long time (e.g. more than 2
months). At this time, please cycle battery at least 3 times by charging it and using it until fully discharged to make
the battery recover to normal condition.
Put back the rubber plug after charge is finished to protect the power connector.
The battery is not warranted due to its service time is greatly influenced by individual.
The work hour will become shorter many months later. It is not a problem of the battery, it is the feature of the
rechargeable battery.
Operating Instructions
2
CUB II
Operating Instructions
Introduction
The Cub II scale is a compact scale with many features.
All our equipment is assembled, tested and packed with great care, should you find any item incorrect please contact
the supplier immediately.
The Cub II scale is a high precision weighing instrument, which has to be approved and stamped by Weights and Measures.
This scale is stamped in our production plant or by your local Weights & Measures office. Please check the official
stamping stickers are on the scale before use.
Please read this instruction manual carefully.
Properly used and maintained, this scale will provide years of accurate weighing. Please handle it as you would any
piece of fine electronic equipment.
Metrological instructions *
Important note
on legal-for-trade scales in EEC
countries
M
Factory verified scales carry this
identification on the label applied on the
package.
M
Scales identified by the green "M" label
applied on the identification plate, can be
operated immediately.
M
Scales calibrated in two stages carry the
corresponding identification on the label
applied on the package
These scales have already been verified in the first
step (declaration of conformity according to EN
45501-8.2) and should receive the second step at
their working place.
This second step must be performed by the certified
METTLER TOLEDO after-sales service.
Please contact your local METTLER TOLEDO
agency.
Retail scales, used for legal trade, must be submitted
for calibration and verification.
Do respect the current metrological directives in your
country.
* This is only for some European Countries.
Contents
INSTALLATION.................................................. 4
Precautions .................................................... 4
Environment ................................................... 4
Unpacking and inspection ................................. 4
Setup............................................................. 4
Power up sequence and Turn Off the Scale......Error!
Bookmark not defined.
DISPLAY AND KEYBOARD ................................... 5
Operator display .............................................. 5
Keys......................... Error! Bookmark not defined.
Cursors ..................... Error! Bookmark not defined.
OPERATIONS ................................................... 6
Straight weighing............................................. 6
Re-zero function .............................................. 6
Tare Function.................................................. 6
Power Save and automatically turning off scale .... 6
Backlight........................................................ 6
OVER/UNDER................................................... 7
Setting mode................................................... 7
Key Function................................................... 7
Set over and under vaulue................................. 7
Operation ....................................................... 7
SETUP ........................................................... 8
Access to setting mode ..................................... 8
Function of the key........................................... 8
Parameter list.................................................. 8
Exit setting mode ............................................. 8
APPENDIX....................................................... 9
Rechargeable lead-acid battery .......................... 9
Daily Maintenance ........................................... 9
Error Messages................................................ 9
Specification ................................................... 9
Operating Instructions
Installation
Precautions
This chapter gives detailed instructions and important information to install the Cub II scale successfully.
Environment
Before you install the scale, identify the best location for the equipment. The proper environment enhances its operation
and longevity. Keep in mind the following factors, which might have a negative influence on the scale's operation:
+Vibration
Vibration diminishes the scale’s ability to measure accurately. Electrical machinery such as conveyors and drill presses
can cause inaccurate and non-repeatable readings. The scale may also read inaccurately if it is not leveled properly.
+Air current
Moving air can cause the scale to read an additional force (add. weight) and have the same effect as vibration.
+Friction
A scale cannot measure accurately if an object is rubbing or pressing against the plate.
Unpacking and inspection
Please inspect the package as it is delivered by the carrier. If the shipping container is damaged, check for internal damage
and file a freight claim with the carrier if necessary. If the container is undamaged, open the box, remove the scale and
place it on a solid, flat surface. Please keep the packing material and shipping insert in case you need to return the scale
to METTLER TOLEDO. The Cub II is a precision instrument and may be permanently damaged if not shipped in factory
approved packaging.
Package contents for all Cub II units include:
Screw for shipping
protection (3 total)
+ Cub II scale
+ platter + AC-DC power adapter + operation manual
Setup
Open the box and pull up the scale. Remove the packing material from each side of the scale.
Set the unit on a sturdy; Remove 3 shipping protection screws on the spider, then remove the
3 plastic column inserts under the spider.
Level the scale by turning the adjustable feet. It is leveled correctly when the bubble
indicator is in the centre of the circle.
Bubble indicator:
Good
Wrong
Spider
Insert for shipping
protection 3 total)
All four feet must touch the surface to make sure that Cub II does not rock. Then Put the platter on top of Cub II.
If no battery is in the scale, unpack the power adapter and plug it into the bottom of the scale. Plug the line cord into a
properly grounded AC power outlet.
Notice: Don’t turn the 2 feet on the back tightly to let the air flowing between inside and outside of the scale smoothly.
But please turn these 2 feet tightly until seal the gap between the foot and base to void water to get into the scale if you
want to wash down the scale with water.
Power up sequence and Turn off the Scale
Press the power key
to turn on the Cub II. It goes through a series of self-tests when it is turned on. The scale performs
diagnoses on its ROM and RAM, and proceeds to normal operating mode. The sequence is as follows:
• Light all segments of the display characters. This verifies operation of all segments.
• Display the software part number, revision number, GEO value and battery type one by one.
• Capture zero and be ready for normal operation.
Note: Before switching on the Cub II scale, always make sure there is nothing on the platter.
Press the power key
until “OFF” is shown to turn off the scale.
4
CUB II
Operating Instructions
Operating Instructions
Display and keyboard
Operator display
METTLER TOLEDO
CUB II
g
Weight
kg
0
UNDER OVER
NET
0
T
F
Max 3 kg Min 20 g e=1 g
Keys
Key
>0<
>T<
F
Name
Zero Key
Tare Key
Function Key
Power key
Function
To return the scale to gross zero if drifting occurs
To tare the scale
To enter over/under setting mode
To turn on or turn off the scale
Cursors
Cursor
>0<
LED
version
Description
To be lit when weight is gross 0
To be lit when power is AC or battery is fully charged
(-)
To be lit when power is battery, it blinks to indicate the voltage of battery is lower than the required
To be lit when power is AC or battery is fully charged
blinking means the voltage is being charged
To be lit when left capacity is 2/3 of the full capacity
blinking means the voltage is being charged
LCD
To be lit when left capacity is 1/3 of the full capacity
version
blinking means the voltage is being charged
In charging mode: blinking means the voltage is being charged
In discharging mode: To be lit when voltage is almost used up. Begin blinking when the power
of the battery is less than the requirement. The scale will be turned off automatically when voltage
is less than the critical voltage point.
Net
To be lit when tare is existed
under
To be lit when weight is less than the under value
over
To be lit when weight is more than the over value
Notice: Some model has back display. Please check with dealer if the model you purchase has back display.
6
CUB II
METTLER TOLEDO
GB
Operations
Straight weighing
Place the item to be weighed on the platter.
Remove the item from the platter, display will return to 0.
Re-zero function
There are two ways to re-zero the scale:
1. Power-up Zero
2. Push button Zero
+ Power-up Zero
The scale will automatically capture zero when it is turned on. The power-up zero capture range is +/-10% of the
scale capacity. When the scale is turned on with a weight on the platter of more than +/-10% of the capacity, the
scale will not capture zero (the weight display will show "-----") and the scale will not be ready for use. After removing
the weight the scale will capture "zero".
+ Pushbutton Zero >0<
The ZERO key re-zeros the scale over a range of +/-2% of the scale capacity. To use this function, the scale must
be in the gross weighing mode(NET cursor must be off) and in a no motion condition. When the weight on the
platter is more then +/-2% of the scale capacity the depression of the zero key will not be accepted.
Tare Function
The Tare key subtracts the weight of the wrapping material.
Place the empty container or wrapping material on the platter, e.g. 50g.
Press >T< key, it show net weight 0g, meanwhile net weight cursor light.
Place the item to be weighed in the container or on the wrapping material and then onto the platter.
Remove the weighed item, as well as the container or wrapping material from the platter, the displays will show
all the negative net weight of the container, e.g. -50g.
Press >T< key to return the scale back to gross weighing mode.
Power Save and automatically turning off scale
Power saving feature is used to save battery power. These functions can be enabled or disabled through setting.
When using the battery and the scale is idle for 2 minutes, the weight display will only display one decimal on the
right and the battery in use cursor is lit. This indicates that the scale is in the power saving cycle. When weight is
placed on the platter or a key is pressed, the scale will wake up automatically.
If there is still no key operation and weight change 15 minutes after power saving status occurred, the scale will
be turned off automatically.
Backlight
>0<
Press key and hold
until to hear 2 continuous beeps to turn on the backlight. Using the same way or just turning
off the scale turn off backlight.
When power is battery the backlight can be turned off temporarily as there is no weight change or no key touching
for 15 seconds, while in this case, if weight changes or any key is pressed, backlight will be turned on automatically.
This function is only available in LCD with backlight version.
CUB II
7
Operating Instructions
Over/Under
Setting mode
Press F key to access to setting mode. The display will show default 0.000 (the digits on the both sides of decimal
point vary with the capacity and its resolution E.g.: 0.000 (3kg scale)) or exiting value.
Notice: All value will be zero after resolution or weight unit is changes.
Cursor over will light when setting over values, and the under will light when setting under value.
Key Function
In over and under setting mode, the functions of the keys will be as follows:
key
Description
>0<
End setting mode and return the scale to weighing mode.
>T<
Chose value in a circle from 0 to 9.
Chose digit in a circle from left to right.
F
Confirm the choice and step forward to next step in a circle of over and under value.
Set over and under value
In setting mode, if the cursor over is lit, the over value can be set. Press key F some times to chose digit you want,
the chosen digit will blink, then press key >T< to change to value of this digit to what you want, use the same way
to set all digits and get the right over value, finally press
to confirm the over value and step forwards to under
value setting. The way to set under value is same as over value. When setting is finish, press >0< key to return the
scale to the weighing mode.
For example: 3kg scale, the over value is 505g, under value is 500g.:
The procedures
display show
Lit cursor
[ 0.000]
over
1) Press F to access to setting mode
2) Press F , then press >T< 5 times
3) Press F twice, then press >T< 5 times
[ 0.500]
over
[ 0.500]
over
[ 0.000]
under
5) Press F , then press >T< 4 times
[ 0.000]
under
6) Press
[ 0.505]
over
4) Press
to set under value
to set over value
[ 0.000]
7) Press >0< to back to weighing mode
The digit in grey shadow mean this digit is blinking.
Operation
When over and under value exists, beep will be available as a sound indication, and the possible mode will be
as follows:
Weight
S3 is 0
S3 is 1
S3 is 2
Lit cursor
> over value
No beep
No beep
beep
over
< under value
No beep
No beep
beep
Under
<= over value and >=under value No beep
beep
No beep
Over and under
Over value=under value =0*
No beep
No beep
No beep
*When both over and under values are 0, over and under indication function is disabled.
8
CUB II
METTLER TOLEDO
GB
Setup
Several parameters in the scale can be changed to enable you to set up the scale to your individual needs.
Access to setting mode
Press and hold >0< until “S1 OFF” is displayed when turn on the scale.
Function of the key
Key
>0<
>T<
F
Name
Finish key
Toggle key
Back key
Accept key
Function
Finish setting
Chose parameter
Step backwards to last step
Confirm choice and step forwards to next step
Parameter list
Softswitch
Description
Automatically turn
off the scale
Available parameter
On: Enable this function
S1
off: disable this function
On: Enable this function
S2
Sleeping function
off: disable this function
0:no beep
Beep range
1:Beep when weight is between over and under value.
S3
2:beep when weigh is out of range of over and under
0:light
1:normal
S4
Filter strength
2:strong
3:very strong
S5
Weight unit
g/kg/lb*
0:normal
1:dimmer than “0”
S6
LED brightness
2:dimmer than “1”
3:dimmer than “2”
Off: rapidly update
S7
Display type
0n: weight hold
* lb is not available on the scales to Europe.
Default
off
on
0
2
g
0
off
Exit setting mode
Press finish key >0< to finish setting. “SAVE” is display to save all changes. Press >T< to toggle between “SAVE”
(save changes) and “Abort” (abort all changes). Press
CUB II
to return the scale to weighing mode.
9
Operating Instructions
Appendix
Replace battery
1) Put the scale on the side as left;
2) Open the holder of the battery by screw driver to unscrew the screws on the battery holder cover on back of
the scale;
3) Remove the fixing plate by screw diver;
4) Disconnect the wire from the battery power poles and remove the battery;
5) Connect wire with power poles of new battery. Notice that red wire with positive pole (+), black wire with
negative pole (-).
6) Put the fixing board back;
7) Put the cover back with more care about the sealing ring, be sure the ring is in the free mode and right place
to assure a good sealing result.
Charge the Rechargeable lead-acid battery
The scale can charge the lead-acid battery (6V/5Ah) as follow:
1) remove the rubber plug which is to seal the hole where the power connector is.
2) connect the output end of the adapter to the power connector to initiate charging no matter the scale is turned
on or not.
3) put the rubber plug back to seal the hole to avoid erosion of the power connector when the scale is in the wet
environment.
Note: please charge battery in the dry environment.
There are two battery cursors, one is , and the other is (-) to indication the battery situation. Please refer to section
“Cursor” for detail.
If the unit is plugged into the wall outlet when battery power is used, the power source will automatically switch
to the wall transformer. And when the AC power is off, power source will automatically switch to battery.
Error Messages
The scale will display an error message if a scale problem or incorrect keyboard entry is sensed. The error codes
are:
E 11
RAM error
METTLER TOLEDO Service
E 16
ROM error
E 18
EEPROM error
E 48
Alarm setup error
ERROR
software running error
-----Unsteadily or can’t find zero
nnnnn in weight window
Weight is more than full capacity plus 9e Remove items from platter
Remove items from platter or
uuuuu in weight display
can not capture zero
calibrate the scale
Specification
Feature
Capacity
Division
Weight display
Operating temperature
Storage temperature
Plug in adapter
Power consumption
Charging current
10
Description
1.5kg
3kg
6kg
15kg
0.5g
1g
2g
5g
6 digits
-10oC~+40oC
-25oC~+50oC
I/P: local AC voltage, O/P:9VDC/500mA
LCD version: 20mA, LED version normally: 60mA
500mA
CUB II
Specifications are subject to change without notice.
Operating Instructions
DECLARATION OF CONFORMITY
We:
Wir:
Nous:
METTLER-TOLEDO (CHANGZHOU) SCALE & SYSTEM LTD.
Noi:
111 Changxi Rd. Changzhou Jiangsu,
Nosotros:
People’s Republic of China 213001
Wij:
Nos:
declare under our sole responsibility, that the product,
erklären in alleiniger Verantwortung, dass das Produkt,
déclarons sous notre seule responsabilité, que le produit
dichiariamo sotto nostra unica responsabilità, che il prodotto,
declaramos bajo nuestra sola responsabilidad, que el producto
verklaren er volledig verantwoordelijk voor te zijn, dat het produkt
declaramos de nossa única respondabilidade, que o producto
Model/Type: Cub II (RWXX..)
to which this declaration relates, is in conformity with the following standards and normative document(s):
auf das sich diese Erklärung bezieht, mit den folgenden EG-Richtlinien und Normen übereinstimmt:
auquel se rapporte cette déclaration, est conforme aux Directives du Conseil européen et aux normes suivantes:
a cui si riferisce questa dichiarazione, è conforme alle seguenti Direttiva del Consiglio e norme:
al cual se refiere esta declaración conforme a las siguientes directivas y normas:
waarop deze verklaring betrekking heeft, overeenkomt met de volgende EG-richtlijnen en normen:
à qual faz referência a presente Declaração, responde às directivas do Conselho Europeu, e às seguintes normas:
EC marking
EC Directive:
Applicable Standards:
73/23/EEC
EN61010-1
Low Voltage
EN61326-1:1997+A1:98 (CLASS B);
EN61326-1:1997 +A1:98 (Minimal
requirements)
89/336/EEC
EMC
90/384/EEC
Non-automatic
Instruments
year
0103
Weighing
EN45501
1)
1) T6356 EC Type approval certificate
Changzhou, May, 2003 METTLER TOLEDO (CHANGZHOU) SCALE & SYSTEM LTD.
David Zheng
President
12
Chu Jinlan
Quality Assurance Manager
CUB II
Operating Instructions
Mettler-Toledo
14
Printed in China 01/2004
CUB II