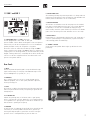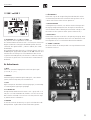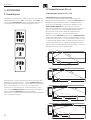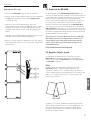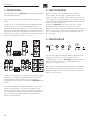
1
BEDIENUNGSANLEITUNG
FRANÇAIS
DEUTSCH
ENGLISH
M ANUA L
ESPAÑOL
1.0
IMPORTANT SAFETY INSTRUCTIONS
WICHTIGE SICHERHEITSHINWEISE!
BEFORE CONNECTING, READ INSTRUCTIONS
BITTE VOR GEBRAUCH LESEN UND FÜR SPÄTEREN GEBRAUCH AUFBEWAHREN!
• Read all of these instructions!
• Das Gerät wurde von HK AUDIO gemäß IEC 9239 gebaut und hat das Werk in sicherheits-
• Save these instructions for later use!
technisch einwandfreiem Zustand verlassen. Um diesen Zustand zu erhalten und einen
• Follow all warnings and instructions marked on the product!
gefahrlosen Betrieb sicherzustellen, muß der Anwender die Hinweise und die Warnvermerke
• Do not use this product near water, i.e. bathtub, sink, swimming pool, wet basement, etc.
beachten, die in der Bedienungsanleitung enthalten sind. Das Gerät entspricht der
Schutzklasse I (schutzgeerdet).
• Do not place this product on an unstable cart, stand or table. The product may fall, causing
• DIE SICHERHEIT, ZUVERLÄSSIGKEIT UND LEISTUNG DES GERÄTES WIRD VON
serious damage to the product or to persons!
HK AUDIO NUR DANN GEWÄHRLEISTET, WENN:
• Slots and openings in the cabinet and the back or bottom are provided for ventilation; to
ensure reliable operation of the product and to protect it from overheating, these openings
• Montage, Erweiterung, Neueinstellung, Änderungen oder Reparaturen von HK AUDIO oder
von dazu ermächtigten Personen ausgeführt werden.
must not be blocked or covered. This product should not be placed in a built-in installation
• die elektrische Installation des betreffenden Raumes den Anforderungen von IEC (ANSI)-
unless proper ventilation is provided.
Festlegungen entspricht.
• This product should not be placed near a source of heat such as a stove, radiator, or
• das Gerät in Übereinstimmung mit der Gebrauchsanweisung verwendet wird.
another heat producing amplifier.
• Use only the supplied power supply or power cord. If you are not sure of the type of power
available, consult your dealer or local power company.
• Do not allow anything to rest on the power cord. Do not locate this product where persons
will walk on the cord.
• Never break off the ground pin on the power supply cord.
• Power supply cords should always be handled carefully. Periodically check cords for cuts or
sign of stress, especially at the plug and the point where the cord exits the unit.
• The power supply cord should be unplugged when the unit is to be unused for long periods
of time.
• If this product is to be mounted in an equipment rack, rear support should be provided.
• This product should be used only with a cart or stand that is recommended by HK AUDIO.
• Never push objects of any kind into this product through cabinet slots as they may touch
dangerous voltage points or short out parts that could result in risk of fire or electric shock.
Never spill liquid of any kind on the product.
• Do not attempt to service this product yourself, as opening or removing covers may expose
you to dangerous voltage points or other risks. Refer all servicing to qualified service
personnel.
• Unplug this product from the wall outlet and refer servicing to qualified service personnel
under the following conditions:
• When the power cord or plug is damaged or frayed.
• If liquid has been spilled into the product.
WARNUNG:
• Wenn Abdeckungen geöffnet oder Gehäuseteile entfernt werden, außer wenn dies von Hand
möglich ist, können Teile freigelegt werden, die Spannung führen.
• Wenn ein Öffnen des Gerätes erforderlich ist, muß das Gerät von allen Spannungsquellen
getrennt sein. Berücksichtigen Sie dies vor dem Abgleich, vor einer Wartung, vor einer
Instandsetzung und vor einem Austausch von Teilen.
• Ein Abgleich, eine Wartung oder eine Reparatur am geöffneten Gerät unter Spannung darf
nur durch eine vom Hersteller autorisierte Fachkraft (nach VBG 4) geschehen, die mit den
verbundenen Gefahren vertraut ist.
• Lautsprecher-Ausgänge, die mit dem IEC 417/5036-Zeichen (Abb.1, s.unten) versehen sind
können berührungsgefährliche Spannungen führen. Deshalb vor dem Einschalten des
Gerätes Verbindung nur mit dem vom Hersteller empfohlenen Anschlußkabel zum
Lautsprecher herstellen.
• Alle Stecker an Verbindungskabeln müssen mit dem Gehäuse verschraubt oder verriegelt
sein, sofern möglich.
• Es dürfen nur Sicherungen vom angegebenen Typ und der angegebenen Nennstromstärke als
Ersatz verwendet werden.
• Eine Verwendung von geflickten Sicherungen oder Kurzschließen des Halters ist unzulässig.
• Niemals die Schutzleiterverbindung unterbrechen.
• Oberflächen, die mit dem „HOT“-Zeichen (Abb.2, s.unten) versehen sind, Rückwände oder
Abdeckungen mit Kühlschlitzen, Kühlkörper und deren Abdeckungen, sowie Röhren und
deren Abdeckungen können im Betrieb erhöhte Temperaturen annehmen und sollten deshalb
nicht berührt werden.
• Hohe Lautstärkepegel können dauernde Gehörschäden verursachen. Vermeiden Sie deshalb
die direkte Nähe von Lautsprechern, die mit hohen Pegeln betrieben werden. Verwenden Sie
einen Gehörschutz bei dauernder Einwirkung hoher Pegel.
• If the product has been exposed to rain or water.
• If the product does not operate normally when the operating instructions are followed.
• If the product has been dropped or the cabinet has been damaged.
• If the product exhibits a distinct change in performance, indicating a need of service!
• Adjust only these controls that are covered by the operating instructions since improper
adjustment of other controls may result in damage and will often require extensive work by
a qualified technician to restore the product to normal operation.
• Exposure to extremely high noise levels may cause a permanent hearing loss.
• Individuals vary considerably in susceptibility to noise induced hearig loss, but nearly
NETZANSCHLUSS:
•
•
•
•
Das Gerät ist für Dauerbetrieb ausgelegt.
Die eingestellte Betriebsspannung muß mit der örtlichen Netzspannung übereinstimmen.
Der Anschluß an das Stromnetz erfolgt mit dem mitgelieferten Netzteil oder Netzkabel.
Netzteil: Eine beschädigte Anschlußleitung kann nicht ersetzt werden. Das Netzteil darf
nicht mehr betrieben werden.
• Vermeiden Sie einen Anschluß an das Stromnetz in Verteilerdosen zusammen mit vielen
anderen Stromverbrauchern.
• Die Steckdose für die Stromversorgung muß nahe am Gerät angebracht und leicht
zugänglich sein.
everyone will lose some hearing if exposed to sufficiently intense noise for a sufficient time.
The U.S. Government´s Occupational Safety and Health Administration (OSHA) has specified
AUFSTELLUNGSORT:
the following permissible noise level exposures:
•
•
•
•
Duration Per Day In Hours
8
6
4
3
2
11/2
1
1
/2
1
/4 or less
Sound LeveldBA, Slow Response
90
92
95
97
100
102
105
110
115
• According to OSHA, any exposure in excess of the above permissible limits could result in
some hearing loss.
• Ear plug protectors in the ear canals or over the ears must be worn when operating this
amplification system in order to prevent a permanent hearing loss if exposure is in excess
of the limits as set forth above. To ensure against potentially dangerous exposure to high
sound pressure levels, it is recommended that all persons exposed to equipment capable of
producing high sound pressure levels such as this amplification system be protected by
hearing protectors while this unit is in operation.
• Fuses: Replace with IEC 127 (5x 20 mms) type and rated fuse for best performance only.
TO PREVENT THE RISK OF FIRE AND SHOCK HAZARD, DO NOT EXPOSE THIS APPLIANCE TO
MOISTURE OR RAIN. DO NOT OPEN CASE; NO USER SERVICE-ABLE PARTS INSIDE.
REFER SERVICING TO QUALIFIED SERVICE PERSONNEL.
Das Gerät sollte nur auf einer sauberen, waagerechten Arbeitsfläche stehen.
Das Gerät darf während des Betriebs keinen Erschütterungen ausgesetzt sein.
Feuchtigkeit und Staub sind nach Möglichkeit fernzuhalten.
Das Gerät darf nicht in der Nähe von Wasser, Badewanne, Waschbecken, Küchenspüle,
Naßraum, Swimmingpool oder feuchten Räumen betrieben werden. Keine mit Flüssigkeit
gefüllten Gegenstände -Vase, Gläser, Flaschen etc. auf das Gerät stellen.
• Sorgen Sie für ausreichende Belüftung der Geräte.
• Eventuelle Ventilationsöffnungen dürfen niemals blockiert oder abgedeckt werden. Das
Gerät muß mindestens 20 cm von Wänden entfernt aufgestellt werden. Das Gerät darf nur
dann in ein Rack eingebaut werden, wenn für ausreichende Ventilation gesorgt ist und die
Einbauanweisungen des Herstellers eingehalten werden.
• Vermeiden Sie direkte Sonneneinstrahlung sowie die unmittelbare Nähe von Heizkörpern
und Heizstrahlern oder ähnlicher Geräte.
• Wenn das Gerät plötzlich von einem kalten an einen warmen Ort gebracht wird, kann sich
im Geräteinnern Kondensfeuchtigkeit bilden. Dies ist insbesondere bei Röhrengeräten zu
beachten. Vor dem Einschalten solange warten bis das Gerät Raumtemperatur angenommen
hat.
• Zubehör: Das Gerät nicht auf einen instabilen Wagen, Ständer, Dreifuß, Untersatz oder Tisch
stellen. Wenn das Gerät herunterfällt, kann es Personenschäden verursachen und selbst
beschädigt werden. Verwenden Sie das Gerät nur mit einem vom Hersteller empfohlenen
oder zusammen mit dem Gerät verkauften Wagen, Rack, Ständer, Dreifuß oder Untersatz. Bei
der Aufstellung des Gerätes müssen die Anweisungen des Herstellers befolgt und muß das
vom Hersteller empfohlene Aufstellzubehör verwendet werden. Eine Kombination aus Gerät
und Gestell muß vorsichtigt bewegt werden. Plötzliches Anhalten, übermäßige
Kraftanwendung und ungleichmäßige Böden können das Umkippen der Kombination aus
Gerät und Gestell bewirken.
• Zusatzvorrichtungen: Verwenden Sie niemals Zusatzvorrichtungen, die nicht vom Hersteller
empfohlen wurden, weil dadurch Unfälle verursacht werden können
• Zum Schutz des Gerätes bei Gewitter oder wenn es längere Zeit nicht beaufsichtigt oder
benutzt wird, sollte der Netzstecker gezogen werden. Dies verhindert Schäden am Gerät
aufgrund von Blitzschlag und Spannungsstößen im Wechselstromnetz.
Abb.1
Abb.2
IMPORTANT ADVICE ON SAFETY!
CONSEILS DE SECURITE IMPORTANTS!
PLEASE READ BEFORE USE AND KEEP FOR LATER USE!
PRIERE DE LIRE AVANT L’EMPLOI ET A CONSERVER POUR UTILISATION ULTERIEURE!
• The unit has been built by HK AUDIO in accordance with IEC 9239 and left the factory in
safe working order. To maintain this condition and ensure non-risk operation, the user must
follow the advice and warning comments found in the operating instructions. The unit
conforms to Protection Class 1 (protectively earthed).
• HK AUDIO ONLY GUARANTEE THE SAFETY, RELIABILITY AND EFFICIENCY OF THE UNIT IF:
• Assembly, extension, re-adjustment, modifications or repairs are carried out by HK AUDIO or
by persons authorized to do so.
• The electrical installation of the relevant area complies with the requirements of IEC (ANSI)
specifications.
• The unit is used in accordance with the operating instructions.
• The unit is regularly checked and tested for electrical safety by a competent technician.
WARNING:
• If covers are opened or sections of casing are removed, except where this can be done
manually, live parts can become exposed.
• If it is necessary to open the unit this must be isolated from all power sources. Please take
this into account before carrying out adjustments, maintenance, repairs and before
replacing parts.
• Adjustment, maintenance and repairs carried out when the unit has been opened and is still
live may only be performed by specialist personnel who are authorized by the manufacturer
(in accordance with VBG 4) and who are aware of the associated hazards.
• Loudspeaker outputs which have the IEC 417/5036 symbol (Diagram 1, below) can carry
voltages which are hazardous if they are made contact with. Before the unit is switched on,
the loudspeaker should therefore only be connected using the lead recommended by the
manufacturer.
• Where possible, all plugs on connection cables must be screwed or locked onto the casing.
• Replace with IEC 127 (5x 20 mms) type and rated fuse for best performance only.
• It is not permitted to use repaired fuses or to short-circuit the fuse holder.
• Never interrupt the protective conductor connection.
• Surfaces which are equipped with the „HOT“ mark (Diagram 2, below), rear panels or
covers with cooling slits, cooling bodies and their covers, as well as tubes and their covers
are purposely designed to dissipate high temperatures and should therefore not be touched.
• High loudspeaker levels can cause permanent hearing damage. You should therefore avoid
the direct vicinity of loudspeakers operating at high levels. Wear hearing protection if
continuously exposed to high levels.
MAINS CONNECTION:
• L’appareil a été conçu par HK AUDIO selon la norme IEC 9239 et a quitté l’entreprise dans
un état irréprochable. Afin de conserver cet état et d’assurer un fonctionnement sans
danger de l’appareil nous conseillons à l’utilisateur la lecture des indications de sécurité
contenues dans le mode d’emploi. L’appareil est conforme à la classification I (mise à terre
de protection).
• SURETE, FIABILITE ET EFFICACITE DE L’APPAREIL NE SONT GARANTIS PAR HK AUDIO QUE SI:
• Montage, extension, nouveau réglage, modification ou réparation sont effectués par
HK AUDIO ou par toute personne autorisée par HK AUDIO.
• L’installation électrique de la pièce concernée correspond aux normes IEC (ANSI).
• L’utilisation de l’appareil suit le mode d’emploi.
AVERTISSEMENT:
• A moins que cela ne soit manuellement possible, tout enlèvement ou ouverture du boîtier
peut entrainer la mise au jour de pieces sous tension.
• Si l’ouverture de l’appareil est nécessaire, celui-ci doit être coupé de chaque source de
courant. Ceci est à prendre en considération avant tout ajustement, entretien, réparation ou
changement de pieces.
• Ajustement, entretien ou réparation sur l’appareil ouvert et sous tension ne peuvent être
éffectués que par un spécialiste autorisé par le fabricant (selon VBG4). Le spécialiste étant
conscient des dangers liés à ce genre de réparation.
• Les sorties de baffles qui portent le signe IEC 417/5036 (fig. 1, voir en bas) peuvent être
sous tension dangereuse. Avant de brancher l’appareil utiliser uniquement le câble de
raccordement conseillé par le fabricant pour raccorder les baffles.
• Toutes les prises des câbles de raccordement doivent être, si possible, vissées ou
verrouillées sur le boîtier.
• Utilisez subsidiairement uniquement des fusibles de type et de puissance de courant
nominale donnés.
• L’utilisation de fusibles rafistolés ou court-circuites est inadmissible.
• Ne jamais interrompre la connexion du circuit protecteur.
• Il est conseillé de ne pas toucher aux surfaces pourvues du signe „HOT“ (fig. 2, voir en
bas), aux parois arrières ou caches munis de fentes d’aération, éléments d’aération et leurs
caches ansi qu’aux tubes et leurs caches. Ces éléments pouvant atteindre des températures
élévées pendant l’utilisation de l’appareil.
• Les Niveaux de puissance élévés peuvent entrainer des lésions auditives durables. Evitez
donc la proximité de haut-parleurs utilisés à haute puissance. Lors de haute puissance
continue utilisez une protection auditive.
•
•
•
•
The unit is designed for continuous operation.
The set operating voltage must match the local mains supply voltage.
The unit is connected to the mains via the supplied power unit or power cable.
Power unit: Never use a damaged connection lead. Any damage must be rectified by a
competent technician.
• Avoid connection to the mains supply in distributor boxes together with several other
power consumers.
• The plug socket for the power supply must be positioned near the unit and must be easily
accessible.
BRANCHEMENT SUR LE SECTEUR:
PLACE OF INSTALLATION:
LIEU D’INSTALLATION:
•
•
•
•
•
•
•
•
The unit should stand only on a clean, horizontal working surface.
The unit must not be exposed to vibrations during operation.
Keep away from moisture and dust where possible.
Do not place the unit near water, baths, wash basins, kitchen sinks, wet areas, swimming
pools or damp rooms. Do not place objects containing liquid on the unit - vases, glasses,
bottles etc.
• Ensure that the unit is well ventilated.
• Any ventilation openings must never be blocked or covered. The unit must be positioned at
least 20 cm away from walls. The unit may only be fitted in a rack if adequate ventilation is
ensured and if the manufacturer’s installation instructions are followed.
• Keep away from direct sunlight and the immediate vicinity of heating elements and radiant
heaters or similar devices.
• If the unit is suddenly moved from a cold to a warm location, condensation can form inside
it. This must be taken into account particularly in the case of tube units. Before switching
on, wait until the unit has reached room temperature.
• Accessories: Do not place the unit on an unsteady trolley, stand, tripod, base or table. If the
unit falls down, it can cause personal injury and itself become damaged. Use the unit only
with the trolley, rack stand, tripod or base recommended by the manufacturer or purchased
together with the unit. When setting the unit up, all the manufacturer’s instructions must be
followed and the setup accessories recommended by the manufacturer must be used. Any
combination of unit and stand must be moved carefully. A sudden stop, excessive use of
force and uneven floors can cause the combination of unit and stand to tip over.
• Additional equipment: Never use additional equipment which has not been recommended
by the manufacturer as this can cause accidents.
• To protect the unit during bad weather or when left unattended for prolonged periods, the
mains plug should be disconnected. This prevents the unit being damaged by lightning and
power surges in the AC mains supply.
Diagram 1
• L’appareil est conçu pour une utilisation continue.
• La tension de fonctionnement doit concorder avec la tension secteur locale.
• Le raccordement au réseau éléctrique s’effectue avec l’adaptateur ou le cordon
d´alimentation livré avec l’appareil.
• Adaptateur: Un câble de raccordement abimé ne peut être remplacé. L’adaptateur est
inutilisable.
• Evitez un raccordement au réseau par des boîtes de distribution surchargées.
• La prise de courant doit être placée à proximité de l’appareil et facile à atteindre.
L’appareil doit être placé sur une surface de travail propre et horizontale.
L’appareil en marche ne doit en aucun cas subir des vibrations.
Evitez dans la mesure du possible poussière et humidité.
L’appareil ne doit pas être placé à proximité d’eau, de baignoire, lavabo, évier, pièce d’eau,
piscine ou dans une pièce humide. Ne placez aucun vase, verre, bouteille ou tout objet
rempli de liquide sur l’appareil.
• L’appareil doit être suffisamment aéré.
• Ne jamais recouvrir les ouvertures d’aération. L’appareil doit être placé à 20 cm du mur au
minimum. L’appareil peut être monté dans un Rack si une ventilation suffisante est possible
et si les conseils de montage du fabricant sont suivis.
• Evitez les rayons de soleil et la proximité de radiateurs, chauffages etc.
• Une condensation d’eau peut se former dans l’appareil si celui-ci est transporté
brusquement d’un endroit froid à un endroit chaud. Ceci est particulièrement important
pour des appareils à tubes. Avant de brancher l’appareil attendre qu’il ait la température
ambiante.
• Accessoires: L’appareil ne doit être placé sur un chariot, support, trépied, bâti ou table
instable. Une chute de l’appareil peut entrainer aussi bien des dommages corporels que
techniques. Utilisez l’appareil uniquement avec un chariot, Rack, support, trépied ou bâti
conseillé par le fabricant ou vendu en combinaison avec l’appareil. Les indications du
fabricant pour l’installation de l’appareil sont à suivre, et les accessoires d’installation
conseillés par le fabricant sont à utiliser. Un ensemble support et appareil doit être déplacé
avec précaution. Des mouvements brusques et des revêtements de sol irreguliers peuvent
entrainer la chute de l´ensemble.
• Equipements supplémentaires: Ne jamais utiliser un équipement supplémentaire n’ayant pas
été conseillé par le fabricant, ceci pouvant entrainer des accidents.
• Afin de protéger l’appareil pendant un orage ou s’il ne doit pas être utilisé pendant un
certain temps, il est conseillé d’enlever la prise au secteur. Ceci évite des dommages dûs à
la foudre ou à des coups de tension dans le réseau à courant alternatif.
Diagram 2
Fig. 1
Fig. 2
3
IMPORTANTI AVVERTIMENTI DI SICUREZZA!
¡INDICACIONES DE SEGURIDAD IMPORTANTES!
Leggere attentamente prima dell’uso e conservare per un utilizzo successivo:
¡LÉANSE ANTES DE UTILIZAR EL APARATO Y GUARDENSE PARA SU USO POSTERIOR!
• L’apparecchio è stato costruito dalla HK AUDIO secondo la normativa europea IEC 9239 ed
ha lasciato il nostro stabilimento in stato ineccepibile. Per garantire il mantenimento di tale
stato e un utilizzo assolutamente privo di rischi l’utente è tenuto ad osservare le indicazioni
e gli avvertimenti di sicurezza contenuti nelle istruzioni per l’uso. L’apparecchio rispecchia il
livello di sicurezza I (collegato a terra).
• Sicurezza, affidabilità e prestazioni dell’apparecchio vengono garantiti dalla HK AUDIO solo
ed esclusivamente se:
• Montaggio, ampliamento, rimessa a punto, modifiche e riparazioni vengono eseguite dalla
HK AUDIO stessa o da personale da essa autorizzato.
• Gli impianti elettrici nei locali prescelti per l’uso dell’apparecchio rispondono alle normative
stabilite dall’ANSI.
• L’apparecchio viene utilizzato come indicato nel libretto delle istruzioni per l’uso.
Avvertimenti:
• In caso di apertura di parti di rivestimento o rimozione di parti dell’involucro, a meno che
non si tratti di pezzi rimovibili semplicemente a mano, possono venire alla luce parti
dell’apparecchio conduttrici di tensione.
• Se l’apertura dell’apparecchio dovesse risultare necessaria è indispensabile staccare
precedentemente quest’ultimo da tutte le fonti di tensione. Rispettare tale misura di
prevenzione anche prima di un allineamento, di operazioni di manutenzione, della messa in
esercizio o della sostituzione di componenti all’interno dell’apparecchio.
• Allineamento, operazioni di manutenzione o eventuali riparazioni dell’apparecchio in presenza di tensione vanno eseguite esclusivamente da personale specializzato ed autorizzato,
in grado di eseguire tali operazioni evitandone i rischi connessi.
• Le uscite degli altoparlanti contrassegnate dai caratteri IEC 417/5036 (vedi illustrazione 1 a
fondo pag.) possono essere conduttrici di tensione pericolosa con cui evitare il contatto. Per
questo motivo, prima di accendere l’apparecchio, collegare quest’ultimo agli altoparlanti
servendosi esclusivamente del cavetto d’allacciamento indicato dal produttore.
• Tutte le spine e i cavi di collegamento devono essere avvitati o fissati all’involucro
dell’apparecchio per quanto possibile.
• Tutti i fusibili di sicurezza vanno sostituiti esclusivamente con fusibili del tipo prescritto e
valore della corrente nominale indicato.
• L’utilizzo di fusibili di sicurezza non integri e la messa in corto circuito del sostegno di
metallo sono proibite.
• Non interrompere mai il collegamento con il circuito di protezione.
• Superfici contrassegnate dalla parola „HOT“ (vedi illustrazione 2 a fondo pag.), cosi come
griglie di aerazione, dispositivi di raffreddamento e i loro rivestimenti di protezione, oppure
valvole e i relativi rivestimenti protettivi possono surriscaldarsi notevolmente durante l’uso
e per questo motivo non vanno toccate.
• L’ascolto di suoni ad alto volume può provocare danni permanenti all’udito. Evitate perciò
la diretta vicinanza con altoparlanti ad alta emissione di suono e utilizzate cuffie protettive
in caso ciò non sia possibile.
Alimentazione:
• L’apparecchio è concepito per il funzionamento continuo.
• La tensione di esercizio deve corrispondere alla tensione di rete a cui ci si allaccia.
• L’allacciamento alla rete elettrica avviene tramite alimentatore o cavetto d’alimentazione
consegnato insieme all’apparecchio.
• Alimentatore: un cavo di connessione danneggiato non può essere sostituito. L’alimentatore
non può più essere utilizzato.
• Evitate un allacciamento alla rete di corrente utilizzando cassette di distribuzione
sovraccariche.
• La spina di corrente deve essere situata nelle vicinanze dell’apparecchio e facilmente
raggiungibile in qualsiasi momento.
Locali di collocamento:
•
•
•
•
Opportuno collocare l’apparecchio su una superficie pulita e orizzontale.
Non sottoporre l’apparecchio in funzione a scosse e vibrazioni.
Proteggere l’apparecchio per quanto possibile da umidità e polvere.
Non collocare l’apparecchio vicino ad acqua, vasche da bagno, lavandini, lavelli da cucina,
locali umidi o piscine. Non appoggiare recipienti contenenti liquidi - vasi, bicchieri,
bottiglie, ecc. - sull’apparecchio.
• Provvedere ad una buone aerazione dell’apparecchio.
• Eventuali aperture previste per la ventilazione dell’apparecchio non vanno ne bloccate, ne
mai coperte. L’apparecchio va collocato ad almeno 20 cm di distanza dalle pareti circostanti
e può essere inserito tra altre componenti di un impianto solo in caso di sufficiente
ventilazione e qualora le direttive di montaggio del produttore vengano rispettate.
• Evitare di esporre l’apparecchio ai raggi del sole e di collocarlo direttamente nelle vicinanze
di fonti di calore come caloriferi, stufette, ecc.
• Se l’apparecchio viene trasportato rapidamente da un locale freddo ad uno riscaldato può
succedere che al suo interno si crei della condensa. Ciò va tenuto in considerazione
soprattutto in caso di apparecchi a valvole. Attendere che l’apparecchio abbia assunto la
temperatura ambiente prima di accenderlo.
• Accessori: non collocare l’apparecchio su carrelli, supporti, treppiedi, superfici o tavoli
instabili. Se l’apparecchio dovesse cadere a terra potrebbe causare danni a terzi o
danneggiarsi irreparabilmente. Utilizzate per il collocamento dell’apparecchio supporti,
treppiedi e superfici che siano consigliate dal produttore o direttamente comprese
nell’offerta di vendita. Per il collocamento dell’apparecchio attenetevi strettamente alle
istruzioni del produttore, utilizzando esclusivamente accessori da esso consigliati.
L’apparecchio in combinazione ad un supporto va spostato con molta attenzione. Movimenti
bruschi o il collocamento su pavimenti non piani possono provocare la caduta
dell’apparecchio e del suo supporto.
• Accessori supplementari: non utilizzate mai accessori supplementari che non siano
consigliati dal produttore, potendo essere ciò causa di incidenti.
• Per proteggere l’apparecchio in caso di temporali o nel caso questo non venisse utilizzato
per diverso tempo si consiglia di staccarne la spina di corrente. In questo modo si evitano
danni all’apparecchio dovuti a colpi di fulmine o ad improvvisi aumenti di tensione nel
circuito di corrente alternata.
Illustrazione 1
4
Illustrazione 2
• El aparato ha sido producido por HK AUDIO según el IEC 9239 y salió de la fábrica en un
estado técnicamente perfecto. Para conservar este estado y asegurar un funcionamiento sin
peligros el usuario debe tener en cuenta las indicaciones y advertencias contenidas en las
instrucciones de manejo. El aparato corresponde a la clase de protección l (toma de tierra
protegida).
• LA SEGURIDAD, LA FIABILIDAD Y EL RENDIMIENTO DEL APARATO SOLO ESTAN
GARANTIZADOS POR HK AUDIO CUANDO:
• el montaje, la ampliación, el reajuste, los cambios o las reparaciones se realicen por
HK AUDIO o por personas autorizadas para ello;
• la instalación eléctrica del recinto en cuestión corresponda a los requisitos de la
determinación del IEC (ANSI);
• el aparato se use de acuerdo con las indicaciones de uso.
ADVERTENCIA:
• Si se destapan protecciones o se retiran piezas de la carcasa, exceptuando si se puede
hacer manualmente, se pueden dejar piezas al descubierto que sean conductoras de
tensión.
• Si es necesario abrir el aparato, éste tiene que estar aislado de todas las fuentes de
alimentación. Esto se debe tener en cuenta antes del ajuste, de un entretenimiento, de una
reparación y de una sustitución de las piezas.
• Un ajuste, un entretenimiento o una reparación en el aparato abierto y bajo tensión sólo
puede ser llevado a cabo por un especialista autorizado por el productor (según VBG 4) que
conozca a fondo los peligros que ello conlleva.
• Las salidas de altavoces que estén provistas de la característica IEC 417/5036 (figura 1,
véase abajo) pueden conducir tensiones peligrosas al contacto. Por ello es indispensable
que antes de poner en marcha el aparato; la conexión se haya realizado únicamente con el
cable de empalmes recomendado por el productor.
• Las clavijas de contacto al final de los cables conectores tienen que estar atornilladas o
enclavadas a la carcasa, en tanto que sea posible.
• Los fusibles de repuesto que se utilicen sólo pueden ser del tipo indicado y tener la
intensidad nominal indicada.
• El uso de fusibles reparados o la puesta en cortocircuito del soporte es inadmisible.
• El empalme del conductor de protección no se puede interrumpir en ningún caso.
• Las superficies provistas de la característica "HOT" (figura 2, véase abajo), los paneles de
fondo trasero o las protecciones con ranuras de ventilación, los cuerpos de ventilación y sus
protecciones, así como las válvulas electrónicas y sus protecciones pueden alcanzar
temperaturas muy altas durante el funcionamiento y por ello no se deberían tocar.
• Niveles elevados de la intensidad de sonido pueden causar continuos daños auditivos; por
ello debe evitar acercarse demasiado a altavoces que funcionen a altos niveles. En tales
casos utilice protecciones auditivas.
ACOMETIDA A LA RED:
• El aparato está proyectado para un funcionamiento continuo.
• La tensión de funcionamiento ajustada tiene que coincidir con la tensión de la red del lugar.
• La conexión a la red eléctrica se efectuará con la fuente de alimentación o con el cable de
red que se entreguen con el aparato.
• Fuente de alimentación: una linea de conexión dañada no se puede sustituir. La fuente de
alimentación no puede volver a ponerse en funcionamiento.
• Evite una conexión de la red eléctrica a distribuidores con muchas tomas de corriente.
• El enchufe para el suministro de corriente tiene que estar cerca del aparato y ser de fácil
acceso.
SITUACION:
•
•
•
•
El aparato debería estar situado en una superficie limpia y totalmente horizontal.
El aparato no puede estar expuesto a ningún tipo de sacudidas durante su funcionamiento.
Se deben evitar la humedad y el polvo.
El aparato no puede ponerse en funcionamiento cerca del agua, la bañera, el lavamanos, la
pila de la cocina, un recinto con tuberías de agua, la piscina o en habitaciones húmedas.
Tampoco se pueden poner objetos llenos de líquido - jarrones, vasos, botellas, etc. - encima
de él.
• Procure que el aparato tenga suficiente ventilación.
• Las aberturas de ventilación existentes no se deben bloquear ni tapar nunca. El aparato
debe estar situado como mínimo a 20 cm de la pared. El aparato sólo se puede montar en
un rack, si se ha procurado la suficiente ventilación y se han cumplido las indicaciones de
montaje del productor.
• Evite los rayos del sol directos así como la proximidad a radiadores, electro-radiadores o
aparatos similares.
• Si el aparato pasa repentinamente de un lugar frío a otro caliente, se puede condensar
humedad en su interior. Esto se debe tener en cuenta sobretodo en los aparatos con
válvulas electrónicas. Antes de poner en marcha el aparato se debe esperar hasta que éste
haya adquirido la temperatura ambiental.
• Accesorios: el aparato no se puede colocar encima de carros, estantes, trípodes, soportes o
mesas inestables. Si el aparato se cae puede causar daños personales y se puede estropear.
Coloque el aparato sólo en un carro, rack, estante, trípode o soporte recomendado por el
productor o que se le haya vendido junto con el aparato. En la instalación se deben seguir
las indicaciones del productor así como utilizar los accesorios recomendados por el mismo
para colocarlo encima. El conjunto del aparato con el pedestal se debe mover con mucho
cuidado. Un paro brusco, la aplicación de una fuerza desmesurada o un suelo irregular
puede ocasionar la caida de todo el conjunto.
• Piezas adicionales: no utilice nunca piezas adicionales que no estén recomendadas por el
productor, ya que se podrían provocar accidentes.
• Para protejer el aparato de una tormenta o si no se supervisa ni utiliza durante algún
tiempo, se debería desconectar la clavija de la red. Así se evitan daños en el aparato a
causa de un rayo y golpes de tensión en la red de corriente alterna.
Figura 1
Figura 2
PROJECTOR MANUAL
Table of Contents
WELCOME TO THE
HK AUDIO FAMILY!
1.
Congratulations on choosing PROJECTOR, a three-way active
sound reinforcement system with the power of a large PA and
the advantages of state-of-art active electronics. Not only is it
easy to transport, you’ll also find that it takes no time at all to
set up and connect PROJECTOR. These advantages and its
remarkable ease of use make PROJECTOR a professional
sound reinforcement system well-suited for larger events.
PROJECTOR System Components . . . . . .6
1.1 PROJECTOR MID-HIGH UNIT . . . . . . . . . . . . . .6
1.2 PROJECTOR SUB 1 and SUB 2 . . . . . . . . . . . . .7
2.
Setting up the System . . . . . . . . . . . . . .8
2.2 Standard System with Tilt Unit . . . . . . . . . . . .8
2.3 How to Fly the MID-HIGH UNIT . . . . . . . . . . .9
2.4 Double PROJECTOR System . . . . . . . . . . . . . .9
3.
Connections . . . . . . . . . . . . . . . . . . . . .10
4.
Powering Up . . . . . . . . . . . . . . . . . . . .10
5.
Settings . . . . . . . . . . . . . . . . . . . . . . . .10
6.
Helpful Hints . . . . . . . . . . . . . . . . . . . .11
7.
Technical Specifications . . . . . . . . . . . .11
8.
Safety Instructions for Flying the System .12
PROJECTOR is comprised of three different cabinets that come
complete with all the required electronic components on board.
As its name would indicate, the MID-HIGH UNIT reproduces
the middle and upper range frequencies via a 12" speaker and
a 2" driver, each powered by a 300-watt power block. SUB 1
and SUB 2 are two different subwoofers equipped with an
18" speaker and a 600-watt power amp each. For maximum
performance and reliability, all cabinets feature a built-in
controller with a limiter and crossover.
A complete PROJECTOR PA system consists of
a MID-HIGH UNIT, a SUB 1 and a SUB 2 on each side.
With all the circuitry integrated into the housings, this system
benefits from shorter signal paths, electronic circuitry that is
fine-tuned specifically to match the built-in speakers, and
active frequency compensation. Taken together, this results in
excellent dynamic and pulse response, maximum protection
against overload, and superior sound. Those tedious soundchecking and fine-tuning chores fall by the wayside, and you’ll
only need to fall back on an equalizer if you have to
compensate for a given venue’s acoustic peculiarities.
5
ENGLISH
2.1 Standard System . . . . . . . . . . . . . . . . . . . . . .8
PROJECTOR MANUAL
1. PROJECTOR SYSTEM COMPONENTS
1.1 MID-HIGH UNIT
MID THROW
SIGNAL/
SOFT LIMIT/
FULL LIMIT
-6 dB
MID THROW
0 dB
ON LIFT
LONG THROW
INPUT
THROUGH
GAIN
HF
MF
GROUND
LONG THROW
SELF-POWERED
LONG THROW SYSTEM
®
PROJECTOR
MADE IN GERMANY
600 W RMS MID-HIGH UNIT
MAINS
INPUT
NRTL (Fairfield)
UL 6500
POWER
NRTL (Fairfield)
UL 6500
ON
CAUTION!
OFF
117 V~ 6.0 A
50 - 60 HZ
MAX. POWER CONSUMPTION 950 VA
CIRCUIT
BREAKER
TURN OFF SYSTEM
BEFORE RESETTING
CIRCUIT BREAKER!
TO PREVENT THE RISK OF FIRE
AND SHOCK HAZARD DON´T
EXPOSE THIS APPLIANCE TO
MOISTURE OR RAIN. DO NOT
OPEN CASE; NO USER
SERVICEABLE PARTS INSIDE.
REFER SERVICING TO QUALIFIED
SERVICE PERSONNEL.
SUB
1
CAUTION!
DON´T EXPOSE THIS APPLIANCE TO MOISTURE OR
RAIN. DO NOT OPEN CASE.
Ser.No.
7. VENTILATION UNIT
This ventilating fan keeps the power amp modules cool. Always make sure
that the fan and the vents are kept free of dirt and debris and that they
remain unobstructed so air can circulate freely.
SUB
2
TO PREVENT THE RISK OF FIRE AND SHOCK HAZARD
NO USER SERVICEABLE PARTS INSIDE.
6. MID THROW / LONG THROW SWITCH
Selects appropriate frequency compensation depending on distance. In
LONG THROW mode, the system’s EQ boosts high frequencies by about
three decibels so that the top end is not lost when the signal is projected
over greater distances. For distances up to 20 meters, set the switch to
MID THROW, for greater distances to LONG THROW.
MID-HIGH
The top unit of the active PROJECTOR system houses a 12” B&C woofer
and a B&C 2" high-frequency driver, both loaded onto 60° x 40°
concentric horns, as well as all the necessary active electronic components
to control and drive them. The Mid Throw / Long Throw switch lets you
choose one of two frequency compensation options for either short and
middle distances or long distances. For distances up to 20 meters, set the
switch to Mid Throw; for distances greater than 20 meters, set it to
Long Throw.
The enclosure is equipped with casters and Aeroquip flight rails as
standard features. These rails, which are mounted on both sides and in a
recessed groove on the rear panel, make it easy to fly the cab.
Rear Panel:
1. INPUT
Electronically balanced input designed to accept the balanced output
signal coming from the mixer (1= ground, 2= +, 3= -)
8. CIRCUIT BREAKER
This automatic circuit breaker serves the same purpose as the standard
fuses that you may be familiar with. If it trips, once you have identified
the problem you can reset the circuit breaker by simply pressing it.
Caution: Always switch the system off before you reset the circuit breaker
(take a look at the mains power switch and make sure it is set to OFF)!
PROJECTOR
9. MAINS INPUT
This Neutrik Powercon socket accepts the mains cable. This is a relatively
new type of connector system featuring a locking mechanism which
prevents the mains cord from being pulled out inadvertently.
10. "POWER" SWITCH
On/off switch for the electronics in the speaker cabinet. It lights up red
when the cab is powered up.
11. AEROQUIP FLIGHT RAILS
These rails are designed to accept steel cables equipped with Aeroquip
studs (see the chapter on Setup / Stacking) to fly the cabinets safely
and securely.
2. THROUGH
This is a parallel output you can use for routing the LINE signal to
additional equipment, such as other systems, individual components,
monitor power amps, etc.
3. GAIN
This knob lets you adjust the power amp to match the input signal level;
reduce it to prevent distortion when you’re patching in signals that are
already fairly hot.
4. MF AND HF LIMITER LED
Indicates the operating status of the limiter. Green = signal present,
yellow = soft limit, red = full limit. NOTE: This is not a clipping indicator;
it is acceptable for it to light up every now and then in red. This tells you
that the limiter is operating at full capacity. The limiter status of the
middle (MF) and high (HF) frequency ranges is indicated in each case by a
dedicated LED.
1
2
3
6
7
8
9
5. GROUND
Ground lift switch for separating the signal and chassis ground when you
encounter problems with hum due to ground loops resulting from
duplicate paths to ground. The connection from signal ground to chassis
is interrupted when you press the button in.
11
6
4
10
5
PROJECTOR MANUAL
1.2 SUB 1 and SUB 2
6. VENTILATION UNIT
This ventilating fan keeps the power amp modules cool. Always make sure
that the fan and the ventilation vents are kept free of dirt and debris and
that they remain unobstructed so air can circulate freely.
-6 dB
SIGNAL/
SOFT LIMIT/
FULL LIMIT
0 dB
ON LIFT
INPUT
THROUGH
GAIN
GROUND
®
SELF-POWERED
LONG THROW SYSTEM
PROJECTOR
MADE IN GERMANY
NRTL (Fairfield)
UL 6500
NRTL (Fairfield)
UL 6500
600 W RMS SUBWOOFER
MAINS
INPUT
POWER
ON
OFF
117 V~ 6.0 A
50 - 60 HZ
MAX. POWER CONSUMPTION 950 VA
CIRCUIT
BREAKER
TURN OFF SYSTEM
BEFORE RESETTING
CIRCUIT BREAKER!
CAUTION!
TO PREVENT THE RISK OF FIRE
AND SHOCK HAZARD DON´T
EXPOSE THIS APPLIANCE TO
MOISTURE OR RAIN. DO NOT
OPEN CASE; NO USER
SERVICEABLE PARTS INSIDE.
REFER SERVICING TO QUALIFIED
SERVICE PERSONNEL.
SUB
2
SUB
1
CAUTION!
TO PREVENT THE RISK OF FIRE AND SHOCK HAZARD
7. CIRCUIT BREAKER
This automatic circuit breaker serves the same purpose as the standard
fuses that you may be familiar with. If it trips, once you have identified
the problem you can reset the circuit breaker by simply pressing it.
Caution: Always switch the system off before you reset the circuit breaker
(take a look at the mains power switch and make sure it is set to OFF)!
DON´T EXPOSE THIS APPLIANCE TO MOISTURE OR
Ser.No.
SUB 1
The PROJECTOR SUB 1 and SUB 2 subwoofers
are each equipped with a horn-loaded 18" B&C speaker. The horn and
pressure chamber of these cabinets are designed so that sound pressure
waves actively cool the massive magnet and voice coil of the 600-watt
speaker; the harder it works, the stronger the cooling effect.
The interiors of the two subwoofers are identical, though the SUB 2’s
layout is actually a mirror image of the SUB 1’s. There is a simple yet very
compelling reason for this design. When you stack the subwoofers (see the
diagram "Stacking subwoofers") as intended, the two halves actually form
a full horn so that the configuration delivers more bottom-end sound
pressure over a greater distance.
Rear Panel:
8. MAINS INPUT
Neutrik Powercon socket designed to take the mains cord. A new type of
connector system featuring a locking mechanism, it prevents the mains
cord from being pulled out inadvertently.
9. "POWER" SWITCH
On/off switch for the speaker cabinet. Lights up red when the cab is
powered up.
1
2
3
4
5
ENGLISH
RAIN. DO NOT OPEN CASE.
NO USER SERVICEABLE PARTS INSIDE.
1. INPUT
Electronically balanced input designed to accept the balanced output
signal from the mixing console by way of the THROUGH output of the
Projector Mid/High Unit (1= ground, 2= +, 3= -)
2. THROUGH
This is a parallel output you can use for routing the LINE signal to
additional equipment, such as other systems, individual components,
monitor power amps, etc
6
7
8
9
3. GAIN
This knob lets you adjust the power amp to match the input signal level;
reduce it to prevent distortion when you’re patching in signals that are
already fairly hot.
4. LF LIMITER LED
Indicates the operating status of the limiter. Green = signal present,
yellow = soft limit, red = full limit. NOTE: This is not a clipping indicator;
it is acceptable for it to light up every now and then in red. This tells you
that the limiter is operating at full capacity.
5. GROUND
Ground lift switch for separating the signal and chassis ground from each
other when you encounter problems with hum due to ground loops
resulting from duplicate paths to ground. The connection from signal
ground to chassis is interrupted when you press this button in.
7
PROJECTOR MANUAL
2. SETTING UP THE SYSTEM
2.1 Standard System
Setup/Stacking: SUB 1 – SUB 2 – MID-HIGH UNIT!
Here’s how you set up the standard system configuration: Always set up
the cabinets as illustrated in the diagram. Set SUB 1 on the floor, SUB 2
on SUB 1, and the MID-HIGH UNIT on top of the stack.
In this configuration, the subwoofers form a full horn and provide the
greatest possible output.
2.2 Standard System with Tilt Unit
PROJECTOR Tilt Unit
(Cabinets with serial number 317961 and higher are factory-equipped
with mounting units. For all PROJECTOR cabinets with lower serial
numbers HK Audio provides a retrofit kit with instructions and all
required parts.)
The Tilt Unit (see the diagram) is a practical tool designed to assist in
aiming stacked PROJECTOR MID-HIGH UNITS directly at the area that
you want the system to cover. This ensures that the sonic energy projected
by the system can be used more effectively. The Tilt Unit offers three
angles of tilt: 5°, 10° and 15°. These options let you adjust the
MID-HIGH UNITS to match the venue and the given position of the
PROJECTOR system. For example, if the system is set on a relatively high
platform (one meter or higher), you should select tilt angles of 10° or 15°
for shorter distances, and 5° for longer distances (e.g. in a big tent or
long hall). If the system is set on a low platform, for example at a height
of 0.2 to 0.6 meters (1 - 2 ft.), you should tilt the mid-high units at an
angle no greater than 5° to 10°.
35 m
8m
tilt 0°
refl
ecti
6m
on
Stage
6m
23 m
35 m
10 m
tilt 5°
refle
ction
6m
Stage
5m
If at all possible, be sure to place the system on a raised platform or stage
so that the mid-high unit is situated above the heads of the audience.
We recommend a platform with a height of about 2 to 3 feet, or 0.5 to
1 meters, depending on the size of the venue and how far you want the
system to project. The rule of thumb is, the longer the venue or greater
the distance you want to cover, the higher you should position the MIDHIGH UNITS. To aid in positioning, we offer the PROJECTOR Tilt Unit as
an option, which lets you adjust the angle of the MID-HIGH UNIT with
greater precision so that it faces the audience directly (more on this in the
following section).
30 m
35 m
14 m
tilt 10°
reflec
tion
6m
Stage
4m
15 m
30 m
35 m
23 m
reflecti
tilt 15°
on
6m
Stage
8
3m
10 m
30 m
PROJECTOR MANUAL
To mount the Tilt Unit, proceed as follows:
2.3 Flying the Mid-High Units
1. Set the PROJECTOR system up as described above
The PROJECTOR MID-HIGH UNITS are equipped with three eightposition Aeroquip flight rails that allow the cabinets to be flown
(i.e. allow the cabs to be hung from a cross beam or flight rig). These rails
are designed to be used with steel cables that are available as an optional
accessory. The rails on the left and right side of the housing serve to
actually “fly,” i.e. suspend the cabinet. The rear rail, in turn, is designed to
accept an additional steel cable that lets you adjust the tilt angle of the
MID/HIGH UNITs. The proper angle for the Mid/High units depends on
the height at which they are suspended and of course the type of venue.
The tilt angle can be varied slightly by means of the eight-position angles
on the rails as well as by the tension exerted by a cable attached to the
rail on the rear panel.
2. Remove the recessed socket head screws (A) from the SUB 2’s side
panels (two screws per side) as well as from the MID-HIGH UNIT’s
panels (1 screw per side)
3. Attach the Tilt Unit’s steel brackets (B) to the SUB 2’s housing using
two star grip screws (C) each. Make sure that the screws are fastened
tightly and that they hold the steel brackets firmly in place.
4. Insert the star grip screws with bearings (D) through the Tilt Unit’s steel
brackets into the threads on the mid-high unit and fasten them tightly.
5. Now tilt the back of the mid-high unit upwards by applying pressure
to the back of the housing. Allow the Tilt Unit to engage at the
desired angle.
CAUTION! Always make absolutely sure that the points at which you attach the
Mid-High units (e.g. aluminum cross beam or a rigging point in the ceiling of the
venue) have sufficient load-carrying capacity and satisfy the applicable safety
standards. If you are in doubt, be sure to seek the advice of a structural engineer,
rigger or the venue’s technician.
(See notes on flying safety)
2.4 Double Projector System
You can add a second Projector system to expand the standard
PROJECTOR system setup. Please follow the instructions on setting up the
PROJECTOR components SUB 1, SUB 2 and MID-HIGH in section 2.1.
A
A
Note:
To prevent phase cancellation, place the PROJECTOR system so that the
side panels are set at an angle of 25° relative to each other. The edges of
the back panels should be set to the same height and they should touch
each other. A distance of some 30 cm (1 ft.) between the two front faces
of the cabinets will give you an angle of 25°.
25°
This 25° angle is the best possible compromise for the majority of
applications. Angles between 20° and 30° are possible, depending on
local factors such as the height, depth or width of the venue and the
distance between the loudspeakers and the walls.
9
ENGLISH
A
PROJECTOR MANUAL
3. CONNECTING CABLES
4. POWERING UP
The integrated design of the PROJECTOR system minimizes the effort
involved in connecting cables.
Turn the GAIN knob on the cabinets all the way down (counterclockwise
as far as the knob will go).
Make sure that the entire system is connected before you power it up and
that all connected peripheral components are already in operation. The
connected mixer and all signal sources such as keyboards, instrument
amps, effects and so forth should be switched on first.
The PROJECTOR should always be switched on last, that means after you
switch on all connected devices. And it should always be switched off first,
that means before you switch on all connected devices. After you power
the system up by activating the ON/OFF switch (it will light up red when it
is set to ON and is getting mains power) turn the GAIN knobs on all
cabinets all the way up (clockwise as far as the knobs will go).
Make sure that all of the system’s mains switches are set to the OFF
position.
Connect the signal-carrying cable from your mixer (master left/right, line
out or a similar circuit) to the balanced input on one of the system’s components. It doesn’t matter which component you plug into, either a subwoofer or top will do. Use a standard XLR microphone cord to patch the
signal from the THROUGH output to the INPUT of the next component,
and continue plugging cords into components in this manner until they are
all connected. Make sure that the XLR connectors you are using have the
following pin assignments: 1= GROUND, 2= +, 3= -.
5. SETTING LEVELS
-6 dB
SIGNAL/
SOFT LIMIT/
FULL LIMIT
0 dB
0 dB
INPUT
THROUGH
GAIN
MID THROW
+6 dB
-6 dB
ON LIFT
LONG THROW
0 dB
THROUGH
GAIN
THROUGH
GAIN
INPUT
THROUGH
GAIN
HF
MF
GROUND
-6 dB
0 dB
INPUT
-6 dB
-6 dB
0 dB
THROUGH
GAIN
THROUGH
GAIN
THROUGH
GAIN
0 dB
INPUT
GAIN
INPUT
GAIN
-6 dB
-6 dB
0 dB
0 dB
-6 dB
-6 dB
0 dB
INPUT
0 dB
INPUT
THROUGH
GAIN
Do not connect the mains power cord until you have made sure that the
mains voltage of the given venue matches the voltage specified on the
device. Connecting the system to the wrong mains voltage can destroy the
PROJECTOR system’s electronic components.
With the new locking Neutrik Powercon connectors, the mains cable can
no longer be pulled out accidentally while the system is up and running.
When you plug the connector in, insert it and then rotate it to the right
like you would a quarter-turn or bayonet-type connector. You have a
secure connection when the connector engages.
10
If you hear distortion or overdriven signals, first check the signal sources
and, if possible, reduce the output signal level there. If the signal that you
are routing to PROJECTOR cannot be adjusted at the source, adjust the
power amps by backing off the GAIN knobs (see Tips and Tricks).
If you encounter low frequency hum, activate the GROUND LIFT switch on
the individual components. If this doesn’t take care of the problem, check
all cords and all signals routed into the mixer (see Helpful Hints) until you
pinpoint the problem.
PROJECTOR MANUAL
1. Don’t expose electronic circuitry to moisture! When you set the system
up outdoors, be sure to protect it against rain. Keep soft drinks, beer or
any other liquids well away from the cabinets to protect their electronic
components from short circuits.
2. To assure proper ventilation, make sure that cabinets are placed a
sufficient distance away from walls and aren’t covered by curtains and
the like. This is crucial to prevent the power amps from overheating.
3. Ensure that the power amp ventilation screens always remain free of
dirt, debris and other obstructions, and that the fan can rotate freely.
Otherwise, the electronic components may overheat and the unit may
be damaged.
4. PROJECTOR delivers optimum sound, so you should provide it with
optimum input signals! Noise such as humming is generally caused by
defective cables, incorrectly wired cables, or unbalanced signals routed
into the mixing console. Check all signal and mains cables, use DI boxes
to balance unbalanced signals, and do everything you can to keep onstage noise to a minimum.
5. Prevent distortion! Not only is it unpleasant to the ears of your
audience, it can also endanger your equipment. Make sure that all
components connected (both directly and indirectly) to the PROJECTOR
system have sufficient power ratings and that they cannot distort
because they‘re running at their respective limits. Provide an
undistorted signal to the system that doesn’t have to be cleaned up by
backing off the GAIN knob.
6. Avoid ground loops! In spite of a balanced signal circuit, redundant
ground circuits in a single audio system may generate undesirable
humming. For example, you may encounter a ground loop when the
mixer is grounded via a mains cord which isn’t connected to the same
mains circuit as the PROJECTOR system. To prevent this problem,
always be sure to connect the cabinets (or more accurately, their power
amps) and the mixing console to the same electrical circuit (same
phase!). If your equipment hums despite this precaution, the
Ground Lift switch can be of help.
CAUTION: Never use electrician’s tape or anything similar
to cover the ground contact of the plug? this endangers
lives!
Parallel Out:
Speakers:
XLR male (1= Ground; 2=+, 3= -)
1x 12” B&C speaker, 1x 2” B&C driver,
both in 60°x40° concentric horns
Total nominal impedance:
8 Ohms (passive)
Power output:
2x 300 watts (active)
Sound pressure level 1W/1m: 104 dB (full space), 110 db (half space)
Max. sound pressure level
119 dB @ 3% THD (200Hz – 5kHz average,
/ 1m:
full space)
125 dB @ 10% THD (200Hz – 5kHz average,
full space)
Directivity:
horizontal: ± 30°; 2 kHz – 20 kHz
vertical: ± 20°; 3 kHz – 20 kHz
Frequency response:
120 Hz – 19 kHz, ± 3dB
Crossover frequencies:
980 Hz; 24 dB / octave
Low cut 120 Hz, 24 dB
Protection circuit:
active limiter
Weight:
65 kg / 132 lbs.
Dimensions incl. casters :
51 cm x 69 cm x 80 cm /
(WxHxD)
20.1” x 27.2” x 31.5”
SUB 1 / SUB 2
Inputs / Outputs:
Line In:
Type of input:
Input impedance:
Sensitivity:
Max input level:
Parallel out:
Speakers:
Total nominal impedance:
Power output:
Sound pressure level 1W/1m:
Max. sound pressure level
/ 1m:
Frequency response:
Crossover frequencies:
Protection circuit:
Weight:
Dimensions incl. casters:
(WxHxD)
XLR female (1= ground; 2= +, 3= -)
electronically balanced & floating
47 kOhms
6 dB (when set to the far right position)
+24 dB
XLR male (1= ground; 2=+, 3= -)
1x 18” B&C woofer
8 Ohms (passive)
600 watts (active)
101 dB (full space), 110 db (half space)
119 dB @ 3% THD (200 Hz – 5 kHz average,
full space)
125 dB @ 10% THD (200 Hz – 5 kHz
average, full space)
40 Hz – 160 Hz
120 Hz; 24 dB / octave
Low cut 43 Hz, 12 dB
active limiter
58 kg / 129 lbs.
51 cm x 69 cm x 80 cm /
20.1” x 27.2” x 31.5”
General electrical data:
7. TECHNICAL SPECIFICATIONS
MID-HIGH UNIT
Inputs / Outputs:
Line In:
Type of input:
Input impedance:
Sensitivity:
Max input level:
XLR female (1= ground; 2= +, 3= -)
electronically balanced & floating
47 kOhms
6 dB (when set to the far right position)
+24 dB
Protection class 1 (protectively earthed)
Max. current consumption:
3 A (230 V)
6 A (117 V)
8 A (100 V)
Max. power consumption:
950 VA
Mains voltage range:
+/- 10%
Ambient temperature range:
-10° C to +60° C (+14 F° to 140°F)
Internal fuses:
2 x slow-blow 4 A for preamp and
power amp operating voltage
11
ENGLISH
6. HELPFUL HINTS
PROJECTOR MANUAL
8. SAFETY INSTRUCTIONS FOR
FLYING THE SYSTEM
PROJECTOR MID-HIGH
Installation Instructions According to TÜV Directives
TÜV (Technischer Überwachungsverein) is Germany’s safety standards authority. These instructions explain the installation procedure for HK AUDIO
PROJECTOR MID-HIGH speaker cabinets equipped with Aeroquip rails. The
following steps are in strict adherence with TÜV installation specifications.
Before you begin installing the cabinets, make sure that the mounting
points on the ceiling (e.g. pulleys, hoists, and so forth) comply with the
venue accident prevention regulations stipulated in section BGV C1 or the
equivalent safety regulations in your country, and that they are certified by
TÜV or the equivalent authority in your country to bear the overall weight
of the rig. (If in doubt, check with the local authorities.) Before each
installation, check the components to ensure that they are in perfect condition, particularly to make sure that the ends of the steel cables (starter
cable) protrude from the cable clamps, and that none of the Aeroquip rails
are damaged or deformed.
Speaker enclosures are referred to as cabinets in the following installation
instructions.
Components:
Starter cable:
Steel-wire cable with a length of 270 mm (10-5/8”), a stud, and a
carabiner (snap link) for fastening the PROJECTOR MID-HIGH cabinet to
the fixing point.
HK AUDIO item no. G 193 543
Mounting:
• Attach the cabinet to the fixing point with two starter cables (carabiner,
a cable with the required length, and a stud). Caution! The starter
cables may not be angled any less than 0 degrees inwards, nor may they
may be angled any more than 30 degrees outwards (see the
illustration)!
right
12
wrong
• You may attach another starter cable to the rear panel of the cabinet.
However, this starter cable is not a weight-bearing cable and therefore
may not be used as such to mount the cabinet to the ceiling! This cable
is merely an auxiliary cable that serves to adjust the cabinet’s horizontal
angle of tilt.
• Do not attach more than one cabinet with a maximum weight of 65 kg.
You may not mount several cabinets under each other in a stacked
multi-cabinet array!
• The tilt angle of the cabinets is determined by the position of the studs
in the Aeroquip rail. Since the length of the cables used to attach the
cabinets to the fixing point (the ceiling of the venue, a cross beam, or
similar base) will vary according to the given venue’s mounting options,
you must adjust the length of the cables accordingly. If the length of the
HK AUDIO starter cable does not suffice, you can commission any certified cable manufacturer to make cables with the required length using
the following parts.
Carabiner:
Carabiner with safety latch, load-carrying capacity 1 ton,
quality grade 8 (e.g. SOCS 6-8)
Stud:
AEROQUIP 5013 Series L double-stud fitting (ISO 9788)
HK AUDIO item no.: G 193195
Cable:
Galvanized steel-wire cable, DIN 3060, Ø 6 mm, 1770 N/mm
2, sZ 6 x 19 + FE, calculated breaking strength: 22.8 kN; minimum breaking strength: 19.6 kN
Important notes on safety:
Use only the parts specified in this operating manual!
Be sure to protect cabinets against rain and moisture when
they are deployed out in the open air! These cabinets must be
mounted in accordance with the instructions stipulated in this
installation manual!
Keep all documents pertaining to the system in a safe place!
PROJECTOR MANUAL
1.
PROJECTOR Systemkomponenten . . . . .14
1.1 PROJECTOR MID-HIGH UNIT . . . . . . . . . . . . .14
1.2 PROJECTOR SUB 1 und SUB 2 . . . . . . . . . . . .15
2.
Aufstellung . . . . . . . . . . . . . . . . . . . . .16
2.1 Standard System . . . . . . . . . . . . . . . . . . . . .16
2.2 Standard System mit Tilt-unit . . . . . . . . . . . .16
2.3 Flugbetrieb der MID-HIGH UNIT . . . . . . . . . .17
2.4 Doppeltes PROJECTOR System . . . . . . . . . . .17
3.
Verkabelung . . . . . . . . . . . . . . . . . . . .17
4.
Inbetriebnahme . . . . . . . . . . . . . . . . . .17
5.
Einstellungen . . . . . . . . . . . . . . . . . . . .18
6.
Tipps und Tricks . . . . . . . . . . . . . . . . . .19
7.
Technische Daten . . . . . . . . . . . . . . . . .19
8.
Sicherheitshinweise zum Flugbetrieb . .20
WILLKOMMEN IN DER
HK AUDIO FAMILIE!
Herzlichen Glückwunsch zu Ihrer Entscheidung für das 3-Weg
Aktiv-System PROJECTOR - einer Beschallungsanlage mit dem
Leistungsniveau einer Groß-PA und den Vorzügen moderner
Aktivelektronik. Der leichte Transport, der schnelle Aufbau und
ein problemloser Anschluss und Betrieb machen PROJECTOR
zur professionellen Beschallungsanlage für größere
Veranstaltungen.
PROJECTOR besteht aus drei verschiedenen Boxen, die mit den
benötigten elektronischen Komponenten bereits ausgestattet
sind. In der MID-HIGH UNIT , der Mitten-Hochtoneinheit,
werden der 12” Speaker und der 2” Treiber durch jeweils einen
300 Watt Power-Block mit Leistung versorgt, während die zwei
verschiedenen Subwoofer SUB 1 und SUB 2 jeweils mit einem
18” Speaker und einer 600-Watt-Endstufe ausgestattet sind.
Alle Boxen verfügen über einen eingebauten Controller samt
Limiter und Frequenzweiche, wodurch maximale Performance
und Betriebssicherheit gewährleistet sind.
Ein komplettes PROJECTOR PA-System besteht aus jeweils
einer MID-HIGH UNIT, einem SUB 1 und einem SUB 2
pro Seite.
Die Integration der gesamten Elektronik bietet durch kürzere
Leitungswege, eine exakte Abstimmung auf die verwendeten
Lautsprecher und die aktive Frequenzkorrektur ein exzellentes
Klang- und Impulsverhalten, größten Schutz vor Überlastung
und einen überragenden Sound. Einstell- und Pegelarbeiten
entfallen, und die Verwendung eines Equalizers ist nur dann
notwendig, wenn akustische Eigenheiten des Raumes
ausgeglichen werden müssen.
13
DEUTSCH
Inhalt
PROJECTOR MANUAL
1. PROJECTOR SYSTEMKOMPONENTEN
1.1 MID-HIGH UNIT
MID THROW
Stellen Sie für Entfernungen bis 20 m den Schalter auf MID THROW, für
weitere Entfernungen auf LONG THROW.
SIGNAL/
SOFT LIMIT/
FULL LIMIT
-6 dB
MID THROW
0 dB
ON LIFT
LONG THROW
INPUT
THROUGH
GAIN
HF
MF
GROUND
LONG THROW
SELF-POWERED
LONG THROW SYSTEM
®
PROJECTOR
MADE IN GERMANY
600 W RMS MID-HIGH UNIT
MAINS
INPUT
NRTL (Fairfield)
UL 6500
7. LÜFTEREINHEIT
Dieser Lüfter sorgt für die nötige Kühlung der Endstufenmodule. Achten
Sie immer darauf, daß der Lüfter und auch die Lüftungsschlitze nicht
verschmutzt sind und einen freien Luftstrom garantieren.
POWER
NRTL (Fairfield)
UL 6500
ON
CAUTION!
OFF
117 V~ 6.0 A
50 - 60 HZ
MAX. POWER CONSUMPTION 950 VA
TO PREVENT THE RISK OF FIRE
AND SHOCK HAZARD DON´T
EXPOSE THIS APPLIANCE TO
MOISTURE OR RAIN. DO NOT
OPEN CASE; NO USER
SERVICEABLE PARTS INSIDE.
REFER SERVICING TO QUALIFIED
SERVICE PERSONNEL.
CIRCUIT
BREAKER
TURN OFF SYSTEM
BEFORE RESETTING
CIRCUIT BREAKER!
SUB
2
SUB
1
CAUTION!
TO PREVENT THE RISK OF FIRE AND SHOCK HAZARD
DON´T EXPOSE THIS APPLIANCE TO MOISTURE OR
RAIN. DO NOT OPEN CASE.
NO USER SERVICEABLE PARTS INSIDE.
Ser.No.
MID-HIGH
Das Topteil des PROJECTOR Aktiv-Systems beherbergt je einen
12” B&C Speaker und einen 2” B&C Treiber, beide in konzentrisch
angeordneten 60° x 40° Hörnern, sowie die gesamte Aktivelektronik.
Per Mid Throw / Long Throw Schalter kann zwischen zwei verschiedenen
Frequenzkorrekturen für kurze und mittlere oder größere Distanzen
gewählt werden. Für Entfernungen von bis zu 20 m sollte der Schalter auf
Mid Throw stehen, für weitere Distanzen auf Long Throw.
Das Topteil ist serienmäßig mit Rollen bestückt und für den fliegenden
Einsatz auf beiden Seiten und in der unteren Gehäuseaussparung der
Rückseite mit Aeroquip-Flugschienen ausgestattet.
Die Bedienelemente:
1. INPUT
Elektronisch symmetrierte Eingangsbuchse für das Mischpult-Signal
(1= Ground, 2= +, 3= -)
8. CIRCUIT BREAKER
Sicherungsautomat, ersetzt die sonst üblichen Schmelzsicherungen. Nach
Beseitigung etwaiger Fehlerquellen kann der ausgelöste Automat durch
einfaches Drücken wieder in Betrieb genommen werden. Achtung: Vor dem
Reset immer erst das System ausschalten (Power-Schalter auf Off )!
PROJECTOR
9. MAINS INPUT
Neutrik Powercon Buchse zum Anschluss der Spannungsversorgung. Dieses
neuartige Verbindungssystem bietet durch seinen Lock-Mechanismus einen
hervorragenden Schutz vor versehentlichem Abziehen des Netzkabels.
10. "POWER"-SCHALTER
Der Ein/Aus-Schalter für die Lautsprecherbox. In eingeschaltetem Zustand
leuchtet der Schalter rot.
11. AEROQUIP FLUGSCHIENEN
In diese Schienen können für den sicheren geflogenen Betrieb
entsprechende Stahlseile mit sogenannten Aeroquip Studs eingeklinkt
werden (siehe Kapitel Aufstellung / Stacking).
2. THROUGH
Paralleler Ausgang zur Weiterleitung des LINE-Signals, z.B. an weitere
Systeme, einzelne Komponenten, Monitorendstufen etc.
3. GAIN
Regler zum Anpassen der Endstufe an das Eingangssignal, zur Vermeidung
von Verzerrungen bei ungünstigen Signalpegeln
4. MF- UND HF-LIMITER LED
Anzeige über den Betriebsstatus des Limiters. Grün = Signal, Gelb = Soft
Limit, Rot = Full Limit. ACHTUNG! Hier handelt es sich nicht um eine Clip
LED. Es darf hin und wieder schon mal kurz rot leuchten, denn dies zeigt
an, daß der Limiter in Vollbetrieb ist. Der Limiterstatus des Mitten (MF)und Hochtonbereichs (HF) wird jeweils über eine eigene LED angezeigt
5. GROUND
Ground-Lift-Schalter für die Trennung von Signal- und Gehäusemasse bei
Brummproblemen. In gedrücktem Zustand wird die Masse getrennt.
1
2
3
6
7
8
9
6. MID THROW/LONG THROW SWITCH
Wahlschalter für den nahen und mittleren Bereich (MID THROW) oder
große Distanzen (LONG THROW). Im LONG THROW Modus wird der
Hochtonanteil vom System-EQ um ca. 3 dB geboostet, so daß auch über
größere Distanzen keine Höhen verloren gehen.
11
14
4
10
5
PROJECTOR MANUAL
1.2 SUB 1 und SUB 2
6. LÜFTEREINHEIT
Dieser Lüfter sorgt für die nötige Kühlung der Endstufenmodule. Achten
Sie immer darauf, daß der Lüfter und auch die Lüftungsschlitze nicht verschmutzt sind und einen freien Luftstrom garantieren.
-6 dB
SIGNAL/
SOFT LIMIT/
FULL LIMIT
0 dB
ON LIFT
INPUT
THROUGH
GAIN
GROUND
®
SELF-POWERED
LONG THROW SYSTEM
PROJECTOR
MADE IN GERMANY
NRTL (Fairfield)
UL 6500
NRTL (Fairfield)
UL 6500
600 W RMS SUBWOOFER
MAINS
INPUT
POWER
ON
OFF
117 V~ 6.0 A
50 - 60 HZ
MAX. POWER CONSUMPTION 950 VA
CIRCUIT
BREAKER
TURN OFF SYSTEM
BEFORE RESETTING
CIRCUIT BREAKER!
CAUTION!
TO PREVENT THE RISK OF FIRE
AND SHOCK HAZARD DON´T
EXPOSE THIS APPLIANCE TO
MOISTURE OR RAIN. DO NOT
OPEN CASE; NO USER
SERVICEABLE PARTS INSIDE.
REFER SERVICING TO QUALIFIED
SERVICE PERSONNEL.
SUB
2
SUB
1
CAUTION!
7. CIRCUIT BREAKER
Sicherungsautomat, ersetzt die sonst üblichen Schmelzsicherungen. Nach
Beseitigung etwaiger Fehlerquellen kann der ausgelöste Automat durch
einfaches Drücken wieder in Betrieb genommen werden. Achtung: Vor dem
Reset immer erst das System ausschalten (Power-Schalter auf Off )!
TO PREVENT THE RISK OF FIRE AND SHOCK HAZARD
DON´T EXPOSE THIS APPLIANCE TO MOISTURE OR
RAIN. DO NOT OPEN CASE.
NO USER SERVICEABLE PARTS INSIDE.
Ser.No.
SUB 1
Die PROJECTOR-Subwoofer SUB 1 und SUB 2
sind jeweils mit einem horngeladenen 18” B&C Speaker bestückt.
Horn und Druckkammer dieser Boxen sind so konstruiert, dass der massive
Magnet und damit die Schwingspule des 600 Watt-Speakers durch die
Schallwellen aktiv gekühlt werden – je härter er arbeitet, desto stärker
der Kühleffekt.
Das Innenleben der beiden Subwoofer ist vollkommen identisch, jedoch ist
der SUB 2 genau spiegelverkehrt aufgebaut wie der SUB 1. Das hat einen
einfachen aber sehr wirkungsvollen Grund: Werden die Subwoofer wie
vorgesehen aufeinandergestackt (siehe Illustration “Subwoofer Stacking”),
so erhält man ein ganzes Horn und somit mehr Druck und Reichweite im
Bassbereich.
Die Bedienelemente:
8. MAINS INPUT
Neutrik Powercon Buchse zum Anschluss der Spannungsversorgung. Dieses
neuartige Verbindungssystem bietet durch seinen Lock-Mechanismus einen
hervorragenden Schutz vor versehentlichem Abziehen des Netzkabels.
9. "POWER"-SCHALTER
Der Ein/Aus-Schalter für die Lautsprecherbox. In eingeschaltetem Zustand
leuchtet der Schalter rot.
1
2
3
4
5
1. INPUT
Elektronisch symmetrierte Eingangsbuchse für das Mischpult-Signal
(1= Ground, 2= +, 3= -)
2. THROUGH
Paralleler Ausgang zur Weiterleitung des LINE-Signals, z.B. an weitere
Systeme, einzelne Komponenten, Monitorendstufen etc.
7
8
DEUTSCH
3. GAIN
Regler zum Anpassen der Endstufe an das Eingangssignal, zur Vermeidung
von Verzerrungen bei ungünstigen Signalpegeln
6
9
4. LF LIMITER LED
Anzeige über den Betriebsstatus des Limiters. Grün = Signal, Gelb = Soft
Limit, Rot = Full Limit. ACHTUNG! Hier handelt es sich nicht um eine Clip
LED. Es darf hin und wieder schon mal kurz rot leuchten, denn dies zeigt
an, daß der Limiter in Vollbetrieb ist.
5. GROUND
Ground-Lift-Schalter für die Trennung von Signal- und Gehäusemasse bei
Brummproblemen. In gedrücktem Zustand wird die Masse getrennt.
15
PROJECTOR MANUAL
2. AUFSTELLUNG
2.1 Standard System
Aufstellen eines Standard Systems: Stellen Sie die Boxen immer wie in der
Abbildung dargestellt auf, also SUB 1 auf den Boden, darauf SUB 2 und
zum Schluß die MID-HIGH UNIT. Auf diese Weise bilden die Subwoofer
ein komplettes Horn und liefern somit den bestmöglichen Output.
2.2 Standard System mit Tilt- unit
Anwendungsbeispiele der Tilt- unit
PROJECTOR Tilt Unit Schrägstellvorrichtung
seit Seriennummer 317961 sind die Gehäuse serienmäßig mit den
Befestigungspunkten ausgestattet. Für vorhergehende PROJECTOR liefert
HK AUDIO eine Nachrüstanleitung mit allen notwendigen Bauteilen.
Die Tilt unit (siehe Abbildung) ist ein praktisches Werkzeug, um die
PROJECTOR MID-HIGH UNITs im gestackten Einsatz (auf den
Subwoofern stehend) besser auf die zu beschallende Fläche ausrichten zu
können. Somit kann die vom System abgegebene Energie effektiver
genutzt werden. Mit der Tilt Unit stehen drei Neigungswinkel zur
Verfügung: 5°, 10° und 15°. Je nach Veranstaltungsort und
Aufstellposition des PROJECTOR Systems können die MID-HIGH UNITS
entsprechend gekippt werden. Steht das System beispielsweise auf einem
hohen Podest (1 m oder höher), so sollten für kürzere Distanzen 10° oder
15° Neigungswinkel gewählt werden, für längere Distanzen (z.B. großes
Festzelt oder lange Halle) nur 5°. Steht das System dagegen auf einem
niedrigen Podest von beispielsweise 0,2 m bis 0,6 m Höhe, so sollten die
Mid-High Units nur mit 5° bis 10° gekippt werden.
35 m
8m
tilt 0°
refl
ecti
6m
on
Stage
6m
23 m
35 m
10 m
tilt 5°
refle
ction
6m
Stage
Nach Möglichkeit sollte das System etwas erhöht auf einem Podest oder
gegebenenfalls auf der Bühne stehen, so daß die MID-HIGH UNIT über
den Köpfen des Publikums plaziert ist. Je nach Länge des zu beschallenden
Feldes ist eine Podesthöhe von ca. 0,5 m bis 1 m empfehlenswert.
Prinzipiell gilt: Je länger die Fläche ist, die beschallt werden soll, desto
höher sollten die MID-HIGH UNITS positioniert werden. Anhand der als
Zubehör erhältlichen PROJECTOR Tilt Unit kann die MittenHochtoneinheit noch genauer auf die Publikumsfläche ausgerichtet werden
(siehe nachfolgender Abschnitt).
5m
30 m
35 m
14 m
tilt 10°
reflec
tion
6m
Stage
4m
15 m
30 m
35 m
23 m
reflecti
tilt 15°
on
6m
Stage
16
3m
10 m
30 m
PROJECTOR MANUAL
Montage der Tilt- unit
2.3 Flugbetrieb der MID-HIGH
1. Stellen Sie das PROJECTOR System wie oben beschrieben auf.
Für den Flugbetrieb sind die PROJECTOR MID-HIGH UNITS mit drei
8-Position Aeroquip Flugschienen ausgestattet. In die Schienen können die
entsprechenden Stahlseile eingeklinkt werden, die als optionales Zubehör
erhältlich sind. Die Schienen auf der linken und rechten Seite des
Gehäuses dienen dabei zum eigentlichen Aufhängen bzw. “Fliegen” der
Box. An der hinteren Schiene kann ein weiteres Stahlseil eingeklinkt
werden, mit welchem man den Neigungswinkel der MID-HIGH UNITS
noch zusätzlich variieren kann. Der richtige Winkel ist von der Höhe der
MID-HIGH UNITS und natürlich auch von der Art des Veranstaltungsortes
abhängig. Durch die 8 verschiedenen Positionswinkel in den Schienen und
die zusätzliche Zugmöglichkeit anhand der Schiene auf der Rückseite kann
der Neigungswinkel leicht variiert werden
2. Entfernen Sie die versenkten Inbusschrauben (A) an den Seitenwänden
des SUB 2 (zwei Schrauben pro Seite) und der MID-HIGH UNIT
(1 Schraube pro Seite)
3. Schrauben Sie die Tilt Unit Stahlbügel (B) mit jeweils zwei
Sterngriffschrauben (C) am Gehäuse des SUB 2 an. Achten Sie dabei
darauf, daß die Schrauben fest sitzen und genügend Druck auf die
Stahlbügel und das Gehäuse ausüben, so daß die Stahlbügel nicht
wackeln.
4. Schrauben Sie die Sterngriffschrauben mit Lager (D) durch die Tilt Unit
Stahlbügel hindurch in die Gewinde der Mid-High Unit.
5. Drücken Sie jetzt das Gehäuse der Mid-High Unit nach oben, indem sie
es auf der Rückseite angreifen. Lassen Sie die Tilt Unit im gewünschten
Winkel einrasten.
Achtung! Vergewissern Sie sich immer, daß die Punkte, an denen Sie die MID-HIGH
UNITS aufhängen (z.B. Alutraverse oder Rigging-Punkt in der Hallendecke) über
genügend Tragkraft verfügen und den gängigen Sicherheitsnormen entsprechen.
Fragen Sie gegebenenfalls einen professionellen Statiker oder Rigger bzw. den
zuständigen Hallentechniker.
(Siehe Sicherheitshinweise für den Flugbetrieb).
2.4 Doppeltes Projector System
Zur Erweiterung des Standard Projector Systems kann ein zweites
PROJECTOR System hinzugefügt werden. Dabei sind ebenfalls die
Hinweise zur Aufstellung der PROJECTOR Komponenten SUB 1, SUB 2
und MID-HIGH zu beachten.
A
A
Wichtig:
Um Auslöschungen im Frequenzgang zu verhindern, müssen die
PROJECTOR Systeme so aufgestellt werden, daß zwischen den
Seitenflächen ein Winkel von 25° entsteht. Die Kanten der Rückseiten
sollten sich dabei auf der gleichen Höhe befinden und sich berühren. Dem
Winkel von 25° entspricht eine Distanz von ca. 30 cm zwischen den
beiden Fronten der Gehäuse.
DEUTSCH
A
25°
Ein Winkel von 25° wird für die Mehrzahl der Anwendungen der bestmögliche Kompromiß darstellen. Je nach örtlichen Gegebenheiten, wie
Höhe, Tiefe oder Breite des Veranstaltungsraumes und Abstand der
Lautsprecher zu den Wänden können grundsätzlich Winkel zwischen
20° und 30° in Betracht kommen.
17
PROJECTOR MANUAL
3. VERKABELUNG
4. INBETRIEBNAHME
Die integrierte Bauweise des PROJECTOR Systems minimiert den Aufwand
für die Verkabelung erheblich.
Drehen Sie an allen Boxen den GAIN-Regler zu (Anschlag links).
Achten Sie darauf, dass das System vor dem Einschalten komplett
verkabelt ist und dass alle übrigen angeschlossenen Komponenten schon
vorher in Betrieb sind. Sowohl das angeschlossene Mischpult als auch alle
mit ihm verbundenen Signalquellen wie Keyboards, Instrumentalverstärker,
Effekte usw. sollten eingeschaltet sein.
Die Boxen von PROJECTOR sollten immer zuletzt , d.h. nach allen
anderen Komponenten, eingeschaltet, und zuerst, d.h. vor allen
angeschlossenen Geräten ausgeschaltet werden. Nach dem Einschalten mit
dem Power On/Off Schalter (leuchtet rot, wenn Spannung anliegt und er
auf “on” steht) drehen Sie an allen Boxen die GAIN-Regler ganz auf
(Anschlag rechts).
Achten Sie darauf, dass alle Netzschalter des Systems in OFF-Position
stehen.
Schließen Sie die von Ihrem Mischpult kommenden Signalkabel (Master
left/right, Line out o.ä.) an die symmetrierte INPUT Buchse einer
Komponente an. Dabei spielt es keine Rolle, ob Sie mit Subwoofer oder
Topteil anfangen. Mit einem handelsüblichen XLR-Mikrofonkabel leiten Sie
das Signal aus der THROUGH - Ausgangsbuchse zum INPUT der nächsten
Komponente, und von dieser in der gleichen Art weiter. Die Belegung der
XLR Stecker muß dabei wie folgt sein: 1= Ground, 2= +, 3= -
5. EINSTELLUNGEN
-6 dB
0 dB
INPUT
THROUGH
SIGNAL/
SOFT LIMIT/
FULL LIMIT
0 dB
GAIN
MID THROW
-6 dB
+6 dB
0 dB
THROUGH
ON LIFT
GAIN
LONG THROW
INPUT
THROUGH
GAIN
HF
MF
GROUND
-6 dB
0 dB
INPUT
THROUGH
GAIN
-6 dB
-6 dB
0 dB
THROUGH
GAIN
THROUGH
GAIN
0 dB
INPUT
GAIN
INPUT
GAIN
-6 dB
-6 dB
0 dB
0 dB
-6 dB
-6 dB
0 dB
INPUT
THROUGH
GAIN
0 dB
INPUT
THROUGH
GAIN
Schließen Sie das Netzkabel erst an, nachdem Sie sich vergewissert haben,
daß die Ihnen zur Verfügung stehende Netzspannung mit der auf dem
Gerät angegebenen übereinstimmt. Der Anschluß an eine falsche
Netzspannung kann die elektronischen Elemente des PROJECTOR Systems
zerstören.
Durch die Verwendung des neuartigen, verriegelbaren Neutrik Powercon
Steckers als Netzverbindung ist ein versehentliches Herausziehen des
Steckes während des Betriebes nicht mehr möglich. Beim Anschließen muß
der Stecker wie bei einem Bajonett-Verschluß zunächst eingesteckt und
dann nach rechts gedreht werden. Sobald der Stecker eingerastet ist,
besteht die sichere Verbindung.
18
Falls Verzerrungen oder Übersteuerungen auftreten, überprüfen Sie die
Signalquellen und reduzieren Sie nach Möglichkeit dort das
Ausgangssignal. Lässt sich das zu PROJECTOR führende Signal auf diese
Weise nicht verändern, passen Sie es mit dem GAIN-Regler an die
Endstufen an. (s.a. Tipps und Tricks)
Beim Auftreten von tieffrequentem Brummen betätigen Sie die GROUND
LIFT Schalter der einzelnen Komponenten. Führt dies nicht zum Erfolg,
überprüfen Sie Kabel und alle am Mischpult ankommenden Signale auf
Mängel. (s.a. Tipps und Tricks)
PROJECTOR MANUAL
1. Lassen Sie keine Feuchtigkeit an die Elektronik kommen! Achten Sie
beim Einsatz im Freien darauf, dass Ihr System vor Regen geschützt aufgestellt wird. Cola, Bier oder andere Flüssigkeiten dürfen nicht an die
Elektronik gelangen, da dies zu Kurzschlüssen führen kann.
2. Sorgen Sie dafür, daß die Boxen genügend Abstand zu Wänden haben
und nicht von Vorhängen o.Ä. verdeckt werden. Nur so bleibt die
Kühlung der Endstufen gewährleistet.
3. Achten Sie darauf, daß die Lüftungsschlitze der Endstufeneinheit immer
frei von Schmutz sind und der Ventilator sich frei drehen kann.
Ansonsten kann die Elekronik überhitzen und Schaden nehmen.
4. PROJECTOR sorgt für optimalen Sound - sorgen Sie für das optimale
Eingangssignal! Brummen ist in den meisten Fällen das Resultat
defekter Kabel, falscher Kabel oder unsymmetrischer Eingangssignale
am Mischpult. Überprüfen Sie alle Signal- und Netzkabel, symmetrieren
Sie unsymmetrische Signale mit DI-Boxen, sorgen Sie für "Ruhe auf
der Bühne".
5. Verhindern Sie Verzerrungen! Verzerrungen sind nicht nur unangenehm
für die Ohren der Zuhörer, sie sind auch gefährlich für Ihre Anlage.
Achten Sie darauf, daß alle direkt und indirekt an PROJECTOR
angeschlossenen Komponenten über genügend Leistung verfügen und
niemals Verzerrungen produzieren, weil sie am Limit betrieben werden.
Sorgen Sie für ein sauberes Signal, das nicht durch den Einsatz des
GAIN-Reglers beeinflusst werden muss.
6. Vermeiden Sie Brummschleifen! Auch trotz symmetrischer Signalführung
kann durch eine doppelte Masse-Erdverbindung innerhalb eines Audio
Systems ein unangenehmer Brummton entstehen. Ist beispielsweise das
Mischpult über das Netzkabel geerdet und hängt nicht auf dem
gleichen Stromkreis wie die PROJECTOR Boxen, so kann es zu einer
sogenannten "Brummschleife" kommen. Schließen Sie deshalb stets
Boxen (bzw. Endstufen) und Mischpult an den gleichen Stromkreis
(gleiche Phase!) an. Sollten Sie trotzdem einmal Brummprobleme mit
der Anlage haben, so kann der Groundliftschalter eine große Hilfe sein.
Lautsprecherbestückung:
Gesamtnennimpedanz:
Leistung:
Schalldruck 1W/1m:
Max. Schalldruck / 1m:
Directivity:
Frequenzgang:
Trennfrequenzen:
Schutzschaltung:
Gewicht:
Maße inkl. Rollen (BxHxT):
1x 12” B&C Speaker, 1x 2” B&C Treiber,
beide in 60°x40° konzentrischen Hörnern
8 Ohm (passive)
2x 300W (active)
104 dB (fullspace), 110 db (half space)
119 dB @ 3% THD (200 Hz – 5 kHz
gemittelt, full space)
125 dB @ 10% THD (200 Hz – 5 kHz
gemittelt, full space)
Horizontal: ± 30°; 2 kHz – 20 kHz
Vertikal: ± 20°; 3 kHz – 20 kHz
120 Hz – 19 kHz, ± 3dB
980 Hz; 24 dB / Oktave
Low cut 120 Hz, 24 dB
aktiver Limiter
65 kg / 132 lbs.
51 cm x 69 cm x 80 cm /
20.1” x 27.2” x 31.5”
SUB 1 / SUB 2
Ein- / Ausgänge:
Line In:
Bauart Eingang:
Eingangsimpedanz:
Empfindlichkeit:
Max. Eingangspegel:
Parallel Out:
Lautsprecherbestückung:
Gesamtnennimpedanz:
Leistung:
Schalldruck 1W/1m:
Max. Schalldruck / 1m:
Frequenzgang:
Trennfrequenzen:
XLR female (1= Ground; 2= +, 3= -)
Elektronisch symmetriert & floating
47 kOhm
6 dB (bei Rechtsanschlag)
+24 dB
XLR male (1= Ground; 2=+, 3= -)
1x 18” B&C woofer
8 Ohm (passive)
600W (active)
101 dB (fullspace), 110 dB (half space)
119 dB @ 3% THD (200 Hz – 5 kHz
gemittelt, full space)
125 dB @ 10% THD (200 Hz – 5 kHz
gemittelt, full space)
40 Hz – 160 Hz
120 Hz; 24 dB / Oktave
Low cut 43 Hz, 12 dB
aktiver Limiter
58 kg / 129 lbs.
51 cm x 69 cm x 80 cm /
20.1” x 27.2” x 31.5”
ACHTUNG: Nie die Masse am Stecker abkleben
- das ist lebensgefährlich!
Schutzschaltung:
Gewicht:
Maße inkl. Rollen (BxHxT):
7. TECHNISCHE DATEN
Allgemeine elektrische Daten:
MID-HIGH UNIT
Schutzklasse
Max. Stromaufnahme:
Ein- / Ausgänge:
Line In:
Bauart Eingang:
Eingangsimpedanz:
Empfindlichkeit:
Max. Eingangspegel:
Parallel Out:
XLR female (1= Ground; 2= +, 3= -)
Elektronisch symmetriert & floating
47 kOhm
6 dB (bei Rechtsanschlag)
+24 dB
XLR male (1= Ground; 2=+, 3= -)
Max. Leistungsaufnahme:
Netzspannungsbereich:
Umgebungstemperaturbereich:
Interne Sicherungen:
DEUTSCH
6. TIPPS UND TRICKS
1
3 A (230 V)
6 A (117 V)
8 A (100 V)
950 VA
+/- 10%
-10° C bis +60° C
2x SB 4 A für Betriebsspannung Vorund Endstufe
19
PROJECTOR MANUAL
8. SICHERHEITSHINWEISE
• Ein weiteres Starterseil kann auf der Rückseite des Cabinets befestigt
werden. Dieses Starter Seil darf nicht zur alleinigen Befestigung verwendet werden! Es ist nur zur Einstellung des horizontalen Neigungswinkels
bestimmt.
PROJECTOR MID-HIGH
Installation gemäß TÜV-Bestimmungen
Diese Installationsanweisungen gelten für die HK AUDIO Lautsprecherbox
PROJECTOR MID-HIGH, die mit Aeroquipschienen ausgestattet ist. Die
TÜV-Vorschriften beinhalten die Installation gemäß nachfolgender
Spezifikationen.
Vergewissern Sie sich vor der Montage, daß die Befestigungspunkte an der
Hallendecke (z.B. Kettenzug) der Unfallverhütungsvorschrift BGV C1
(Veranstaltungs- und Produktionsstätten für szenische Darstellung) entsprechen und für die Gesamtlast TÜV abgenommen sind. Prüfen Sie vor
jeder Installation den einwandfreien Zustand der Komponenten, stellen Sie
insbesondere sicher, daß die Seilenden der Stahlseile (Starterseil ) aus den
Pressklemmen herausschauen und keine der Aeroquipschienen
Beschädigungen oder Verformungen aufweist.
• Maximal 1 Cabinet á 65 kg darf montiert werden. Es dürfen keine
Cabinets untereinander montiert werden!
• Der Neigungswinkel des Cabinets wird durch die Position des Studs in
der Aeroquip-Schiene bestimmt. Da die Länge der Seile zur Befestigung
des Cabinets am Befestigungspunkt (Hallendecke, Traverse o.ä.) abhängig von der Art der jeweiligen Befestigungsmöglichkeit ist, müssen diese
auf die individuellen Gegebenheiten angepaßt sein. Sollte die Länge des
von HK AUDIO angebotenen Starterseils nicht ausreichen, können mit
Hilfe der nachfolgend beschriebenen Teile bei jedem zugelassenen
Seilhersteller Seile der entsprechenden Länge hergestellt werden.
Karabinerhaken:
Karabinerhaken mit Sicherung, Tragfähigkeit
1 Tonne, Güteklasse 8 (z.B.: SOCS 6-8)
In den nachfolgenden Installationshinweisen werden
die Boxen als Cabinets bezeichnet.
Komponenten:
Stud (=Schiffchen):
AEROQUIP 5013 Series L Double Stud Fitting (ISO 9788)
HK AUDIO Artikelnr.: G 193195
Starterseil:
Seil:
Drahtseil verzinkt, DIN 3060, Ø 6 mm, 1770 N/mm
2, sZ 6 x 19 + FE,rechnerische Bruchkraft: 22,8 kN;
minimale Bruchkraft: 19,6 kN
270 mm langes Drahtseil mit einem Stud (=Schiffchen) und einem
Karabinerhaken zur Verbindung des PROJECTOR MID-HIGH mit dem
Befestigungspunkt.
HK AUDIO Artikel-no.: G 193 543
Montage:
• Das Cabinet wird mit zwei Starterseilen (Karabinerhaken, Seil entsprechender Länge und Stud) am Befestigungspunkt befestigt. Achtung! Der
maximale Schrägzug der Starterseile darf 0Grad nach innen und 30 Grad
nach außen nicht unter- bzw. überschreiten (siehe Abb.)!
richtig
20
falsch
Wichtige Sicherheitshinweise:
Verwenden Sie nur die in dieser Bedienungsanleitung
spezifizierten Teile! Bei Verwendung im Freien, Cabinets
unbedingt vor Regen- und Feuchtigkeitseinwirkungen schützen!
Die Montage muß gemäß dieser Installationsanleitung
vorgenommen werden!
Bewahren Sie sämtliche zum System gehörenden Papiere
sorgfältig auf!
PROJECTOR MANUAL
Table des matières
1.
Composants du système PROJECTOR . . .22
BIENVENUE DANS
LA GRANDE FAMILLE
HK AUDIO !
1.1 Unité de médiums/aigus du PROJECTOR . . . . .22
2.
Montage . . . . . . . . . . . . . . . . . . . . . . .24
2.1 Système standard . . . . . . . . . . . . . . . . . . . .24
2.2 Système standard avec unité d'inclinaison . . .24
2.3 "accroche" de l'unité de médiums/aigus . . . .25
2.4 Système PROJECTOR double . . . . . . . . . . . . .25
3.
Câblage . . . . . . . . . . . . . . . . . . . . . . . .26
4.
Mise en service . . . . . . . . . . . . . . . . . .26
5.
Réglages . . . . . . . . . . . . . . . . . . . . . . .26
6.
Trucs et astuces . . . . . . . . . . . . . . . . . .27
7.
Caractéristiques techniques . . . . . . . . .27
8.
Consignes de sécurité . . . . . . . . . . . . .28
Nous vous félicitons d'avoir choisi le système actif à trois voies
PROJECTOR – un système de sonorisation qui allie la
puissance d'une grande installation et les avantages d'une
électronique active moderne. Rapidité de montage et facilité de
transport, de connexion et d'utilisation font du PROJECTOR
l'installation de sonorisation professionnelle idéale pour les
grandes manifestations.
PROJECTOR s'articule autour de trois enceintes différentes qui
sont déjà équipées des composants électroniques nécessaires.
La "MID-HIGH UNIT", l'unité de médiums/aigus, possède un
haut-parleur de 12" et un moteur de 2", tous deux alimentés
par un bloc de puissance de 300 watts, alors que les deux
caissons basse SUB 1 et SUB 1 sont chacun munis d'un hautparleur de 18" et d'un étage de puissance de 600 watts.
Toutes les enceintes disposent d'un contrôleur intégré avec
circuit de limiteur et partie filtre afin de garantir des
performances maximales et une sécurité de fonctionnement à
toute épreuve. Un système de sonorisation PROJECTOR
complet se compose toujours d'une unité de médiums/aigus,
d'un caisson SUB 1 et d'un caisson SUB 2 par côté.
Grâce à des chemins de câbles plus courts, à une adéquation
précise aux haut-parleurs utilisés et à la correction de
fréquence active, l'intégration de l'électronique complète
assure un excellent comportement acoustique et impulsionnel,
une protection maximale contre les surcharges et un son
remarquable. Finis les travaux fastidieux de réglage et
d'équilibrage ; l'égaliseur ne s'avère nécessaire que pour
l’adaptation aux propriétés acoustiques du local.
21
FRANÇAIS
1.2 Sub 1 et Sub 2 du PROJECTOR . . . . . . . . . . .23
PROJECTOR MANUAL
1. COMPOSANTS DU SYSTÈME
PROJECTOR
1.1 UNITÉ DE MÉDIUMS/AIGUS
MID THROW
SIGNAL/
SOFT LIMIT/
FULL LIMIT
-6 dB
MID THROW
6. COMMUTATEUR MID THROW/LONG THROW ce grande
Sélecteur pour courtes/moyennes portées (MID THROW) ou longues
portées (LONG THROW). En mode LONG THROW, les aigus sont amplifiés
d'environ 3 dB par l'égaliseur du système, de façon à éviter les pertes
d'aigus sur de plus grandes distances. Réglez le commutateur sur MID
THROW pour des portées maximales de 20 m et sur LONG THROW pour
des portées supérieures.
0 dB
ON LIFT
LONG THROW
INPUT
THROUGH
GAIN
HF
MF
GROUND
LONG THROW
SELF-POWERED
LONG THROW SYSTEM
®
PROJECTOR
MADE IN GERMANY
600 W RMS MID-HIGH UNIT
MAINS
INPUT
NRTL (Fairfield)
UL 6500
7. UNITE DU VENTILATEUR
Ce ventilateur refroidit les modules de l'étage de puissance. Vérifiez
toujours que le ventilateur et les fentes d'aération ne sont pas encrassés.
Veillez à maintenir une circulation d'air parfaite.
POWER
NRTL (Fairfield)
UL 6500
ON
CAUTION!
OFF
117 V~ 6.0 A
50 - 60 HZ
MAX. POWER CONSUMPTION 950 VA
CIRCUIT
BREAKER
TURN OFF SYSTEM
BEFORE RESETTING
CIRCUIT BREAKER!
TO PREVENT THE RISK OF FIRE
AND SHOCK HAZARD DON´T
EXPOSE THIS APPLIANCE TO
MOISTURE OR RAIN. DO NOT
OPEN CASE; NO USER
SERVICEABLE PARTS INSIDE.
REFER SERVICING TO QUALIFIED
SERVICE PERSONNEL.
SUB
2
SUB
1
CAUTION!
TO PREVENT THE RISK OF FIRE AND SHOCK HAZARD
DON´T EXPOSE THIS APPLIANCE TO MOISTURE OR
RAIN. DO NOT OPEN CASE.
NO USER SERVICEABLE PARTS INSIDE.
Ser.No.
MID-HIGH
La « tête » du système actif PROJECTOR abrite un haut-parleur B&C
de 12" et un moteur B&C de 2", tous deux disposés dans des pavillons
60° x 40° concentriques, ainsi que l'électronique active complète. Vous
pouvez choisir entre deux corrections de fréquences (pour courtes et
moyennes portées ou pour longues portées) grâce à un commutateur Mid
Throw / Long Throw. Le commutateur doit être réglé sur Mid Throw pour
les distances jusqu'à 20 m et sur Long Throw pour les distances
supérieures. Le « tête » est aussi équipé de roulettes d'origine ainsi que,
pour le mode en accroche de rails Aeroquip des deux côtés et dans
l'évidement situé au bas de la face arrière de l’ebenisterie.
Vue arrière
1. INPUT
Prise d'entrée symétrisée électroniquement pour le signal de la table de
mixage (1 = masse, 2 = +, 3 = -).
8. CIRCUIT BREAKER
Coupe-circuit automatique qui remplace les traditionnels fusibles. Une fois
l’éventuel défaut éliminé, il suffit d'enfoncer le coupe-circuit qui s’est
déclenché pour remettre le système en service. Attention : avant la
réinitialisation, le système doit toujours être mis hors tension
(interrupteur Power sur "OFF") !
PROJECTOR
9. MAINS INPUT
Prise Neutrik Powercon pour le cordon d'alimentation électrique.
Ce nouveau système de connexion peut être verrouillé et offre une
protection remarquable en empêchant tout arrachement accidentel du
cordon d'alimentation.
10. INTERRUPTEUR "POWER"
Interrupteur Marche/Arrêt de l'enceinte acoustique. L'interrupteur rouge
s'allume quand le système est sous tension.
11. RAILS AEROQUIP
Pour garantir un mode "accroche" sûr, des câbles métalliques appropriés
peuvent être encliquetés dans ces rails à l'aide de goujons Aeroquip (voir
le chapitre Montage / Superposition).
2. THROUGH
Sortie parallèle pour transmettre le signal LINE, p. ex. à d'autres systèmes,
composants, étages de puissance de contrôle, etc.
3. GAIN
Potentiomètre adaptant l'étage de puissance au signal d'entrée, de
manière à éviter les distorsions si le niveau du signal n'est pas adéquat.
4. DEL POUR LE CIRCUIT DE LIMITEUR DES MEDIUMS (MF) ET
DES AIGUS (HF
Indique l'état du circuit de limiteur : vert = Signal, jaune = Soft Limit,
rouge = Full Limit. ATTENTION ! Il ne s'agit pas d'une DEL Clip. Elle peut
de temps à autre s'allumer en rouge pour indiquer que le circuit de
limiteur fonctionne à plein régime. L'état du circuit de limiteur des
médiums et des aigus est toujours indiqué par une DEL individuelle.
1
2
3
6
7
8
9
5. GROUND
Commutateur séparant la masse du signal et celle du boîtier en présence
de problèmes de ronflement. La masse est séparée quand il est enfoncé.
22
4
11
10
5
PROJECTOR MANUAL
1.2 SUB 1 et SUB 2
6. UNITE DU VENTILATEUR
Ce ventilateur refroidit les modules de l'étage de puissance. Vérifiez
toujours que le ventilateur et les fentes d'aération ne sont pas encrassés.
Veillez à maintenir une circulation d'air parfaite.
-6 dB
SIGNAL/
SOFT LIMIT/
FULL LIMIT
0 dB
ON LIFT
INPUT
THROUGH
GAIN
GROUND
®
SELF-POWERED
LONG THROW SYSTEM
PROJECTOR
MADE IN GERMANY
NRTL (Fairfield)
UL 6500
NRTL (Fairfield)
UL 6500
600 W RMS SUBWOOFER
MAINS
INPUT
POWER
ON
OFF
117 V~ 6.0 A
50 - 60 HZ
MAX. POWER CONSUMPTION 950 VA
CIRCUIT
BREAKER
TURN OFF SYSTEM
BEFORE RESETTING
CIRCUIT BREAKER!
CAUTION!
TO PREVENT THE RISK OF FIRE
AND SHOCK HAZARD DON´T
EXPOSE THIS APPLIANCE TO
MOISTURE OR RAIN. DO NOT
OPEN CASE; NO USER
SERVICEABLE PARTS INSIDE.
REFER SERVICING TO QUALIFIED
SERVICE PERSONNEL.
SUB
2
SUB
1
CAUTION!
TO PREVENT THE RISK OF FIRE AND SHOCK HAZARD
DON´T EXPOSE THIS APPLIANCE TO MOISTURE OR
RAIN. DO NOT OPEN CASE.
NO USER SERVICEABLE PARTS INSIDE.
Ser.No.
SUB 1
Les caissons basse SUB 1 et SUB 2 du
PROJECTOR sont chacun équipés d'un haut-parleur B&C de 18" à
pavillon. Le pavillon et la chambre de pression de ces enceintes sont
conçus de manière à assurer un refroidissement actif de l'aimant massif et
de la bobine mobile du haut-parleur de 600 watts par les ondes de
pression sonore – plus les ondes sont fortes, plus le refroidissement
est performant.
Intérieurement, les deux caissons basse sont parfaitement identiques, à
ceci près que la disposition des éléments est inversée, et ce, pour une
raison aussi simple qu'efficace : en superposant les caissons basse comme
il se doit (voir l'illustration "Subwoofer Stacking"), vous obtenez un pavillon complet et, dès lors, un gain de pression et de portée dans les graves.
Vue arrière
7. CIRCUIT BREAKER
Coupe-circuit automatique qui remplace les traditionnels fusibles.
Une fois l’éventuel défaut éliminé, il suffit d'enfoncer le coupe-circuit qui
s’est déclenché pour remettre le système en service. Attention : avant la
réinitialisation, le système doit toujours être mis hors tension (interrupteur
Power sur "OFF") !
8. MAINS INPUT
Prise Neutrik Powercon pour le cordon d'alimentation électrique.
Ce nouveau système de connexion peut être verrouillé et offre une
protection remarquable en empêchant tout arrachement accidentel du
cordon d'alimentation.
9. INTERRUPTEUR "POWER"
Interrupteur Marche/Arrêt de l'enceinte acoustique. L'interrupteur rouge
s'allume quand le système est sous tension.
1
2
3
4
5
1. INPUT
Prise d'entrée symétrisée électroniquement pour le signal de la table de
mixage (1 = terre, 2 = +, 3 = -)
2. THROUGH
Sortie parallèle pour transmettre le signal LINE, p. ex. à d'autres systèmes,
composants, étages de puissance de contrôle, etc.
3. GAIN
Potentiomètre adaptant l'étage de puissance au signal d'entrée, de
manière à éviter les distorsions si le niveau du signal n'est pas adéquat.
6
7
8
9
FRANÇAIS
4. DEL POUR LE CIRCUIT DE LIMITEUR DES GRAVES (LF)
Indique l'état du circuit de limiteur : vert = Signal, jaune = Soft Limit,
rouge = Full Limit. ATTENTION ! Il ne s'agit pas d'une DEL Clip. Elle peut
de temps à autre s'allumer en rouge pour indiquer que le circuit de
limiteur fonctionne à plein régime.
5. GROUND
Commutateur Ground Lift séparant la masse du signal et celle du boîtier
en présence de problèmes de ronflement. La masse est séparée quand il
est enfoncé.
23
PROJECTOR MANUAL
2. MONTAGE
2.1 Système standard
Montage d'un système standard : installez toujours les enceintes comme
indiqué sur l'illustration, c'est-à-dire le SUB 1 sur le sol, le SUB 2 sur le
SUB 1 et l'unité de médiums/aigus sur l'ensemble.
De cette manière, les caissons basse forment un pavillon complet
et offrent le meilleur résultat possible.
2.2 Système standard avec unité d'inclinaison
Exemples d'utilisation de l'unité d'inclinaison
L'unité d'inclinaison PROJECTOR Tilt Unit
(à partir du numéro de série 317961, les boîtiers sont dotés d'origine de
points de fixation ad hoc. Pour les systèmes PROJECTOR antérieurs,
HK Audio propose un kit de montage ultérieur comportant tous les éléments nécessaires). L'unité d'inclinaison (voir figure) est un outil pratique
qui permet de mieux orienter vers la surface à sonoriser des unités de
médiums/aigus PROJECTOR superposées (installées sur les caissons
basse). L'énergie émise par le système peut ainsi être exploitée plus
efficacement. L'unité d'inclinaison peut être inclinée selon trois angles :
5°, 10° et 15°. Les unités de médiums/aigus peuvent être inclinées en
fonction de la configuration du site de la manifestation et de la position
de montage du système PROJECTOR. Si, par exemple, le système est
installé sur une estrade surélevée (1 m ou plus), il est préférable de choisir
un angle de 10° ou de 15° pour de petites portées, alors qu'un angle de
5° suffit pour des distances plus grandes (p. ex. un chapiteau ou une
grande salle). En revanche, si le système est placé sur une estrade relativement basse (p. ex. de 0,2 à 0,6 m de haut), les unités de médiums/aigus
ne doivent être inclinées que de 5° à 10°.
35 m
8m
tilt 0°
refl
ecti
6m
on
Stage
6m
23 m
35 m
10 m
tilt 5°
refle
ction
6m
Idéalement, le système doit être légèrement surélevé sur une estrade ou
placé à même la scène pour que l'unité de médiums/aigus se trouve audessus de la tête des auditeurs. Selon la longueur de la zone à sonoriser,
il est recommandé de prévoir une estrade d'une hauteur de 0,5 à 1 m.
Il faut normalement appliquer le principe suivant : plus la surface à
sonoriser est longue, plus les unités de médiums/aigus doivent être
installées en hauteur. Les unités d'inclinaison PROJECTOR Tilt Unit,
disponibles en option, permettent d'orienter précisément l'unité de
médiums/aigus vers la zone réservée au public (voir la section suivante).
Stage
5m
30 m
35 m
14 m
tilt 10°
reflec
tion
6m
Stage
4m
15 m
30 m
35 m
23 m
reflecti
tilt 15°
on
6m
Stage
24
3m
10 m
30 m
PROJECTOR MANUAL
Montage de l'unité d'inclinaison
2.3 "Accroche" de l'unité de médiums/aigus
1. Installez le système PROJECTOR comme décrit ci-dessus.
Pour le mode "accroche", les unités de médiums/aigus sont dotées de
trois rails Aeroquip à 8 positions. Les câbles métalliques correspondants,
disponibles en option, peuvent être encliquetés dans les rails. Les rails des
côtés gauche et droit du boîtier servent en fait à suspendre l'enceinte. Un
câble supplémentaire permettant de modifier encore l'angle d'inclinaison
de l'unité de médiums/aigus peut être encliqueté dans le rail arrière.
L'angle correct dépend de la hauteur des unités de médiums/aigus et, bien
évidemment, de la configuration de la salle. Les 8 angles de positionnement des rails et la possibilité de traction supplémentaire via le rail de la
face arrière permettent de modifier légèrement l'angle d'inclinaison.
2. Enlevez les boulons à six pans creux à tête conique (A) fixés dans les
parois latérales du Sub 2 (deux boulons par côté) et sur l'unité de
médiums/aigus (1 boulon par côté).
3. Vissez les étriers métalliques de l'unité d'inclinaison (B) au boîtier du
SUB 2 à l'aide de deux boulons à molette (C). Veillez à ce que les
boulons soient serrés à fond et exercent une pression suffisante sur les
étriers et le boîtier pour que les étriers ne bougent pas.
4. Serrez les boulons à molette avec le coussinet (D) au travers des étriers
métalliques de l'unité d'inclinaison jusque dans les filets de l'unité de
médiums/aigus.
5. Poussez ensuite le boîtier de l'unité de médiums/aigus vers le haut en
la tenant par la face arrière, puis encliquetez l'unité d'inclinaison dans
la position souhaitée.
Attention ! Vérifiez toujours que la force portante des points de suspension des unités
de médiums/aigus (p. ex. traverses en alu ou points d'attache dans le plafond de la
salle) est suffisante et correspond aux normes de sécurité en vigueur. Si nécessaire,
demandez l'avis d'un monteur professionnel ou adressez-vous au technicien
responsable de la salle
(voir les consignes de sécurité pour le mode "Accroche").
2.4 Système PROJECTOR double
Vous pouvez compléter l'installation en ajoutant un second système
Projector. Dans ce cas, vous devez aussi respecter les instructions de
montage des composants PROJECTOR SUB 1, SUB 2 et MID / HIGH
(voir le chapitre 4.1).
Important :
A
A
Pour éviter les interférences dans la réponse en fréquence, les systèmes
PROJECTOR doivent être installés de manière à former un angle de 25°
entre les faces latérales. Les bords des faces arrière doivent se trouver à la
même hauteur et se toucher. Un angle de 25° correspond à une distance
d'environ 30 cm entre les deux faces avant des boîtiers.
Pour la majorité des applications, un angle de 25° constitue le compromis
idéal. Selon les conditions locales (hauteur, profondeur ou largeur de la
salle) et la distance entre les haut-parleurs et les murs, vous pouvez en
principe choisir un angle compris entre 20° et 30°.
FRANÇAIS
A
25°
25
PROJECTOR MANUAL
3. CÂBLAGE
4. MISE EN SERVICE
La conception intégrée du système PROJECTOR réduit le câblage requis
au strict minimum.
Fermez les potentiomètres GAIN de toutes les enceintes (butée de
gauche). Assurez-vous que le système est entièrement câblé avant de le
mettre sous tension et que tous les autres composants connectés ont déjà
été allumés. Il faut mettre sous tension non seulement la table de mixage
raccordée, mais aussi toutes les sources de signaux auxquelles celle-ci est
reliée : claviers, amplificateurs d'instruments, effets, etc.
Les enceintes du PROJECTOR doivent toujours être mises sous tension en
dernier lieu, c'est-à-dire après tous les autres composants, et hors tension
en premier lieu, c'est-à-dire avant tous les appareils connectés. Après la
mise sous tension via l'interrupteur Power ON/OFF (la lampe rouge de
l'interrupteur s'allume quand la tension est appliquée ou que
l'interrupteur se trouve sur "ON"), ouvrez entièrement les potentiomètres
GAIN de toutes les enceintes (butée de droite).
Assurez-vous que tous les interrupteurs secteur du système sont sur OFF.
Branchez le câble de signaux venant de votre table de mixage (Master
left/right, Line Out, etc.) à la prise INPUT symétrisée d'un composant.
À ce stade, il importe peu que vous commenciez par un caisson basse ou
un head. Ensuite, à l'aide d'un câble pour microphone XLR du commerce,
transmettez le signal de la douille de sortie THROUGH à l'entrée INPUT du
composant suivant, et ainsi de suite. L'affectation du connecteur XLR doit
se présenter comme suit : 1 = masse, 2 = +, 3 = -.
-6 dB
5. RÉGLAGES
0 dB
INPUT
THROUGH
GAIN
MID THROW
0 dB
THROUGH
SIGNAL/
SOFT LIMIT/
FULL LIMIT
0 dB
-6 dB
GAIN
+6 dB
ON LIFT
LONG THROW
-6 dB
INPUT
THROUGH
GAIN
HF
MF
GROUND
0 dB
INPUT
THROUGH
GAIN
-6 dB
-6 dB
0 dB
THROUGH
GAIN
THROUGH
GAIN
THROUGH
GAIN
0 dB
INPUT
GAIN
INPUT
GAIN
-6 dB
-6 dB
0 dB
0 dB
-6 dB
-6 dB
0 dB
INPUT
0 dB
INPUT
THROUGH
GAIN
Commencez par brancher le cordon d'alimentation en vous assurant que la
tension secteur disponible correspond à celle indiquée sur l'appareil. Une
tension incorrecte risque de détériorer les composants électroniques du
système PROJECTOR.
La nouvelle fiche verrouillable Neutrik Powercon empêche désormais tout
arrachement accidentel de la fiche en service. Lors du branchement, la
fiche doit d'abord être enfoncée comme un emboîtement à baïonnette,
puis tournée vers la droite. Dès que la fiche est encliquetée, la connexion
est sûre.
26
En présence de distorsions ou de surmodulations, contrôlez les sources de
signaux et, dans toute la mesure du possible, réduisez-y le signal de
sortie. Si ceci ne modifie pas le signal transmis au PROJECTOR, réglez-le
au moyen du potentiomètre GAIN des étages de puissance (voir la section
"Trucs et astuces").
Si un ronflement grave apparaît, actionnez les commutateurs GROUND
LIFT des divers composants. Si cela ne résout pas le problème, vérifiez que
les câbles et tous les signaux arrivant à la table de mixage ne sont pas
défectueux (voir la section "Trucs et astuces").
PROJECTOR MANUAL
6. TRUCS ET ASTUCES
7. CARACTÉRISTIQUES TECHNIQUES
1. Préservez l'électronique de l'humidité ! En plein air,
veillez à installer votre système à l'abri de la pluie.
Évitez de renverser du soda, de la bière ou d'autres
liquides sur l'électronique, car cela risquerait de
provoquer des courts-circuits.
UNITE DE MEDIUMS/AIGUS (MID-HIGH UNIT)
3. Assurez-vous que les fentes d'aération de l'unité d'étage
de puissance ne sont pas encrassées et que le ventilateur peut fonctionner sans entrave. Sinon, l'électronique
risque de surchauffer et d'être endommagée.
4. PROJECTOR se chargeant pour sa part de produire un
son optimal, votre mission consiste donc à garantir la
qualité du signal d'entrée ! La plupart du temps, les
ronflements résultent de câbles défectueux, de câbles
non adaptés ou de la présence de signaux d'entrée
asymétriques au niveau de la table de mixage. Vérifiez
dans ce cas tous les câbles de signaux et les cordons
d'alimentation, et corrigez d’éventuels signaux asymétriques à l'aide de boîtes à entrée numérique. Votre mot
d'ordre doit être "La tranquillité sur scène" !
5. Évitez les distorsions ! Elles sont non seulement
désagréables à l'oreille de l'auditeur, mais aussi
dangereuses pour votre installation. Assurez-vous que
tous les composants raccordés directement ou indirectement au PROJECTOR sont suffisamment puissants et ne
produisent jamais de distorsions parce qu'ils sont
poussés à la limite. Veillez à produire un signal propre
qui ne devra pas être corrigé à l'aide du potentiomètre
GAIN.
6. Évitez les boucles de ronflement ! Même avec une transmission symétrique du signal, une double connexion de
terre-masse peut provoquer, dans un système audio, un
ronflement désagréable. Si, par exemple, la table de
mixage est mise à la terre par l'entremise du cordon
d'alimentation et si elle ne dépend pas du même circuit
de courant que les enceintes PROJECTOR, une boucle
de ronflement peut apparaître. Par conséquent, raccordez toujours les enceintes (ou les étages de puissance)
et la table de mixage sur le même circuit de courant
(même phase !). Le commutateur GROUND LIFT peut
vous être d'un grand secours si vous rencontrez malgré
tout des problèmes de ronflement avec l'installation.
ATTENTION : ne décollez jamais la masse de
la fiche – Danger de mort !
Line In :
Type d'entrée :
Impédance d'entrée :
Sensibilité :
Niveau d'entrée max. :
Parallel Out :
Configuration des haut-parleurs :
XLR femelle (1 = terre, 2 = +, 3 = -)
symétrisée électroniquement et flottante
47 kilo-ohms
6 dB (en butée de droite)
+24 dB
XLR mâle (1 = terre, 2 = +, 3 = -)
1 x haut-parleur B&C de 12", 1 x moteur B&C de
2", tous deux dans des pavillons 60°x40°
concentriques
Impédance nominale totale :
8 ohms (passive)
Puissance :
2 x 300 W (active)
Pression sonore 1W/1m :
104 dB (full space), 110 dB (half space)
Pression sonore max. / 1m :
119 dB à distorsion harmonique totale de 3 %
(moyenne de 200 Hz – 5 kHz, full space)
125 dB à distorsion harmonique totale de 10 %
(moyenne de 200 Hz – 5 kHz, full space)
Directivité :
horizontale : ± 30° ; 2 kHz – 20 kHz
verticale : ± 20° ; 3 kHz – 20 kHz
Réponse en fréquence :
120 Hz – 19 kHz, ± 3 dB
Fréquences de coupure :
980 Hz ; 24 dB / Octave
Coupe bas :120 Hz, 24 dB
Circuit de protection :
circuit de limiteur actif
Poids :
65 kg / 132 lbs
Dimensions avec roulettes (lxhxp) : 51 cm x 69 cm x 80 cm /
20,1" x 27,2" x 31,5"
SUB 1 / SUB 2
Entrées/sorties :
Type d'entrée :
Impédance d'entrée :
Sensibilité :
Niveau d'entrée max. :
Parallel Out :
Configuration
des caissons de basses:
Impédance nominale totale :
Puissance :
Pression sonore 1W/1m :
Pression sonore max. / 1m :
symétrisée électroniquement et flottante
47 kilo-ohms
6 dB (en butée de droite)
+24 dB
XLR mâle (1 = terre, 2 = +, 3 = -)
1 x haut parleur B&C de 18"
8 ohms (passive)
600 W (active)
101 dB (full space), 110 dB (half space)
119 dB à distorsion harmonique totale de 3 %
(moyenne de 200 Hz – 5 kHz, full space)
125 dB à distorsion harmonique totale de 10 %
(moyenne de 200 Hz – 5 kHz, full space)
Réponse en fréquence :
40 Hz – 160 Hz
Fréquences de coupure :
120 Hz ; 24 dB / Octave
Coupe bas : 43 Hz, 12 dB
Circuit de protection :
Circuit de limiteur actif
Poids :
58 kg / 129 lbs
Dimensions avec roulettes (lxhxp) : 51 cm x 69 cm x 80 cm /
20,1" x 27,2" x 31,5"
FRANÇAIS
2. Veillez à placer les enceintes à une distance suffisante
des murs et à ne pas les occulter, par exemple avec des
rideaux. Vous risqueriez sinon d'entraver le refroidissement des étages de puissance.
Entrées/sorties :
Caractéristiques électriques générales :
Classe de protection
Absorption de courant max. :
1
Consommation max. :
Gamme de tensions secteur :
Plage de température ambiante :
Fusibles internes :
950 VA
+/- 10 %
-10 °C à +60 °C
2 x SB 4 A pour tension de service
de préampli et d'étage de puissance
3 A (230 V)
6 A (117 V)
8 A (100 V)
27
PROJECTOR MANUAL
• Si un câble supplémentaire peut être fixé au dos de l’enceinte, il ne peut
cependant en aucun cas être utilisé comme le seul et unique mode de
fixation ! En effet, il sert uniquement à régler l’angle d’inclinaison
horizontal.
8. CONSIGNES DE SÉCURITÉ
PROJECTOR MID-HIGH
Installation conformément aux instructions TÜV
Les présentes instructions d’installation s’appliquent aux enceintes
acoustiques HK AUDIO PROJECTOR MID-HIGH qui sont équipées de rails
Aeroquip. Les règlements TÜV prescrivent de procéder à l’installation
conformément aux spécifications suivantes.
Avant le montage, assurez-vous que les points de fixation situés au
plafond de la salle (par exemple, palans à chaîne) satisfont aux règlements
de prévention des accidents BGV C1 (locaux de manifestations et de
production pour représentation scénique) et sont agréés TÜV pour la
charge totale. Avant chaque installation, vérifiez que les composants sont
en parfait état et assurez-vous en particulier, d’une part, que les boucles
formées aux extrémités des câbles en acier (câbles de soutien) sont
correctement maintenues par les serre-câbles et, d’autre part, qu’aucun
rail Aeroquip ne présente de défaut ou de déformation.
Dans les consignes d’installation suivantes, les enceintes acoustiques sont
simplement désignées sous le nom d’enceintes.
Câble de soutien :
Câble de 270 mm de long avec goujon et mousqueton pour la fixation du
PROJECTOR MID-HIGH au point de fixation.
n° de référence HK AUDIO : G 193 543
Montage :
• Fixez l’enceinte à l’aide des deux câbles de soutien (mousqueton, câble
de longueur adéquate et goujon). Attention : L’angle maximal formé par
les câbles ne peut ni être inférieur ni dépasser 0 degré vers l’intérieur et
30 degrés vers l’extérieur (voir schéma) !
28
• L’angle d’inclinaison de l’enceinte est déterminé par la position du
goujon dans le rail Aeroquip. Étant donné que la longueur des câbles
permettant la fixation de l’enceinte au point de fixation (plafond,
traverse, etc.) est fonction du type de possibilité de fixation, elle doit
être adaptée à la situation en présence. Si la longueur du câble de
soutien fourni par HK AUDIO s’avérait insuffisante, il est possible de
faire réaliser par un fabricant de câbles agréé des câbles de
longueur adéquate.
Mousqueton :
Mousqueton avec sécurité, charge admissible
1 tonne, classe de qualité 8 (par exemple, SOCS 6-8)
Goujon :
AEROQUIP 5013 série L Double Stud Fitting (ISO 9788)
n° de référence HK AUDIO : G 193195
Câble :
Câble galvanisé, DIN 3060, Ø 6 mm, 1770 N/mm
2, sZ 6 x 19 + FE, résistance à la rupture théorique : 22,8 kN;
résistance à la rupture minimale : 19,6 kN
Composants :
correct
• 1 seule enceinte de 65 kg maximum peut être montée. Ne superposez
jamais plusieurs enceintes !
faux
Consignes de sécurité importantes :
Employez exclusivement les pièces spécifiées dans la présente
notice ! En cas d’utilisation à l’extérieur, protégez impérativement les enceintes de la pluie et de l’humidité ! Le montage
doit être effectué conformément à la présente notice !
Conservez soigneusement tous les documents relatifs à ce
système !
PROJECTOR MANUAL
1.
Componentes del sistema . . . . . . . . . .30
1.1 PROJECTOR Mid-High Unit . . . . . . . . . . . . . .30
1.2 PROJECTOR SUB 1 y SUB 2 . . . . . . . . . . . . . .31
2.
Instalación . . . . . . . . . . . . . . . . . . . . . .32
2.1 Standard System . . . . . . . . . . . . . . . . . . . . .32
2.2 Standard System con Tilt- unit . . . . . . . . . . .32
2.3 Funcionamiento suspendido de MID-HIGH . . .33
2.4 Sistema de proyector doble . . . . . . . . . . . . .33
3.
Cableado . . . . . . . . . . . . . . . . . . . . . . .34
4.
Puesta en servicio . . . . . . . . . . . . . . . .34
5.
Ajustes . . . . . . . . . . . . . . . . . . . . . . . .34
6.
Consejos y trucos . . . . . . . . . . . . . . . . .35
7.
Datos técnicos . . . . . . . . . . . . . . . . . . .35
8.
Instrucciones de seguridad . . . . . . . . .36
¡BIENVENIDO
A LA FAMILIA HK AUDIO!
Le felicitamos por su decisión de adquirir el sistema activo de
3 vías PROJECTOR, un sistema de sonorización con el nivel de
potencia de un PA grande y las ventajas de la electrónica
activa moderna. Su facilidad de transporte, rápido montaje y
una conexión y funcionamiento sin problemas convierten a
PROJECTOR en un sistema de sonorización profesional para
grandes eventos.
PROJECTOR está compuesto por tres cajas diferentes que ya
están equipadas con los componentes electrónicos necesarios.
En la MID-HIGH UNIT , la unidad de medios/ agudos, el
altavoz de 12” y el excitador de 2” reciben la alimentación a
través de un bloque de potencia de 300 vatios, mientras que
los dos subwoofer SUB 1 y SUB 2 diferentes están equipados,
respectivamente, con un altavoz de 18” y una etapa final de
600 vatios. Todas las cajas disponen de un controlador
montado además de un limitador y diplexor, con lo que están
garantizados un rendimiento y seguridad de funcionamiento
máximos. Un sistema PA PROJECTOR completo consta de una
MID-HIGH UNIT, un SUB 1 y un SUB 2 por lado.
La integración de toda la electrónica, gracias a las conexiones
más cortas, una adaptación exacta a los altavoces utilizados y
la corrección de frecuencia activa ofrece un comportamiento
excelente sonoro y de impulsos, la máxima protección contra
sobrecarga y un sonido sorprendente. Los trabajos de ajuste y
de nivel son innecesarios y solamente se requiere el empleo de
un ecualizador si es necesario compensar las características
acústicas de la estancia.
29
ESPAÑOL
Contenido
PROJECTOR MANUAL
1. COMPONENTES DEL SISTEMA
1.1 MID-HIGH UNIT
MID THROW
SIGNAL/
SOFT LIMIT/
FULL LIMIT
-6 dB
MID THROW
agudos del EQ del sistema en 3 dB aprox., de manera que no se pierde
ningún agudo incluso a grandes distancias. Para distancias hasta 20m
ajuste el conmutador en MID THROW, para distancias mayores en LONG
THROW.
0 dB
ON LIFT
LONG THROW
INPUT
THROUGH
GAIN
HF
MF
GROUND
LONG THROW
SELF-POWERED
LONG THROW SYSTEM
®
PROJECTOR
MADE IN GERMANY
600 W RMS MID-HIGH UNIT
MAINS
INPUT
NRTL (Fairfield)
UL 6500
7. UNIDAD DEL VENTILADOR
Este ventilador proporciona la refrigeración necesaria de los módulos de
etapa final. Preste atención siempre a que el ventilador ni las ranuras de
ventilación no estén sucias y garanticen una corriente de aire libre.
POWER
NRTL (Fairfield)
UL 6500
ON
CAUTION!
OFF
117 V~ 6.0 A
50 - 60 HZ
MAX. POWER CONSUMPTION 950 VA
CIRCUIT
BREAKER
TURN OFF SYSTEM
BEFORE RESETTING
CIRCUIT BREAKER!
TO PREVENT THE RISK OF FIRE
AND SHOCK HAZARD DON´T
EXPOSE THIS APPLIANCE TO
MOISTURE OR RAIN. DO NOT
OPEN CASE; NO USER
SERVICEABLE PARTS INSIDE.
REFER SERVICING TO QUALIFIED
SERVICE PERSONNEL.
SUB
2
SUB
1
CAUTION!
TO PREVENT THE RISK OF FIRE AND SHOCK HAZARD
DON´T EXPOSE THIS APPLIANCE TO MOISTURE OR
RAIN. DO NOT OPEN CASE.
NO USER SERVICEABLE PARTS INSIDE.
Ser.No.
MID-HIGH
La parte superior del sistema activo PROJECTOR alberga un altavoz de
12” B&C y un excitador de 2” B&C, ambos en trompas de 60° x 40°
dispuestas concéntricamente, así como toda la electrónica activa. Por
medio del conmutador Mid Throw / Long Throw puede seleccionarse entre
dos correcciones de frecuencia diferentes para distancias cortas y medias
o grandes. Para distancias de hasta 20 m el conmutador debería estar en
Mid Throw, para distancias superiores en Long Throw.
La parte superior está equipada de serie con ruedas y para el uso
suspendido, en ambos lados y en la abertura de la parte inferior del panel
trasero de la carcasa tiene guías para suspensión Aeroquip.
8. CIRCUIT BREAKER
El magnetotérmico, sustituye a los fusibles normales. Después de eliminar
las posibles fuentes de fallos, el magnetotérmico disparado puede ponerse
de nuevo en funcionamiento simplemente pulsando. Atención: antes de
reinicializar desconectar siempre primero el sistema (el interruptor de
alimentación en Off ).
PROJECTOR
9. MAINS INPUT
Jack Neutrik Powercon para conectar la alimentación de tensión.
Este nuevo sistema de conexión ofrece a través de su mecanismo de
bloqueo una protección excelente contra la desconexión inadvertida del
cable de red.
10. Interruptor "POWER"
El conmutador de conexión/desconexión para la caja de altavoz.
En estado conectado, el conmutador se ilumina de color rojo.
Vista posterior
1. INPUT
Jack de entrada equilibrado electrónicamente para la señal del pupitre
de mezcla (1= Ground, 2= +, 3= -)
11. GUIAS DE VUELO AEROQUIP
En estas guías pueden encajarse los cables de acero para el
funcionamiento suspendido seguro con los llamados Aeroquip Studs
(véase el capítulo Instalación / apilado).
2. THROUGH
Salida paralela para la transmisión de la señal LINE, p. ej. a otros
sistemas, componentes individuales, etapas finales de monitor, etc.
3. GAIN
Regulador para la adaptación de la etapa final a la señal de entrada, con
el fin de evitar distorsiones con niveles de señal desfavorables
4. MF- / HF-LIMITER LED
Indicación del estado de funcionamiento del limitador. Verde = señal,
amarillo = Soft Limit, rojo = Full Limit. ¡ATENCIÓN! No se trata de un LED
Clip. Si se enciende reiteradamente de color rojo intermitentemente, quiere
decir que el limitador está en funcionamiento ininterrumpido. El estado del
limitador de la gama de medios (MF) y agudos (HF) se indica a través de
un LED propio, respectivamente.
5. GROUND
Conmutador Ground-Lift para la separación de la masa de señal y de la
carcasa, si existen problemas de zumbido. Si está pulsado se separa la
masa.
1
2
3
6
7
8
9
6. MID THROW/LONG THROW SWITCH
Selector para la gama de distancias cortas y medias (MID THROW) o
grandes (LONG THROW). En el modo LONG THROW se potencia la parte de
30
4
11
10
5
PROJECTOR MANUAL
1.2 SUB 1 y SUB 2
6. UNIDAD DE VENTILADOR
Este ventilador proporciona la refrigeración necesaria de los módulos de
etapa final. Preste atención siempre a que el ventilador ni las ranuras de
ventilación no estén sucias y garanticen una corriente de aire libre.
-6 dB
SIGNAL/
SOFT LIMIT/
FULL LIMIT
0 dB
ON LIFT
INPUT
THROUGH
GAIN
GROUND
®
SELF-POWERED
LONG THROW SYSTEM
PROJECTOR
MADE IN GERMANY
NRTL (Fairfield)
UL 6500
NRTL (Fairfield)
UL 6500
600 W RMS SUBWOOFER
MAINS
INPUT
POWER
ON
OFF
117 V~ 6.0 A
50 - 60 HZ
MAX. POWER CONSUMPTION 950 VA
CIRCUIT
BREAKER
TURN OFF SYSTEM
BEFORE RESETTING
CIRCUIT BREAKER!
CAUTION!
TO PREVENT THE RISK OF FIRE
AND SHOCK HAZARD DON´T
EXPOSE THIS APPLIANCE TO
MOISTURE OR RAIN. DO NOT
OPEN CASE; NO USER
SERVICEABLE PARTS INSIDE.
REFER SERVICING TO QUALIFIED
SERVICE PERSONNEL.
SUB
2
SUB
1
CAUTION!
TO PREVENT THE RISK OF FIRE AND SHOCK HAZARD
DON´T EXPOSE THIS APPLIANCE TO MOISTURE OR
RAIN. DO NOT OPEN CASE.
NO USER SERVICEABLE PARTS INSIDE.
Ser.No.
SUB 1
Los subwoofers SUB 1 y SUB 2 de PROJECTOR
están equipados respectivamente con un altavoz de 18” B&C con trompa.
La trompa y la cámara de presión de estas cajas están construidas de
forma que el imán macizo y con ello la bobina oscilatoria del altavoz de
600 vatios se refrigeran activamente mediante las ondas sonoras: cuanto
más intensamente trabajan, más intenso es el efecto de refrigeración.
El sistema interno de los dos subwoofers es completamente idéntico, con
la salvedad de que el SUB 2 está construido invertido, como reflejado en
un espejo, respecto al SUB 1. Esto tiene un motivo simple pero muy
efectivo: si los subwoofer se apilan uno sobre otro, según está previsto
(véase la ilustración ”Subwoofer Stacking”), de este modo se obtiene una
trompa completa y con ello más presión y alcance en la gama de bajos.
7. CIRCUIT BREAKER
El magnetotérmicor, sustituye a los fusibles normales. Después de eliminar
las posibles fuentes de fallos, el magnetotérmico disparado puede ponerse
de nuevo en funcionamiento simplemente pulsando. Atención: antes de
reinicializar desconectar siempre primero el sistema (el interruptor de
alimentación en Off ).
8. MAINS INPUT
Jack Neutrik Powercon para conectar la alimentación de tensión.
Este nuevo sistema de conexión ofrece a través de su mecanismo de
bloqueo una protección excelente contra la desconexión inadvertida
del cable de red.
9. CONMUTADOR "POWER"
El conmutador de conexión/desconexión para la caja de altavoz.
En estado conectado, el conmutador se ilumina de color rojo.
Vista posterior
1. INPUT
Jack de entrada equilibrado electrónicamente para la señal del pupitre de
mezcla (1= Ground, 2= +, 3= -)
1
2
2. THROUGH
Salida paralela para la transmisión de la señal LINE, p. ej. a otros
sistemas, componentes individuales, etapas finales de monitor, etc.
3. GAIN
Regulador para la adaptación de la etapa final a la señal de entrada,
con el fin de evitar distorsiones con niveles de señal desfavorables
3
4
5
6
7
8
9
4. LF LIMITER LED
Indicación del estado de funcionamiento del limitador. Verde = señal,
amarillo = Soft Limit, rojo = Full Limit. ¡ATENCIÓN! No se trata de un LED
Clip. De vez en cuando se enciende en rojo, esto significa que el limitador
está en funcionamiento ininterrumpido.
ESPAÑOL
5. GROUND
Conmutador Ground-Lift para la separación de la masa de señal y
de la carcasa, si existen problemas de zumbido. Si está pulsado
se separa la masa.
31
PROJECTOR MANUAL
2. INSTALACIÓN
2.1 Standard System
Instalación de un Standard System: instale siempre las cajas como se
muestra en la figura, es decir, el SUB 1 sobre el suelo, el SUB 2 encima y
finalmente la MID/HIGH UNIT. De este modo, los subwoofer forman una
trompa completa y suministran la mejor salida posible.
2.2 Standard System con Tilt- unit
Ejemplos de aplicación de la Tilt- unit
Dispositivo de inclinación PROJECTOR Tilt Unit (a partir del número de
serie 317961, las carcasas van equipadas de serie con los puntos de
fijación. Para los equipos PROJECTOR anteriores, HK AUDIO suministra
instrucciones de reequipamiento con todos los componentes necesarios).
La Tilt unit (véase la figura) es una herramienta práctica para poder
orientar las PROJECTOR MID-HIGH UNITS apiladas (sobre los subwoofers) todavía mejor sobre la superficie a sonorizar. De este modo, la
energía que emite el sistema puede aprovecharse más eficazmente. Con la
Tilt Unit pueden ajustarse tres ángulos de inclinación: 5°, 10° y 15°.
Según el lugar de celebración del evento y la posición de instalación del
PROJECTOR System, las MID-HIGH UNITS pueden inclinarse según sea
necesario. Por ejemplo, si el sistema se encuentra sobre una tarima alta
(1m o más alta), para distancias cortas deben seleccionarse 10° o 15° de
ángulo de inclinación, para distancias más largas (p.e. una carpa grande o
un pabellón largo) sólo 5°. Por el contrario, si el sistema está sobre una
tarima baja, por ejemplo, de 0,2m a 0,6m de altura, las MID-HIGH
UNITS solamente tienen que inclinarse de 5° a 10°.
35 m
8m
tilt 0°
refl
ecti
6m
on
Stage
6m
23 m
35 m
10 m
tilt 5°
refle
ction
6m
Stage
Siempre que se pueda, el sistema debería elevarse un poco sobre
una tarima o, si procede, colocarse sobre el escenario, de forma que la
MID-HIGH UNIT quede por encima de las cabezas del público. Según la
longitud del campo a sonorizar, es recomendable una tarima de una altura
de 0,5 m a 1 m aprox. Básicamente, cuanto más larga es la superficie que
tiene que sonorizarse, más altas tienen que posicionarse las MID-HIGH
UNITS. En base a la PROJECTOR Tilt Unit que puede obtenerse como
accesorio, la unidad de medios/ agudos puede orientarse todavía con
mayor precisión sobre la superficie del público (véase la sección
siguiente).
5m
30 m
35 m
14 m
tilt 10°
reflec
tion
6m
Stage
4m
15 m
30 m
35 m
23 m
reflecti
tilt 15°
on
6m
Stage
32
3m
10 m
30 m
PROJECTOR MANUAL
Montage der Tilt- unit
2.3 Funcionamiento suspendido de Mid-High Unit
1. Instale el PROJECTOR System como se ha descrito anteriormente.
Para el funcionamiento suspendido, las PROJECTOR MID/HIGH UNITS
cuentan con tres guías de suspensión Aeroquip de 8 posiciones. En las
guías pueden acoplarse los cables de acero correspondientes, que pueden
obtenerse como un accesorio opcional. Las guías en el lado izquierdo y
derecho de la carcasa sirven para suspender o ”colgar” realmente la caja.
En la guía trasera puede acoplarse otro cable de acero con el que puede
modificarse todavía más el ángulo de inclinación de las MID-HIGH
UNITS. El ángulo correcto depende de la altura de las MID/HIGH UNITS
y naturalmente también del tipo de lugar del evento. Mediante los
8 ángulos de posicionamiento diferentes en las guías y la posibilidad de
acoplamiento de un cable adicional, en la guía trasera, el ángulo de
inclinación puede variarse fácilmente.
2. Extraiga los tornillos de cabeza Allen encastrados (A) en los paneles
laterales del SUB 2 (dos tornillos por lado) y la MID-HIGH UNIT
(1 tornillo por lado)
3. Atornille las abrazaderas de acero de la Tilt Unit (B) con dos tornillos
de mando estrellado (C), respectivamente, en la carcasa del SUB 2.
Asegúrese de que los tornillos estén apretados y que ejerzan una
presión suficiente sobre las abrazaderas de acero y la carcasa, de forma
que las abrazaderas de acero no bailen.
4. Atornille los tornillos de mando estrellado con el apoyo (D) a través
de las abrazaderas de acero de la Tilt Unit en la rosca de la MIDHIGH UNIT.
5. Presione hacia arriba la carcasa de la MID-HIGH UNIT cogiéndola por
el panel posterior. Deje que la Tilt Unit encaje en el ángulo deseado.
¡Atención! Asegúrese siempre de que los puntos en los que se suspenden las MID-HIGH
UNITS (p. ej. traviesas de aluminio o punto de aparejo en el techo del pabellón) tienen
la capacidad portante suficiente y cumplen con las normas de seguridad generales.
Consulte siempre con un arquitecto técnico o aparejador profesional o bien con el
técnico competente del pabellón.
(Véanse las instrucciones de seguridad para el funcionamiento
suspendido).
2.4 Sistema de proyector doble
A
A
Importante:
Para evitar extinciones en la respuesta de frecuencia, los sistemas
PROJECTOR deben instalarse de forma que entre las superficies laterales
haya un ángulo de 25°. Los cantos de los paneles traseros deben encontrarse a la misma altura y tocarse. El ángulo de 25° corresponde a una
distancia de 30 cm aprox. entre los dos paneles frontales de la carcasa.
25°
Un ángulo de 25° supondría para la mayor parte de las aplicaciones el
mejor compromiso posible. Según las circunstancias locales, como la
altura, profundidad o anchura del espacio donde se celebra el evento y la
distancia de los altavoces a las paredes pueden utilizarse básicamente
ángulos entre 20° y 30°.
33
ESPAÑOL
A
Para ampliar el Standard Projector System puede agregarse un segundo
Projector System. Para ello deben seguirse siempre las instrucciones de
instalación de los componentes PROJECTOR Sub 1, Sub 2 y Mid / High
(véase el Capítulo 4.1).
PROJECTOR MANUAL
3. CABLEADO
4. PUESTA EN SERVICIO
La construcción integrada del PROJECTOR System minimiza
considerablemente el cableado necesario.
Cierre en todas las cajas el regulador GAIN (girando a la izquierda hasta
el tope).
Asegúrese de que el sistema esté completamente cableado antes de
conectar y de que todos los restantes componentes conectados ya estén
previamente en funcionamiento. Tanto el pupitre de mezcla conectado
como todas las fuentes de señal conectadas al mismo, como teclados,
amplificadores de instrumental, efectos, etc. deben estar activadas.
Las cajas del PROJECTOR deben activarse siempre las últimas, por lo
tanto, después de todos los demás componentes y en consecuencia,
desconectarse en primer lugar, antes de todos los aparatos conectados.
Después de activar con el conmutador Power On/Off (se ilumina de color
rojo si hay tensión y está en ”on”) abra en todas las cajas completamente
el regulador GAIN (girando a la derecha hasta el tope).
Asegúrese de que todos los conmutadores de red del sistema estén en la
posición OFF.
Conecte el cable de señal procedente de su pupitre de mezcla (Master
left/right, Line out, u otro) al jack INPUT equilibrado de un componente.
Al hacerlo, no importa si empieza con el subwoofer o con la parte
superior. Con un cable microfónico XLR normal dirija la señal desde el jack
de salida THROUGH hacia INPUT del componente siguiente y desde éste
del mismo modo y así sucesivamente. La asignación del conector XLR debe
ser la siguiente: 1= Ground, 2= +, 3= -
-6 dB
5. AJUSTES
0 dB
INPUT
THROUGH
GAIN
MID THROW
0 dB
THROUGH
SIGNAL/
SOFT LIMIT/
FULL LIMIT
0 dB
-6 dB
GAIN
+6 dB
ON LIFT
LONG THROW
-6 dB
INPUT
THROUGH
GAIN
HF
MF
GROUND
0 dB
INPUT
THROUGH
GAIN
-6 dB
-6 dB
0 dB
THROUGH
GAIN
THROUGH
GAIN
THROUGH
GAIN
0 dB
INPUT
GAIN
INPUT
GAIN
-6 dB
-6 dB
0 dB
0 dB
-6 dB
-6 dB
0 dB
INPUT
0 dB
INPUT
THROUGH
GAIN
En primer lugar, conecte el cable de red, después asegúrese de que la tensión de red de que dispone coincide con la indicada en el aparato. La
conexión a una tensión de red incorrecta puede destruir los elementos
electrónicos del PROJECTOR System.
Utilizando el nuevo conector Neutrik Powercon con enclavamiento se
impide la desconexión involuntaria del enchufe durante el funcionamiento.
Al conectar, en primer lugar debe enchufarse el conector como en un
cierre de bayoneta y seguidamente girarse a la derecha. Si el conector
está enclavado, la conexión es segura.
34
Si se producen distorsiones o sobreescitaciones, compruebe las fuentes de
señal y reduzca en ellas la señal de salida en la medida de lo posible. Si
no puede modificarse de este modo la señal que va hacia el PROJECTOR,
adáptela con el regulador GAIN a las etapas finales. (véase Trucos y
recomendaciones)
Si se producen zumbidos de bajas frecuencias, pulse el conmutador
GROUND LIFT de los componentes individuales. Si no da resultado,
compruebe el cable y todas las señales que lleguen al pupitre de mezcla
para detectar deficiencias. (véase Trucos y recomendaciones).
PROJECTOR MANUAL
1. ¡No permita que entre nada de humedad en los circuitos
electrónicos! Cuando se utilice el sistema al aire libre,
asegúrese de que esté protegido de la lluvia. No deben
verterse cola, cerveza ni otros líquidos en los componentes electrónicos, ya que puede producirse un
cortocircuito.
2. Procure que las cajas estén a una distancia suficiente de
las paredes y que no estén cubiertas por cortinas o
similares. Solamente de este modo estará garantizada la
refrigeración de las etapas finales.
7. DATOS TÉCNICOS
MID-HIGH UNIT
Entradas / salidas:
Line In:
Tipo entrada:
Impedancia de entrada:
Sensibilidad:
Nivel de entrada máx:
Parallel Out:
XLR female (1= Ground; 2= +, 3= -)
Electrónica equilibrada & floating
47 kÙ
6 dB (en el tope derecho)
+24 dB
XLR male (1= Ground; 2=+, 3= -)
Altavoces:
1 altavoz de 12” B&C, 1 excitador de 2” B&C, ambos en
trompas de 60°x40° concéntricas
8 Ohmios (pasiva)
2x 300W (activa)
104 dB (fullspace), 110 db (half space)
119 dB @ 3% THD (200Hz – 5kHz promedio, full space)
125 dB @ 10% THD (200Hz – 5kHz promedio, full space)
Horizontal: ± 30°; 2 kHz – 20 kHz
Vertical: ± 20°; 3 kHz – 20 kHz
120 Hz – 19 kHz, ± 3dB
980 Hz; 24 dB / octava
Low cut 120 Hz, 24 dB
limitador activo
65 kg / 132 lbs.
51 cm x 69 cm x 80 cm / 20,1” x 27,2” x 31,5”
3. Asegúrese de que las ranuras de ventilación de la
unidad de etapa final estén siempre libres de suciedad y
que el ventilador pueda girar libremente. De lo
contrario, los componentes electrónicos pueden
calentarse y sufrir daños.
Impedancia nominal total:
Potencia:
Intensidad acústica 1W/1m:
Intensidad acústica máx. / 1m:
4. PROJECTOR proporciona un sonido óptimo, procure que
exista una señal de entrada óptima. Los zumbidos
suelen ser resultado de cables defectuosos, incorrectos o
señales de entrada desequilibradas en el pupitre de
mezcla. Compruebe todos los cables de señal y de red,
equilibre las señales desequilibradas con cajas DI,
procure que haya "silencio en el escenario".
Respuesta de frecuencia:
Frecuencias de separación:
5. ¡Evite las distorsiones! No sólo son desagradables para
los espectadores, sino también peligrosas para la
instalación. Asegúrese de que todos los componentes
conectados directa e indirectamente a PROJECTOR
tengan potencia suficiente y no produzcan nunca
distorsiones por utilizarse al límite. Procure que la señal
sea limpia y no se vea influida por el uso del regulador
GAIN.
6. ¡Evite bucles de zumbido! Aunque la señal sea
equilibrada, debido a una puesta a tierra doble puede
crearse dentro de un sistema de audio un zumbido
desagradable. Por ejemplo, si el pupitre de mezcla está
puesto a tierra a través del cable de red y no está
conectado al mismo circuito de corriente que las cajas
de PROJECTOR puede producirse un "bucle de
zumbido". Por lo tanto, conecte siempre las cajas (o las
etapas finales) y el pupitre de mezcla al mismo circuito
de corriente (¡misma fase!). Si continuara teniendo
problemas de zumbido con la instalación, puede ser de
gran ayuda el conmutador Groundlift.
ATENCIÓN: No despegue nunca la masa en el
conector, ¡peligro de muerte!
Directividad:
Circuito protector:
Peso:
Dimensiones incluidas ruedas ):
(axAxP
SUB 1 / SUB 2
Entradas / salidas:
Line In:
Tipo entrada:
Impedancia de entrada:
Sensibilidad:
Nivel de entrada máx:
Parallel Out:
Altavoces:
Impedancia nominal total:
Potencia:
Intensidad acústica 1W/1m:
Intensidad acústica máx. / 1m:
Respuesta de frecuencia:
Frecuencias de separación:
Circuito protector:
Peso:
Dimensiones incluidas ruedas :
XLR hembra (1= Ground; 2= +, 3= -)
Electrónica equilibrada & floating
47 kÙ
6 dB (en el tope derecho)
+24 dB
XLR macho (1= Ground; 2=+, 3= -)
1x 18” B&C woofer
8 Ohmios (pasiva)
600W (activa)
101 dB (fullspace), 110 db (half space)
119 dB @ 3% THD (200Hz – 5kHz promedio, full space)
125 dB @ 10% THD (200Hz – 5kHz promedio, full space)
40 Hz – 160 kHz
120 Hz; 24 dB / octava
Low cut 43 Hz, 12 dB
limitador activo
58 kg / 129 lbs.
51 cm x 69 cm x 80 cm / 20,1” x 27,2” x 31,5”
Características eléctricas generales:
Clase de protección 1 / protection class 1 (protección puesta a tierra)
Consumo de corriente máx:
3 A (230 V)
6 A (117 V)
8 A (100 V)
Consumo de potencia máx:
Rango de tensión de red:
Rango de temperatura ambiente:
Fusibles internos:
950 VA
+/- 10%
-10° C hasta +60° C
2x SB 4 A para la tensión
de servicio de la etapa previa y final
ESPAÑOL
6. CONSEJOS Y TRUCOS
35
PROJECTOR MANUAL
8. INSTRUCCIONES DE SEGURIDAD
PROJECTOR MID-HIGH (MEDIOS-AGUDOS)
Instalación según las disposiciones TÜV
Estas instrucciones de instalación son válidas para el recinto PROJECTOR
MID-HIGH de HK AUDIO, que está equipada con guías Aeroquip. Las
prescripciones TÜV incluyen la instalación según las especificaciones
siguientes:
Antes del montaje, cerciórese de que los puntos de fijación en el techo de
la nave (por ejemplo, sistemas de sujeción de cadenas) cumplen con la
prescripción de prevención de accidentes BGV C1 (centros de actos y
producción para representación escénica) y están aceptados por TÜV para
la carga total. Compruebe antes de cada instalación el estado correcto de
los componentes, asegúrese especialmente de que los extremos del cable
de acero (cable de mando) miren hacia fuera de las pinzas y ninguna de
las guías Aeroquip presenten daños o deformaciones.
Componentes:
• El ángulo de inclinación del recinto se determina mediante la posición
del espárrago en la guía Aeroquip. Dado que la longitud de los cables
de fijación del recinto en el punto de fijación (techo de la nave,
travesaño, etc.) depende del tipo de posibilidad de fijación respectiva,
tienen que adaptarse a las circunstancias de cada montaje. Si la
longitud del cable de mando ofertado por HK AUDIO no es suficiente,
con la ayuda de las piezas descritas a continuación pueden fabricarse
cables de la longitud correspondiente en cada fabricante autorizado.
Gancho de carabina:
Gancho de carabina con seguro, capacidad de carga
1 tonelada, clase de calidad 8 (p. ej.: SOCS 6-8)
Cable:
Cable metálico galvanizado, DIN 3060, Ø 6 mm, 1770 N/mm
2, sZ 6 x 19 + FE, fuerza de rotura calculatoria: 22,8 kN;
fuerza de rotura mínima: 19,6 kN
Instrucciones de seguridad importantes:
Montaje:
• El recinto se sujeta en el punto de fijación con dos cables de mando
(gancho de carabina, cable de la longitud correspondiente y espárrago).
¡Atención! ¡La tracción máxima inclinada de los cables de mando no
debe ser superior ni inferior a 0 grados hacia dentro y 30 hacia fuera
(véase la Fig.)!
36
• Debe montarse como máximo 1 recinto de 65 kg. ¡No deben montarse
recintos unos encima de otros!
Espárrago:
AEROQUIP 5013 Series L Double Stud Fitting (ISO 9788)
Nº artículo HK AUDIO: G 193195
Cable de mando:
Cable metálico de 270 mm de largo con un espárrago y un gancho de
carabina para unir el PROYECTOR MID-HIGH al punto de fijación.
Nº artículo HK AUDIO: G 193 543
correcto
• Puede fijarse otro cable de mando a la parte posterior del recinto. ¡Este
cable de mando no debe usarse para una única fijación! Está destinado
únicamente al ajuste del ángulo de inclinación horizontal.
falso
¡Utilice exclusivamente las piezas especificadas en estas
instrucciones de manejo! ¡Si se utilizan al aire libre, es
necesario proteger los recintos contra la lluvia y la humedad!
¡El montaje tiene que llevarse a cabo según estas instrucciones
de instalación!
¡Guarde cuidadosamente toda la documentación del sistema!
ESPAÑOL
PROJECTOR MANUAL
37
PROJECTOR MANUAL
38
PROJECTOR MANUAL
This is to certify that
Für das folgend bezeichnete Erzeugnis
HK AUDIO PROJECTOR
HK AUDIO PROJECTOR
complies with the provisions of the Directive of the Council of the European
Communities on the approximation of the laws of the Member States
relating to electromagnetic compatibility (EMC Directive 89/336/EEC) and
the low voltage Directive (73/23/EEC).
This declaration of conformity of the European Communities is the result
of an examination carried out by the Quality Assurance Department of
STAMER GmbH in accordance with European Standards EN 50081-1,
EN 50082-1and EN 60065 for low voltage, as laid down in Article 10 of
the EMC Directive.
wird hiermit bestätigt, daß es den wesentlichen Schutzanforderungen entspricht, die in der Richtlinie des Rates zur Angleichung der Rechtsvorschriften der Mitgliedsstaaten über die elektromagnetische Verträglichkeit
(89/336/EWG) und der Niederspannungsrichtlinie (73/23/EWG) festgelegt sind. Diese Erklärung gilt für alle Exemplare, und bestätigt die Ergebnisse der Messungen, die durch die Qualitätssicherung der Fa. Stamer
Musikanlagen GmbH durchgeführt wurden. Zur Beurteilung des Erzeugnisses
hinsichtlich elektromagnetischer Verträglichkeit wurden folgende Normen
herangezogen: EN 50081-1 • EN 50082-1. Zur Beurteilung der Einhaltung der Niederspannungsrichtlinie wurde folgende Norm herangezogen:
EN 60065
Stamer Musikanlagen GmbH*
Magdeburger Str. 8
66606 St.Wendel
Diese Erklärung wird verantwortlich für den Hersteller
Stamer Musikanlagen GmbH*
Magdeburger Str. 8
66606 St.Wendel
abgegeben durch
Lothar Stamer Dipl.Ing.
Managing Director
St.Wendel, 09/20/00
ENGLISH
Lothar Stamer Dipl.Ing.
Geschäftsführer
St.Wendel, den 20/09/00
FRANÇAIS
DEUTSCH
* Stamer Musikanlagen stellt exklusiv für HK AUDIO her
ESPAÑOL
* Stamer Musikanlagen manufactures exclusively for HK AUDIO
39
PROJECTOR MANUAL
www.hkaudio.com
web site: http://www.hkaudio.com • E-mail: [email protected]
HK AUDIO • Postfach 1509 • 66595 St. Wendel • TEL. 0 68 51 - 90 50 • FAX 0 68 51 - 905 100
MS D-0482 05/01
INTERNATIONAL INQUIRIES: FAX +49 - 68 51 - 905 200 • E-Mail: [email protected]
© 2001 by HK AUDIO
Printed in Germany, 05/01