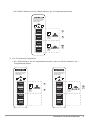
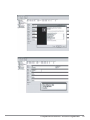
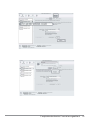
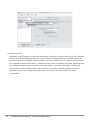
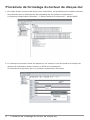
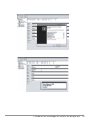
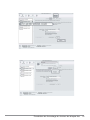
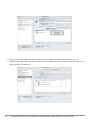
1
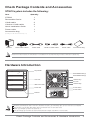
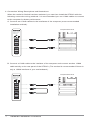
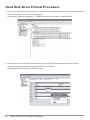
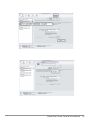
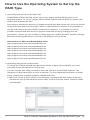
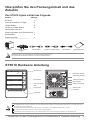
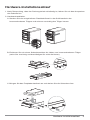
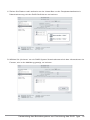
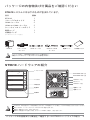
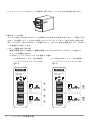
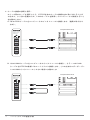
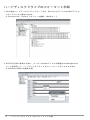
Quick Installation Guide
Version:1.0
SOHOTANK Series
ST5610-4S-WB
Index
Check Package Contents and Accessories................................................. 2
Hardware Introduction................................................................................... 2
Precautions prior to Installation.................................................................... 3
Hardware Installation Procedure................................................................... 4
Hard Disk Drive Format Procedure............................................................... 9
How to Use the Operating System to Set Up the RAID Type ..................... 14
Product Description....................................................................................... 18
Frequently Asked Questions......................................................................... 19
1
Index
Check Package Contents and Accessories
ST5610 system includes the following:
Item
Quantity
ST5610
1
Removable Carrier
4
1394b cable
2
1394a to 1394b cable
2
Quick Installation Guide
1
Power cable
1
Accessories bag
1
(including 24 x 6#-32 screws and Key x 2)
ST5610
Removable Carrier
1394b cable
1394a to 1394b cable
Power cable
Accessories bag
Please check above parts are included prior to installation.The accessories bag contains screws and a plastic key.
Hardware Introduction
Tray Handle
Please ensure each
plug has connected
tightly before turn
on the power.
Raid 0
1 JBOD 2
Lock Hole
1
RAID/JBOD Button(1)
RAID/JBOD Button(2)
1394b Port(1)
8cm Fan
2
HDD Access LED
1394b Port(2)
1394b
Power LED
Power Switch
Power Socket
Fail LED
Status Indications of LEDs:
ACCESS LED will light up blue if the HD is installed. ACCESS LED will always light up red if the HD is not installed.
HDD Access LED will flash Blue when data is accessed from the hard disk drive.
Power LED will light up blue if the power is on.
Fail LED will light up red when the internal temperature is higher than 60°C or the fan fails.
Check Package Contents and Accessories & Hardware Introduction
2
Precautions prior to Installation
1. Before installation, please refer to the Check Package Contents and Accessories and
ensure necessary parts are fully provided. Contact the original distributor in case of any
missing or damaged item.
2. Please use the power cord that comes with the package to connect the power supply. Do
not disassemble or modify the device without authorization. Be sure to use 100-240V,
60Hz, power supply. Any unauthorized disassembly or modification may cause damage to
the electronic parts and deprive you of the benefit under the warranty. STARDOM is not
liable and responsible for any damage due to unauthorized disassembly or modification, if
such unauthorized disassembly or modification results in data damage or loss, or causes
the operating system unable to start.
3. Please carefully go through the Quick Installation Guide and back up your data on the hard
disk drive before installation or use the newly purchased hard disk drive to avoid data loss
in case of inadvertent operation. STARDOM is not reliable and responsible for any data
damage due to inadvertent operation, if such inadvertent operation results in data damage
or loss, or causes the operating system unable to start.
4. Hardware Requirements
To enhance compatibility and transmission efficiency, please connect to motherboards
or external cards supporting 1394b or higher.
5. OS Software Requirements
The product is ideal for any operating system compatible with the 1394 interface
3
Precautions prior to Installation
Hardware Installation Procedure
1. After verifying that the package is complete, proceed to unpack the package.
2. Hardware Installation.
A. Insert the supplied plastic key into the lock hole on the removable tray and carefully
remove the tray.
B. Remove the holder from the removable tray with a screwdriver (be careful not to
damage the nuts)
C. Mount the hard disk drive and fasten the screws.
Hardware Installation Procedure
4
D.Carefully push the removable tray into the slot and push the handle back into place.
3. Use Mode and Connection Wiring Descriptions
Users must determine which mode to use prior to installation. Once the installation mode
is selected, please do not change the mode arbitrarily if possible. Especially when you
have already selected RAID 0 mode but change it to JBOD mode later or vice versa, it will
cause data damage in the HD.
A. Switch Adjustment Mode Illustrations:
With the machine powered off, you can adjust Switch by selecting any of the following
modes from the rear panel of the machine .
a. For 4 Hard Disk Drives Installed
Two JBOD modes, as 4 physical
Two RAID 0 modes, as 2 virtual
hard disk drives
hard disk drives
Please ensure each
plug has connected
tightly before turn
on the power.
Please ensure each
plug has connected
tightly before turn
on the power.
Raid 0
Raid 0
1 JBOD 2
1 JBOD 2
1
1
1 JBOD
1
1 Raid 0
1
2
2 Raid 0
2
2
3
2
2 JBOD
1394b
5
Hardware Installation Procedure
4
1394b
An RAID 0 mode and a JBOD mode, as 3 hard disk drives
Please ensure each
plug has connected
tightly before turn
on the power.
Raid 0
1 JBOD 2
1
1
1 JBOD
2
2
2 Raid 0
3
1394b
b. For 2 Hard Disk Drives Installed
A JBOD mode, supporting 2 hard disk drives; or an RAID 0 mode, as 1 hard
disk drive
Please ensure each
plug has connected
tightly before turn
on the power.
Please ensure each
plug has connected
tightly before turn
on the power.
Raid 0
Raid 0
1 JBOD 2
1 JBOD 2
1
1
1 JBOD
1
1 Raid 0
1
Hardware Installation Procedure
6
2
2
2
1394b
1394b
4. Connection Wiring Descriptions and Illustrations:
When the mode for Switch has been selected, you can then install the ST5610 with the
following connection wiring methods. It is recommended you use 1394b cables to connect
to the computer for better performance.
A. Connect two 1394b cables to the interfaces of the computer (most recommended
installation method).
Computer Back Panel
Please ensure each
plug has connected
tightly before turn
on the power.
Raid 0
1 JBOD 2
1
2
1394b
B. Connect a 1394b cable to the interface of the computer and connect another 1394b
cable serially to the rear panel of the ST5610. (The method is recommended if there is
only a 1394b interface of your motherboard.)
Computer Back Panel
Please ensure each
plug has connected
tightly before turn
on the power.
Raid 0
1 JBOD 2
1
2
1394b
7
Hardware Installation Procedure
C. Connect a 1394b cable only to the interface of the computer.
Computer Back Panel
Please ensure each
plug has connected
tightly before turn
on the power.
Raid 0
1 JBOD 2
1
2
1394b
D. Two ST5610 units serially connected each other
Please ensure each
plug has connected
tightly before turn
on the power.
Please ensure each
plug has connected
tightly before turn
on the power.
Please ensure each
plug has connected
tightly before turn
on the power.
Raid 0
Raid 0
Raid 0
1 JBOD 2
1 JBOD 2
1 JBOD 2
1
1
1
2
2
2
1394b
1394b
1394b
ST5610-4S-WB (1)
ST5610-4S-WB (2)
ST5610-4S-WB (3)
Up to 4 Units
Computer Back Panel
After selecting a desired installation method as stated above, first power of the ST5610, wait until the ST5610
operates normally, and then turn on your PC.
Hardware Installation Procedure
8
Hard Disk Drive Format Procedure
1. In the four individual Hard Disk Drives modes, the installed devices can be detected by the
Device Manager of the operating system.
A. Windows Operating System – 1394b Interface Connection – JBOD Mode
2. Customers can format the hard disk drive by using the Disk Management tool of the
operating system and then using the ST5610 normally.
A.Operating Instructions for Windows OS
9
Hard Disk Drive Format Procedure
Hard Disk Drive Format Procedure
10
B. Operating Instructions for Macintosh
After the hardware installation for the ST5610 is completed, you can restart the system
and connect the device to Macintosh.
Hard Disk Drive Format (same as in the Windows format function)
a. Move the cursor to the Toolbar on the Desktop, and select the Disk Utility. A disk tool
window will pop up with several function tabs, such as First Aid, Erase, Partition,
RAID and Reinstall.
b. Select the Erase tab. If the disk device is ready, the disk information will be displayed
on the left window.
c. To erase all data and volumes on a disk, please select the icon for the disk drive and
a Volume Format and enter a name and then click “Erase”. A dialog will pop up with
the following message, “Erasing a disk will destroy all information on the volume of
the disk. Are you sure you wish to erase the disk ‘XXX’? Cancel or Erase” If you wish
to erase, please click “Erase”. After the disk is formatted, you can use the ST5610
normally. Please refer to the figure for instructions.
11
Hard Disk Drive Format Procedure
Hard Disk Drive Format Procedure
12
C.Partition
Select the disk you wish to partition and the Partition tab. Click the volume name
displayed in the structure and select a Volume Format and enter a name and size. A
dialog will pop up with the following message, “Partitioning a disk will destroy all
information on the volume of the disk. Are you sure you wish to partition the disk
‘XXXXXXX’? Cancel or Erase” Please click “Partition”. After the disk is successfully
partitioned, you can use the ST5610 normally.
13
Hard Disk Drive Format Procedure
How to Use the Operating System to Set Up the
RAID Type
1. Operating Instructions for Windows OS
SOHOTANK ST5610-4S-WB can be set up as a highly efficient RAID system in an
operating system. To set up a highly efficient RAID system with the ST5610, please refer
to Microsoft related web sites.
According to Microsoft’s reference, portable external hard disk drives can not be converted
to dynamic hard disk drives through 1394b or USB interfaces. Namely, it is impossible to
use the OS utility to provide a RAID configuration. However, it is possible to convert
portable external hard disk drives to dynamic hard disk drives by changing the OS
parameters. Unless you are an MIS or related engineer, please DO NOT arbitrarily change
Microsoft related parameters to avoid any OS damage or boot failure.
Information for Microsoft Related Web Sites
http://support.microsoft.com/kb/299598/en-us
http://support.microsoft.com/kb/299598/zh-tw
http://support.microsoft.com/kb/303184/zh-tw
http://support.microsoft.com/kb/302969/en-us
http://support.microsoft.com/kb/302969/zh-tw
http://support.microsoft.com/kb/302969/en-us
http://support.microsoft.com/kb/303237/zh-tw
2. Operating Instructions for Macintosh
To set up an ST5610-4S-WB with Macintosh OS as a highly efficient RAID, you need
hard disk drives with the same storage size.
You can use the disk utility provided by Mac OS 10.4.6 to create RAID systems. The
following is a brief description on how to operate. For more detailed information on RAID
setup, please refer to Apple computer related web sites.
A. Move the cursor to the Toolbar on the Desktop, and select the Disk Utility. A disk tool
window will pop up with several function tabs, such as First Aid, Erase, Partition, RAID
and Reinstall.
How to Use the Operating System to Set Up the RAID Type
14
B. Select the RAID tab. If the disk device is ready, the disk information will be displayed on
the left window. Please select the Volume Format and the RAID Type you wish to
create. Please decide the RAID Type that you create by the amount of external hard
drive disks.
15
How to Use the Operating System to Set Up the RAID Type
C. Drag disks or volumes to the list box to create the hard disk drives according to the
definition of RAID.
D. Select “Create” to create RAID systems according to the information in the window, as
shown in the figure.
How to Use the Operating System to Set Up the RAID Type
16
E. When the format is completed, you will have a highly efficient RAID system featured
with ST5610-4S-WB. You can then access the data through the RAID system, as
shown in the figure.
17
How to Use the Operating System to Set Up the RAID Type
Product Description
Product Characteristics
1. Two sets of 1394b host interface.
a. By connecting two inputs to different computers, the same storage system can be
shared.
b. Connecting two inputs to two individual interfaces of the same computer system for
better transmitting performance.
c. By connecting an input to a computer system, and serially connecting a 1394b cable to
another 1394b interface, users may have a computer for extended storage usage.
2. The product supports RAID 0 and JBOD. When using JBOD, the system will recognize 4
individual hard disk drives. When using RAID 0, the ST5610 will merge two hard disk
drives of the same input into a larger HD; therefore the system will recognize two large
hard disk drives.
3. The product features 4 HD transmission LEDs and HD damage warning LEDs and a
malfunction warning LED for system HD malfunction and overheat detection.
Related Products:
We provide the interfaces for the ST5610 series related products, including ST5610-4S-S2.
1. The ST5610-4S-S2 provides 4 highly efficient SATA 3.0GHz interfaces as a faster, safer
and more reliable system for users
2. For more details on related products, please go to http://www.stardom.com.tw.
1. Most of the SOHORAID series are the RAID series. Customers may set up different RAID levels without adding any
other peripherals. Please refer to the SOHORAID series such as SR3610, SR6500, or SR6600 on the
STARDOM web site.
2. Most of the SOHOTANK series are the external case series. Customers may use a SOHOTANK series product as an
external case or a RAID system with an optional RAID CARD. Please refer to the SOHORAID series such as
ST3620, ST7610, ST6600 on the STARDOM web site.
Product Description
18
Frequently Asked Questions
Q: Does it need additional drivers to run SOHOTANK ST5610 in different operating systems?
A: No. Users do not need any additional driver to run SOHOTANK ST5610 in different
operating systems. As long as the OS supports the 1394 interface, STARDOM systems
are compatible with a variety of operating systems, e.g. Window XP, Linux, and
Macintosh, etc..
Q: Is SOHOTANK ST5610 compatible with any hard disk drive?
A: The product has no problem with hard disk drive compatibility. STARDOM provides the
SATA I / II interface, which is a cost-efficient system with high performance. Please feel
free to contact us for any hard disk drive compatibility problem.
Q: What can I do if I turn on my PC, but the system BIOS cannot detect the hard disk drive?
A: 1. Typically the system BIOS fails to detect the hard disk drive because of improper
connection. To solve this problem, you can try the following procedure: (1) Power off the
system. (2) Turn off the PC. (3) Make sure the cables are connected properly. (4)
Restart SOHOTANK ST5610. (5) Repeat Step (1) to Step (4) for three times. Please
wait at least 5 minutes between each attempt. If the system BIOS still fails to detect the
hard disk drive, make sure the installation and connection procedures are compliant
with regulations described in the manual.
2. If the hard disk drive cannot still be detected, please contact us via phone or contact
our technical support directly through the RMA system.
Q: Why can’t I use the storage device in the operating system, even the system BIOS has
detected the hard disk drive?
A: 1. Please refer to the Hardware Installation Procedure & Hard Disk Drive Format
Procedure in the Quick Installation Guide and make sure the storage devices have
been installed successfully.
2. New hard disk drives can only be displayed in the system after disk partition and format.
Q: What should I do when the Fail LED indicator lights on?
A: Determine if the fan fails, the system is over heated, or the HD is malfunctioned, as soon
as the Fail LED indicator lights on.
1. In case of malfunctioned fan, please check if the fan is jammed with dust. Should any of
the situations occur, please shut down the system and clean the fan up or remove the
wires that trap the fan. Then restart the system again. If the problem still occurs or for
any reason that you are unable to fix the problem on your own, please send it back for
maintenance.
2. In case that the internal temperature has raised over 60°C, please shut down the
system, let it cool down and then restart it. If the problem still occurs, please send it
back for maintenance
19
Frequently Asked Questions
Q: Why can’t my operating system (OS) detect the hard drivers removed immediately when
I pull them from the SOHOTANK ST5610?
A: Because the Oxford 924DSB chipset is used in the ST5610, it doesn’t support Hot-Swap
function. So you have to remove the hard drivers from the Device Manager of OS first,
and then pull them from the ST5610.This action makes sure your OS to keep in the
normal status. Similarly if you insert the hard drivers into the ST5610, but OS can’t detect
them immediately. Please take advantage of Hardware-Scan of the Device Manager. If
they aren’t detected by it, please restart the ST5610 and computer.
Frequently Asked Questions
20
Memo
21
Memo
Schnell-Installationsanleitung
Version:1.0
SOHOTANK Series
ST5610-4S-WB
Inhalt
Überprüfen Sie den Packungsinhalt und das Zubehör................................ 2
Hardware Anleitung...................................................................................... 2
Vorsichtsmaßnahmen vor der Installation.......................................................... 3
Hardware-Installationsablauf........................................................................ 4
Festplattenlaufwerks Formatierungsablauf.................................................. 9
Verwendung des Betriebssystems zur Einrichtung des RAID Typs........... 14
Produktbeschreibung.................................................................................... 18
Oft gestellte Fragen....................................................................................... 19
1
Inhalt
Überprüfen Sie den Packungsinhalt und das
Zubehör
Das ST5610 Sytem enthält das Folgende:
Artikel
Menge
ST5610
1
Herausnehmbarer Träger
4
1394b Kabel
2
1394a to 1394b Kabel
2
Überprüfen Sie den
Packungsinhalt und Zubehörteile 1
Stromkabel
1
Zubehörbeutel
1
(Inklusive 24 x 6#-32 screws und Schlüssel x 2)
ST5610
Herausnehmbarer
Träger
1394b Kabel
1394a to 1394b Kabel
Stromkabel
Zubehörbeutel
Überprüfen Sie vor der Installation ob die obigen Teile enthalten sind.
Der Zubehörbeutel enthält Schrauben und einen Plastikschlüssel.
ST5610 Hardware Anleitung
Schacht-Griff
Please ensure each
plug has connected
tightly before turn
on the power.
Raid 0
1 JBOD 2
RAID/JBOD Taste(1)
RAID/JBOD Taste(2)
Sperröffnung
1
1394b Anschluss(1)
HDD Verbindungs
LED
2
1394b Anschluss(2)
8cm Ventilator
1394b
Energie LED
Stromschalter
Steckdose
Fehler LED
Statusanzeigen der LEDs:
Die ZUGRIFFS-LED wird blau aufleuchten, wenn die FESTPLATTE installiert ist. Die ZUGRIFFS-LED wird immer rot aufleuchten, wenn
die FESTPLATTE nicht installiert ist.
Die Zugriffs-LED der FESTPLATTE wird blau leuchten, wenn Daten vom Festplattenlaufwerk gelesen werden.
Die Energie-LED wird blau aufleuchten, wenn der Strom eingeschaltet ist.
Die Fehler-LED wird rot aufleuchten wenn die Innentemperatur höher als 60°C ist oder der Ventilator eine Fehlfunktion hat.
Überprüfen Sie den Packungsinhalt und Zubehörteile & Hardware Anleitung
2
Vorsichtsmaßnahmen vor der Installation
1. Vor der Installation beziehen Sie sich auf Überprüfen Sie den Packungsinhalt und das
Zubehör und stellen sicher, dass alle notwendigen Teile vollständig vorhanden sind.
Kontaktieren Sie den Original-Händler im Falle eines fehlenden oder beschädigten Teiles.
2. Benutzen Sie bitte das Netzkabel zum Anschluss der Stromversorgung, welches in dem
Paket geliefert wird. Demontieren oder verändern Sie das Gerät nicht ohne Genehmigung.
Stellen Sie sicher eine Stromversorgung zwischen 100-240V, 60Hz, zu verwenden. Jede
ungenehmigte Demontage oder Veränderung kann zu Schäden der elektronischen Teile
führen und Ihre Garantieansprüche unwirksam werden lassen. STARDOM haftet weder,
noch ist verantwortlich für jegliche Schäden, die aufgrund ungenehmigter Demontage oder
Veränderung entstehen, falls diese ungenehmigte Demontage oder Veränderung zu
Datenschäden oder Verlusten führt oder das Betriebssystem nicht mehr starten lassen.
3. Um einen Datenverlust durch einen versehentlichen Vorgang zu vermeiden, lesen Sie bitte
sorgfältig die Schnell-Installationsanleitung und machen Sie eine Sicherungskopie Ihrer
Daten auf dem Festplattenlaufwerk bevor Sie die neu erworbene Festplatte installieren
oder verwenden. STARDOM ist nicht haftbar und verantwortlich für irgendwelche
Datenschäden durch einen versehentlichen Vorgang, falls solch ein versehentlicher
Vorgang zu Datenschäden oder Datenverlust führt oder das Betriebssystem nicht mehr
starten kann.
4. Hardware Voraussetzungen
Um die Kompabilität und Übertragungseffizienz zu steigern, stellen Sie bitte eine
Verbindung zu Hauptplatinen oder externen Karten, die 1394b unterstützen, her.
5. OS Software-Voraussetzungen
Das Produkt ist ideal für jedes Betriebssystem, das mit der 1394 Schnittstelle kompatibel ist.
3
Vorsichtsmaßnahmen vor der Installation
Hardware-Installationsablauf
1. Nach Überprufung, dass der Packungsinhalt vollständig ist, fahren Sie mit dem Auspacken
des Paketes fort.
2. Hardwareinstallation.
A. Stecken Sie den mitgelieferten Plastikschlüssel in das Schlüsselloch des
herausnehmbaren Trägers und nehmen vorsichtig den Träger heraus.
B. Entfernen Sie mit einem Schraubenzieher die Halter vom herausnehmbaren Träger
(seien Sie vorsichtig und beschädigen Sie nicht die Nuten).
C. Bringen Sie das Festplattenlaufwerk an und drehen Sie die Schrauben fest.
Hardware-Installationsablauf
4
D. Drücken Sie vorsichtig den herausnehmbaren Träger in den Einschubrahmen und
drücken Sie den Schacht-Griff wieder in seine Position.
3. Beschreibung des Betriebsmodus
Der Benutzer muss angeben, welcher Modus vor der Installation benutzt werden soll.
Sobald der Installationsmodus gewählt ist, ändern Sie ihn wenn möglich nicht willkürlich.
Gerade wenn Sie bereits den RAID 0 Modus gewählt haben, ihn aber später in den JBOD
Modus ändern oder umgekehrt, wird dies zu Datenverlust auf der FESTPLATTE führen.
A. Abbildungen zur Einstellung des Switchs:
Wenn die Maschine ausgeschaltet ist können Sie den Switch durch die Auswahl jeder
der folgenden Modi von der Rückplatte der Maschine auswählen.
a. Für 4 installierte Festplatten
Zwei JBOD Modi, als 4 physikalische
Zwei RAID 0 Modi, als 2 virtuelle
Festplattenlaufwerke.
Festplattenlaufwerke
Please ensure each
plug has connected
tightly before turn
on the power.
Please ensure each
plug has connected
tightly before turn
on the power.
Raid 0
Raid 0
1 JBOD 2
1 JBOD 2
1
1
1 JBOD
1
1 Raid 0
1
2
2 Raid 0
2
2
3
2
2 JBOD
1394b
5
Hardware-Installationsablauf
4
1394b
Ein RAID 0 Modus and ein JBOD Modus, als 3 Festplattenlaufwerke
Please ensure each
plug has connected
tightly before turn
on the power.
Raid 0
1 JBOD 2
1
1
1 JBOD
2
2
2 Raid 0
3
1394b
b. Für 2 installierte Festplatten
Ein JBOD Modus, als 2 Festplattenlaufwerke; oder ein RAID 0 Modus, als 1
Festplattenlaufwerk.
Please ensure each
plug has connected
tightly before turn
on the power.
Please ensure each
plug has connected
tightly before turn
on the power.
Raid 0
Raid 0
1 JBOD 2
1 JBOD 2
1
1
1 JBOD
1
1 Raid 0
1
Hardware-Installationsablauf
6
2
2
2
1394b
1394b
4. Beschreibungen und Abbildungen der Verkabelung:
Wenn der Modus für den Switch gewählt wurde, können Sie die ST5610 mit den folgenden
Methoden der Verkabelung installieren. Es wird empfohlen, dass Sie für eine bessere
Leistung des Computers 1394b Kabel zur Verbindung verwenden.
A. Verbinden Sie zwei 1394b Kabel an die Schnittstellen des Computers (am häufigsten
empfohlene Installationsmethode).
Computer Back Panel
Please ensure each
plug has connected
tightly before turn
on the power.
Raid 0
1 JBOD 2
1
2
1394b
B. Verbinden Sie ein 1394b Kabel an die Schnittstelle des Computers und verbinden Sie
ein anderes 1394b Kabel seriell mit der Rückplatte der ST5610. (Diese Methode wird
empfohlen, wenn Ihre Hauptplatine nur eine 1394b Schnittstelle besitzt.)
Computer Back Panel
Please ensure each
plug has connected
tightly before turn
on the power.
Raid 0
1 JBOD 2
1
2
1394b
7
Hardware-Installationsablauf
C. Verbinden Sie nur ein 1394b Kabel an die Schnittstelle des Computers.
Computer Back Panel
Please ensure each
plug has connected
tightly before turn
on the power.
Raid 0
1 JBOD 2
1
2
1394b
D. ST5610 Daisy Chain-Verbindung (bis zu vier ST5610 Geräte)
Please ensure each
plug has connected
tightly before turn
on the power.
Please ensure each
plug has connected
tightly before turn
on the power.
Please ensure each
plug has connected
tightly before turn
on the power.
Raid 0
Raid 0
Raid 0
1 JBOD 2
1 JBOD 2
1 JBOD 2
1
1
1
2
2
2
1394b
1394b
1394b
ST5610-4S-WB (1)
ST5610-4S-WB (2)
ST5610-4S-WB (3)
Up to 4 Units
Computer Back Panel
Nach der Auswahl eines gewünschten Installationsmethode, wie oben beschrieben, stellen Sie ab vom ST5610, warten
Sie bis die ST5610 normal arbeitet und schalten Sie Ihren PC ein.
Hardware-Installationsablauf
8
Festplattenlaufwerks Formatierungsablauf
1. In den vier individuellen Festplattenlaufwerksmodi kann das installierte Gerät durch den
Gerätemanager des Betriebssystems erkannt werden.
A. Windows Betriebssystem – 1394b Schnittstellenverbindung – JBOD Modus
2. Kunden können unter Benutzung des Festplattenverwaltungsprogramms des
Betriebssystems das Festplattenlaufwerk vor der normalen Benutzung der ST5610
formatieren.
A. Betriebsinstruktionen für Windows OS
9
Festplattenlaufwerks Formatierungsablauf
Festplattenlaufwerks Formatierungsablauf
10
B. Betriebsinstruktionen für Macintosh
Nachdem die Hardwareinstallation für das ST5610 komplett ist, können Sie das System
neu starten und das Gerät an den Macintosh anschließen.
Festplatten-Laufwerksformat (identensch mit der Windows-Format-Funktion)
1. Bewegen Sie den Curser zu der Werkzeugleiste auf dem Desktop, und wählen das
Plattenzubehör. Ein Plattenwerkzeug-Fenster mit einigen Funktionstabs wird sich
öffnen, so wie Erste Hilfe, Löschen, Partition, RAID und Deinstallation.
2. Wählen Sie den Löschen-Tab. Wenn das Plattengerät bereit ist, wird die
Platteninformation auf der linken Seite des Fensters angezeigt.
3. Um alle Daten und Datenträger auf der Platte zu löschen, wählen Sie das Icon für das
Plattenlaufwerk und ein Datenträgerformat und geben einen Name nein und klicken
dann „Löschen“. Ein Dialog mit der folgenden Nachricht wird sich öffnen, „Das
Löschen einer Platte wird alle Informationen auf dem Datenträger zerstören. Sind Sie
sicher, dass Sie die Platte 'XXX' löschen wollen? Abbrechen oder Löschen“ Falls Sie
löschen möchten, klicken Sie bitte „Löschen“. Nachdem die Platte formatiert ist,
können Sie das ST5610 normal verwenden. Bitte beziehen Sie sich für Instruktionen
auf die Abbildung.
11
Festplattenlaufwerks Formatierungsablauf
Festplattenlaufwerks Formatierungsablauf
12
C.Partitionierung
Wählen Sie die Platte aus die Sie partionieren möchten und den Partitions-Tab. Klicken
Sie auf den Datenträgernamen der in der Struktur angezeigt wird und wählen Sie ein
Laufwerksformat und geben einen Namen und eine Größe ein. Ein Dialog wird sich mit
der folgenden Nachricht öffnen, „Partitionierung eines Laufwerks wird alle Informationen
des Laufwerks der Platte zerstören. Sind Sie sicher, dass Sie die Platte 'XXXXXXX'
partionieren wollen? Abbrechen oder Löschen“ Drücken Sie bitte „Partitionierung“.
Nachdem die Platte erfolgreich partioniert ist, können Sie das ST5610 normal
verwenden.
13
Festplattenlaufwerks Formatierungsablauf
Verwendung des Betriebssystems zur Einrichtung
des RAID Typs
1. Betriebsinstruktionen für Windows OS
SOHOTANK ST5610-4S-WB kann als hocheffizientes RAID System in einem
Betriebssystem eingerichtet werden. Um ein hocheffizientes RAID System mit der ST5610
einzurichten, beziehen Sie sich auf Webseiten von Microsoft.
Entsprechend von Microsofts Empfehlungen, können tragbare externe
Festplattenlaufwerke nicht durch 1394b oder USB Schnittstellen in dynamische
Festplattenlaufwerke umgewandelt werden. Es ist nämlich unmöglich, das
Betriebssystemprogramm zu benutzen, um eine RAID Konfiguration herzustellen. Eine
Umwandlung von externen Festplattenlaufwerken zu dynamischen Festplattenlaufwerken
ist aber dennoch durch Veränderung der Betriebssystemparameter möglich. Solange Sie
kein MIS oder eingebundener Ingenieur sind, ändern Sie NICHT willkürlich Parameter von
Microsoft, um Fehler Ihres Betriebssystems oder beim Starten zu vermeiden.
Information for Microsoft Related Web Sites
http://support.microsoft.com/kb/299598/en-us
http://support.microsoft.com/kb/299598/zh-tw
http://support.microsoft.com/kb/303184/zh-tw
http://support.microsoft.com/kb/302969/en-us
http://support.microsoft.com/kb/302969/zh-tw
http://support.microsoft.com/kb/302969/en-us
http://support.microsoft.com/kb/303237/zh-tw
2. Betriebsinstruktionen für Macintosh
Um eine ST5610-4S-WB mit einem Macintosh Betriebssystem als ein hocheffizientes
RAID einzurichten, benötigen Sie Festplattenlaufwerke mit der gleichen Speichergröße.
Sie können das durch Mac OS 10.4.6 zur Verfügung gestellte Plattenzubehör verwenden
um ein RAID System zu kreieren. Das Folgende ist eine Kurzanweisung der
Vorgehensweise. Für mehr detaillierte Informationen zur RAID Einrichtung, , beziehen Sie
sich bitte auf Apple bezogene Webseiten.
A. Bewegen Sie den Curser zu der Werkzeugleiste auf dem Desktop, und wählen das
Plattenzubehör. Ein Plattenwerkzeug-Fenster mit einigen Funktionstabs wird sich
öffnen, so wie Erste Hilfe, Löschen, Partition, RAID und Deinstallation.
Verwendung des Betriebssystems zur Einrichtung des RAID Typs
14
B. Wählen Sie den RAID Tab. Wenn das Plattengerät bereit ist, wird die Platteninformation
auf der linken Seite des Fensters angezeigt. Wählen Sie bitte das Laufwerksformat und
den RAID Typ den Sie kreieren wollen. Bitte entscheiden Sie den RAID Typ den Sie
kreieren wollen durch die Anzahl der externen Festplattenlaufwerke.
15
Verwendung des Betriebssystems zur Einrichtung des RAID Typs
C. Ziehen Sie Platten und Laufwerke zu der Listen-Box um die Festplattenlaufwerke in
Übereinstimmung mit den RAID Definitionen zu kreieren.
D. Wählen Sie „Kreieren“ um ein RAID System übereinstimmend mit den Informationen im
Fenster, wie in der Abbildung gezeigt, zu kreieren.
Verwendung des Betriebssystems zur Einrichtung des RAID Typs
16
E. Wenn die Formatierung komplett ist, haben Sie ein hocheffizientes RAID System
ausgestattet mit ST5610-4S-WB. Sie können nun, wie in der Abbildung gezeigt, die
Daten durch das RAID System erreichen.
17
Verwendung des Betriebssystems zur Einrichtung des RAID Typs
Produktbeschreibung
Produkteigenschaften
1. Zwei 1394b Eingänge für verschiedene, flexible Anwendungen.
A. Durch das Verbinden der Eingänge zweier verschiedener Computer, kann das gleiche
Speichersystem geteilt werden.
B.Verbindung von zwei Eingängen zweier verschiedener Schnittstellen desselben
Computersystems für bessere Übertragungsleistung.
C.Mit dem Anschließen eines Eingangs an ein Computersystem und dem seriellen
Anschluss eines 1394b Kabels an eine andere 1394b Schnittstelle kann der Benutzer
einen Computer für erweiterte Speichernutzung erhalten.
2. Das Produkt unterstützt RAID 0 und JBOD. Bei der Benutzung von JBOD wird das System
4 individuelle Festplattenlaufwerke erkennen. Bei der Benutzung von RAID 0, wird die
ST5610 zwei Festplattenlaufwerke des gleichen Eingangs zu einer größeren Festplatte
zusammenführen; deswegen wird das System zwei große Festplattenlaufwerke erkennen.
3. Dieses Produkt bietet 4 Festplattenübertragungs-LEDs und Festplattenwarnungs-LEDs
und eine Ausfallwarn-LED für System Festplattenausfall und Überhitzungserkennung.
Produktbeschreibung
Wir bieten die Schnittstellen für die auf die ST5610-Serie bezogenen Produkte, inklusive
ST5610-4S-S2, an.
1. Die ST5610-4S-S2 bietet 4 hocheffiziente SATA 3,0 GHz Schnittstellen als ein schnelleres,
sichereres und zuverlässigeres System für Benutzer an.
2. Für weitere Details über ähnliche Produkte, gehen Sie bitte zu http://www.stardom.com.tw.
1. Die meisten der SOHORAID Serien sind RAID Serien. Kunden können verschiedene RAID Level einrichten ohne
andere Peripherien hinzufügen zu müssen. Bitte beziehen Sie sich auf die SOHORAID Serie wie z.B. SR3610,
SR6500 oder SR6600 auf der STARDOM Webseite.
2. Die meisten der SOHOTANK Serien sind externe Geräte Serien. Kunden können ein SOHOTANK Serienprodukt als
ein externes Gerät oder ein RAID System mit einer optionalen RAID KARTE verwenden. Bitte beziehen Sie sich auf
die SOHORAID Serie wie z.B. ST3620, ST7610, ST6600 auf der STARDOM Webseite.
Produktbeschreibung
18
Oft gestellte Fragen
Q: Braucht man zusätzliche Treiber um SOHOTANK ST5610 in verschiedenen
Betriebssystemen laufen zu lassen?
A: Nein. Benutzer brauchen keinen zusätzlichen Treiber, um SOHOTANK ST5610 in
verschiedenen Betriebssystemen zu betreiben. Solange wie das Betriebssystem die 1394
Schnittstelle unterstützt, sind STARDOM Systeme mit einer Vielzahl von
Betriebssystemen kompatibel, z.B. Windows XP, Linux und Macintosh, usw.
Q: Ist SOHOTANK ST5610 kompatibel mit jedem Festplattenlaufwerk?
A: Das Produkt hat keine Kompatibilitätsprobleme mit Festplattenlaufwerken. STARDOM
bietet den SATA I / II Anschluss, welches ein kosteneffizientes System mit hoher Leistung
ist. Bitte kontaktieren Sie uns falls Sie ein Kompatibilitätsproblem mit einem
Festplattenlaufwerk haben.
Q: Was kann ich machen falls ich den PC einschalte, aber das System BIOS kann das
Festplattenlaufwerk nicht finden?
A: 1. Typischerweise schlägt das System BIOS bei der Erkennung des Festplattenlaufwerks
wegen eines fehlerhaften Anschlusses fehl. Um dieses Problem zu lösen, können Sie
folgende Prozedur probieren: (1) Schalten Sie das System aus. (2) Schalten Sie den PC
aus. (3) Stellen Sie sicher, dass die Kabel korrekt angeschlossen sind. (4) Starten Sie
SOHOTANK ST5610 neu. (5) Wiederholen Sie Schritt (1) bis Schritt (4) drei Mal. Bitte
warten Sie jeweils 5 Minuten zwischen jedem Versuch. Wenn das System BIOS bei der
Erkennung des Festplattenlaufwerks immer noch fehlschlägt, stellen Sie sicher, dass
die Installations- und Anschlussprozeduren mit den in dieser Anleitung beschriebenen
Bestimmungen übereinstimmen.
2. Falls das Festplattenlaufwerk immer noch nicht erkannt werden kann, kontaktieren Sie
uns bitte via Telefon oder unsere technische Unterstützung direkt durch das RMA System.
Q: Warum kann ich das Speichergerät nicht im Betriebssystem benutzen, obwohl das
System BIOS das Festplattenlaufwerk erkannt hat?
A: 1. Bitte beziehen Sie sich auf Hardware Installationsablauf &
Festplattenlaufwerks-Formatierungsablauf in der Schnell-Installationsanleitung und
vergewissern Sie sich, dass die Speichergeräte erfolgreich installiert wurden.
2. Neue Festplattenlaufwerke können nur nach einer Disk Partition und Formatierung
angezeigt werden.
Q: Warum kann mein Betriebssystem (BS) nicht sofort die entfernten Festplatten erkennen,
wenn ich sie aus dem SOHOTANK ST5610 ziehe?
A: Da der Oxford 924DSB Chipsatz im ST5610 verwendet wird, wird die Hot-Swap Funktion
nicht unterstützt. Sie müssen die Festplatten zunächst aus dem Gerätemanager des BS
entfernen und sie dann aus dem ST5610 herausziehen. Dieser Vorgang stellt sicher, dass
Ihr BS in normalem Zustand bleibt. Das gleiche gilt für das Einsetzen der Festplatten in
den ST5610, falls das BS sie nicht sofort erkennen kann. Benutzen Sie die
Hardwareerkennung des Gerätemanagers. Falls sie von dort nicht erkannt werden
können, starten Sie bitte den ST5610 und den Computer neu.
19
Oft gestellte Fragen
Q: Was soll ich machen, wenn die Fehler LED Anzeige aufleuchtet?
A: Stellen Sie zuerst fest, ob der Ventilator eine Fehlfunktion hat oder das System überhitzt
ist, wenn die rote Fehler LED aufleuchtet.
1. Im Falle einer Fehlfunktion des Ventilators, überprüfen Sie ob der Ventilator mit Staub
verschmutzt ist oder durch die rückseitigen Kabel verkeilt ist. Falls eine dieser
Situationen zutrifft, schalten Sie das System aus, reinigen den Ventilator oder entfernen
Sie die Kabel, die zur Einkeilung geführt haben. Dann starten Sie das System erneut.
Falls das Problem immer noch auftaucht oder aus irgend einem Grund können Sie das
Problem nicht allein beheben, schicken Sie es uns zur Wartung zurück.
2. Im Falle, dass die interne Temperatur auf über 60°C angestiegen ist, schalten Sie bitte
das System aus und starten es dann erneut. Falls das Problem immer noch auftaucht,
schicken Sie es uns zur Wartung zurück.
Oft gestellte Fragen
20
Memo
21
Memo
Guide de mise en route rapide
Version:1.0
SOHOTANK Series
ST5610-4S-WB
Index
Vérification du contenu de l’emballage et des accessoires......................... 2
Introduction au matériel du ST5610............................................................. 2
Précautions à prendre avant l’installation..................................................... 3
Procédure d’installation du matériel.............................................................. 4
Procédure de formatage du lecteur de disque dur....................................... 9
Comment utiliser le système d’exploitation pour définir le type RAID.......... 14
Description du produit.................................................................................... 18
Foire Aux questions....................................................................................... 19
1
Index
Vérification du contenu de l’emballage et des
accessoires
Le système ST5610 comprend les éléments suivants:
Item
Quantity
ST5610
1
Boîtier amovible
4
Câble 1394b
2
Câble 1394a to 1394b
2
Guide de Mise en route rapide
1
Cordon d’alimentation
1
Sac d’accessoires
1
(comprend 24 x 6#-32 vis et Clé x 2)
ST5610
Boîtier amovible
Câble 1394b
Câble 1394a to 1394b
Cordon
Sac d’accessoires
d’alimentation
Veuillez vérifier que les éléments ci-dessus sont inclus avant l’installation.
Le sac d’accessoires contient des vis et une clé plastique.
Introduction au matériel du ST5610
Poignée de tiroir
Please ensure each
plug has connected
tightly before turn
on the power.
Raid 0
1 JBOD 2
Serrure
Témoin Accès
disque dur
1
RAID/JBOD Bouton(1)
RAID/JBOD Bouton(2)
Port 1394b(1)
Ventilateur 8cm
2
Port 1394b(2)
1394b
Témoin LED
Alimentation
Commutateur
Alimentation
Témoin LED Echec
Connecteur
Alimentation
Indications d’état des témoins :
La LED d’accès deviendra bleue si le DD est installé. La LED d’accès sera toujours illuminée en rouge si le DD n’est pas installé.
La LED d’accès DHD clignotera bleu en cas de lecture des données sur le disque dur.
Le Témoin d’alimentation s’allumera en bleu lorsque l’appareil sera sous tension.
Le Témoin d’échec s’allumera en rouge lorsque la température interne sera supérieure à 60°C ou lorsque le ventilateur sera arrêté.
Vérification du contenu de l’emballage et des accessoires & Introduction au matériel du ST5610
2
Précautions à prendre avant l’installation
1. Avant l’installation, veuillez vous reporter à la section Vérification du contenu de
l’emballage et des accessoires pour vous assurer que tous les éléments nécessaires sont
bien présents. Veuillez contacter votre distributeur d’origine si des éléments venaient à
manquer ou étaient endommagés.
2. Veuillez utiliser le cordon d’alimentation inclus pour le branchement sur la prise murale. Ne
démontez ou modifiez pas le dispositif sans autorisation. Assurez-vous d’utiliser une
alimentation 100-240V, 60Hz. Tout démontage ou modification pourrait endommager des
pièces et rendre nulle la garantie. STARDOM ne peut être tenue responsable pour tout
dommage lié au démontage ou modification non autorisée, si un tel démontage ou
modification donne lieu à des dommages ou pertes de données, ou rend le système
opération incapable de démarrer.
3. Veuillez lire attentivement le Guide d’installation rapide et effectuer une sauvegarde de vos
données sur le lecteur de disque dur avant l’installation et avant l’utilisation de votre
nouveau lecteur de disque dur, afin d’éviter toute perte de données dans le cas d’une
mauvaise utilisation. STARDOM ne pourra être tenu responsable de toute perte de
données causée par une mauvaise utilisation, et dans le cas où une telle opération
causerait la perte ou la corruption des données, ou entraînerait l’échec du démarrage du
système d’exploitation.
4. Configuration matérielle requise
Pour améliorer l’efficacité de la compatibilité et de la transmission, veuillez raccorder les
cartes mères et les cartes externes qui supportent 1394b ou plus.
5. Configuration matérielle requise
Le produit est idéal pour tout système compatible avec une interface 1394.
3
Précautions à prendre avant l’installation
Procédure d’installation du matériel
1. Après avoir vérifié que le contenu de l’emballage est bien complet, vous pouvez sortir le
contenu de l’emballage.
2. Installation du matériel
A. Insérez la clé plastique fournie dans la serrure du tiroir amovible et retirez le tiroir avec
soin.
B. Retirez le montant du tiroir amovible avec un tournevis (attention de ne pas
endommager les boulons).
C. Montez le lecteur de disque dur et resserrez les vis.
Procédure d’installation du matériel
4
D. Poussez le tiroir amovible dans les rails avec soin et replacez la poignée dans sa
position d’origine.
3. Description des modes opératoires
Les utilisateurs doivent déterminer quel mode utiliser avant l’installation. Une fois le mode
d’installation choisi, veuillez, si possible, ne pas changer le mode de façon arbitraire.
Surtout lorsque vous avez déjà choisi le mode RAID 0 mais l’avez changé à JBOD ou vice
versa. Ceci endommagerait les données du DD.
A. Illustrations des modes d’ajustement d’échange
Avec l’appareil hors tension, vous pouvez ajuster l’Échange en choisissant un des
modes suivants sur le panneau arrière de la machine.
a. Pour 4 unités DD installés
Deux modes JBOD, comme 4 unités
Deux modes RAID 0, comme 2 unités
physiques de disque dur
virtuelles de disque dur
Please ensure each
plug has connected
tightly before turn
on the power.
Please ensure each
plug has connected
tightly before turn
on the power.
Raid 0
Raid 0
1 JBOD 2
1 JBOD 2
1
1
1 JBOD
1
1 Raid 0
1
2
2 Raid 0
2
2
3
2
2 JBOD
1394b
5
Procédure d’installation du matériel
4
1394b
Un mode RAID 0 et un mode JBOD, comme 3 unités de disque dur
Please ensure each
plug has connected
tightly before turn
on the power.
Raid 0
1 JBOD 2
1
1
1 JBOD
2
2
2 Raid 0
3
1394b
b. Pour 2 unités DD installés
Un mode JBOD, comme 2 unités de disque dur ; ou un mode RAID 0, comme 1
unité de disque dur.
Please ensure each
plug has connected
tightly before turn
on the power.
Please ensure each
plug has connected
tightly before turn
on the power.
Raid 0
Raid 0
1 JBOD 2
1 JBOD 2
1
1
1 JBOD
1
1 Raid 0
1
Procédure d’installation du matériel
6
2
2
2
1394b
1394b
4. Illustrations descriptives de connexions et câblages :
Lorsque le mode Échange a été choisi, vous pouvez alors installer le ST5610 avec les
câblages et connexions suivantes. Il est suggéré d’utiliser des câbles 1394b pour le
branchement à l’ordinateur et assurer un meilleur rendement.
A. Branchez deux câbles 1394b sur l’interface de l’ordinateur (méthode d’installation
recommandée).
Computer Back Panel
Please ensure each
plug has connected
tightly before turn
on the power.
Raid 0
1 JBOD 2
1
2
1394b
B. Branchez un câble 1394b à l’interface de l’ordinateur et branchez en série un autre
câble 1394b au panneau arrière du ST5610. (Ceci est la méthode recommandée si
votre carte mère ne dispose que d’une seule interface 1394b).
Computer Back Panel
Please ensure each
plug has connected
tightly before turn
on the power.
Raid 0
1 JBOD 2
1
2
1394b
7
Procédure d’installation du matériel
C. Branchez un câble 1394b seulement sur l’interface de l’ordinateur.
Computer Back Panel
Please ensure each
plug has connected
tightly before turn
on the power.
Raid 0
1 JBOD 2
1
2
1394b
D. Connexion série ST5610 (Jusqu’à quatre unités ST5610)
Please ensure each
plug has connected
tightly before turn
on the power.
Please ensure each
plug has connected
tightly before turn
on the power.
Please ensure each
plug has connected
tightly before turn
on the power.
Raid 0
Raid 0
Raid 0
1 JBOD 2
1 JBOD 2
1 JBOD 2
1
1
1
2
2
2
1394b
1394b
1394b
ST5610-4S-WB (1)
ST5610-4S-WB (2)
ST5610-4S-WB (3)
Up to 4 Units
Computer Back Panel
Une fois le mode d’installation choisi, mettez le ST5610 sous tension, attendez que le ST5610 fonctionne normalement,
puis allumez votre PC.
Procédure d’installation du matériel
8
Procédure de formatage du lecteur de disque dur
1. En mode Quatre Lecteurs de Disque Dur Individuels, les périphériques installés peuvent
être détectés par le Gestionnaire de périphériques du système d’exploitation.
A. Système d’exploitation Windows – 1394b Interface de connexion – Mode JBOD
2. Le client peut formater l’unité de disque dur en utilisant l’outil de Gestion de Disque du
système d’exploitation avant d’utiliser le ST5610 normalement.
A. Instructions d’opération pour le système d’exploitation Windows
9
Procédure de formatage du lecteur de disque dur
Procédure de formatage du lecteur de disque dur
10
B. Instructions d’opération pour Macintosh
Une fois l’installation du matériel du ST5610 terminée, vous pouvez redémarrer le
système et connecter le périphérique au Macintosh.
Formater le lecteur de disque dur (similaire à la fonction formatage de Windows)
1. Déplacez le curseur vers la barre d’outils sur le Bureau, puis choisissez Utilitaire de
disque. Une fenêtre d’outils de disque apparaîtra avec plusieurs onglets, comme
Dépannage, Effacer, Partition, RAID et Réinstaller.
2. Sélectionnez l’onglet Effacer. Si le périphérique de disque est prêt, les informations
du disque seront affichées dans la fenêtre de gauche.
3. Pour effacer toutes les données et les volumes du disque, veuillez sélectionner
l’icône du lecteur de disque ainsi qu’un Format de Volume, puis entrez un nom et
cliquez sur « Effacer ». Une boîte de dialogue s’affichera avec le message suivant, «
En effaçant un disque vous détruirez toutes les informations du volume du disque.
Etes-vous sûr de vouloir effacer le disque ‘XXX’ ? Annuler ou Effacer ». Si vous
souhaitez effacer, cliquez sur « Effacer ». Une fois le disque formaté, vous pouvez
utiliser normalement le ST5610. Veuillez vous reporter à l’illustration pour d’autres
instructions.
11
Procédure de formatage du lecteur de disque dur
Procédure de formatage du lecteur de disque dur
12
C.Partition
Sélectionnez le disque à partitionner et l’onglet Partition. Cliquez sur le nom de Volume
affiché dans la structure et sélectionnez un Format de Volume, puis entrez un nom et
une taille. Une boîte de dialogue s’affichera avec le message suivant : « En partitionnant
un disque vous détruirez toutes les informations du volume du disque. Etes-vous sûr(e)
de vouloir partitionner le disque ‘XXXXXXX’ ? Annuler ou Partitionner » Veuillez cliquer
sur « Partition ». Une fois le disque partitionné, vous pourrez normalement utiliser le
ST5610.
13
Procédure de formatage du lecteur de disque dur
Comment utiliser le système d’exploitation pour
définir le type RAID
1. Le SOHOTANK ST5610-4S-WB peut être installé comme un système RAID très efficace
pour un système d’exploitation. Pour l’installation d’un système RAID efficace avec le
ST5610, veuillez visiter le site web de Microsoft.
D’après les documents Microsoft, les unités de disque dur portables externes ne peuvent
être converties à des unités de disque dur dynamiques à travers un interface 1394b ou
USB. Il est impossible d’utiliser l’utilitaire du SE pour configurer un RAID. Il est cependant
possible de convertir les disques durs externes en unités dynamiques en modifiant les
paramètres du SE. À moins d’être un ingénieur MIS, veuillez NE PAS modifier
arbitrairement les paramètres Microsoft pour éviter tout dégâts à votre SE ou au secteur
d’amorce.
Informations sur les sites Web Microsoft connexes
http://support.microsoft.com/kb/299598/en-us
http://support.microsoft.com/kb/299598/zh-tw
http://support.microsoft.com/kb/303184/zh-tw
http://support.microsoft.com/kb/302969/en-us
http://support.microsoft.com/kb/302969/zh-tw
http://support.microsoft.com/kb/302969/en-us
http://support.microsoft.com/kb/303237/zh-tw
2. Instructions d’opération pour Macintosh
Pour mettre sur pied un RAID efficace ST5610-4S-WB avec un SE Macintosh, vous
aurez besoin de disques durs ayant la même capacité de stockage.
Vous pouvez utiliser l’utilitaire de disque offert par Mac OS 10.4.6 pour créer des systèmes
RAID. Voici une brève description des opérations à suivre. Pour plus de renseignements
sur la configuration RAID, veuillez vous reporter aux sites Web Apple Computer connexes.
A. Déplacez le curseur vers la barre d’outils sur le Bureau, puis choisissez Utilitaire de
disque. Une fenêtre d’outils de disque apparaîtra avec plusieurs onglets, comme
Dépannage, Effacer, Partition, RAID et Réinstaller.
Comment utiliser le système d’exploitation pour définir le type RAID
14
B. Sélectionnez l’onglet RAID. Si le périphérique de disque est prêt, les informations du
disque seront affichées dans la fenêtre de gauche. Veuillez sélectionner le Format du
Volume et le type RAID que vous souhaitez créer. Choisissez un type RAID selon le
nombre de lecteurs de disque dur externes.
15
Comment utiliser le système d’exploitation pour définir le type RAID
C. Faites glisser les disques ou les volumes vers la liste afin de créer les lecteurs de
disque dur selon le type RAID défini.
D. Sélectionnez « Créer » pour créer les systèmes RAID selon les informations de la
fenêtre, comme dans l’illustration.
Comment utiliser le système d’exploitation pour définir le type RAID
16
E. Une fois le formatage terminé, vous aurez un système RAID très efficace avec le
ST5610-4S-WB. Vous pourrez accéder aux données par le système RAID comme il est
indiqué dans l’illustration.
17
Comment utiliser le système d’exploitation pour définir le type RAID
Description du produit
Caractéristiques du produit
1. Deux entrées 1394b pour une flexibilité d’applications.
a. En reliant les deux entrées à deux ordinateurs, l’espace de stockage peut être partagé.
b. Relier les deux entrées à deux interfaces distinctes d’un même ordinateur améliorera le
rendement.
c. En raccordant une entrée à un ordinateur, et brancher un câble 1394b en série à une
autre interface 1394b, l’utilisateur pourrait profiter d’un ordinateur pour un stockage
augmenté.
2. Le produit supporte RAID 0 et JBOD. Lorsque le système utilise JBOD, il reconnaîtra 4
disques durs individuels. En mode RAID 0, le ST5610 fusionnera deux disques durs ayant
la même capacité en un DD plus grand ; donc le système reconnaîtra deux grands
disques durs.
3. Le produit dispose de 4 LEDs de transmission DD, ainsi que des LEDs de dégâts au DD,
de mauvais fonctionnement du système et de surchauffe.
Produits connexes :
Nous fournissons les interfaces pour la série de produits ST5610, y compris le
ST5610-4S-S2.
1. Le ST5610-4S-S2 fournit 4 interfaces très efficaces SATA 3.0Ghz comme alternative plus
rapide, sécuritaire et fiable pour l’utilisateur.
2. Pour plus de détails sur ces produits, veuillez vous rendre à http://www.stardom.com.tw.
1. La plupart des séries SOHORAID sont des séries RAID. Vous pouvez configurer différents niveaux RAID sans autre
périphérique supplémentaire. Veuillez vous reporter aux séries SOHORAID comme SR3610, SR6500, ou SR6600
sur le site Web de STARDOM.
2. La plupart des séries SOHOTANK sont des séries de boîtiers externes. Vous pouvez utiliser un produit des séries
SOHOTANK comme boîtier externe ou comme système RAID avec une carte RAID en option. Veuillez vous reporter
aux séries SOHORAID ST3620, ST7610, ST6600 sur le site Web STARDOM.
Description du produit
18
Oft gestellte Fragen
Q: Des pilotes supplémentaires sont-ils nécessaires pour opérer le SOHOTANK ST5610
sous différents systèmes d’exploitation ?
A: Non. L’utilisateur n’a besoin d’aucun gestionnaire additionnel pour fonctionner le
SOHOTANK ST5610 sur différents systèmes d’exploitation. À condition de supporter
l’interface 1394, les systèmes STARDOM sont compatibles avec plusieurs
systèmes d’exploitation Windows XP, Linux, Macintosh, etc.
Q: Est-ce que le SOHOTANK ST5610 est compatible avec tout lecteur de disque dur ?
A: Ce produit n’a pas de problème de compatibilité avec les lecteurs de disque dur.
STARDOM offre l’interface SATA I / II, qui est un système économique et de hautes
performances. Veuillez nous contacter pour tous problèmes de compatibilité de lecteur de
disque dur.
Q: Que puis-je faire si lors du démarrage de mon ordinateur, le BIOS du système ne peut
détecter le lecteur de disque dur ?
A: 1. En général le BIOS du système ne peut pas détecter le disque dur à cause d’une
mauvaise connexion. Pour résoudre ce problème, suivez la méthode ci-dessous : (1)
Éteignez le système. (2) Éteignez le PC. (3) Assurez-vous que les câbles soient bien
branchés. (4) Redémarrez SOHOTANK ST5610. (5) Répétez les étapes (1) à (4) trois
fois. Attendez 5 minutes entre chaque essai. Si le BIOS du système ne réussi toujours
pas à détecter le disque dur, assurez-vous que les procédures d’installation et de
connexion soient conformes à celles décrites dans ce manuel.
2. Si le disque dur ne peut toujours pas être détecté, veuillez nous contacter par téléphone
ou contactez notre équipe de soutient technique par notre système RMA.
Q: Pourquoi ne puis-je pas utiliser le périphérique de stockage du système d’exploitation,
même lorsque le BIOS du système a détecté le lecteur de disque dur ?
A: 1. Veuillez vous reporter à la section Procédures d’installation du matériel & Procédure de
formatage du lecteur du disque dur du Guide de mise en route rapide, et assurez-vous
que les périphériques de stockage ont été installés avec succès.
2. Les nouveaux lecteurs de disque dur ne peuvent être affichés dans le système
qu’après avoir été formaté et partitionné.
Q: Que dois-je faire lorsque le témoin d’échec s’allume ?
A: Dès qu’une LED d’échec s’allume, déterminez si le ventilateur fait défaut, le système a
surchauffé, ou le DD ne fonctionne pas.
1. Dans le cas d’un disfonctionnement du ventilateur, vérifiez qu’il n’est pas rempli de
poussière. Dans tous les cas, veuillez mettre le système hors tension, nettoyez le
ventilateur et retirez les câbles qui lient le ventilateur. Puis redémarrez le système. Si le
problème se produit de nouveau ou que vous ne pouvez le résoudre par vous-même,
renvoyez le système pour entretien.
2. Dans le cas d’une température interne supérieure à 60°C, veuillez mettre le système
hors tension, le laisser refroidir, puis le redémarrer. Si le problème se produit de
nouveau, renvoyez le système pour entretien
19
Oft gestellte Fragen
Q : Pourquoi mon système d’exploitation (OS) ne peut pas découvrir lecteur de disque dur
enlevé immédiatement quand je les tire du SOHOTANK ST5610 ?
A : Puisque le chipset d’Oxford 924DSB est utilisé dans le ST5610, il ne soutient pas de
fonction d’Échange chaud (Hot-Swap). Donc vous devez enlever les lecteur de disque
dur du gestionnaire de dispositifs du système d’exploitation d’abord et les tirer ensuite
du ST5610. Cette action s’assure votre système d’exploitation pour se conserver dans
le statut normal. De la même façon si vous insérez les lecteur de disque dur dans le
ST5610, mais le système d’exploitation ne peut pas les découvrir immédiatement.
Profitez s’il vous plaît du Hardware-Scan du Gestionnaire de dispositifs. S’ils ne sont
pas découverts par cela, recommencez s’il vous plaît le ST5610 et l’ordinateur.
Oft gestellte Fragen
20
Memo
21
Memo
クイックインストールガイド
Version:1.0
SOHOTANK Series
ST5610-4S-WB
目録
パッケージの内容物及び付属品をご確認下さい......................................... 2
ST5610 ハードウェアの紹介......................................................................
2
設定前の注意事項......................................................................................... 3
ハードウェアの装着手順.............................................................................. 4
ハードディスクドライブのフォーマット手順............................................. 9
OSを使用してRAIDタイプを設定する方法 ................................................. 14
製品の説明..................................................................................................... 18
よくある質問.................................................................................................. 19
1
目録
パッケージの内容物及び付属品をご確認ください
ST5610システムには以下のものが含まれています。
品目
個数
ST5610
1
リムーバブルキャリア
4
1394b ケーブル
2
1394a to 1394b ケーブル
2
クィックインストールガイド
1
電源コード
1
付属品バッグ
1
(24 x 6#-32 ネジとキーx 2 を含む)
ST5610
リムーバブル
1394b ケーブル
1394a to 1394b
電源コード
付属品バッグ
ケーブル
キャリア
インストール前に、上記の部品が含まれることをご確認下さい。
付属品バッグにはスクリュー及びプラスチック鍵が含まれます。
ST5610 ハードウェアの紹介
トレイハンドル
Please ensure each
plug has connected
tightly before turn
on the power.
Raid 0
1 JBOD 2
ロック穴
RAID/JBOD ボタン(1)
RAID/JBOD ボタン(2)
1
1394b ポート(1)
2
1394b ポート(2)
8cmファン
HDD指示灯
1394b
電源LED
電源スイッチ
電源ソケット
故障LED
LEDの状態:
アクセスLED:HDが装着されている場合は青色に点灯します。HDが装着されていない場合、アクセスLEDは赤色に点灯したままになります。
HDDアクセスLED:ハードディスクドライブのアクセス時に青色に点滅します。
電源LED:電源を投入すると、青色に点灯します。
故障LED:内部温度が60℃を超えた場合、またはファンが故障した場合に、赤色に点灯します。
パッケージの内容物及び付属品をご確認下さい & ST5610ハードウェアの紹介
2
設定前の注意事項
1. 設定する前に、内容物及び付属品を参照し、欠品がないことをご確認ください。欠品や部
品に損傷がある場合、元の販売業者にご連絡ください。
2. パッケージに付属する電源コードを使用して電源に接続して下さい。許可なしに本機器の
分解や改造はしないでください。100-240V, 60Hzの電源を使用して下さい。無許可での分
解や改造は電子部品に損害を与える恐れがあり、メーカーの保証対象外となります。不当
な分解や改造により何らかのストレージ機器の不具合、データの破壊や紛失、或いはオペ
レーティングシステムの起動不能が生じた場合でも、STARDOMは不当な分解や改造によ
る損害に対して一切の責任を負わないものとします。
3. クィックスタートガイドを注意深く読んで下さい。また、不注意によるデータの紛失を避
けるため、インストールする前にはハードドライブ上のデータをバックアップするか、ま
たは新購入のハードドライブを使用して下さい。不注意によるデータの破壊、紛失または
OSの起動不能が生じた場合でも、STARDOMはデータの破壊に対して一切の責任を負わ
ないものとします。
4. ハードウェア要件
互換性と伝送効率を向上させるため、1394b以上をサポートするマザーボードや外部カ
ードに接続してください。
5. OSソフトウェアの要件
本製品は1394インタフェース対応のすべてのオペレーティングシステムに最適です。
3
設定前の注意事項
ハードウェアの装着手順
1. パッケージの内容物に問題がないと確認した後、パッケージを開梱します。
2. ハードウェアの取り付け
A. 付属のプラスチック鍵をリムーバルトレイのロック穴に挿入し、トレイを注意深く取り
外します。
B. スクリュードライバでホルダーをリムーバルトレイから取り外します(ネジ山が損傷し
ないように注意します)。
C. ハードドライブを装着し、ネジを締めます。
ハードウェアの装着手順
4
D. リムーバルトレイをスロットに注意深く押し込み、ハンドルを元の位置に戻します。
3. 動作モードの説明
ユーザーは取り付け前にどのモードを使用するかを決める必要があります。一度取り付け
のモードを選択したら、むやみに変更しないようにしてください。特にRAID 0を既に選
択していながら、後にJBODモードを選択したり、またはこの逆の変更を行うと、HDのデ
ータ破損を引き起こします。
A. モード調整の切り替え図
機器の電源を切った状態で、機器の後部パネルから以下のすべてのモードを選んで
スイッチを調節できます。
a. 4台のハードディスクドライブを装着した場合
2つのJBODモードで、4台の物理
2つのRAID 0モードで、2台の仮想
ハードディスクドライブとして使
ハードディスクドライブとして使
用する
用する
Please ensure each
plug has connected
tightly before turn
on the power.
Please ensure each
plug has connected
tightly before turn
on the power.
Raid 0
Raid 0
1 JBOD 2
1 JBOD 2
1
1
1 JBOD
1
1 Raid 0
1
2
2 Raid 0
2
2
3
2
2 JBOD
1394b
5
ハードウェアの装着手順
4
1394b
RAID 0モードとJBODモードで、3台のハードディスクドライブとして使用する
Please ensure each
plug has connected
tightly before turn
on the power.
Raid 0
1 JBOD 2
1
1
1 JBOD
2
2
2 Raid 0
3
1394b
b. 2台のハードディスクドライブを装着した場合
JBODモードで、2台のハードディスクドライブとして使用する;或いはRAID 0
モードで、1台のハードディスクドライブとして使用する
Please ensure each
plug has connected
tightly before turn
on the power.
Please ensure each
plug has connected
tightly before turn
on the power.
Raid 0
Raid 0
1 JBOD 2
1 JBOD 2
1
1
1 JBOD
1
1 Raid 0
1
ハードウェアの装着手順
6
2
2
2
1394b
1394b
4. ケーブル接続の説明と図示:
スイッチ用のモードを選択したら、ST5610を次のケーブル接続方法で取り付けることが
できます。より良い性能のため、1394bケーブルを使用してコンピュータに接続すること
をお勧めします。
A. 2本の1394bケーブルをコンピュータのインタフェースに接続します (推奨の取り付け
方式)。
Computer Back Panel
Please ensure each
plug has connected
tightly before turn
on the power.
Raid 0
1 JBOD 2
1
2
1394b
B. 1本の1394bケーブルをコンピュータのインタフェースに接続し、もう一つの1394b
ケーブルをST5610の後部パネルへシリアルに接続します。(この方法はマザーボードに
1つの1394bインタフェースしかない場合にお勧めします。)。
Computer Back Panel
Please ensure each
plug has connected
tightly before turn
on the power.
Raid 0
1 JBOD 2
1
2
1394b
7
ハードウェアの装着手順
C. 1本の1394bケーブルをコンピュータのインタフェースのみに接続します。
Computer Back Panel
Please ensure each
plug has connected
tightly before turn
on the power.
Raid 0
1 JBOD 2
1
2
1394b
D. ST5610デイジーチェイン接続 (最大4台のST5610ユニット)
Please ensure each
plug has connected
tightly before turn
on the power.
Please ensure each
plug has connected
tightly before turn
on the power.
Please ensure each
plug has connected
tightly before turn
on the power.
Raid 0
Raid 0
Raid 0
1 JBOD 2
1 JBOD 2
1 JBOD 2
1
1
1
2
2
2
1394b
1394b
1394b
ST5610-4S-WB (1)
ST5610-4S-WB (2)
ST5610-4S-WB (3)
Up to 4 Units
Computer Back Panel
上述の必要な取り付け方式を選択した後、まずST5610の電源を入れて、ST5610が正常に動作するのを待ってから、PCの
電源を投入します。
ハードウェアの装着手順
8
ハードディスクドライブのフォーマット手順
1. 4台の独立ハードディスクドライブ モードでは、取り付けたデバイスはOSのデバイス
マネージャにより検出できます。
A. Windows OS – 1394bインタフェース接続 – JBODモード
2. ST5610を正常に使用する前に、ユーザーはOSのディスクの管理(Disk Management)
ツールを使用して、ハードディスクドライブをフォーマットすることができます。
A. Windows OS向けの操作手順
9
ハードディスクドライブのフォーマット手順
ハードディスクドライブのフォーマット手順
10
B. Macintosh向けの操作手順
ST5610のハードウェア取り付けが完了した後、システムを再起動して、デバイスを
Macintoshに接続できます。
ハードディスクドライブのフォーマット(Windowsのフォーマット機能と同様)
1. カーソルをデスクトップのツールバーに移動し、ディスクユーティリティ(Disk
Utility)を選択します。First Aid、消去(Erase)、パーティション(Partition)?RAID
および復元(Reinstall)などの複数の機能タブを持つディスクツールのウィンドウが
表示されます。
2. 消去タブを選択します。ディスク機器の準備が出来ている場合、ディスク情報が左
のウィンドウに表示されます。
3. ディスクのすべてのデータおよびボリュームを消去するには、ディスクドライブ
のアイコンとボリュームフォーマットを選択し、名前を入力してから、「消去
(Erase)」をクリックします。次のメッセージのダイアログがポップアップされます
:「ディスクを消去すると、ディスクのボリュームにある情報がすべて失われます
。ディスク “XXX” を消去してもよろしいですか?キャンセルまたは消去(Erasing a
disk will destroy all information on the volume of the disk. Are you sure you wish to
erase the disk 'XXX'? Cancel or Erase)」。消去する場合は、「消去(Erase)」をクリ
ックします。ディスクがフォーマットされた後、ST5610を正常に使用できます。
11
ハードディスクドライブのフォーマット手順
ハードディスクドライブのフォーマット手順
12
C.パーティション
パーティション作成を行いたいディスクとパーティション(Partition)タブを選択します
。順列表示からボリューム名をクリックし、ボリュームフォーマットを選択し、名前と
サイズを入力します。次のメッセージのダイアログがポップアップされます:「ディス
クにパーティションを作成すると、ディスクのボリュームにある情報がすべて失われま
す。ディスク“XXXXXXX”にパーティションを作成してもよろしいですか?キャンセル
またはパーティション(Partitioning a disk will destroy all information on the volume of
the disk. Are you sure you wish to partition the disk 'XXXXXXX'? Cancel or Erase)」。
「パーティション(Partition)」をクリックしてください。ディスクのパーティション作
成が成功した後、ST5610を正常に使用できます。
13
ハードディスクドライブのフォーマット手順
OSを使用してRAIDタイプを設定する方法
1. Windows OS向けの操作手順
SOHOTANK ST5610-4S-WBによりOSで高効率のRAIDシステムを構築できます。
ST5610で高効率のRAIDシステムを構築するには、Microsoftの関連ウェブサイトを参照
く ださい。
Microsoftのリファレンスによると、ポータブル外部ハードディスクドライブは1394bまた
はUSBインタフェースを通してダイナミックハードディスクに変換できません。即ち、
OSユーティリティを使用してRAID構成を実現できないことになります。しかしながら、
OSパラメータを変更することにより、ポータブル外部ハードディスクドライブをダイナ
ミックハードディスクドライブに変換することは可能です。ユーザがMIS或いは関連
エンジニアである場合を除き、OSの損傷や起動不良を避けるため、むやみにMicrosoft
関連のパラメータを変更しないでください。
Microsoftの関連ウェブサイトの情報
http://support.microsoft.com/kb/299598/en-us
http://support.microsoft.com/kb/299598/zh-tw
http://support.microsoft.com/kb/303184/zh-tw
http://support.microsoft.com/kb/302969/en-us
http://support.microsoft.com/kb/302969/zh-tw
http://support.microsoft.com/kb/302969/en-us
http://support.microsoft.com/kb/303237/zh-tw
2. Macintosh向けの操作手順
Macintosh OSでST5610-4S-WBの高効率RAIDを構築するには、同じストレージサイズ
のハードディスクドライブが必要です。
Mac OS 10.4.6で提供されるディスクユーティリティを使用して、RAIDシステムを作成
できます。以下は操作方法の簡単な説明です。RAID設定に関するより詳細な情報は、
Appleコンピュータの関連ウェブサイトを参照してください。
A. カーソルをデスクトップのツールバーに移動し、ディスクユーティリティ(Disk Utility)
を選択します。First Aid、消去(Erase)、パーティション(Partition)?RAIDおよび復元
(Reinstall)などの複数の機能タブを持つディスクツールのウィンドウが表示されます。
OSを使用してRAIDタイプを設定する方法
14
B. RAIDタブを選択します。ディスクデバイスの準備が出来ている場合、ディスク情報が
左側のウィンドウに表示されます。ボリュームフォーマットと作成したいRAIDの
タイプを選択してください。外部ハードドライブディスクの容量により作成するRAID
タイプを決めてください。
15
OSを使用してRAIDタイプを設定する方法
C. RAIDの定義に従って、ディスクまたはボリュームをリストボックスにドラッグし、
ハードディスクドライブを作成します。
D. 「作成(Create)」を選択して、下図に示すように、ウィンドウの情報に従ってRAID
システムを作成します。
OSを使用してRAIDタイプを設定する方法
16
E. フォーマットが終了すると、ST5610-4S-WBを装備した高効率のRAIDシステムが手に
入ります。図に示すように、RAIDシステムを通してデータにアクセスできます。
17
OSを使用してRAIDタイプを設定する方法
製品の説明
製品の特徴
1. 2つの1394b入力。
A. 2つの入力を異なるコンピュータに接続することにより、同一のストレージシステムを
共有可能。
B. より良い伝送性能のために、2つの入力を同一コンピュータの2つの個別インタフェー
スに接続。
C. 入力をコンピュータシステムに接続し、1394bケーブルを他の1394bインタフェースに
シリアルに接続することにより、コンピュータを拡張ストレージ用途として使用できま
す。
2. 製品はRAID 0とJBODに対応。JBOD使用時には、システムは4台の個別ハードディスクド
ライブを認識。RAID 0使用時には、ST5610は同一入力の2台のハードディスクドライブ
をより大きなHDに併合するため、システムは2台の大きなハードディスクドライブを認識。
3. 製品は4つのHD転送LED、HDダメージ警告LEDおよびシステムHD故障および過熱検出用
の 故障警告LEDを搭載。
関連製品:
ST5610-4S-S2を含む、ST5610シリーズ関連製品向けのインタフェースを提供します。
A. ST5610-4S-S2は、4つの高効率SATA 3.0 GHzインタフェースを高速で安全かつ高信頼性
システムとして提供します。
B.関連製品のより詳細な情報については、http://www.stardom.com.tw を訪問してください。
1. SOHORAIDシリーズの大部分はRAID製品群です。ユーザーは他の周辺装置を増設なしに、異なるRAIDレベルを
設定できます。STARDOMウェブサイトにてSR3610、SR6500、SR6600などのSOHORAIDシリーズをご参考下さい。
2. SOHOTANKシリーズの大部分は外部ケースの製品群です。ユーザーはSOHOTANKシリーズの製品を外部ケースまた
はオプションRAID CARDと共にRAIDシステムとして利用することができます。STARDOMウェブサイトにて
ST3620、ST7610、ST6600などのSOHORAIDシリーズをご参考下さい。
製品の説明
18
よくある質問
Q: 異なるOSでSOHOTANK ST5610を運用する場合、ドライバを追加する必要がある
でしょうか?
A: いいえ。異なるOSでSOHOTANK ST5610を運用する場合でも、追加のドライバは一切必
要ありません。OSが1394インタフェースをサポートする限り、STARDOM
システムは、Windows XP、LinuxおよびMacintoshなどの各種OSと互換性を持ちます。
Q: SOHOTANK ST5610は他のハードディスクドライバと互換性があるでしょうか?
A: 本製品は、ハードディスクドライバとの互換性に問題はありません。STARDOMは高性能
で、コスト効率の高いSATA I / IIのインターフェースを提供します。他のハードディスク
ドライバとの間に、互換性についての問題がある場合、遠慮なく私どもへご連絡下さい。
Q: コンピューターを起動しても、システムBIOSがハードディスクドライブを検出できない
場合、どうすればよいでしょうか?
A: 1. 通常は、接続の間違えが原因で、システムBIOSがハードディスクドライブを検出
できなくなります。問題を解決するために、次の手順を試してください:(1) システム
の電源を落とします。(2) PCの電源を切ります。(3) ケーブルが正しく接続されている
ことを確認します。(4) SOHOTANK ST5610を再起動します。(5) ステップ(1)からステ
ップ(4)を3回繰り返します。各試行の間は少なくとも5分の間隔を置いてください。シ
ステムBIOSが依然としてハードディスクドライブの検出に失敗する場合、取り付けお
よび接続の手順がマニュアルに記されている規則に従っていることを確認してください。
2. ハードディスクドライブが相変わらず検出されない場合、弊社に電話で連絡くださる
か、RMAシステムを通して技術サポートに直接ご連絡ください。
Q: BIOSがハードディスクドライブを検出したのに、何故OSはストレージデバイスを使用
出来ないのでしょうか?
A: 1. クィックインストールガイドのハードウェアー設定手順&ハード・ディスク・ドライブ
のフォーマット手順を参考にし、本ストレージデバイスが正しくインストールされてい
ることを確認して下さい。
2. 新しいハードディスクドライブはディスク分割或いはフォーマットされた後のみOSに
表示できます。
Q: 故障LED指示灯が点灯した場合、どうすればよいでしょうか。
A: 故障LEDが点灯した場合、ファンが故障しているか、システムが過熱しているか、或いは
HDが故障しているかを確認してください。
1. ファンが故障していた場合、ファンにほこりが詰まってないか確認してください。
何らかの状況が存在する場合、システムをシャットダウンして、ファンをクリーニン
グするか、またはファンに引っかかったワイヤを取り除いてください。問題が依然とし
て存在したり、または問題を自分で解決できない場合、修理のために送り返してくださ
い。
2. 内部温度が60度を超えた場合、システムをシャットダウンして下さい。温度が下がっ
てから、再起動して下さい。問題が依然として発生する場合、修理を依頼してくださ
い。
19
よくある質問
Q: SOHOTANK ST5610からハードドライバを取り外しても、なぜ私のオペレーティングシ
ステム(OS)はそれが削除されたことを即時に検出できないのですか?
A: ST5610ではOxford 924DSBチップセットが使われており、ホットスワップ機能をサポー
トしません。このため、先ずOSのデバイスマネージャからハードドライバを削除してか
ら、ST5610から取り外してください。この操作により、OSは正常状態を維持することが
出来ます。同様にハードドライバをST5610に挿入しても、OSは即座に検出することはで
きません。デバイスマネージャのハードウェアスキャンを利用してください。これによ
って検出できない場合、ST5610およびコンピュータを再起動してください。
よくある質問
20
Memo
21
Memo
使用手冊
Version:1.0
SOHOTANK Series
ST5610-4S-WB
目錄
檢查包裝內的物品與配件.............................................................................. 2
硬體介紹........................................................................................................ 2
安裝前應注意事項......................................................................................... 3
硬體安裝步驟................................................................................................. 4
硬碟格式化步驟............................................................................................. 9
如何利用作業系統規劃磁碟陣列模式 ........................................................... 14
產品敘述......................................................................................................... 18
常見問題......................................................................................................... 19
1
目錄
檢查包裝內的物品與配件
ST5610 系統零配件一覽表:
項目
數量
ST5610本體
1
硬碟托盤
4
1394b 線材
2
1394a轉1394b 線材
2
快速安裝手冊
1
電源線
1
零件包
1
(內含 24 x 6#-32 螺絲,塑膠鑰匙 x 2)
硬碟托盤
ST5610
1394b 線材
1394a轉1394b 線材
電源線
零件包
安裝前請先檢查是否已有以上全部產品。零件包內的螺絲與塑膠鑰匙。
硬體介紹
硬碟托盤把手
Please ensure each
plug has connected
tightly before turn
on the power.
Raid 0
1 JBOD 2
1
鑰匙孔
RAID/JBOD 按鈕(1)
RAID/JBOD 按鈕(2)
1394b連接埠(1)
8cm 風扇
2
1394b連接埠(2)
硬碟指示燈
1394b
電源開關
電源指示燈
電源插座
故障指示燈
燈號狀態顯示意義:
有安裝HD時ACCESS LED恆亮藍燈,沒有安裝HD時該ACCESS LED恆亮紅燈。
HDD Access LED硬碟如有資料存取時會有藍燈閃爍。
Power LED當電源開啟時燈號為藍燈。
Fail LED 當內部溫度過高超過攝氏60度或風扇故障,其燈號將亮起為紅燈。
檢查包裝內的物品與配件 & 硬體介紹
2
安裝前應注意事項
1.安裝前請先確認設備是否齊全(參考檢查包裝內的物品與配件),如有任何破損或缺少配件,
請向原購買廠商更換。
2.請使用所附之電源連接線連接電源供應器,勿私自變更或拆解設備,所連接之電源應符合所
提供之電壓(100-240V,60Hz),任何非正常之拆解或變更設計可能造成電子零件損壞,並
使你失去保固權利,假使因而導致您的儲存設備故障或資料損壞、資料遺失或作業系統無法
開機之損壞,STARDOM將不負任何損壞賠償的責任。
3.安裝前請先仔細閱讀簡易安裝手冊,並於安裝系統前先行備份你的資料硬碟或先用新購買的
硬碟安裝,以免儲存資料因意外操作造成資料損壞、資料遺失或作業系統無法開機損壞,
STARDOM不負任何資料損壞賠償的責任。
4.硬體需求
A. 連接1394b介面時請購買至少可以提供1394b的主機板或外接卡,用以提高相容性與傳輸
效率。
5. OS軟體需求
本產品適用於可以提供1394a與1394b界面之各種作業系統
3
安裝前應注意事項
硬體安裝步驟
1.確認相關配件齊全後,即可進行外部包裝卸除。
2.硬碟安裝
A.使用所附之塑膠鑰匙,插進Tray之匙孔,並小心抽出Tray。
B.將Tray的磁架小心用螺絲起子拆下(注意不要使螺帽損壞而無法安裝)。
C.將硬碟裝上並將螺絲鎖緊固定。
硬體安裝步驟
4
D.將Tray小心推入插槽中,並將tray固定把手推入固定位置。
3. 使用模式說明
使用者必需於安裝前先決定要選擇哪一種模式,一但選擇好以哪一方法安裝ST5610,請儘
量 不要再任意更換,特別是如果你選擇有RAID 0的模式時,如果任意變更成為JBOD模式,
或者你選擇有JBOD的模式時,如果任意變更成為RAID 0模式,將造成你的硬碟內資料全部
毀壞。
A. Switch調整模式圖示:
關機狀況下,從機器後面背板你可以選擇以下的模式去調整Switch。
a. 若安裝4個硬碟
2個JBOD模式,形成4個實體硬碟。
Please ensure each
plug has connected
tightly before turn
on the power.
2個RAID 0模式,形成2個大容量硬碟。
Please ensure each
plug has connected
tightly before turn
on the power.
Raid 0
Raid 0
1 JBOD 2
1 JBOD 2
1
1
1 JBOD
1
1 Raid 0
1
2
2 Raid 0
2
2
3
2
1394b
5
硬體安裝步驟
2 JBOD
4
1394b
1個RAID 0模式加上1個JBOD模式,形成3個硬碟。
Please ensure each
plug has connected
tightly before turn
on the power.
Raid 0
1 JBOD 2
1
1
1 JBOD
2
2
2 Raid 0
3
1394b
b. 若安裝2個硬碟
1個JBOD模式,形成2個硬碟,或者1個RAID 0模式,形成1個大容量硬碟。
Please ensure each
plug has connected
tightly before turn
on the power.
Please ensure each
plug has connected
tightly before turn
on the power.
Raid 0
Raid 0
1 JBOD 2
1 JBOD 2
1
1
1 JBOD
1
2
2
2
1394b
1394b
1 Raid 0
1
硬體安裝步驟
6
4. 連接配線說明與圖示:
當你選擇好Switch之模式後,你可以搭配以下的配線方法安裝ST5610,並建議你連接至主
機端的線選擇1394b能得到較好的效能。
A. 兩條1394b線連接至主機介面 (此安裝方法為最佳建議方式) 。
電腦主機背板
Please ensure each
plug has connected
tightly before turn
on the power.
Raid 0
1 JBOD 2
1
2
1394b
B. 1條1394b線連接至主機介面,並串接1條1394b線連接背板的ST5610
(如果你主機板的1394b介面只有一個,此安裝方法為建議方式)
電腦主機背板
Please ensure each
plug has connected
tightly before turn
on the power.
Raid 0
1 JBOD 2
1
2
1394b
7
硬體安裝步驟
C. 只接1條1394b線連接至主機介面
電腦主機背板
Please ensure each
plug has connected
tightly before turn
on the power.
Raid 0
1 JBOD 2
1
2
1394b
G. 多台ST5610機器串接方式
Please ensure each
plug has connected
tightly before turn
on the power.
Please ensure each
plug has connected
tightly before turn
on the power.
Up to 4 Units
Please ensure each
plug has connected
tightly before turn
on the power.
Raid 0
Raid 0
Raid 0
1 JBOD 2
1 JBOD 2
1 JBOD 2
1
1
1
2
2
2
1394b
1394b
1394b
ST5610-4S-WB (1)
ST5610-4S-WB (2)
ST5610-4S-WB (3)
電腦主機背板
當你確定選擇上述一種安裝方法後,先將ST5610 的電源開啟,待ST5610運作正常後,再開啟PC。
硬體安裝步驟
8
硬碟格式化步驟
1. 於四個獨立硬碟模式下,即可由作業系統的裝置管理員中偵測到已安裝的設備。
A. Window作業系統-連接1394b介面-JBOD 模式
2. 客戶可由作業系統中所提供之磁碟檔案管理工具格式化該磁碟設備,即可正常使用ST5610。
A.Window作業系統平台下操作說明
9
硬碟格式化步驟
硬碟格式化步驟
10
B. Macintosh(麥金塔) 作業系統平台下操作說明
若ST5610硬體安裝設置作業就續完成,您可重新開啟電源並將此裝置至連接至Macintosh
(麥金塔)。
格式化(如同Window格式化功能)
a.將游標至桌面的工具列,並選擇磁碟工具程式,會出現磁碟工具視窗含有數個分頁檔功
能選項(如︰修理工具/清除/Partition/RAID/重新安裝)。
b.選擇Erase分頁選項,若磁區裝置一切就續,會於左邊視窗出現磁區訊息。
c.若要清除磁碟和各式卷宗,請選擇該磁碟機代號圖樣,指定一個格式和名稱,然後按
”清除”一下,則視窗會出現如下述訊息為 ”清除磁碟將會銷毀此卷宗裏的有資料,您確定
要清除磁碟 “XXX”嗎?清除或取消”?若要“清除”則選擇 “清除 ”按鍵,點選其一下即可,
待格式化後即可正常使用ST5610。如附圖說明。
11
硬碟格式化步驟
硬碟格式化步驟
12
C.分割
選擇想要分割的磁碟,並選擇分頁檔功能選項Partition架構,按一下架構裡所顯示名稱卷
宗,並指定卷宗的名稱格式和大小,則視窗會出現訊息為”分割磁碟將會銷毀此卷宗裏的
有資料,您確定要分割磁碟 “XXXXXXX”嗎?清除或取消”,然後按 “分割”按鍵,點選其一
下。待分割完成後後即可正常使用ST5610。
13
硬碟格式化步驟
如何利用作業系統規劃磁碟陣列模式
1. Windows作業系統平台下操作說明
SOHOTANK ST5610-4S-WB可利用作業系統化成為高效能的磁碟陣列系統,你必須參考
微軟相關網站資訊,與ST5610共同規劃成為高效能的磁碟陣列系統。
根據Microsoft的資料,可攜式外接硬碟如果透過1394或USB介面將無法轉換成為動態硬碟
,也就無法利用作業系統提供磁碟陣列規劃,但可經由變更微軟作業系統參數讓該硬碟轉換
成為動態硬碟,除非你是MIS人員或者是相關行業的工程人員,請勿任意變更微軟的相關參
數,以免造成你的作業系統損毀或無法啟動。
微軟相關網站資訊
http://support.microsoft.com/kb/299598/en-us
http://support.microsoft.com/kb/299598/zh-tw
http://support.microsoft.com/kb/303184/zh-tw
http://support.microsoft.com/kb/302969/en-us
http://support.microsoft.com/kb/302969/zh-tw
http://support.microsoft.com/kb/302969/en-us
http://support.microsoft.com/kb/303237/zh-tw
2. Macintosh(麥金塔)作業系統平台下操作說明
ST5610-4S-WB欲撘配利用Macintosh(麥金塔) 作業系統規劃成為高效能的磁碟陣列系統
,需有相同大小容量的硬碟才可以規劃。
你可利用Mac OS 10.4.6所提供之磁碟工具程式製作磁碟陣列系統,以下提供簡易操作方法
,詳細磁碟陣列規劃可參考APPLE電腦之相關網站資訊。
A. 將游標至桌面的工具列,並選擇磁碟工具程式,會出現磁碟工具視窗含有數個分頁檔功
能選項(如︰修理工具/清除/Partition/RAID/重新安裝)。
如何利用作業系統規劃磁碟陣列模式
14
B. 選擇RAID分頁選項後,若磁區裝置一切就續,會於左邊視窗出現磁區訊息,於右邊視窗
請選擇你要磁碟陣列格式(Volume Format)以及你要製作之磁碟陣列模式(RAID Type) 。
請依據外接硬碟的數量決定可製作之磁碟陣列模式。
15
如何利用作業系統規劃磁碟陣列模式
C. 依照磁碟陣列之規範選擇你要製作之硬碟,並將之移置工作視窗內。
D. 點選Create選項即可依照視窗訊息製作磁碟陣列系統,如附圖說明。
如何利用作業系統規劃磁碟陣列模式
16
E. 當格式化完成後將得到一個搭配ST5610-4S-WB之高效能磁碟陣列系統。你即可運用此
磁碟陣列系統進行資料儲存,如附圖說明。
17
如何利用作業系統規劃磁碟陣列模式
產品敘述
1. 兩組1394b輸入,可提供使用者不同的彈性應用。
a 將兩組輸入分別連接不同的電腦,可共享一台儲存系統。
b 將兩組輸入同時接到同一台電腦系統的兩個獨立介面,取得較高的傳輸效能。
c 將1組輸入連接一台電腦系統,再由ST5610後面串接一條1394b至另一組1394b介面,可
提供1台電腦作為容量擴充使用。
2. 支援RAID 0 & JBOD,使用JBOD時,系統上認知為4 個獨立硬碟,使用RAID 0 時ST5610
將一組輸入上的兩個硬碟以RAID 0 結合成為一個較大硬碟,系統上認知為兩個大硬碟。
3. 4 組硬碟傳輸及硬碟毀損警示LED, 一組故障警示燈,提供系統硬碟故障及溫度過高的系統
偵測。
相關產品:
我們提供ST5610系列其他相關產品的多種介面,包括ST5610-4S-S2。
1. ST5610-4S-S2提供4個高效能的SATA 3.0GHz介面,提供使用者更快,更安全可靠的系統。
2. 有關產品詳細內容,請上 http://www.stardom.com.tw
1. SOHORAID系列多為磁碟陣列系列,客戶可直接規劃各種不同的磁碟陣列,不需外加其他週邊設備。你可參考
STARDOM網頁中有關 SR3610、SR6500、SR6600等系列產品。
2. SOHOTANK系列多為外接盒系列,可直接當成外接盒使用或另外購買磁碟陣列卡,相互搭配成為磁碟陣列系統。你可
參考STARDOM網頁中有關 ST3620、ST7610、ST6600等系列產品。
產品敘述
18
常見問題
Q: 在不同的作業系統下,SOHOTANK ST5610需要額外的驅動程式嗎?
A: 不需要。使用者在不同的作業系統下,不需要任何驅動程式。只要作業系統可以提供支援
1394b的使用者介面,STARDOM系統皆能相容不同的作業系統,例如 : Window XP,Linux
和Macintosh等。
Q: SOHOTANK ST5610系統可以相容任何硬碟?
A: 對於任何硬碟並沒有相容性的問題。STARDOM提供你符合成本效益的系統,相容具有高執
行效能的SATA I / SATA II介面硬碟,如果你有硬碟相容性問題歡迎來電詢問。
Q: 當開機時系統BIOS偵測不到硬碟時,我能做什麼?
A: 1.在開機時SOHOTANK ST5610偵測不到硬碟通常是因為接觸不良所造成,你可以先關掉
SOHOTANK ST5610電源,再關閉PC電源,並請重新確認連接線是否確定連接完整,再
重新開啟SOHOTANK ST5610。嘗試這個方法3次。在決定停用系統之前,請等待至少
5分鐘。如果系統仍然偵測不到硬碟,且確認安裝與連接方法均符合操作手冊相關規範。
2.以上如仍無法偵測到硬碟請來電或透過RMA系統與我們的技術單位連絡。
Q: 開機時系統BIOS已偵測到硬碟,為何在作業系統中無法使用該儲存設備?
A: 1.請參考快速安裝指南中 硬體安裝步驟與硬碟格式化步驟,確認該系統之儲存設備是
否正常安裝完成。
2.新的硬碟必須進行磁碟分割與格式化後才能在系統中顯示。
Q: Fail LED燈號亮起應當如何處理?
A: Fail LED燈號亮起應判斷是否風扇故障不轉動或內部溫度過高。
1. 如風扇已停止不運轉,請關機後再開機試一試,或是風扇葉片有灰塵,請清除後再開
機試一試(如您無法自行清除或排除障礙建議送修處理),如仍有此問題請送修處理。
2. 內部溫度過高請注意是否裝機環境超過攝氏60度,請先關機待機器冷卻後再開機試
一試,如仍有此問題請送修處理。
Q: 未抽拔硬碟時,無法立刻偵測到該硬碟的實體裝置?
A: 因機器使用Oxford 924DSB chipset,該晶片組沒有提供支援熱抽拔功能,你必須以正常方
式由裝置管理員中移除該顆硬碟,然後再抽取硬碟,如此才不會造成作業系統異常。
而當安裝新硬碟時如果作業系統沒有立即偵測到該硬碟時,請利用裝置管理員中的硬體掃
瞄去偵測該硬碟,如果仍沒有測到該碟碟,請重新開啟ST5610與PC。
19
常見問題