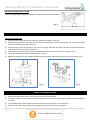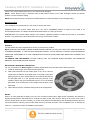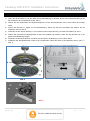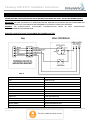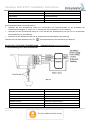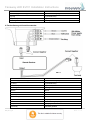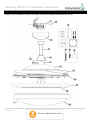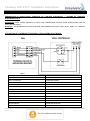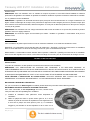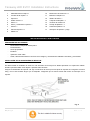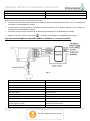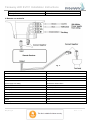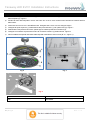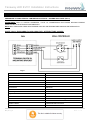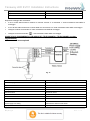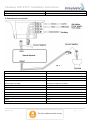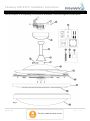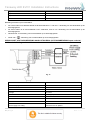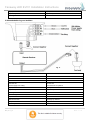
1
FANAWAY LED EVO1 Retracting Blade Ceiling Fan and Light INSTALLATION OPERATION MAINTENANCE WARRANTY INFORMATION CAUTION READ INSTRUCTIONS CAREFULLY FOR SAFE INSTALLATION AND FAN OPERATION. VER 1.0 Fanaway LED EVO1 Installation Instructions GB CONTENTS Installation instruction manual .......................................................................................... 2 D Installationsanleitung ........................................................................................................12 F Guide d’installation............................................................................................................23 E Manual de instrucciones de instalación.............................................................................34 I Manuale delle istruzioni di installazione............................................................................45 NL Installatiehandleiding.........................................................................................................56 1|Page Ver 1.0 Fanaway LED EVO1 Installation Instructions THANK YOU FOR YOUR PURCHASE Thank you for purchasing this quality Fanaway product. To ensure correct function and safety, please read and save all instructions before using the product. SAFETY PRECAUTIONS 1) This appliance can be used by children aged from 8 years and above and persons with reduced physical, sensory or mental capabilities or lack of experience and knowledge if they have been given supervision or instruction concerning use of the appliance in a safe way and understand the hazards involved. Cleaning and maintenance shall not be undertaken by children without supervision. 2) Children should be supervised to ensure that they do not play with the appliance. 3) An all-pole disconnection switch must be incorporated into the fixed wiring, in accordance with local wiring rules. AN ISOLATION SWITCH MUST BE INSTALLED WITH THIS FAN. This is in accordance with Standard AS/NZS 3000:2007/Amendment 2:2012 Electrical installations. Clause 4.13 Motors. Please note warranty will be void if installed without an isolation switch. 4) Do not dispose of electrical appliances as unsorted municipal waste, use separate collection facilities. Contact your local government for information regarding the collection systems available. If electrical appliances are disposed of in landfills or dumps, hazardous substances can leak into the groundwater and get into the food chain, damaging your health and well-being. 5) The structure to which the fan is to be mounted must be capable of supporting a weight of 45kg. 6) The fan should be mounted so that the blades are at least 2.3 metres above the floor In Europe. 7) The fan should be mounted so that the blades are at least 2.1 metres above the floor In Australia. 8) This fan is suitable for indoor use only. 9) Only an authorized electrician should execute the installation. 2|Page Ver 1.0 Fanaway LED EVO1 Installation Instructions BEFORE INSTALLATION Unpack your fan and check contents. You should have the following: Fig. 1 3|Page Ver 1.0 Fanaway LED EVO1 Installation Instructions 1 Mounting bracket x 1 10 Retraction mechanism x 1 2 Canopy screws x 4 11 Lamp base x 1 3 Canopy x 1 12 LED board x 1 4 Down rod x 1 13 Lamp shade x 1 5 Bolt x 1 14 Wooden screws x 2 6 Bolt & pin cover x 1 15 Plastic anchor x 1 7 Pin x 1 16 Balance tapes x 4 8 Top housing x 1 17 Wall switch x 1 set 9 Blades x 4 INSTALLING THE FAN TOOLS REQUIRED: - Phillips / flat head screwdriver - Pair of pliers - Adjustable spanner - Step ladder - Wire cutter - Wiring, supply cable as required by local provincial and national wiring codes and regulations. INSTALLING THE MOUNTING BRACKET The ceiling fan must be installed in a location so that the blades are 300mm spacing from the tip of the blade to the nearest objects or walls. Secure the hanging bracket to the ceiling joist or structure that is capable of carrying a load of at least 45kg, with two long screws provided. Ensure at least 30mm of the screw is threaded into the support. Fig. 2 NOTE: The bracket screws provided are for use with wooden structures only. For structures other than wood, the appropriate screw type MUST be used. 4|Page Ver 1.0 Fanaway LED EVO1 Installation Instructions ANGLED CEILING INSTALLATION This fan hanging system supports a maximum 15 degree angled ceiling installation. Fig. 3 HANGING THE FAN Installing the down rod 1) Feed the down rod (5) through the canopy (4) and the bolt and pin cover (6). 2) Remove the ball joint by loosening the set screw (3) and insert the motor wires through the down rod and then secure the ball joint back to the down rod. 3) Insert the down rod to the coupling (7), line up the coupling holes with the down rod holes and insert the bolt (8). Then insert the pin (9) to the end of the bolt. 4) Finally secure the down rod and coupling by tightening the two set screws (10) on the coupling. Fig. 4 5) Lift the fan assembly onto the mounting bracket (1). Fig. 5 6) Make sure the tab (2) on the mounting bracket socket is properly seated in the groove (3) in the ball joint. Fig. 5 Fig. 4 Fig. 5 LIGHT KIT INSTALLATION 1) Remove the lamp shade from the lamp base by turning it anti-clockwise. 2) Loosen the screw (1) from the base bracket (3). Align the two slot screws (2) with the keyhole slots of the lamp base (4). Fig.6 3) Turn the lamp base counterclockwise until the slot screws are firmly at the end of the slots. 4) Secure screw 1 back to the base bracket. Tighten all three screws. Do not over-tighten. 5|Page Ver 1.0 Fanaway LED EVO1 Installation Instructions 5) Connect the upper plug (1) from the driver to the lower socket (1) in the LED board (3). Fig.7 6) Select the color temperature (3000K or 4000K) by sliding the switch (2). 7) Connect the upper connector from the motor to the lower connector (1) from the driver. Fig.8 8) Finally install the lamp shade to the lamp base by turning it clockwise (No.13 – Fig. 1). Fig. 7 Fig. 6 Fig. 8 6|Page Ver 1.0 Fanaway LED EVO1 Installation Instructions ELECTRICAL WIRING DIRAGRAM PREPARE AND COMPLETE THE ELECTRICAL WIRING --- WIRING DIAGRAM (FIG. 9) WARNING: FOR YOUR SAFETY ALL ELECTRICAL CONNECTIONS MUST BE UNDERTAKEN BY A LICENSED ELECTRICIAN. NOTE: AN ADDITIONAL ALL POLE DISCONNECTION SWITCH MUST BE INCLUDED IN THE FIXED WIRING. USE WITH WALL SWITCH WIRING DIAGRAM: Fig. 9 Wiring requirement at the terminal block: The switched active wire out from the rotary switch speed control “F” to the “L” terminal of the terminal block on the mounting bracket. The switched active wire out from wall controller “light” switch, to the “LA” terminal of the terminal block on the mounting bracket. Supply Neutral to “N” terminal of the terminal block on the mounting bracket. Earth to “ 7|Page ” terminal of the terminal block on the mounting bracket. Ver 1.0 Fanaway LED EVO1 Installation Instructions USE WITH REMOTE WIRING DIAGRAM: (REMOTE sold separately) 1/ Remote without plugs Fig. 10 2/ Remote with plugs Fig. 11 8|Page Ver 1.0 Fanaway LED EVO1 Installation Instructions FINISH THE INSTALLATION Connect the female plug (fan motor) and male plug (mounting bracket) together (1 – Fig.12). Slide the canopy (No.3– Fig. 1) onto the mounting bracket using the slotted holes. Align the other 2 holes and then install the 2 other screws. Tighten all four screws firmly. Avoid damaging the electrical wiring prepared previously. Fig. 12 USING YOUR CEILING FAN FAN WALL CONTROL Turn on the power and check the operation of the fan. • OFF Position – fan off • 3rd Position – low fan speed • 2nd Position – medium fan speed • 1st Position – high fan speed Light Control • Toggle switch – on/off Fig. 13 Using LED fitting with dimmer (not included) WARNING: FOR YOUR SAFETY ALL ELECTRICAL CONNECTIONS MUST BE UNDERTAKEN BY A LICENSED ELECTRICIAN. AN ISOLATION SWITCH MUST BE INSTALLED BEFORE DIMMER IN THE FIXED WIRING. DO NOT use a remote control which has a dimming function to control this LED fitting. This LED light kit is dimmable and has been tested with Clipsal 32E450TM, 32E450UDM and LUCCI SKU# 290998 dimmers only. The use of non-recommended dimmers will void warranty and may damage your LED light fitting. NOTE: For use with LUCCI SKU# 290998 trailing edge dimmer, the best dimming performance is achieved by adjusting the variable resistor at the minimum and maximum dimming position on this dimmer during the install. NOTE: Dimming may cause buzzing sounds or a slight flicker. Slight delays with the lamp starting up and slight uneven light performance can occur when more than one LED light fitting is linked together, switched ON and dimmed. 9|Page Ver 1.0 Fanaway LED EVO1 Installation Instructions This is not a product fault and as such is not covered under warranty. NOTE: Some dimmers have a minimum load of 20W. Before turning on the LED downlight, ensure the dimmer position is on the maximum setting. NOTE: A licensed electrician is required to hardwire/install a local dimmer/switch to the LED light fitting. Reverse function Your ceiling fan can operate either in fan mode or reverse fan mode. SUMMER Mode: The reverse switch shall be in the “LEFT” (SUMMER) position to make the fan rotate in an anticlockwise direction. The airflow will be directed downwards, for cooling in summer. WINTER Mode: The reverse switch shall be in the “RIGHT” (WINTER) position to make the fan rotate in a clockwise direction. The airflow will be directed upwards, for energy conservation in winter. AFTER INSTALLATION WOBBLE: The fan blades have been adjusted in the factory to minimize any wobble. NOTE: CEILING FANS TEND TO MOVE DURING OPERATION DUE TO THE FACT THAT THEY ARE MOUNTED ON A RUBBER GROMMET. IF THE FAN WAS MOUNTED RIGIDLY TO THE CEILING IT WOULD CAUSE EXCESSIVE VIBRATION. MOVEMENT OF A FEW CENTIMETRES IS QUITE ACCEPTABLE AND DOES NOT SUGGEST ANY PROBLEM. TO REDUCE THE FAN WOBBLE: PLEASE CHECK THAT ALL SCREWS WHICH SECURED THE MOUNTING BRACKET AND DOWN ROD ARE SECURE. BALANCING A WOBBLING CEILING FAN: For your convenience, a Balancing Kit is included; please follow this procedure when balancing the fan: 1) Install fan without light dome before balancing the fan. 2) Define the base plate into four areas (point A, B, C & D). Use one weight from the balance kit to lightly stick on the edge of the base plate (say point A), if the wobble worsens, then take off the balance kit and lightly stick it on the opposite side (say point B); if the wobble is worse, then go to the adjacent point C or D, if the wobble gets better, then securely stick on the weight at this location on the base plate. 3) After balancing the fan, assemble the light dome to the light base. NOISE: When it is quiet (especially at night) you may hear occasional small noises. Slight power fluctuations and frequency signals superimposed in the electricity for off-peak hot water control, may cause a change in fan motor noise. This is normal. Please allow a 24-hour “breaking -in” period, most noises associated with a new fan disappear during the time. The manufacturer’s warranty covers actual faults that may develop and NOT minor complaints such as hearing the motor run – All electric motors are audible to some extent. 10 | P a g e Ver 1.0 Fanaway LED EVO1 Installation Instructions CARE AND CLEANING 1) Periodic cleaning of your ceiling fan is the only maintenance required. Use a soft brush or lint free cloth to avoid scratching the paint finish. Please turn off electricity power when you do so. 2) Do not use water when cleaning your ceiling fan. It could damage the motor or the blades and create the possibility of an electrical shock. 3) Motor has permanently lubricated ball bearing. No need to oil NOTE: Always turn off the power and disconnect the female plug 1 and male plug 1 before attempting to clean your fan. TECHNICAL INFORMATION FAN models Rated Voltage Rated power (motor) Light power FANAWAY LED FAN 220-240VAC 60W 40W, 3000K/4000K LED driver model: ES0363D-E090 WARRANTY CONDITIONS IN AUSTRALIA / NEW ZEALAND – Please refer to the separated WARRANTY STATEMENT. IN EUROPE – If you are a European customer please contact the retail outlet where the fan was purchased for a warranty service. 11 | P a g e Ver 1.0 Fanaway LED EVO1 Installation Instructions VIELEN DANK FÜR DEN KAUF DIESES GERÄTES Wir möchten uns hiermit für Ihre Entscheidung zum Kauf dieses Produktes von Fanway bedanken. Um die ordnungsgemäße und sichere Funktion dieses Gerätes zu gewährleisten, müssen Sie alle Hinweise zur Installation und dem Einsatz des Gerätes sorgfältig durchlesen, bevor Sie dieses Gerät in Betrieb nehmen. SICHERHEITSHINWEISE 1) Dieses Gerät kann von Kindern im Alter ab 8 Jahren und von Personen mit verminderten körperlichen, sensorischen oder geistigen Fähigkeiten, sowie von Personen, die keine Erfahrung im Umgang mit dem Gerät haben, eingesetzt werden, wenn diese ordnungsgemäß beaufsichtigt, und über den sicheren und sachgemäßen Gebrauch des Gerätes sowie die bezüglichen Gefahren unterrichtet werden. Reinigungs- und Wartungsarbeiten jeder Art dürfen niemals von Kindern ausgeführt werden, wenn diese nicht von einem Erwachsenen dabei beaufsichtigt werden.. 2) Kinder müssen beim Einsatz dieses Gerätes beaufsichtigt werden, um sicherzustellen, dass diese nicht mit dem Gerät spielen. 3) Ein allpoliger Trennschalter muss gemäß den örtlichen Schutzvorschriften in die Festverkabelung dieses Ventilators integriert werden. IN DIE FESTINSTALLATION DIESES VENTILATORS MUSS EIN TRENNSCHALTER INSTALLIERT WERDEN. Diese Anforderung besteht aufgrund der Norm AS/NZS 3000:2007/Revision 2:2012 Elektrische Installationen. Abschnitt 4.13 Motoren. Bitte beachten Sie, dass die Garantie für dieses Gerät erlischt, wenn es ohne einen Trennschalter im Hauptstromkreis installiert wird. 4) Entsorgen Sie elektrische Geräte nicht mit dem Hausmüll (Restmüll), sondern achten Sie auf umweltgerechte Entsorgung. Falls Sie sich hierzu nicht sicher sind, dann erkundigen Sie sich bitte bei Ihrer örtlichen Behörde nach den sachgerechten Entsorgungsmöglichkeiten. Elektrische Geräte, die auf eine Müllhalde geworfen werden, können Gefahrstoffe in das Grundwasser abgeben, die in die Nahrungskette gelangen und dadurch gesundheitsschädlich sind. 5) Die Decke, an die dieser Ventilator befestigt werden soll, muss ein Gewicht von mindestens 45 kg tragen können.. 6) In Europa sollte der Ventilator so an der Decke befestigt werden, dass sich die Ventilatorflügel mindestens 2,3m über dem Boden befinden.. 7) In Australien sollte der Ventilator so an der Decke befestigt werden, dass sich die Ventilatorflügel mindestens 2,1m über dem Boden befinden. 8) Der Ventilator ist ausschließlich für die Verwendung in geschlossenen Räumen geschaffen. 9) Die Installation sollte nur von einem zugelassenen Elektriker vorgenommen werden. 12 | P a g e Ver 1.0 Fanaway LED EVO1 Installation Instructions VOR DER INSTALLATION Packen Sie Ihren Ventilator aus, und stellen Sie sicher, dass alle Teile im Versandkarton vorhanden sind. Sie sollten folgende Komponenten vorfinden: Abb. 1 13 | P a g e Ver 1.0 Fanaway LED EVO1 Installation Instructions 1 Deckenhalterung x 1 10 Einzugsmechanismus x 1 2 Abdeckschirmschrauben x 4 11 Lampenfassung x 1 3 Abdeckschirm x 1 12 LED-Platine x 1 4 Hängestange x 1 13 Lampenschirm x 1 5 Sicherungsbolzen x 1 14 Holzschrauben x 2 6 Abdeckung für Bolzen & Stift x 1 15 Plastikanker x 1 7 Stift x 1 16 Balance-Streifen x 4 8 Obere Gehäusehälfte x 1 17 Wandschalter x 1 Set 9 Ventilatorflügel x 4 INSTALLATION DES VENTILATORS BENÖTIGTE WERKZEUGE: - Phillips/Schlitzkopf-Schraubenzieher - Zange - Verstellbarer Schraubenschlüssel - Klappleiter - Kabelschneider - Verkabelung, Stromversorgungskabel gemäß den örtlichen und nationalen Schutz- und Installationsvorschriften. INSTALLATION DER DECKENHALTERUNG Der Deckenventilator muss so installiert werden, dass die Spitzen der Ventilatorflügel mindestens 300mm vom nächsten Gegenstand, oder von der Wand entfernt sind. Befestigen Sie die Deckenhalterung nur an Decken oder Deckenverschalungen und anderen Deckenstrukturen, die ein Gewicht von mindestens 45kg sicher halten können; verwenden Sie dazu die zwei langen Schrauben, die mit dem Ventilator ausgeliefert wurden. Stellen Sie sicher, dass die Schraubengewinde mindestens 30mm in das Material eingedreht sind, an dem die Halterung für den Ventilator befestigt wird. Abb. 2 EN BEAM MUST BE ABLE TO SUPPORT UP TO 45KG NOTE: THIS PICTURE IS FOR REPRESENTATION ONLY AND DOES NOT REPRESENT THE ACTUAL BRACKET. 14 | P a g e German DIE TRAGESTRUKTUR MÜSS IN DER LAGE SEIN EIN BIS ZU 45KG ZU TRAGEN HINWEIS: DIE ABBILDUNG DIENT NUR ZUR ILLUSTRATION, UND ZEIGT NICHT DIE TATSÄCHLICHE DECKENHALTRUNG. Ver 1.0 Fanaway LED EVO1 Installation Instructions HINWEIS: Die mitgelieferten Halteschrauben sind nur für Tragestrukturen aus Holz geeignet. Für Tragestrukturen, die nicht aus Holz sind, MUSS der dafür geeignete und zugelassene Schraubentyp verwendet werden. INSTALLATION AN GENEIGTEN DECKEN Dieses Halterungssystem ist nur für die Aufhängung an geneigten Decken mit einem Neigungswinkel von bis zu 15 geeignet. Abb. 3 MONTAGE Installation der Hängestange 1) Führen Sie die Hängestange (5) durch den Schirm (4) und die Abdeckung für den Bolzen und Stift (6). 2) Entfernen Sie das Kugelgelenk, indem Sie die Sicherungsschraube (3) entfernen, führen Sie die Motorkabel durch die Hängestange und sichern Sie das Kugelgelenk anschließend wieder an der Hängestange. 3) Führen Sie die Hängestange durch die Kupplung (7), Richten Sie die Bohrungen der Kupplung auf die Bohrungen der Hängestange aus, und führen Sie den Bolzen (8) ein. Führen Sie nun den Sicherungsstift (9) am überstehenden Ende des Stifts ein. 4) Sichern Sie abschließend die Hängestange an der Kupplung, indem Sie die zwei Fixierschrauben (10) an der Kupplung festziehen. 5) Hängen Sie anschließen den vollständig zusammengebauten Ventilator in der Halterung (1) ein. Abb. 5 6) Stellen Sie sicher, dass die Feder (2) Verdrehsicherung an der Deckenhalterung korrekt in der Nut (3) des Kugelgelenks sitzt. Abb. 5 Abb. 4 15 | P a g e Ver 1.0 Fanaway LED EVO1 Installation Instructions Abb. 5 LICHTBAUSATZ INSTALLATION 1) Lösen Sie die Schraube (1) von der Basis der Deckenhalterung (3). Richten Sie die zwei Schlitzschrauben (2) auf die Schlitze an der Lampenbasis (4) aus. Abb. 6 2) Drehen Sie die Lampenbasis im Gegenuhrzeigersinn bis die Schlitzschrauben fest in den Enden der Schlitze sitzen. 3) Sichern Sie Schraube 1 wieder an der Basishalterung. Ziehen Sie alle drei Schrauben fest. Ziehen Sie die Schrauben nicht zu fest an. 4) Verbinden Sie den oberen Stecker (1) vom Treiber mit der unteren Buchse (1) auf der LED-Platine (3). Abb.7 5) Wählen Sie gewünschte Farbtemperatur für das Licht (3000K oder 4000K), indem Sie den Schalter (2) in die gewünschte Einstellung bringen. 6) Verbinden Sie die Obere Buchse vom Motor mit der unteren Verbindung (1) vom Treiber. Abb.8 7) Installieren Sie abschließend die Lampe in der Lampenbasis, indem Sie diese im Uhrzeigersinn drehen. (Nr.13 – Abb. 1). Abb. 7 Abb. 6 Abb. 8 16 | P a g e Ver 1.0 Fanaway LED EVO1 Installation Instructions ELECTRISCHES SCHALTDIAGRAMM VORBEREITUNG UND AUSFÜHRUNG DER ELEKTRISCHEN VERSCHALTUNG - SCHALTDIAGRAMM (ABB. 9) WARNUNG: UM IHRE SICHERHEIT ZU GEWÄHRLEISETEN, DÜRFEN ELEKTRISCHE INSTALLATIONSARBEITEN UND ANSCHLÜSSE NUR VON EINEM ZUGELASSENEN ELEKTRIKER AUSGEFÜHRT WERDEN. HINWEIS: EIN ZUSÄTZLICHER, ALLPOLIGER TRENNSCHALTER MUSS IM FEST INSTALIERTEN NETZSTROMKREIS VORHANDEN SEIN. DARSTELLUNG DES SCHALTDIAGRAMMS MIT WANDSCHALTER: Abb. 9 EN German Fan VENTILATOR Brown Braun Blue Blau Red Rot Yello/Green Gelb/Grün Fan Live Ventilator Strohmführend Fan & Light Neutral Ventilator & Licht Nullleiter Light Live Licht (Stromführend) Earth Erdung Wall Controller WANDSTEUERUNG Rotary Switch ROTATIONSSCHALTER Speed 1 Geschwindigkeit 1 17 | P a g e Ver 1.0 Fanaway LED EVO1 Installation Instructions Speed 2 Geschwindigkeit 2 Speed 3 Geschwindigkeit 3 Light Switch LICHTSCHALTER Supply Input NETZSTROMVERSORGUNG TERMINAL BLOCK IN MOUNTING BRACKET ANSCHLUSSBLOCK IN DECKENHALTERUG Anschlussanforderungen am Anschlussblock: Verbinden Sie das stromführende Kabel mit Trennschalter vom Rotationsschalter für die Einstellung der Ventilatorgeschwindigkeit “F” mit der mit “L” bezeichneten Anschlussklemme an der Halterung. Verbinden Sie das stromführende Kabel von “Licht”-Schalter der Wandsteuerung mit der mit “LA” bezeichneten Anschlussklemme an der Halterung. Verbinden Sie den Nullleiter mit dem mit “N” bezeichneten Anschlussklemme der Halterung. Verbinden Sie das Erdungskabel mit der mit “ EINSATZ MIT EXTERNER FERNBEDIENUNG: ” Anschlussklemme am Anschlussblock der Halterung. (FERNBEDIENUNG separat erhältlich.) 1/ Fernbedienung ohne Anschlussstecker Abb. 10 EN German Connection plug Verbindungsstecker To motor L Zum Motor L To motor N Zum Motor N For light Für Licht Remote receiver Fernsteuerung Empfänger Yellow/Green Gelb/Grün Brown Braun 18 | P a g e Ver 1.0 Fanaway LED EVO1 Installation Instructions Blue Blau Power supply from ceiling Netzstromversorgung Von der Decke L (Live) L (stromführend) N (Neutral) N (Nulleiter) Earthing Erdung 2/ Fernbedienung mit Anschlussstecker Abb. 11 EN German Power supply from ceiling Netzstromversorgung Von der Decke L (Live) L (stromführend) N (Neutral) N (Nulleiter) Earthing Erdung Brown Braun Blue Blau Green/yellow Grün/ Gelb Connect together Miteinander verbinden Input Eingang Remote Receiver Fernsteuerung Empfänger Output Ausgang Fan body Ventilatorgehäuse 19 | P a g e Ver 1.0 Fanaway LED EVO1 Installation Instructions ABSCHLUSS DER INSTALLATION Verbinden Sie den Buchsenstecker (Ventilatormotor) mit dem Stecker (Halterung) (1 – Fig.12). Schieben Sie den Schirm (Nr. 3– Abb. 1) auf die Halterung, und achten Sie auf den korrekten Sitz der Schlitzbohrungen. Richten Sie die übrigen 2 Bohrungen aufeinander aus, und drehen Sie die 2 Schrauben entsprechend ein. Ziehen Sie nun alle 4 Schrauben fest. Vermeiden Sie dabei die Beschädigung der zuvor ausgeführten, elektrischen Verkabelung. Abb. 12 DER EINSATZ DES DECKENVENTILATORS VENTILATOR WANDSTEUERUNG Schalten Sie den Hauptschalter ein, und überprüfen Sie die Funktion des Ventilators. •AUS-Stellung – Ventilator ist “Aus” • 3. Position – Ventilatorgeschwindigkeit “Niedrig” • 2. Position – Ventilatorgeschwindigkeit “Mittel” • 1. Position – Ventilatorgeschwindigkeit “Hoch” Licht-Steuerung •Kippschalter– Ein/Aus Abb. 13 Der Einsatz der LED-Platine mit Dimmer (nicht mitgeliefert) WARNHINWEIS: UM IHRE SICHERHEIT ZU GEWÄHRLEISETEN, DÜRFEN ELEKTRISCHE INSTALLATIONSARBEITEN UND ANSCHLÜSSE NUR VON EINEM ZUGELASSENEN ELEKTRIKER AUSGEFÜHRT WERDEN. EIN ZUSÄTZLICHER, ALLPOLIGER TRENNSCHALTER MUSS IM FEST INSTALIERTEN NETZSTROMKREIS VORHANDEN SEIN, BEVOR SIE DEN DIMMER IN DER FESTVERKABELUNG INSTALLIEREN: NIEMALS eine Fernbedienung zur Steuerung der LED-Platine verwenden, die über eine Dimmerfunktion verfügt. Dieser LED-Lichtbausatz ist dimmbar, und wurde nur mit den Dimmern der Marken Clipsal 32E450TM, 32E450UDM und LUCCI SKU# 290998 getestet. Durch die Verwendung von nicht vom Hersteller empfohlenen Dimmern erlischt die Garantie für Ihren LED-Lichtbausatz. HINWEIS: Für den Einsatz mit dem Phasenabschnitts-Dimmer der Marke LUCCI SKU# 290998 erzielen Sie die beste Funktion, wenn Sie den variablen Widerstand in die Minimalstellung und die Maximalstellung bei der Installation 20 | P a g e Ver 1.0 Fanaway LED EVO1 Installation Instructions einstellen. HINWEIS: Die Dimmung des Lichts kann Summgeräusche oder ein leichtes Lichtflimmern verursachen. Es können zudem geringfügige Einschaltverzögerungen und eine leicht schwankende Lichtleistung auftreten falls Sie mehr als einen LED-Lichtbausatz verwenden und während das Licht “EIN” geschaltet und gedimmt wird. Dies ist kein Produktmangel, und der Effekt ist dementsprechend nicht unter der Garantieerklärung abgedeckt. HINWEIS: Einige Dimmer benötigen eine Mindestlast von 20W. Bevor Sie das LED-Licht einschalten, müssen Sie sicherstellen, dass sich der Dimmer in der Maximalstellung befindet. HINWEIS: Die Fest-/Installation des ortsgebunden Dimmers/Lichtschalters in Verbindung mit dem LED-Lichtbausatz darf nur von einem zugelassenen Elektriker ausgeführt werden. Umschaltung der Ventilatorlaufrichtung Ihr Deckenventilator kann in beiden Richtungen, rechtsdrehend oder linksdrehend betrieben werden. SOMMER-Betrieb: Der Laufrichtungsumschalter sollte sich in der “LINKEN” Einstellung (SUMMER) befinden, wodurch sich der Ventilator im Gegenuhrzeigersinn dreht. Dadurch wird der Luftstrom zur Kühlung im Sommer nach unten gedrückt. WINTER-Betrieb: Der Laufrichtungsumschalter sollte sich in der “RECHTEN” Einstellung (WINTER) befinden, wodurch sich der Ventilator im Uhrzeigersinn dreht. Dadurch sparen Sie Heizkosten während der Winterzeit. NACH DER INSTALLATION UNWUCHT: Die Ventilatorflügel wurden im Werk justiert, um die Unwucht zu minimieren. HINWEIS: DA DECKENVENTILATOREN AN EINER GUMMI-ISOLIERSCHEIBE MONTIERT SIND, TENDIEREN SIE DAZU, WÄHREND DES BETRIEBS IN BEWEGUNG ZU SEIN. FALLS DER VENTILATOR ZU FEST AN DER DECKE BEFESTIGT WIRD, KANN DIES ZU ÜBERMÄSSIGER VIBRATION FÜHREN. MEHRERE ZENTIMETER BEWEGUNGSSPIELRAUM SIND AKZEPTABEL UND STELLEN KEIN PROBLEM DAR. REDUZIEREN VON WACKELN: ÜBERPRÜFEN SIE, OB ALLE SCHRAUBEN DER BEFESTIGUNGSPLATTEN UND DES HÄNGEROHRS FEST SITZEN. AUSBALANCIEREN EINES WACKELNDEN DECKENVENTILATORS: Um Ihnen den Vorgang zu erleichtern, wird der Deckenventilator mit Unwucht-Gewichten ausgeliefert; bitte beachten Sie die nachfolgenden Hinweise zur Ausbalancierung des Deckenventilators: 4) Installieren Sie den Ventilator ohne Lichtdom, bevor Sie die Ausbalancierung des Ventilators beginnen. 5) Teilen Sie die Grundplatte in vier Quadranten ein (Punkt A, B, C & D). Setzen Sie nun eines der Gewichte auf die Kante der Grundplatte auf (z.B. Punkt A), wenn die Unwucht größer wird, dann nehmen Sie das Gewicht ab, und bringen Sie dieses an der Gegenüberliegenden Seite (z.B. Punkt B) an; wenn die Unwucht auch hier größer wird, dann bringen Sie das Gewicht anschließend an Punkt C oder Punkt D an. Wenn die Unwucht anschließend 21 | P a g e Ver 1.0 Fanaway LED EVO1 Installation Instructions geringer ist, dann bringen Sie das Gewicht fest an dieser Stelle der Grundplatte an. 6) Bringen Sie den Lichtdom nach der Ausbalancierung auf der Grundplatte an. GERÄUSCHE In einer geräuscharmen Umgebung kann es gelegentlich (vor allem nachts) vorkommen, dass leise Geräusche des Ventilators zu vernehmen sind. Das Geräusch des Ventilatormotors kann sich durch geringe Stromschwankungen und Abweichungen in der Stromfrequenz ändern. Das ist völlig normal. Die meisten Geräusche eines neuen Ventilators verschwinden nach einer „Eingewöhnungszeit“ von etwa 24 Stunden. Die Garantie des Herstellers erstreckt sich nur auf tatsächliche Mängel, die u. U. auftreten können, und NICHT auf geringfügige Beschwerden, wie zum Beispiel hörbare Motorgeräusche. - Jeder Elektromotor ist in gewissem Umfang hörbar. REINIGUNGS- UND PFLEGEHINWEISE 1. Außer gelegentlicher Reinigung bedarf dieser Ventilator keiner Wartung. Verwenden Sie hierfür eine weiche Bürste oder einen flusenfreien Lappen, damit die Oberfläche nicht verkratzt wird. Der Ventilator sollte zur Reinigung ausgeschaltet werden. 2. Den Ventilator nicht mit Wasser reinigen. Wasser kann den Motor oder die Flügelblätter beschädigen und zu Stromschlägen führen. 3. Der Motor ist mit schmierungsfreien Kugellagern ausgerüstet. Er muss nicht geölt werden. HINWEIS: Schalten Sie den Trennschalter immer aus, und trennen Sie anschließend die Buchse 1 von Stecker 1, bevor Sie versuchen Ihren Ventilator zu reinigen. TECHNISCHE INFORMATIONEN VENTILATOR-Modelle FANAWAY LED VENTILATOR Nennspannung 220-240VAC Nennleistung (Motor) Nennleistung Beleuchtung 60W 40W, 3000K/4000K LED-Beleuchtungssatz mit Treiber Modell: ES0363D-E090 GARANTIEBEDINGUNGEN IN AUSTRALIA / NEW ZEALAND – Bitte beachten Sie die separate GARANTIEERKLÄRUNG. IN EUROPA – Falls Sie ein Kunde in Europa sind, dann treten Sie für eventuelle Garantieleistungen bitte mit dem Fachgeschäft in Kontakt, bei dem Sie den Ventilator gekauft haben. 22 | P a g e Ver 1.0 Fanaway LED EVO1 Installation Instructions NOUS VOUS REMERCIONS POUR VOTRE ACHAT Nous vous remercions d’avoir acheté ce produit de qualité Fanaway. Afin d'assurer la sécurité et le bon fonctionnement, veuillez lire et conserver toutes les instructions avant utilisation du produit. MESURES DE SÉCURITÉ 1) Cet appareil peut être utilisé par des enfants âgés de 8 ans et plus ou des personnes à capacités physiques, sensorielles ou mentales réduites ou manque d'expérience et de connaissances si elles ont été aidées ou instruites concernant l'utilisation de l'appareil en toute sécurité et comprenant les risques qu’ils entraînent. Le nettoyage et la maintenance ne doivent pas être effectués par des enfants sans surveillance. 2) Les enfants doivent être surveillés pour assurer qu'ils ne jouent pas avec l'appareil. 3) Un interrupteur de déconnexion multipolaire doit être intégré dans le câblage fixe, conformément aux règles de câblage locales. UN INTERRUPTEUR D'ISOLATION DOIT ETRE INSTALLE AVEC CE VENTILATEUR. Ceci est en conformité avec la norme AS/NZS 3000: 2007/Amendement 2:2012 Installations électriques. Clause 4.13 Moteurs. Il faut noter que la garantie sera annulée lorsque les installations seront faites sans un interrupteur d’isolation. 4) Ne jetez pas les appareils électriques avec les déchets municipaux non triés, utiliser les installations de collecte sélective. Contactez votre gouvernement local pour obtenir des informations concernant les systèmes de collecte disponibles. Si les appareils électriques sont éliminés dans des décharges ou des dépotoirs, des substances dangereuses peuvent s’infiltrer dans les eaux souterraines et entrer dans la chaîne alimentaire, affecter votre santé et votre bien-être. 5) La structure à laquelle le ventilateur doit être monté doit être capable de supporter un poids de 45 kg. 6) Le ventilateur doit être monté de tel sorte que les pales soient au moins 2.3 mètres au-dessus du sol en Europe. 7) Le ventilateur doit être monté de tel sorte que les pales soient au moins 2.1 mètres au-dessus du sol en Australie. 8) Ce ventilateur n’est approprié qu’en utilisation intérieure. 9) Seul un électricien agréé doit exécuter l'installation. 23 | P a g e Ver 1.0 Fanaway LED EVO1 Installation Instructions AVANT L’INSTALLATION Déballez votre ventilateur et vérifier le contenu. Vous devez disposer des éléments suivants: Fig. 1 24 | P a g e Ver 1.0 Fanaway LED EVO1 Installation Instructions 1 Support de montage x 1 10 Mécanisme de rétraction x 1 2 Vis pour couvercle x 4 11 Pied de lampe x 1 3 Couvercle x 1 12 Carte à LED x 1 4 Tige descendante x 1 13 Abat-jour x 1 5 Boulon x 1 14 Vis à bois x 2 6 Couvercle de boulon & de goupille x 1 15 Cheville en plastique x 1 7 Goupille x 1 16 Adhésif x 4 8 Boitier supérieur x 1 17 Interrupteur mural x 1 ensemble 9 Pales x 4 INSTALLATION DU VENTILATEUR OUTILS NÉCESSAIRES: - Phillips / tournevis à tête plate - Paire de pinces - Clé à molette - Escabeau - Pince coupante - Câblage, câble d'alimentation tel que requis par les codes et les règles de câblage locaux, provinciaux et nationaux. INSTALLATION DU SUPPORT DE MONTAGE Le ventilateur de plafond doit être installé dans un endroit pour que les pales soient à un écartement de 300mm de l’extrémité de la pale pour les objets ou les parois les plus proches. Fixez le support de suspension aux solives de plafond ou de la structure qui est capable de transporter une charge d'au moins 45 kg, avec deux longues vis fournies. Il faut assurer qu’au moins 30 mm de la vis est vissée dans le support. Fig. 2 25 | P a g e Ver 1.0 Fanaway LED EVO1 Installation Instructions EN FR BEAM MUST BE ABLE TO SUPPORT UP TP 45 KG LA POUTRE DOIT ÊTRE CAPABLE DE SUPPORTER JUSQU'A 45 KG NOTE: THIS PICTURE IS FOR REPRESENTATION ONLY AND DOES NOT REPRESENT THE ACTUAL BRACKET. REMARQUE: CETTE PHOTO EST À TITRE INDICATIF SEULEMENT ET NE REPRÉSENTE PAS LE SUPPORT RÉEL. REMARQUE: Les vis des supports fournis doivent être uniquement utilisées avec des structures en bois. Pour les structures autres que le bois, le type de vis approprié DOIT être utilisé. INSTALLATION DU PLAFOND CATHÉDRALE Ce système de suspension du ventilateur soutient une installation maximale du plafond cathédrale de 15 degrés. Fig. 3 SUSPENSION DU VENTILATEUR Installation de la tige descendante 1) Monter la tige descendante (5) à travers le couvercle(4) et le couvercle de boulon et de goupille (6). 2) Retirer le joint à rotule en desserrant la vis de pression (3) et insérer les câbles du moteur à travers la tige descendante et puis fixer le joint à rotule à la tige descendante. 3) Insérer la tige descendante à l'accouplement (7), aligner les trous de couplage avec les trous de tige descendante et insérer le boulon (8). Ensuite, insérer la goupille (9) à l'extrémité du boulon. 4) Enfin fixer la tige descendante et le couplage en serrant les deux vis de réglage (10) sur l'accouplement. Figure. 4 5) Soulever le ventilateur sur le support de montage (1). Figure. 5 6) Il faut s’assurer que l'onglet (2) sur la prise de support de montage est bien en place dans la rainure (3) dans le joint à rotule. Figure. 5 Fig. 4 26 | P a g e Fig. 5 Ver 1.0 Fanaway LED EVO1 Installation Instructions LUMIÈRE KIT INSTALLATION 1) Desserrer la vis (1) à partir du support de base (3). Aligner les deux vis à fente (2) avec les trous de serrure du pied de la lampe (4). Figure 6 2) Tournez le pied de la lampe dans le sens antihoraire jusqu'à ce que les vis à fente soient bien à la fin des fentes. 3) Serrer la vis 1 vers le support de base. Serrer les trois vis. Ne pas trop serrer. 4) Branchez le bouchon supérieur (1) depuis le pilote à la prise inférieure (1) de la carte à LED (3). Figure 7 5) Sélectionnez la température de couleur (3000K ou 4000K) en faisant glisser le commutateur (2). 6) Connecter le connecteur supérieur du moteur au connecteur inférieur (1) à partir du pilote. Figure 8 7) Enfin, fixer l’ampoule au pied de la lampe en tournant vers la droite (n°13 - Figure 1). Fig. 7 Fig. 6 Fig. 8 EN FR OFF ARRÊT 27 | P a g e Ver 1.0 Fanaway LED EVO1 Installation Instructions SCHÉMA DU CÂBLE ÉLECTRIQUE PRÉPARATION ET INSTALLATION COMPLÈTE DU CABLAGE ELECTRIQUE --- SCHÉMA DU CÂBLAGE ÉLECTRIQUE (Fig. 9) ATTENTION: POUR VOTRE SÉCURITÉ TOUTES LES CONNEXIONS DOIVENT ETRE EFFECTUEES PAR UN ELECTRICIEN AGREE. Remarque: UN INTERRUPTEUR MULTIPOLAIRE SUPPLÉMENTAIRE DOIT ETRE INCLU DANS LE CABLAGE FIXE. UTILISATION DE L’INTERRUPTEUR MURAL AVEC SCHÉMA ELECTRIQUE: Fig. 9 EN FR FAN VENTILATEUR WALL CONTROLLER COMMANDE MURALE Brown Marron (brun) Blue Bleu Red Rouge Yellow/Green Jaune / Vert Fan Live Ventilateur sous-tension Fan & Light Neutral Ventilateur et éclairage Neutre Light Live Éclairage sous-tension (lumière sous-tension) Earth Terre TERMINAL BLOCK IN MOUNTING BRACKET BORNIER DANS LE SUPPORT DE MONTAGE ROTARY SWITCH INTERRUPTEUR ROTATIF SUPPLY INPUT ALIMENTATION D’ENTRÉE 28 | P a g e Ver 1.0 Fanaway LED EVO1 Installation Instructions Speed 1 Vitesse 1 Speed 2 Vitesse 2 Speed 3 Vitesse 3 LIGHT SWITCH INTERRUPTEUR D’ÉCLAIRAGE Exigence de câblage sur le bornier: Le câble à commutation actif à partir d’un contrôle de vitesse de commutateur rotatif « F » à la borne « L » du bornier sur le support de montage. Le câble à commutation actif à partir d’un interrupteur « d’éclairage » à contrôleur mural", à la borne « LA » du bornier sur le support de montage. Alimentation neutre à la borne « N » du bornier sur le support de montage. Borne de mise à la terre « » du bornier sur le support de montage. EMPLOYER AVEC LE SCHÉMA POUR LE CÂBLE DE TÉLÉCOMMANDE: (TÉLÉCOMMANDE vendue séparément) 1 / Télécommande sans bouchons Fig. 10 EN FR Connection plug Fiche de connexion To motor L Pour moteur L To motor N Pour moteur N For light Pour la lumière Remote receiver Récepteur à distance Brown Marron (brun) Blue Bleu Yellow/Green Jaune / Vert 220-240 Vac 220-240 Vac 29 | P a g e Ver 1.0 Fanaway LED EVO1 Installation Instructions Power supply from ceiling Puissance d’alimentation du plafond L(Live) L (Sous-tension) N (Neutral) N (Neutre) Earthing Mise à la terre 2 / Télécommande avec des bouchons Fig. 11 EN FR Brown Marron (brun) Blue Bleu Green/Yellow Vert/Jaune 220-240 Vac 220-240 Vac Power supply from ceiling Puissance d’alimentation du plafond L(Live) L (Sous-tension) N (Neutral) N (Neutre) Earthing Mise à la terre Connect together Connectez ensemble Input Entrée Remote Receiver Récepteur à distance Output Sortie Fan body Corps du ventilateur 30 | P a g e Ver 1.0 Fanaway LED EVO1 Installation Instructions FINIR L'INSTALLATION Brancher la prise femelle (moteur de ventilateur) et la fiche mâle (support de montage) ensemble (1 - Fig.12). Faites glisser le couvercle (No.3 Fig. 1) sur le support de montage en utilisant les trous oblongs. Aligner les deux autres trous, puis installer les deux autres vis. Serrer les quatre vis. Éviter d'endommager le câblage électrique préalablement préparé. Fig. 12 UTILISATION DE VOTRE VENTILATEUR DE PLAFOND COMMANDE DE VENTILATEUR MURAL Mettre en marche et vérifier le fonctionnement du ventilateur. • Position d’arrêt (OFF) – ventilateur arrêté • 3ème position – Vitesse inférieure du ventilateur • 2e position - Vitesse moyenne du ventilateur • 1ère position – Vitesse supérieure du ventilateur Commande de lumière • Interrupteur à bascule - Marche / Arrêt (ON/OFF) EN OFF Light Fig 13 FR ARRÊT LUMIÈRE A l’aide d’un appareil à LED avec un variateur (non inclus) ATTENTIONT: POUR VOTRE SÉCURITÉ TOUTES LES CONNEXIONS DOIVENT ETRE EFFECTUEES PAR UN ELECTRICIEN AGREE. UN INTERRUPTEUR D’ISOLATION DOIT ÊTRE INSTALLÉ AVANT LE VARIATEUR DANS LE CÂBLAGE FIXE. NE PAS utiliser une télécommande qui a une fonction de gradation pour contrôler cet appareil à LED. Ce kit de lumière à LED est réglable et a été uniquement testé avec des variateurs Clip sal 32E450TM, 32E450UDM et LUCCI SKU# 290998. L'utilisation de variateurs non recommandés annule la garantie et peut endommager votre 31 | P a g e Ver 1.0 Fanaway LED EVO1 Installation Instructions lumière à LED. REMARQUE: Pour une utilisation avec un variateur à coupure de phase en aval LUCCI SKU# 290998, la meilleure performance de gradation est réalisée en ajustant la résistance variable à la position minimale et maximale de variation sur ce gradateur lors de l'installation. REMARQUE: La gradation de l'intensité lumineuse peut provoquer des bourdonnements ou un léger scintillement. De légers retards à l'allumage de la lampe et la performance légère de lumière inégale peuvent se produire lorsque plus d'une lumière à LED est liée ensemble, allumée et régulée. Ce n’est pas un défaut du produit et en tant que tel n’est pas couvert par la garantie. REMARQUE: Des variateurs ont une charge minimale de 20W. Avant de mettre sur le spot à LED, assurer la position gradateur est sur le réglage maximal. REMARQUE: Un électricien agréé est nécessaire pour câbler / installer un gradateur / commutateur local pour la lumière à LED. Fonction inverse Votre ventilateur de plafond peut fonctionner soit en mode de ventilateur ou de mode de ventilation inverse. Mode ÉTÉ: Le commutateur inverse doit être dans la position de « GAUCHE » (ETE) pour faire tourner le ventilateur dans un sens antihoraire. Le flux d'air sera dirigé vers le bas, pour le refroidissement en été. Mode HIVER: Le commutateur inverse doit être dans la position « DROITE » (HIVER) pour faire tourner le ventilateur dans le sens des aiguilles d'une montre. Le flux d'air sera dirigé vers le haut, pour la conservation de l'énergie en hiver. APRÈS L'INSTALLATION OSCILLATION: Les pales du ventilateur ont été ajustées à l'usine afin de minimiser toute oscillation. REMARQUE: LES VENTILATEURS DE PLAFOND ONT TENDANCE A SE DEPLACER PENDANT LE FONCTIONNEMENT DUE AU FAIT QU’ILS SONT MONTES A L’ŒILLET DE CAOUTCHOUC. SI LE VENTILATEUR A ETE MONTE DE FAÇON RIGIDE AU PLAFOND CELA CAUSERAIT DES VIBRATIONS EXCESSIVES. MOUVEMENT A QUELQUES CENTIMETRES EST TOUT A FAIT ACCEPTABLE ET NE SUGGERE AUCUN PROBLEME. POUR RÉDUIRE L’OSCILLATION DU VENTILATEUR: VEUILLEZ VÉRIFIER QUE TOUTES LES VIS QUI ASSURERONT LE SUPPORT DU MONTAGE ET LA TIGE DESCENDANTE SONT SÉCURISÉS. BALANCING A WOBBLING CEILING FAN: For your convenience, a Balancing Kit is included; please follow this procedure when balancing the fan: ÉQUILIBRER UN VENTILATEUR DE PLAFOND OSCILLANT: Pour votre commodité, un Kit d'équilibrage est inclus; veuillez suivre cette procédure lors de l'équilibrage du ventilateur: 1) Installez le ventilateur sans plafonnier avant d'équilibrer le ventilateur. 2) Définir la plaque de base en quatre zones (point A, B, C & D). Utilisez un poids de la trousse de l'équilibre en tenir légèrement sur le bord de la plaque de base (disons point A), si l'oscillation s’aggrave, puis décoller le kit de l'équilibre et de le coller sur la 32 | P a g e Ver 1.0 Fanaway LED EVO1 Installation Instructions partie légère côté opposé (disons point B); Si l'oscillation s'aggrave, puis enlever le kit équilibre et coller légèrement sur le côté opposé (disons point B) ; Si l'oscillation est pire, puis allez dans l'adjacent point C ou D, si l'oscillation s'améliore, puis coller solidement sur le poids à cet endroit sur la plaque de base. 3) Après équilibrage du ventilateur, assembler le dôme de lumière à la base de la lumière. BRUIT: Quand tout est calme (surtout la nuit), vous entendrez peut-être des petits bruits occasionnels. Les fluctuations de puissance légères et les signales fréquences superposées dans l'électricité pour la maitrise creuse de l'eau chaude, peuvent provoquer un changement dans le bruit du moteur du ventilateur. Ceci est normal. Veillez permettre un « interrompre » d’une période de 24 heures, la plupart des bruits associés à un nouveau ventilateur disparaissent avec le temps. La garantie du fabricant couvre les défauts réels qui peuvent se développer et non les plaintes mineurs telle que, entendre le fonctionnement du moteur - Tous les moteurs électriques sont audibles dans une certaine mesure. ENTRETIEN ET NETTOYAGE 1) Le nettoyage périodique de votre ventilateur de plafond est le seul entretien nécessaire. Utilisez une brosse douce ou un chiffon non pelucheux pour éviter rayer la peinture de finition. Veillez mettre hors tension l'alimentation électrique lorsque vous le faites. 2) Ne pas utiliser de l'eau lors du nettoyage de votre ventilateur de plafond. Cela pourrait endommager le moteur ou les lames et la possibilité de créer un choc électrique. 3) Moteur est lubrifiés en permanence roulement à billes. Pas besoin d'huile REMARQUE: Toujours mettre hors tension l'appareil et débrancher la fiche mâle et une prise femelle avant d’essayer de nettoyer votre ventilateur. INFORMATION TECHNIQUE Modèles de VENTILATEUR Tension nominale Puissance nominale (moteur) Puissance lumineuse VENTILATEUR À LED FANAWAY 220-240VAC 60W 40W, 3000K/4000K Modèle de pilote LED: ES0363D-E090 CONDITIONS DE GARANTIE EN AUSTRALIE / NOUVELLE-ZELANDE – veuillez se référer à la déclaration de garantie séparés. EN EUROPE – si vous êtes un client européen, veuillez contacter le point de vente où le ventilateur a été acheté pour un service de garantie. 33 | P a g e Ver 1.0 Fanaway LED EVO1 Installation Instructions GRACIAS POR SU COMPRA Gracias por comprar este producto Fanaway de calidad. Para asegurar su correcto funcionamiento y seguridad, rogamos lea y guarde todas las instrucciones antes de usar el producto. PRECAUCIONES DE SEGURIDAD 1) Este aparato pueden usarlo niños mayores de 8 años y aquellas personas con capacidades físicas, sensoriales o mentales reducidas o que carezcan de experiencia o conocimientos si se les ofrece supervisión respecto al uso del aparato de forma segura y entienden los riesgos que implica. Los niños no deben realizar tareas de limpieza o mantenimiento sin supervisión. 2) Se debe supervisor a los niños para asegurarse que no juegan con el aparato. 3) Se debe incorporar un interruptor de desconexión omnipolar en el cableado fijo conforme a la normativa de cableado local. SE DEBE INSTALAR UN INTERRUPTOR DE AISLAMIENTO CON ESTE VENTILADOR. Esto es en cumplimiento del Estándar AS/NZS 3000:2007/Enmienda 2:2012 sobre instalaciones eléctricas. Cláusula 4.13 Motores. Por favor, tenga en cuenta que la garantía quedará anulada si se instala sin un interruptor de aislamiento. 4) No elimine los aparatos eléctricos como residuos municipales sin clasificar; use puntos de recogida separados. Póngase en contacto con las autoridades locales para obtener información respecto a los sistemas de recogida disponibles. Si los aparatos eléctricos se eliminan en vertederos y basureros, se pueden filtrar sustancias peligrosas en el agua subterránea y entrar en la cadena alimentaria, dañando su salud y bienestar. 5) La estructura en la que debe montarse el ventilador debe ser capaz de soportar un peso de 45kg. 6) El ventilador debe montarse de forma que los alabes se encuentren a al menos 2.3 metros por encima del suelo en Europa. 7) El ventilador debe montarse de forma que los alabes se encuentren a al menos 2.1 metros por encima del suelo en Australia. 8) Este ventilador solo es apto para su uso interno. 9) La instalación debe realizarla únicamente un electricista cualificado. 34 | P a g e Ver 1.0 Fanaway LED EVO1 Installation Instructions ANTES DE LA INSTALACIÓN Desembale el ventilador y compruebe los contenidos. Debe disponer de lo siguiente: Fig. 1 35 | P a g e Ver 1.0 Fanaway LED EVO1 Installation Instructions 1 Abrazadera de montaje x 1 10 Mecanismo de retracción x 1 2 Tornillos de la cúpula x 4 11 Base de la lámpara x 1 3 Cúpula x 1 12 Tablero de LED x 1 4 Varilla vertical x 1 13 Tulipa de la lámpara x 1 5 Perno x 1 14 Tornillos de madera x 2 6 Perno y cubierta de la punta x 1 15 Anclaje de plástico x 1 7 Punta x 1 16 Cintas de equilibrio x 4 8 Carcasa superior x 1 17 Interruptor de pared x 1 juego 9 Alabes x 4 INSTALACIÓN DEL VENTILADOR HERRAMIENTAS NECESARIAS: - Destornillador Phillips/de cabeza plana - Par de alicates - Llave fija ajustable - Escalera - Tijeras de cortar cable - Cable, cable de alimentación conforme a los códigos y normativas de cableado nacionales y provinciales. INSTALACIÓN DE LA ABRAZADERA DE MONTAJE Se debe instalar el ventilador de techo en una ubicación de forma que los alabes presenten un espacio de 300mm desde la punta del alabe a los objetos o paredes más cercanos. Asegure la abrazadera de soporte a la viga o estructura del techo que sea capaz de soportar una carga de al menos 45kg, con los dos tornillos largos que se adjuntan. Asegúrese que al menos 30mm del tornillo se enrosque en el soporte. Fig. 2 36 | P a g e Ver 1.0 Fanaway LED EVO1 Installation Instructions EN ES BEAM MUST BE ABLE TO SUPPORT UP TP 45 KG La viga debe ser capaz de soportar hasta 45 kg. NOTE: THIS PICTURE IS FOR REPRESENTATION ONLY AND NOTA: ESTA IMAGEN TIENE ÚNICAMENTE UNA FINALIDAD DOES NOT REPRESENT THE ACTUAL BRACKET. REPRESENTATIVA Y NO REPRESENTA LA ABRAZADERA REAL. NOTA: los tornillos de la abrazadera que se adjuntan son para su uso con estructuras de madera únicamente. Para otras estructuras que no sean madera, se DEBE usar el tipo de tornillos apropiado. INSTALACIÓN EN EL TECHO EN ÁNGULO Este sistema de colgado del ventilador soporta un máximo de instalación en techo con un ángulo de 15 grados. Fig. 3 COLGAR EL VENTILADOR Instalación de la varilla vertical 1) Inserte la varilla vertical (5) a través de la cúpula (4) asícomo el perno y la cubierta de la punta (6). 2) Retire la rótula aflojando el tornillo fijado (3) e inserte los cables del motor a través de la varilla vertical y posteriormente asegure la rótula otra vez en la varilla vertical. 3) Inserte la varilla vertical en el acoplamiento (7); alinee los agujeros de acoplamiento con los agujeros de la varilla vertical e inserte el perno (8). Posteriormente, insértela punta (9) hasta el final del perno. 4) Finalmente, asegure la varilla vertical y acoplamiento apretando los dos tornillos fijados (10) en el acoplamiento. Figura 4 5) Levante el ventilador sobre la abrazadera de montaje (1). Figura 5 6) Asegúrese que la pestaña (2) de la toma de la abrazadera de montaje está debidamente asentada en el surco (3) de la rótula. Figura 5 Fig. 4 37 | P a g e Fig. 5 Ver 1.0 Fanaway LED EVO1 Installation Instructions INSTALACIÓN DEL KIT DE LA LUZ 1) Afloje el tornillo (1) de la abrazadera de la base (3). Alinee los dos tornillos de ranura (2) con las ranuras del ojo de la base de la lámpara (4). Figura 6 2) Gire la base de la lámpara en sentido antihorario hasta que los tornillos de las ranuras se encuentren firmes en el extremo de las ranuras. 3) Vuelva a asegurar el tornillo 1 en la abrazadera de la base. Apriete todos los tres tornillos. No los sobreapriete. 4) Conecte la toma superior (1) desde la unidad a la toma inferior (1) del panel LED (3). Figura 7 5) Seleccione la temperatura del color (3000K o 4000K) deslizando el interruptor (2). 6) Conecte el conector superior desde el motor al conector inferior (1) de la unidad. Figura 8 7) Finamente, instale la base de la lámpara girándola en sentido horario (Nº13 – Figura 1). Fig. 7 Fig. 6 Fig. 8 EN ES Off PAGADO 38 | P a g e Ver 1.0 Fanaway LED EVO1 Installation Instructions DIAGRAMA DE CABLEADO ELÉCTRICO PREPARE Y COMPLETE EL CABLEADO ELÉCTRICO --- DIAGRAMA DE CABLEADO (FIGURA 9) ADVERTENCIA: POR SU SEGURIDAD TODAS ALS CONEXIONES ELÉCTRICAS DEBE REALIZARLAS UN ELECTRICISTA CUALIFICADO. NOTA: SE DENE INCLUIR UN INTERRUPTOR DE DESCONEXIÓN OMNIPOLAR EN EL CABLEADOO FIJO. USAR CON UN DIAGRAMA DE CABALEADO CON INTERRUPTOR DE PARED: Fig. 9 EN ES FAN VENTILADOR WALL CONTROLLER CONTROLADOR DE PARED Brown Marrón Blue Azul Red Rojo Yellow/Green Verde/Amarillo Fan Live Ventilador en funcionamiento Fan & Light Neutral Ventilador y luz en neutro Light Live Luz en funcionamiento Earth A tierra TERMINAL BLOCK IN MOUNTING BRACKET BLOQUE DE TERMINALES EN ABRAZADERA DE MONTAJE ROTARY SWITCH INTERRUPTOR GIRATORIO SUPPLY INPUT ENTRADA DE ALIMENTACIÓN Speed 1 Velocidad 1 39 | P a g e Ver 1.0 Fanaway LED EVO1 Installation Instructions Speed 2 Velocidad 2 Speed 3 Velocidad 3 LLIGHT SWITCH INTERRUPTOR DE LUZ Requerimientos de cableado en el bloque de terminales: El cable activo conectado desde el interruptor rotatorio controla le velocidad de la terminal “F” a la “L” del bloque de terminales en la abrazadera de montaje. El cable activo conectado desde el controlador de pared enciende la “luz”, desde la terminal “LA” del bloque de terminales en la abrazadera de montaje. Suministre corriente neutra a la terminal “N” del bloque de terminales en la abrazadera de montaje. Realice la conexión a tierra a la terminal “ ” del bloque de terminales en la abrazadera de montaje. USO CON UN DIAGRAMA DE CABLEADO REMOTO: (REMOTO se vende por separado) 1/ Remoto sin enchufes Fig. 10 EN ES Connection plug Enchufe de conexión To motor L Al motor L To motor N Al motor N For light Para la luz Remote receiver Receptor remoto Brown Marrón Blue Azul Yellow/Green Verde/Amarillo 220-240 Vac 220-240 Vac Power supply from ceiling Alimentación desde el techo L(Live) L (funcionando) 40 | P a g e Ver 1.0 Fanaway LED EVO1 Installation Instructions N (Neutral) N (neutra) Earthing Toma a tierra 2/ Remoto con enchufes Fig. 11 EN ES Brown Marrón Blue Azul Green/Yellow Amarillo/Verde 220-240 Vac 220-240 Vac Power supply from ceiling Alimentación desde el techo L(Live) L (funcionando) N (Neutral) N (neutra) Earthing Toma a tierra Connect together Conectar conjuntamente Input Entrada Remote Receiver Receptor remoto Output Salida Fan body Carcasa del ventilador 41 | P a g e Ver 1.0 Fanaway LED EVO1 Installation Instructions FINALIZAR LA INSTALACIÓN Conecte el enchufe hembra (motor del ventilador) y el enchufe macho (abrazadera de montaje) juntos (1 – Figura 12). Deslice la cúpula (Nº 3 – Figura 1) sobre la abrazadera de montaje usando los agujeros ranurados. Alinee los otros 2 agujeros y posteriormente instale los otros 2 tornillos. Apriete bien los cuatro tornillos. Evite dañar el cableado eléctrico preparado con anterioridad. Fig. 12 USO DEL VENTILADOR DE TECHO CONTROL DEL VENTILADOR DE PARED Encienda la alimentación y compruebe el funcionamiento del ventilador. • Posición de PAGADO (OFF) – Se apaga el ventilador • 3ªposición – velocidad del ventilador baja • 2ªposición – velocidad del ventilador media • 1ªposición – velocidad del ventilador alta Control de iluminación • Interruptor de cambio – encendido/apagado (on/off) Fig. 13 EN ES OFF PAGADO Light Luz Uso del accesorio LED con un atenuador (no incluido) ADVERTENCIA: PARA SU SEGURIDAD, TODAS LAS CONEXIONES ELÉCTRICAS DEBEN REALIZARLAS UN ELECTRICISTA CUALIFICADO. SE DEBE INSTALAR UN INTERRUPTOR DE AISLAMIENTO ANTES DEL ATENUADOR EN EL CABLEADO FIJO. NO use un mando a distancia que disponga de una función de atenuación para controlar este accesorio LED. Este kit de luz LED es atenuable y se ha testado con los atenuadores Clipsal 32E450TM, 32E450UDM y LUCCI SKU# 42 | P a g e Ver 1.0 Fanaway LED EVO1 Installation Instructions 290998 únicamente. El uso de atenuadores no recomendado anulará la garantía y puede ocasionar daños al accesorio de luz LED. NOTA: Para su uso con el atenuador de borde posterior LUCCI SKU# 290998, el mejor rendimiento de atenuado se consigue ajustando el resistor variable al mínimo y la posición de atenuado al máximo en este atenuador durante la instalación. NOTA: La atenuación puede provocar pitidos o un ligero parpadeo. Se pueden producir ligeros parpadeos al encenderse la lámpara y un ligero funcionamiento irregular de la iluminación cuando se vinculan, se encienden y se atenúan más de un accesorios LED. No se trata de un fallo del producto, y como tal no está cubierto por la garantía. NOTA: Algunos atenuadores presentan una carga mínima de 20W. Antes de encender el aparato de luz intensivo LED, asegúrese que la posición del atenuador se encuentra en la configuración máxima. NOTA: Es necesario un electricista cualificado para cablear/instalar un atenuador/interruptor local al accesorio de luz LED. Función inversa El ventilador de techo puede funcionar bien en modo ventilador o en modo ventilador inverso. Modo VERANO: el interruptor inverso debe estar en la posición “IZQUIERDA” (VERANO) para que el ventilador gire en una dirección antihoraria. El flujo de aire se dirigirá hacia abajo, para refrigerar en verano. Modo INVIERNO: el interruptor inverso debe estar en la posición “DERECHA” (INVIERNO) para que el ventilador gire en una dirección horaria. El flujo de aire se dirigirá hacia arriba, para la conservación de la energía en invierno. TRAS LA INSTALACIÓN BALANCEO: Los alabes del ventilador se han ajustado de fábrica para evitar cualquier tipo de bamboleo. NOTA: LOS VENTILADORES DE TECHO TIENDEN A MOVERSE DURANTE SU FUNCIONAMIENTO DEBIDO AL HECHO DE QUE SE MONTAN SOBRE UN PASAHILOS DE GOMA. SI EL VENTILADOR SE MONTASE DE FORMA RÍGIDA EN EL TECHO CAUSARÍA UNA VIBRACIÓN EXCESIVA. UN MOVIMIENTO DE VARIOS CENTIMETROS ES BASTANTE ACEPTABLE Y NO SUGIERE NINGÚN PROBLEMA. PARA REDUCIR EL BALANCEO DEL VENTILADOR: POR FAVOR, COMPRUEBE QUE TODOS LOS TORNILLOS QUE ASEGURAN LA ABRAZADERA DE MONTAJE Y LA VARILLA VERTICAL ESTÁN SEGUROS. EQUILIBRAR UN VENTILADOR DE TECHO QUE SE BALANCEA: Para su practicidad, se incluye un Kit de equilibrado; por favor, siga este procedimiento cuando equilibre el ventilador: 1) Instale el ventilador sin la cúpula de luz antes de equilibrar el ventilador. 2) Defina la placa de la base en cuatro áreas (puntos A, B, C y D). Use un peso del kit de equilibrado para colocarlo ligeramente sobre el borde de la base (digamos punto A) si el balanceo empeora; posteriormente retire el kit de equilibrado y colóquelo ligeramente en el lado contrario (digamos punto B); si el balanceo empeora, entonces vaya al punto adyacente C o D; si el balanceo 43 | P a g e Ver 1.0 Fanaway LED EVO1 Installation Instructions mejora, entonces coloque el peso con seguridad en esta ubicación sobre la placa de la base. 3) Tras equilibrar el ventilador, monte la cúpula de la luz a la base de la luz. RUIDO: Cuando está silencioso (en especial por la noche) puede que oiga de forma ocasional pequeños ruidos. Las ligeras fluctuaciones de corriente y señales de frecuencia superpuestas en la electricidad para el control del agua caliente fuera de las horas puntas puede provocar un cambio en el ruido del motor del ventilador. Esto es normal. Por favor, permita un periodo de “rodaje” de 24 horas; la mayoría de los ruidos asociados con el ventilador desaparecen durante dicho tiempo. La garantía del fabricante cubre los fallos reales que pueden producirse y NO pequeñas quejas como oír el motor en funcionamiento – Hasta cierto punto todos los motores eléctricos son audibles. CUIDADO Y LIMPIEZA 1) El único mantenimiento requerido es la limpieza periódica del ventilador. Use un cepillo suave o un paño libre de hilos para evitar rayar el acabado de pintura. Por favor, apague la corriente eléctrica cuando lo haga. 2) No use agua cuando limpie el ventilador de techo. Puede dañar el motor o los alabes y crear la posibilidad de una descarga eléctrica. 3) El motor dispone de un cojinete de bola lubricado permanentemente. No es necesario engrasarlo. NOTA: apague siempre la alimentación y desconecte el enchufe hembra 1 y el enchufe macho 1 antes de intentar limpiar el ventilador. INFORMACIÓN TÉCNICA Modelos de VENTILADOR Tensión nominal Potencia nominal (motor) Potencia lumínica VENTILADOR LED FANAWAY 220-240VAC 60W 40W, 3000K/4000K Modelo unidad LED: ES0363D-E090 CONDICIONES DE LA GARANTÍA EN AUSTRALIA / NUEVA ZELANDA – Por favor, remítase a la DECLARACIÓN DE GARANTÍA separada. EN EUROPA – Si es un cliente europeo, por favor, póngase en contacto con el distribuidor donde se adquirió el ventilador para las reparaciones en garantía. 44 | P a g e Ver 1.0 Fanaway LED EVO1 Installation Instructions GRAZIE PER IL VOSTRO ACQUISTO Grazie per aver comprato questo prodotto di qualità Fanaway. Per assicurare un corretto funzionamento e sicurezza, vogliate leggere e conservare tutte le istruzioni prima di usare il prodotto. PRECAUZIONI DI SICUREZZA 1) Questo elettrodomestico può essere utilizzato da bambini a partire dagli 8 anni di età e da persone con capacità fisiche, sensoriali o mentali ridotte o mancanza di esperienza e conoscenza se sono state date loro supervisione o istruzioni relative all’uso dell’elettrodomestico in modo sicuro e comprendono i pericoli connessi. La pulizia e la manutenzione non dovrebbero essere intrapresa da bambini senza supervisione. 2) I bambini dovrebbero essere supervisionati per assicurarsi che non giochino con l’elettrodomestico. 3) Un interruttore di disconnessione di tutti i poli dovrebbe essere incluso nel cablaggio fisso secondo le regole locali di cablaggio. CON QUESTO VENTILATORE DEVE ESSERE INSTALLATO UN INTERRUTTORE DI ISOLAMENTO. Questo secondo lo Standard AS/NZS 3000:2007/Modifica 2:2012 Installazioni elettriche Clausola 4.13 Motori. Vogliate notare che la garanzia commerciale sarà nulla se installato senza un interruttore di isolamento. 4) Non smaltite gli elettrodomestici come rifiuti cittadini non differenziati, usate le strutture di raccolta differenziata. Contattate il vostro governo locale per ottenere informazioni relativamente ai sistemi di raccolta disponibili. Se gli elettrodomestici sono smaltiti in discariche, delle sostanze pericolose possono percolare nelle falde acquifere e inserirsi nella catena alimentare, recando danni alla vostra salute e benessere. 5) La struttura cui il ventilatore deve essere montato deve essere in grado di sostenere un peso di 45 kg. 6) In Europa il ventilatore dovrebbe essere montato in modo che le pale si trovino ad almeno 2,3 metri al di sopra del pavimento. 7) In Australia il ventilatore dovrebbe essere montato in modo che le pale si trovino ad almeno 2,1 metri al di sopra del pavimento. 8) Questo ventilatore è adatto solo per uso interno. 9) L’installazione dovrebbe essere eseguita solo da un elettricista autorizzato. 45 | P a g e Ver 1.0 Fanaway LED EVO1 Installation Instructions PRIMA DELL’INSTALLAZIONE Disimballate il vostro ventilatore e verificate il contenuto. Dovreste avere quanto segue: Fig. 1 46 | P a g e Ver 1.0 Fanaway LED EVO1 Installation Instructions 1 Staffa di montaggio x 1 10 Meccanismo di ritrazione x 1 2 Viti della calotta x 4 11 Base della lampada x 1 3 Calotta x 1 12 Pannello LED x 1 4 Barra discendente x 1 13 Paralume x 1 5 Bullone x 1 14 Viti da legno x 2 6 Copri bullone e perno x 1 15 Tassello di plastica x 1 7 Perno x 1 16 Nastri di bilanciamento x 4 8 Alloggiamento superiore x 1 17 Interruttore a parete x 1 set 9 Pale x 4 INSTALLAZIONE DEL VENTILATORE ATTREZZI NECESSARI: - Cacciavite a stella/a testa piatta - Un paio di pinze - Una chiave inglese regolabile - Scala - Pinza tagliafili - Fili elettrici, cavo di alimentazione, come richiesti dai codici e regolamenti elettrici locali, provinciali e nazionali. INSTALLAZIONE DELLA STAFFA DI MONTAGGIO Il ventilatore da soffitto deve essere installato in una posizione tale che vi siano 300 mm di spazio dalla punta della pala all‘oggetto o al muro più vicino. Assicurate, con le due viti lunghe fornite, la staffa di sospensione alla trave del soffitto o a una struttura che sia in grado di sostenere un carico di almeno 45 kg. Assicuratevi che almeno 30 mm della vite siano avvitati nel supporto. Fig. 2 EN IT BEAM MUST BE ABLE TO SUPPORT UP TP 45 KG LA TRAVE DEVE ESSERE IN GRADO DI SOSTENERE FINO 47 | P a g e Ver 1.0 Fanaway LED EVO1 Installation Instructions A 45 KG NOTE: THIS PICTURE IS FOR REPRESENTATION ONLY AND NOTA: QUESTA IMMAGINE E SOLO PER PRESENTAZIONE DOES NOT REPRESENT THE ACTUAL BRACKET. E NON RAPPRESENTA LA STAFFA REALE NOTA: Le viti della staffa fornite sono per utilizzo solo su strutture in legno. Per strutture diverse dal legno DEVONO essere utilizzate le viti adeguate. INSTALLAZIONE SU SOFFITTO INCLINATO Questo sistema di ventilatore sospeso tollera un’installazione su un soffitto inclinato di massimo 15 gradi. Fig. 3 COME APPENDERE IL VENTILATORE Installazione della barra discendente 1) Fate passare la barra discendente (5) attraverso la calotta 84) e la copertura del bullone e perno (6). 2) Rimuovete il giunto sferico allentando la vite di fissaggio (3) e inserite i cavi del motore attraverso la barra discendente e quindi assicurate il giunto sferico alla barra discendente. 3) Inserite la barra discendente nell’innesto (7), allineate i fori dell’innesto con i fori della barra discendente e inserite il bullone (8). Quindi inserite il perno (9) alla fine del bullone. 4) Infine assicurate la barra discendente e l'innesto stringendo le due viti di fissaggio (10) sull'innesto. Figura 4 5) Sollevate il gruppo ventilatore sulla staffa di montaggio (1). Figura 5 6) Assicuratevi che la linguetta (2) sull’alloggiamento della staffa di montaggio sia correttamente posizionata nella scanalatura (3) del giunto sferico. Figura 5 Fig. 4 48 | P a g e Fig. 5 Ver 1.0 Fanaway LED EVO1 Installation Instructions INSTALLAZIONE KIT LUMINOSO 1) Allentate la vite (1) dalla staffa di base (3). Allineate le due viti a incastro (2) con le scanalature forate della base della lampada (4). Figura 6 2) Ruotate la base della lampada in senso anti-orario fino a che le viti a incastro siano fermamente inserite alla fine dell’incastro. 3) Assicurate di nuovo la vite 1 alla staffa di base. Stringete tutte e tre le viti. Non stringete troppo. 4) Collegate la spina superiore (1) dalla trazione alla presa inferiore (1) nel quadro LED (3). Figura 7 5) Selezionate la temperatura del colore (3000K oppure 4000K sposando l’interruttore (2). 6) Collegate il connettore superiore dal motore al connettore inferiore (1) dalla trazione. Figura 8 7) Infine installate la lampada nella base della lampada ruotandola in senso orario (N°13 – Figura 1). Fig. 7 Fig. 6 Fig. 8 EN IT OFF SPEGNERE 49 | P a g e Ver 1.0 Fanaway LED EVO1 Installation Instructions SCHEMA DI CABLAGGIO ELETTRICO PREPARARE E COMPLETARE IL CABLAGGIO ELETTRICO – SCHEMA ELETTRICO (FIG. 9) AVVERTENZA: PER LA VOSTRA SICUREZZA, TUTTE LE CONNESSIONI ELETTRICHE DEVONO ESSERE ESEGUITE DA UN ELETTRICISTA AUTORIZZATO. NOTA: NEL CABLAGGIO FISSO DEVE ESSERE INCLUSO UN SEZIONATORE ONNIPOLARE AGGIUNTIVO. USATE CON IL DIAGRAMMA DI CABLAGGIO DELL’INTERRUTTORE A MURO: Fig. 9 EN IT FAN VENTILATORE WALL CONTROLLER CONTROLLORE A PARETE Brown Barrone Blue Blu Red Rosso Yellow/Green Yiallo/Verde Fan Live Fase ventilatore Fan & Light Neutral Neutro ventilatore & luce Light Live Fase luce Earth Terra TERMINAL BLOCK IN MOUNTING BRACKET Morsettiera nella staffa di montaggio ROTARY SWITCH INTERRUTTORE ROTATORIO SUPPLY INPUT ALIMENTAZIONE ELETTRICA Speed 1 Velocità 1 50 | P a g e Ver 1.0 Fanaway LED EVO1 Installation Instructions Speed 2 Velocità 2 Speed 3 Velocità 3 LLIGHT SWITCH INTERRUTTORE LUCE Requisiti di cablaggio alla morsettiera: Il cavo di fase dall’interruttore ruotante di controllo velocità “F” al terminale “L” della morsettiera sulla staffa di montaggio. Il cavo di fase dall’interruttore di controllo della luce al terminale “LA” della morsettiera sulla staffa di montaggio. Collegare il Neutro al terminale “N” sulla morsettiera sulla staffa di montaggio. Collegare la terra al terminale “ ” sulla morsettiera sulla staffa di montaggio. USARE CON IL DIAGRAMMA DI CABLAGGIO DEL TELECOMANDO: (TELECOMANDO venduto separatamente) 1/ Telecomando senza spinotti Fig. 10 EN IT Connection plug Spinotto di collegamento To motor L A motore L To motor N A motore N For light Per la luce Remote receiver Ricevitore remoto Brown Marrone Blue Blu Yellow/Green Giallo/Verde 220-240 Vac 220-240 Vac Power supply from ceiling Alimentazione elettrica a dal soffitto L(Live) L (Fase) 51 | P a g e Ver 1.0 Fanaway LED EVO1 Installation Instructions N (Neutral) N (Neutro) Earthing Terra 2/ Telecomando con spinotti Fig. 11 EN IT Brown Marrone Blue Blu Green/Yellow Verde/Giallo 220-240 Vac 220-240 Vac Power supply from ceiling Alimentazione elettrica a dal soffitto L(Live) L (Fase) N (Neutral) N (Neutro) Earthing Terra Connect together Collegare Input Ingresso Remote Receiver Ricevitore remoto Output Uscita Fan body Corpo ventilatore 52 | P a g e Ver 1.0 Fanaway LED EVO1 Installation Instructions COME TERMINARE L’INSTALLAZIONE Collegate la spina femmina (motore del ventilatore) alla spina maschio (staffa di montaggio) (1 - Fig. 12). Fate scivolare la calotta (N°3 – Fig. 1) sulla staffa di montaggio usando i fori scanalati. Allineate gli altri 2 fori e quindi installate le altre 2 viti. Stringete fermamente tutte e quattro le viti. Evitate di danneggiare i fili elettrici predisposti Fig. 12 UTILIZZO DEL VOSTRO VENTILATORE A SOFFITTO CONTROLLO A MURO DEL VENTILATORE Attivate l’alimentazione e controllate il funzionamento del ventilatore. • Posizione SPENTO (OFF) – ventilatore spento • 3a Posizione – velocità ventilatore bassa • 2a Posizione – velocità ventilatore media • 1a Posizione – velocità ventilatore alta Controllo luce • Premere interruttore per - accendere/spegnere (on/off) EN OFF Light Fig. 13 IT SPEGNERE Luce Usare accessorio LED con varialuce (non incluso) AVVERTENZA: PER LA VOSTRA SICUREZZA, TUTTE LE CONNESSIONI ELETTRICHE DEVONO ESSERE ESEGUITE DA UN ELETTRICISTA AUTORIZZATO. DEVE ESSERE INSTALLATO NELCABLAGGIO FISSO UN INTERRUTTORE DI ISOLAMENTO PRIMA DEL VARIALUCE. NON usate un telecomando che ha una funzione di varialuce per controllare questo accessorio LED. Questo kit di luce LED può essere variato e deve essere provato solo con i varialuce Clipsal 32E450TM, 32E450UDM e LUCCI SKU# 290998 L’uso di varialuce non raccomandati invaliderà la garanzia commerciale e potrebbe danneggiare il 53 | P a g e Ver 1.0 Fanaway LED EVO1 Installation Instructions vostro accessorio a luce LED. NOTA: Per l’utilizzo con un varialuce LUCCI SKU# 290998 trailing edge, le migliori prestazioni di varialuce sono ottenute regolando il resistore variabile alle posizioni di minimo e massimo su questo varialuce durante l'installazione. NOTA: La riduzione di luce potrebbe causare dei ronzii o dei leggeri sfarfallii. Si possono verificare leggeri ritardi con l’accensione della lampada e delle prestazioni leggermente irregolari della luce quando più di una luce al LED è collegata insieme, accesa e ridotta di intensità. Questo non è un difetto del prodotto e come tale non è coperto dalla garanzia commerciale. NOTA: Alcuni varialuce hanno un carico minimo di 20W. Prima di accendere la luce a LED assicurarsi che la posizione del varialuce sia nella posizione massima. NOTA: E’ necessario un elettricista qualificato per cablare/installare un interruttore/varialuce all’accessorio della luce LED. Funzione inversione rotazione Il vostro ventilatore a soffitto può funzionare sia in modalità estiva sia in modalità invernale. Modalità SUMMER [ESTIVA]: L’interruttore di inversione si troverà nella posizione “SINISTRA” (SUMMER [ESTIVA]) per far ruotare il ventilatore in direzione anti-oraria. Il flusso d’aria sarà diretto verso il basso, per rinfrescare in estate. Modalità WINTER [INVERNALE]: L’interruttore di inversione si troverà nella posizione “DESTRA” (WINTER [INVERNALE]) per far ruotare il ventilatore in direzione oraria. Il flusso d’aria sarà diretto verso l’alto aiutando la circolazione dell’aria calda, per il risparmio energetico in inverno. DOPO L’INSTALLAZIONE OSCILLAZIONE: Le pale del ventilatore sono state regolate in fabbrica per minimizzare qualsiasi oscillazione. NOTA: I VENTILATORI A SOFFITTO TENDONO A MUOVERSI DURANTE IL FUNZIONAMENTO A CAUSA DEL FATTO CHE SONO MONTATI SU UN ANELLO DI GOMMA. SE IL VENTILATORE FOSSE MONTATO IN MODO RIGIDO AL SOFFITTO QUESTO CAUSEREBBE UNA VIBRAZIONE ECCESSIVA. IL MOVIMENTO DI ALCUNI CENTIMETRI E’ ALQUANTO ACCETTABILE E NON INDICA ALCUN PROBLEMA. PER RIDURRE L’OSCILLAZIONE DEL VENTILATORE: VOGLIATE CONTROLLARE CHE TUTTE LE VITI CHE FISSANO LA STAFFA DI MONTAGGIO E L’ASTA DISCENDENTE SIANO BEN STRETTE. COME EQUILIBRARE UN VENTILATORE A SOFFITTO CHE OSCILLA: Per vostra comodità è incluso un Kit di equilibratura; Vogliate seguire questa procedura quando equilibrate il ventilatore: 1) Installate il ventilatore senza la calotta luminosa prima di equilibrare il ventilatore. 2) Definite la piastra di base in quattro aree (punto A, B, C & D) Usate un peso dal kit di equilibratura da fissare in modo leggero sul bordo della piastra base (diciamo il punto A), se l'oscillazione peggiora, toglietelo e fissatelo dal lato opposto (diciamo punto B); se l'oscillazione peggiora allora mettetelo sul punto vicino, C o D, se l'oscillazione migliora, fissatelo bene in questa 54 | P a g e Ver 1.0 Fanaway LED EVO1 Installation Instructions posizione sulla piastra base. 3) Dopo aver equilibrato il ventilatore, montate la calotta luminosa sulla base della luce. RUMORE: Quando vi è silenzio (specialmente di notte) potreste udire occasionalmente dei piccoli rumori. Leggere fluttuazioni di corrente e segnali di frequenza superimposti nell’elettricità per il controllo dell’acqua calda fuori picco, possono causare un cambiamento nel rumore del motore del ventilatore. Ciò è normale. Vogliate attendere un periodo di 24 ore di “assestamento”; la maggior parte dei rumori associati con un nuovo ventilatore spariscono durante questo periodo di tempo. La garanzia del produttore copre guasti effettivi che possono svilupparsi e NON reclami minori quali l’udire il funzionamento del motore – Tutti i motori elettrici sono udibili in qualche misura. CURA E PULIZIA 1) La pulizia periodica del vostro ventilatore a soffitto è la sola manutenzione richiesta. Usate una spazzola soffice o un panno non peloso per evitare di graffiare la finitura a vernice. Vogliate scollegare l’alimentazione elettrica quando lo fate. 2) Non usate acqua quando pulite il vostro ventilatore a soffitto. Ciò potrebbe danneggiare il motore o le pale e creare la possibilità di una scossa elettrica. 3) Il motore ha un cuscinetto a sfera lubrificato in modo permanente. Non vi è necessita di oliare. NOTA: Togliete sempre l’alimentazione e scollegate la spina femmina 1 e la spina maschio 1 prima di tentare di pulire il vostro ventilatore. INFORMAZIONI TECNICHE Modelli di VENTILATORE FANAWAY LED FAN Tensione nominale 220-240VAC Alimentazione nominale (motore) Potenza di illuminazione 60W 40W, 3000K/4000K Driver del LED modello n°: ES0363D-E090 CONDIZIONI DELLA GARANZA COMMERCIALE IN AUSTRALIA / NUOVA ZELANDA – Vogliate far riferimento alla separata DICHIARAZIONE DI GARANZIA. IN EUROPA – Se siete un cliente europeo vogliate contattare il dettagliante dove è stata comprato il ventilatore per la manutenzione in garanzia. 55 | P a g e Ver 1.0 Fanaway LED EVO1 Installation Instructions BEDANKT VOOR UW AANKOOP Bedankt voor de aankoop van dit Fanaway kwaliteitsproduct. Om de veiligheid van het product en het correct functioneren te garanderen, raden we aan alle instructies te lezen en te bewaren voordat u het product gaat gebruiken. VEILIGHEIDSVOORSCHRIFTEN 1) Dit apparaat kan door kinderen van 8 jaar en ouder, door onervaren personen en door personen met lichamelijke en mentale beperkingen gebruikt worden mits zij het product onder toezicht op een veilige manier gebruiken en de eventuele gevaren begrijpen. Reiniging en onderhoud mag niet door kinderen zonder toezicht worden uitgevoerd. 2) Kinderen moeten onder toezicht blijven bij het gebruik van het apparaat en niet met het apparaat spelen. 3) Een ontkoppelingsschakelaar moet in de vast bedrading geïntegreerd worden, volgens de locale bedradingsvoorschriften. EEN WERKSCHAKELAAR DIENT GEINSTALLEERD TE WORDEN VOOR DEZE VENTILATOR. Dit volgens Norm AS/NZS 3000:2007/Amendment 2:2012 Elektrische installaties. Clausule 4.13 Motors. Zonder werkschakelaar vervalt de garantie. 4) Werp elektrische apparatuur niet weg bij het huishoudafval, gebruik gescheiden afvalverwerkingsfaciliteiten. Neem contact op met uw lokale overheid voor informatie over de beschikbare gescheiden afvalvoorzieningen. Als elektrische apparatuur op stortplaatsen weggeworpen wordt, kunnen gevaarlijke stoffen in het grondwater lekken en in de voedselketen terecht komen wat zeer slecht is voor welzijn en gezondheid. 5) De structuur waar de ventilator op bevestigd wordt, moet 45 kg kunnen dragen. 6) De ventilator moet zo bevestigd worden dat de schoepen tenminste 2.3 meter boven de grond hangen In Europa. 7) De ventilator moet zo bevestigd worden dat de schoepen tenminste 2.1 meter boven de grond hangen In Australië. 8) Deze ventilator is alleen geschikt voor binnengebruik. 9) Alleen een gekwalificeerde elektricien mag de installatie uitvoeren. 56 | P a g e Ver 1.0 Fanaway LED EVO1 Installation Instructions VOOR DE INSTALATIE Haal de ventilator uit de verpakking en controleer de onderdelen. U moet het volgende in bezit hebben: Fig. 1 57 | P a g e Ver 1.0 Fanaway LED EVO1 Installation Instructions 1 Bevestigingsklem x 1 10 Intrekmechanisme x 1 2 Overkappingsschroef x 4 11 Lampbasis x 1 3 Overkapping x 1 12 LED-paneel x 1 4 Stang x 1 13 Lampenkap x 1 5 Bout x 1 14 Houten schroeven x 2 6 Moer & dopje x 1 15 Plastic haak x 1 7 Pen x 1 16 Balanceerplaatjes x 4 8 Behuizing x 1 17 Muurschakelaar x 1 set 9 Schoepen x 4 HET INSTALLEREN VAN DE VENTILATOR BENODIGD GEREEDSCHAP: - Phillips / platte schroevendraaier - Tang - Verstelbare sleutel - Keukentrap - Kabelknipper - Bedrading, kabels zoals door de lokale of nationale bedradingsvereisten voorgeschreven is. INSTALLATIE VAN DE BEVESTIGINGSKLEM De ventilator moet op een plek geïnstalleerd worden waar tenminste 300 mm ruimte is tussen het uiteinde van de schoepen en het dichtstbijzijnde voorwerp of muur. Bevestig de bevestigingsklem aan het plafond of een structuur die 45 kg kan dragen met gebruik van de twee geleverde lange schroeven. Zorg ervoor dat tenminste 30 mm van de schroef in het plafond of structuur gedraaid is. Fig. 2 EN BEAM MUST BE ABLE TO SUPPORT UP TP 45 KG NOTE: THIS PICTURE IS FOR REPRESENTATION ONLY AND 58 | P a g e NL BALK MOET TOT 45 KG KUNNEN DRAGEN OPMERKING: DEZE TEKENING IS ENKEL TER Ver 1.0 Fanaway LED EVO1 Installation Instructions DOES NOT REPRESENT THE ACTUAL BRACKET. ILLUSTRATIE EN GEEFT DE EIGENLIJKE BEVESTIGING NIET WEER. OPMERKING: De bevestigingsschroeven zijn alleen geschikt voor houten structuren. Voor andere structuren MOETEN andere schroeven gebruikt worden, geschikt voor de betreffende structuur. INSTALLATIE IN EEN HOEK AAN PLAFOND Dit ophangsysteem kan in een hoek van maximal 15 graden aan het plafond bevestigd worden. Fig. 3 DE VENTILATOR OPHANGEN Installatie van de stang 1) Steek de stang (5) door de overkapping (4) en de bout en dopje (6). 2) Verwijder het kogelgewricht door de schroeven los te maken (3) en steek de motorbedrading door de stang en bevestig daarna het kogelgewricht weer op de stang. 3) Steek de stang in de koppeling (7), breng de gaten in de koppeling in lijn met de gaten in de stang en steek de bout in de gaten (8). Steek de pen (9) door het uiteinde van de bout. 4) Zet de stang en koppeling vast door de twee schroeven (10) op de koppeling aan te draaien. Fig. 4 5) Hang de ventilator aan de bevestigingsklem (1). Fig. 5 6) Zorg ervoor dat het lipje (2) op de bevestigingsklem goed in de sleuf zit (3) in het kogelgewricht. Fig. 5 Fig. 4 59 | P a g e Fig. 5 Ver 1.0 Fanaway LED EVO1 Installation Instructions INSTALLATIE VAN HET LICHT 1) Maak de schroef los (1) in de onderste klem (3). Lijn de schroeven uit (2) met de gaten van de lamphouder (4). Fig.6 2) Draai de lamphouder tegen de klok in totdat de schroeven stevig in de gaten gedraaid zitten. 3) Draai schroef 1 weer in de onderste klem. Draai alle drie de schroeven aan. Niet te strak aandraaien. 4) Sluit de bovenste stekker (1) van de aandrijving aan op het onderste stopcontact (1) op het LED-paneel (3). Fig.7 5) Selecteer de kleurtemperatuur (3000K of 4000K) door de schakelaar om te zetten (2). 6) Sluit de bovenste aansluiting van de motor aan op de onderste aansluiting (1) van de aandrijving. Fig.8 7) Installeer nu de lamp op de lamphouder door deze met de klok mee te draaien (No.13 – Fig. 1). Fig. 7 Fig. 6 Fig. 8 EN NL OFF UIT 60 | P a g e Ver 1.0 Fanaway LED EVO1 Installation Instructions SCHEMA ELEKTRISCHE BEDRADING ELEKTRISCHE BEDRADING VOORBEREIDEN EN UITVOEREN --- AANSLUITSCHEMA (FIG. 9) WAARSCHUWING: VOOR UW VEILIGHEID MOETEN ALLE ELEKTRISCHE AANSLUITINGEN DOOR EEN ERKENDE ELEKTRICIEN UITGEVOERD WORDEN. OPMERKING: EEN EXTRA ONTKOPPELINGSSCHAKELAAR MOET IN DE BEDRADING GEINTEGREERD WORDEN. GEBRUIK MET MUURSCHAKELAAR AANSLUITSCHEMA: Fig. 9 EN NL FAN VENTILATOR WALL CONTROLLER MUURSCHAKELAAR Brown Bruin Blue Blauw Red Rood Yellow/Green Geel/Groen Fan Live Ventilator live Fan & Light Neutral Ventilator & Licht neutral Light Live Licht live Earth Aarde TERMINAL BLOCK IN MOUNTING BRACKET AANSLUITBLOK IN BEVESTIGINGSKLEM ROTARY SWITCH DRAAIKNOP SUPPLY INPUT STROOMTOEVOER 61 | P a g e Ver 1.0 Fanaway LED EVO1 Installation Instructions Speed 1 Snelheid 1 Speed 2 Snelheid 2 Speed 3 Snelheid 3 LLIGHT SWITCH LICHTKNOP Bedradingsvereisten op het aansluitblok: De actieve kabel uit de draaischakelaar snelheidsschakelaar “F” naar de “L” aansluiting van het aansluitblok op de bevestigingsklem. De actieve kabel uit de muurschakelaar “licht” schakelaar, naar de “LA” aansluiting van het aansluitblok op de bevestigingsklem. Neutraal naar “N” aansluiting van het aansluitblok op de bevestigingsklem. Aarde naar “ ” aansluiting van het aansluitblok op de bevestigingsklem. GEBRUIIK MET AFSTANDSBEDIENING AANSLUITSCHEMA: (AFSTANDSBEDIENING apart verkocht) 1/ Afstandsbediening zonder stekkers Fig. 10 EN NL Connection plug Stekker To motor L Naar motor L To motor N Naar motor N For light Voor licht Remote receiver Ontvanger op afstand Brown Bruin Blue Blauw Yellow/Green Geel/Groen 220-240 Vac 220-240 Vac Power supply from ceiling Stroomtoevoer van plafond 62 | P a g e Ver 1.0 Fanaway LED EVO1 Installation Instructions L(Live) L (live) N (Neutral) N (neutraal) Earthing Aarde 2/ Afstandsbediening met stekkers Fig. 11 EN NL Brown Bruin Blue Blauw Green/Yellow Groen/Geel 220-240 Vac 220-240 Vac Power supply from ceiling Stroomtoevoer van plafond L(Live) L (live) N (Neutral) N (neutraal) Earthing Aarde Connect together Samen aansluiten Input Inkomende stroom Remote Receiver Ontvanger op afstand Output Uitgaande stroom Fan body Ventilatorstructuur 63 | P a g e Ver 1.0 Fanaway LED EVO1 Installation Instructions INSTALLATIE VOLTOOIEN Sluit de vrouwelijke aansluiting (ventilatormotor) aan op de mannelijke aansluiting (bevestigingsklem) (1 – Fig.12). Schuif de kap (No.3– Fig. 1) over de bevestigingsklem in de daarvoor bestemde gleuven. Lijn de andere 2 gaten uit en breng de 2 andere schroeven aan. Draai alle vier schroeven goed aan. Pas op dat de bedrading hierbij niet beschadigd wordt. Fig. 12 DE VENTILATOR GEBRUIKEN MUURKNOP VOOR VENTILATOR Zet de stroom aan en controleer het functioneren van de ventilator. • UIT (OFF)- ventilator uit • 3de stand – lage snelheid • 2de stand – medium snelheid • 1ste stand – hoge snelheid Licht • Schakelaar – aan/uit (on/off) EN OFF Light Fig. 13 NL UIT Licht LED met dimmer (niet inbegrepen) WAARSCHUWING: VOOR UW VEILIGHEID MOETEN ALLE ELEKTRISCHE AANSLUITINGEN DOOR EEN ERKENDE ELEKTRICIEN UITGEVOERD WORDEN. VOORDAT EEN DIMMER OP DE BEDRADING GEINSTALLEERD WORDT, MOET EEN WERKSCHAKELAAR AANGEBRACHT WORDEN. Gebruik GEEN afstandsbediening met dimfunctie om deze LED-lamp te besturen. Deze LED-lamp kan alleen gedimd worden en is getest met Clipsal 32E450TM, 32E450UDM en LUCCI SKU# 290998 64 | P a g e Ver 1.0 Fanaway LED EVO1 Installation Instructions dimmers. Het gebruik van andere dimmers doet de garantie vervallen en kan uw LED-verlichting beschadigen. OPMERKING: Voor gebruik met een LUCCI SKU# 290998 dimmer, wordt het beste resultaat bereikt als een maximum en minimum stand op de variabele resistor van de dimmer geprogrammeerd wordt tijdens installatie. OPMERKING: Dimming kan suizende geluiden of licht geknipper veroorzaken. Kleine vertragingen bij het aandoen van de lamp of varierende lichtsterkte kan voorkomen als meer dan één LED-lamp aangesloten is, aanstaat en gedimd wordt. Dit is geen productfout en valt niet onder de garantie. OPMERKING: Sommige dimmers hebben een minimale spanning van 20W. Zet de dimmer op maximum voordat u het LED-licht aandoet. OPMERKING: Een erkende elektricien moet de dimmer/schakelaar voor het LED-licht installeren. Omkeerfunctie Uw ventilator werkt in ventilatormodus of omkeermodus. ZOMER stand: De omkeerschakelaar moet in de LINKER (ZOMER) stand staan om de ventilator tegen de klok in te laten draaien. De luchtstroom zal dan neerwaarts gaan en de lucht koelen. WINTER stand: De omkeerschakelaar moet in de RECHTER (WINTER) stand staan om de ventilator met de klok met de klok mee te laten draaien. De luchtstroom zal dan naar boven gaan, voor energiebesparing in de winter. NA DE INSTALLATIE WIEBELEN: De schoepen worden in de fabriek afgesteld om wiebelen zoveel mogelijk te voorkomen. OPMERKING: PLAFONDVENTILATORS KUNNEN TIJDENS HET FUNCTIONEREN BEWEGEN AANGEZIEN ZE OP EEN RUBBEREN RING BEVESTIGD ZIJN. ALS DE VENTILATOR STRAK TEGEN HET PLAFOND BEVESTIGD IS, KAN DIT STERKE TRILLING VEROORZAKEN. BEWEGING VAN ENKELE CENTIMETERS IS ACCEPTABEL EN GEEN PROBLEEM VOOR HET FUNCTIONEREN. WIEBELEN BEPERKEN: CONTROLEER ALLE SCHROEVEN VAN DE BEVESTIGINGSKLEM EN DE STANG. WIEBELENDE VENTILATOR UITBALANCEREN: Een Balanceerset wordt bij de ventilator geleverd; volg de volgende procedure bij het balanceren van de ventilator: 1) Installeer de ventilator zonder de lichtkap voordat de ventilator gebalanceerd wordt. 2) Bepaal de vier punten op de houder (punt A, B, C & D). Gebruik één gewicht uit de kit en plak dit aan de rand van de plaat (bijvoorbeeld punt A), als het wiebelen erger wordt, breng het gewicht dan aan op het tegenovergesteld punt (bijvoorbeeld punt B), als het wiebelen erger wordt, ga dan naar punt C of D, als het wiebelen minder wordt, breng het gewicht dan op die plek aan. 3) Nadat de ventilator gebalanceerd is, kunt u de lichtkap aanbrengen. 65 | P a g e Ver 1.0 Fanaway LED EVO1 Installation Instructions GELUID: Als het stil is (voornamelijk ‘s nachts) kan het zijn dat de ventilator soms wat geluid maakt. Variaties in elektrische stroom kunnen geluid veroorzaken. Dit is normaal. Laat de ventilator 24 uur “wennen”, de meeste geluiden zullen daarna verdwenen zijn. De fabrieksgarantie dekt werkelijke defecten en geen klachten zoals het geluid van de draaiende motor – alle elektrische motoren maken geluid. ONDERHOUD EN REINIGING 1) Periodieke reiniging van uw ventilator is het enige vereiste onderhoud. Gebruik een zachte borstel of een stofdoek om krassen te voorkomen cleaning of your ceiling fan is the only maintenance required. Schakel de ventilator uit voordat u begint met schoonmaken. 2) Gebruik geen water voor het reinigen van uw ventilator. Dit kan de motor of de schoepen beschadigen en elektrische schokken veroorzaken. 3) De motor heeft een permanent geolied kogelgewricht. Smeren niet nodig OPMERKING: Zet de stroom altijd uit en ontkoppel de stekker voordat u onderhoud uitvoert. TECHNISCHE INFORMATIE VENTILATOR modellen FANAWAY LED FAN Nominale Spanning Nominaal vermogen (motor) Licht vermogen 60W 40W, 3000K/4000K LED aandrijfmodel: ES0363D-E090 220-240VAC GARANTIE IN AUSTRALIE / NIEUW ZEELAND – Zie aparte GARANTIEVERKLARING. IN EUROPA – Als u een Europese klant bent, neem contact op met de verkoper voor de garantie. 66 | P a g e Ver 1.0