1
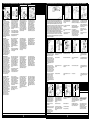
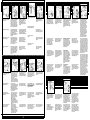
SUPPORT, TERMS & CONDITIONS ● TECHNISCHER KUNDENDIENST UND
GESCHÄFTSBEDINGUNGEN ● ONDERSTEUNING, VOORWAARDEN ● ASSISTANCE ET
CONDITIONS GENERALES
This Omnisat Semitronic Digital is guaranteed against defective parts or workmanship for 2 years from
time of purchase. (This excludes any malfunction caused by improper use, accidental or malicious
damage or removing of the system casing). This does not affect your statutory rights.
If you do experience a problem with the product contact Maxview Customer Services on (01553) 811000.
Please make sure you have the following ready when you call:
Your name ● address ● telephone number ● Model number and Serial Number
● Date of purchase ● Clear and concise details of the fault ● Who installed the product?
All instructions and models are subject to change. In accordance with policy of
progressive product, the company reserve the right to alter specifications.
Copyright© these instructions are the sole property of Maxview Ltd and may not be
reproduced.
B2555 &
B2555/M
Auf die Omnisat Semitronic Digital mit Handkurbelsystem wird mit Hinblick auf
Material- und Verarbeitungsfehler eine Garantie von 2 Jahren ab Verkaufsdatum gewährt. (Diese
schließt Fehlfunktionen aus, die durch unsachgemäßen Gebrauch, versehentliche oder mutwillige
Beschädigung oder durch Entfernung des Anlagengehäuses zustande kommen). Ihre gesetzlich
festgelegten Rechte werden damit nicht beeinträchtigt.
Tritt ein Problem mit diesem Produkt auf, kontaktieren Sie den Maxview-Kundendienst
unter 08145-8840.
Halten Sie für Ihren Anruf die folgenden Informationen bereit:
Ihren Namen ● Adresse ● Telefonnummer ● Nummer des Modells und Seriennummer
Kaufdatum ● Klare und kurzgefasste Beschreibung der Fehlfunktion ● Wer hat das ProduktInstalliert?
OMNISAT SEMITRONIC
DIGITAL SEMI-AUTOMATIC
SATELLITE SYSTEM
HANDBUCH FÜR SAT-ANLAGE
OMNISAT TWISTER
HANDBOEK VOOR OMNISAT
TWISTER SATELLIETSYSTEEM
MANUALE PER IMPIANTO
SATELLITARE OMNISAT TWISTER
Änderungen der Bedienungsanweisungen und Modelle sind vorbehalten. In Übereinstimmung mit
dem Grundsatz von Fortschritten bei Produkten behält sich das Unternehmen das Recht vor,
Spezifikationen zu ändern.
Please keep these instructions safe for future reference.
Recycle packaging where facilities exist.
Das Copyright© dieser Anweisungen ist das alleinige Eigentum von Maxview Ltd. Die
Anweisungen dürfen nicht reproduziert werden.
Bewahren Sie diese Anweisungen als Beleg sicher auf.
Führen Sie diese Verpackung der Wiederverwertung zu, wo die entsprechenden
Einrichtungen vorhanden sind.
Dit Omnisat Semitronic Digital satellietsysteem is gegarandeerd vrij van defecte
onderdelen of foutieve afwerking gedurende 2 jaar vanaf de aankoop. (Dit is met
uitzondering van alle defecten die worden veroorzaakt door verkeered gebruik, onvoorzichtigheid of
opzettelijke beschadiging of het verwijderen van de behuizing van het systeem). Dit heeft geen invloed
op uw wettelijke rechten.
Als u problemen ondervindt met het product neemt u contact op met Maxview Customer Services op
08145-8840.
Zorg dat u het volgende bij de hand hebt:
Uw naam ● adres ● telefoonnummer ● modelnummer en serienummer
● Aankoopdatum ● Duidelijke en beknopte details van het defect ● Wie het product heeft geînstalleerd
Ce système Omnisat Semitronic Digital est garanti contre la main d’oeuvre est les pièces défectueuses pendant
une période de 2 ans à compter de sa date d’achat. (Ceci exclut les pannes résultant d’une mauvaise utilisation,
de dommages accidentels ou malicieux ou du retrait du boîtier du système). Ceci n’affecte pas vos droits
statutaires.
En cas de problème lors de l’utilisation du produit, veuillez contacter Maxview Customer Services au
08145-8840.
Assurez-vous d’avoir les informations suivantes à portée de main lorsque vous téléphonez:
votre nom ● votre adresse ● votre numéro de téléphone ● Le numéro du modèle et son
numéro de série ● La date d’achat ● Le détail clair et concis de la panne -La personne qui a installé le produit.
Toutes les instructions et les modèles peuvent faire l’objet de changements.
Alle instructies en modellen zijn onderhevig aan wijzigingen. Conform het beleid voor progressieve
producten, behoudt het bedrijf zich het recht voor om de specificaties te wijzigen.
Copyright© deze instructies zijn eigendom van Maxview Ltd en mogen niet gekopieered worden.
Bewaar deze instructies op een veilige plaats zodat u ze indien nodig kunt raadplegen.
Recycleer de verpakking indien mogelijk.
Copyright© ces instructions sont la propriété exclusive de Maxview Ltd et leur reproduction est
strictement interdite.
GB
Veuillez conserver ces instructions pour référence ultérieure.
Veuillez recycler l’emballage si possible.
● Date of purchase:
D
The Omnisat Semitronic satellite system has been designed for
permanent fixing through the roof of your vehicle. It will receive
satellite reception almost anywhere in Europe (see footprints). The
Omnimast is an optional accessory to provide support for the ‘Semitronic’
dish. Should you have any difficulty installing your Omnisat satellite system please contact our Customer Helpline on 01553 811000.
For your own records - Please fill in the following, as this information may be required if a problem with the system should occur
● Where purchased:
FIXING INSTRUCTIONS
● Serial No*.:
MONTAGEANLEITUNG
De Omnisat Semitronic wordt stevig op een in het voertuig ingebouwde
schuifmast 34mm gemonteerd. De schotel ontvangt bijna overal in Europa
TV satellieten (zie spotbeams). Indien er vragen zijn over de installatie of
over het gebruik kunt U bellen met uw dealer.
● Who installed the product:
12V
* Your Serial No is located on the zone map supplied
24V
Beleg zu Ihrer Information - Bitte füllen Sie die folgenden Felder aus - diese Angaben werden einem eventuellen Auftreten eines
Problems mit Ihrer Anlage benötigt
● Kaufort:
● Kaufdatum:
● Seriennummer*.:
NL
● Wer hat das Produkt installiert:
12V
* Ihre Seriennummer befindet sich auf der mitgelieferten Zonenkarte
24V
Ter informatie - Noteer de volgende zaken, aangezien deze informatie vereist is indien zich een probleem met het systeem voordoet
● Waar het werd aangekocht:
● Aankoopdatum:
F
MONTAGEHANDLEIDING
● Serienr*.:
INSTRUCTIONS DE MONTAGE
L’Omnisat Semitronic se monte sur un mât coulissant de 34mm intégré à
l’intérieur d’un véhicule. Presque partout en Europe, elle capte les
programmes émis par les satellites de TV (voir zone balayée par les
satellites). L’Omnisat Semitronic est une antenne satellite qui se monte sur un
mât extérieur ayant un diamètre de 50mm maximum.
Die Omnisat Semitronic wird fest auf einen im Fahrzeug eingebauten
Schiebemast 34mm montiert. Sie empfängt fast überall in Europa
TV-Satelliten (siehe spotbeams). Sollten sich bei der Installation oder im
Gebrauch Fragen ergeben,
wenden Sie sich an den Service unter Telefon-Nr 08145 8840
● Wie het product heeft geïnstalleerd:
12V
* Uw Serienr bevindt zich op de meegeleverde zonekaart
24V
Pour vos propres archives - Veuillez remplir le coupon ci-dessous car ces informations pourront être utiles en cas de probléme au niveau
du système
● Lieu d’achat:
● Date d’achat:
● Numero de série*.:
● Qui a installé le produit:
12V
* Votre Numéro de série se trouve-t-il sur le plan des zones fourni
8
24V
9111290 Iss 1
1
MAXVIEW LIMITED
SETCHEY, KING’S LYNN
NORFOLK, PE33 0AT, ENGLAND
CUSTOMER HELPLINE
(01553) 811000
e-mail: [email protected]
website: www.maxview.ltd.uk
VERTRIEBS GMBH,
MAXVIEWVERTRIEBS
MAXVIEW
GMBH,
AUGSBURGERSTRASSE
STRASSE 11
AUGSBURGER
11
D-82291, MAMMENDORF, GERMANY
D-82291, MAMMENDORF, GERMANY
Tel: 08145 8840
Tel:
08145 8840
Fax: 08145 8845
Fax:
08145
8845
e-mail:
[email protected]
e-mail:
[email protected]
www.maxview.de
website: www.maxview.de
COMPONENT ASSEMBLY DIAGRAM
EXPLOSIONSZEICHNUNG
ONDERDELENLIJST
SCHEMA D’ASSEMBLAGE DES COMPOSANTS
1
2
3
4
SYSTEM PARTS
LIST
LISTE DER
ANLAGENBESTANDTEILE
1
2
3
4
5
6
7
8
9
10
11
12
13
14
15
16
17
18
19
20
21
22
23
24
25
1
2
3
4
5
6
7
8
9
10
11
12
13
14
15
16
17
18
19
20
21
22
23
24
25
Dish Assembly
LNB
Ski guide
Mirror pads
Motor bracket assembly
Allen Key Bolt
6mm Allen Key
Motor cable with plug connector
Coax cable with ‘F’ connector
5mm Allen Key
Motor bracket door
Rubber Seal
Plastic sleeve fixing screws
Plastic sleeve
3mm Flat sealing washer
Metal retaining washer
6mm Flat or tapered washer
Vehicle roof
Plastic retaining nut
Plastic spanner
Travelling position mast stickers
Clamp
Map sticker
Mast
Control box
SCHEMA MONTAGE
ONDERDELEN
5
1
2
3
4
5
6
7
8
9
10
11
12
13
14
15
16
17
18
19
20
21
22
23
24
25
7
6
10
11
8
12
9
13
14
15
16
17
18
Sat-Spiegel
LNB
Himmelwegweiser
Doppelseitiger-Klebestreifen
Antriebseinheit
Imbus-Schraube
6mm Imbus-Schlüssel
Steuerkabel mit Stecker
Sat-Kabel mit Schraubstecker
5mm Imbus-Schlüssel
Gehäusedeckel
Dichungsmanschette
Kreuzschrauben
Dachdurchführung
Flache Dichtung
Edelstahlteller
Flache oder schräge Dichtung
Caravandach
Kunststoffmutter
Kunststoffschlüssel
Naufkleber für Fahrstellung
Klemmhalter
Landkartenaufkleber
Mast
Steuergerät
NOMENCLATURE DU
SYSTEME
Satellietschotel
LNB
Hemel gids
Schotelbeschermer
Aandrijving
Inbusbout
6mm Inbusseleutel
Stuurkabel met stekker
Coax kabel met ‘F’ connectors
5mm Inbussleutel
Deksel van omhulsel
Rubberen afdichtmanchet
Schroeven voor kunststof dakdoorvoer
Kunststof dakdoorvoer
Rubberen afdichting
Metalen schoteltje
Vlakke of schuine opvulschijven
Caravandak
Schroefmoer
Kunststof sleutel
Sticker voor rijpositie
Klemmoer
Landkaartsticker
Mast
Stuurinrichting
1
2
3
4
5
6
7
8
9
10
11
12
13
14
15
16
17
18
19
20
21
22
23
24
25
Réflecteur
Convertisseur
Guide de ciel
Ruban adhésif á double face
Boîter du moteur
Vis à pans creux
6mm Clé mâle
Câble de moteur avec fiche
Câble satellite avec fiche à visser
5mm Clé mâle
Unité moteur
Capuchon d’étanchéité
Vis à têtes en croix
Passe-toit
Joint plat
Rondelle métallique inoxydable
Joint plat ou incliné
Toit de caravane
Ecrou en plastique
Clé en plastique
Autocollant position ‘’route”
Système de blocage
Autocollant géographique
Mât
Boîte de commande
TROUBLESHOOTING ● PROBLEMLÖSUNGEN ● STORINGZOEKEN ● DEPISTAGE DE PANNES
Problem:
Solution:
Poor or no picture, although possible correct dish alignment
On page 5 of the instruction manual “Set-up and Travelling Position”, follow steps 8 to 12 to
completely lower the dish (the picture will be lost automatically). If the control box does not
show the down limit symbol, please ensure that there are no obstacles obstructing the progress
of the dish. Once obstacles have been removed, repeat the dish lowering procedure. When the
control box display is showing the down limit symbol, repeat the dish alignment procedure.
Problem:
Lösung:
Schlechtes Fernsehbild obwohl die richtige Neigung eingestellt ist
Sat-Spiegel ganz einfahren (automatische Programmrückstellung). Folgen Sie den Schritten 8 bis 12 in
der Bedienungsanleitung. Sollte das Bedienteil nicht die Endposition anzeigen, vergewissern Sie sich
ob kein Gegenstand den Absenkvorgang behindert. Ist das Dach frei von Gegenständen den
Absenkvorgang wiederholen. Wenn die Rückstellung erfolgreich durchgeführt wurde Sat-Antenne
nochmals ausrichten.
Problem:
Solution:
Satellite dish does not react
Check that power is reaching the control box and if possible, make sure that the voltage is
between 12/24V d.c. Make sure that the control cable and power cables are correctly installed.
Problem:
Lösung:
Sat-Antenne reagiert nicht
Spannungsversorgung überprüfen.
Problem:
Solution:
No signal being received
First check that the dish is pointing in a southerly direction with a direct line of sight with the
satellite. Ensure that there are no obstacles such as trees, houses obstructing the line of sight
between the dish and the satellite. Please bear in mind that the Semitronic Digital has an offset
dish. When the dish is in the vertical (90˚) position, the reception beam is at an elevation of 23˚
(it’s offset value). The elevation angle shown on the Zonemap is only correct when the vehicle is
level, any angle from the horizontal will need to be taken into account. Check that the TV and
satellite receiver is compatible with each other. If using a scart lead, the TV must be switched to
the AV channel.
Problem:
Lösung:
Kein Fernsehbild zu empfangen
Vergewissern Sie sich das die Sicht Richtung Süden frei ist. Es dürfen kein Hindernisse wie Bäume,
Häuser usw. die Sicht zum Satelliten behindern. Achten Sie darauf das es sich bei der Semitronic um
eine Offset-Antenne handelt d.h. wenn die Antenne steht (90˚) dann schaut Sie im Winkel von 23˚
zum Satellit. Stellen Sie sicher das der Fernseher und Sat-Receiver aufeinander abgestimmit sind. Bei
Verwendung eines Scart-Kabel muß beim TV-Gerät auf AV geschaltet werden.
Probleem:
Oplossing:
Slecht beeld alhoewel de juiste hoek is ingesteld
Sat-schotel geheel opnieuw instellen (automatische programma terugstelling). Volgt U stappen
8 tot en met 12 van de gebruiksaanwijzing. Indien het bedieningsdeel niet de eindpositie aanwijst,
controleer dan of er geen voorwerp is, die de voortgang van het neerklappen verhindert. Is het
dak vrij van voorwerpen, dan de handeling herhalen. Zodra de schotel succesvol is neergeklapt de
satellietschotel opnieuw uitrichten.
Problème:
Solution:
L’image du téléviseur est mauvaise alors que la parabole est bien orientée
Faire descendre complètement la parabole (programme automatique). Suivre les étapes 8 à 12 du
mode d’emploi. Si l’élément de commande n’indique pas la position finale, s’assurer que rien ne
gêne la descente. S’il n’y a pas d’objets sur le toit, répéter le procédé de descente. Une fois l’antenne
redescendue, orienter de nouveau la parabole.
Probleem:
Oplossing:
Satellietschotel reageert niet
De spanningsvoorziening controleren.
Problème:
Solution:
L’antenne ne réagit d’image
Vérifier l’alimentation électrique.
Probleem:
Oplossing:
Er is geen televisiebeeld te ontvangen
Controleer of het zicht in de richting van het zuiden vrij is. Er mogen geen obstakels voorkomen
in de richting van de satelliet zoals: bomen, huizen etc. Let u erop u dat bij de semitronicantenne
te maken heeft met een offset-antenne. Dat betekent dat als de antenne loodrecht staat
(90 graden), en deze in een hoek van 23 graden naar de satelliet gericht staat. Controleer of de
televisie en de Sat-receiver op elkaar zijn afgestemd. Bij gebruik van enn Scartkabel moet de
televisie op AV ingeschakeld zijn.
Problème:
Solution:
Aucune réception d’image
S’assurer qu’il n’y a aucun obstacle (arbes, maisons etc) entre l’antenne et le sud. Ne pas oublier
qu’il s’agit d’une antenne semitronic: c’est-à-dire que si l’antenne est en position verticale (90˚),
cela signifie qu’elle forme un angle de 23˚ avec le satellite. Vérifier que le téléviseur est réglé sur le
démodulateur. En cas de câble scart, le téléviseur doit être sur AV.
IMPORTANT INFORMATION - PLEASE READ ● WICHTIGE INFORMATIONEN - BITTE LESEN
BELANGRIJKE INFORMATIE - LEES AANDACHTIG ● INFORMATIONS IMPORTANTES - A LIRE AVEC SOIN
ADVICE & WARNINGS ● EMPFEHLUNGEN & WARNHINWEISE
ADVIES EN WAARSCHUWINGEN ● CONSEILS ET AVERTISSEMENTS
● On unpacking unit check for transport damage
● Untersuchen Sie die Anlage beim Auspacken auf Transportschäden
● On installation personal safety should be considered when using power/hand tools and working at height
● Berücksichtigen Sie bei dem Zusammenbau mit (Elektro-) Werkzeugen und beim Arbeiten in
der Höhe die Aspekte Ihrer eigenen Sicherheit
● Use straps or tie down system if the vehicle is being towed or moved at speed in
a backwards direction. (i.e. Rail transport etc.)
● Do not use abrasive cleaners as they may damage the product surfaces
● Falls das Fahrzeug gezogen wird oder mit großer Geschwindigkeit rückwärts fährt, müssen
Gurte oder ein anderes Festhaltesystem verwendet werden. (z.B. beim Transport per Bahn)
● Do not use Solvent based cleaning agents on plastic parts
● Verwenden Sie keine scharfen Reinigungsmittel, da diese die Produktoberflächen beschädigen können
● If high winds are forecast lower dish into park mode
● Verwenden Sie für Bestandteile aus Kunststoff keine Reinigungsmittel auf Lösungsmittelbasis
● Check for overhead obstacles and hazards before raising unit
● Bei starkem Wind muß der Sat-Spiegel abgeklappt werden
● If you cannot receive a signal or good picture quality check your settings
● Überprüfen Sie vor jedem Heben der Schüssel, ob über Kopf Hindernisse oder Gefahren vorhanden sind
● Use recommended accessories
● Empfangen Sie kein gutes Signal oder ist die Bildqualität schlecht, sollten Sie Ihre Einstellungen überprüfen
● We recommend that you store the supplied Allen keys in your vehicle. In the event of a problem,
the system can then be easily removed from the roof.
● Verwenden Sie das empfohlene Zubehör
● Controleer bij het uitpakken van het toestel op beschadiging tijdens het transport
● Vérifiez la présence éventuelle de détériorations au moment du déballage de l’unité
● Let tijdens de installatie op uw persoonlijke veiligheid wanneer u elektrisch/
handgereedschap gebruikt en op hoogtes werkt
● Lors de l’installation, veillez à votre sécurité personnelle quand vous utilisez des outils
électriques/manuels et que vous travaillez en hauteur
● Gebruik riemen of spansystemen als het voertuig aan een snelheid achterwaarts
wordt versleept of verplaatst (d.w.z. transport op rails, enz)
● Utilisez des sangles ou liez le système si le véhicule doit être remorque ou déplacé
en marche arrière à grande vitesse (ex: transport ferroviaire, etc)
● Gebruik geen schuurmiddelen aangezien deze het oppervlak van het product kunnen beschadigen
● N’utilisez pas de produits de nettoyage abrasifs pour éviter d’endommager les surfaces du produit
● Gebruik geen schoonmaakproducten op basis van oplosmiddel op plastic onderdelen
● N’utilisez pas d’agents de nettoyage à base de solvant sur les composants en plastique
● Als er sterke windstoten voorspeld zijn, brengt u de schotel omlaag in de parkeerstand
● Abaissez la parabole en mode de repos si l’on prévoit un vent fort
● Controleer op belemmeringen en obstakels alvorens het toestel omhoog te brengen
● Vérifiez la présence éventuelle d’obstacles en hauteur et de dangers avant d’installer l’unité
● Als u geen signaal ontvangt of de kwaliteit van het beeld niet goed is, controleert u uw instellingen
● Si vous ne captez pas de signal ou si l’image que vous recevez n’est pas de bonne qualité, vérifiez vos réglages
● Gebruik de aanbevolen accessoires
● Utilisez les accessoires recommandés
● Wir empfehlen Ihnen den mitgelieferten Inbusschlüssel-Satz im Fahrzeug zu verstauen um bei einer Fehlfunktion
die Anlage vom Dach nehmen zu können.
19
20
21
22
23
25
24
● Wij raden U aan om de meegeleverde imbussleutelset in de caravan/camper te bewaren zodat de schotel bij ● Nous recommandons de ranger dans le véhicule le jeu de clés livré avec l’antenne. Cela permet de
démonter l’antenne du toit en cas de mauvais fonctionnement.
een defekt van het gehaald kan worden.
2
7
USER INSTRUCTIONS ● BEDIENUNGSANLEITUNG ● HANDLEITUNG ● USER INSTRUCTIONS
1
3
2
4
MAST INSTALLATION INSTRUCTIONS ● INSTALLATIONSANLEITUNG ● INSTALLATIEHANDLEIDING ● INSTRUCTONS D’INSTALLATION
1
2
4
3
2
secs
2 secs
2 secs
Dish alignment
Turn on the TV and receiver. On the
receiver tune into one of the channels
being transmitted from the desired
satellite (see receiver instructions for
channel numbers). Look at the map
sticker to read off the zone elevation
angle for where you are. Press the dish
up button for at least 2 seconds. When
display shows the elevation angle
required, stop the dish by momentarily
pressing the dish down button. Rotate
the mast until a picture appears. Lock
using the plastic mast spanner. Fine
tuning is possible by pressing the up or
down button momentarily until the best
picture is obtained.
If the chosen elevation is often repeated
it can be saved by pressing the AUTO
button (for at least 2 seconds). The
display flashes once when the setting
has been saved. To repeat this setting
from another elevation momentarily
press the AUTO button - the dish will
automatically seek the position and stop
when reached.
Spiegel ausrichten
TV-Gerät und Receiver einschalten.
Anhand der Frequenzliste die
Kanalnummer des gewünschten
Programms heraus lesen und am
Receiver einstellen (siehe Receiver
Anleitung). Vom Landkarten-Aufkleber
die Elevation des Standortes ablesen.
Knopf ‘Dish Up’ mindestens 2 Sekunden
drücken. Der Spiegel klappt auf.
Erscheint im Display die abgelesene
Elevation. Knopf ‘Dish Down’ kurz
drücken. Mast nun drehen bis das Bild
erscheint. Zur Bildoptimierung mittels
der Knöpfe ‘Dish Up’ und ‘Dish Down’
die Feinausrichtung durchführen und
Mastklemm-Mutter festziehen.
Bleibt man am gleichen Standort, wird
mittels des AUTO-Knopfes die
Einstellung gespeichert (MemoryFunktion). Zur Bestätlgung blinkt das
Display kurz auf. Bei Aufklappen des
Spiegels mittels des Knopfes ‘AUTO’
öffnet sich der Spiegels dann
automatisch auf die abgespeicherte
Neigung.
Uitlijnen Van De Schotel
Zet de TV en de ontvanger aan. Stel de
ontvanger in op een van de kanalen die
door de gewenste satelliet worden
uitgezonden (zie ontvangerinstructies
voor kanaalnummers). Zoek op de
kaartsticker de zone elevatiehoek voor
de plaats waar u bent. Druk de
‘schotel op’ knop minstens 2 seconden
in. Wanneer de display de gewenste
elevatiehoek toont dient u de schotel te
stoppen door even op de ‘schotel neer’
knop te drukken. Roteer de mast tot
een beeld op het scherm komt.
Vergrendel met de plastic mastsleutel.
Fijninstelling is mogelijk door indrukken
van de ‘op’ of ‘neer’ knoppen tot het
beste beeld wordt verkregen.
Indien de gekozen elevatie vaak wordt
herhaald kan deze worden vastgelegd
door de AUTO knop minstens 2
seconden in te drukken. De display zal
eenmaal flitsen na vastleggen van de
instelling. Om deze instelling op een
andere plaats te herhalen dient u even
op de AUTO knop te drukken - de
schotel zal de positie automatisch
zoeken en stoppen wanneer deze is
bereikt.
Comment orienter le réflecteur
Allumer le télèviseur et le
démodulateur. A l’aide de la liste des
fréquences, sélectionner le canal du
programme désiré et accorder le
démodulateur (voir mode d’emploi du
démodulateur). Regarder l’angle
d’élévation du lieu sur l’autocollant
géographique. Appuyer et maintenir
appuyé le bouton “dish up” au moins 2
secondes. Le réflecteur s’ouvre. Quand
l’angle d’élèvation apparaît sur
l’indicateur, appuyer rapidement sur le
bouton “dish down”. Puis, faire pivoter
le mât jusqu’à ce que l’image
apparaisse sur l’écran. Pour optimiser la
qualité de l’image, activer les
boutons “dish up” et “dish down”.
Bloquer le mât en serrant l’écrou.
Si on reste au même endroit,
mémoriser l’orientation du réflecteur en
appuyant sur le bouton AUTO (fonction
mémoire). La mémorisation est
confirmée sur l’indicateur qui clignote
un instant. Pour ouvrir le réflecteur,
appuyer sur le bouton AUTO et le
réflecteur reprend automatiquement sa
position mémorisée.
N.B. Auto seek will not function when
the down or up limit symbol is displayed
- wait until the standby LED illuminates.
Should you forget to press the down
button to stop the upward drive of the
dish, it will automatically stop at its
highest position when the top limit
switch is triggered. The display will
show the top limit symbol (shown
above). Press the dish down button
(for at least 2 seconds) until the dish
starts to drive. Momentarily press the
dish up button to stop the dish at the
required elevation angle.
Before travelling, turn the mast until
the black arrow stickers line up with
each other to ensure the ski rests on
the ski guide. Lower the dish by
pressing the dish down button for at
least 2 seconds. The dish will drive
down and automatically stop at its
lowest position when the down limit
switch is triggered and the down limit
symbol is displayed. Fasten the mast
into position using the plastic spanner.
N.B. Het automatisch opzoeken zal niet
functioneren als de ‘op-limiet’ of
‘neer-limiet’ symbolen worden getoond
- wacht tot de standby LED brandt.
Attention: Cette fonction mémoire
fonctionne seulement en mode
veilleuse. Attendre jusqu’à ce que le
lampe DEL s’allume.
The inside wall of a wardrobe is the
ideal location for fixing the Omnimast.
If the chosen wall is weak, first secure
a wood panel.
Tape template to roof inside the wardrobe.
Leave enough distance from the centre of
the location hole to the adjacent corner
wall to allow easy use of the plastic spanner.
Berücksichtigen Sie bei der Entscheidung, wo die Sat-Antenne montiert werden soll, sowohl
Hindernisse auf dem Dach, als auch im Inneren des Fahrzeugs. Für die Montage des
Mastens im Inneren des Fahrzeugs empfiehlt sich der Kleiderschrank oder ein großer
Hängeschrank. Die Sat-Antenne muß mit Ausrichtung nach hinten, d.h. zur Rückseite des
Fahrzeugs hin, montiert werden. Achten Sie bei der Montage darauf, daß der Spiegel der
Sat-Antenne im abgeklappten Zustand nicht über die Fahrzeugkanten hinausragt.
Eine zu schwache Schrankwand muß
verstärkt werden.
Bohrschablone der Anleitung
entnehmen und mit Klebeband an der
Kleiderschrank-Decke befestigen.
Een te zwakke kastwand moet versterkt
worden.
Het boorsjabloon van de
gebruiksaanwijzing met plakband aan
het plafond van de kleerkast bevestigen.
Si la paroi du placard n’est pas assez
solide, il faut la renforcer.
Prendre le gabarit de perçage joint aux
instructions de montage. Le piacer
contre la paroi du plafond du placard
et le coller avec du ruban adhésif.
Bepaal waar u uw satellietsysteem wilt installeren, let daarbij op mogelijke belemmeringen op het dak en in het voertuig. Een vrije ruimte in een kast is de meest veilige,
praktische en onopvallende plaats. Denk er echter aan dat u deze niet te dicht bij de
rand van het dak monteert, aangezien de schotel kan uitsteken. Het systeem MOET naar
de achterzijde van het voertuig wijzen.
Auto elevation position will be lost when
power supply is disconnected.
Achtung: Dieses Memory-Funktion geht
nur im Standby-Modus. Warten bis die
LED-Anzeige leuchtet.
Decide where you wish to mount your satellite system, taking into account obstacles
both on the roof and inside the vehicle. A cupboard space is ideally the safest, most
practical, and most discrete location we recommend. Although take into account that
you do not mount too close to the edge of the vehicle roof, as there could be overhang
from the dish. The system MUST BE mounted pointing towards the rear of the vehicle.
Solte beim Aufklapp-Vorgang das
Drücken der Taste ‘Dish Down’ bei
Erreichen der Elevation unterblieben
sein, klappt der Spiegel bis zur
Endposition auf. Im Display erscheint
dann das abgeblidete EndstellungSymbol. Zum Abklappen des Spiegels
auf die gewünschte Elevation den Knopf
‘Dish Down’ mindestens 2 Sekunden
drücken und bei Erreichen dieser den
Vorgang durch Drücken des Knopfes
‘Dish Up’ stoppen.
Indien u vergeet de ‘neer’ knop in te
drukken om het verhogen van de
schotel te stoppen zal deze na
aanzetten van de toplimietschakelaar
automatisch in de hoogste positie
stoppen. De display zal het hoger
afgebeeld toplimiet symbool tonen.
Druk minstens 2 seconden op de
‘schotel neer’ knop tot de schotel in
beweging komt. Druk even op de
‘schotel op’ knop om de schotel in de
gewenste elevatiehoek te stoppen.
Si on n’interromp pas l’ouverture avec
le bouton “dish up”, le réflecteur
continue à s’ouvrir jusqu’à ouverture
maximale. Le symbole “ouverture
maximale” apparaît sur l’indicateur.
Pour rabattre le réflecteur dans la
position désirée, appuyer sur le bouton
“dish down” et le maintenir appuyé au
moins 2 secondes. Une fois l’angle
d’élévation obtenu, stopper la
manoeuvre en appuyant sur le bouton
“dish up”.
Vor der Weiterfahrt Mastklemm-Mutter
lösen und Spiegel antgegen die
Fahrtrichtung stellen. Den Knopf ‘Dish
Down’ 2 Sekunden drücken. Der
Spiegel klappt automatisch ganz ab und
das abgebildete Symbol erscheint im
Display. Mastklemm-Mutter anziehen.
Draai vóór het rijden de mast tot de
zwarte pijl stickers met elkaar uitgelijnd
zijn om te garanderen dat het wiel op
de wielgeleider rust. Verlaag de schotel
door minstens 2 seconden op de
‘schotel neer’ knop te drukken. De
schotel zal zakken en automatisch in de
laagste positie stoppen wanneer het
neer-limiet symbool wordt getoond na
gebruik van de neer-limiet schakelaar.
Avant de reprendre la route, desserrer
l’écrou qui bloque le mât et positionner
le réflecteur à l’envers de la marche du
véhicule. Appuyer sur le bouton “dish
down” et le maintenir appuyé au moins
2 secondes. Le réflecteur se rabat
complètement automatiquement. Le
symbole correspondant apparaît sur
l’indicateur. Bloquer le mât en serrant
l’écrou.
5
6
8
7
Drill a small pilot hole through the
roof from inside the vehicle. This will
clearly mark the hole centre position
on the outside of the vehicle roof.
Entsprechend der Markierung auf der
Bohrschablone ein 3-4mm großes Loch
durch die Decke bohren.
Volgens de markering op het
boorsjabloon een 3-4mm gat in het
plafond boren.
Percer un avant-trou au centre du
cercle dessiné.
9
On the roof of the vehicle, drill a large
hole through the roof using a 38-40mm
hole saw OR drill a series of small holes
and file out to 38-40mm diameter.
From outside the vehicle, push the
longer part of the plastic sleeve through
the hole in the roof.
Inside the vehicle, loosely screw the
plastic retaining nut onto the sleeve.
From the roof, push the mast through
the sleeve.
Inside the vehicle, slide the plastic
spanner and clamp body onto the
mast.
Vorbohrung mit einer Lochsäge auf
38-40mm erweitern. Falls keine Lochsäge
vorhanden ist, einen 37mm Kreis um die
Vorbohrung anzeichnen und mit einem
3-4mm Bohrer perforieren. Anschließend
Loch mittels Raspel/Feile auf 38-40mm
erweitern.
Mast von oben einführen.
Rändelmutter von unten aufschrauben.
Von oben Dachdurchführung mittig
einsetzen.
Erst Kunststoffschlüssel und dann den
Klemmhalter auf das Rohr schieben.
Het voorgeboorde gat tot 38-40mm
vergroten. Indien u geen speciaal gereedschap hiervoor heeft, maak dan een cirkel
van 37mm om het gat van het boorsjabloon. Boor daarna met een koortje van
3-4mm deze cirkel rond. U kunt het gat
daarna met een vijf groter maken.
De mast van bovenaf naar beneden
doorvoeren.
De schroefmoer van de onderkant
vastschroeven.
Van boven de dakdoorvoer plaatsen.
Eerst de kunststof ‘vastzethandel’ en
daarna de klemhouder om de mast
schuiven.
De l’extérieur, percer le trou définitif de
38-40mm de diamètre à l’aide d’un
coupe-cercle. Si vous n’avez pas de
coupe-cercle, dessiner un cercle de
37mm autour de l’avant-trou. Perforer
le cercle de petits trous avec un petit
foret. Limer le bord obtenir un cercle de
38-40mm.
De l’extérieur, enfiler le mât.
De l’intérieur, bloquer avec l’écrou en
plastique.
Placer le passe-toit.
De l’intérieur, enfiler par-dessus le mât
la clé en plastique, puis le système de
blocage.
10
11
13
12
200mm
300mm
6
Slide the spanner and clamp body up
the mast until approximately 200mm
below the ceiling. Use a spirit level to
ensure that the mast is vertical to the
ground (and vehicle wall). Make sure
the vehicle is standing truly level.
Mark the screw hole positions with a
bradawl then drill the marked screw
hole positions. Drill appropriate large
sized holes if you need to use cavity
fixing plugs.
Screw clamp body into position with the
screws provided.
Loosen the plastic retaining nut on the
bottom of the sleeve. From the roof,
adjust the mast height to approximately
300mm above the roof of the vehicle.
Remove the sleeve.
De schroefmoer aan de onderkant van
de dakdoorvoer weer losschroeven en
de dakdoorvoer weer verwijderen.
De mast nu tot 300mm boven het
dakinschuiven.
Klemmhalter bis 200mm unter die
Decke schieben.
Schrauben-Löcher vorstechen.
Klemmhalter festschrauben.
De klemhouder naar wens, maar tot maximaal 200mm onder het dak schuiven.
In de klemhouder de schroefgaten
markeren c.q. met een priem indrukken.
De klemnouder vastschroeven.
Rändelmutter abschrauben und
Dachdurchführung wieder entfernen.
Mast 300m über Dach schieben.
Vérifier que le mât soit bien
perpendiculaire au trou de passage.
Maintenir le système de blocage à
env.200mm du plafond.
Marquer l’emplacement de ce système
de blocage.
Visser le système de blocage.
Toujours de l’intérieur, dévisser l’écrou
en plastique bloquant le passe-toit. De
l’extérieur, retirer le capuchon
d’étanchéité du passe-toit. Dévisser les
6 vis devenues alors visibles et faire
sortir du toit le passe-toit en le tirant.
3
17
14
15
6
18
16
7
9
8
10
2
secs
380mm
Apply silicon sealant on the roof of the
vehicle around the hole, approximately
10mm from the edge.
Dichtmittel um die Bohrung auftragen.
Butylkit om het gat aanbrengen (liever
geen siliconen of andere kit).
Appliquer une pâte étanche autour
du trou.
For flat roofs, slide the 6mm flat
sealing washer over the mast followed
by the metal retaining washer. For
sloping roofs use enough tapered
washers to ensure the mast is vertical.
Make sure the washer holes line up
with each other and with the holes in
the metal retaining washer. Push firmly
down to bed into the silicon sealant.
Place the 3mm flat washer over the
mast followed by the plastic sleeve.
Align the fixing holes with the holes in
the retaining plate and sealing
washer(s). Drill pilot holes and screw
the 6 self tapping screws into the roof
and tighten.
Zuerst Edelstahlteller und dann flachen
Dichtring auf die Dachdurchführung
schieben. Bei schrägem Dach anstelle
des flachen Dichtrings soviel
Ausgleichscheiben verwenden, daß die
Dachdurchführung exakt mit dem
Mast fluchtet.
Dachdurchführung samt Edelstahlteller
und Dichtung/Ausgleichscheiben auf
Mast schieben. Mit einem 2mm-Bohrer
die Schraublöcher vorbohren und
Dachdurchführung endgültig befestigen.
Eerst het RVS schoteltje en daarna de
valakke afdichting op de dakdoorvoer
schuiven. Bij een schuin dak gebruikt
u.i.p.v. de vlakke afdichting, zoveel
schuine opvulschijven tot de
dakdoorvoer exact met de mast past
(hoek 90˚ vanuit de kast).
Dakdoorvoer compleet met RVS
schoteltje en afdichting (en) op de
mast schuiven. Met een 2mm boor de
schroefgaten voorboren en de
dakdoorvoer nu definitief bevestigen.
Toit plat/toit incliné. D’abord, enfiler
sur le passe-toit la rondelle métallique
inoxydable jointe au kit satellite. Puis,
enfiler le joint plat si le toit est plat ou
autant de rondelles de compensation
nécessaires si le toit est incliné. Le
mât doit être perpendiculaire au
passe-toit.
Visser le passe-toit et la rondelle
métallique. En cas de premier
montage, percer des avant-trous avec
un petit foret.
Inside the vehicle, replace the plastic
retaining nut and tighten with the plastic
spanner.
150mm
From the roof, push the rubber seal
over the sleeve. Rotate the seal
between finger and thumb to ensure
that it fits.
2
Connect the cables to the control box
as shown. When connecting 12/24V
DC power supply, ensure that the red
lead is connected to the positive
terminal and the power is switched off
at this point.
Set-up and travelling position
Switch on the 12/24V DC power supply.
The display standby light (red LED) will
illuminate. The following set-up
procedure is important to ensure a safe
travelling position and accurate dish
elevation angle, which when selected,
matches that shown on the control box
display.
Press the dish up button for at least 2
seconds to start the dish elevation.
When the display shows
approximately -67, press the down
button momentarily to stop the dish
drive.
Raise the system slightly using the up
button on the control box. With the system in this slightly raised position
secure the ski guide to the roof of the
vehicle. Ensure that this is fixed so that
when the dish is fully lowered for
travelling the ski secures the dish
facing towards the back of the vehicle.
Secure in place with the mirror pads
provided 380mm from the front edge
of the motor bracket assembly.
Raise system further and attach the
dish to the system using the nuts and
bolts supplied. Make sure all the tools
and equipment used to install the dish
are removed from the vehicle roof.
Rotate the dish by hand after
releasing the mast clamp with the plastic spanner. Park and lock system.
Steuerbox 150mm neben dem Mast
etwa auf halber Höhe zwischen
Halterung und Mastende an die Wand
halten und die Schraublöcher
markieren. Vorbohren und die
Steuerbox mit den mitgelleferten
Schrauben endgültig montieren.
Kabel wie abgebildet an der Steuerbox
anschließen. Das rote Kabel ist +_.
Während es Stromnschlussess die
Stromzufuhr unterbrechen!
Grundeinstellung und Fahrposition
Alle zur Installation verwendete
Gegenstände vom Dach entfernen,
12/24V-Stromversorgung einschalten.
Standby-Anzeige erscheint im Display
(rot aufleuchtende LED). Die folgenden
Einstellungen sind wichting für die
Fahrsicherheit und zur sicheren
Bedienung der Anlage.
‘Dish Up’-Knopf mindestens 2
Sekunden drücken, um den
Aufklapp-Vorgang zu starten. Bei
etwa -57, den Vorgang durch Drücken
des Knopfes ‘Dish Down’ stoppen.
Plaats de regelkast ongeveer
150mm van de masten halfweg tussen
het klamplichaam en de onderzijde van
de mast. Markeer de schroefgaten, boor
en schroef de regelkast in positie met
de bijgeleverde schroeven.
Sluit de kabels aan de regelkast aan
zoals afgebeeld. Bij aansluiting van
12/24V gelijkstroom dient u zich ervan
te overtuigen dat de rode kabel wordt
aangesloten aan de positieve klem en
dat de stroom hierbij wordt
uitgeschakeld.
Opstelling En Rijpositie
Overtuig u ervan dat alle voor de
installatie van de schotel gebruikte
gereedschappen van het dak werden
verwijderd. Zet de 12/24V gelijkstroom
voeding aan. Het display-lampje (rode
LED) zal oplichten. De volgende
opstelprocedure is belangrijk om een
veilige rijpositie en een preciese schotel
elevatiehoek te garanderen, die
wanneer geselecteerd overeenstemt
met de positie op de display van de
regelkast.
Druk de ‘schotel op’ knop minstens 2
seconden in om de verhoging van de
schotel te starten. Wanneer de display
ongeveer -57 toont dient u even de
‘schotel neer’ knop in te drukken om de
schotelaandrijving te stoppen.
Heben Sie die Sat-Antenne durch drücken
des “UP” Knopfes leicht an. Befestigen Sie
in dieser Position den Dachschutz und dem
Gleitstück am LNB. Vergewissern Sie sich,
daß die Sat-Antenne in dieser Position zum
Heck des Fahrzeugs schaut. Befestigen Sie
den Dachschutz 380mm von der vorderen
Kante der Motorverkleidung entfernt mit
dem mitgelieferten Klebebads. Nun die SatAntenne weiter ausfahren und den Spiegel
befestigen. Achten Sie darauf, daß Sie alle
benötigten Werkzeuge und Einbaumittel
nach Montageende vom Dach entfernen.
Die Sat-Antenne muß sich nun leicht mit
der Hand drehen lassen.
A l’intérieur du placard, tenir la boîte
de commande à 150mm du mât à
mi-hauteur entre la fixation et
l’extrémité du mât. Faire des marques
à l’endroit des trous pour les vis. Finir
le montage de la boîte de commande
en perçant des avant-trous, puis en
vissant les vis livrées.
Avant de connecter les câbles, couper le
courant! Connecter les câbles avec la
boîte de commande comme sur le
croquis. Le câble rouge ets + .
Travaux préliminaires et
position “route”
Ranger tous les instruments qui ont été
nécessaires à l’installation et qui sont
encore sur le toit. Brancher le courant
12/24V. Le mode veilleuse apparaît sur
l’indicateur (lampe DEL rouge). Les
opérations suivantes sont importantes
pour la sécurité sur route et pour un
bon usage de l’antenne.
Appuyer sur le bouton “dish up” et le
maintenir appuyé au moins 2
secondes pour déclencher l’ouverture
du réflecteur. Pour stopper l’ouverture
à 57, appuyer sur le bouton “dish
down”.
Rändelmutter im Kleiderschrank mit
dem Kunststoffschlüssel anziehen.
Gummimanschette auf die
Dachdurchführung drücken. Vorsicht keinen übermäßigen Druck ausüben.
De vastzetmoer in de kleerkast
vastzetten.
De rubberenmanchet voorzichtig op de
dakdoorvoer drukken, niet teveel druk
uitoefenen.
De l’intérieur, bloquer l’écrou en
plastique avec la clé.
Placer le capuchon d’étanchéité
par-dessus le passe-toit. Ne pas
appuyer trop fort.
SEMITRONIC INSTALLATION INSTRUCTIONS ● SEMITRONIC INSTALLALLATIE ● INSTALLATION DE LA SEMITRONIC ● INSTALLAZIONE DEL SEMITRONIC
1
Position the control box approximately
150mm from the mast and midway
between the clamp body and the
bottom of the mast. Mark the screw
holes, drill and screw the control box
into position with the screws provided.
3
4
1
5
2
1
2
Remove the motor bracket door from
the bracket assembly using the 5mm
Allen key provided.
Push the mast up into the clamp. Make
sure the two cables are not trapped
between the two clamp halves and
tighten the two Allen key bolts with the
6mm Allen key provided.
Replace the motor bracket door. Secure
into position using the 5mm Allen key
provided.
Adjust the height of the mast to slightly
protrude above the rubber seal.
Securely support the motor bracket
and dish assembly near to the mast
and feed both cables down into the
inside of the vehicle.
N.B. It is important to adequately
support the dish assembly at this stage.
Failure to do so could result in damage
to the vehicle roof or the product itself.
Slide the clamp support legs onto the
metal retaining washer flange.
Centralise the legs on the washer and
align the clamp with the mast below.
Mittels 5mm Imbus-Schlüssel den
Gehäusedeckel entfernen.
Mastrohr etwas über der
Gummimanschette hochschieben. Anlage
in die Nähe des Masten halten und die
beiden Kabel in das Rohr einführen.
Achtung: In diesem Stadium der
installation ist Hilfe angebracht, um evtl.
Beschädigungen am Dach oder der
Anlage zu vermeiden.
Anlage mit den Haltearmen von der
Seite her über den Edelstahlteller
schieben und auf den Mast ausrichten.
Mast vom Kleiderschrank aus in die
Halteklammer der Anlage einschieben.
Augenmerk auf die Kabel richten! Mit
dem 6mm Imbus-Schlüssel die
Klemmschrauben anziehen.
Gehäusedeckel aufstecken und mit dem
5mm Imbus-Schlüssel festschrauben
Neem de motorsteundeur van
steunmontage. Gebruik de bijgeleverde
5mm Allen sleutel.
Stel de hoogte van de mast zo af dat
deze een weinig boven de rubber
afdichting uitsteekt. Bevestig de
motorsteun en de schotelmontage
stevig nabij de mast en voed beide
kabels in het voertuig.
N.B. Het is belangrijk om de
schotelmontage in dit stadium
voldoende te ondersteunen. Dit niet te
doen kan resulteren in beschadiging
van het dak van het voertuig of van de
montage zelf.
Schuif de klampsteunvoeten op de metalen borgringflens. Centraliseer de
voeten op de vulring en lijn de klamp
uit met de mast.
Duw de mast omhoog in de klamp.
Vergewis u ervan dat de twee kabels
niet geklemd zijn tussen de
klamphelften en haal de twee Allen
sleutelbouten aan met de bijgeleverde
6mm Allen sleutel.
Plaats de motorsteundeur terug.
Bevestig in positie met de bijgeleverde
5mm Allen sleutel.
A l’aide d’une clé mâle coudée pour vis
à 6 pans creux 5mm, enlever le
couvercle du boîtier gauche.
Soulever légèrement le mât
au-dessus de la garniture en
caoutchouc. Placer l’antenne à
proximité du mât et introduire les deux
câbles à l’intérieur du mât.
Attention: il est recommandé pour
cette opération de se faire aider par
une deuxième personne pour éviter
d’abîmer le toit ou l’antenne.
Par le côté, faire glisser l’antenne avec
les pieds-supports par dessus le disque
métallique et la placer sur le mât.
De l‘intérieur du placard, enfiler le mât
dans l’étrier de l’antenne. Faire
attention aux câbles! A l’aide d’une clé
mâle coudée pour vis à 6 pans creux
6mm, serrer les vis de blocage.
Replacer le couvercle du boitier et le
revisser à l’aide d’une clé mâle coudée
pour vis à 6 pans creux 5mm.
11
4
12
2 secs
Stick the black arrow stickers to the
plastic sleeve and mast inside the
vehicle to mark the travelling position
for subsequent use. Stick the map
provided onto the wall near to the
control box.
Plak de zwarte pijl stickers op de plastic
sleuf en de mast in het voertuig als een
merkteken van de rijpositie voor verder
gebruik. Plak de bijgeleverde kaart op
de wand nabij de regelkast.
Press the down button for at least 2
seconds to fully lower the dish. The
dish will automatically stop at its
lowest position when the down limit
switch is triggered. The display will
read -67 quickly followed by the down
limit symbol (shown above). The dish
is now ready to align with your chosen
satellite transmitter.
Druk de ‘schotel neer’ knop minstens 2
seconden in om de schotel volledig te
verlagen. Na indrukken van de ‘neer
limiet’ schakelaar zal de schotel
automatisch in de laagste stand
stoppen. De display zal -57 aangeven,
snel gevolgd door het hoger getoonde
‘neer limiet’ symbool. De schotel is nu
klaar voor uitlijning met de sattelietzender van uw keuze.
Die Pfeilaufkleber nun
übereinstimmend auf
Dachdurchführung und Mastrohr
kleben und Landkartenaufkleber in der
Nähe des Steuergerätes an der
Kleiderschrankwand anbringen.
A l’intérieur du placard, coller les 2
autocollants avec les flèches, l’un sur le
passe-toit et l’autre sur le mât comme
sur le croquis. Coller également
l’autocollant géographique près de la
boîte de commande sur la paroi du
placard.
Den Knopf ‘Dish Down’ mindesten 2
Sekunden drücken, um den Spiegel
ganz abzusenken. Im Display erscheint
kurz -67 und dann das abgeblidete
Zeichen für die Fahrstellung. Die Anlage
kann nun auf einen Satelliten
ausgerichtet werden.
Appuyer sur le bouton “dish down” et
le maintenir appuyé au moins 2
secondes pour rabattre complètement
le réflecteur. Le nombre 57 apparaît un
instant sur l’indicateur, puis apparaît le
symbole “position route”. L’antenne est
installée. On peut maintenant l’orienter
vers un satellite.
Kantel het systeem enigszins omhoog met
de knop op het regelpaneel. Terwijl het systeem zich in deze gekantelde positie bevindt, bevestigt u de geleider aan het dak van
het voertuig. Zorg ervoor dat deze zodanig
is vastgemaakt dat wanneer de schotel
volledig naar beneden wordt gebracht, de
geleider de schotel vasthoudt, terwijl deze
naar de achterzijde van het voertuig wijst.
Bevestig deze met de meegeleverde
spiegelbeschermers op 380mm van de
voorste rand van de motorsteun. Breng het
systeem verder omhoog en bevestig de
schotel aan het systeem met de
meegeleverde moeren en bouten. Zorg
ervoor dat alle gereedschap, dat wordt
gebruikt om de schotel te installeren, van
het dak verwijderd is. Draai de schotel met
de hand nadat u de mastklem met de plastic moersleutel hebt losgemaakt.
Parkeer- en blokkeersysteem.