1
SMART
I
0DT788 - rev. 25-06-2007
GB
DITEC S.p.A.
Via Mons. Banfi, 3 - 21042 Caronno Pertusella (VA) - ITALY
Tel. +39 02 963911 - Fax +39 02 9650314
www.ditec.it - [email protected]
ISO 9001
Cert. n°0957
MANUALE DI:
- INSTALLAZIONE
- MANUTENZIONE
- USO
INSTRUCTION MANUAL:
- INSTALLATION
- MAINTENANCE
- USE
F
MANUEL DE:
- INSTALLATION
- ENTRETIEN
- UTILISATION
D
HANDBUCH DIE:
- MONTAGE
- WARTUNG
- BEDIENUNG
E
MANUAL DE:
- INSTALACIÒN
- MANUTENCIÒN
- USO
P
MANUAL DE:
- INSTALAÇÃO
- MANUTENÇÃO
- USO
-2-
0DT788 25/06/2007
DITEC S.p.A.
1. CARATTERISTICHE TECNICHE - TECHNICAL CHARACTERISTICS - CARACTERISTIQUES TECHNIQUES
TECHNISCHE MERKMALE - CARACTERISTICAS TECNICAS - CARACTERÍSTICAS TÉCNICAS
Tensione di alimentazione standard .....400 V,50/60 Hz
Assorbimento .......................................................... 3 A
Alimentazione comandi ausiliari ...................... 24V
Potenza motore ............................................... 0,6 KW
Grado di protezione quadro di comando ............ IP 55
Temperatura di esercizio ........................... - 5 + 50 °C
I
Standard power supply voltage ............400 V,50/60 Hz
Power input ............................................................. 3 A
Auxillary control power voltage ........................ 24V
Motor rating ...................................................... 0,6 KW
Control board protection class .............................. IP 55
Operating temperature ................................ - 5 + 50 °C
GB
Tension d'alimentation standard ...........400 V,50/60 Hz
Absorption ............................................................... 3 A
Alimentation commandes auxiliaire ................. 24V
Pulssance moteur ............................................. 0,6 KW
Degrè de protection tableau de commande ......... IP 55
Tempèrature de fonctionnement .................. - 5 + 50 °C
F
Standard Spannungsversorgung ..........400 V,50/60 Hz
Stromaufnahme ....................................................... 3 A
Zubehörversorgung ......................................... 24V
Motorleistung .................................................... 0,6 KW
Schutzgrad der elektr. Schalttafel ......................... IP 55
Betriebstemperat ......................................... - 5 + 50 °C
D
Alimentaciòn standard ..........................400 V,50/60 Hz
Consumo motor ....................................................... 3 A
Tensiòn alimentaciòn mandos auxiliares ......... 24V
Potencia motor ................................................. 0,6 KW
Nivel de protecciòn del cuadro de maniobra ........ IP 55
Temperatura de funcionamiento .................. - 5 + 50 °C
E
Tensão de alimentação padrão ............400 V,50/60 Hz
Absorção ................................................................. 3 A
Alimentação comandos auxiliares ................... 24V
Potência motor ................................................. 0,6 KW
Grau de proteção quadro de comando ................ IP 55
Temperatura nominal ................................... - 5 + 50 °C
P
-3-
0DT788 25/06/2007
DITEC S.p.A.
I
2. AVVERTENZE GENERALI PER LA SICUREZZA
Il presente manuale di installazione è rivolto esclusivamente a personale professionalmente competente.
L’installazione, i collegamenti elettrici e le regolazioni devono essere effettuati nell’osservanza della Buona Tecnica e in ottemperanza alle norme vigenti.
Leggere attentamente le istruzioni prima di iniziare l’installazione del prodotto. Una errata installazione può essere fonte di
pericolo. I materiali dell’imballaggio (plastica, polistirolo, ecc.) non vanno dispersi nell’ambiente e non devono essere lasciati
alla portata dei bambini in quanto potenziali fonti di pericolo.
Prima di iniziare l’installazione verificare l’integrità del prodotto. Non installare il prodotto in ambiente e atmosfera esplosivi:
presenza di gas o fumi infiammabili costituiscono un grave pericolo per la sicurezza. Prima di installare la porta, apportare tutte
le modifiche strutturali relative alla realizzazione dei franchi di sicurezza ed alla protezione o segregazione di tutte le zone di
schiacciamento, cesoiamento, convogliamento e di pericolo in genere.
Verificare che la struttura esistente abbia i necessari requisiti di robustezza e stabilità. I dispositivi di sicurezza (fotocellule,
coste sensibili, arresto di emergenza, ecc.) devono essere installati tenendo in considerazione: le normative e le direttive in
vigore, i criteri della Buona Tecnica, l’ambiente di installazione, la logica di funzionamento del sistema e le forze sviluppate
dalla porta o cancello motorizzati.
I dispositivi di sicurezza devono proteggere eventuali zone di schiacciamento, cesoiamento, convogliamento e di pericolo in
genere, della porta. Applicare le segnalazioni previste dalle norme vigenti per individuare le zone pericolose.
Ogni installazione deve avere visibile l’indicazione dei dati identificativi della porta.
Prima di collegare l’alimentazione elettrica accertarsi che i dati di targa siano rispondenti a quelli della rete di distribuzione
elettrica. Prevedere sulla rete di alimentazione un interruttore/sezionatore onnipolare con distanza d’apertura dei contatti
uguale o superiore a 3 mm. Verificare che a monte dell’impianto elettrico vi sia un interruttore differenziale e una protezione
di sovracorrente adeguati. Collegare la porta ad un efficace impianto di messa a terra eseguito come previsto dalle vigenti
norme di sicurezza. Il costruttore della porta declina ogni responsabilità qualora vengano installati componenti incompatibili ai
fini della sicurezza e del buon funzionamento. Per l’eventuale riparazione o sostituzione dei prodotti dovranno essere utilizzati
esclusivamente ricambi originali DITEC. L’installatore deve fornire tutte le informazioni relative al funzionamento automatico,
manuale e di emergenza della porta o cancello motorizzati, e consegnare all’utilizzatore dell’impianto le istruzioni d’uso.
GB
2. GENERAL SAFETY PRECAUTIONS
This installation manual is intended for professionally competent personnel only.
The installation, the electrical connections and the settings must be completed in conformity with good workmanship and
with the laws in force.
Read the instructions carefully before beginning to install the product. Incorrect installation may be a source of danger.
Packaging materials (plastics, polystyrene, etc) must not be allowed to litter the environment and must be kept out of the
reach of children for whom they may be a source of danger.
Before beginning the installation check that the product is in perfect condition.
Do not install the product in explosive areas and atmospheres: the presence of flammable gas or fumes represents a serious
threat to safety.
Before installing the door, make all the structural modifications necessary in order to create safety clerance and to guard or
isolate all the compression, shearing, trapping and general danger areas.
Check that the existing structure has the necessary strength and stability.
The safety devices must protect against compression, shearing, trapping and general danger areas of the motorized door.
Display the signs required by law to identify danger areas.
Each installation must bear a visible indication of the data identifying the motorised door.
Before connecting to the mains check that the rating is correct for the destination power requirements.
A multipolar isolation switch with minimum contact gaps of 3 mm must be included in the mains supply.
Check that upstream of the electrical installation there is an adequate differential switch and a suitable circuit breaker.
Ensure that the motorised door has an earth terminal in acwireance with the safety adjustements in force.
The manufacturer of the door declines all responsability in cases where components which are incompatible with the safe
and correct operation of the product only original spare parts must be used.
For repairs or replacements of products only DITEC original spare parts must be used.
The fitter must supply all information corcerning the automatic, the manual and emergency operation of the motorised door
or gate, and must provide the user the device with the operating instructions.
F
2. CONSIGNES GENERALES DE SECURITE
Cette notice d’installation est destinée exclusivement aux professionels qualifiès.
L’installation, le raccordement électrique et les réglages doivent être effectuée selon les régles de Bonne Tecniques er respecter
la réglementation en vigueur.
Lire attentivement les instructions avant de procéder à l’installation du produit. Une instalaltion erronée peut être source de
danger. Les materiaux de l’emballage (plastique, polystyréne, etc) ne doivent pas être abandonnées dans la nature et ne doivent pas être laissés à la portée des enfants, car ils sont une source potentielle de danger.
Avant de procéder à l’installation, vérifier l’integrité du produit. Ne pas installer le produit à proximité de matières explosives:
la présence de gaz ou de vapeurs inflammables représente un grave danger pour la securité.
Avant d’installer le automatismes, apporter toutes le modifications structurelles relatives à la realisation des distances de sécurité
et à la protection ou ségrégation de toutes les zones d’écrasement, de cisaillement, d’entraînement et de danger en général.
Vérifier que la structure existante ait les qualités requises de robustesse et de stabilité.
Le dispositifs de securité (photocellules, barres palpeuses, arrêt d’urgence, etc) doivant être installés en tenant compte des
normes et directives en vigueur, des critéres de Bonne Technique, de l’emplacement de l’installation, de la logique de fonctionement du systéme et des forces dégagées par la porte ou le portail équipés d’automatismes.
Les dispositifs de securité doivent protéger les zones éventuelles d’écrasement, de cisaillement, d’entraînement et de danger
en général, de la porte ou du portail automatisés. Appliquer la signalisation prévue par la réglementation en viguer pour localiser
les zones dangereuses. Toute installation doit indiquer de façon visible les données d’identification de la porte ou du portail
automatisés. Avant de procéder au raccordement électrique, s’assurer que les données de la plaquette signalétique correspondent à celles du réseau d’alimentation électrique. Prévoir sur le réseau d’alimentation un dispositif de coupure omnipolaire
avec une distance d’ouverture des contacts égale ou supérieure à 3 mm.Vérifier qu’en amont de l’installation électrique il y ait
un interrupteur différentiel ainsi qu’une protection contre des surchanges de courant adèquate.
Relier la porte ou le portail automatisés à un systéme de mise à la terre efficace installé conformément aux normes de sécurité en vigeur. Le costructeur des automatismes décline toute responsabilité au cas où seraient installés des composants
incompatibles en termes de seécurite et de bon fonctionnement. En cas de réparation ou de remplacement des produits, sed
pièces de rechange originales DITEC. impérativement être utilisées.L’installateur doit fournir tous les renseignements concernant le fonctionement automatique, manuel ou de secours de la porte ou du portail automatisés et remettre la notice d’emploi
à l’utilisateur.
-4-
0DT788 25/06/2007
DITEC S.p.A.
2. ALLGEMEINE SICHERHEITSHINWEISE
Das vorliegende installationshandbuch ist ausschliesslich für das Fachpersonal bestimmt.
Montage, elektrische Anschlüsse und Regelungen sind auf der Grundlage der bestehenden Vorschriften nache den Regeln
der Technik auszüfuhren. Vor Einbaubeginn sind die Anweisungen sorgfältig durchzulesen. Falcher Einbau kann Gefahr mit
sich bringen Das Verpackungsmaterial (Kunststoff, Polystyrol usw.) ist vorschriftsmäßig zu entsorgen. Es ist von Kindern fernzuhalten, da es eine Gefahr für si bedeutet.
Vor Beginn der Montage ist der einwandfreie Zustand des Produkts zu überprüfen. In explosionsgefährdeten Bereichen darf
das Produkt nicht eingebaut werden: Entzündbare Gase oder Rauch stellen eine ernsthafte Sicherheitsgefährdung dar.
Um die vorgeschriebenen Sicherheitsabstände zu schaffen und Quetsch- Scher- Einzieh- und sonstige Gefahrbereiche zu
vermeiden bzw. abzutrennen, sind vor Montagebeginn die notwendigen baulichen Veränderungen vorzunehmen. Es ist sicherzustellen, daß die tregende Struktur die erforderlichen Voraussetzungen an Festigkeit und Stäbilität erfüllt.
Der Hesteller des Antriebs haftet nicht, wenn die Torrahmen oder -pfosten, die für den Antrieb vorgesehen sind, nicht ordnungsgemäß und fachgerecht erstellen sind; er haftet ebenfalls nicht für Verformungen im Betrieb.
Die Sicherheitseinrichtungen (Photozellen, Lichtschranken, Nothalteinrichtungen usw.) sind nach den Regeln der Technik so
zu installieren, daß die geltenden Vorschriften und Richtlinien eingehalten sowie Einbauort, Betriebsweise des Antriebssystems
und die Kräfte, die das Tor beim Antrieb aufweist, berücksichtigt werden.
Die Sicherheitseinrichtungen dienen dem Schutz vor Quetsch-, Scher-, Einzieh- und sonstigen Gefahrbereichen des Tors nach
Montage des Antriebs. Zur Erkennung der Gefahrenbereichen sind die vorgeschiebenen Hinweisschilder anzubringen.
Bei jeder Anlage sind die technischen Daten des Torantriebs gut sichtbar anzubringen. Vor dem Netzanschluß ist sicherzustellen,
daß die Daten auf dem Typenschild mit denen des Stromversorgungsnetzes übereinstimmen.
Netzsetig ist ein Allpoll-Schalter bzw. -Trennschalter mit Abstand der Kontakte in geöffneter Stellung > oder = 3 mm vorzusehen.
Es ist sicherzustellen, daß der Elektroanlage die erforderlichen FI-Schalter und Überstromschutzschalter vorgeschaltet sind.
Der Torantrieb ist an eine ordnungsgemäße Erdung, die nach den geltenden Sicherheitsvorschriften ausgeführ ist, anzuschließen. Der Hersteller des Antriebs lehnt jede Verantwortung ab, wenn beim Einbau Teile montiert werden, die weder den
Sicherheitsanforderungen noch einem ordungsgemäßen Betrieb entsprechen. Bei Reparatur und Austausch sind ausschließlich
Originalersatzteile zu verwenden. Der Einbaubetrieb ist verpflichtet, dem Benutzer alle notwendigen Informationen für Automatik-, Hand- und Notbetrieb des Torantriebs zu liefern und ihm die Betriebanleitung auszuhändigen.
D
2. ADVERTENCIAS GENERALES DE SEGURIDAD
El presente manual de instalaciòn està destinado exclusivamente a profesionales calificados.
La instalaciòn, las conexiones eléctricas y los ajustes de regulaciòn deben ser hechos aplicando las reglas técnicas aceptadas
y de conformidad con las normas vigentes.
Leer atentamente las instrucciones antes de comenzar la instalciòn del producto. Una instalaciòn incorrecta puede ser causa
de peligro. El material de embalaje (plàstico, poliestirol, etc) debe desecharse sin causar daño al medio ambiente y mantenerse
fuera del alcance de los niños, porque es una potencial fuente de peligro. Antes de comenzar la instalaciòn. verificar que el
producto estè integro. No instalar el producrto en ambiente o atmòsfera explosivos. La presencia de gas o humos inflamables
representa un grave resgo para la seguridad.
Antes de instalar la puerta, aportar todas las modificaciones estructurales necesarias para realizar los espacios de franqueo y
para proteger o segregar todas las areas en que pudiens verificarse acciones de aplastamiento, cizallamento, deslizamiento
y otros movimientos peligrosos.
Comprobar que la estructura existente sea suficientemente robusta y estable. Los dispositivos de seguridad (células fotoelectricas, marcos sensibles, tope de emergencia, etc) deben instalarse respetando las normas y dìrectivas vigentes, las reglas
técnicas aceptadas, el ambiente de instalaciòn, el funcionamiento del systema y la fuerza ejercidas por la puerta.
ILos dispositivos de seguridad deben proteger a toda posible zona de aplastamiento, cizallamiento, deslizamiento o peligro
en general de la puerta. Aplicar las señalaciones previstas por las normas vigentes para identificar las zonas peligrosas. Cada
instalaciòn debe llevar en posiciòn visible los datos identificativos de la puerta. Antes de conectar la alimentaciòn elèctrica,
comprobar que la potencia indicada corresponda a la de la red de distribuciòn. Instalar en lar ed de alimentaciòn un interruptor secconador omnipolar con distancia de apertura entre los contactos igual o superior a 3 mm. Comprobar la presencia de
un interruptor diferencial y una protecciòn contra sobracorriente adecuados. Equipar a la puerta con una eficaz conexiòn a
tierra, realizada segùn las normas de seguridad vigentes. El costructor de la puerta declina toda responsabilidad en el casop
que se instalen componentes incompatibles con la seguridad y el buen funcionamiento. Para cualquier reparaciòn o sustituciòn del producto, utilizar exclusivamente repuestos originales DITEC. El instalador debe dar todas las informaciones sobre
el funcionamiento automàtico, manual y de emergencia de la puerta o verja motorizadas y entregar al usuario del equipo las
instrucciones para el uso.
E
2. AVISOS GERAIS PARA A SEGURANÇA
O presente manual de instalação é para o uso exclusivo de pessoal profissionalmente especializado.
A instalação, as ligações elétricas e as regulações devem ser efetuadas com o respeito da Boa Técnica e de acordo com as
normas vigentes.
Ler atentamente as instruções antes de iniciar a instalação do produto. Uma instalação errada pode ser fonte de perigo. Os
materiais da embalagem (plástico, isopor, etc.) não devem ser abandonados no ambiente e não devem ser deixados ao alcance
de crianças porque são fontes potenciais de perigo.
Antes de iniciar a instalação verificar a integridade do produto. Não instalar o produto em ambiente e atmosfera explosivos:
presença de gases ou fumos inflamáveis constituem um grave perigo para a segurança. Antes de instalar a porta, efetuar
todas as reformas de estrutura relativas à realização dos suportes de segurança e à proteção ou isolamento de todas as zonas
de esmagamento, cisalhamento, deslocamento e de perigo em geral.
Verificar que a estrutura existente tenha os requisitos necessários de resistência e estabilidade. Os dispositivos de segurança
(fotocélulas, partes sensíveis, parada de emergência, etc.) devem ser instalados levando em consideração: as normas e as
diretrizes em vigor, os critérios da Boa Técnica, o ambiente de instalação, a lógica de funcionamento do sistemas e as forças
desenvolvidas pela porta ou portão motorizados.
Os dispositivos de segurança devem proteger eventuais zonas de esmagamento, cisalhamento, deslocamento e de perigo em
geral, da porta. Aplicar as sinalizações previstas pelas normas vigentes para marcar as zonas perigosas.
Cada instalação deve manter visível a indicação dos dados identificativos da porta.
Antes de ligar a alimentação elétrica verificar que os dados da placa sejam correspondentes àqueles da rede de distribuição
elétrica. Na rede de alimentação prever um interruptor/disjuntor unipolar com distância de abertura dos contatos igual ou
superior a 3 mm. Verificar que a montante da instalação elétrica haja um interruptor diferencial e uma proteção de excesso
de corrente adequados. Ligar a porta a uma instalação de aterramento eficaz executada conforme previsto pelas normas
de segurança em vigor. O fabricante da porta se exime de qualquer responsabilidade se forem instalados componentes
incompatíveis para os fins de segurança e do bom funcionamento. Para a eventual reparação ou substituição dos produtos
deverão ser utilizados exclusivamente peças de reposição originais DITEC. O instalador deve fornecer todas as informações
relativas ao funcionamento automático, manual e de emergência da porta ou portão motorizados, e entregar ao utilizador da
instalação as instruções de uso.
P
-5-
0DT788 25/06/2007
DITEC S.p.A.
I
INDICE DEGLI ARGOMENTI
Cap.
Argomento ............................................................................................................................................. Pag.
1.
CARATTERISTICHE TECNICHE ................................................................................................................ 3
2.
AVVERTENZE GENERALI PER LA SICUREZZA ....................................................................................... 4
3.
INSTALLAZIONE MECCANICA DELLA STRUTTURA E DEI COMPONENTI
3.1 Verifiche del vano di passaggio................................................................................................................ 8
3.2 Fissaggio dei montanti verticali ................................................................................................................ 8
3.3 Montaggio della traversa ........................................................................................................................ 10
3.4 Montaggio del motoriduttore .................................................................................................................. 10
3.5 Montaggio della costa di sicurezza ........................................................................................................ 12
COLLEGAMENTI ELETTRICI E MESSA IN FUNZIONE
4.1 Collegamenti quadro elettrico / automazione ......................................................................................... 14
4.2 Fotocellula di sicurezza .......................................................................................................................... 14
4.3 Quadro elettronico 48E .......................................................................................................................... 16
VERIFICHE ED AVVIAMENTO
5.1 Verifica dei sensi di movimento .............................................................................................................. 22
5.2 Regolazione dei finecorsa ......................................................................................................................22
RICERCA GUASTI ................................................................................................................................... 23
PIANO DI MANUTENZIONE ...................................................................................................................... 24
4.
5.
6.
7.
GB
CONTENTS
Cap.
Issue ...................................................................................................................................................... Page
1.
TECHNICAL CHARACTERISTICS .............................................................................................................. 3
2.
GENERAL SAFETY PRECAUTIONS .......................................................................................................... 4
3.
MECHANICAL INSTALLATION OF THE FRAME AND COMPONENTS
3.1 Checking the doorway.............................................................................................................................. 8
3.2 Fitting the uprights.................................................................................................................................... 8
3.3 Preparation of the crosspiece ................................................................................................................ 10
3.4 Installation of the crosspiece .................................................................................................................. 10
3.5 Installation of the panel .......................................................................................................................... 12
WIRE CONNECTIONS AND OPERATION
4.1 Connections to electric control unit to the automatic system .................................................................14
4.2 Safety photocells .................................................................................................................................... 14
4.3 Electronic control panel 48E .................................................................................................................. 18
CHECKING AND STARTING
5.1 Check of the movement direction........................................................................................................... 22
5.2 Adjustment of the limit switch ................................................................................................................. 22
TROUBLESHOOTING ................................................................................................................................ 23
MAINTENANCE .......................................................................................................................................... 24
4.
5.
6.
7.
F
SOMMAIRE DES ARGUMENTS
Chap.
Argument .............................................................................................................................................. Page
1.
CARACTERISTIQUES TECHNIQUES ......................................................................................................... 3
2.
CONSIGNES GENERALES DE SECURITE ................................................................................................ 4
3.
INSTALLATION MECANIQUE DE LA STRUCTURE ET DES ELEMENTS
3.1 Vérification de la zone de passage .......................................................................................................... 8
3.2 Fixation des montants verticaux............................................................................................................... 8
3.3 Mise en place de la traverse .................................................................................................................. 10
3.4 Installation de la traverse ....................................................................................................................... 10
3.5 Montage du panneau ............................................................................................................................ 12
CONNEXIONS ELECTRIQUES ET MISE EN FONCTION
4.1 Connexions armoire électrique/automatisme ......................................................................................... 14
4.2 Photocellules de sécurité ....................................................................................................................... 14
4.3 Tableau électronique 48E....................................................................................................................... 20
VERIFICATIONS ET DEMARRAGE
5.1 Vérification des sens du mouvement ..................................................................................................... 22
5.2 Réglage des fins de course.................................................................................................................... 22
RECHERCHE DES PANNES ..................................................................................................................... 24
PROGRAMME DE MAINTENANCE .......................................................................................................... 24
4.
5.
6.
7.
-6-
0DT788 25/06/2007
DITEC S.p.A.
D
INHALTSVERZEICHNIS
Kap.
Inhalt ........................................................................................................................................................... S.
1.
TECHNISCH MERKMALE ........................................................................................................................... 3
2.
ALLGEMEINE SICHERHEITSHINWEISE .................................................................................................... 5
3.
MECHANISCHE INSTALLATION VON STRUCTUR UND KOMPONENTEN
3.1 Überprüfungen des Durchgangs ............................................................................................................ 26
3.2 Befestigung der Seitenpfosten ............................................................................................................... 26
3.3 Vorbereitung zur Montage der Querhalterung....................................................................................... 28
3.4 Montage der Querhalterung ................................................................................................................... 28
3.5 Einbau des Torbehangs ........................................................................................................................ 30
ELEKTRISCHE ANSCHLÜSSE UND INBETRIEBNAHME
4.1 Anschlüsse Schaltkasten/Tor ................................................................................................................. 32
4.2 Sicherheits-Lichtschranken .................................................................................................................... 32
4.3 Elektronische Schalttafel 48E ................................................................................................................ 34
ÜBERPRÜFUNG UND START
5.1 Überprüfung der Bewegungsrichtung .................................................................................................... 40
5.2 Einregulierung der Endschalter .............................................................................................................. 40
STÖRUNGSSUCHE ................................................................................................................................... 41
WARTUNGSPLAN .................................................................................................................................... 42
4.
5.
6.
7.
E
íNDICE DE LOS ARGUMENTOS
Cap.
Argumento ............................................................................................................................................. Pág.
1.
CARACTERISTICAS TECNICAS ............................................................................................................... 3
2.
ADVERTENCIAS GENERALES DE SEGURIDAD ...................................................................................... 5
3.
INSTALACIÓN MECÁNICA DE LA ESTRUCTURA Y DE LOS COMPONENTES
3.1 verificaciones de vano de paso .............................................................................................................. 26
3.2 Fijación de los montantes verticales ...................................................................................................... 26
3.3 Predisposición del montante horizontal ................................................................................................. 28
3.4 Instalación del montante horizontal........................................................................................................ 28
3.5 Instalación del panel ............................................................................................................................. 30
CONEXIONES ELÉCTRICAS Y PUESTA EN FUNCIÓN
4.1 Conexiones del cuadro eléctrico/automatismo ...................................................................................... 32
4.2 Fotocéllulas de seguridad ...................................................................................................................... 32
4.3 Cuadro electrònico 48E.......................................................................................................................... 36
CONTROLES Y PUESTA EN MARCHA
5.1 Control de los sentidos del movimiento ................................................................................................. 40
5.2 Regulación de los finales de carrera ...................................................................................................... 40
DETECCIóN DE LAS FALLAS .................................................................................................................. 41
PLANO DE MANTENIMIENTO .................................................................................................................. 42
4.
5.
6.
7.
P
ÍNDICE DOS ASSUNTOS
Cap.
Assunto .................................................................................................................................................. Pág.
1.
CARACTERÍSTICAS TÉCNICAS .................................................................................................................3
2.
AVISOS GERAIS PARA A SEGURANÇA ....................................................................................................5
3.
INSTALAÇÃO MECÂNICA DA ESTRUTURA E DOS COMPONENTES
3.1 Controles da abertura de passagem ......................................................................................................26
3.2 Fixação das ombreiras verticais .............................................................................................................26
3.3 Predisposição da padieira ......................................................................................................................28
3.4 Montagem dos contrapesos ...................................................................................................................28
3.5 Montagem do painel ..............................................................................................................................30
LIGAÇÕES ELÉTRICAS E COLOCAÇÃO EM FUNÇÃO
4.1 Ligações do quadro elétrico / automação ..............................................................................................32
4.2 Fotocélula de segurança ........................................................................................................................32
4.3 Quadro eletrônico 48E ...........................................................................................................................38
VERIFICAÇÕES E ACIONAMENTO
5.1 Verificação dos sentidos de movimento .................................................................................................40
5.2 Regulagem dos fins de curso .................................................................................................................40
LOCALIZAÇÃO DE AVARIAS ....................................................................................................................42
PLANO DE MANUTENÇÃO .......................................................................................................................42
4.
5.
6.
7.
-7-
0DT788 25/06/2007
DITEC S.p.A.
I
3. INSTALLAZIONE MECCANICA DELLA STRUTTURA E DEI COMPONENTI
3.1 Verifiche del vano di passaggio.
• Verificare le dimensioni del vano e la rispondenza con le misure d’ingombro della porta fornita, considerando le eventuali
tolleranze necessarie nel caso di installazione in luce.
• Verificare che eventuali ingombri esistenti non ostacolino il montaggio della struttura.
• Assicurarsi che i piani d’appoggio siano livellati ed eventualmente ripristinarli mediante degli spessori adeguati.
• Verificare la consistenza della struttura del vano: deve essere garantito un sicuro ancoraggio mediante staffe o tasselli. In
caso di scarsa o dubbia consistenza è necessario realizzare un’adeguata struttura metallica autoportante.
3.2 Fissaggio dei montanti verticali
• Misurare l’ingombro totale della traversa (L).
• Contrassegnare sul pavimento l’esatta posizione dei montanti verticali. (fig.2)
• Rimuovere i coperchi dei montanti verticali e fissarne le basi, in corrispondenza dei contrassegni, mediante appositi tasselli
dimensione viti M8. (fig.3)
• Mettere a piombo i montanti verticali e fissarli in corrispondenza dei punti indicati (A) nel caso di fissaggio con staffe esterne
o (B) per fissaggio da interno colonna. Dimensione tasselli M8. (fig.2)
• Verificare l’ortogonalità del montaggio misurando le diagonali.
GB
3. MECHANICAL INSTALLATION OF THE FRAME AND COMPONENTS
3.1 Checking the doorway.
• Check the dimensions of the doorway and their correspondence to the overall dimensions of the door supplied, bearing in
mind any necessary tolerances in the case of installation in an archway.
• Check that no existing structures obstruct the assembly of the door.
• Ensure that the laying surfaces are level and, if necessary, adapt them using appropriate shims.
• Check the solidity of the structure of the doorway: secure anchorage must be ensured by means of brackets or screw anchors.
In the case of insufficient or dubious solidity, it is necessary to create an adequate self-supporting metal frame.
3.2 Fitting the uprights
• Measure the total dimensions of the crosspiece (L).
• Mark the exact position of the uprights on the floor. (fig.2)
• Take the tops off the uprights and secure their bases in correspondence with the marks, using the special size M8 screw
anchors (fig.3)
• Put the uprights in plumb and secure them in correspondence with the points shown: (A) in the case of anchorage using
external brackets or (B) for anchorage from inside the column. Use size M8 anchor screws. (fig.2)
• Check perpendicularity of assembly by measuring the diagonals.
F
3. INSTALATION MECANIQUE DE LA STRUCTURE ET DES ELEMENTS
3.1 Vérifications de la zone de passage.
• Vérifier les dimensions du passage et la correspondance avec les mesures d’encombrement de la porte fournie en considérant
les éventuelles tolérances nécessaires dans le cas d’installation à l’intérieur de l’ouverture.
• Vérifier que les encombrements éventuels existants n’entravent pas le montage de la structure.
• S’assurer que les plans d’appui soient bien nivelés et, éventuellement, les ajuster en utilisant des épaisseurs appropriées.
• Vérifier la consistance de la structure du passage : un ancrage sûr doit être garanti grâce à l’utilisation d’étriers et chevilles.
En cas de consistance insuffisante ou douteuse, il faut réaliser une structure métallique autoportante adéquate.
3.2 Fixation des montants verticaux
• Mesurer l’encombrement de la traverse (L).
• Délimiter sur le sol la position exacte des montants verticaux. (fig.2)
• Retirer les caches des montants verticaux et en fixer les bases, en correspondance des marques, en utilisant des chevilles
appropriées, dimension des vis M8. (fig.3)
• Mettre à plomb les montants verticaux et les fixer en correspondance des points indiqués (A) dans le cas de fixation avec
étriers externes ou (B) pour fixation à partir de l’intérieur de la colonne. Dimension des chevilles M8. (fig.2)
• Vérifier l’orthogonalité du montage en mesurant les diagonales.
-8-
0DT788 25/06/2007
DITEC S.p.A.
1
LT = ( PL + 380 )
170
50
330
200
1000
~ 1500
PH
HT = ( PH + 530 )
L max 5000
580
200 330
50
200
190
~ 1000
PL
80
360
80
2
3
X=Y± 10mm
A
B
B
X
H
B
Y
1/2H
L
-9-
0DT788 25/06/2007
DITEC S.p.A.
I
3.3 Montaggio della traversa
• Sollevare con cura la traversa mediante carrello elevatore o altro mezzo di sollevamento, facendo attenzione a non rovinare
la stessa e assicurandosi che non possa cadere durante la fase di sollevamento.
• Appoggiare la traversa sui montanti verticali; inserire i bulloni di fissaggio M8 e serrarli. (fig.4).
Fissare la traversa al muro in modo idoneo e sicuro mediante i fori C (fig.5)
• In caso di porte con PL > 4000 si consiglia di fissare centralmente la copertura della traversa (per evitare una flessione
antiestetica della carpenteria).
3.4 Montaggio del Motoriduttore
• Inserire la chiavetta (a) nell'apposita sede (b) sull'albero di avvolgimento
• Infilare il motoriduttore sull'albero
• Fissare il motoriduttore sulla testata (fig.5) mediante l'apposito fissaggio.
• Inserire il gruppo silent block nell’apposita sede (h) della piastra di supporto posizionando i componenti come rappresentato
nella fig.5a.
(d) rosetta 13x24
(e) silent block Ø 25
(f) rosetta 14x36
(g) vite 12x55
• Fissare il silent block sul dado (h) predisposto sulla testata.
GB
3.3 Installation of the crosspiece
• Unscrew the M8 bolts which are pre-assembled at the crosspiece ends.
• Carefully hoist the crosspiece with a lift truck or other hoisting means, making sure not to damage the crosspiece or let it
drop during hoisting.
Fasten the cross-beam to the wall in a suitable and secure manner by means of the holes C. (fig.5)
• Lean the crosspiece on the uprights. Insert the M8 fixing bolts and tighten them. (fig.4)
• In case of orizontal free-passage > 4000 is suggested to fix the crosspiece at middle( to avoid an antiaestetic flexion of the
frame).
3.4 Gearmotor installation
• Insert key (a) in its slot (b) on the winding mast.
• Insert the gearmotor on the mast.
• Fix the gearmotor on the head (fig. 5) by means of the clamp.
• Inser the silent block group in the support plate seat (h), positioning the components as shown in 5a.
(d) washer 13x24
(e) silent block Ø 25
(f) washer 14x36
(g) screw 12x55
• Fix the silent block on the nut (h) on the head.
F
3.3 Installation de la traverse
• Retirer les boulons M8 prémontés aux extrémités de l'entretoise.
• Soulever avec soin l'entretoise à l'aide du chariot élévateur ou dun autre moyen de levage, en faisant attention à ne pas
l'abîmer et en sassurant quelle ne tombera pas durant son soulèvement.
Fixer la traverse au mur de façon adéquate et sûre à l’aide des trous C (fig.5)
• Appuyer l'entretoise sur les montants verticaux; introduire les boulons de fixation M8 et les serrer (fig.4).
• En cas de portes avec passage libre > 4000 on conseille de fixer centralement la traversepour èviter une flexion antiasthétique
de la structure.
3.4 Montage du motoréducteur
• Insérer la clavette (a) dans son logement (b) sur l’arbre d’enroulement.
• Insérer le motoréducteur sur l’arbre.
• Accoupler le motoréducteur sur la tête (fig. 5) à l’aide de sa fixation.
• Insérer le groupe silentbloc dans son logement (h) sur la plaque de support, en positionnant les pièces comme illustré sur
la Fig.5a.
(d) rondelle 13x24
(e) silentbloc Ø 25
(f) rondelle 14x36
(g) vis 12x55
• Fixer le silentbloc sur l’écrou (h) de la tête.
- 10 -
0DT788 25/06/2007
DITEC S.p.A.
4
5
c
a
5a
e
d
f
h
h
g
b
- 11 -
0DT788 25/06/2007
DITEC S.p.A.
I
3.5 Montaggio costa di sicurezza
• Posizionare il telo a circa 1m di altezza agendo con l'apposita asta di sblocco infilata nell'anello posto sotto al motoriduttore
come indicato in fig.7.
• Inserire la costa di sicurezza nella tasca inferiore del telo, (fig.6).
• ATTENZIONE: il lato della costa su cui fuoriescono i cavetti, va posizionato in corrispondenza della colonna sinistra, al cui
interno è fissata la catena portacavi.
• Far scorrere la costa per tutta la lunghezza del telo e centrarla perfettamente rispetto al telo stesso. Il telo deve debordare
in egual misura rispetto al profilo di alluminio della costa di sicurezza.
3.5.1 Fissaggio della catena portacavi alla costa di sicurezza
• Nella colonna sinistra si trova già fissata la catena portacavi con inserito il relativo cavo. Collegare l'estremità libera della
catena portacavi al pattino in nylon della costa di sicurezza, (fig.8).
• Verificare manualmente che tutte le maglie consentano la giusta rotazione della catena portacavi. Nel caso vi fossero
impedimenti, localizzare le maglie montate al contrario e ripristinarle nella giusta posizione.
• Per i collegamenti del cavo al dispositivo di sicurezza della costa vedere il paragrafo 4.
GB
3.5 Fixing of the safety bar to the curtain
• Position the sheet at ca 1m height with the release rod inserted in the ring under the gearmotor as shown in fig.7.
• Insert the safety bar in the lower pocket of the curtain (fig.6).
• CAUTION: the cables outlet side of the bar must be positioned in correspondence with the left column, which houses the
cable-carrying chain.
• Make the bar slide along the full length of the curtain and centre it perfectly in relation to the curtain itself. The curtain must
overlap to the same extent as the aluminium section bar of the safety bar.
3.5.1 Fitting of the cable chain to the safety bar
• The cable chain is already fitted in the left stanchion with the relative cable. Connect the free end of the cable chain to the
nylon slide of the safety bar, (fig.8).
• Manually check that all the chain links allow the correct rotation of the cable chain. In the event of obstruction, check the
links, find those mounted upside down and correctly assemble them.
• For electric connections to the safety device, see par.4.
F
3.5 Montage du bourrelet de sécurité
• Placer la toile à environ 1 m de hauteur en agissant sur la tige de déblocage insérée dans l’anneau sous le motoréducteur,
comme illustré sur la fig.7.
• Introduire le bourrelet de sécurité dans la poche inférieure de la toile (fig.6).
• ATTENTION : les câbles de le côté du bourrelet doit être mis en correspondance de la colonne gauche, à l’intérieur de
laquelle est fixée la chaîne porte câbles.
• Faire coulisser le bourrelet sur toute la longueur de la toile et le centrer parfaitement par rapport à la toile elle-même. La toile
doit déborder en égale mesure de part et d’autre du profilé en aluminium du bourrelet de sécurité
3.5.1 Fixation de la chaîne porte-câbles au bourrelet de sécurité
• La chaîne porte-câbles est déjà fixée dans la colonne de gauche avec le câble relatif. Lier l’extrémité de la chaîne portecâbles au patin en nylon du bourrelet, (fig.8).
• S’assurer manuellement que toutes les mailles permettent la correcte rotation de la chaîne porte-câbles. Au cas où il y aurait
des obstacles presents, vérifier les mailles montées à l’invers et les positionner correctement.
• Pour les branchements du câble au dispositif de sécurité du bourrelet, voir par. 4.
- 12 -
0DT788 25/06/2007
DITEC S.p.A.
6
8
7
Chiude
Close
Fermé
Apre
Open
Ouvre
- 13 -
0DT788 25/06/2007
DITEC S.p.A.
I
4 COLLEGAMENTI ELETTRICI E MESSA IN FUNZIONE
4.1 Collegamenti quadro elettrico / automazione
• In figura 9 sono mostrati schematicamente i cablaggi forniti e il loro posizionamento nella porta; ogni cablaggio è identificato
da un codice apposto su una etichetta adesiva.
• I cablaggi 7725A, 7725B, 7796 e A934E sono già posizionati e fissati negli elementi strutturali (montanti verticali e
traversa).
• I cablaggi 7705 e 7839 sono forniti separatamente.
• Eseguire i collegamenti di questi cablaggi nel quadro elettrico come indicato in fig.11.
4.2 Fotocellule di sicurezza
• Eseguire i collegamenti come indicato in fig.9.
4.2.1 Costa di sicurezza
• Eseguire i collegamenti come indicato in fig.10, riferendosi al dispositivo di sicurezza presente sulla costa di sicurezza.
GB
4. WIRE CONNECTIONS AND OPERATION
4.1 Connections of the electric control unit to the automatic system
• Figure 9 shows the wire diagrams of cablings and their positioning in the door; each cabling is identified by a code indicated
on a sticker.
• The cablings 7725A, 7725B, 7796 and A934E are already routed and fitted in the door frame (uprights and crosspiece).
• The cablings 7705 and 7839 are supplied separately.
• Carry out the connections of these cablings in the electric control panel as indicated in fig.11.
4.2 Safety photocells
• Carry out the electric connections as indicated in fig.9.
4.2.1 Safety bar
• Make the connections as shown in fig.10, acwireing to the safety device featured on the safety bar.
F
4. CONNEXIONS ELECTRIQUES ET MISE EN FONCTION
4.1 Connexions armoire électrique / automatisme
• Dans la figure 9 sont indiqués les schémas électriques fournis et leur position par rapport à la porte: chaque câblage est
indiqué avec un code sur une étiquette.
• Les câblages 7725A, 7725B, 7796 et A934E sont déjà en place et fixés aux éléments de la structure (montants et traverse).
• Les câblages 7705 et 7839 sont fournis séparément.
• Effectuer les connexions de ces câblages de l'armoire électrique de la manière indiquée dan le fig.11.
4.2 Photocellules de sécurité
• Effectuer les branchement comme indiqué dans la fig.9.
4.2.1 Bourrelet de sécurité
• Exécuter les raccordements comme indiqué en fig.10, en se référant au dispositif de sécurité présent sur le bourrelet de
sécurité.
- 14 -
0DT788 25/06/2007
DITEC S.p.A.
9
Nero
Black
Noir
A934E
Bianco
White
Blanc
7796
Blu
Blue
Bleu
Nero
Black
Noir
(0)
(1)
Blu
Blue
Bleu
(0)
(1)
48E
7725A
Rosso
Red
Rouge Bianco
White
Blanc
Rosso
Red
Rouge
FC
49E
400 V 3~
M
7725B
A934E
A934E
7796
7725B
7725A
7705
7839
F
Blu
Blue
Bleu
Nero
Black
Noir
Tx
Rx
Blu
Blue
Bleu
Nero
Black
Noir
Bianco
White
Blanc
Marrone
Brown
Marron
01
0 1 n.c.
TX
RX
7725A
10
POWER
SOFA1
www.ditec.it
COM
Rosso
Red
Rouge
1 I N 41 1
PRG
J7
Bianco
White
Blanc
IN1
7796
EL07L
0000000000000
EO
SO
RP TC
ON
ON
1 2 3 4 5 6
OUT1
- LK +
11
12
17
IN
SA
P 2.0
POWER
NIO
17 14 12 11 0 0 0 1 1 2 3 4 6 8 9 20 41
- 15 -
0DT788 25/06/2007
DITEC S.p.A.
4.3 Quadro elettronico 48E
K22
16
B
Contatto
supplementare
A
Blu
EL07L
0000000000000
F4
SE
Finecorsa chiude
www.ditec.it
SE
Finecorsa apre
F5
Stop
J7
M
3~
EL07PW2
0000000000000
W
1
3
9
4
LDV
LDR
20
SOFA1
U
V
COM
Freno
PRG
140
IN1 41 1
Nero
C
FU
12
11
0
Arancione
FU
Bianco
EO
SO
Rosso
U W V
RP TC
ON
ON
1 2 3 4 5 6
- LK +
11
12
OUT1
I
Bianco
Rosso
17
IN
SA
POWER
Y
NIO
Z
17 14 12 11 0 0 0 1 1 2 3 4 6 8 9 20 41
7705
Arancio
Nero
Blu
Rosso
Bianco
7725A
Arancio
Nero
Blu
Rosso
Bianco
7725B
Nero
Blu
Bianco
Marrone
X
L3
L2
L1
7645
Power 400V~
Regolazioni
Trimmer
Descrizione
TC
0s
30 s
RP
Regolazione tempo chiusura automatica. Da 0 a 30 s.
N.B.: dopo l’attivazione del comando di stop, alla richiusura del contatto 1-9, la chiusura automatica si abilita solo dopo
un comando di apertura totale, parziale o passo-passo.
Regolazione apertura parziale motore. Da 0 a 30 s.
0s
30 s
Dip - switch
Descrizione
OFF
ON
DIP 1
Funzionamento comando 1-3.
Passo-Passo.
Apertura.
DIP 2
Rinnovo tempo chiusura automatica.
50 %
100 %
DIP 3
Prelampeggio fisso di 3 s.
Disabilitato in
apertura.
Abilitato sia in
apertura che in
chiusura.
DIP 4
Tipologia applicazione.
Non Usare
Porta flessibile.
DIP 5
Freno dinamico in chiusura
Disabilitato
Abilitato
DIP 6
USO FUTURO
Disabilitato.
Non Usare
Settaggio SMART
ON
1 2 3 4 5 6
Ponticelli
Descrizione
OFF
ON
SO
Funzionamento sicurezza di inversione
Ad automazione ferma, se il contatto 41-8
è aperto, è possibile attivare la manovra di
apertura.
Ad automazione ferma, se il contatto 41-8 è
aperto, viene impedita qualsiasi manovra.
EO
Elettrofreno.
Di stazionamento.
Normale.
- 16 -
0DT788 25/06/2007
DITEC S.p.A.
I
Ingressi
Comando
Funzione
Descrizione
1
2
N.O
Chiusura automatica
La chiusura permanente del contatto abilita la chiusura automatica.
1
3
N.O
Apertura
Con DIP1=ON la chiusura del contatto attiva la manovra di apertura.
Passo passo
Con DIP1=OFF la chiusura del contatto attiva una manovra di apertura o chiusura in sequenza: apre-stopchiude-apre.
N.B.: se la chiusura automatica è abilitata, lo stop non è permanente ma della durata impostata da TC.
1
4
N.O
Chiusura
La chiusura del contatto attiva la manovra di chiusura.
41
6
N.C
Apertura di sicurezza
L’apertura del contatto arresta e/o impedisce qualsiasi manovra.
41
8
N.C
Sicurezza di inversione
L’apertura del contatto di sicurezza provoca l’inversione del movimento (riapertura) durante la fase di chiusura.
1
9
N.C
Stop
L’apertura del contatto di sicurezza provoca l’arresto del movimento.
Arresto di emergenza
Per ottenere un arresto di emergenza (ad esempio mediante l’apposito pulsante rosso) collegare i comandi
di apertura e chiusura al morsetto 9 anzichè 1 (9-3, 9-4, 9-20).
Comando a uomo
presente
L’apertura permanente del contatto di sicurezza abilita la funzione a uomo presente.
In questa condizione, i comandi di apertura (1-3/1-20) e di chiusura (1-4) funzionano solo se mantenuti
premuti, al loro rilascio l’automazione si ferma.
Le eventuali sicurezze presenti, il comando passo-passo e la chiusura automatica sono disabilitati.
Apertura parziale
La chiusura del contatto attiva una manovra di apertura parziale della durata impostata mediante il trimmer RP.
Ad automazione ferma il comando di apertura parziale effettua la manovra opposta a quella precedente
all’arresto.
L’apertura del contatto del finecorsa arresta il movimento di chiusura.
1
9
1
20
N.O
0
11
N.C
Finecorsa chiude
0
12
N.C
Finecorsa apre
17
L’apertura del contatto del finecorsa arresta il movimento di apertura.
USO FUTURO
ATTENZIONE: Ponticellare tutti i contatti N.C. se non utilizzati. I morsetti con numero uguale sono equivalenti. La garanzia di funzionamento
e le prestazioni dichiarate si ottengono solo con accessori e dispositivi di sicurezza DITEC.
Uscite
Uscita
Valore
Descrizione
1
0
+
-
24 V= / 0,5 A
Alimentazione accessori.
Uscita per alimentazione accessori esterni comprese lampade stato automazione.
0
14
24V= / 50 W
(2 A)
Lampeggiante (LAMPH).
Si attiva durante le manovre di apertura e chiusura.
+LK
24V= / 1,2 A
Elettrofreno motore.
Con EO=ON, l’uscita è attiva per tutta la durata del movimento sia in apertura che in chiusura.
Con EO=OFF, l’uscita è attiva solo a motore fermo. (Freno attivo).
400 V~ / 6 A
Motore trifase.
Collegare il contatto della termica motore in serie ai finecorsa.
N.B.: se la rotazione del motore non corrisponde al corretto senso di marcia invertire le fasi di alimentazione
L2 e L3.
-LK
UWV
M
3~
Segnalazioni
LED
Acceso
POWER
Lampeggiante
Presenza di alimentazione 24 V=.
/
- Indica la funzione di STOP attivata da pulsantiera PT4 (se presente).
- Nel caso di utilizzo di dispositivo SOFA1, indica il fallimento del test di
sicurezza (morsetto 41).
- All’accensione il LED lampeggia indicando il conteggio delle manovre
effettuate:
ogni lampeggio veloce = 10000 manovre
ogni lampeggio lento = 100000 manovre
SA
Indica che almeno uno dei contatti di sicurezza è
aperto.
IN
Si accende ad ogni comando e ad ogni variazione
di dip-switch e ponticelli.
/
11
Indica che il contatto del finecorsa 0-11 é aperto.
/
12
Indica che il contatto del finecorsa 0-12 é aperto.
/
17
USO FUTURO
/
Pulsantiera
Pulsante
LED
ON
Attiva la manovra di apertura.
Il led verde acceso segnala la presenza di alimentazione 24 V=.
Attiva la manovra di apertura parziale.
Attiva e disattiva la funzione di STOP.
Il led rosso acceso segnala l’attivazione dello STOP.
Il led rosso lampeggiante segnala l’attivazione delle sicurezze.
Attiva la manovra di chiusura.
- 17 -
0DT788 25/06/2007
DITEC S.p.A.
4.3 48E electronic control panel
K22
11
B
Additional switch
Blue
EL07L
0000000000000
SE
F4
www.ditec.it
SE
Opening limit
switch
Closing limit
switch
F5
Stop
J7
M
3~
EL07PW2
0000000000000
W
1
3
9
4
LDV
LDR
20
SOFA1
U
V
COM
Brake
PRG
140
IN1 41 1
Black
C
FU
A
12
11
0
Orange
FU
White
EO
SO
Red
U W V
RP TC
ON
ON
1 2 3 4 5 6
- LK +
11
12
OUT1
GB
White
Red
17
IN
SA
POWER
Y
NIO
Z
17 14 12 11 0 0 0 1 1 2 3 4 6 8 9 20 41
7705
Orange
Black
Blue
Red
White
7725A
Orange
Black
Blue
Red
White
7725B
Black
Blue
White
Brown
X
L3
L2
L1
7645
Power 400V~
Settings
Trimmer
Description
TC
0s
Setting automatic closing time. From 0 to 30 s.
Note: after the activation of the stop command, once contact 1-9 has closed again, the automatic closing is only activated
after a total, partial or step-by-step opening command.
30 s
RP
Motor partial opening adjustment. From 0 to 30 s.
0s
30 s
Dip - switches
Description
OFF
ON
DIP 1
Control 1-3 function.
Step-by-Step.
Opening.
DIP 2
Restore automatic closing time.
50 %
100 %
DIP 3
Preflashing set at 3 s.
Disabled during
opening.
Enabled for both
opening and
closing.
DIP 4
Application type.
Do not use
Flexible door
DIP 5
Dynamic brake.
Disabled.
Enable
DIP 6
FUTURE USE
Disabled.
Do not use
Bridges
Description
SMART setting
ON
1 2 3 4 5 6
OFF
ON
SO
Reversal safety switch function.
With the automation blocked, if the contacts
1-8 or 41-8 are open, it is possible to activate
the opening operation.
With the automation blocked, if the contacts
1-8 or 41-8 are open, any operation is
impossible.
EO
Electric brake.
Parking.
Normal.
- 18 -
0DT788 25/06/2007
DITEC S.p.A.
GB
Imput
Command
Function
Description
1
2
N.O
Automatic closing
Permanently closing the contact enables automatic closing.
1
3
N.O
Opening
With DIP1=ON the closure of the contact activates an opening operation.
Step-by-step
With DIP1=OFF the closure of the contact activates an opening or closing operation in the following
sequence: open-stop-close-open.
Note: if automatic closing is enabled, the stop is not permanent but at a time that is set by the TC.
1
4
N.O
Closing
The closing manoeuvre starts when the contact is closed.
41
6
N.C
Safety stop
All operations are stopped and/or blocked when the contact is opened.
41
8
N.C
Reversal safety device
Opening the safety contact triggers a reversal of the movement (reopening) during a closing operation.
1
9
N.C
Stop
Opening the safety contact stops the current operation.
Emergency stop
To enable the emergency stop function (e.g. with a specific red button), connect the opening and closing
controls to terminal 9 instead of 1 (9-3, 9-4, 9-20).
Operator presence
dependent control
Permanently opening the safety contact enables the operator presence dependent function.
In this state, the opening (1-3/1-20) and closing (1-4) controls function only if held in the pressed position,
and the automation stops when the controls are released.
All safety switches, the step-by-step control and the automatic closing function are disabled.
Partial opening
The closing of the contact activates a partial opening operation of the duration set with the RP trimmer.
Once the automation stops, the partial opening control performs the opposite operation to the one
performed before stoppage.
1
9
1
20
N.O
0
11
N.C
Closure limit switch
The opening of the limit switch contact stops the closure operation.
0
12
N.C
Opening limit switch
The opening of the limit switch contact stops the opening operation.
17
FUTURE USE
WARNING: Make a jumper on all NC contacts if not in use. The terminals with the same number are equal. The given operating and
performance features can only be guaranteed with the use of DITEC accessories and safety devices.
Outputs
Output
Value
Description
1
0
+
-
24 V= / 0,5 A
Accessories power supply.
Power supply output for external accessories, including automation status lamp.
0
14
24V= / 50 W
(2 A)
Flashing light (LAMPH).
Activated during opening and closing operations.
+LK
24V= / 1,2 A
Electric motor brake.
With EO=ON, the output is active for the duration of both the opening and closing operation.
With EO=OFF, the output is only active with the motor idle. (Active brake).
400 V~ / 6 A
Three-phase motor.
Connect the contact of the motor circuit breaker in series to the limit switch.
Note: if the direction of rotation of the motor is incorrect for the desired direction of movement, swap the
L2 and L3 phases.
-LK
UWV
M
3~
Signals
LED
On
POWER
Flashing
24 V= power supply.
/
SA
Indicates that at least one of the safety contacts is
open.
IN
Activated at every command and adjustment to the
dip-switch and jumper.
- Indicates the STOP operation activated by pushbutton panel PT4 (if present).
- If the SOFA1-SOFA2 device is installed, this indicates a safety test failure
(terminal 41).
- On power on, the LED flashes to indicate the number of operations
performed:
each rapid flash = 10000 operations
each slow flash = 100000 operations
/
11
Indicates that the 0-11 limit switch contact is open.
/
12
Indicates that the 0-12 limit switch contact is open.
/
17
FUTURE USE
/
Keyboard
Button
LED
ON
Starts the opening operation.
The green LED on indicates the presence of the 24 V=power supply.
Starts the partial opening operation.
Starts and stops the STOP operation.
the red LED on indicates that the STOP has been activated.
the flashing red LED indicates that the safety devices have been activated.
Starts the closing operation.
- 19 -
0DT788 25/06/2007
DITEC S.p.A.
4.3 Tableau électronique 48E
K22
11
B
Commutateur
additional
Bleu
EL07L
0000000000000
SE
F4
www.ditec.it
SE
Fin de course
overture
Fin de course
fermeture
F5
IN1 41 1
Noire
C
FU
A
12
11
0
Orange
FU
Stop
M
3~
EL07PW2
0000000000000
W
1
3
9
4
LDV
LDR
20
SOFA1
U
V
COM
Frein
PRG
140
J7
Blanc
EO
SO
Rouge
U W V
RP TC
ON
ON
OUT1
F
1 2 3 4 5 6
- LK +
11
12
Blanc
Rouge
17
IN
SA
POWER
Y
NIO
Z
17 14 12 11 0 0 0 1 1 2 3 4 6 8 9 20 41
7705
Orange
Noire
Bleu
Rouge
Blanc
7725A
Orange
Noire
Bleu
Rouge
Blanc
7725B
Blanc
Bleu
Blanc
Marron
X
L3
L2
L1
7645
Power 400V~
Reglages
Trimmer
Description
TC
0s
30 s
RP
Réglage du temps de fermeture automatique. De 0 à 30 s.
Remarque: après l’activation de la commande d’arrêt, lorsque le contact 1-9 se referme, la fermeture automatique ne
s’active qu’après une commande d’ouverture, une commande partiel ou pas-à-pas.
Réglage ouverture partielle moteur. De 0 à 30 s.
0s
30 s
Dip - switch
Description
OFF
ON
DIP 1
Fonctionnement commande 1-3.
Pas-à-pas.
Apertura.
DIP 2
Renouvellement du temps de fermeture
automatique.
50 %
100 %
DIP 3
Pré-clignotement fixe de 3 s.
Déshabilitation en
ouverture.
Habilité aussi bien
en ouverture qu’en
fermeture.
DIP 4
Typologie d’application.
Ne pas utiliser
Porte en enroulement
DIP 5
Frein dynamique.
Déshabilité.
Habilité.
DIP 6
UTILISATION FUTURE
Déshabilité.
Ne pas utiliser.
Pontet
Règlage SMART
ON
Description
1 2 3 4 5 6
OFF
ON
SO
Fonctionnement de sécurité de
inversion.
Avec l’automatisme à l’arrêt, si les contacts
1-8 ou 41-8 sont ouverts il est possible
d’activer la manoeuvre d’ouverture.
Avec l’automatisme à l’arrêt, si les contacts
1-8 ou 41-8 sont ouverts, toute manoeuvre
est impossible.
EO
Electrofrein.
Frein activ.
Frein standard.
- 20 -
0DT788 25/06/2007
DITEC S.p.A.
F
Entrée
Commande
Function
Description
1
2
N.O
Fermeture automatique
La fermeture permanente du contact habilite la fermeture automatique.
1
3
N.O
Ouverture
Avec DIP1=ON et TC<MAX la fermeture du contact active la manoeuvre d’ouverture.
Pas-a-Pas
Avec DIP1=OFF la fermeture du contact active une manoeuvre d’ouverture et de fermeture en séquence:
ouverture-stop-fermeture-ouverture.
Remarque: si la fermeture automatique est habilitée, l’arrêt n’est pas permanent mais de la durée établie par TC.
1
4
N.O
Fermeture
La fermeture du contact active la manoeuvre de fermeture.
41
6
N.C
Arret de securite
L’ouverture du contact arrête et/ou empêche toute manoeuvre.
41
8
N.C
Securite d’inversion
L’ouverture du contact de sécurité provoque l’inversion du mouvement (réouverture) lors de la phase de fermeture.
1
9
N.C
Stop
L’ouverture du contact de sécurité provoque l’arrêt du mouvement.
Arret d’urgence
Pour obtenir un arrêt d’urgence (par exemple avec le bouton rouge prévu à cet effet) connecter les
commandes d’ouverture et de fermeture au bornier 9 et non au 1 (9-3, 9-4, 9-20).
Commande homme
mort
L’ouverture permanente du contact de sécurité habilite la fonction homme présent.
Dans cette condition, les commandes d’ouverture (1-3/1-20) et de fermeture (1-4) ne fonctionnent que si
on les presse, lorsqu’on les relâche l’automatisme s’arrête.
Les éventuelles sécurités présentes, la commande pas à pas et la fermeture automatique sont déshabilitées.
Ouverture partielle
La fermeture du contact active la manoeuvre d’ouverture partielle de la durée établie par l’intermédiaire
du trimmer RP.
Avec l’automatisme à l’arrêt la commande d’ouverture partielle effectue la manoeuvre opposée à celle
précédant l’arrêt.
1
9
1
20
N.O
0
11
N.C
F.C. de fermeture
L’ouverture du contact de la fin de course arrête le mouvement de fermeture.
0
12
N.C
F.C. de ouverture
L’ouverture du contact de la fin de course arrête le mouvement d’ouverture.
17
UTILISATION FUTURE
ATTENTION: Shunter tous les contacts N.C. s’ils ne sont pas utilisés. Les bornes présentant le même numéro sont équivalents. La garantie de
fonctionnement et les performances déclarées ne peuvent être obtenues qu’en utilisant les accessoires et les dispositifs de sécurité DITEC.
Sorties
Sortie
Valeur
Description
1
0
+
-
24 V= / 0,5 A
Alimentation des accessoires.
Sortie de l’alimentation des accessoires externes avec lampes d’état d’automatisme.
0
14
24V= / 50 W
(2 A)
Clignotant (LAMPH).
S’active lors de la manoeuvre d’ouverture et de fermeture.
+LK
24V= / 1,2 A
Electrofrein moteur.
Avec EO=ON, la sortie est active pendant toute la durée du mouvement aussi bien en ouverture qu’en fermeture.
Avec EO=OFF, la sortie n’est active qu’avec le moteur à l’arrêt. (Frein activ).
400 V~ / 6 A
Moteur triphasé.
Raccorder le contact de la thermique moteur en série aux fins de course.
Remarque: si le sens de rotation du moteur n’est pas correct il faut inverser les deux phases d’alimentation
L2 avec L3.
-LK
UWV
M
3~
Segnalation
LED
Allumé
POWER
Clignotant
Présence de tension 24 V=.
/
SA
Indique qu’au moins l’un des contacts de sécurité
est ouvert.
IN
S’allume à chaque commande et à chaque
modification des commutateurs DIP et des pontets.
- Indique la fonction d’arrêt activée par le tableau à poussoirs PT4 (si présente).
- Si l’on utilise le dispositif SOFA1-SOFA2, il indique que le test de sécurité a
échoué (borne 41).
- A l’allumage la DEL clignote en indiquant le comptage des manoeuvres
effectuées:
chaque clignotement rapide = 10000 manoeuvres
chaque clignotement lent = 100000 manoeuvres
/
11
Indique que le contact du fin de course 0-11 est ouvert
/
12
Indique que le contact du fin de course 0-12 est ouvert
/
17
UTILISATION FUTURE
/
Boutons
Boutons
LED
ON
Active la manoeuvre d’ouverture.
Remarque: la voyant verte allumée signale la présence d’alimentation 24 V=.
Active la manoeuvre d’ouverture partielle.
Active et désactive la fonction d’arrêt.
La voyant rouge allumée signale l’activation de l’arrêt.
La voyant rouge clignotante signale l’activation des sécurités.
Active la manoeuvre de fermeture.
- 21 -
0DT788 25/06/2007
DITEC S.p.A.
I
5. VERIFICHE ED AVVIAMENTO
5.1 Verifica dei sensi di movimento
• Usare l'asta per il sollevamento di emergenza per portare il telo a circa metà della corsa.
• Azionare la porta, premendo i relativi pulsanti, (fig.12), e verificare il corretto senso di movimento.
• Se necessario, invertire il senso del movimento modificando la sequenza delle fasi, agendo sui fili di linea a monte
dell'interruttore generale.
In caso di mancato funzionamento verificare il corretto inserimento di tutti i connettori.
5.2 Regolazione dei finecorsa
• Usare l'asta per il sollevamento di emergenza e chiudere il telo
• Mediante cacciavite ruotare la camma "C" sino ad impegnare il relativo microswitch, (fig.13).
• Agire analogamente per il finecorsa di apertura: portare il telo nella posizione di porta aperta e regolare la camma "A".
• Verificare la taratura con funzionamento effettivo dell'automazione, se necessario effettuare una taratura "fine".
GB
5. CHECKING AND STARTING
5.1 Check of the movement direction
• Position the curtain at midle way by the suitable bar.
• Open and close the door by pressing the relative push-buttons (fig.12), and check the correct movement direction.
• If required, reverse the movement direction by modifying the sequence of the phase and acting on the line cable before the
main switch.
In case of door run-up trouble check the correct insertion of all the connectors.
5.2 Adjstment of the limit switch
• Use the emergency lift rod and close the sheet.
• By means of a screw driver, turn the “C” cam until the relative microswitch is triggered, (fig.13).
• Carry out the same procedure for the opening limit switch: open the door panel and adjust the “A” cam.
• Open and close the door to check the correct calibration of the system and, if necessary, carry out further calibrations.
F
5. VERIFICATIONS ET DEMARRAGE
5.1 Vérification des sens du mouvement
• Utiliser la tige de soulèvement d’urgence afin de porter approximativement la toile à la moitié de sa course.
• Actionner la porte, en appuyant sur les touches correspondantes, fig.12 ou vérifier le sens correct du mouvement.
• S'il y a lieu, inverser le sens du mouvement en modifiant la séquence des phases, en intervenant sur les fils de ligne en haut
de l'interrupteur général.
En cas de non-fonctionement, vérifier que l’introduction de tous les connecteurs soit correcte.
5.2 Réglage des fins de course
• Utiliser la tige de soulèvement d’urgence et refermer la toile.
• A l'aide du tournevis, tourner la came "C" jusquà ce quelle intervienne sur le microcontact correspondant, fig.13.
• Intervenir de la même manière pour le fin de course d'ouverture: placer le panneau dans la position de porte ouverte et régler
la came "A".
• Vérifier l'étalonnage avec le fonctionnement effectif de l'automatisme, effectuer un étalonnage fin s'il y a lieu.
Pulsante apre
Open push-button
Bouton-poussoir ouvre
12
13
Apertura parziale
Partial opening
Overturure partielle
STOP
C
Pulsante chiude
Close push-button
Bouton-poussoir ferme
A
- 22 -
0DT788 25/06/2007
DITEC S.p.A.
6. RICERCA GUASTI
Un comando qualsiasi
Il telo e il motore non si muovono:
• Assenza alimentazione di rete
• Sicurezza di arresto o emergenza attiva
• Freno non collegato (il motore resta bloccato)
• Motore collegato ai morsetti sbagliati e/o dipswitch con
regolazione errata
• Finecorsa di apertura (FA) e di chiusura (FC) attivi.
• Motore in protezione termica / Attendere il raffreddamento
Il motore gira in senso inverso:
• Invertire due fasi dell’alimentazione di rete
Comando di apertura
Il motore non si muove:
• Finecorsa di apertura (FA) attivo
• Cortocircuito su collegamenti esterni (comando chiusura
e/o sicurezza di arresto)
• Comando di apertura non collegato correttamente o
guasto
• Motore collegato ai morsetti sbagliati e/o dipswitch con
regolazione errata
Comando di chiusura
Il motore non si muove:
• Attendere fine prelampeggio
• Sicurezza di inversione (fotocellule) attiva (in questo caso
la porta si chiude tenendo il pulsante di chiusura premuto
funzionamento a uomo presente)
• Costa di sicurezza attiva o guasta
• Finecorsa di chiusura (FC) attivo
• Comando di chiusura non collegato correttamente o
guasto
6. TROUBLE SHOOTING
Activation of any control
The panel and the motor does not move
• The mains power supply fault down
• The emergency or external stop safety is activated
• The brake is not connected (the motor is blocked)
• The motor is connected to wrong terminals and/or the
dipswitch is not correctly positioned
• Opening (FA) and closing (FC) limit switches engaged
• Motor with thermal switch activated. / Wait that the motor
cools down
The motor turns in the opposite direction
• Reverse the two phases of the mains power supply
Activation of the opening control
The motor does not move
• The opening limit switch (FA) is activated
• A short-circuit is present on external connections (closure
control and/or stop safety)
• The opening control is not correctly connected or is faulty
• The motor is connected to the wrong terminals and/or the
dipswitch is not correctly positioned
Activation of the closure control
The motor does not move
• Wait until the forewarning flashing light has stopped
• The reversion safety (photocells) is activated (in this case
the door closes when the closure push-button is pressed,
manual operation)
• The safety bar is activated or is faulty
• The closing limit switch (FC) is activated
• The closing control is not correctly connected or is faulty
I
Attivazione emergenza o sicurezza d’arresto durante una
manovra della porta
Il motore non si ferma
• Dispositivo di sicurezza di arresto guasto o non connesso
correttamente al Quadro elettrico
Attivazione della costa di sicurezza durante la chiusura
Il movimento della porta non si inverte
• Dispositivo di sicurezza guasto o non connesso correttamente
a Quadro elettrico
• Gomma della costa danneggiata
Porta aperta con chiusura automatica attiva
La porta non chiude automaticamente dopo il tempo
regolato con TC
• Abilitazione della chiusura automatica (collegamento 1 - 2)
non eseguita correttamente
• Circuito tra 1 e 3 non aperto perfettamente (forse a causa di
acqua umidità o altro all’interno di un dispositivo di comando
di apertura)
Durante una manovra
Il telo non si ferma al finecorsa
• Contatto finecorsa in cortocircuito
• Guasto meccanico del finecorsa o del freno
GB
Activation of the safety stop during door motion
The motor does not stop
• The stop safety device is faulty or is not correctly connected
to the electric control panel
Activation of the safety bar in the closing phase
The door movement reversion does not occur
• The safety device (with pressure switch) is faulty or is not
correctly connected to the electric control panel
• The rubber of the safety bar is damaged
The door is opened with automatic closure activated
The door does not close automatically after closing time TC
• The automatic closure enable signal (connection 1/2) has
not been carried out properly
• The circuit between 1 and 3 is not perfectly open (perhaps
due to water, humidity or other inside the opening control
device)
During operation
The panel does not stop at end of stroke
• The limit switch contact is short-circuited
• A mechanical fault at the limit switches or in the brake
- 23 -
0DT788 25/06/2007
DITEC S.p.A.
F
6. RECHERCHE DES PANNES
Activation d’une commande quelconque
Le panneau ne bouge pas et le moteur ne tourne pas
• Absence d’alimentation électrique
• Sécurité d’arrêt active
• Frein non branché (le moteur reste bloqué)
• Moteur relié aux mauvaises bornes et/ou dipswitch en
position erronée
• Fins de course d’ouverture (FA) et de fermeture (FC)
activées
• Moteur en protection thermique / Attendre son
refroidissement
Le moteur tourne dans le sens contraire
• Inverser les deux phases de l’alimentation électrique
Activation commande d’ouverture
Le moteur ne tourne pas
• Fin de course d’ouverture (FA) actif
• Court-circuit sur les connexions extérieures (commande de
fermeture et/ou sécurité d’arrêt)
• Commande d’ouverture non correctement connectée ou en
panne
• Moteur connecté aux bornes erronées et/ou, dipswitch en
position erronée
Activation commande de fermeture
Le moteur ne tourne pas
• Attendre la fin du préclignotement
• Sécurité d’inversion (photocellules) active (dans ce cas la
porte se ferme en conservant la pression sur le boutonpoussoir
de fermeture)
• Bourrelet de sécurité active ou en panne
• Fin de course de fermeture (FC) active
• Commande de fermeture non correctement connectée ou
en panne
I
Activation de la sécurité d’arrêt durant une manœuvre
de la porte
Le moteur ne s’arrête pas
• Dispositif de sécurité d’arrêt en panne ou non correctement
connecté à l’armoire électrique
Activation du bourrelet de sécurité durant la fermeture
Le moteur de la porte ne s’inverse pas
• Dispositif de sécurité active en panne ou non correctement
branché à l’armoire électrique
• Caoutchouc du bourrelet endommagé
Porte ouverte avec fermeture automatique active
La porte ne se ferme pas automatiquement après le temps
réglé avec TC
• Validation de la fermeture automatique (liaison 1 - 2) non
correctement effectuée
• Circuit entre 1 ou 3 non parfaitement ouvert (peut-être cause
de l’eau, de l’humidité ou autre à l’intérieur du dispositif de
commande d’ouverture)
Durant une manouvre
Le panneau ne s’arrête pas au fin de course
• Contact fin de course en court-circuit
• Panne mécanique du fin de course ou du frein
7. PIANO DI MANUTENZIONE (ogni 6 mesi)
FISSAGGIO / MONTAGGIO
Serrare le viti di accoppiamento dei montanti verticali con la
traversa superiore
Verificare l'ancoraggio della porta al vano
MOTORIZZAZIONE
Controllare il fissaggio del motore
DISPOSITIVI DI SICUREZZA
Verificare il funzionamento della costa di sicurezza
Verificare lo stato del profilo in gomma della costa di
sicurezza
Verificare il corretto funzionamento delle fotocellule di
sicurezza
ALBERO DI AVVOLGIMENTO TELO
Controllare il fissaggio dei supporti cuscinetti
GB
7. MAINTENANCE (every 6 months)
INSTALLATION / FITTING
Tighten the fitting screws of the uprights with the crosspiece
Check the anchoring of the door to the door frame
MOTOR
Check the fixing of the motor
SAFETY DEVICES
Check the good safety bar functioning
Check the good conditions of the rubber profile of the safety bar
Check the correct operation of the safety photocells
MAIN SHAFT
Check the good bearing supports fixing
F
7. PROGRAMME DE MAINTENANCE (tous les 6 mois)
FIXATION / MONTAGE
Serrer les vis de couplage des montants verticaux avec
l'entretoise supérieure
Vérifier lancrage de la porte au passage
MOTORISATION
Contrôler la fixation du moteur
DISPOSITIFS DE SECURITE
Vérifier les fonctionnement de le bourrelet de sécurité
Vérifier les conditions du profilé en caoutchouc du bourrelet
de sécurité
Vérifier le fonctionnement correct des photocellules de
sécurité
ARBRE D’ENROULEMENT DU PANNEAU
Contrôler la fixation des supports des roulements
- 24 -
0DT788 25/06/2007
DITEC S.p.A.
INDICAZIONI DI UTILIZZO
Classe di servizio: 4 (minimo 5 anni di utilizzo con 300 cicli al giorno)
Utilizzo: INTENSO (per ingressi di tipo industriale e commerciale con uso intenso)
• La classe di servizio, i tempi di utilizzo e il numero di cicli consecutivi hanno valore indicativo. Sono rilevati statisticamente in
condizioni medie di utilizzo e non possono essere certi per ogni singolo caso. Si riferiscono al periodo nel quale il prodotto
funziona senza necessità di manutenzione straordinaria.
• Ogni ingresso automatico presenta elementi variabili quali: attriti, bilanciature e condizioni ambientali che possono modificare
in maniera sostanziale sia la durata che la qualità di funzionamento dell’ingresso automatico o di parte dei suoi componenti
(fra i quali gli automatismi). È compito dell’installatore adottare coefficienti di sicurezza adeguati ad ogni particolare
installazione.
DICHIARAZIONE DI CONFORMITÀ CE
Fabbricante: DITEC S.p.A.
Indirizzo: via Mons. Banfi, 3 - 21042 Caronno P.lla (VA) - Italy
Dichiara che il prodotto: SMART
è conforme ai requisiti essenziali delle seguenti direttive CE:
- Direttiva compatibilità elettromagnetica 89/336/EEC
- Direttiva macchine 98/37/EC
- Direttiva prodotti da costruzione 89/106/EEC
è conforme alle seguenti caratteristiche della norma EN 13241-1
(Allegato ZA):
I
- Controllo della produzione in fabbrica (Conforme)
- Rilascio di sostanze pericolose (Conforme)
- Apertura sicura (Conforme)
- Resistenza meccanica e stabilità (Conforme)
- Forze di manovra (Conforme)
Organismo notificato: C.S.I. S.p.A.
Registrazione numero: CPD/0497/050/05
Indirizzo: Viale Lombardia, 20 - 20021 Bollate (MI) - ITALY
Caronno Pertusella, 01/05/2005
Fermo Bressanini
(Presidente)
APPLICATIONS
Service life: 4 (minimum 5 years of working life with 300 cycles a day)
Applications: INTENSE (for industrial and commercial access with intense use).
• Service class, running times, and the number of consecutive cycles are to be taken as merely indicative having been statistically
determined under average operating conditions, and are therefore not necessarily applicable to specific conditions of use.
During given time spans product performance characteristics will be such as not to require any special maintenance.
• The actual performance characteristics of each automatic access may be affected by independent variables such as friction,
balancing and environmental factors, all of which may substantially alter the performance characteristics of the automatic
access or curtail its working life or parts thereof (including the automatic devices themselves). When setting up, specific local
conditions must be duly borne in mind and the installation adapted acwireingly for ensuring maximum durability and troublefree operation.
EC DECLARATION OF CONFORMITY
Manufacturer: DITEC S.p.A.
Address: via Mons. Banfi, 3 - 21042 Caronno P.lla (VA) - Italy
declares that the product: SMART
complies with the essential requirements of the following EC
directives:
- EMC Directive 89/336/EEC
- Machinery Directive 98/37/EC
- Construction Products Directive 89/106/EEC
complies with the following characteristics of EN 13241-1
standard (Annex ZA):
GB
- Factory production control (Pass)
- Release of dangerous substances (Pass)
- Safe opening (Pass)
- Mechanical resistance and stability (Pass)
- Operating forces (Pass)
Approved body: C.S.I. S.p.A.
Registration number: CPD/0497/050/05
Address: Viale Lombardia, 20 - 20021 Bollate (MI) - ITALY
Caronno Pertusella, 01/05/2005
Fermo Bressanini
(Chairman)
MODE D’EMPLOI
Classe de service: 4 (minimum 5 ans d’utilisation avec 300 cycles par jour).
Utilisation: INTENSIF (pour acces de type industrial et commercial avec utilisation intensif).
• La classe de service, les temps d’utilisation et le nombre de cycles consécutifs sont donnés à titre indicatif. Il s’agit de valeurs
relevées statistiquement dans des conditions moyennes d’utilisation, n’offrant donc pas une précision absolue pour chaque
cas spécifique. Ces valeurs se réfèrent à la période pendant laquelle le produit fonctionne sans aucune intervention d’entretien
exceptionnel.
• Tout accès automatique présente des éléments variables tels que: frottements, compensations et conditions environnementales
pouvant modifier fondamentalement aussi bien la durée que la qualité de fonctionnement de l’accès automatique ou d’une
partie de ses éléments (entre autres, les automatismes). L’installateur est tenu d’adopter des coefficients de sécurité adaptés
à chaque installation spécifique.
DECLARATION DE CONFORMITE CE
Constructeur: DITEC S.p.A.
Adresse: via Mons. Banfi, 3 - 21042 Caronno P.lla (VA) - Italy
Déclare que le produit: SMART
est conforme aux prescriptions des directives CE suivantes:
- Directive sur la compatibilité électromagnétique 89/336/EEC
- Directive Machines 98/37/EC
- Directive Produits de construction 89/106/EEC
est conforme aux caractéristiques suivantes de la norme EN
13241-1 (Annexe ZA):
- Contrôle de la production en usine (Conforme)
- Rejet de substances dangereuses (Conforme)
- Ouverture sécurisée (Conforme)
- Résistance mécanique et stabilité (Conforme)
- Forces de manoeuvre (Conforme)
Organisme agréé: C.S.I. S.p.A.
n° d’enregistrement: CPD/0497/050/05
Adresse: Viale Lombardia, 20 - 20021 Bollate (MI) - ITALY
Caronno Pertusella, 01/05/2005
Fermo Bressanini
(Président)
- 25 -
0DT788 25/06/2007
DITEC S.p.A.
F
D
3. MECHANISCHE INSTALLATION VON STRUKTUR UND KOMPONENTEN
3.1 Überprüfungen des Durchgangs.
• Die Abmessungen der Öffnung mit den Außenmaßen des gelieferten Tors vergleichen. Bei Installation in der lichten
Durchgangsbreite die eventuell erforderlichen Toleranzen berücksichtigen.
• Sicherstellen, dass die Montage der Struktur durch keine eventuellen Hindernisse beeinträchtigt wird.
• Sicherstellen, dass die Auflageflächen vollkommen eben sind. Gegebenenfalls mit geeigneten Unterlagen ausgleichen.
• Die Beschaffenheit der Wandstruktur überprüfen: Die sichere Verankerung mittels Bügeln oder Dübeln muss gewährleistet
sein. Sollte die Konsistenz ungenügend oder zweifelhaft sein, muss eine entsprechende selbsttragende Metallstruktur
angefertigt werden.
3.2 Befestigung der Seitenpfosten.
• Die gesamten Raumbedarf des Querträgers (L) vermessen.
• Auf dem Boden die genaue Position der Seitenpfosten markieren (abb.2).
• Die Abdeckungen der Seitenpfosten entfernen und deren Grundflächen entsprechend den Markierungen mit Dübeln Abmessung
M8-Schrauben befestigen (abb.3).
• Die Seitenpfosten abloten und entsprechend den angegebenen Punkten (A) befestigen, falls die Befestigung mit Außenbügeln
erfolgt oder (B) für die Befestigung vom Stützeninneren aus. Abmessung der Dübel M8 (abb.2).
• Die Rechtwinkligkeit der Montage durch Abmessung der Diagonalen überprüfen.
E
3. INSTALACIÓN MECÁNICA DE LA ESTRUCTURA Y DE LOS COMPONENTES
3.1 Verificaciones del vano de paso.
• Verificar las dimensiones del vano y la correspondencia con las dimensiones de la puerta suministrada, considerando las
eventuales tolerancias necesarias en caso de instalación en luz.
• Verificar que eventuales estorbos existentes no obstaculicen el montaje de la estructura.
• Asegurarse de que los planos de apoyo estén nivelados y eventualmente restablecerlos mediante las riostras adecuadas.
• Verificar la consistencia de la estructura del vano: se tiene que garantizar un seguro anclaje mediante estribos o espigas.
En caso de consistencia escasa o dudosa es necesario realizar una adecuada estructura metálica autoportante.
3.2 Fijación de los montantes verticales.
• Medir la dimensión total del travesaño (L).
• Marcar en el pavimento la exacta posición de los montantes verticales. (fig.2)
• Quitar las tapas de los montantes verticales y fijar las bases, a la altura de las marcas, mediante espigas dispuestas al efecto
dimensión tornillos M8. (fig.3)
• Poner a desplomo los montantes verticales y fijarlos a la altura de los puntos indicados (A) en caso de fijación con estribos
externos o (B) para fijación en el interior de la columna. Dimensión espigas M8. (fig.2)
• Verificar la ortogonalidad del montaje midiendo las diagonales.
P
3. INSTALAÇÃO MECÂNICA DA ESTRUTURA E DOS COMPONENTES
3.1 Verificações do vão de passagem.
• Verificar as dimensões do vão e a correspondência com as medidas totais da porta fornecida, considerando as eventuais
tolerâncias necessárias no caso de instalação em luz.
• Verificar que eventuais obstáculos existentes não dificultem a montagem da estrutura.
• Verificar que os suportes de apoio sejam nivelados e eventualmente restaurá-los mediante calços adequados.
• Verificar a consistência da estrutura do vão: deve ser garantida uma ancoragem segura mediante suportes ou buchas. No
caso de pouca ou duvidosa consistência é necessário realizar uma estrutura metálica autoportante adequada.
3.2 Fixação das colunas verticais.
• Medir o tamanho total da travessa (L).
• Marcar no piso a posição exata das colunas verticais. (fig.2)
• Remover as tampas das colunas verticais e fixar suas bases, na correspondência das marcas, mediante buchas apropriadas
à dimensão de parafusos M8. (fig.3)
• Regular o prumo das colunas verticais e fixá-las na correspondência dos pontos indicados (A) no caso de fixação com
suportes externos ou (B) para a fixação pela parte interna da coluna. Dimensão das buchas M8. (fig.2)
• Verificar a ortogonalidade da montagem medindo as diagonais.
- 26 -
0DT788 25/06/2007
DITEC S.p.A.
1
LT = ( PL + 380 )
170
50
330
200
1000
~ 1500
PH
HT = ( PH + 530 )
L max 5000
580
200 330
50
200
190
~ 1000
PL
80
360
80
2
3
X=Y± 10mm
A
B
B
X
H
B
Y
1/2H
L
- 27 -
0DT788 25/06/2007
DITEC S.p.A.
D
3.3 Vorbereitung zur Montage der Querhalterung
• Vorsichtig die Querhalterung mit Hilfe eines Hubkarrens oder eines anderen geeigneten Geräts anheben und dabei darauf
achten, daß die Profile nicht beschädigt werden oder beim Anheben das Gleichgewicht verlieren und hinfallen.
• Querhalterung auf die Seitenhalterungen auflegen, Mutterschrauben wieder einfügen und fest anziehen. (abb.4)
Den Querträger auf geeignete und sichere Weise mit Hilfe der Bohrungen C an der Wand befestigen (Abb. 5)
• Mit Türen von durchgangbreite > 4000, empfehlen wir die Kreuzstange zentral zu klemmen (auf diese weise vermeidet man
eine unästhetish Biegung des fachwerks).
3.4 Montage des Getriebemotors
• Führen Sie die Passfeder (a) in die dazugehörige Nut (b) in der Wickelwelle.
• Den Getriebemotor auf die Welle setzen.
• Befestigen Sie den Getriebemotor mit der dazugehörigen Befestigung auf den Zylinderkopf (abb.5).
• Die Silentblock Gruppe auf den Sitz (h) auf der Halteplatte einsetzen und dabei die Komponenten wie auf der Abbildung 5a
dargestellt positionieren.
(d) Unterlegscheibe 13x24
(e) Silentblock Ø 25
(f) Unterlegscheibe 14x36
(g) Schraube 12x55
• Den Silentblock auf der entsprechenden Mutter (h) auf dem Zylinderkopf befestigen.
E
3.3 Instalación del montante horizontal
• Levantar con cuidado el montante horizontal utilizando una carretilla elevadora o un medio de levantamiento, cuidando que
no se dañe y controlando que no pueda caer durante la fase de levantamiento.
• Apoyar el montante horizontal sobre las columnas verticales: proceder a introducir los pernos M8 anteriormente desmontados
y fijarlos con esmero (dis.4).
Fijar el travesaño a la pared de modo idóneo y seguro mediante los agujeros C (fig.5)
• Si las puertas tienen un ancho > 4000, se aconsenta de fijar "la traversa" en el centro (para evitar una flexion antiestético
de la carpenteria).
3.4 Montaje del Motorreductor
• Introducir la llave (a) en el lugar adecuado (b) en el árbol de la doble polea arrollamiento.
• Introducir el motorreductor en el árbol.
• Fijar el motorreductor al morro (fig. 5) mediante la fijación adecuada.
• Introducir el grupo silent block en el lugar adecuado (h) de la placa de soporte, situando los componentes como se indica
en la fig.5a.
(d) arandela 13x24
(e) silent block Ø 25
(f) arandela 14x36
(g) tornillos 12x55
• Fijar el silent block en la tuerca (h) predispuesta en la cabeza.
P
3.3 Montagem da padieira
• Levantar com cuidado a padieira através de empilhadeira ou outro meio de elevação, prestando atenção para não estragar
a mesma e tomando o cuidado para que não caia durante a fase de elevação.
• Apoiar a padieira nas ombreiras verticais; reintroduzir os parafusos de fixação e apertá-los. (fig.4)
Fixar a travessa ao muro de modo idóneo e seguro através dos furos C (fig.5)
• No caso de portas com VPL > 4000 recomenda-se para fixar a padieira no centro (para evitar uma flexão anti-estética dos
caixilhos).
3.4 Montagem do Moto-redutor
• Inserir a chave (a) na especial sede (b) no eixo de envolvimento.
• Inserir o moto-redutor no eixo.
• Fixar o moto-redutor na base (fig. 5) mediante a especial fixagem.
• Inserir o grupo silent block na especial sede (h) da chapa de suporte, posicionando os componentes como representado na
fig. 5a.
(d) anilha 13x24
(e) silent block Ø 25
(f) anilha 14x36
(g) parafuso 12x55
• Fixar o silent block na porca (h) predisposta na base.
- 28 -
0DT788 25/06/2007
DITEC S.p.A.
4
5
c
5a
a
e
d
f
h
h
g
b
- 29 -
0DT788 25/06/2007
DITEC S.p.A.
D
3.5 Befestigung der Kontaktleiste
• Positionieren Sie das Tuch auf ungefähr 1 m Höhe mit Hilfe des Entriegelungsstange, indem Sie den entsprechenden Ring
unter dem Getriebemotor eingeführen, wie in abb.7 angezeigt.
• Die Sicherheitsleiste in die untere Tasche des Torbehangs einführen (abb.6).
• ACHTUNG: die KabelAusgangsseite des Stabes muß in Korrespondenz mit der linken, in deren Innerem die Kabelträgerkette
befestigt ist.
• Die Leiste entlang der gesamten Länge des Torbehangs verlaufen lassen und sie genau zum Torbehang zentrieren. Der
Behang muss im Verhältnis zum Aluminiumprofil der Sicherheitsleiste gleich lang über die Ränder hinaushängen.
3.5.1 Befestigung der Energiekette an der Kontaktleiste
• Im linken Pfosten befindet sich die Energieführungskette bereits befestigt und darin das entsprechende Kabel. Freies Ende
der Energiekette am Gleiter der Kontaktleiste anschließen, abb.8.
• Von Hand prüfen, daß alle Glieder die richtige Drehbewegung der Energieführungskette ermöglichen. Bei Behinderung das
verdrehte Glied in die richtige Stellung bringen.
• Zum Anschluß des Kabels an das Sicherheitsgerät der Leiste, Abschnitt 4. beachten.
E
3.5 Fijación del burlete de seguridad
• Situar la lona a aproximadamente 1m de altura actuando con la adecuada asta de desbloqueo introducida en el anillo situado
bajo el motorreductor como se indica en la in dis.7.
• Introducir la costa de seguridad en la bolsa inferior de la tela, (dis.6).
• ATENCIÓN: el lado de la costa en el que salen los cables ha de colocarse a la altura de la columna izquierda, en cuyo
interior está fijada la cadena portacables.
• Hacer deslizar la costa por toda la largura de la tela y centrarla perfectamente con respecto a la tela misma. La tela tiene
que desbordar de la misma cantidad con respecto al perfil de aluminio de la costa de seguridad.
3.5.1 Fijación de la cadena porta-cables al burlete de seguridad
• En la columna de izquierda se encuentra ya fijada la cadena porta-cables con su cable adecuado. Conectar la extremidad
libre de la cadena porta-cables al deslizador de nylon del burlete de seguridad, (dis.8).
• Controlar manualmente que todas las mallas permitan la correcta rotación de la cadena porta-cables. En el caso de que
estuvieran impedimentos, localizar las mallas montadas al revés y llevarlas a la posición correcta.
• Para las conexiones del cable al dispositivo de seguridad del burlete, véase el párrafo 4.
P
3.5 Montagem da ombreira de segurança
• Posicionar a tela a cerca 1m de altura agindo com a especial haste de desbloqueio enfiada no anel posto abaixo do motoredutor como indicado na fig.7.
• Inserir a ombreira de segurança na bolsa inferior do painel, (fig.6).
• ATENÇÃO a lateral da ombreira onde saem os cabos deve ser posicionada na correspondência da coluna esquerda, dentro
da qual está fixada a corrente porta cabos.
• Deixar correr a ombreira ao longo de todo o comprimento do painel e centralizá-la perfeitamente em relação ao próprio
painel. O painel deve ficar saliente na medida igual em relação ao perfil de alumínio da ombreira de segurança.
3.5.1 Fixação da corrente porta cabos à ombreira de segurança3.5.2 Fixação da corrente porta cabos à ombreira de
segurança
• Na coluna esquerda já está fixada a corrente porta cabos com o relativo cabo inserido. Ligar a extremidade livre da corrente
porta-cabos ao patim de nylon da ombreira de segurança, (fig.8).
• Verificar manualmente que todos os elos permitam a rotação certa da corrente porta cabos. No caso em que houverem
impedimentos, localizar os elos montados ao contrário e recolocá-los na posição certa.
• Para as ligações do cabo ao dispositivo de segurança da ombreira ver o parágrafo 4.
- 30 -
0DT788 25/06/2007
DITEC S.p.A.
6
8
7
Schließen
Cierra
Fecha
Öffnen
Abre
Abre
- 31 -
0DT788 25/06/2007
DITEC S.p.A.
D
4. ELEKTRISCHER ANSCHLUSS UND INBETRIEBNAHME
4.1 Anschlüsse Schaltkasten / Tor
• In Schema 9 werden die gelieferten Verkabelungen und ihre Position im Tor angegeben; jede Verkabelung wird durch eine
eigene Bezeichnung auf einem Aufkleber kenntlich gemacht.
• Verkabelungen 7725A, 7725B, 7796 und A934E sind bereits in Stellung gebracht und in der Konstruktion (Pfosten und
Querträger) befestigt.
• Verkabelungen 7705 und 7839 werden separat geliefert.
• Kabelanschlüsse, gemäß den abb.11, am Schaltkasten vornehmen.
4.2 Sicherheits-Lichtschranken
• Anschlüsse nach abb.9 vornehmen.
4.2.1 Sicherheitsleiste
• Alle Anschlüsse gemäß abb.10, unter Bezugnahme auf die auf der Sicherheitsleiste vorhandene Sicherheitsvorrichtung
vornehmen.
E
4. CONEXIONES ELÉCTRICAS Y PUESTA EN FUNCIÓN
4.1 Conexiones del cuadro eléctrico / automatismo
• En el diseño 9 se pueden ver de forma esquemática los cableados suministrados y su instalación en la puerta; cada cableado
se identifica gracias a un código marcado en una etiqueta autopegante.
• Los cableados 7725A, 7725B, 7796 y A934E se encuentran ya instalados y fijados en los elementos estructurales (columnas
y montante horizontal).
• Los cableados 7705 y 7839 están suministrados por separado.
• Realizar las conexiones de los cableados en el cuadro eléctrico, así como indicado en el dis.11.
4.2 Fotocélulas de seguridad
• Efectuar las conexiones como indicado en el dis.9.
4.2.1 Costa de seguridad
• Efectuar las conexiones como indicado en dis.10, refiriéndose al dispositivo de seguridad presente en la costa de
seguridad.
P
4 LIGAÇÕES ELÉTRICAS E COLOCAÇÃO EM FUNÇÃO
4.1 Ligações do quadro elétrico / automação
• Na figura 10 estão mostrados esquematicamente os cabos fornecidos e sua posição na porta; cada fiação é marcada com
um código colocado sobre uma etiqueta adesiva.
• As fiações 7725A, 7725B, 7796 e A934E já estão posicionadas e fixadas nos elementos estruturais (ombreiras verticais e
padieira).
• As fiações 7705 e 7839 são fornecidas separadamente
• Executar as ligações destas fiações no quadro elétrico conforme indicado na fig.11.
4.2 Fotocélulas de segurança
• Executar as ligações conforme indicado na fig.9.
4.2.1 Ombreira de segurança
• Executar as ligações conforme indicado na fig.10, referindo-se ao dispositivo de segurança presente na ombreira de
segurança.
- 32 -
0DT788 25/06/2007
DITEC S.p.A.
9
Schwarz
Negro
(0)
Preto
Blau
(1)
Azul
Azul
Weiß
Blanco
Branco Rot
Rojo
Vermello
A934E
7796
Schwarz
Negro
Preto
Blau
Azul
Azul
(0)
(1)
48E
7725A
Rot
Rojo
Vermello Weiß
Blanco
Branco
FC
49E
400 V 3~
M
7725B
A934E
A934E
7796
7725B
7725A
7705
7839
F
Blau
Azul
Azul
Schwarz
Negro
Petro
Tx
Rx
Blau
Azul
Azul
Schwarz
Negro
Preto
Weiß
Blanco
Branco
Braun
Maròn
Marrom
01
0 1 n.c.
TX
RX
7725A
10
POWER
SOFA1
www.ditec.it
COM
Rot
Rojo
Vermello
1 I N 41 1
PRG
J7
Weiß
Blanco
Branco
IN1
7796
EL07L
0000000000000
EO
SO
RP TC
ON
ON
1 2 3 4 5 6
OUT1
- LK +
11
12
17
IN
SA
P 2.0
POWER
NIO
17 14 12 11 0 0 0 1 1 2 3 4 6 8 9 20 41
- 33 -
0DT788 25/06/2007
DITEC S.p.A.
4.3 Elektronische Schalttafel 48E
K22
11
B
Zusätzlicher
Schalter
Blau
EL07L
0000000000000
SE
F4
www.ditec.it
SE
Öffnung
begrezungsschalter
Schließender
Begrenzungsschalter
F5
Stop
J7
M
3~
EL07PW2
0000000000000
W
1
3
9
4
LDV
LDR
20
SOFA1
U
V
COM
Bremse
PRG
140
IN1 41 1
Schwarz
C
FU
A
12
11
0
Orange
FU
Weiß
EO
SO
Rot
U W V
RP TC
ON
ON
1 2 3 4 5 6
- LK +
11
12
OUT1
D
Weiß
Rot
17
IN
SA
POWER
Y
NIO
Z
17 14 12 11 0 0 0 1 1 2 3 4 6 8 9 20 41
7705
Orange
Schwarz
Blau
Rot
Weiß
7725A
Orange
Schwarz
Blau
Rot
Weiß
7725B
Schwarz
Blau
Weiß
Braun
X
L3
L2
L1
7645
Power 400V~
Einstellungen
Trimmer
Beschreibung
TC
0s
30 s
RP
Zeiteinstellung der automatischen Schließung. Von 0 bis 30 s.
Anm.: Nach der Aktivierung des Stoppbefehls und nach dem erneuten Schließen des Kontaktes 1-9 schaltet sich die automatische
Schließung erst nach einem Befehl für die totale Öffnung, die teilweise Öffnung oder die Öffnung im Schrittbetrieb ein.
Einstellung teilweise Öffnung Motor. Von 0 bis 30 s.
0s
Dip - switch
30 s
Beschreibung
OFF
ON
DIP 1
Funktion Befehl 1-3.
Schrittbetrieb.
Öffnung.
DIP 2
Erneuerung Zeit automatische Schließung.
50 %
100 %
DIP 3
Prelampeggio fisso di 3 s.
Bei Öffnung
deaktiviert.
Nur bei
Sowohl bei Öffnung
als auch bei
Schließung aktiviert.
DIP 4
Anwendungstypologie.
Nicht verwenden.
Flexible tor.
DIP 5
Dynamische Bremse.
Deaktiviert.
Aktiviert.
DIP 6
Zukünftiger Gebrauch
Deaktiviert.
Nicht verwenden.
Brücken
Beschreibung
Zeiteinstellung SMART
ON
1 2 3 4 5 6
OFF
ON
SO
Betrieb mit Bewegungsumkehr.
Bei stillstehendem Antrieb und wenn die
Kontakte 1-8 oder 41-8 offen sind, ist es
möglich, den Öffnungsvorgang zu aktivieren.
Bei stillstehendem Antrieb und wenn die
Kontakte 1-8 oder 41-8 offen sind, werden
jegliche Vorgänge verhindert.
EO
Elektrobremse.
Feststellbremse.
Normal.
- 34 -
0DT788 25/06/2007
DITEC S.p.A.
D
Eingang
Befehl
Funktion
1
2
N.O
1
3
N.O
Beschreibung
Automatische schließung
Die permanente Schließung des Kontaktes aktiviert die automatische Öffnung.
Öffnung
Bei DIP1=ON wird beim Schließen des Kontaktes eine Öffnung ausgelöst.
Schrittbetrieb
Bei DIP1=OFF wird beim Schließen des Kontaktes eine Öffnung oder Schließung in folgender Reihenfolge
ausgelöst: Öffnet-Stopp-Schließt-Öffnet.
Anm.: Ist die automatische Schließung aktiviert, ist der Stopp nicht von Dauer, sondern hat die von TC
eingegebene Dauer.
1
4
N.O
Schließung
Die Schließung des Kontakts aktiviert den Schließvorgang.
41
6
N.C
Anhaltesicherheit
Die Öffnung des Kontaktes blockiert und/oder verhindert jegliches Manöver.
41
8
N.C
Umkehrsicherheit
Die Öffnung des Sicherheitskontaktes verursacht die Bewegungsumkehr (erneute Öffnung) während der
Schließphase.
1
9
N.C
1
9
1
20
N.O
Stopp
Die Öffnung des Sicherheitskontaktes verursacht das Anhalten der Bewegung.
Notstopp
Um einen Notstopp (z.B. durch die entsprechende rote Taste) zu erhalten, die Öffnungs- und Schließbefehle
an die Klemme 9 statt 1 anschließen (9-3, 9-4, 9-20).
Befehl bei anwesender
person
Die permanente Öffnung des Sicherheitskontaktes aktiviert die Funktion mit anwesender Person.
Unter dieser Bedingung funktionieren die Öffnungs- (1-3/1-20) und Schließbefehle (1-4) nur, wenn sie gedrückt
gehalten werden. Werden sie losgelassen, kommt der Antrieb zum Stillstand. Die eventuell vorhandenen
Sicherheiten, der Befehl für den Schrittbetrieb und die automatische Schließung sind deaktiviert.
Teilöffnung
Die aktive Schließung des Kontaktes aktiviert ein teilweises Öffnungsmanöver mit der durch den Trimmer RP
eingestellten Dauer. Bei stillstehendem Antrieb führt der Befehl für eine teilweise Öffnung das Manöver durch,
das entgegengesetzt zu dem ist, das dem Stillstand vorausgegangen ist.
Die Öffnung des Endschalterkontaktes stoppt die Schließbewegung.
0
11
N.C
Vorendschalter tür zu
0
12
N.C
Vorendschalter tür auf
17
Die Öffnung des Endschalterkontaktes stoppt die Öffnungsbewegung.
ZUKÜNFTIGER GEBRAUCH
ACHTUNG: Alle stromlos geschlossenen Kontakte überbrücken, wenn sie nicht benutzt werden. Die Klemmen mit gleicher Nummer sind
äquivalent. Die Funktionsgarantie und die angegebenen Leistungen werden nur mit Zubehör und Sicherheitsvorrichtungen von DITEC erzielt.
Ausgänge
Ausgang
Wert
Beschreibung
1
0
+
-
24 V= / 0,5 A
Stromversorgung des Zubehörs.
Ausgang für Stromversorgung der externen Zubehörgeräte einschließlich Statuslampen.
0
14
24V= / 50 W
(2 A)
Blinkend (LAMPH).
Schaltet sich während der Öffnungs- und Schließmanöver ein.
+LK
24V= / 1,2 A
Elektrobremse Motor.
Mit EO=ON ist der Ausgang für die gesamte Dauer der Bewegung sowohl bei der Öffnung als auch bei
der Schließung aktiv.
Mit EO=OFF ist der Ausgang nur bei stillstehendem Motor aktiv. (aktive Bremse).
400 V~ / 6 A
Dreiphasenmotor.
Den Kontakt des Motorwärmeschalters in Reihe mit den Endschaltern schalten.
Anm.: Wenn die Drehung des Motors nicht der korrekten Laufrichtung entspricht, die Speisephasen L2
und L3 umkehren.
-LK
UWV
M
3~
Anzeigen
LED
Leuchtet
POWER
Blinkt
Stromversorgung vorhanden 24 V=.
/
SA
Zeigt an, dass mindestens einer der
Sicherheitskontakte geöffnet ist.
- Zeigt die über die Druckknopftafel PT4 (wenn vorhanden) aktivierte STOPFunktion an.
- Bei Verwendung der Befehlseinrichtung SOFA1-SOFA2 zeigt sie das
Misslingen des Sicherheitstests an (Klemme 41).
- Beim Einschalten blinkt die LED und zeigt die Zählung der durchgeführten
Manöver an:
Jedes schnelle Blinken = 10000 Manöver
Jedes langsame Blinken = 100000 Manöver
IN
Schaltet sich bei jedem Befehl und bei jeder
Veränderung an Dip-Schalter und Drahtbrücke ein.
/
11
Zeigt an, dass der Kontakt des Endschalters 0-11 geöffnet ist.
/
12
Zeigt an, dass der Kontakt des Endschalters 0-12 geöffnet ist.
/
17
ZUKÜNFTIGER GEBRAUCH
/
Taste
Taste
LED
ON
Löst den Öffnungsvorgang aus.
Anm.: Die eingeschaltete grüne LED signalisiert das Vorhandensein von 24
V= Versorgung.
Löst den teilweisen Öffnungsvorgang aus.
Aktiviert und deaktiviert die STOP-Funktion.
Anm.: Die eingeschaltete rote LED signalisiert die Aktivierung des STOPPs.
Die blinkende rote LED signalisiert die Aktivierung der Sicherheiten.
Löst den Schließvorgang aus.
- 35 -
0DT788 25/06/2007
DITEC S.p.A.
4.3 Cuadro electrónico 48E
K22
11
B
Interruptor adicional
A
Azul
EL07L
0000000000000
F4
www.ditec.it
SE
Interruptor de límite
de la abertura
Interruptor de límite
de la cierre
SE
C
F5
IN1 41 1
Negro
12
11
0
FU
Anaranjado
FU
Stop
M
3~
EL07PW2
0000000000000
W
1
3
9
4
LDV
LDR
20
SOFA1
U
V
COM
Freno
PRG
140
J7
Blanco
EO
SO
Rojo
U W V
RP TC
ON
ON
OUT1
E
1 2 3 4 5 6
- LK +
11
12
Blanco
Rojo
17
IN
SA
POWER
Y
NIO
Z
17 14 12 11 0 0 0 1 1 2 3 4 6 8 9 20 41
7705
Anaranjado
Negro
Azul
Rojo
Blanco
7725A
Anaranjado
Negro
Azul
Rojo
Blanco
7725B
Negro
Azul
Blanco
Marrón
X
L3
L2
L1
7645
Power 400V~
Regulaciones
Trimmer
Descripción
TC
0s
30 s
RP
Regulación tiempo cierre automático. De 0 a 30 s.
Nota: después de la activación del mando de stop, al volver a cerrar el contacto 1-9, el cierre automático se activa sólo
después de un mando de apertura, apertura parcial o paso-paso.
Regulación apertura parcial motor. De 0 a 30 s.
0s
30 s
Dip - switch
Descripción
OFF
ON
DIP 1
Funcionamiento mando 1-3.
Paso-Paso.
Apertura.
DIP 2
Renovación tiempo cierre automático.
50 %
100 %
DIP 3
Predestello fijo de 3 s.
Inactivo en
apertura.
Activo tanto en
apertura como en
cierre.
DIP 4
Tipología aplicación.
No utilizar.
Puerta flexible.
DIP 5
Freno dinámico.
Inhabilitado.
Habilitado.
DIP 6
Uso futuro.
Inhabilitado.
No utilizar.
Puentes
Descripción
Regulación SMART
ON
1 2 3 4 5 6
OFF
ON
SO
Funcionamiento seguridad de
inversión.
Con el automatismo detenido, si los contactos
1-8 o 41-8 están abiertos, es posible activar la
maniobra de apertura.
Con el automatismo detenido, si los
contactos 1-8 o 41-8 están abiertos, se
impide cualquier maniobra.
EO
Electrofreno.
De estacionamiento.
Normal.
- 36 -
0DT788 25/06/2007
DITEC S.p.A.
E
Entrada
Mando
Funcòn
Descripción
1
2
N.O
Cierre automatico
El cierre permanente del contacto activa el cierre automático.
1
3
N.O
Apertura
Con DIP1=ON el cierre del contacto activa una maniobra de apertura.
Paso paso
Con DIP1=OFF el cierre del contacto activa una maniobra de apertura o cierre en secuencia: abre-stopcierra-abre.
Nota: si el cierre automático está activado, la parada no es permanente, sino de la duración fijada por TC.
1
4
N.O
Cierre
El cierre del contacto activa la maniobra de cierre.
41
6
N.C
Parada de seguridad
La apertura del contacto detiene y/o impide cualquier maniobra.
41
8
N.C
Seguridad de inversión
La apertura del contacto de seguridad provoca la inversión del movimiento (reapertura) durante la fase de cierre.
1
9
N.C
Stop
La apertura del contacto de seguridad provoca la parada del movimiento.
Parada de emergencia
Para obtener una parada de emergencia (por ejemplo, mediante el botón rojo) conecte los mandos de
apertura y cierre al borne 9 en vez de al 1 (9-3, 9-4, 9-20).
Mando con hombre
presente
La apertura permanente del contacto de seguridad activa la función con hombre presente.
En esta situación, los mandos de apertura (1-3/1-20) y cierre (1-4) funcionan sólo si se mantienen
apretados; al soltarlos, el automatismo se detiene.
Las medidas de seguridad presentes, el mando paso-paso y el cierre automático están inactivos.
Apertura parcial
El cierre del contacto activa una maniobra de apertura parcial de la duración configurada mediante el trimmer RP.
Con el automatismo detenido, el mando de apertura parcial efectúa la maniobra opuesta a la que haya precedido
a la parada.
La apertura del contacto del fin de carrera detiene el movimiento de cierre.
1
9
1
20
N.O
0
11
N.C
Fin de carrera cierra
0
12
N.C
Fin de carrera abre
17
La apertura del contacto del fin de carrera detiene el movimiento de apertura.
USO FUTURO
ATENCIÓN: Haga un puente en todos los contactos N.C. que no se utilicen. Los bornes con el mismo número son equivalentes. La garantía
de funcionamiento y las prestaciones declaradas sólo se obtienen con accesorios y dispositivos de seguridad DITEC.
Salidas
Salita
Valor
Descripción
1
0
+
-
24 V= / 0,5 A
Alimentación accesorios.
Salida para la alimentación de accesorios externos, incluidas lámpara estado automatismo.
0
14
24V= / 50 W
(2 A)
Intermitente (LAMPH).
Se activa durante las maniobras de apertura y cierre.
+LK
24V= / 1,2 A
Electrofreno motor.
Con EO=ON, la salida está activa por toda la duración del movimiento, tanto en apertura como en cierre.
Con EO=OFF, la salida está activa solo con el motor parado. (Freno activo).
400 V~ / 6 A
Motor trifásico.
Conecte el contacto de la térmica motor en serie a los fines de carrera.
Nota: si la rotación del motor no corresponde con el sentido de marcha correcto, invierta las fases de
alimentación L2 y L3.
-LK
UWV
M
3~
Señalizaciones
LED
Encendido
POWER
Intermitente
Presencia de alimentación 24 V=.
/
- Indica la función de STOP activada por la botonera PT4 (si la hay).
- Si se usa el dispositivo SOFA1-SOFA2, indica el fallo del test de seguridad
(borne 41).
- Al encenderse, el LED parpadea indicando el número de las maniobras
efectuadas:
cada parpadeo rápido = 10000 maniobras
cada parpadeo lento = 100000 maniobras
SA
Indica que al menos uno de los contactos de
seguridad está abierto.
IN
Se enciende a cada mando y a cada variación de
dip-switch y jumper.
/
11
Indica que el contacto del fin de carrera 0-11 está abierto.
/
12
Indica que el contacto del fin de carrera 0-12 está abierto.
/
17
USO FUTURO
/
Botones
Botones
LED
ON
Activa la maniobra de apertura.
El led verde encendido señala la presencia de alimentación 24 V=.
Activa la maniobra de apertura parcial.
Activa y desactiva la función de STOP.
El led rojo encendido señala la activación del STOP.
El led rojo intermitente señala la activación de las seguridades.
Activa la maniobra de cierre.
- 37 -
0DT788 25/06/2007
DITEC S.p.A.
4.3 Quadro eletrônico 48E
K22
11
B
Interruptor adicional
A
Azul
EL07L
0000000000000
F4
www.ditec.it
SE
Interruptor de limite
da abertura
Interruptor de limite
de fechamento
SE
C
F5
IN1 41 1
Preto
12
11
0
FU
Anaranjada
FU
Stop
M
3~
EL07PW2
0000000000000
W
1
3
9
4
LDV
LDR
20
SOFA1
U
V
COM
Freio
PRG
140
J7
Branco
EO
SO
Vermello
U W V
RP TC
ON
ON
OUT1
P
1 2 3 4 5 6
- LK +
11
12
Branco
Vermello
17
IN
SA
POWER
Y
NIO
Z
17 14 12 11 0 0 0 1 1 2 3 4 6 8 9 20 41
7705
Anaranjado
Preto
Azul
Vermello
Branco
7725A
Anaranjado
Preto
Azul
Vermello
Branco
7725B
Preto
Azul
Branco
Marrom
X
L3
L2
L1
7645
Power 400V~
Regulações
Trimmer
Descrição
TC
0s
30 s
RP
Regulação tempo fechamento automático. De 0 a 30 s.
N.B.: depois da activação do comando de stop, quando o contacto 1-9 fecha novamente, o fechamento automático
activa-se somente depois de um comando de abertura, parcial ou passo-a-passo.
Regulação abertura parcial motor. De 0 a 30 s.
0s
30 s
Dip - switch
Descrição
OFF
ON
DIP 1
Funcionamento do comando 1-3.
Passo-Passo.
Abertura.
DIP 2
Renovação tempo fechamento automático.
50 %
100 %
DIP 3
Pré-lampejo fixo de 3 s.
Disabilitato in
apertura.
Activado tanto ao
abrir quanto ao
fechar.
DIP 4
Tipo aplicação.
Não utilizar.
Porta flexível.
DIP 5
Freio dinâmico.
Desactivado.
Activado.
DIP 6
USO FUTURO
Desactivado.
Não utilizar.
Regulação SMART
ON
1 2 3 4 5 6
Pontes
Descrição
OFF
ON
SO
Funcionamento segurança de inversão.
Com automação parada, e os contactos 1-8
ou 41-8 abertos, é possível activar a manobra
de abertura.
Com automação parada, e os contactos 18 ou 41-8 abertos, qualquer manobra está
impedida.
EO
Freio eléctrico.
De estacionamento.
Normal.
- 38 -
0DT788 25/06/2007
DITEC S.p.A.
P
Entrada
Comando
Função
1
2
N.O
1
3
N.O
Descrição
Fechamento automatico
O fechamento permanente do contacto activa o fechamento automático.
Abertura
Com DIP1=ON o fechamento do contacto activa a manobra de abertura.
Passo-a-passo
Com DIP1=OFF o fechamento do contacto activa uma manobra de abertura ou fechamento em sequência:
abre-stop-fecha-abre.
N.B.: se o fechamento automático é desactivado, o stop não é permanente mas é da duração configurada por TC.
Fechamento
O fechamento do contacto activa a manobra de fechamento.
1
4
N.O
41
6
N.C
Paragem de segurança
A abertura do contacto pára e/ou impede qualquer manobra.
41
8
N.C
Dispositivo de segurança
de inversão
A abertura do contacto de segurança provoca a inversão do movimento (reabertura) durante a fase de
fechamento.
1
9
N.C
1
9
1
20
N.O
Stop
A abertura do contacto de segurança provoca a paragem do movimento.
Paragem de emergência
Para obter uma paragem de emergência (por exemplo, mediante o especial botão vermelho) conectar os
comandos de abertura e fechamento ao prensador 9 em lugar de 1 (9-3, 9-4, 9-20).
Comando a homem
presente
A abertura permanente do contacto de segurança activa a função “a homem presente”. Nesta condição, os
comandos de abertura (1-3/1-20) e de fechamento (1-4) funcionam somente se mantidos
premidos. Ao libertá-los, a automação pára.
Os eventuais dispositivos de segurança presentes, o comando passo-a-passo e o fechamento automático
estão desactivados.
Abertura parcial
O fechamento do contacto activa uma manobra de abertura parcial da duração configurada mediante o trimmer RP.
Com a automação parada, o comando de abertura parcial efectua a manobra contrária à anterior à paragem.
0
11
N.C
Fim de curso fecha
A abertura do contacto do fim de curso pára o movimento de fechamento.
0
12
N.C
Fim de curso abre
A abertura do contacto do fim de curso pára o movimento de abertura.
17
USO FUTURO
ATENÇÃO: Ligar com ponte todos os contactos N.C. se não utilizados. Os prensadores com número igual são equivalentes. A garantia de
funcionamento e as performances declaradas se obtêm somente com acessórios e dispositivos de segurança DITEC.
Saídas
Saída
Valor
Descrição
1
0
+
-
24 V= / 0,5 A
Alimentação acessórios.
Saída para alimentação acessórios externos, incluídas lâmpadas estado automação.
0
14
24V= / 50 W
(2 A)
Lampejante (LAMPH).
Activa-se durante as manobras de abertura e de fechamento.
+LK
24V= / 1,2 A
Freio eléctrico motor.
Com EO=ON, a saída está activa durante toda a duração do movimento tanto ao abrir quanto ao fechar.
Com EO=OFF, a saída está activa apenas com motor parado. (Freio ativo).
400 V~ / 6 A
Motor trifásico.
Ligar o contacto da unidade térmica motor em série aos fins de curso.
N.B.: se a rotação do motor não corresponder ao correcto sentido de marcha, inverter as fases de
alimentação L2 e L3.
-LK
UWV
M
3~
Sinalizações
LED
Acceso
POWER
Lampeggiante
Presença de alimentação 24 V=.
/
- Indica a função de STOP activada através do quadro de botões PT4 (se presente).
- No caso de utilização de dispositivo SOFA1-SOFA2, indica a falha do teste
de segurança (prensador 41).
- Ao acender, o LED relampeja indicando a contagem das manobras
efectuadas:
cada relampejo rápido = 10000 manobras
cada relampejo lento = 100000 manobras
SA
Indica que pelo menos um dos contactos de
segurança está aberto.
IN
Liga-se com cada comando e com cada variação
de Dip-switch e jumper.
/
11
Indica que o contacto do fim de curso 0-11 está aberto.
/
12
Indica que o contacto do fim de curso 0-12 está aberto.
/
17
USO FUTURO
/
Botão
Botão
LED
ON
Activa a manobra de abertura.
O led verde aceso sinaliza a presença de alimentação 24 V=.
Activa a manobra de abertura parcial.
Activa e desactiva a função de STOP.
O led vermelho aceso sinaliza a activação do STOP.
O led vermelho lampejante sinaliza a activação dos dispositivos de egurança.
Activa a manobra de fechamento.
- 39 -
0DT788 25/06/2007
DITEC S.p.A.
D
5. ÜBERPRÜFUNG UND START
5.1 Uberprüfung der Bewegungsrichtung
• Mit Hilfe der Nothebestange bringen Sie das Tuch bis an die Hälfte des Wegs.
• Tor bewegen durch Drücken der entsprechenden Tasten, (abb.12), und Bewegungsrichtung überprüfen.
• Nötigenfalls Bewegungsrichtung durch Änderung der Phasensequenz korrigieren. Dazu werden 2 Phasen vertauscht.
falls es nicht funktioniert sollte, ist nöting die richtige Einführung aller Verbinder zu prüfen.
5.2 Einregulierung der Endschalter
• Schließen Sie das Tuch mit Hilfe der Nothebestange.
• Mit einem Schraubenzieher Nocken “C” drehen, bis der entsprechende Mikroschalter einfällt, (abb.13).
• Mit Öffnungsendschalter analog vorgehen: Behang in Position Tor offen bringen und Nocken “A” einstellen.
• Einstellung durch Inbetriebnahme der Automatik überprüfen und nötigenfalls eine feine Nacheichung vornehmen.
E
5. CONTROLES Y PUESTA EN MARCHA
5.1 Control de los sentidos del movimiento
• Usar el asta para el levantamiento de emergencia para llevar la lona a aproximadamente la mitad del recorrido.
• Activar la puerta, apretando los pulsadores adecuados, véase el (dis.12), y controlar el correcto sentido del movimiento.
• Si necesario, invertir el sentido del movimiento, modificando la secuencia de las fases, utilizando los cables de línea aguas
arriba del interruptor general.
En caso de falta de functionamento verificar la correcta insercion de todos los conectores.
5.2 Regulación de los finales de carrera
• Usar el asta para el levantamiento de emergencia y cerrar la lona.
• Utilizando el destornillador girar la leva “C” hasta empeñar el adecuado microswitch, (dis.13).
• Efectuar la misma maniobra para el final de carrera de apertura: llevar el panel a la posición de puerta abierta y regular la leva “A”.
• Controlar el ajuste poniendo efectivamente en función el automatismo, si necesario efectuar un ajuste “fino”.
P
5. CONTROLES E ACIONAMENTO
5.1 Controle dos sentidos de movimento
• Usar a haste para o levantamento de emergência para trazer a tela a cerca metade do curso.
• Acionar a porta, apertando os respectivos botões, (fig.12), e verificar o sentido correto de movimento.
• Se necessário, inverter o sentido do movimento modificando a seqüência das fases, atuando nos fios de linha a montante
da chave geral.
No caso de falha de funcionamento verificar a introdução correta de todos os conectores.
5.2 Regulagem dos fins de curso
• Usar a haste para o levantamento de emergência e fechar a tela.
• Mediante chave de fenda virar o came “C” até inserir o relativo microswitch, (fig.13).
• Atuar da mesma maneira com o fim de curso de abertura: colocar o painel na posição de porta aberta e regular o came “A”.
• Verificar a calibragem com funcionamento efetivo da automação, se necessário efetuar uma calibragem “fim”.
Pulsante apre
Open push-button
Bouton-poussoir ouvre
12
13
Apertura parziale
Partial opening
Overturure partielle
STOP
C
Pulsante chiude
Close push-button
Bouton-poussoir ferme
A
- 40 -
0DT788 25/06/2007
DITEC S.p.A.
6. STÖRUNGSSUCHE
Aktivierung jeglichen
Befehls Behang und Motor bewegen sich nicht:
• Anhaltesicherheit aktiv
• Stromausfall Bremse nicht angeschlossen (Motor bleibt
blockiert)
• Motor an falsche Klemmen angeschlossen u./o. Dipswitch
in falscher Position
• Endschalter Öffnung (FA) und Schließung (FC) aktiv
• Motor in Hitzeschutz / Abkühlen abwarten
Motor bewegt sich in umgekehrter Richtung
• Zwei Phasen der Stromzufuhr invertieren
Aktivierung Öffnungsbefehl
Motor bewegt sich nicht:
• Öffnungsendschalter (FA) aktiv
• Kurzschaltung ä ußerer Verbindung (Schließbefehl u./o
Anhaltesicherheit)
• Öffnungsbefehl nicht richtig angeschlossen oder defekt
• Motor an falsche Klemmen angeschlossen u./o. Dipswitch
in falscher Position
Aktivierung Schließbefehl
Motor bewegt sich nicht:
• Ende des Vorblinkens abwarten
• Umkehrsicherheit (Lichtschranke) aktiv (in diesem Falle
schließt sich das Tor durch gedrückt Halten der Schließtaste
– Funktion wie in Totmann)
• Kontaktleiste aktiv oder defekt
• Schließendschalter (FC) aktiv
• Schließbefehl nicht richtig angeschlossen oder defekt
6. DETECCIÓN DE LAS FALLAS
Activación de un comando cualquiera
El panel y el motor no se mueven:
• Falta de alimentación de red
• Seguridad de parada activa
• Freno no conectado (el motor queda bloqueado)
• Motor conectado con los bornes equivocados y/o dipswitch
en posición equivocada
• Final de carrera de apertura (FA) y de cierre (FC) activos.
• Motor en protección térmica / Esperar el enfriamiento
El motor gira en el sentido contrario
• Invertir dos fases de la alimentación de red
D
Aktivierung der Anhalte-Sicherheiten während einer
Torbewegung Motor hält nicht an:
• Vorrichtung zur Anhaltesicherheit defekt oder nicht richtig
an der Steuerung angeschlossen
Aktivierung der Kontaktleiste während der Schließung
Torbewegung wird nicht umgekehrt
• Sicherheitsvorrichtung (mit Druckwächter) defekt oder nicht
korrekt an der Steuerung angeschlossen
• Der Gummi der Sicherungsstange wird beschädigt
Tor offen mit aktiver automatischer Schließung
Tor schließt sich nicht automatisch nach über TC
eingestellten Zeit:
• Befähigung zur automatischen Schließung (Anschluß 1 - 2)
nicht korrekt ausgeführt
• Kreislauf zwischen 1 und 3 nicht ganz offen ( vielleicht wegen
Wasserfeuchtigkeit o.ä. im Inneren einer Vorrichtung zum
Öffnungsbefehl)
Während eines Vorgangs
Behang macht nicht am Endschalter halt:
• Endschalterkontakt kurzgeschaltet
• Mechanischer Defekt von Endschalter oder Bremse
E
Activación de la seguridad de parada durante una maniobra de la puerta
El motor no se para:
• Dispositivo de seguridad de parada roto o no conectado
correctamente con el Cuadro eléctrico
Activación del burlete de seguridad durante el cierre
El movimiento de la puerta no se invierte:
• Dispositivo de seguridad (con interruptor de presión) roto o
no conectado correctamente con el Cuadro eléctrico
• Goma del burlete dañado
Activación de uncomando de apertura
El motor no se mueve:
• Final de carrera de apertura (FA) activo
• Cortocircuito en las conexiones externas (comando de cierre
y/o seguridad de parada)
• Comando de apertura no conectado correctamente o dañado
• Motor conectado con los bornes equivocados y/o dipswitch
en posición equivocada
Puerta abierta con cierre automático activo
La puerta no cierra automáticamente después del tiempo
regulado con TC:
• Habilitación del cierre automático (conexión 1-2) no efectuada
correctamente
• Circuito entre 1 y 3 no abierto perfecamente (quizás por
agua, humedad u otra causa dentro de un dispositivo de
comando de apertura)
Activación de un comando de cierre
El motor no se mueve:
• Esperar que finalice la fase de predestello
• Seguridad de inversión (fotocélulas) activa (en este caso
la puerta se cierra teniendo el pulsador de cierre apretado
- funcionamiento con hombre presente)
• Burlete de seguridad activo o roto
• Final de carrera de cierre (FC) activo
• Comando de cierre no conectado correctamente o dañado
Durante una maniobra
El panel no se para al encontrar el final de carrera:
• Contacto del final de carrera en cortocircuito
• Aver’a mecánica del final de carrera o del freno
- 41 -
0DT788 25/06/2007
DITEC S.p.A.
P
6. LOCALIZAÇÃO DE AVARIAS
Um comando qualquer
O painel e o motor não se mexem:
• Falta de alimentação de rede
• Segurança de parada ou emergência ativa
• Freio não ligado (o motor fica bloqueado)
• Motor ligado aos bornes errados e/ou dipswitch na posição
errada
• Fim de curso de abertura (FA) e de fechamento (FC)
ativos.
• Motor na proteção térmica / Esperar o arrefecimento
O motor vira em sentido inverso:
• Inverter as duas fases da alimentação de rede
Comando de abertura
O motor não se mexe:
• Fim de curso de abertura (FA) ativo
• Curto-circuito nas ligações externas (comando fechamento
e/ou segurança de parada)
• Comando de abertura ligado incorretamente ou avariado
• Motor ligado aos bornes errados e/ou dipswitch na posição
errada
Comando de fechamento
O motor não se mexe
• Esperar o fim do pré-lampejo
• Segurança de inversão (fotocélulas) ativa (neste caso a
porta se fecha mantendo o botão de fechamento apertado
funcionamento com homem presente)
• Barra da segurança ativo ou avariado
• Fim de curso de fechamento (FC) ativo
• Comando de fechamento ligado incorretamente ou
avariado
D
ANTRIEB
Motorbefestigung überprüfen
Spannung der Transmissionskette überprüfen
Porta aberta com fechamento automático ativo
A porta não fecha automaticamente após o tempo regulado
com TC
• Habilitação do fechamento automático (ligação 1 - 2)
executada incorretamente
• Circuito entre 1 e 3 não aberto perfeitamente (talvez por
causa de água, umidade ou outro dentro de um dispositivo
de comando de abertura)
Durante uma manobra
O painel não pára no fim de curso
• Contato de fim de curso em curto-circuito
• Avaria mecânica do fim de curso ou do freio
TORBLATT-WICKELWELLE
Befestigung der Lagerhalterungen überprüfen
SICHERHEITSVORRICHTUNGEN
Zustand des Kontaktleiste überprüfen
Zustand des Gummiprofils der Kontaktleiste überprüfen
Korrektes Funktionieren der Lichtschranke überprüfen
7. PLANO DE MANTENIMIENTO (cada 6 meses)
FIJACIÓN / INSTALACIÓN
Apretar los tornillos de acoplamiento de las columnas verticales
con el montante horizontal
Controlar la fijación de la puerta al hueco
MOTORIZACIÓN
Controlar la fijación del motor
Controlar la tensión de la cadena de transmisión
P
Ativação do barra da segurança durante o fechamento
O movimento da porta não se inverte
• Dispositivo de segurança avariado ou ligado incorretamente
ao Quadro elétrico
• Borracha do barr da segurança danificado
7. WARTUNGSPLAN (alle 6 Monate)
BEFESTIGUNG / MONTAGE
Verbindungsschrauben zwischen Seitenpfosten und oberer
Querhalterung anziehen
Verankerung des Tors im Durchgang überprüfen
E
Ativação de emergência ou segurança de parada durante
uma manobra da porta
O motor não pára
• Dispositivo de segurança de parada avariado ou ligado
incorretamente ao Quadro elétrico
ÁRBOL DE ENROLLAMIENTO DEL PANEL
Controlar la fijación de los soportes cojinetes
DISPOSITIVOS DE SEGURIDAD
Controlar el estado del burlete de seguridad
Controlar el estado del perfil de goma del burlete de seguridad
Controlar que las fotocélulas de seguridad funcionen
correctamente
7. PLANO DE MANUTENÇÃO (cada 6 meses)
FIXAÇÃO / MONTAGEM
Apertar os parafusos de acoplamento das colunas verticais
com a travessa superior
Verificar a ancoragem da porta ao alojamento
MOTORIZAÇÃO
Controlar a fixação do motor
Controlar a tensão da corrente de transmissão
EIXO DE ENROLAMENTO DO PAINEL
Controlar a fixação dos suportes dos rolamentos
DISPOSITIVOS DE SEGURANÇA
Verificar o estado do barra da segurança
Verificar o estado do perfil de borracha do barra da segurança
Verificar o funcionamento correto das fotocélulas de segurança
- 42 -
0DT788 25/06/2007
DITEC S.p.A.
HINWEISE ZUM GEBRAUCH
Serviceklasse: 4 (Minimum 5 Betriebsjahre bei 300 Zyklen pro Tag)
Verwendung: INTENSIV (für Industrie und Geshäftszugänge mit intensiv Verwendung).
• Die Betriebsklasse, die Betriebszeiten und die Anzahl aufeinanderfolgender sind Richtwerte. Sie wurden mit Hilfe statistischer
Verfahren unter normalen Betriebsbedingungen ermittelt und können im Einzelfall abweichen. Die Werte beziehen sich auf
den Zeitraum, in dem das Produkt funktionsfähig ist, ohne daß außerordentliche Wartungsarbeiten erfordelich sind.
• Jede Automatikanlage weist veränderliche Faktoren auf: Reibung, Ausgleichvorgänge sowie Umweltbedingungen können
sowohl die Lebensdauer als auch die Qualität der Funktionweise der Automatikanlage oder einer ihrer Komponenten (wie
z.B. die Automatiksysteme) grundlegend ändern. Es ist Aufgabe des Installationstechnikers, für die einzelne Situation
entsprechende Sicherheitskoeffizienten vorzusehen.
EG-KONFORMITÄTSERKLÄRUNG
Hersteller: DITEC S.p.A.
Adresse: via Mons. Banfi, 3 - 21042 Caronno P.lla (VA) - Italy
Hiermit erklären wir, dass die Produkte: SMART
konform sind mit den einschlägigen Bestimmungen der EGMaschinenrichtlinie:
- EMV-Richtlinie 89/336/EWG
- Maschinenrichtlinie 98/37/EG
- Bauprodukte Richtlinie 89/106/EWG
konform sind mit den folgenden Merkmalen der Toreproduktnorm
EN 13241-1 (Anlage ZA):
D
- Kontrolle der Fabrikproduktion (konform)
- Freisetzung von gefährlichen Substanzen (konform)
- Sicheres Öffnen/Dauerfunktion (konform)
- Mechanische Festigkeit und Stabilität (konform)
- Bedienungskräfte (konform)
Benannte Stelle: C.S.I. S.p.A.
Registriernummer: CPD/0497/050/05
Adresse: Viale Lombardia, 20 - 20021 Bollate (MI) - ITALY
Caronno Pertusella, 01/05/2005
Fermo Bressanini
(Geschäftsführer)
MODO DE EMPLEO
Clase de servicio: 4 (mínimo 5 años de uso con 300 ciclos por día)
Uso: INTENSIVO (para accessos de edificios industriales y comerciales con uso intensivo).
• La clase de servicio, los tiempos de utilización y el número de ciclos consecutivos tienen un valor indicativo. Se han detectado
estadísticamente en condiciones medias de uso y no pueden ajustarse a todos los casos. Estos valores se refieren al período
en el cual el producto funciona sin necesidad de mantenimiento extraordinario.
• Cada acceso automático presenta elementos variables como: fricciones, compensaciones y condiciones ambientales que
pueden modificar fundamentalmente tanto la duración como la calidad de funcionamiento del acceso automático o de una
parte de sus componentes (entre los cuales se encuentran los automatismos). Es responsabilidad del instalador adoptar los
coeficientes de seguridad adecuados para cada instalación específica.
DECLARACIÓN DE CONFORMIDAD CE
Fabricante: DITEC S.p.A.
Dirección: via Mons. Banfi, 3 - 21042 Caronno P.lla (VA) - Italy
Declara que el producto: SMART
es conforme a los requisitos esenciales de las siguientes
disposiciones CE:
- Disposición compatibilidad electromagnética 89/336/EEC
- Disposición máquinas 98/37/EC
- Disposición productos de construcción 89/106/EEC
es conforme a las siguientes características de la norma EN
13241-1 (Anexo ZA):
E
- Control de la producción en fábrica (Conforme)
- Liberación de sustancias peligrosas (Conforme)
- Apertura segura (Conforme)
- Resistencia mecánica y estabilidad (Conforme)
- Fuerzas de maniobra (Conforme)
Organismo notificado: C.S.I. S.p.A.
Registro número: CPD/0497/050/05
Dirección: Viale Lombardia, 20 - 20021 Bollate (MI) - ITALY
Caronno Pertusella, 01/05/2005
Fermo Bressanini
(Presidente)
INDICAÇÕES DE USO
Classe de serviço: 4 (mínimo 5 anos de uso com 300 ciclos por dia)
Uso: INTENSO (para entradas de tipo industrial e comercial com uso intenso)
• A classe de serviço, os tempos de uso e o número de ciclos consecutivos têm valor indicativo. São detectados estatisticamente
em condições médias de uso e não podem ser certos para cada caso separadamente. Referem-se ao período no qual o
produto funciona sem a necessidade de manutenção extraordinária.
• Cada entrada automática apresenta elementos variáveis tais como: atritos, balanceamentos e condições ambientais que
podem modificar de maneira substancial tanto a duração quanto a qualidade de funcionamento da entrada automática ou
de parte de seus componentes (entre os quais os automatismos). É tarefa do instalador utilizar coeficientes de segurança
apropriados para cada instalação específica.
DECLARAÇÃO DE CONFORMIDADE CE
Fabricante: DITEC S.p.A.
Endereço: via Mons. Banfi, 3 - 21042 Caronno P.lla (VA) - Italy
Declara que o produto: SMART
é conforme aos requisitos essenciais das seguintes
directivas CE:
- Directiva compatibilidade electromagnética 89/336/EEC
- Directiva máquinas 98/37/EC
- Directiva produtos de construção 89/106/EEC
é conforme às seguintes características da norma EN 13241-1
(Anexo ZA):
- Controlo da produção em fábrica (Conforme)
- Emissão de substâncias perigosas (Conforme)
- Abertura segura (Conforme)
- Resistência mecânica e estabilidade (Conforme)
- Forças de manobra (Conforme)
Organismo notificado: C.S.I. S.p.A.
Cadastro número: CPD/0497/050/05
Endereço: Viale Lombardia, 20 - 20021 Bollate (MI) - ITALY
Caronno Pertusella, 01/05/2005
Fermo Bressanini
(Presidente)
- 43 -
0DT788 25/06/2007
DITEC S.p.A.
P
I
ISTRUZIONI D’USO
AVVERTENZE GENERALI PER LA SICUREZZA
Il presente manuale è parte integrante ed essenziale del prodotto e deve essere
consegnato all’utilizzatore dello stesso. E’ necessario conservare il presente
do cu men to e tra smet ter lo ad even tua li subentranti nell’uso del l’im pian to.
L’automazione in oggetto è una “porta a movimento verticale”, dovrà essere
destinata all’uso per il quale è stata espressamente concepita. Ogni altro uso è da
considerarsi improprio e quindi pericoloso.DITEC S.p.A. declina ogni responsabilità
per danni derivanti da un uso improprio, erroneo o irragionevole.
PRECAUZIONI D’USO
• Non entrare nel raggio di azione della porta durante il movimento.
• In caso di guasto o di cattivo funzionamento disinserire l’interruttore generale. Le
operazioni di manutenzione, regolazione o riparazione devono essere svolte solo
da personale addestrato ed autorizzato.
• Ciascuna automazione è corredata da “Manuale di installazione e manutenzione”,
nel quale è tra l’altro riportato il piano di manutenzione periodica, in particolare si
raccomanda la verifica di tutti i dispositivi si sicurezza.
PULSANTI
• Apertura totale: apre completamente la porta. La regolazione della corsa avviene
mediante microinterruttore di finecorsa.
DA STACCARE E CONSEGNARE ALL’UTILIZZATORE
• Apertura parziale: apre la porta sino al punto regolato a tempo dal trimmer RP.
• STOP: provoca l'arresto immediato della porta.
• Chiusura: chiude completamente la porta. La regolazione della corsa avviene
mediante microinterruttore di finecorsa.
• Per sollevare manualmente il telo, in caso di mancanza di alimentazione o di
guasto agire così:
far sollevare il telo sino alla posizione di porta aperta come illustrato.
Chiude
Close
Fermé
Apre
Open
Ouvre
7. PIANO DI MANUTENZIONE (ogni 6 mesi)
FISSAGGIO / MONTAGGIO
Serrare le viti di accoppiamento dei montanti verticali con la traversa superiore
Verificare l'ancoraggio della porta al vano
MOTORIZZAZIONE
Controllare il fissaggio del motore
ALBERO DI AVVOLGIMENTO TELO
Controllare il fissaggio dei supporti cuscinetti
DISPOSITIVI DI SICUREZZA
Verificare il funzionamento della costa di sicurezza
Verificare lo stato del profilo in gomma della costa di sicurezza
Verificare il corretto funzionamento delle fotocellule di sicurezza
DITEC S.p.A.
Via Mons.Banfi, 3
21042 Caronno P.lla (VA) Italy
Tel.+39 02 963911 - Fax +39 02 9650314
www.ditec.it
ISO 9001 - Cert. n°0957
USE INSTRUCTIONS
GENERAL SAFETY PRECAUTIONS
This use handbook is an integral and essential part of the product and must be
delivered to the users. Keep the present document and give it to any users coming
after.
This automation is a “vertical-roll door”; it must be employed only for its own use.
Any other use is to be considered inappropriate and so dangerous. DITEC refuses all
responsibilities for any damage caused by an improper, wrong and irrational use.
USE PRECAUTIONS
• Do not enter the door action area during moving.
• In case of damage or bad working, turn the main switch off. The operations of
maintenance, adjustment and repair must be carried out by skilled and authorised
staff.
• Each automation has its own “Installation and Maintenance handbook”, reporting the
periodical maintenance plan. Please take care to check all the safety devices.
BUTTONS
• Full opening: the door opens fully. The stroke can be settled by the stop microswitch.
• Partial opening: the door opens partially, point settled in time by trimmer RP.
• STOP: it causes the complete stop of the door.
• Closing: the door closes fully. The stroke can be settled by the stop microswitch.
• To raise manually the panel, in case of power lacking or damage, act as follows:
raise the panel on open door position as shown at side.
Chiude
Close
Fermé
Apre
Open
Ouvre
7. MAINTENANCE (every 6 months)
INSTALLATION / FITTING
Tighten the fitting screws of the uprights with the crosspiece
Check the anchoring of the door to the door frame
MOTOR
Check the fixing of the motor
MAIN SHAFT
Check the good bearing supports fixing
SAFETY DEVICES
Check the good safety bar functioning
Check the good conditions of the rubber profile of the safety bar
Check the correct operation of the safety photocells
DITEC S.p.A.
Via Mons.Banfi, 3
21042 Caronno P.lla (VA) Italy
Tel.+39 02 963911 - Fax +39 02 9650314
www.ditec.it
ISO 9001 - Cert. n°0957
DETACH AND DELIVER TO THE CUSTOMER
GB
F
INSTRUCTIONES D’UTILISATION
CONSIGNES GENERALES DE SECURITE
Ce manuel d’utilisation est partie intégrante et essentielle du produit et doit être
remis à l’utilisateur. Il faut garder le présent document et le remettre à éventuels
utilisateurs succédant dans l’usage de l’installation.
Cet automation est une “porte à mouvement vertical”. Elle doit être destinée à
l’usage pour lequel elle a été conçue. Chaque usage diffèrent doit être considéré
impropre et donc dangereux. DITEC s.p.a. décline toute responsabilité pour
dommages dus à une utilisation impropre, erronée ou irraisonnable.
PRECAUTIONS D’USAGE
• N’entrer pas dans le rayon d’action de la porte pendant le mouvement.
• En cas de panne ou mauvais fonctionnement, débrancher l’interrupteur général.
Les opérations de manutention, régulation et réparation doivent être exécutées
seulement par le personnel expert et autorisé.
• Chacune automation est munie d’un “Manuel d’installation et manutention”,
contenant le plan de manutention périodique. Il est particulièrement conseillé de
vérifier tous les dispositifs de sécurité.
BOUTONS
• Ouverture totale: cause une ouverture partielle de la porte. La régulation de la
course est obtenue par le microinterrupteur de fin de course.
• Overture partielle: regle à temps par trimmer RP.
DETACHER ET LIVRER A L’UTILISATEUR
• Stop arrêt d'urgence: cause l’arrêt de n’importe quelle manoeuvre en cours,
pendant tout le temps de l’ouverture du contact.
• Fermeture: cause une fermeture totale de la porte. La régulation de la course est
obtenue par le microinterrupteur de fin de course
• Pour soulever manuellement la paroi, en cas de manque d’énergie ou de
dommage, agir comme il suit:
faire soulever la paroi à la position de porte ouverte comme montré.
Chiude
Close
Fermé
Apre
Open
Ouvre
7. PROGRAMME DE MAINTENANCE (tous les 6 mois)
FIXATION / MONTAGE
Serrer les vis de couplage des montants verticaux avec l'entretoise supérieure
Vérifier lancrage de la porte au passage
MOTORISATION
Contrôler la fixation du moteur
ARBRE D’ENROULEMENT DU PANNEAU
Contrôler la fixation des supports des roulements
DISPOSITIFS DE SECURITE
Vérifier les fonctionnement de le bourrelet de sécurité
Vérifier les conditions du profilé en caoutchouc du bourrelet de sécurité
Vérifier le fonctionnement correct des photocellules de sécurité
DITEC S.p.A.
Via Mons.Banfi, 3
21042 Caronno P.lla (VA) Italy
Tel.+39 02 963911 - Fax +39 02 9650314
www.ditec.it
ISO 9001 - Cert. n°0957
BEDIENUNGSHANDBUCH
ALLGEMEINE SICHERHEITSHINWEISE
Das vorliegende Handbuch ist integrierender und wesentlicher Bestandteil des
Produkts und muß demselben Verbraucher übergeben werden. Dieses Dokument
muß aufgehoben und möglichen Stellvertretern für den Gebrauch der Anlage
übertragen werden.
Die obengenannte Automation ist ein “Roll-als auch ein Paketierungsmechanismus”
und ist für den Gebrauch für den Sie ausdrücklich hergestellt wurde, bestimmt. Jeder
andere Gebrauch wird als Mißbrauch angesehen und ist daher gefährlich. DITEC
S.p.A. lehnt jede Verhaftung für Schäden, die wegen einem Mißbrauch entstanden
sind, ab.
GEBRAUCHSMAßNAHMEN
• Während der Torbewgung nicht in die nähe des Wirkungsbereichs treten.
• Bei Fehlfunktionen oder Störungen den Hauptschalter ausschalten. Die
Wartungsarbeiten, sowie die Regelungs- und Reparaturarbeiten müssen durch
geschultes und dafür berechtigtem Personal durchgeführt werden
• Jede Automation ist mit einem “Installations- und Wartungshandbuch” ausgestattet
in dem auch die Instandhaltung enthalten ist, vor allem ist es empfehlenswert, alle
Sicherheitsvorrichtungen zu prüfen.
DRUCKTASTEN
• Totale Öffnung: der Drucktaste bewirkt eine totale Öffnung. Die Einstellung des
Endanschlages ergibt sich durch Endmikroschalter.
• Teilöffnung: der öffnungsumfang vird zeitlich durch den Trimmer RP eingestellt.
• STOP: Bei betätigung wird das Tor gestoppt.
• Schließung: der Drucktaste bewirkt eine totale Schließung. Die Einstellung des
Endanschlages ergibt sich durch Endmikroschalter.
• Falls die Notentriegelung aufgrund eines Stromausfalls odereines Schadens
betätigt werden muß, gehen Sie wie folgt vor :
Der Behang kann jetz ungebremst nach oben bewegt werden.
Schließen
Cierra
Fecha
Öffnen
Abre
Abre
7. WARTUNGSPLAN (alle 6 Monate)
BEFESTIGUNG / MONTAGE
Verbindungsschrauben zwischen Seitenpfosten und oberer Querhalterung anziehen
Verankerung des Tors im Durchgang überprüfen
ANTRIEB
Motorbefestigung überprüfen
Spannung der Transmissionskette überprüfen
TORBLATT-WICKELWELLE
Befestigung der Lagerhalterungen überprüfen
SICHERHEITSVORRICHTUNGEN
Zustand des Kontaktleiste überprüfen
Zustand des Gummiprofils der Kontaktleiste überprüfen
Korrektes Funktionieren der Lichtschranke überprüfen
DITEC S.p.A.
Via Mons.Banfi, 3
21042 Caronno P.lla (VA) Italy
Tel.+39 02 963911 - Fax +39 02 9650314
www.ditec.it
ISO 9001 - Cert. n°0957
ABNEHMEN UND DEM BENUTZER AUSZUHANDINGEN
D
E
ISTRUCCIONES DE USO
ADVERTENCIAS GENERALES DE SEGURIDAD
El presente manual de uso es parte integrante y esencial del producto y tiene que
ser entregado al usuario del mismo. Es necesario conservar el presente documento y
entregarlo a eventuales subintrantes en el empleo de la instalación. Esta automación
es una “puerta a marcha vertical”. Tendrá que ser destinada al empleo por el
cual fue concebida. Todos empleos distintos son considerados abusivos y por eso
peligrosos. DITEC s.p.a. declina todas responsabilidades por daños derivados de
un empleo diverso, erróneo y irracional.
PRECAUCIONES DE EMPLEO
• No entrar en el radio de acción de la puerta durante la marcha.
• En caso de avería o de mal funcionamiento, desconectar el interruptor general.
Las operaciones de manutención, regulación y reparación deben ser efectuadas
solamente por personal instruido y autorizado.
• Cada automación es equipada con el “Manual de instalación y manutención”
que indica el plano de manutención periódica. Se recomienda en particular la
verificación de los dispositivos de seguridad.
BOTONES
• Abertura total: causa la abertura total de la puerta. La regulación de la carrera es
obtenida por un microinterruptor de fin de carera.
• Abetura parcial: causa la abertura parcial de la puerta arreglada a tiempo por
trimmer RP.
QUITAR Y ENTREGAR AL USUARIO
• Stop: causa el stop total de la puerta.
• Cierre: causa el cierre total de la puerta. La regulación de la carrera es obtenida
por un microinterruptor de fin de carrera.
• Para solevantar manualmente la pared, en el caso de falta de alimentación
eléctrica, proceder de la siguente forma :
Levantar la pared hasta la posiciòn de puerta abierta deseada;
Schließen
Cierra
Fecha
Öffnen
Abre
Abre
7. PLANO DE MANTENIMIENTO (cada 6 meses)
FIJACIÓN / INSTALACIÓN
Apretar los tornillos de acoplamiento de las columnas verticales con el montante horizontal
Controlar la fijación de la puerta al hueco
MOTORIZACIÓN
Controlar la fijación del motor
Controlar la tensión de la cadena de transmisión
ÁRBOL DE ENROLLAMIENTO DEL PANEL
Controlar la fijación de los soportes cojinetes
DISPOSITIVOS DE SEGURIDAD
Controlar el estado del burlete de seguridad
Controlar el estado del perfil de goma del burlete de seguridad
Controlar que las fotocélulas de seguridad funcionen correctamente
DITEC S.p.A.
Via Mons.Banfi, 3
21042 Caronno P.lla (VA) Italy
Tel.+39 02 963911 - Fax +39 02 9650314
www.ditec.it
ISO 9001 - Cert. n°0957
P
MANUAL DE USO
AVISOS GERAIS PARA A SEGURANÇA
O presente manual é parte integrante e essencial do produto e deve ser entregue
ao utilizador do mesmo. É necessário guardar o presente documento e transmitilo
aos outros usuários que fizerem uso do equipamento.
A automação em referência é uma “porta com movimento vertical”, deverá ser
destinada ao uso para o qual foi expressamente concebida. Qualquer outro uso deve
ser considerado impróprio e portanto perigoso. DITEC S.p.A. se exime de qualquer
responsabilidade por danos decorrentes de uso impróprio, errado ou sem razão.
PRECAUÇÕES DE USO
• Não entrar no raio de ação da porta durante o movimento.
• Em caso de avaria ou de mau funcionamento desligar a chave geral.
As operações de manutenção, regulagem ou reparação devem ser efetuadas
somente por pessoal treinado e autorizado.
• Cada automação é fornecida com “Manual de instalação e manutenção”, no
qual está contido, entre outros, o plano de manutenção periódica, em particular
recomenda-se a verificação de todos os dispositivos de segurança.
BOTÕES
• Abertura total: abre totalmente a porta. A regulação do curso é efetuada mediante
microinterruptor de fim de curso.
• STOP: parada imediata da porta.
• Fechamento: faz fechar totalmente a porta. A regulação do curso é efetuada
mediante microinterruptor de fim de curso.
• Para levantar manualmente o painel, no caso de falta de alimentação ou de avaria
agir assim:
fazer o painel levantar até à posição de porta aberta;
Schließen
Cierra
Fecha
Öffnen
Abre
Abre
7. PLANO DE MANUTENÇÃO (cada 6 meses)
FIXAÇÃO / MONTAGEM
Apertar os parafusos de acoplamento das colunas verticais com a travessa superior
Verificar a ancoragem da porta ao alojamento
MOTORIZAÇÃO
Controlar a fixação do motor
Controlar a tensão da corrente de transmissão
EIXO DE ENROLAMENTO DO PAINEL
Controlar a fixação dos suportes dos rolamentos
DISPOSITIVOS DE SEGURANÇA
Verificar o estado do barra da segurança
Verificar o estado do perfil de borracha do barra da segurança
Verificar o funcionamento correto das fotocélulas de segurança
DITEC S.p.A.
Via Mons.Banfi, 3
21042 Caronno P.lla (VA) Italy
Tel.+39 02 963911 - Fax +39 02 9650314
www.ditec.it
ISO 9001 - Cert. n°0957
DESTAQUE E ENTREGAR A o UTILIZADOR
• Abertura parcial: Activa a manobra de abertura parcial regulação a tempo para
trimmer RP.
Tutti i diritti sono riservati
I dati riportati sono stati redatti e controllati con la massima cura. Tuttavia non possiamo assumerci alcuna responsabilità per
eventuali errori, omissioni o approssimazioni dovute ad esigenze tecniche o grafiche.
All right reserved
All data and specifications have been drawn up and checked with the greatest care. The manufacturer cannot however take
any responsibility for eventual errors, ommisions or incomplete data due to technical or illustrative purposes.
Touts droits reservés
Les informations mentionnées dans ce catalogue ont été controlées avec la plus grande attention. Toutefois, nous déclinos
toute responsabilité en cas d’erreurs, omissions ou approximations dépendant d’exigences techniques ou graphiques.
Alle Rechte vorbehalten
Die wiedergegebenen Daten wurden mit höchster Sorgfalt zusammengestellt und überprüft. Es kann jedoch keinerlei
Verantwortung für eventuelle Fehler, Auslassungen oder Näherungen, die technischen oder graphischen Notwendigkeiten
zuzuschreiben sind, übernommen werden.
Todos los derechos son reservados
Los datos que se indican han sido redactados y controlados con la màxima atenciòn. Sin embargo no podemos asumir ninguna
responsabilidad por eventuales errores, omisiones o aproximaciones debidas a exigencias técnicas o gràficas.
Todos os direitos são reservados
Os dados indicados foram redigidos e controlados com o máximo cuidado. Contudo, não podemos assumir qualquer
responsabilidade por eventuais erros, omissões ou aproximações devidas a exigências técnicas ou gráficas.
- 51 -
0DT788 25/06/2007
DITEC S.p.A.
SMART
0DT717 - rev. 25-06-2007
DITEC S.p.A.
Via Mons. Banfi, 3 - 21042 Caronno Pertusella (VA) - ITALY
Tel. +39 02 963911 - Fax +39 02 9650314
www.ditec.it - [email protected]
DITEC BELGIUM
DITEC DEUTSCHLAND
DITEC FRANCE
DITEC SVIZZERA
DITEC AMERICA
DITEC CHINA
DITEC ESPAÑOLA
LOKEREN
OBERURSEL
PALAISEAU
BALERNA
ORLANDO-FLORIDA-USA
SHANGHAI
BARCELONA
Tel. +32 9 3560051
Tel. +49 6171914150
Tel. +33 1 64532860
Tel. +41 91 6463339
Tel. +1 407 8880699
Tel. +86 21 62363863
Tel. +34 937958399
Fax +32 9 3560052
Fax +49 61719141555
Fax +33 1 64532861
Fax +41 91 6466127
Fax +1 407 8882237
Fax +86 21 62363863
Fax +34 937959026
ISO 9001
Cert. n°0957
www.ditecbelgium.be
www.ditec-germany.de
www.ditec.france.com
www.ditecswiss.ch
www.ditecamerica.com
www.ditec.cn
www.ditecespanola.com

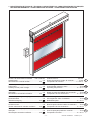


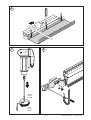
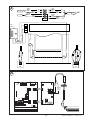


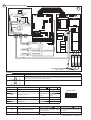
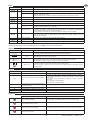


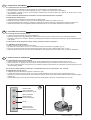


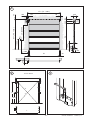


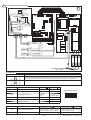


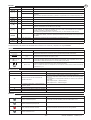
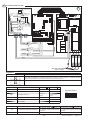

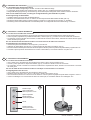

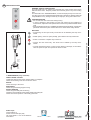
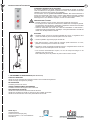
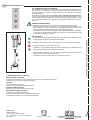
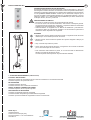


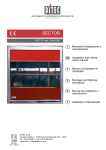
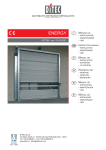
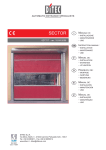

![Documentation technique [1.59 Mo]](http://vs1.manualzilla.com/store/data/006788543_1-357094a5e8900d31cb1a888bc107021d-150x150.png)