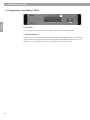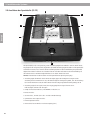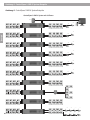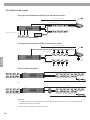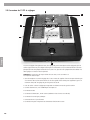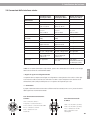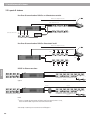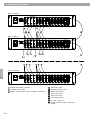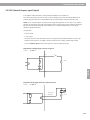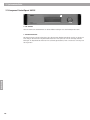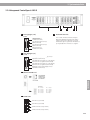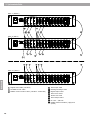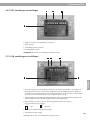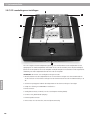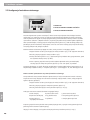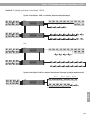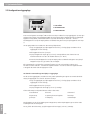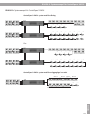
1
Bose ControlSpace AMS-8 Audio Management System ® ® Safety Instructions & Installation Guide Sikkerhedsinstruktioner og installationsvejledning Sicherheitshinweise & Installationshandbuch Instrucciones de seguridad y guía de instalación Consignes de sécurité et notice d’installation Istruzioni di sicurezza e guida all’installazione Veiligheidsinstructies & installatiehandleiding Instrukcja obslugi i bezpiecznego uzytkowania Säkerhetsanvisningar & Installationsguide The manufacturer reserves specification privileges. Information in this manual is subject to change without prior notice or obligation. Table of contents English 1. Safety information Important safety instructions 4 Declaration of conformity 6 2. Introduction 7 3. System installation 3.1 Front panel ControlSpace AMS-8 8 3.2 Rear panel ControlSpace AMS-8 9 ® ® 3.3 Wall Controller configuration 10 3.4 User interface connections 11 3.5 System layouts 12 3.6 Wall Controller connections 15 3.7 Local Input Module connections 15 3.8 Paging Panel connections 16 3.9 General purpose inputs/outputs 17 3.10 Audio input and output connections 18 4. Optional system components 19 5. Upgrade to a ControlSpace AMS-8 II system 21 6. Troubleshooting 22 7. Technical specifications 23 Annex A. ControlSpace AMS-8 system examples ® 24 Annex B. User Interface mounting instructions 26 European sales offices 28 ® 1. Safety information English 1. Important safety instructions Caution marks on the product These CAUTION marks are located on the back of the product. The lightning flash with arrowhead symbol, within an equilateral triangle, is intended to alert the user to the presence of un-insulated dangerous voltage within the system enclosure that may be of sufficient magnitude to constitute a risk of electric shock. The exclamation mark within an equilateral triangle, as marked on the system, is intended to alert the user to the presence of important operating and maintenance instructions in this installation guide Important safety instructions 1. Read these instructions. 2. Keep these instructions for future reference. 3. Heed all warnings on the product. 4. Follow all instructions. 5. Do not use this apparatus near water or moisture. 6. Clean only with a dry cloth. 7. Do not block any ventilation openings. Install in accordance with the manufacturer’s instructions. To ensure reliable operation of the product and to protect it from overheating, put the product in a position and location that will not interfere with its proper ventilation. 8. Do not install near any heat sources, such as radiators, heat registers, stoves, or other apparatus (including amplifiers) that produce heat. 9. Do not defeat the safety purpose of the polarised or grounding type plug. A polarised plug has two blades with one wider than the other. A grounding-type plug has two blades and a third grounding prong. The wider blade or third prong are provided for your safety. If the provided plug does not fit in your outlet, consult an electrician for replacement of the obsolete outlet. 10. Protect the power cord from being walked on or pinched, particularly at plugs, sockets etc. 11. Only use attachments/accessories specified by the manufacturer. 12. Use only with the cart, stand, tripod, bracket, or table specified by the manufacturer or sold with the apparatus. When a cart is used, use caution when moving the cart/apparatus combination to avoid injury from tip-over. 13. U nplug this apparatus during lightning storms or when unused for long periods of time – to prevent damage to the product. 14. Refer all servicing to qualified service personnel. Servicing is required when the apparatus has been damaged in any way such as: power-supply cord or plug is damaged; liquid has been spilled or objects have fallen into the apparatus; the apparatus has been exposed to rain or moisture, does not operate normally, or has been dropped. Do not attempt to service this product yourself. Opening or removing covers may expose you to dangerous voltages or other hazards. Please call Bose to be referred to an authorised service centre near you. 15. To prevent risk of fire or electric shock, avoid overloading wall outlets, extension cords, or integral components. 4 1. Safety information English 16. Do not let objects or liquids enter the product as they may touch dangerous voltage points or short-out parts that could result in a fire or electric shock. 17. See product enclosure for safety related markings. 18. No naked flame sources, such as lighted candles, should be placed on the apparatus. WARNING: To reduce the risk of fire or electric shock, do not expose the ControlSpace AMS-8 to rain or moisture. ® WARNING: The apparatus should not be exposed to dripping or splashing, and objects filled with liquids, such as vases, should not be placed on the apparatus. As with any electronic product, use care not to spill liquids into any part of the system. Liquids can cause a failure and/or fire hazard. Information about products that generate electrical noise If applicable, this equipment has been tested and found to comply with the limits for a Class A digital device, pursuant to Part 15 of the FCC rules. These limits are designed to provide reasonable protection against harmful interference in a residential installation. This equipment generates, uses, and can radiate radio frequency energy and, if not installed and used in accordance with the instructions, may cause harmful interference to radio communications. However, this is no guarantee that interference will not occur in a particular installation. If this equipment does cause harmful interference to radio or television reception, which can be determined by turning the equipment off and on, you are encouraged to try to correct the interference by one or more of the following measures: • Reorient or relocate the receiving antenna. • Increase the separation between the equipment and receiver. • Connect the equipment to an outlet on a different circuit than the one to which the receiver is connected. • Consult the dealer or an experienced radio/TV technician for help. NOTE: Unauthorised modification of the receiver or radio remote pasted from a hifi-product could void the user’s authority to operate this equipment. This product complies with specifications. The information furnished in this installation guide does not include all of the details of design, production, or variations of the equipment. Nor does it cover every possible situation which may arise during installation, operation, or maintenance. If you need assistance beyond the scope of this installation guide, please contact one of our European sales offices listed on the last page of this installation manual. 5 English 1. Safety information Declaration of Conformity The manufacturer of this amplifier hereby declares that this product, including its accessories, is in compliance with the following standards: EMC Directive 89/336/EEC (Electromagnetic Compatibility) EN-55103-1 EN-55103-2 Low Voltage Directive 73/23/EEC EN-60065:2002 7th Edition Rack mounting considerations The audio signal processor requires two 4.4 cm (1.75”) rack space units with 32.5 cm (12.8”) inside depth. When mounting, use four screws with washers to prevent marring the front panel. Neoprene rubber washers are a good choice because they grip the screw heads and prevent the screws from backing out due to vibration or during transportation. Caution: If the unit is rack-mounted and the rack is transported, you must mechanically support the rear of the processor. You can place a shelf across the rear of the processor or use brackets to support the rear unit. General precautions & Ventilation Caution: Place the unit where it will be protected from heat and allow adequate ventilation. Place the unit away from direct heat sources, such as heating vents and radiators. Make sure the air can circulate freely behind, beside and above the unit. If the unit is placed under or above an amplifier, make sure a single unit ventilation plate is placed between the 2 devices. Do not allow the chassis to exceed the maximum operating temperature of 50ºC. Be aware of conditions in an enclosed rack that may increase the temperature above above ambient room conditions. Cautions: Be sure all the fine cores of the wire are twisted together and contained within the connector. If even one core is loose it can touch the adjacent terminal, which may cause a short circuit. 6 2. Introduction 2. Introduction English Introduction The Bose ControlSpace AMS-8 Audio Management System is a flexible, expandable and high quality audio signal processor for audio distribution applications such as restaurants, shops, bars, offices, hotels, conference facilities and sport venues. The main unit includes eight line inputs and eight line outputs. Four available audio slots allow the addition of up to 8 more audio inputs (2 inputs per card). ® ® For more zones, up to 10 AMS-8 system racks can be linked together per system. Each added system rack adds 8 mono zones to the system. Multiple choices of user interfaces are available to give end-users simple and easyto-use control of their ControlSpace AMS-8 system. ® The Bose ControlSpace AMS-8 Live Installer software is used to design systems and configure the AMS-8 and user interfaces. The software runs on a PC and communicates with the AMS-8 system using serial via ethernet. ® ® Features and functions • Expandable and flexible cardframe architecture • 8 (up to 16) analogue line level input channels • Eight analogue line level output channels • GPIO: 8 general purpose control inputs (to activate messages, roomcombining presets or room standby/ mute) and 1 general purpose control output • Wall Controller functionality (optional IR remote control) • Local Input Module functionality • Paging Panel functionality • Messaging functionality (optional Message Storage Card is required) • Design, configuration and system control via PC-based software programs • Tuner functionality (optional Twin Tuner Card is required) • Digital signal processing including: Bose speaker EQs, Dynamic EQ, delay, gain control and source selection. • Automatic detection of input card type • LCD screen and navigation buttons • Room Combining functionality • Event Scheduling functionality Quick start • Connect the audio inputs and audio outputs to the ControlSpace AMS-8 system. (In the case of 2 or more systems racks: connect these racks by using audio link cards, audio link cables and high speed RS485 rack links: see also chapter 3.5). ® • Turn on the ControlSpace AMS-8 system. Because of the default settings the system is now in operation. After each start up of the ControlSpace system, the default settings will be recalled. This means that the system will play at the default source and default volume level as set in the installation menu. ® ® NOTE: To update to features and functions of a ControlSpace AMS-8 II system, see chapter 5 ® Abbreviations CS-WCControlSpace CS-PPControlSpace CS-LIMControlSpace CS-RCControlSpace CS-TICControlSpace CS-TOCControlSpace ® ® ® ® ® ® AMS-8 Wall Controller AMS-8 Paging Panel AMS-8 Local Input Module AMS-8 Remote Control AMS-8 Twin Input Card AMS-8 Twin Output Card CS-ECControlSpace CS-MSCControlSpace CS-DICControlSpace CS-TTCControlSpace CS-HUBControlSpace CS-SCIControlSpace ® ® ® ® ® ® AMS-8 Ethernet Card AMS-8 Message Storage Card AMS-8 Digital Input Card AMS-8 Twin Tuner Card AMS-8 RS485 Hub AMS-8 Serial Code Interface 7 3. System Installation 3.1 Front panel ControlSpace AMS-8 English ® 1 2 1. LCD SCREEN The LCD screen displays the control menus and the possible settings for each menu item. 2 . NAVIGATION BUTTONS With the ‘up’ and ‘down’ buttons one can scroll through the menu items, whilst the ‘left’ and ‘right’ buttons allow the value of the selected menu item to be changed. The ‘OK’ button confirms the current selection, eg. with the ‘Exit’ menu item highlighted, pressing ‘OK’ will return to the previous menu level. 8 3. System Installation 3.2 Rear panel ControlSpace AMS-8 ® 7 9 11 15 13 1 4 5 3 7 5 9 4 5 3 8 1 8 7 Serial Number: Rack Link 1 5 3 Rack Link 2 1 PC Link ! English 1 CAUTION RISK OF ELECTRIC SHOCK DO NOT OPEN AVIS: Risque de chock électrique, ne pas ouvrir System Rack MODEL: 2 6 Bose Corporation, Framingham, MA01701-9168 Made in The Netherlands 10 12 14 16 4 2 13 6 7 8 5 16 Audio Link Source Inputs 1 8 6 4 2 Line Outputs 2 1 Line (1-16) Lineinputs inputs (1-16) 10 3 1 Bus 2 8 To CSPP/CSWC 6 I/O Link 4 2 9 Bus 1 9 12 3 4 5 2 Audio Cardslot slot Audio Link Link Card CSCSTIC TIC Slotfor for Audio CardCard to linkto thelink connected Slot AudioLinkLink two ControlSpace AMS-8 analog sources between Controlspace AMS-8 Audio Systems. An Audio Link Card is only Audio Management Managment Systems. required in the master rack. Add one Audio Link Cable set per four sources to be linked. 6 5 9 3 8 1 8 2 RS-232 & GPIO card 12 8 10 12 14 16 13 2 9 4 6 16 Audio Link RCA Connector RCAInput Input Connector (Unbalanced line level) (Unbalanced line level) Line Outputs 5 9 4 5 9 3 3 7 7 2 6 1 2 3 Line Line outputs outputs (1-8) (1-8) 6 1 CSCSTOC TOC 9 RCAOutput Input Connector Connector Line inputs (1-16)RCA (Unbalanced line level) (Unbalanced line level) 8 6 10 8 6 3 4 2 RS232 port pin out Straight shielded cable (20 meters max.) 2. TX 3. RX 5. GND Audio Link Card slot CSTIC 3-pinOutput Input EuroEuro Blok Connector 3-pin Block Connector (Balanced line level) RCA Input Connector (Balanced line level) (Unbalanced line level) 3 4 1 2 Slot for Audio Link Card to link the connected analog sources between Controlspace AMS-8 9 10 Audio Managment Systems. 3-pinOutput Input EuroEuro Blok Connector 3-pin Block Connector (Balanced 3-pin Inputline Euro Blok Connector (Balanced linelevel) level) (Balanced line level) RCAOutput Input Connector RCA Connector (Unbalanced line level) 3-pin Input Euro Blok Connector (Unbalanced line level) RS-232 & GPIO card 7 8 5 6 3 4 1 2 (Balanced line level) 5 RCA Input Connector (Unbalanced line level) 9 4 Ethernet & GPIO card 4 5 9 RS-485 card 8 3 3 7 7 2 1 6 Line outputs (1-8)Rack link 1 (high speed) 2 1 CSTOC 9 7 5 Rack 2 (high speed) RCAlink Input Connector (Unbalanced line level) CS-WC CS-PP BusBlok 1 (low speed) 3-pin & Input Euro Connector (Balanced line level) 10 8 Pin 6 : Contact 6 Pin 7 : Contact 7 Pin 8 : Contact 8 Pin 9 : Out Pin 10: Common 6 2. TX 3. RX 5. GND DB9 Female 6 3 4 1 2 9 CS-WC CS-PP BusBlok 2 (low speed) 3-pin & Input Euro Connector (Balanced line level) GPIO pinout: Pin 1: Contact 1 Pin 2: Contact 2 Pin 3: Contact 3 Pin 4: Contact 4 Pin 5: Contact 5 Pin 6: Contact 6 Pin 7: Contact 7 Pin 8: Contact 8 Pin 9: Output Pin 10: Common RS232 port pin out Straight shielded cable (20 meters max.) 8 4 Pin 3 : Contact 3 Pin 4 : Contact 4 Pin 5 : Contact 5 7 5 1 DB9 Female 10 7 5 8 8 4 8 Pin 1 : Contact 1 6 9 Source Inputs RCA Input Connector Pin 2 : Contact 2 (Unbalanced line level) 7 Rack Link 2 5 3 I/O Link 4 1 5 7 Bose Corporation, Framingham, MA01701-9168 Made in The Netherlands 2 4 4 Serial Number: 3-pinInput Input Euro Blok Connector 3-pin Euro Block Connector (Balanced line (Balanced linelevel) level) 15 13 Bus 1 11 Bus 2 9 To CSPP/CSWC 7 PC Link 1 1 5 3 ! 3-pinInput Input Euro Blok Connector 3-pin Euro Block Connector (Balanced line (Balanced linelevel) level) CAUTION RISK OF ELECTRIC SHOCK DO NOT OPEN AVIS: Risque de chock électrique, ne pas ouvrir System Rack MODEL: Rack Link 1 ® RCAInput Input Connector RCA Connector (Unbalanced line level) (Unbalanced line level) 10 7 8 5 6 3 4 1 2 Pin 1: Contact 1 Pin 2: Contact 2 Pin 3: Contact 3 Pin 4: Contact 4 Pin 5: Contact 5 Pin 6: Contact 6 Pin 7: Contact 7 Pin 8: Contact 8 Pin 9: Output Pin 10: Common RS-485 card 5 RS485 card Rack link 1 (high speed) Rack link 1 (high speed) Rack link 2 (high speed) Rack link 2 (high speed) CS-WC & CS-PP Bus 1 (low speed) CS-WC & CS-PP Bus 1 (low speed) CS-WC & CS-PP Bus 2 (low speed) CS-WC & CS-PP Bus 2 (low speed) 9 3. System Installation English 3.3 Wall Controller configuration 1 1. LCD SCREEN 2 3 2. VOLUME KEYS 3. CHANNEL KEYS Before configuring the ControlSpace AMS-8, one needs to select a number for each wall controller (1..8), this is normally done the first time the wall controller is connected to the system rack. A few seconds after the wall controller has been connected to the system rack, the Firmware version is displayed on the LCD screen, followed by “Select WC..”. Use the channel buttons to select the appropriate number and confirm this choice by pressing the volume down (-) button. If multiple wall controllers need to be used to control the same room, one should select the same number on these wall controllers as well. In a situation like this, all wall controllers need to be connected to the same rack frame. ® If a wall controller already has a number then it can be altered as follows: 1. Switch the wall controller off (press the channel down (-) button as many times as needed until the wall controller is switched off) 2. Press and hold the channel down (-) button 3. Press the volume up (+) and down (-) buttons at the same time (After the LCD screen has displayed the Firmware version it displays the actual number, e.g. “WC2”). 4. Now you can use the channel buttons to select the appropriate number and confirm this choice by pressing the volume down(-) button in the same way as before. If the system consists of two or more ControlSpace AMS-8 racks, all racks use numbers (1..8). For the first rack numbers 1..8 are used for output channels 1..8, for the second rack output channels 9..16 up to the tenth rack for outputs 73..80. ® Changing room settings using the wall controller For the room where the wall controller is installed one can adjust the audio settings using the hidden menu in the wall controller. Follow the procedure below to enter this menu: 1. Switch the wall controller off (press the channel down (-) button as many times as needed until the wall controller is switched off) 2. Press and hold the volume down (-) button 3. Press the channel up (+) and down (-) buttons at the same time In the hidden menu the following functions can be set or altered: a. default channel b. bass level d. dynamic EQ e. Bose speaker EQ f. maximum volume level g. paging volume level h. delay c. treble level i. default volume level The channel buttons allow you to scroll through the menu items whilst the volume buttons allow you to change the settings for the selected item. To leave the hidden menu, press the channel up (+) and down (-) button at the same time. 10 3. System Installation 3.4 User interfaces connections ControlSpace AMS-8 Paging Panel ControlSpace AMS-8 Local Input Module Voltage 12-24VDC, +/-20% 12-24VDC, +/-10% 24VDC, +5%/-10% Current @ 12VDC 50mA typ @ 24VDC 30mA typ @ 12VDC 140mA typ @ 24VDC 70mA typ @ 24VDC 60mA typ Recommended power supply* BOSE CS AMS-8 24VDC, 2.7A stabilised power supply BOSE CS AMS-8 24VDC, 2.7A stabilised power supply BOSE CS AMS-8 24VDC, 2.7A stabilised power supply Max Distance (/with Hub) 600m (1200m) 600m (1200m) Not applicable Termination *** 120ohm 120ohm Not applicable Cable type 1 pair twisted and shielded 1 pair twisted and shielded Not applicable Nom. Cap. 40pF/m Nom. Cap. 40pF/m Not applicable Nom. Imp. 124ohm Nom. Imp. 124ohm Not applicable ® ® English ControlSpace AMS-8 Wall Controller ® Power supply RS485 wiring** Nom. Att. 2dB @ 1MHz Nom. Att. 2dB @ 1MHz Not applicable Recommended cable BOSE CS AMS-8 communication/ power cable (blue) for CS-WC/CS-PP BOSE CS AMS-8 communication/ power cable (blue) for CS-WC/CS-PP Not applicable Audio wiring Not applicable Standard Mic/Line cable, 1 pair with shielding Bose CS AMS-8 audio/power cable for (yellow) CS-LIM * NOTE: If the above mentioned power supply is not used, any other power supply used in Europe must be compliant with EN/IEC 60950. ** Required RS485 wiring Always connect the components in a daisy-chain configuration (rather than in a star or other configuration). Star wiring is only allowed using the CS-HUB. Be sure to separate the data cable from power wiring (>50V) on the cable tray or other cable management. *** Termination The termination jumper should be placed on the last user interface (CS-WC or CS-PP), located at the end of each RS485 communication line. 4 CS AMS-8 communication/power cable 5 1 2 CS AMS-8 audio/power cable 1. Blue = RS485 communication ‘+’ 6 3 1. Yellow = balanced line cable (shielded) 2. Clear = RS485 communication ‘–’ 5 3. Drainwire = RS485 communication ‘GND’ 3. Red = power ‘24VDC’ 4. Red = power ‘24VDC’ 4. Black = power ‘ground’ 5. Black = power ‘ground’ 1 2 6. Blue jacket 2. Green = balanced line cable (shielded) 3 4 5. Yellow jacket 11 3. System Installation English 3.5 System layouts Two RS485 communication lines and a central power supply: 600m Audio/Microphone cable * RS-485 RS-485 Audio/Microphone cable Power supply 24VDC 2-7A * DC 24V input Two RS485 communication lines and localpower supplies: 600m Audio/Microphone cable PSU * RS-485 PSU RS-485 * RS485 communication line maximum distance: 600 m 600 m Or: 600 m 600 m RS485 HUB 600 m NOTE: * Termination jumper should be placed on the last user interface (CS-WC or CS-PP), located at the end of each RS485 communication line. More system examples can be found in Annex A. 12 3. System Installation English Adding ControlSpace AMS-8 units to create a system up to 80 audio zones ® Optional Audio Link Cards are required. The number of required Audio Link Cable sets depends on the total number of connected sources (incl. paging panels and internal tuner cards). One Audio Link Cable set is required to link up to four analogue sources. For each added rack frame, also add a piece of communication cable (2 wires + shielding) to link the ‘Racklink 1 or 2’ connection of the added rack to a free racklink connection on the previous installed rack. Make sure that the termination jumpers are only placed on the RS485 communication cards of the first and last AMS-8 system. NOTE 1: To link the digital signal of a Message Storage Card, Digital Input Card or the digital signal (instead of analogue) of the Twin Tuner Card, one should add a Digital Input Card and Digital Coaxial Cable (RCA-RCA) per added rack frame. NOTE 2: Only 1 Ethernet port can be used within 1 physical netwerk. The use of VLANS or other virtual networks is not allowed! Use the system menu ‘Rack Installation’ to setup the master and slave configuration: 13 English 3. System Installation Rack 1 (Master) ! CAUTION RISK OF ELECTRIC SHOCK DO NOT OPEN AVIS: Risque de chock électrique, ne pas ouvrir System Rack MODEL: Serial Number: Bose Corporation, Framingham, MA01701-9168 Made in The Netherlands 9 1 4 4 3 2 1 1 1 3 2 5 6 6 6 6 10 7 8 5 6 3 4 1 2 7 8 2 1 1 3 1 Rack 2 (Slave) ! CAUTION RISK OF ELECTRIC SHOCK DO NOT OPEN AVIS: Risque de chock électrique, ne pas ouvrir System Rack MODEL: Serial Number: Bose Corporation, Framingham, MA01701-9168 Made in The Netherlands 9 1 1 4 1 4 1 1 1 1 4 4 5 6 6 6 6 10 7 8 5 6 3 4 1 2 7 8 1 3 2 2 2 1 1 2 1 1 3 Rack 10 (Slave) CAUTION RISK OF ELECTRIC SHOCK DO NOT OPEN ! AVIS: Risque de chock électrique, ne pas ouvrir System Rack MODEL: Serial Number: Bose Corporation, Framingham, MA01701-9168 Made in The Netherlands 9 3 3 3 3 3 1 1 1 5 6 6 6 6 1 Digital coax cable (75 Ohm) 2 CS-AMS-8 Link cable 1 3 RS485 communication cable (120 Ohm - 200m Max) 3 Digital Input Card 10 7 8 5 6 3 4 1 2 7 8 Twin Input Card 2 Message Storage Card 4 Twin Tuner Card 5 Audio Link Card 6 Twin Output Card 7 PC Link - I/O Link 8 RS485 Communication (High/Low speed) 14 3. System Installation 3.6 CS-WC connections and settings 2 3 English 1 4 1. Termination jumper, see NOTE in chapter 3.5 2.RS485 connector 3.Power supply connector (12-24Vdc) 4.Firmware update connector NOTE: See Annex B. Wallpanel mounting instructions 3.7 CS-LIM connections and settings 2 5 4 3 1 1.The CS-LIM is equipped with a microphone gain adjuster, also accessible from the frontpanel by using a ‘0’ screw driver. Turn the adjuster anti-clockwise (seen from the front) to decrease the gain to a minimum of 32dB. Turn the adjuster clockwise to increase the gain to a max of 66dB. The factory gain setting is 38dB. 2.To change the CS-LIM from stereo to mono, this jumper needs to be set. In a mono configuration, the audio cable should be connected to the LEFT output . 3. To activate a voice EQ (optimized EQ for speech) for the microphone input, the jumper needs to be moved from FLAT to VOICE voice flat = flat response voice = voice EQ flat 4.Stereo, balanced line output connector. 5.Power supply connector (24Vdc). NOTE: See Annex B. Wallpanel mounting instructions 15 3. System Installation English 3.8 CS-PP connections and settings 3 7 2 7 1 6 4 5 8 The CS-PP is equipped with voice EQ, a microphone gain adjuster and a chime (attention signal) gain adjuster. In order to be able to adjust both gains, and to connect the CS-PP, one needs to remove the plastic inlay (on top of the frontplate of the CS-PP), then remove the 4 screws and lift the front panel out of the housing. The two adjusters are located at the bottom of the panel. NOTE: Ensure not to short any connections or electronic components 1. Microphone gain: turn the adjuster anti clockwise to decrease the gain with a minimum of 32.6 dB. Turn the adjuster clockwise to increase the gain to a max of 60.1 dB. The factory gain setting is 38 dB. 2. Chime gain: use the adjuster to increase or decrease the level of the chime signal. 3. Termination jumper, see NOTE in chapter 3.5. 4. RS485 connector. 5. Power supply connector, 12-24Vdc (only 2 of the 3 pins are used!). 6. Balanced line output connector. 7. Firmware update connector. 8. XLR-connector for microphone with 22Vdc phantom power 16 3. System Installation 3.9 General Purpose Inputs / Outputs (GPIO) English ControlSpace AMS-8 includes one GPIO / Ethernet card (see also chapter 3.2). Up to 40 GPIO contacts (8 per rack, max 5 rack frames in total) can be used to trigger up to 40 messages, up to 40 room combine presets or the Room Standby function (‘mute’) on different or all outputs. The contacts are triggered by applying 24VDC between the specific contact and the common ground pin. ® NOTE: A ‘Pulse’ contact will play a message once. A ‘Hold’ contact will play and repeat a message until the contact is released. Use a hold contact to activate room combining or standby mode (release this contact to de-activate these two functions) Characteristics • 8 isolated inputs • 1 isolated output • Inputs can be used for message routing, room combining or to put an output or group of outputs in standby mode (outputs will return to default value when contact is released again) • Open collector output is activated when one of the eight inputs is activated Wiring diagram of the 8 input contacts CS-AMS-8 CS-AMS-8 1..8 + 24 Vdc - 10 Wiring diagram of open collector output CS-AMS-8 CS-AMS-8 9 Open collector Max. 50mA + 24 Vdc - 10 17 English 3.10 Audio source in and output connections Audio sources can be connected to the balanced and unbalanced line inputs and outputs using one of the following cable types: Source connector ControlSpace AMS-8 Audio Inputs and Outputs ® RCA S T+ T S- ⊥ + ⊥ L R XLR 1 2+ 2 + ⊥ 1 ⊥ 3 3- L R Phone plug (balanced) T R S⊥ S + ⊥ T+ L R- R Phone plug (unbalanced) T S + ⊥ T+ L S-⊥ R S S T T+ S- ⊥ L R 18 4. Expansion options 4. Optional system components English The standard ControlSpace AMS-8 includes: ® • 8 line level analogue audio input channels (CS-TIC) • 8 line level analogue audio output channels (CS-TOC) • 8 general purpose control contact inputs • 1 general purpose control contact output • 1 Ethernet communication port The ControlSpace AMS-8 system can be expanded with additional user interfaces, optional cards and communication interfaces. ® Optional user interfaces: CS-PP - ControlSpace AMS-8 Paging Panel With the ControlSpace AMS-8 Paging Panel both pre-recorded and realtime voice messages can be relayed to a selected group of zones. ® ® CS-WC - ControlSpace AMS-8 Wall Controller With the ControlSpace AMS-8 Wall Controller the channel can be selected and the volume of the audio signal can be adjusted locally. ® ® CS-LIM - ControlSpace AMS-8 Local Input Module The ControlSpace AMS-8 Local Input Module allows a local source (line or microphone) to be added to the system. ® ® CS-RC - ControlSpace AMS-8 Remote Control The ControlSpace AMS-8 Remote Control (infrared) allows easy control of the Wall Controller up to 5 meters. ® ® Optional Cards: CS-TIC - ControlSpace AMS-8 Twin Input Card Up to four ControlSpace AMS-8 Twin Input Cards can be added per frame to provide an additional 8 line analogue audio input channels. ® ® CS AMS-8 Audio link Card The ControlSpace AMS-8 Audio Link Card allows up to ten frames to be connected together. Audio link cables are also required. ® 19 English 4. Expansion options CS-MSC - ControlSpace AMS-8 Message Storage Card The message storage card occupies one CS-TIC (input card) slot and allows pre-recorded messages to be stored and activated by the appropriate button on the paging panel, via the Event scheduler or via the GPIO contacts. Software to configure the CS-MSC or to record messages is included. ® CS-DIC ControlSpace AMS-8 Digital Input Card The digital input card can be used to add a digital stereo input signal. It also needs to be used to link a CS-MSC, CS-TTC or CS-DIC itself to another rack. ® CS-TTC ControlSpace AMS-8 Twin Tuner Card The Twin Tuner Card can be used to add 1 stereo or 2 mono tuners to the system. ® Optional communication interfaces: CS-SCI ControlSpace Serial Code Interface The Serial Code Interface converts serial codes, sent from or to control devices like Crestron/AMX, to control the AMS-8 system. The CS-SCI also contains 16 programmable open collector outputs (each coupled to a single Room). Each output can be made active when a Room is active or when a page is send to this Room (e.g. for 100Volt attenuator over-ride). ® CS-HUB ControlSpace RS485 Communication Hub RS485 communication hub (CS-HUB) can be used to create a star network to connect up to 5 ControlSpace user interfaces (CS-WC/CS-PP). It can also be used to create larger distances between AMS-8 units and/or Serial Code Interfaces, but also to enlarge the distance between wall controllers and paging panels (connected to a single RS485 communication bus.). ® 20 5. Upgrade to a ControlSpace AMS-8 II system ® 5. Upgrade to a ControlSpace AMS-8 II system ® English 1)Check the Bootloader firmware version, which is shortly shown on the display after the AMS-8 unit is turned on. Proceeding with below steps is only possible if the Bootloader Firmware version is V2.116 or higher. If lower, the unit requires a bootloader firmware update which can only be performed by Bose employees 2) Connect all AMS-8 units in the system (10 max) using the racklink connection (see also chapter 3.5) 3)Make sure that the termination jumpers are only placed on the RS485 communication cards of the first and last AMS-8 system (all other jumpers should not be set) 4)Turn each AMS-8 unit on, while pressing the arrow UP and RIGHT navigation button at the same time. This action will activate the Bootloader mode 5)Select ‘Master’ for the first AMS-8 unit in the system. Select the appropriate number of racks on the master AMS-8 unit, e.g.: “Nr. of Racks: 10” 6)Every added rack will be a ‘Slave’ rack with a number starting at 2, 3, 4, 5 …. up to 10. E.g.: ”Select rackNr: 2” 7)Notice the ‘live-mask’ indication at the bottom of the graphic display. This indicates the number of AMS-8 systems which are installed and connected. This live-mask is displayed as follows: ”Racks: 00000011 11111111”, which indicates 10 installed AMS-8 systems 8)As soon as all slave units have been detected, select ‘Finish’ on the master unit. This will (temporary) set the bootloader configuration 9) Connect your computer to the master rack and start the Bootloader Multi-Installer software 10) Upload the (latest) firmware into the AMS-8 units 11) Wait until the upload and re-update of all units is finished 12)Set the 1st (upper) rack to ”Rack-1 Mst” (master) again and enter the number of slaves (if needed, first repeat step 4 again to do this) 13) Set every slave rack to the correct slave number (”Rack-2” or higher), see also step 5 14) Re-start all racks (due to re-grouping of all the racks), by turning all units off and on again 15)Perform a Total Factory Restore (select this option in the installation menu) on the master rack and wait until the flash update is finished (displayed as: “Updating flash 202”) 16)Re-start all racks again (to implement the new DataFlash memory settings), by turning all units off and on again 17) Update all Bose EQ curves using the Live Installer Software 18) Update to a ControlSpace AMS-8 II system is now finished ® Use the Live Installer Software or the Graphic display + navigation buttons to configure the AMS-8 units. Previously saved BDF-files (Bose Data Files) can not be used anymore to restore into the AMS-8 units (due to new DataFlash memory settings). However, after a unit is re-configured, the new created BDF-file can be saved and re-opened to be used/transfered into other ControlSpace AMS-8 II systems. ® 21 6. Troubleshooting English 6. Troubleshooting No power Plug in power cord, turn power on. Power is on but no sound in Verify that there is an input signal from the source. any zones Verify that there is an output signal. If there is an input signal and no output signal the ControlSpace may be muted or the output levels may be down. ® Power is on but sound is low Verify that the audio input indicator is green. If it is off, increase the source output or the input gain. If the audio input indicator is green and the audio output signal indicator is green, verify there is enough gain in the amplifier and check output levels. Sound is distorted If the input source signal is clean when it enters the CS AMS-8 system, verify that the loudspeakers are not being overdriven and are not damaged. Unnatural sound Verify that the correct speaker EQ or crossover is used in the signal path. Make sure the input signal is not distorted/ too high. Power is on but no sound in Check all connections on the CS AMS-8 system rack. 1 or more zones Check if the amplifier is operating correctly and gains are adjusted appropriately. Verify the default settings and maximum volume settings of the room in the Live installer software or on the system rack. Check if Events or Room Combining presets are activated. No paging/chime from user software Check cabling between PC-soundcard, microphone and system rack. Check volume control settings of the PC itself. No control/ communication from CS-WC/ CS-PP Check the cabling between CS-WC/CS-PP and the system rack. In the room settings menu of the system rack, the status of the wall controller is shown. If it shows ‘WC-‘, then there is no communication with the specific wall controller. Verify the number of the wall controller and, make sure the wall controller number is set to the room number it should serve. 22 No communication/ control between PC and AMS-8 system rack when using the installer software Check the ethernet pinout of the cable. Make sure the installer software shows that the INETGui connection is online. No Audio Signal from a mono configured Local Input Module Make sure the audio cable is connected to the LEFT output connector of the CS-LIM. Audio signal on output drops down when a source with a high output level is playing Make sure to adjust the input gain to 0dB. A constant 3dB input signal will mute the input stage. E.g.: for a CD-player with an output signal of +6dB , the input gain should be reduced with at least 3dB (6dB is prefered). The Talk Led on the paging panel flashes between red and green This indicates a communication problem. Check the communication cabling between AMS-8 and Paging panel. Make sure the termination jumper is set at the last CS-PP. No paging signal from paging panel Check the connection between AMS-8 and the CS-PP. Check the routing settings in the Live Installer Software or on the AMS-8 unit (using the LCD and navigations buttons). 7. Technical specifications 7. Technical specifications English Inputs: Type: 8x analogue (up to 16), unbalanced and electronically balanced, line-level Connectors: RCA and 3 pin Euro block Input Sensitivity: -30dBu to +14dBu Impedance: 50K Ohms Input clip level: +14dBU Digital resolution: 24-Bit Outputs: Type: 8x analogue, unbalanced and electronically balanced, line-level Connectors: RCA and 3 pin Euro block Impedance: 150 Ohms Maximum output level: 18dBu Balanced, 12dBu Unbalanced Bass/Treble control: +/-12dBu, in steps of 1 dB Digital resolution: 24-Bit Signal Processing: Type: 48-bit floating point, Digital Signal Processors Sampling Rate: 96 kHz Audio Latency: <1ms Delay: 10ms, in steps of 0.05ms Frequency response: 20 Hz to 20 kHz (+0dB,-0.3dB) THD: <0.007% (A-weighted, 0dBu in/0dBU out) Channel separation: >103 dB @ 1kHz, 0dBu Signal-to-noise ratio: >100dB, A-weighted, THD<0.02%, balanced in/out >100dB, A-weighted, THD<0.02%, unbalanced in/out 110dB, A-weighted, THD<0.02%, analogue in to digital out 140dB, A-weighted, THD<0.02%, digital in/ digital out Electrical: Power supply Power consumption Size (H x W x D in mm) Weight CS AMS-8 90 - 264 Volt AC (47-63Hz) 37 Watt maximum 88 x 485 285 4.5 kg CS-WC 12 - 24 Volt DC 0.7 Watt maximum 80 x 115 x 48 0.12 kg CS-LIM 24 Volt DC 1.5 Watt maximum 80 x 115 x 48 0.12 kg CS-PP 12 - 24 Volt DC 1.7 Watt maximum 43 x 210 x 212 1.5 kg Environmental: Operating temperature: 0˚C up to 50˚C Humidity: 80% relative humidity (without condensation)v 23 ANNEX A. ControlSpace AMS-8 system example ® ANNEX A. ControlSpace AMS-8 system examples English ® ControlSpace AMS-8 system with 80 zones ® SCI HUB 24 ANNEX A. ControlSpace AMS-8 system example ® ANNEX A. ControlSpace AMS-8 system examples ® English ControlSpace AMS-8 system with multiple paging panels ® or ControlSpace AMS-8 system with multiple wall controllers in a single room ® Zone 1 Zone 5 Zone 6 Zone 2 Zone 7 Zone 3 Zone 4 Zone 8 25 ANNEX B. User Interface mounting instructions English ANNEX B. User Interface mounting instructions Flush mount box The flush mount box is suitable for in-wall mounting of the ControlSpace AMS-8 wall controller and ControlSpace AMS-8 local input module. Dimensions (HxWxD): 7,1 x 10,6 x 5,2 cm ® Surface mount box The surface mount box is suitable for on-wall mounting of the ControlSpace AMS-8 wall controller and ControlSpace AMS-8 local input module. Dimensions (HxWxD): 8,0 x 11,4 x 4,6 cm ® Dry lining box for plasterboard walls Dry lining box for hollow or plasterboards walls for in-wall mounting of the ControlSpace AMS-8 wall controller and ControlSpace AMS-8 local input module. Dimensions (HxWxD): 6,6 x 12,4 x 5,2 cm ® ® Paging panel Use these dimensions to mount the paging panel into a desk or other. Mount a separate XLR-connector (female) next to the paging panel, which needs to be connected to the microphone connection inside the paging panel. In order to avoid any short circuit, remove the power connection before mounting the paging panel. 26 English 27 European sales offices English How to reach the sales offices in Europe Austria Professional Systems Division, Austria Bose Ges.m.b.H., Business Park Vienna Wienerbergstrasse 7, 10 O.G. 1100 Wien, Österreich Telephone: 01-60404340 Fax: 01-604043423 Belgium Professional Systems Division, Belgium Bose N.V., Limesweg 2 3700 Tongeren, België Telephone: 012-390800 Fax: 012-390840 Denmark Professional Systems Division, Denmark Bose Danmark A/S, Industrivej 7 PO Box 14, 2605 Brøndby, Danmark Telephone: 43437777 Fax: 43437818 28 The Netherlands Professional Systems Division, The Netherlands Bose B.V., Nijverheidstraat 8 1135 GE Edam, Nederland Telephone: 0299-390139 Fax: 0299-390109 Norway Professional Systems Division, Norway Bose Filial till Bose A/S Danmark, Lerkev 58 2209 Kongsvinger, Norge Telephone: 062-821560 Fax: 062-821569 Switzerland Professional Systems Division, Switzerland Bose AG, Hauptstrasse 134 4450 Sissach, Sweiz Telephone: 061-9757733 Fax: 061-9757744 France Professional Systems Division, France Bose S.A., 12 rue de Témara 78100 Saint Germain en Laye Telephone: 01-30616363 Fax: 01-30616388 Spain Gaplasa S.A. Avda. Ingeniero Conde de Torroja 25 28022 Madrid, España Telephone: 91 748 29 60 Fax: 91 329 16 75 e-mail: [email protected] Germany Professional Systems Division, Germany Bose GmbH, Max-Planck-Straße 36, 61381 Friedrichsdorf, Deutschland Telephone: 06172-7104-0 Fax: 06172-7104-19 Sweden Professional Systems Division, Sweden Bose, filial till Bose A/S Danmark Johannefredsgatan 4, 43153 Mölndal, Sverige Telephone: 031-878850 Fax: 031-274891 Ireland Professional Systems Division, Ireland Bose GP, Castleblayney Road Carrickmacross, County Monaghan Republic Of Ireland Telephone: 042-9661988, Fax: 042-9661998 United Kingdom Professional Systems Division, United Kingdom Bose Ltd., 1 Ambley Green Gillingham Business Park Gillingham, Kent ME8 0NJ, England Telephone: 0870-741-4500 Fax: 0870-741-4545 Italy Professional Systems Division, Italy Bose SpA, Via della Magliana 876 00148 Roma, Italia Telephone: 066-5670802, Fax: 066-5680177 e-mail: [email protected] Poland Bose Sp. z o.o. Galeria Mokotów ul. Wołoska 12 02-675 Warszawa Telephone: (22) 852 2928 Fax: (22) 852 2927 English 29 Producenten forbeholder sig særlige rettigheder. Oplysningerne i denne vejledning kan ændres uden forudgående varsel og uden forpligtelser. Indholdsfortegnelse 1. Sikkerhedsoplysninger Vigtige sikkerhedsinstruktioner 32 Overensstemmelseserklæring 34 2. Indledning 35 3. Installation af systemet 3.1 Frontpanelet på ControlSpace AMS-8 36 3.2 Bagsiden af ControlSpace AMS-8 37 3.3 Konfiguration af det vægmonterede betjeningspanel 38 3.4 Tilslutning af betjeningspaneler 39 3.5Systemopbygning 40 3.6 Tilslutning af det vægmonterede betjeningspanel 43 3.7 Tilslutning af lokalt inputmodul 43 3.8 Tilslutning af opkaldspanel 44 3.9 Ind- og udgangskontakter 45 3.10 Tilslutning af line-indgange og line-udgange 46 ® ® 4. Ekstratilbehør til systemet 47 5. Opgrader til ControlSpace AMS-8 II system 49 6. Fejlfinding 50 7. Tekniske specifikationer 51 Annex A. ControlSpace AMS-8 system eksempler ® 52 Annex B. User Interface monterings vejledning 54 European sales offices 56 ® Dansk 1. Sikkerhedsoplysninger 1. Vigtige sikkerhedsinstruktioner Advarselsmærkater på produktet Disse mærkater er placeret på produktets bagside. English Dansk Symbolet med et lyn med pilespids i en ligesidet trekant skal gøre brugeren opmærksom på tilstedeværelsen af en ikke-isoleret, farlig spænding i det lukkede system, der kan være tilstrækkelig kraftig til at give elektrisk stød. En ligebenet trekant med et udråbstegn, som markeret på systemet, skal henlede brugerens opmærksomhed på vigtige betjenings- og vedligeholdelsesinstruktioner i denne installationsvejledning. Vigtige sikkerhedsinstruktioner 1. Læs disse instruktioner. 2. Gem disse instruktioner til senere brug. 3. Ret dig efter alle advarsler på produktet. 4. Følg alle instruktioner. 5. Anvend ikke dette apparat i nærheden af vand eller fugt. 6. Rengør kun med en tør klud. 7. Undgå at blokere ventilationsåbningerne. Installer produktet i overensstemmelse med producentens instruktioner – for at sikre pålidelig funktion og beskytte produktet mod overophedning skal det anbringes i en position og på et sted, der ikke hindrer korrekt ventilation. 8. Installer ikke produktet i nærheden af varmekilder såsom radiatorer, varmeovne, komfurer eller andre apparater (herunder forstærkere) der frembringer varme. 9. Omgå ikke sikkerheden ved brug af et netstik, som ikke-er jordforbundet. Et jordforbundet stik har to ben og et tredje til jordforbindelse. Det brede ben eller tredje ben er der for din sikkerhed. Hvis det medfølgende stik ikke passer i stikkontakten, skal du kontakte en elektriker for at få stikkontakten udskiftet. 10. Beskyt netledningen mod at blive trådt på eller klemt, specielt ved stikket, stikkontakter mv. 11. Brug kun det tilslutningsudstyr/tilbehør, der er angivet af producenten. 12. Brug kun tilbehøret med rullebord, højttalerstativ, beslag eller lignende, der er angivet af producenten eller solgt sammen med apparatet. Når der anvendes et rullebord, skal der udvises forsigtighed ved kørsel med bord/apparat, så det ikke vælter. 13. A fbryd strømforsyningen til apparatet under tordenvejr eller når det ikke skal bruges i en længere periode, for at forhindre skade på produktet. 14. Overlad al servicering til kvalificeret servicepersonale. Service er påkrævet, hvis apparatet på nogen måde er blevet beskadiget: f.eks. hvis netledningen eller stikket er blevet beskadiget, hvis der er blevet spildt væske eller faldet genstande ned i apparatet, hvis apparatet er blevet udsat for regn eller fugt, hvis apparatet ikke fungerer normalt, eller hvis apparatet er blevet tabt. Forsøg aldrig at reparere apparatet selv. Åbning eller fjernelse af dele af kabinettet kan udsætte dig for farlig spænding eller andre risici. Kontakt Bose for at få oplysninger om det nærmeste autoriserede servicecenter. 15. Undgå at overbelaste stikkontakter, forlængerledninger eller indbyggede stik af hensyn til risikoen for brand eller elektrisk stød. 32 1. Sikkerhedsoplysninger 16. Undgå at genstande eller væske kommer ind i apparatet, da disse kan komme i kontakt med steder med farlig spænding eller kortslutte dele, hvilket kan resultere i brand eller elektrisk stød. 17. Se de mærkater på bagsiden, der er relevante for sikkerheden. 18. Der må ikke anbringes åben ild såsom tændte stearinlys på apparatet. ADVARSEL! Af hensyn til risikoen for brand eller elektrisk stød må ControlSpace AMS-8 ikke udsættes for regn eller fugt. ® Dansk ADVARSEL! Apparatet må ikke udsættes for dryp eller vandstænk, og genstande fyldt med vand, f.eks. vaser, må ikke placeres på apparatet. Som ved alle elektriske apparater skal du passe på ikke at spilde væske på nogen af systemets dele. Hvis der spildes væske, kan der opstå fejl i systemet og/eller opstå fare for brand. Oplysninger om produkter, der genererer elektrisk støj Dette udstyr er blevet testet og overholder grænserne for en digital enhed i klasse A i henhold til del 15 af FCCreglerne. Disse grænser er udviklet til at yde rimelig beskyttelse mod skadelig interferens i en privat installation. Dette udstyr genererer, bruger og kan udstråle højfrekvent energi, og kan, hvis det ikke installeres og bruges i overensstemmelse med instruktionerne, forårsage skadelig interferens i forbindelse med radiokommunikation. Dette garanterer dog ikke, at der ikke kan forekomme interferens i en bestemt installation. Hvis dette udstyr forårsager skadelig interferens i forbindelse med radio- og tv-modtagelse, hvilket kan kontrolleres ved at slukke og tænde for udstyret, opfordres du til at forsøge at eliminere interferensen via en eller flere af følgende fremgangsmåder: • Ret modtageantennen i en anden retning, eller flyt antennen. • Øg afstanden mellem udstyret og modtageren. • Slut udstyret til en stikkontakt på et andet kredsløb end det, hvor modtageren er tilsluttet. • Kontakt forhandleren eller en radio/tv-tekniker for at få hjælp. Bemærk! Uautoriseret ændring af udstyret eller fjernbetjeningen kan ophæve brugerens ret til at betjene dette udstyr. Dette produkt overholder specifikationerne. Oplysningerne i denne installationsvejledning omfatter ikke alle oplysninger om design, produktion eller variationer af udstyret. De dækker heller ikke enhver tænkelig situation, som kan opstå under installation, betjening eller vedligeholdelse. Hvis du har brug for anden hjælp end oplysningerne i denne installationsvejledning, bedes du kontakte et af vores europæiske salgskontorer. Se listen med salgskontorer på sidste side i denne installationsvejledning. 33 1. Sikkerhedsoplysninger Overensstemmelseserklæring Producenten af denne enhed erklærer hermed, at dette produkt og dets tilbehør er i overensstemmelse med følgende standarder: English Dansk EMC-direktivet 89/336/EØF (elektromagnetisk kompatibilitet) EN-55103-1 EN-55103-2 Lavspændingsdirektivet 73/23/EØF EN-60065:2002 7. udgave Forholdsregler ved rackmontering Lydprocessoren kræver 2 stk. 4,4 cm rackpladser med en indvendig dybde på 32,5 cm. Brug fire skruer med spændskiver til montering, så frontpanelet ikke ødelægges. Gummiskiver af neopren er et godt valg, da de fastholder skruehovedet og forhindrer skruerne i at løsne sig på grund af vibrationer, eller under transport. Forsigtig! Hvis en enhed er monteret i rack og rack’et transporteres, skal processoren understøttes manuelt bagtil. Du kan montere en hylde under den bageste del af processoren eller understøtte den bageste kabinetdel ved hjælp af beslag. Generelle forholdsregler og ventilation Forsigtig! Anbring enheden, hvor den er beskyttet mod varme og får passende ventilation. Hold enheden på afstand af varmekilder såsom varmeriste og radiatorer. Sørg for, at luften kan cirkulere frit bagved, ved siden af og over enheden. Hvis enheden anbringes oven på eller under en forstærker, skal der anbringes en enkelt ventilationsplade mellem de 2 apparater. Kabinettets temperatur må ikke overstige den maksimale driftstemperatur på 50ºC. Vær opmærksom på forhold i en lukket rack, der kan øge temperaturen til over stuetemperatur. Forsigtig! Sørg for, at de tynde tråde i kablerne er snoet sammen og anbragt i stikkene. Hvis blot en enkelt tråd er løs, kan den berøre den nærmeste terminal, hvilket kan medføre kortslutning. 34 2. Indledning 2. Indledning Indledning Bose ControlSpace AMS-8 Lydstyringssystem er en alsidig kvalitets-lydprocessor til styring af lydsignaler i restauranter, butikker, barer, kontorer, hoteller, konferencefaciliteter og sportsarenaer, som kan udvides efter behov. Hovedenheden har 8 line-indgange og 8 line-udgange. Den har 4 lydslots, som giver mulighed for at tilføje op til 8 ekstra lydindgange (2 indgange pr. kort). ® ® Dansk Hvis der er flere end 8 mono zoner, kan op til 10 AMS-8-enheder kobles sammen. Hvert ekstra systemrack tilfører 8 ekstra mono zoner. Der kan vælges mellem flere betjeningspaneler, så slutbrugeren får adgang til let og brugervenlig styring af ControlSpace AMS-8-systemet. ® Live Installationssoftwaren til Bose ControlSpace AMS-8 anvendes til at designe systemer og konfigurere AMS-8 og betjeningspanelerne. Softwaren installeret på en PC kommunikerer med AMS-8 systemet via ethernet. ® ® Egenskaber og funktione • Fleksibel med udvidelsesmulighed via ekstra moduler • LCD-display og betjeningsknapper • Vægmonteret betjeningspanel (valgfri infrarød fjernbetjening) • 8 (op til 16) analoge line-indgange • 8 analoge line-udgange • Mulighed for tilslutning af lokalt inputmodul • GPIO: 8 input kontakter (til at aktivere beskeder, lave zone sammenlægninger, eller standby funktion) og en udgangskontakt • Design, konfiguration og systemstyring sker via pc-baseret software • Digital signalbehandling inkluderer: Bose højttaler-EQ’er, Dynamic EQ, tidsforsinkelse, gain, grafisk EQ og lydkildevalg. • Mulighed for tilslutning af opkaldspanel • Besked funktioner (Message Storage Card behøves) • Radio funktioner (Twin Tuner kort behøves) • Automatisk registrering af input kort type • Rum sammenkoblings-funktion • Event planlægnings-funktioner Kom hurtigt i gang • Slut line-indgangene og line-udgangene til ControlSpace AMS-8-systemet (hvis der er 2 eller flere systemenheder, skal disse tilsluttes ved hjælp af lydforbindelseskort, lydforbindelseskabler og højhastighedsracktilslutningen RS485: se også kapitel 3.5). ® • Tænd for ControlSpace AMS-8-systemet. Systemet starter op med opstartsindstillingerne. Hver gang ControlSpace -systemet startes, gendannes opstartsindstillingerne. Det betyder, at systemet begynder afspilning af den lydkilde og med det lydniveau, der er indstillet som opstart (default settings) i installationsmenuen af installatøren. ® ® NOTE: For at opdatere til funktioner og faciliteter som ControlSpace AMS-8 II system, se kapitel 5 ® Forkortelser CS-WC CS-PP CS-LIM CS-RC CS-TIC CS-TOC Vægmonteret betjeningspanel til ControlSpace AMS-8 Opkaldspanel til ControlSpace AMS-8 Lokalt inputmodul til ControlSpace AMS-8 Fjernbetjening til ControlSpace AMS-8 Dobbelt indputmodul til ControlSpace AMS-8 Dobbelt outputmodul til ControlSpace AMS-8 ® ® ® ® ® ® CS-EC CS-MSC CS-DIC CS-TTC CS-HUB CS-SCI Ethernetmodul til ControlSpace AMS-8 Beskedlagringskort til ControlSpace AMS-8 ControlSpace AMS-8 Digital Input kort ControlSpace AMS-8 Twin Tuner kort ControlSpace AMS-8 RS485 Hub ControlSpace AMS-8 Serial Code Interface ® ® ® ® ® ® 35 3. Installation af systemet 3.1 Frontpanelet på ControlSpace AMS-8 ® 1 English Dansk 2 1. LCD-DISPLAY På LCD-displayet vises kontrolmenuerne og de mulige indstillinger for hvert enkelt menupunkt. 2. BETJENINGSKNAPPER Knapperne ‘op’ og ‘ned’ bruges til at skifte mellem menupunkterne, mens knapperne ‘venstre’ og ‘højre’ bruges til at ændre værdien for det valgte menupunkt. Knappen ‘OK’ bruges til at bekræfte det aktuelle valg; hvis du f.eks. trykker på ‘OK’, når menupunktet ‘Exit’ er valgt, går du tilbage til det forrige niveau i menuen. 36 3. Installation af systemet 3.2 Bagsiden af ControlSpace AMS-8 ® 5 3 7 11 9 15 13 1 4 5 3 7 5 9 4 5 3 8 1 8 7 Serial Number: Rack Link 2 1 PC Link ! Rack Link 1 1 CAUTION RISK OF ELECTRIC SHOCK DO NOT OPEN AVIS: Risque de chock électrique, ne pas ouvrir System Rack MODEL: 2 6 Bose Corporation, Framingham, MA01701-9168 Made in The Netherlands 10 14 12 16 4 2 13 6 8 5 16 1 3 4 Audio Link Card slot Slot til Audio Link Card for at sammenkoble to ControlSpace Slot for Audio Link Card to link the connected AMS-8 Et Audio Link AMS-8 Card er kun nødvendigt i analog systemer. sources between Controlspace Audio Managment Systems. master racket. Benyt et Audio Link kabel for hver fire stk. lydkilder som skal linkes til næste enhed. 11 15 13 4 (Balanced line level) 6 5 3 8 1 8 2 12 8 10 12 14 9 RS-232 & GPIO card 16 13 2 4 6 16 Audio Link Source Inputs RCA Input Connector RCA Input Connector (Unbalanced line level) 9 4 5 9 8 3 7 7 2 3 Line outputs (1-8) 6 2 Line outputs (1-8) 6 1 CS TOC CSTOC 9 Line inputs (1-16)RCA Output Connector RCA Input Connector (Unbalanced line level) (Unbalanced line level) 10 7 8 5 6 3 4 1 2 Audio Link Card slot CSTIC 3-pin Output Euro Block Connector RCA Input Connector 3-pin Input Euro level) Blok Connector (Balanced line (Unbalanced linelevel) level) (Balanced line Slot for Audio Link Card to link the connected analog sources between Controlspace AMS-8 Audio Managment Systems. 9 (Balanced line level) RS-232 & GPIO card 10 7 8 5 6 3 4 1 2 (Unbalanced level) (Balanced line line level) 5 RCA Input Connector (Unbalanced line level) 9 4 Ethernet & GPIO card 4 5 9 8 3 3 7 7 2 1 6 Line outputs (1-8) 2 1 Rack link 1 (high speed) 9 7 5 RCA Input Connector Rack link 2 (high level) (Unbalanced linespeed) 3-pin Input Euro Blok Connector CS-WC & CS-PP Bus 1 (low speed) (Balanced line level) Pin 3 : Contact 3 Pin 4 : Contact 4 Pin 5 : Contact 5 8 Pin 6 : Contact 6 Pin 7 : Contact 7 Pin 8 : Contact 8 Pin 9 : Out Pin 10: Common 4 RS232 port pin out Straight shielded cable (20 meters max.) 2. TX 3. RX 5. GND Pin 1: Contact 1 Pin 2: Contact 2 Pin 3: Contact 3 Pin 4: Contact 4 Pin 5: Contact 5 Pin 6: Contact 6 Pin 7: Contact 7 Pin 8: Contact 8 Pin 9: Output RS232 portCommon pin out Pin 10: Straight shielded cable (20 meters max.) 6 2. TX 3. RX 5. GND DB9 Female 6 3 4 1 2 9 3-pin Input Euro Blok Connector CS-WC & CS-PP Bus 2 (low speed) (Balanced line level) GPIO pinout: Pin 1 : Contact 1 10 8 6 2 8 4 RS-485 card 10 3 DB9 Female 3-pin Output Euro Block Connector 3-pinInput InputEuro EuroBlok BlokConnector Connector 3-pin (Balanced line level) (Balanced line level) RCA Output Connector 3-pin Euroline Blok level) Connector RCA Input Connector (Unbalanced 7 5 1 8 4 3 1 8 Line Outputs 5 (Unbalanced line level) RCA Input Connector Pin 2 : Contact 2 (Unbalanced line level) 6 9 (Balanced line level) 4 7 7 Bose Corporation, Framingham, MA01701-9168 Made in The Netherlands 2 5 3 4 Serial Number: 3-pin Input Euro Block Connector 3-pin Inputline Euro level) Blok Connector (Balanced 1 9 3-pin Input Euro Block Connector 3-pin Inputline Euro level) Blok Connector (Balanced 5 Rack Link 2 9 Bus 1 7 Bus 2 5 To CSPP/CSWC 1 3 PC Link CAUTION RISK OF ELECTRIC SHOCK DO NOT OPEN I/O Link 1 (Unbalanced ! line level) Rack Link 1 ® RCA Input Connector RCA Input Connector (Unbalanced line level) AVIS: Risque de chock électrique, ne pas ouvrir System Rack MODEL: CSTOC 5 2 Audio Link Card slot CSLine TICinputs (1-16) CSTIC 4 Line Outputs 2 1 Line inputs (1-16) 8 6 2 Dansk Audio Link Source Inputs 10 3 1 Bus 2 8 To CSPP/CSWC 6 I/O Link 4 2 9 7 Bus 1 9 12 10 7 8 5 6 3 4 1 2 Pin 1: Contact 1 Pin 2: Contact 2 Pin 3: Contact 3 Pin 4: Contact 4 Pin 5: Contact 5 Pin 6: Contact 6 Pin 7: Contact 7 Pin 8: Contact 8 Pin 9: Output Pin 10: Common RS-485 card 5 RS485 card Rack link 1 (high speed) Rack link 1 (high speed) Rack link 2 (high speed) Rack link 2 (high speed) CS-WC & CS-PP Bus 1 (low speed) CS-WC & CS-PP Bus 1 (low speed) CS-WC & CS-PP Bus 2 (low speed) CS-WC & CS-PP Bus 2 (low speed) 37 3. Installation af systemet 3.3 Konfiguration af det vægmonterede betjeningspanel English Dansk 1 1. LCD-DISPLAY 2 3 2. LYDSTYRKEKNAPPER 3. KANALKNAPPER Før du konfigurerer ControlSpace AMS-8, skal du vælge en adresse for hver af de vægmonterede betjeningspaneler (1-8). Dette gøres normalt, første gang det vægmonterede betjeningspanel sluttes til systemrack’et. Nogle få sekunder efter, at det vægmonterede betjeningspanel er sluttet til systemrack’et, vil Firmware version blive vist på LCD displayet, efterfulgt af, vises “Select WC”. Vælg den korrekte adresse ved hjælp af kanalknapperne, og bekræft den valgte adresse ved at trykke på knappen ‘lydstyrke ned’ (-). Hvis flere betjeningspaneler ønskes installeret i samme lokale skal alle betjeningspaneler have samme nummer. Betjeningspaneler monteret i samme lokale skal forbindes til samme rack. ® Hvis det vægmonterede betjeningspanel allerede har en adresse, kan den ændres på følgende måde: 1. Sluk for det vægmonterede betjeningspanel (tryk flere gange på knappen ‘kanal ned’ (-), indtil det vægmonterede betjeningspanel slukker). 2. Tryk på knappen ‘kanal ned’ (-), og hold den inde. 3. Tryk på knapperne ‘lydstyrke op’ (+) og ‘lydstyrke ned’ (-) samtidigt (Efter LCD skærmen har vist Firmware versionen vises displayet vises den faktiske adresse, f.eks. “WC2”). 4. Du kan nu vælge den korrekte adresse ved hjælp af knapperne og bekræfte den valgte adresse ved at trykke på knappen ‘lydstyrke ned’ (-) på samme måde som tidligere. Hvis systemet består af 2 eller flere ControlSpace AMS-8-enheder, bruger de begge adresserne (1-8). På den første enhed bruges adresserne 1-8 til udgangene 1-8, og på den anden enhed bruges de til udgangene 9-16, op til det tiende rack for output 73..80. ® Ændring af indstillingerne i lokalerne (zonerne) ved hjælp af det vægmonterede betjeningspanel Du kan ændre lydindstillingerne for det lokale, hvor det vægmonterede betjeningspanel sidder, ved hjælp af betjeningspanelets skjulte menu. Følg nedenstående procedure for at åbne denne menu: 1. Sluk for det vægmonterede betjeningspanel (tryk flere gange på knappen ‘ned’ (-), indtil det vægmonterede betjeningspanel slukker). 2. Tryk påknappen ‘lydstyrke ned’ (-), og hold den inde. 3. Tryk på knapperne ‘kanal op’ (+) og ‘ned’ (-)samtidigt. Du kan indstille eller ændre følgende funktioner i den skjulte menu: a. opstartsprogram b. basniveau d. dynamisk EQ g. lydniveau for opkaldspanel h. tidsforsinkelse c. diskantniveau e. Bose højttaler EQ f. maksimalt lydniveau i. opstarts-lydstyrkel Du skifter mellem menupunkterne ved hjælp af knapperne og ændrer indstillingerne for det valgte menupunkt ved hjælp af lydstyrkeknapperne. 38 Du forlader den skjulte menu ved at trykke på knapperne ‘op’ (+) og ‘ned’ (-) samtidigt. 3. Installation af systemet 3.4 Tilslutning af betjeningspaneler ControlSpace AMS-8 vægmonteret betjeningspanel ControlSpace AMS-8 opkaldspanel ControlSpace AMS-8 lokalt inputmodul Spænding 12-24 V DC, +/-20 % 12-24 V DC, +/-10 % 24 V DC, +5 %/-10 % Strømstyrke @ 12 V DC 50 mA typ @ 24 V DC 30 mA typ @ 12 V DC 140 mA typ @ 24 V DC 70 mA typ @ 24 V DC 60 mA typ Anbefalet strømforsyning* BOSE CS AMS-8 BOSE CS AMS-8 BOSE CS AMS-8 24 V DC, 2,7 A stabiliseret 24 V DC, 2,7 A stabiliseret 24 V DC, 2,7 A stabiliseret strømforsyning strømforsyning strømforsyning ® ® ® Strømforsyning Dansk RS485-kabler** Maks. afstand (med HUB 600 m (1200m) 600 m (1200m) Ikke muligt Afbryder *** 120 ohm 120 ohm Ikke muligt Kabeltype 1 parsnoet og afskærmet 1 parsnoet og afskærmet Ikke muligt Nom. kap. 40 pF/m Nom. kap. 40 pF/m Ikke muligt Nom. imp. 124 ohm Nom. imp. 124 ohm Ikke muligt Nom. att. 2 dB ved 1 MHz Nom. att. 2 dB ved 1 MHz Ikke muligt Anbefalet kabel BOSE CS AMS-8 kommunikations-/ strømkabel (blåt) til CS-WC/CS-PP BOSE CS AMS-8 kommunikations-/ strømkabel (blåt) til CS-WC/CS-PP Ikke muligt Lydkabler - Standard Mic/Linekabel, 1 parsnoet med afskærmning Bose CS AMS-8 lyd-/strømkabel (gult) til CS-LIM * Bemærk! Hvis der ikke anvendes en af ovennævnte strømforsyninger, skal en anden type strøm-forsyning, der anvendes i Europa, være i overensstemmelse med EN/IEC 60950. ** Nødvendig RS485 wiring Forbind altid komponenterne i en seriel konfiguration (frem for en stjerneformet eller anden form for konfiguration). Stjerne forbindelse kan kun benyttes sammen med CS-HUB. Sørg for at adskille datakablet fra strømkablerne (>50 V), hvis du anvender kabelbakke eller andet udstyr til kabelstyring. *** Afbryder/jumper Slutjumperen skal placeres på det sidste betjeningspanel (CS-WC eller CS-PP), der sidder sidst på hver af RS485kommunikationslinjerne. CS AMS-8 kommunikations-/strømkabel 4 1. Blå = RS485-kommunikation ‘+’ 5 2. Klar = RS485-kommunikation ‘-’ 1 CS AMS-8 lyd-/strømkabel 2 3. Drainwire = RS485-kommunikation ‘JORD’ 1. Gul = balanceret line-kabel (afskærmet) 4. Rød = strøm ‘24 V DC’ 6 3 1 2 2. Grøn = balanceret line-kabel (afskærmet) 5 5. Sort = strøm ‘-’ 6. Blå kappe 3. Rød = strøm ‘24 V DC’ 4. Sort = strøm ‘-’ 5. Gul kappe 3 4 39 3. Installation af systemet 3.5 Systemopbygning To RS485-kommunikationslinjer og en central strømforsyning: Maks. 600 m (samlet længde) English Dansk Mikrofonkabel * RS-485 RS-485 Mikrofonkabel * Strømforsyning 24VDC 2-7A DC 24V input To RS485-kommunikationslinjer og lokale strømforsyninger: Maks. 600 m (samlet længde) Mikrofonkabel Strømforsyning * RS-485 RS-485 * Strømforsyning Strømforsyning RS485-kommunikationslinje maksimumafstanden: 600 m 600 m eller: 600 m 600 m RS485 HUB 600 m BEMÆRK! * Slutjumperen skal placeres på det sidste betjeningspanel (CS-WC eller CS-PP), der sidder på hver af RS485kommunikationslinjerne. Flere systemeksempler kan findes I Annex A. 40 3. Installation af systemet Tilføj flere ControlSpace AMS-8 enheder for at skabe systemer op til 80 audio zoner ® NOTE 1: For at linke det digitale signal fra et Message Storage Card, Digital Input Card eller det digitale signal (istedet for det analoge) fra Twin Tuner modulet, skal der installeres et Digital Input kort og et Digital Koax kabel (RCA-RCA) for hvert tilført rack. NOTE 2: Der kan kun benyttes en Ethernet port på ET fysisk netværk. Brug af VLANS eller andre virtuelle netværk kan IKKE benyttes. Vælg ‘Rack Installation’ i system menuen, for at vælge master eller slave konfiguration: 41 Dansk Audio Link kort er nødvendigt. Antallet af Audio Link kabler er afhængig af det totale antal af tilsluttede lydkilder (inkl. opkaldspaneler og interne tuner moduler). Et Audio Link kabel behøves for hver fire analog lydkilder. For hvert ekstra Rack som tilføjes, skal der benyttes et kommunikationskabel (2 ledere + skærm) for at forbinde ”Racklink 1 eller 2” forbindelsen på det tilføjede rack, til en fri racklink forbindelse på det forrige installerede rack. Du skal sikre at terminerings jumperne kun er placeret på RS485 kommunikationskortet på det første og sidste AMS-8 rack. 3. Installation af systemet Rack 1 (Master) ! CAUTION RISK OF ELECTRIC SHOCK DO NOT OPEN AVIS: Risque de chock électrique, ne pas ouvrir System Rack MODEL: Serial Number: Bose Corporation, Framingham, MA01701-9168 Made in The Netherlands English Dansk 9 1 4 4 3 2 1 1 1 3 2 5 6 6 6 6 10 7 8 5 6 3 4 1 2 7 8 2 1 1 3 1 Rack 2 (Slave) ! CAUTION RISK OF ELECTRIC SHOCK DO NOT OPEN AVIS: Risque de chock électrique, ne pas ouvrir System Rack MODEL: Serial Number: Bose Corporation, Framingham, MA01701-9168 Made in The Netherlands 9 1 1 4 1 4 1 1 1 1 4 4 5 6 6 6 6 10 7 8 5 6 3 4 1 2 7 8 1 3 2 2 2 1 1 2 1 1 3 Rack 10 (Slave) CAUTION RISK OF ELECTRIC SHOCK DO NOT OPEN ! AVIS: Risque de chock électrique, ne pas ouvrir System Rack MODEL: Serial Number: Bose Corporation, Framingham, MA01701-9168 Made in The Netherlands 9 3 3 3 3 3 1 1 1 5 6 6 6 6 1 Digital coax cable (75 Ohm) 2 CS-AMS-8 Link cable 1 3 RS485 communication cable (120 Ohm - 200m Max) 3 Digital Input Card 10 7 8 5 6 3 4 1 2 7 8 Twin Input Card 2 Message Storage Card 4 Twin Tuner Card 5 Audio Link Card 6 Twin Output Card 7 PC Link - I/O Link 8 RS485 Communication (High/Low speed) 42 3. Installation af systemet 3.6 CS-WC tilslutning og indstillinger 1 2 3 Dansk 4 1. Slutjumper, se BEMÆRK! i afsnit 3.5 2.RS485-stik 3.Stik til strømforsyning (12-24Vdc) 4.Firmware update forbindelse NOTE: Se Annex B. Montering af vægbetjeningspanel 3.7 CS-LIM tilslutning og indstillinger 2 5 4 3 1 1.Det lokale inputmodul er udstyret med lydstyrkeregulering til mikrofon, som også kan indstilles gennem frontpanelet med en “0” skruetrækker. Drej justeringsknappen mod uret for at sænke lydstyrken (set fra fronten); minimumværdien er 32 dB. Drej justeringsknappen med uret for at øge lydstyrken; maksimumværdien er 66 dB. Fabriksindstillingen er 38 dB. 2.Hvis du vil omskifte det lokale inputmodul fra stereo til mono, skal denne jumper ændre position. Ved mono skal kablet forbindes til det VENSTRE output 3. Hvis du vil aktivere stemme-EQ (valgfrit EQ til brug for tale) for mikrofonensinput, skal afbryderen stilles fra FLAT til VOICE voice flat = normal gengivelse voice flat = stemme-EQ 4.Stereo, stik til balanceret line-udgang. 5.Stik til strømforsyning (24Vdc). NOTE: Se Annex B, for montage af vægbetjeningspaneler 43 3. Installation af systemet 3.8 CS-PP tilslutning og indstillinger 3 7 2 7 English Dansk 1 6 4 5 8 Opkaldspanelet er udstyret med lydstyrkejustering til mikrofon og lydstyrkejustering til “ding-dong” (opmærksomhedssignal). For at du kan justere begge lydstyrker og tilslutte opkaldspanelet, skal du afmontere topdækslet (øverst på opkaldspanelets frontplade), skrue de 4 skruer ud, og løfte frontpanelet ud af kabinettet. De to knapper til lydstyrkejustering sidder nederst på opkaldspanelet. NOTE: Vær omhyggelig ikke at kortslutte forbindelser eller komponenter 1. Mikrofonens lydstyrke: Drej justeringsknappen mod uret for at sænke lydstyrken; minimumværdien er 32,6 dB. Drej justeringsknappen med uret for at øge lydstyrken; maksimumværdien er 60,1 dB. Fabriksindstillingen er 38 dB. 2. “Ding-dong”-lydstyrke: Brug justeringsknappen til at øge eller sænke klokkesignalets lydstyrke. 3. Slutjumper, se BEMÆRK! i afsnit 3.5. 4. RS485-stik. 5. Stik til strømforsyning, 12-24Vdc (kun 2 af de 3 termineringer bruges) 6. Stik til balanceret line-udgang. 7. Firmware update tilslutning 8. XLR-tilslutning til mikrofon med 22Vdc phantom power 44 3. Installation af systemet 3.9 Indgangs- og udgangskontakter ControlSpace AMS-8 inkluderer et GPIO/RS232-kort (se også afsnit 3.2). Op til 40 GPIO kontakter (8 pr. Rack, maks 5 racks i alt) kan benyttes for at aktivere op til 40 beskeder, op til 40 presets af rumkombinationer eller rum standby forskellige eller alle outputs. En kontakt aktiveres ved at skabe en spændingsforskel på 24 V DC mellem den pågældende kontakt og den fælles jordterminal. ® Dansk NOTE: En “Pulse” kontakt vil afspille beskeden en gang. En ”Hold” kontakt vil afspille og gentage beskeden til kontakten brydes. Benyt en ”hold” kontakt for aktivering af rum kombination eller standby mode. (Bryd kontakten for at deaktivere disse to funktioner) Egenskaber • 8 isolerede indgangskontakter • 1 isoleret udgangskontakt • Indgangskontakterne anvendes til routing af meddelelser og sammenkobling af zoner/lokaler eller til at mute et output eller en gruppe af outputs (outputs vender tilbage til opstarts niveau efter at have været muted) • Open collector-udgangen aktiveres, når en af de 8 indgangskontakter aktiveres Ledningsdiagram, som viser de 8 indgangskontakter CS-AMS-8 CS-AMS-8 1..8 + 24 Vdc - 10 Ledningsdiagram, som viser open collector-udgangen CS-AMS-8 CS-AMS-8 9 Open collector Max. 50mA + 24 Vdc - 10 45 3. Installation af systemet 3.10 Tilslutning af line-indgange og -udgange Lydkilder kan sluttes til balancerede eller ubalancerede line-indgange og -udgange ved hjælp af følgende kabeltyper: English Dansk Stik på lydkilden Line-indgange og -udgange på ControlSpace AMS-8 ® RCA S T+ T S- ⊥ + ⊥ L R XLR 1 2+ 2 + ⊥ 1 ⊥ 3 3- L R Jackstik (balanceret) T R S⊥ S + ⊥ T+ L R- R Jackstik (ubalanceret) T S + ⊥ T+ L S-⊥ R S S T T+ S- ⊥ L R 46 4. Udvidelsesmuligheder 4. Ekstratilbehør til systemet Standardudgaven af standard ControlSpace AMS-8 inkluderer: ® • 8 analoge line-indgange (CS-TIC) • 8 analoge line-udgange (CS-TOC) Dansk • 8 indgangskontakter og • 1 udgangskontakt • 1 Ethernet kommunikations port ControlSpace AMS-8-systemet kan udvides med yderligere betjeningspaneler og line-indgange og ‑udgange og kommunikations-interface. ® Valgfri betjeningspaneler: CS-PP – ControlSpace AMS-8 opkaldspanel Med ControlSpace AMS-8 opkaldspanel kan både forudindspillede og realtime-(stemme) meddelelser afspilles i en udvalgt gruppe af zoner. ® ® CS-WC – ControlSpace AMS-8 vægmonteret betjeningspanel Med ControlSpace AMS-8 vægmonteret betjeningspanel kan du lokalt vælge lydkilde og lydstyrke for lydkilden. ® ® CS-LIM – ControlSpace AMS-8 lokalt inputmodul ControlSpace AMS-8 lokalt inputmodul giver mulighed for, at en lokal lydkilde (line eller mikrofon) kan sluttes til systemet. ® ® CS-RC - ControlSpace AMS-8 fjernbetjening ControlSpace AMS-8 fjernbetjeningen (infrarød) tilbyder nem betjening op til 5 meter fra vægbetjeningspanelet. ® ® Ekstra moduler: CS-TIC – ControlSpace AMS-8 dobbelt inputmodul Der kan monteres op til 4 ControlSpace AMS-8 dobbelte inputmoduler pr. slot, hvilket giver 8 ekstra analoge line-indgange. ® ® CS AMS-8 audiolinkkort ControlSpace AMS-8 audiolink kort giver op til ti mulighed for at forbinde to AMS-8-enheder. Audio link kabel skal benyttes. ® 47 4. Udvidelsesmuligheder CS-MSC – ControlSpace AMS-8 meddelelseslagringskort Meddelelses kortet optager et CS-TIC (input card) slot, og tillader gemte forudindspillede meddelelser at blive aktiveret via opkaldspanel, via Event timer eller via GPIO kontakterne. Software til indstilling af CS-MSC og besked optagelser er inkluderet. English Dansk ® CS-DIC ControlSpace AMS-8 Digital Input Card Det digitale input modul kan benyttes for at tilføje et digitalt stereo signal. Det skal også benyttes for at forbinde CS-MSC, CS-TTC eller CS-DIC sig selv til et andet rack. ® CS-TTC ControlSpace AMS-8 Twin Tuner Card Tuner modulet kan bruges for at tilføje 1 stereo eller 2 mono radioer til et system. ® Valgfrie kommunikations interfaces CS-SCI ControlSpace Serial Code Interface Modulet konverterer seriel koder, sendt fra eller til kontrolenheder som Crestron/AMX, for at styre AMS-8 systemet. CS-SCI modulet indeholder 16 programmerbare åbne kontakter (hver forbundet til et enkelt rum). Hver kontakt kan gøres aktiv når et rum er aktivt eller når der sendes en talt besked til rummet. (f.eks. for 100Volt prioritets beskeder) ® CS-HUB ControlSpace RS485 Communication Hub RS485 kommunikations HUB (SC-HUB) skal benyttes når du ønsker at lave stjerne netværk i stedet for parallelle forbindelser. Der kan forbindes op til 5 betjeningspaneler (CS-WC/CS-PP). Kan også benyttes når afstanden mellem AMS8 enheder og/eller Seriel Kode interface, eller også til at øge afstanden mellem vægbetjeningspaneler og opkaldspaneler (forbundet til en enkelt RS485 kommunikations port). ® 48 5. Opgradering til ControlSpace AMS-8 II system ® 5. Opgradering til ControlSpace AMS-8 II system ® 1)Chek Bootloader firmware versionen som bliver vist kort i displayet efter at AMS-8 bliver tændt. Det er kun muligt at forsætte med nedenforstående procedure hvis Bootloader Firmware versionen er V2.116 eller højere. Hvis den er lavere skal den opdateres, denne opdatering kan kun foretages af Bose. 2) Tilslut alle AMS-8 enhederne i systemet (maks 10) med racklink tilslutningen (se kapitel 3.5). Dansk 3)Vær sikker på at terminations jumperne kun er sat på RS485 kommunikations kortet i det første og sidste AMS-8 system (alle andre jumpere skal ikke være sat). 4) T ænd for hver AMS-8 mens der trykkes på pil OP og pil HØJRE knapperne samtidigt. Denne procedure aktiverer Bootloader indstillingen. 5)Vælg ‘Master’ for den første AMS-8 enhed i systemet. Vælge det tilhørende nummer af rack i ”Master” rack enheden, fx.: ”Nr. Af rack: 10”. 6) Hvert tilføjet rack vil blive en “slave” af rack med nummer der starter med 2, 3, 4, 5 .... op til 10. 7)Bemærk ‘live-mask’ indikationen i bunden af det grafiske display. Dette indikerer nummeret af AMS-8 systemet som er installeret og tilsluttet. Denne ”live-mask” er vist som: ”Rack: 00000011 11111111”, som viser 10 installeret AMS-8 systemer. 8)Når alle slave enhederne er registreret, vælg ”Finish” på master racket. Dette vil (midligertidigt) opsætte bootloader konfigruationen. 9) Tilslut din computer til master racket og start Bootloader multi installer softwaren. 10) Upload den (nyeste) firmware i AMS-8 enhederne. 11) Vent intil opload og re-opload af alle enhederne er afsluttet. 12)Sæt det første (øverste) rack til “Rack-1 Mst” (master) igen og indtast antallet af slaver (hvis nødvendigt gentag trin 4 igen for at gøre dette). 13) Sæt hvert slave rack til det rigtige slave nummer (”Rack-2” eller højere), se også trin 5. 14) Sluk og tænd for alle rackene (på grund af den nye gruppering af alle rackene). 15)Udfør en total fabriks indlæsning (vælg denne indstilling i installationsmenuen) på master racket og vent intil flash opdateringen er afsluttet (displayet viser: “Opdaterer flash 202”). 16) Sluk og tænd for alle rackene (for at indlæse den nye DataFlash hukommelses indstilling). 17) Opdater alle Bose EQ kurvene ved at bruge Live Installer Softwaren. 18) Opdateringen til ControlSpace AMS-8 II er nu udført. ® Anvend Live Installer Softwaren eller Graphic display + navigations knapperne til at indstille AMS-8 enheden. Tidligere gemte BDF-filer (Bose Data Files) kan ikke genindlæses i AMS-8 enheden (på grund af den nye DataFlash hukommelses indstilling). Dog, efter at enheden er indstillet på ny, kan den ny oprettede BDF fil. Gemmes og åbnes til at blive brugt/overført i et anden ControlSpace AMS-8 II system. ® 49 6. Fejlfinding English Dansk 6. Fejlfinding Ingen strøm Sæt stikket i stikkontakten, og tænd for strømmen. Strømmen er tændt, men der er ingen lyd i nogen af zonerne Kontrollér, at der kommer et indgangssignal fra lydkilden. Kontrollér, at der er et udgangssignal. Hvis der er et indgangssignal, men intet udgangssignal, kan lyden være deaktiveret på ControlSpace , eller der kan være skruet helt ned for udgangssignalet. ® Strømmen er tændt, men lydniveauet er lavt Kontrollér, at audio-input-indikatoren er grøn. Hvis den er slukket, skal du skrue op for udgangen på lydkilden eller indgangssignalets lydstyrke. Hvis audio-input-indikatoren er grøn, og lydud-gangssignalet er grønt, skal du kontrollere, om lydstyrken på forstærkeren er høj nok og kontrollere udgangssignalet. Lyden er forvrænget Hvis line-inputsignalet er rent, når det går ind i CS AMS-8-systemet, skal du kontrollere, at højttalerne ikke presses for hårdt, og at de ikke er beskadigede. Unaturlig støj Kontrollér, at signalvejen anvender den korrekte højttaler-EQ eller crossover. Vær sikker på at, input signalet ikke forvrænger/er for højt. Strømmen er tændt, men der er ingen lyd i 1 eller flere zoner Kontrollér alle tilslutninger på CS AMS-8-system rack’et. Kontrollér, at forstærkeren fungerer korrekt, og at lydstyrkerne er justeret til et passende niveau. Kontrollér opstartsindstillingerne og lokalernes maksimale lydstyrkeindstillinger i Live installationssoftwaren eller på AMS-8-enheden. Tjek om Event eller rum kombinations funktionerne er aktiveret. Ingen kald/”ding-dong” fra brugersoftwaren Kontrollér kablerne mellem computerens lydkort, mikrofonen og AMS-8enheden. Kontrollér computerens lydstyrkeindstillinger. Kontrol af/kommunikation med CS-WC/CS-PP er ikke mulig Kontrollér kablerne mellem CS-WC/CS-PP og AMS-8-enheden. Status for det vægmonterede betjeningspanel vises i menuen for lokale indstillinger på AMS-8-enheden. Hvis displayet viser ‘WC-’, er der ingen kommunikation med det pågældende vægmonterede betjeningspanel. Kontrollér også adressen på det vægmonterede betjeningspanel, og sørg for, at adressen på det vægmonterede betjeningspanel er indstillet på nummeret på det lokale, det skal anvendes i. 50 Ingen kommunikation/ styring mellem computeren og AMS-8systemrack’et ved brug af installationssoftwaren Tjek Ethernet kablet. Kontroller i installationssoftwaren, at INETGui ikon forbindelsen viser at systemet er online. Intet signal fra et mono instillet Lokal Input Modul LIM Sikre at audio kablet er forbundet til venstre output på CS-LIM. Lydstyrken falder på udgangen når en lydkilde med kraftigt output spiller Sikre at input gain er justeret til 0db. Et konstant 3db input signal vil mute inputsignalet. F.eks. for en CD-afspiller med et output på +6db, skal input gain reduceres med minimum 3db. (6db anbefales) Led indicator på opkaldspanel CS-PP blinker rødt og grønt Indikerer en kommunikationsfejl. Check kablet mellem AMS-8 og opkaldspanelet. Sikre at der er benyttet jumper på det det sidste opkaldspanel CS-PP. Ingen opkald fra opkaldspanel Check forbindelsen mellem AMS-8 og CS-PP. Check opsætningen i Live Installer Softwaren eller på AMS-8 enheden. (ved at benytte LCD og navigations knapperne på fronten). 7. Tekniske specifikationer 7. Tekniske specifikationer Dansk Indgange: Type: 8 stk. (op til 16) analoge ubalancerede og elektronisk balancerede line-indgange Stik: RCA og klemrække med 3 skrueterminaler Indgangsfølsomhed: -30 dBu til +14 dBu Impedans: 50 K Ohm Indgangsniveaubegrænsning: +14 dBU Digital opløsning: 24 bit Udgange: Type: 8 stk. analoge ubalancerede og elektronisk balancerede line-udgange Stik: RCA og klemrække med 3 skrueterminaler Impedans: 150 ohm Maksimalt udgangsignal: 18 dBu balanceret, 12 dBu ubalanceret Bas-/diskantkontrol: +/-12 dBu i intervaller på 1 dB Digital opløsning: 24 bit Signalbehandling: Type: 48-bit floating point, digitale signalprocessorer Samplingshastighed: 96 kHz Latens: <1 ms Forsinkelse: 10 ms i intervaller på 0,05 ms Frekvenskurve: 20 Hz til 20 kHz (+0 dB,-0,3 dB) THD: <0,007 % (A-vægtet, 0 dBu ind/0 dBU ud) Kanaladskillelse >103 dB ved 1 kHz, 0 dBu Signal/støjforhold: >100 dB, A-vægtet, THD <0,02 %, balanceret ind/ud >100 dB, A-vægtet, THD <0,02 %, ubalanceret ind/ud 110dB, A-vægtet, THD <0,02 %, analog ind/ digital ud 140dB, A-vægtet, THD <0,02 %, digital ind/ud Elektriske data: Strømforsyning Effektforbrug Mål (H x B x D i mm) Vægt CS AMS-8 90-264 volt AC (47-63 Hz) Maks. 37 watt 88 x 485 x 285 4,5 kg CS-WC 12-24 volt DC Maks. 0,7 watt 80 x 115 x 48 0,12 kg CS-LIM 24 volt DC Maks. 1,5 watt 80 x 115 x 48 0,12 kg CS-PP 12-24 volt DC Maks. 1,7 watt 43 x 210 x 212 1,5 kg Miljømæssige forhold: Driftstemperatur: 0 ˚C til +50 ˚C Luftfugtighed: 80 % relativ luftfugtighed (ikke-kondenserende) 51 ANNEX A. ControlSpace AMS-8 system eksempler ® ANNEX A. ControlSpace AMS-8 system eksempler ® ControlSpace AMS-8 system med 80 zoner ® English Dansk SCI HUB 52 ANNEX A. ControlSpace AMS-8 system examples ® ANNEX A. ControlSpace AMS-8 system examples ® ControlSpace AMS-8 system med flere opkaldspaneler ® Dansk eller ControlSpace AMS-8 system med flere vægpaneler i ét rum ® Zone 1 Zone 5 Zone 6 Zone 2 Zone 7 Zone 3 Zone 4 Zone 8 53 ANNEX B. Bruger enheds monterings instruktion ANNEX B. Bruger enheds monterings instruktion Indmuringsdåse Indmuringsdåsen kan bruges til at montere ControlSpace AMS-8 vægpanelet og ControlSpace AMS-8 lokal input modulet i. Dimensions (HxWxD): 7,1 x 10,6 x 5,2 cm English Dansk ® Vægmonteringsdåse Vægmonteringsdåsen kan bruges til at montere ControlSpace AMS-8 vægpanelet og ControlSpace AMS-8 lokal input modulet i. Dimensions (HxWxD): 8,0 x 11,4 x 4,6 cm ® Indvendig dåse til gipsvægge. Indvendig dåsen til hulmurs eller gipsvægge, kan bruges til at montere ControlSpace AMS-8 vægpanelet og ControlSpace AMS-8 lokal input modulet i. Dimensions (HxWxD): 6,6 x 12,4 x 5,2 cm ® Opkaldspanel Brug disse mål til at montere opkaldspanelet i et bord eller væg. Monter et separat XLR stil (Hun) tæt på panelet dette tilsluttes til mikrofonen tilslutningen inde i opkaldspanelet. For at undgå kortslutninger skal strømmen afbrydes før panelet monteres. 54 Dansk 55 Europæiske salgskontorer English Dansk Sådan kontakter du et salgskontor i Europa: Østrig Professional Systems Division, Austria Bose Ges.m.b.H., Business Park Vienna Wienerbergstrasse 7, 10 O.G. 1100 Wien, Österreich Telefon: +43 (0)1-60404340 Fax: +43 (0)1-604043423 Holland Professional Systems Division, The Netherlands Bose B.V., Nijverheidstraat 8 1135 GE Edam, Nederland Telefon: +31 (0)299-390139 Fax: +31 (0)299-390109 E-mail: [email protected] Belgien Professional Systems Division, Belgium Bose N.V., Limesweg 2 3700 Tongeren, België Telefon: +32 (0)12-390800 Fax: +32 (0)12-390840 Norge Professional Systems Division, Norway Bose Filial till Bose A/S Danmark, Lerkev 58 2209 Kongsvinger, Norge Telefon: +47 (0)62-821560 Fax: +57 (0)62-821569 Danmark Professional Systems Division, Denmark Bose Danmark A/S, Industrivej 7 PO Box 14, 2605 Brøndby, Danmark Telefon: +45 43437777 Fax: +45 43437818 Schweiz Professional Systems Division, Switzerland Bose AG, Hauptstrasse 134 4450 Sissach, Sweiz Telefon: +41 (0)61-9757733 Fax: +41 (0)61-9757744 Frankrig Professional Systems Division, France Bose S.A., 12 rue de Témara 78100 Saint Germain en Laye, France Telefon: +33 (0)1-30616363 Fax: +33 (0)1-30616388 Spanien Gaplasa S.A. Avda. Ingeniero Conde de Torroja 25 28022 Madrid, España Telefon: +34 91 748 29 60 Fax: +34 91 329 16 75 E-mail: [email protected] Tyskland Professional Systems Division, Germany Bose GmbH, Max-Planck-Straße 36, 61381 Friedrichsdorf, Deutschland Telefon: +49 (0)6172-7104-0 Fax: +49 (0)6172-7104-19 Websted: www.bose.de Irland Professional Systems Division, Ireland Bose GP, Castleblayney Road Carrickmacross, County Monaghan Republic Of Ireland Telefon: +353 (0)42-9661988 Fax: +353 (0)42-9661998 Italien Professional Systems Division, Italy Bose SpA, Via della Magliana 876 00148 Roma, Italia Telefon: +39 (0)66-5670802, Fax: +39 (0)66-5680177 E-mail: [email protected] 56 Sverige Professional Systems Division, Sweden Bose, filial till Bose A/S Danmark Johannefredsgatan 4, 43153 Mölndal, Sverige Telefon: +46 (0)31-878850 Fax: +46 (0)31-274891 Storbritannien Professional Systems Division, United Kingdom Bose Ltd., 1 Ambley Green Gillingham Business Park Gillingham, Kent ME8 0NJ, England Telefon: +44 (0)870-741-4500 Fax: +44 (0)870-741-4545 E-mail: [email protected] Websted: www.bose.co.uk Polen Bose Sp. z o.o. Galeria Mokotów ul. Wołoska 12 02-675 Warszawa Telefon: (22) 852 2928 Fax: (22) 852 2927 E-mail: [email protected] Websted: www.bose.pl Der Hersteller behält sich das Recht zur Änderung der technischen Daten vor. Unangekündigte Änderung der in diesem Handbuch enthaltenen Informationen vorbehalten. Inhalt 1. Sicherheitsinformationen Wichtige Sicherheitshinweise 60 Konformitätserklärung 62 2. Einleitung 63 3.1 Das Frontpanel des ControlSpace AMS-8 64 3.2 Die Rückseite des ControlSpace AMS-8 65 3.3 Konfiguration des Wandbedienfeldes 66 3.4 Anschluss der Benutzerschnittstellen 67 3.5Systemkonfigurationen 68 3.6 Anschluss des Wandbedienfeldes 71 3.7 Anschluss des Lokalen Eingangsmoduls 71 3.8 Anschluss der Sprechstelle 72 3.9 Allzweckeingänge und -ausgänge 73 3.10 Anschluss der Audioein- und Audioausgänge 74 ® ® 4. Optionale Systemkomponenten 75 5. Upgrade zu einem ControlSpace AMS-8 II System 77 6. Fehlerbeseitigung 78 7. Technische Spezifikationen 79 Annhang A ControlSpace AMS-8 System Beispiele 80 Annhang B User Interface Installationshinweise 82 Vertriebsniederlassungen in Europa 84 ® ® Deutsch 3. Installation des Systems 1. Sicherheitsinformationen 1. Wichtige Sicherheitshinweise Warnhinweise auf dem Produkt Auf der Rückseite des Produktes sind die folgenden WARNHINWEISE angebracht. Das Blitzsymbol weist den Benutzer auf eine nicht isolierte, gefährliche elektrische Spannung innerhalb des Systemgehäuses hin. Es besteht die Gefahr von Stromschlägen. Deutsch Das Ausrufezeichen macht den Benutzer auf wichtige Bedienungs- und Wartungsanweisungen in diesem Installationshandbuch aufmerksam. Wichtige Sicherheitshinweise 1. Lesen Sie die folgenden Anweisungen aufmerksam durch. 2. Bewahren Sie diese Anweisungen zum späteren Nachschlagen auf. 3. Beachten Sie alle am Produkt angebrachten Warnhinweise. 4. Befolgen Sie alle Anweisungen. 5. Verwenden Sie dieses Gerät nicht in der Nähe von Wasser oder Feuchtigkeit. 6. Reinigen Sie das Gerät nur mit einem sauberen, trockenen Tuch. 7. Achten Sie darauf, dass die Lüftungsöffnungen nicht blockiert sind. Stellen Sie das Gerät nur in Übereinstimmung mit den Anweisungen des Herstellers auf. Um den zuverlässigen Betrieb des Produktes sicherzustellen und es vor Überhitzung zu schützen, platzieren Sie das Produkt an einem Ort und in einer Position, die die ordnungsgemäße Belüftung des Gerätes nicht behindern. 8. Stellen Sie das Gerät nicht in der Nähe von Wärmequellen wie z. B. Heizkörpern, Wärmespeichern, Öfen oder anderen Geräten (auch Verstärkern) auf. 9. Beeinträchtigen Sie in keiner Weise die Schutzfunktion des Schutzkontaktsteckers. Ein gepolter Stecker hat zwei Stromkontakte, von denen einer breiter ist als der andere. Ein Schutzkontaktstecker hat zwei Stromkontakte und einen dritten Erdungskontakt. Der breitere Stromkontakt oder der dritte Kontakt dienen der Sicherheit. Falls der mitgelieferte Stecker nicht in Ihre Steckdose passt, wenden Sie sich an einen qualifizierten Elektriker, um die Steckdose auszutauschen. 10. Verlegen Sie das Netzkabel so, dass keine Stolpergefahr besteht und das Kabel nicht beschädigt werden kann – insbesondere im Bereich von Steckern und Steckdosen. 11. Verwenden Sie nur Zubehör- und Anbauteile, die vom Hersteller zugelassen sind. 12. Verwenden Sie für das Gerät nur Rollwagen, Ständer, Stative, Halterungen oder Tische, die vom Hersteller zugelassen sind oder zusammen mit dem Gerät verkauft werden. Falls Sie einen Rollwagen verwenden, dürfen Sie den Rollwagen mit dem Gerät nur mit Vorsicht bewegen, um Verletzungen durch Umkippen auszuschließen. 13. Z iehen Sie das Netzkabel bei Gewitter oder bei längerer Nichtbenutzung des Gerätes aus der Steckdose, um Schäden am Produkt zu vermeiden. 14. Wenden Sie sich bei allen Reparatur- und Wartungsarbeiten nur an qualifiziertes Kundendienstpersonal. Wartungsarbeiten sind in den folgenden Fällen nötig: Bei jeglichen Beschädigungen beispielsweise am Netzkabel oder Netzstecker; wenn Flüssigkeiten oder Gegenstände in das Gehäuse gelangt sind; wenn das Gerät Regen oder Feuchtigkeit ausgesetzt war, fallen gelassen wurde oder nicht ordnungsgemäß funktioniert. Versuchen Sie nicht, Reparatur- und Wartungsarbeiten am Produkt selbst durchzuführen. Durch Öffnen oder Entfernung der Geräteabdeckungen setzen Sie sich womöglich gefährlichen elektrischen Spannungen oder anderen Gefahren aus. Bitte erkundigen Sie sich bei Bose nach einem autorisierten Service-Center in Ihrer Nähe. 60 1. Sicherheitsinformationen 15. Vermeiden Sie Gefahren durch Brände oder elektrische Schläge, indem Sie Steckdosen, Verlängerungskabel und integrierte Gerätesteckdosen nicht überlasten. 16. Lassen Sie keine Flüssigkeiten oder Gegenstände in das Gehäuse gelangen – diese können unter gefährliche elektrische Spannung gesetzt werden oder Bauteile kurzschließen und Brände oder Stromschläge auslösen. 17. Beachten Sie die Sicherheitshinweise auf dem Gehäuse. 18. Stellen Sie keine brennenden Kerzen und kein offenes Licht auf das Gerät. WARNUNG: Um Bränden oder elektrischen Schlägen vorzubeugen, dürfen Sie das ControlSpace AMS-8 weder Regen noch Feuchtigkeit aussetzen. ® Deutsch WARNUNG: Schützen Sie das Gerät vor tropfenden oder spritzenden Flüssigkeiten, und stellen Sie keine mit Flüssigkeiten gefüllten Gefäße wie z. B. Blumenvasen auf das Gerät. Achten Sie wie bei allen elektronischen Geräten darauf, dass keine Flüssigkeiten in das System gelangen, da es sonst zu Geräteausfällen und/oder zur Entstehung von Bränden kommen kann. Informationen über Produkte, die elektrische Störgeräusche erzeugen Dieses Gerät wurde getestet und hält die Grenzwerte für digitale Geräte der Klasse A gemäß Abschnitt 15 der FCC-Richtlinien ein. Diese Grenzwerte sollen einen angemessenen Schutz gegen elektromagnetische Störungen bei einer Installation in Wohnbereichen bieten. Das Gerät erzeugt und verwendet Hochfrequenzstrahlung und kann sie auch aussenden, daher kann es bei nicht ordnungsgemäßer Installation und Benutzung zu Störungen des Funkverkehrs kommen. Es wird jedoch keine Garantie dafür gegeben, dass bei einer bestimmungsgemäßen Installation keine Störstrahlungen auftreten. Sollte dieses Gerät den Radio- oder Fernsehempfang stören (Sie können dies überprüfen, indem Sie das Gerät aus- und wieder einschalten), so ist der Benutzer dazu angehalten, die Störungen durch eine der folgenden Maßnahmen zu beheben: • Richten Sie die Empfangsantenne anders aus, oder stellen Sie die Antenne an einem anderen Ort auf. • Vergrößern Sie den Abstand zwischen diesem Gerät und dem Radio- oder Fernsehempfänger. • Schließen Sie dieses Gerät an eine Steckdose an, die nicht mit dem Stromkreis des Radio- oder Fernsehempfängers verbunden ist. • Wenden Sie sich an Ihren Händler oder einen erfahrenen Radio- und/oder Fernsehtechniker. Hinweis: Nicht autorisierte Veränderungen können zur Folge haben, dass die Betriebserlaubnis für dieses Gerät erlischt. Dieses Produkt entspricht den genannten Spezifikationen. Die Informationen in diesem Installationshandbuch sind in Bezug auf das Design, die Produktion und mögliche Veränderungen an diesem Gerät nicht vollständig. Auch wird in diesem Handbuch nicht jede Situation oder Fragestellung behandelt, die sich während der Installation, Benutzung oder Wartung ergeben könnte. Wenn Sie Informationen benötigen, die Sie in diesem Handbuch nicht finden, wenden Sie sich bitte an eine unserer europäischen Vertriebsniederlassungen. Ein Verzeichnis finden Sie auf der letzten Seite. 61 1. Sicherheitsinformationen Konformitätserklärung Der Hersteller dieses Audio-Signalprozessors erklärt hiermit, dass dieses Produkt einschließlich seines Zubehörs den folgenden Bestimmungen entspricht: • EMC-Richtlinie 89/336/EWG (Elektromagnetische Kompatibilität) • EN-55103-1 • EN-55103-2 • Niederspannungs-Richtlinie 73/23/EWG Deutsch • EN-60065: 2002, 7. Ausgabe Rack-Montage: Der Audio-Signalprozessor benötigt zwei Rackeinheiten à jeweils 4,4 cm (1,75”) mit jeweils 32,5 cm (12,8”) Innentiefe. Verwenden Sie für die Montage vier Schrauben mit Unterlegscheiben, um eine Beschädigung des Frontpanels zu vermeiden. Besonders zu empfehlen sind Unterlegscheiben aus Neoprengummi, da die Schraubenköpfe hierin einen sicheren Halt finden und sich nicht durch Vibrationen oder Transportbewegungen lösen. Achtung: Wird das Rack mit montierter CS AMS-8 transportiert, muss die Rückseite des Prozessors mechanisch gestützt werden. Zu diesem Zweck können Sie ein Brett quer über die Rückseite des Prozessors anbringen oder die hinten liegende Einheit mit geeigneten Halterungen stützen. Allgemeine Vorsichtsmaßnahmen/Belüftung Achtung: Stellen Sie die Einheit an einem Ort auf, an dem sie vor Hitze geschützt ist und angemessen belüftet wird. Achten Sie darauf, dass die Einheit nicht in der Nähe von Wärmequellen (z.B. Heizkörpern) aufgestellt wird. Stellen Sie eine ungehinderte Luftzirkulation hinter, neben und über der Einheit sicher. Falls die Einheit unter oder über einem Verstärker aufgestellt wird, achten Sie darauf, dass sich zwischen den beiden Geräten ein als einzelne Einheit ausgeführtes Luftleitblech befindet. Stellen Sie sicher, dass das Chassis die maximale Betriebstemperatur von 50ºC nicht überschreitet. Bitte beachten Sie, dass die Temperatur in einem eingebauten Rack über die Raumtemperatur steigen kann. Achtung: Achten Sie darauf, dass alle Kabeladern sorgfältig miteinander verdrillt und an den Stecker angeschlossen sind. Bereits ein einziges loses Kabel kann bei Berührung mit der benachbarten Anschlussklemme einen Kurzschluss auslösen. 62 2. Einleitung 2. Einleitung Einleitung Das Bose ControlSpace AMS-8 Audio Management System ist ein flexibler, ausbaufähiger und hochwertiger Audio-Signalprozessor für Beschallungssysteme in Restaurants, Geschäften, Gaststätten, Büros, Hotels, Versammlungs center und Sportstätten. Die Haupteinheit verfügt über 8 Line-Eingänge und 8 Line-Ausgänge. An 4 verfügbare Audio-Steckplätze können bis zu 8 weitere Audio-Eingänge angeschlossen werden (2 Eingänge pro Karte). Wenn mehrere Zonen beschallt werden sollen, können pro System bis zu 10 AMS-8 Systemracks miteinander verknüpft werden. Jedes weitere Rack erweitert das System um 8 mono Zonen. Eine breite Auswahl an Benutzerschnittstellen ermöglicht dem Endnutzer die einfache und bedienerfreundliche Steuerung seines ControlSpace AMS-8 Systems. ® ® ® Mit Hilfe der Bose ControlSpace AMS-8 Online Installationssoftware werden die Anlagen konzipiert und die AMS8- sowie die Benutzerschnittstellen konfiguriert. Die Software läuft auf einem Windows-PC und kommuniziert mit dem AMS-8 System per Ethernet (TCP/IP). ® ® Deutsch Eigenschaften und Funktionen • Erweiterbare und flexible Cardframe-Architektur • 8 (bis zu 16) analoge Line-Level-Eingangskanäle • Wandbedienfeld-Funktion (Infrarot-Fernbedienung optional erhältlich) • 8 analoge Line-Level-Ausgangskanäle • Funktion lokales Eingangsmodul • GPIO: 8 Kontakteingänge zum Aktivieren von Messages, Presets oder Mute, und einen Kontaktausgang. • Funktion Sprechstelle • Messaging (eine optionale Message Card wird benötigt) • Design, Konfiguration und Systemsteuerung über PC-basierte Softwareprogramme • Tuner (eine optionale Tuner Card wird benötigt) • Digitale Signalverarbeitung mit: Bose Speaker EQs, Dynamic EQ, Delay, Verstärkungsregelung und Klangquellenwahl. • Automatische Erkennung der Eingangskarten • LCD-Bildschirm und Navigations-Tasten • Event Funktionen und zeitabhängige Steuerungen • Room Combining Funktionen Schnellstart • Schließen Sie die Audioeingänge und Audioausgänge an das ControlSpace AMS-8 System an. (Bei Verwendung von zwei oder mehr Systemracks: schließen Sie die zwei Racks unter Verwendung von AudioLink-Karte, Audio-Link-Kabeln und dem High Speed RS485 Rack Link siehe Kapitel 3.5 an). ® • Schalten Sie das ControlSpace AMS-8 System ein. Aufgrund der werksseitigen Standardeinstellungen ist das System nun in Betrieb. Nach jedem Einschalten des ControlSpace Systems werden die Standardeinstellungen wieder aufgerufen. Die Wiedergabe über das System erfolgt daher von der Standard-Klangquelle und in der Standard-Lautstärke entsprechend der Programmierung im Installationsmenü. ® ® Hinweis: Das Update des ControlSpace AMS-8 II Systems ist im Kapitel 5 beschrieben ® Abkürzungen CS-WCControlSpace AMS-8 Wall Controller (Wandbedienfeld) CS-PPControlSpace AMS-8 Paging Panel (Sprechstelle) CS-LIMControlSpace AMS-8 Local Input Module (lokales Eingangsmodul) CS-RCControlSpace AMS-8 Remote Control (Fernbedienung) CS-TIC ControlSpace AMS-8 Twin Input Card (Dual-Eingangskarte) CS-TOCControlSpace AMS-8 Twin Output Card (DualAusgangskarte) ® ® ® ® ® ® CS-ECControlSpace AMS-8 Ethernet Card (Ethernet-Karte) CS-MSCControlSpace AMS-8 Message Storage Card (Ansagen-Speicherkarte) CS-DICControlSpace AMS-8 Digital Input Card CS-TTCControlSpace AMS-8 Twin Tuner Card CS-HUBControlSpace AMS-8 RS485 Hub CS-SCIControlSpace AMS-8 Serial Code Interface ® ® ® ® ® ® 63 3. Installation des Systems 3.1 Das Frontpanel des ControlSpace AMS-8 ® 1 2 1. LCD-ANZEIGE Auf der LCD-Anzeige erscheinen die Steuerungsmenüs und die möglichen Einstellungen für jeden Menüpunkt. Deutsch 2 . NAVIGATIONSTASTEN Mit den ‘Aufwärts-’ und ‘Abwärts-’Tasten können Sie durch die Menüpunkte scrollen, während mit Hilfe der ‘Links-’ und ‘Rechts-’Tasten die Werte des ausgewählten Menüpunktes verändert werden können. Mit der ‘OK’-Taste wird die aktuelle Auswahl bestätigt. Wird z. B. der Menüpunkt ‘Exit’ markiert, kehrt die Anzeige nach Betätigung der ‘OK’-Taste zur zuletzt angezeigten Menüebene zurück. 64 3. Installation des Systems 3.2 Die Rückseite des ControlSpace AMS-8 ® 5 3 7 9 11 15 13 1 4 5 3 7 5 9 4 5 3 8 1 8 7 Serial Number: Rack Link 2 1 PC Link ! Rack Link 1 1 CAUTION RISK OF ELECTRIC SHOCK DO NOT OPEN AVIS: Risque de chock électrique, ne pas ouvrir System Rack MODEL: 2 6 8 10 12 14 16 4 2 13 6 Audio Link Source Inputs 1 6 4 2 3 4 5 Deutsch 2 Slot fürLink Audio-Link-Karte Audio Card slot CSCSTIC TIC Slotfür for Audio Link Card to link theum connected Slot Audio-Link-Karte, zwei ControlSpace AMS-8 analog sources between Controlspace AMS-8 Audio Management Systeme zu verbinden. Es wird nur im Audio Managment Systems. Master-Rack eine Audio-Link-Karte benötigt. Um vier Zonen zu verlinken, benötigen Sie zusätzlich einen Audio-LinkKabelsatz. RS-232 & GPIO card 9 11 4 1 5 3 7 5 4 5 3 8 1 8 7 Bose Corporation, Framingham, MA01701-9168 Made in The Netherlands 2 4 9 Euroblock-Stecker 3-polig 3-pin Input Euro Blok Connector (Balanced line level) (Symmetrisch Line-Level) Serial Number: Euroblock-Stecker 3-polig 3-pin Input Euro Blok Connector (Balanced line level) (Symmetrisch Line-Level) 15 13 2 6 Rack Link 2 7 9 12 6 8 10 12 14 16 13 9 4 2 6 16 Audio Link Source Inputs Chinch-Stecker RCA Input Connector (Unbalanced line level) (Asymmetrisch Line-Level) Line Outputs 5 9 4 5 9 8 3 3 7 7 2 6 2 3 Dual-Ausgangskarte Line outputs (1-8) (1-8) 6 1 CSCSTOC TOC 9 RCA Input Connector Line inputs (1-16)Chinch-Stecker (Asymmetrisch level) (Unbalanced line Line-Level) 10 8 6 3 4 2 RS232 port pin out Straight shielded cable (20 meters max.) 2. TX 3. RX 5. GND DB9 Female 10 7 8 5 7 5 1 8 4 1 8 Bus 1 1 5 Bus 2 3 To CSPP/CSWC 1 PC Link ! I/O Link CAUTION RISK OF ELECTRIC SHOCK DO NOT OPEN AVIS: Risque de chock électrique, ne pas ouvrir System Rack MODEL: Rack Link 1 ® Chinch-Stecker RCA Input Connector (Unbalanced line level) (Asymmetrisch Line-Level) CSTIC 8 5 3 1 Line Outputs 2 1 Dual-Eingangskarte (1-16) Line inputs (1-16) 10 7 8 16 Bus 2 6 9 I/O Link 12 4 2 Bus 1 9 To CSPP/CSWC Bose Corporation, Framingham, MA01701-9168 Made in The Netherlands 6 Audio Link Card slot Euroblock-Stecker 3-pin Input Euro Blok3-polig Connector RCA Input line Connector (Symmetrisch Line-Level) (Balanced level) 3 4 1 2 Slot for Audio Link Card to link the connected analog sources between Controlspace AMS-8 9 10 Audio Managment Systems. (Unbalanced line level) Euroblock-Stecker 3-pin Input Euro Blok3-polig Connector (Symmetrisch Line-Level) 3-pin Inputline Euro Blok Connector (Balanced level) (Balanced line level) Chinch-Stecker RCA Input Connector (Asymmetrisch Line-Level) 3-pin Input Euro (Unbalanced lineBlok level)Connector RS-232 & GPIO card 7 8 5 6 3 4 1 2 (Balanced line level) 5 RCA Input Connector (Unbalanced line level) 9 4 Ethernet und GPIO 4 5 9 RS-485 card 8 4 8 3 3 7 7 2 1 6 Line outputs (1-8) Pin 1: Contact 1 Pin 2: Contact 2 Pin 3: Contact 3 Pin 4: Contact 4 Pin 5: Contact 5 Pin 6: Contact 6 Pin 7: Contact 7 Pin 8: Contact 8 Pin 9: Output Pin 10: Common RS232 port pin out Straight shielded cable (20 meters max.) 2 1 6 2. TX 3. RX 5. GND Rack link 1 (high speed) CSTOC 9 7 5 Rack 2 (high speed) RCAlink Input Connector (Unbalanced line level) 3-pin&Input Euro Connector CS-WC CS-PP BusBlok 1 (low speed) (Balanced line level) DB Female Pin 1 : Kontakt 1 Pin 3 : Kontakt 3 Pin 4 : Kontakt 4 Pin 5 : Kontakt 5 8 DB9 Female 6 4 1 2 9 3-pin &Input Euro Connector CS-WC CS-PP BusBlok 2 (low speed) (Balanced line level) GPIO pinout: RCA Input Connector Pin 2 : Kontakt 2 (Unbalanced line level) 10 3 Pin 6 : Kontakt 6 Pin 7 : Kontakt 7 Pin 8 : Kontakt 8 Pin 9 : Ausgang Pin 10: Masse 10 7 8 5 6 3 4 1 2 Pin 1: Contact 1 Pin 2: Contact 2 Pin 3: Contact 3 Pin 4: Contact 4 Pin 5: Contact 5 Pin 6: Contact 6 Pin 7: Contact 7 Pin 8: Contact 8 Pin 9: Output Pin 10: Common RS-485 card 5 RS485-Karte Rack link 1 (high speed) Rack link 1 (High speed) Rack link 2 (high speed) Rack link 2 (High speed) CS-WC & CS-PP Bus 1 (low speed) Wandbedienfeld & Sprechstelle Bus 1 (Low-Speed) CS-WC & CS-PP Bus 2 (low speed) Wandbedienfeld & Sprechstelle Bus 2 (Low-Speed) 65 3. Installation des Systems 3.3 Konfigurieren des Wandbedienfeldes 1 1. LCD-ANZEIGE 2 3 2. LAUTSTÄRKE-TASTEN 3. KANALWAHL-TASTEN Bevor Sie das ControlSpace AMS-8 konfigurieren, müssen Sie jedem Wandbedienfeld jeweils eine Adresse zuweisen (1 bis 8). Dies geschieht in der Regel, wenn das Wandbedienfeld an das Systemrack angeschlossen wird, die Firmware Version wird angezeigt danach erscheint im Display. Sobald dies geschehen ist wenigen Sekunden die Aufforderung “Select WC..”. Wählen Sie mit Hilfe der Kanalwahl-Tasten die entsprechende Adresse und bestätigen Sie die getroffene Auswahl durch Betätigen der Taste “Lautstärke verringern” (-). Wenn mehrere Wallcontroller in einer Zone verwendet werden muss die gleiche Adresse eingestellt werden und die Wallcontroller müssen am gleichen Rack angeschlossen sein. Deutsch ® Die bereits bestehende Adresse eines Wandbedienfeldes kann folgendermaßen geändert werden: 1. Schalten Sie das Wandbedienfeld aus (drücken Sie die Taste ”Kanal abwärts” (-) so oft, bis das Wandbedienfeld ausgeschaltet wird) 2. Drücken Sie die Taste “Kanal abwärts” (-) und halten Sie sie gedrückt 3. Drücken Sie gleichzeitig die Tasten “Lautstärke erhöhen” (+) und “Lautstärke verringern” (-). (Nachdem das Display die Firmware Version angezeigt hat 4. Auf der LCD-Anzeige erscheint jetzt die bisherige Adresse, z. B. “WC2”. Nun können Sie mit Hilfe der Kanalwahl-Tasten die gewünschte Adresse auswählen und die getroffene Auswahl mit der Taste “Lautstärke verringern” (-) bestätigen. Umfasst das System zwei oder mehrere ControlSpace AMS-8 Racks, arbeiten alle Racks mit Adressen (1 bis 8). Beim ersten Rack werden die Adressen 1 bis 8 für die Ausgangskanäle 1 bis 8, beim zweiten Rack für die Ausgangskanäle 9 bis 16 verwendet bis zum 10. Rack mit den Ausgängen 73-80. ® Raumeinstellungen am Wandbedienfeld ändern Mit dem verborgenen Menü im Wandbedienfeld können die Audio-Einstellungen für den Raum verändert werden, in dem sich das Wandbedienfeld befindet. Zu diesem Menü gelangen Sie folgendermaßen: 1. Schalten Sie das Wandbedienfeld aus (drücken Sie die Taste ”Kanal abwärts” (-) so oft, bis das Wandbedienfeld ausgeschaltet wird). 2. Drücken Sie die Taste “Lautstärke verringern” (-) und halten Sie sie gedrückt. 3. Drücken Sie gleichzeitig die Tasten “Kanal abwärts” (+) und “Kanal abwärts” (-). Im verborgenen Menü können nun die folgenden Funktionen festgelegt oder verändert werden: a. Default-Kanal b. Basspegel d. Dynamic EQ e. Bose Speaker EQ f. Maximale Lautstärke g. Durchsagenlautstärke h. Delay c. Höhenpegel i. Default-Lautstärke Mit Hilfe der Kanalwahl-Tasten können Sie durch die Menüpunkte scrollen, während Sie mit den LautstärkeTasten die Einstellungen für den ausgewählten Menüpunkt verändern können. 66 Zum Verlassen des verborgenen Menüs drücken Sie gleichzeitig die Tasten “Kanal aufwärts” (+) und “Kanal abwärts” (-). 3. Installation des Systems 3.4 Anschlüsse der Benutzerschnittstellen ControlSpace AMS-8 Wandbedienfeld ControlSpace AMS-8 Sprechstelle ControlSpace AMS-8 lokales Eingangsmodul Spannung 12-24 VDC, +/-20% 12-24 VDC, +/-10% 24 VDC, +5%/-10% Stromstärke @ 12 V DC 50 mA typ @ 24 V DC 30 mA typ @ 12 V DC 140 mA typ @ 24 V DC 70 mA typ @ 24 VDC 60 mA typ Empfohlene Stromversorgung* BOSE CS AMS-8 BOSE CS AMS-8 24V DC, 2,7 A stabilisierte 24 V DC, 2,7 A Stromversorgung stabilisierte Stromversorgung BOSE CS AMS-8 24 V DC, 2,7 A stabilisierte Stromversorgung Max. Entfernung (/mit Hub) 600 m (1200m) 600 m (1200m) Nicht anwendbar Abschlusswiderstand*** 120 Ohm 120 Ohm Nicht anwendbar Kabeltyp 1 Paar, verdrillt und abgeschirmt 1 Paar, verdrillt und abgeschirmt Nicht anwendbar Nennkap. 40 pF/m Nennkap. 40 pF/m Nicht anwendbar Nennimp. 124 Ohm Nennimp. 124 Ohm Nicht anwendbar Nom. Dämpfung 2 dB @ 1MHz Nom. Dämpfung 2 dB @ 1MHz Nicht anwendbar Empfohlenes Kabel BOSE CS AMS-8 Kommunikations-/ Stromkabel (blau) für CS-WC/CS-PP BOSE CS AMS-8 Kommunikations-/ Stromkabel (blau) für CS-WC/CS-PP Nicht anwendbar Audio-Kabel Nicht anwendbar Standard-Mic-/Line-Kabel, Bose CS AMS-8 Audio-/ 1 Paar mit Abschirmung Stromkabel (gelb) für CS-LIM ® ® ® Stromversorgung Deutsch RS485-Verkabelung** * Hinweis: Falls nicht die oben genannte Stromversorgung verwendet wird, muss in Europa jede andere verwendete Stromversorgung der Richtlinie EN/IEC 60950 entsprechen. ** Benötigte RS485-Verkabelung Schließen Sie die Komponenten stets in einer Daisy-Chain-Konfiguration an (und nicht in einer Stern- oder einer anderen Konfiguration). Eine sternförmige Verkabelung ist nur mit dem CS-Hub zulässig. Achten Sie darauf, dass das Datenkabel in der Kabelrinne oder einer anderen Kabelführung in jedem Fall von den Stromkabeln (>50 V) getrennt ist *** Abschlusswiderstand Der Jumper für den Abschlusswiderstand sollte an der letzten Benutzerschnittstelle (CS-WC oder CS-PP) angebracht werden, die sich am Ende jeder RS485-Kommunikationsleitung befindet. 4 5 Kabel für Anschluss CS-WC/CS-PP 1 2 Kabel für Anschluss CS-LIM 1. Blau = RS485 Kommunikation ‘+’ 1. Gelb = symmetrisches Line-Kabel (abgeschirmt) 2. Hell = RS485 Kommunikation ‘–’ 6 3 3. Drain-Wire = RS485 Kommunikation ‘GND’ 5 4. Rot = Strom ‘24 V DC’ 3. Rot = Strom ‘24 V DC’ 5. Schwarz = Strom ‘Erde’ 4. Schwarz = Strom ‘Erde’ 6. Blaue Ummantelung 1 2 2. Grün = symmetrisches Line-Kabel (abgeschirmt) 3 4 5. Gelbe Ummantelung 67 3. Installation des Systems 3.5 Systemkonfigurationen Zwei RS485-Kommunikationsleitungen und eine zentrale Stromversorgung: Max. 600 m (Gesamtlänge) Audio-/Mikrofonkabel * RS-485 RS-485 Audio-/Mikrofonkabel Deutsch Stromversorgung 24VDC 2-7A * DC 24 V Eingang Zwei RS485-Kommunikationsleitungen und lokale Stromversorgungen: Max. 600 m (Gesamtlänge) Audio-/Mikrofonkabel PSU * RS-485 PSU RS-485 * PSU RS485-Kommunikationsleitung Maximalentfernung: 600 m 600 m Oder: 600 m 600 m RS485 HUB 600 m HINWEIS: * Der Jumper für den Abschlusswiderstand sollte an der letzten Benutzerschnittstelle (CS-WC oder CS-PP) angebracht werden, die sich am Ende jeder RS485-Kommunikationsleitung befindet. 68 3. Installation des Systems Das ControlSpace AMS 8 System auf 80 Zonen erweitern (mit zusätzlichen AMS 8 Racks) ® Zur Erweiterung ist eine optionale Audio-Link-Karte notwendig. Die Anzahl der benötigten Audio-Link-Kabelsets hängt von der Anzahl der angeschlossenen Quellen ab (inkl. Sprechstelle und interne Tunerkarten). Für vier analogue Quellen wird ein Audio-Link-Kabelset benötigt. Um die beiden Systeme über Rack Link 1 oder 2 miteinander zu verbinden, verwenden Sie bitte ein Datenkabel (2 Adern + Schirm). Von Rack zu jedem weiteren Rack wird eine Verbindung (2 Adern + Schirm) zur Kommunikation benötigt. Bitte beachten Sie das am ersten und am letzten Rack der Abschlußwiderstand auf der RS485 Karte gesetzt ist. Deutsch Hinweis 1: Um die digitalen Signale von einem Rack zum nächsten zu verbinden wird eine Digital Input Karte benötigt. Hinweis 2: Nur ein AMS-8 Master darf in einem IP-Netzwerk verwendet werden. Virtuelle Netzwerke oder VLAN-Konfigurationen sind nicht zulässig. Verwenden Sie das Menue “Rack Installation” um die Master/Slave Einstellungen vorzunehmen: 69 English 3. Installation des Systems Rack 1 (Master) ! CAUTION RISK OF ELECTRIC SHOCK DO NOT OPEN AVIS: Risque de chock électrique, ne pas ouvrir System Rack MODEL: Serial Number: Bose Corporation, Framingham, MA01701-9168 Made in The Netherlands 9 1 4 4 3 2 1 1 1 3 2 5 6 6 6 6 10 7 8 5 6 3 4 1 2 7 8 2 1 1 3 1 Rack 2 (Slave) ! CAUTION RISK OF ELECTRIC SHOCK DO NOT OPEN AVIS: Risque de chock électrique, ne pas ouvrir System Rack MODEL: Serial Number: Bose Corporation, Framingham, MA01701-9168 Made in The Netherlands 9 1 1 4 1 4 1 1 1 1 4 4 5 6 6 6 6 10 7 8 5 6 3 4 1 2 7 8 1 3 2 2 2 1 1 2 1 1 3 Rack 10 (Slave) CAUTION RISK OF ELECTRIC SHOCK DO NOT OPEN ! AVIS: Risque de chock électrique, ne pas ouvrir System Rack MODEL: Serial Number: Bose Corporation, Framingham, MA01701-9168 Made in The Netherlands 9 3 3 3 3 3 1 1 1 5 6 6 6 6 1 Digital coax cable (75 Ohm) 2 CS-AMS-8 Link cable 1 3 RS485 communication cable (120 Ohm - 200m Max) 3 Digital Input Card 10 7 8 5 6 3 4 1 2 7 8 Twin Input Card 2 Message Storage Card 4 Twin Tuner Card 5 Audio Link Card 6 Twin Output Card 7 PC Link - I/O Link 8 RS485 Communication (High/Low speed) 70 3. Installation des Systems 3.6 Anschlüsse Wandbedienfeld und Einstellungen (CS-WC) 1 2 3 4 Deutsch 1. Jumper für Abschlusswiderstand, siehe HINWEIS in Abschnitt 3.5 2.RS485-Anschluss 3.Stromanschluss (12-24Vdc) 4.Firmware Update Anschluß 3.7 Anschlüsse Lokales und Einstellungen Eingangsmoduls (CS-LIM) 2 5 4 3 1 1.Das lokale Eingangsmodul (CS-LIM) ist mit einem Verstärkungsregler für ein Mikrofon ausgestattet, diese Pegelstellen sind auch von vorne mit einem Schraubendreher der Größe 1 erreichbar. Drehen gegen den Uhrzeigersinn (von vorne gesehen) verringert die Verstärkung auf ein Minimum von 32 dB. Drehen im Uhrzeigersinn erhöht den Ausgangspegel auf max. 66 dB. Die werksseitig eingestellte Verstärkung beträgt 38 dB. 2.Um das Lokale Eingangsmodul von Stereo auf Mono umzuschalten, muss dieser Jumper eingestellt werden. In mono konfiguration sollte die audio kabel an den linken ausgang verbunden werden. 3. Um Voice-EQ für den Mikrofoneingang zu aktivieren (optimierter EQ für Sprache), muss der Jumper von FLAT auf VOICE gesteckt werden. voice = Flat response flat voice = Voice EQ flat 4.Stereo, symmetrischer Output-Line-Anschluss. 5.Stromanschluss (24Vdc). Hinweis: Siehe Anhang B für weitere Montagehinweise 71 3. Installation des Systems 3.8 Anschlüsse der Sprechstelle (CS-PP) 3 7 2 7 1 6 Deutsch 4 5 8 Die Sprechstelle (CS-PP) ist mit Sprach EQ, einem Verstärkungsregler für ein Mikrofon sowie mit einem Verstär kungsregler für ein Tonsignal (Chime) ausgestattet. Um beide Verstärkungsregler einstellen und die Sprechstelle anschließen zu können, muss zunächst die Kunststoffeinlage (oben auf der Frontverkleidung der Sprechstelle) abgenommen werden. Entfernen Sie anschließend die vier Schrauben und heben Sie die Frontverkleidung aus dem Gehäuse heraus. Die beiden Regler befinden sich im unteren Bereich des Panels. Hinweis: Bitte beachten Sie den korrekten Anschluß speziell bei der Spannungsversorgung. 1. Verstärkungsregler für Mikrofon: durch Drehen des Reglers gegen den Uhrzeigersinn verringern Sie die Verstärkung bis auf ein Minimum von 32,6 dB. Wird der Regler im Uhrzeigersinn gedreht, kann die Verstärkung bis zu einem Maximum von 60,1 dB erhöht werden. Die werksseitig eingestellte Verstärkung beträgt 38 dB. 2. Verstärkungsregler für Tonsignal (Chime): den Ausgangspegel des Tonsignals können Sie mit Hilfe des Reglers erhöhen oder verringern. 3. Jumper für Abschlusswiderstand, siehe HINWEIS in Abschnitt 3.5. 4. RS485-Anschluss. 5. Stromanschluss, 12-24Vdc (nur 2 der 3 Anschlüsse werden benötigt 6. Symmetrischer Line-Output-Anschluss. 7. Firmware Update Anschluß 8. XLR-Anschluß für ein Mikrofon mit Phantomspeisung (22V) 72 3. Installation des Systems 3.9 Allzweck-Eingänge/-Ausgänge (GPIO) ControlSpace AMS-8 enthält eine RS232-Kontaktanschluss-Karte (siehe auch Abschnitt 3.2). Bis zu 40 Kontakteingänge können verwendet werden (8 pro Rack, max. 5 Racks). Es können folgende Funktionen gesteuert werden: 40 Messages, 40 Presets, Raum Standby Funktionen. Der Auslöseimpuls für die Kontakte entsteht dadurch, dass 24 V DC zwischen dem spezifischen Kontakt und dem gemeinsamen Erdungspol (Ground Pin) angelegt werden. ® Hinweis: Ein Kontakteingang mit der Funktion “Pulse” gibt eine Message einmalig wieder. Bei der Funktion „Hold“ wird eine Message solange wiederholt bis der Kontakt wieder geöffnet wird. Die „Hold“ Funktion ist auch sinnvoll für Roomcombining oder Standbyfunktionen. Eigenschaften Deutsch • 8 isolierte Eingänge • 1 isolierter Ausgang • Die Eingänge können für Durchsagen, die Raumkombinationsfunktion verwendet oder einen Ausgang “muten” oder eine Gruppe von Ausgängen “muten” • Der Open-Collector-Ausgang wird aktiviert, sobald einer der acht Eingänge aktiviert wird Schaltplan der acht Eingangskontakte CS-AMS-8 CS-AMS-8 1..8 + 24 Vdc - 10 Schaltplan des Open-Collector-Ausgangs CS-AMS-8 CS-AMS-8 9 Open collector Max. 50mA + 24 Vdc - 10 73 3. Installation des Systems 3.10 Anschlüsse der Audioeingänge und -ausgänge Mit einem der folgenden Kabeltypen können Klangquellen an die symmetrischen und asymmetrischen LineEingänge und Line-Ausgänge angeschlossen werden: KlangquellenanschlussControlSpace AMS-8 Audioeingänge und -ausgänge ® RCA S T+ T S- ⊥ Deutsch + ⊥ L R XLR 1 2+ 2 + ⊥ 1 ⊥ 3 3- L R Phone-Stecker (symmetriert) T R S⊥ S + ⊥ T+ L R- R Phone-Stecker (asymmetrisch) T S + ⊥ T+ L S-⊥ R S S T T+ S- ⊥ L R 74 4. Erweiterungsoptionen 4. Optionale Systemkomponenten Der Standardumfang des ControlSpace AMS-8 umfasst: ® • 8 analoge Line-Level-Audioeingangskanäle (CS-TIC) • 8 analoge Line-Level-Audioausgangskanäle (CS-TOC) • 8 Allzweck-Steuereingänge und • 1 Allzweck-Steuerausgang • 1 Ethernet Anschluß Zur Erweiterung des ControlSpace AMS-8 Systems sind die folgenden zusätzlichen Benutzerschnittstellen, optionalen Karten erhältlich und Kommunikationsschnittstellen and communication interfaces. ® Deutsch Optionale Benutzerschnittstellen: CS-PP – ControlSpace AMS-8 Sprechstelle Mit der ControlSpace AMS-8 Sprechstelle können zuvor aufgenommene Ansagen oder Ansagen in Echtzeit in einer ausgewählten Gruppe von Zonen abgespielt werden. ® ® CS-WC – ControlSpace AMS-8 Wandbedienfeld Das ControlSpace AMS-8 Wandbedienfeld bietet die Möglichkeit, lokal den Kanal zu wählen und die Lautstärke des Audiosignals zu regeln. ® ® CS-LIM – ControlSpace AMS-8 lokales Eingangsmodul Das lokale Eingangsmodul des ControlSpace AMS-8 Systems schafft die Möglichkeit, dem System eine weitere lokale Klangquelle (Line oder Mikrofon) hinzuzufügen. ® ® CS-RC - ControlSpace AMS-8 Fernbedienung Die ControlSpace AMS-8 Infrarot-Fernbedienung ermöglicht die mühelose Steuerung des Wandbedienfeldes aus bis zu 5 Metern Entfernung. ® ® Optionale Karten: CS-TIC – ControlSpace AMS-8 Dual-Eingangskarte Pro Frame können bis zu vier ControlSpace AMS-8 Dual-Eingangskarten hinzugefügt werden, um das System um acht zusätzliche analoge Audioeingangskanäle zu erweitern. ® ® CS AMS-8 Audio-Link-Karte Mit der ControlSpace AMS-8 Audio-Link-Karte können zwei AMS-8 Systeme miteinander verbunden werden. ® CS-MSC – ControlSpace AMS-8 Ansagen-Speicherkarte Die Ansagen-Speicherkarte belegt einen Steckplatz an der CS-TIC (Input Card) und ermöglicht die Speicherung und Aktivierung von zuvor aufgenommenen Ansagen nach Betätigen einer entsprechenden Taste an der Sprechstelle, mittels der Zeitsteuerung oder über die GPIO-Kontakte. Die Software zur konfiguration der Karte und zum Aufnehmen der Durchsagen ist im Lieferumfang enthalten. ® 75 4. Erweiterungsoptionen CS-DIC ControlSpace AMS-8 Digital Input Card Die digitale Eingangskarte kann verwendet werden zum Einspeisen digitaler Quellen und zum digitalen Verbinden von Racks untereinander. ® CS-TTC ControlSpace AMS-8 Twin Tuner Card Die Twin Tuner Card kann verwendet werden um 2 Radiosender (Mono) oder einen Radiosender (Stereo) einzuspeisen. ® Optionale Schnittstellen: CS-SCI ControlSpace Serial Code Interface Das Serial Code Interface sendet und empfängt serielle Befehle von einer Crestron/AMX und setzt diese Befehle für das AMS-8 System um. Zusätzlich stehen 16 programmierbare Kontaktausgänge zur Verfügung. Jeder kontakt ist fest einer Zone zugeordnet. Die Funktion des Kontaktes ist programmierbar. Deutsch ® CS-HUB ControlSpace RS485 Communication Hub Der RS485 Hub (CS-Hub) wird bei einer sternförmigen Verkabelung und bei großen Kabellängen eingesetzt. Es stehen 5 Abzweige zur Verfügung. ® 76 5. Upgrade zu einem ControlSpace AMS-8 II System 5. Upgrade zu einem ControlSpace AMS-8 II System ® 1)Überprüfen Sie die Firmware Version. Beim Einschalten wird diese kurz am Display des Racks angezeigt. Wenn die angezeigte Version ist 2.116 oder höher können Sie mit dem Upgrade fortfahren. Ist die angezeigte Version niedriger setzten Sie sich bitte mit einem Bose Mitarbeiter in Verbindung. 2) Verbinden Sie alle AMS-8 Racks untereinander (siehe auch Kapitel 3.5). 3)Überprüfen Sie das nur am ersten und letzten Gerät der Abschlußwiderstand (Termination) gesetzt ist auf der RS485 Karte im Rack. 4)Schalten Sie jedes AMS-8 Rack ein und halten dabei die Tasten UP und RIGHT gedrückt. Jetzt wird der „Bootloader Mode“ aktiviert. Deutsch 5)Wählen Sie am ersten Rack die Einstellung ”Master”. Dann geben Sie die Anzahl der Racks ein (inkl. Master). 6)Jedes weitere Rack muß als “Slave” definiert werden. Zusätzlich muß noch die Racknummer definiert werden. Startwert ist 2, fortfolgend bis 10. 7)Beachten Sie dieuntere Zeile des Displays. Hier wird die Anzahl der angeschlossenen Racks angezeigt. Die Anzeige ”Racks: 00000011 11111111”, bedeutet das 10 Racks angeschlossen sind. 8)Wenn alle Slave Racks angemeldet sind, wählen Sie “Finish” am Master Rack. Jetzt wird die Konfiguration temporär gespeichert im „Bootloader“. 9) Verbinden Sie Ihren PC mit dem Master Rack und starten Sie die Bootloader Multi-Installer Software. 10) Führen Sie ein Firmwareupdate bei allen Racks aus wenn nötig. 11) Warten Sie bis der Upload und das Re-update bei allen Racks beendet ist. 12)Stellen Sie am ersten Rack nochmals “Master” ein und stellen Sie nochmals die Anzahl der Racks ein wenn nötig. 13) Stellen Sie an den Slave Racks nochmals die Racknummer ein. 14) Starten Sie alle Racks nochmals neu indem Sie jeweils den Netzschaler Aus/Einschalten. 15)Führen Sie die Funktion “Total Factory Restore” am Masterrack aus (wählen Sie die Funktion im Installationsmenue) . Bitte warten Sie solange bis die Funktion ausgeführ ist. 16) Starten Sie alle Racks nochmals neu indem Sie jeweils den Netzschaler Aus/Einschalten. 17) Updaten Sie alle Bose EQ Kurven mit der Live Installer Software. 18) Der Update auf ein ControlSpace AMS-8 II System ist jetzt abgeschlossen. ® Verwenden Sie die Live Installer Software oder das Display mit den Navigationstasten um das AMS-8 System zu konfigurieren. Vor dem Update gesicherte BDF Dateien können nicht mehr für das AMS-8 System II verwendet werden. 77 6. Fehlersuche 6. Fehlersuche Keine Stromzufuhr. Vergewissern Sie sich, dass das Netzkabel an eine funktionierende Steckdose angeschlossen und das Gerät eingeschaltet ist. Der Strom ist eingeschaltet, aber in keiner Zone ist etwas zu hören. Überprüfen Sie, ob ein Eingangssignal von der Klangquelle ankommt. Überprüfen Sie, ob ein Ausgangssignal vorhanden ist. Sind Eingangs- und Ausgangssignal festzustellen, ist ControlSpace möglicherweise stumm geschaltet oder die Lautstärkeregler sind ganz heruntergedreht. Deutsch ® 78 Der Strom ist eingeschaltet, aber die Wiedergabe ist schwach. Überprüfen Sie, ob die Kontrollleuchte für den Audioeingang grün leuchtet. Falls die Leuchte nicht brennt, erhöhen Sie den Ausgangspegel der Klangquelle oder den Eingangspegel. Wenn diese Kontrollleuchte und auch die Kontrollleuchte für das Audio-Ausgangssignal grün leuchten, überprüfen Sie, ob die vom Verstärker geleistete Verstärkung ausreichend ist, und überprüfen Sie die Ausgangspegel. Die Wiedergabe ist verzerrt. Wenn das Eingangssignal beim Eintritt in das CS AMS-8 System sauber ankommt, überprüfen Sie, ob die Lautsprecher überlastet oder beschädigt sind. Unnatürliche Klangwiedergabe. Überprüfen Sie, ob im Signalpfad die richtige Speaker EQ oder das richtige Crossover verwendet werden. Stellen Sie auch sicher das das Eingangssingnal nicht verzerrt oder zu hoch ist. Der Strom ist eingeschaltet, aber in einer oder mehreren Zonen kommt kein Ton an. Überprüfen Sie • alle Anschlüsse am CS AMS-8 Systemrack. • ob der Verstärker einwandfrei arbeitet und ob die Verstärkungsregler richtig eingestellt sind. • in der Live Installationssoftware oder am Systemrack die Default-Einstellungen und die Einstellungen für die maximale Lautstärke des betreffenden Raumes. • „Hold“ wird eine Message solange wiederholt bis der Kontakt wieder geöffnet wird. Die „Hold“ Funktion ist auch sinnvoll für Roomcombining oder Standbyfunktionen. • Bitte prüfen Sie ob Roomcombining Presets oder Events aktiviert sind. Durchsagen/Tonsignale (Chimes) von der Software des Benutzers werden nicht abgespielt. Überprüfen Sie die Kabelverbindung zwischen der PC-Soundkarte, dem Mikrofon und dem Systemrack. Überprüfen Sie die Lautstärkeeinstellung des PCs. Keine Steuerung/Kommunikation von Wandbedienfeld (CS-WC)/ Sprechstelle (CS-PP). Überprüfen Sie die Kabelverbindungen zwischen Wandbedienfeld/Sprechstelle und dem System-Rack. Im Menü “Raumeinstellungen” wird der Status des Wandbedienfeldes angezeigt. Wenn dort ‘WC-‘ angezeigt wird, ist die Kommunikation mit dem betreffenden Wandbedienfeld unterbrochen. Überprüfen Sie auch die Adresse des Wandbedienfeldes und stellen Sie sicher, dass die Adresse des Wandbedienfeldes auf die Raumnummer eingestellt ist, für die es vorgesehen ist. Bei Verwendung der Installationssoftware keine Kommunikation/Steuerung zwischen PC und AMS-8 System. Prüfen Sie bitte das Ethernetkabel und stellen Sie sicher das die INETGui Software mit dem AMS-8 verbunden ist (Online). Kein Audio Signal von einem LIM Modul in Mono Konfiguration Stellen Sie sicher das das Audiokabel am linken Ausgang des LIM Moduls angeschlossen ist. Das Audiosignal an einem Ausgang wird geringer wenn zu einer Quellemit einer hohen Ausgangslautstärke umgeschaltet wird. Stellen Sie sicher das der Gain des AMS-8 Eingangs auf maximal 0dB justiert ist. Bei einem kontinuierlich zu hohen Eingangssignal (+3dB) wird der Eingang „Stumm“ geschalten. Die LED der Sprechstelle blinkt rot/ grün. Das Blinken Signalisiert einen Fehler in der Kommunikation zwischen Sprechstelle und AMS-8 Rack. Überprüfen Sie die Kabel zwischen den Geräten und die Einstellungen der Anschlußwiderstände. Kein Durchsagesignal von der Sprechstelle. Überprüfen Sie die Audiokabel zur Sprechstelle und die Routingeinstellungen der Sprechstelle. Verwenden Sie die Live Installer Software oder das Gerätedisplay mit den Navigationstasten. 7. Technische Daten 7. Technische Daten Eingänge: Eingangsart: 8 x analog (bis zu 16), asymmetrisch und elektronisch symmetriert, Line-Level Anschlussstecker: Chinch und Euroblock-Stecker 3-polig Eingangsempfindlichkeit: -30 dBu bis +14 dBu Impedanz: 50 K Ohm Ansprechschwelle der Eingangsübersteuerungsanzeige: +14 dBU Digitale Auflösung: 24-Bit Deutsch Ausgänge: Ausgangsart: 8 x analog, asymmetrisch und elektronisch symmetriert, Line-Level Anschlussstecker: Chinch und Euroblock-Stecker 3-polig Impedanz: 150 Ohm Maximaler Ausgangspegel: 18 dBu symmetrisch, 12 dBu assymmetrisch Bass-/Höhenregelung: +/-12 dBu, in 1 dB-Stufen Digitale Auflösung: 24-Bit Signalverarbeitung: Typ: 48-bit Digitale Signalprozessoren Samplingrate: 96 kHz Audiolatenzzeit: <1 ms Zeitverzögerung: 10 ms, in 0,05 ms-Stufen Bandbreite: 20 Hz bis 20 kHz (+0 dB,-0,3 dB) Harmonische Gesamtverzerrung (THD): <0,007% (A-bewertet, 0 dBu in/0 dBu out) Kanaltrennung: >103 dB @ 1 kHz, 0 dBu Signal-Rausch-Verhältnis: >100 dB, A-bewertet, THD<0,02%, symmetrisch in/out >100 dB, A-bewertet, THD<0,02%, asymmetrisch in/out 110dB, A-bewertet, THD <0,02 %, analog in/digital out 140dB, A-bewertet, THD <0,02 %, digital in/out Strom: Stromversorgung Stromverbrauch Abmessungen (H x B x T in mm) Gewicht CS AMS-8 90 - 264 Volt AC (47-63 Hz) max. 37 Watt 88 x 485 x 285 4,5 kg CS-WC 12-24 Volt DC max. 0,7 Watt 80 x 115 x 48 0,12 kg CS-LIM 24 Volt DC max. 1,5 Watt 80 x 115 x 48 0,12 kg CS-PP 12-24 Volt DC max. 1,7 Watt 43 x 210 x 212 1,5 kg Umgebung: Betriebstemperatur: 0˚C bis 50˚C Luftfeuchtigkeit: 80% relative Luftfeuchtigkeit (ohne Kondensation) 79 Annhang A. ControlSpace AMS-8 System Beispiele ® Annhang A. ControlSpace AMS-8 System Beispiele ® ControlSpace AMS 8 System mit 80 Zonen ® Deutsch SCI HUB 80 Annhang A. ControlSpace AMS-8 System Beispiele ® Annhang A. ControlSpace AMS-8 System Beispiele ® ControlSpace AMS-8 System mit mehreren Sprechstellen ® Deutsch oder ControlSpace AMS-8 System mit mehreren Wallcontrollern pro Raum ® Zone 1 Zone 5 Zone 6 Zone 2 Zone 7 Zone 3 Zone 4 Zone 8 81 Annhang B: User Interface Installationshinweise Annhang B: Montaghinweise für Wallcontroller und LIM-Module Unterputzdose Unterputzdose Die Unterputzdose ist für ControlSpace AMS-8 Wallcontroller und ControlSpace AMS-8 LIM-Module geeignet. Abmessungen (HxWxD): 7,1 x 10,6 x 5,2 cm ® Aufputzdose Die Aufputzdose ist für ControlSpace AMS-8 Wallcontroller und ControlSpace AMS-8 LIM-Module geeignet. Farbe: weiß Dimensions (HxWxD): 8,0 x 11,4 x 4,6 cm Deutsch ® Hohlwnddose Die Hohlwanddose ist für ControlSpace AMS-8 Wallcontroller und ControlSpace AMS-8 LIM-Module geeignet. Abmessungen (HxWxD): 6,6 x 12,4 x 5,2 cm ® Einbau der Sprechstelle Verwenden Sie die dargestellten Abmessungen um die Sprechstelle in ein Pult einzubauen. Eine Bohrung für den XLR-Mikrofonanschluß muß zusätzlich noch hergestellt werden. Der Einbau der Sprechstelle sollte spannungslos erfolgen 82 Deutsch 83 Vertriebsniederlassungen in Europa Deutsch So erreichen Sie unsere Vertriebsniederlassungen in Europa Deutschland Professional Systems Division, Deutschland Bose GmbH, Max-Planck-Straße 36, 61381 Friedrichsdorf, Deutschland Telefon: 06172-7104-0 Fax: 06172-7104-19 Niederlande Professional Systems Division, Niederlande Bose B.V., Nijverheidstraat 8 1135 GE Edam, Niederlande Telefon: 0299-390139 Fax: 0299-390109 Österreich Professional Systems Division, Österreich Bose Ges.m.b.H., Business Park Wien Wienerbergstrasse 7, 10 O.G. 1100 Wien, Österreich Telefon: 01-60404340 Fax: 01-604043423 Norwegen Professional Systems Division, Norwegen Bose Filial till Bose A/S Danmark, Lerkev 58 2209 Kongsvinger, Norwegen Telefon: 062-821560 Fax: 062-821569 Belgien Professional Systems Division, Belgien Bose N.V., Limesweg 2 3700 Tongeren, Belgien Telefon: 012-390800 Fax: 012-390840 Dänemark Professional Systems Division, Dänemark Bose Danmark A/S, Industrivej 7 PO Box 14, 2605 Brøndby, Dänemark Telefon: 43437777 Fax: 43437818 Frankreich Professional Systems Division, Frankreich Bose S.A., 12 Rue de Témara 78100 Saint Germain en Laye, Frankreich Telefon: 01-30616363 Fax: 01-30616388 Irland Professional Systems Division, Irland Bose GP, Castleblayney Road Carrickmacross, County Monaghan Irland Telefon: 042-9661988 Fax: 042-9661998 Italien Professional Systems Division, Italien Bose SpA, Via della Magliana 876 00148 Rom, Italien Telefon: 066-5670802 Fax: 066-5680177 84 Schweiz Professional Systems Division, Schweiz Bose AG, Hauptstrasse 134 4450 Sissach, Schweiz Telefon: 061-9757733 Fax: 061-9757744 Spanien Gaplasa S.A. Avda. Ingeniero Conde de Torroja 25 28022 Madrid, Spanien Telefon: 91 748 29 60 Fax: 91 329 16 75 Schweden Professional Systems Division, Schweden Bose, filial till Bose A/S Danmark Johannefredsgatan 4, 43153 Mölndal, Schweden Telefon: 031-878850 Fax: 031-274891 Großbritannien Professional Systems Division, Großbritannien Bose Ltd., 1 Ambley Green Gillingham Business Park Gillingham, Kent ME8 0NJ, England Telefon: 0870-741-4500 Fax 0870-741-4545 Polen Bose Sp. z o.o. Galeria Mokotów ul. Wołoska 12 02-675 Warszawa Telefon: (22) 852 2928 Fax: (22) 852 2927 El fabricante se reserva los derechos de las especificaciones técnicas. La información contenida en este manual está sujeta a cambio sin previo aviso ni obligación. Índice general 1. Información de seguridad Instrucciones de seguridad importantes 88 Declaración de conformidad 90 2. Introducción 91 3. Instalación del sistema 92 3.2 Panel trasero del ControlSpace AMS-8 93 3.3 Configuración del controlador de pared 94 3.4 Conexiones de la interfaz de usuario 95 3.5 Diagramas del sistema 96 3.6 Conexiones del controlador de pared 99 3.7 Conexiones del módulo de entrada local 99 ® ® 3.8 Conexiones de la consola de mensajes 100 3.9 Entradas/salidas generales 101 3.10 Conexiones de entrada y salida de audio 102 4. Componentes de sistema opcionales 103 5. Actualizar a ControlSpace AMS-8 II system 105 6. Localización y solución de problemas 106 7. Especificaciones técnicas 107 ® Anexo A. Ejemplos ControlSpace AMS-8 ejemplos de sistemas 108 Anexo B. Cajas de montaje para paneles de usuario 110 Oficinas de venta de Europa 112 ® Español 3.1 Panel frontal del ControlSpace AMS-8 1. Información sobre seguridad 1. Instrucciones de seguridad importantes Marcas de precaución en el producto Estas marcas de PRECAUCIÓN se encuentran en la parte trasera del producto. El símbolo del rayo con punta en flecha dentro de un triángulo equilátero pretende alertar al usuario de la presencia de tensión eléctrica no aislada dentro de la caja del sistema y que podría ser de una magnitud suficiente para constituir un riesgo de descarga eléctrica. El símbolo de exclamación dentro de un triángulo equilátero, como está marcado en el sistema, pretende alertar al usuario de la presencia de instruciones de funcionamiento y mantenimiento importantes en esta guía de instalación Instrucciones de seguridad importantes 1. Lea estas instrucciones. 2. Conserve estas instrucciones para poder consultarlas en un futuro. Español English 3. Haga caso de todas las advertencias sobre el producto. 4. Siga todas las instrucciones. 5. No utilice este aparato cerca de agua o humedad. 6. Limpie el aparato exclusivamente con un trapo seco. 7. No bloquee ninguna entrada de ventilación. Siga las instrucciones de montaje del fabricante. Para asegurar el correcto funcionamiento del producto y protegerlo del sobrecalentamiento, coloque el producto en una posición y lugar que no impida su adecuada ventilación. 8. No coloque el producto cerca de ninguna fuente de calor, como son radiadores, acumuladores de calor, estufas o cualquier otro aparato (incluyendo amplificadores) que genere calor. 9. No desperdicie la seguridad que proporcionan los enchufes polarizados o con masa. Un enchufe polarizado tiene dos patillas, de las cuales una es más gruesa que la otra. Un enchufe con masa tiene dos patillas y un tercer diente de masa. La patilla más ancha, o tercer diente se proporciona para su seguridad. Si el enchufe que se le sumistró no encaja en su toma de corriente, consulte a un electricista para que le cambie la toma obsoleta. 10. Evite pisar el cable o que se doble, especialmente en los enchufes, tomas, etc. 11. Utilice solamente accesorios especificados por el fabricante. 12. Utilice solamente el carrito, estante, tripode, soporte o tabla especificado por el fabricante o vendido con el aparato. Si utiliza un carrito, tenga cuidado al moverlo conjuntamente con el aparato para evitar que se caiga y resulte dañado. 13. D esconecte este aparato durante tormentas o cuando no vaya a utilizarse durante largos periodos de tiempo para evitar daños en el producto. 14. Remita todas las reparaciones a personal de reparación cualificado. Los trabajos de reparación son necesarios cuando el aparato ha resultado dañado de algún modo, como, por ejemplo: el enchufe o cable de alimentación está dañado; se ha derramado líquido o se han caído objetos sobre el aparato; el aparato ha estado expuesto a lluvia o humedad, no funciona con normalidad, o se ha caído. No intente reparar el aparato usted mismo. La apertura o la retirada de las cubiertas pueden exponerle a tensiones peligrosas u otros riesgos. Por favor, llame a Bose para que le indiquen el centro de servicio autorizado más cercano. 15. Para evitar el riesgo de incendio o descarga eléctrica, evite sobrecargar las tomas de corriente de la pared, cables de extensión, o las tomas de corriente múltiples. 88 1. Información de seguridad 16. No permita que ningún objeto o líquido entre en contacto con el producto, ya que podrían tocar puntos de tensión peligrosos o cortocircuitar piezas que podrían provocar un incendio o una descarga eléctrica. 17. Consulte la caja del producto en relación con las marcas de seguridad. 18. No se deben acercar llamas vivas, como velas, al aparato. ADVERTENCIA: No exponga el sistema ControlSpace AMS-8 a la lluvia o humedad para reducir el riesgo de incendio o descarga eléctrica. ® ADVERTENCIA: No se debe exponer el aparato a goteos o salpicaduras, ni se deben colocar objetos llenos de líquido, como vasos sobre el aparato. Como ocurre con cualquier producto electrónico, tenga cuidado de no verter líquidos dentro de ninguna parte del sistema. Los líquidos pueden causar un fallo u originar un incendio. Información sobre productos que generan ruido eléctrico • Vuelva a orientar o colocar la antena receptora. • Aumente la separación entre el equipo y el receptor. • Conecte el equipo a una toma de corriente en un circuito diferente al que se ha conectado el receptor. • Pida ayuda al distribuidor o a un técnico de radio/televisión experimentado. Español Este equipo ha sido probado y ha demostrado cumplir con los límites propios de un dispositivo de clase A, de acuerdo con la sección 15 de la normativa FCC. Estos límtes se diseñan para proporcionar una protección razonable contra interferencias dañinas en las instalaciones residenciales. Este equipo genera, utiliza y puede emitir energía de radiofrecuencia y, si no se instala y utiliza de acuerdo con las instrucciones, puede causar interferencias dañinas a las comunicaciones de radio. Sin embargo, esto no garantiza que no haya interferencias en una instalación particular. Si este equipo crea interferencias dañinas en la recepción de la señal de radio o televisión, lo cual puede determinarse encendiendo y apagando el equipo, se le recomienda que intente eliminar la interferencia adoptando una de las siguientes medidas: NOTA: La modificación no autorizada del receptor o del mando a distancia de la radio a semejanza de un producto de alta fidelidad podría anular la autoridad del usuario para manejar este equipo. Este producto cumple con las especificaciones técnicas. La información proporcionada en esta guía de instalación no incluye todos los detalles de diseño, producción o variaciones de este equipo. Tampoco abarca todas las situaciones posibles que pudieran darse durante la instalación, el funcionamiento o mantenimiento. Si necesita ayuda más allá de la que ofrece esta guía de instalación, por favor, póngase en contacto con una de nuestras oficinas de venta europeas. Consulte la sección sobre oficinas de venta en la última página de este manual de instalación. 89 1. Información de seguridad Declaración de conformidad El fabricante de este procesador declara, mediante este documento, que este producto y sus accesorios cumplen los siguientes estándares: Directiva EMC 89/336/EEC (compatibilidad electromagnética) EN-55103-1 EN-55103-2 Directiva de baja tensión 73/23/EEC EN-60065:2002 7ª edición Consideraciones para el montaje sobre soporte Español English El procesador de señal de audio requiere dos unidades de espacio de soporte de 4.4 cm (1.75”) de 32.5 cm (12.8”) de profundidad interior. A la hora de la instalación, utilice cuatro tornillos con arandelas para evitar estropear el panel frontal. Las arandelas de goma de neopreno constituyen una buena opción, puesto que sujetan las cabezas de los tornillos evitando que se salgan debido a la vibración o a su transporte. Advertencia: Si la unidad está montada sobre un soporte que se debe transportar, debe fijar mecánicamente la parte trasera del procesador. Puede colocar una balda o utilizar soportes a lo largo de la parte trasera del procesador para fijar la unidad trasera. Precauciones generales y ventilación Precaución: Coloque la unidad donde se encuentre protegida del calor y permita una ventilación adecuada. Coloque la unidad lejos de fuentes directas de calor como, por ejemplo, ventiladores calefactados o radiadores. Asegúrese de que el aire puede circular libremente por todo el perímetro de la unidad. Si se coloca la unidad debajo o encima de un amplificador, asegúrese de que haya una placa individual de ventilación entre los dos dispositivos. No permita que el chasis exceda la temperatura máxima de funcionamiento de 50ºC. Tenga en cuenta las condiciones de un soporte cerrado, ya que podría ocasionar que la temperatura del aparato superase la temperatura ambiente de la habitación. Precauciones: Asegúrese de que todos los hilos finos del cable están unidos y dentro del conector. Si un solo hilo está suelto puede tocar el terminal adyacente, lo que podría provocar un cortocircuito. 90 2. Introducción 2. Introducción Introducción El sistema de gestión de audio Bose ControlSpace AMS-8 es un procesador de señal de audio flexible, con capacidad de ampliación y de alta calidad que se utiliza en aplicaciones de distribución de sonido en lugares tales como restaurantes, tiendas, bares, oficinas, hoteles, instalaciones de conferencias e instalaciones deportivas. La unidad principal incluye ocho entradas de línea y otras ocho salidas. Cuatro ranuras de audio disponibles permiten la adición de hasta 8 entradas más de audio (2 entradas por tarjeta). ® ® Para más zonas, puede unir hasta 10 unidades AMS-8 por cada sistema. Cada rack añadido aumenta en 8 mono zonas el sistema. Dispone de varias opciones de interfaz de usuario para proporcionar al usuario un control sencillo y fácil de usar del sistema ControlSpace AMS-8. ® El Live software de instalación de Bose ControlSpace AMS-8 se utiliza para diseñar sistemas y configurar el AMS-8 y las interfaces de usuario. El software se ejecuta en un PC y se comunica con el sistema AMS-8 a través de Ethernet. ® ® Características y funciones • Pantalla LCD y botones de navegación • Ocho canales analógicos (con capacidad de hasta 16) de entrada de nivel de línea • Funcionalidad del controlador de pared (mando a distancia por infrarrojos opcional) • Funcionalidad del módulo de entrada local • Ocho canales analógicos de salida de nivel de línea • Funcionalidad del panel de mensajería • GP IO: 8 entradas de contactos para el control de, emisión de mansajes, mute, standby de zona y combinador de salas. Más 1 salida de control general • Mensajes Pregrabados (requiere la tarjeta de almacenamiento de mensajes) • Diseño, configuración y control del sistema mediante programas de ordenador • Procesamiento de la señal digital, incluyendo: equalizadores de altavoces Bose, Dynamic EQ, retardo, control de la ganancia y selección de la fuente. Español • Arquitectura por medio de tarjetas, ampliable y flexible • Sintonizador de Radio (requiere la tarjeta sintonizadora) • Detección automática del tipo de tarjeta • Permite combinación de salas • Programador de eventos Inicio rápido • Conecte las entradas y salidas de audio al sistema ControlSpace AMS-8. (En caso de que disponga de dos ó más unidades AMS-8 para crear un sistema utilizando la tarjeta de conexión de audio, conecte los cables de interconexión de audio y la conexión de unidades mediante RS485 de alta velocidad: ver apartado 3.5). ® • Encienda el sistema ControlSpace AMS-8. Gracias a la configuración predeterminada, el sistema ya está en funcionamiento. Tras cada encendido del sistema ControlSpace , se volverá a iniciar con la configuración predeterminada. Esto significa que el sistema seleccionará la fuente y el volumen predeterminado tal y como se configuró en el menú de instalación. ® ® NOTA: Para adaptar las funciones y prestaciones a ControlSpace AMS-8 II system, ver apartado 5 ® Abreviaturas CS-WC CS-PP CS-LIM CS-RC CS-TIC CS-TOC CS-EC Controlador de pared ControlSpace AMS-8 Consola de mensajes ControlSpace AMS-8 Módulo de entrada local ControlSpace AMS-8 Mando a distancia de ControlSpace AMS-8 Tarjeta de entrada dual ControlSpace AMS-8 Tarjeta de salida dual ControlSpace AMS-8 Tarjeta de red Ethernet ControlSpace AMS-8 ® ® ® ® ® ® CS-MSCTarjeta de almacenamiento de mensajes ControlSpace AMS-8 CS-DICControlSpace AMS-8 Tarjeta Entrada Digital CS-TTCControlSpace AMS-8 Sintonizador de Radio CS-HUBControlSpace AMS-8 RS485 Hub CS-SCIControlSpace AMS-8 Interface Serie ® ® ® ® ® ® 91 3. Instalación del sistema 3.1 Panel frontal del ControlSpace AMS-8 ® 1 2 1. Pantalla LCD La pantalla de cristal líquido (LCD) muestra los menús de control y las posibles configuraciones para cada elemento del menú. 2 . Botones de navegación Español English Con los botones arriba y abajo puede desplazarse a través de los elementos de menú, mientras que los botones izquierda y derecha permiten cambiar el valor del elemento de menú seleccionado. El botón “OK” (aceptar) confirma la selección actual, por ejemplo, si presiona el botón “OK” con el elemento de menú “Exit” (salir) seleccionado, volverá al nivel de menú anterior. 92 3. Instalación del sistema 3.2 Panel trasero del ControlSpace AMS-8 ® 5 3 7 9 11 15 13 1 4 5 3 7 5 9 4 5 3 8 1 8 7 Serial Number: Rack Link 2 1 PC Link ! Rack Link 1 1 CAUTION RISK OF ELECTRIC SHOCK DO NOT OPEN AVIS: Risque de chock électrique, ne pas ouvrir System Rack MODEL: 2 6 8 10 12 14 16 4 2 13 6 Audio Link Source Inputs 1 4 3 4 5 15 13 4 1 5 3 7 5 9 4 3-pin Input Euro Blok en Connector Entrada conector Euro Block 3-pin (Nivel line level) de(Balanced línea balanceada) 5 3 8 1 8 7 Serial Number: Bose Corporation, Framingham, MA01701-9168 Made in The Netherlands 2 9 12 2 4 6 8 10 12 14 16 13 9 4 2 6 16 Audio Link Source Inputs RCA Input Connector RCA Entrada conector (Unbalanced line level) (Nivel de línea desbalanceada) Line Outputs 5 9 4 5 9 8 3 3 7 7 2 6 2 3 Salida Line outputs (1-8) (1-8) de Línea 6 1 CSCSTOC TOC 9 RCA Input Connector conector RCA Line inputs (1-16)Salida (Unbalanced line level) (Nivel de línea desbalanceada) CSTIC 3-pin Input Euro Blok Salida conector enConnector Euro Block 3-pin RCA Input line Connector (Balanced level) (Nivel de línea balanceada) (Unbalanced line level) 8 4 2 Slot for Audio Link Card to link the connected analog sources between Controlspace AMS-8 9 10 Audio Managment Systems. RS-232 & GPIO card 7 8 5 6 3 4 1 2 (Balanced line level) 5 9 4 Ethernet & GPIO Cierres de Contacto RS-485 card 4 RS232 port pin out Straight shielded cable (20 meters max.) 2. TX 3. RX 5. GND 6 1 (Balanced line level) RCA Input Connector (Unbalanced line level) 8 6 2 Audio Link Card slot 3 3-pin Input Euro Blok Salida conector enConnector Euro Block 3-pin 3-pin Input Euro Blok Connector (Balanced level) (Nivel de line línea balanceada) Salida conector RCA RCA Input Connector 3-pin Input Euro Connector (Unbalanced lineBlok level) (Nivel de línea desbalanceada) 10 3 DB9 Female 10 7 5 7 5 1 8 4 1 8 Español 3-pin Input Euro Blok en Connector Entrada conector Euro Block 3-pin (Nivel line level) de(Balanced línea balanceada) 6 Rack Link 1 11 Rack Link 2 9 Bus 1 7 Bus 2 1 5 3 PC Link 1 AVIS: Risque de chock électrique, ne pas ouvrir System Rack MODEL: I/O Link ! Slotpara for Audio Card to link theLink connected Slot la Link tarjeta Audio Card que permite unir dos analog sources between Controlspace AMS-8 ControSpace AMS-8 Audio Management Systems. Solo se Audio Managment Systems. puede colocar una por sistema y en la unidad principal. Incorpora las conexiones necesarias para el Audio Link Cable, un set puede enviar a la segunda unidad 4 fuentes RS-232 & GPIO card de entrada To CSPP/CSWC Entrada conector RCA Input Connector RCA (Unbalanced line level) (Nivel de línea desbalanceada) CAUTION 6 2 2 Audio Cardslotslot Audio Link Link Card CSCSTIC TIC RISK OF ELECTRIC SHOCK DO NOT OPEN 8 5 3 1 Line Outputs 2 1 Entrada de(1-16) línea (1-16) Line inputs 10 7 8 16 Bus 2 6 9 I/O Link 12 4 2 Bus 1 9 To CSPP/CSWC Bose Corporation, Framingham, MA01701-9168 Made in The Netherlands 4 5 9 8 4 8 3 3 7 7 2 1 6 Line outputs (1-8) Pin 1: Contact 1 Pin 2: Contact 2 Pin 3: Contact 3 Pin 4: Contact 4 Pin 5: Contact 5 Pin 6: Contact 6 Pin 7: Contact 7 Pin 8: Contact 8 Pin 9: Output Pin 10: Common RS232 port pin out Straight shielded cable (20 meters max.) 2 1 6 2. TX 3. RX 5. GND Rack link 1 (high speed) CSTOC 9 7 5 Rack 2 (high speed) RCAlink Input Connector (Unbalanced line level) 3-pin&Input Euro Connector CS-WC CS-PP BusBlok 1 (low speed) (Balanced line level) Pin 1 : Contacto 1 Pin 3 : Contacto 3 Pin 4 : Contacto 4 Pin 5 : Contacto 5 8 DB9 Female 6 4 1 2 9 3-pin &Input Euro Connector CS-WC CS-PP BusBlok 2 (low speed) (Balanced line level) GPIO pinout: RCA Input Connector Pin 2 : Contacto 2 (Unbalanced line level) 10 3 Pin 6 : Contacto 6 Pin 7 : Contacto 7 Pin 8 : Contacto 8 Pin 9 : Salida Pin 10: Común 10 7 8 5 6 3 4 1 2 Pin 1: Contact 1 Pin 2: Contact 2 Pin 3: Contact 3 Pin 4: Contact 4 Pin 5: Contact 5 Pin 6: Contact 6 Pin 7: Contact 7 Pin 8: Contact 8 Pin 9: Output Pin 10: Common RS-485 card 5 Tarjeta RS485 Rack link 1 (high speed) Rack Link 1 (alta velocidad) Rack link 2 (high speed) Rack Link 2 (alta velocidad) CS-WC & CS-PP Bus 1 (low CS-WC & CS-PP Busspeed) 1 (baja velocidad) CS-WC & CS-PP Bus22 (baja (low speed) CS-WC & Bus velocidad) 93 3. Instalación del sistema 3.3 Configuración del controlador de pared 1 1. Pantalla LCD 2 3 2. Teclas de volumen 3. Teclas de canal Antes de configurar el ControlSpace AMS-8, es necesario seleccionar una dirección para cada controlador de pared (1..8), lo que se realiza, por lo general, la primera vez que el controlador de pared se conecta al soporte del sistema. Unos cuantos segundos después de haber conectado el controlador de pared al soporte del sistema, la versión de firmware es mostrada en la pantalla LCD actuando sobre aparece “Select WC..” (Seleccionar WC). Utilice los botones de canal para seleccionar la dirección apropiada y confirme esta selección presionando el botón de reducción de volumen (-). Si se necesitan múltiples paneles de control para la misma zona, estos deberán tener el mismo numero de identificación. En esta situación, todos los paneles de esa zona se conectaran al mismo Rack. Español English ® Puede modificar la dirección del controlador de pared de la siguiente manera: 1. Apague el controlador de pared (pulse el botón de bajar canal (-) tantas veces como sea necesario hasta que se apague el controlador de pared) 2. Mantenga pulsado el botón de bajar canal (-) 3. Pulse los botones de aumento (+) y reducción (-) del volumen al mismo tiempo (Después la pantalla LCD mostrará la versión de firmware la dirección real, p. ej., “WC2”). 4. Ahora puede emplear los botones de canal para seleccionar la dirección apropiada y confirmar su la selección presionando el botón de reducción de volumen (-) de la misma manera que hizo anteriormente. En el sistema consistente en dos o más racks ControlSpace AMS-8, todos los racks usan los numeros (1..8). Para el primer rack (salidas 1..8) las salidas usadas serán 1..8, para el segundo rack las salidas serán 9..16 hasta el Rack diez con las salidas 73..80. ® Cambiar ajustes de la sala utilizando el panel de control CS-WC Se puede ajustar la configuración de audio de la habitación donde se encuentra el controlador de pared mediante el menú oculto en el controlador de pared. Siga el procedimiento que se explica a continuación para acceder a este menú: 1. Apague el controlador de pared (pulse el botón de bajar canal (-) tantas veces como sea necesario hasta que se apague el controlador de pared) 2. Mantenga pulsado el botón de reducción de volumen (-) 3. Pulse los botones de subir (+) y bajar (-) canal al mismo tiempo En el menú oculto se pueden definir o modificar las siguientes funciones: 94 a. canal predeterminado b. nivel de graves c. nivel de agudos d. ecualizador dinámico e. Altavoz Bose EQ f. nivel de volumen máximo g. nivel de volumen de mensaje h. retardo i. n ivel de volumen predeterminado Los botones de canal le permiten desplazarse a través de los elementos de menú, mientras que los botones de volumen le permiten cambiar la configuración del elemento seleccionado. Para salir del menú oculto, pulse los botones de aumento (+) y reducción (-) al mismo tiempo. 3. Instalación del sistema 3.4 Conexiones de las interfaces de usuario ControlSpace AMS-8 Controlador de pared ControlSpace AMS-8 Consola de mensajes ControlSpace AMS-8 Módulo de entr. local Tensión 12-24 VCC, +/-20% 12-24 VCC, +/-10% 24 VCC, +5%/-10% Corriente @ 12 VCC 50mA typ @ 24 VCC 30mA typ @ 12 VCC 140 mA typ @ 24 VCC 70 mA typ @ 24 VCC 60 mA typ Fuente de alimentación recomendada Fuente de aliment. estabilizada BOSE CS AMS-8 24 VDC, 2.7 A Fuente de aliment. estabilizada BOSE CS AMS-8 24 VDC, 2.7 A Fuente de aliment. estabilizada BOSE CS AMS-8 24 VDC, 2.7 A Max distancia (/con Hub) 600 m (1200m) 600 m (1200m) No aplicable Terminación*** 120 ohm 120 ohm No aplicable Tipo de cable 1 par apantallado 1 par apantallado No aplicable Cap. nom. 40 pF/m Cap. nom. 40 pF/m No aplicable Imp. nom. 124 ohmios Imp. nom. 124 ohmios No aplicable ® ® ® Fuente de alimentación Cableado RS485** At. nom. 2 dB @ 1MHz No aplicable Cable BOSE CS AMS-8 (azul) de comunicación/ alim. para CS-WC/CS-PP Cable BOSE CS AMS-8 (azul) de comunicación/ alim. para CS-WC/CS-PP No aplicable Cableado de audio No aplicable Cable de micrófono/ entrada estándar, 1 par apantallado Cable BOSE CS AMS-8 (amarillo) de audio/alim. CS-LIM Español At. nom. 2 dB @ 1MHz Cable recomendado * Nota: Si no se emplea la fuente de alimentación mencionada arriba, cualquier otra fuente de alimentación utilizada en Europa debe cumplir con la directiva EN/IEC 60950. ** Cableado RS485 requerido Conecte siempre los componentes mediante una configuración en cadena, pero no en estrella ni siguiendo otro tipo de configuración. El cableado en estrella solo esta permitido usando el CS-HUB. Asegúrese de separar el cable de datos del cableado de alimentación (>50V) sobre la bandeja de cables o cualquier otra disposición de cables *** Terminación El puenteo de terminación debería colocarse en el último interfaz de usuario (CS-WC o CS-PP), ubicado en el extremo de cada línea de comunicación RS485. Cable de comunicación/alimentación CS AMS-8 4 1 Cable de audio/alimentación CS AMS-8 2 1. Azul = comunicación RS485 ‘+’ 1. Amarillo = cable de línea balanceada (con cubierta de protección) 2. Transparente = comunicación RS485 ‘–’ 6 3 1 2 3. Hilo de drenaje = comunicación RS485 ‘MASA’ 5 4. Rojo = alimentación ‘24 VDC’ 3. Rojo = alimentación “24 VDC” 5. Negro = alimentación ‘masa’ 6. Camisa azul 2. Verde = cable de línea balanceada (con cubierta de protección) 4. Negro = alimentación “masa” 3 4 5. Camisa amarilla 95 3. Instalación del sistema 3.5 Diagramas del sistema Dos líneas de comunicación RS485 y una fuente de alimentación central: Máx. 600 m (longitud total) Cable de audio/micrófono * RS-485 RS-485 Cable de audio/micr. * Fuente de Alimentación 24VDC 2,7A Dos líneas de comunicación RS485 y fuentes de alimentación local: Español English Máx. 600 m (longitud total) Cable de audio/micrófono PSU * RS-485 PSU RS-485 * RS485 la distancia máxima: 600 m 600 m O: 600 m 600 m RS485 HUB 600 m NOTA: * El puente de terminación debería colocarse en la última interfaz de usuario (CS-WC o CS-PP), ubicada al final de cada línea de comunicación RS485. Puede encontrar más ejemplos de sistemas en el Anexo A. 96 3. Instalación del sistema Añadir unidades ControlSpace AMS-8 para crear un sistema de 80 zonas ® Se necesitan las tarjetas Audio Link Card. El numero de Audio Link Cable necesarios depende del numero total de entradas y racks a unir (incl. consolas de mensajes y tarjetas de radio). Un Audio Link Cable set es necesario para unir hasta cuatro señales analógicas. Por cada Rack añadido tendremos que añadir un cable de comunicación (2 hilos + malla) para unir los Rack 1 y 2 conexionamos el Rack añadido al existente mediante este cable Racklink. Asegurarse que los jumpers están solo colocados en las tarjetas de comunicación RS485 del primero y el ultimo Rack AMS-8. Nota 1: Para unir la señal digital de la tarjeta de mensajes digitales, la tarjeta de entrada digital o la salida digital (en lugar de la analógica) de la tarjeta sintonizadora, se puede añadir una tarjeta digital y un cable coaxial (RCA-RCA) por cada señal añadida al Rack. Nota 2: Sólo un puerto Ethernet se puede utilizar dentro de una red física. El uso de VLAN y otras redes virtuales no está permitido! Español Use ‘Rack Installation” en el menú para la configuración del sistema del maestro (master) y el esclavo (slave) 97 3. Instalación del sistema Rack 1 (Master) ! CAUTION RISK OF ELECTRIC SHOCK DO NOT OPEN AVIS: Risque de chock électrique, ne pas ouvrir System Rack MODEL: Serial Number: Bose Corporation, Framingham, MA01701-9168 Made in The Netherlands 9 1 4 4 3 2 1 1 1 3 2 5 6 6 6 6 10 7 8 5 6 3 4 1 2 7 8 2 1 1 3 1 Rack 2 (Slave) ! CAUTION RISK OF ELECTRIC SHOCK DO NOT OPEN AVIS: Risque de chock électrique, ne pas ouvrir System Rack MODEL: Serial Number: Bose Corporation, Framingham, MA01701-9168 Made in The Netherlands Español English 9 1 1 4 1 4 1 1 1 1 4 4 5 6 6 6 6 10 7 8 5 6 3 4 1 2 7 8 1 3 2 2 2 1 1 2 1 1 3 Rack 10 (Slave) CAUTION RISK OF ELECTRIC SHOCK DO NOT OPEN ! AVIS: Risque de chock électrique, ne pas ouvrir System Rack MODEL: Serial Number: Bose Corporation, Framingham, MA01701-9168 Made in The Netherlands 9 3 3 3 3 3 1 1 1 5 6 6 6 6 1 Digital coax cable (75 Ohm) 2 CS-AMS-8 Link cable 1 3 RS485 communication cable (120 Ohm - 200m Max) 3 Digital Input Card 10 7 8 5 6 3 4 1 2 7 8 Twin Input Card 2 Message Storage Card 4 Twin Tuner Card 5 Audio Link Card 6 Twin Output Card 7 PC Link - I/O Link 8 RS485 Communication (High/Low speed) 98 3. Instalación del sistema 3.6 Conexiones CS-WC y ajustes 1 2 3 4 1. Puente de terminación, véase NOTA en el capítulo 3.5 2.Conector RS485 Español 3.Conector de la fuente de alimentación (12-24Vdc) 4.Conector para la actualización de firmware 3.7 Conexiones CS-LIM y ajustes 2 5 4 3 1 1.El CS-LIM está equipado con un regulador de ganancia de micrófono, también accessible desde el panel frontal con un destornillador plano tipo ‘0’. Gire el regulador en sentido contrario a las agujas del reloj (ver desde el frontal) para reducir la ganancia hasta un mínimo de 32 dB. Gire el regulador en el sentido de las agujas del reloj para aumentar la ganancia hasta un máximo de 66dB. La configuración de ganancia de fábrica es de 38dB. 2.Para cambiar el CS-LIM de estéreo a mono, se necesita colocar este puente. Para configuraciones en mono, el cable de audio tiene que ser conectado en la salida LEFT. 3. Para activar un EQ (EQ optimizado para palabra) de voz para la entrada del micrófono, mueva el puente de FLAT a VOICE voice flat voice flat = resp. plana = ecualizador de voz 4.Conector de línea de salida estéreo balanceada. 5.Conector de la fuente de alimentación (24Vdc). NOTA: Ver anexo B. Instruciones de montaje del panel de entradas 99 3. Instalación del sistema 3.8 Conexiones CS-PP y ajustes 3 7 2 7 1 6 4 Español English 5 8 El CS-PP está equipado con EQ para palabra, un regulador de ganancia del micrófono y un regulador de ganancia de timbre (señal de atención). Para regular ambas ganancias y conectar el CS-PP se debe retirar la tira de plástico (sobre la placa frontal del CS-PP) y retirar los cuatro tornillos y el panel frontal del la carcasa. Los dos reguladores se encuentran en la parte inferior del panel. NOTA: Asegurarse de que no hay corto-circuitos antes de cerrar la consola 1. Ganancia de micrófono: gire el regulador en sentido contrario a las agujas del reloj para disminuir la ganancia hasta un mínimo de 32,6 dB. Gire el regulador en el sentido de las agujas del reloj para aumentar la ganancia hasta un máximo de 60,1 dB. La configuración de ganancia de fábrica es de 38 dB. 2. Ganancia de timbre: utilice el regulador para aumentar o reducir el nivel de la señal de timbre. 3. Puente de terminación, véase NOTA en el capítulo 3.5. 4. Conector RS485. 5. Conector de la fuente de alimentación, 12-24Vdc (solo se usan 2 de los 3 pines!). 6. Conector de salida de línea balanceada. 7. Conector para la actualización de firmware. 8. Conector XLR para micrófono con alimentación phantom de 22Vdc. 100 3.9 Entradas / salidas generales (GPIO) ControlSpace AMS-8 incluye una tarjeta GPIO/RS232 (véase también el capítulo 3.2). Hasta 40 contactos GPIO (8 por Rack, máximo 5 rack en total) pueden ser usados para disparar 40 mensajes, accionar 40 presets ó mutear cada una o todas las salidas. Los contactos se activan aplicando 24 V CC entre el contacto específico y la patilla de masa común. ® NOTA: Un contacto “Pulse “ reproducirá un mensaje una sola vez. Un contacto “Hold” reproducirá y repetirá un mensaje hasta que el contacto sea liberado Características • 8 entradas aisladas • 1 salida aislada • Las entradas se utilizan para la distribución de mensajes, la combinación de habitaciones o mutear un grupo o grupos de salidas (las salidas retornaran a su valor por defecto después del mute) • La salida de colector abierto se activa cuando se activa una de las ocho entradas CS-AMS-8 Español Diagrama de cableado de los 8 contactos de entrada CS-AMS-8 1..8 + 24 Vdc - 10 Diagrama de cableado de la salida de colector abierto CS-AMS-8 CS-AMS-8 9 Open collector Max. 50mA + 24 Vdc - 10 101 3. Instalación del sistema 3.10 Conexiones de entrada y salida de una fuente de audio Las fuentes de audio se pueden conectar a las entradas y salidas de línea balanceada y no balanceada usando uno de los siguientes tipos de cable: Conector fuente Entradas y salidas de audio ControlSpace AMS-8 ® RCA S T+ T S- ⊥ + ⊥ L R Español English XLR 1 2+ 2 + ⊥ 1 ⊥ 3 3- L R Jack (balanceado) T R S⊥ S + ⊥ T+ L R- R Jack (desbalanceado) T S + ⊥ T+ L S-⊥ R S S T T+ S- ⊥ L R 102 4. Opciones de ampliación 4. Componentes de sistema opcionales El ControlSpace AMS-8 estándar incluye: ® • 8 canales analógicos de entrada de audio de nivel de línea (CS-TIC) • 8 canales analógicos de salida de audio de nivel de línea (CS-TOC) • 8 entradas de contacto de control • 1 salida de contacto de control general • 1 Ethernet puerto de comunicación serie El sistema ControlSpace AMS-8 se puede ampliar mediante interfaces de usuario adicionales, tarjetas opcionales y interfaces de comunicación. ® Interfaces de usuario opcionales: CS-PP - Consola de mensajes ControlSpace AMS-8 Con la consola de mensajes ControlSpace AMS-8 se pueden activar mensajes pre-grabados y en tiempo real (voz) en un grupo de zonas seleccionadas. ® Español ® CS-WC - Controlador de pared ControlSpace AMS-8 Con el controlador de pared ControlSpace AMS-8 se puede seleccionar el canal y ajustar de manera local el volumen de la señal de audio. ® ® CS-LIM - Módulo de entrada local ControlSpace AMS-8 El módulo de entrada local ControlSpace AMS-8 permite añadir una fuente local (línea o micrófono) al sistema. ® ® CS-RC - ControlSpace AMS-8 Control Remoto El ControlSpace AMS-8 Control Remoto (Infrarojos) permite el control a distancia del controlador de pared (Wall Controller) hasta 5 metros de distancia. ® ® Tarjetas opcionales: CS-TIC - Tarjeta de entrada dual ControlSpace AMS-8 Se pueden añadir hasta cuatro tarjetas de entrada dual ControlSpace AMS-8 por unidad para proporcionar un aumento de entradas de analógicas audio de 8 líneas. ® ® Conexión de audio CS AMS-8 La conexión de audio ControlSpace AMS-8 posibilita la conexión hasta diez unidades. Audio link cables también son necesarios. ® 103 4. Opciones de ampliación CS-MSC - Tarjeta de almacenamiento de mensajes ControlSpace AMS-8 Esta tarjeta ocupa una ranura de la CS-TIC (tarjeta de entrada) y permite almacenar los mensajes grabados y activarlos mediante el botón adecuado en la consola de mensajes, vía programador de eventos o los contactos GPIO. El software incluido permite configurar el CS-MSC o grabar los mensajes. ® CS-DIC ControlSpace AMS-8 Digital Input Card La tarjeta de entrada digital pude ser usada para añadir una entrada estéreo digital y como entrada donde se necesite unir la señal de las tarjetas CS-MSC, CS-TTC ó CS-DIC de un Rack a otro. ® CS-TTC ControlSpace AMS-8 Twin Tuner Card El sintonizador Twin pude ser utilizado como un sintonizador estéreo o dos mono. ® Optional communication interfaces: CS-SCI ControlSpace Serial Code Interface Este módulo permite mediante códigos serie enviados desde sistemas de control como Crestron/AMX, el control del sistema AMS-8. El CS-SCI también dispone de 16 salidas programables de colector abierto (cada pareja a una zona). Cada salida se puede activar cuando una sala está operativa o cuando se esta emitiendo un mensaje de paging (ej. Prioridad de potenciómetros para línea de 100V). Español English ® CS-HUB ControlSpace RS485 comunicación Hub RS485 comunicación hub (CS-HUB). Permite crear redes de conexión en estrella y conectar hasta 5 paneles de control o consolas de mensajes (CS-WC/CS-PP). También se pueden utilizar para unir a grandes distancias unidades AMS-8 y/o Serial Code Interfaces, paneles de control y consolas de mensajes (cnectados a un bus de comunicación RS485 single). ® 104 5. Actualizar a ControlSpace AMS-8 II system ® 5. Actualizar a ControlSpace AMS-8 II system ® 1)Comprobar en el arranque la versión de firmware, que es mostrada en el panel de la unidad AMS-8 cuando arranca. Proceder con las instrucciones abajo indicadas, solo es posible si la versión de Firmware es V2.116 o superior. Si esta es inferior, la unidad solo puede ser actualizada en fabrica. 2) Conectar todos los AMS-8 del sistema (10 máx.) usar la conexión racklink (ver apartado 3.5) 3)Asegurarse de que los puentes de terminación están colocados en la tarjetas de comunicación del primero y el último AMS-8 (los jumpers de los demás bastidores no deben estar colocados) 4)Colocar cada AMS-8 en on, pulsando los botones de navegación UP y RIGHT al mismo tiempo. Esta acción activará el modo de arranque (Bootloader). 5)Seleccionar ‘Master’ en la primera unidad AMS-8 del sistema. Seleccionar el numero de unidades AMS-8 Ej.: “Nº. de Racks: 10” 6) Todos los rack añadidos serán esclavos empezando por el 2, 3, 4, 5 …. hasta 10. Ej.: ”Select rack Nº: 2” Español 7)Notificar la ‘live-mask’ mostrada en el panel LCD. Indica el numero de Racks AMS-8 que están instalados y conectados en el sistema. Live-mask se mostrará como sigue: ”Racks: 00000011 11111111”, indica que el sistema consta 10 rack AMS-8 instalados. 8)Desde este momento ya se han detectado las unidades esclavas, seleccionar ‘Finish’ en la unidad maestra. Estará temporalmente ajustando la configuración del modo de arranque (bootloader). 9) Conecte su ordenador al rack maestro y arranque el Bootloader Multi-Installer software 10) Cargar el ultimo firmware en las unidades AMS-8 11) Esperar a que la actualización de todas las unidades halla terminado. 12)Ajustar el 1er (superior) rack a ”Rack-1 Mst” (master) introducir otra vez la cantidad de racks esclavos (si fuera necesario, repetir el paso 4 de nuevo) 13) Ajustar cada rack esclavo con su numero (”Rack-2” o superior), ver paso 5 14) Reiniciar todos los racks, apagar y encender las unidades 15)Realizar un Total Factory Restore (seleccionando esta opción en el menú de instalación) en el rack maestro y esperar hasta que la actualización de la memoria flash haya terminado (mostrado como: “Updating flash 202”) 16)Reiniciar los racks de nuevo (para implementar los nuevos datos y ajustes en la memoria flash), apagar y encender las unidades de Nuevo. 17) Actualizar las curvas de EQ de los altavoces Bose con el Live Installer Software 18) Actualizar a ControlSpace AMS-8 II system ha terminado ® Usar el Live Installer Software o el panel LCD + los botones de navegación para las unidades AMS-8. Si fuera necesario conservar los archivos antiguos guardar los archivos BDF (Bose Data Files) antes de actualizar, ya que estos se perderán y nunca podrán ser usados dentro de las unidades AMS-8 (debido a los nuevos ajustes de la memoria Flash). Sin embargo, después de que la unidad haya sido reconfigurada, los nuevos archivos BDF pueden ser guardados y abiertos para ser usados en otros sistemas ControlSpace AMS-8 II. ® 105 6. Solución de problemas 6. Solución de problemas Sin alimentación Conecte el cable de alimentación y enciénda la unidad. Encendido, pero sin sonido Compruebe que haya señal de entrada desde la fuente. Compruebe que haya señal de salida. Si hay una señal de entrada, pero no de salida, puede que se deba a que el ControlSpace esté silenciado o a que los niveles de salida estén bajos. ® Encendido, pero con sonido bajo Compruebe que el indicador de entrada de audio está en verde. Si está apagado, aumente la salida de la fuente o la ganancia de entrada. Español English Si los indicadores de entrada y salida de audio están en verde, compruebe que hay ganancia suficiente en el amplificador y compruebe los niveles de salida. Sonido distorsionado Si la señal de fuente de entrada está limpia cuando entra en el sistema CS AMS-8, compruebe que no se esté saturando los altavoces y que estos no estén dañados. Sonido poco natural Compruebe que se emplea el ecualizador de altavoz adecuado y/o el divisor de frecuencias en el camino de la señal. Asegurarse de que la señal no entra distorsionada / muy alta de nivel. Encendido, pero sin sonido en una o más zonas Compruebe todas las conexiones del soporte del sistema CS AMS-8. Compruebe que el amplificador funciona correctamente y que las ganancias se han ajustado de manera apropiada. Compruebe la configuración predeterminada y de volumen máximo de la habitación en el Live software de instalación o en el soporte del sistema. Comprobar si los presets Events o Room Combining están activados. 106 Sin mensaje/timbre del software de usuario Compruebe el cableado entre la tarjeta de sonido del ordenador, el micrófono y el sistema. Compruebe la configuración de control del volumen del propio ordenador. Sin control/comunicación del CS-WC/CS-PP Compruebe el cableado entre el CS-WC/CS-PP y el sistema. En el menú de configuración de habitación en el sistema, se muestra el estador del controlador de pared. Si muestra “WC-”, significa que no hay comunicación con el controlador de pared específico. Asimismo, compruebe la dirección del controlador de pared y asegúrese de que corresponde con el número correcto de habitación. Sin comunicación/control entre el ordenador y el soporte del sistema AMS-8 al usar el software de instalación Verifique el cable de Ethernet. Asegúrese de que el software de instalación indica que la conexión INETGui está en línea. No hay señal desde un módulo de entrada local configurado en mono Asegurarse de que el cable de señal esta conectado de forma correcta en la salida LEFT del Local Imput Module CS-LIM. La señal de audio en la salida baja cuando conectamos una fuente de señal con nivel muy alto Asegurarse de que la ganacia de entrada esta ajustada a 0dB. Un nivel constante de señal a 3dB puede mutear las entradas. Ej.: Para un CD con una nivel de salida de +6dB, la ganacia de entrada deberia ser bajada por lo menos 3dB (preferentemente 6dB). El Led indicador de hablar en la consola de mensajes se ilumina entre rojo y verde Nos indica que hay un problema de comunicación. Comprobar el cable de comunicación con el AMS-8. Asegurarse que el jumper de terminacion esta colocado en la última consola. No hay señal de paging desde la consola de mensajes Comprobar la conexion entre el AMS-8 y la CS-PP. comprobar los ajustes de router en el Live Installer Software o en la unidad AMS-8 (usando la pantalla LCD y los botones de navegación). 7. Especificaciones técnicas 7. Especificaciones técnicas Entradas: Tipo: 8x análogo (hasta 16), nivel de línea desbalanceada y balanceada electrónicamente Conectores: RCA y Euro block de 3 patillas Sensibilidad de entrada: de -30 dBu a +14 dBu Impedancia: 50 K Ohmios Nivel de clip de entrada: +14 dBU Resolución digital: 24 bits Salidas: Ttipo: 8x analógico, nivel de línea desbalanceada y balanceada electrónicamente Conectores: RCA y Euro de 3 patillas Impedancia: 150 Ohmios Nivel de salida máximo: 18 dBu balanceado, 12 dBu desbalanceado Control de graves/agudos: +/-12dBu, en tramos de 1 dB Resolución digital: 24 bits Español Procesamiento de la señal: Tipo: punto flotande de 48 bits, procesadores de señal digital Tasa de muestreo: 96 kHz Latencia de audio: <1 ms Retardo: 10 ms, en tramos de 0,05 ms Respuesta de frecuencia: 20 Hz a 20 kHz (+0 dB,-0.3 dB) THD: <0,007% (A-balanceado, 0 dBu entrada/0 dBU salida) Separación de canales: >103 dB @ 1 kHz, 0 dBu Relación señal/ruido: >100 dB, A-balanceado, THD<0.02%, entrada/salida balanceado >100 dB, A-balanceado, THD<0.02%, entrada digital y salida analógica 110dB, A-balanceado, THD <0,02 %, entrada analógica / salida digital 140dB, A-balanceado, THD <0,02 %, entrada / salida digital Eléctricas: Tensión de alimentación Consumo eléctrico Tamaño (alt. x ancho x profund. en mm) Peso CS AMS-8 90 - 264 V CA (47-63 Hz) 37 W máx. 88 x 485 285 4,5 kg CS-WC 12 - 24 V CC 0,7 W máx. 80 x 115 x 48 0,12 kg CS-LIM 24 V CC 1,5 W máx. 80 x 115 x 48 0,12 kg CS-PP 12 - 24 V CC 1,7 W máx. 43 x 210 x 212 1,5 kg Medioambientales: Temperatura de funcionamiento: entre 0˚C y 50˚C Humedad: 80% de humedad relativa (sin condensación) 107 Anexo A. ControlSpace AMS-8 ejemplos de sistemas ® Anexo A. ControlSpace AMS-8 ejemplos de sistemas ® ControlSpace AMS-8 systema con 80 zonas ® Español English SCI HUB 108 Anexo A. ControlSpace AMS-8 ejemplos de sistemas ® Anexo A. ControlSpace AMS-8 ejemplos de sistemas ® ControlSpace AMS-8 sistema con múltiples consolas de mensajes ® o Español ControlSpace AMS-8 sistema con múltiples paneles de control y una sala de reunión ® Zone 1 Zone 5 Zone 6 Zone 2 Zone 7 Zone 3 Zone 4 Zone 8 109 Anexo B. Cajas de montaje para paneles de usuario Anexo B. Cajas de montaje para paneles de usuario Caja montaje empotrado Caja para montaje empotrado de los paneles de control ControlSpace AMS-8 y ControlSpace AMS-8 Módulo dde entrada local (Local input module). Dimensiones (AlxAnxF): 7,1 x 10,6 x 5,2 cm ® ® Caja montaje superficie Caja para montaje en superficie de los paneles de control ControlSpace AMS-8 y ControlSpace AMS-8 Módulo dde entrada local (Local input module). Dimensiones (AlxAnxF): 8,0 x 11,4 x 4,6 cm ® ® Caja montaje empotrado predes prefabricadas Caja para montaje empotrado en paredes prefabricadas de los paneles de control ControlSpace AMS-8 y ControlSpace AMS-8 Módulo dde entrada local (Local input module). Dimensiones (AlxAnxF): 6,6 x 12,4 x 5,2 cm Español English ® Consola de Mensajes Use estas dimensiones cuando instale la consola en un mostrador o pared. Coloque un conector hembra XLR junto a la consola para cubrir la necesidad de conectar el micrófono sacando la conexión del panel, prestar atención al cableado y quitar cualquier funte de alimentacion para evitar corto-circuitos mientras se realize el montaje. 110 Español 111 Oficinas de venta en Europa Información de contacto de las oficinas de venta en Europa Austria Professional Systems Division, Austria Bose Ges.m.b.H., Business Park Vienna Wienerbergstrasse 7, 10 O.G. 1100 Wien, Österreich Teléfono: 01-60404340 Fax: 01-604043423 Bélgica Professional Systems Division, Belgium Bose N.V., Limesweg 2 3700 Tongeren, België Teléfono: 012-390800 Fax: 012-390840 Español English Dinamarca Professional Systems Division, Denmark Bose Danmark A/S, Industrivej 7 PO Box 14, 2605 Brøndby, Danmark Teléfono: 43437777 Fax: 43437818 Francia Professional Systems Division, France Bose S.A., 12 rue de Témara 78100 Saint Germain en Laye Teléfono: 01-30616363 Fax: 01-30616388 Alemania Professional Systems Division, Germany Bose GmbH, Max-Planck-Straße 36, 61381 Friedrichsdorf, Deutschland Teléfono: 06172-7104-0 Fax: 06172-7104-19 Irlanda Professional Systems Division, Ireland Bose GP, Castleblayney Road Carrickmacross, County Monaghan Republic Of Ireland Teléfono: 042-9661988, Fax: 042-9661998 Italia Professional Systems Division, Italy Bose SpA, Via della Magliana 876 00148 Roma, Italia Teléfono: 066-5670802, Fax: 066-5680177 112 Holanda Professional Systems Division, The Netherlands Bose B.V., Nijverheidstraat 8 1135 GE Edam, Nederland Teléfono: 0299-390139 Fax: 0299-390109 Noruega Professional Systems Division, Norway Bose Filial till Bose A/S Danmark, Lerkev 58 2209 Kongsvinger, Norge Teléfono: 062-821560 Fax: 062-821569 Suiza Professional Systems Division, Switzerland Bose AG, Hauptstrasse 134 4450 Sissach, Sweiz Teléfono: 061-9757733 Fax: 061-9757744 España Gaplasa S.A. Avda. Ingeniero Conde de Torroja 25 28022 Madrid, España Teléfono: 91 748 29 60 Fax: 91 329 16 75 Suecia Professional Systems Division, Sweden Bose, filial till Bose A/S Danmark Johannefredsgatan 4, 43153 Mölndal, Sverige Teléfono: 031-878850 Fax: 031-274891 Reino Unido Professional Systems Division, United Kingdom Bose Ltd., 1 Ambley Green Gillingham Business Park Gillingham, Kent ME8 0NJ, England Teléfono: 0870-741-4500 Fax: 0870-741-4545 Polonia Bose Sp. z o.o. Galeria Mokotów ul. Wołoska 12 02-675 Warszawa Teléfono: (22) 852 2928 Fax: (22) 852 2927 Le fabricant se réserve le droit de modifier les spécifications contenues dans ce manuel sans préavis. Table des matières 1. Informations de sécurité Informations de sécurité importantes 116 Déclaration de conformité 118 2. Introduction 119 3. Installation du système 120 3.2 Panneau arrière du ControlSpace AMS‑8 121 3.3 Configuration du clavier mural 122 3.4 Connexion des interfaces utilisateur 123 3.5 Architecture du système 124 3.6 Connexion du clavier mural 127 3.7 Connexion de la plaque murale d’entrée 127 3.8 Connexion du pupitre d’appel 128 3.9 Entrées/sorties GPIO 129 3.10 Connexion des entrées/sorties audio 130 ® ® 4. Composants système en option 131 5. Mise à jour vers un système ControlSpace AMS-8 II 133 6. Dépannage 134 7. Informations techniques 135 ® Annexe A. Exemples de systèmes ControlSpace AMS-8 136 Annexe B. Instructions de montage des interfaces utilisateurs 138 Services commerciaux européens 140 ® Français 3.1 Panneau avant du ControlSpace AMS‑8 1. Informations de sécurité 1. Informations de sécurité importantes Marquage de sécurité du produit Ces marquages de SÉCURITÉ se trouvent à l’arrière du produit. Le symbole représentant un éclair avec une flèche à l’intérieur d’un triangle équilatéral est utilisé pour prévenir l’utilisateur de la présence d’une tension électrique dangereuse non isolée à l’intérieur de l’appareil. Cette tension est d’un niveau suffisamment élevé pour représenter un risque d’électrocution. Le symbole représentant un point d’exclamation à l’intérieur d’un triangle équilatéral, tel qu’il figure sur le système, signale à l’utilisateur la présence d’instructions importantes relatives au fonctionnement et à l’entretien de l’appareil dans cette notice d’installation. Informations de sécurité importantes 1. Lisez ces instructions. 2. Veuillez les conserver pour référence ultérieure. 3. Respectez tous les avertissements figurant sur le produit. 4. Suivez toutes les instructions. 5. N’utilisez pas cet appareil à proximité d’eau ou d’une source d’humidité. 6. Utilisez uniquement un chiffon sec pour le nettoyage. Français English 7. Ne bloquez jamais les orifices d’aération. Suivez les instructions du fabricant pour l’installation. Pour garantir un fonctionnement fiable du produit et le protéger contre tout risque de surchauffe, installez‑le à un emplacement et dans une position permettant d’assurer une ventilation correcte. 8. Ne l’installez pas à proximité d’une quelconque source de chaleur, telle qu’un radiateur, une arrivée d’air chaud, un four ou tout autre équipement (notamment les amplificateurs) produisant de la chaleur. 9. Ne tentez pas de modifier les dispositifs de sécurité que constituent les fiches avec terre ou polarisées. Les fiches polarisées sont équipées de deux broches de largeurs différentes. Les fiches avec terre sont équipées de deux broches et d’un orifice permettant la mise à la terre. Ces deux types de dispositifs ont pour but d’assurer votre sécurité. Si la fiche fournie ne s’adapte pas à votre prise de courant, consultez un électricien pour qu’il remplace cette prise obsolète. 10. Protégez le cordon d’alimentation contre les risques de piétinement ou de pincement, notamment au niveau des fiches, des broches, etc. 11. Utilisez uniquement les accessoires spécifiés par le fabricant. 12. Utilisez uniquement le chariot, le support, le trépied, la fixation ou la table spécifié(e) par le fabricant ou vendu(e) avec l’appareil. Lorsque vous utilisez un chariot, faites attention à ne pas vous blesser en déplaçant l’ensemble chariot/appareil car celui‑ci risque de basculer. 13. D ébranchez cet appareil pendant les orages ou au cours des longues périodes de non‑utilisation afin d’éviter de l’endommager. 14. Confiez toute réparation à du personnel qualifié. Une réparation est nécessaire lorsque l’appareil a été endommagé de quelque façon que ce soit (endommagement du cordon d’alimentation ou de la fiche électrique, renversement d’un liquide ou de tout objet dans l’appareil, exposition de l’appareil à la pluie ou à l’humidité, mauvais fonctionnement, chute de l’appareil, etc.). N’essayez pas de réparer ce produit vous‑même. Le fait d’ouvrir ou de retirer un couvercle risque de vous exposer à des tensions dangereuses ou à d’autres dangers. Veuillez contacter Bose pour connaître les coordonnées du centre de réparation agréé le plus proche. 116 1. Informations de sécurité 15. Pour éviter tout risque d’incendie ou d’électrocution, ne surchargez pas les prises murales, les rallonges ou les prises multiples. 16. Ne laissez jamais d’eau ou d’objets pénétrer à l’intérieur du produit : des éléments sous tension pourraient être touchés ou il pourrait se produire un court‑circuit susceptible d’entraîner un incendie ou un risque d’électrocution. 17. Examinez les marquages de sécurité présents sur le boîtier du produit. 18. Ne placez jamais d’objets enflammés, tels que des bougies allumées, sur l’appareil. AVERTISSEMENT : afin de limiter les risques d’incendie ou d’électrocution, n’exposez pas le ControlSpace AMS‑8 à la pluie ou à l’humidité. ® AVERTISSEMENT : protégez l’appareil de tout risque de ruissellement ou d’éclaboussure. Ne placez pas d’objets contenant des liquides, tels que des vases, sur l’appareil. Comme avec tout appareil électronique, veillez à ne pas renverser de liquides sur aucune partie de l’appareil. Informations sur les produits générateurs de bruit électrique • Réorientez ou déplacez l’antenne de réception. • Augmentez la distance séparant le matériel du récepteur. • Connectez le matériel à une prise située sur un circuit différent de celui auquel est connecté le récepteur. • Consultez votre revendeur ou un technicien radio/TV expérimenté pour assistance. Français Ce matériel a fait l’objet de tests prouvant sa conformité aux limites imposées aux appareils numériques de classe A, conformément à la partie 15 des réglementations de la FCC. Ces limites sont conçues pour offrir une protection raisonnable contre les interférences nuisibles dans une installation résidentielle. Ce matériel génère, utilise et est susceptible d’émettre de l’énergie à fréquence radio. À ce titre, s’il n’est pas installé ou utilisé conformément aux instructions, il est susceptible de perturber les communications radio. Cependant, il n’est nullement garanti que de telles perturbations ne se produisent pas dans une installation donnée. Si ce matériel perturbe effectivement la réception de la radio ou de la télévision (ce qui peut être vérifié en allumant et en éteignant le matériel), vous êtes invité à tenter de remédier au problème en prenant une ou plusieurs des mesures ci‑dessous : REMARQUE : toute modification non autorisée du récepteur ou de la télécommande radio d’un produit Hi‑Fi risquerait d’annuler le droit de l’utilisateur à mettre en œuvre ce matériel. Ce produit est conforme aux spécifications de la réglementation. Les informations fournies dans cette notice d’utilisation ne comprennent pas l’ensemble des détails liés à la conception, à la production ou aux différentes variations de ce matériel. Elles ne couvrent pas non plus tous les problèmes susceptibles de survenir au cours de l’installation, de l’utilisation ou de la maintenance de ce matériel. Si vous avez besoin d’une aide dépassant le cadre de cette notice d’utilisation, veuillez contacter l’un de nos services commerciaux européens. Reportez‑vous à la section « Services commerciaux européens » à la dernière page de la présente notice d‘installation. 117 1. Informations de sécurité Déclaration de conformité Le fabricant de cet amplificateur déclare par la présente que ce produit, y compris ses accessoires, respecte les normes suivantes : Directive CEM 89/336/CEE (compatibilité électromagnétique) EN‑55103‑1 EN‑55103‑2 Directive 73/23/CEE sur les basses tensions EN‑60065:2002 7e édition Recommandations pour le montage en rack Le processeur de signaux audio nécessite deux unités (2U) de rack de 4,4 cm, avec une profondeur intérieure de 32,5 cm. Lors du montage, utilisez quatre vis avec rondelles pour éviter d’érafler le panneau avant. Choisissez de préférence des rondelles en caoutchouc néoprène car elles empêchent les vis de se dévisser lors de vibrations ou pendant le transport en maintenant leur tête. Attention : si l’unité est montée en rack et que vous transportez ce dernier, vous devrez soutenir l’arrière du processeur. Pour cela, vous pouvez placer une étagère sous l’arrière du processeur ou utiliser des équerres. Français English Consignes générales et ventilation Attention : placez l’appareil à l’abri de la chaleur et dans un endroit suffisamment aéré. Placez‑le à l’écart de sources de chaleur, comme les bouches de chauffage ou les radiateurs. Assurez‑vous que l’air circule librement à l’arrière, sur les côtés et sous l’appareil. Si l‘appareil est placé en‑dessous ou au‑dessus d’un amplificateur, vérifiez qu’une plaque 1U de ventilation est installée entre les 2 appareils. Veillez à ce que le châssis ne dépasse pas une température maximale de 50ºC lors de son utilisation. Rappelez‑vous que les conditions à l’intérieur d’un rack fermé sont susceptibles d’élever la température par rapport aux conditions ambiantes. Attention : assurez‑vous que les brins des fils sont torsadés et que le connecteur les enserre tous. Si un seul brin se défait et entre en contact avec la borne adjacente, il peut en résulter un court‑circuit. 118 2. Introduction 2. Introduction Introduction Le système de gestion audio Bose ControlSpace AMS‑8 est un processeur de signaux audio évolutif de grande qualité, destiné aux applications audio des restaurants, magasins, bars, bureaux, hôtels, salles de conférence, sites sportifs... L’unité principale inclut huit entrées et huit sorties ligne. Ses quatre emplacements libres permettent d’ajouter jusqu’à 8 entrées audio jusqu’à dix supplémentaires (2 entrées par carte). ® ® Pour un plus grand nombre de zones, il est possible de coupler racks AMS‑8 par système. Chaque rack supplémentaire ajoute 8 mono zones au système. Pour contrôler jusqu’à dix leur système ControlSpace AMS‑8, les utilisateurs ont le choix entre plusieurs interfaces utilisateur. ® Le logiciel Bose ControlSpace AMS‑8 Live Installer sert à concevoir les systèmes et à configurer le AMS‑8 ainsi que les interfaces utilisateur. Il s’exécute sur un PC et communiqué avec l’AMS-8 via une connexion Ethernet. ® ® Fonctionnalités • Architecture à cartes modulaire et évolutive • Huit (jusqu’à seize) canaux d’entrée niveau ligne analogiques • Huit canaux de sortie niveau ligne analogiques par rack • Huit entrées et une sortie de commande GPIO par rack • Processeur de signaux numériques (DSP) incluant : égalisation des enceintes Bose, égalisation dynamique, délai, commande de gain et sélection de sources • Possibilité de connexion de plaques murales d’entrée • Possibilité de connexion de pupitres d’appel • Possibilité d’envoyer des messages (nécessite la carte de stockage de messages) • Possibilité d’avoir des tuners (nécessite la carte double tuner) Français • Conception, configuration et gestion du système à l’aide de programmes logicielles pour PC • Commande par claviers muraux (télécommande infrarouge en option) • Détection automatique du type de cartes d’entrées • Possibilité de réaliser des couplages de salles • Possibilité de programmer des événements horaires • Ecran LCD et touches de navigation • Connectez les entrées et sorties audio au système ControlSpace AMS‑8. (Si vous possédez 2 racks ou plus : connectez les racks à l’aide de cartes et de câbles de couplage audio ainsi que les connexions entre les racks RS485 haut débit : voir aussi le chapitre 3.5). ® • Mettez le système ControlSpace AMS‑8 sous tension. Grâce aux paramètres par défaut, le système est immédiatement opérationnel. À chaque démarrage du système ControlSpace , les paramètres par défaut seront rappelés : le système utilisera donc la source et le niveau de volume par défaut, tels que définis dans le menu d’installation. ® ® REMARQUE : Pour mettre à jour les caractéristiques et les fonctions d’un système ControlSpace AMS-8, voir le chapitre 5. ® Abréviations CS‑WC Clavier mural ControlSpace AMS‑8 CS‑PP CS‑LIM CS‑TIC CS‑TOC CS-RC Pupitre d’appel ControlSpace AMS‑8 Plaque murale d’entrée ControlSpace AMS‑8 Carte double entrée ControlSpace AMS‑8 Carte double sortie ControlSpace AMS‑8 Télécommande infrarouge ContolSpace AMS-8 ® ® ® ® ® CS‑MSC Carte de stockage des messages ControlSpace AMS‑8 CS-DIC CS-TTC CS-HUB CS-SCI Carte d’entrée numérique ControlSpace AMS-8 Carte double tuner ControlSpace AMS-8 Répartiteur RS485 ControlSpace AMS-8 Interface de code série ControlSpace AMS-8 ® 119 3. Installation du système 3.1 Panneau avant du ControlSpace AMS‑8 ® 1 2 1. ÉCRAN LCD L’écran LCD affiche les menus de commande et les paramètres possibles pour chaque élément de menu. 2 . TOUCHES DE NAVIGATION Français English Vous pouvez faire défiler les éléments de menu à l’aide des touches Haut et Bas tandis que les touches Gauche et Droite vous permettent de modifier la valeur de l’élément de menu sélectionné. La touche OK sert à confirmer la sélection en cours. Par exemple, si l’élément de menu Exit est sélectionné (en surbrillance), le bouton OK permet de revenir au niveau de menu précédent. 120 3. Installation du système 3.2 Panneau arrière du ControlSpace AMS‑8 ® 5 3 7 9 11 15 13 1 4 5 3 7 5 9 4 5 3 8 1 8 7 Serial Number: Rack Link 2 1 PC Link ! Rack Link 1 1 CAUTION RISK OF ELECTRIC SHOCK DO NOT OPEN AVIS: Risque de chock électrique, ne pas ouvrir System Rack MODEL: 2 6 8 10 12 14 16 4 2 13 6 Audio Link Source Inputs 1 4 3 4 5 11 4 6 1 5 3 7 5 4 5 3 8 1 8 7 Bose Corporation, Framingham, MA01701-9168 Made in The Netherlands 2 4 9 Connecteur d’entrée Euroblock 3 3-pin Input Euro Blok Connector (Balanced line level)ligne symétrique) broches(niveau Serial Number: Connecteur d’entrée Euroblock 3 3-pin Input Euro Blok Connector (Balanced line level)ligne symétrique) broches(niveau 15 13 2 6 Rack Link 1 9 Rack Link 2 7 9 12 8 10 12 14 16 13 9 4 2 6 16 Audio Link Source Inputs Connecteur d’entrée RCA RCA Input Connector (Unbalanced level) (niveau lignelineasymétrique) Line Outputs 5 9 4 5 9 8 3 3 7 7 2 6 2 3 Sorties Line outputs ligne(1-8) (1-8) 6 1 CSCSTOC TOC 9 RCA Input Connector de sortie RCA Line inputs (1-16)Connecteur level) (Unbalanced (niveau lignelineasymétrique) 10 8 6 3 4 2 RS232 port pin out Straight shielded cable (20 meters max.) 2. TX 3. RX 5. GND DB9 Female 10 7 8 5 7 5 1 8 4 1 8 Bus 1 1 5 Bus 2 3 To CSPP/CSWC 1 AVIS: Risque de chock électrique, ne pas ouvrir System Rack MODEL: PC Link ! Slot for Audio Link Card to link the connected analog sources between Controlspace AMS-8 Emplacement pour carte de couplage audio, permettant de Audio Managment Systems. relier deux Systèmes de gestion audio ControlSpace AMS-8. Une carte de couplage audio est nécessaire uniquement dans le rack maître.card Ajoutez un câble de couplage audio RS-232 & GPIO pour quatre sources devant être reliées. I/O Link Connecteur d’entrée RCA RCA Input Connector (Unbalanced level) (niveau lignelineasymétrique) CAUTION 6 2 2 Emplacement Audio Link Cardpour slot carte de couplage audio CSCSTIC TIC RISK OF ELECTRIC SHOCK DO NOT OPEN 8 5 3 1 Line Outputs 2 1 Entrées ligne (1-16) Line inputs (1-16) 10 7 8 16 Bus 2 6 9 I/O Link 12 4 2 Bus 1 9 To CSPP/CSWC Bose Corporation, Framingham, MA01701-9168 Made in The Netherlands 6 Audio Link Card slot 3-pin Input Euro Connector Connecteur deBlok sortie Euroblock 3 RCA Input line Connector (Balanced level)ligne symétrique) broches(niveau (Unbalanced line level) 4 1 2 Slot for Audio Link Card to link the connected analog sources between Controlspace AMS-8 9 10 Audio Managment Systems. 3-pin Input Euro Connector Connecteur deBlok sortie Euroblock 3 3-pin Inputline Euro Blok Connector (Balanced level) broches(niveau ligne symétrique) (Balanced line level) Connecteur de sortie RCA RCA Input Connector 3-pin Input Euro Blok (Unbalanced lineasymétrique) level)Connector (niveau ligne RS-232 & GPIO card 7 8 5 6 3 4 1 2 (Balanced line level) 5 RCA Input Connector (Unbalanced line level) 9 4 Carte Ethernet et GPIO 4 5 9 RS-485 card 8 3 7 7 2 1 6 Line outputs (1-8) Pin 1: Contact 1 Pin 2: Contact 2 Pin 3: Contact 3 Pin 4: Contact 4 Pin 5: Contact 5 Pin 6: Contact 6 Pin 7: Contact 7 Pin 8: Contact 8 Pin 9: Output Pin 10: Common RS232 port pin out Straight shielded cable (20 meters max.) 8 4 3 Français CSTIC 3 2 1 6 2. TX 3. RX 5. GND Rack link 1 (high speed) CSTOC 9 7 5 Rack 2 (high speed) RCAlink Input Connector (Unbalanced line level) 3-pin&Input Euro Connector CS-WC CS-PP BusBlok 1 (low speed) (Balanced line level) Pin 1 : Contacto 1 Pin 3 : Contacto 3 Pin 4 : Contacto 4 Pin 5 : Contacto 5 8 DB9 Female 6 4 1 2 9 3-pin &Input Euro Connector CS-WC CS-PP BusBlok 2 (low speed) (Balanced line level) Brochage GPIO: RCA Input Connector Pin 2 : Contacto 2 (Unbalanced line level) 10 3 Pin 6 : Contacto 6 Pin 7 : Contacto 7 Pin 8 : Contacto 8 Pin 9 : Sortie Pin 10: Commun 10 7 8 5 6 3 4 1 2 Pin 1: Contact 1 Pin 2: Contact 2 Pin 3: Contact 3 Pin 4: Contact 4 Pin 5: Contact 5 Pin 6: Contact 6 Pin 7: Contact 7 Pin 8: Contact 8 Pin 9: Output Pin 10: Common RS-485RS-485 card 5 Carte Rack link 1 (high speed) Rack Link 1 (haut débit) Rack link 2 (high speed) Rack Link 2 (haut débit) CS-WC CS-PP Bus&1 CS-PP (low speed) Bus 1& CS-WC (bas débit) CS-WC CS-PP Bus&2 CS-PP (low speed) Bus 2& CS-WC (bas débit) 121 3. Installation du système 3.3 Configuration du clavier mural 1 1. ÉCRAN LCD 2 3 2. TOUCHES DE RÉGLAGE DU VOLUME 3. TOUCHES DE SÉLECTION DES CANAUX Avant de configurer le ControlSpace AMS‑8, il convient de sélectionner une adresse pour chaque clavier mural (1..8). Normalement, cette procédure est effectuée lors de la première connexion du clavier mural au rack système. Quelques secondes après la connexion du clavier mural au rack système, la version du firmware s’affiche sur l’écran LCD, suivi par “Select WC..”. Utilisez les touches de sélection des canaux pour sélectionner l’adresse appropriée et confirmez ce choix en appuyant sur la touche de réglage du volume (‑). Lorsque plusieurs claviers muraux sont utilisés pour contrôler la même zone, on doit sélectionner la même adresse sur ces claviers. ® Dans ce cas ces claviers doivent être connectés sur le même rack. Français English Si une adresse est déjà affectée au clavier mural, vous pouvez la modifier comme suit : 1. Mettez le clavier mural à l’arrêt (off) (appuyez sur la touche de sélection des canaux (‑) autant de fois que nécessaire jusqu’à ce que le clavier mural soit à l’arrêt) 2. Appuyez sur la touche de sélection des canaux (‑) et maintenez‑la enfoncée 3. Appuyez sur les touches de réglage du volume (+) et (‑) simultanément. (après que l’écran LCD ait affiché la version du firmware, il indique l’adresse actuelle, par exemple « WC2 »). À présent, vous pouvez utiliser les touches de sélection des canaux pour sélectionner l’adresse appropriée et confirmer ce choix en appuyant sur la touche de réglage du volume (‑) comme précédemment. Si le système se compose de deux racks ControlSpace AMS‑8 ou plus, ils utilisent tous les adresses (1..8). Les adresses 1..8 sont utilisées pour les canaux de sortie 1..8 du premier rack et pour les canaux de sortie 9..16 du second rack, et ainsi de suite jusqu’aux canaux de sortie 73..80 du dixième rack. ® Modification des paramètres d’une pièce à l’aide du clavier mural Vous pouvez régler les paramètres audio de la pièce où est installé le clavier mural à l’aide du menu caché de ce dernier. Suivez la procédure ci‑dessous pour entrer dans ce menu : 1. Mettez le clavier mural à l’arrêt (off) (appuyez sur la touche de sélection des canaux (‑) autant de fois que nécessaire jusqu’à ce que le clavier mural soit à l’arrêt) 2. Appuyez sur la touche de réglage du volume (‑) et maintenez‑la enfoncée 3. Appuyez simultanément sur les touches de sélection des canaux (+) et (‑) Les fonctions suivantes peuvent être configurées ou modifiées depuis le menu caché : a. canal par défaut b. niveau de graves c. niveau des aigus d. égalisation dynamique e. égalisation d’enceinte Bose f. niveau de volume maximal g. niveau de volume du pupitre d’appel h. délai i. niveau de volume par défaut Les touches de sélection des canaux permettent de faire défiler les éléments de menu tandis que les boutons de réglage du volume sont utilisés pour modifier les paramètres de l’élément sélectionné. 122 Pour quitter le menu caché, appuyez simultanément sur les touches de sélection des canaux (+) et (‑). 3. Installation du système 3.4 Connexion des interfaces utilisateur Clavier mural ControlSpace AMS‑8 Pupitre d’appel ControlSpace AMS‑8 Plaque murale d’entrée ControlSpace AMS‑8 Tension 12‑24 VDC, +/‑20 % 12‑24 VDC, +/‑10 % 24 VDC, +5 %/‑10 % Courant @ 12 VDC 50 mA typ. @ 24 VDC 30 mA typ. @ 12 VDC 140 mA typ. @ 24 VDC 70 mA typ. @ 24 VDC 60 mA typ. Alimentation électrique recommandée* Alimentation BOSE CS AMS‑8 24 VDC, 2,7 A stabilisés Alimentation BOSE CS AMS‑8 24 VDC, 2,7 A stabilisés Alimentation BOSE CS AMS‑8 24 VDC, 2,7 A stabilisés Distance maximale (/avec CS-HUB) 600 m (1200m) 600 m (1200m) Non applicable Terminaison*** 120 Ohm 120 Ohm Non applicable Type de câble 1 paire torsadée blindée 1 paire torsadée blindée Non applicable Cap. nom. 40 pF/m Cap. nom. 40 pF/m Non applicable Imp. nom. 124 Ohm Imp. nom. 124 Ohm Non applicable Att. nom. 2 dB @ 1 MHz Att. nom. 2 dB @ 1 MHz Non applicable Câble recommandé Câble de communication/ d’alimentation (bleu) BOSE CS AMS‑8 pour CS‑WC/CS‑PP Câble de communication/ d’alimentation (bleu) BOSE CS AMS‑8 pour CS‑WC/CS‑PP Non applicable Câblage audio Non applicable Câble microphone/ligne standard, 1 paire avec blindage Câble audio/ d’alimentation (jaune) Bose CS AMS‑8 pour CS‑LIM ® ® ® Alimentation électrique Câblage RS485** Français * Remarque : si l’alimentation mentionnée ci‑dessus n’est pas utilisée, toute alimentation utilisée en Europe doit être conforme à la norme EN/IEC 60950. ** Câblage RS485 requis Connectez toujours les composants en chaîne (plutôt qu’en étoile ou toute autre configuration). Le câblage en étoile est autorisé uniquement avec l’utilisation du CS-HUB. Veillez à séparer le câble de données des câbles de puissance (>50 V) dans le chemin de câbles ou toute autre solution de câblage. *** Terminaison Le cavalier de terminaison doit être placé sur la dernière interface utilisateur (CS‑WC ou CS‑PP), située à l’extrémité de chaque ligne de communication RS485. Câble de communication/d’alimentation CS AMS‑8 4 1. Bleu = communication RS485 ‘+’ 5 2. Transparent = communication RS485 ‘–’ 6 3 1 2 1 Câble audio/alimentation CS AMS‑8 2 3. Drain de masse = communication RS485 ‘GND’ 1. Jaune = câble ligne symétrique (blindé) 4. Rouge = alimentation ‘+ 24 V’ 2. Vert = câble ligne symétrique (blindé) 5 5. Noir = alimentation ‘‑ 24 V’ 6. Gaine bleue 3. Rouge = alimentation ‘+ 24 V’ 4. Noir = alimentation ‘‑ 24 V’ 5. Gaine jaune 3 4 123 3.5 Architecture du système Deux lignes de communication RS485 et une alimentation centrale : 600 m max. (longueur totale) Câble audio/microphone * RS-485 RS-485 Câble audio/microphone Alimentation 24VDC 2,7A * Entrée 24 VDC Deux lignes de communication RS485 et alimentations locales : 600 m max. (longueur totale) Câble audio/microphone Bloc d’alimentation * RS-485 Français English RS-485 * Bloc d’alimentation Bloc d’alimentation RS485 la distance maximale : 600 m 600 m Ou 600 m 600 m RS485 HUB 600 m REMARQUE : * Le cavalier de terminaison doit être placé sur la dernière interface utilisateur (CS‑WC ou CS‑PP), située à l’extrémité de chaque ligne de communication RS485. D’autres exemples de systèmes se trouvent en Annexe A. 124 3. Installation du système Ajouter d’autres racks ControlSpace AMS-8 pour obtenir un système aillant jusqu’à 80 zones audio ® Des Cartes de couplage audio sont nécessaires. Le nombre de câbles de couplage audio à utiliser dépend du nombre de sources connectées (incluant les pupitres d’appel et des cartes tuners internes). Un câble de couplage audio est nécessaire pour relier jusqu’à quatre sources. Pour chaque rack ajouté, utiliser un câble de communication (2 conducteurs blindés) pour relier la connexion “Racklink 1 ou 2” du rack ajouté à une connexion “Racklink” libre du précédent rack installé.Assurez-vous que les cavaliers de terminaison de ligne sont placés uniquement sur la carte de communication RS485 du premier et du dernier rack AMS-8. Remarque 1: Pour relier le signal numérique d’une carte de stockage de messages, d’une carte d’entrée numérique ou le signal numérique (à la place de l’analogique) d’une carte double tuner, on doit ajouter une carte d’entrée numérique et un câble coaxial (RCA-RCA) par rack supplémentaire. Remarque 2: Seulement 1 port Ethernet peut être utilisé au sein d’un réseau physique. L’utilisation de VLAN ou d’autres source de réseaux virtuels n’est pas autorisé. Utilisez le menu système ‘Rack Installation’ pour la configuration du maître et esclave: Français 125 3. Installation du système Rack 1 (Master) ! CAUTION RISK OF ELECTRIC SHOCK DO NOT OPEN AVIS: Risque de chock électrique, ne pas ouvrir System Rack MODEL: Serial Number: Bose Corporation, Framingham, MA01701-9168 Made in The Netherlands 9 1 4 4 3 2 1 1 1 3 2 5 6 6 6 6 10 7 8 5 6 3 4 1 2 7 8 2 1 1 3 1 Rack 2 (Slave) ! CAUTION RISK OF ELECTRIC SHOCK DO NOT OPEN AVIS: Risque de chock électrique, ne pas ouvrir System Rack MODEL: Serial Number: Bose Corporation, Framingham, MA01701-9168 Made in The Netherlands 9 1 1 4 1 1 1 1 1 4 4 5 6 6 6 6 8 5 6 3 4 1 2 7 8 1 3 2 2 Français English 4 10 7 2 1 1 2 1 1 3 Rack 10 (Slave) CAUTION RISK OF ELECTRIC SHOCK DO NOT OPEN ! AVIS: Risque de chock électrique, ne pas ouvrir System Rack MODEL: Serial Number: Bose Corporation, Framingham, MA01701-9168 Made in The Netherlands 9 3 3 3 3 3 1 1 1 5 6 6 6 6 1 Digital coax cable (75 Ohm) 2 CS-AMS-8 Link cable 1 3 RS485 communication cable (120 Ohm - 200m Max) 3 Digital Input Card 10 7 8 5 6 3 4 1 2 7 8 Twin Input Card 2 Message Storage Card 4 Twin Tuner Card 5 Audio Link Card 6 Twin Output Card 7 PC Link - I/O Link 8 RS485 Communication (High/Low speed) 126 3. Installation du système 3.6 Connexion du CS‑WC et réglages 1 2 3 4 1. Cavalier de terminaison, voir la REMARQUE du chapitre 3.5 2.Connecteur RS485 3.Connecteur d’alimentation (12-24V continu) 4. Connecteur de mise à jour du firmware REMARQUE: Voir Annexe B, pour les instructions de montage des plaques murales 3.7 Connexion du CS‑LIM et réglages 5 4 3 Français 2 1 1.Le CS‑LIM est équipé d’un réglage de gain du microphone, il est également accessible en façade en utilisant un tournevis de taille “0”. Tournez le réglage dans le sens inverse des aiguilles d’une montre (vu de la façade) pour réduire le gain à un minimum de 32 dB. Tournez‑le dans le sens des aiguilles d’une montre pour augmenter le gain à un maximum de 66 dB. Le réglage de gain d’origine est de 38 dB. 2.Pour passer le CS‑LIM de stéréo en mono, ce cavalier doit être mis en place. En configuration mono, le câble audio doit être connecté à la sortie LEFT. 3.Pour activer l’égalisation voix (optimisée pour la parole) de l’entrée du microphone, le cavalier doit passer de FLAT à VOICE . voice flat = réponse plate voice flat = égalisation voix 4.Connecteur de sortie ligne stéréo symétrique. 5.Connecteur d’alimentation (24V continu). REMARQUE: Voir Annexe B, pour les instructions de montage des plaques murales. 127 3.8 Connexion du CS‑PP et réglages 3 7 2 7 1 6 4 Français English 5 8 Le CS‑PP est équipé d’une égalisation voie, d’un réglage de gain du microphone et d’un réglage de gain du carillon (signal d’annonce). Pour régler les deux gains et connecter le CS‑PP, il convient de retirer le cache en plastique (en haut de la plaque frontale du CS‑PP) et les 4 vis, puis de sortir la plaque frontale du boîtier. Les deux réglages sont situés en bas du panneau. REMARQUE : Assurez-vous de ne pas réaliser de court circuit, sur les connexions ou les composants électroniques. 1. Gain du microphone : tournez le réglage dans le sens inverse des aiguilles d’une montre pour réduire le gain à un minimum de 32,6 dB. Tournez‑le dans le sens des aiguilles d’une montre pour augmenter le gain à un maximum de 60,1 dB. Le réglage de gain d’origine est de 38 dB. 2. Gain du carillon : utilisez le réglage pour augmenter ou réduire le niveau du signal du carillon. 3. Cavalier de terminaison, voir la REMARQUE du chapitre 3.5. 4. Connecteur RS485. 5. Connecteur d’alimentation, 12-24V continu (seulement 2 des 3 bornes sont utilisées). 6. Connecteur de sortie ligne symétrique. 7. Connecteur de mise à jour firmware 8. Connecteur XLR pour microphone avec alimentation fantôme 22V continu 128 3.9 Entrées/sorties GPIO à usage général Le ControlSpace inclut une carte GPIO/RS232 (voir également le chapitre 3.2). Jusqu’à 40 contacts GPIO (8 par rack, sur 5 rack au maximum) peuvent être utilisés pour déclenchés jusqu’à: 40 messages ou 40 presets de couplage de salles ou muter différentes ou toutes les sorties. Les contacts sont déclenchés en appliquant 24 VDC entre le contact spécifique et la broche de masse commune. ® NOTE : Un contact à Impulsion déclenchera la lecture d’un message une fois. Un contact maintenu répétera le message jusqu’à ce que celui-ci soit relâché. Un contact maintenu est nécessaire pour activer le couplage de salles (room combining) ou le mode de veille (le relâchement de ce contact désactivera ces deux fonctions). Caractéristiques • 8 entrées isolées • 1 sortie isolée • Les entrées peuvent être utilisées pour le déclenchement de messages, le couplage de salles, muter une sortie ou un groupe de sorties (celles-ci retournent à leurs valeurs par défaut après un mute) • La sortie collecteur ouvert est activée lorsqu’une des huit entrées est activée Schéma de câblage des 8 contacts d’entrée CS-AMS-8 CS-AMS-8 Français 1..8 + 24 Vdc - 10 Schéma de câblage de la sortie collecteur ouvert CS-AMS-8 CS-AMS-8 9 Open collector Max. 50mA + 24 Vdc - 10 129 3. Installation du système 3.10 Connexion des entrées et sorties audio Les sources audio peuvent être connectées aux entrées et sorties ligne symétriques et asymétriques à l’aide des types de câble suivants : Connecteur source Entrées et sorties audio du ControlSpace AMS‑8 ® RCA S T+ T S- ⊥ + ⊥ L R XLR 1 2+ 2 + ⊥ 1 ⊥ Français English 3 3- L R Fiche Jack (symétrique) T R S⊥ S + ⊥ T+ L R- R Fiche Jack (asymétrique) T S + ⊥ T+ L S-⊥ R S S T T+ S- ⊥ L R 130 4. Extensions en option 4. Composants système en option Le ControlSpace AMS‑8 standard inclut : ® • 8 canaux d’entrée audio analogiques niveau ligne (CS‑TIC) • 8 canaux de sortie audio analogiques niveau ligne (CS TOC) • 8 entrées de contact GPIO et • 1 sortie de contact GPIO • 1 port de communication Ethernet Il est possible d’étendre le système ControlSpace AMS‑8 avec des interfaces utilisateur supplémentaires, des cartes en option et des interfaces de communication. ® Interfaces utilisateur en option CS‑PP ‑ Pupitre d’appel ControlSpace AMS‑8 Avec le pupitre d’appel ControlSpace AMS‑8, des messages (vocaux) préenregistrés et en temps réel peuvent être diffusés à un groupe de zones sélectionné. ® ® CS‑WC ‑ Clavier mural ControlSpace AMS‑8 Le clavier mural ControlSpace AMS‑8 permet de sélectionner le canal et de régler le volume du signal audio en local. ® ® Français CS‑LIM ‑ Plaque murale d’entrée ControlSpace AMS‑8 La plaque murale d’entrée ControlSpace AMS‑8 permet d’ajouter une source locale (ligne ou microphone) au système. ® ® CS-RC - Télécommande infrarouge ControlSpace AMS-8 La télécommande infrarouge ControlSpace AMS-8 permet un contrôle facile des claviers muraux CS-WC jusqu’à une distance de 5m. ® ® Cartes en option CS‑TIC ‑ Carte double entrée ControlSpace AMS‑8 Il est possible d’ajouter jusqu’à quatre cartes double entrée ControlSpace AMS‑8 par rack pour obtenir 8 canaux d’entrée audio analogiques niveau ligne supplémentaires. ® ® Carte de couplage audio CS AMS‑8 La carte de couplage audio ControlSpace AMS‑8 permet de relier deux racks. Des câbles de couplage audio sont également nécessaires. ® 131 4. Extensions en option CS‑MSC ‑ Carte de stockage des messages ControlSpace AMS‑8 La carte de stockage des messages occupe un emplacement CS‑TIC (carte d’entrée). Elle permet de stocker des messages préenregistrés et de les activer à l’aide du bouton approprié sur le pupitre d’appel, via un événement horaire ou via les contacts GPIO. Un logiciel de configuration de la carte CS-MSC et d’enregistrement de messages est inclus. ® CS-DIC - Carte d’entrée numérique ControlSpace AMS-8 La carte d’entrée numérique peut être utilisée pour connecter un signal d’entrée numérique stéréo. Elle est également nécessaire pour relier, une CS-MSC, CS-TTC ou une CS-DIC à un autre rack. ® CS-TTC - Carte double tuner ControlSpace AMS-8 La carte double tuner peut être utilisé pour ajouter 1 tuner stéréo ou 2 tuners mono au système. ® Interfaces de communication optionnels CS-SCI -Interface de code série ControlSpace L’interface de code série convertit les codes séries provenant ou allant à des appareils de type Crestron/AMX pour contrôler AMS-8. Le CS-SCI comporte également 16 sorties collecteur ouvert programmable (chacune couplée à une seule salle). Chaque sortie peut être activée lorsque la salle correspondante est active ou lorsque un appel est envoyé dans cette salle (exemple: pour le rétablissement des atténuateurs 100V). Français English ® CS-HUB - Répartiteur de communication RS485 ControlSpace Le répartiteur de communication RS485 peut être utilisé pour créer un réseau en étoile pour connecter jusqu’à 5 interfaces utilisateurs (CS-WC / CS-PP). Il peut également être utilisé pour allonger la distance entre l’AMS-8 et l’interface de code série, des claviers muraux ou des pupitres d’appel (connectés à un bus de communication RS485 unique). 132 5. Mise à jour d’un système ControlSpace AMS-8 ® 5. Mise à jour d’un système ControlSpace AMS-8 ® 1) Vérifié la version de la séquence de chargement du firmware, qui est indiqué sur l’afficheur de l’AMS-8 lorsque celui-ci est mis sous tension. Suivez les étapes ci-dessous seulement si la version de la séquence de chargement du firmware est V2.116 ou supérieur. Si celle-ci est inférieur, la mise à jour doit être réaliser par une personne de Bose. 2) Connectez toutes les unités AMS-8 du système (10 au maximum) en utilisant la connexion “racklink” (voir chapitre 3.5) 3) Assurez-vous que les cavaliers de terminaisons sont en place, sur les cartes de communications RS485, seulement sur le premier et le dernier AMS-8 du système (tous les autres cavaliers doivent être retirés). 4) Mettez sous tension chaque unité AMS-8, tout en appuyant simultanément sur les touches de navigation haute et basse. Cette action active la sequence de chargement. 5) Sélectionnez “Master” sur la première unité AMS-8 du système. Sélectionnez le nombre de racks approprié sur l’unité AMS-8 maitre, exemple: “Nr. of Racks: 10” 6) Chaque rack additionnel sera esclave “Slave” avec un numéro commencent à 2, 3, 4, 5.....jusqu’à 10. 7) N otez le “live-mask” indiqué en bas de l’afficheur graphique. Ceci indique le nombre de racks AMS-8 installés et connectés. Ce “Live-Mask” est affiché comme suis: “Racks: 00000011 11111111”, qui indique que 10 racks AMS-8 sont installés. 8) Dès que les unités esclaves ont été détectées, sélectionnez “finish” sur l’unité maitre. Ceci démarre (temporairement) la configuration de la sequence de chargement. 9) Connectez un ordinateur sur le rack maitre et lancez le logiciel “Bootloader Multi-Installer”. Français 10) Chargez le (dernier) firmware dans les unités AMS-8. 11) Attendez jusqu’à ce que “upload” et “re-update” soit terminé sur toutes les unités. 12) Placez à nouveau le 1er rack en “Rack-1Mst” (maitre) et entrez le nombre d’esclaves (si nécessaire, répétez à nouveau l’étape 4) 13) placez pour tous les racks le numéro d’esclave correct (“Rack-2” ou supérieur), voir l’étape 5. 14) R edémarrez tous les racks (en raison du re-groupage de ceux-ci) en plaçant les interrupteurs sur “off” puis sur “on”. 15) Exécutez une restauration totale d’usine (sélectionnez cette option dans le menu d’installation) sur le rack maitre et attendez jusqu’à ce que la mise à jour de la mémoire flash soit terminée (l’afficheur indique: “Updating flash 202”) 16) Redémarrez à nouveau tous les racks (pour exécuter les nouveaux réglages de la mémoire “DataFlash”), en plaçant les interrupteurs sur “off” puis sur “on”. 17) Mettez à jour les courbes d’égalisation Bose en utilisant le logiciel Live Installer. 18) La mise à jour du ControlSpace AMS-8 II est à présent terminée. Utilisez le logiciel Live Installer ou l’afficheur graphique et les boutons de navigation pour configurer les unités AMS-8. Les fichiers .BDF (Bose Data File) sauvés précédemment ne peuvent pas utilisé pour restaurer la configuration des unités AMS-8 (en raison des nouveaux réglages de la mémoire “DataFlash”). Toutefois, après la re-configuration des unités, le nouveau fichier .BDF créé, peut être sauvé et ré-ouvert, pour être utilisé / transféré dans d’autres systèmes ControlSpace AMS-8 II. 133 6. Dépannage 6. Dépannage Pas de tension Branchez le cordon d’alimentation et mettez le ControlSpace sous tension. ® L’appareil est sous tension Vérifiez qu’il existe un signal d’entrée au niveau de la source. mais vous n’avez pas de son Vérifiez qu’il existe un signal de sortie. Si vous avez bien un signal d’entrée mais aucun signal de sortie, le son du ControlSpace est peut‑être coupé ou les niveaux de sortie sont peut‑être à zéro. ® L’appareil est sous tension mais le son est faible Vérifiez que l’indicateur d’entrée audio est vert. S’il est éteint, augmentez le gain de la source ou le gain d’entrée. Si l’indicateur d’entrée audio et l’indicateur du signal de sortie audio sont verts, vérifiez que le gain de l’amplificateur est suffisant et contrôlez les niveaux de sortie. Le son est mauvais Si le signal de source d’entrée est clair lorsqu’il parvient au système CS AMS‑8, vérifiez que les haut‑parleurs ne sont pas surchargés ni abîmés. Le son n’est pas naturel Vérifiez que l’égalisation d’enceinte Bose ou le filtre adéquate est utilisé, dans le chemin du signal. Assurez vous que le signal n’est pas distordu / trop élevé. L’appareil est sous tension Vérifiez toutes les connexions au rack système CS AMS‑8. mais vous n’avez pas de son Vérifiez que l’amplificateur fonctionne correctement et que les gains sont dans une ou plusieurs zones réglés de façon adéquate. Vérifiez les paramètres par défaut ainsi que le niveau de volume maximal de la salle dans le logiciel Live Installer ou sur le rack système. Français English Vérifiez si les presets d’événements (Events) ou de couplage de salle (Room Combining) sont activés. Absence de diffusion d’appel/carillon au sein du logiciel utilisateur Vérifiez le câblage entre la carte son du PC, le microphone et le rack système. Vérifiez le volume du PC. Absence de commande/ communication avec le CS‑WC/CS‑PP Vérifiez le câblage entre le CS‑WC/CS‑PP et le rack système. L’état du clavier mural s’affiche dans le menu de configuration du rack système. « WC‑ » signale l’absence de communication avec le clavier mural. Vérifiez également l’adresse du clavier mural. Assurez‑vous qu’elle correspond au numéro de la pièce que le clavier doit desservir. 134 Absence de commande/ communication entre le PC et le système AMS‑8 lors de l’utilisation du logiciel Installer Vérifier le cable. Assurez vous que l’installer software montre que la connection INETgui est active. Pas de signal audio en provenance d’un module d’entrée locale (CS-LIM) en configuration mono. Assurez-vous que le câble audio est connecté à la sortie “Left” du CS-LIM. Le signal audio en sortie diminue, lorsqu’une source aillant un niveau de sortie important est utilisée. Assurez-vous que le gain est réglé à 0dB. Un signal d’entrée constant de +3dB coupe l’étage d’entrée. Exemple: un lecteur de CD avec un niveau de sortie de +6dB, le gain d’entrée doit être réduit d’au moins 3dB (6dB est préférable) La Led “Talk” sur le pupitre d’appel clignote vert et rouge. Ceci indique un problème de communication. Testez le câblage de communication entre l’AMS-8 et le pupitre d’appel. Assurez-vous que le cavalier de terminaison est placé sur le dernier CS-PP. Pas de signal d’appel en provenance du pupitre d’appel. Testez la connexion entre l’AMS-8 et le CS-PP. Vérifiez les réglages de “paging” dans le logiciel Live Installer ou sur l’AMS-8 (utilisez l’afficheur et les boutons de navigations) 7. Informations techniques 7. Informations techniques Entrées : Type : 8 entrées analogiques (jusqu’à 16) asymétriques et symétriques électroniques, niveau ligne Connecteurs : RCA et Euroblock 3 broches Sensibilité : ‑30 dBu à +14 dBu Impédance : 50 K Ohms Niveau de saturation d’entrée : +14 dBU Résolution numérique : 24 bits Sorties : Type : 8 sorties analogiques asymétriques et symétriques électroniques, niveau ligne Connecteurs : RCA et Euroblock 3 broches Impédance : 150 Ohms Niveau maximal de sortie : 18 dBu symétriques, 12 dBu asymétriques Réglage des graves et des aigus : +/‑12 dBu, par pas de 1 dB Résolution numérique : 24 bits Traitement du signal : Type : Digital Signal Processors, 48 bits à virgule flottante Taux d’échantillonnage : 96 kHz Latence audio : <1 ms Délai : 10 ms, par pas de 0,05 ms Réponse en fréquence : 20 Hz à 20 kHz (+0 dB, ‑0,3 dB) Français Distorsion Harmonique Totale (DHT) : <0,007 % (pondéré A, entrée 0 dBu/sortie 0 dBU) Séparation des voies : >103 dB @ 1 kHz, 0 dBu Rapport signal/bruit : >100 dB, pondéré A, DHT<0,02 %, entrée/sortie symétrique >100 dB, pondéré A, DHT<0,02 %, entrée/sortie asymétrique 110dB, pondéré A, DHT<0,02 %, analogiques entrée/digital sortie 140dB, pondéré A, DHT<0,02 %, digital entrée /sortie Caractéristiques électriques : Alimentation Consommation électrique Dimensions (HxLxP en mm) Poids CS AMS-8 90 ‑ 264 Volts CA (47‑63 Hz) 37 watts maximum 88 x 485 285 4,5 kg CS‑WC 12 ‑ 24 Volts CC 0,7 watt maximum 80 x 115 x 48 0,12 kg CS‑LIM 24 Volts CC 1,5 watt maximum 80 x 115 x 48 0,12 kg CS‑PP 12 ‑ 24 Volts CC 1,7 watt maximum 43 x 210 x 212 1,5 kg Caractéristiques environnementales : Température : de 0˚ C à 50˚ C Humidité : 80 % d’humidité relative (sans condensation) 135 ANNEXE A. Exemples de systèmes ControlSpace AMS-8 ® ANNEXE A. Instructions de montage des interfaces utilisateurs Système ControlSpace AMS-8 avec 80 zones Français English SCI HUB 136 ANNEXE A. Exemples de systèmes ControlSpace AMS-8 ® ANNEXE A. Exemples de systèmes ControlSpace AMS-8 ® Système ControlSpace AMS-8 avec plusieurs pupitres d’appel ® ou Français Système ControlSpace AMS-8 avec plusieurs claviers muraux dans la même salle Zone 1 Zone 5 Zone 6 Zone 2 Zone 7 Zone 3 Zone 4 Zone 8 137 ANNEXE B. Instructions de montage des interfaces utilisateurs ANNEXE B. Instructions de montage des interfaces utilisateurs Boite d’encastrement La boite d’encastrement est utilisable pour le montage encastré dans les murs des claviers muraux ControlSpace AMS-8 et des modules d’entées locaux ControlSpace AMS-8. Dimensions (HxLxP): 7,1 x 10,6 x 5,2 cm ® Boite de montage en surface La boite de montage en surface est utilisable pour poser sur un mur les claviers muraux ControlSpace AMS-8 et les modules d’entrées locaux ControlSpace AMS-8. Dimensions (HxLxP): 8,0 x 11,4 x 4,6 cm ® Boite d’encastrement pour cloison sèche en plaques de plâtre La boite d’encastrement pour cloison sèche est utilisable pour placer dans des murs en plaques de plâtre, les claviers muraux ControlSpace AMS-8 et les modules d’entrées locaux ControlSpace AMS-8. Dimensions (HxLxP): 6,6 x 12,4 x 5,2 cm ® Français English Pupitre d’appel Utilisez ces dimensions pour encastrer le pupitre d’appel dans un meuble. Installez un connecteur XLR femelle à coté du pupitre d’appel, celui-ci doit être relié à la connexion microphone à l’intérieur du pupitre. Afin d’éviter tout court-circuit, enlevez la connexion d’alimentation avant le montage du pupitre 138 Français 139 Services commerciaux européens Pour contacter nos services commerciaux européens Allemage Professional Systems Division, Germany Bose GmbH, Max‑Planck‑Straße 36, 61381 Friedrichsdorf, Deutschland Téléphone : 06172‑7104‑0 Fax : 06172‑7104‑19 Italie Professional Systems Division, Italy Bose SpA, Via della Magliana 876 00148 Roma, Italia Téléphone : 066‑5670802 Fax : 066‑5680177 Autriche Professional Systems Division, Austria Bose Ges.m.b.H., Business Park Vienna Wienerbergstrasse 7, 10 O.G. 1100 Wien, Österreich Téléphone : 01‑60404340 Fax : 01‑604043423 Pays‑Bas Professional Systems Division, The Netherlands Bose B.V., Nijverheidstraat 8 1135 GE Edam, Nederland Téléphone : 0299‑390139 Fax : 0299‑390109 Belgique Professional Systems Division, Belgium Bose N.V., Limesweg 2 3700 Tongeren, België Téléphone : 012‑390800 Fax : 012‑390840 Français English Danemark Professional Systems Division, Denmark Bose Danmark A/S, Industrivej 7 PO Box 14, 2605 Brøndby, Danmark Téléphone : 43437777 Fax : 43437818 Espagne Gaplasa S.A. Avda. Ingeniero Conde de Torroja 25 28022 Madrid, España Téléphone : 91 748 29 60 Fax : 91 329 16 75 140 Norvège Professional Systems Division, Norway Bose Filial till Bose A/S Danmark, Lerkev 58 2209 Kongsvinger, Norge Téléphone : 062‑821560 Fax : 062‑821569 Suisse Professional Systems Division, Switzerland Bose AG, Hauptstrasse 134 4450 Sissach, Sweiz Téléphone : 061‑9757733 Fax : 061‑9757744 Suède Professional Systems Division, Sweden Bose, filial till Bose A/S Danmark Johannefredsgatan 4, 43153 Mölndal, Sverige Téléphone : 031‑878850 Fax : 031‑274891 France Professional Systems Division, France Bose S.A., 12 rue de Témara 78100 Saint Germain en Laye Téléphone : 01‑30616363 Fax : 01 30 61 63 88 Royaume‑Uni Professional Systems Division, United Kingdom Bose Ltd., 1 Ambley Green Gillingham Business Park Gillingham, Kent ME8 0NJ, England Téléphone : 0870‑741‑4500 Fax : 0870‑741‑4545 Irlande Professional Systems Division, Ireland Bose GP, Castleblayney Road Carrickmacross, County Monaghan Republic Of Ireland Téléphone : 042‑9661988, Fax : 042‑9661998 Pologne Bose Sp. z o.o. Galeria Mokotów ul. Wołoska 12 02-675 Warszawa Téléphone : (22) 852 2928 Fax: (22) 852 2927 Il produttore si riserva diritti di definire le specifiche. Le informazioni contenute nel presente manuale sono soggette a modifica senza obblighi o preavviso. Sommario 1. Informazioni per la sicurezza Istruzioni importanti per la sicurezza 144 Dichiarazione di conformità 146 2. Introduzione 147 3. Installazione del sistema 3.1 Pannello anteriore del ControlSpace AMS-8 148 3.2 Pannello posteriore del ControlSpace AMS-8 149 3.3 Configurazione del controller da parete 150 3.4 Connessioni delle interfacce utente 151 3.5 Layout di sistema 152 3.6 Connessioni del controller da parete 155 3.7 Connessioni del modulo di input locale 155 3.8 Connessioni del pannello di chiamata 156 3.9 GPIO (General Purpose Input/Output) 157 3.10 Connessioni di ingresso e di uscita della sorgente audio 158 ® ® 4. Componenti di sistema opzionali 159 161 6. Soluzione dei problemi 162 7. Specifiche tecniche 163 ® Appendice A. Esempi di applicazioni del ControlSpace AMS-8 164 Appendice B. Istruzioni per il montaggio dell’Interfaccia Utente 166 Sedi commerciali europee 168 ® Italiano 5. Aggiornamento al sistema ControlSpace AMS-8 II 1. Informazioni per la sicurezza 1. Istruzioni importanti per la sicurezza Segnali di attenzione presenti sul prodotto Questi segnali di ATTENZIONE sono situati sulla parte posteriore del prodotto. Il segno del fulmine completato dal simbolo della freccia all’interno di un triangolo equilatero ha lo scopo di segnalare la presenza nel sistema di una fonte di tensione non isolata di potenza sufficiente a creare un rischio di scossa elettrica. Il punto esclamativo all’interno di un triangolo equilatero, come indicato sul sistema, ha lo scopo di segnalare la presenza in questa guida di installazione di importanti istruzioni relative a utilizzo e manutenzione. Importanti istruzioni per la sicurezza 1. Legga le presenti istruzioni. 2. Conservi le istruzioni per riferimento futuro. 3. Osservi tutti gli avvisi di pericolo presenti sul prodotto. 4. Segua tutte le istruzioni. 5. Non utilizzi questo apparecchio nei pressi di fonti di acqua o umidità. 6. Pulisca solo con un panno asciutto. 7. Non blocchi le aperture di ventilazione. Esegua l’installazione come indicato dal produttore. Per garantire un utilizzo affidabile del prodotto e per proteggerlo da eventuali surriscaldamenti, lo collochi in una posizione e in un ambiente che non ne impediscano la corretta ventilazione. 8. Non lo installi vicino a fonti di calore quali caloriferi, diffusori di aria calda, stufe o altri apparecchi (inclusi gli amplificatori) che possono generare calore. Italiano English 9. Non elimini i dispositivi di sicurezza della spina polarizzata o di terra. Le spine polarizzate sono dotate di due poli lamellari, uno più ampio dell’altro, mentre le spine dotate di messa a terra possiedono due poli più un terzo polo per la messa a terra. Il polo più ampio o il terzo polo sono elementi destinati alla sicurezza. Se la spina in dotazione non è compatibile con la presa che intende utilizzare, consulti un elettricista per la sostituzione. 10. Il cavo di alimentazione non deve essere calpestato o schiacciato, soprattutto in prossimità della spina, della presa e così via. 11. Utilizzi esclusivamente i componenti aggiuntivi/accessori indicati dal produttore. 12. Utilizzi il prodotto solo con carrelli, supporti, cavalletti, staffe o tavoli specificati dal produttore o venduti insieme all’apparecchio. Se utilizza un carrello, presti attenzione quando lo sposta in modo da evitare possibiliribaltamenti. 13. S colleghi l’apparecchio in caso di temporali o se rimane inutilizzato per un periodo prolungato, in modo da evitare che il prodotto venga danneggiato. 14. Occorre l’intervento dell’Assistenza Tecnica quando: l’apparecchio ha subito un danno al cavo di alimentazione o alla spina di alimentazione; all’interno sono penetrati degli oggetti o del liquido; è stato esposto a pioggia o umidità; si riscontra un funzionamento anomalo; è stato fatto cadere. Non intervenga autonomamente sul prodotto. L’apertura o la rimozione dei coperchi espone a rischi di tensioni elevate o altri pericoli. Per informazioni sul centro di assistenza autorizzato più vicino, contatti la Bose. 15. Per evitare rischi di incendio o scossa elettrica, non sovraccarichi le prese della rete di alimentazione, i cavi di alimentazione o le ciabatte multipresa. 144 1. Informazioni per la sicurezza 16. Eviti che oggetti o liquidi penetrino nel prodotto, poiché potrebbero entrare in contatto con punti ad alta tensione o provocare dei cortocircuiti, con conseguenti rischi di incendio o scossa elettrica. 17. Per informazioni sui simboli relativi alla sicurezza, faccia riferimento alla confezione del prodotto. 18. Non collochi sull’apparecchio fonti di fiamme libere, ad esempio candele accese. ATTENZIONE: per ridurre il rischio di incendio o di scossa elettrica, non esponga il ControlSpace AMS-8 a pioggia o umidità. ® ATTENZIONE: Eviti di esporre l’apparecchio a gocciolii o schizzi e non collochi oggetti contenenti liquidi, ad esempio vasi, sull’apparecchio stesso. Come per tutti i prodotti elettronici, presti attenzione a non versare liquidi in qualsiasi parte del sistema, poiché questi possono causare danni e/o rischi di incendio. Informazioni sui prodotti che generano rumore elettrico Se applicabile, questo apparecchio è stato sottoposto a test ed è risultato conforme ai limiti per i dispositivi digitali di classe A, in base alla parte 15 delle norme FCC. Tali limiti sono studiati per fornire una protezione accettabile dalle interferenze dannose in installazioni in un ambiente domestico. Questo apparecchio genera, utilizza e può irradiare energia a radiofrequenza e, in caso di installazione o uso non conforme alle istruzioni, può provocare interferenze dannose per le comunicazioni radio. Tuttavia, non esiste alcuna garanzia che non si verifichino interferenze in un’installazione particolare. Nel caso in cui l’apparecchio provochi interferenze dannose per la ricezione radio o televisiva, che si possono verificare accendendo e spegnendo l’apparecchio, consigliamo di cercare di risolvere l’interferenza adottando uno o alcuni dei seguenti provvedimenti: • Riorientamento o riposizionamento dell’antenna ricevente. • Aumento della distanza che separa l’apparecchio dal ricevitore. • Collegamento dell’apparecchio a una presa di un circuito diverso da quello al quale è collegato il ricevitore. • Per assistenza, consulti il rivenditore o un tecnico radio/TV esperto. Questo prodotto è conforme alle specifiche. Le informazioni fornite nella presente guida all’installazione non includono tutti i dettagli relativi a progettazione, produzione o variazioni dell’apparecchio, né trattano ogni possibile situazione che potrebbe verificarsi durante l’installazione, l’utilizzo o la manutenzione. Se ha necessità di un tipo di assistenza che esula dal contenuto di questa guida all’installazione, contatti una delle nostre sedi commerciali in Europa. Consulti la sezione “Sedi commerciali europee” nell’ultima pagina del manuale di installazione. 145 Italiano Nota: modifiche non autorizzate al ricevitore o al telecomando copiate da altri prodotti hi-fi potrebbero impedirle di utilizzare questo apparecchio. 1. Informazioni per la sicurezza Dichiarazione di conformità Il produttore del presente apparecchio dichiara che il prodotto e i relativi accessori sono conformi ai seguenti standard: Direttiva EMC 89/336/CEE (compatibilità elettromagnetica) EN-55103-1 EN-55103-2 Direttiva per la bassa tensione 73/23/CEE EN-60065:2002 settima edizione Considerazioni sul montaggio in rack L’elaboratore del segnale audio richiede due unità di spazio rack da 4,4 cm con 32,5 cm di profondità interna. Per l’installazione, utilizzi quattro viti con rondelle per evitare di danneggiare il pannello frontale. La scelta ideale è costituita dalle rondelle in neoprene, poiché trattengono le teste delle viti e ne impediscono la fuoriuscita durante il trasporto o a causa delle vibrazioni. Attenzione: se l’unità è installata in rack e il rack viene trasportato, preveda un supporto meccanico per la parte posteriore dell’elaboratore. A questo scopo, può utilizzare un ripiano o staffe di supporto. Precauzioni generali e ventilazione Attenzione: collochi l’unità in un luogo in cui sia protetta dal calore e che consenta una ventilazione adeguata. Collochi l’unità lontano da fonti di calore dirette, quali bocchette di ventilazione per l’aria calda e caloriferi. Verifichi che l’aria riesca a circolare liberamente intorno all’intera unità. Italiano English Se colloca l’unità al di sopra o al di sotto di un amplificatore, verifichi che tra i due dispositivi sia interposta una griglia di ventilazione alta 1 unità. Eviti che la temperatura operativa massima del telaio superi i 50 ºC. Tenga in considerazione le condizioni che si creano in un rack chiuso, in cui la temperatura può essere superiore a quella dell’ambiente. Attenzione: controlli che tutti i sottili trefoli del cavo siano intrecciati insieme e inseriti nel connettore. Anche un solo trefolo allentato potrebbe entrare in contatto con il terminale adiacente, causando così un cortocircuito. 146 2. Introduzione 2. Introduzione Introduzione Il sistema di gestione audio Bose ControlSpace AMS-8 è un elaboratore di segnale audio flessibile, espandibile e di elevata qualità per sistemi di distribuzione audio in ambienti quali ristoranti, negozi, bar, uffici, hotel, sale conferenza e strutture sportive. L’unità principale include otto ingressi di linea e otto uscite di linea. La disponibilità di quattro alloggiamenti audio consente di aggiungere fino a 8 ingressi (2 ingressi per scheda). ® ® Per ulteriori zone, possono essere utilizzati fino a 10 rack AMS8 per sistema. Ogni rack aggiunto consente di espandere di 8 mono zone il sistema. Sono disponibili varie interfacce utente che semplificano il controllo del sistema ControlSpace AMS-8. ® Il software Live Installer del Bose ControlSpace AMS-8 consente di progettare il sistema e di configurare l’AMS-8 e le interfacce utente. Il software è in eseguzione e il PC comunica con l’AMS-8 e via ethernet. Caratteristiche e funzioni • Architettura espandibile e flessibile del cardframe • Funzionalità del controller da parete (telecomando a infrarossi opzionale) • Otto (fino a 16) canali di ingresso di linea analogici • Funzionalità del modulo di ingresso locale • Otto canali di uscita di linea analogici • Funzionalità del pannello di paging • Otto ingressi di controllo di uso generale e un’uscita di controllo di uso generale (GPIO) • Diffusione automatica dei messaggi (è richiesta la scheda opzionale di memorizzazione messaggi) • Progettazione, configurazione e controllo del sistema con software per PC • Possibilità di ricezione segnali radio (è richiesta la scheda Twin Tuner) • L’elaborazione del segnale digitale include: EQ del diffusore Bose, l’equalizzazione dinamica, ritardo, controllo del guadagno e selezione della sorgente. • Rilevazione automatica del tipo di card di ingresso inserita • Display LCD e pulsanti di navigazione • Possibilità di programmare eventi • Possibilità di accorpamento zone Italiano Avvio rapido • Colleghi gli ingressi e le uscite audio al ControlSpace AMS-8 (in caso di 2 o più rack: connettere i rack utilizzando una o più card audio link, uno o più set di cavi audio link e le porte RS485 ad alta velocità, vedere anche il capitolo 3.5). ® • Accenda il sistema ControlSpace AMS-8. Il sistema è ora operativo e programmato secondo le impostazioni predefinite. Le impostazioni predefinite verranno richiamate dopo ogni avvio del ControlSpace . Questo significa che il sistema avvierà la riproduzione con la sorgente predefinita e con il livello di volume predefinito impostati nel menu di installazione. ® ® NOTA: per l’aggiornamento alle funziooi e alle caratteristiche del sistema ControlSpace AMS-8 II, vedere il capitolo 5 ® Abbreviazioni CS-WC CS-PP CS-LIM CS-RC CS-TIC CS-TOC Controller da parete ControlSpace AMS-8 Pannello di paging ControlSpace AMS-8 Modulo di input locale ControlSpace AMS-8 Telecomando ControlSpace AMS-8 Doppia scheda di ingresso ControlSpace AMS-8 Doppia scheda di uscita ControlSpace AMS-8 ® ® ® ® ® ® CS-EC Scheda Ethernet ControlSpace AMS-8 CS-MSCControlSpace AMS-8 Scheda di memorizzazione messaggi CS-DICControlSpace AMS-8 Scheda di Ingresso Digitale CS-TTCControlSpace AMS-8 Scheda doppio sintonizzatore CS-HUBControlSpace AMS-8 Hub RS485 CS-SCIControlSpace AMS-8 Interfaccia Codici Seriali ® ® ® ® ® ® 147 3. Installazione del sistema 3.1 Pannello anteriore del ControlSpace AMS-8 ® 1 2 1. DISPLAY LCD Il display LCD visualizza i menu di controllo e le impostazioni disponibili per le singole voci di menu. 2. PULSANTI DI NAVIGAZIONE Italiano English I pulsanti “Su” e “Giù” consento di scorrere le voci di menu, mentre i pulsanti “sinistra” e “destra” permettono di modificare il valore della voce di menu selezionata. Con il pulsante “OK” è possibile confermare la selezione corrente. Ad esempio, se preme “OK” quando è selezionata la voce di menu “Exit”, verrà visualizzato il livello di menu precedente. 148 3. Installazione del sistema 3.2 Pannello posteriore del ControlSpace AMS-8 ® 5 3 7 9 11 15 13 1 4 5 3 7 5 9 4 5 3 8 1 8 7 Serial Number: Rack Link 2 1 PC Link ! Rack Link 1 1 CAUTION RISK OF ELECTRIC SHOCK DO NOT OPEN AVIS: Risque de chock électrique, ne pas ouvrir System Rack MODEL: 2 6 8 10 12 14 16 4 2 13 6 Audio Link Source Inputs 1 4 3 4 5 11 4 Connettore d’ingresso RCA RCA Input Connector (livello linea sbilanciato) (Unbalanced line level) 6 8 1 5 3 7 5 9 5 3 8 1 8 7 Bose Corporation, Framingham, MA01701-9168 Made in The Netherlands 2 4 4 Serial Number: Connettore d’ingresso Euro Block a 3 pin 3-pin Input Euro Blok Connector (livello linea bilanciato) (Balanced line level) 15 13 2 6 Rack Link 1 9 Rack Link 2 7 9 RS-232 & GPIO card 12 10 12 14 16 13 9 4 2 6 16 Audio Link Source Inputs Line Outputs 5 9 4 5 9 8 3 3 7 7 2 6 2 3 Uscite linea (1-8) (1 - 8) Line outputs 6 1 CSCSTOC TOC 9 RCA Input Connector d’uscita RCA Line inputs (1-16)Connettore level) (Unbalanced (livello linealine sbilanciato) 10 8 6 3 4 2 RS232 port pin out Straight shielded cable (20 meters max.) 2. TX 3. RX 5. GND DB9 Female 10 7 8 5 7 5 1 8 4 1 8 Bus 1 1 5 Bus 2 3 AVIS: Risque de chock électrique, ne pas ouvrir System Rack MODEL: PC Link 1 Connettore d’ingresso Euro Block a 3 pin 3-pin Input Euro Blok Connector (livello linea (Balanced linebilanciato) level) I/O Link ! Slotper for Audio Link CardAudio to link the connected Slot la scheda Link che consente il collegamento di analog sources between Controlspace AMS-8 due AMS-8 Audio Management Systems. È necessaria una sola Audio Managment Systems. Card nell’unità AMS-8 principale. Aggiungere un cavo Audio Link ogni 4 sorgenti da condividere. To CSPP/CSWC Connettore d’ingresso RCA RCA Input Connector (livello linea line sbilanciato) (Unbalanced level) CAUTION 6 2 2 Slot perLink scheda Audio Link Audio Card slot CSCSTIC TIC RISK OF ELECTRIC SHOCK DO NOT OPEN 8 5 3 1 Line Outputs 2 1 Ingressi linea (1 - 16) Line inputs (1-16) 10 7 8 16 Bus 2 6 9 I/O Link 12 4 2 Bus 1 9 To CSPP/CSWC Bose Corporation, Framingham, MA01701-9168 Made in The Netherlands 6 Audio Link Card slot CSTIC Connettore d’uscita Euro Block a 3 pin 3-pin Input Euro Blok Connector RCA Input line Connector (Balanced level) (livello linea bilanciato) (Unbalanced line level) 3 4 1 2 Slot for Audio Link Card to link the connected analog sources between Controlspace AMS-8 9 10 Audio Managment Systems. Connettore d’uscita Euro Block a 3 pin 3-pin Input Euro Blok Connector 3-pin Input Euro Blok Connector (Balanced line level) (livello linea bilanciato) (Balanced line level) Connettore d’uscita RCA RCA Input Connector 3-pin Input Blok (Unbalanced line level)Connector (livello lineaEuro sbilanciato) RS-232 & GPIO card 7 8 5 6 3 4 1 2 (Balanced line level) 9 4 Ethernet & GPIO 4 5 9 8 4 RS-485 card 8 3 3 7 7 2 1 6 Line outputs (1-8) Italiano 5 RCA Input Connector (Unbalanced line level) Pin 1: Contact 1 Pin 2: Contact 2 Pin 3: Contact 3 Pin 4: Contact 4 Pin 5: Contact 5 Pin 6: Contact 6 Pin 7: Contact 7 Pin 8: Contact 8 Pin 9: Output Pin 10: Common RS232 port pin out Straight shielded cable (20 meters max.) 2 1 6 2. TX 3. RX 5. GND Rack link 1 (high speed) CSTOC 9 7 5 Rack 2 (high speed) RCAlink Input Connector (Unbalanced line level) 3-pin&Input Euro Connector CS-WC CS-PP BusBlok 1 (low speed) (Balanced line level) 3-pin &Input Euro Blok Connector Piedinatura GPIO CS-WC CS-PP Bus 2 (low speed) (Balanced line level) Pin 1 : Contatto 1 Pin 2 : Contatto 2 RCA Input Connector 3 : Contatto 3 (Unbalanced linePin level) Pin 4 : Contatto 4 Pin 5 : Contatto 5 10 8 DB9 Female 6 3 4 1 2 9 Pin 6 : Contatto 6 Pin 7 : Contatto 7 Pin 8 : Contatto 8 Pin 9 : Contatto Out Pin 10: Comune 10 7 8 5 6 3 4 1 2 Pin 1: Contact 1 Pin 2: Contact 2 Pin 3: Contact 3 Pin 4: Contact 4 Pin 5: Contact 5 Pin 6: Contact 6 Pin 7: Contact 7 Pin 8: Contact 8 Pin 9: Output Pin 10: Common RS-485 card 5 Scheda RS485 Rack link 1 (high speed) Rack Link 1 (alta velocità) Rack link 2 (high speed) Rack Link 2 (alta velocità) CS-WC Bus 1 Bus (low speed) CS-WC& CS-PP & CS-PP 1 (bassa velocità) CS-WC Bus 2 Bus (low speed) CS-WC& CS-PP & CS-PP 2 (bassa velocità) 149 3. Installazione del sistema 3.3 Configurazione del controller da parete 1 1. DISPLAY LCD 2 3 2. PULSANTI VOLUME 3. PULSANTI CANALE Prima di configurare il ControlSpace AMS-8, selezioni un indirizzo per ognuno dei controller da parete (1..8). Questa operazione viene generalmente eseguita al momento della prima connessione del controller stesso al rack di sistema. La versione del firmware viene mostrata sul display seguita da “Select WC”. Utilizzare i pulsanti di selezione sorgente per scegliere il numero appropriato e confermare la scelta premendo il tasto volume giù (-). Se per controllare la stessa zona devono essere utilizzati più pannelli da parete, su di essi deve essere selezionato lo stesso numero e devono essere collegati tutti alla stessa unità. ® Se un controller da parete possiede già un indirizzo, per modificarlo proceda come segue: 1. Spenga il controller da parete (prema il pulsante canale meno (-) per il numero di volte necessario a spegnere il controller) 2. Prema e tenga premuto il pulsante volume meno (-) 3. Prema contemporaneamente i pulsanti volume più (+) e meno (-) (Dopo la versione del firmware sul display appare il numero attuale, ad es. “WC2”). 4. A questo punto può utilizzare i pulsanti canale per selezionare l’indirizzo appropriato e confermare la scelta premendo il pulsante volume meno (-) come descritto sopra. Se il sistema è composto da due o più unità ControlSpace AMS-8, tutte le unità utilizzano numeri da 1 a 8. Per la prima unità i numeri 1..8 vengono utilizzati per i canali di uscita 1..8, per la seconda unità i numeri 9..16, per la terza i numeri 17..24 e così via fino alla decima unità in cui vengono utilizzati i numeri 73..80 Italiano English ® Cambiare la configurazione di una zona utilizzando il pannello da parete Dall’ambiente in cui è installato il controller da parete è possibile regolare le impostazioni audio ricorrendo al menu nascosto nel controller. Per accedere a tale menu, si attenga alla seguente procedura: 1. Spenga il controller da parete (per eseguire questa operazione, prema il pulsante canale meno (-) per il numero di volte necessario) 2. Prema e tenga premuto il pulsante volume meno (-) 3. Prema contemporaneamente i pulsanti canale più (+) e meno (-) Nel menu nascosto è possibile impostare o modificare le seguenti funzioni: a. canale predefinito b. livello bassi c. livello alti d. EQ dinamica e. EQ per diffusori Bose f. livello volume massimo g. livello volume paging h. ritardo i. volume predefinito I pulsanti canale consentono di scorrere le voci di menu, mentre i pulsanti volume permettono di modificare le impostazioni relative alla voce selezionata. Per uscire dal menu nascosto, prema contemporaneamente i pulsanti canale più (+) e meno (-). 150 3. Installazione del sistema 3.4 Connessioni delle interfacce utente Controller da parete ControlSpace AMS-8 Pannello di paging ControlSpace AMS-8 Modulo di input locale ControlSpace AMS-8 Tensione 12-24 V CC, +/-20% 12-24 V CC, +/-10% 24 V CC, +5%/-10% Corrente @ 12 V CC 50 mA @ 24 V CC 30 mA @ 12 V CC 140 mA @ 24 V CC 70 mA @ 24 V CC 60 mA Alimentatore consigliato* Aliment. stabilizzato 24 V CC, 2,7 A BOSE CS AMS-8 Aliment. stabilizzato 24 V CC, 2,7 A BOSE CS AMS-8 Aliment. stabilizzato 24 V CC, 2,7 A BOSE CS AMS-8 Distanza max. (/con l’Hub) 600 m (1200) 600 m (1200) Non applicabile Terminazione*** 120 ohm 120 ohm Non applicabile Tipo di cavo 1 cavo schermato a doppini intrecciati 1 cavo schermato a doppini intrecciati Non applicabile Cap. nom. 40 pF/m Cap. nom. 40 pF/m Non applicabile Imp. nom. 124 ohm Imp. nom. 124 ohm Non applicabile Att. nom. 2 dB @ 1 MHz Att. nom. 2 dB @ 1 MHz Non applicabile Cavo consigliato Cavo (blu) alim./comunic. BOSE CS AMS-8 per CS-WC/CS-PP Cavo (blu) alim./comunic. BOSE CS AMS-8 per CS-WC/CS-PP Non applicabile Cavo audio Non applicabile Cavo mic/linea standard, passa cavi Cavo (giallo) alimentazione/audio Bose CS AMS-8 per CS-LIM ® ® ® Alimentazione Cavi RS485** Italiano * Nota: se non utilizza l’alimentatore sopra indicato, qualsiasi altro alimentatore che si intenda usare in Europa deve essere conforme allo standard EN/IEC 60950. ** Regole da seguire nei collegamenti RS485 I componenti devono sempre essere collegati in configurazione a catena (piuttosto che a stella o di altro tipo). La connessione a stella è consentita solo utilizzando il CS-HUB. Si accerti di separare il cavo dati dal cavo di alimentazione (>50 V) nella passerella porta-cavi o in qualsiasi altro dispositivo passa cavi. *** Terminazione Il jumper di terminazione deve essere inserito sull’ultima interfaccia utente (CS-WC o CS-PP), situata al termine delle singole linee di comunicazione RS485. Cavo alimentazione/comunicazione CS AMS-8 4 5 1 Cavo alimentazione/audio CS AMS-8 2 1. Blu = comunicazione RS485 “+” 2. Trasparente = comunicazione RS485 “–” 6 3 1. Giallo = cavo linea bilanc. (schermato) 3. Filo di continuità = comunicazione RS485 “GND” 5 4. Rosso = alimentazione “24 V DC” 3. Rosso = alimentazione “24 V DC” 5. Nero = alimentazione “terra” 4. Nero = alimentazione “terra” 6. Guaina blu 1 2 2. Verde = cavo linea bilanc. (schermato) 3 4 5. Guaina gialla 151 3. Installazione del sistema 3.5 Layout di sistema Due linee di comunicazione RS485 e un alimentatore centrale: Max. 600 m (lunghezza totale) Cavo audio/microfono * RS-485 RS-485 Cavo audio/microfono Alimentatore 24 V DC 2-7 A * Ingresso CC 24 V Due linee di comunicazione RS485 e alimentatori locali: Max. 600 m (lunghezza totale) Cavo audio/microfono PSU * RS-485 PSU RS-485 * PSU RS485 la distanza massima: Italiano English 600 m 600 m oppure: 600 m 600 m RS485 HUB 600 m NOTA: * Inserisca il jumper di terminazione sull’ultima interfaccia utente (CS-WC o CS-PP), situata al termine delle singole linee di comunicazione RS485. Altri esempi di sistema possono essere trovati nell’allegato A. 152 3. Installazione del sistema Aggiunta di unità AMS-8 per creare sistemi fino a 80 zone audio Sono richieste Schede Audio Link. Il numero di set di cavi Audio Link dipende dal numero totale di sorgenti connesse (inclusi i pannelli di paging e le schede sintonizzatori interne). E’ necessario un set di cavi Audio Link ogni quattro sorgenti analogiche. Per ogni unità AMS-8 aggiunta, aggiungere anche un cavo di comunicazione (2 poli + schermo) per connettere il connettore Racklink 1 o 2 dell’unità aggiunta a un connettore Racklink libero dell’unità preesistente. Assicurarsi che i jumper di terminazione vengano inseriti solo sulle schede di comunicazione RS485 della prima e dell’ultima unità AMS-8. NOTA 1: Per il collegamento del segnale digitale di una scheda di Memorizzazione Messaggi, di una scheda di Ingresso Digitale o il segnale digitale (al posto di quello analogico) di una scheda doppio Sintonizzatore, occorre aggiungere una scheda di Ingresso Digitale e un cavo coassiale digitale (RCA-RCA) per ogni unità AMS-8 aggiunta. NOTA 2: Una sola porta Ethernet può essere utilizzata con un networks. L’utilizzo della VLANS o altri networks non è permesso. Usa il menu “Rack Installation” per la configurazione dell’unità master e slave. Italiano 153 3. Installazione del sistema Rack 1 (Master) ! CAUTION RISK OF ELECTRIC SHOCK DO NOT OPEN AVIS: Risque de chock électrique, ne pas ouvrir System Rack MODEL: Serial Number: Bose Corporation, Framingham, MA01701-9168 Made in The Netherlands 9 1 4 4 3 2 1 1 1 3 2 5 6 6 6 6 10 7 8 5 6 3 4 1 2 7 8 2 1 1 3 1 Rack 2 (Slave) ! CAUTION RISK OF ELECTRIC SHOCK DO NOT OPEN AVIS: Risque de chock électrique, ne pas ouvrir System Rack MODEL: Serial Number: Bose Corporation, Framingham, MA01701-9168 Made in The Netherlands 9 1 1 4 1 4 1 1 1 1 4 4 5 6 6 6 6 10 7 8 5 6 3 4 1 2 7 8 1 3 2 2 2 1 1 2 1 1 3 Italiano English Rack 10 (Slave) CAUTION RISK OF ELECTRIC SHOCK DO NOT OPEN ! AVIS: Risque de chock électrique, ne pas ouvrir System Rack MODEL: Serial Number: Bose Corporation, Framingham, MA01701-9168 Made in The Netherlands 9 3 3 3 3 3 1 1 1 5 6 6 6 6 1 Digital coax cable (75 Ohm) 2 CS-AMS-8 Link cable 1 3 RS485 communication cable (120 Ohm - 200m Max) 3 Digital Input Card 10 7 8 5 6 3 4 1 2 7 8 Twin Input Card 2 Message Storage Card 4 Twin Tuner Card 5 Audio Link Card 6 Twin Output Card 7 PC Link - I/O Link 8 RS485 Communication (High/Low speed) 154 3. Installazione del sistema 3.6 Connessioni e configurazione del CS-WC 1 2 3 4 1. Jumper di terminazione, vedere NOTA del capitolo 3.5. 2.Connettore RS485. 3.Connettore alimentatore (12-24Vdc). 4. Connettore per l’aggiornamento del firmware Nota: Vedere Allegato B. Istruzioni per il montaggio del pannello da parete 3.7 Connessioni e configurazione del CS-LIM 2 5 4 Italiano 3 1 1.Il CS-LIM è dotato di un regolatore per il guadagno del microfono, accessibile anche dal pannello frontale utilizzando un cacciavite ‘0’. Ruoti il regolatore in senso anti-orario (vedendo dal davanti) per ridurre il guadagno fino a un minimo di 32 dB e in senso orario per aumentare il guadagno fino a un massimo di 66 dB. L’impostazione predefinita del guadagno è 38 dB. 2.Per passare dalla configurazione stereo del CS-LIM a quella mono, inserisca questo jumper. In una configurazione mono, il cavo di segnale deve essere collegato all’uscita sinistra. 3.Per attivare la equalizzazione per la voce (ottimizzata per il parlato) per l’ingresso microfonico, sposti il jumper da FLAT a VOICE. voice flat voice = risposta lineare = equalizzazione per la voce flat 4.Connettore di uscita di linea stereo bilanciato. 5.Connettore alimentatore (24Vdc). NOTA: Vedere Allegato B. Istruzioni per il montaggio del pannello da parete 155 3. Installazione del sistema 3.8 Connessioni e configurazione del CS-PP 3 7 2 7 1 6 4 5 8 Italiano English Il CS-PP è fornito di un circuito di equalizzazione per la voce, di un regolatore di guadagno per il microfono e di uno per il segnale di attenzione. Per poter regolare i guadagni e connettere il CS-PP, rimuova come prima cosa l’inserto in plastica (nella parte superiore del pannello anteriore del CS-PP), quindi rimuova le 4 viti ed estragga il pannello anteriore dal relativo alloggiamento. I due regolatori sono collocati nella parte inferiore del pannello. Nota: Attenzione a non causare corto circuiti tra i fili e i terminali dei componenti 1. Guadagno del microfono: ruoti il regolatore in senso anti-orario per ridurre il guadagno fino a un minimo di 32,6 dB e in senso orario per aumentare il guadagno fino a un massimo di 60,1 dB. L’impostazione predefinita del guadagno è 38 dB. 2. Guadagno del segnale di attenzione: utilizzi il regolatore per ridurre o aumentare il livello. 3. Jumper di terminazione, veda la NOTA del capitolo 3.5. 4. Connettore RS485. 5. Connettore alimentatore, 12-24Vdc (solo due dei tre contatti sono utilizzati!) 6. Connettore uscita linea bilanciata. 7. Connettore per l’aggiornamento del firmware 8. Connettore XLR per il microfono con alimentazione phantom a 22Vdc 156 3. Installazione del sistema 3.9 GPIO (General Purpose Input/Output) Il ControlSpace AMS-8 include una scheda GPIO/RS232 (vedere anche il capitolo 3.2). Fino a 40 contatti GPIO (8 per unità, massimo 5 unità in totale) possono essere utilizzati per abilitare l’invio di 40 messaggi, per attivare fino a 40 combinazioni di zone e per mettere in mute singole uscite o tutte. ® NOTA: Con un contatto eseguito con pulsante il messaggio verrà riprodotto una sola volta. Con un contatto eseguito con interruttore il messaggio verrà ripetuto finché il contatto venga rilasciato. Utilizzare quest’ultimo tipo di contatto anche per attivare un Room Combining o la modalità Standby (rilasciare il contatto per disattivare queste due funzioni). Caratteristiche • 8 ingressi isolati • 1 uscita isolata • Gli ingressi possono essere utilizzati per smistare i messaggi, richiamare delle combinazioni di zone o per mettere in mute un’uscita o un gruppo di uscite (le uscite ritornano al livello di default dopo il mute) • L’uscita a collettore aperto viene attivata quando si attiva uno degli otto ingressi Dagramma di cablaggio degli 8 contatti di ingresso CS-AMS-8 CS-AMS-8 1..8 + 24 Vdc - Italiano 10 Diagramma di cablaggio dell’uscita a collettore aperto CS-AMS-8 CS-AMS-8 9 Open collector Max. 50mA + 24 Vdc - 10 157 3. Installazione del sistema 3.10 Collegamenti di ingresso e di uscita I collegamenti di ingresso e di uscita possono essere effettuati utilizzando uno dei seguenti tipi di cavo: Connettore lato sorgente Ingressi e uscite audio del ControlSpace AMS-8 ® RCA S T+ T S- ⊥ + ⊥ L R XLR 1 2+ 2 + ⊥ 1 ⊥ 3 3- L R Spinotto telefono (bilanciato) T R S⊥ S + ⊥ T+ L R- Italiano English R Spinotto telefono (non bilanciato) T S + ⊥ T+ L S-⊥ R S S T T+ S- ⊥ L R 158 4. Opzioni di espansione 4. Componenti di sistema opzionali Il sistema ControlSpace AMS-8 standard include: ® • 8 canali di ingresso audio di linea analogici (CS-TIC) • 8 canali di uscita audio di linea analogici (CS-TOC) • 8 contatti di controllo di ingresso per uso generale • 1 contatto di controllo di uscita per uso generale • 1 porta di comunicazione Ethernet Il ControlSpace AMS-8 può essere esteso utilizzando interfacce utente aggiuntive e schede opzionali e interfacce di comunicazione. ® Interfacce utente opzionali: CS-PP - Pannello di paging ControlSpace AMS-8 Il pannello di paging ControlSpace AMS-8 consente di trasmettere a un determinato gruppo di zone messaggi pre-registrati o in tempo reale (vocali). ® ® CS-WC - Controller da parete ControlSpace AMS-8 Il controller da parete ControlSpace AMS-8 consente di selezionare il canale e di regolare localmente il volume del segnale audio. ® ® CS-LIM - Modulo di ingresso locale ControlSpace AMS-8 Il modulo di input locale ControlSpace AMS-8 permette di aggiungere al sistema una sorgente locale (linea o microfono). ® ® ® ® Schede opzionali: CS-TIC - Doppia scheda di ingresso ControlSpace AMS-8 È possibile aggiungere fino a quattro doppie schede di ingresso ControlSpace AMS-8 per sistema, in modo da fornire altri 8 canali di ingresso audio di linea analogici. ® ® Scheda CS AMS-8 Audio Link La scheda ControlSpace AMS-8 Audio Link consente di collegare insieme fino a 10 unità. Per il collegamento sono anche necessari i cavi Audio Link. ® 159 Italiano CS-RC - Telecomando ControlSpace AMS-8 Il telecomando ad infrarossi ControlSpace AMS-8 consente di comandare agevolmente i Controller da parete sino a una distanza di 5 metri. 4. Opzioni di espansione CS-MSC - Scheda per memorizzare messaggi ControlSpace AMS-8 La scheda per memorizzare i messaggi, che occupa un alloggiamento CS-TIC (scheda di ingresso), consente di memorizzare messaggi pre-registrati e di attivarli utilizzando il pulsante corrispondente presente sul pannello di paging o tramite la programmazione eventi o i contatti GPIO. Il software per la configurazione della scheda e per la registrazione dei messaggi è incluso. ® CS-DIC ControlSpace AMS-8 scheda di ingresso digitale La scheda di ingresso digitale può essere utilizzata per aggiungere un segnale digitale stereo al sistema. Essa deve essere utilizzata anche per connettere una CS-MSC, una CS-TTC o un’altra CS-DIC stessa a una seconda unità AMS-8 ® CS-TTC ControlSpace AMS-8 Twin Tuner Card La scheda doppio sintonizzatore può essere utilizzata per aggiungere un sintonizzatore stereo o due mono al sistema. ® Interfacce di comunicazione opzionali CS-SCI ControlSpace Interfaccia Codici Seriali L’Interfaccia Codici Seriali converte i codici seriali, inviati o ricevuti da un sistema Crestron o AMX che controlla il sistema AMS-8. La CS-SCI contiene anche 16 uscite open collector programmabili ciascuna collegata a una zona. Ciascuna uscita può essere resa attiva quando la zona viene accesa o quando un messaggio di paging viene inviato a quella zona (ad es. per bypassare un regolatore di volume 100V) ® CS-HUB ControlSpace Hub di comunicazione RS485 L’Hub di comunicazione RS485 (CS-HUB) può essere utilizzato per creare una rete di connessione a stella per le interfacce utente (CS-WC e CS-PP). Può anche essere utilizzato per realizzare collegamenti di maggiore lunghezza tra le unità AMS-8, i pannelli di controllo da parete, i pannelli di paging e le Interfacce Codici Seriali (connessi alla stessa porta RS-485). Italiano English ® 160 5. Aggiornamento a un sistema ControlSpace AMS-8 II ® 5. Aggiornamento a un sistema ControlSpace AMS-8 II ® 1)Controllare la versione del firmware Bootloader, essa appare per un breve istante sul display quando l’unità AMS-8 viene accesa. I passi successivi sono possibili solamente se la versione è la V2.116 o successiva. Se è una versione precedente il firmware dell’unità deve essere aggiornato, operazione effettuabile dal personale Bose 2)Connettere tutte le unità AMS-8 del sistema (massimo 10) utilizzando le apposite schede e cavi (vedere anche il capitolo 3.5) 3)Assicurarsi che il jumper di terminazione sulle schede di comunicazione RS485 sia inserito solamente sulla prima e l’ultima unità AMS-8 (su tutte le altre unità deve restare disinserito) 4)Accendere ogni unità AMS-8 premendo contemporaneamente i pulsanti di navigazione UP e down. Tale operazione attiva la modalità Bootloader. 5)Selezionare ‘Master’ sulla prima unità AMS-8 del sistema. Indicare il corretto numero di unità del sistema sull’unità master, ad es.: “Nr. di rack: 10”. 6)Tutte le altre unità devono essere etichettate come ‘Slave’ e vengono individuate dai numeri da 2 a 10. Per esempio: “Seleziona il numero di unità 2” 7)Notare il parametro ‘live –mask’ nella parte inferiore del display. Esso indica il numero delle unità AMS-8 installate e connesse. Il live-mask è mostrato nel seguente modo: “Unità: 00000011 11111111, che indica che sono installate 10 unità AMS-8 8) Q uando tutte le unità slave sono state individuate, selezionare ‘Finito’ sull’unità master. Questa operazione avvierà (temporaneamente) la modalità bootloder 9) Connettere il computer all’unità master ed avviare il software Bootloader Multi-Installer 10) Caricare l’ultima versione del firmware sulle unità AMS-8 11) Attendere la fine dell’operazione di aggiornamento per tutte le unità AMS-8 12)Settare nuovamente sulla prima unità “Rack-1 Mst” (master) ed introdurre il numero delle unità slave (se necessario, ripetere prima il passo 4 per fare questo) Italiano 13) Settare su ogni unità slave il corretto numero (“Rack 2”, “Rack 3”, ecc.) vedere anche il passo 5 14)Rieseguire la inizializzazione di tutte le unità (dal momento che le unità hanno subito un diverso raggruppamento), spegnendo e riaccendendo ciascuna di esse 15)Eseguire un Ripristino delle Impostazioni di Fabbrica (selezionare tale operazione nel menù Installation) sull’unità master) e attendere che l’aggiornamento della memoria flash sia terminato (evento evidenziato dal messaggio: “Updating flash 202”) 16)Inizializzare nuovamente tutte le unità (per attivare i nuovi settaggi della memoria Flash), spegnendo e riaccendendo le unità 17) Aggiornare le curve di equalizzazione per I diffusori Bose utilizzando il software Live Installer 18) La operazione di aggiornamento a ControlSpace AMS-8 II è completata ® Utilizzare il software Live Installer oppure il display e i pulsanti di navigazione per configurare le unità AMS-8 I vecchi file BDF (Bose Data File) non possono più essere utilizzati nelle nuove unità AMS-8 (a causa dei differenti settaggi della memoria Flash). Comunque, dopo la riconfigurazione dell’unità, i nuovi file creati possono essere salvati e riaperti in altri sistemi ControlSpace AMS-8 II. ® 161 6. Risoluzione dei problemi 6. Risoluzione dei problemi L’alimentazione è assente Colleghi il cavo di alimentazione e accenda il sistema. L’apparecchio è acceso, ma l’audio non è presente in nessuna zona Verifichi che dalla sorgente provenga un segnale di ingresso. Verifichi che sia presente un segnale di uscita. Se il segnale di ingresso è presente, mentre quello di uscita è assente, è possibile che l’audio del ControlSpace sia in Mute o che i livelli di uscita siano bassi. ® L’apparecchio è acceso, ma l’audio è basso Verifichi che l’indicatore di ingresso audio sia verde. Se è spento, aumenti l’uscita della sorgente o il guadagno dell’ingresso. Se l’indicatore di ingresso audio e l’indicatore del segnale di uscita audio sono verdi, verifichi che il guadagno dell’amplificatore sia sufficiente e controlli i livelli di uscita. Il suono è distorto Se il segnale della sorgente di ingresso è pulito quando entra nel sistema CS AMS-8, verifichi che i diffusori non siano sovrapilotati e/o danneggiati. Il suono risulta innaturale Verificare che sul percorso del segnale sia stata usata la corretta curva di equalizzazione e il corretto taglio di frequenza. Assicurarsi che il segnale in ingresso non sia distorto o troppo alto. L’apparecchio è acceso, ma l’audio non è presente in una o più zone Verificare che l’amplificatore funzioni correttamente e che i controlli di guadagno siano regolati opportunamente. Controllare le regolazioni di default e il volume massimo della zona sul software Live Installer o sull’unità. Italiano English Controlla se i preset Eventi o Room Combining sono attivati. Assenza di paging/suoneria dal software utente Controlli il collegamento tra scheda audio del PC, microfono e rack di sistema. Verifichi le impostazioni di controllo del volume del PC stesso. Assenza di controllo/ comunicazione da CS-WC/CS-PP Controlli il collegamento tra CS-WC/CS-PP e il rack di sistema. Il menu delle impostazioni dell’ambiente del rack indica lo stato del controller da parete. ‘WC-‘ indica che la comunicazione con il controller è assente. Verifichi l’indirizzo del controller da parete e che questo sia impostato sul numero di ambiente a cui deve fare riferimento. Assenza di comunicazione/ controllo tra il PC e il rack di sistema AMS-8 quando utilizza il software per l’installazione3 Verifica il cavo. Verifica che il software installatore ti renda visibile che la connesione INETGui è online. Nessun segnale audio da un Assicurarsi che il cavo di segnale sia collegato all’uscita sinistra del Modulo di Ingresso Locale connettore del CS-LIM. configurato Mono Il segnale audio in uscita cala quando sta suonando una sorgente con uscita elevata Assicurasi di aver settato il guadagno d’ingresso a 0dB. Un segnale di ingresso al livello costante di 3dB porrà in mute lo stadio d’ingresso. Per es.: per un lettore CD con un’uscita di 6dB, il guadagno d’ingresso dovrebbe essere ridotto di almeno 3dB (6dB è preferibile). Il Led Talk sul pannello di paging assume i colori verde e rosso Questo indica un problema di comunicazione. Controllare il cavo di collegamento tra il pannello di paging e l’AMS-8. Assicurarsi che il jumper di terminazione sia inserito sull’ultimo CS-PP. Nessun segnale dal pannello Controllare il cavo di collegamento tra il pannello di paging e l’AMSdi paging 8. Controllare i settaggi sul software Live Installer o sull’unità AMS-8 (utilizzando il display e i pulsanti di navigazione). 162 7. Specifiche tecniche 7. Specifiche tecniche Ingressi: Tipo: 8 (fino a 16) analogici di linea, non bilanciati e bilanciati elettronicamente Connettori: RCA ed Euroblock a 3 pin Sensibilità: da -30 dBu a +14 dBu Impedenza: 50 kohm Livello clip di ingresso: +14 dBU Risoluzione digitale: 24 bit Uscite: Tipo: 8 analogiche di linea, non bilanciate e bilanciate elettronicamente Connettori: RCA ed Euroblock a 3 pin Impedenza: 150 ohm Livello di uscita massimo: 18 dBu bilanciato, 12 dBu non bilanciato Controllo bassi/acuti: +/-12 dBu, con incrementi di 1 dB Risoluzione digitale: 24 bit Elaborazione del segnale: Tipo: elaboratori digitali del segnale a 48 bit, virgola mobile Frequenza di campionamento: 96 kHz Latenza audio: <1 ms Ritardo: 10 ms, con incrementi di 0,05 ms Risposta in frequenza: Da 20 Hz a 20 kHz (+0 dB/-0,3 dB) Distorsione armonica totale (THD): <0,007% (pesata A, 0 dBu in/0 dBU out) Separazione dei canali: >103 dB a 1 kHz, 0 dBu Italiano Rapporto segnale/rumore: >100 dB, pesato A, THD<0,02%, in/out bilanciati >100 dB, pesato A, THD<0,2%, in/out non bilanciati >100dB, pesato A, THD<0,02%, ingresso digitale, uscita analogica 110dB, pesato A, THD<0,02 %, analogic in/digital out 140dB, pesato A, THD<0,02 %, digital in/out Specifiche elettriche: Alimentatore Consumo energia Dimensioni (A x L x P in mm) Peso CS AMS-8 CA 90 - 264 Volt (47-63 Hz) 37 watt massimo 88 x 485 x 285 4,5 kg CS-WC CC 12 - 24 Volt 0,7 watt massimo 80 x 115 x 48 0,12 kg CS-LIM CC 24 Volt 1,5 watt massimo 80 x 115 x 48 0,12 kg CS-PP CC 12 - 24 Volt 1,7 watt massimo 43 x 210 x 212 1,5 kg Specifiche ambientali: Temperatura operativa: da 0˚C fino a 50˚C Umidità: 80% di umidità relativa (senza condensa) 163 Appendice A. Esempi di applicazioni del ControlSpace AMS-8 ® Appendice A. Esempi di applicazioni del ControlSpace AMS-8 ® Sistema ControlSpace AMS-8 con 80 zone ® Italiano English SCI HUB 164 Appendice A. Esempi di applicazioni del ControlSpace AMS-8 ® Appendice A. Esempi di applicazioni del ControlSpace AMS-8 ® Sistema ControlSpace AMS-8 con diversi pannelli di paging ® oppure: Italiano Sistema ControlSpace AMS-8 con diversi controlli da parete nella stessa zona ® Zone 1 Zone 5 Zone 6 Zone 2 Zone 7 Zone 3 Zone 4 Zone 8 165 Appendice B. Istruzioni per il montaggio dell’Interfaccia Utente Appendice B. Istruzioni per il montaggio dell’Interfaccia Utente Scatola per il montaggio ad incasso La scatola per il montaggio ad incasso è adatta per il montaggio a incasso a parete del ControlSpace AMS-8 Controllo da parete e del ControSpace Modulo di ingresso locale. Dimensioni (AxLXP): 7,1 x 10,6 x 5,2 cm ® Scatola per montaggio superficiale La scatola per montaggio superficiale è adatta per il montaggio superficiale a parete del ControlSpace AMS-8 Controllo da parete e del ControlSpace Modulo di ingresso locale. Dimensioni (AxLXP): 8 x 11,4 x 4,6 cm ® Scatola con spigoli arrotondati per il montaggio in pareti in cartongesso La scatola con spigoli arrotondati è adatta al montaggio a incasso su pareti in cartongesso del ControlSpace AMS-8. Controllo da parete e del ControSpace Modulo di ingresso locale. Dimensioni (AxLXP): 6.6 x 12,4 x 5,2 cm ® Italiano English Pannello di paging Utilizzare le misure riportate per incassare il pannello di paging in un banco reception o altro. Montare un connettore XLR (femmina) vicino al pannello di paging e connetterlo alle connessioni per il microfono all’interno del pannello. Per evitare corto circuiti, scollegare l’alimentazione prima del montaggio. 166 Italiano 167 Sedi commerciali europee Per contattare le sedi commerciali europee Austria Professional Systems Division, Austria Bose Ges.m.b.H., Business Park Vienna Wienerbergstrasse 7, 10 O.G. 1100 Wien, Österreich Telefono: 01-60404340 Fax: 01-604043423 Belgio Professional Systems Division, Belgium Bose N.V., Limesweg 2 3700 Tongeren, België Telefono: 012-390800 Fax: 012-390840 Danimarca Professional Systems Division, Denmark Bose Danmark A/S, Industrivej 7 PO Box 14, 2605 Brøndby, Danmark Telefono: 43437777 Fax: 43437818 Francia Professional Systems Division, France Bose S.A., 12 rue de Témara 78100 Saint Germain en Laye Telefono: 01-30616363 Fax: 01-30616388 Italiano English Germania Professional Systems Division, Germany Bose GmbH, Max-Planck-Straße 36, 61381 Friedrichsdorf, Deutschland Telefono: 06172-7104-0 Fax: 06172-7104-19 Irlanda Professional Systems Division, Ireland Bose GP, Castleblayney Road Carrickmacross, County Monaghan Republic Of Ireland Telefono: 042-9661988, Fax: 042-9661998 Italia Divisione Professionale, Italia Bose S.p.A., Via della Magliana 876 00148 Roma, Italia Telefono: 06-60292292, Fax 06-60292159 168 Paesi Bassi Professional Systems Division, The Netherlands Bose B.V., Nijverheidstraat 8 1135 GE Edam, Nederland Telefono: 0299-390139 Fax: 0299-390109 Norvegia Professional Systems Division, Norway Bose Filial till Bose A/S Danmark, Lerkev 58 2209 Kongsvinger, Norge Telefono: 062-821560 Fax: 062-821569 Svizzera Professional Systems Division, Switzerland Bose AG, Hauptstrasse 134 4450 Sissach, Sweiz Telefono: 061-9757733 Fax: 061-9757744 Spagna Gaplasa S.A. Avda. Ingeniero Conde de Torroja 25 28022 Madrid, España Telephone: 91 748 29 60 Fax: 91 329 16 75 Svezia Professional Systems Division, Sweden Bose, filial till Bose A/S Danmark Johannefredsgatan 4, 43153 Mölndal, Sverige Telefono: 031-878850 Fax: 031-274891 Regno Unito Professional Systems Division, United Kingdom Bose Ltd., 1 Ambley Green Gillingham Business Park Gillingham, Kent ME8 0NJ, England Telefono: 0870-741-4500 Fax: 0870-741-4545 Polonia Bose Sp. z o.o. Galeria Mokotów ul. Wołoska 12 02-675 Warszawa Telefono: (22) 852 2928 Fax: (22) 852 2927 Wijzigingen in specificaties voorbehouden. Informatie in dit document kan zonder voorafgaande kennisgeving of verplichting worden gewijzigd. Inhoudsopgave 1. Veiligheidsinformatie Belangrijke veiligheidsinstructies 172 Conformiteitsverklaring 174 2. Inleiding 175 3. Systeeminstallatie 3.1 Voorpaneel ControlSpace AMS-8 176 3.2 Achterpaneel ControlSpace AMS-8 177 3.3 Configuratie wandregelaar 178 3.4 Aansluitingen gebruikersinterface 179 3.5Systeemindelingen 180 3.6 Aansluitingen (wandregelaar) 183 3.7 Aansluitingen (lokale input module) 183 3.8 Aansluitingen (oproeppaneel) 184 3.9 Algemene ingangen/uitgangen 185 3.10 Aansluitingen audio-ingangen en -uitgangen 186 ® ® 187 5. Upgrade naar een ControlSpace AMS-8 II systeem 189 6. Problemen oplossen 190 7. Technische specificaties 191 Annex A. ControlSpace AMS-8 systeem voorbeelden 192 Annex B. Gebruikersinterface montage intstructies 194 Europese verkoopkantoren 196 ® ® Nederlands 4. Optionele systeemcomponenten 1. Veiligheidsinformatie 1. Belangrijke veiligheidsinstructies Waarschuwingslabels op het product De volgende waarschuwingslabels bevinden zich achter op het product. De bliksemschicht met een pijl in een driehoek waarschuwt de gebruiker voor de aanwezig-heid van gevaarlijke niet-geïsoleerde spanning in de systeembehuizing, waardoor er kans op elektrische schokken bestaat. Het uitroepteken in de driehoek dat is afgebeeld op het systeem maakt de gebruiker attent op belangrijke bedienings- en onderhoudsinstructies in deze installatiehandleiding. Belangrijke veiligheidsinstructies 1. Lees deze instructies door. 2. Bewaar deze instructies voor toekomstig gebruik. 3. Neem de waarschuwingen op het product in acht. 4. Volg alle instructies. 5. Gebruik dit apparaat niet in de buurt van water of vochtige locaties. 6. Reinig het product alleen met een droge doek. 7. Blokkeer geen ventilatieopeningen. Installeer het product volgens de instructies van de fabrikant. Plaats het product in een positie en op een locatie waar de ventilatie niet belemmerd wordt om ervoor te zorgen dat het product correct werkt en niet oververhit raakt. 8. Installeer het product niet in de buurt van warmtebronnen als radiatoren, ventilatieroosters, kachels of andere apparaten (waaronder versterkers) die warmte produceren. 9. Monteer geen andere stekker aan het apparaat. De bijbehorende stekker moet voorzien zijn van randaarde. Randaarde is aangebracht voor uw veiligheid. Als de stekker niet in uw stopcontact past, neemt u contact op met een elektrotechnisch installateur om het stopcontact te vervangen. 10. Zorg dat de voedingskabel zodanig is aangesloten dat er geen kans bestaat dat personen op de kabel gaan staan of dat de kabel wordt afgeknepen, met name bij stekkers, stopcontacten en het punt waar de kabel uit het apparaat komt. Nederlands English 11. Gebruik alleen toebehoren/accessoires die door de fabrikant worden opgegeven. 12. Gebruik dit apparaat alleen in combinatie met een door de fabrikant voorgeschreven verrijdbaar plateau, statief, beugel of tafel die eventueel bij het apparaat wordt verkocht. Zorg bij gebruik van een verrijdbaar plateau dat het apparaat voorzichtig wordt verplaatst om te voorkomen dat het plateau kantelt. 13. T rek de stekker van de voedingskabel van het apparaat uit het stopcontact bij onweer of als het apparaat langere tijd niet wordt gebruikt. 14. Laat onderhoud en service over aan gekwalificeerd onderhoudspersoneel. Onderhoud is vereist als het apparaat is beschadigd, bijvoorbeeld wanneer de voedingskabel of stekker van het apparaat is beschadigd; als er vloeistof of een object in het apparaat is terechtgekomen; als het apparaat is blootgesteld aan regen of vocht, niet werkt of is gevallen. Voer zelf geen onderhoud aan het apparaat uit. Als u de behuizing opent of verwijdert, wordt u mogelijk blootgesteld aan gevaarlijke spanning of andere risico’s. Neem contact op met Bose voor informatie over een geautoriseerd servicecenter. 15. Zorg dat stopcontacten, verlengsnoeren of integrale contactdozen niet overbelast worden om brand of een elektrische schok te voorkomen. 172 1. Veiligheidsinformatie 16. Zorg dat er geen objecten of vloeistoffen in het product terechtkomen – deze kunnen in contact komen met gevaarlijke spanningspunten of kortsluiting veroorzaken hetgeen kan leiden tot brand of elektrische schokken. 17. Raadpleeg de behuizing van het product voor veiligheidswaarschuwingen. 18. Er mag geen open vuur in de buurt van of op het apparaat worden gebruikt. WAARSCHUWING: Stel de ControlSpace AMS-8 niet bloot aan regen of vocht om brand en elektrische schokken te voorkomen. ® WAARSCHUWING: Het apparaat mag niet worden blootgesteld aan druipende of spattende vloeistoffen. Objecten gevuld met vloeistof, bijvoorbeeld vazen, mogen niet op het apparaat worden geplaatst. Net als bij andere elektrische producten moet u ervoor zorgen dat er geen vloeistoffen in het systeem terechtkomen. Vloeistoffen kunnen storingen en/of brand veroorzaken. Informatie over producten die elektrische ruis genereren Indien van toepassing, is dit apparaat getest en voldoet het aan de voorschriften voor een digitaal apparaat Klasse A, conform Deel 15 van de FCC-regels. Deze voorschriften zijn ontworpen om een redelijke bescherming te bieden tegen schadelijke storing bij gebruik in een woonomgeving. Dit apparaat genereert en gebruikt hoogfrequentie-energie en kan deze uitstralen. Als dit apparaat niet overeenkomstig de instructies wordt geïnstalleerd, kan het apparaat schadelijke storingen in radiocommunicatie veroorzaken. Er kan echter geen garantie worden gegeven dat dit apparaat in een bepaalde installatie storingsvrij zal functioneren. Mochten er schadelijke storingen optreden in radio- of televisieontvangst, hetgeen kan worden vastgesteld door het apparaat uit en weer in te schakelen, dan kan de gebruiker proberen de storing te verhelpen door een of meer van de volgende maatregelen te nemen: • Verander de ontvangstantenne van richting of van plaats. • Vergroot de afstand tussen het apparaat en de ontvanger. • Sluit het apparaat aan op een ander elektrisch circuit dan dat waarop de ontvanger is aangesloten. • Neem contact op met de leverancier of een ervaren radio- of tv-monteur voor ondersteuning. Opmerking: Niet-geautoriseerde aanpassingen van de ontvanger of afstandsbediening kunnen het recht van de gebruiker om dit apparaat te bedienen ongeldig maken. Nederlands Dit product voldoet aan de specificaties. De informatie in deze installatiehandleiding omvat niet alle details met betrekking tot ontwerp, productie of varianten van dit product. Ook wordt niet elke situatie behandeld die zich kan voordoen tijdens installatie, bediening of onderhoud. Als u ondersteuning nodig hebt waarvoor de informatie in deze handleiding ontoereikend is, kunt u contact opnemen met een van onze Europese verkoopkantoren. Zie “Europese verkoopkantoren” op de laatste pagina van deze handleiding voor meer informatie. 173 1. Veiligheidsinformatie Conformiteitsverklaring De fabrikant verklaart hierbij dat dit product, inclusief de bijbehorende accessoires, voldoet aan de volgende richtlijnen: EMC-richtlijn 89/336/EEG (Elektromagnetische compatibiliteit) EN-55103-1 EN-55103-2 Laagspanningsrichtlijn 73/23/EEG EN-60065: 2002 7e Editie Aandachtspunten bij montage in een rack Voor de montage van de audiosignaalprocessor in een rack zijn twee rackunits van 4,4 cm (2HE totaal) met een diepte van 32,5 cm vereist. Gebruik voor de montage vier schroeven met plastic sluitringen om schade aan het voorpaneel te voorkomen. Sluitringen van neopreen zijn uitermate geschikt omdat deze de schroefkoppen goed grip geven en voorkomen dat de schroeven lostrillen door vibraties of tijdens transport. Let op: Wanneer de unit wordt getransporteerd als deze is gemonteerd in een rack, moet u de achter-kant van de unit afschermen met een plank of beugels gebruiken om de achterkant van de unit te ondersteunen tegen doorbuigen. Algemene voorzorgsmaatregelen & ventilatie Let op: Plaats de unit op een locatie waar deze wordt beschermd tegen hitte en zorg voor voldoende ventilatie. Plaats de unit niet in de buurt van warmtebronnen zoals heteluchtkanalen en radiatoren. Controleer of naast, onder en boven de unit voldoende ruimte is voor goede luchtcirculatie. Als de unit in het rack onder of boven een versterker wordt geplaatst, moet tussen de twee apparaten een losse ventilatieplaat van 1HE worden geplaatst. Zorg dat de behuizing niet warmer wordt dan de maximale bedieningstemperatuur van 50ºC. Houd er rekening mee dat in een afgesloten rack de temperatuur hoger kan zijn dan de omgevingstemperatuur van de ruimte. Nederlands English Let op: Zorg dat alle draden van de kabel goed in elkaar zijn gedraaid en correct in de connector zijn gestoken. Als een draad niet goed in de connector is gestoken, kan de draad in contact komen met een andere terminal waardoor kortsluiting kan ontstaan. 174 2. Inleiding 2. Inleiding Inleiding Het Bose ControlSpace AMS-8 Audio Management Systeem is een flexibele, uitbreidbare en kwalitatief hoogwaardige audiosignaalprocessor voor geluidsdistributietoepassingen in bijvoorbeeld restaurants, winkels, café’s, kantoren, hotels, conferentiezalen en sportcomplexen. De centrale unit bevat 8 lijningangen en 8 lijnuitgangen. Er zijn vier audioslots beschikbaar waarmee de unit kan worden uitgebreid met 8 extra audioingangen (2 ingangen per kaart). ® ® Voor meerdere zones kunnen per systeem tien AMS-8 systeemracken worden gekoppeld. (Elk toegevoegd rack voegt 8 mono zones toe aan het system) Er zijn meerdere gebruikersinterfaces beschikbaar waarmee eindgebruikers snel en eenvoudig het ControlSpace AMS-8 systeem kunnen bedienen. ® De Bose ControlSpace AMS-8 Live Installer-software wordt gebruikt voor systeemontwerp en configuratie van de AMS-8 en gebruikersinterfaces. De software draait op een computer en communiceert met het AMS-8 systeem via een Ethernet aansluiting. ® ® Kenmerken en functies • Uitbreidbaar en flexibel ontwerp voor uitbreidingskaarten • LCD-scherm en navigatietoetsen • 8 analoge lijningangen (maximaal 16) • Wandregelaar (met optionele infrarood afstandsbediening) • 8 analoge lijnuitgangen • Lokale inputmodule • 8 algemene bedieningsingangen (voor het activeren van berichten, presets van ruimte koppeling of ruimte standby/mute) en 1 algemene bedieningsuitgang (GPIO) • Oproeppaneel • Ontwerp, configuratie en systeembeheer met PC-software • Digitale signaalverwerking omvat o.a.: luidsprekerEQ’s van Bose, Dynamic EQ, delay, volumeregeling en bronselectie • Berichten functionaliteit (optionele Message Storage Card is benodigd)) • Tuner functionaliteit (optionele Twin Tuner Card is benodigd) • Automatische detectie van het type ingangskaart • Room combining functionaliteit • Event planning functionaliteit Snel aan de slag • Sluit de audio in- en -uitgangen aan op het ControlSpace AMS-8 systeem (In het geval van 2 of meer systeem racken, verbindt de racken door middel van audio link kaarten, audio link kabels en hoge snelheid RS485 rack verbindingen: zie hoofdstuk 3.5) ® Nederlands • Zet het ControlSpace AMS-8 systeem aan. Het systeem is standaard zo ingesteld dat het gelijk gebruikt kan worden. Als het systeem opnieuw wordt opgestart, worden de standaardinstellingen hersteld en worden de standaardbron en het standaardvolumeniveau gebruikt die zijn ingesteld in het installatiemenu. ® OPMERKING: Zie hoofdstuk 5 voor het updaten van het systeem naar de kenmerken en functionaliteiten van een AMS-8 II systeem Afkortingen CS-WCControlSpace CS-PPControlSpace CS-LIMControlSpace CS-RCControlSpace CS-TICControlSpace CS-TOCControlSpace ® ® ® ® ® ® AMS-8 wandregelaar AMS-8 oproeppaneel AMS-8 lokale inputmodule AMS-8 afstandsbediening AMS-8 dubbele ingangskaart AMS-8 dubbele uitgangskaart CS-ECControlSpace CS-MSCControlSpace CS-DICControlSpace CS-TTCControlSpace CS-HUBControlSpace CS-SCIControlSpace ® ® ® ® ® ® AMS-8 Ethernet-kaart AMS-8 berichtenkaart AMS-8 digitale input kaart AMS-8 dubbele tuner kaart AMS-8 RS485 Hub AMS-8 Serial Code Interface 175 3. Systeeminstallatie 3.1 Voorpaneel ControlSpace AMS-8 ® 1 2 1. LCD-SCHERM Het LCD-scherm toont de beheermenu’s en de beschikbare instellingen voor de afzonderlijke menu-items. 2 . NAVIGATIETOETSEN Nederlands English Met de pijl omhoog en de pijl omlaag kunt u door de menu-items bladeren. Met de pijl naar links en de pijl naar rechts wijzigt u de waarde van het geselecteerde menu-item. Druk op de toets ‘OK’ om de huidige selectie te bevestigen. Als bijvoorbeeld het menu-item ‘Exit’ (Afsluiten) geselecteerd is, keert u met de toets ‘OK’ terug naar het vorige menu. 176 3. Systeeminstallatie 3.2 Achterpaneel ControlSpace AMS-8 ® 5 3 7 9 11 15 13 1 4 5 3 7 5 9 4 5 3 8 1 8 7 Serial Number: Rack Link 2 1 PC Link ! Rack Link 1 1 CAUTION RISK OF ELECTRIC SHOCK DO NOT OPEN AVIS: Risque de chock électrique, ne pas ouvrir System Rack MODEL: 2 6 8 10 12 14 16 4 2 13 6 Audio Link Source Inputs 1 8 5 6 3 4 1 2 Line Outputs 2 1 Line Line ingangen inputs (1-16)(1-16) 10 7 8 16 Bus 2 6 9 I/O Link 12 4 2 Bus 1 9 To CSPP/CSWC Bose Corporation, Framingham, MA01701-9168 Made in The Netherlands 3 4 5 2 Audio kaart Audio Link Link Card slotslot CSCSTIC TIC Slotvoor for Audio Link Card link theom connected Slot Audio Linktokaart twee ControlSpace analog sources between Controlspace AMS-8 AMS-8 Audio Management Systemen aan elkaar te Audio Managment Systems. koppelen. Alleen in het hoofdsysteem is een Audio Link kaart benodigd. Voeg één Audio Link kabelset toe per vier geluidsbronnen om deze door te koppelen. RS-232 & GPIO card 9 11 4 6 1 5 3 5 5 3 8 1 8 7 2 6 9 12 8 10 12 14 16 13 9 4 2 6 16 Audio Link Source Inputs RCA Connector RCAInput Input Connector (Unbalanced line level) (Unbalanced line level) Line Outputs 5 9 4 5 9 8 3 3 7 7 2 6 1 2 3 Line Line uitgangen outputs (1-8)(1-8) 6 1 CSCSTOC TOC 9 3-pin Output Euro Block Connector: 3-pins Uitgang 3-pin Input Euro Blok Connector Euro Block connector (gebalanceerd line niveau) RCA Input line Connector (Balanced level) (Unbalanced line level) 3-pin Output Euro Block Connector: 3-pins Uitgang 3-pin Input Euro Blok Connector Euro Block connector (gebalanceerd line niveau) 3-pin Inputline Euro Blok Connector (Balanced level) 8 5 4 2 Slot for Audio Link Card to link the connected analog sources between Controlspace AMS-8 9 10 Audio Managment Systems. RS-232 & GPIO card 7 8 5 6 3 4 1 2 5 9 4 Ethernet & GPIO card 4 5 9 RS-485 card 8 6 4 2 RS232 port pin out Straight shielded cable (20 meters max.) 2. TX 3. RX 5. GND 6 1 (Balanced line level) RCA Input Connector (Unbalanced line level) 10 3 Audio Link Card slot 3 (Balanced line level) RCA Output connector: RCA Uitgangconnector RCA Input Connector (ongebalanceerd line niveau) 3-pin Input Euro Connector (Unbalanced lineBlok level) 7 5 1 DB9 Female 10 7 RCA Output connector: RCA Uitgangconnector Line inputs (1-16) RCA Input Connector (ongebalanceerd line niveau) (Unbalanced line level) 8 8 4 CSTIC 7 4 Bose Corporation, Framingham, MA01701-9168 Made in The Netherlands 2 4 9 3-pin Euro Connector 3-pinInput Input Euro BlokBlock Connector (Balanced line level) (Balanced line level) Serial Number: 3-pin Euro Connector 3-pinInput Input Euro BlokBlock Connector (Balanced line level) (Balanced line level) 15 13 Rack Link 2 7 Bus 1 5 Bus 2 1 3 To CSPP/CSWC 1 PC Link ! I/O Link CAUTION RISK OF ELECTRIC SHOCK DO NOT OPEN AVIS: Risque de chock électrique, ne pas ouvrir System Rack MODEL: Rack Link 1 ® RCA Connector RCAInput Input Connector (Unbalanced line level) (Unbalanced line level) 8 4 8 3 3 7 7 2 1 6 Line outputs (1-8) Pin 1: Contact 1 Pin 2: Contact 2 Pin 3: Contact 3 Pin 4: Contact 4 Pin 5: Contact 5 Pin 6: Contact 6 Pin 7: Contact 7 Pin 8: Contact 8 Pin 9: Output Pin 10: Common RS232 port pin out Straight shielded cable (20 meters max.) 2 1 6 2. TX 3. RX 5. GND Rack link 1 (high speed) CSTOC 9 7 5 3-pin&Input Euro Connector CS-WC CS-PP BusBlok 1 (low speed) (Balanced line level) 3-pin &Input Euro Blok Connector CS-WC CS-PP Bus 2 (low speed) GPIO pinout: (Balanced line level) Pin 1 : Contact 1 Pin 2 : Contact 2 RCA Input Connector 3 : Contact 3 (Unbalanced linePin level) Pin 4 : Contact 4 Pin 5 : Contact 5 8 DB9 Female 6 4 1 2 9 Pin 6 : Contact 6 Pin 7 : Contact 7 Pin 8 : Contact 8 Pin 9 : Uitgang Pin 10: Massa 10 7 8 5 6 3 4 1 2 Nederlands Rack 2 (high speed) RCAlink Input Connector (Unbalanced line level) 10 3 Pin 1: Contact 1 Pin 2: Contact 2 Pin 3: Contact 3 Pin 4: Contact 4 Pin 5: Contact 5 Pin 6: Contact 6 Pin 7: Contact 7 Pin 8: Contact 8 Pin 9: Output Pin 10: Common RS-485 card 5 RS485 kaart Rack link 1 (high speed) Rack Link 1 (hoge snelheid) Rack link 2 (high speed) Rack Link 2 (hoge snelheid) CS-WC Bus 1 Bus (low speed) CS-WC& CS-PP & CS-PP 1 (lage snelheid) CS-WC Bus 2 Bus (low speed) CS-WC& CS-PP & CS-PP 2 (lage snelheid) 177 3. Systeeminstallatie 3.3 Configuratie wandregelaar 1 1. LCD-SCHERM 2 3 2. VOLUMETOETSEN 3. KANAALTOETSEN Voordat de ControlSpace AMS-8 kan worden geconfigureerd, moeten de adressen voor de afzonderlijke wandregelaars (1..8) worden ingesteld. Een aantal seconden na het verbinden van de wandregelaar met het systeem, zal de firmware versie weergegeven worden op het LCD display, gevolgd door “Select WC..”. Selecteer het juiste adres met de kanaaltoetsen en bevestig de instelling met de volumetoets (-). Wanneer men meerdere wandregelaars wil gebruiken in dezelfde ruimte, moet men deze hetzelfde nummer geven. In een situatie als deze moeten alle wandregelaars op hetzelfde rack worden aangesloten ® Als voor een wandregelaar al een adres is ingesteld, wijzigt u het adres als volgt: 1. Schakel de wandregelaar uit (druk herhaaldelijk op de kanaaltoets (-) tot de wandregelaar wordt uitgeschakeld). 2. Houd de kanaaltoets (-) ingedrukt. 3. Druk de volumetoetsen (+) en (-) gelijktijdig in. Nadat het lcd scherm de Firmware versie heeft weergegeven, zal deze het ingestelde adres weergeven, bijvoorbeeld “WC2”. Selecteer het juiste adres met de kanaaltoetsen en bevestig de instelling met de volumetoets (-). Indien een systeem uit twee of meerdere ControlSpace AMS-8 racken bestaat, dan worden de adressen (1..8) voor alle racken gebruikt. De adressen 1..8 worden voor het eerste rack gebruikt voor de uitgangen 1..8 , voor het tweede rack de uitgangen 9..16 tot en met het tiende rack voor de uitgangen 73..80. ® Ruimte instellingen wijzigen met behulp van de wandregelaar Nederlands English Met het verborgen menu van de wandregelaar kunnen de audio-instellingen worden aangepast voor de ruimte waar de wandregelaar geplaatst is. U opent dit menu als volgt: 1. Schakel de wandregelaar uit (druk herhaaldelijk op de kanaaltoets (-) tot de wandregelaar wordt uitgeschakeld). 2. Houd de volumetoets (-) ingedrukt. 3. Druk de kanaaltoetsen (+) en (-) gelijktijdig in. In het verborgen menu kunt u de volgende functies instellen of wijzigen: a. standaardkanaalb. bassc. treble d. dynamische EQ e. Bose speaker EQ f. maximum volume g. volume oproeppaneel h. delay i. standaard volume Met de kanaaltoetsen kunt u door de menu-items bladeren. De volumetoetsen kunt u gebruiken om de instellingen te wijzigen voor het geselecteerde item. Druk de kanaaltoetsen (+) en (-) gelijktijdig in om het verborgen menu te sluiten. 178 3. Systeeminstallatie 3.4 Aansluitingen gebruikersinterface ControlSpace AMS-8 wandregelaar ControlSpace AMS-8 oproeppaneel ControlSpace AMS-8 lokale inputmodule Voltage 12-24 V DC, +/-20% 12-24 V DC, +/-10% 24 V DC, +5%/-10% Spanning bij 12V DC 50mA norm. bij 24V DC 30mA norm. bij 12VDC 140mA norm. bij 24VDC 70mA norm. bij 24V DC 60mA norm. Aanbevolen voedingsbron* BOSE CS AMS-8 24 V DC 2,7 A gestabiliseerde voedingsbron BOSE CS AMS-8 24 V DC 2,7 A gestabiliseerde voedingsbron BOSE CS AMS-8 24 V DC 2,7 A gestabiliseerde voedingsbron Maximumlengte (/with Hub) 600 m (/1200m) 600 m (/1200m) Niet van toepassing Afsluiting*** 120 Ohm 120 Ohm Niet van toepassing Kabeltype 1 STP-kabel 1 STP-kabel Niet van toepassing Nom. Cap. 40 pF/m Nom. Cap. 40 pF/m Niet van toepassing Nom. Imp. 124 Ohm Nom. Imp. 124 Ohm Niet van toepassing ® ® ® Voedingsbron RS485-kabels** Nom. Att. 2 dB bij 1MHz Nom. Att. 2 dB bij 1MHz Niet van toepassing Aanbevolen kabel BOSE CS AMS-8 communicatie/voedingskabel (blauw) voor CS-WC/CS-PP BOSE CS AMS-8 communicatie/voedingskabel (blauw) voor CS-WC/CS-PP Niet van toepassing Audiokabels Niet van toepassing 1 standaard-mic/lijnkabel, afgeschermd Bose CS AMS-8 audio/voedingskabel (geel) voor CS-LIM * Opmerking: Als de hierboven vermelde voedingsbron niet wordt gebruikt, mogen in Europa alleen voedingsbronnen worden gebruikt die voldoen aan EN/IEC 60950. ** Benodigde RS485 bekabeling Nederlands Gebruik voor de componenten altijd een seriële configuratie, in plaats van een sterconfiguratie of andere configuratie. Ster bekabeling is alleen toegestaan wanneer men een CS-HUB gebruikt. Zorg dat de datakabel gescheiden is van de voedingskabel (>50 V) in de kabelgoot of ander kabelsysteem. *** Afsluiting De jumper voor afsluiting moet op de laatste gebruikersinterface (CS-WC of CS-PP) worden geplaatst, aan het einde van elke RS485-communicatielijn. 4 5 CS AMS-8 communicatie/voedingskabel 1 2 CS AMS-8 audio/voedings-kabel 1. Blauw = RS485-communicatie ‘+’ 6 3 1 2 1. Geel = gebalanc. lijn (afgeschermd) 2. Transparant = RS485-communicatie ‘–’ 5 2. Groen = gebalanc. lijn (afgeschermd) 3. Drainwire = RS485-communicatie ‘aarde’ 3. Rood = voeding ‘24 V DC’ 4. Rood = voeding ‘24 V DC’ 4. Zwart = ‘aarde’ 5. Zwart = ‘aarde’ 6. Blauw omhulsel 3 4 5. Geel omhulsel 179 3. Systeeminstallatie 3.5 Systeemindelingen Twee RS485-communicatielijnen en een centrale voedingsbron: Max. 600 m (totale lengte) Audio-/microfoonkabel * RS-485 RS-485 Audio-/microfoonkabel Voedingsbron 24VDC 2-7A * DC 24 V input Twee RS485-communicatielijnen en lokale voedingsbronnen: Max. 600 m (totale lengte) Audio-/microfoonkabel Voeding * RS-485 Voeding RS-485 * Voeding RS485-communicatielijn maximumlengte: 600 m Nederlands English 600 m Of: 600 m 600 m RS485 HUB 600 m OPMERKING: * De jumper voor afsluiting moet op de laatste gebruikersinterface (CS-WC of CS-PP) worden geplaatst, aan het einde van elke RS485-communicatielijn. Meer systeem voorbeelden kan men vinden in Bijlage A 180 3. Systeeminstallatie ControlSpace AMS-8 units toevoegen om uit te breiden naar maximaal 80 audio zones ® Optionele Audio Link kaarten zijn hiervoor nodig) Het aantal benodigde Audio Link kabelsets is afhankelijk van het totaal aantal door te koppelen bronnen. (incl. omroeppanelen en interne tuner kaarten). Eén Audio Link kabelset is nodig om maximaal vier analoge bronnen door te koppelen. Gebruik voor elk rack dat is toevoegd een stuk communicatiekabel (2 aderig + afscherming) om Racklink 1 of 2 van een rack door te koppelen met Racklink 1 of 2 van een ander rack. Zorg ervoor dat de afsluit jumper alleen geplaatst is op de RS485 communicatie kaart van het eerste en het laatste AMS-8 systeem. OPMERKING 1: Om het digitale signaal van een Berichten kaart, Digitale ingangskaart of het digitale signaal (in plaats van het analoge signaal) van de dubbele Tuner kaart door te koppelen, moet men per toegevoegd rack een Digitale ingangskaart en Digitale Coax kabel (RCA-RCA) toevoegen. OPMERKING 2: Een puls contact zal een bericht eenmalig weergeven. Een ‘houd’ contactzal een bericht weergeven en blijven herhalen tot het contact weer verbroken is. Een houd contact moet gebruikt worden om een room combining preset of de standby mode te activeren. Gebruik het systeem menu ‘Rack Installation’ om de Master en Slave konfiguratie in te stellen: Nederlands 181 3. Systeeminstallatie Rack 1 (Master) ! CAUTION RISK OF ELECTRIC SHOCK DO NOT OPEN AVIS: Risque de chock électrique, ne pas ouvrir System Rack MODEL: Serial Number: Bose Corporation, Framingham, MA01701-9168 Made in The Netherlands 9 1 4 4 3 2 1 1 1 3 2 5 6 6 6 6 10 7 8 5 6 3 4 1 2 7 8 2 1 1 3 1 Rack 2 (Slave) ! CAUTION RISK OF ELECTRIC SHOCK DO NOT OPEN AVIS: Risque de chock électrique, ne pas ouvrir System Rack MODEL: Serial Number: Bose Corporation, Framingham, MA01701-9168 Made in The Netherlands 9 1 1 4 1 4 1 1 1 1 4 4 5 6 6 6 6 10 7 8 5 6 3 4 1 2 7 8 1 3 2 2 2 1 1 2 1 1 3 Rack 10 (Slave) CAUTION RISK OF ELECTRIC SHOCK DO NOT OPEN ! AVIS: Risque de chock électrique, ne pas ouvrir System Rack MODEL: Serial Number: Bose Corporation, Framingham, MA01701-9168 Made in The Netherlands Nederlands English 9 3 3 3 3 3 1 1 1 5 6 6 6 6 1 Digital coax cable (75 Ohm) 2 CS-AMS-8 Link cable 1 3 RS485 communication cable (120 Ohm - 200m Max) 3 Digital Input Card 10 7 8 5 6 3 4 1 2 7 8 Twin Input Card 2 Message Storage Card 4 Twin Tuner Card 5 Audio Link Card 6 Twin Output Card 7 PC Link - I/O Link 8 RS485 Communication (High/Low speed) 182 3. Systeeminstallatie 3.6 CS-WC aansluitingen en instellingen 1 2 3 4 1. Jumper voor afsluiting, zie OPMERKING in hoofdstuk 3.5 2.RS485-connector 3.Voedingsbronconnector (12-24Vdc) 4. Firmware update connector OPMERKING: Zie Annex B. voor wandregelaar montage instructies. 3.7 CS-LIM aansluitingen en instellingen 2 5 4 3 1 Nederlands 1.De CS-LIM is uitgerust met een instelbare potmeter voor het microfoonvolume, deze is ook instelbaar via het frontpaneel door een ‘0’ schroevendraaier te gebruiken. Draai de instelpotmeter linksom (gezien van de voorkant) om het volume te verlagen naar de minimumwaarde van 32 dB of rechtsom om het volume te verhogen naar de maximumwaarde van 66 dB. De fabrieksinstelling is 38 dB. 2.Stel deze jumper in als de CS-LIM moet worden gewijzigd van stereo- in monoconfiguratie.In het geval van een mono configuratie moet de audio kabel aangeloten worden op de LINKER uitgang. 3. Wijzig de jumper van FLAT in VOICE om spraak-EQ (geoptimaliseerde EQ voor spraak) | voor de microfooningang te activeren. voice flat = vlak voice = spraak-EQ flat 4.Connector voor gebalanceerde lijnuitgang (Stereo). 5.Voedingsbronconnector (24Vdc). OPMERKING: Zie Annex B. voor wandregelaar montage instructies. 183 3. Systeeminstallatie 3.8 CS-PP caansluitingen en instellingen 3 7 2 7 1 6 4 5 8 De CS-PP is uitgerust met een instelpotmeter (spraak EQ), voor microfoonvolume en een instelpotmeter voor het oproepsignaal. Als u beide instelpotmeters wilt instellen en de CS-PP wilt aansluiten, moet u de plastic afdekplaat (boven aan het voorpaneel van de CS-PP) verwijderen. Verwijder vervolgens de 4 schroeven en til het voorpaneel uit de behuizing. De twee instelpotmeters bevinden zich onder aan het paneel. OPMERKING: Zie Annex B. voor wandregelaar montage instructies. Nederlands English 1. Microfoonvolume: Draai de instelpotmeter linksom om het volume te verlagen naar de minimumwaarde van 32 dB of rechtsom om het volume te verhogen naar de maximumwaarde van 66 dB. De fabrieksinstelling is 38 dB. 2. Volume voor oproepsignaal: Gebruik de instelpotmeter om het volume te verhogen of te verlagen. 3. Jumper voor afsluiting, zie OPMERKING in hoofdstuk 3.5. 4. RS485-connector. 5. Voedingsbronconnector, 12-24Vdc (2 van de 3 aansluitpinnen worden gebruikt). 6. Connector voor gebalanceerde lijnuitgang. 7. Firmware update connector. 8. XLR-connector voor een microfoon, met 22Vdc phantoomvoeding. 184 3. Systeeminstallatie ControlSpace AMS-8 bevat 1 GPIO/RS232-kaart(zie ook hoofdstuk 3.2). Men kan maximaal 40 GPIO contacten (8 per rack, maximaal 5 racken in totaal) gebruiken voor het activeren van maximaal 40 berichten, maximaal 40 ruimte koppelingen of de ruimte Standby functie(mute) voor verschillende of alle uitgangen. De contacten worden geactiveerd bij een spanning van 24 volt gelijkspanning tussen het betreffende contact en de gemeenschappelijke massa. ® OPMERKING: Een ‘Pulse’ contact zal een bericht eenmalig afspelen. Een ‘Hold’ contact zal het bericht afspelen en blijven herhalen tot hetzelfde contact afvalt. Gebruik voor de activatie van roomcombining of standby modus een houd contact (ontkoppel dit contact voor het de-activeren van deze twee functies). Kenmerken • 8 geïsoleerde ingangen • 1 geïsoleerde uitgang • Ingangen kunnen worden gebruikt voor berichtrouting, ruimte koppeling of om een uitgang of een groep van uitgangen in standby modus te zetten (de uitgangen zullen bij het verbreken van het contact terug vallen naar de beginwaarden). • Uitgang voor open collector wordt geactiveerd als een van de acht ingangen wordt geactiveerd Elektrisch schema voor de 8 ingangscontacten CS-AMS-8 CS-AMS-8 1..8 + 24 Vdc - 10 Nederlands Elektrisch schema voor uitgang open collector CS-AMS-8 CS-AMS-8 9 Open collector Max. 50mA + 24 Vdc - 10 185 3. Systeeminstallatie 3.10 Aansluitingen voor audiobroningangen en -uitgangen De volgende kabeltypen kunnen worden gebruikt om audiobronnen aan te sluiten op de gebalanceerde en ongebalanceerde lijningangen en -uitgangen: BronconnectorControlSpace AMS-8 audio-ingangen en -uitgangen ® RCA S T+ T S- ⊥ + ⊥ L R XLR 1 2+ 2 + ⊥ 1 ⊥ 3 3- L R Jack 6.3mm stereo (gebalanceerd) T R S⊥ S + ⊥ T+ L R- R Nederlands English Jack 6.3mm mono (ongebalanceerd) T S + ⊥ T+ L S-⊥ R S S T T+ S- ⊥ L R 186 4. Uitbreidingsopties 4. Optionele systeemcomponenten De ControlSpace AMS-8 wordt standaard geleverd met de volgende componenten: ® • 8 analoge audio-lijningangen (CS-TIC) • 8 analoge audio-lijnuitgangen (CS-TOC) • 8 algemene bedieningsingangen • 1 algemene bedieningsuitgang • 1 Ethernet communicatie port Het ControlSpace AMS-8 system kan worden uitgebreid met extra gebruikersinterfaces, optionele kaarten en communicatie interfaces. ® Optionele gebruikersinterfaces: ControlSpace AMS-8 oproeppaneel (CS-PP) Met het ControlSpace AMS-8 oproeppaneel kunnen live en opgenomen (spraak)berichten in geselecteerde groepen of zones worden afgespeeld. ® ® ControlSpace AMS-8 wandregelaar (CS-WC) Met de ControlSpace AMS-8 wandregelaar kan een kanaal worden geselecteerd. Tevens kan het volume lokaal worden aangepast. ® ControlSpace AMS-8 lokale inputmodule (CS-LIM) Met de ControlSpace AMS-8 lokale inputmodule kan een lokale bron (lijn of microfoon) worden toegevoegd aan het systeem. ® ® CS-RC - ControlSpace AMS-8 Afstandsbediening De ControlSpace AMS-8 Afstandsbediening (infrarood) zorgt voor gemakkelijke bediening van de wandregelaar tot 5 meter afstand maximaal. ® ® Nederlands Optionele kaarten: ControlSpace AMS-8 dubbele ingangskaart (CS-TIC) Per systeem kunnen maximaal vier dubbele ingangskaarten worden toegevoegd voor 8 extra analoge lijningangen. ® CS AMS-8 Audio Link Card Met de ControlSpace AMS-8 Audio Link kaarten kunnen maximaal tien systemen worden gekoppeld. Audio Link kabels zijn ook benodigd. ® 187 4. Uitbreidingsopties CS-MSC ControlSpace AMS-8 berichtenkaart De geheugenmodule past in een CS-TIC-slot (ingangskaart), door Event planning of door de GPIO contacten. Op deze module kunnen opgenomen berichten worden opgeslagen. De berichten kunnen vervolgens worden geactiveerd met de betreffende knop op het oproeppaneel of via de GPIO-contacten. De software om de CS-MSC te configureren of om berichten op te nemen is inbegrepen. ® CS-DIC ControlSpace AMS-8 Digitale input kaart De digitale input kaart kan gebruikt worden voor het toevoegen van een digitaal stereo ingangssignaal. Tevens moet deze gebruikt worden voor het koppelen van een CS-MSC, CS-TTC of een CS-DIC zelf om deze door te koppelen naar een ander rack. ® CS-TTC AMS-8 Dubbele Tunerkaart De dubbele tuner kaart kan worden gebruikt om 1 stereo of 2 mono tuners toe te voegen aan het systeem Optionele communicatie interfaces CS-SCI ControlSpace Serial Code Interface De Serial Code Interface zet seriele codes om van of naar besturingsapparaten als Crestron/AMX, welke het AMS-8 systeem besturen. De CS-SCI bevat daarnaast 16 programmeerbare open collector uitgangen (elk gekoppeld aan een ruimte). Elke uitgang kan worden geactiveerd wanneer een ruimte actief is of wanneer er in deze ruimte wordt omgeroepen. (bijv. voor 100Volt volume regelaar overbrugging) ® CS-HUB ControlSpace RS485 Communicatie Hub De RS485 communicatie hub (CS-HUB) kan worden gebruikt om een ster network te creëren met maximaal 5 ControlSpace user interfaces (CS-WC/CS-PP). Tevens kan deze gebruikt worden om langere afstanden te creëren tussen AMS-8 systemen en/of Serial Code Interfaces, maar ook voor het vergrotem van de afstand tussen wandregelaars en paging panels (verbonden met één RS485 communicatie bus). Nederlands English ® 188 5. Upgrade naar een ControlSpace AMS-8 II system ® 5. Upgrade naar een ControlSpace AMS-8 II system ® 1)Controleer de Bootloader firmware versie, welke kort op het display wordt weergegeven wanneer de AMS-8 wordt aangezet. Vervolg alleen de onderstaande stappen indien de Bootloader versie V2.116 of hoger is. Indien lager, dan heeft het AMS-8 systeem een Bootloader firmware update nodig, wat alleen kan worden uitgevoerd door een Bose Pro medewerker. 2) Verbind alle AMS-8 racks (maximaal 10) met elkaar via de racklink connecite (Zie ook hoofstuk 3.5) 3)Zorg ervoor dat alleen in het eerste en in het laatste AMS-8 systeem de afsluitjumpers op de RS485 communicatie kaarten geplaatst zijn (Alle andere afsluitjumpers mogen niet geplaatst zijn). 4)Houdt tijdens het aanzetten van elke kast de bovenste en rechter navigatietoets tegelijkertijd ingedrukt (UP en RIGHT). Deze actie zal de Bootloader modus activeren. 5)Stel het bovenste/eerste rack in op ‘Master’ en kies het juiste aantal racks in het totale systeem, b.v.: ”Nr of Racks: 10” 6)Elk toegevoegd rack wordt een ‘Slave’ rack waarbij de nummering begint met 2 oplopend tot 10. Bijv.: ”Select rackNr: 2” 7)Let op het zg. ‘live-mask’ onderin op het LCD-display van het master rack. Deze geeft aan hoeveel racks er verbonden en geinstalleerd zijn. Bij bijv. 10 racks moet het volgende zichtbaar zijn ”Racks: 00000011 11111111” 8)Zodra alles slaves units gedetecteerd zijn; selecteer “Finish” op het Master-rack. Hiermee wordt (tijdelijk) de bootloader configuratie gefixeerd. 9) Verbind een computer met het master rack en start de Bootloader Multi-Installer software op. 10)Upload de (nieuwste) firmware versie in het AMS-8 systeem (het Master rack stuurt deze firmware automatisch door naar alle Slave racken) 11) Wacht net zolang totdat de upload en re-update procedure bij alle systemen is voltooid. 12)Maak nu het bovenste rack weer ”Rack-1 Mst” (Master) en geef het nummer van het aantal slaves racks opnieuw in (wanneer nodig, herhaal eerst stap 4 alvorens dit te goed). 13) Stel op elk slave rack het juiste slave nummer in (”Rack-2” of hoger) 14)Herstart allen racken (vanwege het opnieuw indelen van de racken), door alle racken uit en aan te zetten. Nederlands 15)Voer een Totale Factory Restore uit ( selecteer deze optie in het installatie menu) op het master rack en wacht totdat de flash update voltooid is (Wordt aangegeven als: ”Updating flash 202”). 16)Herstart alle racken nogmaals (voor implementatie van de nieuwe dataflash indeling), door alle racken uit en aan te zetten. 17) Update alle Bose EQ curves, door gebruik te maken van de Live Installer Software. 18) De upgrade naar een ControlSpace AMS-8 II systeem is nu voltooid. ® Gebruik de Live Installer Software of het Grafische display + navigatie toetsen om het ControlSpace AMS-8 systeem te configureren. ® Eerder opgelagen BDF-files (Bose Data Files) van ControlSpace AMS-8 I systemen kunnen niet meer in ControlSpace AMS-8 II systemen gebruikt worden (dit vanwege de nieuwe instellingen in het Dataflash geheugen). Echter, wanneer een systeem opnieuw geconfigureerd is, kan de nieuw gecreerde BDF-file wel bewaard en geopend worden om opnieuw gebruikt te worden in andere ControlSpace AMS-8 II systemen. ® ® ® 189 6. Problemen oplossen 6. Problemen oplossen Geen stroom Sluit de voedingsbron aan op het stopcontact en schakel de stroom in. Stoom is ingeschakeld, Controleer of de bron een invoersignaal afgeeft. maar er is geen geluid in de Controleer of er een uitvoersignaal is. zones Is er wel een invoersignaal maar geen uitvoer-signaal, dan is op de ControlSpace mogelijk de mute ingeschakeld of zijn de uitgangen uitgeschakeld. ® Stroom is ingeschakeld, maar geluid klinkt zacht Controleer of de indicator voor de audio-ingang groen brandt. Als de indicator niet brandt, verhoogt u de bronuitvoer of het ingangsvolume. Als de indicators voor audio-ingang en -uitgang groen branden, controleert u de uitgangsniveaus en controleert u het volume van de versterker. Geluid wordt vervormd Als het bronsignaal zuiver is wanneer het binnen komt op het CS AMS-8 systeem, controleert u of de luidsprekers niet overbelast of beschadigd zijn. Geluid klinkt niet natuurlijk Controleer of voor het signaalpad de juiste luidspreker-EQ en/ of crossoverinstellingen worden gebruikt. Zorg ervoor dat het ingangssignaal niet vervormd is en niet een te hoog nivo heeft. Stroom is ingeschakeld, maar er is geen geluid in een of meer zones Controleer alle aansluitingen van het CS AMS-8 systeemrack. Controleer of de versterker goed werkt en of de correct zijn ingesteld. Controleer met de Installer-software of met het systeemrack de standaardinstellingen en het maximumvolume voor de ruimte. Controleer of er Events of Room Combining presets actief zijn. Geen oproep-/ waarschuwingssignaal via de software Controleer de aansluitingen tussen de geluidskaart van de PC, de microfoon en het systeemrack. Controleer ook de volume-instellingen van de PC. Geen bediening/ communicatie via CS-WC/ CS-PP Controleer de aansluitingen tussen de CS-WC/CS-PP en het systeemrack. Controleer of de status van de wandregelaar wordt weergegeven in het systeemmenu met instellingen voor ruimten. Als in het menu ‘WC-‘ wordt weergegeven, is er geen communicatie mogelijk met de betreffende wandregelaar. Nederlands English Controleer tevens het adres van de wandregelaar om na te gaan of het adres is ingesteld op de ruimte die met de wandregelaar moet worden bediend. Geen communicatie/ bediening voor PC en AMS-8 systeemrack bij gebruik van de Installersoftware Raadpleeg de Ethernet-pinout van de kabel. Controleer of de Installatie Software aangeeft dat de INETGui verbinding online. Geen Audio Signaal vanuit een mono geconfigureerde Locale Input module Zorg ervoor dat de audio kabel verbonden is met de linker uitgang van de CS-LIM. Audio signal aan de uitgang valt terug in nivo wanneer een bron met een hoog uitgangsniveau aan het spelen is. Zorg ervoor dat de ingangsversterking afgeregeld is op 0dB. Een constant 3dB ingangssignaal zal de ingang muten. Bijv. Bij gebruik van een CD-speler met een uitgangssignaal van +6dB, moet de ingangsversterking vermindert worden met minimaal 3dB (bij voorkeur 6dB). De Talk Led op het omroeppaneel knippert tussen rood en groen Dit geeft aan dat er een communicatie problem is. Controleer de bekabeling tussen AMS-8 en de omroeppanelen. Controleer ook of de afluitjumper op het laatste omroeppaneel is geplaatst. Geen omroepsignaal van de Controleer de verbinding tussen AMS-8 en de omroeppanelen. Controleer de omroeppanelen routing settings in de Live Installer Software of via het AMS-8 systeem door gebruik te maken van het LCD-scherm en de navigatieknoppen. 190 7. Technische specificaties 7. Technische specificaties Ingangen: Type: 8x analoog (maximaal 16), ongebalanceerd en elektronisch gebalanceerd, lijningang Connectors: RCA en Euroblock, 3-pins Input sensitivity: -30 dBV tot +14 dBV Impedantie: 50 kOhm Clipniveau ingang +14 dBV Digitale resolutie: 24-bits Uitgangen: Type: 8x analoog, ongebalanceerd en elektronisch gebalanceerd, lijningang Connectors: RCA en Euroblock, 3-pins Impedantie: 150 Ohm Maximaal uitgangsniveau: 18 dBV gebalanceerd, 12 dBV ongebalanceerd Bass/Treble-regeling: +/-12 dBV, in stappen van 1 dB Digitale resolutie: 24-bits Signaalverwerking: Type: 48-bits floating point digitale signaalverwerking Sample rate: 96 kHz Audio latency: <1ms Delay: 10ms, in stappen van 0,05ms Frequentiebereik: 20 Hz tot 20 kHz (+0dB,-0,3 dB) Totale harmonische vervorming: <0,007% (A-gewogen, 0dBV in/0dBV uit) Kanaalscheiding: >103 dB bij 1kHz, 0 dBV Signaal-ruisverhouding: >100 dB, A-gewogen, totale harmonische vervorming <0,02%, gebalanceerd in/uit >100 dB, A-gewogen, totale harmonische vervorming <0,02%, ongebalanceerd in/uit 110dB, A-weighted, THD<0.02%, analoog in, digitaal uit 140dB, A-weighted, THD<0.02%, digitaal in, digitaal uit Elektrisch: Opgenomen vermogen Afmeting (H x B x D in mm) Gewicht CS AMS-8 90 - 264 volt AC (47-63Hz) 37 watt maximaal 88 x 485 x 285 4,5 kg CS-WC 12 - 24 volt DC 0,7 watt maximaal 80 x 115 x 48 0,12 kg CS-LIM 24 volt DC 1,5 watt maximaal 80 x 115 x 48 0,12 kg CS-PP 12 - 24 volt DC 1,7 watt maximaal 43 x 210 x 212 1,5 kg Nederlands Voeding Omgeving: Bedrijftemperatuur: 0˚C tot maximaal 50˚C Luchtvochtigheid: 80% relatieve luchtvochtigheid (zonder condens) 191 ANNEX A. ControlSpace AMS-8 systeem voorbeelden ® ANNEX A. ControlSpace AMS-8 systeem voorbeelden ® ControlSpace AMS-8 systeem met 80 zones ® Nederlands English SCI HUB 192 ANNEX A. ControlSpace AMS-8 systeem voorbeelden ® ANNEX A. ControlSpace AMS-8 systeem voorbeelden ® ControlSpace AMS-8 systeem met meerdere omroep panelen ® of ControlSpace AMS-8 systeem met meerdere wandregelaars in een ruimte ® Zone 1 Zone 7 Zone 3 Zone 4 Nederlands Zone 5 Zone 6 Zone 2 Zone 8 193 ANNEX B. Gebruikersinterface montage intstructies. ANNEX B. Gebruikersinterface montage intstructies. Inbouw doos Inbouw doos geschikt voor het inbouwen van de ControlSpace AMS-8 wand regelaar en lokale ingangs module. Afmetingen (LxBxH): 7,1 x 10,6 x 5,2 cm ® Opbouw doos Opbouw doos geschikt voor het opbouwen van de ControlSpace AMS-8 wand regelaar en lokale ingangs module. Afmetingen (LxBxH): 8,0 x 11,4 x 4,6 cm ® Hollewand doos Hollewand doos voor montagein hollewanden of gipsplaatswanden, geschikt voor het inbouwen van de ControlSpace AMS-8 wand regelaar en lokale ingangs module. Afmetingen (LxBxH): 6,6 x 12,4 x 5,2 cm ® Nederlands English Omroep paneel Gebruik deze afmetingen voor het inbouwen van het omroep paneel in bv. een buro. Monteer een separate XLR-connector (female) naast het omroep paneel, welke aangesloten moet worden op de microfoon aansluiting aan de onderzijde van het omroep paneel. Om kortsluiting te voorkomen moeten alle aansluitingen in het paneel worden afgekoppeld , voordat heet paneel wordt gemonteerd. 194 Nederlands 195 Europese verkoopkantoren Contactgegevens verkoopkantoren Europa België Professional Systems Division, Belgium Bose N.V., Limesweg 2 3700 Tongeren, België Telefoon: 012-390800 Fax: 012-390840 Noorwegen Professional Systems Division, Norway Bose Filial till Bose A/S Danmark, Lerkev 58 2209 Kongsvinger, Norge Telefoon: 062-821560 Fax: 062-821569 Denemarken Professional Systems Division, Denmark Bose Danmark A/S, Industrivej 7 PO Box 14, 2605 Brøndby, Danmark Telefoon: 43437777 Fax: 43437818 Oostenrijk Professional Systems Division, Austria Bose Ges.m.b.H., Business Park Vienna Wienerbergstrasse 7, 10 O.G. 1100 Wien, Österreich Telefoon: 01-60404340 Fax: 01-604043423 Duitsland Professional Systems Division, Germany Bose GmbH, Max-Planck-Straße 36, 61381 Friedrichsdorf, Deutschland Telefoon: 06172-7104-0 Fax: 06172-7104-19 Frankrijk Professional Systems Division, France Bose S.A., 12 rue de Témara 78100 Saint Germain en Laye Telefoon: 01-30616363 Fax: 01-30616388 Ierland Professional Systems Division, Ireland Bose GP, Castleblayney Road Carrickmacross, County Monaghan Republic Of Ireland Telefoon: 042-9661988, Fax: 042-9661998 Nederlands English Italië Professional Systems Division, Italy Bose SpA, Via della Magliana 876 00148 Roma, Italia Telefoon: 066-5670802, Fax: 066-5680177 Nederland Professional Systems Division, The Netherlands Bose B.V., Nijverheidstraat 8 1135 GE Edam, Nederland Telefoon: 0299-390139 Fax: 0299-390109 196 Polen Bose Sp. z o.o. Galeria Mokotów ul. Wołoska 12 02-675 Warszawa Telefoon: (22) 852 2928 Fax: (22) 852 2927 Spanje Gaplasa S.A. Avda. Ingeniero Conde de Torroja 25 28022 Madrid, España Telefoon: 91 748 29 60 Fax: 91 329 16 75 Verenigd Koninkrijk Professional Systems Division, United Kingdom Bose Ltd., 1 Ambley Green Gillingham Business Park Gillingham, Kent ME8 0NJ, England Telefoon: 0870-741-4500 Fax: 0870-741-4545 Zwitserland Professional Systems Division, Switzerland Bose AG, Hauptstrasse 134 4450 Sissach, Sweiz Telefoon: 061-9757733 Fax: 061-9757744 Zweden Professional Systems Division, Sweden Bose, filial till Bose A/S Danmark Johannefredsgatan 4, 43153 Mölndal, Sverige Telefoon: 031-878850 Fax: 031-274891 Nederlands 197 Producent zastrzega sobie prawa do zmiany danych technicznych. Informacje w tej instrukcji obsługi mogą ulec zmianie bez powiadomienia i bez żadnych zobowiązań. Spis treści 1. Informacje dotyczące bezpieczeństwa Ważne instrukcje dotyczące bezpieczeństwa 200 Deklaracja zgodności 202 2. Wstęp 203 3. Instalacja systemu 3.1 Panel przedni ControlSpace AMS-8 204 3.2 Panel tylny ControlSpace AMS-8 205 3.3 Konfiguracja kontrolera naściennego 206 3.4 Połączenia interfejsu użytkownika 207 3.5 Schematy systemu 208 3.6 Połączenia kontrolera naściennego 211 3.7 Połączenia lokalnego modułu wejść 211 3.8 Połączenia pulpitu mikrofonowego 212 3.9 Wejścia/wyjścia ogólnego przeznaczenia 213 3.10 Połączenia wejść i wyjść audio 214 ® ® 4. Opcjonalne elementy systemu 215 5. Aktualizacja do wersji ControlSpace AMS-8 II 217 6. Problemy 218 7. Specyfikacja techniczna 219 ® 220 Aneks B. Montaż interfejsu użytkownika 222 Biura sprzedaży w Europie 224 ® Polski Aneks A. Przykłady systemów ControlSpace AMS-8 1. Informacje dotyczące bezpieczeństwa 1. Ważne instrukcje dotyczące bezpieczeństwa Znaki ostrzegawcze na urządzeniu Z tyłu urządzenia znajdują się poniższe ZNAKI OSTRZEGAWCZE. Symbol błyskawicy zakończonej grotem, umieszczony w trójkącie równobocznym, ma na celu ostrzeżenie użytkownika o obecności wewnątrz obudowy nieizolowanych elementów wytwarzających napięcie elektryczne o dostatecznej wysokości, aby stwarzać ryzyko porażenia. Znak wykrzyknika w trójkącie równobocznym, umieszczony na urządzeniu, ma na celu poinformowanie użytkownika o tym, że w niniejszym przewodniku instalacji znajdują się ważne instrukcje dotyczące obsługi i konserwacji urządzenia. Ważne instrukcje dotyczące bezpieczeństwa 1. Należy przeczytać te instrukcje. 2. Należy zachować te instrukcje do użytku w przyszłości. 3. Należy postępować zgodnie ze wszystkimi ostrzeżeniami znajdującymi się na urządzeniu. 4. Należy stosować się do wszystkich instrukcji. 5. Urządzenia nie należy używać w pobliżu ujęć wody ani wilgoci. 6. Urządzenie należy czyścić tylko suchą szmatką. 7. Nie należy zasłaniać otworów wentylacyjnych. Należy instalować zgodnie ze wskazówkami producenta — Aby zagwarantować niezawodne działanie urządzenia i zabezpieczyć je przed przegrzaniem, należy ustawić je w takiej pozycji i takim miejscu, które nie przeszkodzą w jego właściwej wentylacji. 8. Urządzenia nie należy instalować w pobliżu źródeł ciepła, takich jak grzejniki, kratki wentylacyjne, piece lub inne urządzenia (w tym wzmacniacze), które wytwarzają ciepło. 9. Nie należy neutralizować zabezpieczenia wtyczki w postaci polaryzacji lub uziemienia. Wtyczka z polaryzacją ma dwa bolce: jeden szerszy i jeden węższy. Wtyczka z uziemieniem ma dwa bolce oraz trzeci bolec uziemiający. Szerszy bolec lub trzeci bolec mają zapewnić bezpieczeństwo użytkownikowi. Jeżeli dostarczona wtyczka nie pasuje do gniazda, należy zasięgnąć porady elektryka w celu wymiany przestarzałego gniazda. 10. Przewód zasilania należy chronić przed nadepnięciem i ściśnięciem, zwłaszcza przy wtyczkach i gniazdach. 11. Należy używać wyłącznie przyłączy/akcesoriów określonych przez producenta. 12. Urządzenia należy używać wyłącznie ze stelażem, podstawką, statywem, wspornikiem lub uchwytem określonym przez producenta lub sprzedawanym wraz z urządzeniem. W przypadku korzystania ze stelażu należy zachować ostrożność przy przemieszczaniu szafy z urządzeniem, aby uniknąć obrażeń ciała spowodowanych przewróceniem zestawu. 13. U rządzenie należy odłączyć od sieci elektrycznej podczas burz z wyładowaniami lub w przypadku niekorzystania z niego przez długi czas. Pozwoli to zapobiec uszkodzeniu urządzenia. English Polski 14. Wszystkie naprawy należy powierzyć wykwalifikowanym pracownikom serwisu. Serwis jest wymagany w przypadku dowolnego uszkodzenia urządzenia, takiego jak: uszkodzenie przewodu zasilania, przedostanie się cieczy lub wpadnięcie przedmiotu do środka urządzenia, wystawienie urządzenia na działanie deszczu lub wilgoci, nieprawidłowe działanie urządzenia lub jego upuszczenie. Nie należy podejmować prób samodzielnego serwisu tego urządzenia. Otwarcie lub zdjęcie pokryw może narazić użytkownika na niebezpieczne napięcie lub inne niebezpieczeństwa. Prosimy zadzwonić do firmy Bose, która wskaże najbliższy autoryzowany serwis. 15. Aby zapobiec ryzyku pożaru lub porażenia prądem elektrycznym, należy unikać przeciążania gniazd elektrycznych, przedłużaczy i wbudowanych gniazd o wygodnym dostępie. 200 1. Informacje dotyczące bezpieczeństwa 16. Nie wolno dopuścić, aby do urządzenia dostał się jakikolwiek przedmiot lub ciecz — mogą one zetknąć się z miejscami o niebezpiecznym poziomie napięcia lub doprowadzić do zwarcia elementów, powodując pożar lub porażenie prądem elektrycznym. 17. Oznaczenia związane z bezpieczeństwem można znaleźć na obudowie urządzenia. 18. Na urządzeniu nie należy umieszczać źródeł otwartego ognia, takich jak palące się świece. OSTRZEŻENIE: Aby ograniczyć ryzyko pożaru lub porażenia prądem elektrycznym, urządzenie ControlSpace AMS-8 należy chronić przed wilgocią i opadami atmosferycznymi. ® OSTRZEŻENIE: Urządzenia nie należy wystawiać na działanie kapiącej lub rozchlapywanej cieczy i nie wolno na nim stawiać przedmiotów wypełnionych cieczą, takich jak wazony. Tak jak w przypadku każdego urządzenia elektronicznego, należy uważać, aby do żadnej części systemu nie dostała się ciecz. Ciecze mogą być przyczyną awarii i/lub niebezpieczeństwa pożaru. Informacje na temat urządzeń wytwarzających szumy elektryczne To urządzenie zostało przetestowane i uznane za zgodne z limitami dotyczącymi urządzenia cyfrowego klasy B według części 15 przepisów FCC, jeśli tylko odnośne urządzenie podlega tym przepisom. Limity te mają zapewnić odpowiednią ochronę przed szkodliwymi zakłóceniami w instalacji elektrycznej budynków mieszkalnych. To urządzenie wytwarza, wykorzystuje i może emitować energię o częstotliwości radiowej, a jeżeli nie zostanie zainstalowane i nie będzie używane zgodnie z instrukcją, może powodować szkodliwe zakłócenia łączności radiowej. Nie ma jednak gwarancji, że w konkretnej instalacji zakłócenia nie wystąpią. Jeżeli to urządzenie rzeczywiście powoduje szkodliwe zakłócenia w odbiorze sygnału radiowego lub telewizyjnego, co można ustalić przez wyłączenie i włączenie urządzenia, zalecane jest podjęcie próby usunięcia tych zakłóceń przez wykonanie jednej z poniższych czynności: • Zmiana orientacji lub miejsca położenia anteny odbiorczej. • Lepsze odseparowanie urządzenia i odbiornika. • Podłączenie urządzenia do gniazda znajdującego się w obwodzie innym niż ten, do którego podłączony jest odbiornik. • Skontaktowanie się ze sprzedawcą lub doświadczonym technikiem radiowo-telewizyjnym w celu uzyskania pomocy. Uwaga: Niedozwolona modyfikacja odbiornika lub pilota zdalnego sterowania z wykorzystaniem części pochodzących z innego urządzenia hi-fi może unieważnić prawo użytkownika do korzystania z tego urządzenia. 201 Polski To urządzenie jest zgodne ze specyfikacjami. Informacje podane w tym przewodniku instalacji nie obejmują wszystkich szczegółów projektu, produkcji ani odmian sprzętu. Nie obejmuje ona także wszystkich możliwych sytuacji, które mogą wystąpić podczas instalacji, obsługi lub konserwacji urządzenia. Jeżeli będzie potrzebna pomoc dotycząca zagadnienia nieomówionego w tym przewodniku instalacji, należy skontaktować się z naszymi biurami sprzedaży w Europie. Zobacz listę biur sprzedaży znajdującą się na ostatniej stronie instrukcji instalacji. 1. Informacje dotyczące bezpieczeństwa Deklaracja zgodności Producent niniejszym oświadcza, że to urządzenie, w tym jego akcesoria, są zgodne z następującymi standardami: Dyrektywa dotycząca zgodności elektromagnetycznej 89/336/EEC EN-55103-1 EN-55103-2 Dyrektywa dotycząca niskiego napięcia 73/23/EEC EN-60065:2002, wydanie 7 Informacje dotyczące montowania w stelażu Procesor sygnału audio ma rozmiar 2U w stelażu, gdzie 1U ma następujące wymiary: 4,4 cm wysokości i 32,5 cm głębokości. Do montażu należy użyć czterech śrub z podkładkami, aby zapobiec uszkodzeniu panelu przedniego. Do tego celu doskonale nadają się gumowe podkładki neoprenowe, ponieważ blokują łeb śruby i zapobiegają wykręcaniu śrub pod wpływem wibracji lub podczas transportu. Ostrożnie: Jeżeli urządzenie jest zamontowane w stelażu i jest w nim transportowane, konieczne jest mechaniczne podparcie tylnej części procesora. Do podparcia tylnej części urządzenia można użyć półki lub wsporników. Środki bezpieczeństwa i wentylacja Ostrożnie: Urządzenie należy umieścić w miejscu, w którym będzie zabezpieczone przed ciepłem i z odpowiednią wentylacją. Urządzenie należy umieścić z dala od bezpośrednich źródeł ciepła, takich jak przewody grzewcze i grzejniki. Należy zapewnić swobodny przepływ powietrza obok i nad urządzeniem. Jeżeli urządzenie znajduje się nad lub pod wzmacniaczem, między dwoma urządzeniami należy pozostawić jedno wolne miejsce wielkości 1U w celu zapewnienia odpowiedniej wentylacji. Nie wolno dopuścić, aby temperatura obudowy przekroczyła maksymalną temperaturę działania wynoszącą 50ºC. Należy pamiętać, że temperatura w zamkniętym stelażu może być wyższa niż w pomieszczeniu. English Polski Ostrzeżenia: Wszystkie rdzenie przewodu muszą być skręcone z sobą i mieścić się w złączu. Nawet jeden odstający rdzeń, który dotknie sąsiadującej końcówki, może spowodować zwarcie. 202 2. Wstęp 2. Wstęp Wstęp Bose ControlSpace AMS-8 jest uniwersalnym, wielofunkcyjnym, wysokiej klasy procesorem dźwiękowym, przeznaczonym do dystrybucji sygnału audio w takich aplikacjach jak restauracje, sklepy, kawiarnie, biura, hotele, centra konferencyjne czy obiekty sportowe. Urządzenie główne zawiera osiem wejść liniowych oraz osiem wyjść liniowych. Cztery dostępne gniazda audio umożliwiają dodanie maksymalnie 8 dodatkowych wejść audio (2 wejścia na kartę). ® ® Dla większej ilości stref, do 10 urządzeń AMS-8 może zostać połączonych razem w jeden system. Każde dołączone urządzenie dodaje 8 mono nowych stref do systemu. Dostępny jest szeroki wybór interfejsów użytkownika umożliwiających użytkownikowi końcowemu łatwe i wygodne sterowanie systemem ControlSpace AMS-8. ® Oprogramowanie Live instalatora systemu Bose ControlSpace AMS-8 służy do projektowania systemów i konfigurowania systemu AMS-8 oraz interfejsów użytkownika. Oprogramowanie dzia³a na komputerach PC i komunikuje siê z systemem AMS-8 poprzez Ethernet. ® ® Funkcje • Uniwersalna architektura z możliwością rozbudowy oparta na kartach • Funkcjonalność kontrolera naściennego (opcjonalne zdalne sterowanie na podczerwień) • 8 (do 16) kanałów analogowych wejść liniowych • Funkcjonalność lokalnego modułu wejść • Osiem kanałów analogowych wyjść liniowych • Funkcjonalność panelu dystrybucji komunikatów • GPIO: 8 wejść ogólnego przeznaczenia (aktywacja komunikatów, zmiana trybów pracy, wyłączanie stref) i 1 wyjście ogólnego przeznaczenia • Funkcja komunikatów (wymaga dodatkowej karty “Message Storage Card”) • Projektowanie, konfiguracja oraz sterowanie systemem za pomocą oprogramowania dla komputerów PC • Cyfrowe przetwarzanie sygnału obejmuje: Korekcję EQ dla głośników Bose, Dynamiczna EQ, opóźnienie, kontrolę wzmocnienia oraz wybór źródła. • Funkcja tunera (wymaga dodatkowej karty “Twin Tuner Card”) • Automatyczne wykrywanie typu karty wejściowej • Funkcja łączenia pomieszczeń • Funkcja programowania wydarzeń • Ekran LCD i przyciski nawigacyjne Szybkie uruchomienie urządzenia • Podłącz wejściowe i wyjściowe przewody audio do ControlSpace AMS-8. (W przypadku, gdy w systemie są 2 lub więcej urządzeń, połącz je ze sobą wykorzystując karty Audio Link, przewody Audio Link i wysokoprzepustowe łącze RS485: patrz rozdział 3.5). • Włącz system ControlSpace AMS-8. Dzięki ustawieniom domyślnym system jest teraz gotowy do działania. Ustawienia domyślne będą przywracane po każdym uruchomieniu systemu ControlSpace . Oznacza to, że system będzie odtwarzać dźwięk z domyślnego źródła oraz przy domyślnym poziomie głośności, zgodnie z ustawieniami określonymi w menu instalacji. ® ® ® Skróty CS-WC Kontroler naścienny dla systemu ControlSpace AMS-8 CS-EC Karta Ethernet dla systemu ControlSpace AMS-8 CS-PP Pulpit mikrofonowy dla systemu ControlSpace AMS-8 CS-MSC Karta do zapisywania komunikatów dla systemu ControlSpace AMS-8 CS-LIM Lokalny moduł wejść dla systemu ControlSpace AMS-8 CS-DIC cyfrowa karta wejściowa ControlSpace AMS-8 CS-RC Pilot zdalnego sterowania dla systemu ControlSpace AMS-8 CS-TTC podwójna karta tunera ControlSpace AMS-8 CS-TIC Karta z dwoma wejściami dla systemu ControlSpace AMS-8 CS-HUB Hub RS 485 ControlSpace AMS-8 CS-TOC Karta z dwoma wyjściami dla systemu ControlSpace AMS-8 CS-SCI ® ® ® ® ® ® ® ® ® ® ® interfejs szeregowy ControlSpace AMS-8 ® 203 Polski UWAGA: Aby zaktualizować system do możliwości ControlSpace AMS-8 II, zapoznaj się z rozdziałem 5 3. Instalacja systemu 3.1 Panel przedni systemu ControlSpace AMS-8 ® 1 2 1. EKRAN LCD Na ekranie LCD są wyświetlane menu sterujące oraz możliwe ustawienia dla każdej pozycji menu. 2. PRZYCISKI NAWIGACYJNE English Polski Przyciski „w górę” i „w dół” służą do przewijania pozycji menu, a „w lewo” i „w prawo” do zmiany wartości wybranych pozycji menu. Przycisk „OK” umożliwia potwierdzenie dokonanego wyboru, np. po podświetleniu pozycji menu „Exit” („Zakończ”) naciśnięcie przycisku „OK” spowoduje powrót do poprzedniego poziomu menu. 204 3. Instalacja systemu 3.2 Panel tylny systemu ControlSpace AMS-8 ® 5 3 7 9 11 15 13 1 4 5 3 7 5 9 4 5 3 8 1 8 7 Serial Number: Rack Link 2 1 PC Link ! Rack Link 1 1 CAUTION RISK OF ELECTRIC SHOCK DO NOT OPEN AVIS: Risque de chock électrique, ne pas ouvrir System Rack MODEL: 2 6 8 10 12 14 16 4 2 13 6 Audio Link Source Inputs 1 8 5 6 3 4 1 2 Line Outputs 2 3 4 5 na kartę „Audio Link” 2 Slot Audio Link Card slot 5 7 9 11 15 13 4 1 5 3 7 5 9 4 3-pin Inputwejście Euro Blok „Euro Connector 3-pinowe Block” (Balanced line level) (zbalansowane) 5 3 8 1 8 7 Serial Number: Bose Corporation, Framingham, MA01701-9168 Made in The Netherlands 2 9 12 2 4 6 Rack Link 1 1 3 AVIS: Risque de chock électrique, ne pas ouvrir System Rack MODEL: PC Link CAUTION RISK OF ELECTRIC SHOCK DO NOT OPEN Wejście na kartę “Audio Link” umożliwia połączenie dwóch Slot for Audio Link Card to link the connected analog sources between Controlspace AMS-8 systemów ControlSpace AMS-8. Zainstalowanie karty Audio Managment Systems. wymagane jest tylko w pierwszym urządzeniu głównym. Jeden zestaw przewodów „Audio Link” pozwala na połączenie czterech źródeł. RS-232 & GPIO card 6 8 3-pin Input Euro Blok Connector 3-pinowe wejście „Euro Block” (Balanced line level) (zbalansowane) 10 12 14 16 13 9 4 2 6 16 Audio Link Source Inputs RCA Input Connector wejście RCA (niezbalansowane) (Unbalanced line level) Line Outputs 5 9 4 5 9 8 3 3 7 7 2 liniowe (1-16) 3 Wyjścia Line outputs (1-8) 6 2 6 1 CS TOC CSTOC 9 RCA Input Connector Line inputs (1-16)wyjście RCA (niezbalansowane) (Unbalanced line level) CSTIC 8 4 2 RS-232 & GPIO card 7 8 5 6 3 4 1 2 (Balanced line level) 5 RCA Input Connector 9 (Unbalanced line level) GPIO 4 Port Ethernet i karta 4 5 9 RS-485 card 4 RS232 port pin out Straight shielded cable (20 meters max.) 2. TX 3. RX 5. GND 6 1 3-pin Input Euro Blok Connector 3-pinowe wyjście „Euro Block” 3-pin Inputline Euro Blok Connector (Balanced level) (zbalansowane) (Balanced line level) RCA Input Connector wyjście RCA (niezbalansowane) 3-pin Input Euro (Unbalanced lineBlok level)Connector 8 6 2 Audio Link Card slot 3 Slot for Audio Link Card to link the connected analog sources between Controlspace AMS-8 9 10 Audio Managment Systems. 3-pin Inputwyjście Euro Blok Connector 3-pinowe „Euro Block” RCA Input line Connector (Balanced level) (zbalansowane) (Unbalanced line level) 10 3 DB9 Female 10 7 5 7 5 1 8 4 1 8 I/O Link (Unbalanced line level) 1 ! Rack Link 2 wejście RCA (niezbalansowane) RCA Input Connector Bus 1 CSTIC Bus 2 CS TIC To CSPP/CSWC liniowe (1-16) 1 Wejścia Line inputs (1-16) 10 7 8 16 Bus 2 6 9 I/O Link 12 4 2 Bus 1 9 To CSPP/CSWC Bose Corporation, Framingham, MA01701-9168 Made in The Netherlands 8 4 8 3 3 7 7 2 1 6 Line outputs (1-8) Pin 1: Contact 1 Pin 2: Contact 2 Pin 3: Contact 3 Pin 4: Contact 4 Pin 5: Contact 5 Pin 6: Contact 6 Pin 7: Contact 7 Pin 8: Contact 8 Pin 9: Output Pin 10: Common RS232 port pin out Straight shielded cable (20 meters max.) 2 1 6 2. TX 3. RX 5. GND Rack link 1 (high speed) CSTOC 9 7 5 Rack 2 (high speed) RCAlink Input Connector (Unbalanced line level) 3-pin&Input Euro Connector CS-WC CS-PP BusBlok 1 (low speed) (Balanced line level) Pin 1 : Styk 1 Pin 3 : Styk 3 Pin 4 : Styk 4 Pin 5 : Styk 5 8 DB9 Female 6 4 1 2 9 3-pin &Input Euro Blok Connector CS-WC CS-PP Bus 2 (low speed) piny wyjsciowe (Balanced line level) GPIO: RCA Input Connector Pin 2 : Styk 2 (Unbalanced line level) 10 3 7 8 5 6 3 4 1 2 Pin 1: Contact 1 Pin 2: Contact 2 Pin 3: Contact 3 Pin 4: Contact 4 Pin 5: Contact 5 Pin 6: Contact 6 Pin 7: Contact 7 Pin 8: Contact 8 Pin 9: Output Pin 10: Common Polski Pin 6 : Styk 6 Pin 7 : Styk 7 Pin 8 : Styk 8 Pin 9 : wyjscie Pin 10: kom 10 RS-485RS card485 5 Karta Rack link 1 (high speed) Rack Link 1 (wysokoprzepustowy) Rack link 2 (high speed) Rack Link 2 (wysokoprzepustowy) CS-WC & CS-PP 1 BusCS-WC 1 (low speed) magistrala i CS-PP (niskoprzepustowa) CS-WC & CS-PP 2 BusCS-WC 2 (low speed) magistrala i CS-PP (niskoprzepustowa) 205 3. Instalacja systemu 3.3 Konfiguracja kontrolera naściennego 1 1. EKRAN LCD 2 3 2. PRZYCISKI ZMIANY POZIOMU GŁOŚNOŚCI 3. PRZYCISKI ZMIANY KANAŁÓW Przed skonfigurowaniem systemu ControlSpace AMS-8 konieczne jest wybranie adresu każdego kontrolera naściennego (1–8). Zazwyczaj czynność tę wykonuje się przy pierwszym podłączeniu kontrolera naściennego do Na wyświetlaczu LCD pojawi się wersja oprogramowania, po kilku sekundach informacja zniknie i wyświetli się komunikat “Select WC” (“Wybierz kontroler”). Za pomocą przycisków zmiany kanałów wybierz odpowiedni adres i potwierdź wybór, naciskając przycisk zmniejszania poziomu głośności (-). Jeżeli do obsługi jednej strefy potrzebnych jest kilka kontrolerów, należy wybrać na nich ten sam numer. W takiej sytuacji wszystkie kontrolery muszą być podłączone do jednego urządzenia. ® Jeżeli kontrolerowi naściennemu już przypisano adres, można go zmienić w następujący sposób: 1. Wyłącz kontroler naścienny (naciskaj przycisk zmiany kanałów w tył (-), aż do wyłączenia kontrolera) 2. Naciśnij i przytrzymaj przycisk zmiany kanałów w tył (-). 3. Wciśnij oba klawisze głośności (+) i (-) jednocześnie (po wyświetleniu wersji oprogramowania, panel LCD wyświetla aktualny numer, np “WC2”) 4. Teraz za pomocą przycisków zmiany kanałów wybierz odpowiedni adres i potwierdź wybór, naciskając przycisk zmniejszania poziomu głośności (-) w ten sam sposób, co przedtem. W systemie składającym się z dwóch lub więcej urządzeń AMS-8, każde urządzenie wykorzystuje numerację (1...8). Dla pierwszego urządzenia numery 1...8 używane są dla wyjść 1...8, dla drugiego 9...16, aż do dziesiątego 73...80. Zmiana ustawień pomieszczenia za pomocą kontrolera naściennego Istnieje możliwość zmiany ustawień dźwięku w pomieszczeniu, w którym zainstalowano kontroler naścienny. W tym celu można użyć ukrytego menu kontrolera naściennego. Aby wyświetlić to menu, należy postępować zgodnie z poniższą procedurą: 1. Wyłącz kontroler naścienny (naciskaj przycisk zmiany kanałów w tył (-), aż do wyłączenia kontrolera). 2. Naciśnij i przytrzymaj przycisk zmniejszenia poziomu głośności (-). 3. Naciśnij jednocześnie przyciski zmiany kanałów w przód (+) i w tył (-). English Polski W ukrytym menu można ustawić lub zmienić następujące funkcje: a. kanał domyślny b. poziom tonów niskich c. poziom tonów wysokich d. dynamiczna korekcja EQ e. EQ głośników Bose f. maksymalny poziom głośności g. poziom głośności dystrybucji komunikatów h. opóźnienie i. domyślny poziom głośności Za pomocą przycisków zmiany kanałów można przewijać pozycje menu, a przyciski zmiany poziomu głośności pozwalają zmienić ustawienia wybranej pozycji. Aby wyjść z menu ukrytego, naciśnij jednocześnie przyciski zmiany kanałów w przód (+) i w tył (-). 206 3. Instalacja systemu 3.4 Połączenia interfejsu użytkownika ControlSpace AMS-8 — ControlSpace AMS-8 — ControlSpace AMS-8 — kontroler naścienny pulpit mikrofonowy lokalny moduł wejść ® Zasilanie Napięcie Prąd Zalecane zasilanie* Okablowanie RS485** Maksymalna odległość (z Hubem) Końcówka*** Typ kabla Zalecany Okablowanie audio ® ® 12–24 V prądu stałego, +/-20% przy 12 V prądu stałego, 50 mA typ przy 24 V prądu stałego, 30 mA typ Stabilizowany zasilacz Bose dla systemu CS AMS‑8 24 V prądu stałego, 2,7 A 12–24 V prądu stałego, +/-10% przy 12 V prądu stałego, 140 mA typ przy 24 V prądu stałego, 70 mA typ Stabilizowany zasilacz Bose dla systemu CS AMS‑8 24 V prądu stałego, 2,7 A 24 V prądu stałego, +5%/-10% przy 24 V prądu stałego, 60 mA typ 600 m 1200m 120 omów 1 ekranowany kabel dwużyłowy skręcany Pojemność nominalna: 40 pF/m Oporność nominalna: 124 omy Tłumienie nominalne: 2 dB przy 1 MHz Kabel komunikacyjny/ zasilający BOSE CS AMS‑8 (niebieski) dla CS-WC/CS-PP Nie dotyczy 600 m 1200m 120 omów 1 ekranowany kabel dwużyłowyskręcany Pojemność nominalna: 40 pF/m Oporność nominalna: 124 omy Tłumienie nominalne: 2 dB przy 1 MHz Kabel komunikacyjny/ zasilający BOSE CS AMS‑8 (niebieski) dla CS-WC/CS-PP Standardowy kabel Mic/ Line, 1 kabel dwużyłowy ekranowany Nie dotyczy Stabilizowany zasilacz Bose dla systemu CS AMS‑8 24 V prądu stałego, 2,7 A Nie dotyczy Nie dotyczy Nie dotyczy Nie dotyczy Nie dotyczy Nie dotyczy Kabel audio/zasilający Bose CS AMS‑8 (żółty) dla CS-LIM * Uwaga: Jeżeli wyżej wymieniony zasilacz nie jest stosowany, wszystkie inne zasilacze używane w Europie muszą być zgodne z normą EN/IEC 60950. ** Wymagane okablowanie RS485 Elementy systemu należy zawsze podłączać w konfiguracji łańcuchowej (zamiast gwiazdy lub innej konfiguracji). Oprzewodowanie gwiaździste dozwolone jest jedynie przy użyciu CS-HUB. Należy pamiętać o oddzieleniu kabla danych od okablowania zasilania (>50 V) na płycie kabli lub zastosować inny metodę zarządzania kablami. *** Zakończenie Polski Zworkę końcową należy umieścić na ostatnim interfejsie użytkownika (CS-WC lub CS-PP) znajdującym się na końcu każdej linii komunikacyjnej RS485. Kabel komunikacyjny/zasilający CS AMS-8 4 1 5 2 Kabel audio/zasilający CS AMS-8 1. Niebieski = komunikacja RS485 „+” 2. Bez koloru = komunikacja RS485 „-” 6 3 1. Żółty = kabel linii zbalansowanej (ekranowany) 3. Przewód drenu = komunikacja RS485 „GND” 5 4. Czerwony = zasilanie „24VDC” 3. Czerwony = zasilanie „24VDC” 5. Czarny = uziemienie 4. Czarny = uziemienie 6. Niebieska koszulka 1 2 2. Zielony = kabel linii zbalansowanej (ekranowany) 3 4 5. Żółta koszulka 207 3. Instalacja systemu 3.5 Schematy sytemu Dwie linie komunikacyjne RS485 i centralny zasilacz: Maks. 600 m (długość całkowita) Kabel audio/mikrofonowy * RS-485 RS-485 Kabel audio/mikrofonowy zasilacz 24VDC 2-7A * Wejście 24 V prądu stałego Dwie linie komunikacyjne RS485 i lokalne zasilacze: Maks. 600 m (długość całkowita) Kabel audio/mikrofonowy Zasilacz * RS-485 Zasilacz RS-485 * Zasilacz RS485 maksymalną odległość: 600 m 600 m Lub: 600 m 600 m English Polski RS485 HUB 600 m UWAGA: * Zworkę końcową należy umieścić na ostatnim interfejsie użytkownika (CS-WC lub CS-PP) znajdującym się na końcu każdej linii komunikacyjnej RS485. Więcej przykładów konfiguracji można znaleźć w aneksie A. 208 3. Instalacja systemu Łączenie urządzeń AMS-8 dla stworzenia systemu z maksymalnie 80 strefami Konieczne są dodatkowe karty Audio Link.Ilość potrzebnych łączy Audio Link zależy od całkowitej ilości podłączonych źródeł (w tym pulpitów mikrofonowych i wewnętrznych kart tunera). Jeden zestaw przewodów Audio Link pozwala na połączenie do 4 źródeł analogowych. Dla każdego dodanego urządzenia dołącz przewód komunikacyjny (2 żyły + ekran), aby połączyć wejście ‘Racklink 1 or 2’ dołączanego urządzenia z wolnym wyjściem urządzenia poprzedniego. Upewnij się, że zwory końcowe w kartach komunikacyjnych RS 485 znajdują się tylko w pierwszym i ostatnim urządzeniu AMS-8. UWAGA 1: Aby podłączyć sygnał cyfrowy z karty komunikatów, wejściowej karty cyfrowej, lub karty tunera (zamiast sygnału analogowego), do nowego urządzenia AMS-8 należy dodać cyfrową kartę wejściową i cyfrowy przewód koaksjalny 75Ω (RCA-RCA). UWAGA 2: Tylko 1 port Ethernet może być użyty w jednej fizycznej sieci. Wykorzystywanie VLAN lub innych wirtualnych sieci nie jest dozwolone! Użyj menu systemowego ‘Instalacja urządzenia’, aby skonfigurować urządzenia główne i zależne: Polski 209 3. Instalacja systemu Rack 1 (Master) ! CAUTION RISK OF ELECTRIC SHOCK DO NOT OPEN AVIS: Risque de chock électrique, ne pas ouvrir System Rack MODEL: Serial Number: Bose Corporation, Framingham, MA01701-9168 Made in The Netherlands 9 1 4 4 3 2 1 1 1 3 2 5 6 6 6 6 10 7 8 5 6 3 4 1 2 7 8 2 1 1 3 1 Rack 2 (Slave) ! CAUTION RISK OF ELECTRIC SHOCK DO NOT OPEN AVIS: Risque de chock électrique, ne pas ouvrir System Rack MODEL: Serial Number: Bose Corporation, Framingham, MA01701-9168 Made in The Netherlands 9 1 1 4 1 4 1 1 1 1 4 4 5 6 6 6 6 10 7 8 5 6 3 4 1 2 7 8 1 3 2 2 2 1 1 2 1 1 3 Rack 10 (Slave) CAUTION RISK OF ELECTRIC SHOCK DO NOT OPEN ! AVIS: Risque de chock électrique, ne pas ouvrir System Rack MODEL: Serial Number: Bose Corporation, Framingham, MA01701-9168 Made in The Netherlands 9 English Polski 3 3 3 3 3 1 1 1 5 6 6 6 6 1 Digital coax cable (75 Ohm) 2 CS-AMS-8 Link cable 1 3 RS485 communication cable (120 Ohm - 200m Max) 3 Digital Input Card 10 7 8 5 6 3 4 1 2 7 8 Twin Input Card 2 Message Storage Card 4 Twin Tuner Card 5 Audio Link Card 6 Twin Output Card 7 PC Link - I/O Link 8 RS485 Communication (High/Low speed) 210 3. Instalacja systemu 3.6 Połączenia CS-WC i ustawienia 1 2 3 4 1. Zworka końcowa, patrz UWAGA w rozdziale 3.5 2.Złącze RS485 3.Złącze zasilacza (12-24Vdc) 4.Wejście uaktualnienia oprogramowania UWAGA: Zapoznaj się z aneksem B - sposób montażu kontrolera 3.7 Połączenia CS-LIM i ustawienia 2 5 4 3 1 1. CS-LIM wyposażono w pokrętło regulacji wzmocnienia mikrofonu, dostępny także z panelu frontowego z użyciem wkrętaka ‘0’. Obróć pokrętło regulacji w kierunku przeciwnym do ruchu wskazówek zegara (widoczne na froncie), aby zmniejszyć wzmocnienie na wartość minimalną 32 dB. Obróć pokrętło regulacji zgodnie z kierunkiem ruchu wskazówek zegara, aby zwiększyć wzmocnienie na wartość maksymalną 66 dB. Ustawienie fabryczne wzmocnienia to 38dB. Polski 2.Aby zmienić ustawienie CS-LIM ze stereo na mono, należy ustawić zworkę. W konfiguracji mono sygnał audio powinien być podłączony do LEWEGO wyjścia. 3. Aby włączyć korekcję EQ (EQ zoptymalizowane dla mowy) głosu dla wejścia mikrofonowego, należy przenieść zworkę z pozycji FLAT na VOICE voice = czysty sygnał flat voice = korekcja EQ głosu flat 4.Złącze zbalansowanego wejścia liniowego stereo. 5.Złącze zasilacza (24Vdc). UWAGA: Zapoznaj się z aneksem B - sposób montażu kontrolera 211 3. Instalacja systemu 3.8 Połączenia CS-PP / i ustawienia 3 7 2 7 1 6 4 5 8 CS-PP wyposażono w, pokrętło regulacji wzmocnienia mikrofonu oraz pokrętło regulacji wzmocnienia gongu (sygnał uwagi). Aby dostosować te dwa typy wzmocnienia i podłączyć CS-PP, należy zdjąć plastikową pokrywę (w górnej części płyty przedniej CS-PP), a następnie odkręcić 4 śruby i ściągnąć panel przedni. Dwa pokrętła regulacji znajdują się w dolnej części panelu. UWAGA: Upewnij się, że w połączeniach nie ma zwarć. 1. Wzmocnienie mikrofonu: obróć pokrętło regulacji w kierunku przeciwnym do ruchu wskazówek zegara, aby zmniejszyć wzmocnienie na wartość minimalną 32,6 dB. Obróć pokrętło modułu regulacji zgodnie z kierunkiem ruchu wskazówek zegara, aby zwiększyć wzmocnienie na wartość maksymalną 60,1 dB. Ustawienie fabryczne wzmocnienia to 38 dB. 2. Wzmocnienie gongu: za pomocą pokrętła regulacji zwiększ lub zmniejsz poziom sygnału gongu. 3. Zworka końcowa, patrz UWAGA w rozdziale 3.5. 4. Złącze RS485. English Polski 5. Złącze zasilacza, 12-24Vdc (tylko 2 z 3 pinów są używane!). 6. Złącze zbalansowanego wyjścia liniowego. 7. Wejście uaktualnienia oprogramowania. 8. Wejście XLR dla mikrofonu z 22 Vdc zasilaniem “phantom” 212 3. Instalacja systemu 3.9 Wejścia/wyjścia ogólnego przeznaczenia System ControlSpace zawiera jedną kartę wejść/wyjść ogólnego przeznaczenia/RS232 (zobacz także rozdział 3.2). Do 40 styków GPIO (8 na jedno urządzenie, maksymalnie 5 urządzeń) może być wykorzystanych do emisji maks. 40 komunikatów, maks. 40 programów łączenia pomieszczeń, lub wyciszania wybranych lub wszystkich wyjść. Styki są wyzwalane przez skierowanie prądu stałego o napięciu 24 V DC między określonym stykiem oraz wspólnym stykiem uziemienia. ® UWAGA: Styk “Pulse” odtworzy wiadomosc jeden raz. Styk “Hold” bedzie odtwarzac wiadomosc az do zwolnienia polaczenia styku. Uzyj styku “hold” do aktywacji laczenia pomieszczen lub wyboru trybu “standby” (zwolnij polaczenie styku, aby dezaktywowac te funkcje) Charakterystyka • 8 izolowanych wejść • 1 izolowane wyjście • Wejścia mogą być wykorzystywane do adresowania komunikatów, łączenia pomieszczeń, lub do wyłączania strefy lub grupy stref (wyjścia powrócą do stanu domyślnego po ponownej aktywacji styku) • Wejście otwartego kolektora jest aktywowane wraz z aktywacją jednego z ośmiu wejść. Schemat okablowania styków 8 wejść CS-AMS-8 CS-AMS-8 1..8 + 24 Vdc - 10 Schemat okablowania wejścia otwartego kolektora CS-AMS-8 CS-AMS-8 Open collector Max. 50mA Polski 9 + 24 Vdc - 10 213 3. Instalacja systemu 3.10 Połączenia wejść i wyjść źródeł audio Źródła audio można podłączyć do zbalansowanych i niezbalansowanych wejść i wyjść liniowych za pomocą następujących typów kabli: Złącze źródła Wejścia i wyjścia audio systemu ControlSpace AMS-8 ® RCA S T+ T S- ⊥ + ⊥ L R XLR 1 2+ 2 + ⊥ 1 ⊥ 3 3- L R Wtyczka słuchawek (zbalansowana) T R S⊥ S + ⊥ T+ L R- R Wtyczka słuchawek (niezbalansowana) T S + ⊥ T+ L S-⊥ R S English Polski S T T+ S- ⊥ L R 214 4. Opcje rozszerzenia 4. Opcjonalne elementy systemu Standardowy system ControlSpace AMS-8 zawiera: ® • 8 kanałów liniowych analogowych wejść audio (CS-TIC) • 8 kanałów liniowych analogowych wyjść audio (CS-TOC) • 8 stykowych wejść sterujących ogólnego przeznaczenia • 1 stykowe wyjście sterujące ogólnego przeznaczenia • 1 port komunikacyjny Ethernet System ControlSpace AMS-8 można rozbudować o dodatkowe interfejsy użytkownika i opcjonalne karty. ® Opcjonalne interfejsy użytkownika: CS-PP — Panel dystrybucji komunikatów dla ControlSpace AMS-8 Panel dystrybucji komunikatów dla systemu ControlSpace AMS-8 umożliwia uruchamianie wcześniej nagranych (głosowych) komunikatów lub komunikatów w czasie rzeczywistym w wybranych grupach stref. ® ® CS-WC — Kontroler naścienny dla systemu ControlSpace AMS-8 Kontroler naścienny dla systemu ControlSpace AMS-8 umożliwia lokalne wybieranie kanałów i regulację głośności sygnału audio. ® ® CS-LIM — Lokalny moduł wejść dla systemu ControlSpace AMS-8 Lokalny moduł wejść dla systemu ControlSpace AMS-8 umożliwia dodanie do systemu lokalnego źródła (liniowego lub mikrofonu). ® ® CS-RC - pilot IR do systemu ControlSpace AMS-8 Nadajnik zdalnego sterowania (na podczerwień) pozwala na łatwą obsługę kontrolera ściennego na maks. 5 m ® Opcjonalne karty: CS-TIC — Karta z dwoma wejściami dla systemu ControlSpace AMS-8 Do jednego systemu można podłączyć do 4 kart z dwoma wejściami dla systemu ControlSpace AMS-8, co daje 8 dodatkowych kanałów analogowych wyjść liniowych audio. ® ® Polski Łącze audio CS AMS-8 Karta Karta Audio ControlSpace AMS-8 umożliwia łączenie w jeden system maks. 10 urządzeń. Wymagane są również przewody audio. 215 4. Opcje rozszerzenia CS-MSC — Karta do zapisywania komunikatów dla systemu ControlSpace AMS-8 Karta do zapisu komunikatów zajmuje jeden slot CS-TIC (na kartę) i pozwala przechowywać i uaktywniać komunikaty poprzez pulpit mikrofonowy, kalendarz wydarzeń lub styki GPIO. Oprogramowanie do konfiguracji CS-MSC i nagrywania komunikatów jest na wyposażeniu. ® CS-DIC - Cyfrowa Karta Wejściowa ControlSpace AMS-8 Cyfrowa karta wejściowa może być wykorzystana do podłączenia sygnału cyfrowego. Należy ją także wykorzystać do połączenia CS-MSC, CS-TTC lub CS-DIC z następnym urządzeniem. ® CS-TTC - Podwójna Karta Tunera ControlSpace AMS-8 Podwójna Karta Tunera pozwala na podłączenie do systemu 1 tunera stereofonicznego lub 2 monofonicznych. ® Opcjonalne interfejsy komunikacyjne: CS-SCI - Interfejs Szeregowy ControlSpace Interfejs Szeregowy konwertuje kody szeregowe wysyłane z/lub do urządzeń takich, jak Crestron/AMX do obsługi AMS-8. CS-SCI posiada także 16 programowalnych wyjść (każde przypisane do pojedynczego pomieszczenia). Każde wyjście można aktywować gdy pomieszczenie jest w trybie aktywnym, lub poprzez wysłanie do danego pomieszczenia komunikatu (np. 100V wyzwalacz). ® CS-HUB – Hub Komunikacyjny ControlSpace Hub Komunikacyjny RS485 (CS-HUB) może być użyty do stworzenia gwiaździstej sieci przy podłączeniu maks. 5 interfejsów użytkownika (CS-WC/CS-PP). Można go także wykorzystać przy większych odległościach pomiędzy urządzeniami AMS-8 i/lub CS-SCI, ale również do zwiększenia dystansu pomiędzy regulatorami ściennymi lub panelami mikrofonowymi (podłączonymi do pojedynczego portu komunikacyjnego RS485). English Polski ® 216 5. Aktualizacja do wersji ControlSpace AMS-8 II ® 5. Aktualizacja do wersji ControlSpace AMS-8 II ® 1)Sprawdź wersję oprogramowania, wyświetli się ona na krótko na wyświetlaczu zaraz po włączeniu urządzenia. Poniższe kroki są mozliwe tylko wtedy, gdy wersja oprogramowania to V2.116 lub wyższa. Jeżeli wersja oprogramowania jest niższa, aktualizację może przeprowadzić jedynie serwis Bose. 2)Podłącz wszystkie urządzenia AMS-8 ze sobą (maks. 10) za pomocą dedykowanych przewodów (zobacz także rozdział 3.5) 3)Upewnij się, że zwory końcowe w kartach komunikacyjnych RS485 znajdują się tylko w pierwszym i ostatnim urządzeniu systemu (wszystkie pozostałe należy zdemontować) 4)Włącz każde urządzenieAMS-8 naciskając jednocześnie klawisze GÓRA i DÓŁ. W ten sposób aktywuje się tryb aktualizacji. 5)Wybierz ‘Master’ dla pierwszego urządzenia AMS-8 w systemie. Wybierz odpowiednią ilość urządzeń w systemie, np: “Ilość urządzeń: 10” 6)Każde dodane urządzenie będzie ‘dodatkowym’, z numerami 2, 3, 4, 5… aż do 10. Np.: „Wybierz urządzenie nr: 2” 7)Zwróć uwagę na wskażnik ‘live-mask’ na dole wyświetlacza. Oznacza on ilość zainstalowanych i połączonych urządzeń AMS-8. Wygląda to następująco: ”Racks: 00000011 11111111” i oznacza 10 zainstalowanych urządzeń. 8)Gdy wszystkie urządzenia zostaną wykryte, wybierz ‘zakończ’ w głównym urządzeniu. Spowoduje to (tymczasową) konfigurację bootloadera 9) Podłącz swój komputer do urządzenia głównego i uruchom oprogramowanie instalacyjne 10) Wgraj (najnowszą) wersję oprogramowania do urządzeń AMS-8 11) Poczekaj, aż tryb upload i re-update we wszystkich urządzeniach zakończy się. 12)Ustaw pierwsze (górne) urządzenie jako ”Rack-1 Mst” (główne) ponownie i wprowadź ilość urządzeń dodatkowych (jeśli to konieczne, powtórz kroki z pkt 4) 13) Ustaw każde urządzenie dodatkowe na odpowiedni numer (“Rack-2” lub wyższy) 14)Zrestartuj wszystkie urządzenia (celem zapisania odpowiednich numerów) poprzez wyłączenie i ponowne włączenie 15)Wybierz powrót do ustawień fabrycznych (wybierz tę opcję z menu instalacyjnego) w urządzeniu głównym i poczekaj, aż dane zostaną załadowane (wyświetli się komunikat “Updating flash 202”) 16)Zrestartuj ponownie wszystkie urządzenia (aby załadować nowe ustawienia do pamięci) wyłączając i włączając je. 17) Zaktualizuj wszystkie krzywe korekcji EQ Bose za pomocą oprogramowania instalacyjnego 18) Aktualizacja do wersji ControlSpace AMS-8 II jest w tym momencie zakończona. ® Użyj oprogramowania instalacyjnego lub klawiszy nawigacyjnych na panelu do konfiguracji urządzeń. Polski Poprzednio zapisane pliki BDF (Bose Data Files) nie mogą już być ponownie wykorzystywane (ze względu na nadpisanie pamięci urządzeń). Jednak po przekonfigurowaniu urządzenia nowo powstały plik BDF może zostać zapisany i użyty do przesłania/wczytania do innych systemów ControlSpace AMS-8 II. ® 217 6. Rozwiązywanie problemów 6. Rozwiązywanie problemów Brak zasilania Podłącz kabel zasilający, włącz zasilanie. Zasilanie jest włączone, ale w żadnej strefie nie słychać dźwięku. Sprawdź, czy jest sygnał na wejściu ze źródła. Sprawdź, czy jest sygnał na wyjściu. Jeżeli jest sygnał na wejściu, ale nie ma na wyjściu, być może system ControlSpace został wyciszony lub poziom głośności został maksymalnie zmniejszony. ® Zasilanie jest włączone, jednak dźwięk jest bardzo cichy Sprawdź, czy wskaźnik wejścia audio świeci się na zielono. Jeżeli wskaźnik nie świeci się, zwiększ wzmocnienie wyjścia lub wejścia źródła. Dźwięk jest zniekształcony Jeżeli sygnał źródła wejścia jest czysty, gdy wchodzi do systemu CS AMS-8, sprawdź, czy głośniki nie są przesterowane lub uszkodzone. Nienaturalny dźwięk. Upewnij się, że dla sygnału wybrano odpowiednią korekcję EQ. Upewnij się, że sygnał wejściowy nie jest zniekształcony / zbyt wysoki. Zasilanie jest włączone, ale w co najmniej jednej strefie nie słychać dźwięku. Sprawdź wszystkie połączenia w stelażu systemu CS AMS-8. Jeżeli wskaźnik wejścia audio i wskaźnik wyjścia sygnału audio świecą się na zielono, sprawdź, czy na wzmacniaczu jest ustawione odpowiednie wzmocnienie i sprawdź poziomy wyjścia. Sprawdź, czy wzmacniacz działa prawidłowo i czy jest ustawiony odpowiedni poziom wzmocnienia. W oprogramowaniu instalatora lub w stelażu systemu sprawdź domyślne ustawienia oraz ustawienia maksymalnego poziomu głośności w pomieszczeniu. Sprawdz, czy tryby “Wydarzenia” lub “Laczenie pomieszczen” sa aktywne Brak dystrybucji komunikatów/ gongu z oprogramowania użytkownika. Sprawdź połączenie między kartą dźwiękową komputera PC, mikrofonem i systemem. Sprawdź ustawienia głośności na komputerze PC. Brak sterowania/ komunikacji z CS-WC/CS-PP. Sprawdź okablowanie między CS-WC/CS-PP a systemem. Stan kontrolera naściennego jest wyświetlany w menu ustawień pomieszczenia. Jeżeli jest wyświetlany komunikat „WC-”, oznacza to, że nie ma komunikacji z określonym kontrolerem naściennym. Sprawdź adres kontrolera naściennego, a także upewnij się, że jego adres jest ustawiony zgodnie z numerem pomieszczenia, które powinien obsługiwać. English Polski Brak komunikacji/sterowania SprawdŸ przewód Ethernet. Upewnij siê, czy oprogramowanie informuje, ¿e między komputerem PC po³¹czenie INETGui jest w trybie online. a systemem AMS-8 w przypadku korzystania z oprogramowania instalatora. Brak dźwięku z lokalnego panelu przy konfiguracji mono Sprawdź, czy przewód sygnałowy jest podłączony do LEWEGO wyjścia CS-LIM. Poziom dźwięku na wyjściu spada gdy odtwarzany jest sygnał o wysokim poziomie wyjściowym Sprawdź, czy poziom gain jest ustawiony na 0dB. Stały sygnał o czułości 3dB będzie wyciszał układ wejściowy. Np dla odtwarzacza CD z sygnałem wyjściowym +6dB, czułość wejściowa musi być zredukowana o przynajmniej 3dB (zaleca się 6dB). Dioda “Talk” na panelu Oznacza to problem komunikacyjny. Sprawdź połączenia pomiędzy AMS-8 mikrofonowym świeci się na a pulpitem mikrofonowym. Upewnij się, że na ostatnim pulpicie CS-PP jest czerwono i zielono zwora końcowa. Brak sygnału z pulpitu mikrofonowego 218 Sprawdź połączenia pomiędzy AMS-8 a CS-PP. Sprawdź ustawienia emisji komunikatów w programie instalacyjnym w AMS-8 (na wyświetlaczu LCD i za pomocą klawiszy nawigacyjnych). 7. Dane techniczne 7. Dane techniczne Wejścia: Typ: 8 wejść analogowych (maks. 16), niezbalansowanych i elektronicznie zbalansowanych, liniowych Złącza: RCA i 3-stykowe złącze Euro Czułość na wejściu: -30 dBu do +14 dBu Oporność: 50 kiloomów Poziom ograniczania wejścia: +14 dBu Rozdzielczość cyfrowa: 24-bitowa Wyjścia: Typ: 8 wyjść analogowych, niezbalansowanych i elektronicznie zbalansowanych, liniowych Złącza: RCA i 3-stykowe złącze Euro Oporność: 150 omów Maksymalny poziom wyjścia: 18 dBu — wyjście zbalansowane, 12 dBu — wyjście niezbalansowane Regulacja tonów niskich/tonów wysokich: +/-12 dBu, co 1 dB Rozdzielczość cyfrowa: 24-bitowa Przetwarzanie sygnału: Typ: 48-bitowe zmiennoprzecinkowe, cyfrowe procesory sygnału Częstotliwość próbkowania: 96 kHz Latencja dźwięku: <1 ms Opóźnienie: 10 ms, co 0,05 ms Pasmo przenoszenia: 20 Hz do 20 kHz (+0 dB, -0,3 dB) Całkowite zniekształcenia harmoniczne: <0,007% (średnia ważona, wejście 0 dBu/wyjście 0 dBu) Separacja kanałów: >103 dB przy 1 kHz, 0 dBu Stosunek sygnału do szumu: >100 dB, średnia ważona, całkowite zniekształcenia harmoniczne <0,02%, wejście/wyjście zbalansowane >100 dB, średnia ważona, całkowite zniekształcenia harmoniczne <0,02%, wejście/wyjście niezbalansowane >100dB, ważony-A, THD<0.02%, wejście cyfrowe – wyjście analogowe 110dB, średnia ważona, całkowite zniekształcenia harmoniczne <0,02%, wejście analogowe - wyjście cyfrowe 140dB, średnia ważona, całkowite zniekształcenia harmoniczne <0,02%, cyfrowe wejście/wyjście Dane elektryczne: Pobór mocy Wymiary (wys. x szer. x gł. w mm) Masa CS AMS-8 90–264 V prądu zmiennego (47–63 Hz) Maksymalnie 37 W 88 x 485 x 285 4,5 kg CS-WC 12–24 V prądu zmiennego Maksymalnie 0,7 W 80 x 115 x 48 0,12 kg CS-LIM 24 V prądu zmiennego Maksymalnie 1,5 W 80 x 115 x 48 0,12 kg CS-PP 12–24 V prądu zmiennego Maksymalnie 1,7 W 43 x 210 x 212 1,5 kg Dane dotyczące środowiska: Temperatura działania: 0˚C do 50˚C Wilgotność: wilgotność względna 80% (bez kondensacji) Polski Zasilanie 219 Aneks A. Przykłady systemów ControlSpace AMS-8 ® Aneks A. Przykłady systemów ControlSpace AMS-8 ® System ControlSpace AMS-8 z 80 strefami ® English Polski SCI HUB 220 Aneks A. Przykłady systemów ControlSpace AMS-8 ® Aneks A. Przykłady systemów ControlSpace AMS-8 ® System ControlSpace AMS-8 z wieloma pulpitami mikrofonowymi ® Lub System ControlSpace AMS-8 z wieloma kontrolerami ściennymi w jednym pomieszczeniu ® Zone 1 Zone 5 Zone 6 Zone 2 Zone 7 Zone 3 Zone 4 Zone 8 Polski 221 Aneks B. Montaż interfejsu użytkownika Aneks Montaż interfejsu użytkownika 7. DaneB.techniczne Puszka podtynkowa Puszka do zainstalowania w ścianie kontrolera ściennego lub modułu źródła lokalnego. Wymiary (WxSzxG): 7,1 x 10,6 x 5,2 cm Puszka natynkowa Puszka do zainstalowania na ścianie kontrolera ściennego lub modułu źródła lokalnego. Wymiary (WxSzxG): 8,0 x 11,4 x 4,6 cm Puszka do płyt kartonowo-gipsowych Puszka do zainstalowania w płycie g/k kontrolera ściennego lub modułu źródła lokalnego. Wymiary (WxSzxG): 6,6 x 12,4 x 5,2 cm English Polski Pulpit mikrofonowy Użyj tych wymiarów aby zamontować pulpit w blacie lub innym podłożu. Zamontuj oddzielne gniazdo XLR przy pulpicie, musi ono być połączone z linią mikrofonową wewnątrz pulpitu. Aby uniknąć potencjalnych zwarć, przed montażem pulpitu odłącz zasilanie. 222 Polski 223 Biura sprzedaży w Europie Jak skontaktować się z biurami sprzedaży w Europie Austria Professional Systems Division, Austria Bose Ges.m.b.H., Business Park Vienna Wienerbergstrasse 7, 10 O.G. 1100 Wien, Österreich Telefon: 01-60404340 Faks: 01-604043423 Belgia Professional Systems Division, Belgium Bose N.V., Limesweg 2 3700 Tongeren, België Telefon: 012-390800 Faks: 012-390840 Dania Professional Systems Division, Denmark Bose Danmark A/S, Industrivej 7 PO Box 14, 2605 Brøndby, Danmark Telefon: 43437777 Faks: 43437818 Francja Professional Systems Division, France Bose S.A., 12 rue de Témara 78100 Saint Germain en Laye Telefon: 01-30616363 Faks: 01-30616388 Niemcy Professional Systems Division, Germany Bose GmbH, Max-Planck-Straße 36, 61381 Friedrichsdorf, Deutschland Telefon: 06172-7104-0 Faks: 06172-7104-19 Irlandia Professional Systems Division, Ireland Bose GP, Castleblayney Road Carrickmacross, County Monaghan Republic Of Ireland Telefon: 042-9661988 Faks: 042-9661998 English Polski Włochy Professional Systems Division, Italy Bose SpA, Via della Magliana 876 00148 Roma, Italia Telefon: 066-5670802, Fax: 066-5680177 224 Holandia Professional Systems Division, The Netherlands Bose B.V., Nijverheidstraat 8 1135 GE Edam, Nederland Telefon: 0299-390139 Faks: 0299-390109 Norwegia Professional Systems Division, Norway Bose Filial till Bose A/S Danmark, Lerkev 58 2209 Kongsvinger, Norge Telefon: 062-821560 Faks: 062-821569 Szwajcaria Professional Systems Division, Switzerland Bose AG, Hauptstrasse 134 4450 Sissach, Sweiz Telefon: 061-9757733 Faks: 061-9757744 Hiszpania Gaplasa S.A. Avda. Ingeniero Conde de Torroja 25 28022 Madrid, España Telefon: 91 748 29 60 Faks: 91 329 16 75 Szwecja Professional Systems Division, Sweden Bose, filial till Bose A/S Danmark Johannefredsgatan 4, 43153 Mölndal, Sverige Telefon: 031-878850 Faks: 031-274891 Wielka Brytania Professional Systems Division, United Kingdom Bose Ltd., 1 Ambley Green Gillingham Business Park Gillingham, Kent ME8 0NJ, England Telefon: 0870-741-4500 Faks: 0870-741-4545 Polska Bose Sp. z o.o. Galeria Mokotów ul. Wołoska 12 02-675 Warszawa Telefon: (22) 852 2928 Faks: (22) 852 2927 English Tillverkaren förbehåller sig specifikationsrättigheter. Informationen i den här manualen är förbehållet rätten att ändras utan förvarning eller skyldigheter. Innehållsförteckning 1. Säkerhetsinformation Viktiga säkerhetsanvisningar 228 Konformitetsdeklaration 230 2. Inledning 231 3. Systeminstallation 3.1 Frontpanelens ControlSpace AMS-8 232 3.2 Baksidans ControlSpace AMS-8 233 3.3 Konfiguration väggreglage 234 3.4 Anslutningar för användargränssnitt 235 3.5Systemarrangemang 236 3.6 Anslutningar till väggreglage 239 3.7 Anslutningar till den lokala ingångsmodulen 239 3.8 Anslutningar till sökpanel 240 3.9 Allmän användning ingångar/utgångar 241 3.10 In- och utgående ljudanslutningar 242 ® ® 4. Valfria systemkomponenter 243 5. Uppgradera till ett ControlSpace AMS-8 II-system 245 6. Felsökning 246 7. Tekniska specifikationer 247 ® Bilaga A. Systemexempel för ControlSpace AMS-8 248 Bilaga B. Monteringsanvisningar för användargränssnitt 250 Europeiska försäljningskontor 252 ® Svenska 1. Säkerhetsinformation 1. Viktiga säkerhetsanvisningar Varningsmarkeringar på produkten Varningsmarkeringarna finns på produktens baksida. Blixten med pilhuvuds-symbolen i en likbent triangel är avsedd att uppmärksamma användaren på att det finns oisolerad farlig spänning i systemet som kan vara tillräckligt stark för att innebära risk för elektriska stötar. Blixten med pilhuvuds-symbolen i en likbent triangel är avsedd att uppmärksamma användaren på att det finns oisolerad farlig spänning i systemet som kan vara tillräckligt stark för att innebära risk för elektriska stötar. Viktiga säkerhetsanvisningar 1. Läs de här anvisningarna. 2. Behåll anvisningarna för framtida bruk. 3. Ge akt på alla varningar på produkten. 4. Följ alla anvisningar. 5. Använd inte apparaten nära vatten eller i fuktiga miljöer. 6. Rengör endast med en torr trasa. 7. Blockera inte ventilationsöppningarna. Installera produkten efter tillverkarens anvisningar – Placera den så att korrekt ventilation inte hindras för att försäkra dig om pålitlig funktion och skydd mot överhettning. 8. Installera inte produkten nära värmekällor, t.ex. radiatorer, högtalare, spisar eller andra apparater (inklusive förstärkare) som producerar värme. 9. Var försiktig med säkerheten när det gäller den polariserade eller jordade kontakten. En polariserad kontakt har två blad där det ena är bredare än det andra. En skyddsjordad kontakt har ett jordningsbleck utöver de vanliga två kontaktstiften. Det bredare bladet eller det tredje blecket är till för din säkerhet. Om den medföljande kontakten inte passar i uttaget, låt en elektriker byta ut uttaget. 10. Placera strömkabeln så att ingen går på den eller klämmer den, särskilt vid kontakter, uttag etc. 11. Använd endast tillbehör som godkänts av tillverkaren. 12. Använd endast apparaten tillsammans med vagn, stativ, konsol eller bord som rekommenderats av tillverkaren eller sålts tillsammans med apparaten. Var försiktig när du använder vagn så att apparaten inte skadas genom att den faller vid förflyttning. 13. K oppla ur apparaten vid åskväder eller när den inte ska användas under en längre tid – för att förhindra att produkten skadas. 14. Låt allt underhåll utföras av kvalificerad servicepersonal. Underhåll krävs när apparaten har skadats på något sätt: om t.ex. skada på kabel eller kontakt uppstått, om vätska har spillts i apparaten eller främmande föremål har hamnat i den, om apparaten har blivit utsatt för regn eller fukt, om apparaten inte fungerar felfritt eller har tappats. Försök inte att själv att åtgärda felen på produkten. Öppning och borttagning av höljet kan utsätta dig för farlig spänning eller andra risker. Kontakta Bose för information om ett auktoriserat servicecenter nära dig. Svenska 15. Undvik att överbelasta vägguttag, förlängningskablar och inbyggda honuttag för att förhindra brandrisk och elektriska stötar. 228 1. Säkerhetsinformation 16. Låt inte föremål eller vätskor tränga in i produkten. De kan komma i kontakt med farliga spänningspunkter eller kortsluta delar, vilket kan resultera i brand och elektriska stötar. 17. Granska de säkerhetsrelaterade märkena på produkten. 18. Placera inte öppen eld, t.ex. tända stearinljus, på apparaten. VARNING: Minska risken för brand eller elektriska stötar genom att inte utsätta systemet för regn eller fuktighet. VARNING: Apparaten får inte utsättas för dropp eller stänk. Placera därför inte föremål som är fyllda med vatten, t.ex. vaser, på apparaten. Liksom med andra elektroniska produkter ska du se till att du inte spiller vätska i någon del av systemet. Vätskor kan orsaka fel och/eller brandfara. Information om produkter som skapar elektriskt brus Den här utrustningen har testats och uppfyller begränsningarna för digitala enheter av klass A enligt del 15 av FCC:s regelverk, om tillämpligt. Dessa gränser har utformats för att ge rimligt skydd mot skadlig störning från en installation i boendemiljö. Denna utrustning skapar, använder och kan avge radiofrekvensenergi och kan, om den inte installeras och används enligt instruktionerna, störa radiokommunikation. Detta är dock ingen garanti för att strålning inte uppstår i en viss installation. Om denna utrustning stör radio- eller TV-mottagning, vilket kan avgöras genom att utrustningen stängs av och sätts på, är det lämpligt att försöka åtgärda störningen med hjälp av en eller flera av följande åtgärder: • Rikta om eller flytta mottagarantennen. • Öka avståndet mellan utrustningen och mottagaren. • Anslut utrustningen till ett uttag som sitter på en annan krets än den som mottagaren är ansluten till. • Kontakta återförsäljaren eller en erfaren radio/TV-tekniker om du behöver hjälp. Obs! Ej auktoriserade ändringar på mottagaren eller radiofjärrkontrollen insatt från en hi-fi produkt kan göra att användaren inte längre har rätt att använda denna utrustning. Den här produkten uppfyller de specifikationer som finns. Informationen som tillhandahålls i den här installationsanvisningen innehåller inte utrustningens alla design/produktionsdetaljer och varianter. Den täcker inte heller alla situationer som kan uppstå under installation, drift eller underhåll. Om du behöver hjälp utöver installationsanvisningarna, kontakta ett av våra Europeiska försäljningskontor. Se “försäljningskontor” på sista sidan i installationsanvisningarna. Svenska 229 1. Säkerhetsinformation Konformitetsdeklaration Tillverkaren av denna förstärkare intygar härmed att apparaten, inklusive tillbehör, följer följande standarder: EMC-direktiv 89/336/EEC (elektromagnetisk kompatibilitet) EN-55103-1 EN-55103-2 Lågspänningsdirektivet 73/23/EEG EN-60065:2002 7:e utgåvan Övervägande vid rackmontering Ljudsignalsprocessorn kräver två höjdenheter 4,4 cm rack, med ett innerdjup på 32,5 cm. Använd fyra skruvar med brickor vid montering för att förhindra märken i frontpanelen. Brickor av neoprengummi är att föredra eftersom de håller fast skruvskallarna och hindrar skruvarna från att gängas ur av vibrationer eller under transport. Varning: Om enheten är rackmonterad och racket transporteras måste processorns baksida stödjas mekaniskt. Du kan placera en hylla längs processorns baksida eller använda fästen för att stödja den bakre enheten. Allmänna försiktighetsåtgärder & ventilation Varning: Placera enheten på en plats där den skyddas från hög värme och där det finns tillräcklig ventilering. Placera inte enheten i närheten av direkta värmekällor, som t.ex. värmeventilation eller element. Se till att luften kan cirkulera fritt bakom, bredvid och ovanför enheten. Ifall enheten är placerad under eller ovanför en förstärkare, se till så att en separat ventilationsplatta är placerad mellan de 2 enheterna. Låt inte höljet bli varmare än den maximala arbetstemperaturen 50ºC. Tänk på att värmen i ett stängt rackskåp kan vara högre än den omgivande rumstemperaturen. Svenska Varningar: Försäkra dig om att de tunna kabeltrådarna är sammantvinnade och att inte någon sticker ut ur kontakten. Det räcker med att en enda tråd är lös och kan komma åt den närliggande polen för att det ska bli kortslutning. 230 2. Inledning 2. Inledning Inledning Bose ControlSpace AMS-8 Audio Management System är en flexibel, utbyggbar och högkvalitativ ljudsignalsprocessor för användning av ljuddistribution inom t.ex. restauranger, butiker, barer, kontor, hotell, konferensanläggningar och idrottsanläggningar. Huvudenheten inkluderar åtta ingående linjer och åtta utgående. Fyra lediga ljudöppningar (slots) gör att man kan lägga till upp till 8 ytterligare ljudingångar (2 ingångar per kort). ® ® För fler zoner kan upp till 10 AMS-8 rackenheter användas per system. Varje ytterligare systemrack lägger till 8 mono zoner i systemet För att göra det enkelt för slutanvändaren att använda ControlSpace AMS-8-systemet, kan man välja på flera olika användargränssnitt. ® Bose ControlSpace AMS-8 Live Installer programvara används för att utforma system och konfigurera AMS‑8 och användargränssnitt. Programmet körs på PC och kommunicerar med AMS-8 via Ethernet. ® ® Egenskaper och funktioner • Utbyggbar och flexibel kortramskonstruktion • LCD-skärm och navigeringsknappar • 8 (upp till 16) analoga kanaler för linjenivåingång • Väggreglagets funktionalitet (valfri IR fjärrkontroll) • Åtta analoga kanaler för linjenivåutgång • Funktionalitet lokal ingångsmodul • GPIO: 8 kontroll ingångar (för aktivering av meddelanden, roomcombining presets och rumsavstängning/volym av) samt 1 kontroll utgång • Funktionalitet sökpanel • Meddelandefunktioner (tillvalet kort för meddelandelagring krävs) • Utformning, konfiguration och systemkontroll via PC-baserade mjukvaruprogram • Tunerfunktioner (tillvalet dubbelt tunerkort krävs) • Automatisk avkänning av indatakorttyp • Inklistrad från ESP-88-bladet men inte lämplig för AMS8, eftersom DSP-behandling inte är modulär. Digital signalbehandling innefattar: Bose högtalare EQs, fördröjning, styrning av förstärkning och källval. • Rumskombineringsfunktioner • Planeringsfunktioner Snabbstart • Anslut ljudingångar och ljudutgångar till ControlSpace AMS-8-systemet. (Om man har 2 eller fler systemsrack: Koppla ihop de dessa racken genom att använda ljudlinkskortet, ljudlinkskablarna och high speed RS485racklink: se även kapitel 3.5). ® • Sätt på ControlSpace AMS-8-systemet. Tack vare standardinställningarna är systemet nu igång. Efter varje uppstart av ControlSpace system kommer standardinställningarna att kommas ihåg. Detta betyder att systemet kommer att använda den standardkälla och standardvolym som angivits i installationsmenyn. ® ® OBS! Om du vill uppdatera funktionerna i ett ControlSpace AMS-8 II-system kan du se kapitel 5 ® Abbreviations CS-WCControlSpace AMS-8 väggreglage CS-ECControlSpace AMS-8 ethernet-kort CS-PPControlSpace AMS-8 sökpanel CS-MSCControlSpace AMS-8 lagringskort för meddelanden CS-LIMControlSpace AMS-8 lokal ingångsmodul CS-DICControlSpace AMS-8 digitalt ingångskort CS-RCControlSpace AMS-8 fjärrkontroll CS-TTCControlSpace AMS-8 dubbelt tunerkort CS-TICControlSpace AMS-8 dubbelt ingångskort CS-HUBControlSpace AMS-8 RS485-hubb CS-TOCControlSpace AMS-8 dubbelt utgångskort CS-SCIControlSpace AMS-8 seriegränssnitt ® ® ® ® ® ® ® Svenska ® ® ® ® ® 231 3. Systeminstallation 3.1 Frontpanel ControlSpace AMS-8 ® 1 2 1. LCD-SKÄRM LCD-skärmen visar kontrollmenyn och de möjliga inställningarna för varje menypost. 2. NAVIGERINGSKNAPPAR Svenska Med knapparna ‘up’ och ‘down’ kan man bläddra genom menyposterna, medan knapparna ‘left’ och ‘right’ ändrar inställningsvärdet på den valda menyposten. Knappen ‘OK’ bekräftar det gjorda valet. Exempel: Om man trycker på ‘OK’ när menyposten ‘Exit’ är markerad så kommer man tillbaka till föregående menynivå. 232 3. Systeminstallation 3.2 Baksida ControlSpace AMS-8 ® 5 3 7 9 11 15 13 1 4 5 3 7 5 9 4 5 3 8 1 8 7 Serial Number: Rack Link 2 1 PC Link ! Rack Link 1 1 CAUTION RISK OF ELECTRIC SHOCK DO NOT OPEN AVIS: Risque de chock électrique, ne pas ouvrir System Rack MODEL: 2 6 8 10 12 14 16 4 2 13 6 Audio Link Source Inputs 1 8 5 6 3 4 1 2 Line Outputs 2 (1-16) 1 Linjeingång Line inputs (1-16) 10 7 8 16 Bus 2 6 9 I/O Link 12 4 2 Bus 1 9 To CSPP/CSWC Bose Corporation, Framingham, MA01701-9168 Made in The Netherlands 3 4 5 2 Audio kortplats Audio Link Link Card slot 5 7 9 11 15 13 4 1 5 3 7 5 9 3-stifts ingångsanslutning 3-pin Input Euro Blok Connector Euro Block (Balanced line linjenivå) level) (Balanserad 4 Bose Corporation, Framingham, MA01701-9168 Made in The Netherlands 4 2 6 8 3 8 1 8 7 Serial Number: 3-stifts ingångsanslutning 3-pin Input Euro Blok Connector Euro Block (Balanced line linjenivå) level) (Balanserad 5 2 6 Rack Link 1 1 3 9 RS-232 & GPIO card 12 10 12 14 16 13 9 4 2 6 16 Audio Link Source Inputs RCA RCAIngångsanslutning Input Connector (Unbalanced linelinjenivå) level) (Obalanserad Line Outputs 5 9 4 5 9 8 3 3 7 7 2 6 2 (1-8) 3 Linjeutgång Line outputs (1-8) 6 1 CSCSTOC TOC 9 RCAugångsanalutning Input Connector Line inputs (1-16)RCA (Unbalanced line level) (obalanserad linjenivå) 10 8 6 3 4 2 RS232 port pin out Straight shielded cable (20 meters max.) 2. TX 3. RX 5. GND DB9 Female 10 7 8 5 7 5 1 8 4 1 8 ® Rack Link 2 1 Bus 1 ! AVIS: Risque de chock électrique, ne pas ouvrir System Rack MODEL: PC Link CAUTION RISK OF ELECTRIC SHOCK DO NOT OPEN Slot for Audio Card to link the connected Kortplats förLink Audio Link kort för att länka två ControlSpace analog sources between Controlspace AMS-8 AMS-8 AUdio Management system. Endast i masterrack är Audio Managment Systems. ett Audio Link kort nödvändigt. För att länka, lägg till ett Audio Link kabelset per fyra källor. I/O Link RCAIngångsanslutning Input Connector RCA (Unbalanced linelinjenivå) level) (Obalanserad Bus 2 CSTIC To CSPP/CSWC CS TIC 6 Audio Link Card slot CSTIC 3-pin Input Euro Blok Connector Euro block 3-stift utgångsanslutning RCA Input line Connector (Balanced level) (balanserad linjenivå) (Unbalanced line level) 3 4 1 2 Slot for Audio Link Card to link the connected analog sources between Controlspace AMS-8 9 10 Audio Managment Systems. 3-pin Input Euro Blok Connector Euro block 3-stift utgångsanslutning 3-pin Inputline Euro Blok Connector (Balanced level) (balanserad linjenivå) (Balanced line level) RS-232 & GPIO card RCAugångsanalutning Input Connector RCA 3-pin Input Euro Blok (Unbalanced linelinjenivå) level)Connector (obalanserad (Balanced line level) 7 8 5 6 3 4 1 2 5 RCA Input Connector 9 kort line level) 4 Ethernet & GPIO(Unbalanced 4 5 9 RS-485 card 8 4 8 3 3 7 7 2 1 6 Line outputs (1-8) Pin 1: Contact 1 Pin 2: Contact 2 Pin 3: Contact 3 Pin 4: Contact 4 Pin 5: Contact 5 Pin 6: Contact 6 Pin 7: Contact 7 Pin 8: Contact 8 Pin 9: Output Pin 10: Common RS232 port pin out Straight shielded cable (20 meters max.) 2 1 6 2. TX 3. RX 5. GND Rack link 1 (high speed) CSTOC 9 7 5 Rack 2 (high speed) RCAlink Input Connector (Unbalanced line level) 3-pin&Input Euro Connector CS-WC CS-PP BusBlok 1 (low speed) (Balanced line level) Pin 1 : Kontakt 1 Pin 3 : Kontakt 3 Pin 4 : Kontakt 4 Pin 5 : Kontakt 5 8 DB9 Female 6 4 1 2 9 GPIO 3-pin &Input Euro Blok Connector CS-WC CS-PP Bus 2 (low speed) stiftutgång: (Balanced line level) RCA Input Connector Pin 2 : Kontakt 2 (Unbalanced line level) 10 3 Pin 6 : Kontakt 6 Pin 7 : Kontakt 7 Pin 8 : Kontakt 8 Pin 9 : ut Pin 10: jord/skärm 10 7 8 5 6 3 4 1 2 Pin 1: Contact 1 Pin 2: Contact 2 Pin 3: Contact 3 Pin 4: Contact 4 Pin 5: Contact 5 Pin 6: Contact 6 Pin 7: Contact 7 Pin 8: Contact 8 Pin 9: Output Pin 10: Common RS-485 card 5 RS485 kort Rack linklänk 1 (high Rack 1 speed) (high speed) Rack linklänk 2 (high Rack 2 speed) (high speed) speed) CS-WC & CS-PP Bus 2 (low CS-WC & CS-PP Busspeed) 2 (low speed) Svenska CS-WC & CS-PP Bus 1 (low CS-WC & CS-PP Busspeed) 1 (low 233 3. Systeminstallation 3.3 Konfiguration väggreglage 1 1. LCD-SKÄRM 2 3 2. VOLYMKNAPPAR 3. KANALKNAPPAR Innan man konfigurerar ControlSpace AMS-8 måste man välja en address för varje väggreglage (1..8). Detta görs vanligtvis första gången som väggreglaget kopplas till racksystemet. Några sekunder efter det att väggreglaget kopplats till racksystemet, maskinvaruversionen visas på LCD-skärmen följt av “Select WC..”. Använd kanalknapparna för att välja en lämplig address och bekräfta valet genom att trycka på knappen för sänk volym (-). ® Om ett reglage redan har en address kan den ändras på följande sätt: 1. Stäng av väggreglaget (tryck på knappen för kanal ner (-) så många gånger som behövs för att väggreglaget ska vara avstängt) 2. Håll knappen för kanal ner (-) intryckt 3. Tryck på knapparna för volym upp (+) och ner (-) samtidigt (Efter att LCD-skärmen har visat maskinvaruversionen visar den den aktuella adressen, t.ex. “WC2”) 4. Använd nu kanalknapparna för att välja en lämplig adress och bekräfta valet genom att trycka på knappen för volym ner (-) på samma sätt som tidigare. Ifall systemet består av två eller flera ControlSpace AMS-8-rack, alla rack ska båda ha adresser (1..8). För de första rackets adresser 1..8 används för utgående kanaler 1..8 och för ett andra rack utgående kanaler 9..16 upp till det tionde racket för utgångarna 73..80. ® Att förändra rumsinställningar med hjälp av väggreglaget För det rum där väggreglaget är installerat kan man justera ljudinställningarna genom att använda den dolda menyn på väggreglaget. Gör så här för att komma åt menyn: 1. Stäng av väggreglaget (tryck på knappen för kanal ner (-) så många gånger som behövs för att väggreglaget ska vara avstängt) 2. Håll knappen för kanal ner (-) intryckt 3. Tryck på knapparna för kanal upp (+) och ner (-) samtidigt På den dolda menyn kan följande funktioner ställas in eller ändras: a. standardkanalb. basnivåc. diskantnivå d. dynamisk EQ g. sökvolym e. Utjämning för Bose-högtalare f. maxvolym h. fördröjning i. standardvolym Svenska Kanalknapparna gör att du kan bläddra genom menyposterna, medan volymknapparna gör att du kan ändra inställningarna för den valda posten. För att gå ifrån den dolda menyn, tryck på knapparna för kanal upp (+) och ner (-) samtidigt. 234 3. Systeminstallation 3.4 Anslutningar för användargränssnitt ControlSpace AMS-8 Väggreglage ControlSpace AMS-8 Sökpanel ControlSpace AMS-8 Lokal ingångsmodul Spänning 12-24VDC, +/-20% 12-24VDC, +/-10% 24VDC, +5%/-10% Ström @ 12VDC 50mA typ @ 24VDC 30mA typ @ 12VDC 140mA typ @ 24VDC 70mA typ @ 24VDC 60mA typ Rekommenderad strömförsörjning* BOSE CS AMS-8 24VDC, 2.7A stabiliserad strömförsörjning BOSE CS AMS-8 24VDC, 2.7A stabiliserad strömförsörjning BOSE CS AMS-8 24VDC, 2.7A stabiliserad strömförsörjning Maxavstånd (/med hubb) 600m (1200 m) 600m (1200 m) Inte tillämpligt Terminering *** 120ohm 120ohm Inte tillämpligt tillämpligtKabeltyp 1 par tvinnad och skärmad 1 par tvinnad och skärmad Inte tillämpligt Nom. Cap. 40pF/m Nom. Cap. 40pF/m Inte tillämpligt Nom. Imp. 124ohm Nom. Imp. 124ohm Inte tillämpligt Nom. Att. 2dB @ 1MHz Nom. Att. 2dB @ 1MHz Inte tillämpligt Rekommenderade kablar BOSE CS AMS-8 kommunikation/strömkabel (blå) för CS-WC/ CS-PP BOSE CS AMS-8 kommunikation/strömkabel (blå) för CS-WC/ CS-PP Inte tillämpligt Audio wiring Inte tillämpligt Standard Mic/Line-kabel, 1 par med skärm Bose CS AMS-8 ljud/ strömkabel (gul) för CS-LIM ® ® ® Nätdel RS485 kablar** * Obs! Om ovan nämnda strömförsörjning inte används, måste all annan strömförsörjning som används i Europa överensstämma med EN/IEC 60950. ** Nödvändiga RS485-kablar Koppla alltid ihop komponenterna i en kedjekopplad konfiguration (hellre än i en stjärna eller någon annan konfiguration). Stjärnkoppling tillåts endast vid användning av CS-HUB. Var säker på att du skiljer datakablarna från strömkablarna (>50V) på kabelbrickan eller annat med handhavande av kablarna. *** Terminering Termineringsbygeln ska placeras på det sista användargränssnittet (CS-WC eller CS-PP), som finns i änden av varje RS485-kommunikationslinje. 4 5 CS AMS-8 kommunikation/strömkabel 1 2 CS AMS-8 ljud/strömkabel 1. Blå = RS485 kommunikation ‘+’ 3 5 3. Jord-ledning = RS485 kommunikation ‘GND’ 2 6. Blått hölje 2. Grön = balanserad linjekabel (skärmad) 3. Röd = effekt ‘24VDC’ 4. Röd = effekt ‘24VDC’ 4. Svart = effekt ‘mark’ 5. Svart = effekt ‘mark’ 1 Svenska 6 1. Gul = balanserad linjekabel (skärmad) 2. Genomskinlig = RS485 kommunikation ‘–’ 3 4 5. Gult hölje 235 3. Systeminstallation 3.5 Systemarrangemang Två RS485-kommunikationslinjer och en central strömförsörjning: Max. 600 m (total längd) Ljud/Mikrofon-kabel * RS-485 RS-485 Ljud/Mikrofon-kabel Nätdel 24VDC 2-7A * DC 24V input Två RS485-kommunikationslinjer och lokal strömförsörjning: Max. 600 m (total längd) Ljud/Mikrofon-kabel PSU * RS-485 PSU RS-485 * PSU RS485-kommunikationslinje maxavståndet: 600 m 600 m Eller: 600 m 600 m RS485 HUB 600 m OBS! * Termineringsbygeln ska placeras på det sista användargränssnittet (CS-WC eller CS-wPP), Svenska som finns i änden av varje RS485-kommunikationslinje. Fler systemexempel finns i Bilaga A. 236 3. Systeminstallation Installera fler ControlSpace AMS-8 enheter för system med upp till 80 zoner Ytterligare Audio Link kort behövs för detta. Beroende på antalet anslutna källor (inkl.utrops paneler och interna tunerkort) behöver man ett antal Audio Link kabelset. Ett kabelset är nödvändigt för att länka upp till fyra analoga källor. För varje rackstomme som läggs till måste även en kommunikationskabel läggas till (2 ledare + avskärmning) för att koppla ”Racklink 1 eller 2”-anslutningen hos det ytterligare racket till en ledig Racklink-anslutning på det rack som installerats tidigare. Se till att termineringsbyglarna endast placeras på RS485-kommunikationskorten för det första och sista AMS-8-systemet. OBS 1! För att koppla den digitala signalen från ett kort för meddelandelagring, digitalt ingångskort eller den digitala signalen (i stället för analog) från det dubbla tunerkortet bör man lägga till ett digitalt ingångskort och en digital koaxialkabel (RCA-RCA) per tillagd rackstomme. OBS 2! Endast 1 Ethernet port kan användas på ett fysiskt nätverk. VLAN eller andra virtuella nätvärk är inte tillåtna. Använd system menyn “Rack Installation” för att välja master och slave Konfiguration. Svenska 237 3. Systeminstallation Rack 1 (Master) ! CAUTION RISK OF ELECTRIC SHOCK DO NOT OPEN AVIS: Risque de chock électrique, ne pas ouvrir System Rack MODEL: Serial Number: Bose Corporation, Framingham, MA01701-9168 Made in The Netherlands 9 1 4 4 3 2 1 1 1 3 2 5 6 6 6 6 10 7 8 5 6 3 4 1 2 7 8 2 1 1 3 1 Rack 2 (Slave) ! CAUTION RISK OF ELECTRIC SHOCK DO NOT OPEN AVIS: Risque de chock électrique, ne pas ouvrir System Rack MODEL: Serial Number: Bose Corporation, Framingham, MA01701-9168 Made in The Netherlands 9 1 1 4 1 4 1 1 1 1 4 4 5 6 6 6 6 10 7 8 5 6 3 4 1 2 7 8 1 3 2 2 2 1 1 2 1 1 3 Rack 10 (Slave) CAUTION RISK OF ELECTRIC SHOCK DO NOT OPEN ! AVIS: Risque de chock électrique, ne pas ouvrir System Rack MODEL: Serial Number: Bose Corporation, Framingham, MA01701-9168 Made in The Netherlands 9 3 3 3 3 3 1 1 1 5 6 6 6 6 1 Digital coax cable (75 Ohm) 2 CS-AMS-8 Link cable 1 3 RS485 communication cable (120 Ohm - 200m Max) 3 Digital Input Card 10 7 8 5 6 3 4 1 2 7 8 Twin Input Card 2 Message Storage Card 4 Twin Tuner Card 5 Audio Link Card 6 Twin Output Card Svenska 7 PC Link - I/O Link 8 RS485 Communication (High/Low speed) 238 3. Systeminstallation 3.6 CS-WC kopplingar och inställningar 1 2 3 4 1. Termineringsbygel, se OBS! i kapitel 3.5 2.RS485-kontakt 3.Strömförsörjningskontakt (12-24 V likström) 4. Anslutning för uppdatering av maskinvara OBS! Se Bilaga B. Monteringsanvisningar för väggpanel 3.7 CS-LIM-anslutningar och inställningar 2 5 4 3 1 1.CS-LIM är utrustad med en justeringsanordning för mikrofonförstärkning, går även att komma åt från framsidan med hjälp av en ”0”-skruvmejsel. Vrid justeringsanordningen moturs för att minska förstärkningen till ett minimum på 32dB. Vrid justeringsanordningen moturs för att öka förstärkningen till ett maximum på 66dB. Fabriksinställningen för förstärkning är 38dB. 2.För att ändra CS-LIM från stereo till mono behöver den här bygeln ställas in. I en monokonfiguration ska ljudkabeln anslutas till VÄNSTER utgång. 3. För att aktivera en röst EQ (optimerad utjämning för tal) för mikrofoningången måste bygeln flyttas från ‘FLAT’ till ‘VOICE’ voice flat flat = rak återgivning = röst EQ Svenska voice 4.Stereo, anslutning balanserad utgångslinje. 5.Strömförsörjningskontakt (24 V likström). OBS! Se Bilaga B. för monteringsanvisningar för väggpanel 239 3. Systeminstallation 3.8 CS-WC anslutningar och inställningar 3 7 2 7 1 6 4 5 8 CS-PP är utrustad med röstbalansering, en justeringsanordning för mikrofonförstärkning en för tonförstärkning (uppmärksamhetssignal). För att kunna justera båda förstärkningarna, och kunna ansluta CS-PP:n, behöver man avlägsna plastinlägget (överst på frontplattan på CS-PP:n), sedan ta bort de 4 skruvarna och lyfta frontpanelen ut ur höljet. De två justeringsanordningarna finns längst ner på panelen. 1. Mikrofonförstärkning: vrid justeringsanordningen moturs för att minska förstärkningen till ett minimum på 32,6dB. Vrid justeringsanordningen medurs för att öka förstärkningen till ett maximum på 60,1dB. Fabriksinställningen för förstärkning är 38dB. 2. Tonförstärkning: Använd justeringsanordningen för att minska eller öka nivån på tonsignalen. 3. Termineringsbygel, se OBS! i kapitel 3.5 4. RS485-kontakt 5. Strömförsörjningskontakt, 12-24 V likström (endast 2 av de 3 stiften används!). 6. Anslutning balanserad utgångslinje. 7. Anslutning för uppdatering av maskinvara. Svenska 8. XLR-anslutning för mikrofon med 22 V likström fantommatning 240 3. Systeminstallation 3.9 Allmän användning ingångar/utgångar (GPIO) ControlSpace AMS-8 innefattar ett GPIO/RS232-kort (se även kapitel 3.2). Upp till 40 GPIO-kontakter (8 per rack, högst 5 rackstommar totalt) kan användas för att starta upp till 40 meddelanden, upp till 40 förvalda rumskombinationer eller standby-funktionen för rum (”tyst”) på olika eller alla utgångar. Kontakterna startar genom användning av 24VDC mellan den specifika kontakten och jordningsstiftet. ® OBS! En momentan slutning gör att meddelandet spelas upp en gång. En konstant slutning gör att meddelandet spelas upp och återupprepas till slutningen bryts. Använd sluten kontakt för att aktivera room combining eller standby mode (släpp denna slutning för att avaktivera dessa två funktioner) Egenskaper • 8 enskilda ingångar • 1 enskild utgång • Ingångarna kan användas för meddelandestyrning, rumskombinering eller för att ställa en utgång eller en utgångsgrupp i standby-läge (utgångarna återgår till standardvärdet när kontakten släpps igen) • Utgång för öppen kollektor aktiveras när en av de åtta ingångarna aktiveras Kabeldiagram för de 8 ingångskontakterna CS-AMS-8 CS-AMS-8 1..8 + 24 Vdc - 10 Kabeldiagram utgång öppen kollektor CS-AMS-8 CS-AMS-8 9 Open collector Max. 50mA + 24 Vdc - 10 Svenska 241 3. Systeminstallation 3.10 Ljudkälla in- och utgående anslutningar Ljudkällor kan anslutas till de balanserade och obalanserade linjeingångarna och linjeutgångarna genom användning av någon av följande kabeltyper: KällanslutningControlSpace AMS-8 ljudingångar och ljudutgångar ® RCA S T+ T S- ⊥ + ⊥ L R XLR 1 2+ 2 + ⊥ 1 ⊥ 3 3- L R Telefonkontakt (balanserad)) T R S⊥ S + ⊥ T+ L R- R Telefonkontakt (obalanserad) T S + ⊥ T+ L S-⊥ R S S T T+ S- ⊥ L Svenska R 242 4. Utbyggnadsalternativ 4. Valfria systemkomponenter Standard ControlSpace AMS-8 innehåller: ® • 8 kanaler för analoga ljudingångar, linjenivå (CS-TIC) • 8 kanaler för analoga ljudutgångar, linjenivå (CS-TOC) • 8 ingångar styrkontakt allmän användning och • 1 utgång styrkontakt allmän användning • 1 Ethernet-kommunikationsport ControlSpace AMS-8-systemet kan utökas med ytterligare användargränssnitt, tillvalskort och kommunikationsgränssnitt. ® Valfria användargränssnitt: CS-PP - ControlSpace AMS-8 Sökpanel Med ControlSpace AMS-8 Sökpanel kan såväl förinspelade som meddelanden i realtid (röst) startas i en utvald grupp zoner. ® ® CS-WC - ControlSpace AMS-8 Väggreglage Med ControlSpace AMS-8 Väggreglage kan kanalen väljas och ljudsignalens volym justeras lokalt. ® ® CS-LIM - ControlSpace AMS-8 Lokal ingångsmodul ControlSpace AMS-8 Lokal ingångsmodul möjliggör för en lokal källa (linje eller mikrofon) att läggas till i systemet. ® ® CS-RC - ControlSpace AMS-8 fjärrkontroll Den infraröda fjärrkontrollen kontrollerar väggkontrollen upp till 5 meter ifrån. ® Tillvalskort: CS-TIC - ControlSpace AMS-8 dubbelt ingångskort Upp till fyra ControlSpace AMS-8 dubbla ingångskort kan läggas till per stomme för att ge ytterligare 8 analoga linjeljudingång kanaler. ® ® CS AMS-8 ljudlinkkort ControlSpace AMS-8 ljudlinkkort tillåter ihopkoppling av upp till 10 enheter. Ljudlinkkablar krävs också. ® Svenska 243 4. Utbyggnadsalternativ CS-MSC - ControlSpace AMS-8 Lagringskort för meddelanden Lagringskortet upptar en CS-TIC (ingångskort) -slot och tillåter förinspelade meddelanden att lagras och aktiveras av rätt knapp på sökpanelen via händelseplaneringen eller via GPIO-kontakter. Programvara för att konfigurera CS-MSC eller för att spela in meddelanden medföljer. ® CS-DIC ControlSpace AMS-8 digitalt ingångskort Det digitala ingångskortet kan användas för att lägga till en digital stereoindatasignal. Det behövs också för att koppla själva CS-MSC, CS-TTC eller CS-DIC till ett annat rack. ® CS-TTC ControlSpace AMS-8 dubbelt tunerkort Det dubbla tunerkortet kan användas för att lägga till 1 stereotuner eller 2 monotuners i systemet. ® Valfria kommunikationsgränssnitt: CS-SCI ControlSpace seriegränssnitt Seriegränssnittet omvandlar seriekoder som skickas från eller till kontrollenheter som Crestron/AMX för att styra AMS-8-systemet. CS-SCI innehåller även 16 programmerbara öppna transistorutgångar (var och en kopplad till ett enskilt rum). Varje utgång kan aktiveras när ett rum är aktiverat eller när en sökning skickas till detta rum (t.ex. för åsidosättning av 100 Volt ljuddämpare). ® CS-HUB ControlSpace RS485-kommunikationshubb RS485-kommunikationshubben (CS-HUB) kan användas för att skapa ett stjärnnätverk för att ansluta upp till 5 ControlSpace-användargränssnitt (CS-WC/CS-PP). Den kan också användas för att skapa större avstånd mellan AMS-8-enheter och/eller seriegränssnitt, men även för att öka avståndet mellan väggreglage och meddelandepaneler (anslutna till en enstaka RS485-kommunikationsbuss.). Svenska ® 244 5. Uppgradera till ett ControlSpace AMS-8 II-system ® 5. Uppgradera till ett ControlSpace AMS-8 II-system ® 1)Kontrollera versionen av Bootloader, som visas snabbt på displayen efter att AMS-8-enheten har satts på. Det går endast att fortsätta med stegen nedan om Bootloader-versionen är V2.116 eller senare. Om den är lägre måste en uppdatering göras av Bootloader-maskinvaran som endast kan utföras av Bose-personal 2)Anslut alla AMS-8-enheter i systemet (högst 10) med hjälp av racklinkanslutningen (se även kapitel 3.5) 3)Se till att termineringsbyglarna endast placeras på RS485-kommunikationskorten för det första och sista AMS-8-systemet (de andra byglarna ska inte ställas in). 4)Sätt på varje AMS-8-enhet, samtidigt som du trycker på navigeringspilknapparna UPPÅT och HÖGER. Detta aktiverar Bootloader-läget. 5)Välj ”Master” för den första AMS-8-enheten i systemet. Välj lämpligt antal rack på AMS-8-huvudenheten, t.ex.: ”Nr. of Racks: 10” 6)Varje rack som läggs till blir ett ”slav-rack” med ett nummer som börjar på 2, 3, 4, 5… upp till 10. T.ex.: ”Select rackNr: 2” 7)Lägg märke till ”live-mask”-indikeringen längst ner på displayen. Detta anger antalet AMS-8-system som är installerade och anslutna. Denna live-mask visas enligt följande: ”Racks: 00000011 11111111”, som anger 10 installerade AMS-8-system 8)Så fort alla slavenheter har hittats väljer du ”Finish” på huvudenheten. Detta ställer (tillfälligt) in Bootloader-konfigurationen 9) Anslut datorn till huvudracket och starta programvaran Bootloader Multi-Installer 10) Ladda upp (den senaste) maskinvaran i AMS-8-enheterna 11) Vänta tills uppladdning och omuppdatering av alla enheter har slutförts. 12)Ställ in det första (översta) racket på ”Rack-1 Mst” (huvudenhet) igen och ange antalet slavenheter (vid behov upprepa först steg 4 för att göra detta) 13) Ställ in varje slavrack på rätt slavnummer (”Rack-2” eller högre), se även steg 5 14)Starta om alla rack (på grund av omgruppering av alla racken) genom att stänga av alla enheter och sätta på dem igen 15)Genomför en total fabriksåterställning (välj alternativet ”Total Factory Restore” på installationsmenyn) på huvudracket och vänta tills flash-uppdateringen är färdig (visas som: ”Updating flash 202”) 16)Starta om alla rack igen (för att implementera de nya DataFlash-minnesinställningarna) genom att stänga av alla enheter och sätta på dem igen 17) Uppdatera alla Bose EQ-kurvor med programmet Live Installer 18) Uppdateringen till ett ControlSpace AMS-8 II-system är nu slutförd ® Använd programmet Live Installer eller den grafiska displayen tillsammans med navigeringsknapparna för att konfigurera AMS-8-enheterna. BDF-filer (Bose Data Files) som sparats tidigare kan inte längre användas för att återställa AMS 8 enheterna (på grund av nya DataFlash-minnesinställningar). Efter att en enhet har konfigurerats om kan dock den nyskapade BDFfilen sparas och öppnas för att användas/överföras till andra ControlSpace AMS-8 II-system. ® Svenska 245 6. Felsökning 6. Felsökning Ingen ström Sätt i strömkabeln, slå på strömmen. Strömmen är på, men inget ljud i någon av zonerna Kontrollera att det finns en ingångssignal från källan. Kontrollera att det finns en utgångssignal. Om det finns ingångssignal men ingen utgångssignal måste ControlSpace kanske dämpas eller så är kanske utgångsnivåerna nere. ® Strömmen är på, men ljudet Kontrollera att indikatorn för ingångskällan är grön. Om den är av, öka är lågt källutgången eller ingångsförstärkningen. Ifall indikatorn för ljudingången är grön och indikatorn för ljudutgångssignalen är grön, kontrollera att det finns nog förstärkning i förstärkaren och kontrollera utgångsnivåerna. Ljudet är förvrängt Om ingångskällsignalen är ren när den når CS AMS-8-systemet, kontrollera att högtalarna inte pressas för hårt och att de inte är skadade. Onaturliga ljud Kontrollera att rätt högtalare EQ och/eller övergång används i signalstigen. Se till att indatasignalen inte är förvrängd/för hög. Strömmen är på, men inget ljud i en eller flera av zonerna Kontrollera alla anslutningar på CS AMS-8-racksystemet. Kontrollera att förstärkaren fungerar korrekt och att förstärkningarna är lämpligt justerade. Kontrollera standardinställningarna samt inställningarna för rummets maxvolym i Live installationsprogrammet eller på racksystemet. Kontrollera att Event eller Room Combining preset är aktiverad. Ingen sökning/ton från användarprogrammet Kontrollera kablarna mellan PC-ljudkort, mikrofon och racksystem. Kontrollera inställningarna för volymkontroll på själva PC:n. Ingen styrning/ kommunikation från CS-WC/CS-PP Kontrollera kablarna mellan CS-WC/CS-PP och racksystemet. I racksystemets meny för rumsinställningar visas statusen för väggreglaget. Ifall ‘WC-‘ visas så finns det ingen kommunikation med det specifika väggreglaget. Kontrollera även väggreglagets adress, försäkra dig om att väggreglagets adress är inställd på det rumsnummer som det ska serva. Ingen kommunikation/ styrning mellan PC och AMS-8-systemstativ när installationsprogrammet används Kontrollera Ethernet kabeln, kontrollera även att installationsprogrammet visar att INETGui är online. Ingen ljudsignal från en monokonfigurerad lokal ingångsmodul Se till att ljudkabeln är ansluten till VÄNSTER utdataanslutning på CS LIM. Ljudsignal på utgången faller när en källa med hög utdatanivå spelas upp Se till att justera ingångsförstärkningen till 0 dB. En konstant indatasignal på 3 dB stänger av ljudet på indatastadiet. T.ex.: för en CD-spelare med en utdatasignal på +6 dB bör ingångsförstärkningen minskas med minst 3 dB (6 dB är att föredra). Röstlampan på Detta tyder på ett kommunikationsproblem. Kontrollera meddelandepanelen blinkar kommunikationsanslutningarna mellan AMS-8 och meddelandepanelen. rött och grönt Kontrollera att termineringsbygeln är inställd på senaste CS-PP. Svenska Ingen meddelandesignal från meddelandepanelen 246 Kontrollera anslutningen mellan AMS-8 och CS-PP. Kontrollera routerinställningarna i programmet Live Installer eller på AMS-8-enheten (med hjälp av LCD-skärmen och navigeringsknapparna). 7. Tekniska specifikationer 7. Tekniska specifikationer Ingångar: Typ: 8x analoga (upp till 16), obalanserade och elektroniskt balanserade linjenivåanslutningar: RCA och 3 stifts Europeiskt block Ingångskänslighet: -30dBu till +14dBu Impedans: 50K Ohms Ingång klippningsnivå: +14dBU Digital upplösning: 24-bitar Utgångar: Typ: 8x analoga obalanserade och elektroniskt balanserade linjenivåanslutningar: RCA och 3 stifts Europeiskt block Impedans: 150 Ohms Max utgångsnivå: 18dBu balanserad, 12dBu obalanserad Bas/Diskant kontroll: +/-12dBu, i steg av 1 dB Digital upplösning: 24-bitar Signalbehandling: Typ: 48-bitars flytpunkt, digitala signalprocessorer Samplingsfrekvens: 96 kHz Ljudfördröjning: <1ms Fördröjning: 10ms, i steg om 0.05ms Frekvensåtergivning: 20 Hz till 20 kHz (+0dB,-0.3dB) THD: <0.007% (A-vägd, 0dBu in/0dBU ut) Kanalsärskiljning: >103 dB @ 1kHz, 0dBu Signal/brusförhållande: >100dB, A-vägd, THD<0.02%, balanserad in/ut >100dB, A-vägd, THD<0.02%, obalanserad in/ut 110dB, A-vägd, THD <0,02 %, analog in/digital ut 140dB, A-vägd, THD <0,02 %, digital in/ut El: Nätdel Effektförbrukning Storlek (H x B x D i mm) Vikt CS AMS-8 90 - 264 volt AC (47-63Hz) 37 Watt maximum 88 x 485 285 4.5 kg CS-WC 12 - 24 volt DC 0.7 Watt maximum 80 x 115 x 48 0.12 kg CS-LIM 24 volt DC 1.5 Watt maximum 80 x 115 x 48 0.12 kg CS-PP 12 - 24 volt DC 1.7 Watt maximum 43 x 210 x 212 1.5 kg Miljö: Driftstemperatur: 0˚C upp till 50˚C fuktighet: 80% relativ fuktighet (utan kondensering) Svenska 247 BILAGA A. Systemexempel för ControlSpace AMS-8 ® BILAGA A. Systemexempel för ControlSpace AMS-8 ® ControlSpace AMS-8-system med 80 zoner ® SCI Svenska HUB 248 BILAGA A. Systemexempel för ControlSpace AMS-8 ® BILAGA A. Systemexempel för ControlSpace AMS-8 ® ControlSpace AMS-8-system med flersökning ® Eller: ControlSpace AMS-8-system med flera väggreglage i en enda ® Zone 1 Zone 5 Zone 6 Zone 2 Zone 7 Zone 3 Zone 4 Zone 8 Svenska 249 BILAGA B. Monteringsanvisningar för användargränssnitt BILAGA B. Monteringsanvisningar för användargränssnitt Box för infälld montering Boxen för infälld montering passar för montering i väggen av ControlSpace AMS-8 väggreglage och ControlSpace AMS-8 lokal ingångsmodul. Mått (HxBxD): 7,1 x 10,6 x 5,2 cm ® Box för utanpåliggande montering Boxen för utanpåliggande montering är lämplig för montering på vägg av ControlSpace AMS-8 väggreglage och ControlSpace AMS-8 lokal ingångsmodul. Mått (HxBxD): 8,0 x 11,4 x 4,6 cm ® Dry lining box for plasterboard walls Dry lining box for hollow or plasterboards walls for in-wall mounting of the ControlSpace AMS-8 wall controller and ControlSpace AMS-8 local input module. Dimensions (HxWxD): 6,6 x 12,4 x 5,2 cm ® ® Fodrad box för gipsväggar Fodrad box för ihåliga väggar eller gipsväggar för montering i vägg av ControlSpace AMS-8 väggreglage och ControlSpace AMS-8 lokal ingångsmodul. Mått (HxBxD): 6,6 x 12,4 x 5,2 cm Svenska ® 250 Svenska 251 Europeiska försäljningskontor Så här når du våra europeiska försäljningskontor Österrike Professional Systems Division, Austria Bose Ges.m.b.H., Business Park Vienna Wienerbergstrasse 7, 10 O.G. 1100 Wien, Österreich Telefon: 01-60404340 Fax: 01-604043423 Belgien Professional Systems Division, Belgium Bose N.V., Limesweg 2 3700 Tongeren, België Telefon: 012-390800 Fax: 012-390840 Danmark Professional Systems Division, Denmark Bose Danmark A/S, Industrivej 7 PO Box 14, 2605 Brøndby, Danmark Telefon: 43437777 Fax: 43437818 Frankrike Professional Systems Division, France Bose S.A., 12 rue de Témara 78100 Saint Germain en Laye Telefon: 01-30616363 Fax: 01-30616388 Tyskland Professional Systems Division, Germany Bose GmbH, Max-Planck-Straße 36, 61381 Friedrichsdorf, Deutschland Telefon: 06172-7104-0 Fax: 06172-7104-19 Irland Professional Systems Division, Ireland Bose GP, Castleblayney Road Carrickmacross, County Monaghan Republic Of Ireland Telefon: 042-9661988, Fax: 042-9661998 Svenska Italien Professional Systems Division, Italy Bose SpA, Via della Magliana 876 00148 Roma, Italia Telefon: 066-5670802, Fax: 066-5680177 252 Nederländerna Professional Systems Division, The Netherlands Bose B.V., Nijverheidstraat 8 1135 GE Edam, Nederland Telefon: 0299-390139 Fax: 0299-390109 Norge Professional Systems Division, Norway Bose Filial till Bose A/S Danmark, Lerkev 58 2209 Kongsvinger, Norge Telefon: 062-821560 Fax: 062-821569 Schweiz Professional Systems Division, Switzerland Bose AG, Hauptstrasse 134 4450 Sissach, Sweiz Telefon: 061-9757733 Fax: 061-9757744 Spanien Gaplasa S.A. Avda. Ingeniero Conde de Torroja 25 28022 Madrid, España Telefon: 91 748 29 60 Fax: 91 329 16 75 Sverige Professional Systems Division, Sweden Bose, filial till Bose A/S Danmark Johannefredsgatan 4, 43153 Mölndal, Sverige Telefon: 031-878850 Fax: 031-274891 Storbritannien Professional Systems Division, United Kingdom Bose Ltd., 1 Ambley Green Gillingham Business Park Gillingham, Kent ME8 0NJ, England Telefon: 0870-741-4500 Fax: 0870-741-4545 Polen Bose Sp. z o.o. Galeria Mokotów ul. Wołoska 12 02-675 Warszawa Telefon: (22) 852 2928 Fax: (22) 852 2927 Svenska 253