1
NETZWERKKAMERA Benutzerhandbuch SNB-3000(P) übersicht VORSICHT GEFAHR EINES ELEKTROSCHOCKSNICHT ÖFFNEN VORSICHT: NICHT DIE RÜCKSEITIGE ABDECKUNG ÖFFNEN, ABDECKUNG (ODER RÜCKSEITE) NICHT ABNEHMEN. KEINE VOM BENUTZER ZU WARTENDE TEILE INNEN. WENDEN SIE SICH AN QUALIFIZIERTESKUNDENDIENSTPERSONAL. Dieses Symbol zeigt an, dass bei diesem Gerät gefährliche Spannung Elektroschock zur Folge haben kann. Dieses Symbol zeigt an, dass wichtige Betriebs- und Wartungsanleitungen in dem Prospekt enthalten sind, der mit diesem Gerät geliefert wird. WARNUNG y Setzen Sie dieses Gerät nicht Regen oder Feuchtigkeit aus, um die Gefahr eines Brands oder Elektroschocks zu reduzieren. y Die Kamera ist nur an PoE-Netzwerke anzuschließen, ohne Verlegung zur Außeninstallation. WARNUNG 1. Achten Sie darauf, nur den im Datenblatt angegebenen Standard-Adapter zu verwenden. Die Verwendung eines anderen Adapters kann Brand, Elektroschock oderSchäden am Produkt verursachen. 2. Falscher Anschluss des Netzkabels oder Austausch der Batterie kann Explosion, Brand, Elektroschock oder Schäden am Produkt zur Folge haben. 3. Schließen Sie nicht mehrere Kameras an einen einzelnen Adapter an. Überschreiten der Kapazität kann abnormale Wärme oder Brand erzeugen. 4. Schließen Sie das Netzkabel sicher an die Steckdose an. Ein ungesicherter Anschluss kann einen Brand verursachen. 5. Wenn Sie die Kamera installieren, befestigen Sie sie sicher und fest. Eine herunterfallende Kamera kann Körperverletzungen verursachen. 6. Stellen Sie keine leitenden Gegenstände (z.B. Schraubendreher, Münzen, Metallgegenstände, usw.) oder Behälter mit Wasser auf die Kamera. Dies kann sonst Körperverletzungen aufgrund von Brand, Elektroschock oder herunterfallenden Gegenständen verursachen. 2_ übersicht VORSICHT 1. Lassen Sie keine Gegenstände auf das Produkt fallen oder setzen Sie es keinen starken Stößen aus. Halten Sie sich fern von Standorten die übermäßiger Erschütterung oder magnetischer Beeinflussung ausgesetzt sind. 2. Installieren Sie das Gerät nicht an einem Standort, der hohen Temperaturen (über 50°C), niedrigen Temperaturen (unter -10°C) oder hoher Feuchtigkeit ausgesetzt ist. Dies führt sonst zu Brand oder Elektroschock. 3. Wenn Sie das bereits installierte Gerät versetzen möchten, achten Sie darauf, die Stromversorgung abzuschalten und es dann erst zu versetzen und erneut zu installieren. 4. Ziehen Sie den Netzstecker bei Gewitter. Nichtbeachtung kann Brand oder Schäden am Gerät verursachen. 5. Halten Sie das Gerät fern von direktem Sonnenlicht und anderen Wärmestrahlungsquellen. Dies kann sonst zu Brand führen. 6. Installieren Sie das Gerät an einem Ort mit guter Belüftung. 7. Zielen Sie mit der Kamera nicht direkt in Richtung extrem heller Gegenstände wie zum Beispiel die Sonne, da dies den CCDBildsensor beschädigen kann. 8. Das Gerät darf nicht mit Wasser oder anderen Flüssigkeiten in Berührung kommen. Außerdem dürfen keine mit Flüssigkeiten gefüllten Behälter, wie beispielsweise Vasen, darauf abgestellt werden. 9. Der Netzstecker sollte jederzeit in Reichweite und zugänglich sein, da er aus der Steckdose entfernt werden muss, um das Gerät vollständig abzuschalten. 10. Wird die Kamera im Freien verwendet, kann die Kamera innen aufgrund der unterschiedlichen Temperatur im Haus und im Freien feucht werden. Deshalb ist es empfehlenswert die Kamera im Haus zu installieren. Verwenden Sie die Kamera bei Gebrauch im Freien mit dem eingebauten Lüfter und der Heizung. Deutsch _3 ● ÜBERSICHT 7. Installieren Sie das Gerät nicht an feuchten, staubigen oder rußigen Standorten. Dies führt sonst zu Brand oder Elektroschock. 8. Verwenden Sie das Produkt nicht weiter, wenn eine ungewöhnliche Geruchs- oder Rauchentwicklung auftritt. Ziehen Sie in diesem Fall sofort den Netzstecker und wenden Sie sich an den Kundendienst. Wenn Sie das Gerät unter diesen Bedingungen weiterhin verwenden, kann Brand oder Elektroschock resultieren. 9. Wenn dieses Produkt nicht einwandfrei funktioniert, wenden Sie sich an den nächstgelegenen Kundendienst. Zerlegen oder modifizieren Sie dieses Produkt nie in irgendeiner Weise. (SAMSUNG haftet nicht für Schäden, die durch unbefugte Änderungen oder Reparaturversuche verursacht werden.) 10. Spritzen Sie während der Reinigung kein Wasser direkt auf die Produktteile. Dies führt sonst zu Brand oder Elektroschock. 11. Setzen Sie das Gerät nicht dem direkten Luftstrom einer Klimaanlage aus. Dadurch kann es aufgrund des Unterschieds zwischen interner und externer Temperatur zu Feuchtigkeitsansammlungen innerhalb der Kuppelkamera Clear Dome kommen. 12. Wenn Sie dieses Produkt an einem Ort mit niedriger Temperatur, z. B. in einem gekühlten Geschäft, montieren, müssen Sie den Kabelkanal mit Silikon verschließen, damit die Luft von außen nicht in das Gehäuse eindringen kann. Ansonsten kann externe Luft mit hoher Luftfeuchtigkeit in das Gehäuseinnere gelangen, wo die Feuchtigkeit eingeschlossen wird oder aufgrund des Unterschieds zwischen interner und externer Temperatur verdampft. übersicht IMPORTANT SAFETY INSTRUCTIONS 1. Lesen Sie diese Anweisungen. 2. Bewahren Sie sie auf. 3. Beachten Sie alle Warnungen. 4. Befolgen Sie alle Anweisungen. 5. Verwenden Sie dieses Gerät nicht in der Nähe von Wasser. 6. Reinigen Sie es nur mit einem trockenen Lappen. 7. Blockieren Sie keine Belüftungsöffnungen. Installieren Sie es gemäß den Herstelleranweisungen. 8. Installieren Sie das Gerät nicht in der Nähe von Wärmequellen wie beispielsweise von Radiatoren, Heizkörpern oder anderen Geräten (einschließlich Verstärkern), die Wärme erzeugen. 9. Bitte achten Sie darauf, die Schutzvorrichtung des gepolten bzw. geerdeten Steckers nicht zu beschädigen. Ein gepolter Stecker verfügt über zwei Stifte, von denen einer breiter als der andere ist. Ein geerdeter Stecker hat zwei Stifte und einen Erdungsstift. Der breite Stift oder der dritte Stift ist für Ihre Sicherheit vorgesehen. Wenn der vorgesehene Stecker nicht in Ihre Steckdose passt, wenden Sie sich an einen Elektriker, um die veraltete Steckdose austauschen zu lassen. 10. Schützen Sie das Netzkabel so, dass nicht darauf getreten wird, und dass es insbesondere an den Steckern oder passenden Steckdosen bzw. der Stelle, an der das Kabel das Gerät verlässt, nicht abgeklemmt wird. 11. Verwenden Sie nur die vom Hersteller angegebenen Zusatzgeräte/Zubehörteile. 12. Verwenden Sie für das Gerät nur Gestelle, Ständer, Stative, Konsolen und Tische, die vom Hersteller empfohlen oder in Verbindung mit dem Gerät verkauft werden. Bei Verwendung eines Transportwagens bewegen Sie das Gerät nur mit äußerster Vorsicht, um Verletzungen durch Umkippen zu vermeiden. 13. Trennen Sie das Gerät bei Gewitter oder längerer Abwesenheit vom Stromnetz. 14. Überlassen Sie alle Wartungsarbeiten qualifiziertem Kundendienstpersonal. Wartungsarbeiten sind erforderlich, wenn das Gerät in irgendeiner Weise beschädigt wurde, wie zum Beispiel ein beschädigtes Netzkabel oder Stecker, verschüttete Flüssigkeiten oder Gegenstände, die in das Gerät gefallen sind, das Gerät Regen oder Feuchtigkeit ausgesetzt wurde, nicht normal funktioniert oder fallen gelassen wurde. 4_ übersicht INHALTSANGABE ÜBERSICHT 2 4 7 7 INSTALLATION & VERBINDUNG 12 13 12 14 16 Anbringen des Objektivs Einsetzen/Entfernen einer SD-Speicherkarte Speicherkarteninformation (nicht enthalten) Anschluss an andere Geräte KAMERAEINSTELLUNG 20 21 21 22 26 27 28 So Verwenden sie die Taste Menü Hauptmenü Profil Kameraeinstellung Privatzone Sonstiges Systeminfo NETZWERKVERBINDUNGEN UND -KONFIGURATION 29 29 30 Verbinden der Kamera an einen Breitband-Router über das xDSL/ Kabelmodem Die Kamera mit Einem BreitbandRouter in Einem Lokalen Netzwerk Verbinden Direktes Verbinden der Kamera an ein DHCP-basiertes xDSL/ Kabelmodem Direktes Verbinden der Kamera an das LAN Konfiguration von IP-Adressen Einstellung der statischen IP Einstellung der dynamischen IP Portbereichweiterleitung konfigurieren (Port Mapping) Von einem gemeinsamen lokalen PC eine Verbindung zu der Kamera herstellen Von einem entfernten PC eine Verbindung zu der Kamera über das Internet herstellen 20 31 32 33 34 37 38 39 39 Deutsch _5 ● ÜBERSICHT 7 8 9 Important Safety Instructions Funktionen des Produktes Vorsichtsmaßnahmen – Installation und Verwendung Empfohlene PC-Spezifikationen Lieferumfang Auf einen Blick übersicht WEB VIEWER 40 40 41 42 43 44 47 BILDSCHIRM FÜR DIE EINSTELLUNGEN 48 ANHANG 67 6_ übersicht 48 Verbindung zu der Kamera herstellen Anmelden ActiveX-Steuerelement installieren Den Live-Bildschirm verwenden Backup Benutzung des SD Suchbildschirms 48 53 56 57 66 Den Bildschirm für die Einstellungen öffnen Standardeinstellungen Systemeinstellungen Overlay-Einstellung Ereigniseinstellung Netzwerkeinrichtung 67 68 70 74 80 86 88 Profil Begriffsdefinition Technische Daten Bildrate (NTSC) Bildrate (PAL) Fehlersuche GPL/LGPL Software License FUNKTIONEN DES PRODUKTES VORSICHTSMASSNAHMEN – INSTALLATION UND VERWENDUNG y Vermeiden Sie es, die SD-Speicherkarte zu verbiegen oder fallen zu lassen. y Lagern oder verwenden Sie die SD-Speicherkarte nicht an Orten mit hoher Temperatur, hoher Luftfeuchtigkeit oder viel Staub. y Achten Sie darauf, dass auf die Kontakte der SD-Speicherkarte keine Fremdsubstanzen gelangen. y Falls Sie die Kontakte reinigen möchten, wischen Sie sanft mit einem weichen Tuch darüber. y Vor dem Auswerfen der SD-Speicherkarte müssen Sie unter <Alarmbild einstellen> das Kontrollkästchen <SD-Kartenspeicherung> deaktivieren und die Schaltfläche <Übernehmen> betätigen. (Seite 59) y Wenn die Lebensdauer der SD-Speicherkarte erreicht ist, werden keine Daten mehr gespeichert. Kaufen Sie in diesem Fall eine neue SD-Speicherkarte und setzen Sie diese ein. EMPFOHLENE PC-SPEZIFIKATIONEN y y y y CPU : Pentium4/2,4GHz oder höher Betriebssystem : Windows XP (Service Pack2, Service Pack3) / Windows Vista / Windows 7 Auflösung : 1024X768 Pixel oder höher RAM : 512MB oder höher Deutsch _7 ● ÜBERSICHT y Unterstützung von verschiedenen Kommunikationsprotokollen Unterstützt TCP/IP, UDP, RTP/RTSP, SMTP für E-Mails und FTP-Protokolle sowie verschiedene Internetprotokolle wie ARP, HTTP, HTTPS und DHCP. y Überwachung über Webbrowser Der Webbrowser kann verwendet werden, um die Bildanzeige in einer lokalen Netzwerkumgebung wiederzugeben y Automatische lokale IP-Einrichtung Selbst für Anfänger im Umgang mit Netzwerken ist die Installation ohne großen Aufwand durchzuführen. y Alarm Wenn ein Alarmsensor angeschlossen ist und eine Bewegung erkannt wird, wird über FTP/E-Mail (SMTP) eine Nachricht an die registrierte Adresse versandt bzw. die Nachricht wird auf der SDSpeicherkarte gespeichert oder ein Alarm wird an den Alarmausgabe-Terminal gesendet. y Intelligente Videoanalyse (Die Ereignisregel und das rechteckige Bewegungsfeld werden nur im MJPEG Live-Bildschirm angezeigt.) Wenn für die Videoanalyse eine Ereignisregel festgelegt wurde und eine Bewegung im konfigurierten Regelbereich erkannt wird, wird über FTP/E-Mail (SMTP) eine Nachricht an die registrierte Adresse versandt bzw. die Nachricht wird auf der SD-Speicherkarte gespeichert oder ein Alarm wird an den Alarmausgabe-Terminal gesendet. y ONVIF (Spec 1.01) Compliance Dieses Produkt unterstützt ONVIF Core Spec. 1. 01. Weitere Informationen finden Sie unter www.onvif.org. übersicht y y y y Webbrowser : Internet Explorer 6.0 oder höher Videokarte : Radeon, Nvidia Videospeicher : 128MB DirectX 8.1 oder höher Kompatible Breitband-Routers y Linksys / D-Link / Netgear Kompatible PoE-Schalter y Linksys SRW224G4P / D-Link DES-1316 / SMC SMCPWR-INJ3 LIEFERUMFANG Bitte überprüfen Sie, ob die Kamera und alle Zubehörteile im Lieferumfang enthalten sind. Kamera C Montageadapter Stecker für Auto-Blendenobjektiv Benutzerhandbuch, Installations S/W CD, CMS S/W DVD Kurzanleitung Objektivmöglichkeiten CS-Objektiv 8_ übersicht C-Objektiv Kamerahalterung (zum Anbringen an die Wand) & Schrauben (2 Stk.) AUF EINEN BLICK Vorderseite ● ÜBERSICHT Bezeichnung Beschreibung Schraublöcher zum Anbringen der Kamera an eine Wand/Decke Zum Anbringen der Kamera an eine Halterung, wobei das Verbindungsteil der Kamerahalterung (zum Anbringen an die Wand/Decke) an der Halterung befestigt wird. Objektiv mit automatischer Blendenregelung (optional) Wird am Objektivadapter angebracht. Anschluss für Objektiv Zur Übertragung des Stroms und des Ausgangssignals, um die Blende des mit automatischer Objektivs zu steuern. Blendenregelung M Falls die Oberfläche des Objektivs verschmutzt sein sollte, reinigen Sie sie sanft mit einem entsprechenden Tuch, auf dem sich etwas Ethanol befindet. Deutsch _9 übersicht Rückseite AUDIO OUT AUDIO IN SD CARD SD SYSTEM POWER VIDEO 1 2 3 4 5 1,2 : ALARM IN 1,2 3 : GND 4,5 : ALARM OUT 1,2 Bezeichnung RESET NETWORK ACT LINK AC 24V DC 12V GND Beschreibung SD-Speicherkartenfach Fach für die SD-Speicherkarte Anschluss für Audioausgang AUDIO OUT Anschluss für Audioausgabe AUDIO IN Anschluss für Audioeingang SD EIN: Eine Speicherkarte, die ordnungsgemäß funktioniert, ist eingelegt. Blinken: Fehler bei Aufnahme durch unzureichende Kapazität oder falsches Einlegen. AUS: Kamera ist ausgeschalten, Kamera wird gerade neu gestartet oder keine Speicherkarte ist eingelegt. SYSTEM EIN: Die Kamera ist eingeschaltet und ordnungsgemäß mit dem Netzwerk verbunden. Blinken: Falls während der DDNS-Einstellung ein Fehler auftritt oder wenn die Netzwerkverbindung unstabil ist AUS: Wenn das System neu gestartet wird oder ausgeschaltet ist POWER EIN: Wenn das Gerät eingeschaltet ist AUS: Wenn das Gerät ausgeschaltet ist System-, Stromanzeigen 10_ übersicht Zum Zurücksetzen der Kameraeinstellungen auf die Standardeinstellungen. Halten Sie sie ungefähr 3 Sekunden lang gedrückt, damit die Systemanzeige ausgeschaltet und das System neu gestartet wird. Stromanschluss Zum Anschlus des Stromkabels. GND Für die Erdung. Netzwerkanschluss Zum Anschluss des Netzwerkkabels. I/O-Port Videoausgang ALARM IN 1,2 Zur Verbindung des Signals für den Alarmeingang. GND Für die Erdung. ALARM OUT 1,2 Zur Verbindung des Signals für den Alarmausgang. Port für die Ausgabe des Videosignals. Wird mit dem Monitor verbunden. Deutsch _11 ● ÜBERSICHT Reset-Taste installation & verbindung ANBRINGEN DES OBJEKTIVS Trennen Sie die Stromverbindung, bevor Sie fortfahren. Anbringen des CS-Objektivs Schrauben Sie das optionale CS-Objektiv im Uhrzeigersinn ein. CS-Objektiv Anbringen des C-Objektivs Schrauben Sie den C-Objektivadapter und das C-Objektiv im Uhrzeigersinn ein. C-Objektiv 12_ installation & verbindung Objektiv mit automatischer Blendenregelung anschließen Setzen Sie den Anschluss des Objektivs in die entsprechende Öffnung der Kamera ein. Drehen Sie das Objektiv nach links oder rechts, um den Zoom zu steuern und das Objektiv zu fokussieren, damit Sie das Motiv klar und deutlich sehen können. EINSETZEN/ENTFERNEN EINER SD-SPEICHERKARTE Einsetzen einer SD-Speicherkarte Drücken Sie die SD-Speicherkarte in Pfeilrichtung, wie im Schaubild dargestellt. J Legen Sie die SD-Speicherkarte nicht gewaltsam verkehrt ein. Dadurch kann die SD-Speicherkarte beschädigt werden. Deutsch _13 ● INSTALLATION & VERBINDUNG Fokussieren installation & verbindung Entfernen einer SD-Speicherkarte Drücken Sie leicht am ungeschützten Ende der Speicherkarte, wie im Schaubild zu sehen, um die Speicherkarte aus dem Steckplatz auszuwerfen. J Ein zu starkes Drücken auf die SD-Speicherkarte kann bewirken, dass die Karte unkontrolliert aus dem Steckplatz herausspringt. Vor dem Auswerfen der SD-Speicherkarte müssen Sie unter <Alarmbild-Setup> das Kontrollkästchen <SD-Kartenspeicherung> deaktivieren und die Schaltfläche [Übernehmen] betätigen. (Seite 59) SPEICHERKARTENINFORMATION (NICHT ENTHALTEN) Was ist eine Speicherkarte? Die Speicherkarte ist ein externes Datenspeichergerät, das entwickelt wurde, um einen völlig neuen Weg für die Aufnahme und die Freigabe von Video-, Audio- und Textdaten mithilfe digitaler Geräte anzubieten. Wählen Sie eine für Ihre Zwecke geeignete Speicherkarte Ihre Kamera unterstützt SDHC-Speicherkarten. Sie können jedoch Kompabilitätsprobleme abhängig vom Modell und der Marke der Speicherkarte erhalten. Ihre Kamera unterstützt SD-Speicherkarten. Beachten Sie, dass nur Speicherkarten mit einer max. Kapazität von 2 GB unterstützt werden. Wir empfehlen Ihnen für Ihre Kamera die Verwendung einer Speicherkarte der folgenden Hersteller:SDHC/SD-Speicherkarte: Panasonic, Sandisk, Toshiba Ihre Kamera unterstützt 128MB bis 16GB (SD-Karte : 2GB) der Speicherkartenkapazität. Die Wiedergabeleistung kann abhängig von der Geschwindigkeit der Speicherkarte beeinträchtigt werden, verwenden Sie deshalb eine Hochgeschwindigkeits-Speicherkarte. Wir empfehlen Ihnen eine Speicherkarte zu verwenden, die eine Schreib-/ Lesegeschwindigkeit von mindestens 10Mbps und Klasse 6 unterstützt, um eine korrekte Aufnahme der Videodaten sicher zu stellen. 14_ installation & verbindung Verwendung der Speicherkarte SD- und SDHC-Speicherkarten besitzen einen Schalter, der das Schreiben von Daten auf das Medium deaktiviert. Befindet sich dieser Schalter in der Verriegelungsposition, wird das unbeabsichtigte Löschen von Daten auf der Speicherkarte verhindert, das Schreiben von Daten auf dem Medium wird jedoch ebenfalls gleichzeitig verhindert. ● INSTALLATION & VERBINDUNG ❖ Komponenten der Speicherkarte Kontakte Verriegelungsschalter SDHC Deutsch _15 installation & verbindung ANSCHLUSS AN ANDERE GERÄTE Monitor AUDIO OUT AUDIO IN SD CARD SD SYSTEM POWER VIDEO RESET 1 2 3 4 5 1,2 : ALARM IN 1,2 3 : GND 4,5 : ALARM OUT 1,2 NETWORK ACT LINK GND AC 24V DC 12V Energie Netzwerk Anschluss des Monitors Verbinden Sie den Port für den Videoausgang der Kamera [VIDEO] mit dem Port für den Videoeingang des Monitors. Netzwerk-Verbindung Verbinden Sie das Netzwerkkabel mit dem lokalen Netzwerk oder dem Internet. Stromversorgung Verwenden Sie einen Schraubenzieher, um die verschiedenen Leitungen des Stromkabels an die entsprechenden Kamera-Ports anzuschließen. J Achten Sie beim Anschluss des Stromkabels darauf, Plus- und Minuspol nicht zu vertauschen. Sie können ebenfalls einen Router verwenden, der die Funktion PoE (Strom über Ethernet) unterstützt, um die Kamera mit Strom zu versorgen. 16_ installation & verbindung Verbinden an den Audio Eingang/Ausgang Mikrofon Lautsprecher Vor-Verstärker LINE-OUT Vor-Verstärker Mikrofon 1. Schließen Sie den AUDIO IN Port der Kamera direkt an das Mikrofon oder an den LINE OUT Port des Verstärkers an, an dem das Mikrofon angeschlossen ist. y Direkter Mik-Anschluss: Einstellen der Audio-Eingangsverstärkung auf hoch (10). (siehe Seite 49) y Line Out-Anschluss: Einstellen der Audio-Eingangsverstärkung auf niedrig (1). (siehe Seite 49) 2. Schließen Sie den AUDIO OUT Port der Kamera an den LINE IN Port der Lautsprecher an. Deutsch _17 ● INSTALLATION & VERBINDUNG LINE-IN installation & verbindung Audio E/A Blockdiagramm PC Netzwerk Mikrofon Mikrofon Lautsprecher VorVerstärker VorVerstärker y Audio Codec G.711 PCM, μ-law 64kbps 8kHz Schaltfrequenz y Vollduplex Audio y Audio Ein Dient für den Monosignal Leitungseingang (Max.2,4 Vpp) y Audio Aus Dient für den Monosignal Leitungsausgang (Max.2,4 Vpp) y Line out Impedanz 600 18_ installation & verbindung Anschluss an die I/O-Port-Box Zum Verbinden des Alarmeingangs/Alarmausgangs mit dem entsprechenden Port auf der hinteren Port-Box. AUDIO OUT AUDIO IN 1 2 3 4 5 SD CARD SD SYSTEM POWER 1 2 3 4 5 1,2 : ALARM IN 1,2 3 : GND 4,5 : ALARM OUT 1,2 1,2 : ALARM IN 1,2 3 : GND 4,5 : ALARM OUT 1,2 RESET NETWORK ACT LINK AC 24V DC 12V GND y ALARM IN 1, 2 : Zur Verbindung des Signals für den Alarmeingang. y GND : Für die Erdung. y ALARM OUT 1, 2 : Zur Verbindung des Signals für den Alarmausgang. Verbindung der Kabel für den Alarmeingang/Alarmausgang ALARM IN 1 1 ALARM IN 2 2 GND 3 External Relay ALARM OUT 1 4 External Relay ALARM OUT 2 5 Deutsch _19 ● INSTALLATION & VERBINDUNG VIDEO kameraeinstellung Mit dem Web Viewer können Sie die Kameraeinstellungen konfigurieren. M Informationen über den Zugang zum Web Viewer finden Sie unter „Netzwerkverbindungen und -konfiguration“. (Seite 29) SO VERWENDEN SIE DIE TASTE MENÜ Befolgen Sie die im Folgenden beschriebenen Schritte, um die Menüs im Web Viewer einzustellen. 1. Starten Sie den Web Viewer 2. Klicken Sie in dem Menü [Kamera-OSD] im linken Fenster auf [MENÜ]. Der Bildschirm <HAUPTMENÜ> wird angezeigt. 3. Klicken Sie auf die Schaltflächen Hoch/Runter (▲▼), um zu der gewünschten Option zu gelangen. 4. Klicken Sie auf die 4 Richtungsschaltflächen (▲▼◄ ►), um durch die Menüpunkte zu steuern. 5. Um die Einstellung einer ausgewählten Option zu ändern, klicken Sie auf die Schaltflächen Links/Rechts (◄ ►). 6. Klicken Sie auf [ ]. Ihre Änderungen werden übernommen. : Der Bildschirm für die Menüeinstellung wird verlassen. Wählen Sie, bevor Sie den Bildschirm für die Einstellungen verlassen, [SICHERN], um Ihre Einstellungen zu speichern oder [VERL], um sie abzubrechen. : Ihre Einstellungen werden gespeichert und es wird zum vorherigen Bildschirm zurückkehrt. : Verwenden Sie dieses Symbol, wenn Sie ihre Einstellungen speichern möchten, nachdem Sie einen Maskenbereich, eine Privatzone usw. festgelegt haben. Wenn Sie ihre Einstellungen gespeichert haben, so werden die Änderungen beibehalten, selbst wenn Sie [VERL] zum Verlassen wählen. : Wählen Sie dieses Symbol, wenn Sie eine Maske, Privatzone usw. löschen möchten. Wenn Sie ihre Einstellungen gelöscht haben, so bleiben sie gelöscht, selbst wenn Sie [VERL] zum Verlassen wählen. : Dieser Pfeil erscheint neben einem Menü, das Untermenüpunkte beinhaltet. Für Einheiten, neben denen rechts die Markierung "*" angezeigt wird, finden Sie weitere Informationen unter dem Abschnitt „Begriffsdefinition“. (Seite 68) J Wenn die Intelligente Videoanalyse aktiviert wurde, kann die Bedienung des Bildschirmmenüs der Kamera als Ereignis festgelegt werden. 20_ kameraeinstellung HAUPTMENÜ PROFIL Sie können einen der zur Verfügung stehenden Modi auswählen, der für die Installationsumgebung der Kamera angemessen ist. Jede Einstellung, die sie unter PROFIL vornehmen, hat Einfluss auf alle anderen Kameraeinstellungen. Informationen zu den Einstellungen finden Sie unter dem Abschnitt „PROFIL“. (Seite 67) Informationen über die Auswahl und Speicherung jedes Menüpunktes finden Sie unter dem Abschnitt „So verwenden sie die taste menü“. (Seite 20) y STANDARD ◄ PROFIL ► Die Kameraeinstellungen werden automatisch *STANDARD für die normale Umgebung optimiert. ITS y ITS GGLICHT TAG/NACHT Mit dieser Einstellung können Sie die SPIELB. Verkehrssituation analysieren und BANK Verkehrsinformationen auf einen Blick überprüfen. ANPASS y GGLICHT Mit dieser Einstellung können Sie Ihren Hintergrund und ein Objekt auch bei Gegenlicht scharf stellen. y TAG/NACHT Die Kameraeinstellungen werden automatisch für Tag- und Nachtszenen optimiert. y SPIELB. Dadurch werden die Einstellungen automatisch konfiguriert, damit Sie - wie in Innenräumen - mit stabilen Lichtverhältnissen arbeiten können. y BANK Optimiert automatisch die Kameraeinstellungen auf die Umgebungsbedingungen. y ANPASS Durch Ihre Änderungen, die Sie an den PROFIL-Einstellungen vorgenommen haben, wechselt der Bildschirm zu ANPASS. Deutsch _21 ● KAMERAEINSTELLUNG Sie können die Kameraeinstellungen nach Ihren Bedürfnissen konfigurieren. y PROFIL ** HAUPTMENÜ ** Sie können einen Modus auswählen, der für die PROFIL Installationsumgebung der Kamera angemessen ist. KAMERA PROG PRIVATZONE y KAMERA PROG WEITERE PROG SYSTEMINFO Konfigurieren sie die Funktionen und Einstellungen der Kamera. y PRIVATZONE Sie können die Einstellungen für die Privatzone konfigurieren. y WEITERE PROG Sie können weitere Einstellungen, einschließlich der WERKSEINSTELLUNGEN, konfigurieren. y SYSTEMINFO Zeigt Version und Typ der Kamera an. kameraeinstellung KAMERAEINSTELLUNG Sie können die allgemeinen Einstellungen des Kameramoduls konfigurieren. Informationen über die Auswahl und Speicherung jedes Menüpunktes finden Sie unter dem Abschnitt „So verwenden sie die taste menü“. (Seite 20) KAMERA-ID Geben Sie die ID und die Position der Kamera an, die auf dem Bildschirm angezeigt wird. 1. Wählen Sie <KAMERA PROG> - <KAMERA ID>. 2. Verwenden Sie die vier Richtungstasten (▲▼◄ ►), um ein gewünschtes Zeichen auszuwählen. Das ausgewählte Zeichen wird in das untere Eingabefeld auf dem Bildschirm eingefügt. Sie können bis zu 54 Zeichen, einschließlich Buchstaben, Zahlen und Sonderzeichen eingeben. 3. Wenn Sie damit fertig sind, wählen Sie <POSITION>, um die Anzeigeposition der Kamera-ID festzulegen. KAMERA ID ABCDEFGHIJKLMNOPQRSTUVWXYZO BCDEFGHIJKLMNOPQRSTUVWXYZO _ 123456789 : ? + *()/ SP►► ◄◄ SP►► ◄◄ SP POSITION ------------------------------------------------- BLENDE Sie können die Blende so einstellen, dass die Strahlungsintensität, die in die Kamera eingeht, gesteuert wird. 1. Wählen Sie <KAMERA PROG> - <BLENDE>. ALC 2. Verwenden Sie die Tasten links/rechts (◄ ►), um <ALC> oder <ELC> auszuwählen. OBJEKTIV DC [ 00 PEGEL 00]] ---- I ---y ALC : Die Luminanz wird automatisch GGLICHT AUS gesteuert. - OBJEKTIV : Wählen Sie ein zu verwendendes Objektiv. - PEGEL: Wählen Sie den allgemeinen Helligkeitswert aus. - GGLICHT: Wählen Sie WDR oder BLC. - WDR: Legen Sie den Gewichtungsfaktor, die Verschlusszeit für den WDR-Pegel und für den Weißabgleich die Optionen extern oder innen fest. - BLC (Gegenlichtkompensation): Legen Sie Größe und Ort für den Bereich der Gegenlichtkompensation fest. y ELC : Der Pegel wird elektronisch gesteuert. - PEGEL : Wählen Sie einen allgemeinen Helligkeitspegel aus. - GGLICHT: Bestimmen Sie den Bereich für die Gegenlichtkompensation. Wenn Sie unter <BEREICH> <BENUTZER> auswählen, können Sie Bereichsgröße und Ort bestimmen. M Wenn die Blende auf <ALC> gestellt ist, hat die Einstellung der Blende Vorrang, wenn Sie die automatische Belichtung und die Verschlusszeit einstellen. 22_ kameraeinstellung AKTIVITAET ◄ KAMERA PROG KAMERA ID BLENDE AKTIVITAET DNR VRSCHL EMPF-PLUS FLIMMERFREI XDR DIS ► EIN ALC (S.SCHN) (S.SCHN)----MITT AUS AUTO X4 AUS MITT AUS DNR Zur Reduzierung von Rauschen auf dem Bildschirm. Dies ist vor allem für einen Bildschirm mit Bildrauschen hilfreich. Mit der Einstellung auf <BENUTZER>, können Sie den Pegel festlegen. VRSCHL TAG/NACHT AUTO WEISSABGL DIGITAL ZOOM AUS [2] DETAIL AGC UNTD FARBÜBERL MITT POSI/NEGA + PIP AUS Mit dem Menü VRSCHL kann der festgelegte elektronische Schnellverschluss oder der automatische elektronische Schnellverschluss eingestellt werden. EMPF-PLUS Wenn die Helligkeit des Videosignals zu niedrig ist, wird die langsame Verschlusszeit aktiviert. Die langsame Verschlusszeit kann die einzelne maximale Bildfrequenz erfassen, um die Einstellung anzupassen. FLIMMERFREI Ist diese Funktion auf <EIN> gestellt, beträgt die Verschlussgeschwindigkeit 1/100 Sekunden. Dadurch wird einer eventuellen Bildstörung vorgebeugt, die aufgrund der Interferenz zwischen der Vertikalfrequenz und der Blinkfrequenz der Lichtquelle entsteht. Wenn BLENDE auf ELC/VRSCHL im Modus AUTO, FIX, EXT / EMPF PLUS auf FIX / AGC im Modus FIX gestellt ist, wird das Menü <DIS> deaktiviert. XDR Hiermit wird ein Helligkeitsunterschied zwischen verschiedenen Szenen ausgeglichen, damit ein optimales Bild angezeigt wird. Je höher der Wert ist, desto höher ist die Korrekturstufe. DIS Für die automatische Kompensierung eines Flimmerns auf dem Bildschirm. Ist diese Funktion auf <EIN> gestellt, wird das Bild mit dem digitalen Zoom der Kompensierung entsprechend vergrößert. Wenn Sie DIS auf EIN stellen, wird der Stabilisierungsbereich entsprechend der Einstellung des Faktors des digitalen Zooms vergrößert. Wenn Sie einen Faktor des digitalen Zooms einstellen, der den vergrößerten Zoomfaktor der Stabilisierung überschreitet, wird die Funktion DIS deaktiviert. Deutsch _23 ● KAMERAEINSTELLUNG Sie können eine AGC-Stufe festlegen, um die Bewegungsaufnahme der Kamera zu steuern. Wählen Sie S.SCHN, wenn Sie ein sich sehr schnell bewegendes Objekt während einer Aufnahme mit schwachem Kontrast überwachen möchten und S.LANGS wenn ein sich sehr langsam bewegendes oder stillstehendes Objekt unter gleichen Bedingungen überwacht wird. Wenn TAG/NACHT auf AUTO gestellt ist, steht das Menü <AKTIVITAET> nicht zur Verfügung. kameraeinstellung TAG/NACHT Sie können einen Aufnahmemodus entsprechend der Szene festlegen, die Sie aufnehmen möchten. 1. Wählen Sie <KAMERA PROG> - <TAG/ NACHT>. AUTO FARBTRAGER AUS 2. Wählen Sie entsprechend der Beleuchtung einen TAG NACHT Modus für den Bildschirmübergang und stellen Sie HELLIGKEIT MITT SCHWELLZEIT 2S dann die dazugehörigen Optionen ein. NACHT TAG y TAG : Unabhängig von der Szene ist der HELLIGKEIT MITT SCHWELLZEIT 5S Modus TAG eingestellt. MASK.BER. 1 2 y NACHT : Unabhängig von der Szene ist der Modus NACHT eingestellt. Wenn FARBTRAGER auf <EIN> gestellt ist, wird das Farberkennungssignal gesendet. y AUTO : Entsprechend den Lichtverhältnissen MASK.BER. wird zwischen den Modi TAG und NACHT <GROESSE> <POSITION> gewechselt. y TAG NACHT / NACHT TAG : Ist die Option <AUTO> eingestellt, können Sie die Helligkeitsstufe festlegen, bei der zwischen den Modi TAG und NACHT gewechselt wird. Sie können ebenfalls das Zeitintervall einstellen. y MASK.BER. : Sollte in einer Nachtszene eine helle Lichtquelle vorhanden sein, können Sie die Größe und Position Ihren Bedürfnissen entsprechend einstellen. Übermäßig helle Bereiche in der Nachtszene werden MASKIERT. WEISSABGL Wenn Sie die Helligkeit des Bildschirms einstellen müssen, verwenden Sie die Funktion WEISSABGLEICH. 1. Wählen Sie <KAMERA PROG> - <WEISSABGL>. 2. Wählen Sie einen Modus für das Einstellen des Abgleichs. y TAG : Sie können die Werte ROT und BLAU im Modus TAG einstellen. y NACHT : Sie können den <WEISSABGL> den Lichtverhältnissen anpassen. 24_ kameraeinstellung WEISSABGL TAG/NACHT MODUS ROT BLAU TAG ATW2 [ 00] 00] ---- I ---[ 00 00]] ---- I ---- Sie können die Werte R-VERST und B-VERST nur im Modus AWC einstellen. DIGITAL ZOOM Sie können den Faktor und die Position des digitalen Zooms einstellen. Wenn der Faktor und die Position festgelegt sind, kann die digitale Zoomfunktion verwendet werden. Wenn Sie den Faktor des digitalen Zooms so einstellen, dass er größer als die aktuelle Kompensierungsvergrößerung ist, wird die Funktion DIS deaktiviert. DETAIL Sie können jeweils die horizontale und vertikale Schärfe einstellen. AGC UNTD FARBÜBERL Die Farbzusammensetzung wird dem AGC-Wert angepasst. POSI/NEGA Das Videohelligkeitssignal wird normal oder umgekehrt angezeigt. PIP Sie können ein Hauptbild und ein untergeordnetes Bild auf dem gleichen Bildschirm sehen. Wenn mehr als eine Privatzone eingestellt ist und PRIVAT FESTL auf EIN gestellt ist, so wird die Funktion PIP deaktiviert. Deutsch _25 ● KAMERAEINSTELLUNG 3. Wählen Sie entsprechend des festgelegten WEISSABGL Aufnahmemodus einen WEISSABGL mit den nötigen Optionen. TAG/NACHT NACHT HELLIGKEIT MITT y HELLIGKEIT : Legen Sie eine Helligkeitsstufe MODUS AWC [ 00 ROT 00]] ---- I ---fest, bei der zwischen den Modi TAG und [ 00 BLAU 00]] ---- I ---NACHT gewechselt wird. [[0040 R-VERST 0040]] [ [0133 ] B-VERST 0133] y MODUS : Entsprechend des ausgewählten Modus können Sie die Farbstufe für ROT und BLAU festlegen. - ROT : Stellen Sie die Farbkraft der Farbe Rot ein. - BLAU : Stellen Sie die Farbkraft der Farbe Blau ein. - R-VERST/B-VERST : Legen Sie die Farbtemperatur manuell fest. kameraeinstellung PRIVATZONE Sie können bis zu 12 Privatzonen festlegen, die zum Schutz der Privatsphäre während der Aufnahme verborgen werden. Informationen über die Auswahl und Speicherung jedes Menüpunktes finden Sie unter dem Abschnitt „So verwenden sie die taste menü“. (Seite 20) EINSTELLUNG DER PRIVATZONE 1. Wählen Sie <HAUPTMENÜ> - <PRIVATZONE>. 2. Verwenden Sie die vier Richtungstasten (▲▼◄ ►), um eine gewünschte Nummer auszuwählen. Der Bildschirm für die Einstellung der Privatzone wird angezeigt. 3. Stellen Sie die <PIXELANZ> ein. Legen Sie die Pixelanzahl für die Einstellung POSITION fest. 4. Wählen Sie <PKT>. Sie sehen Punkte auf dem Bildschirm. ◄ 1 7 PRIVATZONE 2 8 3 9 4 10 PRIVAT FESTL STIL ► 5 11 6 12 EIN MOSAIK1 PROG PRIV.ZONE1 PIXELANZ <PKT> <POS.> [4] 5. Verwenden Sie die vier Richtungstasten (▲▼◄ ►), um die Position der vier Punkte festzulegen. 6. Wählen Sie <POS.> und verwenden Sie die vier Richtungstasten (▲▼◄ ►), um die Position der vier Punkte festzulegen. 7. Speichern Sie die Änderungen und kehren Sie zum vorherigen Bildschirm zurück. Wählen Sie dann <STIL>. Wählen Sie <FARBE> und entscheiden Sie sich für eine gewünschte Farbe. M Durch das Einstellen einer oder mehrerer Privatzonen und durch Aktivierung der entsprechenden Funktion wird die Funktion PIP deaktiviert. 26_ kameraeinstellung SONSTIGES Sie können die Einstellungen der Kamera zurücksetzen oder die Farbe der Bildschirmschrift verändern. Informationen über die Auswahl und Speicherung jedes Menüpunktes finden Sie unter dem Abschnitt „So verwenden sie die taste menü“. (Seite 20) SPRACHE Wählen Sie Ihre Sprache indem Sie die linken und rechten Tasten verwenden. ◄ WEITERE PROG SPRACHE WERKSEINST. OSD-FARB ► DEUTSCH S/W WERKSEINSTELLUNGEN 1. Wählen Sie <HAUPTMENÜ> - <WEITERE PROG> - <WERKSEINST.>. Der Bildschirm für die WERKSEINSTELLUNGEN erscheint. 2. Wählen Sie <OK>. Alle Einstellungen werden auf die werksseitigen Standardeinstellungen zurückgesetzt. Die Spracheinstellung wird jedoch nicht zurückgesetzt. WERKSEINST. OK BEENDEN OSD-FARB Sie können die Schriftfarbe der Benutzeroberfläche einstellen. Deutsch _27 ● KAMERAEINSTELLUNG Sie können eine gewünschte Sprache für den Bildschirm auswählen. kameraeinstellung SYSTEMINFO Sie können die Systeminformationen überprüfen. Informationen über die Auswahl und Speicherung jedes Menüpunktes finden Sie unter dem Abschnitt „So verwenden sie die taste menü“. (Seite 20) 1. Wählen Sie <HAUPTMENÜ> - <SYSTEMINFO>. 2. Die aktuellen Systeminformationen werden angezeigt. M Je nach Videosignal kann der Kameratyp unterschiedlich sein. 28_ kameraeinstellung ◄ SYSTEMINFO TYP KAMERA VERSION ► 3_IPV_P v2.00_100501 netzwerkverbindungen und -konfiguration Sie können die Netzwerkeinstellungen gemäß Ihrer Netzwerkkonfigurationen einrichten. M Vor oder während der Installation dieses Programm, besuchen Sie www.samsungsecurity.com, Sie können die neueste Software-Version herunterladen und Ihr Produkt Aktualisieren. Das ist für eine kleine Netzwerkumgebung wie zum Beispiel Eigenheime, SOHO und gewöhnliche Geschäfte. SNB-3000 INTERNET SNB-3000 pwḩ㡔ὤ BreitbandRouter kzsG❄⏈G xDSL oder jG⯜⒴ Kabelmodem kzsG❄⏈G xDSL oder jG⯜⒴ Kabelmodem 㞬⺴G㠄ᷝGwj Externer Fern-PC ⦐䀠wj Lokaler PC kkuzG㉐ⶸ DDNS-Server OkGjSGrvylhP (Datenzentrum, KOREA) Konfigurieren der Netzwerkeinstellungen des an einen Breitband-Router Befolgen Sie die nachfolgenden Anweisungen zur Konfiguration der Netzwerkeinstellungen des an einen Breitband-Routerangeschlossenen lokalen PCs. y Wählen Sie : <Network Neighborhood> <Properties> <Local Area Connection> <Properties> <General> <Internet Protocol (TCP/IP)> <Properties> <Obtain an IP address automatically> oder <Use the following IP address>. y Befolgen Sie die nachfolgenden Anweisungen bei der Auswahl von <Use the following IP address>: bsp1) Wenn die Adresse (LAN IP)des Breitband-Routers 192.168.1.1 ist IP-Adresse: 192.168.1.100 Subnetz Maske: 255.255.255.0 Standard Gateway: 192.168.1.1 bsp2) Wenn die Adresse (LAN IP)des Breitband-Routers 192.168.0.1 ist IP-Adresse: 192.168.0.100 Subnetz Maske: 255.255.255.0 Standard Gateway: 192.168.0.1 Deutsch _29 ● NETZWERKVERBINDUNGEN UND -KONFIGURATION VERBINDEN DER KAMERA AN EINEN BREITBANDROUTER ÜBER DAS XDSL/KABELMODEM netzwerkverbindungen und -konfiguration bsp3) Wenn die Adresse (LAN IP)des Breitband-Routers 192.168.xxx.1 ist IP-Adresse: 192.168.xxx.100 Subnetz Maske: 255.255.255.0 Standard Gateway: 192.168.xxx.1 M Sehen Sie bezüglich der Adresse des Breitband-Routers in der Dokumentation des Gerätes nach. Prüfen Sie, ob der Breitband-Router korrekt an das xDSL/Kabelmodem angeschlossen ist Wählen Sie <Status> im Einstellmenü des Breitband-Routers y Bei korrektem Anschluss werden <IP Address>, <Subnet Mask> und <Gateway>, bereitgestellt durch Ihren ISP, angezeigt. Bewahren Sie diese Werte auf, da sie für den Anschluss des externen Ferncomputers des Breitband-Routers an die Kamera erforderlich sind. Beachten Sie jedoch, dass bestimmte ISPs die Einstellungen der <IP Address>, <Subnet Mask> und <Gateway> regelmässig ändern y Bei fehlerhaftem Anschluss des Breitband-Routers drücken Sie die Schaltfläche [Connect], um erneut zu verbinden oder prüfen Sie, ob die Einstellungen des BreitbandRouters korrekt sind. DIE KAMERA MIT EINEM BREITBAND-ROUTER IN EINEM LOKALEN NETZWERK VERBINDEN Dies wird für eine große Netzwerkumgebung benötigt, wie beispielsweise Unternehmenszentralen, Gebäude, öffentliche Büros und Firmen. SNB-3000 Switch HUB INTERNET pwGḩ㡔ὤ Breitband- SNB-3000 Router Externer Fern-PC 㞬⺴G㠄ᷝGwj Firewall ⵝ䞈ⷱ ⦐䀠Gwj Lokaler PC ḩ㡔ὤG㞬⺴Gwj Lokaler PC kkuzG㉐ⶸ DDNS-Server OkGjSGrvylhP (Datenzentrum, KOREA) Konfigurieren der Netzwerkeinstellungen des an einen Breitband-Router Befolgen Sie die nachfolgenden Anweisungen zur Konfiguration der Netzwerkeinstellungen des an einen Breitband-Routerangeschlossenen lokalen PC. 30_ netzwerkverbindungen und -konfiguration M Sehen Sie bezüglich der Adresse des Breitband-Routers in der Dokumentation des Gerätes nach. DIREKTES VERBINDEN DER KAMERA AN EIN DHCPBASIERTES XDSL/KABELMODEM INTERNET kzsG❄⏈ xDSL oder jG⯜⒴ Kabelmodem 㞬⺴G㠄ᷝGwj Externer Fern-PC SNB-3000 kkuzG㉐ⶸ DDNS-Server OkGjSGrvylhP (Datenzentrum, KOREA) Einstellung des Breitband-Routers Das ist für ein Modem mit DHCP möglich. 1. Die statische oder dynamische IP-Adresse einrichten. (seiten 34~37) 2. Starten Sie einen Internetbrowser am lokalen PC, der an Breitband-Router angeschlossen ist. 3. Geben Sie die Adresse des Breitband-Routers in die Adressenleiste des Browsers. ein.Bsp) http://192.168.1.1 ,http://192.168.0.1 oder http://192.168.xxx.1 Zum Finden der DDNS-URL-Adresse, lesen Sie bitte „DDNS-Adresse überprüfen“. (seite 41) Deutsch _31 ● NETZWERKVERBINDUNGEN UND -KONFIGURATION y Wählen Sie : <Network Neighborhood> <Properties> <Local Area Connection> <Properties> <General> <Internet Protocol (TCP/IP)> <Properties> <Obtain an IP address automatically> oder <Use the following IP address>. y Befolgen Sie die nachfolgenden Anweisungen bei der Auswahl von <Use the following IP address>: bsp1) Wenn die Adresse (LAN IP)des Breitband-Routers 192.168.1.1 ist IP-Adresse: 192.168.1.100 Subnetz Maske: 255.255.255.0 Standard Gateway: 192.168.1.1 bsp2) Wenn die Adresse (LAN IP)des Breitband-Routers 192.168.0.1 ist IP-Adresse: 192.168.0.100 Subnetz Maske: 255.255.255.0 Standard Gateway: 192.168.0.1 bsp3) Wenn die Adresse (LAN IP)des Breitband-Routers 192.168.xxx.1 ist IP-Adresse: 192.168.xxx.100 Subnetz Maske: 255.255.255.0 Standard Gateway: 192.168.xxx.1 netzwerkverbindungen und -konfiguration 4. Sobald der Breitband-Router verbunden ist, wird das Anmeldefenster eingeblendet und fordert Sie zur Eingabe des Kennworts auf. Siehe Breitband-RouterDokumentation bezüglich der Anmelde-IP und des Kennworts. 5. Nach erfolgreicher Anmeldung wird das Fenster des Breitband-Routersangezeigt. Wählen Sie im Einstellmenü “Automatische Konfiguration-DHCP” für den Internet Verbindungstyp. In der Dokumentation des Breitband-Routersfinden Sie das Menü für den Internet Verbindungstyp oder die DHCP-Auswahl. 6. Nach erfolgter Einstellung klicken Sie auf die Schaltfläche [Save] oder [Apply], um die Einstellungen zu speichern. DIREKTES VERBINDEN DER KAMERA AN DAS LAN Anschluss an die Kamera von einem lokalen PC im LAN 1. Starten sie einen Internetbrowser am lokalen PC. 2. Geben sie die IP-adresse der kamera in die adressenleiste des browsers ein. SNB-3000 Switch HUB SNB-3000 INTERNET Externer Fern-PC 㞬⺴G㠄ᷝGwj ⵝ䞈ⷱ Firewall ⦐䀠GwjPC Lokaler M kkuzG㉐ⶸ DDNS-Server OkGjSGrvylhP (Datenzentrum, KOREA) Ein Fern-PC in einem externen Internetausgang des LAN Netzwerks kann eventuell die im Intranet installierte Kamera nicht ansteuern, wenn die Portweiterleitung nicht korrekt festgelegt oder eine Firewall eingestellt ist. Wenden Sie sich in dem Fall zur Lösung des Problems an Ihren Netzwerkadministrator. 32_ netzwerkverbindungen und -konfiguration KONFIGURATION VON IP-ADRESSEN ● NETZWERKVERBINDUNGEN UND -KONFIGURATION Schaltflächen des IP-Installationsprogramms Bezeichnung Beschreibung Device Name Modellname der verbundenen Kamera. Klicken Sie auf die Spalte, um die Liste nach Modellnamen zu sortieren. Wenn Sie jedoch während einer Suche darauf klicken, wird die Suche gestoppt. Mode Für den aktuellen Verbindungsstatus des Netzwerkes wird entweder <Static> oder <Dynamic> angezeigt. MAC(Ethernet) Address Ethernetadresse der verbundenen Kamera. Klicken Sie auf die Spalte, um die Liste nach Ethernetadressen zu sortieren. Wenn Sie jedoch während einer Suche darauf klicken, wird die Suche gestoppt. IP Address IP-Adresse. Klicken Sie auf die Spalte, um die Liste nach IP-Adressen zu sortieren. Wenn Sie jedoch während einer Suche darauf klicken, wird die Suche gestoppt. Der Standardwert lautet „192.168.1.200“. Protocol Netzwerkeinstellungen der Kamera. Standardmäßig ist „IPv4“ eingestellt. Kameras mit der Einstellung „IPv6“ werden mit „IPv6“ angezeigt. UPnP Status Diese Funktion steht zurzeit nicht zur Verfügung. URL DDNS URL-Adresse für den externen Zugriff vom Internet aus. Diese wird jedoch von der <IP Address> der Kamera ersetzt, wenn die DDNS-Registrierung fehlschlug. Deutsch _33 netzwerkverbindungen und -konfiguration IPv4 Sucht nach Kameras mit der Einstellung IPv4. IPv6 Sucht nach Kameras mit der Einstellung IPv6. Search Sucht nach Kameras, die zurzeit mit dem Netzwerk verbunden sind. Wenn weder IPv4 noch IPv6 aktiviert sind, wird diese Schaltfläche grau dargestellt. Auto Set Das Programm <IP Installer> wird die Netzwerkeinstellungen automatisch vornehmen. Manual Set Sie müssen die Netzwerkeinstellungen manuell vornehmen. Exit Damit wird das IP-Installationsprogramm beendet. EINSTELLUNG DER STATISCHEN IP Manuelle Netzwerkeinstellung Führen Sie die Datei <IP Installer.exe> aus, um die Kamerasuchliste anzuzeigen. Anfangs werden sowohl [Auto Set] als auch [Manual Set] grau dargestellt. M Für gefundene Kameras mit der Einstellung IPv6 werden diese Schaltflächen grau dargestellt, da die Kameras diese Funktion nicht unterstützen. 1. Wählen Sie eine Kamera aus der Suchliste. Suchen Sie die MAC-(Ethernet)Adresse, die sich auf der Rückseite der Kamera befindet. Die Schaltflächen [Auto Set] und [Manual Set] sind nun aktiviert. 2. Klicken Sie auf [Manual Set]. Das Dialogfenster für die MANUELLE EINSTELLUNG erscheint. Die Standardwerte der Kamera für <IP Address>, <Subnet Mask>, <Gateway> und <HTTP Port> werden angezeigt. Das standardmäßige <PASSWORD> lautet 4321. 3. Geben Sie die nötigen Informationen in dem Fenster <ADDRESS> an. MAC-(Ethernet)Adresse : Die MAC(Ethernet)Adresse der verwendeten Kamera wird automatisch eingerichtet. Sie müssen sie also nicht manuell eingeben. 34_ netzwerkverbindungen und -konfiguration Bei Verwendung eines Breitband-Routers: Wenn Sie keinen Breitband-Router verwenden: Kontaktieren Sie ihren Netzwerkadministrator für die Einstellung der <IP Address>, <Subnet Mask> und für das <Gateway>. M Die Werte des Gerätes, TCP, UDP, Upload und Multicast-Ports können nicht manuell geändert werden und werden entsprechend dem Wert des HTTP-Ports angepasst. 4. Geben Sie die nötigen Informationen in dem Fenster <PORT> an. y HTTP Port : Zum Zugriff auf die Kamera über den Internetbrowser. Standardmäßig ist der Wert 80 eingestellt. Verwenden Sie die Drehschaltfläche, um den Wert des HTTP-Ports zu ändern. Der Startwert des Ports ist 80 und kann um 6 verringert oder erhöht werden, z. B. 10000, 10006, 10012. y Device Port : Wird verwendet, um die Videosignalübertragung zu steuern. Der Standardwert lautet 60001 (TCP). y TCP Port : Port für die Videosignalübertragung mit TCP-Protokollen. Der Standardwert lautet 60002 (TCP). y UDP Port : Port für die Videosignalübertragung mit der Methode UDP-Unicast. Der Standardwert lautet 60003 (UDP). y Upload Port : Wird für die Aktualisierung der Firmwaresoftware verwendet. Der Standardwert lautet 60004 (TCP). y Multicast Port : Port für die Videosignalübertragung mit der Methode UDPMulticast. Der Standardwert lautet 60005 (UDP). 5. Geben Sie das Kennwort ein. Es handelt sich um das Kennwort zum Anmelden des Benutzers „admin“, der auf die Kamera zugreift. Das Standardkennwort lautet „4321“. 6. Klicken Sie auf [OK]. Die manuelle Netzwerkeinstellung ist beendet. 7. Wenn die manuelle Einstellung einschließlich <IP> beendet wurde, wird die Kamera neu gestartet. Deutsch _35 ● NETZWERKVERBINDUNGEN UND -KONFIGURATION y IP Address : Geben Sie eine Adresse ein, die sich im IP-Bereich des Breitband-Routers befindet. beispiel : 192.168.1.2~254, 192.168.0.2~254, 192.168.XXX.2~254 y Subnet Mask : Die <Subnet Mask> des Breitband-Routers ist ebenfalls die <Subnet Mask> der Kamera. y Gateway : Die <Local IP Address> des Breitband-Routers ist das <Gateway> der Kamera. netzwerkverbindungen und -konfiguration Wenn mehrere Kameras mit dem Breitband-Router verbunden sind Konfigurieren Sie die IP- und Port-Einstellungen für jede Kamera einzeln und in Übereinstimmung mit den anderen. Kategorie Kamera #1 Kamera #2 IP-Einstellungen IP Address Subnet Mask Gateway 192.168.1.200 255.255.255.0 192.168.1.1 192.168.1.201 255.255.255.0 192.168.1.1 Port-Einstellungen HTTP Port Device Port TCP Port UDP Port Upload Port Multicast Port 80 60001 60002 60003 60004 60005 10000 10001 10002 10003 10004 10005 M Wenn der Wert des <HTTP Port> nicht 80 ist, müssen Sie die <PORT>-Nummer in die Internetadresszeile eingeben, bevor Sie auf die Kamera zugreifen können. beispiel) http://IP-Adresse: HTTP-Port http://192.168.1.201:10000 Automatische Netzwerkeinstellung Führen Sie die Datei <IP Installer.exe> aus, um die Kamerasuchliste anzuzeigen. Anfangs werden sowohl [Auto Set] als auch [Manual Set] grau dargestellt. M Für gefundene Kameras mit der Einstellung IPv6 werden diese Schaltflächen grau dargestellt, da die Kameras diese Funktion nicht unterstützen. 1. Wählen Sie eine Kamera aus der Suchliste. Suchen Sie die MAC-(Ethernet)Adresse, die sich auf der Rückseite der Kamera befindet. Die Schaltflächen [Auto Set] und [Manual Set] sind nun aktiviert. 2. Klicken Sie auf [Auto Set]. Das Dialogfenster für die AUTOMATISCHE EINSTELLUNG erscheint. Die <IP Address>, <Subnet Mask> und das <Gateway> werden automatisch eingerichtet. 36_ netzwerkverbindungen und -konfiguration 3. Geben Sie das Kennwort ein. Es handelt sich um das Kennwort zum Anmelden des Benutzers „admin“, der auf die Kamera zugreift. Das Standardkennwort lautet „4321“. 4. Klicken Sie auf [OK]. Die automatische Netzwerkeinstellung ist beendet. EINSTELLUNG DER DYNAMISCHEN IP Einstellung der dynamischen IP-Umgebung y Beispiel einer dynamischen IP-Umgebung: - Wenn einem Breitband-Router, mit dem Kameras verbunden sind, eine IP-Adresse von einem DHCP-Server zugewiesen wird - Wenn die Kamera direkt mit einem xDSL- oder Kabelmodem mithilfe eines DHCPProtokolls verbunden wird - Wenn die IP-Adressen von dem internen DHCP-Server über eine LAN-Verbindung zugewiesen werden Die dynamische IP überprüfen 1. Führen Sie auf einem lokalen Computer das Programm <IP Installer> aus, damit eine Liste der Kameras angezeigt wird, denen eine <Dynamic IP> zugewiesen ist. 2. Wählen Sie eine Kamera aus der Liste und klicken Sie auf [Manual Set], um die <Dynamic IP> der Kamera zu überprüfen. Wenn Sie die Auswahl von <DHCP> entfernen, können Sie <IP> oder <PORT> auf <STATIC> ändern. Deutsch _37 ● NETZWERKVERBINDUNGEN UND -KONFIGURATION 5. Die Kamera wird die Netzwerkeinstellungen automatisch beenden und neu starten. netzwerkverbindungen und -konfiguration PORTBEREICHWEITERLEITUNG KONFIGURIEREN (PORT MAPPING) Wenn Sie einen Breitband-Router mit verbundener Kamera installiert haben, müssen Sie die Weiterleitung des Portbereichs für den Breitband-Router einstellen, damit auch ein entfernter Computer auf die verbundene Kamera zugreifen kann. Manuelle Portbereichweiterleitung 1. Wählen Sie aus dem Einstellungsmenü des Breitband-Routers <Applications & Gaming> - <Port Range Forward>. Für die Einstellung der Portbereichweiterleitung eines Breitband-Routers von einem anderen Anbieter lesen Sie die Bedienungsanleitung dieses BreitbandRouters. 2. Wählen Sie <TCP> und <UDP Port> für jede Kamera, die mit dem Breitband-Router verbunden ist. Jede Portnummer des BreitbandRouters sollte mit den Werten übereinstimmen, die im Einstellungsmenü der Kamera unter <Basic> - <IP> festgelegt sind. 3. Wenn Sie fertig sind, klicken Sie auf [Save Settings]. Ihre Einstellungen werden gespeichert. 38_ netzwerkverbindungen und -konfiguration VON EINEM GEMEINSAMEN LOKALEN PC EINE VERBINDUNG ZU DER KAMERA HERSTELLEN 1. Starten Sie das Programm <IP Installer>. Es wird nach verbundenen Kameras gesucht und eine entsprechende Liste angezeigt. M Sie können ebenfalls auf die Kamera zugreifen, indem Sie die IP-Adresse der gefundenen Kamera in der Adresszeile des Internetbrowsers eingeben. VON EINEM ENTFERNTEN PC EINE VERBINDUNG ZU DER KAMERA ÜBER DAS INTERNET HERSTELLEN Da ein entfernter Computer nicht direkt auf das Programm <IP Installer> zugreifen kann, sollten Sie mithilfe der DDNS-URL der Kamera auf die Kamera im Breitband-Routernetzwerk zugreifen. 1. Bevor Sie auf eine Kamera im Breitband-Routernetzwerk zugreifen können, sollten Sie die Portbereichweiterleitung für den Breitband-Router eingestellt haben. 2. Starten Sie den Internetbrowser auf dem entfernten Computer und geben Sie die DDNS-URL der Kamera oder die IP-Adresse des Breitband-Routers in die Adresszeile ein. beispiel) http://mfffe42.websamsung.net Zum Finden der DDNS-URL-Adresse, lesen Sie bitte „DDNS-Adresse überprüfen“. (Seite 41) Deutsch _39 ● NETZWERKVERBINDUNGEN UND -KONFIGURATION 2. Doppelklicken Sie auf eine Kamera, um auf sie zuzugreifen. Der Internetbrowser wird gestartet und stellt eine Verbindung zu der Kamera her. web viewer VERBINDUNG ZU DER KAMERA HERSTELLEN Normalerweise gehen Sie so vor 1. Starten Sie den Internetbrowser. 2. Geben Sie die IP-Adresse der Kamera in die Adresszeile ein. beispiel) • IP-Adresse (IPv4) : 192.168.1.200 http://192.168.1.200 - der Anmeldedialog sollte erscheinen. • IP-Adresse (IPv6) : 2001:230:abcd: ffff:0000:0000:ffff:1111 http://[2001:230:abcd:ffff:0000 :0000:ffff:1111] Falls die Nummer des HTTP-Ports nicht 80 ist 1. Starten Sie den Internetbrowser. 2. Geben Sie die IP-Adresse und die Nummer des HTTP-Ports der Kamera in die Adresszeile ein. beispiel) IP-Adresse: 192.168.1.200:Port number(10000) http://192.168.1.200:10000 - der Anmeldedialog sollte erscheinen. URL verwenden 1. Starten Sie den Internetbrowser. 2. Geben Sie die DDNS-URL der Kamera in die Adresszeile ein. beispiel) URL-Adresse: http://mfffe42.websamsung.net - der Anmeldedialog sollte erscheinen. Verbindung über URL (falls die Nummer des HTTP-Ports nicht 80 ist) 1. Starten Sie den Internetbrowser. 2. Geben Sie die DDNS-URL und die Nummer des HTTP-Ports der Kamera in die Adresszeile ein. beispiel) URL-Adresse: http://mfffe42.websamsung.net:Port number(10000) http://mfffe42.websamsung.net:10000 - der Anmeldedialog sollte erscheinen. 40_ Web Viewer DDNS-Adresse überprüfen J Die oben aufgeführten Adressen sind Beispiele; verwenden Sie sie nicht um eine Verbindung herzustellen. ANMELDEN Die Standard-Benutzer-ID lautet „admin“ und das Standardkennwort ist „4321“. 1. Geben Sie „admin“ in das Eingabefeld <User Name> ein. 2. Geben sie „4321“ in das Eingabefeld <Password> ein. Wenn das Kennwort geändert wurde, geben Sie das geänderte Kennwort ein. 3. Klicken Sie auf [OK]. Nach erfolgreicher Anmeldung erscheint der Bildschirm des Live Viewers. M Ändern Sie aus Sicherheitsgründen das Kennwort unter <Basic> - <Benutzer>. Die Administrator-ID „admin“ kann nicht geändert werden. Wenn Sie die Option „Save this password in your password list“ markieren, wird die Anmeldung beim nächsten Mal automatisch durchgeführt und Sie müssen die Anmeldeinformationen nicht mehr angeben. J Für diese Funktion muss DirectX 8.1 oder eine neuere Version auf Ihrem Computer installiert sein. Sie können die neuste Version von DirectX unter http://www.microsoft.com/download herunterladen. Wenn Sie den Internet Explorer 7.0 oder 8.0 als Standardbrowser verwenden, erreichen Sie die beste Bildqualität mit einem Bildseitenverhältnis von 100 %. Durch die Reduzierung des Bildseitenverhältnisses kann der Bildrand abgeschnitten erscheinen. Deutsch _41 ● WEB VIEWER Die DDNS-Adresse besteht aus: <einem der Kleinbuchstaben: c, m, p> + <den 6 letzten Stellen der MAC-(Ethernet)Adresse> + <websamsung.net> Der Kleinbuchstabe ist <c>, wenn die 6 ersten Stellen der MAC-(Ethernet)Adresse <00:00:f0> lauten oder <m>, wenn sie <00:16:6c> lauten oder <p>, wenn sie <00:68:36> lauten oder < i >, wenn sie <00:09:18> lauten. beispiel) - Wenn die MAC-(Ethernet)Adresse 00:00:f0:ff:fe:42: c + fffe42 + websamsung.net = cfffe42.websamsung.net - Wenn die MAC-(Ethernet)Adresse 00:16:6c:ff:fe:42: m + fffe42 +websamsung.net = mfffe42.websamsung.net - Wenn die MAC-(Ethernet)Adresse 00:68:36:ff:fe:42: p + fffe42 +websamsung.net = pfffe42.websamsung.net - Wenn die MAC-(Ethernet)Adresse 00:09:18:ff:fe:42: i + fffe42 + websamsung.net = ifffe42.websamsung.net web viewer ACTIVEX-STEUERELEMENT INSTALLIEREN Wenn Sie das erste Mal eine Verbindung zu einer Kamera herstellen, erscheint die Installationsbenachrichtigung. Installieren Sie dann das erforderliche ActiveX-Steuerelement, um auf die Kamera zugreifen zu können und das Video in Echtzeit zu steuern. Für Benutzer von Windows XP Service Pack 2 1. Klicken Sie auf die Installationsbenachr ichtigung, die erscheint, wenn Sie zum ersten Mal auf die Kamera zugreifen. 2. Klicken Sie auf <Install ActiveX Control...>. 3. Das Fenster mit einer Sicherheitswarnung erscheint. Klicken Sie auf [Install]. 4. Wenn das erforderliche ActiveX-Steuerelement nach dem Zugriff auf die Kamera erfolgreich installiert ist, sollte der LiveBildschirm erscheinen. J Stellen Sie die Pop-up-Blockierung für eine normale Installierung wie folgt ein: Internet Explorer ➝ Extras ➝ Pop-upFenster blockieren ➝ Pop-ups der aktuellen Seite immer erlauben (A) 42_ web viewer DEN LIVE-BILDSCHIRM VERWENDEN ● WEB VIEWER Bezeichnung Beschreibung SD suche Sie gelangen zum Bildschirm, in dem Sie die SD-Karte nach Ereignisbildern durchsuchen können. Setup Der Bildschirm für die Einstellungen wird geöffnet. Details Sie können die Version der Firmware, die Seriennummer und Herstellerinformationen betrachten. Alarm zurücksetzen Das Alarmsymbol wird zurückgesetzt. (Die Symbole für Alarm und Intelligente Videoanalyse verschwinden.) Aufnahme Der Schnappschuss wird in dem Format .jpeg oder .bmp gespeichert. Drucken Druckt das aktuelle Bild aus. Speichern Das aktuelle Video wird im avi-Dateiformat aufgenommen. Vollbild Der Live-Bildschirm wird als Vollbild angezeigt. Videoformat Sie können das Videoformat (MJPEG, H.264/MPEG4) für Videodateien festlegen. Beachten Sie, dass sich die Menükonfiguration von Ihren Einstellungen unter <H.264 & MPEG-4-Video auswählen> im Menü Videoeinstellungen unterscheiden kann. Alarmsignal Ein : Der ausgewählte Alarmausgang wird aktiviert. Aus : Der ausgewählte Alarmausgang wird deaktiviert. Impuls : Der Alarmausgang wird so oft aktiviert, wie dies festgelegt wurde, bevor er deaktiviert wird. Deutsch _43 web viewer Zum Aufrufen und Anpassen des Menüs zur Kameraeinstellung. Kamera-OSD Informationen über die Auswahl und Speicherung jedes Menüpunktes finden Sie unter dem Abschnitt „So verwenden sie die taste menü“. (Seite 20) Audio Haken Sie das Kontrollkästchen Anhören oder Sprechen für Audio ab. Viewer-Bildschirm Das Live-Video wird auf dem Bildschirm angezeigt. BACKUP Sie können den Schnappschuss aufnehmen, ausdrucken und unter einem festgelegten Pfad speichern. Einen Schnappschuss aufnehmen 1. Klicken Sie während einer Szene, die Sie aufnehmen möchten, auf [ ]. Das Dialogfenster für die Aufnahme sollte erscheinen. 2. Klicken Sie auf [OK]. Das Bildschirmfoto wird unter dem festgelegten Pfad gespeichert. y Standarddateipfad - Windows XP: C: \Programme\Samsung\SNB-3000\SnapShot\Live Wenn Sie den Pfad ändern möchten, klicken Sie auf [Pfad einstellen ( )] und geben Sie einen Pfad an. - Windows Vista, Windows 7: C:\users\[UserID]\Documents\Samsung\SNB-3000\ SnapShot\Live Bei Windows Vista, Windows 7 ist der Speicherpfad festgelegt. y Die Datei des Bildschirmfotos wird automatisch mit dem Format <IP address_Port number_YYYYMMDD_hhmmss_index> benannt. beispiel) 192.168.0.72_60001_20090828_170250_00 44_ web viewer Ein Bildschirmfoto ausdrucken 1. Klicken Sie während einer Szene, die Sie ausdrucken möchten, auf [ ]. Das Dialogfenster für die Druckeinstellungen erscheint. 2. Geben Sie den Namen des verbundenen Druckers an und klicken Sie auf [OK]. ● WEB VIEWER Ein Video aufnehmen 1. Klicken Sie während einer Szene, die Sie aufnehmen möchten, auf [ ]. 2. Das Dialogfenster zum Speichern einer AVI-Datei erscheint; geben Sie die nötigen Informationen an. y Pfad speichern: Sie können den Speicherpfad ändern. y Dateiname : Sie können den Dateinamen ändern. y HDD Min freier Speicherplatz : Wenn der freie Speicherplatz auf der Festplatte geringer als die Größe der Aufnahmedatei ist, so wird die Aufnahme beendet. 3. Klicken Sie auf [OK]. Die Aufnahme startet und die Anzeige <REC> erscheint auf dem Bildschirm. Die Videodatei wird unter dem festgelegten Pfad gespeichert. 4. Wenn Sie die Aufnahme beenden möchten, klicken Sie erneut auf [ ]. Deutsch _45 web viewer y Standarddateipfad - Windows XP : C:\Programme\Samsung\SNB-3000\VideoClip\Live Wenn Sie den Pfad ändern möchten, klicken Sie auf [Pfad einstellen ( )] und geben Sie einen Pfad an. - Windows Vista, Windows 7 : C:\users\[UserID]\Documents\Samsung\ SNB-3000\VideoClip\Live Bei Windows Vista, Windows 7 ist der Speicherpfad festgelegt. y Die Datei des Bildschirmfotos wird automatisch mit dem Format <IP address_Port number_YYYYMMDD_hhmmss_index> benannt. beispiel) 192.168.0.72_60001_20090828_170745_00 y Wenn Sie eine AVI-Datei wiedergeben möchten, muss der entsprechende DivX-Codec auf Ihrem System installiert sein. Sie können DivX kostenlos unter folgender Adresse herunterladen: http://sourceforge. net/projects/ffdshow/. y Zur Wiedergabe des Videos im MPEG4-Format ist ein bestimmtes MPEG4-VideoCodec erforderlich. Sie können das Codec für MPEG4-Videos unter www.samsungsecurity.com herunterladen. 46_ web viewer BENUTZUNG DES SD SUCHBILDSCHIRMS 1. Klicken Sie in der Live-Anzeige auf die Registerkarte <SD suche>. 2. Es erscheint der SD-Suchbildschirm. Anordnung Hauptbild ● WEB VIEWER Name Funktion und Beschreibung Vorschaugröße Die Vorschaubilder werden basierend auf der ausgewählten Größe angezeigt. Datum Sie können das gewünschte Datum auswählen, um nach erzeugten Ereignissen zu suchen. Planen Sie können die gewünschte Zeit auswählen, um nach Zeitplan-Ereignissen zu suchen. Alarmeingabe Sie können die gewünschte Zeit auswählen, um nach Alarmereignissen zu suchen. Intelligente Videoanalyse Sie können durch Festlegen des Zeitbereichs nach Ereignissen suchen. Deutsch _47 bildschirm für die einstellungen DEN BILDSCHIRM FÜR DIE EINSTELLUNGEN ÖFFNEN Sie können die Standardeinstellungen, das System, die Overlay-Optionen, Ereignis- und Netzwerkeinstellungen konfigurieren und sie wenn nötig ändern. 1. Klicken Sie auf dem Live-Bildschirm auf den Reiter <Setup>. 2. Der Bildschirm für die Einstellungen erscheint. STANDARDEINSTELLUNGEN Video- und Audioeinstellungen konfigurieren Sie können die Einstellungen für Videoauflösung, Qualität, CODEC und Audioeingang/-ausgang festlegen. 1. Wählen Sie <Basic> - <Video & Audio>. Der Bildschirm „Video- und Audioeinstellungen” erscheint. y Helligkeit : Die Bildschirmhelligkeit kann auf einen Wert zwischen 1 und 100 eingestellt werden. y Kontrast : Der Kontrast auf einen Wert zwischen 1 und 100 eingestellt werden. y Auflösung : Stellen Sie die Videogröße von MPEG4-, H.264- und MPEG-Dateien ein. - NTSC : 4CIF(704x480), VGA(640X480), CIF(352X240) - PAL : 4CIF(704x576), VGA(640X480) ,CIF(352X288) y Qualität : Die Bildqualität kann auf einen Wert zwischen 1 und 10 eingestellt werden. y Bildfrequenz : Wählen Sie zwischen 30 fps, 15 fps, 8 fps,3 fps und 1 fps. y Bitrate-Kontr.* : Wählen Sie CBR (Constant Bit Rate) oder VBR (Variable Bit Rate) als Kompressionsmethode. Wenn Sie VBR auswählen, können Sie die Ziel-Bitrate nicht einstellen. 48_ bildschirm für die einstellungen J y Profil : Wählen Sie Baseline oder Main für die H.264-Profilierungsmethode. y Entrop.-Coding* : Reduziert den Kompressionsverlust, der bei der Kodierung entsteht. Wenn Sie das Profil auf Baseline einstellen, steht die Entropiekodierung nur für CAVLC* zur Verfügung; wenn Sie es auf HPT stellen, steht die Entropiekodierung für CAVLC* und CABAC* zur Verfügung. J y Schätzung d. Bew. : Die Pixelbewegung wird durch Bestimmung von Bewegungsvektoren geschätzt. y Modus Flip : Drehen Sie das von der Kamera aufgenommene Bild herum. y Spiegel Modus : Drehen Sie das von der Kamera aufgenommene Bild horizont y Eingangsverstärkung : Sie können die Audio-Eingangsverstärkung von 0 auf 10 erhöhen. y Ausg.steig. : Sie können die Audio-Ausgangsverstärkung von 0 auf 10 erhöhen. J Wenn die Audio-Eingangsverstärkung auf 0 gesetzt ist, ist kein Ton zu hören. 2. Wenn Sie fertig sind, klicken Sie auf [Übernehmen]. Ihre Einstellungen werden gespeichert. IP-Einstellungen konfigurieren 1. Wählen Sie <Basic> - <IP>. Das Fenster für IP-Einstellungen erscheint. y IP-Konfiguration : Legen Sie die IP- und Port-Einstellungen für die Kamera fest. - IP-Typ : Wählen Sie zwischen <Statische IP>, <Dynamische IP> und <PPPoE IP>. Wenn Sie <PPPoE IP> auswählen, können Sie die optionale ADSL-IP und das Kennwort angeben. Die Multicast-Werte (Multicast-Adresse, Port, TTL) für VNP und RTP werden jedoch ausgeblendet. Deutsch _49 ● BILDSCHIRM FÜR DIE EINSTELLUNGEN y Ziel-Bitrate: Das Videosignal wird mit einer festgelegten Bitrate übertragen. y Kompression : Stellen Sie eine Kompressionsrate von 5 bis 100 in Fünferschritten ein. y Verschl.priorit. : Stellen Sie die Methode der Videoübertragung auf BILDFREQUENZ oder QUALITÄT. y GOP*-Gr. : Wählen Sie eine GOP-Gr. zwischen 5 und 15. y Freigeb. : Die Ränder zwischen den Macroblocks werden enthärtet. y De-Interlacing: Sie können mithilfe der Funktion De-Interlacing Betriebsgeräusche reduzieren. Ist nur dann verfügbar, wenn die Auflösung für MPEG4 auf 4CIF gesetzt wurde. Wenn für WDR <AUS> festgelegt wurde oder die MPEG4-Auflösung nicht 4CIF ist, können Sie das Deinterlacing für den MPEG4 CODEC nicht aktivieren. bildschirm für die einstellungen - MAC-Adresse : Die Ethernet-MAC-Adresse wird angezeigt. Sie wird für die Erstellung einer DDNS-Adresse verwendet. - IP-Adresse : Die aktuelle IP-Adresse wird angezeigt. - Subnetzmaske : Die <Subnetzmaske> der eingestellten IP-Adresse wird angezeigt. - Gateway : Das <Gateway> der eingestellten IP-Adresse wird angezeigt. - DNS-Server : Zeigt die DNS-(Domain Name Service)Serveradresse an. - HTTP-Webserver-Port : Der HTTP-Port, der verwendet wird, um mit einem Internetbrowser auf die Kamera zuzugreifen. Der Standardwert ist 80 (TCP). - Upload Port (TCP) : Used to upgrade the software firmware, defaulted to 60004(TCP). y IPv6-Konfiguration : Wird für die Aktualisierung der Firmwaresoftware verwendet. Der Standardwert lautet 60004 (TCP). y VNP-Konfiguration : Stellen Sie einen Port ein, der verwendet wird, um Videosignale mit Samsung-Protokollen zu übertragen. - Geräteport (TCP) : Wird verwendet, um die Videosignalübertragung zu steuern. Der Standardwert lautet 60001 (TCP). - TCP-Streaming-Port : Port für die Videosignalübertragung mit TCP-Protokollen. Der Standardwert lautet 60002 (TCP). - UDP-Streaming-Port : UDP-Port für die Übertragung des Videosignals mit UDPUnicast-Protokollen. Der Standardwert ist 60003 (UDP). - Multicast-Adresse : IP-Adresse für die Übertragung des Videosignals mit UDPMulticast-Protokollen. Die Standardadresse lautet 225.128.1.128. Wenn Sie die Adresse ändern möchten, wählen Sie eine aus dem Bereich zwischen 224.0.0.0 und 239.255.255.255 aus. - Multicast-Port : UDP-Port für die Übertragung des Videosignals mit UDPMulticast-Protokollen. Der Standardwert ist 60005 (UDP). - TTL* : Stellen Sie das TTL-Feld für das VNP-Paket ein. Der Standardwert lautet 63. Wenn Sie den Wert ändern möchten, wählen Sie einen aus dem Bereich zwischen 0 und 255 aus. y RTP-Konfiguration : Sie können das RTP-Protokoll einstellen. - RTSP-Port : Sie können den RTSP-Port einstellen. - Streaming-Port : Zur Übertragung des Videosignals mit RTP-Protokollen. Der Standardbereich liegt zwischen 61000 und 61999. - Multicast-Adresse : IP-Adresse für die Übertragung des Videosignals mit RTPProtokollen. - Multicast-Port : Zur Übertragung des Videosignals mit Multicast unter Verwendung eines RTP-Protokolls. - TTL* : Sie können das TTL-Feld für das RTP-Paket festlegen. 2. Wenn Sie fertig sind, klicken Sie auf [Übernehmen]. Ihre Einstellungen werden gespeichert und das System wird neu gestartet. Der momentan geöffnete Webbrowser wird geschlossen. M Wenn mehrere Kameras mit dem Breitband-Router verbunden sind, sollten Sie die IP- und PortEinstellungen einzeln vornehmen. 50_ bildschirm für die einstellungen Ein Benutzerkonto einrichten 2. Fügen Sie Benutzer hinzu oder bearbeiten Sie Benutzer-ID und Kennwort. y Benutzer-ID/Kennwort-Liste : Zeigt eine Liste zugänglicher Benutzer-IDs, Kennwörter und Ratings an. - Sie können bis zu 10 Benutzer hinzufügen. - Die Admin-ID lautet „admin“. - Das Kennwort für die Admin-ID kann geändert, jedoch nicht hinzugefügt oder gelöscht werden. Benutzerregistrierung 1. Klicken Sie im Fenster für das Einrichten eines BENUTZERS auf [Einlegen]. Das Fenster für die Benutzerregistrierung wird geöffnet. 2. Geben Sie jeweils die Informationen für <Benutzer-ID>, <Kennwort> und <Kennwort bestätigen> ein. Sie können jeweils bis zu 9 Buchstaben, Zahlen und Sonderzeichen (manche sind ausgeschlossen) für die Benutzer-ID und das Kennwort eingeben. 3. Wählen Sie einen Benutzertyp aus. Wählen Sie bezüglich der Rechte eines neuen Benutzers entweder <Betreiber> oder <Benutzer>. 4. Klicken Sie auf [Übernehmen]. Die Benutzerregistrierung ist damit abgeschlossen. J Eine bestehende Benutzer-ID kann nicht erneut hinzugefügt werden. Ebenfalls kann weder die Admin-ID noch eine Gäste-ID registriert werden. Deutsch _51 ● BILDSCHIRM FÜR DIE EINSTELLUNGEN 1. Klicken Sie auf <Basic> - <Benutzer>. Das Fenster für die Einrichtung eines BENUTZERS wird geöffnet. y Authentifizierte anmeldung : Sie können die Authentifizierung des Benutzers bei der Anmeldung einstellen. - Wenn Sie <Aktivieren> auswählen, muss der Benutzer sich bei der Anmeldung authentifizieren; wenn Sie <Deaktivieren> auswählen, kann jeder Benutzer mit den üblichen Benutzerrechten auf das System zugreifen, ohne sich bei der Anmeldung authentifizieren zu müssen. - Wenn Sie fertig sind, klicken Sie auf [Übernehmen]. Ihre Einstellungen werden gespeichert. bildschirm für die einstellungen Ein registriertes Benutzerkonto bearbeiten 1. Wählen Sie eine Benutzer-ID, die Sie verändern möchten, aus dem Fenster zum Einrichten eines Benutzers aus. 2. Klicken Sie im Fenster für das Einrichten eines Benutzers auf [Ändern]. Das Fenster zum Ändern von Benutzereinstellungen wird geöffnet. 3. Ändern Sie nach Wunsch eine der folgenden Angaben: <Benutzer-ID>, <Kennwort>, <Kennwort bestätigen> und <Stufe>. 4. Klicken Sie auf [Übernehmen]. Die ausgewählte Benutzer-ID wird verändert. Eine Benutzer-ID löschen 1. Wählen Sie eine Benutzer-ID, die Sie löschen möchten, aus dem Fenster zum Einrichten eines Benutzers aus. 2. Klicken Sie im Fenster für das Einrichten eines Benutzers auf [Löschen]. Die ausgewählte Benutzer-ID wird gelöscht. M Über Benutzerrechte Administrator : Hat Zugriff auf alle Funktionen (Änderungs-/Kontrolleinstellungen). Betreiber : Kann nur die Funktionen des Live Viewers verwenden. Benutzer : Kann nur Videos im Live Viewer wiedergeben. Anzeigesprache festlegen 1. Klicken Sie auf <Basic> - <Sprache>. Das Fenster für die Einstellung der SPRACHE wird geöffnet. Sie können zwischen sieben verschiedenen Sprachen wählen (Englisch/Koreanisch/Chinesisch/ Französisch/Italienisch/Spanisch/Deutsch). 2. Wenn Sie fertig sind, klicken Sie auf [Übernehmen]. Die ausgewählte Sprache wird übernommen. 52_ bildschirm für die einstellungen SYSTEMEINSTELLUNGEN Datum/Uhrzeit einstellen Sie können die aktuelle Systemzeit von dem NTP-Server oder Ihrem Computer für die Zeiteinstellung übernehmen. 2. Wenn Sie Manuell auswählen, geben Sie das Datum und die Uhrzeit manuell ein. Ihre Einstellungen werden gespeichert. y Aktuelle systemzeit : Die unter „Systemzeit-Setup“ festgelegte Zeit wird übernommen. y Systemzeit-Setup : Sie können die Systemzeit mit dem NTP-Server (Zeit-Server) oder Ihrem Computer synchronisieren oder sie manuell festlegen. M Sie können eine Zeit zwischen dem 1. Januar 2000 und dem 31. Dezember 2037 festlegen. Die Systemzeit einstellen 1. Wählen Sie eine gewünschte Adresse unter <Adresse> oder wählen Sie <Mit PC-Betrachter synchronisieren>. 2. Wenn Sie Manuell auswählen, geben Sie das Datum und die Uhrzeit manuell ein. 3. Klicken Sie auf [Übernehmen]. Die festgelegte Systemzeit wird übernommen. M <NTP-Server-IP> wird von einer öffentlichen Dienststelle zur Verfügung gestellt. Deren Liste kann sich von Zeit zu Zeit ändern. In einem lokalen Netzwerk muss ein separater NTP-Server manuell festgelegt werden. J Die aktuelle Zeit kann je nach regionalen (WZ und MESZ) und länderspezifischen Einstellungen (Zeitkonfiguration des PCs) des Computers verschieden sein. Deutsch _53 ● BILDSCHIRM FÜR DIE EINSTELLUNGEN 1. Wählen Sie <System> - <Datum & Zeit>. Das Fenster zum Einstellen des Datums & der Zeit erscheint. bildschirm für die einstellungen Protokollinformationen überprüfen Wählen Sie <System> - <Protokoll>. Die Liste mit den Protokollinformationen erscheint. y Systemprotokoll-Liste : Hier werden die Protokolldaten zu Systemänderungen einschließlich Uhrzeit und IP-Adressen angezeigt. - System gestartet: Wenn sich die Kamera einschaltet - Benutzer-Login: Wenn sich der Benutzer bei der Kamera anmeldet - System-Rücksetzung: Wenn die Kamera neu gestartet wird - Netzwerk aktiv: Beim Zugriff auf das Netzwerk - Netzwerk inaktiv: Wenn kein Zugriff auf das Netzwerk erfolgt - Video param. geändert: Wenn die auf das Video bezogenen Parameter geändert wurden - Systemzeit geändert: Wenn die Systemzeit geändert wurde - Änderung der Netzwerkkonfiguration: Wenn die Einstellungen des Netzwerks geändert wurden - Alarmeintritt 1, 2: Wenn ein Alarm ausgelöst wurde - Einsatz der Intelligenten Videoanalyse: Wenn durch die Intelligente Videoanalyse ein Ereignis ausgelöst wurde - FTP-Sendefehler: Wenn die FTP-Übertragung fehlgeschlagen ist - SMTP-Sendefehler: Wenn das Versenden einer E-Mail-Nachricht über den SMTPServer fehlgeschlagen ist Es können maximal 2000 Protokolle aufgenommen werden. Wenn die Anzahl der Protokolle 2000 überschreitet, wird das unterste Protokoll in der Liste durch ein neues Protokoll ersetzt. M Die Software aktualisieren Wählen Sie <System> - <Software-Update>. Das Fenster für das Software-Update wird eingeblendet. Die Software aktualisieren 1. Klicken Sie in dem Fenster für das Software-Update auf [Browse…]. Das Dialogfenster für das Öffnen einer Datei wird eingeblendet. 2. Wählen Sie eine Datei, die aktualisiert werden kann, und klicken Sie auf [Open]. 3. Klicken Sie in dem Fenster für das Software-Update auf [Installieren]. Die ausgewählte Datei wird geöffnet und das Update gestartet. Es kann einige Minuten dauern, bis das Update fertiggestellt ist. 54_ bildschirm für die einstellungen 4. Nachdem die Aktualisierung der Software abgeschlossen wurde, werden Sie dazu aufgefordert, das System neuzustarten. 5. Klicken Sie auf [OK], um das System neuzustarten. Da die aktuelle Verbindung getrennt wird, müssen Sie eine neue Verbindung zum System herstellen. J Das System funktioniert nicht, wenn keine Verbindung zum Netzwerk besteht, die Stromversorgung fehlschlägt oder der Computer während des Updates nicht ordnungsgemäß betrieben wird. System zurücksetzen Wählen Sie <Systyem> - <Zurücksetz.>. Das Fenster zum Zurücksetz. erscheint. y Neu starten : Das System wird neu gestartet. y Standardwerte : Das System wird mit einer der folgenden zwei Optionen auf die Standardwerte zurückgesetzt: - Außer netzwerkparameter : Alle Einstellungen bis auf die Netzwerkparameter werden zurückgesetzt. - Alle : Alle Werte werden auf die Standardwerte zurückgesetzt. Dieser Vorgang entspricht dem, der beim Drücken der Taste [RESET] auf der Rückseite der Kamera durchgeführt wird. Nachdem das System zurückgesetzt oder neu gestartet wurde, sollten Sie versuchen, wieder eine Verbindung zur Kamera herzustellen. Der Neustart des Systems dauert einige Minuten. Warten Sie, bis der Neustart abgeschlossen ist, und versuchen Sie eine erneute Verbindung herzustellen. Nachdem Sie das System auf <Standardwerte> zurückgesetzt haben, müssen Sie das Programm <IP Installer.exe> ausführen, um grundlegende Netzwerkeinstellungen wie die IP-Adresse, Subnetzmaske, das Gateway usw. vorzunehmen, bevor Sie eine Verbindung mit dem Internet herstellen können. J HTTPS einstellen 1. Wählen Sie <System> - <HTTPS>. Das Fenster für die Einstellung von HTTPS wird geöffnet. y Sicheres verbindungssyst. : Wählen Sie ein sicheres Verbindungssystem. Um eine sichere Verbindung zu verwenden, die ein Zertifikat für das sichere Verbindungssystem erfordert, muss ein signiertes Zertifikat, das von einer Zertifizierungsstelle ausgestellt wird, auf Ihrem System installiert sein. y Öffentl. zertifikat install. : Um ein Zertifikat für eine Kamera zu installieren, müssen Sie den Zertifikatnamen (dieser kann beliebig vom Benutzer zugewiesen werden), die Zertifizierungsdatei, die von der Zertifizierungsstelle ausgestellt wurde und einen Schlüssel eingeben. Wenn Sie fertig sind, klicken Sie auf [Installieren]. Wenn das Zertifikat erfolgreich installiert wurde, wird der vom Benutzer ausgewählte Zertifikatname angezeigt. Außerdem wird die Optionsschaltfläche <HTTPS (Sicherer verb.modus verw. öffentliches zertifikat)> im oberen Bereich aktiviert. Deutsch _55 ● BILDSCHIRM FÜR DIE EINSTELLUNGEN Starten Sie das System neu oder setzen Sie es zurück, falls es nicht ordnungsgemäß funktioniert oder Probleme verursacht. bildschirm für die einstellungen M Um über den Modus HTTPS auf die Kamera zuzugreifen, müssen Sie die IP-Adresse der Kamera auf diese Weise angeben: „https://<Kamera_IP>“. 2. Wenn Sie fertig sind, klicken Sie auf [Übernehmen]. Der Web Viewer wird zum sicheren Verbindungssystem wechseln. IP-Filter festlegen 1. Klicken Sie auf <System>-<IP-Entstörung>. Der Bildschirm „IP-Filtereinstellungen” erscheint. y Grundlegende politik: Sie können die Regeln für die IP-Filterung auswählen. Wenn Sie diese auf Berechtigung setzen, erlaubt der Webserver allen IP-Adressen, die zugreifen wollen, den Zugriff. Ausgenommen davon sind Adressen, die Teil der Verweigerungsliste sind. Wenn Sie diese auf Verweigerung setzen, erlaubt der Webserver den Zugriff nur jenen IP-Adressen, die in der Zulassungsliste vorhanden sind. Alle anderen IP-Adressen werden abgewiesen. Um die Regeln für die IP-Filterung zu übernehmen, klicken Sie auf die Schaltfläche [Übernehmen] 2. Geben Sie in das IP-Feld jene IP-Adresse und Subnetzmaske ein, denen der Zugriff erlaubt oder verweigert werden soll. Der Filterbereich* wird sich abhängig von den festgelegten IP-Adressen und Subnetzmasken unterscheiden. OVERLAY-EINSTELLUNG Sie können einen Text auf dem Bildschirm anzeigen lassen. Text einstellen 1. Wählen Sie <Overlay> - <Overlaytext>. Das Einstellungsfenster für den Overlaytext wird geöffnet. 2. Wenn Sie fertig sind, klicken Sie auf [Übernehmen]. Ihre Einstellungen werden gespeichert. y Overlaytext-Einstellungen : Wenn Sie <Deaktivieren> auswählen, wird der Overlaytext nicht angezeigt; wenn Sie <Aktivieren> auswählen, wird er auf dem Bildschirm angezeigt. y Datum anzeigen : Stellen Sie ein, ob das Datum im unteren Bildschirmbereich angezeigt werden soll. - Ausgangsformat : Wählen Sie ein Anzeigeformat für das Datum. JJJJ-MM-TT : Jahr-Monat-Tag / MM-TT-JJJJ : Monat-Tag-Jahr / TT-MM-JJJJ : Tag-Monat-Jahr 56_ bildschirm für die einstellungen y Zeit anzeigen : Stellen Sie ein, ob die Uhrzeit im unteren Bildschirmbereich angezeigt werden soll. - Ausgangsformat : Wählen Sie ein Anzeigeformat für die Uhrzeit. 24hr : Die Uhrzeit wird im 24 Stunden-Format angezeigt. 12hr : Die Uhrzeit wird im 12 Stunden-Format angezeigt. y Textfarbe : Wählen Sie eine weiße oder schwarze Textfarbe. y Hintergrundfarbe : Wählen Sie eine weiße oder schwarze Hintergrundfarbe. ● BILDSCHIRM FÜR DIE EINSTELLUNGEN EREIGNISEINSTELLUNG Die Funktion der Ereignisübertragung einstellen Sie können den FTP/E-Mail-Server (SMTP) so einstellen, dass er im Falle eines Alarmereignisses Bilder, die von der Kamera aufgenommen wurden, überträgt. Wählen Sie <Ereignis> - <Übertragungssetup>. Das Fenster für die Einstellung der Bildübertragung wird geöffnet. M Weitere Informationen über kommerzielle SMTP-Services erhalten Sie von Ihrem SMTP-Serviceprovider. Die FTP-Übertragung testen Klicken Sie auf [Test]. Dadurch wird getestet, ob das Bild ordnungsgemäß zu dem festgelegten FTP-Server übertragen wird. Wenn der Test der FTP-Server-Verbindung und Übertragung abgeschlossen wurde, erscheint die Nachricht <( Bestätigt )>. Sollte der Test fehlschlagen, erscheint eine Fehlernachricht. Wenn dies der Fall sein sollte, überprüfen Sie den Status oder die Einstellungen des FTP-Servers erneut. y FTP-Übertragung : Mit dieser Funktion können Sie Alarmbilder zum FTP-Server übertragen. Wenn die ursprünglichen Einstellungen und die Verbindung des FTP-Servers nicht bestätigt werden konnten, wird die Nachricht <( Nicht bestätigt )> angezeigt. Deutsch _57 bildschirm für die einstellungen - Passivmodus verwenden : Wählen Sie diese Option, wenn aufgrund der Firewalloder FTP-Servereinstellungen eine Verbindung mit Passivmodus unumgänglich ist. - FTP-Serveradresse : Geben Sie die IP-Adresse des FTP-Servers ein, zu dem das Alarmbild übertragen werden soll. - Upload-Pfad : Legen Sie hier den Pfad zum FTP-Verzeichnis fest, zu dem das Alarmbild übertragen werden soll. Sie können den Pfad festlegen, indem Sie in dieses Feld </Verzeichnisname> oder <Verzeichnisname> eintragen. Wird kein Pfad angegeben, so wird das Root-Verzeichnis des FTP-Servers als Standardpfad benutzt. - Port : Der FTP-Port ist standardmäßig 21. Dieser Wert kann entsprechend den Einstellungen des FTP-Servers geändert werden. - Benutzer-ID : Geben Sie die ID des Benutzerkontos an, um auf den FTP-Server zugreifen zu können. - Kennwort : Geben Sie das Kennwort des Benutzerkontos an, um auf den FTPServer zugreifen zu können. y E-Mail-Übertragung (SMTP) : Mit dieser Funktion können Sie Alarmbilder zum E-Mail-Server übertragen. Diese Funktion steht nur für den E-Mail-Server (SMTP) zur Verfügung. Wenn die ursprünglichen SMTP-Servereinstellungen und die Verbindung nicht bestätigt wurden, wird die Meldung <Nicht bestätigt> eingeblendet. - SMTP-Serveradresse : Geben Sie die SMTP-Serveradresse ein, die verwendet werden soll, wenn Sie eine E-Mail versenden. beispiel) 10.240.56.228 - Port : Geben Sie eine Portnummer ein, die verwendet werden soll, wenn Sie eine E-Mail versenden. Der Standardwert ist 25. - Benutzer-ID : Geben Sie die ID des Benutzerkontos an, um auf den SMTP-Server zugreifen zu können. - Kennwort : Geben Sie das Kennwort des Benutzerkontos an, um auf den SMTPServer zugreifen zu können. - E-Mail-Sender : Geben Sie die E-Mail-Adresse des Absenders ein. Wenn Sie eine falsche Adresse eingeben, wird die E-Mail vom SMTP-Server eventuell als SPAM eingestuft und nicht verschickt. - E-Mail-Empfänger : Geben Sie die E-Mail-Adresse des Empfängers ein. - Überschrift : Geben Sie den Betreff der E-Mail ein. - Nachricht : Geben Sie den Text der E-Mail ein. Die E-Mail-Übertragung testen Klicken Sie auf [Test]. Dadurch wird getestet, ob das Bild ordnungsgemäß zu dem festgelegten SMTP-Server übertragen wird. Wenn der Test der SMTP-Server-Verbindung und Übertragung abgeschlossen wurde, erscheint die Nachricht <( Bestätigt )>. Sollte der Test fehlschlagen, erscheint eine Fehlernachricht. Wenn dies der Fall sein sollte, überprüfen Sie den Status oder die Einstellungen des SMTP-Servers erneut. 58_ bildschirm für die einstellungen Zur Einstellung der Aufnahme Alarmbild einstellen Sie können festlegen, dass eine Nachricht über FTP/E-Mail (SMTP) versandt wird oder diese auf der SD-Speicherkarte gespeichert wird. Wählen Sie eine Übertragungsmethode, die angewendet werden soll, wenn ein Ereignis auftritt oder die zeitgeplante Übertragung aktiviert ist. 1. Wählen Sie <Ereignis> - <Alarmbild.>. Das Fenster für die Einstellung des Alarmbildes wird geöffnet. y Übertragungsmodus : Sie können als Methode zur Benachrichtigung im Falle eines Alarms entweder FTP/ E-Mail-Übertragung oder Speicherung auf SD-Karte auswählen. - FTP-Übertragung : Das Bild wird zu der festgelegten FTP-Adresse gesendet. - E-Mail-Übertragung : Das Bild wird zu der festgelegten E-Mail-Adresse gesendet. - SD-Kartenspeicherung : Die Bilder werden auf der SD-Speicherkarte gespeichert. M Wenn keine SD-Speicherkarte eingelegt ist, ist die entsprechende Schaltfläche deaktiviert. Legen Sie in diesem Fall eine SD-Speicherkarte ein und aktualisieren Sie die Seite, um die Schaltfläche zu aktivieren. J Wenn eine SD-Speicherkarte eingelegt ist und die Schaltfläche betätigt wird, wird die Kamera automatisch neu gestartet. y Setup für benennung übertragener bilder : Legen Sie hier einen Namen für die Bilddatei fest, die bei einem Alarm oder zu einer vorprogrammierten Uhrzeit versendet wird. y Bild vor/nach dem alarm : Sie können einstellen, dass das Bild vor oder nach dem Alarm gespeichert wird. - Anzahl der Bilder : Die Bildfrequenz pro Sekunde kann auf 1, 2, 3, und 5 eingestellt werden. - Vor-Alarmdauer : Die Aufnahmedauer vor dem Alarm kann 5 Sekunden, 10 Sekunden, 15 Sekunden und 30 Sekunden betragen. Sie können eine Aufnahme vor dem Alarm von bis zu 30 Sekunden vor der Auslösung des Alarms versenden. (Die maximale Zeit ist je nach Bildfrequenz unterschiedlich) Deutsch _59 ● BILDSCHIRM FÜR DIE EINSTELLUNGEN 1. Klicken Sie auf <Event> - <Aufnahmesetup>. Das Fenster Aufnahmesetup wird eingeblendet. 2. Sobald die Einstellung abgeschlossen ist, klicken Sie auf die Schaltfläche [Übernehmen]. Die Einstellungen werden gespeichert. y SD-Karte : Ermöglicht Ihnen die auf der SD-Speicherkarte gespeicherten Daten zu überprüfen und die Speicherkarte zu formatieren. Es ist möglich das automatische Löschen von Filmclips festzulegen, die vor einem bestimmten Zeitraum (z.B. 1 Woche, 1 Monat oder 1 Jahr) aufgenommen wurden. y Optionen : Legen Sie fest, ob Sie eine E-Mail-Benachrichtigung über unzureichende Kapazitätswarnungen erhalten möchten. bildschirm für die einstellungen - Nach-Alarmdauer : Die Aufnahmedauer nach dem Alarm kann 5 Sekunden, 10 Sekunden, 15 Sekunden und 30 Sekunden betragen. Sie können eine Aufnahme nach dem Alarm von bis zu 30 Sekunden nach der Auslösung des Alarms versenden. (Die maximale Zeit ist je nach Bildfrequenz unterschiedlich) M Die Dauer vor/nach dem Alarm steht beim SMTP-Übertragungsmodus nicht zur Verfügung. Es wird nur ein Bild für einen entsprechenden Zeitpunkt versendet. 2. Wenn Sie fertig sind, klicken Sie auf [Übernehmen]. Ihre Einstellungen werden gespeichert. Alarmeingang einstellen 1. Wählen Sie <Ereignis> - <Alarmeingabe 1> oder <Alarmeingabe 2>. Das Fenster für die Einstellung der Alarmeingangs wird geöffnet. 2. Wenn Sie fertig sind, klicken Sie auf [Übernehmen]. Ihre Einstellungen werden gespeichert. y Geräte-Setup eingeben : Wählen Sie einen Eingangstyp, der den Merkmalen des Alarmsensors auf der Rückseite der Kamera entspricht. - Aus : Deaktiviert die Einstellung des Alarmeingangs. - NO (Normal Offen) : Ist er normalerweise geöffnet und wird geschlossen, so wird ein Alarm ausgelöst. - NC (Normal Geschlossen) : Ist er normalerweise geschlossen und wird geöffnet, so wird ein Alarm ausgelöst. y Aktivierungszeit : Sie können eine Zeit für die Ausführung eines bestimmten Befehls nach Alarmauftritt einstellen. - Immer : Der festgelegte Befehl wird immer ausgeführt, wenn ein Alarm auftritt. - Nur festgelegte zeit : Eine Benachrichtigung erfolgt nur dann, wenn während der festgelegten Zeitdauer ein Alarmereignis aufgetreten ist. y Aktion : Sie können eine Aktion einstellen, die durchgeführt werden soll, wenn ein Alarm auftritt. - Alarmsignal : Stellen Sie den Port für die Ausgabe des Alarmsignals ein. - Signaldauer : Stellen sie ein, wie lange bei einem Alarm das Alarmsignal an den angegebenen Alarmausgang gesendet werden soll. Wenn ein neues Alarmereignis während des Sendens des Alarmsignals entdeckt wird, wird die Verzögerungszeit basierend auf dem Zeitpunkt der Entdeckung des aktuellen Alarms neu berechnet. - Alarmbildübertragung : Wenn Sie <Ein> gewählt haben, können Sie je nach den erfolgten Einstellungen unter <Ereignis> - <Übertragungssetup> JPEG-Dateien via FTP- oder SMTP-Server an eine registrierte Adresse senden oder die Bilder auf der SD-Speicherkarte speichern. 60_ bildschirm für die einstellungen Einstellen der Bewegungserkennung 1. Einen Bewegungserkennungsmodus auswählen. 2. Die Verwendung der Bewegungserkennung festlegen. 3. Einen Empfindlichkeitslevel für die Bewegungserkennung auswählen. ● BILDSCHIRM FÜR DIE EINSTELLUNGEN 4. Den Cursor an einem Punkt im Video platzieren und an die gewünschte Stelle ziehen. Es können bis zu vier Bewegungserkennungsbereiche festgelegt werden. 5. Legen Sie die Aktivierungszeit und Aktivierungsbedingung fest. Weitere Informationen über <Aktivierungszeit> und <Aktion> finden Sie unter „Alarmeingabe“. (Seite 60) 6. Klicken Sie auf [Anwenden], wenn Sie die Einstellungen vorgenommen haben. Deutsch _61 bildschirm für die einstellungen Einstellen der Intelligenten Video-Analyse 1. Einen Modus für die Intelligente VideoAnalyse auswählen. 2. Festelegen, ob die Intelligente VideoAnalyse verwendet werden soll. 3. Einstellen, ob Overlay verwendet werden soll. 4. Einen Empfindlichkeitslevel für die Objekterkennung der Kamera auswählen. 5. Die Ereignisregeln festlegen. 6. Legen Sie die Aktivierungszeit und Aktivierungsbedingung fest. Weitere Informationen über <Aktivierungszeit> und <Aktion> finden Sie unter „Alarmeingabe“. (Seite 60) 7. Klicken Sie auf [Anwenden], wenn Sie die Einstellungen vorgenommen haben. J Die Bewegungserkennung und die Intelligente Video-Analyse kann nicht gleichzeitig verwendet werden. Wenn mit der Kamera ein Objekt in der Nähe erfasst wird, kann die Funktionsfähigkeit der Videoanalyse herabgesetzt werden. M In den folgenden Fällen kann es vorkommen, dass die Videoanalysefunktion bei konfigurierten Ereignissen und bei der Bewegungserkennung keine einwandfreien Ergebnisse liefert. - Die Farbe oder Helligkeit des Objekts ist ähnlich wie die des Hintergrunds - Mehrere willkürliche Bewegungen aufgrund eines Szenenwechsels oder aus anderen Gründen. - Wenn das fixierte Objekt sich auch weiterhin in der gleichen Position bewegt. - Ein Objekt verdeckt andere Objekte. - 2 oder mehrere Objekte überdecken sich oder 1 Objekt ist in mehrere Objekte unterteilt. - Objekt ist zu schnell (zur Erkennung sollte ein Objekt überlappend zwischen benachbarten Bildern liegen). - Spiegelung/Unschärfe/Schatten aufgrund von direkter Sonneneinstrahlung, Beleuchtung oder Scheinwerfer - Bei starkem Schneefall, Regen, Wind oder bei Morgengrauen/Dämmerung - Objekt in Bewegung kommt zu nahe an Kamera heran 62_ bildschirm für die einstellungen y Overlay : Wenn <Aktivieren> gewählt wurde, werden die festgelegten Ereignisregeln und das bewegte Bild auf der Live-Anzeige angezeigt. Durch Auswahl von <Deaktivieren> werden keine Overlay-Informationen angezeigt. M Das bewegte Bild wird in der Live-Anzeige auf zwei verschiedene Arten angezeigt. Grüner Rahmen – zeigt das Objekt in Bewegung an Roter Rahmen – Das Objekt in Bewegung, das aufgrund der konfigurierten Ereignisregeln erkannt wird, wird vorübergehend angezeigt. y Regeln einstellen Sie können die Ereignisregeln festlegen. - Regeln für virt. bereich : Sie können die Ereignisregeln für bis zu 3 virtuelle Bereiche festlegen. <Ereignistypen> Passieren : Ein Ereignis wird ausgelöst, wenn das Objekt in Bewegung den virtuellen Bereich in die festgelegte Richtung quert ( , , ). - Regeln für festgel. bereich : Sie können für bis zu 3 benutzerdefinierte Bereiche Ereignisregeln festlegen. <Ereignistypen> c Eintritt : Ein Ereignis wird ausgelöst, wenn ein sich bewegendes Objekt in den festgelegten Bereich von außen eindringt. d Austritt : Ein Ereignis wird ausgelöst, wenn ein sich bewegendes Objekt vom festgelegten Bereich nach außen austritt. e Erscheinen : Ein Objekt, das bis zum vorherigen Bild nicht in diesem Bereich vorhanden war, erscheint plötzlich im festgelegten Bereich, ohne die Grenze zu passieren. f Verschwinden : Ein Objekt, das bis zum vorherigen Bild in diesem Bereich vorhanden war, verschwindet plötzlich, ohne die Grenze zu passieren. - Regeln für ges. bereich : Sie können die Ereignisregeln für den gesamten Videobereich festlegen. Deutsch _63 ● BILDSCHIRM FÜR DIE EINSTELLUNGEN y Empfindlichkeit : Zum Festlegen der Empfindlichkeit für die Intelligente Videoanalyse. - Empfindlichkeit : Zum Auswählen der Empfindlichkeit zwischen <Sehr hoch>, <Hoch>, <Normal>, <Niedrig> und <Sehr niedrig>. Bei Auswahl von <Sehr hoch> arbeitet die Intelligente Videoanalyse mit der niedrigsten Bewegungserkennung. bildschirm für die einstellungen <Ereignistypen> c Erscheinen : Ein Objekt, das bis zum vorherigen Bild nicht vorhanden war, erscheint im Bereich. d Verschwinden : Ein Objekt, das bis zum vorherigen Bild vorhanden war, verschwindet aus dem Bereich. e Szenenwechsel : Dieses Ereignis wird aufgrund eines kompletten Szenenwechsels, z. B. wenn die Kamera von einer Hand verdeckt oder das Kameraziel geändert wird, etc., ausgelöst. - Objektgröße : Die maximale Größe eines Objekts, für das eine Bewegungserkennung zum Auslösen eines Ereignisses möglich ist. Die Mindestgröße kann in 5 Stufen angepasst werden. Mindestgröße (kleinster rechteckiger Bereich zur Bewegungserkennung): Schritt 1: 6 x 6 (Pixel), Schritt 5: 50 x 50 (Pixel) Maximale Größe (größter rechteckiger Bereich zur Bewegungserkennung): Schritt 1: 60 x 60 (Pixel), Schritt 5: 320 x 240 (Pixel) Die ursprünglichen Einstellungen für die Mindestgröße betragen 6 x 6 und für die maximale Größe 320 x 420. y Aktivierungszeit: Legt die Betriebsdauer für die Intelligente Videoanalyse fest. - Immer : Die festgelegte Aktion wird ausgeführt, wann immer ein Ereignis der Intelligenten Videoanalyse auftritt. - Nur festgelegte zeit : Die festgelegte Aktion wird ausgeführt, wann immer ein Ereignis der Intelligenten Videoanalyse während einer bestimmten Zeitdauer auftritt. y Aktion : Sie können die Aktion für ein Ereignis der Intelligenten Videoanalyse festlegen. - Alarmsignal : Legen Sie den Alarmausgang für das Signal im Falle eines Ereignisses der Intelligenten Videoanalyse fest. - Signaldauer : Legen Sie für das Alarmsignal im Falle eines Ereignisses der Intelligenten Videoanalyse die Verweilzeit fest. Wenn danach noch ein Ereignis der Intelligenten Videoanalyse auftritt, richtet sich die Signaldauer nach dem zuletzt aufgetretenen Ereignis. - Alarmbildübertragung : Wenn <Aktivieren> gewählt wurde, wird abhängig von Ihren Einstellungen unter <Ereignis> - <Übertragungssetup> das Bild im JPEG-Format über FTP oder E-Mail (SMTP) an die registrierte Adresse versandt oder auf der SD-Speicherkarte gespeichert. 64_ bildschirm für die einstellungen Die zeitgeplante Übertragung einstellen Sie können bestimmen, ob das JPEG-Bild in bestimmten Abständen via FTP/SMTP-Server an eine registrierte Adresse versandt oder auf der SD-Speicherkarte gespeichert werden soll. 2. Wenn Sie fertig sind, klicken Sie auf [Übernehmen]. Ihre Einstellungen werden gespeichert. Deutsch _65 ● BILDSCHIRM FÜR DIE EINSTELLUNGEN 1. Wählen Sie <Ereignis> - <Planen>. Das Fenster für die Einstellung der geplanten Übertragung erscheint. y Funktion für geplante Übertragung : Wenn Sie <Aktivieren> auswählen, wird die Funktion für geplante Übertragung aktiviert; wenn Sie <Deaktivieren> auswählen, wird die Funktion deaktiviert. y Übertragungsintervall : Legen Sie hier die Zeitabstände fest, in denen Bilder übertragen werden sollen. Die Einheit des Zeitintervalls kann auf <sekunden> oder <minuten> gestellt werden; Sie können ebenfalls einstellen, dass ein Bild alle 5/15/30/45/60 Sekunden oder alle 5/15/30/45/60 Minuten übertragen wird. y Aktivierungszeit : Sie können eine Zeit für die Ausführung eines bestimmten Befehls einstellen, wenn eine geplante Übertragung auftritt. - Immer : Es wird immer ein Bild zu dem eingestellten Zeitintervall gesendet. - Nur festgelegte zeit : Das Bild wird während der festgelegten Zeitdauer regelmäßig übertragen. bildschirm für die einstellungen NETZWERKEINRICHTUNG Den Modus der Videoübertragung einstellen Sie können die Übertragungsrate entsprechend dem Modus der Videoübertragung und der Netzwerkgeschwindigkeit steuern. 1. Wählen Sie <Netzwerk> <Streaming-Typ>. Das Fenster für die Einstellung der Videoübertragung wird geöffnet. 2. Wenn Sie fertig sind, klicken Sie auf [Übernehmen]. Ihre Einstellungen werden gespeichert. y VNP streaming : Sie können das Protokoll von Samsung (VNP) für das Streaming verwenden. - Protokoll : Wählen Sie unter TCP*, UDP (Unicast)* oder UDP (Multicast)* das Protokoll für die Videoübertragung. Sprachaufzeichnungen über ein Mikrofon werden von der Kamera nicht unterstützt. Multicast Backbone (MBone) wird nicht unterstützt; Sie können nur innerhalb der lokalen Multicast-Netzwerkumgebung auf die Kamera zugreifen. y RTP streaming : Sie können das RTP-Protokoll für das Streaming verwenden. - Protokoll : Wählen Sie unter UDP (Unicast) oder UDP (Multicast) das Protokoll für die Videoübertragung. DDNS einstellen DDNS ist die Abkürzung für „Dynamic Domain Name Service“. Über diesen Dienst wird die IP-Adresse einer Kamera in einen allgemeinen, benutzerfreundlicheren Hostnamen umgewandelt. Dieser Hostname wird selbst bei dynamischer Änderung der IP-Adresse der Kamera beibehalten. 1. Wählen Sie <Netzwerk> - <DDNS>. Das DDNS-einstellungsfenster wird geöffnet. 2. Wenn Sie fertig sind, klicken Sie auf [Übernehmen]. Ihre Einstellungen werden gespeichert. M Zum Überprüfen der DDNS-Adresse, lesen Sie bitte „DDNS-Adresse überprüfen“. (Seite 41) 66_ bildschirm für die einstellungen anhang PROFIL MENÜ KAMERAEINSTELLUNGEN Obermenü STANDARD ITS GGLICHT TAG/NACHT ALC ALC ALC - - - DC DC DC SPIELB. BANK ALC ALC ALC - - - DC DC DC Untermenüs BLENDE OBJEKTIV WERT 0 0 0 0 0 0 AUS AUS WDR AUS AUS WDR BEWEGUNG (SCHNELL) --- (SCHNELL) --- NORMAL (SCHNELL) --- LANGSAM (SCHNELL) --- GEGENLICHT DNR MITTEL MITTEL MITTEL MITTEL MITTEL MITTEL VERSCHLUSSZEIT AUS AUTO 1/250 AUS AUS AUS AUS EMPFINDLICHKEIT PLUS AUTO X4 AUTO X2 AUTO X4 AUTO X4 AUTO X4 AUTO X4 XDR MITTEL MITTEL MITTEL MITTEL MITTEL MITTEL AUTO AUTO TAG AUTO TAG AUTO - - - - - - AUS EIN AUS AUS AUS AUS TAG TAG/NACHT TAG TAG/NACHT TAG TAG - - - - - - ATW2 ATW1 ATW1 ATW1 ATW1 ATW2 ROT 0 0 0 0 0 0 BLAU 0 0 0 0 0 0 - - - - - - MITTEL Benutzerdefinierte Einstellung MITTEL ATW2 AUS ATW2 TAG/NACHT NACHT FARBTRAGER TAG MODUS WEISSABGLEICH NACHT Benutzerdefinierte HELLIGKEIT Einstellung MODUS AUS Benutzerdefinierte ROT Einstellung Benutzerdefinierte BLAU Einstellung DETAIL 2 0 0 2 Benutzerdefinierte Einstellung Benutzerdefinierte Einstellung 2 0 0 2 Benutzerdefinierte Benutzerdefinierte Einstellung Einstellung AUS AUS Benutzerdefinierte Benutzerdefinierte Einstellung Einstellung Benutzerdefinierte Benutzerdefinierte Einstellung Einstellung 2 2 Deutsch _67 ● ANHANG ALC anhang BEGRIFFSDEFINITION y GOP (Group of Pictures/Bildgruppe) : Sie können für MPEG4-Dateien und den H.264 CODEC einen Wert zwischen 5 und 15 festlegen. Der Standardwert ist 15, und wenn dieser eingestellt ist, wird ein I-Einzelbild für 15 Einzelbilder ausgegeben, da ein I-Einzelbild und 14 P-Einzelbilder die GOP bilden. Je kleiner die GOP ist, desto besser ist die Qualität; jedoch werden die Bitrate und die Datengröße ansteigen, wodurch die Anzahl der fps (Einzelbilder pro Sekunde) gesenkt wird. Die GOP (Group of Pictures/Bildgruppe) ist eine Zusammenstellung von Videoeinzelbildern für die Kompression der Formate MPEG4 und H.264, die verschiedene Bildtypen, vom anfänglichen I-Einzelbild (Referenzbild) bis zum nächsten I-Einzelbild, enthält. Die GOP besteht aus 2 Bildtypen: I-Einzelbild und P-Einzelbild. Ein I-Einzelbild ist das Referenzbild für die Kompression und wird auch als Schlüsselbild bezeichnet. Es beinhaltet alle Bilddaten. Das P-Einzelbild enthält nur die Differenz-Informationen aus dem vorhergehenden I-Einzelbild. y Entropiekodierung : Es handelt sich um eine Technologie für die Datenübertragung, die verwendet wird, um den Kompressionsverlust bei einer Kodierung zu reduzieren. - CAVLC (Context-adaptive variable-length coding): Erzeugt eine höhere Kompressionsverlustrate als CABAC. - CABAC (Context-adaptive binary arithmetic coding): Erzeugt eine niedrigere Kompressionsverlustrate als CAVLC. y Bitrate-Kontr. - CBR(Constant Bitrate) Dadurch werden die Videodaten stets in der gleichen Größe übertragen, unabhängig von der Komplexität des Videos. Je nach Komplexität des Videos kann die Videoqualität beeinträchtigt werden. - VBR (Variable Bitrate) Je nach Komplexität des Videos kann der Umfang der Videodaten unterschiedlich sein. Dadurch werden die Videodaten stets in der gleichen Qualität empfangen. y TTL : TTL steht für „Time-to-live“. Sie können dieses Protokoll festlegen, damit Datenpakete, die mehrere Router durchlaufen nicht verloren gehen. Die TTL von Paketen wird auf jedem Router, den das Paket passiert um 1 verringert; wenn der TTL-Wert 0 erreicht, kann das Paket nicht an weitere Router gesendet werden. y TCP : Hierbei handelt es sich um ein Protokoll für allgemeine Zwecke. Es ist für Übertragungen geeignet, die Zuverlässigkeit erfordern. Dank einer konstanten Kommunikation zwischen Absender und Empfänger bietet es eine hohe Zuverlässigkeit gegenüber Datenverlust; es hat die Aufgabe große Datenmengen in Echtzeit und mit einer hohen Geschwindigkeit zu übertragen. Es ermöglicht eine zuverlässige Datenübertragung über xDSL und kabelgebundene Netzwerke mit relativ niedriger Geschwindigkeit. y UDP (Unicast) : Das Protokoll ist einem System zugewiesen, das Daten zwischen nur einem Sender und Empfänger übermittelt (1:1). y UDP (Multicast) : Mit diesem Datenübertragungsprotokoll können Daten von einem Sender an mehrere Empfänger übertragen werden (1:N). Dadurch wird die benötigte Bandbreite erheblich reduziert. Allerdings ist für diese Übertragungsart ein <Multicast>-Router erforderlich. Wenden Sie ich an Ihren Netzwerkadministrator, wenn Sie sich nicht sicher sind, ob das Netzwerk, mit dem die Kamera verbunden ist, <Multicast> unterstützt. y UDP : Mit diesem Protokoll können große Datenmengen wie Multimediadaten mit einer hohen Geschwindigkeit übertragen werden. Es stellt eine verbindungsunabhängige Struktur dar und bietet eine höhere Übertragungseffektivität als TCP, besonders in einer lokalen Netzwerkumgebung (LAN) mit einer schnelleren Verbindung als 100Mbps. 68_ anhang Deutsch _69 ● ANHANG y Filterbereich Der Filterbereich wird anhand der IP-Adresse und der Subnetzmaske, welche vom Benutzer wie folgt eingegeben wurden, berechnet: Der Subnetzwert legt die Anzahl der maskierten Bits, welche die aus 32-Bit-Binärzahlen bestehende IP-Adresse maskieren, fest; die restlichen Bits werden ignoriert, um den Bereich wie unten dargestellt festzulegen. Z. B.: IP-Adresse: 128.128.128.128 c Wenn die Subnetzmaske mit 8 festgelegt wurde, lautet die konvertierte IP 1000 0000.1000 0000.1000 0000.1000 0000. Die Subnetzmaske versucht nun, Übereinstimmungen zwischen dem ersten und dem 8. Bit zu finden und erzeugt so einen Filterbereich von 1000 0000.???? ????.???? ????.???? ????, der wiederum in einen IP-Adressbereich von 128.0.0.0 - 128.255.255.255 umgewandelt wird. d Wenn die Subnetzmaske mit 10 festgelegt wurde, lautet die konvertierte IP 1000 0000.1000 0000.1000 0000.1000 0000. Die Subnetzmaske versucht nun, Übereinstimmungen zwischen dem ersten und dem 10. Bit zu finden und erzeugt so einen Filterbereich von 1000 0000.0000.10?? ????.???? ????.???? ????, der wiederum in einen IP-Adressbereich von 128.0.0.0 - 128.191.255.255 umgewandelt wird. e Wenn die Subnetzmaske mit 20 festgelegt wurde, lautet die konvertierte IP 1000 0000.1000 0000.1000 0000.1000 0000. Die Subnetzmaske versucht nun, Übereinstimmungen zwischen dem ersten und dem 20. Bit zu finden und erzeugt so einen Filterbereich von 1000 00001000 0000.1000 ????.???? ????, der wiederum in einen IP-Adressbereich von 128.128.128.0 - 128.128.143.255 umgewandelt wird. f Wenn die Subnetzmaske mit 30 festgelegt wurde, lautet die konvertierte IP 1000 0000.1000 0000.1000 0000.1000 0000. Die Subnetzmaske versucht nun, Übereinstimmungen zwischen dem ersten und dem 30. Bit zu finden und erzeugt so einen Filterbereich von 1000 0000.1000 0000.1000 0000.1000 00??, der wiederum in einen IP-Adressbereich von 128.128.128.128 ~ 128.128.128.131 umgewandelt wird. g Wenn die Subnetzmaske mit 32 festgelegt wurde, lautet die konvertierte IP 1000 0000.1000 0000.1000 0000.1000 0000. Die Subnetzmaske versucht nun, Übereinstimmungen zwischen dem ersten und dem 32. Bit zu finden und erzeugt so einen Filterbereich von 1000 0000.1000 0000.1000 0000.1000 0000, der wiederum in einen IP-Adressbereich von 128.128.128.128 umgewandelt wird. anhang TECHNISCHE DATEN Beschreibung Bezeichnung Kameratyp Bild Abtastung NTSC Farbe/SW Gerät Pixel Gesamt Effektiv System Horizontalfrequenz Vertikalfrequenz 70_ anhang PAL 795 x 596 752 x 582 15,625 Hz 50 Hz Farbe Sens off : 0,12 Lux (15 IRE), 0,2 Lux (30 IRE), 0,4Lux (50 IRE)@F1,2 Sens up x512 : 0,00023 Lux (15 IRE), 0,0005 Lux (30 IRE), 0,0008Lux (50 IRE)@F1.2 S/W Sens off : 0,012 Lux (15 IRE), 0,02 Lux (30 IRE), 0,04Lux (50 IRE)@F1,2 Sens up x512 : 0,000023 Lux (15 IRE), 0,00005 Lux (30 IRE), 0,00008Lux (50 IRE)@F1.2 Anzahl der Privatzonen Tag/Nacht WDR Erweiterter dynamischer Bereich D-Zoom PIP Hochgeschwindigkeitsverschluss Flimmerfrei Empf-Plus BLC AGC ELC Kamera-ID Weißabgleich Digitale Rauschfilter Digitale Bildstabilisierung Etc-Funktion 12 ea Tag/Nacht/AUTO (Hardware-Methode) Aus/Ein (x128) Aus/Ein (x160) Aus/Ein (Stufeneinstellung) x1 ~ x16 (x0,1-SCHRITT) Aus/Ein (Erweitert) 1/60 ~ 1/10K Sek. 1/50 ~ 1/10K Sek. Aus/Ein x2 ~ x512 Aus/Ein (Bereichseinstellung) Aus/Ein (Max. Stufeneinstellung) Aus/Ein ( ~ 1/200K Sek.) Aus/Ein (Max. 54 ea/2 Zeilen) ATW1/ATW2/AWC/3200K/5600K Aus/Ein (Adaptiv 3D+2D) Aus/Ein Detail, Rückwärts (H/V), Posi/Nega Mindestbeleuchtung Funktionen Farbe 1/3" Super-HAD PS CCD 811 x 508 768 x 494 Progressiv 15,734 Hz 59.94 Hz Beschreibung Bezeichnung NTSC Horizontal PAL 600 TV-Zeilen Auflösung Videoausgang Vertikal 350 TV-Zeilen Videoausgang VBS 1.0Vp-p Signal-Rauschabstand Signal-Rauschabstand ungefähr 52 dB MANUELL/AI (VIDEO/DC) CS/C ● ANHANG Art des Objektivantriebs Anbringungsart Objektiv Betriebssystem Eingebettetes Linux Flash-Speicher 32 MB RAM 256 MB DSP TI Davinci Ethernet RJ-45 (10/100BASE-T) PoE Ja (IEEE802.3af) Netzwerkkarte Hardware Eingang 2 ea Ausgang 2 ea Kompression H.264 / MPEG4 / MJPEG Mehrfach-Codec (H.264 / MPEG4 auswählbar) Gleichzeitiges Dual-Streaming Alarm Video Auflösung 4CIF 704x480 VGA 640x480 CIF 704x576 352x240 352x288 Bildfrequenz 30, 15, 8, 3, 1 fps 25, 13, 6, 3, 1 fps Qualität Stufe 1 ~ 10 Audio Kompression G.711 : Vollduplex, 64 kbit/s, 8 Khz Sampling BILDSCHIRMANZEIGE Steuerung und Einrichtung der Kamera Bildschirmmenü bei Video (Menüeingang/-Ausgang, Steuerung durch Web UI) * Einige Menüs für die Tasteneinstellungen werden von CGI API unterstützt. Erkennung durch Intelligente Videoanalyse Empfindlichkeit Sehr hoch, Hoch, Normal, Niedrig, Sehr niedrig Bewegungserkennung Empfindlichkeits- und Bereichseinstellung Hoch, Mittel, Niedrig Deutsch _71 anhang Beschreibung Bezeichnung NTSC IP IPv4 TCP/IP, UDP/IP, RTP (UDP), RTP (TCP), RTSP, NTP, HTTP, HTTPS, SSL, DHCP PPPoE, FTP, SMTP, ICMP, IGMP, SNMPv1/v2c/v3 (MIB-2), ARP, DNS, DDNS IPv6 TCP/IP, HTTP, HTTPS, SSL, DHCP Netzwerkprotokoll Protokoll Streaming Unicast (TCP, UDP), Multicast (UDP) Sicherheit DDNS ONVIF-Übereinstimmung Maximaler Benutzerzugriff Administrator Verbindung Benutzerzugriffsstufen Betreiber Benutzer Software für Videoverwaltung Anwendung 72_ anhang Live-Überwachung Erkennung durch Intelligente Videoanalyse Zeitplan JPEG-Bildübertragung : FTP, SMTP, SD-Karte Unterstütztes Betriebssystem Windows XP, Windows VISTA, Windows 7 Unterstützter Browser Betrachtung über Webbrowser (Standard) Sprache der Benutzeroberfläche Video-Player HTTPS-Anmeldeauthentifizierung Digest Login Authentication Unterstützung von Samsung DDNS- und öffentlichen DDNS-Services Ja Max. 10 Benutzer im Modus Unicast (TCP, UDP) Max. 20 Benutzer im Modus Multicast (UDP) Live-Überwachung, Steuerung des Alarmeingangs/ Alarmausgangs, Steuerung des Bildschirmmenüs, SETUP Live-Überwachung, Steuerung des Alarmeingangs/ Alarmausgangs JPEG-Bildübertragung: FTP, SMTP, SD-Karte Benachrichtigung: Benachrichtigung an Betrachter oder per E-Mail (ein Bildanhang) Alarmausgang Alarmeingang Ereignisverwaltung PAL IPv4 / IPv6 Internet Explorer 6.0 oder neuer E/F/G/S/I/C/K Software-Aktualisierung Support RTP/RTSP-Streaming Quicktime, VLC-Player Videoverwaltungssystem IP-Installation Samsung iPOLiS Softwareanwendung eines anderen Anbieters IP-Installationsprogramm für alle IP-Geräte von Samsung Bezeichnung HTTP API CGI-Befehl SDK RTP/RTSP API Energie RTP-Header, RTSP-Befehlsdokument SDK ActiveX API für die Betrachtung von Daten-Streams von einer IP-Kamera. AC24V±10%(60Hz±0.3Hz)/ DC12V+10%/-5%/ PoE (Power over Ethernet/Strom über Ethernet) Stromverbrauch Max. 6W(DC12V), Max. 7W(AC24V), Max. 8W(PoE) Betriebstemperatur -10˚C~50˚C Relative Luftfeuchtigkeit ~90% Größe (B X H X L) B72 X H60 X L139mm Gewicht Ca. 435 g Deutsch _73 ● ANHANG ActiveX Beschreibung NTSC PAL Funktionen zur Kamerasteuerung und zum Einstellen/ Abrufen von internen Parameterwerten. JPEG-Bild oder MJPEG-Stream erhalten Steuerung des Alarmeingangs/Alarmausgangs anhang BILDRATE (NTSC) Testbedingung: MJPEG - Auflösung(CIF), Qualität(1), Bildfrequenz(1) M H.264 - Bitrate-Kontr.(CBR), Kompression(40), Verschl.priorit.(Bildfrequenz), GOP-Gr.(15), Freigeb.(EIN), Profil(Baseline), Entrop.-Coding(CAVLC), Schätzung d. Bew.(HPel) MPEG4 - Bitrate-Kontr.(CBR), Kompression(40), Verschl.priorit.(Bildfrequenz), GOP-Gr.(15) ❖ MPEG4 (4CIF) Bildfrequenz 30 FPS 15 FPS 8 FPS 3 FPS 1 FPS PEGEL10 4239 Kbps 23 FPS 2765 Kbps 15 FPS 1290 Kbps 7 FPS 737 Kbps 4 FPS 221 Kbps 1 FPS PEGEL9 3686 Kbps 24 FPS 2304 Kbps 15 FPS 1075 Kbps 7 FPS 614 Kbps 4 FPS 184 Kbps 1 FPS PEGEL8 3072 Kbps 25 FPS 1843 Kbps 15 FPS 860 Kbps 7 FPS 492 Kbps 4 FPS 147 Kbps 1 FPS PEGEL7 2396 Kbps 26 FPS 1382 Kbps 15 FPS 645 Kbps 7 FPS 369 Kbps 4 FPS 111 Kbps 1 FPS PEGEL6 1659 Kbps 27 FPS 922 Kbps 15 FPS 430 Kbps 7 FPS 246 Kbps 4 FPS 74 Kbps 1 FPS PEGEL5 1336 Kbps 29 FPS 691 Kbps 15 FPS 323 Kbps 7 FPS 184 Kbps 4 FPS 55 Kbps 1 FPS PEGEL4 1133 Kbps 30 FPS 576 Kbps 15 FPS 269 Kbps 7 FPS 154 Kbps 4 FPS 46 Kbps 1 FPS PEGEL3 922 Kbps 30 FPS 461 Kbps 15 FPS 215 Kbps 7 FPS 123 Kbps 4 FPS 37 Kbps 1 FPS PEGEL2 691 Kbps 30 FPS 346 Kbps 15 FPS 161 Kbps 7 FPS 92 Kbps 4 FPS 28 Kbps 1 FPS PEGEL1 461 Kbps 30 FPS 230 Kbps 15 FPS 108 Kbps 7 FPS 61 Kbps 4 FPS 18 Kbps 1 FPS Qualität 74_ anhang ❖ H.264 (4CIF) Bildfrequenz 15 FPS 8 FPS 3 FPS 1 FPS PEGEL10 1229 Kbps 10 FPS 737 Kbps 6 FPS 369 Kbps 3 FPS 147 Kbps 1 FPS PEGEL9 1751 Kbps 19 FPS 1198 Kbps 13 FPS 645 Kbps 7 FPS 369 Kbps 4 FPS 111 Kbps 1 FPS PEGEL8 1536 Kbps 20 FPS 1075 Kbps 14 FPS 538 Kbps 7 FPS 307 Kbps 4 FPS 92 Kbps 1 FPS PEGEL7 1352 Kbps 22 FPS 897 Kbps 15 FPS 430 Kbps 7 FPS 246 Kbps 4 FPS 74 Kbps 1 FPS PEGEL6 1129 Kbps 25 FPS 691 Kbps 15 FPS 369 Kbps 8 FPS 184 Kbps 4 FPS 55 Kbps 1 FPS PEGEL5 960 Kbps 25 FPS 576 Kbps 15 FPS 307 Kbps 8 FPS 154 Kbps 4 FPS 46 Kbps 1 FPS PEGEL4 799 Kbps 26 FPS 461 Kbps 15 FPS 246 Kbps 8 FPS 123 Kbps 4 FPS 37 Kbps 1 FPS PEGEL3 622 Kbps 27 FPS 346 Kbps 15 FPS 184 Kbps 8 FPS 92 Kbps 4 FPS 28 Kbps 1 FPS PEGEL2 445 Kbps 29 FPS 230 Kbps 15 FPS 123 Kbps 8 FPS 61 Kbps 4 FPS 18 Kbps 1 FPS PEGEL1 223 Kbps 29 FPS 115 Kbps 15 FPS 61 Kbps 8 FPS 31 Kbps 4 FPS 9 Kbps 1 FPS Deutsch _75 ● ANHANG 30 FPS 2298 Kbps 19 FPS Qualität anhang ❖ MPEG4 (VGA) Bildfrequenz 30 FPS 15 FPS 8 FPS 3 FPS 1 FPS PEGEL10 4055 Kbps 22 FPS 2580 Kbps 14 FPS 1290 Kbps 7 FPS 737 Kbps 4 FPS 221 Kbps 1 FPS PEGEL9 3533 Kbps 23 FPS 2304 Kbps 15 FPS 1075 Kbps 7 FPS 614 Kbps 4 FPS 184 Kbps 1 FPS PEGEL8 2949 Kbps 24 FPS 1843 Kbps 15 FPS 860 Kbps 7 FPS 492 Kbps 4 FPS 147 Kbps 1 FPS PEGEL7 2304 Kbps 25 FPS 1382 Kbps 15 FPS 645 Kbps 7 FPS 369 Kbps 4 FPS 111 Kbps 1 FPS PEGEL6 1536 Kbps 25 FPS 922 Kbps 15 FPS 430 Kbps 7 FPS 246 Kbps 4 FPS 74 Kbps 1 FPS PEGEL5 1152 Kbps 25 FPS 691 Kbps 15 FPS 323 Kbps 7 FPS 184 Kbps 4 FPS 55 Kbps 1 FPS PEGEL4 998 Kbps 26 FPS 576 Kbps 15 FPS 269 Kbps 7 FPS 154 Kbps 4 FPS 46 Kbps 1 FPS PEGEL3 799 Kbps 26 FPS 461 Kbps 15 FPS 246 Kbps 8 FPS 123 Kbps 4 FPS 37 Kbps 1 FPS PEGEL2 622 Kbps 27 FPS 346 Kbps 15 FPS 184 Kbps 8 FPS 92 Kbps 4 FPS 28 Kbps 1 FPS PEGEL1 415 Kbps 27 FPS 230 Kbps 15 FPS 123 Kbps 8 FPS 61 Kbps 4 FPS 18 Kbps 1 FPS Qualität 76_ anhang ❖ H.264 (VGA) Bildfrequenz 15 FPS 8 FPS 3 FPS 1 FPS PEGEL10 1229 Kbps 10 FPS 737 Kbps 6 FPS 369 Kbps 3 FPS 147 Kbps 1 FPS PEGEL9 1659 Kbps 18 FPS 1014 Kbps 11 FPS 553 Kbps 6 FPS 276 Kbps 3 FPS 111 Kbps 1 FPS PEGEL8 1459 Kbps 19 FPS 845 Kbps 11 FPS 538 Kbps 7 FPS 307 Kbps 4 FPS 92 Kbps 1 FPS PEGEL7 1229 Kbps 20 FPS 737 Kbps 12 FPS 430 Kbps 7 FPS 246 Kbps 4 FPS 74 Kbps 1 FPS PEGEL6 1014 Kbps 22 FPS 691 Kbps 15 FPS 323 Kbps 7 FPS 184 Kbps 4 FPS 55 Kbps 1 FPS PEGEL5 883 Kbps 23 FPS 576 Kbps 15 FPS 269 Kbps 7 FPS 154 Kbps 4 FPS 46 Kbps 1 FPS PEGEL4 707 Kbps 23 FPS 461 Kbps 15 FPS 215 Kbps 7 FPS 123 Kbps 4 FPS 37 Kbps 1 FPS PEGEL3 553 Kbps 24 FPS 346 Kbps 15 FPS 161 Kbps 7 FPS 92 Kbps 4 FPS 28 Kbps 1 FPS PEGEL2 384 Kbps 25 FPS 230 Kbps 15 FPS 108 Kbps 7 FPS 61 Kbps 4 FPS 18 Kbps 1 FPS PEGEL1 200 Kbps 26 FPS 115 Kbps 15 FPS 54 Kbps 7 FPS 31 Kbps 4 FPS 9 Kbps 1 FPS Deutsch _77 ● ANHANG 30 FPS 2089 Kbps 17 FPS Qualität anhang ❖ MPEG4 (CIF) Bildfrequenz 30 FPS 15 FPS 8 FPS 3 FPS 1 FPS PEGEL10 1382 Kbps 30 FPS 691 Kbps 15 FPS 369 Kbps 8 FPS 184 Kbps 4 FPS 55 Kbps 1 FPS PEGEL9 1152 Kbps 30 FPS 576 Kbps 15 FPS 307 Kbps 8 FPS 154 Kbps 4 FPS 46 Kbps 1 FPS PEGEL8 922 Kbps 30 FPS 461 Kbps 15 FPS 246 Kbps 8 FPS 123 Kbps 4 FPS 37 Kbps 1 FPS PEGEL7 691 Kbps 30 FPS 346 Kbps 15 FPS 184 Kbps 8 FPS 92 Kbps 4 FPS 28 Kbps 1 FPS PEGEL6 461 Kbps 30 FPS 230 Kbps 15 FPS 123 Kbps 8 FPS 61 Kbps 4 FPS 18 Kbps 1 FPS PEGEL5 346 Kbps 30 FPS 173 Kbps 15 FPS 92 Kbps 8 FPS 46 Kbps 4 FPS 14 Kbps 1 FPS PEGEL4 288 Kbps 30 FPS 144 Kbps 15 FPS 77 Kbps 8 FPS 38 Kbps 4 FPS 12 Kbps 1 FPS PEGEL3 230 Kbps 30 FPS 115 Kbps 15 FPS 61 Kbps 8 FPS 31 Kbps 4 FPS 9 Kbps 1 FPS PEGEL2 173 Kbps 30 FPS 86 Kbps 15 FPS 46 Kbps 8 FPS 23 Kbps 4 FPS 7 Kbps 1 FPS PEGEL1 151 Kbps 30 FPS 76 Kbps 15 FPS 40 Kbps 8 FPS 20 Kbps 4 FPS 6 Kbps 1 FPS Qualität 78_ anhang ❖ H.264 (CIF) Bildfrequenz 15 FPS 8 FPS 3 FPS 1 FPS PEGEL10 461 Kbps 15 FPS 215 Kbps 7 FPS 123 Kbps 4 FPS 37 Kbps 1 FPS PEGEL9 691 Kbps 30 FPS 346 Kbps 15 FPS 184 Kbps 8 FPS 92 Kbps 4 FPS 28 Kbps 1 FPS PEGEL8 576 Kbps 30 FPS 288 Kbps 15 FPS 134 Kbps 7 FPS 77 Kbps 4 FPS 23 Kbps 1 FPS PEGEL7 461 Kbps 30 FPS 230 Kbps 15 FPS 108 Kbps 7 FPS 61 Kbps 4 FPS 18 Kbps 1 FPS PEGEL6 346 Kbps 30 FPS 173 Kbps 15 FPS 81 Kbps 7 FPS 46 Kbps 4 FPS 14 Kbps 1 FPS PEGEL5 288 Kbps 30 FPS 144 Kbps 15 FPS 67 Kbps 7 FPS 38 Kbps 4 FPS 12 Kbps 1 FPS PEGEL4 230 Kbps 30 FPS 115 Kbps 15 FPS 54 Kbps 7 FPS 31 Kbps 4 FPS 9 Kbps 1 FPS PEGEL3 173 Kbps 30 FPS 86 Kbps 15 FPS 40 Kbps 7 FPS 23 Kbps 4 FPS 7 Kbps 1 FPS PEGEL2 115 Kbps 30 FPS 58 Kbps 15 FPS 27 Kbps 7 FPS 15 Kbps 4 FPS 5 Kbps 1 FPS PEGEL1 58 Kbps 30 FPS 29 Kbps 15 FPS 13 Kbps 7 FPS 8 Kbps 4 FPS 2 Kbps 1 FPS Deutsch _79 ● ANHANG 30 FPS 922 Kbps 30 FPS Qualität anhang BILDRATE (PAL) Testbedingung: MJPEG - Auflösung(CIF), Qualität(1), Bildfrequenz(1) M H.264 - Bitrate-Kontr.(CBR), Kompression(40), Verschl.priorit.(Bildfrequenz), GOP-Gr.(15), Freigeb.(EIN), Profil(Baseline), Entrop.-Coding(CAVLC), Schätzung d. Bew.(HPel) MPEG4 - Bitrate-Kontr.(CBR), Kompression(40), Verschl.priorit.(Bildfrequenz), GOP-Gr.(15) ❖ MPEG4 (4CIF) Bildfrequenz 25 FPS 13 FPS 6 FPS 3 FPS 1 FPS PEGEL10 4645 Kbps 21 FPS 2654 Kbps 12 FPS 1327 Kbps 6 FPS 664 Kbps 3 FPS 221 Kbps 1 FPS PEGEL9 4055 Kbps 22 FPS 2212 Kbps 12 FPS 1106 Kbps 6 FPS 553 Kbps 3 FPS 184 Kbps 1 FPS PEGEL8 3391 Kbps 23 FPS 1769 Kbps 12 FPS 885 Kbps 6 FPS 442 Kbps 3 FPS 147 Kbps 1 FPS PEGEL7 2544 Kbps 23 FPS 1327 Kbps 12 FPS 664 Kbps 6 FPS 332 Kbps 3 FPS 111 Kbps 1 FPS PEGEL6 1769 Kbps 24 FPS 885 Kbps 12 FPS 442 Kbps 6 FPS 221 Kbps 3 FPS 74 Kbps 1 FPS PEGEL5 1382 Kbps 25 FPS 664 Kbps 12 FPS 332 Kbps 6 FPS 166 Kbps 3 FPS 55 Kbps 1 FPS PEGEL4 1152 Kbps 25 FPS 553 Kbps 12 FPS 276 Kbps 6 FPS 138 Kbps 3 FPS 46 Kbps 1 FPS PEGEL3 922 Kbps 25 FPS 442 Kbps 12 FPS 221 Kbps 6 FPS 111 Kbps 3 FPS 37 Kbps 1 FPS PEGEL2 691 Kbps 25 FPS 332 Kbps 12 FPS 166 Kbps 6 FPS 83 Kbps 3 FPS 28 Kbps 1 FPS PEGEL1 461 Kbps 25 FPS 221 Kbps 12 FPS 111 Kbps 6 FPS 55 Kbps 3 FPS 18 Kbps 1 FPS Qualität 80_ anhang ❖ H.264 (4CIF) Bildfrequenz 13 FPS 6 FPS 3 FPS 1 FPS PEGEL10 1180 Kbps 8 FPS 737 Kbps 5 FPS 442 Kbps 3 FPS 147 Kbps 1 FPS PEGEL9 1991 Kbps 18 FPS 1106 Kbps 10 FPS 664 Kbps 6 FPS 332 Kbps 3 FPS 111 Kbps 1 FPS PEGEL8 1751 Kbps 19 FPS 1014 Kbps 11 FPS 553 Kbps 6 FPS 276 Kbps 3 FPS 92 Kbps 1 FPS PEGEL7 1475 Kbps 20 FPS 885 Kbps 12 FPS 442 Kbps 6 FPS 221 Kbps 3 FPS 74 Kbps 1 FPS PEGEL6 1161 Kbps 21 FPS 664 Kbps 12 FPS 332 Kbps 6 FPS 166 Kbps 3 FPS 55 Kbps 1 FPS PEGEL5 968 Kbps 21 FPS 553 Kbps 12 FPS 276 Kbps 6 FPS 138 Kbps 3 FPS 46 Kbps 1 FPS PEGEL4 811 Kbps 22 FPS 442 Kbps 12 FPS 221 Kbps 6 FPS 111 Kbps 3 FPS 37 Kbps 1 FPS PEGEL3 608 Kbps 22 FPS 332 Kbps 12 FPS 166 Kbps 6 FPS 83 Kbps 3 FPS 28 Kbps 1 FPS PEGEL2 424 Kbps 23 FPS 221 Kbps 12 FPS 111 Kbps 6 FPS 55 Kbps 3 FPS 18 Kbps 1 FPS PEGEL1 230 Kbps 25 FPS 111 Kbps 12 FPS 55 Kbps 6 FPS 28 Kbps 3 FPS 9 Kbps 1 FPS Deutsch _81 ● ANHANG 25 FPS 2359 Kbps 16 FPS Qualität anhang ❖ MPEG4 (VGA) Bildfrequenz 25 FPS 13 FPS 6 FPS 3 FPS 1 FPS PEGEL10 4424 Kbps 20 FPS 2654 Kbps 12 FPS 1327 Kbps 6 FPS 664 Kbps 3 FPS 221 Kbps 1 FPS PEGEL9 3871 Kbps 21 FPS 2212 Kbps 12 FPS 1106 Kbps 6 FPS 553 Kbps 3 FPS 184 Kbps 1 FPS PEGEL8 3097 Kbps 21 FPS 1769 Kbps 12 FPS 885 Kbps 6 FPS 442 Kbps 3 FPS 147 Kbps 1 FPS PEGEL7 2433 Kbps 22 FPS 1327 Kbps 12 FPS 664 Kbps 6 FPS 332 Kbps 3 FPS 111 Kbps 1 FPS PEGEL6 1769 Kbps 24 FPS 885 Kbps 12 FPS 442 Kbps 6 FPS 221 Kbps 3 FPS 74 Kbps 1 FPS PEGEL5 1382 Kbps 25 FPS 664 Kbps 12 FPS 332 Kbps 6 FPS 166 Kbps 3 FPS 55 Kbps 1 FPS PEGEL4 1152 Kbps 25 FPS 553 Kbps 12 FPS 276 Kbps 6 FPS 138 Kbps 3 FPS 46 Kbps 1 FPS PEGEL3 922 Kbps 25 FPS 442 Kbps 12 FPS 221 Kbps 6 FPS 111 Kbps 3 FPS 37 Kbps 1 FPS PEGEL2 691 Kbps 25 FPS 332 Kbps 12 FPS 166 Kbps 6 FPS 83 Kbps 3 FPS 28 Kbps 1 FPS PEGEL1 461 Kbps 25 FPS 221 Kbps 12 FPS 111 Kbps 6 FPS 55 Kbps 3 FPS 18 Kbps 1 FPS Qualität 82_ anhang ❖ H.264 (VGA) Bildfrequenz 13 FPS 6 FPS 3 FPS 1 FPS PEGEL10 1327 Kbps 9 FPS 737 Kbps 5 FPS 442 Kbps 3 FPS 147 Kbps 1 FPS PEGEL9 1991 Kbps 18 FPS 1217 Kbps 11 FPS 664 Kbps 6 FPS 332 Kbps 3 FPS 111 Kbps 1 FPS PEGEL8 1659 Kbps 18 FPS 1106 Kbps 12 FPS 553 Kbps 6 FPS 276 Kbps 3 FPS 92 Kbps 1 FPS PEGEL7 1401 Kbps 19 FPS 885 Kbps 12 FPS 442 Kbps 6 FPS 221 Kbps 3 FPS 74 Kbps 1 FPS PEGEL6 1106 Kbps 20 FPS 664 Kbps 12 FPS 332 Kbps 6 FPS 166 Kbps 3 FPS 55 Kbps 1 FPS PEGEL5 968 Kbps 21 FPS 553 Kbps 12 FPS 276 Kbps 6 FPS 138 Kbps 3 FPS 46 Kbps 1 FPS PEGEL4 774 Kbps 21 FPS 442 Kbps 12 FPS 221 Kbps 6 FPS 111 Kbps 3 FPS 37 Kbps 1 FPS PEGEL3 608 Kbps 22 FPS 332 Kbps 12 FPS 166 Kbps 6 FPS 83 Kbps 3 FPS 28 Kbps 1 FPS PEGEL2 424 Kbps 23 FPS 221 Kbps 12 FPS 111 Kbps 6 FPS 55 Kbps 3 FPS 18 Kbps 1 FPS PEGEL1 230 Kbps 25 FPS 111 Kbps 12 FPS 55 Kbps 6 FPS 28 Kbps 3 FPS 9 Kbps 1 FPS Deutsch _83 ● ANHANG 25 FPS 2507 Kbps 17 FPS Qualität anhang ❖ MPEG4 (CIF) Bildfrequenz 25 FPS 13 FPS 6 FPS 3 FPS 1 FPS PEGEL10 1382 Kbps 25 FPS 664 Kbps 12 FPS 332 Kbps 6 FPS 166 Kbps 3 FPS 55 Kbps 1 FPS PEGEL9 1152 Kbps 25 FPS 553 Kbps 12 FPS 276 Kbps 6 FPS 138 Kbps 3 FPS 46 Kbps 1 FPS PEGEL8 922 Kbps 25 FPS 442 Kbps 12 FPS 221 Kbps 6 FPS 111 Kbps 3 FPS 37 Kbps 1 FPS PEGEL7 691 Kbps 25 FPS 332 Kbps 12 FPS 166 Kbps 6 FPS 83 Kbps 3 FPS 28 Kbps 1 FPS PEGEL6 461 Kbps 25 FPS 221 Kbps 12 FPS 111 Kbps 6 FPS 55 Kbps 3 FPS 18 Kbps 1 FPS PEGEL5 346 Kbps 25 FPS 166 Kbps 12 FPS 83 Kbps 6 FPS 41 Kbps 3 FPS 14 Kbps 1 FPS PEGEL4 288 Kbps 25 FPS 138 Kbps 12 FPS 69 Kbps 6 FPS 35 Kbps 3 FPS 12 Kbps 1 FPS PEGEL3 230 Kbps 25 FPS 111 Kbps 12 FPS 55 Kbps 6 FPS 28 Kbps 3 FPS 9 Kbps 1 FPS PEGEL2 173 Kbps 25 FPS 83 Kbps 12 FPS 41 Kbps 6 FPS 21 Kbps 3 FPS 7 Kbps 1 FPS PEGEL1 151 Kbps 25 FPS 73 Kbps 12 FPS 36 Kbps 6 FPS 18 Kbps 3 FPS 6 Kbps 1 FPS Qualität 84_ anhang ❖ H.264 (CIF) Bildfrequenz 13 FPS 6 FPS 3 FPS 1 FPS PEGEL10 442 Kbps 12 FPS 221 Kbps 6 FPS 111 Kbps 3 FPS 37 Kbps 1 FPS PEGEL9 691 Kbps 25 FPS 332 Kbps 12 FPS 166 Kbps 6 FPS 83 Kbps 3 FPS 28 Kbps 1 FPS PEGEL8 576 Kbps 25 FPS 276 Kbps 12 FPS 138 Kbps 6 FPS 69 Kbps 3 FPS 23 Kbps 1 FPS PEGEL7 461 Kbps 25 FPS 221 Kbps 12 FPS 111 Kbps 6 FPS 55 Kbps 3 FPS 18 Kbps 1 FPS PEGEL6 346 Kbps 25 FPS 166 Kbps 12 FPS 83 Kbps 6 FPS 41 Kbps 3 FPS 14 Kbps 1 FPS PEGEL5 288 Kbps 25 FPS 138 Kbps 12 FPS 69 Kbps 6 FPS 35 Kbps 3 FPS 12 Kbps 1 FPS PEGEL4 230 Kbps 25 FPS 111 Kbps 12 FPS 55 Kbps 6 FPS 28 Kbps 3 FPS 9 Kbps 1 FPS PEGEL3 173 Kbps 25 FPS 83 Kbps 12 FPS 41 Kbps 6 FPS 21 Kbps 3 FPS 7 Kbps 1 FPS PEGEL2 115 Kbps 25 FPS 55 Kbps 12 FPS 28 Kbps 6 FPS 14 Kbps 3 FPS 5 Kbps 1 FPS PEGEL1 58 Kbps 25 FPS 28 Kbps 12 FPS 14 Kbps 6 FPS 7 Kbps 3 FPS 2 Kbps 1 FPS Deutsch _85 ● ANHANG 25 FPS 922 Kbps 25 FPS Qualität anhang FEHLERSUCHE PROBLEM LÖSUNG y Überprüfen Sie, ob die Netzwerkeinstellungen der Kamera entsprechend sind. y Kontrollieren Sie, oballe Netzwerkkabel korrekt angechlossen wurden. Ich kann von einem Webbrowser nicht auf die Kamera zugreifen. y Prüfen Sie bei einer Verbindung über DHCP, ob die Kamera dynamische IP-Adressen problemlos erhalten kann. y Prüfen Sie bei einer Verbindung über DDNS URL, ob die MAC- Adresse korrekt eingegeben wurde. y Prüfen Sie, wenn die Kamera mit einem Router verbunden ist, ob die Portweiterleitung korrekt konfiguriert ist. y Verbundene Viewer werden nach etwaigen Änderungen an der Kamera oder den Netzwerkkonfigurationen getrennt. Der Viewer wurde während der Überwachung getrennt. y Prüfen Sie alle Netzwerkverbindungen. Ich kann mit einem Registerbrowser von Internet Explorer 7.0 nicht an das System verbinden. y Wenn Sie versuchen das System mit einem Registerbrowser zu verbinden, wird dieselbe Cookie-Information gemeinsam benutzt und führt bei der Verbindung zu Fehlern. Öffnen Sie deshalb ein neues Browserfenster, um zum System zu verbinden, statt einen Registerbrowser zu verwenden. Die an das Netzwerk verbundene Kamera wird im IPInstallationsprogramm nicht erkannt. y Schalten Sie die Firewall-Einstellungen an Ihrem PC aus und suchen Sie dann die Kamera erneut. Die Bilder überlappen. y Prüfen Sie, ob zwei oder mehr Kameras auf einer einzigen MulticastAdresse anstelle verschiedener Adressen festgelegt sind. Wenn eine einzige Adresse für mehrere Kameras verwendet wird, können die Bilder überlappen. Es wird kein Bild eingeblendet. y Wenn die Übertragungsmethode auf Multicast festgelegt ist, müssen Sie überprüfen, ob ein Router vorhanden ist der Multicast im LAN, an das die Kamera verbunden ist, unterstützt. 86_ anhang y Wenn die Kamera über ein xDSL-Netzwerk verbunden ist, kann der Viewer bei schlechten Netzwerkbedingungen getrennt werden. PROBLEM LÖSUNG y Überpüfen Sie die Einstellungen in folgender Reihenfolge: A. NTP muss korrekt konfiguriert werden. B. Die Funktion <Intelligente Videoanalyse> sollte auf <Aktivieren> gesetzt werden. C. Alarm Videoübertragung muss aktiviert sein. D. Prüfen Sie auf einen Zeitplankonflikt. Kann die Option <Regeln einstellen> auch dann konfiguriert y Ja, das ist möglich. Sie können trotz der Einstellungen für die Intelligente werden, wenn <Intelligente Videoanalyse auch die Regeln für Ereignisse festlegen. Videoanalyse> auf <Deaktivieren> gesetzt wurde? Es wird trotz Ereignis der Intelligenten Videoanalyse kein Signal ausgegeben. Speicherung auf der SDSpeicherkarte nicht möglich. Die Anzeige für die SDSpeicherkarte ist nicht zu sehen, obwohl die SD-Speicherkarte eingelegt wurde. Die SD-Speicherkarte ist eingelegt, die Kamera funktioniert jedoch nicht richtig. Die SD-Speicherkarte kann nicht formatiert werden. y Überprüfen Sie die Einstellungen für den Alarmsignal-Port. y Überprüfen Sie, ob die Speicherkarte defekt ist. y Überprüfen Sie, ob der Schreibschutz der Speicherkarte auf „SPERRE“ gesetzt wurde. y Überprüfen Sie, ob die Speicherkarte defekt ist. y Überprüfen Sie, ob unter <Setup> - <Ereignis> - <Alarmbild-Setup> die Option <SD-Kartenspeicherung> aktiviert ist. y Überprüfen Sie, ob die Speicherkarte richtig herum eingelegt ist. Es kann nicht garantiert werden, dass eine Speicherkarte, die mit anderen Geräten formatiert wurde, in dieser Kamera richtig funktioniert. y Formatieren Sie die Speicherkarte unter <Setup> - <Ereignis> <Aufnahmesetup> erneut. y Überprüfen Sie, ob der Schreibschutz der Speicherkarte auf „SPERRE“ gesetzt wurde. Deutsch _87 ● ANHANG Bei Auftreten eines Ereignisses der Intelligenten Videoanalyse wird auch dann keine JPEGDatei über FTP/SMTP versandt, wenn die Funktion <Intelligente Videoanalyse> auf <Aktivieren> gesetzt wurde. GPL/LGPL SOFTWARE LICENSE The software included in this product contains copyrighted software that is licensed under the GPL/LGPL. You may obtain the complete Corresponding Source code from us for a period of three years after our last shipment of this product by sending email to [email protected] If you want to obtain the complete Corresponding Source code in the physical medium such as CD-ROM, the cost of physically performing source distribution might be charged. y GPL S/W - Base Kernel, Busybox, Sysvinit, dosfstools y LGPL S/W - gLibc, Inetutils GNU GENERAL PUBLIC LICENSE Version 2, June 1991 Copyright (C)1989, 1991 Free Software Foundation, Inc. 51 Franklin Street,Fifth Floor, Boston, MA 02110-1301, USA Everyone is permitted to copy and distribute verbatim copies of this license document, but changing it is not allowed. Preamble The licenses for most software are designed to take away your freedom to share and change it. By contrast, the GNU General Public License is intended to guarantee your freedom to share and change free software-- to make sure the software is free for all its users. This General Public License applies to most of the Free Software Foundation's software and to any other program whose authors commit to using it. (Some other Free Software Foundation software is covered by the GNU Lesser General Public License instead.) You can apply it to your programs, too. When we speak of free software, we are referring to freedom, not price. Our General Public Licenses are designed to make sure that you have the freedom to distribute copies of free software (and charge for this service if you wish), that you receive source code or can get it if you want it, that you can change the software or use pieces of it in new free programs ; and that you know you can do these things. To protect your rights, we need to make restrictions that forbid anyone to deny you these rights or to ask you to surrender the rights. These restrictions translate to certain responsibilities for you if you distribute copies of the software, or if you modify it. For example, if you distribute copies of such a program, whether gratis or for a fee, you must give the recipients all the rights that you have. You must make sure that they, too, receive or can get the source code. And you must show them these terms so they know their rights. We protect your rights with two steps : (1)copyright the software, and (2)offer you this license which gives you legal permission to copy, distribute and/or modify the software. Also, for each author's protection and ours, we want to make certain that everyone understands that there is no warranty for this free software. If the software is modified by someone else and passed on, we want its recipients to know that what they have is not the original, so that any problems introduced by others will not reflect on the original authors' reputations. Finally, any free program is threatened constantly by software patents. We wish to avoid the danger that redistributors of a free program will individually obtain patent licenses, in effect making the program proprietary. To prevent this, we have made it clear that any patent must be licensed for everyone's free use or not licensed at all. The precise terms and conditions for copying, distribution and modification follow. TERMS AND CONDITIONS FOR COPYING, DISTRIBUTION AND MODIFICATION Version 2, June 1991 Copyright (C) 1989, 1991 Free Software Foundation, Inc. 51 Franklin S 0. This License applies to any program or other work which contains a notice placed by the copyright holder saying it may be distributed under the terms of this General Public License. The "Program", below, refers to any such program or work, and a "work based on the Program" means either the Program or any derivative work under copyright law : that is to say, a work containing the Program or a portion of it, either verbatim or with modifications and/or translated into another language. (Hereinafter, translation is included without limitation in the term "modification".) Each licensee is addressed as "you". Activities other than copying, distribution and modification are not covered by this License ; they are outside its scope. The act of running the Program is not restricted, and the output from the Program is covered only if its contents constitute a work based on the Program (independent of having been made by running the Program). Whether that is true depends on what the Program does. 1. You may copy and distribute verbatim copies of the Program's source code as you receive it, in any medium, provided that you conspicuously and appropriately publish on each copy an appropriate copyright notice and disclaimer of warranty; keep intact all the notices that refer to this License and to the absence of any warranty ; and give any other recipients of the Program a copy of this License along with the Program. You may charge a fee for the physical act of transferring a copy, and you may at your option offer warranty protection in exchange for a fee. 2. You may modify your copy or copies of the Program or any portion of it, thus forming a work based on the Program, and copy and distribute such modifications or work under the terms of Section 1 above, provided that you also meet all of these conditions : a) You must cause the modified files to carry prominent notices stating that you changed the files and the date of any change. b) You must cause any work that you distribute or publish, that in whole or in part contains or is derived from the Program or any part thereof, to be licensed as a whole at no charge to all third parties under the terms of this License. c) If the modified program normally reads commands interactively when run,you must cause it, when started running for such interactive use in the most ordinary way, to print or display an announcement including an appropriate copyright notice and a notice that there is no warranty (or else, saying that you provide a warranty) and that users may redistribute the program under these conditions, and telling the user how to view a copy of this License. (Exception:if the Program itself is interactive but does not normally print such an announcement, your work based on the Program is not required to print an announcement.) These requirements apply to the modified work as a whole. If identifiable sections of that work are not derived from the Program, and can be reasonably considered independent and separate works in themselves, then this License, and its terms, do not apply to those sections when you distribute them as separate works. But when you distribute the same sections as part of a whole which is a work based on the Program, the distribution of the whole must be on the terms of this License, whose permissions for other licensees extend to the entire whole, and thus to each and every part regardless of who wrote it. Thus, it is not the intent of this section to claim rights or contest your rights to work written entirely by you ; rather, the intent is to exercise the right to control the distribution of derivative or collective works based on the Program. In addition, mere aggregation of another work not based on the Program with the Program (or with a work based on the Program)on a volume of a storage or distribution medium does not bring the other work under the scope of this License. 3. You may copy and distribute the Program (or a work based on it, under Section 2)in object code or executable form under the terms of Sections 1 and 2 above provided that you also do one of the following : a) Accompany it with the complete corresponding machine-readable source code, which must be distributed under the terms of Sections 1 and 2 above on a medium customarily used for software interchange ; or, b) Accompany it with a written offer, valid for at least three years, to give any third party, for a charge no more than your cost of physically performing source distribution, a complete machinereadable copy of the corresponding source code, to be distributed under the terms of Sections 1 and 2 above on a medium customarily used for software interchange ; or, c) Accompany it with the information you received as to the offer to distribute corresponding source code. (This alternative is allowed only for noncommercial distribution and only if you received the program in object code or executable form with such an offer, in accord with Subsection b above.) The source code for a work means the preferred form of the work for making modifications to it. For an executable work, complete source code means all the source code for all modules it contains, plus any associated interface definition files, plus the scripts used to control compilation and installation of the executable. However, as a special exception, the source code distributed need not include anything that is normally distributed (in either source or binary form)with the major components (compiler, kernel, and so on)of the operating system on which the executable runs, unless that component itself accompanies the executable. If distribution of executable or object code is made by offering access to copy from a designated place, then offering equivalent access to copy the source code from the same place counts as distribution of the source code, even though third parties are not compelled to copy the source along with the object code. 4. You may not copy, modify, sublicense, or distribute the Program except as expressly provided under this License. Any attempt otherwise to copy, modify, sublicense or distribute the Program is void, and will automatically terminate your rights under this License. However, parties who have received copies, or rights, from you under this License will not have their licenses terminated so long as such parties remain in full compliance. 5. You are not required to accept this License, since you have not signed it. However, nothing else grants you permission to modify or distribute the Program or its derivative works. These actions are prohibited by law if you do not accept this License.Therefore, by modifying or distributing the Program (or any work based on the Program), you indicate your acceptance of this License to do so, and all its terms and conditions for copying, distributing or modifying the Program or works based on it. 6. Each time you redistribute the Program (or any work based on the Program), the recipient automatically receives a license from the original licensor to copy, distribute or modify the Program subject to these terms and conditions. You may not impose any further restrictions on the recipients' exercise of the rights granted herein. You are not responsible for enforcing compliance by third parties to this License. 7. If, as a consequence of a court judgment or allegation of patent infringement or for any other reason (not limited to patent issues), conditions are imposed on you (whether by court order, agreement or otherwise)that contradict the conditions of this License, they do not excuse you from the conditions of this License. If you cannot distribute so as to satisfy simultaneously your obligations under this License and any other pertinent obligations, then as a consequence you may not distribute the Program at all. For example, if a patent license would not permit royalty-free redistribution of the Program by all those who receive copies directly or indirectly through you, then the only way you could satisfy both it and this License would be to refrain entirely from distribution of the Program. If any portion of this section is held invalid or unenforceable under any particular circumstance, the balance of the section is intended to apply and the section as a whole is intended to apply in other circumstances. It is not the purpose of this section to induce you to infringe any patents or other property right claims or to contest validity of any such claims; this section has the sole purpose of protecting the integrity of the free software distribution system, which is implemented by public license practices. Many people have made generous contributions to the wide range of software distributed through that system in reliance on consistent application of that system ; it is up to the author/donor to decide if he or she is willing to distribute software through any other system and a licensee cannot impose that choice. This section is intended to make thoroughly clear what is believed to be a consequence of the rest of this License. 8. If the distribution and/or use of the Program is restricted in certain countries either by patents or by copyrighted interfaces, the original copyright holder who places the Program under this License may add an explicit geographical distribution limitation excluding those countries,so that distribution is permitted only in or among countries not thus excluded. In such case, this License incorporates the limitation as if written in the body of this License. 9. The Free Software Foundation may publish revised and/or new versions of the General Public License from time to time. Such new versions will be similar in spirit to the present version, but may differ in detail to address new problems or concerns. Each version is given a distinguishing version number. If the Program specifies a version number of this License which applies to it and "any later version", you have the option of following the terms and conditions either of that version or of any later version published by the Free Software Foundation. If the Program does not specify a version number of this License, you may choose any version ever published by the Free Software Foundation. 10. If you wish to incorporate parts of the Program into other free programs whose distribution conditions are different, write to the author to ask for permission. For software which is copyrighted by the Free Software Foundation,write to the Free Software Foundation ; we sometimes make exceptions for this. Our decision will be guided by the two goals of preserving the free status of all derivatives of our free software and of promoting the sharing and reuse of software generally. NO WARRANTY 11. BECAUSE THE PROGRAM IS LICENSED FREE OF CHARGE, THERE IS NO WARRANTY FOR THE PROGRAM, TO THE EXTENT PERMITTED BY APPLICABLE LAW. EXCEPT WHEN OTHERWISE STATED IN WRITING THE COPYRIGHT HOLDERS AND/OR OTHER PARTIES PROVIDE THE PROGRAM "ASIS" WITHOUT WARRANTY OF ANY KIND, EITHER EXPRESSED OR IMPLIED, INCLUDING, BUT NOT LIMITED TO, THE IMPLIED WARRANTIES OF MERCHANTABILITY AND FITNESS FOR A PARTICULAR PURPOSE. THE ENTIRE RISK AS TO THE QUALITY AND PERFORMANCE OF THE PROGRAM IS WITH YOU. SHOULD THE PROGRAMPROVE DEFECTIVE, YOU ASSUME THE COST OF ALL NECESSARY SERVICING, REPAIR OR CORRECTION. 12. IN NO EVENT UNLESS REQUIRED BY APPLICABLE LAW OR AGREED TO IN WRITING WILL ANY COPYRIGHT HOLDER, OR ANY OTHER PARTY WHO MAY MODIFY AND/OR REDISTRIBUTE DAMAGES, INCLUDING ANY GENERAL, SPECIAL, INCIDENTAL OR CONSEQUENTIAL DAMAGES ARISING OUT OF THE USE OR INABILITY TO USE THE PROGRAM (INCLUDING BUT NOT LIMITED TO LOSS OF DATA OR DATA BEING RENDERED INACCURATE OR LOSSES SUSTAINED BY YOU OR THIRD PARTIES OR A FAILURE OF THE PROGRAM TO OPERATE WITH ANY OTHER PROGRAMS), EVEN IF SUCH HOLDER OR OTHER PARTY HAS BEEN ADVISED OF THE POSSIBILITY OF SUCH DAMAGES. END OF TERMS AND CONDITIONS How to Apply These Terms to Your New Programs If you develop a new program, and you want it to be of the greatest possible use to the public, the best way to achieve this is to make it free software which everyone can redistribute and change under these terms. To do so, attach the following notices to the program. It is safest to attach them to the start of each source file to most effectively convey the exclusion of warranty ; and each file should have at least the "copyright" line and a pointer to where the full notice is found. one line to give the program's name and an idea of what it does. Copyright (C)yyyy name of author This program is free software ; you can redistribute it and/or modify it under the terms of the GNU General Public License as published by the Free Software Foundation ; either version 2 of the License, or (at your option)any later version. This program is distributed in the hope that it will be useful, but WITHOUT ANY WARRANTY ; without even the implied warranty of MERCHANTABILITY or FITNESS FOR A PARTICULAR PURPOSE. See the GNU General Public License for more details. You should have received a copy of the GNU General Public License along with this program ; if not, write to the Free Software Foundation, Inc.,51 Franklin Street, Fifth Floor, Boston, MA 02110-1301, USA. Also add information on how to contact you by electronic and paper mail. If the program is interactive, make it output a short notice like this when it starts in an interactive mode : program is a subroutine library, you may consider it more useful to permit linking proprietary applications with the library. If this is what you want to do, use the GNU Lesser General Public License instead of this License. GNU GENERAL PUBLIC LICENSE Version 3, 29 June 2007 Copyright © 2007 Free Software Foundation, Inc. <http://fsf.org/> Everyone is permitted to copy and distribute verbatim copies of this license document, but changing it is not allowed. Gnomovision version 69, Preamble Copyright (C) year name of author The GNU General Public License is a free, copyleft Gnomovision comes with ABSOLUTELY NO WARRANTY ; for details type ‘show w’. This is free software, and you are welcome to redistribute it under certain conditions ; type ‘show c’ for details. The hypothetical commands ‘show w’ and ‘show c’ should show the appropriate parts of the General Public License. Of course, the commands you use may be called something other than ‘show w’ and ‘show c’ ; they could even be mouse-clicks or menu items-- whatever suits your program. You should also get your employer (if you work as a programmer)or your school, if any, to sign a "copyright disclaimer" for the program,if necessary. Here is a sample ; alter the names: Yoyodyne, Inc.,hereby disclaims all copyright interest in the program ‘ Gnomovision’ (which makes passes at compilers) written by James Hacker. signature of Ty Coon, 1 April 1989 Ty Coon, President of Vice This General Public License does not permit incorporating your program into proprietary programs. If your license for software and other kinds of works. The licenses for most software and other practical works are designed to take away your freedom to share and change the works. By contrast, the GNU General Public License is intended to guarantee your freedom to share and change all versions of a program--to make sure it remains free software for all its users. We, the Free Software Foundation, use the GNU General Public License for most of our software; it applies also to any other work released this way by its authors. You can apply it to your programs, too. When we speak of free software, we are referring to freedom, not price. Our General Public Licenses are designed to make sure that you have the freedom to distribute copies of free software (and charge for them if you wish), that you receive source code or can get it if you want it, that you can change the software or use pieces of it in new free programs, and that you know you can do these things. To protect your rights, we need to prevent others from denying you these rights or asking you to surrender the rights. Therefore, you have certain responsibilities if you distribute copies of the software, or if you modify it: responsibilities to respect the freedom of others. For example, if you distribute copies of such a program, whether gratis or for a fee, you must pass on to the recipients the same freedoms that you received. You must make sure that they, too, receive or can get the source code. And you must show them these terms so they know their rights. Developers that use the GNU GPL protect your rights with two steps: (1) assert copyright on the software, and (2) offer you this License giving you legal permission to copy, distribute and/or modify it. For the developers' and authors' protection, the GPL clearly explains that there is no warranty for this free software. For both users' and authors' sake, the GPL requires that modified versions be marked as changed, so that their problems will not be attributed erroneously to authors of previous versions. Some devices are designed to deny users access to install or run modified versions of the software inside them, although the manufacturer can do so. This is fundamentally incompatible with the aim of protecting users' freedom to change the software. The systematic pattern of such abuse occurs in the area of products for individuals to use, which is precisely where it is most unacceptable. Therefore, we have designed this version of the GPL to prohibit the practice for those products. If such problems arise substantially in other domains, we stand ready to extend this provision to those domains in future versions of the GPL, as needed to protect the freedom of users. Finally, every program is threatened constantly by software patents. States should not allow patents to restrict development and use of software on general-purpose computers, but in those that do, we wish to avoid the special danger that patents applied to a free program could make it effectively proprietary. To prevent this, the GPL assures that patents cannot be used to render the program nonfree. The precise terms and conditions for copying, distribution and modification follow. TERMS AND CONDITIONS 0. Definitions. “This License” refers to version 3 of the GNU General Public License. “Copyright” also means copyright-like laws that apply to other kinds of works, such as semiconductor masks. “The Program” refers to any copyrightable work licensed under this License. Each licensee is addressed as “you”. “Licensees” and “recipients” may be individuals or organizations. To “modify” a work means to copy from or adapt all or part of the work in a fashion requiring copyright permission, other than the making of an exact copy. The resulting work is called a “modified version” of the earlier work or a work “based on” the earlier work. A “covered work” means either the unmodified Program or a work based on the Program. To “propagate” a work means to do anything with it that, without permission, would make you directly or secondarily liable for infringement under applicable copyright law, except executing it on a computer or modifying a private copy. Propagation includes copying, distribution (with or without modification), making available to the public, and in some countries other activities as well. To “convey” a work means any kind of propagation that enables other parties to make or receive copies. Mere interaction with a user through a computer network, with no transfer of a copy, is not conveying. An interactive user interface displays “Appropriate Legal Notices” to the extent that it includes a convenient and prominently visible feature that (1) displays an appropriate copyright notice, and (2) tells the user that there is no warranty for the work (except to the extent that warranties are provided), that licensees may convey the work under this License, and how to view a copy of this License. If the interface presents a list of user commands or options, such as a menu, a prominent item in the list meets this criterion. 1. Source Code. The “source code” for a work means the preferred form of the work for making modifications to it. “Object code” means any non-source form of a work. A “Standard Interface” means an interface that either is an official standard defined by a recognized standards body, or, in the case of interfaces specified for a particular programming language, one that is widely used among developers working in that language. The “System Libraries” of an executable work include anything, other than the work as a whole, that (a) is included in the normal form of packaging a Major Component, but which is not part of that Major Component, and (b) serves only to enable use of the work with that Major Component, or to implement a Standard Interface for which an implementation is available to the public in source code form. A “Major Component”, in this context, means a major essential component (kernel, window system, and so on) of the specific operating system (if any) on which the executable work runs, or a compiler used to produce the work, or an object code interpreter used to run it. The “Corresponding Source” for a work in object code form means all the source code needed to generate, install, and (for an executable work) run the object code and to modify the work, including scripts to control those activities. However, it does not include the work's System Libraries, or general-purpose tools or generally available free programs which are used unmodified in performing those activities but which are not part of the work. For example, Corresponding Source includes interface definition files associated with source files for the work, and the source code for shared libraries and dynamically linked subprograms that the work is specifically designed to require, such as by intimate data communication or control flow between those subprograms and other parts of the work. The Corresponding Source need not include anything that users can regenerate automatically from other parts of the Corresponding Source. The Corresponding Source for a work in source code form is that same work. 2. Basic Permissions. All rights granted under this License are granted for the term of copyright on the Program, and are irrevocable provided the stated conditions are met. This License explicitly affirms your unlimited permission to run the unmodified Program. The output from running a covered work is covered by this License only if the output, given its content, constitutes a covered work. This License acknowledges your rights of fair use or other equivalent, as provided by copyright law. You may make, run and propagate covered works that you do not convey, without conditions so long as your license otherwise remains in force. You may convey covered works to others for the sole purpose of having them make modifications exclusively for you, or provide you with facilities for running those works, provided that you comply with the terms of this License in conveying all material for which you do not control copyright. Those thus making or running the covered works for you must do so exclusively on your behalf, under your direction and control, on terms that prohibit them from making any copies of your copyrighted material outside their relationship with you. Conveying under any other circumstances is permitted solely under the conditions stated below. Sublicensing is not allowed; section 10 makes it unnecessary. 3. Protecting Users' Legal Rights From Anti-Circumvention Law. No covered work shall be deemed part of an effective technological measure under any applicable law fulfilling obligations under article 11 of the WIPO copyright treaty adopted on 20 December 1996, or similar laws prohibiting or restricting circumvention of such measures. When you convey a covered work, you waive any legal power to forbid circumvention of technological measures to the extent such circumvention is effected by exercising rights under this License with respect to the covered work, and you disclaim any intention to limit operation or modification of the work as a means of enforcing, against the work's users, your or third parties' legal rights to forbid circumvention of technological measures. 4. Conveying Verbatim Copies. You may convey verbatim copies of the Program's source code as you receive it, in any medium, provided that you conspicuously and appropriately publish on each copy an appropriate copyright notice; keep intact all notices stating that this License and any non-permissive terms added in accord with section 7 apply to the code; keep intact all notices of the absence of any warranty; and give all recipients a copy of this License along with the Program. You may charge any price or no price for each copy that you convey, and you may offer support or warranty protection for a fee. 5. Conveying Modified Source Versions. You may convey a work based on the Program, or the modifications to produce it from the Program, in the form of source code under the terms of section 4, provided that you also meet all of these conditions: a) The work must carry prominent notices stating that you modified it, and giving a relevant date. b) The work must carry prominent notices stating that it is released under this License and any conditions added under section 7. This requirement modifies the requirement in section 4 to “keep intact all notices”. c) You must license the entire work, as a whole, under this License to anyone who comes into possession of a copy. This License will therefore apply, along with any applicable section 7 additional terms, to the whole of the work, and all its parts, regardless of how they are packaged. This License gives no permission to license the work in any other way, but it does not invalidate such permission if you have separately received it. d) If the work has interactive user interfaces, each must display Appropriate Legal Notices; however, if the Program has interactive interfaces that do not display Appropriate Legal Notices, your work need not make them do so. A compilation of a covered work with other separate and independent works, which are not by their nature extensions of the covered work, and which are not combined with it such as to form a larger program, in or on a volume of a storage or distribution medium, is called an “aggregate” if the compilation and its resulting copyright are not used to limit the access or legal rights of the compilation's users beyond what the individual works permit. Inclusion of a covered work in an aggregate does not cause this License to apply to the other parts of the aggregate. 6. Conveying Non-Source Forms. You may convey a covered work in object code form under the terms of sections 4 and 5, provided that you also convey the machinereadable Corresponding Source under the terms of this License, in one of these ways: a) Convey the object code in, or embodied in, a physical product (including a physical distribution medium), accompanied by the Corresponding Source fixed on a durable physical medium customarily used for software interchange. b) Convey the object code in, or embodied in, a physical product (including a physical distribution medium), accompanied by a written offer, valid for at least three years and valid for as long as you offer spare parts or customer support for that product model, to give anyone who possesses the object code either (1) a copy of the Corresponding Source for all the software in the product that is covered by this License, on a durable physical medium customarily used for software interchange, for a price no more than your reasonable cost of physically performing this conveying of source, or (2) access to copy the Corresponding Source from a network server at no charge. c) Convey individual copies of the object code with a copy of the written offer to provide the corresponding Source. This alternative is allowed only occasionally and noncommercially, and only if you received the object code with such an offer, in accord with subsection 6b. d) Convey the object code by offering access from a designated place (gratis or for a charge), and offer equivalent access to the Corresponding Source in the same way through the same place at no further charge. You need not require recipients to copy the Corresponding Source along with the object code. If the place to copy the object code is a network server, the Corresponding Source may be on a different server (operated by you or a third party) that supports equivalent copying facilities, provided you maintain clear directions next to the object code saying where to find the Corresponding Source. Regardless of what server hosts the Corresponding Source, you remain obligated to ensure that it is available for as long as needed to satisfy these requirements. e) Convey the object code using peer-topeer transmission, provided you inform other peers where the object code and Corresponding Source of the work are being offered to the general public at no charge under subsection 6d. A separable portion of the object code, whose source code is excluded from the Corresponding Source as a System Library, need not be included in conveying the object code work. A “User Product” is either (1) a “consumer product”, which means any tangible personal property which is normally used for personal, family, or household purposes, or (2) anything designed or sold for incorporation into a dwelling. In determining whether a product is a consumer product, doubtful cases shall be resolved in favor of coverage. For a particular product received by a particular user, “normally used” refers to a typical or common use of that class of product, regardless of the status of the particular user or of the way in which the particular user actually uses, or expects or is expected to use, the product. A product is a consumer product regardless of whether the product has substantial commercial, industrial or non-consumer uses, unless such uses represent the only significant mode of use of the product. “Installation Information” for a User Product means any methods, procedures, authorization keys, or other information required to install and execute modified versions of a covered work in that User Product from a modified version of its Corresponding Source. The information must suffice to ensure that the continued functioning of the modified object code is in no case prevented or interfered with solely because modification has been made. If you convey an object code work under this section in, or with, or specifically for use in, a User Product, and the conveying occurs as part of a transaction in which the right of possession and use of the User Product is transferred to the recipient in perpetuity or for a fixed term (regardless of how the transaction is characterized), the Corresponding Source conveyed under this section must be accompanied by the Installation Information. But this requirement does not apply if neither you nor any third party retains the ability to install modified object code on the User Product (for example, the work has been installed in ROM). The requirement to provide Installation Information does not include a requirement to continue to provide support service, warranty, or updates for a work that has been modified or installed by the recipient, or for the User Product in which it has been modified or installed. Access to a network may be denied when the modification itself materially and adversely affects the operation of the network or violates the rules and protocols for communication across the network. Corresponding Source conveyed, and Installation Information provided, in accord with this section must be in a format that is publicly documented (and with an implementation available to the public in source code form), and must require no special password or key for unpacking, reading or copying. 7. Additional Terms. “Additional permissions” are terms that supplement the terms of this License by making exceptions from one or more of its conditions. Additional permissions that are applicable to the entire Program shall be treated as though they were included in this License, to the extent that they are valid under applicable law. If additional permissions apply only to part of the Program, that part may be used separately under those permissions, but the entire Program remains governed by this License without regard to the additional permissions. When you convey a copy of a covered work, you may at your option remove any additional permissions from that copy, or from any part of it. (Additional permissions may be written to require their own removal in certain cases when you modify the work.) You may place additional permissions on material, added by you to a covered work, for which you have or can give appropriate copyright permission. Notwithstanding any other provision of this License, for material you add to a covered work, you may (if authorized by the copyright holders of that material) supplement the terms of this License with terms: a) Disclaiming warranty or limiting liability differently from the terms of sections 15 and 16 of this License; or b) Requiring preservation of specified reasonable legal notices or author attributions in that material or in the Appropriate Legal Notices displayed by works containing it; or c) Prohibiting misrepresentation of the origin of that material, or requiring that modified versions of such material be marked in reasonable ways as different from the original version; or d) Limiting the use for publicity purposes of names of licensors or authors of the material; or e) Declining to grant rights under trademark law for use of some trade names, trademarks, or service marks; or f) Requiring indemnification of licensors and authors of that material by anyone who conveys the material (or modified versions of it) with contractual assumptions of liability to the recipient, for any liability that these contractual assumptions directly impose on those licensors and authors. All other non-permissive additional terms are considered “further restrictions” within the meaning of section 10. If the Program as you received it, or any part of it, contains a notice stating that it is governed by this License along with a term that is a further restriction, you may remove that term. If a license document contains a further restriction but permits relicensing or conveying under this License, you may add to a covered work material governed by the terms of that license document, provided that the further restriction does not survive such relicensing or conveying. If you add terms to a covered work in accord with this section, you must place, in the relevant source files, a statement of the additional terms that apply to those files, or a notice indicating where to find the applicable terms. Additional terms, permissive or nonpermissive, may be stated in the form of a separately written license, or stated as exceptions; the above requirements apply either way. 8. Termination. You may not propagate or modify a covered work except as expressly provided under this License. Any attempt otherwise to propagate or modify it is void, and will automatically terminate your rights under this License (including any patent licenses granted under the third paragraph of section 11). from the original licensors, to run, modify and propagate that work, subject to this License. You are not responsible for enforcing compliance by third parties with this License. However, if you cease all violation of this License, then your license from a particular copyright holder is reinstated (a) provisionally, unless and until the copyright holder explicitly and finally terminates your license, and (b) permanently, if the copyright holder fails to notify you of the violation by some reasonable means prior to 60 days after the cessation. An “entity transaction” is a transaction transferring control of an organization, or substantially all assets of one, or subdividing an organization, or merging organizations. If propagation of a covered work results from an entity transaction, each party to that transaction who receives a copy of the work also receives whatever licenses to the work the party's predecessor in interest had or could give under the previous paragraph, plus a right to possession of the Corresponding Source of the work from the predecessor in interest, if the predecessor has it or can get it with reasonable efforts. Moreover, your license from a particular copyright holder is reinstated permanently if the copyright holder notifies you of the violation by some reasonable means, this is the first time you have received notice of violation of this License (for any work) from that copyright holder, and you cure the violation prior to 30 days after your receipt of the notice. Termination of your rights under this section does not terminate the licenses of parties who have received copies or rights from you under this License. If your rights have been terminated and not permanently reinstated, you do not qualify to receive new licenses for the same material under section 10. 9. Acceptance Not Required for Having Copies. You are not required to accept this License in order to receive or run a copy of the Program. Ancillary propagation of a covered work occurring solely as a consequence of using peer-to-peer transmission to receive a copy likewise does not require acceptance. However, nothing other than this License grants you permission to propagate or modify any covered work. These actions infringe copyright if you do not accept this License. Therefore, by modifying or propagating a covered work, you indicate your acceptance of this License to do so. 10. Automatic Licensing of Downstream Recipients. Each time you convey a covered work, the recipient automatically receives a license You may not impose any further restrictions on the exercise of the rights granted or affirmed under this License. For example, you may not impose a license fee, royalty, or other charge for exercise of rights granted under this License, and you may not initiate litigation (including a cross-claim or counterclaim in a lawsuit) alleging that any patent claim is infringed by making, using, selling, offering for sale, or importing the Program or any portion of it. 11. Patents. A “contributor” is a copyright holder who authorizes use under this License of the Program or a work on which the Program is based. The work thus licensed is called the contributor's “contributor version”. A contributor's “essential patent claims” are all patent claims owned or controlled by the contributor, whether already acquired or hereafter acquired, that would be infringed by some manner, permitted by this License, of making, using, or selling its contributor version, but do not include claims that would be infringed only as a consequence of further modification of the contributor version. For purposes of this definition, “control” includes the right to grant patent sublicenses in a manner consistent with the requirements of this License. Each contributor grants you a non-exclusive, worldwide, royalty-free patent license under the contributor's essential patent claims, to make, use, sell, offer for sale, import and otherwise run, modify and propagate the contents of its contributor version. In the following three paragraphs, a “patent license” is any express agreement or commitment, however denominated, not to enforce a patent (such as an express permission to practice a patent or covenant not to sue for patent infringement). To “grant” such a patent license to a party means to make such an agreement or commitment not to enforce a patent against the party. If you convey a covered work, knowingly relying on a patent license, and the Corresponding Source of the work is not available for anyone to copy, free of charge and under the terms of this License, through a publicly available network server or other readily accessible means, then you must either (1) cause the Corresponding Source to be so available, or (2) arrange to deprive yourself of the benefit of the patent license for this particular work, or (3) arrange, in a manner consistent with the requirements of this License, to extend the patent license to downstream recipients. “Knowingly relying” means you have actual knowledge that, but for the patent license, your conveying the covered work in a country, or your recipient's use of the covered work in a country, would infringe one or more identifiable patents in that country that you have reason to believe are valid. If, pursuant to or in connection with a single transaction or arrangement, you convey, or propagate by procuring conveyance of, a covered work, and grant a patent license to some of the parties receiving the covered work authorizing them to use, propagate, modify or convey a specific copy of the covered work, then the patent license you grant is automatically extended to all recipients of the covered work and works based on it. A patent license is “discriminatory” if it does not include within the scope of its coverage, prohibits the exercise of, or is conditioned on the non-exercise of one or more of the rights that are specifically granted under this License. You may not convey a covered work if you are a party to an arrangement with a third party that is in the business of distributing software, under which you make payment to the third party based on the extent of your activity of conveying the work, and under which the third party grants, to any of the parties who would receive the covered work from you, a discriminatory patent license (a) in connection with copies of the covered work conveyed by you (or copies made from those copies), or (b) primarily for and in connection with specific products or compilations that contain the covered work, unless you entered into that arrangement, or that patent license was granted, prior to 28 March 2007. Nothing in this License shall be construed as excluding or limiting any implied license or other defenses to infringement that may otherwise be available to you under applicable patent law. 12. No Surrender of Others' Freedom. If conditions are imposed on you (whether by court order, agreement or otherwise) that contradict the conditions of this License, they do not excuse you from the conditions of this License. If you cannot convey a covered work so as to satisfy simultaneously your obligations under this License and any other pertinent obligations, then as a consequence you may not convey it at all. For example, if you agree to terms that obligate you to collect a royalty for further conveying from those to whom you convey the Program, the only way you could satisfy both those terms and this License would be to refrain entirely from conveying the Program. 13. Use with the GNU Affero General Public License. Notwithstanding any other provision of this License, you have permission to link or combine any covered work with a work licensed under version 3 of the GNU Affero General Public License into a single combined work, and to convey the resulting work. The terms of this License will continue to apply to the part which is the covered work, but the special requirements of the GNU Affero General Public License, section 13, concerning interaction through a network will apply to the combination as such. 14. Revised Versions of this License. The Free Software Foundation may publish revised and/ or new versions of the GNU General Public License from time to time. Such new versions will be similar in spirit to the present version, but may differ in detail to address new problems or concerns. Each version is given a distinguishing version number. If the Program specifies that a certain numbered version of the GNU General Public License “or any later version” applies to it, you have the option of following the terms and conditions either of that numbered version or of any later version published by the Free Software Foundation. If the Program does not specify a version number of the GNU General Public License, you may choose any version ever published by the Free Software Foundation. If the Program specifies that a proxy can decide which future versions of the GNU General Public License can be used, that proxy's public statement of acceptance of a version permanently authorizes you to choose that version for the Program. Later license versions may give you additional or different permissions. However, no additional obligations are imposed on any author or copyright holder as a result of your choosing to follow a later version. 15. Disclaimer of Warranty. THERE IS NO WARRANTY FOR THE PROGRAM, TO THE EXTENT PERMITTED BY APPLICABLE LAW. EXCEPT WHEN OTHERWISE STATED IN WRITING THE COPYRIGHT HOLDERS AND/OR OTHER PARTIES PROVIDE THE PROGRAM “AS IS” WITHOUT WARRANTY OF ANY KIND, EITHER EXPRESSED OR IMPLIED, INCLUDING, BUT NOT LIMITED TO, THE IMPLIED WARRANTIES OF MERCHANTABILITY AND FITNESS FOR A PARTICULAR PURPOSE. THE ENTIRE RISK AS TO THE QUALITY AND PERFORMANCE OF THE PROGRAM IS WITH YOU. SHOULD THE PROGRAM PROVE DEFECTIVE, YOU ASSUME THE COST OF ALL NECESSARY SERVICING, REPAIR OR CORRECTION. 16. Limitation of Liability. IN NO EVENT UNLESS REQUIRED BY APPLICABLE LAW OR AGREED TO IN WRITING WILL ANY COPYRIGHT HOLDER, OR ANY OTHER PARTY WHO MODIFIES AND/OR CONVEYS THE PROGRAM AS PERMITTED ABOVE, BE LIABLE TO YOU FOR DAMAGES, INCLUDING ANY GENERAL, SPECIAL, INCIDENTAL OR CONSEQUENTIAL DAMAGES ARISING OUT OF THE USE OR INABILITY TO USE THE PROGRAM (INCLUDING BUT NOT LIMITED TO LOSS OF DATA OR DATA BEING RENDERED INACCURATE OR LOSSES SUSTAINED BY YOU OR THIRD PARTIES OR A FAILURE OF THE PROGRAM TO OPERATE WITH ANY OTHER PROGRAMS), EVEN IF SUCH HOLDER OR OTHER PARTY HAS BEEN ADVISED OF THE POSSIBILITY OF SUCH DAMAGES. 17. Interpretation of Sections 15 and 16. If the disclaimer of warranty and limitation of liability provided above cannot be given local legal effect according to their terms, reviewing courts shall apply local law that most closely approximates an absolute waiver of all civil liability in connection with the Program, unless a warranty or assumption of liability accompanies a copy of the Program in return for a fee. END OF TERMS AND CONDITIONS GNU LESSER GENERAL PUBLIC LICENSE Version 2.1, February 1999 Copyright (C) 1991, 1999 Free Software Foundation, Inc. 51 Franklin Street, Fifth Floor, Boston, MA 02110-1301 USA Everyone is permitted to copy and distribute verbatim copies of this license document, but changing it is not allowed. [This is the first released version of the Lesser GPL. It also counts as the successor of the GNU Library Public License, version 2, hence the version number 2.1.] Preamble The licenses for most software are designed to take away your freedom to share and change it. By contrast, the GNU General Public Licenses are intended to guarantee your freedom to share and change free software to make sure the software is free for all its users. This license, the Lesser General Public License, applies to some specially designated software packages-typically libraries-of the Free Software Foundation and other authors who decide to use it. You can use it too, but we suggest you first think carefully about whether this license or the ordinary General Public License is the better strategy to use in any particular case, based on the explanations below. When we speak of free software, we are referring to freedom of use, not price. Our General Public Licenses are designed to make sure that you have the freedom to distribute copies of free software (and charge for this service if you wish); that you receive source code or can get it if you want it; that you can change the software and use pieces of it in new free programs; and that you are informed that you can do these things. To protect your rights, we need to make restrictions that forbid distributors to deny you these rights or to ask you to surrender these rights. These restrictions translate to certain responsibilities for you if you distribute copies of the library or if you modify it. For example, if you distribute copies of the library, whether gratis or for a fee, you must give the recipients all the rights that we gave you. You must make sure that they, too, receive or can get the source code. If you link other code with the library, you must provide complete object files to the recipients, so that they can relink them with the library after making changes to the library and recompiling it. And you must show them these terms so they know their rights. We protect your rights with a two-step method: (1) we copyright the library, and (2) we offer you this license, which gives you legal permission to copy, distribute and/or modify the library. To protect each distributor, we want to make it very clear that there is no warranty for the free library. Also, if the library is modified by someone else and passed on, the recipients should know that what they have is not the original version, so that the original author’s reputation will not be affected by problems that might be introduced by others. Finally, software patents pose a constant threat to the existence of any free program. We wish to make sure that a company cannot effectively restrict the users of a free program by obtaining a restrictive license from a patent holder. Therefore, we insist that any patent license obtained for a version of the library must be consistent with the full freedom of use specified in this license. Most GNU software, including some libraries, is covered by the ordinary GNU General Public License. This license, the GNU Lesser General Public License, applies to certain designated libraries, and is quite different from the ordinary General Public License. We use this license for certain libraries in order to permit linking those libraries into non-free programs. When a program is linked with a library, whether statically or using a shared library, the combination of the two is legally speaking a combined work, a derivative of the original library. The ordinary General Public License therefore permits such linking only if the entire combination fits its criteria of freedom. The Lesser General Public License permits more lax criteria for linking other code with the library. We call this license the “Lesser” General Public License because it does Less to protect the user’s freedom than the ordinary General Public License. It also provides other free software developers Less of an advantage over competing nonfree programs. These disadvantages are the reason we use the ordinary General Public License for many libraries. However, the Lesser license provides advantages in certain special circumstances. For example, on rare occasions, there may be a special need to encourage the widest possible use of a certain library, so that it becomes a de-facto standard. To achieve this, non-free programs must be allowed to use the library. A more frequent case is that a free library does the same job as widely used non-free libraries. In this case, there is little to gain by limiting the free library to free software only, so we use the Lesser General Public License. In other cases, permission to use a particular library in non-free programs enables a greater number of people to use a large body of free software. For example, permission to use the GNU C Library in non-free programs enables many more people to use the whole GNU operating system, as well as its variant, the GNU/ Linux operating system. Although the Lesser General Public License is Less protective of the users’ freedom, it does ensure that the user of a program that is linked with the Library has the freedom and the wherewithal to run that program using a modified version of the Library. The precise terms and conditions for copying, distribution and modification follow. Pay close attention to the difference between a “work based on the library” and a “work that uses the library”. The former contains code derived from the library, whereas the latter must be combined with the library in order to run. TERMS AND CONDITIONS FOR COPYING, DISTRIBUTION AND MODIFICATION 0. This License Agreement applies to any software library or other program which contains a notice placed by the copyright holder or other authorized party saying it may be distributed under the terms of this Lesser General Public License (also called “this License”). Each licensee is addressed as “you”. A “library” means a collection of software functions and/ or data prepared so as to be conveniently linked with application programs (which use some of those functions and data) to form executables. The “Library”, below, refers to any such software library or work which has been distributed under these terms. A “work based on the Library” means either the Library or any derivative work under copyright law: that is to say, a work containing the Library or a portion of it, either verbatim or with modifications and/or translated straightforwardly into another language. (Hereinafter, translation is included without limitation in the term “modification”.) “Source code” for a work means the preferred form of the work for making modifications to it. For a library, complete source code means all the source code for all modules it contains, plus any associated interface definition files, plus the scripts used to control compilation and installation of the library. Activities other than copying, distribution and modification are not covered by this License; they are outside its scope. The act of running a program using the Library is not restricted, and output from such a program is covered only if its contents constitute a work based on the Library (independent of the use of the Library in a tool for writing it). Whether that is true depends on what the Library does and what the program that uses the Library does. 1. You may copy and distribute verbatim copies of the Library’s complete source code as you receive it, in any medium, provided that you conspicuously and appropriately publish on each copy an appropriate copyright notice and disclaimer of warranty; keep intact all the notices that refer to this License and to the absence of any warranty; and distribute a copy of this License along with the Library. You may charge a fee for the physical act of transferring a copy, and you may at your option offer warranty protection in exchange for a fee. 2. You may modify your copy or copies of the Library or any portion of it, thus forming a work based on the Library, and copy and distribute such modifications or work under the terms of Section 1 above, provided that you also meet all of these conditions: a) The modified work must itself be a software library. b) You must cause the files modified to carry prominent notices stating that you changed the files and the date of any change. c) You must cause the whole of the work to be licensed at no charge to all third parties under the terms of this License. d) If a facility in the modified Library refers to a function or a table of data to be supplied by an application program that uses the facility, other than as an argument passed when the facility is invoked, then you must make a good faith effort to ensure that, in the event an application does not supply such function or table, the facility still operates, and performs whatever part of its purpose remains meaningful. (For example, a function in a library to compute square roots has a purpose that is entirely well-defined independent of the application. Therefore, Subsection 2d requires that any application-supplied function or table used by this function must be optional: if the application does not supply it, the square root function must still compute square roots.) These requirements apply to the modified work as a whole. If identifiable sections of that work are not derived from the Library, and can be reasonably considered independent and separate works in themselves, then this License, and its terms, do not apply to those sections when you distribute them as separate works. But when you distribute the same sections as part of a whole which is a work based on the Library, the distribution of the whole must be on the terms of this License, whose permissions for other licensees extend to the entire whole, and thus to each and every part regardless of who wrote it. Thus, it is not the intent of this section to claim rights or contest your rights to work written entirely by you; rather, the intent is to exercise the right to control the distribution of derivative or collective works based on the Library. In addition, mere aggregation of another work not based on the Library with the Library (or with a work based on the Library) on a volume of a storage or distribution medium does not bring the other work under the scope of this License. 3. You may opt to apply the terms of the ordinary GNU General Public License instead of this License to a given copy of the Library. To do this, you must alter all the notices that refer to this License, so that they refer to the ordinary GNU General Public License, version 2, instead of to this License. (If a newer version than version 2 of the ordinary GNU General Public License has appeared, then you can specify that version instead if you wish.) Do not make any other change in these notices. Once this change is made in a given copy, it is irreversible for that copy, so the ordinary GNU General Public License applies to all subsequent copies and derivative works made from that copy. This option is useful when you wish to copy part of the code of the Library into a program that is not a library. 4. You may copy and distribute the Library (or a portion or derivative of it, under Section 2) in object code or executable form under the terms of Sections 1 and 2 above provided t hat you accompany it with the complete corresponding machine-readable source code, which must be distributed under the terms of Sections 1 and 2 above on a medium customarily used for software interchange. If distribution of object code is made by offering access to copy from a designated place, then offering equivalent access to copy the source code from the same place satisfies the requirement to distribute the source code, even though third parties are not compelled to copy the source along with the object code. 5. A program that contains no derivative of any portion of the Library, but is designed to work with the Library by being compiled or linked with it, is called a “work that uses the Library”. Such a work, in isolation, is not a derivative work of the Library, and therefore falls outside the scope of this License. However, linking a “work that uses the Library” with the Library creates an executable that is a derivative of the Library (because it contains portions of the Library), rather than a “work that uses the library”. The executable is therefore covered by this License. Section 6 states terms for distribution of such executables. When a “work that uses the Library” uses material from a header file that is part of the Library, the object code for the work may be a derivative work of the Library even though the source code is not. Whether this is true is especially significant if the work can be linked without the Library, or if the work is itself a library. The threshold for this to be true is not precisely defined by law. If such an object file uses only numerical parameters, data structure layouts and accessors, and small macros and small inline functions (ten lines or less in length), then the use of the object file is unrestricted, regardless of whether it is legally a derivative work. (Executables containing this object code plus portions of the Library will still fall under Section 6.) Otherwise, if the work is a derivative of the Library, you may distribute the object code for the work under the terms of Section 6. Any executables containing that work also fall under Section 6, whether or not they are linked directly with the Library itself. 6. As an exception to the Sections above, you may also combine or link a “work that uses the Library” with the Library to produce a work containing portions of the Library, and distribute that work under terms of your choice, provided that the terms permit modification of the work for the customer’s own use and reverse engineering for debugging such modifications. You must give prominent notice with each copy of the work that the Library is used in it and that the Library and its use are covered by this License. You must supply a copy of this License. If the work during execution displays copyright notices, you must include the copyright notice for the Library among them, as well as a reference directing the user to the copy of this License. Also, you must do one of these things: a) Accompany the work with the complete corresponding machine-readable source code for the Library including whatever changes were used in the work (which must be distributed under Sections 1 and 2 above); and, if the work is an executable linked with the Library, with the complete machine readable “ work that uses the Library”, as object code and/or source code, so that the user can modify the Library and then relink to produce a modified executable containing the modified Library. (It is understood that the user who changes the contents of definitions files in the Library will not necessarily be able to recompile the application to use the modified definitions.) b) Use a suitable shared library mechanism for linking with the Library. A suitable mechanism is one that (1) uses at run time a copy of the library already present on the user’s computer system, rather than copying library functions into the executable, and (2) will operate properly with a modified version of the library, if the user installs one, as long as the modified version is interfacecompatible with the version that the work was made with. c) Accompany the work with a written offer, valid for at least three years, to give the same user the materials specified in Subsection 6a, above, for a charge no more than the cost of performing this distribution. d) If distribution of the work is made by offering access to copy from a designated place, offer equivalent access to copy the above specified materials from the same place. e) Verify that the user has already received a copy of these materials or that you have already sent this user a copy. For an executable, the required form of the “work that uses the Library” must include any data and utility programs needed for reproducing the executable from it. However, as a special exception, the materials to be distributed need not include anything that is normally distributed (in either source or binary form) with the major components (compiler, kernel, and so on) of the operating system on which the executable runs, unless that component itself accompanies the executable. It may happen that this requirement contradicts the license restrictions of other proprietary libraries that do not normally accompany the operating system. Such a contradiction means you cannot use both them and the Library together in an executable that you distribute. 7. You may place library facilities that are a work based on the Library side-byside in a single library together with other library facilities not covered by this License, and distribute such a combined library, provided that the separate distribution of the work based on the Library and of the other library facilities is otherwise permitted, and provided that you do these two things: a) Accompany the combined library with a copy of the same work based on the Library, uncombined with any other library facilities. This must be distributed under the terms of the Sections above. b) Give prominent notice with the combined library of the fact that part of it is a work based on the Library, and explaining where to find the accompanying uncombined form of the same work. 8. You may not copy, modify, sublicense, link with, or distribute the Library except as expressly provided under this License. Any attempt otherwise to copy, modify, sublicense, link with, or distribute the Library is void, and will automatically terminate your rights under this License. However, parties who have received copies, or rights, from you under this License will not have their licenses terminated so long as such parties remain in full compliance. 9. You are not required to accept this License, since you have not signed it. However, nothing else grants you permission to modify or distribute the Library or its derivative works. These actions are prohibited by law if you do not accept this License. Therefore, by modifying or distributing the Library (or any work based on the Library), you indicate your acceptance of this License to do so, and all its terms and conditions for copying, distributing or modifying the Library or works based on it. 10. Each time you redistribute the Library (or any work based on the Library), the recipient automatically receives a license from the original licensor to copy, distribute, link with or modify the Library subject to these terms and conditions. You may not impose any further restrictions on the recipients’ exercise of the rights granted herein. You are not responsible for enforcing compliance by third parties with this License. 11. If, as a consequence of a court judgment or allegation of patent infringement or for any other reason (not limited to patent issues), conditions are imposed on you (whether by court order, agreement or otherwise) that contradict the conditions of this License, they do not excuse you from the conditions of this License. If you cannot distribute so as to satisfy simultaneously your obligations under this License and any other pertinent obligations, then as a consequence you may not distribute the Library at all. For example, if a patent license would not permit royalty free redistribution of the Library by all those who receive copies directly or indirectly through you, then the only way you could satisfy both it and this License would be to refrain entirely from distribution of the Library. If any portion of this section is held invalid or unenforceable under any particular circumstance, the balance of the section is intended to apply, and the section as a whole is intended to apply in other circumstances. It is not the purpose of this section to induce you to infringe any patents or other property right claims or to contest validity of any such claims; this section has the sole purpose of protecting the integrity of the free software distribution system which is implemented by public license practices. Many people have made generous contributions to the wide range of software distributed through that system in reliance on consistent application of that system; it is up to the author/donor to decide if he or she is willing to distribute software through any other system and a licensee cannot impose that choice. This section is intended to make thoroughly clear what is believed to be a consequence of the rest of this License. 12. If the distribution and/or use of the Library is restricted in certain countries either by patents or by copyrighted interfaces, the original copyright holder who places the Library under this License may add an explicit geographical distribution limitation excluding those countries, so that distribution is permitted only in or among countries not thus excluded. In such case, this License incorporates the limitation as if written in the body of this License. 13. The Free Software Foundation may publish revised and/or new versions of the Lesser General Public License from time to time. Such new versions will be similar in spirit to the present version, but may differ in detail to address new problems or concerns. Each version is given a distinguishing version number. If the Library specifies a version number of this License which applies to it and “any later version”, you have the option of following the terms and conditions either of that version or of any later version published by the Free Software Foundation. If the Library does not specify a license version number, you may choose any version ever published by the Free Software Foundation. 14. If you wish to incorporate parts of the Library into other free programs whose distribution conditions are incompatible with these, write to the author to ask for permission. For software which is copyrighted by the Free Software Foundation, write to the Free Software Foundation; we sometimes make exceptions for this. Our decision will be guided by the two goals of preserving the free status of all derivatives of our free software and of promoting the sharing and reuse of software generally. NO WARRANTY 15. BECAUSE THE LIBRARY IS LICENSED FREE OF CHARGE, THERE IS NO WARRANTY FOR THE LIBRARY, TO THE EXTENT PERMITTED BY APPLICABLE LAW. EXCEPT WHEN OTHERWISE STATED IN WRITING THE COPYRIGHT HOLDERS AND/ OR OTHER PARTIES PROVIDE THE LIBRARY “AS IS” WITHOUT WARRANTY OF ANY KIND, EITHER EXPRESSED OR IMPLIED, INCLUDING, BUT NOT LIMITED TO, THE IMPLIED WARRANTIES OF MERCHANTABILITY AND FITNESS FOR A PARTICULAR PURPOSE. THE ENTIRE RISK AS TO THE QUALITY AND PERFORMANCE OF THE LIBRARY IS WITH YOU. SHOULD THE LIBRARY PROVE DEFECTIVE, YOU ASSUME THE COST OF ALL NECESSARY SERVICING, REPAIR OR CORRECTION. 16. IN NO EVENT UNLESS REQUIRED BY APPLICABLE LAW OR AGREED TO IN WRITING WILL ANY COPYRIGHT HOLDER, OR ANY OTHER PARTY WHO MAY MODIFY AND/OR REDISTRIBUTE THE LIBRARY AS PERMITTED ABOVE, BE LIABLE TO YOU FOR DAMAGES, INCLUDING ANY GENERAL, SPECIAL, INCIDENTAL OR CONSEQUENTIAL DAMAGES ARISING OUT OF THE USE OR INABILITY TO USE THE LIBRARY (INCLUDING BUT NOT LIMITED TO LOSS OF DATA OR DATA BEING RENDERED INACCURATE OR LOSSES SUSTAINED BY YOU OR THIRD PARTIES OR A FAILURE OF THE LIBRARY TO OPERATE WITH ANY OTHER SOFTWARE), EVEN IF SUCH HOLDER OR OTHER PARTY HAS BEEN ADVISED OF THE POSSIBILITY OF SUCH DAMAGES. END OF TERMS AND CONDITIONS How to Apply These Terms to Your New Libraries If you develop a new library, and you want it to be of the greatest possible use to the public, we recommend making it free software that everyone can redistribute and change. You can do so by permitting redistribution under these terms (or, alternatively, under the terms of the ordinary General Public License). To apply these terms, attach the following notices to the library. It is safest to attach them to the start of each source file to most effectively convey the exclusion of warranty; and each file should have at least the “copyright” line and a pointer to where the full notice is found. one line to give the library’s name and an idea of what it does. Copyright (C) year name of author This library is free software; you can redistribute it and/ or modify it under the terms of the GNU Lesser General Public License as published by the Free Software Foundation; either version 2.1 of the License, or (at your option) any later version. This library is distributed in the hope that it will be useful, but WITHOUT ANY WARRANTY; without even the implied warranty of MERCHANTABILITY or FITNESS FOR A PARTICULAR PURPOSE. See the GNU Lesser General Public License for more details. You should have received a copy of the GNU Lesser General Public License along with this library; if not, write to the Free Software Foundation, Inc., 51 Franklin Street, Fifth Floor, Boston, MA 02110-1301 USA Also add information on how to contact you by electronic and paper mail. You should also get your employer (if you work as a programmer) or your school, if any, to sign a “copyright disclaimer” for the library, if necessary. Here is a sample; alter the names: Yoyodyne, Inc., hereby disclaims all copyright interest in the library ‘Frob’ (a library for tweaking knobs) written by James Random Hacker. signature of Ty Coon, 1 April 1990 Ty Coon, President of Vice. OpenSSL LICENSE Copyright (c) 1998-2006 The OpenSSL Project. All rights reserved. Redistribution and use in source and binary forms, with or without modification, are permitted provided that the following conditions are met: 1. Redistributions of source code must retain the above copyright notice, this list of conditions and the following disclaimer. 2. Redistributions in binary form must reproduce the above copyright notice, this list of conditions and the following disclaimer in the documentation and/or other materials provided with the distribution. 3. All advertising materials mentioning features or use of this software must display the following acknowledgment: “This product includes software developed by the OpenSSL Project for use in the OpenSSL Toolkit. (http://www. openssl.org/)” 4. The names “OpenSSL Toolkit” and “OpenSSL Project” must not be used to endorse or promote products derived from this software without prior written permission. For written permission, please contact [email protected]. 5. Products derived from this software may not be called “OpenSSL” nor may “OpenSSL” appear in their names without prior written permission of the OpenSSL Project. 6. Redistributions of any form whatsoever must retain the following acknowledgment: “This product includes software developed by the OpenSSL Project for use in the OpenSSL Toolkit (http://www.openssl.org/)” THIS SOFTWARE IS PROVIDED BY THE OpenSSL PROJECT “AS IS” AND ANY EXPRESSED OR IMPLIED WARRANTIES, INCLUDING, BUT NOT LIMITED TO, THE IMPLIED WARRANTIES OF MERCHANTABILITY AND FITNESS FOR A PARTICULAR PURPOSE ARE DISCLAIMED. IN NO EVENT SHALL THE OpenSSL PROJECT OR ITS CONTRIBUTORS BE LIABLE FOR ANY DIRECT, INDIRECT, INCIDENTAL, SPECIAL, EXEMPLARY, OR CONSEQUENTIAL DAMAGES (INCLUDING, BUT NOT LIMITED TO, PROCUREMENT OF SUBSTITUTE GOODS OR SERVICES; LOSS OF USE, DATA, OR PROFITS; OR BUSINESS INTERRUPTION) HOWEVER CAUSED AND ON ANY THEORY OF LIABILITY, WHETHER IN CONTRACT, STRICT LIABILITY, OR TORT (INCLUDING NEGLIGENCE OR OTHERWISE) ARISING IN ANY WAY OUT OF THE USE OF THIS SOFTWARE, EVEN IF ADVISED OF THE POSSIBILITY OF SUCH DAMAGE. This product includes cryptographic software written by Eric Young ([email protected]). This product includes software written by Tim Hudson([email protected]). Original SSLeay License Copyright (C) 1995-1998 Eric Young (eay@ cryptsoft. com) All rights reserved. This package is an SSL implementation written by Eric Young (eay@cryptsoft. com). The implementation was written so as to conform with Netscapes SSL. This library is free for commercial and non-commercial use as long as the following conditions are aheared to. The following conditions apply to all code found in this distribution, be it the RC4, RSA, lhash, DES, etc., code; not just the SSL code. The SSL documentation included with this distribution is covered by the same copyright terms except that the holder is Tim Hudson ([email protected]). Copyright remains Eric Young’s, and as such any Copyright notices in the code are not to be removed. If this package is used in a product, Eric Young should be given attribution as the author of the parts of the library used. This can be in the form of a textual message at program startup or in documentation (online or textual) provided with the package. Redistribution and use in source and binary forms, with or without modification, are permitted provided that the following conditions are met: 1. Redistributions of source code must retain the copyright notice, this list of conditions and the following disclaimer. 2. Redistributions in binary form must reproduce the above copyright notice, this list of conditions and the following disclaimer in the documentation and/or other materials provided with the distribution. 3. All advertising materials mentioning features or use of this software must display the following acknowledgement: “This product includes cryptographic software written by Eric Young (eay@ cryptsoft.com)” The word ‘cryptographic’ can be left out if the rouines from the library being used are not cryptographic related :-). 4. If you include any Windows specific code (or a derivative thereof) from the apps directory (application code) you must include an acknowledgement: “This product includes software written by Tim Hudson (tjh@ cryptsoft.com)” THIS SOFTWARE IS PROVIDED BY ERIC YOUNG ‘‘AS IS AND ANY EXPRESS OR IMPLIED WARRANTIES, INCLUDING, BUT NOT LIMITED TO, THE IMPLIED WARRANTIES OF MERCHANTABILITY AND FITNESS FOR A PARTICULAR PURPOSE ARE DISCLAIMED. IN NO EVENT SHALL THE AUTHOR OR CONTRIBUTORS BE LIABLE FOR ANY DIRECT, INDIRECT, INCIDENTAL, SPECIAL, EXEMPLARY, OR CONSEQUENTIAL DAMAGES (INCLUDING, BUT NOT LIMITED TO, PROCUREMENT OF SUBSTITUTE GOODS OR SERVICES; LOSS OF USE, DATA, OR PROFITS; OR BUSINESS INTERRUPTION) HOWEVER CAUSED AND ON ANY THEORY OF LIABILITY, WHETHER IN CONTRACT, STRICT LIABILITY, OR TORT (INCLUDING NEGLIGENCE OR OTHERWISE) ARISING IN ANY WAY OUT OF THE USE OF THIS SOFTWARE, EVEN IF ADVISED OF THE POSSIBILITY OF SUCH DAMAGE. The licence and distribution terms for any publically available version or derivative of this code cannot be changed. i.e. this code cannot simply be copied and put under another distribution licence [including the GNU Public Licence]. Samsung Techwin hat sich dem Schutz der Umwelt verpflichtet und wendet in allen Phasen des Produktherstellungsprozesses umweltfreundliche Verfahren an, um seinen Kunden umweltgerechtere Produkte zu liefern. Das Eco-Gütesiegel ist ein Zeichen für die Absicht von Samsung Techwin, Produkte zu liefern, und zeigt an, dass die Produkte die RoHS-Richtlinie der EU erfüllen. Korrekte Entsorgung von Altgeräten (Elektroschrott) (In den Ländern der Europäischen Union und anderen europäischen Ländern mit einem separaten Sammelsystem) Die Kennzeichnung auf dem Produkt, Zubehörteilen bzw. auf der dazugehörigen Dokumentation gibt an, dass das Produkt und Zubehörteile (z. B. Ladegerät, Kopfhörer, USB-Kabel) nach ihrer Lebensdauer nicht zusammen mit dem normalen Haushaltsmüll entsorgt werden dürfen. Entsorgen Sie dieses Gerät und Zubehörteile bitte getrennt von anderen Abfällen, um der Umwelt bzw. der menschlichen Gesundheit nicht durch unkontrollierte Müllbeseitigung zu schaden. Helfen Sie mit, das Altgerät und Zubehörteile fachgerecht zu entsorgen, um die nachhaltige Wiederverwertung von stoffl ichen Ressourcen zu fördern. Private Nutzer wenden sich an den Händler, bei dem das Produkt gekauft wurde, oder kontaktieren die zuständigen Behörden, um in Erfahrung zu bringen, wo Sie das Altgerät bzw. Zubehörteile für eine umweltfreundliche Entsorgung abgeben können. Gewerbliche Nutzer wenden sich an ihren Lieferanten und gehen nach den Bedingungen des Verkaufsvertrags vor. Dieses Produkt und elektronische Zubehörteile dürfen nicht zusammen mit anderem Gewerbemüll entsorgt werden. VERKAUFSNETZWERK SAMSUNG TECHWIN CO., LTD. Samsungtechwin R&D Center, 701, Sampyeong-dong, Bundang-gu, Seongnam-si, Gyeonggi-do, Korea, 463-400 TEL : +82-70-7147-8740~60 FAX : +82-31-8018-3745 SAMSUNG TECHWIN AMERICA Inc. 100 Challenger Rd. Suite 700 Ridgefield Park, NJ 07660 Toll Free : +1-877-213-1222 Direct : +1-201-325-6920 Fax : +1-201-373-0124 www.samsungcctvusa.com www.samsungtechwin.com www.samsungsecurity.com www.samsungipolis.com SAMSUNG TECHWIN EUROPE LTD. Samsung House, 1000 Hillswood Drive, Hillswood Business Park Chertsey, Surrey, UNITED KINGDOM KT16 OPS TEL : +44-1932-45-5300 FAX : +44-1932-45-5325


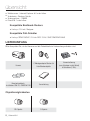

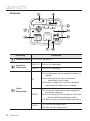
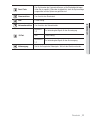
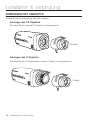
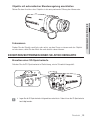
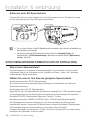
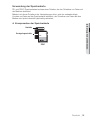
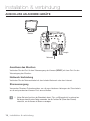
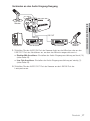
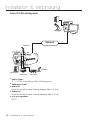
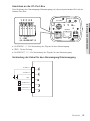
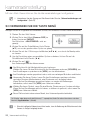
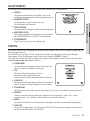
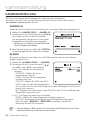
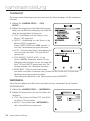
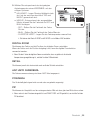
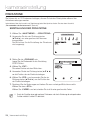
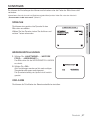
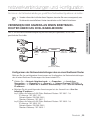
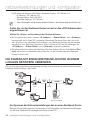
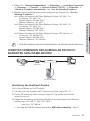
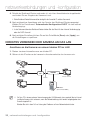
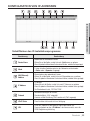
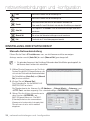
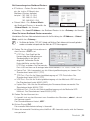
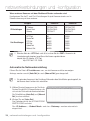
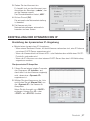


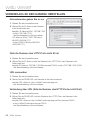
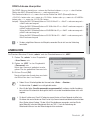
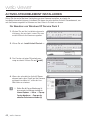
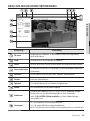
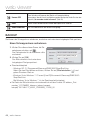
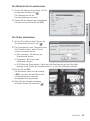
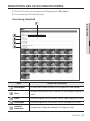
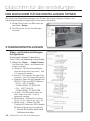
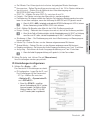
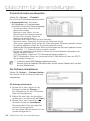
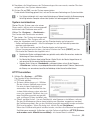
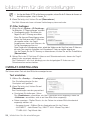
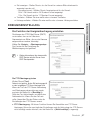
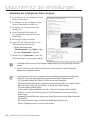
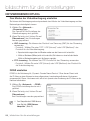
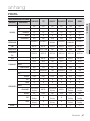
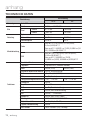
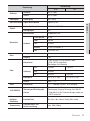
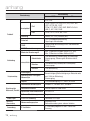
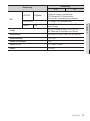
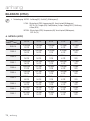


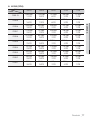
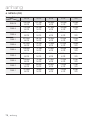
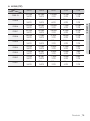
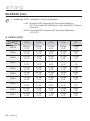

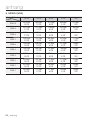
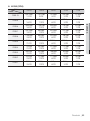
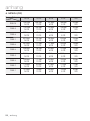

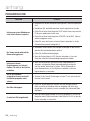
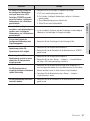


![Handbuch (deutsch) [PDF ]](http://vs1.manualzilla.com/store/data/006796800_1-cbf54affdce1ad3315a659d893f0554a-150x150.png)