1
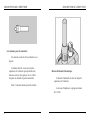
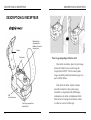
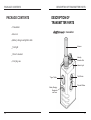
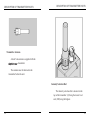
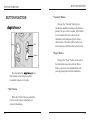
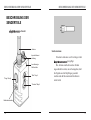
PRINCIPALES CARACTERISTIQUES
2
RAPPORT DE SECURITE ET DE SANTE
DU PRODUIT
3
LE CONTENU DE LA MALLETTE
4
DESCRIPTION DE L’EMETTEUR
5
FONCTIONNEMENT DES BOUTONS
10
DESCRIPTION DU RECEPTEUR
12
CHARGEUR DE BATTERIE
16
COMMENT TESTER VOTRE COLLIER
17
MISE EN PLACE DU COLLIER SUR LE
CHIEN
19
LA CHARGE DES BATTERIES
21
RECEPTION
23
ACCESSOIRES
24
ENTRETIEN
25
GUIDE DE DEPANNAGE
26
GARANTIE ET INFORMATIONS
RELATIVES A LA REPARATION
29
R&TTE DECLARATION DE
CONFORMITE
31
FRANCE
CONTENU
1
PRINCIPALES CARACTERISTIQUES
PRINCIPALES CARACTERISTIQUES
L’émetteur facile à utiliser.
Un bouton d’intensité fonctionnant comme un
rhéostat, augmentant progressivement l’intensité
de stimulation sans aucun saut entre les niveaux
(0-100).
La série
mètres.
a une portée de 400
Type de stimulation - “Nick”, “Continu” et nonstimulation - Pager/Vibration.
Des batteries Ni-MH rechargeables et
remplaçables par 1’utilisateur.
RAPPORTS DE SECURITE ET DE SANTE DU PRODUIT
RAPPORTS DE SECURITE ET DE SANTE DU PRODUIT
Utilisation appropriée du collier
Les colliers sont prévus pour le dressage des
chiens. Ils ne sont pas prévus pour l’utilisation
humaine ou l’usage sur d’autres animaux. La Société
Dogtra-Europe n’assume aucune responsabilité pour
l’usage incorrect du collier de dressage Dogtra.
Chiens agressifs
Dogtra ne recommande pas l’utilisation du collier
par les dresseurs pour corriger les chiens agressifs
envers leur congénère ou l’homme. Dans beaucoup de
cas, le chien associe la stimulation au chien ou à
l’individu qui se trouve en face de lui et devient même
agressif. Ce type de comportement agressif du chien
doit être traité par un spécialiste du dressage.
Collier étanche émetteur résistant à l’eau.
Pas d’antenne externe sur le récepteur du collier.
Un système de double prise sur le chargeur de
batteries permet de recharger en même temps
l’émetteur et le récepteur.
Plus de 999 codes différents d’identifications
préviennent toutes interférences entre les
colliers.
La couleur du LED indique l’état de charge de la
batterie du récepteur.
2
Interférence avec d’autres dispositifs électroniques
Le système de filtrage de la technologie Dogtra
assure un minimum d’interférence avec d’autres
dispositifs électroniques (téléphones portables,
systèmes de surveillances etc.). Notre microprocesseur
numérique offre des milliers de codes uniques pour
éliminer l’interférences avec d’autres colliers.
Activation négligente
Si le bouton “continu” est maintenu pendant 12
secondes ou plus, l’unité s’arrête automatiquement.
Le collier est réactif lorsque vous appuyez de
nouveau sur le bouton.
3
DESCRIPTION DE L EMETTEUR
LE CONTENU DE LA MALLETTE
LE CONTENU DE LA MALLETTE
L’émetteur
Le récepteur
DESCRIPTION DE
L EMETTEUR
L émetteur du
Le chargeur de batterie et les câbles
La lampe test
Antenne
Le mode d’emploi
Bouton de
réglage du
niveau
d intensité
La mallette de transport
LED
(Voyant lumineux)
Bouton “Nick”
Bouton “Pager”
Bouton “Constant”
Réceptacle de
chargement de Batterie
et bouchon de prise jack
4
5
DESCRIPTION DE L’EMETTEUR
DESCRIPTION DE L’EMETTEUR
Les antennes pour les émetteurs
Une antenne courte de 5cm est fournie avec
le pack.
L’antenne doit être vissée sur la partie
supérieure de l’émetteur pour permettre une
émission correcte des signaux vers le collier
récepteur et atteindre la portée maximale.
Bouton d’intensité rhéostatique
Le bouton d’intensité est situé sur la partie
supérieure de l’émetteur.
Seule, 1’antenne fournie peut être utilisée.
Le niveau d’impulsion va progressivement
de 0 à 100.
6
7
DESCRIPTION DE L’EMETTEUR
Le LED(Voyant lumineux) de l émetteur
Le LED est situé sur la face de l’émetteur,
devant le bouton d’intensité.
Lorsque l’on appuie sur les boutons
“Nick”ou “Continu” de l’émetteur, le LED
s’allume rouge pour indiquer la mise en action
de l’émetteur.
Lorsque les accumulateurs ont besoin d’être
chargés, le LED clignote toutes les 0.5
secondes.
8
DESCRIPTION DE L’EMETTEUR
La prise jack pour chargeur de batterie de
1’émetteur.
Située sur le côté droit de l’émetteur, sous le
bouton “Pager”, la prise jack pour chargeur de
batterie est recouverte par un bouchon en
caoutchouc.
Insérer une extrémité du câble du chargeur de
batterie dans le réceptacle pour charger la
batterie. (Voir la procédure de recharge de
batteries en page22.)
Après chaque recharge, refermer le réceptacle
avec le bouchon caoutchouc pour prévenir toute
pénétration de saleté ou d’eau dans la prise.
9
FONCTIONNEMENT DES BOUTONS
FONCTIONNEMENT DES BOUTONS
FONCTIONNEMENT DES BOUTONS
POUR 1 CHIEN
Pager
Nick
Bouton “Continu”
Le bouton “Continu”est situé sur le bas de la
face avant de l’émetteur. L’appui sur le bouton
“Continu” provoque une stimulation continue
aussi longtemps que le bouton est appuyé, dans
la limite de 12 secondes. Si le bouton n’est pas
relâché au bout de 12 secondes, la stimulation
s’arrête automatiquement. Le collier est réactivé
lorsque vous appuyez de nouveau sur le bouton.
Continu
Bouton “Pager”
L’émetteur du
pour un chien
a trois boutons. (Deux sur la face avant de
l’émetteur, et un sur le côté gauche).
Le bouton “Pager” est situé sur le côté
gauche de l’émetteur. L’appui sur le bouton
“Pager” provoque la vibration du collier dans la
limite de 12 secondes.
Bouton “Nick”
Le bouton “Nick” est situé sur le haut de la
face avant de l’émetteur.
Lorsque le bouton “Nick” est actionné, le
collier émet une seule et rapide impulsion
électrostatique.
10
11
DESCRIPTION DU RECEPTEUR
DESCRIPTION DU RECEPTEUR
DESCRIPTION DU RECEPTEUR
Réceptacle de
chargement de
Batterie et bouchon
de prise jack
Sangle
Electrodes
Point rouge magnétique Marche/Arrêt
Pour mettre en marche, placer le point rouge
du dos de l’émetteur sur le point rouge du
récepteur du 410NCP. Tenir les deux points
rouges ensemble pendant un moment jusqu’à ce
que le LED s’allume.
LED
Voyant lumineux
Point rouge magnétique
Marche/Arrêt
12
Pour arrêter le collier, répéter le même
procédé en tenant les deux points rouges
ensemble. Le clignotement du LED stoppe,
indiquant que le collier est maintenant arrêté.
Pour préserver l’énergie de la batterie, arrêter
le collier si vous ne l’utilisez pas.
13
DESCRIPTION DU RECEPTEUR
Le LED (voyant lumineux du récepteur)
Situé à l’avant du collier, le LED s’allume
puis clignote seul toutes les 2 secondes dès que
le collier est mis en marche.
La couleur du LED indique l’état de charge
de la batterie du récepteur.
(Vert = charge complète, Ambre = charge
moyenne, Rouge = besoin de charge)
DESCRIPTION DU RECEPTEUR
Le réceptacle de prise jack du chargeur de
batterie
Sur la partie interne du collier, juste à côté
de la sangle, se trouve la prise jack pour le
chargeur de batterie avec son bouchon
caoutchouc.
L’antenne interne
Lorsque le bouton “Continu” est actionné sur
l’émetteur, le voyant du collier luit de façon
statique aussi longtemps que le bouton est
maintenu appuyé, avec un maximum de douze
secondes. Lorsque le bouton”Nick” est actionné
le voyant s’allume pendant une fraction de
seconde.
14
Le
n’a pas d’antenne
externe sur le récepteur. Elle est incorporée à
l’intérieur du récepteur du collier.
15
COMMENT TESTER VOTRE COLLIER
CHARGEUR DE BATTERIE
CHARGEUR DE BATTERIE
Le câble de charge
COMMENT TESTER VOTRE
COLLIER
Chargeur 220 Volt
Le chargeur de batterie et la double prise
permettent de recharger simultanément
l’émetteur et le récepteur. Le chargeur de
batterie fonctionne sur 220 Volts.
Un chargeur 12 Volts pour automobile est
aussi disponible.
Pour utiliser le chargeur avec l’équipement
pour deux chiens, il suffit de connecter les
doubles prises comme indiqué. Ceci vous
permet de charger l’émetteur et les récepteurs
simultanément.
Remarque: Utiliser seulement la batterie
Ni-MH ainsi que le chargeur fourni avec
votre équipement pour charger votre collier
Dogtra.
Ainsi vous évitez tout dommage éventuel
à votre matériel.
16
Pour activer votre
, placer
le point rouge du dos de l’émetteur sur le
point rouge du récepteur. Maintenir les deux
points ensemble pendant un moment, jusqu’à
ce que le LED s’allume vert. Votre collier est
alors prêt à l’utilisation. Le LED s’allume au
bout d’un moment puis clignote une fois
toutes les deux secondes, indiquant que le
collier est prêt à être utilisé (Si la couleur du
LED devient rouge, la batterie doit être
chargée)
17
COMMENT TESTER VOTRE COLLIER
Placer la lampe test, incluse dans l’équipement,
sur les électrodes comme sur le dessin.
Appuyer sur le bouton “Nick”, la lampe test
s’allume pendant une fraction de seconde.
MISE EN PLACE DU COLLIER SUR LE CHIEN
MISE EN PLACE DU COLLIER SUR LE CHIEN
Appuyer sur le bouton “Continu”, la lampe test
s’allume aussi longtemps que le bouton est
maintenu, dans la limite de 12 secondes.
Tourner le bouton d’intensité dans le sens des
aiguilles d’une montre puis dans le sens inverse.
Plus le niveau de stimulation est élevé, plus la
lumière de la lampe test est intense.
Le bouton “Pager” fait vibrer le collier jusqu’à
12 secondes. Le collier se réactive en repoussant le
bouton.
REMARQUE : Il est normal que la lampe
test ne s’allume pas si le niveau d’intensité est
inférieur à 10.
Le collier doit être placé sur le cou du chien
de telle sorte que les électrodes en acier
chirurgical inoxydable appuient fermement sur
la peau du chien. Vous devez être capable de
passer un doigt entre les électrodes et le cou de
votre chien.
Si le collier n’est pas bien serré, il peut
provoquer une irritation due au frottement des
électrodes contre la peau. Si le collier est trop
lâche, les électrodes deviennent inutiles, et la
correction n’est pas prise en compte par le
chien.
Dogtra utilise des électrodes en acier
18
19
MISE EN PLACE DU COLLIER SUR LE CHIEN
chirurgical inoxydable et du plastique antimicrobien pour protéger la peau de votre chien.
LA CHARGE DES BATTERIES
LA CHARGE DES BATTERIES
ATTENTION!
Eviter de laisser le collier sur le cou du
chien pendant plus de 8 heures à la suite par
jour. Laisser les électrodes trop longtemps au
même endroit du cou du chien peut provoquer
des irritations. Si le chien doit porter le collier
pendant une longue période, repositionner le
récepteur de temps en temps afin que les
électrodes soient placées à différents points du
cou du chien.
Sélection d’intensité
Pour choisir le niveau d’intensité, commencer
par le nombre zéro. Augmenter progressivement
le niveau d’intensité jusqu’à obtenir de la part de
votre chien une réponse équivalente à un coup sec
sur la laisse.
1. Charger l’accumulateur avant d’utiliser le
collier pour la première fois.
Rappelez-vous que vous devez adapter
l’intensité du collier (plus fort ou faible) aux
différentes attitudes de votre chien.
3. Charger les accumulateurs complètement
pendant 10 heures si le collier doit être
stocké sans utilisation pendant une période
de un mois ou plus.
REMARQUE: La stimulation
électrostatique peut être ajustée alors que vous
êtes en train de donner une correction à votre
chien.
20
Le
utilise des batteries Ni MH (Nickel - Métal - Hybride).
2. Ne pas recharger les accumulateurs à
proximité de substances inflammables.
Recharger l’unité si :
Le LED lumineux du récepteur émet une
lumière rouge.
21
LA CHARGE DES BATTERIES
Le LED de l’émetteur ou du récepteur ne
fonctionne pas.
Le LED de l’émetteur ou du récepteur
s’allume pendant un moment, mais ne le reste
pas quand le bouton “Continu” est appuyé.
Procédure de charge des accumulateurs
1. Brancher les câbles de chargement entre
l’émetteur et le récepteur, voir dessin page21.
2. Brancher le chargeur sur le 220 Volt ou dans la
prise allume cigare si vous utilisez un chargeur
automobile. Quand le branchement est
effectué, tous les indicateurs lumineux doivent
s’allumer en rouge. Pendant la procédure de
chargement l’appareil est éteint. Une fois que
le câble est débranché de l’appareil et que ce
dernier est complètement chargé vous devez
rallumer l’appareil avant de l’utiliser à
nouveau.
3. Après la charge, refermer les réceptacles de
l’émetteur et du récepteur à l’aide des
bouchons en caoutchouc.
4. La batterie est totalement chargée au bout de
10 heures. Le voyant reste toujours rouge
pendant et même en fin de charge. Plus de 10
heures de charge des accumulateurs peut
réduire leur durée de vie.
22
RECEPTION
RECEPTION
Le
a une portée de 400
mètres. Selon la configuration du terrain où vous
utilisé votre collier, la portée peut varier.
La portée est meilleure, en tenant l’émetteur
loin de votre corps et si vous ne le tenez pas par
l’antenne.
Si vous touchez l’antenne en tournant le
variateur d’intensité, la portée peut être réduite.
Pour l’obtention d’un signal maximum garder
votre appareil proprement chargé.
Portée Maximale
Portée Normale
Portée Minimale
23
ENTRETIEN
ACCESSOIRES
ACCESSOIRES
Les équipements suivants peuvent être
obtenus séparément.
Collier factice
Le collier factice est recommandé pour une
utilisation avec des chiens très sensibles, afin de
les habituer à la taille et au poids du collier.
Le chargeur 110V
Un chargeur conforme aux normes et
standards des U.S.A.
Chargeur automobile
Destiné à être utilisé avec l’allume cigare 12
Volts de voiture.
ENTRETIEN
S’assurer que le bouchon en caoutchouc est
bien placé lors de l’utilisation du collier. Si le
bouchon est cassé ou abîmé, contacter notre
service après vente au +33 (0) 1 30 62 65 65, afin
de le remplacer.
Après chaque utilisation, vérifier qu’il ne
vous manque rien et qu’il n’y a pas de dommage
sur votre matériel. La casse du boîtier de
l’émetteur ou du récepteur peut affecter
l’étanchéité du matériel. L’antenne de l’émetteur
doit être sécurisée et fixée pour une utilisation
optimum. Rincer l’appareil après chaque
utilisation et nettoyer-le de toute saleté et débris.
Entretien de stockage
Charger le collier pendant 10 heures avant de
l’entreposer. Un appareil stocké, doit être
rechargé tous les 3 mois, et une fois avant de le
réutiliser.
Lors d’un voyage, essayer de stocker votre
collier dans une pièce à température ambiante ou
un peu plus chaude. Attention ne transporter ou
n’entreposer pas le collier sous des températures
extrêmes.
Dépannage:
Lors d’une constatation de disfonctionnement
de votre appareil, référez-vous à la partie “Guide
de Dépannage” du manuel avant de nous le
renvoyer. Si vous avez des questions, ou besoin
de renseignements, vous pouvez vous adresser
directement à [email protected] ou
appelez au +33 (0) 1 30 62 65 65.
24
25
GUIDE DE DEPANNAGE
GUIDE DE DEPANNAGE
1. Mon chien ne réagit pas aux fonctions du
collier.
- Vérifier que le récepteur est en marche.
Placer ensemble les 2 points rouges de
l’émetteur et du récepteur pour activer le
système.
- S’assurer que le collier est assez serré et que
les électrodes sont bien en contact avec la
peau du chien.
- Les électrodes peuvent être trop courtes pour
votre chien. Vous pouvez obtenir des
électrodes d’une longueur appropriée en nous
contactant.
- Si vous possédez déjà les plus grandes
électrodes disponibles, raser le cou de votre
chien à l’endroit où se placent les électrodes
afin qu’elles touchent la peau du chien.
- Le niveau d’intensité peut être trop bas pour
votre chien. Continuer à augmenter la
stimulation jusqu’à ce que le chien réponde,
habituellement en bougeant la tête, en
remuant son cou ou en regardant au-dessus de
son épaule, etc
26
GUIDE DE DEPANNAGE
2. La lampe test fonctionne mais je ne sens pas
d’impulsion.
- Votre tolérance peut être très forte comme
votre chien, ou votre peau est très épaisse,
essayer alors de poser les deux électrodes sur
le bout de vos doigts.
- La batterie est déchargée, vérifier la couleur
du LED pour voir l’état de la batterie.
- Si la batterie est entièrement chargée, et que
vous avez fait tout ce que nous vous
conseillons, alors contacter notre Service
Après Vente.
3. L’émetteur n’a pas de portée, ou l’impulsion
est faible quand le chien est loin.
- L’antenne peut être endommagée. Dans ce cas
nous contacter.
- La portée indiquée sur l’appareil est pour des
terrains plats et dégagés. Des obstacles,
arbres, collines, peuvent affecter la portée du
collier. Pour une meilleure portée, tenir
l’émetteur verticalement au-dessus de votre
tête et essayer aussi de vous placer sur une
position surélevée.
27
GUIDE DE DEPANNAGE
- Des conducteurs électriques peuvent affecter
la portée, comme les voitures, des colliers ou
chalnes en acier, des constructions
métalliques, des tours de radios. Pour de
meilleurs résultats, éloignez-vous de tout ce
qui pourrait nuire au bon fonctionnement de
votre collier.
4. Mon collier ne reste pas chargé
- La prise de chargement doit être propre
avant de recharger. Nettoyer la saleté avec
un coton imbibé d’alcool.
- Si le chien a été dans de l’eau salée (eau de
mer) faites en sorte de rincer le récepteur et
le réceptacle de chargement avec de l’eau
douce.
- Vos batteries ont peut être besoin d’être
changées, vous pouvez les remplacer vousmême en commandant les pièces de
rechange en contactant notre société. Sauf si
l’appareil est encore sous garantie. Dans ce
cas nous vous conseillons de renvoyer votre
collier dans notre service après vente afin
que nous procédions gratuitement à
l’échange de batterie.
28
GARANTIE ET INFORMATIONS RELATIVE A LA REPARATION
GARANTIE ET INFORMATIONS
RELATIVE A LA REPARATION
Réparations sous garantie
La société Dogtra offre à l’acheteur initial
une garantie, limitée aux pièces et au travail de
réparation, de deux ans à compter de la date
d’achat initiale. La garantie ne couvre pas les
pannes résultantes de dégâts liés à une mauvaise
utilisation ou les pertes de pièces. La garantie
s’arrête si l’équipement a été modifié ou si une
personne non habilitée a tenté d’intervenir.
Une copie de facture faisant apparaître la
date d’achat est demandée avant toute
intervention sous garantie.
Joindre un papier expliquant le problème
rencontré en y précisant vos noms, prénom,
adresse, code postal ainsi que vos numéros de
téléphone de domicile et/ou de bureau.
Pour tout renseignement concernant votre
collier n’hésitez pas à nous contacter.
29
GARANTIE ET INFORMATIONS RELATIVE A LA REPARATION
Les réparations hors garantie
Pour les travaux de réparation qui ne sont
plus couverts par la garantie, après contrôle du
technicien, un devis vous sera communiqué.
Il comprend le cout des pièces de rechange,
le travail et le transport. Joindre un courrier
expliquant le problème rencontré préciser vos
noms, prénoms, adresse (ville, code postal),
vos téléphones de domicile et de bureau.
R&TTE DECLARATION DE CONFORMITE
R&TTE DECLARATION DE
CONFORMITE
La Société :
DOGTRA-EUROPE
déclare sous notre seule responsabilité que le produit :
satisfait à toutes les dispositions de la Directive
R&TTE 1989/336/CE.
et est conforme aux normes suivantes :
ETSI EN 300 220
30
31
CONTENTS
MAIN FEATURES
34
PRODUCT SAFETY AND HEALTH
STATEMENTS
35
PACKAGE CONTENTS
36
BUTTON FUNCTION
42
DESCRIPTION OF COLLAR / RECEIVER
PARTS
44
BATTERY CHARGER
48
TESTING YOUR
ENGLISH
DESCRIPTION OF TRANSMITTER PARTS 37
COLLAR 49
FITTING THE COLLAR ON THE DOG
51
CHARGING THE BATTERIES
53
RECEPTION
56
ACCESSORIES
57
BASIC MAINTENANCE
58
TROUBLESHOOTING GUIDE
59
WARRANTY AND REPAIR INFORMATION
62
DECLARATION OF R&TTE CONFORMITY
64
33
MAIN FEATURES
PRODUCT SAFETY AND HEALTH STATEMENTS
MAIN FEATURES
Easy-to-use, ergonomic transmitter.
Rheostat dial that allows for gradual
increases in stimulation intensity with no
jumps between levels.
The
has a range of 400m.
Waterproof collar/receiver and waterresistant transmitter.
No external antenna on the collar receiver.
Rechargeable, user-replaceable Ni-MH
batteries.
One-charger system allows the transmitter
and receiver to be charged at the same time.
Over 999 different identity codes to prevent
conflicts with other e-collars.
34
PRODUCT SAFETY AND HEALTH STATEMENTS
Proper e-collar use
Dogtra e-collars are intended for the sole purpose
of behavior modification of dogs. They are not
intended for human use or use on other animals.
Dogtra Company does not assume any liability for
improper use of the Dogtra e-collar.
Aggressive dogs
Dogtra does not recommend using the e-collar to
correct dogs that are aggressive towards other dogs or
people. In many such cases the dog will associate the
stimulation with the other dog or individual and
become even more aggressive. Dog aggression is best
treated by a dog-training specialist.
Interference with other electronic devices
Dogtra’s industry-leading technology filtering
system ensures minimal interference with other
electronic devices (garage door openers, pacemakers,
etc.). Our digital microprocessor offers thousands of
unique codes to eliminate frequency match-up with
other Dogtra e-collars.
Inadvertent activation
If the constant button is held down for 12 seconds
or more the unit will automatically shut down. It will
reactivate when the button is released.
35
PACKAGE CONTENTS
PACKAGE CONTENTS
DESCRIPTON OF TRANSMITTER PARTS
DESCRIPTION OF
TRANSMITTER PARTS
Transmitter
transmitter
Receiver
Battery charger and splitter cable
Antenna
Test light
Owner’s manual
Intensity
Selection Dial
Carrying case
Indicator Light
“Pager” Button
“Nick” Button
“Constant” Button
Battery Charging
Receptacle
and Cover
36
37
DESCRIPTON OF TRANSMITTER PARTS
DESCRIPTON OF TRANSMITTER PARTS
Transmitter Antenna
A short 5cm antenna is supplied with the
transmitter.
The antenna must be fastened to the
transmitter before the unit.
Intensity Selection Dial
The intensity selection dial is located on the
top of the transmitter: (0) being the lowest level
and (100) being the highest.
38
39
DESCRIPTON OF TRANSMITTER PARTS
DESCRIPTON OF TRANSMITTER PARTS
Transmitter Indicator Light (LED window)
Transmitter Battery Charging Receptacle
The transmitter indicator light is located near
the intensity selection dial. When a button on the
transmitter is pushed, the light comes on to
indicate that the transmitter is being activated.
The color of the light indicates the status of
battery life. The LED glows green when the
battery is fully charged and turns to amber when
battery life is getting low. When the LED emits a
blinking red light, the battery needs to be
recharged.
Located on the side of the transmitter, the
receptacle is covered by a rubber plug.
Insert one end of the battery charging cable into
the receptacle to charge the battery.
(See Battery Charging Procedure on page 54.)
After charging is completed, cover the
receptacle with its rubber plug to make sure dirt
or water does not get inside.
(Green = full charge, Amber = medium charge
Red = needs charge)
40
41
BUTTON FUNCTION
BUTTON FUNCTION
“Constant” Button
BUTTON FUNCTION
Pager
Nick
Constant
The transmitter for
three buttons (two on the face of the
transmitter and one on the side).
has
Pressing the “Constant” button gives
continuous stimulation as long as the button is
pushed, for up to twelve seconds. If the button
is not released after twelve seconds, the
stimulation will automatically turn off as a
safety feature. The collar will be ready to be
reactivated once the button has been released.
“Pager” Button
Pressing the “Pager” button on the side of
the transmitter causes the collar to vibrate.
This is a great way of communicating with
your dog using non-electrical stimulation.
“Nick” Button
When the “Nick” button is pushed the
receiver emits a single, rapid pulse of
electrical stimulation.
42
43
DESCRIPTION OF COLLAR / RECEIVER PARTS
DESCRIPTION OF COLLAR / RECEIVER PARTS
DESCRIPTION OF
COLLAR / RECEIVER PARTS
Collar
Collar strap
Battery
Charging
Receptacle
and Cover
On/Off Magnetic Switch
Contact Points
To activate the
, place the
red dot on the back of the transmitter to the red
dot on the collar receiver. Hold the two red
dots together for a moment until the LED
indicator light comes on.
Indicator Light
(LED Window)
Red Dot On/Off
Magnetic Switch
44
To deactivate the
repeat the
same procedure holding the two red dots
together momentarily. The LED light will stop
blinking, indicating that the unit is now shut
off.
45
DESCRIPTION OF COLLAR / RECEIVER PARTS
DESCRIPTION OF COLLAR / RECEIVER PARTS
Receiver Indicator Light (LED window)
Located on the front of the receiver/collar,
the indicator light comes on and blinks once
every 2 seconds after the collar has been
turned on. The color of the LED indicates the
battery life of the receiver.
(Green = full charge, Amber = medium
charge, Red = needs charge)
When the “Constant” button on the
transmitter is pushed, the collar indicator light
will glow steadily (either green, amber, or red
based on the remaining battery life), as long as
you hold the button down, for up to 12
seconds.
Receiver Battery Charging Receptacle &
Rubber Plug
On the inside of the collar receiver, next
to the collar strap, is a battery-charging
receptacle with a rubber plug.
Internal Antenna
All Dogtra E-collars have non-exposed
antennas that are located inside the
collar/receiver.
When the “Nick” button is pushed, the
light comes on for a fraction of a second.
46
47
TESTING
BATTERY CHARGER
TESTING YOUR
BATTERY CHARGER
COLLAR
Charging Cable
220 volt
Charger
Wall Outlet
The battery charger and charging cables
allow you to charge both the transmitter and
receiver at the same time. The battery charger
is designed for a 220-volt wall outlet.
(U.S.A. 110-volt AC chargers and 12-volt field
charger for your automobile are also available.)
1. To activate your
place the
red dot on the back of the transmitter to the
red dot on the collar/receiver. Hold the two
red dots together for a moment until the
green colored LED indicator light comes on.
2. Place the Test light included in the package
contents on the contact points as shown in
the diagram.
48
49
TESTING
3. Watch the test light as you push the “Nick”
button on the transmitter. It should light
for just a moment.
FITTING THE COLLAR ON THE DOG
FITTING THE COLLAR ON THE DOG
4. Watch the test light as you push the
“Constant” button on the transmitter. It
should light for as long as the button is
pressed. However, as a safety feature, the
collar/receiver will automatically shut off
stimulation if the constant button is
depressed for 12 seconds or longer.
5. Turn the Rheostat Intensity Dial on the
transmitter clockwise and then
counterclockwise.
The test light should glow brighter with
higher levels of stimulation and dimmer
with lower levels.
6. Pressing the “Pager” button on the front of
the transmitter causes the collar to vibrate
for up to 12 seconds. The collar will
reactivate when you push the button again.
NOTE : The test light may not luminate if
the intensity level is set below level ten.
50
The collar should be fitted so that the
Surgical Stainless Steel contact points press
firmly against the dog’s skin. You should be
able to fit a finger in between the contact point
and your dog’s skin.
A loose fit can allow the collar to move
around on the dog’s neck. When this happens,
the contact points may rub the skin and cause
irritation. If the collar is too loose, electrical
contact will be inconsistent and your
corrections will be inconsistent also.
51
FITTING THE COLLAR ON THE DOG
Dogtra uses Surgical Stainless Steel contact
points and Anti-microbial plastic to protect the
dog’s skin.
CHARGING THE BATTERIES
CHARGING THE BATTERIES
ATTENTION!
Avoid having the dog wear the collar for
more than 8 hours out of every 24-hour period.
Leaving the points on the same spot for
extended periods of time can cause skin
irritation. If the dog is to wear the e-collar for
long periods, occasionally reposition the collar
so that the contact points are moved to a
different spot on the dog’s neck.
INTENSITY SELECTION
The
has a Rheostat Intensity
Dial on the top of the transmitter. (0 is the
lowest and 100 is the highest). Remember that
you will need to adjust the setting (upward or
downward) depending on your dog’s
temperament and threshold for stimulation.
Also, as the dog’s attitude changes, especially
during times of increased excitement or
distraction, you might need to adjust the
intensity level.
uses Ni-MH (NickelMetal-Hydride) batteries.
1. Charge the unit before using the unit for the
first time.
2. Do not charge the batteries near any
flammable substances.
3. Fully charge the batteries if the unit is to be
stored without use for a period of 3 months
or more.
NOTE : The stimulation intensity can be
adjusted even while the stimulation is in
use.
52
53
CHARGING THE BATTERIES
Recharge the unit if:
The indicator light on the collar is emitting a
red color.
The indicator light on the transmitter or
receiver will not come on.
The indicator light on the transmitter or
receiver comes on momentarily, but will not
stay on when the “Constant” button is pushed.
CHARGING THE BATTERIES
3. After charging, cover the battery charging
receptacles with the rubber plugs on the
transmitter and receiver.
4. The battery is fully charged with a 10-hour
charge. The lights will stay red during the
charging process. They DO NOT turn green
when fully charged. Charging the batteries for
more than 10 hours at one time will not extend
battery life.
Battery Charging Procedure
1. Attach the charging cables to both the
transmitter and receiver(s), as shown on
page53.
2. Plug the charger into a 220-volt wall outlet
or, if using the accessory field charger, plug
into a cigarette lighter. (Use a 110-volt
charger for U.S.A.) When properly plugged
in, all indicator lights should glow red.
The receiver automatically turns off when
you insert the charging cable into the batterycharging receptacle on the receiver.
54
55
RECEPTION
ACCESSORIES
RECEPTION
The
collar has a range of
400m. Depending on the way you use your
transmitter, the transmitter range may vary.
ACCESSORIES
The following items may be purchased
separately.
U.S.A. Charger
Hold the transmitter away from your body
and avoid touching the antenna, to get the
greatest range.
For maximum signal strength, keep your
unit properly charged.
Designed for use with 110V AC electrical
outlets in U.S.A.
Field Auto Charger
Designed for use with the 12-volt cigarette
lighter in your car.
Maximum Range
Typical Range
Minimum Range
56
57
BASIC MAINTENANCE
BASIC MAINTENANCE
Be sure that the rubber charging plugs are
always secured when the collar is in use. If your
plugs break or are ripped, please contact
Customer Service at +33 (0) 1 30 62 65 65 to
obtain replacements.
After each session, carefully inspect your unit
for any missing parts, or casing damage. Broken
casings on either the receiver or transmitter may
affect the waterproof guarantee of the unit. The
transmitter antenna should be secured and tight
for optimum performance. Rinse the unit after
each session and clean off any dirt or debris.
Storage Maintenance
Your unit should be fully charged for 10
hours before extended storage. During storage,
the unit should be charged every 3 months for 10
hours, and once before the first use.
When traveling, try to store your units in
room or slightly warmer temperatures, do not
transport the unit exposed in extreme climates.
Troubleshooting:
If you suspect your unit is malfunctioning
please refer to the “Troubleshooting Guide”
before you send your unit in for service.
If you have any questions or concerns, you
may direct your inquiries to
[email protected] or call +33 (0) 1 30 62
65 65.
58
TROUBLESHOOTING GUIDE
TROUBLESHOOTING GUIDE
1. My dog is not reacting to the collar.
- Make sure the receiver is turned on. Place
the two red dots together to activate the
receiver.
Push the blue button on the transmitter until
it illuminates to activate the transmitter.
- Be sure the collar strap is tight enough so
both contact points are touching the dog’s
skin.
- The contact points may be too short for the
dog. To place an order for longer contacts
appropriate for your dog, please call +33 (0)
1 30 62 65 65.
- If you are already using the longest contact
point available, you might need to trim
down the hair on the dog’s neck so both
contact points are touching the dog’s skin.
- The intensity level may be too low for your
dog. Keep increasing the stimulation until
the dog responds usually by neck movement,
head shaking, looking over his shoulder, etc.
(response may be very subtle so pay
attention.)
59
TROUBLESHOOTING GUIDE
2. The test light comes on, but I do not feel
any stimulation.
- Your tolerance may be higher than your
dogs, or your skin very thick, so you may
need to try the unit on your fingertips where
sensitivity is higher. Be sure both contact
points are touching your fingertips.
- The battery may be low, check the LED
light for battery life.
- If you have a full charge, and you have done
all of the above, your unit may need to be
serviced. Please contact Customer Service
at [email protected] or call +33 (0) 1
30 62 65 65.
3. The transmitter has no range, or
stimulation is less when the dog is farther
away.
- The antenna(s) may be damaged.
TROUBLESHOOTING GUIDE
- Any electrical conductors will affect the
range, such as cars, chain-link dog runs,
metal buildings, radio towers. For best
results, operate away from these structures.
4. My collars are not holding a charge.
- The charging port must be clean prior to
charging, clean the dirt out with a cotton
swab and some rubbing alcohol. If the dog is
in salt-water, be sure to rinse the receiver
and charging port with clean water.
- Your batteries may need to be replaced. You
can replace them yourself by ordering the
parts from Dogtra. This is the only time you
should open the unit, any other unauthorized
servicing of the unit voids your limited
lifetime warranty.
- To order parts please contact Customer
Service at +33 (0) 1 30 62 65 65.
- The range indicated on the unit’s box is for
flat terrain. Heavy brush, trees, hills or
moisture will affect the range of your unit.
For best range, hold the transmitter
vertically above your head. Try also moving
to higher ground.
60
61
WARRANTY AND REPAIR INFORMATION
WARRANTY AND
REPAIR INFORMATION
Warranty Repair
Dogtra-Europe provides the original
purchaser a two-year limited warranty on parts
and labor from the date of the original purchase.
The warranty does not cover failure resulting
from damage, abuse or loss of parts. The
warranty is void if the unit has been altered or
an unauthorized person has attempted work.
Batteries or the labor to replace them are not
covered under warranty after the first year.
A copy of the sales receipt showing purchase
date is required before warranty work is begun.
Write a note briefly explaining the problem
and include your name, address, city/state/zip
code, daytime and evening phone numbers.
Return shipping for warranty is the owner’s
responsibility. Costs for shipping(via regular
groun service) back to the customer is covered
by Dogtra-Europe. Any expedited shipping
service will be at the owner’s expense.
62
WARRANTY AND REPAIR INFORMATION
Out of Warranty Repair
For repair work that is no longer covered by
warranty, the cost of repair will include parts,
labor and shipping. Write a note briefly
explaining the problem. Include your name,
address, city/state/zip code, daytime phone
number and evening phone number.
Send equipment to :
63
DECLARATION OF R&TTE
CONFORMITY
The company :
DOGTRA-EUROPE
declare under our responsibility that the following
product :
comply to all dispositions of the European Directives
R&TTE 1999/5/CE
and comply with standards below :
ETSI EN 300 220
64
EINFÜHRUNG
66
EIGENSCHAFTEN
68
SICHERHEIT
69
PACKUNGSINHALT
69
BESCHREIBUNG DER SENDERTEILE
70
KNOPFFUNKTION
75
BESCHREIBUNG DER
HALSBAND/EMFÄNGER TEILE
78
BATTERIELADEGERAT
83
AUFLADEN DER BATTERIEN
84
FUNKTIONSTEST IHRES
AUSBILDUNGSHALSBANDS
87
EMPFANG
91
ZUBEHÖR
92
GARANTIE-UND
REPARATURINFORMATIONEN
93
WICHTIGE ZUSATZINFORMATIONEN
95
DEUTSCH
INHALT
DECLARATION OF R&TTE CONFORMITY
65
EINFÜHRUNG
EINFÜHRUNG
Dogtra Ausbildungshalsbänder geben Ihnen
die Möglichkeit, mit Ihrem Hund zum richtigen
Zeitpunkt zu kommunizieren, selbst wenn der
Hund nicht direkt bei Ihnen ist. Dies erleichtert
Ihrem Hund das Lernen, weil nachträgliche
Korrekturen für den Hund sehr verwirrend sind.
Halsbänder bieten Ihnen 3
verschiedene Impulsarten:
Wenn Sie den “Nick” Knopf betätigen, wird
ein sehr kurzer elektrischer Impuls ausgelöst.
Dieser Impuls schaltet sich automatisch in einem
Sekundenbruchteil aus, unabhängig davon, wie
lange der Knopf gedrückt bleibt.
“Nick” wird als Ersatz für das Einwirken mit
der Leine eingesetzt, wenn der Hund nicht
angeleint ist. Diese Funktion ist sanft aber
motivierend!
EINFÜHRUNG
gewünschten Verhalten zu bringen oder bei
höherer Stärke als Reservemittel, um
gefährliches Verhalten des Hundes zu
unterbinden (z.B. wenn Ihr Hund wildert,
anderen Tieren oder Autos nachjagt).
Wird der “Pager” Knopf betätigt, vibriert das
Halsband wie ein Handy. Damit können Sie
Ihren Hund mit nicht-elektrischen Impulsen
ausbilden. Eine großartige Weise, die
Aufmerksamkeit Ihres Hundes auf sich zu
lenken.
Alle Dogtra Halsbänder werden komplett mit
Handsender, Halsband mit Empfänger,
Batterieladegerät, Prüflampe-und
Bedienungsanleitung geliefert.
Wenn der Knopf “Constant” betätigt wird,
wird ein Impuls von maximal 12 Sekunden
Dauer ausgelöst, solange der Knopf gedrückt
bleibt. Die “Constant” Funktion dient bei
niedriger Stromstärke dazu, Hunde zu dem
66
67
EIGENSCHAFTEN
EIGENSCHAFTEN
EMPFÄNGERHALSBAND - Einfaches
Anpassen des Halsbandes durch ein neues Design
WASSERDICHTES GEHÄUSE - Der Sender ist
wassergeschützt, das Hundehalsband ist
wasserdicht
BENUTZERFREUNDLICHE GRÖSSE - Der
ergonomische Sender ist klein aber er liegt gut in
der Hand
SICHERHEIT
SICHERHEIT
Dogtra Ausbildungshalsbänder sind mit
neuester Mikrocomputertechnologie
ausgestattet. Sowohl der Sender als auch der
Empfänger haben eine automatische Kontrolle,
die den Impuls im “Constant” Modus auf 12
Sekunden begrenzt. Der “Nick” Modus gibt
dem Hund einen Kurzimpuls. Ein eigner
Frequenz Bereich verhindert den Empfang von
anderen Quellen als von Ihrem Sender.
VERSTECKTE ANTENNE - Das
Hundehalsband ist leicht und sieht unauffällig aus
EFFEKTIVE REICHWEITE - Sendet Impulse
bis zu 400 m.
TASTKNÖPFE - auch mit Handschuhen bei
schlechtem Wetter angenehm zu bedienen
EIN LADEGERÄT - Lädt sowohl den Sender als
auch das Hundehalsband
- bei täglichem Gebrauch hält die Ladung bis zu
einer Woche und länger.
68
PACKUNGSINHALT
Sender
Empfänger
Batterieladegerät und Y-Kabel
Bedienungsanleitung
Gerätekoffer
69
BESCHREIBUNG DER SENDERTEILE
BESCHREIBUNG DER SENDERTEILE
BESCHREIBUNG DER
SENDERTEILE
Sender
Antenne
Senderantenne
Impulsstärkenei
nstellung
Leuchtanzeige
Wahlschalter
“Nick” Knopf
“Pager” Knopf
Eine kurze Antenne von 5cm Länge ist der
beigefügt.
Die Antenne muß oben an den Sender
angeschraubt werden, um sicherzugehen, daß
die Signale an den Empfänger gesendet
werden und daß die maximale Reichweite
erzielt wird.
“Constant” Knopf
Batterieladebuchse
70
71
BESCHREIBUNG DER SENDERTEILE
BESCHREIBUNG DER SENDERTEILE
Leuchtanzeige LED am Sender
Impulsstärkenregler
Der Impulsstärkenregler befindet sich oben
auf dem Sender. Nummer 1 ist die niedrigste
Stärke und Nummer 100 ist die höchste.
Die Leuchtanzeige am Sender befindet
sich zwischen der Antenne und dem
Impulsstärkenregler.
Wenn ein Knopf am Sender betätigt wird,
leuchtet das rote Licht auf, um anzuzeigen,
daß der Sender aktiviert wird.
Wenn die Batterie schwach ist, blinkt die
Leuchtanzeige alle 0.5 Sekunden.
72
73
KNOPFFUNKTION
BESCHREIBUNG DES EMPFÄNGERS
KNOPFFUNKTION
Pager
Batterieladebuchse am Sender
Die Batterieladebuchse befindet sich an der
Seite des Senders und ist mit einer
Gummiabdeckung versehen. Stecken Sie das
Batterieladekabel in die Buchse, um die Batterie
aufzuladen (sh. Batterieladevorgang.)
Wenn der Ladevorgang abgeschlossen ist,
verschließen Sie die Buchse wieder mit der
Gummiabdeckung um zu vermeiden, daß
Schmutz in die Buchse gerät.
74
Nick
Constant
Der Sender des
hat drei
Knöpfe (2 auf der Vorderseite des Senders und
einen an der Seite.)
Der obere der beiden Knöpfe auf der
Vorderseite des Senders löst einen vorgegebenen
“Nick” Impuls aus, wenn er betätigt wird.
Der untere oder “Constant” Knopf löst einen
Dauerimpuls aus, solange er gedrückt bleibt, bis
75
KNOPFFUNKTION
zu maximal 12 Sekunden Dauer.
Der Knopf an der Seite ist der “Pager” Knopf.
Wird er betätigt, beginnt der Halsbandempfänger
zu vibrieren. Der Pager Modus erzeugt keinen
Elektroimpuls.
“Nick” Knopf
Wenn der “Nick” Knopf gedrückt wird, wird
am Empfänger ein extrem kurzer Elektroimpuls
ausgelöst, der sich automatisch abschaltet,
unabhängig davon, wie lange Sie Ihren Finger
auf dem Knopf lassen. Der “Nick” ist sanft aber
motivierend!
KNOPFFUNKTION
“Pager” Knopf
Wenn auf den “Pager” Knopf an der Seite des
Senders gedrückt wird, beginnt das Halsband zu
vibrieren.
Auf diese Weise können Sie mit Ihrem Hund
kommunizieren, ohne Elektroimpulse
einzusetzen. Sie lenken so die Aufmerksamkeit
des Hundes auf sich. Diese Funktion gibt Ihnen
zusätzliche Trainingsfinesse.
“Constant” Knopf
Das Betätigen des “Constant” Knopfes löst
einen Dauerimpuls von maximal 12 Sekunden
aus. Nach Ablauf der 12 Sekunden schaltet sich
das Halsband aus. Wird der Knopf erneut
gedrückt, schaltet sich das Halsband wieder ein.
76
77
BESCHREIBUNG DER HALSBAND/EMPFÄNGERSTEILE
BESCHREIBUNG DER HALSBAND/EMPFÄNGERSTEILE
BESCHREIBUNG DER
HALSBAND/EMPFÄNGERSTEILE
Batterieladebuchse
Halsbandriemen
Kontakte
EIN/AUS Magnetschalter
Um das
Halsband zu
aktivieren, halten Sie kurz den roten Punkt hinten
auf dem Sender auf den roten Punkt am Halsband,
bis die LED Anzeige aufleuchtet.
Das Licht blinkt alle 2 Sekunden und zeigt so
an, da das Gerät aufgeladen und betriebsbereit
ist. (Wenn das rote Licht im 2-Sekunden-Takt
blinkt, mu das Gerät geladen werden).
Leuchtanzeige
Magnetischer Ein/Aus Schalter
78
Um das
auszuschalten halten
Sie kurz den roten Punkt auf dem Sender gegen
den roten Punkt am Halsband.
Das rote Licht hört auf zu blinken, das Gerät
ist jetzt ausgeschaltet. Um die Lebensdauer der
Batterie zu verlängern, schalten Sie das Gerät
immer aus, wenn es nicht benutzt wird.
79
BESCHREIBUNG DER HALSBAND/EMPFÄNGERSTEILE
Leuchtanzeige am Empfänger (LED)
Die Leuchtanzeige befindet sich an der
Vorderseite des Halsbands und blinkt alle 2
Sekunden, wenn das Halsband eingeschaltet ist.
Die Farbe des LED Lichtes zeigt die
Lebensdauer des Empfänger-Akkus an.
(grün = volle Ladung, gelb = mittlere Ladung,
rot = Empfänger muß geladen werden.
Wird der “Constant” Knopf am Sender
betätigt, leuchtet die Anzeige solange Sie auf den
Knopf drücken, maximal 12 Sekunden lang.
Wenn Sie auf den “Nick” Knopf drücken,
leuchtet das Licht für einen Sekundenbruchteil
auf.
80
BESCHREIBUNG DER HALSBAND/EMPFÄNGERSTEILE
Kontakte
Das Halsband sollte so angepaßt werden, daß
die Edelstahlkontakte fest auf der Haut des
Hundes liegen.
Ist das Halsband zu locker, kann es am Hals
des Hundes verrutschen. Dadurch können sich
die Kontakte an der Haut reiben und Reizungen
hervorrufen. Außerdem ist bei einem lockeren
Halsband der elektrische Kontakt ungleichmäßig
und dadurch werden Ihre Korrekturen
inkonsequent.
81
BESCHREIBUNG DER HALSBAND/EMPFÄNGERSTEILE
BATTERIELADEGERAT
BATTERIELADEGERAT
Ladekabel
220 Volt Ladegerät
Batterieladebuchse am Empfänger
An der Innenseite des Halsbands, neben
dem Halsbandriemen, befindet sich die
Batterieladebuchse mit einer
Gummiabdeckung.
Integrierte Antenne
Das
hat keine externe
Antenne am Halsband. Die Antenne befindet
sich innen im Halsbandempfänger.
82
Das Batterieladegerät mit dem
dazugehörigen Kabel ermöglicht es Ihnen,
den Sender und den Empfänger gleichzeitig
aufzuladen.
Das Batterieladegerät passt in eine 220
Volt Steckdose. (US 110 Volt Ladegeräte
sowie 12 Volt Ladegeräte für Ihr Auto sind
ebenfalls erhältlich.)
83
AUFLADEN DER BATTERIEN
AUFLADEN DER BATTERIEN
AUFLADEN DER BATTERIEN
3. Wenn das Gerät einen Monat lang oder länger
nicht gebraucht wird, laden Sie die Batterien
10 stunden lang auf, bevor Sie es lagern.
4. Laden Sie die Batterie, wenn
die Leuchtanzeige am Halsband alle 2
Sekunden ein Doppelsignal blinkt
die Leuchtanzeige am Sender oder am
Empfänger nicht funktioniert
die Leuchtanzeige am Sender oder am
Empfänger kurz aufleuchtet, aber nicht
weiterleuchtet, während der Constant
Knopf gedrückt wird.
verwendet Ni-MH (Nickel-MetallHydrid) Batterien, bei denen kein Memory-Effekt
entsteht. Sie könnnen regelmäßig aufgeladen
werden, ohne daß es ihnen schadet. Es ist
nicht nötig, die Batterien vor dem Aufladen
vollkommen leerlaufen zu lassen.
1. Vor dem ersten Gebrauch des Geräts laden Sie
die Batterien 10 stunden lang auf.
2. Laden Sie die Batterien nicht in unmittelbarer
Nähe leicht brennbarer Substanzen auf.
84
85
AUFLADEN DER BATTERIEN
Der Ladevorgang
1. Stecken Sie die beiden Enden des Ladekabels
in den Sender bzw. in den Empfänger,
(sh. Abbildung S. 84)
FUNKTIONSTEST IHRES
FUNKTIONSTEST IHRES
AUSBILDUNGSHALSBANDS
2. Stecken Sie das Ladegerät in eine 220 Volt
Steckdose. Wenn Sie das Autoladegerät
verwenden, stecken Sie es in den
Zigarrettenanzünder.
(Für die USA wird ein 110 Volt Ladegerät
benötigt).
Wenn das Ladegerät richtig angeschlossen ist,
leuchten alle Leuchtanzeigen rot auf.
Der Empfänger schaltet sich selbsttätig aus,
wenn Sie das Ladekabel in die
Batterieladebuchse am Empfänger stecken.
3. Wenn der Ladevorgang abgeschlossen ist,
bedecken Sie die Ladebuchsen an Sender und
Empfänger wieder mit den
Gummiabdeckungen.
4. Die Batterie ist nach 10 Stunden voll geladen.
86
1. Halten Sie den roten Punkt auf der Rückseite
des Senders auf den roten Punkt am
Halsband, um das Gerät einzuschalten.
Halten Sie die zwei roten Markierungen kurz
aneinander, bis die Leuchtanzeige rot
aufleuchtet. Die Leuchtanzeige blinkt alle 2
Sekunden und zeigt somit an, daß das Gerät
geladen und betriebsbereit ist. ( Sollte das
Licht alle 2 Sekunden zweimal blinken,
müssen die Batterien aufgeladen werden.)
87
FUNKTIONSTEST IHRES
FUNKTIONSTEST IHRES
2. Das
schaltet sich
sicherheitshalber selbsttätig aus, wenn der
Constant Knopf 12 Sekunden oder länger
betätigt wird. Um das Gerät wieder
einzuschalten, lassen Sie den Knopf 3
Sekunden lang los.
Anpassen des Halsbands
Das Halsband sollte so angepasst werden, daß
die Kontakte fest auf der Haut des Hundes
liegen. Ein zu lockeres Halsband kann zu
Hautreizungen führen, weil sich die Kontakte an
der Haut reiben.
Hat Ihr Hund ein dickes Fell, bewegen Sie den
Empfänger auf und ab, damit die Kontakte durch
das Fell an die Haut des Hundes gelangen.
ACHTUNG!
Vermeiden Sie, daß der Hund das
Halsband für mehr als zwei Stunden mit den
Kontakten an derselben Stelle trägt.
Dies kann zu Hautreizungen führen. Wenn
der Hund das Ausbildungshalsband über
einen längeren Zeitraum tragen soll, legen Sie
es ab und zu neu an, und zwar so, daß die
Kontakte an einer anderen Stelle den Hals des
Hundes berühren
88
89
FUNKTIONSTEST IHRES
Wählen der Impulsstärke
Beginnen Sie beim Einstellen der
Impulsstärke auf der Null Einstellung.
Erhöhen Sie langsam die Intensität, bis Sie eine
Reaktion von Ihrem Hund bekommen, wie es
bei einem schnellen Leinenruck der Fall wäre.
Bitte vergessen Sie nicht, daßSie die
Einstellung verändern müssen (stärker oder
schwächer), wenn der Hund ein anderes
Verhalten zeigt, besonders wenn der Hund sehr
aufgeregt oder abgelenkt ist.
Pflege
90
EMPFANG
EMPFANG
Das
hat eine Reichweite
von ca. 400 Metern. Je nachdem, wie Sie Ihren
Sender benutzen, kann die Reichweite
variieren.
Sie erzielen eine größere Reichweite, wenn
Sie während des Betätigens der Knöpfe den
Sender von Ihrem Körper weghalten und die
Antenne nicht berühren.
Maximale Reichweite
Normale Reichweite
Nach jedem Gebrauch in Salzwasser muß
das Halsband sorgfältig gereinigt und mit
Leitungswasser abgespült werden.
Minimale Reichweite
Der Empfänger und das Halsband sollten
von Zeit zu Zeit mit einem milden
Reinigungsmittel gesäubert werden, um eine
Fehlfunktion zu vermeiden.
Wenn Ihr Finger die Antenne neben dem
Regler oben am Sender berühtrt, kann
dadurch die Reichweite verringert werden
91
ZUBEHÖR
ZUBEHÖR
Die folgenden Artikel können zusätzlich
erworben werden
Halsband Attrappe
Wir empfehlen den Gebrauch einer
Attrappe bei sehr sensiblen Hunden, damit sie
sich an die Größe und das Gewicht des
Halsbands gewöhnen.
US-Ladegerät
Für den Gebrauch mit 110Volt Steckdosen
in den USA.
Autoladegerät
Für den Gebrauch mit dem 12 Volt
Zigarrettenanzünder in Ihrem Auto.
GARANTIE-UND REPARATURINFORMATIONEN
GARANTIE-UND
REPARATURINFORMATIONEN
Reparatur während der Garantiezeit
gewährt dem Erstkäufer
eine eingeschränkte Garantie von zwei Jahren ab
Kaufdatum auf Teile und Arbeit. Nicht
eingeschlossen sind Schäden, die durch
Beschädigung, unsachgemäße Behandlung oder
den Verlust von Teilen entstanden sind. Die
Garantie erlischt, wenn das Gerät verändert
worden ist, oder wenn eine nicht-autorisierte
Person versucht hat, daran zu arbeiten.
Eine datierte Kopie der Verkaufsquittung muß
vor Beginn der Garantiearbeiten vorgelegt
werden. Bitte fügen Sie eine kurze schriftliche
Beschreibung des Problems sowie Ihren Namen
und Adresse bei.
Bei Fragen stehen wir Ihnen gern zur
Verfügung.
Michael Schweikert
Hundesportartikel
Zum Mühlgraben 10-12
68642 Bürstadt
Tel. 06206-70690
e-mail: [email protected]
92
93
GARANTIE-UND REPARATURINFORMATIONEN
Reparatur außerhalb der Garantiezeit
Bei Reparaturen, die nicht mehr in die
Garantiezeit fallen, werden Ersatzteile, Arbeit
sowie Porto berechnet. Bitte fügen Sie eine kurze
schriftliche Beschreibung des Problems sowie
Ihren Namen und Adresse bei.
Bei Fragen stehen wir Ihnen gern zur
Verfügung.
Michael Schweikert
Hundesportartikel
Zum Mühlgraben 10-12
68642 Bürstadt
Tel. 06206-70690
e-mail: [email protected]
WICHTIGE ZUSATZINFORMATIONEN
WICHTIGE ZUSATZINFORMATIONEN
1.1 Verwendungszweck des Gerätes
Bei diesem Gerät handelt es sich um einen im
Nahbereich wirksamen Radiosender für die
Fernsteuerung von Hundehalsbändern, die für die
Hundedressur verwendet werden. Es darf nur in den
Ländern der EG mit der Außenantenne eingesetzt
werden, die mit dem Gerät mitgeliefert wird.
1.2 Typengenehmigungserklärung
Dieses Gerät erfüllt in jeder Hinsicht die
wesentlichen Anforderungen der Radio- und
Sendegeräterichtlinie 1999/05/EG. Auf der
Webseite http://www.dogtra-europe.com
http://www.dogtra-europe.com kann eine Kopie der
ausgefüllten und unterzeichneten EG-Erklärung
eingesehen werden.
1.3
Warnhinweis an den Benutzer
Der Benutzer sollte sich dessen bewusst sein, dass
die Verwendung von Radiosendern in gewissen
Ländern an Auflagen gebunden ist und dass eine
Nutzerlizenz vorgeschrieben werden kann. Zum
Zeitpunkt des Druckes dieser Information
( November 2000 ) sind Nahbereichssendegeräte
nach wie vor genehmigungspflichtig.
2. Kennzeichnung am Produkt, im Benutzerhandbuch
und auf der Verpackung
3. EG-Formblatt für die Typengenehmigung
Emitech France wird dogtra ein offiziell
unterschriebenes EG-Formblatt für die
Typengenehmigung schicken, das Sie scannen und
auf Ihrer Webseite anbieten können.
94
95