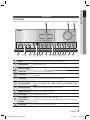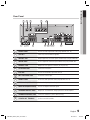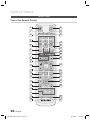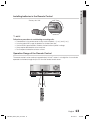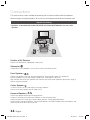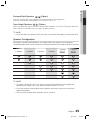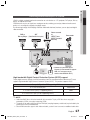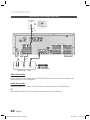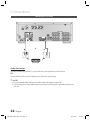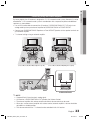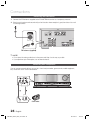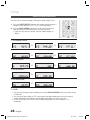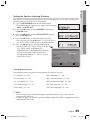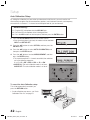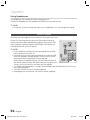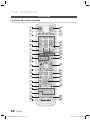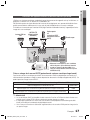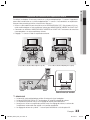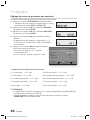
1
HW-D600 HW-D650S AV Receiver System user manual imagine the possibilities Thank you for purchasing this Samsung product. To receive more complete service, please register your product at www.samsung.com/register HW-D600_D650S_XAC_0614.indd 1 2011-06-17 10:34:09 Safety Information Safety Warnings TO REDUCE THE RISK OF ELECTRIC SHOCK, DO NOT REMOVE THE COVER(OR BACK). NO USER-SERVICEABLE PARTS ARE INSIDE. REFER SERVICING TO QUALIFIED SERVICE PERSONNEL. This symbol indicates “dangerous voltage” inside the product that presents a risk of electric shock or personal injury. CAUTION RISK OF ELECTRIC SHOCK DO NOT OPEN This symbol indicates important instructions accompanying the product. Note to CATV system installer This reminder is provided to call the CATV system installer’s attention to Section 820~40 of the NEC which provides guidelines for proper grounding and, in particular, specifies that the cable ground shall be connected to the grounding system of the building, as close to the point of cable entry as practical. WARNING • To reduce the risk of fire or electric shock, do not expose this appliance to rain or moisture. CAUTION • Apparatus shall not be exposed to dripping or splashing and no objects filled with liquids, such as vases, shall be placed on the apparatus. Precautions • Ensure that the AC power supply in your house complies with specifications listed on the identification sticker located on the back of your product. • Install your product horizontally, on a suitable base (furniture), with enough space around it for ventilation (7.5~10cm / 20~25 inches). • Do not place the product on amplifiers or other equipment which may become hot. Make sure the ventilation slots are not covered. • Do not stack anything on top of the product. • To disconnect the product completely from the power supply, remove its plug from the wall outlet. - If you leave the product unused for a long period of time, disconnect the plug from the wall outlet. • During thunderstorms, disconnect the AC plug from the wall outlet. Voltage spikes caused by lightning could damage the product. • Do not expose the product to direct sunlight or other heat sources. This could cause the product to overheat and malfunction. • Protect the product from moisture, excess heat, and equipment creating strong magnetic or electric fields (i.e. speakers.). • Disconnect the power cable from the AC supply if the product malfunctions. • Your product is not intended for industrial use. It is for personal use only. • Condensation may occur if you store your product in cold temperatures. If transporting the product during the winter, wait approximately 2 hours until the product has reached room temperature before using. • The batteries used with this product contain chemicals that are harmful to the environment. Do not dispose of batteries in the general household trash. 2 English HW-D600_D650S_XAC_0614.indd 2 2011-06-17 10:34:34 Contents Safety Warnings Precautions GETTING STARTED 5 6 7 7 8 9 10 Key features of your new AV Receiver Accessories Description Front Panel Display Rear Panel Remote Control CONNECTIONS 14 16 17 18 19 20 21 22 23 24 26 26 Speaker Positioning Connecting the Speakers Connecting External Devices/your TV via HDMI HDMI Function Connecting to your TV Connecting a DVD or BD(Blu-ray) Player Connecting a Cable, Satellite or Set-top Box Connecting a CD Player Connecting Using the External Amplifier Connecting an iPod Connecting the FM Antenna Connecting AUX Components SETUP 27 27 28 29 32 32 Before Using the AV Receiver Home Menu Selecting Digital/HDMI/Analog Setup Menu Tree Audio Setup Selecting a Source Device And Connection Jack (Digital Audio In) Setting the Speaker Size Connection Setting For Surround Back Setting the Speaker Listening Distance Setting the Speaker Level Setting the Test Tone Setting Dolby Pro Logic Mode Surround Setup Setting Dolby Pro Logic IIx Setting NEO:6 Mode Setting EX/ES Mode Other Settings Audio Sync Tone Control MP3 Enhancer Smart Volume Auto Calibration Setup DRC Setup Dual Mono Setup HDMI Setup 2 5 14 27 32 34 35 36 37 38 38 38 39 39 40 40 40 41 41 42 43 43 44 English HW-D600_D650S_XAC_0614.indd 3 2011-06-17 ENGLISH 2 2 SAFETY INFORMATION 3 10:34:34 Contents OPERATION 45 53 54 Operating your TV with the Remote Control Operating your DVD or BD Player with the Remote Control OTHER INFORMATION 55 56 56 57 Troubleshooting Product Protection Function Auto Calibration Error List Specifications 55 • • 4 46 47 47 48 48 49 49 49 50 50 51 51 51 52 52 Using the Surround Modes Using the AUDIO EFFECT Button On the Front of the Main Unit Using the S.DIRECT Button Using the SUBWOOFER button Listening to the Radio To Listen in Mono/Stereo Presetting Radio Stations Using an iPod Listening to Music (iPod audio function) Watching a Movie (iPod video function) Convenient Functions Sleep Timer Function Mute Function Adjust the Display Reset Function Using Headphones Software Upgrade MISCELLANEOUS 53 • 45 45 Figures and illustrations in this User Manual are provided for reference only and may differ from actual product appearance. An administration fee may be charged if either a. an engineer is called out at your request and there is no defect in the product (i.e. where you have failed to read this user manual) b. you bring the unit to a repair center and there is no defect in the product (i.e. where you have failed to read this user manual). The amount of such administration charge will be advised to you before any work or home visit is carried out. English HW-D600_D650S_XAC_0614.indd 4 2011-06-17 10:34:34 01 Getting Started Getting Started Key features of your new AV Receiver Product Features Digital AV Receiver This product is a pure digital AV receiver that performs digital signal processing to minimize signal distortion and loss. Dolby Digital Effective audio encoding/decoding technology that provides a vivid surround sound in up to 5.1 channels. Dolby Pro Logic llx Dolby Pro Logic IIx is a new technology that provides discrete 7.1 channels out of 2 channel or multi channel sources.It also provides Music,Movie and Game modes. Dolby Pro Logic IIx is an improved surround system that is optimized to a 7.1 CH multimedia system, enabling you to maximize your entertainment experience. Dolby Pro Logic llz Dolby Pro Logic IIz adds front height channels to surround sound, creating a 7.1 playback system for video games, home music, and movies; bringing enhanced spatial effects and enveloping sound. Dolby Digital EX Adds a surround back channel for more spacious sound compared to regular 5.1 channel Dolby Digital. Dolby Digital Plus Dolby Digital Plus is the next-generation audio technology for all high-definition programming and media. Dolby True-HD Dolby True-HD is Dolby’s next-generation lossless technology developed for high-definition disc-based media. DTS 96/24 DTS 96/24 encodes standard 16 bit/44.1 kHz sound to 24 bit/96kHz and applies it to a 5.1 CH sound track. DTS (Digital Theater Systems) DTS provides a discrete 5.1 CH digital audio signal for both music and movie contents and uses less compression than Dolby Digital for richer sound. DTS-HD (Master Audio, High Resolution) (Digital Theater Systems - High Definition) DTS-HD Audio provides the highest quality multi-channel sound possible. It delivers sound quality that matches the clear and vivid images of high-definition video. DTS Provides a full range of 6 channels by converting a digital PCM or analog stereo signal using DTS digital matrix decoding. English HW-D600_D650S_XAC_0614.indd 5 2011-06-17 5 10:34:34 Getting Started DTS-ES (Extended Surround) The DTS-ES (Extended Surround) system is a new multi digital signal format that was developed by Digital Theater Systems Inc. Supporting full compatibility with the conventional DTS digital surround sound format, the DTS-ES (Extended Surround) system improves the surround signal for a 360-degree surround effect. DTS-ES adds an additional rear center surround channel for 6.1 channel sound. iPod You can enjoy music files by connecting your iPod/iPhone to the AV Receiver with the supplied iPod dock. SFE (Sound Field Effect) Using 32bit Audio Digital Signal Processing Provides more realistic surround sound with normal stereo audio sources. Anynet+ (HDMI-CEC) Function Anynet+ is a function that can be used to operate this AV Receiver with a Samsung TV remote control, by connecting the receiver to a SAMSUNG TV using an HDMI Cable. (This function is available only in connection with Samsung TV and DVD player supporting Anynet+(HDMI-CEC).) Accessories Check the box for the supplied accessories listed below. INPUT SELECT TV SOURCE POWER AMP TV BD 1 DVD 2 4 NEO:6 3 5 6 SLEEP DIMMER 7 8 9 PROLOGIC AUDIO ASSIGN DSP 0 MUTE TUNING /CH VOL S.DIRECT TONE MO/ST TUNER MEMORY SETUP/MENU INFO RETURN EXIT BD/DVD SAT GAME/TV AV SYNC AUX iPod TUNER CROSS OVER 3D SOUND ASC SUB WOOFER CD Remote Control/ Batteries (AAA size) 6 FM antenna User’s manual iPod Dock ASC microphone English HW-D600_D650S_XAC_0614.indd 6 2011-06-17 10:34:35 01 Getting Started Description Front Panel 1 4 5 6 7 8 9 10 11 3 2 12 13 14 15 16 17 18 19 20 1 DISPLAY Displays the speaker/audio input status, listening mode, etc. 2 VOLUME CONTROL Adjusts the volume level. 3 POWER BUTTON ( 4 PHONES JACK Used to connect a set of headphones. 5 AUX IN JACKS Auxiliary AV input terminals used to connect a camcorder, portable DVD player or gaming device. 6 ASC MIC JACK Used to connect the ASC MIC for setting up Auto calibration. 7 INPUT SELECT BUTTON Used to select a source. FM TV BD/DVD SAT GAME AUX CD IPOD AUDIO IPOD VIDEO 8 AUDIO ASSIGN BUTTON Toggles to select an input mode for the selected source. 9 SOUND EFFECT BUTTON Toggles to select a surround sound mode. 10 SETUP BUTTON Displays the SETUP menu. 11 UP(,), DOWN(.), LEFT(<), RIGHT(>) BUTTONS Used to move the cursor up, down, left or right. Also used to select detailed options in the SOUND EFFECT mode and to change the tone level. 12 ENTER BUTTON Used to select an item in the SETUP menu. ) Turns the receiver on/off. English HW-D600_D650S_XAC_0614.indd 7 2011-06-17 7 10:34:36 Getting Started 13 RETURN BUTTON Return to the previous menu. 14 ASC BUTTON Used to select the auto calibration mode. 15 S.DIRECT / STEREO BUTTON Used to select the S.DIRECT or STEREO mode. (Output the original signal as it is without applying the sound field effect or any other sound effect.) 16 3D SOUND BUTTON Press to apply 3D Sound effect. 17 TONE CONTROL BUTTON Used to set the bass, treble level and tone to on/off. 18 TUNING MODE BUTTON Used to select the Manual or Preset mode for FM radio. 19 SELECT BUTTON Used to change the radio frequency. 20 MEMORY BUTTON Used to set a preset radio frequency. Display 1 2 3 4 5 7 6 1 2 3 4 5 6 SPEAKER INDICATORS Displays sound producing speakers. LISTENING MODE INDICATORS Displays the current listening mode and audio source. TUNING INDICATORS Displays the status of the current radio broadcast. AUDIO INPUT INDICATORS Displays the audio input signal type of the currently connected external audio source. SPEAKER LEVEL INDICATOR Displays the speaker level. RADIO FREQUENCY INDICATORS Displays the current radio frequency range. 7 MESSAGE DISPLAY Informs you of the status of the receiver. 8 English HW-D600_D650S_XAC_0614.indd 8 2011-06-17 10:34:36 01 Getting Started Rear Panel 1 2 3 4 5 ONLY FOR UPDATE SURROUND BACK OUT SUBWOOFER OUT ONLY FOR SERVICE 6 7 8 9 10 11 12 13 14 1 VIDEO IN JACKS Receives the video signal from a video player (BD/DVD, SAT, TV). 2 USB PORT Can be only used for firmware upgrades. 3 HDMI OUT JACK Outputs digital video and audio signals simultaneously using an HDMI cable. 4 HDMI IN JACKS Receives digital video and audio signals simultaneously using an HDMI cable. 5 VIDEO OUT JACK Outputs the video signal to a monitors (TV, Projector etc). 6 FM ANTENNA JACK Connect the FM antenna. 7 iPod JACK Receives the audio/video signal from an iPod. 8 ONLY FOR SERVICE JACK Used for the service repair. 9 AUDIO IN JACKS Receives the audio signal from a video player (BD/DVD, SAT, TV). 10 OPTICAL IN JACKS (DIGITAL AUDIO IN) Receives the digital optical audio signal. 11 COAXIAL IN JACK (DIGITAL AUDIO IN) Receives the digital coaxial audio signal. 12 SURROUND BACK OUT JACKS Outputs the "Surround Back" analog signal to the external amplifier. 13 SUBWOOFER AUDIO OUT JACK Connect the subwoofers. (Active subwoofer only) 14 SPEAKERS OUT TERMINALS Speaker connection terminals. English HW-D600_D650S_XAC_0614.indd 9 2011-06-17 9 10:34:37 Getting Started Remote Control Tour of the Remote Control 1 INPUT SELECT TV SOURCE POWER 20 21 2 AMP TV BD DVD 3 1 4 5 2 3 4 5 6 NEO:6 SLEEP DIMMER 7 8 9 PROLOGIC AUDIO ASSIGN DSP 0 6 22 23 24 25 7 26 27 8 28 MUTE 9 10 TUNING /CH VOL S.DIRECT 11 12 TONE MO/ST TUNER MEMORY 31 INFO 32 33 14 16 30 SETUP/MENU 13 15 29 RETURN EXIT BD/DVD SAT GAME/TV CD AV SYNC AUX iPod TUNER CROSS OVER 3D SOUND 34 17 ASC 10 SUB WOOFER 18 35 19 36 English HW-D600_D650S_XAC_0614.indd 10 2011-06-17 10:34:38 01 Getting Started 1 POWER BUTTON Turns the receiver on/off. 2 TV BUTTON To change to TV mode, press the TV button. 3 AMP BUTTON To change to AMP mode, press the AMP button. 4 NUMBER BUTTONS Used to select a TV channel. 5 NEO : 6 BUTTON Select the desired NEO:6 mode. 6 PROLOGIC BUTTON Select the desired Dolby Pro Logic audio mode. 7 SKIP BUTTONS Press to skip backwards or forwards on a connected DVD/BD player or iPod. 8 STOP/PLAY BUTTON Press to stop/start playback on a connected DVD/BD player or iPod. 9 MUTE BUTTON Mutes the sound of a connected device. 10 VOLUME CONTROL BUTTONS Adjusts the volume of the selected device. 11 MO/ST BUTTON Select MONO or STEREO for radio broadcasts. 12 TONE BUTTON You can adjust the bass and treble level. 13 SETUP/MENU BUTTON Displays the SETUP menu. 14 UP/DOWN/LEFT/RIGHT BUTTONS Used to navigate the menus. 15 RETURN BUTTON Used to return to the previous menu from the SETUP menu. 16 FUNCTION SELECTOR BUTTONS Used to select an input source. 17 AV SYNC BUTTON Used to select the Audio Delay Mode. 18 ASC BUTTON Used to set the Auto Sound Calibration function. 19 SUBWOOFER BUTTON Used to select the Subwoofer. 20 INPUT SELECT, TV SOURCE BUTTON Toggles to find and select an input source. Press to select a connected TV's video source. 21 BD BUTTON To change to BD mode, press the BD button. 22 DVD BUTTON To change to DVD mode, press the DVD button. 23 SLEEP BUTTON Used to set the Sleep Timer. English HW-D600_D650S_XAC_0614.indd 11 11 2011-06-17 10:34:38 Getting Started 24 DIMMER BUTTON Adjusts the brightness of the display. 25 DSP BUTTON Used to select the SFE mode. 26 AUDIO ASSIGN BUTTON Toggles to select an input mode for the selected source. 27 SEARCH BUTTON Press to search backwards or forwards. 28 PAUSE BUTTON Pauses playback on a connected device. 29 TUNING/CHANNEL BUTTONS Used to change the radio broadcasting frequency or TV channel. 30 S.DIRECT BUTTON Press to select S.DIRECT mode. 31 TUNER MEMORY BUTTON Used to set a preset radio frequency. 32 INFO BUTTON Display information on the connected device currently being used. 33 ENTER BUTTON Used to select an item in the SETUP menu. 34 EXIT BUTTON Exits the SETUP menu. 35 3D SOUND BUTTON Press to apply 3D Sound effect. 36 CROSS OVER BUTTON Press to adjust the crossover frequency. 12 English HW-D600_D650S_XAC_0614.indd 12 2011-06-17 10:34:38 01 Getting Started Installing batteries in the Remote Control * Battery size: AAA ✎ NOTE Follow these precautions to avoid leaking or cracking cells: Place batteries in the remote control so they match the polarity : (+) to (+) and (–) to (–). Assuming typical AVR usage, the batteries last for about one year. Use the correct type of batteries. Batteries that look similar may differ in voltage. Always replace both batteries at the same time. Do not expose the batteries to heat or a flame. Operation Range of the Remote Control The remote control can be used up to approximately 23 feet/7 meters in a straight line. It can also be operated at a horizontal angle of up to 30° from the remote control sensor. English HW-D600_D650S_XAC_0614.indd 13 13 2011-06-17 10:34:38 Connections This section involves various methods of connecting the AV receiver to other external components. Before moving or installing the product, be sure to turn off the power and disconnect the power cord. Speaker Positioning * Speakers are provided with model HW-D650S only. Model HW-D600 does not come with speakers. 6.6~9.8 feet (2~3m) AV RECEIVER SL SR Position of AV Receiver Place the AV Receiver on a dedicated stand or rack. Subwoofer g The position of the subwoofer is not so critical. Place it anywhere you like. Front Speakers Place these speakers in front of your listening position, facing inwards (about 45°) toward you. Place the speakers so that their tweeters will be at the same height as your ears. Align the front face of the front speakers with the front face of the center speaker or place them slightly in front of the center speaker. Center Speaker It is best to install it at the same height as the front speakers. You can also install it directly over or under the TV. Surround Speakers Place these speakers behind your listening position. If there isn't enough room, place these speakers so they face each other. Place them about 2 to 3 feet (60 to 90cm) above your ears, facing slightly downward. Unlike the front and center speakers, the surround speakers are used to handle mainly sound effects and sound will not come from them all the time. 14 English HW-D600_D650S_XAC_0614.indd 14 2011-06-17 10:34:39 02 SBL SBR Connections Surround Back Speakers (Option) If you are using two rear center speakers, place them behind the listening position. Place the surround back speaker about 2.3-3.3 feet (70 cm to 1 m). Front Height Speakers FHL FHR (Option) When using Dolby Pro Logic IIz, place the Surround Back Speakers on the FHL, FHR position above the front L and front R speakers at least 3.3 feet(1 m) above each one. ✎ NOTE When you attach the speakers to the wall, make sure to fasten them tightly so they do not fall off. Speaker Configuration For the best surround-sound experience, you should connect five speakers and a subwoofer. The following table shows which channels you should use based on the number of speakers you have. 7 speakers 2 speakers 3 speakers 4 speakers 5 speakers (DPL IIx) (Option) 7 speakers (DPL IIz) (Option) SBL FHL SBR FHR ✎ NOTE If you place a speaker near your TV set, screen color may be distorted because of the magnetic field generated by the speaker. If this occurs, place the speaker away from your TV set. If you have a external stereo Amplifier and two Speakers and connect them, you can constitute 7 speaker configuration. Also if you have a external active subwoofer, you can connect it. English HW-D600_D650S_XAC_0614.indd 15 15 2011-06-17 10:34:41 Connections Connecting the Speakers Connecting Speaker Wire 1. Loosen the knob by turning counterclockwise. 2. Insert the bare part of the wire into the hole in the side of each terminal. 3. Tighten the knob by turning clockwise to secure the wire. FRONT (R) SURROUND (R) SUBWOOFER SURROUND (L) ACTIVE SUBWOOFER (not supplied) SUBWOOFER OUT ONLY FOR UPDATE SURROUND BACK OUT SUBWOOFER OUT CENTER FRONT (L) ONLY FOR SERVICE Model HW-D600 AV Receiver HW-D600 Model HW-D650S AV Receiver FRONT SPEAKER CENTER SPEAKER SURROUND SPEAKER SUBWOOFER SPEAKER HW-D600 PS-FC560S PS-CC560S PS-RC560S PS-WC560S ✎ NOTE Speakers are provided with model HW-D650S only. Model HW-D600 does not come with speakers. Contact a Samsung Electronics retailer for purchasing. Keep the subwoofer speaker out of reach of children to prevent them from inserting their hands or objects into the duct (hole). Never touch speaker terminals while the power is on. Doing so could result in electric shock. Make sure the polarities (+ and -) are correct. If you want to use a active subwoofer speaker (not supplied), connect a subwoofer speaker into the SUBWOOFER OUT terminal in the rear panel. By using an external amplifier, you can connect the surround back speakers (SBL/SBR) or front height speakers(FHL/FHR) to improve your system up to a 7.1 channel system. 16 English HW-D600_D650S_XAC_0614.indd 16 2011-06-17 10:34:43 02 Connections Connecting External Devices/your TV via HDMI HDMI is a digital standard interface for connection to such devices as a TV, projector, DVD player, Blu-ray player, set-top box and more. HDMI removes any loss of signal from analog conversion, enabling you to enjoy video and audio sound quality as it was originally created in the digital source. By connecting through the HDMI(High-Definition Multimedia Interface) interface, you can play back digital video and audio. DVD or Blu-ray Player SAT (Cable/Satellite/Set-top box) Game console or HDTV Tuner (HDTV Terrestrial Receiver) Camcorder ONLY FOR UPDATE SURROUND BACK OUT SUBWOOFER OUT ONLY FOR SERVICE OPTICAL OUT • Connect it if you want to use Anynet+. (If connected TV support ARC, it is not necessary to connect the OPTICAL OUT.) High-bandwidth Digital Content Protection System (HDCP) support To play digital contents through the HDMI connection, both the connected external device and TV must support High-bandwidth Digital Content Protection System (HDCP). This product supports HDCP. Compatibility with a TV Supporting HDMI A TV with an HDMI jack. Video/Audio A TV with a DVI-D jack (TV supporting HDCP) Video A TV with a DVI-D jack (TV not supporting HDCP) - ✎ NOTE Audio from SACD discs will not be heard with this connection. To play a DVD disc whose copyright is protected by CPPM, use a player supporting CPPM. The quality of the audio output through the HDMI jack (sampling frequency and bit rate) may be limited by the performance of the connected device. Since HDMI connection supports both video and audio, you don’t have to connect an additional audio cable. English HW-D600_D650S_XAC_0614.indd 17 17 2011-06-17 10:34:47 Connections HDMI Function Using Anynet+ (HDMI-CEC) Anynet+ is a function that enables you to control other Samsung Devices with your Samsung TV's remote control. Anynet + can be used by connecting this AV Receiver to a SAMSUNG TV using an HDMI Cable. This is only available with SAMSUNG TVs and SAMSUNG AV Products that support Anynet+. 1. Connect the AV receiver to a Samsung TV with an HDMI cable. (See page 17) 2. Set the Anynet+ function on your TV. (See the TV instructions manual for more information.) • You can operate the volume on the AV receiver by using Volume buttons on the TV remote control. To Turn on Anynet+ 1. Press the SETUP/MENU button on the remote control. • Each time the button is pressed, the mode switches between INPUT and SETUP OFF. 2. 3. 4. 5. Press the ▲▼ buttons to select OPTION, and then press the ENTER button. Press the ▲▼ buttons to select HDMI SETUP, and then press the ENTER button. Press the ▲▼ buttons to select HDMI ANYNET+, and then press the ENTER button. Press the ▲▼ buttons to set ANYNET+ to ON, and then press the ENTER button. To exit setup mode • Press the SETUP/MENU or EXIT button on the remote control. SETUP OFF appears on the display and Setup Mode is exited. ✎ NOTE If you use an HDMI cable to connect a Samsung TV to your AV Receiver, you can operate the AV receiver using the TV’s remote control. This function is available only in connection with Samsung TV and DVD player supporting Anynet + (HDMI-CEC). Please check your TV for the ANYNET+ logo. If your TV has an ANYNET+ logo, then it supports the Anynet+ function. When you are making Anynet+ connection, do not connect more than two AV receivers (Anynet+ installed). Otherwise, it can cause a malfunction. 18 English HW-D600_D650S_XAC_0614.indd 18 2011-06-17 10:34:51 02 Connections Connecting to your TV ONLY FOR UPDATE SURROUND BACK OUT SUBWOOFER OUT ONLY FOR SERVICE or VIDEO IN OPTICAL OUT AUDIO OUT Video Connection Connect the Video cable (not supplied) from the VIDEO OUT (MONITOR) jack on the back of your AV Receiver to the Video Input jack on your TV. Audio Connection Connect the Digital Input (OPTICAL 3) on your AV Receiver to the Digital Output of the TV. OR Connect AUDIO IN (TV) on your AV Receiver to the Audio Out of the TV. English HW-D600_D650S_XAC_0614.indd 19 19 2011-06-17 10:34:51 Connections Connecting a DVD or BD(Blu-ray) Player VIDEO IN or ONLY FOR UPDATE SURROUND BACK OUT SUBWOOFER OUT ONLY FOR SERVICE or AUDIO OUT VIDEO OUT OPTICAL OUT DVD or BD Player or Video Connection Connect a Video cable (not supplied) from the VIDEO IN (BD/DVD) jack on the back of your AV Receiver to the Video Output jack on your DVD/BD player. Audio Connection Connect the Digital Input (OPTICAL 1) on your AV Receiver to the Digital Output of the DVD/BD player. OR Connect AUDIO IN (BD/DVD) on your AV Receiver to the Audio Out of the DVD/BD player. 20 English HW-D600_D650S_XAC_0614.indd 20 2011-06-17 10:34:54 02 Connections Connecting a Cable, Satellite or Set-top Box VIDEO IN or ONLY FOR UPDATE SURROUND BACK OUT SUBWOOFER OUT ONLY FOR SERVICE or SAT(Cable/Satellite/Set-top box) VIDEO OUT AUDIO OUT OPTICAL OUT or Video Connection Connect a Video cable (not supplied) from the VIDEO IN (SAT) jack on the back of your AV Receiver to the Video Output jack on your SAT. Audio Connection Connect the Digital Input (OPTICAL 2) on your AV Receiver to the Digital Output of the SAT. OR Connect AUDIO IN (SAT) on your AV Receiver to the Audio Out of the SAT. ✎ NOTE Disconnect the power plug from the outlet if you will not use this unit for a long period of time. If the cable/set-top box has only one audio output jack, connect it to either the right or left audio input jack of the main unit. Connect the audio cable's red plug to the red jack and white cable to the white jack. English HW-D600_D650S_XAC_0614.indd 21 21 2011-06-17 10:34:57 Connections Connecting a CD Player ONLY FOR UPDATE SURROUND BACK OUT SUBWOOFER OUT ONLY FOR SERVICE or AUDIO OUT COAXIAL OUT CD Player Audio Connection Connect the Digital Input (COAXIAL) on your AV Receiver to the Digital Output of the CD Player. OR Connect AUDIO IN (CD) on your AV Receiver to the Audio Out of the CD player. ✎ NOTE Connect the audio cable's red plug to the red jack and white cable to the white jack. If the CD player has only one audio output jack, connect it to either the right or left audio input jack of the main unit. 22 English HW-D600_D650S_XAC_0614.indd 22 2011-06-17 10:35:01 02 Connections Connecting Using the External Amplifier By factory default, the AV receiver is designed as 5.1 CH surround sound system. However, it can be extended to 7.1CH surround sound system in combination with a separate amplifier and additional speakers as shown below: • Use an RCA audio cable to connect the AV receiver’s SURROUND BACK OUT L/R jacks to an analog audio input on your external amplifier for SURROUND BACK or FRONT HEIGHT. • Connect your SURROUND BACK Speakers or Front HEIGHT Speakers to the speaker terminals on your external amplifier. • 7.1 channel settings using an external amplifier. FHL FHR 6.6~9.8 feet (2~3m) AV RECEIVER 6.6~9.8 feet (2~3m) External Amplifier External Amplifier AV RECEIVER Bi-AMP Bi-AMP SL SR SBL SL SR SBR L, R, C, SW, SL, SR, SBL, SBR ( Dolby Pro Logic IIx ) L, R, C, SW, SL, SR, FHL, FHR( Dolby Pro Logic IIz) SURROUND BACK OUT SBL SBR ONLY FOR UPDATE SURROUND BACK OUT SUBWOOFER OUT ONLY FOR SERVICE External Amplifier SURROUND BACK ✎ NOTE Surround Back Out only outputs analog signal. AV Receiver's SURROUND BACK OUT provides the Volume Control. The external amplifier with volume control and without volume control can be used. When you use the external amplifier with volume control, external amplifier's volume should be adjusted to a suitable position. The volume control for the 7.1 channel can be controlled in this AV receiver. English HW-D600_D650S_XAC_0614.indd 23 23 2011-06-17 10:35:04 Connections Connecting an iPod You can listen to audio from an iPod through the main unit. For iPod operation with your receiver, see this page and pages 49 ~ 50. ONLY FOR UPDATE SURROUND BACK OUT SUBWOOFER OUT ONLY FOR SERVICE 1. Connect the iPod dock connector to the iPod jack on your reciever. 2. Place the iPod in the Dock. • If you want to play a movie stored in your iPod player, you should set the player's TV Out option to On before inserting it into the dock. See pages 49 ~ 50. 3. Press the iPod button on the remote control. • You can also use the INPUT SELECT on the main unit. The mode switches as follows : FM TV BD/DVD SAT GAME AUX CD IPOD AUDIO IPOD VIDEO ✎ NOTE You must have the VIDEO (Monitor or TV) output connected to your TV to view iPod video. See page 19. Adjust the volume to a moderate level before you connect your iPod and AV Receiver. When the unit is powered on and you connect an iPod, the unit will charge your iPod's battery. Make sure to connect the dock connector so that the label “SAMSUNG” faces upward. 24 English HW-D600_D650S_XAC_0614.indd 24 2011-06-17 10:35:08 02 Connections Disconnecting an iPod Follow the steps below to prevent damage to an iPod and data when disconnecting from your AV receiver. 1. Use the INPUT SELECT on the main unit to switch to a mode other than IPOD AUDIO or IPOD VIDEO. OR 1. Turn off the AV Receiver. 2. Disconnect the iPod player from the iPod dock, or remove the iPod dock connector from the AV receiver. iPod/iPhone Models You Can Use with This Product iPod touch (3rd generation) iPod touch (2nd generation) iPod touch (1st generation) iPod classic iPod with video iPod with dock connector iPod with Click Wheel iPod nano (5th generation) iPod nano (4th generation) iPod nano (3rd generation) iPod nano (2nd generation) iPod nano (1st generation) iPhone 4 iPhone 3GS iPhone 3G iPhone ✎ NOTE “Made for iPod” means that an electronic accessory has been designed to connect specifically to iPods and has been certified by the developer to meet Apple performance standards. “Made for iPhone” means that an electronic accessory has been designed to connect specifically to iPhones and has been certified by the developer to meet Apple performance standards. Apple is not responsible for the operation of this device or its compliance with safety and regulatory standards. iPod is a trademark of Apple Inc., registered in the U.S. and other countries. iPhone is a trademark of Apple Inc. English HW-D600_D650S_XAC_0614.indd 25 25 2011-06-17 10:35:11 Connections Connecting the FM Antenna 1. Connect the FM antenna supplied to the FM ANTENNA terminal as a temporary measure. 2. Slowly move the antenna wire around until you find a location where reception is good, then fasten it to a wall or other rigid surface. 3. ONLY FOR UPDATE SURROUND BACK OUT SUBWOOFER OUT ONLY FOR SERVICE FM antenna (supplied) ✎ NOTE Do not place the antenna cable close to the power cord. Keep it as far away as possible. If you experience poor FM reception, use an external antenna. Connecting AUX Components You can connect external devices you use for a short time (camcorder, game console, mobile equipment, etc.) to the front of this unit for convenience. VIDEO OUT 26 AUDIO OUT Camcorder English HW-D600_D650S_XAC_0614.indd 26 2011-06-17 10:35:11 03 Setup Setup For your convenience, you can set this AV receiver's features for the best use. Before Using the AV Receiver Turning On/Off Connect the power plug to the outlet. This unit will set to Standby mode. Press the POWER button on the main unit for 2 seconds. • This unit will be turned on. • You can also turn the unit on/off by pressing the POWER button on the remote control. Remote Control Functions You can operate your AMP (this AV receiver)/ TV and BD(Samsung only)/DVD player with this remote control. See pages 53 ~ 54 for more details. To Select a Function Method 1 Press the INPUT SELECT button on the remote control. • Each time you press this button, FM TV BD/DVD SAT GAME AUX CD IPOD AUDIO IPOD VIDEO will be selected in turn. Method 2 Press the BD/DVD, SAT, GAME/TV, CD, iPod or TUNER button. • You can directly select the desired function. Home Menu Use the HDMI cable to connect between main unit and monitor. Press SETUP/MENU to display the “INPUT” message on the display screen. You will see the OSD menu in a few seconds. ✎ NOTE The OSD menu will be displayed only if you use the HDMI cable for the connection. INPUT INPUT SELECTION SPEAKER Q SURROUND OPTION > MOVE SELECT ' RETURN EXIT For using the OSD menus, refer to using the menus on the display screen. The OSD (On Screen Display) may change in this product after you upgrade the software version. English HW-D600_D650S_XAC_0614.indd 27 27 2011-06-17 10:35:14 Setup Selecting Digital/HDMI/Analog You can listen to sound of analog, HDMI, optical input using this unit. 1. Press the INPUT SELECT button on the remote control to select a desired function (BD/DVD, SAT, TV, CD, AUX). See page 27. 2. Press the AUDIO ASSIGN button on the remote control to select the audio input source of the external device you have connected. • Each time you press this button, the input mode changes as follows: • For BD/DVD function • For SAT function • For TV function • For CD function • For AUX function ✎ NOTE You can also change the input mode by pressing the AUDIO ASSIGN button on the front of your AV Receiver. You can enjoy Dolby Digital or DTS if you connect the digital audio output jack of an external audio component to the optical or coaxial digital audio input jack on the main unit. For the TV function, the TV ARC menu will be displayed only if an ARC-compliant TV is connected. 28 English HW-D600_D650S_XAC_0614.indd 28 2011-06-17 10:35:14 03 Setup Setup Menu Tree Here’s a quick look at how the setup menus are organized on your AV Receiver. INPUT INPUT SELECTION BD/DVD OPTICAL1, 2 COAXIAL OPTICAL1, 2 COAXIAL OPTICAL1, 2 COAXIAL SAT CD SPEAKER SPEAKER SIZE 7.1 CHANNEL SPEAKER DISTANCE SPEAKER LEVEL TEST TONE SURROUND DPLIIx DTS NEO:6 EX/ES OPTION AUDIO SYNC TONE CONTROL MP3 ENHANCER SMART VOLUME AUTO CALIBRATION DRC DUAL MONO HDMI SETUP English HW-D600_D650S_XAC_0614.indd 29 29 2011-06-17 10:35:18 Setup SPEAKER SPEAKER SIZE FRONT LARGE SMALL CENTER LARGE SMALL NONE SURROUND LARGE SMALL NONE SURROUND BACK LARGE SMALL NONE FRONT HEIGHT LARGE SMALL SUBWOOFER YES NO CROSSOVER 7.1 CHANNEL 60Hz, 80Hz, 100Hz, 120Hz, 150Hz, 180Hz, 200Hz SURR.BACK PLIIz SPEAKER DISTANCE FRONT LEFT FRONT RIGHT CENTER SURROND LEFT 1 ~ 30FT (1 foot steps) , default : 10FT SURROUND RIGHT SURROUND BACK LEFT FRONT HEIGHT LEFT SURROUND BACK RIGHT FRONT HEIGHT RIGHT SUBWOOFER SPEAKER LEVEL FRONT LEFT FRONT RIGHT CENTER SURROND LEFT SURROUND RIGHT -10 ~ +10dB (1dB step) , default : 00dB SURROUND BACK LEFT FRONT HEIGHT LEFT SURROUND BACK RIGHT FRONT HEIGHT RIGHT SUBWOOFER TEST TONE AUTO move to "Test Tone check Page" MANUAL ✎ NOTE If Dolby Pro Logic IIz is set to On, the Surround Back speaker (SBL/SBR) is changed to the Front Height Speaker (FHL/FHR). 30 English HW-D600_D650S_XAC_0614.indd 30 2011-06-17 10:35:18 03 Setup SURROUND DPLIIx PANORAMA OFF ON DIMENSION -7~+7 CENTER WIDTH 0~7 DTS NEO:6 CENTER IMAGE 0~5 EX/ES AUTO OFF ON OPTION AUDIO SYNC TONE CONTROL 0ms~240ms (10ms step) TONE OFF ON BASS -6dB ~ +6dB (1dB Step) TREBLE -6dB ~ +6dB (1dB Step) MP3 ENHANCER OFF ON SMART VOLUME OFF ON AUTO CALIBRATION MODE OFF move to "Auto Calibration Measurement Page" MEASUREMENT DRC AUTO DUAL MONO CH1 HDMI SETUP AUTO SYNC ON MINIMUM STANDARD MAXIMUM CH2 BOTH OFF ON AVR TV OFF ON OFF AUTO HDMI AUDIO HDMI ANYNET+ ARC English HW-D600_D650S_XAC_0614.indd 31 31 2011-06-17 10:35:18 Setup Audio Setup Selecting a Source Device And Connection Jack (Digital Audio In) Select the external devices you have connected to the receiver. 1. Press the SETUP/MENU button on the remote control. • Each time the button is pressed, the mode switches between INPUT and SETUP OFF. 2. Press the ENTER button to select INPUT. 3. Press the ENTER button to select INPUT SELECTION. 4. Press the ▲▼ buttons to select a desired jack. • Devices switch as follows; BD/DVD, SAT, CD ✎ NOTE You can also use the SETUP, ,,., ENTER, RETURN buttons on the front of your AV Receiver. Setting the Speaker Size Signal outputs and frequency response from the speaker will be adjusted according to your speaker configuration and whether certain speakers are used or not. 1. Press the SETUP/MENU button on the remote control. • Each time the button is pressed, the mode switches between INPUT and SETUP OFF. 2. Press the ▲▼ buttons to select SPEAKER, and then press the ENTER button. 3. Press the ▲▼ buttons to select SPK SIZE, and then press the ENTER button. 4. Press the ▲▼ buttons to select the speaker you want, and then press the ENTER button. • Each time you press the ▲▼ buttons, FRONT CENTER SURR SBACK(DPLIIx) / FRONTH(DPLIIz) SUBW CROVR will be selected in turn. 5. Press the ▲▼ buttons to set the mode (LARGE, SMALL etc.) for the selected speaker. SPEAKER SIZE 6. Repeat steps 2-5 to set the mode for each speaker. USER > MOVE 32 FRONT : SMALL LARGE CENTER : SMALL SMALL SURROUND : SMALL SURROUND BACK : SMALL SUBWOOFER : YES CROSSOVER : 100Hz SELECT ' RETURN EXIT English HW-D600_D650S_XAC_0614.indd 32 2011-06-17 10:35:19 03 Setup - To exit setup mode • Press the SETUP/MENU or EXIT button on the remote control. SETUP OFF appears on the display and Setup Mode is exited. Setting the Speaker SPEAKER Possible Settings Default Setting FRONT (Front) LARGE, SMALL SMALL CENTER (Center) LARGE, SMALL, NONE SMALL SURR (Surround) LARGE, SMALL, NONE SMALL SBACK (Surround Back) LARGE, SMALL, NONE NONE FRONTH (Front Height) LARGE, SMALL SMALL SUBW (Subwoofer) YES, NO YES CROVR (Crossover Frequency) 60, 80, 100,120, 150, 180, 200(Hz) 100Hz • • • • • • LARGE : Select when using large speakers. You can listen to full range sound. SMALL : Select this when using small speakers. NONE : Select when no speaker is used. YES (subwoofer) : Select when using the subwoofer speaker. NO (subwoofer) : Select when not using the subwoofer speaker. CROVR : Select the crossover frequency for the best bass response in your speakers. ✎ NOTE You can also use the SETUP, ,,., ENTER, RETURN buttons on the front of your AV Receiver. When the Front speaker is only set to LARGE, you can select LARGE of other speakers. When the Surround speaker is set to LARGE, you can select LARGE of SBACK (Surround Back) speaker. When the 7.1 CHANNEL is set to PLIIz, you can not select NONE of surround speaker and front height speaker. You can also change the crossover frequency by using the CROSS OVER, <, > buttons on the remote control. English HW-D600_D650S_XAC_0614.indd 33 33 2011-06-17 10:35:19 Setup Connection Setting For Surround Back Settings for the surround back speaker differ depending on the connection method and installation site of the speaker to be connected. You must configure the 7.1 CHANNEL settings according to the connected speaker before you listen to music properly. 1. Press the SETUP/MENU button on the remote control. • Each time the button is pressed, the mode switches between INPUT and SETUP OFF. 2. Press the ▲▼ buttons to select SPEAKER, and then press the ENTER button. 3. Press the ▲▼ buttons to select 7.1 CHANNEL, and then press the ENTER button. 4. Press the ▲▼ to select a proper setting for the surround back speaker. • SURR.BACK : Select this if you want to install the surround back speaker in the default settings. With this setting, you can enable the Dolby Pro Logic IIx mode. • PLIIz : Select this if you want to install the surround back speaker in the top front corner. With this setting, you can enable the Dolby Pro Logic IIz INPUT mode. SPEAKER Q SURROUND SPEAKER SIZE 7.1 CHANNEL SURR.BACK SPEAKER DISTANCE PLIIz SPEAKER LEVEL TEST TONE OPTION > MOVE SELECT ' RETURN EXIT ✎ NOTE Depending on the 7.1 CHANNEL settings, the surround back speaker or front height speaker menus may not be activated or may differ in the speaker menu: SPEAKER SIZE, SPEAKER LEVEL, SPEAKER DISTANCE. Depending on your setting, you may not use different features simultaneously. If you set SURR-BACK, for instance, you cannot use the following feature: PLIIz. 34 English HW-D600_D650S_XAC_0614.indd 34 2011-06-17 10:35:20 03 Setup Setting the Speaker Listening Distance If the speakers cannot be placed at equal distances from the listening position, you can adjust the delay time of the audio signals from the center and surround speakers. 1. Press the SETUP/MENU button on the remote control. • Each time the button is pressed, the mode switches between INPUT and SETUP OFF. 2. Press the ▲▼ buttons to select SPEAKER, and then press the ENTER button. 3. Press the ▲▼ buttons to select SPK DISTANCE, and then press the ENTER button. 4. Press the ▲▼ buttons to select the speaker you want. • Each time you press the ▲▼ buttons, F.L F.R CEN S.L S.R SBL SBR S.W will be selected in turn. 5. Press the ◄ ► buttons to set the Speaker Distance. • For the FRONT LEFT, FRONT RIGHT, CENTER, SURR. LEFT, SURR. RIGHT, SURRBACK.LEFT, SURRBACK.RIGHT and SUBWOOFER Speakers, you can set the distance from the speaker to FRONT LEFT FRONT RIGHT listening position between 1ft ~ 30ft (0.3~9.0m) in CENTER intervals of 1ft (0.3m). SPEAKER DISTANCE 10FT ► 10FT 10FT SURROUND LEFT 10FT SURROUND RIGHT 10FT ▼ > MOVE SELECT ' RETURN EXIT - Setting Speaker Distance Set the distance from the speaker to listening position in intervals of 1ft(0.3m). • F.L (front left) : 1ft ~ 30ft • SW (subwoofer) : 1ft ~ 30ft • F.R (front right) : 1ft ~ 30ft • SBL (surround back left) : 1ft ~ 30ft • S.L (surround left) : 1ft ~ 30ft • SBR (surround back right) : 1ft ~ 30ft • S.R (surround right) : 1ft ~ 30ft • FHL (front height left) : 1ft ~ 30ft • CEN (center) : 1ft ~ 30ft • FHR (front height right) : 1ft ~ 30ft ✎ NOTE If the listening position is beyond the range of the speaker distance setup, set the speaker distance to the maximum. If Dolby Pro Logic IIz is set to On, the Surround Back speaker (SBL/SBR) is changed to the Front Height Speaker (FHL/FHR). English HW-D600_D650S_XAC_0614.indd 35 35 2011-06-17 10:35:20 Setup Setting the Speaker Level You can set the balance and level of speakers. 1. Press the SETUP/MENU button on the remote control. • Each time the button is pressed, the mode switches between INPUT and SETUP OFF. 2. Press the ▲▼ buttons to select SPEAKER, and then press the ENTER button. 3. Press the ▲▼ buttons to select SPK LEVEL, and then press the ENTER button. 4. Press the ▲▼ buttons to select the speaker you want. • Each time you press this button, F.L F.R CEN S.L S.R SBL SBR S.W will be selected in turn. 5. Press the ◄ ► buttons to set the Speaker Level mode. • You can adjust it from -10 to +10dB in 1 step increments. • The sound gets quieter at -10dB and louder at +10dB. SPEAKER LEVEL FRONT LEFT ◄ 0dB FRONT RIGHT 0dB CENTER 0dB SURROUND LEFT 0dB SURROUND RIGHT 0dB ► ▼ > MOVE SELECT ' RETURN EXIT - Setting Speaker Level • F.L (front left) : -10 ~ +10dB • SW (subwoofer) : -10 ~ +10dB • F.R (front right) : -10 ~ +10dB • SBL (surround back left) : -10 ~ +10dB • S.L (surround left) : -10 ~ +10dB • SBR (surround back right) : -10 ~ +10dB • S.R (surround right) : -10 ~ +10dB • FHL (front height left) : -10 ~ +10dB • CEN (center) : -10 ~ +10dB • FHR (front height right) : -10 ~ +10dB ✎ NOTE If Dolby Pro Logic IIz is set to On, the Surround Back speaker (SBL/SBR) is changed to the Front Height Speaker (FHL/FHR). You can also change the subwoofer level by using the SUBWOOFER, <, > buttons on the remote control. 36 English HW-D600_D650S_XAC_0614.indd 36 2011-06-17 10:35:21 03 Setup Setting the Test Tone Use the test tone to check the speaker connection status or level. 1. Press the SETUP/MENU button on the remote control. • Each time the button is pressed, the mode switches between INPUT and SETUP OFF. 2. Press the ▲▼ buttons to select SPEAKER, and then press the ENTER button. 3. Press the ▲▼ buttons to select TEST TONE, and then press the ENTER button. 4. Press the ▲▼ buttons to select the option you want, and then press the ENTER button. • AUTO : Test signal will be automatically output as follows; F.L CEN S.W F.R S.R S.L. - During test tone output, press the ▲▼ buttons to adjust the speaker output level from -10 to +10 dB by 1 step. • MANUAL : Enables you to adjust the output level of the speaker manually. 1) Press the ENTER button to select the speaker you want. Each time you press the ENTER button, F.L CEN S.W F.R S.R S.L will be selected in turn. 2) Press the ▲▼ buttons to set the Test Tone mode you want. You can adjust the speaker output level from -10 to +10dB by 1 step. The sound gets quieter at -10dB and louder at +10dB. MANUAL ▲FL 0dB ▼ SL 0dB > MOVE C 0dB SW 0dB SR 0dB USER SELECT FR 0dB ' RETURN EXIT - Test Tone Output • F.L (front left) : -10 ~ +10dB • F.R (front right) : -10 ~ +10dB • S L (surround left) : -10 ~ +10dB • S.R (surround right) : -10 ~ +10dB • CEN (center) : -10 ~ +10dB • S.W (subwoofer) : -10 ~ +10dB • SBL (surround back left) : -10 ~ +10dB • SBR (surround back right) : -10 ~ +10dB - To stop test tone • Press the SETUP/MENU button once. SETUP OFF appears on the display and test tone stops. ✎ NOTE In the Dolby Pro Logic IIx mode, test signal will be automatically output as follows : F.L CEN S.W F.R S.R SBR SBL S.L. In the Dolby Pro Logic IIz mode, test signal will be automatically output as follows : F.L FHL CEN S.W FHR F.R S.R S.L. English HW-D600_D650S_XAC_0614.indd 37 37 2011-06-17 10:35:21 Setup Setting Dolby Pro Logic Mode This mode provides up to 7.1 channel sound from 2 channel sources, or provides 7.1 channel sound from 5.1 channel sources for music or movie mode. Press the PROLOGIC button on the remote control. • • • • • • MOVIE : Adds realism to the movie soundtrack. MUSIC : Provides up to 7.1 channel surround sound for digital, analog or existing stereo sources. GAME : Enhances the excitement of the game’s sound. MATRIX : You will hear up to 7.1 channel surround sound. PL (Pro Logic) : You will experience a surround effect with 5.1 channel surround sound. OFF : Output the original signal as it is without applying the sound field effect or any other sound effect. Surround Setup Setting Dolby Pro Logic IIx This function works only in Dolby Pro Logic IIx MUSIC mode. 1. Press the SETUP/MENU button on the remote control. • Each time the button is pressed, the mode switches between INPUT and SETUP OFF. 2. Press the ▲▼ buttons to select SURROUND, and then press the ENTER button. 3. Press the ▲▼ buttons to select DPLIIx, and then press the ENTER button. 4. Press the ▲▼ buttons to select the option you want, and then press the ENTER button. • PANORAMA : Press the ▲▼ buttons to select ON or OFF. (This mode extends the front stereo image to include the surround speakers for an exciting "wraparound" effect with side wall imaging.) • DIMENSION : Press the ◄ ► buttons to set from -7 to 7. (Incrementally adjusts the sound field (DSP)from the front or surround.) • C- WIDTH : Press the ◄ ► buttons to set from 0 to 7. (This sets the width of the center sound image. The higher the setting, the less sound comes from the center speaker.) ✎ NOTE PANORAMA, DIMENSION and CENTER WIDTH settings are enabled only if the Dolby Pro Logic Mode is set to MUSIC. You cannot use Dolby Pro Logic llx mode for multi channel signals such as Dolby Digital, Dolly Digital +, Dolby true HD, DTS, DTS-HD Master Audio. Pro Logic works only for PCM audio signals with sampling frequencies of 32KHz, 44KHz or 48KHz. When Dolby Pro Logic IIz is set ON, Dolby Pro Logic IIx can not be used. 38 English HW-D600_D650S_XAC_0614.indd 38 2011-06-17 10:35:22 03 Setup Setting NEO:6 Mode You can play back 2 channel sound over 5.1 or 7.1 channels when enjoying music or a movie. 1. Press the SETUP/MENU button on the remote control. • Each time the button is pressed, the mode switches between INPUT and SETUP OFF. 2. Press the ▲▼ buttons to select SURROUND, and then press the ENTER button. 3. Press the ▲▼ buttons to select DTS NEO:6, and then press the ENTER button. 4. Press the ENTER buttons to set the C-IMAGE mode you want. Press the ◄ ► buttons to set the C-IMAGE from 0 to 5. This parameter adjusts the center image through the front and center speakers. "5" is the wider. Using NEO:6 Mode Press the NEO:6 button on the remote control. • MUSIC : When listening to music, you can experience sound effects as if you are listening to the actual performance. • CINEMA : Adds realism to the movie soundtrack. • OFF : Output the original signal as it is without applying the sound field effect or any other sound effect. ✎ NOTE NEO:6 works only for 2-ch audio signals with sampling frequencies of 32KHz, 44KHz or 48KHz. Setting EX/ES Mode When surround back speakers are connected, you can listen to 7.1 multi-channel sound using the built-in Dolby Digital Surround EX or DTS ES decoder. This function works when a Dolby Digital or DTS source (such as a DVD player) is input, and does not work with L.PCM and Dolby Digital 2 channel sources. 1. Press the SETUP/MENU button on the remote control. • Each time the button is pressed, the mode switches between INPUT and SETUP OFF. 2. Press the ▲▼ buttons to select SURROUND, and then press the ENTER button. 3. Press the ▲▼ buttons to select EX/ES, and then press the ENTER button. 4. Press the ▲▼ buttons to set the EX/ES mode you want. • AUTO : If the unit receives an audio signal that it can recognize, it will select an optimal decoder for playback in 7.1 channels. If the amplifier does not recognize the audio signal, it will not play in 7.1 channel automatically. • OFF : Dolby Digital Surround EX / DTS ES decoder will not be used for playback. • ON : Dolby Digital or DTS signal will be played in 7.1 channel using Dolby Digital Surround EX / DTS ES decoder. ✎ NOTE You cannot use DTS-ES without surround back speakers connected. English HW-D600_D650S_XAC_0614.indd 39 39 2011-06-17 10:35:22 Setup Other Settings Audio Sync Video may look slower than the audio if it is connected to a digital TV. If this occurs, adjust the audio delay time to match the video. 1. Press the SETUP/MENU button on the remote control. • Each time the button is pressed, the mode switches between INPUT and SETUP OFF. 2. Press the ▲▼ buttons to select OPTION, and then press the ENTER button. 3. Press the ▲▼ buttons to select AUDIO SYNC, and then press the ENTER button. 4. Press the ◄ ► buttons to set the AUDIO SYNC Delay Time. • You can adjust it from 0 to 240MS in 10MS steps. Tone Control This will enable you to adjust the bass and treble level. 1. Press the SETUP/MENU button on the remote control. • Each time the button is pressed, the mode switches between INPUT and SETUP OFF. 2. Press the ▲▼ buttons to select OPTION, and then press the ENTER button. 3. Press the ▲▼ buttons to select TONE CONTROL, and then press the ENTER button. 4. Press the ▲▼ buttons to select TONE, and then press the ENTER button. 5. Press the ▲▼ buttons to select ON or OFF you want, and then press the ENTER button. • If it is set to TONE OFF, the Tone Control function will be disabled. 6. Press the ▲▼ buttons to set the Tone Control mode you want. • BASS & TREBLE : Press the ◄ ► buttons to set from -6 to 6. • Each time you press this button, TONE BASS TREBLE will be selected in turn. • You can adjust it from -6 to +6dB by 1 step. • The sound gets quieter at -6dB and louder at +6dB. ✎ NOTE The Tone Control function can be applied to the front channels only. 40 English HW-D600_D650S_XAC_0614.indd 40 2011-06-17 10:35:23 03 Setup MP3 Enhancer This also helps enhance your sound experience (ex. mp3 music). Use this if you want to hear better sound from a low quality mp3 source. 1. Press the SETUP/MENU button on the remote control. • Each time the button is pressed, the mode switches between INPUT and SETUP OFF. 2. Press the ▲▼ buttons to select OPTION, and then press the ENTER button. 3. Press the ▲▼ buttons to select MP3 ENHANCER, and then press the ENTER button. 4. Press the ▲▼ buttons to select ON or OFF. Smart Volume This will regulate and stabilize the volume level against a drastic volume change when changing channels or during a scene transition. 1. Press the SETUP/MENU button on the remote control. • Each time the button is pressed, the mode switches between INPUT and SETUP OFF. 2. Press the ▲▼ buttons to select OPTION, and then press the ENTER button. 3. Press the ▲▼ buttons to select SMART VOLUME, and then press the ENTER button. 4. Press the ▲▼ buttons to select ON or OFF. English HW-D600_D650S_XAC_0614.indd 41 41 2011-06-17 10:35:23 Setup Auto Calibration Setup By setting the calibration just once when you relocate or install the unit, you can have the unit automatically recognize the distance between speakers, levels between channels, and frequency characteristics to create a 5.1-channel sound field optimized for your environment. - Before Setting 1. Plug the ASC microphone into the ASC MIC jack. 2. Place the ASC microphone at the listening position. 3. Press the ASC button on the front panel, and then press the ENTER button. 1. Press the SETUP/MENU button on the remote control. • Each time the button is pressed, the mode switches between INPUT and SETUP OFF. 2. Press the ▲▼ buttons to select OPTION, and then press the ENTER button. 3. Press the ▲▼ buttons to select AUTO CALIBRATION, and then press the ENTER button. 4. Press the ▲▼ buttons to select MEASUREMENT, and then press the ENTER button. • To create the optimal 5.1 channel sound field, the selections are in the following sequence: L ➞ C ➞ R ➞ SR ➞ SBR ➞ SBL ➞ SL ➞ SW • MODE ON : The auto calibration mode is set to on. CALIBRATION MODE OFF: The auto calibration mode is set to off. FL 0dB 0.3m SL 0dB 0.3m FR 0dB 0.3m SW 0dB 0.3m C 0dB 0.3m SR 0dB 0.3m USER SBL 0dB 0.0m > MOVE SBR 0dB 0.0m SELECT ' RETURN EXIT To cancel the Auto Calibration setup. This will be automatically reverted if you press the RETURN button. • If auto calibration error occurs, see "Auto Calibration Error List" on page 56. ASC Microphone 42 English HW-D600_D650S_XAC_0614.indd 42 2011-06-17 10:35:24 03 Setup ✎ NOTE Setting the calibration takes about 3 minutes. Because the volume level of the tone is fixed during the Auto Calibration setup, you cannot adjust the volume using the volume control. If the ASC microphone is disconnected during the Auto Calibration setup, the setup will be canceled. You can also press the ASC button on the remote control to use this function. If Dolby Pro Logic ||z is set to ON, the selection are in the following sequence : FL CEN FR SR FHR FHL SL SW. DRC Setup You can use this function to enjoy Dolby Digital sound when watching movies at low volume at night. DRC compresses the audio to make the loudest sounds quieter and the quietest sounds louder. 1. Press the SETUP/MENU button on the remote control. • Each time the button is pressed, the mode switches between INPUT and SETUP OFF. 2. Press the ▲▼ buttons to select OPTION, and then press the ENTER button. 3. Press the ▲▼ buttons to select DRC, and then press the ENTER button. 4. Press the ▲▼ buttons to set the DRC you want. • AUTO : The Dynamic Range Control will be set automatically based on the information provided by the Dolby TrueHD Soundtrack. • MIN : Sets DRC effect to minimum. • STD : Sets DRC effect to standard. • MAX : Sets DRC effect to maximum. Dual Mono Setup Dual mono programs have two independent mono channels. You can use this function when dual mono programs are played. When you use this function, select audio channels CH1, CH2 or both Channel. 1. Press the SETUP/MENU button on the remote control. • Each time the button is pressed, the mode switches between INPUT and SETUP OFF. 2. Press the ▲▼ buttons to select OPTION, and then press the ENTER button. 3. Press the ▲▼ buttons to select DUAL MONO, and then press the ENTER button. 4. Press the ▲▼ buttons to select the DUAL MONO option you want. • CH1 : Channel 1 is heard only. • CH2 : Channel 2 is heard only. • BOTH : Both channels are heard from front speakers. English HW-D600_D650S_XAC_0614.indd 43 43 2011-06-17 10:35:25 Setup HDMI Setup Use this if you want to receive audio from HDMI connected external devices. 1. Press the SETUP/MENU button on the remote control. • Each time the button is pressed, the mode switches between INPUT and SETUP OFF. 2. Press the ▲▼ buttons to select OPTION, and then press the ENTER button. 3. Press the ▲▼ buttons to select HDMI SETUP, and then press the ENTER button. 4. Press the ▲▼ buttons to set the HDMI Setup mode you want, and then press the ENTER button. 5. Press the ▲▼ buttons to set you want. • AUTO SYNC : ON, OFF The AV receiver can be set to automatically correct any delay between the video and the audio, based on the data from the connected TV. - ON : HDMI Sync is enabled. - OFF : HDMI Sync is disabled. • HDMI AUDIO : AVR(Audio Video Receiver), TV This preference determines whether audio received at the HDMI IN is output by the HDMI OUT. If you want to listen to audio from an HDMI connected external device through your HDMI connected TV's speakers, set it to TV. Otherwise, leave it on AVR to listen to audio from the A/V receiver. - AVR : HDMI audio is not output - TV : HDMI audio is output • HDMI ANYNET+ : ON, OFF Anynet+ is a function that enables you to control other Samsung Devices with your Samsung TV's remote control. - ON : Anynet+ is enabled. - OFF : Anynet+ is disabled. • ARC : AUTO , OFF If you use the HDMI cable to connect between HDMI IN of an Audio Return Channel-compliant TV and HDMI OUT (ARC) of the main unit, you can listen to the TV sound through the main unit connected speaker without the further connection. - AUTO : The audio signal from the TV can be sent to the HDMI OUT of the main unit. - OFF : Turn TV ARC funtion off. ✎ NOTE HDMI Audio is enabled only if both the HDMI INPUT and HDMI OUT are connected properly and working normally. HDMI Sync function works only if your HDMI compatible TV supports this function. If HDMI ANYNET+ is set to OFF, TV ARC will be set to OFF accordingly that cannot switch to AUTO. The ARC function will be active only via the HDMI OUT terminal. 44 English HW-D600_D650S_XAC_0614.indd 44 2011-06-17 10:35:26 04 Operation Operation Using the Surround Modes Using the AUDIO EFFECT Button On the Front of the Main Unit Selecting the DPLIIx mode 1. Press the AUDIO EFFECT button to select DPLIIx mode. • Each time you press this button, 3D SOUND will be selected in turn. 2. Press the <, > button. • Each time you press the <, > button, MUSIC GAME MATRIX PL PL OFF MOVIE will be selected in turn. • If you turn Dolby Pro Logic IIz on, HEIGHT PL OFF will be selected in turn. • You can also select the DPLIIx mode by pressing the PROLOGIC button on the remote control. Selecting the NEO:6 mode 1. Press the AUDIO EFFECT button briefly to select NEO:6 mode. • Each time you press this button, 3D SOUND will be selected in turn. 2. Press the <, > button. • Each time you press the <, > button, MUSIC CINEMA OFF will be selected in turn. • You can also select the NEO:6 mode by pressing the NEO : 6 button on the remote control. Selecting the DSP mode 1. Press the AUDIO EFFECT button to select DSP mode. • Each time you press this button, 3D SOUND will be selected in turn. 2. Press the <, > button. • Each time you press the <, > button, STEREO HALL 1 HALL 2 J.CLUB CHURCH ROCK CLASSIC LIVE GAME MOVIE CONCERT STADIUM will be selected in turn. • You can also select the DSP mode by pressing the DSP button on the remote control. Selecting the 3D SOUND mode 1. Press the AUDIO EFFECT button to select 3D SOUND mode. • Each time you press this button, 3D SOUND will be selected in turn. 2. Press the <, > button. • Each time you press the <, > button, 3D SOUND ON 3D SOUND OFF will be selected in turn. • You can also select the 3D SOUND mode by pressing the 3D SOUND button on the remote control. ✎ NOTE The 3D sound effect will not be available for Dolby TrueHD, Dolby Digital Plus, DTS-HD Master Audio and DTS-HD High Resolution Audio. You cannot use Dolby Pro Logic llx mode for Analog multi channel signals, LPCM multi channel signals from HDMI, Dolby TrueHD, Dolby Digital Plus, DTS-HD Master Audio and DTS-HD High Resolution Audio. Pro Logic works with the audio signals with sampling frequencies of 32KHz, 44KHz or 48KHz. The 3D sound effect will not be available for FM. English HW-D600_D650S_XAC_0614.indd 45 45 2011-06-17 10:35:26 Operation Using the S.DIRECT Button Output the original signal as it is without applying the sound field effect or any other sound effect. Press the S.DIRECT button. ✎ NOTE The screen will display “DIRECT” instead of “S.DIRECT”. Input Signal and Surround Chart o = active, – = inactive Input Signal Dolby Digital Dolby Digitital EX Surround Mode Output Channel SL SBL SUBW SR SBR Display Information Signal Format Channel Status L/R C Dolby Digital O O O – O Digital + Dolby Digital Dolby Digital EX O O O O O Digital +Dolby Digital EX L, C, R, SL, SR ,SBL, SBR, SW L, C, R, SL, SR ,SBL, SBR, SW L, C, R, SL, SR, SW Dolby Digital + ProLogic IIx O O O O O Digital + Dolby Digital + ProLogic IIx Dolby Digital + ProLogic IIz O O O O (Height) O Digital + Dolby Digital + ProLogic IIz Dolby Digital Plus Dolby Digital Plus O O O O O Digital + Dolby Digital Plus L, C, R, SL, SR ,SBL, SBR, SW Dolby TrueHD Dolby TrueHD O O O O O Dolby TrueHD L, C, R, SL, SR ,SBL, SBR, SW DTS (5.1-ch) DTS Surround O O O – O DTS DTS-ES DTS Digital + ProLogic IIx O O O O O DTS + ProLogic IIx L, C, R, SL, SR ,SBL, SBR, SW DTS Digital + ProLogic IIz O O O O (Height) O DTS + ProLogic IIz L, C, R, SL, SR ,SBL, SBR, SW DTS 96/24 DTS-ES O O O O O DTS ES L, C, R, SL, SR ,SBL, SBR, SW DTS 96/24 O O O – O DTS 96/24 DTS-HD Master Audio O O O O O DTS-HD MSTR L, C, R, SL, SR ,SBL, SBR, SW DTS-HD High Resolution O O O O O DTS-HD L, C, R, SL, SR, SBL, SBR, SW Multi-Channel O O O O O Digital + LPCM L, C, R, SL, SR, SBL, SBR, SW Multi-Channel O O O O (Height) O Digital + LPCM L, C, R, SL, SR, H, SW Stereo O – – – O ProLogic IIx O O O O O L, C, R, SL, SR ,SBL, SBR, SW L, C, R, SL, SR ,SBL, SBR, SW DTS-HD LPCM Multi-Channel 2-ch PCM Analog 2-ch L, C, R, SL, SR, SW L, C, R, SL, SR, SW ProLogic IIz O O O O (Height) O NEO:6 O O O O O Digital + LPCM Digital + LPCM + Dolby Digital + ProLogic IIx Digital + LPCM + Dolby Digital + ProLogic IIz Digital + LPCM + DTS + NEO:6 SFE O O O O O Digital + LPCM + LIVE SURR Stereo O – – – O Analog ProLogic IIx O O O O O Analog + Dolby Digital + ProLogic IIx ProLogic IIz O O O O (Height) O Analog + Dolby Digital + ProLogic IIz NEO:6 O O O O O Analog + DTS NEO:6 L, C, R, SL, SR ,SBL, SBR, SW SFE O O O O O Analog + LIVE SURR L, C, R, SL, SR ,SBL, SBR, SW • L/R : front speaker (left/right) C : center speaker SL/SR : surround speaker (left/right) SBL/SBR : surround back speaker (left/right) H = FHL/FHR : front height speaker (left/right) SW : subwoofer 46 L, C, R, SL, SR, H, SW L, R, SW L, C, R, SL, SR ,SBL, SBR, SW L, C, R, SL, SR, H, SW L, R, SW L, C, R, SL, SR ,SBL, SBR, SW L, C, R, SL, SR, H, SW • LIVE SURR : LIVE SURROUND English HW-D600_D650S_XAC_0614.indd 46 2011-06-17 10:35:27 04 Operation ✎ NOTE Channel status displays are dependent on the speaker configuration. SFE mode works with 2-ch signals. If Dolby Pro Logic IIz is set to On, the Surround Back speaker(SBL/SBR) is changed to the Front Height Speaker(FHL/FHR), Dolby true HD, Dolby plus, DTS-HD Audio ,SFE and NE0:6 will be output 5.1 channel. ProLogic IIx and ProLogic IIz works only audio signals with sampling frequencies of 32KHz, 44KHz or 48KHz. Using the SUBWOOFER button You can set the subwoofer Level. 1. Press the SUBWOOFER button. 2. Press the ◄ ► buttons to select Subwoofer LEVEL under the Display with S.W. (The display disappears automatically.) - Setting the Subwoofer Level• SW (Subwoofer) : -10 ~ +10dB Listening to the Radio You can listen to the radio by using either automatic or manual tuning. 1. Press the INPUT SELECT button on the remote control to select FM. 2. Select a frequency (radio broadcast). • Preset tuning : Press the #,$ buttons on the remote control to select the preset frequency. • Manual tuning 1 (Automatic tuning): Press and hold the TUNING/CH ( .,, ) buttons on the remote control to automatically tune in a frequency. • Manual tuning 2 : Press the TUNING/CH ( .,, ) buttons on the remote control to increase or decrease the frequency step by step. ✎ NOTE You can also use the SELECT (.,,) button on the main uint to change the radio frequency. English HW-D600_D650S_XAC_0614.indd 47 47 2011-06-17 10:35:27 Operation To Listen in Mono/Stereo Press the MO/ST button on the remote control. • Each time you press this button, STEREO or MONO will be selected in turn. • If you select MONO in an area with weak reception, it will help to reduce noise. • This function works only with the remote control. Presetting Radio Stations You can preset up to 15 FM stations. E.g.: Setting station FM 89.10 in preset 2. 1. Press the INPUT SELECT button on the remote control to select FM. 2. Press the TUNING/CH ( .,, ) buttons on the remote control to select 89.10. • Refer to step 2 above to tune in automatically and manually. 3. Press the TUNER MEMORY button on the main unit. • You can also use the TUNER MEMORY button on the remote control. • Tuner number will blink on the display. 4. Press the TUNING/CH ( .,, ) buttons on the remote control to select preset 2. • You can select from presets 1 to 15. 5. Press the TUNER MEMORY button on the main unit. • Tuner number will disappear and station 89.10 will be saved in preset 2. 6. To preset other stations, repeat steps 2 to 5. To Listen to Preset Station • Press the TUNING MODE button to select PRESET and press the SELECT ( .,, ) buttons. 48 English HW-D600_D650S_XAC_0614.indd 48 2011-06-17 10:35:27 04 Operation Using an iPod You can enjoy playback of your iPod using the supplied remote control. Listening to Music (iPod audio function) You can play music files stored in the iPod player by connecting it to the AV receiver. 1. Connect the iPod dock connector to the iPod jack on the AV Receiver. 2. Place the iPod in the dock. • Your iPod is automatically turned on. 3. Press the INPUT SELECT button on the remote control to select IPOD AUDIO mode. 4. Press the PLAY button on the remote control to play. • The AV receiver starts playing from the first track of the iPod player. 5. You can use the remote control to control simple playback functions such as the PLAY, PAUSE, STOP, SKIP (#,$) buttons. ✎ NOTE See page 25 for compatible iPods. Compatibility depends on the software version of your iPod. You can also select iPod by pressing the iPod button on the remote control. Watching a Movie (iPod video function) You can play video files stored in the iPod player on a TV by connecting it to the AV receiver. 1. Connect the iPod dock connector to the iPod jack on the AV receiver. 2. In the iPod screen, move to Videos > Settings and set the TV Out option to On. 3. Place the iPod in the dock. 4. Press the INPUT SELECT button on the remote control to select IPOD VIDEO mode. 5. Set the AV IN option of the TV connected to the AV receiver to COMPOSITE. <iPod Screen> Follow the iPod onscreen guide through the following steps. 6. Press the , buttons on the remote control to select Videos and press the ENTER button. 7. Press the , buttons on the remote control to select Movies and press the ENTER button. English HW-D600_D650S_XAC_0614.indd 49 49 2011-06-17 10:35:27 Operation 8. Press the , buttons to select the file to play and press the ENTER button. • The iPod's video files will be played on the TV screen. 9. You can use the remote control to control simple playback functions such as the PLAY, PAUSE, STOP, SKIP (#,$) buttons. • If you press the PREV button after the playback, the player will move to the start screen of the current file. <iPod Screen> • Press the STOP button to stop playing and return to the list screen. • Press the RETURN button to return to the previous menu. ✎ NOTE Before you can play the video files in the iPod player, you must connect the Audio/Video terminals of the TV to the receiver using the Composite (A/V) cable. See page 25 for compatible iPods. Compatibility depends on the software version of your iPod. When the current file is played to the end, the next file will not be played automatically. To play the next file, select a file to play in the list screen of the iPod player. No other screen than the playback one will appear on the TV screen. Check other screens on the iPod player. Convenient Functions Sleep Timer Function You can set the time that this unit will shut itself off. Press the SLEEP button. • SLEEP : OFF 10M 20M 30M 60M 90M 120M 150M will be selected in turn. To check sleep timer Press the SLEEP button. • The remaining time before this unit will shut itself off is shown on the display. • Pressing the button again changes the sleep time from what you set previously. To cancle sleep timer • Press the SLEEP button until SLEEP OFF appears on the display. 50 English HW-D600_D650S_XAC_0614.indd 50 2011-06-17 10:35:28 04 Operation Mute Function This function is useful when answering a doorbell or telephone call. Press the MUTE button. • MUTE appears on the display. To output sound again Press the MUTE button again or press the Volume button. • MUTE will disappear and sound will output. Adjust the Display You can adjust the brightness of the display. Press the DIMMER button. • Each time you press this button, the brightness changes as follows : Dark Bright. ✎ NOTE SLEEP, Mute and the Adjust Display functions can only be operated with the remote control. Reset Function When the Power is on, 1. Press the MUTE button. • MUTE appears on the display. 2. Press the 2 button five times and then press the ENTER button. • INITIAL : NO appears on the display. 3. Press the ◄ ► buttons to select YES. • The unit will turn off after 5 seconds. When the Power is Off, 1. Press and hold the TUNER MEMORY button on the front of your AV Receiver for longer than 5 seconds. • POWER LED will blink one time. ✎ NOTE Using the RESET function will erase all stored settings. Do not use this unless necessary. English HW-D600_D650S_XAC_0614.indd 51 51 2011-06-17 10:35:29 Operation Using Headphones Use headphones (not supplied) for private listening pleasure. Connect the headphones to the headphone (PHONES) jack and listen to music. ✎ NOTE Do not turn the volume up too high when you use headphones as it may damage your hearing. Software Upgrade Samsung may offer upgrades for AV Receiver's firmware in the future. Please visit Samsung.com or contact the Samsung call centre to receive information about downloading upgrades and using a USB drive. Upgrades will be possible by connecting a USB drive to the USB port located on your AV Receiver. ONLY FOR UPDATE ✎ NOTE Insert a USB drive containing the firmware upgrade into the USB port on the back of the main unit. Please be careful to not disconnect the power or remove the USB drive while upgrades are being applied. The main unit will turn off automatically after completing the firmware upgrade. When software is upgraded, settings you have made will return to their default (factory) settings. We recommend you write down your settings so that you can easily reset them after the upgrade. If you failed software upgrade, it is strongly recommended whole USB data format to FAT16 and retry software upgrade. The NTFS USB File System can not be supported. Depending on the manufacturer, the USB may not be supported. ONLY FOR SERVICE 52 English HW-D600_D650S_XAC_0614.indd 52 2011-06-17 10:35:30 05 Miscellaneous Miscellaneous Operating your TV with the Remote Control 1. Press the POWER button to turn on the TV. 2. Press the TV button to set the remote to TV mode. 3. Point the remote control toward the TV. 4. While holding down the POWER button, enter the code corresponding to your brand of TV. • If there is more than one code listed for your TV in the table, enter one at a time to determine which code works. • If the code matches the TV's code, the TV will be turned off. 5. If TV is turned on or off when you press the POWER button of the remote control, the setting is completed. • You can use the TV POWER, VOLUME, CHANNEL, MENU and Numeric buttons (0~9). ✎ NOTE The remote control may not work on some brands of TVs. Also, some operations may not be possible depending on your brand of TV. The remote control will work with Samsung TVs by default. TV Brand Code List Brand Code Brand Code Brand Code Admiral (M.Wards) 56, 57, 58 Hitachi 15, 18, 50, 59, 69 Realistic 03, 19 A Mark 01, 15 Inkel 45 Sampo 40 Anam 01, 02, 03, 04, 05, 06, 07, 08, 09, 10, 11, 12, 13, 14 JC Penny 56, 59, 67, 86 Samsung 00, 15, 16, 17, 40, 43, 46, 47, 48, 49, 59, 60, 98 AOC 01, 18, 40, 48 Bell & Howell (M.Wards) Brocsonic Candle JVC 70 KTV 59, 61, 87, 88 57, 58, 81 KEC 03, 15, 40 59, 60 KMC 15 LG (Goldstar) 01, 15, 16, 17, 37, 38, 39, 40, 41, 42, 43, 44 Luxman 18 18 Cetronic 03 Citizen 03, 18, 25 Cinema 97 Classic 03 Concerto 18 Contec 46 Sanyo 19, 61, 65 Scott 03, 40, 60, 61 Sears 15, 18, 19 Sharp 15, 57, 64 Signature 2000 (M.Wards) 57, 58 LXI (Sears) 19, 54, 56, 59, 60, 62, 63, 65, 71 Sony 50, 51, 52, 53, 55 Magnavox 15, 17, 18, 48, 54, 59, 60, 62, 72, 89 Soundesign 03, 40 Marantz 40, 54 Spectricon 01 Matsui 54 SSS 18 MGA 18, 40 Sylvania 18, 40, 48, 54, 59, 60, 62 Coronado 15 Craig 03, 05, 61, 82, 83, 84 Mitsubishi/ MGA 18, 40, 59, 60, 75 Symphonic 61, 95, 96 Croslex 62 MTC 18 Tatung 06 Crown 03 NEC 18, 19, 20, 40, 59, 60 Techwood 18 Curtis Mates 59, 61, 63 Nikei 03 Teknika 03, 15, 18, 25 CXC 03 Onking 03 TMK 18, 40 Onwa 03 Toshiba 19, 57, 63, 71 Daewoo 02, 03, 04, 15, 16, 17, 18, 19, 20, 21, 22, 23, 24, 25, 26, 27, 28, 29, 30, 32, 34, 35, 36, 48, 59, 90 Panasonic 06, 07, 08, 09, 54, 66, 67, 73, 74 Vidtech 18 Daytron 40 Penney 18 Videch 59, 60, 69 Dynasty 03 Philco 03, 15, 17, 18, 48, 54, 59, 62, 69, 90 Wards 15, 17, 18, 40, 48, 54, 62, 72 15, 17, 18, 40, 48, 54, 60, 64 03, 15, 40, 46, 59, 61, 64, 82, 83, 84, 85 Philips Pioneer 63, 66, 80, 91 Yamaha 18 Fisher 19, 65 Portland 15, 18, 59 York 40 Funai 03 Proton 40 Futuretech 03 Quasar 06, 66, 67 General Electric (GE) 06, 40, 56, 59, 66, 67, 68 Radio Shack 17, 48, 56, 60, 61, 75 40 RCA/Proscan 18, 59, 67, 76, 77, 78, 92, 93, 94 Emerson Hall Mark Yupiteru 03 Zenith 58, 79 Zonda 01 Dongyang 03, 54 English HW-D600_D650S_XAC_0614.indd 53 53 2011-06-17 10:35:31 Miscellaneous Operating your DVD or BD Player with the Remote Control 1. Press the POWER button to turn on the DVD (BD) player. 2. Press the BD/DVD button on the remote control to set the remote to DVD (BD) mode. 3. Point the remote control toward the DVD (BD). 4. While holding down POWER button, enter the code corresponding to your brand of DVD (BD). • If there is more than one code listed for your DVD (BD) in the table, enter one at a time to determine which code works. • If the code matches the DVD (BD)'s code, the DVD (BD) will be turned off. 5. If DVD (BD) is turned on or off when you press the POWER button of the remote controller, the setting is completed. • You can use DVD (BD) POWER, PLAY, PAUSE, STOP, SKIP, MENU and Numeric buttons (0~9). ✎ NOTE The remote control may not work on some brands of DVD. Also, some operations may not be possible depending on your brand of DVD. The remote control will work with Samsung DVD (BD) by default. DVD Brand Code List Brand DENON DOONOON DMTECH FISHER GE HARMAN/KARDON JVC KENWOOD LG MAGNAVOX MITSUBISHI Code Number 003, 032 019 017 002 006 012 010, 013 008 001 004 005, 016 Brand ONKYO OPTIMUS PANASONIC PROSCAN PHILIPS PIONEER RCA SAMSUNG SANYO SONY THETA DIGITAL Code Number Brand 004, 014 011 021 006 004, 023 007, 011, 022, 025 006 000, 027 002 015, 020 011 TOSHIBA YAMAHA ZENITH TAEGWANG PS2 X-BOX APEX Marantz Code Number 004, 018 009, 033 004, 024 026 028 029 030 031 BD Player Brand Code List Brand SAMSUNG Code Number 000, 001, 002, 003, 004 ✎ NOTE The remote control will control Samsung BD players only. 54 English HW-D600_D650S_XAC_0614.indd 54 2011-06-17 10:35:32 06 Other Information Other Information Troubleshooting Before requesting service, please check the following. Symptom Check Remedy The unit will not turn on. • Is the power cord plugged into the outlet? • Connect the power plug to the outlet. A function does not work when the button is pressed. • Is there static electricity in the air? • Disconnect the power plug and connect it again. Sound is not produced. • Are the speakers and external components connected properly? • Is the Mute function on? • Is the volume set to minimum? • Is the Speaker Size set incorrectly to NONE? • Connect them correctly. • Press the MUTE button to cancel the function. • Adjust the volume. • Refer to pages 33 to select LARGE, SMALL or YES. Picture does not appear on a TV when the function is selected. • Is the external component connected properly? • Connect it correctly. Remote controller does not work. • Are the batteries drained? • Is the distance between remote control and main unit too great? • Replace with new batteries. • Operate at close distance. The sound from the left/ right channels is reversed. • Are the left/right speaker or left/right input/output cables connected properly? • Check the left/right channel and connect it/them correctly. Can't receive radio broadcasts. • Is FM antenna connected properly? • Connect the antenna correctly. • If the input strength of antenna signal is weak, install the FM antenna in a place with good reception. There is no sound from surround speakers. • Are the surround speakers connected properly? • Is SURR (surround) incorrectly set to NONE in the Speaker Size? • Is surround mode set to stereo? • Refer to page 16 to connect them properly. • Refer to page 33 to select LARGE or SMALL. • Refer to pages 45 ~ 47 to select proper Surround Mode. There is no sound from surround back speakers • Are the surround back speakers connected properly? • Is SBACK (Surround Back) set to NONE in the Speaker Size? • Is Surround Mode set to EX/ES? • Refer to page 16 to connect them properly. • Refer to page 33 to select LARGE or SMALL. • Refer to page 39 to set Surround Mode to EX/ES. Can't select EX/ES mode. • Is SBACK (Surround Back) set to NONE in the Speaker Size? • Is the input signal selected properly? • Refer to page 33 to select LARGE or SMALL. • Use a 7.1 channel external component. English HW-D600_D650S_XAC_0614.indd 55 55 2011-06-17 10:35:32 Other Information Symptom Check Remedy Can't select Dolby Pro Logic llx mode. • Is the input signal selected properly? • Only 2 channel signal can select Dolby Pro Logic IIx mode. (ex:Dolby Digital, PCM, 2 channel analog input signal.) Can't select NEO:6 mode. • Is the input signal selected properly? • Use PCM and Analog input signal. There is no sound when playing a DTS encoded DVD. • Is Digital input selected? • Check whether the DVD player is properly connected and refer to page 28 to select the digital input. Product Protection Function Heat protection • The protection function will come on if the main unit or power transformer overheats. " will appear in the display . " This function will come on : - If speaker terminal is shorted - If speaker cable is shorted If there is no problem when you turn the unit on again after turning it off, PROTECTION mark will disappear on the display and the unit will work properly. Auto Calibration Error List Error No. Auto Calibration Error Message on OSD E02 NO MIC Connect the calibration microphone. E03 NOISY Keep quiet during the measurement. E04 MIC LEVL The speaker are too close to the microphone. Install all speakers and the calibration microphone at the proper location. E05 NO FRONT Connect the front speaker correctly. E07 LEVL OVR Install all speakers and the calibration microphone at the proper location. E08 DIST OVR Some speakers are too far from calibration microphone. Install all speakers and the calibration microphone at the proper location. E13 TIME OVR E14 CODE ERR 56 Unplug and re-plug the power cable. Then, perfrom the measurement again. Unplug and re-plug the power cable. Then, perfrom the measurement again. English HW-D600_D650S_XAC_0614.indd 56 2011-06-17 10:35:32 06 Other Information Specifications FM TUNER AMPLIFIER FREQUENCY RESPONSE HDMI VIDEO OUTPUT Weight 13.67 Ibs Dimensions (W x H x D) 16.9 x 6.5 x 14.2 inches Operating temperature range 41°F~+95°F Operating humidity range 10%~75% Frequency response 87.5~108.0MHz Usable sensitivity 12dBf S/N ratio MONO/STEREO 55/55dB Distortion MONO/STEREO 0.3/0.8% Stereo separation 30dB Tuner output level 1kHz, 75kHz Dev Rated output 20Hz~20kHz/THD = 0.9% Front speaker (left+right) 6 Ω 100W/CH Center speaker 6 Ω 100W/CH Surround speaker (left+right) 6 Ω 100W/CH Subwoofer speaker 6 Ω 100W/CH Input sensitivity/impedance 450mV/47kΩ S/N ratio (analog input) 80dB Separation (1kHz) 60dB Analog input 20Hz~20kHz(±3dB) Digital input/96kHz PCM 20Hz ~44kHz(±3dB) Input Compatible 1080p Output Compatible 1080p TV format NTSC/PAL Input level/impedance 1Vp-p/75 Ω Output level/impedance 1Vp-p/75 Ω Video frequency response 5Hz to 10kHz(-3dB) S/N Ratio 60dB * S/N Ratio, Distortion, Separation and Usable sensitivity are based on measurement using AES (Audio Engineering Society) guidelines. - Samsung Electronics Co., Ltd reserves the right to change the specifications without notice. - Weight and dimensions are approximate. - Design and specifications are subject to change without prior notice. - For the power supply and Power Consumption, refer to the label attached to the product. English HW-D600_D650S_XAC_0614.indd 57 57 2011-06-17 10:35:32 LIMITED WARRANTY TO ORIGINAL PURCHASER Samsung Electronics Canada Inc.(SECA), warrants that this product is free from defective material and workmanship. SECA further warrants that if this product falls to operate properly within the specified warranty period and the failure is due to improper workmanship or defective materials, SECA will repair or replace the product at its option. All warranty repairs must be performed by a SECA Authorized Service Center. (The name and address of the location nearest you can be obtained by calling toll free: 1- 800- SAMSUNG) LABOR PARTS One year (Carry- in) One year On carry-in models, transportation to and from the service center is the customer’s responsibility. The original dated sales receipt must be retained by the customer and is the only acceptable proof of purchase. It must be presented to the authorized service center at the time service is requested. EXCLUSIONS (WHAT IS NOT COVERED) This warranty does not cover damage due to accident, fire, flood and/ or other acts of God; misuse, incorrect line voltage, improper installation, improper or unauthorized repairs, commercial use or damage that occurs in shipping. Exterior and interior finish, lamps, glass are not covered under this warranty. Customer adjustments which are explained in the instruction manual are not covered under the terms of this warranty. This warranty will automatically be voided for any unit found with a missing or altered serial number. This warranty is valid only on products purchased and used in Canada. HEADQUARTERS SAMSUNG ELECTRONICS CANADA INC., CUSTOMER SERVICE 55 STANDISH COURT MISSISSAUGA, ONTARIO L5R 4B2 CANADA FABRIQUE EN CORÉE 1-800-SAMSUNG (1-800-7267864) WWW.SAMSUNG.COM/CA HW-D600_D650S_XAC_0614.indd 58 2011-06-17 10:35:32 Contact SAMSUNG WORLD WIDE If you have any questions or comments relating to Samsung products, please contact the SAMSUNG customer care center. Area ` North America Canada Mexico U.S.A Contact Center Web Site 1-800-SAMSUNG (726-7864) 01-800-SAMSUNG (726-7864) 1-800-SAMSUNG (726-7864) www.samsung.com www.samsung.com www.samsung.com 0800-333-3733 0800-124-421 / 4004-0000 800-SAMSUNG (726-7864) 01-8000112112 0-800-507-7267 1-800-751-2676 1-800-10-7267 800-6225 1-800-299-0013 800-7919267 1-800-234-7267 00-1800-5077267 800-7267 0-800-777-08 1-800-682-3180 www.samsung.com www.samsung.com www.samsung.com www.samsung.com www.samsung.com www.samsung.com www.samsung.com www.samsung.com www.samsung.com www.samsung.com www.samsung.com www.samsung.com www.samsung.com www.samsung.com www.samsung.com 1-800-SAMSUNG (726-7864) www.samsung.com 0-800-100-5303 www.samsung.com 42 27 5755 0810 - SAMSUNG (7267864, € 0.07/min) - ` Latin America Argentine Brazil Chile Colombia Costa Rica Dominica Ecuador El Salvador Guatemala Honduras Jamaica Nicaragua Panama Peru Puerto Rico Trinidad & Tobago Venezuela Austria Belgium 02-201-24-18 Bosnia Bulgaria Croatia 05 133 1999 07001 33 11 062 SAMSUNG (062 726 7864) 800-SAMSUNG (800-726786) Samsung Zrt., česká organizační složka, Oasis Florenc, Sokolovská394/17, 180 00, Praha 8 70 70 19 70 030 - 6227 515 01 48 63 00 00 01805 - SAMSUNG (726-7864 € 0,14/Min) 06-80-SAMSUNG (726-7864) 800-SAMSUNG (726-7864) +381 0113216899 261 03 710 023 207 777 020 405 888 0900-SAMSUNG (0900-7267864) (€ 0,10/Min) 815-56 480 0 801 1SAMSUNG (172678) / 022-607-93-33 80820-SAMSUNG (726-7864) 1. 08010 SAMSUNG (72678) doar din reţeaua Romtelecom, tarif local 2. 021.206.01.10 - din orice reţea, tarif normal Czech Denmark Finland France Germany Hungary Italia Kosovo Luxemburg Macedonia Montenegro Netherlands Norway Poland Portugal Rumania HW-D600_D650S_XAC_0614.indd 59 Slovakia Spain Sweden Contact Center 0700 Samsung (0700 726 7864) 0800-SAMSUNG (726-7864) 902-1-SAMSUNG (902 172 678) 0771 726 7864 (SAMSUNG) Switzerland 0848-SAMSUNG (7267864, CHF 0.08/min) U.K Eire Lithuania Latvia Estonia 0330 SAMSUNG (7267864) 0818 717100 8-800-77777 8000-7267 800-7267 Uzbekistan Kyrgyzstan Tadjikistan Ukraine 0-800-502-000 www.samsung.com Belarus Moldova 810-800-500-55-500 00-800-500-55-500 www.samsung.com/ be (Dutch) www.samsung.com/ be_fr (French) www.samsung.com www.samsung.com ` Asia Pacific www.samsung.com Russia Georgia Armenia Azerbaijan Kazakhstan Australia New Zealand China 1300 362 603 0800 SAMSUNG (0800 726 786) 400-810-5858 / 010-6475 1880 Hong Kong (852) 3698 4698 India Indonesia www.samsung.com www.samsung.com www.samsung.com Japan Malaysia www.samsung.com Philippines www.samsung.com www.samsung.com www.samsung.com - Singapore Thailand Taiwan Vietnam www.samsung.com www.samsung.com www.samsung.com www.samsung.com www.samsung.com Web Site www.samsung.com www.samsung.com www.samsung.com www.samsung.com www.samsung.com/ch www.samsung.com/ ch_fr/(French) www.samsung.com www.samsung.com www.samsung.com www.samsung.com www.samsung.com ` CIS 8-800-555-55-55 8-800-555-555 0-800-05-555 088-55-55-555 8-10-800-500-55-500 (GSM: 7799) 8-10-800-500-55-500 00-800-500-55-500 8-10-800-500-55-500 ` Europe Albania Area Serbia www.samsung.com www.samsung.com www.samsung.com www.samsung.com www.samsung.com www.samsung.ua www.samsung.com/ ua_ru www.samsung.com www.samsung.com www.samsung.com www.samsung.com/hk www.samsung.com/ hk_en/ 3030 8282 / 1800 110011 / 1800 3000 8282 / 1800 266 8282 0800-112-8888 / 021-5699-7777 0120-327-527 1800-88-9999 1-800-10-SAMSUNG(726-7864) / 1-800-3-SAMSUNG(726-7864) / 1-800-8-SAMSUNG(726-7864) / 02-5805777 1800-SAMSUNG (726-7864) 1800-29-3232 / 02-689-3232 0800-329-999 1 800 588 889 www.samsung.com www.samsung.com www.samsung.com www.samsung.com 8000-4726 08000-726786 800-22273 080 100 2255 800-SAMSUNG (726-7864) 9200-21230 444 77 11 800-SAMSUNG (726-7864) www.samsung.com www.samsung.com www.samsung.com www.samsung.com www.samsung.com www.samsung.com www.samsung.com www.samsung.com 0800-SAMSUNG (726-7864) 0860-SAMSUNG (726-7864 ) www.samsung.com www.samsung.com www.samsung.com www.samsung.com www.samsung.com www.samsung.com www.samsung.com ` Middle East Bahrain Egypt Jordan Morocco Oman Saudi Arabia Turkey U.A.E ` Africa Nigeria South Africa 2011-06-17 10:35:32 HW-D600_D650S_XAC_0614.indd 60 2011-06-17 10:35:33 HW-D600 HW-D650S Récepteur AV guide d'utilisation imaginez les possibilités Merci d'avoir acheté ce produit Samsung. Pour obtenir un service plus complet, veuillez enregistrer votre produit à www.samsung.com/register HW-D600_D650S_FRC_0617.indd 1 2011-06-17 10:32:20 Directives de sécurité Avertissements POUR RÉDUIRE LES RISQUES D’ÉLECTROCUTION, NE RETIREZ PAS LE COUVERCLE (NI LE PANNEAU ARRIÈRE). AUCUNE PIÈCE SITUÉE À L'INTÉRIEUR NE PEUT ÊTRE RÉPARÉE PAR L'UTILISATEUR. POUR TOUT DÉPANNAGE, ADRESSEZ-VOUS À UN TECHNICIEN QUALIFIÉ. Ce symbole indique qu'un « potentiel dangereux » est présent à l'intérieur du produit et qu'il représente un risque de décharge électrique ou peut provoquer des lésions corporelles. ATTENTION RISQUE D’ÉLECTROCUTION NE PAS OUVRIR Ce symbole indique les directives importantes qui accompagnent le produit. Note à l’installateur du système de câblodistribution Le présent rappel a pour but d’inviter l’installateur du système de câblodistribution à consulter le Code national du bâtiment qui renferme des directives sur la mise à la terre et qui stipule que la mise à la terre du câble doit être reliée au système de mise à la terre de l’édifice, le plus près possible du point d’entrée du câble dans l’édifice. AVERTISSEMENT • Afin de diminuer les risques d’incendie ou de choc électrique, n’exposez pas cet appareil à la pluie ou à l’humidité. MISE EN GARDE • Pour prévenir les chocs électriques, branchez la fiche au fond, en prenant soin d'insérer la tige large dans la fente large. Précautions • Assurez-vous que l'alimentation c.a. de votre maison correspond bien à celle indiquée sur l’étiquette d’identification collée au dos de l’appareil. • Posez votre produit à plat sur un meuble stable en veillant à laisser un espace de 7,5 à 10 cm (3 à 4 po) autour de l'appareil afin d’assurer une ventilation adéquate. • Ne posez pas l'appareil sur des amplificateurs ou autres dispositifs qui risquent de chauffer. Veillez à ne pas obstruer les orifices de ventilation. • Ne posez rien sur l’appareil. • Pour débrancher complètement le produit de l’alimentation, retirez la fiche principale de la prise murale. - Si vous n’utilisez pas le produit pendant une période prolongée, débranchez la fiche de la prise murale. • En cas d’orage, débranchez l’appareil de sa prise de courant. Les surtensions causées par les éclairs pourraient endommager l’appareil. • N’exposez pas l’appareil à la lumière directe du soleil ni à d’autres sources de chaleur. L’appareil pourrait surchauffer et mal fonctionner. • N’exposez pas l’appareil à l’humidité ni à aucune source de chaleur excessive et éloignez-le des appareils générant des ondes magnétiques ou des champs électriques intenses (ex. : haut-parleurs). • Débranchez le câble d’alimentation de l’alimentation c.a. en cas de dysfonctionnement. • Votre produit n’est pas conçu pour un usage industriel. Il est uniquement réservé à un usage privé. • De la condensation pourrait se former si votre produit a été entreposé dans un endroit exposé à de basses températures. Si l’a ppareil doit être transporté pendant l’hiver, attendez environ 2 heures pour qu’il s’adapte à la température de la pièce avant de l’utiliser. • Les piles utilisées dans cet appareil contiennent des produits chimiques néfastes pour l’environnement. Ne jetez pas les piles avec les déchets domestiques. 2 Français HW-D600_D650S_FRC_0617.indd 2 2011-06-17 10:32:45 Table des matières Avertissements Précautions POUR COMMENCER 5 6 7 7 8 9 10 Caractéristiques principales de votre nouveau récepteur AV Accessoires Description Panneau avant Affichage Panneau arrière Télécommande CONNEXIONS 14 16 17 Disposition des enceintes Connexion des enceintes Connexion des appareils externes et de votre téléviseur par HDMI Fonction HDMI Connexion à votre téléviseur Connexion d’un lecteur DVD ou BD Connexion d’un câble, d’un satellite ou d’un décodeur Connexion d’un lecteur CD Connexion via l’utilisation d’un amplificateur externe Connexion d’un iPod Connexion de l'antenne FM Connexion des composants auxiliaires 2 5 14 CONFIGURATION 27 18 19 20 21 22 23 24 26 26 27 27 28 29 32 32 32 34 35 36 37 38 38 38 39 39 40 40 40 41 41 42 43 43 44 Avant d'utiliser le récepteur AV Menu Accueil Sélection de l'entrée numérique/HDMI/analogique Configuration de l'arborescence du menu Configuration audio Sélection d’un appareil source et d’un connecteur (Entrée audio numérique) Réglage de la taille des enceintes Réglage de connexion de l'enceinte ambiophonique arrière Réglage de la distance d'écoute des enceintes Réglage du niveau de puissance des enceintes Réglage de la tonalité d’essai Réglage du mode Dolby Pro Logic Configuration ambiophonique Réglage Dolby Pro Logic IIx Réglage du mode NEO:6 Réglage du mode EX/ES Autres réglages Audio Sync Commande de la tonalité Amplificateur MP3 Volume intelligent Configuration de l’étalonnage automatique Configuration DRC Configuration double mono Configuration de l’option HDMI Français HW-D600_D650S_FRC_0617.indd 3 FRANÇAIS ENGLISH 2 2 DIRECTIVES DE SÉCURITÉ 2011-06-17 3 10:35:48 Table des matières FONCTIONNEMENT 45 45 45 46 47 47 48 48 49 49 49 50 50 51 51 51 52 52 Utilisation des modes ambiophoniques Utilisation de la touche AUDIO EFFECT à l’avant de l’unité principale Utilisation de la touche S.DIRECT Utilisation de la touche SUBWOOFER Écoute de la radio Pour écouter en mode mono ou stéréo Préréglage des stations radio Utilisation d’un iPod Pour écouter de la musique (fonction iPod audio) Pour visionner un film (fonction iPod Video) Fonctions pratiques Fonction Minuteur d'arrêt Fonction Sourdine Réglage de l'affichage Fonction Réinitialisation Utilisation d’un casque d’écoute Mise à niveau du logiciel DIVERS 53 54 Commande du téléviseur au moyen de la télécommande Commande de votre lecteur DVD ou de votre lecteur BD au moyen de la télécommande AUTRES INFORMATIONS 55 56 56 57 Dépannage Fonction de protection du produit Liste des erreurs d’étalonnage automatique Fiche technique 53 55 • Les figures et illustrations de ce manuel d’utilisation sont fournies à titre de référence et peuvent différer de l’ apparence réelle de l’appareil. • Des frais supplémentaires pourront vous être facturés dans les cas suivants : a. Lorsqu’un ingénieur est amené à intervenir, à votre demande, alors que le produit ne présente aucune anomalie (par ex., dans le cas où vous auriez omis de consulter le présent Guide d'utilisation) b. Lorsque vous portez l'unité au centre de réparation alors qu’il s'avère que celle-ci ne présente aucune défaillance (par ex., dans le cas où vous auriez omis de consulter le présent Guide d'utilisation). • Le montant de ces frais vous sera communiqué avant l'exécution d'éventuels travaux ou la conduite d'une intervention à domicile. 4 Français HW-D600_D650S_FRC_0617.indd 4 2011-06-17 10:32:45 01 Pour commencer Pour commencer Caractéristiques principales de votre nouveau récepteur AV Fonctions du produit Récepteur AV numérique Cet appareil est un récepteur AV de signaux numériques purs permettant de traiter les signaux numériques afin de minimiser la distorsion et la perte des signaux. Dolby Digital Technologie d’encodage/décodage audio performante qui fournit un son ambiophonique vigoureux de qualité 5.1 canaux. Dolby Pro Logic llx Dolby Pro Logic IIx est une nouvelle technologie qui fournit 7.1 canaux discrets aux sorties des sources à 2 canaux ou multi-canaux. Elle permet également la lecture de fichiers de musique, de films et de jeux. Dolby Pro Logic IIx est un système ambiophonique amélioré mis à niveau à un système multimédia de 7.1 canaux, qui vous permet d’optimiser votre expérience en matière de divertissement. Dolby Pro Logic llz Dolby Pro Logic IIz ajoute des canaux frontaux en hauteur au système ambiophonique afin de créer un système de lecture 7.1 pour les jeux vidéo, la musique et les films, ce qui améliore les effets spatiaux et crée un son plus enveloppant. Dolby Digital EX Ajoute un canal ambiophonique arrière pour offrir un son ambiophonique étendu comparativement au format sonore Dolby Digital ordinaire 5.1 canaux. Dolby Digital Plus Dolby Digital Plus constitue la technologie audio de la prochaine génération pour la programmation haute définition et pour tous les supports. Dolby True-HD Dolby TrueHD représente la technologie de la prochaine génération sans perte, qui a été développée pour les supports sur disques haute définition. DTS 96/24 Ajoute un canal ambiophonique arrière pour offrir un son ambiophonique étendu comparativement au format sonore Dolby Digital ordinaire de 5.1 canaux. DTS (système cinéma numérique) Le format sonore DTS fournit un signal numérique audio discret de 5.1 canaux tant pour la musique que pour les films en utilisant une compression moins importante que le Dolby Digital, et ce, pour offrir un son aux tonalités plus riches. DTS-HD (Master audio, Haute résolution) (Digital Theater Systems - High Definition/Cinéma maison numérique – Haute définition) Le système audio DTS-HD offre la meilleure reproduction sonore multi-canaux. Il reproduit une qualité de son qui s’harmonise avec la netteté des images et des couleurs que procure la vidéo haute définition. DTS Offre une gamme complète de 6 canaux en convertissant un signal numérique MIC (modulation par impulsions et codage) ou un signal stéréo analogique par un processus de décodage de matrice numérique DTS. Français HW-D600_D650S_FRC_0617.indd 5 2011-06-17 5 10:32:45 Pour commencer DTS-ES (Extended Surround/Ambiophonie étendue) Le système DTS-ES (Extended Surround/Ambiophonie étendue) est un nouveau format de signal multi-numérique mis au point par Digital Theater Systems Inc. Totalement compatible avec le format sonore ambiophonique numérique DTS traditionnel, le système DTS-ES (Extended Surround/Ambiophonie étendue) améliore le signal ambiophonique pour fournir un effet ambiophonique de 360 degrés. Le format sonore DTS-ES ajoute un canal ambiophonique central arrière pour générer un son à 6.1 canaux. iPod Vous pouvez écouter des fichiers de musique en raccordant votre iPod au récepteur AV au moyen du socle pour iPod/iPhone fourni. SFE (Effet sonore des champs acoustiques) utilisant un processeur de signal numérique audio de 32 bits Fournit un son ambiophonique plus réaliste avec des sources audio stéréo normales. Fonction Anynet+ (HDMI-CEC) Anynet+ est une fonction qui peut être utilisée pour commander le récepteur AV avec une télécommande de téléviseur SAMSUNG en connectant le récepteur au téléviseur SAMSUNG à l’aide d’un câble HDMI. [(Offerte uniquement avec les téléviseurs et les lecteurs de DVD SAMSUNG prenant en charge la fonction Anynet+.(HDMI-CEC).] Accessoires Vérifiez que vous disposez bien des accessoires suivants. INPUT SELECT TV SOURCE POWER AMP TV BD 1 DVD 2 4 NEO:6 3 5 6 SLEEP DIMMER 7 8 9 PROLOGIC AUDIO ASSIGN DSP 0 MUTE TUNING /CH VOL S.DIRECT TONE MO/ST TUNER MEMORY SETUP/MENU INFO RETURN EXIT BD/DVD SAT GAME/TV AV SYNC AUX iPod TUNER CROSS OVER 3D SOUND ASC SUB WOOFER CD Télécommande/ Piles (AAA) 6 Antenne FM Guide de l’utilisateur Socle d’iPod Microphone ASC Français HW-D600_D650S_FRC_0617.indd 6 2011-06-17 10:32:46 01 Pour commencer Description Panneau avant 1 4 5 6 7 8 9 10 11 3 2 12 13 14 15 16 17 18 19 20 1 ÉCRAN D’AFFICHAGE Affiche l’état de l’enceinte/entrée audio, du mode d’écoute, etc. 2 COMMANDE DU VOLUME Pour régler le volume. 3 TOUCHE POWER ( Pour mettre le récepteur sous et hors tension. 4 PRISE PHONES Pour connecter un casque d’écoute. 5 PRISE AUX IN Bornes d’entrée audio vidéo auxiliaires qui servent à connecter un caméscope, un lecteur de DVD portatif ou une console de jeux. 6 PRISE ASC MIC Pour connecter le microphone ASC afin de configurer l’étalonnage automatique. 7 TOUCHE INPUT SELECT Pour sélectionner une source. FM TV BD/DVD SAT GAME AUX CD IPOD AUDIO IPOD VIDEO 8 TOUCHE AUDIO ASSIGN Bascule afin de sélectionner un mode d’entrée pour la source sélectionnée. 9 TOUCHE SOUND EFFECT Bascule pour sélectionner un mode de son ambiophonique. 10 TOUCHE SETUP Affiche le menu SETUP. 11 TOUCHES HAUT(,), BAS (.), GAUCHE(<), DROITE(>) Pour déplacer le curseur vers le haut, vers le bas, vers la gauche ou vers la droite. Également pour sélectionner les options détaillées du mode SOUND EFFECT et pour changer le niveau de tonalité. 12 TOUCHE ENTER Pour sélectionner un article dans le menu SETUP. ) Français HW-D600_D650S_FRC_0617.indd 7 2011-06-17 7 10:32:47 Pour commencer 13 TOUCHE RETURN Permet de revenir au menu précédent. 14 TOUCHE ASC Pour sélectionner le mode d’étalonnage automatique. 15 TOUCHE S.DIRECT / STEREO Pour sélectionner le mode S.DIRECT ou STÉRÉO. (Émet le signal original sans lui appliquer l'effet sonore des champs acoustiques ni aucun autre effet sonore.) 16 TOUCHE 3D SOUND Appuyez pour appliquer l’effet sonore 3D. 17 TOUCHE TONE CONTROL Pour régler le niveau des graves et des aigus et pour mettre sous/hors tension. 18 TOUCHE TUNING MODE Pour sélectionner le mode Manuel ou Préréglé de la radio FM. 19 TOUCHE SELECT Pour changer de fréquence radio. 20 TOUCHE MEMORY Pour sélectionner une fréquence radio préréglée. Affichage 1 2 3 4 5 7 6 1 2 3 TÉMOINS DES ENCEINTES Affichent les enceintes connectées. TÉMOINS DU MODE D’ÉCOUTE Affichent le mode d’écoute actuel. TÉMOINS DE SYNTONISATION Affichent l’état de la station de radio en cours de diffusion. 4 TÉMOINS D’ENTRÉE AUDIO Affichent le type de signal d’entrée audio de la source audio externe actuellement connectée. 5 TÉMOIN DU NIVEAU DE PUISSANCE DES ENCEINTES Affiche le niveau de puissance des enceintes. 6 TÉMOIN DE FRÉQUENCE RADIO Affiche la gamme de fréquence radio actuelle. 7 AFFICHAGE DES MESSAGES Vous informe de l’état du récepteur. 8 Français HW-D600_D650S_FRC_0617.indd 8 2011-06-17 10:32:47 01 Pour commencer Panneau arrière 1 2 3 4 5 ONLY FOR UPDATE SURROUND BACK OUT SUBWOOFER OUT ONLY FOR SERVICE 6 7 8 9 10 11 12 13 14 1 PRISES VIDEO IN Reçoit le signal vidéo d’un lecteur vidéo (BD/DVD, SATELLITE, TÉLÉVISEUR). 2 PORT USB Peut seulement être utilisé pour les mises à niveau de micrologiciels. 3 PRISE HDMI OUT 4 PRISES HDMI IN 5 PRISE VIDEO OUT Transmet le signal vidéo aux périphériques vidéo (téléviseur, projecteur, etc.). 6 PRISE FM ANTENNA Permet de brancher l'antenne FM. 7 PRISE iPod Reçoit le signal audio/vidéo d’un iPod. 8 PRISE ONLY FOR SERVICE Pour le service de réparations. 9 PRISES AUDIO IN Reçoivent le signal audio d’un lecteur vidéo (BD/DVD, SATELLITE, TÉLÉVISEUR). 10 PRISES OPTICAL IN (DIGITAL AUDIO IN) Reçoivent le signal audio numérique optique. 11 ENTRÉE COAXIALE (DIGITAL AUDIO IN) Reçoit le signal audio numérique coaxial. 12 PRISES SURROUND BACK OUT 13 PRISE SUBWOOFER OUT 14 BORNES SPEAKER OUT Transmet les signaux vidéo et audio numériques simultanément au moyen d’un câble HDMI. Reçoit les signaux vidéo et audio numériques simultanément à l’aide d’un câble HDMI. Émet le signal analogique « Ambiophonique arrière » sur l’amplificateur externe. Pour connecter le caisson d’extrêmes graves. (Caisson de graves activé uniquement) Bornes de connexion des enceintes. Français HW-D600_D650S_FRC_0617.indd 9 2011-06-17 9 10:32:47 Pour commencer Télécommande Fonctions de la télécommande 1 INPUT SELECT TV SOURCE POWER 20 21 2 AMP TV BD DVD 3 1 4 5 2 3 4 5 6 NEO:6 SLEEP DIMMER 7 8 9 PROLOGIC AUDIO ASSIGN DSP 0 6 22 23 24 25 7 26 27 8 28 MUTE 9 10 TUNING /CH VOL S.DIRECT 11 12 TONE MO/ST TUNER MEMORY 31 INFO 32 33 14 16 30 SETUP/MENU 13 15 29 RETURN EXIT BD/DVD SAT GAME/TV CD AV SYNC AUX iPod TUNER CROSS OVER 3D SOUND 34 17 ASC 10 SUB WOOFER 18 35 19 36 Français HW-D600_D650S_FRC_0617.indd 10 2011-06-17 10:32:48 01 TOUCHE POWER Pour mettre le récepteur sous et hors tension. 2 TOUCHE TV Pour sélectionner le mode téléviseur, appuyez sur la touche TV. 3 TOUCHE AMP Pour sélectionner le mode AMP, appuyez sur la touche AMP. 4 TOUCHES DES NUMÉROS Pour sélectionner une chaîne de télévision. 5 TOUCHE NEO : 6 Pour sélectionner le mode NEO:6 voulu. 6 TOUCHE PROLOGIC Pour sélectionner le mode Dolby Pro Logic audio souhaité. 7 TOUCHES DE SAUT 8 TOUCHE ARRÊT/LECTURE 9 TOUCHE MUTE Pour couper le son d’un appareil connecté. 10 TOUCHES DE RÉGLAGE DU VOLUME Pour régler le volume de l’appareil sélectionné. 11 TOUCHE MO/ST Sélectionnez MONO ou STÉRÉO pour la diffusion de la radio. 12 TOUCHE TONE Pour régler le niveau des graves et des aigus. 13 TOUCHE SETUP/MENU Affiche le menu SETUP. 14 TOUCHES HAUT/BAS/GAUCHE/ DROITE Pour naviguer dans les menus. 15 TOUCHE RETURN Pour revenir au menu précédent depuis le menu SETUP. 16 TOUCHES DE SÉLECTION DE FONCTION Pour sélectionner une source d’entrée. 17 TOUCHE AV SYNC Pour sélectionner le mode Audio Delay (Retard audio). 18 TOUCHE ASC Pour sélectionner la fonction Auto Sound Calibration (Étalonnage automatique du son) 19 TOUCHE SUBWOOFER Pour sélectionner le caisson d’extrêmes graves. 20 TOUCHE INPUT SELECT, TV SOURCE Bascule pour rechercher et sélectionner une source d’entrée. Appuyez ici pour sélectionner la source vidéo connectée au téléviseur. 21 TOUCHE BD Pour sélectionner le mode BD, appuyez sur la touche BD. 22 TOUCHE DVD Pour sélectionner le mode DVD, appuyez sur la touche DVD. 23 TOUCHE SLEEP Pour régler l’heure de mise en veille. Appuyez ici pour effectuer une avance ou un retour rapide sur le lecteur DVD/ BD ou iPod connecté. Appuyez ici pour arrêter/démarrer la lecture sur le lecteur DVD/BD ou iPod connecté. Français HW-D600_D650S_FRC_0617.indd 11 Pour commencer 1 11 2011-06-17 10:32:49 Pour commencer 24 TOUCHE DIMMER Pour régler la luminosité de l'écran d'affichage. 25 TOUCHE DSP Pour sélectionner le mode SFE. 26 TOUCHE AUDIO ASSIGN Bascule afin de sélectionner un mode d’entrée pour la source sélectionnée. 27 TOUCHES DE LECTURE ACCÉLÉRÉE Pour chercher vers l’arrière ou vers l’avant. 28 TOUCHE PAUSE Pour interrompre la lecture d’un appareil connecté. 29 TOUCHES TUNING/CHANNEL Pour changer la fréquence de diffusion de la radio ou la chaîne de télévision. 30 TOUCHE S.DIRECT Pour sélectionner le mode S.DIRECT. 31 TOUCHE TUNER MEMORY Pour sélectionner une fréquence radio préréglée. 32 TOUCHE INFO Affiche l’information relative au périphérique connecté qui est actuellement utilisé. 33 TOUCHE ENTER Pour sélectionner un article dans le menu SETUP. 34 TOUCHE EXIT Pour quitter le menu SETUP. 35 TOUCHE 3D SOUND Appuyez pour appliquer l’effet sonore 3D. 36 TOUCHE CROSS OVER Pour régler la fréquence de transition. 12 Français HW-D600_D650S_FRC_0617.indd 12 2011-06-17 10:32:49 01 Pour commencer Insertion des piles dans la télécommande * Piles (AAA) ✎ REMARQUE Suivez les consignes suivantes afin d’éviter toute fuite ou fissure des piles : Placez les piles dans la télécommande conformément à la polarité : (+) avec (+) et (–) avec (–). Selon un usage normal du téléviseur, les piles devraient durer environ un an. Utilisez le type de piles approprié. Des piles qui semblent similaires peuvent avoir une tension différente. Remplacez toujours les deux piles en même temps. N’exposez pas les piles à la chaleur ou à une flamme. Portée de la télécommande La portée de la télécommande est d'environ 7 mètres (23 pi) en ligne droite. Elle peut aussi être utilisée dans un rayon horizontal pouvant atteindre 30 degrés, du capteur de télécommande. Français HW-D600_D650S_FRC_0617.indd 13 13 2011-06-17 10:32:49 Connexions Cette section décrit différentes méthodes de connexion du récepteur AV aux autres composants externes. Avant de déplacer ou d'installer l'appareil, assurez-vous de le mettre hors tension et de débrancher le cordon d'alimentation. Disposition des enceintes * Les enceintes ne sont disponibles que sur le modèle HW-D650S. Elles ne sont pas fournies avec le modèle HW-D600. 6.6~9.8 feet (2~3m) RÉCEPTEUR AV SL SR Disposition du récepteur AV Placez le récepteur AV sur une étagère ou un socle réservé à cet effet. Caisson de graves g Son emplacement n’est pas d’une importance cruciale. Vous pouvez le placer où vous voulez. Enceintes avant Placez ces enceintes devant votre position d'écoute, face vers l'intérieur (environ 45 degrés) vers vous. Installez-les de façon à ce que les haut-parleurs d'aigus soient à la hauteur de vos oreilles. Alignez la face des enceintes avant avec la face de l'enceinte centrale ou placez-les légèrement en avant de l’enceinte centrale. Enceinte centrale Il est préférable de l'installer à la même hauteur que les enceintes avant. Vous pouvez aussi l'installer directement sur ou sous le téléviseur. Enceintes ambiophoniques Placez ces enceintes derrière votre position d'écoute. Si vous manquez d’espace, placez-les face à face. Placez-les à environ 60 à 90 cm (2 à 3 pi) au-dessus de vos oreilles, face légèrement inclinée vers le bas. Contrairement aux enceintes avant et centrale, les enceintes ambiophoniques sont utilisées essentiellement pour les effets sonores; elles ne reproduisent pas de son en permanence. 14 Français HW-D600_D650S_FRC_0617.indd 14 2011-06-17 10:32:50 02 SBL SBR Connexions Enceintes ambiophoniques arrière (Option) Si vous utilisez les deux enceintes centrales arrière, placez-les face vers l’avant, derrière la position d’écoute. Placez l’enceinte ambiophonique arrière à une distance de 0,70 à 1 m (2,3 à 3,3 pi). you Enceintes Avant Haut FHL FHR (Option) Si vous utilisez un système Dolby Pro Logic IIz, placez les enceintes ambiophoniques arrière aux positions FHL, FHR, situées au-dessus des enceintes L et R en façade à une distance de 1 m (3,3 pieds) l'une de l'autre. ✎ REMARQUE Lorsque vous fixez les enceintes à un mur, veillez à les fixer solidement afin qu'elles ne tombent pas. Configuration des enceintes Pour obtenir un son ambiophonique optimal, vous devez connecter cinq enceintes et un caisson de graves. Le tableau suivant indique les canaux que vous devriez utiliser selon le nombre d’enceintes dont vous disposez. 7 enceintes 2 enceintes 3 enceintes 4 enceintes 5 enceintes (DPL IIx) (Option) 7 enceintes (DPL IIz) (Option) SBL FHL SBR FHR ✎ REMARQUE Si vous placez une enceinte près du téléviseur, la couleur de l’écran pourra s’altérer en raison du champ magnétique généré par l’enceinte. Le cas échéant, éloignez l’enceinte du téléviseur. Si vous disposez d’un amplificateur stéréo externe et de deux enceintes distinctes et que vous les connectez, vous pourrez constituer une configuration de 7 enceintes. Si vous avez un caisson de graves externe activé, vous pourrez le connecter également. Français HW-D600_D650S_FRC_0617.indd 15 15 2011-06-17 10:32:51 Connexions Connexion des enceintes Connexion du câble d'enceinte 1. Desserrez le bouton en le tournant dans le sens inverse des aiguilles d’une montre. 2. Insérez la partie dénudée du fil dans le trou situé sur le côté de chaque borne. 3. Serrez le bouton en le tournant dans le sens des aiguilles d’une montre pour fixer le fil. AVANT AMBIOPHONIQUE (DROIT) (DROITE) CAISSON DE GRAVES AMBIOPHONIQUE (GAUCHE) CAISSON DE GRAVES ACTIVÉ (non fourni) SUBWOOFER OUT ONLY FOR UPDATE SURROUND BACK OUT SUBWOOFER OUT CENTRALE AVANT (GAUCHE) ONLY FOR SERVICE Modèle HW-D600 Récepteur AV ✎ REMARQUE Modèle HW-D650S Récepteur AV ENCEINTE AVANT ENCEINTE CENTRALE ENCEINTE AMBIOPHONIQUE CAISSON D’EXTRÊMES GRAVES HW-D600 HW-D600 PS-FC560S PS-CC560S PS-RC560S PS-WC560S Les enceintes ne sont disponibles que sur le modèle HW-D650S. Elles ne sont pas fournies avec le modèle HW-D600. Pour vous procurer des enceintes, contactez un détaillant Samsung Electronics. Maintenez l'enceinte de caisson de graves hors de portée des enfants afin d'éviter qu'ils ne mettent leurs mains ou des objets dans le conduit (orifice). Ne touchez jamais les bornes d’enceintes en fonctionnement. Vous pourriez subir un choc électrique. Assurez-vous que les polarités (+ et -) sont positionnées correctement. Si vous souhaitez utiliser un caisson de graves activé (non fourni), branchez le caisson dans la borne SUBWOOFER OUT située sur le panneau arrière. En utilisant l’amplificateur externe, vous pouvez connecter les enceintes ambiophoniques arrière (SBL/SBR) ou les enceintes avant haut (FHL/FHR) pour transformer votre système en un système de qualité 7.1 canaux. 16 Français HW-D600_D650S_FRC_0617.indd 16 2011-06-17 11:21:35 02 Connexions Connexion des appareils externes et de votre téléviseur par HDMI HDMI est une interface numérique standard qui permet de connecter des appareils tels qu’un téléviseur, un projecteur, un lecteur DVD, un lecteur BD, un décodeur, etc. Elle élimine les pertes de signal découlant de la conversion analogique et vous permet de bénéficier d’une qualité sonore vidéo et audio comme si le son avait été créé initiallement dans la source numérique. En établissant la connexion par l'interface HDMI (High-Definition Multimedia Interface), l’appareil peut lire les images et le son numériques. Spelcomputer SATELLITE ou Lecteur DVD ou (câble/satellite/ syntoniseur HDTV BD décodeur) (Récepteur terrestre Caméscope HDTV) ONLY FOR UPDATE SURROUND BACK OUT SUBWOOFER OUT ONLY FOR SERVICE OPTICAL OUT • Effectuez la connexion si vous souhaitez utiliser Anynet+. (Si le téléviseur branché prend en charge la fonction ARC, il ne sera pas nécessaire de connecter la prise OPTICAL OUT.) Prise en charge de la norme HDCP (protection de contenu numérique large bande) Pour lire des contenus numériques par le biais d'une connexion HDMI, les périphériques connectés et le téléviseur doivent prendre en charge la norme de protection de contenu numérique large bande (HDCP). Ce produit prend en charge la norme HDCP. Compatibilité avec un téléviseur prenant en charge l’interface HDMI Téléviseur équipé d'un connecteur HDMI Video/Audio Téléviseur équipé d'un connecteur DVI-D (téléviseur prenant en charge la norme HDCP) Video Téléviseur équipé d'un connecteur DVI-D (téléviseur ne prenant pas en charge la norme HDCP) - ✎ REMARQUE Le son des disques SACD est inaudible via cette connexion. Pour lire un DVD dont les droits d’auteur sont protégés par le système CPPM, utilisez un lecteur qui prend en charge ce système. Il se peut que la qualité du son sortant avec une connexion HDMI (fréquence d'échantillonnage et débit binaire) soit limitée par le rendement du périphérique branché. Vous n'avez pas à brancher un câble audio supplémentaire car la connexion HDMI prend en charge tant le son que les images. Français HW-D600_D650S_FRC_0617.indd 17 17 2011-06-17 10:32:57 Connexions Fonction HDMI Utilisation de la fonction Anynet+ (HDMI-CEC) Anynet+ est une fonction qui vous permet de commander les autres appareils Samsung à l’aide de la télécommande de votre téléviseur Samsung. Vous pouvez utiliser la fonction Anynet + en connectant ce récepteur AV à un téléviseur SAMSUNG à l’aide d’un câble HDMI. Ceci ne s’applique qu’aux téléviseurs SAMSUNG et aux produits audio-vidéo SAMSUNG prenant en charge la fonction Anynet+. 1. Connectez le récepteur AV à un téléviseur Samsung à l'aide d'un câble HDMI. (Voir page 17.) 2. Réglez la fonction Anynet+ sur votre téléviseur. (Pour de plus amples renseignements, consultez le guide d'utilisation du téléviseur.) • Vous pouvez régler le volume du récepteur AV à l'aide des touches de réglage du volume de la télécommande du téléviseur. Pour activer la fonction Anynet+ 1. Appuyez sur la touche SETUP/MENU de la télécommande. • Chaque fois que vous appuyez sur cette touche, le système bascule entre les modes INPUT et SETUP OFF. 2. 3. 4. 5. Appuyez sur les touches ▲▼ pour sélectionner OPTION, puis sur la touche ENTER. Appuyez sur les touches ▲▼ pour sélectionner HDMI SETUP, puis sur la touche ENTER. Appuyez sur les touches ▲▼ pour sélectionner HDMI ANYNET+, puis sur la touche ENTER. Appuyez sur les touches ▲▼pour régler la fonction ANYNET+ à ON, puis sur la touche ENTER. Pour quitter le mode de configuration • Appuyez sur les touches SETUP/MENU ou EXIT de la télécommande. SETUP OFF s'affiche à l'écran et l'appareil quitte le mode de configuration. ✎ REMARQUE Si vous utilisez un câble HDMI pour brancher un téléviseur Samsung à votre récepteur AV, vous pouvez commander ce dernier à l’aide de la télécommande du téléviseur. Cette fonction est uniquement offerte avec les téléviseurs et les lecteurs DVD SAMSUNG prenant en charge la fonction Anynet+ (HDMI-CEC). Vérifiez si le logo ANYNET+ est apposé sur votre téléviseur. Si c’est le cas, votre téléviseur prendra en charge la fonction Anynet+. Lorsque vous établissez une connexion Anynet+, ne connectez pas plus de deux récepteurs AV (Anynet+ installée). Sinon, le système pourrait ne pas fonctionner correctement. 18 Français HW-D600_D650S_FRC_0617.indd 18 2011-06-17 10:33:00 02 Connexions Connexion à votre téléviseur ONLY FOR UPDATE SURROUND BACK OUT SUBWOOFER OUT ONLY FOR SERVICE ou VIDEO IN OPTICAL OUT AUDIO OUT Connexion vidéo Branchez une extrémité du câble vidéo (non fourni) au connecteur de sortie VIDEO OUT (MONITEUR) situé à l'arrière de votre récepteur AV et l'autre extrémité au connecteur d'entrée vidéo de votre téléviseur. Connexion audio Connectez l'entrée numérique (OPTICAL 3) de votre récepteur AV à la sortie numérique du téléviseur. OU Connectez l’entrée AUDIO IN (TV) de votre récepteur AV à la sortie audio du téléviseur. Français HW-D600_D650S_FRC_0617.indd 19 19 2011-06-17 10:33:00 Connexions Connexion d’un lecteur DVD ou BD VIDEO IN ou ONLY FOR UPDATE SURROUND BACK OUT SUBWOOFER OUT ONLY FOR SERVICE ou AUDIO OUT VIDEO OUT OPTICAL OUT Lecteur DVD ou BD ou Connexion vidéo Branchez un câble vidéo (non fourni) du connecteur d’entrée VIDEO IN (BD/DVD) situé à l'arrière de votre récepteur AV au connecteur de sortie vidéo de votre lecteur DVD/BD. Connexion audio Connectez l'entrée numérique (OPTICAL 1) de votre récepteur AV à la sortie numérique du lecteur DVD/BD. OU Connectez l’entrée AUDIO IN (BD/DVD) de votre récepteur AV à la sortie audio du lecteur DVD/BD. 20 Français HW-D600_D650S_FRC_0617.indd 20 2011-06-17 10:33:03 02 Connexions Connexion d’un câble, d’un satellite ou d’un décodeur VIDEO IN ou ONLY FOR UPDATE SURROUND BACK OUT SUBWOOFER OUT ONLY FOR SERVICE ou VIDEO OUT AUDIO OUT OPTICAL OUT SATELLITE (câble/satellite/décodeur) ou Connexion vidéo Branchez un câble vidéo (non fourni) du connecteur d’entrée VIDEO IN (SAT) situé à l'arrière de votre récepteur AV au connecteur de sortie vidéo de votre SATELLITE. Connexion audio Connectez l'entrée numérique (OPTICAL 2) de votre récepteur AV à la sortie numérique du SATELLITE. OU Connectez l’entrée AUDIO IN (SAT) de votre récepteur AV à la sortie audio du SATELLITE. ✎ REMARQUE Retirez la fiche de la prise murale si vous n'utilisez pas l'appareil pendant une période prolongée. Si le câble/boîtier décodeur n’est muni que d’une seule prise de sortie audio, connectez-le à la prise d’entrée audio droite ou gauche de l’unité principale. Connectez la fiche rouge du câble audio à la prise rouge et le câble blanc à la prise blanche. Français HW-D600_D650S_FRC_0617.indd 21 21 2011-06-17 10:33:06 Connexions Connexion d’un lecteur CD ONLY FOR UPDATE SURROUND BACK OUT SUBWOOFER OUT ONLY FOR SERVICE ou AUDIO OUT COAXIAL OUT Lecteur CD Connexion audio Connectez l'entrée numérique (COAXIAL) de votre récepteur AV à la sortie numérique du lecteur CD. OU Connectez l’entrée AUDIO IN (CD) de votre récepteur AV à la sortie audio du lecteur CD. ✎ REMARQUE Connectez la fiche rouge du câble audio à la prise rouge et le câble blanc à la prise blanche. Si le lecteur de CD n’est muni que d’une seule prise de sortie audio, connectez-le à la prise d’entrée audio droite ou gauche de l’unité principale. 22 Français HW-D600_D650S_FRC_0617.indd 22 2011-06-17 10:33:09 02 Connexions Connexion via l’utilisation d’un amplificateur externe Par défaut, le récepteur AV est conçu comme un système ambiophonique 5.1 canaux. Cependant, il pourra être transformé en un système ambiophonique 7.1 canaux s’il est combiné à un amplificateur externe et des enceintes distinctes, tel qu’illustré ci-dessous : • Utilisez un câble audio RCA pour connecter les prises SURROUND BACK OUT L/R du récepteur AV à une entrée audio analogique sur votre amplificateur externe pour AMBIOPHONIQUE ARRIÈRE ou AVANT HAUT. • Connectez vos enceintes AMBIOPHONIQUE ARRIÈRE ou AVANT HAUT aux bornes des enceintes correspondantes sur votre amplificateur externe. • Réglages 7.1 canaux à l’aide un amplificateur externe. FHL FHR 6.6~9.8 feet (2~3m) RÉCEPTEUR AV 6.6~9.8 feet (2~3m) Amplificateur externe Amplificateur externe RÉCEPTEUR AV Bi-AMP Bi-AMP SL SR SBL SL SR SBR L, R, C, SW, SL, SR, SBL, SBR ( Dolby Pro Logic IIx ) L, R, C, SW, SL, SR, FHL, FHR( Dolby Pro Logic IIz) SURROUND BACK OUT SBL SBR ONLY FOR UPDATE SURROUND BACK OUT SUBWOOFER OUT ONLY FOR SERVICE Amplificateur externe AMBIOPHONIQUE ARRIÈRE ✎ REMARQUE La borne de sortie ambiophonique arrière n’émet que le signal analogique. La borne SURROUND BACK OUT du récepteur AV autorise le réglage de volume. Un amplificateur externe avec ou sans réglage de volume pourra être utilisé. Lorsque vous utilisez un amplificateur externe muni d’un réglage de volume, le volume de l’amplificateur externe doit être spécifié sur la position appropriée. Le réglage de volume du système 7.1 canaux peut être effectué sur le récepteur AV. Français HW-D600_D650S_FRC_0617.indd 23 23 2011-06-17 10:33:13 Connexions Connexion d’un iPod Vous pouvez écouter l’audio d’un iPod via l’unité principale. Pour utiliser un iPod avec votre récepteur, reportez-vous aux pages 49 et 50. ONLY FOR UPDATE SURROUND BACK OUT SUBWOOFER OUT ONLY FOR SERVICE 1. Connectez la fiche du socle du iPod au connecteur de iPod de votre récepteur. 2. Placez le iPod sur le socle. • Si vous souhaitez visionner un film stocké sur votre lecteur iPod, vous devez régler l’option TV Out du lecteur à On avant de le placer sur le socle. Voir pages 49 et 50. 3. Appuyez sur la touche iPod de la télécommande. • Vous pouvez aussi utiliser la touche INPUT SELECT de l'unité principale. Le mode change dans l’ordre suivant : FM TV BD/DVD SAT GAME AUX CD IPOD AUDIO IPOD VIDEO ✎ REMARQUE La sortie VIDEO (Monitor ou TV) doit être connectée à votre téléviseur pour que vous puissiez visionner la vidéo stockée sur le iPod. Voir page 19. Réglez le volume à un niveau modéré avant de connecter votre iPod au récepteur AV. Si vous connectez un iPod lorsque l’unité est sous tension, l’unité charge la pile du iPod. Assurez-vous de raccorder la fiche du socle de sorte que le mot « SAMSUNG » soit dirigé vers le haut. 24 Français HW-D600_D650S_FRC_0617.indd 24 2011-06-17 10:33:16 02 Suivez les étapes ci-dessous pour éviter d'endommager le iPod et ses données en le déconnectant de votre récepteur AV. Connexions Déconnexion d’un iPod 1. Appuyez sur la touche INPUT SELECT de l’unité principale et sélectionnez un mode autre que le mode IPOD AUDIO ou IPOD VIDEO. OU 1. Mettez le récepteur AV hors tension. 2. Déconnectez le lecteur iPod de son socle ou retirez la fiche du socle du récepteur AV. Modèles iPod/iPhone susceptibles d’être utilisés avec ce produit iPod touch (3ème génération) iPod touch (2ème génération) iPod touch (1ère génération) iPod classic iPod vidéo iPod avec connecteur dock iPod avec Click Wheel iPod nano (5ème génération) iPod nano (4ème génération) iPod nano (3ème génération) iPod nano (2ème génération) iPod nano (1ère génération) iPhone 4 iPhone 3GS iPhone 3G iPhone ✎ REMARQUE « Made for iPod » signifie que l’accessoire électronique a été conçu pour être connecté spécialement à un iPod et a été certifié conforme aux normes de performance Apple par le développeur. « Made for iPhone » signifie que l’accessoire électronique a été conçu pour être connecté spécialement à un iPhone et a été certifié conforme aux normes de performance Apple par le développeur. Apple ne peut être tenu responsable du fonctionnement de cet appareil ou de sa conformité aux normes de sécurité et aux normes réglementaires. iPod est une marque de commerce d’Apple Inc., déposée aux États-Unis et dans d’autres pays. iPhone est une marque de commerce de Apple Inc. Français HW-D600_D650S_FRC_0617.indd 25 25 2011-06-17 10:33:19 Connexions Connexion de l'antenne FM 1. Connectez provisoirement l’antenne FM fournie à la borne FM ANTENNA. 2. Déplacez lentement le fil de l’antenne jusqu’à ce que vous trouviez l’endroit où la réception est bonne, puis fixez-le au mur ou sur une surface rigide. ONLY FOR UPDATE SURROUND BACK OUT SUBWOOFER OUT ONLY FOR SERVICE Antenne FM (fournie) ✎ REMARQUE Ne placez pas le câble d’antenne près du cordon d’alimentation, mais le plus éloigné possible. Si la réception FM n’est pas satisfaisante, utilisez une antenne externe. Connexion des composants auxiliaires Pour plus de commodité, vous pouvez connecter pendant une courte période de temps des appareils externes (caméscope, console de jeux, équipement mobile, etc.) à l’avant de cette unité. VIDEO OUT 26 AUDIO OUT Caméscope Français HW-D600_D650S_FRC_0617.indd 26 2011-06-17 10:33:19 03 Configuration Configuration Pour plus de commodité, vous pouvez régler les fonctions de ce récepteur AV selon vos besoins. Avant d'utiliser le récepteur AV Mise sous/hors tension Branchez la fiche dans la prise murale. L’unité se met en mode veille. Appuyez pendant 2 secondes sur la touche POWER de l'unité principale. • L’unité s’allume. • Vous pouvez aussi allumer et éteindre l’unité en appuyant sur la touche POWER de la télécommande. Fonctions de la télécommande Cette télécommande vous permet de commander votre AMPLIFICATEUR (ce récepteur A/V), votre TÉLÉVISEUR et votre lecteur de DVD ou BD. Pour plus de détails, reportez-vous aux pages 53 à 54. Pour sélectionner une fonction Méthode 1 Appuyez sur la touche INPUT SELECT de la télécommande. • Chaque fois que vous appuyez sur cette touche, FM TV BD/DVD SAT GAME AUX CD IPOD AUDIO IPOD VIDEO défilent dans cet ordre. Méthode 2 Appuyez sur la touche BD/DVD, SAT, GAME/TV, CD, iPod ou TUNER. • Vous pouvez directement sélectionner la fonction voulue. Menu Accueil Utilisez le câble HDMI pour connecter l’unité principale au moniteur. Appuyez sur la touche SETUP/MENU pour afficher le message « INPUT » sur l’écran d’affichage. Le menu OSD d’affichage à l’écran apparaît au bout de quelques secondes. ✎ INPUT INPUT SELECTION SPEAKER Q SURROUND REMARQUE Le menu OSD apparaîtra uniquement si vous utilisez OPTION > MOVE SELECT ' RETURN EXIT le câble HDMI pour effectuer la connexion. Pour utiliser les menus OSD, reportez-vous aux menus sur l’écran d’affichage. L'affichage à l'écran (OSD (On Screen Display) peut changer sur cet appareil après une mise à niveau de la version du logiciel. Français HW-D600_D650S_FRC_0617.indd 27 27 2011-06-17 10:33:22 Configuration Sélection de l'entrée numérique/HDMI/analogique Vous pouvez écouter le son en utilisant l’entrée analogique, HDMI ou optique de l’unité. 1. Appuyez sur la touche INPUT SELECT de la télécommande pour sélectionner la fonction souhaitée (BD/DVD, SAT, TV, CD, AUX). Voir page 27. 2. Appuyez sur la touche AUDIO ASSIGN de la télécommande pour sélectionner la source d’entrée audio du périphérique externe que vous avez connecté. • Chaque fois que vous appuyez sur cette touche, les fonctions du mode d’entrée défilent comme suit : • Pour la fonction BD/DVD • Pour la fonction SAT • Pour la fonction TV • Pour la fonction CD • Pour la fonction AUX ✎ REMARQUE Vous pouvez également changer le mode d’entrée en appuyant sur la touche AUDIO ASSIGN située à l’avant de votre récepteur AV. Pour bénéficier d'un son numérique Dolby Digital ou DTS, raccordez le connecteur de sortie audio numérique du composant audio externe au connecteur d’entrée audio numérique, optique ou coaxiale de l’unité principale. Pour la fonction TV, le menu TV ARC s’affiche uniquement en cas de connexion d’un téléviseur compatible ARC. 28 Français HW-D600_D650S_FRC_0617.indd 28 2011-06-17 10:33:22 03 Configuration Configuration de l'arborescence du menu Voici un bref aperçu de la façon dont sont organisés les menus de configuration sur votre récepteur AV. INPUT INPUT SELECTION BD/DVD OPTICAL1, 2 COAXIAL OPTICAL1, 2 COAXIAL OPTICAL1, 2 COAXIAL SAT CD SPEAKER SPEAKER SIZE 7.1 CHANNEL SPEAKER DISTANCE SPEAKER LEVEL TEST TONE SURROUND DPLIIx DTS NEO:6 EX/ES OPTION AUDIO SYNC TONE CONTROL MP3 ENHANCER SMART VOLUME AUTO CALIBRATION DRC DUAL MONO HDMI SETUP Français HW-D600_D650S_FRC_0617.indd 29 29 2011-06-17 10:33:25 Configuration SPEAKER SPEAKER SIZE FRONT LARGE SMALL CENTER LARGE SMALL NONE SURROUND LARGE SMALL NONE SURROUND BACK LARGE SMALL NONE FRONT HEIGHT LARGE SMALL SUBWOOFER YES NO CROSSOVER 7.1 CHANNEL 60Hz, 80Hz, 100Hz, 120Hz, 150Hz, 180Hz, 200Hz SURR.BACK PLIIz SPEAKER DISTANCE FRONT LEFT FRONT RIGHT CENTER SURROND LEFT 1 ~ 30 FT (pas de 1 pied), valeur par défaut : 10 FT SURROUND RIGHT SURROUND BACK LEFT FRONT HEIGHT LEFT SURROUND BACK RIGHT FRONT HEIGHT RIGHT SUBWOOFER SPEAKER LEVEL FRONT LEFT FRONT RIGHT CENTER SURROND LEFT SURROUND RIGHT -10 ~ +10 dB (pas de 1 dB), valeur par défaut : 00 dB SURROUND BACK LEFT FRONT HEIGHT LEFT SURROUND BACK RIGHT FRONT HEIGHT RIGHT SUBWOOFER TEST TONE AUTO pour passer à « Page de vérification de la tonalité d’essai » MANUAL ✎ REMARQUE Si le système Dolby Pro Logic IIz est réglé sur On, le réglage des enceintes ambiophoniques arrière (SBL/SBR) basculera sur celui des enceintes frontales en hauteur. 30 Français HW-D600_D650S_FRC_0617.indd 30 2011-06-17 10:33:26 03 Configuration SURROUND DPLIIx PANORAMA OFF ON DIMENSION -7~+7 CENTER WIDTH 0~7 DTS NEO:6 CENTER IMAGE 0~5 EX/ES AUTO OFF ON OPTION AUDIO SYNC TONE CONTROL 0 ms~240 ms (pas de 10 ms) TONE OFF ON BASS -6 dB ~ +6 dB (pas de 1 dB) TREBLE -6 dB ~ +6 dB (pas de 1 dB) MP3 ENHANCER OFF ON SMART VOLUME OFF ON AUTO CALIBRATION MODE OFF MEASUREMENT DRC AUTO DUAL MONO CH1 HDMI SETUP AUTO SYNC ON pour passer à « Page de mesure de l’étalonnage automatique » MINIMUM STANDARD MAXIMUM CH2 BOTH OFF ON AVR TV OFF ON OFF AUTO HDMI AUDIO HDMI ANYNET+ ARC Français HW-D600_D650S_FRC_0617.indd 31 31 2011-06-17 10:33:26 Configuration Configuration audio Sélection d’un appareil source et d’un connecteur (Entrée audio numérique) Sélectionnez les appareils externes que vous avez connectés au récepteur. 1. Appuyez sur la touche SETUP/MENU de la télécommande. • Chaque fois que vous appuyez sur cette touche, le système bascule entre les modes INPUT et SETUP OFF. 2. Appuyez sur la touche ENTER pour sélectionner INPUT. 3. Appuyez sur la touche ENTER pour sélectionner INPUT SELECTION. 4. Appuyez sur les touches ▲ ou ▼ pour sélectionner la prise souhaitée. • Les fonctions du périphérique source défilent comme suit : BD/DVD, SAT, CD ✎ REMARQUE Vous pouvez également utiliser les touches SETUP, ,,., ENTER et RETURN situées à l’avant de votre récepteur audio-vidéo. Réglage de la taille des enceintes Les sorties de signal et la réponse en fréquence des enceintes seront réglées en fonction de la configuration de ces dernières et de l'utilisation ou non de certaines d'entre elles. 1. Appuyez sur la touche SETUP/MENU de la télécommande. • Chaque fois que vous appuyez sur cette touche, le système bascule entre les modes INPUT et SETUP OFF. 2. Appuyez sur les touches ▲▼ pour sélectionner SPEAKER, puis appuyez sur la touche ENTER. 3. Appuyez sur les touches ▲▼ pour sélectionner SPK SIZE, puis appuyez sur la touche ENTER. 4. Appuyez sur les touches ▲▼ pour sélectionner l’enceinte que vous voulez, puis appuyez sur la touche ENTER. • Chaque fois que vous appuyez sur les touches ▲▼, les enceintes FRONT CENTER SURR SBACK(DPLIIx) / FRONTH(DPLIIz) SUBW CROVR défilent dans cet ordre. 5. Appuyez sur la touche ▲▼ pour régler le mode (LARGE, SMALL, etc.) de l’enceinte sélectionnée. 6. Répétez les étapes 2 à 5 pour régler le mode d e chaque enceinte. SPEAKER SIZE USER > MOVE 32 FRONT : SMALL LARGE CENTER : SMALL SMALL SURROUND : SMALL SURROUND BACK : SMALL SUBWOOFER : YES CROSSOVER : 100Hz SELECT ' RETURN EXIT Français HW-D600_D650S_FRC_0617.indd 32 2011-06-17 10:33:26 03 Configuration - Pour quitter le mode de configuration • Appuyez sur les touches SETUP/MENU ou EXIT de la télécommande. SETUP OFF s'affiche à l'écran et l'appareil quitte le mode de configuration. Configuration des enceintes ENCEINTE Réglages possibles Réglage par défaut FRONT (Avant) LARGE, SMALL SMALL CENTER (Centrale) LARGE, SMALL, NONE SMALL SURR (Ambiophonique) LARGE, SMALL, NONE SMALL SBACK (Ambiophonique arrière) LARGE, SMALL, NONE NONE FRONTH (Avant Haut) LARGE, SMALL SMALL SUBW (Caisson de graves) YES, NO YES CROVR (Fréquence de transition) 60, 80, 100,120, 150, 180, 200(Hz) 100Hz • LARGE : sélectionnez cette option lorsque vous utilisez de grandes enceintes. Cette fonction vous permet d’écouter un son à gamme étendue. • SMALL : Ssélectionnez cette option lorsque vous utilisez de petites enceintes. • NONE : sélectionnez cette option lorsque vous n’utilisez aucune enceinte. • YES (caisson de graves) : sélectionnez cette option lorsque vous utilisez un caisson de graves. • NO (caisson de graves) : sélectionnez cette option lorsque vous n’utilisez pas de caisson de graves. • CROVR : Sélectionnez cette option pour obtenir la meilleure réponse de basse sur vos enceintes. ✎ REMARQUE Vous pouvez également utiliser les touches SETUP, ,,., ENTER et RETURN situées à l’avant de votre récepteur audio-vidéo. Lorsque l’enceinte avant est seulement réglée à LARGE, vous pouvez sélectionner l’option LARGE des autres enceintes. Lorsque l’enceinte ambiophonique est réglée sur LARGE, vous pouvez sélectionner l’option LARGE de l’enceinte SBACK (Ambiophonique arrière). Lorsque l’option 7.1 CHANNEL est réglée sur PLIIz, vous ne pouvez sélectionner NI l’enceinte ambiophonique NI l’enceinte avant haut. Vous pouvez également modifier la fréquence de transition en utilisation les touches CROSS OVER, <, > de la télécommande. Français HW-D600_D650S_FRC_0617.indd 33 33 2011-06-17 10:33:26 Configuration Réglage de connexion de l'enceinte ambiophonique arrière Les réglages de l’enceinte ambiophonique arrière varient selon la méthode de connexion et le site d’installation de l’enceinte à connecter. Vous devez configurer les réglages 7.1 CHANNEL en fonction de l’enceinte connectée pour pouvoir écouter correctement la musique. 1. Appuyez sur la touche SETUP/MENU de la télécommande. • Chaque fois que vous appuyez sur cette touche, le système bascule entre les modes INPUT et SETUP OFF. 2. Appuyez sur les touches ▲▼ pour sélectionner SPEAKER, puis appuyez sur la touche ENTER. 3. Appuyez sur les touches ▲▼ pour sélectionner 7.1 CHANNEL, puis appuyez sur la touche ENTER. 4. Appuyez sur ▲▼ pour sélectionner un réglage approprié pour l’enceinte ambiophonique arrière. • SURR.BACK : Sélectionnez ceci pour installer l’enceinte ambiophonique arrière dans les réglages par défaut. Ce réglage vous permet d’activer le mode Dolby Pro Logic IIx. • PLIIz : Sélectionnez ceci pour installer l’enceinte ambiophonique arrière dans le coin supérieur avant. INPUT Ce réglage vous permet d’activer le mode Dolby SPEAKER Pro Logic IIz. Q SURROUND SPEAKER SIZE 7.1 CHANNEL SURR.BACK SPEAKER DISTANCE PLIIz SPEAKER LEVEL TEST TONE OPTION > MOVE SELECT ' RETURN EXIT ✎ REMARQUE Selon les réglages 7.1 CHANNEL sélectionnés, les menus correspondants à l’enceinte ambiophonique arrière ou à l’enceinte avant haut peuvent ne pas être activés ou différer du menu de l’enceinte : SPEAKER SIZE, SPEAKER LEVEL, SPEAKER DISTANCE. Selon le réglage sélectionné, il est possible que vous ne puissiez pas utiliser les différentes fonctionnalités simultanément. Si vous choisissez le réglage SURR-BACK, par exemple, vous ne pourrez pas utiliser la fonction suivante : PLIIz. 34 Français HW-D600_D650S_FRC_0617.indd 34 2011-06-17 10:33:27 03 Configuration Réglage de la distance d'écoute des enceintes Si les enceintes ne peuvent être placées à égale distance de votre position d’écoute, vous pouvez régler le temps de décroissance des signaux audio émis depuis les enceintes centrales et ambiophoniques. 1. Appuyez sur la touche SETUP/MENU de la télécommande. • Chaque fois que vous appuyez sur cette touche, le système bascule entre les modes INPUT et SETUP OFF. 2. Appuyez sur les touches ▲▼ pour sélectionner SPEAKER, puis appuyez sur la touche ENTER. 3. Appuyez sur les touches ▲▼ pour sélectionner SPK DISTANCE, puis appuyez sur la touche ENTER. 4. Appuyez sur les touches ▲▼ pour sélectionner l’enceinte souhaitée. • Chaque fois que vous appuyez sur les touches ▲▼, F.L F.R CEN S.L S.R SBL SBR S.W défilent dans cet ordre. 5. Appuyez sur les touches ◄ ► pour régler la distance des enceintes. • Vous pouvez régler les enceintes FRONT LEFT, FRONT RIGHT, CENTER, SURR. LEFT, SURR. RIGHT, SURRBACK.LEFT, SURRBACK.RIGHT et SUBWOOFER à une distance de 1 à 30 pi (0,3 à 9 m) entre l’enceinte et la position d’écoute et les espacer de 1 pi (0,3m). SPEAKER DISTANCE FRONT LEFT 10FT FRONT RIGHT 10FT CENTER 10FT SURROUND LEFT 10FT SURROUND RIGHT 10FT ► ▼ > MOVE SELECT ' RETURN EXIT - Réglage de la distance de l'enceinte Réglez la distance séparant l'enceinte de la position d'écoute par intervalles de 0,3 m (1 pi). • F.L (avant gauche) : 1 à 30 pi • SW (caisson de graves) : 1 à 30 pi • F.R (avant droite) : 1 à 30 pi • SBL (ambiophonique arrière gauche) : 1 à 30 pi • S.L (ambiophonique gauche) : 1 à 30 pi • SBR (ambiophonique arrière droite) : 1 à 30 pi • S.R (ambiophonique droite) : 1 à 30 pi • FHL (avant haut gauche) : 1 à 30 pi • CEN (centrale) : 1 à 30 pi • FHR (avant haut droite) : 1 à 30 pi ✎ REMARQUE Si la position d'écoute est au-delà de la plage de distances configurée pour l'enceinte, réglez l'enceinte à la distance maximale. Si l’option Dolby Pro Logic IIz est réglée sur On, l’enceinte ambiophonique arrière (SBL/SBR) sera convertie en enceinte avant haut (FHL/FHR). Français HW-D600_D650S_FRC_0617.indd 35 35 2011-06-17 10:33:27 Configuration Réglage du niveau de puissance des enceintes Vous pouvez régler l’équilibre sonore et le niveau de puissance des enceintes. 1. Appuyez sur la touche SETUP/MENU de la télécommande. • Chaque fois que vous appuyez sur cette touche, le système bascule entre les modes INPUT et SETUP OFF. 2. Appuyez sur les touches ▲▼ pour sélectionner SPEAKER, puis appuyez sur la touche ENTER. 3. Appuyez sur les touches ▲▼ pour sélectionner SPK LEVEL, puis appuyez sur la touche ENTER. 4. Appuyez sur les touches ▲▼ pour sélectionner l’enceinte souhaitée. • Chaque fois que vous appuyez sur cette touche, F.L F.R CEN S.L S.R SBL SBR S.W défilent dans cet ordre. 5. Appuyez sur les touches ◄ ►pour régler le mode de niveau de puissance des enceintes. • Vous pouvez le régler de -10 à +10 dB par incrémentations de 1. • Le son s’atténue à 10 dB et s’amplifie à +10 dB. SPEAKER LEVEL FRONT LEFT ◄ 0dB FRONT RIGHT 0dB CENTER 0dB SURROUND LEFT 0dB SURROUND RIGHT 0dB ► ▼ > MOVE SELECT ' RETURN EXIT - Réglage du niveau de puissance des enceintes • F.L (avant gauche) : - 10 à + 10 dB • SW (caisson de graves) : - 10 à + 10 dB • F.R (avant droite) : - 10 à + 10 dB • SBL (ambiophonique arrière gauche) : - 10 à + 10 dB • S.L (ambiophonique gauche) : - 10 à + 10 dB • SBR (ambiophonique arrière droite) : - 10 à + 10 dB • S.R (ambiophonique droite) : - 10 à + 10 dB • FHL (avant haut gauche) : - 10 à + 10 dB • CEN (centrale) : - 10 à + 10 dB • FHR (avant haut droite) : - 10 à + 10 dB ✎ REMARQUE Si l’option Dolby Pro Logic IIz est réglée sur On, l’enceinte ambiophonique arrière (SBL/SBR) sera convertie en enceinte avant haut (FHL/FHR). Vous pouvez également modifier le niveau du caisson de graves en utilisation les touches SUBWOOFER, <, > de la télécommande. 36 Français HW-D600_D650S_FRC_0617.indd 36 2011-06-17 10:33:28 03 Configuration Réglage de la tonalité d’essai Vous utiliserez cette fonction pour vérifier l'état de la connexion ou le niveau de puissance des enceintes. 1. Appuyez sur la touche SETUP/MENU de la télécommande. • Chaque fois que vous appuyez sur cette touche, le système bascule entre les modes INPUT et SETUP OFF. 2. Appuyez sur les touches ▲▼ pour sélectionner SPEAKER, puis appuyez sur la touche ENTER. 3. Appuyez sur les touches ▲▼ pour sélectionner TEST TONE, puis appuyez sur la touche ENTER. 4. Appuyez sur les touches ▲▼ pour sélectionner l’option que vous voulez, puis appuyez sur la touche ENTER. • AUTO : le signal d’essai sera automatiquement émis dans l’ordre suivant : F.L CEN S.W F.R S.R S.L. - Pendant l’émission de la tonalité d’essai, appuyez sur les touches ▲▼ pour régler le niveau de puissance de sortie de l'enceinte de – 10 à + 10 dB par incrémentations de 1. • MANUAL : vous permet de régler manuellement le niveau de puissance de sortie des enceintes. 1) Appuyez sur la touche ENTER pour sélectionner FL l’enceinte voulue. 0dB Chaque fois que vous appuyez sur la touche SL ENTER, les enceintes F.L CEN S.W F.R 0dB S.R S.L défilent dans cet ordre. MANUAL ▲ ▼ 2) Appuyez sur les touches ▲▼ pour régler le > MOVE mode de tonalité d’essai de votre choix. Vous pouvez régler le niveau de sortie de l'enceinte de – 10 à + 10 dB par incrémentations de 1. Le son s’atténue à –10 dB et s’amplifie à +10 dB. C 0dB SW 0dB SR 0dB USER SELECT FR 0dB ' RETURN EXIT - Sortie de la tonalité d'essai • F.L (avant gauche) : - 10 à + 10 dB • F.R (avant droite) : - 10 à + 10 dB • S.L (ambiophonique gauche) : - 10 à + 10 dB • S.R (ambiophonique droite) : - 10 à + 10 dB • CEN (centrale) : - 10 à + 10 dB • SW (caisson de graves) : - 10 à + 10 dB • SBL (ambiophonique arrière gauche) : - 10 à + 10 dB • SBR (ambiophonique arrière droite) : - 10 à + 10 dB - Pour arrêter la tonalité d'essai • Appuyez une fois sur la touche SETUP/MENU. SETUP OFF s'affiche à l'écran et la tonalité d'essai s'arrête. ✎ REMARQUE En mode Dolby Pro Logic IIx, le signal de test sera automatiquement émis comme suit : F.L CEN S.W F.R S.R SBR SBL S.L. En mode Dolby Pro Logic IIz, le signal de test sera automatiquement émis comme suit : F.L FHL CEN S.W FHR F.R S.R S.L. Français HW-D600_D650S_FRC_0617.indd 37 37 2011-06-17 10:33:28 Configuration Réglage du mode Dolby Pro Logic Ce mode fournit un son 7.1 canaux à partir de deux canaux sources. Il peut également fournir un son de qualité 7.1 canaux à partir de sources de son 5.1 canaux pour les besoins des modes musique ou vidéo. Appuyez sur la touche PROLOGIC de la télécommande. • • • • • MOVIE : assure un son plus réel à la bande son du film. MUSIC : assure un son ambiophonique 7.1 aux sources numériques, analogiques ou stéréo existantes. GAME : améliore la qualité sonore du jeu. MATRIX : vous bénéficierez d'un son ambiophonique 7.1. PL (Pro Logic) : Vous pouvez faire l'expérience d'un effet ambiophonique avec le son ambiophonique 5.1. • OFF : Émet le signal original sans lui appliquer l'effet sonore des champs acoustiques ni aucun autre effet sonore. Configuration ambiophonique Réglage Dolby Pro Logic IIx Cette fonction n'est disponible qu'en mode Dolby Pro Logic llx MUSIC. 1. Appuyez sur la touche SETUP/MENU de la télécommande. • Chaque fois que vous appuyez sur cette touche, le système bascule entre les modes INPUT et SETUP OFF. 2. Appuyez sur les touches ▲▼ pour sélectionner SURROUND, puis appuyez sur la touche ENTER. 3. Appuyez sur les touches ▲▼ pour sélectionner DPLIIx, puis appuyez sur la touche ENTER. 4. Appuyez sur les touches ▲▼ pour sélectionner l’option que vous voulez, puis appuyez sur la touche ENTER. • PANORAMA : Appuyez sur les touches ▲▼pour sélectionner ON ou OFF. (Ce mode permet d'étendre l'image stéréo avant afin d'intégrer les enceintes ambiophoniques pour obtenir un effetd' « enveloppement » exceptionnel avec traitement latéral de l'image.) • DIMENSION : Appuyez sur les touches ◄ ► pour régler une valeur entre -7 et 7. (Permet de régler le champ sonore (traitement numérique des signaux) par paliers de l'enceinte avant ou ambiophonique.) • C- WIDTH : Appuyez sur les touches ◄ ► pour régler une valeur entre 0 et 7. (Cette fonction permet de régler la largeur de l'image centrale. Plus le réglage est élevé, moins le son émis par l'enceinte centrale est audible.) ✎ REMARQUE Les réglages PANORAMA, DIMENSION et CENTER WIDTH ne seront activés que si l’option Dolby Pro Logic Mode est réglée sur MUSIC (MUSIQUE). Il n'est pas possible d'utiliser le mode Dolby Pro Logic llx pour les signaux multi-canaux tels que Dolby Digital, Dolly Digital +, Dolby true HD, DTS et DTS-HD Master Audio. Le mode Pro Logic fonctionne uniquement avec les signaux audio PCM dotés d'une fréquence d'échantillonnage de 32 kHz, 44 kHz ou 48 kHz. Lorsque Dolby Pro Logic IIz est réglé à ON, Dolby Pro Logic IIx ne peut pas être utilisé. 38 Français HW-D600_D650S_FRC_0617.indd 38 2011-06-17 10:33:29 03 Configuration Réglage du mode NEO:6 Vous pouvez utiliser le son 2 canaux sur un son 5.1 canaux ou 7.1 canaux pour écouter de la musique ou visionner un film. 1. Appuyez sur la touche SETUP/MENU de la télécommande. • Chaque fois que vous appuyez sur cette touche, le système bascule entre les modes INPUT et SETUP OFF. 2. Appuyez sur les touches ▲▼ pour sélectionner SURROUND, puis appuyez sur la touche ENTER. 3. Appuyez sur les touches ▲▼ pour sélectionner DTS NEO:6, puis appuyez sur la touche ENTER. 4. Appuyez sur la touche ENTER pour régler le mode C-IMAGE de votre choix. Appuyez sur les touches ◄ ►pour régler CIMAGE sur une valeur entre 0 et 5. Ce paramètre permet de régler l’image centrale via les enceintes avant et centrale. « 5 » est la plus valeur la plus élevée. Utilisation du mode NEO:6 Appuyez sur la touche NEO:6 de la télécommande. • MUSIC : Lorsque vous écoutez de la musique, vous pouvez profiter des effets sonores comme si vous étiez physiquement dans la salle de concert. • CINEMA : Ajoute du réalisme à la bande son du film. • OFF : Émet le signal original sans lui appliquer l'effet sonore des champs acoustiques ni aucun autre effet sonore. ✎ REMARQUE Le mode NEO:6 fonctionne uniquement avec les signaux audio 2 canaux dotés de fréquences d’échantillonnage de 32 kHz, 44 kHz ou 48 kHz. Réglage du mode EX/ES Lorsque les enceintes ambiophoniques arrière sont connectées, vous pouvez écouter le son multi-canal 7.1 à l’aide d’un décodeur intégré Dolby Digital Surround EX ou DTS ES. Cette fonction est compatible avec une source Dolby Digital ou DTS (telle qu’un lecteur de DVD), mais pas avec des sources à 2 canaux LPCM ou Dolby Digital. 1. Appuyez sur la touche SETUP/MENU de la télécommande. • Chaque fois que vous appuyez sur cette touche, le système bascule entre les modes INPUT et SETUP OFF. 2. Appuyez sur les touches ▲▼ pour sélectionner SURROUND, puis appuyez sur la touche ENTER. 3. Appuyez sur les touches ▲▼ pour sélectionner EX/ES, puis appuyez sur la touche ENTER. 4. Appuyez sur la touche ▲▼ pour régler le mode EX/ES de votre choix. • AUTO : si l’unité reçoit un signal audio qu’elle peut reconnaître, elle sélectionne le meilleur décodeur pour effectuer la lecture par le biais des canaux 7.1. Si l’amplificateur ne reconnaît pas le signal audio, elle n’effectuera pas automatiquement la lecture par le biais des canaux 7.1. • OFF : Le décodeur Surround EX/DTS ES Dolby Digital ne sera pas utilisé pour la lecture. • ON : le signal Dolby Digital ou DTS sera émis par le biais des canaux 7.1 à l’aide du décodeur Surround EX/DTS ES Dolby Digital. ✎ REMARQUE Vous ne pouvez pas utiliser le canal DTS-ES si les enceintes ambiophoniques arrière ne sont pas connectées. Français HW-D600_D650S_FRC_0617.indd 39 39 2011-06-17 10:33:29 Configuration Autres réglages Audio Sync Les images sembler en retard par rapport au son s'il y a eu connexion à un téléviseur numérique. Si cela se produit, corrigez le décalage audio pour synchroniser les images et le son. 1. Appuyez sur la touche SETUP/MENU de la télécommande. • Chaque fois que vous appuyez sur cette touche, le système bascule entre les modes INPUT et SETUP OFF. 2. Appuyez sur les touches ▲▼ pour sélectionner OPTION, puis appuyez sur la touche ENTER. 3. Appuyez sur les touches ▲▼ pour sélectionner AUDIO SYNC, puis appuyez sur la touche ENTER. 4. Appuyez sur les touches ◄ ► pour régler le temps de retard AUDIO SYNC. • Vous pouvez le régler de 0 à 240 MS par paliers de 10 MS. Commande de la tonalité Cette fonction vous permet de régler le niveau des graves et des aigus. 1. Appuyez sur la touche SETUP/MENU de la télécommande. • Chaque fois que vous appuyez sur cette touche, le système bascule entre les modes INPUT et SETUP OFF. 2. Appuyez sur les touches ▲▼ pour sélectionner OPTION, puis appuyez sur la touche ENTER. 3. Appuyez sur les touches ▲▼ pour sélectionner TONE CONTROL, puis appuyez sur la touche ENTER. 4. Appuyez sur les touches ▲▼ pour sélectionner TONE, puis appuyez sur la touche ENTER. 5. Appuyez sur les touches ▲▼ pour sélectionner ON ou OFF, puis appuyez sur la touche ENTER. • S’il est réglé à TONE OFF, la fonction de commande de la tonalité est désactivée. 6. Appuyez sur les touches ▲▼ pour régler le mode de commande de la tonalité de votre choix. • BASS & TREBLE : Appuyez sur les touches ◄ ► pour régler une valeur entre -6 et 6. • Chaque fois que vous appuyez sur cette touche, les options TONE BASS TREBLE défilent dans cet ordre. • Vous pouvez la régler de - 6 à + 6 dB par incrémentations de 1. • Le son s’atténue à –6 dB et s’amplifie à +6 dB. ✎ REMARQUE La fonction Commande de la tonalité ne peut s’appliquer qu’aux canaux avant. 40 Français HW-D600_D650S_FRC_0617.indd 40 2011-06-17 10:33:29 03 Configuration Amplificateur MP3 Cette option vous permet aussi d’améliorer votre expérience sonore (ex., musique MP3). Vous l’utiliserez si vous souhaitez améliorer le son d’une source MP3 de mauvaise qualité. 1. Appuyez sur la touche SETUP/MENU de la télécommande. • Chaque fois que vous appuyez sur cette touche, le système bascule entre les modes INPUT et SETUP OFF. 2. Appuyez sur les touches ▲▼ pour sélectionner OPTION, puis appuyez sur la touche ENTER. 3. Appuyez sur les touches ▲▼ pour sélectionner MP3 ENHANCER, puis appuyez sur la touche ENTER. 4. Appuyez sur les touches ▲▼pour sélectionner ON ou OFF. Volume intelligent Cette option permet de régler et de stabiliser le volume afin d’éviter les variations importantes lors du changement de chaîne ou pendant un changement de scène. 1. Appuyez sur la touche SETUP/MENU de la télécommande. • Chaque fois que vous appuyez sur cette touche, le système bascule entre les modes INPUT et SETUP OFF. 2. Appuyez sur les touches ▲▼ pour sélectionner OPTION, puis appuyez sur la touche ENTER. 3. Appuyez sur les touches ▲▼ pour sélectionner SMART VOLUME, puis appuyez sur la touche ENTER. 4. Appuyez sur les touches ▲▼pour sélectionner ON ou OFF. Français HW-D600_D650S_FRC_0617.indd 41 41 2011-06-17 10:33:29 Configuration Configuration de l’étalonnage automatique Si vous réglez une seule fois la fonction d’étalonnage lorsque vous déplacez ou installez l’unité, celle-ci reconnaîtra automatiquement la distance entre les enceintes, les niveaux de puissance entre les canaux et les caractéristiques de fréquence afin de reproduire un champ sonore 5.1 optimisé pour votre environnement d’écoute. - Avant le réglage 1. Branchez le microphone ASC au connecteur d’entrée ASC MIC. 2. Installez le microphone ASC à la position d’écoute. 3. Appuyez sur la touche ASC du panneau avant, puis sur la touche ENTER. 1. Appuyez sur la touche SETUP/MENU de la télécommande. • Chaque fois que vous appuyez sur cette touche, le système bascule entre les modes INPUT et SETUP OFF. 2. Appuyez sur les touches ▲▼ pour sélectionner OPTION, puis appuyez sur la touche ENTER. 3. Appuyez sur les touches ▲▼ pour sélectionner AUTO CALIBRATION, puis appuyez sur la touche ENTER. 4. Appuyez sur les touches ▲▼ pour sélectionner MEASUREMENT, puis appuyez sur la touche ENTER. • Pour créer un champ sonore 5.1 canaux optimal, les sélections s’effectuent dans l’ordre suivant : L ➞ C ➞ R ➞ SR ➞ SBR ➞ SBL ➞ SL ➞ SW • MODE ON : Le mode d’étalonnage automatique est activé. MODE OFF: Le mode d’étalonnage automatique est désactivé. CALIBRATION FL 0dB 0.3m SL 0dB 0.3m FR 0dB 0.3m SW 0dB 0.3m C 0dB 0.3m SR 0dB 0.3m USER SBL 0dB 0.0m > MOVE SBR 0dB 0.0m SELECT ' RETURN EXIT Pour annuler la configuration de l’étalonnage automatique. S’inverse automatiquement si vous appuyez sur la touche RETURN. • Si une erreur d’étalonnage automatique se produit, reportez-vous à la section « Liste des erreurs d’étalonnage automatique » à la page 56. Microphone ASC 42 Français HW-D600_D650S_FRC_0617.indd 42 2011-06-17 10:33:30 03 Configuration ✎ REMARQUE Le réglage de la fonction d’étalonnage prend environ 3 minutes. Comme le niveau de volume ne change pas pendant la configuration de la fonction d’étalonnage automatique, vous ne pouvez pas utiliser le réglage de volume. Si vous débranchez le microphone ASC pendant la configuration de la fonction d’étalonnage automatique, la configuration sera annulée. Vous pouvez aussi appuyer sur la touche ASC de la télécommande pour utiliser cette fonction. Si Dolby Pro Logic IIz est réglé à ON, la sélection s’effectue dans l’ordre suivant : FL CEN FR SR FHR FHL SL SW. Configuration DRC Vous pouvez utiliser cette fonction pour bénéficier du son Dolby Digital lorsque vous visionnez un film à faible volume (ex. : la nuit). La fonction DRC permet de compresser l’audio afin d’atténuer les sons les plus forts et d’amplifier les sons les plus faibles. 1. Appuyez sur la touche SETUP/MENU de la télécommande. • Chaque fois que vous appuyez sur cette touche, le système bascule entre les modes INPUT et SETUP OFF. 2. Appuyez sur les touches ▲▼ pour sélectionner OPTION, puis appuyez sur la touche ENTER. 3. Appuyez sur les touches ▲▼ pour sélectionner DRC, puis appuyez sur la touche ENTER. 4. Appuyez sur les touches ▲▼ pour spécifier l’effet DRC de votre choix. • AUTO : L’effet Contrôle de la gamme dynamique est automatiquement réglé sur la base des informations fournies par la bande son Dolby TrueHD. • MIN : permet de régler l'effet DRC au niveau minimum. • STD : permet de régler l'effet DRC au niveau standard. • MAX : permet de régler l'effet DRC au niveau maximum. Configuration double mono Les programmes double mono ont deux canaux mono indépendants. Vous pouvez utiliser cette fonction lors de l'exécution de programmes double mono. Lorsque vous utilisez cette fonction, sélectionnez les canaux audio CH1 ou CH2 ou les deux canaux à la fois. 1. Appuyez sur la touche SETUP/MENU de la télécommande. • Chaque fois que vous appuyez sur cette touche, le système bascule entre les modes INPUT et SETUP OFF. 2. Appuyez sur les touches ▲▼ pour sélectionner OPTION, puis appuyez sur la touche ENTER. 3. Appuyez sur les touches ▲▼ pour sélectionner DUAL MONO, puis appuyez sur la touche ENTER. 4. Appuyez sur les touches ▲▼ pour sélectionner l’option DUAL MONO souhaitée. • CH1 : Seul le canal 1 retentit. • CH2 : Seul le canal 2 retentit. • BOTH : Les deux canaux retentissent via les enceintes avant. Français HW-D600_D650S_FRC_0617.indd 43 43 2011-06-17 10:33:31 Configuration Configuration de l’option HDMI Vous utiliserez cette option si vous souhaitez transmettre le signal audio à l’aide d’un câble HDMI. 1. Appuyez sur la touche SETUP/MENU de la télécommande. • Chaque fois que vous appuyez sur cette touche, le système bascule entre les modes INPUT et SETUP OFF. 2. Appuyez sur les touches ▲▼ pour sélectionner OPTION, puis appuyez sur la touche ENTER. 3. Appuyez sur les touches ▲▼ pour sélectionner HDMI SETUP, puis appuyez sur la touche ENTER. 4. Appuyez sur les touches ▲▼ pour régler le mode de configuration HDMI de votre choix, puis appuyez sur la touche ENTER. 5. Appuyez sur les touches ▲▼ pour spécifier le réglage de votre choix. • AUTO SYNC : ON, OFF Le récepteur A/V peut être réglé pour corriger automatiquement tout décalage entre la vidéo et l’audio, en fonction des données du téléviseur connecté. - ON : HDMI Sync est activée. - OFF : HDMI Sync est désactivée. • HDMI AUDIO : AVR (Audio Vidéo Récepteur), TV. Cette préférence détermine si l’audio reçue à l’entrée HDMI IN est générée à la sortie HDMI OUT. Si vous souhaitez écouter l’audio depuis un périphérique externe connecté à HDMI par l’intermédiaire de vos enceintes de téléviseur connectés à HDMI, réglez l’audio à TV. Sinon, laissez-la à AVR pour écouter l’audio depuis le récepteur A/V. - AVR : l’audio HDMI n’est pas transmise. - TV : l’audio HDMI est transmise. • HDMI ANYNET+ : ON, OFF Anynet+ est une fonction qui vous permet de commander les autres appareils Samsung à l’aide de la télécommande de votre téléviseur Samsung. - ON : Anynet + est activée. - OFF : Anynet + est désactivée. • ARC : AUTO , OFF Si vous utilisez un câble HDMI pour connecter la borne HDMI IN d’un téléviseur compatible ARC à la borne HDMI OUT (ARC) de l’unité principale, vous pourrez écouter le son du téléviseur via l’enceinte connectée à l’unité principale sans autre connexion. - AUTO : Le signal audio du téléviseur peut être envoyé vers la borne HDMI OUT de l'unité principale. - OFF : Désactivez la fonction ARC du téléviseur. ✎ REMARQUE HDMI Audio n’est activée que si les deux connecteurs HDMI INPUT et HDMI OUT sont correctement connectés et fonctionnent normalement. La fonction HDMI Sync ne sera opérationnelle que si votre téléviseur compatible HDMI prend en charge cette fonction. Si la fonction HDMI ANYNET+ est réglée sur OFF, l’option TV ARC sera spécifiée sur OFF en conséquence et ne pourra pas basculer sur AUTO. La fonction ARC ne peut être activée que via la borne HDMI OUT. 44 Français HW-D600_D650S_FRC_0617.indd 44 2011-06-17 10:33:32 04 Fonctionnement Fonctionnement Utilisation des modes ambiophoniques Utilisation de la touche AUDIO EFFECT à l’avant de l’unité principale Sélection du mode DPLIIx 1. Appuyez sur la touche AUDIO EFFECT pour sélectionner le mode DPLIIx. • Chaque fois que vous appuyez sur cette touche, 3D SOUND défilent dans cet ordre. 2. Appuyez sur la touche <, >. • Chaque fois que vous appuyez sur la touche <, >, les options MUSIC GAME MATRIX PL PL OFF MOVIE défilent dans cet ordre. • Si vous activez Dolby Pro Logic IIz, vous entraînerez la sélection de HEIGHT PL OFF. • Vous pouvez aussi sélectionner le mode DPLIIx en appuyant sur la touche PROLOGIC de la télécommande. Sélection du mode NEO:6 1. Appuyez sur la touche AUDIO EFFECT pour sélectionner le mode NEO:6. • Chaque fois que vous appuyez sur cette touche, 3D SOUND défilent dans cet ordre. 2. Appuyez sur la touche <, >. • Chaque fois que vous appuyez sur la touche <, >, les options MUSIC CINEMA OFF défilent dans cet ordre. • Vous pouvez aussi sélectionner le mode NEO : 6 en appuyant sur la touche NEO : 6 de la télécommande. Sélection du mode DSP 1. Appuyez sur la touche AUDIO EFFECT pour sélectionner le mode DSP. • Chaque fois que vous appuyez sur cette touche, 3D SOUND défilent dans cet ordre. 2. Appuyez sur la touche <, >. • Chaque fois que vous appuyez sur la touche <, >, les options STEREO HALL 1 HALL 2 J.CLUB CHURCH ROCK CLASSIC LIVE GAME MOVIE CONCERT STADIUM défilent dans cet ordre. • Vous pouvez aussi sélectionner le mode DSP en appuyant sur la touche DSP de la télécommande. Sélection du mode 3D SOUND 1. Appuyez sur la touche AUDIO EFFECT pour sélectionner le mode 3D SOUND. • Chaque fois que vous appuyez sur cette touche, 3D SOUND défilent dans cet ordre. 2. Appuyez sur la touche <, >. • Chaque fois que vous appuyez sur la touche <, >, les options 3D SOUND ON 3D SOUND OFF défilent dans cet ordre. • Vous pouvez aussi sélectionner le mode 3D SOUND en appuyant sur la touche 3D SOUND de la télécommande. ✎ REMARQUE L'effet sonore en 3D n’est pas disponible pour les formats Dolby TrueHD, Dolby Digital Plus, DTS-HD Master Audio et DTS-HD High Resolution Audio. Vous ne pouvez pas utiliser le mode Dolby Pro Logic llx pour les signaux multicanaux analogiques, les signaux multicanaux LPCM émis sur HDMI et les formats Dolby TrueHD, Dolby Digital Plus, DTS-HD Master Audio et DTS-HD High Resolution Audio. Le mode Pro Logic fonctionne uniquement avec les signaux audio dotés d'une fréquence d'échantillonnage de 32 kHz, 44 kHz ou 48 kHz. L'effet sonore 3D n’est pas disponible en mode FM. Français HW-D600_D650S_FRC_0617.indd 45 45 2011-06-17 10:33:32 Fonctionnement Utilisation de la touche S.DIRECT Émet le signal original sans lui appliquer l'effet sonore des champs acoustiques ni aucun autre effet sonore. Appuyez sur la touche S.DIRECT. ✎ REMARQUE L’écran affiche « DIRECT » au lieu de « S.DIRECT ». Tableaux des signaux d’entrées et des modes ambiophoniques o = actif, – = inactif Signal d’entrée Dolby Digital Mode ambiophonique L/R Canal de sortie SL SBL C SUBW SR SBR Information affichage Format du signal État du canal Dolby Digital O O O – O Numérique + Dolby Digital Dolby Digital EX O O O O O Numérique +Dolby Digital EX L, C, R, SL, SR ,SBL, SBR, SW Dolby Digital + ProLogic IIx O O O O O Numérique + Dolby Digital + ProLogic IIx L, C, R, SL, SR ,SBL, SBR, SW Dolby Digital + ProLogic IIz O O O O (Haut) O Numérique + Dolby Digital + ProLogic IIz Dolby Digital Plus Dolby Digital Plus O O O O O Numérique + Dolby Digital Plus L, C, R, SL, SR ,SBL, SBR, SW Dolby TrueHD Dolby TrueHD O O O O O Dolby TrueHD L, C, R, SL, SR ,SBL, SBR, SW DTS (5.1-ch) DTS Surround O O O – O DTS DTS-ES DTS Digital + ProLogic IIx O O O O O DTS + ProLogic IIx L, C, R, SL, SR ,SBL, SBR, SW DTS Digital + ProLogic IIz O O O O (Haut) O DTS + ProLogic IIz L, C, R, SL, SR ,SBL, SBR, SW DTS 96/24 DTS-ES O O O O O DTS ES L, C, R, SL, SR ,SBL, SBR, SW DTS 96/24 O O O – O DTS 96/24 DTS-HD Master Audio O O O O O DTS-HD MSTR L, C, R, SL, SR ,SBL, SBR, SW DTS-HD High Resolution O O O O O DTS-HD L, C, R, SL, SR, SBL, SBR, SW Multi-Channel O O O O O Numérique + LPCM L, C, R, SL, SR, SBL, SBR, SW Multi-Channel O O O O (Haut) O Numérique + LPCM L, C, R, SL, SR, H, SW Stereo O – – – O ProLogic IIx O O O O O ProLogic IIz O O O O (Haut) O L, C, R, SL, SR ,SBL, SBR, SW L, C, R, SL, SR ,SBL, SBR, SW Dolby Digitital EX DTS-HD LPCM Multi-Channel 2-ch PCM Analog 2-ch NEO:6 O O O O O Numérique + LPCM Numérique + LPCM + Dolby Digital + ProLogic IIx Numérique + LPCM + Dolby Digital + ProLogic IIz Numérique + LPCM + DTS + NEO:6 SFE O O O O O Numérique + LPCM + LIVE SURR Stereo O – – – O Analogique ProLogic IIx O O O O O Analogique + Dolby Digital + ProLogic IIx L, C, R, SL, SR, SW L, C, R, SL, SR, H, SW L, C, R, SL, SR, SW L, C, R, SL, SR, SW L, R, SW L, C, R, SL, SR ,SBL, SBR, SW L, C, R, SL, SR, H, SW L, R, SW L, C, R, SL, SR ,SBL, SBR, SW ProLogic IIz O O O O (Haut) O Analogique + Dolby Digital + ProLogic IIz NEO:6 O O O O O Analogique + DTS NEO:6 L, C, R, SL, SR ,SBL, SBR, SW L, C, R, SL, SR, H, SW SFE O O O O O Analogique + LIVE SURR L, C, R, SL, SR ,SBL, SBR, SW • LIVE SURR : LIVE SURROUND • L/R : enceinte avant (gauche/droite) C : enceinte centrale SL/SR : enceinte ambiophonique (gauche/droite) SBL/SBR : enceinte ambiophonique arrière (gauche/droite) H = FHL/FHR : enceinte avant haut (gauche/droite) SW : caisson de graves 46 Français HW-D600_D650S_FRC_0617.indd 46 2011-06-17 10:33:32 04 L'affichage de l'état des canaux dépend de la configuration des enceintes. Le mode SFE fonctionne avec des signaux 2 canaux (2 CH). Si Dolby Pro Logic IIz est réglé à On, l’enceinte ambiophonique arrière (SBL/SBR) devient l’enceinte avant haut (FHL/FHR); Dolby true HD, Dolby plus, DTS-HD Master Audio ,SFE et NE0:6 sont alors transmis par le système à 5.1 canaux. Les modes ProLogic IIx et ProLogic IIz fonctionnement uniquement avec les signaux audio dotés d'une fréquence d'échantillonnage de 32 kHz, 44 kHz ou 48 kHz. Fonctionnement ✎ REMARQUE Utilisation de la touche SUBWOOFER Vous pouvez régler le niveau du caisson de graves. 1. Appuyez sur la touche SUBWOOFER. 2. Appuyez sur les touches ◄ ► pour sélectionner le réglage LEVEL du caisson de graves sur l’écran affichant S.W. (l’affichage disparaît automatiquement). - Réglage du niveau de caisson de graves • SW (Caisson de graves) : -10 ~ +10 dB Écoute de la radio Vous pouvez écouter la radio en suivant la procédure de syntonisation automatique ou manuelle. 1. Appuyez sur la touche INPUT SELECT pour sélectionner FM. 2. Sélectionnez une fréquence (diffusion radio). • Préréglez la syntonisation : Appuyez sur les touches #,$ de la télécommande pour sélectionner la fréquence préréglée. • Syntonisation manuelle 1 (syntonisation automatique) : Appuyez sur les touches TUNING/CH ( .,, ) de la télécommande et maintenez-les enfoncées pour syntoniser automatiquement une fréquence. • Syntonisation manuelle 2 : Appuyez sur les touches TUNING/CH ( .,, ) de la télécommande pour sélectionner une fréquence supérieure ou inférieure étape par étape. ✎ REMARQUE Vous pouvez aussi utiliser les touches SELECT ( .,, ) de l'unité principale pour changer de fréquence radio. Français HW-D600_D650S_FRC_0617.indd 47 47 2011-06-17 10:33:32 Fonctionnement Pour écouter en mode mono ou stéréo Appuyez sur la touche MO/ST de la télécommande. • Chaque fois que vous appuyez sur cette touche, les options STEREO ou MONO sont sélectionnées successivement. • Si vous sélectionnez MONO dans une zone où la réception est mauvaise, cela permet de réduire le bruit. • Cette fonction n'est accessible qu'à partir de la télécommande. Préréglage des stations radio Vous pouvez prérégler jusqu'à 15 stations FM. Ex. : réglage de la station FM 89.10 sur la fréquence de préréglage 2. 1. Appuyez sur la touche INPUT SELECT pour sélectionner FM. 2. Appuyez sur les touches TUNING/CH ( .,, ) de la télécommande pour sélectionner 89.10. • Reportez-vous à l’étape 2 ci-dessus pour effectuer une syntonisation automatique ou manuelle. 3. Appuyez sur la touche TUNER MEMORY de l'unité principale. • Vous pouvez également utiliser la touche TUNER MEMORY de la télécommande. • Le numéro du syntoniseur clignote à l’écran. 4. Appuyez sur les touches TUNING/CH ( .,, ) de la télécommande pour sélectionner le préréglage 2. • Vous pouvez sélectionner les préréglages dans une plage de 1 à 15. 5. Appuyez sur la touche TUNER MEMORY de l'unité principale. • Le numéro de syntoniseur disparaîtra et la station 89.10 sera enregistrée dans le préréglage 2. 6. Pour prérégler d'autres stations, répétez les étapes 2 à 5. Pour écouter une station préréglée • Appuyez sur la touche TUNING MODE pour sélectionner PRESET, puis sur les touches SELECT ( .,, ). 48 Français HW-D600_D650S_FRC_0617.indd 48 2011-06-17 10:33:32 04 Fonctionnement Utilisation d’un iPod Vous pouvez utiliser votre iPod à l'aide de la télécommande fournie. Pour écouter de la musique (fonction iPod audio) Vous pouvez écouter les fichiers de musique stockés dans votre iPod en connectant celui-ci au récepteur AV. 1. Connectez le connecteur du socle du iPod à la prise pour iPod du récepteur AV. 2. Placez le iPod sur le socle. • Votre iPod se met automatiquement sous tension. 3. Appuyez sur la touche INPUT SELECT de la télécommande pour sélectionner le mode IPOD AUDIO. 4. Appuyez sur la touche LECTURE de la télécommande pour commencer la lecture. • Le récepteur AV commence la lecture à partir de la première piste du lecteur iPod. 5. Vous pouvez utiliser la télécommande pour exécuter les fonctions de lecture de base telles que LECTURE, PAUSE, ARRÊT, #,$ en utilisant les touches correspondantes. ✎ REMARQUE Voir la page 25 pour consulter la liste des iPod compatibles. La compatibilité dépend de la version du logiciel de votre iPod. Vous pouvez aussi sélectionner le mode iPod en appuyant sur la touche iPod de la télécommande. Pour visionner un film (fonction iPod Video) Vous pouvez visionner les fichiers vidéo stockés dans votre iPod en connectant celui-ci au récepteur AV. 1. Connectez le connecteur du socle du iPod à la prise pour iPod du récepteur AV. 2. À l’écran du iPod, allez à Videos > Settings et réglez l’option de sortie de téléviseur TV Out à On. 3. Placez le iPod sur le socle. 4. Appuyez sur la touche INPUT SELECT de la télécommande pour sélectionner le mode IPOD VIDEO. 5. Réglez l’option AV IN du téléviseur connecté au récepteur AV à COMPOSITE. <Écran iPod> Suivez les instructions à l’écran du iPod pour exécuter les étapes suivantes. 6. Appuyez sur les touches , de la télécommande pour sélectionner Videos, puis sur la touche ENTER. 7. Appuyez sur les touches , de la télécommande pour sélectionner Movies, puis sur la touche ENTER. Français HW-D600_D650S_FRC_0617.indd 49 49 2011-06-17 10:33:32 Fonctionnement 8. Appuyez sur les touches , pour sélectionner le fichier à lire, puis sur la touche ENTER. • Les fichiers vidéo du lecteur iPod sont alors lus à l’écran du téléviseur. 9. Vous pouvez utiliser la télécommande pour exécuter les fonctions de lecture de base telles que LECTURE, PAUSE, ARRÊT et #,$ en utilisant les touches correspondantes. • Si vous appuyez sur la touche PREV après le début de la lecture, le lecteur passera à l'écran de début du fichier actuel. <Écran iPod> • Appuyez sur la touche ARRÊT pour arrêter la lecture et revenir à l’écran de la liste. • Appuyez sur la touche RETURN pour revenir à l'écran précédent. ✎ REMARQUE Pour que vous puissiez lire les fichiers vidéo sur le lecteur iPod, vous devez d’abord connecter les bornes Audio/Vidéo du téléviseur au récepteur à l’aide du câble Composite (A/V). Voir la page 25 pour consulter la liste des iPod compatibles. La compatibilité dépend de la version du logiciel de votre iPod. Lorsque le fichier actuel est lu jusqu’à la fin, la lecture du fichier suivant ne commence pas automatiquement. Pour lire le fichier suivant, sélectionnez un fichier à lire dans la liste affichée à l’écran du iPod. Aucun écran autre que l’écran de lecture n’apparaît à l’écran du téléviseur. Vérifiez les autres écrans du iPod. Fonctions pratiques Fonction Minuteur d'arrêt Vous pouvez définir une heure d'arrêt automatique de l'appareil. Appuyez sur la touche SLEEP. • Les options SLEEP : OFF 10M 20M 30M 60M 90M 120M 150M sont sélectionnées successivement. Pour vérifier le minuteur d'arrêt automatique Appuyez sur la touche SLEEP. • Le temps restant avant l'arrêt automatique de l'appareil s'affiche à l'écran. • Si vous appuyez de nouveau sur cette touche, vous changez l'heure d'arrêt que vous aviez définie auparavant. Pour annuler le minuteur d'arrêt automatique • Appuyez sur la touche SLEEP jusqu'à ce que le message « SLEEP : OFF » apparaisse à l'écran. 50 Français HW-D600_D650S_FRC_0617.indd 50 2011-06-17 10:33:33 04 Fonctionnement Fonction Sourdine Cette fonction s'avère particulièrement utile lorsqu'on sonne à votre porte ou lorsque vous devez répondre à un appel téléphonique. Appuyez sur la touche MUTE. • Le mot MUTE apparaît à l'écran. Pour rétablir le son Appuyez sur la touche MUTE à nouveau ou appuyez sur la touche Volume. • Le mot MUTE disparaît de l’écran et le son est rétabli. Réglage de l'affichage Vous pouvez régler la luminosité de l'affichage. Appuyez sur la touche DIMMER. • Chaque fois que vous appuyez sur cette touche, la luminosité change comme comme suit : Sombre Lumineux. ✎ REMARQUE Les fonctions ARRÊT AUTOMATIQUE, Sourdine et Régler l'affichage ne peuvent être exécutées qu'à partir de la télécommande. Fonction Réinitialisation Tandis que l’appareil est sous tension : 1. Appuyez sur la touche MUTE. • MUTE apparaît à l’écran. 2. Appuyez cinq fois sur la touche 2, puis sur la touche ENTER. • INITIAL : NO apparaît à l'écran. 3. Appuyez sur les touches ◄ ► pour sélectionner YES. • L'appareil s’éteint automatiquement après 5 secondes. Tandis que l’appareil est hors tension : 1. Appuyez pendant plus de 5 secondes sur le bouton TUNER MEMORY situé à l’avant de votre récepteur A/V. • La LED POWER clignote une fois. ✎ REMARQUE L'utilisation de la fonction RÉINITIALISER efface tous les réglages enregistrés. N'utilisez cette fonction que lorsque cela s'avère nécessaire. Français HW-D600_D650S_FRC_0617.indd 51 51 2011-06-17 10:33:33 Fonctionnement Utilisation d’un casque d’écoute Vous pouvez utiliser un casque d’écoute (non fourni) pour écouter vos enregistrements sans déranger qui que ce soit. Connectez le casque d’écoute à la prise de casque (PHONES) et écoutez de la musique. ✎ REMARQUE Ne réglez pas le volume à un niveau trop élevé lorsque vous utilisez le casque, vous pourriez altérer votre acuité auditive. Mise à niveau du logiciel Samsung pourrait offrir des mises à niveau du micrologiciel du récepteur A/V dans le futur. Veuillez consulter Samsung.com pour recevoir de l’information sur le téléchargement des mises à niveau et l’utilisation d’un lecteur USB. Pour effectuer les mises à niveau, connectez un lecteur USB au port USB situé sur votre récepteur A/V. ONLY FOR UPDATE ✎ REMARQUE Insérez un lecteur USB contenant la mise à niveau du micrologiciel dans le port USB à l’arrière de l’unité principale. Veillez à ne pas couper l’alimentation ou retirer le lecteur USB pendant le déroulement des mises à niveau. L’unité principale s’éteindra automatiquement après l’exécution de la mise à niveau. Après la mise à niveau du logiciel, les réglages que vous avez définis sont rétablis aux valeurs par défaut (usine). Nous vous conseillons de noter vos réglages afin de pouvoir les redéfinir facilement après la mise à niveau. En cas d'échec de la mise à jour logicielle, il est fortement recommandé de convertir toutes les données USB au format FAT16 et de réessayer la mise à niveau du logiciel. Le système de fichiers NTFS USB n'est pas pris en charge. Tout dépendant du fabricant, le USB pourrait ne pas être compatible. ONLY FOR SERVICE 52 Français HW-D600_D650S_FRC_0617.indd 52 2011-06-17 10:33:34 05 Divers Divers Commande du téléviseur au moyen de la télécommande 1. 2. 3. 4. Appuyez sur la touche POWER pour allumer le téléviseur. Appuyez sur la touche TV pour régler la télécommande au mode TV. Pointez la télécommande vers le téléviseur. Tout en maintenant la touche POWER enfoncée, saisissez le code correspondant à la marque de votre téléviseur. • Si plusieurs codes correspondant à votre téléviseur figurent dans le tableau, saisissez-les les uns après les autres pour trouver le code approprié. • Si le code correspond au code du téléviseur, celui-ci s'éteint. 5. Si le téléviseur s'éteint ou s'allume lorsque vous appuyez sur la touche Power (Hors/Sous tension) de la télécommande, cela signifie que le réglage est terminé. • Vous pouvez utiliser les touches POWER, VOLUME, CHANNEL, MENU ainsi que les touches numériques (0 à 9) du téléviseur. ✎ REMARQUE Il se pourrait que la télécommande ne soit pas compatible avec certaines marques de téléviseurs. Selon la marque de votre téléviseur, il se pourrait également que certaines fonctions ne puissent pas être exécutées. Par défaut, la télécommande fonctionne avec les téléviseurs Samsung. Liste des codes par marque de téléviseur Marque Code Marque Code Marque Code Admiral (M.Wards) 56, 57, 58 Hitachi 15, 18, 50, 59, 69 Realistic 03, 19 A Mark 01, 15 Inkel 45 Sampo 40 Anam 01, 02, 03, 04, 05, 06, 07, 08, 09, 10, 11, 12, 13, 14 JC Penny 56, 59, 67, 86 Samsung 00, 15, 16, 17, 40, 43, 46, 47, 48, 49, 59, 60, 98 AOC 01, 18, 40, 48 Bell & Howell (M.Wards) Brocsonic Candle JVC 70 KTV 59, 61, 87, 88 57, 58, 81 KEC 03, 15, 40 59, 60 KMC 15 LG (Goldstar) 01, 15, 16, 17, 37, 38, 39, 40, 41, 42, 43, 44 Luxman 18 18 Cetronic 03 Citizen 03, 18, 25 Cinema 97 Classic 03 Concerto 18 Contec 46 Sanyo 19, 61, 65 Scott 03, 40, 60, 61 Sears 15, 18, 19 Sharp 15, 57, 64 Signature 2000 (M.Wards) 57, 58 LXI (Sears) 19, 54, 56, 59, 60, 62, 63, 65, 71 Sony 50, 51, 52, 53, 55 Magnavox 15, 17, 18, 48, 54, 59, 60, 62, 72, 89 Soundesign 03, 40 Marantz 40, 54 Spectricon 01 Matsui 54 SSS 18 MGA 18, 40 Sylvania 18, 40, 48, 54, 59, 60, 62 Coronado 15 Craig 03, 05, 61, 82, 83, 84 Mitsubishi/ MGA 18, 40, 59, 60, 75 Symphonic 61, 95, 96 Croslex 62 MTC 18 Tatung 06 Crown 03 NEC 18, 19, 20, 40, 59, 60 Techwood 18 Curtis Mates 59, 61, 63 Nikei 03 Teknika 03, 15, 18, 25 CXC 03 Onking 03 TMK 18, 40 Onwa 03 Toshiba 19, 57, 63, 71 Daewoo 02, 03, 04, 15, 16, 17, 18, 19, 20, 21, 22, 23, 24, 25, 26, 27, 28, 29, 30, 32, 34, 35, 36, 48, 59, 90 Panasonic 06, 07, 08, 09, 54, 66, 67, 73, 74 Vidtech 18 Daytron 40 Penney 18 Videch 59, 60, 69 Dynasty 03 Philco 03, 15, 17, 18, 48, 54, 59, 62, 69, 90 Wards 15, 17, 18, 40, 48, 54, 62, 72 15, 17, 18, 40, 48, 54, 60, 64 03, 15, 40, 46, 59, 61, 64, 82, 83, 84, 85 Philips Pioneer 63, 66, 80, 91 Yamaha 18 Fisher 19, 65 Portland 15, 18, 59 York 40 Funai 03 Proton 40 Futuretech 03 Quasar 06, 66, 67 General Electric (GE) 06, 40, 56, 59, 66, 67, 68 Radio Shack 17, 48, 56, 60, 61, 75 40 RCA/Proscan 18, 59, 67, 76, 77, 78, 92, 93, 94 Emerson Hall Mark Yupiteru 03 Zenith 58, 79 Zonda 01 Dongyang 03, 54 Français HW-D600_D650S_FRC_0617.indd 53 53 2011-06-17 10:33:36 Divers Commande de votre lecteur DVD ou de votre lecteur BD au moyen de la télécommande 1. 2. 3. 4. Appuyez sur la touche POWER pour mettre le lecteur DVD (BD) sous tension. Appuyez sur la touche BD/DVD pour régler la télécommande au mode DVD (BD). Pointez la télécommande vers le lecteur DVD (BD). Tout en maintenant la touche POWER enfoncée, saisissez le code correspondant à la marque de votre lecteur DVD (BD). • Si plusieurs codes correspondant à votre lecteur DVD (BD) figurent dans le tableau, saisissez-les les uns après les autres pour trouver le code approprié. • Si le code correspond au code du lecteur DVD (BD), le lecteur s'éteint. 5. Si le lecteur DVD (magnétoscope) s'éteint ou s'allume lorsque vous appuyez sur la touche POWER de la télécommande, cela signifie que le réglage est terminé. • Vous pouvez utiliser les touches DVD (BD) POWER, LECTURE, PAUSE, ARRÊT, SAUT, MENU et les touches numériques (0 à 9). ✎ REMARQUE Il se pourrait que la télécommande ne soit pas compatible avec certaines marques de lecteurs DVD. Selon la marque de votre lecteur DVD, il se pourrait également que certaines fonctions ne puissent pas être exécutées. Par défaut, la télécommande fonctionne avec les lecteurs DVD (BD) Samsung. Liste des codes par marque de lecteur DVD Marque DENON DOONOON DMTECH FISHER GE HARMAN/KARDON JVC KENWOOD LG MAGNAVOX MITSUBISHI Code 003, 032 019 017 002 006 012 010, 013 008 001 004 005, 016 Marque Code ONKYO OPTIMUS PANASONIC PROSCAN PHILIPS PIONEER RCA SAMSUNG SANYO SONY THETA DIGITAL 004, 014 011 021 006 004, 023 007, 011, 022, 025 006 000, 027 002 015, 020 011 Marque TOSHIBA YAMAHA ZENITH TAEGWANG PS2 X-BOX APEX Marantz Code 004, 018 009, 033 004, 024 026 028 029 030 031 Liste des codes par marque de lecteur BD Marque SAMSUNG Code 000, 001, 002, 003, 004 ✎ REMARQUE La télécommande commande uniquement les lecteurs BD Samsung. 54 Français HW-D600_D650S_FRC_0617.indd 54 2011-06-17 10:33:36 06 Autres informations Autres informations Dépannage Avant de demander un service après-vente, veuillez effectuer les vérifications suivantes. Problème L'appareil ne s'allume pas. Une fonction ne s’active pas lorsque la touche correspondant est pressée. Aucun son n'est émis. Aucune image n'apparaît à l’écran du téléviseur lorsque la fonction est sélectionnée. La télécommande ne fonctionne pas. Le son provenant des canaux gauche/droit est inversé. La réception des émissions de radio est impossible. Vérification Solution • Le cordon d'alimentation est-il branché dans la prise? • L’air est-il chargé d’électricité statique? • Branchez la fiche dans la prise. • Les enceintes et les composants externes sont-ils correctement branchés? • La fonction Sourdine est-elle activée? • Le volume est-il réglé au minimum? • La taille des enceintes est-elle définie par erreur à NONE? • Les composants externes sont-ils branchés correctement? • Connectez-les correctement. • Appuyez sur la touche Sourdine pour désactiver la fonction. • Réglez le volume. • Consultez la page 33 pour sélectionner LARGE, SMALL ou YES. • Connectez-les correctement. • Les piles sont-elles épuisées? • La distance entre la télécommande et l’unité principale est-elle trop grande? • L’enceinte droite/gauche ou les câbles d’entrée/sortie gauche/droits sont-ils branchés correctement? • L’antenne FM est-elle correctement connectée? • Remplacez les piles. • Réduisez la distance. Aucun son n'est émis par les enceintes ambiophoniques. • L'enceinte ambiophonique est-elle connectée correctement? • L’enceinte SURR (surround) a-t-elle été définie par erreur à NONE? • Le mode ambiophonique est-il réglé à stéréo? Aucun son n'est émis par les enceintes ambiophoniques arrière. • Les enceintes ambiophoniques arrière sont-elles connectées correctement? • L’enceinte S.BACK (Ambiophonique arrière) a-t-elle été réglée à NONE dans le menu de configuration des enceintes? • Le mode ambiophonique est-il réglé à EX/ES? Impossible de sélectionner le mode EX/ES. • L’enceinte S.BACK (Ambiophonique arrière) a-t-elle été réglée à NONE dans le menu de configuration des enceintes? • Le signal d’entrée a-t-il été sélectionné correctement? • Débranchez le cordon d’alimentation et rebranchez-le. • Vérifiez le canal gauche/droit et connectez-le(s) correctement. • Connectez l’antenne correctement. • Si la puissance d'entrée du signal d’antenne est faible, installez l'antenne FM à un endroit où la réception sera de meilleure qualité. • Consultez la page16 pour la connecter correctement. • Consultez la page 33 pour sélectionner LARGE ou SMALL. • Consultez les pages 45 à 47 pour sélectionner le mode Ambiophonique approprié. • Consultez la page16 pour la connecter correctement. • Consultez la page 33 pour sélectionner LARGE ou SMALL. • Consultez la page 39 pour régler le mode Ambiophonique à EX/ES. • Consultez la page 33 pour sélectionner LARGE ou SMALL. • Utilisez le composant externe à 7.1 canaux. Français HW-D600_D650S_FRC_0617.indd 55 55 2011-06-17 10:33:36 Autres informations Problème Vérification Solution Il est impossible de sélectionner le mode Dolby Pro Logic llx. • Le signal d’entrée est-il sélectionné correctement? • Seul le signal 2 canaux peut sélectionner le mode Dolby Pro Logic IIx. (ex : Dolby Digital, PCM, signal d’entrée analogique 2 canaux.) Impossible de sélectionner le mode NEO:6 • Le signal d’entrée a-t-il été sélectionné correctement? • Utilisez le signal d’entrée PCM (MIC) et Analogique. Aucun son n'est émis lors de la lecture d’un DVD codé en format DTS. • L’entrée Digital (Numérique) est-elle sélectionnée? • Vérifiez si le lecteur DVD est correctement connecté et consultez la page 28 pour sélectionner l’entrée numérique. Fonction de protection du produit Protection contre la chaleur • La fonction de protection s’active en cas de surchauffe de l’unité principale ou du transformateur d’alimentation. " " s’affiche à l’écran. Cette fonction s’active : - en présence d’un court-circuit dans les bornes d’enceinte; - en présence d’un court-circuit dans le câble d’enceinte. Si aucun problème n'est détecté lorsque vous rallumez l’appareil après l'avoir éteint, l'icône PROTECTION disparaît de l'écran et l'appareil fonctionne de nouveau correctement. Liste des erreurs d’étalonnage automatique N° de l’erreur Message d’erreur d’étalonnage automatique affiché à l’écran E02 NO MIC Connectez le microphone d’étalonnage. E03 NOISY Gardez le silence durant la mesure. E04 MIC LEVL L’enceinte est trop rapprochée du microphone. Installez toutes les enceintes et le microphone d’étalonnage à leur emplacement approprié. E05 NO FRONT Connectez l’enceinte avant correctement. E07 LEVL OVR E08 DIST OVR E13 TIME OVR E14 CODE ERR 56 Installez toutes les enceintes et le microphone d’étalonnage à leur emplacement approprié. Certaines enceintes sont trop éloignées du microphone d’étalonnage. Installez toutes les enceintes et le microphone d’étalonnage à leur emplacement approprié. Débranchez et rebranchez le câble d’alimentation. Puis recommencez la mesure. Débranchez et rebranchez le câble d’alimentation. Puis recommencez la mesure. Français HW-D600_D650S_FRC_0617.indd 56 2011-06-17 10:33:36 06 Autres informations Fiche technique GÉNÉRALITÉS SYNTONISEUR FM AMPLIFICATEUR Poids 13,67 Ibs Dimensions (L x H x P) 16,9 x 6,5 x 14,2 po Plage de températures de fonctionnement 41°F à +95°F Plage de taux d’humidité de fonctionnement 10 % à 75 % Courbe de raisonnance 87,5 à 108,0 MHz Sensibilité utilisable 12dBf Rapport signal/bruit MONO/STÉRÉO 55/55 dB Distorsion MONO/STÉRÉO 0,3/0,8 dB Séparation des canaux 30dB Puissance de sortie du syntoniseur 1kHz, 75kHz Dev Sortie nominale 20 Hz~20 kHz/THD = 0,9 % Enceinte avant (gauche + droite) 6 Ω 100W/Canal Enceinte centrale 6 Ω 100W/Canal Enceinte ambiophonique (gauche + droite) 6 Ω 100W/Canal Caisson d’extrêmes graves 6 Ω 100W/Canal Sensibilité d'entrée/impédance 450mV/47kΩ Rapport signal/bruit (entrée analogique) 80dB Séparation (1 kHz) 60dB COURBE DE RAISONNANCE Entrée analogique 20 Hz à 20 kHz (±3 dB) Entrée numérique/96 kHz PCM 20 Hz à 44 kHz (±3 dB) HDMI (Interface multimédia haute définition) Entrée Compatible 1080p Sortie Compatible 1080p Format de téléviseur NTSC/PAL SORTIE VIDÉO Niveau d'entrée/impédance 1Vp-p/75 Ω Niveau de sortie/impédance 1Vp-p/75 Ω Courbe de raisonnance vidéo 5 Hz à 10 kHz (-3 dB) Rapport signal/bruit 60dB * Le rapport signal/bruit, la distorsion, la séparation et la sensibilité utilisable sont calculées selon les directives AES (Audio Engineering Society). - Samsung Electronics Co., Ltd se réserve le droit de modifier ces caractéristiques techniques sans préavis. - Le poids et les dimensions sont approximatifs. - Le design et les spécifications peuvent changer sans préavis. - Pour les caractéristiques d'alimentation et de consommation électrique, voir l'étiquette fixée au produit. Français HW-D600_D650S_FRC_0617.indd 57 57 2011-06-17 10:33:36 GARANTIE LIMITÉE DE L’ACHETEUR INITIAL Samsung Electronics Canada Inc. (SECA) garantit ce produit contre les vices de matériau(x) et de fabrication. Si l'appareil ne fonctionne pas convenablement durant la période de garantie et que son mauvais fonctionnement est dû à un défaut de matériau(x) ou de fabrication, SECA réparera ou remplacera, à sa seule discrétion, l'appareil défectueux. Toutes les réparations sous garantie doivent être effectuées par un centre de service autorisé SECA. Vous pouvez obtenir le nom et l'adresse du centre de service le plus près de chez vous en composant sans frais le 1 800 SAMSUNG. Main-d’oeuvre Pièces un (1) an (au comptoir) un (1) an Pour toute réparation de modèle portatif dans un centre de service, le client est responsable du transport aller-retour de l'appareil. Le client doit conserver le reçu original sur lequel la date d'achat est indiquée, car il s'agit de la seule preuve d'achat acceptée. Le client doit présenter ce reçu au centre de service au moment où il fait la demande de réparation sous garantie. EXCLUSIONS (CE QUI N’EST PAS COUVERT) Cette garantie ne couvre pas les dommages causés par un accident, un incendie, une inondation et/ou tout cas de force majeure. Elle ne couvre pas non plus les dommages causés par une mauvaise utilisation, un branchement à une tension inappropriée, une mauvaise installation, une réparation inappropriée ou non autorisée, une utilisation commerciale, ni les dommages survenus lors du transport. Le fini extérieur et intérieur, les ampoules et les pièces en verre ne sont pas couverts par cette garantie. Les réglages expliqués dans le manuel et effectués par le client ne sont pas couverts par cette garantie. Cette garantie est automatiquement annulée si le numéro de série imprimé sur l'appareil a été effacé ou modifié. La garantie ne couvre que les produits achetés et utilisés au Canada. SIÈGE SOCIAL SAMSUNG ELECTRONIQUE CANADA INC., SERVICE À LA CLIENTÈLE 55 STANDISH COURT MISSISSAUGA, ONTARIO L5R 4B2 CANADA FABRIQUÉ EN CORÉE 1 800 SAMSUNG (1 800 726-7864) WWW.SAMSUNG.COM/CA HW-D600_D650S_FRC_0617.indd 58 2011-06-17 10:33:36 Contacter SAMSUNG À TRAVERS LE MONDE Si vous avez des questions ou commentaires concernant les produits Samsung, veuillez communiquer avec le service à la clientèle SAMSUNG. Area ` North America Canada Mexico U.S.A Contact Center Web Site 1-800-SAMSUNG (726-7864) 01-800-SAMSUNG (726-7864) 1-800-SAMSUNG (726-7864) www.samsung.com www.samsung.com www.samsung.com 0800-333-3733 0800-124-421 / 4004-0000 800-SAMSUNG (726-7864) 01-8000112112 0-800-507-7267 1-800-751-2676 1-800-10-7267 800-6225 1-800-299-0013 800-7919267 1-800-234-7267 00-1800-5077267 800-7267 0-800-777-08 1-800-682-3180 www.samsung.com www.samsung.com www.samsung.com www.samsung.com www.samsung.com www.samsung.com www.samsung.com www.samsung.com www.samsung.com www.samsung.com www.samsung.com www.samsung.com www.samsung.com www.samsung.com www.samsung.com 1-800-SAMSUNG (726-7864) www.samsung.com 0-800-100-5303 www.samsung.com 42 27 5755 0810 - SAMSUNG (7267864, € 0.07/min) - ` Latin America Argentine Brazil Chile Colombia Costa Rica Dominica Ecuador El Salvador Guatemala Honduras Jamaica Nicaragua Panama Peru Puerto Rico Trinidad & Tobago Venezuela Austria Belgium 02-201-24-18 Bosnia Bulgaria Croatia 05 133 1999 07001 33 11 062 SAMSUNG (062 726 7864) 800-SAMSUNG (800-726786) Samsung Zrt., česká organizační složka, Oasis Florenc, Sokolovská394/17, 180 00, Praha 8 70 70 19 70 030 - 6227 515 01 48 63 00 00 01805 - SAMSUNG (726-7864 € 0,14/Min) 06-80-SAMSUNG (726-7864) 800-SAMSUNG (726-7864) +381 0113216899 261 03 710 023 207 777 020 405 888 0900-SAMSUNG (0900-7267864) (€ 0,10/Min) 815-56 480 0 801 1SAMSUNG (172678) / 022-607-93-33 80820-SAMSUNG (726-7864) 1. 08010 SAMSUNG (72678) doar din reţeaua Romtelecom, tarif local 2. 021.206.01.10 - din orice reţea, tarif normal Czech Denmark Finland France Germany Hungary Italia Kosovo Luxemburg Macedonia Montenegro Netherlands Norway Poland Portugal Rumania HW-D600_D650S_FRC_0617.indd 59 Slovakia Spain Sweden Contact Center 0700 Samsung (0700 726 7864) 0800-SAMSUNG (726-7864) 902-1-SAMSUNG (902 172 678) 0771 726 7864 (SAMSUNG) Switzerland 0848-SAMSUNG (7267864, CHF 0.08/min) U.K Eire Lithuania Latvia Estonia 0330 SAMSUNG (7267864) 0818 717100 8-800-77777 8000-7267 800-7267 Uzbekistan Kyrgyzstan Tadjikistan Ukraine 0-800-502-000 www.samsung.com Belarus Moldova 810-800-500-55-500 00-800-500-55-500 www.samsung.com/ be (Dutch) www.samsung.com/ be_fr (French) www.samsung.com www.samsung.com ` Asia Pacific www.samsung.com Russia Georgia Armenia Azerbaijan Kazakhstan Australia New Zealand China 1300 362 603 0800 SAMSUNG (0800 726 786) 400-810-5858 / 010-6475 1880 Hong Kong (852) 3698 4698 India Indonesia www.samsung.com www.samsung.com www.samsung.com Japan Malaysia www.samsung.com Philippines www.samsung.com www.samsung.com www.samsung.com - Singapore Thailand Taiwan Vietnam www.samsung.com www.samsung.com www.samsung.com www.samsung.com www.samsung.com Web Site www.samsung.com www.samsung.com www.samsung.com www.samsung.com www.samsung.com/ch www.samsung.com/ ch_fr/(French) www.samsung.com www.samsung.com www.samsung.com www.samsung.com www.samsung.com ` CIS 8-800-555-55-55 8-800-555-555 0-800-05-555 088-55-55-555 8-10-800-500-55-500 (GSM: 7799) 8-10-800-500-55-500 00-800-500-55-500 8-10-800-500-55-500 ` Europe Albania Area Serbia www.samsung.com www.samsung.com www.samsung.com www.samsung.com www.samsung.com www.samsung.ua www.samsung.com/ ua_ru www.samsung.com www.samsung.com www.samsung.com www.samsung.com/hk www.samsung.com/ hk_en/ 3030 8282 / 1800 110011 / 1800 3000 8282 / 1800 266 8282 0800-112-8888 / 021-5699-7777 0120-327-527 1800-88-9999 1-800-10-SAMSUNG(726-7864) / 1-800-3-SAMSUNG(726-7864) / 1-800-8-SAMSUNG(726-7864) / 02-5805777 1800-SAMSUNG (726-7864) 1800-29-3232 / 02-689-3232 0800-329-999 1 800 588 889 www.samsung.com www.samsung.com www.samsung.com www.samsung.com 8000-4726 08000-726786 800-22273 080 100 2255 800-SAMSUNG (726-7864) 9200-21230 444 77 11 800-SAMSUNG (726-7864) www.samsung.com www.samsung.com www.samsung.com www.samsung.com www.samsung.com www.samsung.com www.samsung.com www.samsung.com 0800-SAMSUNG (726-7864) 0860-SAMSUNG (726-7864 ) www.samsung.com www.samsung.com www.samsung.com www.samsung.com www.samsung.com www.samsung.com www.samsung.com ` Middle East Bahrain Egypt Jordan Morocco Oman Saudi Arabia Turkey U.A.E ` Africa Nigeria South Africa 2011-06-17 10:33:37 Code No. AH68-02354L HW-D600_D650S_FRC_0617.indd 60 2011-06-17 11:12:39