1
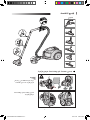
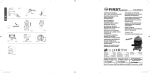
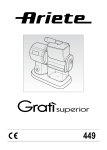
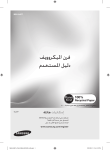
DJ68-00339A (EN)-0.2 9/27/06 2:31 PM Page 1 Operating Instructions VACUUM CLEANER ❈ Before operating this unit, please read the instructions carefully. ❈ Indoor use only. Register your product at www.samsung.com/global/register DJ68-00339V REV(0.1) DJ68-00339A (EN)-0.2 9/27/06 2:31 PM Page 2 IMPORTANT SAFEGUARDS 1. Read all instructions carefully. Before switching on, make sure that the voltage of your electricity supply is the same as that indicated on the rating plate on the bottom of the cleaner. 2. WARNING: Do not use the vacuum cleaner when rug or floor is wet. Do not use to suck up water. 3. Close supervision is necessary when any appliance is used by or near children. Do not allow the vacuum cleaner to be used as a toy. Do not allow the vacuum cleaner to run unattended at any time. Use the vacuum cleaner only for its intended use as described in these instructions. 4. Do not use the vacuum cleaner without a dust bin. Empty the dust bin before it is full in order to maintain the best efficiency. 5. Do not use the vacuum cleaner to pick up matches, live ashes or cigarette butts. Keep the vacuum cleaner away from stoves and other heat sources. Heat can deform and discolour the plastic parts of the unit. 6. Avoid picking up hard, sharp objects with the vacuum cleaner as they may damage the cleaner parts. Do not stand on the hose assembly. Do not put weight on the hose. Do not block the suction or the exhaust port. 7. Switch the vacuum cleaner off on the body of the machine before unplugging from the electrical outlet. Disconnect the plug from the electrical outlet before changing the dust bag or dust container. To avoid damage, please remove the plug by grasping the plug itself, not by pulling on the cord. 8. This appliance is not intended for use by young persons or infirm persons without supervision unless they are adequately supervised by a responsible person to ensure that they can use the appliance safely. Young children should be supervised to ensure that they do not play with the appliance. 9. The plug must be removed from the socket outlet before cleaning or maintaining the appliance. 10. The use of an extension cord is not recommended. 11. If your vacuum cleaner is not operating correctly, switch off the power supply and consult an authorized service agent. 12. If the supply cord is damaged, it must be replaced by the manufacturer or its service agent or a similarly qualified person in order to avoid a hazard. 13. Don’t carry the vacuum cleaner by holding the hose. Use the handle on the vacuum cleaner set. 1 DJ68-00339A (EN)-0.2 9/27/06 2:31 PM Page 3 1 ASSEMBLING THE CLEANER ▼ OPTION Features may vary according to model. CAUTION Please do not press the button of dust bin handle when carrying machine. For storage, park the floor nozzle. 2 DJ68-00339A (EN)-0.2 9/27/06 2:31 PM Page 4 2 OPERATING THE CLEANER 2-1 ON/OFF SWITCH 1) BODY CONTROL TYPE 2) ON/OFF TYPE 2-2 POWER CORD NOTE When removing the plug from the electrical outlet, grasp the plug, not the cord. 2-3 POWER-CONTROL 1) SILDE CONTROL TYPE ONLY (Optional) • SLIDE TO THE STOP POSITION Vacuum-cleaner switches off (stand by mode) • SLIDE FORWARD TO MAX Suction capacity increases smoothly up to maximum. 2) BODY-CONTROL TYPE / ON/OFF TYPE - HOSE To reduce suction for cleaning draperies, small rugs, and other light fabrics, pull the tap air until the hole is open. - BODY (BODY-CONTROL TYPE ONLY) MIN = For delicate surface e.g. net curtains. MAX = For hard floors and heavily soiled carpets. 3 DJ68-00339A (EN)-0.2 9/27/06 2:31 PM Page 5 ▼ 2-4 HOW TO USE AND MAINTAIN THE ACCESSORIES Features may vary according to model. PIPE Adjust the length of the telescopic pipe by sliding the length control button located in the center of the telescopic pipe back and forth. ACCESSORY To check for blockages, separate the telescopic pipe and adjust to shorten. This allows for easier removal of waste clogging the tube. Push the accessory on to the end of the hose handle. Pull out and turn the dusting brush for cleaning delicate areas. To use the upholstery tool, push the accessory on to the end of the hose handle in the opposite direction. OPTION Carpet Cleaning Floor Cleaning Adjust the inlet lever according to the floor surface. 4 Remove waste matter completely if the inlet is blocked. DJ68-00339A (EN)-0.2 OPTION OPTION 9/27/06 2:31 PM Page 6 - Detach transparent drum cover for easy cleaning. Clogs on turbine keep brush from turning, thus need to be unclogged as follows. Turbine Brush Brush for blanket For picking up pet hair and fibre on upholstery and bed linen. Remove waste Turn the lock button to matter com‘UNLOCK’, and remove pletely when inlet is blocked. waste matter. To reassemble, align the cover to the front of the main body and close. After closing the cover, ensure that the lock button is turned to the ‘LOCK’ position. Warning : Use for bedclothes only. Be cautious not to damage brush during unclogging. 5 DJ68-00339A (EN)-0.2 9/27/06 2:31 PM Page 7 3 EMPTYING THE DUST BIN 1 2 Option Once dust reaches the dust full mark, or once the dust full light is on, empty the dust bin. 3 Take the dust bin out by pressing the button. Separate the dust bin cover. CLICK 4 5 Throw away dust into the bin. 6 Close the dust bin cover. - Empty into a plastic bag (recommended for asthma/allergy sufferers) NOTE You may rinse the dust bin with cold water 6 Before use, push the dust bin into the main body of the vacuum cleaner until you hear the "click" sound. DJ68-00339A (EN)-0.2 9/27/06 2:31 PM Page 8 4 CLEANING THE DUST PACK 4-1. WHEN TO CLEAN THE DUST PACK - If suction is noticeably reduced during cleaning, please check the dust pack as indicated below. Suction is significantly weakened during cleaning. Shaking sound of inlet stuck to the floor (soft mats, blankets, etc.) is heard. Turn the vacuum power to 'MAX' HANDLE CONTROL If the filter check indicator turns red with the inlet floating 10 cm above flat floor, clean it. When the indicator light comes on, please empty the Dust Pack(4-2) as shown in the following illustrations. 7 DJ68-00339A (EN)-0.4 7/3/07 10:26 AM Page 9 4-2 CLEANING THE DUST PACK 1 3 2 Remove the dust bin and dust pack as shown. 4 Remove the fixed frame of the dust pack cover. 5 Wash the sponge and the filter of the dust pack with water. 7 Remove the sponge and filter from the dust pack. 6 Let the sponge and filter dry in the shade for more than 12 hours. Put the sponge and filter into the dust pack. 8 Before reassembly, align the dust pack cover and dust pack correctly. Put the assembled dust pack into the main body. NOTE : Make sure the filter is completely dry before putting it back into the vacuum cleaner. Allow 12 hours for it to dry. 8 DJ68-00339A (EN)-0.2 9/27/06 2:31 PM Page 10 5 CLEANING THE MOTOR PROTECTION FILTER Remove the motor protection filter from the vacuum cleaner. Shake and tap the dust from it and put back in machine. Take out both the dust bin and the dust pack. 6 CLEANING THE OUTLET FILTER Press the fixed frame part at the back of the main body to remove. Pull out the HEPA Filter Dust the HEPA filter. using the tab. Put the HEPA filter into the main body until you hear a ‘click’ sound. OPTION - MICRO CARBON FILTER NOTE : Replacement filters are available at your local Samsung distributor. Remove and replace the blocked outlet filter. 9 DJ68-00339A (EN)-0.2 9/27/06 2:31 PM Page 11 - IF YOU HAVE A PROBLEM PROBLEM Motor does not start. CAUSE REMEDY 0 No power supply. Thermal cut-out. Nozzle, suction hose or tube is blocked. Check cable, plug and socket. Leave to cool. Check for blockage and remove it. Check that the cord is not twisted or wound unevenly. Pull the cord out 2-3m and push the cord rewind button. Vacuum cleaner does not pick up dirt. Crack or hole in hose. Check hose and replace if required. Low or decreasing suction Filter is full of dust. Please check filter and, if necessary, clean as illustrated in the instructions. Suction force is gradually decreasing. Cord does not rewind fully. 10 DJ68-00339A (EN)-0.2 9/27/06 2:31 PM Page 12 DJ68-00339A-0215-ARABIC.indd 11 2007.2.21 2:33:32 PM في حالة وجود مشكلةاملشكلة السبب احلل احملرك ال يبدأ في التشغيل. ال يوجد إمداد بالطاقة. انقطاع احلرارة تنخفض قوة الشفط تدريجياً. يوجد انسداد بفتحة اخلرطوم ،أو بخرطوم الشفط ،أو باألنبوب. افحص وجود انسداد ثم أزله. ال يلتف السلك بشكل كامل. تأكد أن السلك غير مثني أو ملفوف بطريقة غير مستوية. اسحب السلك للخارج مبقدار 3-2متر ال تلتقط املكنسة األوساخ. ثم اضغط زر التفاف السلك. يوجد شق أو فتحة في اخلرطوم. افحص اخلرطوم واستبدله إذا لزم األمر. شفط ضعيف أو منخفض. املرشح ممتلئ باألتربة. برجاء فحص املرشح ،وإذا لزم األمر، نظفه كما هو موضح في التعليمات. افحص الكابل ،والقابس واملقبس. اتركه حتى يبرد. جنوسماس ةكرش ءالمع ةمدخب لاصتإلا ىجري جنوسماس تاجتنملل ةقالع ال ةلئسأ. Country ☎ Customer Care Center Web Site U.A.E )800SAMSUNG (7267864 www.samsung.com/mea 10 2007.2.21 2:33:32 PM DJ68-00339A-0215-ARABIC.indd 10 5 تنظيف مرشح حماية احملرك فك مرشح حماية احملرك من املكنسة. هز األتربة ونظفها من املرشح ثم ضعه مرة أخرى في املكنسة. أخرج كالً من كيس األتربة وعلبة األتربة. 6 تنظيف مرشح مخرج الهواء اضغط على جزء اإلطار الثابت في مؤخرة الهيكل الرئيسي إلزالة املرشح. نظف مرشح .HEPA اسحب مرشح HEPA مستخدما ً اللسان. ضع مرشح HEPAفي الهيكل الرئيسي للمكنسة حتى تسمع صوت طقطقة. اختياري – املرشح الكربوني الدقيق مالحظة: تتوافر مرشحات االستبدال لدى املوزع احمللي لشركة .Samsung أزل مرشح مخرج الهواء واستبدله. 2007.2.21 2:33:32 PM DJ68-00339A-0215-ARABIC.indd 9 2-4تنظيف علبة األتربة 1 3 2 أزل كيس األتربة وعلبة األتربة. أزل اإلطار الثابت لغطاء علبة األتربة. 4 5 ضع اإلسفنجة والفلتر في حاوية األتربة 7 قم بإخراج اإلسفنجة والفلتر من حاوية األتربة 6 اترك اإلسفنجة والفلتر يجفان في الظل ألكثر من 12ساعة. ضع اإلسفنجة في علبة األتربة. 8 قبل إعادة التجميع ،قم مبحاذاة غطاء علبة األتربة وعلبة األتربة بطريقة صحيحة. ضع علبة األتربة التي مت جتميعها في الهيكل الرئيسي للمكنسة. مالحظة :تأكد أن املرشح جاف متاما ً قبل وضعه مرة أخرى في املكنسة .اتركه 12ساعة ليجف. 4 تنظيف علبة األتربة 1-4متى يتم تنظيف علبة األتربة -برجاء فحص علبة األتربة في حالة انخفاض الشفط بشكل ملحوظ أثناء التنظيف كما هو موضح أدناه. قم بتغيير قوة املكنسة إلى <( >MAXاحلد األقصى). التحكم باملقبض في حالة تغير ضوء مؤشر فحص املرشح إلى اللون األحمر مع انحراف الفتحة 10سم فوق األرضية املسطحة ،نظف املرشح. في حالة ظهور ضوء املؤشر ،برجاء تفريغ علبة األتربة ( )2-4كما هو موضح في الرسومات التالية. 2007.2.21 2:33:25 PM DJ68-00339A-0215-ARABIC.indd 7 3 تفريغ كيس األتربة 1 2 اختياري مبجرد وصول مستوى األتربة إلى عالمة امتالء كيس األتربة ،أو مبجرد تشغيل ضوء امتالء كيس األتربة ،قم بتفريع كيس األتربة. 4 3 اسحب كيس األتربة للخارج عن طريق الضغط على الزر. 6 5 تخلص من األتربة بإلقائها في سلة املهمالت. أغلق غطاء كيس األتربة. افصل غطاء كيس األتربة. CLICK طقطقة صوت قبل االستخدام ،ادفع كيس األتربة داخل الهيكل الرئيسي للمكنسة حتى تسمع صوت طقطقة. -أفرغ األتربة في كيس بالستيك. (ينصح بهذا ملرضى الربو/والذين يعانون من احلساسية) مالحظة قد يتطلب األمر شطف كيس األتربة باملاء البارد. 2007.2.21 2:33:23 PM DJ68-00339A-0215-ARABIC.indd 6 اختياري -افصل غطاء األسطوانة الشفافة للتنظيف السهل. اختياري تعوق االنسدادات حول احملرك الفرشاة عن التحرك ،ولذلك يجب إزالة االنسدادات كما يلي. احملرك الفرشاة فرشاة البطاطني أزل الفضالت متاما ً إذا كان هناك انسداد أدر زر التأمني على ‘’UNLOCK “إلغاء التأمني” ،وأزل الفضالت. بالفتحة. إلعادة التجميع ،قم مبحاذاة الغطاء باحلافة األمامية للهيكل الرئيسي ثم أغلقه .بعد غلق الغطاء ،تأكد أن زر التأمني مضبوط على وضع ‘( ’LOCKتأمني). إللتقاط شعر احليوانات األليفة واأللياف على فرش التنجيد وماليات األسرة .حتذير :لالستخدام مع الشراشف فقط .كن على حذر حتى تتجنب تلف الفرشاة أثناء إزالة االنسداد. 2007.2.21 2:33:12 PM DJ68-00339A-0215-ARABIC.indd 5 4-2كيفية استخدام امللحقات واحلفاظ عليها تختلف امليزات طبقاً للطراز. األنبوب اضبط طول األنبوب املتداخل عن طريق حتريك لفحص األنبوب للتأكد من عدم وجود زر التحكم بالطول املوجود مبنتصف األنبوب انسدادات ،افصل األنبوب املتداخل ثم اضبطه لتقصيره .ويسمح هذا بإزالة الفضالت التي املتداخل لألمام وللخلف. تسد األنبوب بسهولة. امللحق ادفع بامللحق إلى نهاية مقبض اخلرطوم. اسحب فرشاة تنظيف األتربة ثم لفها لتنظيف األماكن الدقيقة. الستخدام أداة تنظيف التنجيد ،ادفع امللحق إلى نهاية مقبض اخلرطوم في االجتاه العكسي. اختياري تنظيف السجاد تنظيف األرضية اضبط ذراع الفتحة طبقا ً لسطح األرضية. أزل الفضالت متاما ً إذا كان هناك انسداد بالفتحة. 2007.2.21 2:33:8 PM DJ68-00339A-0215-ARABIC.indd 4 2 تشغيل املكنسة 1-2مفتاح التشغيل/إيقاف التشغيل )1نوع التحكم في الهيكل )2نوع تشغيل/إيقاف تشغيل 2-2سلك الطاقة مالحظة عند فصل القابس من منفذ التيار الكهربائي ،أمسك بالقابس ،وليس بالسلك. 3-2التحكم في الطاقة )1نوع مفتاح التحكم في التحريك فقط (اختياري) • حرك الزر حتى موضع اإليقاف تتوقف املكنسة عن التشغيل (وضع االنتظار) • حرك الزر لألمام حتى عالمة ( MAXاحلد األقصى) تزداد سعة الشفط ببطء حتى تصل إلى احلد األقصى. )2نوع التحكم في الهيكل/نوع تشغيل/إيقاف تشغيل -اخلرطوم -الهيكل (نوع التحكم في الهيكل فقط) خلفض قوة الشفط لتنظيف املالبس اجلاهزة، والسجاجيد الصغيرة ،واملواد املصنعة اخلفيفة األخرى ،اسحب سدادة فتحة الهواء حتى تنفتح الفتحة. ( MINاحلد األدنى) = لألسطح الرقيقة ،مثل الستائر الشبكية. ( MAXاحلد األقصى) = لألسطح الصعبة والسجاجيد الثقيلة املتسخة. 2007.2.21 2:33:2 PM DJ68-00339A-0215-ARABIC.indd 3 1 جتميع املكنسة اختياري لتخزين املكنسة ،قم بإيقاف فتحة خرطوم األرضية. تنبيه برجاء عدم الضغط على زر مقبض كيس األتربة عند حمل املكنسة. لتخزين املكنسة ،قم بإيقاف فتحة خرطوم األرضية. 2007.2.21 2:32:58 PM DJ68-00339A-0215-ARABIC.indd 2 إجراءات وقائية مهمة ,1برجاء قراءة كافة التعليمات بعناية .قبل تشغيل املكنسة ،تأكد أن فولطية مصدر الكهرباء هي نفسها الفولطية املشار إليها على لوحة التقدير أسفل املكنسة. .2حتذير :ال تستخدم املكنسة عندما تكون السجاجيد أو األرضية مبللة. ال تستخدم املكنسة لشفط املاء. .3يجب االنتباه الشديد عند استخدام املكنسة من قبل األطفال أو عندما تكون قريبة منهم. ال تستخدم املكنسة كلعبة .ال تترك املكنسة لتعمل دون إشراف في أي وقت .استخدم املكنسة في األغراض اخملصصة لها فقط كما هو مفصل في هذه التعليمات. .4ال تستخدم املكنسة بدون كيس األتربة .أفرع كيس األتربة قبل امتالئه حتى يتسنى احلفاظ على أفضل كفاءة للمكنسة. .5ال تستخدم املكنسة اللتقاط أعواد الكبريت ،أو الرماد املشتعل ،أو أعقاب السجائر .احتفظ باملكنسة بعيدا ً عن املواقد ومصادر احلرارة األخرى .تؤدي احلرارة إلى تشويه وإتالف ألوان األجزاء البالستيكية للمكنسة. .6جتنب التقاط األغراض الصلبة واحلادة باستخدام املكنسة حيث قد يؤدي ذلك إلى تلف أجزاء املكنسة .جتنب الوقوف على مجمع خرطوم املكنسة .جتنب وضع أية أثقال على اخلرطوم .جتنب سد منفذ الشفط أو العادم. .7أوقف تشغيل املكنسة على جانب اجلهاز قبل فصلها عن منفذ التيار الكهربائي .افصل القابس من منفذ التيار الكهربائي قبل تغيير كيس األتربة أو حاوية األتربة .لتجنب تلف املكنسة ،برجاء فصل القابس بواسطة اإلمساك بالقابس ذاته ،وليس سحب السلك. .8هذا اجلهاز غير مخصص لالستخدام من قبل الصغار أو العجزة دون إشراف إال في حالة اإلشراف الكافي من قبل شخص مسئول للتأكد من أنهم قادرين على استخدام اجلهاز بطريقة آمنة. يجب اإلشراف على األطفال الصغار للتأكد أنهم ال يلعبون باجلهاز. .9يجب فصل القابس من منفذ املقبس قبل التنظيف أو احلفاظ على اجلهاز. .10ال ينصح باستخدام سلك متديد (تطويل). .11إذا لم تعمل املكنسة بطريقة سليمة ،أوقف تشغيل اإلمداد بالطاقة واستشر وكيل خدمة معتمد. .12إذا كان سلك التيار الكهربائي تالفًا ،فيجب استبداله بواسطة املصنع أو وكيل اخلدمة أو أي شخص مؤهل لتجنب اخلطر. .13ال حتمل املكنسة مستخدما ً اخلرطوم. استخدم املقبض املوجود باملكنسة. 2007.2.21 2:32:55 PM DJ68-00339A-0215-ARABIC.indd 1 تعليمات التشغيل مكنسة كهربائية ❈ قبل تشغيل هذه الوحدة ،برجاء قراءة التعليمات بعناية. ❈ لالستخدام املنزلي فقط. قم بتسجيل منتجك على www.samsung.com/global/register )DJ68-00339V REV(0.1 2007.2.21 2:32:55 PM DJ68-00339A-0215-ARABIC.indd 1