1
t~^ZlznTWZ[_[tTWXluUGGwGXGGm SGt GX[SGYWXWGGZaZYGwt
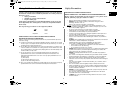
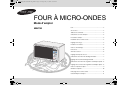
MICROWAVE OVEN
Owner’s Instructions
MW73E
Oven..........................................................................................2
Accessories ...............................................................................2
Control Panel ............................................................................2
Using this Instruction Booklet....................................................3
Safety Precautions ....................................................................3
Installing Your Microwave oven ................................................4
Setting the Time ........................................................................5
What to Do if You are in Doubt or Have a Problem ..................5
Cooking / Reheating..................................................................6
Power Levels.............................................................................6
Stopping the Cooking................................................................6
Adjusting the Cooking Time ......................................................7
Using the Instant Reheat Feature .............................................7
Instant Reheat Settings.............................................................7
Using the Auto Rapid Defrost Feature ......................................8
Auto Rapid Defrost Settings......................................................8
Multistage Cooking....................................................................9
Cookware Guide .....................................................................10
Cleaning Your Microwave Oven .............................................11
Technical Specifications..........................................................11
Code No. : DE68-03484M-01
t~^ZlznTWZ[_[tTWXluUGGwGYGGm SGt GX[SGYWXWGGZaZYGwt
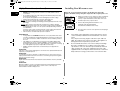
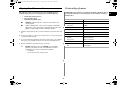
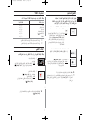
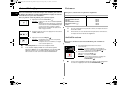
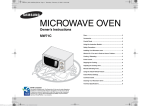
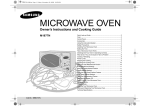
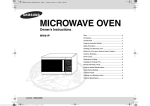
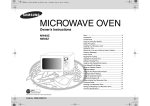
Oven
EN
Control Panel
VENTILATION HOLES
DISPLAY
LIGHT
DOOR
CONTROL PANEL
1
7
2
ROLLER RING
DOOR LATCHES
TURNTABLE
COUPLER
OPEN DOOR
PUSH BUTTON
SAFETY INTERLOCK
HOLES
3
Accessories
8
4
Depending on the model that you have purchased, you are supplied
with several accessories that can be used in a variety of ways.
1. Coupler, already placed over the motor shaft in the
base of the oven.
Purpose: The coupler rotates the turntable.
5
9
6
2. Roller ring, to be placed in the centre of the oven.
Purpose: The roller ring supports the turntable.
3. Turntable, to be placed on the roller ring with the centre
fitting to the coupler.
Purpose: The turntable serves as the main cooking
surface; it can be easily removed for
cleaning.
1. DISPLAY
2. AUTO RAPID DEFROST
FEATURE SELECTION
3. AUTO REHEAT/COOK
SELECTION
4. MICROWAVE MODE SELECTION
DO NOT operate the microwave oven without the roller ring and
turntable.
2
5.
6.
7.
8.
9.
TIME SETTING
STOP/CANCEL BUTTON
WEIGHT SELECTION
CLOCK SETTING
START BUTTON
t~^ZlznTWZ[_[tTWXluUGGwGZGGm SGt GX[SGYWXWGGZaZYGwt
Using this Instruction Booklet
Safety Precautions
You have just purchased a SAMSUNG microwave oven. Your Owner’s
Instructions contain much valuable information on cooking with your
microwave oven:
• Safety precautions
• Suitable accessories and cookware
• Useful cooking tips
At the front of the booklet you will find illustrations of the oven, and
more importantly the control panel, so that you can find the buttons
more easily.
The step-by-step procedures use two different symbols.
IMPORTANT SAFETY INSTRUCTIONS.
READ CAREFULLY AND KEEP FOR FUTURE REFERENCE.
Before cooking food or liquids in your microwave oven, please check
that the following safety precautions are taken.
Important
Note
•
Only use utensils that are suitable for use in microwave ovens;
DO NOT use any metallic containers, Dinnerware with gold or silver
trimmings, Skewers, forks, etc.
Remove wire twist ties from paper or plastic bags.
Reason: Electric arcing or sparking may occur and may damage the oven.
• When heating food in plastic or paper containers, keep an eye on the oven
due to the possibility of ignition;
Do not use your microwave oven to dry papers or clothes.
• Small amounts of food require shorter cooking or heating time.
If normal times are allowed they may overheat and burn.
• If smoke is observed, switch off or unplug the appliance and keep the door
closed in order to stifle any flames;
• Microwave heating of beverages can result in delayed eruptive boiling,
therefore care must be taken when handling the container; To prevent this
situation
ALWAYS allow a standing time of at least 20 seconds after the oven has been
switched off so that the temperature can equalize.
Stir during heating, if necessary, and ALWAYS stir after heating.
In the event of scalding, follow these FIRST AID instructions:
* Immerse the scalded area in cold water for at least 10 minutes.
* Cover with a clean, dry dressing.
* Do not apply any creams, oils or lotions.
• NEVER fill the container to the top and choose a container that is wider at the
top than at the bottom to prevent the liquid from boiling over. Bottles with
narrow necks may also explode if overheated.
NEVER heat a babys bottle with the teat on, as the bottle may explode if
overheated.
• The contents of feeding bottles and baby food jars shall be stirred or shaken
and the temperature checked before consumption, in order to avoid burns;
• Eggs in their shell and whole hard-boiled eggs should not be heated in
microwave ovens since they may explode, even after microwave heating has
ended;
Also do not heat airtight or vacuum-sealed bottles, jars, containers, nuts in
shells, tomatoes etc.
• The oven should be cleaned regularly and any food deposits removed;
• Failure to maintain the oven in a clean condition could lead to deterioration of
the surface that could adversely affect the life of the appliance and possibly
result in a hazardous situation;
• DO NOT cover the ventilation slots with cloths or paper. They may catch fire
as hot air is evacuated from the oven.
The oven may overheat and automatically switch itself off. It will remain
inoperable until it has cooled sufficiently.
•
ALWAYS use oven gloves when removing a dish from the oven to avoid
unintentional burn.
PRECAUTIONS TO AVOID POSSIBLE EXPOSURE TO
EXCESSIVE MICROWAVE ENERGY
Failure to observe the following safety precautions may result in harmful exposure to
microwave energy.
(a) Under no circumstances should any attempt be made to operate the oven with
the door open or to tamper with the safety interlocks (door latches) or to insert
anything into the safety interlock holes.
(b) Do not place any object between the oven door and front face or allow food or
cleaner residues to accumulate on sealing surfaces. Ensure that the door and
door sealing surfaces are kept clean by wiping after use first with a damp cloth
and then with a soft dry cloth.
(c) Do not operate the oven if it is damaged until it has been repaired by a
qualified microwave service technician trained by the manufacturer. It is
particularly important that the oven door closes properly and that there is no
damage to the:
(1) Door (bent)
(2) Door hinges (broken or loose)
(3) door seals and sealing surfaces
(d) The oven should not be adjusted or repaired by anyone other than a properly
qualified microwave service technician trained by the manufacturer.
3
EN
t~^ZlznTWZ[_[tTWXluUGGwG[GGm SGt GX[SGYWXWGGZaZYGwt
Safety Precautions (continued)
EN
Installing Your Microwave oven
Place the oven on a flat level surface 85cm above the floor. The
surface should be strong enough to safety bear the weight of the oven.
•
DO NOT touch heating elements or interior oven walls until the oven be
cooled down.
• Do not immerse the power cable or plug in water and keep the power cable
away from heated surfaces.
Do not operate this appliance if it has a damaged power cable or plug.
• Stand at arms length from the oven when opening the door.
Reason: The hot air or steam released may cause scalding.
• You may notice a Clicking sound during operation(especially when the oven is
defrosting).
Reason: This sound is normal when the electrical power output is changing.
• DO NOT operate the microwave oven when it is empty. The power will be cut
off automatically for safety. You can operate normally after letting it stand for
over 30 minutes.
It is best to leave a glass of water inside the oven at all times.The water will
absorb the microwaves energy if the oven accidently started.
• The microwave oven shall not be placed in a cabinet.
20 cm
above
10 cm
of the side
•
•
1. When you install your oven, make sure there is adequate
ventilation for your oven by leaving at least 10 cm (4
inches) of space behind and, on the sides of the oven
and 20 cm (8 inches) of space above.
2. Remove all packing materials inside the oven.
Install the roller ring and turntable.
Check that the turntable rotates freely.
3. This microwave oven has to be positioned so that plug is
accessible.
IMPORTANT
•
10 cm
behind
Young children should NEVER be allowed to use or play with the microwave
oven. Nor should they be left unattended near the microwave oven when it is
in use. Items of interest to children should not be stored or hidden just above
the oven.
This appliance is not intended for use by persons (including children) with
reduced physical, sensory or mental capabilities, or lack of experience and
knowledge, unless they have been given supervision or instruction concerning
use of the appliance by a person responsible for their safety.
Children should be supervised to ensure that they do not play with the
appliance.
WARNING:
If the door or door seals are damaged, the oven must not be operated until it has been
repaired by a competent person.
WARNING:
It is hazardous for anyone other than a comperent person to carry out any service or
repair operation which involves the removal of a cover which gives protection against
exposure to microwave energy.
WARNING:
Liquids and other foods must not be heated in sealed containers since they are liable
to explode.
WARNING:
Only allow children to use the oven without supervision when adequate instructions
have been given so that the child is able to use the oven in a safe way and
understands the hazards of improper use.
4
If the supply cord is damaged, it must be replaced by a special
cord or assembly available from the manufacturer or its service
agent.
For your personal safety, plug the cable into a 3-pin, 230 Volt,
50Hz, AC earthed socket. If the power cable of this appliance is
damaged, it must be replaced by a special cable.
Do not install the microwave oven in hot or damp surroundings
like next to a traditional oven or radiator. The power supply
specifications of the oven must be respected and any extension
cable used must be of the same standard as the power cable
supplied with the oven. Wipe the interior and the door seal with a
damp cloth before using your microwave oven for the first time.
t~^ZlznTWZ[_[tTWXluUGGwG\GGm SGt GX[SGYWXWGGZaZYGwt
Setting the Time
What to Do if You are in Doubt or Have a
Problem
Your microwave oven has an inbuilt clock. When power is supplied, :0,
88:88 or 12:00 is automatically displayed on the display. Please set the
current time. The time can be displayed in either the 24-hour or 12hour notation. You must set the clock:
• When you first install your microwave oven
• After a power failure
EN
If you have any of the problems listed below try the solutions given.
This is normal.
• Condensation inside the oven
• Air flow around the door and outer casing
• Light reflection around the door and outer casing
• Steam escaping from around the door or vents
Do not forget to reset the clock when you switch to and from
summer and winter time.
1. To display the time
in the...
24-hour notation
12-hour notation
The oven does not start when you press the Start(
• Is the door completely closed?
Then press the
Clock( ) button...
Once
Twice
) button.
The food is not cooked at all
• Have you set the timer correctly and/or pressed the Start( ) button?
• Is the door closed?
• Have you overloaded the electric circuit and caused a fuse to blow or a breaker to
be triggered?
2. Set the hour with the h button and the minutes with the
min button.
The food is either overcooked or undercooked
• Was the appropriate cooking length set for the type of food?
• Was an appropriate power level chosen?
3. When the right time is displayed, press the Clock( )
button again to start the clock.
Result :
The time is displayed whenever you are not
using the microwave oven
Sparking and cracking occur inside the oven (arcing)
• Have you used a dish with metal trimmings?
• Have you left a fork or other metal utensil inside the oven?
• Is aluminium foil too close to the inside walls?
The oven causes interference with radios or televisions
• Slight interference may be observed on televisions or radios when the oven is
operating. This is normal.To solve this problem, install the oven away from
televisions, radios and aerials.
• If interference is detected by the oven’s microprocessor, the display may be reset.
To solve this problem, disconnect the power plug and reconnect it. Reset the time.
5
If the above guidelines do not enable you to solve the problem,
contact your local dealer or SAMSUNG after-sales service.
t~^ZlznTWZ[_[tTWXluUGGwG]GGm SGt GX[SGYWXWGGZaZYGwt
EN
Cooking / Reheating
Power Levels
The following procedure explains how to cook or reheat food.
ALWAYS check your cooking settings before leaving the oven
unattended.
First, place the food in the centre of the turntable and close the door.
You can choose among the power levels below.
1. Press the
Result :
button.
The 800W (maximum cooking power)
indications are displayed:
Select the appropriate power level by
pressing the
button again until the
corresponding wattage is displayed. Refer to
the power level table on the next page.
Output
HIGH
MEDIUM HIGH
MEDIUM
MEDIUM LOW
DEFROST( )
LOW
800 W
600 W
450 W
300 W
180 W
100 W
2. Set the cooking time by pressing the 10min, 1min and 10s
button.
If you select higher power level, the cooking time must be
decreased.
If you select lower power level, the cooking time must be
increased.
Stopping the Cooking
3. Press the Start( ) button.
Result :
The oven light comes on and the turntable
starts rotating.
Cooking starts and when it has finished the
oven beeps four times.
Power Level
You can stop cooking at any time to check the food.
1. To stop temporarily;
Open the door.
Result :
Cooking stops. To resume cooking, close the
door and press Start( ) again.
Never switch the microwave oven on when it is empty.
If you wish to heat a dish for a short period of time at maximum
power (800W), simply press the +30 s button once for each 30
seconds of cooking time. The oven starts immediately.
2. To stop Completely;
Press the Stop( ) button.
Result :
The cooking stops.
If you wish to cancel the cooking settings,
press the Stop button.
6
You can cancel any setting before starting cooking by simply
pressing Stop( ) button.
t~^ZlznTWZ[_[tTWXluUGGwG^GGm SGt GX[SGYWXWGGZaZYGwt
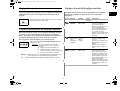
Adjusting the Cooking Time
Instant Reheat Settings
You can increase the cooking time by pressing the +30 s button once
for each 30 seconds to be added.
The following table presents the various Instant Reheat Programmes,
quantities, standing times and appropriate recommendations.
Button Food
Press the +30 s button once for each 30 seconds to be added.
Serving Size
Standing
Time
Recommendations
Ready Meals
300-350 g
400-450 g
3 min.
Put on a ceramic plate and
cover it with microwave cling
film. This programme is suitable
for meals consisting of 3
components (e.g. meat with
sauce, vegetables and side dish
like potatoes, rice or pasta).
Frozen Ready
Meals
300 - 350 g
400 - 450 g
4 min.
Take frozen ready meal and
check if dish is suitable for
microwave. Pierce film of ready
meal. Put the frozen ready meal
in the centre. This programme is
suitable for frozen ready meals
consisting of 3 components
(e.g. meat with sauce,
vegetables and a side dish like
potatoes, rice or pasta).
Drinks
(coffee, milk,
tea, water with
room
temperature)
150 ml
(1 cup)
250 ml
(1 mug)
1- 2 min.
Pour into a ceramic cup and
reheat uncovered.
Place cup(150 ml) or mug(250
ml) in the centre of turntable.
Stir carefully before and after
standing time.
Using the Instant Reheat Feature
With the Instant Reheat feature, the cooking time is set automatically
and you do not have to press the Start button. You can adjust the
number of servings by pressing the appropriate Instant Reheat button
the required number of times.
First, place the food in the centre of the turntable and close the door.
Press the Instant Reheat button which you want the required
number of times.
Result :
Cooking starts after about two seconds.
When it has finished:
1) The oven beeps four times.
2) The end reminder signal will beep 3 times
(once every minute).
3) The current time is displayed again.
Example: Press the Drinks button one times to reheat one cups of coffee. Refer to
the table on the next page.
Use only recipients that are microwave-safe.
7
EN
t~^ZlznTWZ[_[tTWXluUGGwG_GGm SGt GX[SGYWXWGGZaZYGwt
EN
Using the Auto Rapid Defrost Feature
Auto Rapid Defrost Settings
The Auto Rapid Defrost feature enables you to defrost meat, poultry,
fish or fruit/Berry.
The defrost time and power level are set automatically. You simply
select the programme and the weight.
The following table presents the various Auto Rapid Defrost
programmes, quantities, standing times and appropriate
recommendations.
Remove all kinds of package material before defrosting. Place meat,
poultry, fish and fruit/Berry on a ceramic plate.
Use only dishes that are microwave-safe.
First, place the frozen food in the centre of the turntable and close the
door.
1. Press the Rapid( ) button.
Result :
The following indication is displayed:
Press the Rapid( ) button one or more times according to
the type of food to be defrosted. Refer to the table on the
next page for further details.
Code / Food
Portion
Standing
Time
1. Meat
100 - 2000 g 20-90 min.
Shield the edges with aluminium foil.
Turn the meat over, when the oven
beeps.
This programme is suitable for beef,
lamb, pork, steaks, chops, minced meat.
2. Poultry
100 - 2000 g 20-90 min.
Shield the leg and wing tips with
aluminium foil. Turn the poultry over,
when the oven beeps. This programme
is suitable for whole chicken as well as
for chicken portions.
3. Fish
100 - 2000 g 20-80 min.
Shield the tail of a whole fish with
aluminium foil. Turn the fish over, when
the oven beeps. This programme is
suitable for whole fishes as well as for
fish fillets.
2. Select the food weight by pressing the 100g button.
It is possible to set up to a maximum of 2000g.
3. Press Start( ) button.
Result :
Defrosting begins.
The oven beeps halfway through
defrosting to remind you to turn the food
over.
Press Start again to finish defrosting.
4. Fruit/Berry 100 - 600 g
You can also defrost food manually. To do so, select the
microwave cooking/reheating function with a power level of
180W. Refer to the section entitled “ Cooking/Reheating” on page
6 for further details.
8
5-20 min.
Recommendations
Spread fruits evenly into a flat glass dish.
This programme is suitable for all kind of
fruits.
t~^ZlznTWZ[_[tTWXluUGGwG`GGm SGt GX[SGYWXWGGZaZYGwt
Multistage Cooking
7. Press the Start( ) button.
Result :
The three modes [defrosting and cooking(I,II)]
are selected on after. According to the
defrosting mode that you have chosen, the
oven may beep half way through defrosting to
remind you to turn the food over.
When cooking is over, the oven beeps
four times.
Your microwave oven can be programmed to cook food in up to three
stages.
Example: You wish to defrost food and cook it without having to reset
the oven after each stage. You can thus defrost and cook a
500g fish in three stages:
• Defrosting
• Cook I
• Cook II
You can set between two and three stages in multistage cooking.
If you set three stage, the first stage must be defrosting.
Don’t press Start button until you’ve set the final stage.
1. Press the Rapid (
) button once or more times.
2. Set the weight by pressing the 100g buttons the
appropriate number of times(500g in the example).
3. Press the
button.
The microwave mode(I):
;
if necessary, set the power level by pressing the
button again one or more times.
(600W in the example)
4. Set the cooking time by pressing the 10min, 1min and 10s
buttons the appropriate number of times (4 minutes in the
example).
5. Press the
button.
The microwave mode(II):
;
if necessary, set the power level by pressing the
button again one or more times.
(450W in the example)
6. Set the cooking time by pressing the 10min, 1min and 10s
buttons the appropriate number of times (5 minutes in the
example).
9
EN
t~^ZlznTWZ[_[tTWXluUGGwGXWGGm SGt GX[SGYWXWGGZaZYGwt
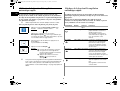
Cookware Guide
EN
To cook food in the microwave oven, the microwaves must be able to
penetrate the food, without being reflected or absorbed by the dish
used.
Care must therefore be taken when choosing the cookware. If the
cookware is marked microwave-safe, you do not need to worry.
The following table lists various types of cookware and indicates
whether and how they should be used in a microwave oven.
Paper
•
•
Plates, cups, napkins
and Kitchen paper
Recycled paper
Plastic
• Containers
Cookware
MicrowaveSafe
Comments
•
Cling film
Aluminium foil
Can be used in small quantities to protect
areas against overcooking. Arcing can
occur if the foil is too close to the oven
wall or if too much foil is used.
•
Freezer bags
Browning plate
Do not preheat for more than eight
minutes.
China and earthenware
Porcelain, pottery, glazed earthenware
and bone china are usually suitable,
unless decorated with a metal trim.
Disposable polyester
cardboard dishes
Some frozen foods are packaged in
these dishes.
Can be used to warm food. Overheating
may cause the polystyrene to melt.
May catch fire.
May cause arcing.
Can be used, unless decorated with a
metal trim.
Can be used to warm foods or liquids.
Delicate glass may break or crack if
heated suddenly.
Must remove the lid. Suitable for warming
only.
Fast-food packaging
• Polystyrene cups
containers
• Paper bags or
newspaper
• Recycled paper or
metal trims
Glassware
Glassware
• Oven-to-table ware
•
Fine glassware
•
Glass jars
Dishes
Freezer bag twist ties
Metal
•
•
Wax or grease-proof paper
:Recommended
:Use Caution
:Unsafe
May cause arcing or fire.
10
For short cooking times and warming.
Also to absorb excess moisture.
May cause arcing.
Particularly if heat-resistant
thermoplastic. Some other plastics may
warp or discolour at high temperatures.
Do not use Melamine plastic.
Can be used to retain moisture. Should
not touch the food. Take care when
removing the film as hot steam will
escape.
Only if boilable or oven-proof. Should not
be airtight. Prick with a fork, if necessary.
Can be used to retain moisture and
prevent spattering.
t~^ZlznTWZ[_[tTWXluUGGwGXXGGm SGt GX[SGYWXWGGZaZYGwt
Cleaning Your Microwave Oven
Technical Specifications
The following parts of your microwave oven should be cleaned
regularly to prevent grease and food particles from building up:
SAMSUNG strives to improve its products at all times. Both the design EN
specifications and these user instructions are thus subject to change
without notice.
•
•
•
Inside and outside surfaces
Door and door seals
Turntable and Roller rings
ALWAYS ensure that the door seals are clean and the door
closes properly.
Failure to maintain the oven in a clean condition could lead to
deterioration of the surface that could adversely affect the of the
appliance and possibly result in a hazardous situation.
1. Clean the outside surfaces with a soft cloth and warm, soapy water. Rinse and
dry.
2. Remove any splashes or stains on the inside surfaces or on the roller ring with
a soapy cloth. Rinse and dry.
3. To loosen hardened food particles and remove smells, place a cup of diluted
lemon juice on the turntable and heat for ten minutes at maximum power.
4. Wash the dishwasher-safe plate whenever necessary.
DO NOT spill water in the vents. NEVER use any abrasive
products or chemical solvents. Take particular care when
cleaning the door seals to ensure that no particles:
•
•
Accumulate
Prevent the door from closing correctly
11
Model
MW73E
Power source
230V ~ 50 Hz
Power consumption
Microwave
1150 W
Output power
100 W / 800 W (IEC-705)
Operating frequency
2450 MHz
Magnetron
OM75S(31)
Cooling method
Cooling fan motor
Dimensions (W x H x D)
Outside
Oven cavity
489 x 275 x 365 mm
306 x 211 x 320 mm
Volume
20 liter
Weight
Net
12.5 kg approx
t~^ZlznTWZ[_[tTWXluUGGwGXYGGm SGt GX[SGYWXWGGZaZYGwt
TURKEY
444-77-11
SOUTH AFRICA
0860-SAMSUNG (726-7864)
U.A.E
800-SAMSUNG (726-7864)
BAHRAIN
8000-4726
-
JORDAN
800-22273
-
www.samsung.com
Page 1
م 01:00
01/04/2008
ن ا' وو&%
إر دات ا' 6
ان ٢ ............................................................................................
MW73E
ادوات ا
٢ ..............................................................................
ا ٢ ....................................................................................
اام آ ا ر دات ٣ ......................................................................
ا $ت ا٣ .............................................................................. !"#
(آ ن ا' وو&٤ ...................................................................... %
,ا٥ .................................................................................... *+! & :ا 9م 2 78ا 4'5 2 60ان أو 1! 2د !٥ .......... /0
ا>=/2ا٦ .................................................................................. ; #
! &#ت ا> ٦ ................................................................................ +
إ& 9ف /'5ا>=٦ ............................................................................ 2
,و *+ا>=٧ .............................................................................. 2اام ! Eة ا ; #اري ٧ ................................................................
إ5ادات ا ; #اري ٧ ......................................................................
اام ! Eة ا ذا 8او(! ( ا٨ ............................................ F/G/ H&#
إ5ادات ا ذا 8او(! ( ا٨.................................................. F/G/ H&#
ا>=! K/5 2اH! 4دة ٩....................................................................
د 4أدوات ا>=١٠............................................................................ 2
( % OPن ا' وو&١١.................................................................... %
ا'ا Qت ا١١.............................................................................. P
MW73E.qxp
Page 2
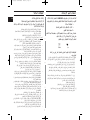
ان
45ا%3
اHض
AR
م 01:00
01/04/2008
MW73E.qxp
ا
ا -ب
ا
ت ا=&
ءة
١
٢
٧
زر Sا -ب
ا 9/اوارة
ت 4+
ا! ن
ادوات ا
ا9ص اوار
٣
"+ا -ب
أداة او&
٨
٤
ا اا ق
#$ %وك ! ادوات ا
!دة و ً/ 1از ا,ي *) (ا'&.
٥
٩
.١أداة او( ،ن ! '5 K/5 4H 8 5د ا'(ر ا'Uد
5 + 2ة ان.
اZض9( :م أداة او& 8و& ا9ص اوار.
٦
.٢ا 1/3اوارة & ،و 2 =Hو ,ان.
اZض 5( :ا 9/اوارة ا9ص اوار.
" .١اHض" )(DISPLAY
.٢زر " (& ا ذا 8او(! ( اH&#
"F/G/
.٣ا1ص اوار & ،و K/5 7Hا 9/اوارة !] و ] !آ\E
K/5أداة او&.
اZض -H& :ا9ص اوار ا S>#ا ،2=>/ 2و&';
إ^ا.% OP/ =#8 7U
☛
)(AUTO RAPID DEFROST FEATURE
.٣زر " (& و ] ا/; #ا>=2
ا"2b 9/
)(AUTO REHEAT/COOK SELECTION
ا Aء ?م <=($ن ا' وو&8 %ون ا 9/اوارة وا9ص اوار.
٢
.٤زر " (& و ] ا' وو&"%
.٥
.٦
.٧
.٨
.٩
)(MICROWAVE MODE SELECTION
"إ5اد ا(TIME SETTING) "*+
اEر "إ& 9ف /إ Zء" )(STOP/ CANCEL
زر " (& ازن" )WEIGHT
(SELECTION
"إ5اد ا(CLOCK SETTING) "5 #
زر "ا(START) "4 Z0
Page 3
اام آ Iا ر Hدات
ا R 4ت اPQ
( )* 1اء ن وو M$ .SAMSUNG Kإر Hدات ا
ا Oا! 5/ت اة ا! 1/ام ن اوو:K
• ا R 4ت اPQ
وأدوات ا ا S
• ادوات ا
• 3/$ت ة /
T Xر ا Iر 5ت / 3 5$ن ،و 45/ ً T5UVا%3
YQ Y4ا!ف ? Y/ازرار (< أ<.
Q$م ا Aاءات ا /Uر. / #
☛
هم
م 01:00
01/04/2008
MW73E.qxp
إر Hدات ه .PQ ]/!$
ا*أ ا ر Hدات ! وا5A/ _4ع إ .ًPS1Q
* R <Sا! م أو ا5Qا'< ن اوو ،Kا Aء اaآ ا $ذ
إAاءات ا PQا .
• ام اوا 2pا'" - Pام 2أ ان ا' وو&,9 %؛
\3اام أدوات ا' bة ذات ا ^Eرف اuه -أو ا dأو ا' ت ا' pH
وا0ك ،و! إ Kذ.6
r8 +زا ار >8ا ;! /#اآ س ار +وا. "-
ا& + :-#ث ! ً آ= ً 8أو ارة ( %/ان.
• A !6 # 3 ,-/ B ! C#3 # $ #1D %$/
.E ' D 0 0 % 6 F 7 1
و#( eم ن ا' وو& % : %ا %1أو ا'"z8
3D % H" .A3 7 >% 1 > G? -
•
.' ! 5 >%I+ #$ 1 J 1 %3 C>% 1
5 1( O"! 2د^ ن 9&r8 + ،ف ( 4 Z0ان أو ;5 7/ Q( 41ا ر
•
ا= 2b 8وا(ك 8ب ان ! '^ 9ً /Zد أي ا Hل؛
• %$/ %% K%! ," 0 % / L $ %3
(03 HM A5 K%! $ $D A 1 %$/ H! H 7$ -
?- AG 0 4" %1 A3D ,-/ #$ 5 <O ," A
$ >%
N
.> ! # % #% 1
# ! . %1 %
P -4 3 C D + H" * $5 -4 3
:# #D 1) % " C' ! # ?R N 1
* ( .A3D ,-/ 'I 3% 9O >% % * ' !- J 1 H *+
* . 2 # $ # #14 ' ! #G 3
* .' ! ,-/ A( + 6
• M 3 -1 M 3 #$S C M/ , ! #$T *A
H" - ' '$1 H + P J 1 %3 .AI $ -
.+ 5 7$
H" $ %3 7$ K! C 7-/ # >%% #/ +
.%I+ - 1
• '4! 7 -4 A D *H( $ #/ + ! U
F' ! K%! $ 7% A 3 7 ! # %
• ! P '- J NH ! J '-
%3 ;$D V 4 % %
+ 6 NH F0 #-/ * 7 $ %1 , ! $
4 ( '%$ != #4-G *7 7G $D $
.W C
• F 1- 4 #+" $ A 0 $
• A 5X %3 ;! # ! M% ," 0 $ A M) %X Y
F% 6 %$/ > NH / L $ %3 + 7 ,-/ -
• >Z8 %1$ bت ا=& اء ;! ]>98ا '9ش أو ارق 4H0( + .ا Pان 2
ا '9ش أو ارق ~&( P5ا=اء ا ;! ;^ #ان.
;5 FP& 9ذ 6ار( ع در Uارة ان 408زا bوإ& 9ف ( .ً b 9/( 7/ Z0و&4O
ان " 48 + lام -& Kد 9 8ر ا .2
ام دو ً +زات P5إ^اج ;! -$ان P:ا 8 8 Qوق.
•
✉
\4P
5 ;5 FP& +م اEeام $ 8ت ا !"#ا اHض Hا' وو& %ا dرة.
)أ( *( :& eأي hوف ( 4 Z0ان و 8ب ان !ح أو ا 2/98 f-Hا! ن
) 2/+ا -ب( أو و ] أي 2/+ 2 2 iا! ن.
) ب( !
!" # $ %& .'() *+ ,-/ 0 $ 1
)(' 2 3 #14 5 #-- 2 3 #13 ' / % 6 %1 7! #
.#/ $ #
)ج( 4 Z08 9( eا' وو& 2 %وUد ( & K 78 %/إ8 7"Qا>
p Q 2PأE=Uة ! وو&o! %ه 4و!رب ى ا0آ ا' :& .HP1إ"lق ا -ب
r8م واqآ !; 5م وUد (:2 %/
)(* $5$ ; 1 ) (9
)<( ? ) > ( ( != #
)@( '() !" 3
) د( ,- :& eان أو إ8 7"Qا> أي p Q 2P l sأE=Uة
ا' وو&o! %ه 4و!رب ى ا0آ ا'.HP1
٣
AR
Page 4
ا R 4ت ا(d $ ) PQ
AR
$آ Iن اووK
! .% A 3 - #-% % *+ E
•
• ! ( A % 1 " ,-/ B ! C* E 4 7 A
E 4 I 7 A 0- # ! + 7 AG
! .#$ D
? ;.
• . %$/ Z H # ,-/ 03
.' ! # ?R J 1 *7 %3 :
• .( 1 % N 4 %$/ 6) AG * $5 “#44” ? ! %3
.1 M C# $ #I 7 #3 %4 G %$/ ? HM %? :
! / I 7 A? . P( %$/ 0 AG
•
% #43% @O >% ; %1 % / A ;-G N$ .# /% PI 4-
#1 B ? * 4 K! . A% * P N P% A .A/
.[ M & ' ;-G # ! 0
• .#$+ 0 %/
dان ? ? % ٨٥ !S$ Q 5Q f Y/ارض IX .أن
5ن ا ً 5* fQر <3 $ Aوزن ان aن.
/
هم
•
•
•
م 01:00
01/04/2008
MW73E.qxp
١٠
!; ا%/
٢٠
!; أK/5
( P5 .١آ انq( ،آ !; وUد (=& Uة /ن و(ك ! #
' P ١٠ات ) K/5 (Q8 ٤ا ;! 4+eا ،%/و2-p U P5
ان و!ً' P ٢٠ #ا ) (Q8 ٨أ. \"5
;! ١٠اp :
r8 + .٢زا آ !اد ا % /Zا'Uدة دا^ 4ان.
8 +آ ا 9/اوارة وا9ص اوار.
(qآ !; دوران ا9ص اوار .&8
:& .٣و ] ا' وو&& f 8 %ن z-9! ;! ً-&+ا ر ا=28
و&.7/ Q( 4=#
:& eا '#ح أًا $ل 8ام ن ا' وو& %أو ا .78 f-Hو( :& eآ=
9 8ب !; ن ا' وو&8 %ون !ا -+أ Pء اا! .7آ :& e 6uو ]
ا ء ا( 2ن ! ] اه' م !; ا $ل أو إ^ =bق ان ! -ة.
ا =:ز e ]P1! lا!8 7ا> أ ص &p Hن !; إ + 5ت ! د& أو #
أو 2 '8 ) /95ذ 6ا $ل( أو &= 2 s9pا-ة وا' !/Hت إ eإذا ^Hdا
اف أو ( (Eو&ه r8ر دات ( 8 /Hام ا =:ز !; o#! s 4-+ول
.=!" ;5
& :ا اف K/5ا $ل 'dن 5م =: 8 =G-5ز.
☛
☛
:,3$
H( 2ض ا -ب أو 2/+ا -ب 4 Z0( :& e ،%//ان & Kإ"Qح ان
8ا> o! sه.4
:,3$
أي l sا s0ا'oه 9/ 4م p 1 8أو /'5إ"Qح ( ;'dإزا ا >Zء اuي &29
!; اHض Hا' وو&H& %ض .>/ 7#p
:,3$
; #( :& eا 'H$أو ا#ا 2 4bو& ت !H( + f 9/Zض " :pر.
:,3$
:& eا '#ح $ل 8ام ان دون !ا -+إ H8 eإ >5ء ا ' /Hت ا'f 8 - P
&'; ا> ;! 4اام ان P! 9&>8و&= ً Uا ا' $اH& + 2ض = : p
اeام lا.S 1
٤
إذا (Hض 6/ا> :& ،%// +ا-ا 6/#8 7أو وة !; Q ^ 7 5p
! ة !; ا0آ ا' HP1أو !آ Eا!.
6!"#ا 4 Q8 + ، 10ا ( z-9! 2 4-ر !دد &ن !; "
أ$اف ( 4 Qو+ =:8ر\ * ٢٣٠و(دد +ر\ ٥٠ه( .Eإذا آ ن آ4-
ا ر ا=u= 2b 8ا ا =:ز ( ً :& ،ا-ا ^ 4-8 7ص.
&( Oآ ن ا' وو&:8 %ار أ ء ( =P! fH-Pارة أو رK/5 ،8$
4 -ا' Gل ،و :8 7Hار ن ( /9ي أو ! :& . .اEeام ' 8ا Qت
ا 1'8 Qر ا> +ا ص 8ن وأي آ & 4Q! 4-اا! :& 7أن
&ن z & 9! zP8آ 4-ا> +اuي & (Eو&\ !] ان .ا! S#ا:ران اا^ /
و 4+ا -ب '+ H>98ش ! 4-+ //-اام ن ا' وو&'/ %ة او.K
Page 5
IXا 1م & 4ا( ?< ان
أو U 4د (/
hSا)*5
CBي 4ن ا) وو W' 0Q1 (Q)N% (1- ZO1ا) وو (^' ،
ا*رم “ ”:0أو “ ”88:88أو “ ZO1 ”12:00ا?( ' .ًdJOا \ء n+5
ا Iا .Bو ) 1 Kض ا (1- 24 ` QC Iأو ':(1- 12 ` Q
• ' 0Q1آ 4 Eن ا) وو )Oة ا*وZ
• 0اJ9ع اCر ا
✉
إذا Tد ) أي ا( آ< اQودة أد 4 k iول ,$أي ا5/3ل
ا! ة.
◆
& -Hذ 6أ!اً 5د&ً.
• ا % Gدا^ 4ان
• وUد ( ر هاء ل ا -ب وا #:ا ر2U
• ا Hpس اdء ل ا -ب وا #:ا ر2U
• ا H-pث ا -ر !; ل ا -ب وا ت
◆
4 Z0( & eان P5ا K/5 ,ZdاEر " ) (Start) "<=($
• ه 4ا -ب ! ا/Z؟
[T, nإ7دة 01ا $T7 7ا =( $1أو إ[ ا . /ا 5 4أو ا ي.
! .١ض ا)*5
...
(5 ٢٤ #P
(5 ١٢ #P
م 01:01
01/04/2008
MW73E.qxp
%mا = hا#ر "ا"? Q
)...( ) (Clock
!ة
!( ن
,-d8 + .٢ا 8 5 #ام اEر " ?" ) (hو ,-اb +
8ام اEر " د*.(min) "1
•
◆
•
•
=h P5 .٣ر ا *+ا ،S 1ا K/5 ,ZاEر "ا(Clock) "? Q
) ( !ة أ^ى -ء ( 4 Z0ا.5 #
ا =O& : :: Pا *+أ Pء 5م اام ن ا' وو&%
& 2=$ا> Hم K/5ا "$ق
ه ,-d8 *'+ 4ا' S Q 408 *+oو/أو ا K/5 ,ZdاEر " (Start) "<=($
) (؟
ه 4ا -ب !/Z؟
ه &E8 *'+ 4دة ا' K/5 4ااbة ا= 2 -#( '! 8ا >9pع 6/
ا' =1Pأو 41ا ر ا=28؟
◆
ا> Hم زا bا FdPأو .i p
• ه &( ( 4ا'ة ا' 2=> - Pهuا اPع !; ا> Hم؟
• ه ( 4ا^ ر !#ى ا> +ا' P؟
◆
إ H-pث ارة و&1ر Qت H++دا^ 4ان ) ! س آ=(28
• ه#( 4م -$ذو ز^ رف ! pH؟
• ه( 4آ* آ أو أداة ! pHأ^ى دا^ 4ان؟
• ه 4ورق ا' pم U &+اً !; ا:ران اا^ /؟
◆
& -#ان 2وث ( K/5 &0أE=Uة ااد& وا&E/ن
• K/5 , #8 &0( "&ُ +أE=Uة ا&E/ن وااد& 4 Z0( P5انH& .
ذ 6أ!اً 5د&ً 4 .ه \uا' ] /0ان H8اً ;5أE=Uة ا&E/ن وااد&
وا=ا bت.
2وث ( p U ;! &0ا' F Hا'/ Z1ن & + ، ،إ 5دة (; H
•
اHض 4 .ه \uا' z8 + 418 + ،/0ا ر وإ 5دة (! 7/ Qة
أ^ى .أ ,- 5ا.*+
✉
٥
(:
إذا (5 #ك ا ر دات ا'Uدة أ 4 2 \"5ه \uا' ،/0ا( ]b - 8 41ا'2/
أو H8 ! !8ا :P' ] -ت .SAMSUNG
AR
Page 6
ا/اQ
AR
01/04/2008
م 01:01
MW73E.qxp
5Qت ا *
ا Vbر 5Qت ا * ا5A5دة أد.k i
f 5ا Aاء ا آ Rا! م أو .&Q$
a$آ دو ً إ?ادات ا *$ <Sك ان ون .\4P
dا! م أو ً bو hا1ص اوار وأ ]/pا Sب
ا * ا X$
5Qى ا *
5
!2 5 ,
!>
!> !dP
إذا 8ا( ) ':
!dP
.١ا K/5 ,ZاEر"5Qى ا *" ) (Power Level
(
)
=O& :# $ا' ٨٠٠" oوات" ) + $ا>= 2ا19ى(:
د !#ى ا> +ا'8 Pا> ,ZاEر
" 5Qى ا *" )! (Power Levelة أ^ى
إ Kأن & 5ض !#ى ا> +ا'>/ب وا'9ر
8ات .راU ]Uول ! &#ت ا> +ا'Uد 2
ا 1ا .
✉
✉
٨٠٠
٦٠٠
٤٥٠
٣٠٠
١٨٠
١٠٠
وات
وات
وات
وات
وات
وات
#! &( 2ى + $أ 4 /9( :& ،K/5و *+ا>=.2
#! &( 2ى + $أ :& ،4+ز& دة و *+ا>=.2
إ 1ف ا
.٢ا ,-و *+ا>= K/5 ,Zd 8 2ازرار 10min
) ١٠د* ']( و ١) 1minد* (1و 5m ١٠) 10sان(.
إ 1ف ا أي و*) ]13/ى qMiا! م.
3X A 0 4) .١؛
.
ا /'5 %+( :: Pا>= /'5 H8 ' .2ا>= ،2أ /lا -ب
وا ! ,Zة أ^ى K/5اEر " ( ) (Start) "<=($
(
.٣ا K/5 ,ZاEر " ) (Start) "<=($
-1! id& : :# $ح ان و&-أ ا9ص اوار 2اوران.
(-أ /'5ا>= 2و P5ا1ُ& =b =pر ان Qت
( 7 -Pأر! ]8ات.
☛
✉
9& .٢ف 2b =p 408؛
) (Stop) " &" + ,-/ G
ا.7 0 4" :: P
"+ ,-/ G C7 %%/" * G" % H
4 Z0( \3ن ا' وو&& !P5 %ن ر.ًl
",-/ G C( ]OO) \?4 #3 > ?3 >% ' % H
"A1 % .7 3 #$ 5 @O A (+30s) " % #$ +
! .A
(
"& " )) (Stop
☛
٦
(
&' 6Pإ& 9ف أي إ5اد 8 4-+ء ا>=8 2ا> ا+ K/5 ,Zd
"& " ).( ) (Stop
Page 7
hSو*) ا
إ?ادات ا Qا5ري
ز دة و*) ا Y/? h=Mا#ر "(+30s) "i m ٣٠+
< i m ٣٠ة.
ا K/5 ,ZاEر "! (+30s) "i m ٣٠+ة واة
! 4ة.
SاXول ا ا qا Qا5ري وا ت ااد Rوو*)
ا \ibر ،وا T5ت ا .S
ا#ر
p ٣٠
ا! م
اام #ة ا Qا5ري
? اام #ة ا Qا5ري hS % ،و*) ا ً ' 1/$و
M$إ Yا Y/? h=Mا#ر " ? hS .(Start)"<=($د ا SRق
Y/? h=Mزر ا Qا 5U3/ Iل ?? Y/د اات ا .I
dا! م أو ً bو hا1ص اوار وأ ]/pا Sب.
✉
ا
ا SA5ت ا Xه#ة ٣٥٠-٣٠٠
Uام
٤٥٠-٤٠٠
Uام
ا SA5ت ا Xه#ة ٣٥٠-٣٠٠
٤د uُ^ b +ا -Uا :هEة ا'':ة و(qآ !;
إ! pاام ا> ]! -ا' وو&.%
ا >l 9ء ا -Uا :هEة ] .ا-U
ا :هEة ا'':ة 2ا P& .,هuا
ا F! p-ا -Uت ا :هEة ا'':ة
ا' p! ٣ ;! pت ) ! Gل ،ا/
1/1 8واdاوات وأ ا -$ق
ا 4G! -p :ا z$ >-أو ارز
أو ا' P:Hت(.
Uام
٤٥٠-٤٠٠
Uام
ا(و ت
) =+ة و;-
و ي و! ء
8ر Uارة
ا( Z
ا K/5 ,ZاEر " (و ت" )! (Drinksة واة :P ; #ن !; ا=9ة.
را ]Uا:ول 2ا 1ا ' 4 Q ( Hأآ.G
ام ,9اوا 2pا''#ح 8ا!= !] ا' وو&.%
.
٧
ة
ا \ibر
ا T5ت
2 E^ -$ 2 =Hو= >Z8 +
٣دb +
;! 9->8ورق ا' وو& %ااري.
& Pهuا ا F! p-ا -Uت ا';! p
p! ٣ت ) ! Gل ،ا1/1 8 /
واdاوات وأ ا -$ق ا -p :
! 4Gا z$ >-أو ارز أو ا' P:Hت(.
اXة
ا K/5 ,ZاEر "ا Qا5ري" ) (Instant Reheatاuي (&\
5د ا'ات ا'".b
ا-& :: Pأ ا>= H8 2ا P5 .; p 2ا =peء:
1& (١ر ان Qت ( 7 -Pأر! ]8ات.
1& (٢ر !u( oآ ا =peء Qت (" 7 -Pث
!ات! ) .ة آ 4د(9 +
5 & (٣ض ا *+ا ! 2ة أ^ى.
Oل:
م 01:01
01/04/2008
MW73E.qxp
2//! ١٥٠
) :P ١ن(
2//! ٢٥٠
) ١آب
^(2 E
٢ -١د Q 9 +ا'0وب 2آب ^ 2 Eو+
8 7P #8ون >lء ] .اب
) (2//! ١٥٠أو اب ا٢٥٠) 2 E
! 2 (2//و ,ا9ص اوار ،و/+
ا0اب ً Uا ! 4-+ة ا Opeر وH8ه .
AR
Page 8
اام #ة ا ذا او $ 5$اq/O/ !Q
AR
إ?ادات ا زا او $ 5$اq/O/ !Q
SاXول ا ا " qا زا او $ 5$ا "q/O/ dQوا ت
ااد إزا ا ? q/Oوأو* ت ا \ibر وا T5ت ا .S
*x %زا آ أ5iاع 5اد ا= <S* K/ء إزا ا d .q/Oا53/م
واوا Aوا ك وا آ/ا5ت . #V ]SR
# ُ$ة " ا ذا او $ 5$ا "q/O/ !Qإذا X$ا53/م
أو اوا Aأو ا ك أو ا آ أو ا5ت hS % .و*) إذا اX
و5Qى ا * 4 h1 .ً ' 1/$د ا q iSوا5زن.
✉
ام ,9ا -$ق ا''#ح 8ا!= !] ا' وو&.%
dا! م ا Xأو ً bو hا1ص اوار وأ ]/pا Sب.
.١ا K/5 ,ZاEر " ) Rapid "d
& =Oا' oا :2
ا:: P
ا5د /ا! م ا1ار
.١ا53/م
(
ا K/5 ,ZاEر " ! ( ) Rapid "dة واة أو أآ# G
pع ا> Hم ا'اد .\ ':( 6را ]Uا:ول 2ا 1ا
' 4 Q ( Hأآ.G
.٢اواA
.٢د وزن ا> Hم !; ^"ل ا K/5 ,ZdاEر "A ١٠٠ام"
).(100g
&'; (& ازن 8أ 41& K1+إU ٢٠٠٠ Kام.
.٣ا ك
(.
.٣ا K/5 ,ZاEر " ) Start "<=($
ا:: P
◆ (ِ-أ /'5إزا ا.F/G
◆ &1ر ان Qت (%1P! 2 7 -P
6 /'5اu ':آك /98ا> Hم.
◆ ا ,ZاEر " ! Start "<=($ة أ^ى
=pء 6 /'5ا. ':
✉
م 01:02
01/04/2008
MW73E.qxp
٢٠٠٠ -١٠٠
Uام
& '8 + ٩٠ – ٢٠ااف ا 8 Hرق ا' pم+ .
/98ا/م 1ُ& !P5ر ان Qت (.7 -P
د9 +
& Pهuا ا ]! F! p-ا /ا9-ي و
اqdن وا Sbا 6 #و ]>+ا /وا/
ا'ي
٢٠٠٠ -١٠٠
Uام
& '8 + ٩٠ – ٢٠أ$اف ار 4Uوا 8 PUام
ورق ا' pم ا /+اوا1ُ& !P5 ;Uر
د9 +
ان Qت ( P& .7 -Pهuا ا]! F! p-
د U Uآ ! /و ]>+ا Uج.
٢٠٠٠-١٠٠
Uام
& '8 + ٨٠ – ٢٠ذ&ل ا' ك ا ! 8 /ام ورق
ا' pم .ا /+ا' ك 1ُ& !P5ر ان
د9 +
Qت ( P& .7 -Pهuا ا ]! F! p-ا' ك
ا ! /و ]>+ا 6'#ا .7 /
.٤اا آ U ٦٠٠-١٠٠ /ام
ا5ت
&' 6Pأ& ًdإزا ا ;5 F/Gا> Hم &و&ً 9/ .م ،6u8د و hا>=/2ا; #
!] (& !#ى ا> +إ ١٨٠ Kوات .را ]UاE:ء "ا>=/2ا2 "; #
1/ ٦ Qل ;! &E! K/5ا .4 Q
٨
ة ا \ibر ا T5ت
٢٠ – ٥
د9 +
وزع ا آ= #! 408و -$ 2ز2U U
!.S>#
& Pهuا ا F! p-آ أpاع ا آ=.
Page 9
م 01:02
01/04/2008
MW73E.qxp
ا ?? Y/ة ا<4
إ?اد و dاوو Kا! م ?Pm Y/ث ا.<4
إذا آ) X$ Ip$ا! م و &Rدون إ? دة <=($
Oل:
ان ! آ< X$ ./4وزA ٥٠٠ iام
وPm Y/? Rث ا:<4
• إذا اX
• ا ١
• ا ٢
✉
✉
✉
.٦ا ,-و *+ا>= K/5 ,Zd 8 2ازرار " ١٠د* ']"
) ،(10minو " ١د* (1min) "1و "5m ١٠ان" ) ،(10sاHد
ا' ;! Pا'ات ) ٥د 9 +آ' ه ! 2 Sا' Gل(.
.٧ا K/5 ,ZاEر " ! ( ) Start "<=($ة
ا &( & :: Pاو ع ا] "Gإزا ا F/Gوا>=2
) [(II ،Iاا ( /ا^ # .و ] إزا ا F/Gاuي
ا^(1& ،7ر ان Qت ( /'5 %1P! 2 7 -P
إزا اu F/Gآك /98ا> Hم.
◆ &1ر ان Qت ( 7 -Pأر]8
!ات :'8د ا =pء و *+ا>=.2
&' ; /! ; 8 ! ; H( 6Pو"ث !ا 2 4ا>=5 K/5 2ة !ا.4
إذا " ; H8 *'+ث !ا :& ،4أن (ن ا' /او Kه 6 2ا. ':
K/5 ,Zd( eاEر " 9( K Start "<=($م ,-d8ا' /ا^ ة.
.١
ا ,ZاEر " ) Rapid "d
( !ة واة أو أآ.G
.٢د وزن ا> Hم 8ا> ا K/5 ,ZdاEر "A ١٠٠ام"
)(100g
5د ا'ات ا'U ٥٠٠) Pام آ' ه ! 2 Sا' Gل(.
.٣ا K/5 ,ZاEر ) (.
و ] ا' وو&:(I) %
; إذا ا *d+ا ،Uد !#ى ا> K/5 ,Zd 8 +
اEر ) ( !ة واة أو أآ.G
) ٦٠٠وات 2ا' Gل(
.٤ا ,-و *+ا>= K/5 ,Zd 8 2ازرار " ١٠د* ']"
) ،(10minو " ١د* ،(1min) "1و "5m ١٠ان" ) (10sاHد
ا' ;! Pا'ات ) ٤د 9 +آ' ه ! 2 Sا' Gل(.
.٥ا K/5 ,ZاEر ) (.
و ] ا' وو&:(II) %
; إذا ا *d+ا ،Uد !#ى ا> K/5 ,Zd 8 +
اEر ) (.
!ة واة أو أآ.G
) ٤٥٠وات 2ا' Gل(
٩
AR
Page 10
م 01:02
01/04/2008
MW73E.qxp
د< أدوات ا
AR
ا! دن
•
ا ام ن اوو IX ،Kأن $أ !Hاوو K
اVاق ا! م دون أن Y/? z!$ا SRق أو U$ا SRق
ا.Q
,ا YV5$ IXا,3ر ? ا Vر أدوات ا .إذا آ )iأداة ا <3$
?5Q) "Microwave Safe" Pح ا dاوو،(K
Pدا? .]/1/
Qد اXول ا ا5iاع ا /دوات ا و( إ Yإذا آ ن
اا ن اوو Kأم bوإ Yآ اا .
أدوات ا
5Qح
ا
اووK
1/!$ت
ورق ا5i5م
✗✓
&'; اا! '8 7ت ZQة ' &
أ> Sا ;! 'H$ا FdPاEا ;'& .bأن
&ث ! س آ= 28إذا آ ن ورق ا' pم
ًU &+ا !; Uار ان أو إذا ( اام
آ' ت آ -ة !.7P
]SRا3
✓
✓
ً9-#! 7P #( & eآ ' ;! Gن د.b +
اوا iا Uوا #
ا SRق ا5$ن ا ?5U
ا Q5Sا Q$م ة
وا4ة
K/=$ا !Rا!Q
• اآاب ا';! 5P1
ا;& #-
•
•
✓
✓
✓
&'; اا!= إ eإذا آ 8 P&E! *pاف
!. pH
&'; اا!= ( 2ا 'H$وا#ا+ .4b
& -#ا ; #ا' UE/ iUج ا2 +
( #/ 7 Hأو ا0خ.
& :إزا ا >Zء.,9 / P! .
اآ س ار +أو ا✗ %1
ارق ا' Hد ( 7H P1أو ✗
ادوات ا U UEا'P&E
^E8رف ! pH
ادوات اA A#
• أدوات ان ا2
(#م K/5ا' bة
• ادوات ا U UEا✓ 9 +
•
ا p '$-ت ا U UE
✓
أر >8أآ س ا&Eر
✗
ا -$ق واآاب
و! Pد& 4ا' bة وورق
ا'>-
ارق ا' Hد (7H P1
✓
✗
(#م 2=$ 2ا> Hم اuي &Z#ق
ات 1+ة و ( 2ا> Hم#( .م
أ& 1!e ًdص ا 8$اEاbة.
2 -#& +وث ! س آ=.2b 8
اوا2p
✓
•
ارق ااري
✓
•
أآ س ا&Eر
✗✓
^ Qإذا آ 9! *pو! /ارة& + .ث
ااء H-أpاع ا 6 "-ا^ى أو
& P5 =p Zدر Uت اارة ا'(.H
#( eم ادوات ا' ;! 5P1ا' "! ;.
&'; اا! " 7ظ .8$ 8
:& eأن &"! zا> Hم .آ; &P5 ً1
إزا 9-$ارق ااري fH-P& f
8ر ^;.
,9إذا آ 4'( *pدر Uا /Zن أو إذا
آ " Q *pام 2ان:& e .
أن (ن !' ا "lق .ا08 =-9آ ،إذا
ا *d+ا .U
•
ا5رق
•
•
اPS
•
(ن اوا 2pا Eواوا 2pا ر&
واوا 2pا Eا'> /واوا 2pا 5 P 1دة
! ^E8 P&E! ;( ! ،- Pرف !. pH
& ( H8 % /Zا 'H$ا'':ة 2ه\u
ا -$ق.
&'; اا!= ( 2ا> Hم-#( + .
اارة اEاbة =Q 2ادوات ا'5P1
!; ام.
( +ق.
2 -#& +وث ! س آ=.2b 8
ا -$ق
✗
2 -#( +وث ! س آ=2b 8
أو &.
ا5رق ا(! أو اه
✓ & YT5 :
✗ ✓ Q:م ,3ر
| p:
✗
١٠
✓
&'; اا! " 7ظ 8$ 8و!]P
( Pا> Hم.
Page 11
K\$ن اووK
ا5ا Tت ا
H Y!Q$آ A SAMSUNGهة إ5A Q3$ Yدة $ Xار.
و,ا ا5 dM$ ،ISQا Tت ا %Uوإر Hدات اQم =/دون
] إ?Pم
ن اوو Y/? Kات \ d
K\$ IXا#Aاء ا
$اآ %اه5ن و 1ا! م:
• ا fاا /Vوا رA
• ا Sب و* /ا Sب
• ا1ص اوار وا 1/3اوارة
☛
☛
م 01:02
01/04/2008
(qآ دو ً !; 2/+ Opا -ب و!; إ"lق ا -ب r8م.
&ُ'; أن &oدي ا ه' ل % OP( 2ان إ( Kهر ا>o& + '! S
K/5 2-/ 408ا =:ز و ;5 FP& +ذ>^ 6رة P5اeام.
% OP8 + .١ا S>#ا ر '+ H>98 2Uش '5 pو! ء دا iو8 Qن .و7#'8 +
و(.7 :
ااز
MW73E
Uر ا ر ا
٥٠ ~ * ٢٣٠ه(E
اPك ا *
ا' وو&%
١١٥٠وات
ا * ا X$
١٠٠وات ٨٠٠/وات )(IEC-705
$دد ا(=<
: ! ٢٤٥٠ه(E
ا Aون
)OM75S(31
أ5/ب اS
!(ر !و ا&-
.٣زا & 98ا> Hم واوا ] ،Sbآب !; 15ا' /ن ا' K/5 %ا9ص اوار
و' ; # 8 +ة 05د 8 b +ام ا> +ا19ى.
ا! د )اHض × اeر( ع × ا('H
ا ر U
( %&:ان
! ٣٦٥ × ٢٧٥ × ٤٨٩
! ٣٢٠ × ٢١١ × ٣٠٦
ا%X3
٢٠
.٤ا 4#lاu8 P 1ر '8ء دا iو8 Qن أو ا #l 2 =/#lا -$ق.
ا5زن
ا2 1
١٢٥آ U /ام (ً-&9
r8 + .٢زا أي U! ]98دة K/5ا> Sاا^ /أو K/5ا 9/اوارة '+ H>98ش !//-
8 1 8ن ' 8 =#'8 + .ء و(. = :
✉
MW73E.qxp
\3ا' ء 2ا ت \3 .اام أي ! :Pت أو ! -&uت آ ' و&.
آ; &ًU ً1ا 2/+ % OP( P5ا -ب 'dن 5م وUد أي : & 98
• !اآ'
• (ل دون إ"lق ا -ب S Q 408
11
AR
MW73E.qxp
01/04/2008
01:02 م
Page 12
الستفساراتكم أو تعليقاتكم
املوقع االلكتروني
رقم الهاتف
البلد
444-77-11
TURKEY
0860-SAMSUNG (726-7864)
SOUTH AFRICA
800-SAMSUNG (726-7864)
U.A.E
-
8000-4726
BAHRAIN
-
800-22273
JORDAN
www.samsung.com
t~^ZlznTWZ[_[tTWXmyUGGwGXGGm SGt GX[SGYWXWGGZaZ[Gwt
FOUR À MICRO-ONDES
Mode d’emploi
MW73E
Four ...........................................................................................2
Accessoires ...............................................................................2
Tableau de commande .............................................................2
Utilisation de ce mode d'emploi ................................................3
Précautions d'emploi .................................................................3
Installation du four à micro-ondes .............................................4
Réglage de l'horloge .................................................................5
Problèmes et solutions..............................................................5
Cuisson / Réchauffage..............................................................6
Puissances ................................................................................6
Arrêt de la cuisson ....................................................................6
Réglage du temps de cuisson...................................................7
Utilisation de la fonction Réchauffage immédiat .......................7
Réglages du mode Réchauffage immédiat...............................7
Utilisation de la fonction Décongélation automatique rapide ....8
Réglages de la fonction Décongélation automatique rapide ....8
Cuisson en plusieurs étapes .....................................................9
Guide des récipients ...............................................................10
Nettoyage du four à micro-ondes............................................11
Caractéristiques techniques....................................................11
t~^ZlznTWZ[_[tTWXmyUGGwGYGGm SGt GX[SGYWXWGGZaZ[Gwt
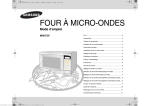
Four
FR
Tableau de commande
ORIFICES DE VENTILATION
AFFICHAGE
ÉCLAIRAGE
PORTE
TABLEAU DE
COMMANDE
1
7
2
PLATEAU TOURNANT
LOQUETS DE
LA PORTE
BOUTON-POUSSOIR
D'OUVERTURE DE
LA PORTE
ORIFICES DU SYSTÈME DE
VERROUILLAGE DE SÉCURITÉ
ANNEAU DE
GUIDAGE
COUPLEUR
3
8
4
Accessoires
Selon le modèle de votre four à micro-ondes, vous disposez de
plusieurs accessoires à fonctionnalités multiples.
5
1. Coupleur : situé sur l'axe moteur, au centre du plancher
du four.
Fonction : Le coupleur permet de faire tourner le
plateau.
9
6
2. Anneau de guidage : à placer au centre du four.
Fonction : L'anneau de guidage sert de support au
plateau.
1. AFFICHAGE
2. SÉLECTION DE LA FONCTION
DE DÉCONGÉLATION
AUTOMATIQUE RAPIDE
3. SÉLECTION DE LA CUISSON ET
DU RÉCHAUFFAGE
AUTOMATIQUES
4. SÉLECTION DU MODE MICROONDES
3. Plateau tournant : à placer sur l'anneau de guidage en
emboîtant la partie centrale sur le coupleur.
Fonction : Ce plateau constitue la principale surface
de cuisson. Il est facile de le retirer pour le
nettoyer.
N'utilisez JAMAIS le four à micro-ondes sans le coupleur,
l'anneau de guidage et le plateau.
2
5.
6.
7.
8.
9.
RÉGLAGE DU TEMPS
BOUTON ARRÊT/ANNULER
SÉLECTION DU POIDS
RÉGLAGE DE L'HORLOGE
BOUTON DÉPART
t~^ZlznTWZ[_[tTWXmyUGGwGZGGm SGt GX[SGYWXWGGZaZ[Gwt
Utilisation de ce mode d'emploi
Précautions d'emploi
Vous venez d'acquérir un four à micro-ondes SAMSUNG. Le mode
d'emploi contient de nombreux conseils et instructions sur son
utilisation :
• Précautions d'emploi
• Récipients et ustensiles recommandés
• Conseils utiles
Au début du mode d'emploi, vous trouverez une illustration du four, et
plus particulièrement du tableau de commande, pour vous permettre
de mieux localiser les boutons.
Les instructions pas à pas emploient deux symboles.
CONSIGNES DE SÉCURITÉ IMPORTANTES.
LISEZ ATTENTIVEMENT CE MANUEL ET CONSERVEZ-LE
PRÉCIEUSEMENT EN VUE D'UNE CONSULTATION ULTÉRIEURE.
Avant de faire cuire des aliments ou des liquides dans votre four à
micro-ondes, prenez les précautions suivantes :
Important
Remarque
•
Utilisez uniquement des ustensiles adaptés à la cuisson au four à microondes. N'utilisez JAMAIS de récipients métalliques, de vaisselle comportant
des ornements dorés ou argentés, de pics à brochette, de fourchettes, etc.
Retirez les attaches métalliques des sacs en papier ou en plastique.
Pourquoi ? Des arcs électriques ou des étincelles susceptibles d'endommager le
four risquent de se former.
• Lorsque vous faites réchauffer des aliments dans des récipients en plastique
ou en papier, veillez à ce que ces derniers ne s'enflamment pas. N'utilisez pas
votre four à micro-ondes pour faire sécher des papiers ou des vêtements.
• Les petites quantités d'aliments nécessitent un temps de cuisson ou de
chauffe plus court. Même en appliquant les temps de cuisson indiqués, ces
aliments sont susceptibles de surchauffer et de brûler.
• Si de la fumée s'échappe de l'appareil, laissez la porte de celui-ci fermée afin
d'étouffer les flammes et éteignez-le ou débranchez-le de la prise murale.
• Si vous faites réchauffer des liquides au four à micro-ondes, l'ébullition peut
survenir à retardement ; faites donc bien attention lorsque vous sortez le
récipient du four. Pour éviter cette situation : laissez
TOUJOURS les aliments reposer au moins 20 secondes après l'arrêt du four
afin de permettre à la température de s'homogénéiser.
Remuez SYSTÉMATIQUEMENT le contenu en fin de cuisson (et pendant la
cuisson si nécessaire).
En cas d'accident, effectuez les gestes de PREMIERS SECOURS suivants :
* immergez la zone brûlée dans de l'eau froide pendant au moins 10 minutes ;
* recouvrez-la d'un tissu propre et sec ;
* n'appliquez aucune crème, huile ou lotion.
• NE remplissez JAMAIS le récipient à ras bord. Choisissez un récipient évasé
afin de prévenir tout débordement éventuel. Les bouteilles à goulot étroit
peuvent exploser en cas de surchauffe.
NE faites JAMAIS chauffer un biberon encore muni de sa tétine ; il risquerait
d'exploser en cas de surchauffe.
• Avant de consommer le contenu des biberons et des petits pots pour bébé,
vérifiez-en toujours la température pour éviter tout risque de brûlure ; pour ce
faire, mélangez-en le contenu ou secouez-les.
• Ne faites jamais réchauffer d'œufs (frais ou durs) dans leur coquille car ils
risquent d'exploser, et ce même une fois le cycle de cuisson terminé. Ne faites
jamais réchauffer de bouteilles, de pots ou de récipients fermés
hermétiquement ou emballés sous vide. Il en va de même pour les noix dans
leur coquille ou encore les tomates.
• Le four doit être nettoyé régulièrement afin d'en retirer tout reste de nourriture.
• En négligeant la propreté de votre four, vous risquez d'en détériorer les
surfaces et par conséquent de réduire la durée de vie de l'appareil et de créer
des situations dangereuses.
CONSIGNES PERMETTANT D'ÉVITER UNE EXPOSITION
EXCESSIVE AUX MICRO-ONDES
La non observation des consignes de sécurité suivantes peut se traduire par une
exposition dangereuse à l'énergie des micro-ondes.
(a) Ne tentez jamais d'utiliser le four avec la porte ouverte, de modifier les
systèmes de verrouillage (loquets) ou d'insérer un objet dans les orifices de
verrouillage de sécurité.
(b) Ne placez aucun objet entre la façade du four et la porte et ne laissez aucune
salissure ni aucun reste de produit d'entretien s'accumuler sur les surfaces
assurant l'étanchéité. Maintenez la porte et les joints d'étanchéité propres en
permanence : après chaque utilisation du four, essuyez-les d'abord avec un
chiffon humide, puis avec un chiffon doux et sec.
(c) Si le four est endommagé, ne l'utilisez pas tant qu'il n'a pas été réparé par un
technicien micro-ondes qualifié formé par le fabricant. Il est impératif que la
porte du four ferme correctement et que les éléments suivants ne soient pas
endommagés :
(1) porte (déformée)
(2) charnières de porte (cassées ou lâches)
(3) joints de la porte et surfaces d'étanchéité
(d) Le four doit être réglé ou réparé exclusivement par un technicien micro-ondes
qualifié formé par le fabricant.
3
FR
t~^ZlznTWZ[_[tTWXmyUGGwG[GGm SGt GX[SGYWXWGGZaZ[Gwt
Précautions d'emploi (suite)
FR
Installation du four à micro-ondes
•
N'obstruez JAMAIS les orifices de ventilation du four avec une pièce de tissu ou
un morceau de papier. Le tissu ou le papier risque de s'enflammer lorsque l'air
chaud est évacué du four. Le four peut alors surchauffer et s'éteindre
automatiquement. Il restera inutilisable tant qu'il n'aura pas suffisamment refroidi.
• Utilisez TOUJOURS des maniques pour retirer un plat du four afin d'éviter
toute brûlure accidentelle.
• NE touchez PAS les éléments chauffants ou les parois internes du four tant
que celui-ci n'a pas refroidi.
• Évitez que le câble électrique ou la prise n'entre en contact avec de l'eau ou
une surface chauffante.
N'utilisez pas l'appareil si le cordon ou la fiche est endommagé(e).
• Lorsque vous ouvrez la porte du four, maintenez une certaine distance entre
vous et l'appareil (env. 50 cm).
Pourquoi ? L'air ou la vapeur s'échappant du four à ce moment précis risque de
vous brûler.
• Un cliquetis peut se faire entendre pendant le fonctionnement du four, et plus
particulièrement pendant la décongélation.
Pourquoi ? Ces bruits sont normaux. Ils indiquent un changement de puissance.
• NE faites JAMAIS fonctionner le four à vide. Il serait automatiquement mis
hors tension pour des raisons de sécurité. Le four fonctionnera à nouveau
normalement après une période de repos d'au moins 30 minutes.
Nous vous recommandons de laisser en permanence un verre d'eau à
l'intérieur du four ; ainsi, si vous mettez le four en marche par inadvertance
alors qu'il est vide, l'eau absorbera les micro-ondes.
• Le four à micro-ondes ne doit pas être installé dans un élément de cuisine.
Placez le four sur une surface plane située à 85 cm au-dessus du sol.
Cette surface doit être suffisamment résistante pour supporter le poids
du four en toute sécurité.
20 cm
au-dessus
10 cm
du côté
•
•
1. Lorsque vous installez votre four, assurez une ventilation
adéquate de celui-ci en laissant un espace d'au moins 10
cm à l'arrière (4 pouces) et sur les côtés et un espace de
20 cm (8 pouces) au-dessus.
2. Retirez tout élément d'emballage de l'intérieur du four.
Installez l'anneau et le plateau.
Vérifiez que le plateau tourne librement.
3. Installez le four à micro-ondes de façon à ce qu'il puisse
facilement être branché sur l'alimentation.
IMPORTANT
•
10 cm à
l'arrière
Cet appareil N'EST PAS conçu pour être utilisé par des jeunes enfants non
assistés par un adulte responsable. Ne les laissez jamais sans surveillance à
proximité du four lorsque celui-ci est en marche. De même, évitez d'entreposer
ou de cacher tout objet suscitant l'intérêt des enfants au-dessus du four.
Cet appareil n'est pas conçu pour être utilisé par des personnes (y compris les
enfants) inexpérimentées ou dont les capacités physiques, sensorielles ou
mentales sont réduites, sauf si celles-ci sont sous la surveillance ou ont reçu les
instructions d'utilisation appropriées de la personne responsable de leur sécurité.
Les enfants ne doivent pas utiliser l'appareil sans la surveillance d'un adulte.
AVERTISSEMENT :
si la porte ou les joints de la porte sont endommagés, le four ne doit pas être utilisé tant
que ces pièces n'ont pas été réparées par une personne qualifiée.
AVERTISSEMENT :
il est très dangereux pour toute personne non habilitée d'effectuer des manipulations
ou des réparations impliquant le démontage de l'habillage de protection contre les
micro-ondes.
AVERTISSEMENT :
les liquides et autres aliments ne doivent pas être réchauffés dans des récipients
fermés car ils risquent d'exploser.
AVERTISSEMENT :
n'autorisez des enfants à utiliser le four seuls que lorsqu'ils connaissent parfaitement
les instructions de fonctionnement et qu'ils sont conscients des risques engendrés par
une utilisation incorrecte.
4
Si le cordon d'alimentation est défectueux, il doit être remplacé
par un composant ou un câble spécial disponible chez votre
fabricant ou un réparateur agréé.
Pour votre sécurité, cet appareil doit être branché sur une prise
murale à 3 broches avec mise à la terre de 230 V CA - 50 Hz. Si
le câble électrique de cet appareil est endommagé, il doit être
remplacé par un câble spécial.
N'installez pas le four dans un environnement chaud ou humide
(ex. : à côté d'un radiateur ou d'un four traditionnel). Respectez
les caractéristiques électriques du four. Si vous utilisez une
rallonge, celle-ci doit correspondre aux normes du cordon
d'alimentation d'origine. Avant d'utiliser votre four pour la
première fois, nettoyez les parois internes et le joint d'étanchéité
de la porte à l'aide d'un chiffon humide.
t~^ZlznTWZ[_[tTWXmyUGGwG\GGm SGt GX[SGYWXWGGZaZ[Gwt
Réglage de l'horloge
Problèmes et solutions
Votre four à micro-ondes est équipé d’une horloge grâce à laquelle
vous pouvez Lorsque l'alimentation est fournie, « 0 », « 88:88 » ou «
12:00 » s'affiche automatiquement à l'écran. Réglez l’heure actuelle.
afficher l’heure sur 24 heures ou sur 12 heures. Vous devez régler
l’horloge :
• à l'installation initiale,
• après une coupure de courant.
Si vous êtes confronté à l'un des problèmes ci-dessous, effectuez les
vérifications suivantes.
Il est tout à fait normal que
• de la condensation se forme à l'intérieur du four ;
• de l'air circule autour de la porte et du four ;
• qu'un reflet lumineux apparaisse autour de la porte et du four ;
• que de la vapeur s'échappe du pourtour de la porte ou des orifices de
ventilation.
N'oubliez pas de changer l'heure lors du passage de l'heure
d'hiver à celle d'été et inversement.
1. Pour afficher l'heure
au format...
24 heures
12 heures
Le four ne démarre pas lorsque vous appuyez sur le bouton Départ (
• La porte est-elle bien fermée ?
Appuyez sur le bouton
Horloge ( )
Une fois
Deux fois
).
Les aliments ne sont pas du tout cuits
• Avez-vous bien réglé le temps de cuisson et/ou appuyé sur le bouton
Départ ( ) ?
• La porte est-elle bien fermée ?
• L'alimentation secteur a-t-elle disjoncté ou le fusible a-t-il fondu à la suite
d'une surcharge électrique ?
2. Réglez l'heure à l'aide du bouton h et les minutes à l'aide
du bouton min.
Les aliments sont trop ou pas assez cuits
• Avez-vous indiqué un temps de cuisson adapté au type d'aliment ?
• Avez-vous choisi la puissance appropriée ?
3. Lorsque l'heure affichée est correcte, appuyez à nouveau
sur le bouton Horloge ( ) pour activer l'horloge.
Résultat : l'heure est affichée lorsque le four à microondes n'est pas en cours d'utilisation.
Des étincelles et des craquements se produisent à l'intérieur du four (arcs
électriques)
• Avez-vous utilisé un plat comportant des ornements métalliques ?
• Avez-vous laissé une fourchette ou un autre ustensile métallique dans le
four ?
• L'aluminium que vous avez utilisé se situe-t-il trop près des parois du
four ?
Le four provoque des interférences sur les radios ou les téléviseurs
• Ce phénomène, bien que modéré, peut en effet survenir lorsque le four
fonctionne. Ceci est tout à fait normal. Pour remédier à ce problème,
installez le four loin des téléviseurs, postes de radio ou antennes.
• Si le microprocesseur du four détecte une interférence, l'afficheur peut
être réinitialisé. Pour remédier à ce problème, déconnectez le cordon
d’alimentation puis rebranchez-le. Réglez l'horloge à nouveau.
5
Si le problème ne peut être résolu à l'aide des consignes cidessus, contactez votre revendeur ou le service après-vente
SAMSUNG le plus proche.
FR
t~^ZlznTWZ[_[tTWXmyUGGwG]GGm SGt GX[SGYWXWGGZaZ[Gwt
FR
Cuisson/Réchauffage
Puissances
Suivez les instructions ci-dessous lorsque vous souhaitez faire cuire ou
réchauffer des aliments. Vérifiez TOUJOURS les réglages de cuisson
avant de laisser le four sans surveillance.
Placez le plat au centre du plateau, puis refermez la porte.
Vous pouvez choisir entre six puissances différentes.
Niveau de puissance
ÉLEVÉ
MOYENNEMENT ÉLEVÉ
MOYEN
MOYENNEMENT FAIBLE
DÉCONGÉLATION ( )
FAIBLE
1. Appuyez sur le bouton Puissance ( ).
Résultat : la puissance de cuisson maximale (800 W)
s'affiche.
Réglez la puissance appropriée en appuyant
à nouveau sur le bouton Puissance jusqu'à
ce que la puissance souhaitée s'affiche.
Reportez-vous au tableau des puissances
situé en page suivante.
2. Réglez le temps de cuisson en appuyant sur les boutons
10 min, 1 min et 10 s.
800 W
600 W
450 W
300 W
180 W
100 W
Si vous sélectionnez une puissance élevée, le temps de cuisson
devra être réduit.
En revanche, si vous sélectionnez une puissance moins élevée,
le temps de cuisson devra être augmenté.
Arrêt de la cuisson
3. Appuyez sur le bouton Départ ( ).
Résultat : l'éclairage du four est activé et le plateau
commence à tourner.
Lorsque la cuisson est terminée, un signal
sonore retentit quatre fois.
Puissance
Vous pouvez arrêter la cuisson à tout moment pour contrôler les
aliments.
1. Pour interrompre provisoirement la cuisson :
ouvrez la porte.
Résultat : la cuisson s'arrête. Pour reprendre la
cuisson, refermez la porte et appuyez de
nouveau sur le bouton Départ ( ).
2. Pour arrêter définitivement la cuisson,
Appuyez sur le bouton Arrêt ( ).
Résultat : la cuisson s'arrête.
Si vous désirez annuler les réglages de
cuisson, appuyez sur le bouton
Arrêt/Annuler ( ).
Ne mettez jamais le four en route lorsqu'il est vide.
Pour chauffer un plat pendant une courte durée à pleine
puissance (800 W), il vous suffit d'appuyer sur le bouton +30s
autant de fois que vous souhaitez ajouter de tranches de
30 secondes. Le four se met en marche immédiatement.
6
Vous pouvez également annuler les réglages avant de démarrer
la cuisson en appuyant sur le bouton Arrêt/Annuler ( ).
t~^ZlznTWZ[_[tTWXmyUGGwG^GGm SGt GX[SGYWXWGGZaZ[Gwt
Réglage du temps de cuisson
Réglages du mode Réchauffage immédiat
Vous pouvez augmenter le temps de cuisson en appuyant sur le bouton
+30s autant de fois que vous souhaitez ajouter de tranches de 30
secondes.
Le tableau suivant présente les divers programmes de réchauffage
immédiat, les quantités, les temps de repos et les instructions
appropriées.
Bouton Aliments
Appuyez sur le bouton +30s autant de fois que vous souhaitez
ajouter de tranches de 30 secondes.
Quantité
Temps
Instructions
de repos
Plats
préparés
300 à 350 g
400 à 450 g
3 min.
Boissons
(café, lait, thé,
eau à
température
ambiante)
150 ml
(1 tasse)
250 ml
(1 mug)
1 à 2 min. Versez la boisson dans une
tasse en céramique sans
recouvrir.
Placez la tasse (150 ml) ou le
mug (250 ml) au centre du
plateau.
Remuez avec précaution
avant et après le temps de
repos.
Utilisation de la fonction Réchauffage immédiat
Grâce à la fonction de cuisson et de réchauffage immédiats, le temps
de cuisson se règle automatiquement sans appuyer sur le bouton
Départ . Vous pouvez régler la quantité en appuyant sur le bouton de
réchauffage immédiat approprié autant de fois que nécessaire.
Placez le plat au centre du plateau, puis refermez la porte.
Appuyez sur le bouton Réchauffage immédiat autant de
fois que nécessaire.
Résultat : La cuisson démarre au bout de deux
secondes environ. Une fois la cuisson
terminée :
1) le signal sonore retentit quatre fois.
2) Le signal de rappel de fin de cuisson
retentit 3 fois (une fois toutes les minutes).
3) L'heure actuelle s'affiche à nouveau.
Plat préparé 300 à 350 g
400 à 450 g
(surgelé)
Exemple : Appuyez une fois sur le bouton Boissons pour réchauffer une tasse
de café. Reportez-vous au tableau situé en page suivante.
Utilisez uniquement de la vaisselle adaptée aux micro-ondes.
7
4 min.
Placez les aliments dans une
assiette en céramique et
recouvrez-la d'un film
plastique résistant aux microondes. Ce programme
convient aux plats composés
de trois aliments différents
(ex. : viande en sauce,
légumes et accompagnement
tel que pommes de terre, riz
ou pâtes).
Vérifiez que l'emballage est
adapté à la cuisson aux
micro-ondes, puis percez le
film protecteur. Mettez le plat
préparé surgelé dans le four.
Ce programme concerne des
plats congelés composés de
3 aliments (exemple :
morceau de viande en sauce,
légumes et accompagnement
tel que pommes de terre, riz
ou pâtes).
FR
t~^ZlznTWZ[_[tTWXmyUGGwG_GGm SGt GX[SGYWXWGGZaZ[Gwt
Utilisation de la fonction Décongélation
automatique rapide
Réglages de la fonction Décongélation
automatique rapide
La fonction Décongélation automatique rapide permet de faire
décongeler de la viande, de la volaille, du poisson ou des fruits/baies.
Le temps de décongélation et la puissance se règlent automatiquement.
Il vous suffit de sélectionner le programme et le poids correspondant
aux aliments à décongeler.
Le tableau suivant répertorie les programmes de Décongélation
automatique rapide, les quantités, les temps de repos et les instructions
appropriées.
Retirez tous les éléments d'emballage des aliments avant de
commencer la décongélation. Placez la viande, la volaille, le poisson
ou les fruits/baies sur une assiette en céramique.
FR
Utilisez unquement de la vaisselle adaptée aux micro-ondes.
Placez le plat surgelé au centre du plateau, puis fermez la porte.
1. Appuyez sur le bouton Décongélation rapide (
Résultat : l'indication suivante s'affiche :
Code/Aliment
Quantité
1. Viande
100 à 2000 g 20 à 90 min. Protégez les extrémités avec du
papier aluminium. Retournez la
viande au signal sonore.
Ce programme convient pour la
cuisson du bœuf, de l’agneau, du
porc, des côtelettes ou des
émincés.
2. Volaille
100 à 2000 g 20 à 90 min. Protégez les extrémités des cuisses
et des ailes avec de l'aluminium.
Retournez la volaille au signal
sonore. Ce programme convient
aussi bien à un poulet entier qu'à
des morceaux.
3. Poisson
100 à 2000 g 20 à 80 min. Protégez la queue d'un poisson
entier avec du papier d'aluminium.
Retournez le poisson au signal
sonore. Ce programme convient
aussi bien à la cuisson des poissons
entiers qu'à celle des filets.
).
Appuyez une ou plusieurs fois sur le bouton
Décongélation rapide ( ) selon le type d'aliments que
vous devez décongeler. Pour plus d'informations, reportezvous au tableau situé à la page suivante.
2. Sélectionnez le poids de l'aliment en appuyant sur le
bouton 100 g.
Le poids maximal est de 2000 g.
3. Appuyez sur le bouton Départ ( ).
Résultat :
La phase de décongélation commence.
Un signal sonore vous rappelant de
retourner l'aliment retentit à la moitié du
temps de décongélation.
Appuyez de nouveau sur le bouton
Départ ( ) pour poursuivre la
décongélation.
4. Fruits/baies 100 à 600 g
Vous pouvez aussi programmer la décongélation manuellement.
Pour ce faire, sélectionnez la fonction Cuisson/Réchauffage par
micro-ondes et une puissance de 180 W. Reportez-vous à la
section intitulée « Cuisson/Réchauffage » en page 6 pour plus de
détails.
8
Temps de
repos
5 à 20 min.
Instructions
Répartissez uniformément les fruits
dans un récipient en verre à fond
plat.
Ce programme convient à toutes
sortes de fruits.
t~^ZlznTWZ[_[tTWXmyUGGwG`GGm SGt GX[SGYWXWGGZaZ[Gwt
Cuisson en plusieurs étapes
6. Réglez le temps de cuisson en appuyant sur les boutons
10 min, 1 min et 10 s autant de fois que nécessaire
(5 minutes dans cet exemple).
Vous pouvez programmer votre four à micro-ondes pour qu’il cuise
des aliments en plusieurs étapes (3 étapes maxi.).
Exemple : vous souhaitez décongeler et faire cuire un aliment sans
avoir à régler de nouveau le four après chaque étape. Ainsi
vous pouvez décongeler et cuire un poisson de 500 g en trois
étapes :
• décongélation ;
• cuisson I
• cuisson II
7. Appuyez sur le bouton Départ ( ).
Résultat : les trois modes [décongélation et cuisson (I,II)]
sont activés successivement. En fonction du
mode de décongélation que vous avez choisi,
un signal sonore peut retentir à la moitié du
temps de décongélation pour que vous
n’oubliiez pas de retourner l’aliment.
Une fois la cuisson terminée, le signal
sonore retentit quatre fois.
Vous pouvez définir de deux à trois étapes pour ce type de
cuisson.
Si vous définissez trois étapes, la première étape doit être la
décongélation.
N’appuyez pas sur le bouton Départ tant que vous n’avez pas
défini la dernière étape.
1. Appuyez une ou plusieurs fois sur le bouton
Décongélation rapide ( ).
2. Réglez le poids en appuyant sur les boutons 100 g autant
de fois que nécessaire (pour obtenir 500 g dans cet
exemple).
3. Appuyez sur le bouton Puissance ( ).
Mode (I) du four à micro-ondes :
;
si nécessaire, réglez la puissance en appuyant
une ou plusieurs fois sur le bouton Puissance.
(600 W dans cet exemple)
4. Réglez le temps de cuisson en appuyant sur les boutons
10 min, 1 min et 10 s autant de fois que nécessaire
(4 minutes dans cet exemple).
5. Appuyez sur le bouton Puissance ( ).
Mode (II) du four micro-ondes :
;
si nécessaire, réglez la puissance en appuyant
une ou plusieurs fois sur le bouton
Puissance ( ) .
(450 W dans cet exemple).
9
FR
t~^ZlznTWZ[_[tTWXmyUGGwGXWGGm SGt GX[SGYWXWGGZaZ[Gwt
Guide des récipients
FR
Pour faire cuire des aliments dans le four à micro-ondes, il est
nécessaire que les micro-ondes pénètrent dans les aliments sans être
réfléchies ou absorbées par le plat utilisé.
Il est donc essentiel de bien choisir le type de récipient employé. Pour
cela, assurez-vous que celui-ci présente une mention spécifiant qu'il
convient à une cuisson aux micro-ondes (« adapté aux micro-ondes »).
Le tableau suivant indique la liste des divers types de récipients et leur
méthode d'utilisation dans un four à micro-ondes.
Récipient
Papier aluminium
Le temps de préchauffage ne doit pas
excéder huit minutes.
Porcelaine et terre cuite
S'ils ne comportent pas d'ornements
métalliques, les récipients en céramique,
en terre cuite, en faïence et en porcelaine
sont généralement adaptés.
Plats en carton ou en
polyester jetables
Certains aliments surgelés sont emballés
dans ce type de plat.
Peuvent être utilisés pour faire réchauffer
des aliments. Une chaleur excessive peut
faire fondre le polystyrène.
Peuvent s'enflammer.
Peuvent provoquer des étincelles.
•
Sacs en papier ou
papier journal
Papier recyclé ou
récipients en verre
avec décorations
métalliques
Métal
•
•
Peut être utilisé en petite quantité afin
d'empêcher certaines zones de trop cuire.
Des arcs électriques peuvent se former si
l'aluminium est placé trop près des parois
du four ou si vous en utilisez en trop grande
quantité.
•
•
Remarques
Adapté
aux microondes
Plat brunisseur
Emballages de fast-food
• Tasses en
polystyrène
Plats en verre
• Plats de service
adaptés à la
cuisson au four
• Plats en verre fin
Peuvent être utilisés sauf s'ils sont ornés
de décorations métalliques.
Peuvent être utilisés pour faire réchauffer
des aliments ou des liquides. Les objets
fragiles peuvent se briser ou se fendre s'ils
sont brusquement soumis à une chaleur
excessive.
Retirez-en le couvercle. Pour réchauffer
uniquement.
Pots en verre
Plats
Attaches
métalliques des
sacs de congélation
Peuvent provoquer des arcs électriques ou
des flammes.
Pour des temps de cuisson courts ou de
simples réchauffages. Pour absorber
l'excès d'humidité.
Peuvent provoquer des arcs électriques.
Papier
• Assiettes, tasses,
serviettes de table
et papier absorbant
• Papier recyclé
Plastique
• Récipients
•
Film étirable
•
Sacs de
congélation
Papier paraffiné ou
sulfurisé
: recommandé
: à utiliser avec précaution
: dangereux
10
Tout particulièrement s'il s'agit de
thermoplastique résistant à la chaleur.
Certaines matières plastiques peuvent se
voiler ou se décolorer lorsqu'elles sont
soumises à des températures élevées.
N'utilisez pas de plastique mélaminé.
Peut être utilisé afin de retenir l'humidité.
Ne doit pas entrer en contact avec les
aliments. Soyez particulièrement vigilant
lorsque vous retirez le film du récipient ; la
vapeur s'échappant à ce moment est très
chaude.
Uniquement s'ils supportent la température
d'ébullition ou s'ils sont adaptés au four.
Ne doivent pas être fermés
hermétiquement. Perforez-en la surface
avec une fourchette si nécessaire.
Peut être utilisé afin de retenir l'humidité et
d'empêcher les projections.
t~^ZlznTWZ[_[tTWXmyUGGwGXXGGm SGt GX[SGYWXWGGZaZ[Gwt
Nettoyage du four à micro-ondes
Caractéristiques techniques
Pour empêcher l'accumulation de graisses et de particules d'aliments,
nettoyez régulièrement les éléments suivants du four à micro-ondes :
SAMSUNG s'efforce sans cesse d'améliorer ses produits. Les
caractéristiques et le mode d'emploi de ce produit peuvent être
modifiés sans préavis.
•
•
•
les surfaces intérieures et extérieures
la porte et les joints d'étanchéité ;
le plateau et l'anneau de guidage.
Veillez TOUJOURS à ce que les joints de la porte soient propres
et à ce que celle-ci se ferme correctement.
En négligeant la propreté de votre four, vous risquez d'en
détériorer les surfaces et par conséquent l'appareil lui-même, ce
qui pourrait être dangereux.
1. Nettoyez l'extérieur avec un chiffon doux et de l'eau savonneuse tiède. Rincez
et séchez.
2. Retirez les projections et autres traces tenaces adhérant aux parois ou sur
l'anneau de guidage à l'aide d'un tissu imbibé d'eau savonneuse. Rincez et
séchez.
3. Si votre four est très sale ou si une odeur désagréable s'en dégage, placez
une tasse d'eau citronnée sur le plateau et faites-la chauffer pendant dix
minutes à pleine puissance.
4. Nettoyez le plateau si nécessaire, ce dernier est adapté au lave-vaisselle.
Ne laissez JAMAIS s'écouler d'eau dans les orifices de
ventilation. N'utilisez JAMAIS de produits abrasifs ou de solvants
chimiques. Nettoyez avec un soin tout particulier les joints de la
porte afin qu'aucune particule :
•
•
ne s'y accumule ;
ne nuise à l'étanchéité de la porte.
11
Modèle
MW73E
Source d'alimentation
230 V ~ 50 Hz
Puissance
Micro-ondes
1150 W
Puissance de sortie
100 W/800 W (IEC-705)
Fréquence de fonctionnement
2450 MHz
Magnétron
OM75S(31)
Système de refroidissement
Moteur de ventilation
Dimensions (L x H x P)
Extérieures
Cavité du four
489 x 275 x 365 mm
306 x 211 x 320 mm
Capacité
20 litres
Poids
Net
12,5 kg env.
FR
t~^ZlznTWZ[_[tTWXmyUGGwGXYGGm SGt GX[SGYWXWGGZaZ[Gwt
TURKEY
444-77-11
SOUTH AFRICA
0860-SAMSUNG (726-7864)
U.A.E
800-SAMSUNG (726-7864)
BAHRAIN
8000-4726
-
JORDAN
800-22273
-
www.samsung.com