1
Refrigerator
user manual
English
This manual is made with 100% recycled paper.
imagine the possibilities
Thank you for purchasing a Samsung product.
To receive a more complete service,
please register your product at
www.samsung.com/register
Free Standing Appliance
DA99-03327L-1 EN.indd 1
Code No. DA99-03327L REV(0.1)
2012.3.5 3:53:31 PM
Safety information
SAFETY INFORMATION
• Before operating the appliance, please
read this manual thoroughly and retain
WARNING
it for your reference.
• Because these following operating instructions
cover various models, the characteristics of
your refrigerator may differ slightly from those
described in this manual.
CAUTION/WARNING SYMBOLS USED
WARNING
Indicates that a danger of death or serious
injury exists.
CAUTION
Indicates that a risk of personal injury or
material damage exists.
Represents something you must NOT do.
Represents something you must NOT
disassemble.
Represents something you must NOT touch.
Represents something you must follow.
• This refrigerator must be properly installed and
located in accordance with the manual before it
is used.
• Use this appliance only for its intended purpose
as described in this instruction manual.
• We strongly recommend that any servicing be
performed by a qualified individual.
• R600a or R134a can be used as a refrigerant.
Check the compressor label on the rear of
the appliance and the rating label inside the
fridge to see which refrigerant is used for the
refrigerator.
• In case of R600a refrigerant, this gas
is natural gas with high environmental
compatibility that is, however, also
combustible.
When transporting and installing the
appliance, care should be taken to
ensure that no parts of the refrigerating
circuit are damaged.
• Refrigerant squirting out of the pipes could
ignite or cause an eye injury.
If a leak is detected, avoid any naked flames or
potential sources of ignition and air the room
in which the appliance is standing for several
minutes.
Indicates that you must disconnect the power
plug from the socket.
Represents a ground is needed to prevent
electric shock.
It is recommended that this symbol be handled
by service man.
These warning signs are here to prevent
injury to you and others. Please follow them
carefully. After reading this section, keep it in
a safe place for future reference.
•
•
•
• Contains fluorinated greenhouse gases covered
by the Kyoto Protocol. Hermetically sealed
system. Do not vent gases into the atmosphere.
Refrigerant type: R-134a / Quantity: 0.19Kg
Global Warming Potential (GWP) = 1300
• Foam blown with fluorinated greenhouse gases.
• In order to avoid the creation of a
flammable gas-air mixture if a leak in
the refrigerating circuit occurs, the size
of the room in which the appliance
may be sited depends on the amount
of refrigerant used.
Never start up an appliance showing any signs
of damage.
If in doubt, consult your dealer.
The room must be 1m³ in size for every 8g of
R600a refrigerant inside the appliance.
The amount of refrigerant in your particular
appliance is shown on the identification plate
inside the appliance.
Please dispose of the packaging material for
this product in an environmentally friendly
manner.
Pull the power plug out of the socket before
changing the interior light of the refrigerator.
Otherwise, there is a risk of electric shock.
WARNING
•
•
-
02_ safety information
DA99-03327L-1 EN.indd 02
2012.3.5 3:53:32 PM
• This appliance is not intended for use by
persons (including children) with reduced
physical, sensory or mental capabilities, or
lack of experience and knowledge, unless they
have been given supervision or instruction
concerning use of the appliance by a person
responsible for their safety.
• Children should be supervised to ensure that
they do not play with the appliance.
SEVERE WARNING SIGNS
• Do not install the refrigerator in a damp
place or place where it may come in
contact with water or gas.
Deteriorated insulation of electrical parts may
cause an electric shock or fire.
Do not place this refrigerator in direct sunlight or
expose to the heat from stoves, room heaters
or other appliance.
Allow sufficient space to install the refrigerator
on a flat surface.
If your refrigerator is not level, the internal
cooling system may not work correctly.
Do not plug several appliances into the same
power socket.
The refrigerator should always be plugged into
its own individual electrical socket which has a
voltage rating that matched the rating plate.
This provides the best performance and
also prevents overloading house wiring
circuits, which could cause a fire hazard from
overheated wires.
Never unplug your refrigerator by pulling on the
power cord.
Always grip plug firmly and pull - Damage to
the cord may cause a short-circuit, fire and/or
electric shock.
Make sure that the power plug is not squashed
or damaged by the back of the refrigerator.
Do not bend the power cord excessively or
place heavy articles on it.
This constitutes a fire hazard.
Have the power cord repaired or replaced
immediately by the manufacturer or its service
agent if power cord has become frayed or
damaged.
Do not use a cord that shows cracks or abrasion
damage along its length or at either end.
If the power cord is damaged, have it replaced
immediately by the manufacturer or its service
agent.
CAUTION
•
•
•
-
•
•
•
•
•
•
• When moving the refrigerator, be careful not to
roll over or damage the power cord.
• Do not insert the power plug with wet hands.
• Unplug the refrigerator before cleaning and
making repairs.
• Do not use a wet or damp cloth when cleaning
the plug.
• Remove any foreign matter or dust from the
power plug pins.
- Otherwise there is a risk of fire.
• If the refrigerator is disconnected from the
power supply, you should wait for at least ten
minutes before plugging it back.
• If the wall socket is loose, do not insert the
power plug.
- There is a risk of electric shock or fire.
• The appliance must be positioned so that the
plug is accessible after installation.
• In the event of a gas leak (such as propane
gas, LP gas, etc.), ventilate immediately without
touching the power plug.
Do not touch the appliance or power cord.
- Do not use a ventilating fan.
- A spark may result in an explosion or fire.
• Do not use a hair dryer to dry the inside of the
refrigerator.
Do not place a lighted candle in the refrigerator
for removing bad odours.
- This may result in electric shock or fire.
• The refrigerator must be grounded.
- You must ground the refrigerator to
prevent any power leakages or electric
shocks caused by current leakage from
the refrigerator.
• Never use gas pipes, telephone lines or
other potential lightening rods as ground.
- Improper use of the ground plug can result in
electric shock.
• Do not dissemble or repair the refrigerator by
yourself.
- You run risk of causing a fire, malfunction and/
or personal injury.
• If the appliance generates a strange noise, a
burning or smell or smoke, unplug the power
plug immediately and contact your nearest
service centre.
• Keep ventilation opening in the appliance
enclosure or mounting structure clear of
obstruction.
safety information _03
DA99-03327L-1 EN.indd 03
2012.3.5 3:53:32 PM
• Do not use mechanical devices or any other
means to accelerate the defrosting process,
other than those recommended by the
manufacturer.
• Do not damage the refrigerant circuit.
• Do not place or use electrical appliance inside
the refrigerator/freezer, unless they are of a type
recommended by the manufacturer.
• Before changing the interior light, unplug the
appliance from the power supply.
• If you experience difficulty when changing the
light, contact your service center.
• The appliance is not intended for use by
persons (including children) with reduced
physical, sensory or mental capabilities, or
lack of experience and knowledge, unless they
have been given supervision or instruction
concerning use of the appliance by a person
responsible for their safety.
• Children should be supervised to ensure that
they do not play with the appliance.
• Do not let children hang on the door.
If not, a serious injury may occur.
• Do not touch the inside walls of the freezer or
products stored in the freezer with wet hands.
- This may cause frostbite.
• If the refrigerator is not to be used for a long
period of time, pull out the power plug.
- Deterioration in the power cord insulation may
cause fire.
• Do not store articles on the top of the appliance.
- When you open or close the door, the articles
may fall and cause personal injury and/or
material damage.
CAUTION SIGNS
• This product is intended only for the storage of
food in a domestic environment.
• Manufacturer’s recommended storage times
and expiry dates of frozen foods should be
adhered to. Refer to relevant instructions.
• Bottles should be stored tightly together so that
they do not fall out.
• Do not place carbonated or fizzy drinks in the
freezer compartment
• Do not overfill the refrigerator with food.
- When you open the door, an item may fall out
and cause personal injury or material damage.
• Do not put bottles or glass containers in the
freezer.
•
•
•
-
•
•
•
•
-
When the contents freeze, the glass may break
and cause personal injury.
Do not spray inflammable gas near the
refrigerator.
There is a risk of explosion or fire.
Do not directly spray water inside or outside the
refrigerator.
There is a risk of fire or electric shock.
Do not store volatile or flammable substances in
the refrigerator.
The storage of benzene, thinner, alcohol, ether,
LP gas and other such products may cause
explosions.
If you have a long vacation planned, it is
advisable to empty the appliance or use the
vacation function.
Do not re-freeze frozen foods that have thawed
completely.
Do not store pharmaceuticals products,
scientific materials or temperature-sensitive
products in the refrigerator.
Products that require strict temperature controls
must not be stored in the refrigerator.
Do not put a container filled with water on the
refrigerator.
If any foreign substance such as water has
entered the appliance, unplug the power plug
and contact your nearest service center.
There is a risk of fire or electric shock.
CAUTION SIGNS FOR CLEANING
• Do not insert your hands into the bottom area
under the appliance.
- Any sharp edges may cause personal injury.
• Do not use a wet or damp cloth when cleaning
the plug, remove any foreign material or dust
from the power plug pins.
- Otherwise there is a risk of fire.
WARNING SIGNS FOR DISPOSAL
• When disposing of this or other refrigerators,
remove the door/door seals, door latch so
that small children or animals cannot become
trapped inside.
• Leave the shelves in place so that children may
not easily climb inside.
• R600a or R134a is used as a refrigerant.
Check the compressor label on the rear of
04_ safety information
DA99-03327L-1 EN.indd 04
2012.3.5 3:53:32 PM
the appliance or the rating label inside the
fridge to see which refrigerant is used for your
refrigerator.
When this product contains flammable
gas(Refrigerant R600a) contact your local
authority in regard to safe disposal of this
product.
• Cyclopentane is used as a insulation blowing
gas. The gases in insulation material require
special disposal procedure.
Please contact your local authorities in regard
to the environmentally safe disposal of this
product.
Ensure that none of the pipes on the back of
the appliances are damaged prior to disposal.
The pipes shall be broke in the open space.
In the event of a power failure, call the
local office of your Electricity Company
and ask how long it is going to last.
Most power failures that are corrected in an hour
or two will not affect your refrigerator temperatures.
However, you should minimize the number of door
openings while the power is off.
But should the power failure last more than
24hours, remove all frozen food.
For doors or lids fitted with locks and keys, the
keys be kept out of the reach of children and not in
the vicinity of the refrigerating appliance, in order to
prevent children from being locked inside.
CAUTION
• The appliance might not operate consistently
(possibility of defrosting of contents or
temperature becoming too warm in the frozen
food compartment) when sited for an extended
period of time below the cold end of the range
of temperatures for which the refrigerating
appliance is designed.
• Do not store food which goes bad easily at low
temperature, such as bananas, melons.
• Place the ice tray at the originally provided
posistion by manufacturer in order to achieve
optimal ice-freezing.
• Your appliance is frost free, which means there
is no need to manually defrost your appliance,
as this will be carried out automatically.
• Temperature rising during the defrost can
comply with ISO requirement.
But If you want to prevent an undue rise in the
temperature of the frozen food while defrosting
the appliance, please wrap the frozen food in
several layers of paper such as newspaper.
• Any increase in temperature of frozen food
during defrosting can shorten its storage life.
Saving Energy Tips
-
-
ADDITIONAL TIPS FOR PROPER
USAGE
• Allow the appliance to stand for 2 hours after
installation.
• To get best performance of product,
- Do not place foods too closely in front of
the vents at the rear of the appliance as it
can obstruct free air circulation in the freezer
compartment.
- Wrap the food up properly or place it in airtight
containers before put it into the fridge freezer
- Do not put any newly introduced food for
freezing near to already frozen food.
• There is no need to disconnect the refrigerator
from the power supply if you will be away for
less than three weeks.
But, remove all the food if you are going away
for three weeks or more. Unplug the refrigerator
and clean it, rinse and dry.
-
-
-
-
Install the appliance in a cool, dry room with
adequate ventilation.
Ensure that it is not exposed to direct sunlight
and never put it near a direct source of heat
(radiator, for example).
Never block any vents or grilles on the
appliance.
Allow warm food to cool down before placing it
in the appliance.
Put frozen food in the refrigerator to thaw.
You can then use the low temperatures of the
frozen products to cool food in the refrigerator.
Do not keep the door of the appliance open for
too long when putting food in or taking food
out. The shorter time for which the door is
open, the less ice will form in the freezer.
Clean the rear of the refrigerator regularly.
Dust increases energy consumption.
Do not set temperature colder than necessary.
Ensure sufficient air exhaust at the refrigerator
base and at the back wall of the refrigerator.
Do not cover air vent openings.
Allow clearance to the right, left, back and top
when installing.
This will help reduce power consumption and
keep your energy bills lower.
safety information _05
DA99-03327L-1 EN.indd 05
2012.3.5 3:53:32 PM
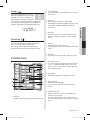
Contents
SETTING UP YOUR SIDE-BY-SIDE REFRIGERATOR ……………………………………… 06
PRODUCT FEATURES ………………………………………………………………………… 09
OPERATING THE SAMSUNGSIDE-BY-SIDE REFRIGERATOR …………………………… 10
TROUBLESHOOTING …………………………………………………………………………… 15
Setting up your side-by-side
refrigerator
Selecting the best location for the
refrigerator
• Select a location with easy access to the water
supply.
• Select a location without direct exposure to
sunlight.
• Select a location with level (or nearly level)
flooring.
• Select a location with enough space for the
refrigerator doors to open easily.
• Allow sufficient space to the right, left, back and
top for air circulation.
- If your refrigerator is not level, the internal
cooling system may not work correctly.
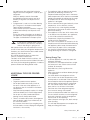
- Refer to drawing and dimensions below for
overall space required for use.
• Please ensure that appliance can be moved
freely in the event of maintenance & service.
990 mm
1350 mm
Congratulations on the purchase of your Samsung
Side-By-Side Refrigerator.
We hope you will enjoy the many state-of-the-art
features and efficiencies that this new appliance
has to offer.
at least 6mm
945 mm
at least 6mm
1223 mm
GETTING READY TO INSTALL THE
REFRIGERATOR
160º 160º
1725 mm
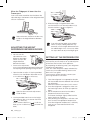
When moving your refrigerator
To prevent floor damage, be sure the adjusting legs
are in the up position (above the floor).
Refer to ‘Adjusting the doors’ in the manual (on
page 8). To protect the finish of the flooring, place
the protection sheet such as packing carton under
the refrigerator.
Leg
Screw Driver
CAUTION
When installing, servicing or cleaning
behind the refrigerator, be sure to pull the
unit straight out and push back in straight
after finishing.
23mm
50mm
06_ setting up
DA99-03327L-1 EN.indd 06
2012.3.5 3:53:32 PM
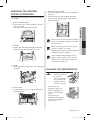
SETTING UP THE REFRIGERATOR
DOORS
(1)
If your entrance won’t allow the refrigerator to pass
easily through it, you can remove the doors.
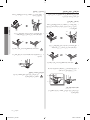
Removing the Freezer Doors
(1)
2. Removing the FIXER HINGE ,and next take off
the upper hinge. Be careful that the door does
not fall on you as you are removing it.
(2)
CAUTION
2. Removing the FIXER HINGE ,and next take off
the upper hinge. Be careful that the door does
not fall on you as you are removing it.
01 SETTING UP
1. Disassemble the hinge cover ( 1 ) with a
screwdriver while the door is open and then
close the door, and then disconnect the wires
by gently pulling them apart ( 2 ).
Be sure to keep track of all parts you are
removing.
3. Remove the door from the lower hinge ( 2 ) by
lifting the door straight up ( 3 ).
(3)
(2)
CAUTION
Be sure to keep track of all parts you are
removing.
3. Next, remove the door from the lower hinge ( 3 )
by carefully lifting the door straight up ( 4 ).
(4)
(3)
Reattaching the Fridge Door
CAUTION
To reattach the fridge doors, replace parts
in reverse order.
LEVELLING THE REFRIGERATOR
If you install the refrigerator on an uneven floor, it
may cause a height difference between the doors.
When the Freezer part is lower than the
Fridge part.
Reattaching the Freezer Doors
To reattach the freezer doors, replace parts in
reverse order.
Insert a flat-head screwdriver into the hole of the
adjustable leg at the bottom of the freezer door
and turn it clockwise.
Removing the Fridge Door
1. Disassemble the hinge cover ( 1 ) with a
screwdriver while the door is open and then
close the door.
setting up _07
DA99-03327L-1 EN.indd 07
2012.3.5 3:53:33 PM
When the Fridge part is lower than the
Freezer part.
Insert a flat-head screwdriver into the hole of the
adjustable leg at the bottom of the refrigerator door
and turn it clockwise.
3. When the height is aligned on both sides,
use the wrench to turn the adjustable nut ( a )
counter clockwise (
) to tighten it.
Refer to the next section for the best way
to Adjust the height difference between
doors.
ADJUSTING THE HEIGHT
DIFFERENCE BETWEEN DOORS
If one door is lower than the other.
• You can use the
adjustable nut at the
bottom of the fridge/
freezer to adjust the
height difference
between the doors.
• An excessive adjustment
may cause interference between the door and
the top hinge while opening/closing the door.
1. Open the door to adjust it. Use the provided
wrench to turn the bottom adjustable nut ( a )
as far clockwise (
) as necessary.
Open the door and make adjustments
inside the door.
2. Use the provided wrench to turn the height
adjustable nut ( b ) as far counter clockwise
(
) as necessary.
(Turn it counter clockwise (
) to lift the
) to lower the
door up; turn it clockwise (
door.)
If you adjusted the height of the product
while it is empty, adding food later may
eventually cause a height difference due to
the added weight. If this is the case, follow
the steps above to adjust the height again.
SETTING UP THE REFRIGERATOR
Now that you have your new refrigerator installed
and in place, you are ready to set up and enjoy the
full features and functions of the appliance.
By completing the following steps, your refrigerator
should be fully operational.
If not, first check the power supply and electricity
source or try the troubleshooting section at the
back of this user guide.
If you have any further questions, contact your
Samsung Electronics call center.
1. Place the refrigerator in an appropriate location
with reasonable clearance between the wall and
the refrigerator.
Refer to installation instructions in this manual.
2. Once the refrigerator is plugged in, make sure
the interior light comes on when you open the
doors.
3. Set the temperature control to the coldest
temperature and wait for an hour.
The freezer should get slightly chilled and the
motor should run smoothly.
4. After powering the refrigerator, it will take a few
hours to reach the appropriate temperature.
Once the refrigerator temperature is sufficiently
cool, you can store food and drink in the
refrigerator.
08_ setting up
DA99-03327L-1 EN.indd 08
2012.3.5 3:53:35 PM
Product features
Surround Multi Air Outlets
The Samsung Side by side
Refrigerator has plenty of
space for all your groceries,
beverages,frozen foods and
leftovers.
It’s the perfect size for
any occasion - holiday
celebration, family reunion or
Super Bowl party.
Cooling air flows out through
multiple outlets in every shelf
level.
This provides even cooling
throughout the refrigerator,
and quickly returns back to
temperature when the door
has been opened.
So it maintains an ideal temperature to keep your
food fresh longer.
Flavor Chamber – Now more advanced
than ever, thanks to meat-aging mode.
Featuring Zipel’s exclusive
food storage technology, the
Flavor Chamber locks in the
stored food’s moisture so that
it stays fresh and nutritious
for longer.
The Flavor Chamber also
utilizes a special meat-aging
algorithm developed in conjunction with the Korea
Advanced Food Research Institute.
Kimchi/Shikhye mode maintains a temperature of
-1ºC inside the chamber ensuring that the stored
food stays fresh; Flavor Defrost mode lets you
defrost food without sacrificing its flavor; Rapid
Refrigeration lets you refrigerate food quickly; and
Refrigerate mode frees up more storage space
inside the refrigerator.
LED Tower Lighting
This space-saving LED fixture
illuminates every corner of the
fridge, so things are easier to
find.
Also LED emits less heat than
conventional bulb lighting,
affecting less damage to the
temperature management.
Twin Cooling System
02 PRODUCT FEATURES
Larger Capacity
The refrigerator and the
freezer have two evaporators.
Given this independent
system, the freezer and
the refrigerator are cooled
individually as required and
are, therefore, more efficient.
Food odor from the
refrigerator does not affect food in the freezer due
to separate air flow circulation.
Disinfecting and Deodorizing Fresh
Doctor
Your refrigerator features
SPi - 2 (Samsung Super
Plasma Ion II) technology,
which eliminates airborne
and surface bacteria inside
the refrigeration chamber,
as well as a solar power
deodorizer that delivers twice
the deodorizing power.
product features _09
DA99-03327L-1 EN.indd 09
2012.3.5 3:53:35 PM
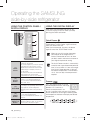
Operating the SAMSUNG
side-by-side refrigerator
USING THE CONTROL PANEL /
DIGITAL DISPLAY
USING THE DIGITAL DISPLAY
When not in use the Display will turn off, this
is normal. Display will turn on When you keep
pressing the Child Lock button.
(1)
(2)
(3)
Quick Freeze
This icon will light up when you keep press the
Freezer button. “Quick Freeze” is great for times
when you need a lot of ice.
When you have enough, just press the button
again to cancel the “Quick Freeze” mode.
(4)
(5)
(1)
Quick
Freeze
Speeds up the time needed to freeze
products in the freezer.
This can be helpful if you need to quickly
freeze items that spoil easily or if the
temperature in the freezer has warmed
dramatically (For example, if the door
was left open).
This Function must be activated before
putting large items in the freezer
compartment at least 24 hours before.
(2)
Freezer
Button
Press the Freezer button to set the
freezer to your desired temperature.
You can set the temperature between
-14ºC and -23ºC.
(3)
Smart ECO
Keep freshness of food using 11 sensors
according to the operating environment,
usage pattern and the refrigerator
operating status while saving electricity
costs.
(4)
Fridge
Button
Press the Fridge button to set the fridge
to your desired temperature.
You can set temperature between 1°C
and 7°C.
(5)
Child Lock
Button
By pressing this button for 3 second,
all buttons will be locked. To cancel this
function, press this button again.
When you use this function the energy
consumption of the refrigerator will
increase. Remember to turn it off when
you don’t need it and return the freezer to
your original temperature setting.
The Quick Freeze function is automatically
turned off after a pre-determined period of
time (72 hours/within a 1 hour error range).
If the Quick Freeze operation is finished,
the freezer compartment is maintained at
-20°C. You can adjust the temperature if
required.
Freezer
Press the Freezer button to set the
desired temperature from the range
between -14°C and -23°C.
Default set temperature is set
on -20°C and each time you press the Freezer
button temperature will change in following order
and temperature indicator will display the desired
temperature.
10_ operating
DA99-03327L-1 EN.indd 10
2012.3.5 3:53:46 PM
2. Tray Ice Maker
• For more space to store food, you can remove
the ice tray.
Fridge
Press the Fridge button to set the
desired temperature from the range
between 1°C and 7°C. Default set
temperature is set on 3°C and each
time you press the Fridge button, temperature
will change in following order and temperature
indicator will display the desired temperature.
4. Dairy Bin
• Can be used to store smaller dairy items like
butter or margarine, yogurt or cream-cheese
bricks.
Child Lock
This icon will light up when you activate the Child
Lock function by pressing Child Lock button.
Press this button again to reactivate.
Use this function to prevent children from
tampering with temperature and filter settings.
03 OPERATING
3. Drawers
• Best used to store meats or dry foods.
Stored food should be wrapped securely using
foil or other suitable wrapping materials or
containers.
5. Shelves
• Designed to be crack-resistant.
They can be used to store all types of food and
drinks.
6. Door Bins
• Can be used to store various kinds of sauces.
STORING FOOD
➍
➎
➏
➐
➑
➒
➊
7. Beverage Station
• Can be used to store the frequently used items,
such as canned beverages and snacks and
allows access to these items without opening
the refrigerator door.
8. Deodorizer
• Deodorizer help hide an unpleasant smell.
➓
➋
➌
1. Door Bins
• Can be used for small packages of frozen food.
9. Egg Container
• Best place to keep eggs.
Place the EGG TRAY on the shelf for easy
access.
10.Coolselct Zone™
• Helps to preserve the taste, and prolong the
freshness of your food.
Use it to store cheese, meat, poultry, fish or
any other foods that are consumed on a regular
basis.
operating _11
DA99-03327L-1 EN.indd 11
2012.3.5 3:53:47 PM
11.Fruit & Vegetable Drawer
• Used to preserve the freshness of your stored
vegetables and fruits.
12.Door Bins
• Designed to handle large, bulky items such
as gallons of milk or other large bottles and
containers.
Bottles should be stored tightly together
so that they do not tip and fall out when
the refrigerator door is opened.
• If you plan to go away for a significant
time, empty the refrigerator and turn it
off. Wipe the excess moisture from the
inside of the appliance and leave the
doors open.
This helps keep odor and mold from
developing.
Deterioration in the power cord insulation may
cause fire.
WARNING
-
Thaw
When “Thaw” is selected, warm and cold air is
alternately blown into the CoolSelect Zone™
Drawer. Depending on the weight of the frozen
food, you can select a 4 hrs, 6 hrs, 10 hrs, and 12
hrs thawing time.
When “Thaw” ends, food is in a half-frozen state,
making it easy to cut for cooking.
In addition, when “Thaw” ends, the CoolSelect
Zone™ Drawer returns to the original “0 Zone”
condition. To cancel this function mid-cycle, just
press any button besides “Thaw”.
Here are the approximate thawing times of meat
and fish by weight (and based on a 25.4mm (1in.)
thickness). This chart represents the total weight of
food in the CoolSelect Zone™ Drawer.
THAW TIME
WEIGHT
4hours
363g (0.8Ib)
6hours
590g (1.3Ib)
10hours
771g (1.7Ib)
12hours
1000g (2.2Ib)
Quick Cool
USING THE COOLSELECT
ZONE™ DRAWER (OPTIONAL)
The CoolSelect Zone™ Drawer is designed to
make your busy life just a little bit easier.
You can use the “Quick Cool” operation with the
CoolSelect Zone™ Drawer to quickly cool 1~3
canned beverages in about an hour.
When the “Quick Cool” process ends, the
CoolSelect Zone™ Drawer automatically returns to
the previously set temperature.
To cancel this operation, press the Quick Cool
button again and the CoolSelect Zone™ Drawer
returns to the previously set temperature.
Fresh Meat
When “Fresh Meat” is selected on the CoolSelect
Zone™ Drawer. A temperature of 3°C enables
faster ripening and the temperature is periodically
set to -1°C so that the meat becomes more tender,
the flavour is improved and the taste is enhanced
while suppressing microbes.
0 Zone
When “0 Zone” is selected, the temperature of
the CoolSelect Zone™ Drawer is kept at 0°C,
regardless of the overall temperature setting of the
refrigerator. This feature also helps keep meat or
fish fresh for longer.
Cool
When “Cool” is selected, the temperature in the
CoolSelect Zone™ Drawer will be the same as the
overall temperature setting of the refrigerator.
The drawer digital panel shows the same
temperature as that of the refrigerator display
panel. Since the “Cool” function mimics the
refrigerator temperature, you have extra general
storage space.
Depending on the size and thickness of
the meat or fish, thawing times may vary.
When “Thaw” is in operation, any items
that you do not want affected should be
moved out of the drawer.
12_ operating
DA99-03327L-1 EN.indd 12
2012.3.5 3:53:47 PM
REMOVING THE FREEZER/
FRIDGE ACCESSORIES
Cleaning and rearranging the interior of the freezer
is a simple.
5. Beverage Station (Fridge)
• Lift up the upper bin at the top of the fridge and
pull it out.
• After pressing the cover wrapped with both
hands, remove the beverage station cover by
pulling toward up.
03 OPERATING
1. Shelves (Freezer/Fridge)
• Remove the Glass shelf by pulling the shelf out
as far as it will go.
Then, gently lift it down and remove it.
Do not use excessive force when removing
the cover. Otherwise, the cover may break
and cause injury.
2. Door Bin
• Remove the Door Bin by holding the door bin
with both hands and then gently lift it up.
Before removing any accessories, make
sure that no food is in the way.
When possible, remove the food altogether
to reduce the risk of accidents.
To get the best energy efficiency of this
product, please leave all selves, drawers
and baskets on their original position like
as illustration in page (11).
3. Drawer
• Remove the Drawer by pulling it out and lifting it
up slightly.
CLEANING THE REFRIGERATOR
CAUTION
4. Drawer Cover
• Pull the cover out as far as it goes, and then lift
up and remove it.
• Do not use Benzene,
Thinner or Clorox™
for cleaning.
They may damage
the surface of the
appliance and can
create a risk of fire.
• Do not spray the
refrigerator with water
while it is plugged in, as
it may cause an electric
shock.
Do not clean the
refrigerator with benzene,
thinner or car detergent
for risk of fire.
operating _13
DA99-03327L-1 EN.indd 13
2012.3.5 3:53:47 PM
CHANGING THE INTERIOR
LIGHTS
CAUTION
Do not disassemble or replace the LED
type Lighting.
To change the LED Type Lighting contact
Samsung service center or your authorised
Samsung dealer.
USING THE DOORS
The refrigerator doors are equipped with a door
opening and closing feature that ensures that the
doors close all the way and are securely sealed.
After opening beyond a certain point, the door will
“catch” and remain open.
When the door is ajar ahead of the catch that
allows it to stay open, it will close automatically.
FEATURES OF THE FRESH
DOCTOR
• Each time you open and close the refrigerator
door, invisible airborne germs make their way
inside your refrigerator.
These germs attach themselves to the walls
and surfaces inside the refrigerator and even
float around inside the refrigerator.
Fresh Doctor, which features advanced SPi - 2
(Super Plasma Ion ll) technology, eliminates
these germs effectively.
• Fresh Doctor also features a solar power
deodorizer with more than twice the standard
deodorization power.
Fresh Doctor remains active at all times and can
be used semi-permanently without the need to
replace or clean its parts.
Outside
the Refrigerator
Fresh Doctor
Inside the
Refrigerator
UV, -OH
TO IMPROVE THE COOLING
PERFORMANCE
If the cold air outlet is blocked by food
items, the cold air cannot penetrate the
entire compartment and will be unable to
freeze the food efficiently which results in a
degraded cooling performance.
Plasma
Airborne Germs and
Foul Odors Enter
the Refrigerator
Disinfection,
Deodorization and Ion
Generation
Elimination of
Surface Germs
Cold air outlet
In particular, there is load limit at the top of
the freezing compartment. Please do not
put food items above this limit.
Load limit in the
freezing compartment
14_ operating
DA99-03327L-1 EN.indd 14
2012.3.5 3:53:48 PM
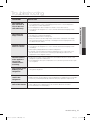
Troubleshooting
SOLUTION
The refrigerator
does not work at
all or it does not
chill sufficiently.
• Check that the power plug is properly connected.
• Is the temperature control on the display panel set to the correct temperature?
Try setting it to a lower temperature.
• Is the refrigerator in direct sunlight or located too near a heat source?
• Is the back of the refrigerator too close to the wall and therefore keeping air from
circulating?
The food in the
fridge is frozen.
• Is the temperature control on the display panel set to the correct temperature?
Try setting it to a warmer temperature.
• Is the temperature in the room very low?
• Did you store the food with a high water content in the coldest part of the fridge?
Try moving those items into the body of the fridge instead of keeping them in the
CoolSelect Zone™ drawer.
You hear unusual
noises or sounds.
• Check that the refrigerator is level and stable.
• Is the back of the refrigerator too close to the wall and therefore keeping air from
circulating?
• Was anything dropped behind or under the refrigerator?
• A “ticking” sound is heard from inside the refrigerator. This is normal and occurs
because various accessories are contracting or expanding in relation to the
temperature of the refrigerator interior.
The front corners
of the appliance
are hot and
condensation is
occurring.
• Some heat is normal as anti-condensators are installed in the front corners of the
refrigerator to prevent condensation.
• Is the refrigerator door ajar? Condensation can occur when you leave the door open
for a long time.
You can hear water
bubbling in the
refrigerator.
• This is normal. The bubbling comes from the refrigerant coolant liquid circulating
through the refrigerator.
There is a bad
smell in the
refrigerator.
• Has a food item spoiled?
• Make sure that strong smelling food (for example, fish) is wrapped so that it is airtight.
• Clean out your freezer periodically and throw away any spoiled or suspect food.
Frost forms on the
walls of the freezer.
• Is the air vent blocked? Remove any obstructions so air can circulate freely.
• Allow sufficient space between the foods stored for efficient air circulation.
• Is the freezer door closed properly?
04 TROUBLESHOOTING
PROBLEM
troubleshooting _15
DA99-03327L-1 EN.indd 15
2012.3.5 3:53:48 PM
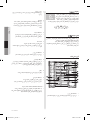
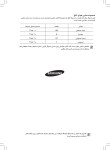
Ambient Room Temperature Limits
This fridge/freezer is designed to operate in ambient temperatures specified by its temperature class
marked on the rating plate.
Class
Symbol
Ambient Temperature range(°C)
Extended Temperate
SN
+10 to +32
Temperate
N
+16 to +32
Subtropical
ST
+16 to +38
Tropical
T
+16 to +43
Internal temperatures may be affected by such factors as the location of the fridge/freezer,
ambient temperature and the frequency with which you open the door.
Adjust the temperature as required to compensate for these factors.
DA99-03327L-1 EN.indd 16
2012.3.5 3:53:49 PM
محدوده های دمای محیط در اتاق
محیط که توسط طبقه بندی دمائی که در پالک درجه بندی آن قید شده کار کند.
این یخچال/فریزر طوری طراحی شده که در دماهای
َ
دماهای داخلی ممکن است حتت تأثیر عواملی از قبیل محل یخچال/فریزر ،دمای محیط و دفعاتی که در را باز می کنید ،قرار گیرند.
طبقه بندی
عالمت
گستره دمای محیط (درجه سانتی گراد)
متعادل تمدید شده
SN
+10تا +32
متعادل
N
+16تا +32
نیمه حاره
ST
+16تا +38
حاره
T
+16تا +43
دما را در صورت لزوم برای جبران این عوامل تنظیم کنید.
3/9/2012 2:32:11 PM
DA99-03327L(0.1)_FA.indd 16
حل مشکالت
مشکل
یخچال اصال ً کار منی کند یا
به اندازه کافی سرد منی کند.
راه حل
•آیا کنترل دما در صفحه منایش ،روی دمای درست تنظیم شده است؟
آنرا روی دمای گرم تری تنظیم کنید.
•آیا دمای اتاق بسیار پایین است؟
•آیا غذائی که محتوی آب زیادی می باشد را در سردترین بخش یخچال گذاشته اید؟ سعی کنید که اقالم را در داخل
یخچال قرار دهید به جای اینکه آنها را در کشوی ™ CoolSelect Zoneبگذارید.
سروصدا یا صداهای
غیرعادی می شنوید.
گوشه های جلوی دستگاه
داغ بوده و تقطیر ایجاد
می شود.
•قدری گرما عادیست چون وسائل ضد تقطیر در گوشه های جلوی یخچال نصب شده تا از تقطیر جلوگیری شود.
•آیا در یخچال کامال ً باز است؟ تقطیر ممکن است زمانی پیش بیاید که در را برای مدت طوالنی باز بگذارید.
می توانید صدای کف
کردن آب در داخل یخچال را
بشنوید.
•این موضوع عادیست .کف کردن از جریان پیدا کردن مایع سردساز در داخل یخچال ایجاد می شود.
بوی متعفنی در داخل
یخچال به مشام می رسد.
•آیا غذائی خراب شده است؟
•مطمئن شوید غذائی که بوی قوی دارد (برای مثال ،ماهی) به طور کیپ پوشانده شده باشد.
•فریزر را به طور نوبتی متیز کرده و غذاهای فاسد یا مشکوک را دور بریزید.
دیوارهای فریزر برفک می
گیرند.
•آیا منفذ هوا مسدود شده است؟ هرگونه مانع را بردارید تا هوا بتواند به راحتی گردش کند.
•برای گردش موثر هوا ،فضای کافی را بین غذاهای ذخیره شده قائل شوید.
•آیا در فریزر درست بسته می شود؟
04الکشم عفر
غذای داخل یخچال منجمد
شده است.
•کنترل کنید که دوشاخه درست وصل شده باشد.
•آیا کنترل دما در صفحه منایش ،روی دمای درست تنظیم شده است؟
آنرا روی دمای پائین تری تنظیم کنید.
•آیا یخچال در معرض نور مستقیم خورشید یا زیادی نزدیک منبع گرما قرار دارد؟
•آیا پشت یخچال زیادی نزدیک دیوار است و به همین دلیل جلوی جریان هوا گرفته می شود؟
•کنترل کنید که یخچال تراز و باثبات باشد.
•آیا پشت یخچال زیادی نزدیک دیوار است و به همین دلیل جلوی جریان هوا گرفته می شود؟
•آیا چیزی پشت یخچال یا زیر آن افتاده؟
•یک صدای "تیک تیک" از داخل یخچال به گوش می رسد .این موضوع عادیست و چون ملحقات مختلف در رابطه با دمای
داخل یخچال منقبض و منبسط می شوند ،این صدا ایجاد می شود.
الکشم عفر _15
3/9/2012 2:32:11 PM
DA99-03327L(0.1)_FA.indd 15
تعویض المپ های داخلی
احتیاط
المپ های نوع LEDرا اوراق یا تعویض نکنید.
برای تعویض چراغ های نوع LEDبا مرکز خدمات Samsung
یا فروشنده Samsungمجاز خود متاس بگیرید.
استفاده از درها
درهای یخچال مجهز به ویژگی باز کردن و بسنت در می باشد تا اطمینان
حاصل شود که درها کامال ً بسته شده و به طور ایمن کیپ می شوند.
پس از باز کردن در به میزان مشخص ،در "گیر" کرده و باز باقی خواهد
ماند.
اگر در قبل از "گیر کردن" که به آن امکان می دهد باز باقی مباند کامال ً
باز شود ،به طور خودکار بسته خواهد شد.
ویژگی های دکتر تازه
•هربار که در یخچال را باز و بست می کنید ،میکروب های نامرئی
هوازی به یخچال وارد می شوند.
این میکروب ها خودشان را به دیواره ها و سطوح داخل یخچال می
چسبانند و حتی در داخل یخچال شناور می شوند.
دکتر تازه که از فناوری پیشرفته SPi - 2()Super Plasma Ion ll
استفاده می کند ،این میکروب ها را به طور مؤثر نابود می کند.
•دکتر تازه از بوگیر نیروی خورشیدی با بیش از دوبرابر نیروی بوزدائی
استاندارد نیز استفاده می کند.
دکتر تازه در همه اوقات فعال باقی می ماند و می توان از آن به طور
نیمه دائم بدون نیاز به تعویض یا متیز کردن قطعاتش استفاده کرد.
داخل یخچال
دکتر تازه
خارج
یخچال
UV, -OH
پالسما
برای بهبود کارآئی خنک کنندگی
اگر خروجی هوای سرد توسط اقالم غذائی مسدود شده
باشد ،هوای سرد منی تواند به همه محفظه نفوذ کرده و
منی تواند غذا را به طور موثر منجمد کند که منجر به افت
کارآئی خنک کنندگی می شود.
از بین بردن میکروب های
سطحی
ضدعفونی ،بوزدائی و تولید یون
میکروب های هوازی و
بوهای متعفن وارد یخچال
می شوند
خروجی هوای سرد
مخصوصا ً یک حد گنجایش در باالی محفظه اجنماد وجود
دارد .لطفا ً اقالم غذائی را در باالی این حد قرار ندهید.
حد گنجایش در محفظه اجنماد
_14هدافتسا
3/9/2012 2:32:11 PM
DA99-03327L(0.1)_FA.indd 14
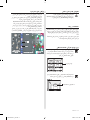
برداشنت ملحقات فریزر/یخچال
متیز کردن و دوباره مرتب کردن داخل فریزر آسان است.
1 .1قفسه ها (فریزر/یخچال)
•قفسه شیشه ای را با کشیدن قفسه به بیرون تا جائی که ممکن
است بردارید.
سپس با مالیمت آنرا به پائین بلند کرده و بردارید.
5 .5ایستگاه نوشابه (یخچال)
•محفظه فوقانی در باالی یخچال را بلند کرده و به بیرون بکشید.
•پس از فشردن پوشش که با هردو دست گرفته شده ،پوشش
ایستگاه نوشابه را با کشیدن آن به سمت باال بردارید.
1
03هدافتسا
2
هنگام برداشنت پوشش ،زیاد فشار وارد نکنید .در غیر
اینصورت ممکن است که پوشش بشکند و موجب
مصدومیت شود.
2 .2محفظه روی در
•با نگه داشنت محفظه روی در با دو دست و سپس بلند کردن آن با
مالیمت ،آنرا خارج کنید.
قبل از برداشنت هرگونه ملحقات ،مطمئن شوید که اقالم
غذائی سر راه نباشد.
در صورت ممکن همه غذاها را خارج کنید تا خطر بروز حادثه
کاهش پیدا کند.
برای کسب بهترین بازده انرژی از این محصول ،لطفا ً همه
قفسه ها ،کشوها و سبدها را در وضعیت اولیه به صورت
منودار در صفحه ( )11قرار دهید.
3 .3کشو
•کشو را با بیرون کشیدن و قدری بلند کردن خارج کنید.
متیز کردن یخچال
احتیاط
4 .4سرپوش کشو
•سرپوش را تا جائی که ممکن است بیرون بکشید و سپس آنرا بلند
کرده و خارج کنید.
•از بنزن ،تینر یا ™Clorox
برای متیز کردن استفاده
نکنید.
ممکن است به سطح
دستگاه آسیب وارد کرده و
خطر آتشسوزی ایجاد کند.
•هنگامیکه یخچال به پریز برق زده
شده روی آن آب نپاشید چون ممکن
است موجب برق گرفتگی شود.
یخچال را با بنزن ،تینر یا شوینده
اتومبیل متیز نکنید چون خطر
آتشسوزی وجود دارد.
هدافتسا _13
3/9/2012 2:32:04 PM
DA99-03327L(0.1)_FA.indd 13
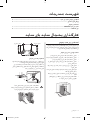
1111کشوی میوه و سبزیجات
•برای حفظ تازگی سبزیجات و میوه های نگهداری شده استفاده
شود.
1212محفظه های روی در
•برای نگهداری اقالم پرحجم از قبیل گالن های شیر یا سایر بطری
ها و محفظه های بزرگ طراحی شده است.
بطری ها بایستی در کنار هم نگهداری شوند تا هنگامیکه
در یخچال باز می شود واژگون نشده و به بیرون پرتاب نشوند.
•اگر برای مدت طوالنی به مسافرت می روید ،یخچال
را خالی کرده و آنرا خاموش کنید .رطوبت اضافی را از
هشدار
داخل دستگاه پاک کرده و درها را باز بگذارید.
اینکار از تولید بو و کپک جلوگیری می کند.
-فرسودگی در عایق بندی سیم برق ممکن است موجب آتشسوزیشود.
استفاده از کشوی ™CoolSelect Zone
(حوزه انتخاب سرما) (انتخابی)
کشوی ™( CoolSelect Zoneحوزه انتخاب سرما) طوری طراحی شده تا
زندگی پرمشغله شما را قدری آسان تر کند.
گوشت تازه
هنگامیکه "( "Fresh Meatگوشت تازه) در کشوی
™( CoolSelect Zoneحوزه انتخاب سرما) انتخاب می شود .دمای
3درجه سانتی گراد رسیده شدن سریع تر را میسر می کند و دما
به طور دوره ای روی -1درجه سانتی گراد تنظیم می شود تا گوشت
تردتر شود ،طعم بهبود پیدا کند و مزه در حالیکه از تولید میکروب ها
جلوگیری می شود بهبود پیدا کند.
حوزه 0
هنگامیکه "( "0 Zoneحوزه )0انتخاب شود ،دمای کشوی
™( CoolSelect Zoneحوزه انتخاب سرما) علیرغم دمای کلی یخچال،
روی 0درجه سانتی گراد نگه داشته می شود .این ویژگی همچنین
کمک می کند تا گوشت یا ماهی به مدت طوالنی تری تازه مباند.
آب شدن
هنگامیکه "( "Thawآب شدن) انتخاب شود ،هوای گرم و سرد به طور
متناوب در کشوی ™( CoolSelect Zoneحوزه انتخاب سرما) وزیده می
شود .بستگی به وزن غذای منجمد ،می توانید زمان آب شدن را روی
4ساعت 6 ،ساعت 10 ،ساعت و 12ساعت انتخاب کنید.
هنگامیکه "( "Thawآب شدن) متام شد ،غذا در وضعیت نیمه منجمد
بوده و بریدن آن برای پخنت آسان می شود.
عالوه براین ،هنگامیکه "( "Thawآب شدن) متام شد ،کشوی
™( CoolSelect Zoneحوزه انتخاب سرما) به وضعیت اصلی
"( "0 Zoneحوزه )0برمی گردد .برای لغو این عملکرد در وسط چرخه،
صرفا ً هر دکمه ای را به غیر از "( "Thawآب شدن) فشار دهید.
در اینجا مدت آب شدن تقریبی گوشت و ماهی برحسب وزن (و براساس
ضخامت 25/4میلی متر ( 1اینچ)) ذکر می شود .این جدول منایشگر وزن
کل غذا در کشوی ™( CoolSelect Zoneحوزه انتخاب سرد) می باشد.
مدت آب شدن
وزن
4ساعت
363گرم ( 0/8پوند)
6ساعت
590گرم ( 1/3پوند)
10ساعت
771گرم ( 1/7پوند)
12ساعت
1000گرم ( 2/2پوند)
( Quick Coolخنک سریع)
می توانید از کارکرد "( "Quick Coolخنک سریع) به همراه کشوی
™( CoolSelect Zoneحوزه انتخاب سرد) برای خنک کردن سریع
1تا 3قوطی نوشابه در ظرف حدود یک ساعت استفاده کنید.
هنگامیکه فرایند "( "Quick Coolخنک سریع) متام شد ،کشوی
™( CoolSelect Zoneحوزه انتخاب سرد) به طور خودکار به دمای
تنظیم شده قبلی برمی گردد.
برای لغو این کارکرد ،دکمه ( Quick Coolخنک سریع) را دوباره فشار داده
و کشوی ™( CoolSelect Zoneحوزه انتخاب سرما) به دمای تنظیم
شده قبلی برمی گردد.
خنک
هنگامیکه "( "Coolخنک) انتخاب شود ،دما در کشوی
™( CoolSelect Zoneحوزه انتخاب سرما) به میزان دمای کلی در
یخچال خواهد بود.
صفحه دیجیتال کشو همان دمائی را نشان می دهد که صفحه منایش
یخچال نشان می دهد .چون عملکرد "( "Coolخنک) از دمای یخچال
تقلید می کند ،شما فضای بیشتری را برای نگه داری غذا دارید.
بستگی به اندازه و ضخامت گوشت یا ماهی ،مدت آب شدن
ممکن است متفاوت باشد.
هنگامیکه "( "Thawآب شدن) در حال اجراست ،اقالمی که
منی خواهید آب شوند بایستی از کشو خارج شوند.
_12هدافتسا
3/9/2012 2:31:49 PM
DA99-03327L(0.1)_FA.indd 12
2 .2سینی یخ ساز
•برای ایجاد فضای بیشتر برای قراردادن غذا ،می توانید سینی یخ را
بردارید.
یخچال
دکمه ( Fridgeیخچال) را برای تنظیم دمای دخلواه
از 1تا 7درجه سانتی گراد فشار دهید .دمای از پیش
تنظیم شده 3درجه سانتی گراد است و هربار که
دکمه ( Fridgeیخچال) را فشار می دهید ،دما به
ترتیب زیر تغییر کرده و نشانگر دما ،مقادیر دخلواه را نشان خواهد داد.
4 .4محفظه لبنیات
•می توان برای نگهداری اقالم کوچکتر لبنیات از قبیل کره یا
مارگارین ،ماست یا قالب های خامه پنیر از آن استفاده کرد.
قفل کودک
این مناد هنگامی روشن خواهد شد که عملکرد قفل کودک را با فشردن
دکمه ( Child Lockقفل کودک) فعال کرده باشید.
این دکمه را دوباره برای فعال کردن مجدد فشار دهید.
از این عملکرد برای جلوگیری از ور رفنت و دستکاری کودکان با تنظیمات
دما و فیلتر استفاده کنید.
5 .5قفسه ها
•طوری طراحی شده اند که ترک نخورند.
می توان برای نگهداری همه نوع غذا و نوشیدنی از آنها استفاده
کرد.
6 .6محفظه های روی در
•برای قرار دادن انواع مختلف ُسس ها می توان استفاده کرد.
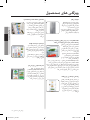
قرار دادن غذا
4
➍
7 .7جایگاه نوشیدنی
•می توان برای نگهداری اقالمی که اغلب استفاده می شوند از آن
استفاده کرد از قبیل قوطی های نوشیدنی و اسنک و بدون باز کردن
در یخچال به این اقالم دسترسی پیدا کرد.
7
➐
8 .8بوگیر
•بوگیر به پنهان سازی بوی ناخوشایند کمک می کند.
5
➎
6
➏
8
➑
9
➒
10
➓
1
➊
11
2
➋
12
03هدافتسا
3 .3کشوها
•برای نگه داری گوشت یا غذاهای خشک بسیار مناسب است.
غذا ذخیره شده بایستی با استفاده از کاغذ آلومنیمی یا مواد
پیچیندن یا محفظه های مناسب دیگر به خوبی پیچیده شده
باشد.
9 .9محفظه تخم مرغ
•بهترین محل برای نگهداری تخم مرغ ها.
سینی تخم مرغ را برای دسترسی آسان روی قفسه قرار دهید.
3
➌
1 .1محفظه های روی در
•می توان برای بسته های کوچک غذای یخ زده از آنها استفاده کرد.
( Coolselct Zone™1010منطقه انتخاب سرما)
•به حفظ طعم غذا و طوالنی کردن تازگی آن کمک می کند.
از آن برای نگهداری پنیر ،گوشت ،گوشت مرغ یا هرگونه غذائی که
به طور مرتب مصرف می شود استفاده کنید.
هدافتسا _11
3/9/2012 2:31:47 PM
DA99-03327L(0.1)_FA.indd 11
استفاده از یخچال
ساید بای ساید SAMSUNG
استفاده از صفحه کنترل /منایشگر دیجیتال
استفاده از منایشگر دیجیتال
منایشگر هنگامیکه از آن استفاده منی شود خاموش می شود ،این
موضوع عادیست .هنگامیکه به فشردن دکمه
( Child Lockقفل کودک) ادامه می دهید ،منایشگر روشن خواهد شد.
()1
()2
یخ زدن سریع
()3
این مناد هنگامیکه به فشردن دکمه ( Freezerفریزر) ادامه می دهید
روشن خواهد شد( "Quick Freeze" .یخ زدن سریع) برای مواقعی ایده آل
است که به مقدار زیادی یخ نیاز دارید.
هنگامیکه مقدار کافی تولید شد ،کافیست دکمه را برای لغو حالت
"("Quick Freezeپخ زدن سریع) دوباره فشار دهید.
()4
()5
()1
یخ زدن سریع
زمان الزم برای منجمد کردن محصوالت در داخل فریزر را
سریع تر می کند.
این عملکرد هنگامی می تواند مفید باشد که می
خواهید سریعا ً اقالمی که به راحتی خراب می شوند را
منجمد کنید یا اینکه دمای داخل فریزر به طور شدید
گرم شده باشد (برای مثال اگر در باز گذاشته شده
باشد).
این عملکرد بایستی قبل از قرار دادن اقالم بزرگ در
محفظه فریزر حداقل 24ساعت قبل فعال شود.
()2
دکمه Freezer
(فریزر)
دکمه ( Freezerفریزر) را برای تنظیم فریزر روی دمای مورد
نظرتان فشار دهید.
می توانید دما را بین -14و -23درجه سانتی گراد تنظیم
کنید.
()3
Smart ECO
(صرفه جوئی
هوشمند)
تازگی غذا را با استفاده از 11سنسور بستگی به محیط
استفاده ،الگوی استفاده و وضعیت استفاده از یخچال
حفظ می کند در ضمن اینکه در هزینه برق صرفه جوئی
می شود.
()4
دکمه Fridge
(یخچال)
دکمه ( Fridgeیخچال) را برای تنظیم یخچال روی دمای
مورد نظرتان فشار دهید.
می توانید دما را بین 1و 7درجه سانتی گراد تنظیم
کنید.
هنگامیکه از این عملکرد استفاده می کنید ،مصرف
انرژی یخچال افزایش پیدا می کند .فراموش نکنید که آنرا
هنگامیکه به آن نیاز ندارید خاموش کنید و فریزر را به
تنظیمات دمای اصلی تان برگردانید.
عملکرد ( Quick Freezeیخ زدن سریع) بعد از یک مدت از
قبل تنظیم شده ( 72ساعت/در محدوده گستره خطای
1ساعته) به طور خودکار خاموش می شود .اگر کارکرد
( Quick Freezeیخ زدن سریع) متام شده است ،درجه
محفظه فریزر به میزان -20درجه سانتی گراد حفظ می
شود .در صورت لزوم می توانید دما را تغییر دهید.
فریزر
دکمه ( Freezerفریزر) را برای تنظیم دمای دخلواه از
-14تا -23درجه سانتی گراد فشار دهید.
دمای از پیش تنظیم شده -20درجه سانتی گراد
است و هربار که دکمه (Freezerفریزر) را فشار می
دهید ،دما به ترتیب زیر تغییر کرده و نشانگر دما ،مقادیر دخلواه را نشان
خواهد داد.
()5
با فشردن این دکمه برای 3ثانیه ،همه دکمه ها قفل
دکمه Child Lockخواهند شد .برای لغو این عملکرد ،این دکمه را دوباره
فشار دهید.
(قفل کودک)
_10هدافتسا
3/9/2012 2:31:40 PM
DA99-03327L(0.1)_FA.indd 10
ویژگی های محصول
یخچال ساید بای ساید Samsung
فضای کافی برای همه مواد خوراکی،
نوشیدنی ها ،غذاهای یخ زده و خوراک
های پس مانده شما دارد.
اندازه آن برای هر موقعیتی ایده آل است
جشن تعطیلی ،گردهمآئی خانوادگییا ضیافیت مسابقات ورزشی.
هوای خنک از طریق چندین منفذ در هر
سطح طبقه ها جریان پیدا می کند.
این موضوع خنک سازی یکدست را
در سرتاسر یخچال ایجاد می کند و
هنگامیکه در باز شده باشد با سرعت
به دما بر می گردد.
بنابراین دمای ایده آلی را برای تازه نگه
داشنت غذا به مدت طوالنی تر حفظ
می کند.
اتاقک طعم غذا -از هر زمان دیگری پیشرفته تر است که به
واسطه حالت رسیده سازی گوشت می باشد.
اتاقک طعم غذا با بهره گیری از فناوری
انحصاری ذخیره سازی غذای ،Zipel
رطوبت را در غذای ذخیره شده قفل می
کند تا برای مدت بیشتری تازه و مغذی
باقی مباند.
اتاقک طعم غذا با همکاری انستیتو
حتقیقات غذائی پیشرفته کره از
آلگوریتم رسیده سازی گوشت ویژه ای
نیز استفاده می کند.
حالت Kimchi/Shikhyeدمائی معادل -1درجه سانتی گراد را در داخل
اتاقک حفظ کرده که تازگی غذای ذخیره شده را تضمین می کند؛
حالت یخ زدائی طعم غذا به شما امکان می دهد تا غذا را بدون از دست
رفنت طعم آن یخ زدائی کنید؛ سردسازی سریع به شما امکان می دهد
که غذا را به طور سریع سرد کنید؛ و حالت سرد کردن ،فضای ذخیره
سازی بیشتری را در داخل یخچال ایجاد می کند.
روشنائی توسط برج چراغ LED
این اسباب روشنائی LEDکه در فضای
موجود صرفه جوئی می کند هر گوشه
ای از یخچال را روشن می کند و بنابراین
پیدا کردن اقالم آسان تر می شود.
همچنین چراغ LEDحرارت کمتری را در
مقایسه با المپ سنتی ساطع کرده
و زیان کمتری را به مدیریت دمائی وارد
می کند.
02لوصحم یاه یگژیو
ظرفیت بزرگتر
منفذهای احاطه کننده چندگانه هوا
سیستم سردکننده دوگانه
یخچال و فریزر دو تبخیرکننده دارند.
با توجه به این سیستم مستقل ،فریزر
و یخچال در صورت لزوم به طور جداگانه
سرد شده و بنابراین بازدهی بیشتری
دارند.
بوی غذا در یخچال به واسطه گردش
جداگانه جریان هوا بر روی غذا در فریزر
تأثیری منی گذارد.
دکتر ضدعفونی و بوزدائی تازه
پخچال شما فناوری SPi - 2
( )Samsung Super Plasma Ion IIرا
به ارمغان می آورد که باکتری هوابرد و
سطحی در داخل اتاقک سردکننده را
از بین می برد و همچنین بوگیر با انرژی
خورشیدی دارد که قدرت بوزدائی به
میزان دوبرابر را عرضه می کند.
لوصحم یاه یگژیو _09
3/9/2012 2:31:34 PM
DA99-03327L(0.1)_FA.indd 9
تراز کردن یخچال
اگر یخچال را روی زمین غیر مسطح نصب می کنید ،ممکن است موجب
تفاوت ارتفاع بین درها شود.
هنگامیکه قسمت فریزر پائین تر از قسمت یخچال است.
2 .2از آچار ارائه شده برای گرداندن مهره قابل تنظیم ارتفاع ( ) b تا
جایی که ممکن است در جهت خالف عقربه ساعت (
)
استفاده کنید.
) برای بلند کردن در
(آنرا در جهت خالف عقربه ساعت (
) برای پایین آوردن در
گردانده؛ آنرا در جهت عقربه ساعت (
بگردانید).
یک پیچ گوشتی تیغه تخت را در داخل سوراح پایه قابل تنظیم در پایین
در فریزر قرار داده و آنرا در جهت عقربه ساعت بگردانید.
3 .3هنگامیکه ارتفاع در هر دو طرف همتراز شد ،از آچار برای گرداندن
مهره قابل تنظیم ( ) a در جهت خالف عقربه ساعت (
)
برای محکم کردن آن استفاده کنید.
هنگامیکه قسمت یخچال پائین تر از قسمت فریزر است.
یک پیچ گوشتی تیغه تخت را در داخل سوراح پایه قابل تنظیم در پایین
در یخچال قرار داده و آنرا در جهت عقربه ساعت بگردانید.
اگر ارتفاع محصول را هنگامیکه خالی می باشد تنظیم
کردید ،افزودن غذا پس از آن ممکن است سراجنام موجب
تفاوت ارتفاع به واسطه وزن اضافی شود .در این صورت
مراحل فوق را دوباره برای تنظیم ارتفاع اجرا منایید.
کارگذاری یخچال
برای بهترین روش تنظیم تفاوت ارتفاع در بین درها به بخش
بعدی مراجعه کنید.
تنظیم تفاوت ارتفاع بین درها
اگر یک در پایین تر از در دیگر است.
•می توانید از مهره قابل تنظیم در
پایین یخچال/فریزر برای تنظیم تفاوت
ارتفاع بین درها استفاده منایید.
•تنظیم بیش از حد ممکن است بین
در و لوالی باالیی در هنگام باز/بسته
کردن در ایجاد اختالل کند.
1 .1در را برای تنظیم کردن آن باز کنید .از آچار ارائه شده برای گرداندن
مهره قابل تنظیم پایین ( ) a تا جایی که ممکن است در جهت
) استفاده کنید.
عقربه ساعت (
حاال که یخچال جدید را سرجایش نصب کرده اید ،آماده اید که آنرا راه
بیاندازید و از ویژگی ها و عملکردهای کامل آن بهره مند شوید.
یخچال بایستی با اجرای مراحل زیر کامال ً راه اندازی شود.
در غیر اینصورت ،منبع نیرو و منبع برق را کنترل کرده یا به بخش رفع
مشکالت در پشت این راهنمای استفاده کاربر مراجعه کنید.
اگر سؤال دیگری دارید ،با مرکز خدمات Samsung Electronicsمتاس
بگیرید.
.1
.2
.3
.4
1یخچال را در محل مناسب و در فاصله قابل قبول بین دیوار و یخچال
قرار دهید.
به دستورالعمل های نصب در این دفترچه راهنما مراجعه کنید.
2هنگامیکه یخچال به پریز زده شد ،مطمئن شوید که چراغ داخلی
هنگامیکه درها را باز می کنید ،روشن شود.
3کنترل دما را روی سردترین دما قرار داده و برای یک ساعت منتظر
شوید.
فریزر بایستی قدری سرد شده و موتور به طور روان گردش کند.
4پس از روشن کردن یخچال ،چند ساعتی طول می کشد تا به دمای
مناسب برسد .هنگامیکه دمای یخچال به قدر کافی خنک شد،
می توانید غذا و نوشیدنی را در داخل یخچال قرار دهید.
در را باز کرده و تنظیمات داخل در را ایجاد کنید.
_08یراذگراک
3/9/2012 2:28:56 PM
DA99-03327L(0.1)_FA.indd 8
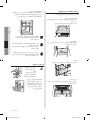
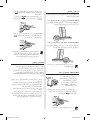
کارگذاری درهای یخچال
جدا کردن در یخچال
اگر در ورودی به شما امکان منی دهد تا یخچال را به راحتی از داخل آن
عبور دهید ،می توانید درها را بردارید.
1 .1پوشش لوال ( ) 1 را در حالیکه در باز است با پیچ گوشتی برداشته
و سپس در را ببندید.
جدا کردن درهای فریزر
()1
()2
()1
2 .2لوالی ثابت کننده را جدا کرده و سپس لوالی فوقانی را بردارید.
مراقب باشید که در حین جدا کردن در ،روی شما نیافتد.
2 .2لوالی ثابت کننده را جدا کرده و سپس لوالی فوقانی را بردارید.
مراقب باشید که در حین جدا کردن در ،روی شما نیافتد.
احتیاط
01یراذگراک
1 .1پوشش لوال ( ) 1 را در حالیکه در باز است با پیچ گوشتی برداشته
و سپس در را ببندید و سپس سیم ها را توسط جدا کردن آرام آنها،
قطع کنید (.) 2
حتما ً حساب همه قطعاتی که جدا می کنید را نگه دارید.
3 .3در را مستقیم به سمت باال بلند کنید ( ) 2 تا از لوالی حتتانی () 3
جدا شود.
()3
احتیاط
حتما ً حساب همه قطعاتی که جدا می کنید را نگه دارید.
()2
3 .3سپس توسط بلند کردن در با احتیاط و مستقیم به سمت باال
( ،) 3 در را از لوالی حتتانی ( ) 4 جدا کنید.
سوار کردن مجدد در یخچال
()4
احتیاط
برای سوار کردن دوباره درهای یخچال ،قطعات را به ترتیب
معکوس سرجایشان بگذارید.
()3
نصب مجدد درهای فریزر
برای سوار کردن دوباره درهای فریزر ،قطعات را به ترتیب معکوس سر
جایشان بگذارید.
یراذگراک _07
3/9/2012 2:28:50 PM
DA99-03327L(0.1)_FA.indd 7
فهرست مندرجات
کارگذاری یخچال ساید بای ساید ………………………………………………………………………………………………………………………………………………………………………………………………………… …06
ویژگی های محصول ………………………………………………………………………………………………………………………………………………………………………………………………………………………………………… …09
استفاده از یخچال
ساید بای ساید 10… …………………………………………………………………………………………………………………………………………………………………………………………………………………………SAMSUNG
حل مشکالت………………………………………………………………………………………………………………………………………………………………………………………………………………………………………………………… …15
کارگذاری یخچال ساید بای ساید
آماده شدن برای نصب یخچال
حداقل 6میلی متر
990میلی متر
1350میلی متر
1223میلی متر
945میلی متر
خرید یخچال ساید بای ساید Samsungرا به شما تبریک می گوئیم.
امیدواریم که از بسیاری ویژگی ها و کارآئی های بسیار پیشرفته ای که
این دستگاه جدید عرضه می کند لذت ببرید.
حداقل 6میلی متر
`°160 `°160
انتخاب بهترین محل برای یخچال
•محلی را انتخاب کنید که دسترسی آسان به منبع آب دارد.
•محلی را انتخاب کنید که در معرض نور مستقیم خورشید نیست.
•محلی را انتخاب کنید که زمین تراز (یا تقریبا ً تراز) دارد.
•محلی را انتخاب کنید که برای باز کردن آسان درهای یخچال به
اندازه کافی جا دارد.
•فضای کافی را برای جریان هوا در سمت راست ،چپ ،پشت و باال
قائل شوید.
اگر یخچال هم تراز نباشد ،سیستم سردکننده داخلی ممکن استبه طور صحیح کار نکند.
برای فضای کلی الزم برای استفاده به تصویر و ابعاد زیر مراجعهکنید.
•لطفا ً مطمئن شوید که می توان دستگاه را در موقع حفظ و
نگهداری و تعمیر به راحتی حرکت داد.
1725میلی متر
هنگام حرکت دادن یخچال
برای جلوگیری از وارد شدن آسیب به کف اتاق ،مطمئن شوید که پایه
های تراز کردن در وضعیت باال (باالی کف اتاق) باشند.
به "تنظیم درها" در دفترچه راهنما (صفحه )8مراجعه کنید .برای
محافظت از سطح صیقلی شده کف اتفاق ،ورقه محافظتی از قبیل
کارتن بسته بندی را زیر یخچال قرار دهید.
پایه
پیچ گوشتی
23میلی متر
احتیاط
هنگام نصب ،تعمیر یا متیز کردن پشت یخچال ،حتما ً
دستگاه را به طور مستقیم به بیرون کشیده و بعد از اینکه
کارتان متام شد به طور مستقیم سرجایش ُهل دهید.
50میلی متر
_06یراذگراک
3/9/2012 2:28:35 PM
DA99-03327L(0.1)_FA.indd 6
راهنمائی های اضافی برای استفاده صحیح
•اجازه بدهید که دستگاه پس از نصب برای 2ساعت به طور
ایستاده باقی مباند.
•برای کسب بهترین عملکرد از این محصول،
غذاها را زیاد نزدیک هواکش ها و در عقب دستگاه قرار ندهید چونممکن است جلوی گردش آزاد هوا را در محفظه فریزر بگیرند.
غذا را قبل از گذاشنت در یخچال ،درست بپوشانید یا در محفظههای کیپ و در بسته قرار دهید.
غذاهای تازه را برای منجمد شدن در کنار غذاهائی که قبال ً منجمدشده اند قرار ندهید.
•اگر برای کمتر از سه هفته به مرخصی می روید ،الزم نیست که
یخچال را از پریز برق بکشید.
ولی اگر برای سه هفته یا بیشتر به مرخصی می روید ،همه اقالم
غذائی را خارج کنید .یخچال را از پریز کشیده و آنرا متیز ،آبکشی و
خشک کنید.
•این دستگاه هنگامیکه برای مدت طوالنی در پایین ترین حدود سرما
که این یخچال برای آن طراحی شده قرار داده شود ممکن است به
طور مداوم کار نکند (احتمال یخ زدائی محتویات یا گرم شدن زیاد
دما در محفظه غذای منجد).
•از غذاهائی از قبیل موز و طالبی که به آسانی خراب می شوند در
دمای پایین نگه داری نکنید.
•جا یخی را در محلی قرار دهید که توسط سازنده برای آن طراحی
شده تا یخ زدن بهینه ایجاد شود.
•این دستگاه برفک منی زند ،یعنی الزم نیست به طور دستی آنرا یخ
زدائی کرد چون اینکار به طور خودکار اجنام می شود.
•باال رفنت دما در طول یخ زدائی می تواند با شرایط ISOسازگار
باشد.
ولی اگر می خواهید از افزایش بیش از حد دمای غذای منجمد در
طول یخ زدائی دستگاه جلوگیری کنید ،لطفا ً غذای منجمد را در
چند الیه کاغذ از قبیل روزنامه بپیچید.
•افزایش دمای غذای منجمد در طول یخ زدائی ممکن است طول عمر
نگهداری آن را کوتاه کند.
نکاتی در مورد صرفه جوئی در انرژی
-
-
این دستگاه را در یک اتاق خنک و خشک نصب کنید که به اندازهکافی تهویه می شود.
مطمئن شوید که در معرض نور مستقیم خورشید قرار داده نشده
و هرگز آنرا نزدیک یک منبع مستقیم گرما (برای مثال شوفاژ) قرار
ندهید.
هرگز منفذهای تهویه یا هواکش های مشبک دستگاه را مسدودنکنید.
قبل از قرار دادن غذای گرم در داخل این دستگاه ،بگذارید خنک شود.غذای منجمد را برای آب شدن در یخچال بگذارید.سپس می توانید از دماهای پایین محصوالت منجمد برای خنک
کردن غذا در یخچال استفاده کنید.
نگذارید در یخچال هنگام گذاشنت یا برداشنت غذا از داخل آن زیادیباز باقی مباند .هرچه در یخچال کمتر باز باقی مباند ،یخ کمتری در
فریزر تولید خواهد شد.
پشت یخچال را به طور مرتب متیز کنید.گرد و غبار مصرف انرژی را افزایش می دهد.
دما را سردتر از میزان الزم تنظیم نکنید.مطمئن شوید که هوای کافی از زیر یخچال و دیواره پشتی آن خارجمی شود.
روزنه های منفذ هوا را نپوشانید.
هنگام نصب ،فضای کافی را در سمت راست ،چپ ،پشت و باالقائل شوید.
این موضوع به کاهش مصرف برق کمک کرده و میزان برق مصرفی
در صورحتساب های برق شما را کمتر خواهد کرد.
نمیا تاعالطا _05
3/9/2012 2:28:23 PM
DA99-03327L(0.1)_FA.indd 5
عالئم احتیاط
-
•این محصول فقط به منظور نگهداری غذا در محیط خانگی می
باشد.
•بایستی مدت نگهداری توصیه شده توسط سازنده و تاریخ مصرف
مواد غذائی مراعات شود .به دستورات مربوطه مراجعه کنید.
•بطری ها بایستی تنگ هم قرار داده شوند تا نیافتند.
•نوشابه های گازدار یا پرکف را در محفظه فریزر قرار ندهید
•یخچال را زیادی با غذا پر نکنید.
هنگامیکه در را باز می کنید ،اقالم ممکن است به بیرون بیافتند وموجب مصدومیت شخصی یا آسیب اقالم شوند.
•بطری یا محفظه های شیشه ای را در فریزر قرار ندهید.
بطری هنگامیکه محتویات آن منجمد شد ،ممکن است بشکند وموجب مصدومیت شخصی شود.
•گاز قابل اشتعال را در نزدیکی یخچال اسپری نکنید.
خطر انفجار یا آتشسوزی وجود دارد.•به طور مستقیم به داخل یا خارج یخچال آب نپاشید.
خطر آتشسوزی یا برق گرفتگی وجود دارد.•مواد فرار یا قابل اشتعال را در یخچال نگه ندارید.
نگهداری بنزن ،تینر ،الکل ،اتر ،گاز مایع و سایر محصوالت مشابهممکن است موجب انفجار شود.
•اگر در نظر دارید که برای مدت طوالنی به مرخصی بروید ،توصیه
می شود که دستگاه را تخلیه کنید یا از عملکرد مرخصی
استفاده کنید.
•غذاهای یخ زده که کامال ً آب شده اند را دوباره منجمد نکنید.
•محصوالت داروئی ،مواد علمی یا محصوالتی که در مقابل دما
حساس هستند را در یخچال نگه ندارید.
محصوالتی که به کنترل شدید دما نیاز دارند نبایستی در اینیخچال نگهداری شوند.
•محفظه ای که با آب پر شده را روی یخچال قرار ندهید.
اگر هرگونه ماده خارجی از قبیل آب وارد دستگاه شده ،دوشاخه را
از پریز کشیده و با نزدیکترین مرکز تعمیرات متاس حاصل منایید.
-خطر آتشسوزی یا برق گرفتگی وجود دارد.
عالئم هشدار برای دور انداخنت
•هنگام دور انداخنت این یخچال یا سایر یخچال ها ،در/الستیک های
دور در و چفت در را جدا کنید تا کودکان یا حیوانات کوچک نتوانند
در داخل محبوس شوند.
•قفسه های یخچال را خارج نکنید تا کودکان نتوانند به راحتی
داخل شوند.
•از R600aیا R134aبه عنوان سردساز استفاده شده است.
برچسب کمپرسور در پشت دستگاه یا برچسب درجه بندی در داخل
یخچال را کنترل کنید تا ببینید از چه سردسازی برای یخچال شما
استفاده شده است.
هنگامیکه این محصول حاوی گاز قابل اشتعال است (سردساز
،)R600aدر مورد روش دور انداخنت بی خطر محصول با مقامات
محلی متاس بگیرید.
•از سیکلوپنتان به عنوان گاز دمش عایق بندی استفاده شده است.
گازهای داخل مواد عایق بندی نیاز به شیوه دور انداخنت ویژه دارند.
لطفا ً در مورد دورانداخنت ایمن این محصول از حلاظ محیط زیست،
با مقامات محلی تان متاس بگیرید.
قبل از دور انداخنت ،مطمئن شوید که به هیچیک از لوله ها در
پشت دستگاه آسیب وارد نشده باشد.
لوله ها در فضای باز خواهند شکست.
در صورت قطع شدن برق ،با مأمور محلی شرکت برق متاس
گرفته و از وی بپرسید که این قطع شدگی چه مدت طول
احتیاط
خواهد کشید.
بیشتر قطع شدگی های برق که در ظرف یکی دوساعت برطرف شوند بر
روی دمای یخچال تأثیری نخواهند گذاشت.
با این وجود بایستی هنگام قطع شدن برق ،تعداد دفعات بازکردن در
یخچال را به حداقل برسانید.
ولی اگر قطعی برق بیش از 24ساعت طول کشید ،همه غذاهای
منجمد را خارج کنید.
برای درها و دریچه هائی که قفل و کلید دارند ،نبایستی کلیدها را در
دسترس کودکان و در مجاورت دستگاه های سردکننده قرار داد تا از
حبس شدن کودکان در داخل دستگاه جلوگیری شود.
عالئم احتیاط برای متیز کردن
-
•دست هایتان را به زیر دستگاه وارد نکنید.
هرگونه لبه تیز ممکن است موجب مصدومیت شخصی شود.•هنگام متیز کردن دوشاخه از پارچه خیس یا من دار استفاده نکنید،
هرگونه ذرات خارجی یا گرد و غبار را از خارهای دوشاخه پاک کنید.
-در غیراینصورت خطر آتشسوزی وجود دارد.
_04نمیا تاعالطا
3/9/2012 2:28:23 PM
DA99-03327L(0.1)_FA.indd 4
عالئم هشدار شدید
-
•یخچال را در محیط منناک یا محلی که ممکن است در
متاس با آب یا گاز قرار گیرد ،نصب نکنید.
احتیاط
فرسودگی در عایق بندی بخش های برقی ممکن است موجب برقگرفتگی یا آتشسوزی شود.
•این یخچال را در معرض نور مستقیم خورشید یا گرمای اجاق،
بخاری یا سایر دستگاه ها قرار ندهید.
•فضای کافی را برای نصب یخچال روی یک سطح صاف قائل شوید.
اگر یخچال هم تراز نباشد ،سیستم سردکننده داخلی ممکن استبه طور صحیح کار نکند.
•چندین دستگاه را به یک پریز برق نزنید.
یخچال بایستی همیشه به پریز برق جداگانه خودش زده شود که
درجه ولتاژ آن با پالک درجه بندی برابر است.
اینکار بهترین طرزکار را ارائه کرده و از زیاد پر شدن مدارهای سیمیخانه جلوگیری می کند که ممکن است موجب خطر آتشسوزی به
دلیل سیم های زیاد گرم شده شود.
•هرگز یخچال را با کشیدن سیم برق از پریز نکشید.
همیشه دوشاخه را محکم گرفته و بکشید -صدمه وارد شده به
سیم برق ممکن است موجب اتصالی ،آتشسوزی و/یا برق گرفتگی
شود.
•مطمئن شوید که دوشاخه در پشت یخچال فشرده نشده یا به آن
آسیب وارد نشود.
•سیم برق را زیادی خم نکنید یا اشیاء سنگین را بر روی آن قرار
ندهید.
این موضوع خطر آتشسوزی محسوب می شود.•اگر سیم برق فرسوده شده یا آسیب دیده ،فورا ً آنرا توسط سازنده
یا مأمور تعمیراتی آن تعمیر یا تعویض کنید.
•از سیمی که در امتداد طولش یا در هر دو انتهایش نشانه های ترک
خوردگی یا سائیدگی وجود دارد ،استفاده نکنید.
•اگر سیم برق صدمه دیده ،فورا ً ترتیب تعویض آنرا توسط سازنده یا
متصدی تعمیراتی اش بدهید.
•هنگام حرکت دادن یخچال ،مراقب باشید که آنرا روی سیم برق
نغلطانید یا به سیم آسیب وارد نکنید.
•دوشاخه برق را با دست های خیس وارد نکنید.
•یخچال را قبل از متیز کردن و اجنام تعمیرات از پریز بکشید.
•هنگام متیز کردن دوشاخه از پارچه خیس یا مرطوب استفاده نکنید.
•هرگونه ذرات خارجی یا گرد و غبار را از خارهای دوشاخه پاک کنید.
در غیراینصورت خطر آتشسوزی وجود دارد.•اگر یخچال از منبع نیرو قطع شود ،بایستی قبل از زدن دوباره به پریز
برای حداقل ده دقیقه صبر کنید.
•اگر پریز شل شده ،دوشاخه را به آن نزنید.
خطر برق گرفتگی یا آتشسوزی وجود دارد.•این دستگاه بایستی به صورتی قرار داده شود که دوشاخه پس از
نصب قابل دسترسی باشد.
•در صورت نشت گاز (از قبیل گاز پروپان ،گاز LPو غیره) ،بدون دست
زدن به دوشاخه فورا ً هواگیری کنید.
به دستگاه یا سیم برق دست نزنید.
از پنکه تهویه استفاده نکنید.یک جرقه ممکن است منجر به انفجار یا آتشسوزی شود.•از سشوار برای خشک کردن داخل یخچال استفاده نکنید.
شمع مشتعل را در داخل یخچال برای از بین بردن بوی متعفن قرار
ندهید.
-اینکار ممکن است منجر به برق گرفتگی یا آتشسوزی شود.
-
-
•یخچال بایستی گراند (زمینی) شود.
بایستی برای جلوگیری از نشت برق یا برق گرفتگی کهتوسط نشت جریان برق از یخچال ایجاد می شود ،یخچال
را گراند کنید.
•هرگز از لوله های گاز ،خطوط تلفن یا سایر میله های برق
گیر بالقوه به عنوان گراند استفاده نکنید.
استفاده نادرست از دوشاخه زمینی ممکن است منجر به برقگرفتگی شود.
•یخچال را خودتان اوراق یا تعمیر نکنید.
اینکار ممکن است موجب آتشسوزی ،خراب کار کردن و/یامصدومیت شخصی شود.
•اگر دستگاه صدای غیرعادی ،بوی سوختگی یا دود ایجاد می کند،
فورا ً دوشاخه را کشیده و با نزدیکترین مرکز تعمیراتی خود متاس
بگیرید.
•نگذارید که روزنه هواگیری در محفظه دستگاه یا ساختار سوار
کردن مسدود شود.
•از وسائل مکانیکی یا هرروش دیگری به غیر از روش هائی که توسط
سازنده توصیه شده برای تسریع روال یخ زدائی استفاده نکنید.
•به مدار سردساز آسیب وارد نکنید.
•وسائل برقی را در یخچال/فریزر قرار نداده و از آنها استفاده نکنید،
مگراینکه از نوعی هستند که توسط سازنده برای اینکار توصیه
شده باشند.
•قبل از تعویض المپ داخل یخچال ،دستگاه را از پریز برق بکشید.
•اگر در هنگام عوض کردن المپ با مشکالتی روبرو شدید ،با مرکز
تعمیرات متاس بگیرید.
•این دستگاه به منظور استفاده توسط اشخاص (شامل کودکان)
نیست که در توانائی های جسمانی ،حسی یا فکری کمبود داشته
یا در جتربه و دانش فقدان دارند ،مگراینکه توسط شخصی که
مسئول ایمنی آنهاست ،نظارت یا دستوراتی را در رابطه با استفاده
از دستگاه دریافت کرده باشند.
•کودکان بایستی سرپرستی شوند تا اطمینان حاصل شود که با
دستگاه بازی نکنند.
•اجازه ندهید که کودکان به در آویزان شوند.
در غیر اینصورت ممکن است موجب مصدومیت جدی شود.
•دیواره های داخل فریزر یا محصوالتی که در فریزر گذاشته شده اند
را با دست های خیس ملس نکنید.
اینکار ممکن است موجب سرمازدگی شود.•اگر قرار است از یخچال برای مدت طوالنی استفاده نشود ،دوشاخه
را بکشید.
فرسودگی در عایق بندی سیم برق ممکن است موجب آتشسوزیشود.
•اشیاء را بر روی دستگاه انبار نکنید.
هنگامیکه در را باز یا بسته می کنید ،ممکن است که اشیاءبیفتند و موجب مصدومیت شخصی و/یا آسیب اقالم شود.
نمیا تاعالطا _03
3/9/2012 2:28:23 PM
DA99-03327L(0.1)_FA.indd 3
اطالعات ایمنی
اطالعات ایمنی
•قبل از استفاده از دستگاه ،لطفا ً این دفترچه راهنما را
با دقت مطالعه کرده و برای مراجعه آینده نگه دارید.
هشدار
•چون دستورالعمل های استفاده زیر مربوط به مدل های مختلفی
می شود ،ممکن است خصوصیات یخچال شما با آنچه در این
دفترچه راهنما توصیف شده تفاوت داشته باشد.
عالئم احتیاط/هشدار استفاده شده
هشدار
احتیاط
نشان می دهد که خطر مرگ یا مصدومیت شدید وجود دارد.
نشان می دهد که خطر مصدومیت شخصی یا آسیب وارد شدن
به مواد وجود دارد.
نشان دهنده کاریست که نباید اجنام دهید.
نشان دهنده چیزیست که نباید اوراق کنید.
نشان دهنده چیزیست که نباید ملس کنید.
نشان دهنده کاریست که بایستی مراعات کنید.
•اگر سردساز از نوع R600aمی باشد ،این گاز طبیعی
سازگاری زیادی با محیط زیست داشته ولی قابل احتراق
نیز می باشد.
هنگام حمل و نقل و نصب دستگاه ،بایستی مراقب بود تا
اطمینان حاصل شود به هیچ بخشی از مدار سرد کننده
آسیب وارد نشود.
•سردسازی که از لوله ها به بیرون می پاشد ممکن است محترق
شده و موجب مصدومیت چشم شود.
اگر نشت مشاهده شد ،از هرگونه شعله باز یا منابع بالقوه حریق
اجتناب کرده و اتاقی که در آن دستگاه قرار دارد را برای چندین دقیقه
هواگیری کنید.
نشان می دهد که بایستی دوشاخه برق را از پریز بکشید.
نشان می دهد که برای جلوگیری از شوک برقی الزم است گراند
(زمینی) شود.
توصیه می شود که این عالمت توسط تعمیرکار رسیدگی شود.
این عالئم هشدار برای جلوگیری از مصدومیت شما و دیگران در
اینجا ذکر شده اند .لطفا ً با دقت به آنها عمل کنید .این بخش را
پس از مطالعه ،برای مراجعه در آینده در یک محل امن بگذارید.
•حاوی گازهای گلخانه ای فلورینه می باشد که حتت پوشش پروتکل
Kyotoاست .سیستم کیپ هوابندی شده گازها را به داخل هوای
آزاد تخلیه نکنید.
نوع سردساز / R-134a :مقدار 0/19 :کیلوگرم
پتانسیل گرمایش جهانی (1300 = )GWP
•کف ایجاد شده توسط گازهای گلخانه ای فلورینه شده.
•این یخچال بایستی قبل از استفاده برطبق دفترچه راهنمای
استفاده به طور مناسب نصب و قرار داده شود.
•از این دستگاه فقط برای منظوری که در این دفترچه دستورات
توضیح داده شده استفاده کنید.
•اکیدا ً توصیه می کنیم که هرگونه تعمیرات توسط یک شخص
مجرب اجنام شود.
•از R600aیا R134aمی توان به عنوان سردساز استفاده کرد.
برچسب کمپرسور در پشت دستگاه و برچسب درجه بندی در
داخل یخچال را کنترل کنید تا ببینید از چه سردسازی برای یخچال
استفاده شده است.
•برای جلوگیری از ایجاد ترکیب گاز و هوای قابل اشتعال
در صورت ایجاد نشت در مدار سردکننده ،اندازه اتاقی
هشدار
که می توان دستگاه را در آن قرار داد بستگی به مقدار
سردسازی دارد که استفاده شده است.
•هرگز دستگاهی که نشانه های آسیب دارد را به کار نیاندازید.
اگر مطمئن نیستید ،با فروشنده مشورت کنید.
•اندازه اتاق بایستی 1متر مکعب برای هر 8گرم سردساز R600a
استفاده شده در داخل دستگاه باشد.
•مقدار سردساز در دستگاه خاص شما بر روی پالک مشخصات در
داخل دستگاه نشان داده شده است.
•لطفا ً مواد بسته بندی برای این محصول را به صورتی دور بریزید که
دوستدار محیط زیست باشد.
•قبل از تعویض المپ داخل یخچال ،دوشاخه را از پریز بکشید.
در غیر اینصورت خطر برق گرفتگی وجود دارد.•این دستگاه به منظور استفاده توسط اشخاص (شامل کودکان)
نیست که در توانائی های جسمانی ،حسی یا فکری کاستی داشته
یا در جتربه و دانش کمبود دارند ،مگراینکه توسط شخصی که
مسئول ایمنی آنهاست ،نظارت یا دستوراتی را در رابطه با استفاده
از دستگاه دریافت کرده باشند.
•کودکان بایستی سرپرستی شوند تا اطمینان حاصل شود که با
دستگاه بازی نکنند.
_02نمیا تاعالطا
3/9/2012 2:28:23 PM
DA99-03327L(0.1)_FA.indd 2
یخچال
دفترچه راهنمای کاربر
فارسی
این دفترچه راهنما از کاغذ 100درصد بازیابی شده تهیه شده است.
امکانات را تصور کنید
از اینکه این محصول Samsungرا خریداری کردید تشکر می کنیم.
برای دریافت خدمات کاملتر،
لطفا ً محصول خود را در این آدرس ثبت کنید
www.samsung.com/register
دستگاه خودایستا
3/9/2012 2:28:22 PM
)Code No. DA99-03327L REV(0.1
DA99-03327L(0.1)_FA.indd 1