1
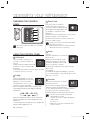
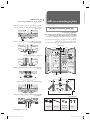
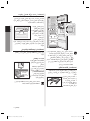
Refrigerator user manual This manual is made with 100% recycled paper. English imagine the possibilities Thank you for purchasing this Samsung product. To receive more complete service, please register your product at www.samsung.com/register Free Standing Appliance DA99-01950B(0.9).indb 1 Code No. DA99-01950B REV(0.9) 2012.5.24 2:13:16 PM safety information SAFETY INFORMATION • Before operating the appliance, please read this manual thoroughly and retain it for your reference. • Use this appliance only for its intended purpose as described in this instruction manual. This appliance is not intended for use by persons (including children) with reduced physical, sensory or mental capabilities, or lack of experience and knowledge, unless they have been given supervision or instruction concerning use of the appliance by a person responsible for their safety. • Because these following operating instructions cover various models, the characteristics of your refrigerator may differ slightly from those described in this manual. Important safety symbols and precautions : WARNING CAUTION Hazards or unsafe practices that may result in severe personal injury or death. Hazards or unsafe practices that may result in minor personal injury or property damage. Do NOT attempt. Do NOT disassemble. Do NOT touch. These warning signs are here to prevent injury to you and others. Please follow them carefully. After reading this section, keep it in a safe place for future reference. WARNING SEVERE WARNING SIGNS FOR INSTALLATION • Do not install the refrigerator in a damp place or place where it may come in contact with water. - Deteriorated insulation of electrical parts may cause an electric shock or fire. • Do not place this refrigerator in direct sunlight or expose to the heat from stoves, room heaters or other appliance. • Never use gas pipes, telephone lines or other potential lightening rods as ground. - Improper use of the ground plug can result in electric shock. • Do not plug several appliances into the same multiple power board. The refrigerator should always be plugged into its own individual electrical which has a voltage rating that matched the rating plate. - This provides the best performance and also prevents overloading house wiring circuits, which could cause a fire hazard from overheated wires. • If the wall socket is loose, do not insert the power plug. - There is a risk of electric shock of fire. • Do not use a cord that shows cracks or abrasion damage along its length or at either end. • Do not bend the power cord excessively or place heavy articles on it. Follow directions carefully. Unplug the power plug from the wall socket. Make sure the machine is grounded to prevent electric shock. Call the contact center for help. Note. 2_ safety information DA99-01950B(0.9).indb Sec2:2 2012.5.24 2:13:17 PM • This refrigerator must be properly installed and located in accordance with the manual before it is used. • Connect the power plug in proper position with the cord hanging down. - If you connect the power plug upside down, wire can get cut off and cause fire or electric shock. • When moving the refrigerator, be careful not to roll over or damage the power cord. - This constitutes a fire hazard. • Make sure that the power plug is not squashed or damaged by the back of the refrigerator. • Keep the packing materials out of reach of children. - There is a risk of death from suffocation if children put them on their head. • The appliance must be positioned so that the plug is accessible after installation. • The refrigerator must be grounded. - You must ground the refrigerator to prevent any power leakages or electric shocks caused by current leakage from the refrigerator. • If the power cord is damaged, have it replaced immediately by the manufacturer or its service agent. • The fuse on refrigerator must be changed by a qualified technician or service company. - Failing to do so may result in electric shock or personal injury. CAUTION CAUTION SIGNS FOR INSTALLATION • Keep ventilation opening in the appliance enclosure or mounting structure clear of obstruction. • Allow the appliance to stand for 2 hours after installation. WARNING SEVERE WARNING SIGNS FOR USING • Do not put a container filled with water on the refrigerator. - If spilled, there is a risk of fire or electric shock. • Do not let children hang on the door. If not, a serious injury may occur. • Do not let children enter inside of the refrigerator. There is a risk of children entrapment. • Never put fingers or other objects into the dispenser hole. - It may cause personal injury or material damage. • Do not store volatile or flammable substances in the refrigerator. - The storage of benzene, thinner, alcohol, ether, LP gas and other such products may cause explosions. • Do not store pharmaceuticals products, scientific materials or temperature sensitive products in the refrigerator. - Products that require strict temperature controls must not be stored in the refrigerator. • Do not place or use electrical appliance inside the refrigerator, unless they are of a type recommended by the manufacturer. • Do not use mechanical devices or any other means to accelerate the defrosting process, other than those recommended by the manufacturer. • Do not damage the refrigerant circuit. • Do not disassemble or repair the refrigerator by yourself. - You run risk of causing a fire, malfunction and/or personal injury. • Children should be supervised to ensure that they do not play with the appliance. • Bottles should be stored tightly together so that they do not fall out. • This product is intended only for the storage of food in a domestic environment. • If a gas leak is detected, avoid any naked flames or potential sources of ignition and air the room in which the appliance is standing for several minutes. • Use only the LED Lamps provided by manufacturer or service agents. • Do not insert the power plug with wet hands. • Do not store articles on the top of the appliance. - When you open or close the door, the articles may fall and cause personal injury and/or material damage. safety information _3 DA99-01950B(0.9).indb Sec2:3 2012.5.24 2:13:17 PM • If you smell pharmaceutical or smoke, pull out power plug immediately and contact your Samsung Electronics service center. • If you experience difficulty when changing the light, contact service agents. • If the products equipped with LED Lamp, do not disassemble Lamp Cover and LED Lamp by yourself. - Please contact your service agents. CAUTION CAUTION SIGNS FOR USING • To get Best performance of product, - Do not place foods too closely in front of the vents at the rear of the appliance as it can obstruct free air circulation in the refrigerator compartment. - Wrap the food up properly or place it in airtight containers before put it into the refrigerator. • Fill water tank, ice tray, water cubes only with potable water. • If the refrigerator is damaged by water, pull out the power plug and contact your Samsung Electronics service center. CAUTION CAUTION SIGNS FOR CLEANING • Do not directly spray water inside or outside the refrigerator. - There is a risk of fire or electric shock. • Do not spray inflammable gas near the refrigerator. - There is a risk of explosion or fire. • Do not spray cleaning products directly on the display. - Printed letters on the display may come off. • Remove any foreign matter or dust from the power plug pins. But do not use a wet or damp cloth when cleaning the plug, remove any foreign material or dust from the power plug pins. - Otherwise there is a risk of fire or electric shock. • Unplug the refrigerator before cleaning and making repairs. WARNING SEVERE WARNING SIGNS FOR DISPOSAL • When disposing of this or other refrigerators, remove the door/door seals, door latch so that small children or animals cannot become trapped inside. Children should be supervised to ensure that they do not play with the appliance. • Please dispose of the packaging material for this product in an environmentally friendly manner. • Leave the shelves in place so that children may not easily climb inside. Ensure that none of the pipes on the back of the appliance are damaged prior to disposal. • R600a or R134a is used as a refrigerant. Check the compressor label on the rear of the appliance or the rating label inside the refrigerator to see which refrigerant is used for your refrigerator. When this product contains flammable gas (Refrigerant R600a), contact your local authority in regard to safe disposal of this product. Cyclopentane is used as a insulation blowing gas. The gases in insulation material require special disposal procedure. Please contact your local authorities in regard to the environmentally safe disposal of this product. Ensure that none of the pipes on the back of the appliances are damaged prior to disposal. The pipes shall be broke in the open space. • If the appliance contains iso-butane refrigerant (R600a), a natural gas with high environmental compatibility that is, however, also combustible. When transporting and installing the appliance, care should be taken to ensure that no parts of the refrigerating circuit are damaged. • Refrigerant squirting out of the pipes could ignite or cause an eye injury. If a leak is detected, avoid any naked flames or potential sources of ignition and air the room in which the appliance is standing for several minutes. 4_ safety information DA99-01950B(0.9).indb Sec2:4 2012.5.24 2:13:17 PM • In order to avoid the creation of a flammable gas-air mixture if a leak in the refrigerating circuit occurs, the size of the room in which the appliance may be sited depends on the amount of refrigerant used. Never start up an appliance showing any signs of damage. If in doubt, consult your dealer. The room must be 1m³ in size for every 8g of R600a refrigerant inside the appliance. The amount of refrigerant in your particular appliance is shown on the identification plate inside the appliance. ADDITIONAL TIPS FOR PROPER USAGE • In the event of a power failure, call the local office of your Electricity Company and ask how long it is going to last. - Most power failures that are corrected in an hour or two will not affect your refrigerator temperatures. However, you should minimize the number of door openings while the power is off. • If the key is provided with refrigerator, the keys should be kept out of the reach of children and not in vicinity of the appliance. • The appliance might not operate consistently (possibility of temperature becoming too warm in refrigerator) when sited for an extended period of time below the cold end of the range of temperatures for which the refrigerating appliance is designed. • Do not store food which spoils easily at low temperature, such as bananas, melons. • Your appliance is frost free, which means there is no need to manually defrost your appliance, as this will be carried out automatically. contents SETING UP YOUR SIDE-BY-SIDE REFRIGERATOR ·····································6 OPERATING YOUR REFRIGERATOR ····························································10 TROUBLESHOOTING ·····················································································14 INSTALL YOUR REFRIGERATOR···································································15 safety information _5 DA99-01950B(0.9).indb Sec2:5 2012.5.24 2:13:18 PM setting up your refrigerator 100 mm GETTING READY TO INSTALL THE REFRIGERATOR Congratulations on your purchase of this Samsung Refrigerator. We hope you enjoy the state-of-art features and efficiencies that this new appliance offers. • This refrigerator must be properly installed and located in accordance with the manual before it is used. • Use this appliance only for its intended purpose as described in this instruction manual. • We strongly recommend that any servicing be performed by a qualified individual. • Please dispose of the packaging material for this product in an environmentally friendly manner. 1800 mm or 1650 mm 50 mm 600 mm at least 50 mm Pull the power plug out of the socket before changing the interior light of the WARNING refrigerator. - Otherwise, there is a risk of electric shock. 550 mm 1,175 mm 1,010 mm Selecting the best location for the refrigerator • A location without direct exposure to sunlight. • A location with flat floor surface. • A location with enough space for the refrigerator door to open easily. • Allow sufficient space to the right, left, back and top for air circulation. If the refrigerator does not have enough space, the internal cooling system may not work properly. • Please ensure that appliance can be moved freely in the event of maintenance & service. • Height of the product may be different depending on the models. • Allow clearance to the right, left, back and top when installing. This will help reduce power consumption and keep your energy bills lower. • Do not install the refrigerator in a place with the temperature lower than 10°C. Pull the unit straight out when installing, servicing or cleaning behind the CAUTION refrigerator and push it straight back after work is complete. Make sure your floor can support fully loaded refrigerator. 6_ setting up DA99-01950B(0.9).indb Sec4:6 2012.5.24 2:13:18 PM REVERSING THE REFRIGERATOR DOOR 3. Disconnect the wires and then remove 3 bolts. Any damage caused while attempting to reverse the door opening is not covered under the appliance manufactures warranty. Any repairs requested due to this circumstance will be completed on a chargeable basis at the customers expense. WARNING Make sure your refrigerator is unplugged before handling electrical wires. 01 SETTING UP Samsung recommends that reversing of the door opening is only completed by WARNING Samsung approved Service providers. This will be on a chargeable basis and at the customers expense. 4. Remove the door from the lower hinge by carefully lifting the door straight up. Required Tools (Not provided) Phillips Head Driver (+) Flat Head Driver (-) 10 mm Socket Wrench (for bolts) Refrigerator door is heavy, be careful not to injure yourself when removing the CAUTION refrigerator door. 8 mm Socket Wrench (for bolts) Spanner (for hinge shaft) 4 mm Hex Wrench (for bottom hinge shaft) 5. Separate the front leg cover after removing 2 screws. 1. Remove 2 screws on the top of the refrigerator. Screw Screw 2. Remove the plastic cover and make sure to disconnect the wire connected to it. After removing the plastic cover, check the parts for reversing the door. 6. Unscrew 3 bolts tightening the hinge and also unscrew 3 bolts on the bottom left side by the front leg where removed hinge will be attached. 10mm 10mm CAUTION Be careful not to damage the electrical wires when removing the plastic cover. setting up _7 DA99-01950B(0.9).indb Sec4:7 2012.5.24 2:13:18 PM 7. Separate the hinge shaft by using hex wrench first. Unscrew the bolt to remove the hinge riser and switch the side of the hinge shaft and the hinge riser. 11. Remove the hinge and the grommet from the refrigerator door. Detach the right side hinge cover and pull the wires out of the hinge cover. Hinge shaft Hinge cover Grommet Hinge riser 8mm Bolt CAUTION 8. Attach the hinge on the bottom left side of the refrigerator where bolts were previously removed in step 6. Screw the bolts that were removed on the bottom right side of the refrigerator for the future usage. Be careful not to damage the electrical wires when removing the hinge cover. 12. Use wrench to separate the hinge shaft and then flip the hinge and reattach the hinge shaft. 10mm 10mm 9. Remove the screws on the bottom left and right side of the refrigerator door. Switch the side of the door stopper from right to the left. Hinge riser should be switched as well. Hinge riser 13. Reassemble the hinge on the refrigerator door by reversing the step 11. Make sure to use left side hinge cover (which can be found underneath the removed plastic cover from step 2) and remove the grommet. After reassembling the hinge, wire and the hinge cover, switch the side from right to the left. Hinge riser Grommet 10. Remove the wire cover on top of the refrigerator door to switch the side of the wires. 14. After switching the hinge, close it with the wire cover on the top of refrigerator door. “Cover Wire Door R” can be found in the packaging 8_ setting up DA99-01950B(0.9).indb Sec4:8 2012.5.24 2:13:18 PM 15. Take off the handle cover and remove the screws, make sure to detach the caps and the handle from the left to right side of the door. (Make sure to cover the left side with detached caps.) 19. Tighten 2 screws back to its place. 01 SETTING UP 20. Detach the Fridge and the Freezer door gaskets and then attach them after rotating them 180˚. Handles may not have cover depending on the models. 16. Switch the hinge cap and attach the front leg cover. Carefully put the refrigerator door back on. Hinge cap 17. Tighten the 3 bolts and then connect the wires back together. • After reversing the doors, make sure the Fridge and Freezer door gaskets are WARNING properly arranged. If not, there might be a noise or dew formed which affects perfomance of the refrigerator. LEVELLING THE REFRIGERATOR If the front of the appliance is slightly higher than the rear, the door can be opened and closed more easily. Turn the adjusting legs clockwise to raise and counter-clockwise to lower the height. Case 1) The appliance tilts down to the left. • Turn the left adjusting leg in the direction of the arrow until the appliance is level. Case 2) The appliance tilts down to the right. • Turn the right adjusting leg in the direction of the arrow until the appliance is level. WARNING Make sure your refrigerator is unplugged before handling electrical wires. 18. Connect the wire on the plastic cover and put the cover back to its original position. < Case1 > < Case2 > setting up _9 DA99-01950B(0.9).indb Sec4:9 2012.5.24 2:13:18 PM operating your refrigerator CHECKING THE CONTROL PANEL 1 2 3 (Hold Hold 3 sec for Display) Display 4 5 3 Power Cool function cannot be used together with Vacation function. Selecting Vacation function will automatically deactivate the Power Cool function. Each time you press the button, a short beep will sound. 4 USING THE CONTROL PANEL 1 Child Lock Press the Child Lock button for 3 seconds to activate the Child Lock function. Child lock indicator will light up and all the buttons on the control panel will be locked. To deactivate the Child Lock function, press the Child Lock button again for 3 seconds. 2 Fridge Press the Fridge button to set the desired temperature from the range between 1°C and 7°C. Default set temperature is set on 3°C and each time you press the Fridge button, temperature will change in following order and temperature indicator will display the desired temperature. When the temperature setting is done, temperature indicator will display the current temperature of the refrigerator. If current temperature is higher than 9°C, temperature indicator will be displayed as 9°C. Power Cool Press the Power Cool button to activate the Power Cool function. Power Cool indicator will light up and the refrigerator will speed up the time to needed to cool products in the refrigerator. Power Cool function will operate for 2 hours and 30 minutes to quickly cool the refrigerator. To deactivate the Power Cool function, press the Power Cool button again. Alarm 1. Alarm Press the Alarm button to activate the Alarm function. Alarm indicator will light up and the refrigerator will alert you with alarm sound if the refrigerator door is kept open for longer than 2 minutes. To deactivate the Alarm function, press the Alarm button again. 2. Display Off As standard, the temperature display is switched off, to switch between on and off mode, press alarm button for 3 seconds. 5 Vacation Press the Vacation button to activate the Vacation function. Vacation indicator will light up and the refrigerator will set the temperature to 15°C to minimize the power consumption while you are away (on vacation or business trip etc). Keep the refrigerator free from bacteria and odor. • Vacation function will be automatically deactivated If you select Power Cool function or adjust temperature while Vacation function is on. • Make sure to remove foods before using Vacation function. 10_ operating DA99-01950B(0.9).indb 섹션1:10 2012.5.24 2:13:19 PM USING THE MOISTURE CONTROL BIG BOX 1 You can use the moisture control big box to control the humidity for the products which needs to be preserved its freshness. • Some of the features such as water tank and the beverage station can be different and may not be available depending on the model. • To get more space, you can remove water 1 tank. It does not affect thermal and mechanical characteristics. A declared storage volume of refrigerator compartment is calculated with this part removed. 02 OPERATING Use the humidity control lever on the top of the drawer to adjust the humidity. Move the lever to the right side to keep the humidity low within the drawer. Move the lever to the left side to keep the humidity high. More holes will allow higher humidity within the drawer. USING THE BEVERAGE STATION To open the beverage station, push the top part of the beverage station. Anti-sweat heater switch When the humidity of the indoor is high, sweat may form around the beverage station. Turn the Anti-sweat heater switch on, to remove the sweat and turn the switch off when the sweat disappears. Anti-sweat heater switch USING THE FOLDABLE SHELF You can tuck in the foldable shelf if you need to accommodate taller containers or products on the shelf underneath. Beverage station may not be available depending on the model. 1. Slightly lift up the shelf and slide it inward. 2. You can simply pull the tucked in shelf to use the fully extended shelf. operating _11 DA99-01950B(0.9).indb 섹션1:11 2012.5.24 2:13:22 PM USING THE WATER DISPENSER Filling the water You can fill the water with the water tank sitting inside of the refrigerator or you can remove the water tank to fill the water. Method 1 Fill the water through the hole on the top of the water tank. If you pour the water too fast, water may overflow. Method 2 1. Release the lock on the both side of the water tank to remove the lid on the water tank. REMOVING THE INTERIOR PARTS Moveable deli bin Pull the deli bin out fully then slightly lift it up to remove it. Shelves Gently lift up the shelves with both hands and pull it toward you. (Glass shelf/Foldable shelf) 2. Fill the water in the water tank. Drawers Pull the drawers out fully then slightly lift it up to remove the drawers. (Plastic drawer/Moisture control big box) CAUTION Do not put anything other than water in the water tank. Getting water from the dispenser Door guards Place a glass underneath the water outlet and push it gently against the water dispenser lever with your glass. Blue light will turn on when you push the lever. Firmly grab the door guards with both hands and lift it up gently to remove the door guards. • Make sure the glass is in line with the dispenser to prevent the water from splashing out. • Water dispenser may not be available depending on the model. Water tank Firmly grab the water tank with both hands and lift it up towards you gently to remove the water tanks. Water tank may not be available depending on the model. 12_ operating DA99-01950B(0.9).indb 섹션1:12 2012.5.24 2:13:23 PM Beverage station 1. Remove the door bin locate on the top of the beverage station. 02 OPERATING 2. Press the bottom left and right part of the beverage station with both hands lift up to open. Beverage station may not be available depending on the model. Deodorizer Push the lever as arrow indicates and pull the cover. To get the best energy efficiency of this product, please leave all selves, drawers and baskets on their original position like as illustration in page (11). CLEANING THE REFRIGERATOR WARNING CAUTION Do not use Benzene, Thinner or Clorox™ for cleaning. They may damage the surface of the appliance and can create a risk of fire. Do not spray the refrigerator with water while it is plugged in, as it may cause an electric shock. Do not clean the refrigerator with benzene, thinner or car detergent for risk of fire. REPLACING THE INTERIOR LIGHT Please contact your service agents. operating _13 DA99-01950B(0.9).indb 섹션1:13 2012.5.24 2:13:24 PM troubleshooting PROBLEM The appliance is not operating at all or the temperature is too high. SOLUTION • Check if the power plug is correctly connected. • Is the temperature control on the front panel correctly set? • Does sun shine on the appliance or are there any heat sources nearby? • Is the back of the appliance too close to the wall? • Check if the appliance is installed on a stable and even floor. • Is the back of the appliance too close to the wall? There are unusual noises. • Have any foreign objects fallen behind or under the appliance? • Is the noise coming from the compressor in the appliance? • A ticking sound may be heard inside the appliance; this is normal. This sound occurs when the various accessories contract or expand. The front corners and sides of the appliance are warm and condensation starts to form. You can hear a liquid bubbling in the appliance. • Heat-proof pipes are installed in the front corners of the appliance to prevent condensation from forming. When the surrounding temperature rises, this may not always be effective. However, this is not abnormal. • In very humid weather, condensation may form on the outer surface of the appliance when the moisture in the air comes into contact with the cool surface of the appliance. • This is the refrigerant, which cools the inside of the appliance. • Is there any spoiled food inside of the refrigerator? There is a bad smell inside the appliance. There is a layer of frost on the appliances walls. Condensation forms on the inside wall of the appliance and around vegetables. • Make sure that strong smelling food (for example, fish) is wrapped so that it is airtight. • Clean out your refrigerator periodically and throw away any spoiled or suspect food. • Are the air outlet vents blocked by food stored inside the refrigerator? • Space the food out as much as possible to improve ventilation. • Is the door fully closed? • Food with a high water content is stored uncovered with a high humidity level or the door has been left open for a long time. • Store the food with a cover or in sealed containers. 14_ troubleshooting DA99-01950B(0.9).indb 섹션2:14 2012.5.24 2:13:24 PM How to install the product Make sure to turn off the power for both of the products. Installation Part Installing the products together 1. Keep the distance between the refrigerator and the freezer about 5~7mm. 2. Remove the front leg cover on both refrigerator and the freezer by removing the screws. Side by Side combination possible with Samsung Models starting with R Z**,RR**. Please ask the shop for detail such as Color and Design. For Side by Side arrangement, please make sure followings. - Recommend to place the Fridge on the Right for best performance - For perfect finish, allow the following clearance and install SPACERS in installation Kit provided. (Only available on some models) - Make the height of the refigerator and the freezer same with refering the 9 page. 3. Remove the screw from the each of the product and attach them back after putting the bottom fixer. Install Direction Fixer Joining Strip Bottom Fixer A 4. Insert the joining strip in between the refrigerator and the freezer. Freezer Refrigerator 5. Insert two fixers firmly on the top of the products. Bottom Fixer A Front Leg Cover Fixer 6. Place the front leg cover back on both of the products. at least 50mm Joining Strip 1175 at least 50mm Install Direction 2030 7. Join the bottom fixer B with screws at back of the products. Required Tools Fixer Joining Strip Bottom Fixer A, B Screws Bottom Fixer B install your refrigerator _15 DA99-01950B(0.9).indb 섹션2:15 2012.5.24 2:13:24 PM Ambient Room Temperature Limits This refrigerator is designed to operate in ambient temperatures specified by its temperature class marked on the rating plate. Class Symbol Ambient Temperature range (°C) Extended Temperate SN +10 to +32 +16 to +32 Temperate N Subtropical ST +16 to +38 Tropical T +16 to +43 Internal temperatures may be affected by such factors as the location of the refrigerator, ambient temperature and the frequency with which you open the door. Adjust the temperature as required to compensate for these factors. DA99-01950B(0.9).indb 섹션2:16 2012.5.24 2:13:28 PM ﻣﺤﺪﻭﺩﻩ ﺩﻣﺎﯾﯽ ﻣﺤﻞ ﻗﺮﺍﺭ ﮔﺮﻓﺘﻦ ﻓﺮﯾﺰﺭ ﺍﯾﻦ ﻓﺮﯾﺰﺭ ﺑﺮﺍی ﺍﺳﺘﻔﺎﺩﻩ ﺩﺭ ﯾﮏ ﻣﺤﯿﻂ ﺧﺎﻧﮕﯽ ﻃﺮﺍﺣﯽ ﺷﺪﻩ ﻭ ﻣﺤﺪﻭﺩﻩ ﺩﻣﺎﯾﯽ ﻋﻤﻠﮑﺮﺩ ﺁﻥ ﻧﯿﺰ ﺑﺮ ﺭﻭی ﺻﻔﺤﻪ ﺩﺭﺟﻪ ﺑﻨﺪی ﺁﻥ ﻣﺸﺨﺺ ﮔﺮﺩﯾﺪﻩ ﺍﺳﺖ. ﮐﻼﺱ ﺩﻣﺎﯾﯽ ﻧﺸﺎﻧﻪ ﻣﺤﺪﻭﺩﻩ ﺩﻣﺎی ﻣﺤﯿﻂ ﻧﯿﻤﻪ ﻣﻌﺘﺪﻝ SN +10 to +32 ﻣﻌﺘﺪﻝ N +16 to +32 ﺍﺳﺘﻮﺍﯾﯽ ST +16 to +38 ﻧﯿﻤﻪ ﺍﺳﺘﻮﺍﯾﯽ T +16 to +43 ﺩﻣﺎی ﺩﺍﺧﻞ ﻓﺮﯾﺰﺭ ﻣﻤﮑﻦ ﺍﺳﺖ ﺗﺤﺖ ﺗﺎﺛﯿﺮ ﺑﺮﺧﯽ ﻓﺎﮐﺘﻮﺭﻫﺎ ﻣﺜﻞ ﻣﺤﻞ ﻓﺮﯾﺰﺭ ،ﺩﻣﺎی ﻣﺤﯿﻂ ﻭ ﺗﻌﺪﺍﺩ ﺩﻓﻌﺎﺗﯽ ﮐﻪ ﺷﻤﺎ ﺩﺭﺏ ﻓﺮﯾﺰﺭ ﺭﺍ ﺑﺎﺯ ﻭ ﺑﺴﺘﻪ ﻣﯽ ﮐﻨﯿﺪ ،ﻗﺮﺍﺭ ﮔﯿﺮﺩ .ﺑﺮﺍی ﺟﺒﺮﺍﻥ ﺗﺎﺛﯿﺮ ﺍﯾﻦ ﻓﺎﮐﺘﻮﺭﻫﺎ ،ﺩﻣﺎ ﺭﺍ ﺑﺮ ﺣﺴﺐ ﻧﯿﺎﺯﺗﺎﻥ ﺗﻨﻈﯿﻢ ﮐﻨﯿﺪ 2012.5.24 2:13:28 PM DA99-01950B(0.9).indb 1 ﺑﺨﺶﻣﺮﺑﻮﻁﺑﻪﻧﺼﺐﺩﺳﺘﮕﺎﻩ ﺭﻭﺵ ﺍﺗﺼﺎﻝ ﻣﺤﺼﻮﻻﺕ ﺑﻪ ﯾﮑﺪﯾﮕﺮ ﺭﻭﺵ ﻧﺼﺐ ﺩﺳﺘﮕﺎﻩ ﺍﺯ ﺧﺎﻣﻮﺵ ﺑﻮﺩﻥ ﻫﺮ ﺩﻭ ﺩﺳﺘﮕﺎﻩ ﺍﻃﻤﯿﻨﺎﻥ ﺣﺎﺻﻞ ﮐﻨﯿﺪ. .١ﻓﺎﺻﻠﻪ ﺑﯿﻦ ﯾﺨﭽﺎﻝ ﻭ ﻓﺮﯾﺰﺭ ﺭﺍ ﺩﺭ ﺣﺪﻭﺩ ٥~٧ﻣﯿﻠﯿﻤﺘﺮ ﺭﻋﺎﯾﺖ ﻧﻤﺎﺋﯿﺪ. .٢ﺑﺎ ﺑﺎﺯ ﮐﺮﺩﻥ ﭘﯿﭻ ﻫﺎی ﻣﺮﺑﻮﻃﻪ ،ﺭﻭﮐﺶ ﻫﺎی ﭘﺎﯾﻪ ﺟﻠﻮﺋﯽ ﯾﺨﭽﺎﻝ ﻭ ﻓﺮﯾﺰﺭ ﺭﺍ ﺑﺮﺩﺍﺭﯾﺪ. ﺩﺭ ﻣﺪﻝ ﻫﺎی ﺳﺎﻣﺴﻮﻧﮓ ﮐﻪ ﺑﺎ ﺣﺮﻭﻑ ** RR** ,RZﺁﻏﺎﺯ ﻣﯿﺸﻮﻧﺪ ،ﺍﻣﮑﺎﻥ ﺗﺮﮐﯿﺐ ﺳﺎﯾﺪ ﺑﺎی ﺳﺎﯾﺪ ﻭﺟﻮﺩ ﺩﺍﺭﺩ. ﻟﻄﻔﺎ ﺩﺭ ﺧﺼﻮﺹ ﺟﺰﺋﯿﺎﺗﯽ ﺍﺯ ﻗﺒﯿﻞ ﻃﺮﺡ ﻭ ﺭﻧﮓ ،ﺍﺯ ﻓﺮﻭﺷﻨﺪﻩ ﺭﺍﻫﻨﻤﺎﺋﯽ ﺑﮕﯿﺮﯾﺪ. ﺑﻤﻨﻈﻮﺭ ﻗﺮﺍﺭ ﺩﺍﺩﻥ ﺑﺼﻮﺭﺕ ﺳﺎﯾﺪ ﺑﺎی ﺳﺎﯾﺪ ،ﻣﻮﺍﺭﺩ ﺯﯾﺮ ﺭﺍ ﺍﻧﺠﺎﻡ ﺩﻫﯿﺪ ﺟﻬﺖ ﺩﺳﺘﯿﺎﺑﯽ ﺑﻪ ﺑﻬﺘﺮﯾﻦ ﺣﺎﻟﺖ ﮐﺎﺭﮐﺮﺩ ،ﺗﻮﺻﯿﻪ ﻣﯿﺸﻮﺩ ﮐﻪ ﻓﺮﯾﺰﺭ ﺭﺍ ﺩﺭ ﺳﻤﺖ ﺭﺍﺳﺖﻗﺮﺍﺭ ﺩﻫﯿﺪ. ﺟﻬﺖ ﺗﮑﻤﯿﻞ ﻣﻨﺎﺳﺐ ﻧﺼﺐ ،ﻓﻀﺎی ﮐﺎﻓﯽ ﺭﺍ ﺭﻋﺎﯾﺖ ﻧﻤﻮﺩﻩ ﻭ ﺟﺪﺍﺳﺎﺯ ﻫﺎﺋﯽ ﮐﻪ ﺩﺭ ﮐﯿﺖﻧﺼﺐ ﺍﺭﺍﺋﻪ ﺷﺪﻩ ﺍﻧﺪ ﺭﺍ ﻣﻮﺭﺩ ﺑﻬﺮﻩ ﺑﺮﺩﺍﺭی ﻗﺮﺍﺭ ﺩﻫﯿﺪ).ﺍﻧﺘﺨﺎﺑﻲ( -ﺑﺎ ﺗﻮﺟﻪ ﺑﻪ ﻣﻄﺎﻟﺐ ﺻﻔﺤﻪ ،٩ﺍﺭﺗﻔﺎﻉ ﻳﺨﭽﺎﻝ ﻭ ﻓﺮﻳﺰﺭ ﺭﺍ ﺑﺼﻮﺭﺕ ﻳﻜﺴﺎﻥ ﺗﻨﻈﻴﻢ ﻧﻤﺎﻳﻴﺪ. .٣ﭘﯿﭻ ﻫﺎی ﻫﺮ ﺩﻭ ﺩﺳﺘﮕﺎﻩ ﺭﺍ ﺑﺎﺯ ﻧﻤﻮﺩﻩ ﻭ ﭘﺲ ﺍﺯ ﻗﺮﺍﺭ ﺩﺍﺩﻥ ﺛﺎﺑﺖ ﮐﻨﻨﺪﻩ ﭘﺎﯾﯿﻦ ،ﻣﺠﺪﺩﺍ ﺁﻧﻬﺎ ﺭﺍ ﺑﺒﻨﺪﯾﺪ. ﺭﺍﻫﻨﻤﺎی ﻧﺼﺐ ﺛﺎﺑﺖ ﮐﻨﻨﺪﻩ ﻧﻮﺍﺭ ﺍﺗﺼﺎﻝ ﺛﺎﺑﺖ ﮐﻨﻨﺪﻩ ﭘﺎﯾﯿﻦ A .۴ﻧﻮﺍﺭ ﺍﺗﺼﺎﻝ ﺭﺍ ﺑﯿﻦ ﯾﺨﭽﺎﻝ ﻭ ﻓﺮﯾﺰﺭ ﻗﺮﺍﺭ ﺩﻫﯿﺪ. ﻓﺮﯾﺰﺭ ﯾﺨﭽﺎﻝ .۵ﺩﻭ ﻋﺪﺩ ﺛﺎﺑﺖ ﮐﻨﻨﺪﻩ ﺭﺍ ﺑﻄﻮﺭ ﻣﺤﮑﻢ ﺩﺭ ﻗﺴﻤﺖ ﺑﺎﻻی ﺩﺳﺘﮕﺎﻩ ﻫﺎ ﻗﺮﺍﺭ ﺩﻫﯿﺪ. ﺛﺎﺑﺖ ﮐﻨﻨﺪﻩ ﭘﺎﯾﯿﻦ A ﺭﻭﮐﺶ ﭘﺎﯾﻪ ﺟﻠﻮ ﺛﺎﺑﺖ ﮐﻨﻨﺪﻩ ﺣﺪﺍﻗﻞ ٠٥ ﻣﯿﻠﯿﻤﺘﺮ ﺣﺪﺍﻗﻞ ٠٥ ﻣﯿﻠﯿﻤﺘﺮ .۶ﺭﻭﮐﺶ ﭘﺎﯾﻪ ﺟﻠﻮی ﻫﺮ ﺩﻭ ﺩﺳﺘﮕﺎﻩ ﺭﺍ ﺳﺮ ﺟﺎی ﺧﻮﺩ ﺑﮕﺬﺍﺭﯾﺪ. 1175 ﻧﻮﺍﺭ ﺍﺗﺼﺎﻝ ﺭﺍﻫﻨﻤﺎی ﻧﺼﺐ 2030 .٧ﻧﮕﻪ ﺩﺍﺭﻧﺪﻩ Bﺭﺍ ﺑﺎ ﺍﺳﺘﻔﺎﺩﻩ ﺍﺯ ﭘﻴﭻ ﻫﺎﻱ ﻣﺮﺑﻮﻃﻪ ﺑﻪ ﻗﺴﻤﺖ ﻛﻒ ﺩﺳﺘﮕﺎﻩ ﺑﺒﻨﺪﻳﺪ. ﺍﺑﺰﺍﺭ ﻣﻮﺭﺩ ﻧﯿﺎﺯ ﺛﺎﺑﺖ ﮐﻨﻨﺪﻩ ﭘﻴﭻ ﻫﺎinstall your refrigerator _A15 ﭘﺎﯾﯿﻦ ,B 2012.5.24 2:13:28 PM ﻧﻮﺍﺭ ﺍﺗﺼﺎﻝ ﺛﺎﺑﺖ ﮐﻨﻨﺪﻩ ﺛﺎﺑﺖ ﮐﻨﻨﺪﻩ ﭘﺎﯾﯿﻦ B ﺭﻭﺵ ﻧﺼﺐ ﻳﺨﭽﺎﻝ ﺷﻤﺎ١۵- DA99-01950B(0.9).indb 2 ﻋﯿﺐ ﯾﺎﺑﯽ ﻣﺸﮑﻞ ﺭﺍﻩ ﺣﻞ ﺩﺳﺘﮕﺎﻩ ﺍﺻﻼ ﮐﺎﺭ ﻧﻤﯽ ﮐﻨﺪ ﯾﺎ ﺩﻣﺎی ﯾﺨﭽﺎﻝ ﺧﯿﻠﯽ ﺑﺎﻻﺳﺖ. • ﺑﺮﺭﺳﯽ ﮐﻨﯿﺪ ﮐﻪ ﺳﯿﻢ ﺑﺮﻕ ﺑﻪ ﺩﺭﺳﺘﯽ ﻭﺻﻞ ﺷﺪﻩ ﺑﺎﺷﺪ. • ﺁﯾﺎ ﮐﻨﺘﺮﻝ ﺩﻣﺎ ﺑﺮ ﺭﻭی ﭘﻨﻞ ﺟﻠﻮﯾﯽ ﺩﺭﺳﺖ ﺗﻨﻈﯿﻢ ﺷﺪﻩ ﺍﺳﺖ؟ • ﺁﯾﺎ ﺩﺳﺘﮕﺎﻩ ﺩﺭ ﻣﻌﺮﺽ ﻧﻮﺭ ﺁﻓﺘﺎﺏ ﻗﺮﺍﺭﺩﺍﺭﺩ ﯾﺎ ﻣﻨﺎﺑﻊ ﮔﺮﻣﺎﯾﯽ ﺩﺭ ﻧﺰﺩﯾﮑﯽ ﺁﻥ ﻣﯽ ﺑﺎﺷﻨﺪ؟ • ﺁﯾﺎ ﭘﺸﺖ ﯾﺨﭽﺎﻝ ﺧﯿﻠﯽ ﺑﻪ ﺩﯾﻮﺍﺭ ﻧﺰﺩﯾﮏ ﺍﺳﺖ؟ ﺻﺪﺍﻫﺎی ﻏﯿﺮ ﻣﻌﻤﻮﻝ ﺑﻪ ﮔﻮﺵ ﻣﯽ ﺭﺳﺪ. • ﺑﺮﺭﺳﯽ ﮐﻨﯿﺪ ﮐﻪ ﺩﺳﺘﮕﺎﻩ ﺑﺮﺭﻭی ﯾﮏ ﻣﺤﻞ ﻣﺴﻄﺢ ﻭ ﺗﺮﺍﺯ ﻧﺼﺐ ﺷﺪﻩ ﺑﺎﺷﺪ. • ﺁﯾﺎ ﭘﺸﺖ ﯾﺨﭽﺎﻝ ﺧﯿﻠﯽ ﺑﻪ ﺩﯾﻮﺍﺭ ﻧﺰﺩﯾﮏ ﺍﺳﺖ؟ • ﺁﯾﺎ ﺷﯽ ﺧﺎﺭﺟﯽ ﭘﺸﺖ ﯾﺎ ﺯﯾﺮ ﯾﺨﭽﺎﻝ ﺍﻓﺘﺎﺩﻩ ﺍﺳﺖ؟ • ﺁﯾﺎ ﺻﺪﺍ ﺍﺯ ﮐﻤﭙﺮﺳﻮﺭ ﺩﺳﺘﮕﺎﻩ ﻧﺎﺷﯽ ﻣﯽ ﺷﻮﺩ؟ • ﺻﺪﺍی ﺗﯿﮏ ﻣﺎﻧﻨﺪی ﮐﻪ ﻣﻤﮑﻦ ﺍﺳﺖ ﺍﺯ ﺩﺍﺧﻞ ﻭﺳﯿﻠﻪ ﺑﻪ ﮔﻮﺵ ﺑﺮﺳﺪ ﯾﮏ ﺍﻣﺮ ﻃﺒﯿﻌﯽ ﺍﺳﺖ ﮐﻪ ﺑﻪ ﺩﻟﯿﻞ ﺍﻧﺒﺴﺎﻁ ﯾﺎ ﺍﻧﻘﺒﺎﺽ ﻭﺳﺎﯾﻞ ﺩﺍﺧﻞ ﺩﺳﺘﮕﺎﻩ ﻣﯽ ﺑﺎﺷﺪ. ﮔﻮﺷﻪ ﻫﺎ ﻭ ﮐﻨﺎﺭﻩ ﻫﺎی ﺩﺳﺘﮕﺎﻩ ﮔﺮﻡ ﺑﻮﺩﻩ ﻭ ﭼﮕﺎﻟﺶ ﺗﻮﻟﯿﺪ ﺷﺪﻩ ﺍﺳﺖ. • ﻟﻮﻟﻪ ﻫﺎی ﺿﺪ ﮔﺮﻣﺎ ﺩﺭ ﮔﻮﺷﻪ ﻫﺎی ﺟﻠﻮﯾﯽ ﺩﺳﺘﮕﺎﻩ ﺑﻪ ﻣﻨﻈﻮﺭ ﺟﻠﻮﮔﯿﺮی ﺍﺯ ﺗﺸﮑﯿﻞ ﭼﮕﺎﻟﺶ ﺗﻌﺒﯿﻪ ﺷﺪﻩ ﺍﻧﺪ. ﻫﮕﺎﻣﯽ ﮐﻪ ﺩﻣﺎی ﻣﺤﯿﻂ ﺧﺎﺭﺝ ﺍﻓﺰﺍﯾﺶ ﻣﯽ ﯾﺎﺑﺪ ،ﻣﻤﮑﻦ ﺍﺳﺖ ﺍﯾﻦ ﻟﻮﻟﻪ ﻫﺎ ﻣﻮﺛﺮ ﻭﺍﻗﻊ ﻧﺸﻮﻧﺪ .ﺩﺭ ﻫﺮ ﺻﻮﺭﺕ ﺍﯾﻦ ﺍﺗﻔﺎﻕ ﻃﺒﯿﻌﯽ ﺍﺳﺖ. • ﺩﺭ ﺁﺏ ﻭ ﻫﻮﺍی ﻣﺮﻃﻮﺏ ،ﻣﻤﮑﻦ ﺍﺳﺖ ﺳﻄﺢ ﺧﺎﺭﺟﯽ ﺩﺳﺘﮕﺎﻩ ﺑﻪ ﻫﻨﮕﺎﻡ ﺗﻤﺎﺱ ﺭﻃﻮﺑﺖ ﻫﻮﺍ ﺑﺎ ﺳﻄﺢ ﺳﺮﺩ ﺩﺳﺘﮕﺎﻩ ﻋﺮﻕ ﮐﻨﺪ. ﺻﺪﺍی ﺗﺸﮑﯿﻞ ﺣﺒﺎﺏ ﻣﺎﯾﻊ ﺍﺯ ﺩﺍﺧﻞ ﯾﺨﭽﺎﻝ ﺑﻪ ﮔﻮﺵ ﻣﯽ ﺭﺳﺪ. • ﺍﯾﻦ ﺻﺪﺍ ﺍﺯ ﺧﻨﮏ ﮐﻨﻨﺪﻩ ﺍی ﮐﻪ ﺩﺍﺧﻞ ﯾﺨﭽﺎﻝ ﺭﺍ ﺧﻨﮏ ﻣﯽ ﮐﻨﺪ ﻧﺎﺷﯽ ﻣﯿﺸﻮﺩ. ﺑﻮی ﺑﺪی ﺩﺍﺧﻞ ﺩﺳﺘﮕﺎﻩ ﺍﺳﺘﺸﻤﺎﻡ ﻣﯽ ﺷﻮﺩ. • ﺁﯾﺎ ﻏﺬﺍﯾﯽ ﻓﺎﺳﺪ ﺷﺪﻩ ﺍﺳﺖ؟ • ﻣﻄﻤﺌﻦ ﺷﻮﯾﺪ ﮐﻪ ﻏﺬﺍﻫﺎی ﺑﻮﺩﺍﺭ ) ﺑﺮﺍی ﻣﺜﺎﻝ ﻣﺎﻫﯽ( ﺭﺍ ﻃﻮﺭی ﺑﺴﺘﻪ ﺑﻨﺪی ﮐﺮﺩﻩ ﺍﯾﺪ ﮐﻪ ﻫﻮﺍ ﺑﻪ ﺩﺍﺧﻞ ﺁﻥ ﻧﻔﻮﺫ ﻧﮑﻨﺪ. • ﯾﺨﭽﺎﻝ ﺭﺍ ﻫﺮ ﭼﻨﺪ ﻭﻗﺖ ﯾﮑﺒﺎﺭ ﺗﻤﯿﺰ ﮐﺮﺩﻩ ﻭ ﻫﺮ ﮔﻮﻧﻪ ﻣﻮﺍﺩ ﻏﺬﺍﯾﯽ ﻓﺎﺳﺪ ﯾﺎ ﻣﺸﮑﻮک ﺭﺍ ﺩﻭﺭ ﺑﺮﯾﺰﯾﺪ. ﯾﮏ ﻻﯾﻪ ﺑﺮﻓﮏ ﺑﺮ ﺭﻭی ﺩﯾﻮﺍﺭﻩ ﻫﺎی ﯾﺨﭽﺎﻝ ﺗﺸﮑﯿﻞ ﺷﺪﻩ ﺍﺳﺖ. • ﺁﯾﺎ ﺩﺭﯾﭽﻪ ﻫﺎی ﯾﺨﭽﺎﻝ ﺑﺎ ﻣﻮﺍﺩ ﺩﺍﺧﻞ ﺁﻥ ﻣﺴﺪﻭﺩ ﺷﺪﻩ ﺍﺳﺖ؟ • ﺑﻪ ﻣﻨﻈﻮﺭ ﺗﻬﻮﯾﻪ ﯾﺨﭽﺎﻝ ﻏﺬﺍ ﺭﺍ ﺗﺎ ﺣﺪ ﺍﻣﮑﺎﻥ ﺍﺯ ﺩﺭﯾﭽﻪ ﺗﻬﻮﯾﻪ ﺩﻭﺭ ﻧﮕﻪ ﺩﺍﺭﯾﺪ. • ﺁﯾﺎ ﺩﺭﺏ ﮐﺎﻣﻼ ﺑﺴﺘﻪ ﺍﺳﺖ؟ ﭼﮕﺎﻟﺶ ﺑﺮ ﺭﻭی ﺩﯾﻮﺍﺭﻩ ﺩﺳﺘﮕﺎﻩ ﻭ ﺩﺭ ﺍﻃﺮﺍﻑ ﺳﺒﺰﯾﺠﺎﺕ ﺗﺸﮑﯿﻞ ﻣﯽ ﺷﻮﺩ. • ﻏﺬﺍﯾﯽ ﺑﺎ ﺁﺏ ﺯﯾﺎﺩ ﺭﺍ ﺑﺪﻭﻥ ﺩﺭﭘﻮﺵ ﺩﺭ ﯾﺨﭽﺎﻝ ﮔﺬﺍﺷﺘﻪ ﺍﯾﺪ ﯾﺎ ﺩﺭﺏ ﺑﺮﺍی ﯾﮏ ﻣﺪﺕ ﻃﻮﻻﻧﯽ ﺑﺎﺯ ﻣﺎﻧﺪﻩ ﺍﺳﺖ. • ﻏﺬﺍ ﺭﺍ ﺑﺎ ﯾﮏ ﺩﺭﭘﻮﺵ ﻧﮕﻬﺪﺍﺭی ﮐﺮﺩﻩ ﯾﺎ ﺩﺭ ﻇﺮﻭﻑ ﺩﺭ ﺑﺴﺘﻪ ﺑﮕﺬﺍﺭﯾﺪ. -١۴ﻋﯿﺐ ﯾﺎﺑﯽ 2012.5.24 2:13:31 PM DA99-01950B(0.9).indb 3 ﺍﯾﺴﺘﮕﺎﻩ ﻧﻮﺷﯿﺪﻧﯽ ﻋﻤﻠﮑﺮﺩ ٠٢ .١ﻣﺤﻔﻈﻪ ﻗﺮﺍﺭ ﮔﺮﻓﺘﻪ ﺑﺮ ﺭﻭی ﺑﺎﻻی ﺍﯾﺴﺘﮕﮕﺎﻩ ﻧﻮﺷﯿﺪﻧﯽ ﺭﺍ ﺩﺭﺁﻭﺭﺑﺪ. .٢ﺳﻤﺖ ﭼﭗ ﻭ ﺭﺍﺳﺖ ﻗﺴﻤﺖ ﭘﺎﯾﯿﻨﯽ ﺍﯾﺴﺘﮕﺎﻩ ﻧﻮﺷﯿﺪﻧﯽ ﺭﺍ ﺑﺎ ﺩﻭ ﺩﺳﺖ ﺑﺎﻻ ﮐﺸﯿﺪﻩ ﺗﺎ ﺑﺎﺯ ﺷﻮﺩ. ﺑﺴﺘﻪ ﺑﻪ ﻣﺪﻝ ﻣﻤﮑﻦ ﺍﺳﺖ ﺍﯾﺴﺘﮕﺎﻩ ﻧﻮﺷﯿﺪﻧﯽ ﺩﺭ ﯾﺨﭽﺎﻝ ﻣﻮﺟﻮﺩ ﻧﺒﺎﺷﺪ. ﺑﻮﮔﯿﺮ ﺍﻫﺮﻡ ﺑﻮﮔﯿﺮ ﺭﺍ ﺩﺭ ﺟﻬﺖ ﻧﺸﺎﻥ ﺩﺍﺩﻩ ﺷﺪﻩ ﻓﺸﺎﺭ ﺩﺍﺩﻩ ﻭ ﺩﺭﺏ ﺭﺍ ﺑﮑﺸﯿﺪ. ﲤﯿﺰ ﮐﺮﺩﻥ ﯾﺨﭽﺎﻝ ﺑﺮﺍی ﺗﻤﯿﺰ ﮐﺮﺩﻥ ﯾﺨﭽﺎﻝ ﺍﺯ ﺑﻨﺰﻥ ،ﺗﯿﻨﯽ ﯾﺎ ﮐﻠﻮﺭﮐﺲ ﺍﺳﺘﻔﺎﺩﻩ ﻧﮑﻨﯿﺪ .ﺍﯾﻦ ﻣﻮﺍﺩ ﻣﻤﮑﻦ ﺍﺳﺖ ﺑﻪ ﺳﻄﺢ ﺍﺧﻄﺎﺭ ﺩﺳﺘﮕﺎﻩ ﺁﺳﯿﺐ ﺭﺳﺎﻧﺪﻩ ﻭ ﺳﺒﺐ ﺷﻮک ﺍﻟﮑﺘﺮﯾﮑﯽ ﺷﻮﺩ. ﻫﻨﮕﺎﻣﯽ ﮐﻪ ﯾﺨﭽﺎﻝ ﺑﻪ ﺑﺮﻕ ﻣﺘﺼﻞ ﺍﺳﺖ ،ﺁﺏ ﺭﺍ ﺑﻪ ﺁﻥ ﺍﺳﭙﺮی ﻧﮑﻨﯿﺪ.ﭼﻮﻥ ﺧﻄﺮ ﺷﻮک ﺍﻟﮑﺘﺮﯾﮑﯽ ﺍﺣﺘﯿﺎﻁ ﻭﺟﻮﺩ ﺩﺍﺭﺩ .ﯾﺨﭽﺎﻝ ﺭﺍ ﺑﺎ ﺑﻨﺰﯾﻦ ،ﺗﯿﻨﺮ ﯾﺎ ﺗﻤﯿﺰ ﮐﻨﻨﺪﻩ ﻫﺎی ﻣﺎﺷﯿﻦ ﺗﻤﯿﺰ ﻧﮑﻨﯿﺪ ﭼﻮﻥ ﺧﻄﺮ ﺷﻮک ﺍﻟﮑﺘﺮﯾﮑﯽ ﻭﺟﻮﺩ ﺩﺍﺭﺩ. ﺗﻌﻮﯾﺾ ﻻﻣﭗ ﺩﺍﺧﻞ ﯾﺨﭽﺎﻝ ﺑﺮﺍی ﻻﻣﭗ ،LEDﻟﻄﻔﺎ ﺑﺎ ﺳﺮﻭﯾﺲ ﻣﻬﻨﺪﺳﯽ ﺑﺮﺍی ﺗﻌﻮﯾﺾ ﻻﻣﭗ ﺗﻤﺎﺱ ﺑﮕﯿﺮﯾﺪ. ﻋﻤﻠﮑﺮﺩ١٣- 2012.5.24 2:13:31 PM DA99-01950B(0.9).indb 4 ﺍﺳﺘﻔﺎﺩﻩ ﺍﺯ ﺁﺏ ﺳﺮﺩ ﮐﻦ ﺩﺭﺁﻭﺭﺩﻥ ﻗﻄﻌﺎﺕ ﯾﺨﭽﺎﻝ ﭘﺮ ﮐﺮﺩﻥ ﺁﺏ ﻣﺤﻔﻈﻪ ﻣﺘﺤﺮک ﺷﻤﺎ ﻣﯽ ﺗﻮﺍﻧﯿﺪ ﺗﺎﻧﮏ ﺁﺏ ﺭﺍ ﺩﺍﺧﻞ ﯾﺨﭽﺎﻝ ﭘﺮ ﮐﺮﺩﻩ ﻭ ﯾﺎ ﻣﯽ ﺗﻮﺍﻧﯽ ﺁﻥ ﺭﺍ ﺑﯿﺮﻭﻥ ﺁﻭﺭﺩﻩ ﻭ ﭘﺮ ﮐﻨﯿﺪ. ﮐﺸﻮ ﺭﺍ ﺗﺎ ﺁﺧﺮ ﺑﯿﺮﻭﻥ ﮐﺸﯿﺪﻩ ،ﮐﻤﯽ ﺑﺎﻻ ﺑﺮﺩﻩ ﻭ ﺩﺭﺁﻭﺭﯾﺪ. ﺭﻭﺵ ١ ﺁﺏ ﺭﺍ ﺍﺯ ﻃﺮﯾﻖ ﺣﻔﺮﻩ ﺑﺎﻻی ﺗﺎﻧﮏ ﺍﺏ ﺩﺭﻭﻥ ﺁﻥ ﺑﺮﯾﺰﯾﺪ .ﺩﺭ ﺻﻮﺭﺗﯿﮑﻪ ﺁﺏ ﺭﺍ ﺧﯿﻠﯽ ﺑﺎ ﺳﺮﻋﺖ ﺑﺮﯾﺰﯾﺪ ،ﻣﻤﮑﻦ ﺍﺳﺖ ﺁﺏ ﺳﺮﺭﯾﺰ ﺷﻮﺩ. ﺭﻭﺵ ٢ .١ﻗﻔﻞ ﻫﺎی ﻣﻮﺟﻮﺩ ﺩﺭ ﺩﻭ ﻃﺮﻑ ﺗﺎﻧﮏ ﺁﺏ ﺭﺍ ﺑﺎﺯ ﮐﺮﺩﻩ ﺗﺎ ﺑﺘﺌﺎﻧﯿﺪ ﺩﺭﺏ ﺑﺰﺭگ ﺁﻥ ﺭﺍ ﺑﺮﺩﺍﺭﯾﺪ. .٢ﺗﺎﻧﮏ ﺭﺍ ﺍﺯ ﺁﺏ ﭘﺮ ﮐﻨﯿﺪ. ﻗﻔﺴﻪ ﻫﺎ ﺑﺎ ﻫﺮ ﺩﻭ ﺩﺳﺖ ﺑﻪ ﺁﺭﺍﻣﯽ ﻗﻔﺴﻪ ﻫﺎ ﺭﺍ ﺑﺎﻻ ﺑﺮﺩﻩ ﻭ ﺑﻪ ﺳﻤﺖ ﺧﻮﺩﺗﺎﻥ ﺑﮑﺸﯿﺪ. ) ﻗﻔﺴﻪ ﺷﯿﺸﻪ ﺍی ،ﻗﻔﺴﻪ ﺗﺎﺷﻮ( ﮐﺸﻮﻫﺎ ﺍﺣﺘﯿﺎﻁ ﭼﯿﺰی ﺑﻪ ﻏﯿﺮ ﺍﺯ ﺁﺏ ﺩﺍﺧﻞ ﺗﺎﻧﮏ ﺁﺏ ﻧﺮﯾﺨﺘﻪ ﯾﺎ ﻧﮕﺬﺍﺭﯾﺪ. ﮔﺮﻓﺘﻦ ﺁﺏ ﺍﺯ ﺁﺏ ﺳﺮﺩ ﮐﻦ ﯾﮏ ﻟﯿﻮﺍﻥ ﺷﯿﺸﻪ ﺍی ﺯﯾﺮ ﺧﺮﻭﺟﯽ ﺁﺏ ﺳﺮﺩ ﮐﻦ ﮔﺬﺍﺷﺘﻪ ﻭ ﺑﻪ ﺁﺭﺍﻣﯽ ﺍﻫﺮﻡ ﺁﻥ ﺭﺍ ﺑﺎ ﻟﯿﻮﺍﻥ ﻓﺸﺎﺭ ﺩﻫﯿﺪ .ﻫﻨﮕﺎﻣﯽ ﮐﻪ ﺍﻫﺮﻡ ﺭﺍ ﻓﺸﺎﺭ ﻣﯽ ﺩﻫﯿﺪ ،ﻻﻣﭗ ﺁﺑﯽ ﺭﻭﺷﻦ ﻣﯽ ﺷﻮﺩ. • ﺑﻪ ﻣﻨﻈﻮﺭ ﺟﻠﻮﮔﯿﺮی ﺍﺯ ﺗﺮﺷﺢ ﺁﺏ ،ﻣﻄﻤﺌﻦ ﺷﻮی ﮐﻪ ﻟﯿﻮﺍﻥ ﻭ ﺁﺏ ﺳﺮﺩ ﮐﻦ ﺩﺭ ﯾﮏ ﺭﺍﺳﺘﺎ ﻗﺮﺍﺭ ﺩﺍﺷﺘﻪ ﺑﺎﺷﻨﺪ. • ﺑﺴﺘﻪ ﺑﻪ ﻣﺪﻝ ﻣﻤﮑﻦ ﺍﺳﺖ ﺁﺏ ﺳﺮﺩ ﮐﻦ ﺩﺭ ﺩﺳﺘﮕﺎﻩ ﺷﻤﺎ ﻣﻮﺟﻮﺩ ﻧﺒﺎﺷﺪ. ﮐﺸﻮ ﺭﺍ ﺗﺎ ﺁﺧﺮ ﺑﯿﺮﻭﻥ ﮐﺸﯿﺪﻩ ﻭ ﮐﻤﯽ ﺑﺎﻻ ﺑﺒﺮﯾﺪ ﺗﺎ ﺧﺎﺭﺝ ﺷﻮﺩ. )ﮐﺸﻮی ﭘﻼﺳﺘﯿﮑﯽ /ﺳﺒﺪ ﺑﺰﺭگ ﮐﻨﺘﺮﻝ ﺭﻃﻮﺑﺖ( ﻣﺤﻔﻈﻪ ﻫﺎی ﺩﺍﺧﻞ ﺩﺭﺏ ﻣﺤﻔﻈﻪ ﻫﺎ ﺭﺍ ﺑﻪ ﻃﻮﺭ ﻣﺤﮑﻢ ﺑﺎ ﺩﻭ ﺩﺳﺖ ﮔﺮﻓﺘﻪ ﻭ ﺑﻪ ﺁﺭﺍﻣﯽ ﺑﺎﻻ ﺑﺮﺩﻩ ﻭ ﺩﺭﺁﻭﺭﯾﺪ. ﺗﺎﻧﮏ ﺁﺏ ﺗﺎﻧﮏ ﺁﺏ ﺭﺍ ﺑﻪ ﻃﻮﺭ ﻣﺤﮑﻢ ﺑﺎ ﺩﻭ ﺩﺳﺖ ﮔﺮﻓﺘﻪ ﻭ ﺑﻪ ﺁﺭﺍﻣﯽ ﺑﺎﻻ ﺑﺮﺩﻩ ﻭ ﺩﺭﺁﻭﺭﯾﺪ. ﻣﻮﺟﻮﺩ ﻧﺒﺎﺷﺪ. -١٢ﻋﻤﻠﮑﺮﺩ 2012.5.24 2:13:31 PM DA99-01950B(0.9).indb 5 ﺍﺳﺘﻔﺎﺩﻩ ﺍﺯ ﺳﺒﺪ ﺑﺰﺭگ ﮐﻨﺘﺮﻝ ﺭﻃﻮﺑﺖ ﺍﺯ ﺍﻫﺮﻡ ﮐﻨﺘﺮﻝ ﺭﻃﻮﺑﺖ ﻭﺍﻗﻊ ﺑﺮ ﺑﺎﻻی ﮐﺸﻮ ﺭﻃﻮﺑﺖ ﺭﺍ ﺗﻨﻈﯿﻢ ﮐﻨﯿﺪ. ﺑﺮﺍی ﮐﺎﻫﺶ ﺳﻄﺢ ﺭﻃﻮﺑﺖ ﺩﺭ ﮐﺸﻮ ،ﺍﻫﺮﻡ ﺭﺍ ﺑﻪ ﺳﻤﺖ ﺭﺍﺳﺖ ﺑﭽﺮﺧﺎﻧﯿﺪ. ﺑﺮﺍی ﺍﻓﺰﺍﯾﺶ ﺳﻄﺢ ﺭﻃﻮﺑﺖ ﺩﺭ ﮐﺸﻮ ﺍﻫﺮﻡ ﺭﺍ ﺑﻪ ﺳﻤﺖ ﺭﺍﺳﺖ ﺑﭽﺮﺧﺎﻧﯿﺪ .ﺣﻔﺮﻩ ﻫﺎی ﺑﯿﺸﺘﺮ ﺳﺒﺐ ﺑﺎﻻ ﺭﻓﺘﻦ ﺳﻄﺢ ﺭﻃﻮﺑﺖ ﺩﺭ ﮐﺸﻮ ﻣﯽ ﺷﻮﻧﺪ. ﻋﻤﻠﮑﺮﺩ ٠٢ ١ ﺷﻤﺎ ﻣﯽ ﺗﻮﺍﻧﯿﺪ ﺍﺯ ﺳﺒﺪ ﺑﺰﺭگ ﮐﻨﺘﺮﻝ ﺭﻃﻮﺑﺖ ﺑﺮﺍی ﮐﻨﺘﺮﻝ ﺭﻃﻮﺑﺖ ﻣﻮﺍﺩ ﻏﺬﺍﯾﯽ ﮐﻪ ﻣﯽ ﺧﻮﺍﻫﯿﺪ ﺷﺎﺩﺍﺑﯽ ﻭ ﺗﺎﺯﮔﯽ ﺧﻮﺩ ﺭﺍ ﺣﻔﻆ ﮐﻨﻨﺪ ،ﺍﺳﺘﻔﺎﺩﻩ ﮐﻨﯿﺪ. ﺍﺳﺘﻔﺎﺩﻩ ﺍﺯ ﺍﯾﺴﺘﮕﺎﻩ ﻧﻮﺷﯿﺪﻧﯽ • ﺑﺴﺘﻪ ﺑﻪ ﻣﺪﻝ ﺑﺮﺧﯽ ﺍﺯ ﻭﯾﮋﮔﯽ ﻫﺎ ﻣﺘﻔﺎﻭﺕ ﺑﻮﺩﻩ ﻭ ﻣﻤﮑﻦ ﺍﺳﺖ ﺩﺭ ﯾﺨﭽﺎﻝ ﺷﻤﺎ ﻣﻮﺟﻮﺩ ﻧﺒﺎﺷﻨﺪ. • ﺑﺮﺍی ﺩﺍﺷﺘﻦ ﻓﻀﺎی ﺑﯿﺸﺘﺮ ،ﻣﯽ ﺗﻮﺍﻧﯿﺪ ﺗﺎﻧﮏ ﺁﺏ ، ١ﺭﺍ ﺩﺭﺁﻭﺭﯾﺪ.ﺍﯾﻦ ﮐﺎﺭ ﺑﺮ ﻋﻤﻠﮑﺮﺩ ﻣﮑﺎﻧﯿﮑﯽ ﻭ ﮔﺮﻣﺎﯾﯽ ﯾﺨﭽﺎﻝ ﺗﺎﺛﯿﺮی ﻧﺨﻮﺍﻫﺪ ﮔﺬﺍﺷﺖ .ﺣﺠﻢ ﺫﺧﯿﺮﻩ ﺍﻋﻼﻡ ﺷﺪﻩ ﯾﺨﭽﺎﻝ ﺑﻪ ﻫﻨﮕﺎﻡ ﺩﺭﺍﻭﺭﺩﻥ ﺍﯾﻦ ﻗﻄﻌﻪ ﻣﺤﺎﺳﺒﻪ ﻣﯽ ﺷﻮﺩ. ﺍﺳﺘﻔﺎﺩﻩ ﺍﺯ ﻗﻔﺴﻪ ﺗﺎﺷﻮ ﺩﺭ ﺻﻮﺭﺗﯿﮑﻪ ﻣﯽ ﺧﻮﺍﻫﯿﺪ ﻇﺮﻭﻑ ﺑﻠﻨﺪﺗﺮ ﯾﺎ ﻣﺤﺼﻮﻻﺕ ﺑﺰﺭﮔﺘﺮ ﺭﺍ ﺑﺮ ﺭﻭی ﻗﻔﺴﻪ ﺑﮕﺬﺍﺭﯾﺪ ،ﻣﯽ ﺗﻮﺍﻧﯿﺪ ﺁﻥ ﺭﺍﺟﻤﻊ ﮐﻨﯿﺪ. .١ﻗﻔﺴﻪ ﺭﺍ ﮐﻤﯽ ﺟﻠﻮ ﺑﺮﺩﻩ ﻭ ﺑﻪ ﺳﻤﺖ ﺩﺍﺧﻞ ﺑﮑﺸﯿﺪ. .٢ﺷﻤﺎ ﻣﯽ ﺗﻮﺍﻧﯿﺪ ﺑﻪ ﺳﺎﺩﮔﯽ ﻗﻔﺴﻪ ﺭﺍ ﺑﺎﺯ ﮐﺮﺩﻩ ﺗﺎ ﺍﺯ ﻗﻔﺴﻪ ﺑﺎ ﻋﺮﺽ ﮐﺎﻣﻞ ﺍﺳﺘﻔﺎﺩﻩ ﮐﻨﯿﺪ. ﺑﺮﺍی ﺑﺎﺯ ﮐﺮﺩﻥ ﺍﯾﺴﺘﮕﺎﻩ ﻧﻮﺷﯿﺪﻧﯽ ،ﺑﺎﻻی ﺩﺭﺏ ﺁﻥ ﺭﺍ ﻓﺸﺎﺭ ﺩﻫﯿﺪ. ﮐﻠﯿﺪ ﺿﺪ ﭼﮕﺎﻟﺶ ﻫﻨﮕﺎﻣﯿﮑﻪ ﺳﻄﺢ ﺭﻃﻮﺑﺖ ﺩﺍﺧﻞ ﯾﺨﭽﺎﻝ ﺯﯾﺎﺩ ﻣﯿﺸﻮﺩ، ﻣﻤﮑﻦ ﺍﺳﺖ ﺍﻃﺮﺍﻑ ﺍﯾﺴﺘﮕﺎﻩ ﻧﻮﺷﯿﺪﻧﯽ ﻋﺮﻕ ﮐﻨﺪ .ﺑﺮﺍی ﺯ ﺑﯿﻦ ﺑﺮﺩﻥ ﭼﮕﺎﻟﺶ ﻭ ﺗﮑﻤﻪ Anti-Sweat heaterﺭﺍ ﺧﺎﻣﻮﺵ ﮐﺮﺩﻩ ﻭ ﻭﻗﺘﯽ ﻗﻄﺮﺍﺕ ﺁﺏ ﻧﺎﭘﺪﯾﺪ ﺷﺪﻧﺪ ،ﺁﻥ ﺭﺍ ﺧﺎﻣﻮﺵ ﮐﻨﯿﺪ. Anti-sweat heater switch ﺑﺴﺘﻪ ﺑﻪ ﻣﺪﻝ ﻣﻤﮑﻦ ﺍﺳﺖ ﺍﯾﺴﺘﮕﺎﻩ ﻧﻮﺷﯿﺪﻧﯽ ﺩﺭ ﺩﺳﺘﮕﺎﻩ ﺷﻤﺎ ﻭﺟﻮﺩ ﻧﺪﺍﺷﺘﻪ ﺑﺎﺷﺪ. ﻋﻤﻠﮑﺮﺩ١١- 2012.5.24 2:13:32 PM DA99-01950B(0.9).indb 6 ﻋﻤﻠﮑﺮﺩ ﯾﺨﭽﺎﻝ ﺑﺮﺭﺳﯽ ﭘﻨﻞ ﮐﻨﺘﺮﻝ ١ ٢ ٣ ۴ (Hold 3 sec )for Display ۵ ﻫﺮ ﺑﺎﺭ ﮐﻪ ﺷﻤﺎ ﺗﮑﻤﻪ ﺍی ﺭﺍ ﻓﺸﺎﺭ ﻣﯽ ﺩﻫﯿﺪ، ﺻﺪﺍی ﺑﻮﻕ ﮐﻮﺗﺎﻫﯽ ﺑﻪ ﮔﻮﺵ ﻣﯽ ﺭﺳﺪ. ﺍﺳﺘﻔﺎﺩﻩ ﺍﺯ ﭘﻨﻞ ﮐﻨﺘﺮﻝ ١ ﻗﻔﻞ ﮐﻮﺩک ﺗﮑﻤﻪ Child Lockﺭﺍ ﺑﻪ ﻣﺪﺕ ٣ﺛﺎﻧﯿﻪ ﻓﺸﺎﺭ ﺩﻫﯿﺪ ﺗﺎ ﻋﻤﻠﮑﺮﺩ ﻗﻔﻞ ﮐﻮﺩک ﻓﻌﺎﻝ ﺷﻮﺩ. ﻧﺸﺎﻧﮕﺮ ﻗﻔﻞ ﮐﻮﺩک ﺭﻭﺷﻦ ﺷﺪﻩ ﻭ ﺗﻤﺎﻣﯽ ﺗﮑﻤﻪ ﻫﺎی ﺭﻭی ﭘﻨﻞ ﮐﻨﺘﺮﻝ ﻗﻔﻞ ﻣﯽ ﺷﻮﻧﺪ. ﺑﺮﺍی ﻏﯿﺮ ﻓﻌﺎﻝ ﮐﺮﺩﻥ ﻗﻔﻞ ﮐﻮﺩک ،ﺩﻭﺑﺎﺭﻩ ﺗﮑﻤﻪ Child Lockﺭﺍ ﺑﻪ ﻣﺪﺕ ٣ﺛﺎﻧﯿﻪ ﻓﺸﺎﺭ ﺩﻫﯿﺪ. ٢ ﯾﺨﭽﺎﻝ ﺗﮑﻤﻪ Fridgeﺭﺍ ﺑﺮﺍی ﺗﻨﻈﯿﻢ ﺩﻣﺎی ﻣﻮﺭﺩ ﻧﻈﺮ ﺑﯿﻦ ١ﻭ ٧ﻓﺸﺎﺭ ﺩﻫﯿﺪ. ﺩﻣﺎی ﭘﯿﺶ ﻓﺮﺽ ﺑﺮ ﺭﻭی ٣ﺗﻨﻈﯿﻢ ﺷﺪﻩ ﺍﺳﺖ ﻭ ﻫﺮ ﺑﺎﺭ ﮐﻪ ﺷﻤﺎ ﺗﮑﻤﻪ Fridgeﺭﺍ ﻓﺸﺎﺭ ﻣﯽ ﺩﻫﯿﺪ ﺩﻣﺎ ﺑﻪ ﺗﺮﺗﯿﺐ ﺯﯾﺮ ﺗﻐﯿﯿﺮ ﮐﺮﺩﻩ ﻭ ﻧﺸﺎﻧﮕﺮ ﺩﻣﺎ، ﺩﻣﺎی ﻣﻮﺭﺩ ﻧﻈﺮ ﺭﺍ ﻧﺸﺎﻥ ﺧﻮﺍﻫﺪ ﺩﺍﺩ. ﻫﻨﮕﺎﻣﯽ ﮐﻪ ﺗﻨﻈﯿﻢ ﺩﻣﺎ ﺍﻧﺠﺎﻡ ﺷﺪ ،ﻧﺸﺎﻧﮕﺮ ﺩﻣﺎ ﺩﻣﺎی ﮐﻨﻮﻧﯽ ﯾﺨﭽﺎﻝ ﺭﺍ ﻧﺸﺎﻥ ﺧﻮﺍﻫﺪ ﺩﺍﺩ. ﺍﻣﺎ ﺩﺭ ﺻﻮﺭﺗﯿﮑﻪ ﺩﻣﺎی ﯾﺨﭽﺎﻝ ﺑﯿﺶ ﺍﺯ ٩ﺑﺎﺷﺪ ،ﻧﺸﺎﻧﮕﺮ ﺩﻣﺎ ﻫﻤﺎﻥ ٩ﺭﺍ ﻧﺸﺎﻥ ﻣﯽ ﺩﻫﺪ. ٣ ﺧﻨﮏ ﮐﻨﻨﺪﮔﯽ ﺳﺮﯾﻊ ﺗﮑﻤﻪ Power Coolﺭﺍ ﺑﺮﺍی ﻓﻌﺎﻝ ﮐﺮﺩﻥ ﻋﻤﻠﮑﺮﺩ ﺧﻨﮏ ﮐﻨﻨﺪﮔﯽ ﺳﺮﯾﻊ ﻓﺸﺎﺭ ﺩﻫﯿﺪ. ﻧﺸﺎﻧﮕﺮ ﻋﻤﻠﮑﺮﺩ ﺧﻨﮏ ﮐﻨﻨﺪﮔﯽ ﺳﺮﯾﻊ ﺭﻭﺷﻦ ﺷﺪﻩ ﻭ ﯾﺨﭽﺎﻝ ﺯﻣﺎﻥ ﻣﻮﺭﺩ ﻧﯿﺎﺯ ﺑﺮﺍی ﺧﻨﮏ ﮐﻨﻨﺪﮔﯽ ﻣﺤﺼﻮﻻﺕ ﺭﺍ ﺗﺴﺮﯾﻊ ﻣﯽ ﺑﺨﺸﺪ. ﻋﻤﻠﮑﺮﺩ ﺳﺮﺩ ﮐﻦ ﺳﺮﯾﻊ ﺟﻬﺖ ﺧﻨﮏ ﮐﺮﺩﻥ ﻓﻮﺭی ﻣﺤﻔﻈﻪ ﯾﺨﭽﺎﻝ ﺑﻤﺪﺕ ٢ﺳﺎﻋﺖ ٣٠ﺩﻗﯿﻘﻪ ﮐﺎﺭ ﻣﯽ ﮐﻨﺪ. ﺑﻤﻨﻈﻮﺭ ﻏﯿﺮ ﻓﻌﺎﻝ ﮐﺮﺩﻥ ﻋﻤﻠﮑﺮﺩ ﺳﺮﺩ ﮐﻦ ﺳﺮﯾﻊ ،ﻣﺠﺪﺩﺍ ﺩﮐﻤﻪ Power Coolﺭﺍ ﻓﺸﺎﺭ ﺩﻫﯿﺪ. ﺑﺮﺍی ﻏﯿﺮ ﻓﻌﺎﻝ ﮐﺮﺩﻥ ﺍﯾﻦ ﻋﻤﻠﮑﺮﺩ ﺗﮑﻤﻪ Power Cool ﺭﺍ ﻓﺸﺎﺭ ﺩﻫﯿﺪ. ﻋﻤﻠﮑﺮﺩ ﻫﻤﺰﻣﺎﻥ ﺗﮑﻤﻪ Power Coolﻭ Vacation ﺍﻣﮑﺎﻧﭙﺬﯾﺮ ﻧﻤﯽ ﺑﺎﺷﺪ. ﺑﺎ ﺍﻧﺘﺨﺎﺏ ﻋﻤﻠﮑﺮﺩ Vacationﻋﻤﻠﮑﺮﺩ ﺍﻧﺠﻤﺎﺩ ﺳﺮﯾﻊ ﺑﻪ ﻃﻮﺭ ﺧﻮﺩﮐﺎﺭ ﻟﻐﻮ ﻣﯽ ﺷﻮﺩ. ۴ ﺁﻻﺭﻡ .١ﺁﻻﺭﻡ ﺑﺮﺍی ﻓﻌﺎﻝ ﮐﺮﺩﻥ ﻋﻤﻠﮑﺮﺩ ﺁﻻﺭﻡ ﺍﯾﻦ ﺗﮑﻤﻪ ﺭﺍ ﻓﺸﺎﺭ ﺩﻫﯿﺪ. ﻧﺸﺎﻧﮕﺮ ﺁﻻﺭﻡ ﺭﻭﺷﻦ ﺷﺪﻩ ﻭ ﺩﺭ ﺻﻮﺭﺗﯿﮑﻪ ﺩﺭﺏ ﯾﺨﭽﺎﻝ ﺑﺮﺍی ﻣﺪﺕ ﺑﯿﺶ ﺍﺯ ٢ﺩﻗﯿﻘﻪ ﺑﺎﺯ ﺑﻤﺎﻧﺪ ،ﺍﯾﻦ ﺑﻮﻕ ﺑﻪ ﺷﻤﺎ ﻫﺸﺪﺍﺭ ﻣﯽ ﺩﻫﺪ. ﺑﺮﺍی ﻟﻐﻮ ﺍﯾﻦ ﻋﻤﻠﮑﺮﺩ ﺗﮑﻤﻪ Alarmﺭﺍ ﻣﺠﺪﺩﺍ ﻓﺸﺎﺭ ﺩﻫﯿﺪ. .٢ﺻﻔﺤﻪ ﻧﻤﺎﯾﺸﮕﺮ ﻏﯿﺮ ﻓﻌﺎﻝ ﺑﺼﻮﺭﺕ ﺍﺳﺘﺎﻧﺪﺍﺭﺩ ،ﺻﻔﺤﻪ ﻧﻤﺎﯾﺸﮕﺮ ﺑﻪ ﺣﺎﻟﺖ ﻏﯿﺮ ﻓﻌﺎﻝ ﻣﯽ ﺑﺎﺷﺪ ،ﺑﻪ ﺟﻬﺖ ﻓﻌﺎﻝ ﻭ ﻏﯿﺮ ﻓﻌﺎﻝ ﺳﺎﺯی ﺁﻥ ،ﺩﮐﻤﻪ ﺁﻻﺭﻡ ﺭﺍ ﺑﻤﺪﺕ ٣ﺛﺎﻧﯿﻪ ﻓﺸﺎﺭ ﺩﻫﯿﺪ. ۵ ﺗﻌﻄﯿﻼﺕ ﺑﺮﺍی ﻓﻌﺎﻝ ﮐﺮﺩﻥ ﻋﻤﻠﮑﺮﺩ ﺗﻌﻄﯿﻼﺕ ،ﺗﮑﻤﻪ Vacationﺭﺍ ﻓﺸﺎﺭ ﺩﻫﯿﺪ.ﻧﺸﺎﻧﮕﺮ ﺗﻌﻄﯿﻼﺕ ﺭﻭﺷﻦ ﺷﺪﻩ ﻭ ﯾﺨﭽﺎﻝ ﺩﻣﺎ ﺭﺍ ﺑﻪ ﻣﻨﻈﻮﺭ ﮐﺎﻫﺶ ﻣﺼﺮﻑ ﺍﻧﺮژی ﺑﺮ ﺭﻭی ١۵ﺗﻨﻈﯿﻢ ﻣﯽ ﮐﻨﺪ .ﺍﯾﻦ ﻋﻤﻠﮑﺮﺩ ﻫﻤﭽﻨﯿﻦ ﺳﺒﺐ ﻣﯽ ﺷﻮﺩ ﮐﻪ ﯾﺨﭽﺎﻝ ﺑﻮ ﻧﮕﺮﻓﺘﻪ ﻭ ﮐﭙﮏ ﻧﺰﻧﺪ) .ﻫﻨﮕﺎﻣﯿﮑﻪ ﺩﺭ ﺳﻔﺮ ﮐﺎﺭی ﯾﺎ ﺗﻌﻄﯿﻼﺕ ﺑﻪ ﺳﺮ ﻣﯽ ﺑﺮﯾﺪ( • ﺑﺎ ﺍﻧﺘﺨﺎﺏ ﻋﻤﻠﮑﺮﺩ Vacationﻋﻤﻠﮑﺮﺩ ﺍﻧﺠﻤﺎﺩ ﺳﺮﯾﻊ ﺑﻪ ﻃﻮﺭ ﺧﻮﺩﮐﺎﺭ ﻟﻐﻮ ﻣﯽ ﺷﻮﺩ. ﺩﺭ ﻏﯿﺮ ﺍﯾﻨﺼﻮﺭﺕ ﺩﻣﺎ ﺑﻪ ﻫﻨﮕﺎﻡ ﻓﻌﺎﻝ ﺑﻮﺩﻥ ﺍﯾﻦ ﻋﻤﻠﮑﺮﺩ ﺗﻨﻈﯿﻢ ﻣﯽ ﺷﻮﺩ. • ﻟﻄﻔﺎ ﺗﻤﺎﻣﯽ ﻏﺬﺍﻫﺎ ﺭﺍ ﻗﺒﻞ ﺍﺯ ﺍﻧﺘﺨﺎﺏ ﻋﻤﻠﮑﺮﺩ Vacationﺍﺯ ﯾﺨﭽﺎﻝ ﺧﺎﺭﺝ ﮐﻨﯿﺪ. -١٠ﻋﻤﻠﮑﺮﺩ 2012.5.24 2:13:33 PM DA99-01950B(0.9).indb 7 .٢٠ﺩﺭﺯﮔﯿﺮﻫﺎی ﺩﺭ ﯾﺨﭽﺎﻝ ﻭ ﻓﺮﯾﺰﺭ ﺭﺍ ﺑﺎﺯ ﮐﺮﺩﻩ ﻭ ﺳﭙﺲ ﺁﻧﻬﺎ ﺭﺍ ﭘﺲ ﺍﺯ ﮔﺮﺩﺍﻧﺪﻥ ﺑﻪ ﻣﯿﺰﺍﻥ ١٨٠ﺩﺭﺟﻪ ﻣﺘﺼﻞ ﮐﻨﯿﺪ. ﻧﺼﺐ ٠١ .١۵ﺭﻭﮐﺶ ﺩﺳﺘﻪ ﺭﺍ ﺩﺭﺁﻭﺭﺩﻩ ﻭ ﭘﯿﭻ ﻫﺎ ﺭﺍ ﺑﺎﺯ ﻧﻤﺎﺋﯿﺪ ،ﺍﺯ ﺟﺪﺍ ﻧﻤﻮﺩﻥ ﺳﺮﭘﻮﺵ ﻫﺎ ﻭ ﺍﻧﺘﻘﺎﻝ ﺩﺳﺘﻪ ﺍﺯ ﺳﻤﺖ ﭼﭗ ﺑﻪ ﺭﺍﺳﺖ ﺩﺭﺏ ﺍﻃﻤﯿﻨﺎﻥ ﺣﺎﺻﻞ ﻧﻤﺎﺋﯿﺪ. )ﺍﺯﭘﻮﺷﺎﻧﺪﻥ ﺳﻮﺭﺍﺥ ﻫﺎی ﺳﻤﺖ ﭼﭗ ﺗﻮﺳﻂ ﺳﺮﭘﻮﺵ ﻫﺎی ﺟﺪﺍ ﺷﺪﻩ ﺍﻃﻤﯿﻨﺎﻥ ﺣﺎﺻﻞ ﻧﻤﺎﺋﯿﺪ(. ٢ .١٩ﭘﯿﭻ ﺭﺍ ﺳﺮ ﺟﺎی ﺧﻮﺩ ﻣﺤﮑﻢ ﮐﻨﯿﺪ. ﺑﺴﺘﻪ ﺑﻪ ﻣﺪﻟﻬﺎی ﻣﺨﺘﻠﻒ ﻣﻤﮑﻦ ﺍﺳﺖ ﺩﺳﺘﻪ ﻫﺎ ﺳﺮﭘﻮﺵ ﻧﺪﺍﺷﺘﻪ ﺑﺎﺷﻨﺪ. .١۶ﺳﺮﭘﻮﺵ ﻟﻮﻻ ﺭﺍ ﺟﺪﺍ ﻧﻤﻮﺩﻩ ﻭ ﺩﺭﭘﻮﺵ ﭘﺎﯾﻪ ﺟﻠﻮﺋﯽ ﺭﺍ ﻧﺼﺐ ﻧﻤﺎﺋﯿﺪ. ﺳﺮﭘﻮﺵ ﻟﻮﻻ ٣ .١٧ﭘﯿﭻ ﺭﺍ ﺑﺴﺘﻪ ﻭ ﺳﯿﻢ ﻫﺎ ﺭﺍ ﺳﺮ ﺟﺎی ﺧﻮﺩ ﻭﺻﻞ ﻧﻤﺎﯾﯿﺪ. ﺍﻃﻤﯿﻨﺎﻥ ﺣﺎﺻﻞ ﻧﻤﺎﯾﯿﺪ ﮐﻪ ﻗﺒﻞ ﺍﺯ ﺑﺴﺘﻦ ﺳﯿﻢ ﺍﺧﻄﺎﺭ ﻫﺎی ﺍﻟﮑﺘﺮﯾﮑﯽ ﯾﺨﭽﺎﻝ ﺭﺍ ﺍﺯ ﺑﺮﻕ ﮐﺸﯿﺪﻩ ﺑﺎﺷﯿﺪ. .١٨ﺳﯿﻢ ﻭﺍﻗﻊ ﺑﺮ ﺭﻭی ﺩﺭﭘﻮﺵ ﭘﻼﺳﺘﯿﮑﯽ ﺭﺍ ﻭﺻﻞ ﮐﺮﺩﻩ ﻭ ﺩﺭﭘﻮﺵ ﺭﺍ ﺳﺮ ﺟﺎی ﺧﻮﺩ ﺑﮕﺬﺍﺭﯾﺪ. ﭘﺲ ﺍﺯ ﺑﺮﻋﮑﺲ ﮐﺮﺩﻥ ﺩﺭﻫﺎ ،ﺩﻗﺖ ﻧﻤﺎﺋﯿﺪ ﮐﻪ ﺩﺭﺯﮔﯿﺮﻫﺎی ﺩﺭ ﯾﺨﭽﺎﻝ ﻭ ﻓﺮﯾﺰﺭ ﺩﺭﺳﺖ ﻣﺮﺗﺐ ﺷﺪﻩ ﺍﺧﻄﺎﺭ ﺑﺎﺷﻨﺪ .ﺩﺭ ﻏﯿﺮﺍﯾﻨﺼﻮﺭﺕ ،ﻣﻤﮑﻦ ﺍﺳﺖ ﺳﺮﻭﺻﺪﺍ ﯾﺎ ﺷﺒﻨﻢ ﺍﯾﺠﺎﺩ ﺷﻮﺩ ﮐﻪ ﺑﺮ ﺭﻭی ﻃﺮﺯﮐﺎﺭ ﯾﺨﭽﺎﻝ ﺗﺄﺛﯿﺮ ﻣﯽ ﮔﺬﺍﺭﺩ. ﺗﺮﺍﺯ ﮐﺮﺩﻥ ﯾﺨﭽﺎﻝ ﺩﺭ ﺻﻮﺭﺗﯽ ﮐﻪ ﺟﻠﻮی ﻓﺮﯾﺰﺭ ﮐﻤﯽ ﺑﺎﻻﺗﺮ ﺍﺯ ﭘﺸﺖ ﺁﻥ ﺑﺎﺷﺪ، ﺩﺭﺏ ﮐﻤﯽ ﺁﺳﺎﻧﺘﺮ ﺑﺎﺯ ﻭ ﺑﺴﺘﻪ ﻣﯽ ﺷﻮﺩ .ﭘﺎﯾﻪ ﺗﻨﻈﯿﻢ ﮐﻨﻨﺪﻩ ﺭﺍ ﻣﻮﺍﻓﻖ ﻋﻘﺮﺑﻪ ﻫﺎی ﺳﺎﻋﺖ ﺑﭽﺮﺧﺎﻧﯿﺪ ﺗﺎ ﺩﺭﺏ ﺑﺎﻻ ﺭﻓﺘﻪ ﻭ ﺑﺮﺍی ﮐﺎﻫﺶ ﺍﺭﺗﻔﺎﻉ ﻓﺮﯾﺰﺭ ﺁﻥ ﺭﺍ ﺧﻼﻑ ﺟﻬﺖ ﻋﻘﺮﺑﻪ ﻫﺎی ﺳﺎﻋﺖ ﺑﭽﺮﺧﺎﻧﯿﺪ. ﺣﺎﻟﺖ (١ﺩﺳﺘﮕﺎﻩ ﺑﻪ ﺳﻤﺖ ﭼﭗ ﺗﻤﺎﯾﻞ ﺩﺍﺭﺩ. • ﭘﺎﯾﻪ ﺗﻨﻈﯿﻢ ﮐﻨﻨﺪﻩ ﺳﻤﺖ ﭼﭗ ﺭﺍ ﺩﺭ ﺟﻬﺖ ﻓﻠﺶ ﺑﭽﺮﺧﺎﻧﯿﺪ ﺗﺎ ﺩﺳﺘﮕﺎﻩ ﺗﺮﺍﺯ ﺷﻮﺩ. ﺣﺎﻟﺖ (٢ﺩﺳﺘﮕﺎﻩ ﺑﻪ ﺳﻤﺖ ﺭﺍﺳﺖ ﺗﻤﺎﯾﻞ ﺩﺍﺭﺩ. • ﭘﺎﯾﻪ ﺗﻨﻈﯿﻢ ﮐﻨﻨﺪﻩ ﺳﻤﺖ ﺭﺍﺳﺖ ﺭﺍ ﺩﺭ ﺟﻬﺖ ﻓﻠﺶ ﺑﭽﺮﺧﺎﻧﯿﺪ ﺗﺎ ﺩﺳﺘﮕﺎﻩ ﺗﺮﺍﺯ ﺷﻮﺩ. > ﺣﺎﻟﺖ< ١ > ﺣﺎﻟﺖ< ٢ ﻧﺼﺐ٩- 2012.5.24 2:13:34 PM DA99-01950B(0.9).indb 8 .٧ﺍﺑﺘﺪﺍ ﺗﻮﺳﻂ ﺁﭼﺎﺭ ﻣﺤﻮﺭ ﻟﻮﻻ ﺭﺍ ﺑﺎﺯ ﻧﻤﺎﺋﯿﺪ .ﺟﻬﺖ ﺑﺮﺩﺍﺷﺘﻦ ﻧﮕﻪ ﺩﺍﺭﻧﺪﻩ ﻟﻮﻻ ،ﻣﻬﺮﻩ ﺭﺍ ﺷﻞ ﻧﻤﻮﺩﻩ ﻭ ﻣﺤﻮﺭ ﻟﻮﻻ ﻭ ﺑﺎﻻ ﺁﻭﺭﻧﺪﻩ ﺁﻥ ﺭﺍ ﺟﺎﺑﺠﺎ ﻧﻤﺎﺋﯿﺪ .ﺟﻬﺖ ﺑﺮﺩﺍﺷﺘﻦ ﻧﮕﻪ ﺩﺍﺭﻧﺪﻩ ﻟﻮﻻ ،ﻣﻬﺮﻩ ﺭﺍ ﺷﻞ ﻧﻤﻮﺩﻩ ﻭ ﻣﺤﻮﺭ ﻟﻮﻻ ﻭ ﺑﺎﻻ ﺁﻭﺭﻧﺪﻩ ﺁﻥ ﺭﺍ ﺟﺎﺑﺠﺎ ﻧﻤﺎﺋﯿﺪ. .١١ﻟﻮﻻ ﺭﺍ ﺍﺯ ﺩﺭﺏ ﯾﺨﭽﺎﻝ ﺟﺪﺍ ﮐﻨﯿﺪ .ﭘﻮﺷﺶ ﻟﻮﻻی ﺳﻤﺖ ﺭﺍﺳﺖ ﺭﺍ ﺑﺎﺯ ﮐﺮﺩﻩ ﻭ ﺳﯿﻢ ﻫﺎ ﺭﺍ ﺍﺯ ﺩﺍﺧﻞ ﻟﻮﻻ ﺑﯿﺮﻭﻥ ﺑﯿﺎﻭﺭﯾﺪ. ﭘﻮﺷﺶ ﻟﻮﻻ ﻣﺤﻮﺭ ﻟﻮﻻ ﻣﺤﺎﻓﻆ ﻧﮕﻪ ﺩﺍﺭﻧﺪﻩ ﻟﻮﻻ ﻣﻬﺮﻩ ٨ﻣﯿﻠﯿﻤﺘﺮی .٨ﻟﻮﻻ ﺭﺍ ﺑﺮ ﺭﻭی ﻗﺴﻤﺖ ﺍﻧﺘﻬﺎﯾﯽ ﺳﻤﺖ ﭼﭗ ﯾﺨﭽﺎﻝ ﺟﺎﯾﯽ ﮐﻪ ﭘﯿﭻ ﻫﺎ ﺭﺍ ﺩﺭ ﻣﺮﺣﻠﻪ ۶ﺑﺎﺯ ﮐﺮﺩﻩ ﺑﻮﺩﯾﺪ ،ﻣﺘﺼﻞ ﮐﻨﯿﺪ .ﭘﯿﭻ ﻫﺎﯾﯽ ﺭﺍ ﮐﻪ ﺍﺯ ﻗﺴﻤﺖ ﺍﻧﺘﻬﺎﯾﯽ ﺳﻤﺖ ﺭﺍﺳﺖ ﯾﺨﭽﺎﻝ ﺑﺎﺯ ﮐﺮﺩﻩ ﺑﻮﺩﯾﺪ ،ﺑﺮﺍی ﺍﺳﺘﻔﺎﺩﻩ ﺩﺭ ﺁﯾﻨﺪﻩ ﻧﮕﻬﺪﺍﺭﯾﺪ. 10mm 10mm .٩ﭘﯿﭻ ﻫﺎی ﻭﺍﻗﻊ ﺑﺮ ﺭﻭی ﺳﻤﺖ ﭼﭗ ﻭ ﺭﺍﺳﺖ ﻗﺴﻤﺖ ﺍﻧﺘﻬﺎﯾﯽ ﯾﺨﭽﺎﻝ ﺭﺍ ﺑﺎﺯ ﮐﻨﯿﺪ .ﺟﺎﯾﮕﺎﻩ Stopperﺭﺍ ﺍﺯ ﻗﺴﻤﺖ ﺭﺍﺳﺖ ﺑﻪ ﻗﺴﻤﺖ ﭼﭗ ﺗﻐﯿﯿﺮ ﺩﻫﯿﺪ .ﻧﮕﻪ ﺩﺍﺭﻧﺪﻩ ﻟﻮﻻ ﻧﯿﺰ ﺑﺎﯾﺴﺘﯽ ﺟﺎﺑﺠﺎ ﺷﻮﺩ. ﻧﮕﻪ ﺩﺍﺭﻧﺪﻩ ﻟﻮﻻ ﻣﺮﺍﻗﺐ ﺑﺎﺷﯿﺪ ﮐﻪ ﺩﺭ ﻫﻨﮕﺎﻡ ﺑﺮﺩﺍﺷﱳ ﺭﻭﮐﺶ ﻟﻮﻻ، ﺍﺣﺘﯿﺎﻁ ﺑﻪ ﺳﯿﻤﻬﺎی ﺑﺮﻕ ﺁﺳﯿﺒﯽ ﻧﺮﺳﺎﻧﯿﺪ. .١٢ﺍﺯ ﺁﭼﺎﺭ ﺑﺮﺍی ﺑﺎﺯ ﮐﺮﺩﻥ ﻣﯿﻠﻪ ﻟﻮﻻ ﺍﺳﺘﻔﺎﺩﻩ ﮐﺮﺩﻩ ﻭ ﺳﭙﺲ ﻟﻮﻻ ﺭﺍ ﺑﺮﻋﮑﺲ ﮐﺮﺩﻩ ﻭ ﻣﯿﻠﻪ ﻟﻮﻻ ﺭﺍ ﻣﺠﺪﺩﺍ ﻭﺻﻞ ﮐﻨﯿﺪ. .١٣ﻟﻮﻻی ﺩﺭﺏ ﯾﺨﭽﺎﻝ ﺭﺍ ﺑﺎ ﺍﻧﺠﺎﻡ ﻣﺮﺣﻠﻪ ١١ﺑﻪ ﻃﻮﺭ ﻣﻌﮑﻮﺱ ﻣﺘﺼﻞ ﮐﻨﯿﺪ .ﺍﻃﻤﯿﻨﺎﻥ ﺣﺎﺻﻞ ﻧﻤﺎﯾﯿﺪ ﮐﻪ ﺍﺯ ﺩﺭﭘﻮﺵ ﻟﻮﻻی ﺳﻤﺖ ﭼﭗ ﮐﻪ ﺩﺭ ﻗﺴﻤﺖ ﺯﯾﺮﯾﻦ ﺩﺭﭘﻮﺵ ﭘﻼﺳﺘﯿﮑﯽ ﺑﺮﺩﺍﺷﺘﻪ ﺷﺪﻩ ﺩﺭ ﻣﺮﺣﻠﻪ ٢ﻗﺮﺍﺭﺩﺍﺭﺩ، ﺍﺳﺘﻔﺎﺩﻩ ﮐﻨﯿﺪ. ﻣﺤﺎﻓﻆ ﻧﮕﻪ ﺩﺍﺭﻧﺪﻩ ﻟﻮﻻ .١۴ﭘﺲ ﺍﺯ ﺗﻌﻮﻳﺾ ﺟﻬﺖ ﻟﻮﻻ ،ﺁﻧﺮﺍ ﺑﻮﺳﻴﻠﻪ ﺭﻭﻛﺶ ﺳﻴﻤﻲ ﻛﻪ ﺩﺭ ﺑﺎﻻﻱ ﺩﺭﺏ ﻳﺨﭽﺎﻝ ﻗﺮﺍﺭ ﺩﺍﺭﺩ ،ﺑﺒﻨﺪﻳﺪ. .١٠ﺩﺭﭘﻮﺵ ﺳﯿﻢ ﻭﺍﻗﻊ ﺑﺮ ﺭﻭی ﻗﺴﻤﺖ ﺑﺎﻻﯾﯽ ﯾﺨﭽﺎﻝ ﺭﺍ ﺑﺮﺩﺍﺭﯾﺪ. »ﺭﻭﮐﺶ ﻋﻘﺐ ﺳﯿﻢ ﺩﺭﺏ« ﺭﺍ ﻣﯽ ﺗﻮﺍﻥ ﺩﺭ ﺩﺭ ﺑﺴﺘﻪ ﺑﻨﺪی ﻣﺤﺼﻮﻝ ﯾﺎﻓﺖ. -٨ﻧﺼﺐ 2012.5.24 2:13:35 PM DA99-01950B(0.9).indb 9 ﻣﻌﮑﻮﺱ ﮐﺮﺩﻥ ﺩﺭﺏ ﻓﺮﯾﺰﺭ Samsungﺗﻮﺻﯿﻪ ﻣﯽ ﮐﻨﺪ ﮐﻪ ﺑﺮﻋﮑﺲ ﮐﺮﺩﻥ ﺩﺭ ﯾﺨﭽﺎﻝ ﺗﻨﻬﺎ ﺗﻮﺳﻂ ﺍﺭﺍﺋﻪ ﮐﻨﻨﺪﮔﺎﻥ ﺧﺪﻣﺎﺗﯽ ﺍﺧﻄﺎﺭ ﻣﺠﺎﺯ Samsungﺍﻧﺠﺎﻡ ﺷﻮﺩ .ﺍﯾﻨﮑﺎﺭ ﺩﺭ ﻣﻘﺎﺑﻞ ﺩﺭﯾﺎﻓﺖ ﺩﺳﺘﻤﺰﺩ ﺍﻧﺠﺎﻡ ﺷﺪﻩ ﻭ ﺑﻪ ﺧﺮﺝ ﻣﺸﺘﺮی ﺧﻮﺍﻫﺪ ﺑﻮﺩ. ﻫﺮﮔﻮﻧﻪ ﺁﺳﯿﺒﯽ ﮐﻪ ﺩﺭ ﻫﻨﮕﺎﻡ ﺑﺮﻋﮑﺲ ﮐﺮﺩﻥ ﺩﺭ ﯾﺨﭽﺎﻝ ﺍﯾﺠﺎﺩ ﺷﻮﺩ ﺗﺤﺖ ﭘﻮﺷﺶ ﮔﺎﺭﺍﻧﺘﯽ ﺳﺎﺯﻧﺪﮔﺎﻥ ﺩﺳﺘﮕﺎﻩ ﻧﻤﯽ ﺑﺎﺷﺪ .ﻫﺮﮔﻮﻧﻪ ﺗﻌﻤﯿﺮﺍﺕ ﺩﺭﺧﻮﺍﺳﺖ ﺷﺪﻩ ﺑﻪ ﻭﺍﺳﻄﻪ ﭼﻨﯿﻦ ﺷﺮﺍﯾﻄﯽ ﺩﺭ ﻣﻘﺎﺑﻞ ﺩﺭﯾﺎﻓﺖ ﺩﺳﺘﻤﺰﺩ ﻭ ﺑﻪ ﺧﺮﺝ ﻣﺸﺘﺮی ﺍﻧﺠﺎﻡ ﺧﻮﺍﻫﺪ ﺷﺪ. ﻗﺒﻞ ﺍﺯ ﺑﺎﺯ ﮐﺮﺩﻥ ﺳﯿﻢ ﻫﺎی ﺍﻟﮑﺘﺮﯾﮑﯽ ﺍﻃﻤﯿﻨﺎﻥ ﺣﺎﺻﻞ ﻧﻤﺎﯾﯿﺪ ﮐﻪ ﯾﺨﭽﺎﻝ ﺭﺍ ﺍﺯ ﺑﺮﻕ ﮐﺸﯿﺪﻩ ﺍﺧﻄﺎﺭ ﺑﺎﺷﯿﺪ. ﻧﺼﺐ ٠١ .٣ﺳﯿﻢ ﻫﺎ ﺭﺍ ﺑﺎﺯ ﮐﺮﺩﻩ ﻭ ٣ﻣﻬﺮﻩ ﺭﺍ ﺑﺎﺯ ﮐﻨﯿﺪ. .۴ﺑﺎ ﺑﺎﻻ ﺑﺮﺩﻥ ﺩﺭﺏ ﺑﻪ ﺻﻮﺭﺕ ﻣﺴﺘﻘﯿﻢ ﺁﻥ ﺭﺍ ﺍﺯ ﻟﻮﻻی ﭘﺎﯾﯿﻨﯽ ﺩﺭ ﺁﻭﺭﯾﺪ. ﺍﺑﺰﺍﺭ ﻻﺯﻡ)ﺗﺎﻣﯿﻦ ﻧﺸﺪﻩ( ﭘﯿﭻ ﮔﻮﺷﺘﯽ ﭼﻬﺎﺭﺳﻮ ﭘﯿﭻ ﮔﻮﺷﺘﯽ ﺩﻭﺳﻮ ﺁﭼﺎﺭ ﺳﻮﮐﺖ ١٠ﻣﯿﻠﯽ ﻣﺘﺮی) ﺑﺮﺍی ﻣﻬﺮﻩ ﻫﺎ( ﺁﭼﺎﺭ ﺳﻮﮐﺖ ٨ﻣﯿﻠﯽ ﻣﺘﺮی) ﺑﺮﺍی ﻣﻬﺮﻩ ﻫﺎ( ﺁﭼﺎﺭ )ﺑﺮﺍﻱ ﺷﻔﺖ ﻟﻮﻻ( ﺁﭼﺎﺭ Hexﭼﻬﺎﺭ ﻣﯿﻠﯽ ﻣﺘﺮی) ﺑﺮﺍی ﺍﻧﺘﻬﺎی ﻣﯿﻠﻪ ﻟﻮﻻ ( ﺍﺣﺘﯿﺎﻁ ﺩﺭﺏ ﯾﺨﭽﺎﻝ ﺳﻨﮕﯿﻦ ﺍﺳﺖ ،ﻣﺮﺍﻗﺐ ﺑﺎﺷﯿﺪ ﺑﻪ ﻫﻨﮕﺎﻡ ﺩﺭﺁﻭﺭﺩﻥ ﺑﺮ ﺭﻭی ﺷﻤﺎ ﻧﯿﻔﺘﺪ. .۵ﺩﺭﭘﻮﺵ ﭘﺎﯾﻪ ﺟﻠﻮﯾﯽ ﺭﺍ ﺑﺎ ﺑﺎﺯ ﮐﺮﺩﻥ ﺩﻭ ﭘﯿﭻ ﺟﺪﺍ ﮐﻨﯿﺪ. .١ﺩﻭ ﭘﯿﭻ ﺑﺎﻻی ﯾﺨﭽﺎﻝ ﺭﺍ ﺑﺎﺯ ﮐﻨﯿﺪ. ﭘﯿﭻ ﻫﺎ ﭘﯿﭻ ﻫﺎ ٣ .۶ﭘﯿﭻ ﻣﺤﮑﻢ ﮐﻨﻨﺪﻩ ﻟﻮﻻ ﺭﺍ ﺑﺎﺯ ﮐﺮﺩﻩ ﻭ ٣ﭘﯿﭻ ﺍﻧﺘﻬﺎﯾﯽ ﺳﻤﺖ ﭼﭗ ﭘﺎﯾﻪ ﺟﻠﻮﯾﯽ ،ﺟﺎﯾﯽ ﮐﻪ ﻟﻮﻻ ﺑﻪ ﺁﻥ ﻣﺘﺼﻞ ﺷﺪﻩ ﺍﺳﺖ ﺭﺍ ﺑﺎﺯ ﮐﻨﯿﺪ. .٢ﺩﺭﭘﻮﺵ ﭘﻼﺳﺘﯿﮑﯽ ﺭﺍ ﺑﺮﺩﺍﺷﺘﻪ ﻭ ﺍﻃﻤﯿﻨﺎﻥ ﺣﺎﺻﻞ ﻧﻤﺎﯾﯿﺪ ﮐﻪ ﺳﯿﻢ ﻣﺘﺼﻞ ﺑﻪ ﺁﻥ ﺑﺎﺯ ﻧﺸﻮﺩ .ﺑﻌﺪ ﺍﺯ ﺑﺮﺩﺍﺷﺘﻦ ﺩﺭﭘﻮﺵ ﭘﻼﺳﺘﯿﮑﯽ ،ﻗﻄﻌﺎﺕ ﺭﺍ ﺑﺮﺍی ﺗﻌﻮﯾﺾ ﺟﻬﺖ ﺑﺎﺯ ﺷﺪﻥ ﺩﺭﺏ ﺑﺎﺯ ﮐﻨﯿﺪ. 10mm 10mm ﺩﻗﺖ ﳕﺎﺋﯿﺪ ﮐﻪ ﺩﺭ ﻫﻨﮕﺎﻡ ﺑﺮﺩﺍﺷﱳ ﺭﻭﮐﺶ ﺍﺣﺘﯿﺎﻁ ﭘﻼﺳﺘﯿﮑﯽ ،ﺳﯿﻢ ﻫﺎی ﺑﺮﻕ ﺁﺳﯿﺐ ﻧﺒﯿﻨﻨﺪ. ﻧﺼﺐ٧- 2012.5.24 2:13:35 PM DA99-01950B(0.9).indb 10 ﻧﺼﺐ ﯾﺨﭽﺎﻝ ﺳﺎﻣﺴﻮﻧﮓ ﺁﻣﺎﺩﻩ ﺳﺎﺯی ﺑﺮﺍی ﻧﺼﺐ ﯾﺨﭽﺎﻝ ﺑﻪ ﺷﻤﺎ ﺑﻪ ﺧﺎﻃﺮ ﺍﻧﺘﺨﺎﺏ ﻭ ﺧﺮﯾﺪ ﯾﺨﭽﺎﻝ ﺳﺎﻣﺴﻮﻧﮓ ﺗﺒﺮﯾﮏ ﻣﯽ ﮔﻮﯾﯿﻢ .ﺍﻣﯿﺪﻭﺍﺭﯾﻢ ﺍﺯ ﻭﯾﮋﮔﯽ ﻫﺎی ﻣﻨﺤﺼﺮ ﺑﻪ ﻓﺮﺩ ﻭ ﺑﺎﺯﺩﻫﯽ ﮐﻪ ﺍﯾﻦ ﺩﺳﺘﮕﺎﻩ ﺍﺭﺍﺋﻪ ﻣﯽ ﺩﻫﺪ ،ﻧﻬﺎﯾﺖ ﺍﺳﺘﻔﺎﺩﻩ ﺭﺍ ﺑﺒﺮﯾﺪ. or • ﺍﯾﻦ ﯾﺨﭽﺎﻝ ﺑﺎﯾﺪ ﺑﻪ ﺩﺭﺳﺘﯽ ﻧﺼﺐ ﺷﺪﻩ ﻭ ﻗﺒﻞ ﺍﺯ ﺍﺳﺘﻔﺎﺩﻩ ﻣﻄﺎﺑﻖ ﺑﺎ ﺩﺳﺘﻮﺭﺍﻟﻌﻤﻞ ﻫﺎی ﺍﯾﻦ ﺩﻓﺘﺮﭼﻪ ﺩﺭ ﻣﺤﻞ ﺧﻮﺩ ﻗﺮﺍﺭ ﺩﺍﺩﻩ ﺷﻮﺩ. • ﺍﺯ ﺍﯾﻦ ﺩﺳﺘﮕﺎﻩ ﻓﻘﻂ ﺑﺮﺍی ﺍﻫﺪﺍﻓﯽ ﮐﻪ ﺩﺭ ﺍﯾﻦ ﺩﻓﺘﺮﭼﻪ ﺭﺍﻫﻨﻤﺎ ﺁﻣﺪﻩ ﺍﺳﺖ ،ﺍﺳﺘﻔﺎﺩﻩ ﮐﻨﯿﺪ. • ﺍﮐﯿﺪﺍ ﺗﻮﺻﯿﻪ ﻣﯽ ﺷﻮﺩ ﮐﻪ ﻫﺮﮔﻮﻧﻪ ﺳﺮﻭﯾﺲ ﯾﺎ ﺗﻌﻤﯿﺮﺍﺕ ﺗﻮﺳﻂ ﺗﮑﻨﯿﺴﯿﻦ ﻭﺍﺟﺪ ﺷﺮﺍﯾﻂ ﺍﻧﺠﺎﻡ ﮔﯿﺮﺩ. • ﻟﻄﻔﺎ ﻣﻮﺍﺩ ﺑﺴﺘﻪ ﺑﻨﺪی ﺍﯾﻦ ﻣﺤﺼﻮﻝ ﺭﺍ ﻣﻄﺎﺑﻖ ﺑﺎ ﻗﻮﺍﻧﯿﻦ ﻣﺤﯿﻂ ﺯﯾﺴﺖ ﺍﺯ ﺑﯿﻦ ﺑﺒﺮﯾﺪ. 600mm 550mm ﻟﻄﻔﺎ ﻗﺒﻞ ﺍﺯ ﺗﻌﻮﯾﺾ ﻻﻣﭗ ﺩﺍﺧﻠﯽ ﯾﺨﭽﺎﻝ، ﺩﻭﺷﺎﺧﻪ ﺭﺍ ﺍﺯ ﺑﺮﻕ ﺑﮑﺸﯿﺪ. ﺍﺧﻄﺎﺭ -ﺩﺭ ﻏﯿﺮ ﺍﯾﻨﺼﻮﺭﺕ ﺧﻄﺮ ﺷﻮک ﺍﻟﮑﺘﺮﯾﮑﯽ ﻭﺟﻮﺩ ﺩﺍﺭﺩ. ﺣﺪﺍﻗﻞ ۵٠ ﻣﯿﻠﯿﻤﺘﺮ 1,175mm ﺍﻧﺘﺨﺎﺏ ﯾﮏ ﻣﺤﻞ ﻣﻨﺎﺳﺐ ﺑﺮﺍی ﻧﺼﺐ • ﻣﺤﻠﯽ ﮐﻪ ﺩﺭ ﻣﻌﺮﺽ ﻧﻮﺭ ﻣﺴﺘﻘﯿﻢ ﺁﻓﺘﺎﺏ ﻧﺒﺎﺷﺪ. • ﻣﺤﻠﯽ ﺑﺎ ﺳﻄﺢ ﺻﺎﻑ ﻭ ﻣﺴﻄﺢ. • ﻣﺤﻠﯽ ﮐﻪ ﻓﻀﺎی ﮐﺎﻓﯽ ﺑﺮﺍی ﺑﺎﺯ ﺷﺪﻥ ﺁﺳﺎﻥ ﺩﺭﺏ ﯾﺨﭽﺎﻝ ﺩﺍﺷﺘﻪ ﺑﺎﺷﺪ. • ﺟﻬﺖ ﺍﻧﺠﺎﻡ ﺗﻬﻮﯾﻪ ﻣﻨﺎﺳﺐ ﻫﻮﺍ ،ﻓﻀﺎی ﮐﺎﻓﯽ ﺭﺍ ﺩﺭ ﻗﺴﻤﺖ ﻫﺎی ﺭﺍﺳﺖ ،ﭼﭗ ،ﻋﻘﺐ ﻭ ﺑﺎﻻی ﺩﺳﺘﮕﺎﻩ ﺩﺭ ﻧﻈﺮ ﺑﮕﯿﺮﯾﺪ. ﺩﺭ ﺻﻮﺭﺗﯿﮑﻪ ﯾﺨﭽﺎﻝ ﺑﻘﺪﺭ ﮐﺎﻓﯽ ﺟﺎ ﻧﺪﺍﺷﺘﻪ ﺑﺎﺷﺪ، ﻋﻤﻠﮑﺮﺩ ﺳﯿﺴﺘﻢ ﺧﻨﮏ ﺳﺎﺯ ﺩﺍﺧﻠﯽ ﺑﯿﺸﺘﺮ ﺧﻮﺍﻫﺪ ﺷﺪ. • ﻟﻄﻔﺎ ﺍﺯ ﺣﺮﮐﺖ ﺁﺯﺍﺩﺍﻧﻪ ﺩﺳﺘﮕﺎﻩ ﺩﺭ ﻣﻮﺍﻗﻊ ﺗﻌﻤﯿﺮﺍﺕ ﻭ ﺳﺮﻭﯾﺲ ،ﺍﻃﻤﯿﻨﺎﻥ ﺣﺎﺻﻞ ﺑﻔﺮﻣﺎﯾﯿﺪ. 1,010mm • ﺍﺭﺗﻔﺎﻉ ﻣﺤﺼﻮﻝ ﻣﻤﮑﻦ ﺍﺳﺖ ﺑﺴﺘﻪ ﺑﻪ ﻣﺪﻝ ﻣﺘﻔﺎﻭﺕ ﺑﺎﺷﺪ. • ﺑﻪ ﻫﻨﮕﺎﻡ ﻧﺼﺐ ﻓﻀﺎی ﮐﺎﻓﯽ ﺍﺯ ﺭﺍﺳﺖ ،ﭼﭗ ،ﭘﺸﺖ ﻭ ﺑﺎﻻ ﺩﺭ ﻧﻈﺮ ﺑﮕﯿﺮﯾﺪ .ﺍﯾﻦ ﮐﺎﺭ ﺑﻪ ﮐﺎﻫﺶ ﻣﺼﺮﻑ ﺑﺮﻕ ﻣﮑﻢ ﮐﺮﺩﻩ ﻭ ﻫﺰﯾﻨﻪ ﺑﺮﻕ ﺭﺍ ﮐﺎﻫﺶ ﻣﯽ ﺩﻫﺪ. • ﯾﺨﭽﺎﻝ ﺭﺍ ﺩﺭ ﻣﺤﻠﯽ ﮐﻪ ﺩﻣﺎی ﺁﻥ ﺍﺯ ١٠ﺗﺠﺎﻭﺯ ﻣﯽ ﮐﻨﺪ، ﻧﺼﺐ ﻧﮑﻨﯿﺪ. ﺑﻪ ﻫﻨﮕﺎﻡ ﻧﺼﺐ ،ﺳﺮﻭﯾﺲ ﯾﺎ ﺗﻤﯿﺰ ﮐﺮﺩﻥ ﭘﺸﺖ ﯾﺨﭽﺎﻝ ،ﺁﻥ ﺭﺍ ﺑﻪ ﻃﻮﺭ ﻣﺴﺘﻘﯿﻢ ﺟﻠﻮ ﮐﺸﯿﺪﻩ ﺍﺣﺘﯿﺎﻁ ﻭ ﺑﻌﺪ ﺍﺯ ﺍﺗﻤﺎﻡ ﮐﺎﺭ ﺁﻥ ﺭﺍ ﺑﻪ ﻫﻤﺎﻥ ﺻﻮﺭﺕ ﻋﻘﺐ ﺑﮑﺸﯿﺪ. ﺍﻃﻤﯿﻨﺎﻥ ﺣﺎﺻﻞ ﻧﻤﺎﯾﯿﺪ ﮐﻪ ﮐﻒ ﺗﺤﻤﻞ ﻭﺯﻥ ﯾﺨﭽﺎﻝ ﺭﺍ ﺩﺍﺷﺘﻪ ﺑﺎﺷﺪ. -۶ﻧﺼﺐ 2012.5.24 2:13:36 PM DA99-01950B(0.9).indb 11 • ﺩﺭ ﺻﻮﺭﺕ ﺑﺮﻭﺯ ﻧﺸﺘﯽ ﺩﺭ ﭼﺮﺧﻪ ﻣﺎﺩﻩ ﺧﻨﮏ ﺳﺎﺯ ﺩﺳﺘﮕﺎﻩ ﻭ ﺑﻤﻨﻈﻮﺭ ﺟﻠﻮﮔﯿﺮی ﺍﺯ ﺗﻮﻟﯿﺪ ﻣﺨﻠﻮﻁ ﮔﺎﺯ-ﻫﻮﺍ ﮐﻪ ﺍﺷﺘﻌﺎﻝ ﺯﺍ ﻧﯿﺰ ﻣﯽ ﺑﺎﺷﺪ ،ﺍﻧﺪﺍﺯﻩ ﺍﻃﺎﻗﯽ ﮐﻪ ﺩﺳﺘﮕﺎﻩ ﺩﺭ ﺩﺍﺧﻞ ﺁﻥ ﻗﺮﺍﺭ ﺩﺍﺩﻩ ﻣﯿﺸﻮﺩ ﺑﺎﯾﺴﺘﯽ ﺑﺎ ﺣﺠﻢ ﻣﺎﺩﻩ ﺧﻨﮏ ﺳﺎﺯ ﻫﻤﺨﻮﺍﻧﯽ ﺩﺍﺷﺘﻪ ﺑﺎﺷﺪ. ﺩﺭ ﺻﻮﺭﺕ ﻭﺟﻮﺩ ﻫﺮﮔﻮﻧﻪ ﻧﺸﺎﻧﻪ ﺧﺮﺍﺑﯽ ﺩﺳﺘﮕﺎﻩ، ﻫﺮﮔﺰ ﺁﻥ ﺭﺍ ﺭﻭﺷﻦ ﻧﮑﻨﯿﺪ .ﺩﺭ ﺻﻮﺭﺕ ﺗﺮﺩﯾﺪ ،ﺑﺎ ﻓﺮﻭﺷﻨﺪﻩ ﺩﺳﺘﮕﺎﻩ ﺗﻤﺎﺱ ﺣﺎﺻﻞ ﻧﻤﺎﺋﯿﺪ. ﺍﺗﺎﻕ ﺑﺎﯾﺪ ﺑﺮﺍی ﻫﺮ ٨ﮔﺮﻡ ﺧﻨﮏ ﮐﻨﻨﺪﻩ R۶٠٠a ﺑﻪ ﺍﻧﺪﺍﺯﻩ ١m³ﻓﻀﺎ ﺩﺍﺷﺘﻪ ﺑﺎﺷﺪ .ﻣﯿﺰﺍﻥ ﺧﻨﮏ ﮐﻨﻨﺪﻩ ﺍﺳﺘﻔﺎﺩﻩ ﺷﺪﻩ ﺩﺭ ﺩﺳﺘﮕﺎﻩ ﺷﻤﺎ ،ﺑﺮ ﺭﻭی ﺻﻔﺤﻪ ﻣﺸﺨﺼﺎﺕ ﺩﺍﺧﻞ ﻓﺮﯾﺰﺭ ﻧﺸﺎﻥ ﺩﺍﺩﻩ ﺷﺪﻩ ﺍﺳﺖ. ﻧﮑﺎﺕ ﺍﺿﺎﻓﯽ ﺑﺮﺍی ﺍﺳﺘﻔﺎﺩﻩ ﺻﺤﯿﺢ ﺍﺯ ﺩﺳﺘﮕﺎﻩ • ﺩﺭ ﻣﻮﺍﻗﻊ ﻗﻄﻌﯽ ﺑﺮﻕ ،ﺑﺎ ﻣﻘﺎﻣﺎﺕ ﻣﺤﻠﯽ ﺳﺎﺯﻣﺎﻥ ﺑﺮﻕ ﺗﻤﺎﺱ ﮔﺮﻓﺘﻪ ﻭ ﺍﺯ ﻣﺪﺕ ﺯﻣﺎﻥ ﻗﻄﻊ ﺑﻮﺩﻥ ﺑﺮﻕ ﺁﮔﺎﻫﯽ ﺣﺎﺻﻞ ﻧﻤﺎﯾﯿﺪ. ﺑﯿﺸﺘﺮ ﻗﻄﻌﯽ ﻫﺎی ﺑﺮﻕ ﮐﻪ ﺩﻭ ﯾﺎ ﺳﻪ ﺳﺎﻋﺖ ﻃﻮﻝ ﻣﯽﮐﺸﻨﺪ ،ﺑﺮ ﺩﻣﺎی ﯾﺨﭽﺎﻝ ﺗﺎﺛﯿﺮ ﻧﻤﯽ ﮔﺬﺍﺭﻧﺪ. ﺍﻣﺎ ﺷﻤﺎ ﺑﺎﯾﺪ ﺗﻌﺪﺍﺩ ﺩﻓﻌﺎﺕ ﺑﺎﺯ ﻭ ﺑﺴﺘﻪ ﮐﺮﺩﻥ ﺩﺭﺏ ﺭﺍ ﺩﺭ ﺍﯾﻦ ﺳﺎﻋﺎﺕ ﺑﻪ ﺣﺪﺍﻗﻞ ﺑﺮﺳﺎﻧﯿﺪ. • ﺩﺭ ﺻﻮﺭﺗﯿﮑﻪ ﯾﺨﭽﺎﻝ ﺷﻤﺎ ﻣﺠﻬﺰ ﺑﻪ ﮐﻠﯿﺪ ﻣﯽ ﺑﺎﺷﺪ، ﮐﻠﯿﺪ ﺭﺍ ﺍﺯ ﺩﺳﺘﺮﺱ ﮐﻮﺩﮐﺎﻥ ﺩﻭﺭ ﮐﺮﺩﻩ ﻭ ﺁﻥ ﺭﺍ ﺩﺭ ﻧﺰﺩﯾﮑﯽ ﯾﺨﭽﺎﻝ ﻗﺮﺍﺭ ﻧﺪﻫﯿﺪ. • ﺩﺭ ﺻﻮﺭﺗﯿﮑﻪ ﺩﺳﺘﮕﺎﻩ ﺑﺮﺍی ﯾﮏ ﻣﺪﺕ ﻃﻮﻻﻧﯽ ﺯﯾﺮ ﻣﺤﺪﻭﺩﻩ ﺩﻣﺎﯾﯽ ﮐﻪ ﻋﻤﻠﮑﺮﺩ ﯾﺨﭽﺎﻝ ﺩﺭ ﺁﻥ ﻃﺮﺍﺣﯽ ﺷﺪﻩ ﺍﺳﺖ ،ﻗﺮﺍﺭ ﺑﮕﯿﺮﺩ ﻣﻤﮑﻦ ﺍﺳﺖ ﺑﻪ ﺩﺭﺳﺘﯽ ﮐﺎﺭ ﻧﮑﻨﺪ ).ﺍﺣﺘﻤﺎﻝ ﯾﺦ ﺯﺩﺍﯾﯽ ﻣﻮﺍﺩ ﻣﻨﺠﻤﺪ ﻭ ﯾﺎ ﮔﺮﻡ ﺷﺪﻥ ﺑﯿﺶ ﺍﺯ ﺣﺪ ﻏﺬﺍﻫﺎی ﻣﻮﺟﻮﺩ ﺩﺭ ﯾﺨﭽﺎﻝ( • ﻣﻮﺍﺩ ﻏﺬﺍﯾﯽ ﮐﻪ ﺩﺭ ﺩﻣﺎی ﭘﺎﯾﯿﻦ ﺧﺮﺍﺏ ﻣﯽ ﺷﻮﺩ ﻣﺜﻞ ﻣﻮﺯ ﻭ ﻫﻨﺪﻭﺍﻧﻪ ﺭﺍ ﺩﺭ ﻓﺮﯾﺰ ﻧﮕﻬﺪﺍﺭی ﻧﮑﻨﯿﺪ. • ﺩﺳﺘﮕﺎﻩ ﺷﻤﺎ ﺑﺪﻭﻥ ﺑﺮﻓﮏ ﻣﯽ ﺑﺎﺷﺪ ،ﺍﯾﻦ ﺑﺪﯾﻦ ﻣﻌﻨﯽ ﺍﺳﺖ ﮐﻪ ﻧﯿﺎﺯی ﻧﯿﺴﺖ ﮐﻪ ﺷﻤﺎ ﺑﻪ ﻃﻮﺭ ﺩﺳﺘﯽ ﺍﯾﻦ ﮐﺎﺭ ﺭﺍ ﺍﻧﺠﺎﻡ ﺩﻫﯿﺪ.ﭼﻮﻥ ﺍﯾﻦ ﮐﺎﺭ ﺑﻪ ﻃﻮﺭ ﺧﻮﺩﮐﺎﺭ ﺍﻧﺠﺎﻡ ﻣﯽ ﺷﻮﺩ. ﻓﻬﺮﺳﺖ ﻧﺼﺐ ﯾﺨﭽﺎﻝ ۶ ........................................................................................................................................ ﻋﻤﻠﮑﺮﺩ ﯾﺨﭽﺎﻝ ١٠ ................................................................................................................................... ﻋﯿﺐ ﯾﺎﺑﯽ ١۴ ................................................................................................................................................ ﺭﻭﺵ ﻧﺼﺐ ﻳﺨﭽﺎﻝ ﺷﻤﺎ ١۵ ................................................................................................................... ﺍﻃﻼﻋﺎﺕ ﺍﯾﻤﻨﯽ ۵- 2012.5.24 2:13:36 PM DA99-01950B(0.9).indb 12 • ﺩﺭ ﺻﻮﺭﺗﯿﮑﻪ ﺑﻮی ﺩﻭﺩ ﯾﺎ ﺩﺍﺭﻭ ﻣﺎﻧﻨﺪ ﺍﺣﺴﺎﺱ ﻣﯽ ﮐﻨﯿﺪ ،ﻓﻮﺭﺍ ﯾﺨﭽﺎﻝ ﺭﺍ ﺍﺯ ﺑﺮﻕ ﮐﺸﯿﺪﻩ ﻭ ﺑﺎ ﻣﺮﮐﺰ ﺧﺪﻣﺎﺕ ﺍﻟﮑﺘﺮﻭﻧﯿﮏ ﺳﺎﻣﺴﻮﻧﮓ ﺗﻤﺎﺱ ﺑﮕﯿﺮﯾﺪ. • ﺩﺭ ﺻﻮﺭﺗﯿﮑﻪ ﺑﻪ ﻫﻨﮕﺎﻡ ﺗﻌﻮﯾﺾ ﻻﻣﭗ ﺩﺍﺧﻠﯽ ﺑﺎ ﻣﺸﮑﻞ ﻣﻮﺍﺟﻪ ﺷﺪﯾﺪ ،ﺑﺎ ﻧﻤﺎﯾﻨﺪﻩ ﺧﺪﻣﺎﺕ ﺗﻤﺎﺱ ﺑﮕﯿﺮﯾﺪ. • ﺩﺭ ﺻﻮﺭﺗﯿﮑﻪ ﯾﺨﭽﺎﻝ ﺷﻤﺎ ﺟﻬﺰ ﺑﻪ ﻻﻣﭗ LEDﻣﯽ ﺑﺎﺷﺪ، ﺩﺭﭘﻮﺵ ﻻﻣﭗ ﻭ ﺧﻮﺩ ﻻﻣﭗ LEDﺭﺍ ﺧﻮﺩﺗﺎﻥ ﺑﺎﺯ ﻧﮑﯿﻨﯿﺪ. ﺑﺮﺍی ﺍﯾﻦ ﮐﺎﺭ ﺑﺎ ﻧﻤﺎﯾﻨﺪﻩ ﺧﺪﻣﺎﺕ ﺗﻤﺎﺱ ﺑﮕﯿﺮﯾﺪ.ﺍﺣﺘﯿﺎﻁ ﻧﺸﺎﻧﻪ ﻫﺎی ﺍﺣﺘﯿﺎﻁ ﺑﺮﺍی ﺍﺳﺘﻔﺎﺩﻩ • ﺑﻪ ﻣﻨﻈﻮﺭ ﮔﺮﻓﺘﻦ ﺑﻬﺘﺮﯾﻦ ﻋﻤﻠﮑﺮﺩ ﺍﺯ ﺩﺳﺘﮕﺎﻩ, ﻏﺬﺍﻫﺎ ﺭﺍ ﻧﺰﺩﯾﮏ ﺩﺭﯾﭽﻪ ﺗﻬﻮﯾﻪ ﻭﺍﻗﻊ ﺩﺭ ﻗﺴﻤﺖﭘﺸﺘﯽ ﻗﺮﺍﺭ ﻧﺪﻫﯿﺪ ﭼﻮﻥ ﺍﯾﻦ ﮐﺎﺭ ﺟﺮﯾﺎﻥ ﻫﻮﺍی ﺁﺯﺍﺩ ﺩﺭ ﻣﺤﻔﻈﻪ ﯾﺨﭽﺎﻝ ﺭﺍ ﻣﺴﺪﻭﺩ ﻣﯽ ﮐﻨﺪ. ﻏﺬﺍﻫﺎ ﺭﺍ ﻗﺒﻞ ﺍﺯ ﮔﺬﺍﺷﺘﻦ ﺩﺭ ﯾﺨﭽﺎﻝ ﮐﺎﻣﻼ ﭘﻮﺷﺎﻧﺪﻩ ﻭ ﯾﺎﺩﺭ ﻇﺮﻭﻑ ﯾﺨﭽﺎﻝ ﺑﮕﺬﺍﺭﯾﺪ ﺗﺎ ﻫﻮﺍ ﺑﻪ ﺁﻥ ﻧﻔﻮﺫ ﻧﮑﻨﺪ. • ﺗﺎﻧﮏ ﺁﺏ ،ﺳﯿﻨﯽ ﯾﺦ ﻭ ﻗﺎﻟﺐ ﻫﺎی ﯾﺦ ﺭﺍ ﺑﺎ ﺁﺏ ﺁﺷﺎﻣﯿﺪﻧﯽ ﭘﺮ ﮐﻨﯿﺪ. • ﺩﺭ ﺻﻮﺭﺗﯿﮑﻪ ﺩﺳﺘﮕﺎﻩ ﺩﺭ ﻣﻌﺮﺽ ﺁﺏ ﻗﺮﺍﺭ ﮔﺮﻓﺖ، ﺁﻥ ﺭﺍ ﺍﺯ ﺑﺮﻕ ﮐﺸﯿﺪﻩ ﻭ ﺑﺎ ﻣﺮﮐﺰ ﺧﺪﻣﺎﺕ ﻣﺠﺎﺯ ﺳﺎﻣﺴﻮﻧﮓ ﺗﻤﺎﺱ ﺑﮕﯿﺮﯾﺪ. ﻧﺸﺎﻧﻪ ﻫﺎی ﺍﺣﺘﯿﺎﻁ ﺑﺮﺍی ﲤﯿﺰ ﮐﺮﺩﻥ ﺍﺣﺘﯿﺎﻁ ﺩﺳﺘﮕﺎﻩ • ﺁﺏ ﺭﺍ ﺑﻪ ﻃﻮﺭ ﻣﺴﺘﻘﯿﻢ ﺑﻪ ﺑﯿﺮﻭﻥ ﯾﺎ ﺩﺍﺧﻞ ﺩﺳﺘﮕﺎﻩ ﻧﭙﺎﺷﯿﺪ. ﺧﻄﺮ ﺁﺗﺶ ﺳﻮﺯی ﯾﺎ ﺷﻮک ﺍﻟﮑﺘﺮﯾﮑﯽ ﻭﺟﻮﺩ ﺩﺍﺭﺩ.• ﻫﺮﮔﺰ ﮔﺎﺯ ﻗﺎﺑﻞ ﺍﺷﺘﻌﺎﻝ ﺭﺍ ﻧﺰﺩﯾﮏ ﯾﺨﭽﺎﻝ ﺍﺳﭙﺮی ﻧﮑﻨﯿﺪ. ﺧﻄﺮ ﺍﻧﻔﺠﺎﺭ ﯾﺎ ﺁﺗﺶ ﺳﻮﺯی ﻭﺟﻮﺩ ﺩﺍﺭﺩ.• ﻣﻮﺍﺩ ﺗﻤﯿﺰ ﮐﻨﻨﺪﻩ ﺭﺍ ﻣﺴﺘﻘﯿﻤﺎ ﺑﺮ ﺭﻭی ﺻﻔﺤﻪ ﻧﻤﺎﯾﺸﮕﺮ ﻧﭙﺎﺷﯿﺪ. ﻣﻤﮑﻦ ﺍﺳﺖ ﺣﺮﻭﻑ ﺣﮏ ﺷﺪﻩ ﺑﺮ ﺭﻭی ﺻﻔﺤﻪ ﻧﻤﺎﯾﺸﮕﺮﭘﺎک ﺷﻮﻧﺪ. • ﻫﺮﮔﻮﻧﻪ ﻣﻮﺍﺩ ﺧﺎﺭﺟﯽ ﯾﺎ ﮔﺮﺩ ﻭ ﺧﺎک ﺭﺍ ﺍﺯ ﭘﺮﯾﺰ ﺗﻤﯿﺰ ﮐﻨﯿﺪ.ﺍﻣﺎ ﺍﺯ ﭘﺎﺭﭼﻪ ﺧﯿﺲ ﯾﺎ ﻣﺮﻃﻮﺏ ﺑﺮﺍی ﺗﻤﯿﺰ ﮐﺮﺩﻥ ﯾﺎ ﺧﺎﺭﺝ ﮐﺮﺩﻥ ﻣﻮﺍﺩ ﺧﺎﺭﺟﯽ ﺍﺯﭘﺮﯾﺰ ﺍﺳﺘﻔﺎﺩﻩ ﻧﮑﻨﯿﺪ. ﺩﺭ ﻏﯿﺮ ﺍﯾﻨﺼﻮﺭﺕ ﺧﻄﺮ ﺷﻮک ﺍﻟﮑﺘﺮﯾﮑﯽ ﯾﺎ ﺁﺗﺶ ﺳﻮﺯیﻭﺟﻮﺩ ﺩﺍﺭﺩ. • ﻗﺒﻞ ﺍﺯ ﺗﻤﯿﺰ ﮐﺮﺩﻥ ﻭ ﯾﺎ ﺍﻧﺠﺎﻡ ﺗﻌﻤﯿﺮﺍﺕ ﯾﺨﭽﺎﻝ ﺭﺍ ﺍﺯ ﺑﺮﻕ ﺑﮑﺸﯿﺪ. ﺍﺧﻄﺎﺭ ﻧﺸﺎﻧﻪ ﻫﺎی ﻫﺸﺪﺍﺭ ﺟﺪی ﺑﺮﺍی ﺩﻭﺭ ﺍﻧﺪﺍﺧﱳ ﺩﺳﺘﮕﺎﻩ • ﺑﻪ ﻫﻨﮕﺎﻡ ﺩﻭﺭﺍﻧﺪﺍﺧﺘﻦ ﺍﯾﻦ ﺩﺳﺘﮕﺎﻩ ،ﺩﺭﺏ ﻫﺎ ﻭ ﻻﺳﺘﯿﮏ ﻫﺎی ﺩﺭﺏ ﺭﺍ ﺩﺭﺁﻭﺭﺩﻩ ﺗﺎ ﮐﻮﺩﮐﺎﻥ ﺩﺍﺧﻞ ﺁﻥ ﮔﯿﺮ ﻧﮑﻨﻨﺪ.ﮐﻮﺩﮐﺎﻥ ﺑﺎﯾﺪ ﻧﻈﺎﺭﺕ ﺷﻮﻧﺪ ﺗﺎ ﺍﻃﻤﯿﻨﺎﻥ ﺣﺎﺻﻞ ﺷﻮﺩ ﮐﻪ ﺑﺎ ﺩﺳﺘﮕﺎﻩ ﺑﺎﺯی ﻧﻤﯽ ﮐﻨﻨﺪ. • ﻟﻄﻔﺎ ﻣﻮﺍﺩ ﺑﺴﺘﻪ ﺑﻨﺪی ﺍﯾﻦ ﻣﺤﺼﻮﻝ ﺭﺍ ﺑﻪ ﺭﻭﺵ ﺳﺎﺯﮔﺎﺭ ﺑﺎ ﻣﺤﯿﻂ ﺯﯾﺴﺖ ﺍﺯ ﺑﯿﻦ ﺑﺒﺮﯾﺪ. • ﻗﻔﺴﻪ ﻫﺎی ﺩﺍﺧﻞ ﯾﺨﭽﺎﻝ ﺭﺍ ﺩﺭﺁﻭﺭﯾﺪ ﺗﺎ ﮐﻮﺩﮐﺎﻥ ﻭ ﺣﯿﻮﺍﻧﺎﺕ ﺍﺯ ﺁﻥ ﺑﺎﻻ ﻧﺮﻭﻧﺪ .ﻗﺒﻞ ﺍﺯ ﺩﻭﺭ ﺍﻧﺪﺍﺧﺘﻦ ﺩﺳﺘﮕﺎﻩ ﺍﻃﻤﯿﻨﺎﻥ ﺣﺎﺻﻞ ﻧﻤﺎﯾﯿﺪ ﻫﯿﭻ ﯾﮏ ﺍﺯ ﻟﻮﻟﻪ ﻫﺎی ﭘﺸﺖ ﺩﺳﺘﮕﺎﻩ ﺁﺳﯿﺐ ﻧﺪﯾﺪﻩ ﺑﺎﺷﺪ. • R۶٠٠aﻭ R١٣۴aﺑﻪ ﻋﻨﻮﺍﻥ ﺧﻨﮏ ﮐﻨﻨﺪﻩ ﺩﺭ ﯾﺨﭽﺎﻝ ﺍﺳﺘﻔﺎﺩﻩ ﻣﯽ ﺷﻮﻧﺪ.ﺑﺮﭼﺴﺐ ﮐﻤﭙﺮﺳﻮﺭ ﭘﺸﺖ ﺩﺳﺘﮕﺎﻩ ﯾﺎ ﺩﺭﺟﻪ ﺩﺍﺧﻞ ﯾﺨﭽﺎﻝ ﺭﺍ ﺑﺮﺭﺳﯽ ﮐﻨﯿﺪ ﺗﺎ ﺑﺪﺍﻧﯿﺪ ﺍﺯ ﮐﺪﺍﻡ ﻧﻮﻉ ﺧﻨﮏ ﮐﻨﻨﺪﻩ ﺩﺭ ﺍﯾﻦ ﺩﺳﺘﮕﺎﻩ ﺍﺳﺘﻔﺎﺩﻩ ﺷﺪﻩ ﺍﺳﺖ. ﺩﺭ ﺻﻮﺭﺗﯿﮑﻪ ﺍﺯ ﻧﻮﻉ R۶٠٠aﻣﯽ ﺑﺎﺷﺪ ﺑﺮﺍی ﺩﻭﺭ ﺍﻧﺪﺍﺧﺘﻦ ﺻﺤﯿﺢ ﻭ ﺍﯾﻤﻦ ﺩﺳﺘﮕﺎﻩ ﺑﺎ ﻣﻘﺎﻣﺎﺕ ﻣﺤﻠﯽ ﺗﻤﺎﺱ ﺑﮕﯿﺮﯾﺪ.ﺳﯿﮑﻠﻮﭘﻨﺘﺎﻥ ﺑﻪ ﻋﻨﻮﺍﻥ ﮔﺎﺯ ﺩﻣﻨﺪﻩ ﻋﺎﯾﻖ ﺍﺳﺘﻔﺎﺩﻩ ﺷﺪﻩ ﺍﺳﺖ.ﻟﻄﻔﺎ ﺑﻪ ﻣﻨﻈﻮﺭ ﺍﺯ ﺑﯿﻦ ﺑﺮﺩﻥ ﺻﺤﯿﺢ ﻭ ﺳﺎﺯﮔﺎﺯ ﺑﺎ ﻣﺤﯿﻂ ﺯﯾﺴﺖ ﺑﺎ ﻣﻘﺎﻣﺎﺕ ﻣﺤﻠﯽ ﺗﻤﺎﺱ ﺑﮕﯿﺮﯾﺪ .ﻗﺒﻞ ﺍﺯ ﺩﻭﺭ ﺍﻧﺪﺍﺧﺘﻦ ﺩﺳﺘﮕﺎﻩ ﺍﻃﻤﯿﻨﺎﻥ ﺣﺎﺻﻞ ﻧﻤﺎﯾﯿﺪ ﻫﯿﭻ ﯾﮏ ﺍﺯ ﻟﻮﻟﻪ ﻫﺎی ﭘﺸﺖ ﺩﺳﺘﮕﺎﻩ ﺁﺳﯿﺐ ﻧﺪﯾﺪﻩ ﺑﺎﺷﺪ .ﻟﻮﻟﻪ ﻫﺎ ﺑﺎﯾﺪ ﺩﺭ ﻣﺤﯿﻂ ﺑﺎﺯ ﺷﮑﺴﺘﻪ ﺷﻮﻧﺪ. • ﺍﮔﺮﭼﻪ ﺧﻨﮏ ﮐﻨﻨﺪﻩ ﺩﺳﺘﮕﺎﻩ ﯾﻌﻨﯽ ﺍﯾﺰﻭ ﺑﻮﺗﺎﻥ )(R۶٠٠a ،ﮔﺎﺯی ﺑﺎ ﺳﺎﺯﮔﺎﺭی ﺑﺎﻻ ﺑﺎ ﻣﺤﯿﻂ ﺯﯾﺴﺖ ﻣﯽ ﺑﺎﺷﺪ ،ﺍﻣﺎ ﻗﺎﺑﻞ ﺍﻧﻔﺠﺎﺭ ﻧﯿﺰ ﻣﯽ ﺑﺎﺷﺪ.ﺑﻪ ﻫﻨﮕﺎﻡ ﺣﻤﻞ ﻭ ﻧﺼﺐ ﺩﺳﺘﮕﺎﻩ ،ﻣﺮﺍﻗﺐ ﺑﺎﺷﯿﺪ ﮐﻪ ﻫﯿﭻ ﯾﮏ ﺍﺯ ﻗﻄﻌﺎﺕ ﻣﺪﺍﺭ ﺧﻨﮏ ﮐﻨﻨﺪﻩ ﺁﺳﯿﺐ ﻧﺪﯾﺪﻩ ﺑﺎﺷﺪ. • ﻧﺸﺖ ﻣﺎﯾﻊ ﺧﻨﮏ ﮐﻨﻨﺪﻩ ﺍﺯ ﻟﻮﻟﻪ ﻫﺎ ﻣﯽ ﺗﻮﺍﻧﺪ ﺳﺒﺐ ﺟﺮﻗﻪ ﯾﺎ ﺁﺳﯿﺐ ﺭﺳﯿﺪﻥ ﭼﺸﻢ ﺷﻮﺩ. ﺩﺭ ﺻﻮﺭﺗﯿﮑﻪ ﻧﺸﺖ ﮔﺎﺯ ﺭﺍ ﺍﺣﺴﺎﺱ ﮐﺮﺩﯾﺪ ،ﺍﺯ ﻧﺰﺩﯾﮏ ﮐﺮﺩﻥ ﻫﺮ ﮔﻮﻧﻪ ﺷﻌﻠﻪ ﻣﺴﺘﻘﯿﻢ ﯾﺎ ﻣﻨﺎﺑﻊ ﮔﺮﻣﺎﯾﯽ ﺑﻪ ﺩﺳﺘﮕﺎﻩ ﺧﻮﺩﺩﺍﺭی ﮐﺮﺩﻩ ﻭ ﺍﺗﺎﻗﯽ ﺭﺍ ﮐﻪ ﺩﺳﺘﮕﺎﻩ ﺩﺭ ﺁﻥ ﻗﺮﺍﺭ ﺩﺍﺭﺩ ،ﺑﻪ ﻣﺪﺕ ﭼﻨﺪ ﺩﻗﯿﻘﻪ ﺗﻬﻮﯾﻪ ﮐﻨﯿﺪ. -۴ﺍﻃﻼﻋﺎﺕ ﺍﯾﻤﻨﯽ 2012.5.24 2:13:37 PM DA99-01950B(0.9).indb 13 • ﺍﯾﻦ ﯾﺨﭽﺎﻝ ﺑﺎﯾﺪ ﺑﻪ ﺩﺭﺳﺘﯽ ﻧﺼﺐ ﺷﺪﻩ ﻭ ﺑﺮ ﻃﺒﻖ ﺩﺳﺘﻮﺭﺍﻟﻌﻤﻞ ﻫﺎی ﺍﯾﻦ ﺩﻓﺘﺮﭼﻪ ﺭﺍﻫﻨﻤﺎ ﺩﺭ ﻣﺤﻞ ﻣﻨﺎﺳﺐ ﻗﺮﺍﺭ ﺩﺍﺩﻩ ﺷﻮﺩ. • ﺩﻭ ﺷﺎﺧﻪ ﺑﺮﻕ ﺭﺍ ﺑﺎ ﺳﯿﻢ ﻣﺨﺼﻮﺹ ﺧﻮﺩ ﻭﺻﻞ ﮐﻨﯿﺪ. ﺩﺭ ﻏﯿﺮ ﺍﯾﻨﺼﻮﺭﺕ ﺳﯿﻢ ﺧﻢ ﺷﺪﻩ ﻭ ﻣﯽ ﺗﻮﺍﻧﺪ ﺳﺒﺐﺷﻮک ﺍﻟﮑﺘﺮﯾﮑﯽ ﻭ ﯾﺎ ﺁﺗﺶ ﺳﻮﺯی ﺷﻮﺩ. • ﺑﻪ ﻫﻨﮕﺎﻡ ﺣﺮﮐﺖ ﺩﺍﺩﻥ ﯾﺨﭽﺎﻝ ،ﻣﺮﺍﻗﺐ ﺑﺎﺷﯿﺪ ﮐﻪ ﺳﯿﻢ ﺑﺮﻕ ﺳﺎﯾﯿﺪﻩ ﻧﺸﺪﻩ ﻭ ﯾﺎ ﺁﺳﯿﺐ ﻧﺒﯿﻨﺪ. ﺧﻄﺮ ﺁﺗﺶ ﺳﻮﺯی ﻭﺟﻮﺩ ﺩﺍﺭﺩ.• ﺍﻃﻤﯿﻨﺎﻥ ﺣﺎﺻﻞ ﻧﻤﺎﯾﯿﺪ ﮐﻪ ﺳﯿﻢ ﺑﺮﻕ ﺗﻮﺳﻂ ﭘﺸﺖ ﻓﺮﯾﺰ ﺭﺧﺮﺍﺷﯿﺪﻩ ﻭ ﯾﺎ ﺁﺳﯿﺐ ﻧﺪﯾﺪﻩ ﺑﺎﺷﺪ. • ﻣﻮﺍﺩ ﺑﺴﺘﻪ ﺑﻨﺪی ﻣﺤﺼﻮﻝ ﺭﺍ ﺩﻭﺭ ﺍﺯ ﺩﺳﺘﺮﺱ ﮐﻮﺩﮐﺎﻥ ﻗﺮﺍﺭ ﺩﻫﯿﺪ. ﺩﺭ ﺻﻮﺭﺗﯿﮑﻪ ﮐﻮﺩﮐﺎﻥ ﺁﻧﻬﺎ ﺭﺍ ﺑﺮ ﺭﻭی ﺳﺮﺷﺎﻥ ﺑﮕﺬﺍﺭﻧﺪ،ﺧﻄﺮ ﺧﻔﮕﯽ ﻭﺟﻮﺩ ﺩﺍﺭﺩ. • ﺩﺳﺘﮕﺎﻩ ﺑﺎﯾﺪ ﺩﺭ ﻣﺤﻠﯽ ﻗﺮﺍﺭ ﺩﺍﺩﻩ ﺷﻮﺩ ﮐﻪ ﺑﻌﺪ ﺍﺯ ﻧﺼﺐ ﺩﺳﺘﺮﺳﯽ ﺑﻪ ﭘﺮﯾﺰ ﺁﺳﺎﻥ ﺑﺎﺷﺪ. • ﯾﺨﭽﺎﻝ ﺑﺎﯾﺪ ﺑﻪ ﺯﻣﯿﻦ ﻣﺘﺼﻞ ﺷﻮﺩ. ﺷﻤﺎ ﺑﺎﯾﺪ ﺑﻪ ﻣﻨﻈﻮﺭ ﺟﻠﻮﮔﯿﺮی ﺍﺯ ﻧﺸﺖ ﺟﺮﯾﺎﻥﯾﺎ ﺷﻮک ﺍﻟﮑﺘﺮﯾﮑﯽ ﻧﺎﺷﯽ ﺍﺯ ﻧﺸﺖ ﺟﺮﯾﺎﻥ ﺍﺯ ﯾﺨﭽﺎﻝ ،ﺁﻥ ﺭﺍ ﺑﻪ ﺯﻣﯿﻦ ﻣﺘﺼﻞ ﮐﻨﯿﺪ. • ﺩﺭ ﺻﻮﺭﺗﯿﮑﻪ ﺳﯿﻢ ﺑﺮﻕ ﺁﺳﯿﺐ ﺩﯾﺪ ،ﺁﻥ ﺭﺍ ﻓﻮﺭﺍ ﺗﻮﺳﻂ ﺳﺎﺯﻧﺪﻩ ﯾﺎ ﻧﻤﺎﯾﻨﺪﮔﯽ ﺧﺪﻣﺎﺕ ﺗﻌﻮﯾﺾ ﮐﻨﯿﺪ. ﺍﺣﺘﯿﺎﻁ ﻧﺸﺎﻧﻪ ﻫﺎی ﺍﺣﺘﯿﺎﻁ ﺑﺮﺍی ﻧﺼﺐ • ﺩﺭﯾﭽﻪ ﺗﻬﻮﯾﻪ ﺩﺳﺘﮕﺎﻩ ﺭﺍ ﺑﺎﭼﯿﺰی ﻣﺴﺪﻭﺩ ﻧﮑﻨﯿﺪ. • ﺍﺟﺎﺯﻩ ﺩﻫﯿﺪ ﺩﺳﺘﮕﺎﻩ ٢ﺳﺎﻋﺖ ﭘﺲ ﺍﺯ ﻧﺼﺐ ﺑﺪﻭﻥ ﺍﺳﺘﻔﺎﺩﻩ ﺑﺎﻗﯽ ﺑﻤﺎﻧﺪ. ﺍﺧﻄﺎﺭ ﻧﺸﺎﻧﻪ ﻫﺎی ﻫﺸﺪﺍﺭ ﺟﺪی ﺑﺮﺍی ﺍﺳﺘﻔﺎﺩﻩ ﺍﺯ ﺩﺳﺘﮕﺎﻩ • ﺩﻭ ﺷﺎﺧﻪ ﺭﺍ ﺑﺎ ﺩﺳﺖ ﺧﯿﺲ ﺑﻪ ﭘﺮﯾﺰ ﻧﺰﻧﯿﺪ. • ﭼﯿﺰی ﺭﺍ ﺑﺮ ﺭﻭی ﯾﺨﭽﺎﻝ ﻧﮕﻬﺪﺍﺭی ﻧﮑﻨﯿﺪ. ﻫﻨﮕﺎﻣﯽ ﮐﻪ ﺩﺭﺏ ﺭﺍ ﺑﺎﺯ ﻭ ﺑﺴﺘﻪ ﻣﯽ ﮐﻨﯿﺪ ،ﻣﻤﮑﻦ ﺍﺳﺖﺷﯽ ﺍﻓﺘﺎﺩﻩ ﻭ ﺳﺒﺐ ﺻﺪﻣﻪ ﺷﺨﺺ ﯾﺎ ﺁﺳﯿﺐ ﺭﺳﯿﺪﻥ ﺑﻪ ﺩﺳﺘﮕﺎﻩ ﺷﻮﺩ. • ﻇﺮﻑ ﭘﺮ ﺍﺯ ﺁﺏ ﺭﺍ ﺑﺮ ﺭﻭی ﯾﺨﭽﺎﻝ ﻧﮕﺬﺍﺭﯾﺪ. ﺩﺭ ﺻﻮﺭﺕ ﺭﯾﺨﺘﻦ ﺧﻄﺮ ﺷﻮک ﺍﻟﮑﺘﺮﯾﮑﯽ ﻭﺟﻮﺩ ﺩﺍﺭﺩ.• ﺍﺟﺎﺯﻩ ﻧﺪﻫﯿﺪ ﮐﻮﺩﮐﺎﻥ ﺍﺯ ﺩﺭﺏ ﺁﻭﯾﺰﺍﻥ ﺷﻮﻧﺪ.ﺩﺭ ﺍﯾﻦ ﺻﻮﺭﺕ ﺧﻄﺮ ﺻﺪﻣﻪ ﺟﺪی ﻭﺟﻮﺩ ﺩﺍﺭﺩ. • ﺧﻄﺮ ﮔﯿﺮ ﮐﺮﺩﻥ ﮐﻮﺩﮐﺎﻥ ﺩﺭ ﯾﺨﭽﺎﻝ ﻭﺟﻮﺩ ﺩﺍﺭﺩ.ﺍﺟﺎﺯﻩ ﻧﺪﻫﯿﺪ ﮐﻪ ﮐﻮﺩﮐﺎﻥ ﺑﻪ ﺩﺍﺧﻞ ﯾﺨﭽﺎﻝ ﺑﺮﻭﻧﺪ. • ﺍﻧﮕﺸﺘﺎﻥ ﯾﺎ ﺷﯽ ﺭﺍ ﻭﺍﺭﺩ ﺣﻔﺮﻩ ﺁﺏ ﺳﺮﺩ ﮐﻦ ﻓﺮﻭ ﻧﺒﺮﯾﺪ. ﺳﺒﺐ ﺻﺪﻣﻪ ﺟﺪی ﯾﺎ ﺁﺳﯿﺐ ﺭﺳﯿﺪﻥ ﺑﻪ ﺩﺳﺘﮕﺎﻩ ﻣﯽﺷﻮﺩ. • ﺣﺸﺮﻩ ﮐﺶ ﯾﺎ ﻣﻮﺍﺩ ﺍﺷﺘﻌﺎﻝ ﺯﺍ ﺭﺍ ﺩﺭ ﯾﺨﭽﺎﻝ ﻧﮕﻬﺪﺍﺭی ﻧﮑﻨﯿﺪ. ﻧﮕﻬﺪﺍﺭی ﺑﻨﺰﯾﻦ ،ﺗﯿﻨﺮ ،ﺍﻟﮑﻞ ،ﺍﺗﺮ ،ﮔﺎﺯ LPﻭ ﺩﯾﮕﺮﻣﺤﺼﻮﻻﺕ ﺍﯾﻨﭽﻨﯿﻦ ﻣﯽ ﺗﻮﺍﻧﺪ ﻣﻨﺠﺮ ﺑﻪ ﺍﻧﻔﺠﺎﺭ ﮔﺮﺩﺩ. • ﻣﺤﺼﻮﻻﺕ ﺁﺯﻣﺎﯾﺸﮕﺎﻫﯽ ،ﻣﻮﺍﺩ ﺩﺍﺭﻭﯾﯽ ﻭ ﯾﺎ ﻣﻮﺍﺩ ﺣﺴﺎﺱ ﺑﻪ ﺩﻣﺎ ﺭﺍ ﺩﺭ ﯾﺨﭽﺎﻝ ﻧﮕﻬﺪﺍﺭی ﻧﮑﻨﯿﺪ. ﻣﻮﺍﺩی ﮐﻪ ﻧﯿﺎﺯ ﺑﻪ ﮐﻨﺘﺮﻝ ﺩﻗﯿﻖ ﺩﻣﺎ ﺩﺍﺭﻧﺪ ،ﻧﺒﺎﯾﺪ ﺩﺭ ﯾﺨﭽﺎﻝﻧﮕﻬﺪﺍﺭی ﺷﻮﻧﺪ. • ﺍﺯ ﻫﯿﭻ ﮔﻮﻧﻪ ﻭﺳﯿﻠﻪ ﺍﻟﮑﺘﺮﯾﮑﯽ ﺩﺍﺧﻞ ﯾﺨﭽﺎﻝ ﺍﺳﺘﻔﺎﺩﻩ ﻧﮑﻨﯿﺪ.ﻣﮕﺮ ﻭﺳﺎﯾﻠﯽ ﮐﻪ ﺩﺭ ﺍﯾﻦ ﺩﻓﺘﺮﭼﻪ ﺭﺍﻫﻨﻤﺎ ﺗﻮﺻﯿﻪ ﺷﺪﻩ ﺑﺎﺷﺪ. • ﺍﺯ ﻭﺳﺎﯾﻞ ﻣﮑﺎﻧﯿﮑﯽ ﯾﺎ ﺩﯾﮕﺮ ﻭﺳﺎﯾﻞ ﺑﻪ ﻣﻨﻈﻮﺭ ﺗﺴﺮﯾﻊ ﺑﺮﻓﮏ ﺯﺩﺍﯾﯽ ﺍﺳﺘﻔﺎﺩﻩ ﻧﮑﻨﯿﺪ ﻣﮕﺮ ﻭﺳﺎﯾﻠﯽ ﮐﻪ ﺳﺎﺯﻧﺪﻩ ﺁﻧﻬﺎ ﺭﺍ ﺗﻮﺻﯿﻪ ﮐﺮﺩﻩ ﺍﺳﺖ. • ﺑﻪ ﻣﺪﺍﺭ ﺧﻨﮏ ﮐﻨﻨﺪﻩ ﺁﺳﯿﺐ ﻧﺰﻧﯿﺪ. • ﻫﺮﮔﺰ ﺧﻮﺩﺗﺎﻥ ﺍﻗﺪﺍﻡ ﺑﻪ ﺗﻌﻤﯿﺮ ﯾﺎ ﺑﺎﺯ ﮐﺮﺩﻥ ﯾﺨﭽﺎﻝ ﻧﮑﻨﯿﺪ. ﺧﻄﺮ ﺁﺗﺶ ﺳﻮﺯی ،ﺧﺮﺍﺑﯽ ﺩﺳﺘﮕﺎﻩ ﯾﺎ ﺻﺪﻣﻪﺟﺪی ﻭﺟﻮﺩ ﺩﺍﺭﺩ. • ﮐﻮﺩﮐﺎﻥ ﺑﺎﯾﺪ ﻧﻈﺎﺭﺕ ﺷﻮﻧﺪ ﺗﺎ ﺍﻃﻤﯿﻨﺎﻥ ﺣﺎﺻﻞ ﺷﻮﺩ ﮐﻪ ﺑﺎ ﺩﺳﺘﮕﺎﻩ ﺑﺎﺯی ﻧﻤﯽ ﮐﻨﻨﺪ. • ﺑﻄﺮی ﻫﺎ ﺑﺎﯾﺪ ﻃﻮﺭی ﮐﯿﭗ ﻫﻢ ﻗﺮﺍﺭ ﺑﮕﯿﺮﻥ ﺗﺎ ﻧﻠﻐﺰﯾﺪﻩ ﻭ ﺳﻘﻮﻁ ﻧﮑﻨﻨﺪ. • ﺍﯾﻦ ﻣﺤﺼﻮﻝ ﺗﻨﻬﺎ ﺑﺮﺍی ﻧﮕﻬﺪﺍﺭی ﻏﺬﺍ ﺩﺭ ﯾﮏ ﻣﺤﯿﻂ ﺧﺎﻧﮕﯽ ﻃﺮﺍﺣﯽ ﺷﺪﻩ ﺍﺳﺖ. • ﺩﺭ ﺻﻮﺭﺗﯿﮑﻪ ﻧﺸﺖ ﮔﺎﺯ ﺍﺣﺴﺎﺱ ﻣﯽ ﮐﻨﯿﺪ ،ﺍﺯ ﻧﺰﺩﯾﮏ ﮐﺮﺩﻥ ﻫﺮﮔﻮﻧﻪ ﺷﻌﻠﻪ ﻣﺴﺘﻘﯿﻢ ،ﺟﺮﻗﻪ ﯾﺎ ﻣﻨﺎﺑﻊ ﮔﺮﻣﺎﯾﯽ ﺑﻪ ﯾﺨﭽﺎﻝ ﺧﻮﺩﺩﺍﺭی ﮐﺮﺩﻩ ﻭ ﺍﺗﺎﻗﯽ ﮐﻪ ﺩﺳﺘﮕﺎﻩ ﺩﺭ ﺁﻥ ﻗﺮﺍﺭﺩﺍﺭﺩ ﺭﺍ ﺑﻪ ﻣﺪﺕ ﭼﻨﺪ ﺩﻗﯿﻘﻪ ﺗﻬﻮﯾﻪ ﮐﻨﯿﺪ. • ﺗﻨﻬﺎ ﺍﺯ ﻻﻣﭗ ﻫﺎی LEDﺗﺎﻣﯿﻦ ﺷﺪﻩ ﺗﻮﺳﻂ ﺳﺎﺯﻧﺪﻩ ﯾﺎ ﻧﻤﺎﯾﻨﺪﻩ ﺧﺪﻣﺎﺕ ﺍﺳﺘﻔﺎﺩﻩ ﮐﻨﯿﺪ. ﺍﻃﻼﻋﺎﺕ ﺍﯾﻤﻨﯽ ٣- 2012.5.24 2:13:37 PM DA99-01950B(0.9).indb 14 ﺍﻃﻼﻋﺎﺕ ﺍﯾﻤﻨﯽ ﺍﻃﻼﻋﺎﺕ ﺍﯾﻤﻨﯽ • ﻗﺒﻞ ﺍﺯ ﮐﺎﺭ ﮐﺮﺩﻥ ﺑﺎ ﺩﺳﺘﮕﺎﻩ ،ﻟﻄﻔﺎ ﺍﯾﻦ ﺩﻓﺘﺮﭼﻪ ﺭﺍﻫﻨﻤﺎ ﺭﺍ ﺑﻪ ﻃﻮﺭ ﮐﺎﻣﻞ ﻣﻄﺎﻟﻌﻪ ﮐﺮﺩﻩ ﻭ ﺑﺮﺍی ﺭﺟﻮﻉ ﺩﺭ ﺁﯾﻨﺪﻩ ﻧﮕﻪ ﺩﺍﺭﯾﺪ. • ﺍﺯ ﺍﯾﻦ ﺩﺳﺘﮕﺎﻩ ﻓﻘﻂ ﺑﺮﺍی ﺍﻫﺪﺍﻑ ﺗﻌﯿﯿﻦ ﺷﺪﻩ ﮐﻪ ﺩﺭ ﺍﯾﻦ ﺩﻓﺘﺮﭼﻪ ﺭﺍﻫﻨﻤﺎ ﺗﻮﺻﯿﻪ ﺷﺪﻩ ﺍﺳﺖ ،ﺍﺳﺘﻔﺎﺩﻩ ﮐﻨﯿﺪ. ﺍﯾﻦ ﺩﺳﺘﮕﺎﻩ ﺑﺮﺍی ﺍﺳﺘﻔﺎﺩﻩ ﺍﻓﺮﺍﺩ ﺑﺎ ﻧﺎﺗﻮﺍﻧﯽ ﻫﺎی ﺟﺴﻤﯽ ﻭ ﺫﻫﻨﯽ ) ﺷﺎﻣﻞ ﮐﻮﺩﮐﺎﻥ( ﯾﺎ ﺍﻓﺮﺍﺩی ﮐﻪ ﺗﺠﺮﺑﻪ ﻭ ﺩﺍﻧﺶ ﮐﻤﯽ ﺑﺮﺍی ﮐﺎﺭﮐﺮﺩﻥ ﺑﺎ ﺩﺳﺘﮕﺎﻩ ﺩﺍﺭﻧﺪ ،ﻃﺮﺍﺣﯽ ﻧﺸﺪﻩ ﺍﺳﺖ .ﻣﮕﺮ ﺍﯾﻨﮑﻪ ﺗﻮﺳﻂ ﯾﮏ ﻓﺮﺩ ﻣﺴﺌﻮﻝ ﻭ ﺑﺎ ﺗﺠﺮﺑﻪ ﻧﻈﺎﺭﺕ ﺷﻮﻧﺪ. • ﺍﺯ ﺁﻧﺠﺎﯾﯿﮑﻪ ﺍﯾﻦ ﺩﺳﺘﻮﺭﺍﻟﻌﻤﻞ ﻫﺎ ﭼﻨﺪﯾﻦ ﻣﺪﻝ ﺭﺍ ﺩﺭ ﺑﺮ ﻣﯽ ﮔﯿﺮﺩ ) ،ﻧﻮﻉ ﮐﻨﺘﺮﻝ ﺍﻟﮑﺘﺮﻭﻧﯿﮑﯽ ،ﻧﻮﻉ ﮐﻨﺘﺮﻝ ﻣﮑﺎﻧﯿﮑﯽ( ﻣﻤﮑﻦ ﺍﺳﺖ ﻭﯾﮋﮔﯽ ﻫﺎی ﯾﺨﭽﺎﻝ ﺷﻤﺎ ﮐﻤﯽ ﺑﺎ ﺁﻧﭽﻪ ﺩﺭ ﺍﯾﻦ ﺩﻓﺘﺮﭼﻪ ﺁﻣﺪﻩ ﺍﺳﺖ ،ﻣﺘﻔﺎﻭﺕ ﺑﺎﺷﺪ ﻧﺸﺎﻧﻪ ﻫﺎی ﺍﺣﺘﯿﺎﻁ/ﺍﺧﻄﺎﺭ ﺍﺳﺘﻔﺎﺩﻩ ﺷﺪﻩ ﺩﺭ ﺍﯾﻦ ﺩﻓﺘﺮﭼﻪ: ﺍﺧﻄﺎﺭ ﻋﻤﻞ ﺧﻄﺮﻧﺎک ﯾﺎ ﻧﺎﺍﻣﻦ ﮐﻪ ﻣﻤﮑﻦ ﺍﺳﺖ ﺑﻪ ﺧﻄﺮ ﻣﺮگ ﯾﺎ ﺻﺪﻣﻪ ﺟﺪی ﻣﻨﺠﺮ ﮔﺮﺩﺩ. ﺍﺣﺘﯿﺎﻁ ﻋﻤﻞ ﺧﻄﺮﻧﺎک ﯾﺎ ﻧﺎ ﺍﻣﻦ ﮐﻪ ﻣﻤﮑﻦ ﺍﺳﺖ ﺑﻪ ﺧﻄﺮ ﺻﺪﻣﻪ ﻓﺮﺩی ﯾﺎ ﺁﺳﯿﺐ ﺭﺳﯿﺪﻥ ﺑﻪ ﺩﺳﺘﮕﺎﻩ ﻣﻨﺠﺮ ﮔﺮﺩﺩ. ﻧﺸﺎﻧﮕﺮ ﮐﺎﺭی ﺍﺳﺖ ﮐﻪ ﻧﺒﺎﯾﺪ ﺍﻧﺠﺎﻡ ﺩﻫﯿﺪ. ﻧﺸﺎﻧﮕﺮ ﺁﻥ ﺍﺳﺖ ﮐﻪ ﻧﺒﺎﯾﺪ ﺑﺎﺯ ﺷﻮﺩ. ﻧﺸﺎﻧﮕﺮ ﺁﻥ ﺍﺳﺖ ﮐﻪ ﻧﺒﺎﯾﺪ ﻟﻤﺲ ﺷﻮﺩ. ﻧﺸﺎﻧﮕﺮ ﮐﺎﺭی ﺍﺳﺖ ﮐﻪ ﺑﺎﯾﺪ ﺭﻋﺎﯾﺖ ﮐﻨﯿﺪ. ﻧﺸﺎﻧﮕﺮ ﺁﻥ ﺍﺳﺖ ﮐﻪ ﺑﺎﯾﺪ ﺩﻭﺷﺎﺧﻪ ﺭﺍ ﺍﺯ ﭘﺮﯾﺰ ﺑﮑﺸﯿﺪ. ﺍﯾﻦ ﻧﺸﺎﻧﻪ ﻫﺎی ﻫﺸﺪﺍﺭ ﺑﻪ ﻣﻨﻈﻮﺭ ﺟﻠﻮﮔﯿﺮی ﺍﺯ ﺁﺳﯿﺐ ﺭﺳﯿﺪﻥ ﺑﻪ ﺷﻤﺎ ﻭ ﺩﯾﮕﺮﺍﻥ ﺁﻭﺭﺩﻩ ﺷﺪﻩ ﺍﻧﺪ .ﻟﻄﻔﺎ ﺁﻧﻬﺎ ﺭﺍ ﮐﺎﻣﻼ ﺭﻋﺎﯾﺖ ﮐﻨﯿﺪ. ﺑﻌﺪ ﺍﺯ ﺧﻮﺍﻧﺪﻥ ﺍﯾﻦ ﺩﻓﺘﺮﭼﻪ ﺭﺍﻫﻨﻤﺎ ﺁﻥ ﺭﺍ ﺩﺭ ﯾﮏ ﻣﺤﻞ ﺍﻣﻦ ﺑﻪ ﻣﻨﻈﻮﺭ ﺭﺟﻮﻉ ﺩﺭ ﺁﯾﻨﺪﻩ ﻧﮕﻬﺪﺍﺭی ﮐﻨﯿﺪ. ﺍﺧﻄﺎﺭ ﻧﺸﺎﻧﻪ ﻫﺎی ﻫﺸﺪﺍﺭ ﺟﺪی ﺑﺮﺍی ﻧﺼﺐ ﺩﺳﺘﮕﺎﻩ • ﯾﺨﭽﺎﻝ ﺭﺍ ﺩﺭ ﯾﮏ ﻣﺤﻞ ﻣﺮﻃﻮﺏ ﯾﺎ ﻣﺤﻠﯽ ﮐﻪ ﻣﻤﮑﻦ ﺍﺳﺖ ﺩﺭ ﻣﻌﺮﺽ ﺁﺏ ﺑﺎﺷﺪ ،ﻧﺼﺐ ﻧﮑﻨﯿﺪ. ﻋﺎﯾﻖ ﺑﻨﺪی ﺧﺮﺍﺏ ﻗﻄﻌﺎﺕ ﺍﻟﮑﺘﺮﯾﮑﯽ ﻣﯽ ﺗﻮﺍﻧﺪ ﺳﺒﺐﺷﻮک ﺍﻟﮑﺘﺮﯾﮑﯽ ﯾﺎ ﺁﺗﺶ ﺳﻮﺯی ﺷﻮﺩ. • ﺍﯾﻦ ﯾﺨﭽﺎﻝ ﺭﺍ ﺩﺭ ﻣﻌﺮﺽ ﻣﺴﺘﻘﯿﻢ ﻧﻮﺭ ﺁﻓﺘﺎﺏ ﯾﺎ ﺩﺭ ﻣﺤﻠﯽ ﮐﻪ ﺩﺭ ﻣﻌﺮﺽ ﮔﺮﻣﺎی ﺣﺎﺻﻞ ﺍﺯ ﺍﺟﺎﻕ ﮔﺎﺯ ،ﻫﯿﺘﺮ ﻫﺎی ﺑﺮﻗﯽ ﻭ ﺩﯾﮕﺮ ﻭﺳﺎﯾﻞ ﻗﺮﺍﺭﺩﺍﺭﺩ ،ﻧﺼﺐ ﻧﮑﻨﯿﺪ. • ﻫﺮﮔﺰ ﺍﺯ ﻟﻮﻟﻪ ﻫﺎی ﮔﺎﺯ ،ﺧﻄﻮﻁ ﺗﻠﻔﻦ ،ﯾﺎ ﺩﯾﮕﺮ ﺳﯿﻢ ﻫﺎی ﺑﺮﻕ ﺑﺮﺍی ﺳﯿﻢ ﺍﺗﺼﺎﻝ ﺑﻪ ﺯﻣﯿﻦ ﺍﺳﺘﻔﺎﺩﻩ ﻧﮑﻨﯿﺪ. ﺍﺳﺘﻔﺎﺩﻩ ﻧﺎﺩﺭﺳﺖ ﺍﺯ ﺩﻭﺷﺎﺧﻪ ﺍﺗﺼﺎﻝ ﺑﻪ ﺯﻣﯿﻦ ﻣﯽ ﺗﻮﺍﻧﺪﺑﻪ ﺷﻮک ﺍﻟﮑﺘﺮﯾﮑﯽ ﻣﻨﺠﺮ ﮔﺮﺩﺩ. • ﻫﺮﮔﺰ ﭼﻨﺪﯾﻦ ﻭﺳﯿﻠﻪ ﺭﺍ ﺑﺎ ﻫﻢ ﺑﻪ ﯾﮏ ﺑﺮﺩ ﻭﺻﻞ ﻧﮑﻨﯿﺪ. ﯾﺨﭽﺎﻝ ﺑﺎﯾﺪ ﻫﻤﻮﺍﺭﻩ ﺑﻪ ﯾﮏ ﭘﺮﯾﺰ ﺟﺪﺍﮔﺎﻧﻪ ﮐﻪ ﺩﺍﺭﺍی ﺩﺭﺟﻪ ﺑﻨﺪی ﺟﺮﯾﺎﻥ ﻣﻄﺎﺑﻖ ﺑﺎ ﺟﺮﯾﺎﻥ ﻧﺸﺎﻥ ﺩﺍﺩﻩ ﺷﺪﻩ ﺑﺮ ﺭﻭی ﺻﻔﺤﻪ ﯾﺨﭽﺎﻝ ،ﻭﺻﻞ ﮔﺮﺩﺩ. ﺍﯾﻦ ﮐﺎﺭ ﺑﻬﺘﺮﯾﻦ ﻋﻤﻠﮑﺮﺩ ﺭﺍ ﺍﺭﺍﺋﻪ ﺩﺍﺩﻩ ﻭ ﺍﺯ ﺍﺿﺎﻓﻪ ﺟﺮﯾﺎﻥﻣﺪﺍﺭ ﺳﯿﻢ ﮐﺸﯽ ﻫﺎی ﺧﺎﻧﮕﯽ ﮐﻪ ﻣﯽ ﺗﻮﺍﻧﺪ ﺳﺒﺐ ﺁﺗﺶ ﺳﻮﺯی ﻧﺎﺷﯽ ﺍﺯ ﮔﺮﻡ ﺷﺪﻥ ﺑﯿﺶ ﺍﺯ ﺣﺪ ﺳﯿﻢ ﻫﺎ ﺟﻠﻮﮔﯿﺮی ﻣﯽ ﮐﻨﺪ. • ﺍﺯ ﺳﯿﻤﯽ ﮐﻪ ﻧﺸﺎﻧﻪ ﺍی ﺍﺯ ﭘﺎﺭﮔﯽ ﯾﺎ ﺳﺎﯾﯿﺪﮔﯽ ﺩﺭ ﻃﻮﻝ ﻭ ﯾﺎ ﺍﻧﺘﻬﺎی ﺁﻥ ﺩﯾﺪﻩ ﻣﯽ ﺷﻮﺩ ،ﺩﻭ ﺷﺎﺧﻪ ﺭﺍ ﺑﺎ ﺩﺳﺖ ﺧﯿﺲ ﻟﻤﺲ ﻧﮑﻨﯿﺪ. ﺧﻄﺮ ﺷﻮک ﺍﻟﮑﺘﺮﯾﮑﯽ ﯾﺎ ﺁﺗﺶ ﺳﻮﺯی ﻭﺟﻮﺩ ﺩﺍﺭﺩ.• ﺍﺯ ﺳﯿﻤﯽ ﮐﻪ ﻧﺸﺎﻧﻪ ﺍی ﺍﺯ ﭘﺎﺭﮔﯽ ﯾﺎ ﺳﺎﯾﯿﺪﮔﯽ ﺩﺭ ﻃﻮﻝ ﻭ ﯾﺎ ﺍﻧﺘﻬﺎی ﺁﻥ ﺩﯾﺪﻩ ﻣﯽ ﺷﻮﺩ ،ﺍﺳﺘﻔﺎﺩﻩ ﻧﮑﻨﯿﺪ. • ﺳﯿﻢ ﺑﺮﻕ ﺭﺍ ﺑﯿﺶ ﺍﺯ ﺣﺪ ﺧﻢ ﻧﮑﺮﺩﻩ ﯾﺎ ﺍﺟﺴﺎﻡ ﺧﯿﻠﯽ ﺳﻨﮕﯿﻦ ﺑﺮ ﺭﻭی ﺁﻥ ﻧﮕﺬﺍﺭﯾﺪ. ﻧﺸﺎﻧﮕﺮ ﺁﻥ ﺍﺳﺖ ﮐﻪ ﺍﺗﺼﺎﻝ ﺑﻪ ﺯﻣﯿﻦ ﺑﺎﯾﺪ ﺍﻧﺠﺎﻡ ﮔﺮﺩﺩ. ﺗﻮﺻﯿﻪ ﻣﯽ ﺷﻮﺩ ﺑﺎ ﺗﻌﻤﯿﺮ ﮐﺎﺭ ﺗﻤﺎﺱ ﺑﮕﯿﺮﯾﺪ. ﻧﮑﺘﻪ. -٢ﺍﻃﻼﻋﺎﺕ ﺍﯾﻤﻨﯽ 2012.5.24 2:13:37 PM DA99-01950B(0.9).indb 15 ﺩﻓﺘﺮﭼﻪ ﺭﺍﻫﻨﻤﺎﻱ ﻳﺨﭽﺎﻝ ﻓﺎﺭﺳﯽ ﺍﯾﻦ ﮐﺘﺎﺑﭽﻪ ﺭﺍﻫﻨﻤﺎ ﺍﺯ ﮐﺎﻏﺬ ١٠٠ﺩﺭﺻﺪ ﺑﺎﺯﯾﺎﺑﯽ ﺷﺪﻩ ﺗﻬﯿﻪ ﺷﺪﻩ ﺍﺳﺖ. ﺍﻣﮑﺎﻧﺎﺕ ﺭﺍ ﺗﺼﻮﺭ ﮐﻨﯿﺪ. ﺍﺯ ﺷﻤﺎ ﺑﻪ ﺧﺎﻃﺮ ﺍﻧﺘﺨﺎﺏ ﻭ ﺧﺮﯾﺪ ﻣﺤﺼﻮﻝ ﺳﺎﻣﺴﻮﻧﮓ .ﻣﺘﺸﮑﺮﯾﻢ ﺑﻪ ﻣﻨﻈﻮﺭ ﺩﺭﯾﺎﻓﺖ ﺧﺪﻣﺎﺕ ﮐﺎﻣﻠﺘﺮ ،ﻟﻄﻔﺎ ﻣﺤﺼﻮﻝ ﺧﻮﺩ ﺭﺍ ﺩﺭ ﺳﺎﯾﺖ :www.samsung.com/registerﺯﯾﺮ ﺛﺒﺖ ﻧﻤﺎﯾﯿﺪ ﺩﺳﺘﮕﺎﻩ ﺑﺪﻭﻥ ﭘﺎﯾﻪ 2012.5.24 2:13:37 PM )Code No. DA99-01950B REV(0.9 DA99-01950B(0.9).indb 16